Tag Archives: Butz Choquin Pipes

Sprucing up one that I have always wanted – BC Origine Mava


Blog by Steve Laug

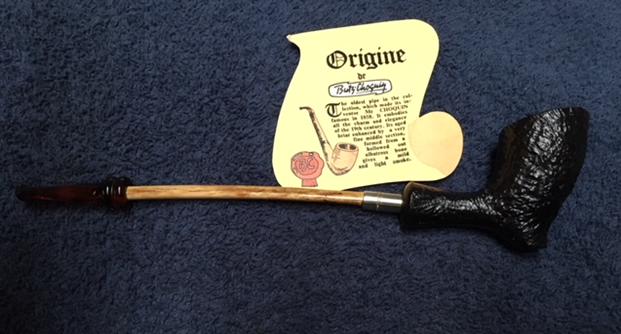
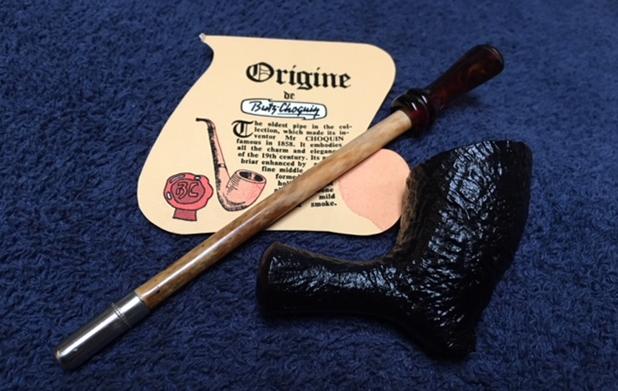
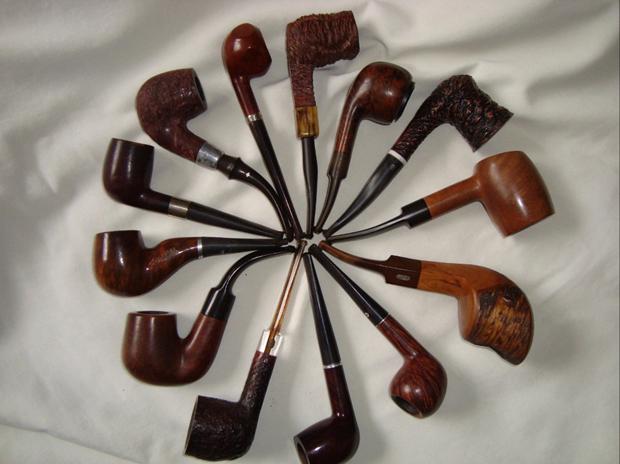
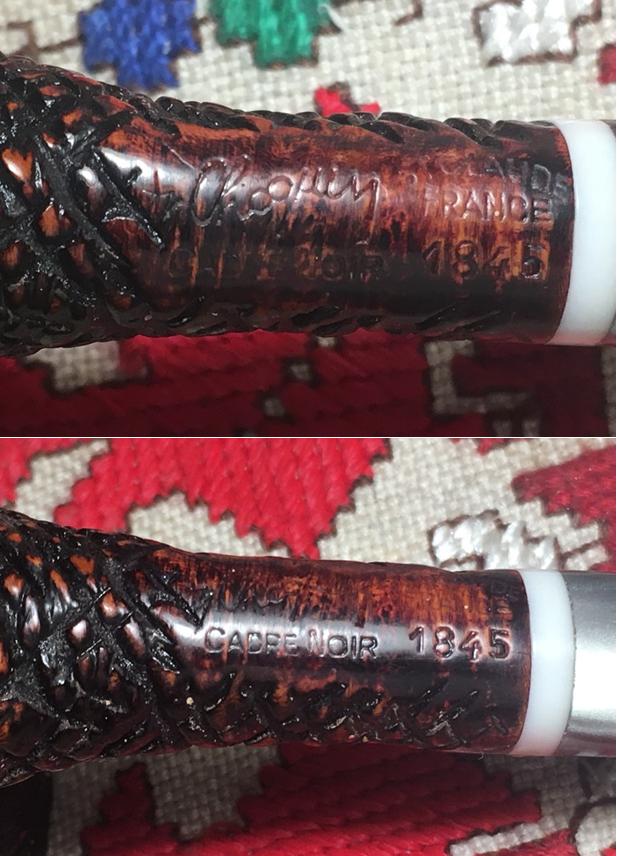
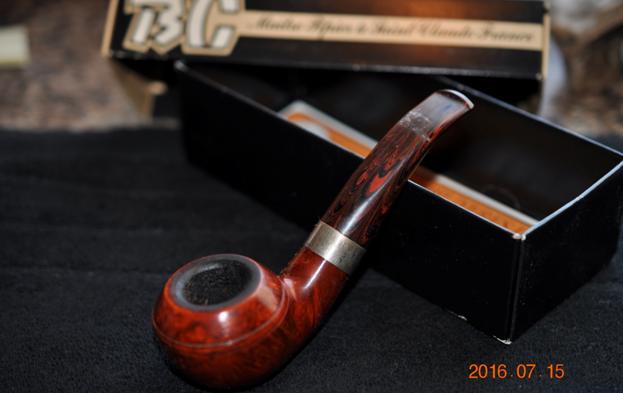
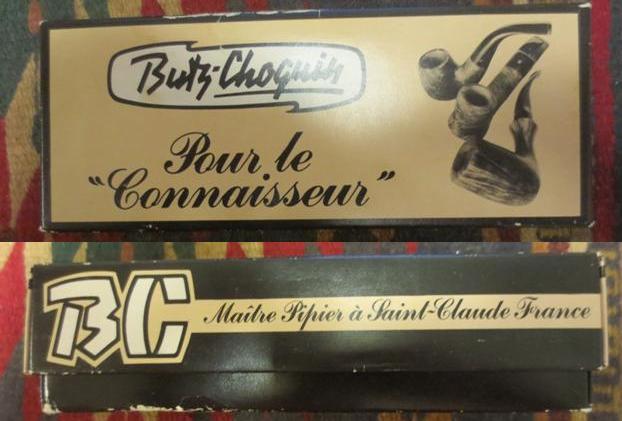
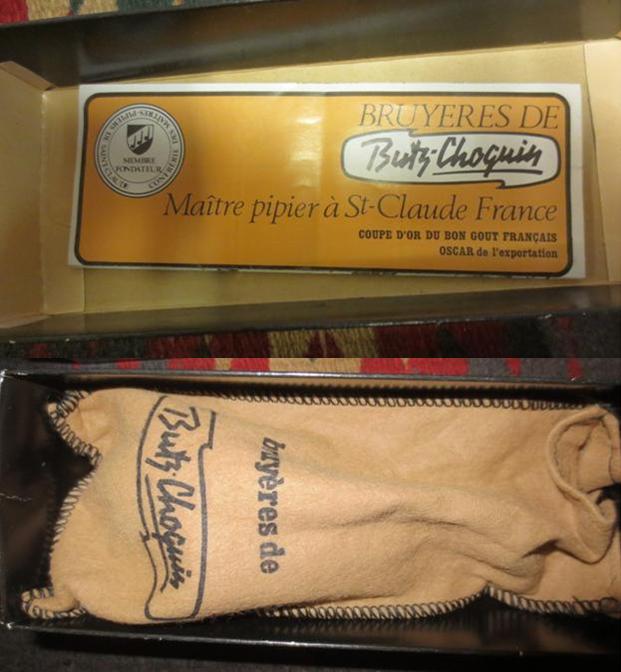
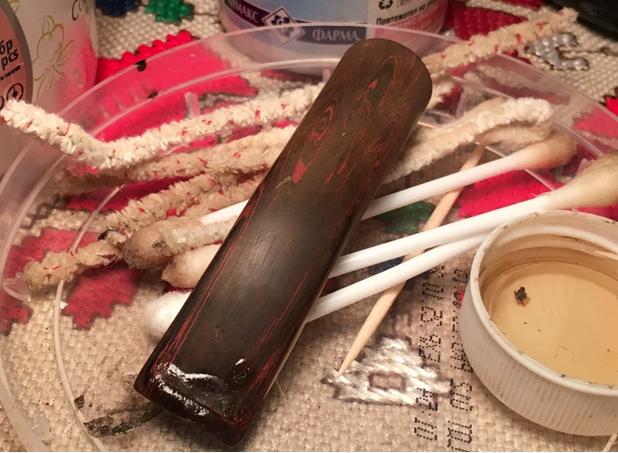
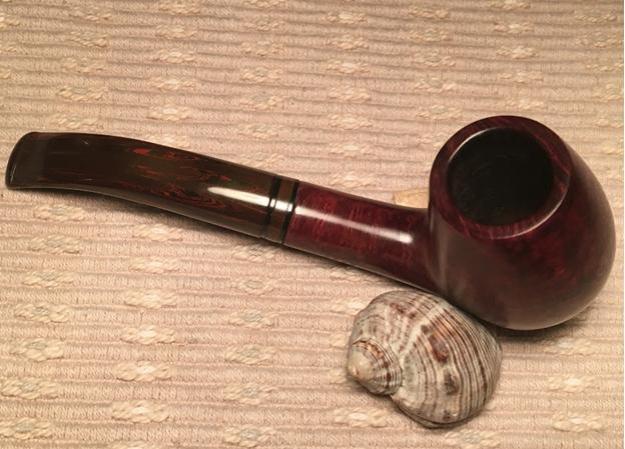
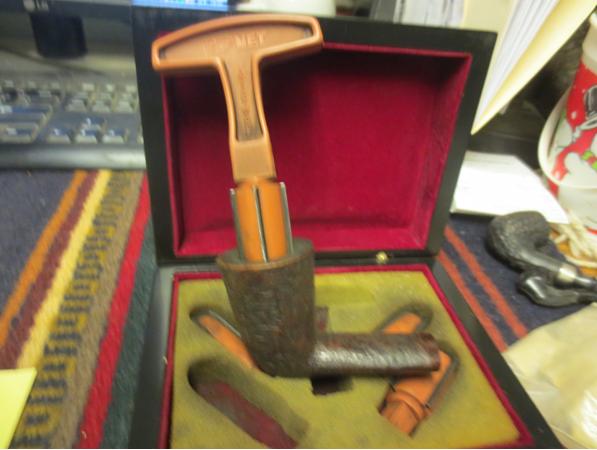
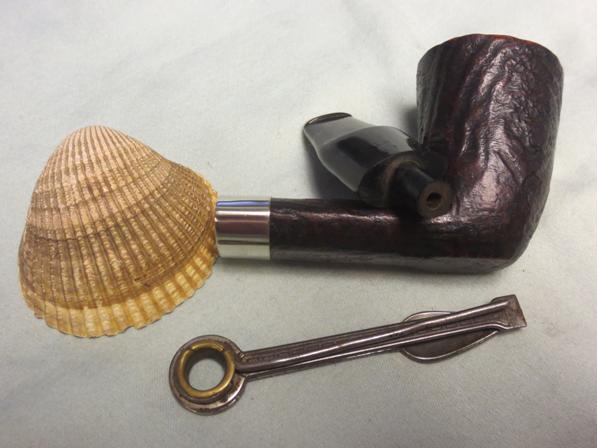
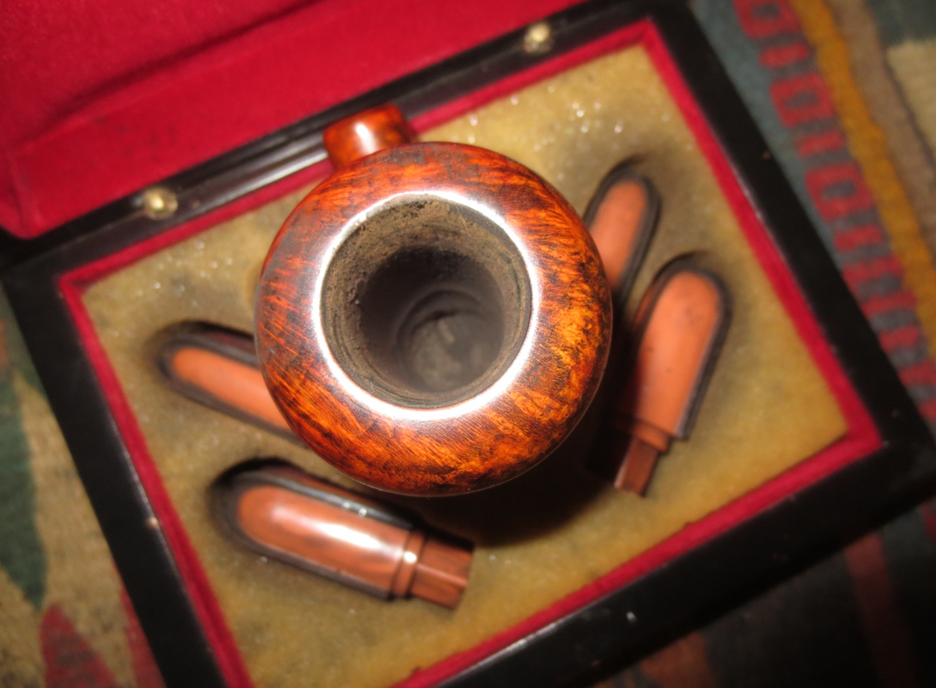
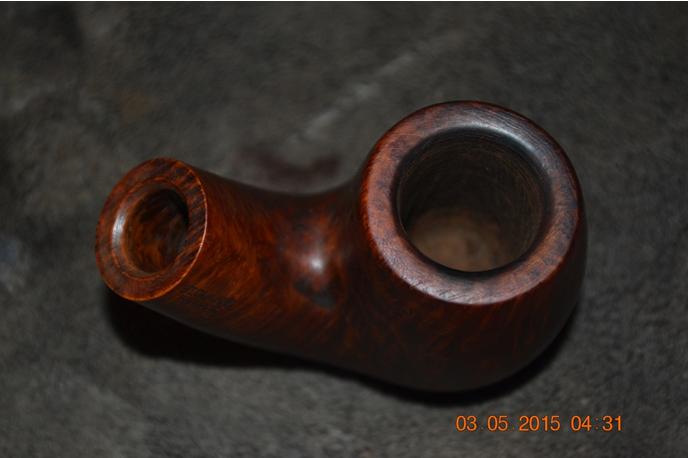
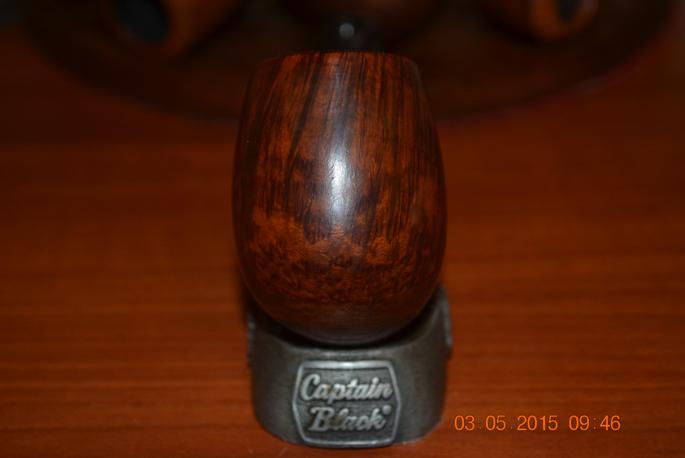
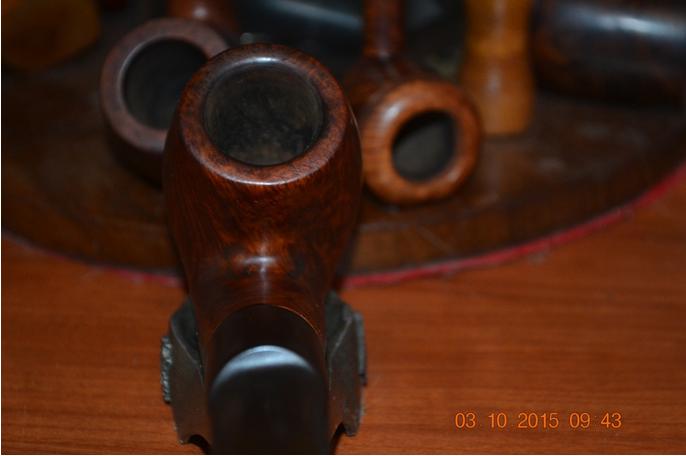
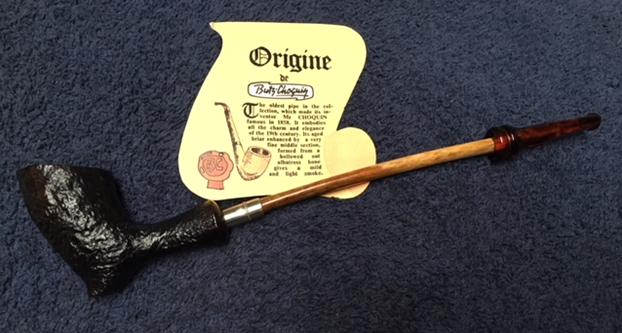
A few weeks ago I received an email from a reader of the blog living in Edmonton, Alberta, Canada about some pipes that he was selling. There were some Bari’s, Stanwell’s, Svendborgs, and a Butz-Choquin. He sent me pictures of the lot and I was hooked. He is primarily a cigarette smoker so these pipes are relatively clean. He said that the Butz-Choquin had hardly been smoked. We did an etransfer and the pipes were on their way to me. They arrived in Vancouver in a couple of days (quite different from the ones I pick up in Eastern Canada or in the US). I opened the box and looked through the eight pipes I purchased and the pipe rack that he included. I was pleased with the purchase. I decided to work on the BC one first. I took photos of my own discovery of what the Butz-Choquin pipe looked like. I took photos of the box to give an idea of the process of discover. When I opened the box there was an interesting looking pipe – not very big but one that I had wanted to see for a long time. It also had a tag in the box that I took a photo of as well.
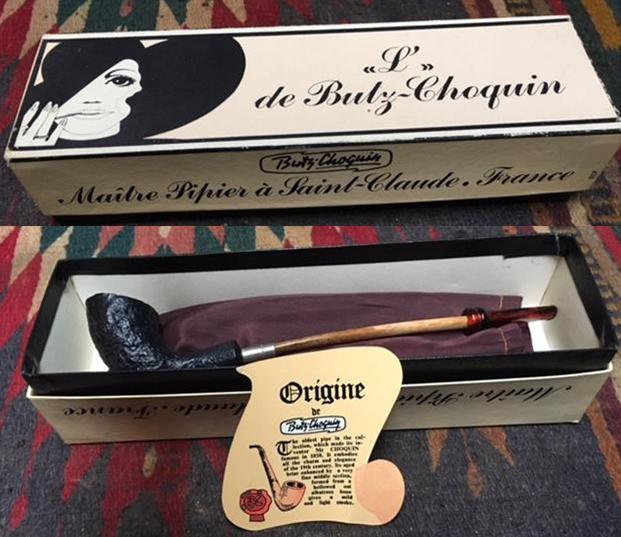
I took a photo of the card that was in the box with the pipe. It can be seen in the next two photos with English on the one side and the other side in French. It reads: Origine de Butz Choquin. The oldest pipe in the collection, which made its inventor, Mr. Choquin famous in 1858. It embodies all the charm and elegance of the 19th century. Its aged briar enhanced by a very fine middle section, formed from a hollowed out albatross bone gives a mild and light smoke. 
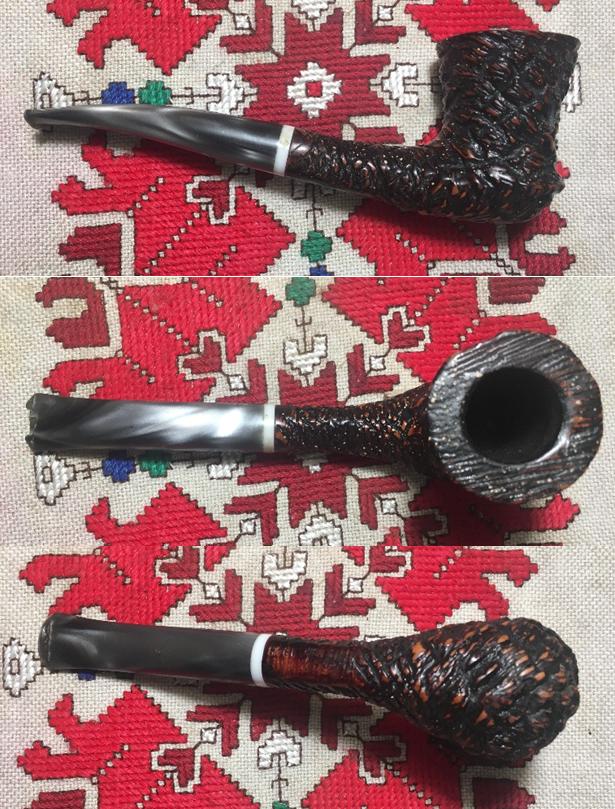
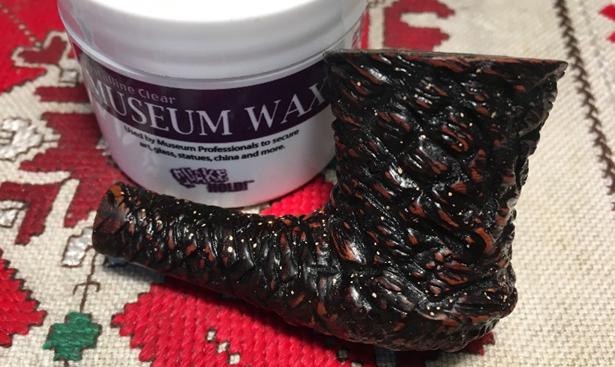
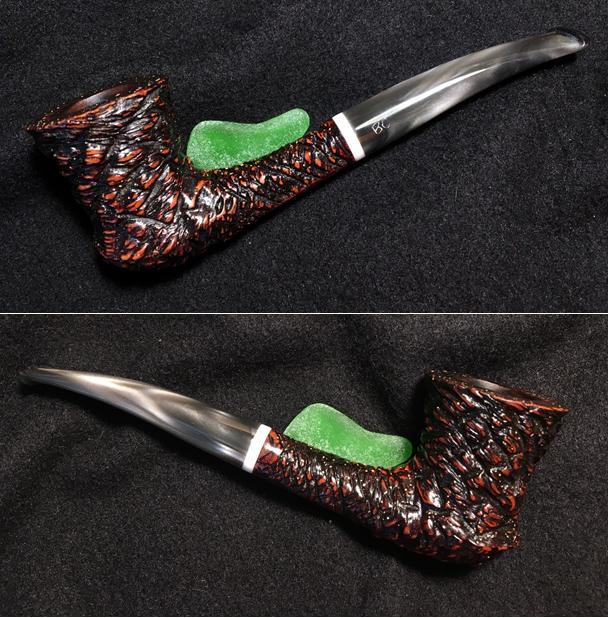
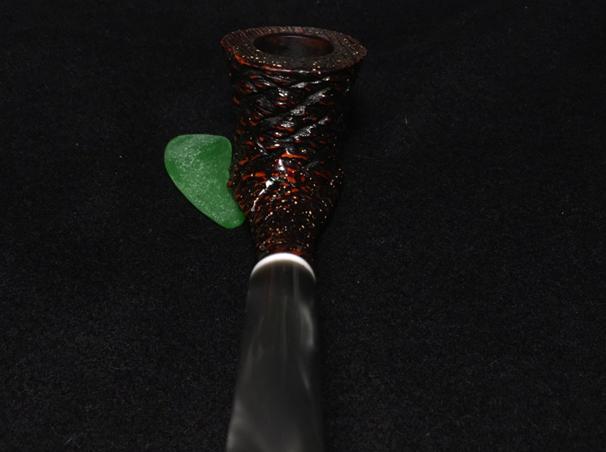
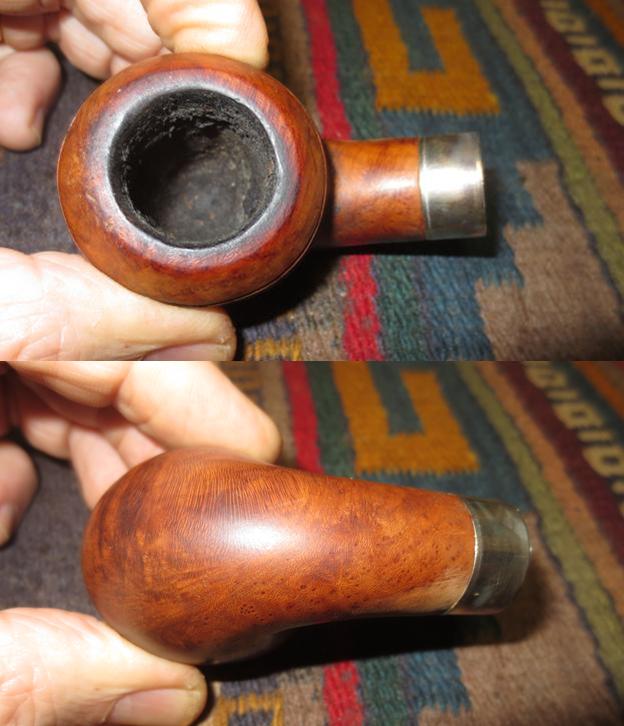
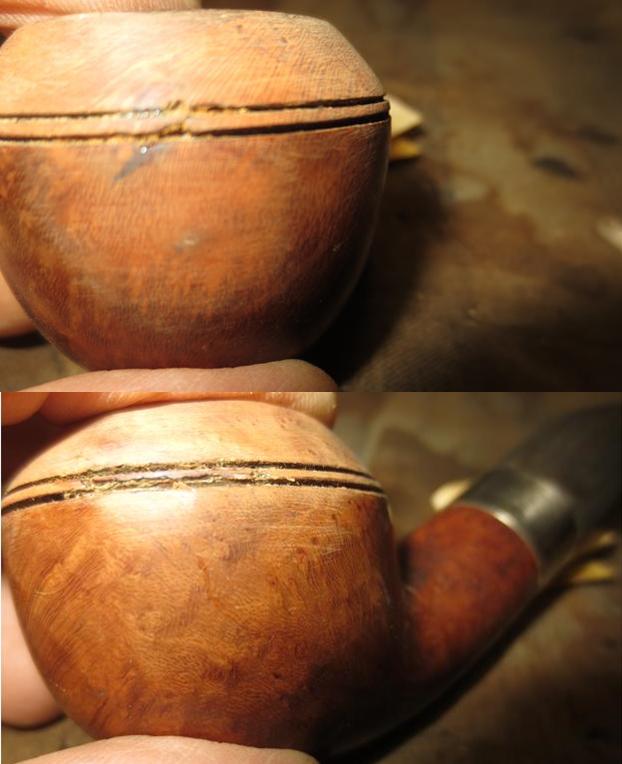
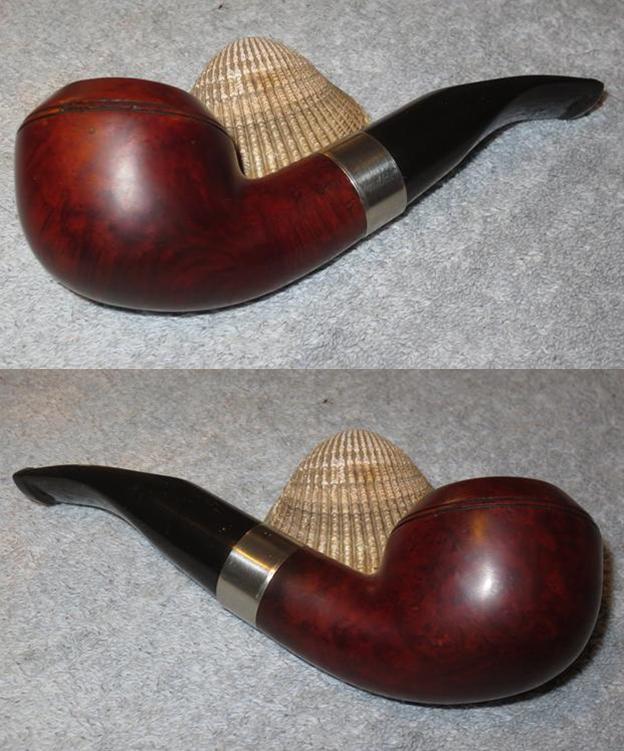
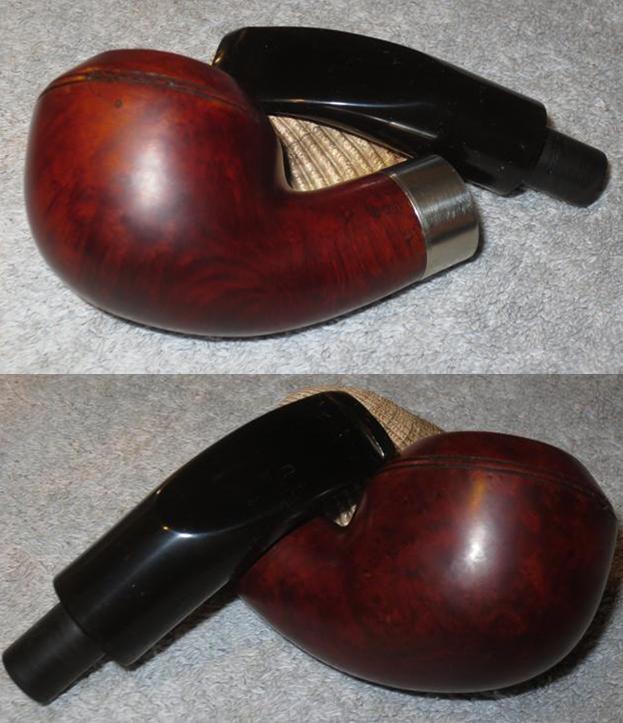
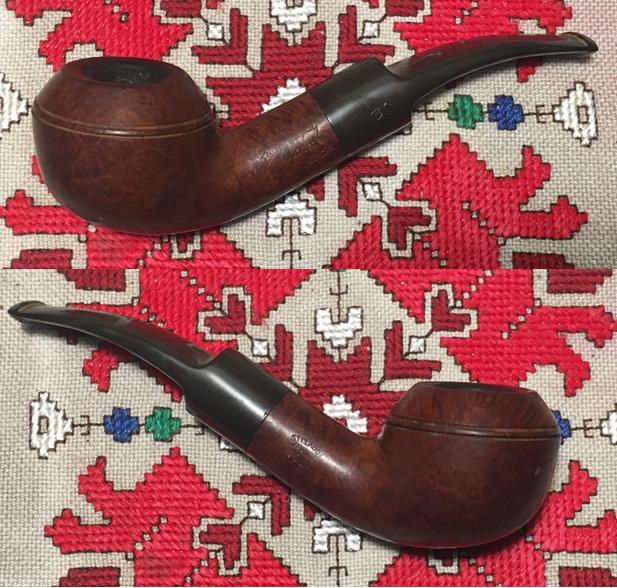
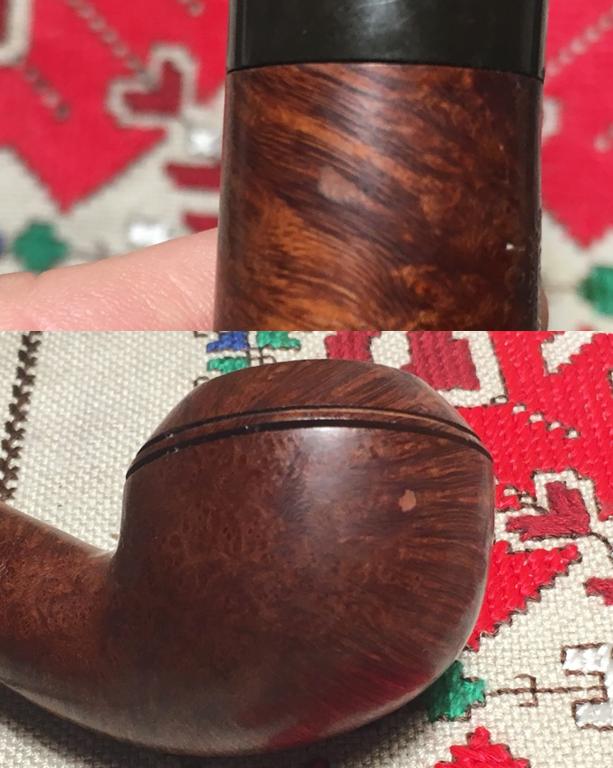
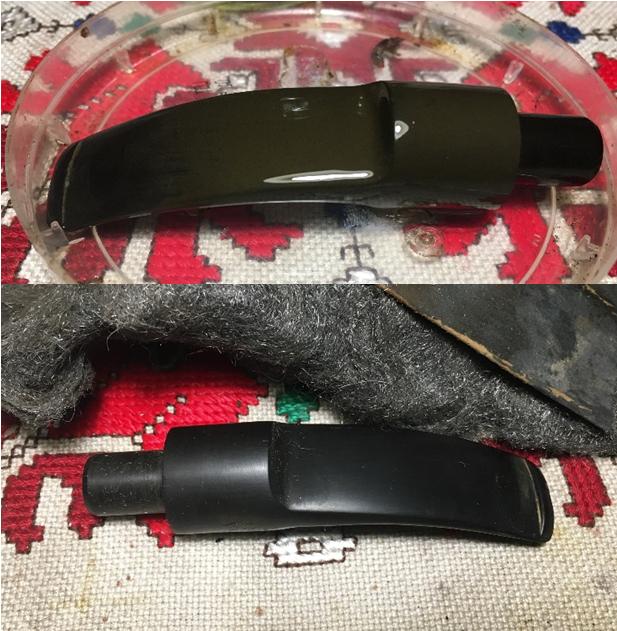
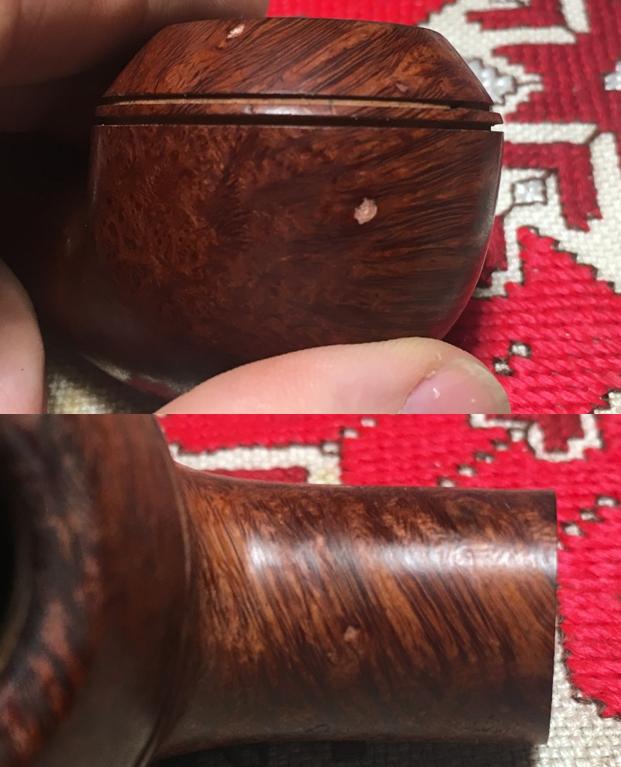
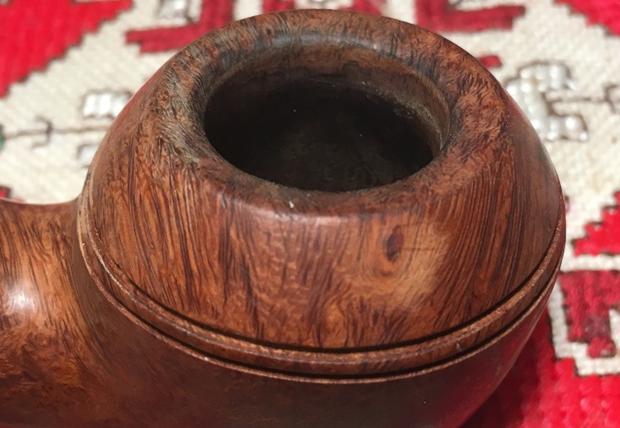
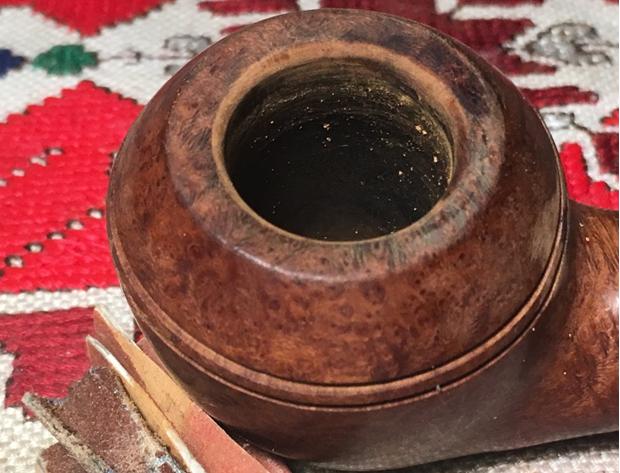
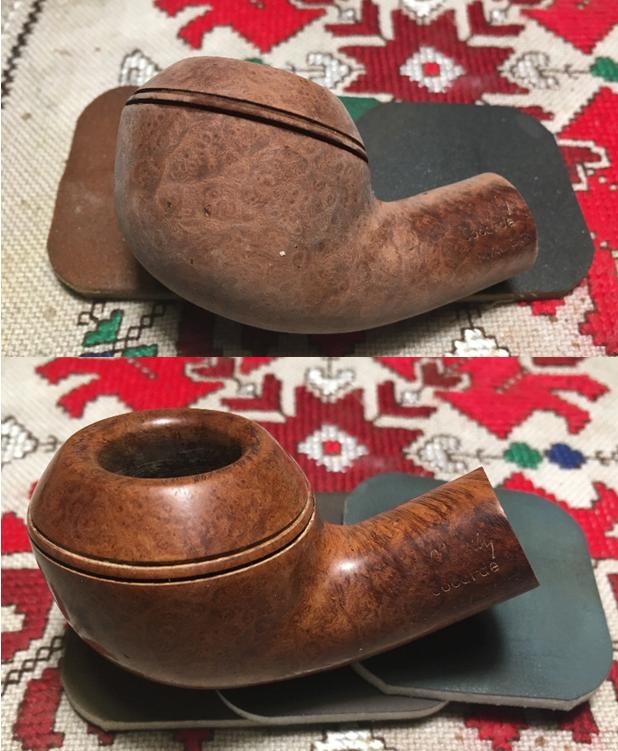
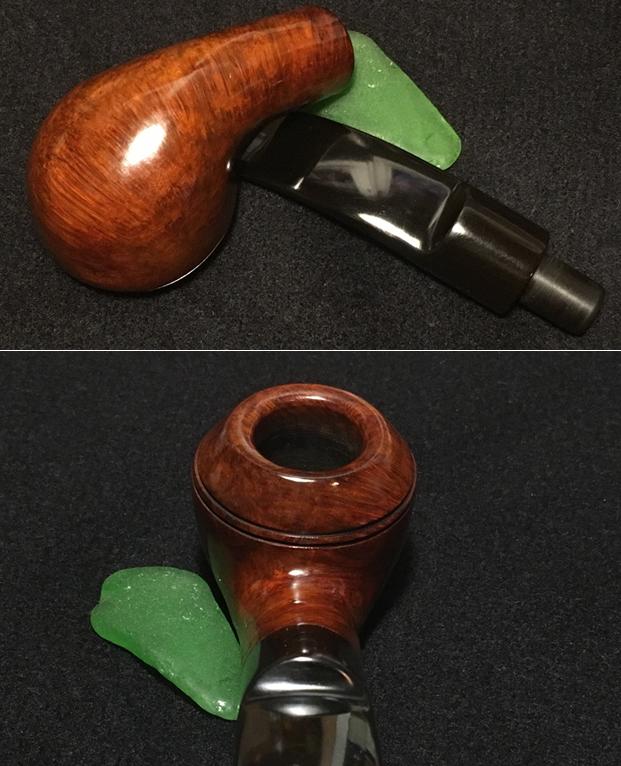
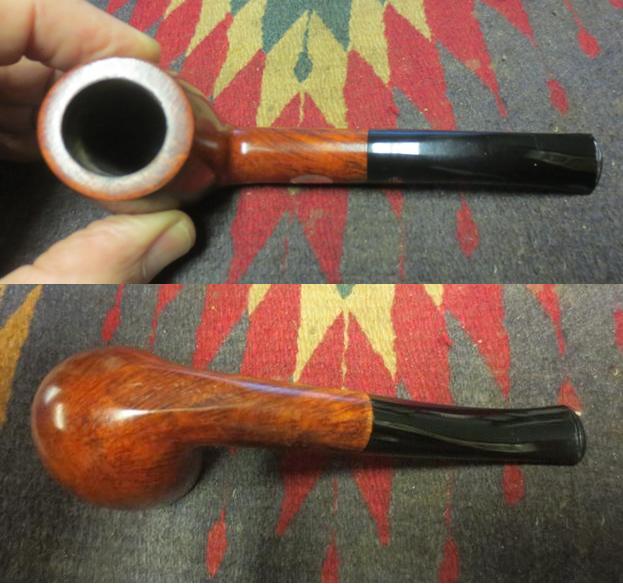
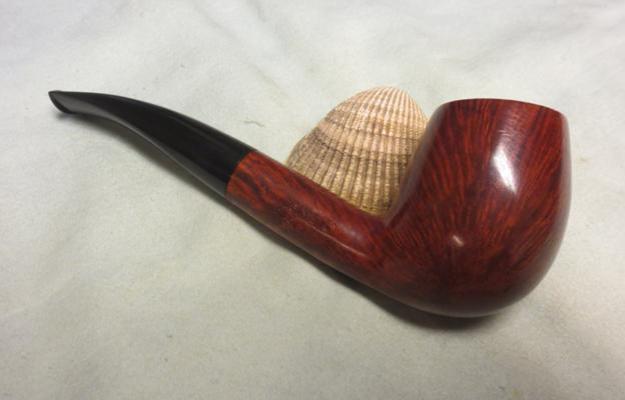
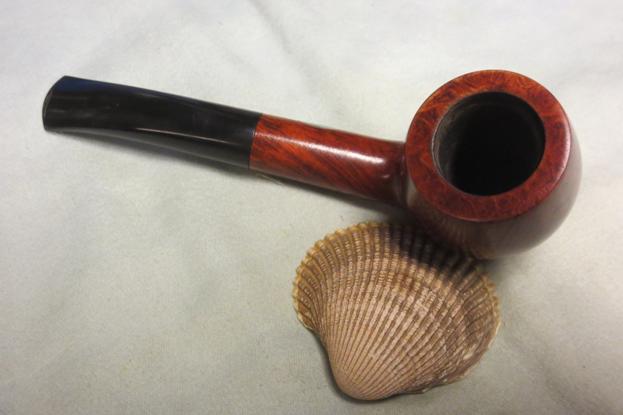
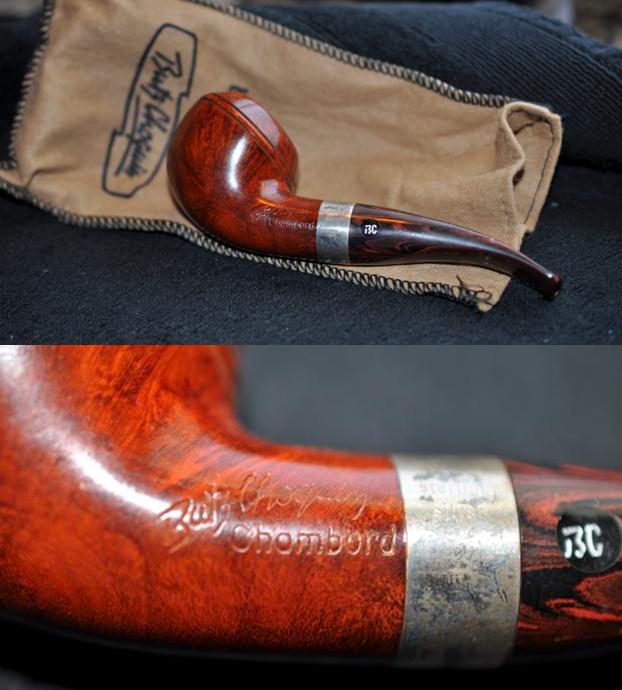
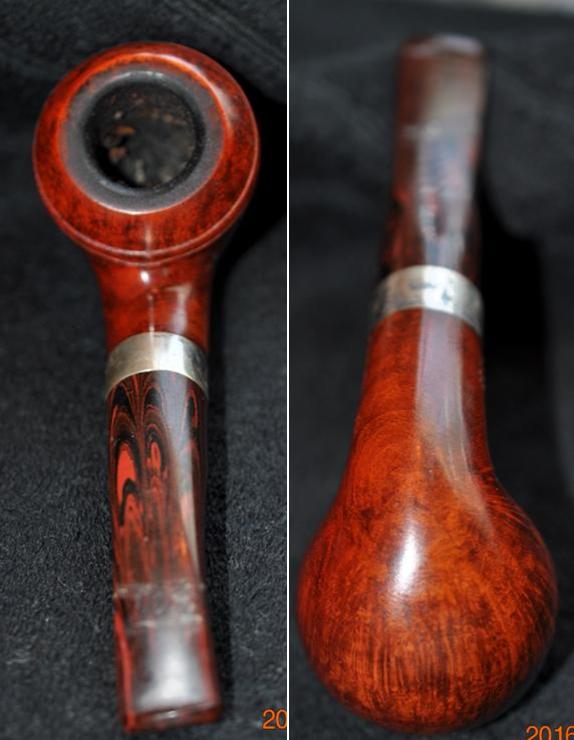
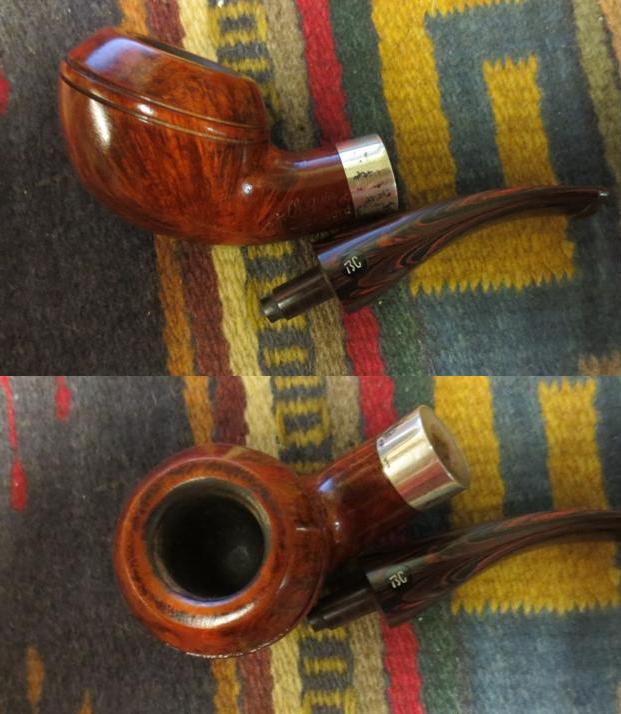
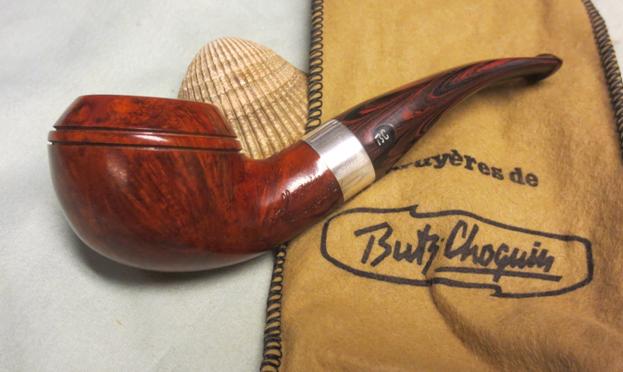
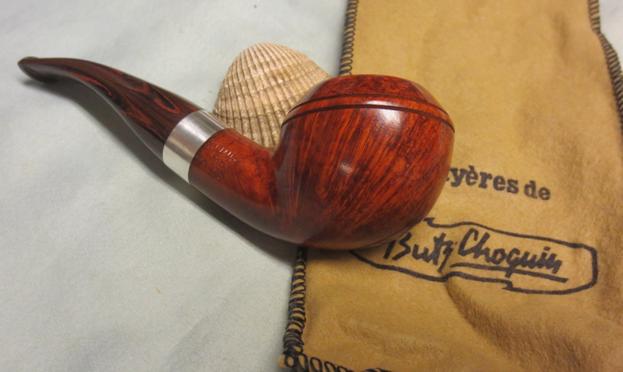
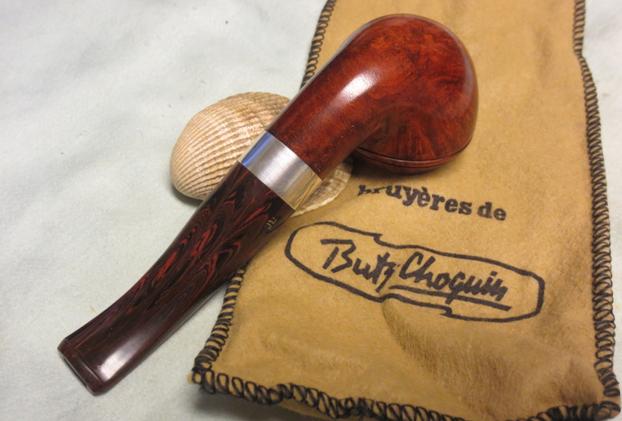
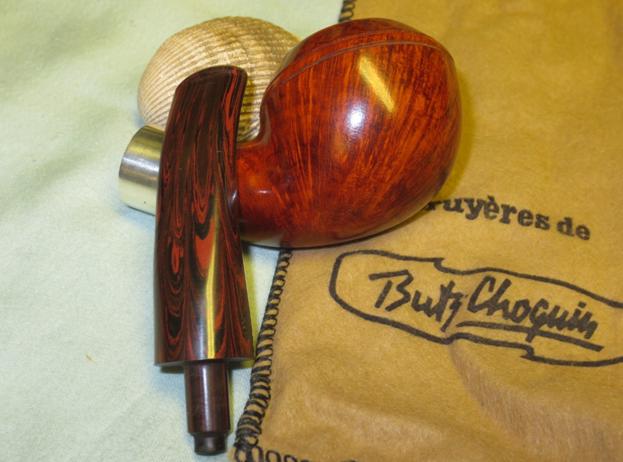
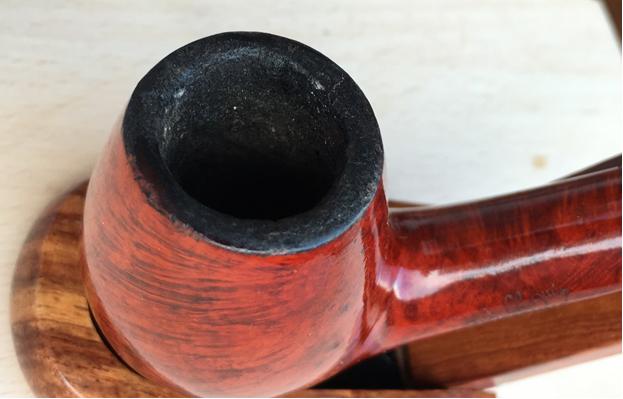
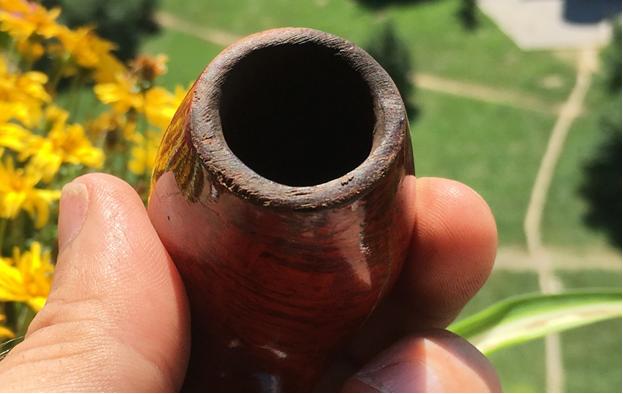
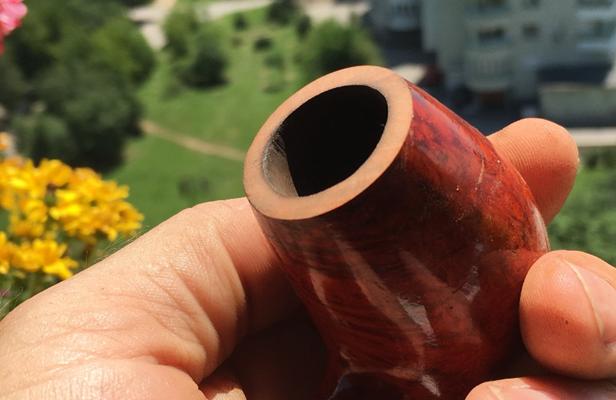
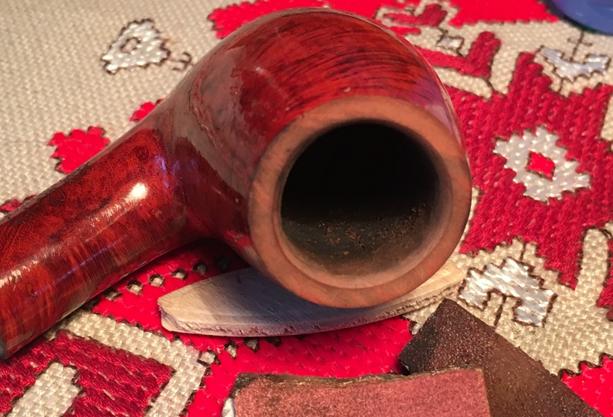
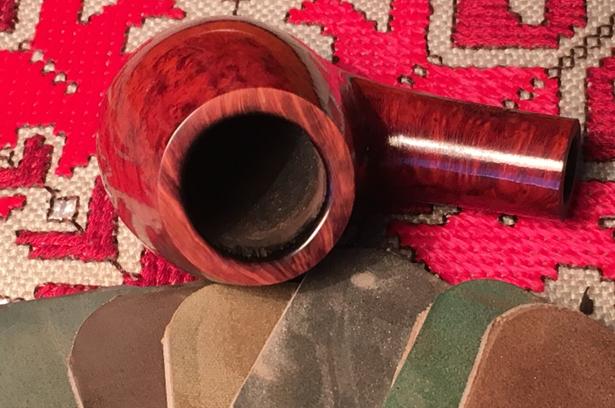
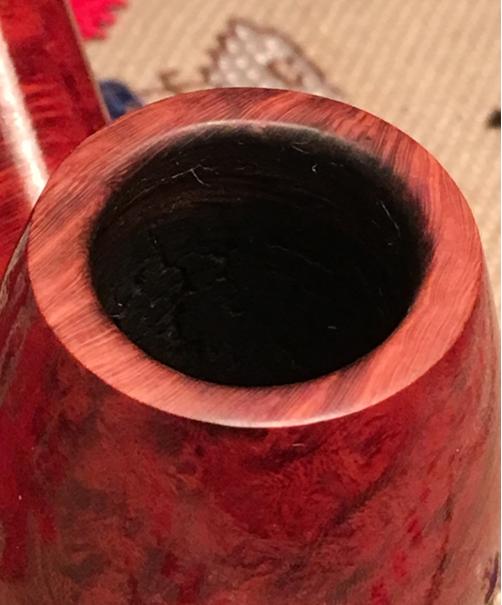
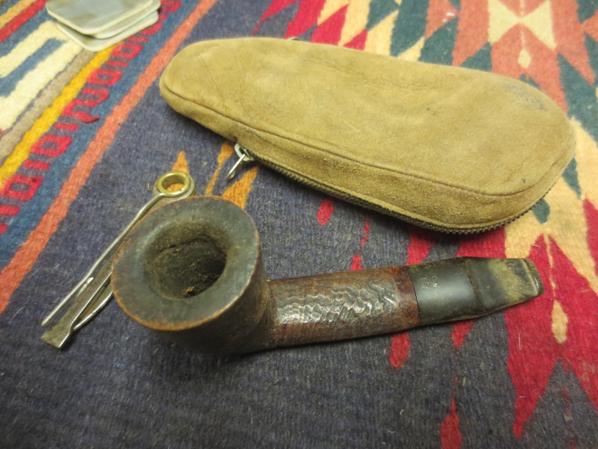
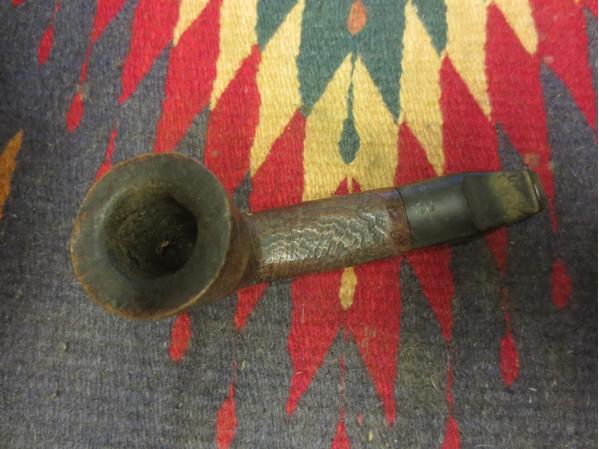
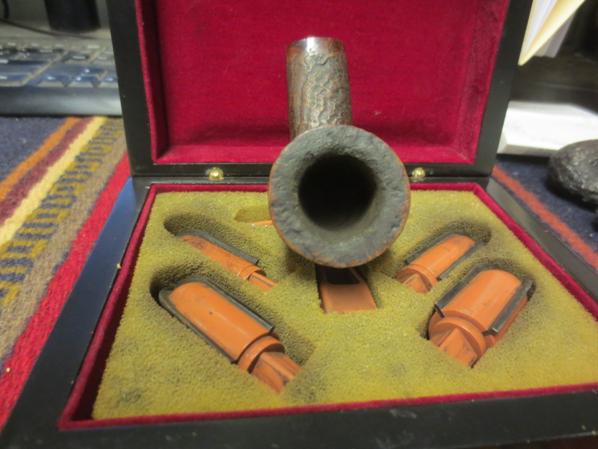
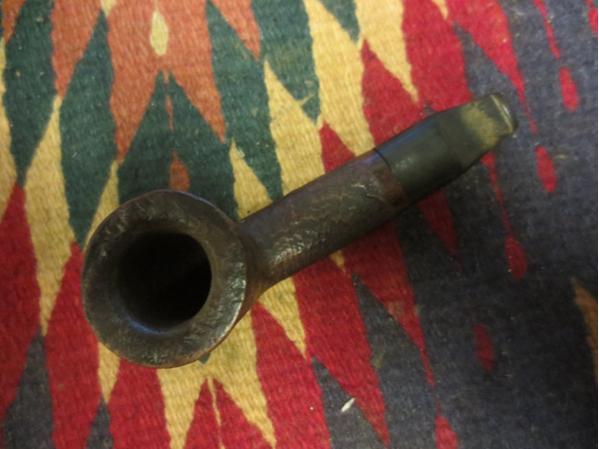
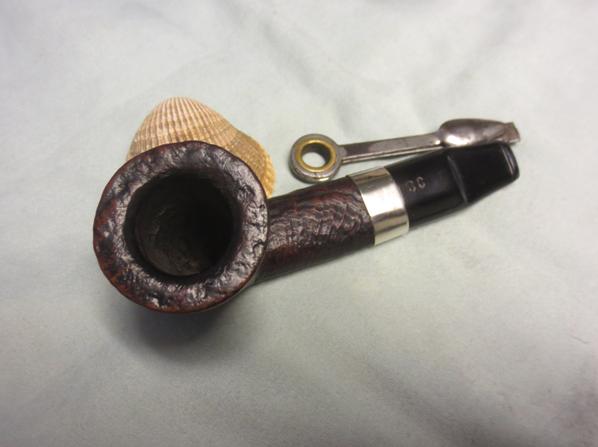
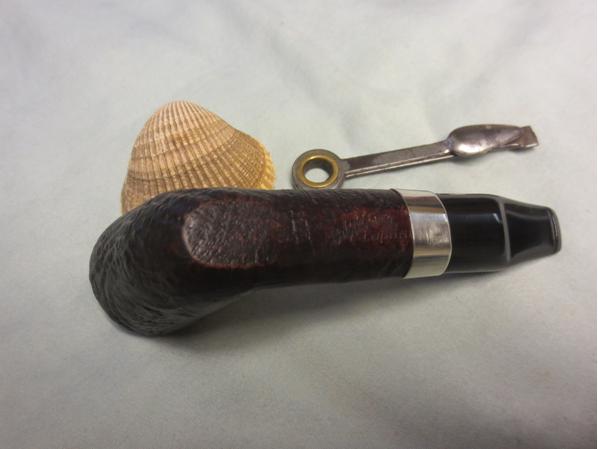
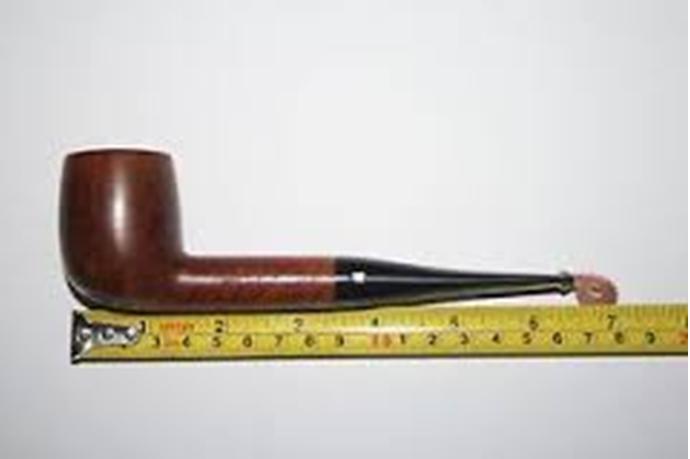
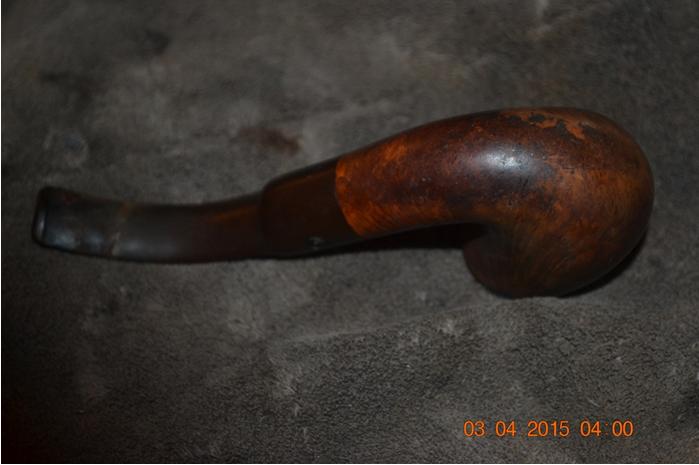
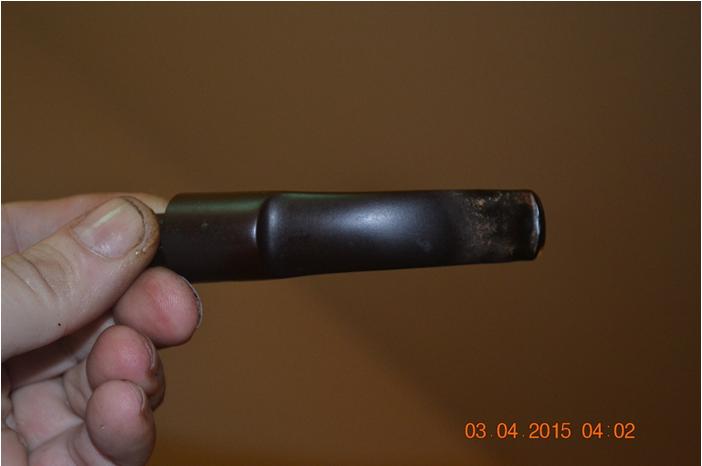
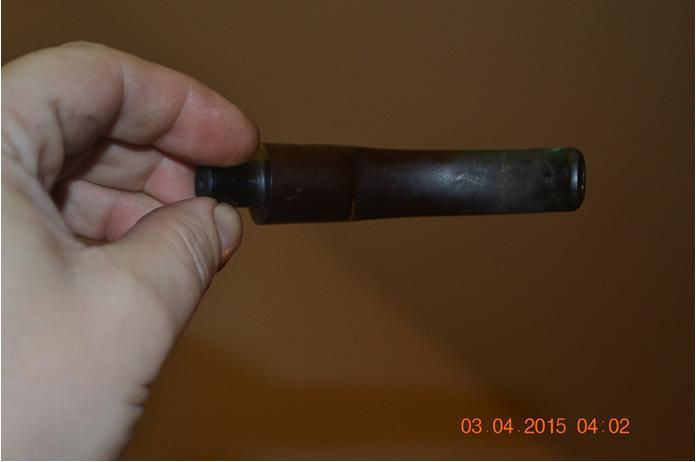
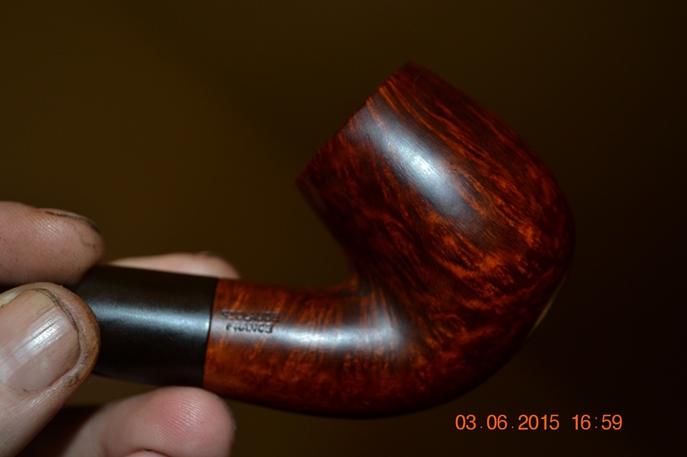
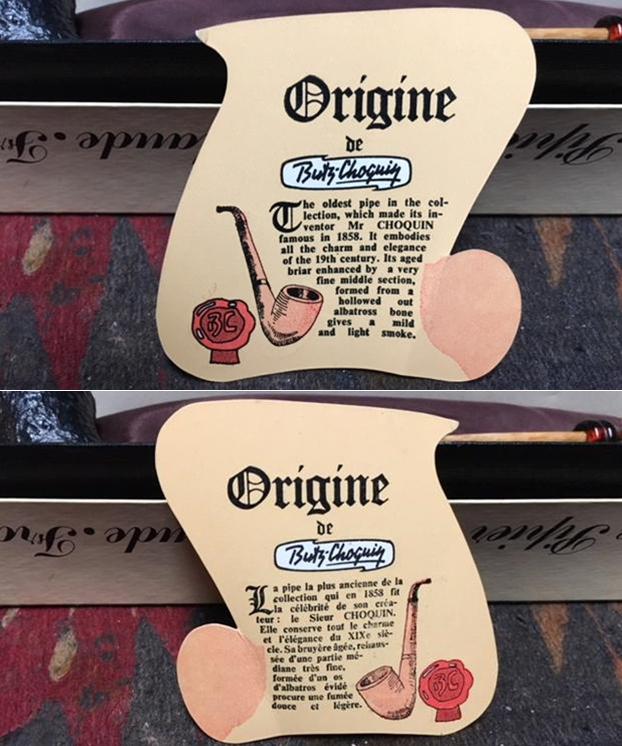
The fellow who sent it to me had packed it in a pipe bag. It was not original but it did the job. I took the pipe out of the bag and took photos of it from different angles to give an idea of the uniqueness and beauty of this pipe. The pipe is 7 ½ inches long, 1 ¾ inches tall, the diameter of the bowl is 1 1/8 inches and the chamber diameter is 5/8 inches. The sandblast finish is a little dusty but in very good condition and really quite attractive. The shape of the bowl has a foot on the bottom, almost like a clay tavern pipe and sits easily on the foot. The albatross bone is in great shape. It has a silver coloured end cap on it that is a bit tarnished. The stem is acrylic with Tortoiseshell amber or Bakelite look to it and it is in excellent condition. The bowl is lightly smoked and not even broken in; my guess is that maybe one of two bowls were smoked in it. There is still raw briar in the bottom third of the bowl. 
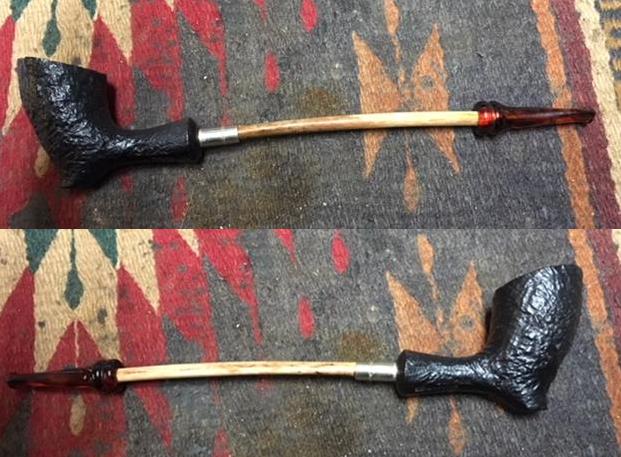
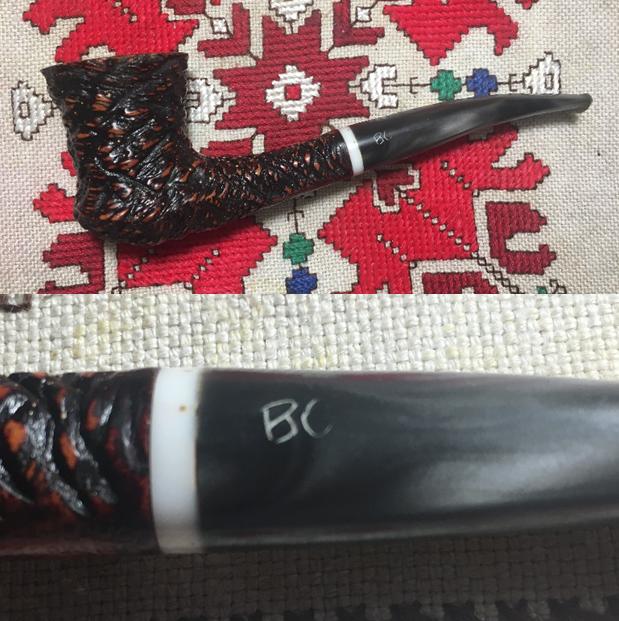
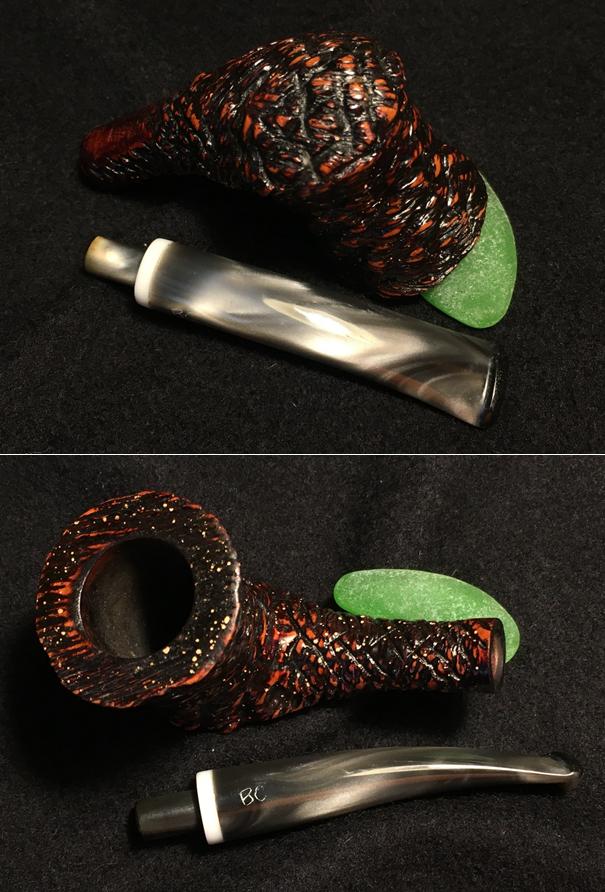
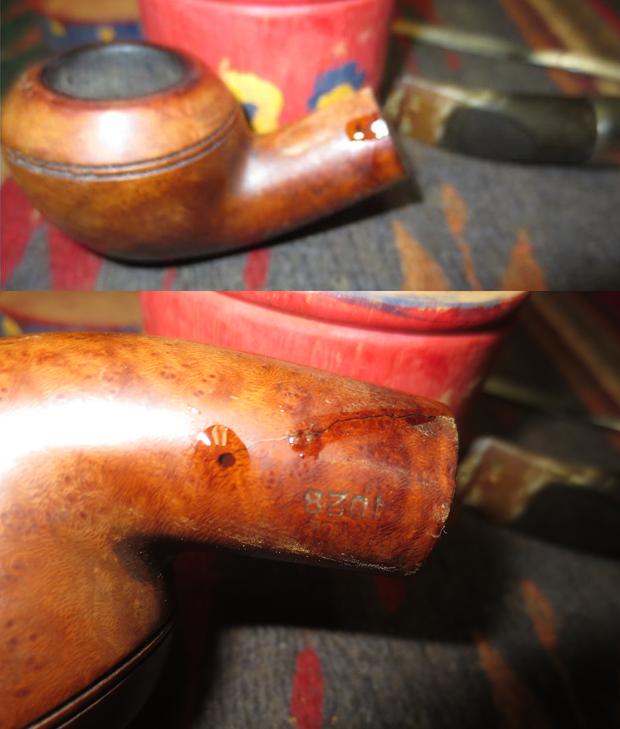
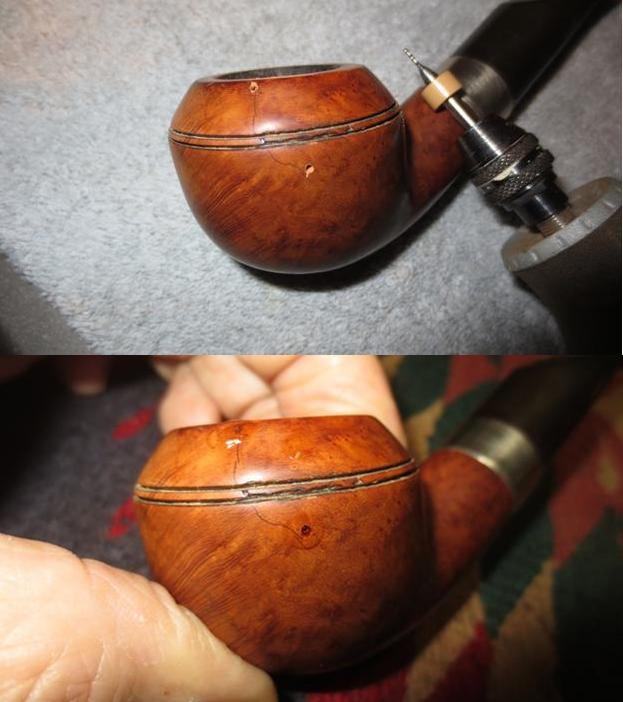
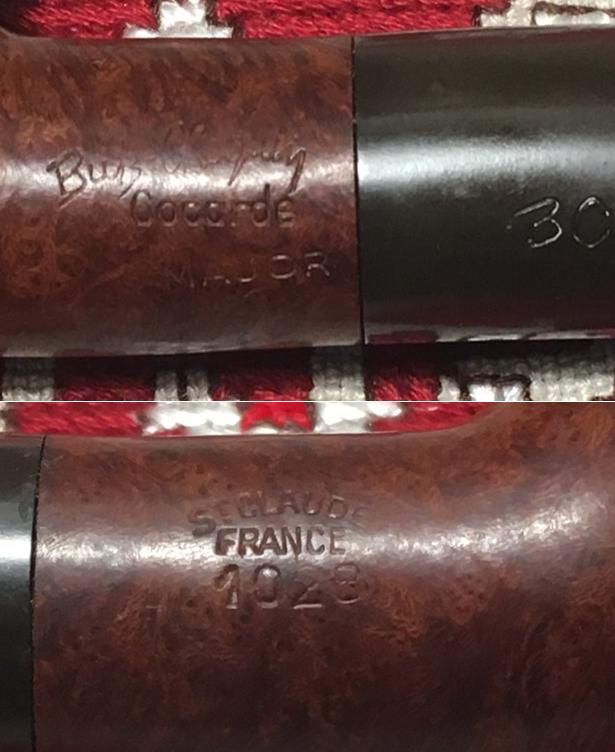
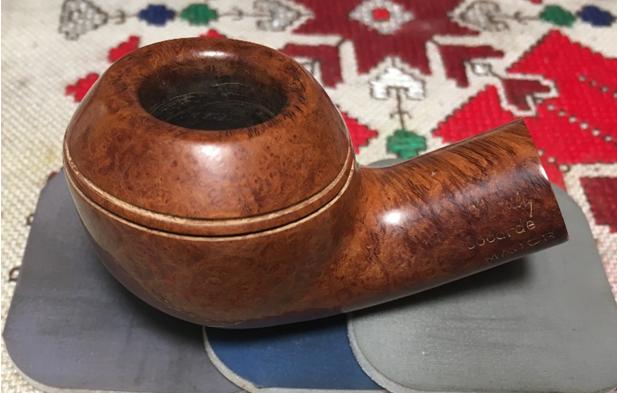
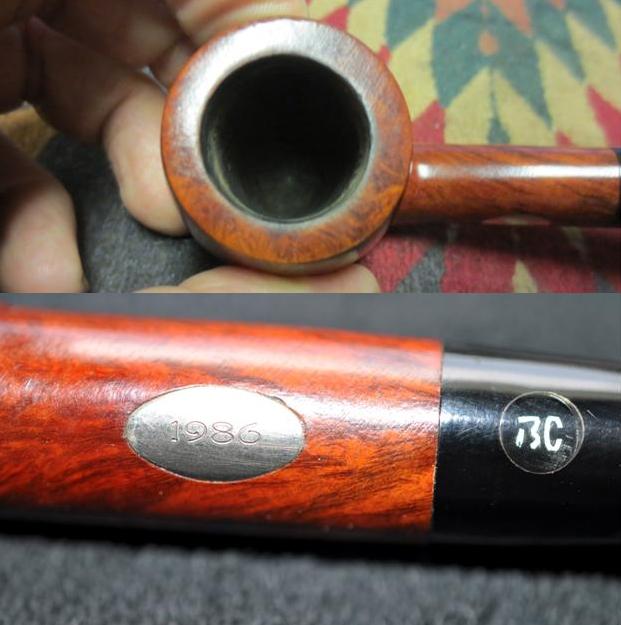
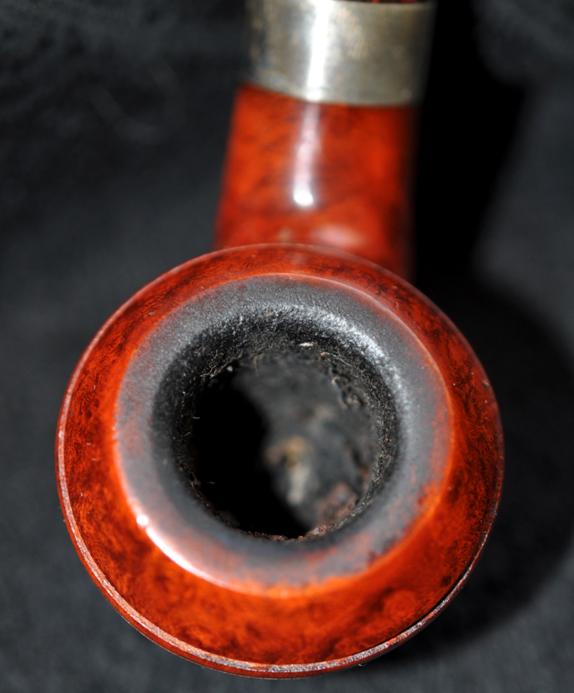
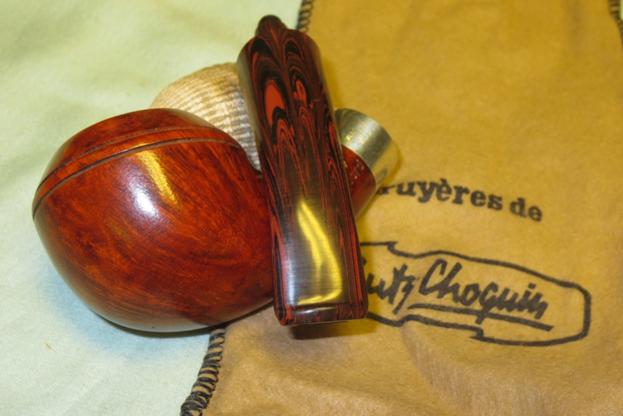
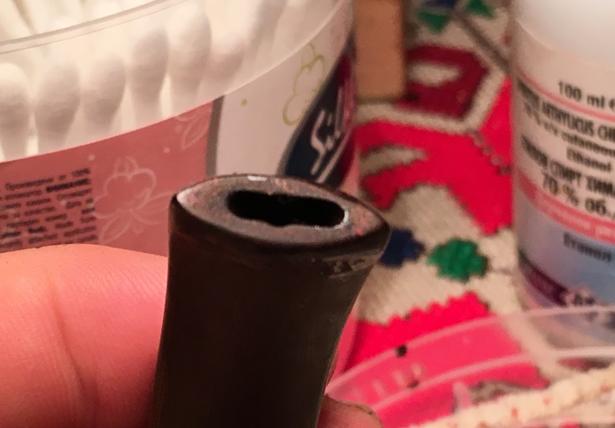
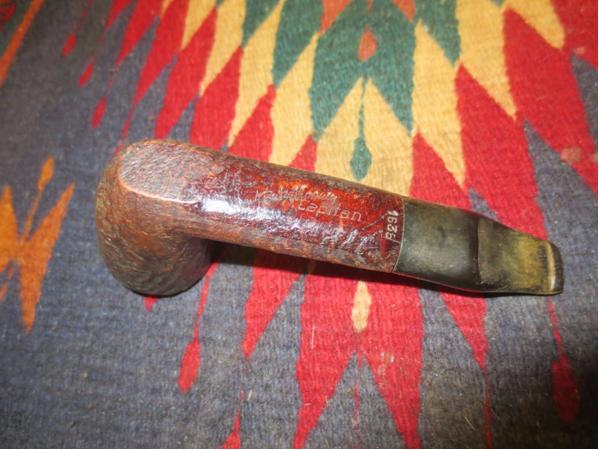
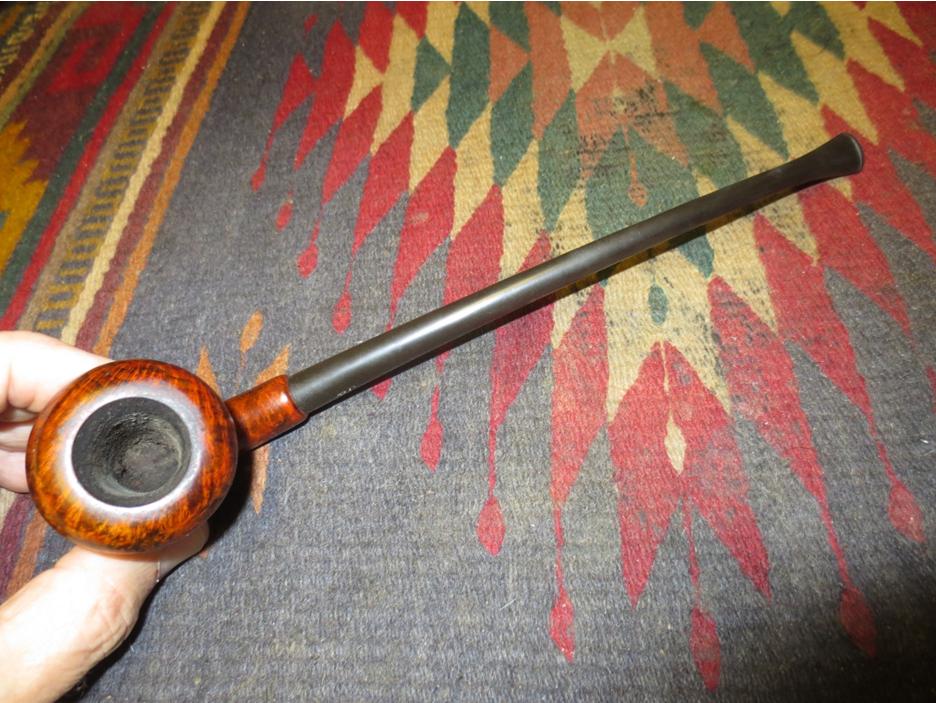
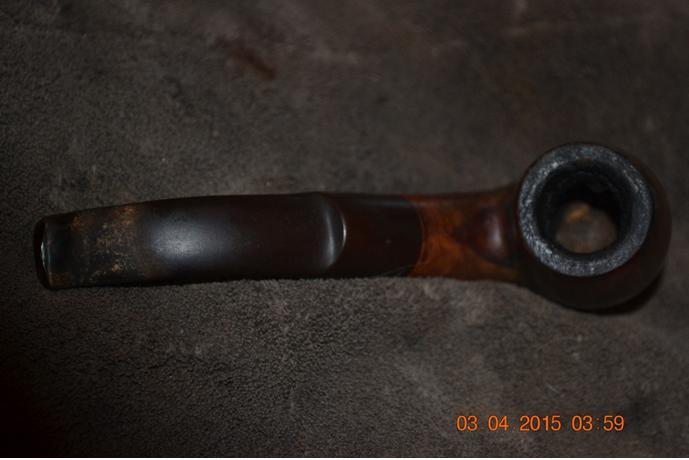
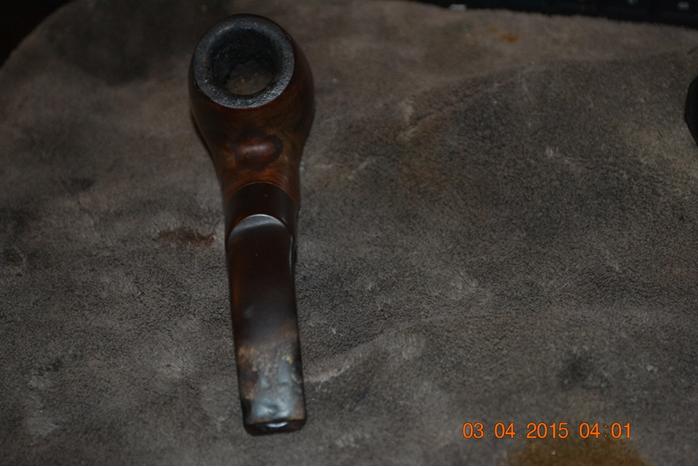
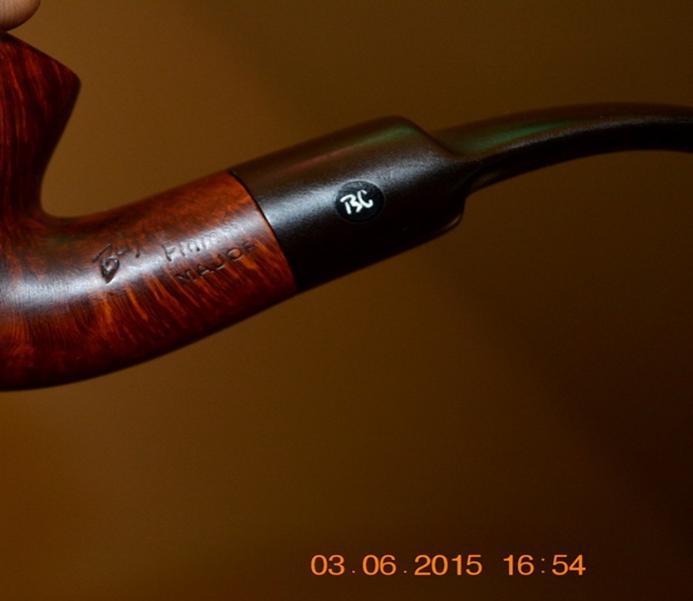
I took some close up photos of the underside of the shank to capture the stamping there. It reads Butz-Choquin over MAVA with the number 025 on the shank end. As the pipe is turned it is also stamped on the underside St. Claude France.
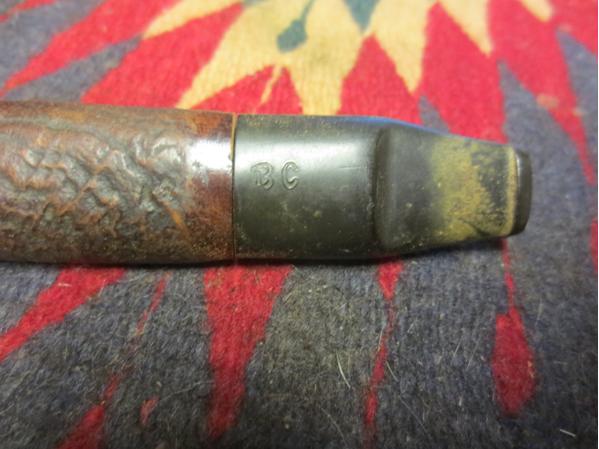
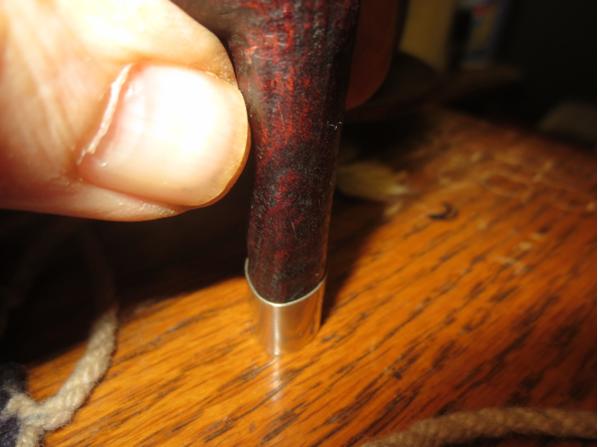
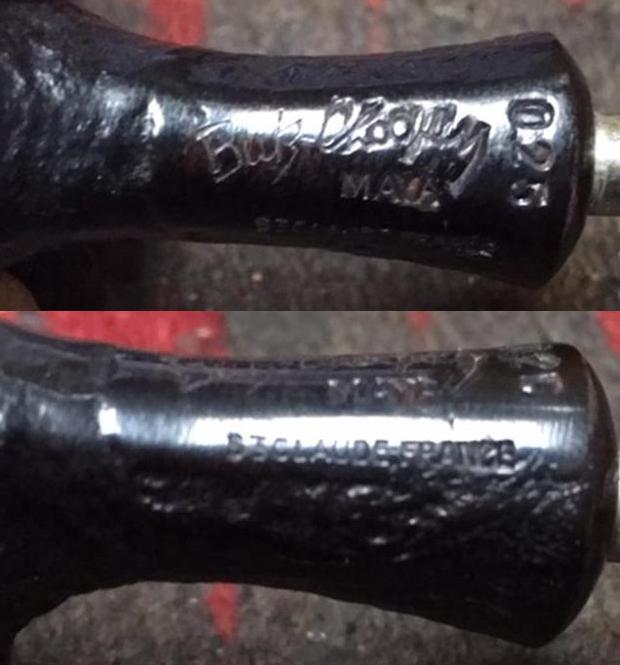
I took a photo of the end of the shank to show brass ring inset in the end to strengthen the briar with the long stem and the metal end cap on the stem.
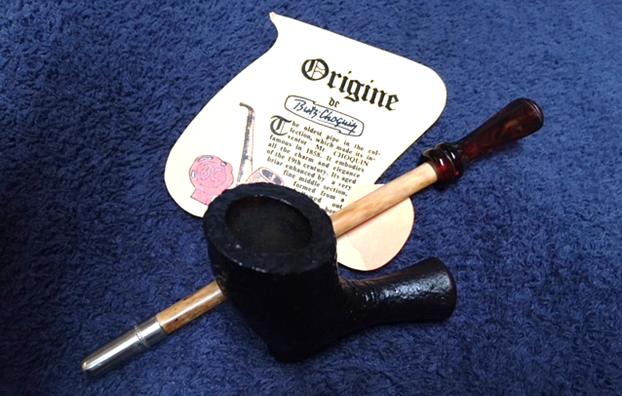
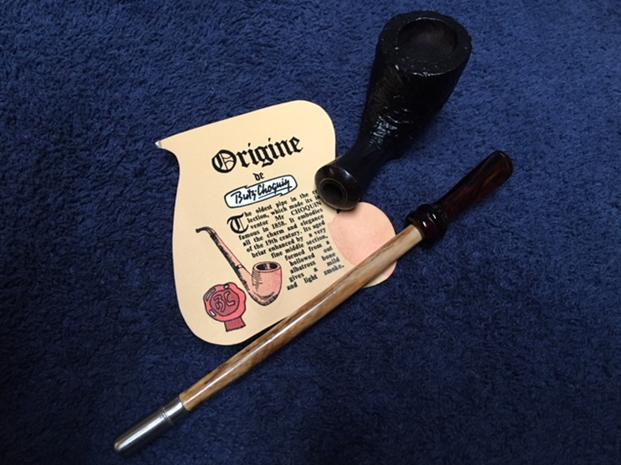
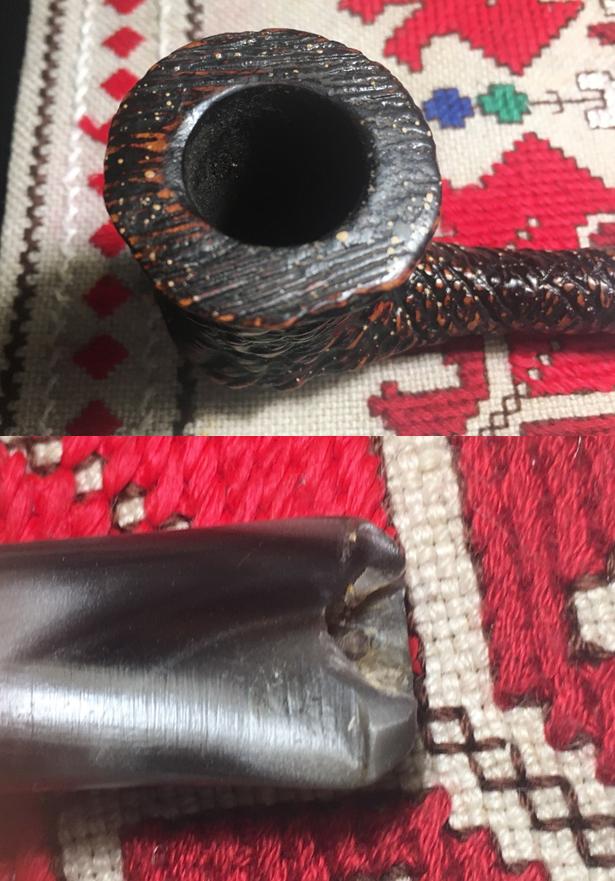
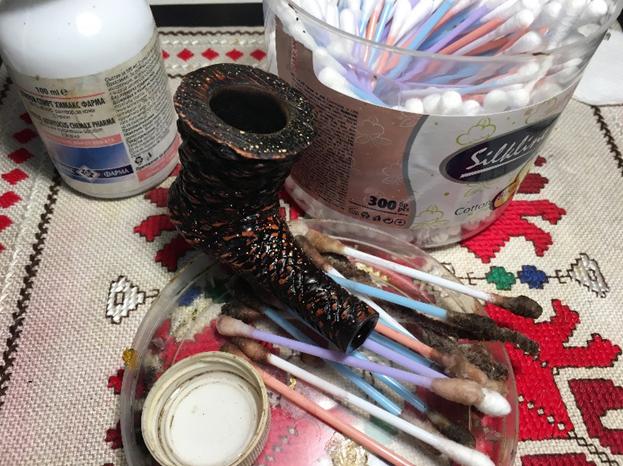
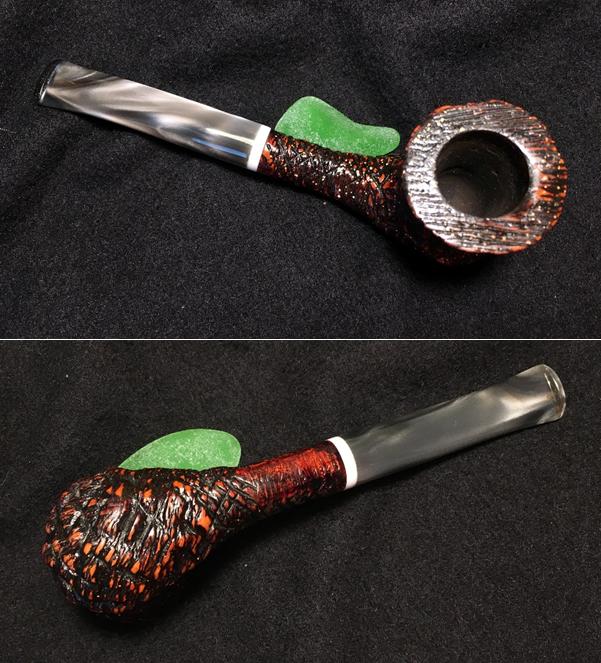
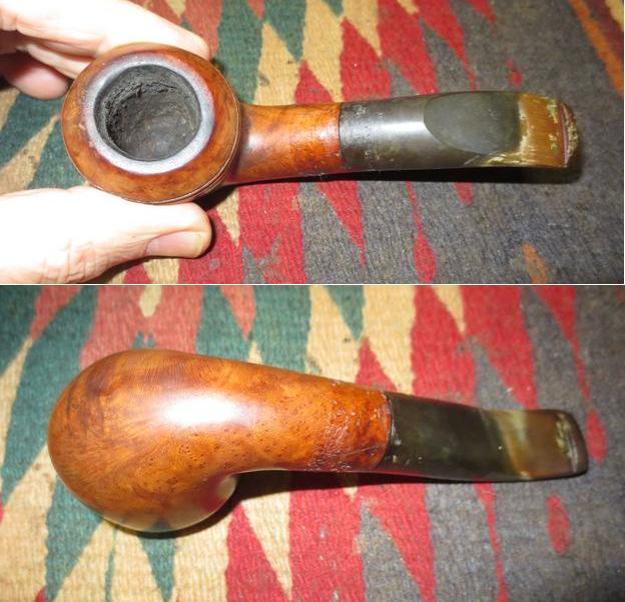
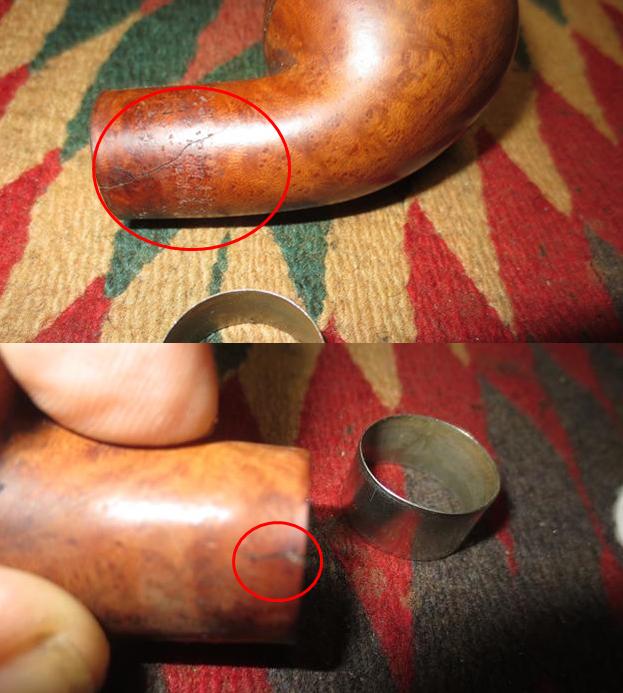
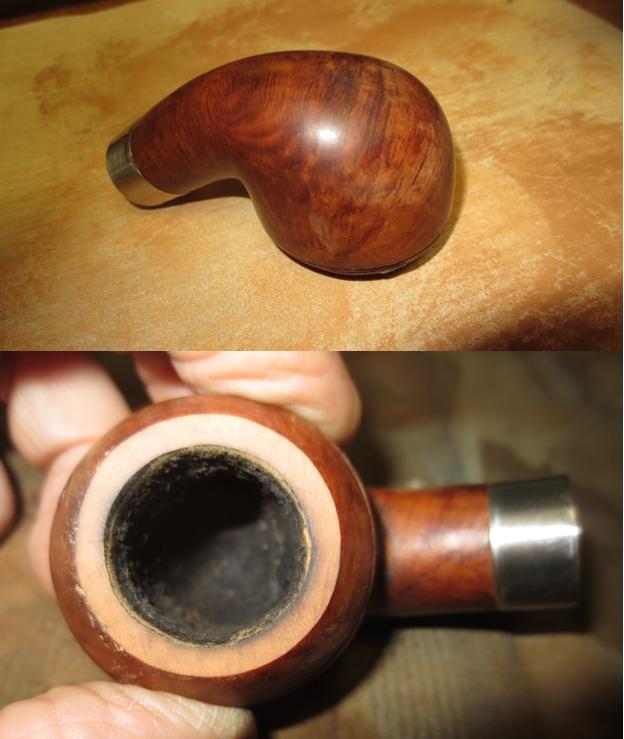
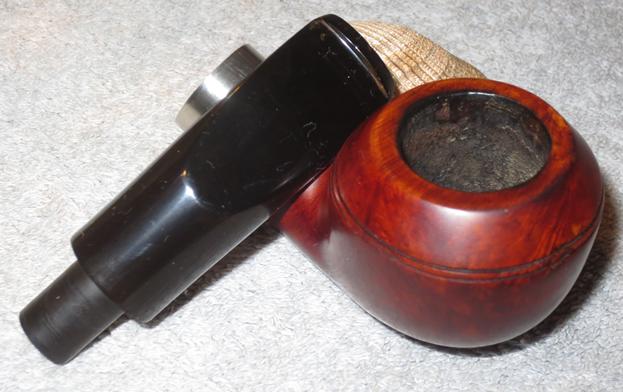
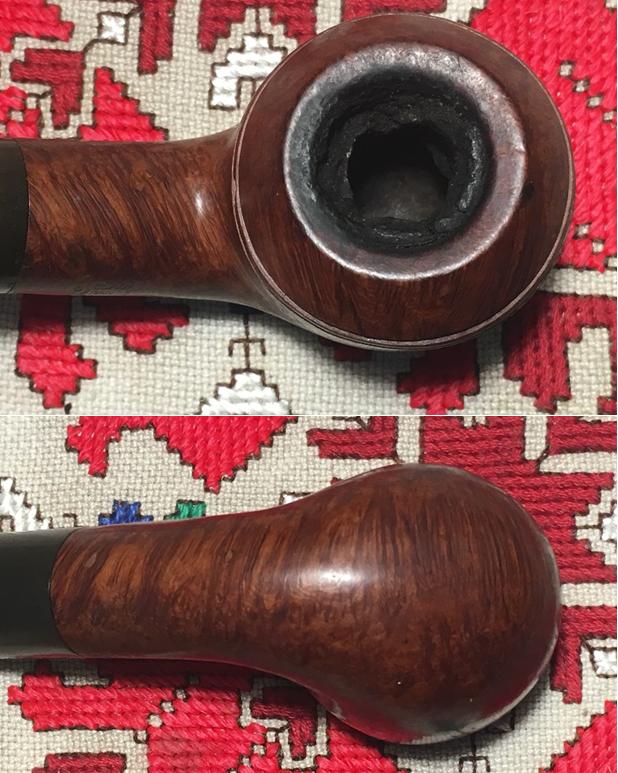
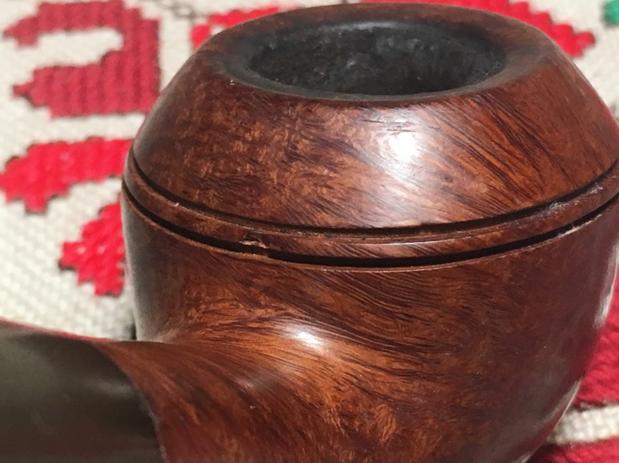
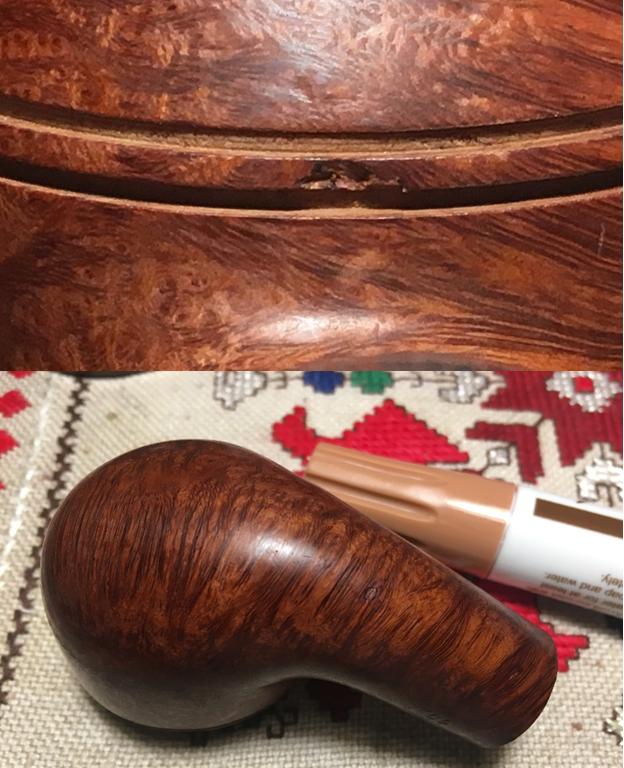
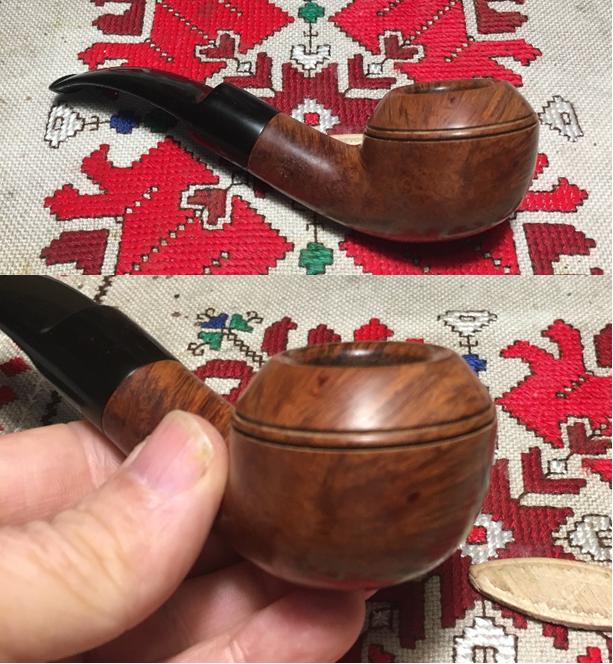
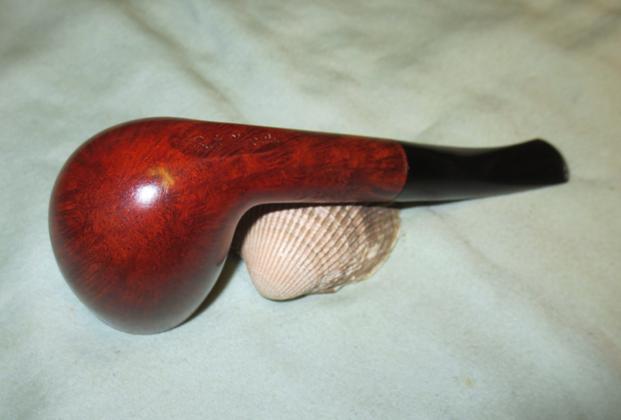
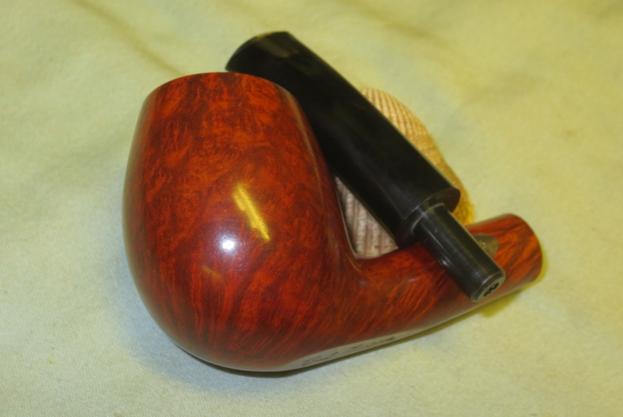
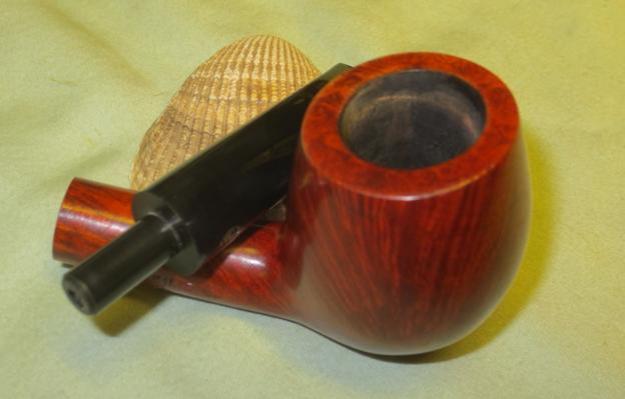
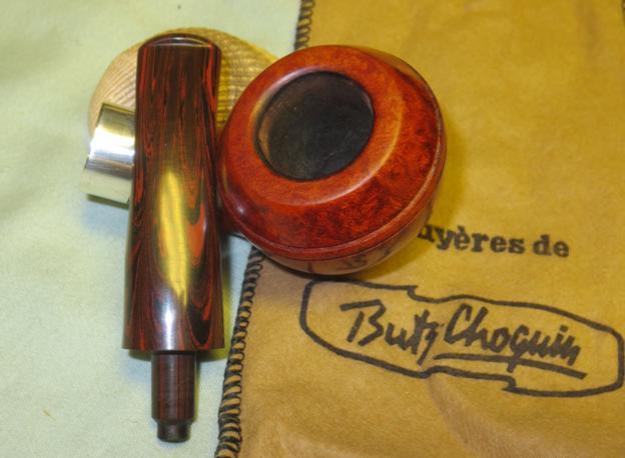
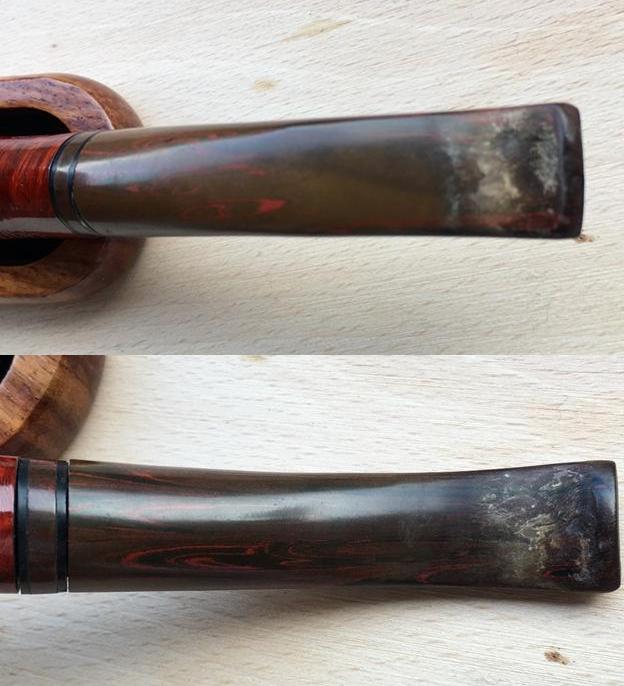
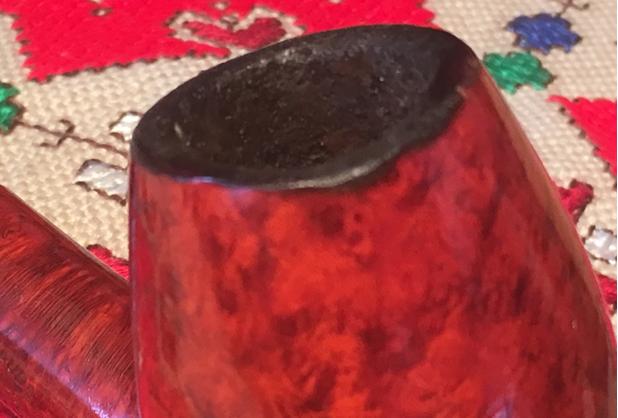
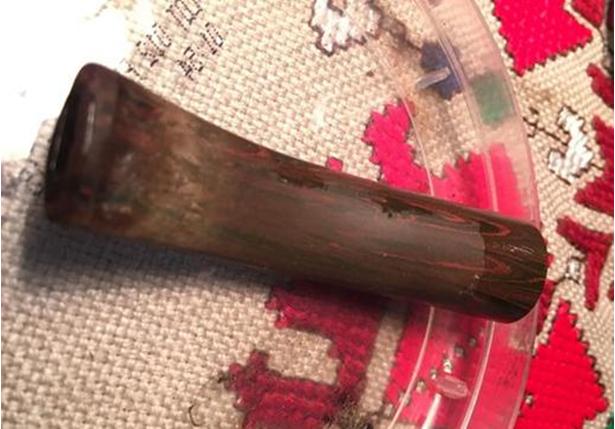
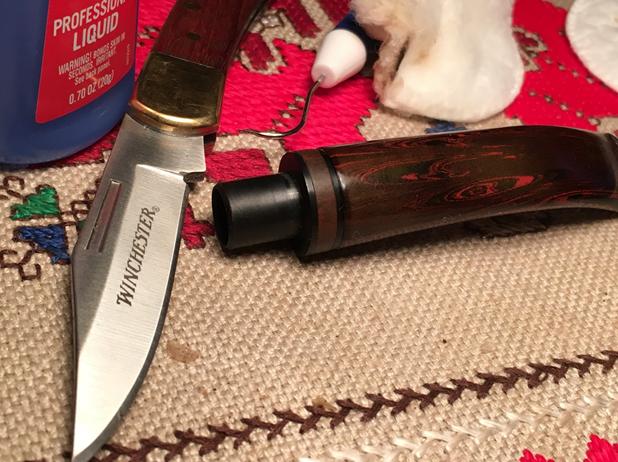
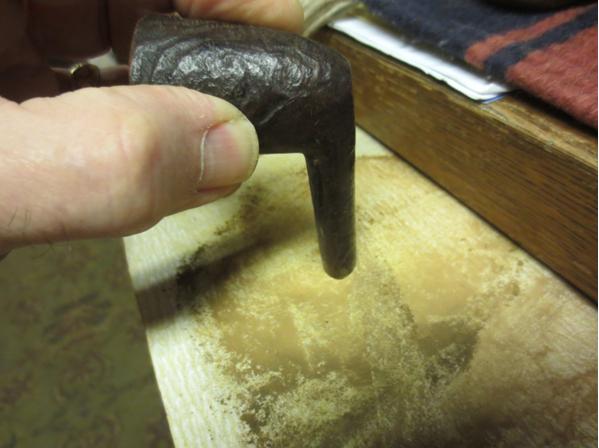
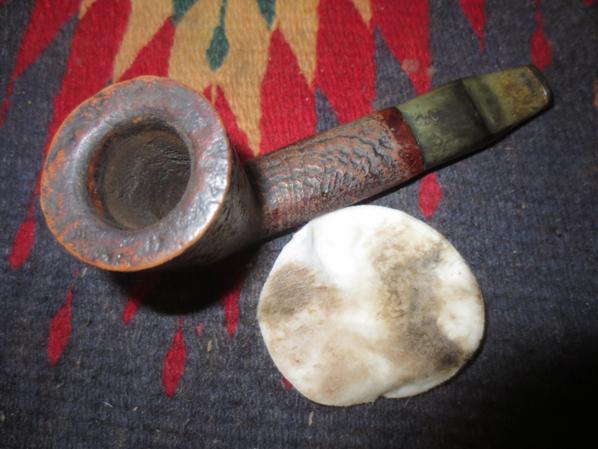
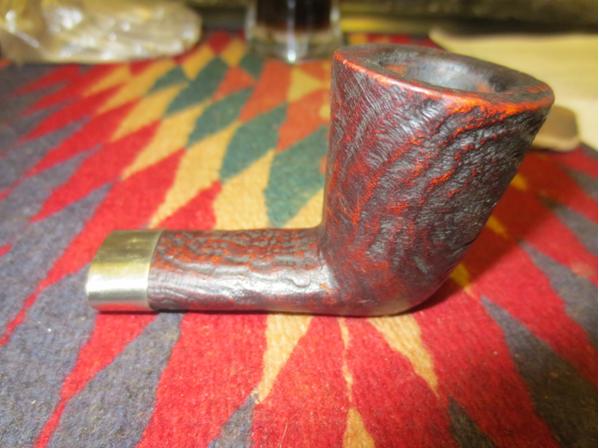
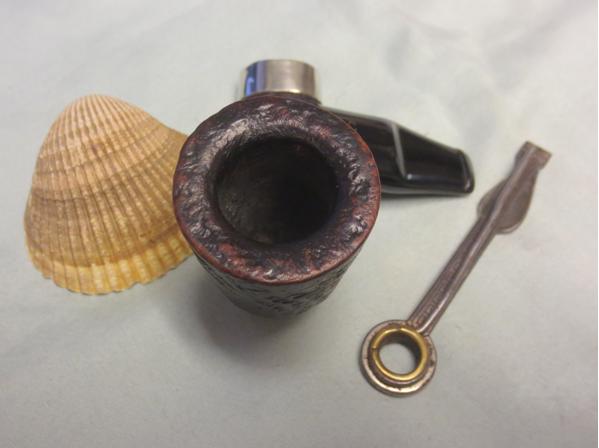
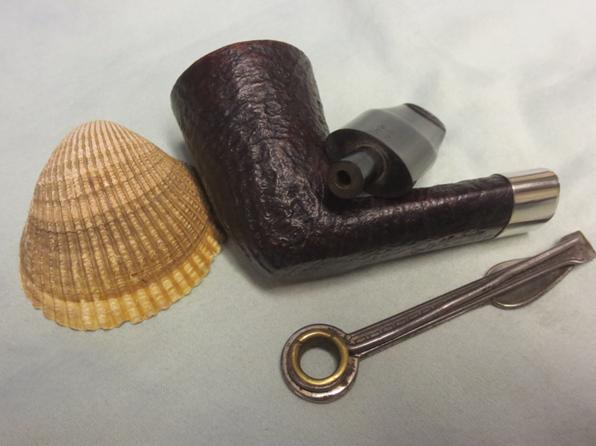
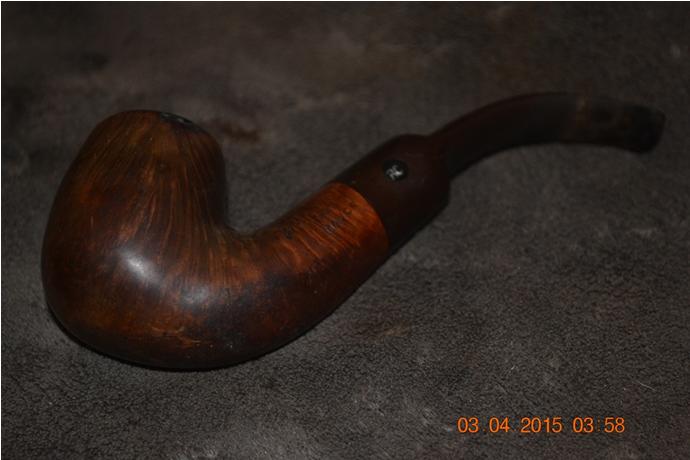
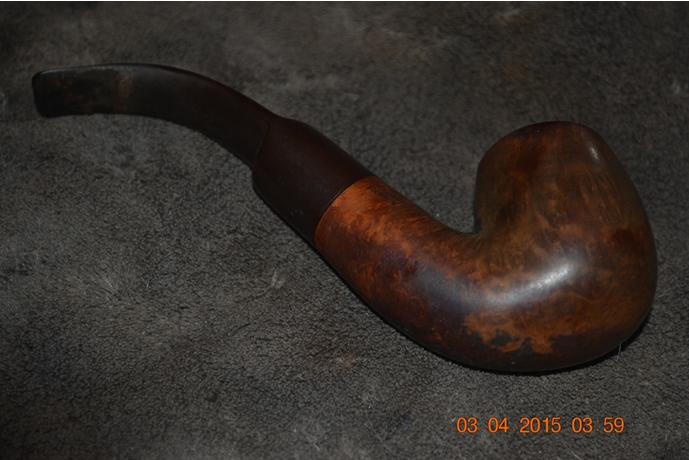
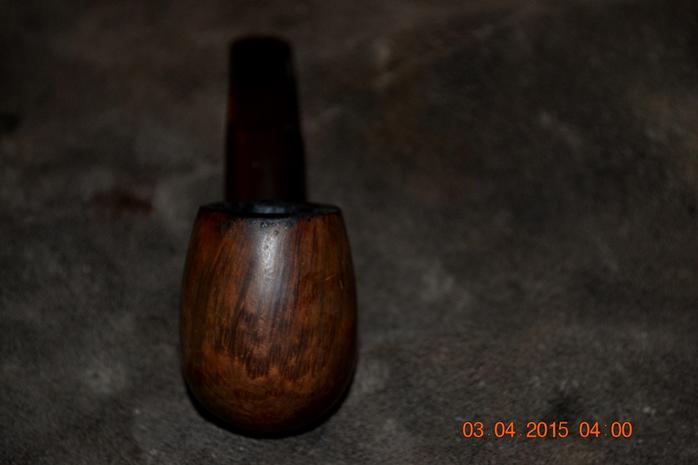
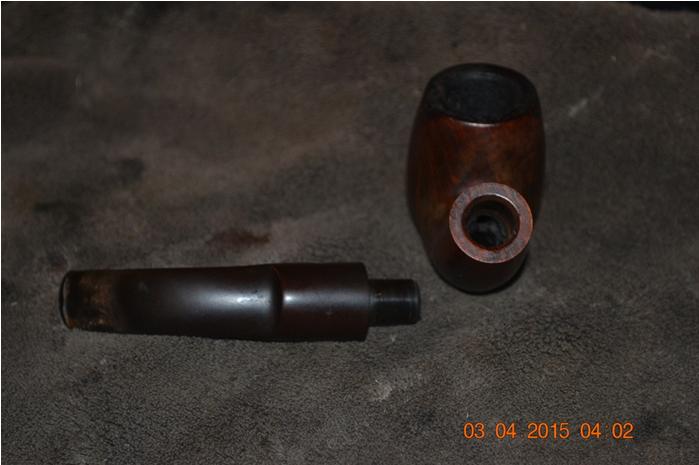
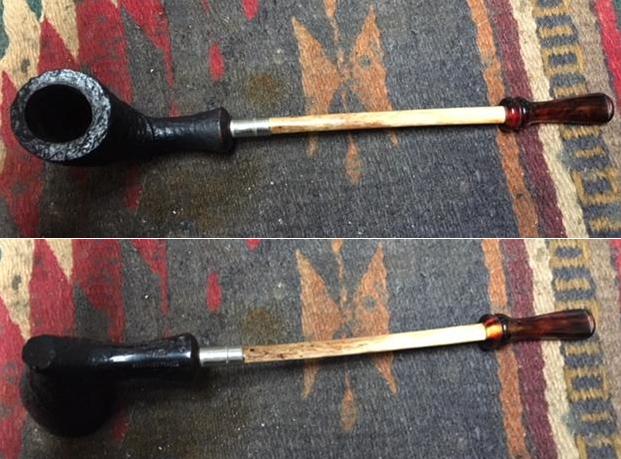
I took the pipe apart and took pictures of the pieces. The first one below shows the bowl. You can see the raw briar in the bottom of the bowl and the slight darkening to the rest of the bowl. It is quite clean with a slight aromatic smell. I took photos of the albatross wing bone and the acrylic stem that was permanently attached to the bone.
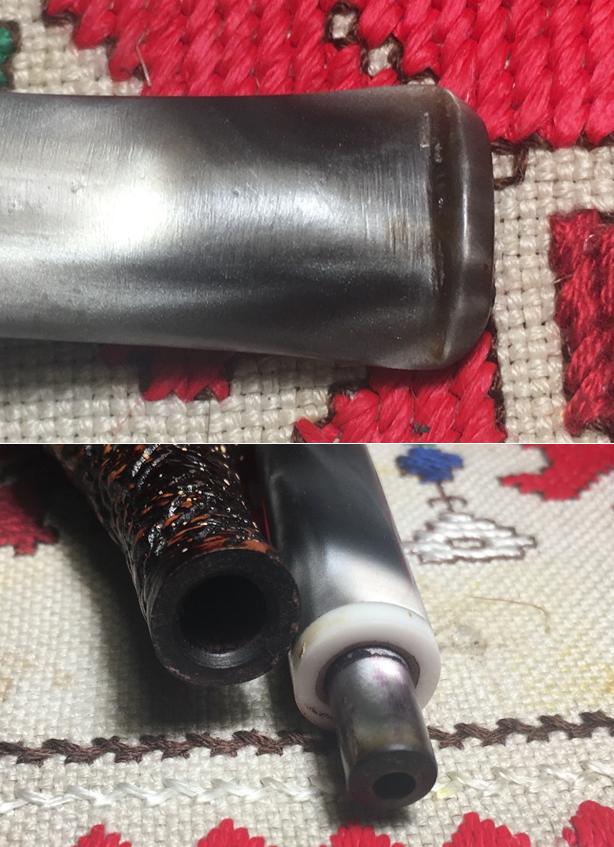
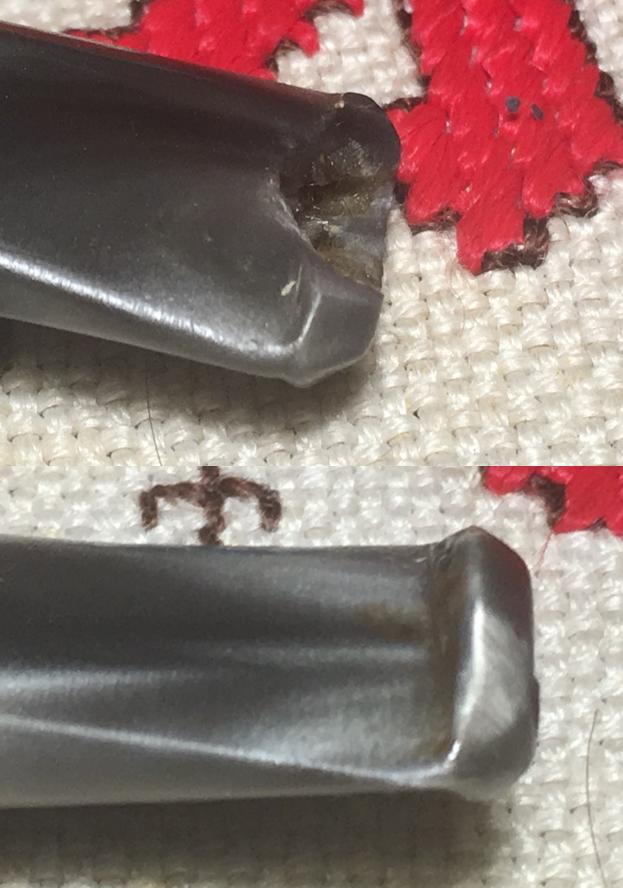
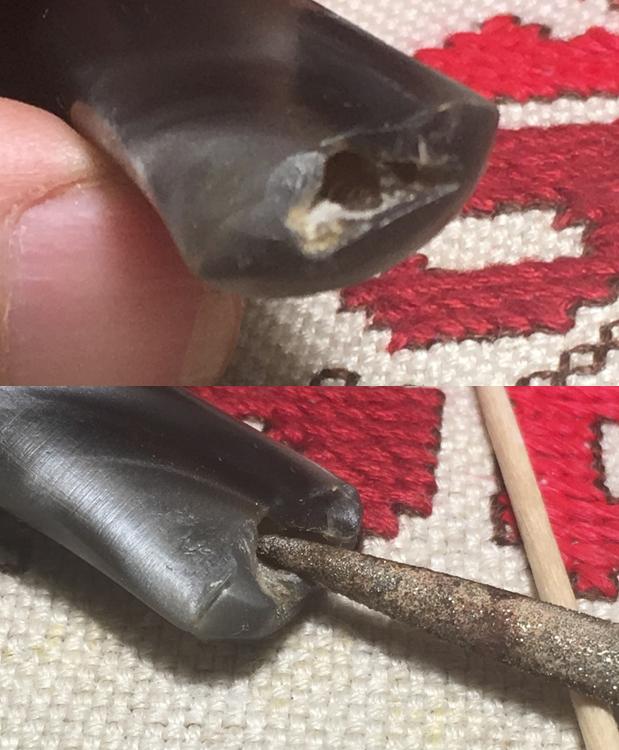
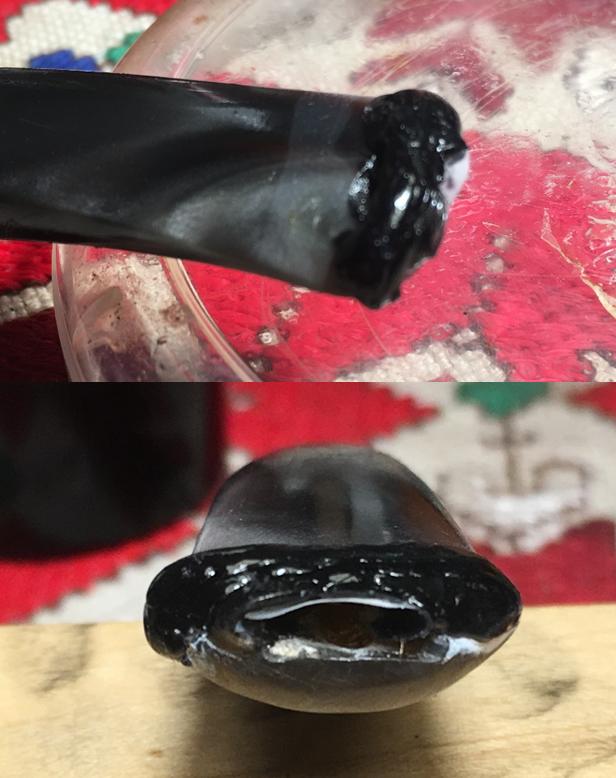
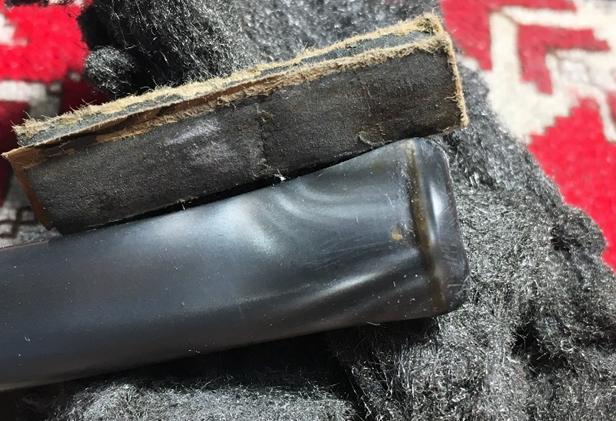
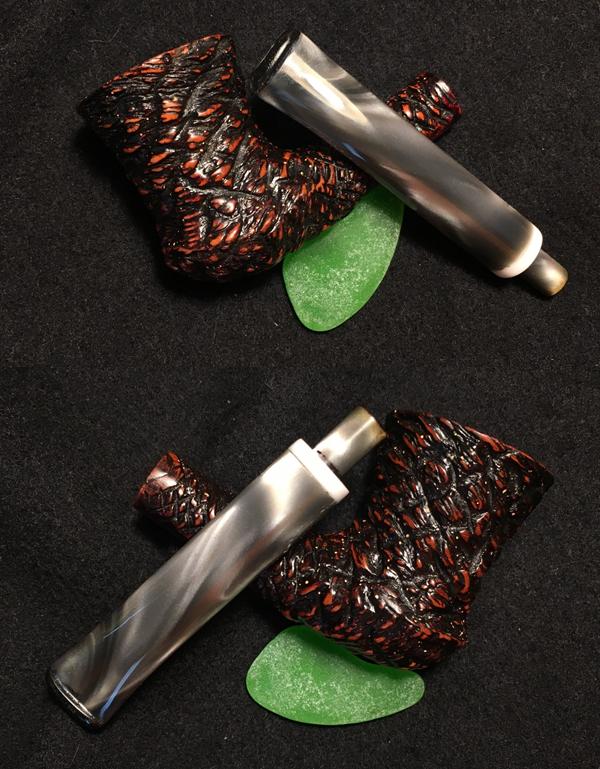
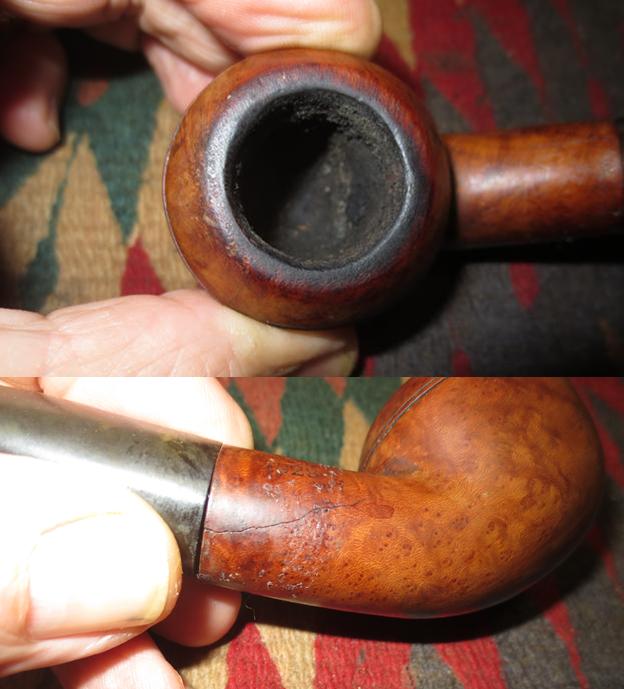
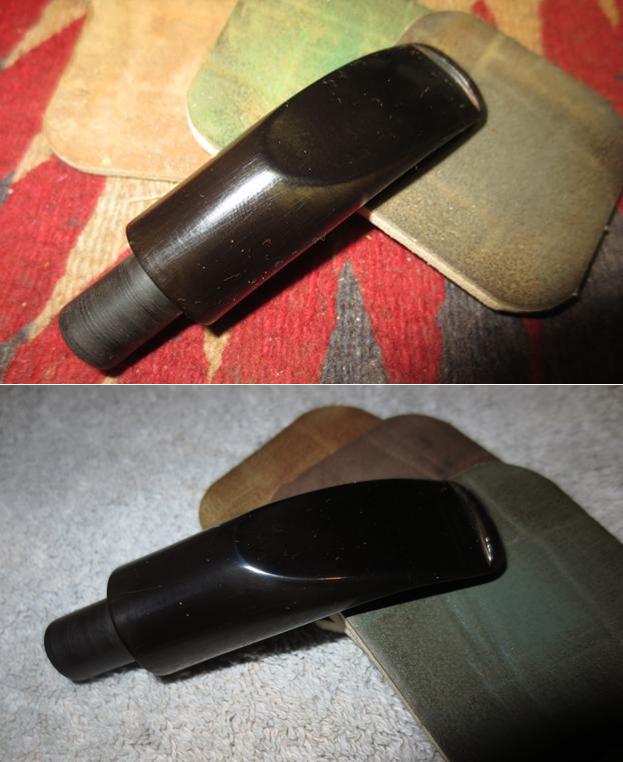
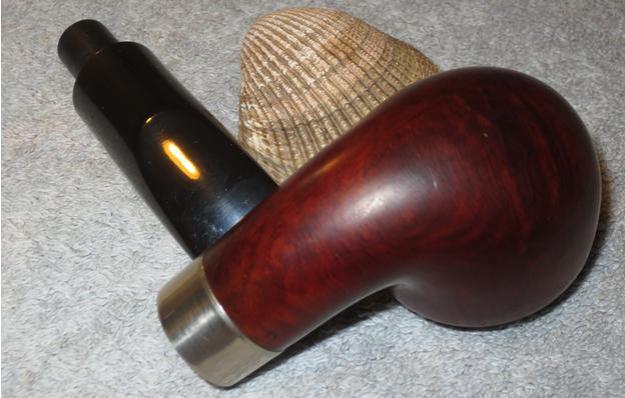
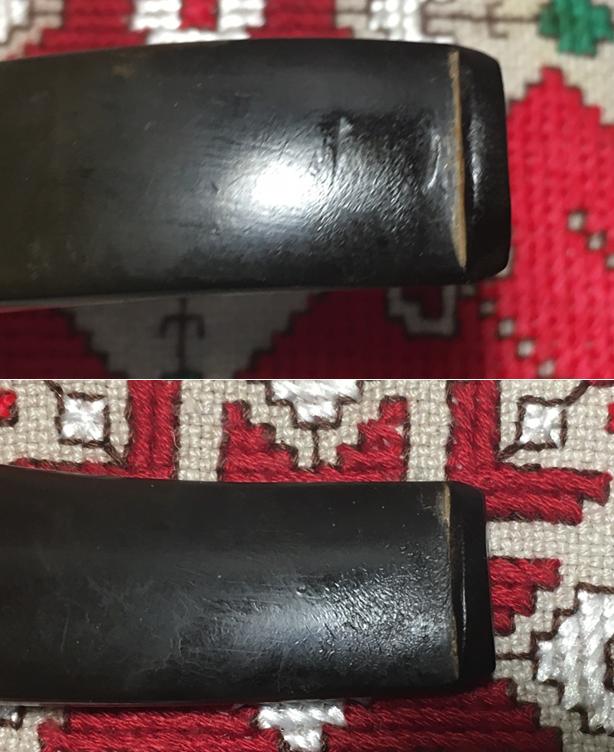
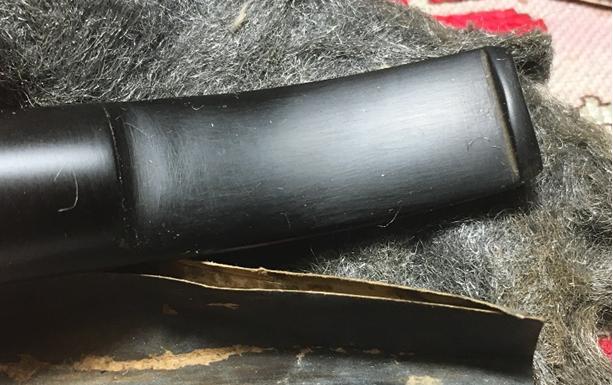
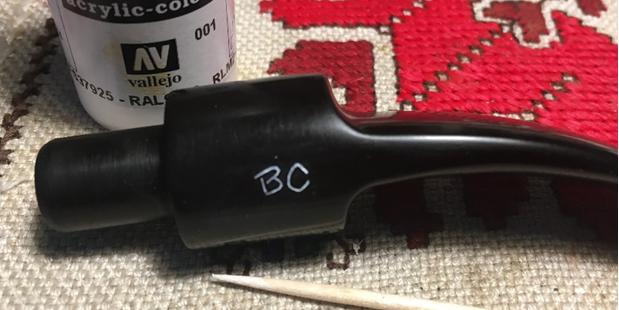
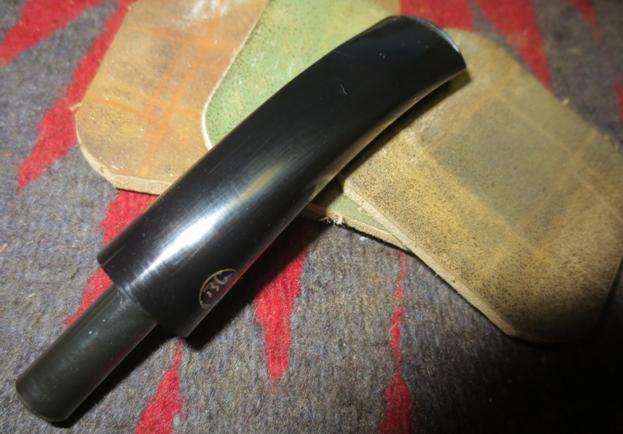
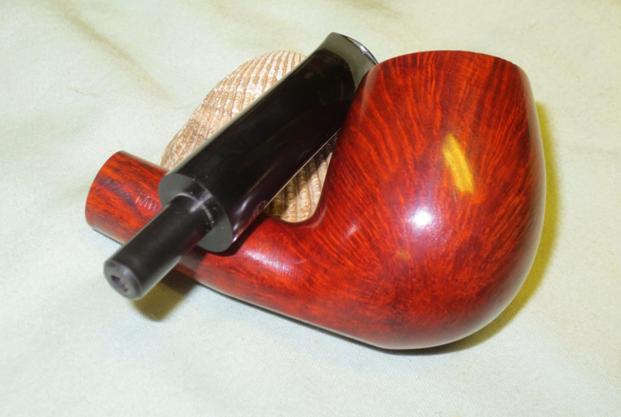
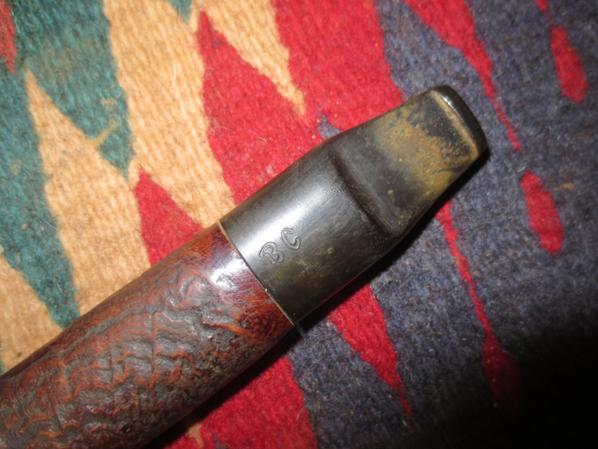
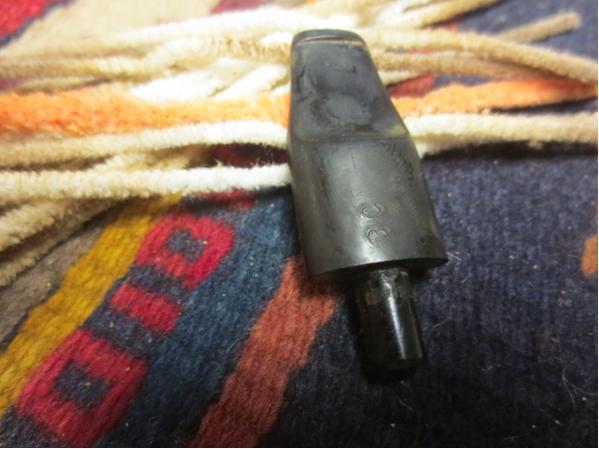
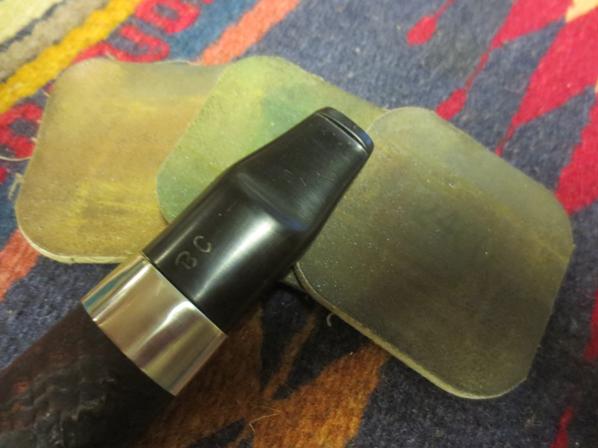
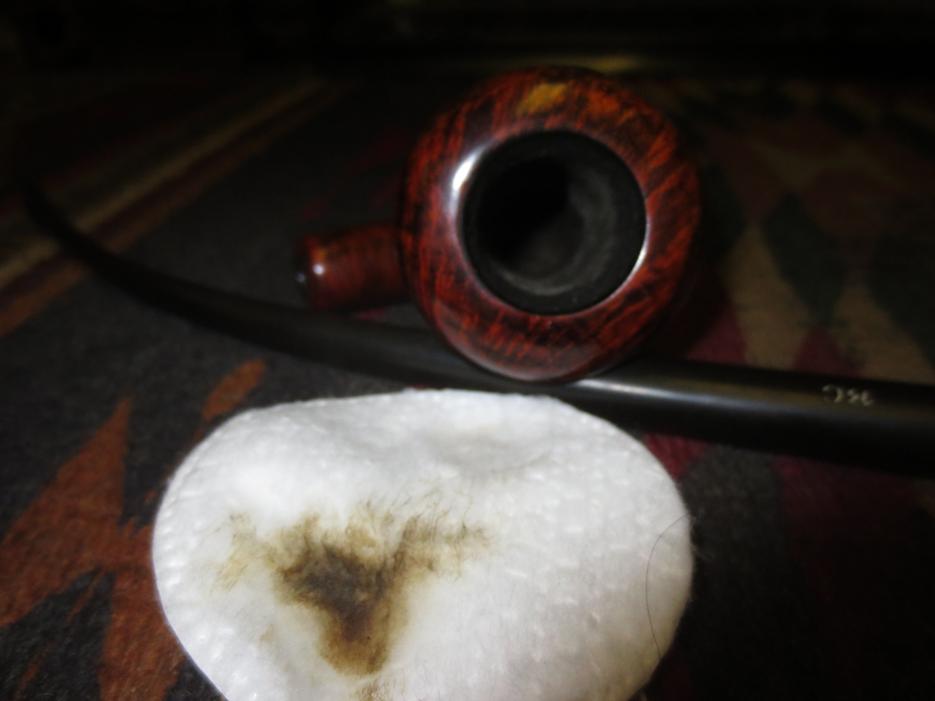
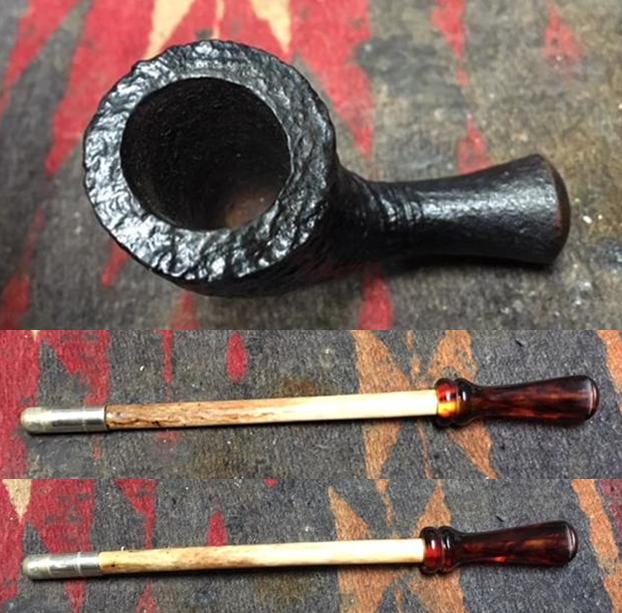
I took some close up photos of the stem to show its general condition. It is hard to tell from the photos but the stem has a Tortoiseshell pattern in the reds of the acrylic. There was some light tooth chatter on both sides of the stem at the button – nothing to deep or damaging. I also took a close up of the metal end cap on the shank end of the wing bone. It is tarnished where it is inserted in the shank but otherwise just dull.
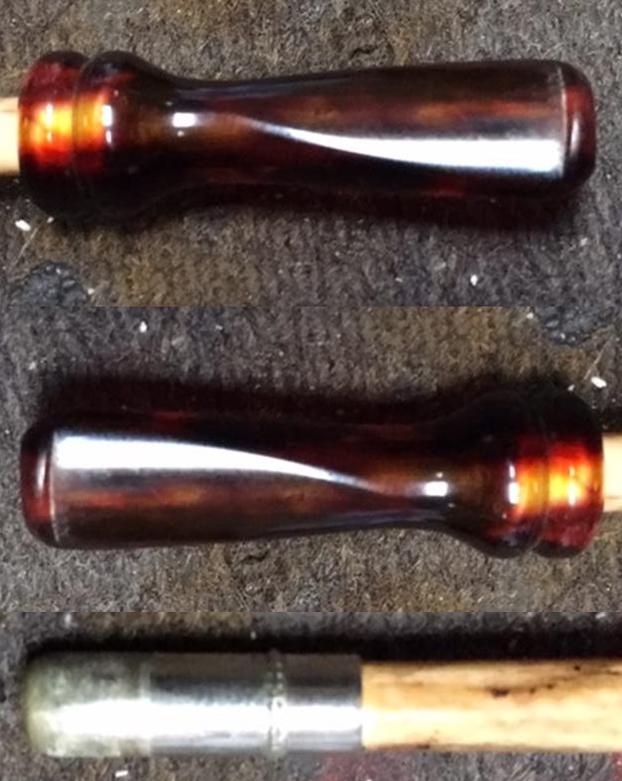
It was time to do a bit of reading about this pipe. The one I have is a little different from the one that is described in the quote below. It is not a billiard shape but rather a cutty shaped pipe. The extended stem on the one I have appears to be true bone rather than the white acrylic that is shown in the photos that accompany the article. The stem itself is reddish, amber or Bakelite colour rather than the black as noted. It is very light weight and actually quite delicate looking.

On the GQ Tobaccos site I found some interesting information about the brand and this particular pipe. The link is; http://www.gqtobaccos.com/pipes/butz-choquin-origine-sandblasted/. I quote in full from the website.

The Butz Choquin Origine pipes represent one of the first designs created by Jean-Baptiste Choquin and Gustave Butz in the mid 1800’s. The Original Origine made use of an albatross wing bone, for the long, extended stem. The deep billiard style bowl, sports a slight foot on the base and is finished sandblasted with a brown stain. The stem extenders is made from Acrylic (faux bone effect) and fitted with a nickel spigot and matching band near the mouthpiece. The black acrylic mouthpiece is curved, making this demi warden/reading pipe ideal for hands free smoking. The spigot fitting makes the use of the common 9mm filter impossible, but it can be used without easily.

Butz Choquin started life back as a tobacconist in Metz, during 1850’s run by Jean-Baptiste Choquin. One of Jeans longest serving members of staff was a young Gustave Butz who had a desire to not only sell pipes, but also create them. In 1958 Gustave married Jeans eldest Daughter Marie and become an actual part of the family.

The pair set about creating a unique and distinct pipe, the now world famous “BC Origine” was first created in same year. This flat bottomed bowl was fitted with a long albatross bone shank and dual silver rings. To this day this pipe is one of the most iconic from Butz Choquin range, although sadly it no longer has the natural shank, replaced with acrylic.

Over the years the pair created a large range of pipes which not only sold within their own, but exported all over Europe and further field. The popularity of the pairs pipes grew and grew and by the 1951 the Berrod-Regad company brought out the family company. Production continued in Metz until 2002 when the whole operation was shifted to the mountain community St Claude. This picturesque village had been the centre of the worlds Briar trade for generations and the local craftsmen continued to produce high quality pipes.

To this day Butz Choquin are renowned for their desire of making more interesting and left field colour schemes. Using high quality briar, original equipment and colourful dyes/acrylic rods.

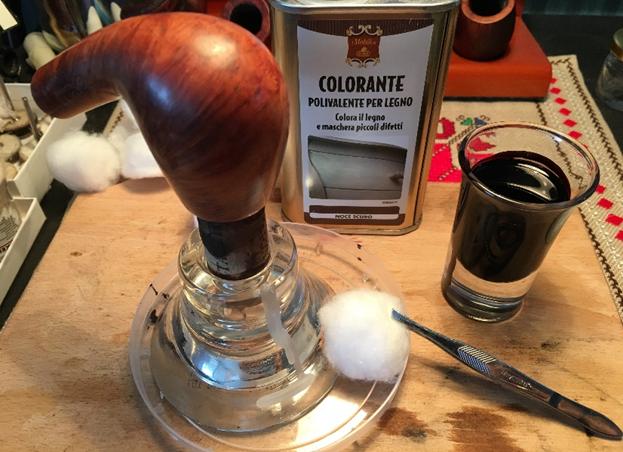
With that information I turned to the relative simple refurbish on this pipe. Looking at the bowl it is very different from the photos of the ones that I have seen online. The extension is not the white acrylic and the plumbing for holding it all together is very different from the current photos. It makes me wonder the age of the pipe. I wrote to the fellow who sold it to me to see if he remembers when he purchased it… the verdict is out on this one for now.

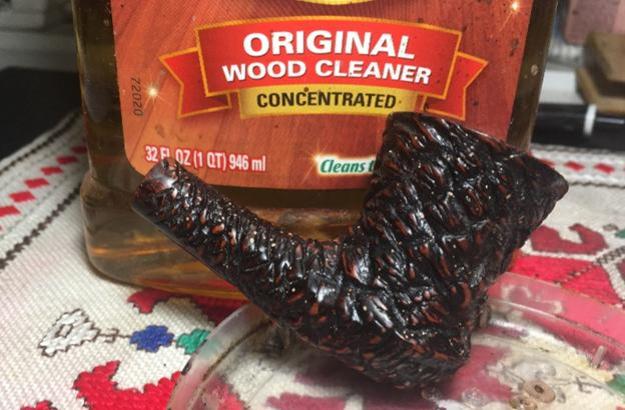
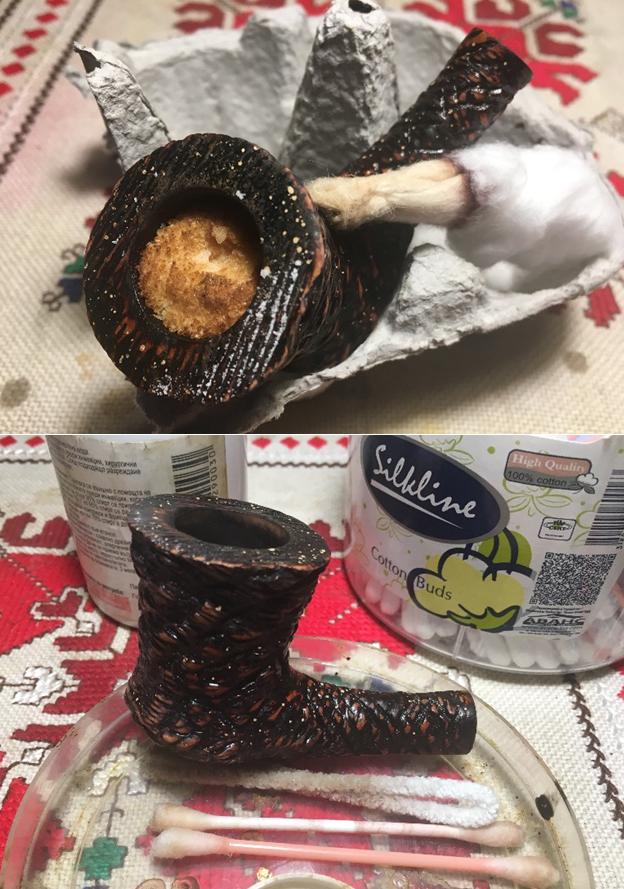
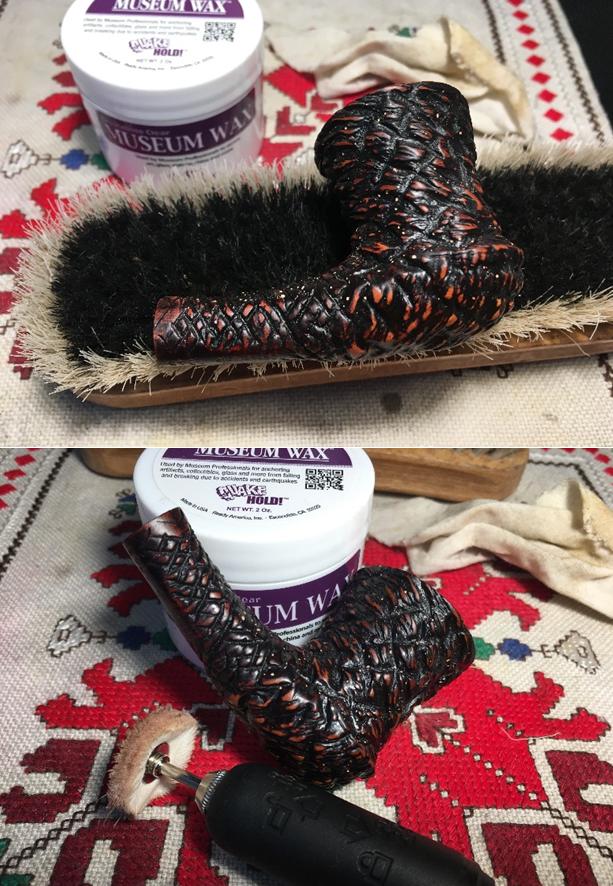
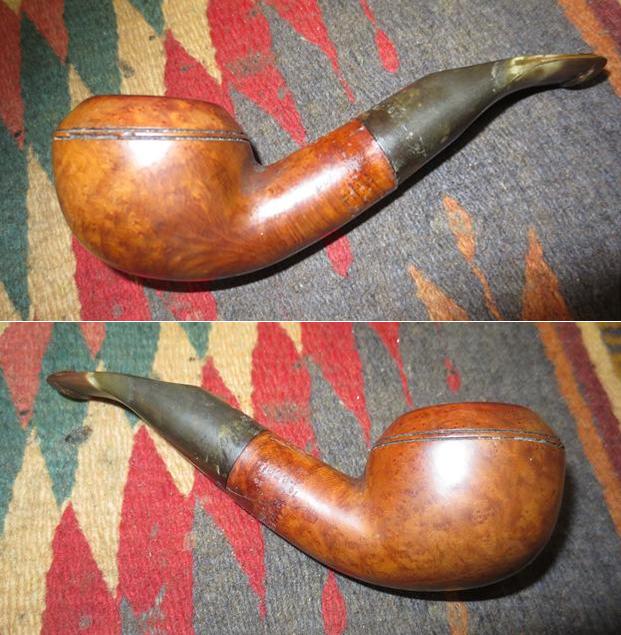
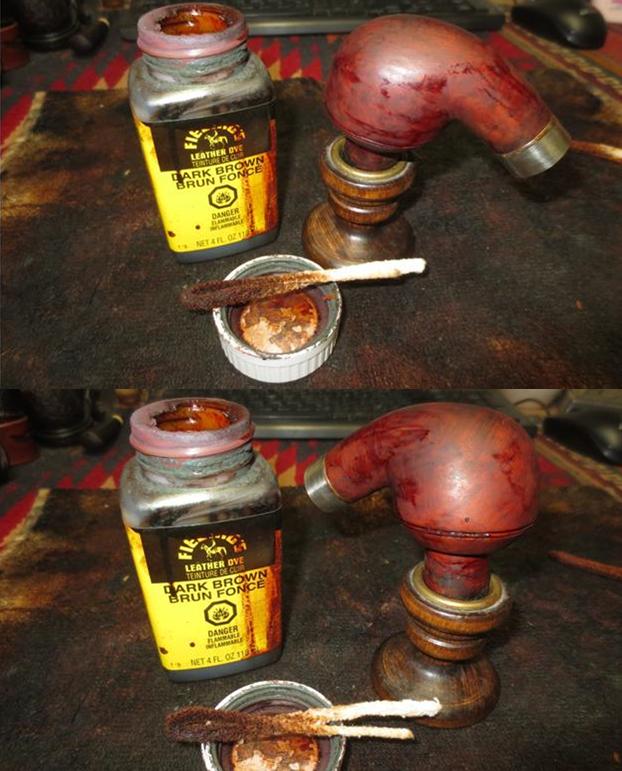
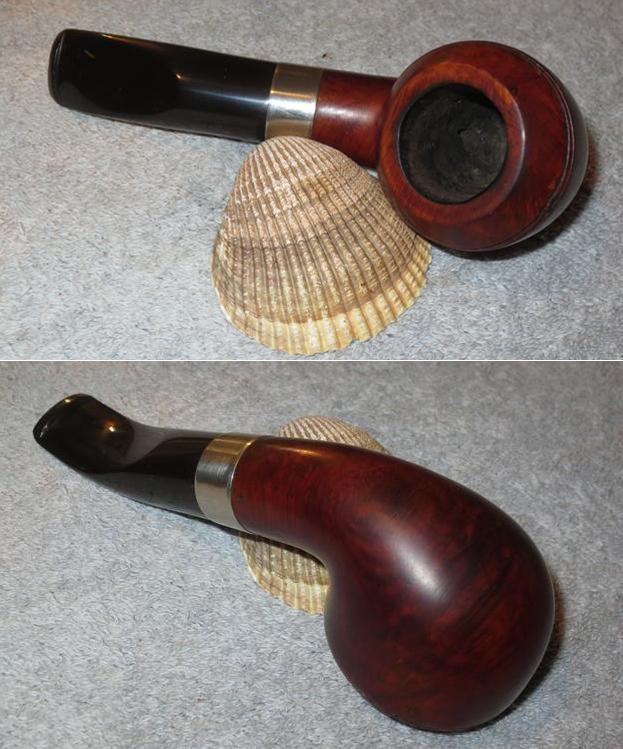
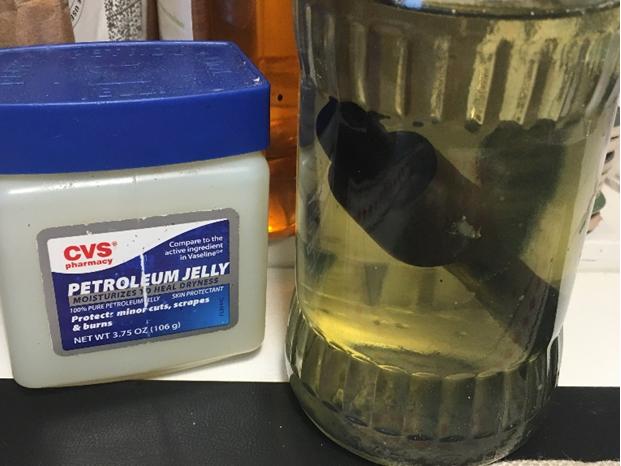
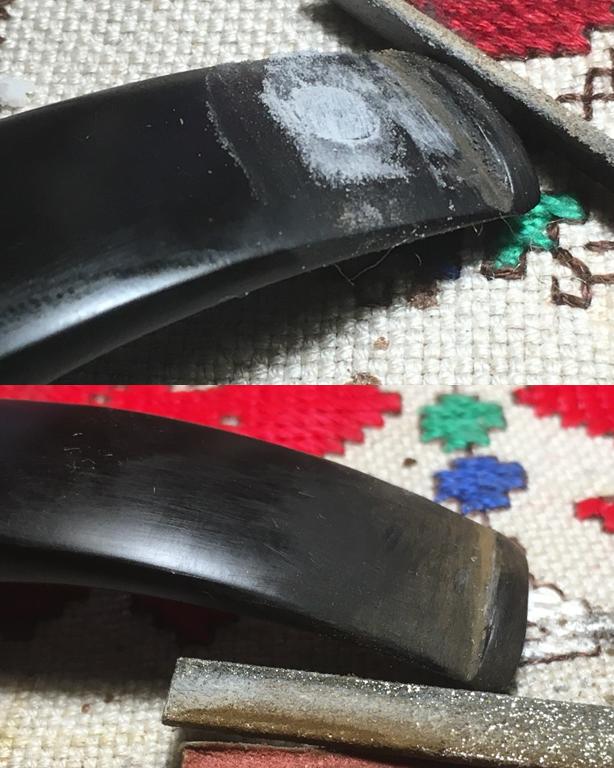
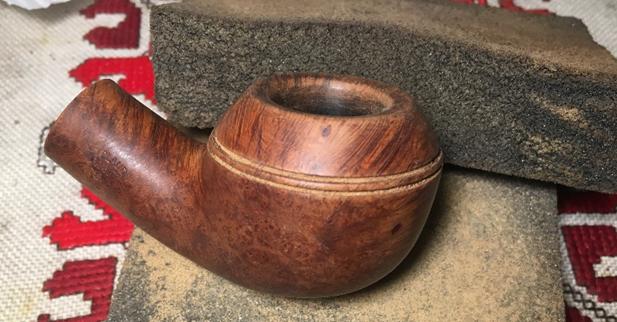
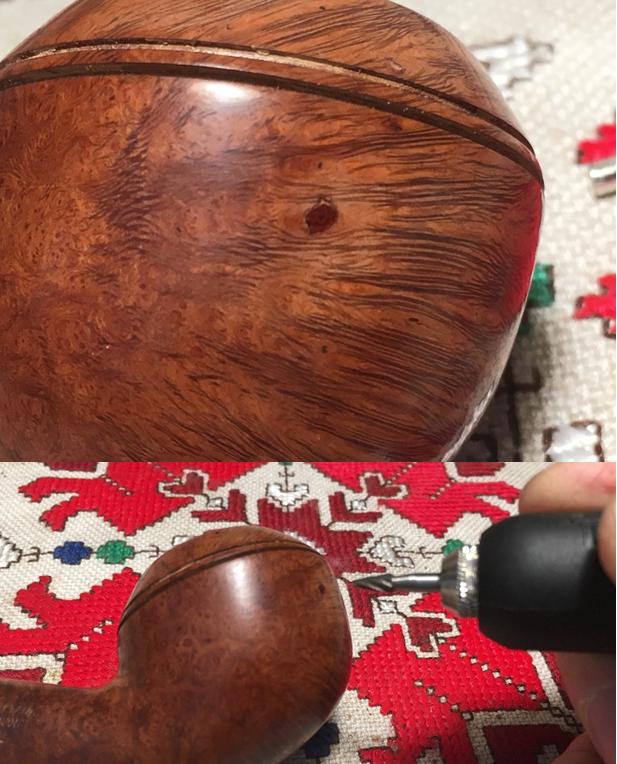
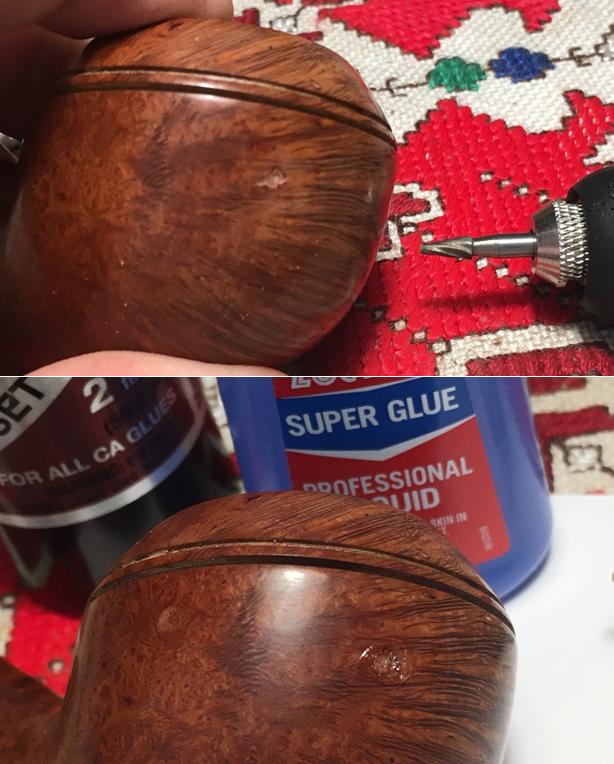
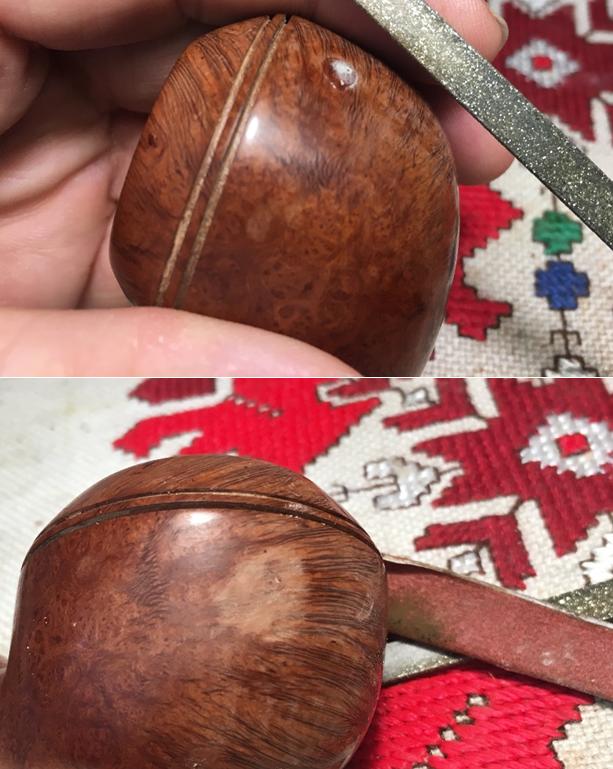
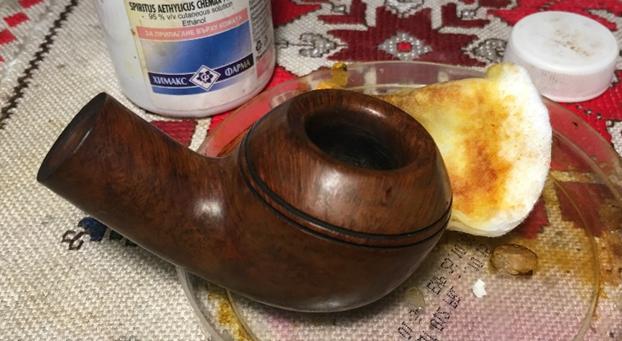
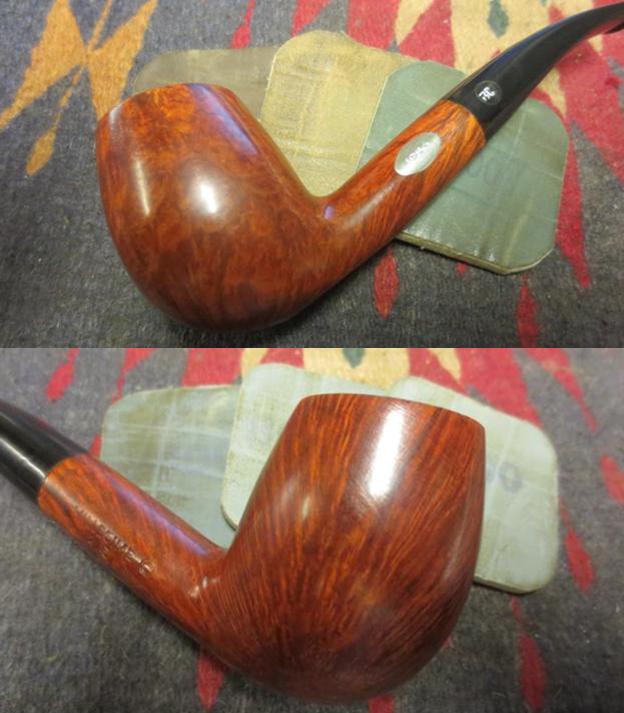
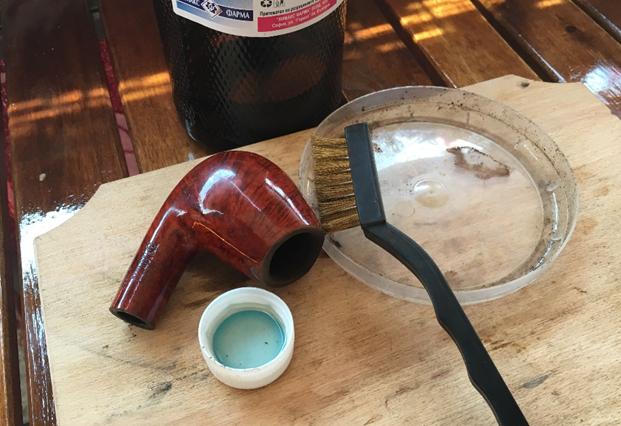
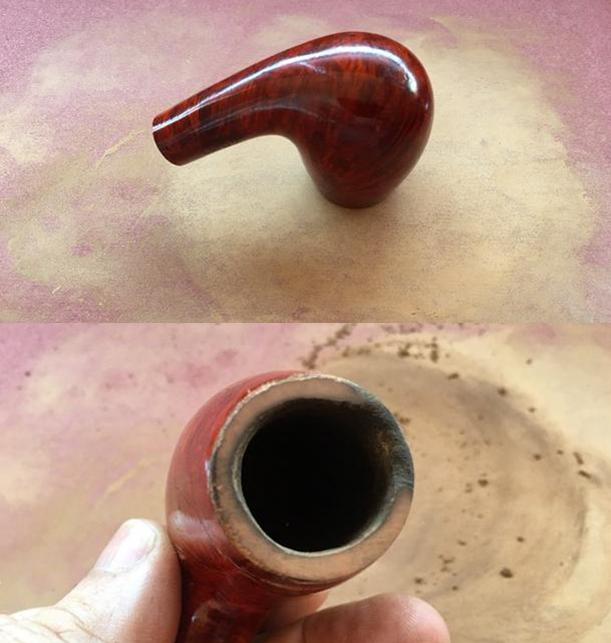
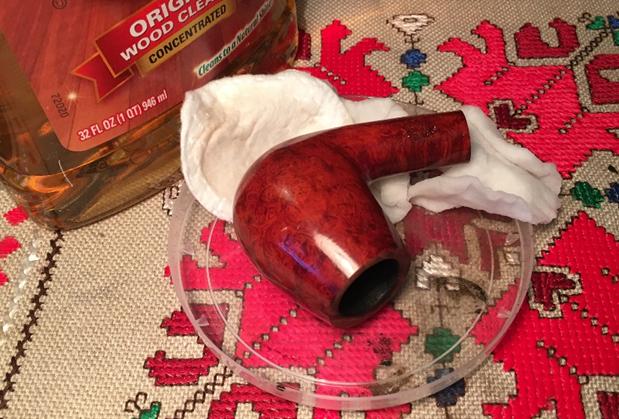
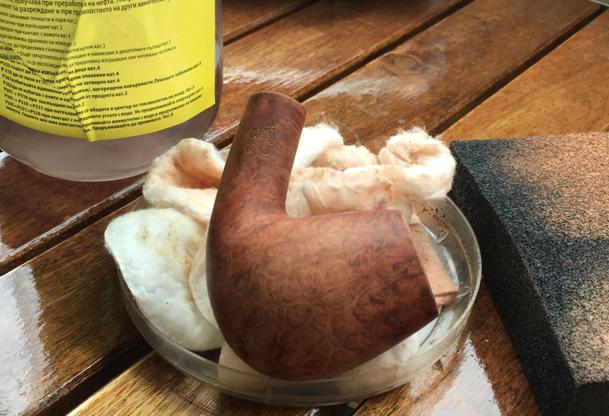
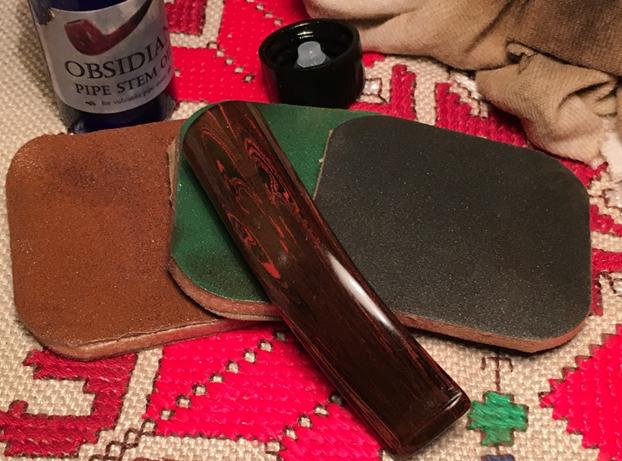
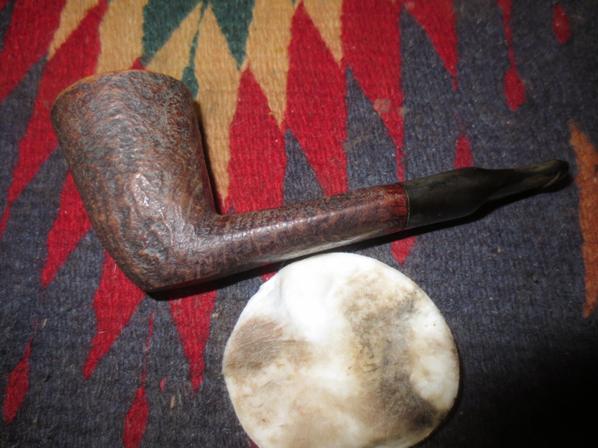
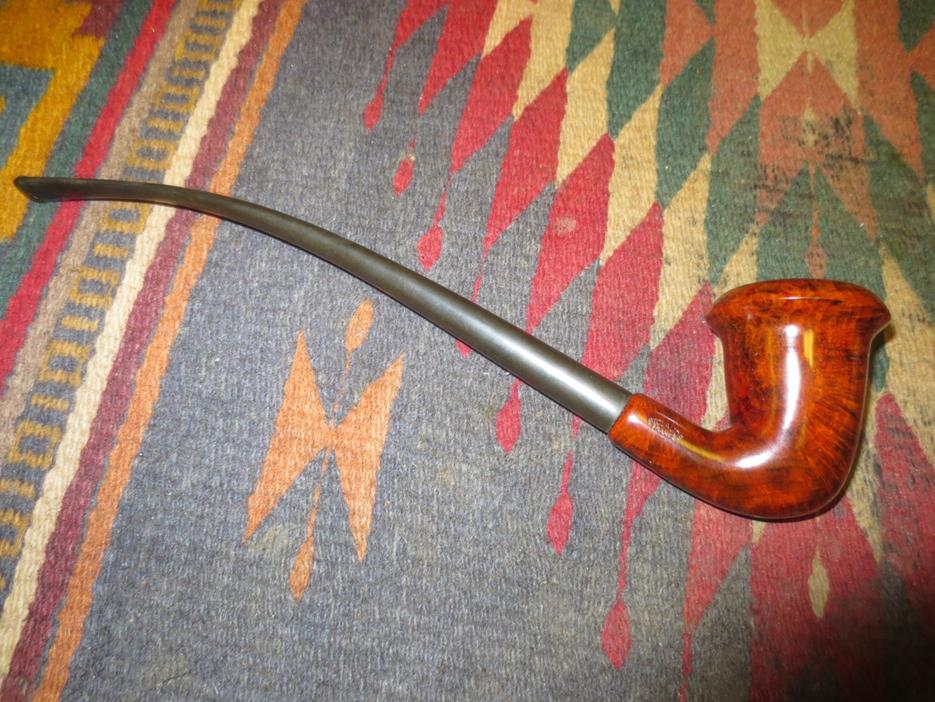
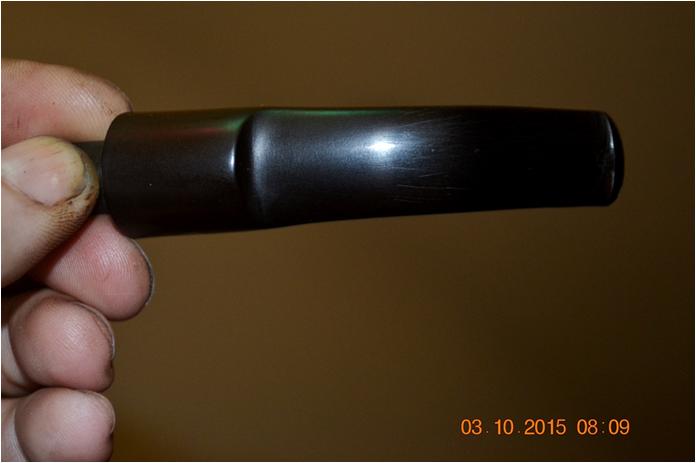
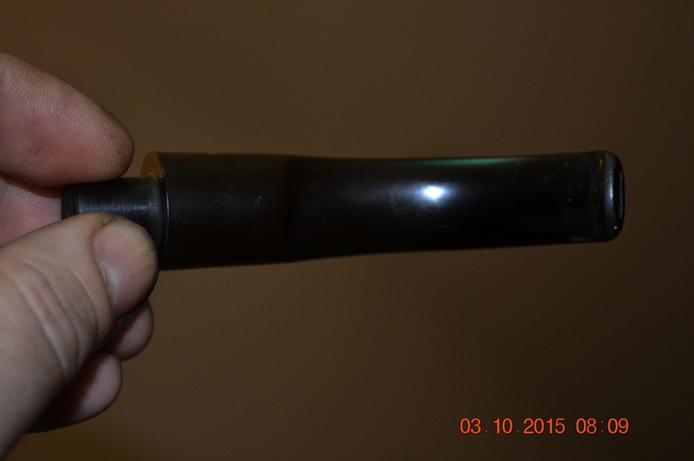
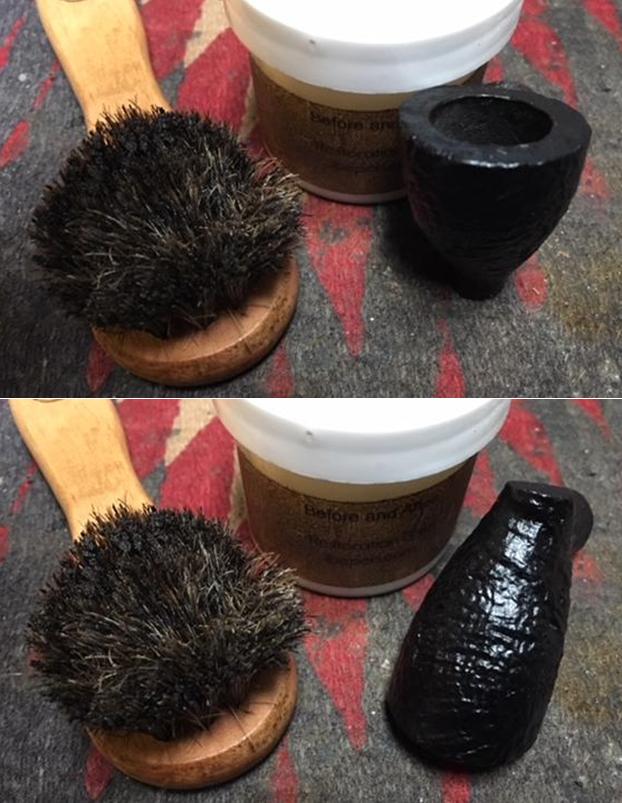
I started my clean up by working some Before & After Restoration Balm into nooks and crannies of the sandblast finish on the bowl and shank with my fingers and a horsehair shoe brush. I want the product to go deep into the finish because it works to clean, enliven and protect the briar. Once I was confident that it was deeply worked into the blast I wiped it off and buffed it with a soft cloth to polish it. The pipe really began to have a rich shine. I took some photos of the bowl at this point to mark the progress in the restoration. The sandblast finish shows the character of the grain on the underlying briar in the photos below. It is a really nice piece of wood and the shape is quite unique in terms of the finished look. 
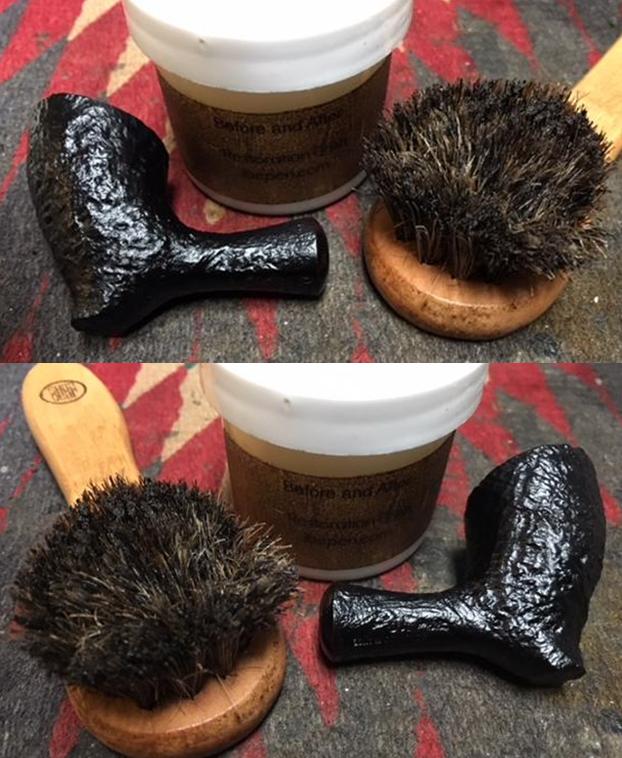
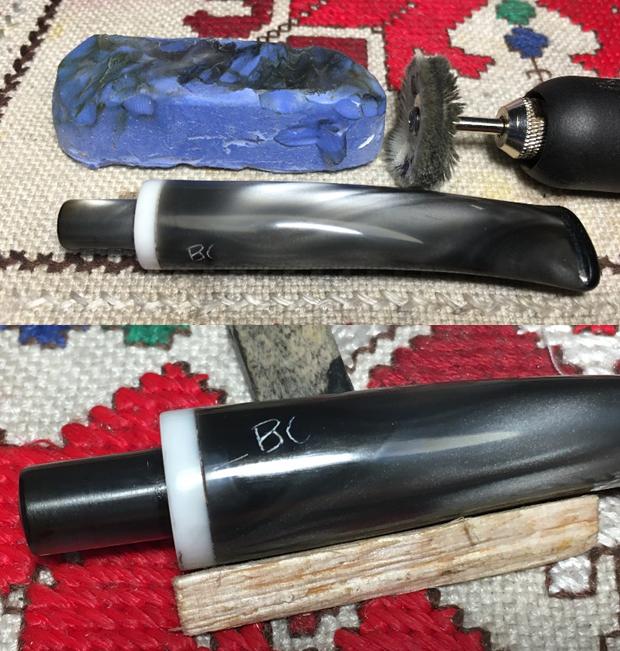
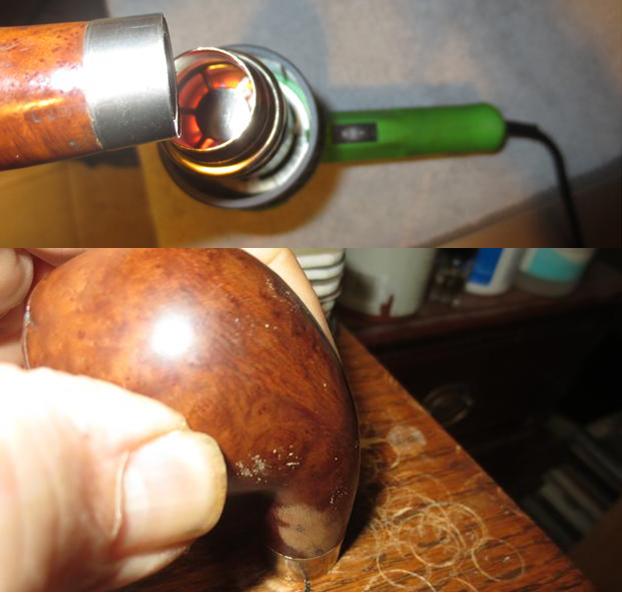
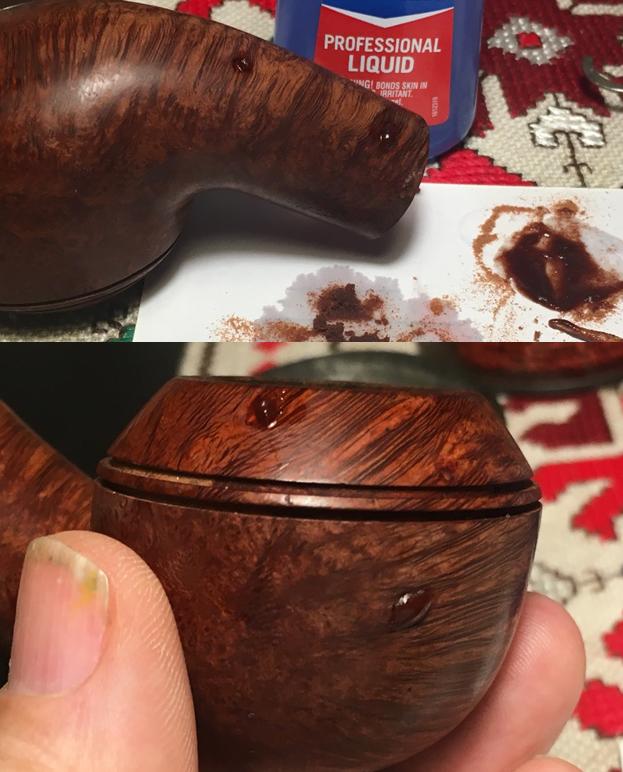
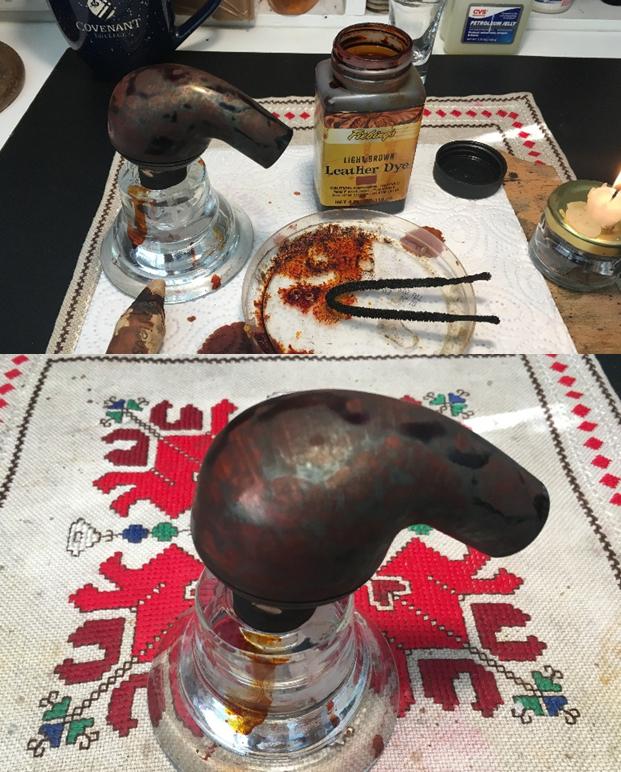
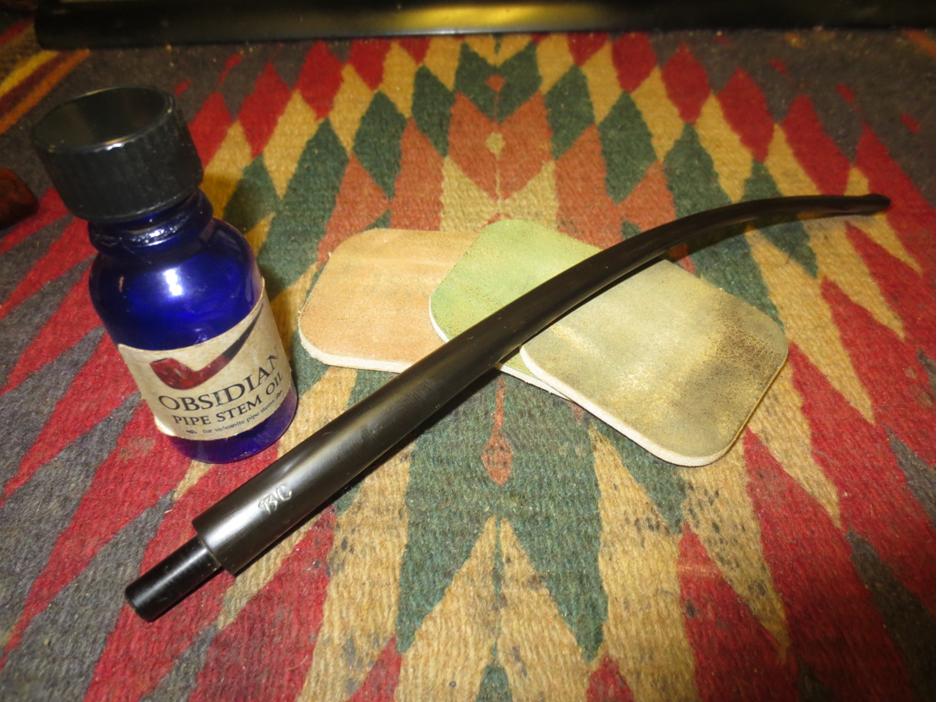
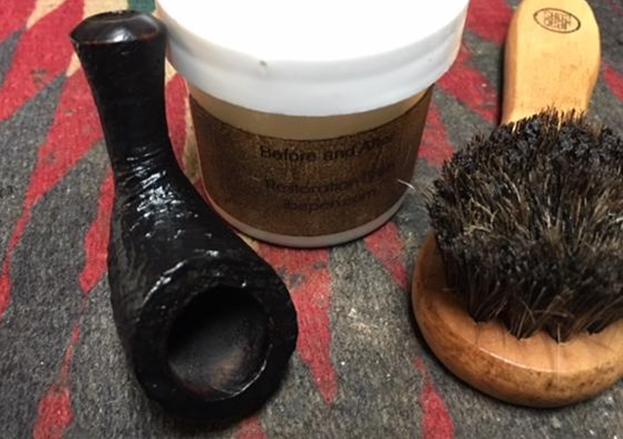
I decided to use the Before & After Restoration Balm on the extended shank. If it was bone then it would enliven it and add protection to it. If it is acrylic the same would be true. Whatever the material is it is an oval piece with a slight bend in it. It is set in the stem and in the metal end cap. I rubbed it in by hand and buffed it off with a soft cloth. 
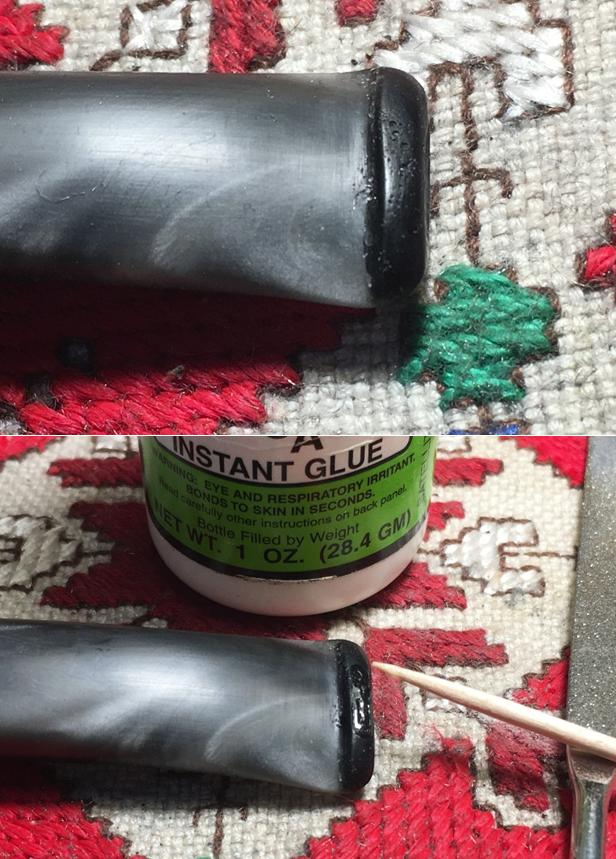
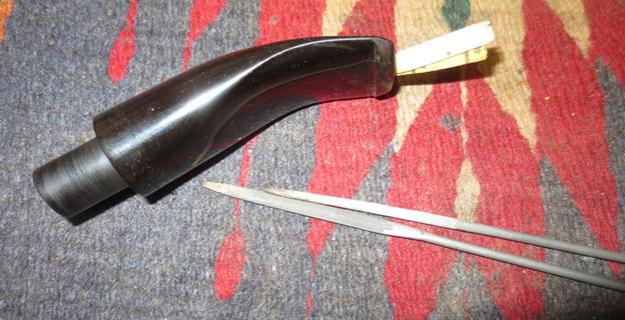
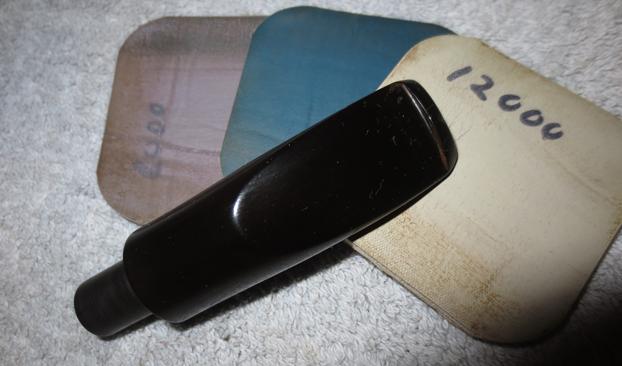
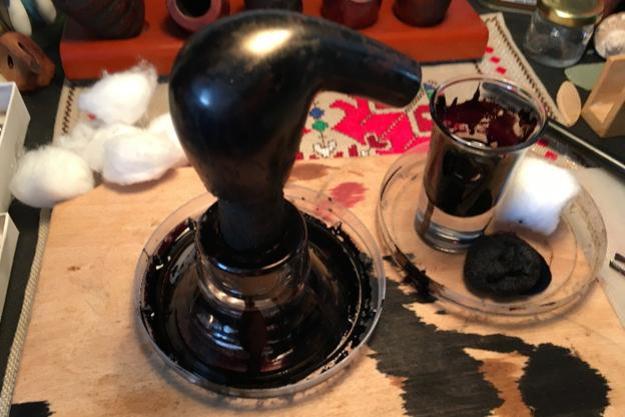
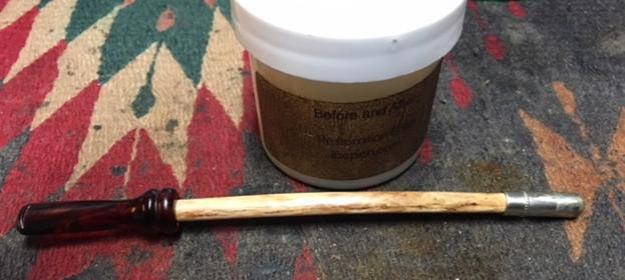
I polished the end cap with micromesh sanding pads – using 1500-12000 grit pads to bring a real sheen to the metal. It is probably nickel as it does not have any silver standard stamps on the cap. I polished it with a jeweler’s cloth as a finishing touch. It looks far better after cleaning.
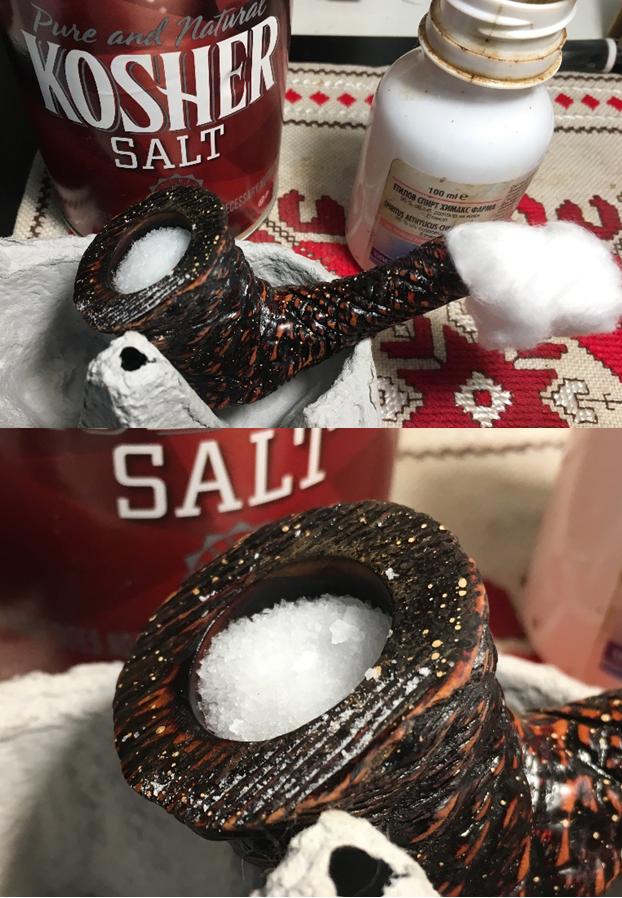
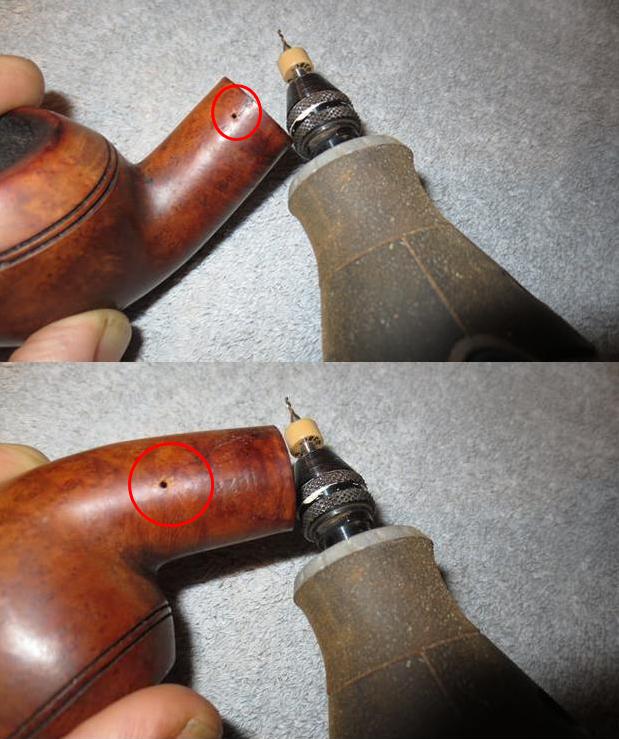
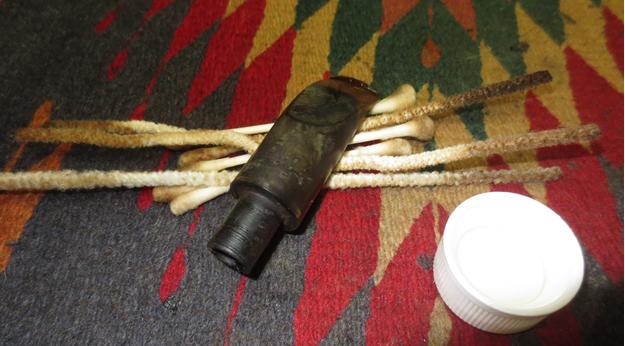
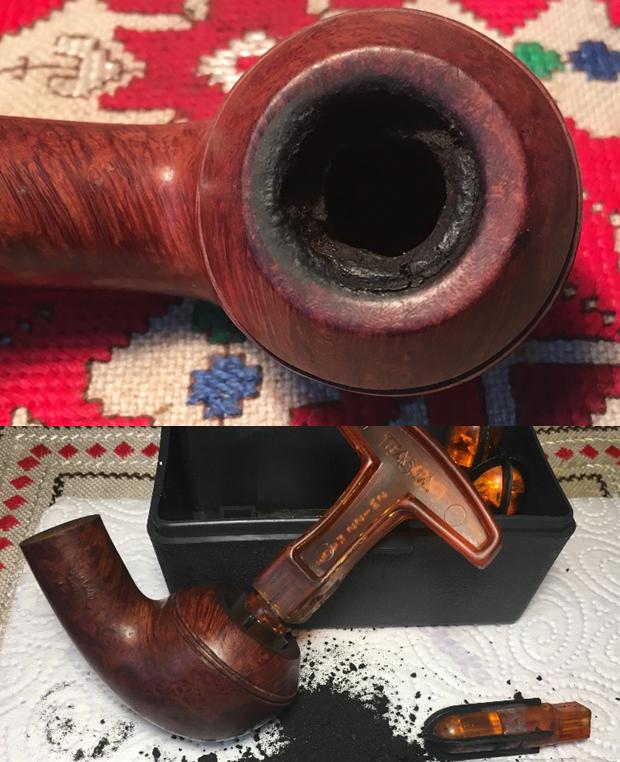
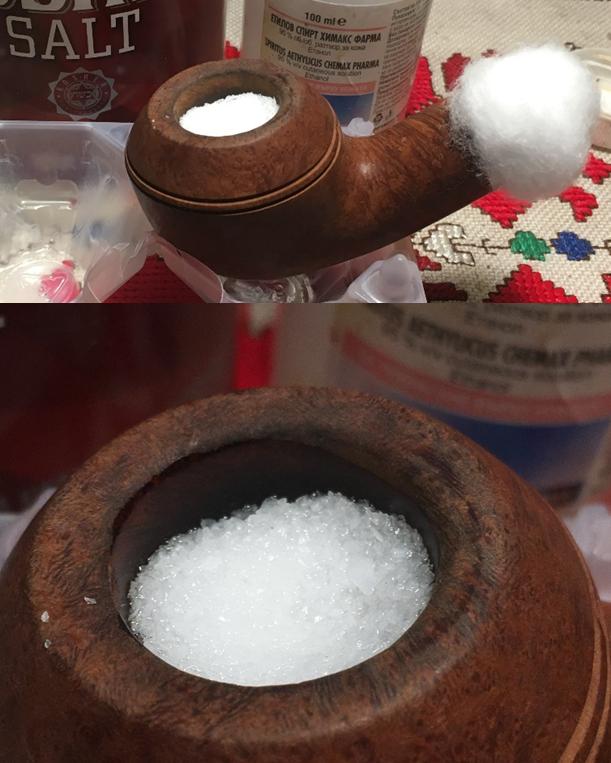
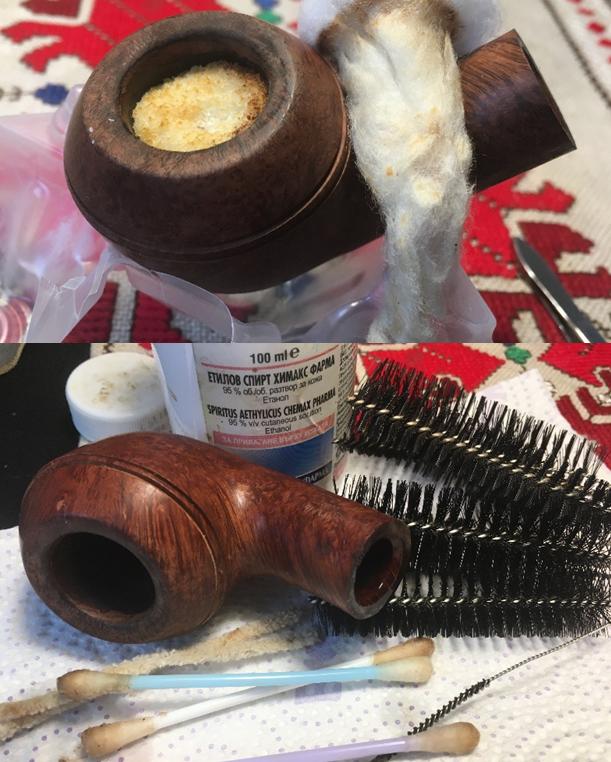
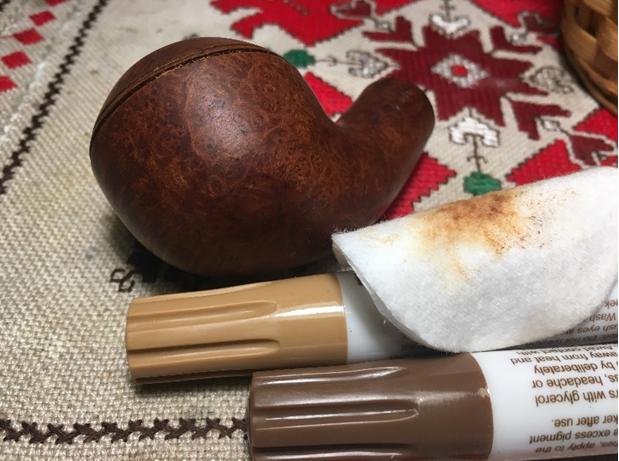
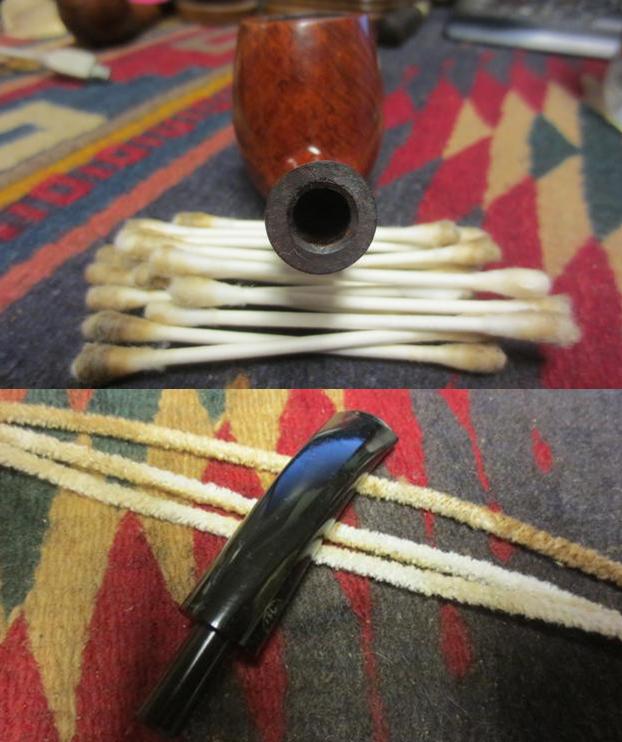
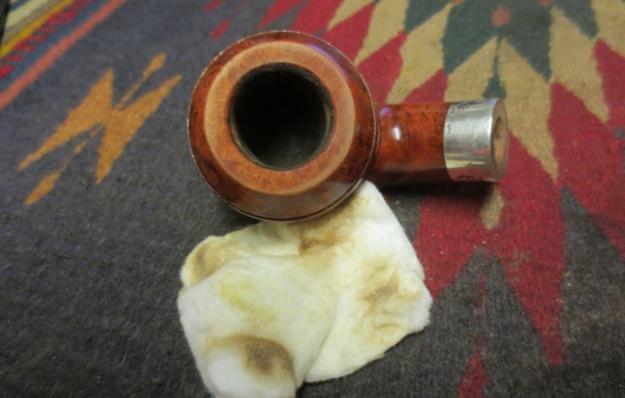
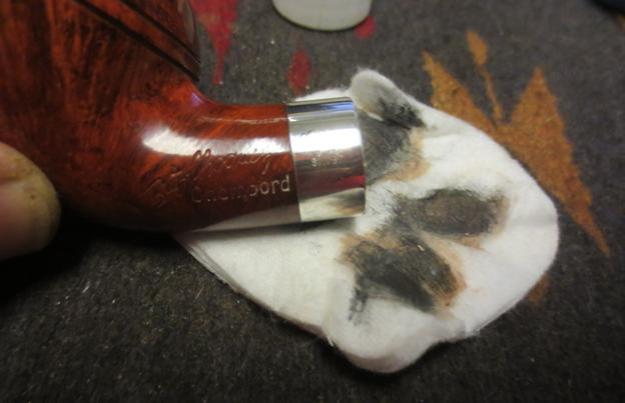
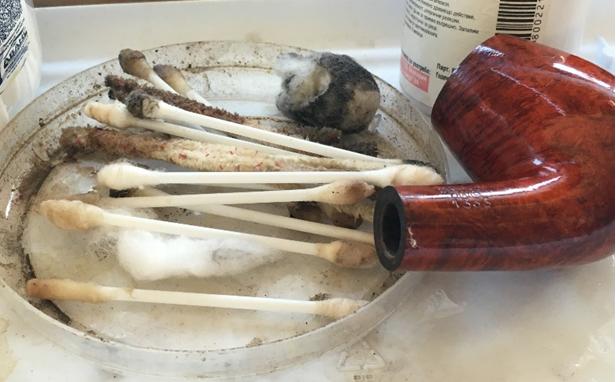
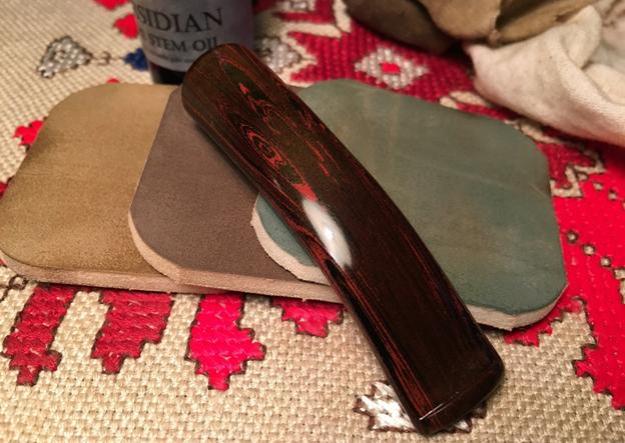
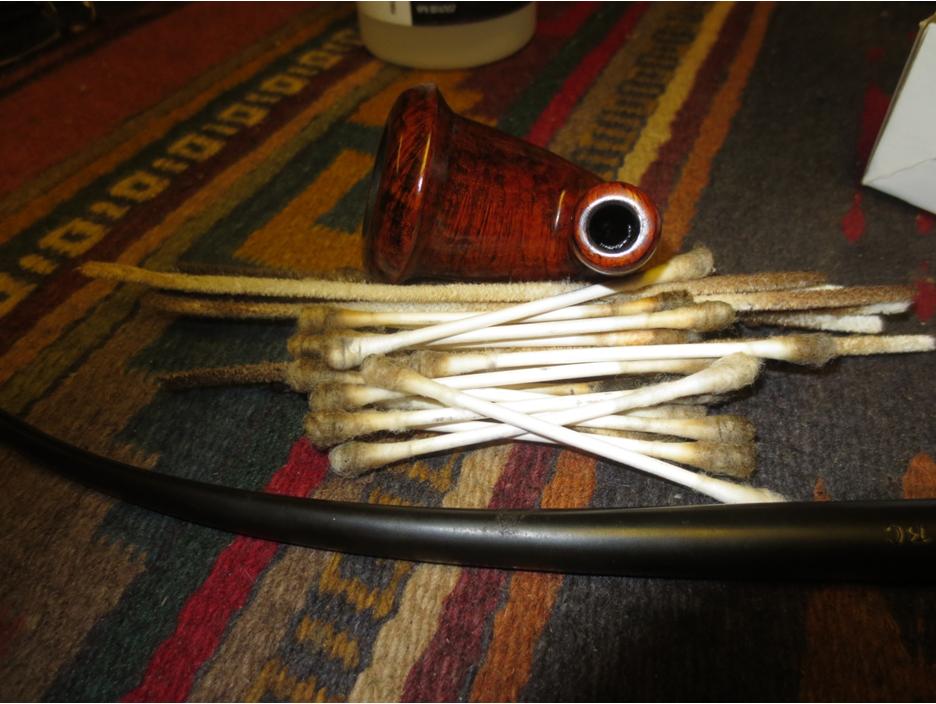
I cleaned out the mortise and airway in the shank and the stem with alcohol, cotton swabs and pipe cleaners to remove the lingering aromatic smell and any tars or oils that had collected in those spots. It was pretty clean so it did not take too much to clean those spots.  
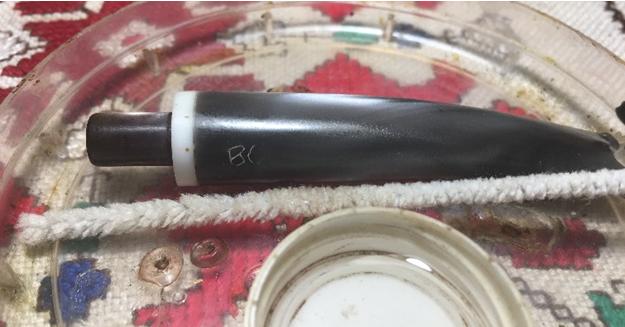
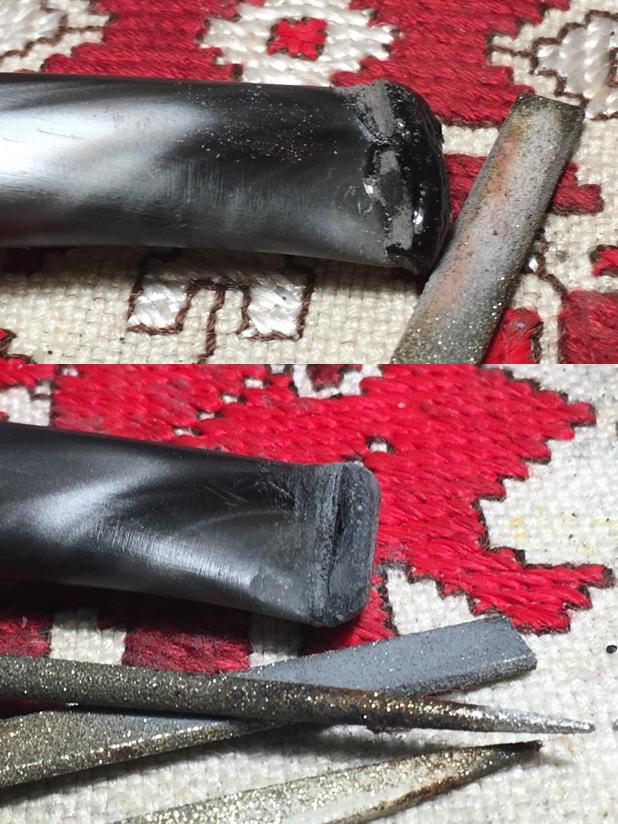
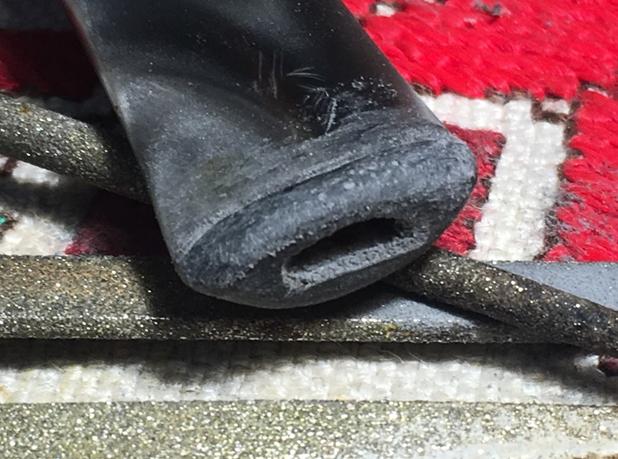
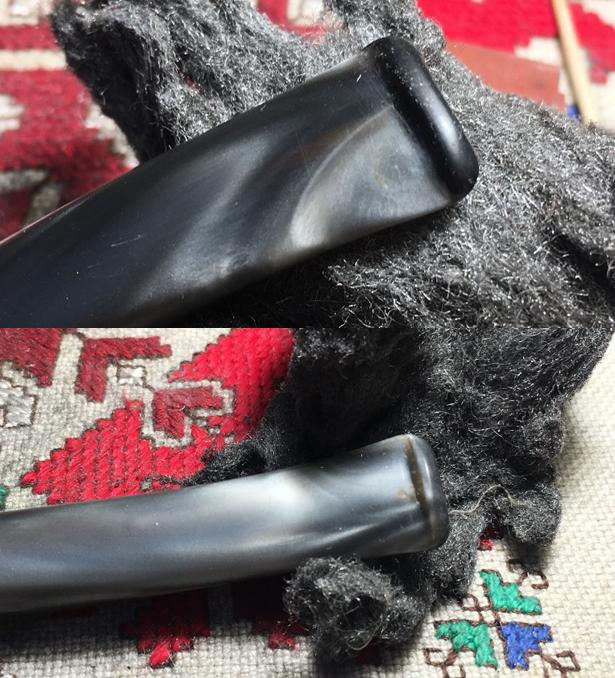
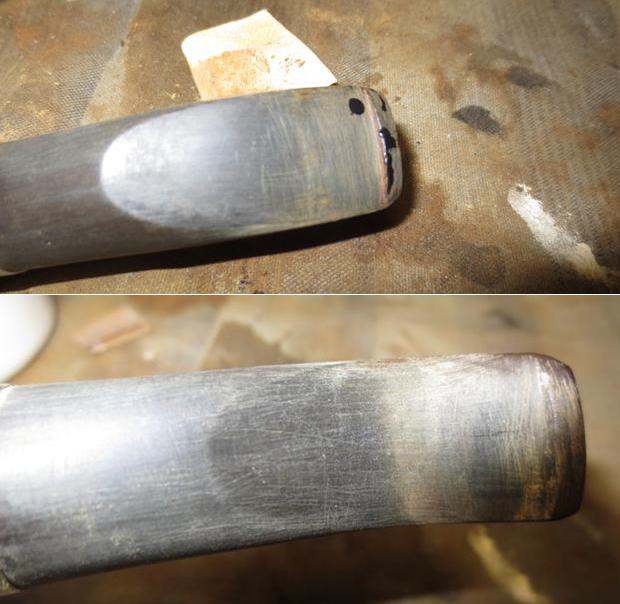
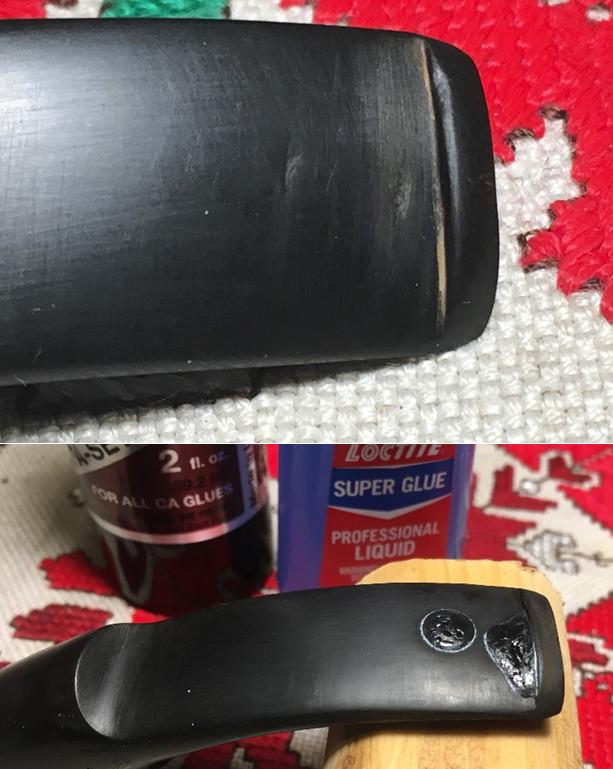
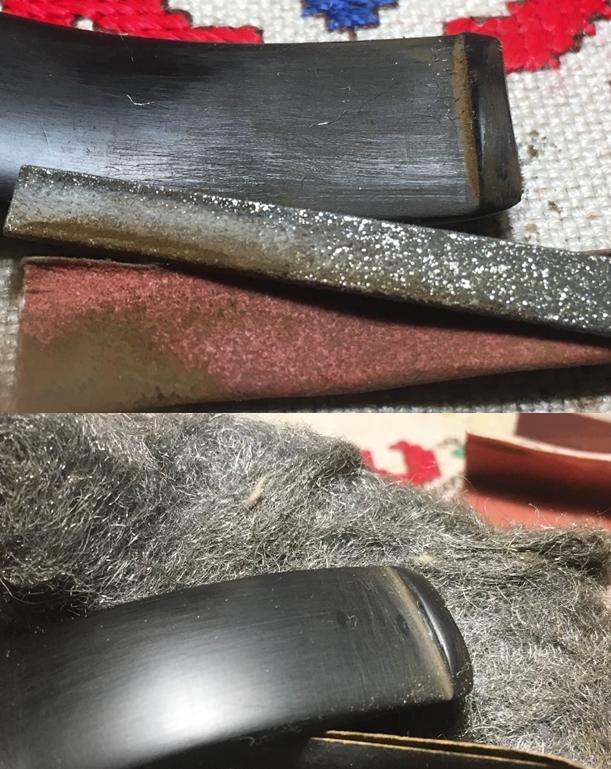
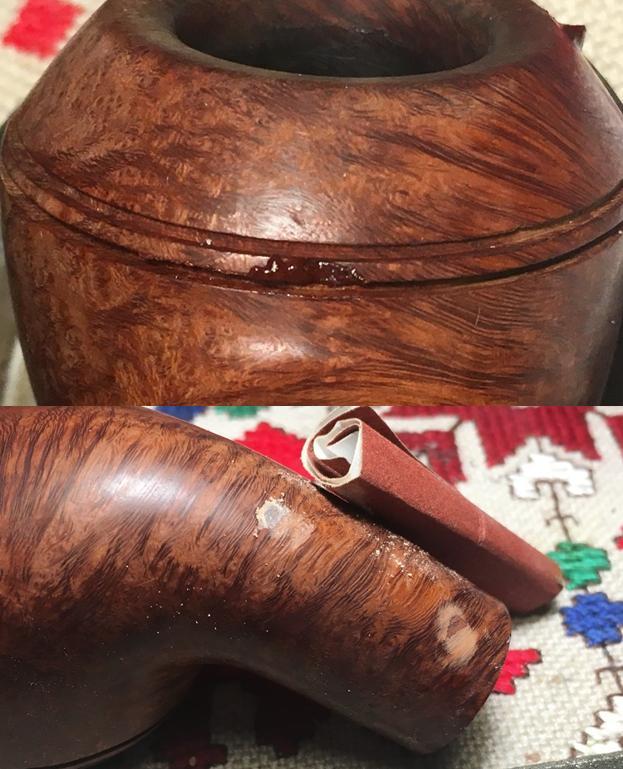
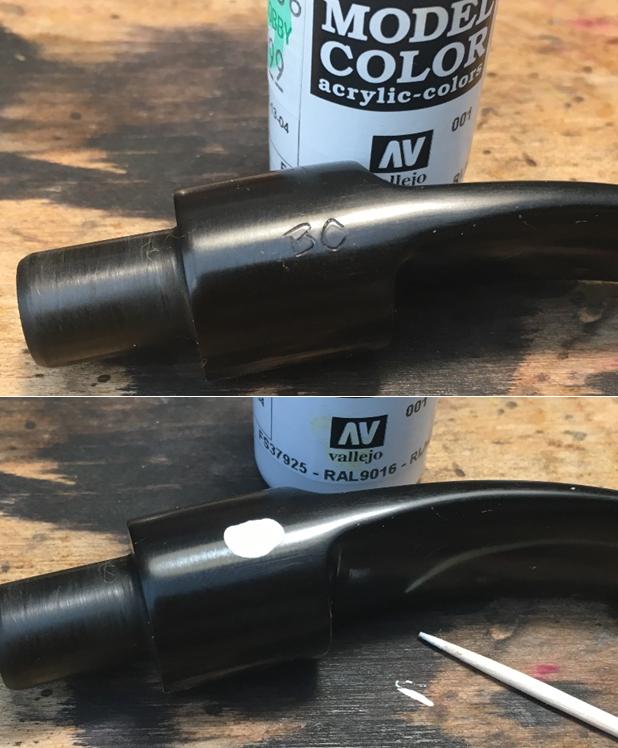
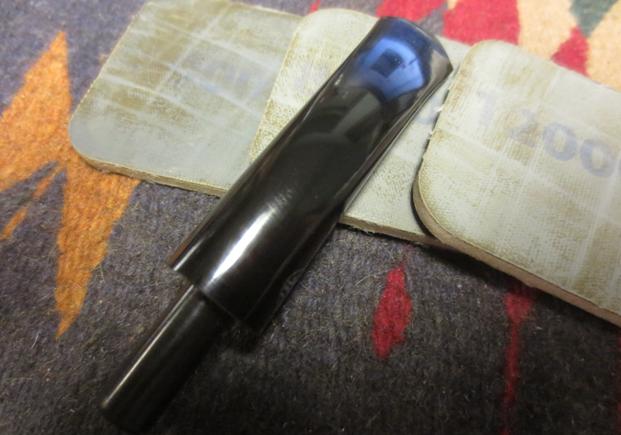
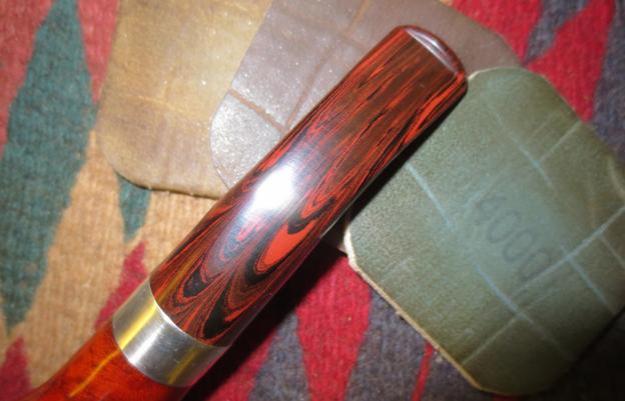
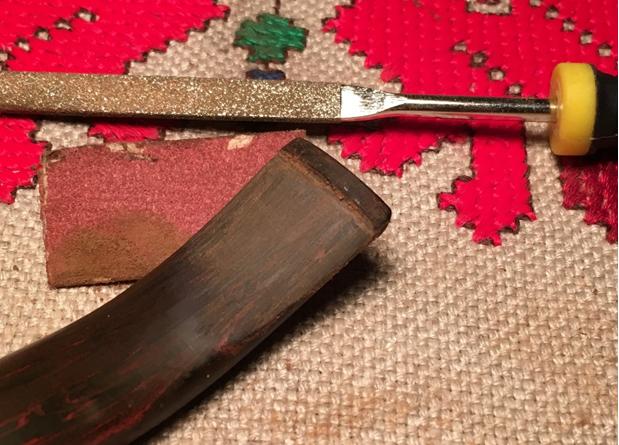
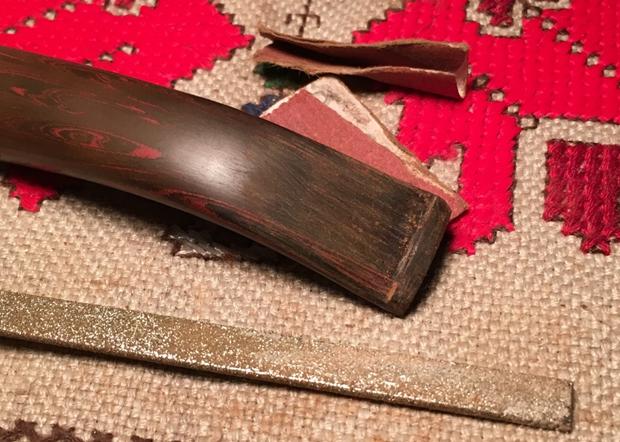
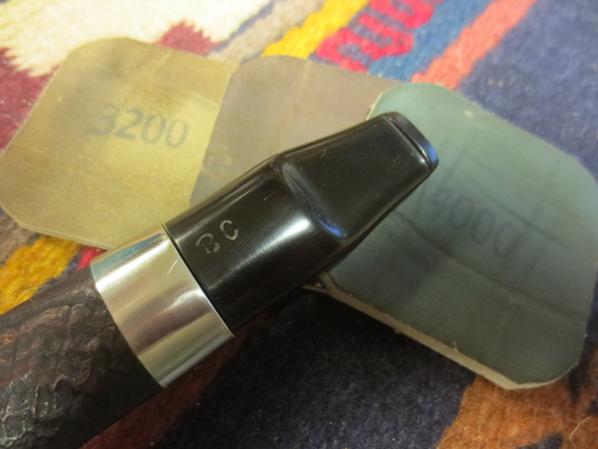
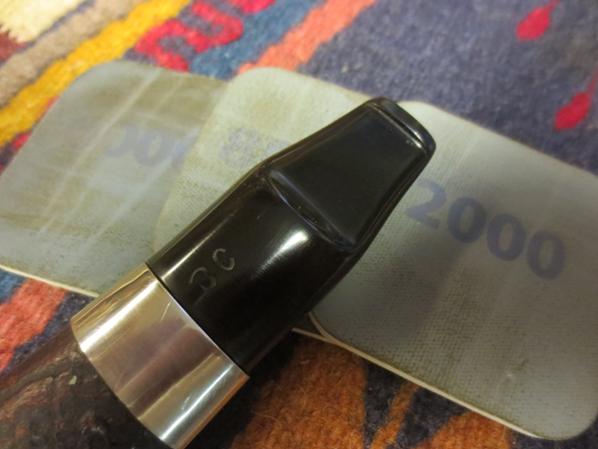
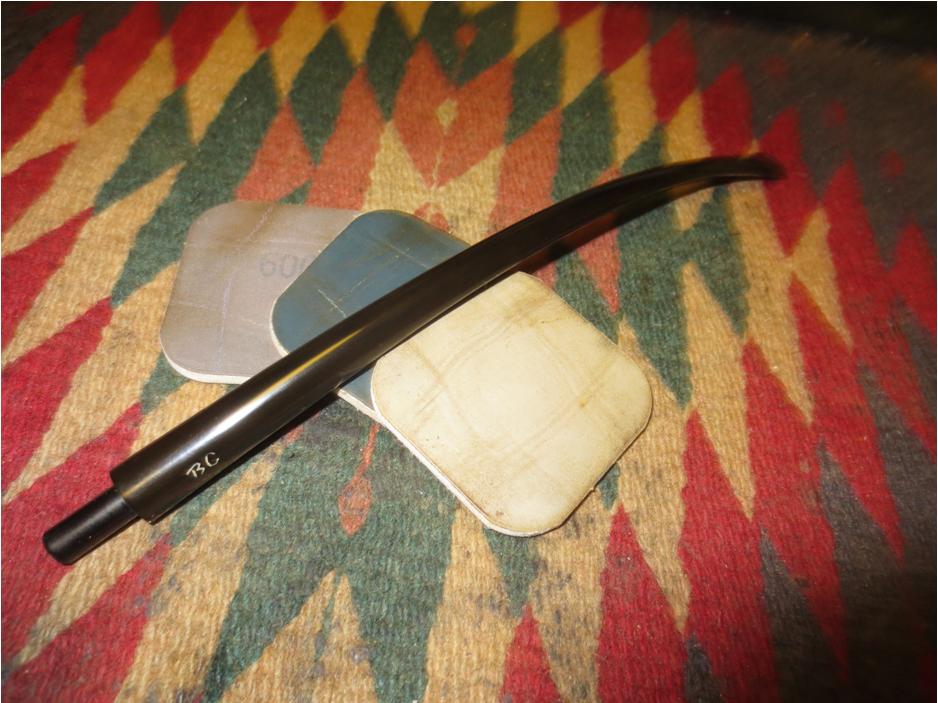
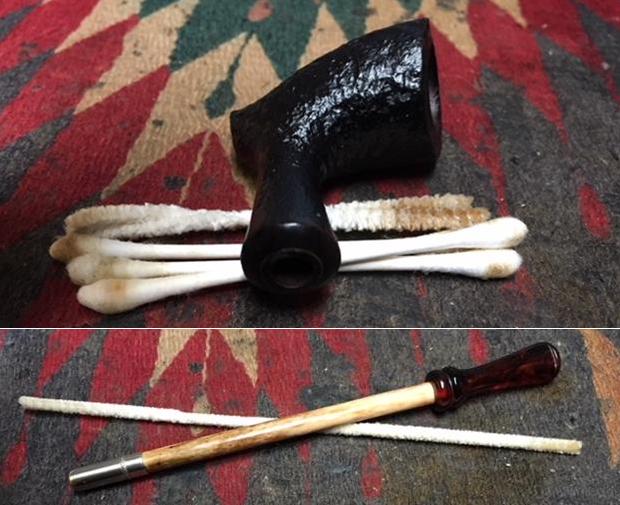
The bowl and shank extension were clean and polished. I set the bowl aside and worked on the stem. I sanded out the tooth chatter with micromesh sanding pads – wet sanding it with 1500-2400 grit pads and dry sanding with 3200-12000 grit pads. I gave it a final coat of oil and set it aside to dry. 
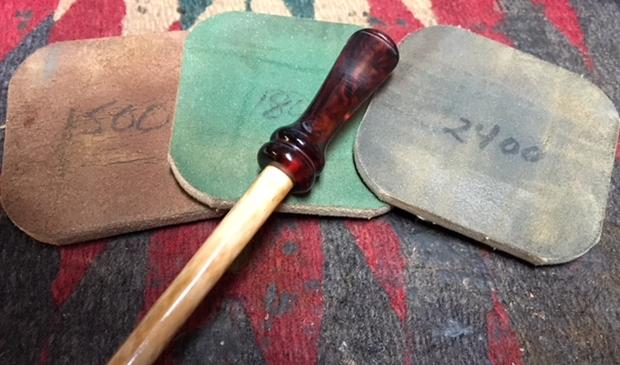
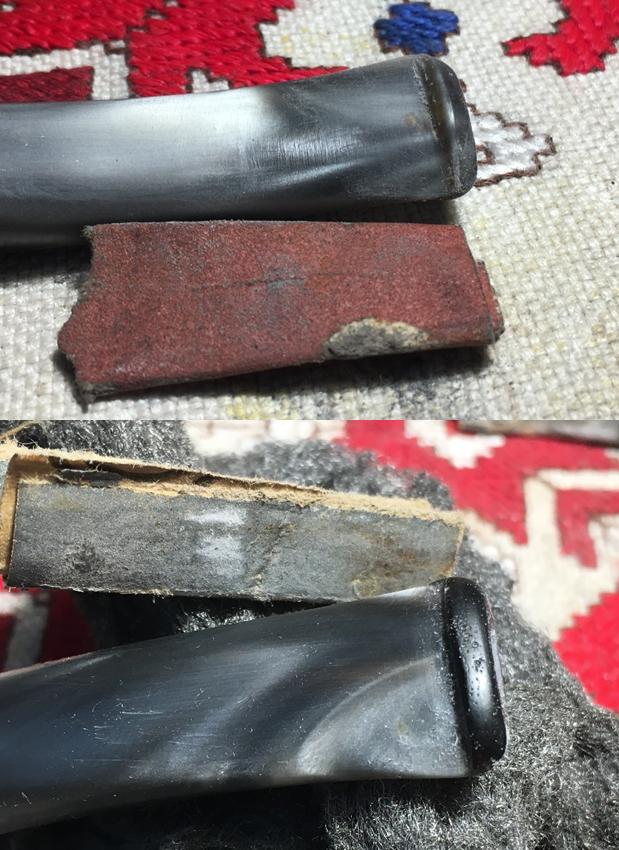
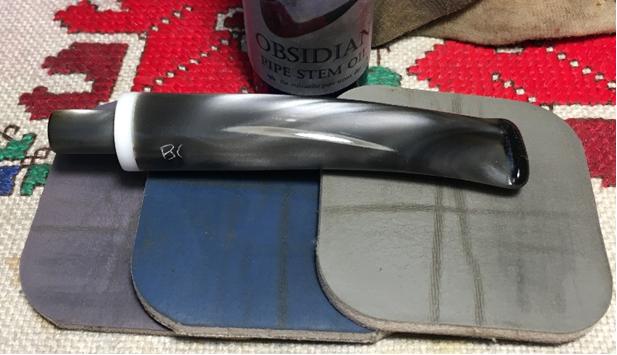
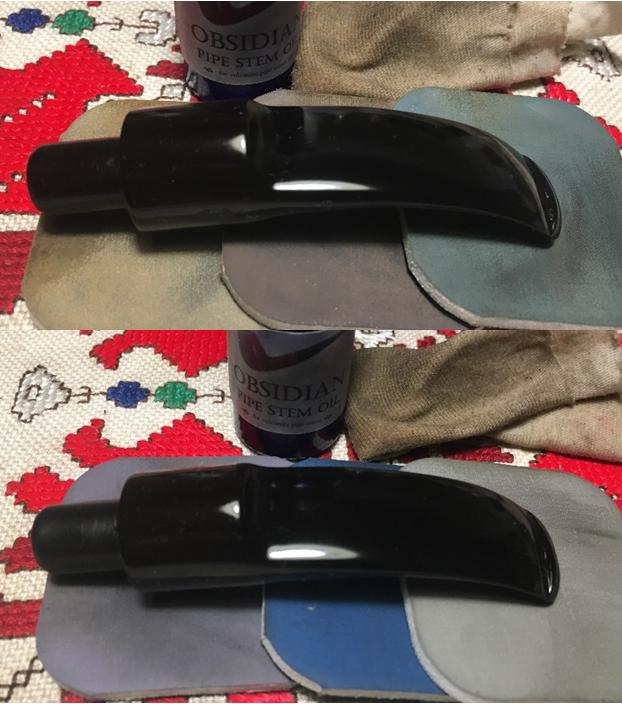
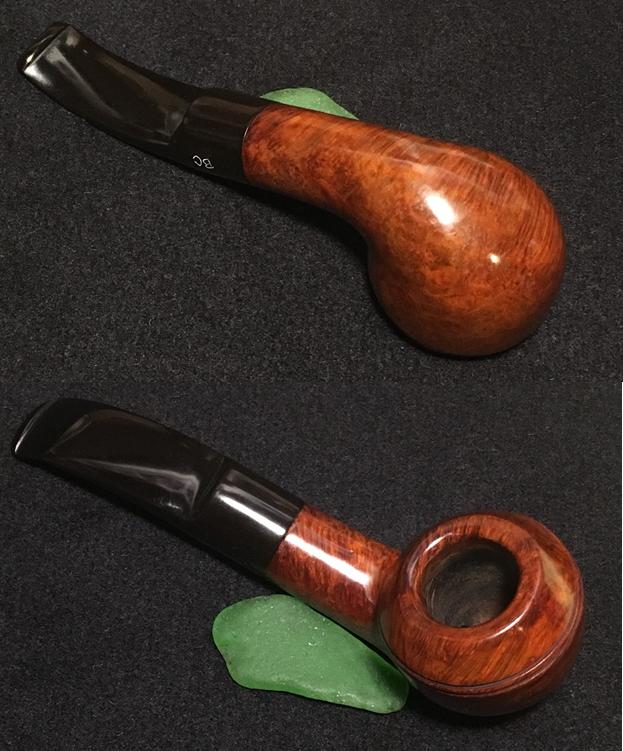
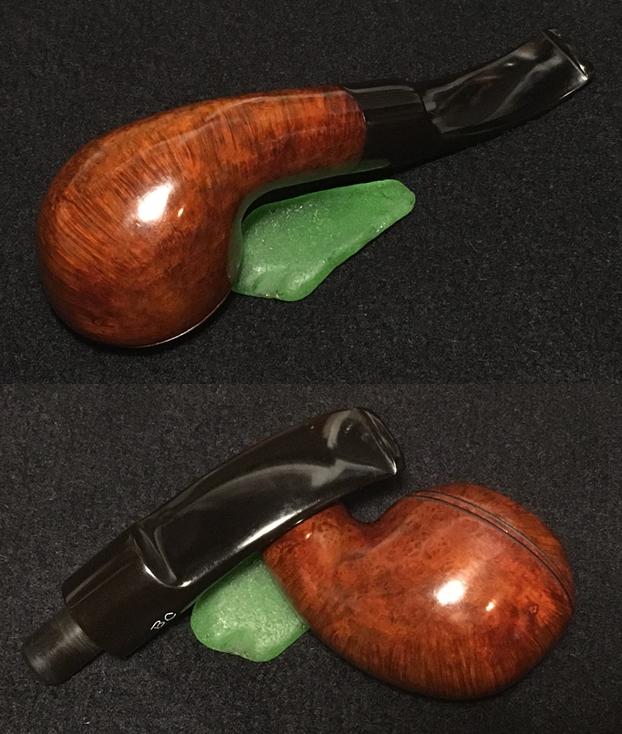
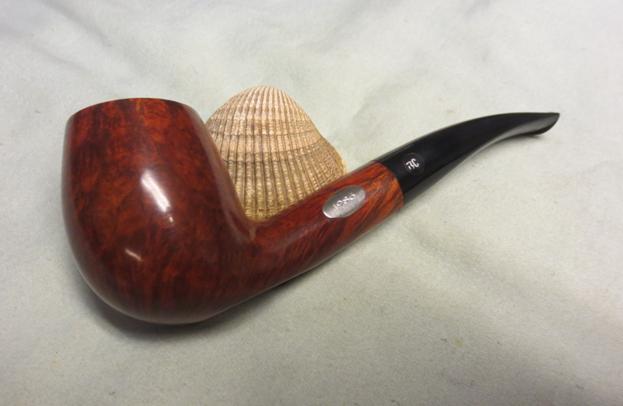
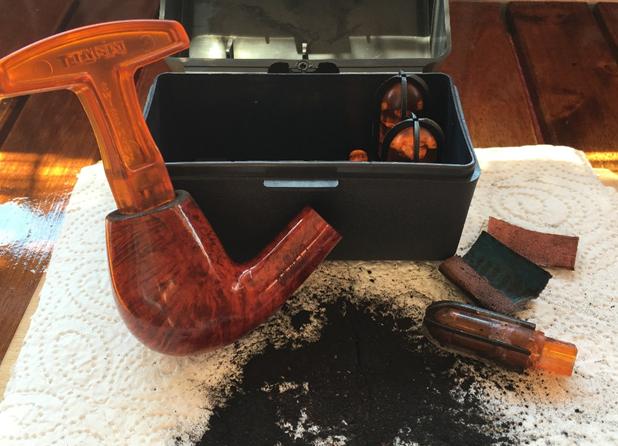
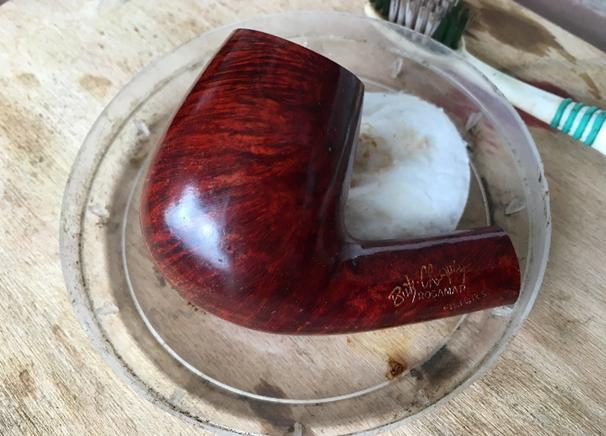
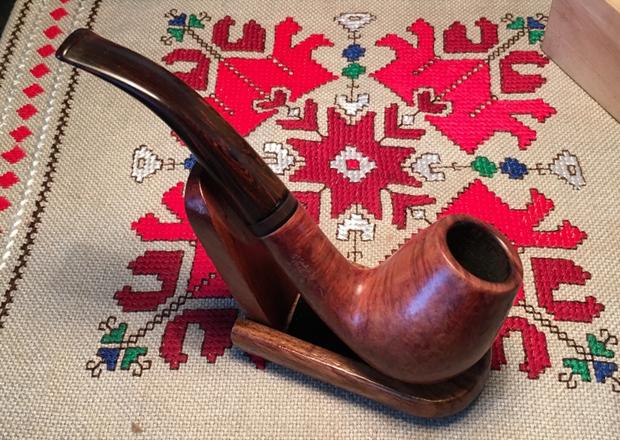
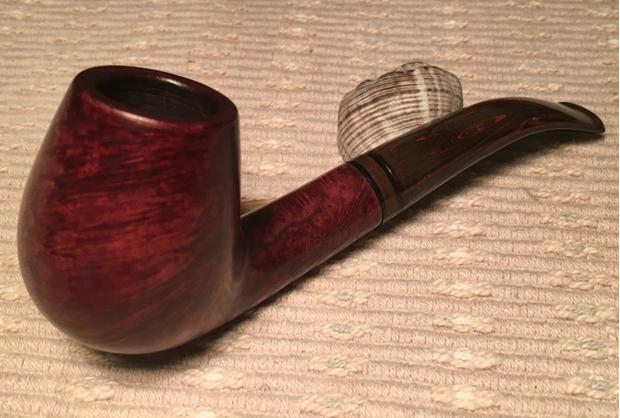
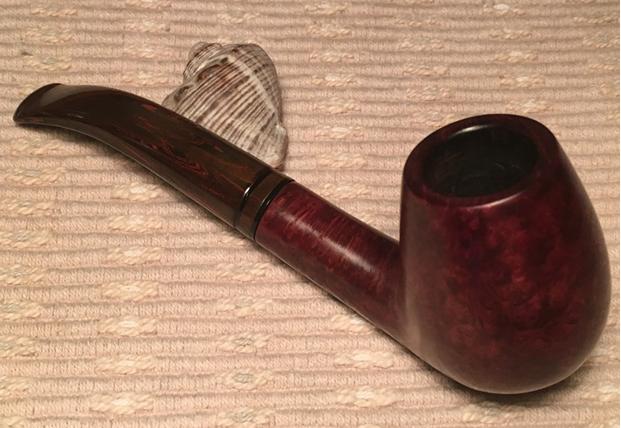
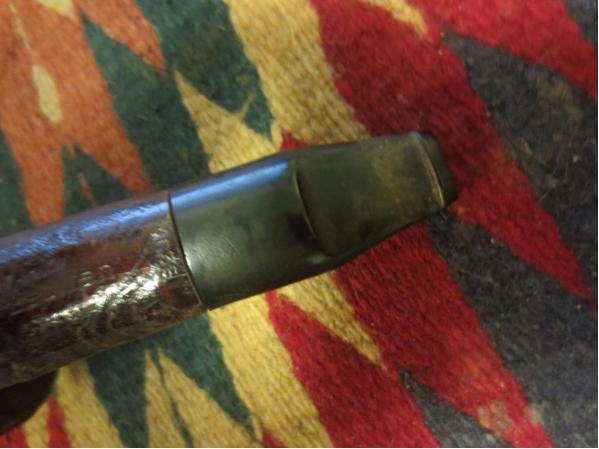
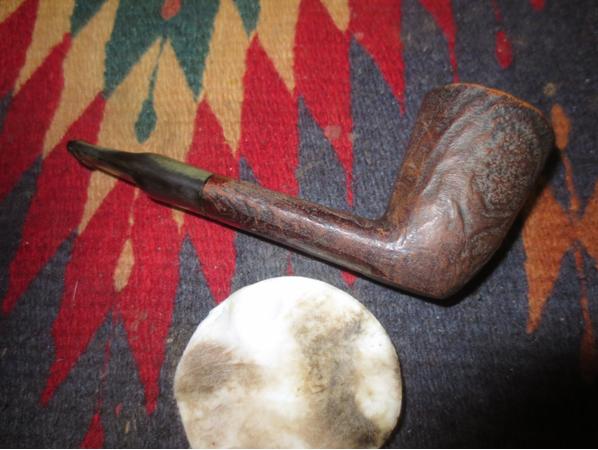
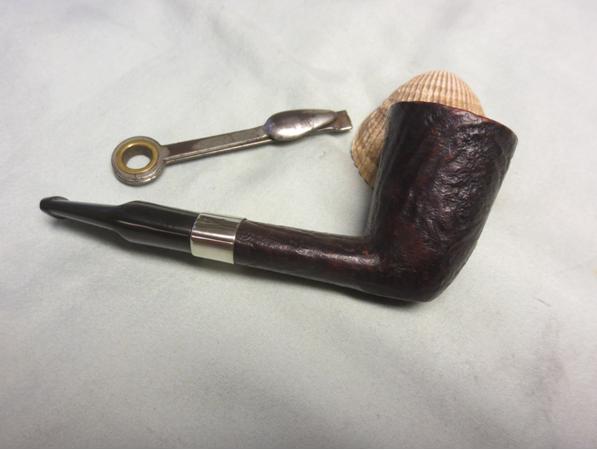
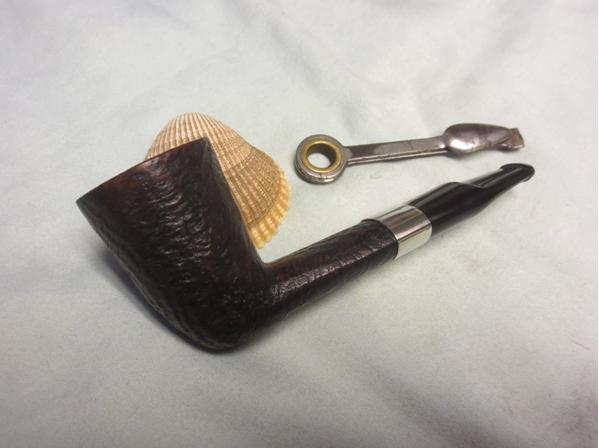
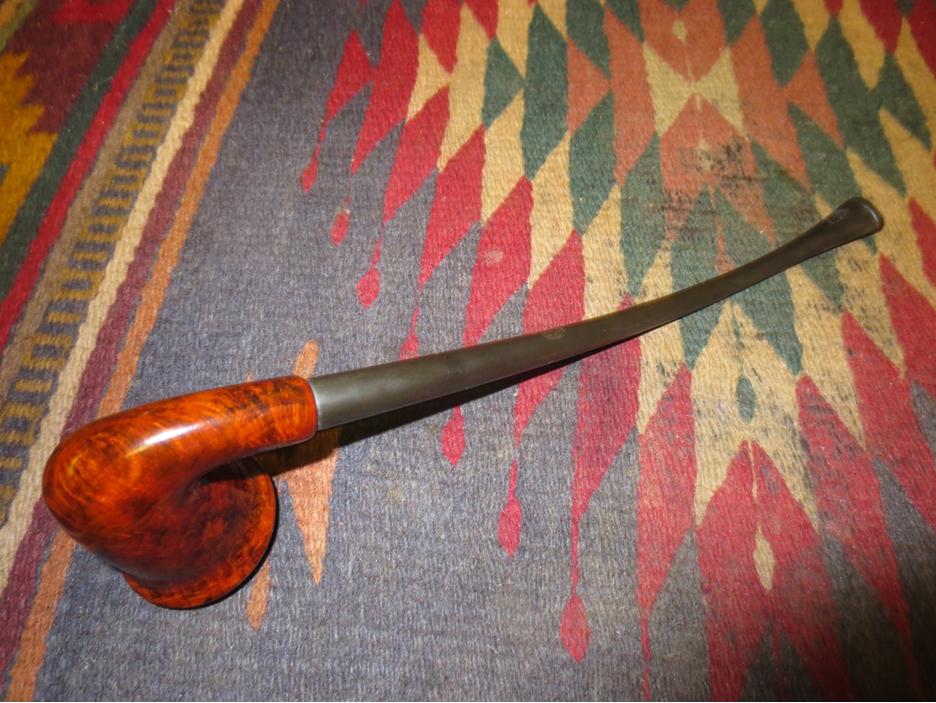
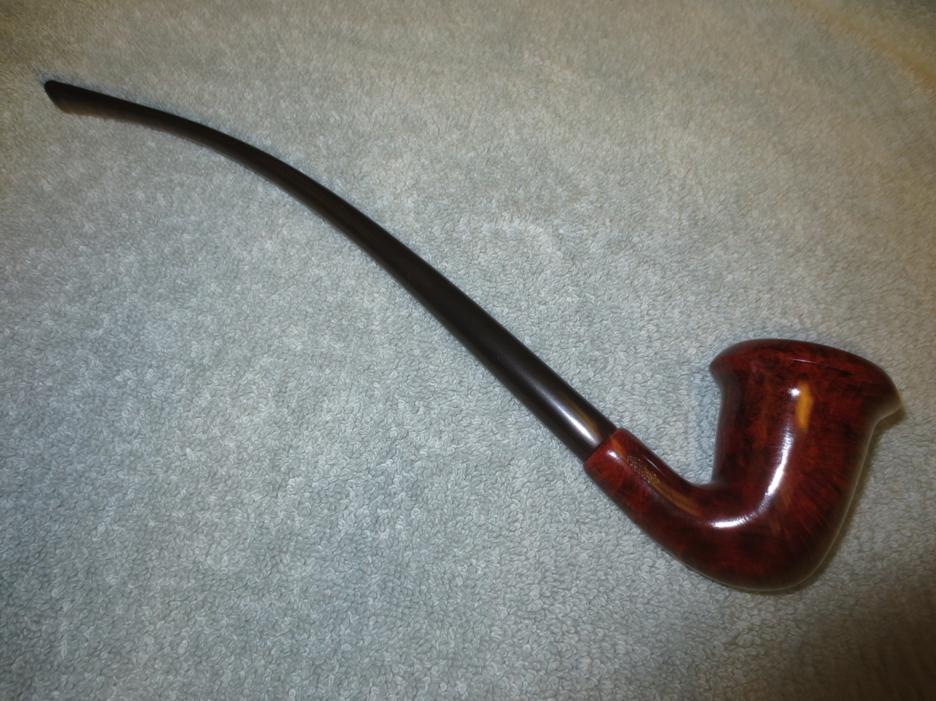
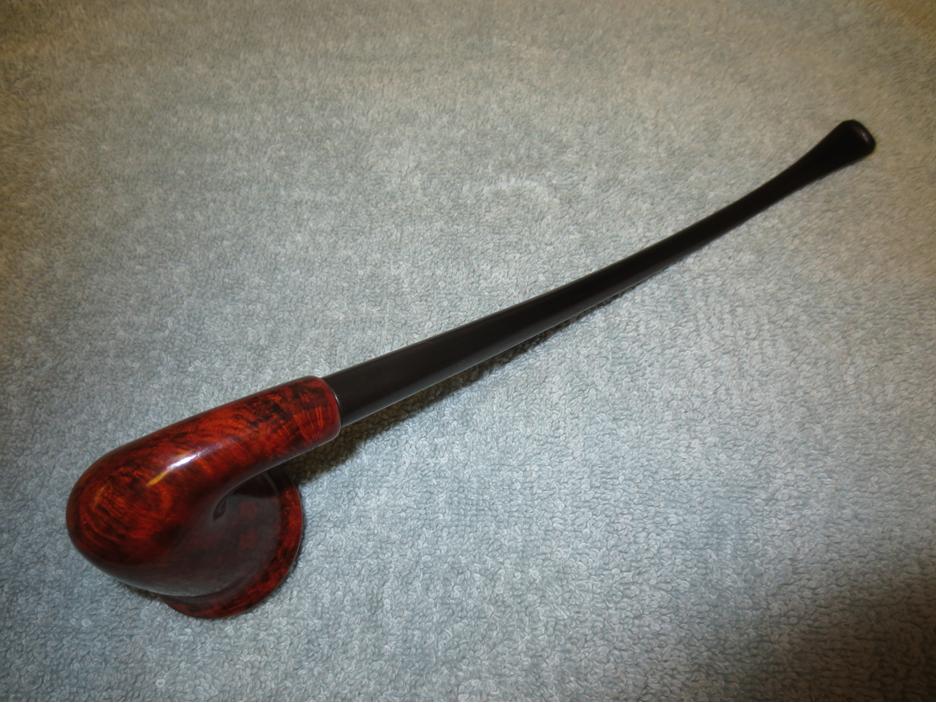
I carefully polished bowl and the stem with Blue Diamond to polish out the remaining small scratches. I gave the bowl, shank extension and the stem multiple coats of Conservator’s Wax and buffed the bowl separately with a clean buffing pad to raise the shine. I hand buffed the extended shank and pipe with a microfiber cloth to deepen the shine. The pipe polished up pretty nicely. The dark brown stain worked really well with the mottled “wing bone” extension and the Tortoiseshell acrylic stem. The finished pipe has a truly unique look to it that I had not seen before. I really like the looks of it. The finished pipe is shown in the photos below. The dimensions of the pipe are Length: 7 1/2 inches, Height: 1 3/4 inches, Outer diameter of the bowl: 1 1/8 inches, Chamber diameter: 5/8 inches. This unique is staying with me as an addition to my collection. I look forward to loading it with some rich, aged McClellands 5100 and enjoying a quiet and reflective bowl. Hopefully this refurbishment was worth your time to read. Thank you for walking with me as I worked over this beauty. 

Acrylic Stem Repair – A Butz-Choquin Cadre Noir 1845 St. Claude France


Blog by Dal Stanton

The next pipe on my work table is at 2 o’clock in this Lot of 13 I acquired from an eBay seller in Nevada.  There were several other pipes that attracted me in this lot as well, especially the Cherry Wood Ropp at the 4 o’clock position.  The LHS Purex at 9 o’clock is also an interesting shape – most of these are still waiting in my ‘Help Me!’ basket.  The Butz Choquin Cadre Noir got the attention of a couple who are in Bulgaria working with us for the summer.  Joy saw the pipe and wanted it as a gift for her brother.  I think it was the combination of the rustified Leprechaun shape and the gray marble acrylic stem that got her attention.When I bring the BC to my worktable, I take additional pictures to fill in the gaps.  The nomenclature is stamped on the lower side of the shank with the left side of the stamping reading in a fancy script, ‘Choquin’ [over] ‘Cadre Noir’ which means in French according to Google Translate, ‘Black Framework’ or ‘Black Setting’.  On the right side of the stamping is an arched ST CLAUDE [over] FRANCE [over] 1845 – which I’m assuming is a shape number. Pipephil was helpful in identifying the 1845 as a shape number.  The C’est bon below is the same BC pipe shape in a smooth version, which I described above as a Leprechaun – perhaps a mix between freehand and Dublin? The bowl moves from a wide rim, a narrower mid-section and then flares out again at the heel with ridges tapering toward the shank.  Very nice looking.Searching for the BC Cadre Noir online, one finds several examples of what TobaccoPipes.com describes as a BC line depicting a “modern pipe”.

BC’s Cadre Noir pipes are a unique rusticated pipe with an ostentatious clear acrylic stem. Unlike most rusticated tobacco pipes, this one is thoroughly modern.

Another listing of a 1772 Brandy shape sheds light on the actual understanding of Cadre Noir.

The Cadre Noir is a world-famous French riding school for jockeys and horses. This Butz-Choquin pipe, in order to pay some form of tribute to the country’s prized institute, has a rustic finish consisting of parallel trenches running across the bowl. With a black and clear acrylic stem, this 1772 brandy shaped pipe is a dapper addition to both a pipe collection and an equestrian’s repertoire.

The BC before me does not have a clear acrylic stem, yet it could be described as opaque in places.  The only thing that is a significant obstacle to recommissioning this BC Cadre Noir is the damage to the gray swirl acrylic stem.  The pipe generally needs only a clean-up.  The upper button has chipped off and needs to be rebuilt.  The challenge in this rebuild is getting anywhere close to matching the colors of the patch material and the acrylic stem grays.  Before I begin any repairs, I clean the pipe.  Starting with the fire chamber, using the Savinelli Pipe Knife, I scrape out the minor carbon build up on the chamber walls.  Following this, using 240 grit sanding paper wrapped around a Sharpie Pen I clean the chamber out further.  I finish by wiping the chamber with a cotton pad wetted with alcohol to remove the carbon dust.  Now looking to the external rustified surface, I use Murphy’s Oil Soap undiluted with a cotton pad and a bristled tooth brush to get into the nooks and crannies of the surface.  The pictures show the cleaning. Switching to the internals, I use pipe cleaners and cotton swabs to do the job.  When I realize my time is waning, I decide to complete the internal cleaning and refreshing with the use of a salt – alcohol bath.  Using kosher salt, I fill the bowl, and stretch and twist a cotton ball to create a wick to stuff down the mortise.  I fill the bowl with alcohol until it surfaces over the salt and I put it aside to let it soak for several hours. The soak did the job when I return home later that day.  The salt and wick had absorbed the oils and tars from the briar.  I toss the old salt, wipe the chamber with paper towel and use a bristle brush to remove all the salt residue.  I return to using cotton swabs and as billed, the soak had done the job.  The pictures show the cleaning process.Now to the acrylic stem.  I first clean the internals which were in great shape.The major challenge I face with this BC Cadre Noir 1845, is the acrylic stem button repair.  I did a repair on a Meerschaum’s Bakelite stem which was a clinic in trial and error, but finally realizing success.  That Meerschaum is now a good friend in my rotation and you can see the Bakelite stem repair at The Pipe Steward blog site here: LINK.  I take some additional close-ups of the chipped button.  This acrylic stem has a gray marble color.  The good news is that the lower button (pictured above) is intact and acts as a template for the upper button rebuild.  The challenge is matching the patch material color with the multi-colored hues of gray.  My idea of how to approach this is to use clear thick CA glue as a base.  I will mix some white acrylic paint with it to create the light base.  Then, I will very gradually add activated charcoal to the mixture to create the movement toward the grays.  I have no idea how the white acrylic paint and the CA glue will react together.  I begin this repair using a needle file to work on the button while its exposed – filing down the lower surface of the slot which is rough from the break.  I then cut an index card forming a triangle, cover it with scotch tape which prevents the patch material from adhering to it, and insert it into the slot acting as a mold.  The mold will shape the slot area as well as guard the airway from the patch material seeping into it and clogging it. Well, mixing white acrylic paint with CA glue doesn’t work, so don’t try that path!  The paint immediately gummed up as it was mixed and did not provide a lightening effect.  To build the button, I end up simply applying thick CA glue and charcoal powder mixture to the button and spraying it with an accelerator to shorten the curing time.  It doesn’t have the gray hue I was wanting to blend better, but it should look ok after sanding and shaping.  I pull out the index mold and the slot looks rough now, but good.  Using a flat needle file, I start shaping the button lip.  Without a doubt – in my opinion, button rebuilding is the most time consuming and meticulous aspect of restoring estate pipes.  Patiently, I file the button and slot to a shape that is consistent with the original button curvature.  Using the lower lip as the template, I shape, file, shape, file….  It’s looking good.  Pictures show the progress. With the main file sculpting done, I use 240 grit sanding paper and sand the button, bit, and slot to blend the patch and the native acrylic.  Then, using 600 grit paper I fine tune, then a hearty buffing with 0000 steel wool.  Often when rebuilding a button, the patch material reveals air pockets as the sanding and buffing move toward the final stages.  This button was no different.  To cover these air pockets, I paint a fine layer of thick CA glue over the lip with a tooth pick.  The air pocket pits are filled with the CA glue.  I again run over the lip surface with a light 240 grit, then 600 grit papers, then the final 0000 grade steel wool buff to blend. With the button repair completed, I move on with the micromesh pad sanding of the acrylic stem.  I wet sand using pads 1500 to 2400.  I follow this with pads 3200 to 4000 then finish with pads 6000 to 12000.  I’m careful to avoid the ‘BC’ stem stamping as I sand. During the sanding, I also sand the white acrylic divider between stem and shank to spruce it up as well.  Even though I don’t believe the application of Obsidian Oil helps an acrylic stem, I do it anyway because it looks good and seems to bring out the marbling.  I have to admit, the button’s rebuild came out better than expected.  Even though I couldn’t create the gray hue in the patch material, the black seems to blend perfectly with the stem.  The dubbing of this Butz-Choquin Cadre Noir as being a ‘modern’ pipe, I think fits well with the results – looks great.  The pictures show the stem’s progress. Next, I look at the BC’s rustified stummel.  The dark deep contours of the bubbled rustication make the peaks of the bubbles stand out.  I like the Leprechaun look of the pipe.  To polish and protect the surface, I use Museum Wax wetted with a bit of spittle, applying it with a cotton cloth.  I work the wax into the crooks and crannies of the rustification.  After working the Museum Wax into the rustified surface, I do an initial hand buff with a bristled shoe brush.  Following this, to deepen the buff and heighten the shine, I mount the Dremel with a cotton cloth buffing wheel set at 40% speed and buff the surface further.  Pictures show the progress. Again, picking up the stem, after mounting the Dremel with a cotton cloth wheel for Blue Diamond, I buff the acrylic stem with a high gloss using the compound.  Before applying carnauba wax to the stem, I want to freshen the ‘BC’ stamping on the side of the stem.  The ‘C’ has grown less distinct.  Using white acrylic paint, I apply it over the stamping hoping that there’s enough edge left in the ‘C’ to hold the paint.  After it dries, I gently rub off the excess paint using the middle flat edge of a tooth pick.  The ‘BC’ is a bit more distinct now.  Pictures show the progress. The cotton cloth is mounted on the Dremel and I apply carnauba wax to the acrylic stem at 40% speed.  After applying the carnauba over the stem, I reunite the gray marbled acrylic stem with the Leprechaun stummel and give it a good hand buff using a micromesh cloth.

I’m very pleased with the outcome of the button rebuild and how well the patch material blends with the gray marble acrylic stem.  This French made Butz-Choquin Cadre Noir 1845, is a unique shape and will draw attention.  I’m happy to recommission this BC for Joy’s brother who will be his new steward.  Joy’s gift benefits the Daughters of Bulgaria, our work here in Bulgaria with women and girls who have been trafficked and sexually exploited.  Thanks Joy!  To learn more about how my restorations help, check out my blog, The Pipe Steward.  Thanks for joining me!

Resurrecting a Butz Choquin Commander 1028 Rhodesian


Blog by Steve Laug

This is the third pipe that I a working on for the pipe smoker who stopped by my house last week and dropped off his pipes for repair. This one is a Butz Choquin Rhodesian. It is stamped Butz Choquin over Commander on the left side of the shank and under that it is stamped Filtre Extra. On the right side, the shape number 1028 is stamped. It was another one that had a replacement stem that is a tight fit in the shank. The owner was pretty sure that the replacement stem is what cracked the shank in two places and that certainly could be true. The stem was oxidized and had tooth marks on both sides just in front of the button. The briar is in rough shape. The rim had a coating of lava that overflow from the bowl and had a lot of nicks and dings from where the pipe had been knocked against a hard surface to remove the dottle. The bowl had a thick crumbly cake that was uneven. There were burn marks around the outer edges of the rim. The double ring had been nicked and some of the band around the top of the bowl was broken. The shank had two cracks on it – one on the right side that extended half way along the shank and one on the top left that was about a ¼ inch long. The finish was gone and the stamping had been over buffed somewhere along the way so it was hard to read. I took a close up photo of the rim and bowl to show the damage and overflow onto the rim. The nicks and roughness are visible in the bowl. It appears that the bowl had been over reamed somewhere along the way and there was a gap between the bottom of the bowl and the entrance of the airway into the bowl. The second photo below shows the crack in the shank on the right side. It was quite long and rough to touch.The next photos show the condition of the replacement stem. You can see the oxidation and tooth marks on both sides and on the button top itself.I took some close up photos of the cracked shank. I circled both cracked areas in red. (I apologize for the blurry second photo. I should have checked the pic before I move on but did not. The crack is still visible.)I drilled a small hole with a microdrill bit at the terminus of both cracks to stop the crack from expanding further. (Again they are circle in red in the photos below.)I pressed briar dust into the cracks and put super glue on top of the dust to fill in the crack and the drilled hole. I sanded the fills until they were blended into the shank.I put the band onto the end of the shank and heated it with a heat gun to expand it. Once it was hot, I pressed it down against a board that I use for this purpose. Make sure to hold the shank straight up and down to keep the band moving up the shank evenly.Once the band was in place on the shank and the end was even with the end of the shank I let is cool. As the band cooled, the cracks were held tightly together and from the end of the shank were visible only if you knew where to look. I took photos of the newly banded shank to show the look of the pipe with the band. I lightly topped the bowl on the topping board with 220 grit sandpaper to remove the rim damage and burn marks.I reamed the bowl with the PipeNet reamer and the Savinelli Fitsall Reamer to take the cake back to the bare walls. I sanded the bowl with sandpaper to smooth it out. I scrubbed the rim and airway in the shank and the stem with pipe cleaners, cotton swabs and alcohol. There was still work to do but it was getting there. I sanded the oxidation and build up on the stem with 220 grit sandpaper to remove it and the tooth marks. Those that could not be sanded out I filled with black super glue.I cleaned out the grooves around the bowl with a thin blade and wiped it down with alcohol. I sanded the rim cap and the ring to smooth out the damage and give me a clear picture of what I needed to do to repair these areas. The two photos below show the damaged areas.I filled in the missing spots on the ring with super glue and briar dust. I used a sharp knife to clean out the rings from the excess glue and fill. I used a piece of sandpaper to sand the edges on the centre ring. I was able to fill in the majority of the damage though there were still some spots on the ring that showed damage.As I cleaned and sanded the rim cap with micromesh sanding  pads I noticed one more small crack on the left side of the bowl from the edge of the rim down the side of the bowl. It was not all the way through the bowl into the inside of the bowl but it was there. I used a microdrill bit on the Dremel to drill small holes at the end of the top edge and also on the hook of the bottom edge of the crack. I filled in the holes and the crack with super glue and briar dust. I sanded the spots once the glue had dried. I smoothed out the repair to blend it into the rest of the briar.I stained the bowl with dark brown aniline stain and flamed it with a lighter to set it in the grain. I repeated the process until I was happy with the coverage on the briar. The stain blended the repairs on the shank and the bowl with the rest of the briar. They are still visible if you know where to look but really look like small black spots in the briar.I hand buffed the bowl with a microfibre cloth and took the following photos to show the state of things at this point in the process. I am pretty happy with the finish at this point. I opened the slot in the button with needle files – both a flat oval and thicker oval to make it easier to pass a pipe cleaner through to the bowl. Once it was clearly opened I used a folded piece of 220 grit sandpaper to smooth out the file marks in the slot.I turned my attention to the surface of the stem. The oxidation was deep and it took some work to get it out. I worked on the stem with 220 grit sandpaper to remove the surface oxidation. It removed much of the oxidation but there was still work to be done. I polished the stem with micromesh sanding pads – wet sanding with 1500-2400 grit pads. The photo below shows that there was still some oxidation to work on. I buffed it with red Tripoli to further remove the oxidation. I was happy with it once it was buffed. I dry sanded it with 3200-4000 grit pads. The second photo shows the stem after that buffing. The oxidation was finally conquered. I rubbed it down with Obsidian Oil. I polished it with the last three grits of micromesh – 6000-12000 grit pads and rubbed it down with Obsidian Oil. I set it aside to let the oil dry.I buffed the bowl and stem with Blue Diamond on the buffing wheel to polish out the last of the scratches. I gave the bowl and stem multiple coats of carnauba wax with the wax wheel. I buffed it with a clean buffing pad to raise the shine and with a microfibre cloth to deepen the shine. The finished pipe is shown in the photos below. The third pipe is finished for the pipe smoker who dropped them by for me to restore. This one had a few challenges but I think they were met and the pipe looks better than when I began. Thanks for looking.

Hole in the Wall Gold Mine: Butz-Choquin Cocarde Major Rhodesian


Blog by Dal Stanton

Even though it was a snow trudging kind of day, making it to the ‘Hole in the Wall’ paid off again.  I mentioned this visit before when I was writing up the restoration of the Stanwell Silver Mount.  On this visit, I saw the Stanwell for the first time, but didn’t bite.  The next time I would!  On this visit, I found another very nice example of St. Claude, France’s claim to fame as an historic center of pipe production – rivaling the UK for market share in Europe.  When I saw the Butz-Choquin Cocarde Major in the pipe basket on the cluttered Hole in the Wall shelf, my initial reaction was its size – a hefty guy.  My first assessment was that it was a Bulldog shape, then I noted the large rounded shank – a Rhodesian or a Bullmoose?  This one is going home with me regardless!  I looked in the basket for a good pipe to bundle and I saw an attractive, diminutive, Bent Billiard Sitter with a swan neck stem – unmarked, but a very nice looking pipe.  When I got home I took a quick picture of the bundled pair and put them in the ‘Help Me!’ basket for later attention.butz1 butz2When I take the BC Cocarde Major out of the basket, I am anxious to recommission this nice-looking Rhodesian, I decide.  The first thing I do is pull up Google Translator and insert Cocarde Major in the French to English machine.  I did not study French in school so help is appreciated.  I want to know if special meaning is attached to this St. Claude BC.  Cocarde translated into English as the word, ‘Cockade’ which was defined as, a rosette, roundel or knot of ribbons worn in a hat as a badge of office or party, or as part of a livery. With a little looking on the internet, I found these interesting French examples of Cocardes.butz3With this meaning for ‘Cocarde’ it put doubt in my mind regarding my original thought that ‘Major’ referred to large or big.  Attaching Major to the idea of the French symbol of national pride, it is most likely pointing to a level of rank, or when ‘Major’ is attached to another rank (e.g., sergeant-major) it denotes the ranking of one superior among those of the same rank.  I emailed a colleague living and working in Toulouse, France, whose command of the language could help.  His comments confirmed what I was thinking:

The word cockade refers to a national symbole for the French, like “cocarde tricolore’ refers to the French flag which is, of course, one of the most important symbols of the French people and national pride.  It has many meanings, but for example official cars or planes have this symbol on it.  You are right about the word Major, refering to a military grade. Used as an adjectif, “majeur” it means big.   I would conclude that this is simply the name of the pipe.  You can’t translate it literally.  The pipe’s name implies in my opinion that it is a symbol of French pride, like the French insignia for a general in the military.

With the symbols of French pride stamped on this BC Rhodesian, I have a greater appreciation for the pipe when I take more pictures now on my worktable.butz4 butz5 butz6 butz7 butz8The stampings on the left side of the shank are “Butz-Choquin” in an arched script over “Concarde” over “Major”.  On the right side is, “St Claude” arched over “France” over “1028”, the BC shape number.  Per Pipedia’s history of the name, when Jean-Baptiste Choquin of Metz, started out as a tobacconist and the business prospered.  In 1858, one of his employees, one Gustave Butz, fell for his boss’ daughter and they were married.  That same year, Butz and Choquin came together to form the enterprise that is now known as Butz-Choquin, and eventually moved the operation from Metz to St. Claude, known as “the world capital of the briar pipe”.  Looking on the internet, I found another BC shape ‘1028’ but was called a ‘Bourbon Major’.  The shape was that of a Bulldog, with the diamond shank.  I know there is debate regarding the difference between Bulldog and a Rhodesian classification, but I am happy with Bill Burney’s descriptive difference in the Pipedia shapes Chart, that the difference between the two is, the Rhodesian has a round shank and the Bulldog, a diamond.

So, looking more closely at the BC Rhodesian in front of me, I see that the surface is generally in good shape – striking grain patterns.  There are two noticeable fills that need addressing.  There is also a chip over the shank, where the double grooves meet – the grooves forming the border between the upper and lower cones of the Rhodesian stummel.  The chamber has thick carbon cake buildup and needs removal down to the briar for a fresh start.  The stem has very little oxidation and a couple distinct clincher tooth marks on the top bit and chatter above and below.  The stamped ‘BC’ stem marking is in good shape but the white color needs touching up.  The following pictures show the question areas on the stummel – mainly fills and the chip.butz9 butz10Even though the oxidation is minor, I put the stem in an Oxi-Clean bath for a few hours to raise the oxidation to the surface.  I first cover the stem ‘BC’ stamp with petroleum oil.  Turning to the stummel, I take the Pipnet Pipe Reamer kit and use the two smaller blades of the four available and remove the cake using first the smallest, then graduating to the next larger when the blade stops meeting resistance.  This cake is hard and crusty but vacates in short order.  I fine tune the reaming with my Savinelli Pipe Knife.  I’ve grown to like this handy tool.  What The Pipe Smoker blog says about it is spot on:

Basically, a three-sided scraper, it can be placed in the chamber exactly where it needs to be placed and then cake is scraped off with a simple movement of the wrist. It allows full control over where the cake is being reduced. It has a rounded tip, which means that it will not damage the bottom of the bowl. It makes no difference, whether the chamber is straight or conical, I can use the same tool on either. It requires no adjustment. 

After the Savinelli pipe knife scrapes the chamber wall, I wrap 240 grit paper around a Sharpie pen and sand the chamber removing the last vestiges of carbon.  I then wipe the bowl with a cotton pad wetted with isopropyl 95%.  The chamber looks great.  I fold up the paper towel and my work station is clean again.  Pictures show the progress.butz11 butz12 butz13 butz14I then switch to the internals of the stummel and clean the mortise and airhole with pipe cleaners and cotton swabs dipped in isopropyl 95%.  After some extended effort, pipe cleaners and cotton swabs are coming out clean.  Later, I’ll add another measure of cleaning by giving the stummel a kosher salt and alcohol soak.  I like to go the extra mile when I’m preparing a pipe for a new steward.  The picture shows the progress.butz15Turning to the stummel externals, I remove the grime on the surface and clean the rim.  I use undiluted Murphy Oil Soap with cotton pads.  I use a bristle tooth brush as well to clean the double grooves circling the cone.  I also employ a brass brush to clean the lava and grime off the rim.  The pictures show the progress.butz16Time to fish the stem from the Oxi-Clean bath.  It’s amazing that even when the stem looks to have little oxidation, the Oxi-Clean bath raises the oxidation to the surface.  I wet sand with 600 grit paper to remove the bulk of the oxidation from the vulcanite and then follow-up using 0000 steel wool. Throughout this process, I give care to work around the ‘BC’ stem stamping.  Pictures show the progress.butz17With the tooth dents on the upper bit, I attempt to remove by using a lit candle’s heat to raise the indentations by expanding the vulcanite but it wasn’t working well.  So, I apply a small drop of super glue to the spots and then apply an accelerator to cure the glue.  After a few minutes, I use the flat edge needle file to file down the superglue patches to the vulcanite surface.  While I have the file out, I file the button lip, upper and lower, to give them more definition.  I follow with applying 240 grit paper to remove the file marks and to fine tune and blend the superglue patches.  I follow with 600 grit paper and then 0000 steel wool.  The pictures show the progress.butz18 butz19 butz20 butz21I clean and freshen the internals of the stummel further with a Kosher Salt/alcohol soak for several hours.  I set the stummel in a sturdy egg carton and twist a cotton ball and feed it into the mortise, pushing it in with a straight wire.  I then fill the chamber with kosher salt which is not iodized – which can leave a taste.  Then, I fill the chamber with isopropyl 95% until it surfaces above the salt.  The pictures show the process.butz22The next morning, the salt/alcohol soak had run its course and from the darkening of the salt and the cotton wick, the process effectively cleaned and freshened the stummel internals even after the plethora of pipe cleaners and cotton swabs.  I dump the old expended salt and thump the stummel on my palm, then use a paper towel and wipe the bowl.  I use bristle brushes to clean the mortise and again, pipe cleaners through the airway to finish the cleanup.  As billed, the soak works.  Pictures show the soak results.butz23With the internals of the stummel clean, I clean the internals of the stem.  Using pipe cleaners dipped in isopropyl 95% I work on the stem.  After I begin, even though the ¼ bent saddle stem is not an extreme bend, I’m surprised that I am not able to move a pipe cleaner through the stem without difficulty.  Finally, I pass a bristled pipe cleaner through and move it back and forth, hoping that it loosens up the passageway. It doesn’t.  I decide to use the technique that Charles Lemon used on Dad’s Pipes (See here: Link) of expanding the airway by heating the stem and moving a pipe cleaner through.  Just to be on the safe side, I draw an outline of the stem’s bend to use as a template for a comparison after I re-bend the pipe back to the original.  I first straighten the stem by warming it with a heat gun until the vulcanite becomes pliable.  After inserting a pipe cleaner through the stem, I then reheat the stem and return the stem to the ¼ bend.  Now, back to the original curve comparing to the template, without difficulty I complete the cleaning of the stem using isopropyl dipped pipe cleaners moving freely through the airway.  I also clean the crud out of the slot with a dental probe.  Pictures show the process.butz24 butz25Before starting the micromesh phase to raise the luster of the BC bent stem, I use Miracle Eraser on the ‘BC’ stem stamp to remove the oxidation without applying an abrasive to the stamp.  It does seem to help.  Then, I wet sand the stem using micromesh pads 1500 to 2400, followed by dry sanding with 3200 to 4000, then 6000 to 12000.  I complete each set by applying Obsidian Oil to revitalize the vulcanite.  To watch the stem gradually pop, is an amazing process.  This Butz-Choquin is cleaning up nicely.  I set the stem aside to dry.butz26 butz27Now I return to the stummel and take a close look.  After cleaning with Murphy’s Soap, I detect about 4 or 5 fills on the surface that need addressing. The fills are solid but with some, I’m able to scrape of the upper layer of the fill.  There is also a chip in the double grove going around the stummel.  With the smaller fills, that are not pitted, I use dye sticks, starting with a lighter hue and graduating to a darker hue, until the blend is best.  I then use a lightly dampened cotton pad with isopropyl 95% to dab the areas to blend further with the surrounding briar.  The pictures show the progress.butz28 butz29With those more pitted, I mix a bit of superglue and briar dust to form a putty and apply on the pitted fills.  Carefully, I also paint the groove chip and before the putty start hardening, I clear overflow putty from the grooves with a sharp dental probe.  I use an accelerator to cure the briar dust putty patches more rapidly.   After a short time, I sand each putty fill to bring it to the briar surface.  I first carefully use a flat needle file to work the putty hills down to almost surface level then I use 240 grit paper to sand to the surface level.butz30 butz31 butz32Decision time.  I want to restore this Butz-Choquin as close to the original shade as I can.  I discovered on TobaccoPipes.com a BC in the same shape group as the Cocarde Major – 1028.  In the picture below, the shade of the stummel is light and I think I can achieve this by simply sanding the stummel and restoring the briar to its original natural luster – MINUS what appears to be an acrylic finish below. I can still decide to apply a stain at the end of the sanding process after I have a better idea of the briar as it emerges.  The shape below is a BC Cocarde 1025 – the only difference I detect is the tapered stem versus the saddle stem.butz33First, I want to freshen the rim lines and re-cut an inner bevel which will look better and remove discoloration on the inner rim edge.  The rim has a subtle slant toward the chamber.  I cut the initial bevel using a coarse 120 grip paper rolled tightly.  When I reestablish the bevel, I follow by sanding with 240 grit sanding paper.  I then sand the stummel using a medium grade sanding sponge, followed by a light grade sanding sponge.  I am careful to work around the stampings on the sides of the shank.  Before I move on to the micromesh sanding, I use dye sticks to help blend the fill patch areas that are not yet blending.  After applying the dye stick, I then lightly dab the area with a cotton pad slightly wetted with alcohol.  This helps blend with the surrounding briar.  The pictures show the progress.butz34 butz35 butz36 butz37I follow by using micromesh pads 1500 to 2400 and wet sand the stummel.  After this, I dry sand using 3200 to 4000 then finish with pads 6000 to 12000.  I then run a toothpick through both grooves connecting the upper and lower domes of the Rhodesian to remove residue remaining from the sanding process.butz38 butz39To step back and take in the big picture, I reunite stem and stummel and take a picture.  I see two distinct briar dust putty fills that are looking like I should have used a clear superglue fill instead.  They are darker than the surrounding grain environment – not an ideal situation.butz40I decide I can live with the fill on the upper cone, next to the rim.  It is smaller and I hope that it will blend after applying a light brown stain which is looking like will be needed.  With the larger lower fill, I will delicately try reaming the fill with the point of a Dremel tool to remove the putty.  Depending on how that goes, the next step will be to shape the fill somewhat so that the shape is less circular and flows more with the surrounding grain pattern.  Then, I will fill the new hole with clear superglue, sand and again be back to where I am now – hopefully with better blending.  Phase one seems to go well – very carefully.  With the Dremel tool I clean the putty fill and shape the pit circle to flow with the grain.  I then spot-glue and use accelerator to cure the new clear patch.  Looking good so far.   I use a flat needle file to remove the superglue fill mound almost to the briar surface, then I use 240 grit paper rolled, to strategically stay on top of the glue to bring it down to surface.  I follow with 600 grit, then steel wool, then the full array of 9 micromesh pads, 1500 to 12000.  I touch up a bit with a light dye stick and blend with a cotton pad with a bit of alcohol.  I am now back to where I was at the beginning of the detour. The fill is still visible, but doesn’t jump out proclaiming, “Here I am, Boys!”  The pictures show the detoured progress.butz41 butz42 butz43 butz44Now, to promote blending throughout the entire stummel, I use Fiebing’s Light Brown Leather Dye.  I warm the stummel to open the grains to receive the dye.  Using a doubled-over pipe cleaner I liberally apply the dye over the stummel careful to achieve full coverage, rim and grooves.  I then flame the aniline dye with a lit candle and the alcohol immediately burns off, setting the dye in the grain.  To achieve total coverage, I repeat the process above after a few minutes, complete with flaming.  I put the stummel aside to rest and I’ll return to it after work this evening.butz45One last task to do before heading to work.  I want to freshen the ‘BC’ stem marking with white acrylic paint.  I put a small dab of paint over the ‘BC’ and then use a toothpick to spread the paint, making sure the marks are fully covered.  Tonight, after the paint is fully cured, I’ll scrape off the excess leaving a fresh Butz-Choquin stem.butz46Back home and ready to go.  The white acrylic paint has fully cured on the stem marking.  I take a toothpick and gently scrape the excess paint away using the side of the toothpick.  Doing this, the toothpick passes over the top of the stamping leaving the indentations fully renewed.butz47Time to ‘unwrap’ the fire crusted stummel after applying Fiebing’s Light Brown Leather Dye.  Using the felt wheel, I set the speed of the Dremel to the slowest possible and using Tripoli compound, after purging the wheel of old compound with the sharp edge of the Dremel’s adjustment wrench, I remove the crust from the stummel.  I take a picture to show this process.  After the crust is removed, I use cotton pads wet with isopropyl 95% to wipe down the stummel.  I lighten the stummel’s hue a good bit aiming for the original as closely as possible and to blend the dye across the grain.  When I reach the hue that looks good, I switch to a cotton cloth wheel mounted on the Dremel, and after reuniting stem and stummel, I apply Blue Diamond compound both.  I’m loving watching the grain on this BC Cocarde Major Rhodesian start popping – it is truly an amazing process and the components of such fine abrasion produce such a result in the briar. When completed with Blue Diamond I give the pipe a buff with a felt towel, not so much for shining but to remove residue compound before I apply the wax.  After mounting the cotton cloth wheel on the Dremel, I increase the speed to the second slowest speed and apply several coats of carnauba wax to stem and stubble.  When finished, I rigorously hand buff the pipe with a micromesh cloth.butz48 butz49The grain on this Rhodesian is placed perfectly to enhance the proud, chin forward carriage of the stummel.  The horizontal flame grain crosses the heel of the stummel and flows to the sides terminating in bird’s eye – a beautiful showpiece of briar that is well-suited to bear the name of French pride – Cocarde Major.  This Butz-Choquin Rhodesian, another traveler from St. Claude, is looking for a new steward.  I sell the pipes I restore and give the profits to benefit the work we do here in Bulgaria with the Daughters of Bulgaria – rescuing women and children who have been trafficked and sexually exploited.  If you are interested in adding this Butz-Choquin Cocarde Major Rhodesian to your collection, you can find it at the store at my blog site, The Pipe Steward.  Thanks for joining me!butz50 butz51 butz52 butz53 butz54 butz55

A Butz-Choquin Millesime Limited Edition 1986 Pipe


Blog by Steve Laug

One of the pipes that my brother sent me was a Butz-Choquin that was in a large presentation box. It was stamped Butz-Choquin on the bottom of the shank and had a silver disk on the left side of the shank with 1986 engraved on it. On the right side of the shank it was stamped MILLESIME with C in a circle and 215 underneath. The box was satin lined and the pipe was held in place by an elasticized band. The stem bore the acrylic inset BC logo. In the lid of the box was a Butz-Choquin pipe sock and a certificate stating that this pipe was a limited edition and bore the number 215 of 1200 pipes made.BC1On the satin lining of the box it was stamped BC and the Butz-Choquin logo. Underneath was Millesime. Underneath that to the left it read Limited Edition, central it read Maitre Pipier a Saint Claude – France, and to the right it read edition numerotee. A little research on Google told me that Millesime translated Year and the Millesimei line was composed of the BC pipes of the year. Thus I had in my hands a 1986 Pipe of the Year.BC2I took the pipe out of the box and laid it on the pipe sock and took a photo of it. It is a beautifully grained piece of briar with a shiny Lucite stem.BC3The certificate has the BC Butz-Choquin logo and Millesime. Then it reads:

This year we have carefully selected this model B.C. Millesime 1986. This year is engraved on a silver plate inlaid in the briar and the edition is limited to 1200 pieces.

We have created the B.C. Millesime for the special and individual taste of pipe lovers. Those who appreciate their pipe will be able to savour this new B.C. shape and start a new collection.

The distribution has been intentionally limited and great attention has been given to it production.

This has made this B.C. Millesime 1986, with the No. 215, a pipe that caters to the pipe smoker’s enjoyment.

This certificate which accompanies this pipe guarantees its authentic and unique character and justifies its prestige.

Jacques et Jean-Paul Berrod, Maitres Pipiers a Saint-Claude. The certificate bears his signature below the name and title.BC4I took the pipe to the work table and took some photos of it before I started to clean it up. The first four photos show the various views of the pipe. The grain on the pipe is quite a stunning mixture of flame, cross grain and birdseye.BC5 BC6The pipe had obviously been lightly smoked as the tobacco chamber still the bowl coating on the bottom two-thirds of the bowl. I think that the most disturbing feature of this pipe to me was that the sanding marks were still visible on the rim and bowl. I am not sure if those were original or if the entire pipe had been brushed with a coat of varnish. In the close up photos you can see the marks that I am talking about. Each of the photos shows a different portion of the pipe from the rim to the stamping on the sides and bottom of the shank.BC7 BC8I cleaned out the mortise and the airway in the shank and the stem with alcohol, cotton swabs and pipe cleaners until they were clean.BC9The Lucite stem had scratches and small nicks in the surface so wet sanded it with 1500-2400 grit micromesh sanding pads and dry sanded it with 3200-12000 grit pads. I wiped it down with a damp cotton pad between each set of three grits.BC10 BC11I sanded the briar with the same sequence of micromesh pads to remove the scratches. The more I worked with them the more convinced I became that the surface had a brushed on coat of varnish or shellac. I don’t think it came that way originally but had probably been done by the eBay seller to make the pipe look shiny.BC12When I finished sanding it with the micromesh sanding pads I buffed the bowl and the stem with Blue Diamond polish on the buffing wheel. The sanding pads and the buffing wheel took out the scratches and polished the finish. The grain really stands out after the buffing. I gave the pipe and stem several coats of carnauba wax and buffed it with a clean buffing pad. I hand buffed it with a microfibre cloth to deepen the shine. The finished pipe is shown in the photos below. The Lucite stem looks great with the newly polished bowl and shank. The silver inlaid disk engraved 1986 also shined up nicely with some silver polish.BC13 BC14 BC15 BC16 BC17 BC18 BC19

Cleaning up a Butz-Choquin Chombord Rhodesian


Blog by Steve Laug

The Rhodesian is one of my favourite shapes and recently I stumbled on the BC 1025 that really captures the Rhodesian shape well. It is right up there with the GBD 9438 and the Peterson 999. So when my brother and I saw this one on Ebay we of course were smitten with PAD. I wanted that pipe. The Cumberland stem is definitely a plus because I like that as well and to have the two combined in one pipe was bonus. This one is stamped on the left side of the shank Butz-Choquin over Chombord. On the right side it is stamped St Claude in an arch over France over the shape number 1025. The silver band is stamped Sterling Silver. It was dirty – the rim had a tarry top coat and there was a cake in the bowl. The silver was tarnished and the Cumberland stem was oxidized. It also bore some calcification on the stem where it looked as if the stem had borne a softee bit. The good thing about the softee bit is it often prevents tooth marks or in some cases hides them. The stem bore the BC logo encased in clear resin and set in the left side. This pipe came with the box, the original pipe sock and a BC brochure. BC1 BC2 BC3 BC4When the pipe arrived in Vancouver it came in its original box and sock. I couldn’t wait to open it up and check it out.BC5Inside the lid was the brochure that gave the variety of BC pipe shapes along with a simple guide on pipe care called “The Minor Art of Pipe-Smoking”.BC6I took the pipe sock out of the box and took the pipe out to see it. Once again my brother did an incredible job cleaning and reaming this one. It came to me in really great shape. The finish was actually pristine on the bowl after the clean up. The stem was clean and lightly oxidized. The silver was tarnished. All of these were minor clean up issues. The rim had a very light coat of tar that had not come off in the scrubbing.BC7 BC8The next two photos are close up pics. The first is of the bowl and stem separated and shows the tarnish on the silver. The second photo shows what is left on the rim top. Neither issue would actually take a lot of work.BC9I used 1500 grit micromesh sanding pads and also a cotton pad and alcohol to remove the remaining tars.BC10I cleaned off the tarnish with some silver tarnish remover and a cotton pad. I scrubbed it until the silver shone.BC11I wet sanded the Cumberland stem with 1500-2400 grit micromesh sanding pads and rubbed it down with Obsidian Oil. I dry sanded it with 3200-4000 grit sanding pads and gave it another coat of oil. I finished sanding the stem with 6000-12000 grit sanding pads, gave it a final coat of oil and set it aside to dry.BC12 BC13 BC14I buffed the bowl and stem with Blue Diamond on the buffing wheel and gave it multiple coats of carnauba wax. I buffed the pipe with a clean buffing pad and by hand with a microfibre cloth. The finished pipe is shown in the photos below. The finished pipe is shown in the photos below. Thanks for looking.BC15 BC16 BC17 BC18 BC19 BC20 BC21

Sofia Hole in the Wall #3: A Butz-Choquin Rocamar with a Cumberland stem


Blog by Dal Stanton

This is my third restoration from what I called the ‘Bag of 4’ that Steve and I saw at the ‘Hole in the Wall’ antique store during his visit to Sofia, Bulgaria.  Thanks again for indulging my ‘newbie’ offerings. My favorite of the bunch was a Savinelli Tortuga (https://rebornpipes.com/2016/06/18/sofia-hole-in-the-wall-find-savinelli-tortuga/).  The second, which I didn’t write up, was a beautiful Danske Club Vario, which I discovered on Pipedia is a Stanwell second.  Behind the Tortuga, the Vario was a close second. It is now next to my Tortuga in regular rotation – a great addition to my growing collection. Take a look at a few pictures of the finished Danish Danske Club Vario. I’m drawn to the blended smooth and sandblasted briar finishes on this pipe:Dal1 Dal2The markings I found on pipe #3 on the left side is Butz-Choquin over Rocamar with a ‘Filter 9’ diagonal imprint.  On the right side, St. Claude, France 1333, which I assume is the BC shape or series number.  The Cumberland stem has the BC imprinted marking.  From Pipedia I discovered a bit of the early history of the name from Pipedia:

“Jean-Baptiste Choquin of Metz started out as a tobacconist. This enterprise was prosperous; he had several employees. Among those, there was a certain Gustave Butz who was its first workman and who became his son-in-law by marrying Choquin’s daughter Marie in 1858.  In 1858 Jean-Baptiste Choquin created, in collaboration with Gustave Butz, the Choquin pipe. This bent pipe with a flat-bottomed bowl was finished with an albatross-bone mouthpiece, fixed with silver rings.  In 1858, still in Metz, Gustave Butz built an establishment for the manufacture of the Choquin pipe which took the name of -. In 1951, the Berrod-Regad company bought the trademark, continuing manufacture until 2002. Departing from Metz, the workshop was relocated to Saint-Claude, then also called ‘the world capital of the briar pipe,’ under the Berrod-Regad group.”

I could find nothing specific about the series name Rocamar so I decided to send an email to Butz-Choquin using their info contact from their current website which is under construction (http://www.butzchoquin.com/).  We’ll see where that goes.

The BC Rocamar has an attractive fiery grain and the bent billiard chimney is tall and elegant to me – perhaps tending toward an egg shaped bowl.  What I’m drawn to also is the bent Cumberland stem – my first to work on.  Not quite knowing what kind of stem it was I did a bit of research and discovered pipesmokersforum.com a thread discussing this stem:

“Cumberland proper is a vulcanite rod made up from red and black rods, melted and swirled together for the brown/red marble effect. It is very soft, and oxydizes fairly quickly if the protective wax coating is scraped off. There is a harder version in ebonite, which has a higher sulfur content if I understand these things correctly, but the color combos are not quite as subdued as the vulcanite version. It’s a bit more “brick” colored.”  Another comment I read was that if one found a Cumberland stem it was most likely hand cut – to me that is cool.  Helpful information.  Here are pictures of the BC Rocamar when it arrived home from the Hole in the Wall:Dal3 Dal4 Dal5 Dal6 Dal7The briar is in great shape and will need basic clean-up.  The rim shows a burn scar about 2 o’clock and lava build up.  As the comments about Cumberland stems and oxidation stated, this one had its share.  The bit has significant teeth chatter and some significant divots that will need repair.  Yet, I see the potential of the color swirl of the Cumberland being a very nice augmentation to the fiery briar stummel.  The filter casing had dislodged from the stem and that will need to be reattached.  I decide to drop the stem in an Oxyclean bath to start working on the oxidation while I turn my attention to the bowl – whoops, that is after I retrieved the stem from underneath the bed – I forgot it was on my lap when I stood to head for the Oxyclean!  I took a close-up of the rim and bowl before I go to work.  I moved from the bedroom work table to the 10th floor balcony mobile work station with Pipnet reaming kit in hand.  I want to minimize pipe soot being released into the bedroom atmosphere resulting in a happier wife.  I use only the two smallest blades from the reaming kit to take the cake down to the wood.  I finish the fire chamber by rubbing it with 120 then 240 grit sanding paper to smooth and clean the chamber walls even more.  Turning to the rim, I clean it with isopropyl 95% and a brass brush which will not scratch the surface of the bowl. I want to see the rim wood clearly before I top the bowl to repair the burn scar and reveal the briar.  With the sunshine helping I can see the rim (and holding tightly not to lose it over the edge!).  I note that the rim circumference is small as the sloping shape of the bowl culminates. Dal8 Dal9 Dal10 Dal11I move to top the bowl but with a view to take off as little as possible to preserve the dimensions of the slender egg-peeked chimney of the bowl.  With the stem soaking in the Oxyclean bath I’m not able to reattach it to the stummel to help make sure I’m maintaining a true perpendicular top and not leaning into the softer burned area.  Before rotating the bowl to top it, I let it free stand and gently rotated the pitch of the bowl so that I could ‘feel’ the low spot where the rim was burned.  By doing this I was able to acclimate to the ‘healthy’ flat part of the rim during the sanding rotation.  It worked well!  I took a picture after only a few rotations on the topping board.  It revealed that I wasn’t fudging into the low spot as it was not yet impacted by the sanding but the other ¾ of the rim was.  I’m careful to keep eyeballing the progress.  I use 240 grit paper on a chop board as my topping table. Moving in a circular, even motion I remove only what is needed.  Satisfied with the topping, I made a small bevel on the inside of the rim using 120 and 240 grit paper.  I did this to take out a bit of inner rim damage and a small bevel is always nice and gives a classy touch. I followed this by using micromesh (1500-12000) on the rim to remove all scratches.  The pictures tell the story.Dal12 Dal13 Dal14 Dal15I decided to wait on staining the rim using a stain-stick and move to the cleaning of the internal and external of the bowl.  The reason I did this was I was able to differentiate the actual unstained color of the briar by looking at the newly repaired rim and compare it to the bowl color.  The rim briar leaned brown whereas the bowl, to the reds.  With cleaning with Murphy’s Soap of the external bowl, I expect there to be a slight change in the color of the bowl briar.  At that point I would go to work again on the color of the rim aiming for the best match.  I decided at this point to move to cleaning the internals of the stummel with Q-tips and pipe cleaners dipped in isopropyl 95%.  I found the internals to be amazingly free of muck and it was not long before Q-tips and pipe cleaners were coming out clean.  Turning to the external cleaning, I used Murphy’s Soap undiluted with cotton pads to remove the wax and grime on the bowl.  The bowl itself is in great shape – no significant scratches or fills.Dal16 Dal17At this point, I came to a road block which necessitated a quick email to ‘Master Obi-wan Steve’ for his input.  After the Murphy’s Soap cleaning I was expecting/hoping the high gloss finish on the bowl to have been dulled – getting to a more natural grain look not competing so much with the bared rim – at least this is what was in my mind.  My hesitations were not wanting to be too aggressive with the bowl finish and mess up the patina that is under the gloss….  With the time difference between Sofia and Vancouver, I put the stummel aside and turn to the much anticipated work on the Cumberland stem – what to me is the unique part of this BC stummel/stem ensemble.  After I extract the stem from the Oxyclean bath, I take some pictures to chronicle the progress.  After an initial buff with 000 steel wool to remove the surfaced oxidation, I take a closer look at the significant teeth divots on the bit and decide to apply super glue to the top and bottom to be able to redefine the button and cover the chatter damage. I want the superglue patches in place before beginning the sanding of the stem.Dal18 Dal19 Dal20 Dal21With the superglue curing, Steve’s reply came about my bowl conundrum and it is now decision time. He suspects that I’m dealing with a urethane finish much like he just dealt with in a Jobey restore (https://rebornpipes.com/2016/06/29/i-thought-this-one-would-be-easy-boy-was-i-wrong/) that was a bear to remove. The options before me are to either come up with a high gloss finish for the rim seeking to match up with the bowl or to aggressively remove the plastic, gloss finish and rescue the beautiful briar beneath.  The close-up picture below revealing the bare briar in rim repair sealed my decision – I put the bowl in an overnight alcohol bath hopefully to soften the glossy finish to be revisited tomorrow.  The time had come to watch some European football – Portugal and Poland – on my widescreen HDTV in my favorite recliner.Dal22The next day, with Poland and Portugal playing to a 1-1 tie the night before, I was anxious to see if the alcohol bath made a dent on the glossy finish.  Upon inspection (picture 1) it was still pretty shiny so I took a light grit sanding sponge to loosen the finish.  I was careful to lightly work around the nomenclature.  This did the trick.  The alcohol bath undoubtedly softened things up.  After the sponge sanding, I followed with rubbing the bowl with acetone with cotton pads to draw the stain out of the grain.  I finished with wiping down the stummel with isopropyl 95% to make sure all was cleaned and no grit left behind.Dal23 Dal24 Dal25I feel like I’m on a roll and I’m anxious to see the grain of this piece of briar unveiled.  I use micromesh pads from 1500 to 2400, 3200 to 4000, and 6000 to 12000.  The pictures below show the progress.  I have to be honest, this is perhaps my favorite part of the restoration process – each set of micromesh pads brings out more of the grain revealing the profoundly unique ‘fingerprint’ of each piece of briar we handle.  I euphemistically think of micromesh pads as ‘magicmesh’ pads – they bring the wood to life.  In my opinion, the grain that I’m now enjoying is much more satisfying than looking through the plastic shiny sheen of the original Butz-Choquin design.Dal26 Dal27 Dal28I decide to put the bowl aside and focus now on completing the Cumberland stem clean up and restoration.  I want to have an idea of the colors of the finished stem before I decide on the best finish for the stummel.  I like working on a clean stem so I first clean the airway using pipe cleaners and Q-tips dipped in isopropyl 95%.  During the cleaning, I saw something that I had missed before.  The button airway opening has a divot – I’ll need to add that to the list.  The superglue applications on the bit and button have had plenty of time to dry.  I use 240 grit sanding paper and needle files to work on the bit and button repair.  The bit repair looks good so I move to micromesh and the homestretch.  I wet sand using 1500-2400 and then apply Obsidian oil to the stem.  At this point, I inspect the repair work on the bit to make sure there are no scratches that I’ve missed before proceeding.  I’ve learned that often scratches are covered by the rough vulcanite.  With the Obsidian oil on the stem I dry-sand using micromesh pads 3200-4000 and apply more Obsidian oil.  I do the same with the last set of three – 6000-12000 and give a good coat of oil and put it aside to dry.  The pictures show the progress rejuvenating the Cumberland stem.  I like what I’m seeing.Dal29 Dal30 Dal31 Dal32 Dal33 Dal34 Dal35I had one undone job – re-attach the filter casing to the stem.  My assumption is that it was initially glued and after inspecting the inside of the stem, I detected residue that I assume was the glue previously used.  I clean the old gunk off the housing and the inside of the stem with alcohol and cotton pad and reattach the housing with superglue.  To get the job done I used my Winchester pocket knife and a dental pick to dig out the old glue.  With the filter housing reattached, the stem is complete.  I really like the rich color of the Cumberland stem.Dal36 Dal37After allowing the filter housing glue to dry I want to see the lay of the land, I rejoin the Cumberland stem to the stummel (picture #1 below).  I decide to stain the bowl with a new stain I found at the German owned ‘Mr. Prakteker’ –  like Home Depot in the US.  Finding alcohol-based stains in Bulgaria has been a challenge so I’ve been mixing my own batches up to this point. The brand is Italian and the cost was a bit more – I’m hoping that translates into better quality. When I opened the tin, a whiff of the stain revealed alcohol.  With the help of Google Translate, the flavor of the stain is Dark Nut.  The Bulgarian stick-on information tag said Dark Walnut.  My thinking is to aim for a darker stummel to blend with the darker hues of the stem.  If this succeeds, then I’m hoping the reds of the Cumberland stem ‘pop’ more instead of competing with the stummel.  We’ll see!   I can use alcohol-dipped cotton pads to lighten the stain after application if I choose.   After setting the stummel up on the cork/candle stand I apply the stain undiluted with a cotton swab to see how it goes.  I liberally allow stain to move over the inverted stummel – making sure of coverage over the inverted rim.  After a good covering I use a lighter to fire the stain which is a quick-combustion of the alcohol leaving the stain to set well into the grain.  The Italian stain ‘fired’ as hoped!  I repeated the procedure and then used the alcohol dipped pads to clean off the burn layer of the stain revealing how the grain received the stain – it’s never the same!  I take a picture to do a quick compare of stummel and stem.  After comparing I’m thinking that I like the dark hue but it needs some reds so I decide to add a layer of Cheren stain – red which I will mix with alcohol as it is a water based stain.  In my mind I’m thinking of the ‘Ox Blood’ depth that Steve uses – which is not found in Bulgaria!  I think the addition of the red stain does the trick (last picture) though it’s difficult to see the difference comparing the last two pictures.Dal38 Dal39 Dal40 Dal41 Dal42Next, I apply several layers of carnauba wax to the stummel and stem with Dremel and cotton wheels.  I’m careful to keep the Dremel wheel moving in rotation over the wood and use the lowest speed so not to overheat the wood. The buffing brings out the grain and the luster of the Cumberland stem.  I continue the buffing with a clean cotton wheel over the entire stummel and stem surface.  I finished with a thorough vigorous buffing with microfiber cloth to bring out the grain depth while watching Germany and Italy’s World Cup match.  The recommissioning of this Butz-Choquin Rocamar was more of a project than I was expecting.  I prefer the finish now before me to the shiny finish I started with.  I like the new color scheme for the bowl and Cumberland stem – I believe it works well.  The reds in the Cumberland stem match the grain amazingly well and the grain swirl in the rim has the appearance of continuing in the stem – a neat effect.  I’m very pleased with the color blends.  Another project done with new things learned to draw upon for the next candidate brought back to life!  Thanks for joining me!Dal43 Dal44 Dal45 Dal46 Dal47 Dal48 Dal49 Dal50

Unzipped an old Pouch and found a Butz Choquin Oval Shank Capitan 1635


Blog by Steve Laug

My brother sent me another box of pipes that he had picked up on eBay and in different shops. Included in this lot was a suede leather pipe pouch. It was dried out and worn with a zipper on the top and a zipper on the bottom. I unzipped the top area and found that it was canvas lined and had an old 3 way pipe tool inside. I unzipped the bottom and found a small compact Dublin pipe. It was a mess and looked well smoked and poorly cared for. The finish was worn and dirty but had an interesting sandblast poking through. The rim was caked with lava and it was hard to see any of the blast on the surface. The bowl had a very thick, hard cake inside that would need to go. The pipe was stamped Butz Choquin over Capitan on the underside of the shank. At the stem shank union it had the shape number 1635. The mouthpiece did not sit against the shank. There was a gap on both sides with the stem touching in the middle. When held up the light this gap was angled and large. It was also wider on the underside of the stem than the topside. The stem was oxidized and dirty. The slot in the button was closed to the size of a small thumb tack.Butz1 Butz2 Butz3I took some pictures of the pipe before I started working on it (I remembered to do that once again!). You can see the issues that I pointed out above as you look at the photos.Butz4 Butz5 Butz6 Butz7I took some close up photos of the rim/bowl and the stem to try to capture how dirty this pipe was when I removed it from the pouch. In the photo of the stem you can see the gap I mentioned at the stem shank union.Butz8 Butz9I decided to try a variety of methods to try to tighten up the fit of the stem. I started by carefully facing the shank on a topping board. I have had success in the past with this and was hoping that it would solve the issue.Butz10I also used a sharp knife to bevel the end of the mortise thinking that it would better accommodate the rise around the tenon.Butz11But none of these measures solved the issue of the fit against the shank. The fit was better but the gap remained. I would need to come up with another solution.Butz12 Butz13I laid that issue aside and reamed the bowl with a PipNet reamer.Butz14 Butz15After reaming I used a brass brush to clean off the buildup on the rim. I was able to get rid of the thick tars and reveal the sandblast that was underneath.Butz16I scrubbed the finish on the bowl with acetone and cotton pads to remove the grime and grit in the crevices of the blast.Butz17 Butz18 Butz19 Butz20The more I looked at the pipe the more I wondered if someone had not cut off the end of the shank to shorten it or to remove damaged areas. The number stamping was really close to the stem even before I faced it. I worked on the stem to clean it up. I used a dental pick to open the slot on the end and then used pipe cleaners and alcohol to clean out the tars and oils.Butz21I cleaned out the shank at the same time with pipe cleaners, cotton swabs and alcohol. While I was at it I thought a band might look good on the pipe and give me a clean edge to fit the stem against. I went through my box of bands and found a round one that was the correct diameter. I squashed it to the shape of the shank and heated it with a lighter. I pressed it onto the shank. It covered the shape number but did not affect the rest of the stamping.Butz22I liked the classic look of the nickel band on the shank of the Dublin and figured that once I had polished it and the stem I would have a good looking pipe.Butz23 Butz24I sanded the stem with 220 grit sandpaper to clean up the bite marks, the tooth chatter and the build up around the button. It also loosened the oxidation. I wet sanded it with 1500-2400 grit micromesh sanding pads and gave it a rub down with Obsidian Oil. I dry sanded it with 3200-4000 grit micromesh pads and then gave it another coat of oil. I finished sanding it with 6000-12000 grit pads and gave it a final coat of oil. I let the oil dry.Butz25 Butz26 Butz27I buffed the pipe with Blue Diamond on the buffing wheel to raise the shine on the stem and the band. I lightly buffed the bowl so as not to damage the sandblast. I gave the bowl a light coat of carnauba wax and the stem several coats of wax. I buffed it with a clean buffing pad and then by hand with a microfibre cloth to deepen the shine. The finished pipe is shown in the photos below. I think the band gave this particular pipe a touch of class. The pipe is a beautiful example of this shape. Thanks for looking.Butz28 Butz29 Butz30 Butz31 Butz32 Butz33 Butz34

A Straight Forward Rejuvenation on a Butz Choquin Calabash Churchwarden


Blog by Steve Laug

This pipe came to me from a friend who wanted me to sell it for him and give a donation to the SA Foundation’s work in Kathmandu, Nepal. Having just come home from there I thought it was time to work on this one. I have a buyer for it already so it is just a matter of cleaning it up and then sending it off. It is a Butz-Choquin Calabash Churchwarden and it is in pretty decent shape. It is stamped Butz-Choquin over Calabash on the left side of the shank and St Claude arched over France on the right side. The finish was quite nice and just had some build up and oils on the surface. The bowl had a thin cake that was running over the rim. The finish while dirty was in decent shape. The stem was stamped with the BC logo and was lightly oxidized. It would not take a lot of time or energy to clean up and get it ready for its new owner.BC1

BC2

BC3

BC4

BC5

BC6 I scrubbed down the rim with saliva and cotton pads until it all came off and left the surface fresh. I gave the bowl a coat of carnauba wax and buffed it lightly by hand.BC7 I reamed the bowl with a PipNet reamer and took the cake back to a very thin coat (almost nothing) as it will give the new owner the opportunity to build his own cake.BC8

BC9 I cleaned out the bowl and shank with pipe cleaners, cotton swabs and alcohol to remove carbon from the wall of the bowl and the tars and oils that were trapped in the shank and airway. I also cleaned out the airway in the stem at the same time.BC10 I sanded the stem down with a medium and a fine grit sanding sponge and then wet sanded it with 1500-2400 grit micromesh sanding pads. I rubbed it down with Obsidian Oil before progressing to dry sanding with 3200-4000 grit pads. I gave it another coat of oil and then finished with 6000-12,000 grit micromesh pads. I gave it a final coat of Obsidian Oil and let it dry.BC11

BC12

BC13 Once it was absorbed into the vulcanite I buffed it with White Diamond and then Blue Diamond to polish it and remove any remaining oxidation. I gave it several coats of carnauba wax and then buffed with a clean flannel buff. I finished by hand buffing the pipe with a microfibre cloth to raise the shine. The finished pipe is shown in the photos below. Tomorrow it will be mailed out to the new owner. I think he will enjoy this long stemmed pipe. It is truly a beauty.BC14

BC15

BC16

BC17

The French Girl with the Fuzzy Identity


Guest Blog by Robert M. Boughton
Member, North American Society of Pipe Collectors
http://www.naspc.org
http://www.roadrunnerpipes.com
http://about.me/boughtonrobert
Photos © the Author

“The problem with putting two and two together is that sometimes you get four, and sometimes you get twenty-two.”
― Dashiell Hammett (1894-1961), U.S. author who re-invented and popularized the hard-boiled private investigator genre, in “The Thin Man” (1934)

INTRODUCTION
I take great solace from life’s frequent misadventures through activities that nevertheless focus on the same causes of grief: reading a good book, realistic or fantastic; writing news articles, blogs, letters to the editor and my own versions of literature; photographing street life, landscapes, nature and the occasional spot news event; drafting, filing and arguing civil actions in courts of law when I too frequently encounter those who would do me harm through ignorance or the misperception that I lack understanding of that study of knowledge, and researching and at times investigating anything and everything. But when I need to retreat all the way into the pleasure centers of my brain, I have only my local tobacconist and pipe acquisition disorder on which to fall back, and on the great majority of my P.A.D. attacks for almost a year now I can at least blame my small but expanding online business of refurbishing or restoring estate pipes for sale. Yet even that endeavor involves research and background checks.

Other than the classic but elegant shape and crafting of the Butz-Choquin bent billiard I scored a few months ago in an estate lot with several lesser gems – including a unique red Kaywoodie lumberman that was, for the most part, sandblasted, but with two natural rings around the billiard bowl and matching sitter bottom and ferrule – the obvious challenge of restoring the shapely French pipe to her original fine condition was a definite attraction. Except for the BC logo clear on the left side of the stem and the overall haggard appearance, I had no idea what I was getting. When the lot arrived, I searched for the BC, but when I found her the nomenclature was so fuzzy I could make out little more of the brand stamp on the left shank than the distinctive cursive B. Of the name itself, I saw two lines, the top beginning with a definite F and the bottom a clear word: MAJOR.

This may sound like plenty to go by, but my browser search suggested multiple possibilities for Butz-Choquin matches starting with F. There was the Formula, Formula Noir, Fait Main and filter, all of which I ruled out. And so I added an L and found Flamme, Flamme Extra, Flamme Standard, Flash and Fleuron. Then I tried Flamme Major and, seeing no suggestions, just Major. That excavated a site with images for BC Major Pipes, among which I saw a similar although straight stem specimen.Butz1 Therefore I returned to the full Butz-Choquin Flamme Major search and completed it, confirming that indeed was what I had.

THE RESTORATION
Butz2

Butz3

Butz4

Butz5

Butz6

Butz7

Butz8 I recently started making several basic changes in my pattern of restoration S.O.P. First, I now begin with an OxiClean stem wash as it can go on in the background, so to speak, while I do other tasks. I’ve also found it really works, although not with the comprehensive results sworn to in the site I found for its basic instructions, including the consistent lack of need for additional work such as sanding and on occasion using Black Super Glue for deep fills. Sometimes after washing with OxiClean and warm water, rubbing out the excess discoloration with a cloth and micro-meshing, the result is a perfect stem ready for the wheel. More often than not, however, I need to sand out scratches that are exposed. Such was the case with this stem. But the practice serves its purpose, to clean the stem inside and out and make the job of producing a shinier end product far easier.

Before
Butz9

Butz10
Ready for buffing:Butz11

Butz12 The second new habit is working on the rim and chamber and scraping out the major buildup of old tobacco and its related substances from the shank with a wire cleaner rinsed over and over in Everclear. All of these can be completed during the OxiClean wash. Third, I now retort every pipe at this stage.

All of these stages of the process completed, I turned to the bowl and shank, which showed the wear and tear of age. Tell me about it! After washing the briar with purified water, I used a piece of super fine steel wool to lighten the all-too-often over-dark original finish, shine the wood and make the grain show with more clarity. The wood was in very good condition with no pits, dings or scratches worth mentioning, and the slight appearance of discoloring in areas disappeared. I did a full micromesh workup with 1500, 1800, 2400, 3200, 3600 and 4000.

By the end of the restoration, the nomenclature somehow was much clearer.Butz13

Butz14

Butz15

Butz16

Butz17The time was right for the final buffing, and so I repaired from the comfort of the living room for the prep work to the workroom for finishing. The stem, as usual, I gave a nice shine with red Tripoli and White Diamond. The briar I buffed with white Tripoli, White Diamond, and a few coats of carnauba.Butz18

Butz19

Butz20

Butz21

Butz22

Butz23

Butz24

Butz25CONCLUSION
I think the most notable achievement of this restoration is that for the first time I was able to sand the chamber until it was baby smooth and like-new. I accomplished this by reaming and then sanding with 150-grit paper as usual but followed those steps with a second sanding using 320-grit paper.

All in all, I am happy with the outcome and will, of course, be sorry to let this one get away from me.