Blog by Steve Laug
I decided I needed a change of pace in my restoration/clean up work. I went through my pipes waiting in the queue and chose pone from a group of four pipes that were given to us by a woman in Columbus, Ohio, USA. It had belonged to her Grandfather who lived from 1882 to 1977. There were four pipes that she sent us from his estate – the metal bowled apple, a cased meerschaum with a broken shank and an amber stem, a Whitehall rusticated apple and a BBB Glokar Fraternity Pipe. If you have followed rebornpipes for a while now you know that I really have a passion for BBB pipes. I have one BBB GLOKAR already that is a pleasure so when I saw this one I knew it would be one I would like to work on. Also, the fact that it is a taper stem Rhodesian also adds to its charm for me. I could see that it was an old timer but I would have to decode the silver hallmarks on the stem to pin down a date. It was well smoked, reamed with a knife. The stamp on the left side of the shank had BBB in a Diamond and on the underside of the shank it read ENGLAND next to the silver band. The oxidized and tarnished silver band was stamped with a BBB Diamond [over] L-B. That was followed by the word GLOKAR [over] Trademark. Underneath that were three silver hallmarks. The first mark was a cartouche with an anchor in it that was the mark for Birmingham, England. The second mark was a cartouche with a rampant lion – the symbol for Sterling Silver. The final mark was a cartouche with a lower case “m” in it that would give me the date for the pipe. The pipe was dirty and well used. The finish had deep grime ground into the smooth briar around the bowl. The bowl had tobacco debris in it and a very thick cake overflowing as lava onto the rim top. The rim top and edges were hard to assess because of the lava coat and the cake flowing out of the bowl onto the rim top. It was also hard to assess the outer edge of the rim. There were two Greek letters in Silver inlaid into the front of the bowl – a Sigma and a Delta which are attached to a Fraternity. The stem was hard rubber had a slight bend to it and fit the shank well. It had oxidation, calcification and light tooth marks and chatter on both sides ahead of the button. The button was the patented GLOKAR slot and airway through the stem. Jeff took photos of the pipe before he started his cleanup work.
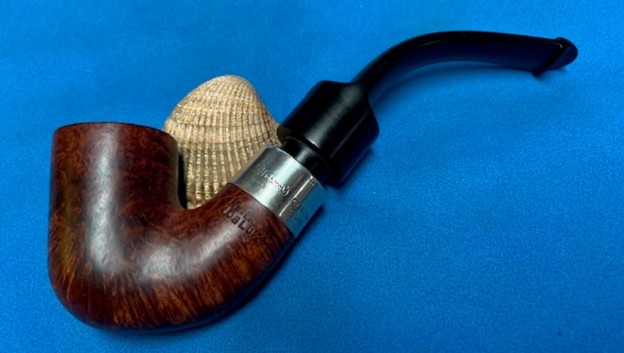
  Jeff took photos of the rim top and bowl to show the condition. You can see the thick cake in the bowl and the lava coat on the top of the rim. The condition of the inner edge of the bowl is a hard to assess but the outer edge appears to have some damage on the front outer edge. It was obviously another of her grandfather’s favourite pipes. The hard rubber taper stem was oxidized, calcified and had tooth marks and chatter on both sides ahead of the button. It was nice but will take some work.

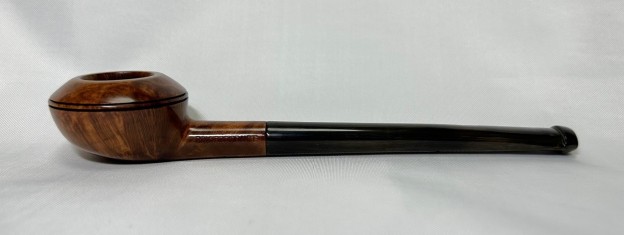
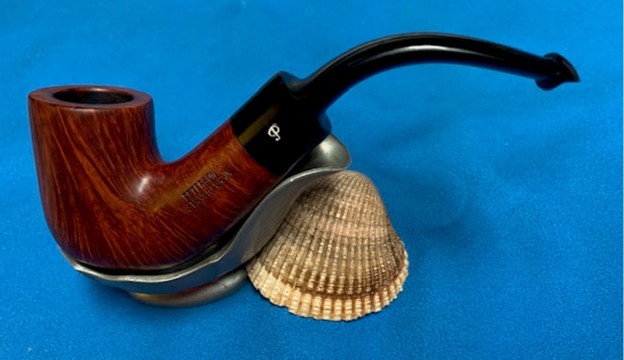
 Jeff took photos of the sides and heel of the bowl to show the grain and the bowl and shank and shape of the pipe. The twin rings around the bowl cap are in good condition and are very clean and undamaged. The shape of the bowl makes it quite nice looking.
 Jeff captured the inlaid Greek letters Sigma Delta on the front of the bowl. There were tarnished but looked very good.
  He took a photo of the stamping on the smooth panel on the left side of the shank. You can see that it is readable as noted above. The name of the brand is stamped on the top of the silver band. It reads as noted above. The stamp on the underside of the shank is ENGLAND and it is readable.
 Since the hallmarks were so clear, I turned to one of the numerous silver hallmark charts on line for the city of Birmingham, England to see what I could find out about the “m” date stamp and pin down and age for the pipe (https://www.silvermakersmarks.co.uk/Dates/Birmingham.html). I clicked on the section that applied to the date stamp on this pipe. The first chart below is the chart from 1773-2024.
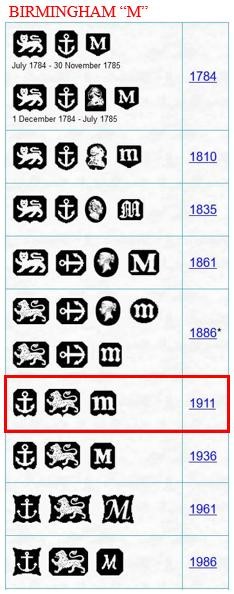 I am also including screen capture of the enlarged section on the Birmingham dates for the letter M. This chart covers pipes made in 1778-1986. I have drawn a read box around the hallmark pattern that matches the one on the BBB Silver ferrule. You can see that it dates the pipe to 1911. That means that this little pipe is roughly 112 years old.
With the information from the hallmark site I had a clear date for the manufacture of the pipe. It was definitely an old timer and really was another stellar acquisition.
I wanted know more about the GLOKAR stamp and what it signified. I had an inkling that I was dealing with a BBB system pipe not unlike the Peterson’s System pipes but I wanted to see what I could find out about that. I have a facsimile of a 1912 BBB Catalogue No. 20 that has a section dedicated to the Glokar. On page 107-110 there is information about the pipe and the various versions available. Interestingly it does not include a picture/drawing of my Poker. I quote the description of the Trademarked Glokar below.
The “Glokar” Mouthpiece does away with the great drawback of all ordinary pipes, viz., the unpleasant and possibly injurious, effect of the smoke upon the tongue, as the end of the stem has a smooth, concave surface, which while forming a pleasant rest for the tongue, acts as a barrier between it and the smoke. Instead of pressing through an ordinary round bore, the smoke leaves the mouthpiece through a fan-shaped slot, which is drilled in and upward direction – thus preventing saliva from entering the bore of the pipe.
Advantages:
- The bore, being kept dry, requires less cleaning than that of an ordinary pipe.
- As no saliva can reach the bowl, the tobacco can be consumed to the last particle.
- The shape of the mouthpiece affords the perfection of comfort for the mouth, tongue ad lips.
I took a photo of the picture that was included in the catalogue for the “GLOKAR” and have included it below. The cutaway diagram shows the system in the bowl and shank as well a the patented lip design. It is remarkably like a Peterson’s system pipe. One of the differences is the shape of the exit of the air way in the button. This one is a slot rather than a round hole.
Now it was time to work on the pipe. Jeff carefully cleaned the pipe from top to stern. He reamed it with a PipNet pipe reamer and then cleaned up the reaming with a Savinelli Fitsall Pipe Knife. He scrubbed out the internals of the shank, stem and shank extension with alcohol, pipe cleaners and cotton swabs until the pipe was clean. He scrubbed the exterior of the bowl with Murphy’s Oil Soap and a tooth brush to remove the grime and grit on the briar and stem. The finish looks much better and has a deep richness in the colour that highlights grain of the briar. The rim top looked good with some darkening and damage on the top and inner and outer edge of the bowl. Jeff worked it over with Soft Scrub All Purpose Cleaner to remove any remnants of oxidation. He then soaked the stem in bath of Briarville Pipe Stem Deoxidizer to remove the oxidation on the rubber. When the pipe arrived here in Vancouver I was amazed it looked so good. Here are some photos of what I saw.
Now time for a confession… when Jeff was cleaning it a pipe cleaner broke off in the stem just inside the Glokar style slot. He had tried many ways to remove it but could not. It was up to me to remove the blockage. Last evening, I got in a hurry to work on it so I used a heat gun to straighten the stem so I could work the offending piece of wire out. It dawned on my once I finished straightening it that I had forgotten to take any photos of the pipe when it arrived. Once finished, I took the following photos… sorry for my haste!
 I took photos of the bowl and the rim top to show the condition. It is clean and the damage is very clear. The bowl is very clean and there were nicks, burn damage and cuts all around the inner edge and top. The bowl was out of round due to the damage. The vulcanite stem is clean and the damage on the Glokar slot is very visible. The rest stem surface ahead of the button is clean and undamaged.
 I took a photo of the top of the shank and the silver band to capture the stamping on the silver. I took a photo of the BBB diamond on the left side of the shank. It is faint but it is still readable. I took a photo of the bowl and shank separated to show the condition of the pipe. It really is a great looking pipe.
 I started my work on the rim top by addressing the issues with the rim top and edge. I started by smoothing out the damage on the edge and smoothed out the top of the rim with a folded piece of 220 grit sandpaper. I lightly topped the bowl on a topping board with 220 grit sandpaper to flatten on the damage on the rim top. It looked much better! Once I started polishing it with the micromesh sanding pads you can see the rim top.
 I polished the briar with micromesh sanding pads – 1500-12000 grit pads. I dry sanded the briar and then progressively brought a shine to the pipe. It looked really amazing – the combination of rustic and smooth portions of the briar. It is a beauty!
 I set aside the sanding pads to stain the rim top to match the rest of the bowl and shank on the pipe. I looked pretty good but I think with the rest of the micromesh sanding pads it would look very good. I went back to the sanding pads.


 I rubbed the bowl down with Before & After Restoration Balm. I worked it into the finish with my fingertips and into the twin rings with a shoe brush. The product works to clean, preserve and protect the briar. I let it sit and absorb for 10 minutes. I buffed it off with a soft cloth and then gave it a rigorous buff to raise the shine. It looks good at this point.

 I polished the silver band and silver inlaid letters on the front of the bowl with a jeweler’s cloth to remove any residual tarnish and also to protect it from future tarnish (at least for a while). With that done the bowl was finished other than the final buffing.

 I set the bowl aside and turned my attention to unplugging the broken pipe cleaner in the stem. I started by heating the stem with a heat gun and straightening it out. I took a photo of it once I had it straightened.
 I carefully straightened a paper clip and used it to probe the plugged area. It took time and patience to carefully work around the clog. I continued to pull out bits of pipe cleaners as I worked on it. I used two different paper clips that I worked with. I used a fine round file to push the clog out. I worked on it from both end of the stem. Finally, I blew through the stem and the clog of pipe cleaner piece flew out. In the photo below, it is the brown piece at the bottom of the photo.
  There was a chip out of the top side of the button. It had chipped away when Jeff was working on removing the broken piece. It was not big but it needed to be repaired. I greased a pipe cleaner with Vaseline and inserted it in the airway below the chipped area. I filled in the chipped area with black KMS CA rubberized glue. I removed the pipe cleaner and set it aside to let the glue cure. Once the repair cured I flattened out the repair with a flat file to smooth out the excess and flatten the surface of the button. I sanded the stem surface and shaped the repair to blend the repairs into the surrounding rubber. It looked quite good at this point in the process.

 With the repairs and reshaping of the button finished it was time to rebend the stem. I heated it with a heat gun to soften the rubber and once it softened bent it back to what was there previously.
 I bent the heated stem once it was flexible to match the previous bend it had before I straightened it. I put it back on the pipe and took the following photos.
 I polished out the chatter and marks on the stem surface with micromesh sanding pads – dry sanding with 1500-12000 grit sanding pads. I wiped it down with Obsidian Oil on a cloth after the sanding pads.
 I finished the hand polishing of the stem with Before & After Pipe Polish – both the Fine and Extra Fine polishes. I gave it a final coat of Obsidian oil and set it aside to dry.
  With the bowl and the stem finished I put the pipe back together and buffed it on the wheel using Blue Diamond to give it a shine. I gave the bowl and stem multiple coats of carnauba wax on the wheel and then buffed it with a clean buffing pad to raise the shine. I hand buffed it with a microfiber cloth to deepen the shine. It really is an amazing little pipe. The dimensions of this part of the pipe are – Length: 5 inches, Height: 1 ½ inches, Outside diameter of the bowl: 1 ¾ inches, Chamber diameter: ¾ of an inch. The weight of this pipe is 2.15 ounces /62 grams. This unique find – a 1911 BBB Glokar Rhodesian System pipe with a silver band is joining the other pipes in my collection of BBB pipes and will hold a place of honour while it is in my trust. This is another pipe that one day soon I will enjoy a special bowl of tobacco in it and be transported to a slower paced time in history where I can enjoy a respite. Thanks for walking through the restoration with me.
As always, I encourage your questions and comments as you read the blog. Thanks to each of you who are reading this blog. Remember we are not pipe owners; we are pipe men and women who hold our pipes in trust until they pass on into the trust of those who follow us.