Blog by Steve Laug
This story starts like many of my blogs when I am travelling. On my last visit to Budapest I was able to visit Gallwitz shop and visit with Viktor Zollner. I enjoyed looking through the estate pipes that he had there – both those he had finished restoring and those yet to be restored. I purchased the interesting Japanese Tatu pipe which I restored and wrote about on the blog (https://rebornpipes.com/2023/11/06/restoring-a-budapest-purchase-a-tatu-pipe-1126-freehand/). Here is the regret that the title hints at. When I returned to Canada I was haunted with the regret that I had walked away from a beautiful and unique LASSE SKOVGAARD Tadpole sandblast pipe shown to the below. I loved the unique look of the pipe and was intrigued by it. I turned it over in my hands looking at the blast, the carving, the construction and the well-made stem in the shank end. I looked it over many times before I set it aside and chose the Tatu. I regretfully set it aside and left the shop and Budapest. Inside I was hoping that perhaps I could sell a few of my own pipes to fund the purchase of the Skovgaard but that was a gamble. I took a few “horrible photos” of the pipe so that I could remember it! I really had no idea if it would be available when I had the funds ready to buy it. Here was hoping and regretting!
 I remember meeting Lasse Skovgaard in Chicago in 2004 when he was introduced to the pipe world and missed the opportunity then and again when he was there in 2005. I had wanted to add one of his pipes to my collection at that time but he sold out and I went home empty handed. Since them I have looked for one of his pipes that called my name on eBay and other sales sites to add to my collection. I have looked at online sellers as well and have not found the pipe that spoke to me. I don’t know how to explain it other than this description. Then in Gallwitz shop in Budapest I saw this one and it spoke to me. It was one I wanted to add to my rack.
Sadly, I walked away and left it there while I tried to sell a few pipes to finance this purchase. A month went by after my return from Budapest, finally I had sold enough pipes to help with the purchase of this one. I figured it would be a great present for my early December Birthday. In the middle of November, I was ready to see if the pipe was still available and to put it on order. I sent Viktor an email about the pipe and sent him the above photos so he would know which  pipe I was speaking of… I think the funniest part of the transaction for me was the fact that in the month since I had returned home my old brain had totally dropped Lasse’s name but I knew it was one that I was looking for. I am sure Viktor must have laughed when he received my email about the above pipe without a name attached and asked him to remind me of the maker’s name.
It is one of those moments when it is almost embarrassing to admit that you have forgotten the name of a maker that you have been saving for! But I did forget and Viktor was kind of enough to not only send me the information I had asked for as well as four far better photos of the pipe than the ones that included in my email to him. I have included is photos along side of these paragraphs.
Viktor replied that the pipe was stamped Lasse Skovgaard on the underside of the shank and had a small symbol stamped on it as well. I believe that the shank is boxwood but I am not certain. The photos capture what I saw when I had held the pipe in my hands when in his shop in Budapest.
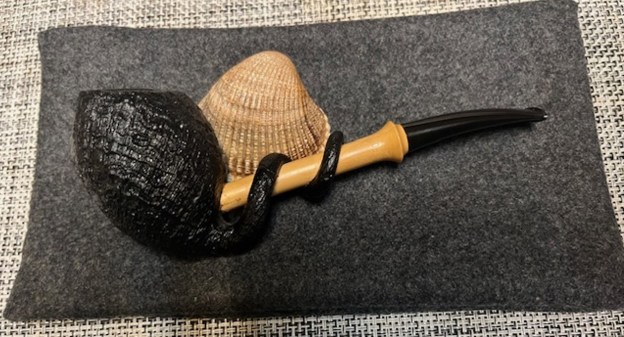
The sandblast briar bowl and the curved tail wrapped around the shank make a unique and memorable pipe even for my old brain and “shaky memory”. (Keep in mind I did not forget the pipe just the name of the maker!)
It was very tactile and I think that as it heats up during a smoke it would be warm and even more so.
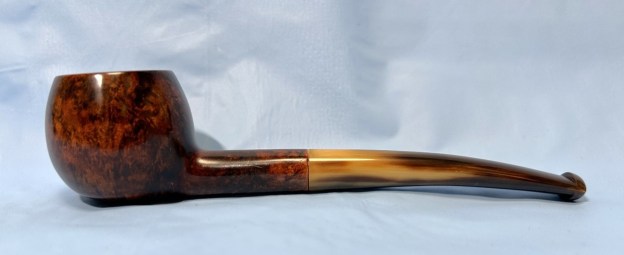
The blast on the bowl and around the tadpole twisting tail is stained dark and the contrast with the smooth wooden shank and black stem is quite stunning. The smooth shank has the look of a piece of bamboo in terms of colour but not in terms the finish on the wood. It does not have the knuckles or the striations that I expect in a piece of bamboo but the colour is very similar. The fit of the shank to the bowl is quite unique. When Dunhill fit bamboo to a briar bowl there is generally a bit of briar shank to attach it too. Other pipemakers use a piece of stainless steel or Delrin to attach the shank and bowl together. My guess is that this one is attached with either of those.
I really like the way that the briar tail curves around the boxwood shank. The sandblast on the briar continues down the bowl sides and all around the tail. The grain that shows through the blast is quite nice and mix of different patterns. The contrast between the sandblast and the smooth wooden shank is quite nice.
 It appears to me that the stem is Ebionite or high-quality vulcanite. There was no oxidation on the stem which speaks to either it having been recently buffed and cleaned or to the quality of the material. There were light tooth marks and chatter on the stem surface on both sides ahead of the button. The slot in the stem is well done with rounded ends on each side. It should easily pass a pipe cleaner.
I wrote back to Viktor and asked him tell me the details of the stamping on the underside of the smooth shank. He said that there was a hard to read symbol above the stamp that read LASSE [arched over] SKOVGAARD. He also included a photo of the stamping to show me. The issue for me was that the stamp curved around the underside of the shank. You can see portions of the stamping in the photo to the left. You can also see remnants of the small symbol above the stamp. My guess is the symbol will give me the information I will need to grade the pipe when it arrives.
I wanted to refresh my memory about the background of the pipemaker himself. I turned to the two sites that I always turn to for background information offered by Pipephil and Pipedia as generally one of them gives me a short synopsis of the brand and the other gives me detail and history of the brand.
I turned first to Pipephil’s site (http://www.pipephil.eu/logos/en/logo-s9.html) and found the information in the screen capture and the sidebar info as well below. Artisan: Lasse Skovgaard Jørgensen (born 1983) is the son of Bennie Jørgensen. Production (2006): ~ 400 pipes/year. Grading (ascending): 1, 2, 3 and lion.
I think that I just figured out the symbol stamped on the pipe I have coming in. It is a lion stamp symbolizing the highest grade of Lasse’s pipes.
From there I turned to Pipedia to gather more information (https://pipedia.org/wiki/Skovgaard). I was happy to learn that the article there was written by Lasse himself and included an email address that I could send him some questions about this pipe. Here is what I found including a photo of the carver.
 By Lasse Skovgaard My name is Lasse Skovgaard Jørgensen, I am 22 years old (2006). I live in Denmark on the southern part of Zealand, where I enjoy my life as a Danish pipe maker.
Since I was a little boy, I’ve been interested in what my father (Benni Jørgensen) was doing in his workshop. At the age of sixteen I started to make buffalo horn tampers for W.O. Larsen, and I also tried to make a couple of “pipes”, (my father did not think they looked like pipes) but they were not good enough.
After making like a hundred pipes, they started to look better and better and of course with just a little help from my father. I realized that it definitely was not easy to even make a pipe functional, and it also has to look beautiful and elegant. With lots and lots of practice it got easier, and when I was about eighteen I started to make “two tone” and “select” pipes for W.Ø. Larsen.
Along with my education in high school, I was practicing making pipes in my father’s workshop. I was nineteen years old when I started to make the W.O. Larsen straight grains.
Teddy Knudsen is a friend of my father; I spoke to him about the big pipe show in Chicago. Teddy told me to try and come to the show in Chicago and bring pipes stamped with my own name.
I went to the 2004 Chicagoland International Pipe & Tobacciana Show with a batch of 12 smooth pipes.
I could not have wished for a better welcome; everyone treated me very friendly and it was a lot of fun to meet many of the other pipe makers in the world. I sold out all 12 pipes at the show.
The next year in Chicago 2005 I brought 75 pipes and a lot of them were sandblasted pipes. My sandblasted pipes seemed to be extremely popular and I sold out all my pipes again.
After attending the show in Chicago, I am now selling my pipes in many countries around the world.
The pipe arrived in Vancouver yesterday. It was a quick delivery by DHL from Budapest to Vancouver. The familiar yellow and red plastic package held a box inside. It came with no damage or tears in the package. I took it to the worktable and cut the yellow envelope open and removed the box inside. It was a good-sized box marked Passatore on the top. Passatore is the maker of fine accessories for cigar and pipe smokers. That was an appropriate box for what was inside. I opened the box and inside was a leather pipe pouch stamped with the Gallwitz logo over 1880 (the year that the shop opened). It was a nice-looking suede pipe sock with a draw string. To me it was another layer of fine packaging. It also was another layer that kept me from seeing the pipe that was on the inside! Sweet impatience!
 I removed the leather pipe sock from the box and then slid the second pipe sock that was on the inside of the first pouch. It was printed and read Lasse Skovgarrd Handmade Made in Denmark (three lines). It was a black felt draw string pouch with scalloped edges.
 I loosened the draw strings on the pouch and removed pipe from inside. I really is everything that I remembered. Amazing sandblast on the bowl, the tail of the tadpole wrapped around the Boxwood shank and the vulcanite stem look very good together. it was one of those moments when you know you made the right decision.
 Now it was time to examine the pipe itself more thoroughly. It was obvious that the pipe had not been cleaned at all other than a cursory polishing. That is what I actually like as I have my own methods and standards for the clean up of a pipe. Knowing that I examined the bowl and found that I was correct in that it had not been reamed or cleaned. The shank and airway in the stem were both dirty. The joint of the bowl to the boxwood shank is a glued joint but I think there is a tube inside joining the two parts together. It appears to have been repaired or at least the glue repaired around the joint. It was a little sloppy in that there were glue spots on the boxwood shank. They were under the first twist of the tadpole tail. The finish on the bowl looked very good and the blast was deep and rugged. The joint of the stem to the shank was well fit. The stem showed no oxidation though there were tooth marks on the top and underside just ahead of the button. There was no chatter on either side to speak of. I was pleased with what I saw and the clean up would be very straight forward. I took pictures of the pipe to show its condition. You can hopefully see why I am taken with it. It is different from every other pipe I have in my collection.
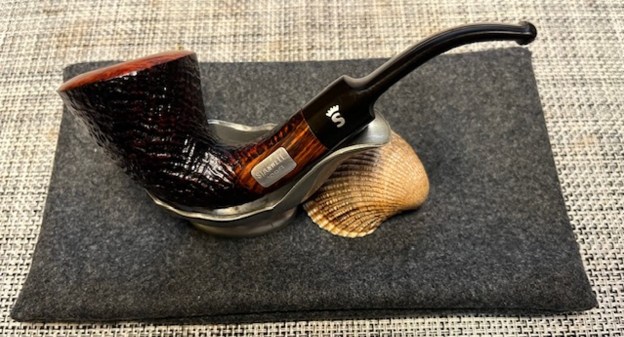
 I took a close up photo of the bowl and the rim top. You can see the cake in the bowl and it is a moderate cake. The rim top was in very good shape with no grime in the grooves of the sandblast surface. The inner and outer edges looked very good. The stem also looked quite good. There were tooth marks on the top and underside next to the button. They were not too deep but would need work to lift and then repair.
 I took a photo of the stamping. It is hard to capture the whole stamp as it is wrapped around the shank ahead of the stem shank joint. It does read as noted above. The figure stamped over Lasse is hard to see in total but I am pretty sure it is a lion which makes the pipe a Lion grade pipe. I took the stem off the shank and took a photo of the parts together to get a sense of the flow of the pipe.
 Now it was time to work on the pipe. I used a sanding stick with a pointed end to work on the glue around the shank/bowl joint. I also used it to sand the dark spots on the shank side under the first wrap of the tail.
 Now I turned to work on the inside of the bowl and shank. I reamed the pipe with a PipNet pipe reamer using the second reaming head. I took the cake back to bare briar. I cleaned up the reaming with a Savinelli Fitsall Pipe Knife and sanded the bowl walls smooth with 220 grit sandpaper wrapped around a piece of dowel. I checked the bowl walls and they were smooth and showed no heat damage or checking. I let out a sigh of relief as this is one of the invisible risks that you take when purchasing an estate pipe.
 I cleaned out the shank – mortise and airway and the airway in the stem. I used pipe cleaners, cotton swabs and isopropyl alcohol to clean out tars and oils in both. There was a lot of that in both.
 I rubbed the briar down with Before & After Restoration Balm. I worked it into the briar with my fingertips and a horsehair shoe brush. I carefully worked it into the twisted tail around the shank and the boxwood shank as well. I used qtips to get into the tight spots. The product works to clean, enliven and preserve the briar. I let it sit for fifteen minutes then buffed it with a cotton cloth to deepen the shine. The briar really comes alive with the balm.

 I set the bowl aside and turned my attention to the stem. I “painted” the surface of the stem with the flame of a lighter to try and lift the tooth marks. They did not come up much at all. I filled them in with black CA glue and set it aside to cure. I used a small file to flatten the repairs and blend them into the surface. I sanded out the repairs to blend them into the surface with a folded piece of 220 grit sandpaper. I started polishing the stem with 600 grit wet dry sandpaper.

 I polished the stem with micromesh sanding pads – dry sanding with 1500-12000 grit pads. I wiped the stem down after each sanding pad with Obsidian Oil.
 I polished it with Before & After Pipe Stem Polish – both Fine and Extra Fine. I gave it a coat of Obsidian Pipe Stem Oil. I set it aside to dry.
  I really like the both the craftsmanship and the artistry of this beautiful Lasse Skovgaard Hand Made Sandblast Lion Grade Tadpole. It is a real stunning example of the skill of the pipe maker. I carefully worked some Conservator’s Wax into the briar and the boxwood to polish and protect it. I did it by had so I would not potentially damage the twisted tail of the pipe. I buffed it with a shoe brush and a microfibre cloth to raise the shine. I buffed the stem with Blue Diamond on the wheel and gave it multiple coats of carnauba wax. I buffed the stem with a clean buffing pad to raise the shine. I put the pipe back together and hand buffed it again with microfibre cloth to deepen the shine. It is fun to see what the polished bowl looks like with the polished boxwood shank and the vulcanite stem. The rugged sandblast on the bowl, rim top and twisted tail of this Lasse Skovgaard Tadpole make it a beautiful pipe that feels great in my hand. It is light and well balanced. Have a look at it with the photos below. The dimensions are Length: 5 ¾ inches, Height: 2 ¼ inches, Outside diameter of the bowl: 1 ¼ inches, Chamber diameter: ¾ of an inch. The weight of the pipe is 1.45 ounces/41 grams. It is a beautiful pipe and one that I am looking forward to enjoying soon. I have some aged Seattle Pipe Club Deception Pass that should smoke well in this bowl. It will be a great afternoon smoke and one I will savour along with the memory of the trip and circuitous purchase of the pipe. Thanks for walking through the cleanup with me as I worked over this pipe.
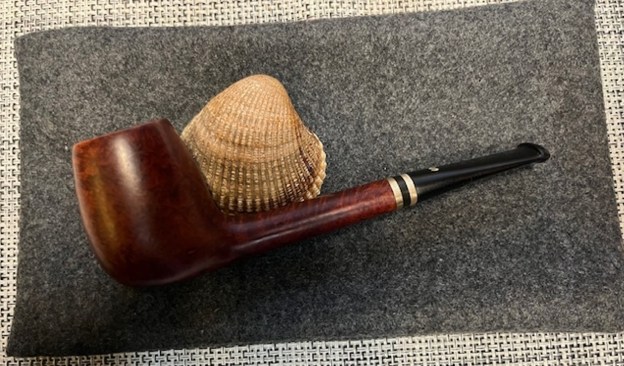
As always, I encourage your questions and comments as you read the blog. Thanks to each of you who are reading this blog. Remember we are not pipe owners; we are pipe men and women who hold our pipes in trust until they pass on into the trust of those who follow us. 


 The next photos of the rim and the shank show the condition of the pipe at its arrival in Idaho. You can see the cake in the bowl and the lava on the rim top and inner edge. The stem looked good with light marks on the top and underside at the button edge.
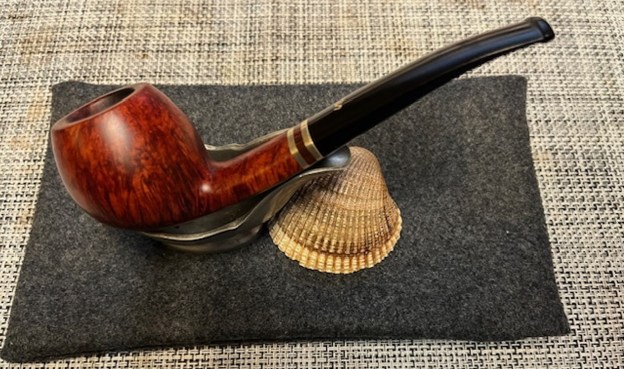
 Jeff took photos of the rich stain highlighting the grain on the sides and heel of the bowl. It really is a stunning piece of briar. The contrast stain really makes it stand out clearly.
 The next photos show the stamping on the underside of the shank. It is clear and readable as noted above.
 Before I started my work on the pipe I wanted to see if I could find any information that would help me get a sense of the line. I turned to Pipephil to see if there was any listing on the Brass Band Line (http://pipephil.eu/logos/en/logo-stanwell.html). There was nothing listed.
 I turned to Pipedia and looked at the Shape Numbers and Designers article to see if there were any specifics (https://pipedia.org/wiki/Stanwell_Shape_Numbers_and_Designers) that could help. This is what I found there. The shape number 113 is designated as a Canadian with conical bowl. Now it was time to work on the pipe.
 I took photos of the bowl and rim top as well as the stem to show how clean they were. You can see that rim top and edges look very good. There is some slight darkening on the rim top that should come off with polishing. The stem is clean and the tooth and chatter on both sides ahead of the button is very light. I think I have a Stanwell Canadian stem with a brass Crown S so I will be replacing this one.
  I took photos of the stamping on the shank. The stamping is readable as noted above.
 I took the stem off the shank and took a photo to give a sense of the flow and proportion of the pipe. It is a beautiful looking pipe with a bowl Stanwell describe as Conical but that I would describe as a Brandy!
 I started my work on the pipe by polishing the briar with 1500-12000 grit micromesh sanding pads. I wiped the bowl down after each sanding pad with a damp cloth.


 I rubbed the briar down with Before & After Restoration Balm. I worked it into the briar with my fingertips. The product works to clean, enliven and preserve the briar. I let it sit for 10 minutes while I worked on the stem. After the time passed I buffed it with a cotton cloth to deepen the shine. The briar really comes alive with the balm.

 I set the bowl aside and turned my attention to the stem. I went through my stems and fount the brass Crown S stem that would work for the Canadian. I worked over the tenon a little bit to clean off the grime. It fit well. The stem was dirty but had light tooth marks.
 I cleaned off the surface of the stem and button with a cotton pad and some Soft Scrub. It removed the grime and the calcification. I wiped it down with a damp cloth to remove the dust. I filled in the tooth marks on the button surface and the button edge with black CA glue. I set it aside to let the repairs cure.
 Once the repair cured I sanded the surface of the stem and the button with sanding pas. I used 350-3500 grit sanding pads to smooth out the surface and adjust the fit on the shank. The pads work very well and the stem looked much better.
 I cleaned out the airway in the stem I was working on with pipe cleaners and isopropyl alcohol. It was quite dirty but I expected that when I took it from my can of stems.
 I polished the stem with micromesh sanding pads – dry sanding with 1500-12000 grit pads. I wiped the stem down after each sanding pad with Obsidian Oil.
 I polished it with Before & After Pipe Stem Polish – both Fine and Extra Fine. I gave it a coat of Obsidian Pipe Stem Oil. It works to protect the stem from oxidizing. I set it aside to dry.
  I am excited to put the finishing touches on this Stanwell Brass Band 113 Made in Denmark Canadian. I am so glad I happened to have a Stanwell Crown S Brass stem that was a perfect fit and actually was the correct stem. I put the pipe back together and buffed it with Blue Diamond on the buffing wheel. I gave the bowl and the stem multiple coats of carnauba wax. I buffed the pipe with a clean buffing pad to raise the shine and hand buffed it with microfiber cloth to deepen the shine. It is fun to see what the polished bowl looks like with the silver plaquette and the polished vulcanite stem was beautiful. This Made in Denmark Stanwell Brass Band 113 is nice looking and the pipe feels great in my hand. It is light and well balanced. Have a look at it with the photos below. The dimensions are Length: 5 ½ inches, Height: 1 ¾ inches, Outside diameter of the bowl: 1 inch, Chamber diameter: ¾ of an inch. The weight of the pipe is 1.31 ounces/37 grams. It is a beautiful pipe and one that I will be putting in the Danish Pipemaker Section on the rebornpipes store. Thanks for walking through the cleanup with me as I worked over this pipe.