Blog by Steve Laug
The next pipe on the table is a beautiful sandblast finished Canadian with a silver band. We purchased it from an estate sale in Oregon City, Oregon, USA on 03/21/2024.The pipe is stamped on a smooth panel on the underside of the shank and reads Made [over] Italy followed by Becker & Musico in script [over] 5 years – 3. The smooth rim top is covered with a thick lava coat that is heavier on the left side of the top. There was grime ground into the sandblast around the bowl and shank. The pipe had been smoked heavily and was someone’s obvious favourite. There was a thick cake in the bowl with a thick lava overflow on the rim top. It was hard to know the condition of the inner edge but it appeared to have a bit of darkening and potential burn damage on the left side. The oxidized band on the shank is Sterling Silver and bears the Silver [over] 925 stamp on the underside. There is a // logo stamped on the top of the taper stem. The stem is oxidized and calcified. It had light tooth marks on both the top and underside of the stem ahead of the button. Jeff took photos of the pipe before he started his clean up work. I have included them below.
 Jeff took photos of the rim top, bowl and the surfaces of the stem to give a sense of the condition of the pipe. The walls of the bowl had a thick cake which overflowed over the rim edges and onto the rim top making a mess. The stem is oxidized, calcified and dirty. There are light tooth marks on both sides ahead of the button.
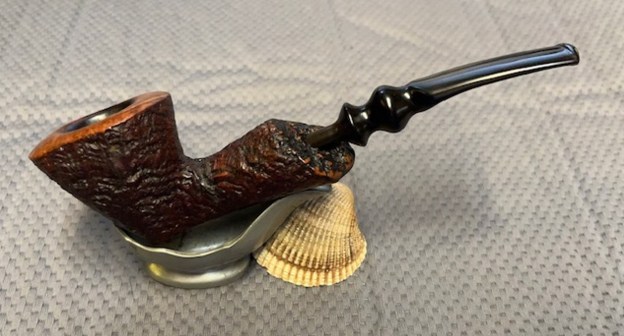
 He took photos of the sides and heel of the bowl to give a clear picture of the way the shape follows the grain. The sandblast is really beautiful even showing through the grime filling in the valleys and low spots. It reveals some interesting grain patterns under the blast. Superbly done.
 He took photos of the stamping on the smooth panel on the underside the shank. It is clear and readable and read as noted above. The silver band has clear stamping under the oxidation that reads as noted above. The // logo on the top of the stem is clear and readable.
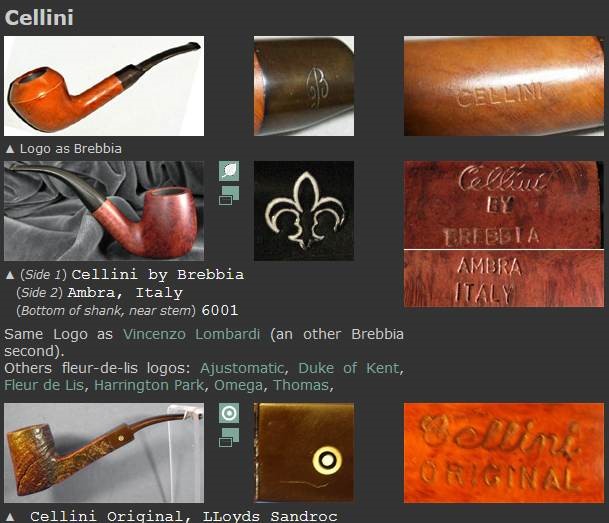
 Over my years of smoking a pipe I have looked for Becker-Musico pipes as there was always something about them that caught my attention. I have never had one to work on in my 30+ years of working on pipes. So in many ways this is a new and a fun pipe for me to work on. I have wanted to work on one and I have wanted to fire one up to smoke! But before I go further on this I decided to do a bit of research on the brand to confirm what I thought I remembered. I turned first to Pipephil’s site (http://www.pipephil.eu/logos/en/logo-b3.html). There was an entry there that I have captured and included below. I have also included the information below the screen capture that was in the sidebar of the entry. To me this is always a great starting point for developing a sense of background on a particular pipe that I am working on.
 This brand comes from the partnership of Fritz & Paolo Becker and Giorgio Musicò ending up in the Becker & Musicò shop in 1989. When Fritz Becker passed, his son Paolo Becker didn’t continue the collaboration. Massimo Musicò (son of Giorgio) established a new brand: Foundation
I liked the idea that it was a collaborative work between the two Becker (father and son) and Giorgio Musico of Rome. I wanted more information to feed my curiousity so I turned to Pipedia to see what I could find (https://pipedia.org/wiki/Becker_%26_Music%C3%B2). The information is more definitive and helpful. I quote from the article below:
Paolo Becker, son of famed pipemaker Fritz Becker and Massimo Musicò, son of Giorgio Musicò, former manager of the famous Carmignani pipe shop in Rome, joined together in a pipe shop in 1990, and in 1995 began to make pipes together. The pipes were turned by Paolo on the lathe and finished by hand, and Massimo fit the mouthpieces and crafted spigots and silver bands to go with the pipes. Most were sandblasted, and approximately 2,000 pipes a year were made. The blasted pipes were stamped with “Five Years” denoting pipes made in 1995, and an additional number was added for each year, so that 5 years – 3 for example would refer to 1998. Smooth pipes were stamped with the years since 1990, so that a “6 years” pipe would have been made in 1996. The pipes were imported to the United States by R.D. Field, until 2002 when Becker returned to full time pipemaking under his own name. From 2002 on Becker & Musicò pipes were only sold in their shop, if at all.
Sadly, Paolo Becker died in 2014. Massimo Musicò continued to make pipes after the partnership ended under the Foundation name.
I also found a thread on Pipesmagazine forums discussing the brand. A fellow asked about the history of the brand as he purchased two of the pipes. The answer given by “disinformatique” give us an interesting piece of information that came originally from SmokingPipes.com (https://pipesmagazine.com/forums/threads/two-new-pipes-i-acquired.56159/). I quote it below.
Here is some history on Musico pipes. Courtesy SmokingPipes.com
“If you know Becker pipes, well, chances seem slim you wouldn’t also know the name Musico. It was Giorgio Musico who, as an enthusiastic supporter of their work and as the manager of the Carmignani shop in Rome, bought up every pipe Fritz and Paolo Becker could bring him, from the time he first discovered the Beckers in 1979. Later would come both the Becker & Musico pipe shop (a hidden gem still found today on Via di San Vincenzo in Rome) and the Becker & Musico pipe. The latter was a result of collaboration between the son of Giorgio, Massimo Musico, and Paolo Becker, encouraged by Giorgio Musico’s love of classic shapes. These were made in the back workshop of the Becker & Musico shop itself, which Massimo and Paolo also ran together.
In 2002, however, Paolo turned his focus to the creation and development of Becker pipes full-time, while Massimo continued to both run the Becker & Musico shop and create Becker & Musico briars. Without Paolo, production was much more limited; a solution came, however, with Foundation, the name stamped on the Musico pipes you’ll find here. This again was created as a collaboration, but a broader one: Massimo, Giorgio, and a team of hand-picked Italian artisans (Gian Maria Gamboni was one you will surely recognize). That was the beginning of Foundation by Musico.”
Cheers, Chris :puffpipe:
Combining the information above I knew that the classic shaped Canadian by Becker-Musico was a collaboration of Paolo Becker and Massimo Musico. It was made in their shop in Rome. The stamp is 5 Years – 3 and tells us that the sandblast pipes which started in 1995 (5 Years) and added 3 years to that for a date of 1998.
Now it was my turn to work on the pipe. Jeff had done an amazing cleanup of the pipe. He reamed the light cake with a PipNet reamer and cleaned up that with a Savinelli Fitsall Pipe Knife. He scrubbed the internals of the bowl and stem with alcohol, cotton swabs and pipe cleaners. He scrubbed the externals with undiluted Murphy’s Oil Soap and rinsed the bowl off with running water. He soaked the stem in Briarville’s Pipe stem Deoxidizer and once it had soaked rinsed it off with warm water to remove the residual solution. He dried it off and rubbed it down to remove any oxidation that was still on the stem. The pipe looked very good when I received it.
 I took photos of the bowl and the rim top as well as both sides of the stem to show the condition of the pipe before I started my work. The rim top was very clean but there were scratches on the flat surface and the inner edge showed some nicks, roughness and burn damage. The Sterling Silver band looked much better without the oxidation and darkening. The stem showed light tooth marks on the top and underside of the stem near the button. There was a light mark on the top right of the button edge.
 I took a photo of the stamping on the shank. The photo of the stamping is clear and readable. I took a photo of the logo on the top of the short taper stem. I removed the stem from the shank and took a photo of the pipe parts.
 I started my work on the pipe by addressing the damage to the inner edge of the bowl. I used a folded piece of 220 sandpaper to smooth out the roughness of the rim edge. Once I was finished it looked much better.
 I polished the smooth rim top with micromesh sanding pads. I dry sanded it with 1500-12000 grit sanding pads and wiped the bowl down after each pad with a damp cloth. By the final pads the briar really had a shine.
 I rubbed the briar down with Before & After Restoration Balm. I worked it into the smooth rim top surface with my fingertips and into the sandblast with a shoebrush. The product works to clean, enliven and preserve the briar. I let it sit for 10 minutes then I buffed it with a cotton cloth to deepen the shine. The briar really comes alive with the balm.

 I polished the silver band with a jeweller’s cloth to clean up and prevent further oxidation in the future. The contrast between the silver and the dark sandblast is very nice.
 I set the bowl aside and turned my attention to the stem. I scrubbed the stem surface with Soft Scrub cleanser to remove the oxidation. It took the majority of the oxidation off the stem and left behind just a bit of pitting and roughness on the vulcanite surface. It looked much better after the cleaning.
 I sanded out the roughness and light tooth damage with 320-3500 grit sanding pads. I wiped the stem down after each pad with Obsidian Oil. I was able to remove the damage and the stem looked better.
 I polished the vulcanite stem with micromesh sanding pads – 1500-12000 grit pads. I wiped it down with Obsidian Oil after each sanding pad. I used Before & After Pipe Polish – both Fine and Extra Fine to further polish the stem.
 This Becker-Musico 5 years – 3 Sandblast Canadian has a beautiful, reddish brown finish on the smooth rim top and a dark brown/black stain on the sandblast bowl and shank. The sandblast is well done and really highlights some beautiful grain. The polished vulcanite stem adds to the mix. I put the stem back on the bowl and buffed the pipe with Blue Diamond on the buffing wheel being careful to not buff the stamping. I gave the bowl multiple coats of Conservator’s Wax and the stem multiple coats of carnauba wax on the buffing wheel and followed that by buffing it with a clean buffing pad. I hand buffed the pipe with a microfiber cloth to deepen the shine. The finished Becker-Musico Sandblast Canadian is quite stunning and feels great in my hand. Give the finished pipe a look in the photos below. The dimensions of the pipe are Length: 6 inches, Height: 1 ¾ inches, Outside diameter of the bowl: 1 ¼ inches, Chamber diameter: ¾ of an inch. The weight of the pipe is 1.38 ounces/39 grams. Thanks for walking through the restoration with me as I worked over another beautiful pipe. I am going to keep this one around for awhile to try it out as I have wanted one for a long time. Thanks for your time.