THE YOUNG MAN
AND
THE PIPE
ROBERT M. BOUGHTON
________________________________________
To Sonia Golden
And
To Chuck Richards
And
To Steve Laug
And
To Capitan Gregorio Fuentes
(1898-2002)
For the first two hundred and fifty days the boy was in a small wet space where the climate was almost always right. It made him think of islands in the stream of the Gulf where the air was humid but there was a breeze that made a boy feel free.
Sometimes the woman who kept him in the place let the others outside become too loud when he was sleeping. He considered this behavior beyond inconsiderate but had an uneasy feeling in his stomach every time he wanted to slap her during the good part of his life when he was always safe and most of the time comfortable.
If he squirmed and tried to free his hands which were bound he could tell she was aware but often she did nothing. Then he had to kick twice to get her attention. The boy thought she wanted to keep him there forever. For the first time his mind turned to escape but he had no plan. At the end of the two hundred and fifty days he kicked harder than before and understood he was outside.
“Cabezota!” the woman said with true strength and meaning. That was not a nice thing to say, and the boy knew she was his mother. Although the sound of the word never changed in the years that followed, the conviction behind it gave way as a woman’s complaints will when she is forced to surrender over time.
But in secret he liked the word his mother called him then and often later as he grew as well as he could, which was not much for many years. It gave him a warm sureness of identity and was the only feeling of control he had over his mother.
The minute the boy escaped the prison, people with masks on their faces glared down at him. One of these people held him upside-down by the ankles and gave him the first slap on the rear he ever received for no good reason he could imagine. But knowing that boys did not show their emotions he did not cry even then. All he did was gasp in shock. It seemed as though his life would be like men without women.
For the rest of his life he remembered in his mind and heart that belonged to no one else the looks of stupid amazement on the faces of his parents as they smiled at him. He could never forget their bared teeth like burros chomping on the bit. He wanted to scream but could not.
He was only a newborn and later had no way to explain the images and sounds and feelings that rushed together with a clarity similar to that of a soldier sprinting for his life with the same raw terrified taste of phlegm and bleach in his mouth. But the boy recognized the words that were spoken to him as one by the two when his mother held him in her arms for the first time.
“Gabriel Miguel Jorge de Sabato,” the new parents said to their boy in the thick accent of Spain and made the unfortunate burro faces.
The boy was small because he came early. He was also quiet unlike the others. He tried never to scream the way most people did for the first few years after they learned the bigger world was not the Garden of Eden. That could be good or bad, depending on how the child was raised.
He did not like the name his parents gave to him for as long as he knew and he had gone nine thousand six hundred and fifty days, counting Leap Years, since the first slap and he remembered before then.
The boy was never afraid of his parents. Even as an infant he understood they meant well. But when he was out of the first place and then the oven machine with a glass window he heard the sounds more often. I know for whom the bell tolls, he tried to say to himself, but the thought took the form of a stream of spittle.
His mind again turned to escape. He did his best but in the end he was not at all his usual quiet self. He howled as a lobo and kept at it until he was breathless with the coughing that comes and worn out whenever he heard the words. They were like a hyena caught unaware by a lion. As any real man who liked nothing better than to get out in the middle of life and grab hold of it knew, from even one hunting safari to the green hills of Africa, the sound of a wounded and dying hyena was nothing like laughing.
If they had a clue how much of their babble I understand, he thought, they would engage their brains before their mouths.
The skin of the baby boy was wrinkled and he was old in every other way including the eyes which were the blue of ice in the calderas of a volcano.
His days were long from confinement in the new cell. It was in a clean, well-lighted place and square and open at the top which was too high to get over because of the wooden slats that formed the walls.
Still the boy grew more desperate. Every time he heard the words during the first few years he lost all of the contents of his stomach. Sometimes it was so bad he also made other messes.
I should have taken better aim and spat on their faces, the boy thought. Instead he went still the way a leopard does before it strikes its prey. He lay in his cage, dreaming or pretending to be asleep thinking about what he would do one day.
I will get out of here, he told himself, and crawl across the river and into the trees and never look back. The boy was already aware of his habit of having big thoughts but never acting on them.
He decided while still in the crib, which is the most important time of life, that he would never have anything to do with the name he refused even to think about. One night he felt smothered by a blanket the color of Caribbean coastlines, where the sky reflects from the shallow water over the white sand before the shelves drop off into navy blue depths. With that thought in mind he chose to call himself Mike.
Then without warning he was released from the pen for no reason he could conceive. But he was wise enough not to question the turn of events and soon met other people his size. In spite of the vacant gravy-eyed stares he received in return, he always introduced himself by his chosen name.
Mike loved his grandfather who was his mother’s father even more than his own parents. What a terrible idea, he thought to himself in the early days and later said aloud when it came to him. Sometimes a boy talked to himself when he was alone and that was normal.
But he always dismissed the notion that his thoughts made him bad. This one was true and nothing could be done about it. The grandfather taught the boy everything important in life and that was why he loved him the way he did which was a man-like love.
The grandfather was already very old when Mike was born and lived in a small house made of adobe in Taos. His given first name was Eduardo and he, also, had two middle names.
The old man was podgy and had a full head of white hair for as long as Mike knew him. His skin was a natural dark the color of the earth in Castillo, Spain, which was where he was born early in the previous century. The only part of his appearance that changed was his big wrinkled face that was like an apple left in the sun.
The boy thought that if the old man could somehow be stretched out to full size he would have the classic look of a Spanish nobleman except for the tattoo of a cheap looking young woman on his right arm. Much later the boy learned the woman was his grandmother, who died before he was born.
But the first time he met Mike during the prison days he leaned close so that the boy feared the old man was going to give him one of the bad wet kisses. He knew that if this was done to his belly, which he hated, he would direct more than a scream at him. The infant smelled something on the breath of the old man that was sour and harsh and liked it.
Instead of doing the bad wet thing or worse, saying the words the boy could not bear to hear, his grandfather rubbed the boy’s belly in a way that made both of them laugh and spoke in a whisper so that the parents would not hear. Mike knew right away it was a secret and so he listened even more than he had always done.
“I am your grandfather, Ed,” the old man said, and right away Mike knew that this big person was different than all of the others, “but you can call me grandfather or grandpa or just Ed. I will call you chaval for now because that is what you are until you grow out of it or tell me you do not like it.”
Mike thought about what to call his grandfather for a long time, until he was three months old, and one night at dinner when the old man was with them he made up his mind.
“Grandpapa,” Mike said.
The grandfather and parents all stopped the way animals in a forest will when they sense danger, the old man with his round glass of the dark gold clear liquid with no ice that he poured often from a big bottle in the freezer and the other two with their spoons and forks in their mouths. None of them had ever heard of such a thing and they were without words.
Then the laughter began. His parents did it the way they could not help but the old man the boy loved spilled his drink and slapped his hands on the table and his legs and chest with joy until tears streamed down his face and the coughing started. All of the others carried on at the same time with so much loudness and confusion and talking over each other that the boy could not understand a word of it and he became hot and angry and could not stand it any longer.
“Grandpapa!” Mike said again with firmness to let them know he was not finished.
Again no one could find words. Good, Mike thought, now I have struck them dumb for real and I have their attention.
“What is that thing you put in your mouth before and after dinner?”
The first complete sentence of the infant was not so easy to follow but his meaning was clear.
“Qué milagro!” said the mother, who was a devout Catholic and crossed herself.

When the last light of the winter day was gone and darkness outside the hacienda-was as full as the moon and everything from the dining room was cleared to the kitchen and washed by hand in the sink, all of the adults sighed again in satisfaction. The boy burped. The paella valenciana with duck and snails was the best either of the men ever remembered eating and they told her so. The boy’s mashed vegetables in a jar were as good as he could expect. His mother smiled until the old man spoke again.
“You inherited that gift from your mother, God bless her soul.”
She frowned but turned back to everyone with a forced smile.
“Now is the time for Gabriel’s diapers and bedtime,” she said.
Ed, who was rolling on the floor with the boy, at once got to his knees and picked him up.
“I will do it,” he said.
The parents looked at each other the way that said without words they thought they could stop the old man but it was too late. He was already standing and carrying the boy under one arm that was still big and strong despite his very old age. The mother and father watched with the nervousness parents have when their child goes off on his own to war or college or any dangerous place as the other two moved down the long hallway.
“Just tell me where do you keep the diapers, chaval,” the old man said to the boy in a quiet voice the parents heard anyway. Ed turned his head and held Mike close to his ear. “Ah. In the dresser in your room. Of course.”
After the grandfather changed Mike’s diaper with a sprinkle of the white powder that most of the time annoyed the boy but on this special occasion again made both of them laugh as if at a private joke, Ed bent over to put Mike back in the cage which for once in his life he did not notice.
The boy’s attention was caught by something that fell to the carpet from the inside pocket of the old man’s tattered and comfortable coat. The boy tried to see what it was and started to become angry that he could not move fast enough. Ed understood Mike’s curiosity. He picked up the thing and held it so the boy could see.
“Do you like him?” he said.
He held the pipe that fell and was nothing like the bent one Mike had surprised everyone by asking about after dinner. This pipe was new and shiny but in many other ways the boy could not describe, even to himself,not as much to look at as the one his grandfather had smoked that day and evening.
Ed had a different pipe every time the boy saw him. Still Mike’s eyes had a flash of fire when they fixed on the fine strong pipe.
“Yep,” the boy said with a hard sound to the “p” that made the old man go into another fit of laughter with the clapping of the hands and slapping of the knees and chest. And so of course Mike could not help joining him.
“Then you keep it,” the old man said and smiled, but there was faint sadness the boy did not miss and another look on his face as he handed it with care to the infant. “And always take care of this pipe for it is special and smokes better and longer than any other pipe ever made. It was hand-carved by an Italian who is new to the craft but shows great potential.”
Mike bit his lip even though he still had no teeth and clasped all of his fingers together and trembled with the thrill that came from the strange and unfamiliar way he wanted the pipe, but did not move to take the gift that was held out to him.
“Go on. It won’t bite. Take it. And do not worry about sticking it in your mouth like I do because it is well cleaned and you will catch none of my germs.” This made them both laugh again. “Of course I cannot give you any of my tobacco or your mother and father would kill me or worse yet never speak to me again.”
Mike, who did not understand the joke, still did not take the offered pipe. He could feel the strong emotions that Ed tried to disguise.
“Ah,” the grandfather said. “You sense my attachment to this thing. Well, this is true or I would not give it to you, for nothing that is not of value to the giver is worthy of parting with. Besides, I have not had it long, for the pipe maker, as I said, is a newcomer. ”
None of this reasoning made sense to the boy but he trusted his grandfather’s sincerity and knew the old man would not take no for an answer. Mike held out a hand that shook with the passion of doing something he knew his parents would not like and accepted the pipe. Ed chuckled. The boy was aware it was because he understood these things.
That night and many others afterward Mike fell asleep sucking on the pipe the way most children his age did with their fingers or other small objects that were sold at stores to pacify them.
________________________________________
Mike’s parents were very proud to be descended from the brave and heroic Conquistadores who were the first people to find New Mexico not counting the natives. The parents disapproved of this name their one child told everyone was his but could do nothing to stop him.
The mother and father still spoke the language of the old country that the boy pretended he did not know. They also read many books by authors of the Spanish language, which is not the same as Spanish writers the way most of the people in the rugged high desert Land of Entrapment meant it and that was to say Hispanic.
It was from the authors of some of these books that the boy’s mother and father named their son. The last name being a coincidence was to the fledgling Mike God’s biggest joke. He went to great lengths to hide the fact that he borrowed and read many of the same books in the Spanish of his ancestors.
“Qué chorrada!” Mike’s mother said for the first time when he was three and he refused to eat the mashed pea baby food from the jar. She was determined to feed him pasty green mush when he only wanted a few of the good kind that he saw and smelled the bigger people eating. Mike wondered at the woman’s own nonsense. It reminded him of the day he decided to come out of her. She seemed then to try her best to keep him inside and now out.
Women, the boy thought. They make no sense but must be necessary in some way for life to go on.
As early as the time known as primary school Mike began to show the signs of being different. They were in the slight build and big doleful eyes with an obvious but unknown imagination behind them and the standing alone in the middle of the schoolyard or playing field with the body still and arms limp and in the strange way he stared up at the sky or into the distance. Whatever he saw no one else could tell.
All of these were like bad omens and scared the others who were deaf to Mike’s thoughts. The adults including his parents said he was sensitive as if that were a good thing.
Mike grew as well as he was able which still was not much. All that the others could talk about in hushed voices whether he was present or not was that the boy was a runt but dangerous somehow for being weak or, more often, a contrapelo which was not a nice thing to say or even think about anyone.
 The truth was that Mike was always sad while those about him were at peace, as it seemed to him. The worst time was when the sun set although he knew the sun also rises.
What, he wondered to himself, if one day the sun did not rise? He remained this way even when the other boys his age began to have the changes that lead to manhood.
 There were times when he had that sick gaunt scared look of a small dog that is thrown into deep dirty water and must paddle around in circles looking foolish or sink and drown or pull itself out with all the strength in its front paws and still more, almost dragging itself by its own collar, until it is left shaking with the tail between the shivering legs. That was unlucky.
“Gabriela!” said some of the other seven year old boys in school the first time they taunted him to fight. They knew they would win. All animals smell fear.
But Mike never backed down and he always struggled up onto his feet for more. He seemed to like the beatings. They left his skin, which had softened and smoothed since he was a baby, bruised even through the natural color of milk with a little cocoa. His eyes were almost always puffy and black and blue, which was an unfortunate condition of his life but good for the building of strength and character. To the few other outcasts in his pack Mike was a doe, caught in the crosshairs of a big game hunter’s rifle, that senses something is wrong but has no understanding of the true nature.
Until the boy was almost out of high school he had nightmares. He could never remember them long enough to tell the doctors his parents made him see. Mike was too forgetful to keep a journal of the awful visions as the men in white coats always asked him to do.
He did not know how lucky he was to have parents who gave him everything he needed if not all that he wanted, or the idea of to have and have not. Oftentimes his mother reminded him of all the starving children in India.
Most of his waking hours were filled with despair every time he observed two or more other boys pushing and shoving each other, sometimes with fierceness like lion cubs but always in good nature and followed by nervous laughter and camaraderie that was never of the wrong kind, as though their fun and games were a moveable feast.
Years passed this way. Mike began to grow stronger a little at a time. I should do something to change the way my life is going, he thought, but was always afraid. And so he continued to take the beatings from the others in the schoolyards that were sometimes different but in the important ways the same. One afternoon in high school all of the kids were laughing and joking in their groups.
“Gabriela!” said one boy.
“Chulo!” said another.
But this fight was to be remembered for many reasons. Mike had had enough. Over the years he had learned to get back on his feet faster and then to strike in a clumsy fashion that at first hit only the air and made the other boys laugh even more and make fake scared faces which were known to cause Mike to lose control in a way that was always his undoing.
In time some of his punches began to connect with the dull sound of a piece of meat falling to a slaughterhouse floor. At last one of them lead to the bloodshed of another boy even if a mere dribble from the nose that resulted on that occasion in one of Mike’s most painful yet rewarding losses.
But on the day when the other boys called him their names for the last time, everything changed. Other than the name-calling, everyone present, who seemed to include all of the students and none of the teachers, agreed that it was Mike who in fact threw the first punch. But nobody, in fact, saw anyone but Mike hit anyone else. And there was no mistaking who the winner was, as Mike was the only boy standing while all the regular suspects lay unconscious all about in pools of their own blood. By the time teachers arrived, nobody else had seen anything.
No one in the schoolyard including Mike had ever seen his style of combat that was like the Dirvishers Dance, or the Sacred Ritual of Love, even though Mike danced alone and love had nothing to do with it.
 Only one year short of being a man according to the law the fighting stopped for Mike. The bigger boys found someone else smaller to terrorize and even invited Mike to join them but he just said no. He had seen enough of the fighting in life and desired only to make a farewell to arms.
The others had not learned this lesson and Mike sometimes watched them with a strange feeling inside as they stalked their new victim. The feeling was not relief for himself or pity for the other boy. He felt nothing, like a shell-shocked soldier returned home from war.
Mike began to grow and for a while his parents had to buy him new clothes almost every week. That was a difficult time for the entire small family but in particular the boy who then realized he had started what he thought would be a happier road to becoming a man. But it was not so.
The infant boy grew for twenty-six years that turned him first into a bitter teenager and, as time sometimes will do, hardened and calmed him into a quiet young man.
His height was six feet and two inches and he had the natural lean strong body that youth gives without working for it. He made good money doing construction labor and was known and respected for his hard work.
The foreman at the first site where Mike worked almost straight out of high school hired him for his size and the fact that he had checked on the application that he had reliable transportation to and from the sites. When the foreman found out Mike meant his feet he told him he would have to get a car if he wanted to continue doing that kind of work because he might be called early or late and without notice.
Mike knew he was cabezota as his mother always said and his mind was a steel trap and so he did not much care for the new condition of his work. But the pleasure and peace he gained from the toil he did were the only reasons he paid for new transportation.
The small pickup he found was used but in good condition and did not drink gasoline the way his grandfather drank scotch and was not cheap. Mike was forced to barter with the salesman, which he hated, and paid a fair price in full with cash as he did for everything he owned. He did not trust banks and could not bring himself to borrow money.
The next thing you know, he thought, you will be a beggar.
Mike did not keep his money under his mattress but in a solid fireproof safe bolted to the floor of his closet. And he kept a sawed-off double barrel shotgun strapped behind the nightstand.
He lived alone in a small furnished studio apartment. There were some photographs of his family, most of them his grandfather or the two of them fishing or working on pipes together, stuck with pins to a piece of particle wood he hung on the wall or in frames on a large work table he added to the room. He was what most of the people in the sprawling college town of Albuquerque would call a loner.
But what the others called him each time he passed them by, the ones who reminded Mike of rattle snakes in nests, was nothing new to Mike. He pretended not to hear the few who held themselves above everyone else whisper that the young man was loco, which was the worst kind of unusual. The word that the young man believed had no power over him also gave him a feeling of pride and he felt good and better than the others were for knowing something about them. This information he kept inside him as his own.
Most of the time when Mike was not working he walked the good and bad parts of the streets alone with his own thoughts. He was not afraid of anyone when walking because he knew what he could do. Maybe the others saw it in his eyes.
________________________________________
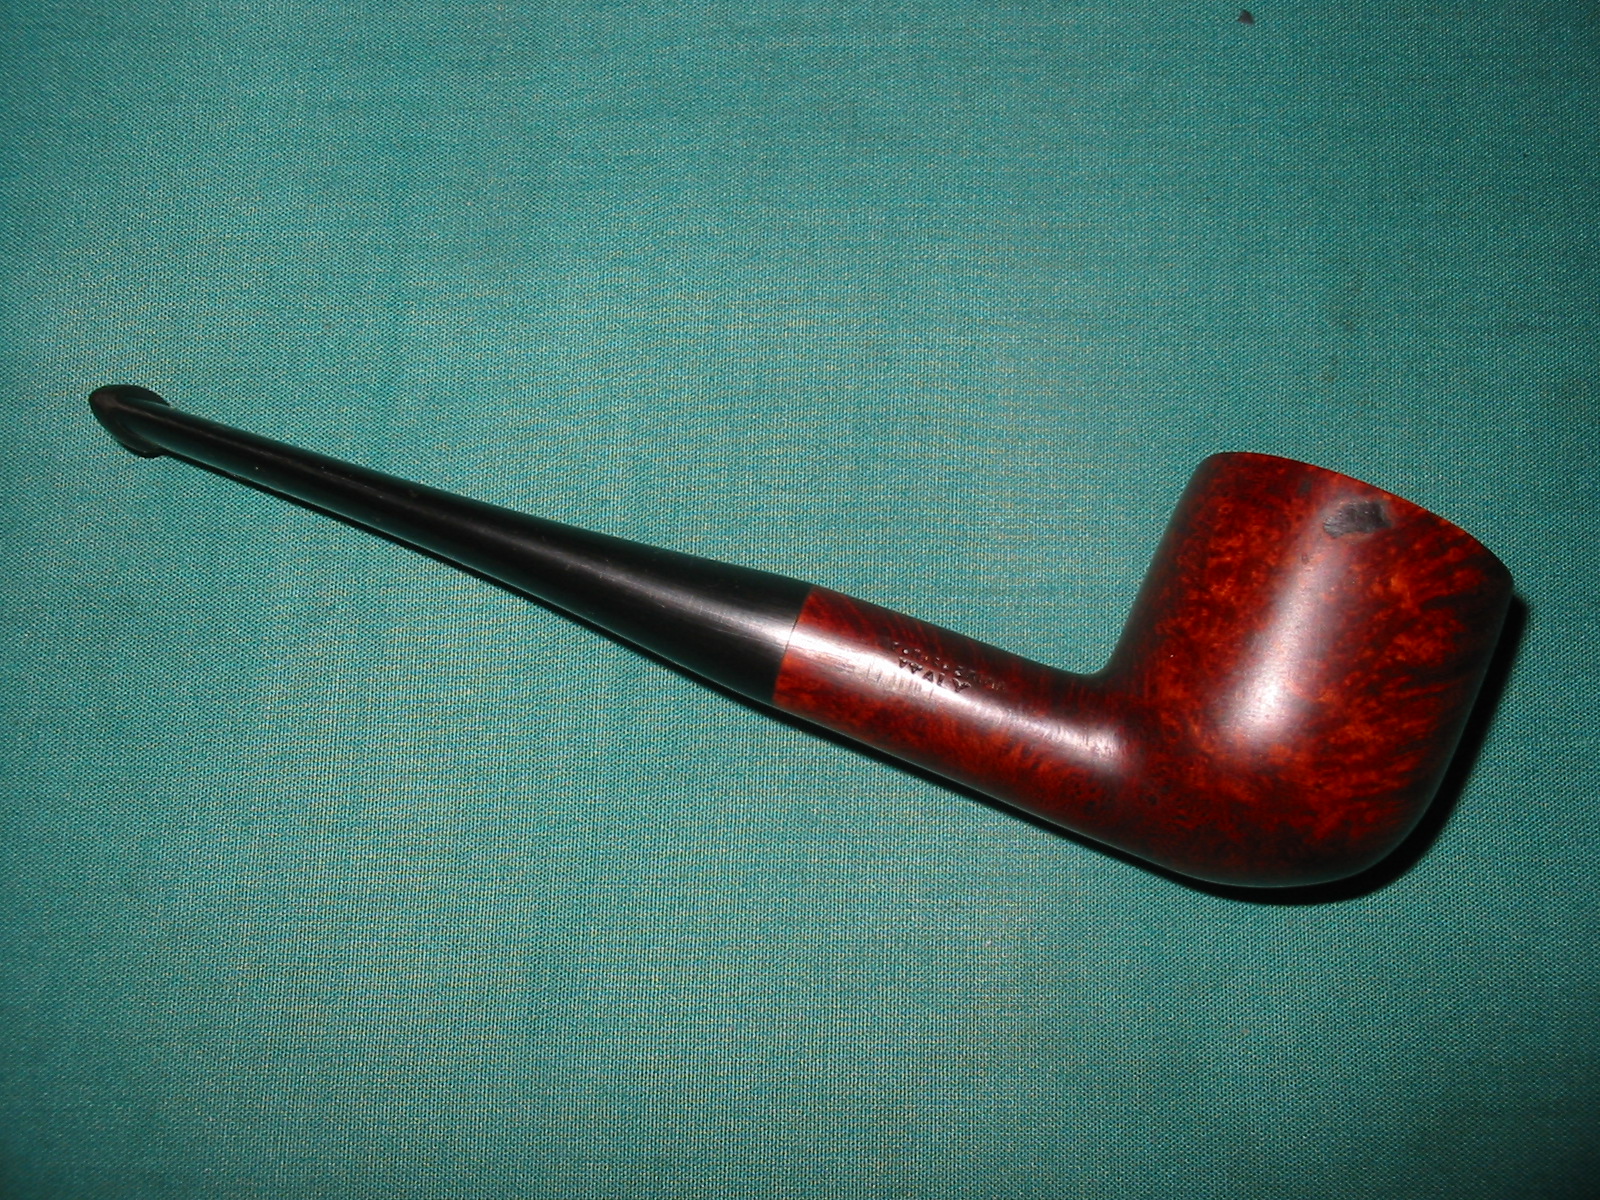
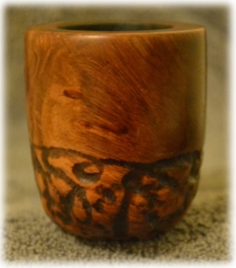
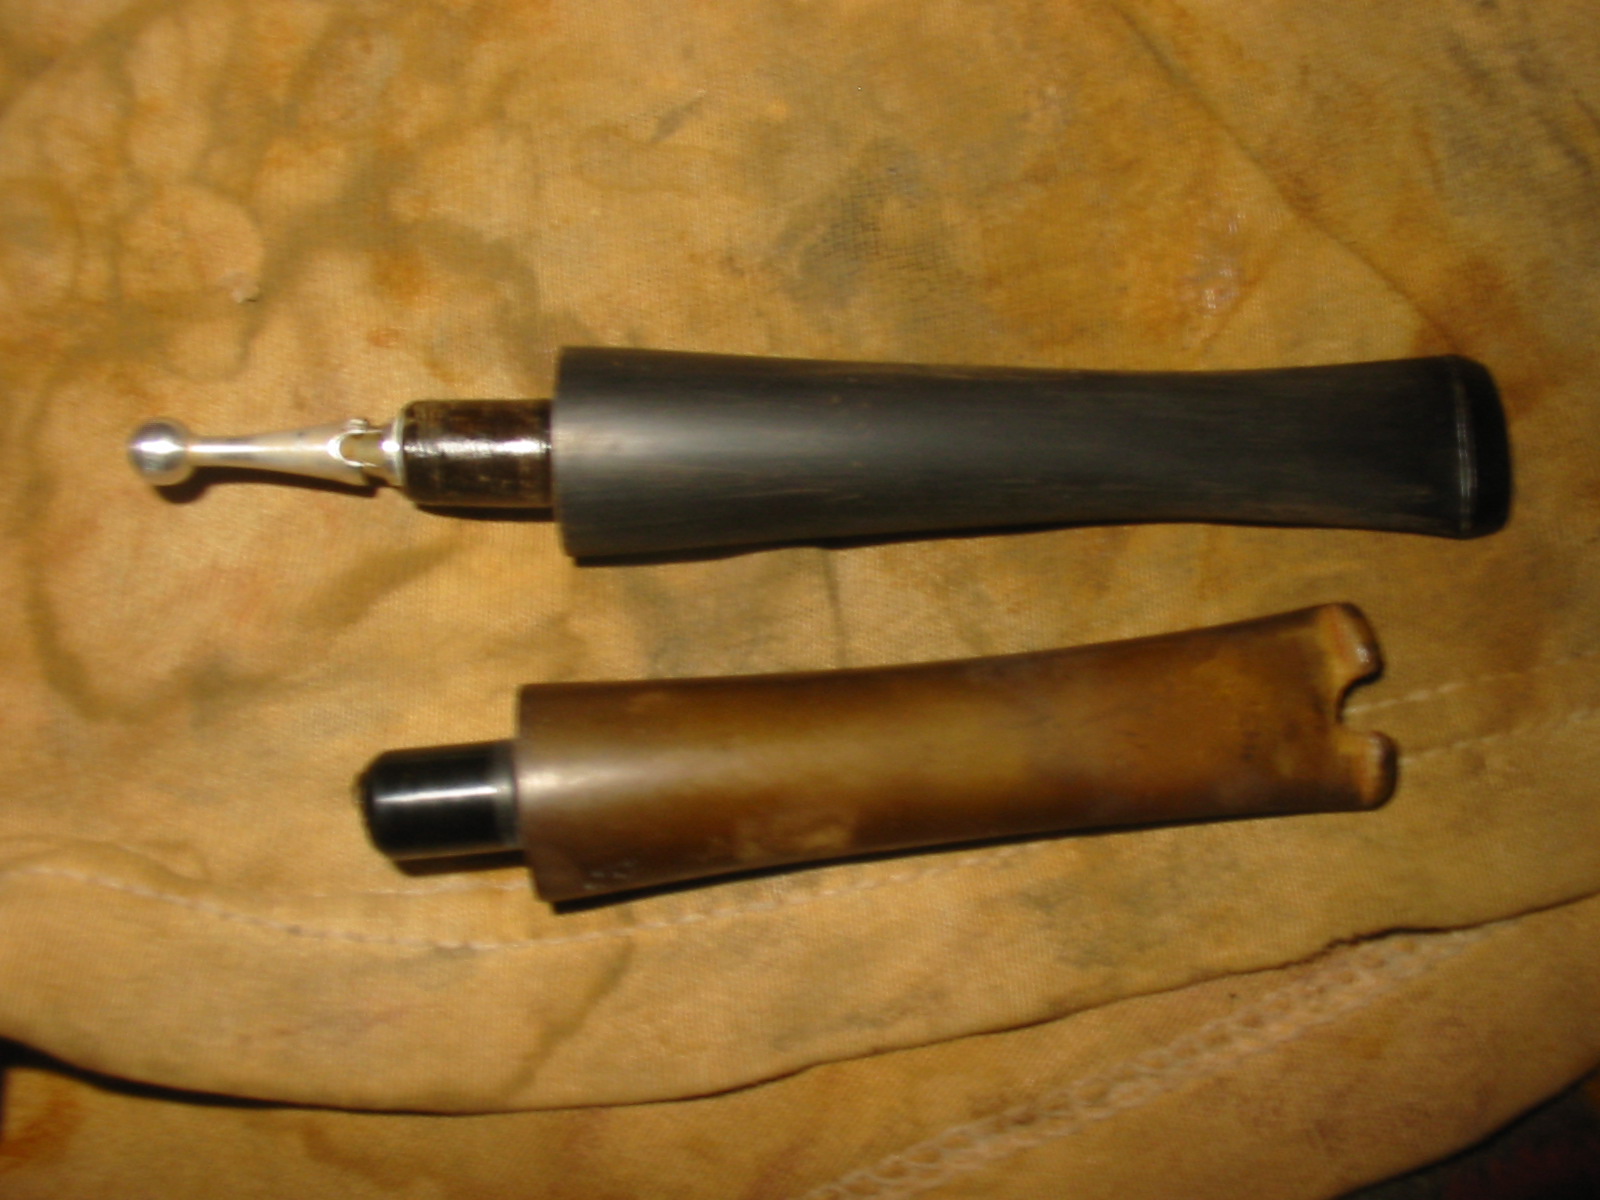
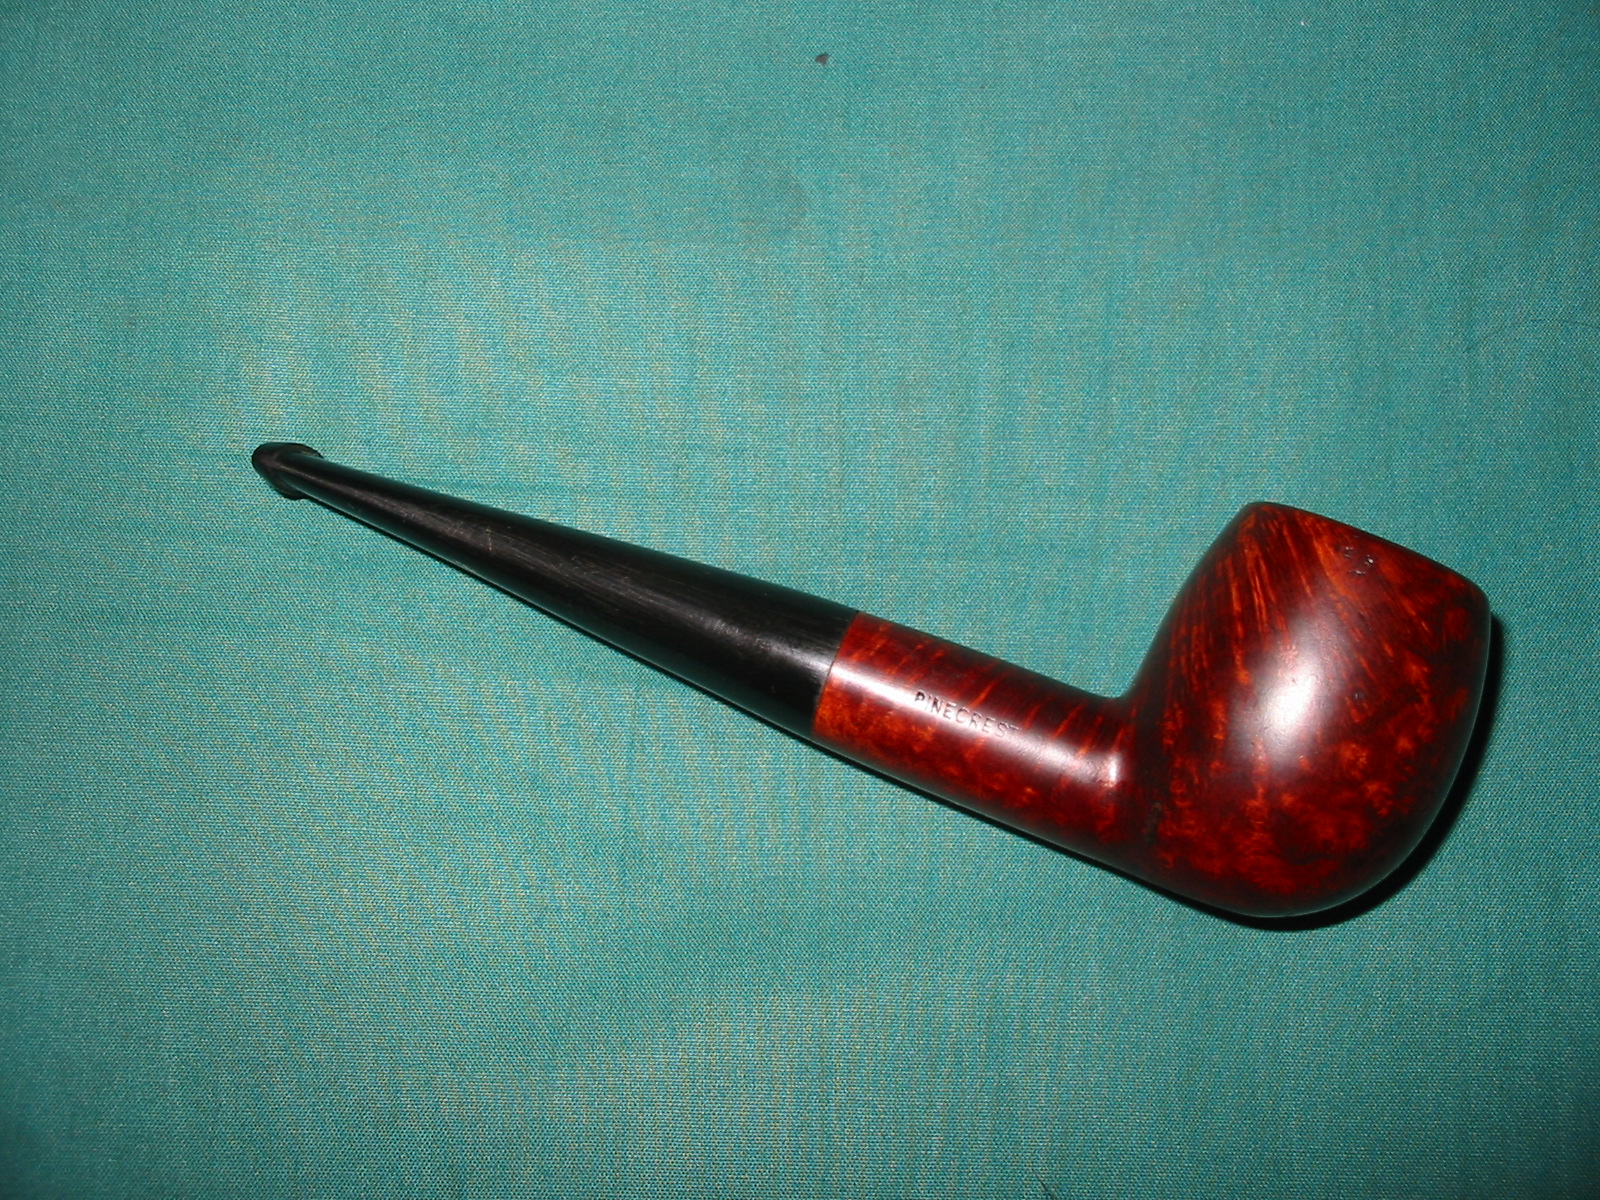
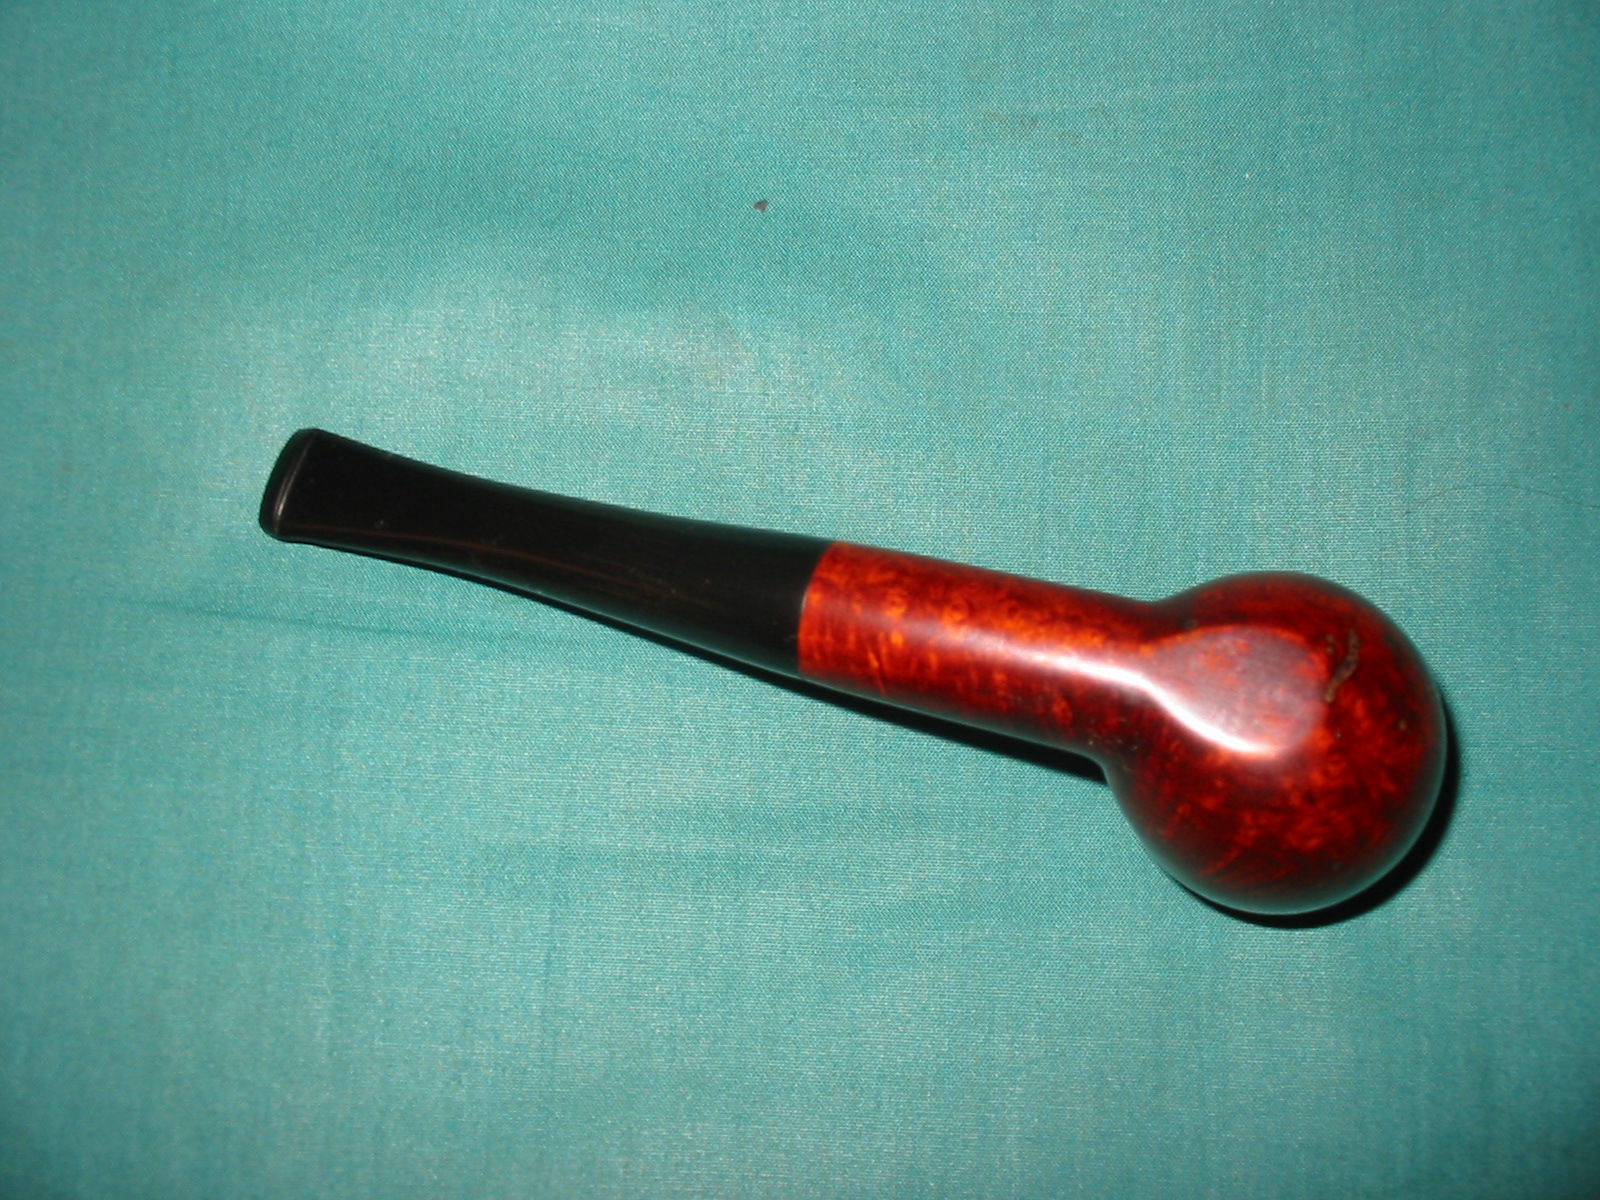
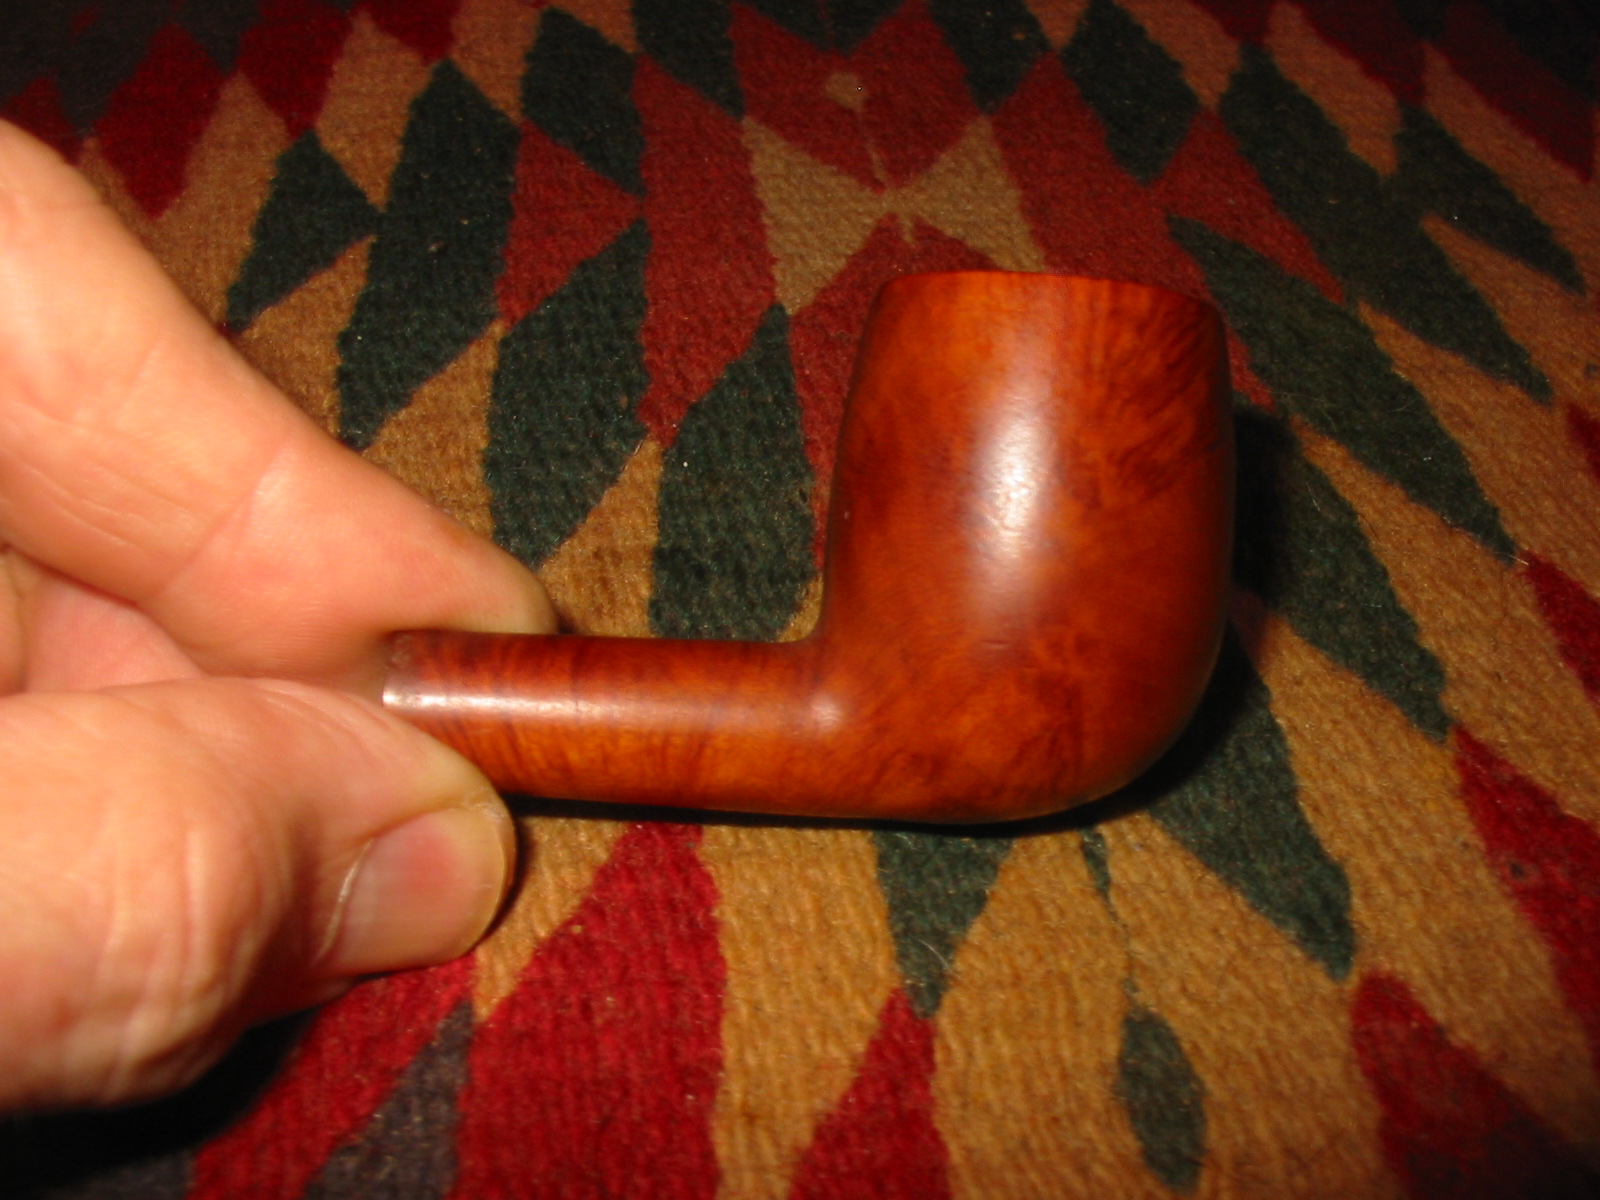
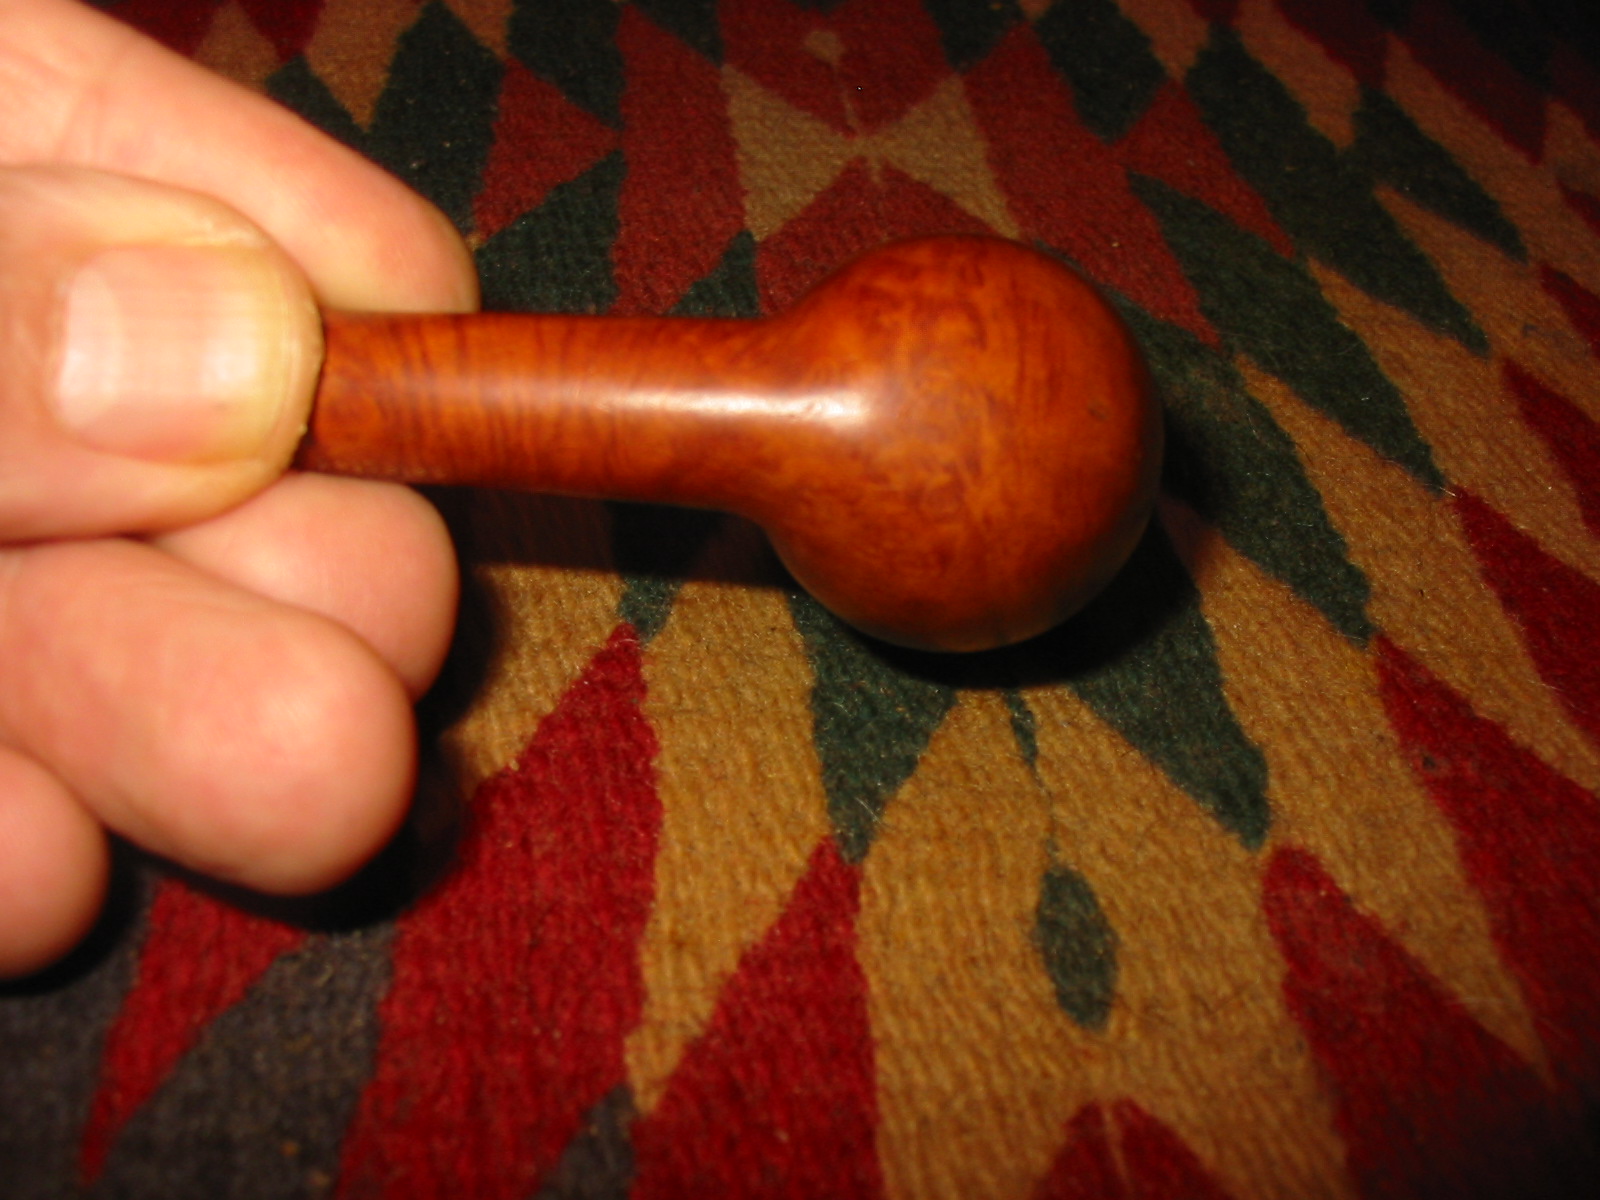
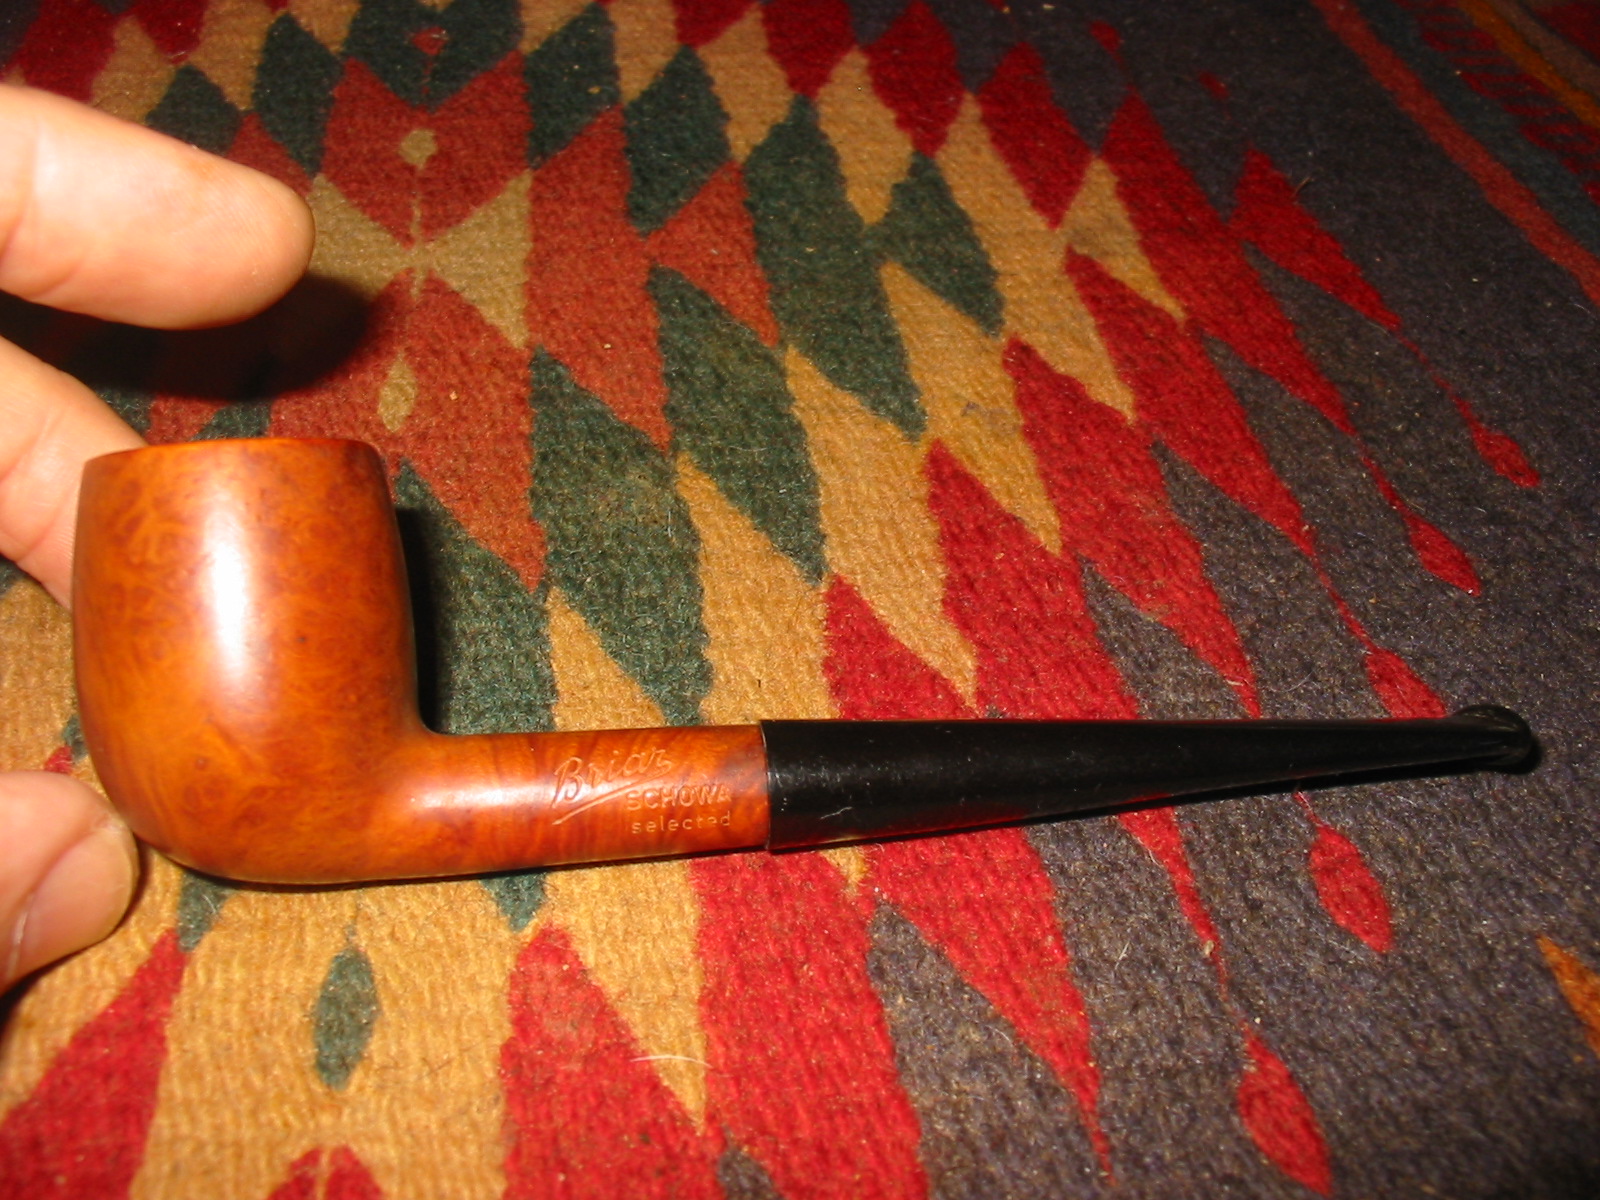
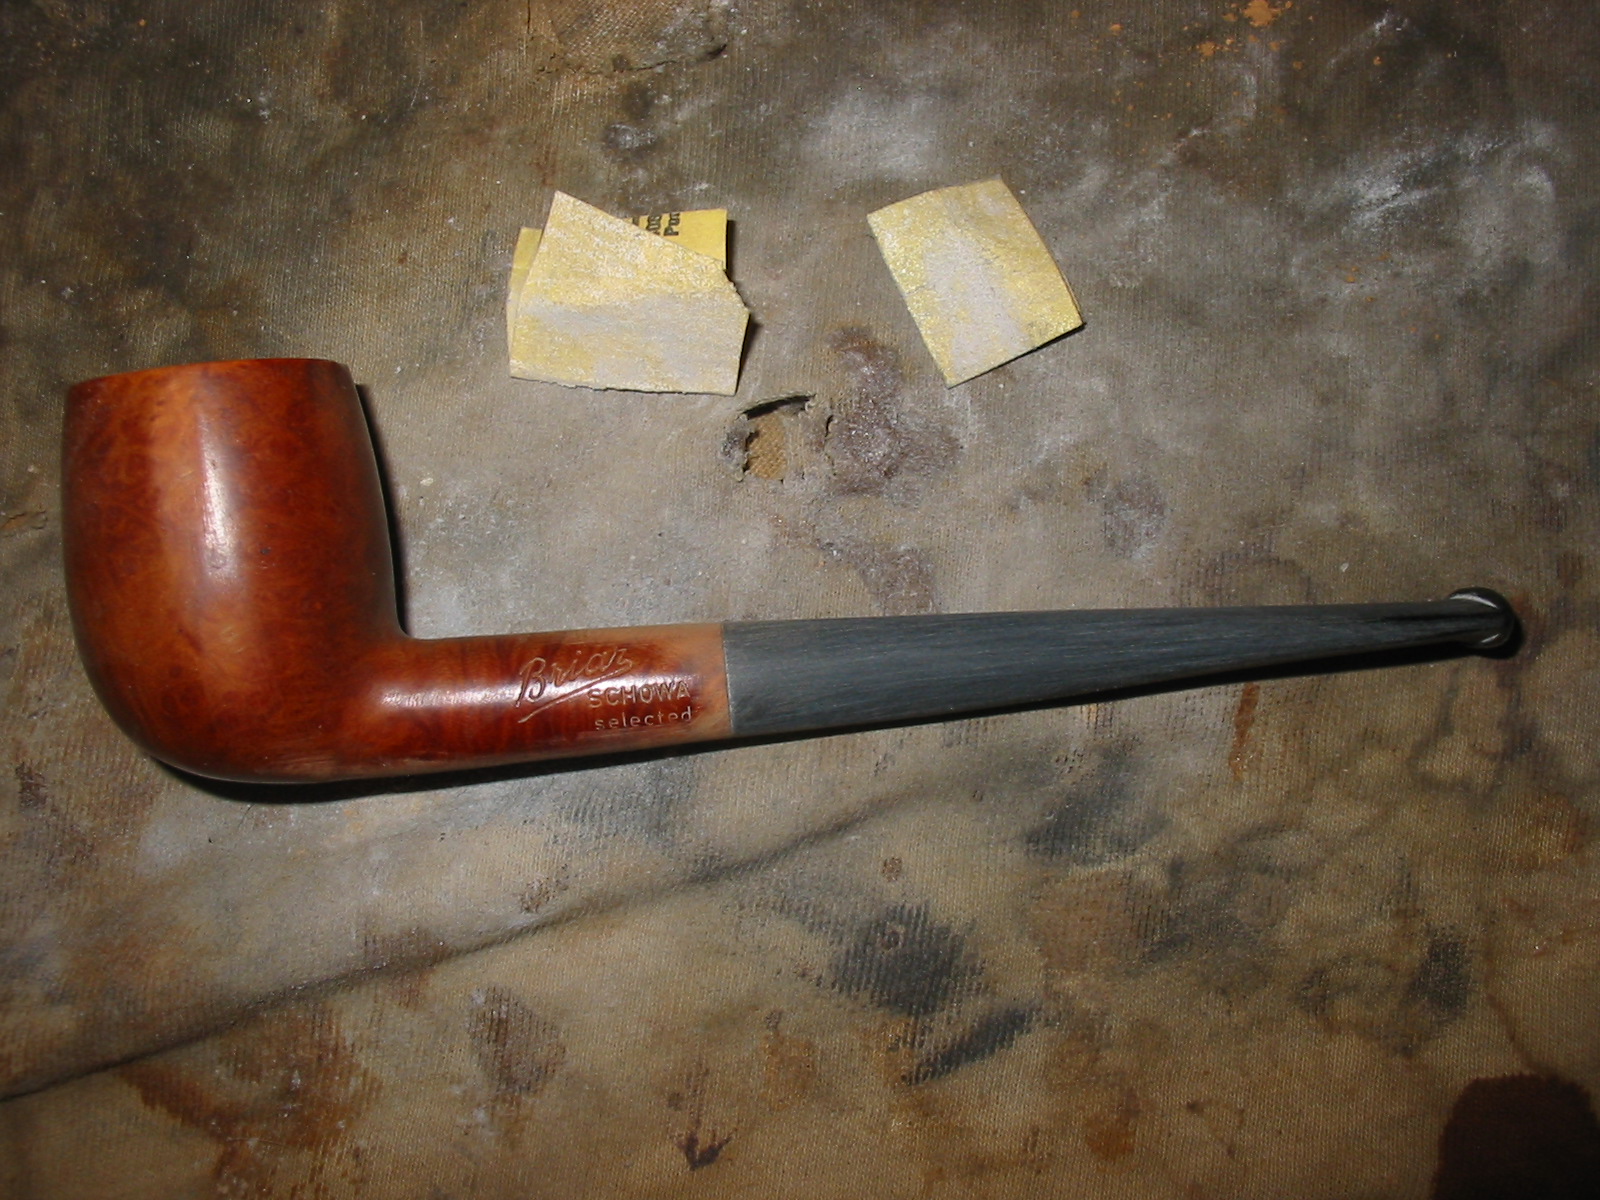
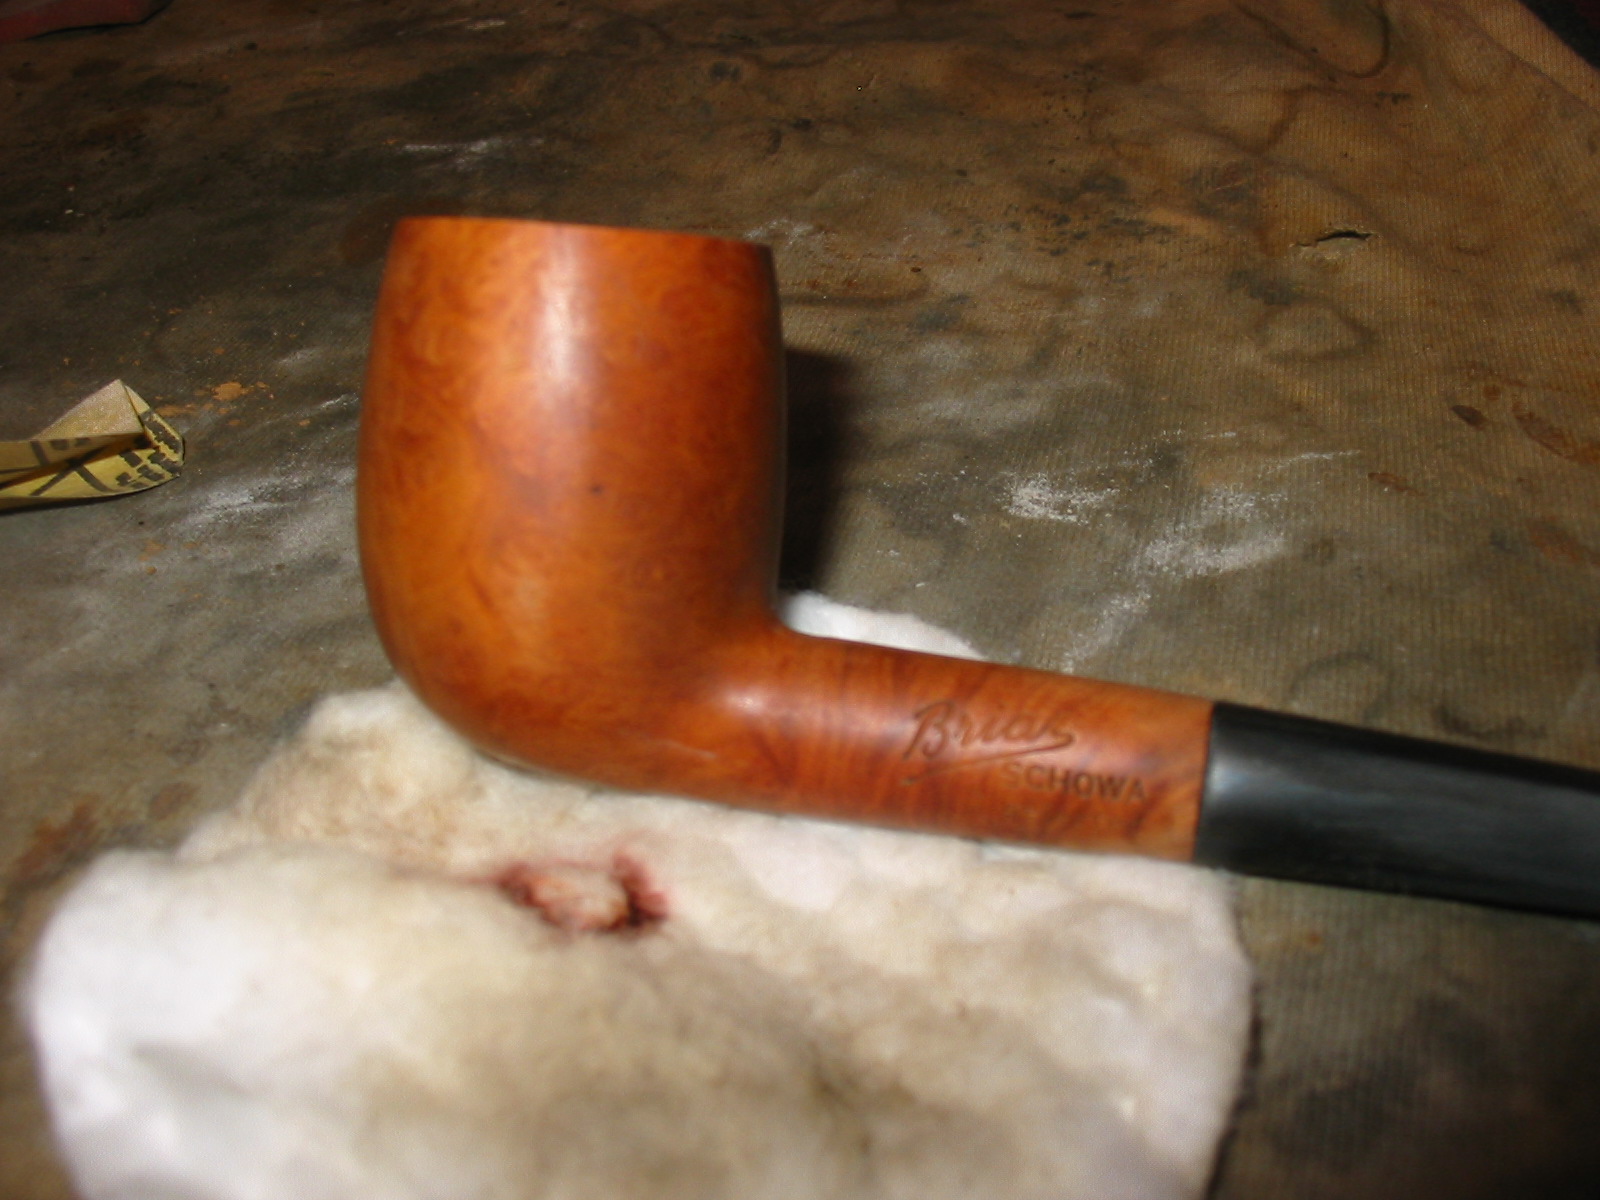
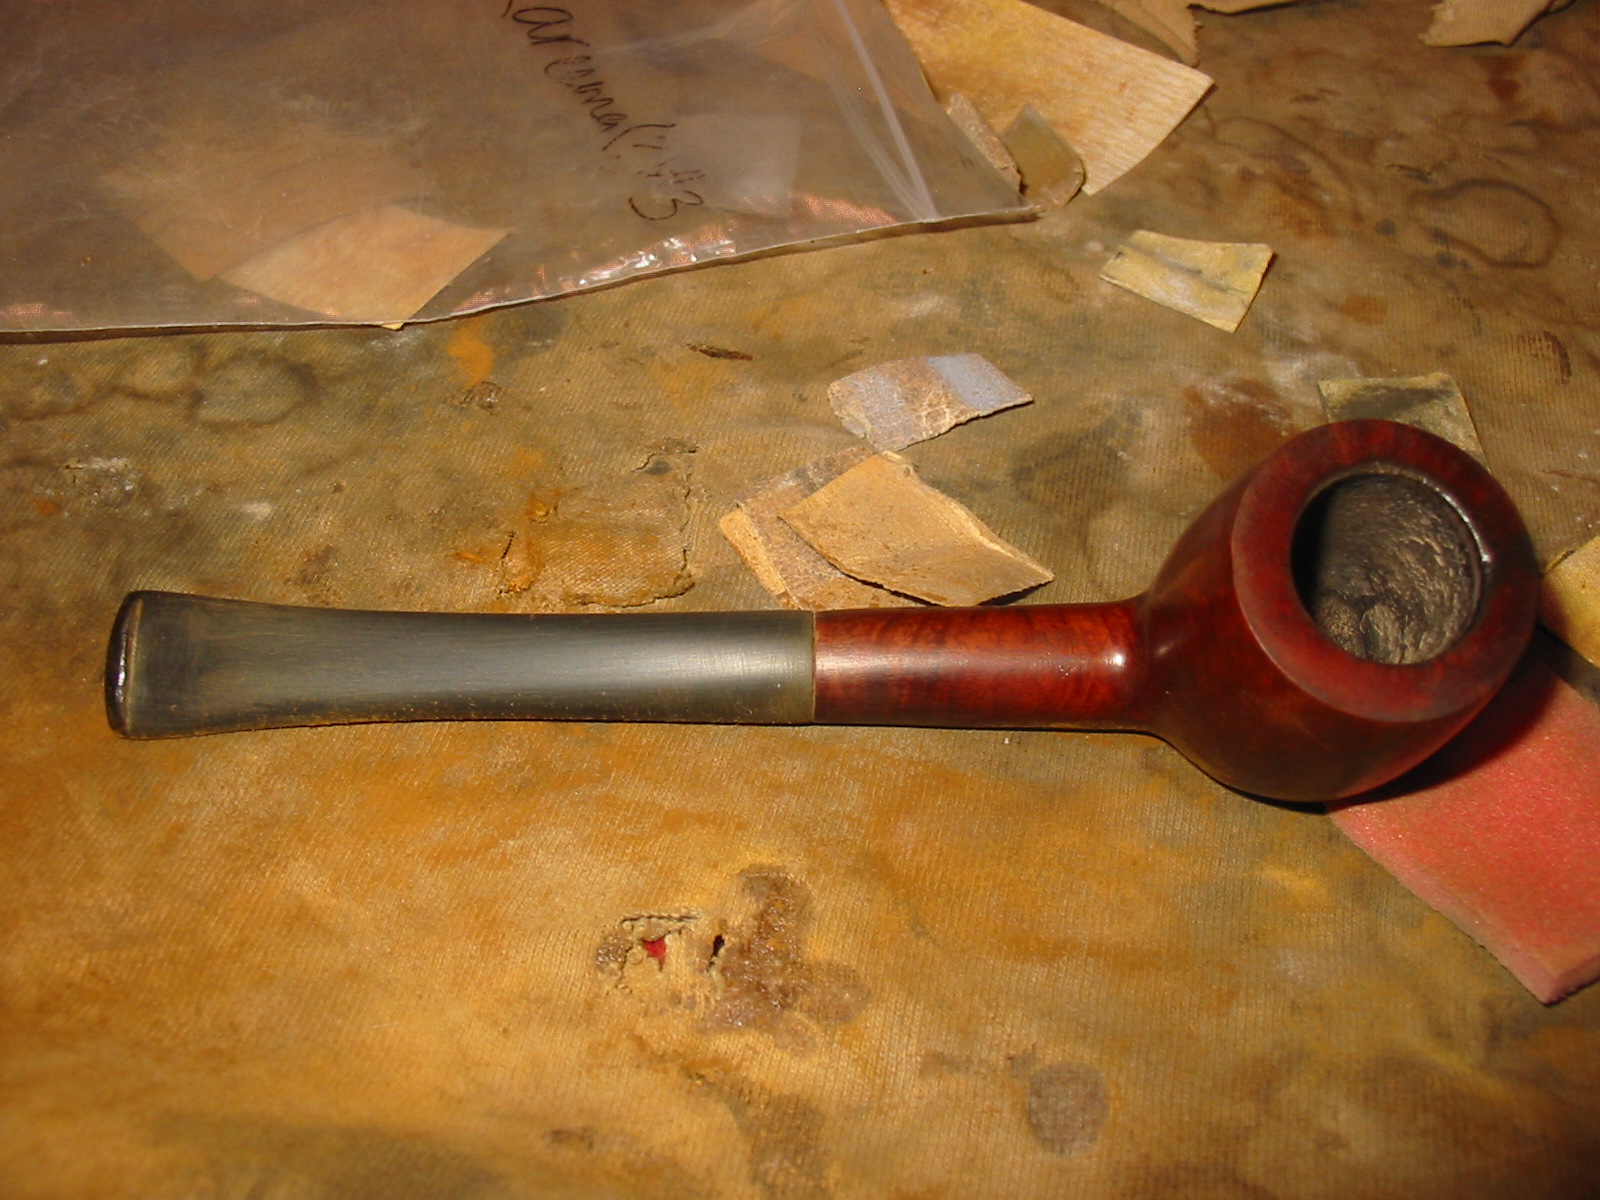
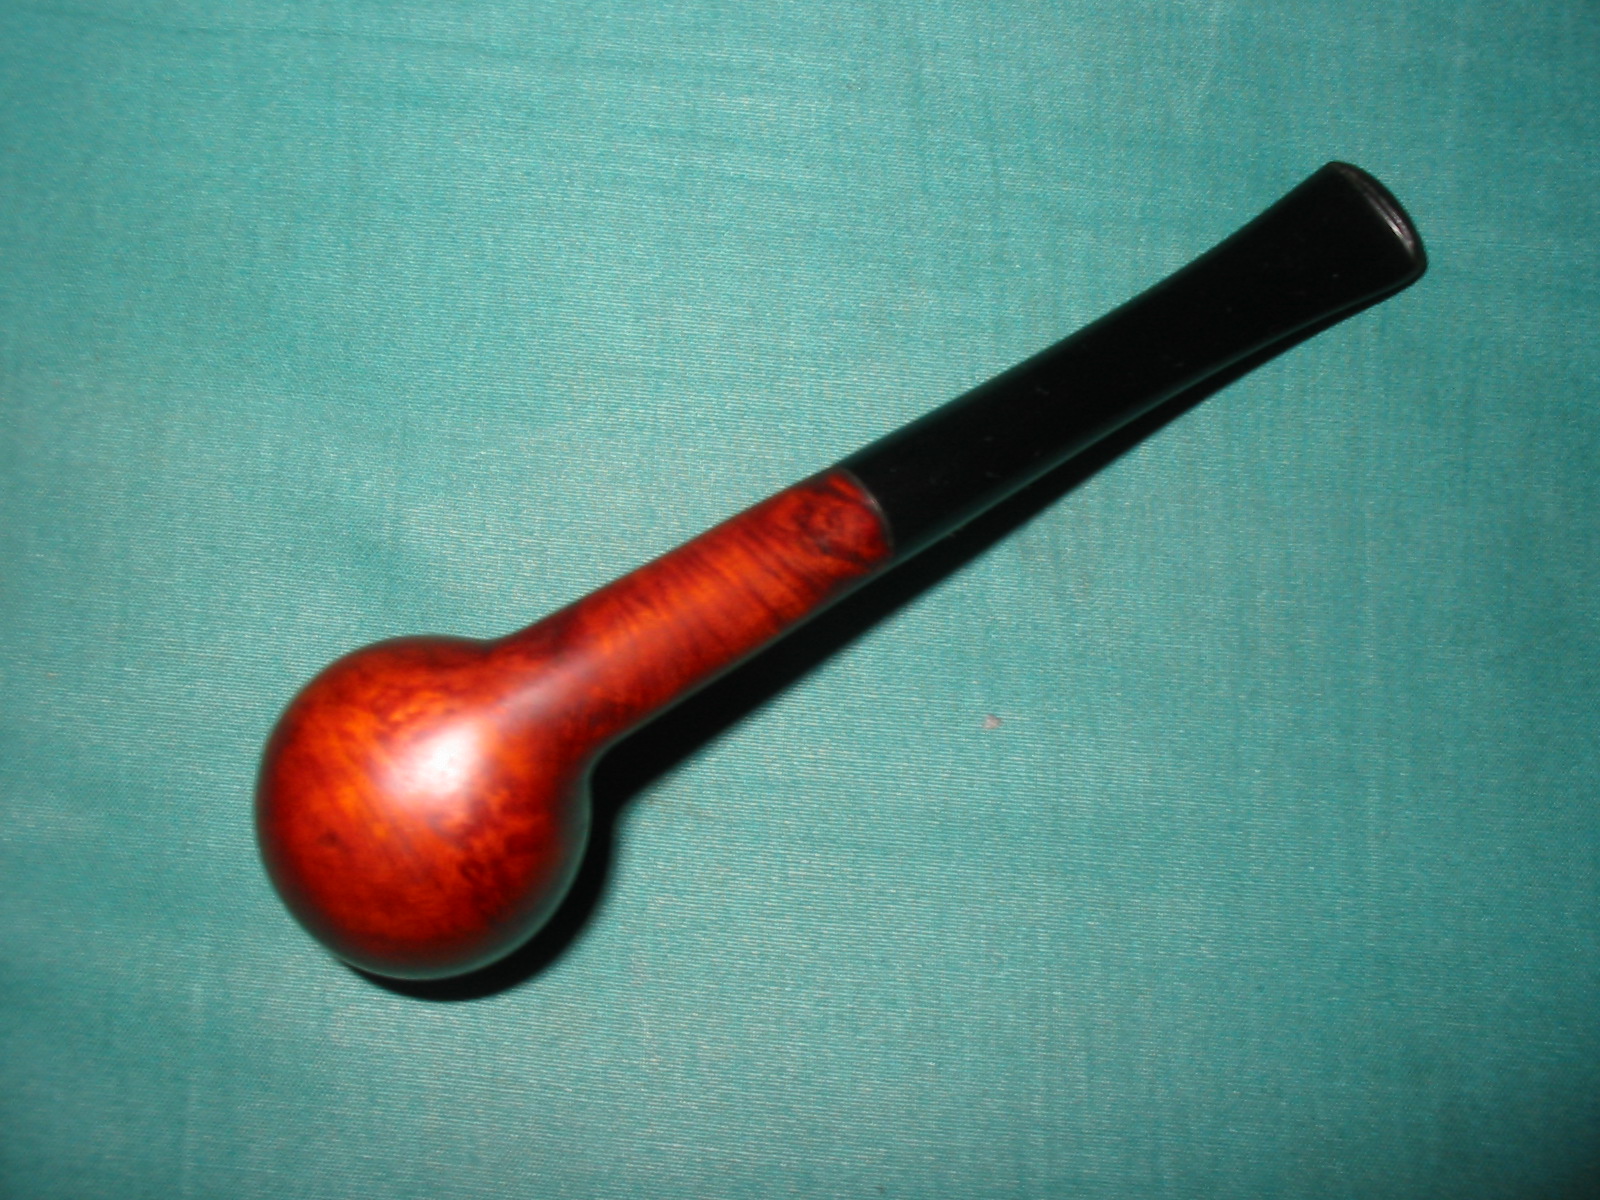
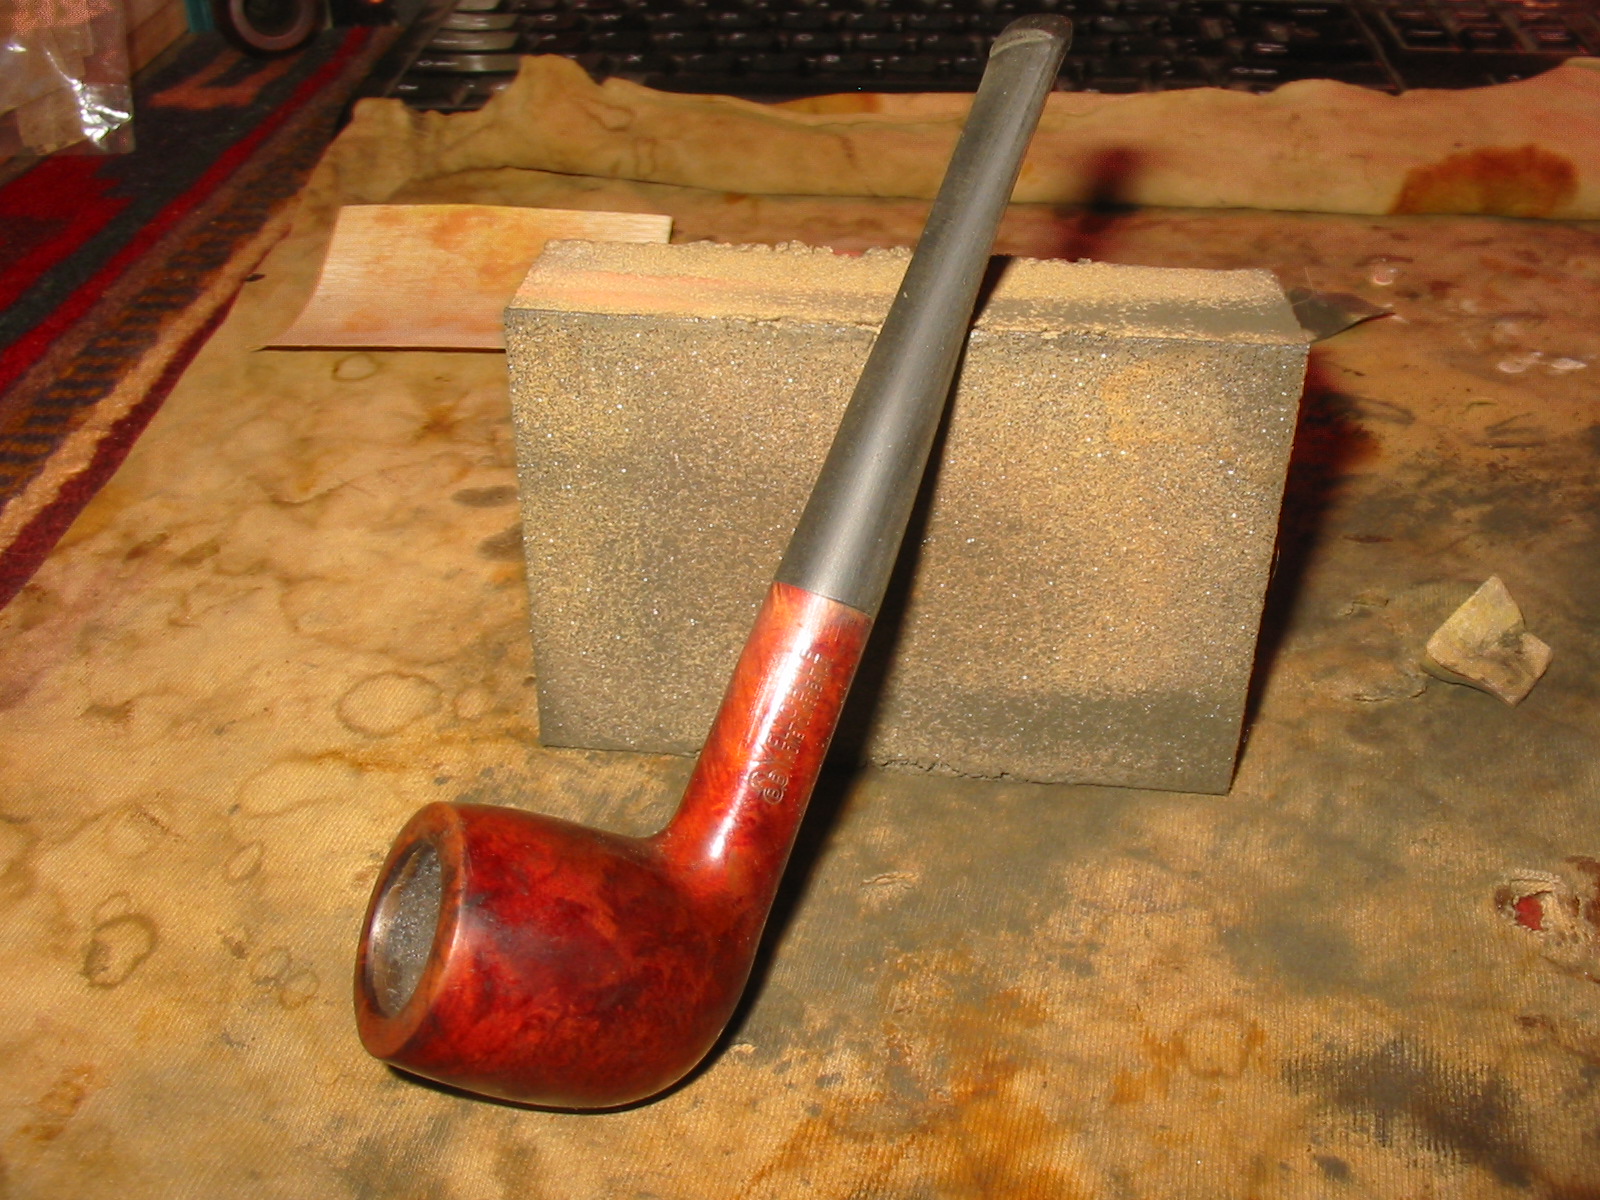
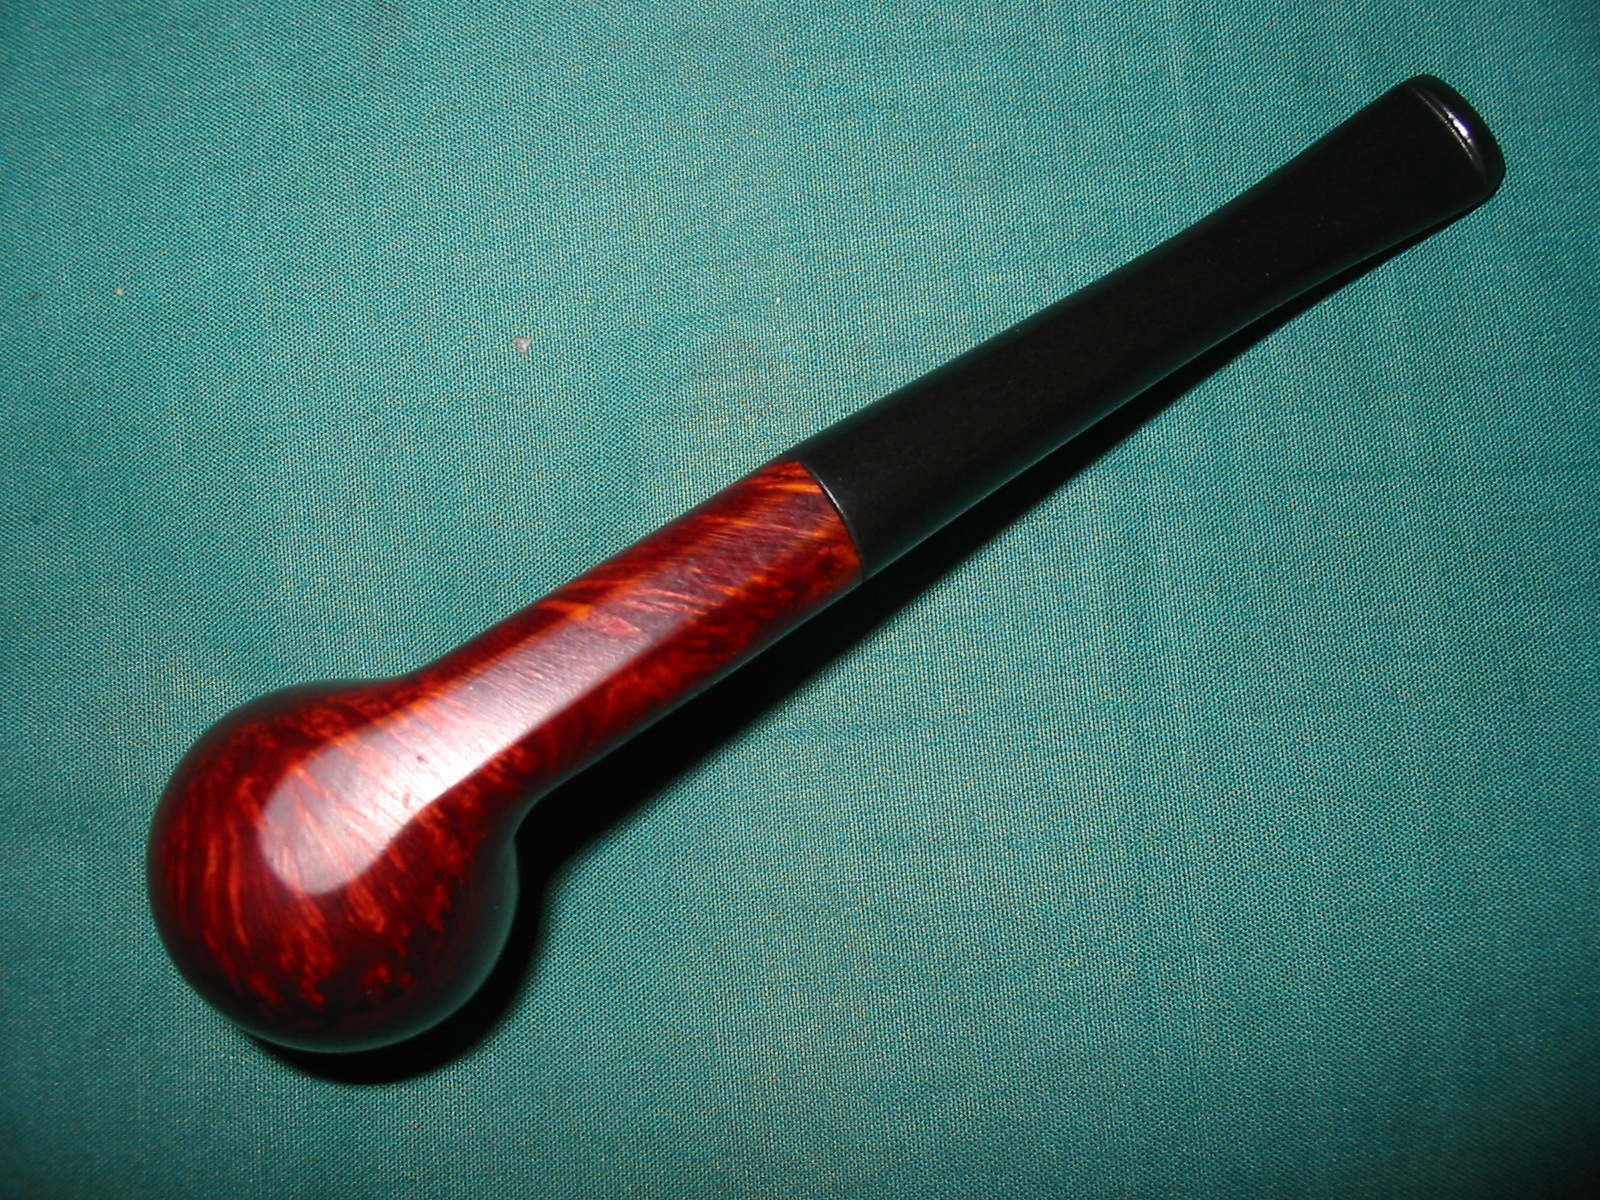
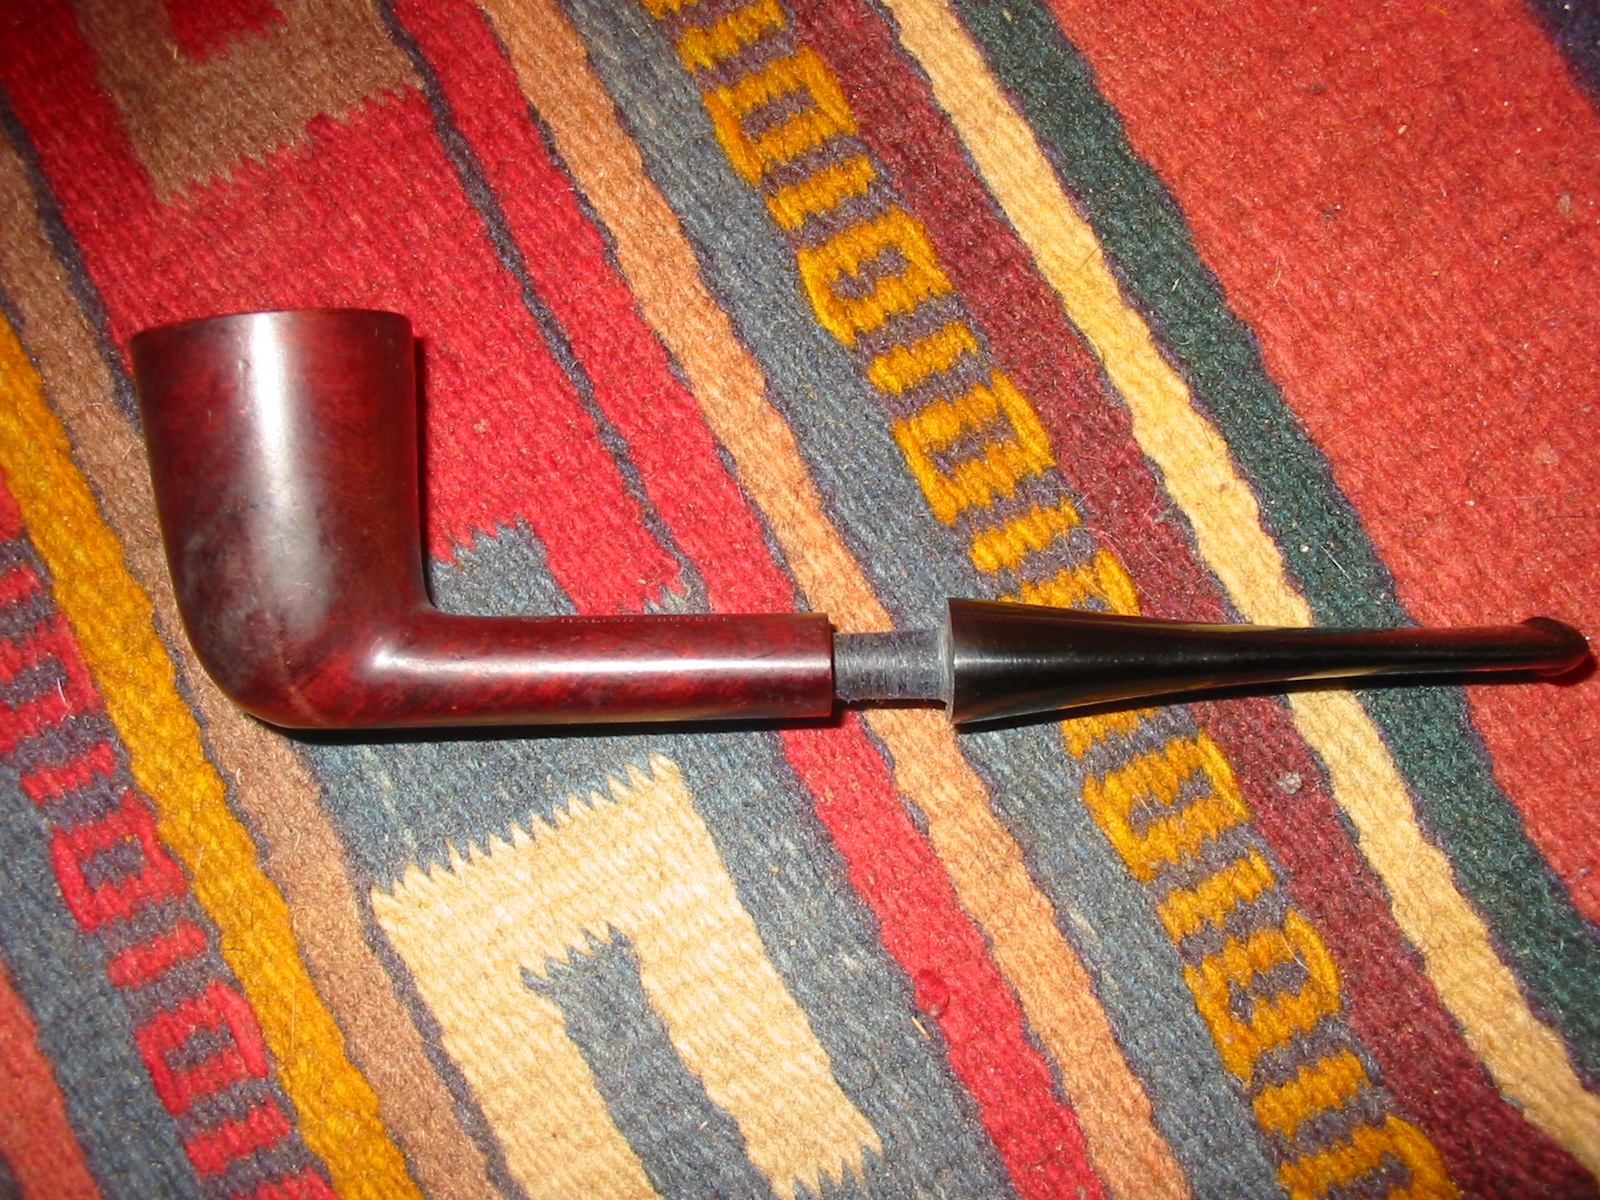
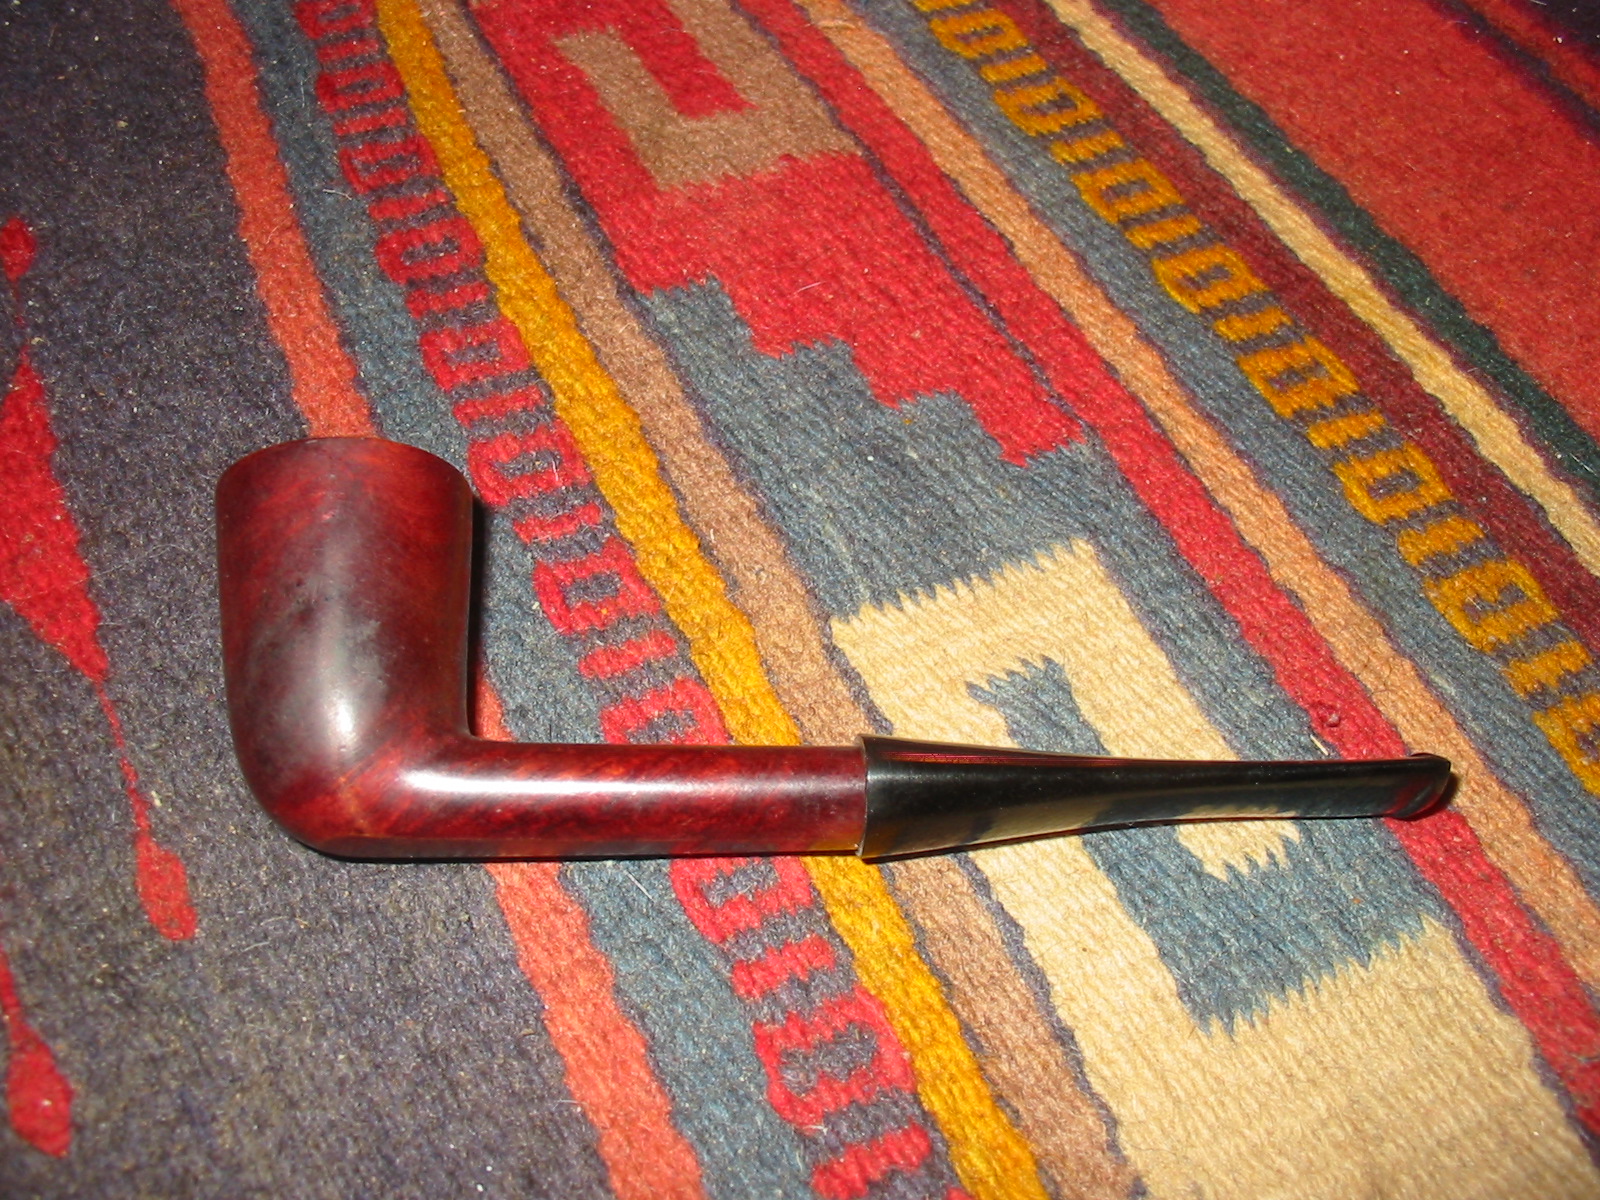
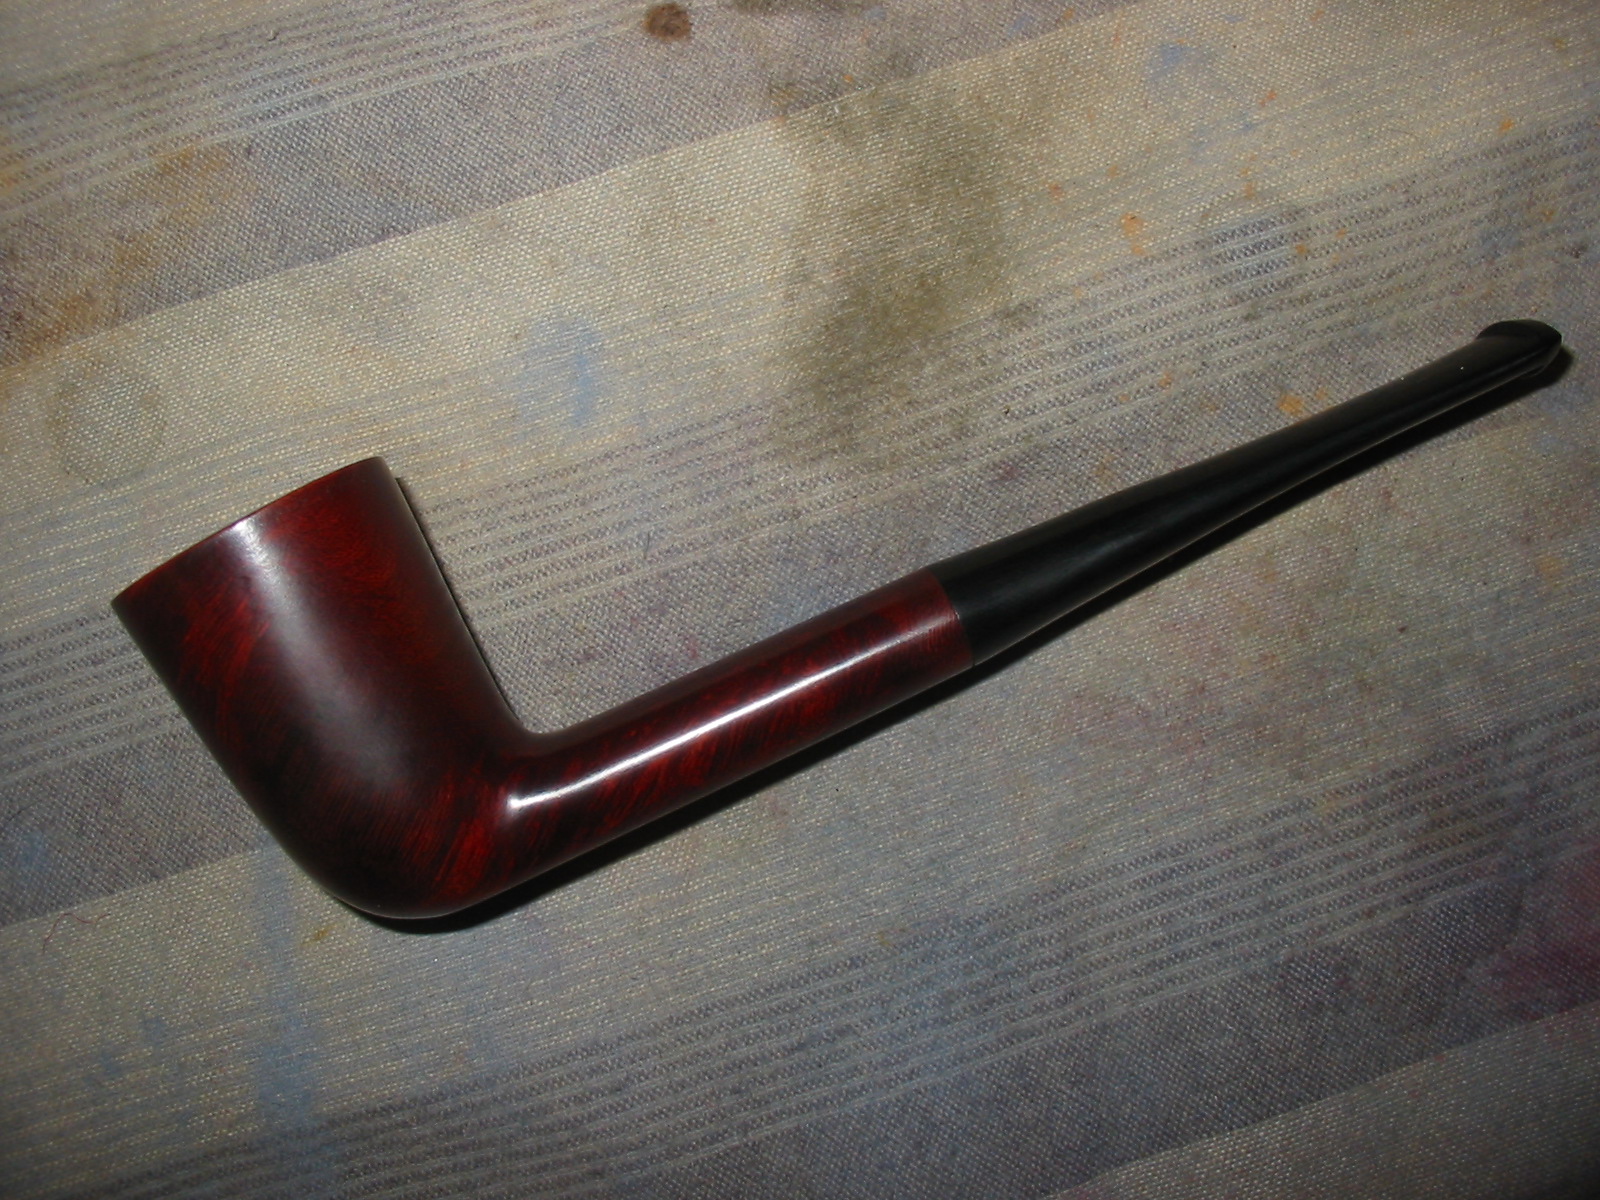
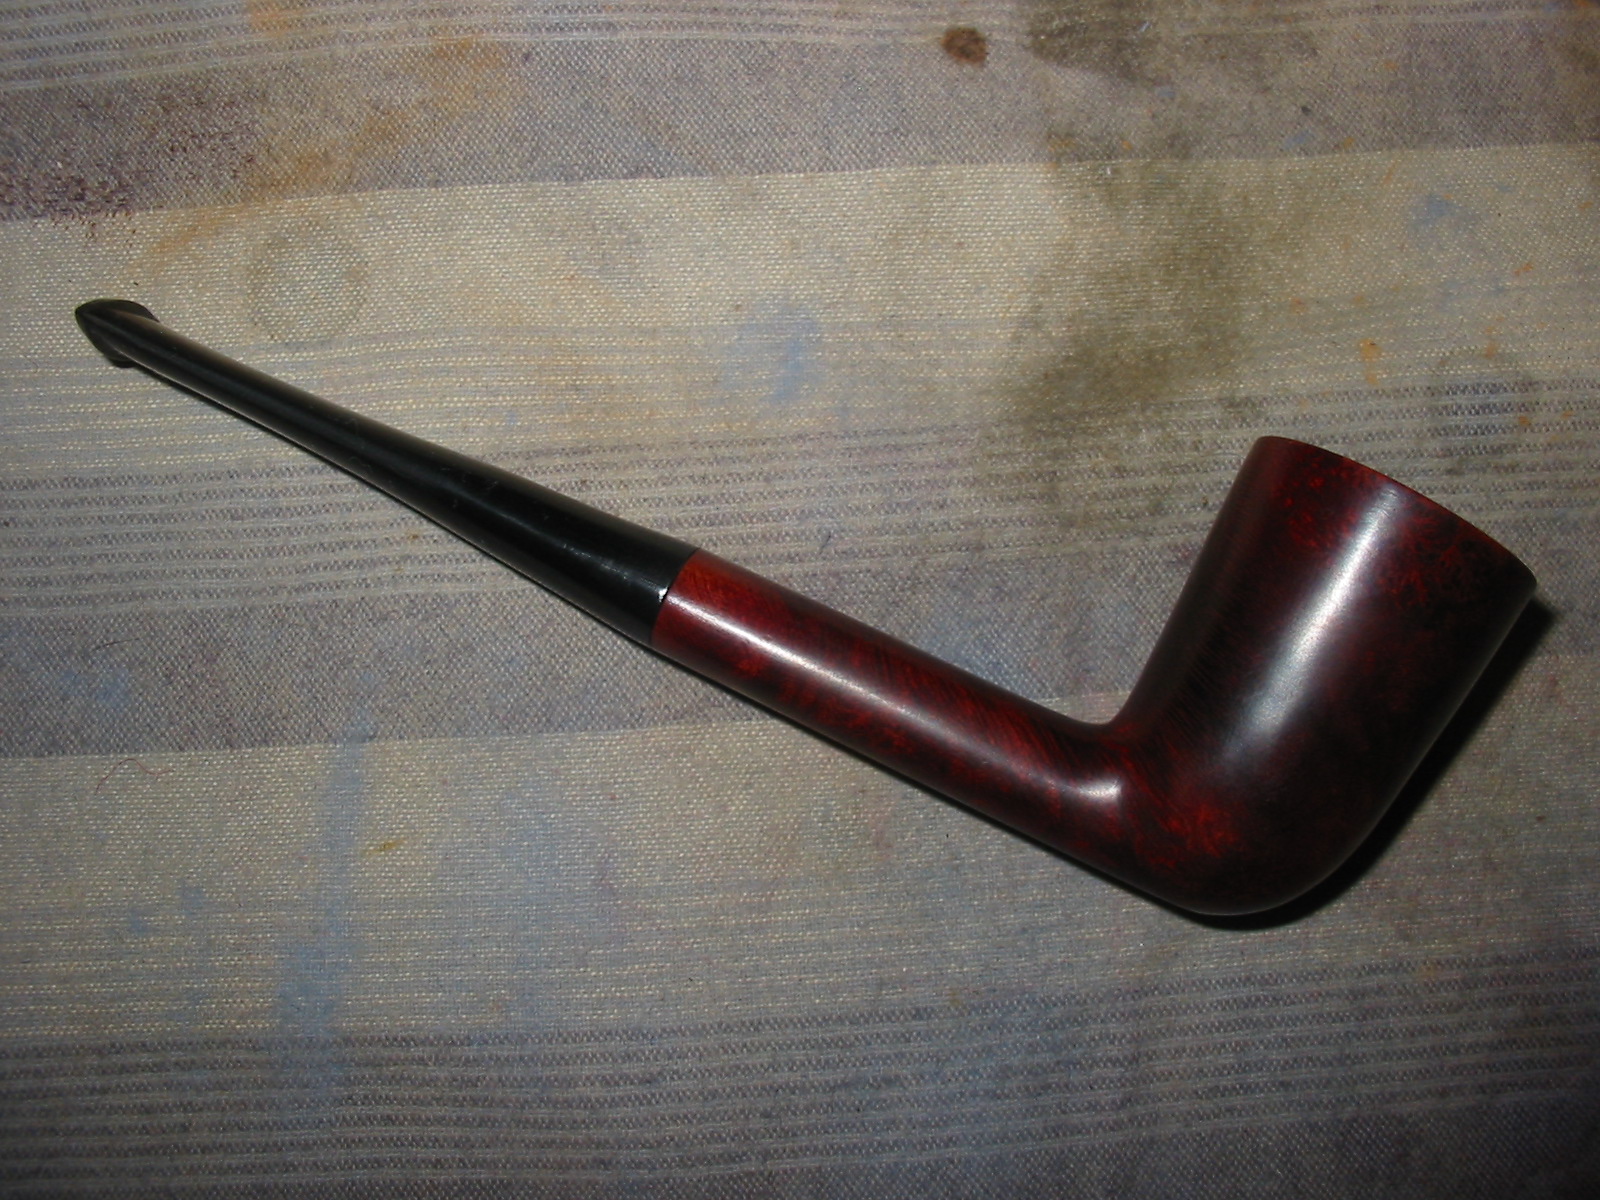
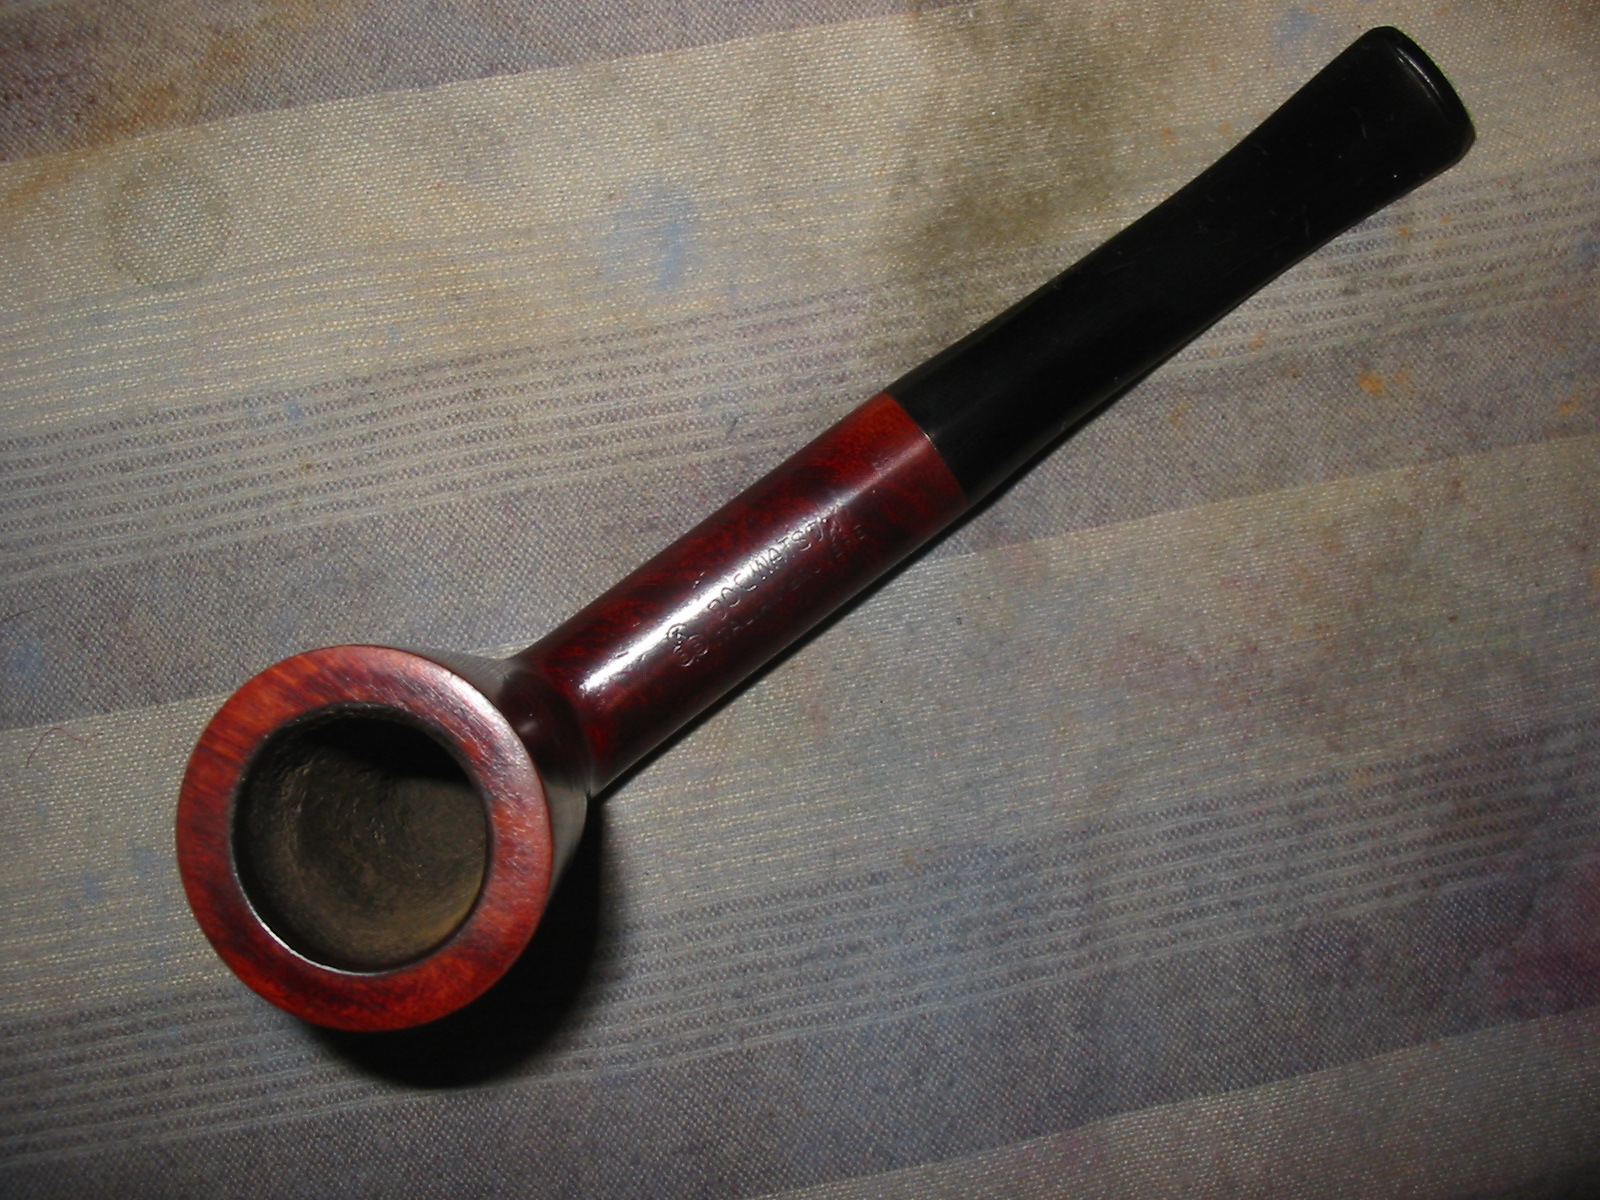
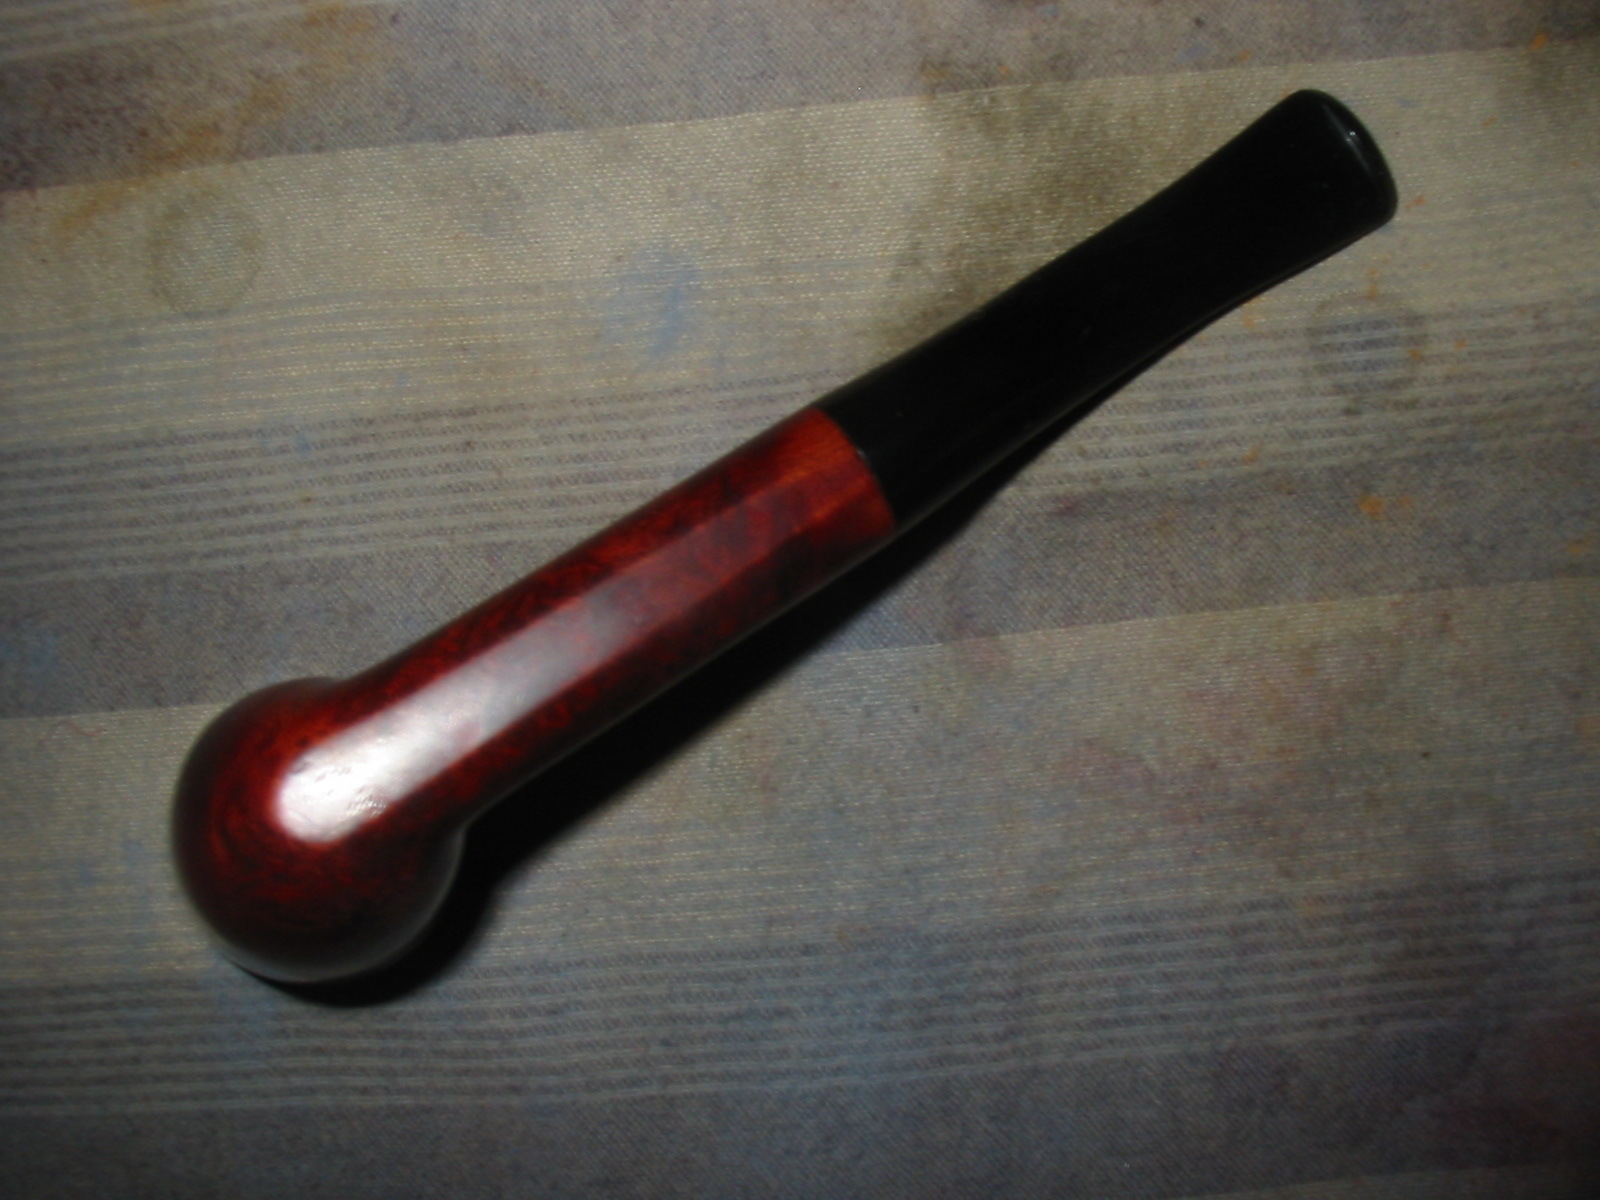
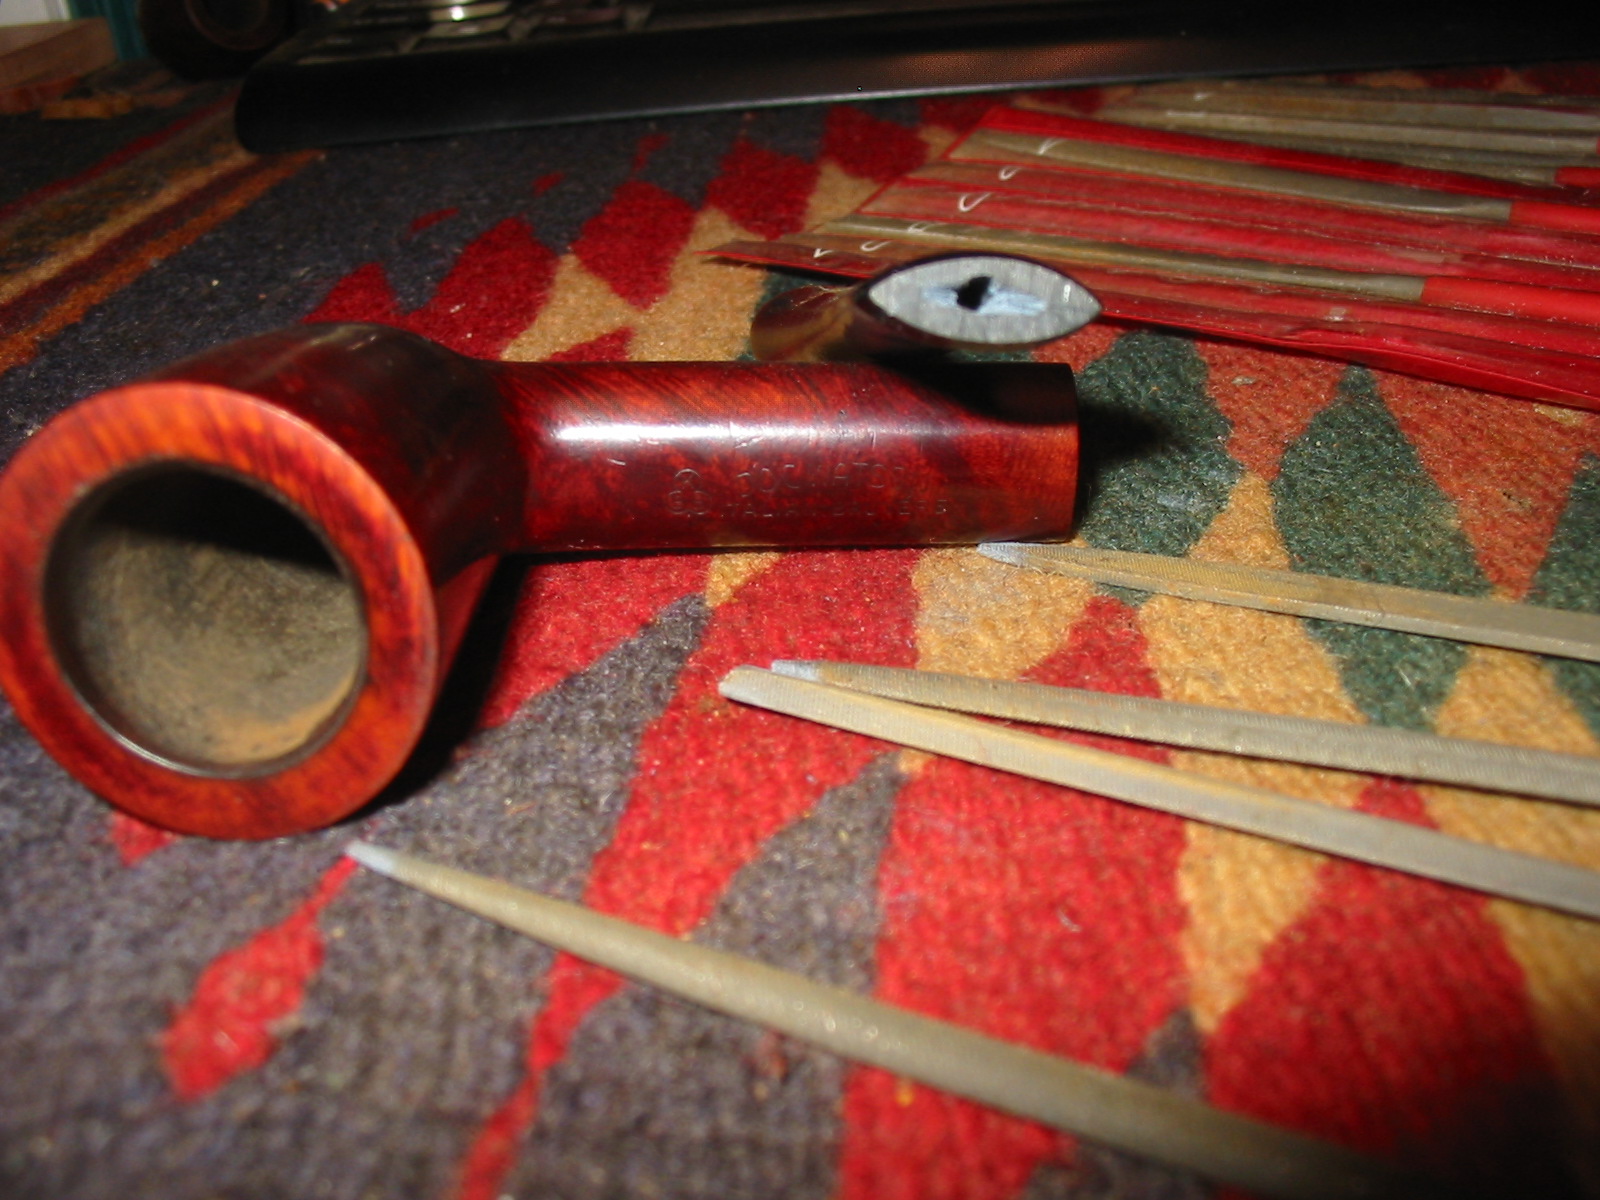
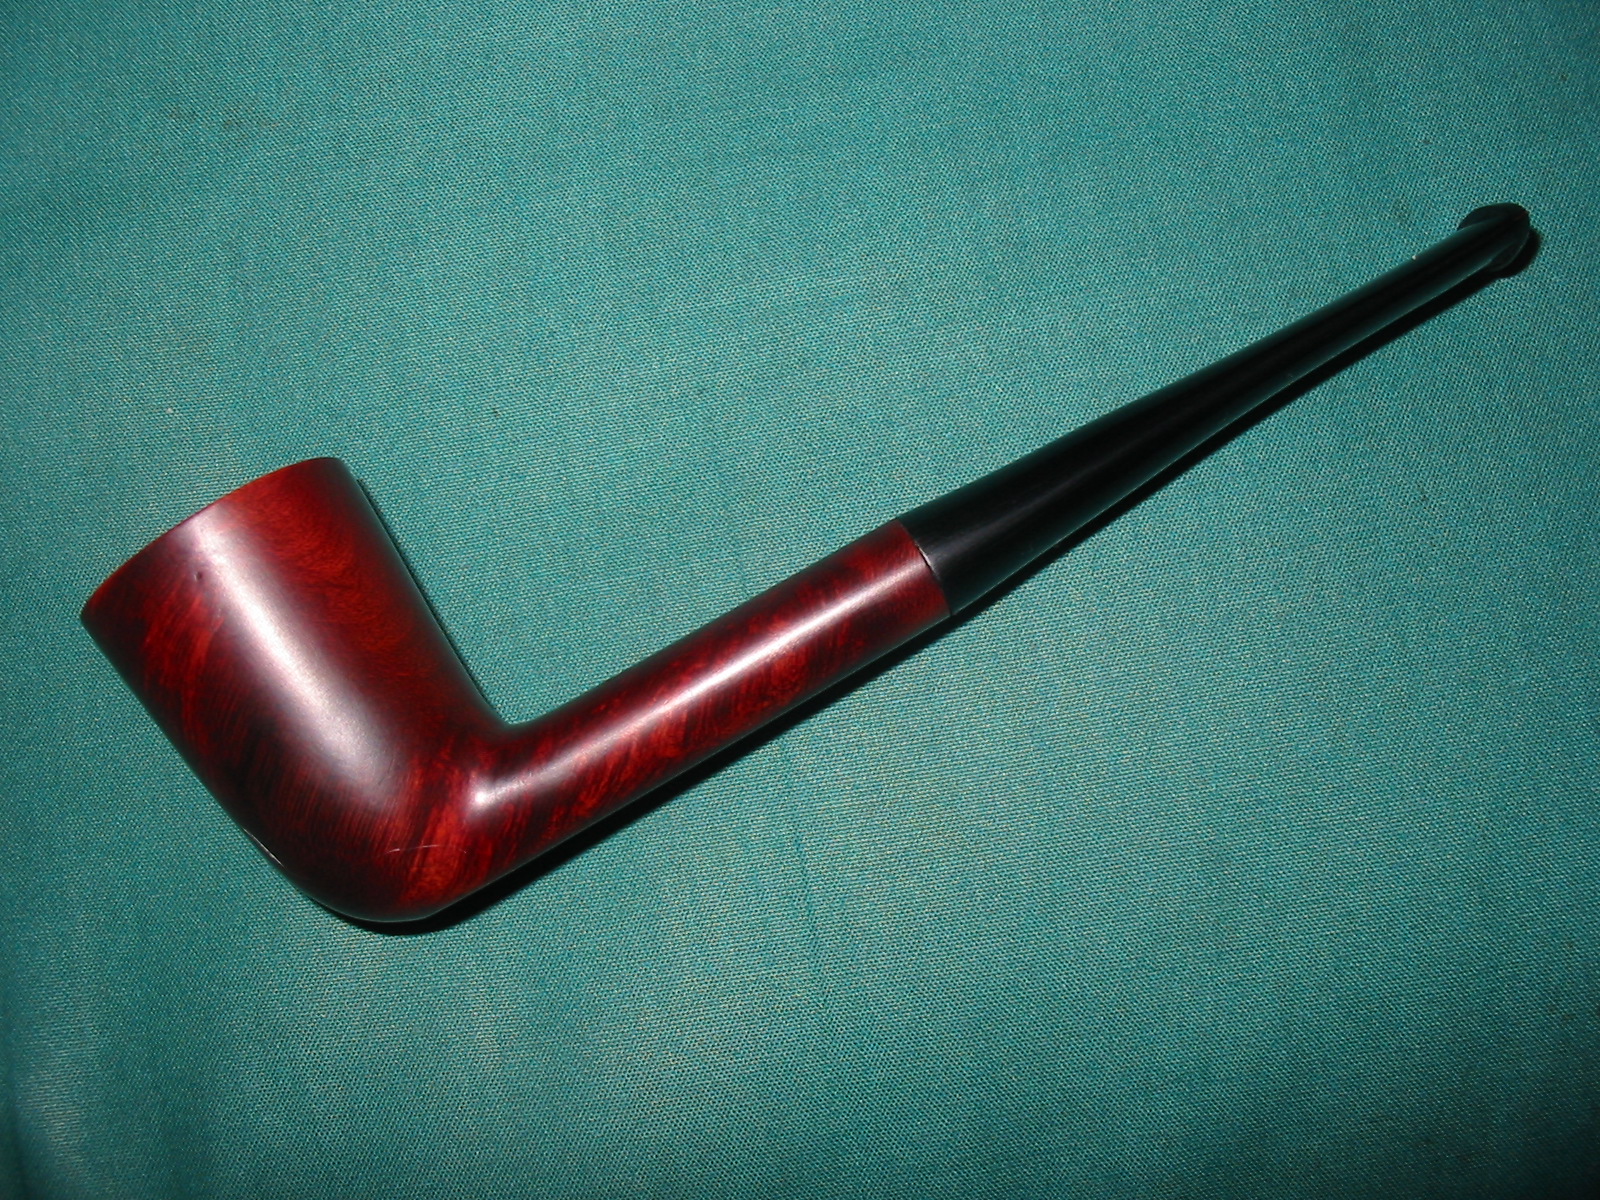
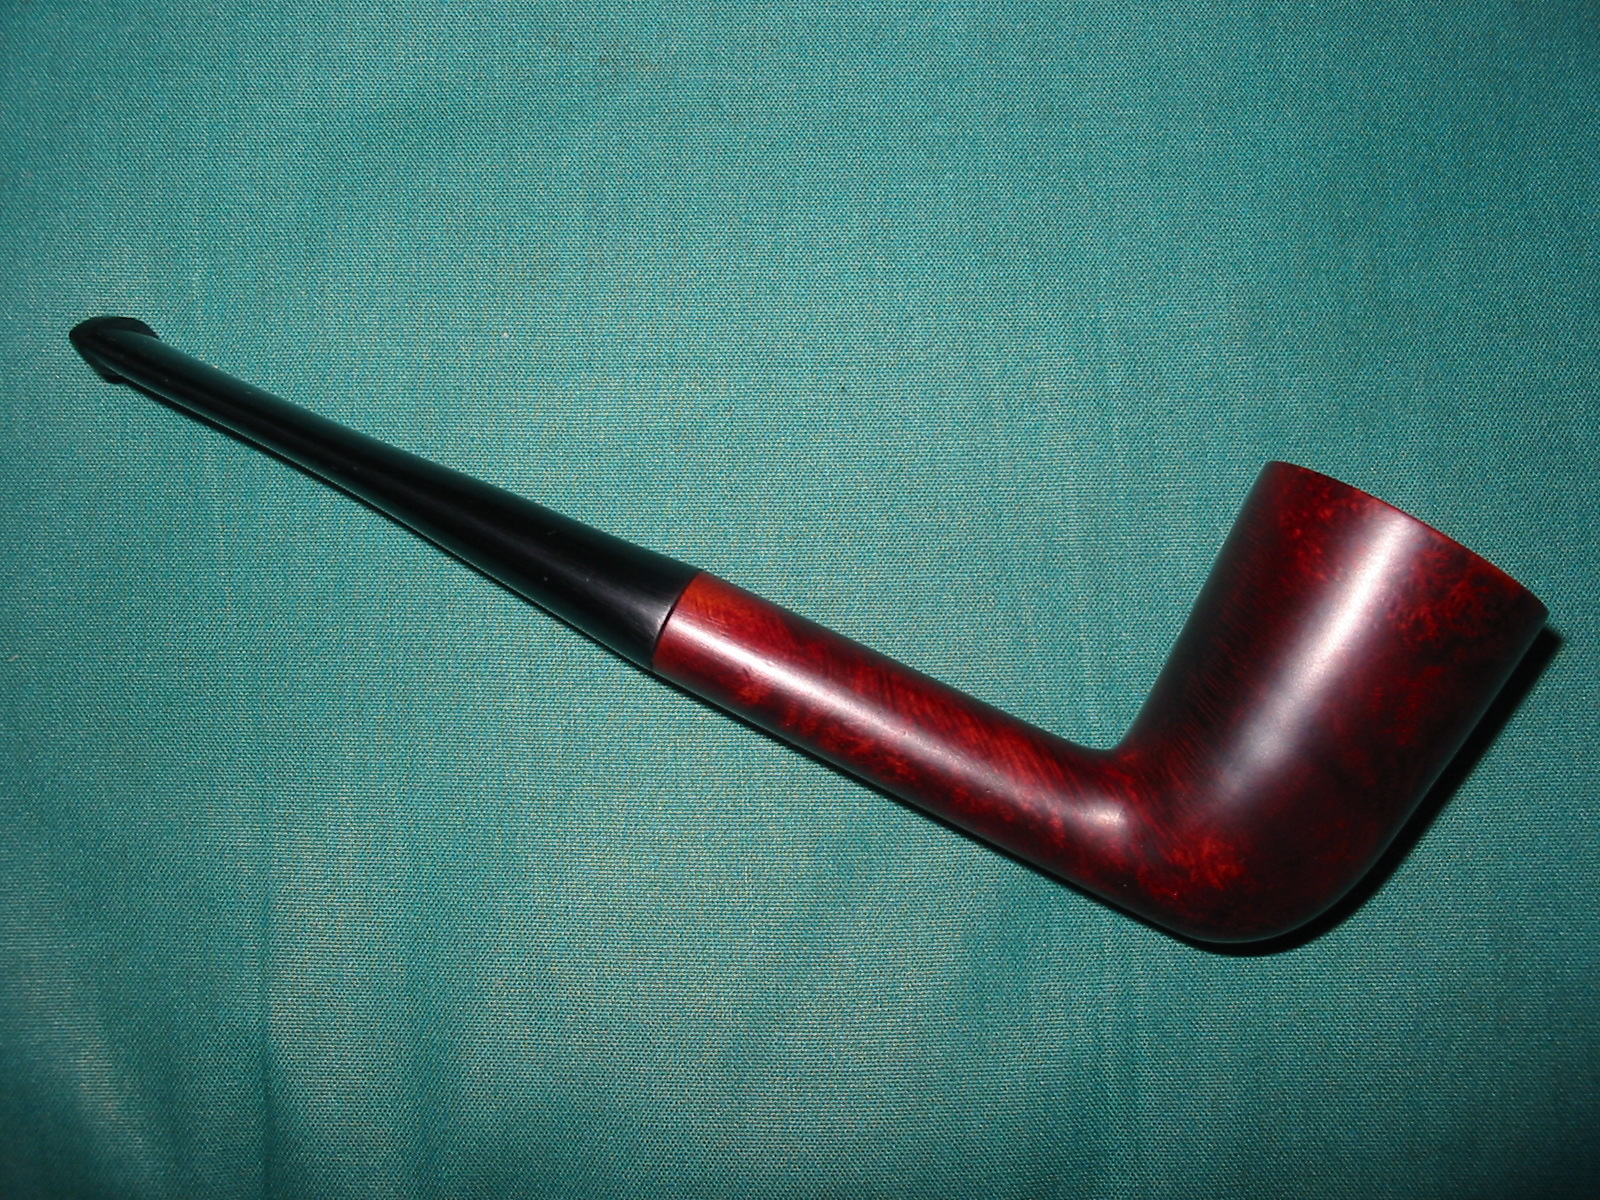
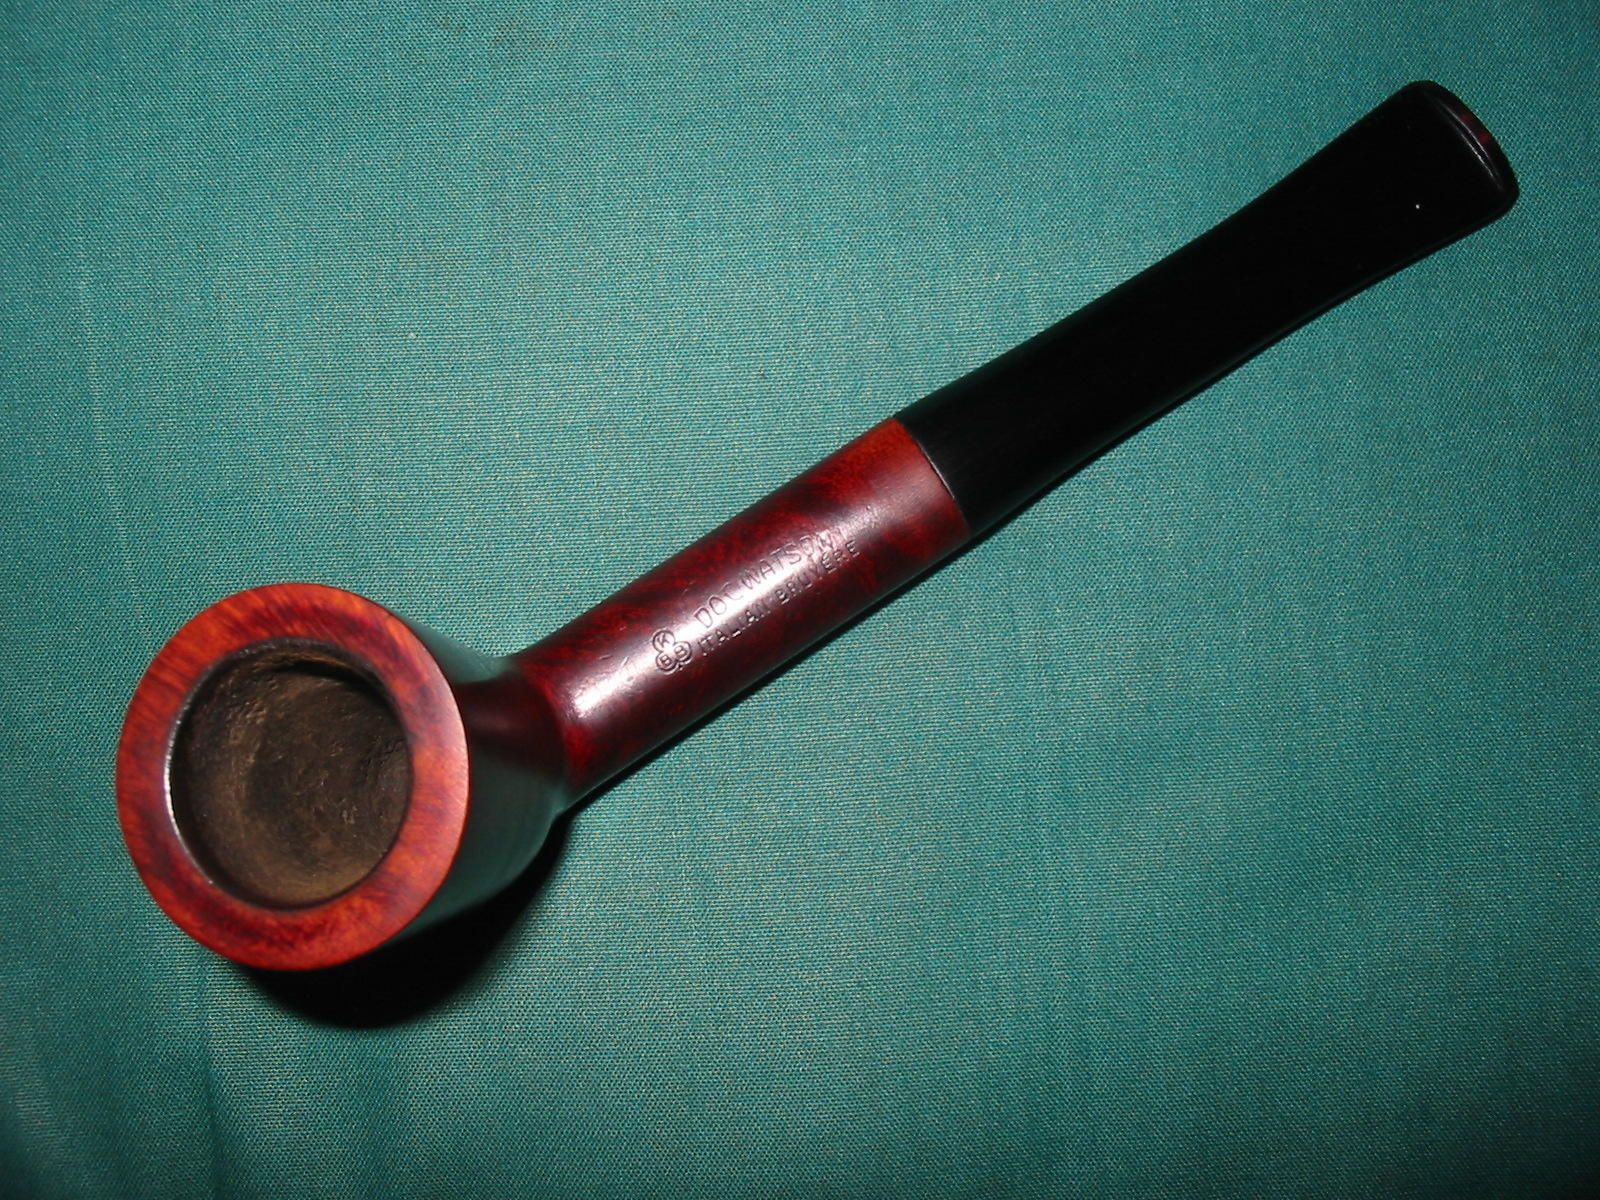
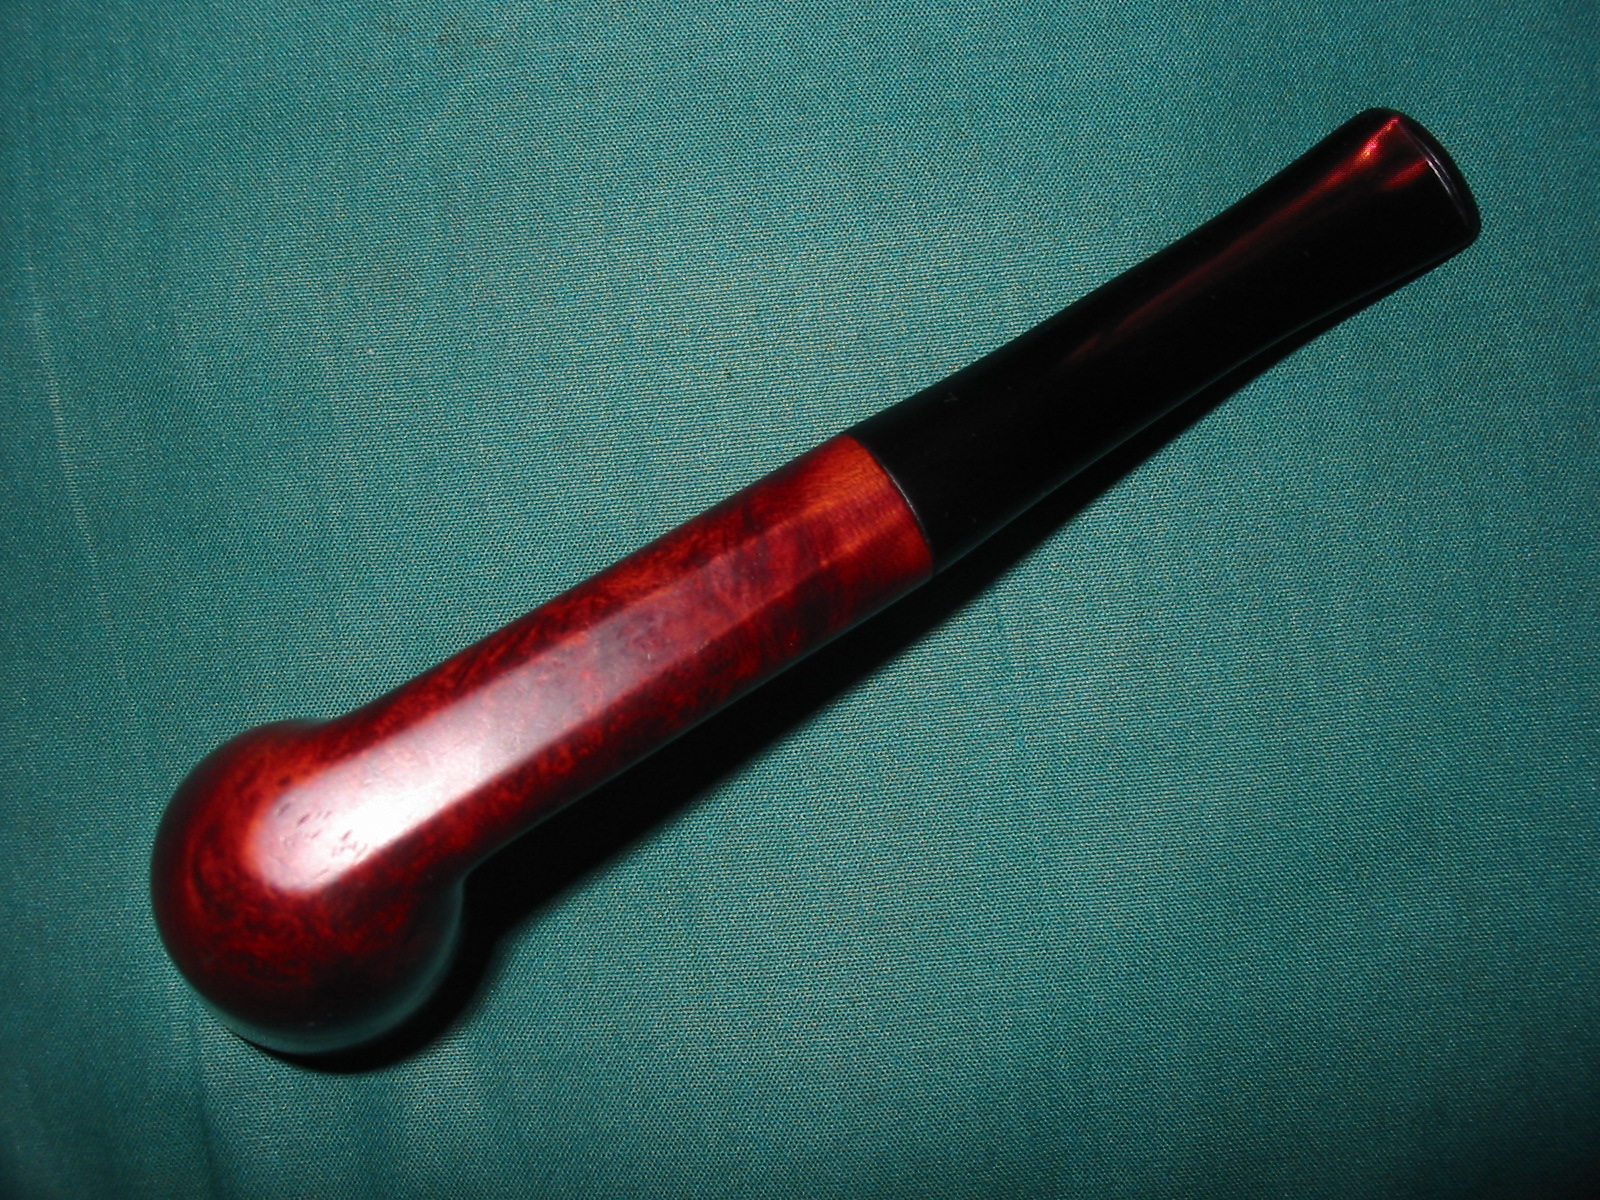
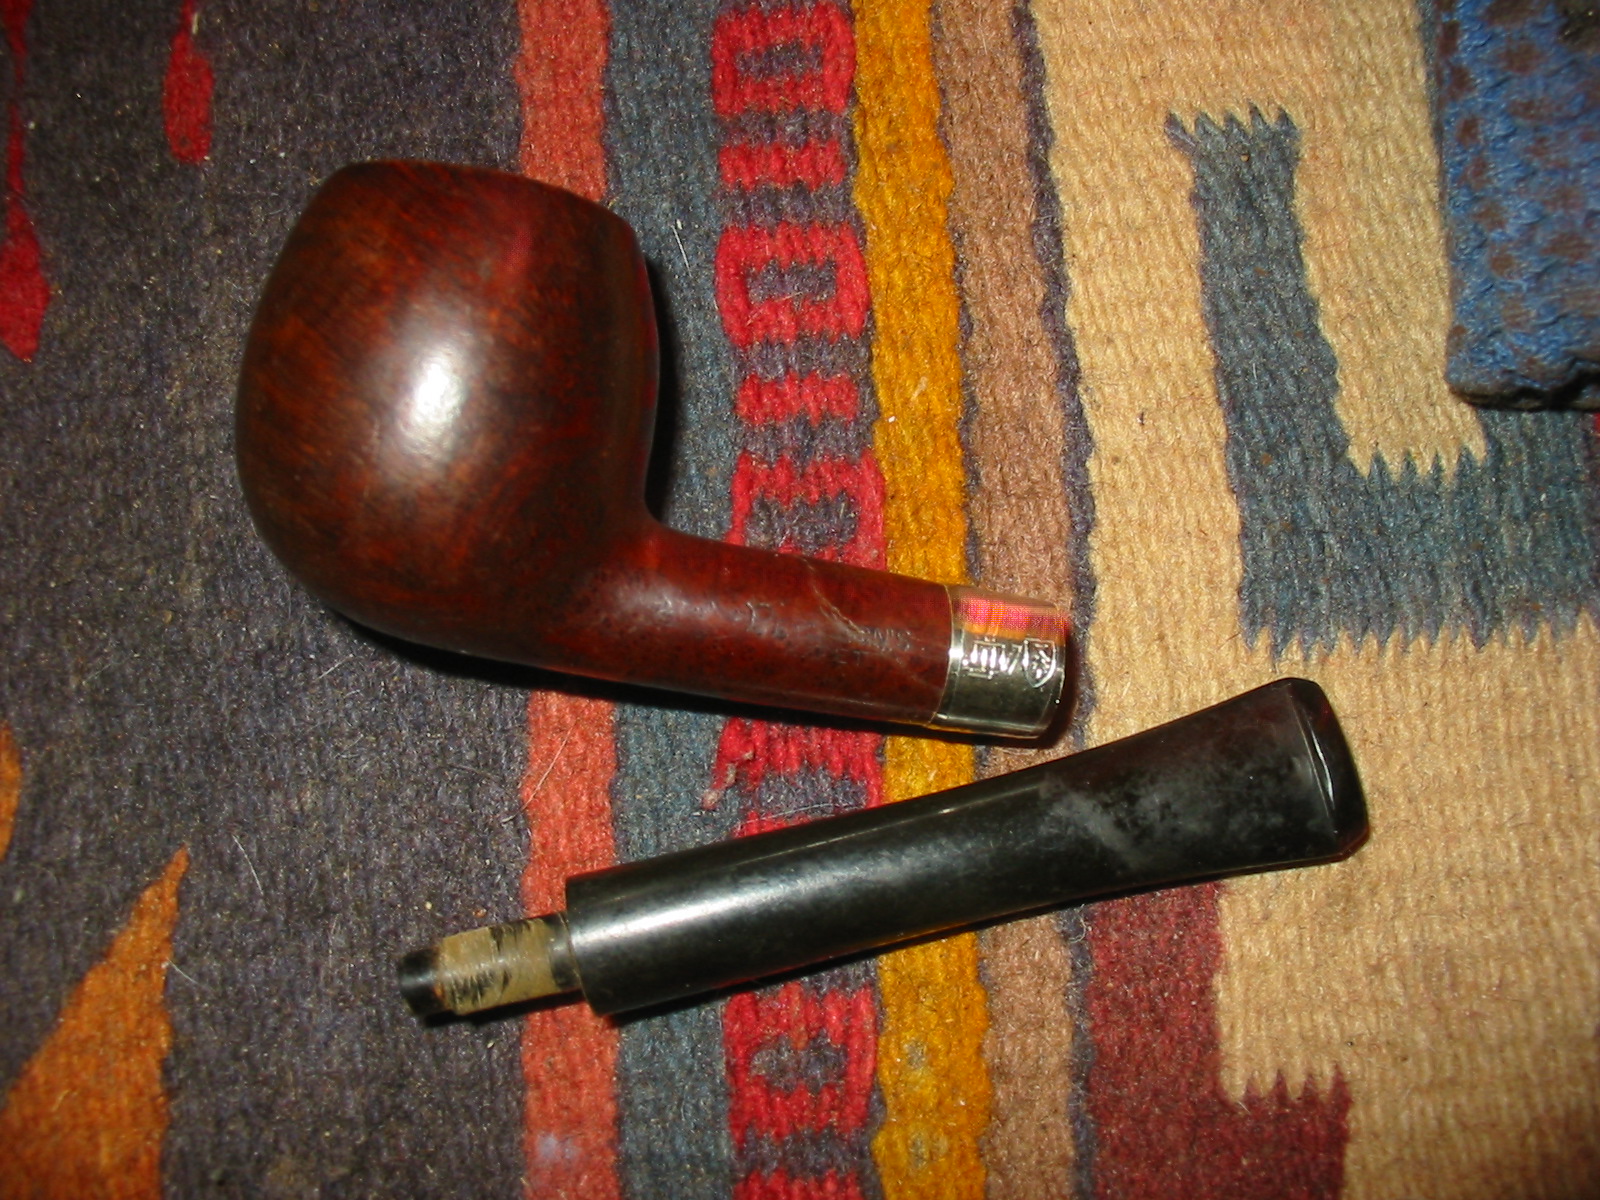
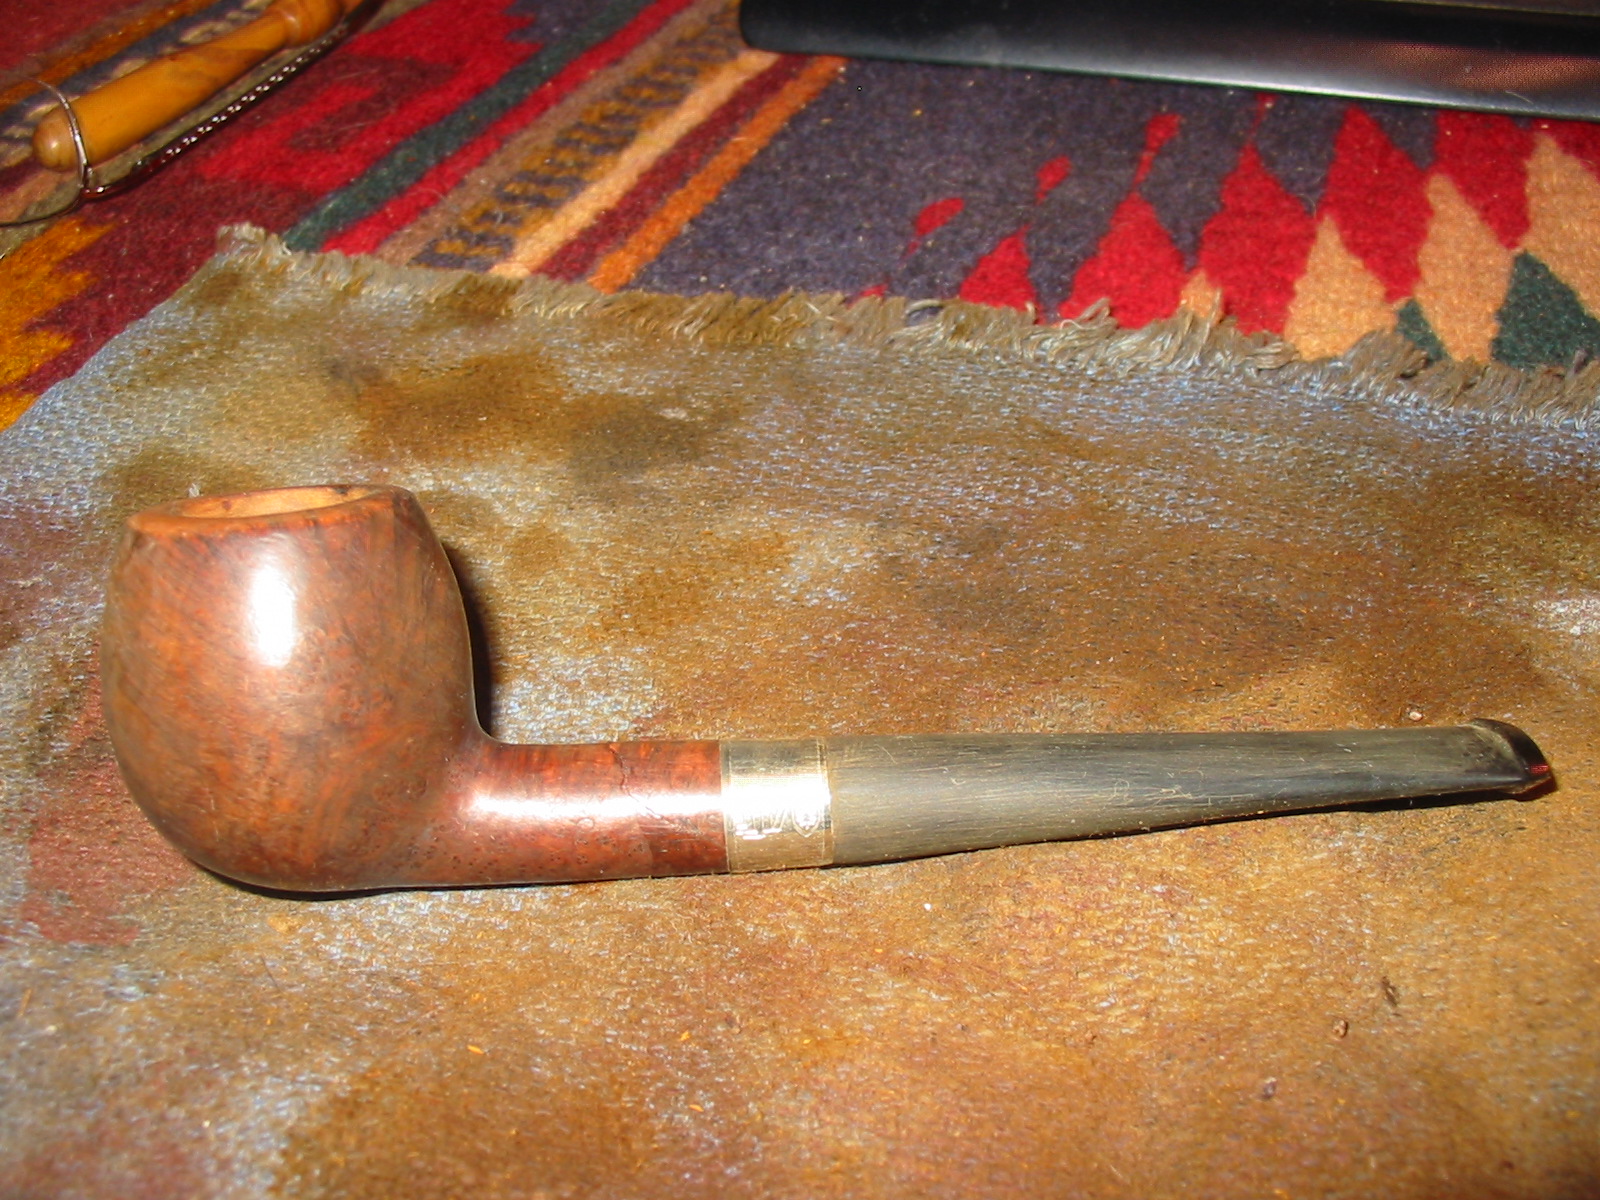
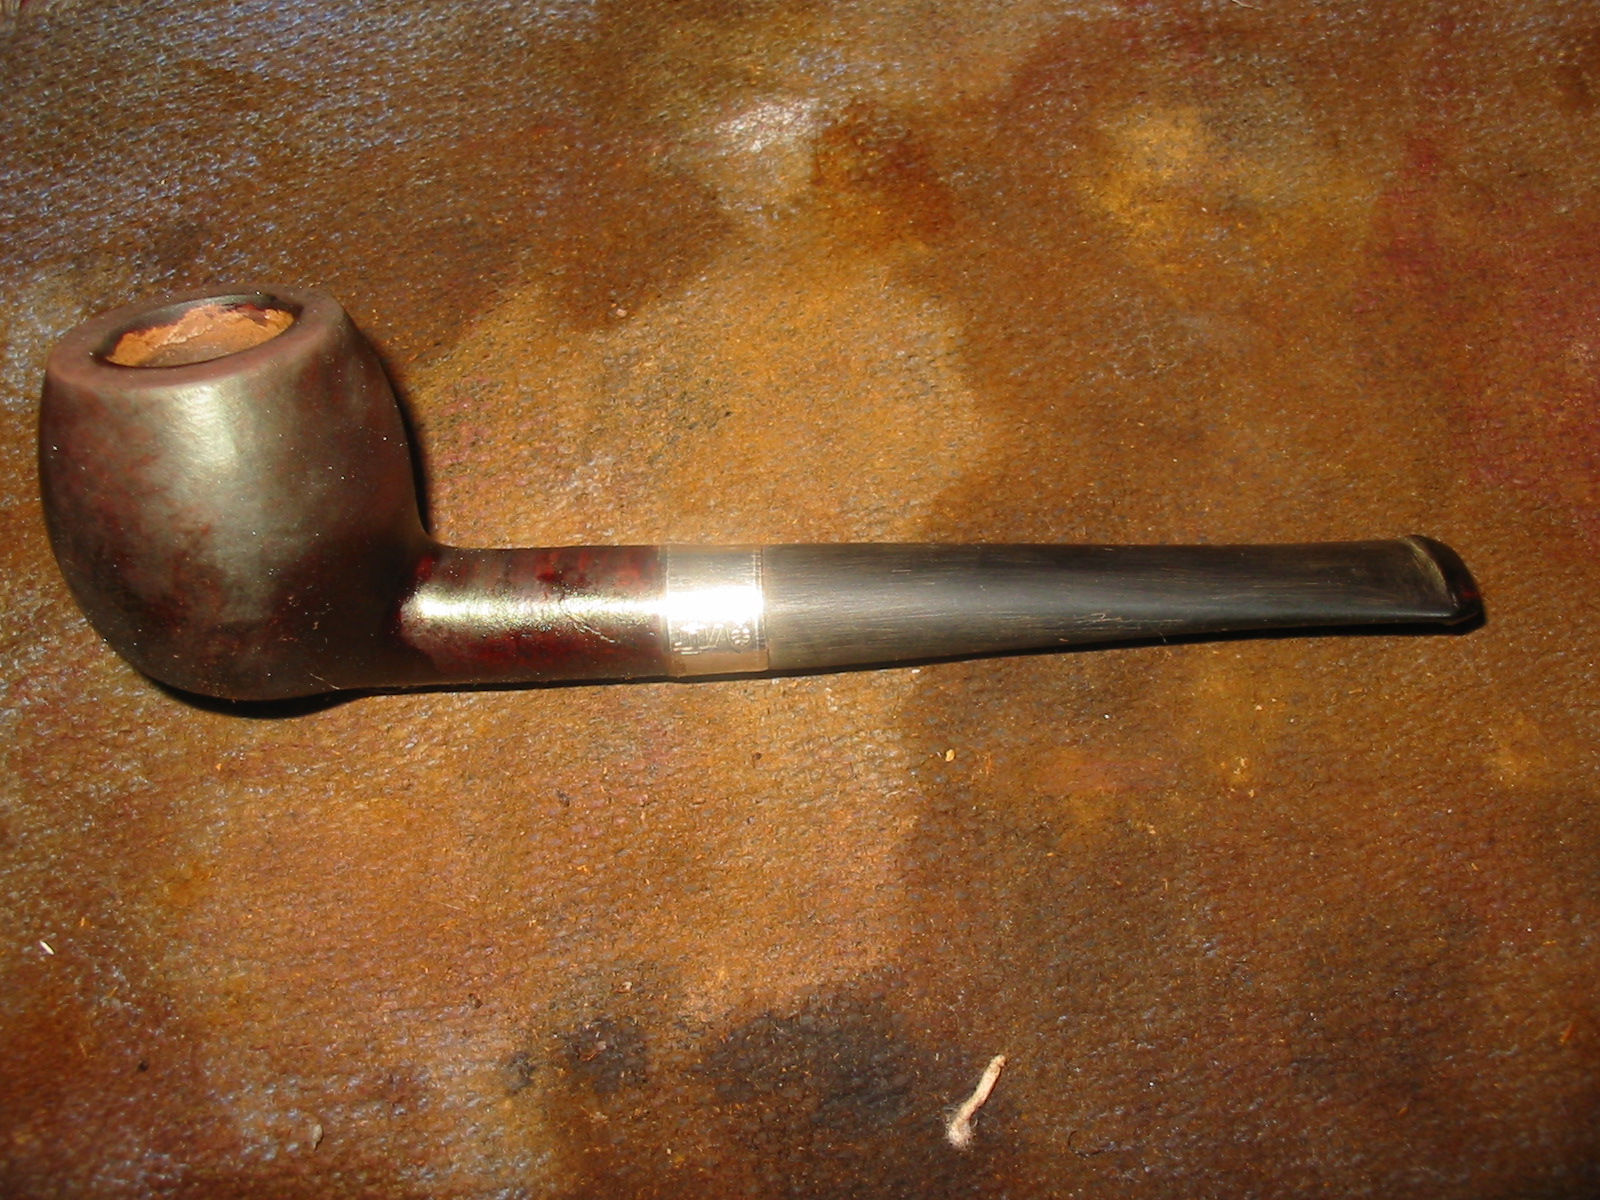
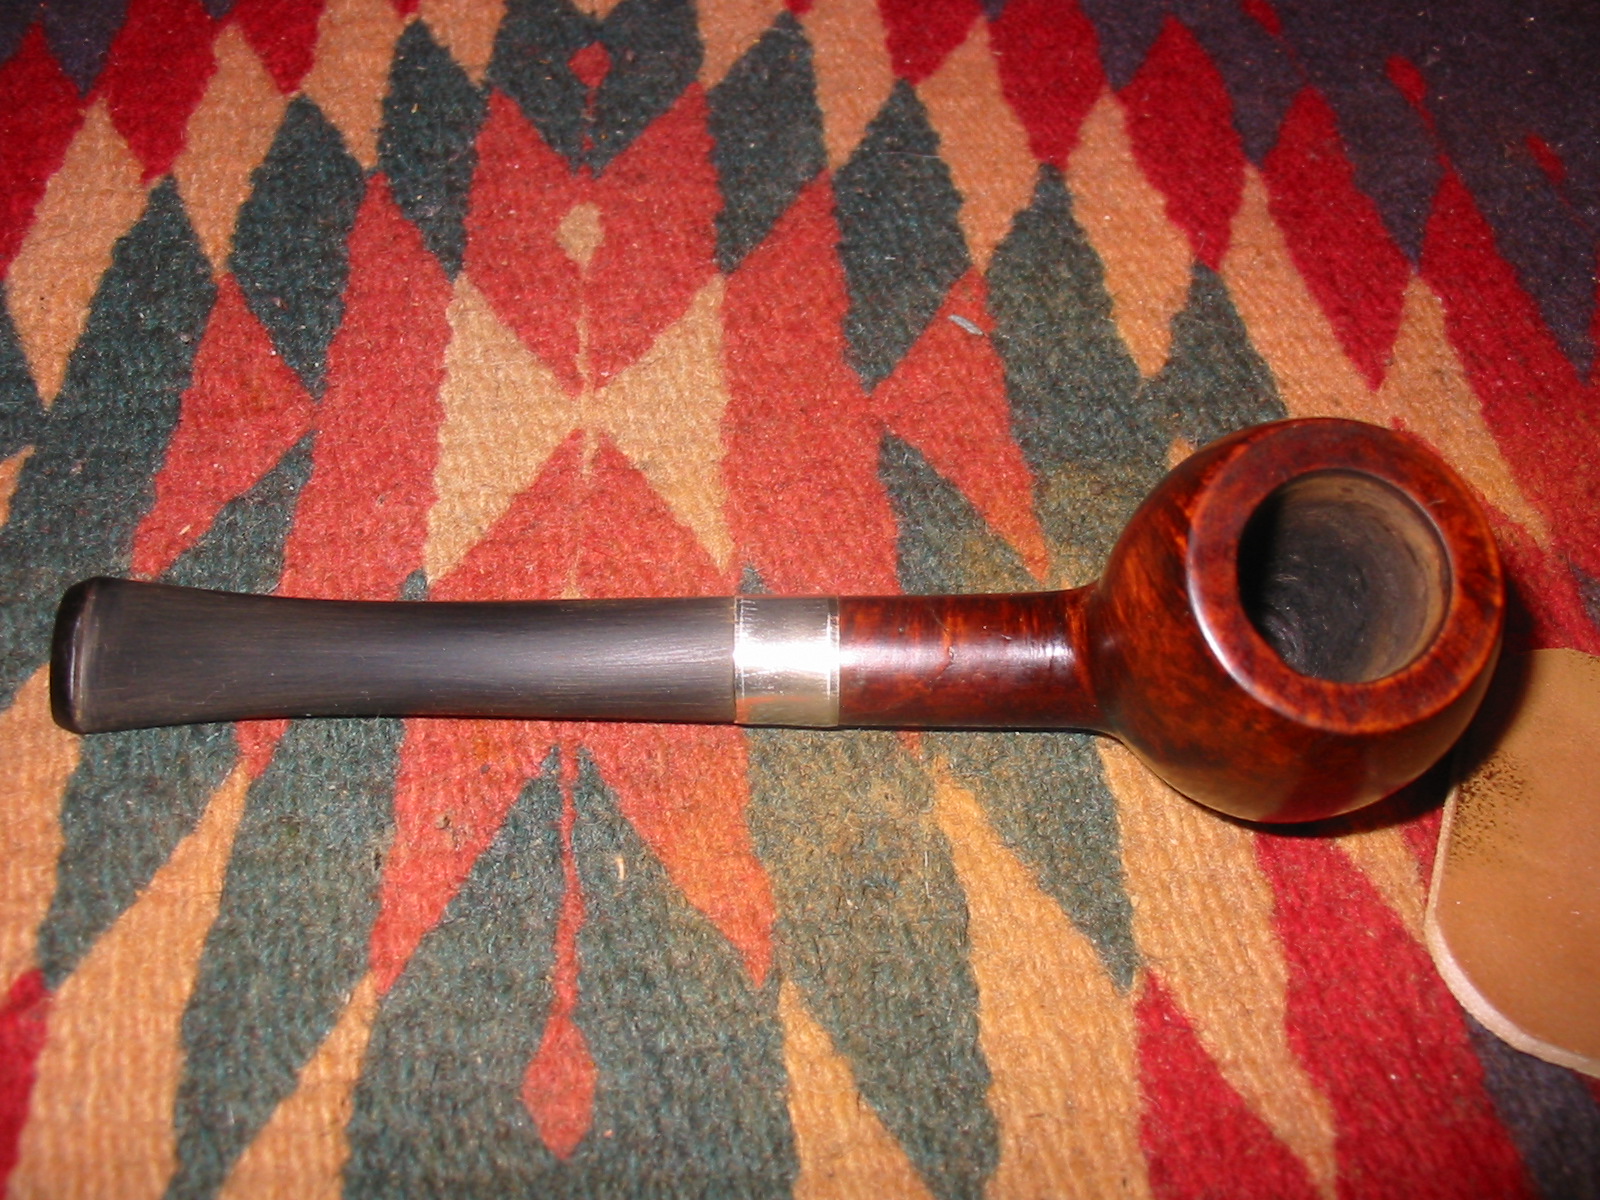
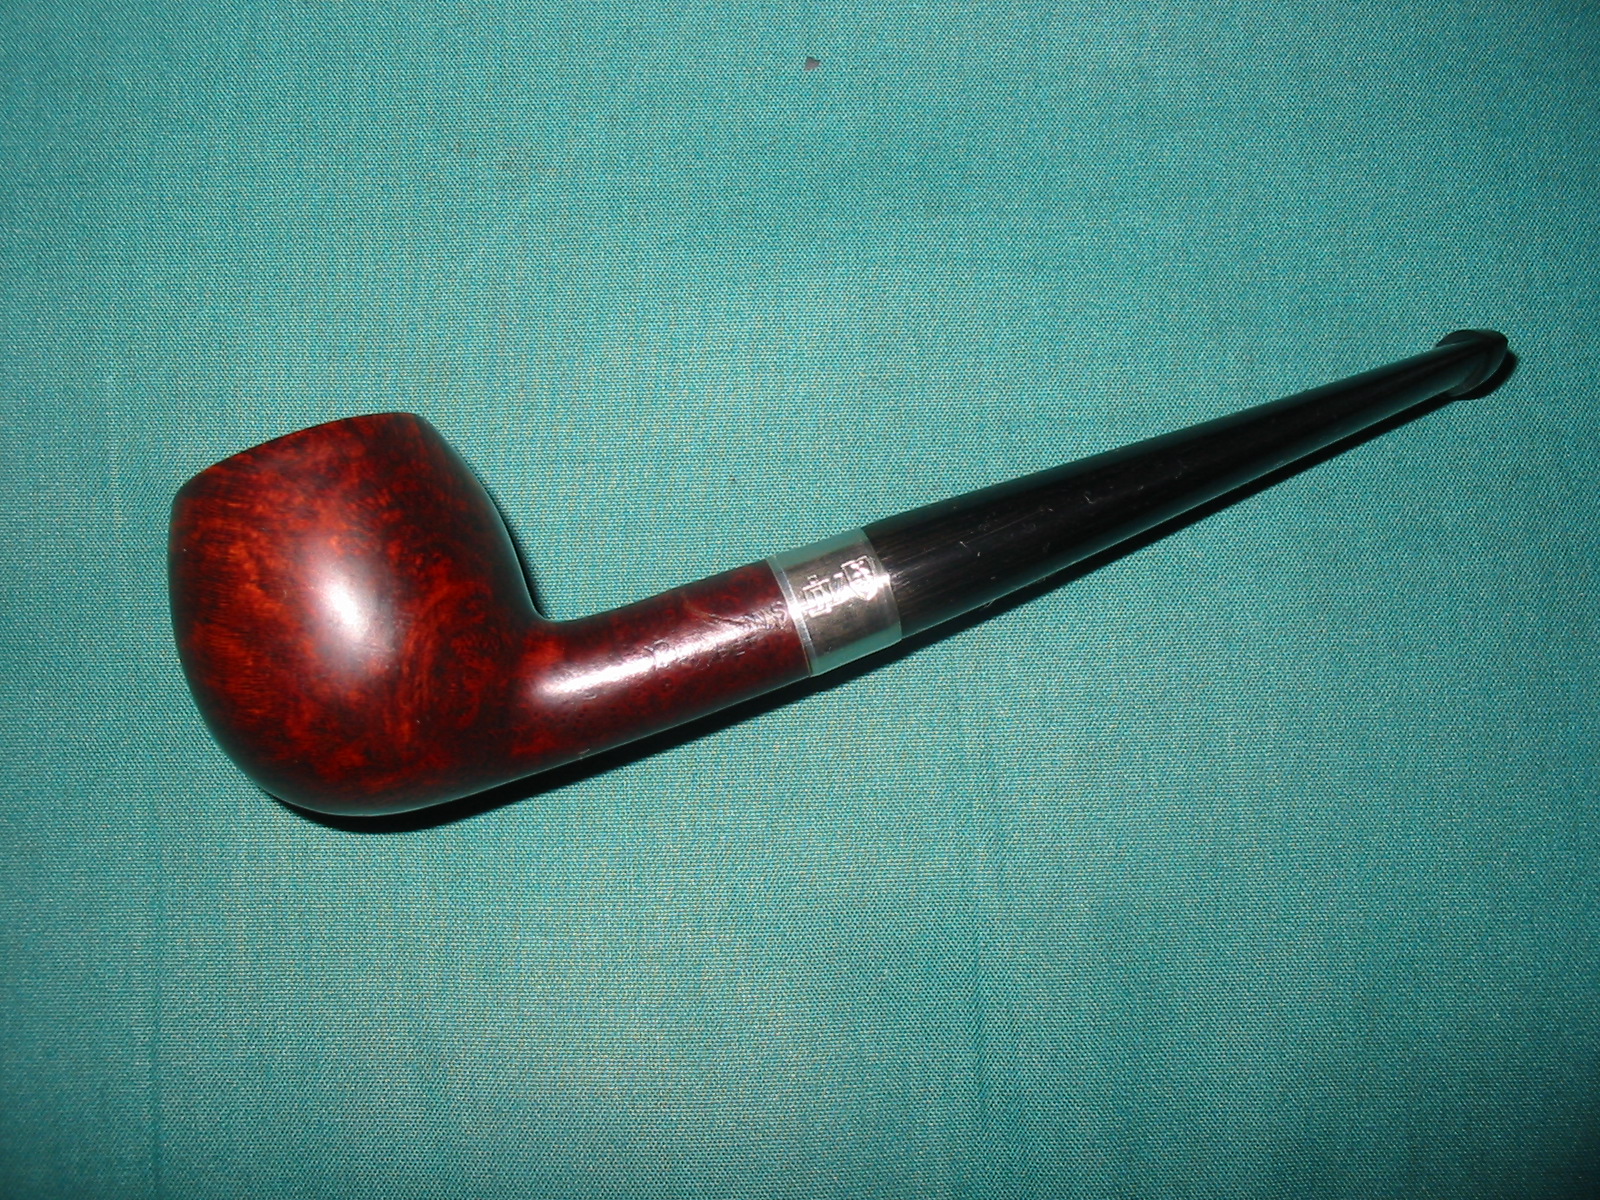
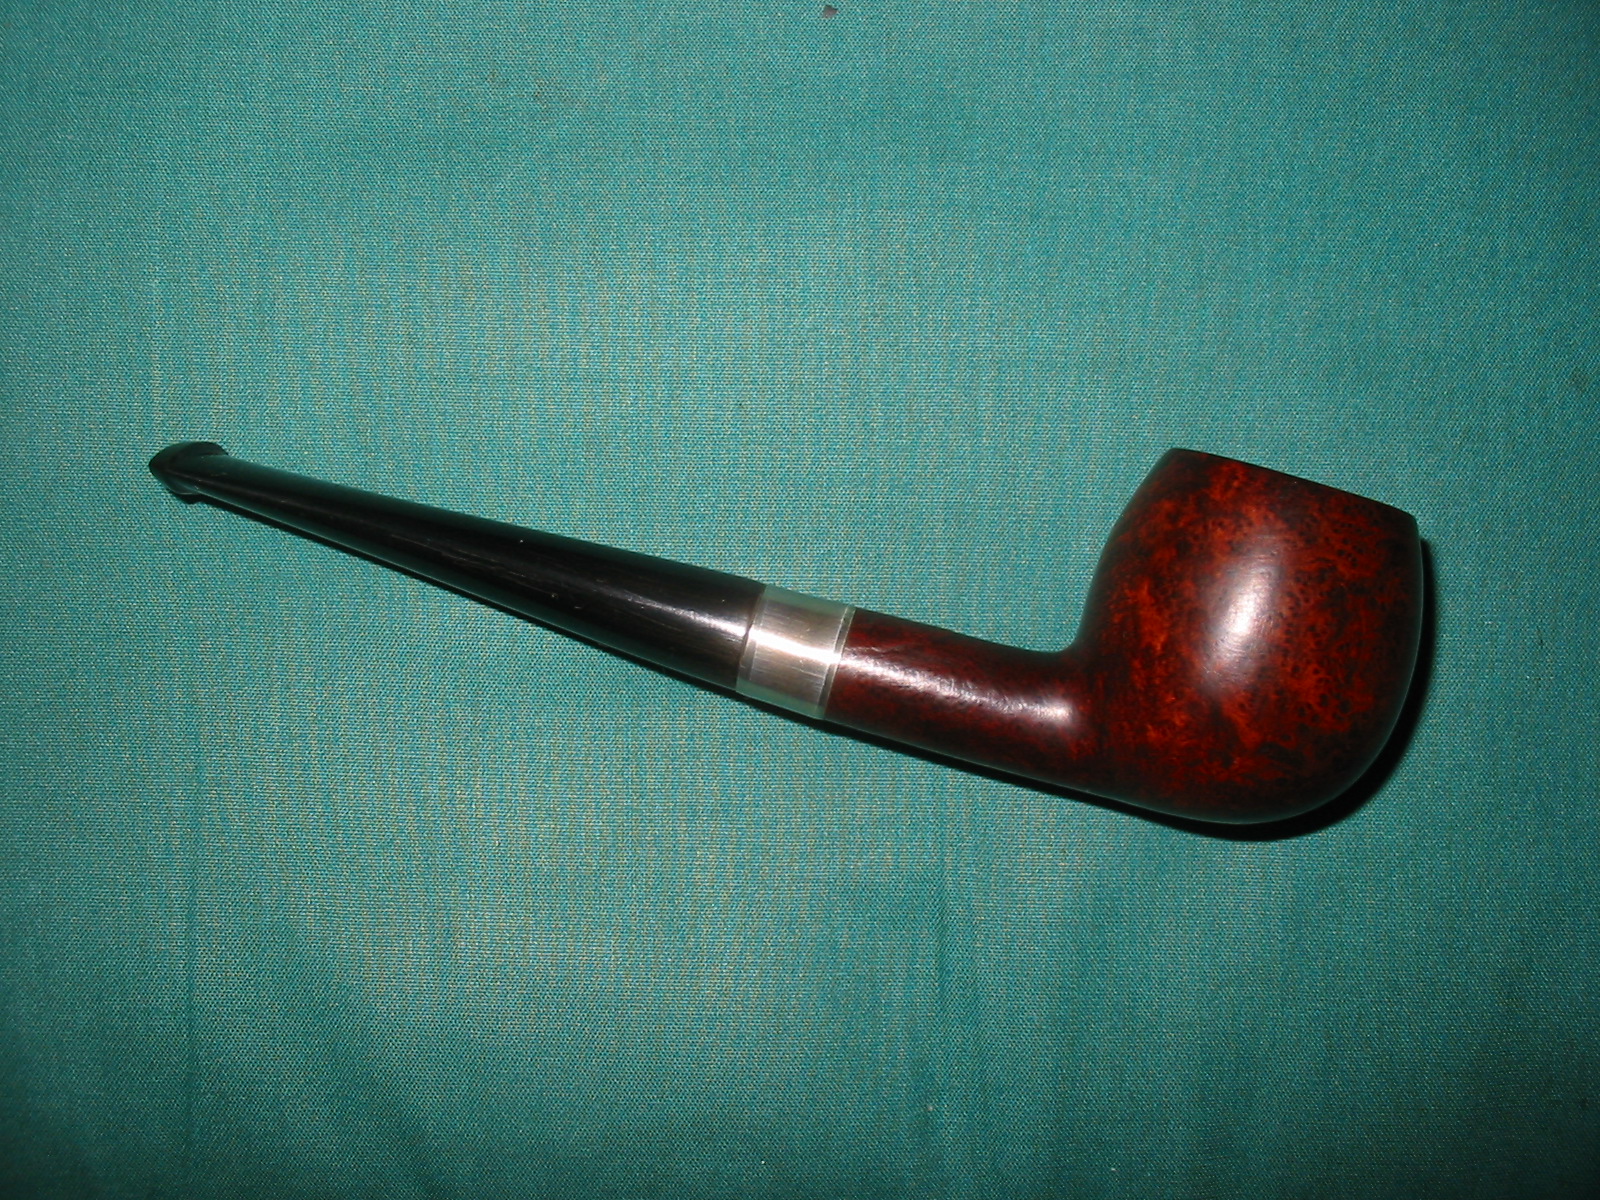
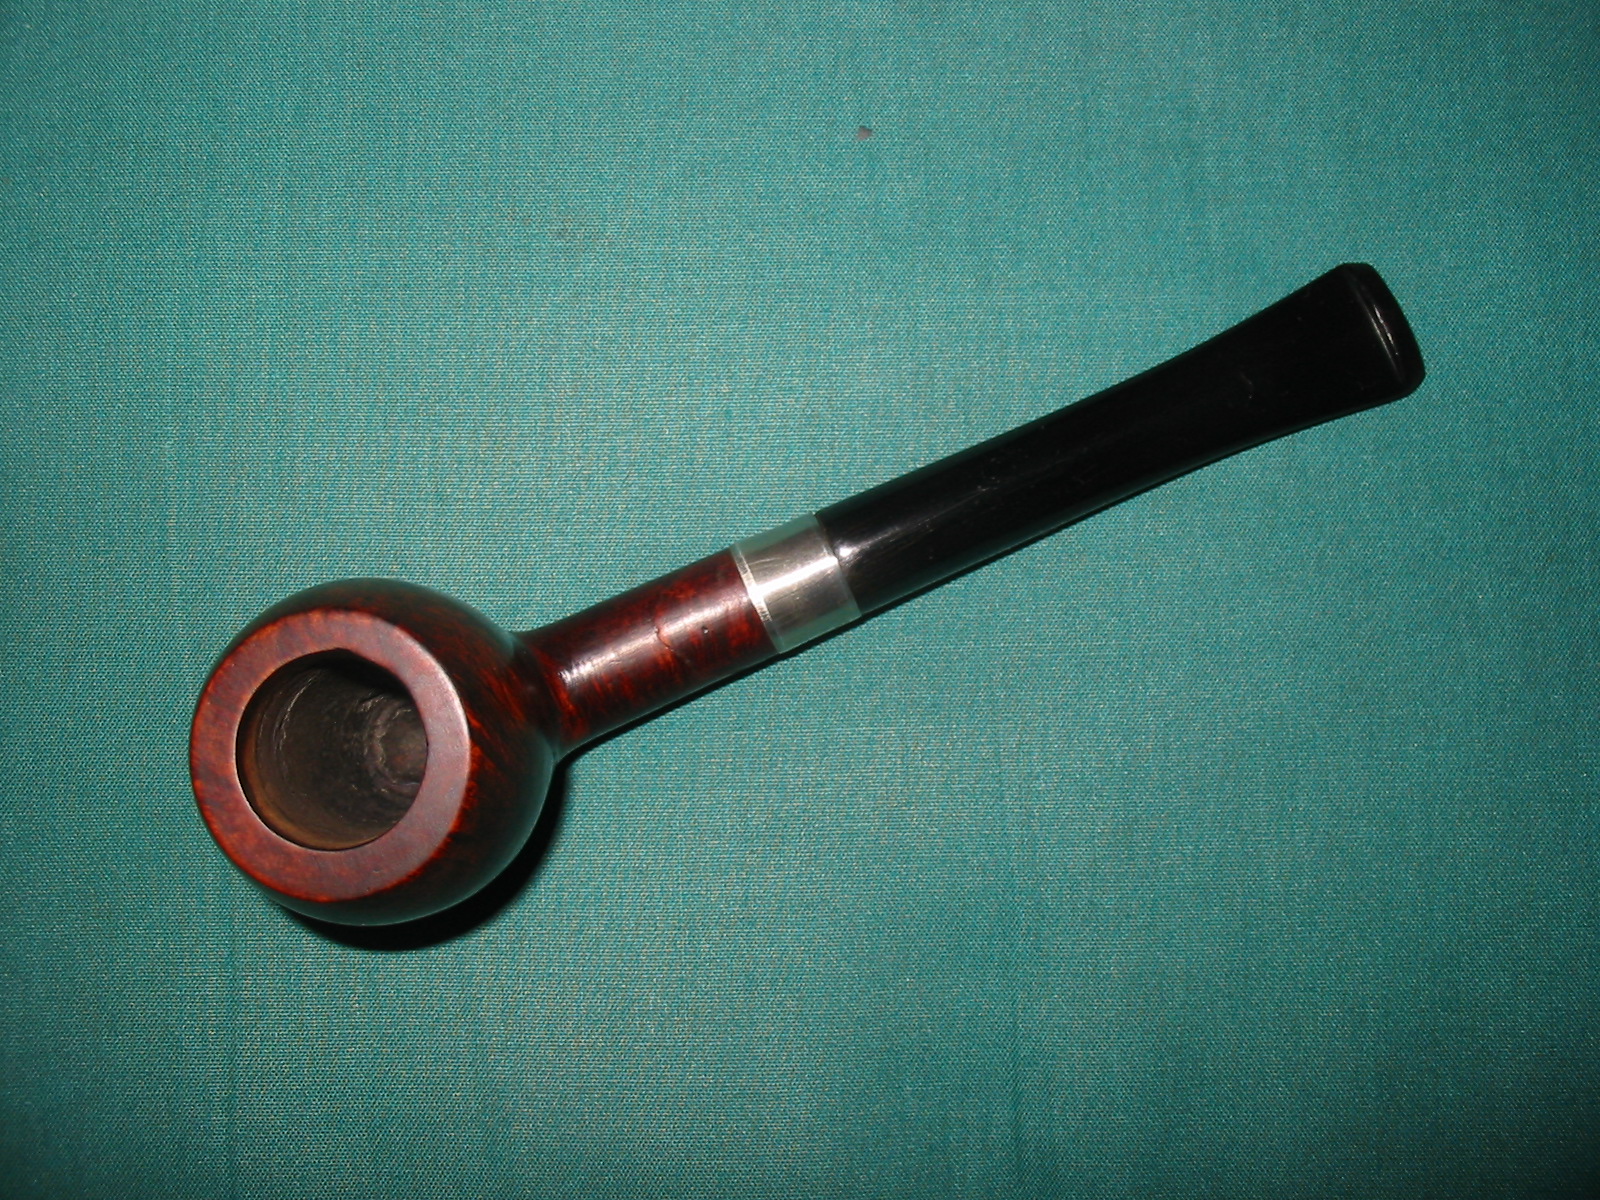
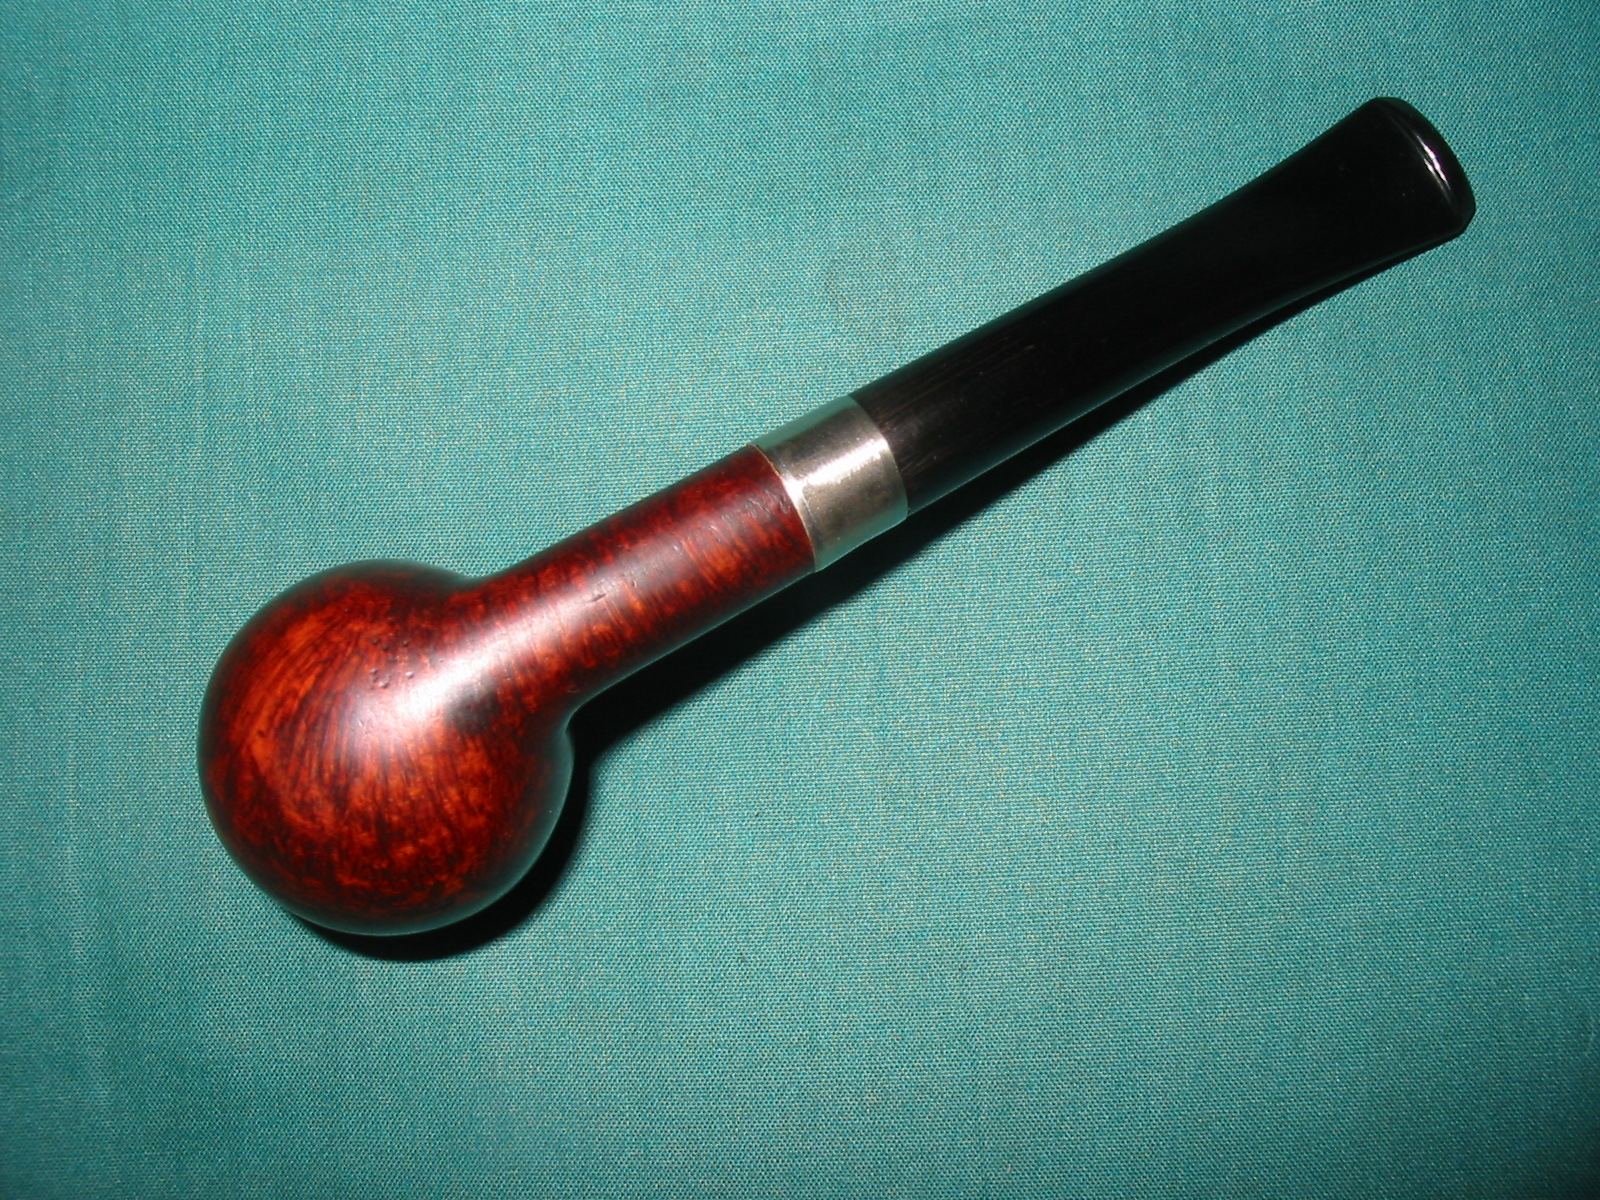
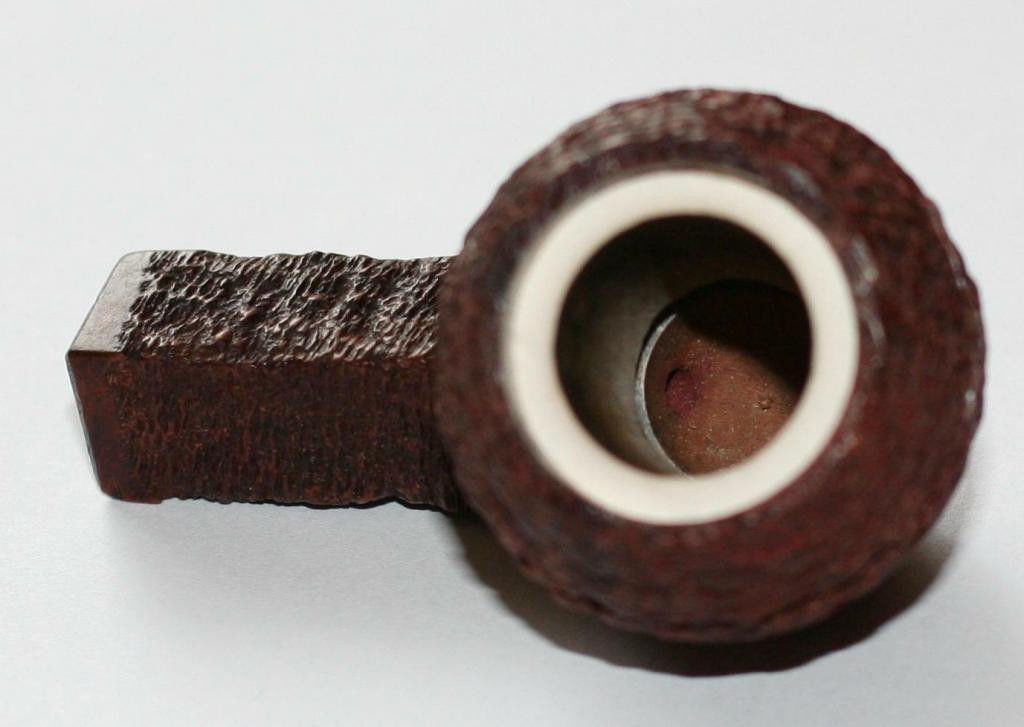
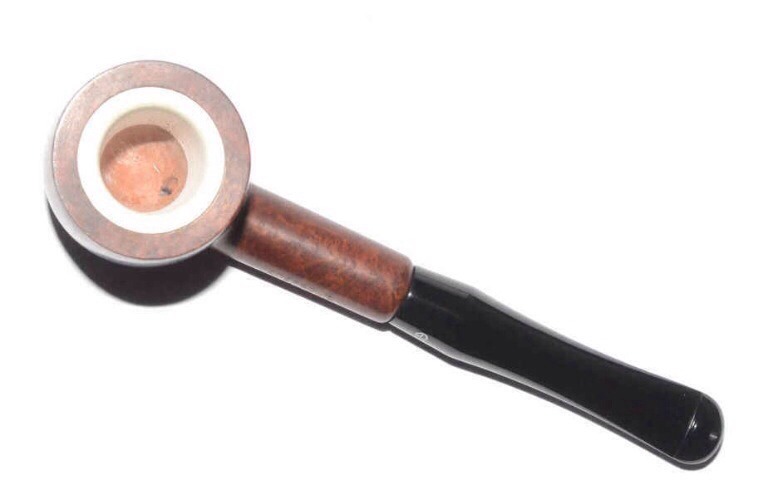
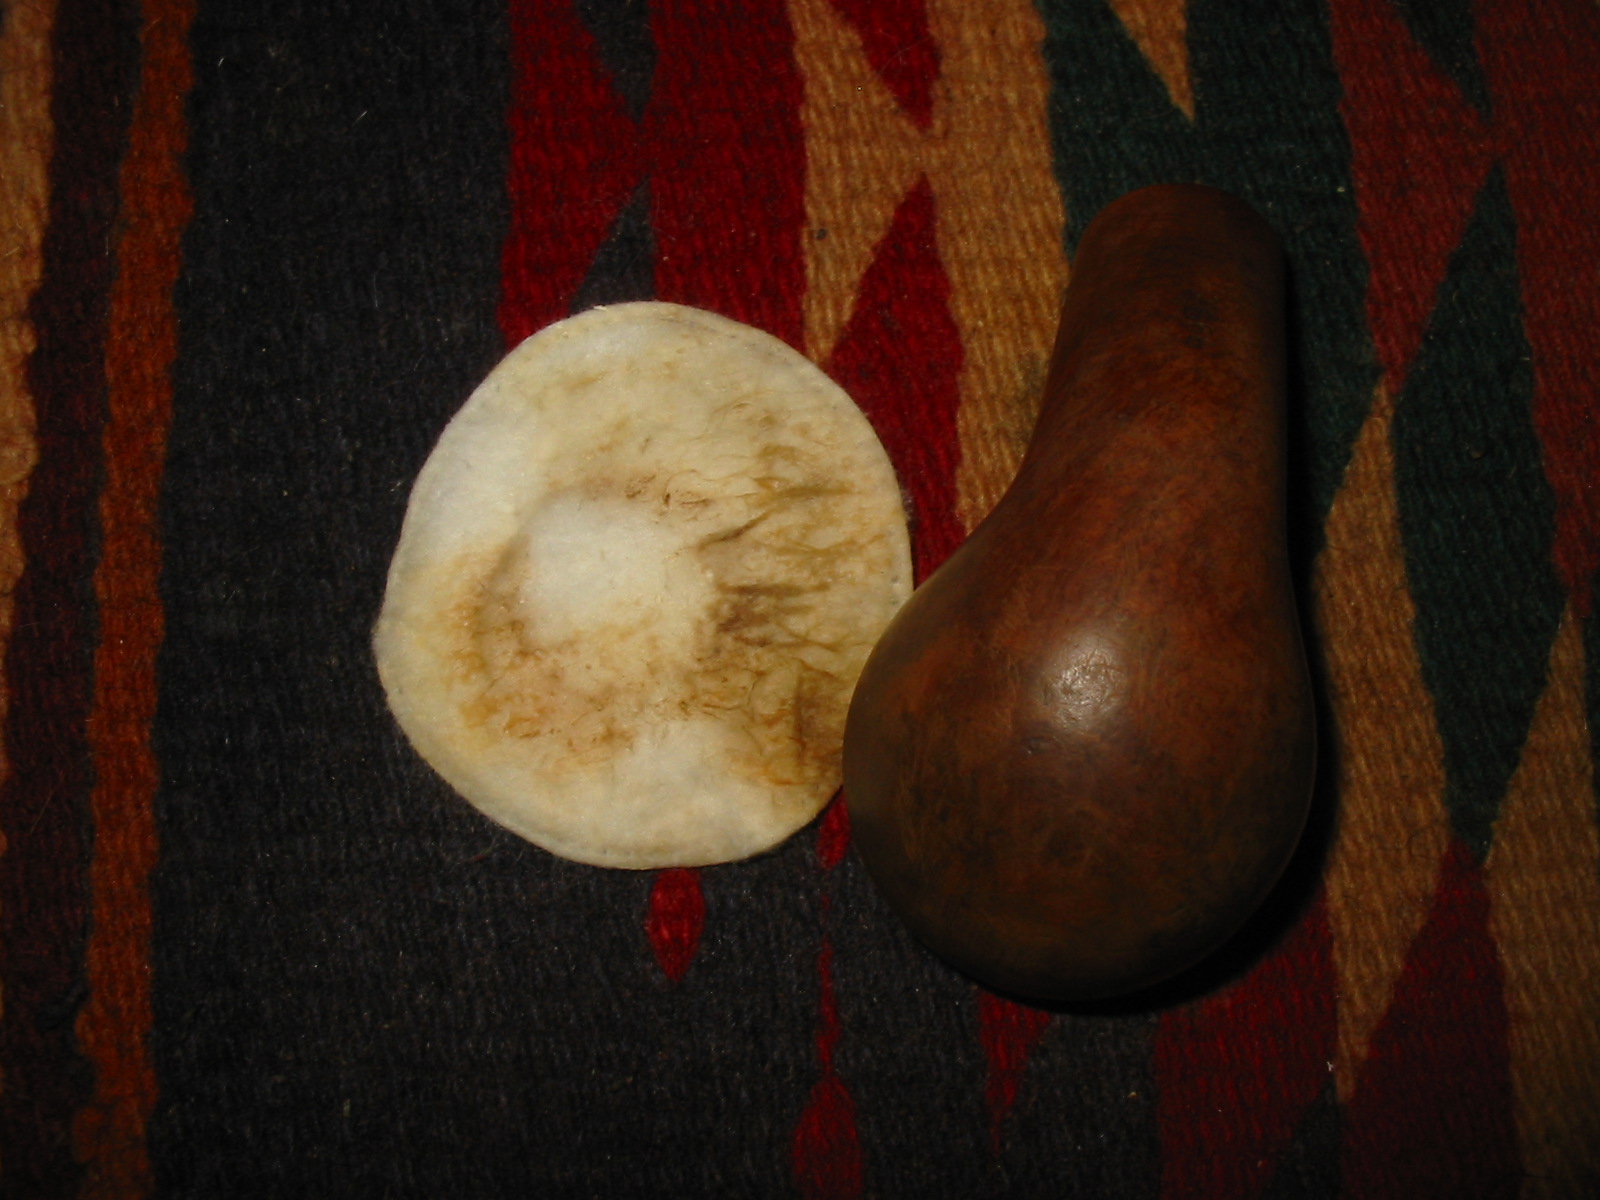
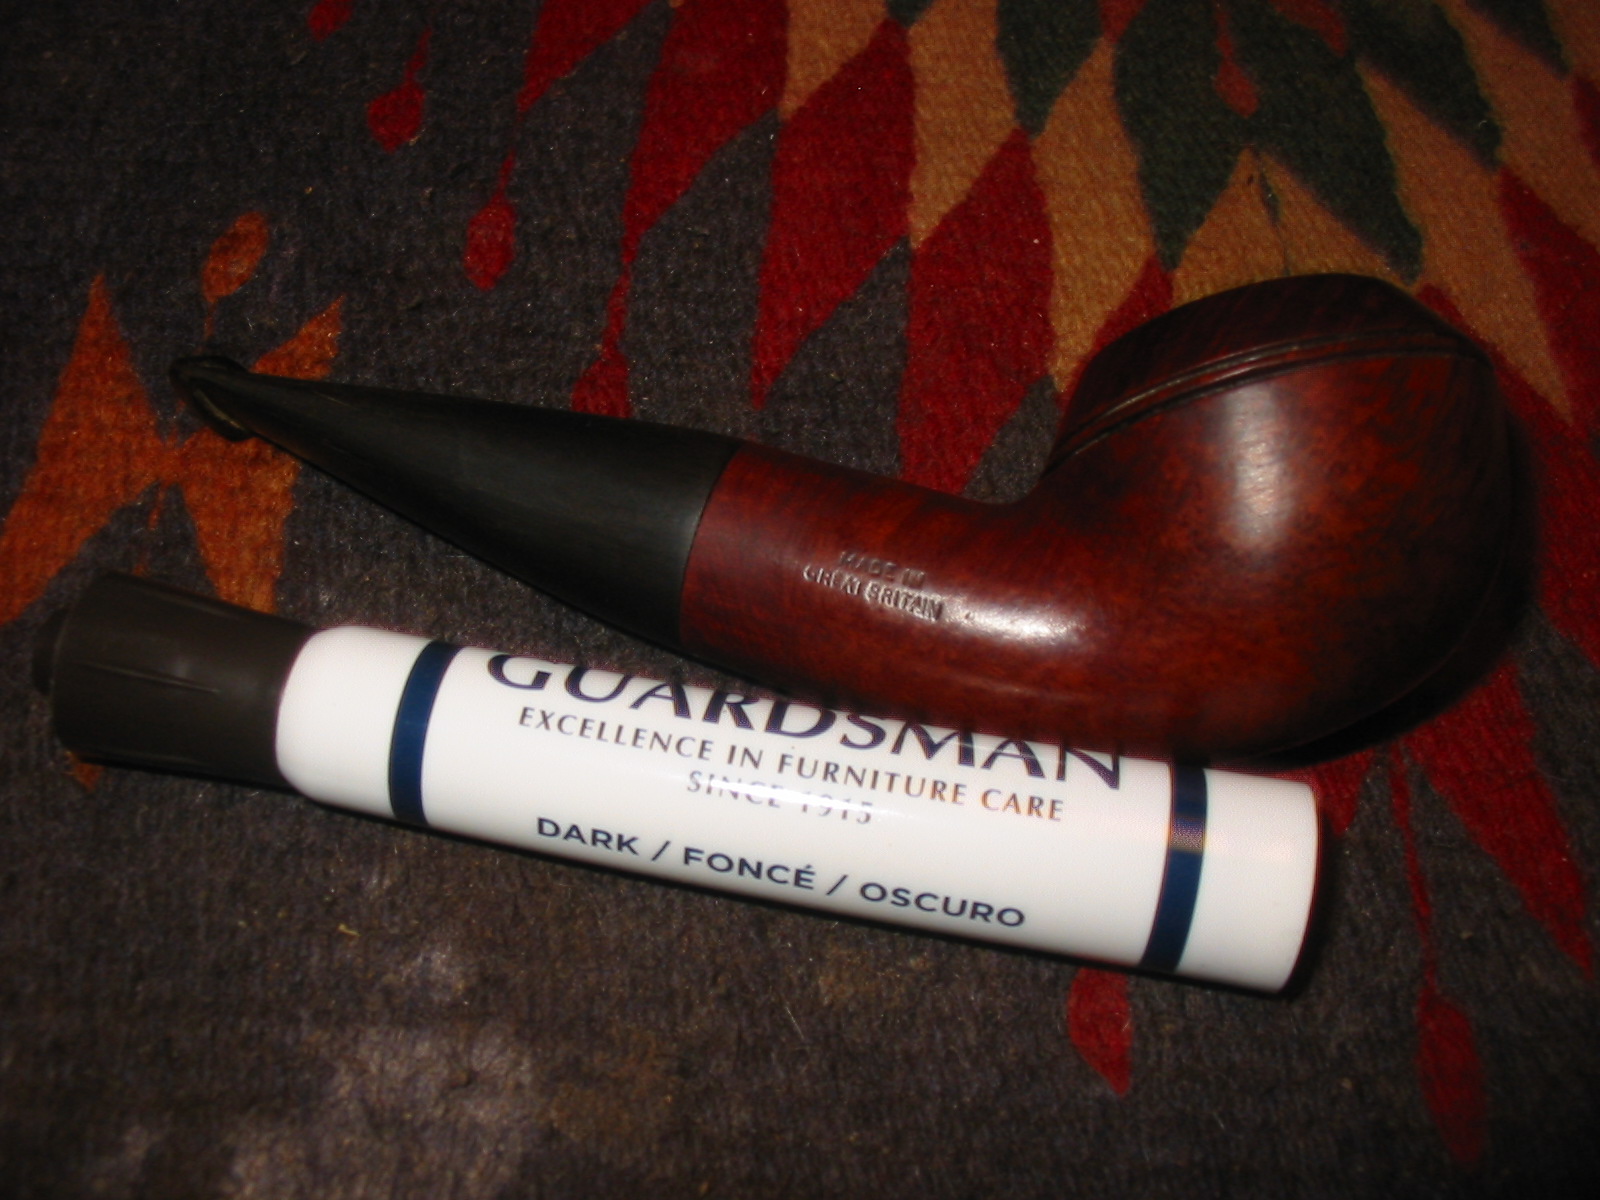
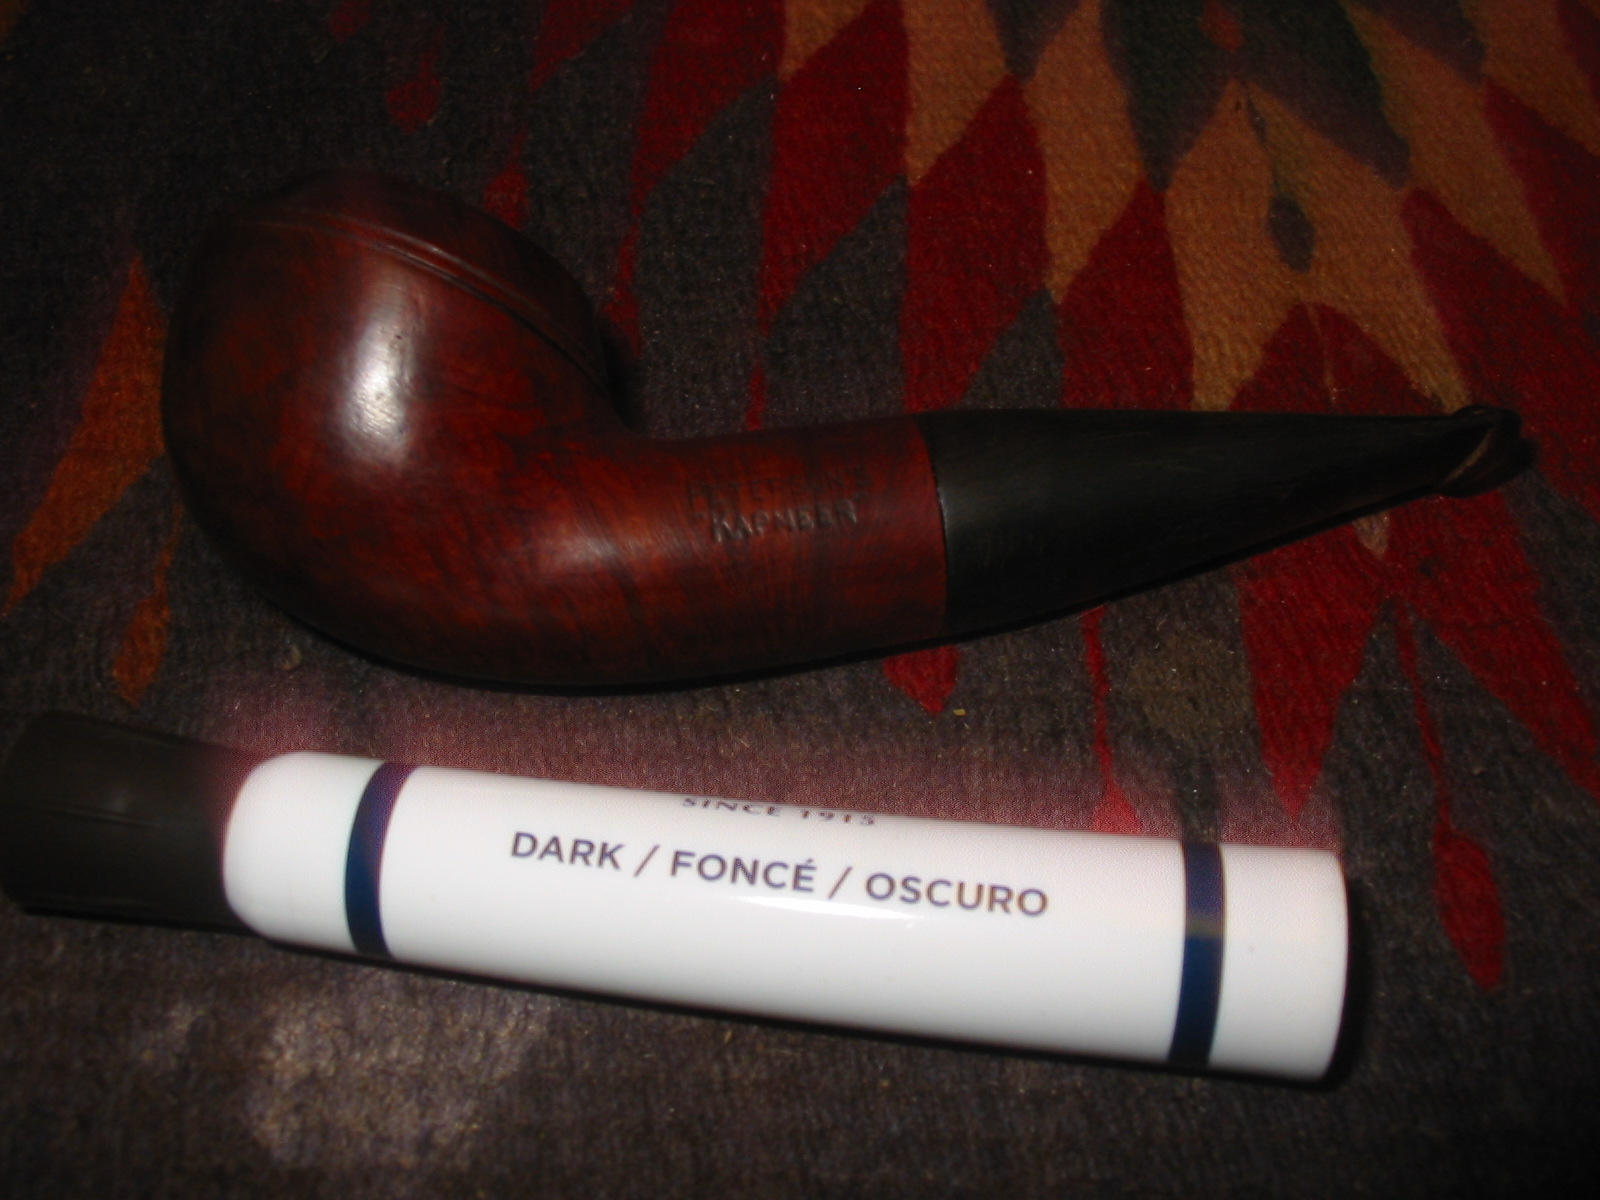
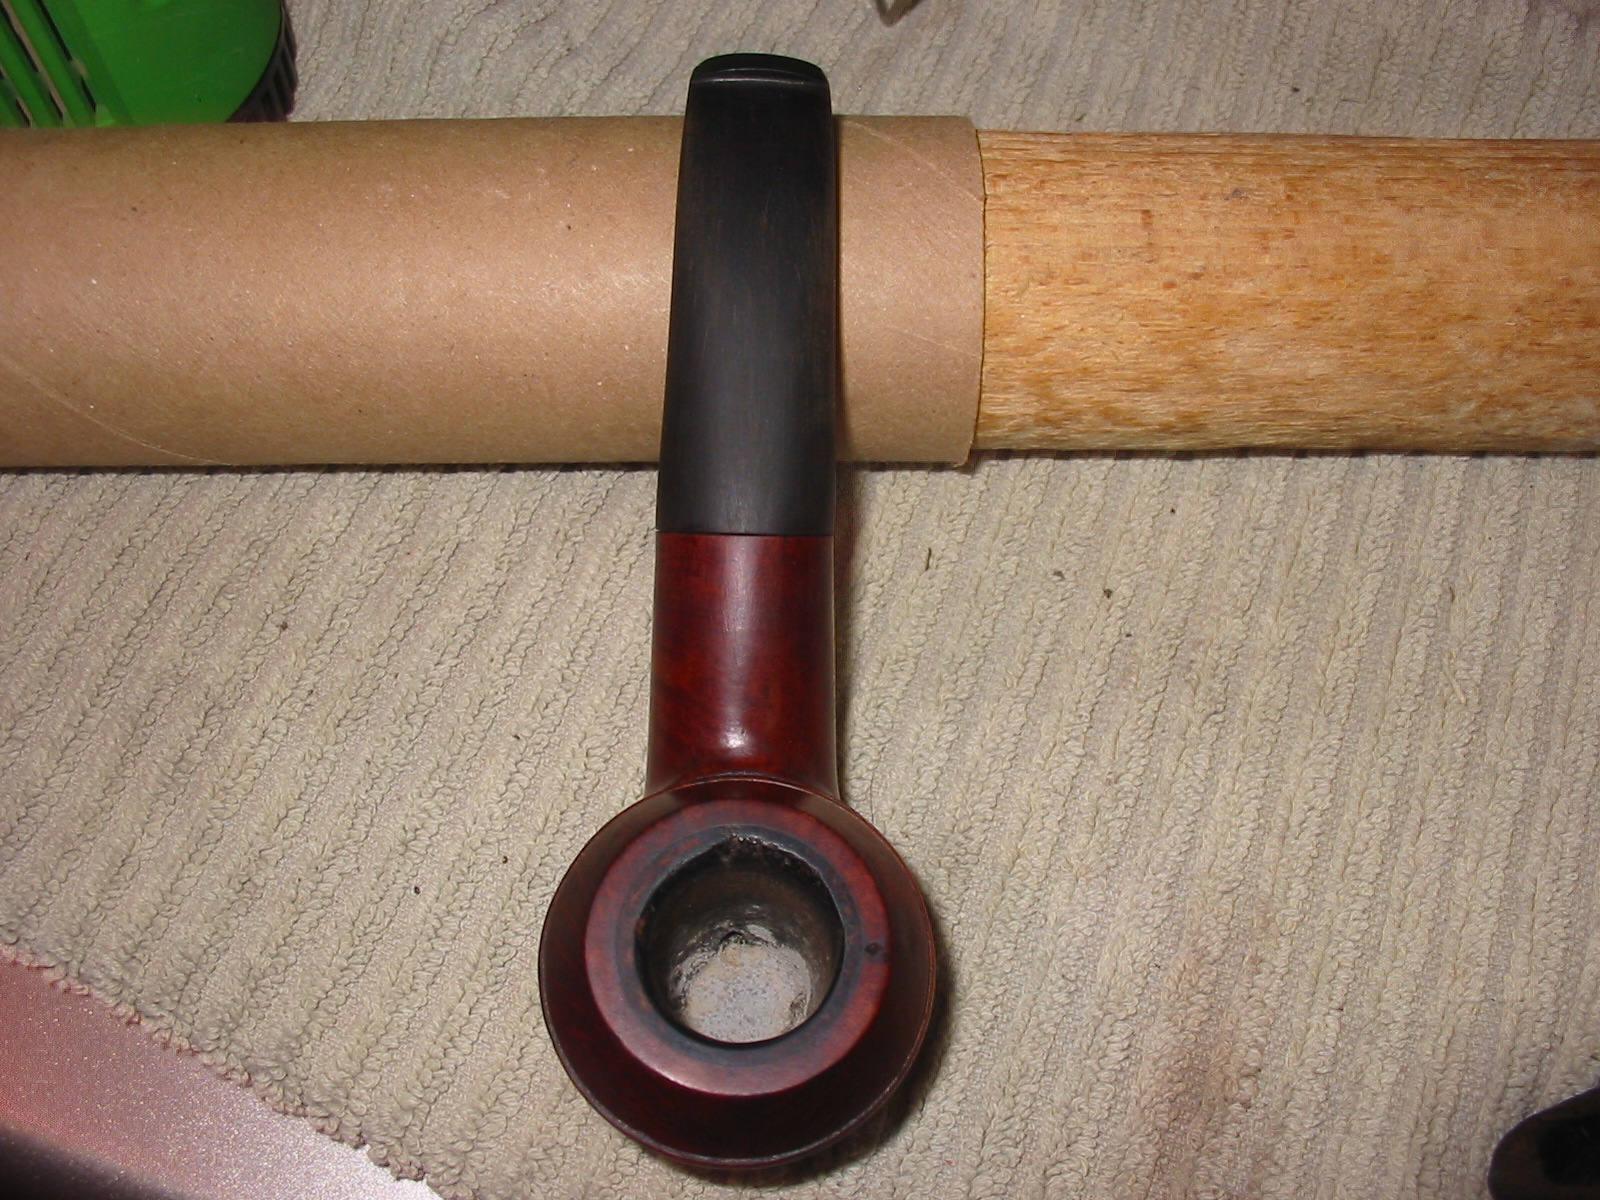
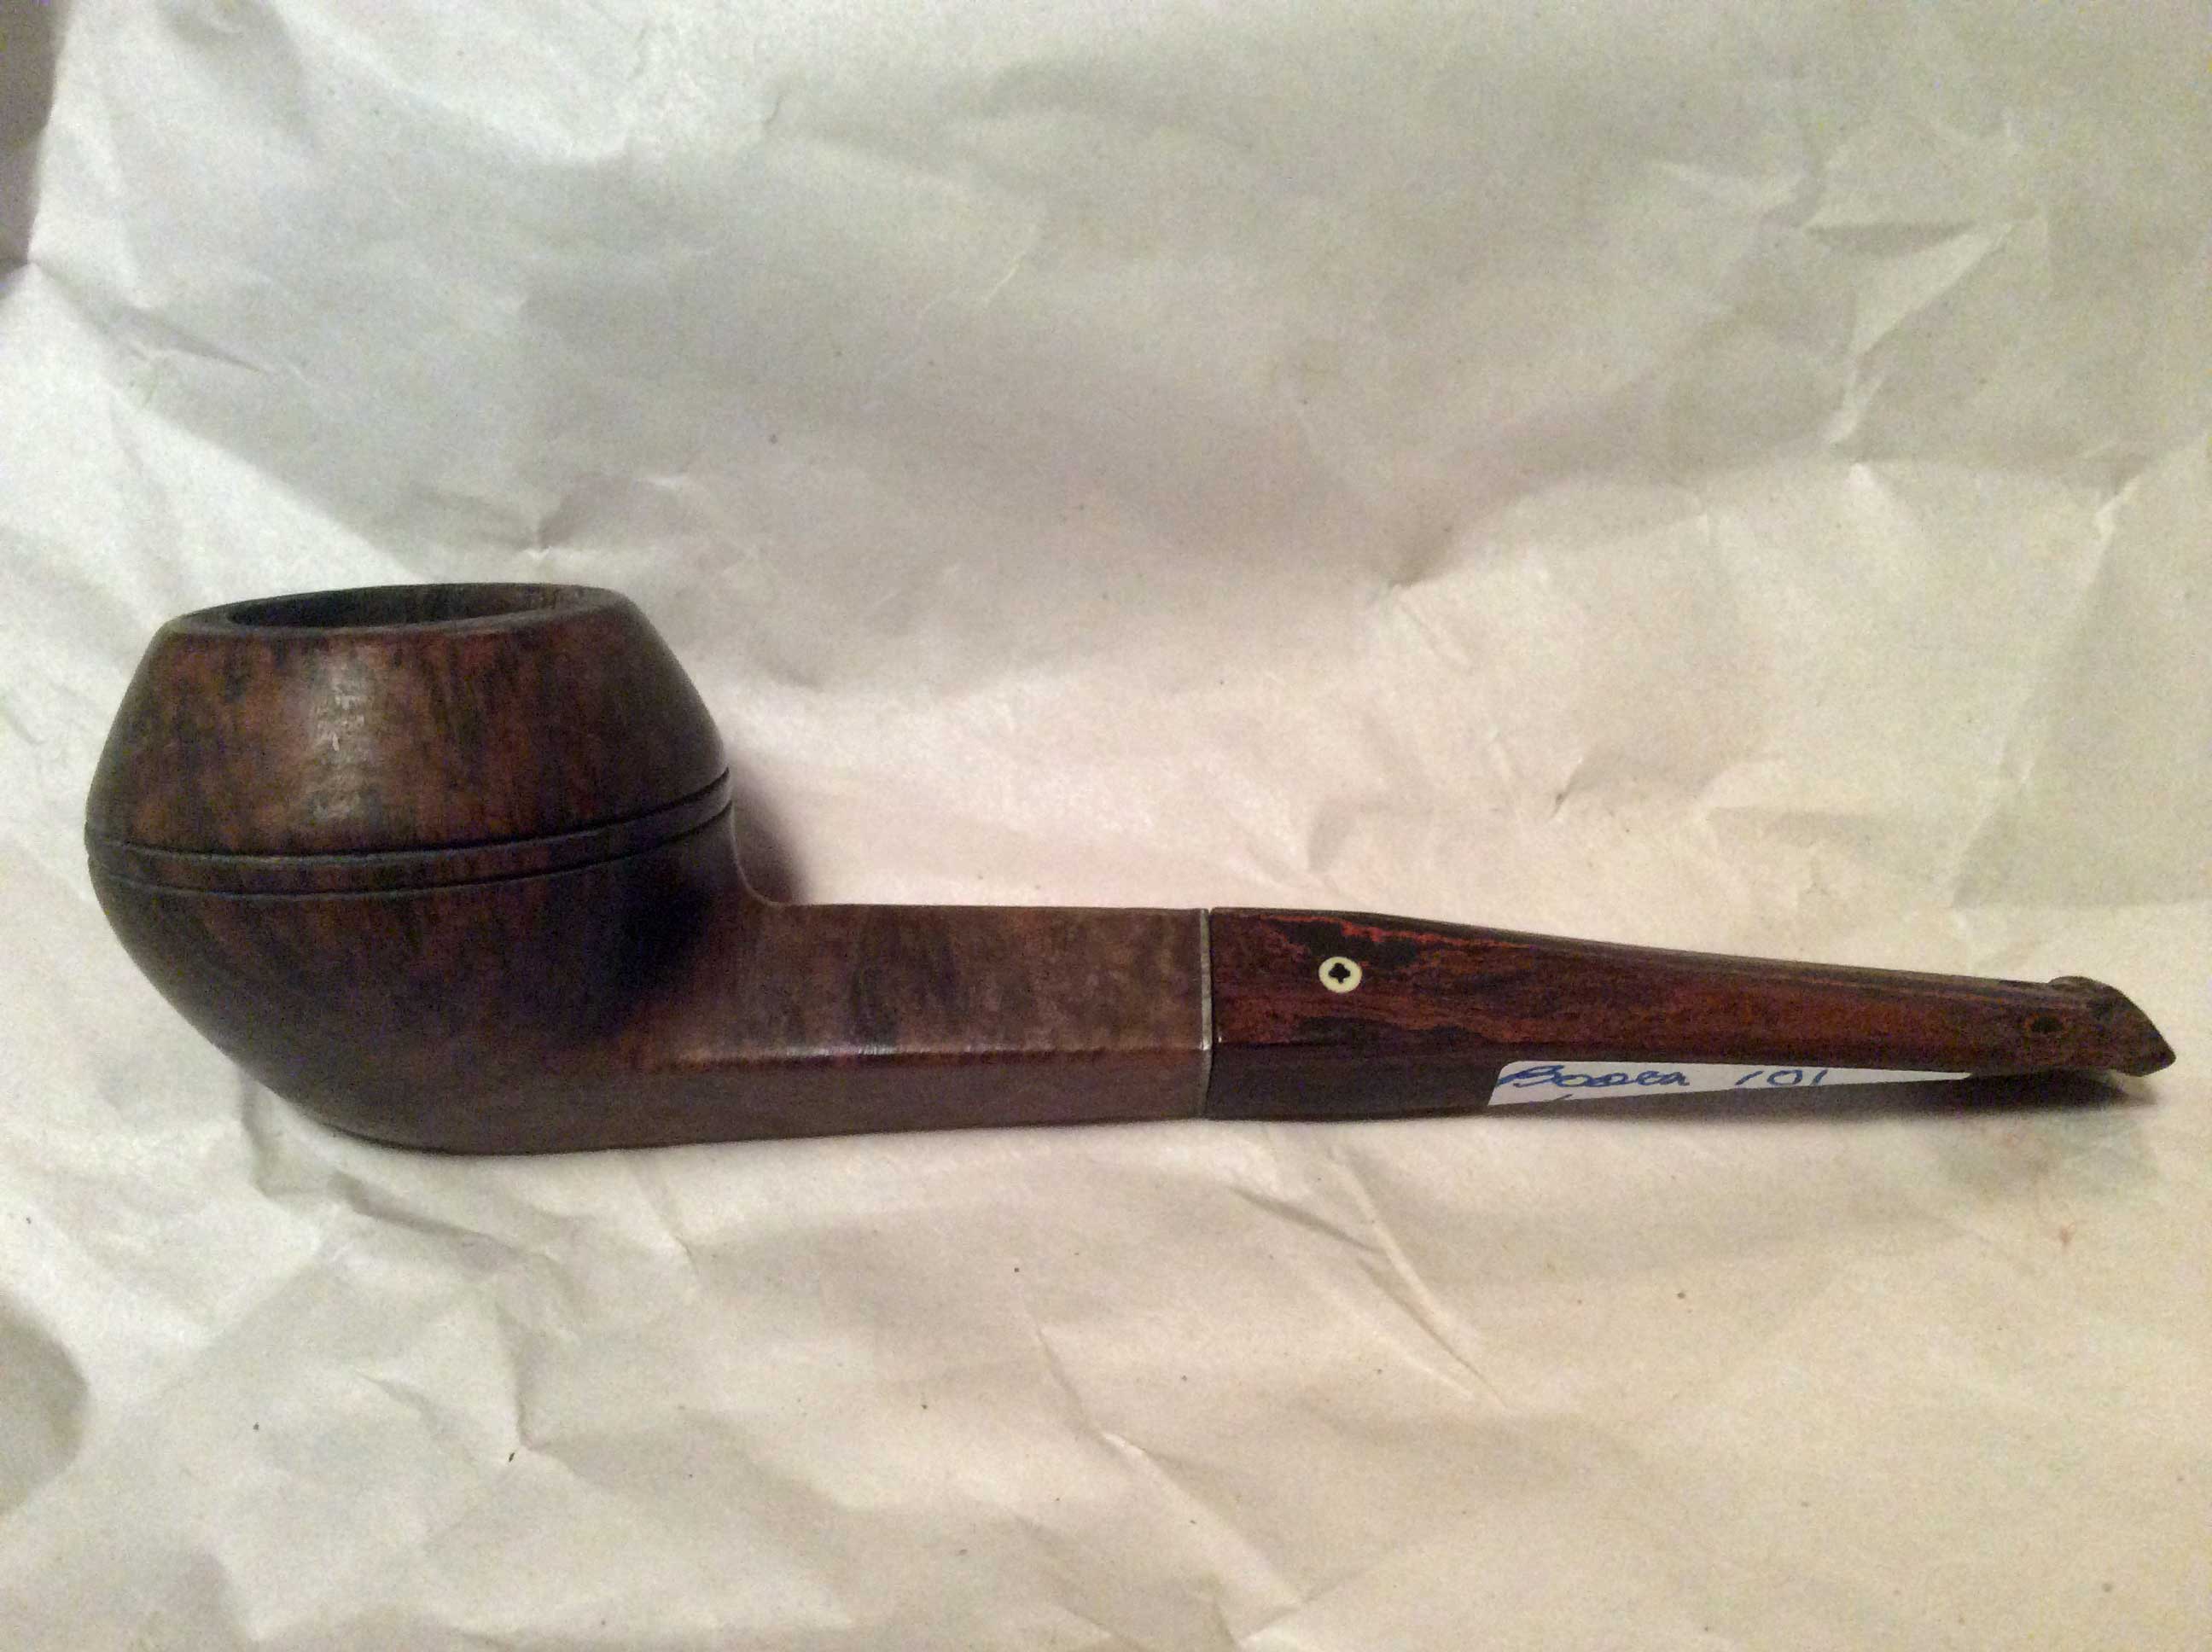
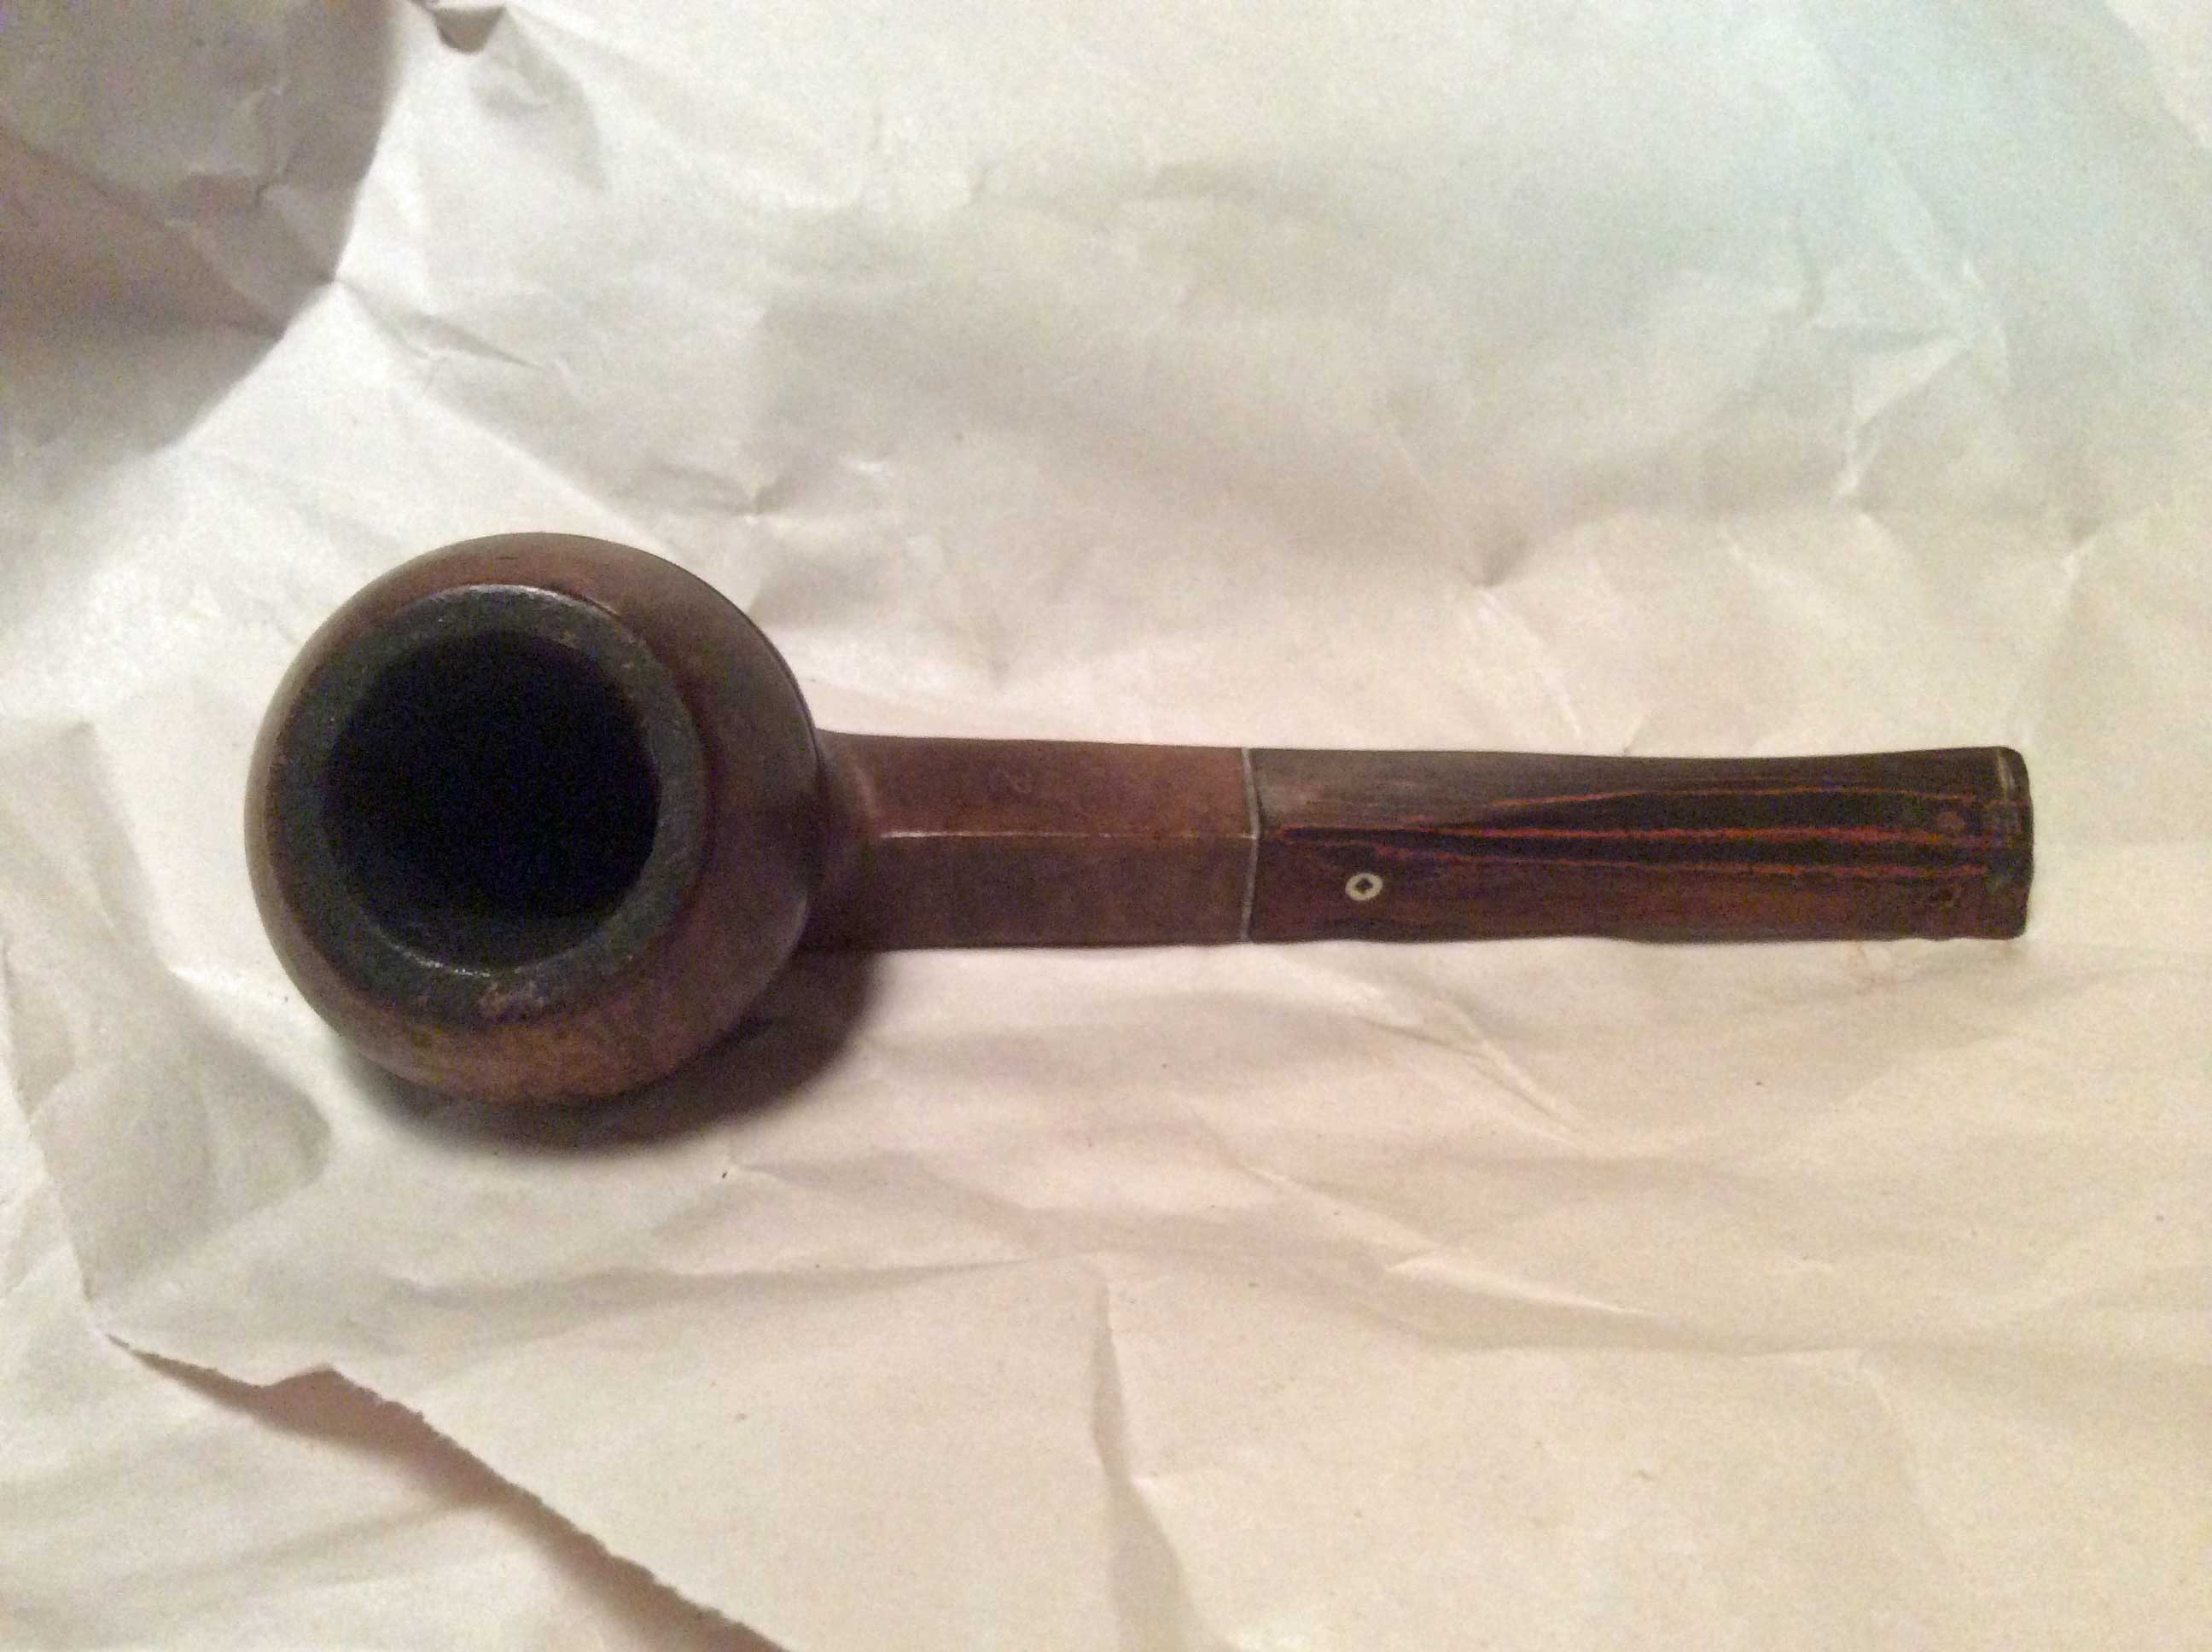
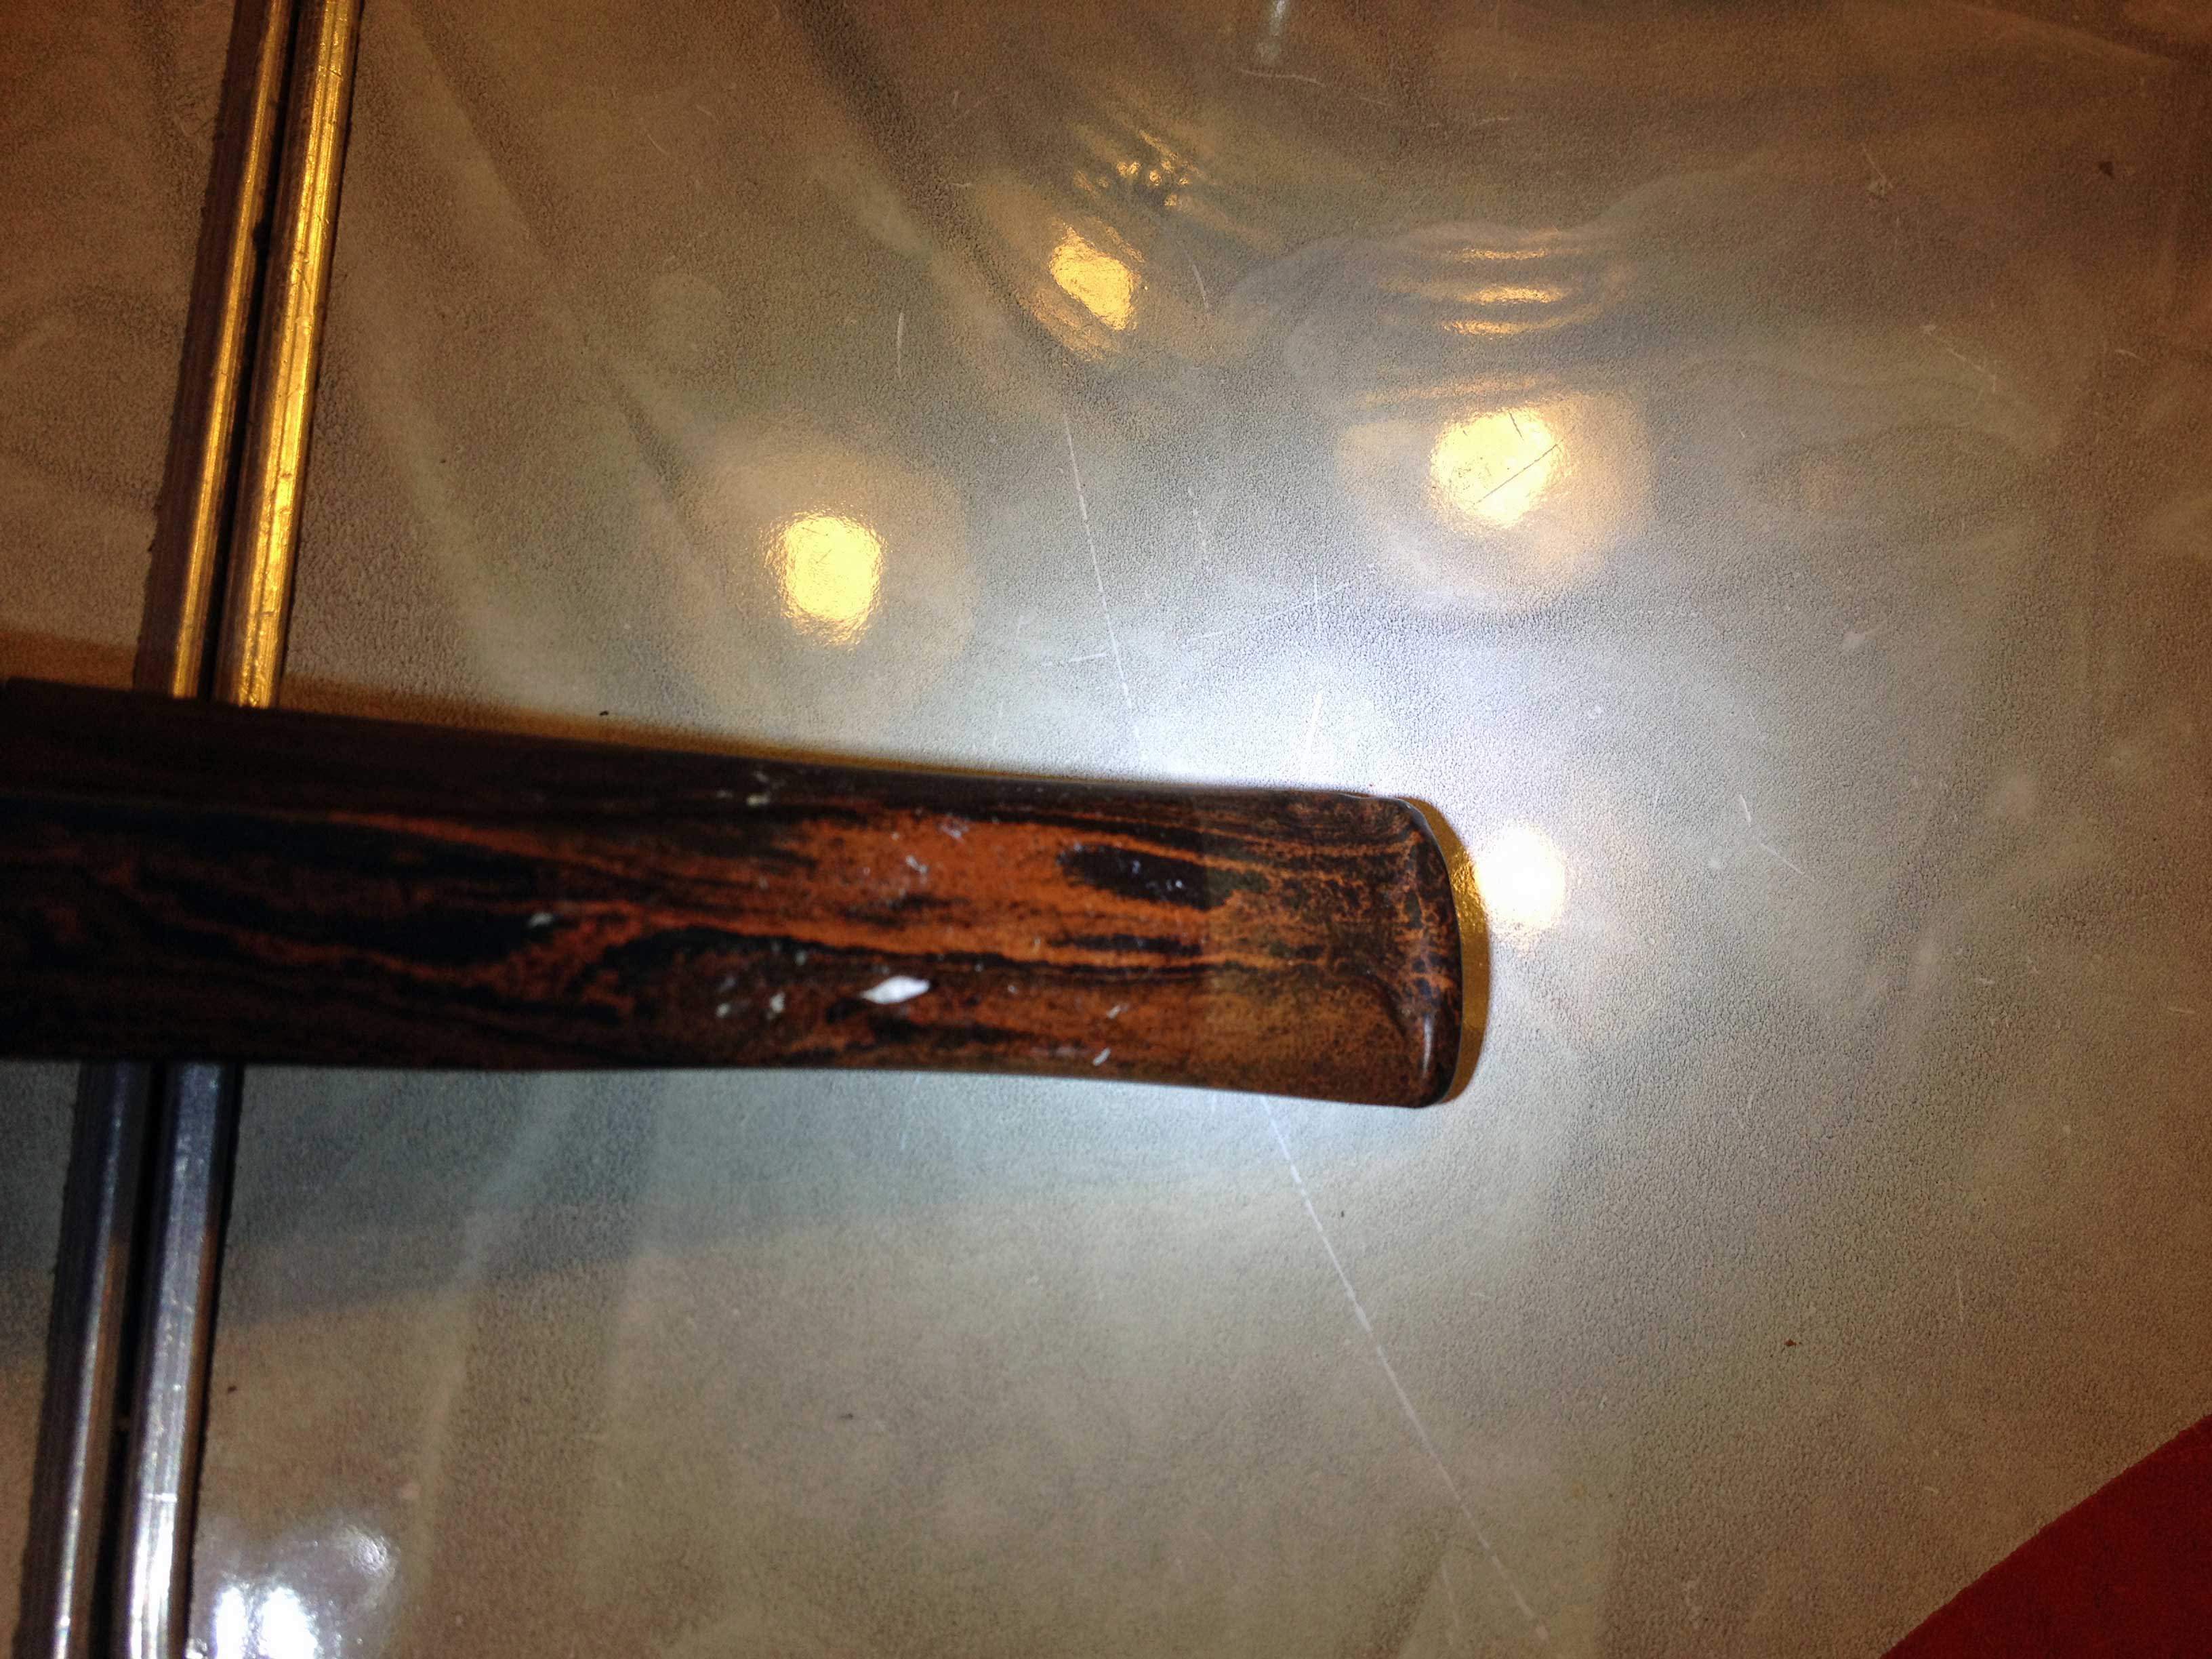
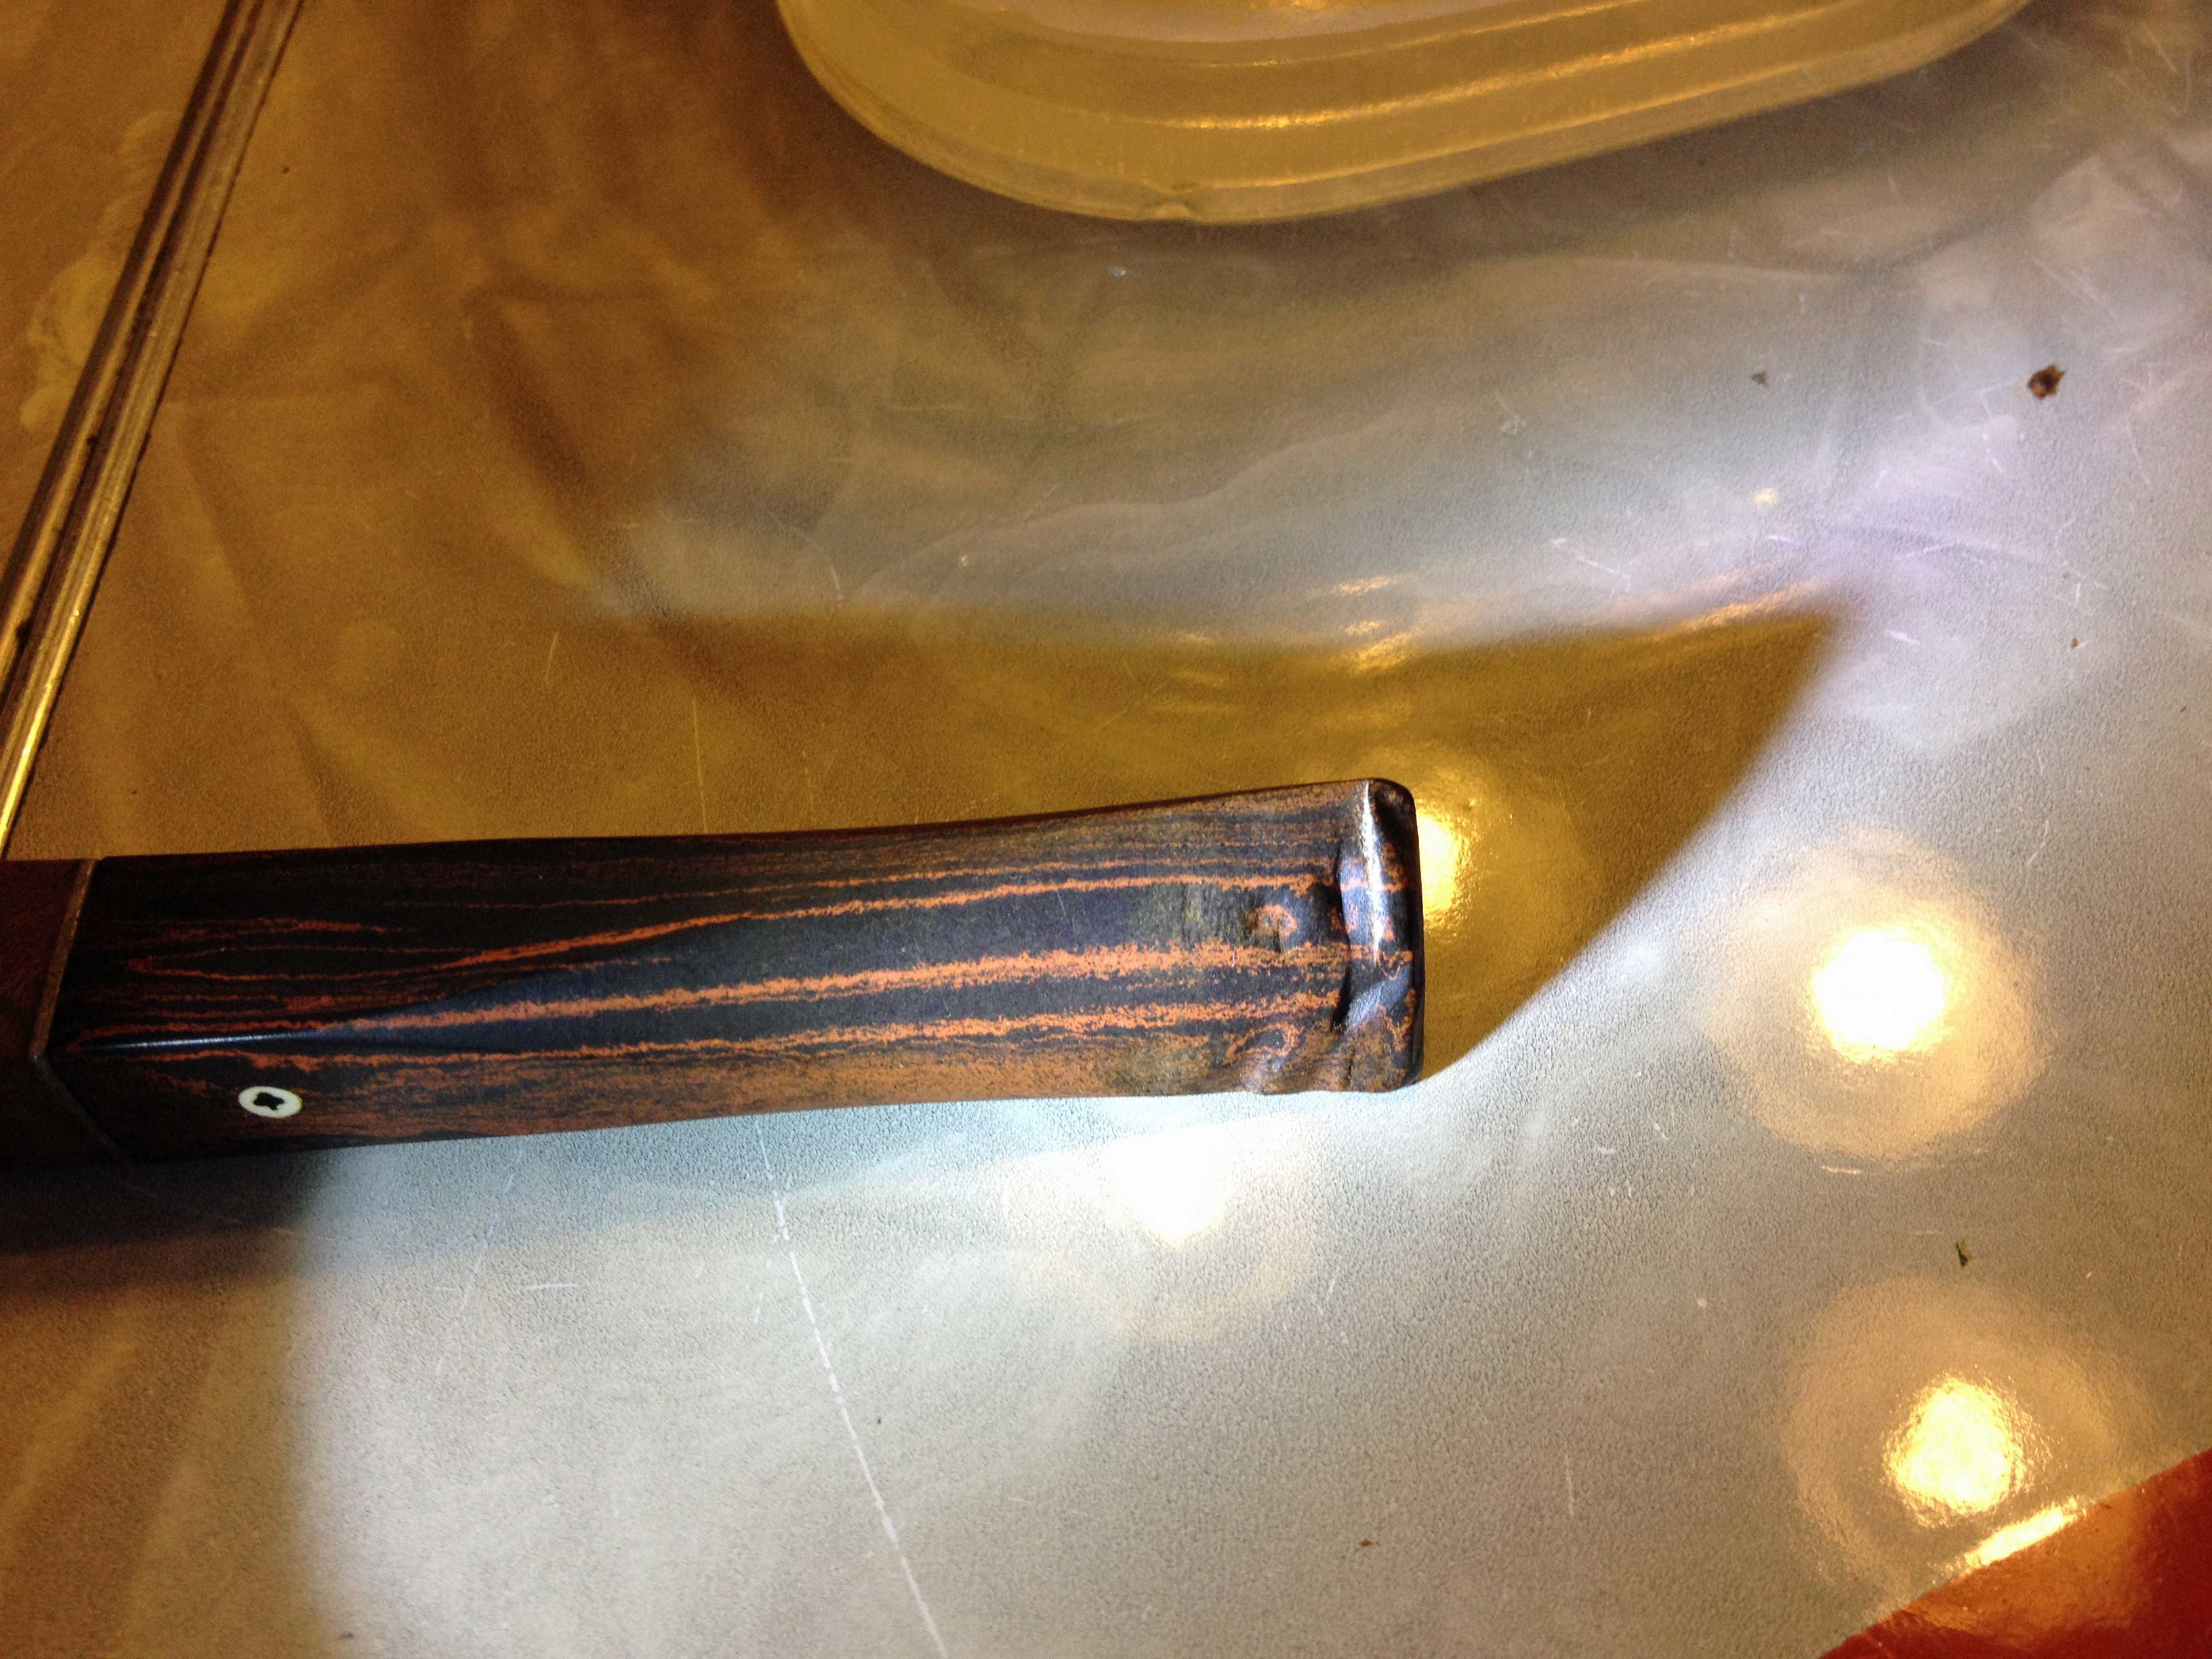
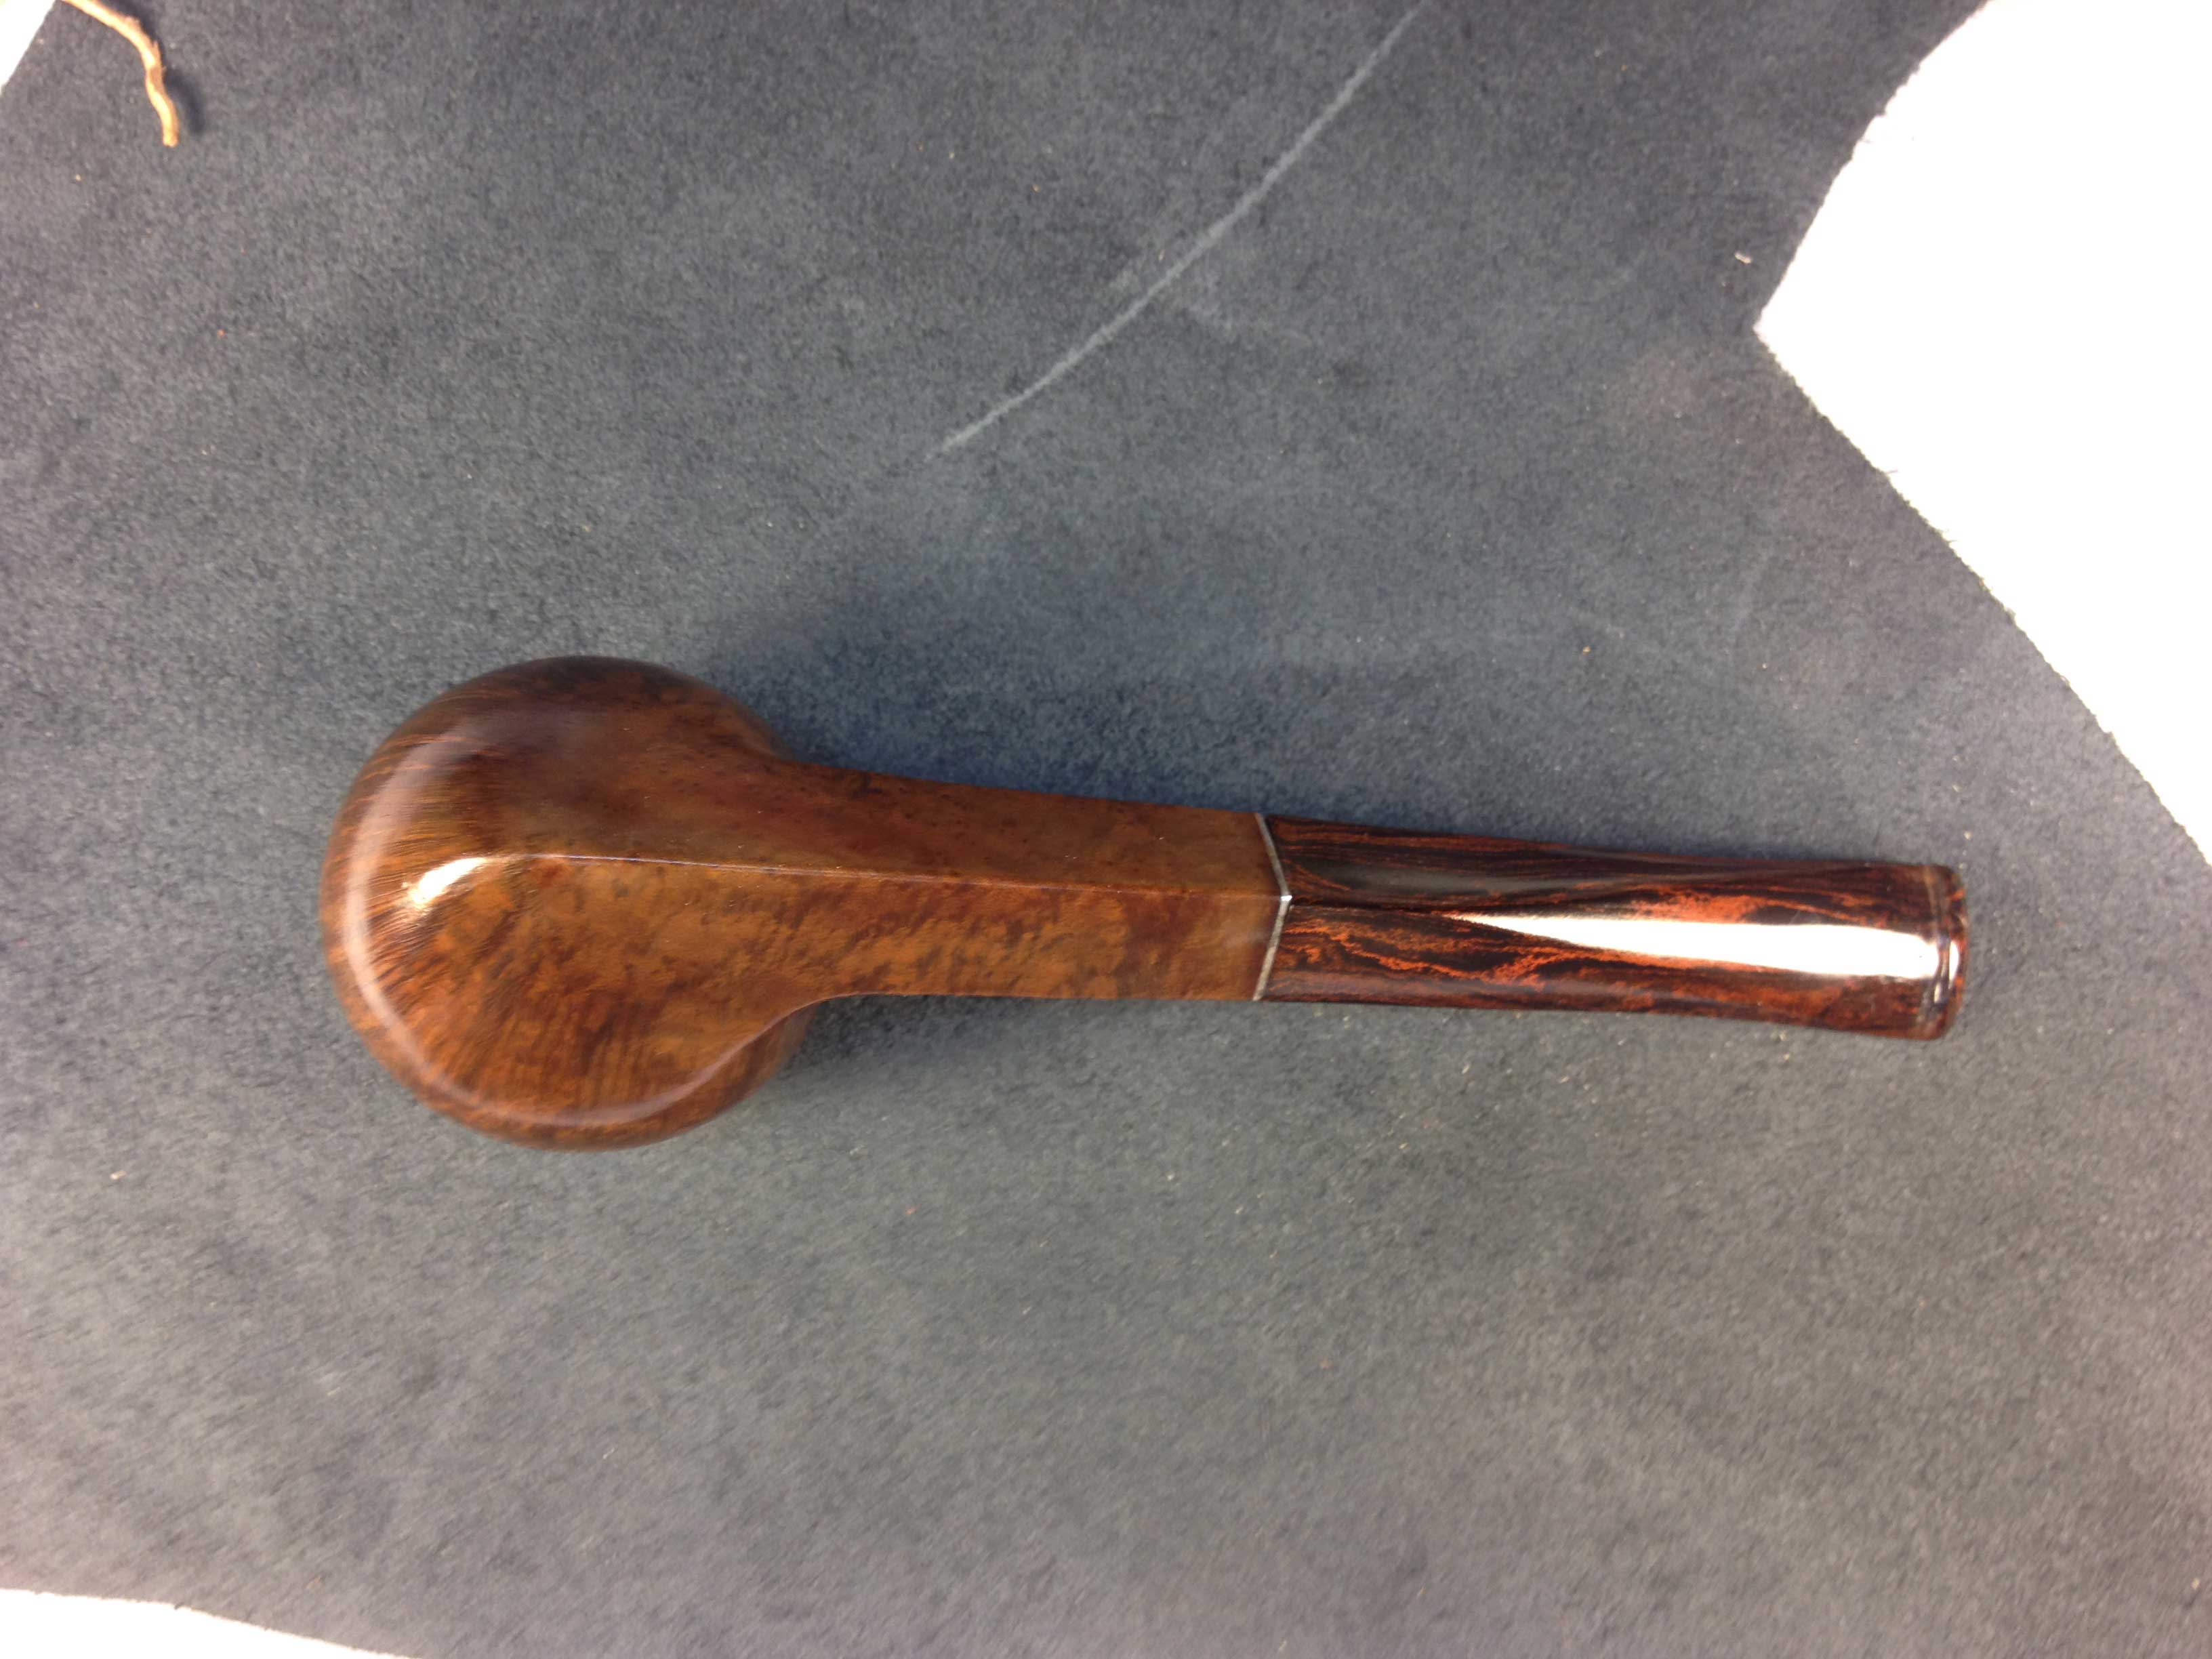
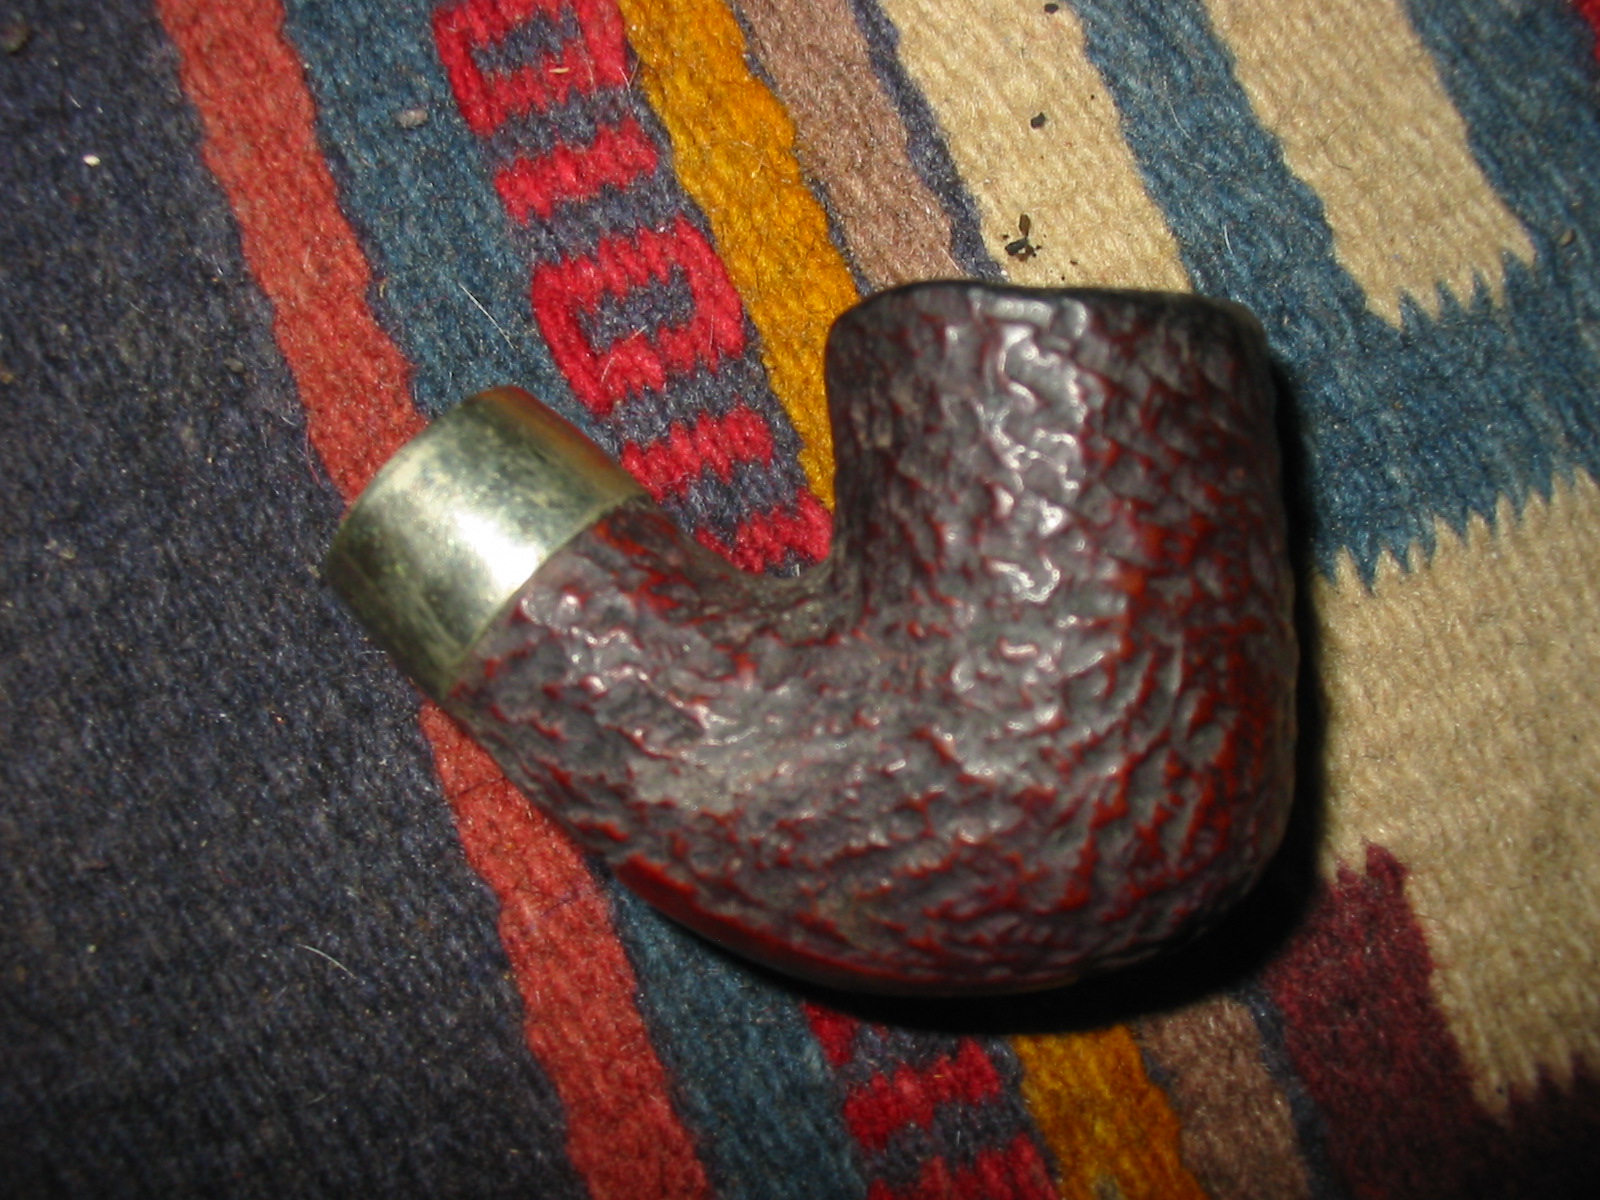
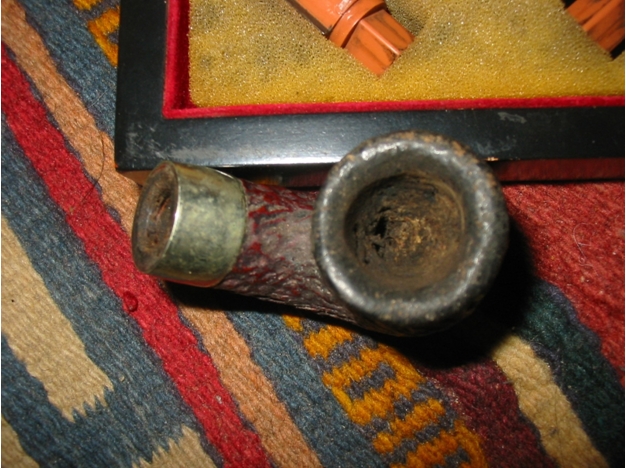
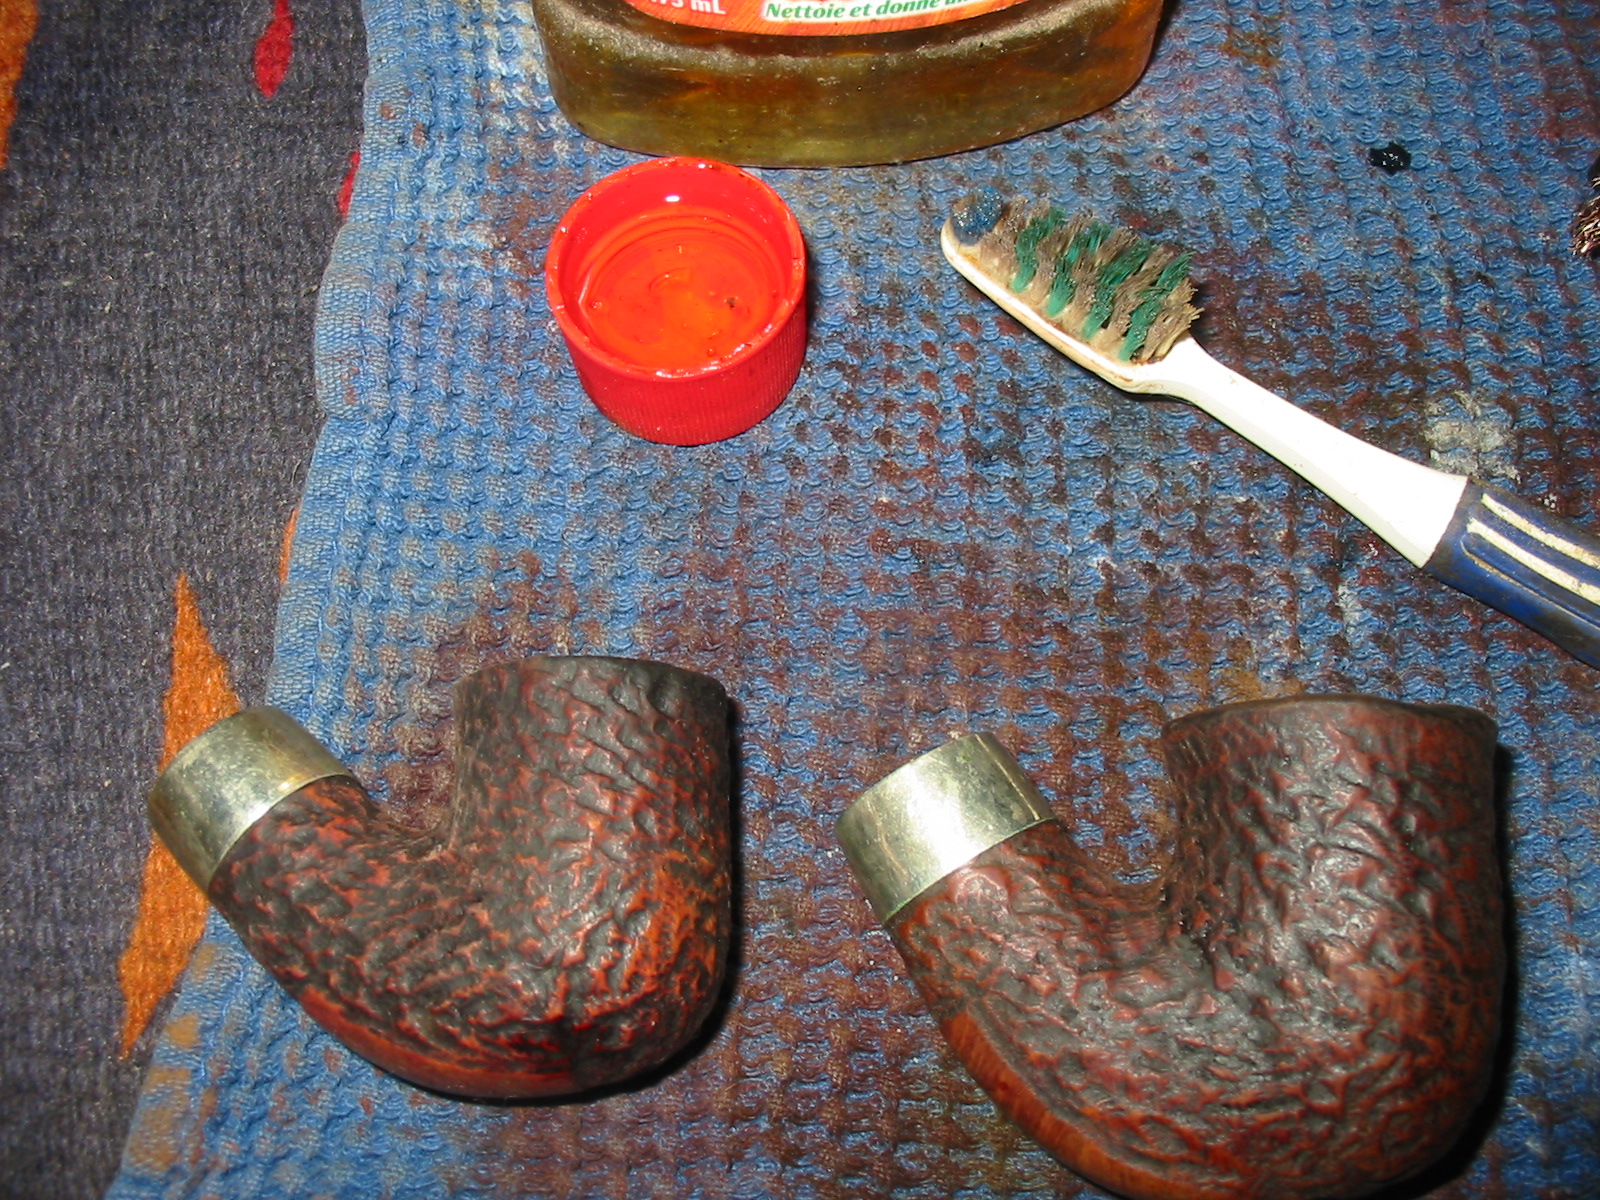
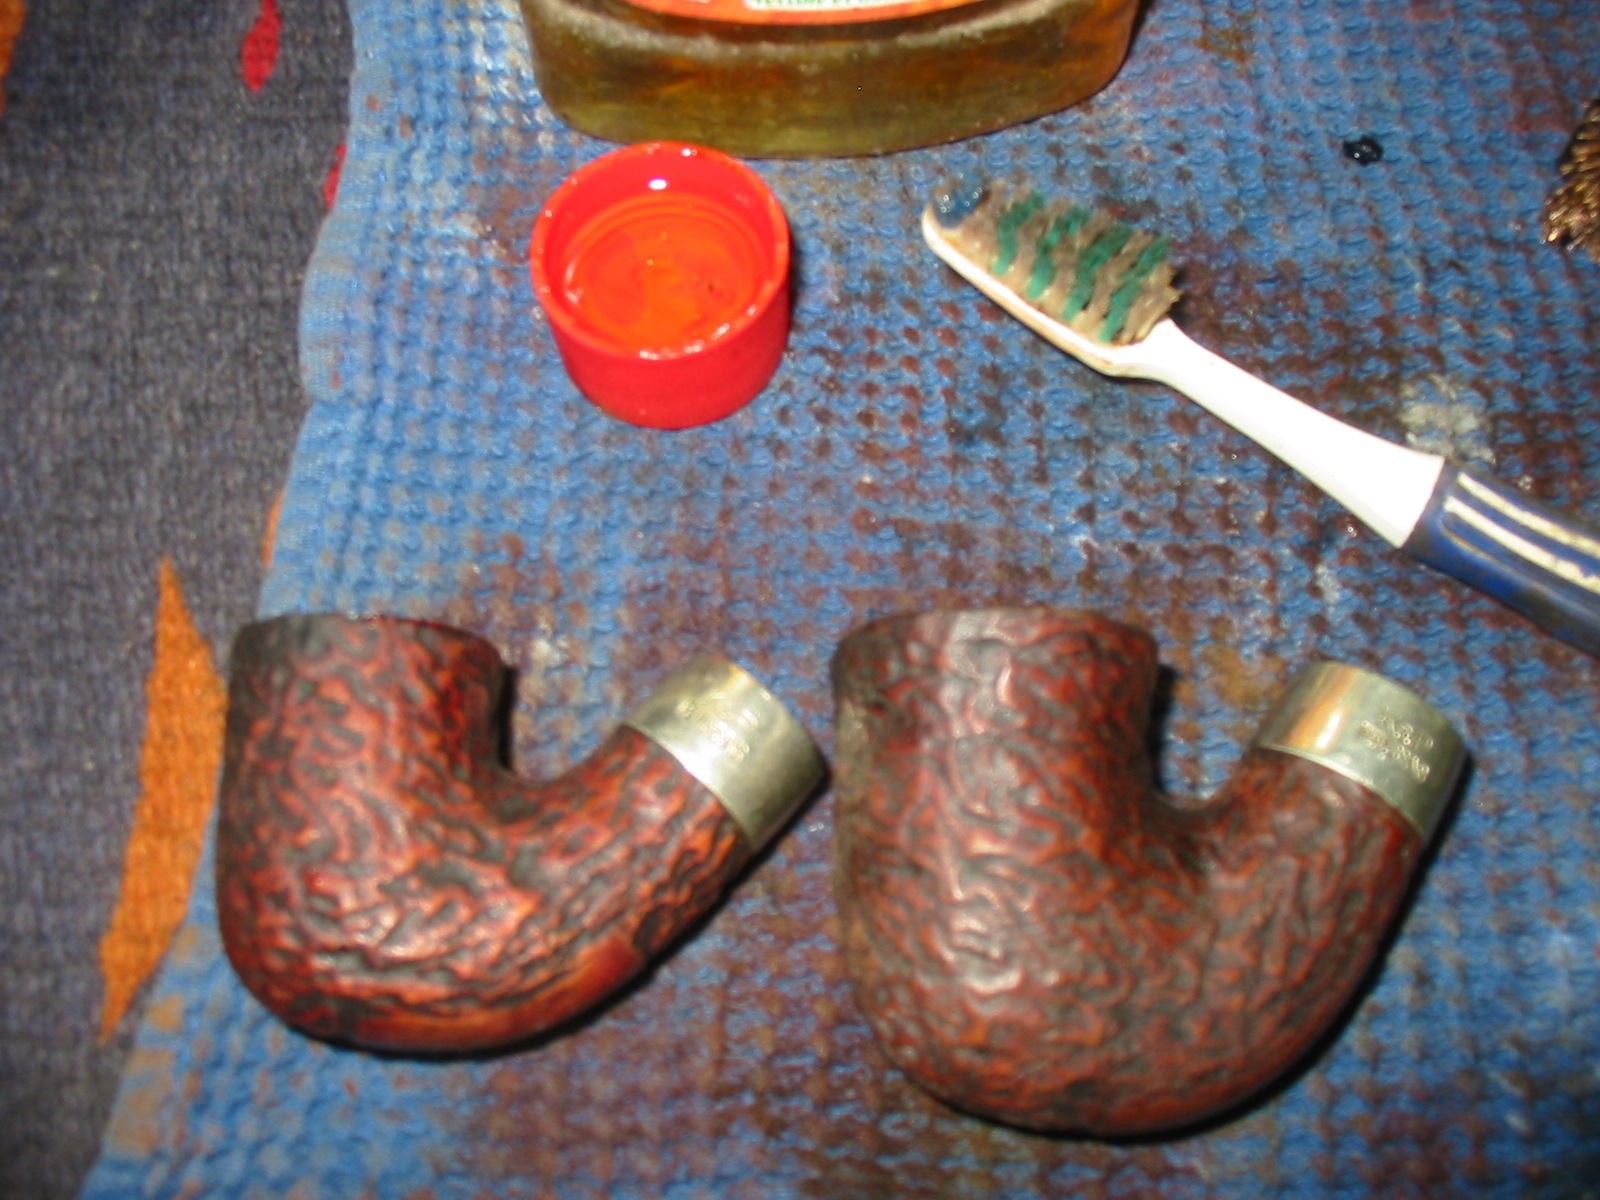
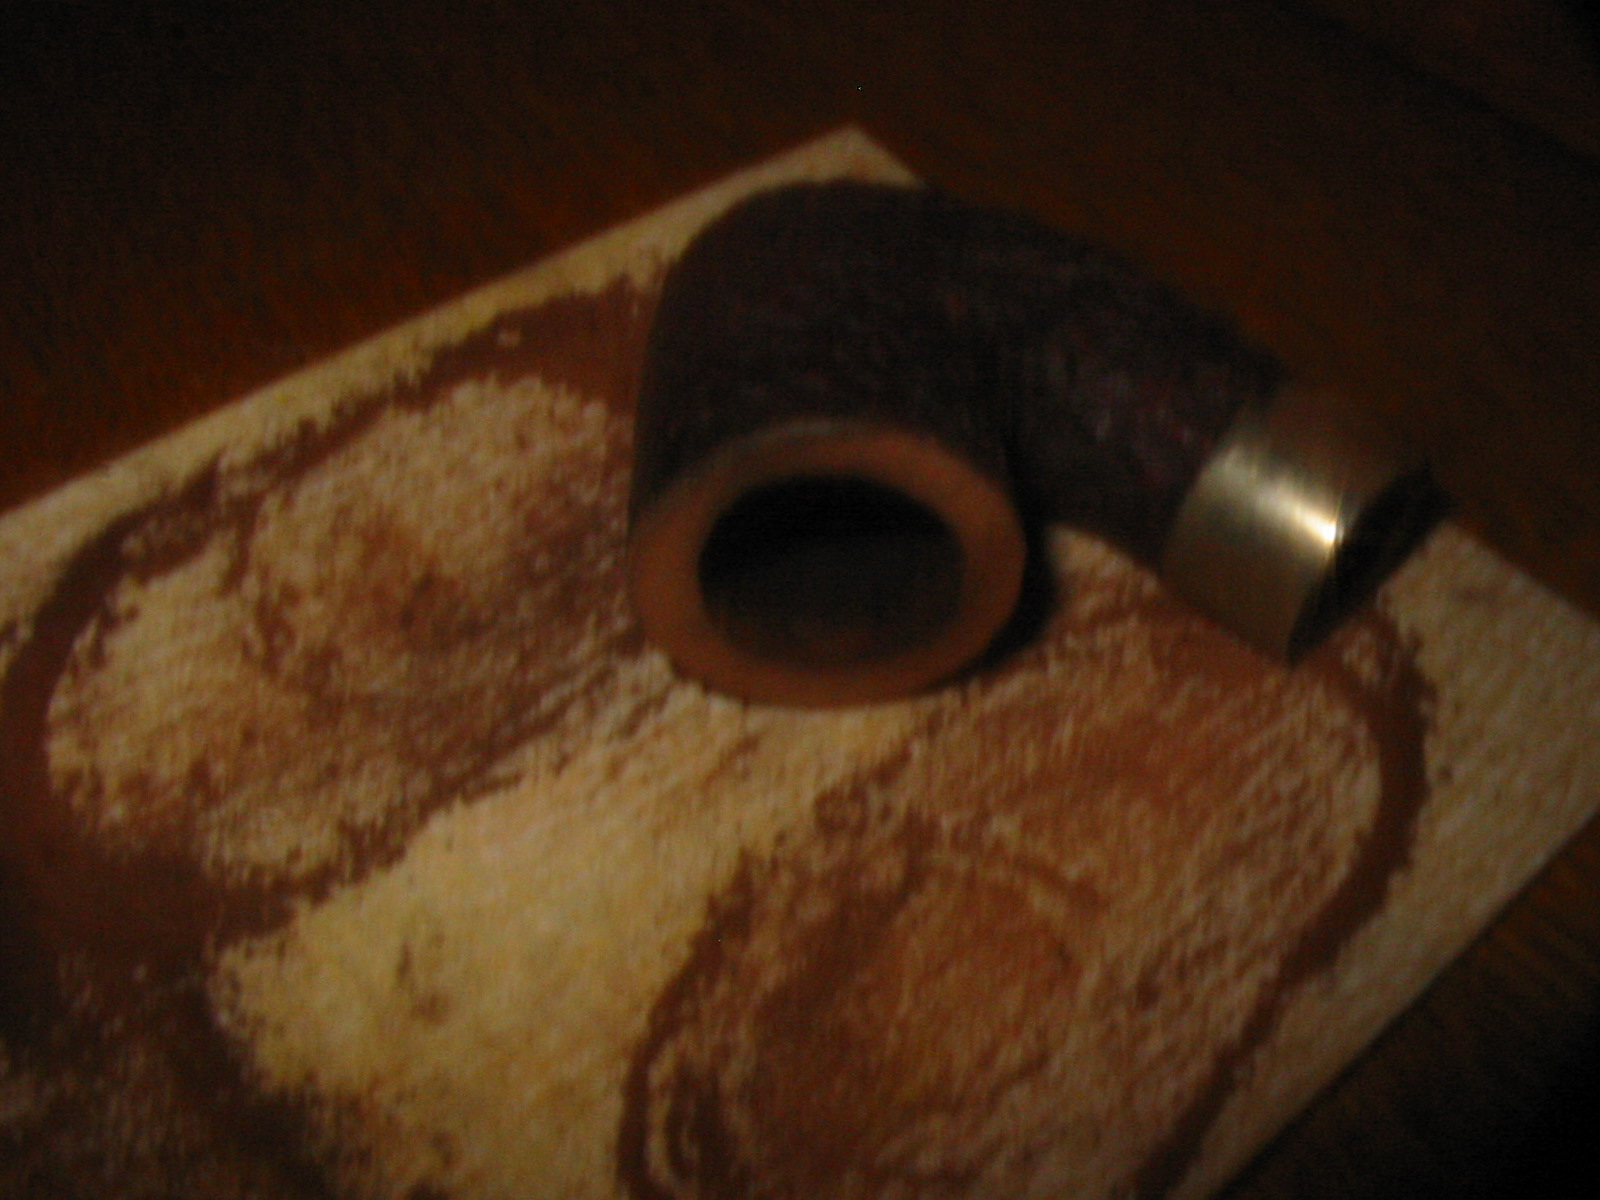
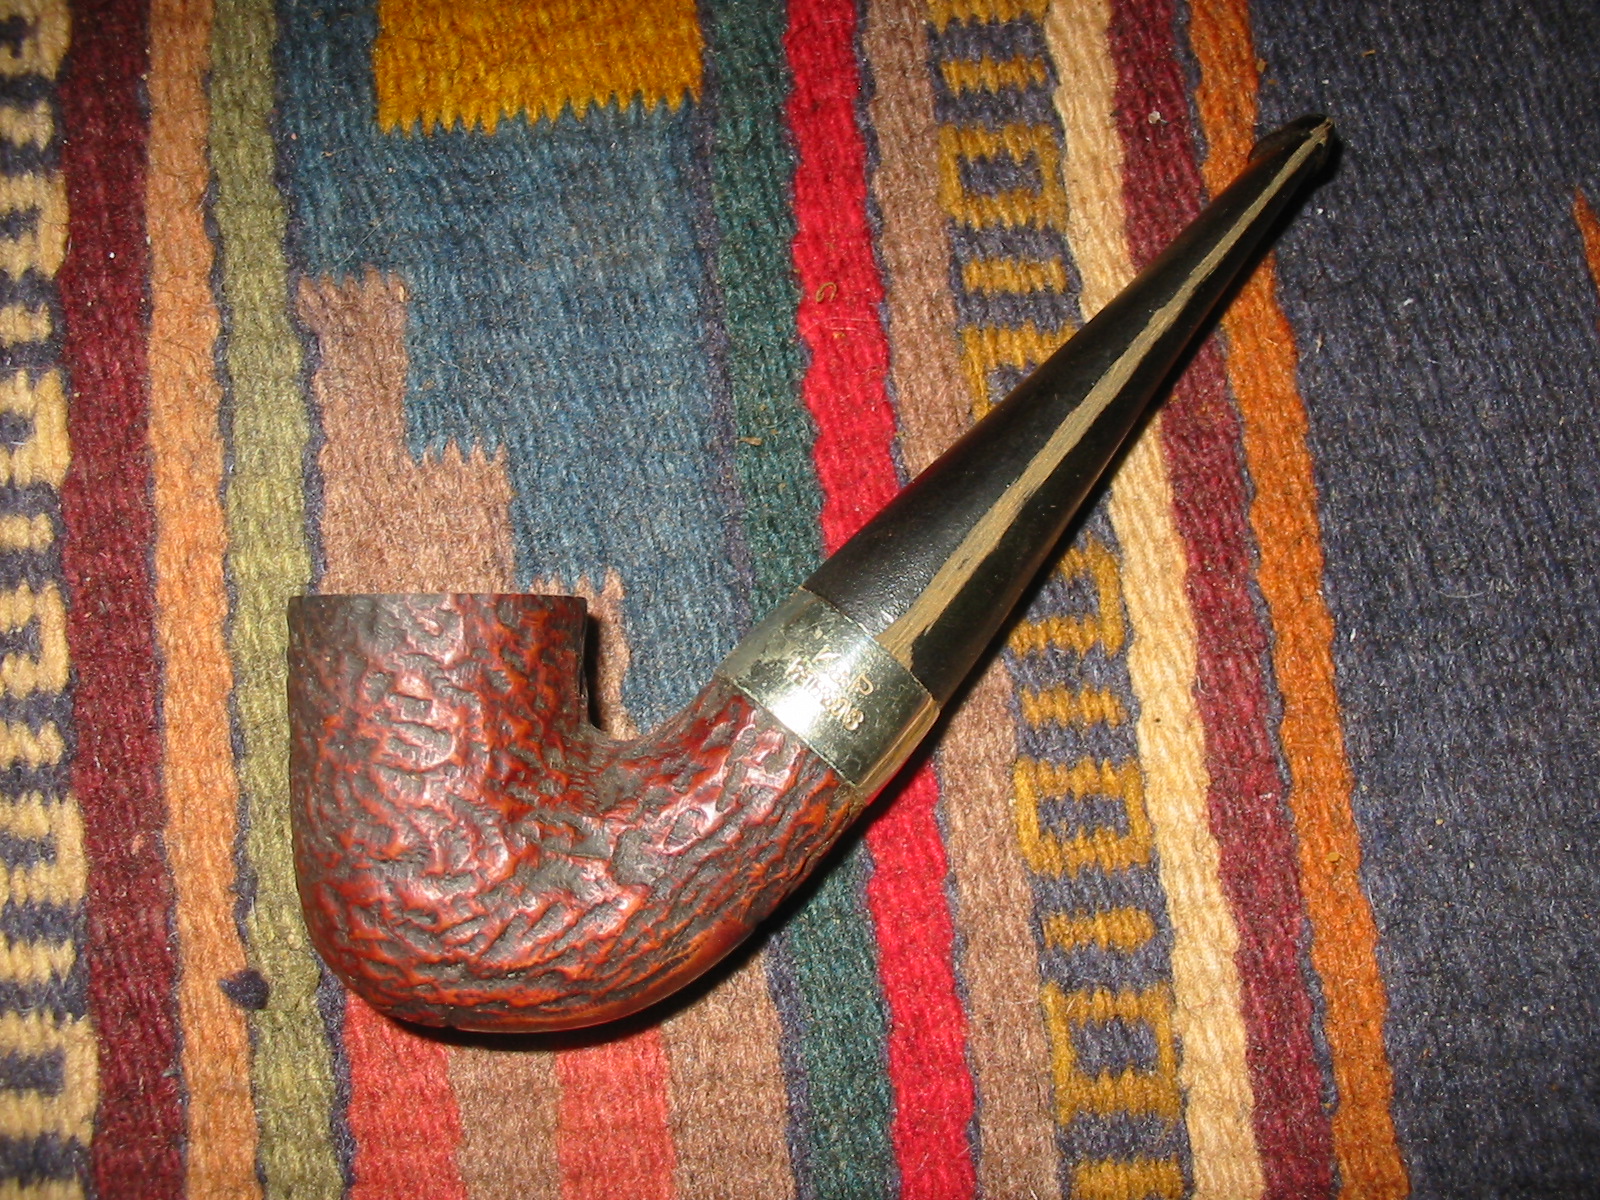
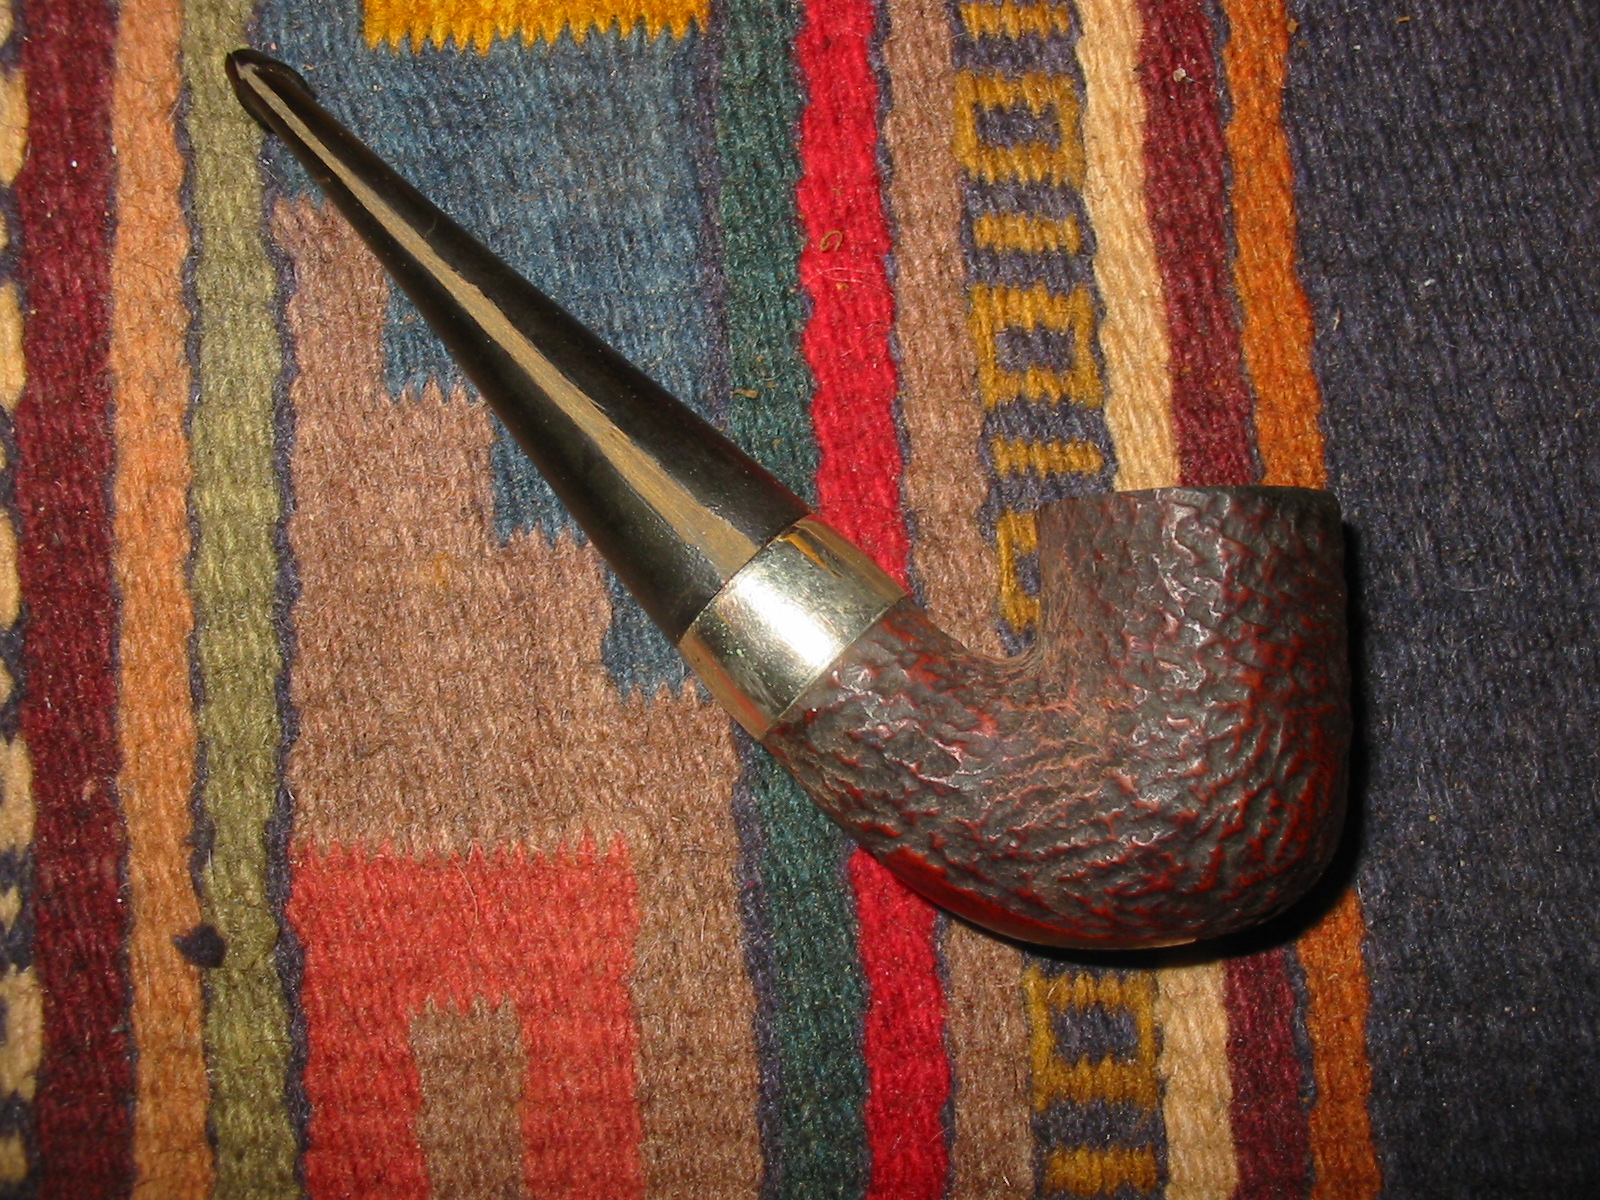
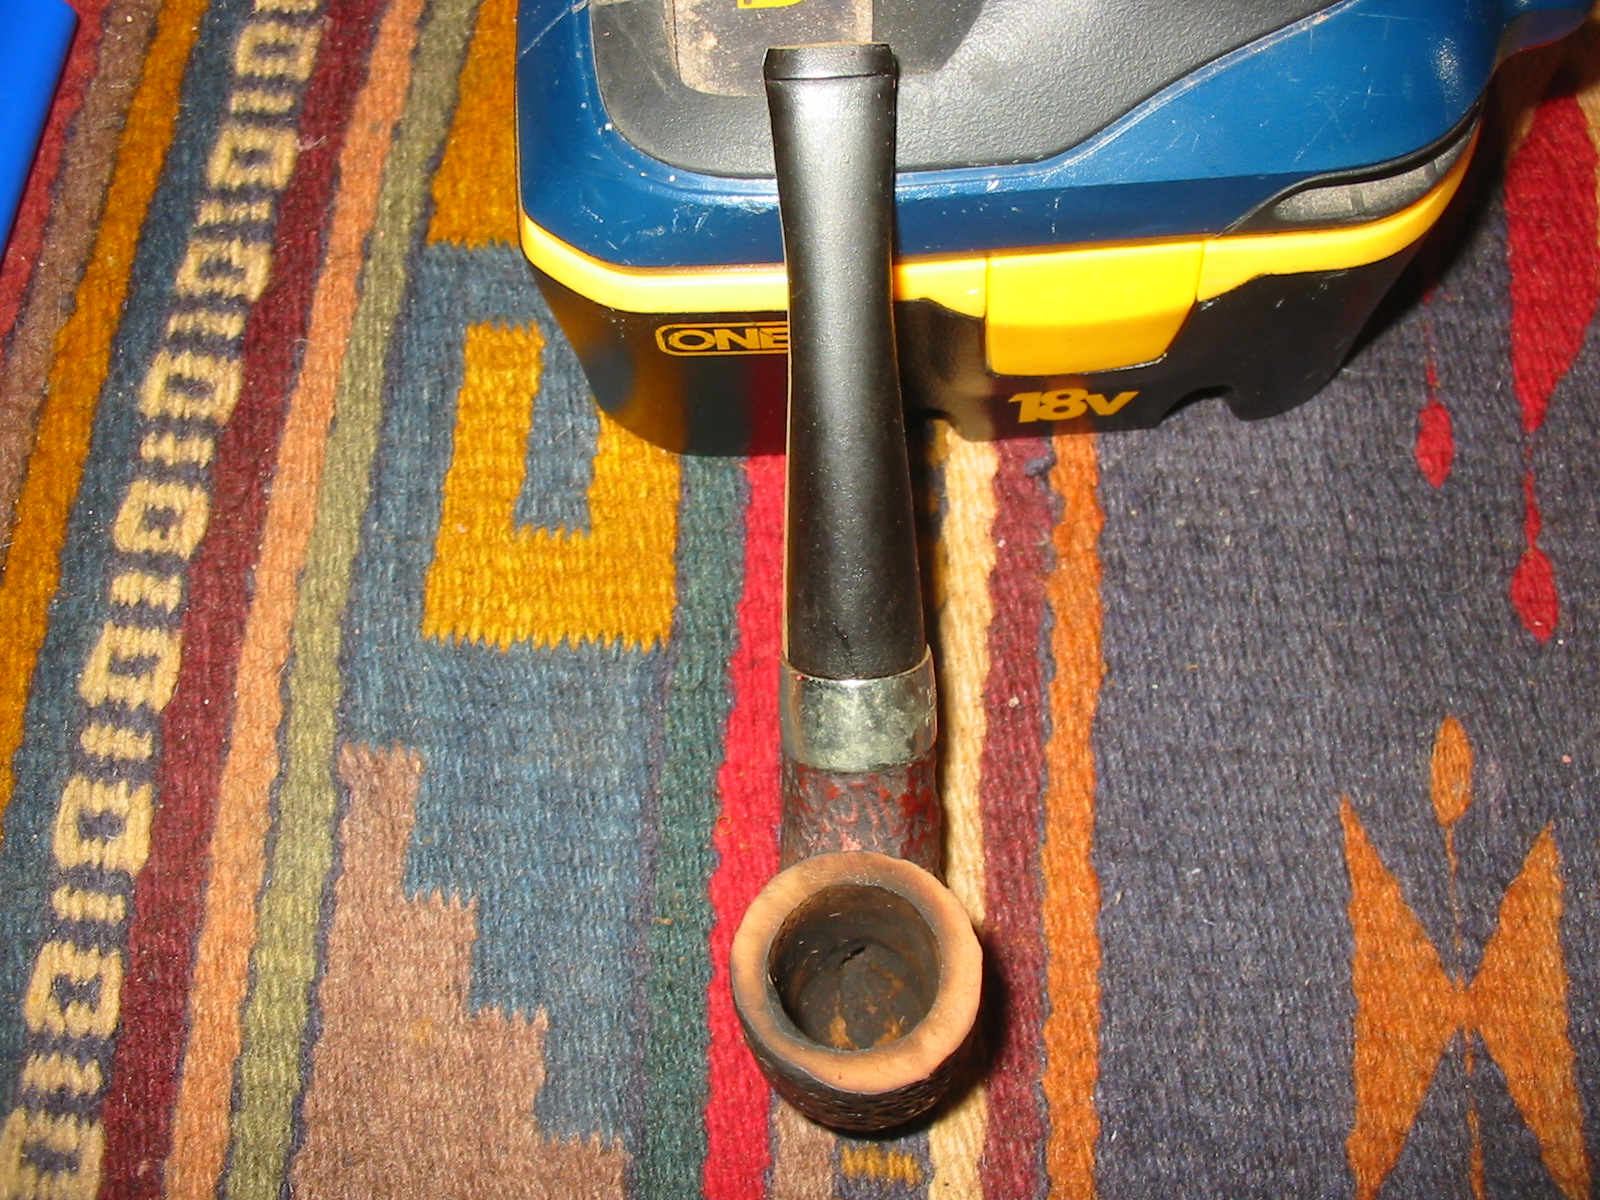
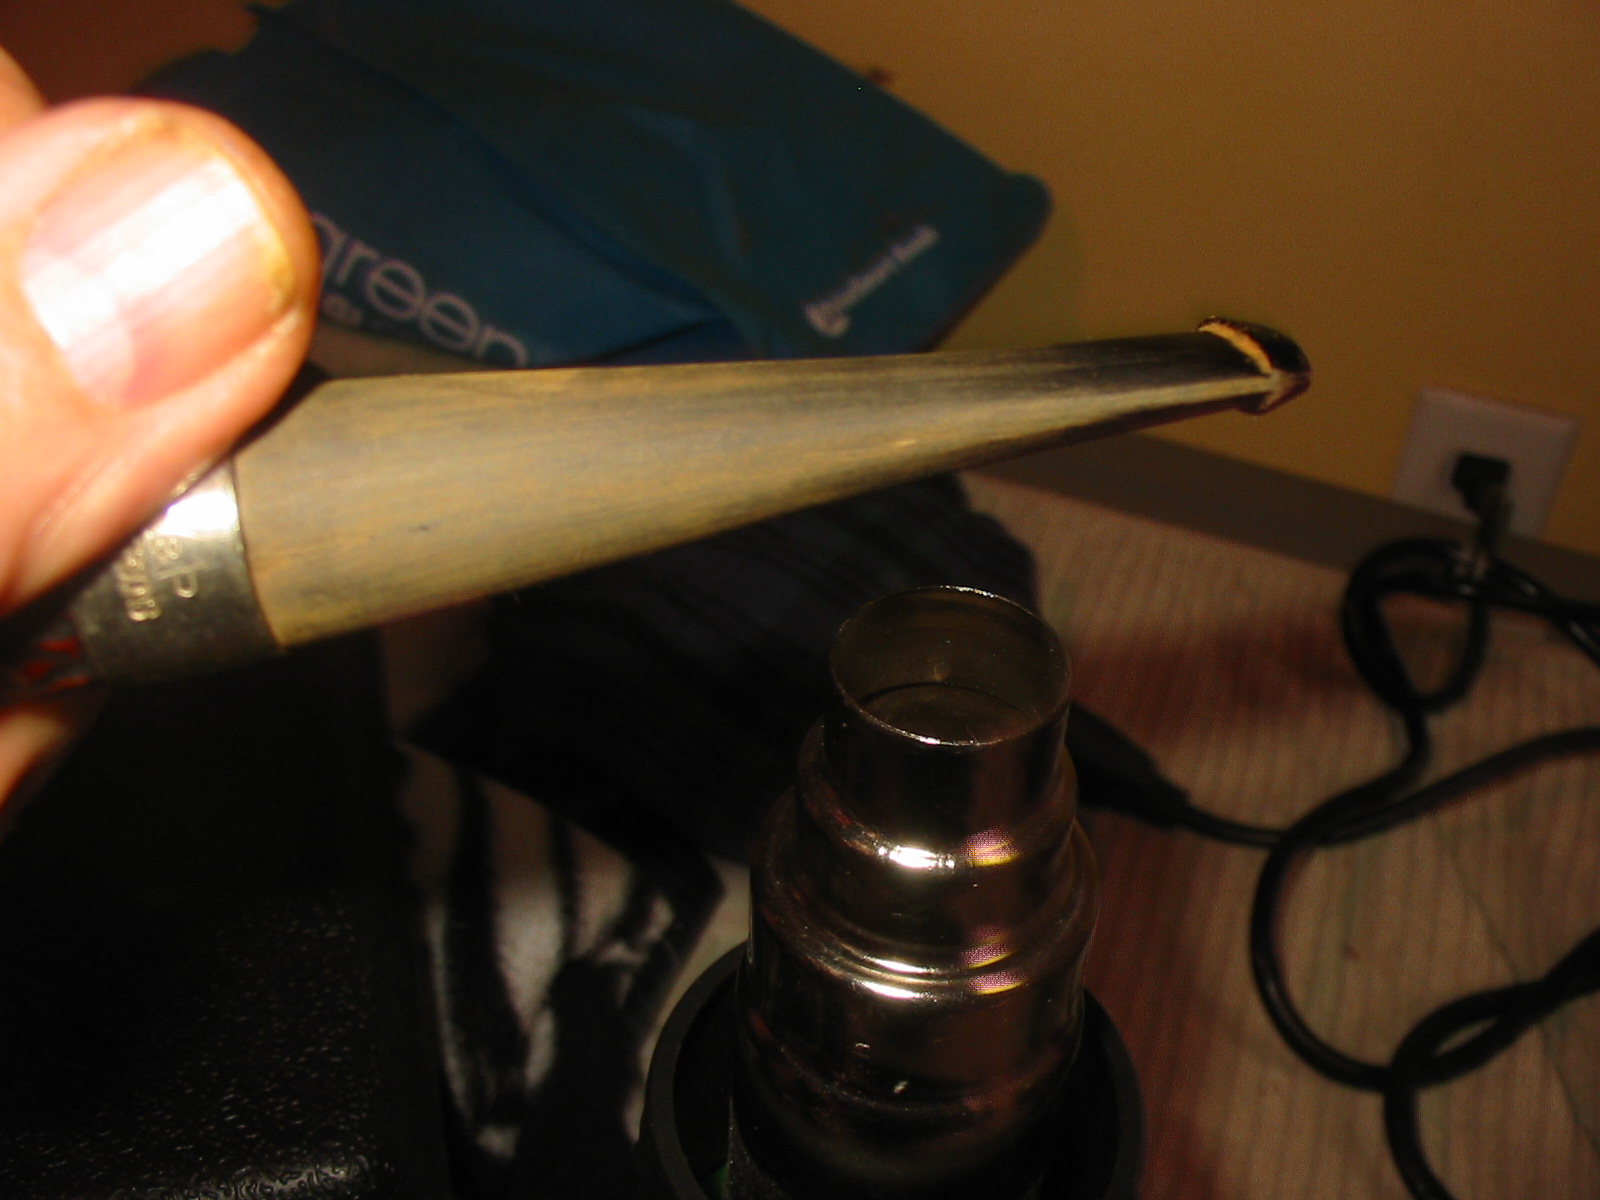
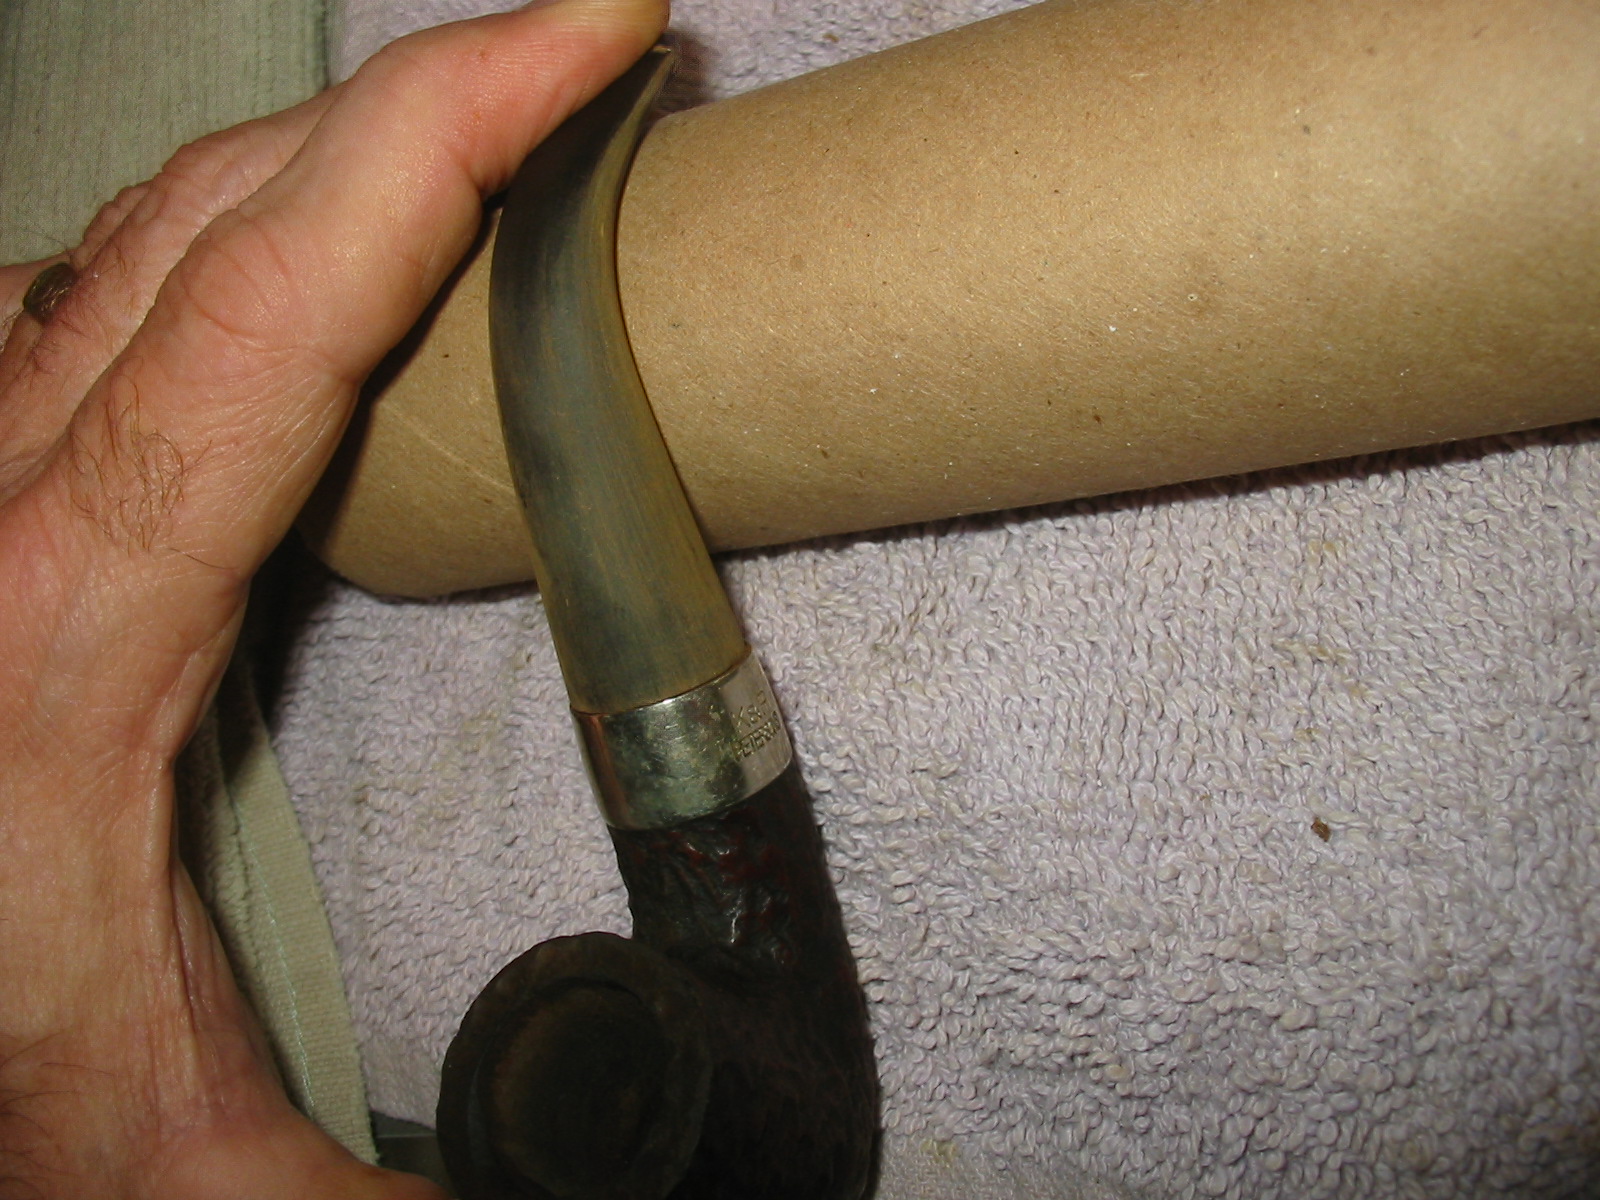
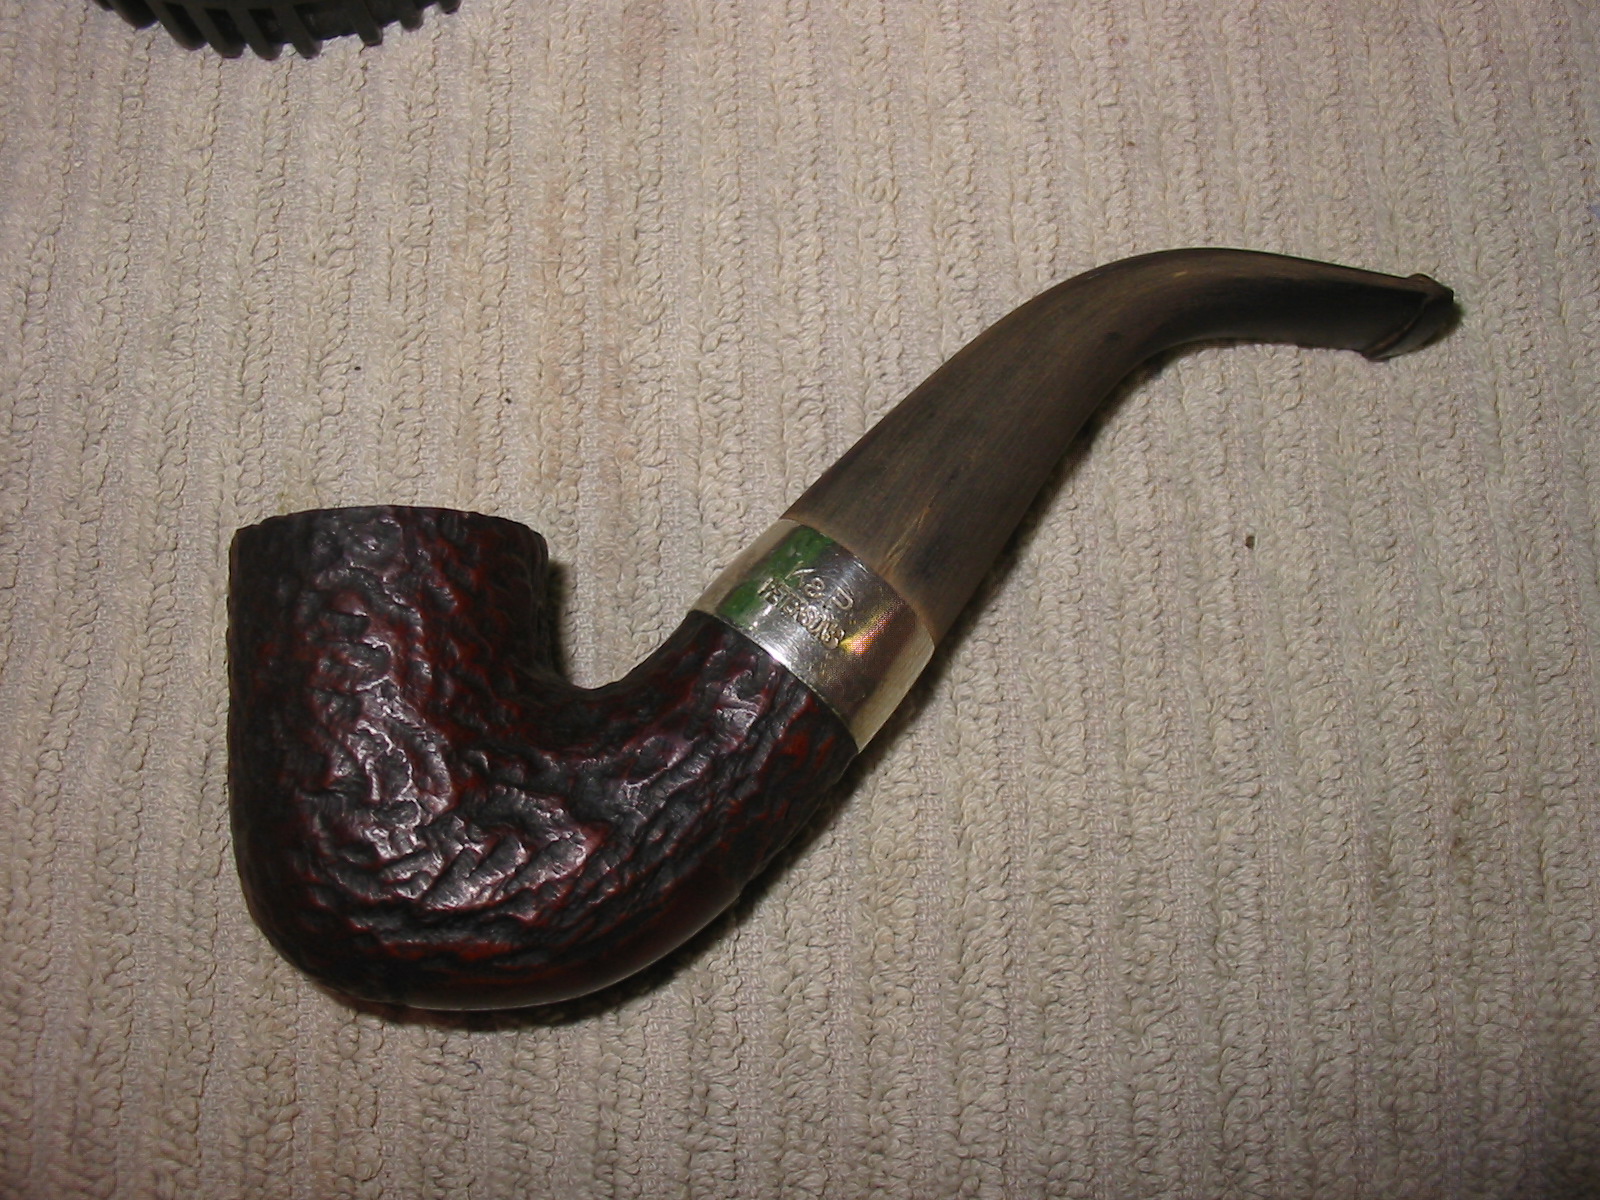
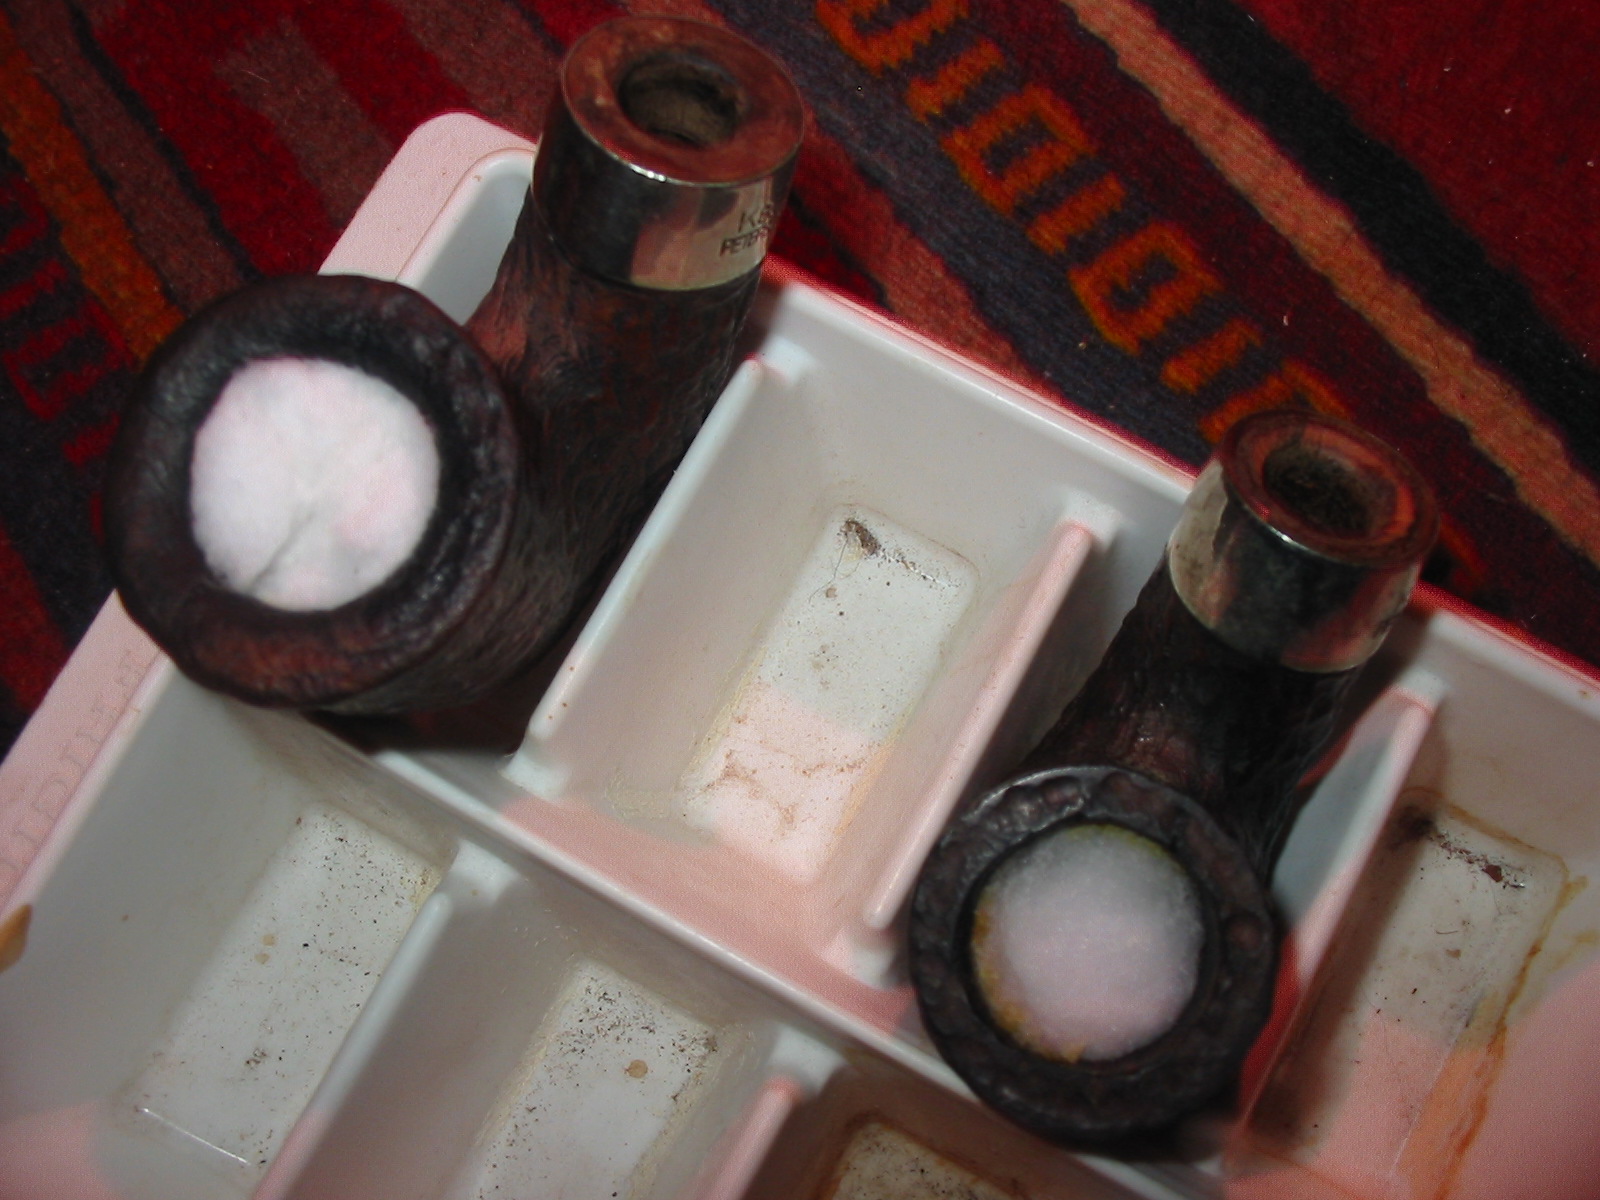
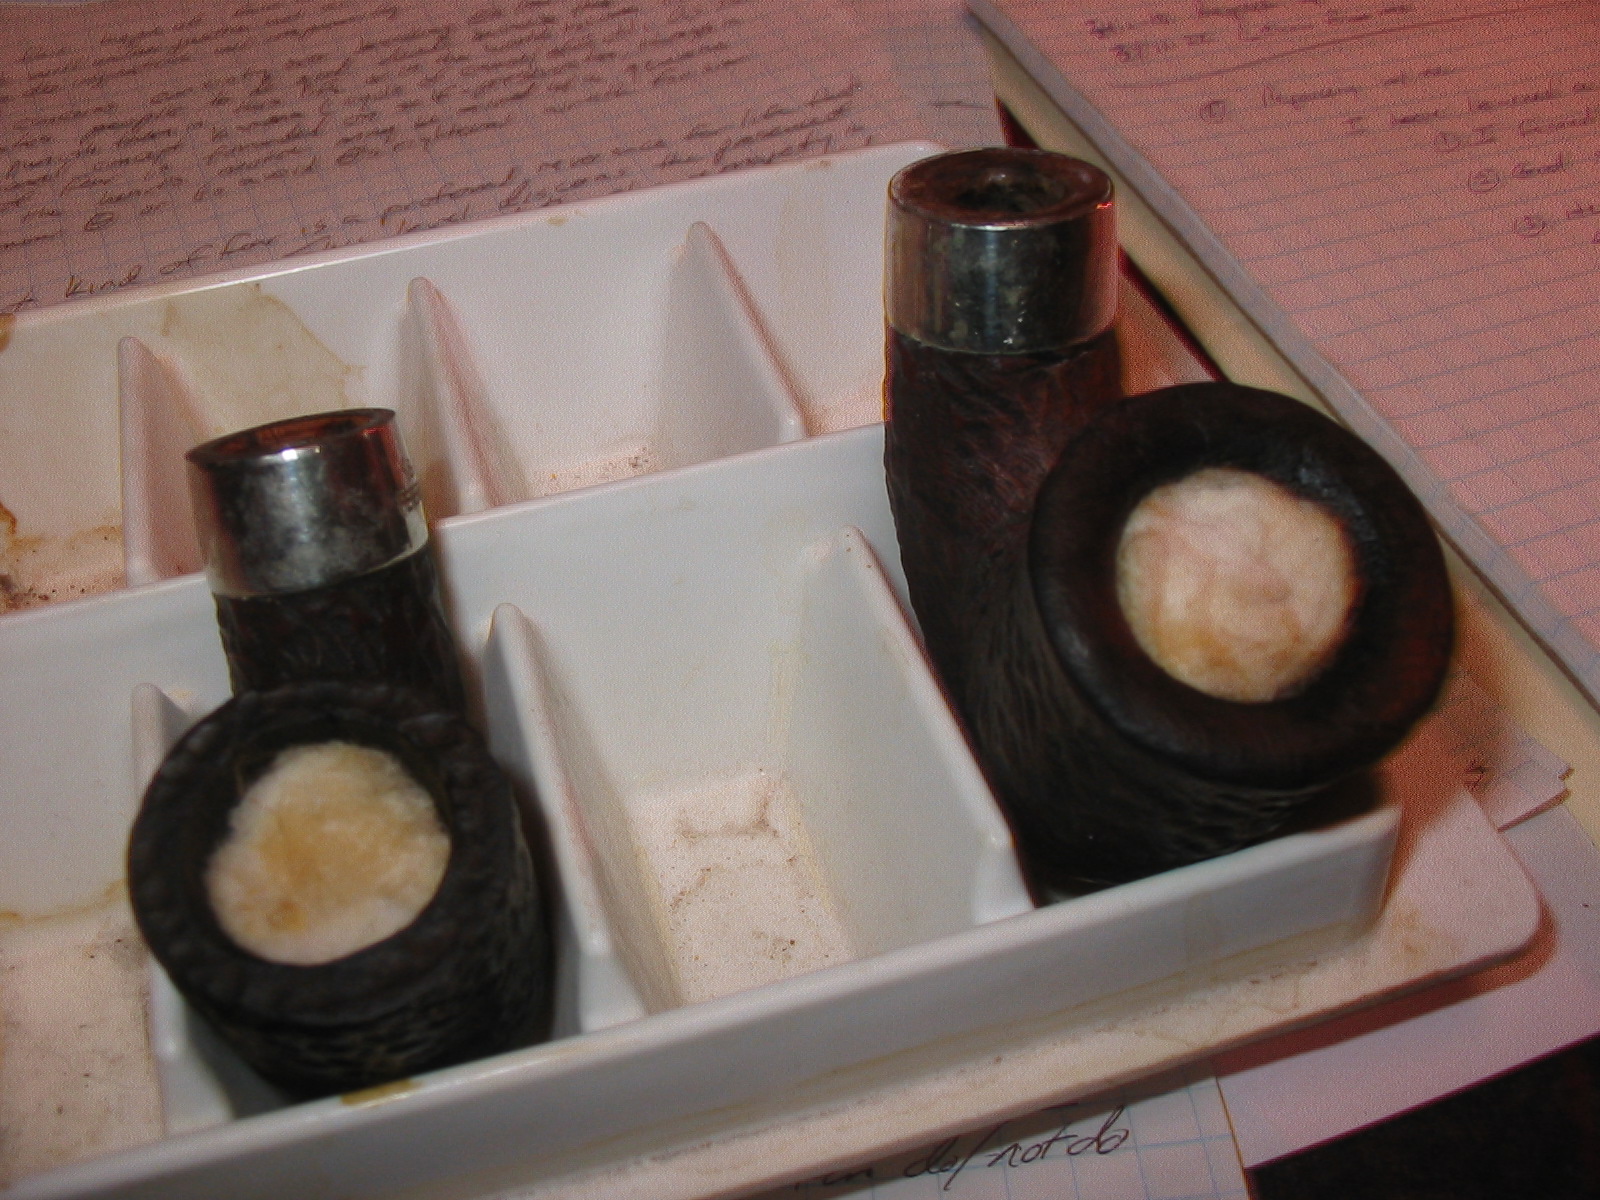
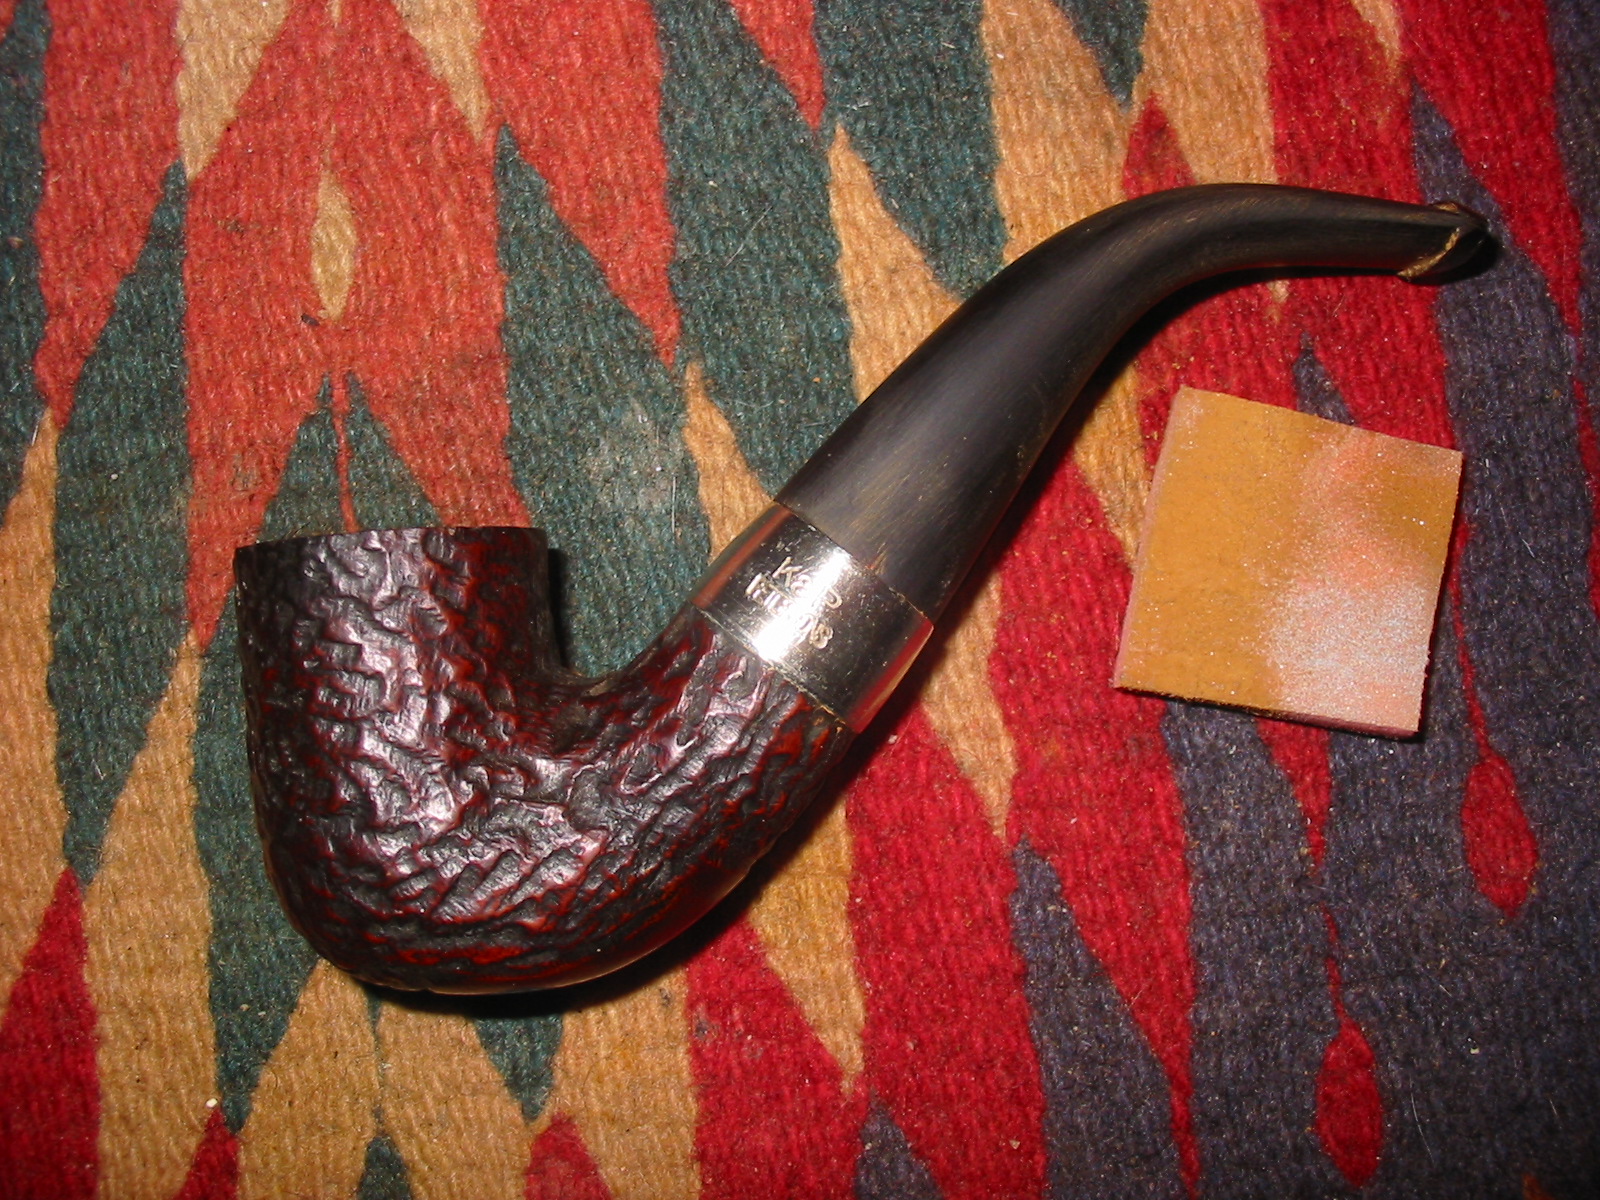
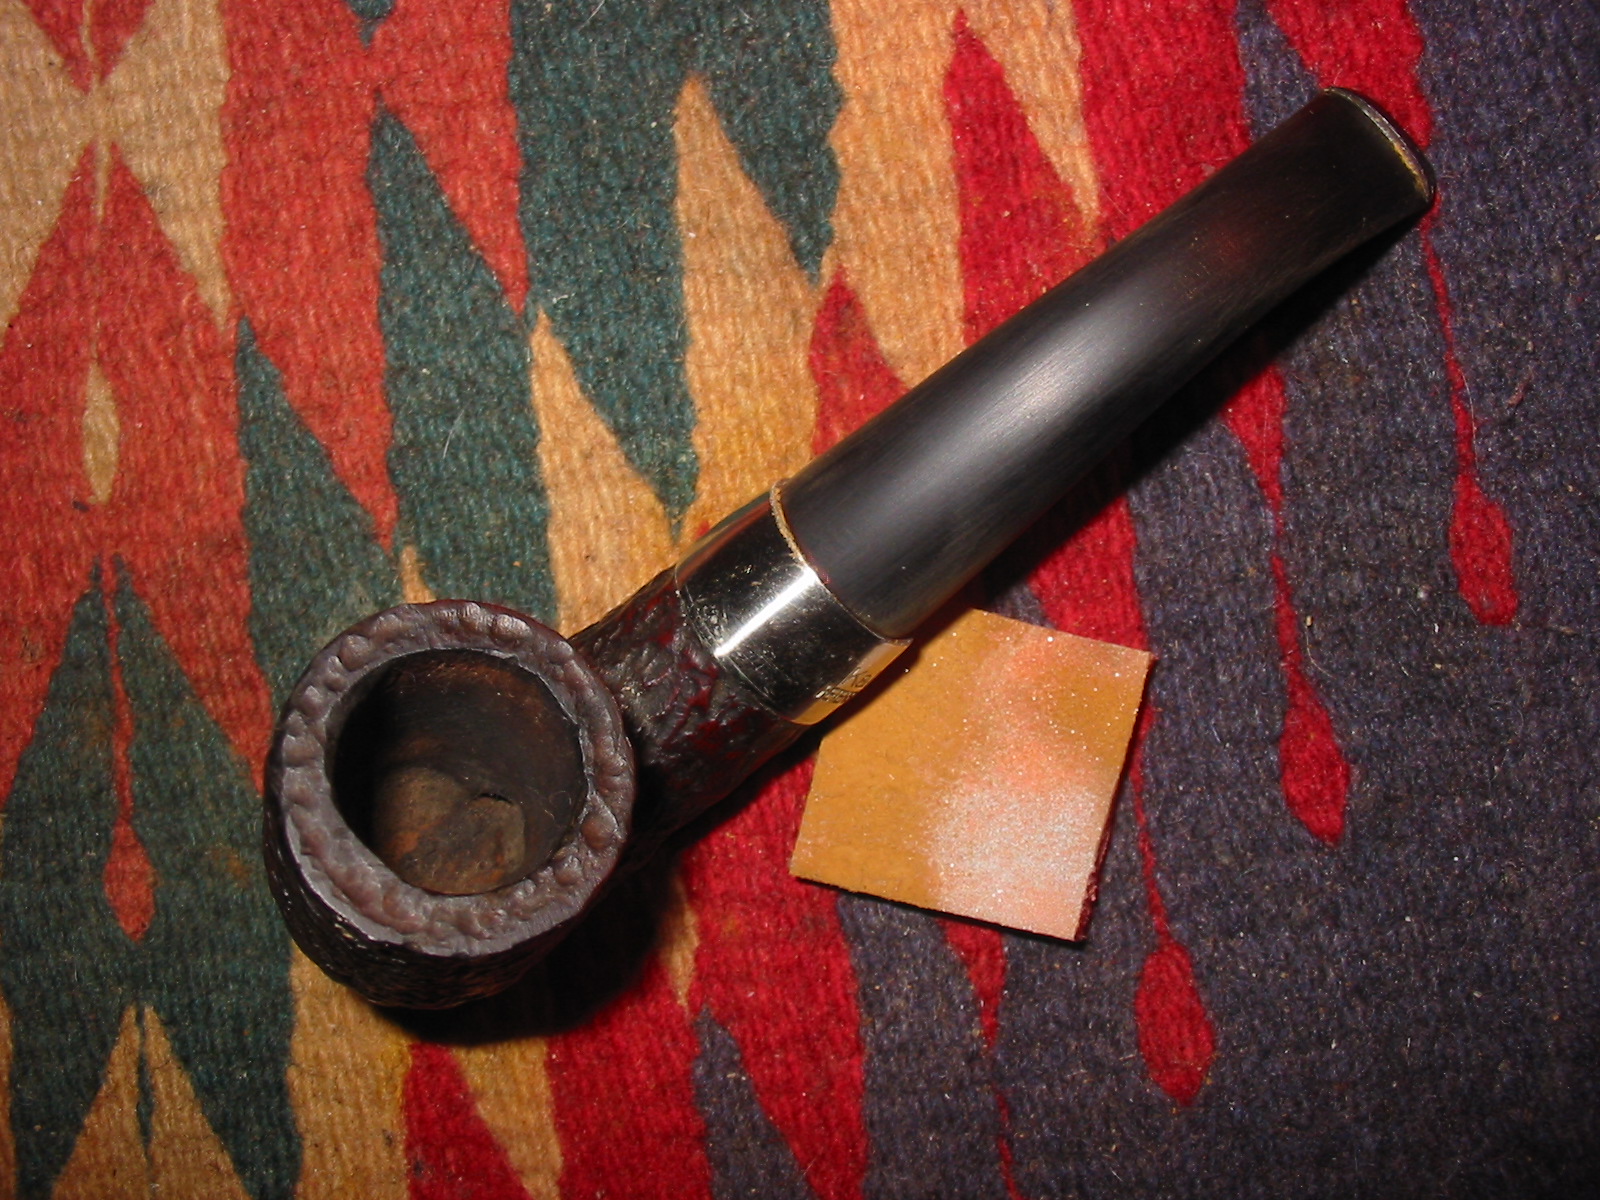
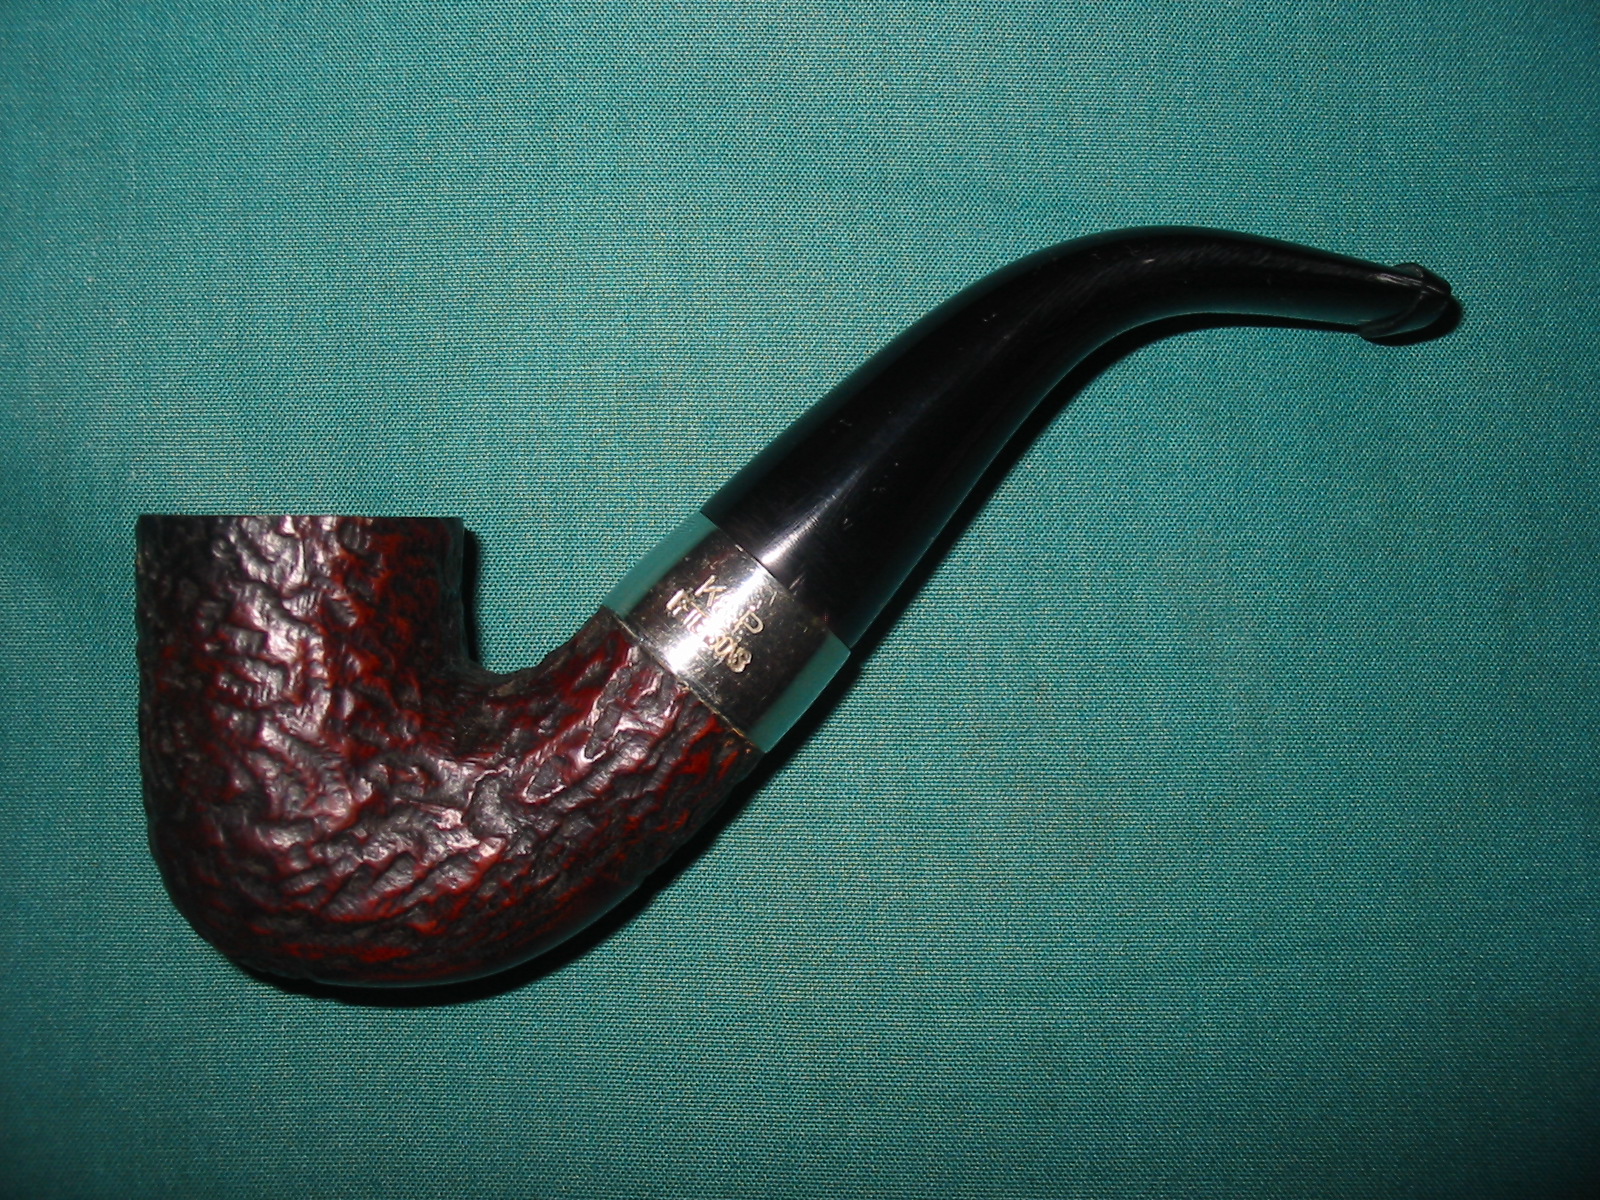
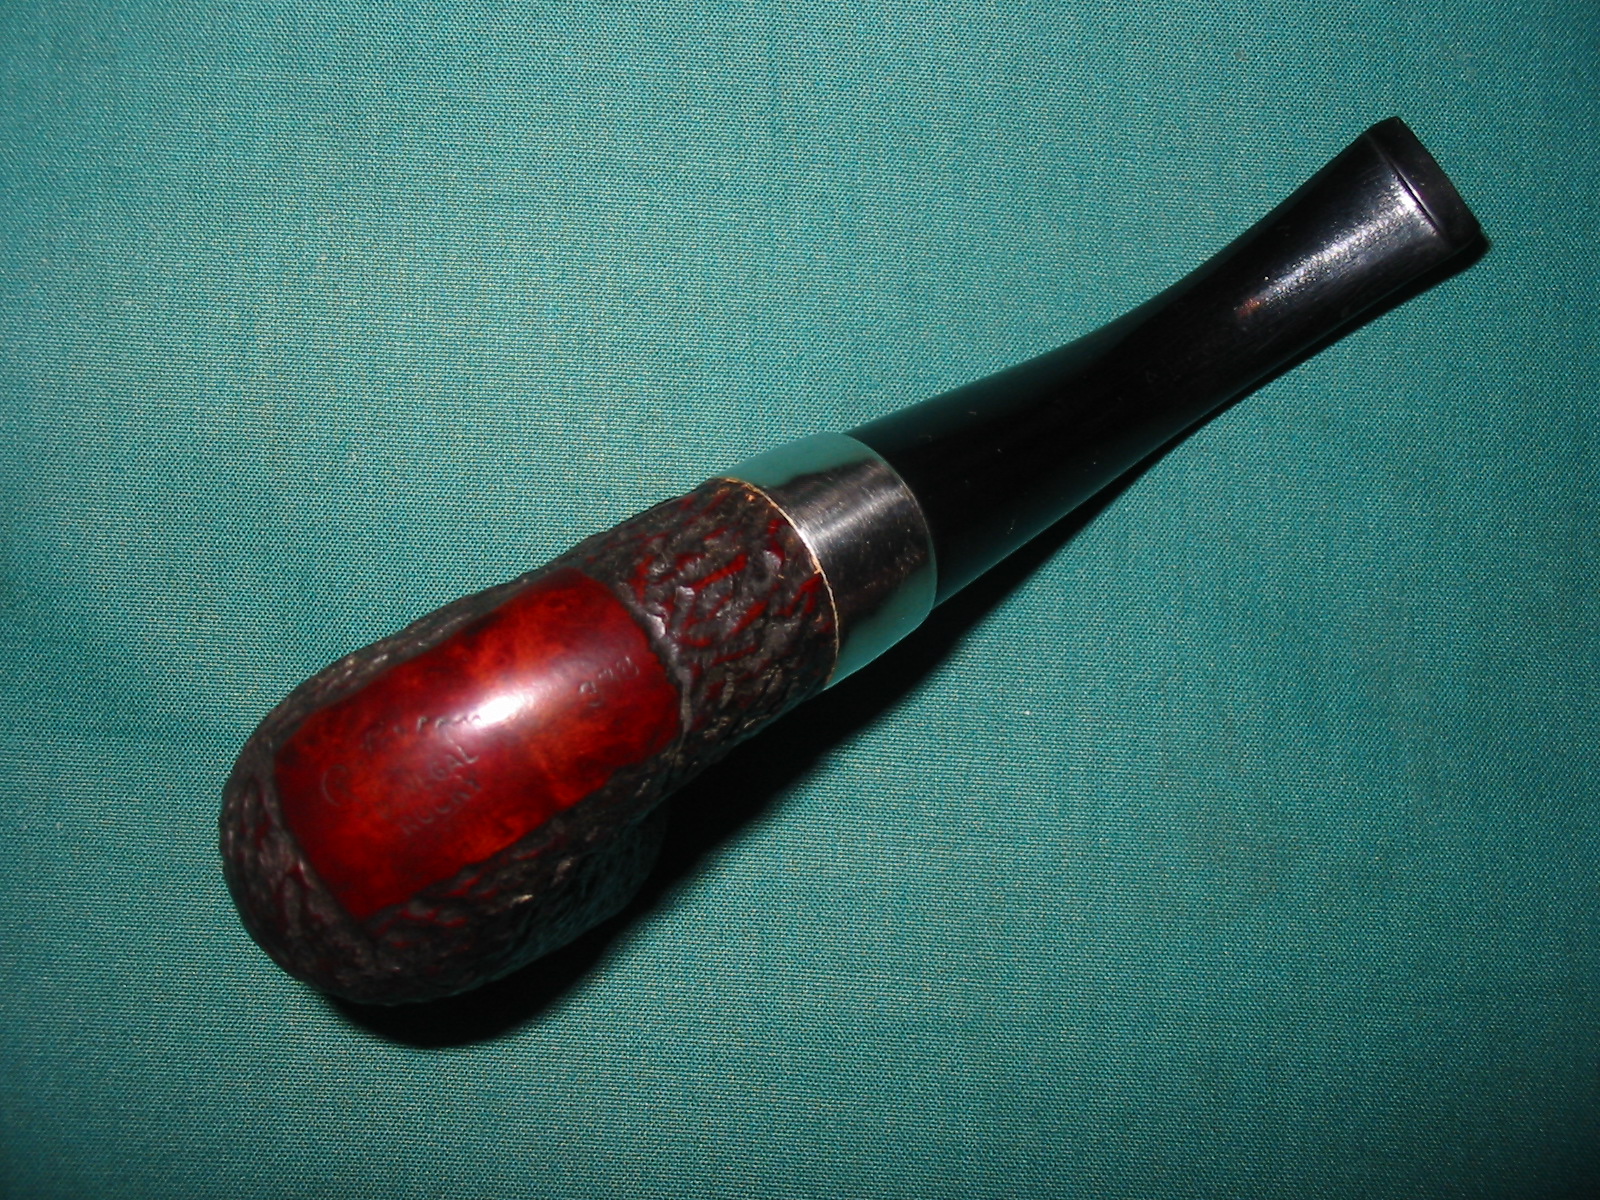
The pipe Ed gave the boy when he was too young to understand its true value and craftsmanship was called Cavicchi, which was short for Cavicchi Four C Freehand. It had a tall curved bowl with rough edges along the top and many close lines of grain from top to bottom. The stem was bent with a silver band. The boy kept it in a box with soft lining and took it out and held it every morning when he awoke and again whenever he returned to his home and at night before he went to bed.
He could read “Cavicchi C” on the left side of the part he learned from his grandfather was called the shank and “Fatto a Mano in Italia” on the right and, underneath, a row of four circles with Cs in them. At first the thing was a reminder of the old man but over time it became a good luck charm despite the years of the many beatings and the physical changes that were worse in some ways and the boy tried his best not to think about.
After all, he thought, I survived them, did I not? And despite everything the magic pipe never abandoned me.
But he did not smoke Cavicchi until he was of the legal age and his grandfather gave him his first tin of good tobacco. He coughed, as all young men or boys do when trying tobacco for the first time, and his grandfather laughed with him but taught him the secret of not inhaling the smoke.
One day when Mike was walking on the old Route 66 that ran through the center of Albuquerque he came to the east end of the Nob Hill District and noticed a big glass building with the word arcade on it. He had seen the place many times but never thought to go inside.
As most young people do, which is to say without thought, he entered the ratty old place filled with antiques and vintage memorabilia and asked another young man behind the counter if he had any smoking pipes. Mike surprised himself with the question as he heard it in his own voice.
I have my own favorite tobacconist where I can buy any pipe I could want if I needed one better than Cavicchi, he thought.
The other young man had short hair of the cut known as Ivy League and small round eyeglasses and wore straight-legged pin-striped slacks from the 1950s and a starched dress shirt with buttons on the collar and a bow tie.
“Could this guy be more of a nerd if he tried?” Mike said to himself.
Then he had a pang of guilt he had never before felt and asked himself why that should be. The answer came to him so fast it made him lighter in the head than Five Brothers Smoking Tobacco.
He is just like I am, or was. I don’t even know his name. Who am I to judge him for his unfortunate haircut and silly clothes? My own hair being much longer than his and my loose jeans and tee-shirt make me no better than he is.
Mike wondered how he had learned compassion. The understanding of a different person’s feelings still hit Mike like the heavy rain and near-gale force winds of what the locals called the monsoon season.
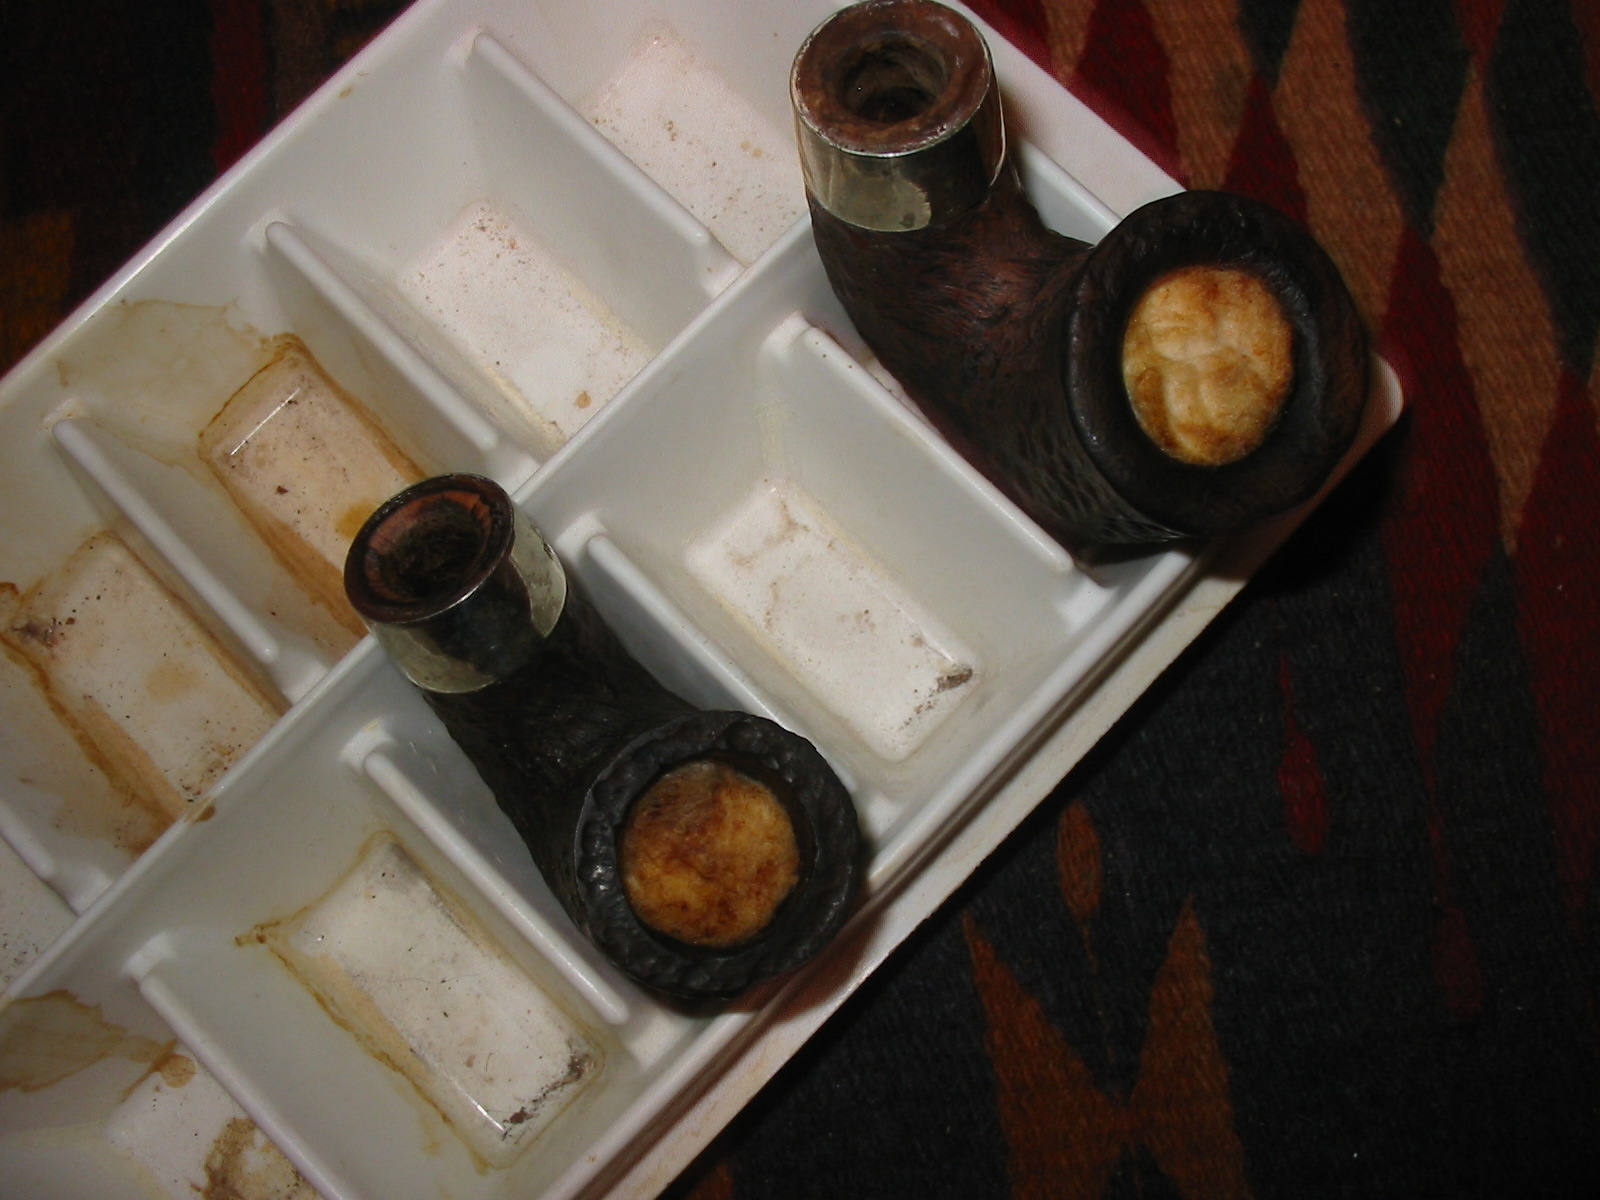
“Hmm, I think I might have a couple over here,” the other young man said, and before he turned to lead the way Mike looked for a name tag which identified him as Andrew. The two wound their way to the Continental Divide of the ground floor of the huge disordered place and stopped by a locked glass case. Inside it Mike saw two old worn pipes in a six-hole stand of the color of the mashed peas he was forced to eat from a jar when he was a baby. Andrew pointed them out.
“May I take a closer look at the pipes, Andrew?” Mike said and noticed the pleased smile on the other youth’s face at the use of his name. Again Mike had an odd feeling but it was good and so he dismissed it.
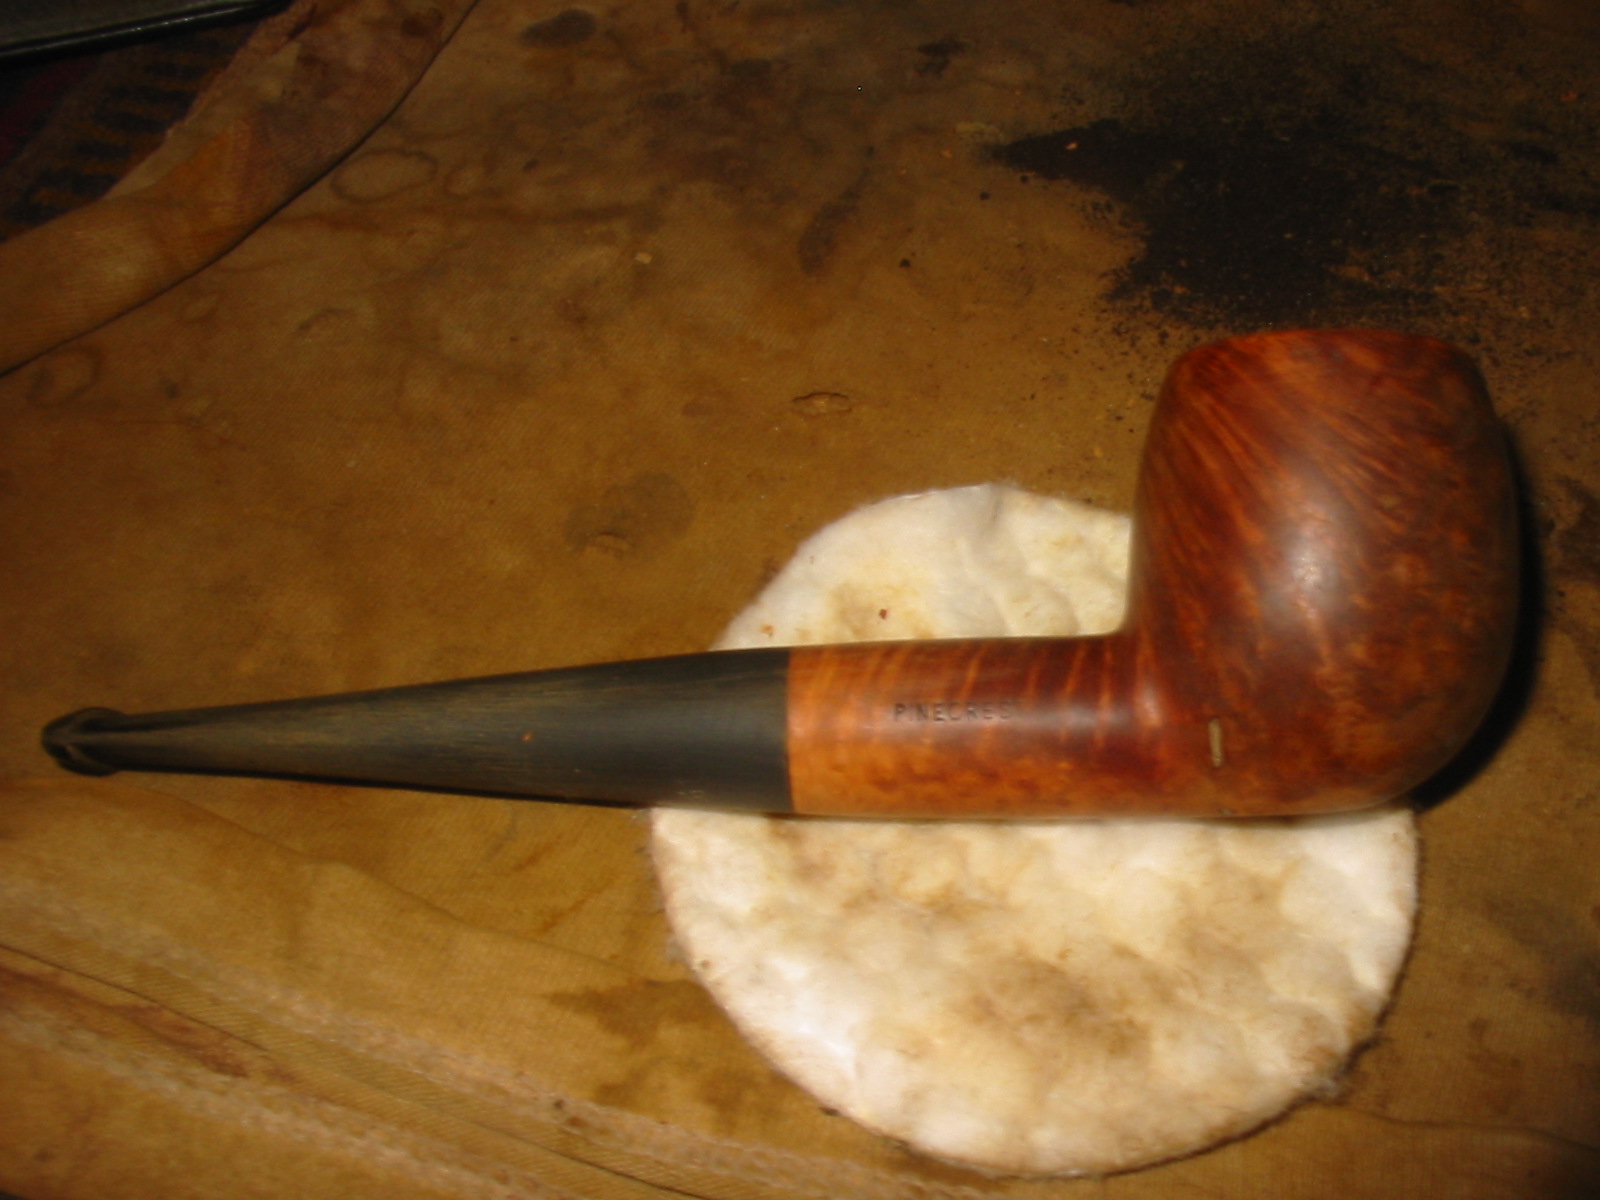
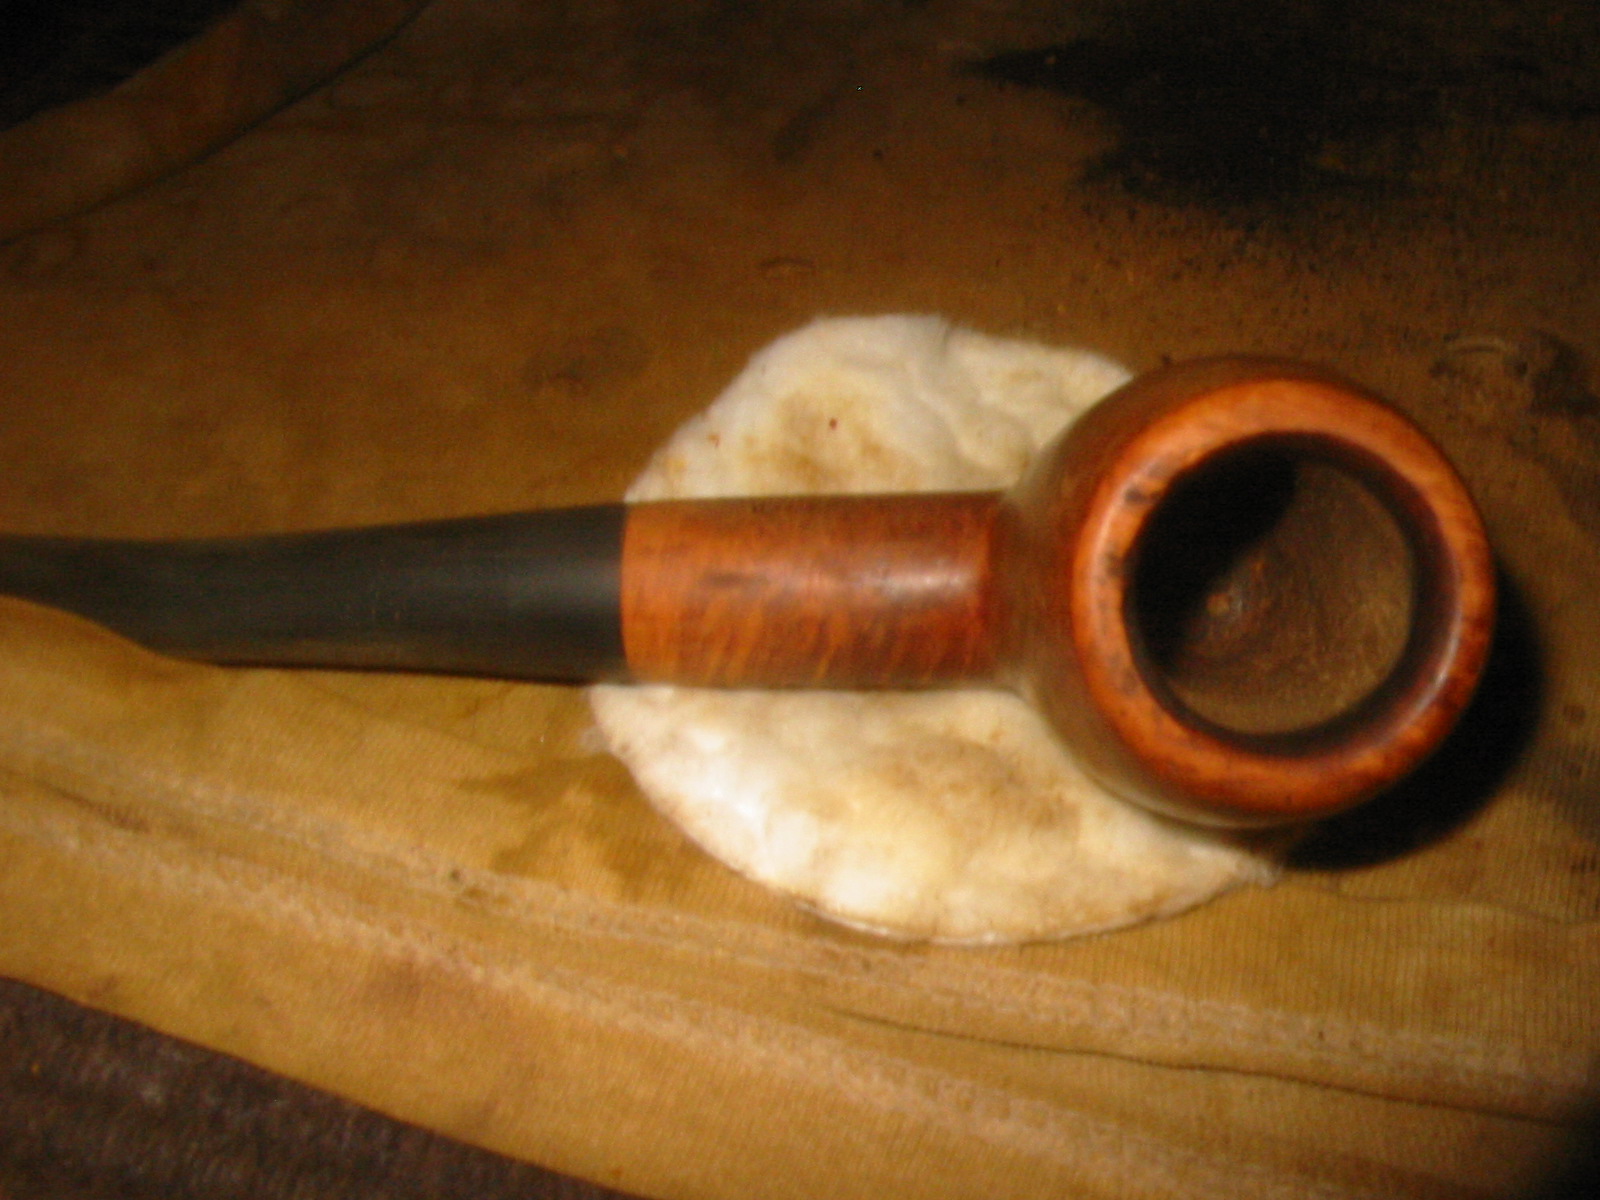
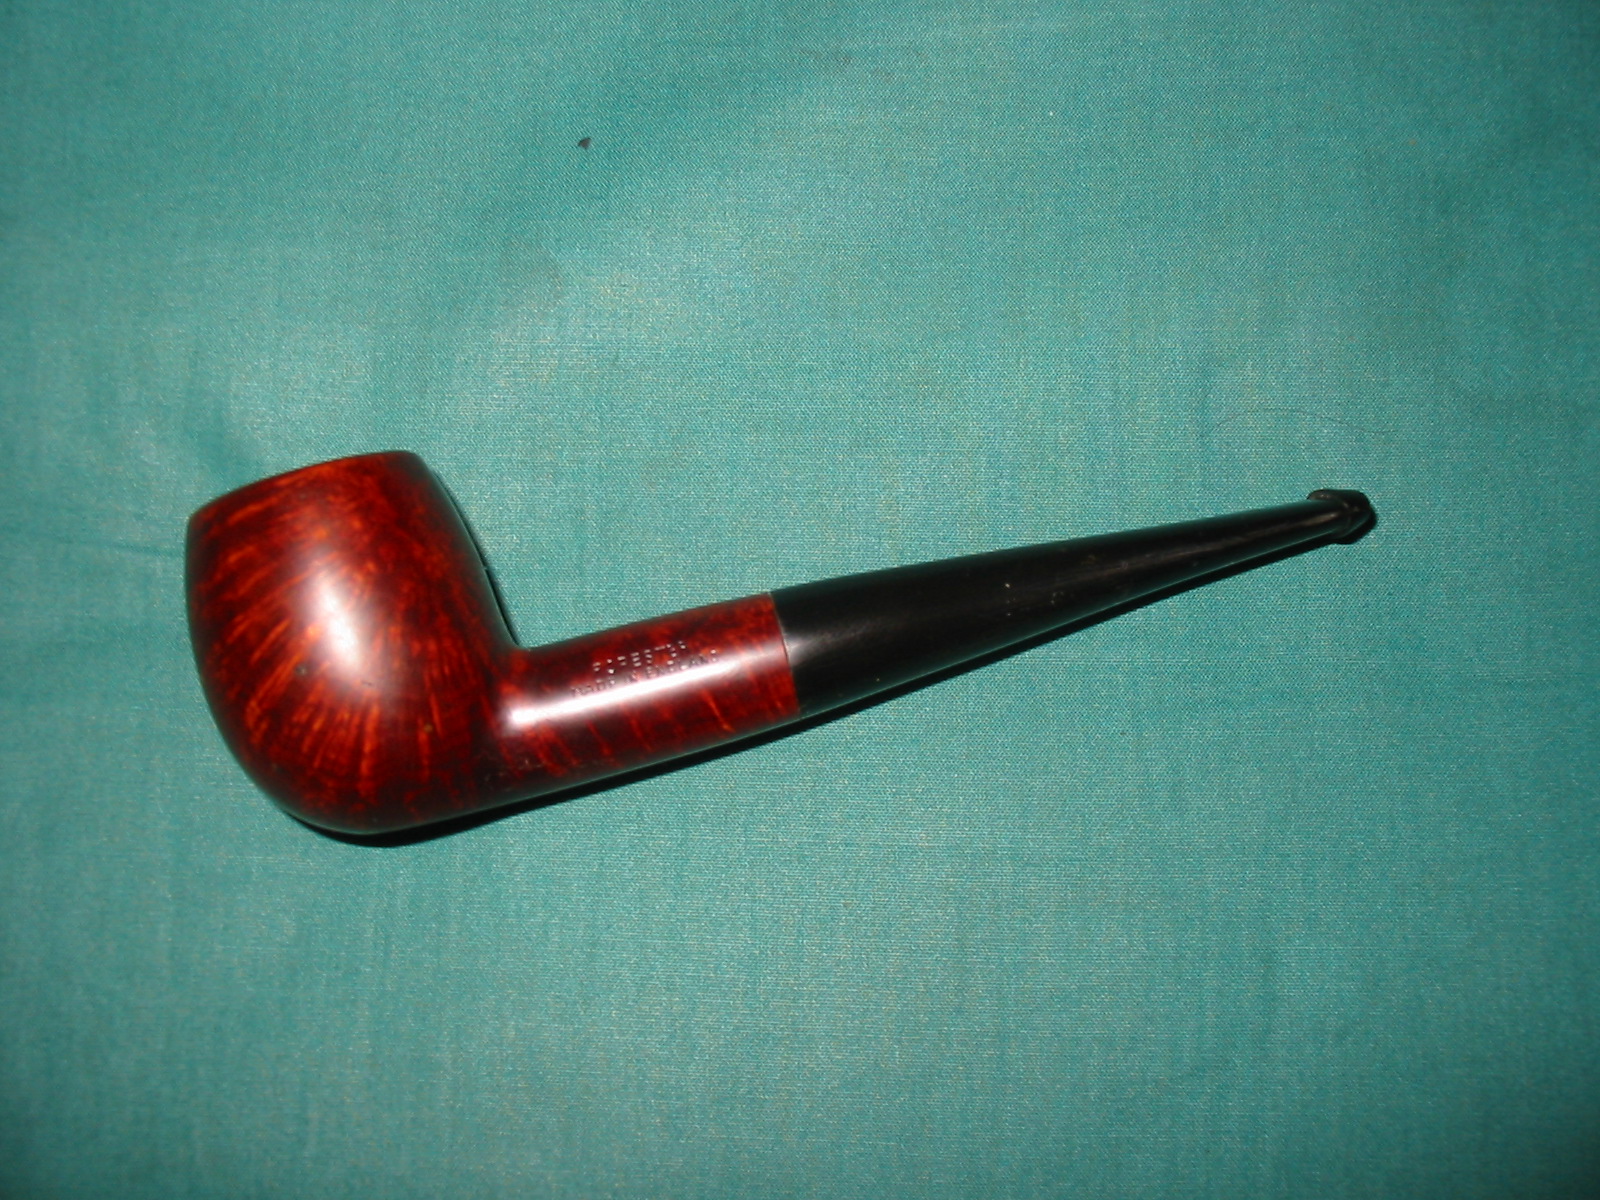
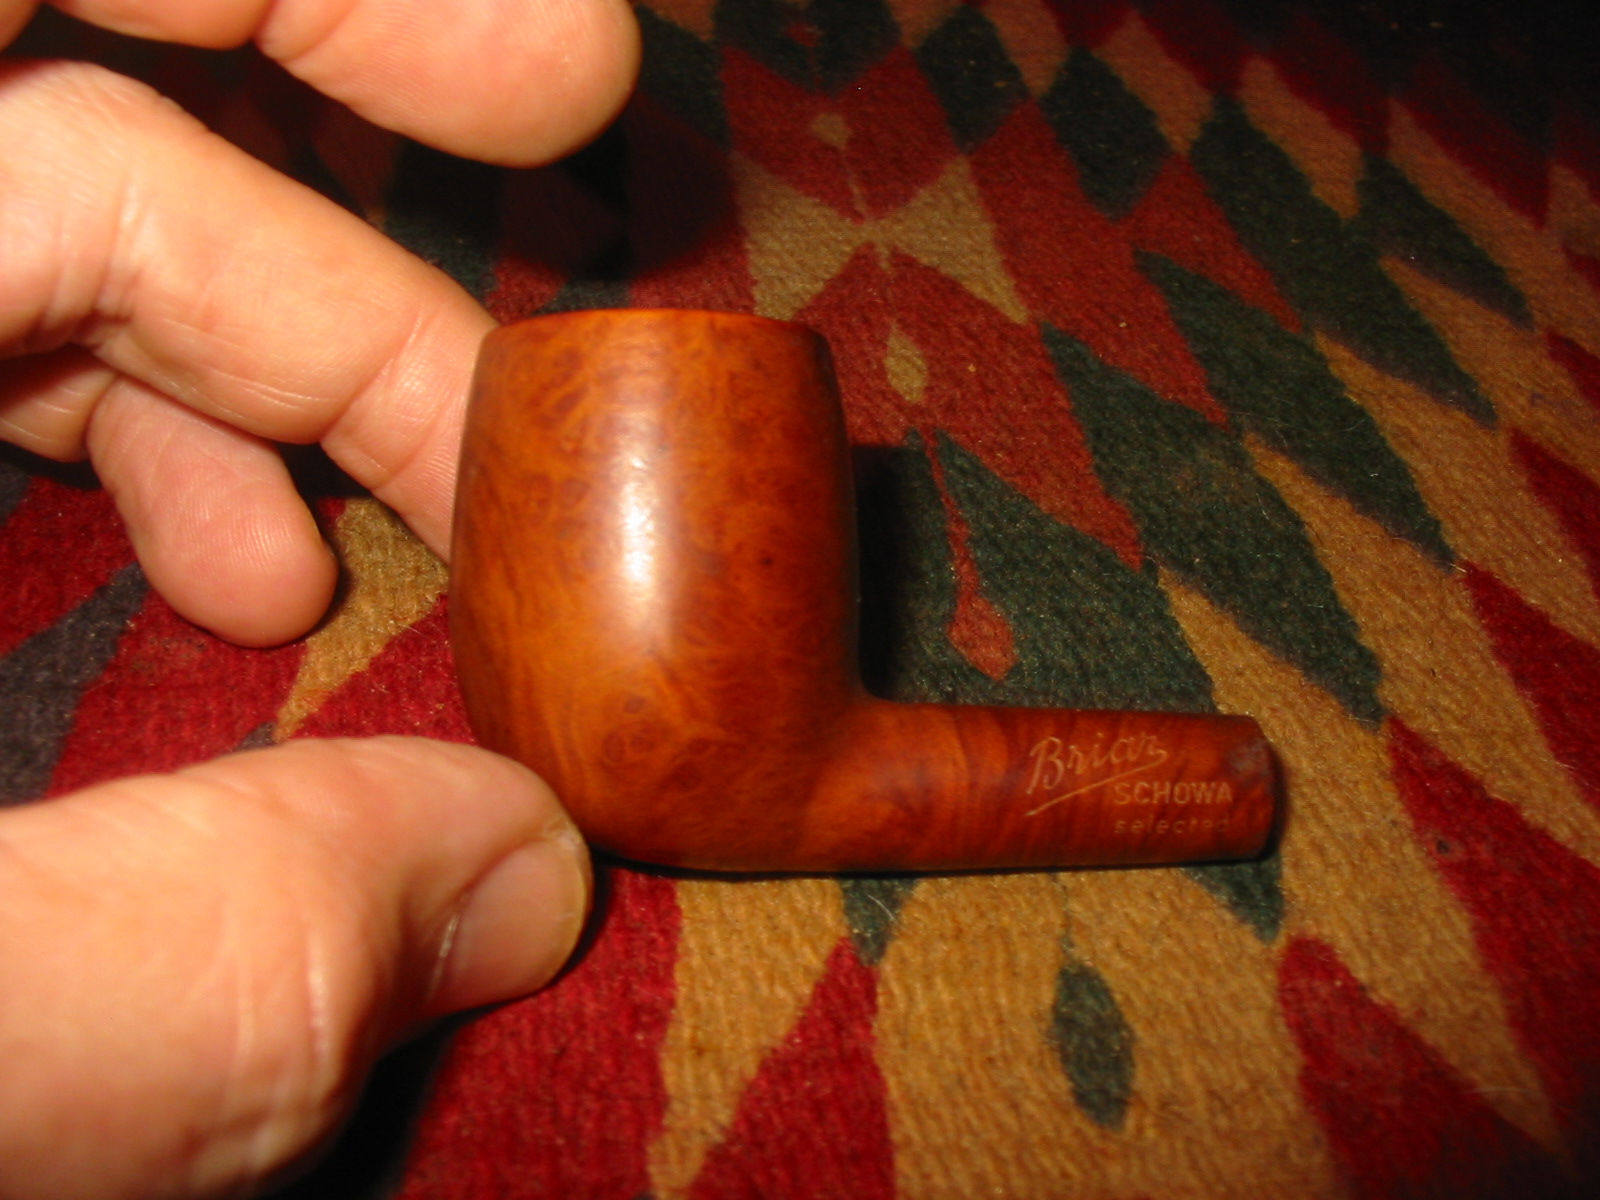
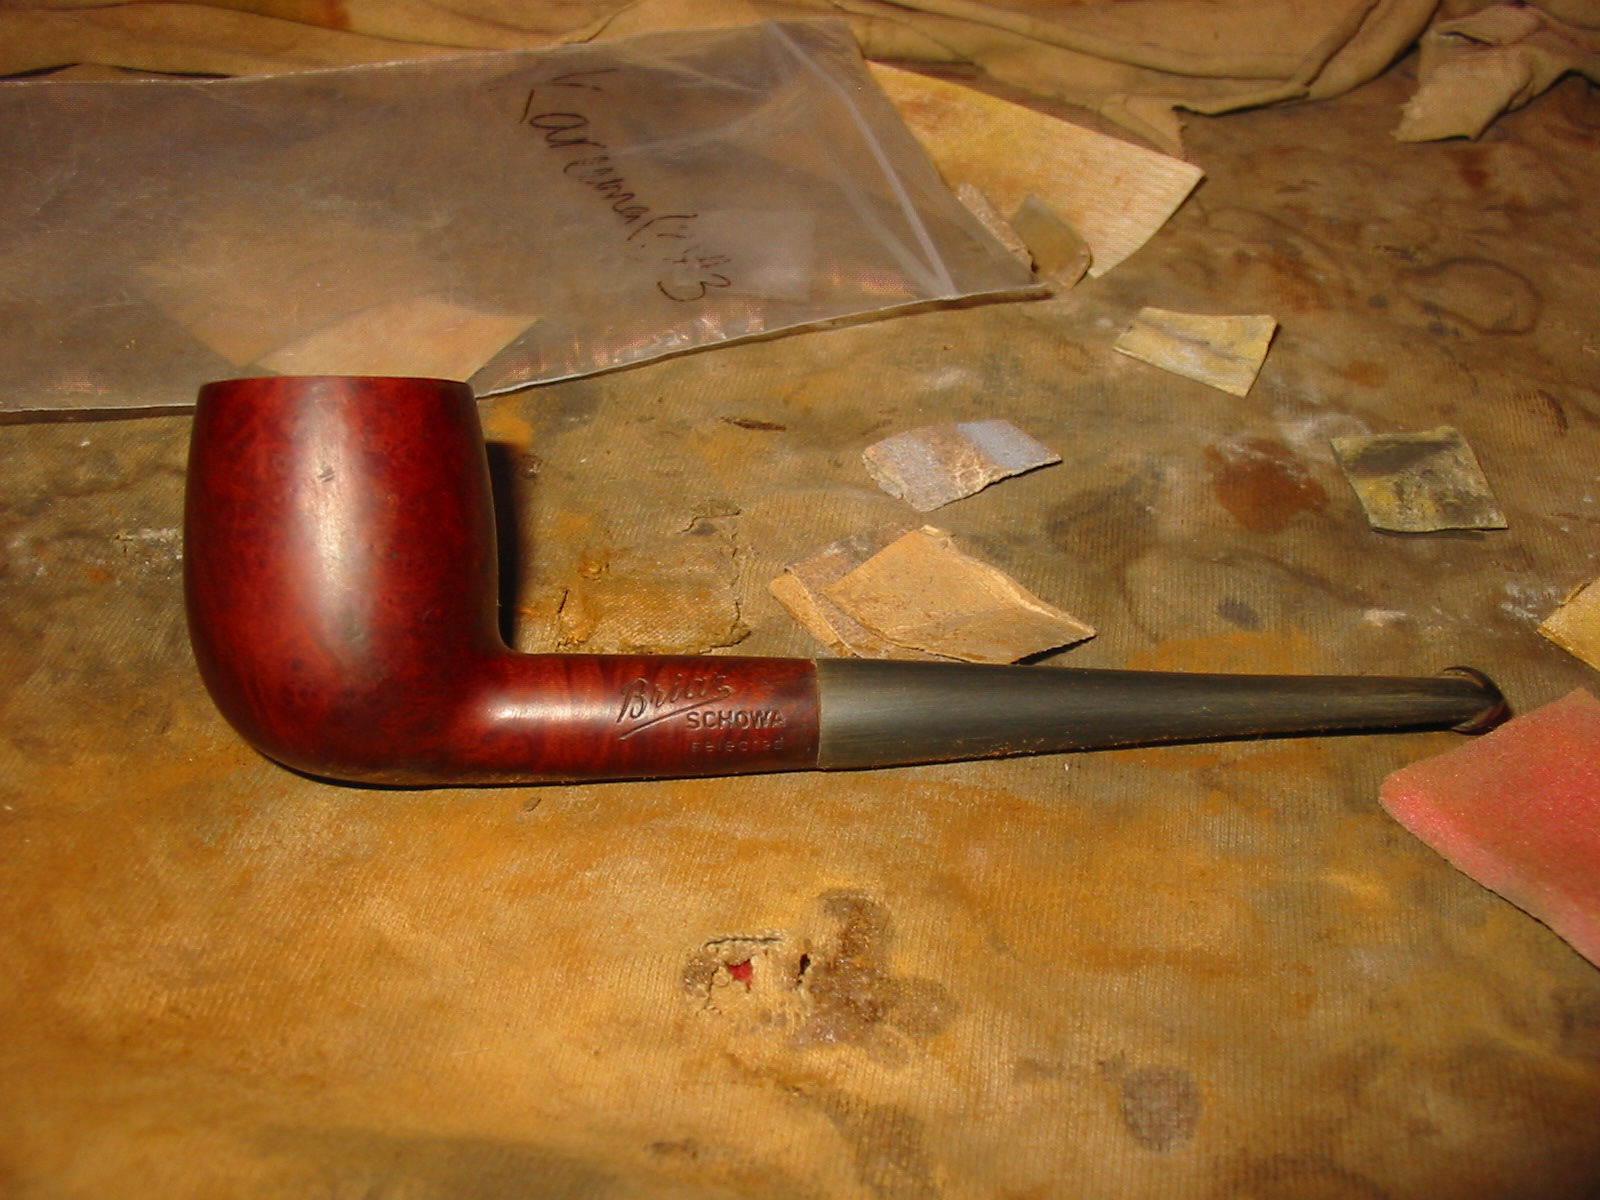
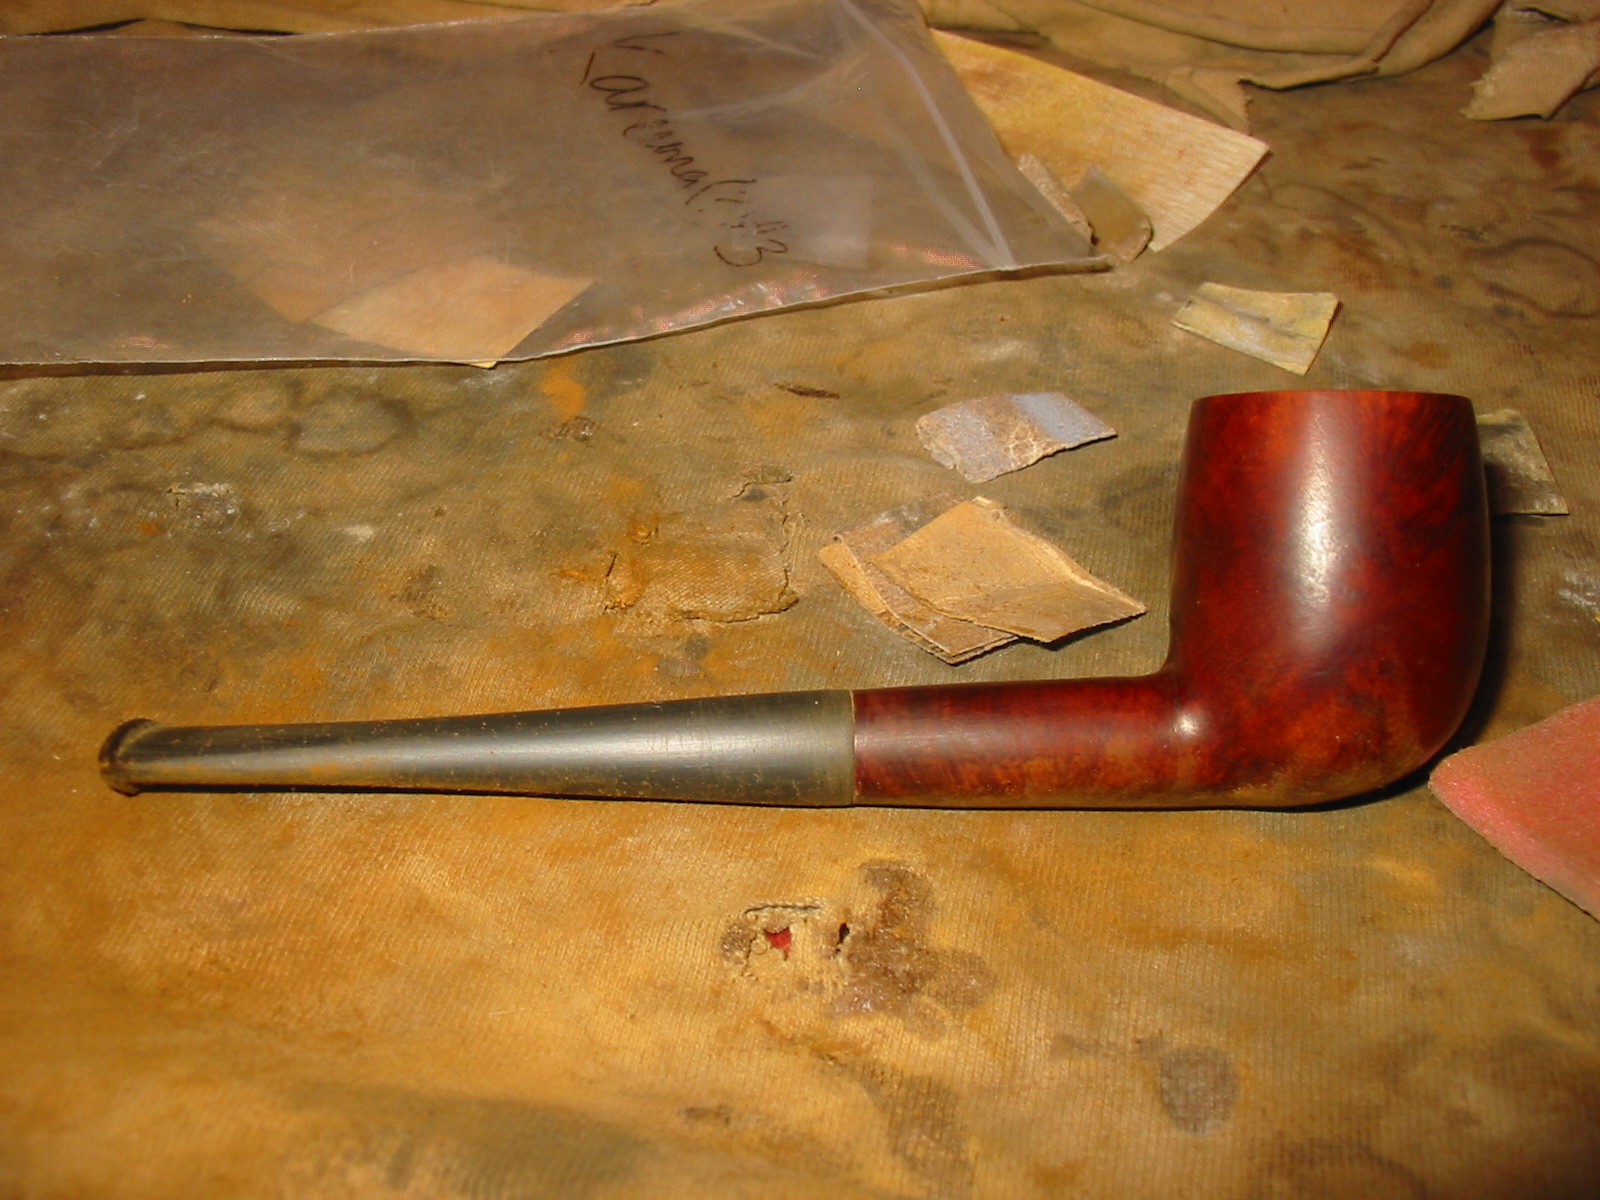
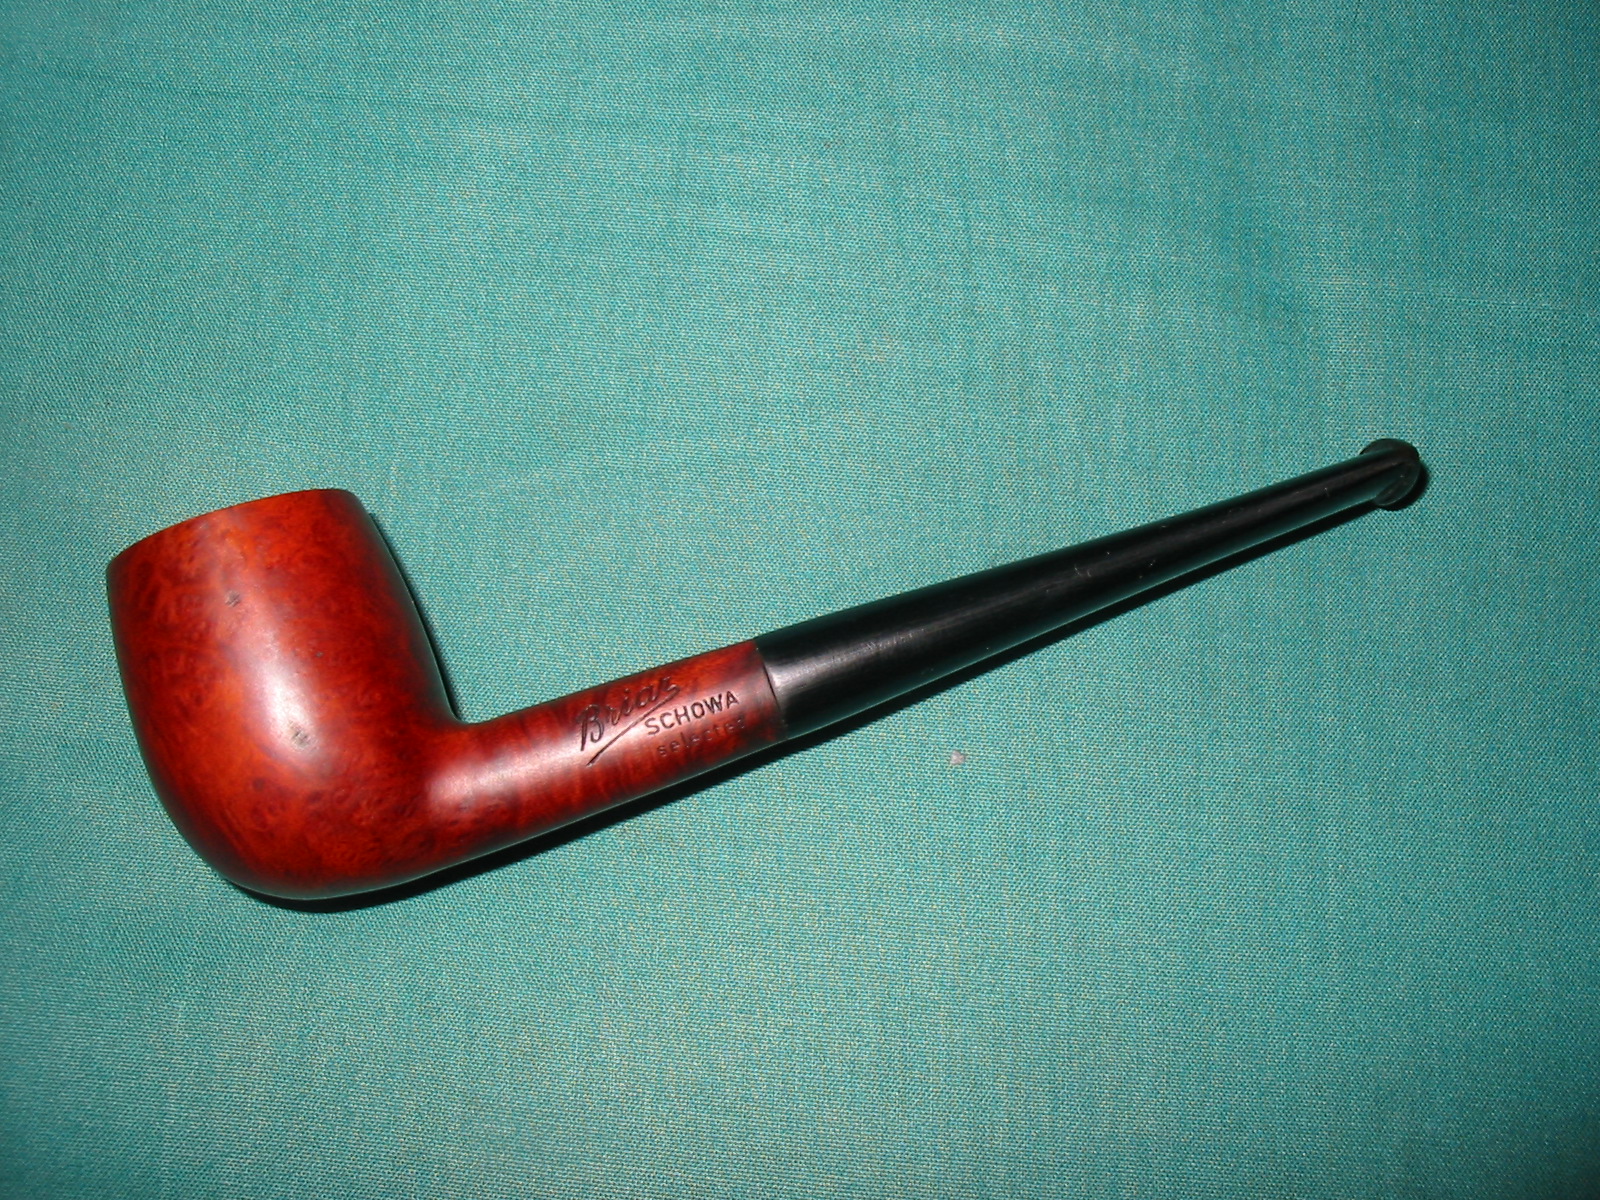
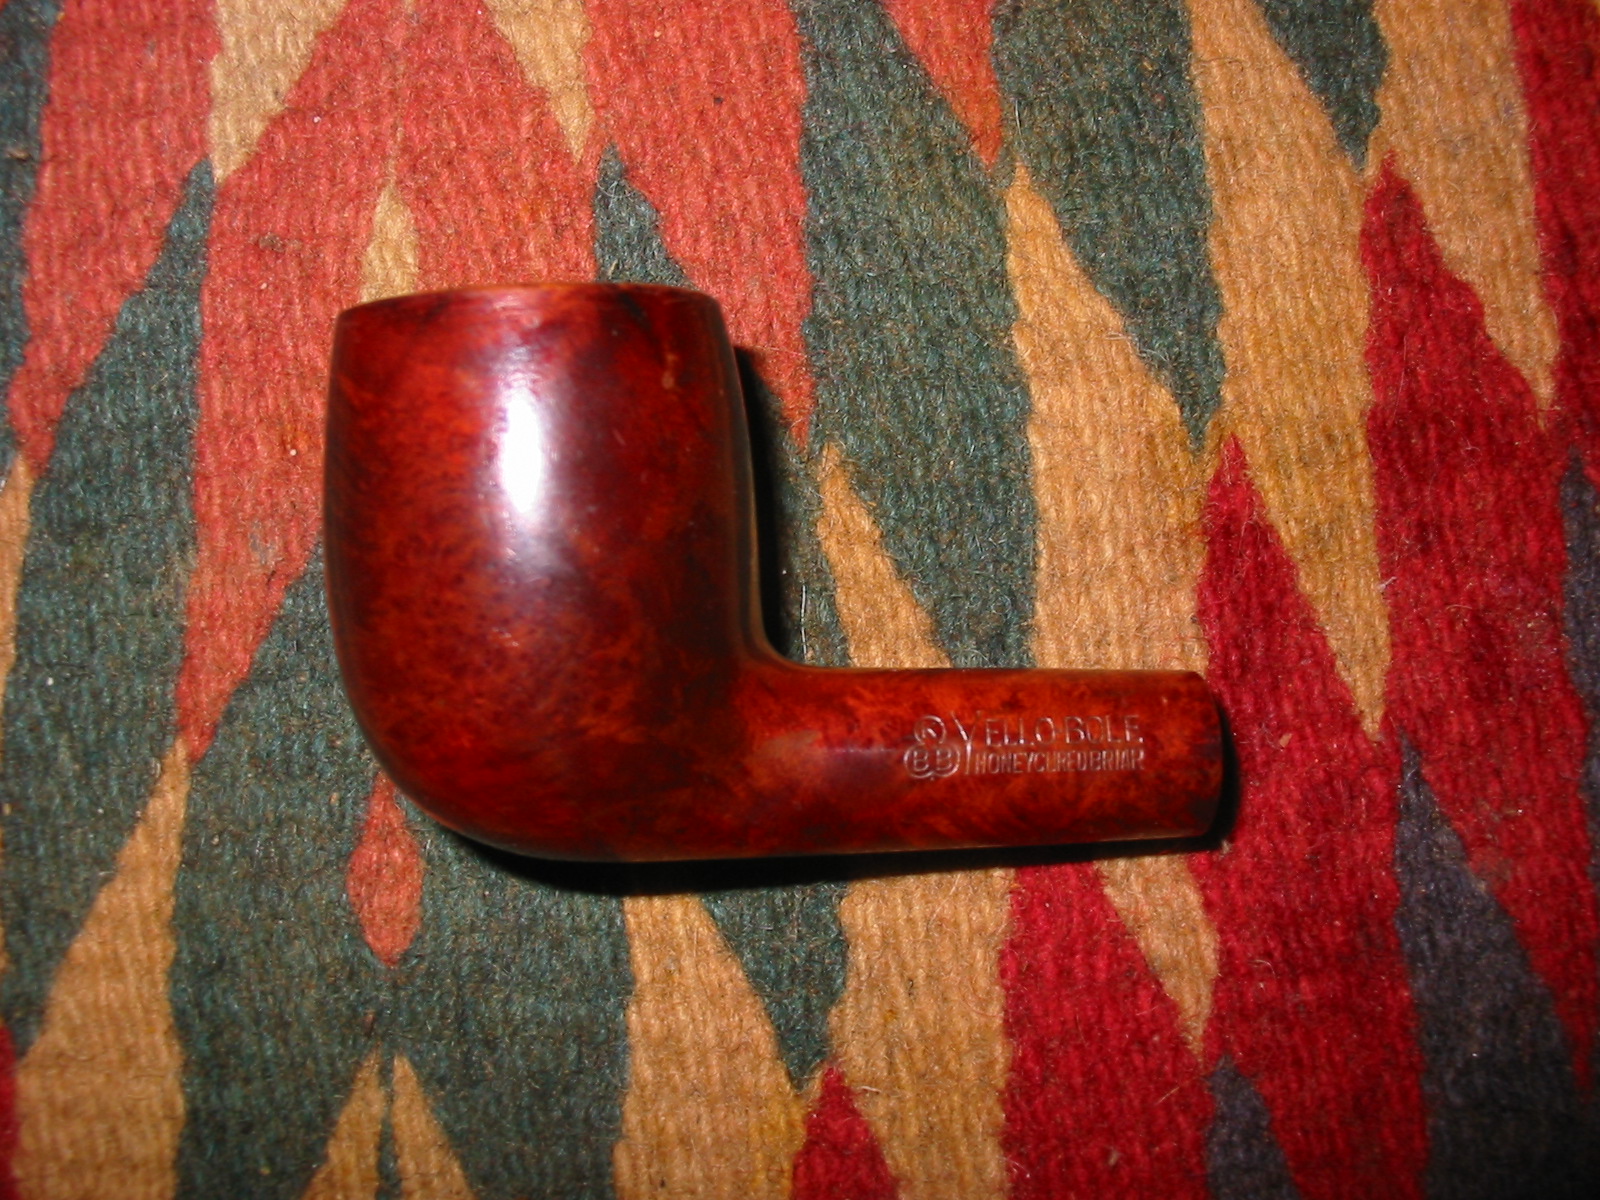
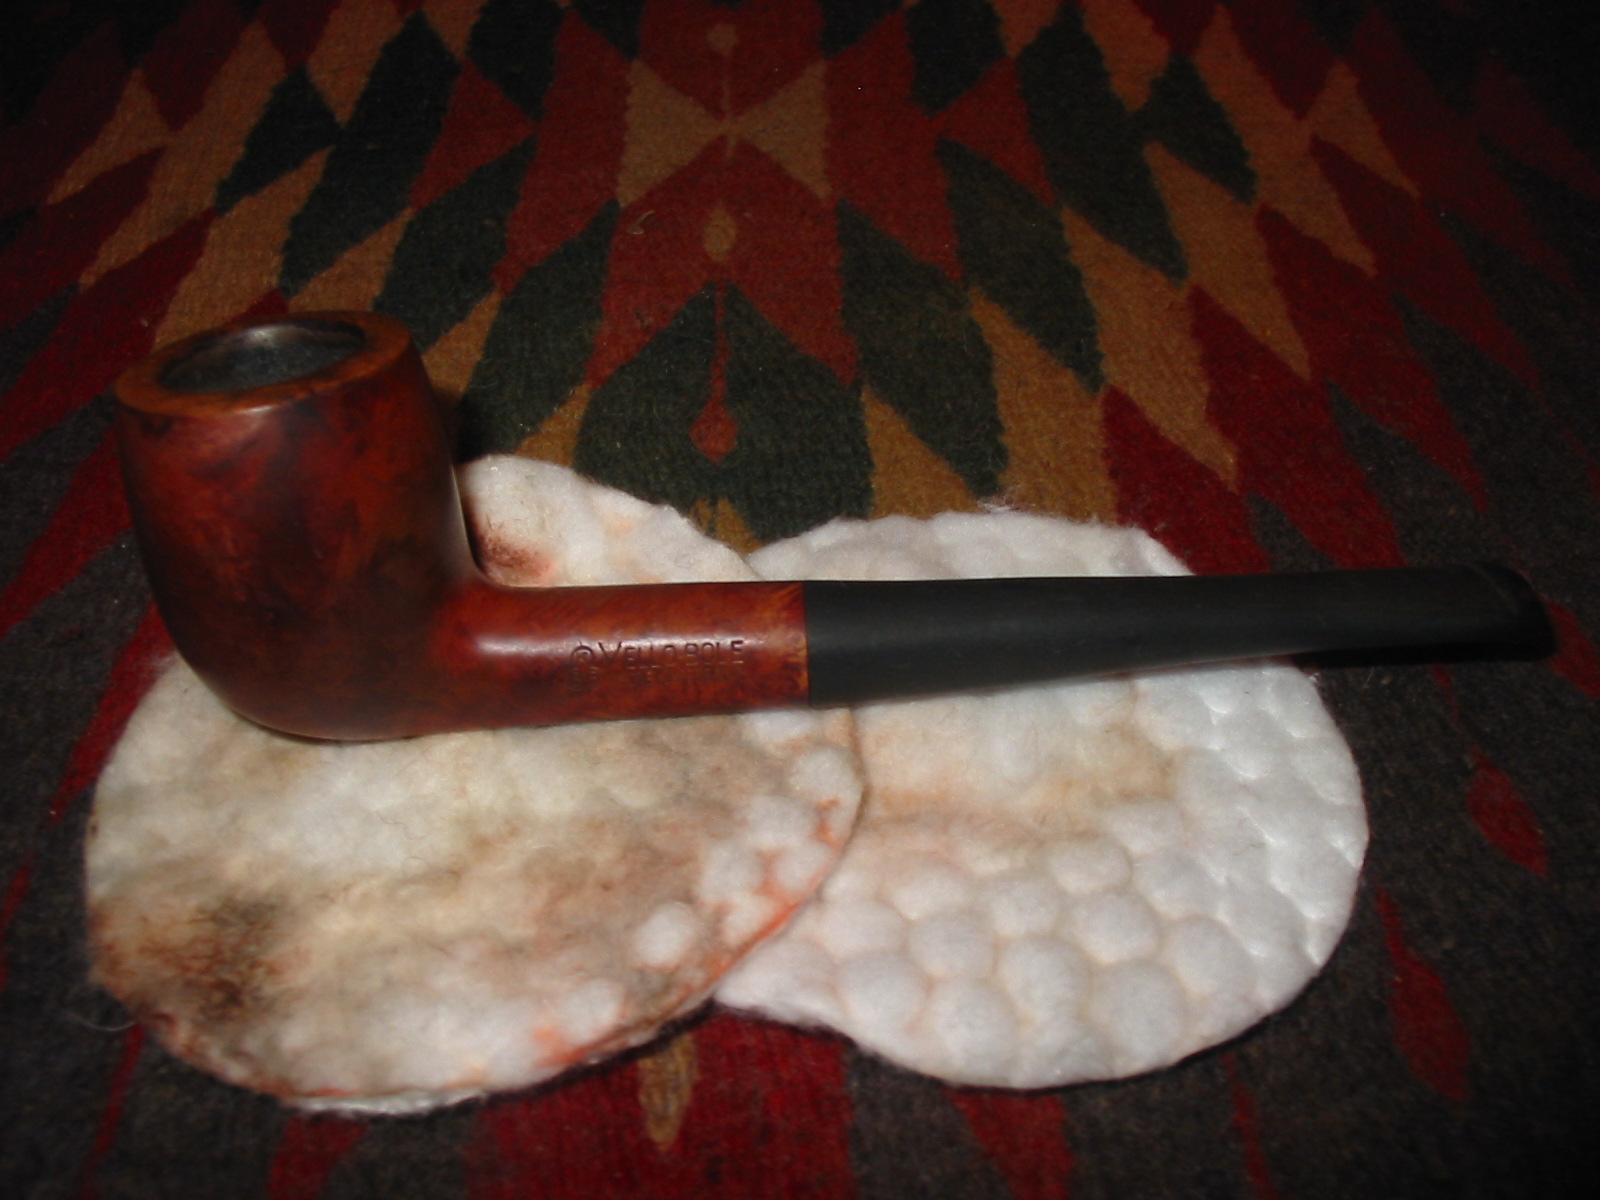
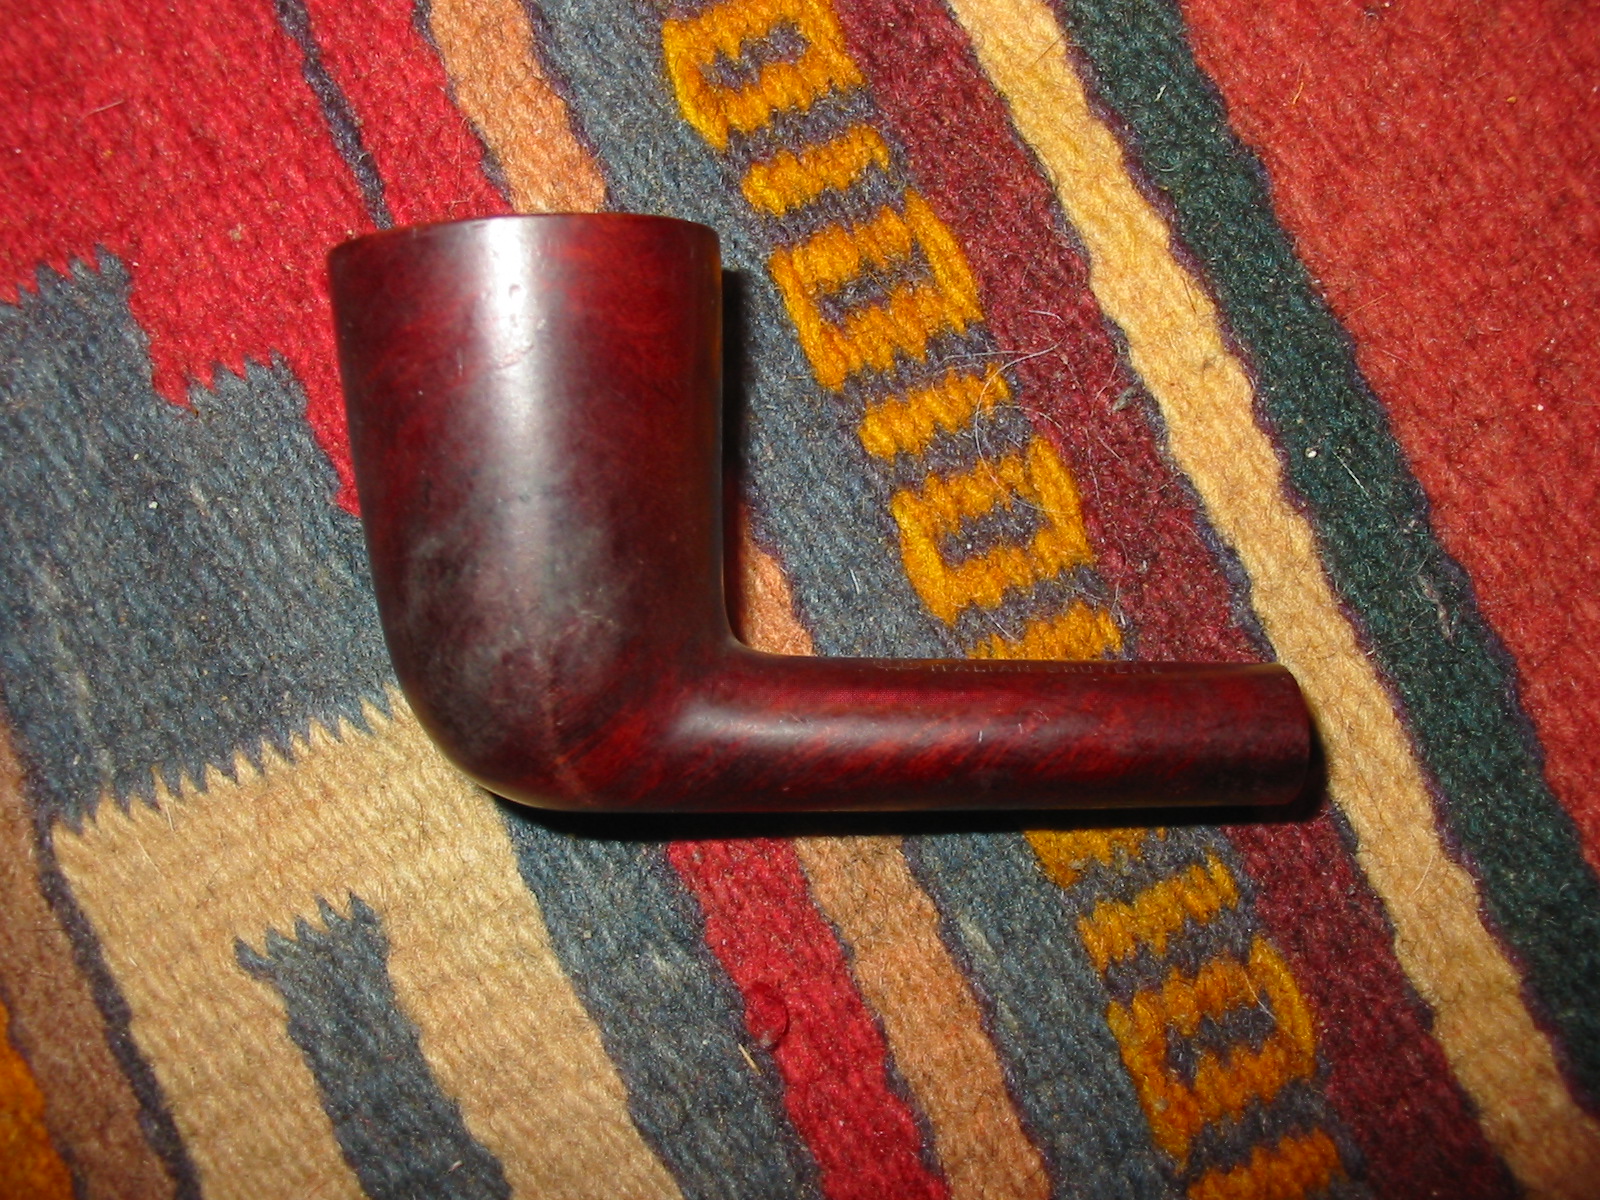
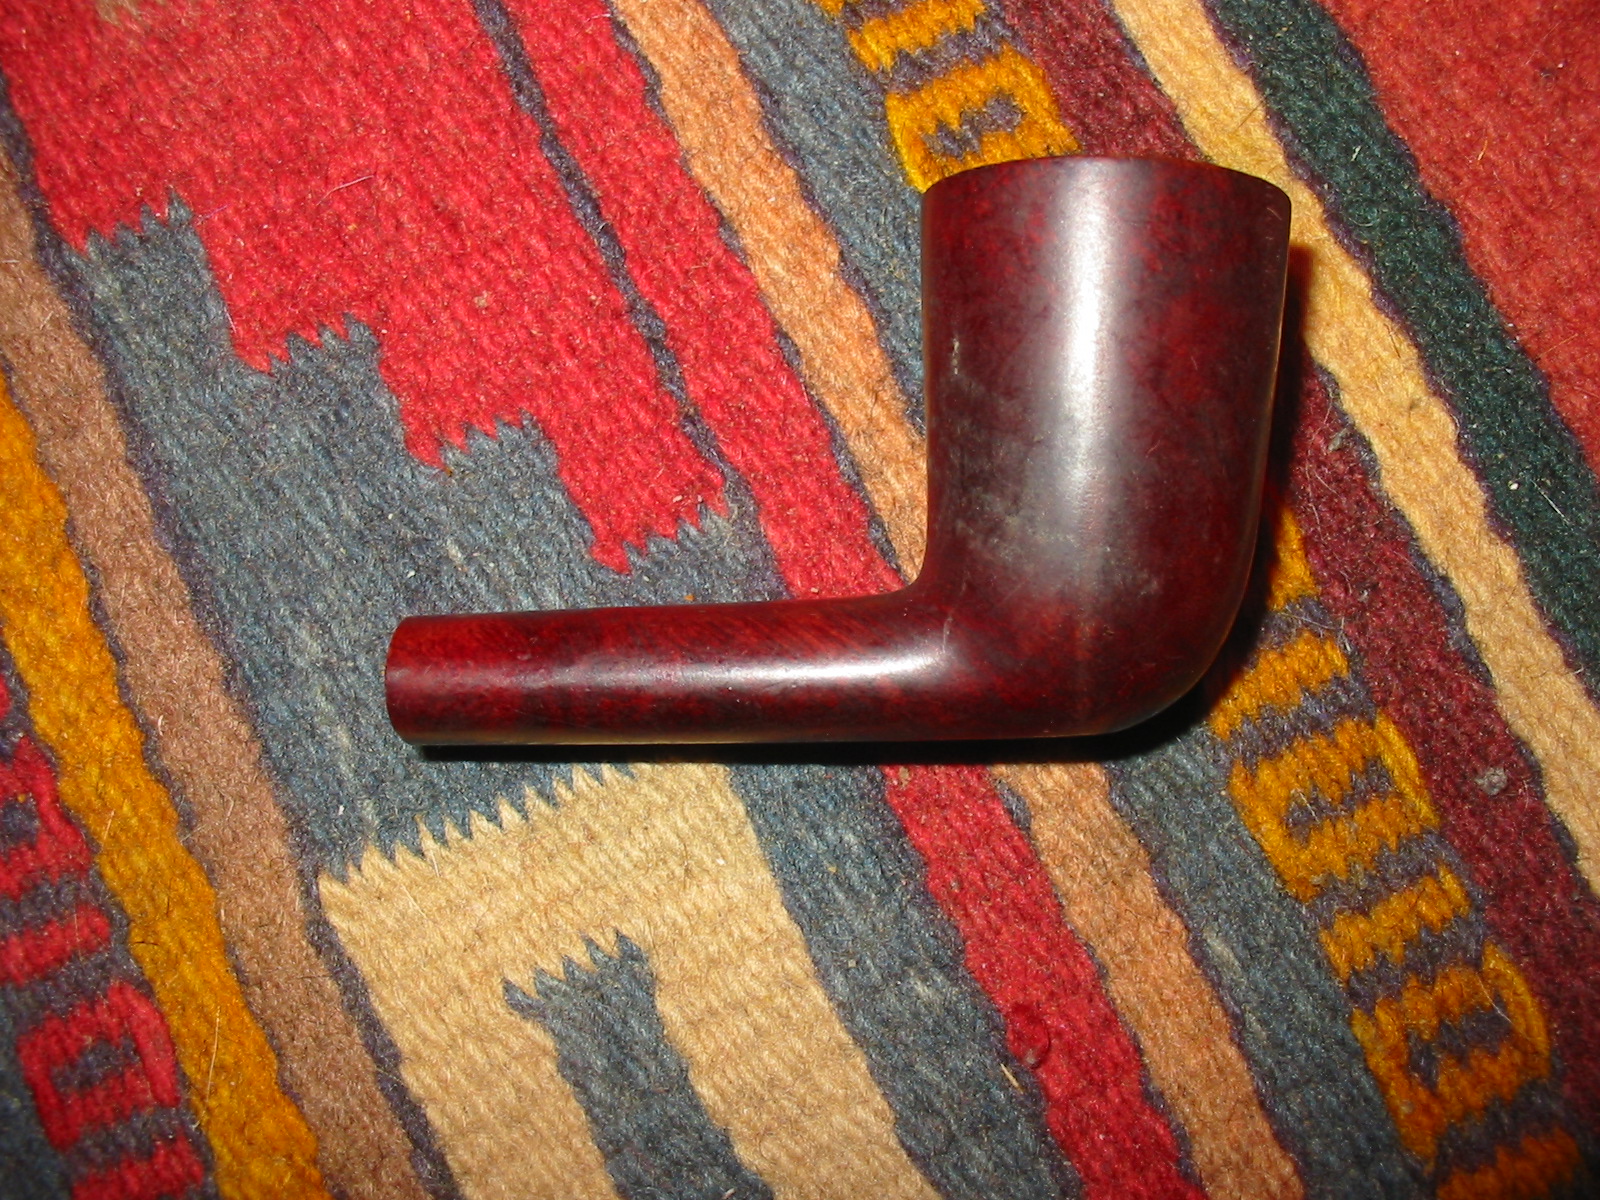
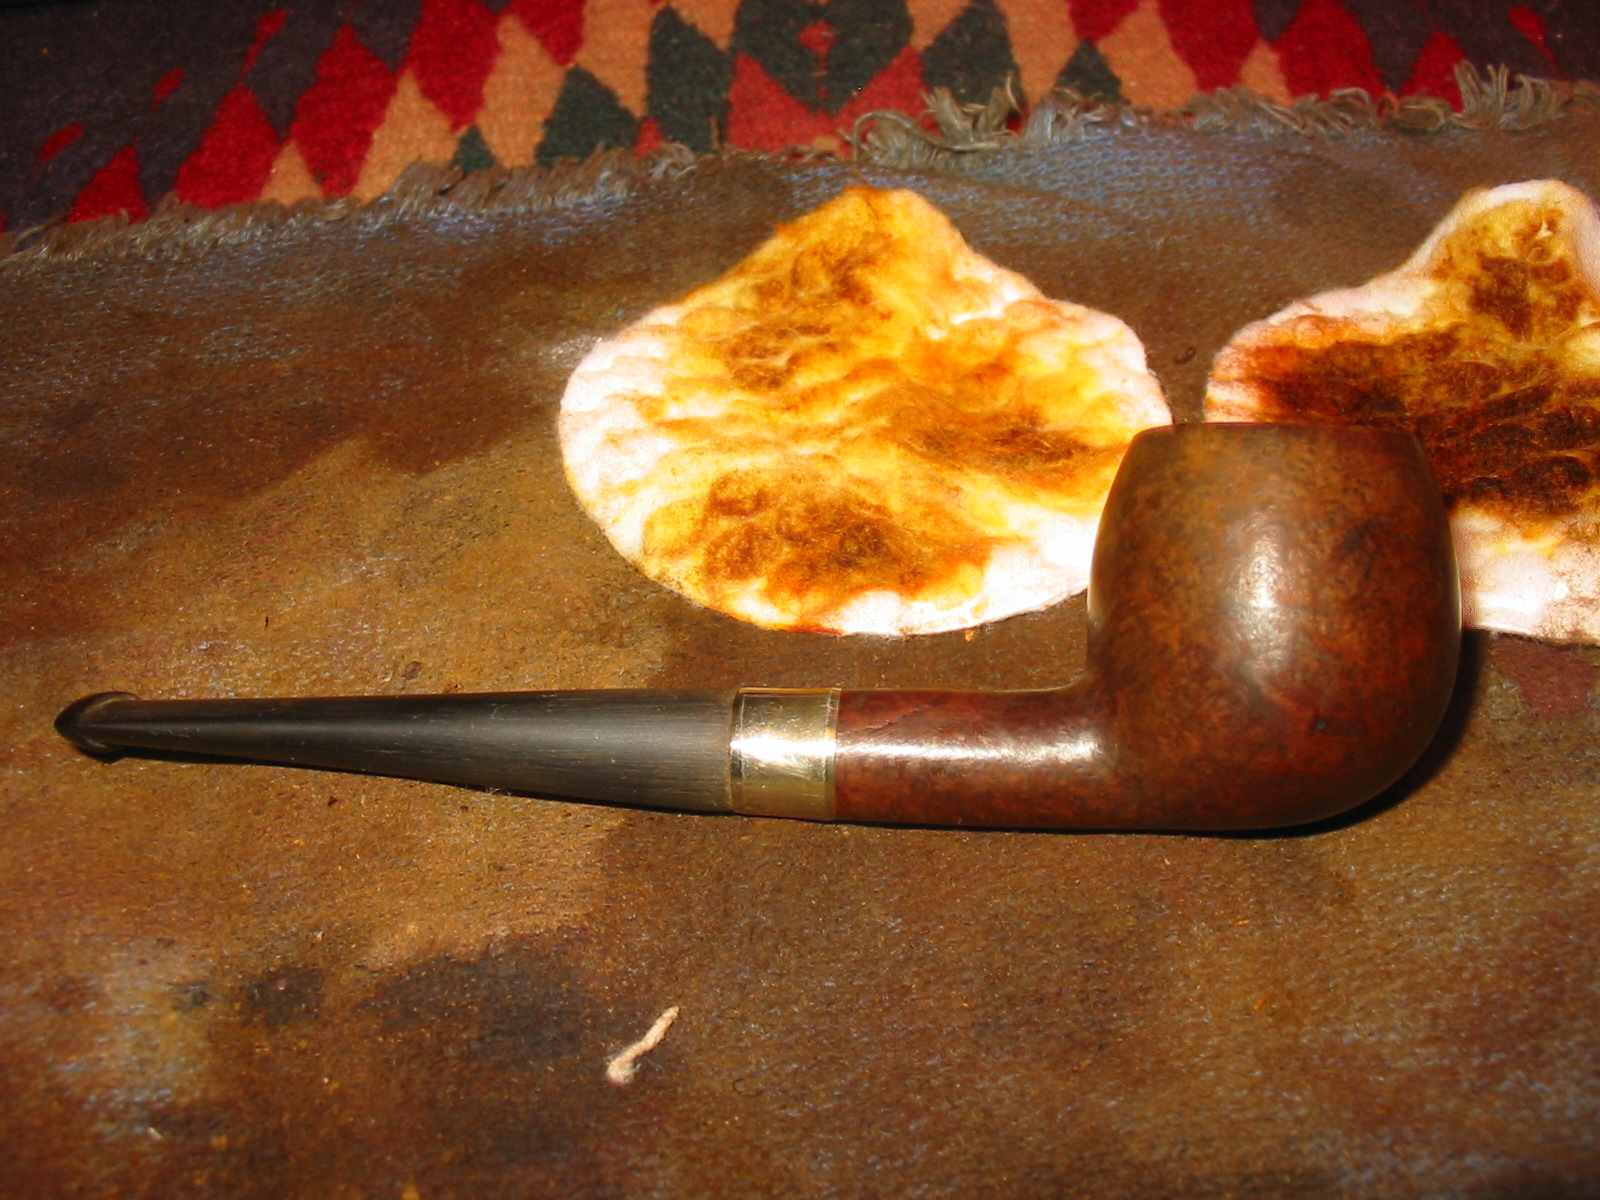
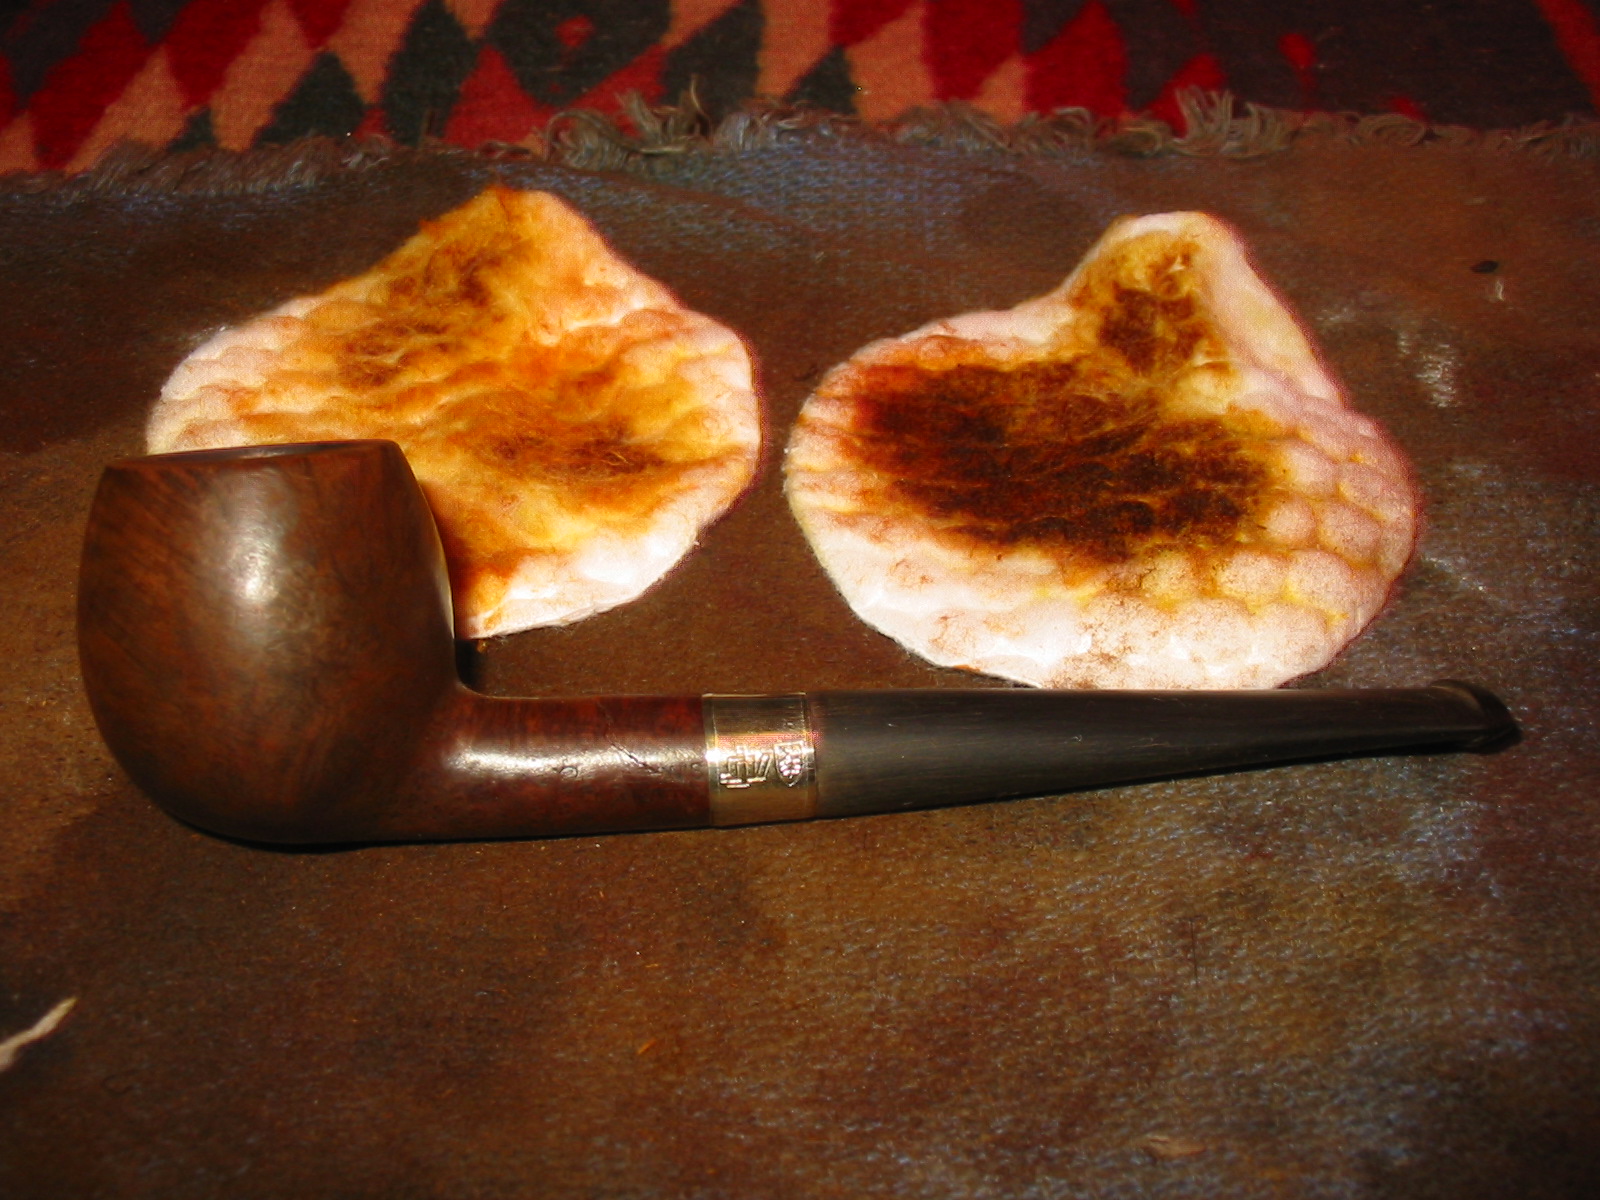
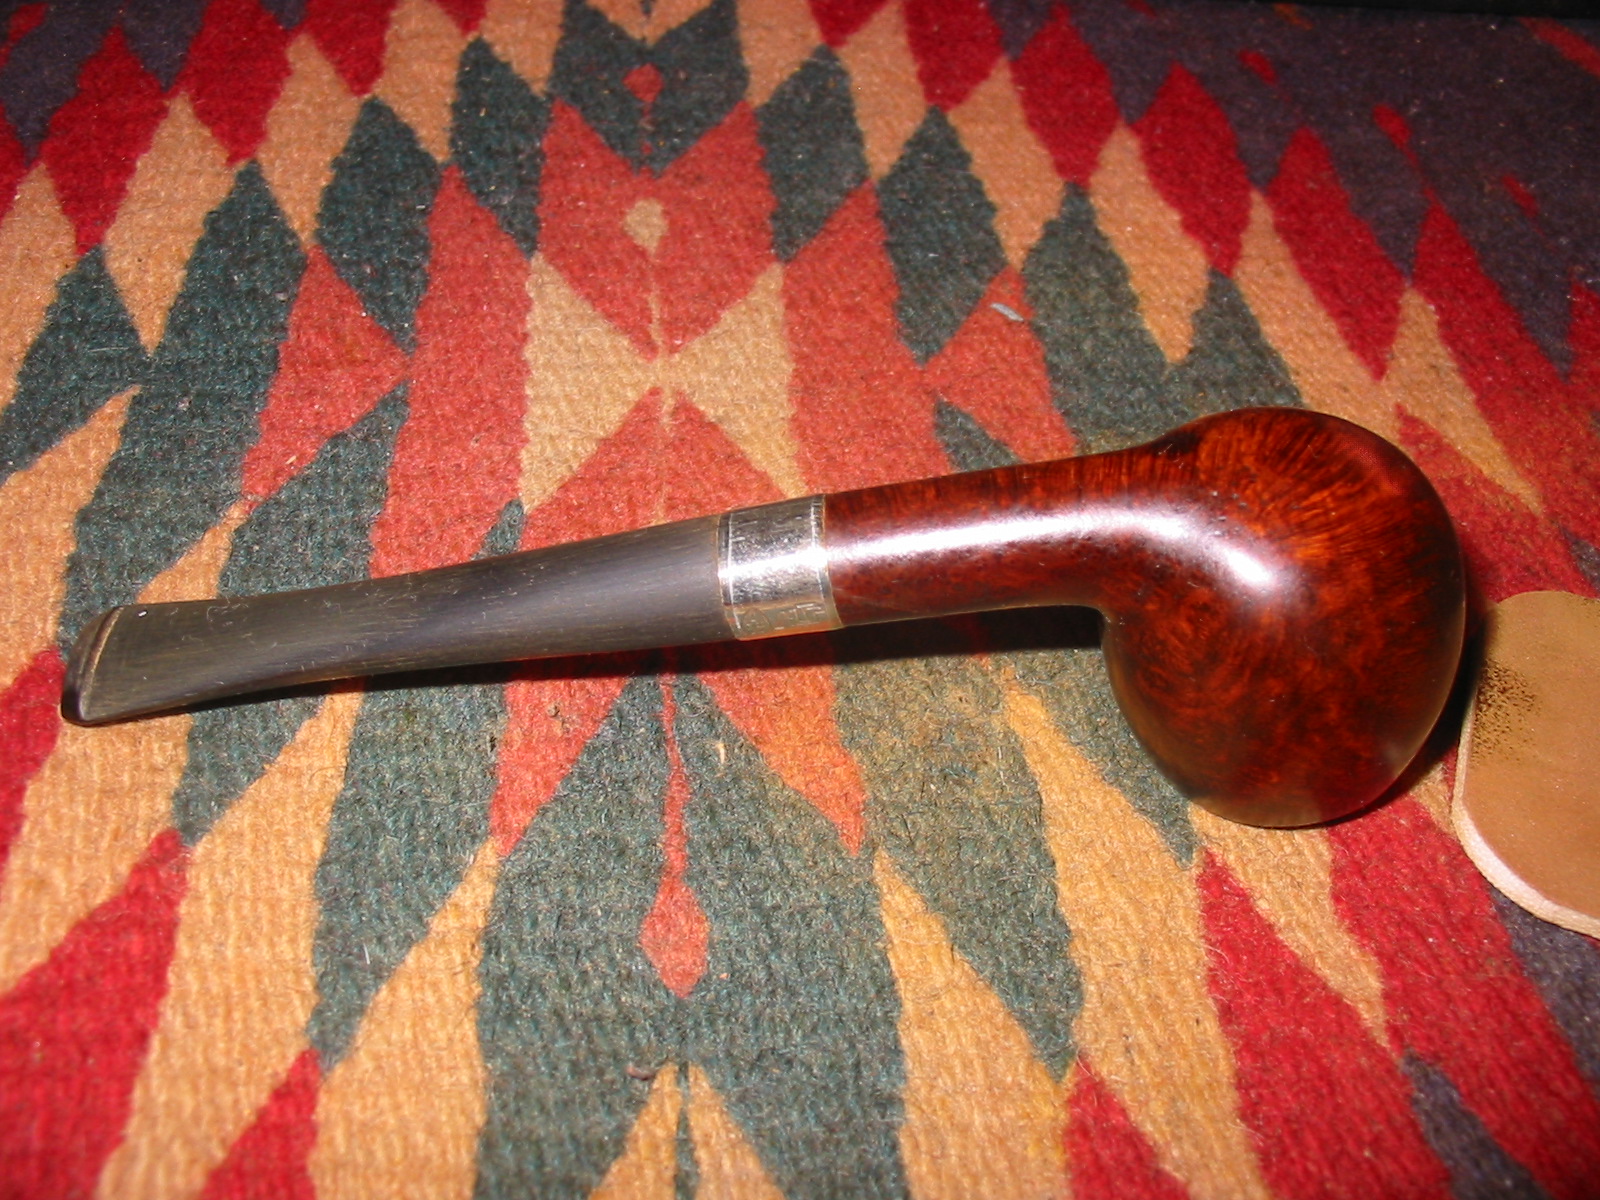
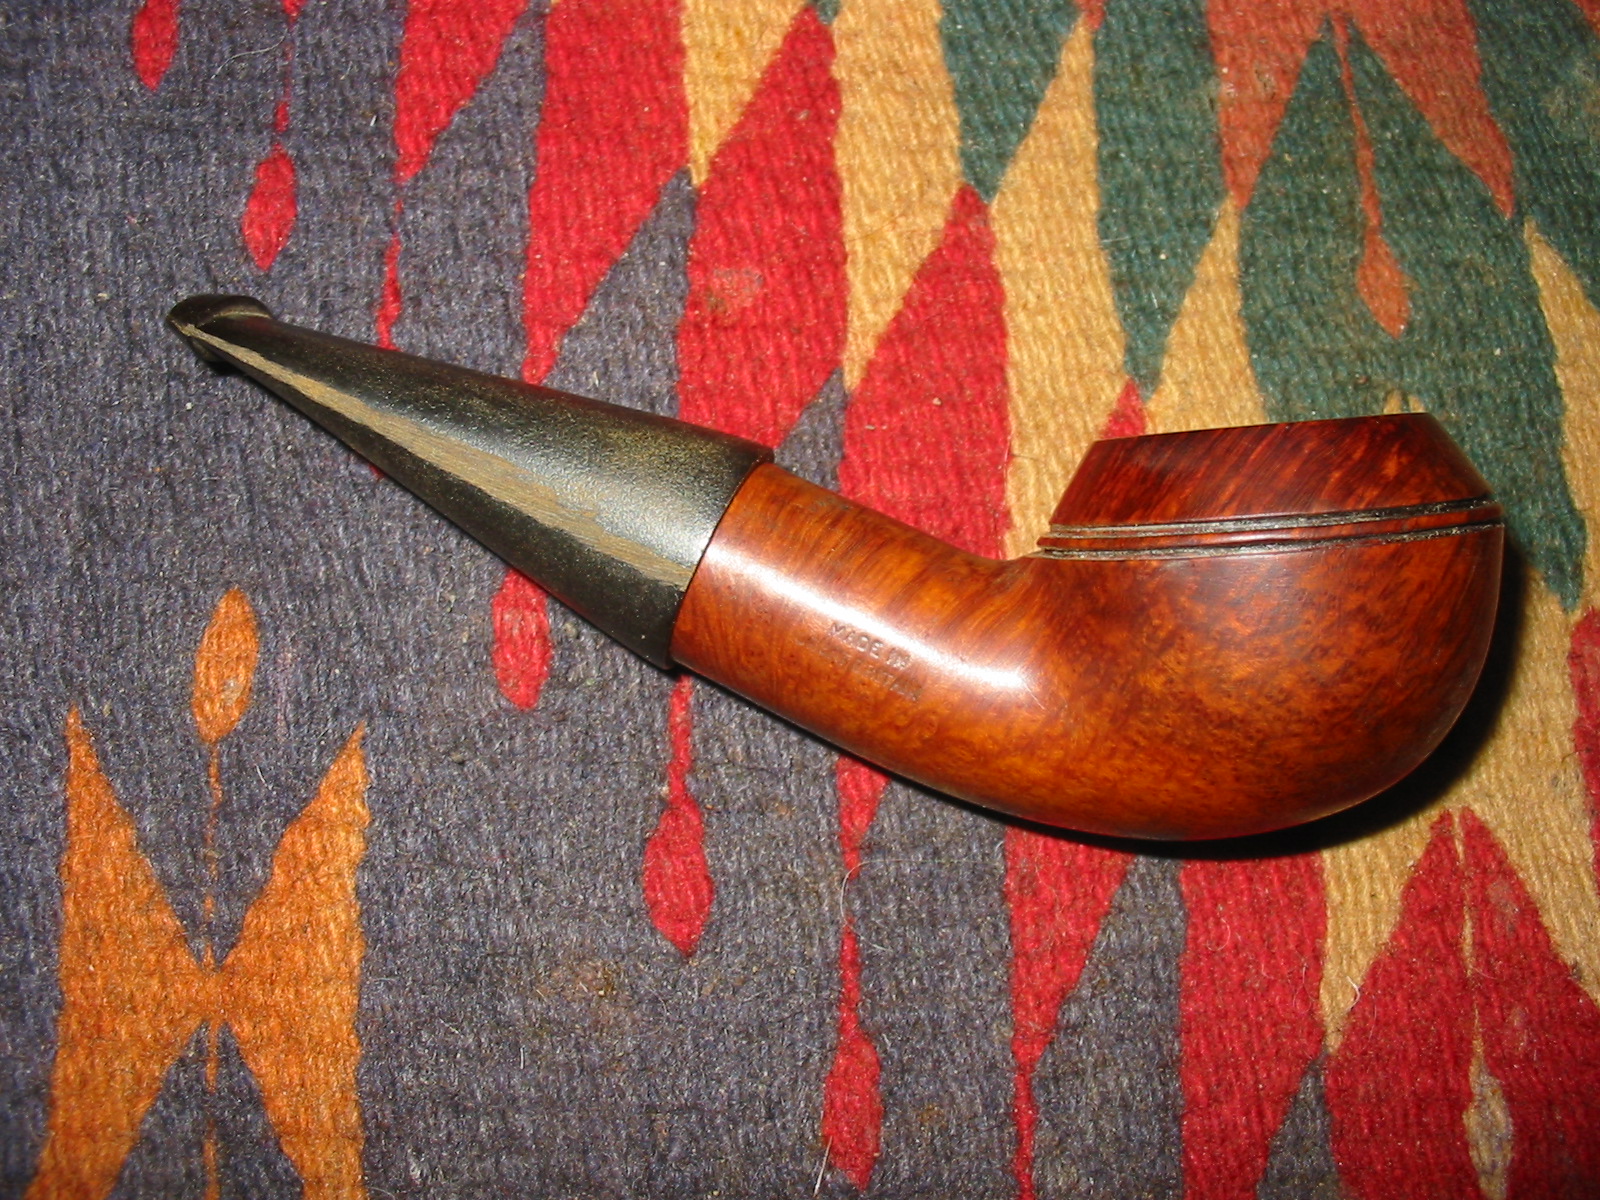
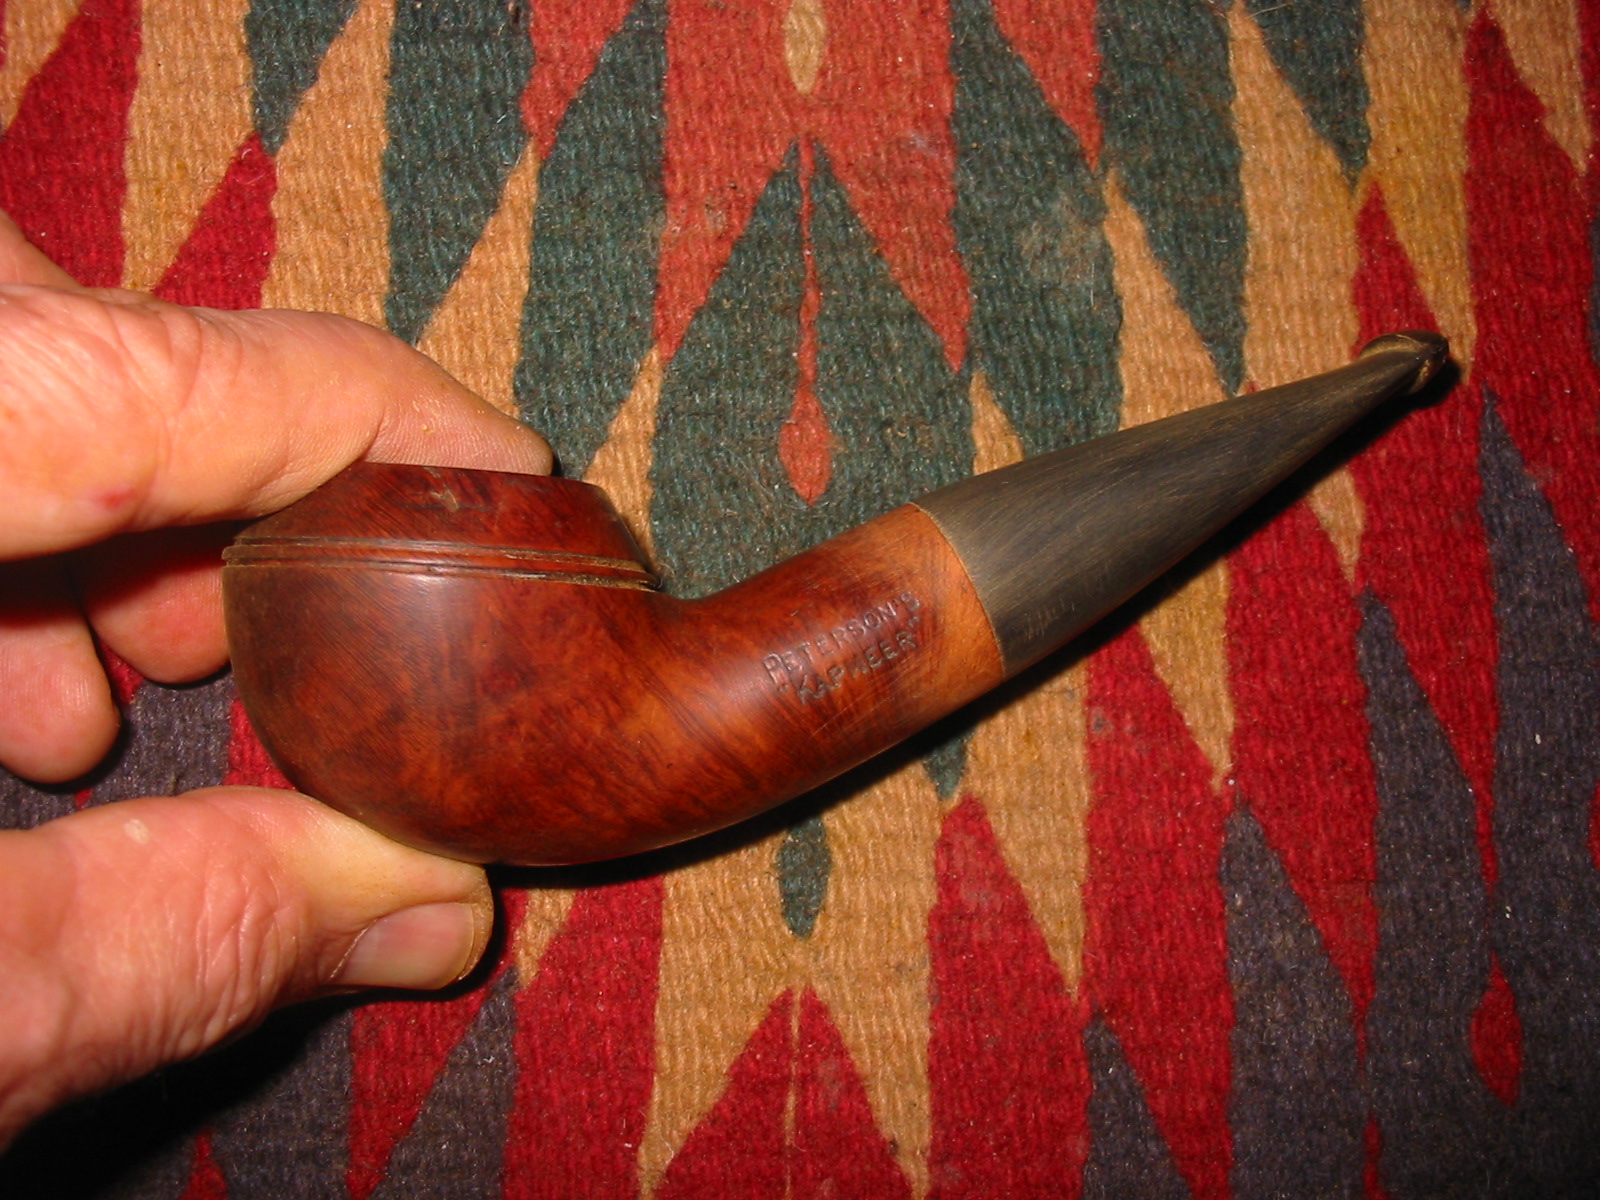
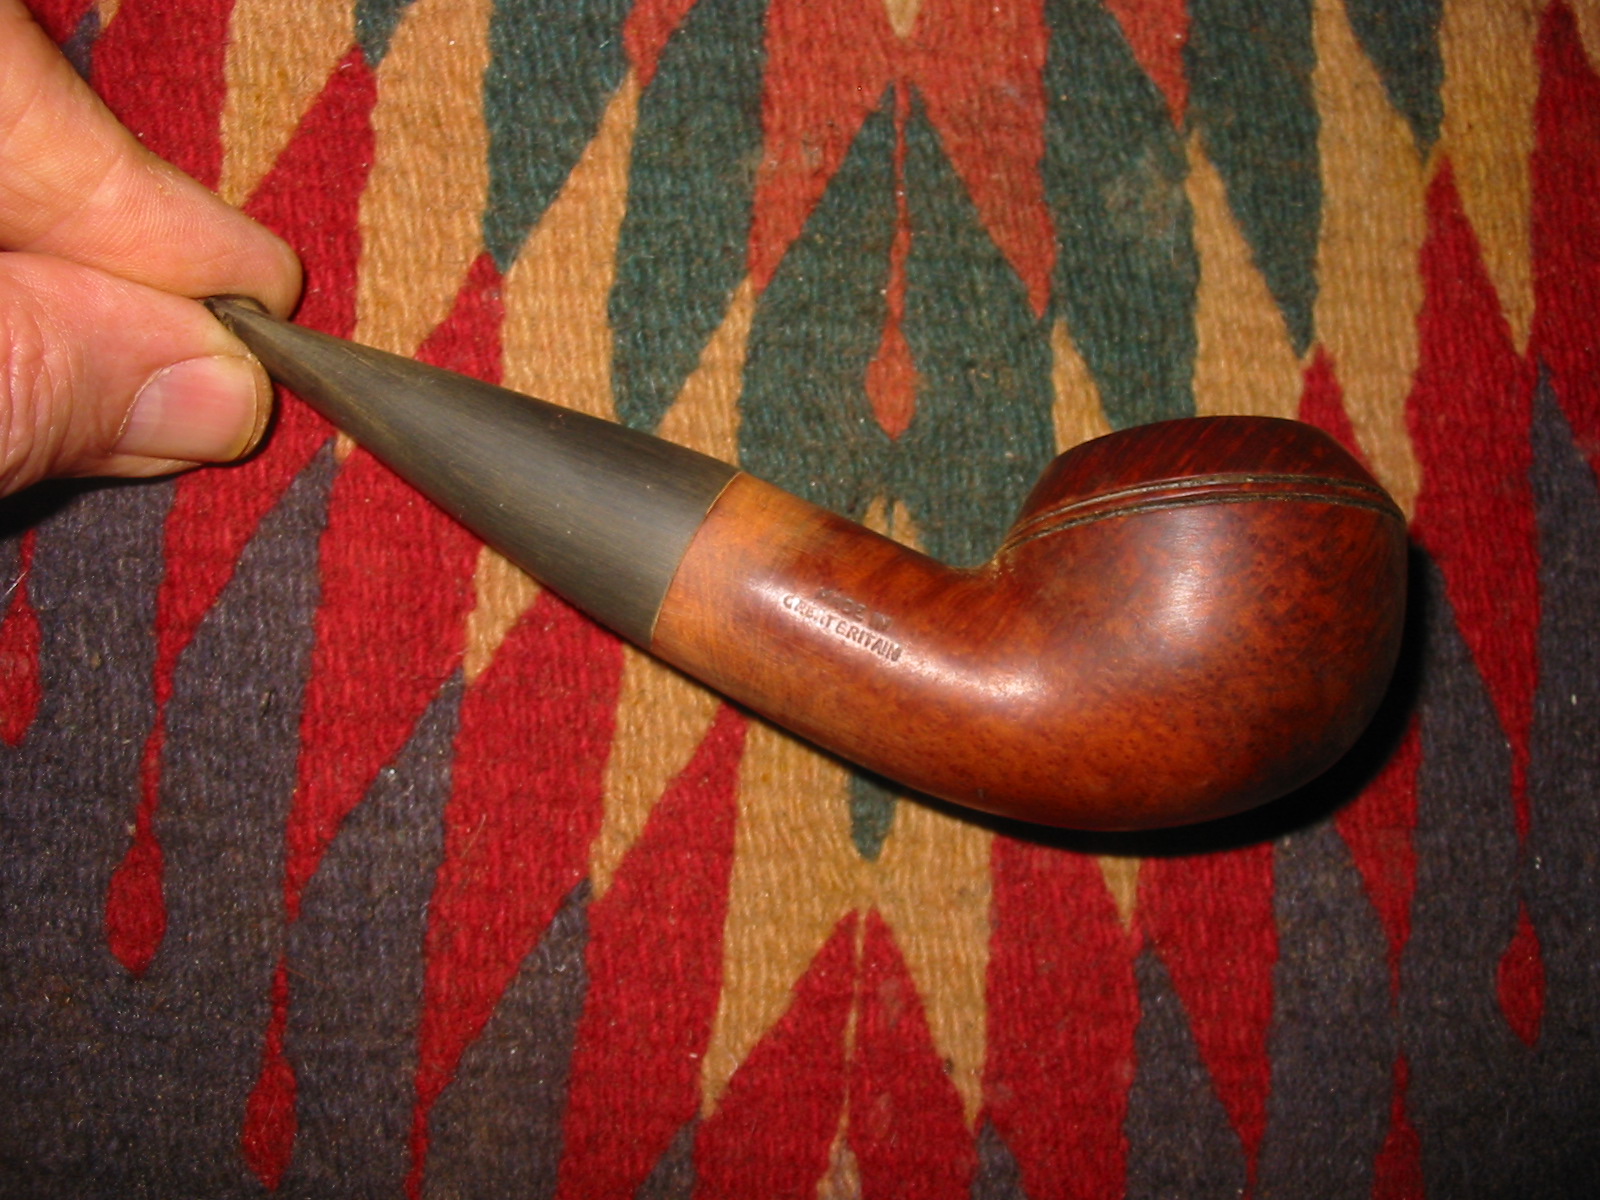
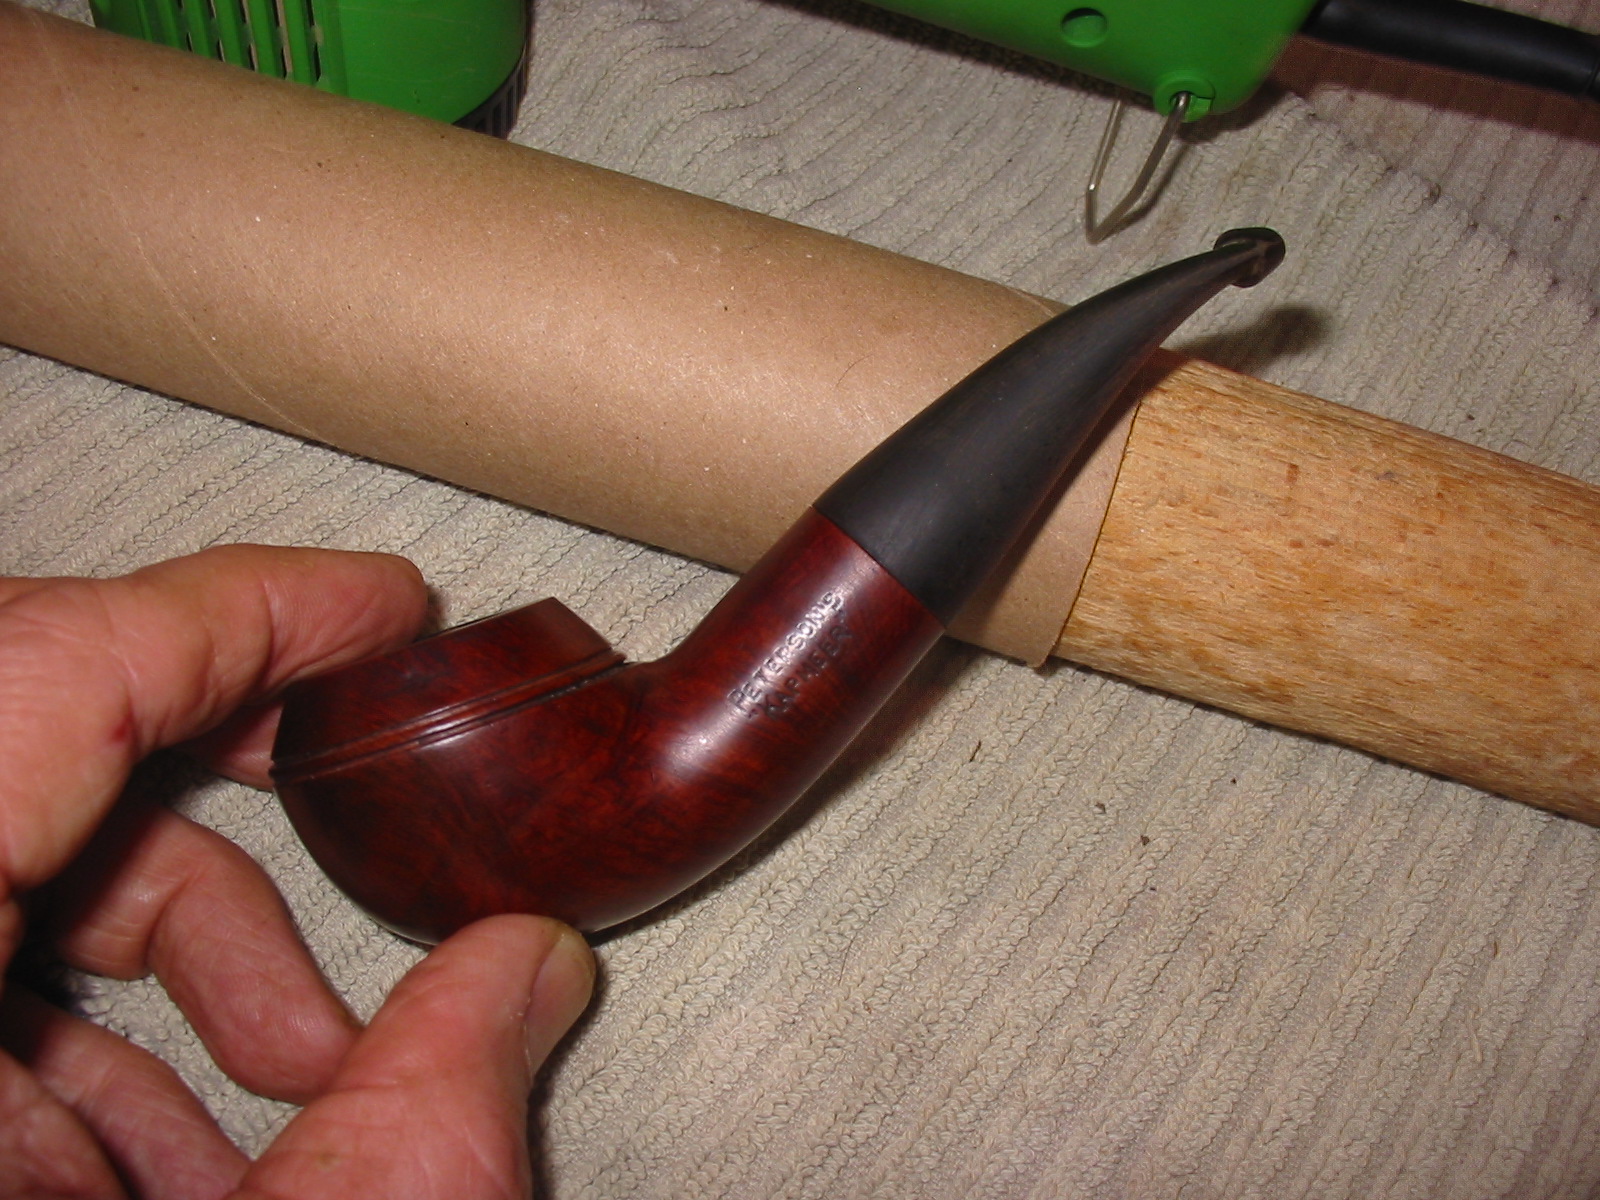
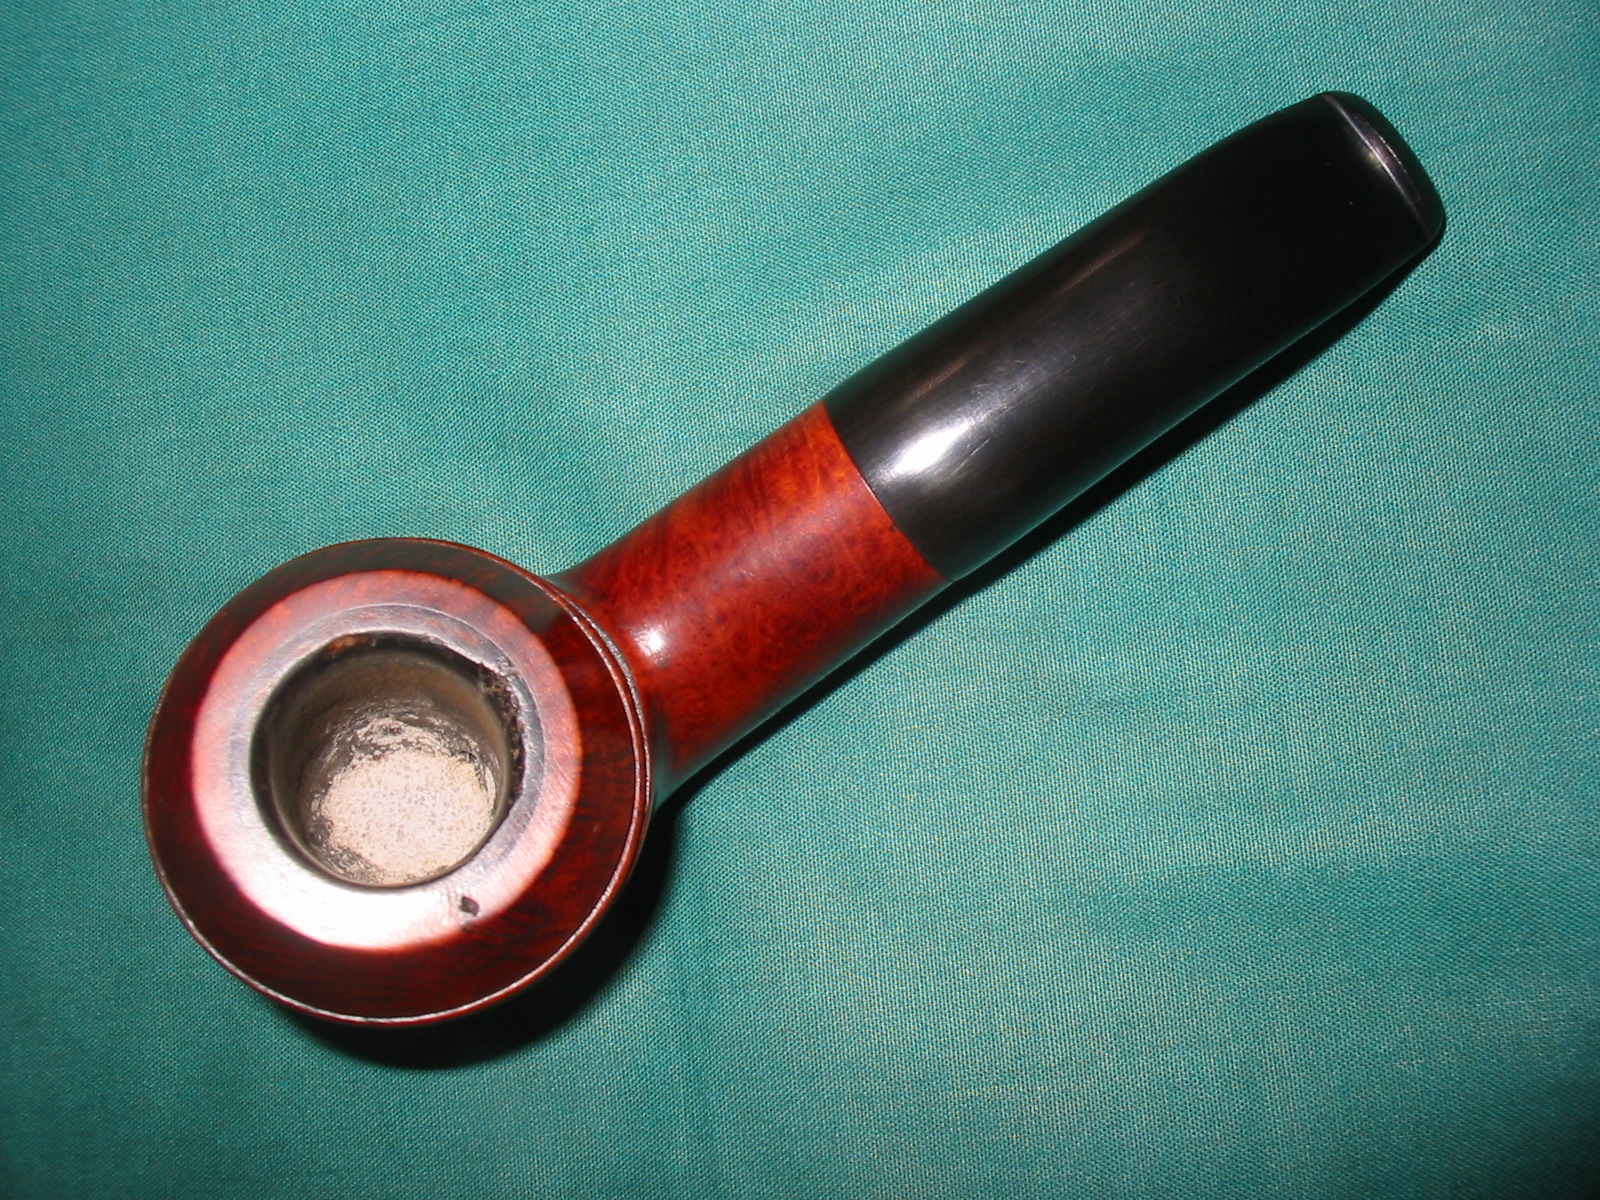
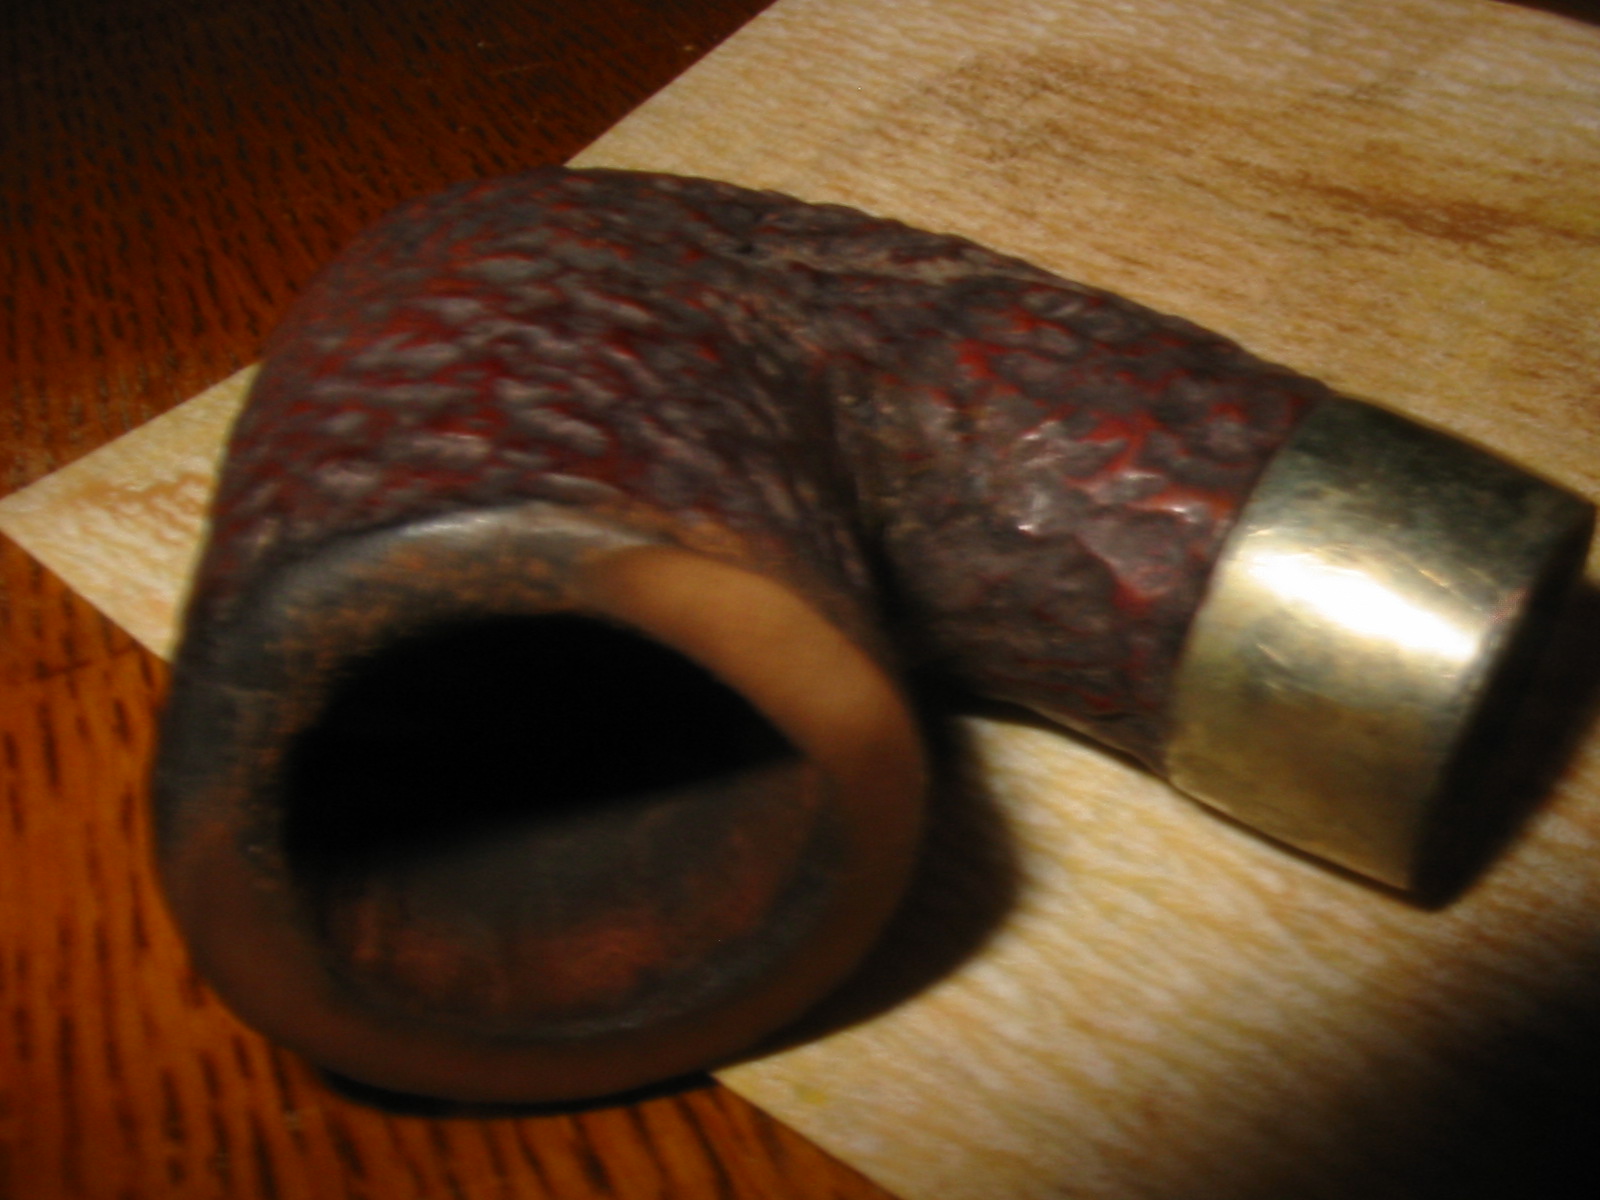
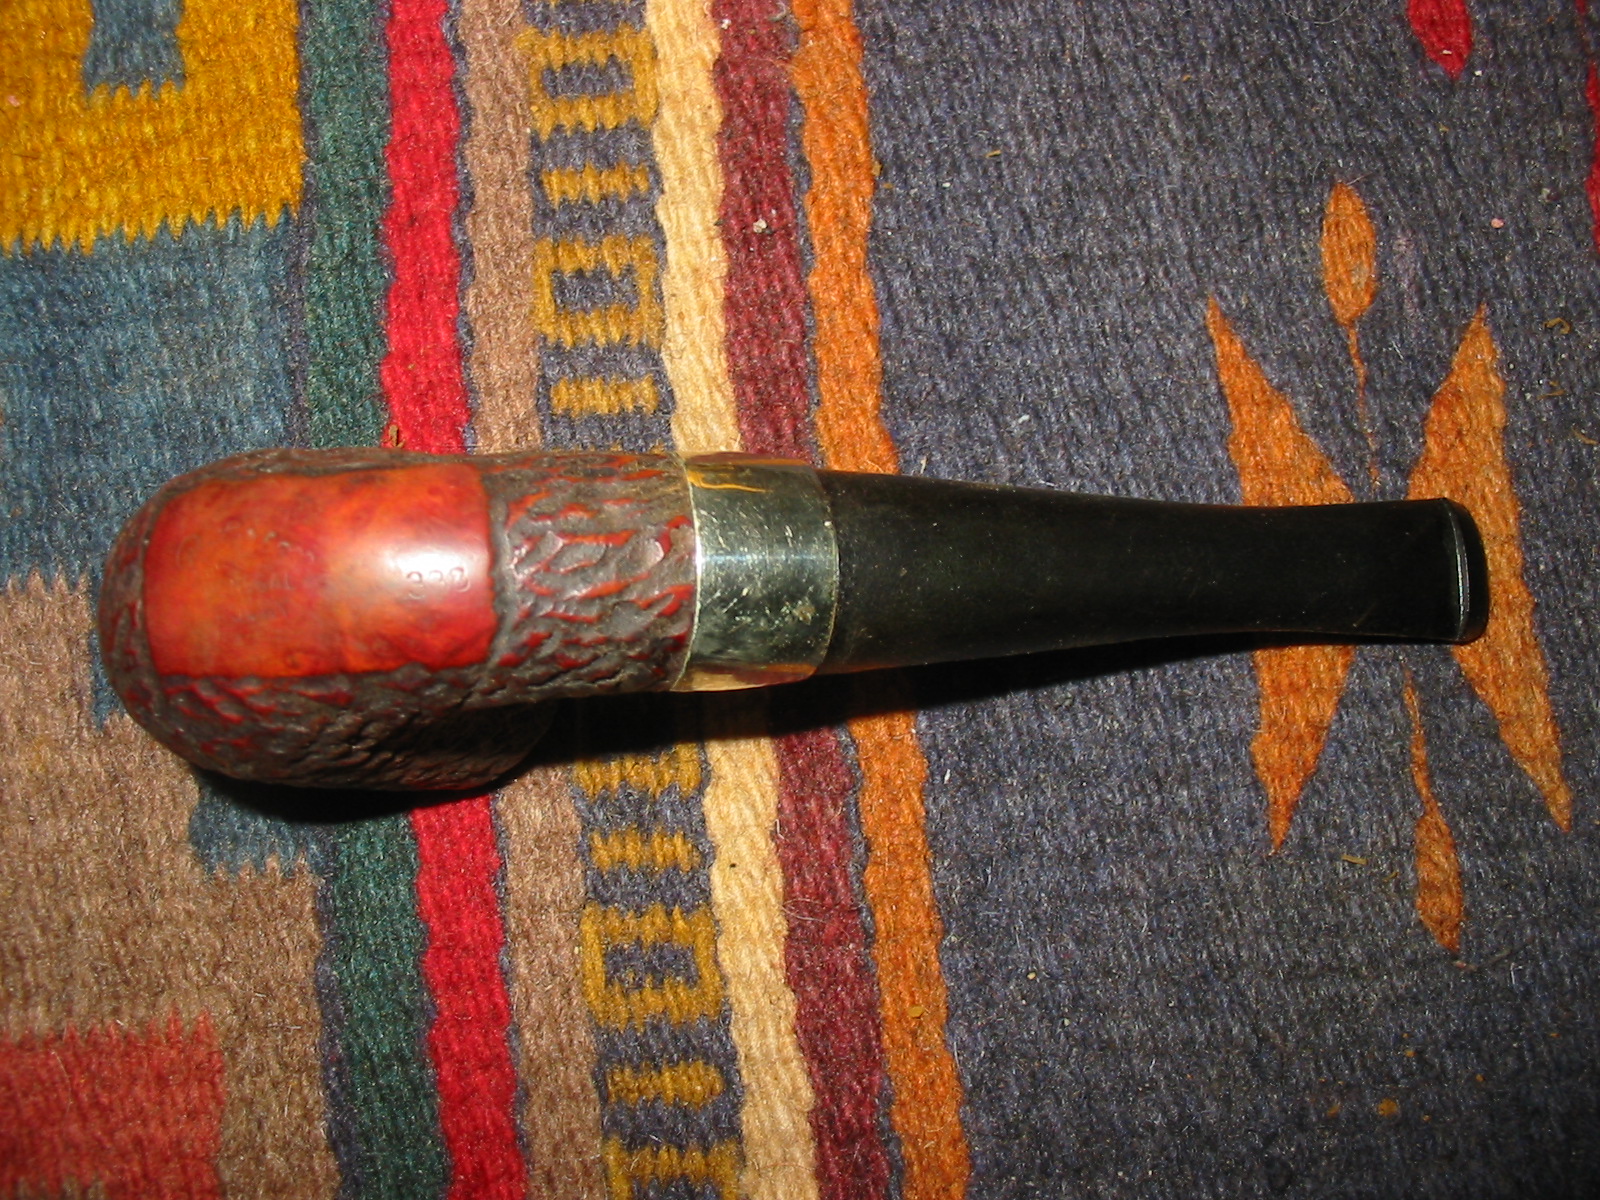
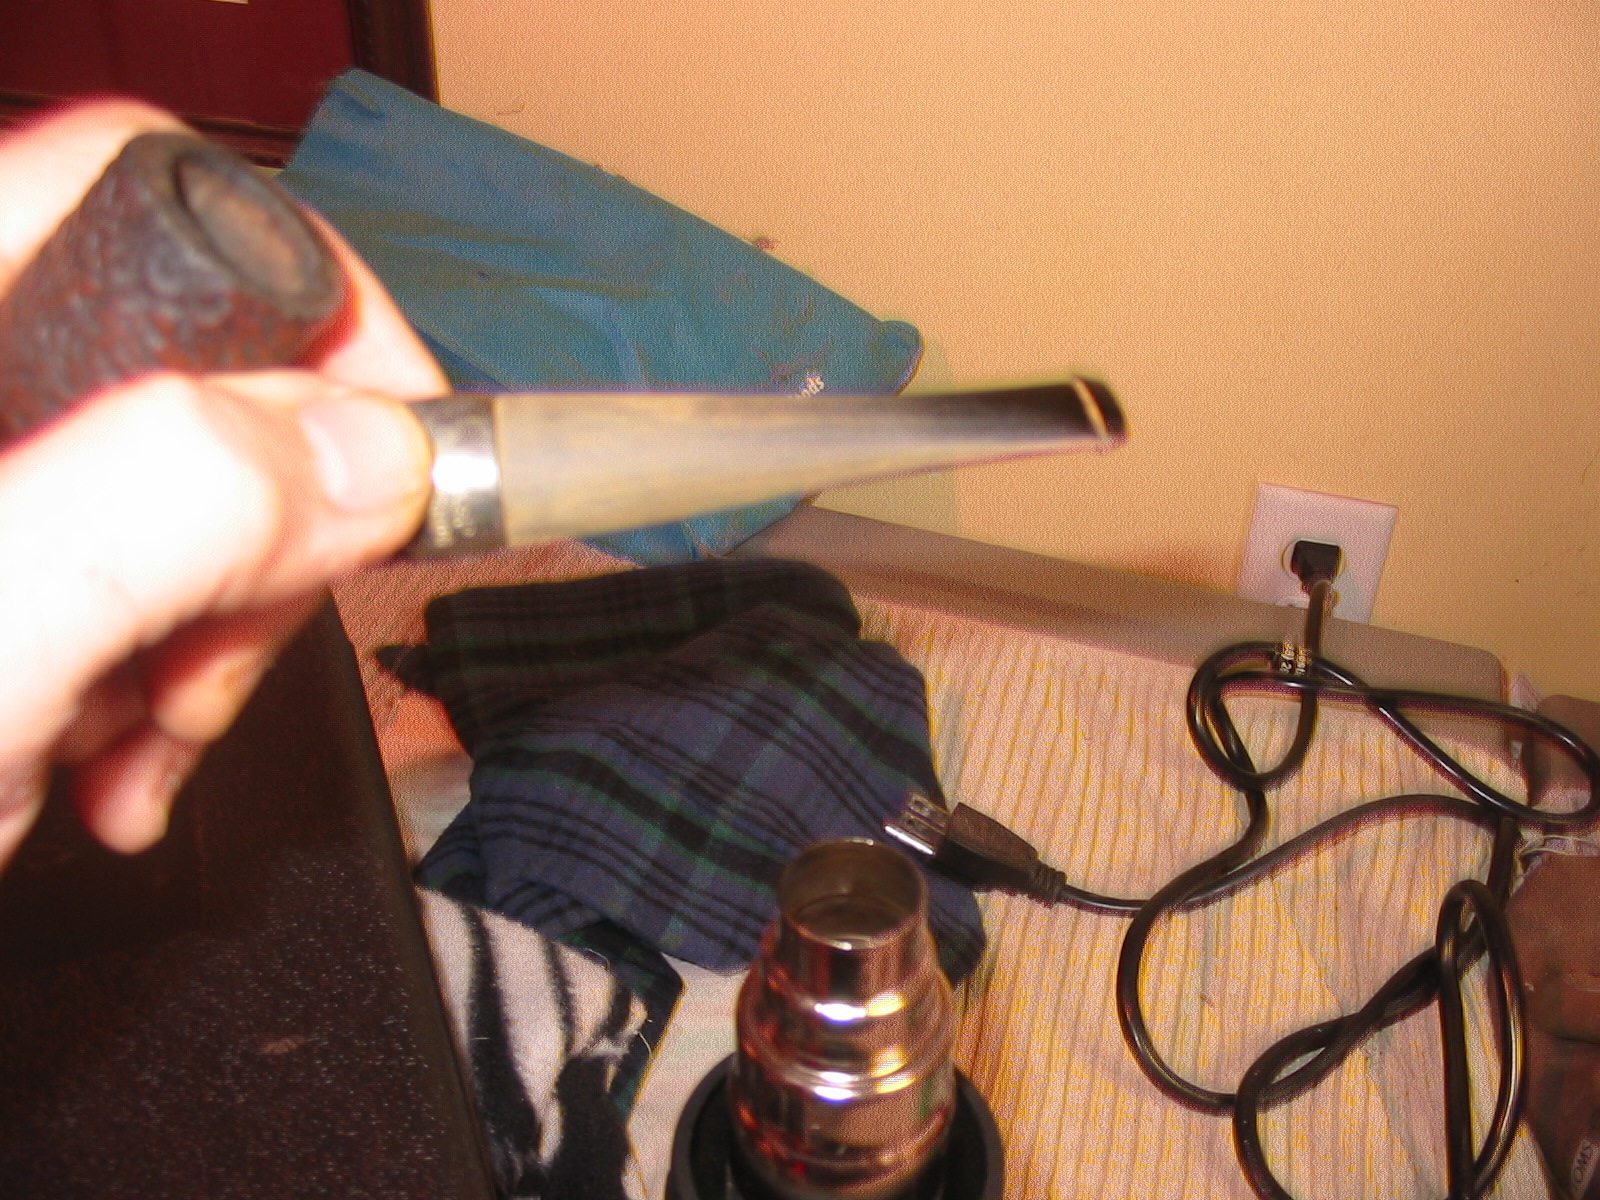
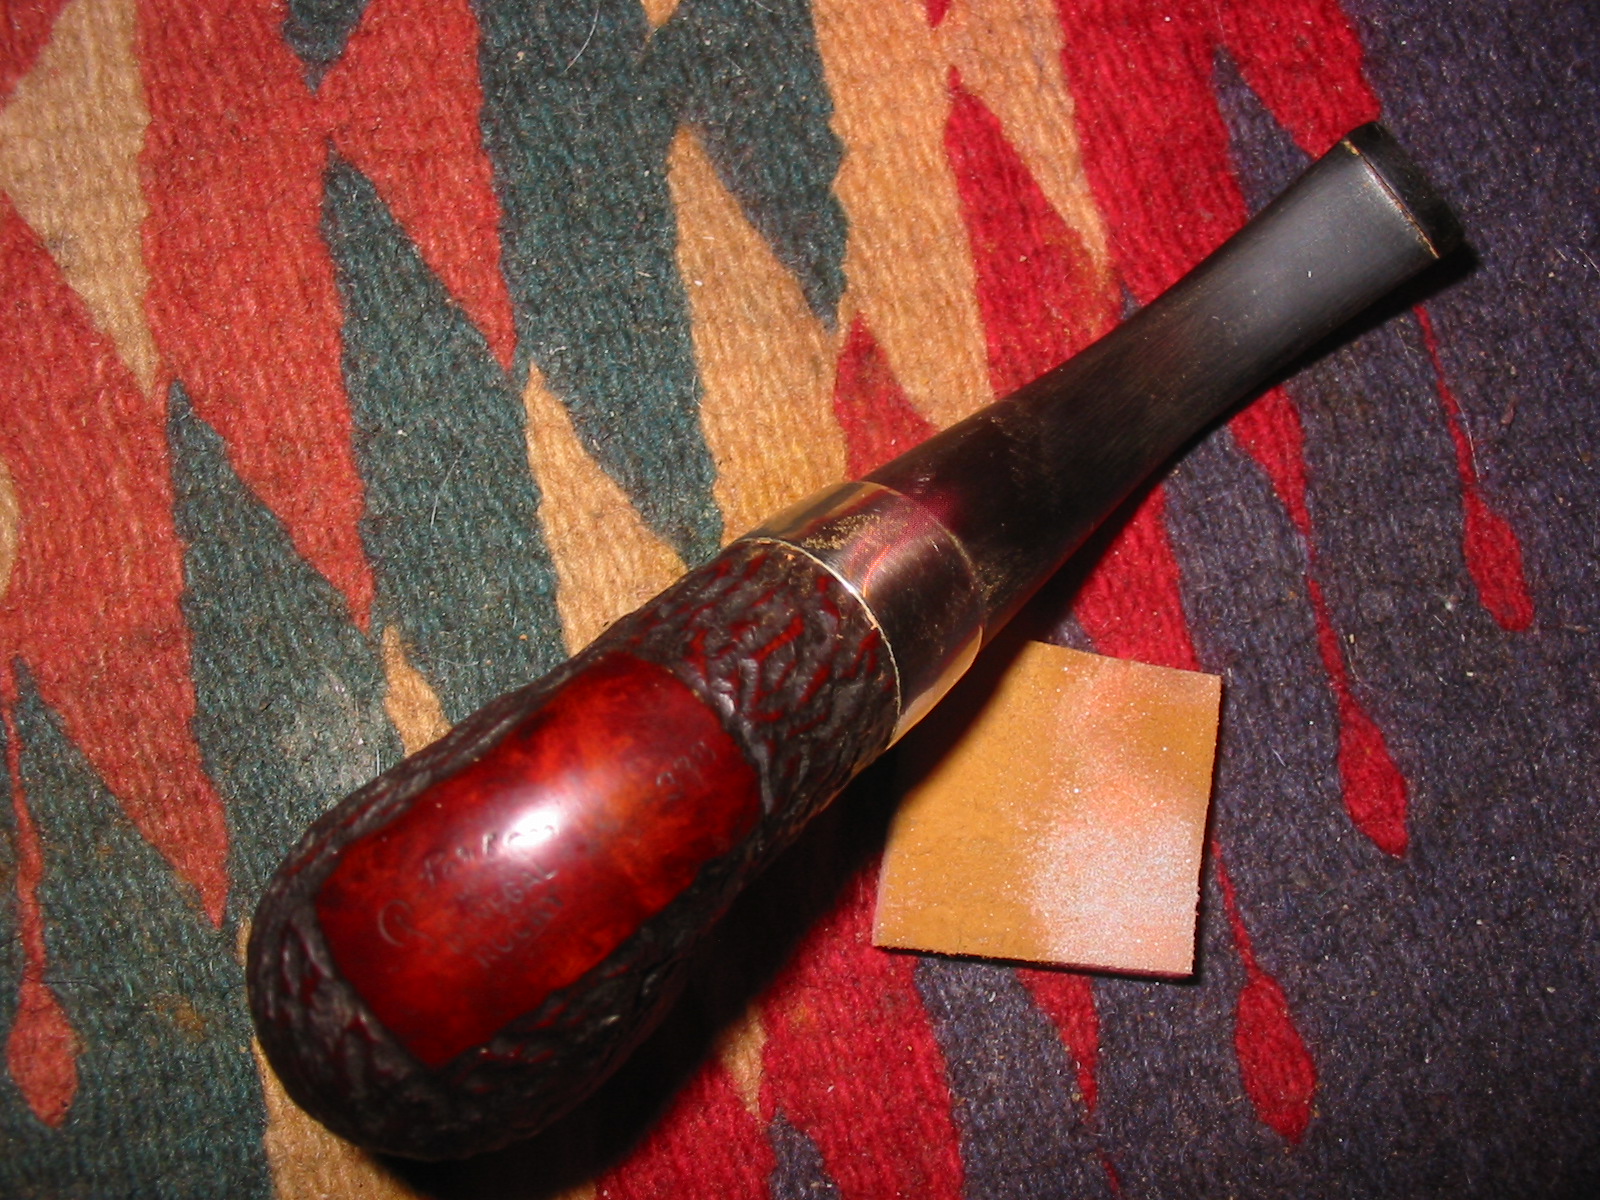
Mike glanced at the left side of the shank of the first pipe for a name, even though he did not care for the look of it, and saw it was a Dr. Grabow of no special character or personality. He gave it back to Andrew and inspected the other pipe, first its general appearance and how it fit in his hand which he liked and then for markings on the shank. In three lines of capital letters he read Thinbite and Imported Briar and Italy.
“How much for this one and the stand?” he said, expecting to have to resort to haggling, which he still hated despite his success with the pick-up truck, but after all the stand was an unfortunate color and had a space for a large jar that was not on it and both of these he would have to fix.
“Hmm, let’s see,” Andrew said and it was obvious he made up a price in his head. “Eight dollars for the stand plus five for the pipe, that’s thirteen dollars.”
Mike could not argue with the price and paid for them at the front counter.
“Thank you, Andrew,” he said and left but not before seeing the smile again.
________________________________________
Mike had three miles to walk from the arcade to his apartment and the rain began just after he reached full stride. He ducked under an overhang and removed from his backpack a bright yellow slicker with hood that he put on and zippered to his Adam’s apple. The overcoat and his high-laced combat boots would keep him dry.
Rain helped him to slow down and focus on the race of thoughts that sometimes still bothered him. When Mike was in school the doctors wanted him to take pills they said would do the same thing and his parents agreed so Mike went along with the idea.
But he never took the pills. At first he gave them to other boys he knew and thought they would help until these boys returned to him talking so fast he could not follow and blinking and rubbing their noses all the time and he noticed they never stopped moving or twitching and begging Mike for more.
He made up a story about how the doctors no longer gave him the pills and from then on he crushed them all with his hands and threw them in the trash. Mike thought maybe his parents wanted to poison him and was happy he never took even one.
The rain was also calming as it came down as if in the torrents of spring almost five months after his twenty-sixth birthday. Mike saw none of the usual small children and animals and wondered if they blew away.
During the walk home that seemed short Mike remembered the good times he had with his grandfather during his annual summer vacations to the town of Taos in the far north-central part of the state. His parents did not approve, which was one of the best excuses for the trips as far as Mike was concerned although he needed no other reason than his great love for the old man and the wisdom and lessons he was given in the art of restoring pipes. These memories were the best part of Mike and he kept them with him all of his life in a special place apart from the rest.
The tall muscular young man cut his way through the storm and ducked his head against the attacking rain and when he had no other choice he leaned into the strong wind to keep his footing firm. He did not need to look where he was going. From the cracks in the sidewalks and the uneven spots and even sometimes the faded old War Powers Act stamps on ground-hole covers Mike could find his way almost anywhere in the city.
He spent more time staring at the cement than at the life around him although he was aware of everything. When he was almost home he stopped and looked forward and felt the cold air and hard rain lash his face. He accepted this challenge of the weather and had an idea stronger than the storm.
“I will restore Thinbite to its original glory,” he said and smiled and was aware that he had done this. It was the first true smile he could remember for a long time. “And I will give it to grandfather on his one hundred and fourth birthday as a work I did on my own, even if it does not compare to Cavicchi.”
A car horn honked loud and long and Mike looked up to see that he blocked the way of a car pulling out of the parking lot. Oblivious to the continued blare of the horn and other signs of the driver’s road rage, he continued on his way and walked the last few blocks to his apartment as fast as he could, which took little time thanks to a change in the wind’s direction in his favor that he took as a good omen.
________________________________________
When he opened the door to the room that was his home, Mike left behind the wetness and traded the fresh smell of rain for the strong but good traces of fresh salmon he baked in foil with lemon, onions and spices the night before.
Mike knew only the door and thin windows shuddered and whistled with the buffets of the storm that intensified but the entire studio seemed little better than a skiff that swayed and rattled from the rolling waves of rain and wind in an ocean of confusion outside.
The single Spartan room was smaller than his parents’ garage and he knew his truck would take up almost all of it but he was happy there with the Murphy bed and kitchenette and walk-in closet he could reach into for anything he needed and the bathroom with its toilet, sink, medicine cabinet and shower.
“My castle,” he said, remembering the story of the knight who tilted at windmills and his own first given middle name in honor of the ancient writer who made it all up.“But I need no Sancho Panza to keep me company. Maybe someday I will rescue a dog from the pound and I know what I will name him.”
He removed his dripping coat and shook it out and ran his fingers through his hair to clear the dampness as he stood by his heavy wooden work table by the one window. The table was where he kept the few things that meant the most to him not counting Cavicchi and his tins of good tobaccos. Those he stored in his nightstand.
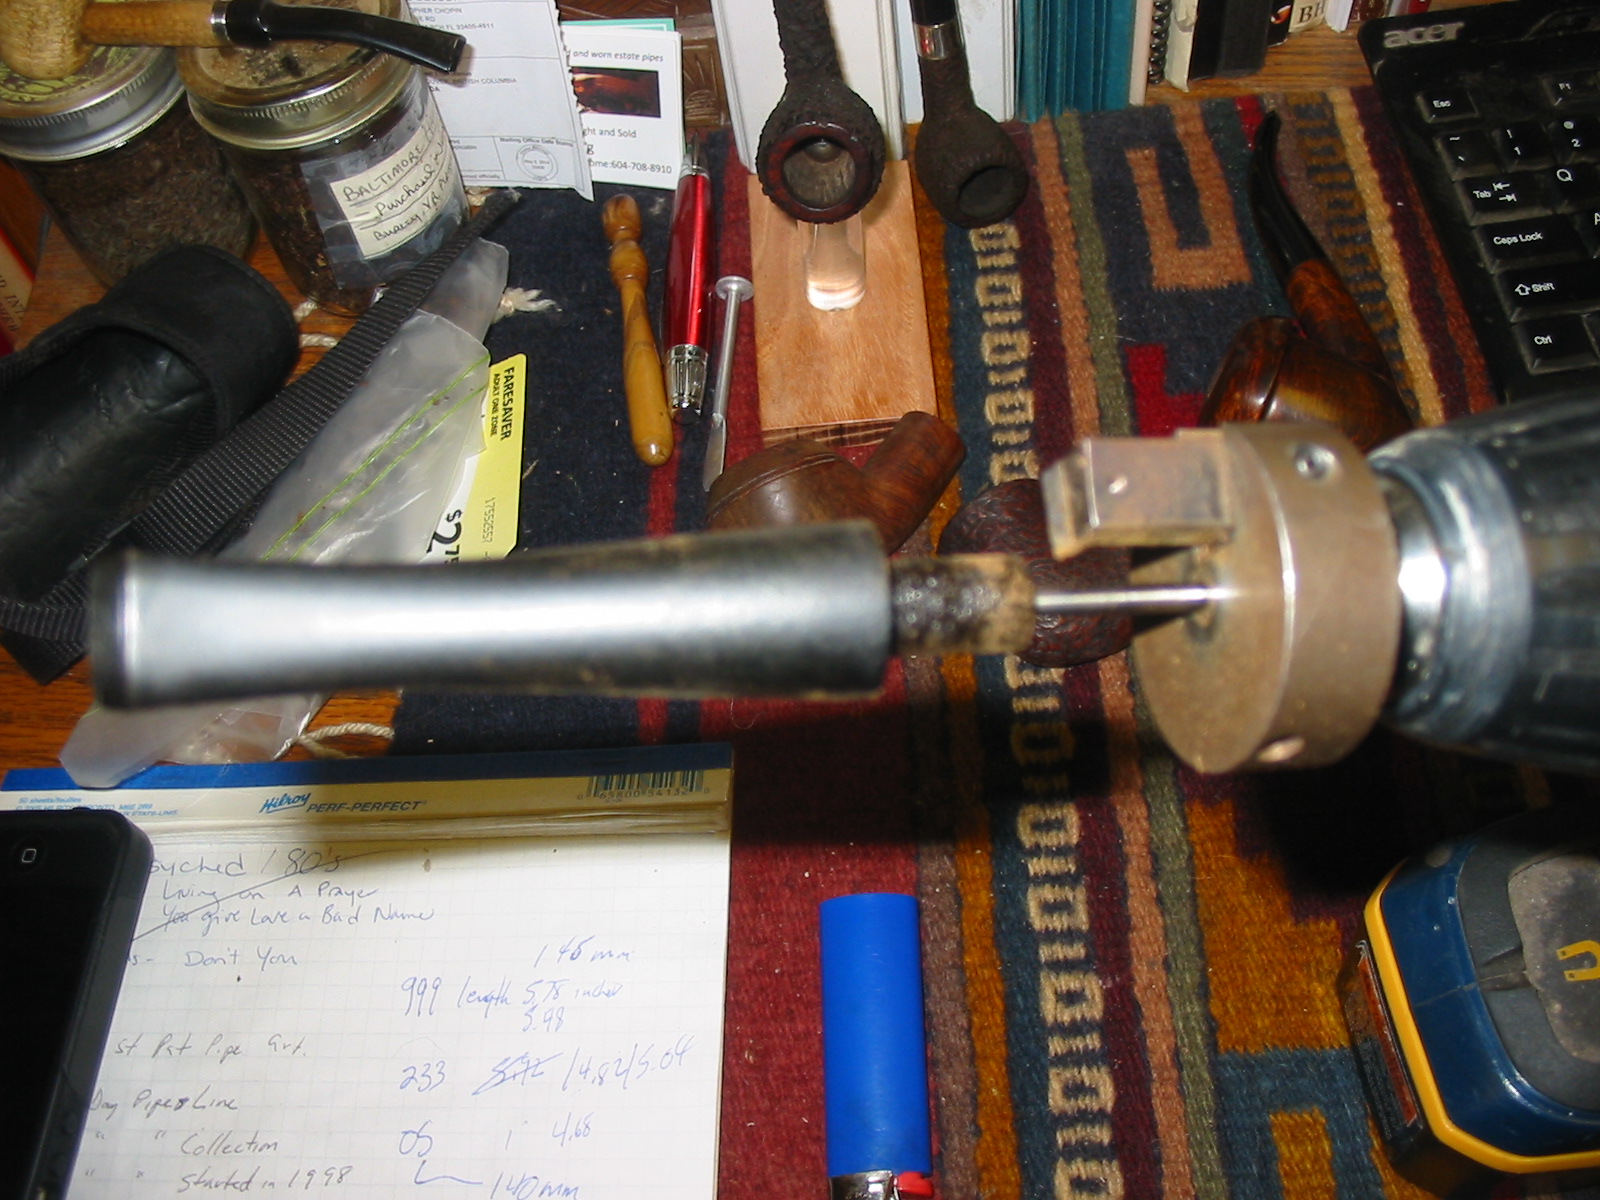
He ran his hands over the machine at the back of the table with its three fixed buffer wheels. Mike wanted and could afford a newer three-on mandrel lathe and motor but this one was of great sentimental importance and he never got around to searching the Internet for another. The old man gave the machine to Mike when he was twelve, and he had not yet used it outside of his grandfather’s house. That was not good. Tools were made to be used.
After Mike switched the places of his laptop computer and the very old wood buffer to a spot where he could sit on his stool and reach it without trouble he picked up a rag that he dampened with distilled water and wiped it clean of dust and dirt from many years without use. He covered the laptop with some plastic and plugged in the machine that was heavy enough not to need to be bolted to the table and put on his clear goggles before making sure it still worked.
“This is silly,” the young man said as he adjusted his goggles until they were snug over his eyes, “because I have kept it safe and clean except for a little dust and grime and have even replaced the used buffer wheels that were on it when grandfather gave it to me. But the old man taught me well and all of the good lessons are coming back like riding a bicycle.”
Mike flipped the power switch up and right away felt a small chunk of something hit his goggles and so was happy for the old man’s lesson. He felt a rush of blood fill his entire body with a warmth that was so good it almost made a natural thing happen as he heard the smooth even hum of the motor and saw the cloth buffers that were loose and white tighten up at high speed.
The machine was not cheap when it was new and so it could be adjusted down as was better when working with wood. He turned a knob to one thousand seven-hundred and fifty revolutions per minute and listened as the whirring slowed. It was a thing of beauty despite its age and use and Mike remembered the old man’s words when he gave him Cavicchi.
“Nothing that is not of value to the giver is worthy of parting with.”
The young man loved his grandfather more than ever and thought about how to restore Thinbite.
“Should I only clean him up with a nice bath to remove the years of grime that are on him and clear away the scratches the way a plastic surgeon does a nip and tuck? Maybe Thinbite deserves more. What if I could do something more original,closer to a make-over?”
He looked at the rugged Thinbite and considered the possibilities from every angle.

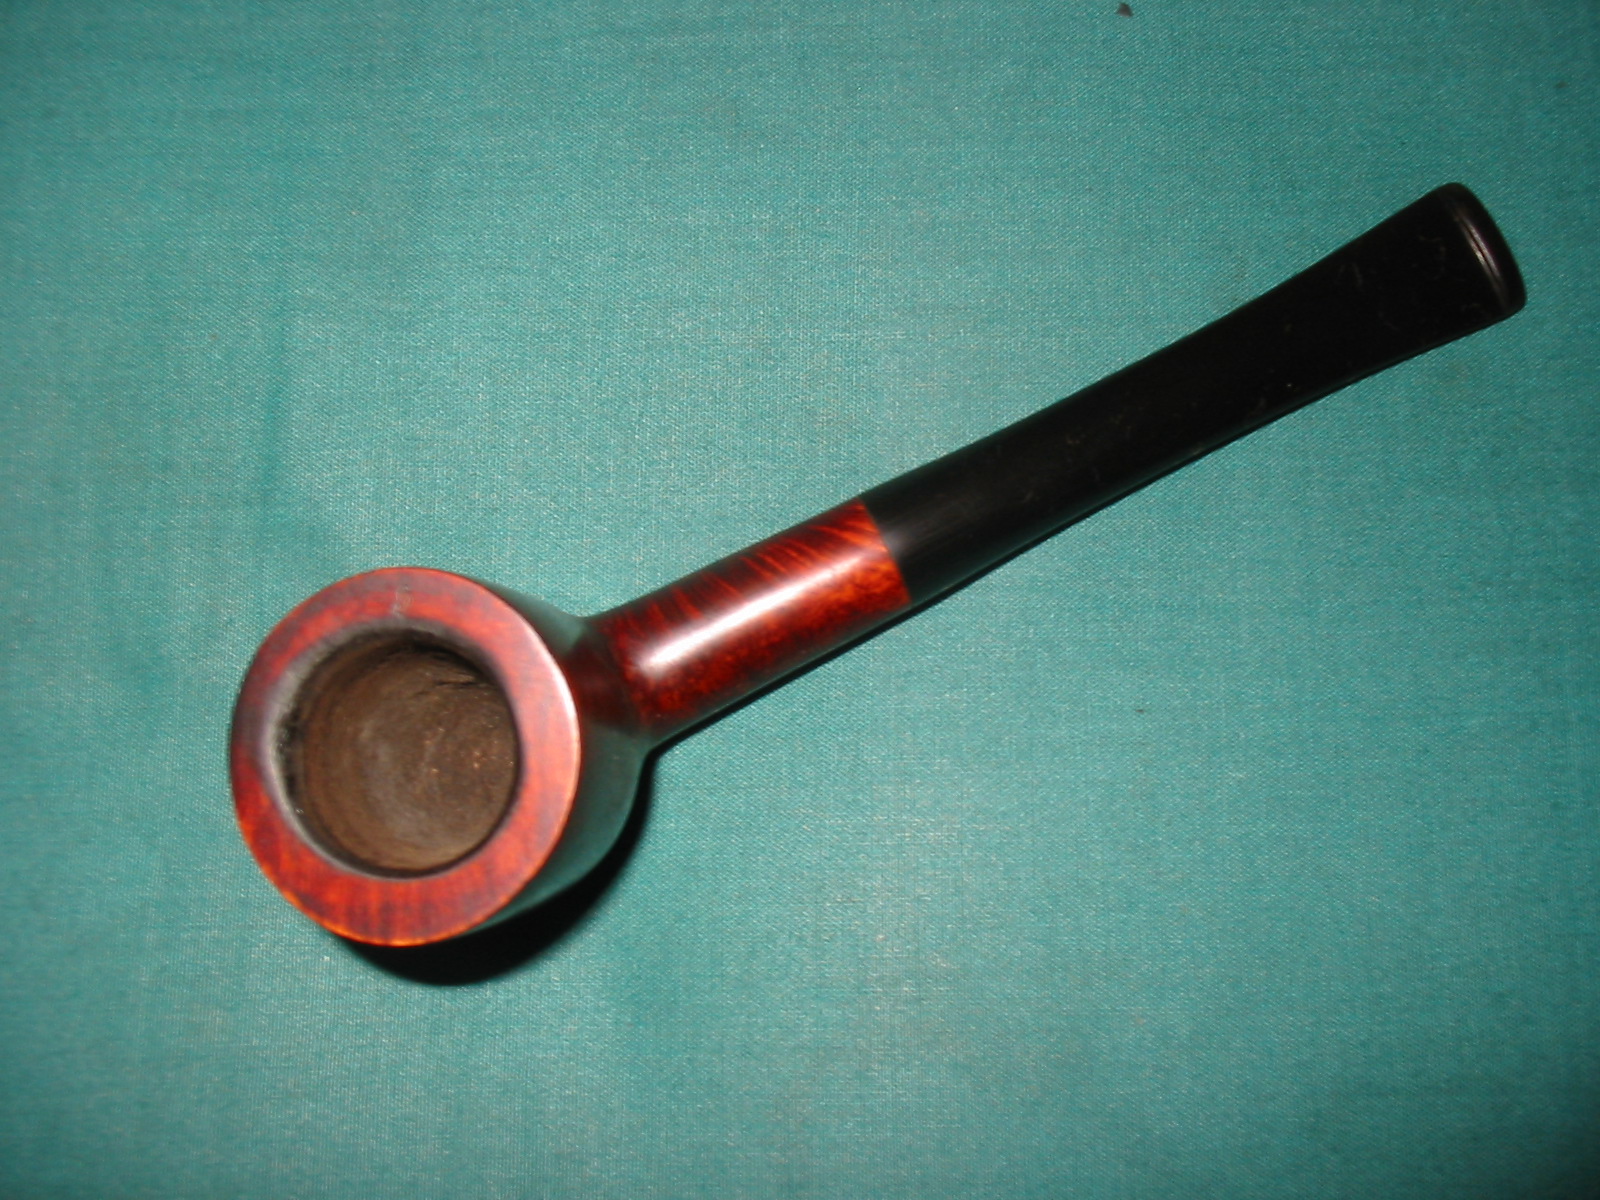
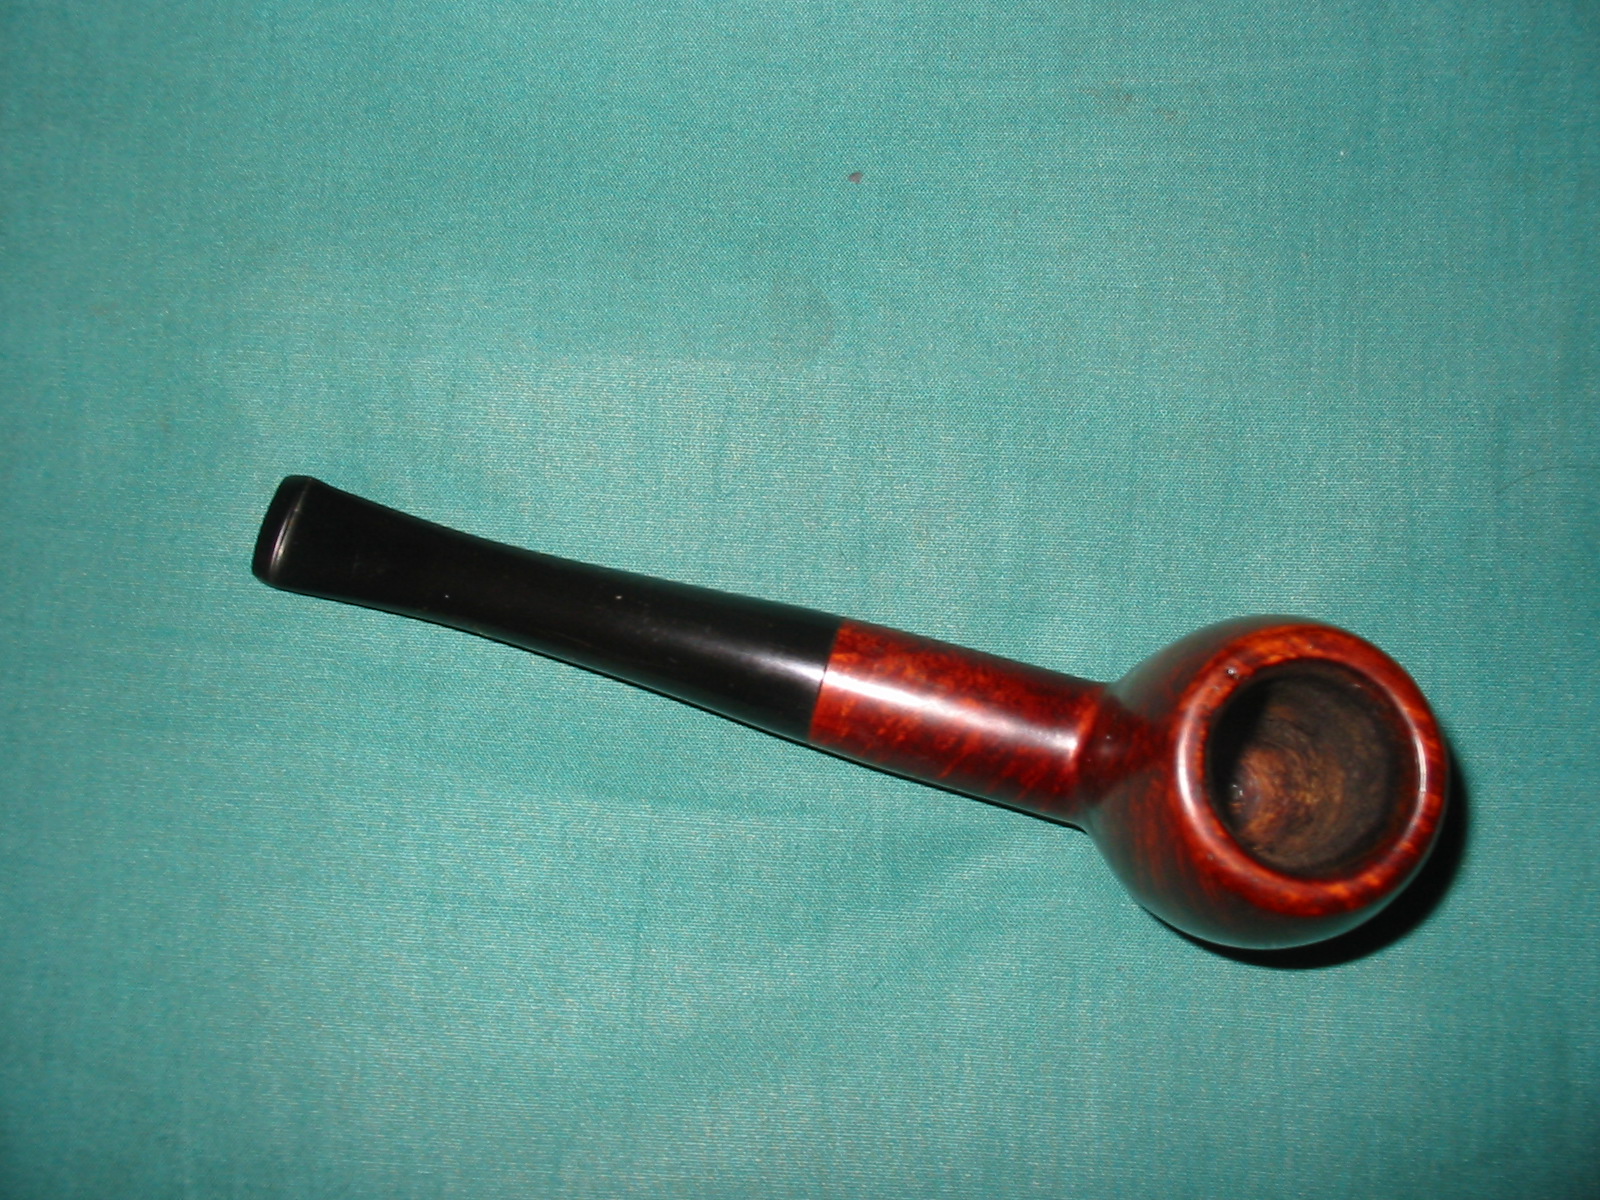
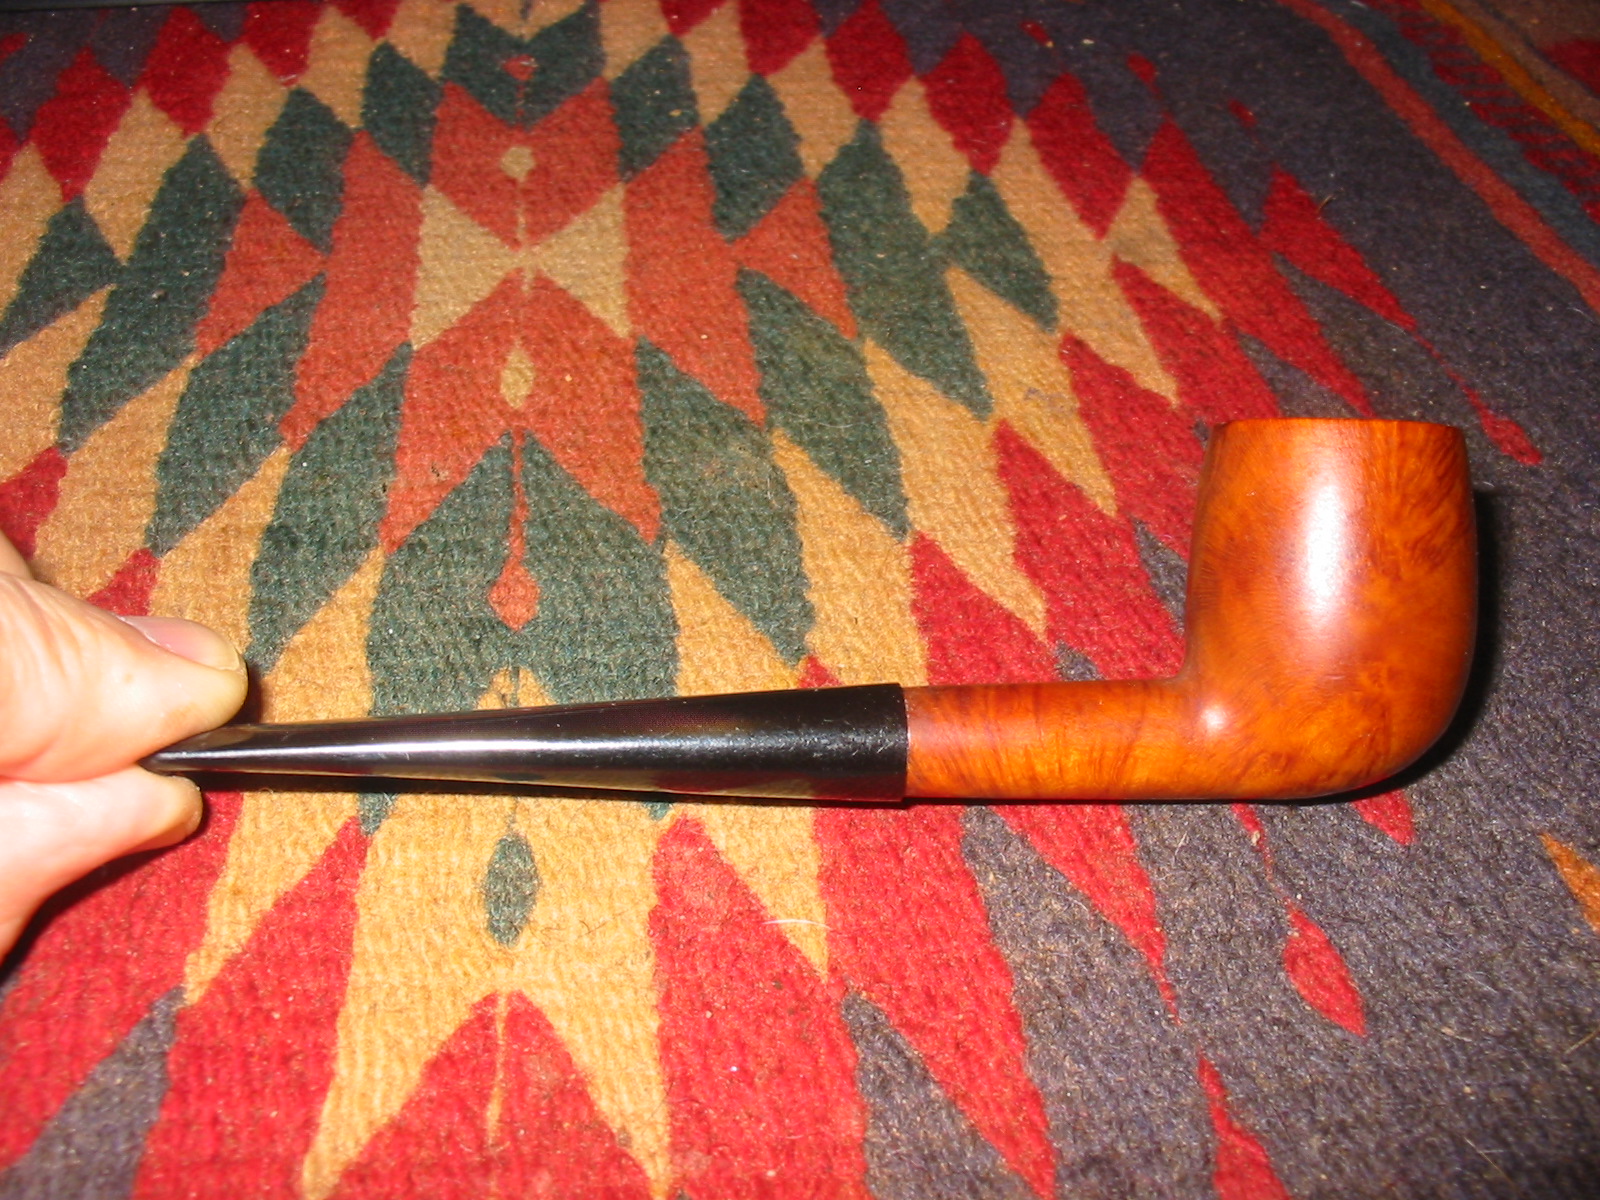
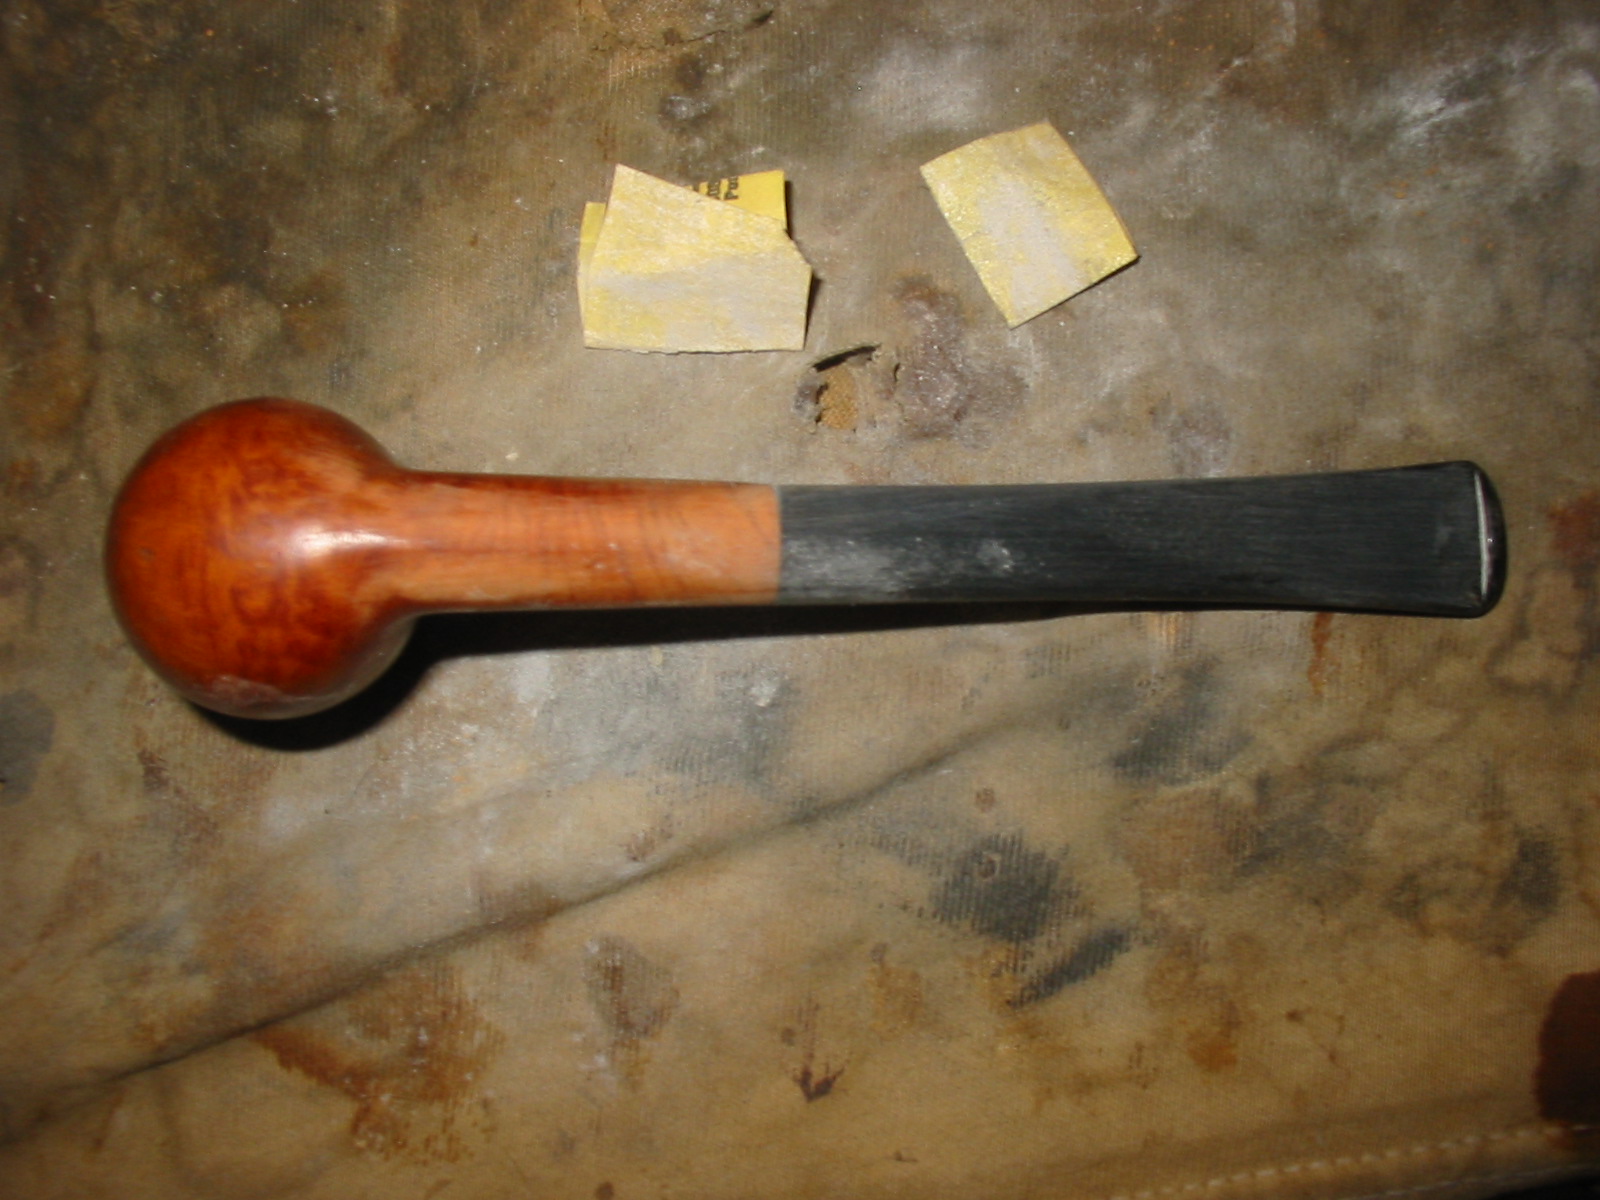
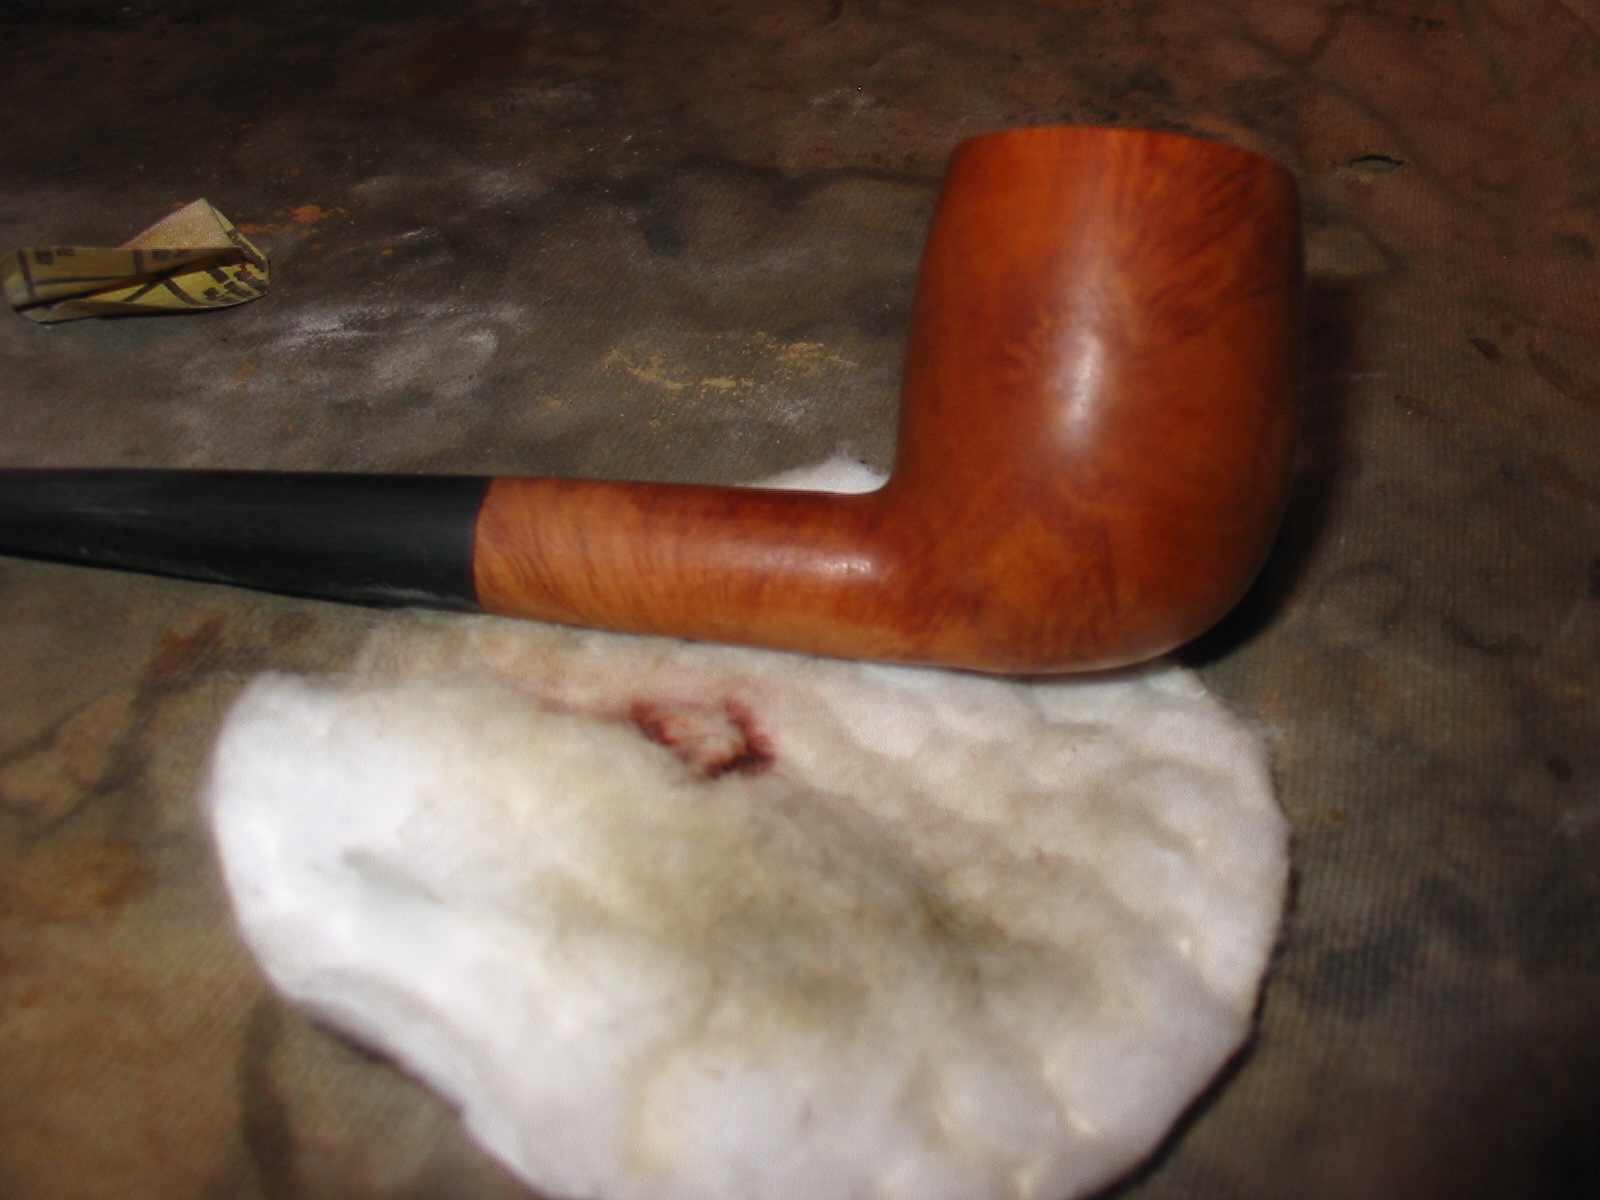
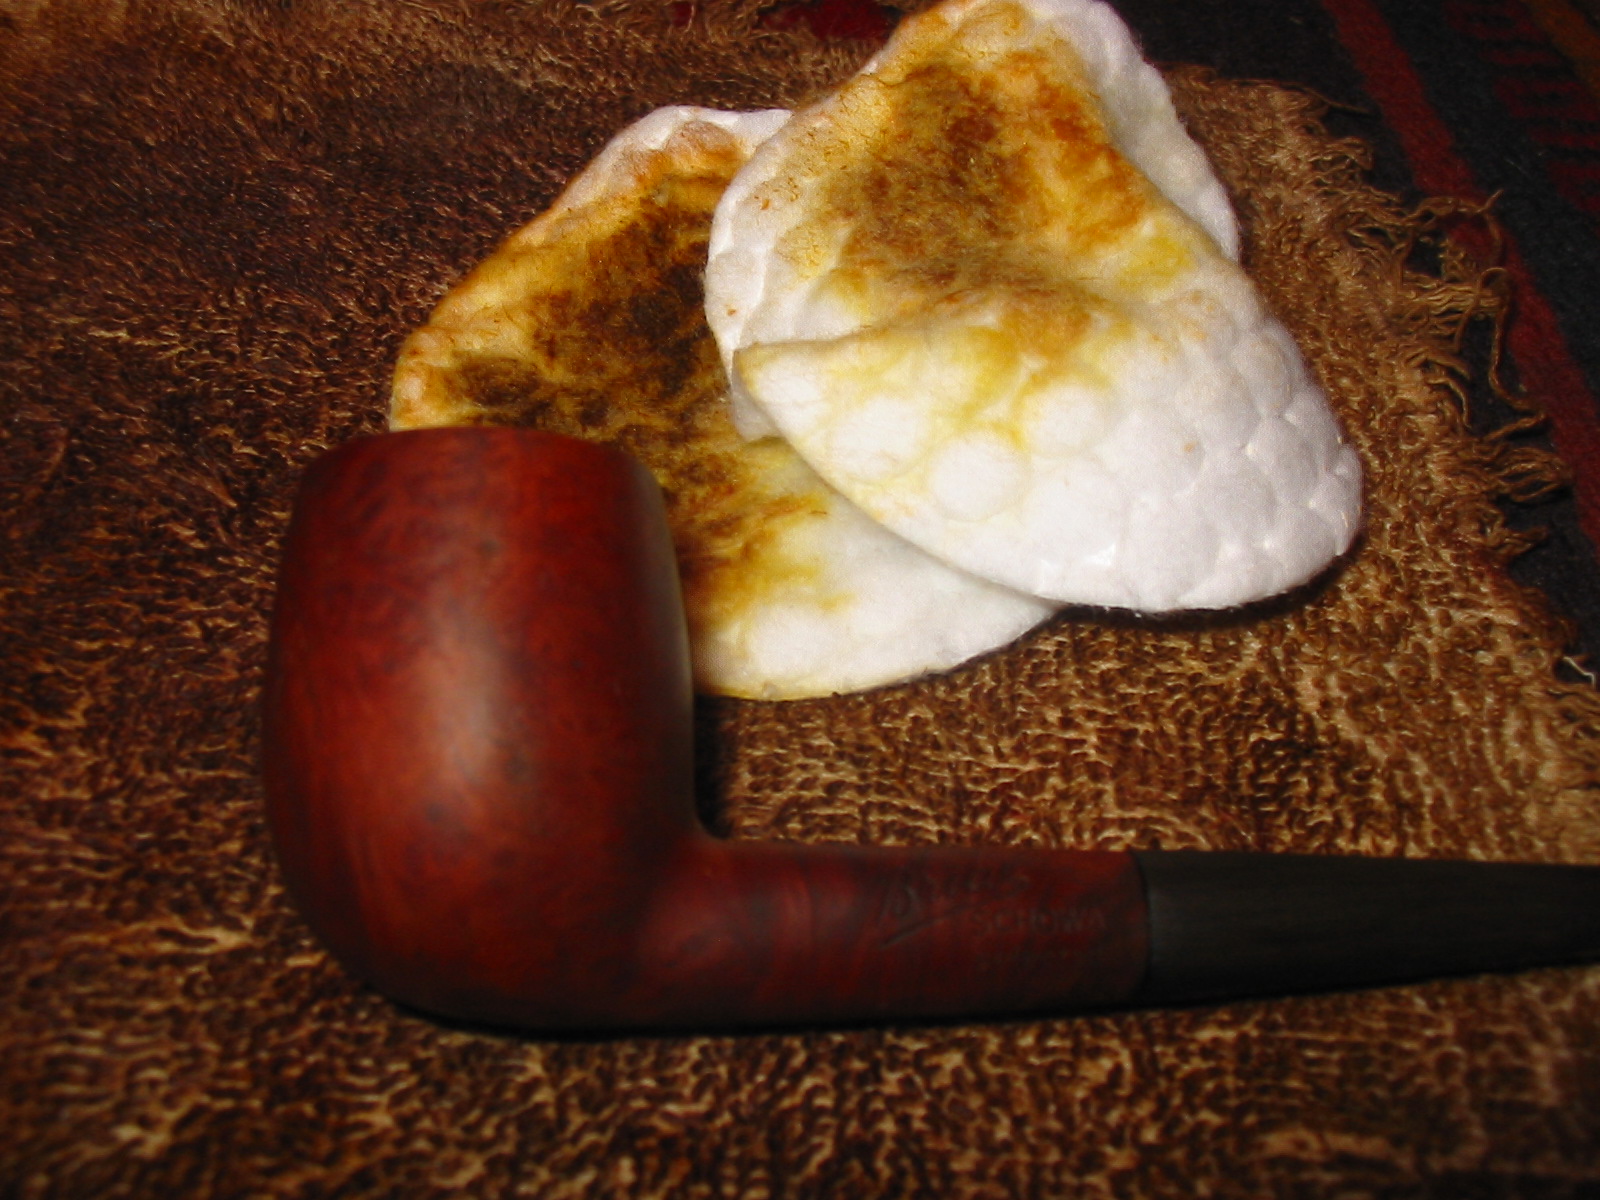
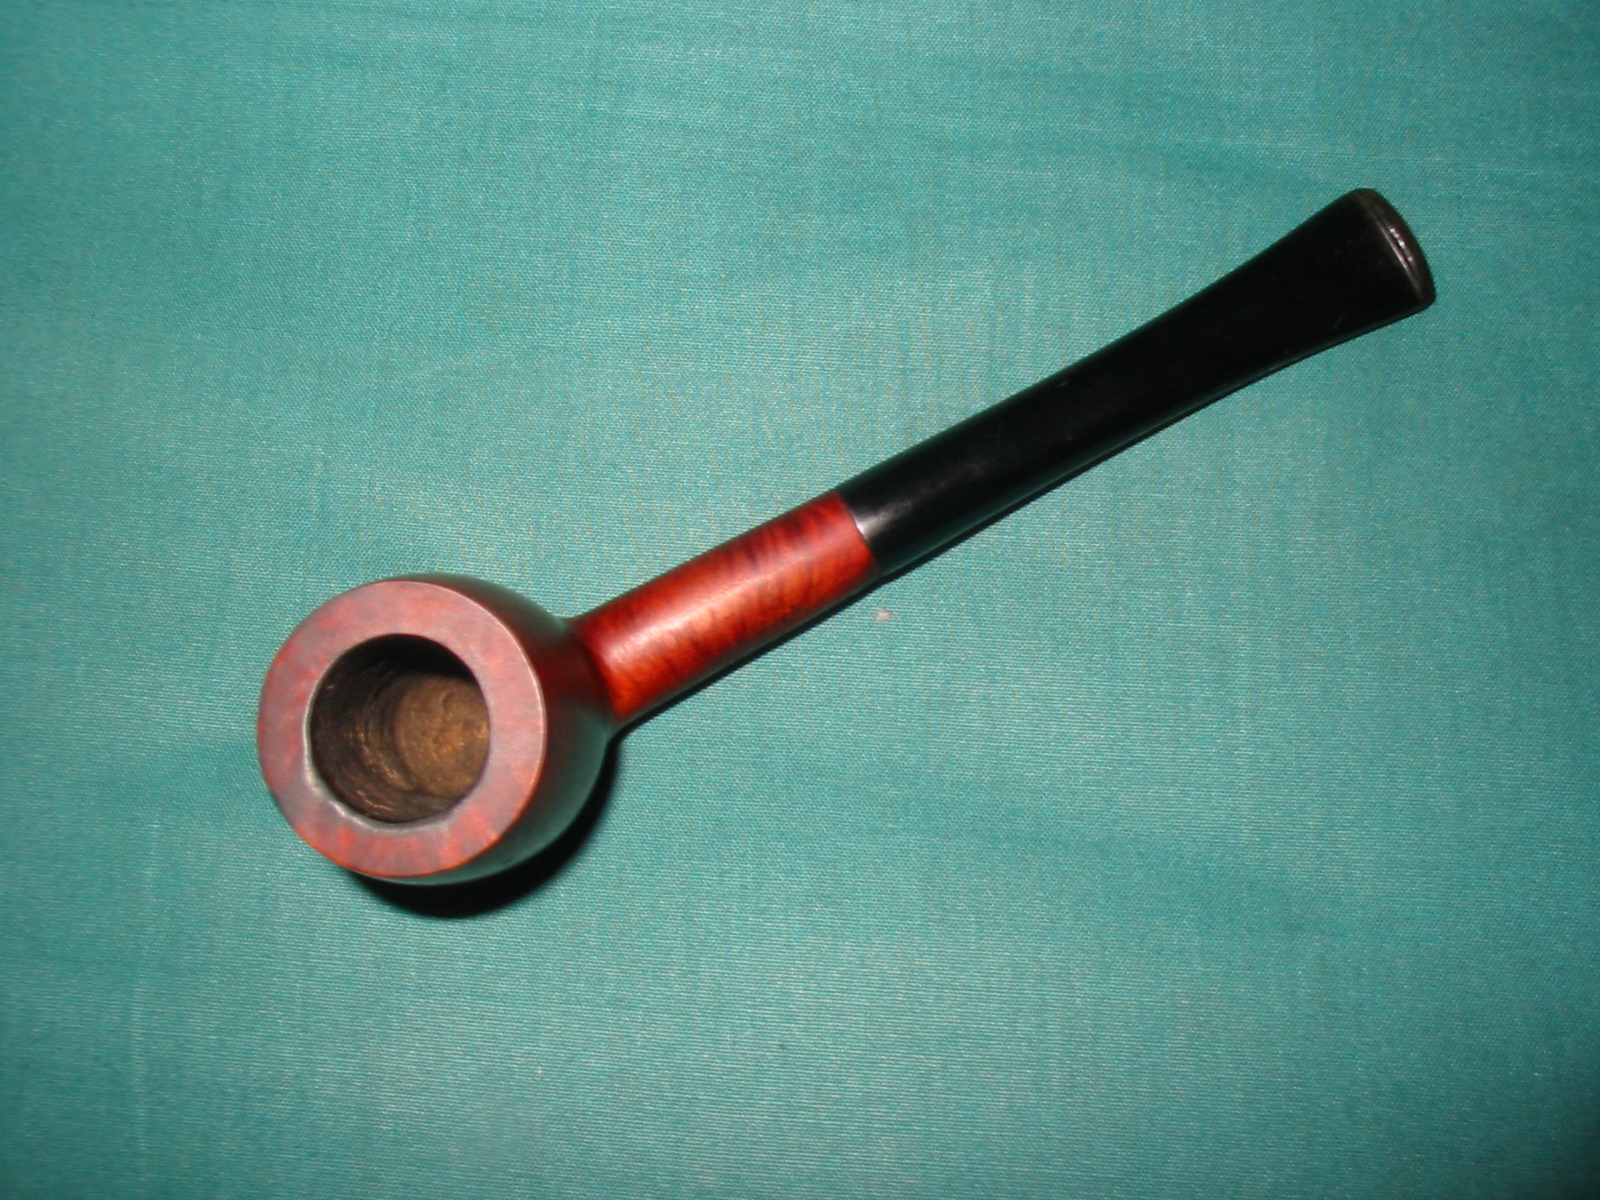
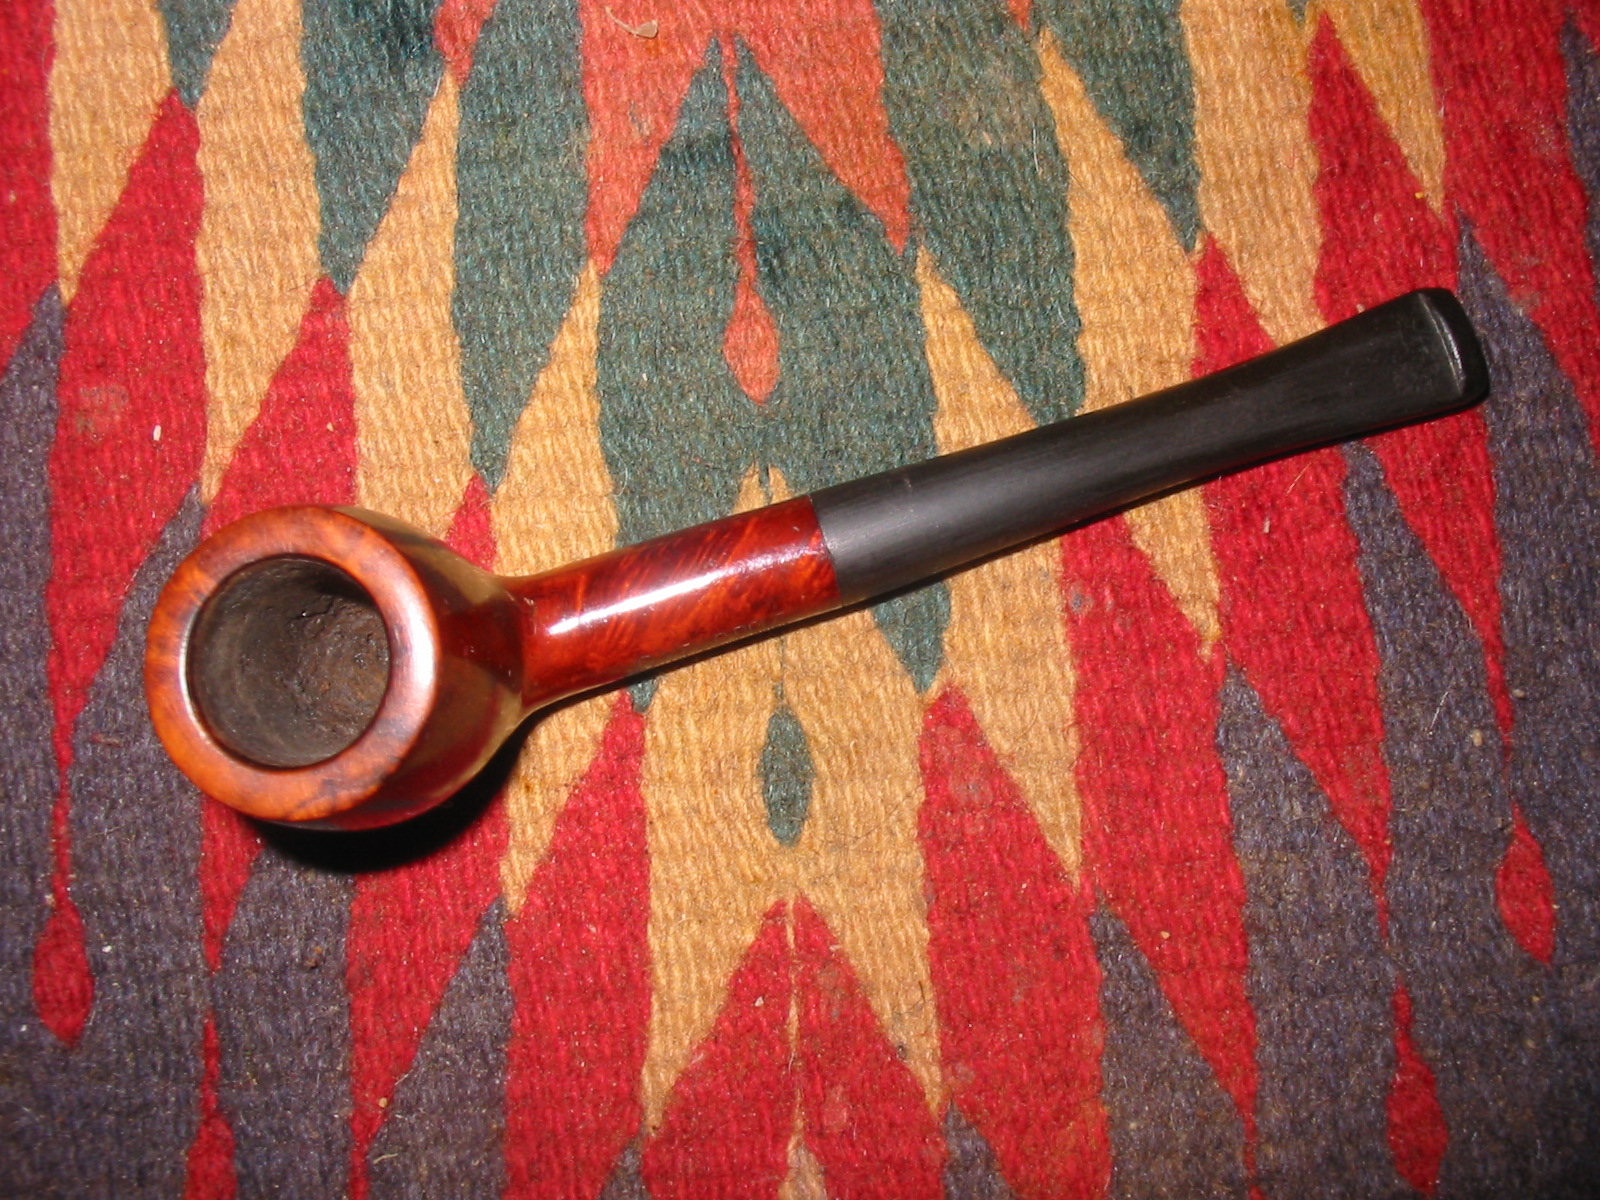
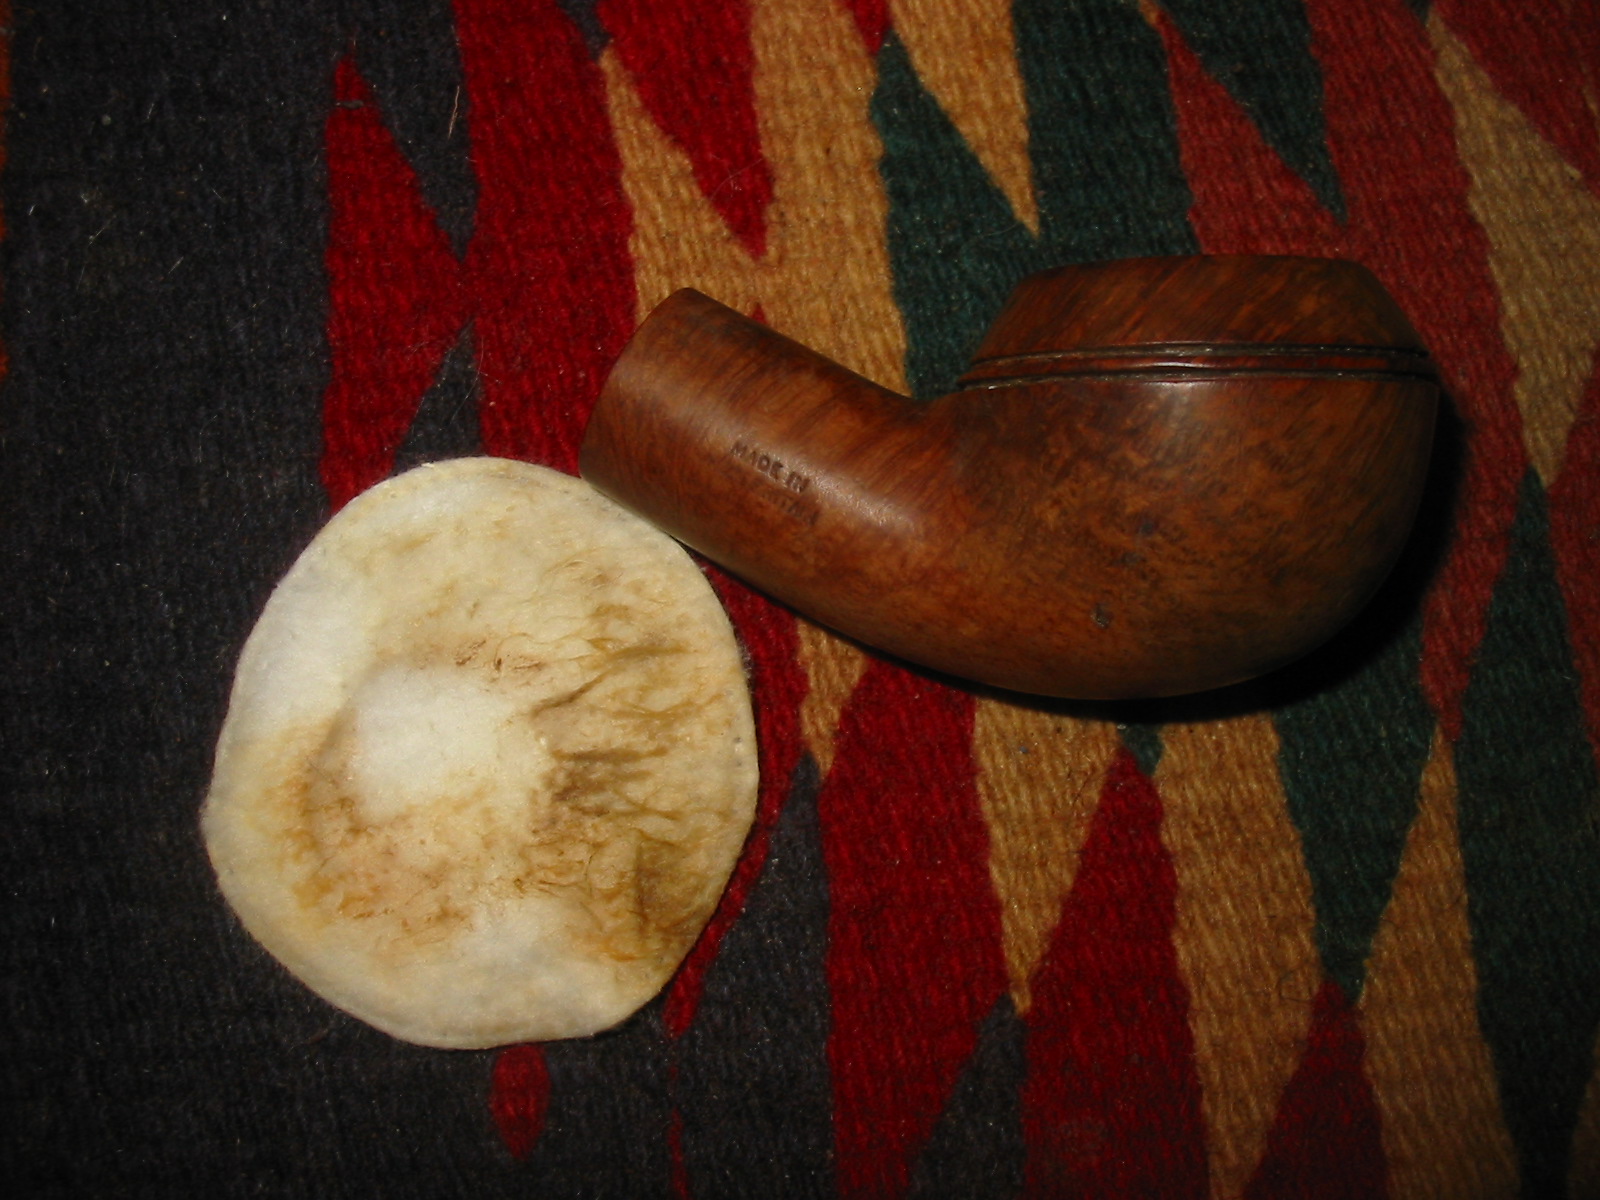
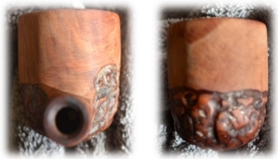
 The part of Mike that did not know what to make of itself knew he already liked Thinbite and the uncommon use of smooth natural briar on the shank and most of the bowl, with the small rusticated area around the bottom, and that he felt that way from the moment he saw the pipe. But the suspicious side that was still in his nature wondered what flaws in the grain of the wood the rustication and heavy but faded stain might hide.
He took a serious step. He knew, from experience watching his grandfather strip old pipes covered with rustication or thick stains of black for dress pipes or green for St. Patrick’s Day or red for Christmas that the wood might be strong but still have unfortunate weaknesses.
The feeling in Mike’s stomach was a mix of fear and hope that there could be serious problems he had to correct. Most of the pipes with these signs that he watched his grandfather strip had bad grains or pits that were filled with putty because they were too deep or numerous to correct any other way. Mike had to know. He was always curious that way.
 Even when he was learning the basics of pipe craft from the old man, Mike liked to work at a pace that was steady but not rushed because having something to keep him busy at all times not only made him more efficient but he also felt better.
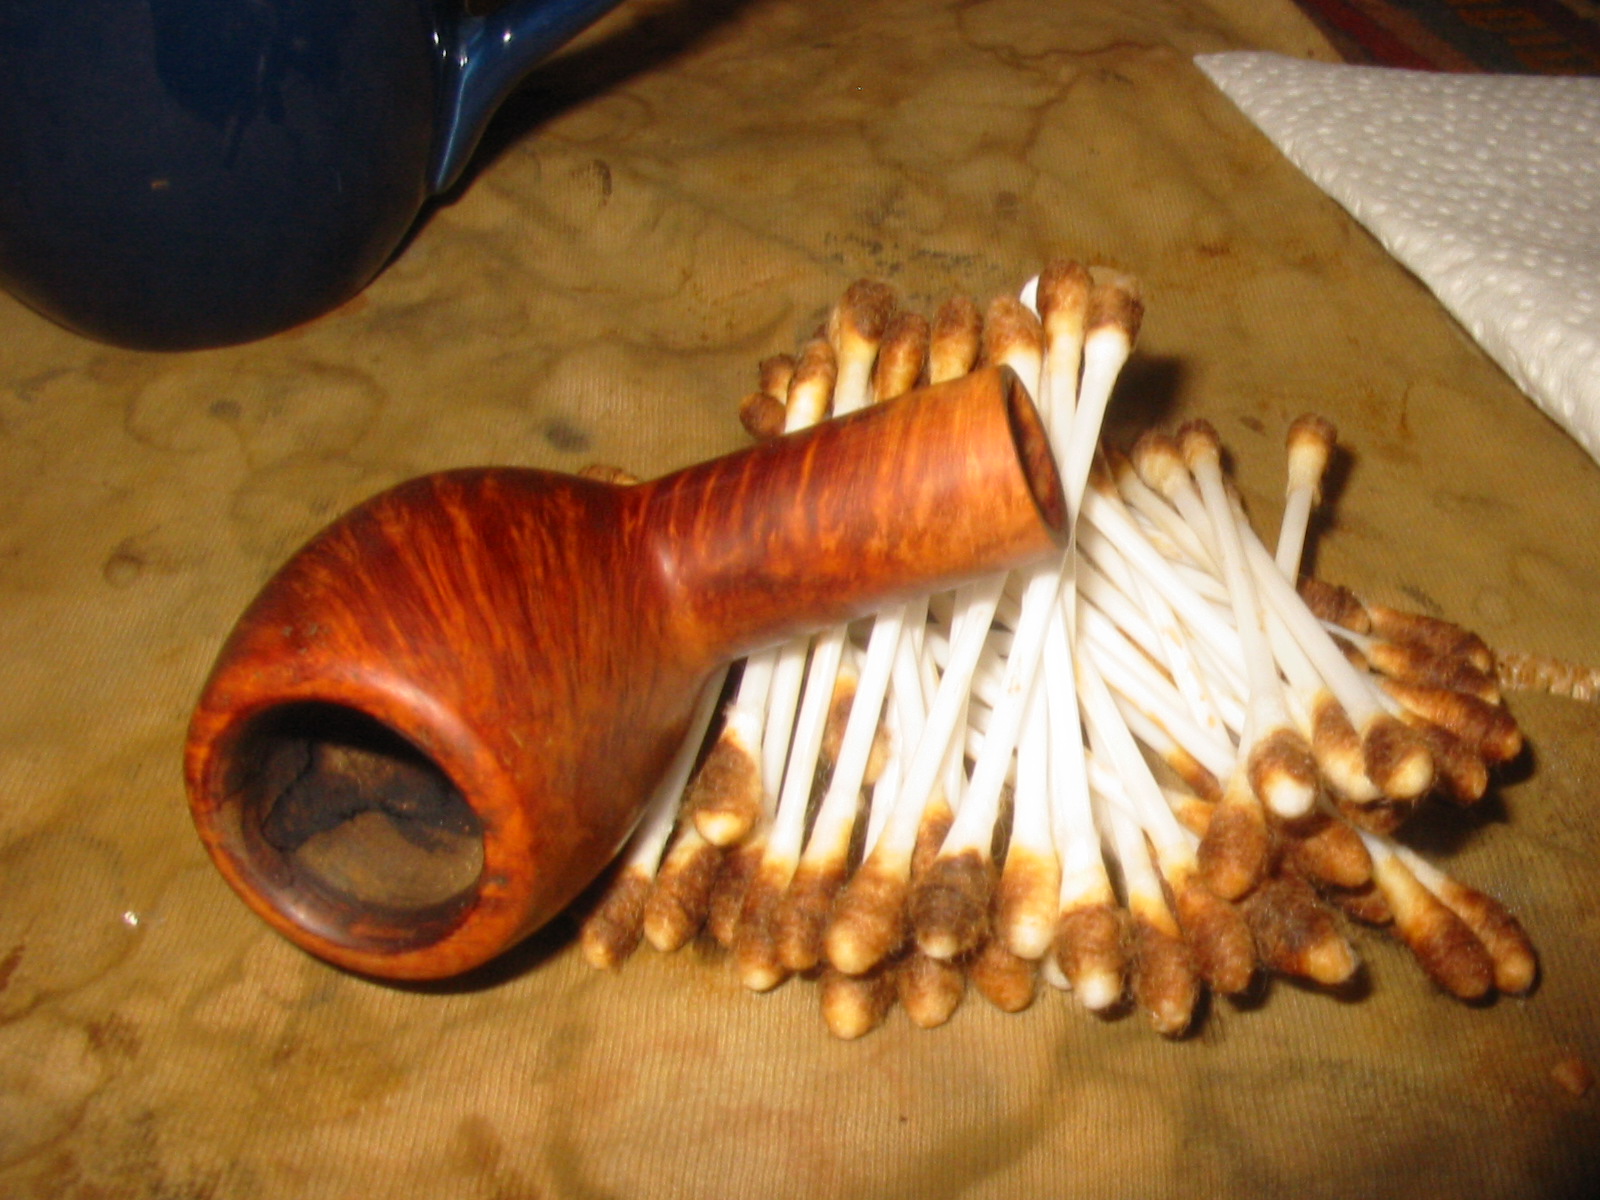
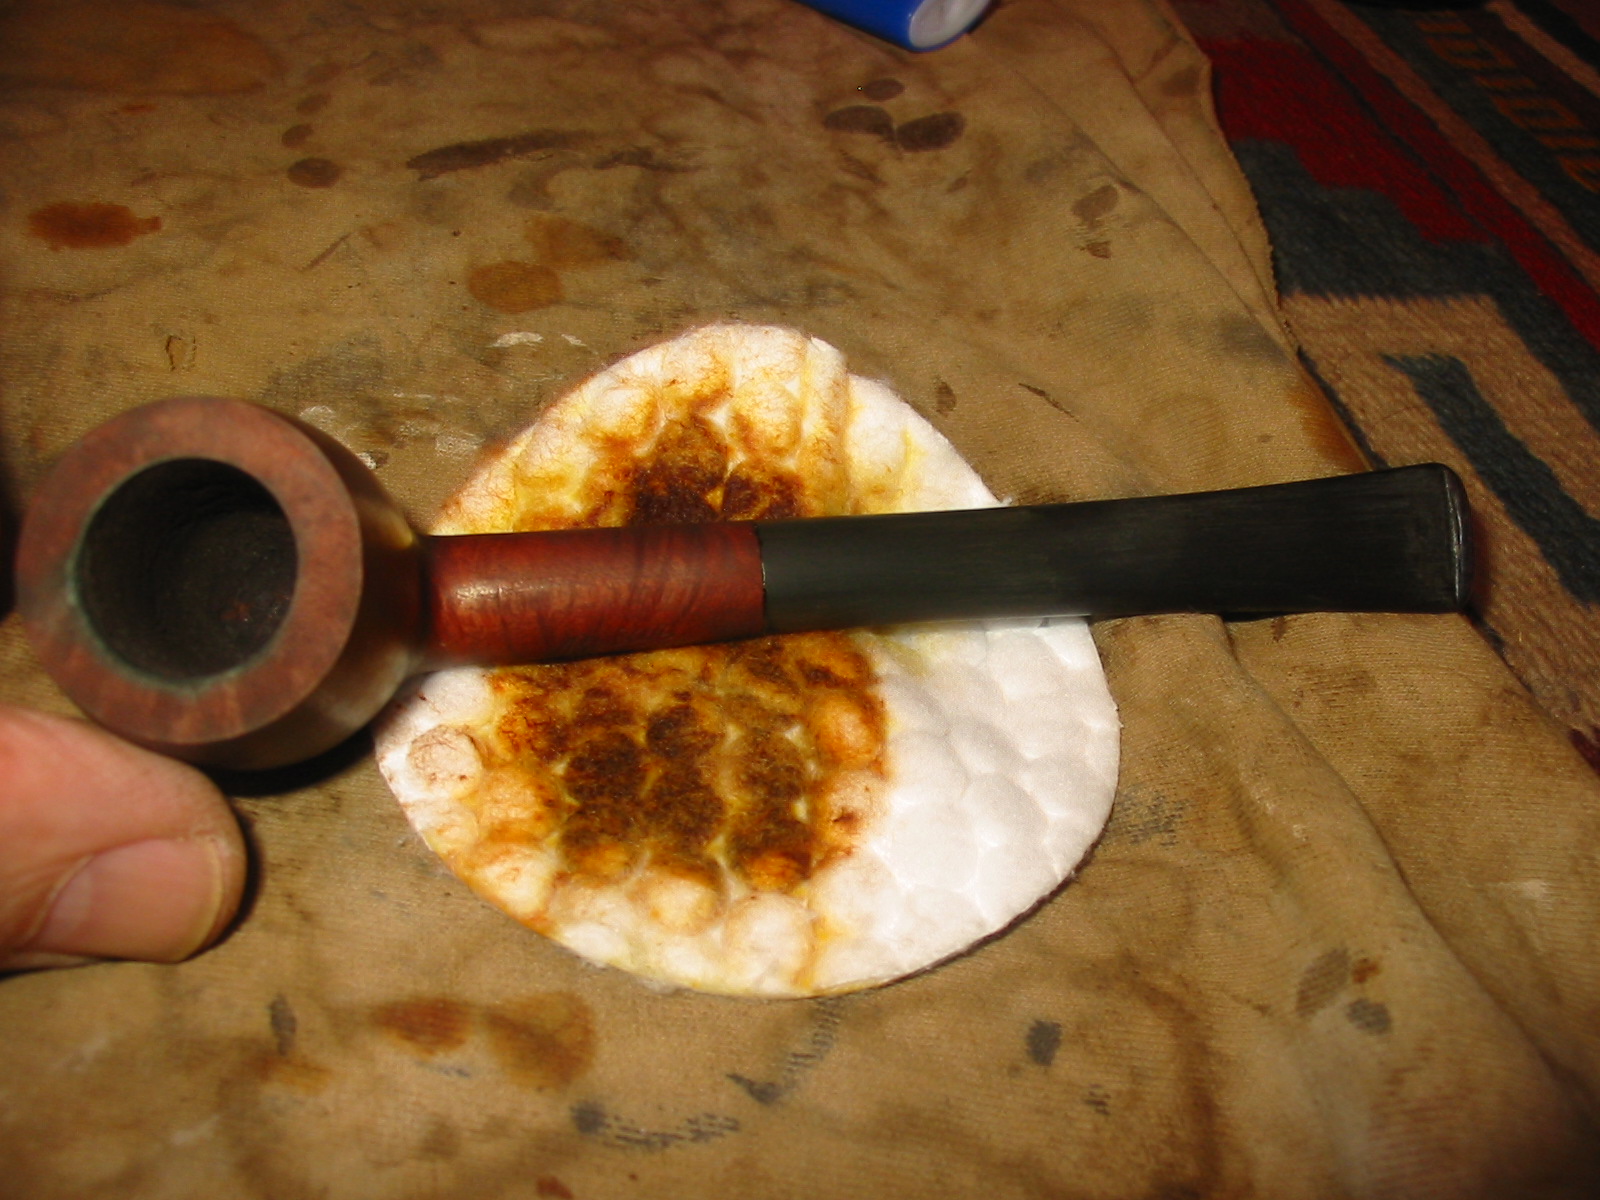
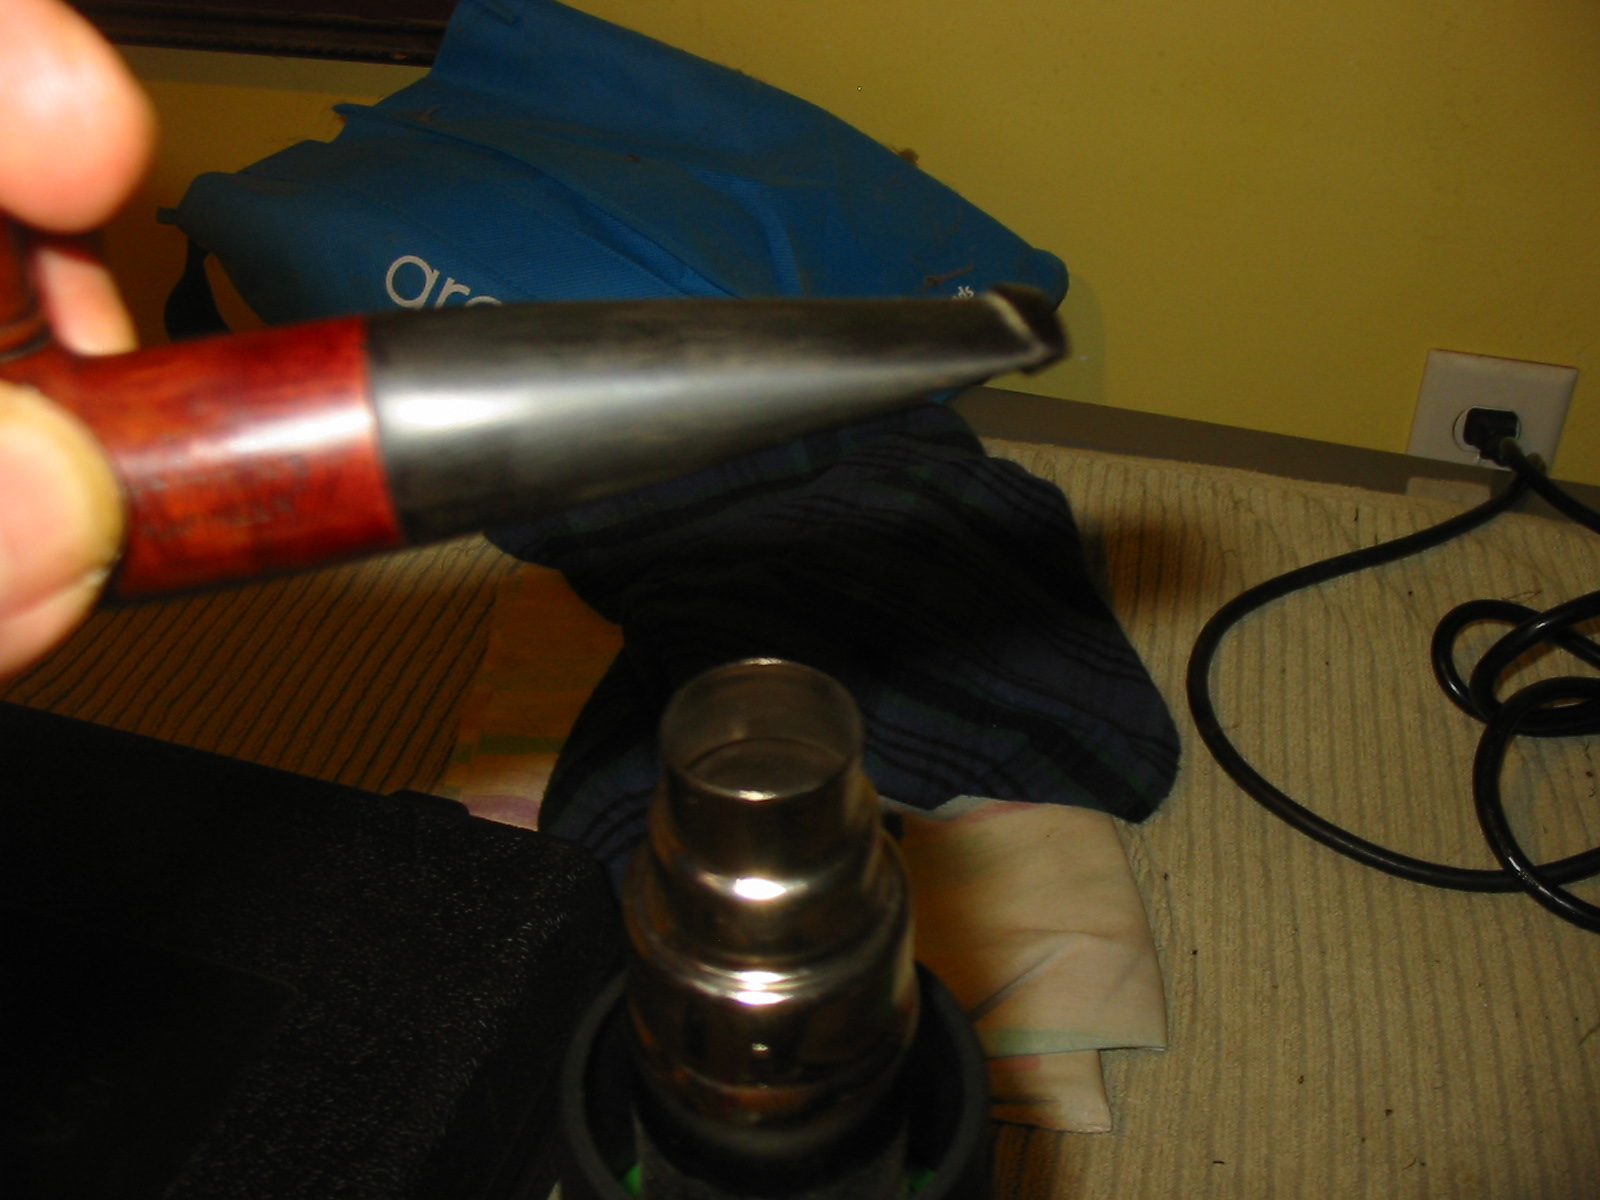
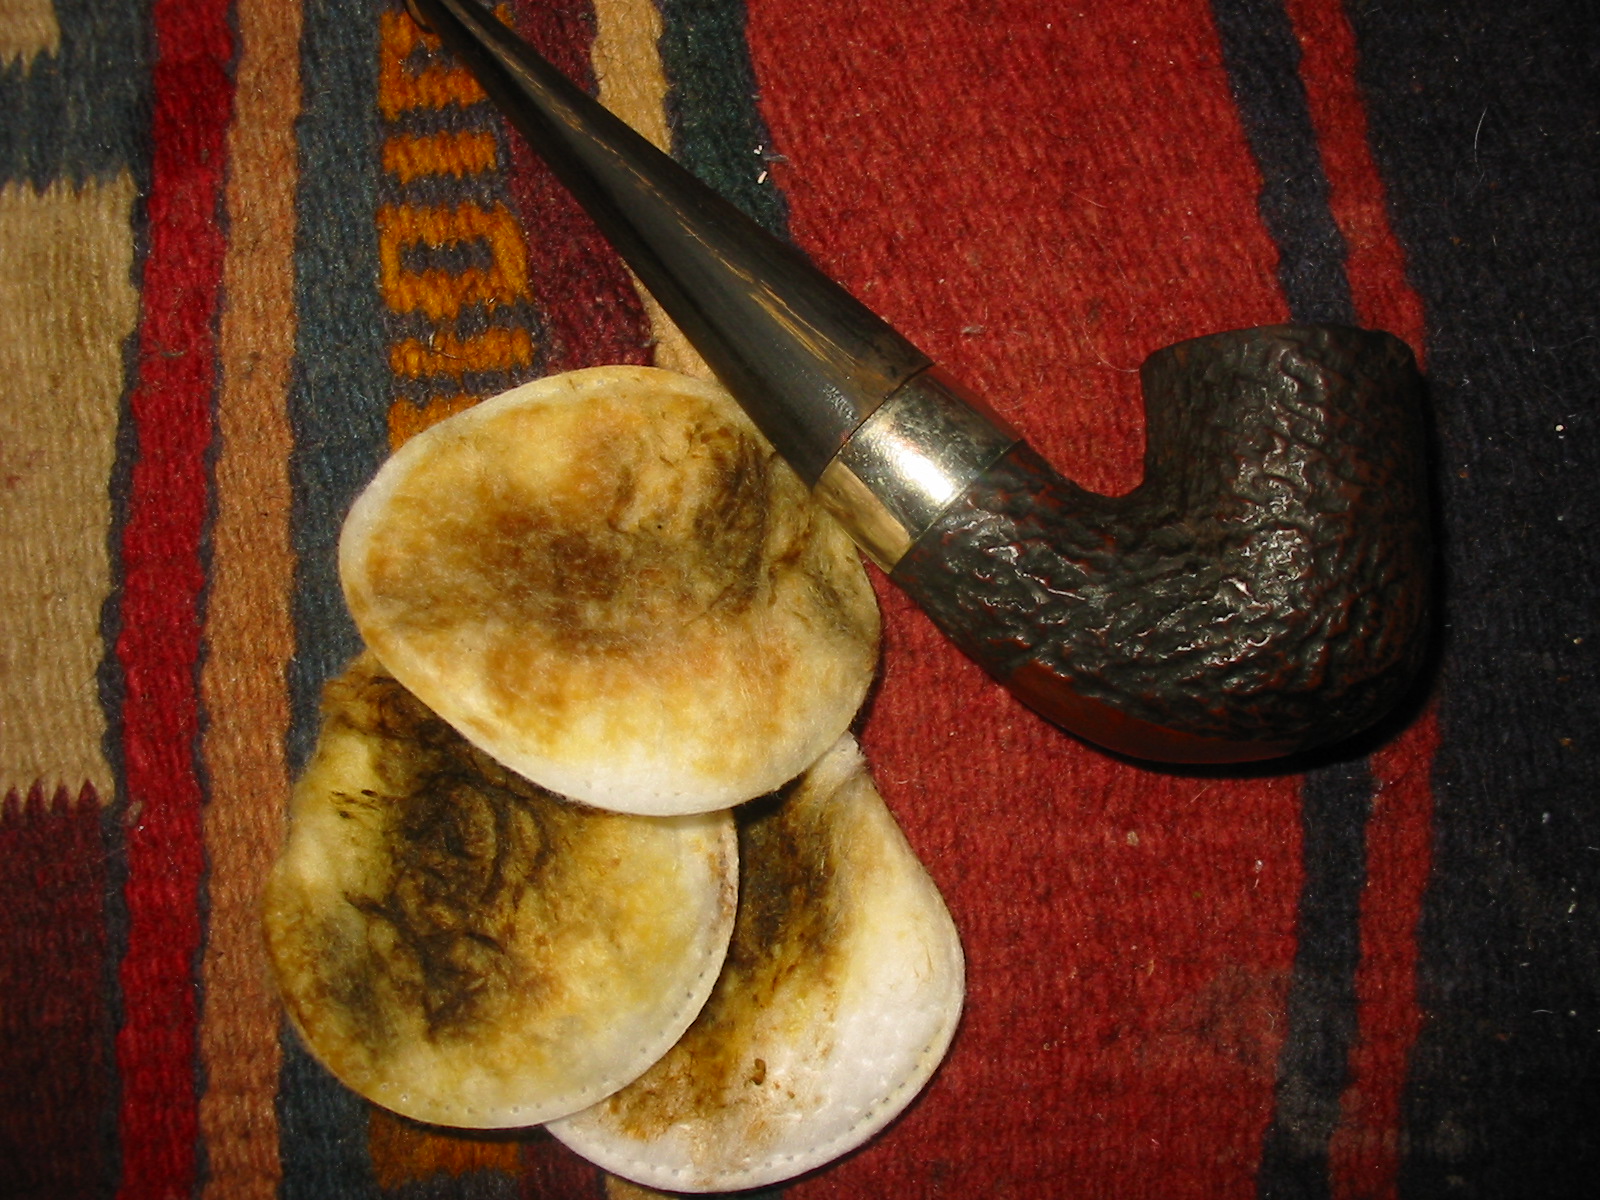
First he began to clean and sanitize Thinbite with bristled pipe cleaners from a bundle on the table and an unopened bottle of Everclear in the freezer that he bought two years earlier for that day. He broke the seal on the bottle and lowered a pipe cleaner a third of its length into the strong one hundred and ninety-proof alcohol.
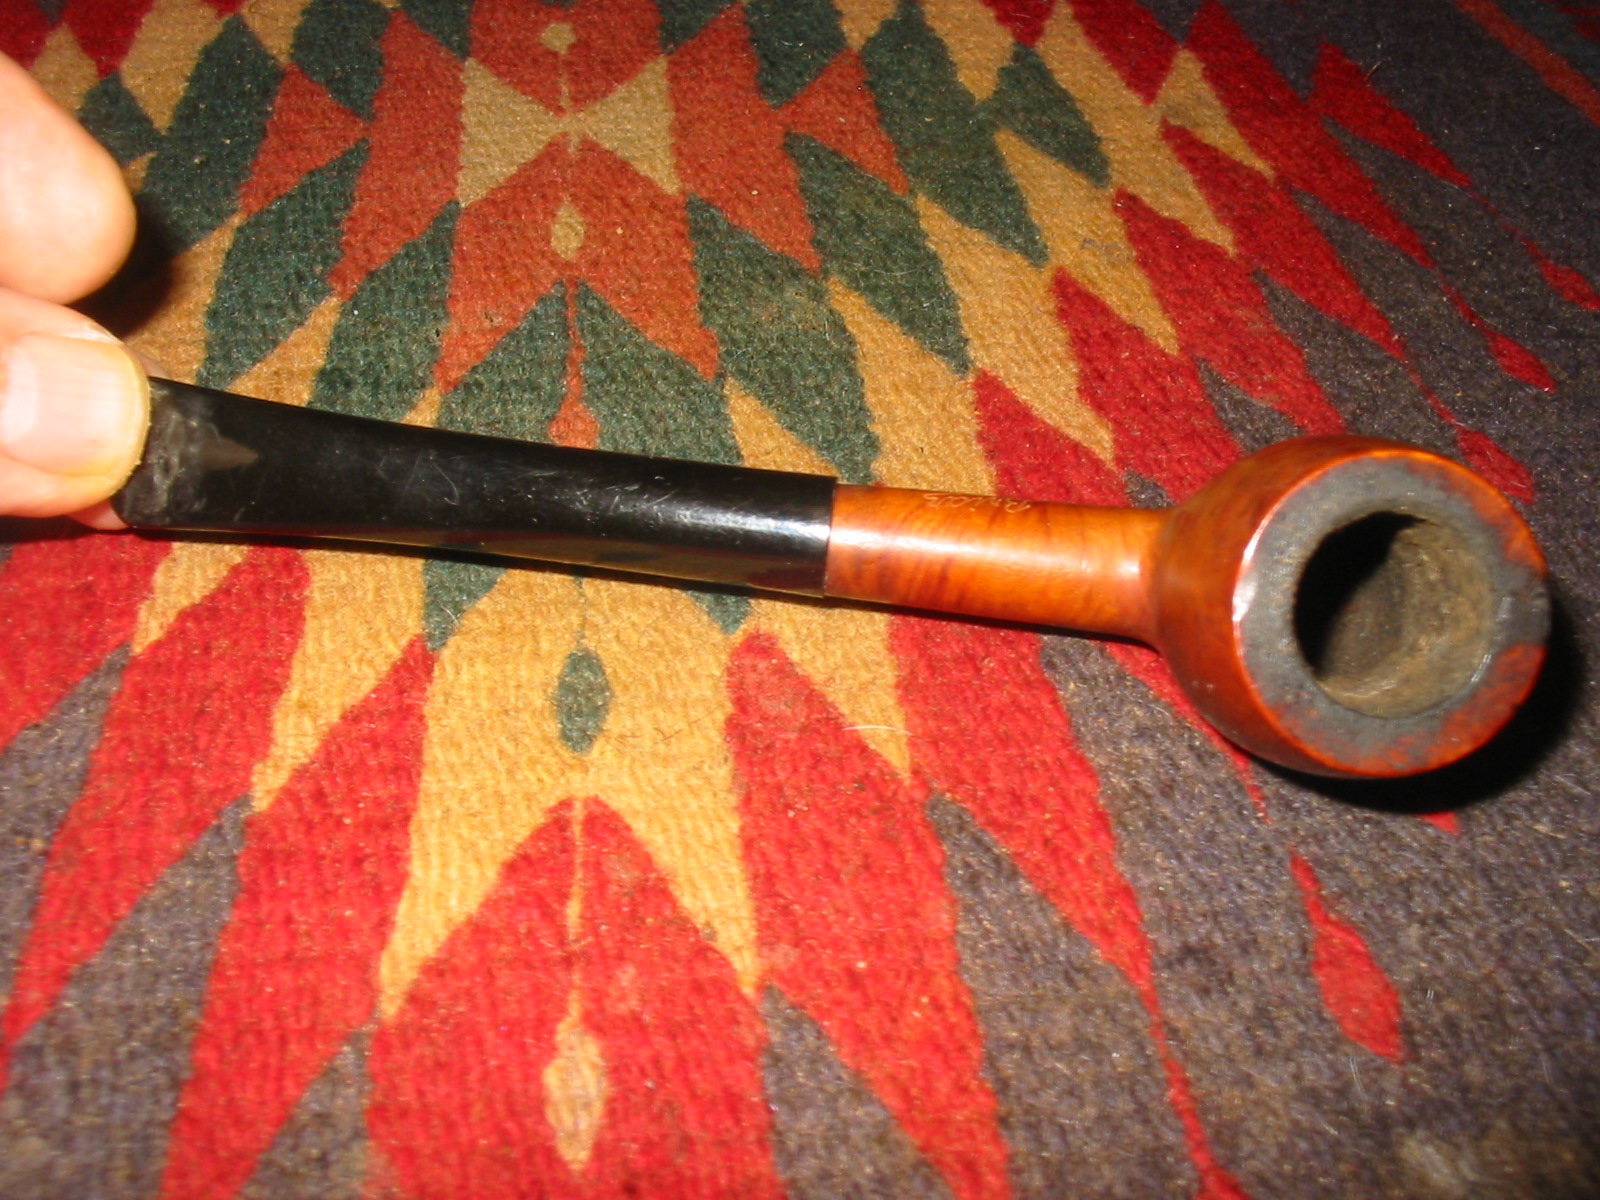
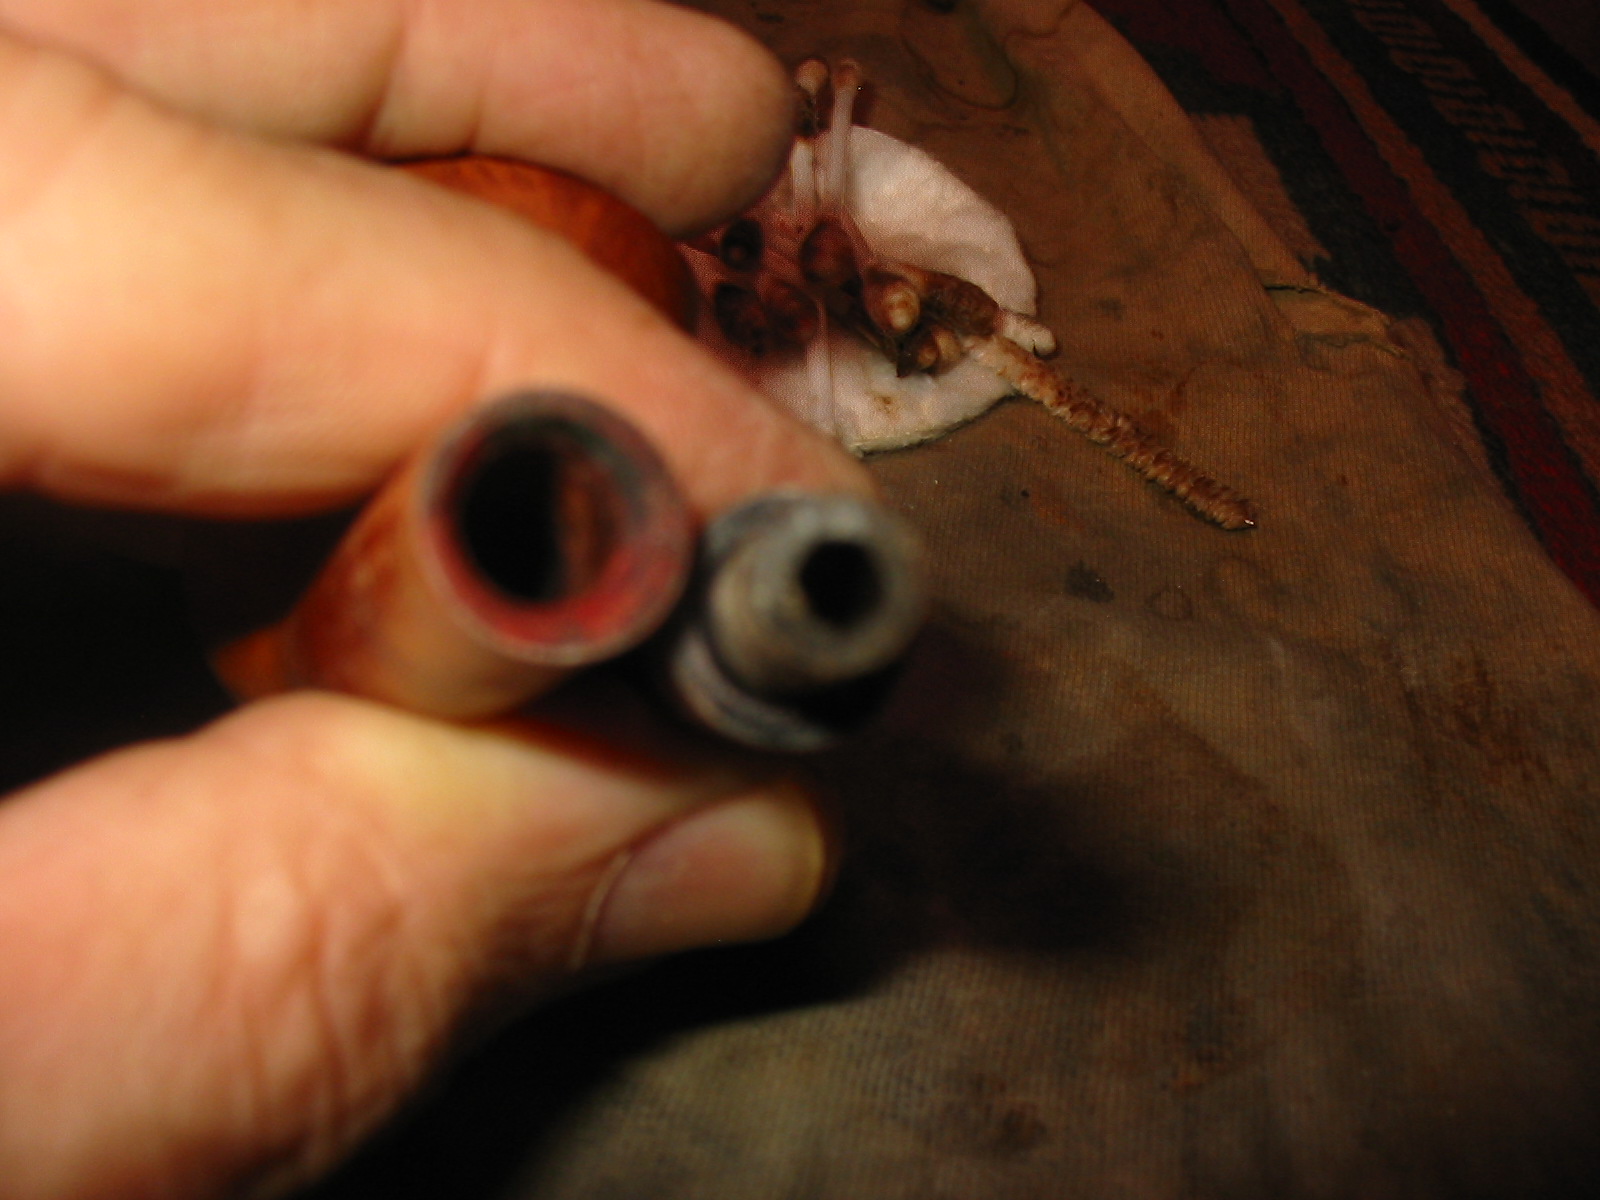
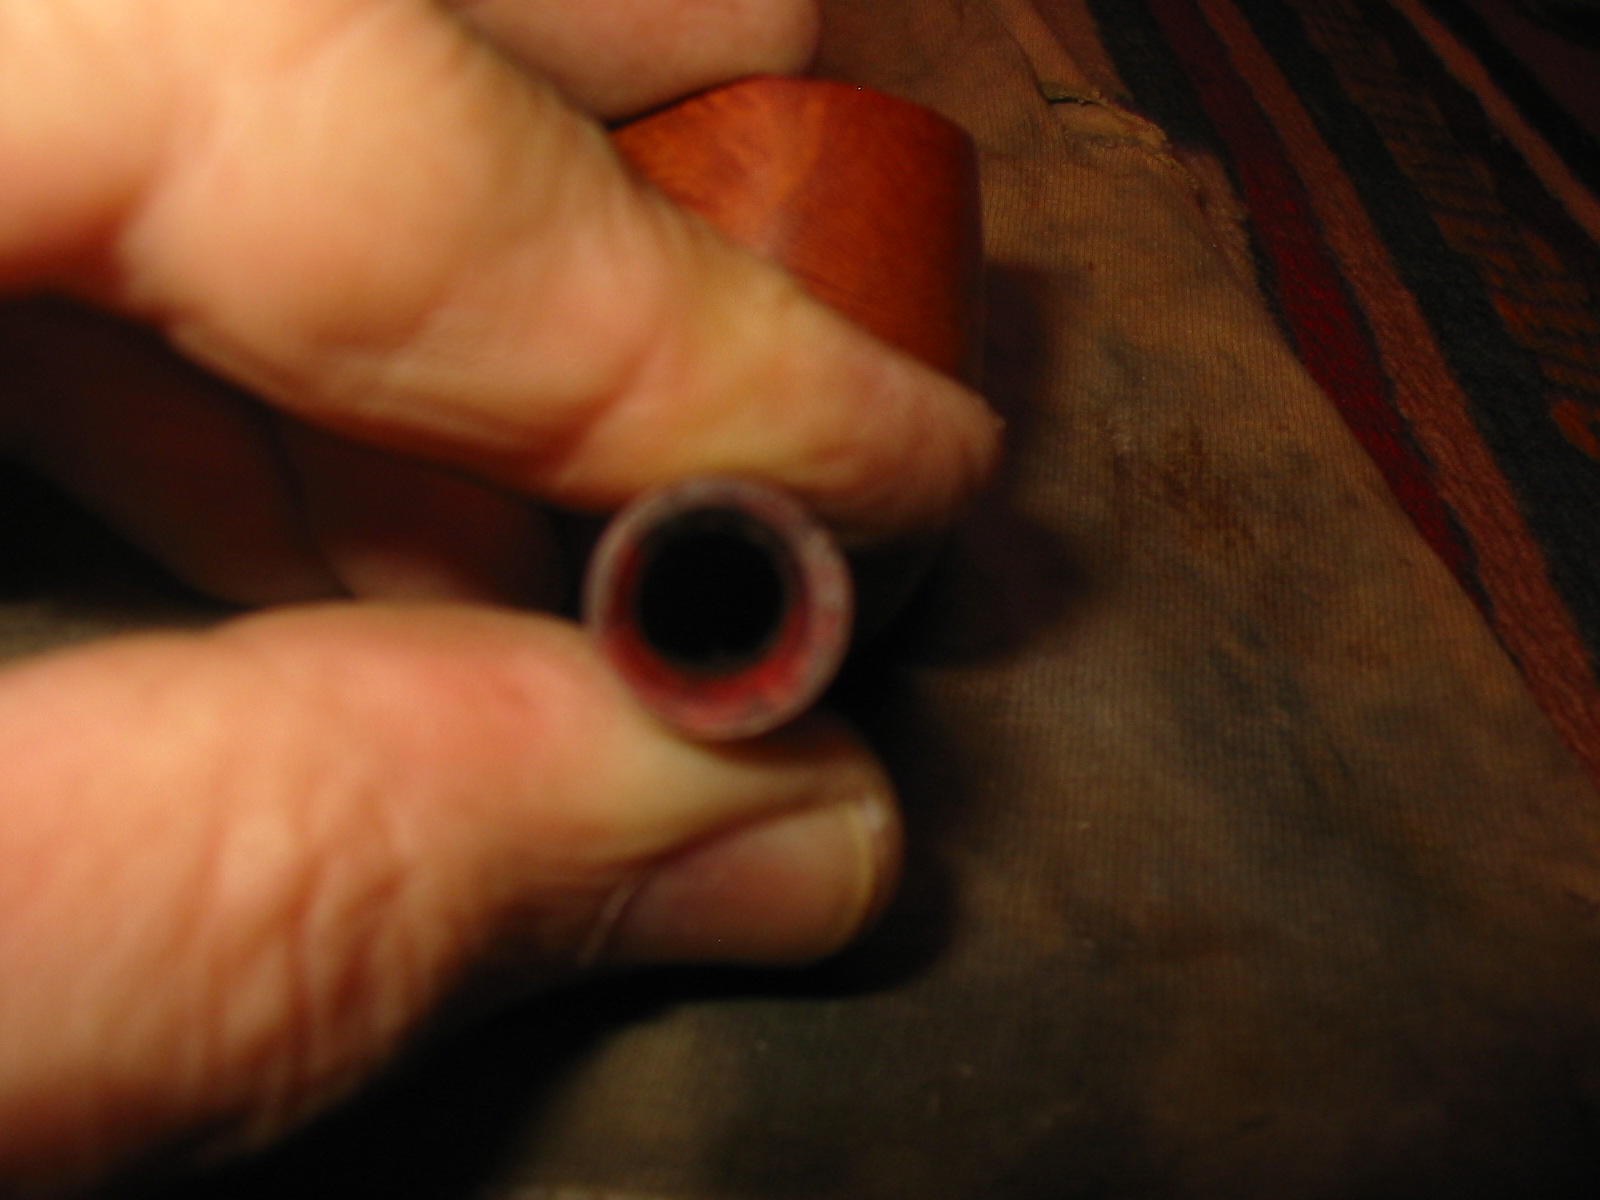
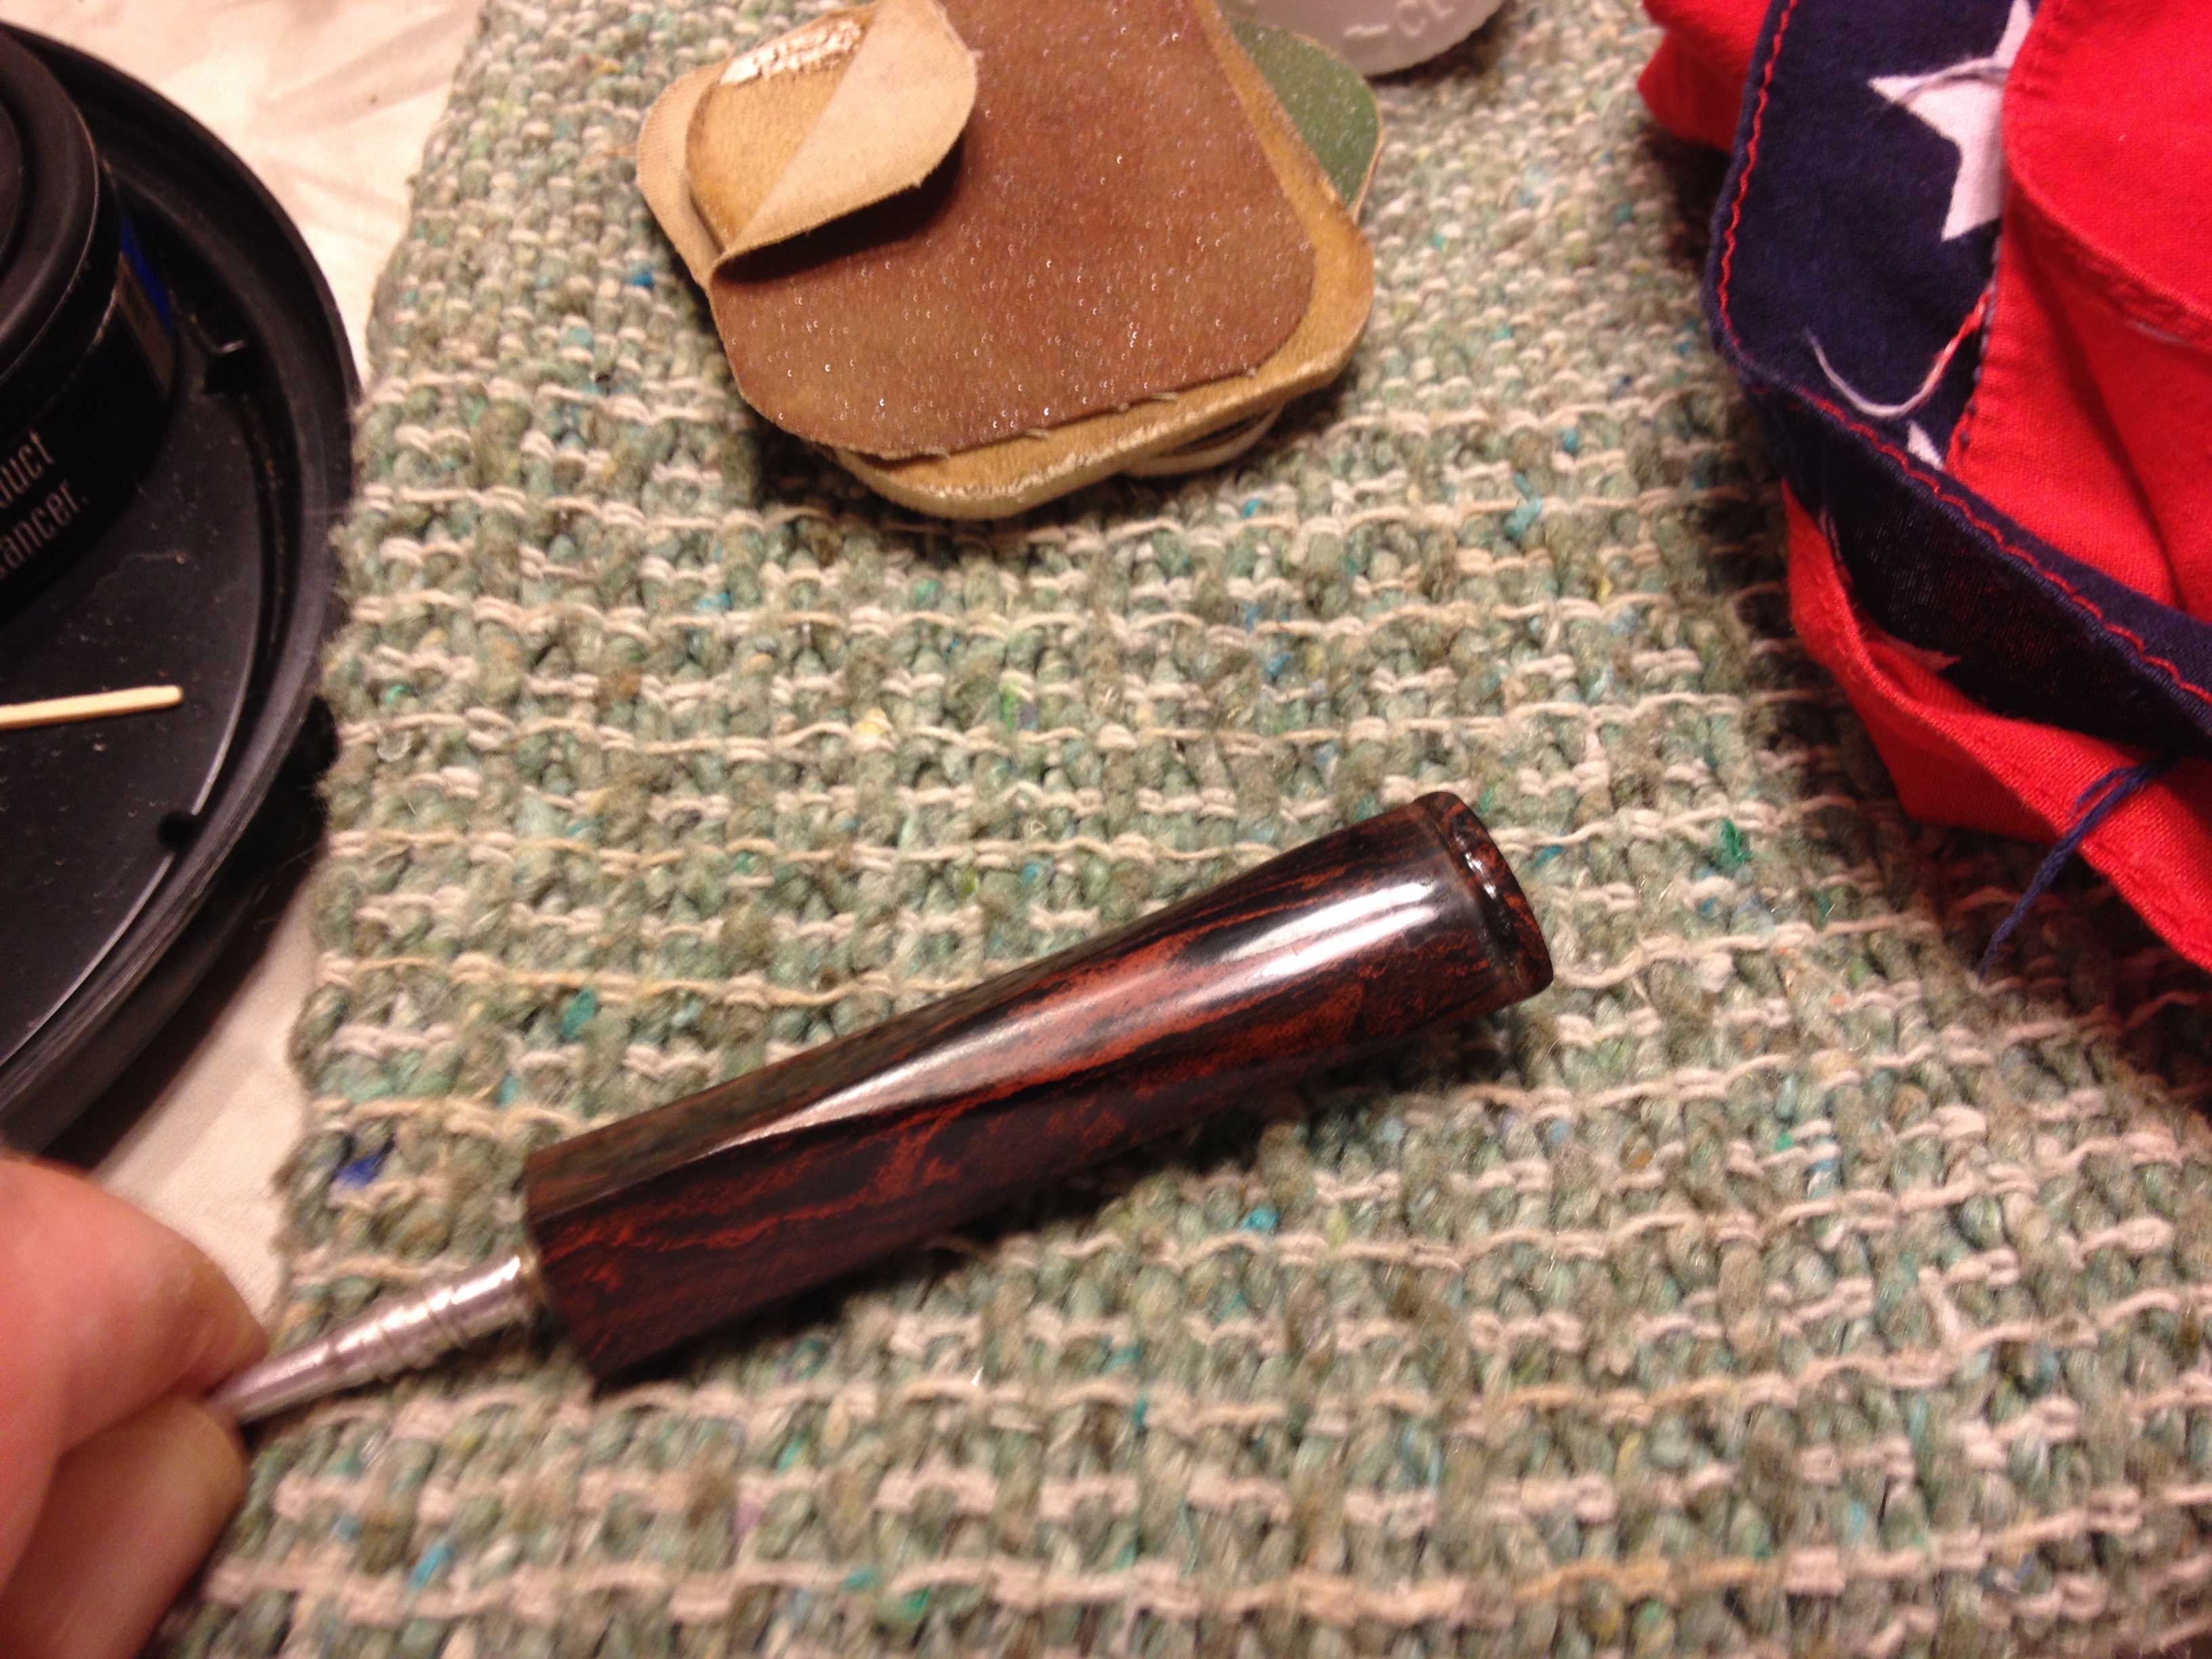
He held the pipe stem that he removed from the shank and worked the wet cleaner into the hole of the bit. This was not as easy as he thought it would be. The cleaner jammed less than an inch into the stem and no matter how hard he tried he could not force it deeper. But the young man was stubborn and determined.
“I will defeat you, stem,” Mike said to the little piece of Vulcanite that was the regrettable color of the stand he bought along with it.
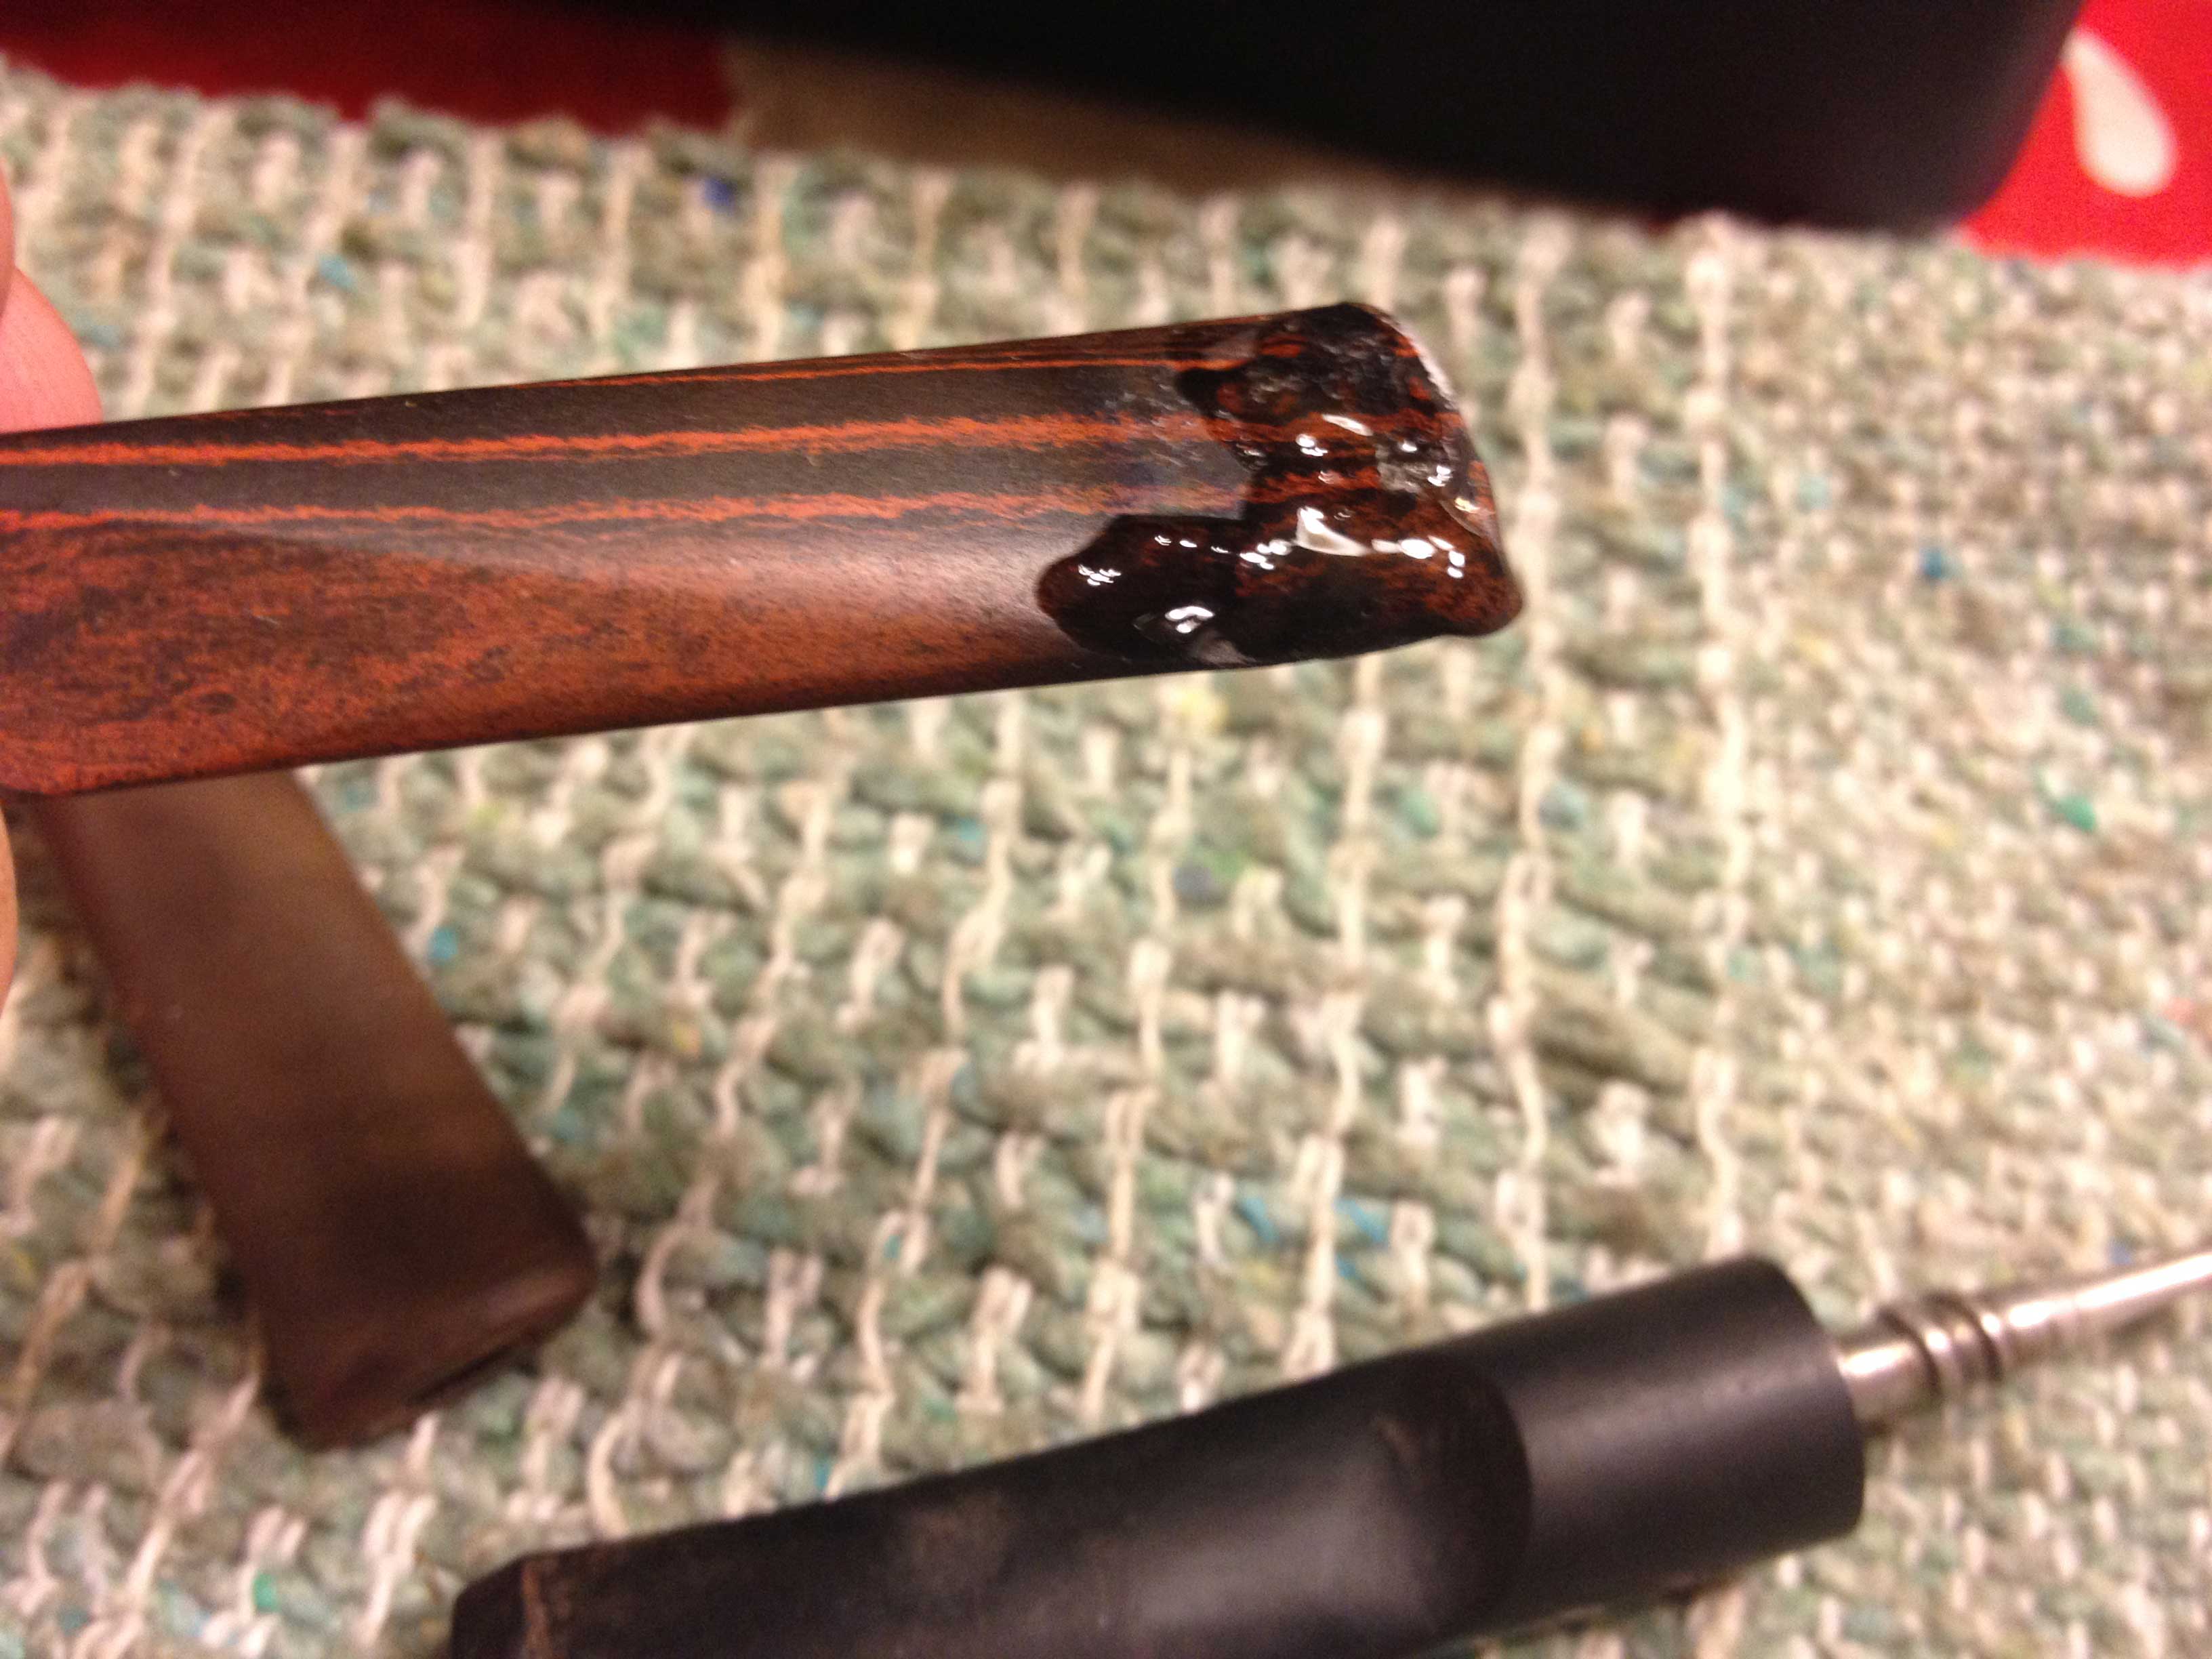
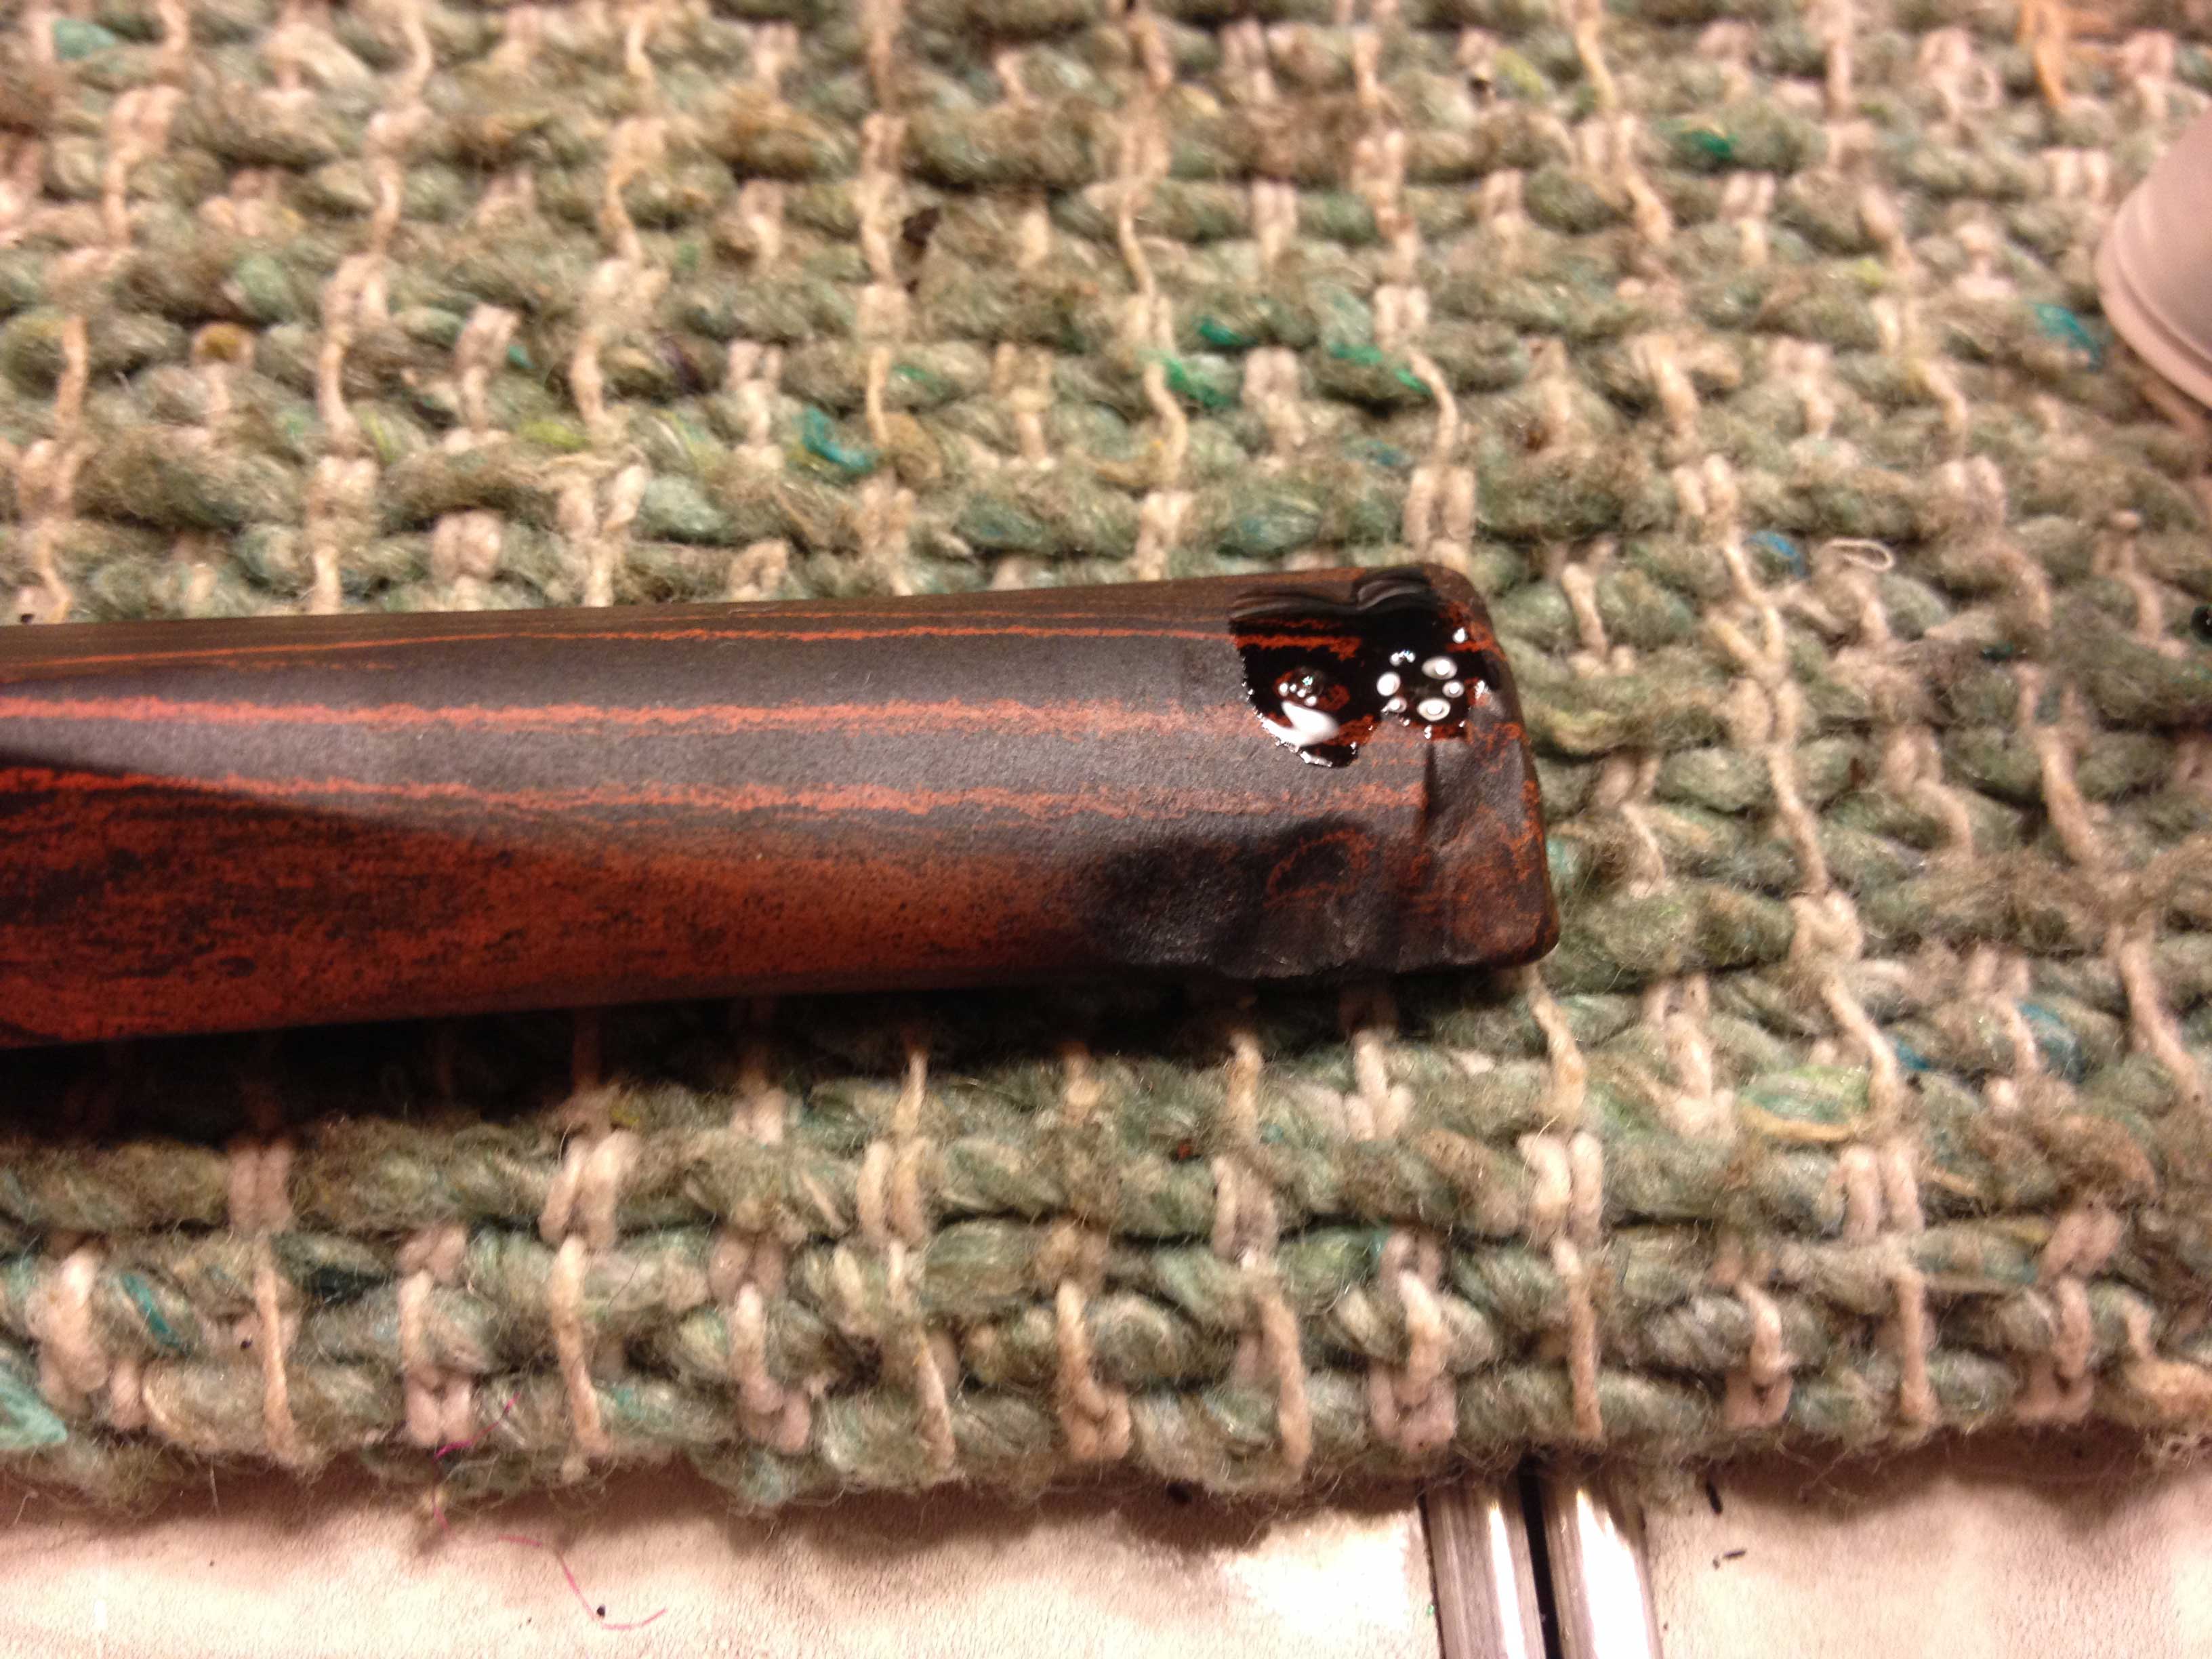
And so he removed the difficult cleaner, which was ruined with soot as far as it had penetrated the old stem, and wet the clean end in the Everclear. With a sneak attack through the tiny hole in the stinger at the other end of the stem he overcame the initial resistance and was able to make it all the way through, but again not without a skirmish. The entire cleaner had the color and consistency of resin and made Mike suspect with unhappiness that someone had smoked something different than tobacco in Thinbite. That was more than he wanted to know of its history.
Mike understood the stem was going to be a long battle but one he would win with time. He took a second cleaner from the bundle and soaked all of it in the Everclear before he returned to the stinger hole and again did not give up until the cleaner stuck out of both ends of the stem, where he left it to soak up more of the badness inside.
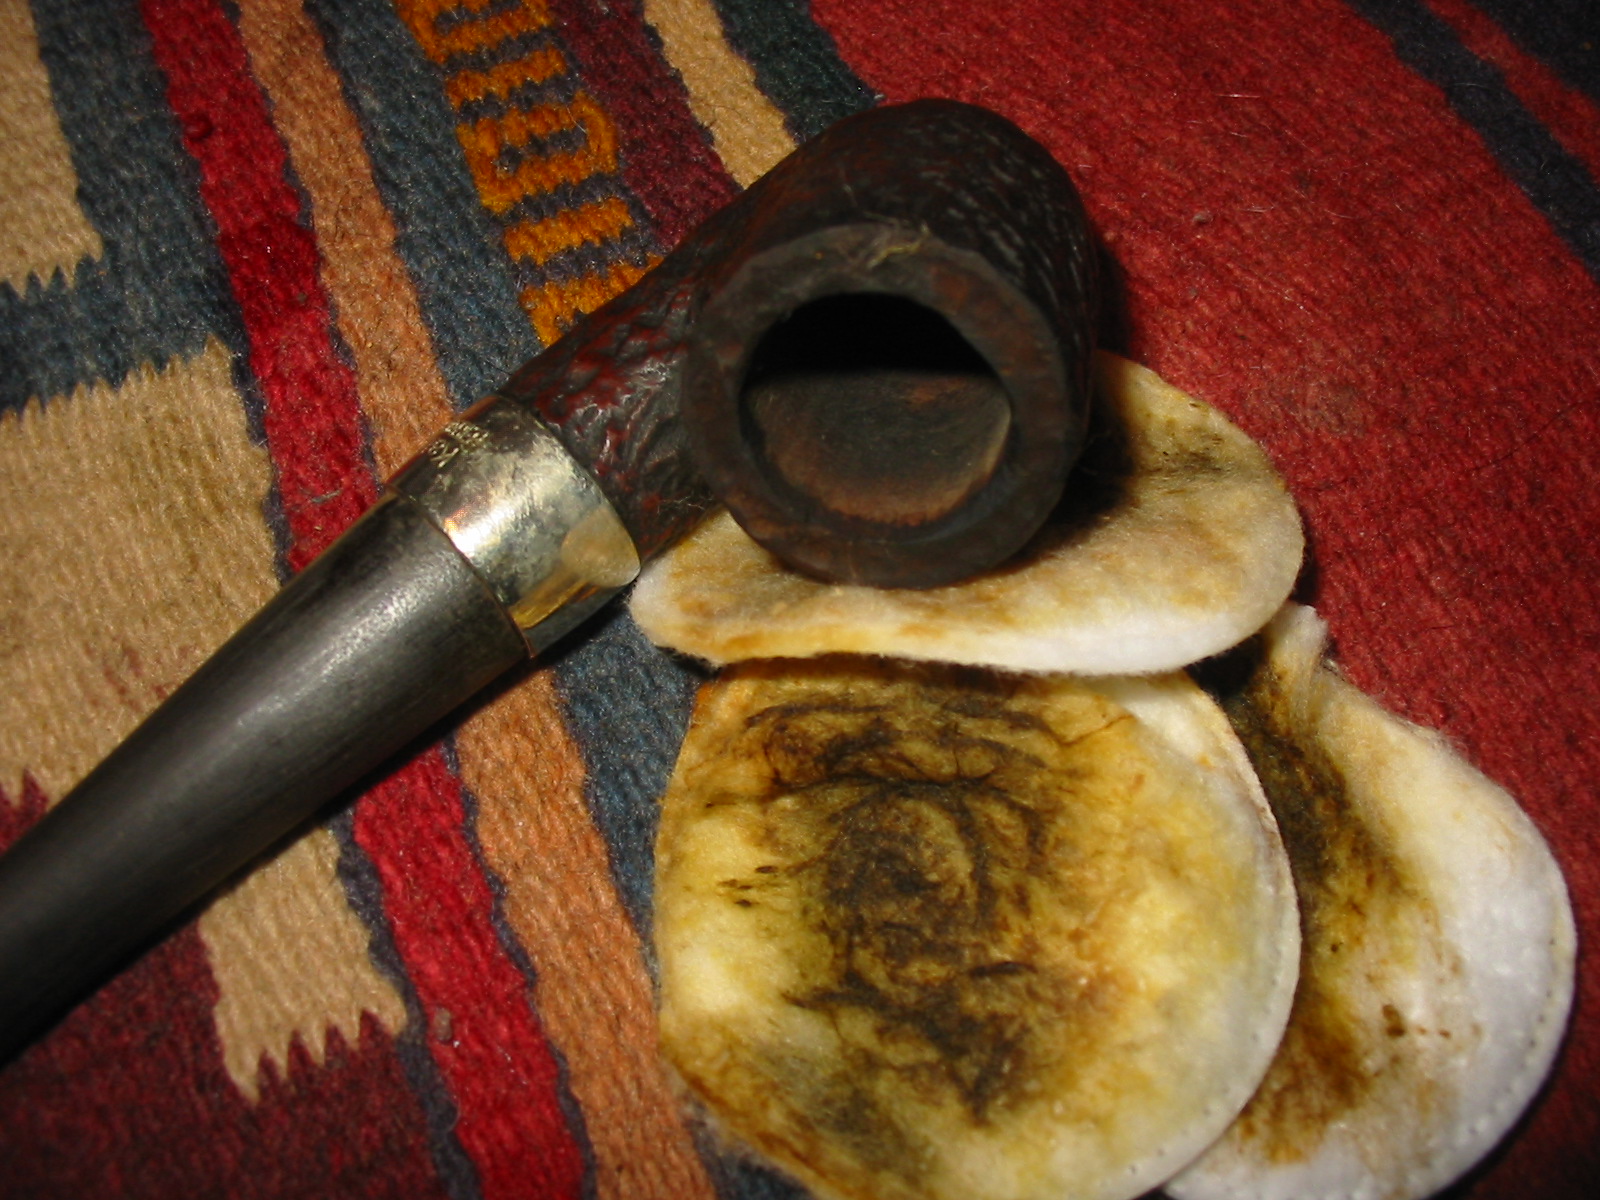
He rubbed the rim of the bowl with patience his grandfather taught him, but that he still only had for pipes, for however long the alcohol required to remove most of the scorching so he could see the clean but duller grain of wood again. There were some dings and scratches but they could wait. The rest of the blackness he took away with medium grain sandpaper.
In a kitchen cupboard he found a clean empty plastic pint container from seafood salad he ate with crackers and returned to put Thinbite without its stem at the bottom before pouring enough of the Everclear to cover it. Mike held Thinbite down until the alcohol flowed all the way through the bowl and shank. The piece of wood turned and bobbed for a few seconds before it stilled as though lifeless and floated on its side. The young man felt a stab of guilt as if he had water-boarded a friend.
While he watched the alcohol that immersed the pipe bowl come to a still, Mike was reminded of a day when he was twelve and visiting his grandfather. The two were restoring pipes as usual, the old man doing the majority of the work, as was to be expected. But for the first time the old man gave Mike more responsibility by allowing him to buff five pipes and stems on two lathes including the three-on buffer he was later given.
Each pipe was of a different shape and quality but to the boy they were all special and beautiful. The repairs were made, so when Mike was done with his part the pipes would be ready to be returned to their owners.
The old man was a master at his craft and the most popular pipe fixer in northern New Mexico and into Colorado, but he never carved pipes because he knew what he was born to do. He did not attain his skills and status being stupid or blind, and so he noticed cuts and bruises that covered Mike’s body and were worse than usual.
Certain the parents did not do these things to their child, Ed always suspected bullies but knew better than to push the boy to talk. He had been a chaval once and had a very good memory despite his age.
“This one and I, we are both cabezota,” the old man said to himself when he was alone and thinking of the boy, which was often.
After Ed gave the five unpolished pipes to Mike, he said again, as he had very few times before, “You will always say what you have to say when you are ready, no?”
“Of course,” Mike said. He wondered if his grandpapa might be psychic and appreciated that the old man did not try to force him to talk about it like some people or read his mind still more. That was another reason he loved the man.
The grandfather lay down and closed his eyes on the couch in the living room where the boy worked. This was how he got the little rest he needed, at times during the days and nights when there was nothing else to do. Without seeing he could tell the bigger work load helped the boy focus a little more on the pipe restoring he enjoyed instead of the pain he felt.
Because of the wounds to the boy’s hands, which the man noticed more from the skill and potential for true greatness beyond his own that he observed they already showed, Mike at times had trouble controlling the small pieces of wood as he held them against the buffers. He did not let any get loose so that they flew across the room as he had done sometimes when he was younger and still learning, but he came close more often than he liked.
As he completed each bowl and stem, Mike attached the two and set the finished pipe on a large cloth of thick cotton of the type made for drying cars washed by hand. The cloth was on a small folding wooden stand to his right.
At the exact midpoint of his work, the boy had polished and set aside two pipes that were by the same maker. Both were apple bowls but of different sizes that made Mike think of them as a man and woman. He screwed the third together and saw that the stem was uneven with the shank by about an eighth of an inch.
He smiled because he knew this was not a mistake his grandpapa would make. The old man was playing a trick on him, to see if he would catch the flaw and remember how to correct it.
Mike turned to get up from his seat and tried not to disturb the old man’s sleep that he knew was like a cat’s. His leg brushed against the unsteady wooden stand, which made a soft creaking noise that brought a grin to the old man’s lips because he knew the boy was passing the test but did not hear the splash of a pipe into the dirty water of a mop bucket below.
Ed forced the grin to go away just as the boy looked at him to see if he noticed. Mike stood and walked around the room looking for a stem cleaner and a bottle of distilled water. With both in his hands, he opened the water bottle and inserted the bristled cleaner all the way inside, turning the bottle enough to soak the cleaner.
When the cleaner was soaked he bent it into four even sides and pushed them together to fit into the shank. He inserted the loose stem and placed the pipe in the refrigerator to let the water in the cleaner soak into the shank and make the two pieces an even fit.
The boy returned to the last two pipes and soon was done. His breathing stopped as he saw only three pipes to his right where there should be four, not counting the fifth that was in the refrigerator.
While he was up he returned to the refrigerator to retrieve the pipe. With a toothpick he removed the bent cleaner and replaced the stem, which was a perfect fit.
At least the trick worked, Mike thought. But where can the other pipe be?
He looked everywhere, on the two buffer machines, on the floor, on the little wooden stand again. The boy dropped to his knees as though in prayer but placed both hands on the floor and felt a sickening panic fill him when he still could not see the missing pipe anywhere at that level.
At last Mike noticed the mop bucket and at once knew the awful truth. The boy recalled the basic rule of deduction, which he learned in a literature class and was one of the few useful things he had taken with him from that period of his life he would rather forget.
His lips moved but he did not say the words, “Once you eliminate the impossible, whatever remains, no matter how improbable, must be the truth.”
Mike crawled toward the bucket as though it were a rabid dog, looked into the filthy gray contents and almost retched at the stink of it. But he summoned all of his courage and winced as he put a hand into the foulness and felt around until he found the slimy pipe bowl and pulled its sallow, lifeless form from the depths.
“I have killed her,” the boy said in a whisper, seeing the smaller of the two apples covered with a nasty wet film of dirt on the once beautiful bowl.
“Killed who?” the old man said, pretending to awaken. He startled the boy, who turned so fast that he knocked his head on one of the buffer machines.
“The female Winston Club,” the boy said, biting back an urge to cry, but still a single tear escaped an eye and rolled down his smooth, bruised face.
Ed, who knew how his grandson felt and for the first time understood he was turning into a man, lost the urge to laugh and said, “Would you prefer that it had been the male?”
The youth, who did not know how to reply, stammered the next words.
“I do not know. I mean yes. No.” He paused again to choke down the need to cry, which he knew only babies and girls did. “I only know that it is the worst thing I have ever done and the saddest thing I have ever seen.”
Noticing his grandpapa’s eyes glisten with emotion but not understanding the cause, Mike experienced the most intense shame he had ever known.
“It is true, Mike, this unfortunate thing is very sad, but if it is the worst you have ever done then you are a very lucky young man.”
The boy could not believe his grandpapa had called him by his chosen name and a young man as well after such a huge mistake.
Ed cut Mike off before he could speak and said, “Besides, I don’t think she is dead but only holding her breath until someone gives her a good bath. Females are particular that way. Have you ever given a girl a bath?”
The boy’s eyes widened and he shook his head no.
“I thought not. Here, I will show you how.”
“No,” the boy said and put his hand on the old man’s arm as he reached for the pipe. “This is my mess. I will give her the bath and make her as beautiful as she was.”
Ed tried to conceal the pride he felt for the boy, who saw it in the old man’s eyes and smiled.
Mike was always a quiet boy and when the time came to drive him back to his parents’ home the old man spoke of the boy’s troubles at school the only way he knew.
“You know, Mike, I am a peaceful man and can count the fights I have been in on fewer fingers than I have on one stubby hand,” he said as they bypassed the town of Bernalillo on the freeway. “And most of those the drink made me do it. But sometimes a fight, like war, cannot be avoided. On those rare occasions, a man or boy must be willing to stand and defend his honor or else live with the regret and be walked over for the rest of his life. I know this. I was a foot soldier in the Great War, which started when I was 31 and therefore I was known by most of the others, who were just kids, as Dad or even Granny. It was not so great for all of the men at the bottom who had to do the fighting. But we knew it was a good cause and so we did what we must.”
Mike considered his grandfather’s words with his most serious expression and nodded.
“Besides,” the old man said before closing the subject forever, “now and then it just feels good to give some ignorant S.O.B. a nice solid wallop to the face and watch him go down.”
Then the boy and the old man laughed. Mike remembered the words five years later.
________________________________________
Mike forced his mind back to the present.
“I am not at my grandfather’s, I am here, now, and I must finish Thinbite,” he said.
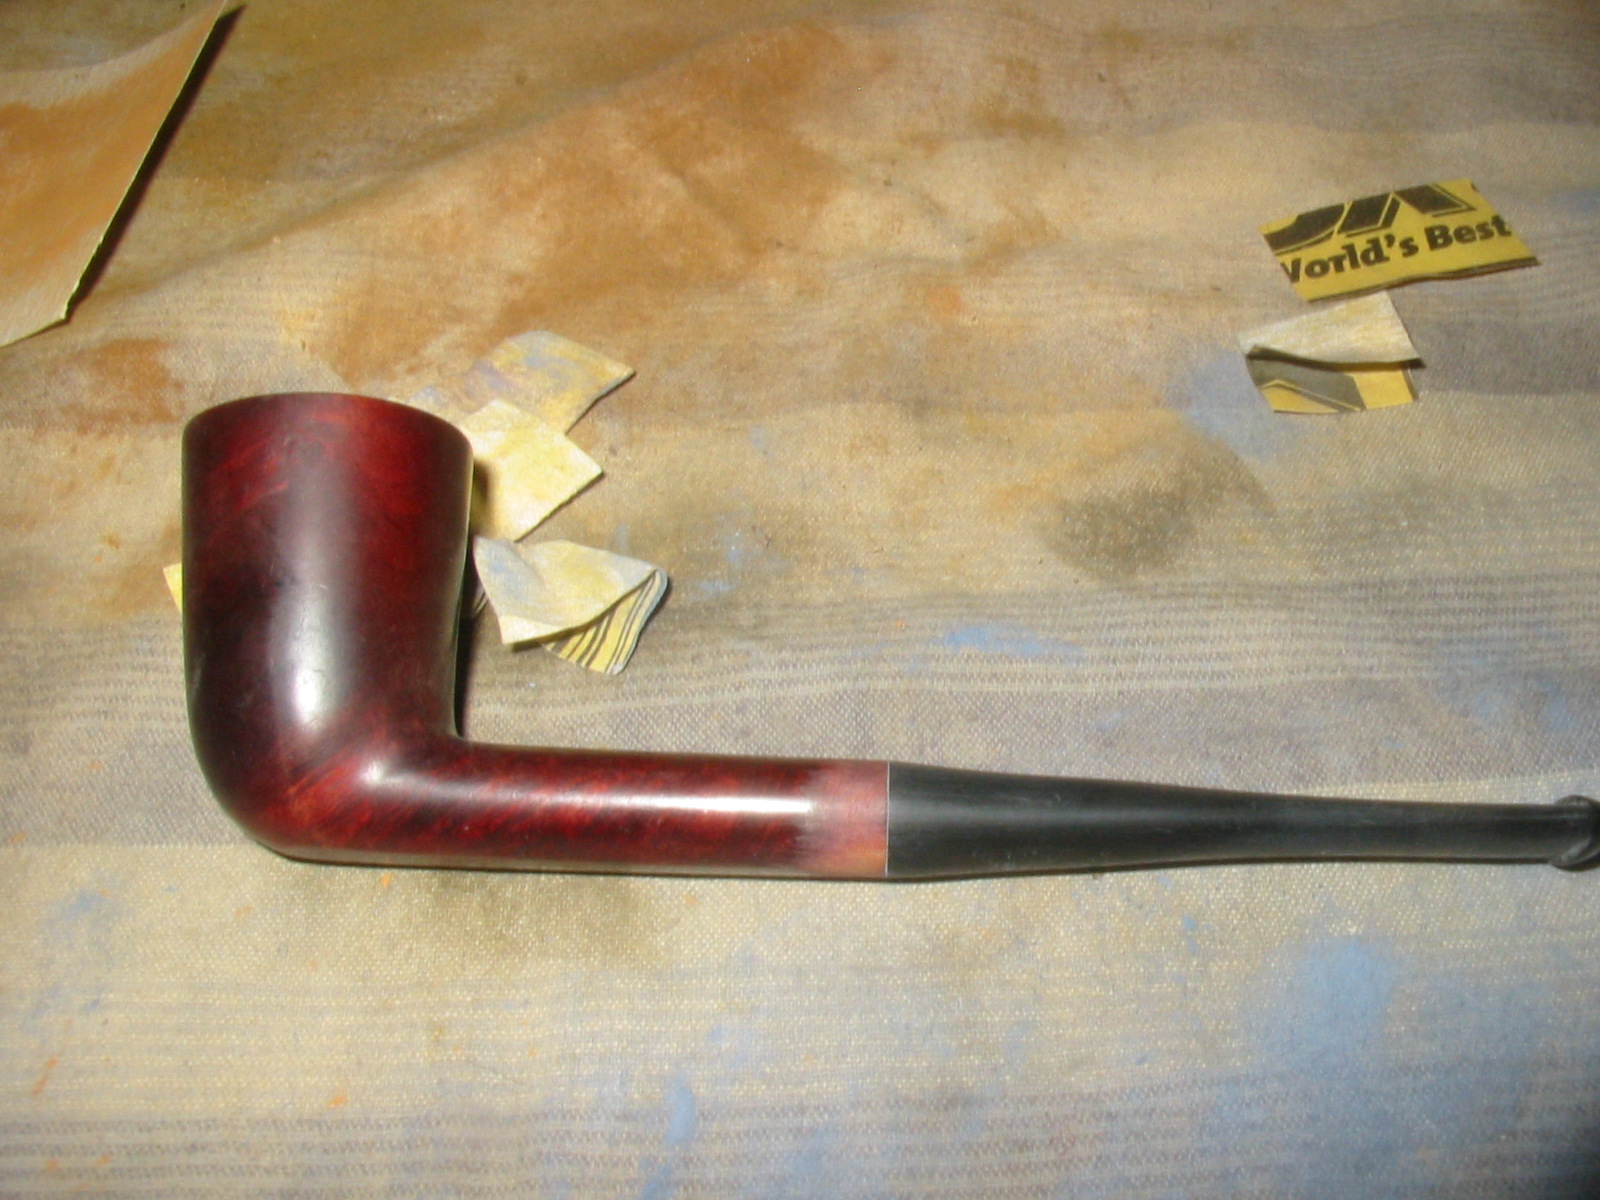
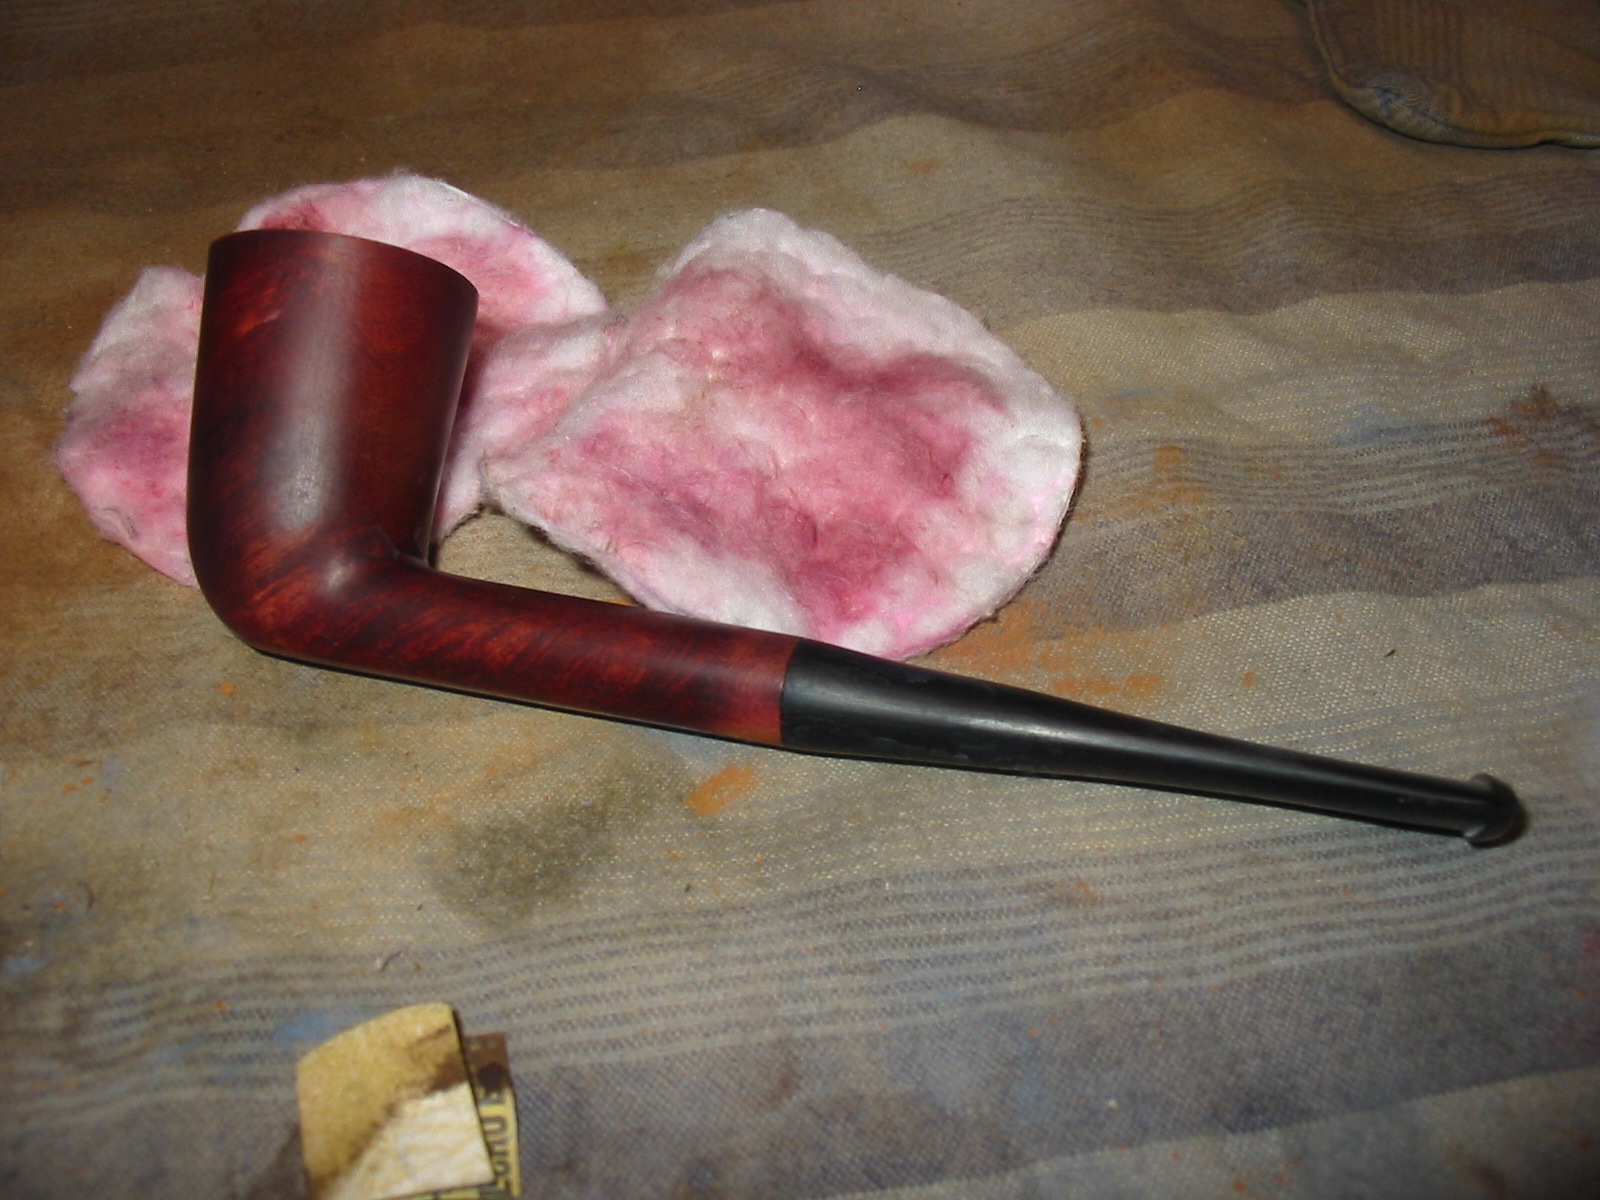
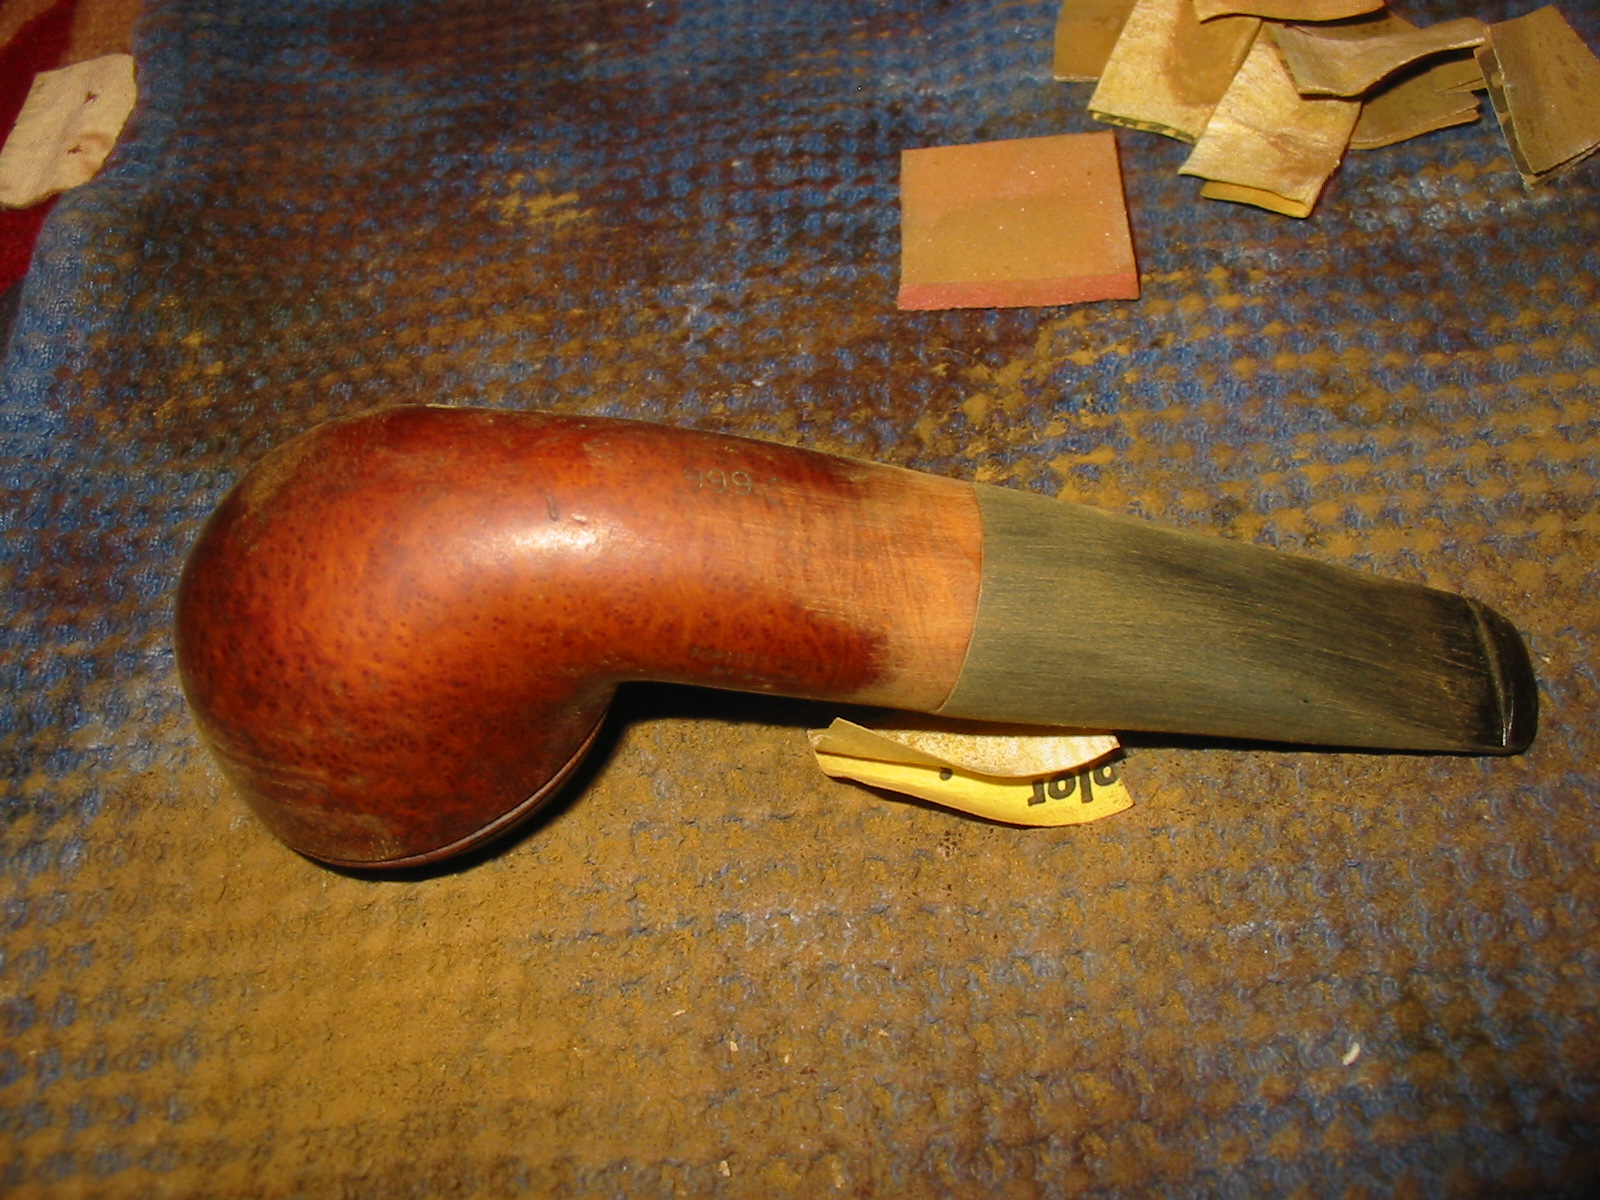
He knew the soaking of the bowl in alcohol was an extreme measure but decided it was the best course because if the stem was so dirty then the shank and bowl would be guarro, which is not at all nice.But Mike also considered the rustication and the words on the pipe and how to avoid scratching the smooth wooden area with sandpaper.
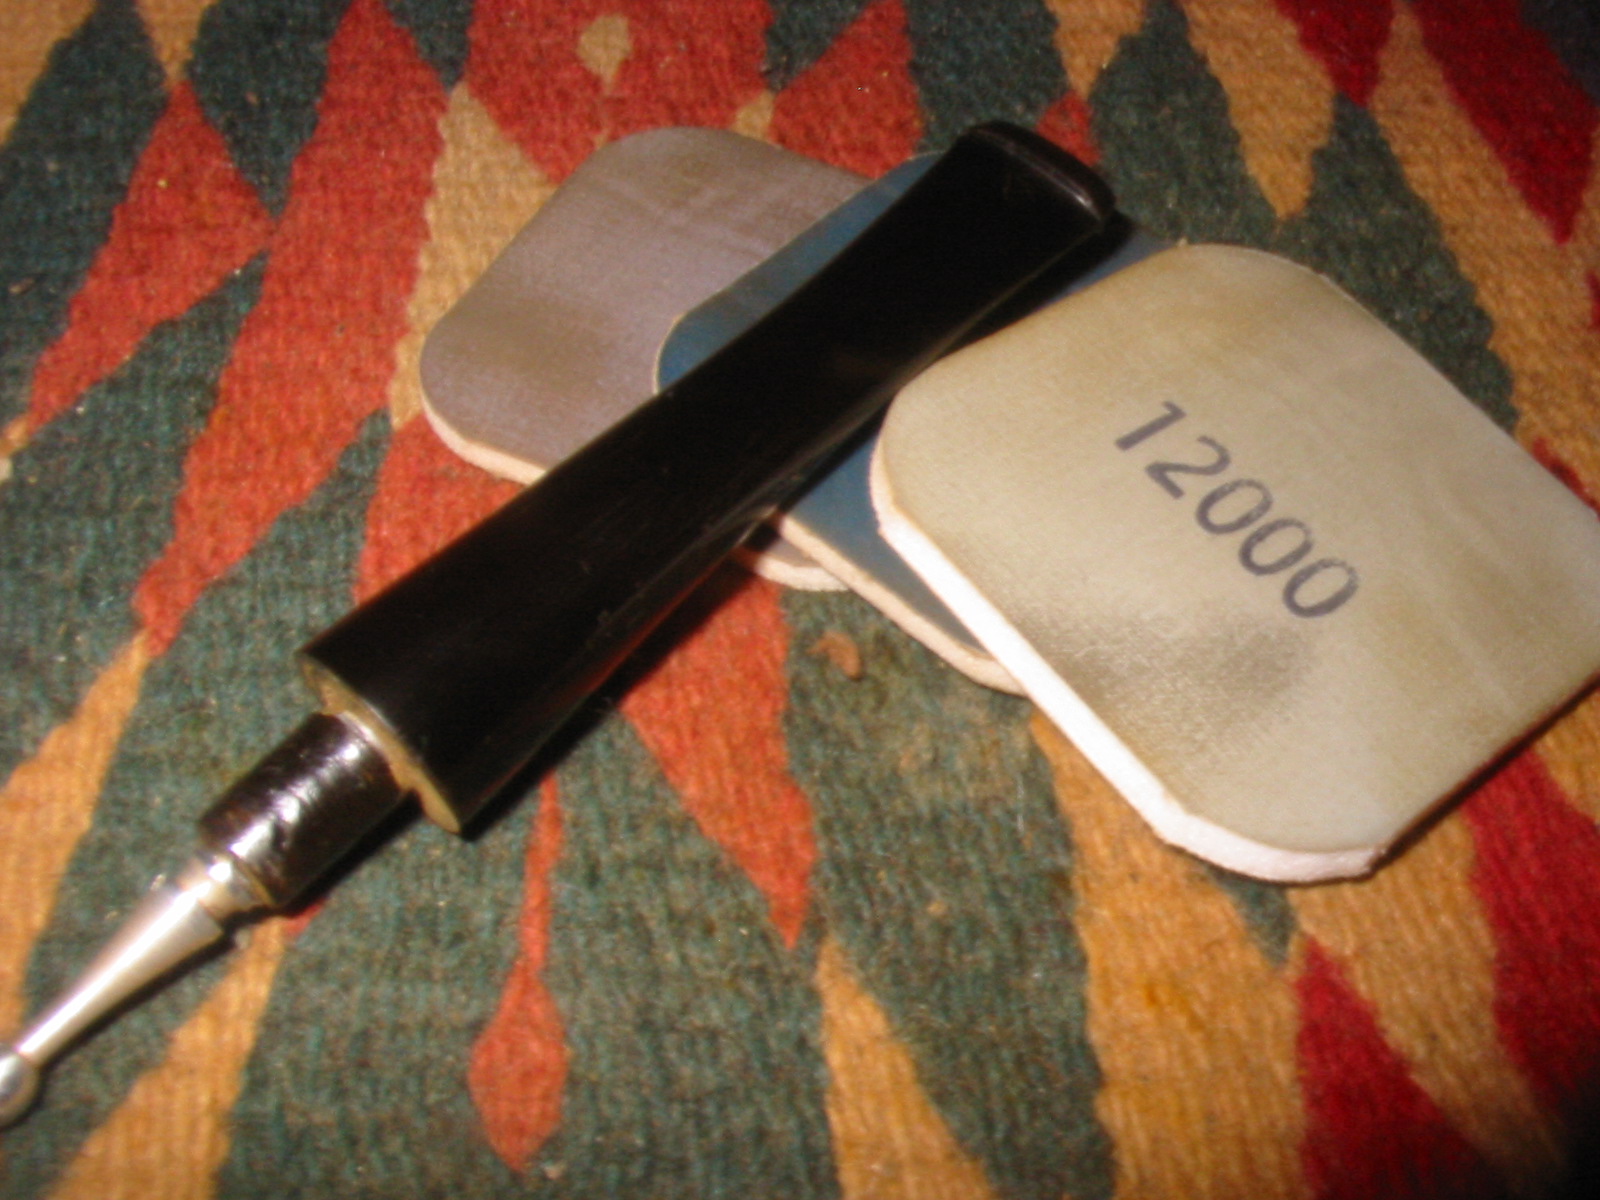
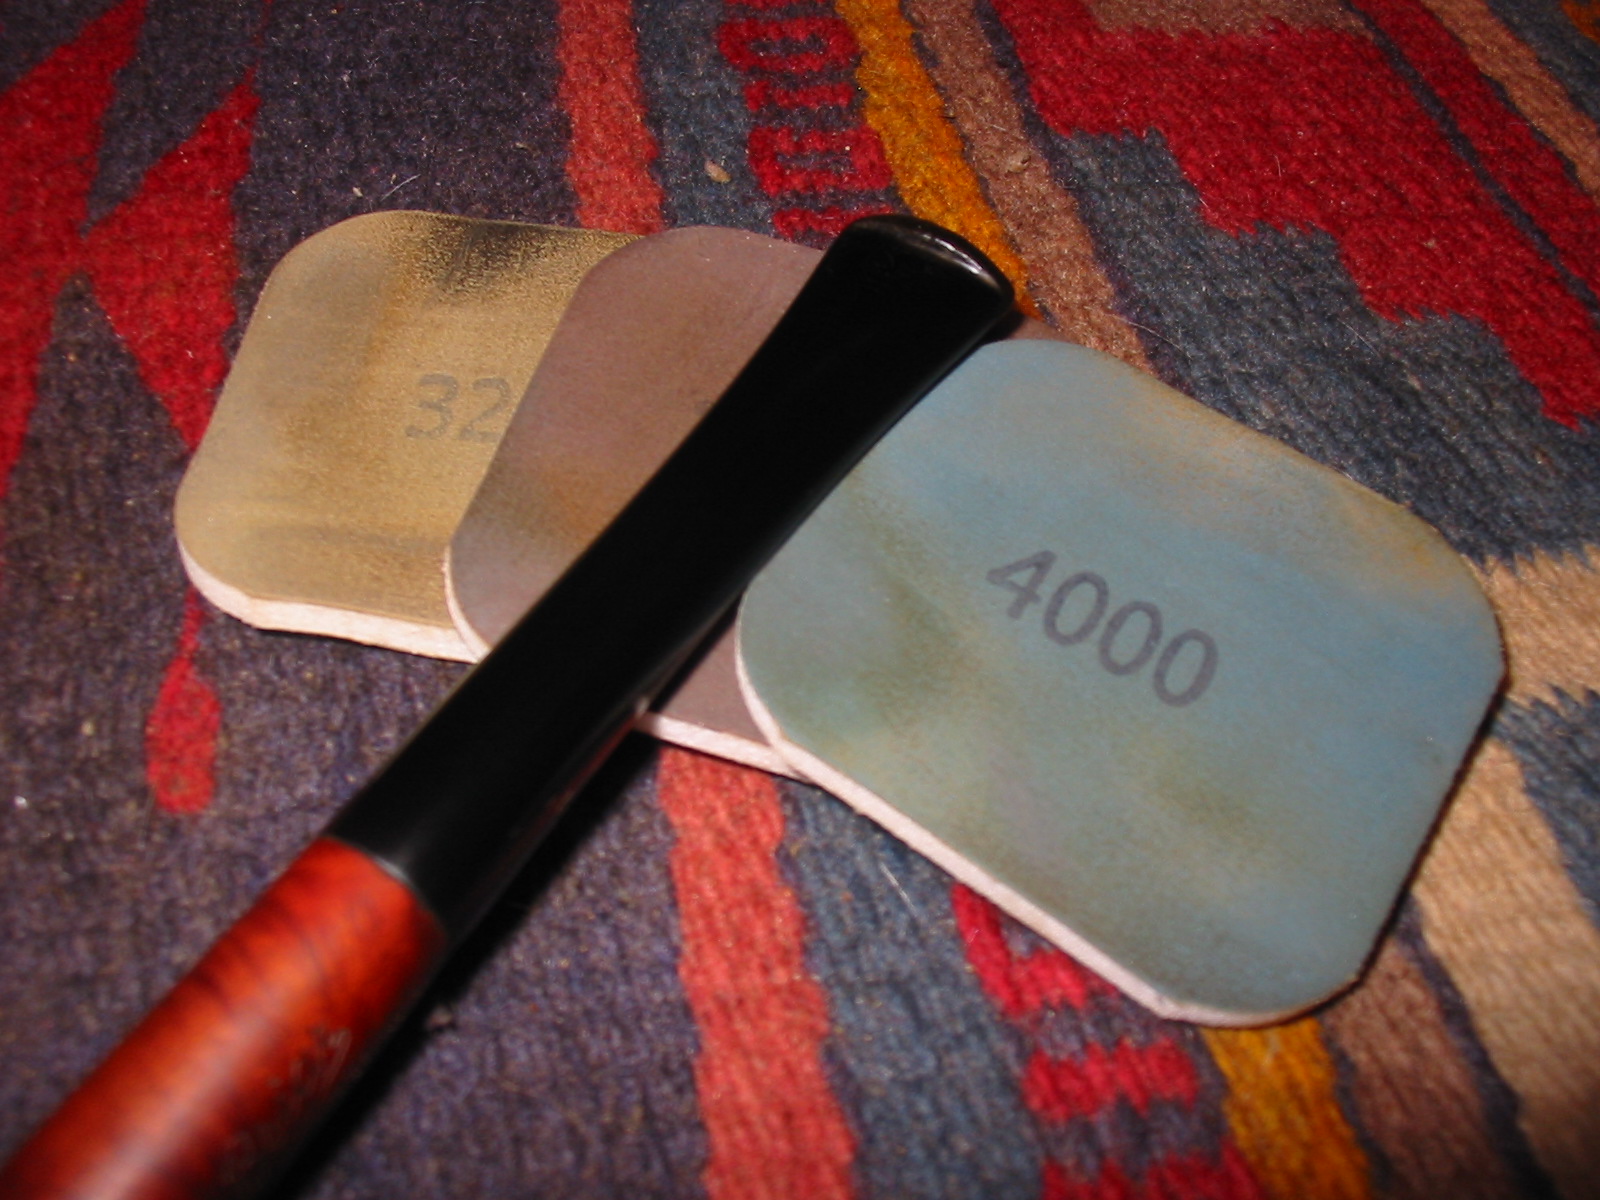
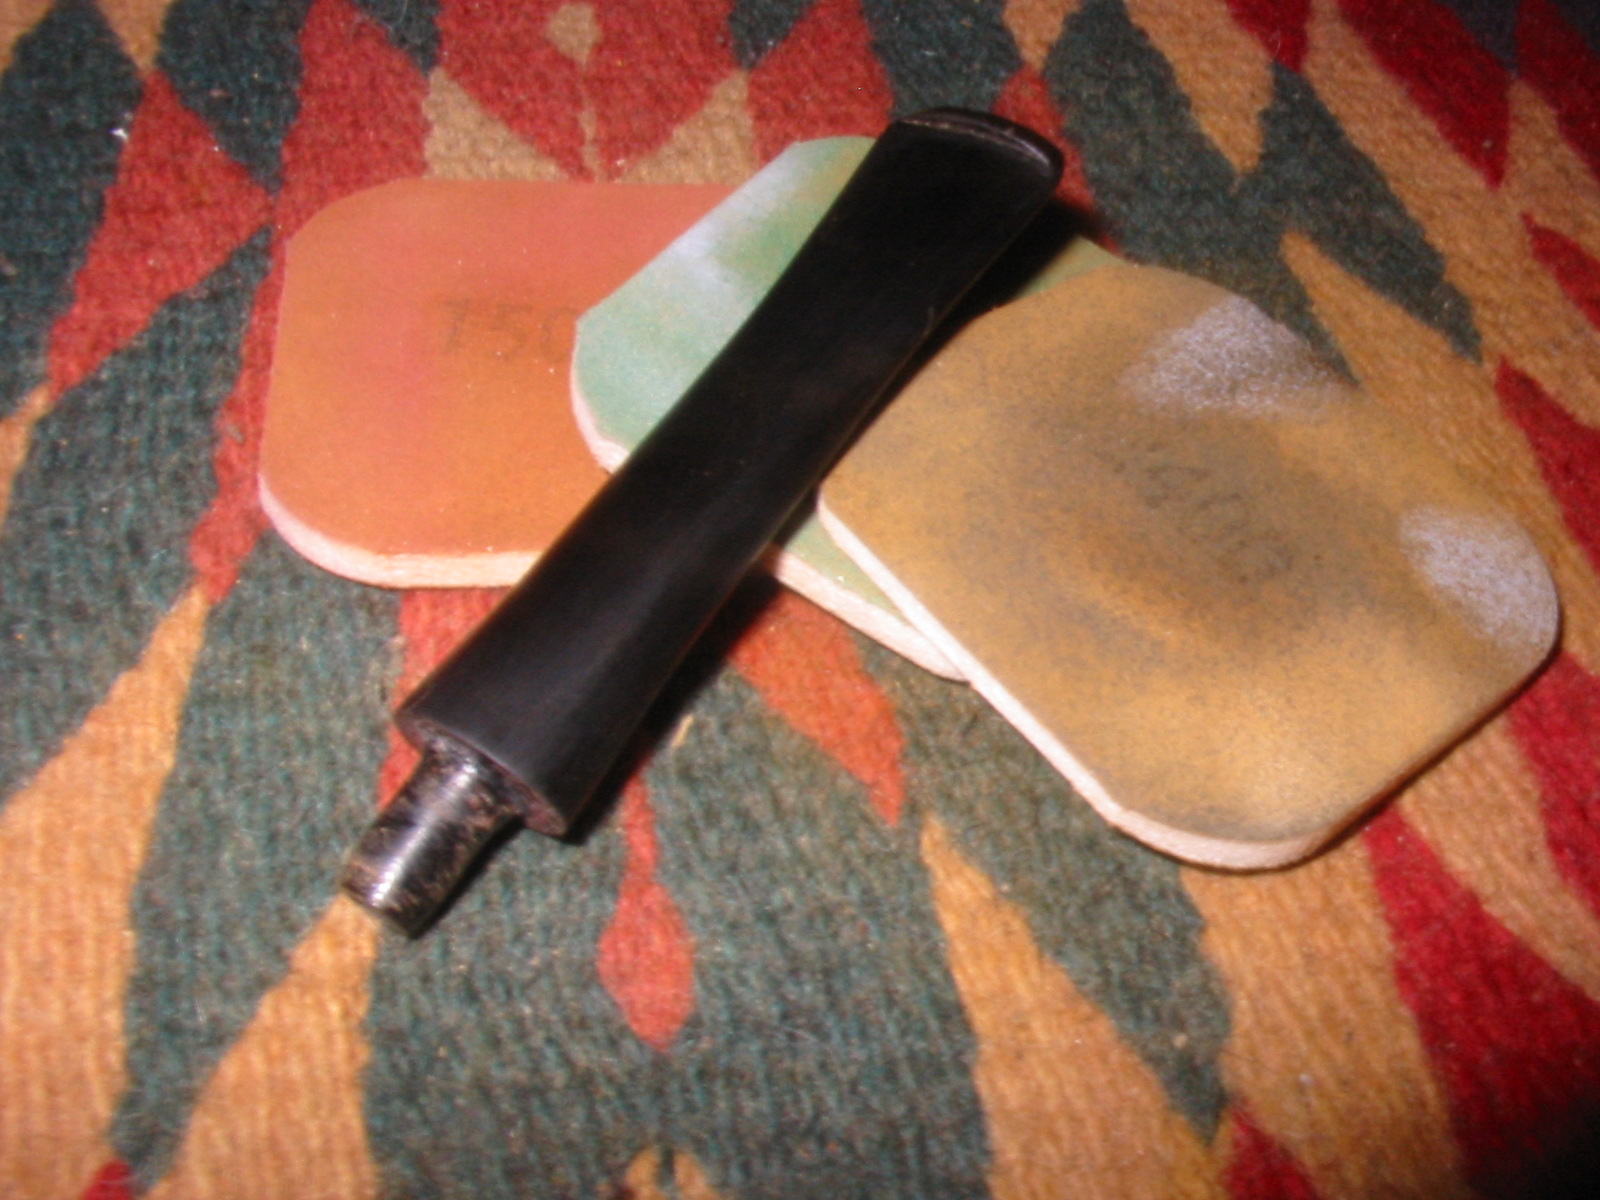
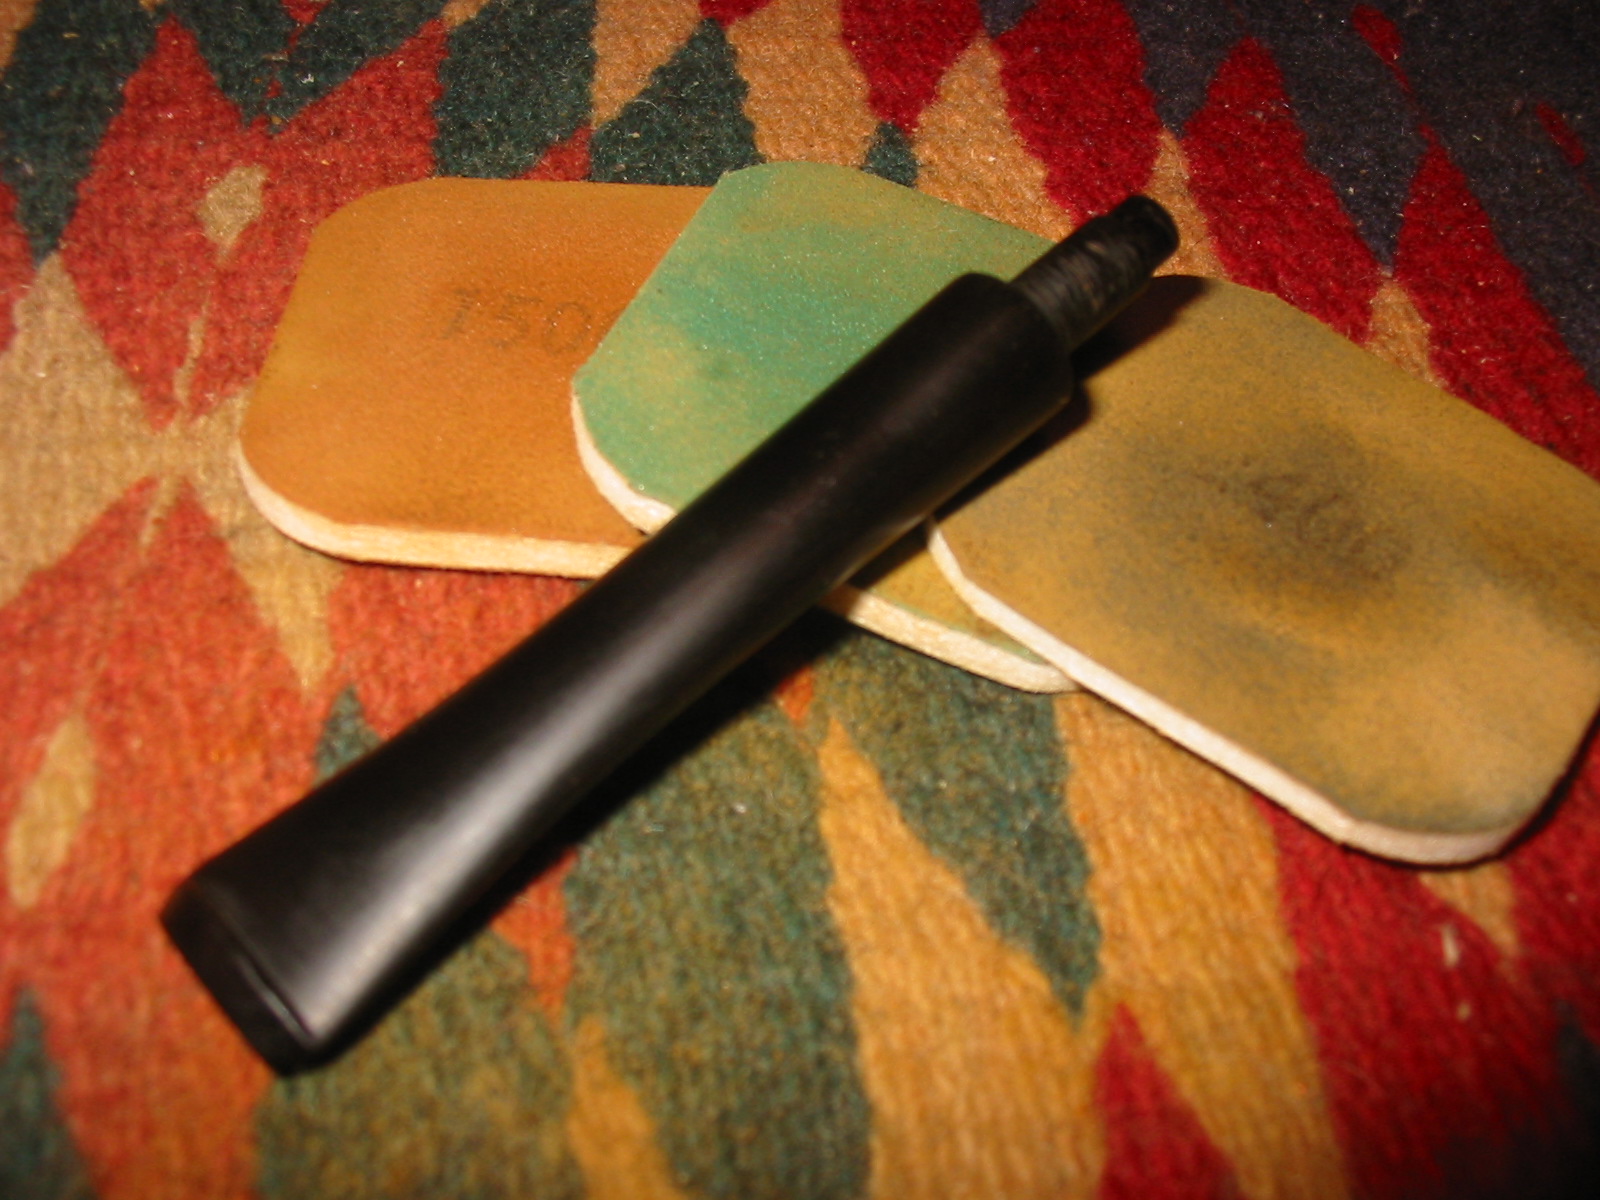
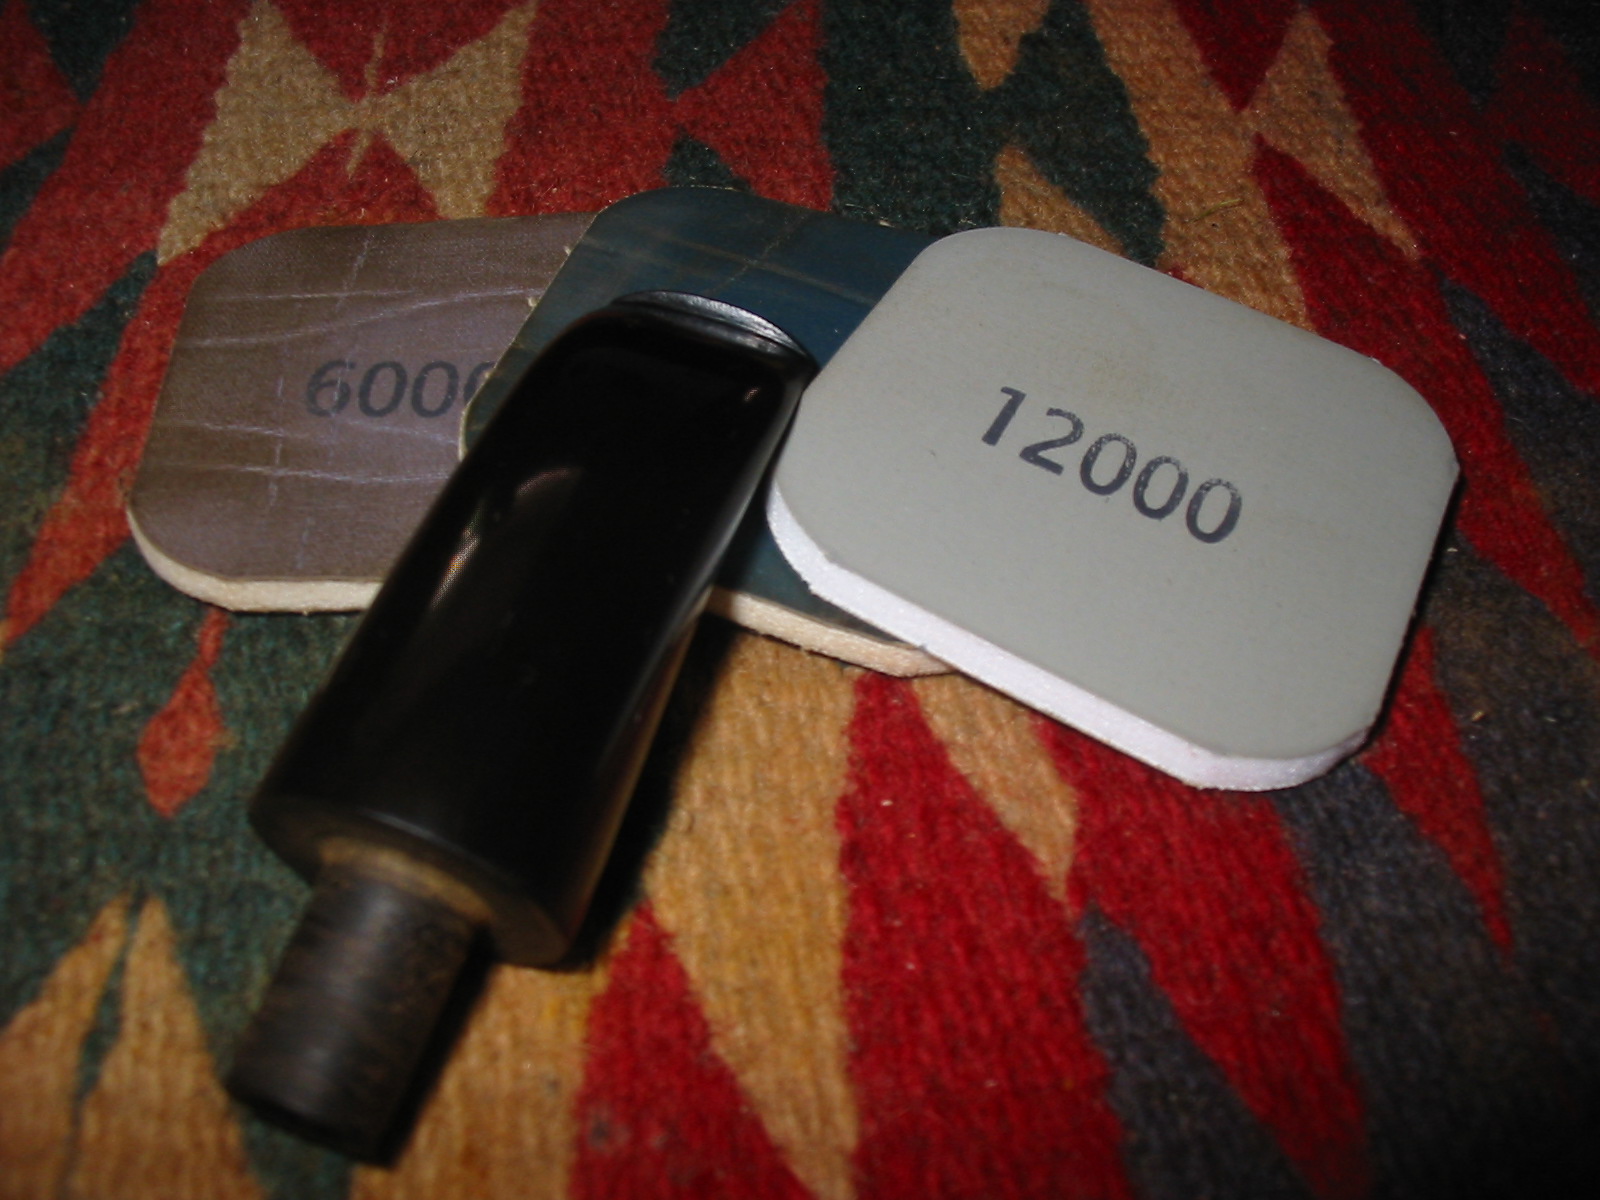
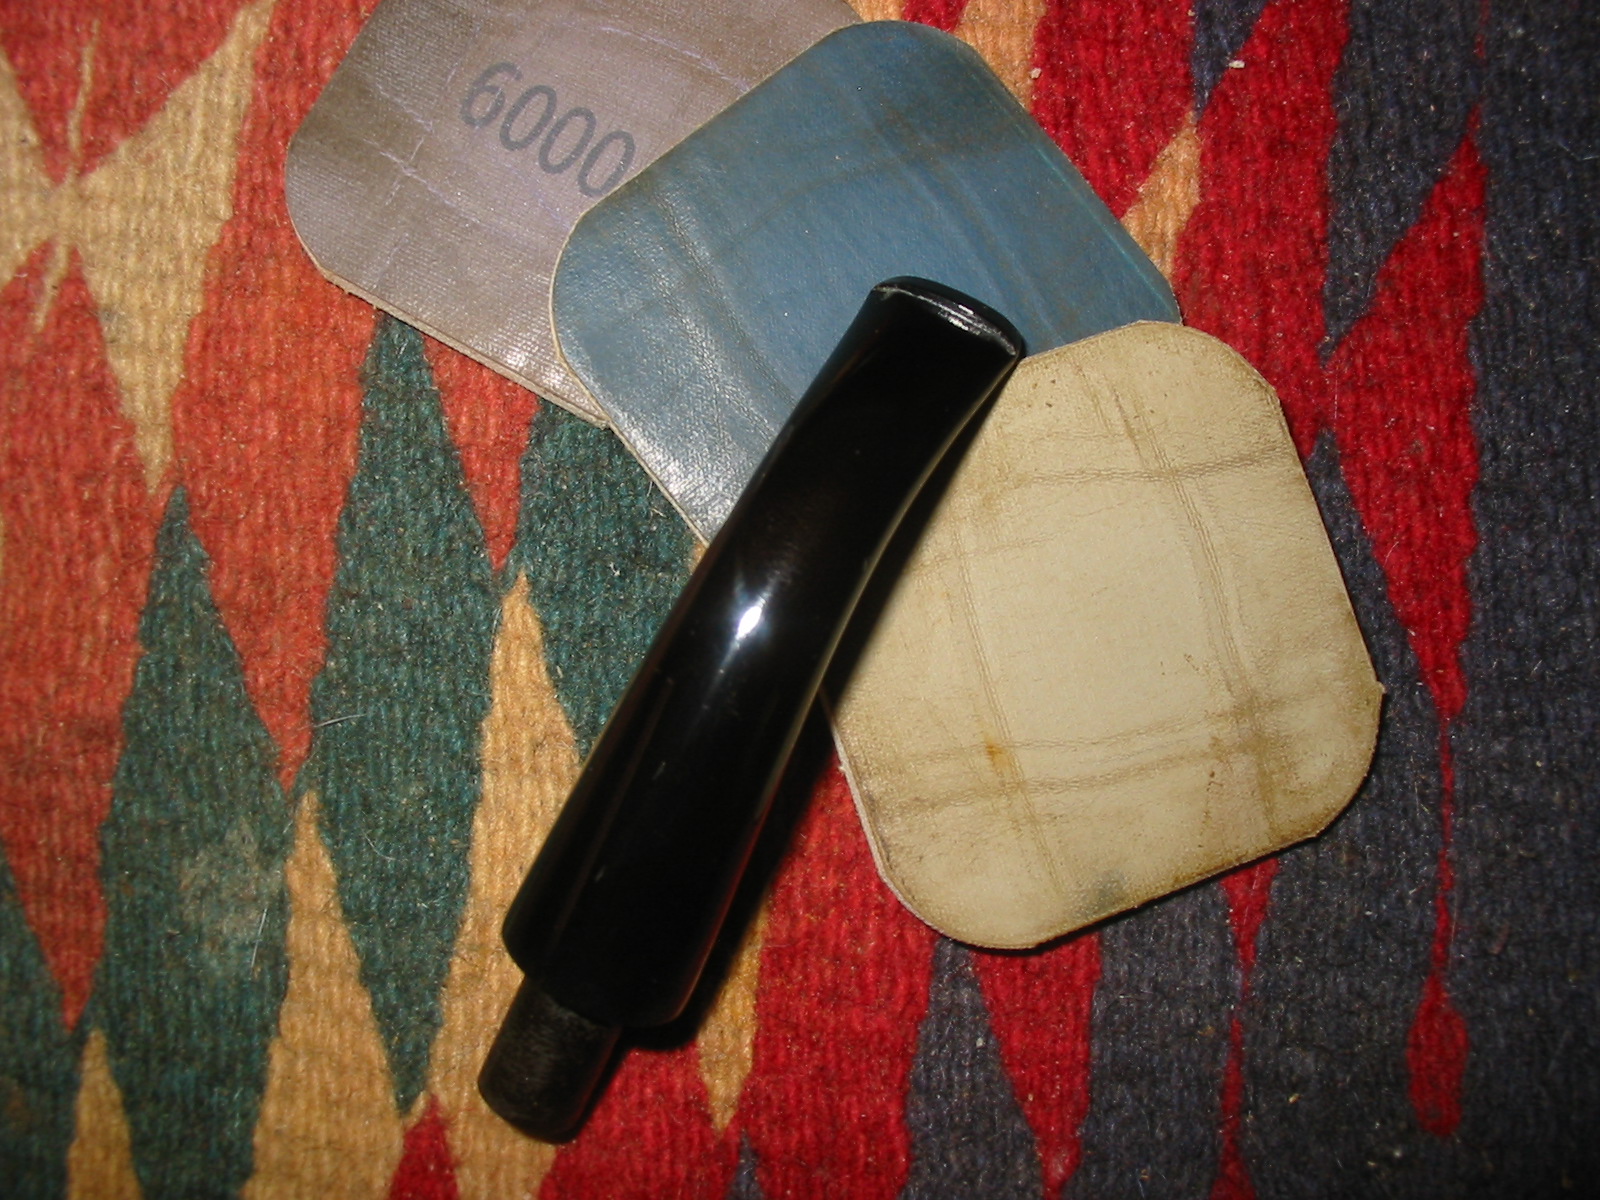
Patience was not something Mike had much experience practicing. At first he sat at his work table and set in a row everything he thought he might need for his project: the micromesh kit, the super fine steel wool, the alcohol-based boot stains he was taught were best for pipes, bars of red and white Tripoli, carnauba and Halcyon II waxes and even a couple of extra buffer wheels in case he wanted them. These things he bought over the years to be prepared for the special day.All he could do then was to wait for the Everclear to reveal the truth of Thinbite.
________________________________________
Lightning, sudden and jarring as a grenade explosion, awoke Mike and lit the studio with the clarity of day. His last memory was sitting with his back against the pillows on the bed he pulled down from where he stowed it in the wall and eating albacore chunks from a tin. The thought that he had slept away the night gave Mike a sick feeling until he heard the heavy artillery report of thunder less than a mile away and not a second later the darkness was replaced by light.
He knew the front line of the storm had reached him and by instinct reached for his flashlight in the nightstand and looked outside his window to see if lightning had struck his truck. He saw a tree split in half.
Relieved, Mike looked at his watch with its glowing green hands and saw the time was just after three in the morning. With the sure feet of a seasoned sailor on a boat adrift at sea in a night squall Mike walked to the wall in the kitchen alcove where the breaker box was located. He opened the small case and felt all of the switches.
Nothing was tripped so he moved a small emergency generator in the closet to the floor by the work table and plugged in the lathe and a halogen lamp. He turned on the blinding light. From the silent but still icy freezer he took a bottle of strong imported beer he had aged for more than two months and opened it with a hand even though the lid was not made to be twisted.
“Now at last I can sit down and get to work,” he said, and took a good swallow of the thick dark stout liquid.
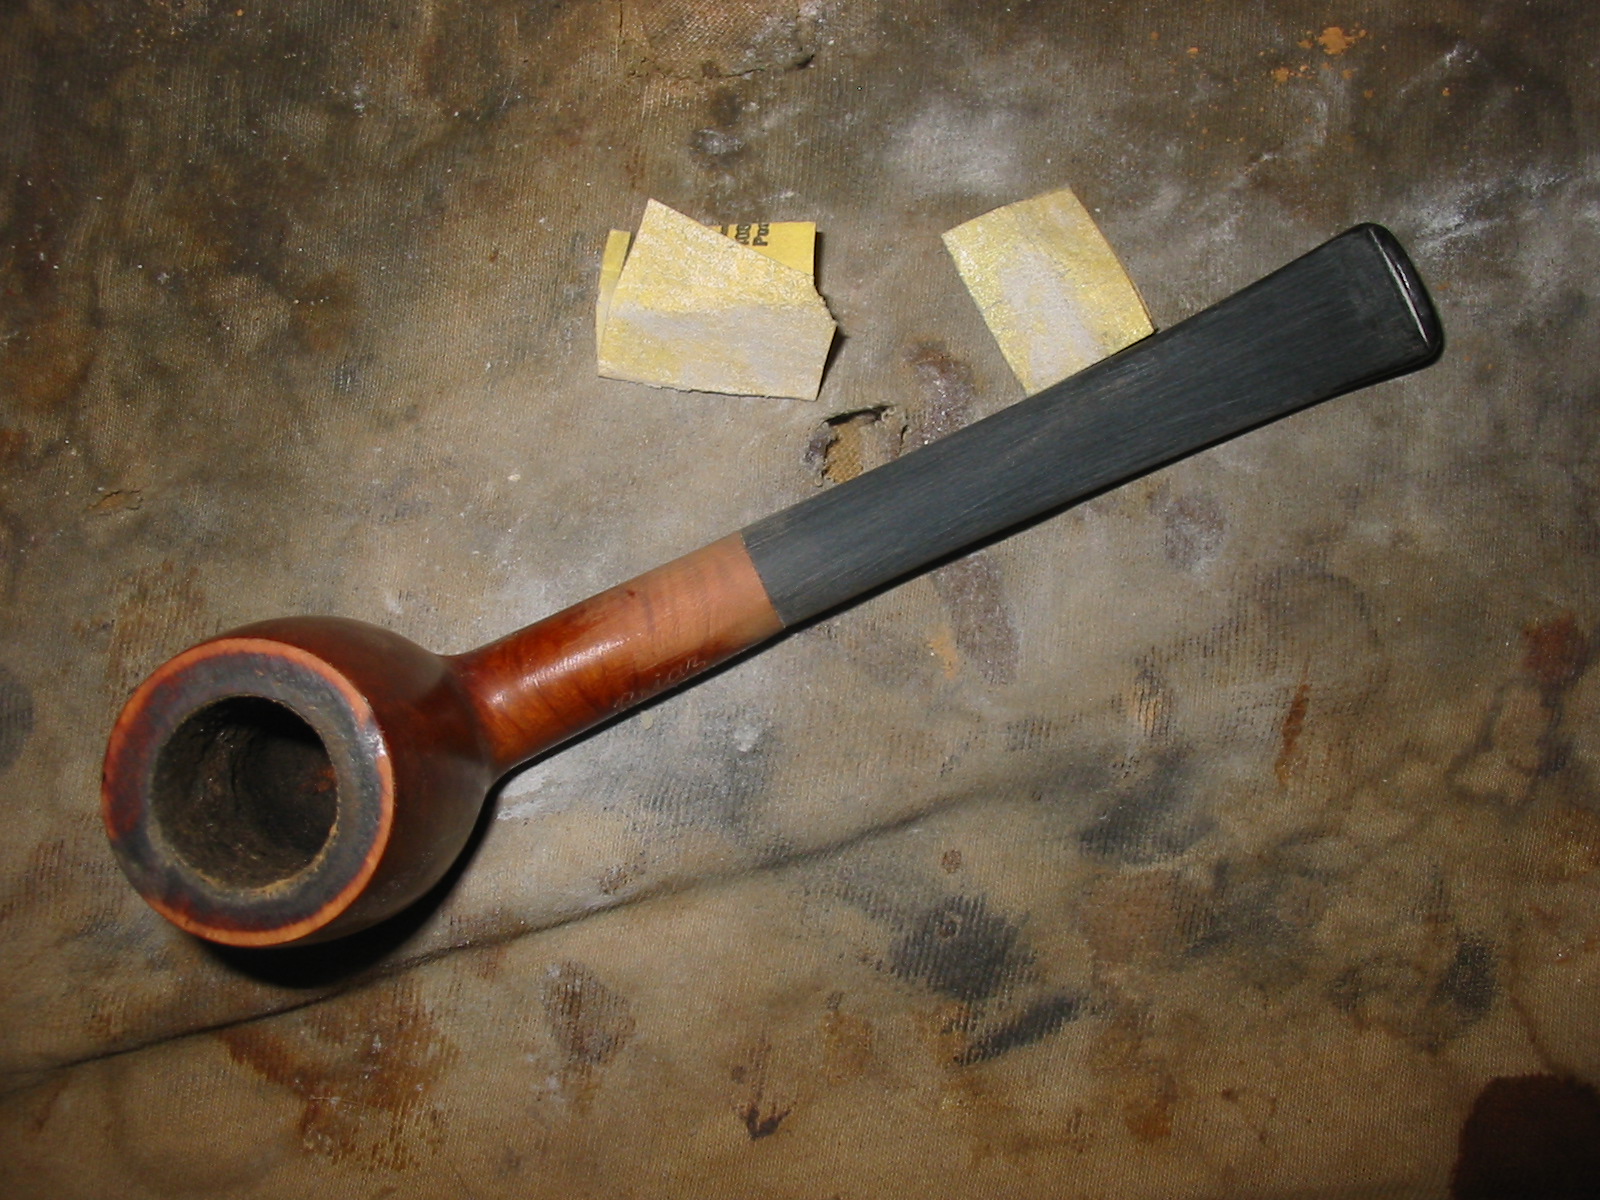
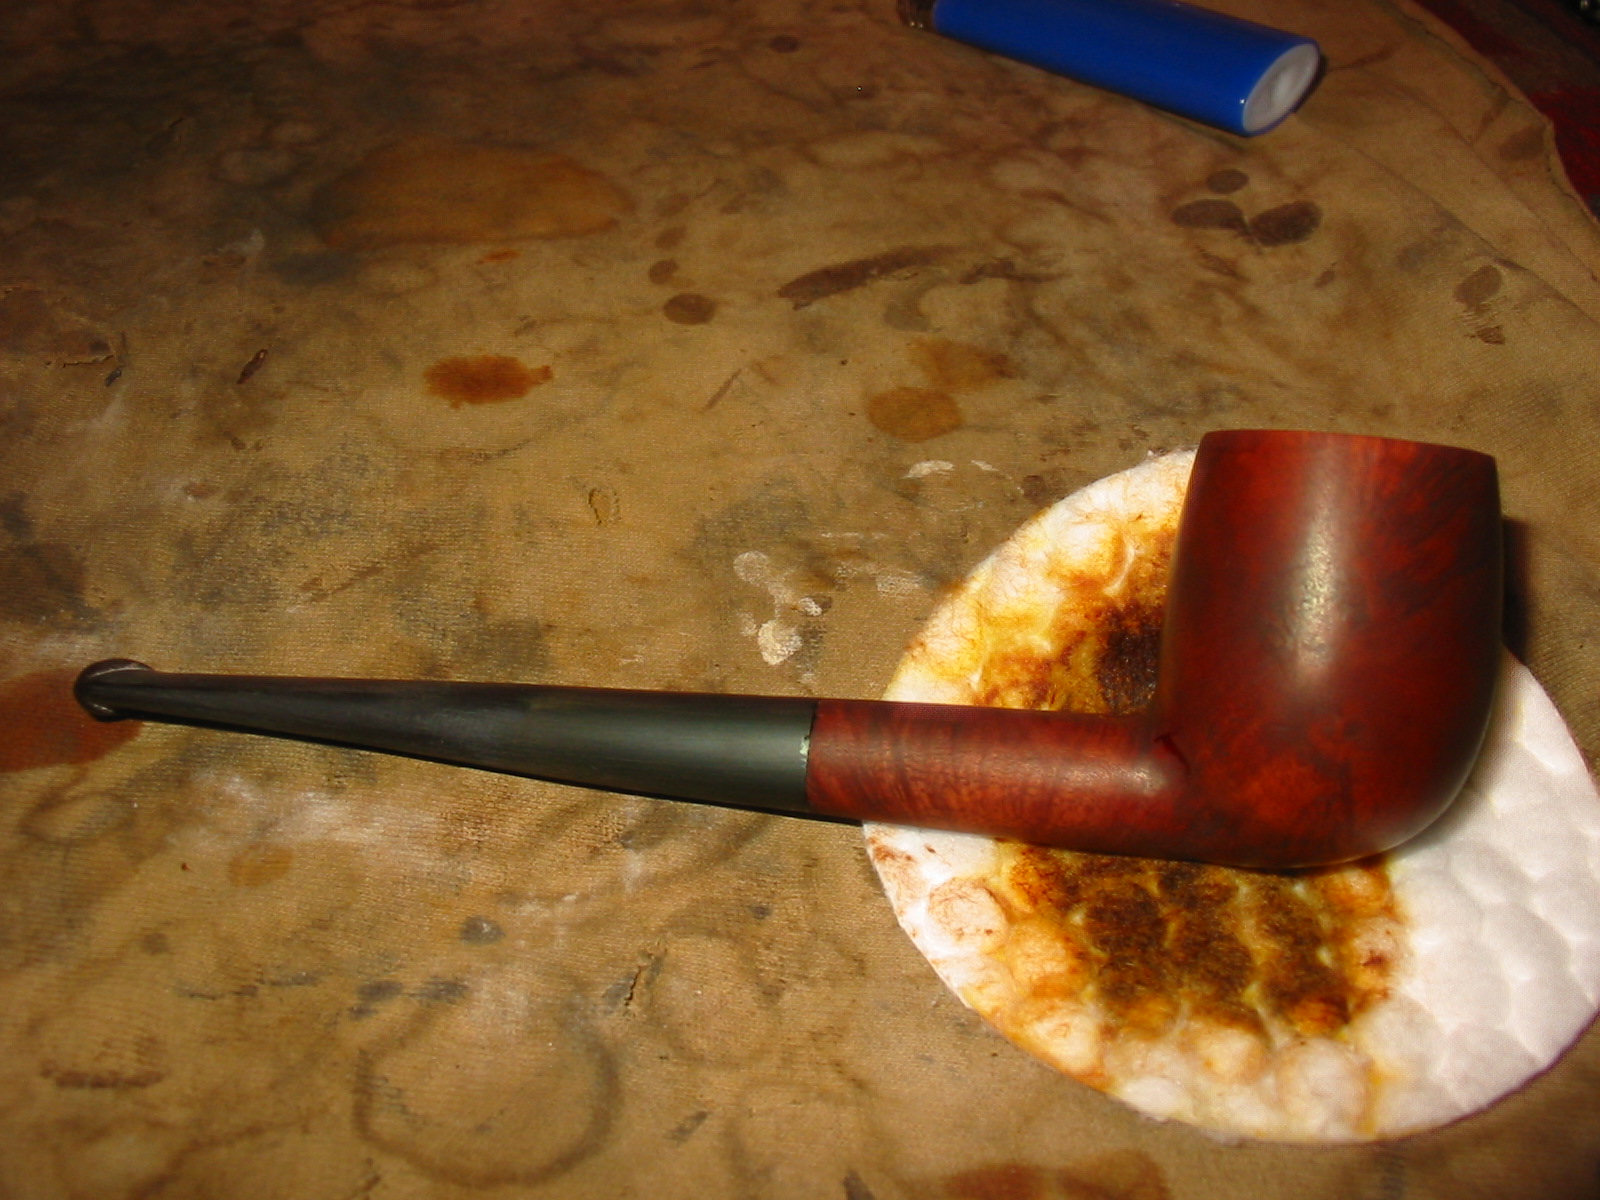
He took the pipe bowl from the jar with alcohol that had turned the gold of whiskey. Real whiskey made Mike, unlike his grandfather, feel like an amateur and he enjoyed hard drink only now and then. This was not his fault. Some people are born that way.He was happy to watch the one hundred and ninety-proof alcohol evaporate and reveal briar with a white coating on the smooth area and a slight green on the rusticated part. He set it down on a small square of cotton cloth.
Tearing off a piece of the finest steel wool he set to work brushing away the dried residue of alcohol. Holding the pipe inside a thick cotton rag he turned it in his hands to clear away the tiny particles of steel wool that were still on it. He tilted the bowl away from his eyes and blew through the shank, watching the dark gray cloud that cleared the bowl.
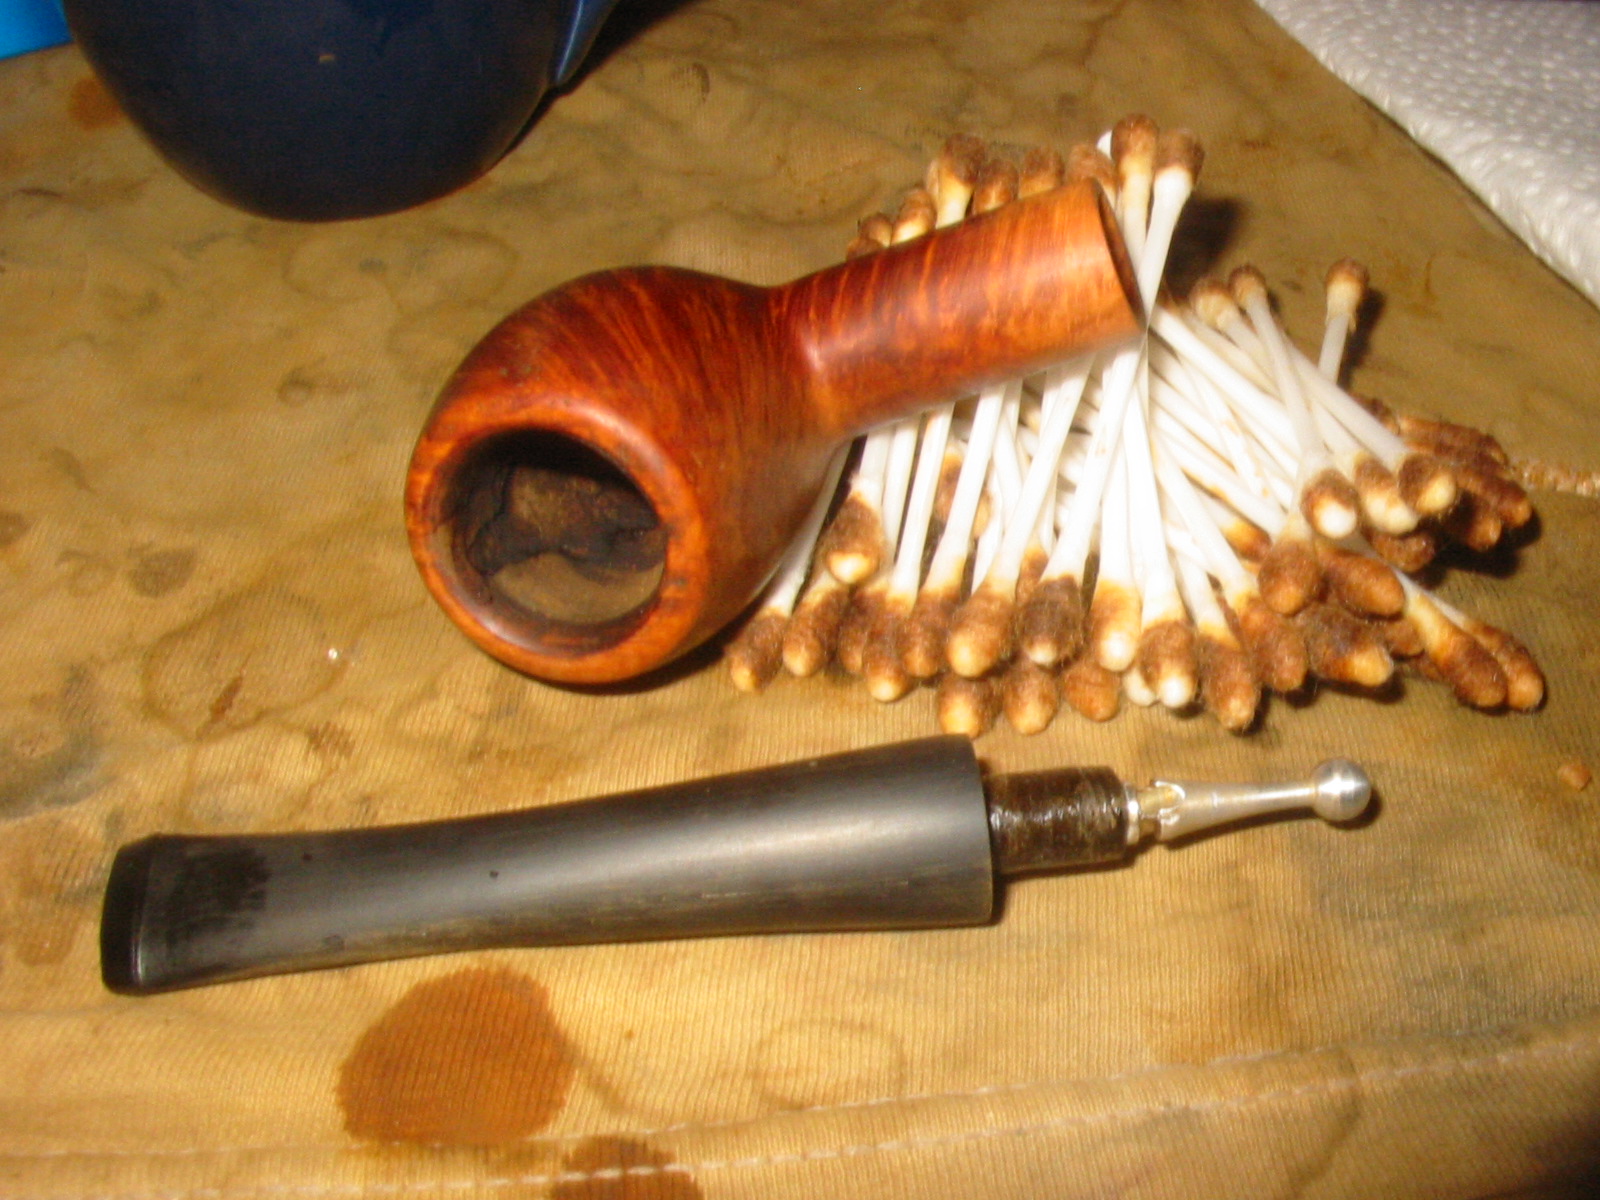
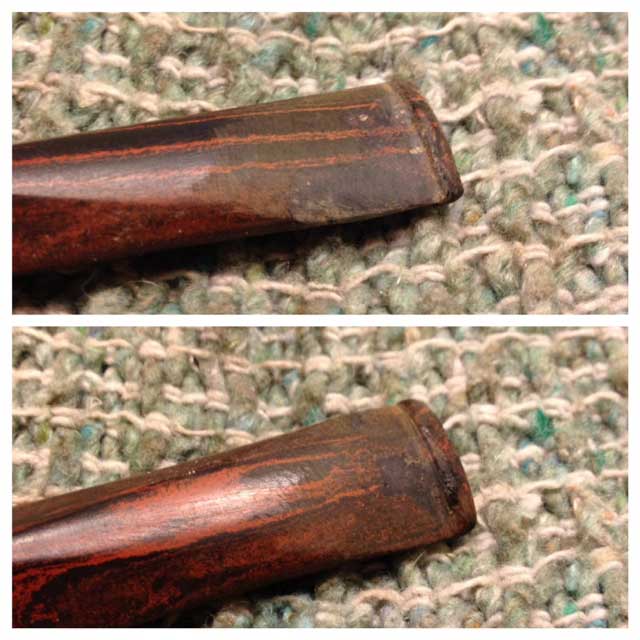
Mike’s first look at the raw briar was all he needed to understand the use of rustication and thick staining on Thinbite.In the middle of the front and the top of the right sides of the pipe were signs of gouges that had been smoothed with wood filler. He knew his grandfather on a summer day long past had told him one of his many tricks that was the exact way to deal with this problem but he could not remember what it was no matter how hard he tried. All he knew was that it sounded simple at the time. He was sure the answer would come to him if he put the matter out of his mind.
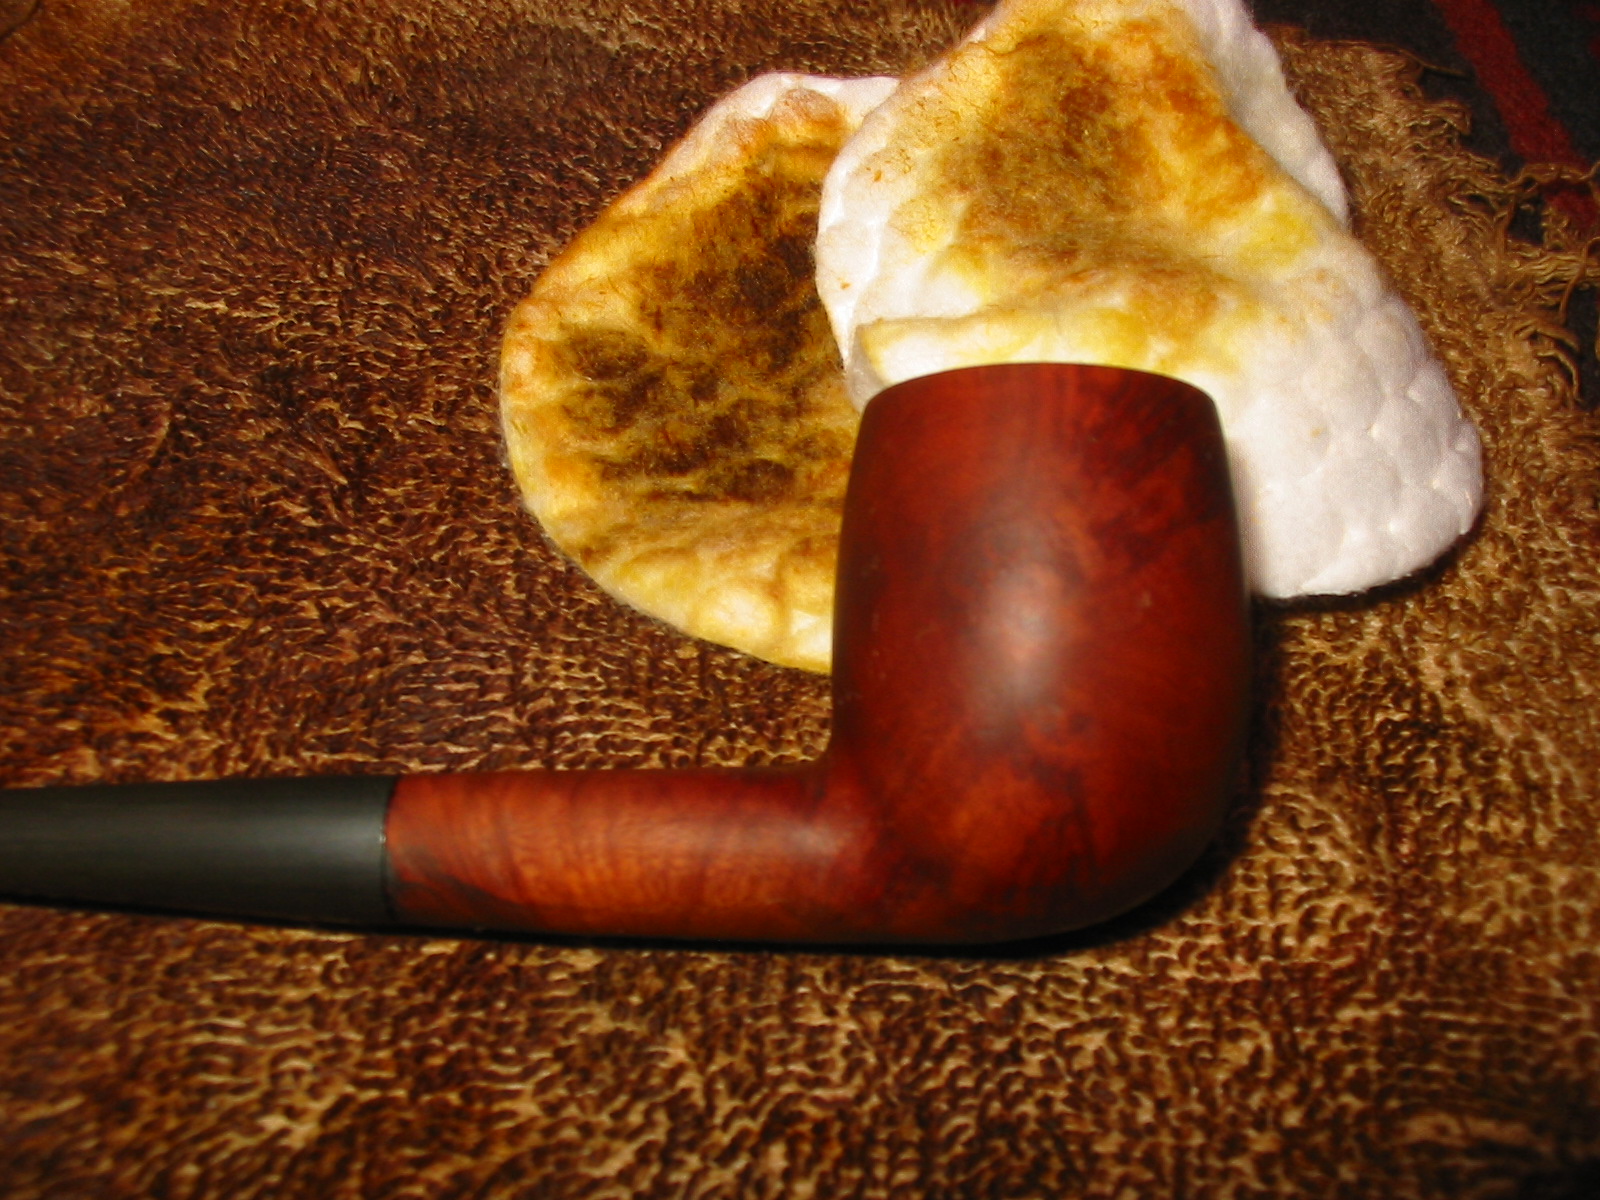
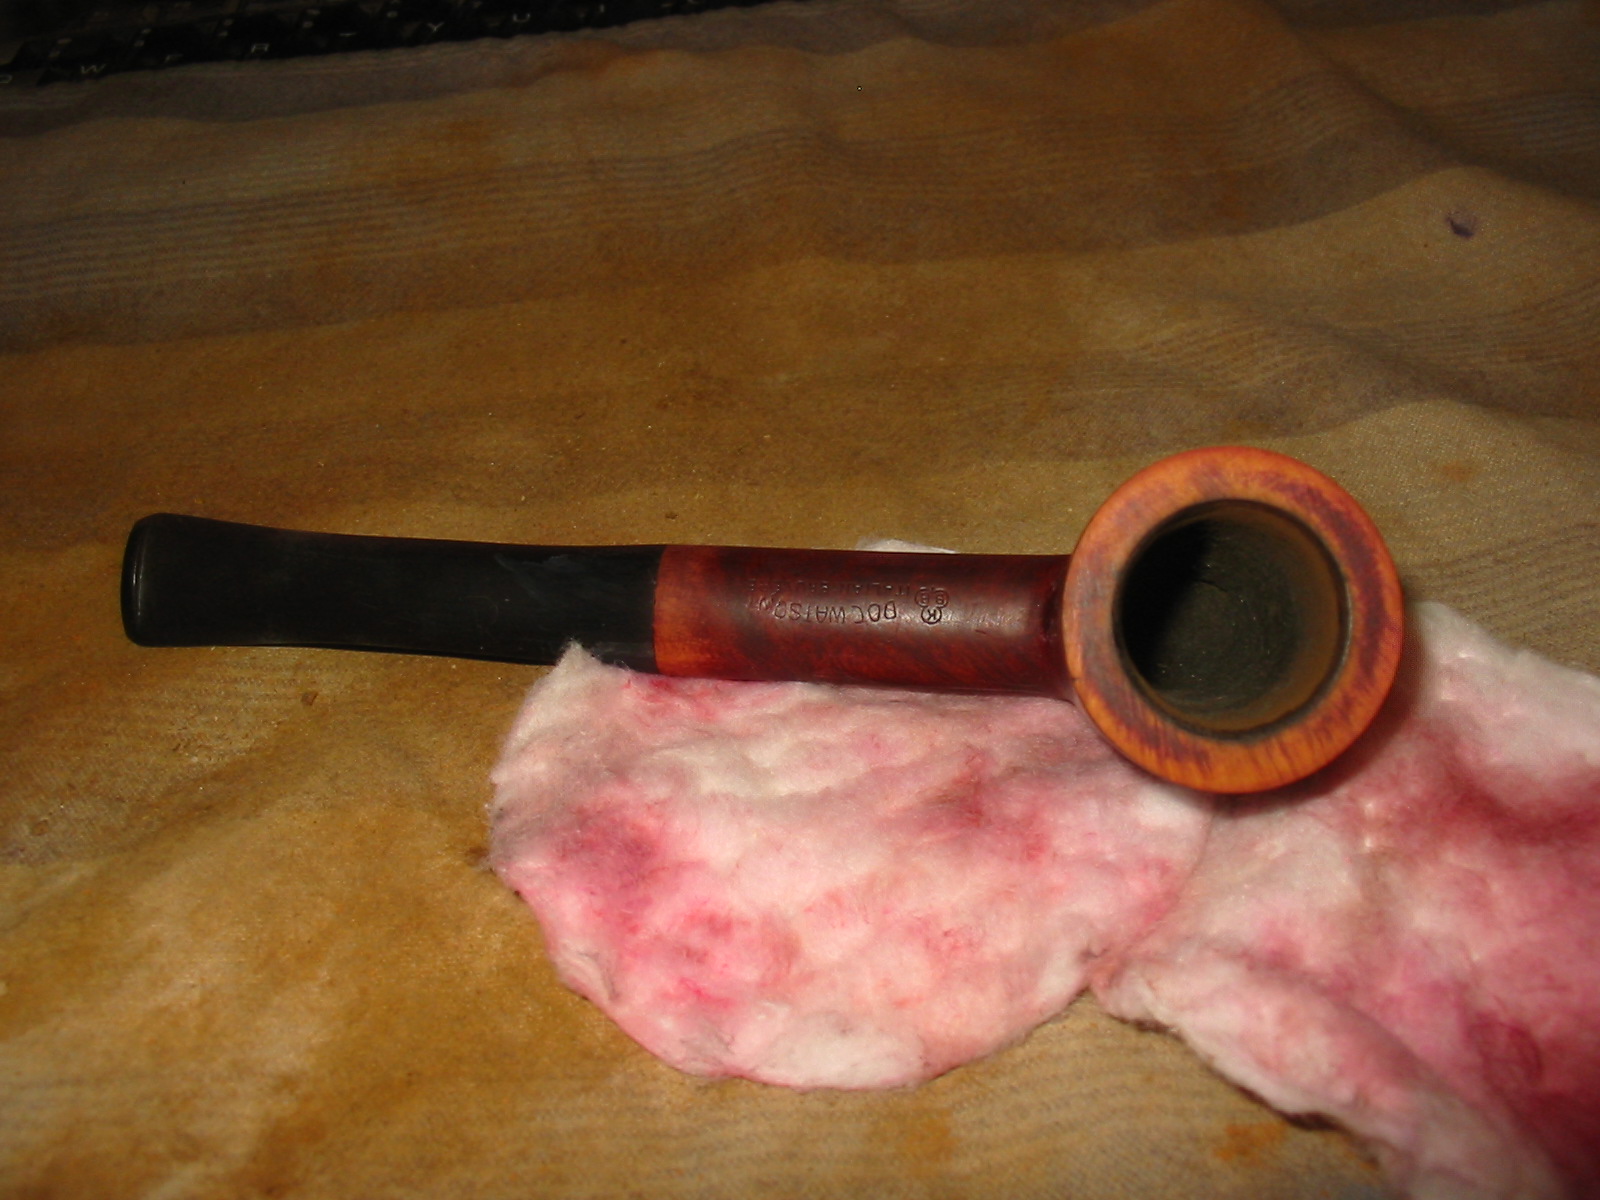
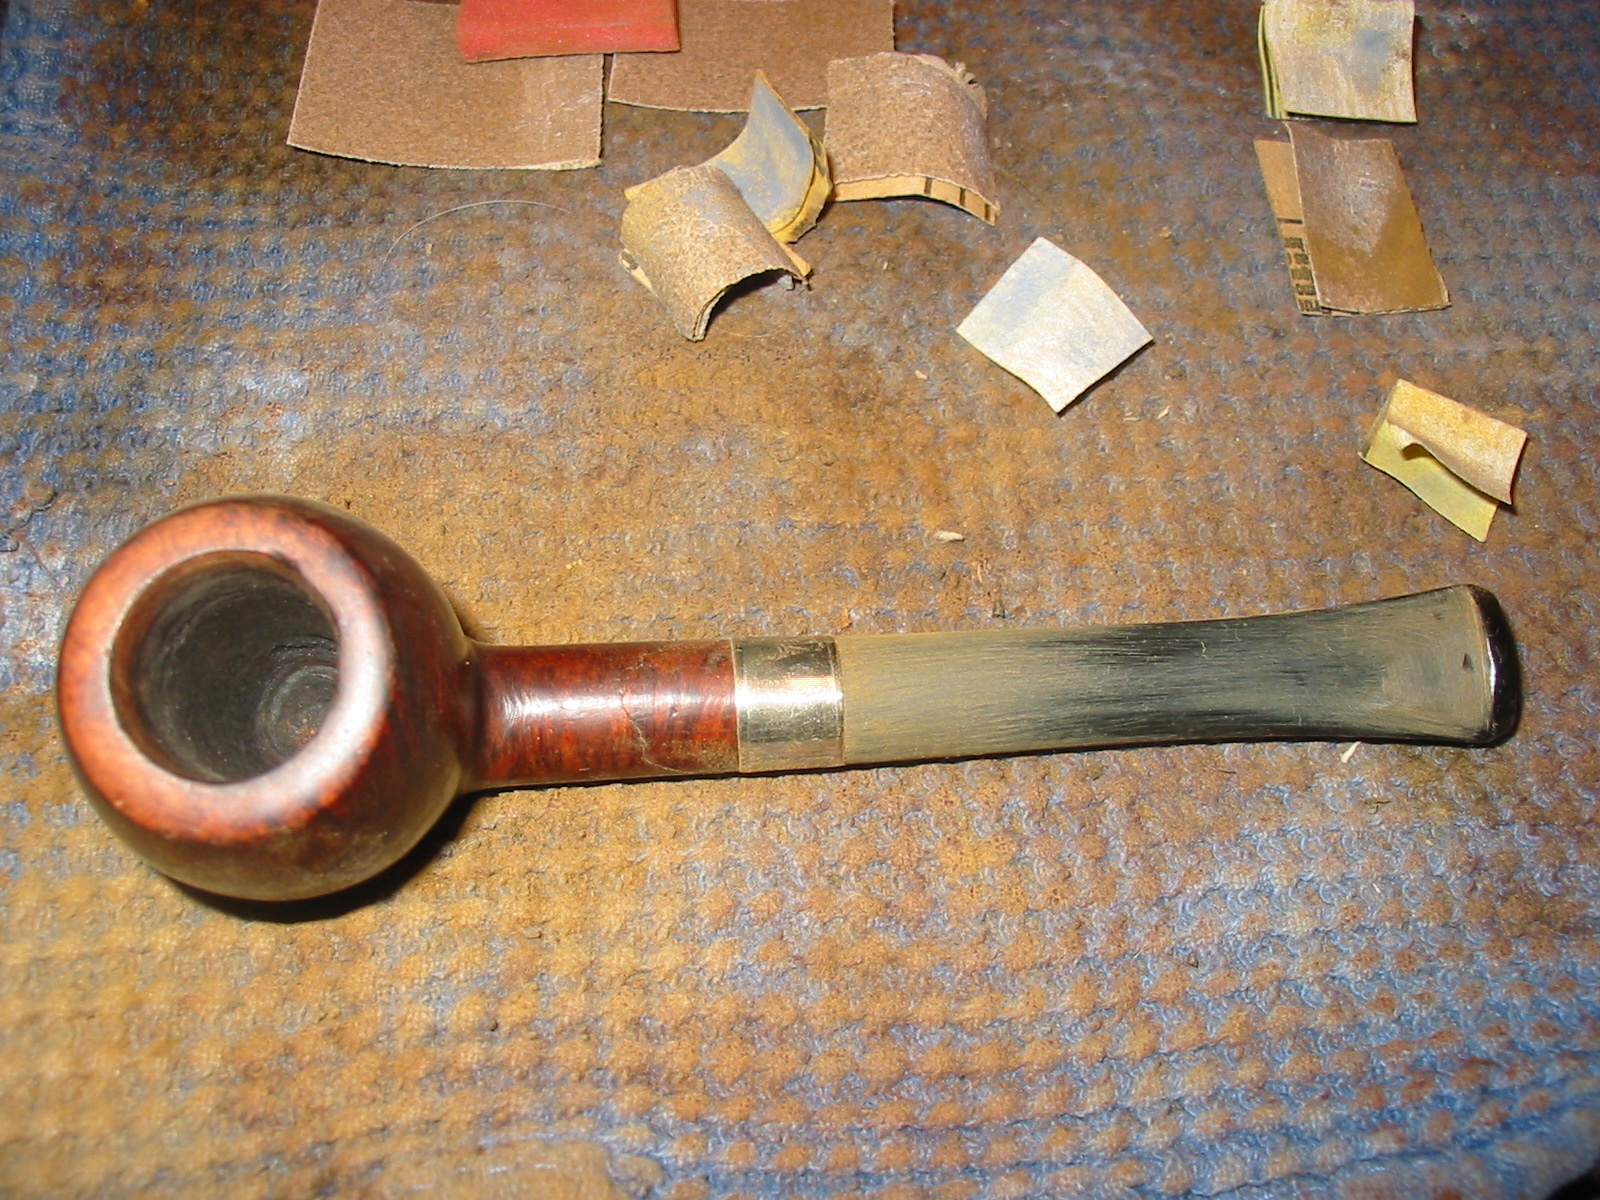
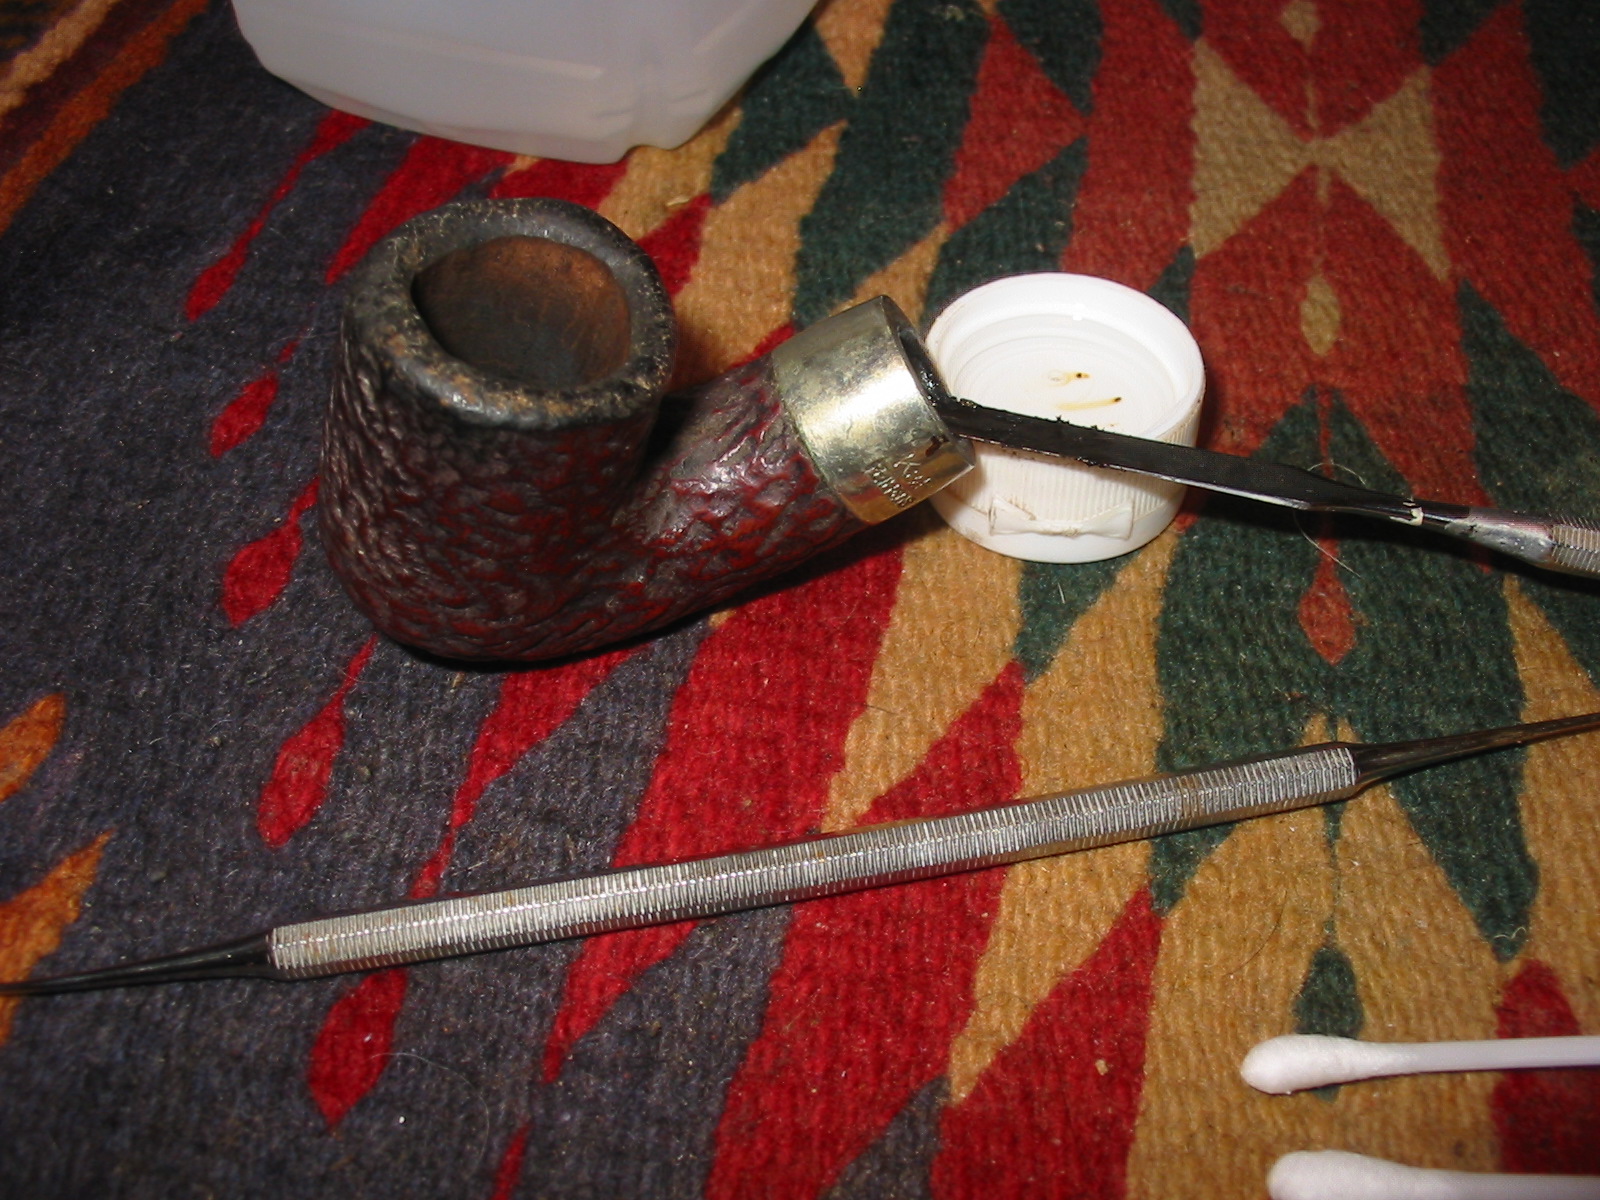
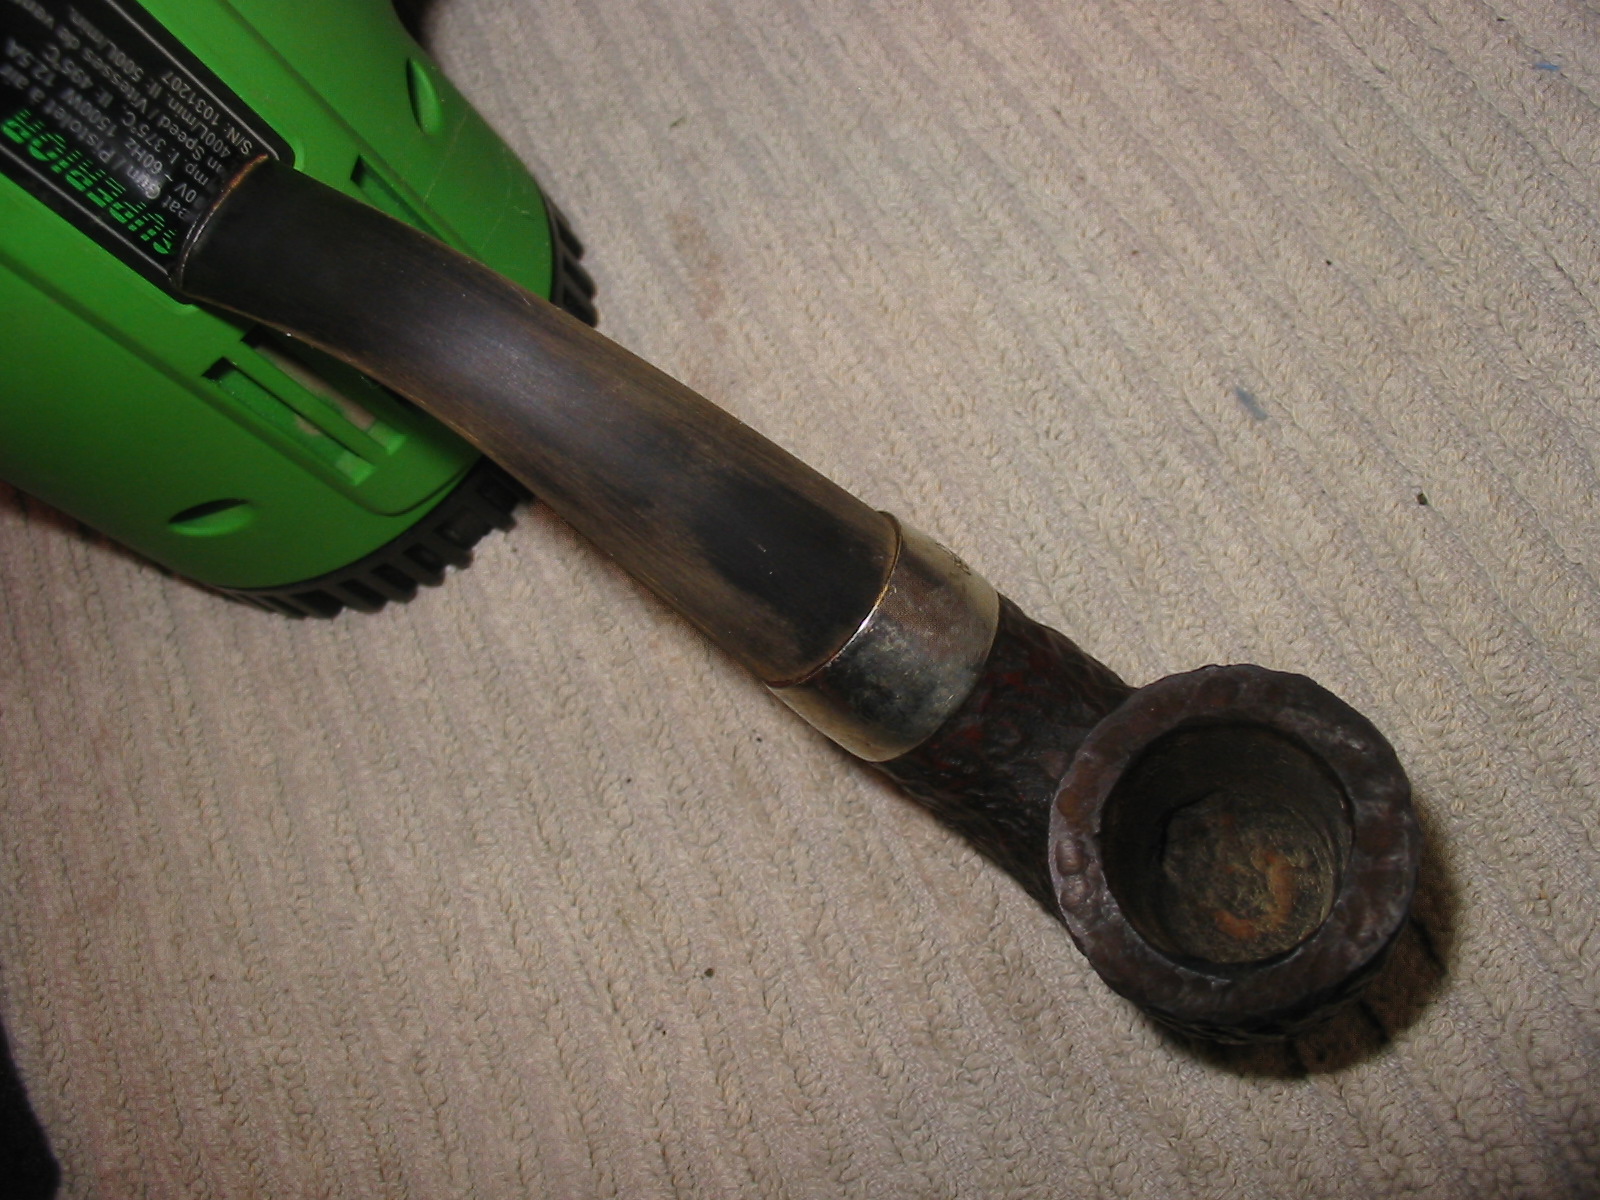
To stay busy while he did not think about the trick, Mike used an old toothbrush to work on the rusticated bottom and smoothed the rim with a small piece of very fine grit sandpaper. He removed the thin patches of the remaining old stain, careful to leave the name of Thinbite and its place of birth and type of wood untouched.
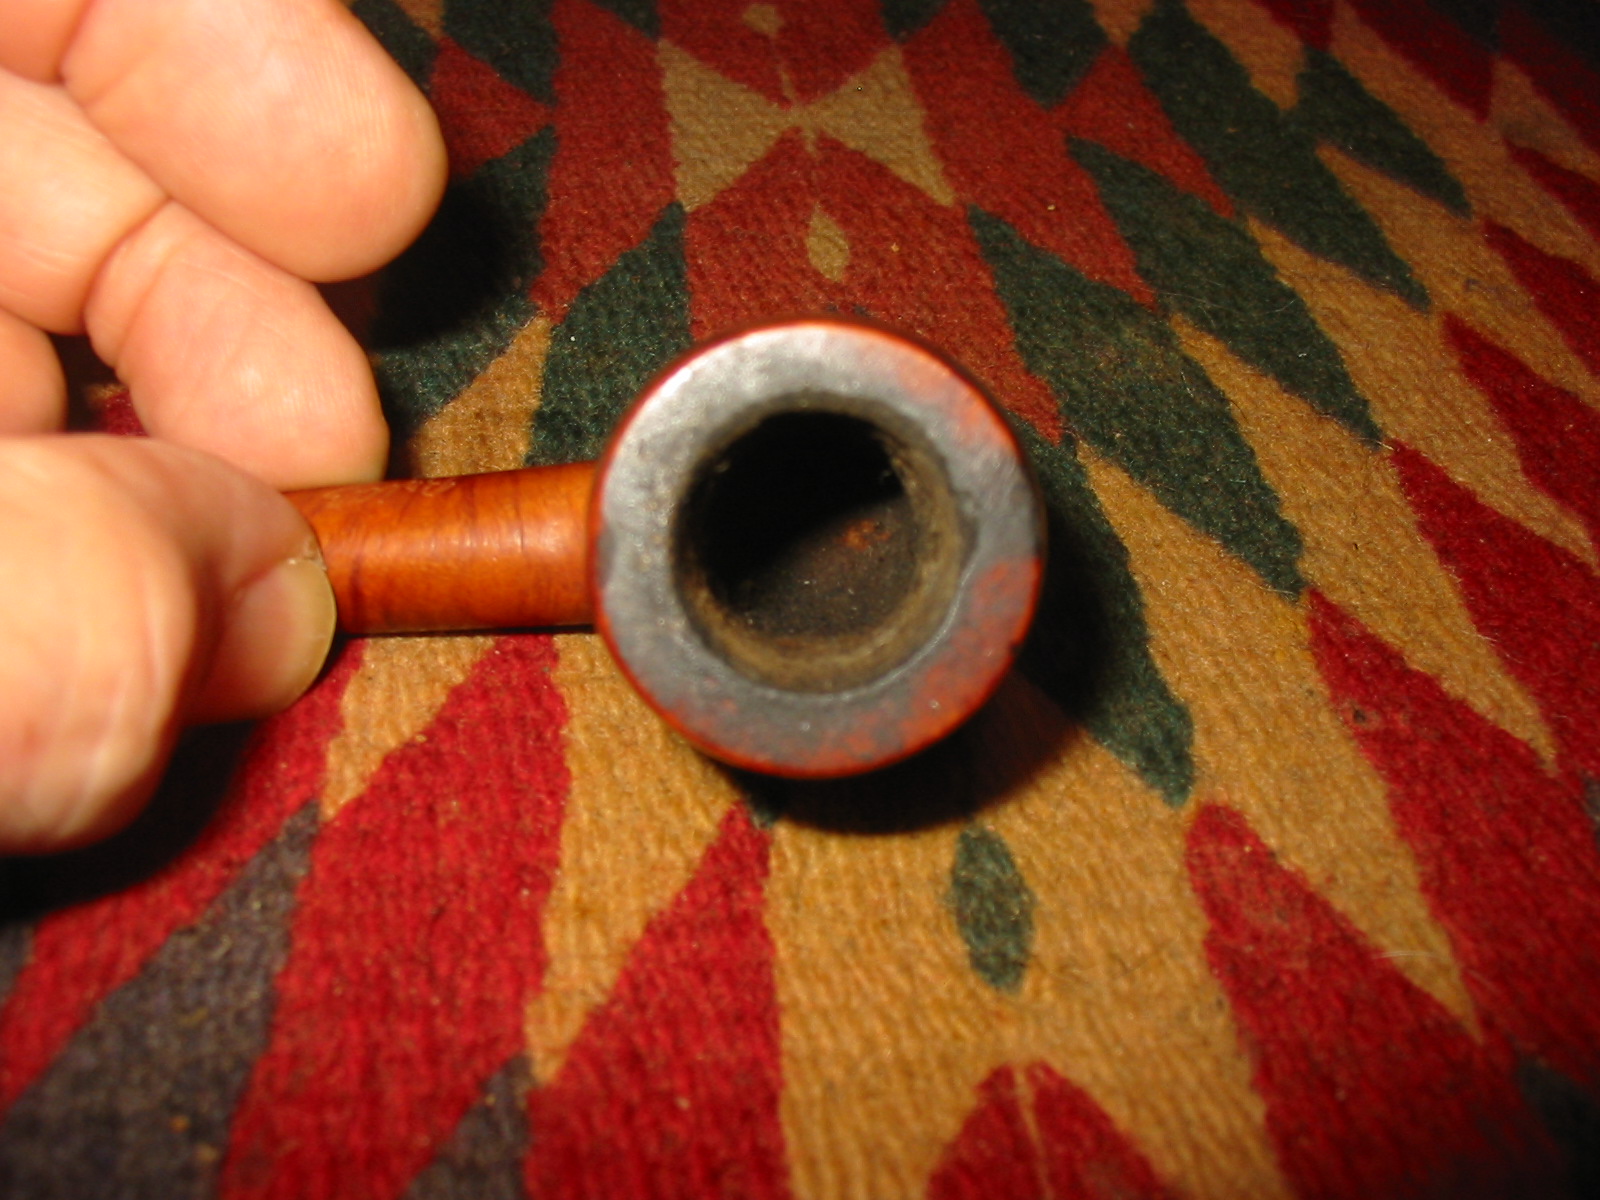
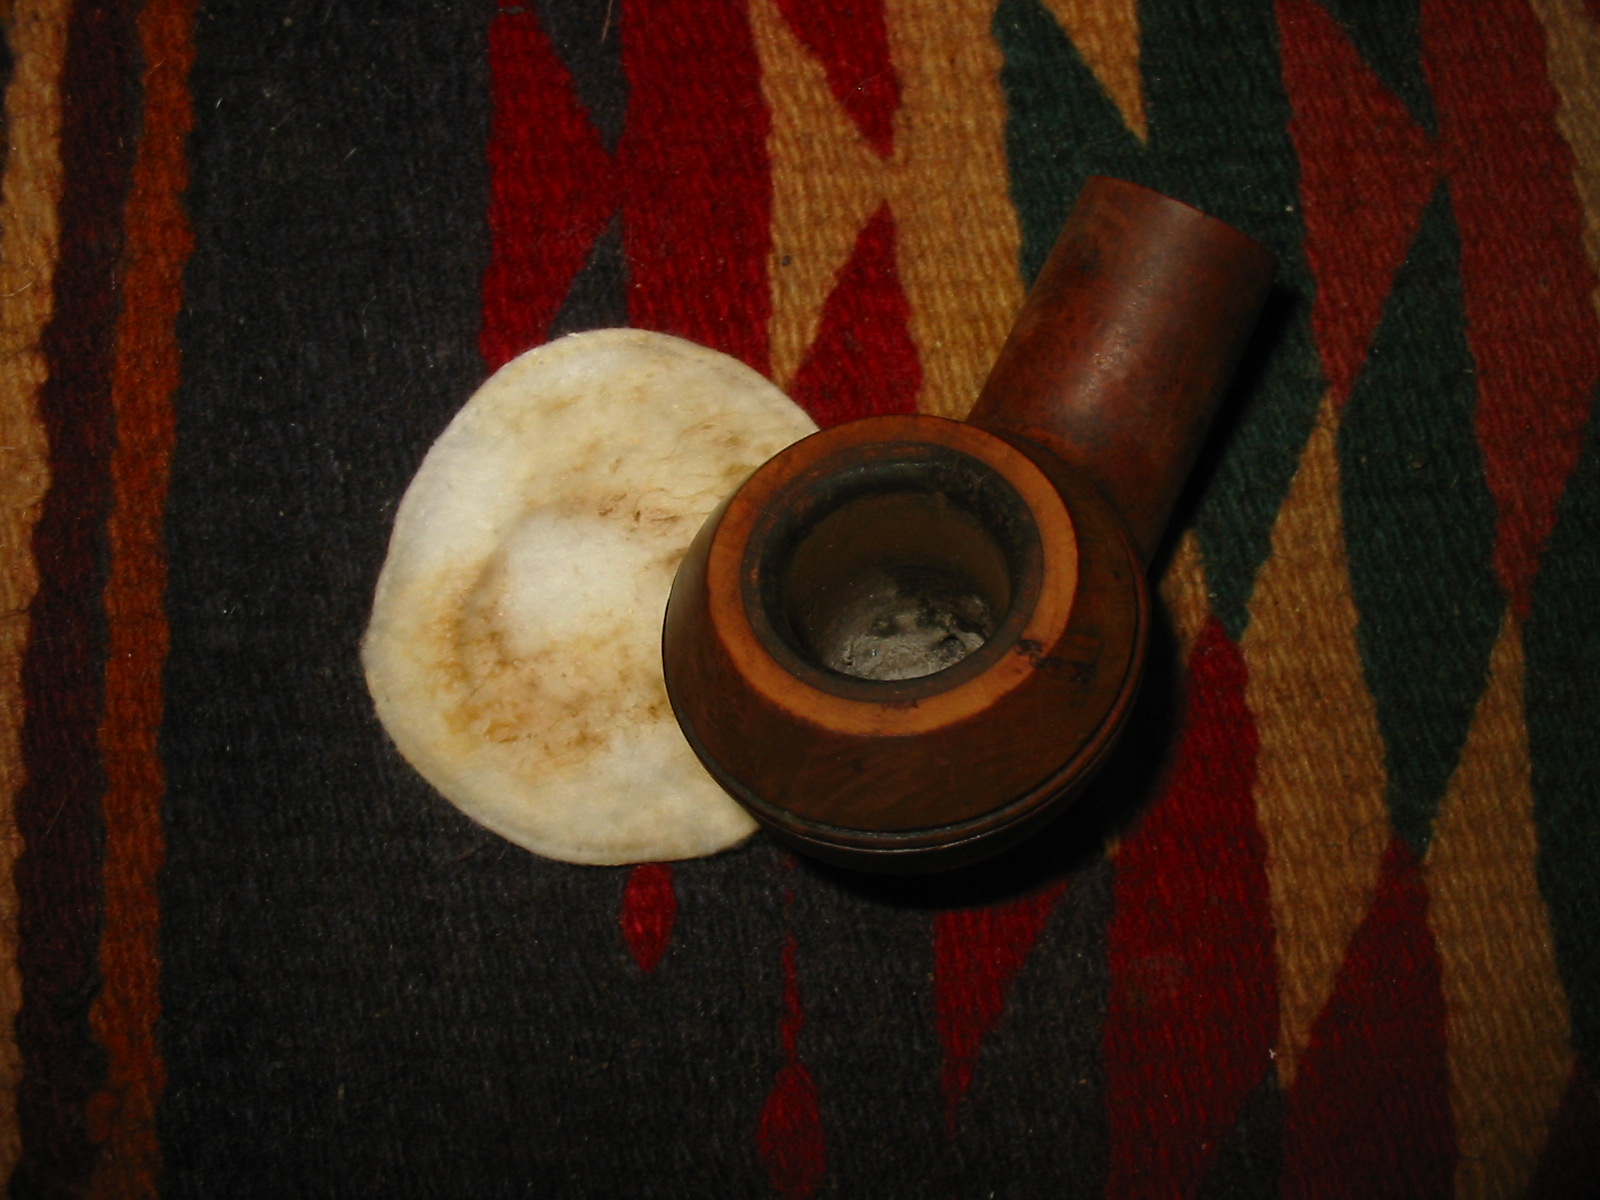
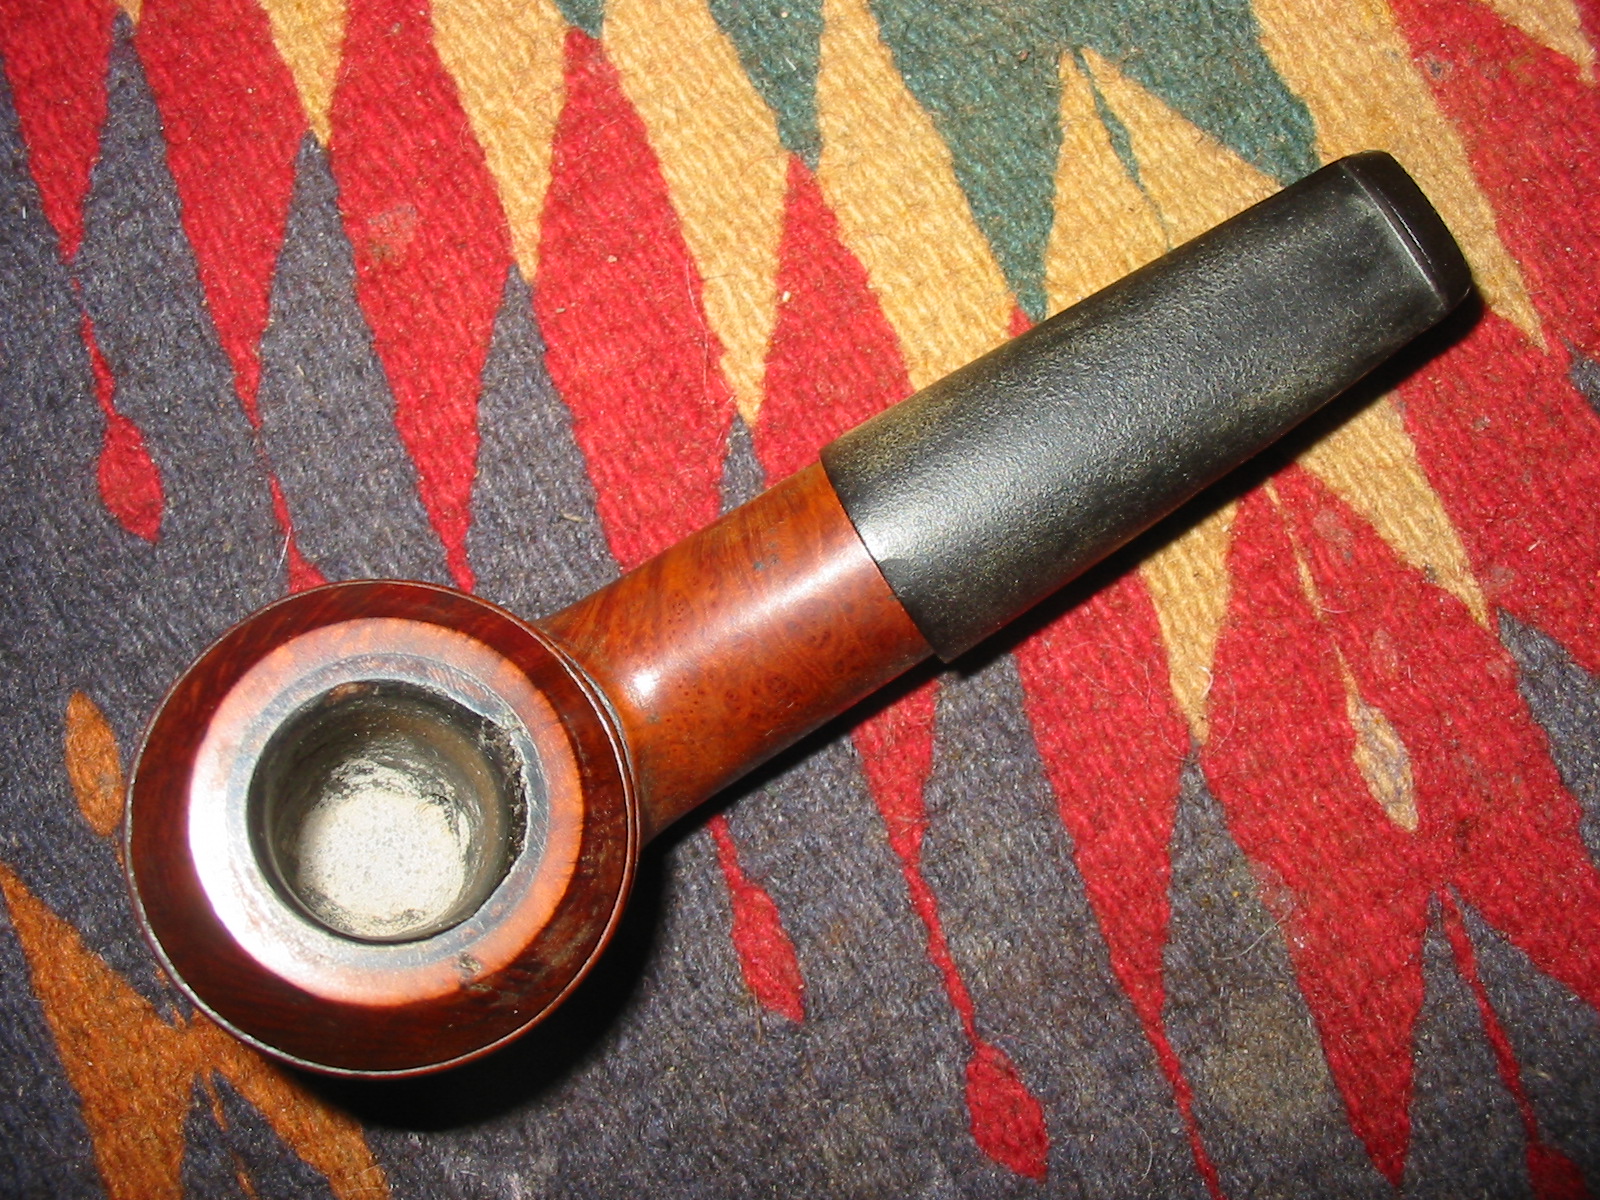
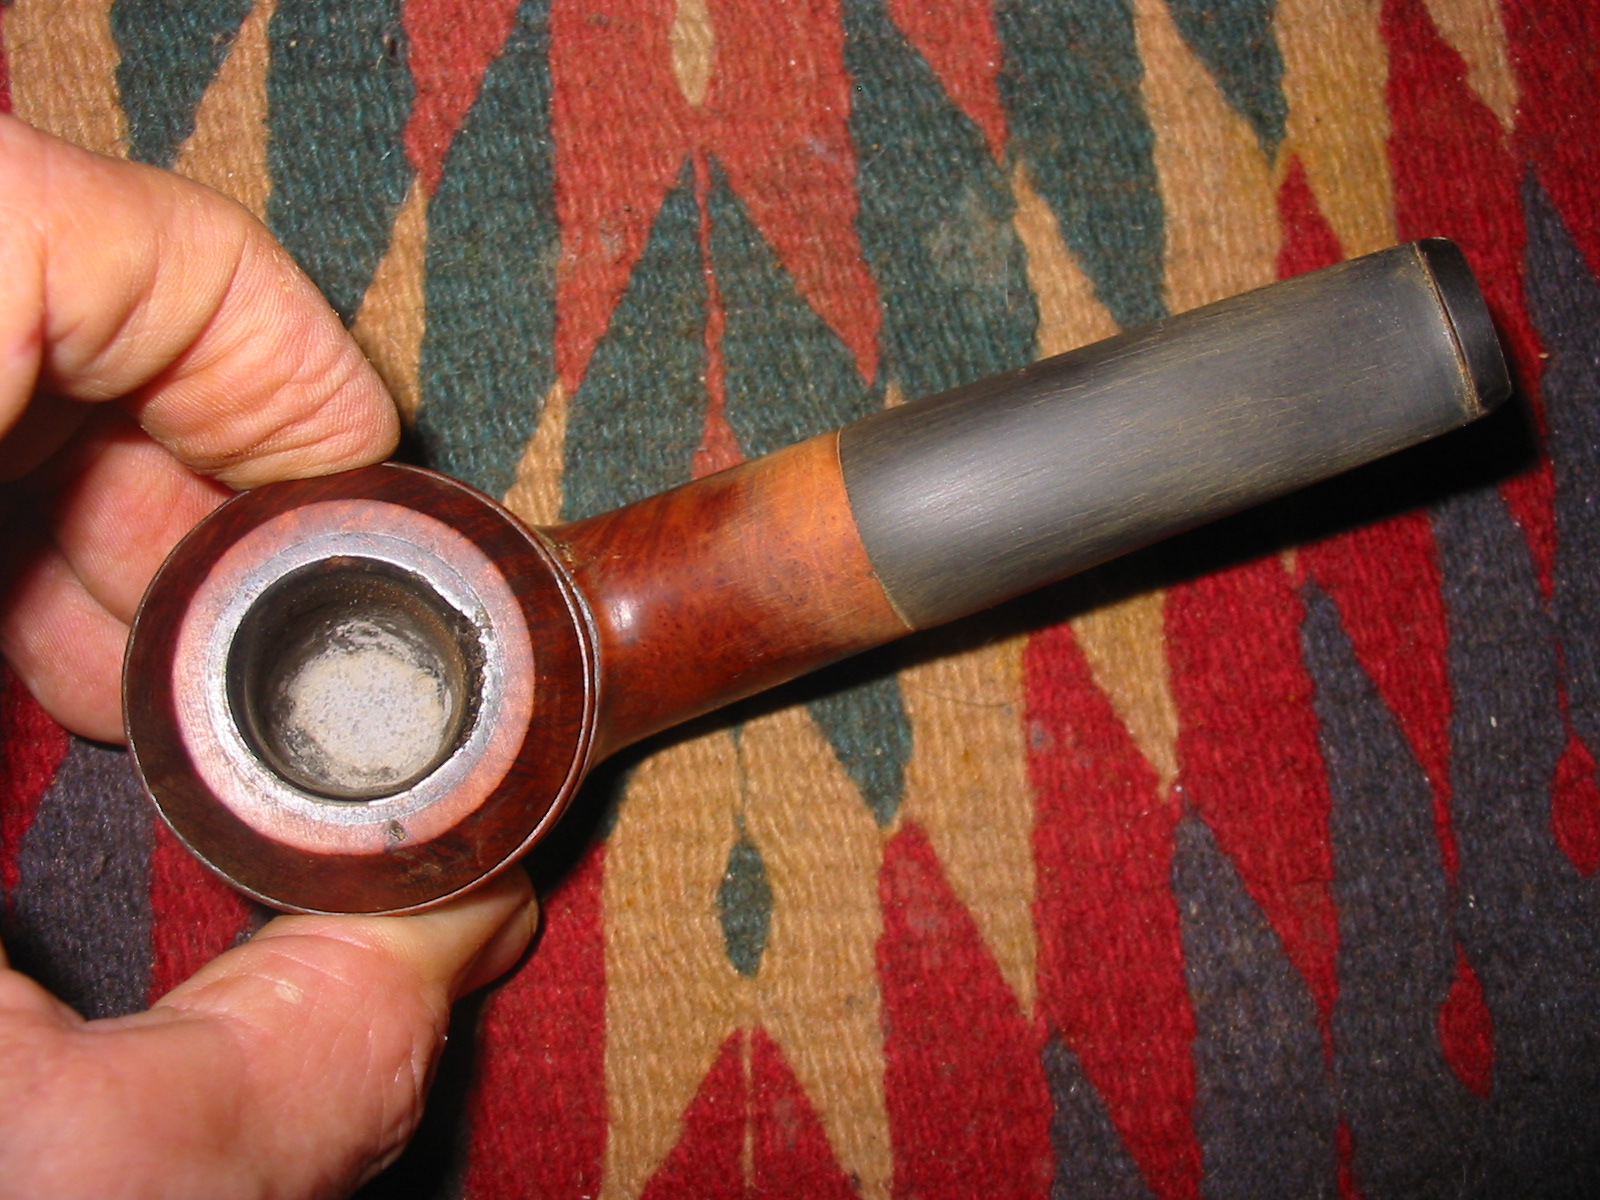
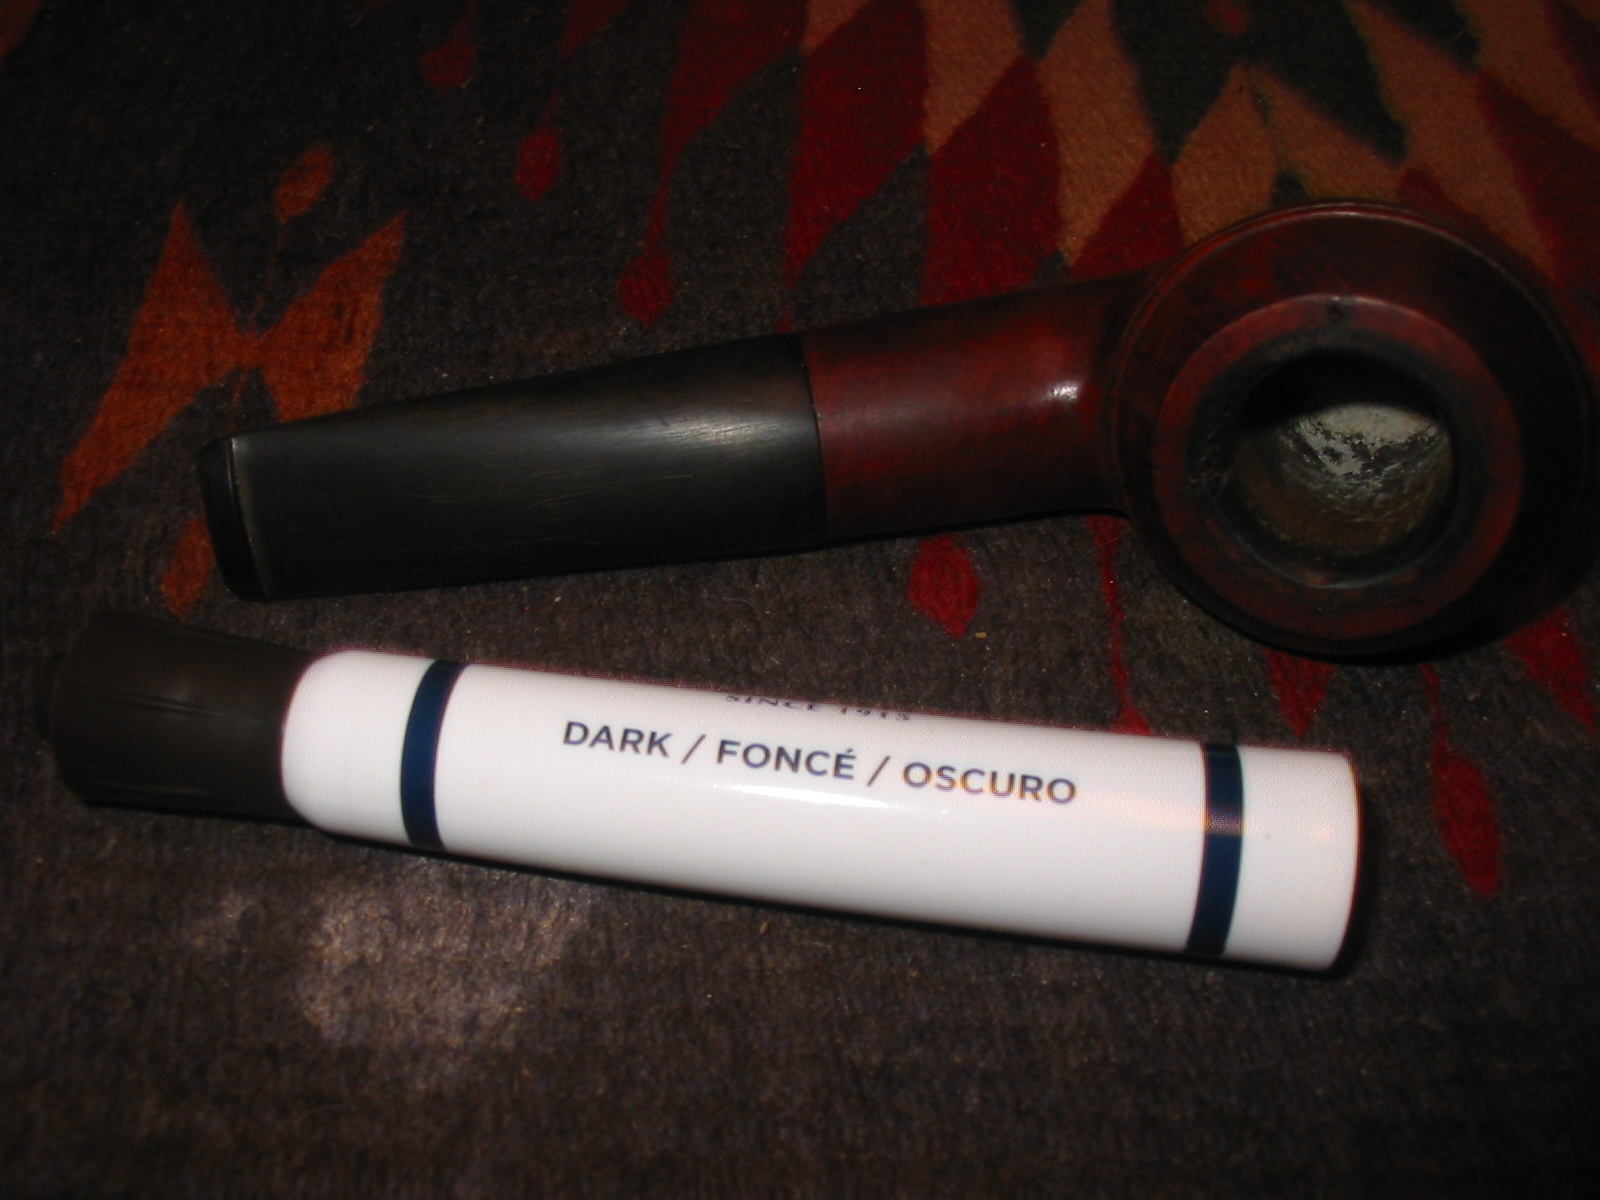
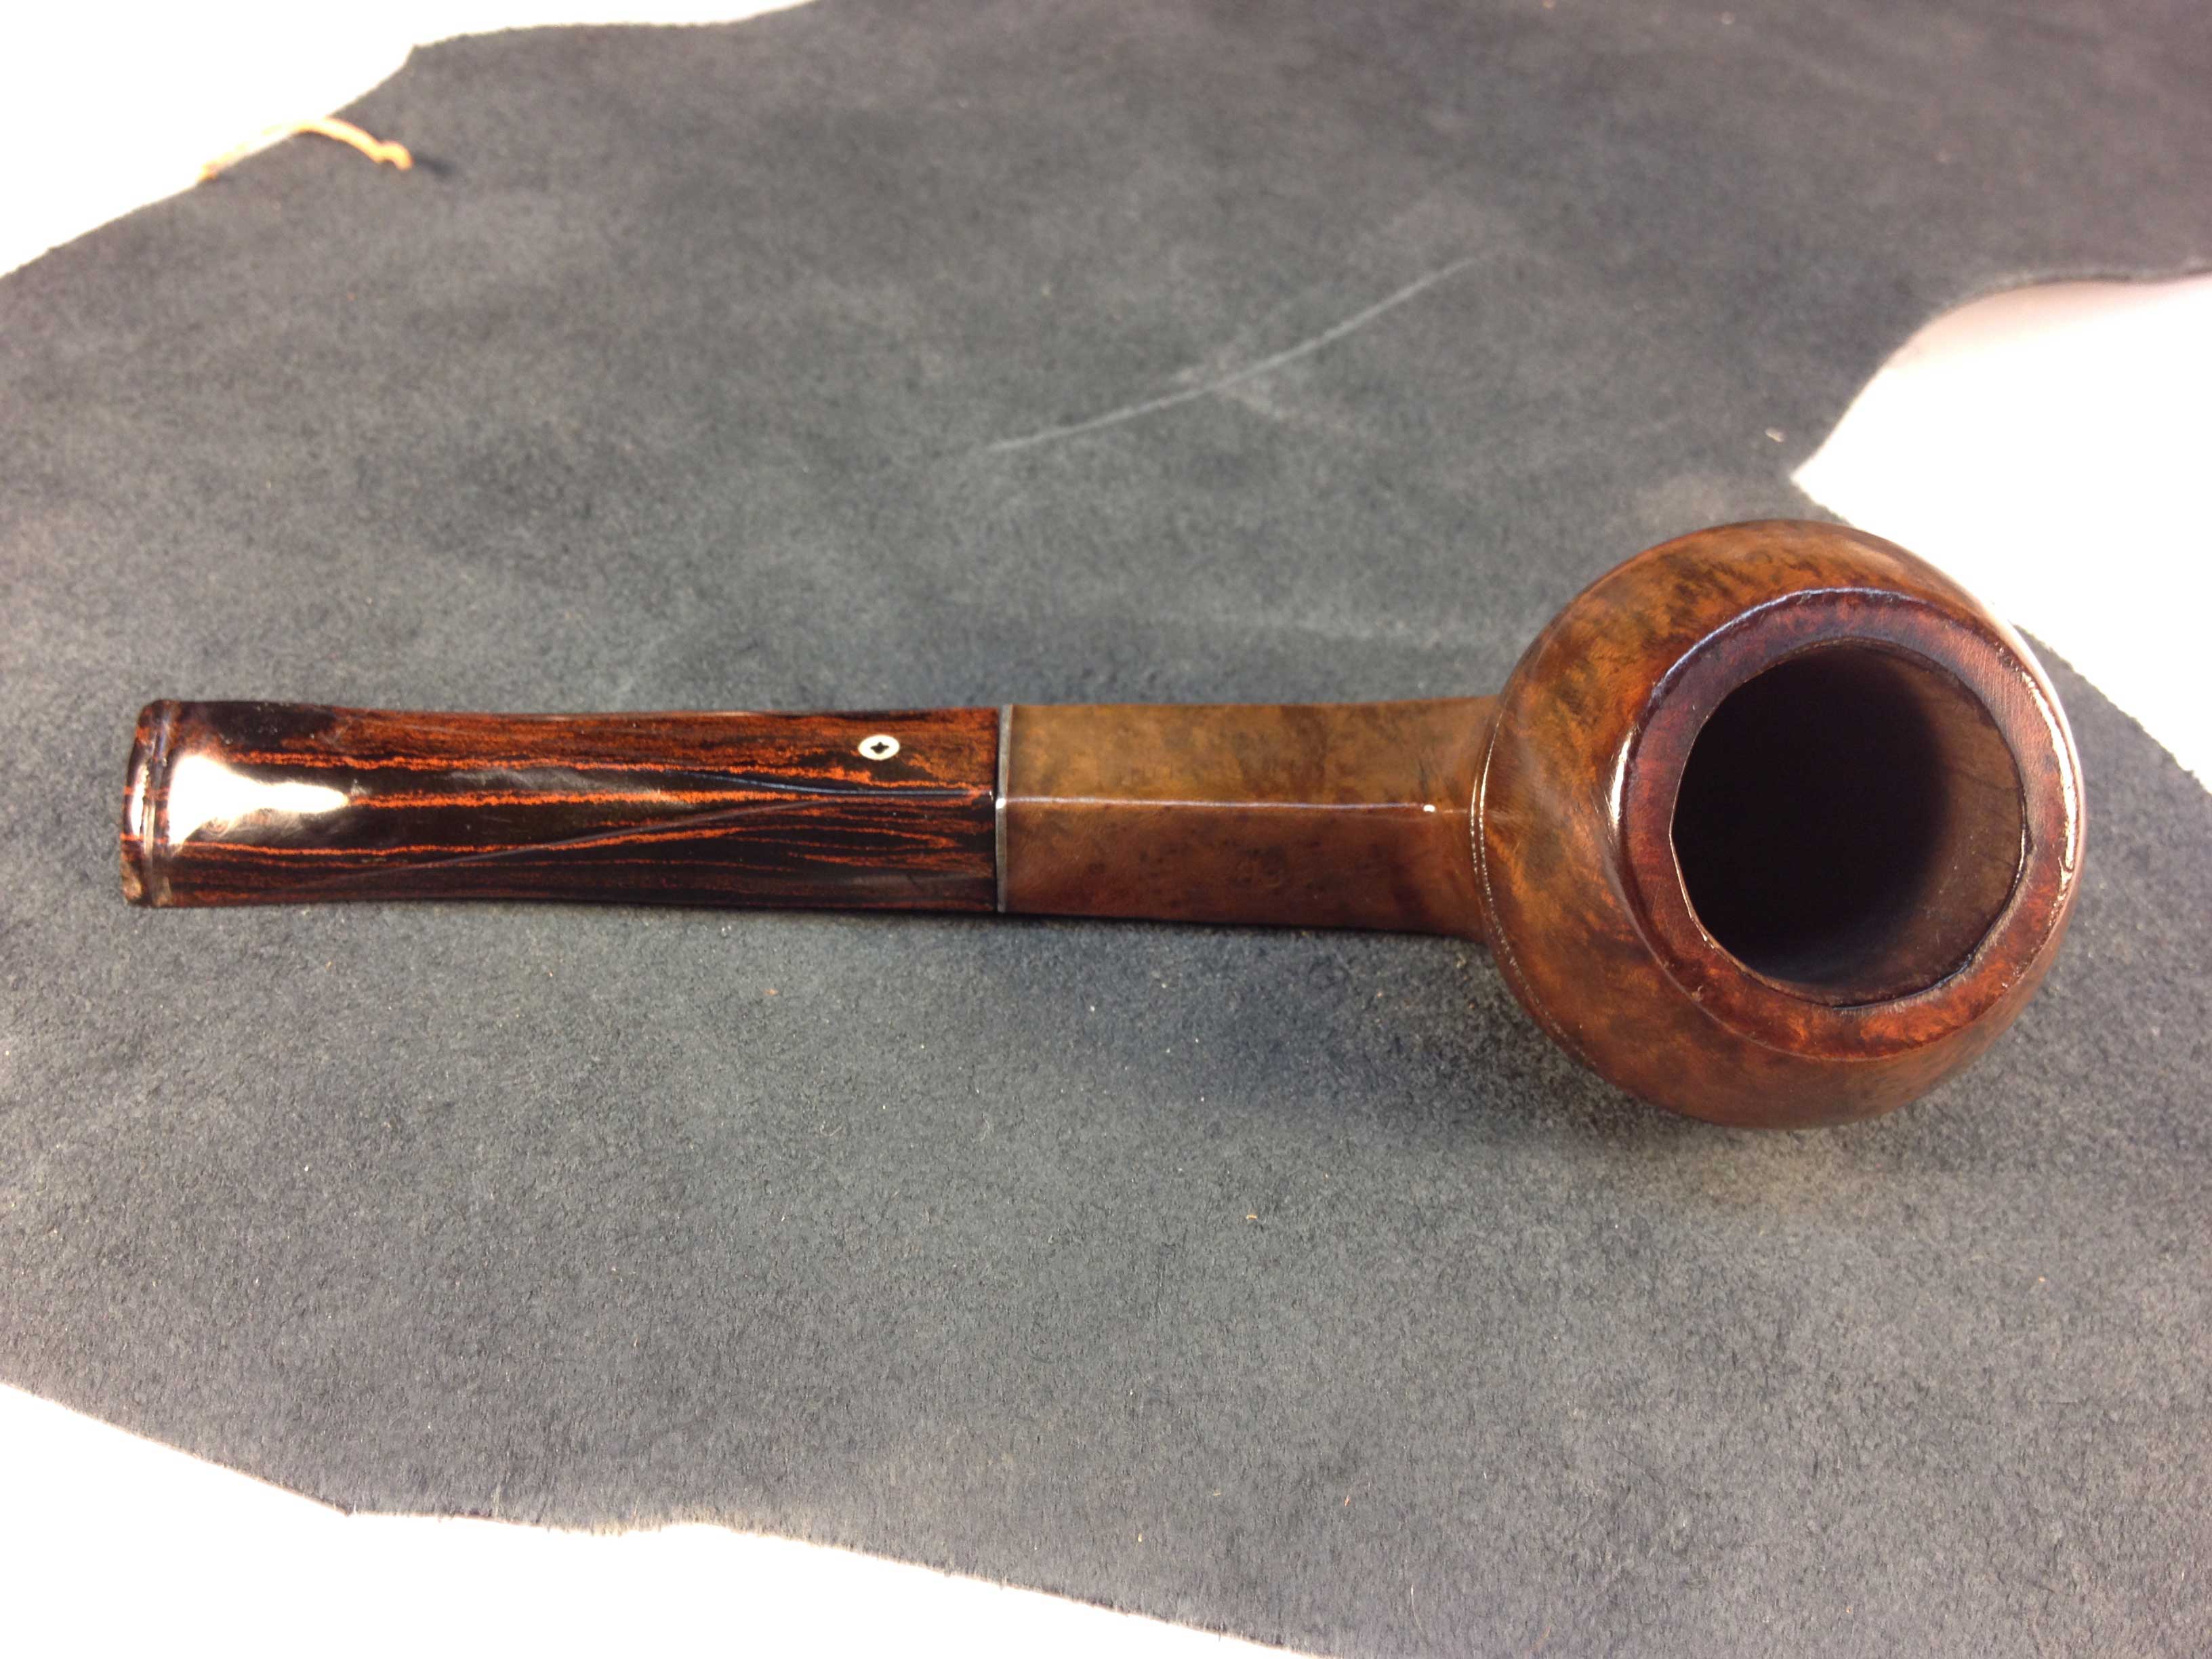
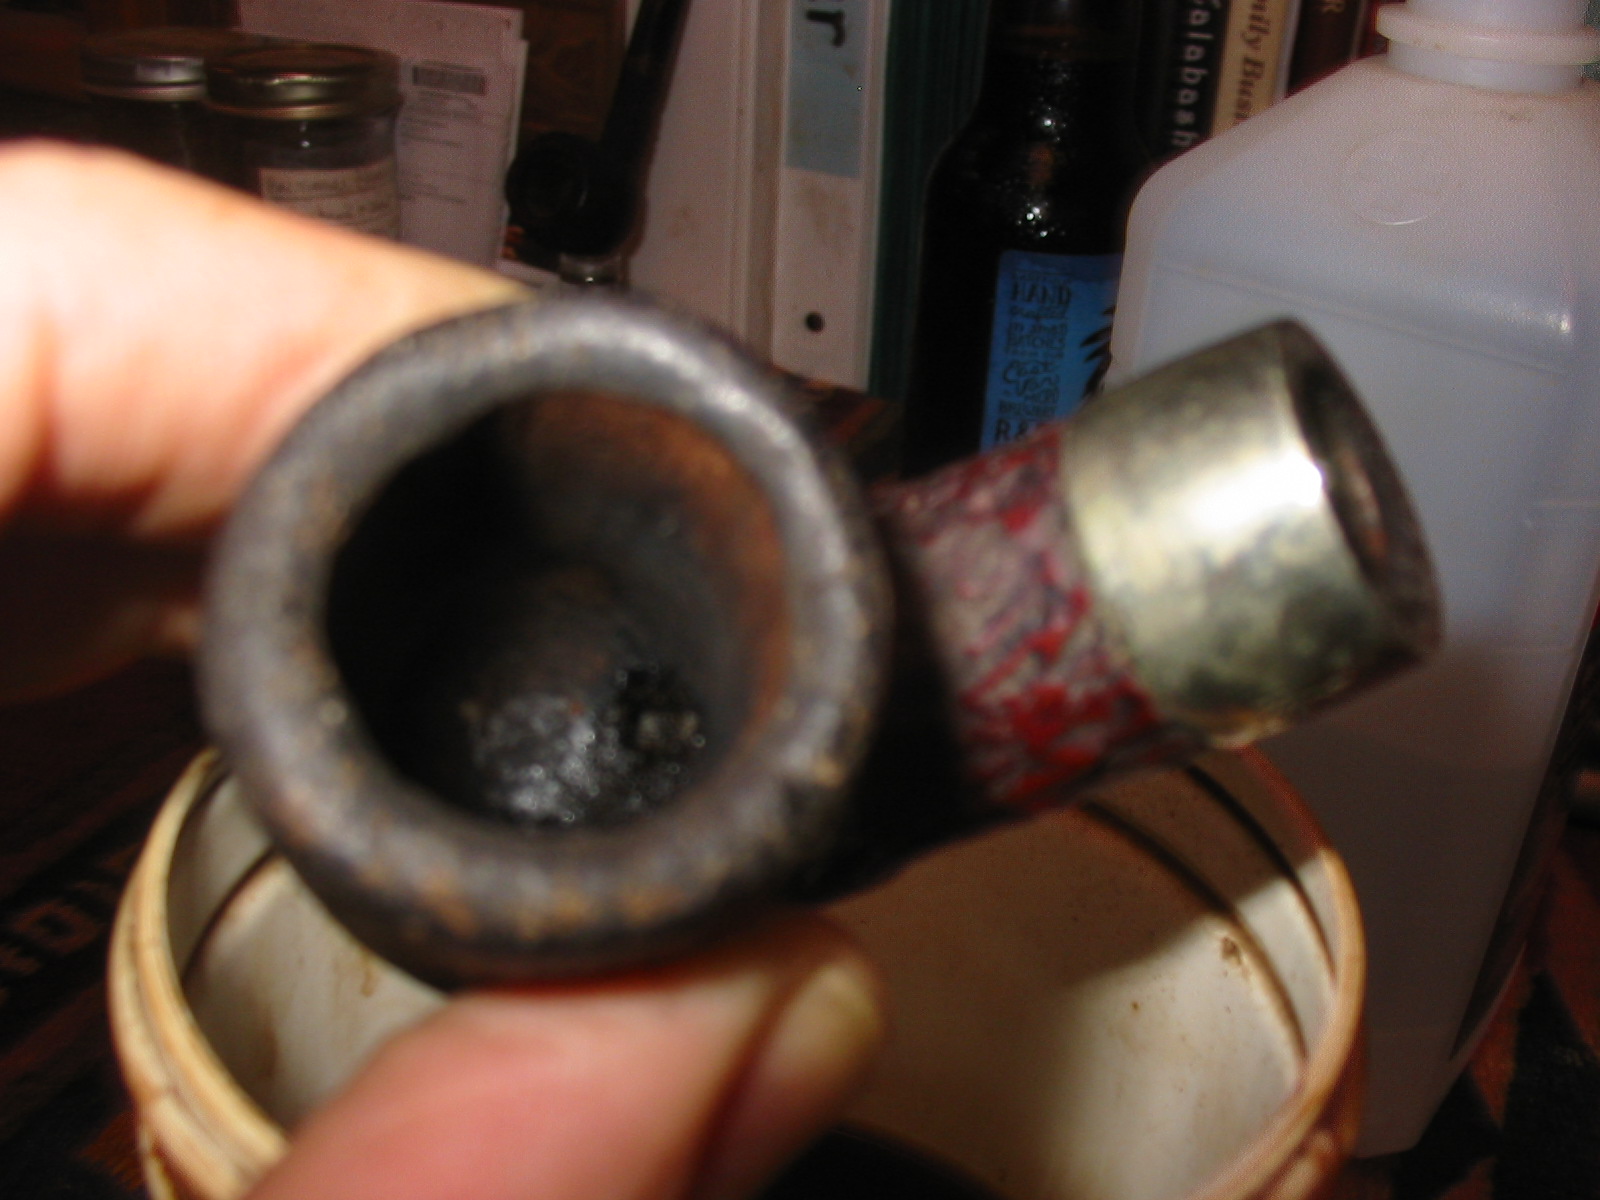
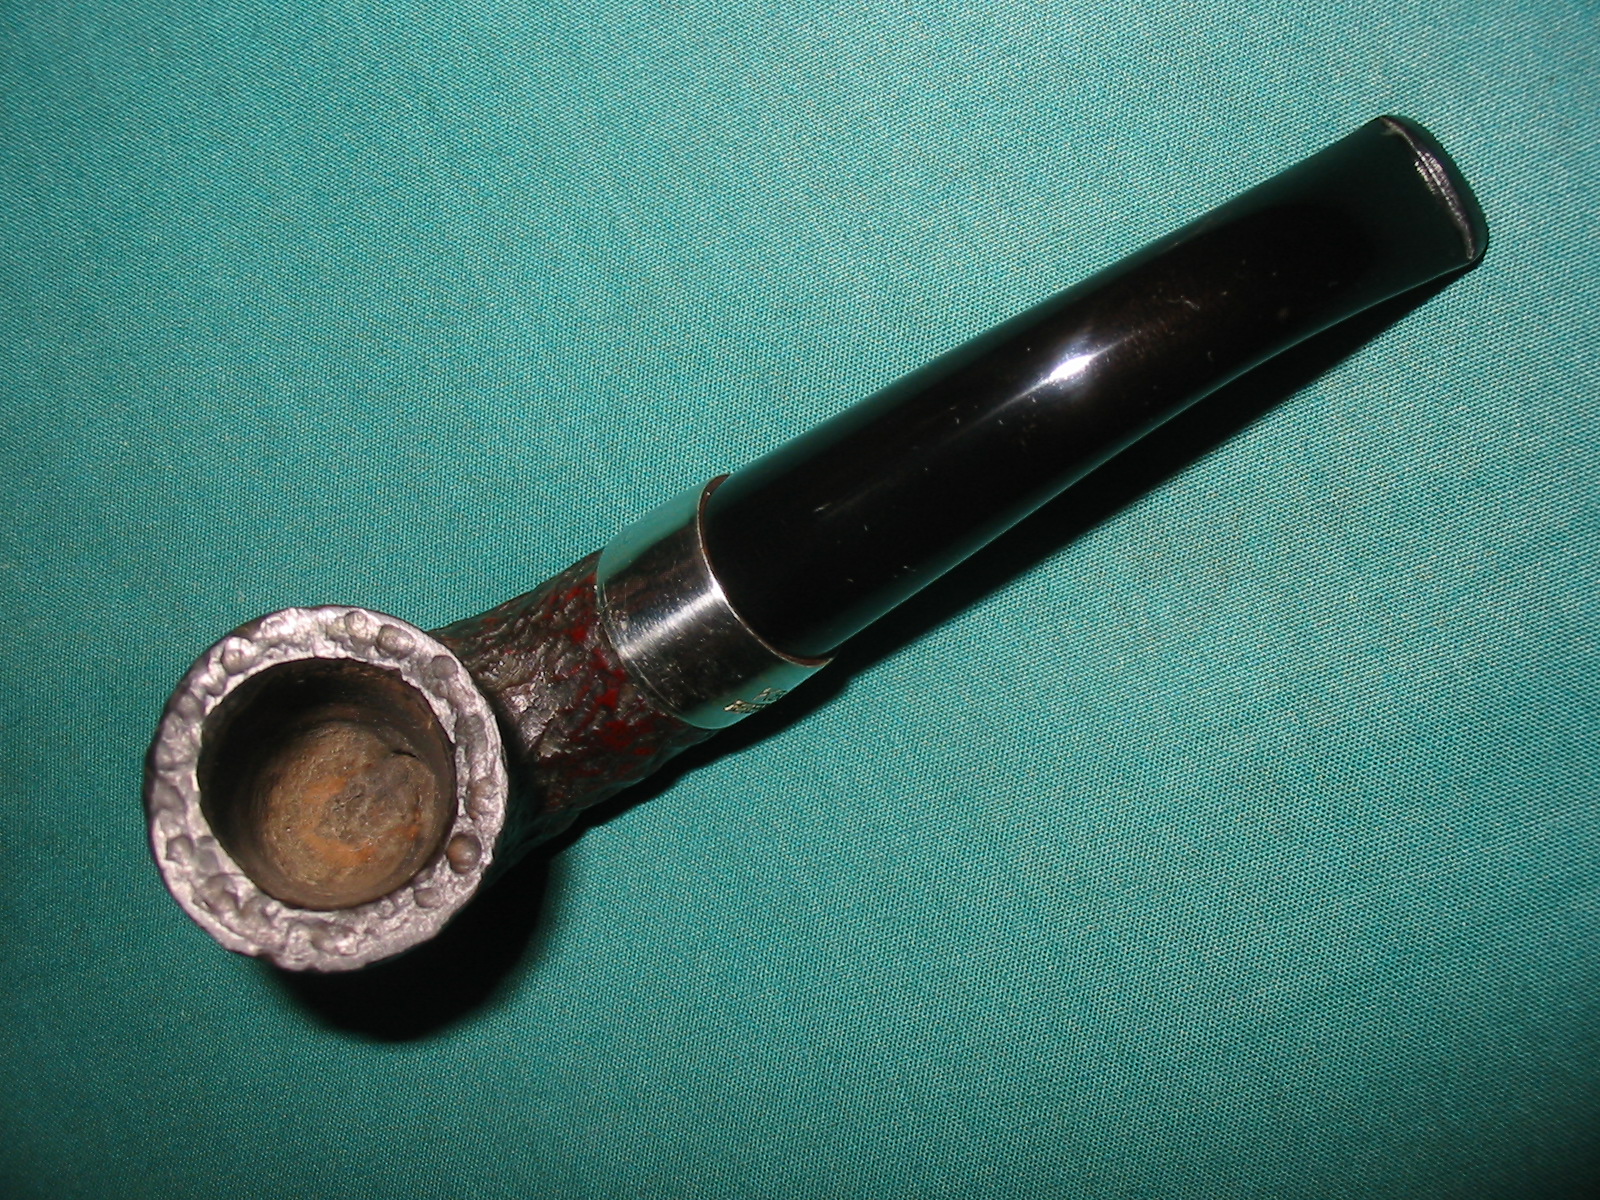
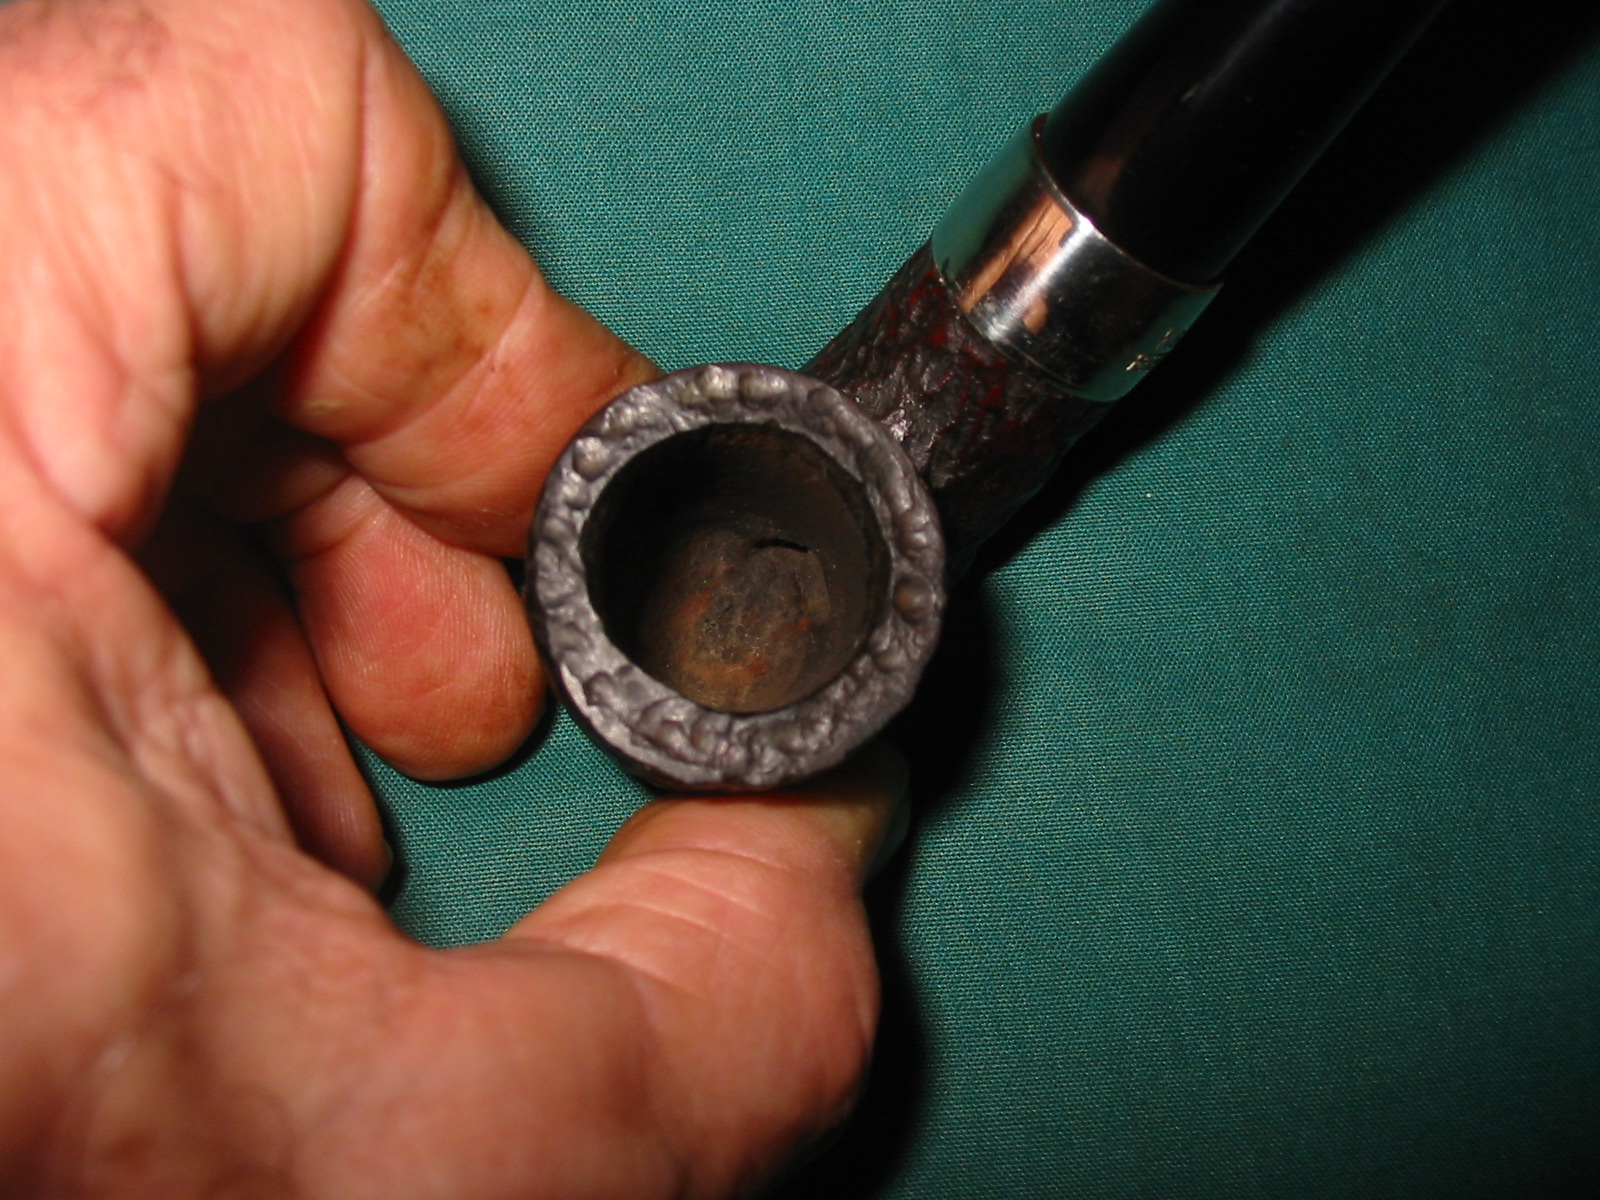
A glance in the bowl showed a buildup of cake so thick he could almost not work his little finger to the bottom. This called for the reamer, which was at hand. He turned the knob on top until the blades were as close as they would go and slid the sharp end as far as it would fit inside the bowl, halfway down. Then he tightened the blades again and began to turn the tool in a slow and even way around the inside.
During this stage of the work Mike tapped onto a small square of cotton the built up carbon as he loosened it with the reamer. The half-hour needed to work his way to the bottom of the bowl and clear cake and make its interior smoother left a pile of soot an inch high and wide, and Mike was behind the schedule he had set. When he considered the character of the owner of Thinbite who had so abused the noble pipe the young man was angered. But he knew the delay was necessary.
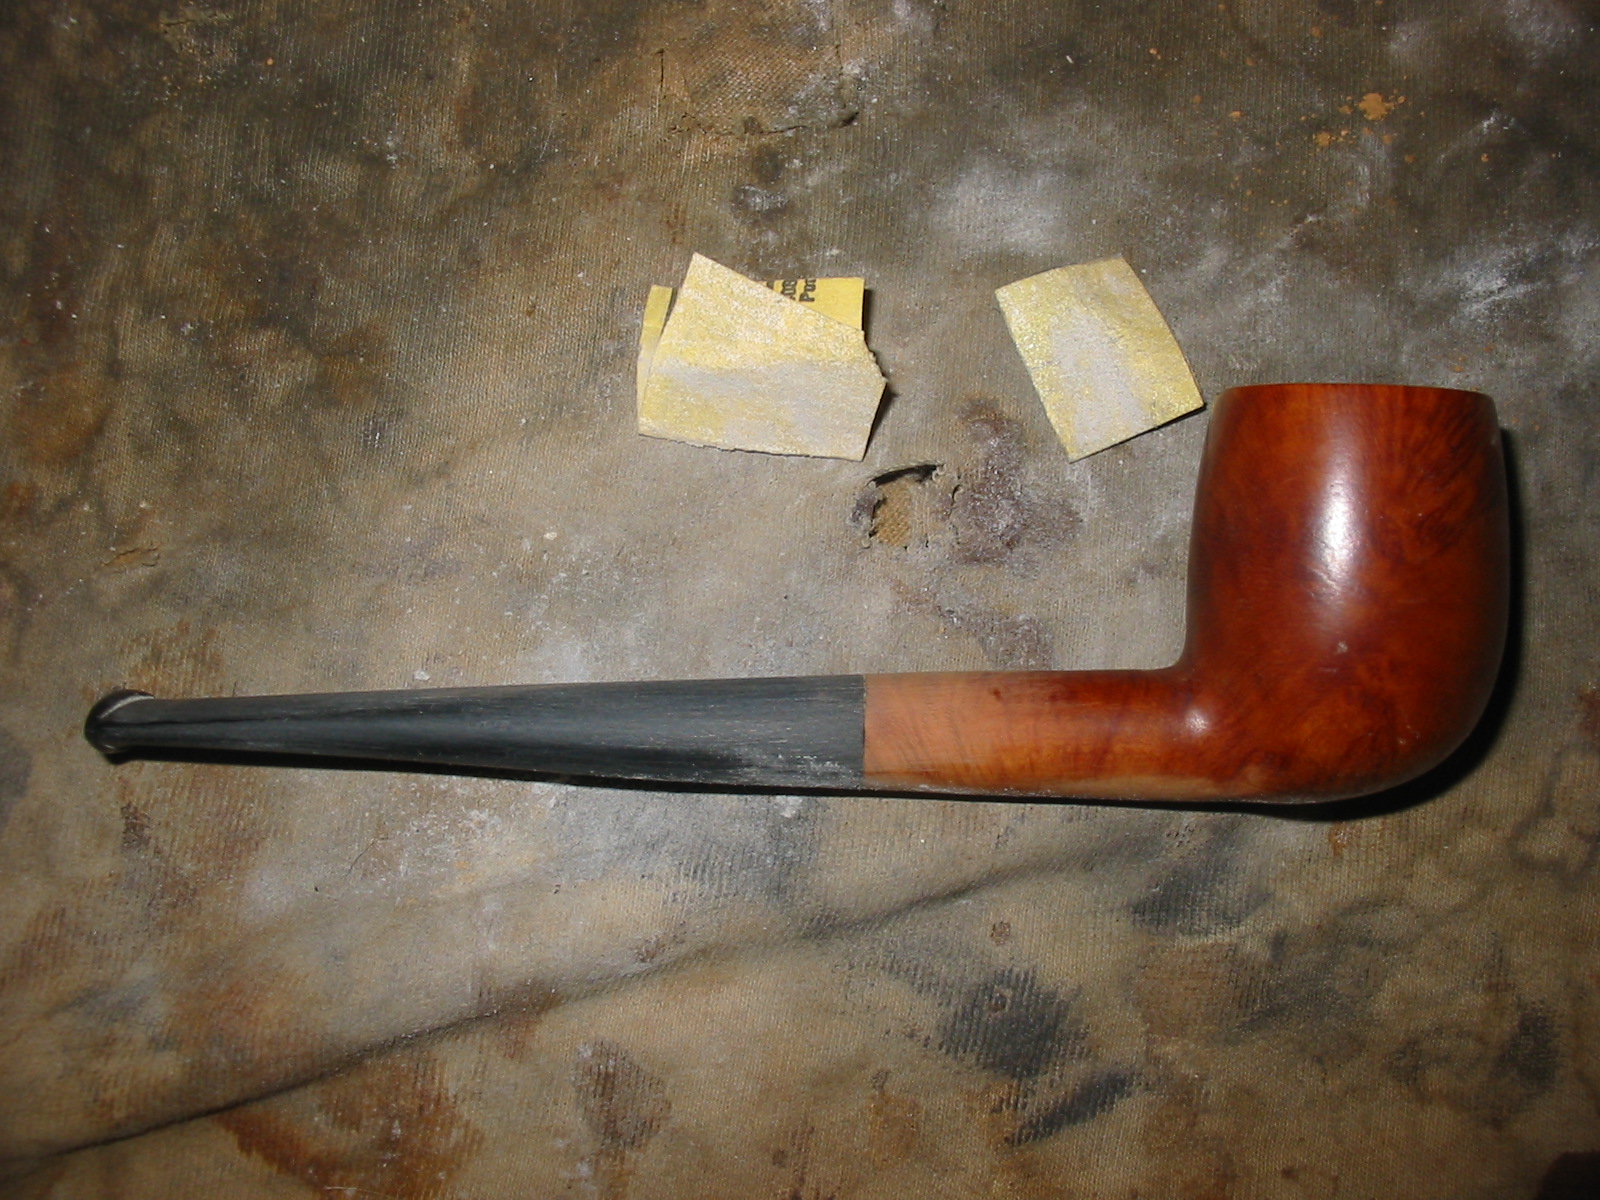
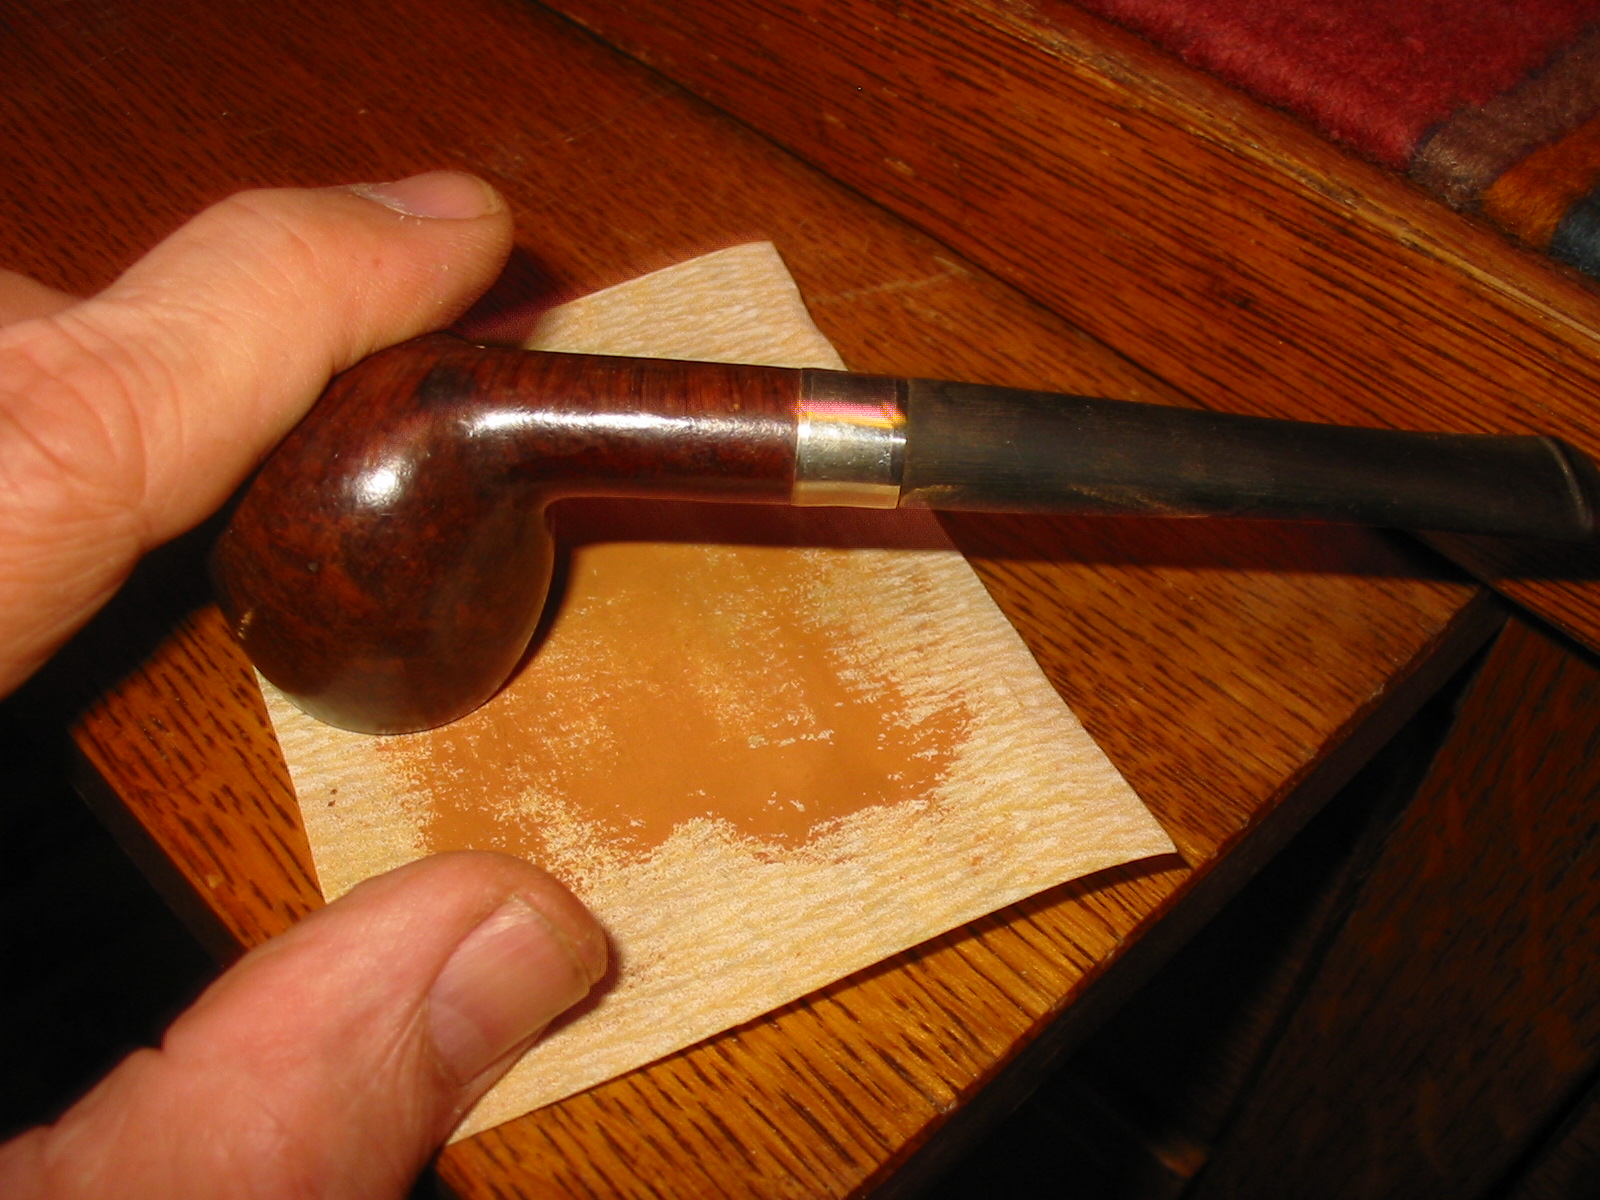
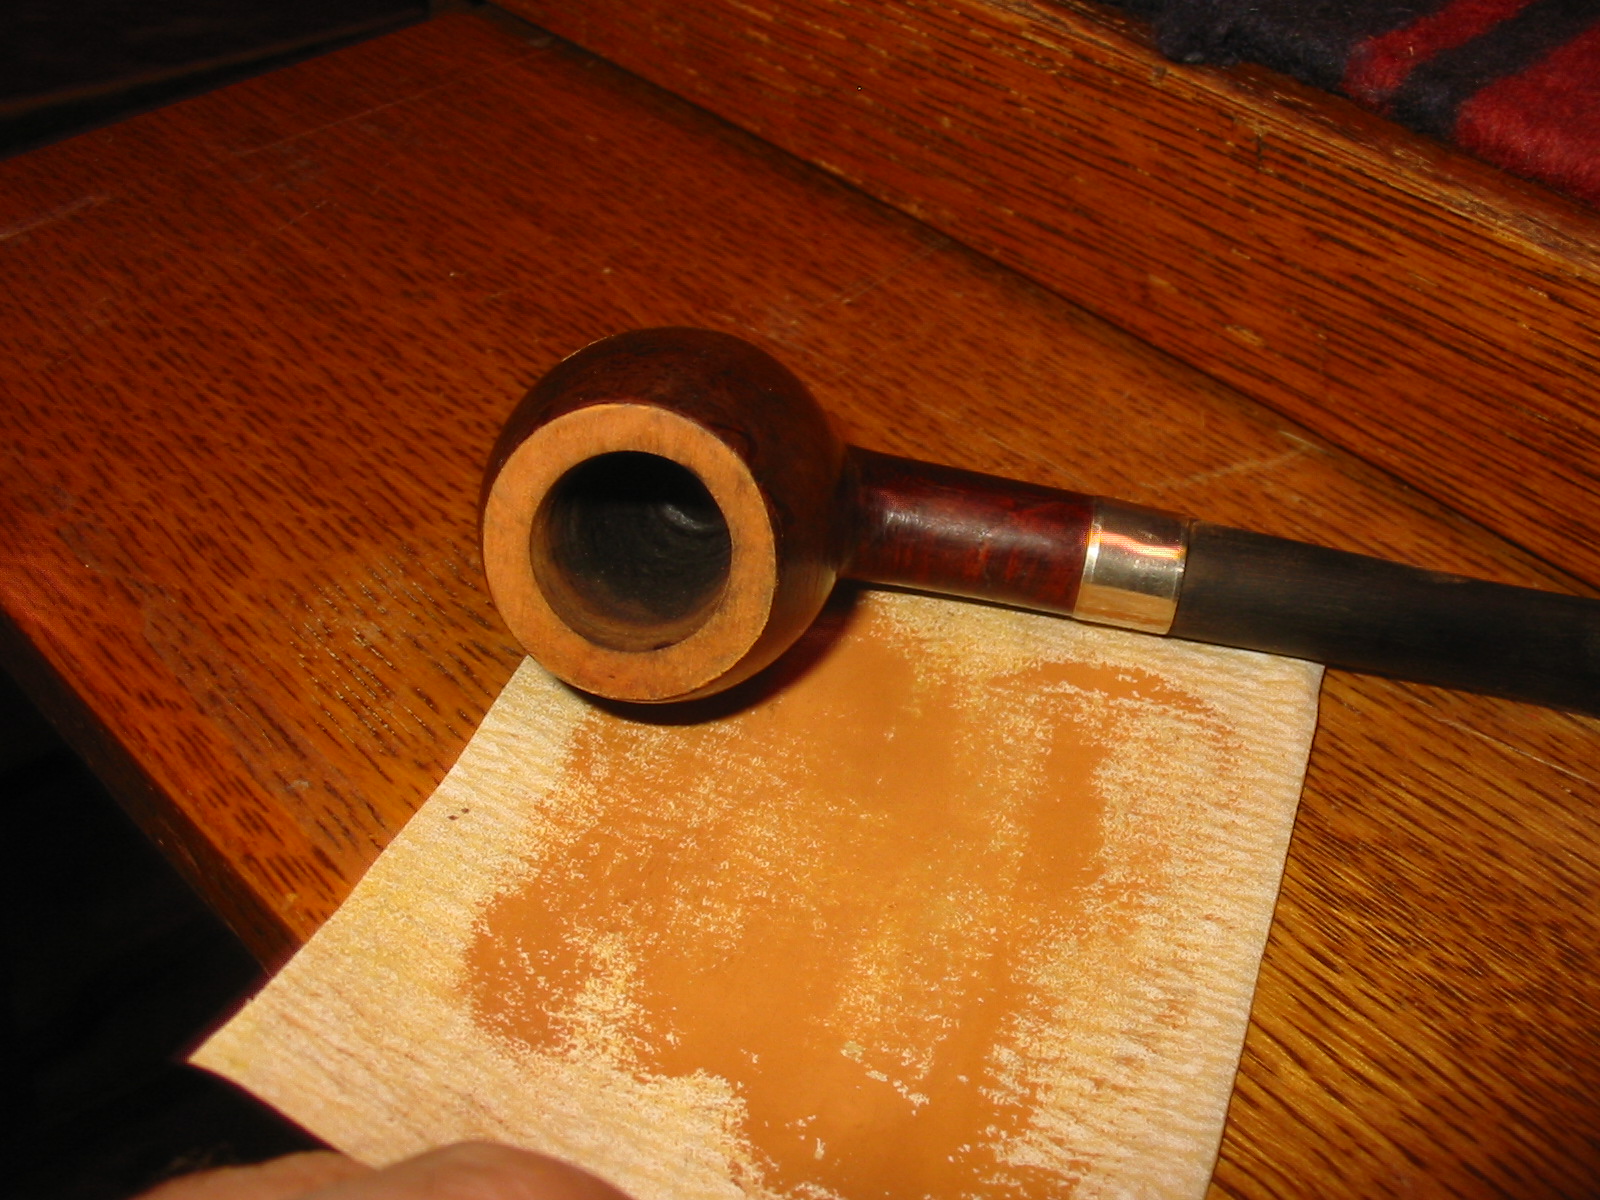
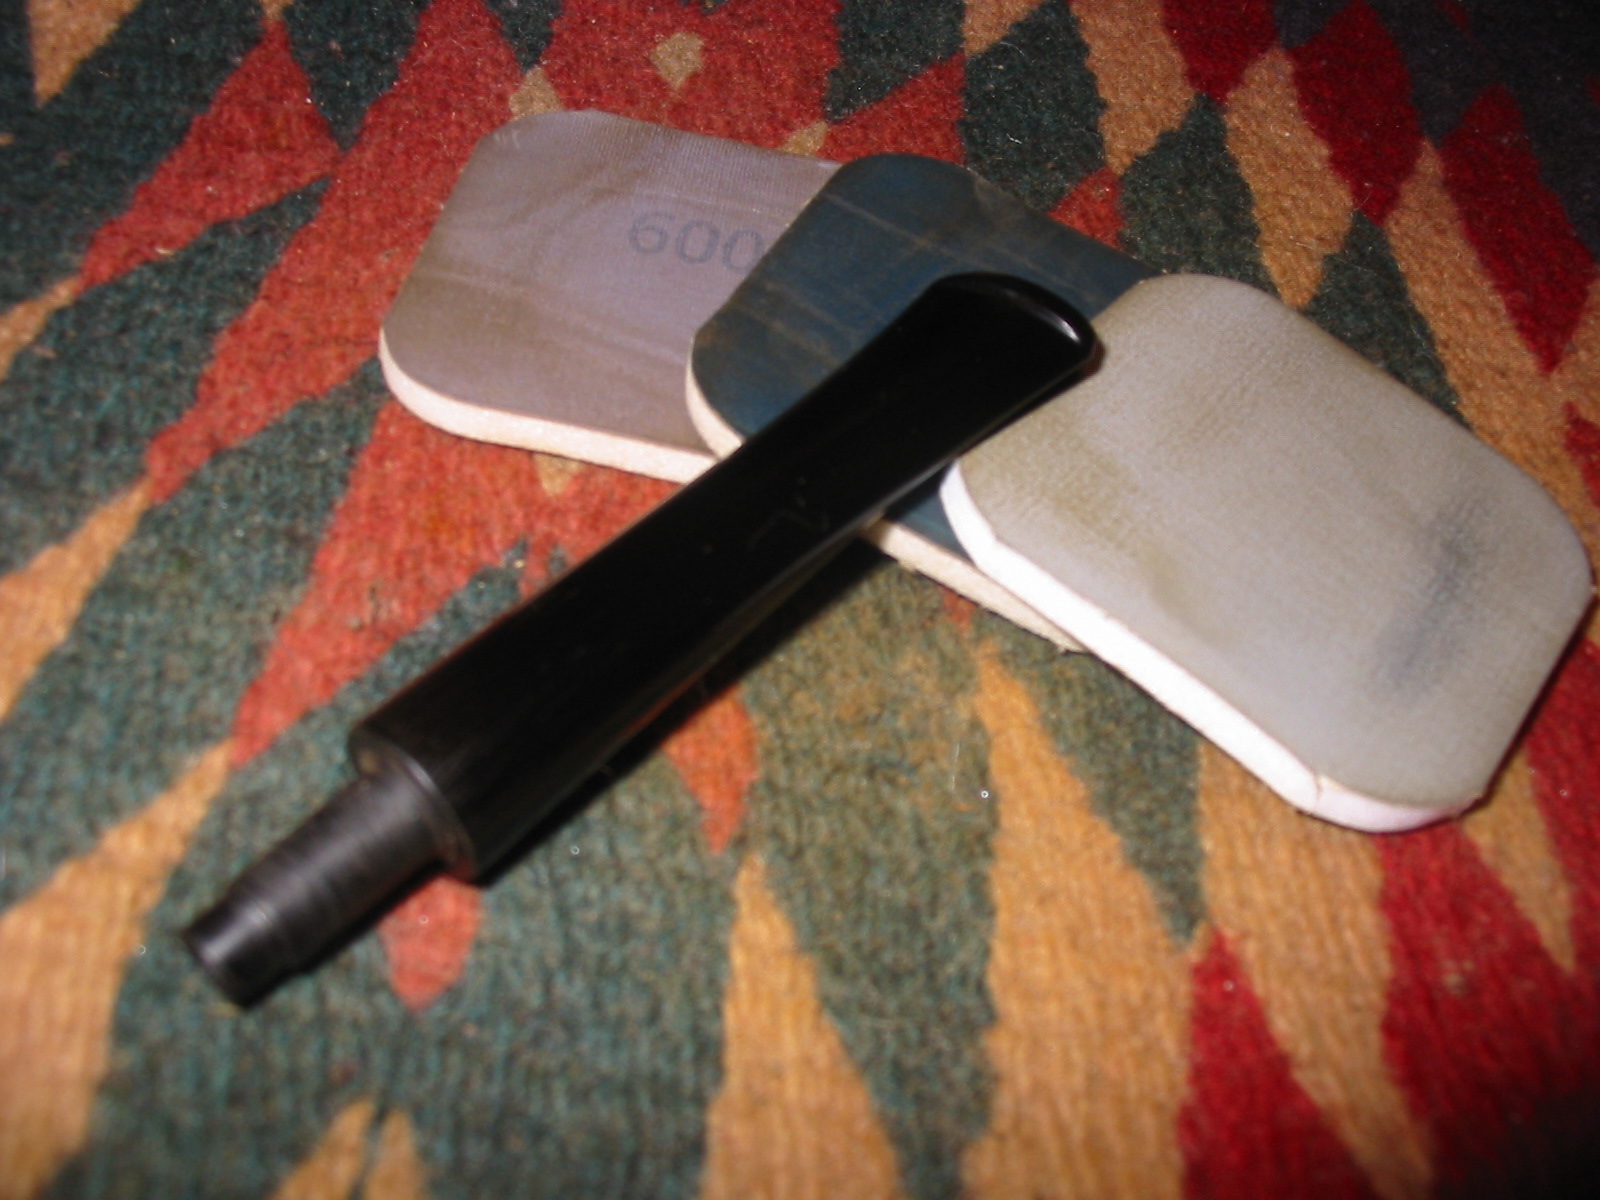
Mike finished smoothing the inside of the bowl with a piece of 400-grit sandpaper wrapped around his pinkie so he could keep the paper where he wanted it. When he felt no resistance he removed the paper and again blew a big cloud of old cake from the bowl.
He dampened a square of cotton with alcohol and turned it in the inside of the bowl. The cotton came out black but when he again ran a finger against the inner bowl it was as smooth as it had ever been, and his finger was clean.
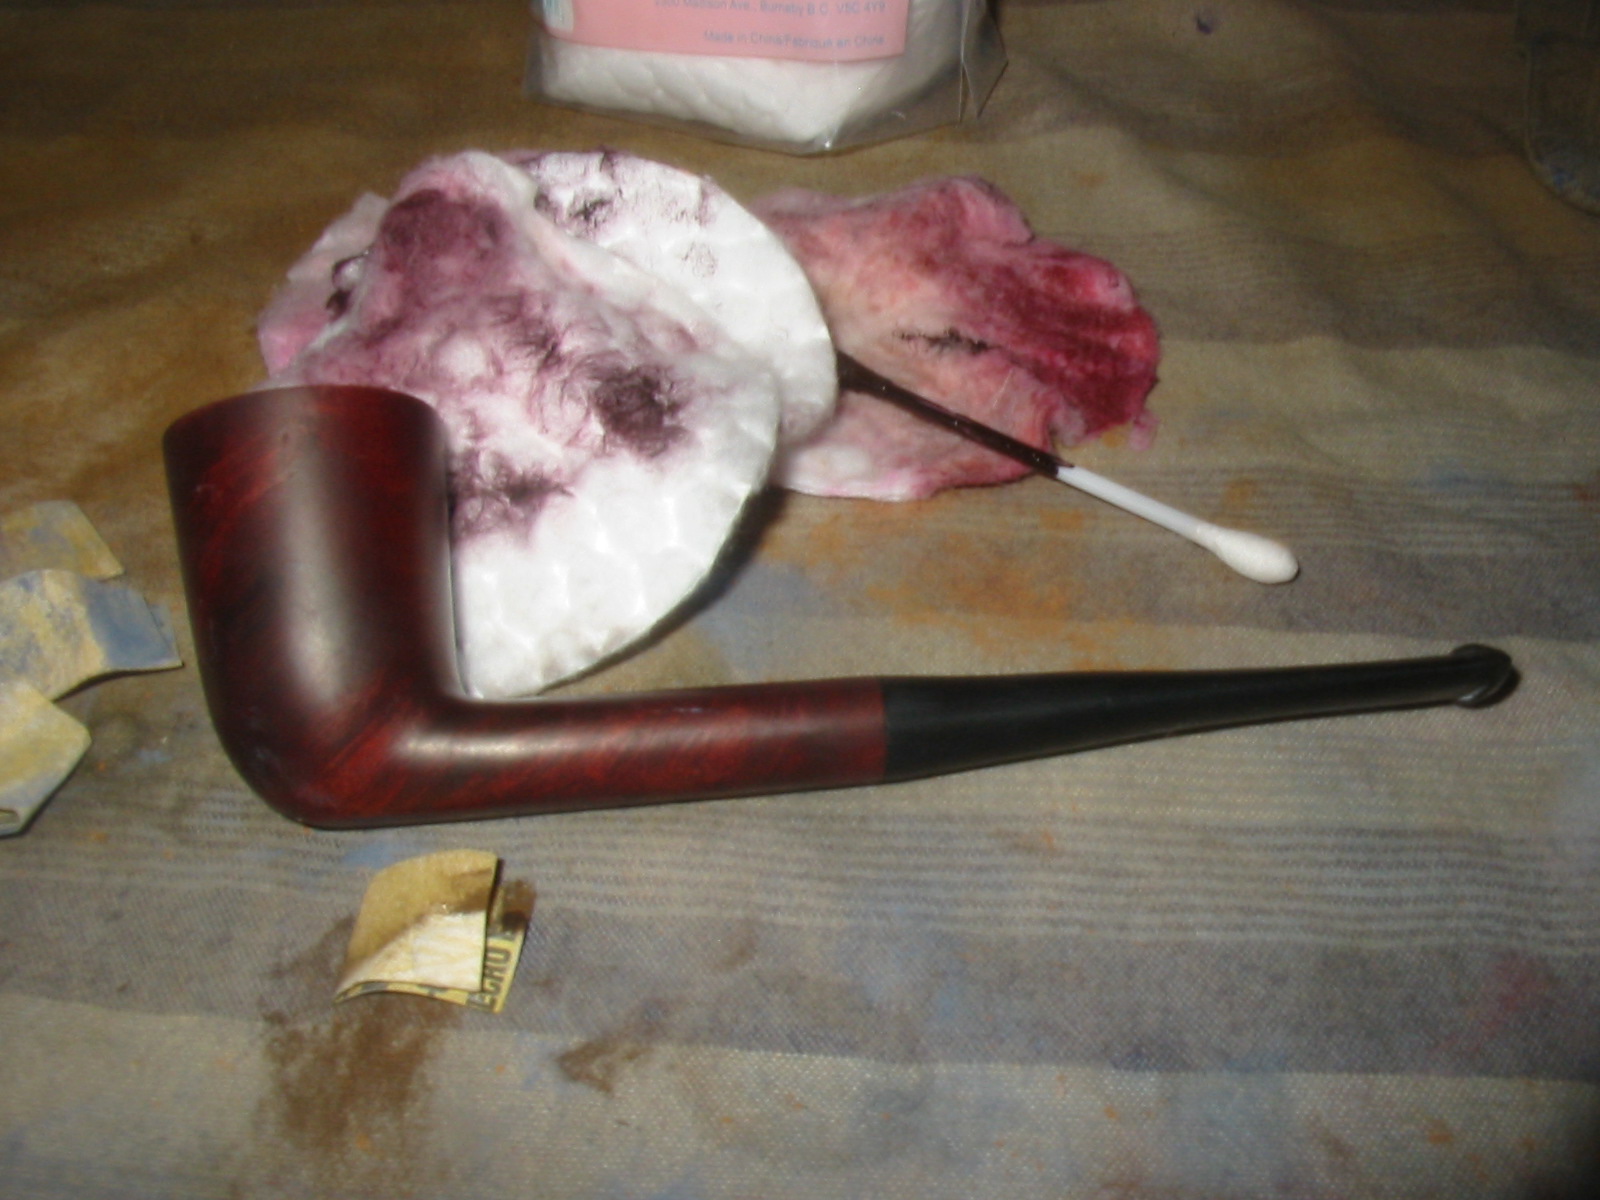
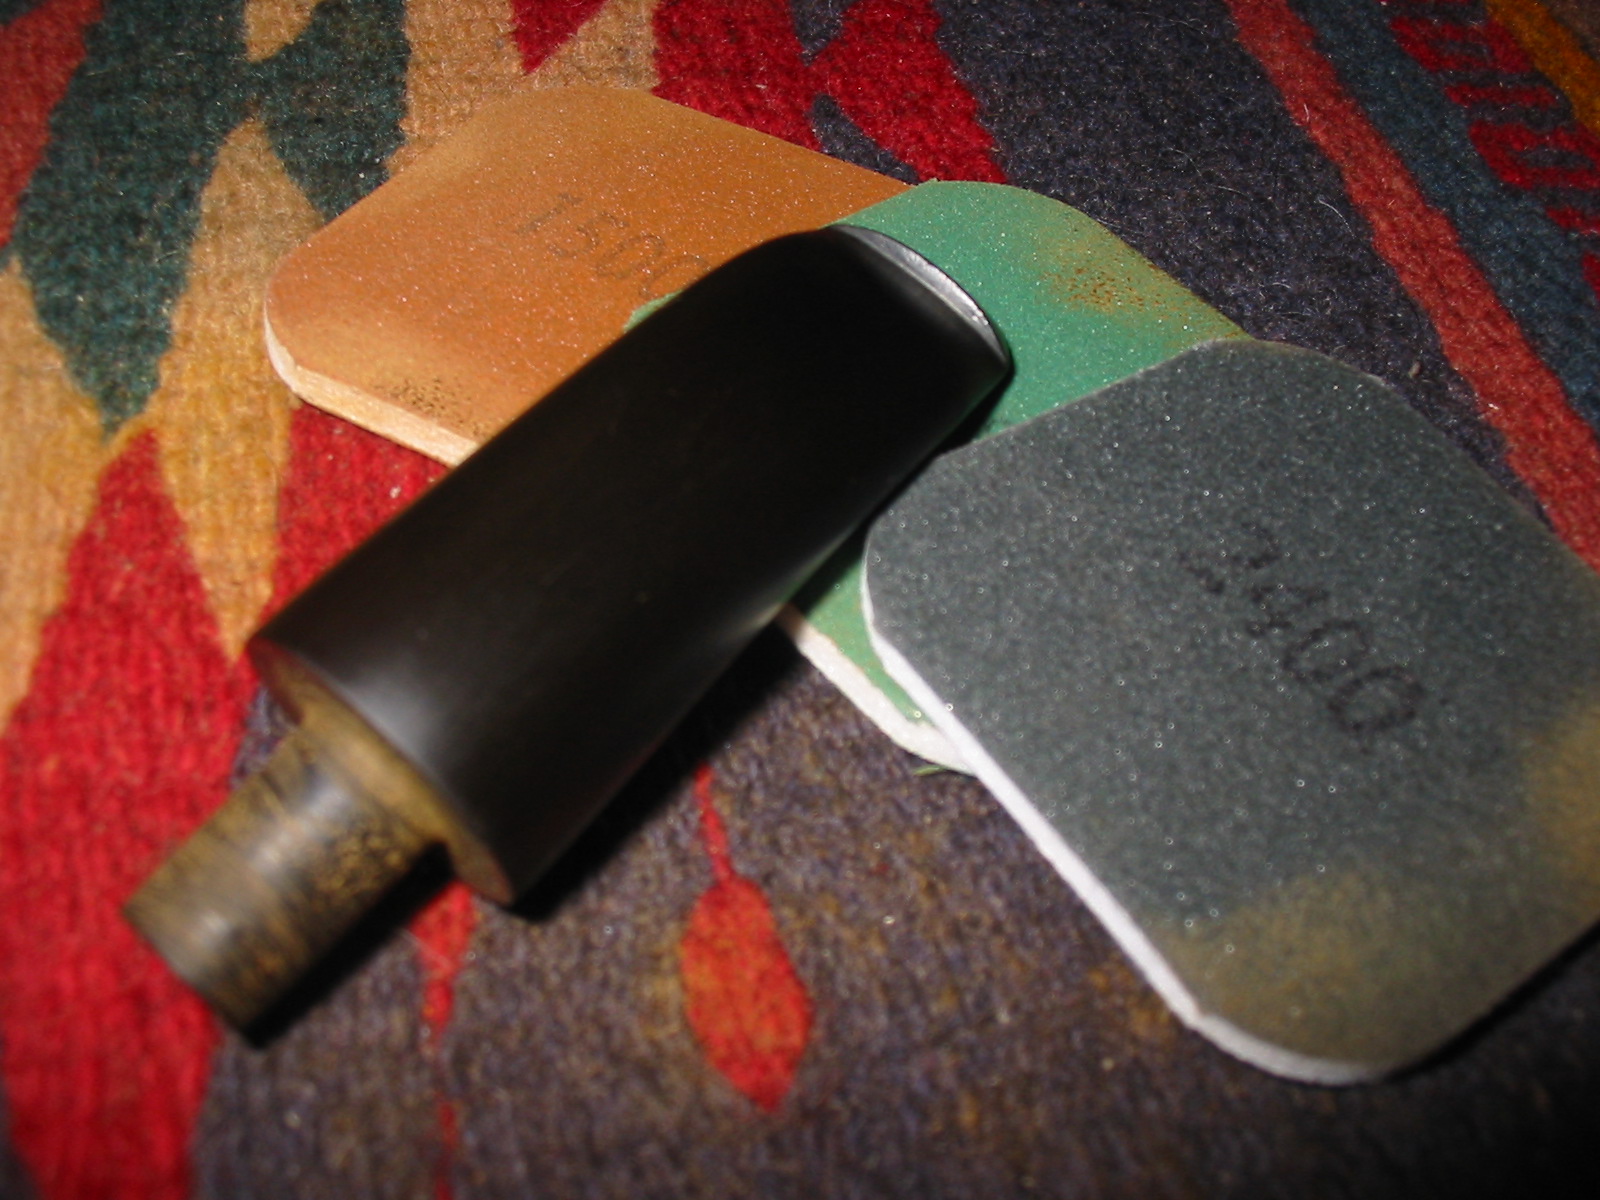
Then, starting with a regular piece of the same paper, Mike made the dings and scratches in the rim of Thinbite disappear before smoothing it with 1000-grit micromesh.
The fills in the wood seemed to make nasty faces at Mike. But instead of giving in to their taunts, the young man thought until his eyes narrowed and the furrow in his brow grew deep.
“I remember!” he said, loud enough to awaken his neighbors, and then lowered his voice. He never liked it when others did this to him. “The trick is using an indelible marker the same color as the grain of the wood to draw over the fills and mask them before the stain and waxes are applied.”
Mike held his breath while he searched his work table for a pack of colored markers and let out the sigh of relief when he found it. He chose the only brown pen there was even though it seemed to be too dark, which when he drew over the fills in the wood that were circles and lines and other shapes he found he was correct.
“Well, then,” he said. “I will just have to improvise with coats of lighter colors until is at least closer to the true color.”
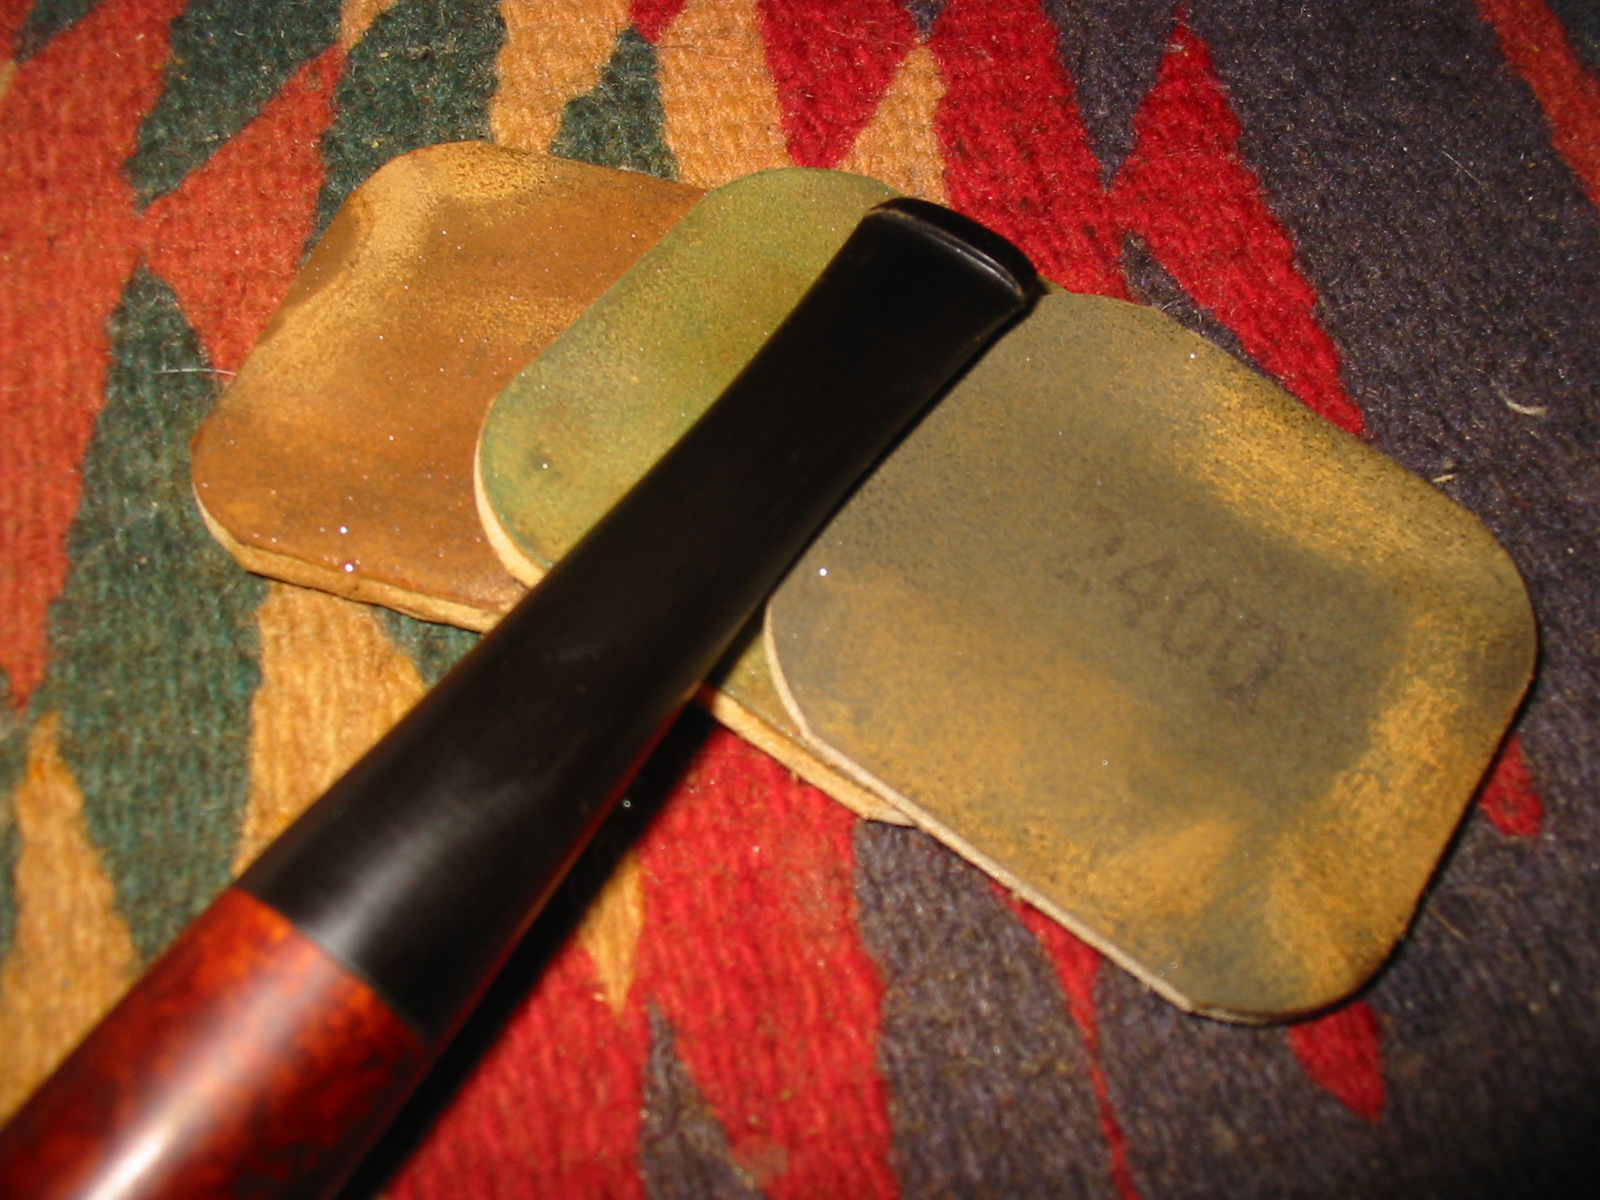
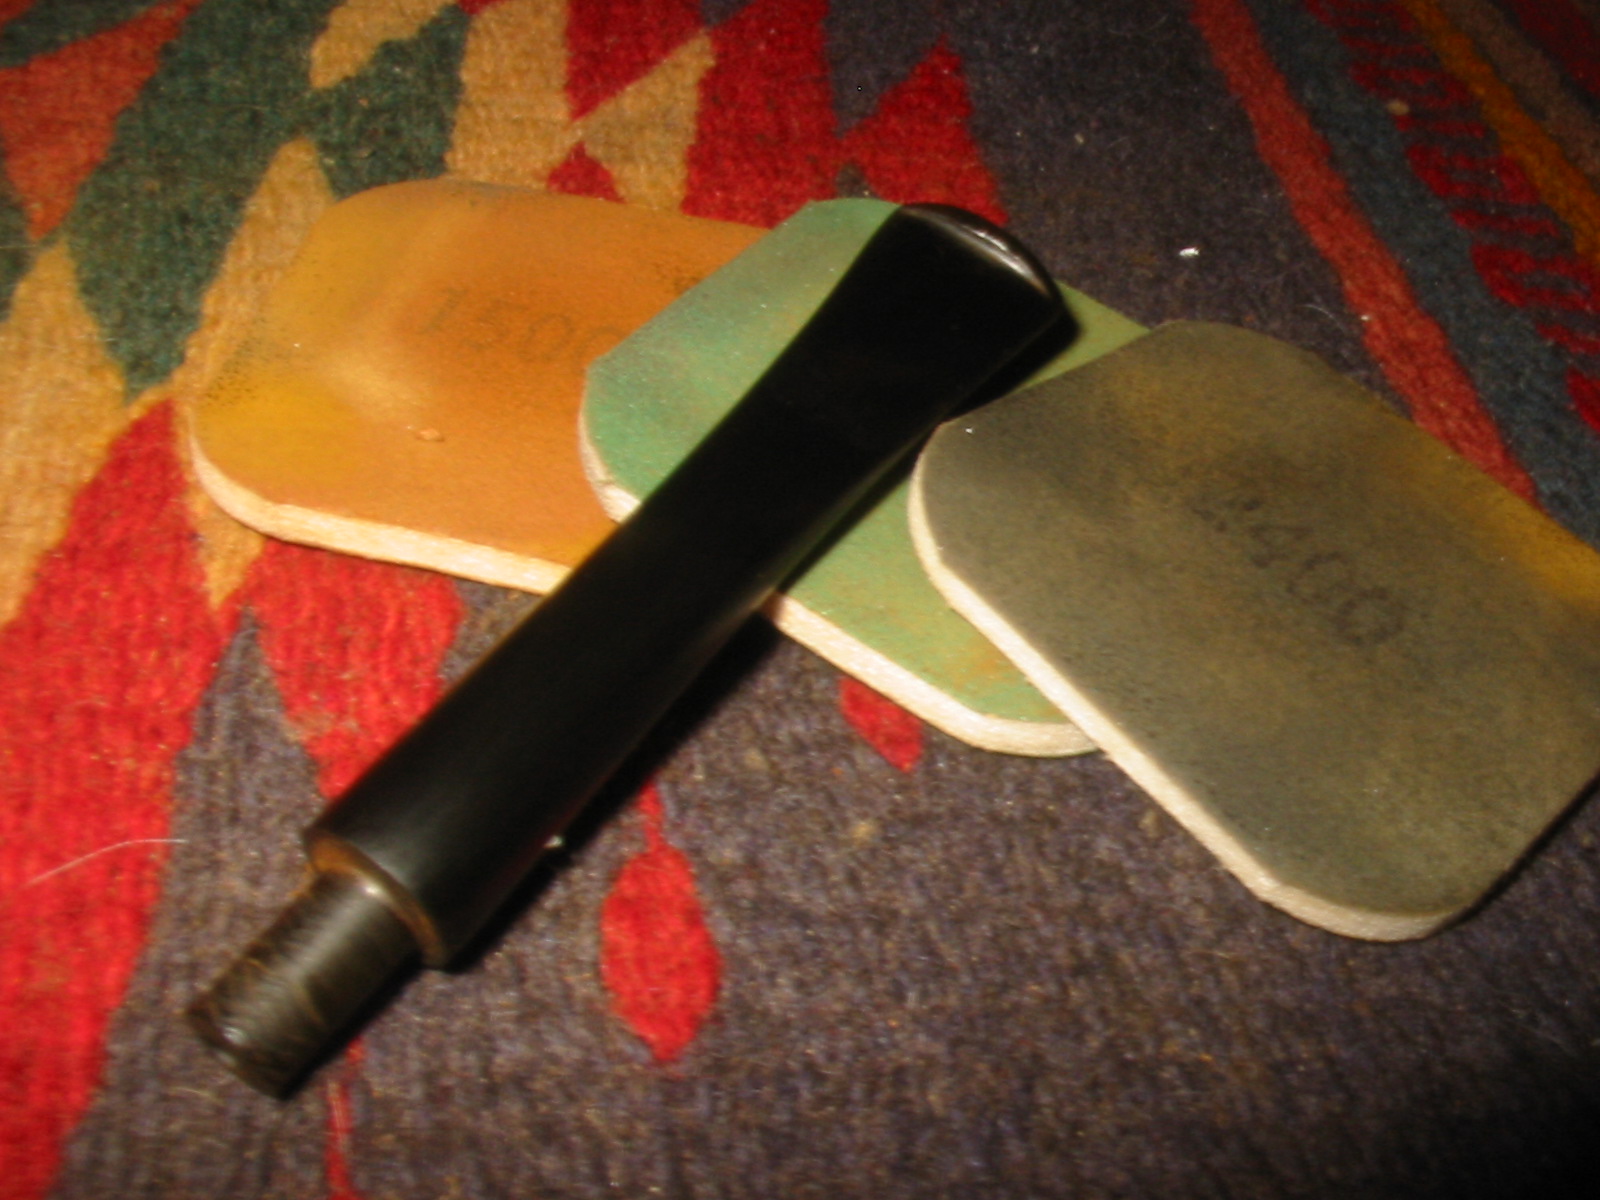
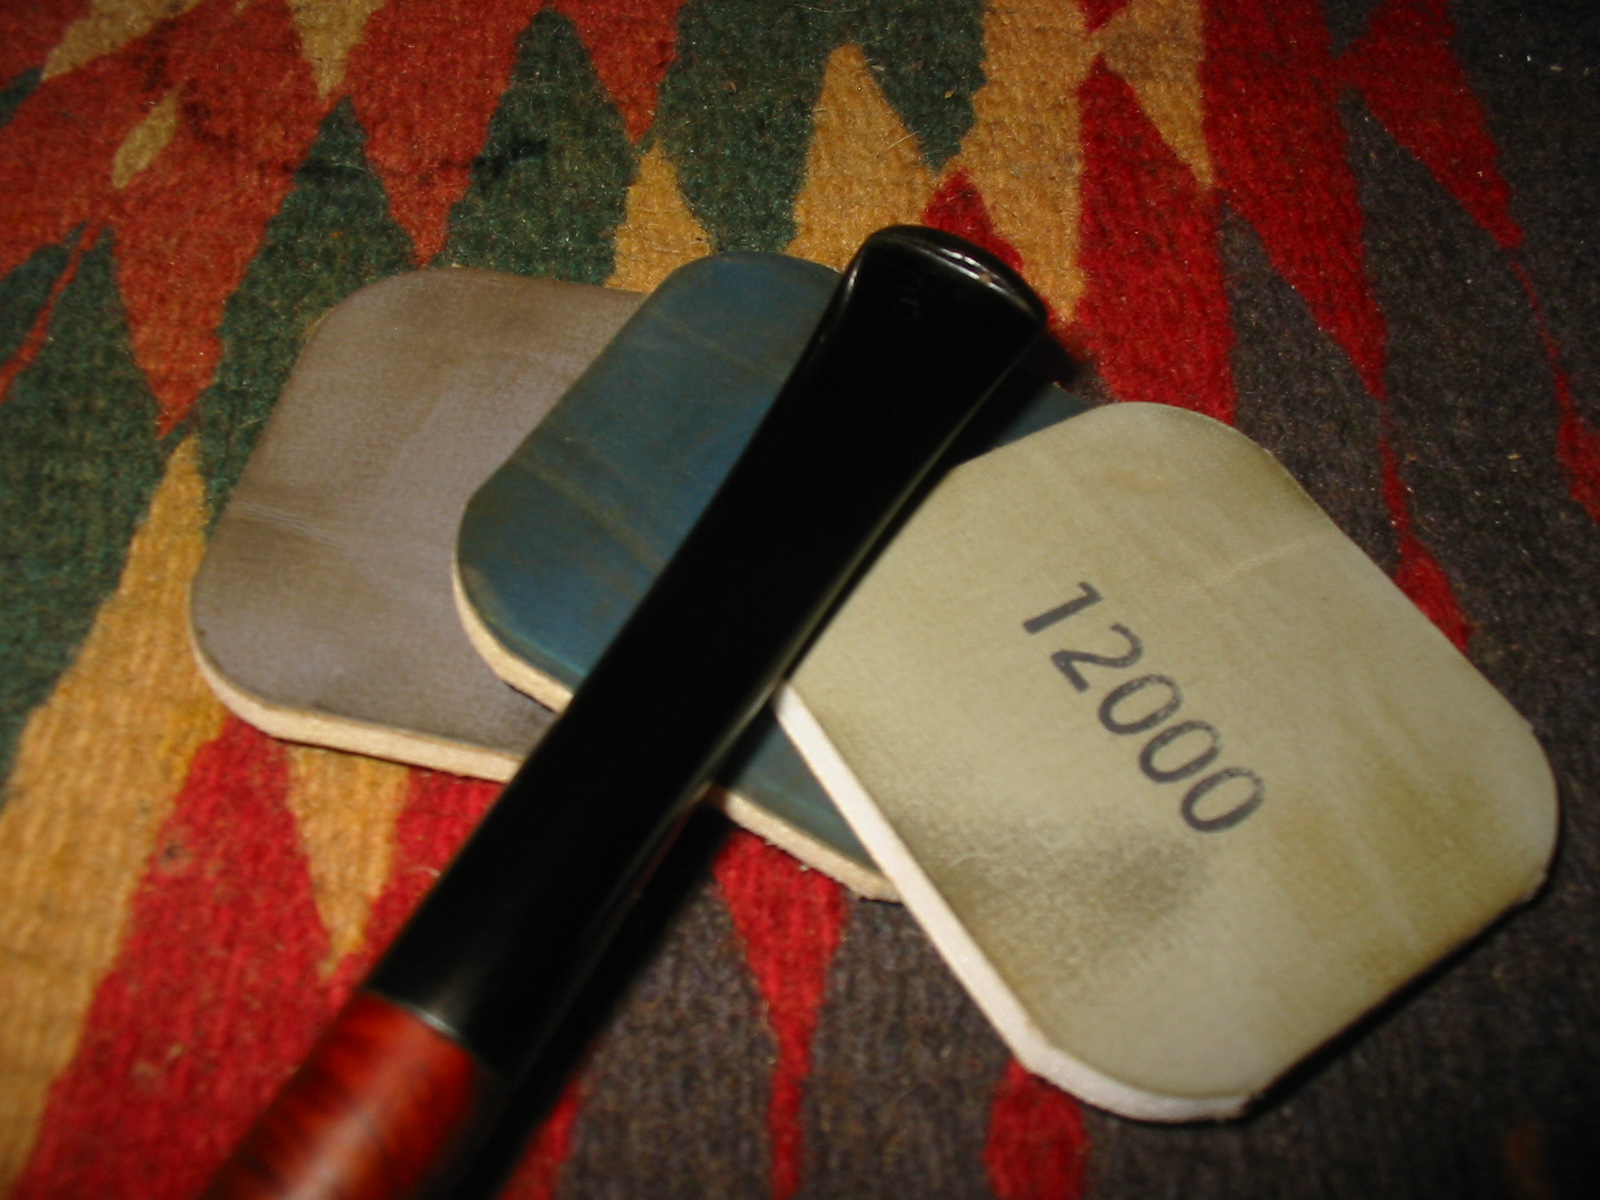
He did this, first with yellow, then orange, and to his surprise the result was good. He gave the finished work the gentlest micromesh he could manage, which was almost not even a flick of the 3200 paper over the marked wood. 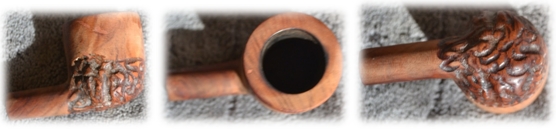
 The rest is not all that bad, Mike thought as he examined the entire pipe for scratches. He found some but they all went away with gentle sanding.Something nagged at the back of his mind that he had forgotten a detail of his grandfather’s method.
But at that moment, as though from a clear sky over an endless smooth ocean, which Mike had never seen, the idea came to him that he could use different colored stains on the pipe. After a moment of consideration, he decided on the red of Catalonian wine for the lower region of the bowl with its rustication and smooth shank, and the brown of the Ebro River Valley hills for the upper area.He drifted into a reverie.
Mike had never visited either of these places but read about them in some of the books he used to pretend he did not understand. His father most of the last five years when Mike lived with his parents understood the boy’s need for privacy but on one occasion without knocking opened the door to the bathroom and caught Mike, on his knees, dressed only in his underwear and bent over one of the books written in the language of Spain.
“What are you doing with that book you cannot even read?” the father said with a look of anger and horror on his face. The boy flushed red and at first he stammered.
“I like the pictures,” he said and felt dirty as a sudden sweat covered his body from the lie.
“There are no pictures on those pages,” the father said. He seemed confused and embarrassed and at last relieved as he understood. “Oh. Carry on.”
And when he left he smiled, in a way that told the boy he had been discovered, and closed the door. The fact that he could read Spanish was no longer his secret. Mike had never been filled with such complete humiliation.
In his private studio Mike’s thoughts returned to the reality of the pipe in his hands and he smiled, at peace with the past and present.
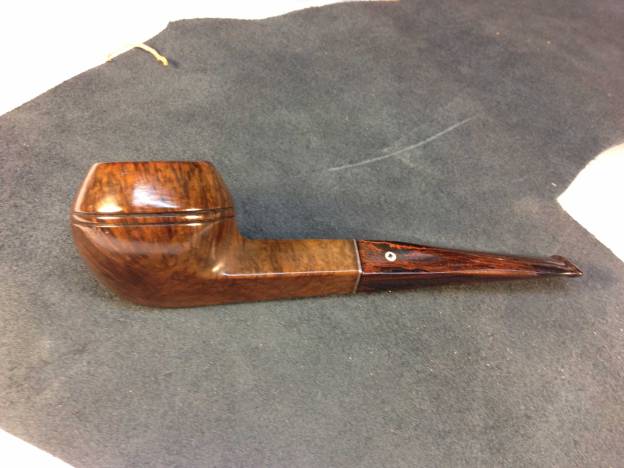
“This Thinbite of Italy will have some of the best parts of Spain when I am finished with it,” Mike said.
The wood was shiny and free of imperfections except for the filled places. But even they looked better.
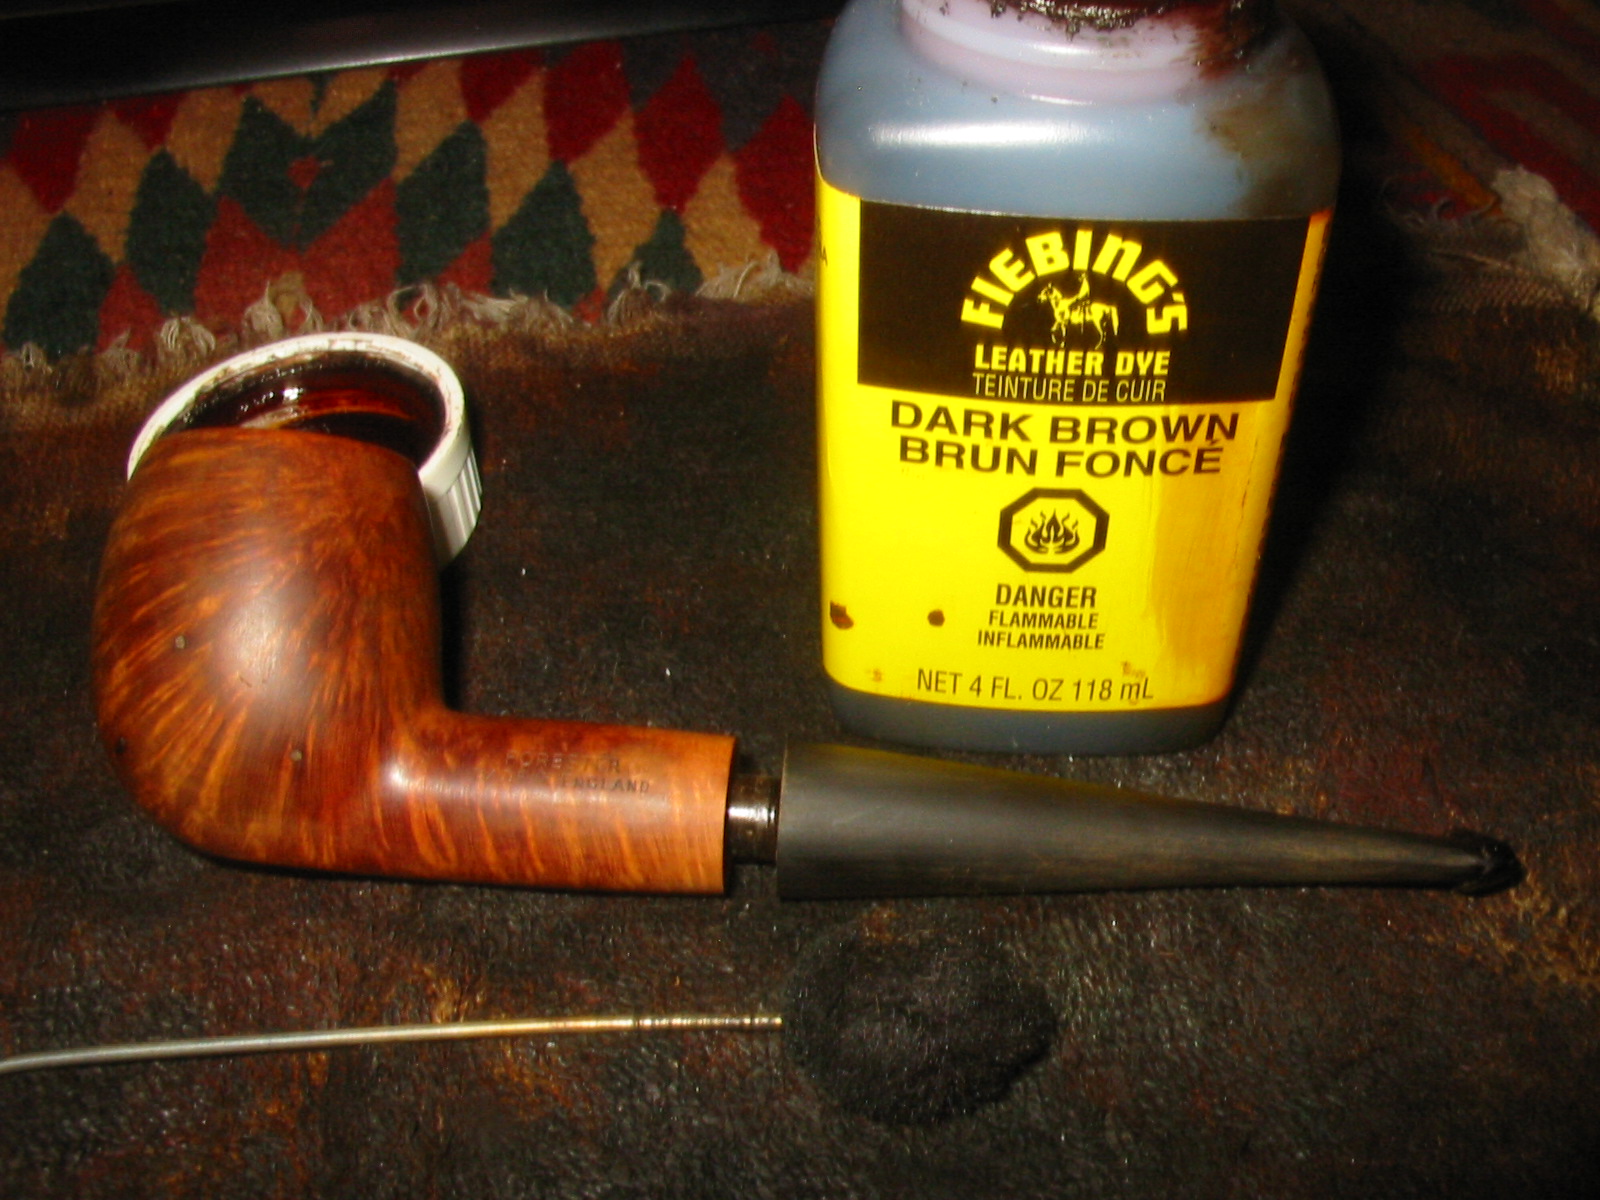
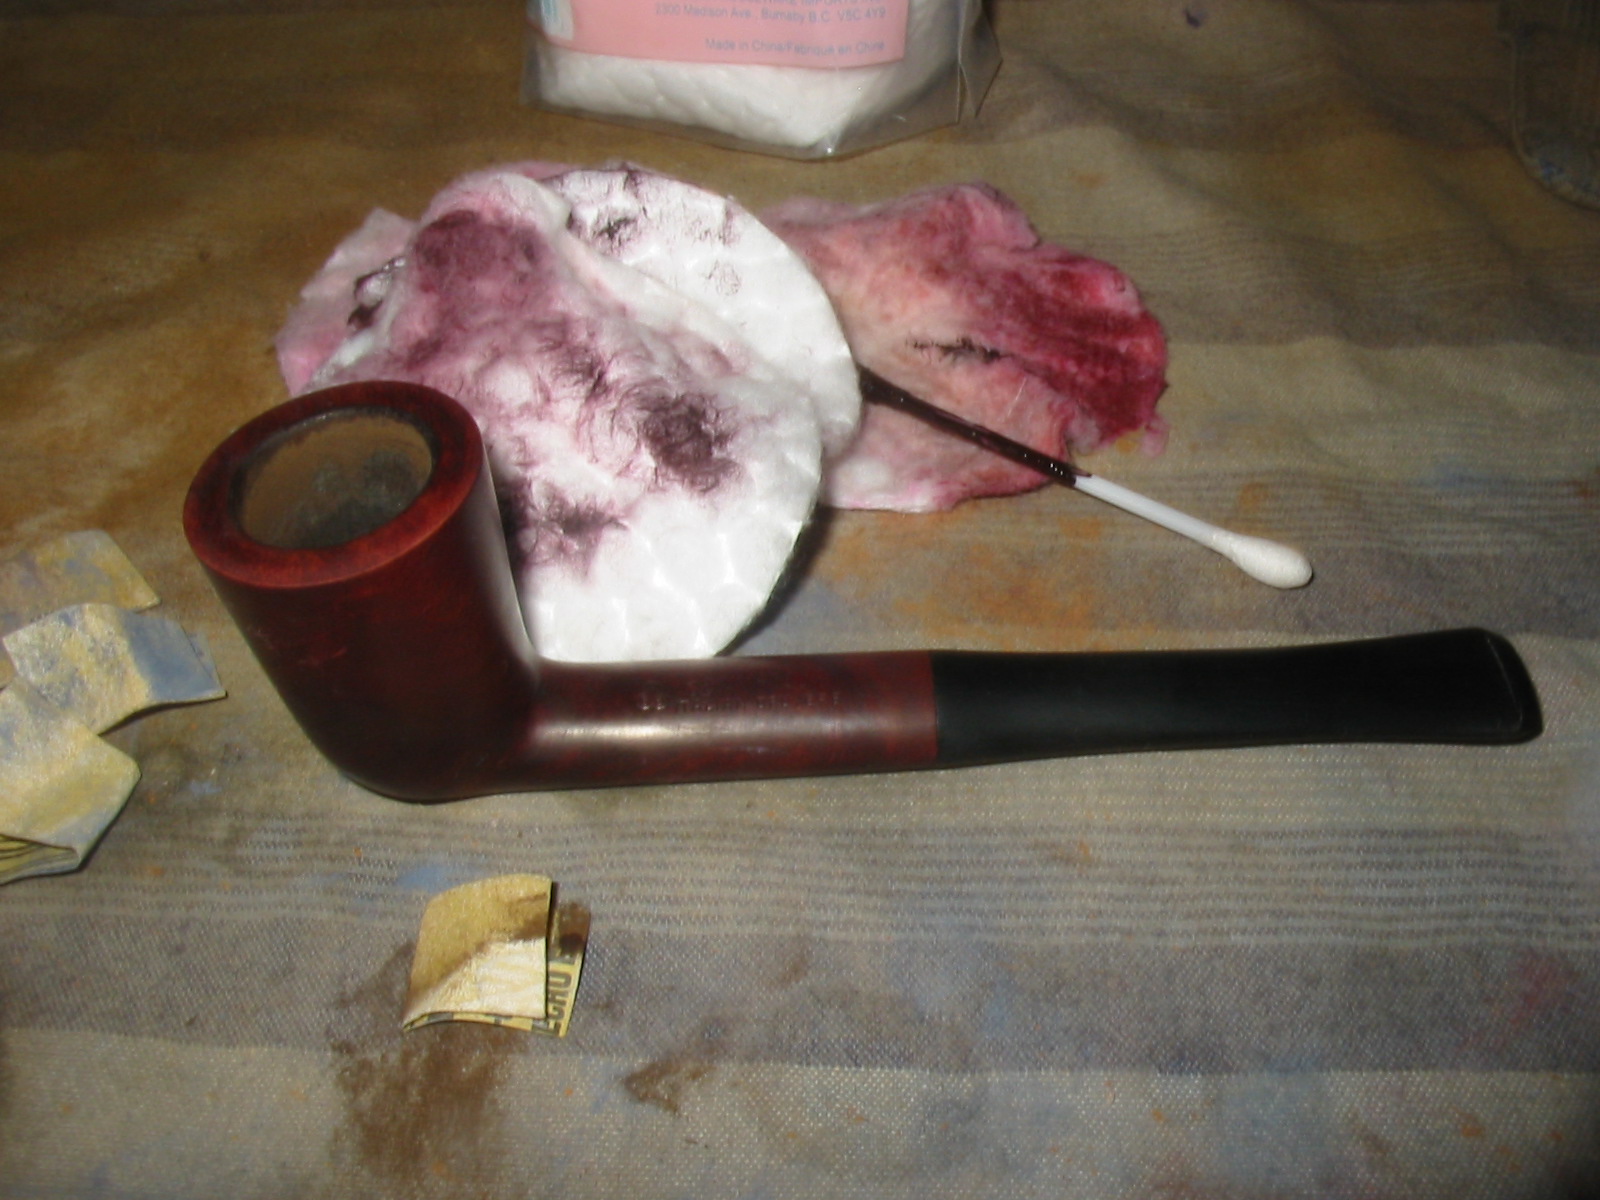
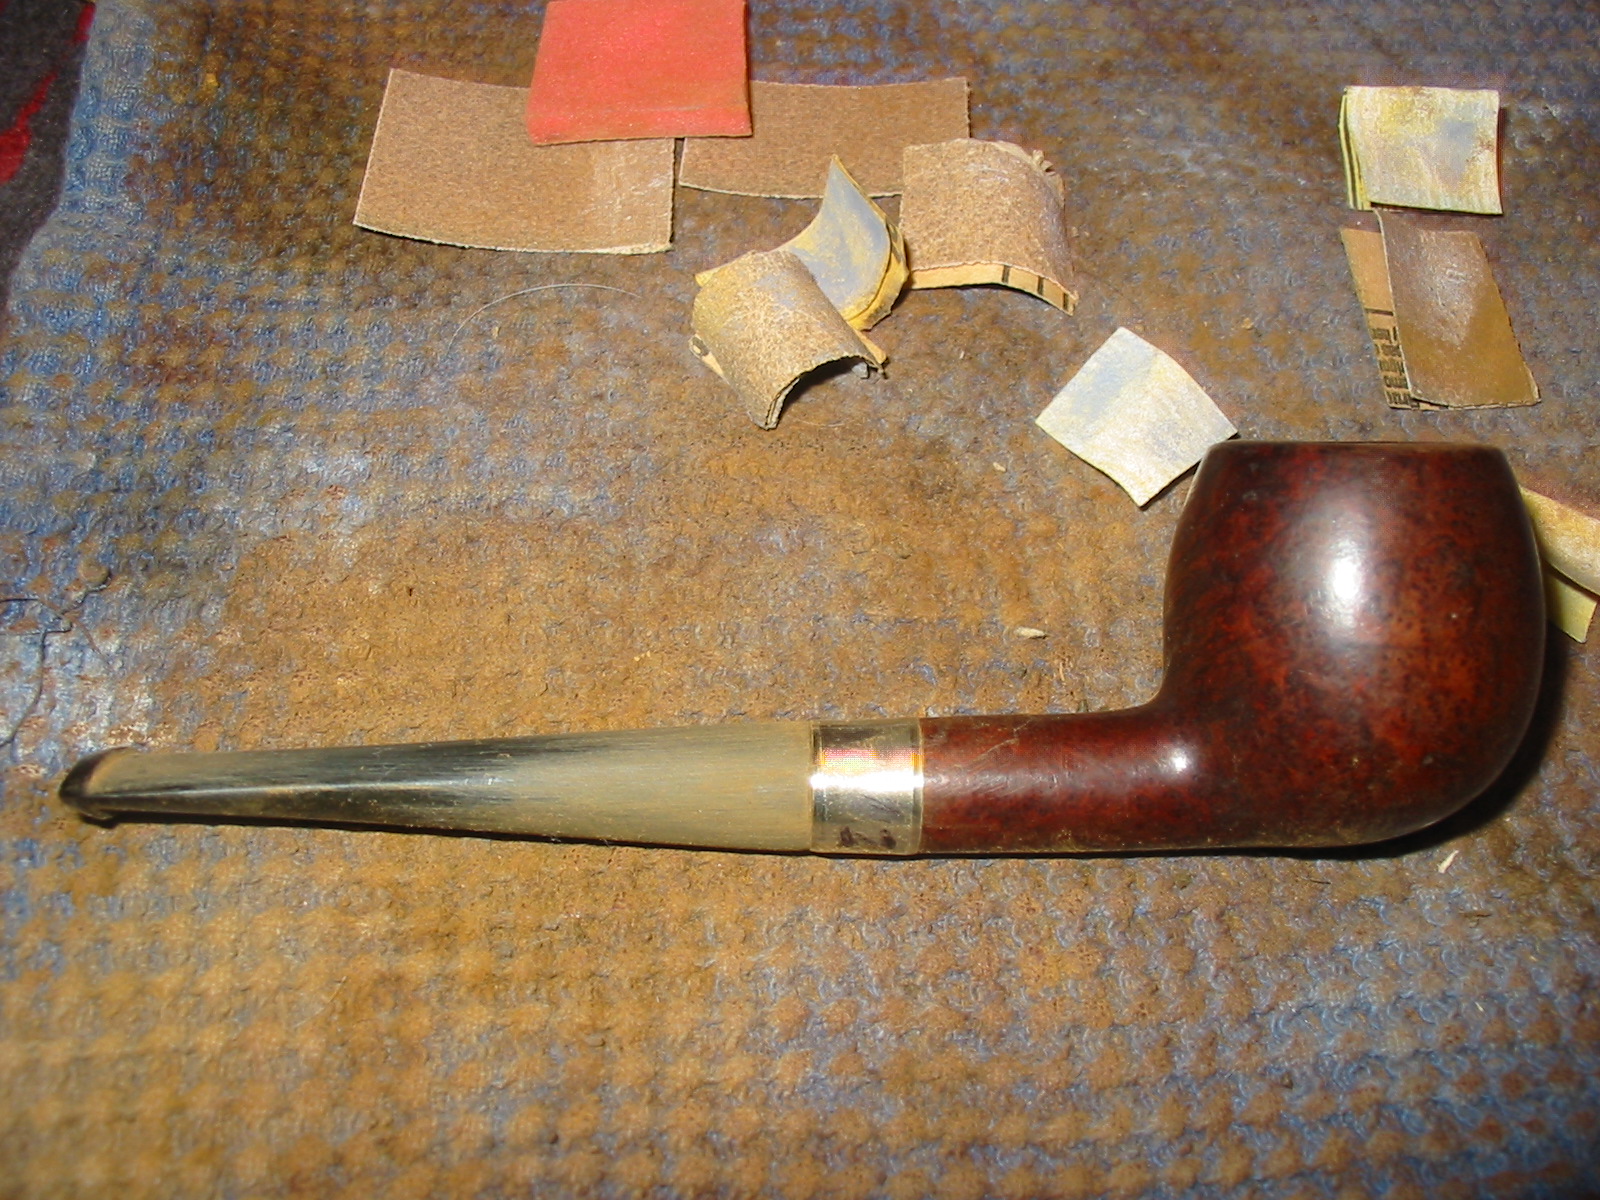
He decided to go ahead with the next step of applying the burgundy-red leather stain to the lower part of Thinbite and the rim. He was careful to fill every groove in the rustication and to leave an even line for the brown stain he would use to coat the natural wood of the upper bowl.
With the red dye still wet in places, Mike stuck a folded cleaner in the shank and help up the pipe. He kept it steady as he turned the damp part of the lower pipe over a candle and then the rim with the flame a few inches from the surface. He took pleasure as he saw the puffs of blue flame appear for a moment on the stained wood and knew the alcohol was being removed.
When he was done with this he inspected the stained areas and saw they were blackened but was not alarmed. With a piece of 600-grit micromesh he rubbed away the darkness with care to reveal a red coloring on the flamed areas. The rustication shone and Mike could see the good grain of the shank. The rim and bowl still showed the spots where it was filled.
“I can live with that,” he said and believed his own words.
Placing the glass jar of red stain back in its box with the swab he squeezed as dry as he could with a strip of the cotton cloth, Mike replaced it where it belonged and picked up another box with light brown stain inside. With a finger in the bowl to hold the pipe and a growing excitement he slid its swab through the narrow opening of the bottle until he saw the tip dip halfway into the liquid and pulled it back out.
This time he took even more care not to let the stain drip or pool up on the smooth briar top, cutting the shiny dye onto the untreated part of the wood from the rim downward.He was growing tired again and had to use all of his control not to slip and overlap the dyes. Mike held the pipe in one hand and again turned the fresh-stained area of the bowl over the candle flame to remove the alcohol.
“All I have left to do before the finishing is buff off the char from the flaming of the alcohol,” Mike said.
Outside, the strongest storm anyone who lived in the city had seen in many years still made the door and window shiver. The young man was aware of the knocks and hisses caused by the wind only with the part of his mind that would miss them if they stopped, in the same way he knew when the power returned and he unplugged the bright hot halogen lamp and buffer machine from the generator and back into the wall. His stomach made more noise to him than the downpour but he ignored the minor discomfort with little effort.
He was in a hurry to finish Thinbite. In a remote area of his brain that was his instinct he knew he should slow down. Still he overrode such thoughts and stood, stretching with his arms thrown back behind his head and his back arching. His body shuddered in relief and he groaned and yawned.
“I am sure it is time for the final steps of buffing the bowl and shank and the Vulcanite stem with the waxes,” Mike said as though the words would make it so. But a thought snapped at the back of his mind like a crocodile in pursuit of a hunter’s leg. This doubt came to him through a mental bayou and made him recall the days when he lived at home and his mother would nag him on and on and he would block out her words.
He could still see the fills in the pipe and knew whatever Thinbite was trying to tell him was important and so he made his best effort to hear the words but without success.
“I wish the old man was here,” he said to himself. “No, he is not here and this is to be a surprise for him. The waxes and the buffing wheels will work out the little flaws, I am sure of it. I have seen this many times.”
The presence on the work table of the old buffer machine dusted and cleaned was that of a young living thing waiting to be let out to play. Seeing the machine on his work table made Mike recall every visit to his grandfather in Taos during the summers and sometimes shorter trips on special occasions and that was saying something.
He sometimes suspected his ability to summon the details of all the events of his life was unusual but did not know for sure and so he ignored the thought whenever it came to him. The young man’s only certainty was that he watched everything and always listened, except when he chose to tune out his mother which was to be expected.
He peeled the plastic from the end of the big bar of White Tripoli wax and put on his goggles before turning on the machine and re-checking the speed. The three clean buffers whirled in a blur that tightened them up. Still, Mike knew the left buffer was the tightest. For two revolutions of the cloth he applied, with an odd gentleness, a thin, even layer of the chalk-like wax. With the machine still running he set the brick out of the way and picked up the pipe bowl.
With another light touch no one would expect from such a big strong young man, Mike held the fragile pipe bowl to the buffer and turned it with careful, deliberate slowness, waxing only the smooth upper part of the bowl and the shank. As he did this he could see the briar grow shiny as it made contact with the thick clothe buffer. He took special care around the lines of the shank and gave the rim a quick sideways turn before stopping.
Mike held up the bowl to inspect it and was pleased with what he saw before he repeated the process on the middle buffer, which was dry and took away the left over oils and small bits of white wax.
To the third loose buffer Mike applied only the smallest amount of carnauba and gave the smooth parts of Thinbite a final spin, mindful not to miss any groove of the natural wood. Excitement filled him as he imagined a hunter must feel when he has followed the tracks of a large dangerous animal in a jungle in the darkness and at last has the beast, in his sights as the sun begins to come up, proud and true at first light.
With the tip of a finger Mike applied the Halcyon II wax to the rusticated area a little at a time until the entire rough part of the bowl was covered. He set it down on its rim on a rag on the table to dry for five minutes.
When the time was right the young man gave the rusticated bottom a turn on the dry middle buffer to bring out the true shine of the special wax he had used. Before his eyes he saw the shimmer spread and was reminded of light from a sunset playing on a quiet northwestern New Mexico lake as the water lapped and his loose fishing line tightened.
Using a soft old toothbrush he had saved, Mike worked on the rusticated creases to remove leftover wax from the last buffing.
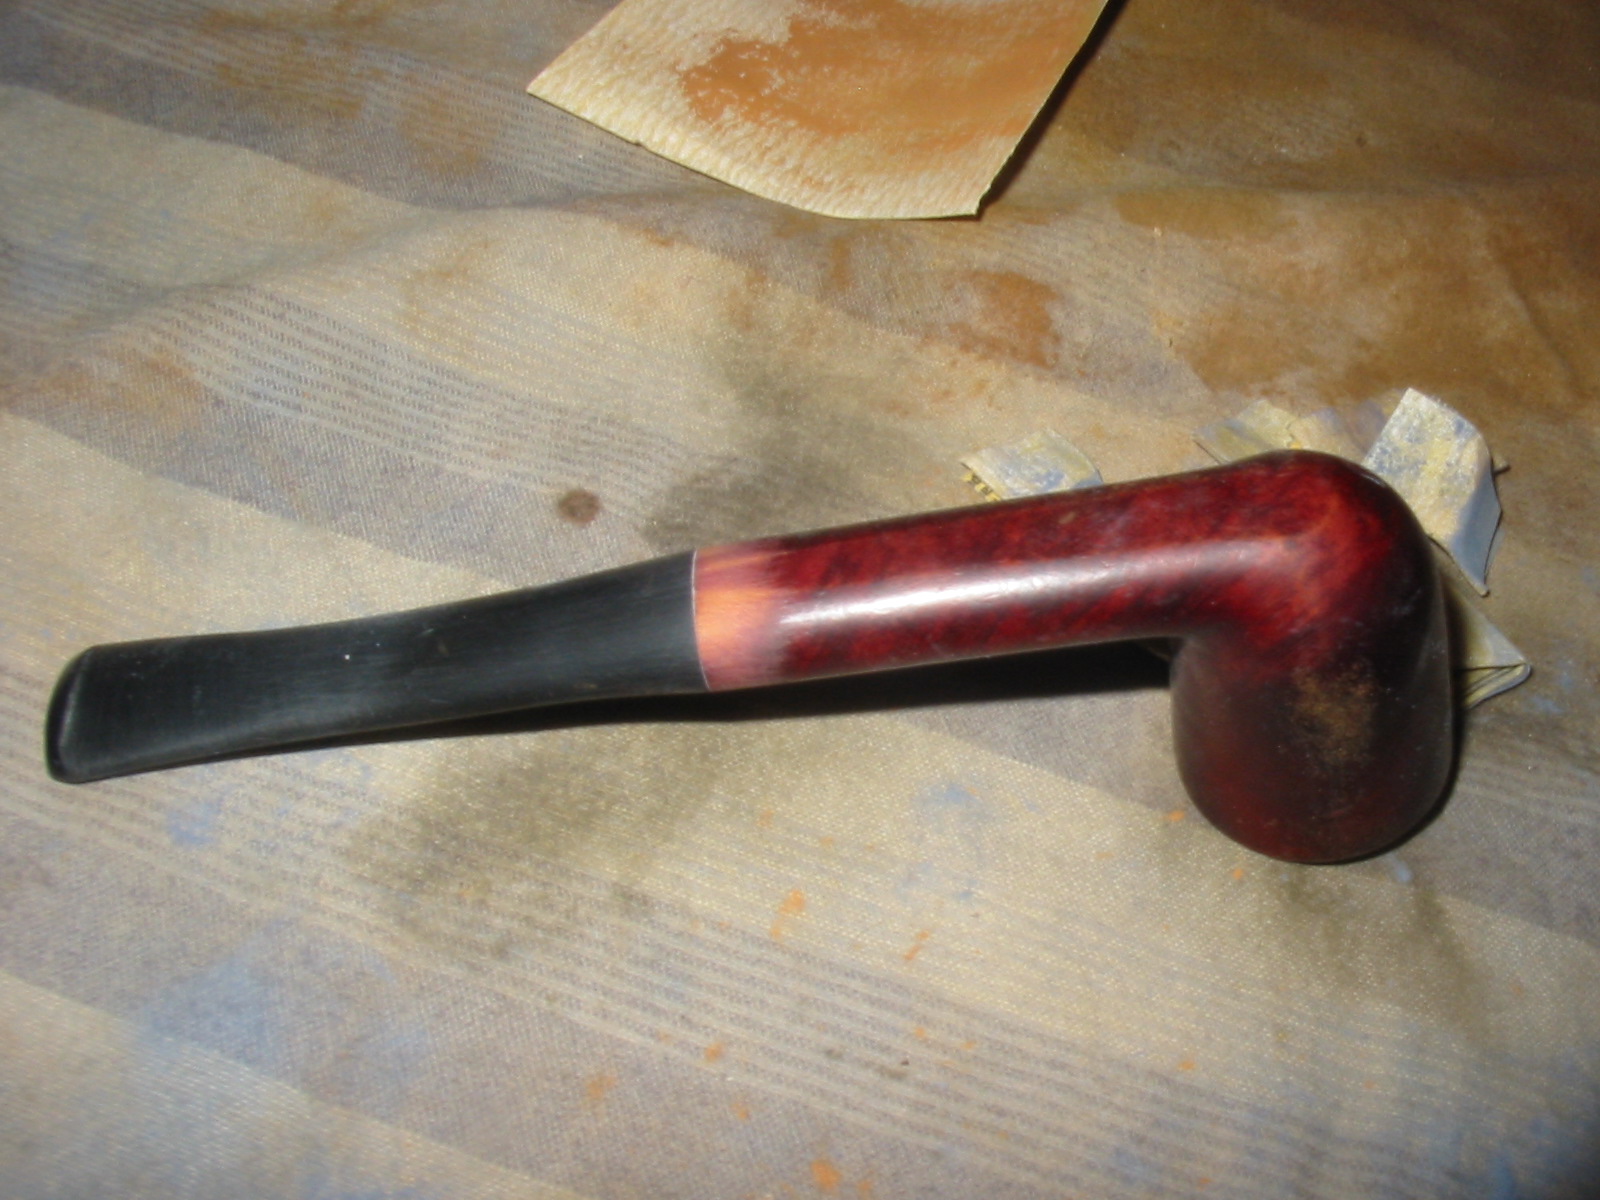
Wishing to see the full results of his efforts only when Thinbite was whole and complete again, Mike wrapped the bowl in his large cotton cloth and turned it in his strong hands so there would be no smears and set the covered bowl on the work table.He turned his attention to the stem.
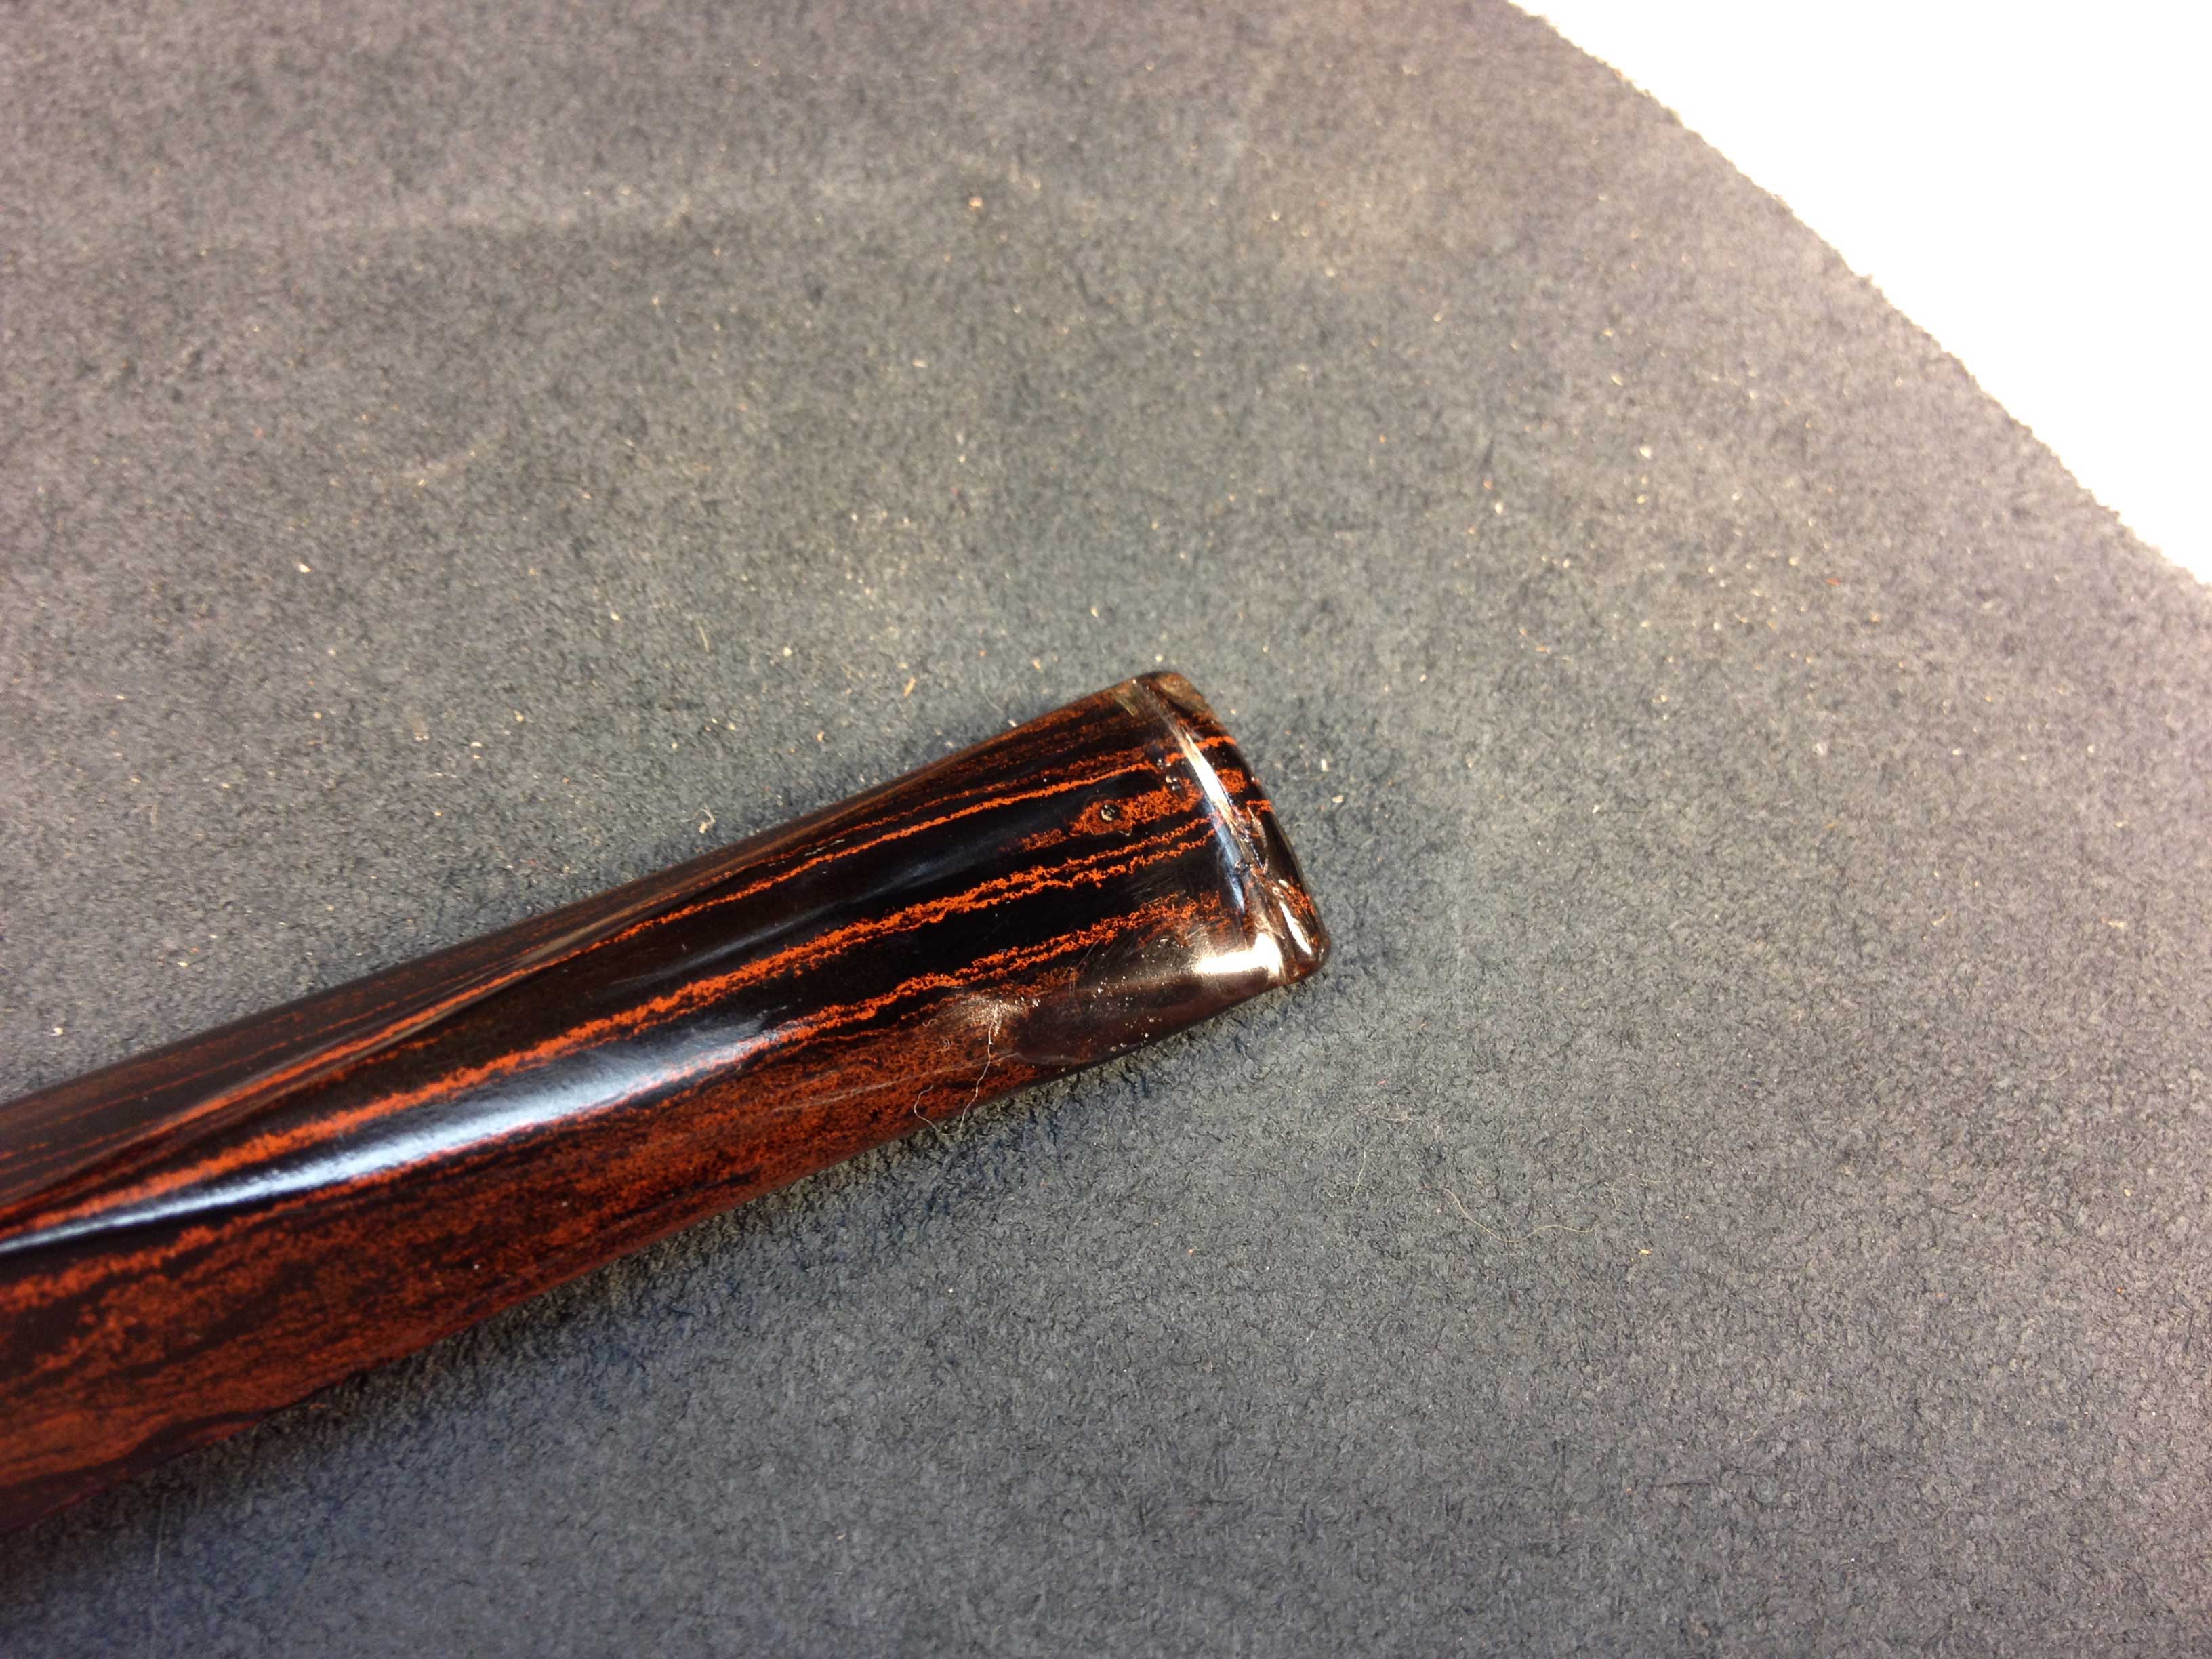
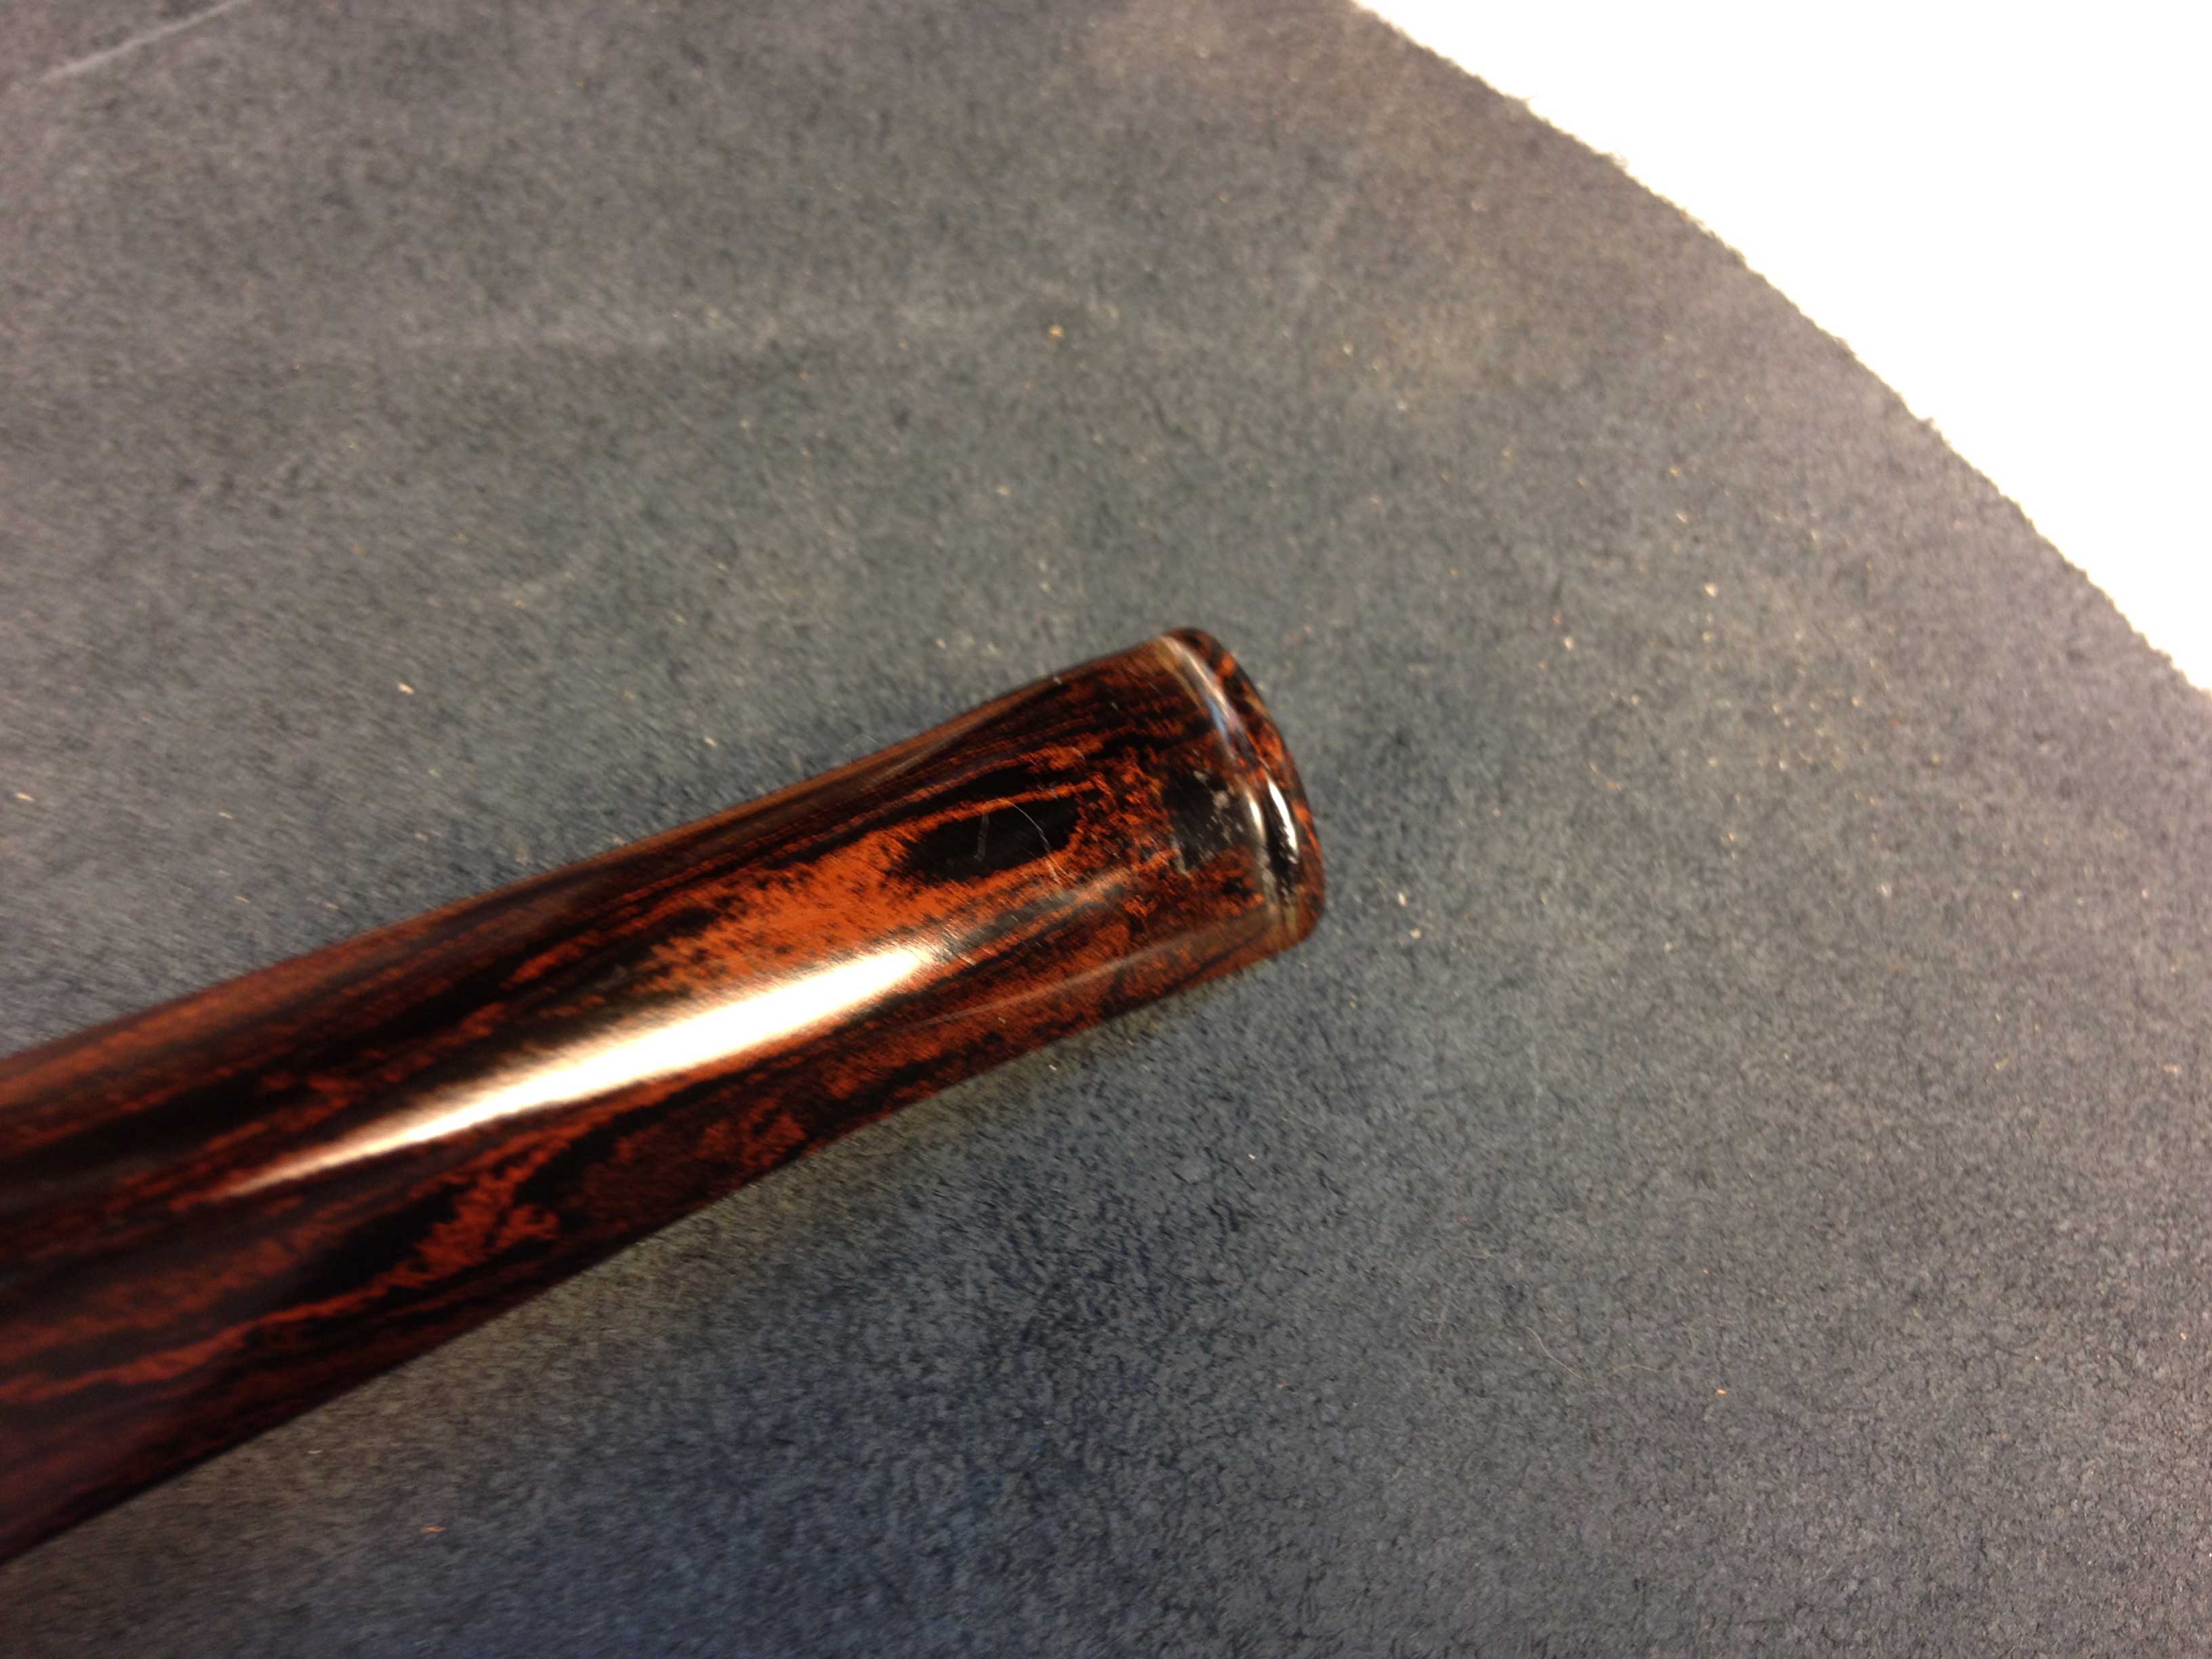
“Scratches on the Vulcanite that is green with age and teeth marks and other chatter around the bit,” Mike said. “But this is not bad. I have seen carnage that seemed to have been left by wild beasts with bite marks so deep I wondered if the thing that had smoked the pipe was in fact human or perhaps a werewolf with the stem like a piece of bone that he tore at and gnawed with his great salivating and dripping fangs. And grandpapa taught me well the lore of how to mend even these horrible kinds of wounds.”
Then another memory filled Mike’s young heart for a moment. Even in his mind he had not thought of his grandfather as grandpapa since he was twelve when the old man stopped addressing him as chaval, for Mike was no longer a boy and should not be called a kid, which, after all, is another word for a young goat. From then on Mike was referred to as young man or his chosen name, or sometimes the old man just said “Come here.”
Mike smiled again and sighed and finished cleaning and sanitizing the stem. He gave the entire stem an even sanding with 420-grit paper that removed the nasty green color and the scratches and teeth marks up to the bit. There he had to apply more pressure to even out the places where, over the years, someone had chipped away at the lip, but he knew he was lucky he did not need black Super Glue because the rain still came down in sheets and there was nowhere in Albuquerque to buy it anyway.
The strong odor of a burned tire from the stem sanding reminded Mike again of his grandfather’s house. He used micromesh 1000 to smooth the stem before wiping the surface with a rag and bringing it to a high gloss with a Red Tripoli buff followed by rubbing with another cotton rag and buffing once more with White Tripoli. Thinking his project finished gave the young man a sense of pride that made him wonder for an instant if he should feel guilty.
“Screw guilt,” he said, and thought but did not speak the same about his mother for raising him in a way that would make him even question such a simple pleasure in life. “That hang-up is hers to deal with, and besides, it cannot be her fault entirely because from what I heard of my grandmother she was either a saint or a demon.” He reflected some more. “I wish I had met her so I could make an informed decision. Maybe she was only human.”
For the second time in less than twenty-four hours, Mike felt as though he had been knocked in the head by this new-found empathy. He returned to his work right away.
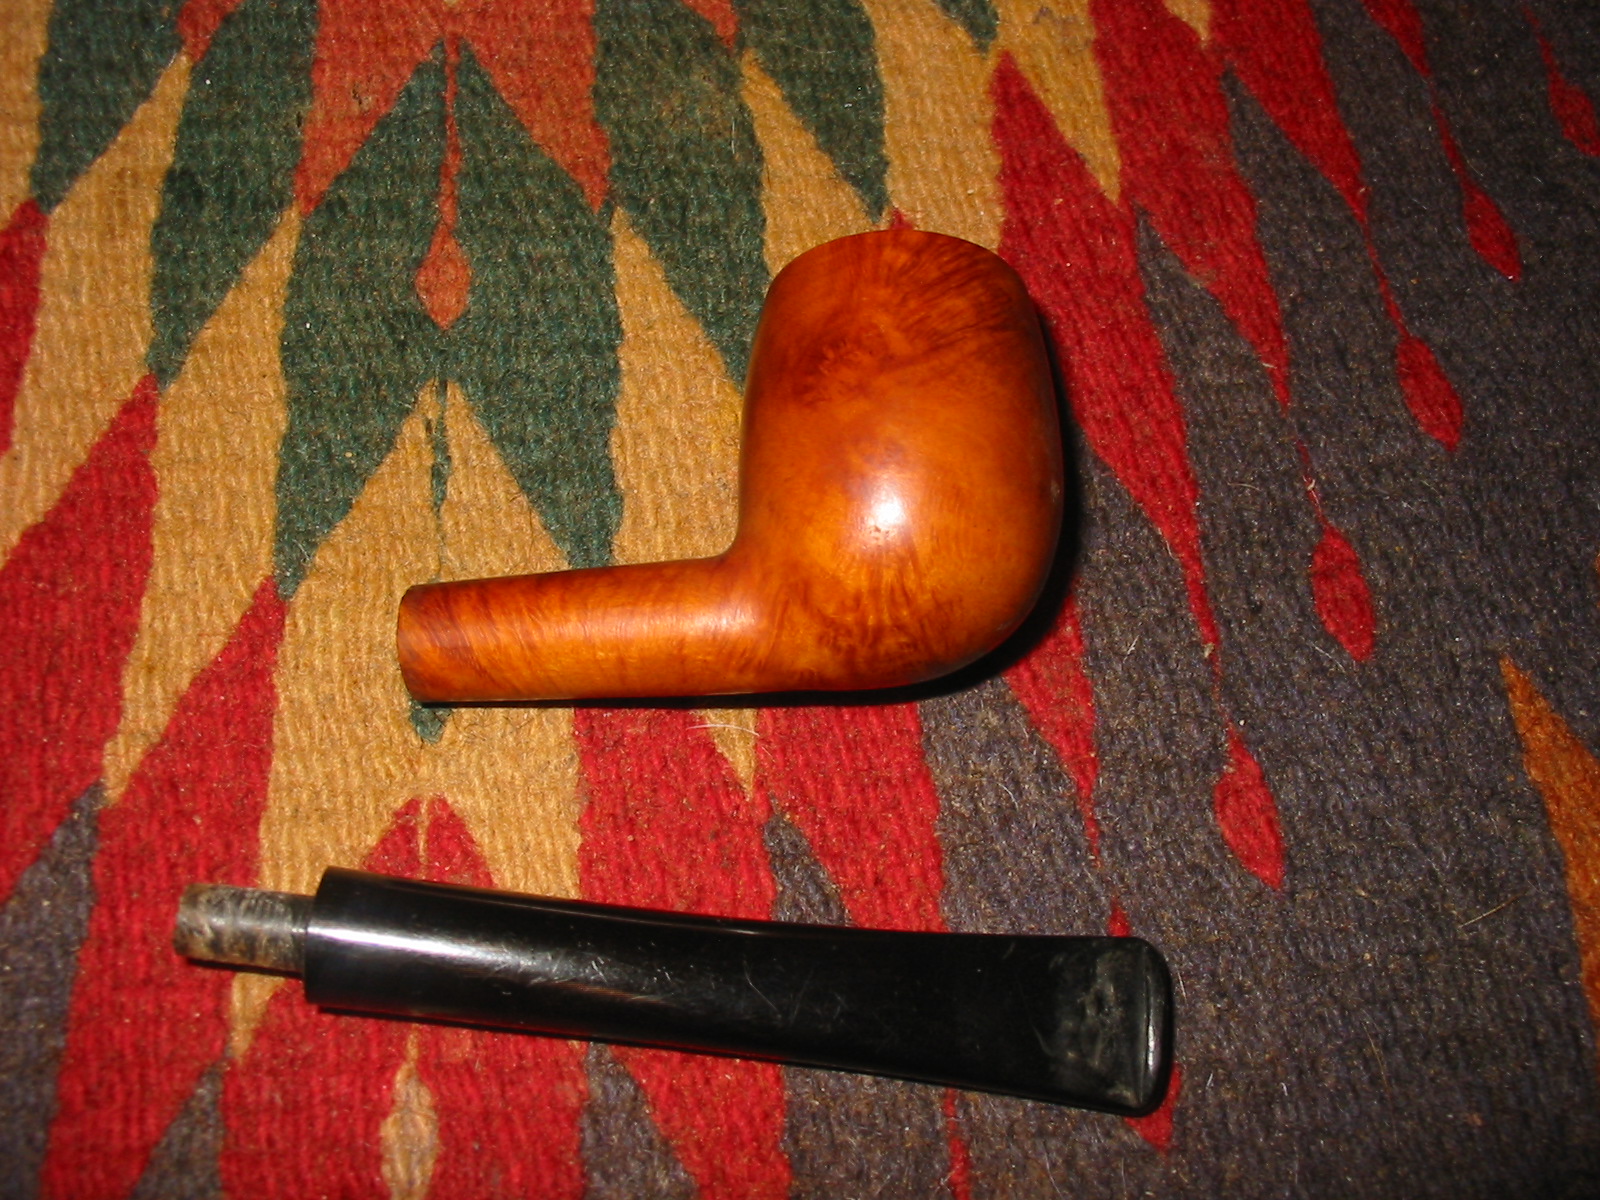
The stem was ready to attach and Mike could feel his excitement growing. Doing his best not to look at the bowl as he uncovered it in the cotton cloth, he took it in one big hand and with the other pushed the delrin tenon into the shank and adjusted the fit.
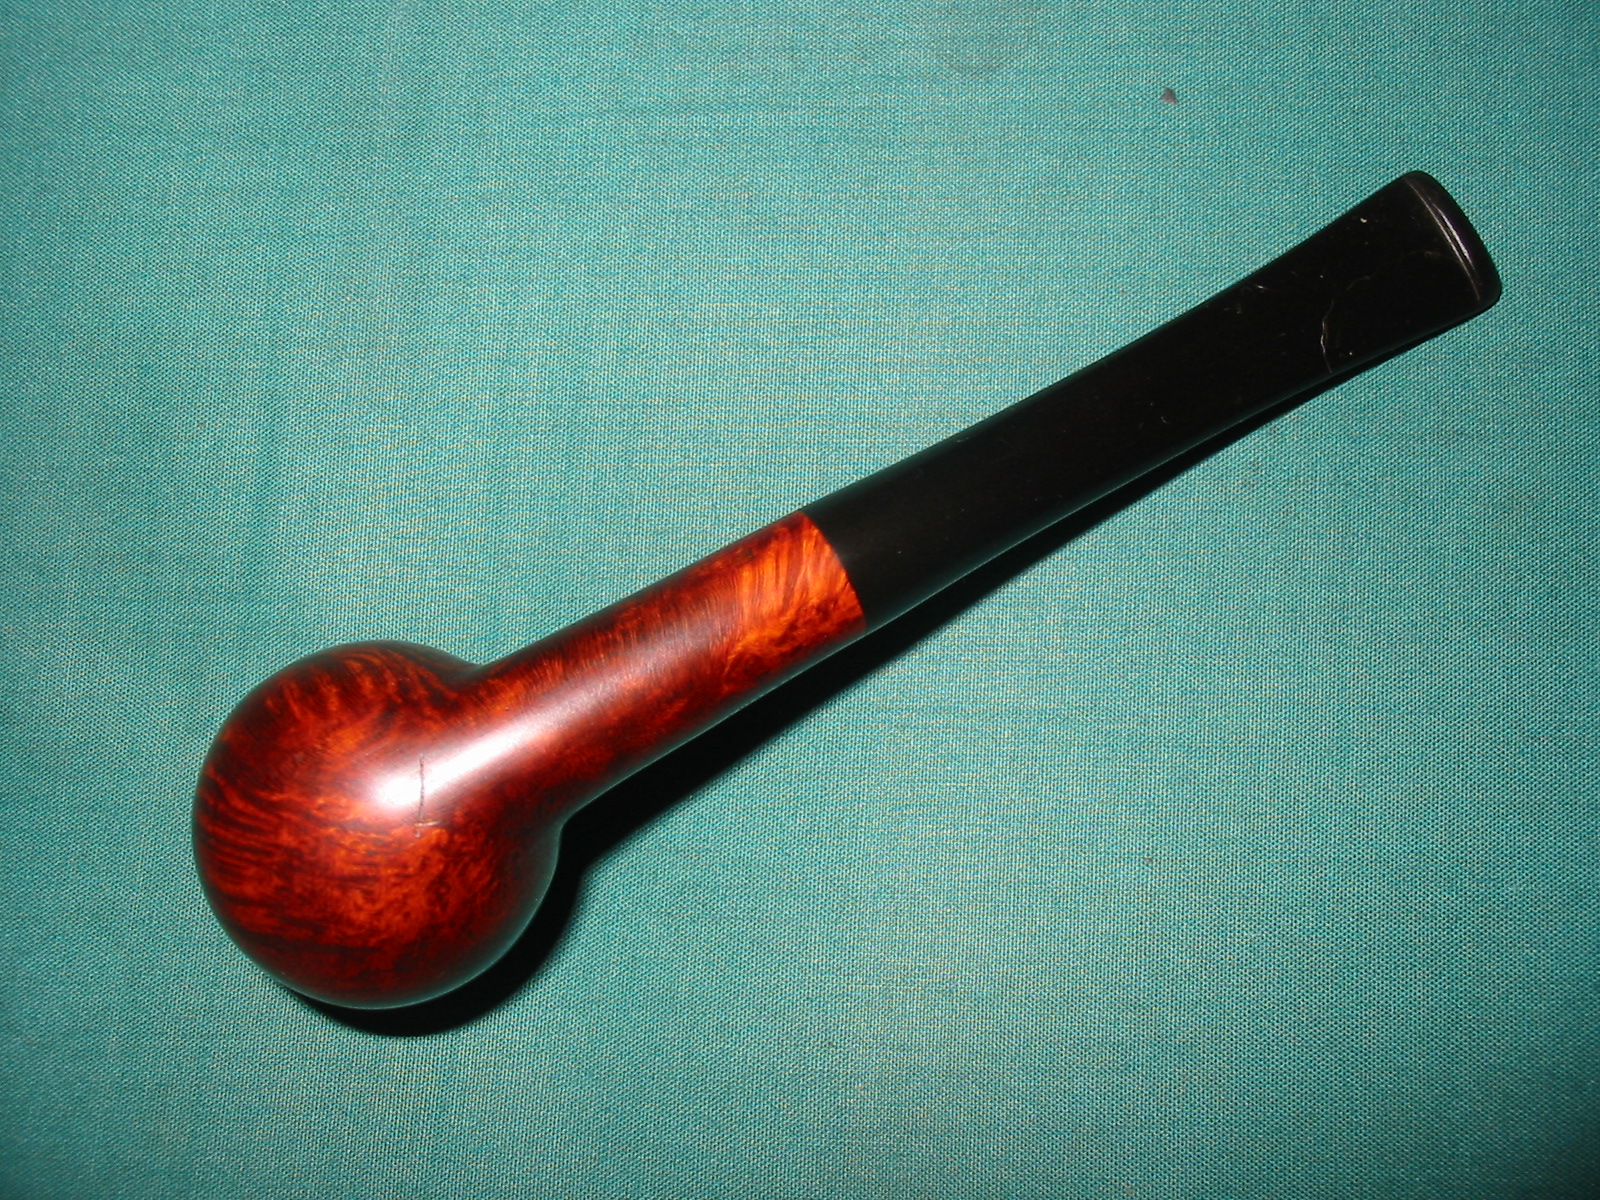
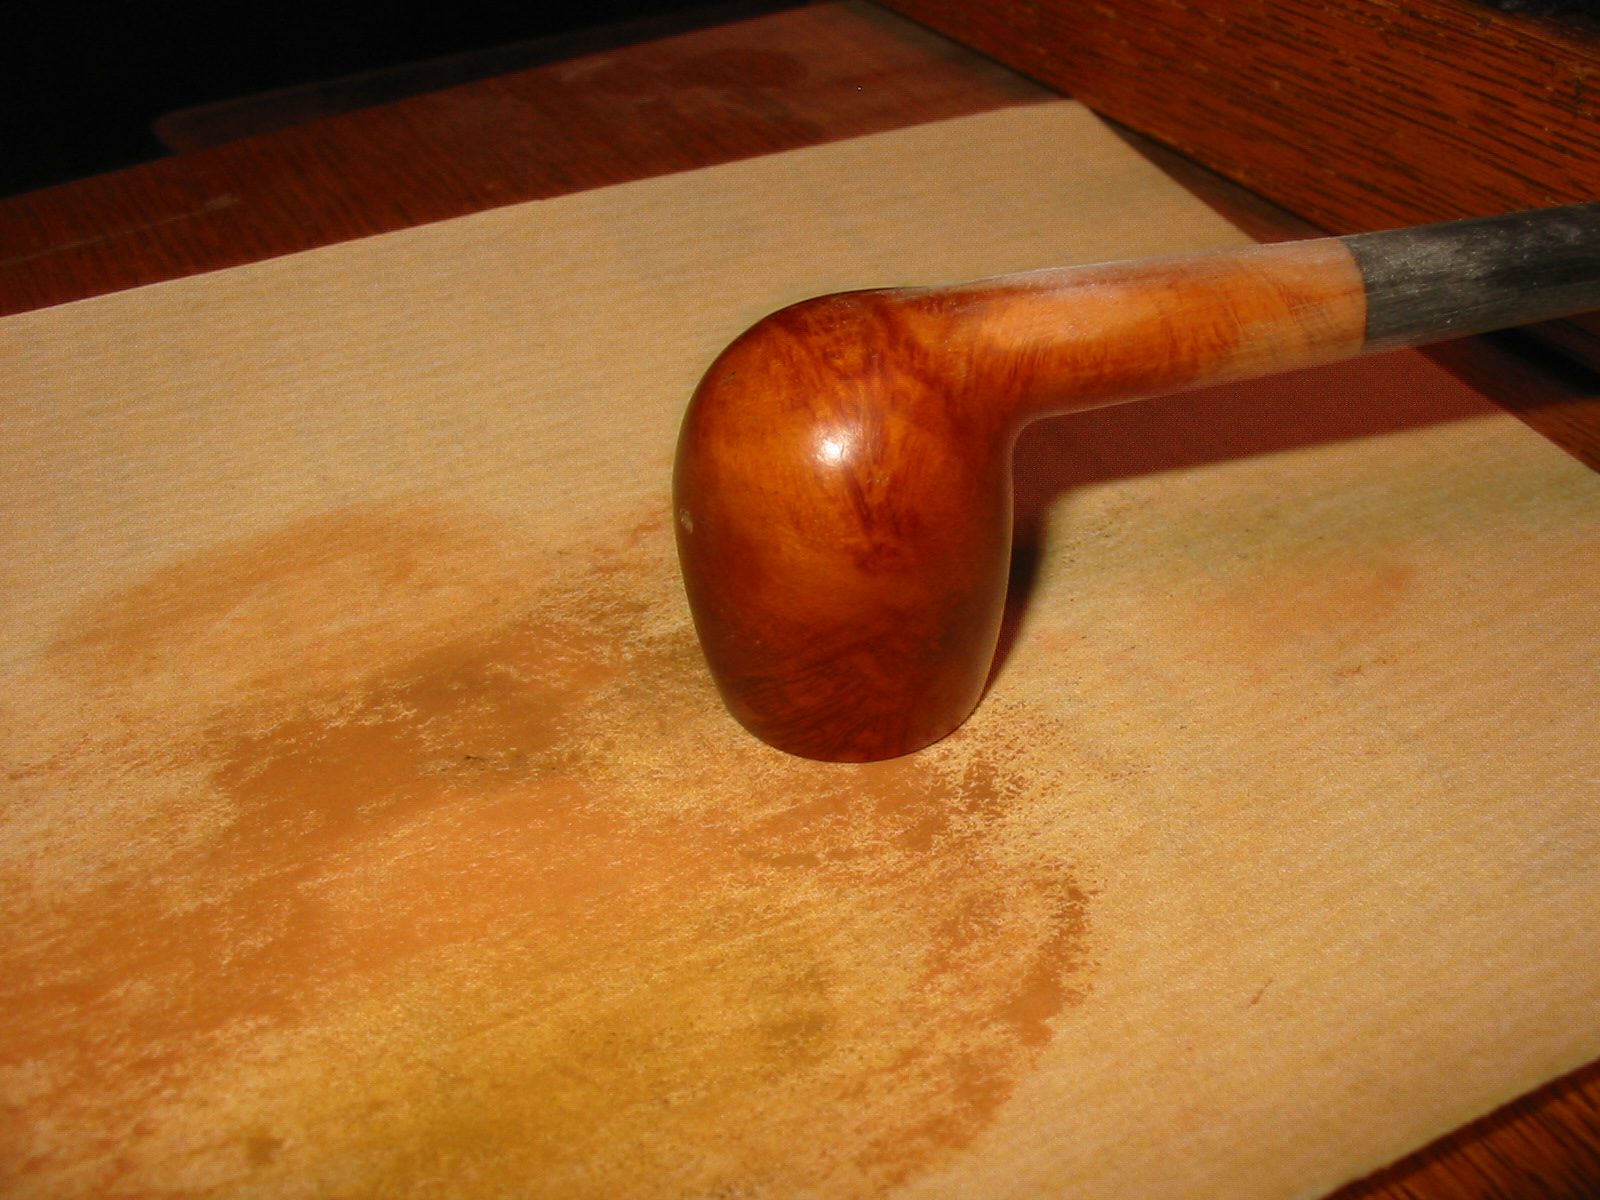
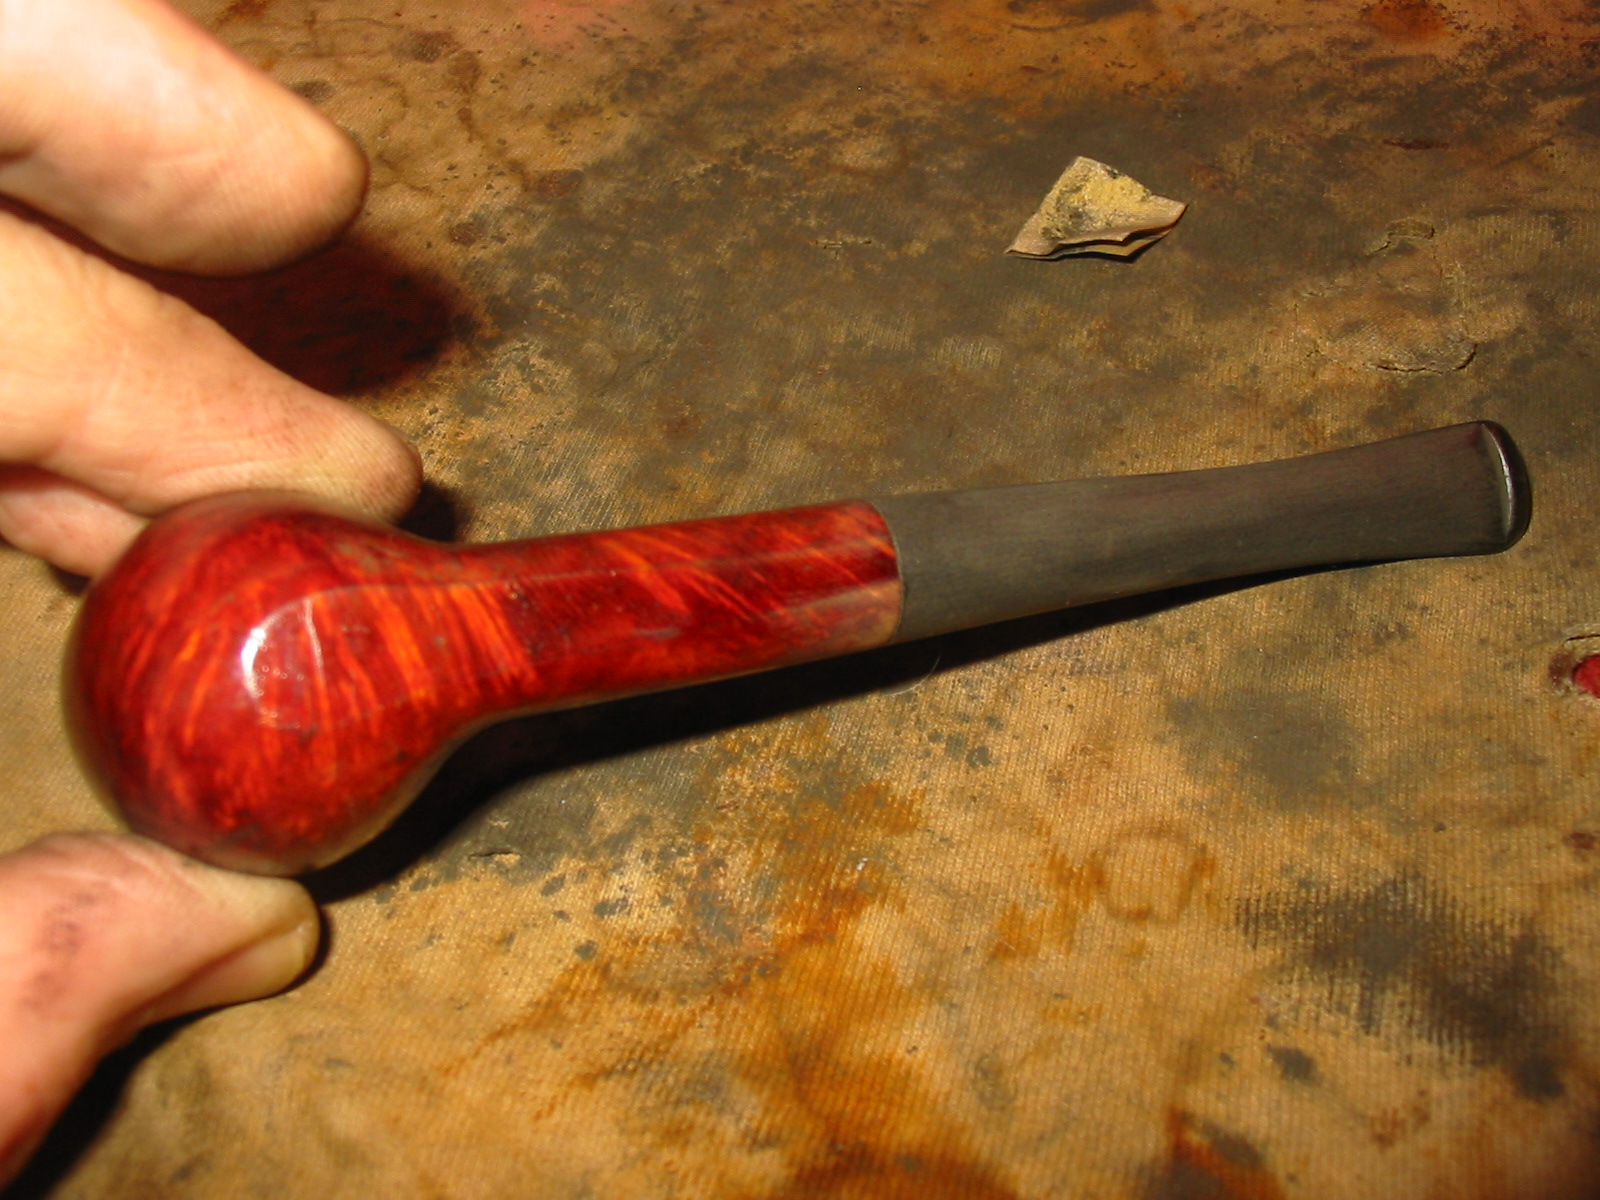
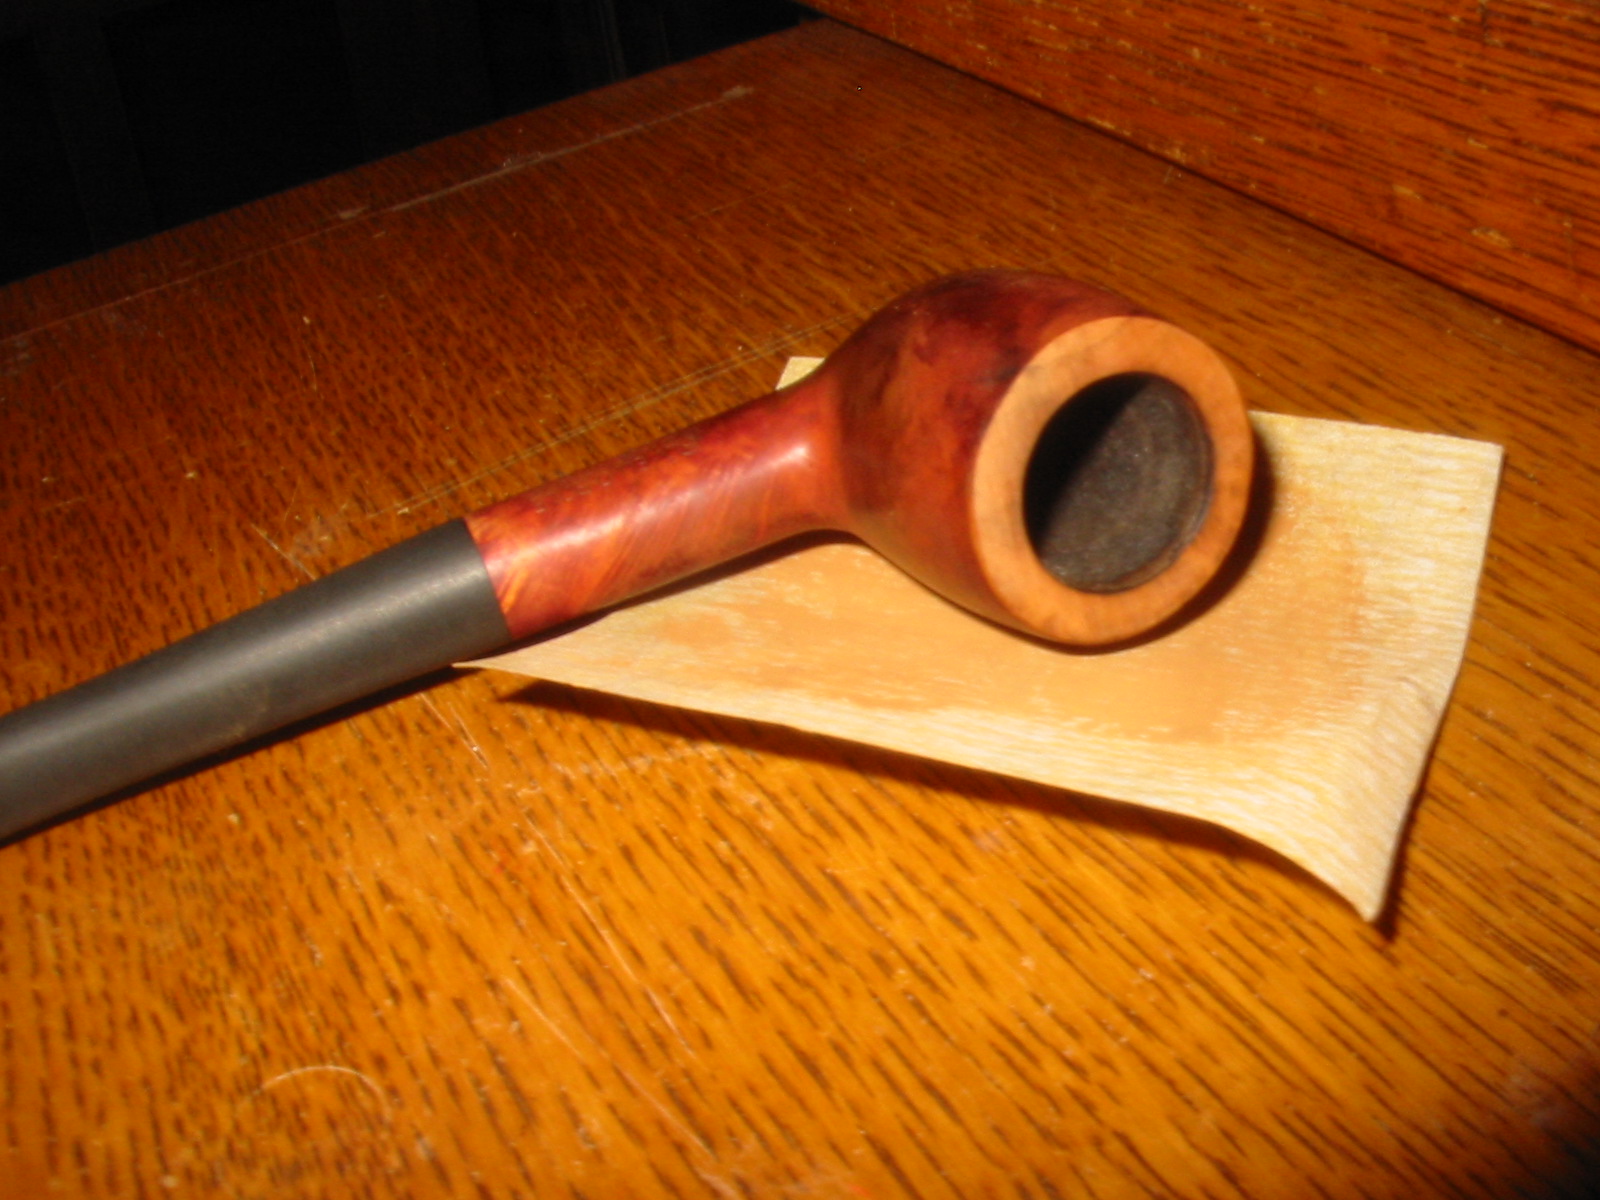
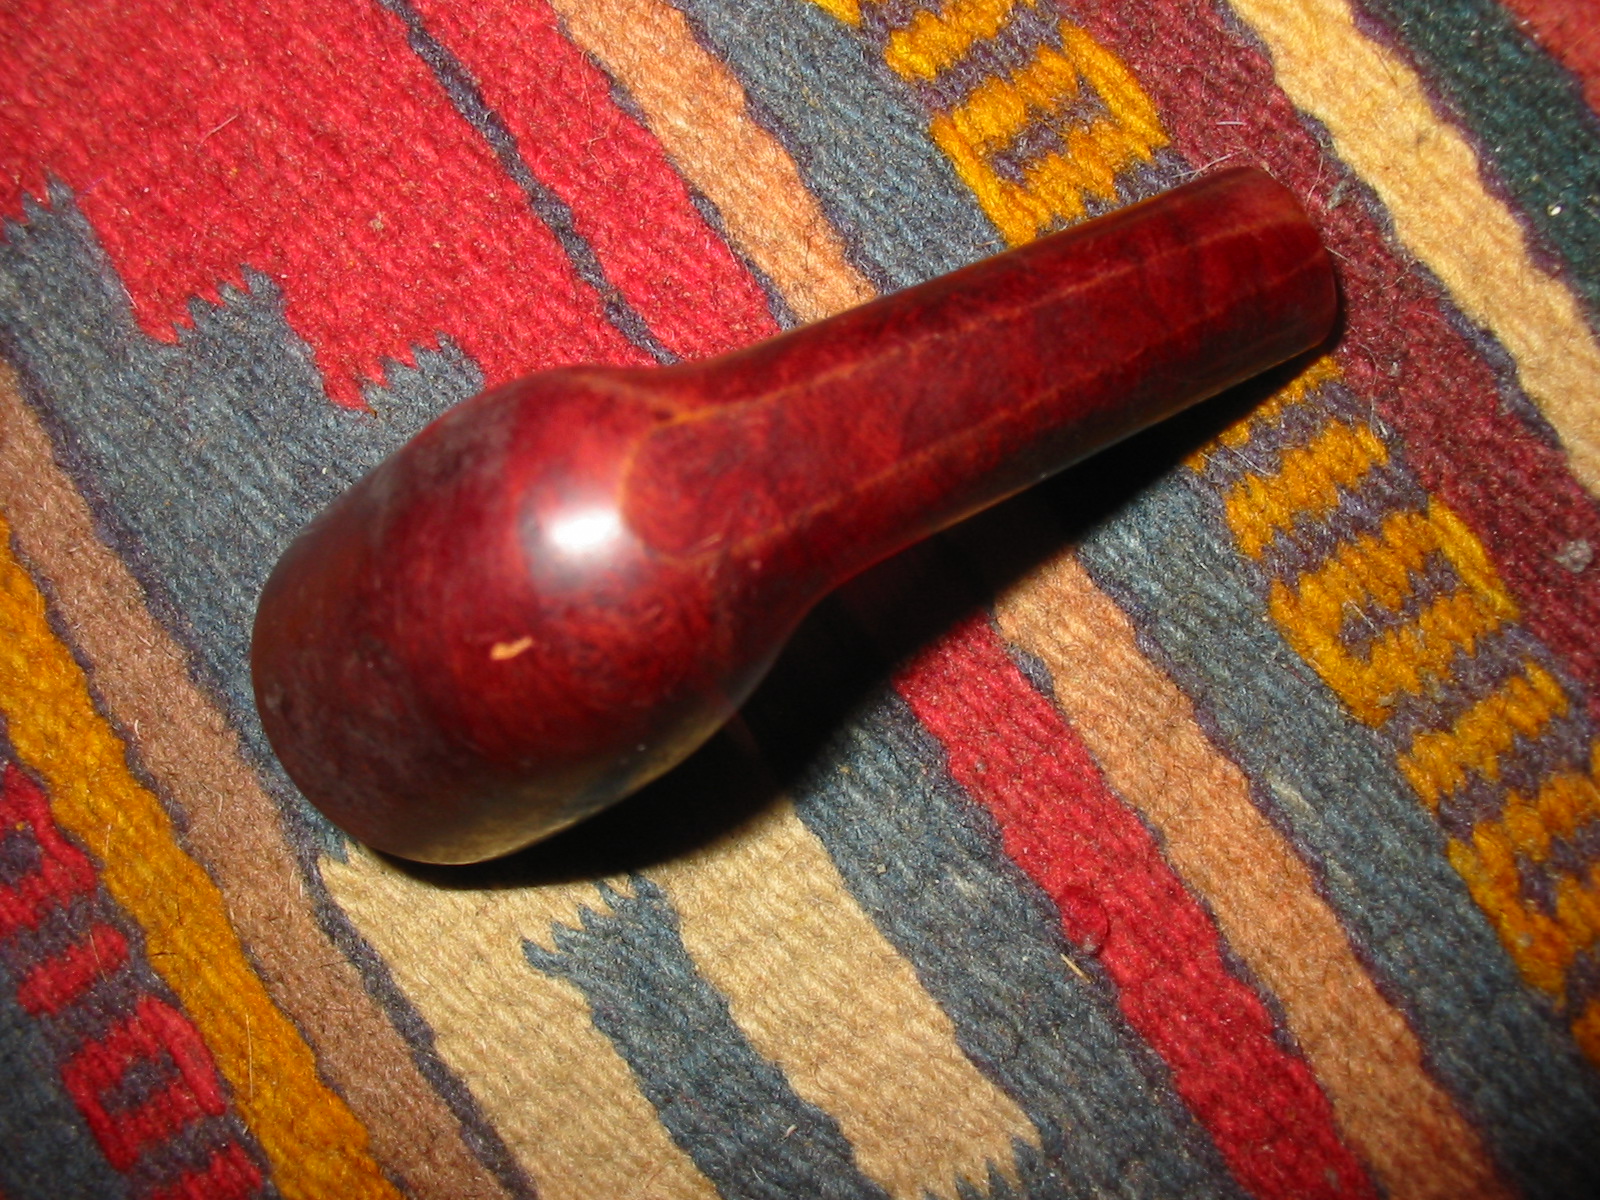
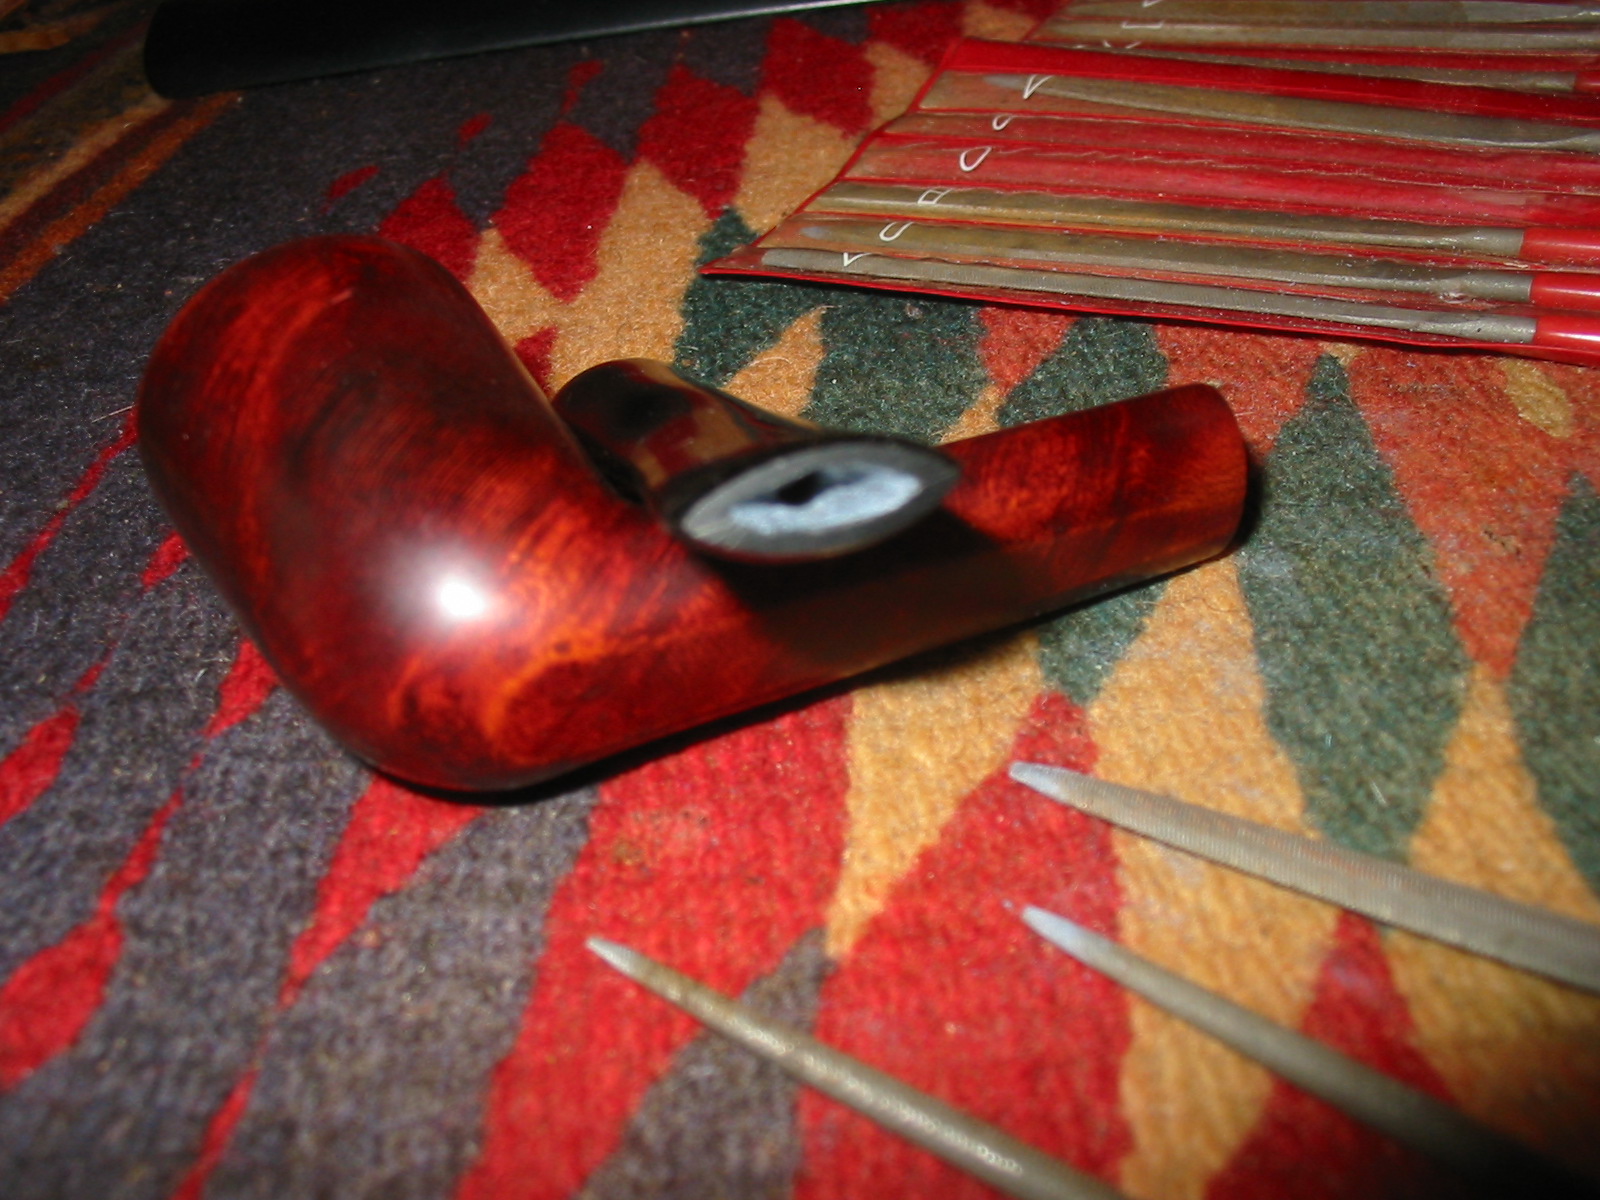
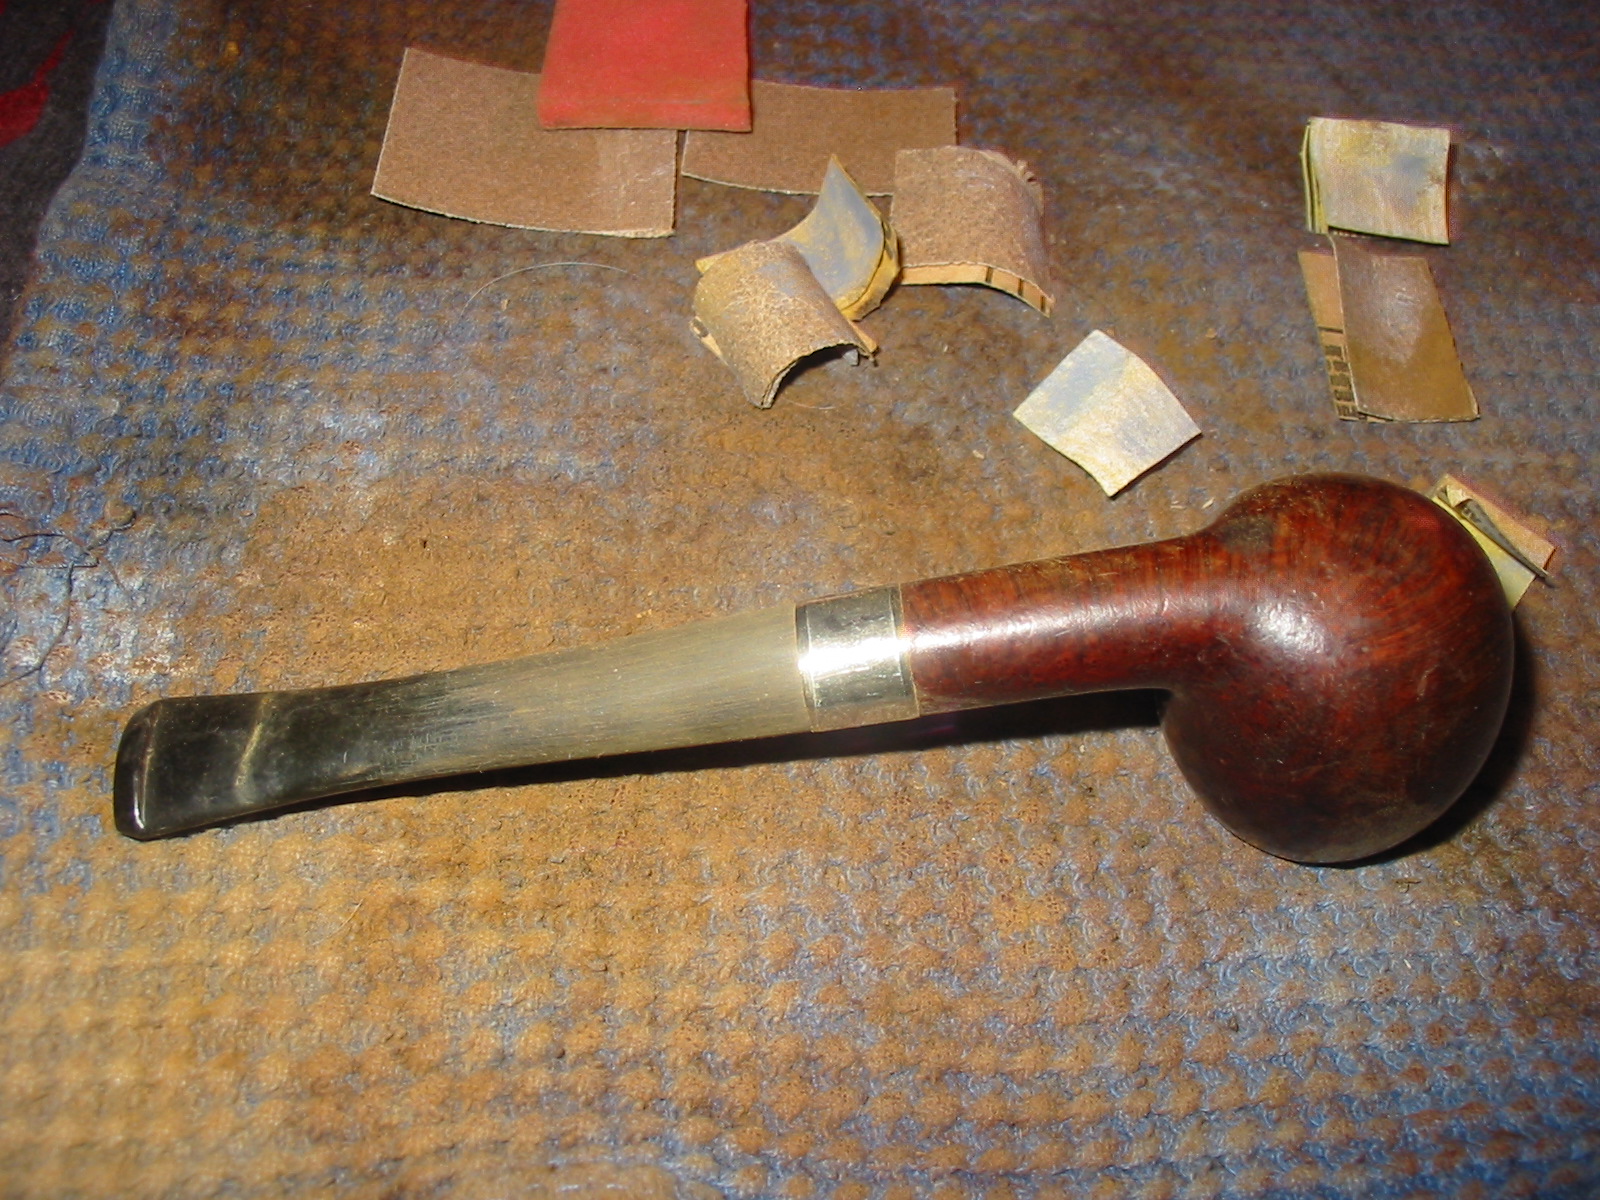
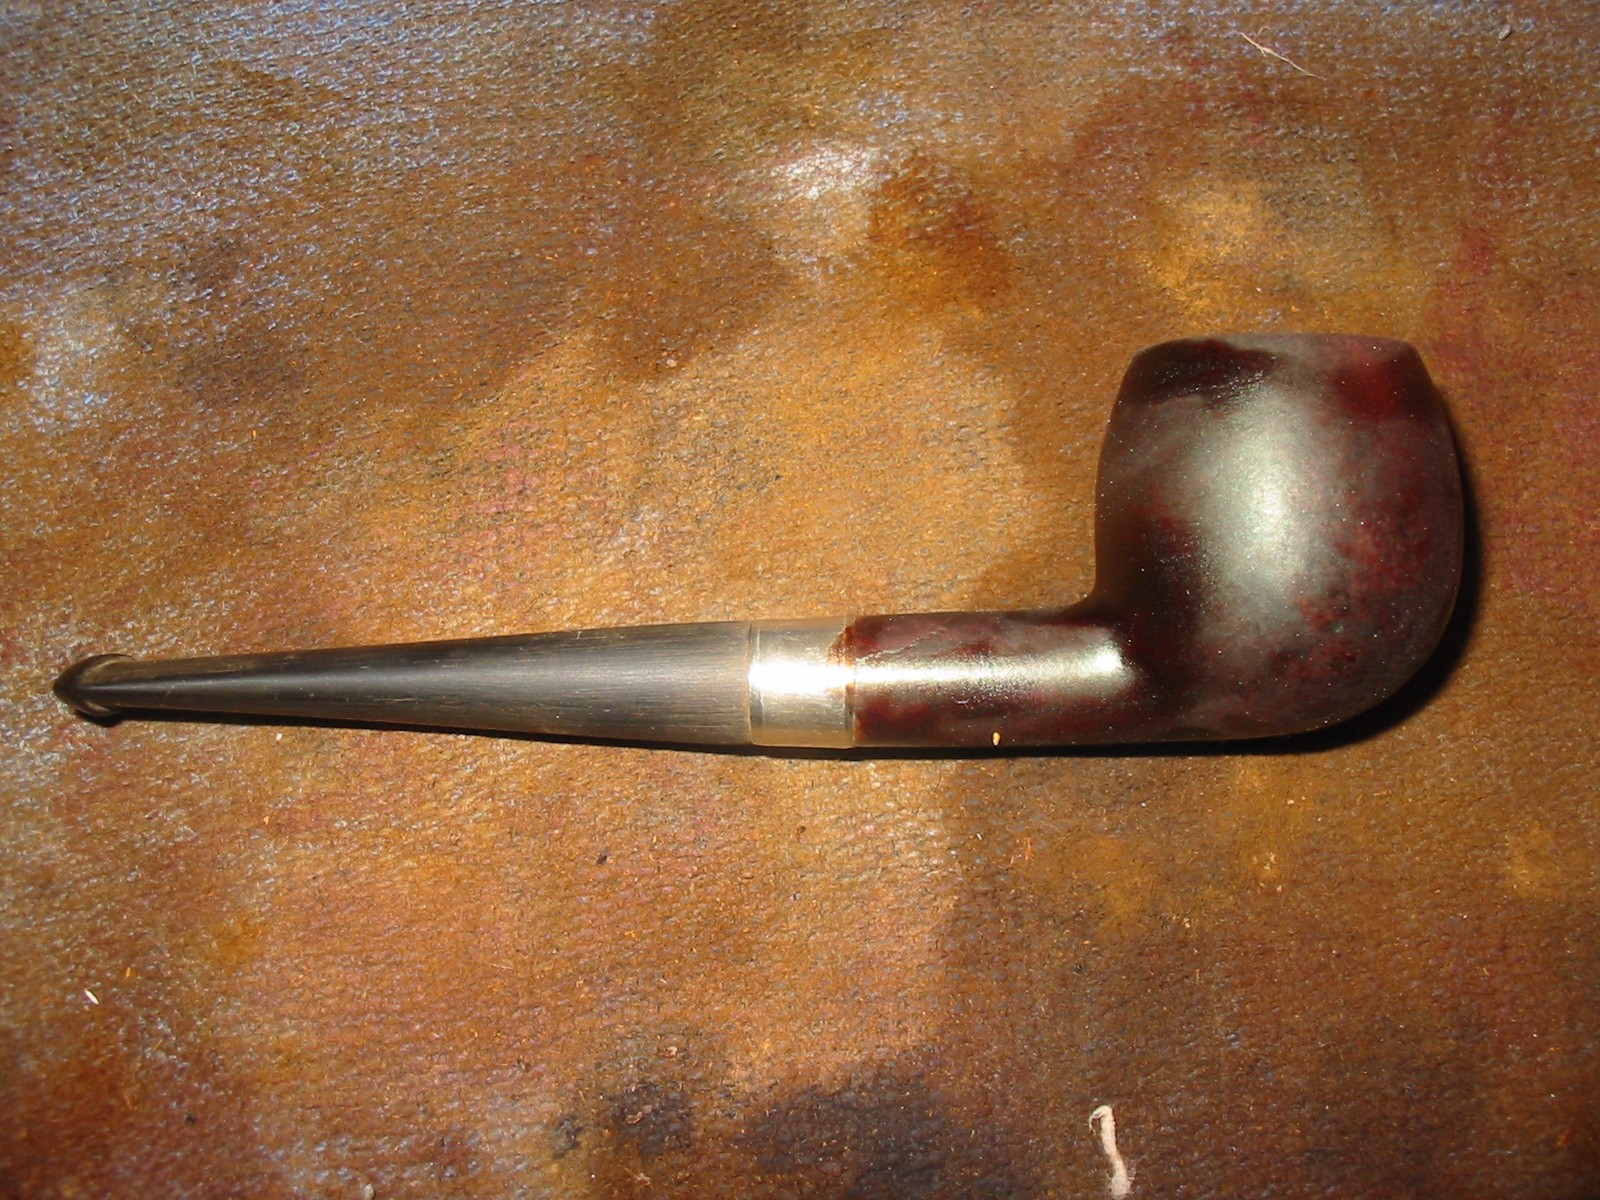
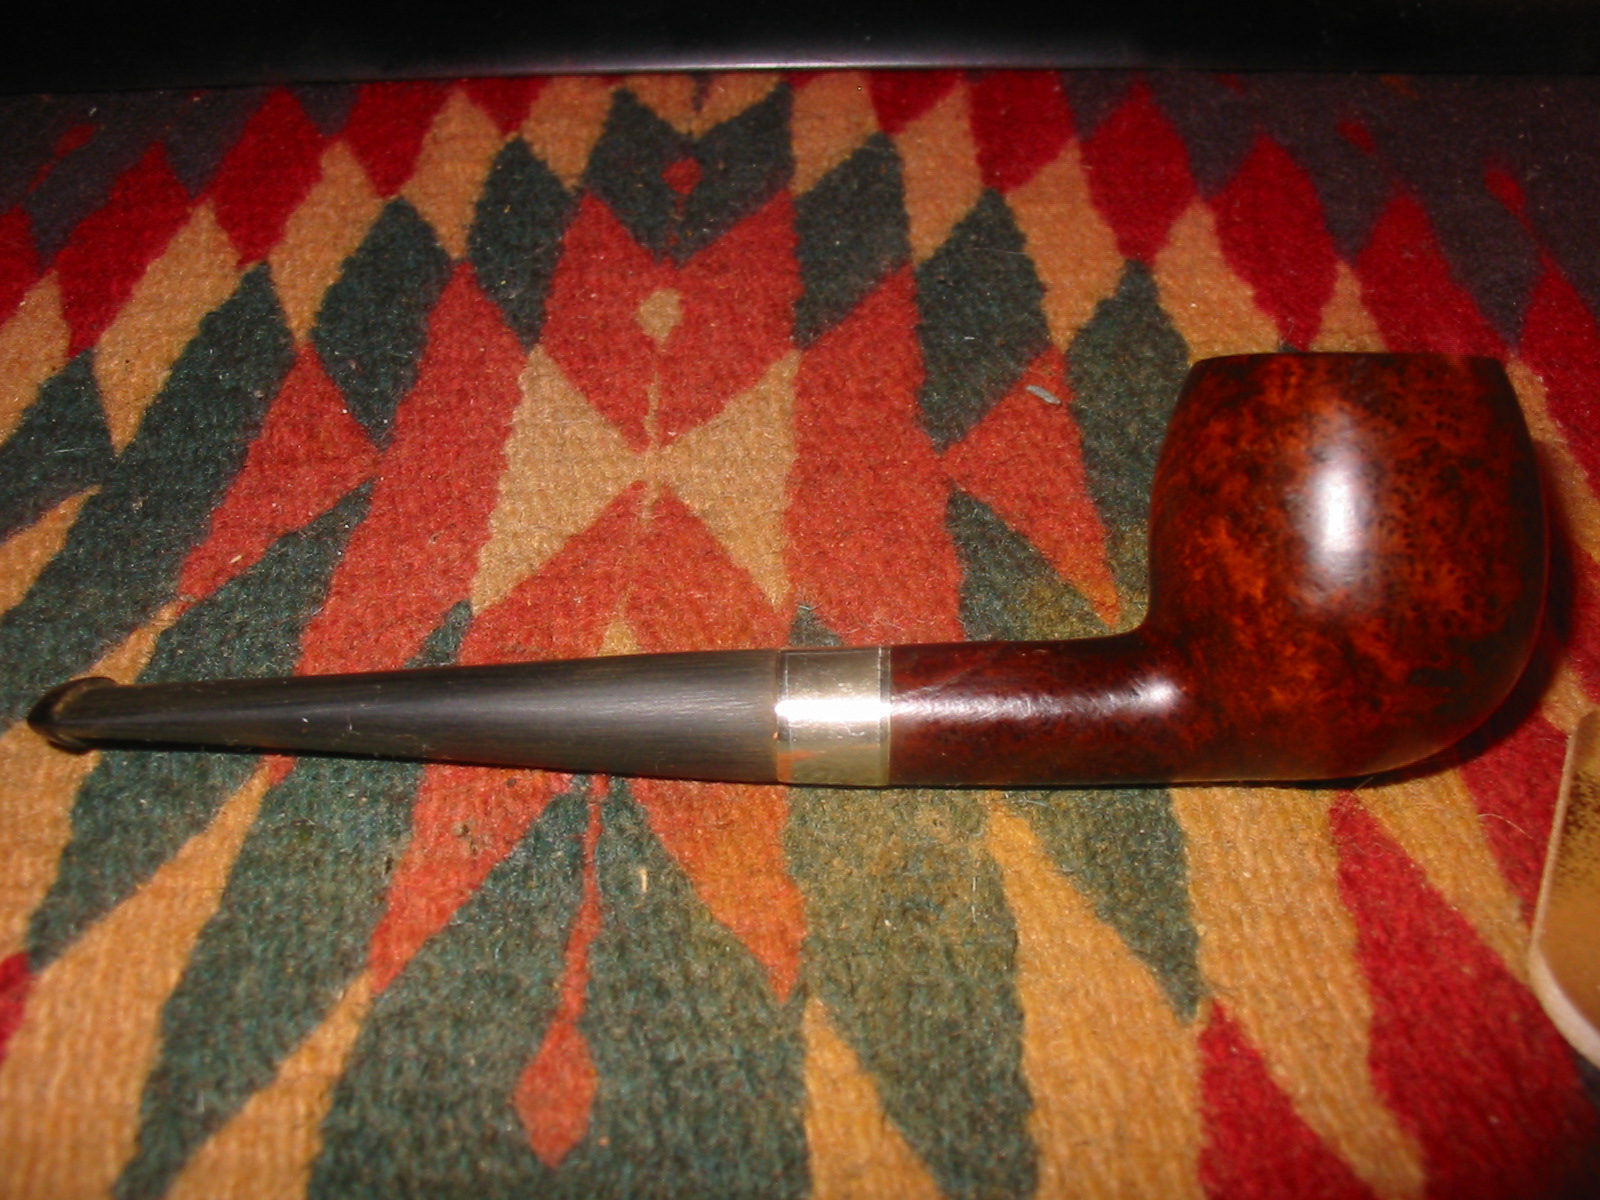
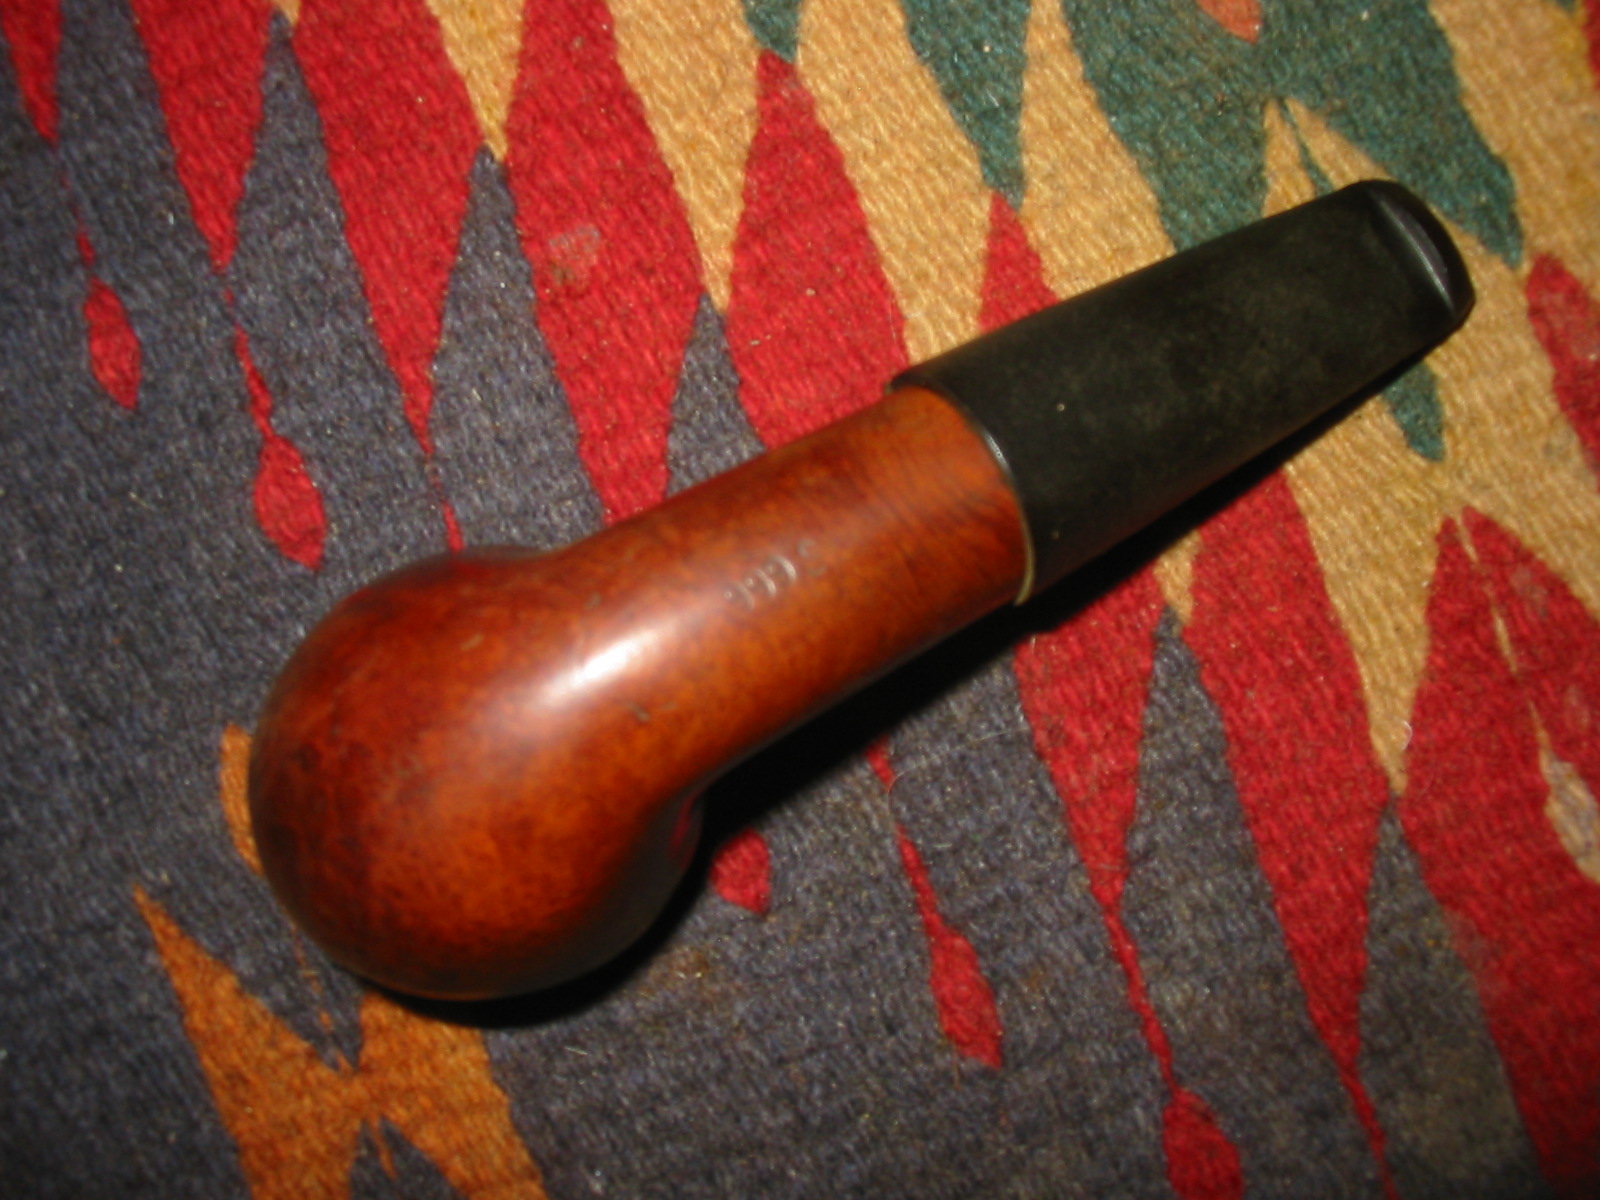
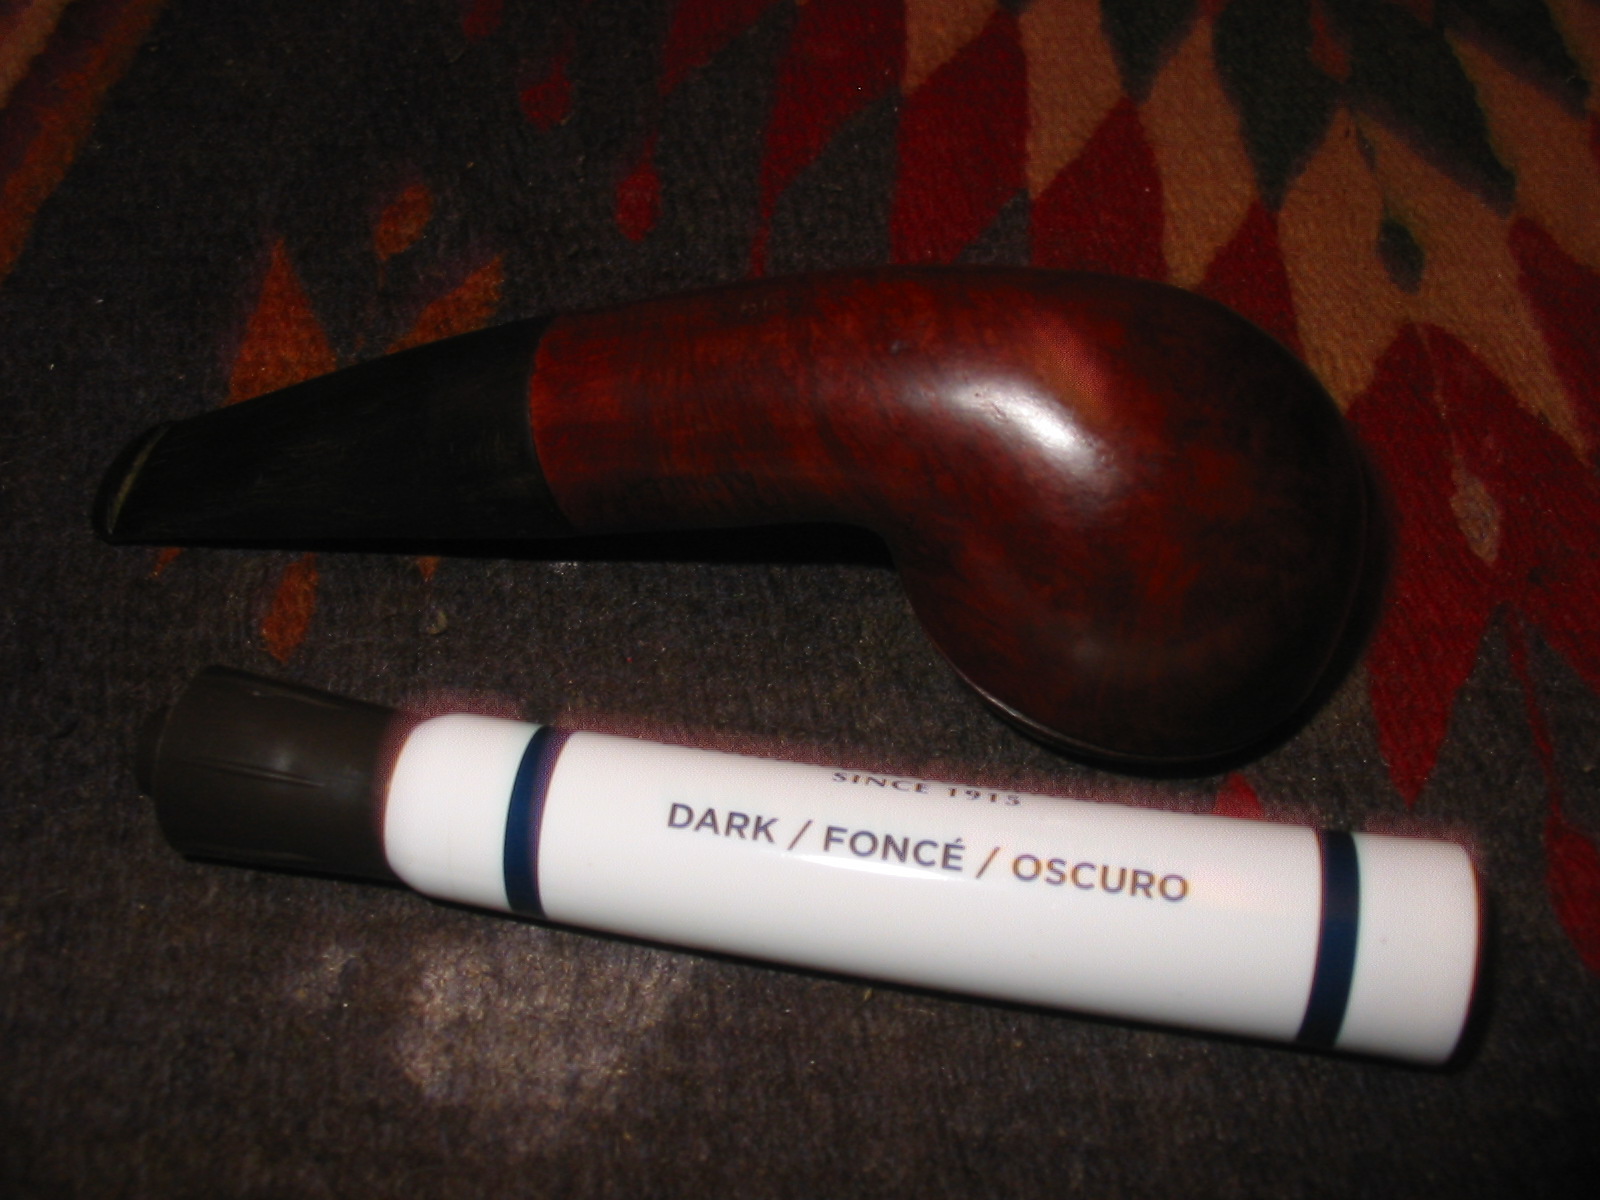
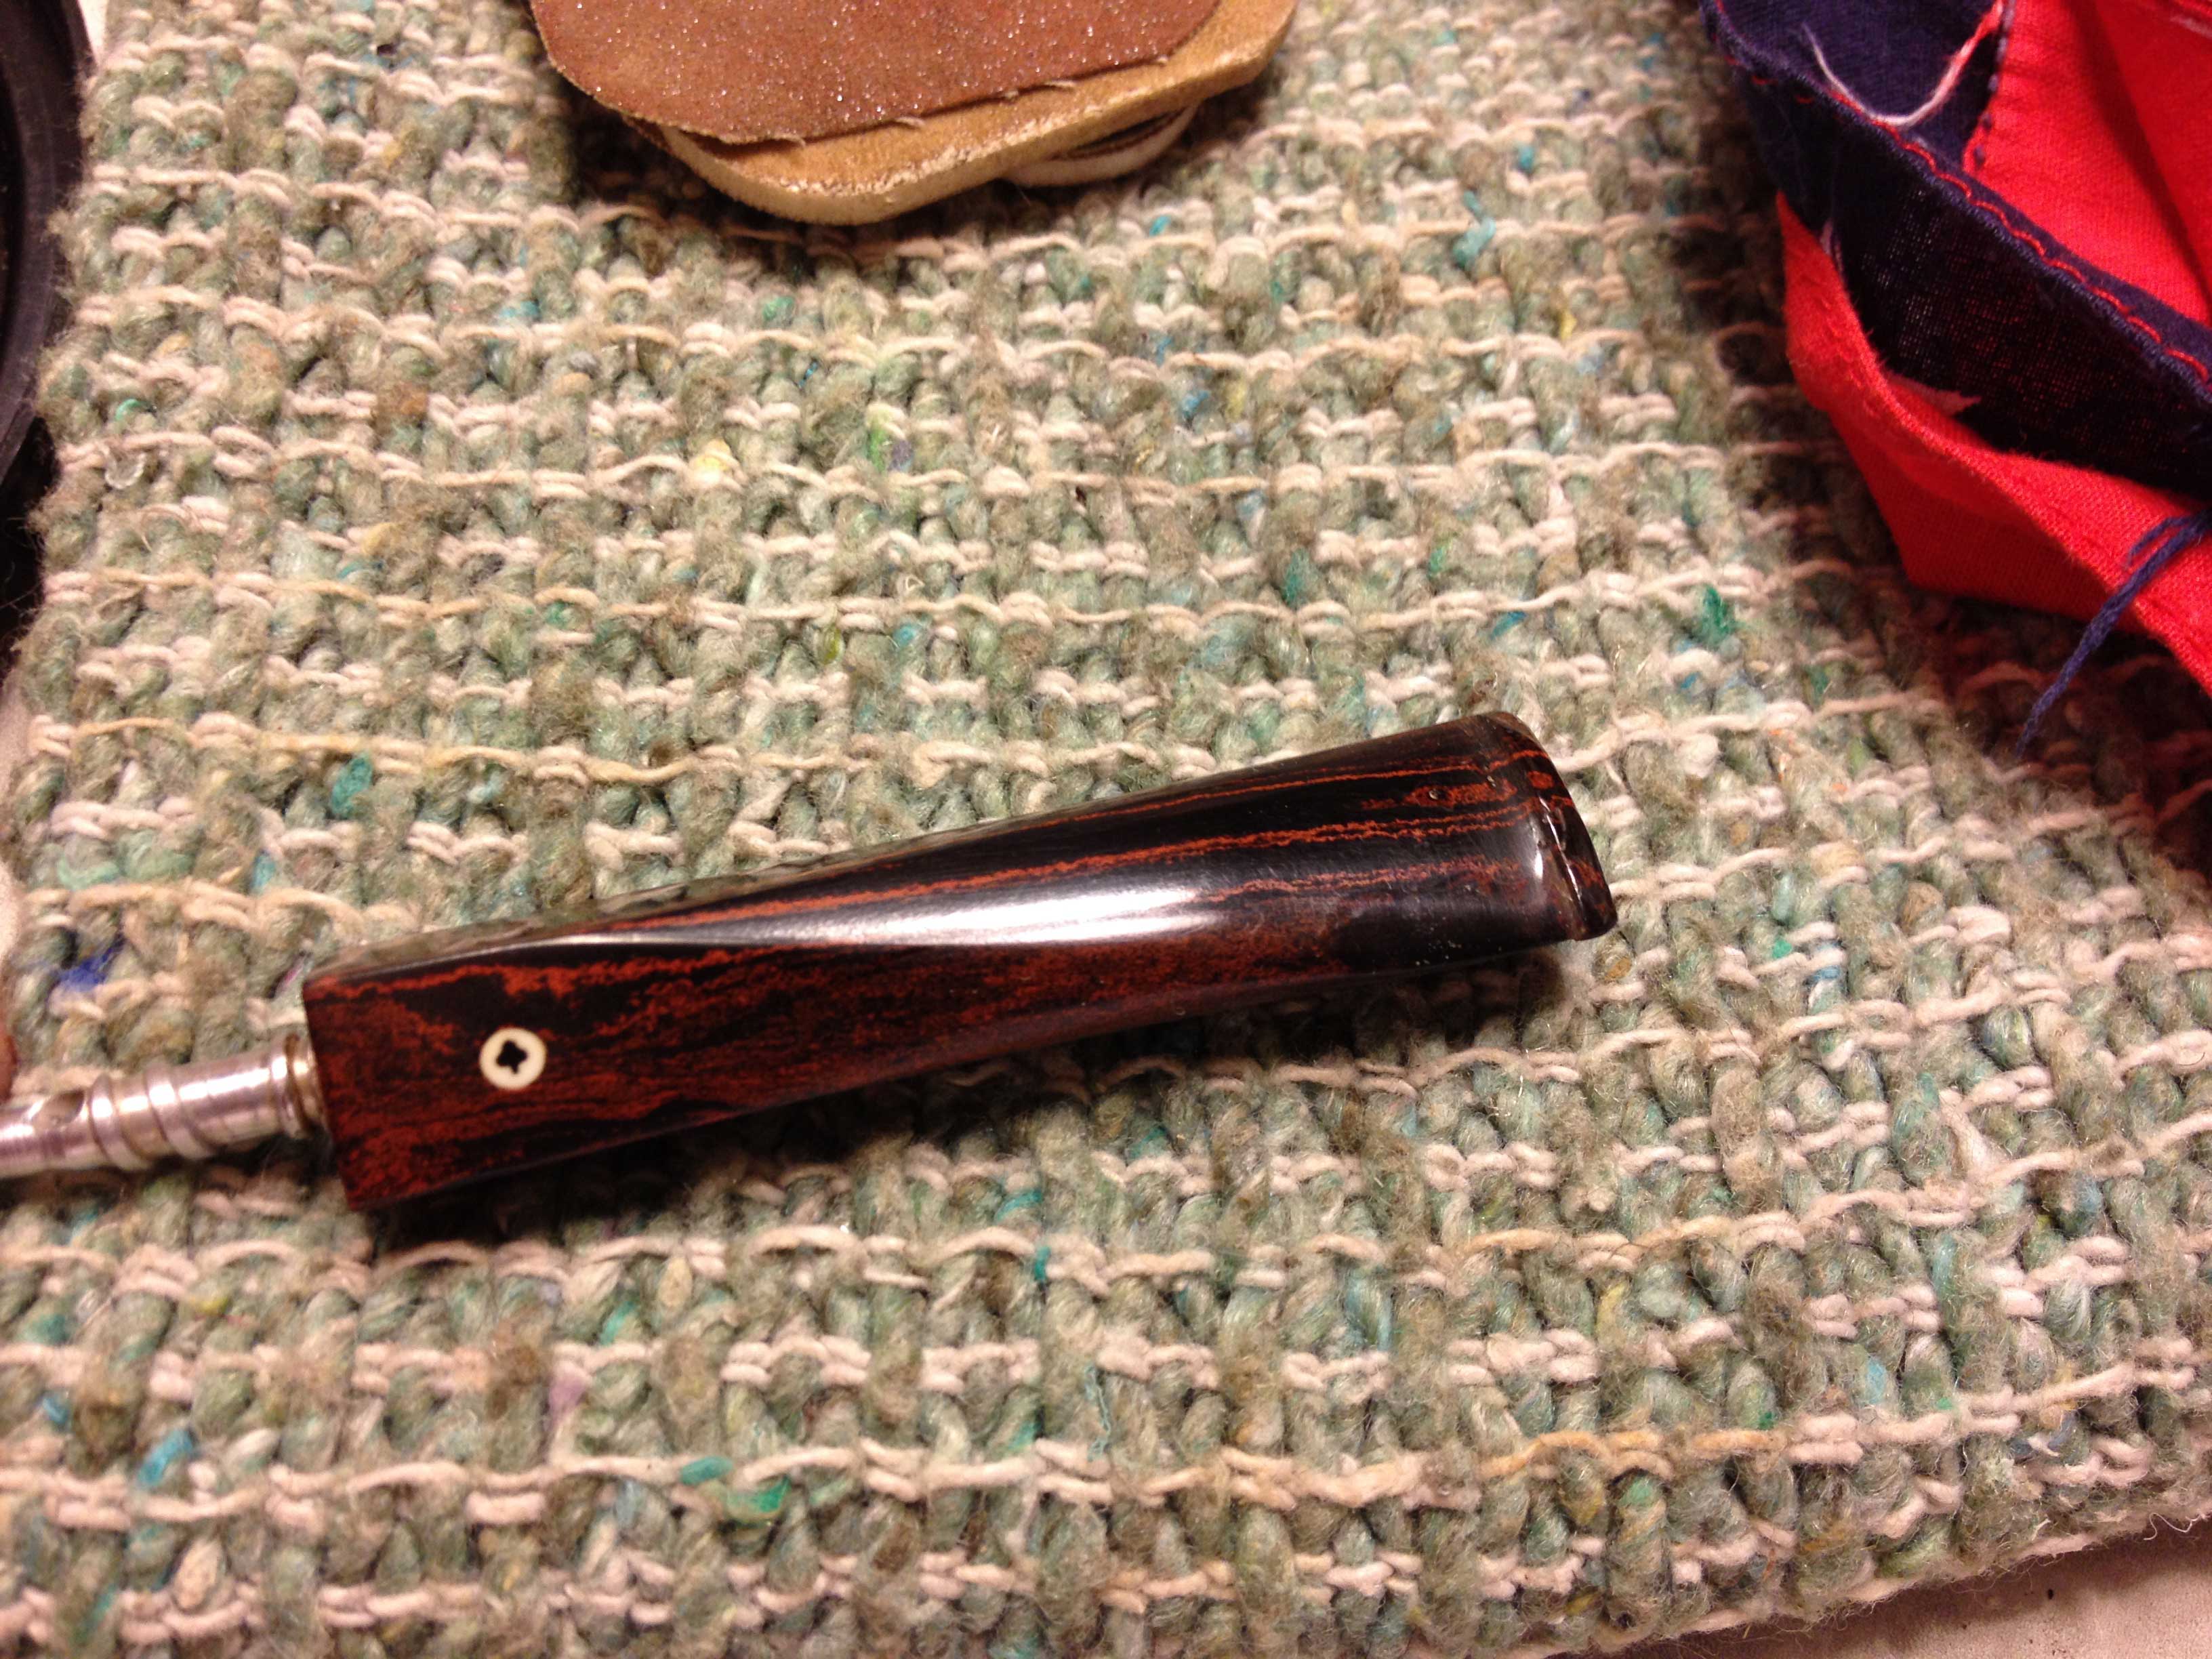
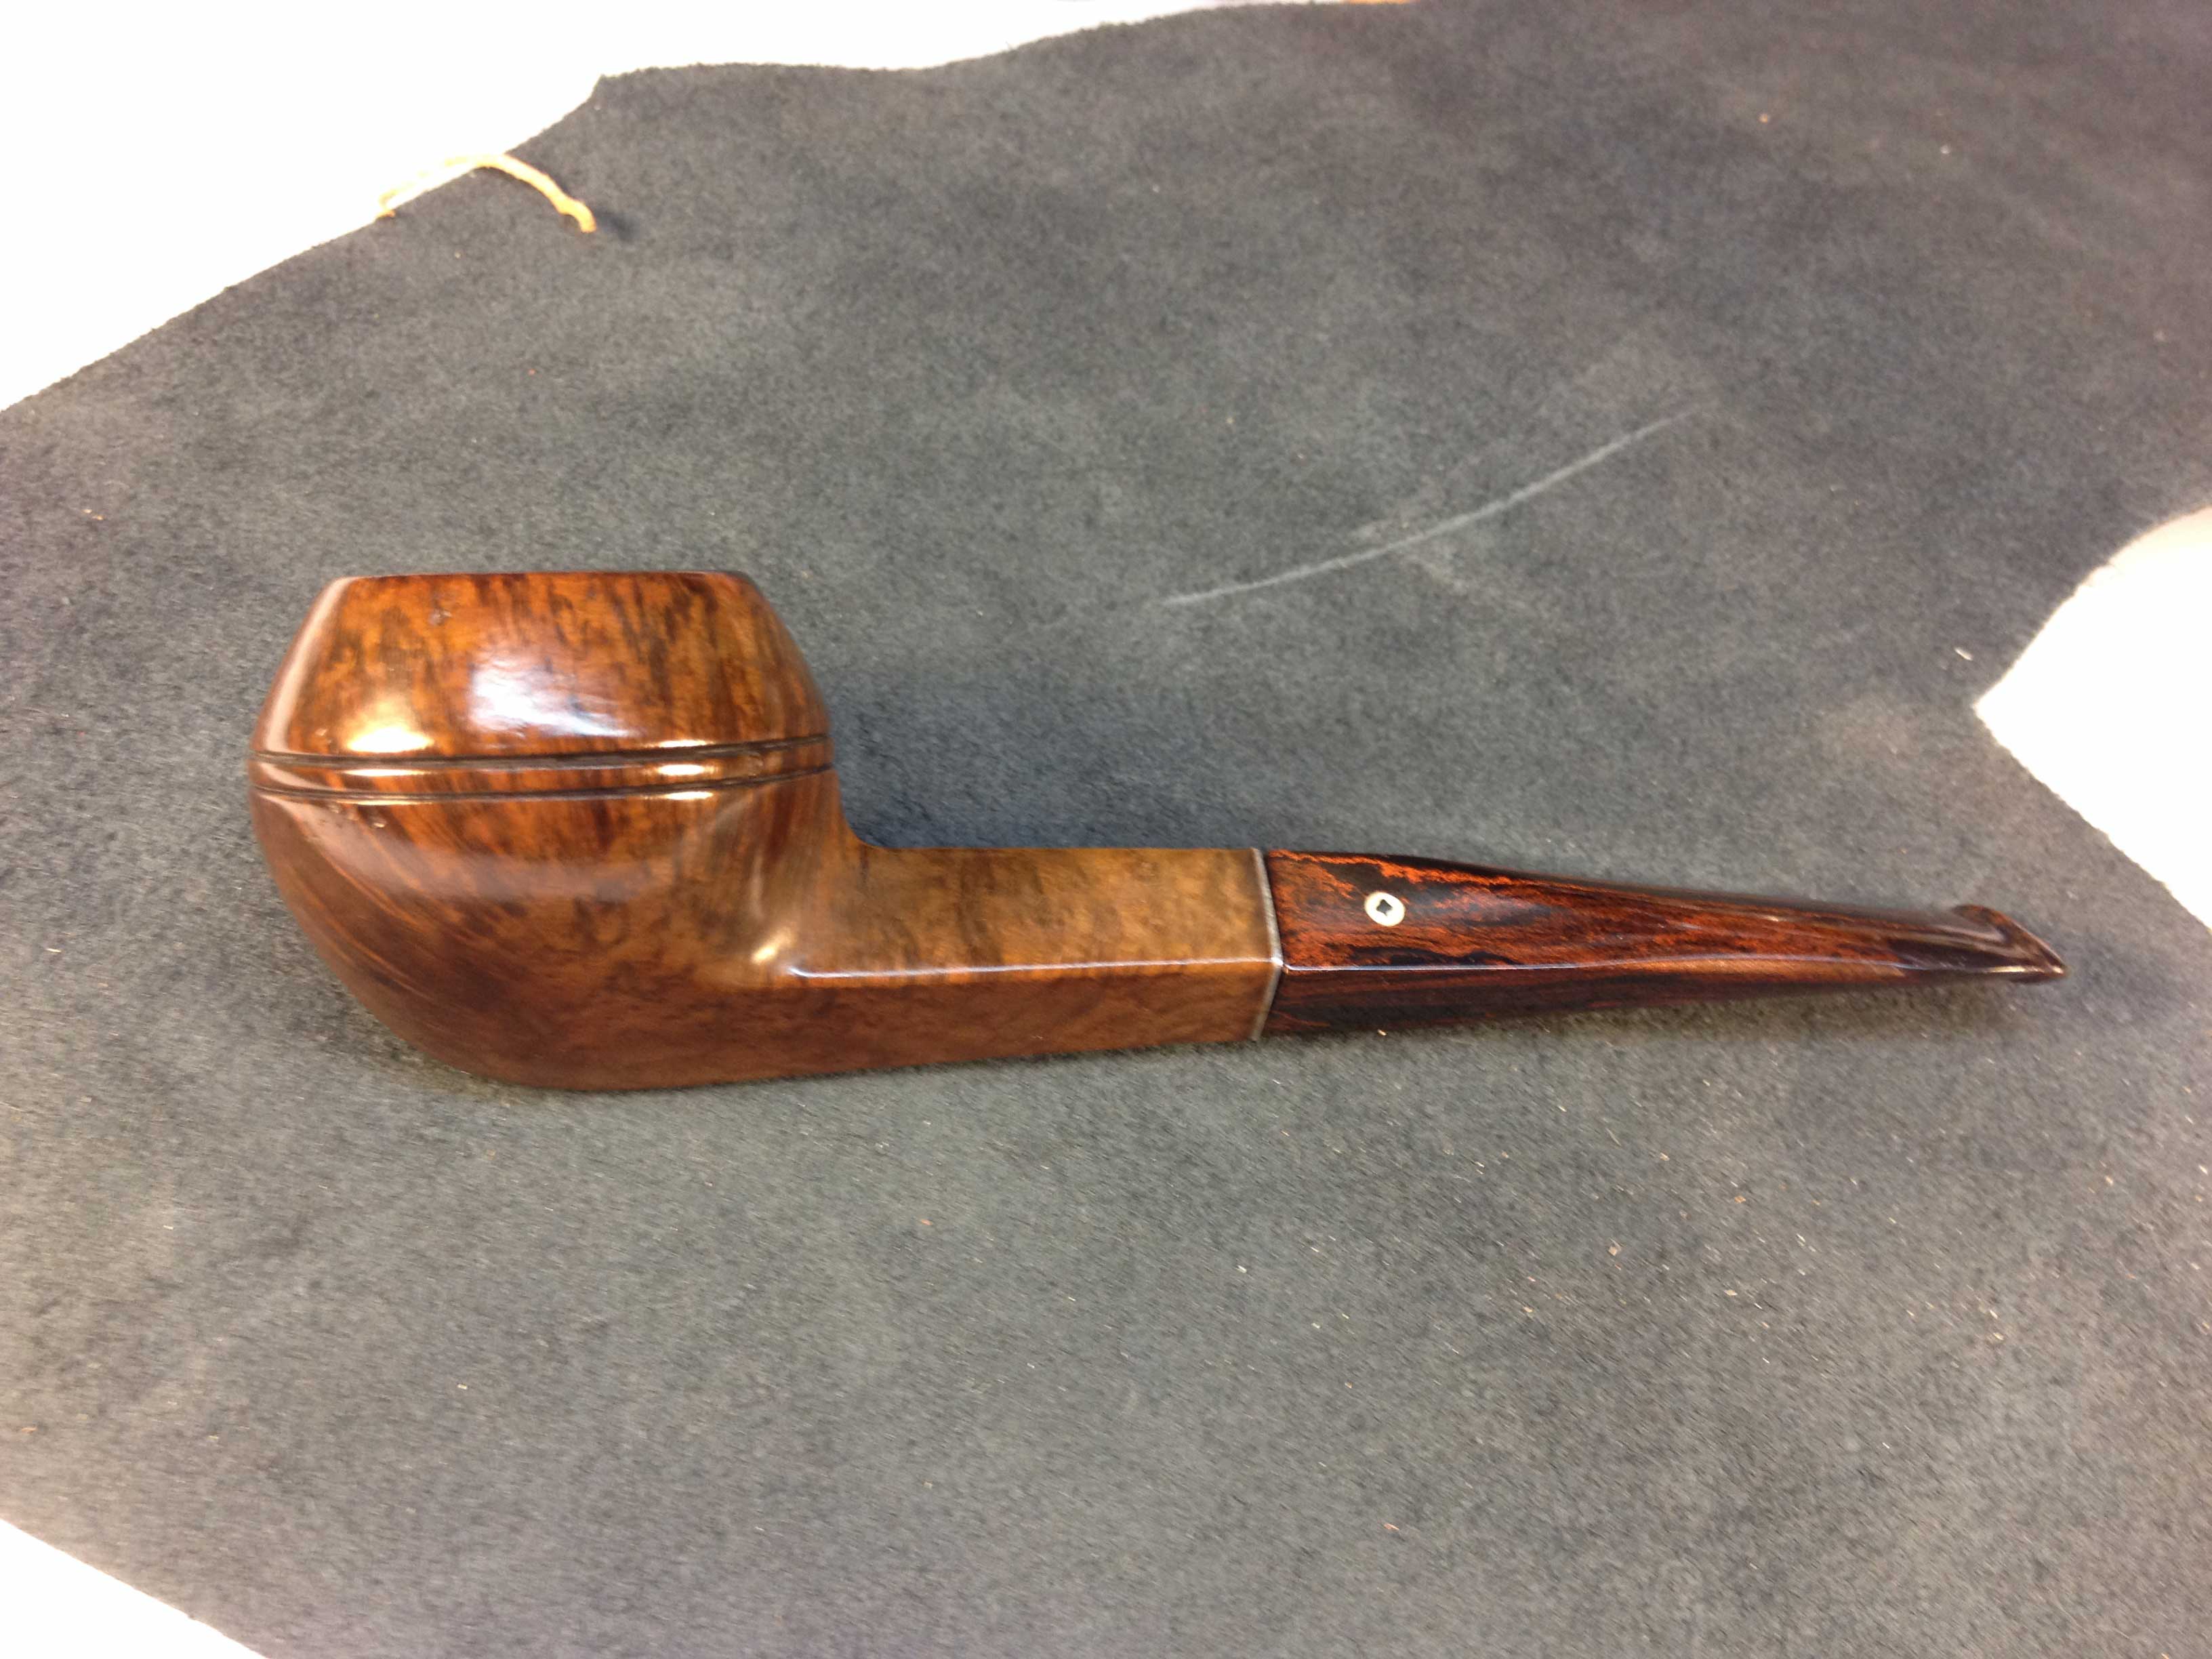
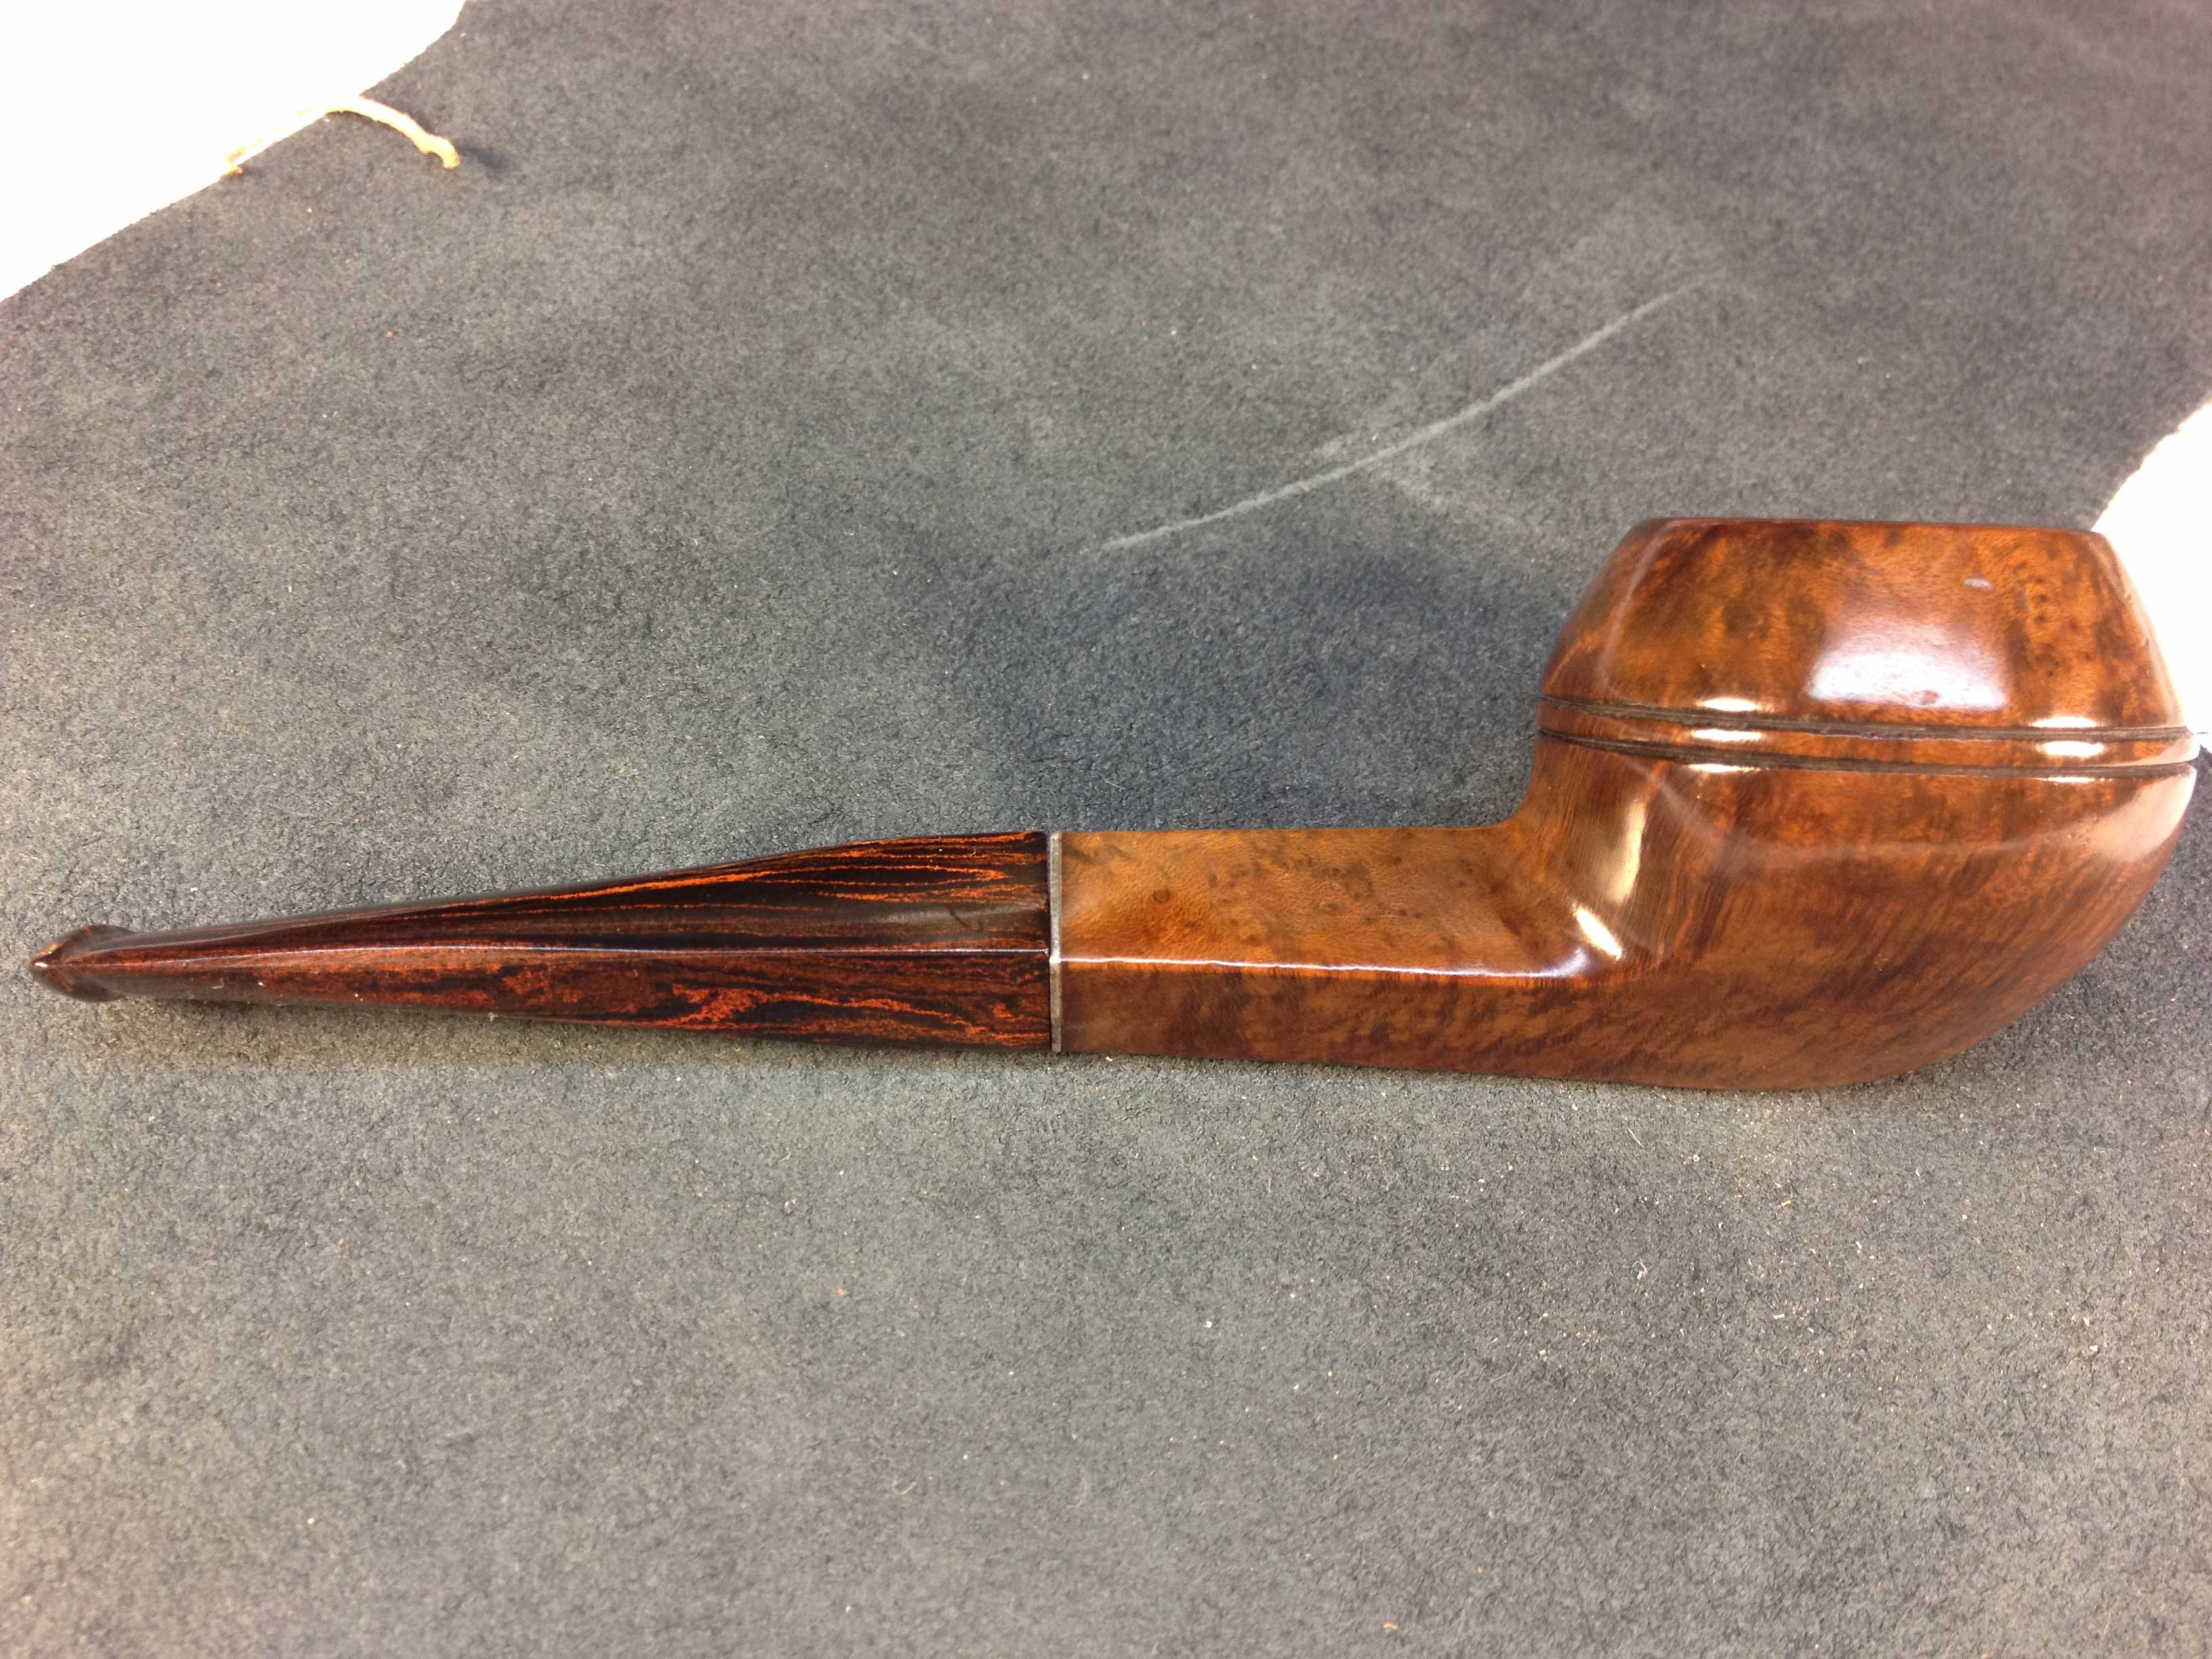
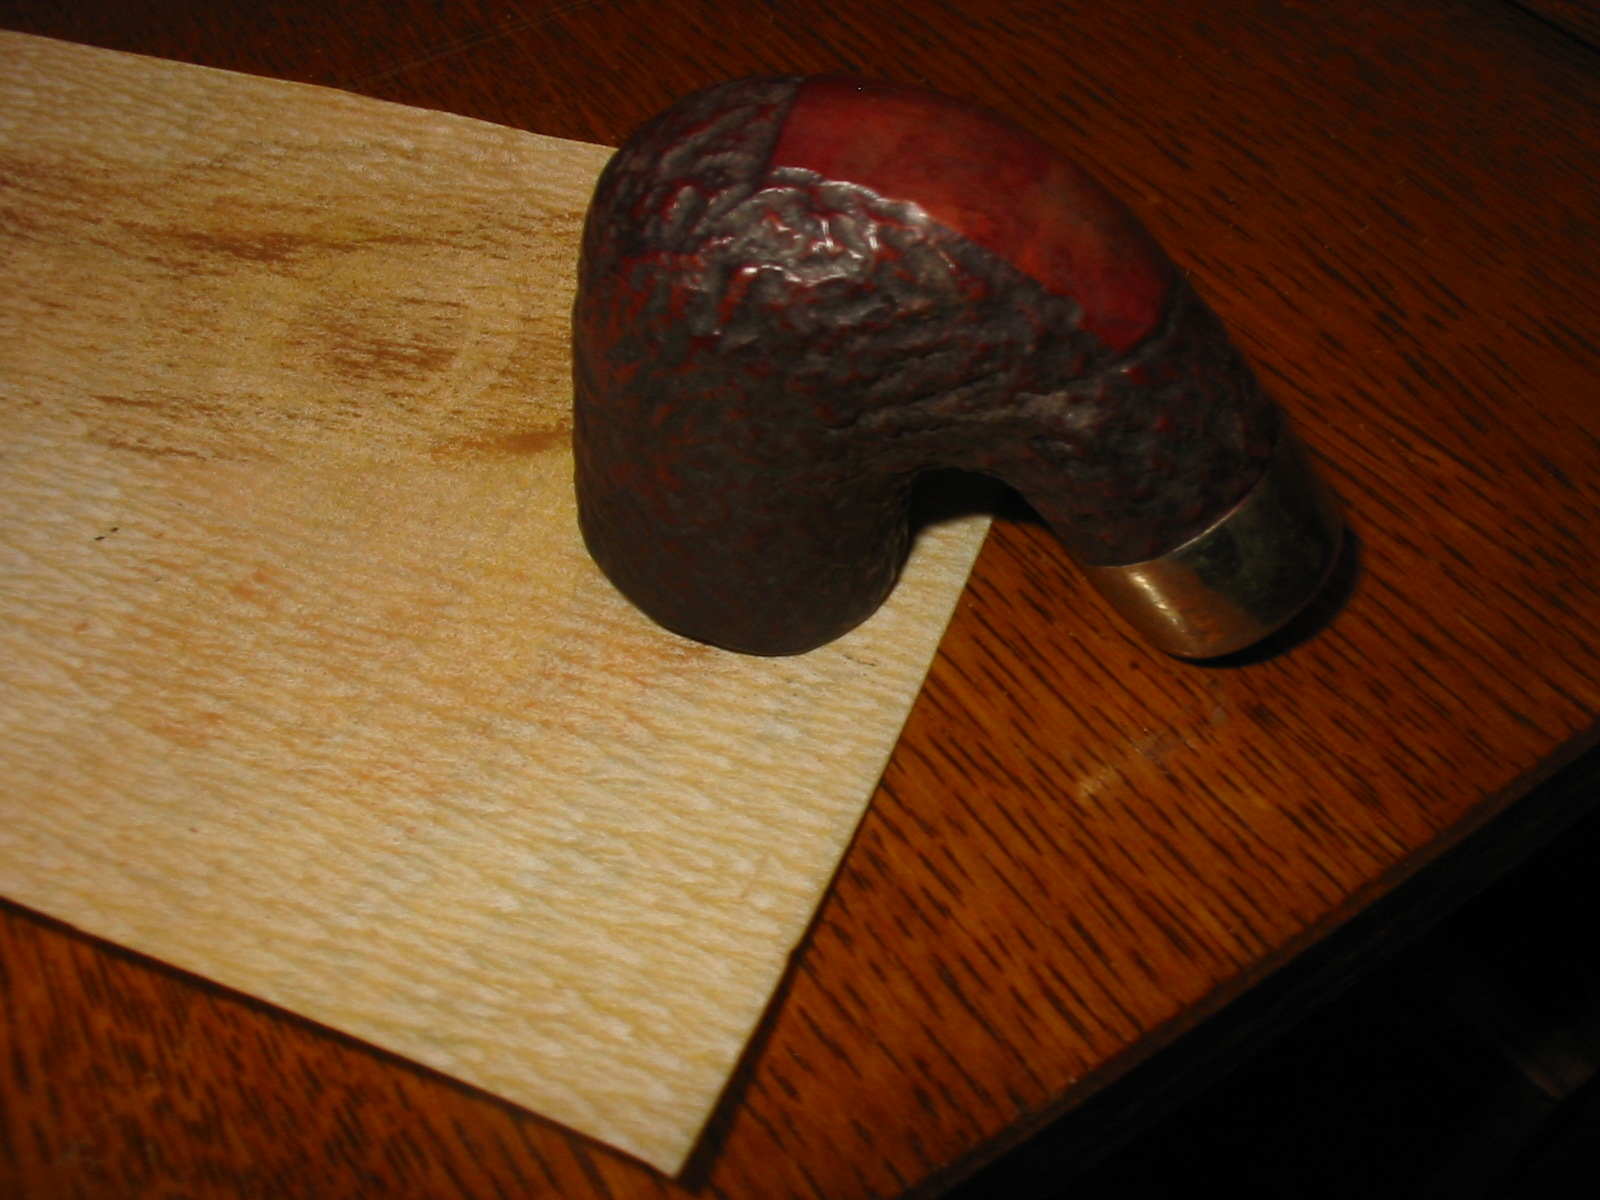
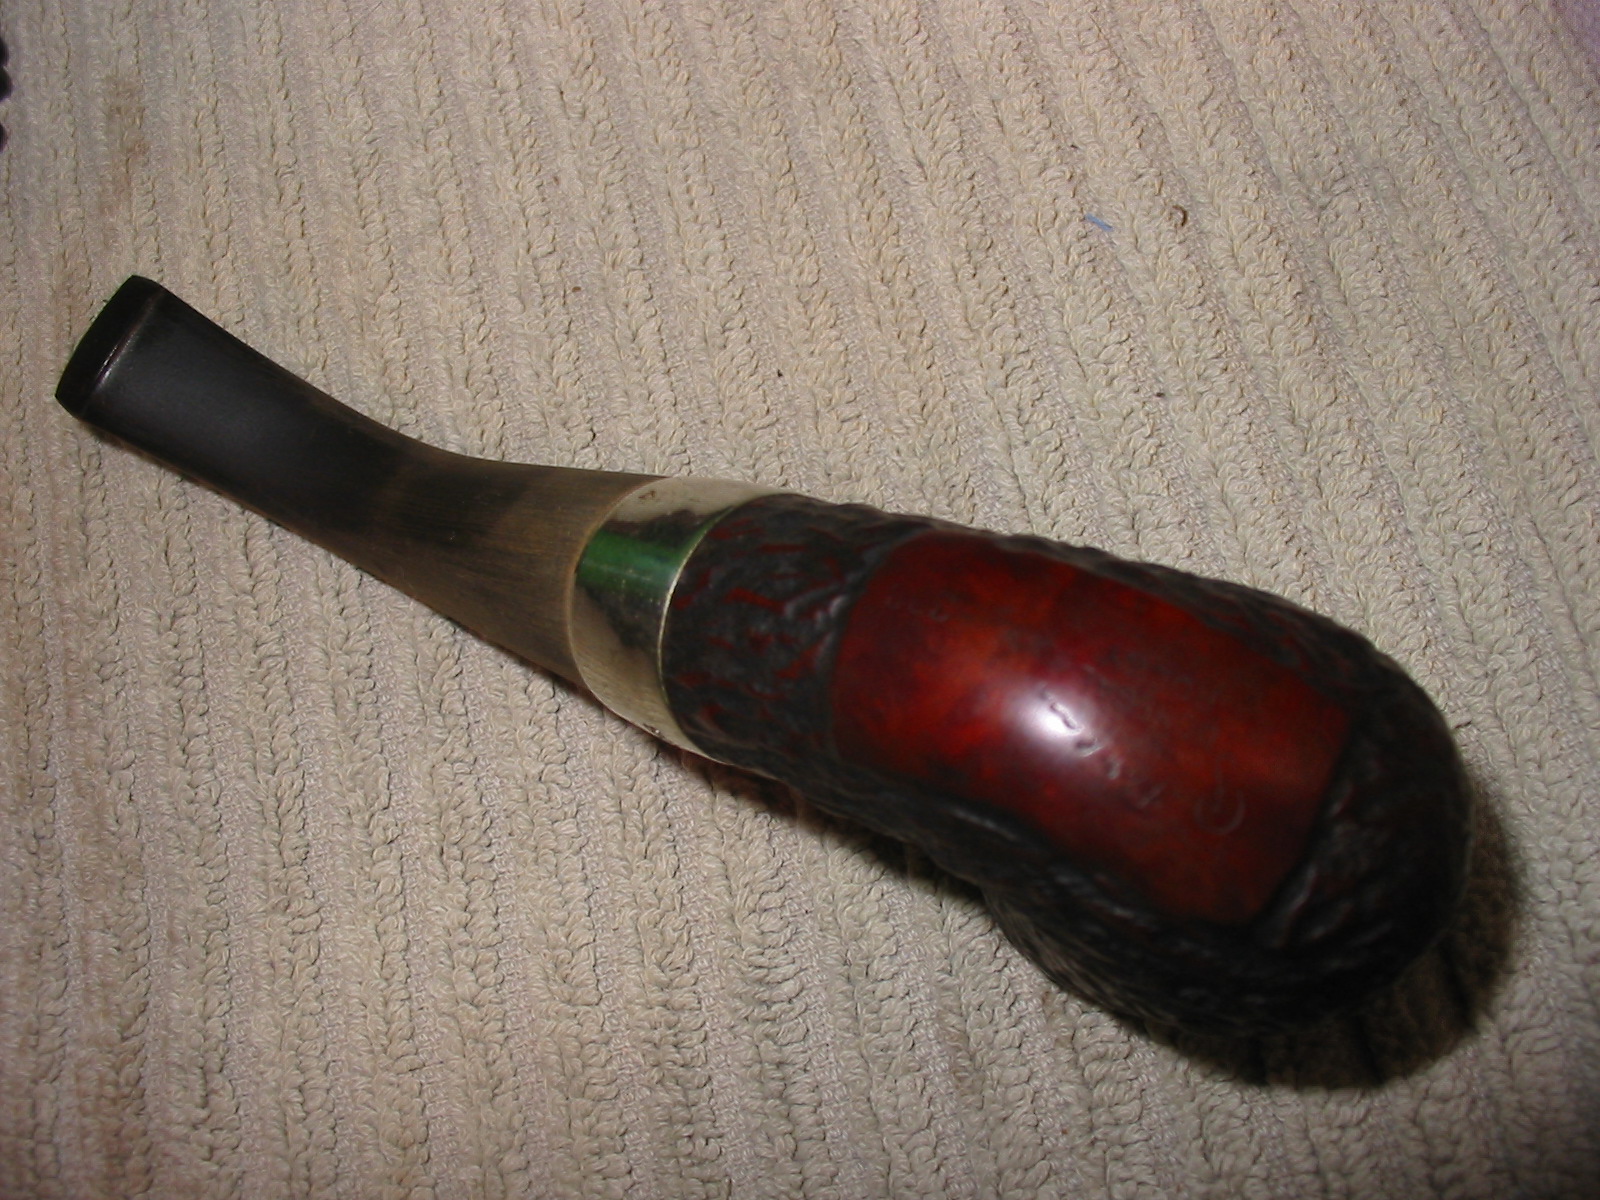
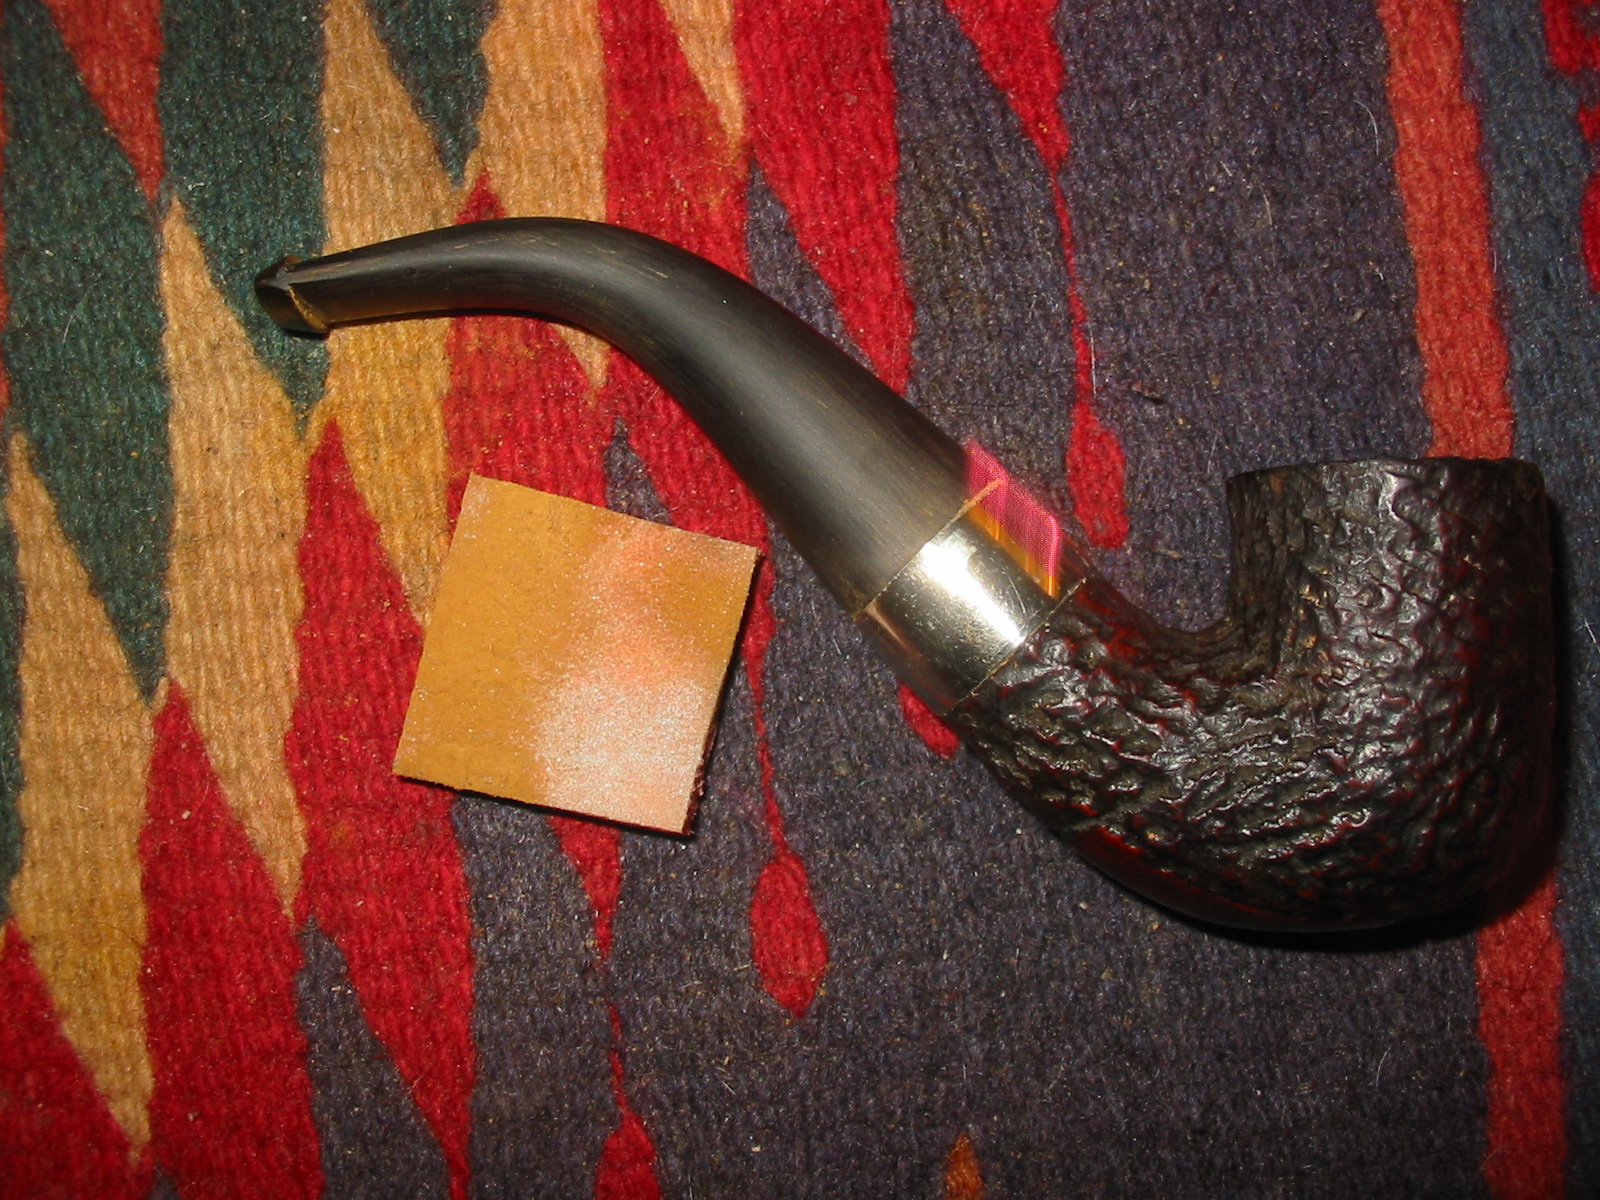
The time had come to look on Thinbite in his full glory. The stem was good as was the shank it was attached to. The rusticated area was a rich burgundy red and flawless. The rim and right side of the bowl were smooth and shiny with good grain.

An explosion of thunder filled the room.
The fills in the bowl in those places still showed like scabs on a wound, which he was familiar with. The young man was sure his heart would stop beating despite his youth and good health. He stared at the flaws for several minutes as though that might make them go away.
Then an anger he had not felt in many years filled him and it took all of his control not to slam the pipe down on the work table and bash it to bits. Somehow he set Thinbite on the cotton cloth and staggered to his bed, where he collapsed on his back.
“I wish grandfather were here,” he said again, “or I with him in Taos.” He stared at the ceiling until it blurred. “But he is not here and I am not there and this is my mess to fix.”
The young man wanted to give up on his project and go to his tobacconist to buy the old man the best pipe he could find but in the end he remembered the word surrender was one he did not know.
“I will close my eyes and picture the old man in my mind. What would he do if he had Thinbite in his great masterful hands now?”
Mike fell into a state between wakefulness and sleep. He imagined his grandfather in his shop. Thinbite was in the old man’s hands as he turned it once and smiled. As the young man suspected, the old man knew what needed to be done to make Thinbite whole and good again.
Mike watched from above as his grandfather chose the right piece of micromesh from his table and removed the stain from the areas covering the fills and wiped the bowl clean of dust.
The old man reached for something Mike at first could not see because it was buried in the clutter. As the old man’s fingers moved through the many tools he had for every situation, the young man felt his breathing increase to an almost unbearable pace.
Mike and his grandfather saw what he was looking for at the same time.
“Super Glue,” Mike said and exhaled, and his eyes opened. He found he had been holding his breath. “Of course. How could I be so stupid? Thank you, Grandfather, for the help.” He felt the old man’s presence and wondered if he had been heard.
He stood again and walked to his table and sat on the stool. He did not yet have so many of the tools and supplies that build up, from years of work restoring pipes, that he could not find what he sought with a quick look. One day he would possess all of these things, some found in stores but most contrived by ingenuity and all of them horded for the day when nothing else will do. Mike soon found the small double packet of Super Glue he knew was there. He tore off the top and took out one tube and set it nearby.
Mike considered his grandfather’s approach to Thinbite and made the conscious decision to do it his own way. Although the old man did the correct thing under the circumstances by removing only the patches of wax and stain over the affected areas of Thinbite, Mike came to the sudden decision that the difference in colors of the two stains he used was not enough to bother with, and the better choice was to stain the entire pipe in the burgundy color. To remove the brown stain and the waxes coating it from the smooth upper area he preferred the careful use of steel wool.  The process of reversing his mistake went with surprising ease. He stripped his original attempt to re-stain and wax the smooth part of the pipe with the steel wool and rubbed the light red briar with the 1800-grit micromesh. Then he matched the filled places with a brown marker and covered those spots with the Super Glue. When it dried he chose the 1000-grit micromesh to take away the roughness of the hardened glue. He now remembered this was the trick to be sure the ink from the marker did not run or even show when buffed.
Mike took a deep breath and let it go. The time had come to see if he or the pipe would win.
“You will not defeat me, pipe,” he said.
He was tired and wanted to be done with it, and it was already the old man’s birthday. The young man tried to imagine living one hundred and four years but could not. He could not even think of being as old as his parents.
Taking the same steps above as he had below, the young man stained the upper half of the pipe again, this time with the same burgundy color as the bottom, and lit the candle again and flamed it with careful, even turns. The blue light that danced across the surface of the bowl as the heat from the candle evaporated the alcohol in the stain never failed to make him smile.
Mike had a good feeling about Thinbite again and was happy he did not break it to kindling wood as he wanted to do earlier.
Just then he noticed something was different. The room was silent except for the hum of the refrigerator.
“The storm has stopped,” he said and opened the drapes, which let in streaks of the dawn sun that highlighted the dust floating in the air of his room. “Now this is a good omen if ever I saw one.”
The buffing passed in a blur, with Mike’s hands working on their own the way a great musician does, not thinking about the music but making it.
Mike did not remember shutting off the machine but knew he must have done so when the mandrel slowed to a stop and he found himself rubbing the finished bowl in the cloth.
The young man picked up the stem and for the second time in a day turned it into place in the shank. He did not know how tired he was until he leaned forward on the stool to rest his elbows on the table where he could better see the details of Thinbite in the natural light. His entire body ached with stiffness, but what he saw was worth the pain. 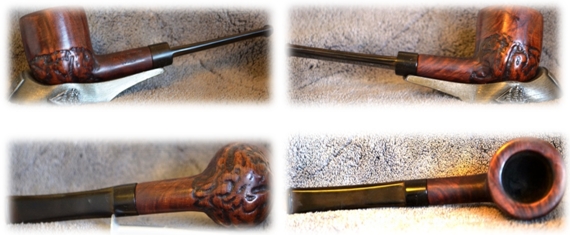
 “Thinbite, you are whole again,” the young man said and felt a new kind of joy.
But he was tired and needed to rest for an hour or two before the long drive to Taos and the old man.
He lay on his bed and thought he was awake, but he dreamed of a boat on a lake and the fish he would catch.
________________________________________
For the drive to Taos Mike packed a Styrofoam chest with ice in which he buried cans of Coca-Cola. He was a man and therefore stuffed a change of clothes into his knapsack and of course put the box with Cavicchi on top, knowing there would be time for smoking. He shouldered the pack as he would a rifle.
The young man wrapped Thinbite in bubble plastic and taped it closed before shutting the drapes.
Taking also his shotgun under an arm to secure in the locker in the bed of his pickup, he left, locking the door behind him with his key in one hand and Thinbite in the other.
The gas tank was full and he had only two stops to make, at his tobacconist for a felt pipe bag with a drawstring for Thinbite and a plain box to put them in and a good liquor store he knew for a thirty-year-old bottle of the old man’s favorite Scotch he had special ordered.
He was in a hurry to see his grandfather and had no time to waste on feminine formalities such as wrapping paper and bows. Neither, Mike knew, did the old man.
When he was on the northbound Interstate he was free at last and popped a can of Coke to celebrate.
The trip took a few hours the way Mike drove, both his speed and shortcuts. He pulled up to the modest little adobe house sitting on five acres of unspoiled land a half-mile from the official Taos town limit in the late summer heat of early afternoon.
Ed waited outside, as he always did. Mike thought he must have been looking out the window and seen the pickup kicking up dust down the private road or have excellent hearing, or maybe he was psychic, as the boy Mike had often suspected.
The two embraced as men do, with hard claps on the back.
“Heavenly Father, I always forget how big and tall you have become!” the old man said. “Always when I think of you it is as the chaval you have outgrown.”
“Just as I always picture you in your seventies,” Mike said with a smile. “But I swear you don’t look a day older than ninety-four now.”
That made them both laugh.
“Happy one hundred and fourth, grandfather.”
“Ah, that’s enough of that,” Ed said. “I stopped counting years ago.”
Mike loved the old house and the beautiful piece of land almost as much as he did his grandfather and had spent many hours arguing with his parents to let him move there to live with the old man.
“Think of what I could learn there!” he said.
“Exactly,” his mother said in her most sarcastic, wine-addled voice that always made Mike think of Elizabeth Taylor in Who’s Afraid of Virginia Wolf.
He recalled his grandfather’s occasional comments on the subject of women and drinking.
“If it were up to me there would be a law against the whole thing,” the old man said, and they always laughed. “There is a definite evil that can come to some from the drink, God knows even plenty of men, but women are pre-disposed to evil enough as it is without adding the ammunition of booze.”
The two were still standing in the drive by the house when Mike’s nervousness began to show in the way he moved, his legs jangling and light on his feet, which seemed ready to leave the ground.
“Well, out with it,” the old man said. “Do you just have to pee or have you done something you need to talk about?”
Mike sucked in a deep breath of air and held it a moment. Without letting it out he said, “Why don’t I get my things and we can go inside and sit down and have a drink.”
His grandfather was alarmed.
“Oh, my Lord, you’re in some kind of trouble.”
When they were in the familiar living room, the old man looked again at his grandson and said in an unhappy but resigned voice, “I suppose sitting is in order.”
“Happy birthday again,” Mike said and handed the box to his grandfather, who was close enough to the couch that when he fell into it he was not hurt. “And this is what I meant by a drink.”
From behind his back he pulled the bottle of vintage Scotch, which the shop clerk had wrapped up in clear red plastic despite Mike’s protests. A small fancy card was attached. Ed saw the note and it was clear he was moved beyond words. He fumbled with the bottle and set it down on the coffee table, at last taking the card in hand and clearing his throat before reading it aloud.
“My dear grandfather,” he said, reading, and his voice began to tremble. “You are so much more to me than a grandfather that I can never repay you. You have been a father, a mentor and a friend. Love, Chaval.”
Mike did not care if his grandfather saw the tears that were close to his own eyes but did not wish to shame the old man. He suggested that his grandfather open the box. The young man was relieved to hear his grandfather clear his throat with gruffness and become more himself again.
Ed of course knew a pipe box when he saw one but believed it must be a trick to disguise the real contents. But when he took off the lid and saw the dark blue felt bag his body went still a moment as he considered the possibility that his grandson was returning the Cavicchi as some sort of gesture.
A closer look at the size and shape of the bulge within the bag told him he was mistaken. Stealing a glance at Mike’s expectant young face he took it from the box and pulled the drawn top open. Inside the bag the old man felt the stem and not knowing what to expect removed the pipe.
Although his glasses were on the table he said, “Why, this looks like a Thinbite! I haven’t seen one of these in years. Where did you find a new one?”
The young man let out an audible sigh of relief, certain the moment would never be replaced as the greatest of his life.
“I apologize, grandfather, because it is a Thinbite but it is not new. I found it in a second-hand store in rough shape and restored it for you. I used the skills you taught me to fix it.”
Not since baby Mike first called him grandpapa at the dinner table more than twenty-six years before, or the last quarter of Ed’s life, had he been so speechless.
“Do you like it, grandfather?”
When he realized he was staring at his grandson and seeing the gawky bruised boy he once was, the old man shook his head as though to come to his senses.
“I think it is time for a toast,” he said and tore the plastic wrapping from the Scotch bottle and opened it as fast as he could while Mike went for crystal shot glasses in an antique cabinet nearby.
Ed filled both to the brim as Mike looked on.The young man followed his grandfather’s lead in raising his glass and waited for the toast.
He continued to wait. Just as Mike was going to suggest one himself, the old man spoke up.
“A toast,” he said, “to my grandson,Gabriel Miguel Jorge de Sabato, who has become what he was born to be, and is ready to carry on the tradition started by my father’s father’s father.”
Mike heard his given name and was surprised that it did not bother him. In fact, from his grandfather’s mouth, it even had a special rightness to it. But he still concluded the old man started celebrating early that morning even if he did claim not to count the years any more.
“To me!” Mike said, going along, and they both knocked back their shots. The young man poured two more and lifted the glass. “To my grandfather, the greatest and oldest pipe restorer in the world.”
Again they emptied their glasses, and this time slammed them down. Mike was already beginning to feel the effects of the good Scotch but was prepared for any consequences if the old man stayed happy.
“I have thought of another toast,” Ed said.
“I am not surprised,” Mike said, joking, but his grandfather looked serious.
“As they say in England,‘The King is dead! Long live the King!’”
Mike did not care for the sound of that, but what could he do other than drink the shot? He poured what he intended to be the last, at least for himself, if only to brighten the shifting mood.
“May the reigning King live forever,” he said.
“Ah!” the old man said, and of course they downed the drinks.
A long silence followed, but the young man was comfortable with it.
“I have been thinking much for some time now,” his grandfather said at last.
“Oh, no!” Mike said, and the alcohol swimming in his head made him giggle.
He thought about the first time, when he was fifteen and said something impertinent to the old man, who just glanced at him with his eyes that burrowed and said nothing. But since then Mike treated the reprieve he received as the good fortune it was and never abused the license.
“No, no, seriously,” the patriarch of the family said. “But we do not need to speak of that now. When the time comes, you will find everything in my files, which are very organized, under your name.”
The young man’s head cleared as fast as the storm in Albuquerque had that morning.The conversation was turning a different direction than he planned.
“I think it is time for a bowl of tobacco,” he said and reached for his knapsack to get Cavicchi.
The old man’s face brightened as he saw the old pipe that was new when he bought it just before giving it to Mike all of those years before. They now seemed to have passed in a flash.
“I love that pipe,” the grandfather said with a warm smile that gave the young man hope again.
“I know. That is why you gave it to me.”
Their eyes met and they gazed at each other with the rare understanding that needs no words.
“I have just broken in a Costello CanadianI traded two Savinellis for,” the old man said with victory in his eyes. He picked it up from the table and showed it to Mike.
“Nice,” the young man said and nodded in honest admiration.
“Nice, yes,” the old man said, in his mind adding the word to his list of youthful vernacular with which he tried to stay current.
The way they talk these days can be so strange at times, he thought. That word my grandson used just now, for example, means so much more than nice used to mean, which is a good thing. Ah, times change, and one must change with them.
After one bowl of the strong burley mix the old man offered, Mike was even more light-headed than before.
“I think it is time for a nap,” he said. “We will have all night to continue talking.”
“Yes,” his grandfather said.
“I never told you how much I love my Cavicchi of Italy.”
Ed at once picked up on the lead to their old game.
“I still like the Peterson’s of Ireland, in particular the older models and special editions.”
“And the Ropps of France,” Mike said.
“Right now I am a great fan of the Thinbites of Italy, even though they are managed by an American company called Whitehall. But I fear the new Dunhills of England, which need much practice to restore to their old greatness.”
“The Nordings of Denmark are excellent,” Mike said. “You can always count on the Danes to make a good fighting pipe.”
They stopped and laughed, the old man throwing his hands up in defeat.
“You were the best student I ever had,” the old man said.
Mike ignored the obvious answer, yawned and said, “Well, I need a nap. I’ll take the couch.”
“Good,” Ed said. “I will sit back in the recliner and sleep like a cat, which I must have been in another life or am preparing to be in the next.”
Mike thought about all the times he had stayed at his grandfather’s and never seen him use the big bed in the one room that was always closed. When he was a boy Mike camped out in the living room in his sleeping bag to be close to the old man.
“Why do you never sleep in the bed?” he said.
Never before had he seen a look of dread on the old man’s face and was astonished to learn that his grandfather could be afraid of anything. The idea would have been the same as learning there was no Santa Claus if the young man had ever believed in such things.
His grandfather was nervous and tried to grin to hide the fact when he said, “I used to sleep there but have not done so now for thirty years, since your grandmother, God rest her soul, passed in that bed.”
A sadness and loss was so deep that Mike saw it in the old man’s wrinkled face and for the first time observed how frail his grandfather seemed. He felt it inside himself like a punch to the kidney. He would have put an arm over his grandfather’s shoulder but knew that would make the man more uncomfortable.
“Come with me,” the young man said. He had never used the imperative form of speech with the old man. His grandfather stood and allowed himself to be led into the bedroom. The door had to be opened with a slight shove and the hinges squeaked. Mike pulled back the covers on the bed and left the room.
From where Mike lay on the couch he heard the old man pace for many minutes followed by the sound of bedsprings as his grandfather sat. Two shoes dropping one at a time to the floor.
“Thank you, Mike, for helping me,” he said in a quiet, worn out voice from the bedroom. “I see I was afraid of something I did not understand. I am ready now.”
“No problem, grandfather,” Mike said in reply, mumbling, already almost passed out.
Ed paused and said, “Good night, chaval.”
“G’night, grandpapa.”
When an hour had passed, Mike awoke with a start. The sun was still high in the sky although his watch read four-thirty. He did not dream during the short but deep sleep. Nothing was out of the ordinary except for the unusual silence. The air inside and out was still, and even the birds did not sing.
Mike walked to the bedroom door, which was ajar, to check on the old man. He was sure his grandfather was not still sleeping even if his eyes were closed.But he opened the door with care to avoid the long creak that he found was unavoidable and saw the old man with the heavy Navajo bedspread over him so that only his head and shoulders and arms showed.
His eyes were open, but they were fixed on the ceiling in a way the young man had never before seen. Mike gazed at his grandfather’s pale face for a few seconds and burst out in uncontrollable tears he had not spilled since he was a baby.
All he could say, over and over, was “No.”
When the sobs subsided he moved to the old man’s side and reached out to touch Ed’s face. He knew the man he loved more than anything else in life was not the body before him but still recoiled at the feel of cooling skin.
Mike forced his hand back to close the eyes and with his fingers straighten the white hair so that when he was ready to call the people who would take his grandfather’s physical remains away forever they would see him as he wished to be seen.
The deep breath he took as he stood again was choked with the last raspy sob the young man thought he would ever make.
Mike remembered the old man telling him little more than an hour earlier that the young man would know the time to look in the files. And so he went without further thought to the work room.
He opened many cabinets in order searching through the alphabet for his name. At last he came to three folders that could hold the mysterious secret his grandfather chose to keep to himself until he was gone.
One had old copies of every report card and note to the boy’s parents about his progress, as they called it, sent by the schools he attended. And he had a copy of Mike’s record of live birth certified the year he was born.
Another held numerous detailed notes in the old man’s writing describing Mike’s learning of pipe restoration over the years.This folder, with his grandfather’s diary of his rising excitement at Mike’s rapid grasp of every important element of the restoration process, showed a side of the old man he never knew.
Because of what it told the young man about Ed’s obvious pride in his grandson and the special relationship between the two as teacher and apprentice, Mike spent the most time reading every word Ed wrote about him.
His immediate conclusion was that this was the folder he was meant to discover.
Then the young man saw the third folder overflowing with official papers. They appeared to be the old man’s most vital documents. There were his marriage license and certificate, the deed to the old adobe house and the title to Ed’s truck. The house and truck were free and clear for many years in the old man’s name, which he learned was Eduardo Abelardo Baldomero de Castillo.
“What a magnificent name,” Mike said, knowing it meant guardian of prosperity and noble strength and bold and famous of Castillo.”
But in the back of this file were legal documents including a last will and testament that named Gabriel Miguel Jorge de Sabato, “also known as Mike de Sabato,” as the sole heir.
Sole heir.
The words took time to sink in. The young man knew from skimming the will that Ed left everything he owned to his beloved and only grandchild. Those words in particular meant more to the young man than he could express at the time. The entire idea met with resistance when matched against Mike’s grief, which still burned with the slow steady progress of a fine pipe tobacco.
Mike thought about his grandfather’s clear plans for him and what they meant. He never had to consider what he would do with his life beyond construction labor. Maybe he was born to restore old and abused pipes as his grandfather’s notes claimed.
He remembered every word his grandfather spoke to him during their last brief visit and wondered at the old man’s apparent premonition of death. The odd toast of the king is dead, long live the king.
The comment that the young man would find what he needed when the time came. The sad reference to his wife, who died in the same bed to which Mike led him. The old man’s whispered admission to Mike that he had been afraid of the unknown but now was ready. And more than anything else, the final “Goodnight, chaval,” which he had not called Mike since he was twelve.
Mike wanted to blame himself for his grandfather’s death.
“Why did I make him go to the room and sleep in that bed?” Mike said. “Maybe he would still be here with me if I had let him sleep in the big chair as he wanted.”
But taking all of the facts as a whole, Mike could not dispel the idea that the old man had known he would die that day, on his one hundred and fourth birthday, in his home with his grandson there to see him off. He even seemed to plan the event as a death in the afternoon.
At least, Mike thought, he died as one of the undefeated, which was the only thing that counts. The old man lived his life, did what he was born to be,ate what he liked and smoked the best pipes and drank only good whiskey right up to the very end.
After an hour passed, the young man still could not bear the thought of the old man’s body being taken from his home and place of business for the past seventy-five years. But he made the call he knew was inevitable.
Within ten minutes after he called the police, it seemed to Mike as though more cars than the Taos Police Department had were there to investigate, not counting the paramedics and a reporter from the local newspaper.
“Did you see the write-up in today’s paper?” the sergeant who appeared to be in charge said.
“No,” Mike said, confused.
He had no idea what a write-up was and hoped the old man was not caught driving while intoxicated. New Mexico had one of the country’s highest rates for that crime so the courts were cracking down on offenders.
Then he remembered why everyone was there and realized his grandfather had a bigger problem. He would have laughed at himself if he had not still wanted to cry.
“Yeah,” the sergeant said and tucked his shirt in over his gut, “I guess living a hundred and four years is one way to get your picture on the front page in these parts.”
Mike decided he did not care much for the man. He took a slow, deep breath and let it out to control his impulse to see if he could disarm the sergeant. He thought the probability that he could do so was high.
But at that moment he heard a zipping sound from the bedroom and turned so he would not see the bag carried out.
“Do you know if he was intestate?” the sergeant said.
“Intestate?” the young man said. He knew what the word meant but did not see any reason for the sergeant to ask.
“Yeah, intestate, meaning he had no will. Because if that’s the case the state takes everything.”
Mike’s lips turned into a grin, but his eyes said something else. The sergeant took a step backward.
“My name is Gabriel Miguel Jorge de Sabato, and my grandfather, Mr. de Castillo to you, was not intestate. He left everything to me.”
“Really,” the sergeant said. His eyelids shut halfway. “Well, then, I’d appreciate it if you’d stay in town until further notice.”
The young man gave the sergeant the most servile and compliant nod he could muster. He was having fun.
“Oh, don’t worry about that, sergeant. I’ll be here for you any time you need me. By the way, I’m moving here, and who knows? If I’m lucky I might be around for another seventy-eight years.”
Gabriel knew he did not like the sergeant and thought it would be nice to become a permanent thorn in his fat side.
But he understood the time had come to grow up and do what he was born to do. Living in Taos would give him a new chance at life. He thought he might even meet some of the bellamujeres who were everywhere and one would like him.
THE END
AFTERWORD
“How simple the writing of literature would be if it were only necessary to write in another way what has been well written. It is because we have had such great writers in the past that a writer is driven far out past where he can go, out to where no one can help him”
— Ernest Hemingway, Nobel Prize acceptance speech, 1954
The inspiration to write a tribute to Ernest Hemingway, in the style of his Nobel Prize winning novella The Old Man and the Sea, came to me a little more than five months ago. I found a neglected little Thinbite pot from Italy that had the potential to be beautiful again in a local second hand store and finished restoring it in time to donate the pipe to my club’s raffle on International Pipe Smoking Day 2014. I was both pleased and surprised when the pipe was chosen by the first winner, my friend Lindsay, before others of more distinction. Lindsay said he liked the look and feel of the Thinbite.
Because of the extreme difficulties I experienced in the restoration process, I had to make three separate attempts before I got the job done right. My mind working as it does, which is to say in often random sparks of odd connections, I remembered the classic tale of the old fisherman who takes epic measures to catch a huge marlin, only to find that his greater battles are with the sharks that eat away at the captured fish until there is nothing left of it but the skeleton by the time the fisherman returns to his village in his battered skiff.
Hemingway’s brilliant and descriptive prose is the work of a masterful writer who was able to condense complex characters and storylines into lean prose using what is often called, by fans and detractors alike, simple structure and language. But his stories, in particular his masterpiece on which this story blog is modeled, are anything but simple to write. In his letter accompanying the manuscript to his editor, Hemingway wrote that “it is the best I can write ever for all of my life I think.”
Thinking at first that my story blog would follow Hemingway’s own closer in format, I soon realized that I did not wish to borrow more than the most basic storyline: that of a struggle that often seems hopeless. I wanted somehow to make it my own. To that end, while the details of my attempt at a re-telling vary considerably, the details of the restored pipe that constitute the blog aspect of my work remain essentially accurate. But I never expected to become as involved as I did in the creation of a work of my own that followed the tale of The Old Man and the Sea but did not parody or make fun of it. I soon came to the understanding, however, that to pull off a credible tribute to Papa’s greatest work would require far more of my own heart and soul. I am also somewhat of a perfectionist and did my best to employ many of the same language uses of the late author.
That being said, I must emphasize that the characters and events of my version are not, for the most part, based on my own life. In fact I found myself more and more amazed as the “people” in this version took on shapes of their own choosing, as it were, diverging from my personal youthful experiences. While most of the story is fictional, including the young man’s formative life events as a child and later, as well as his relationships with his parents and grandfather, some elements of my own personality are revealed in the narrative, as is true with any work of fiction.
Last but not least, I beseech the readers of this work to understand, as I have already tried to make clear, that I know I am no Hemingway and do not intend this to be a strict re-telling of the original story with its eternal themes and characterizations. I only hope that you appreciate and enjoy the use of considerable humor mixed with drama in my rendition.
As a reward to the first person who made it this far in reading my humble offering and can name in the comments field all of the titles of other Hemingway books incorporated into this text – excluding my gracious host, Steve, whom I know is a bit of an expert on the subject – I offer a pipe of my own full restoration (to be chosen, of course, by me). If anyone can calculate the exact birthday of the young man, Mike, using the information provided in the story, I will be very impressed, and an honorable mention will be acknowledged. (Steve, you are welcome to attempt this challenge.)
I thank you for your indulgence in reading this tribute, which ran longer than expected, to Hemingway and the lesser known Thinbite pipe.
Robert M. Boughton
Albuquerque, New Mexico, USA, July 31, 2014
http://www.roadrunnerpipes.com
http://about.me/boughtonrobert
Photos copyright © the Author
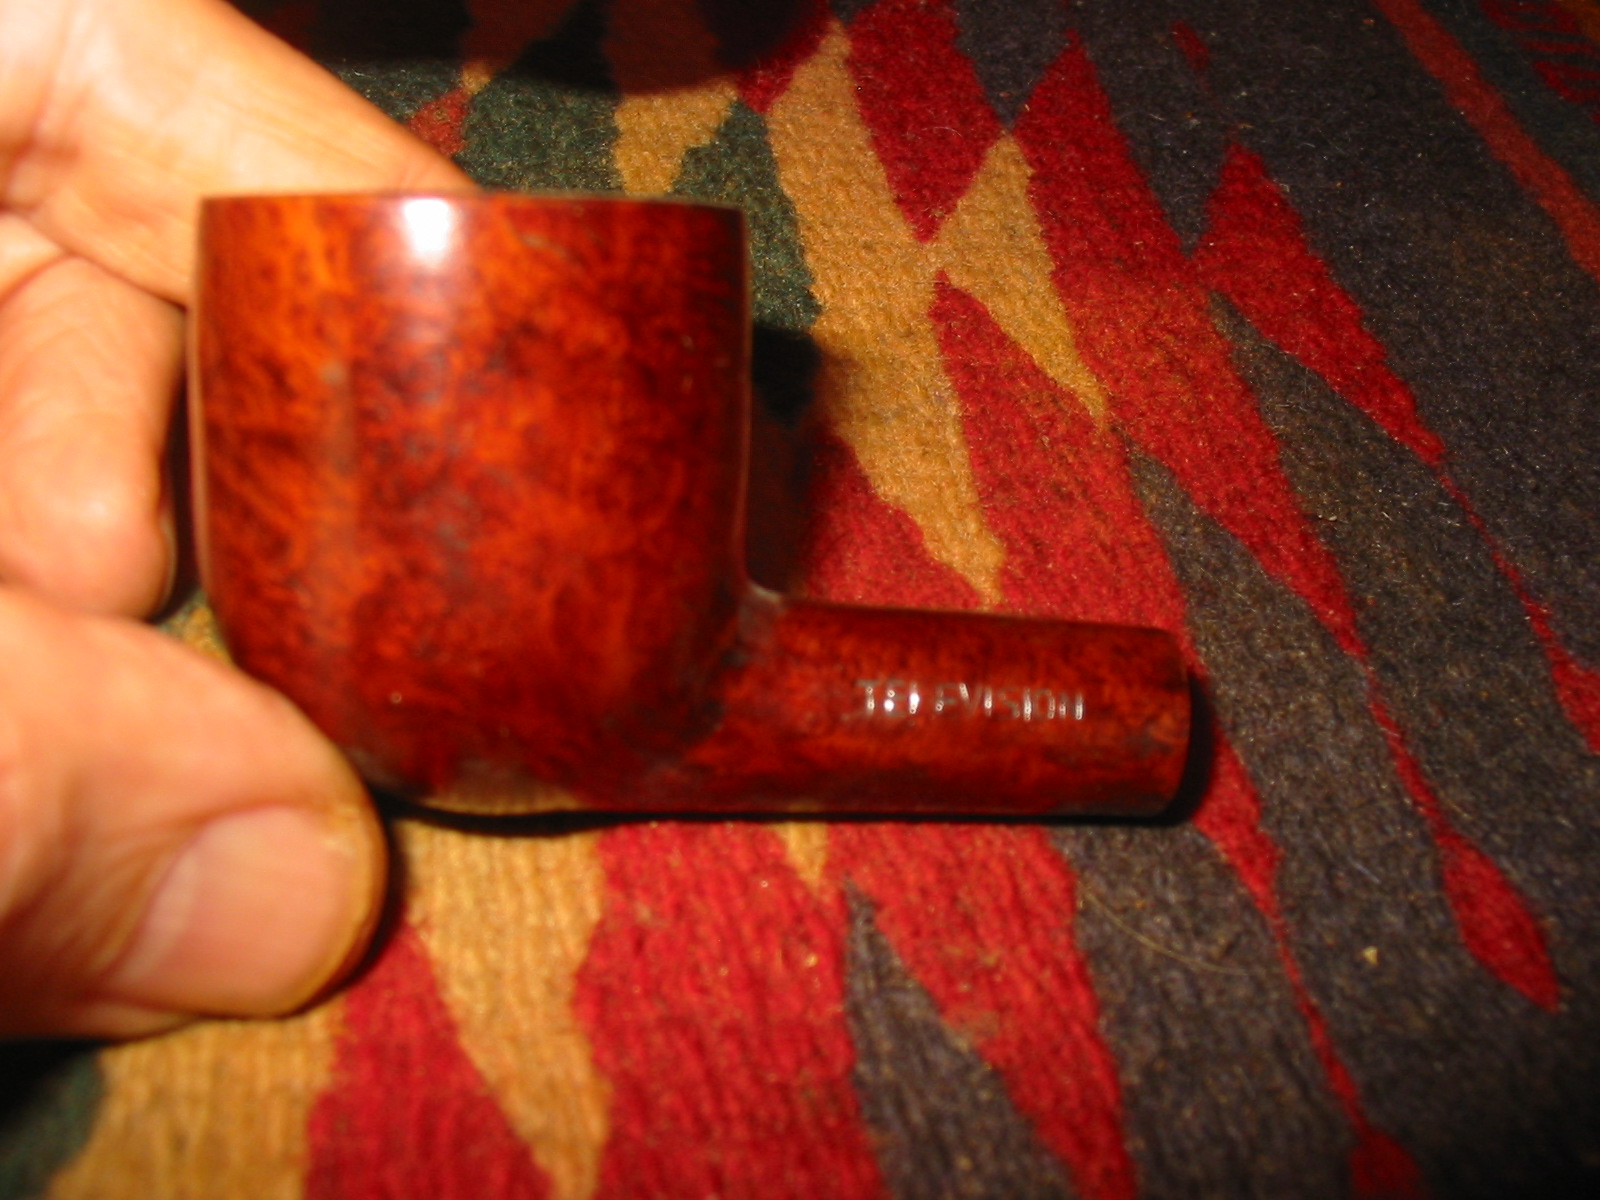
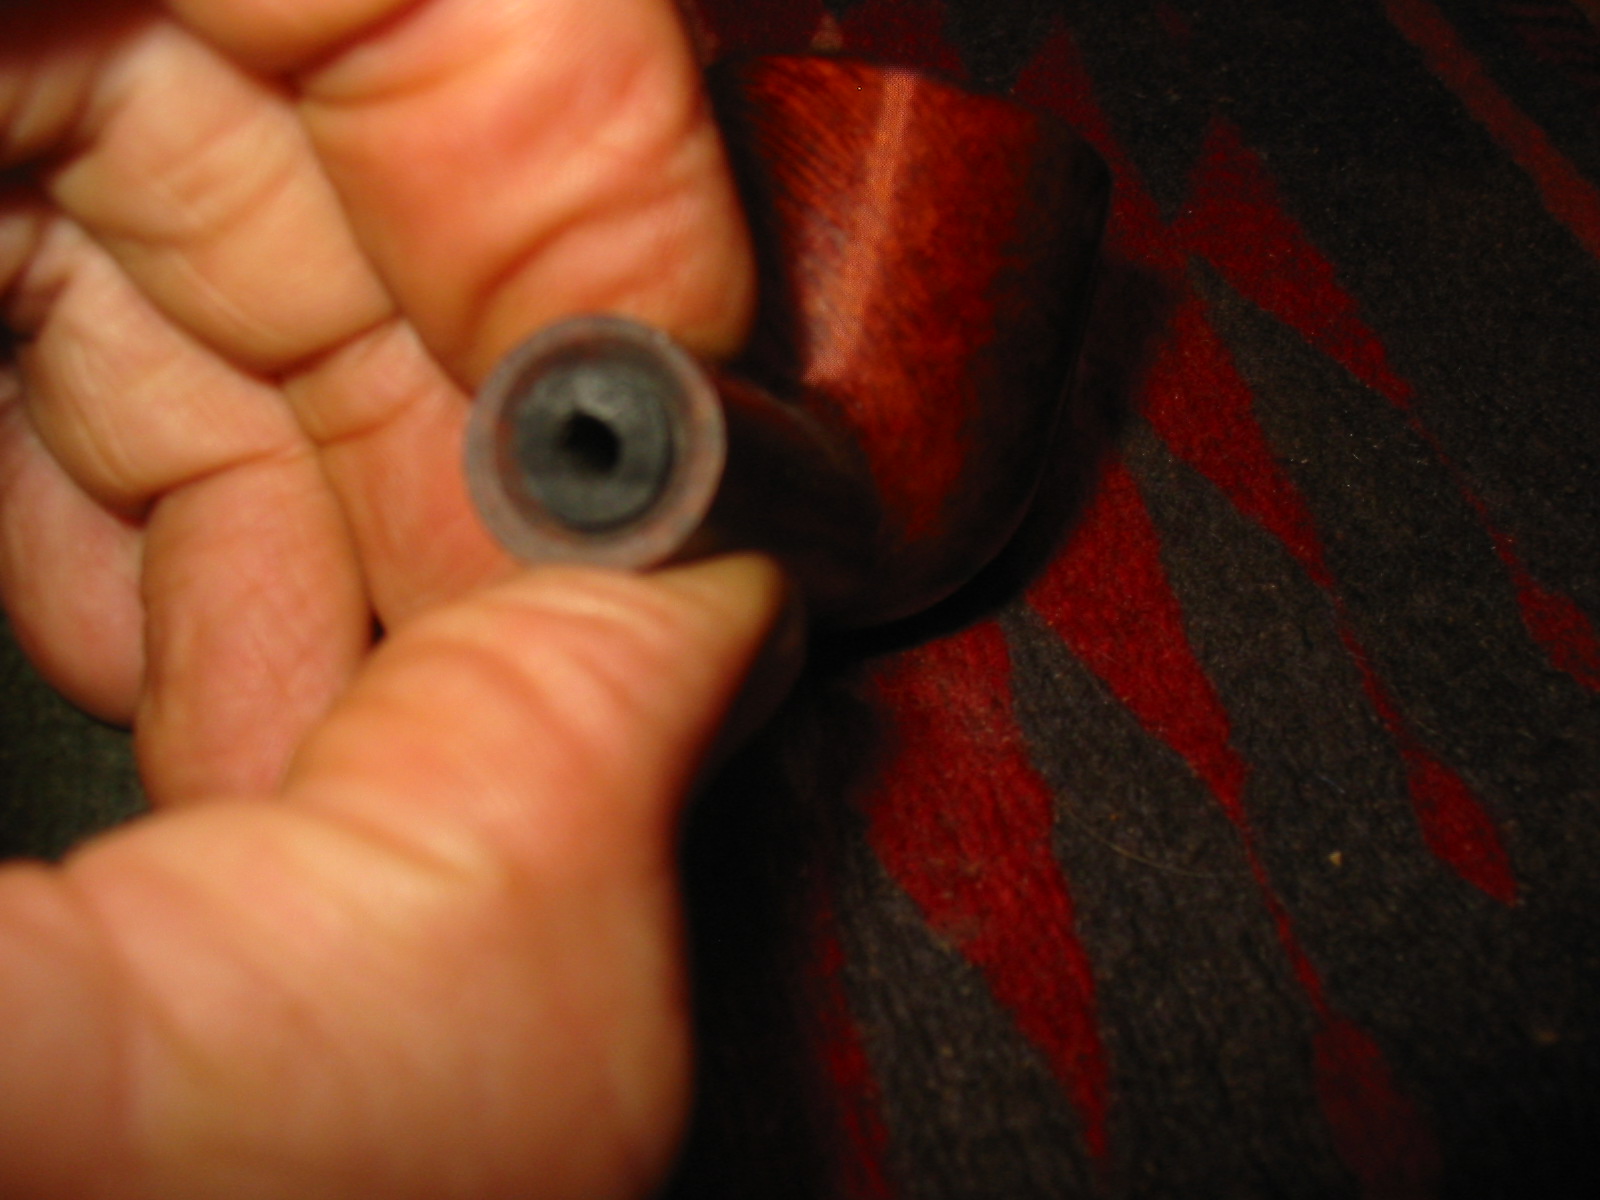
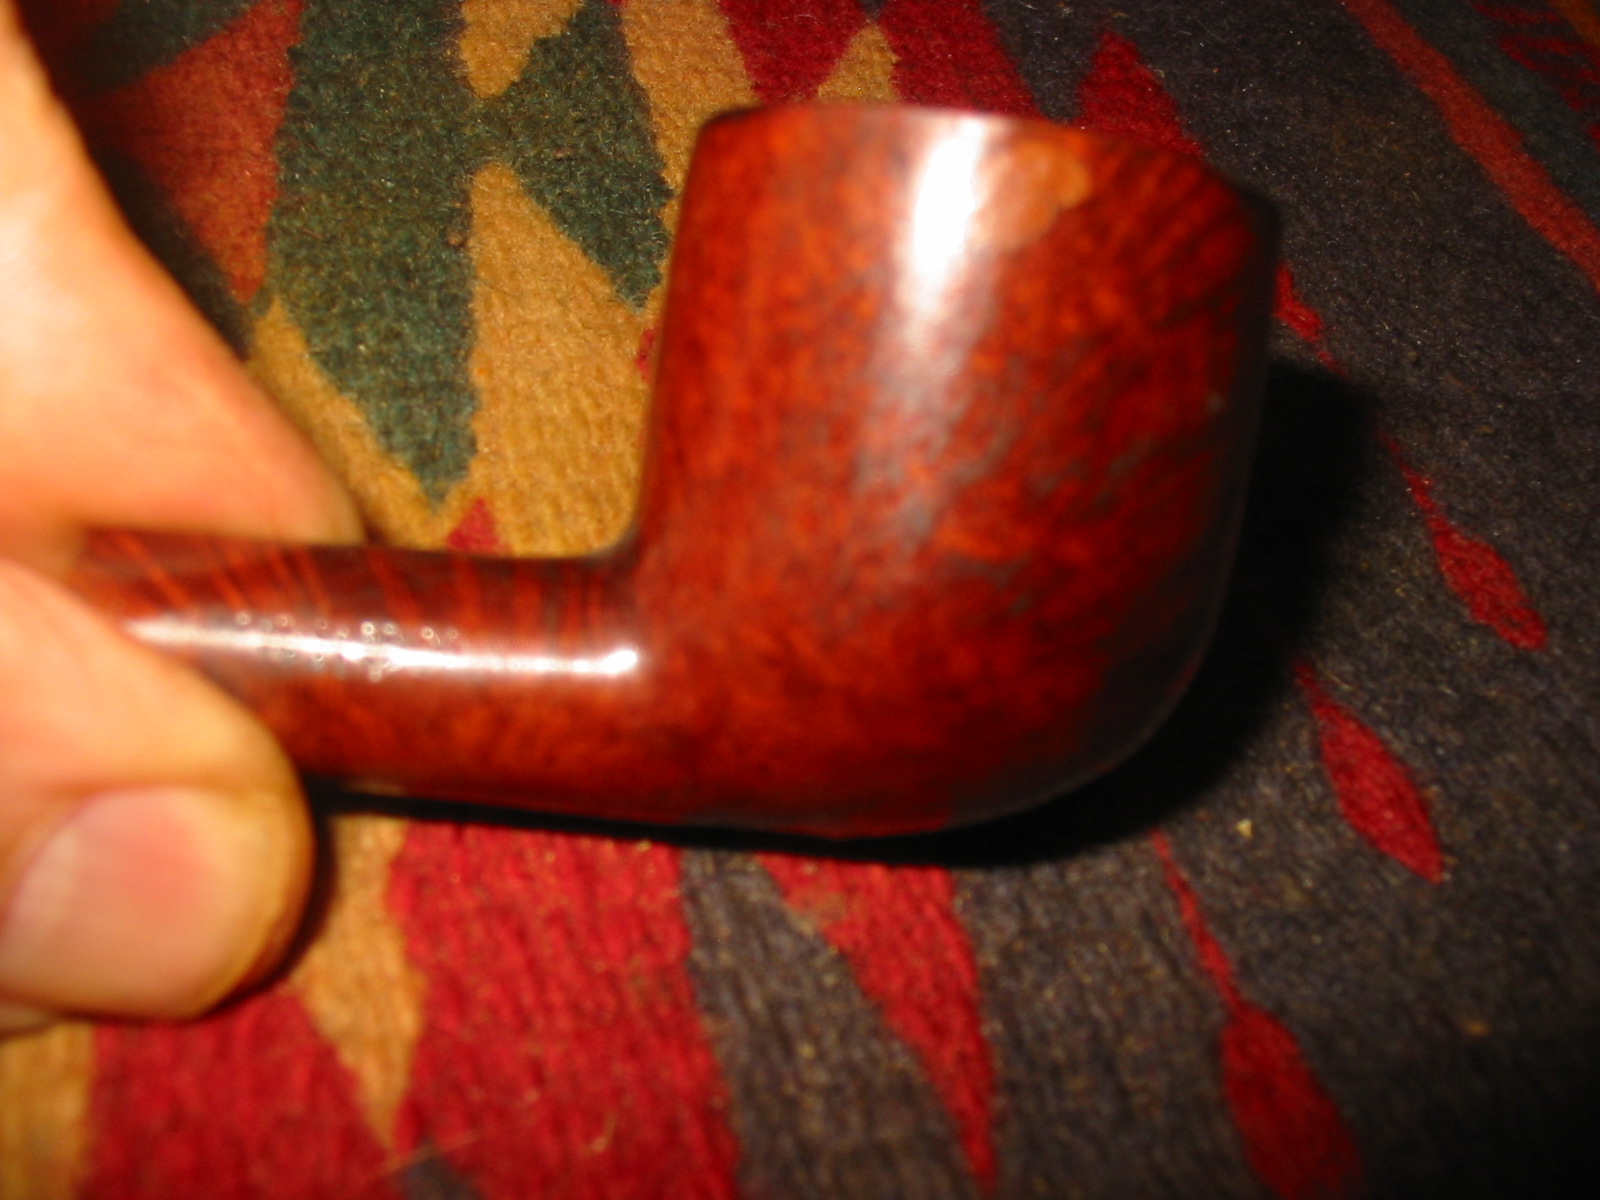 I used a wood screw I keep around for pulling out the broken tenons. I screw it in by hand and the wiggle it until it comes out. I removed the broken tenon from both of the pipe shanks while I was at it.
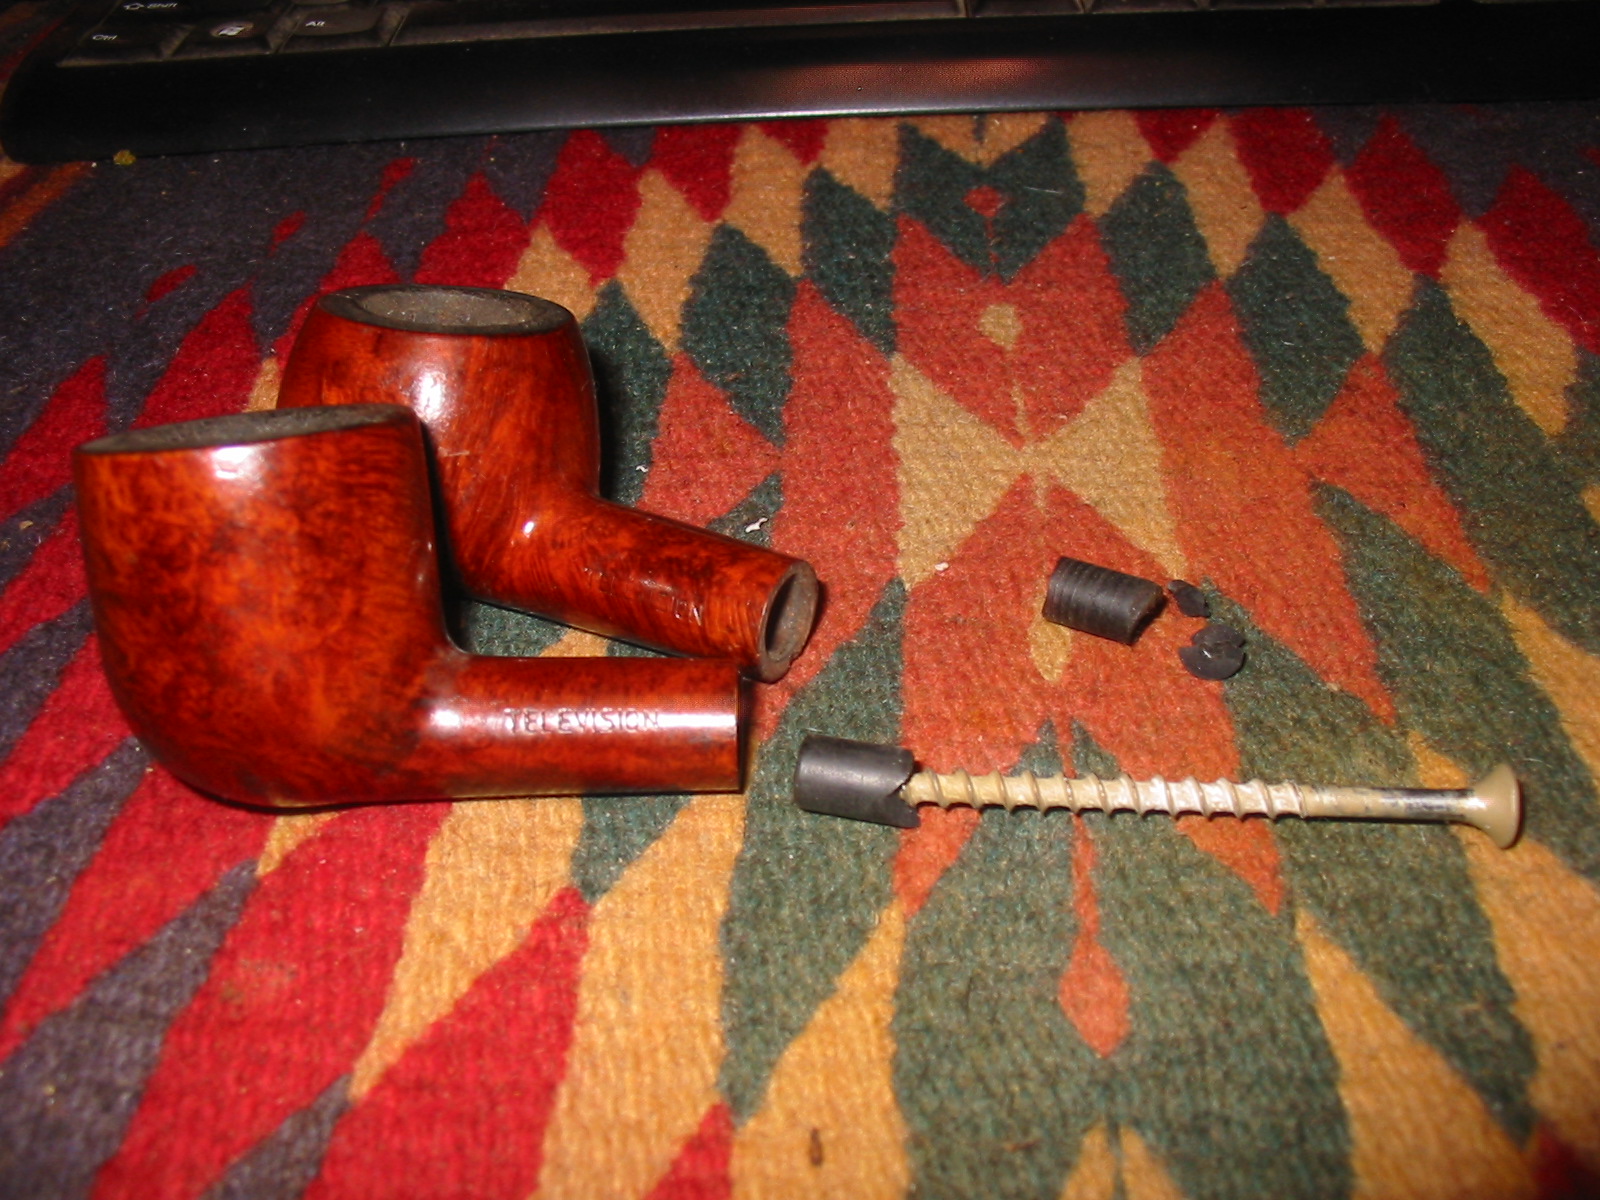 I found a vulcanite stem in my can of stems that would work with the pipe and make it a standard pot shape pipe and stem. I turned the tenon on the PIMO Tenon Turning Tool until it was close and then fine tuned the fit with 220 grit sandpaper. The diameter of the stem was larger than that of the shank so I sanded it with 220 grit sandpaper to match the two.
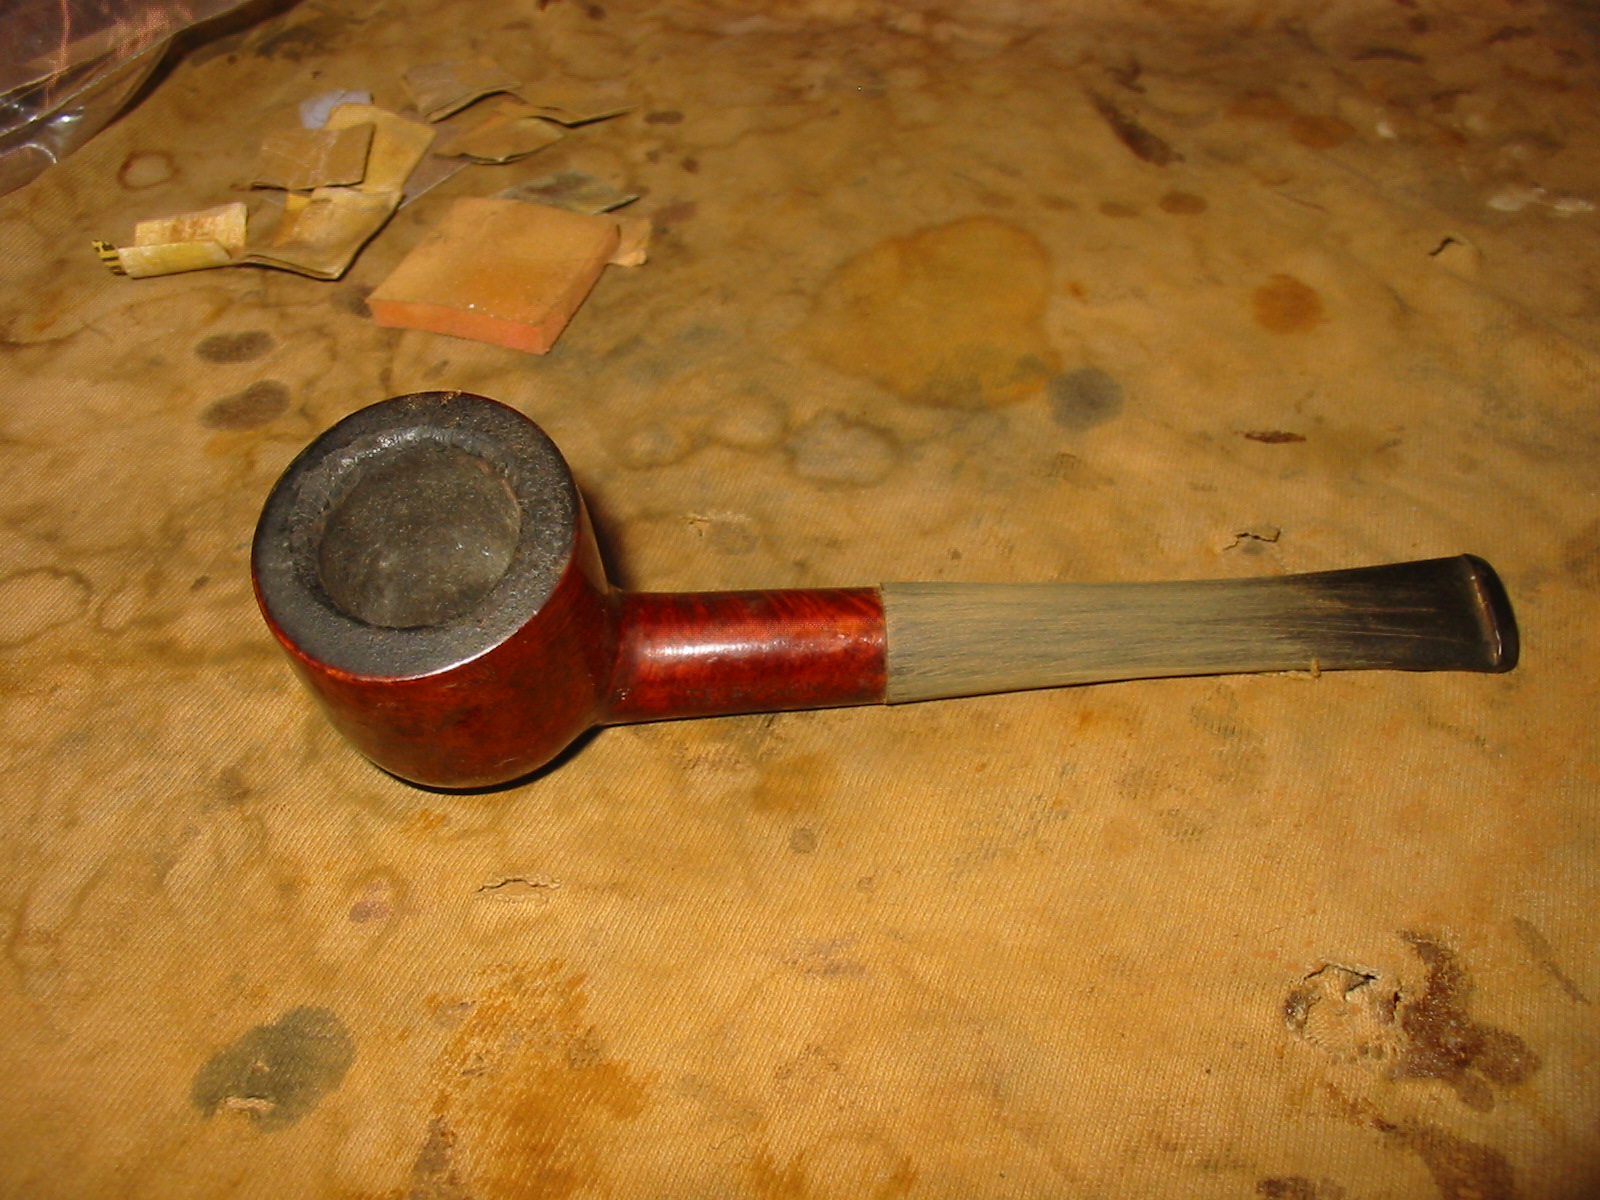
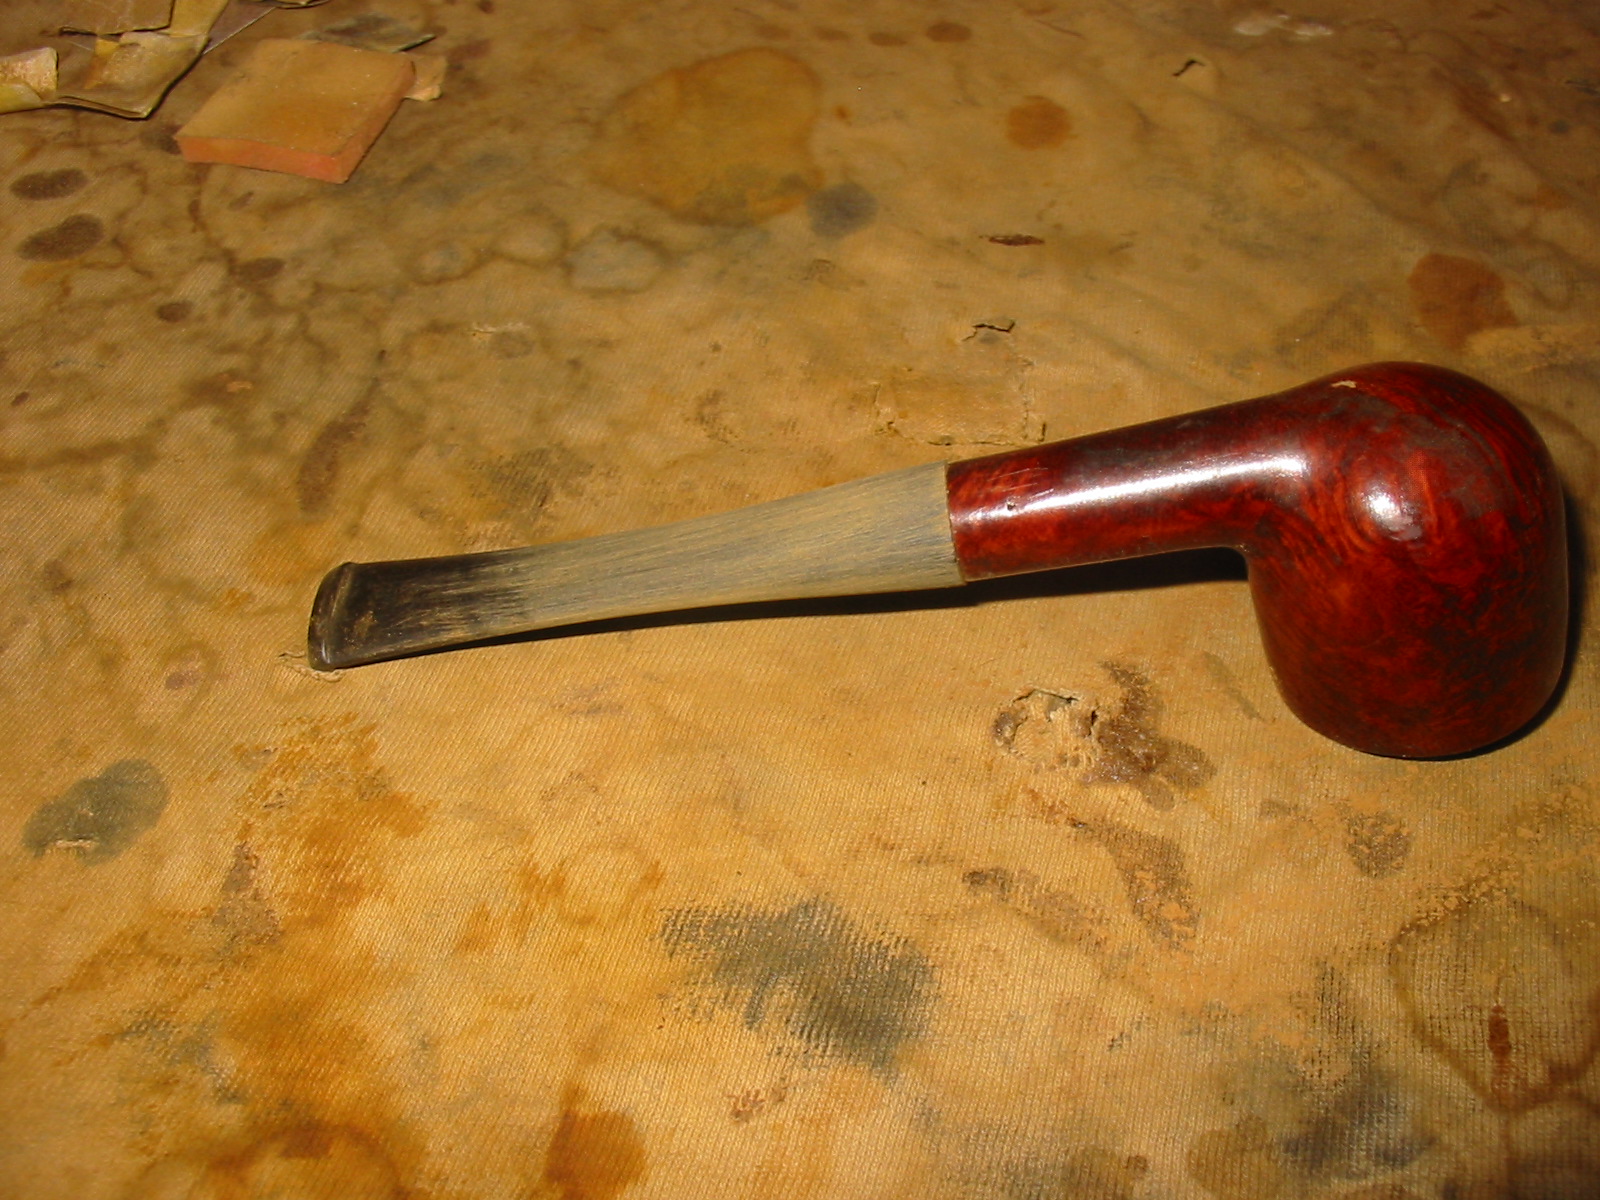
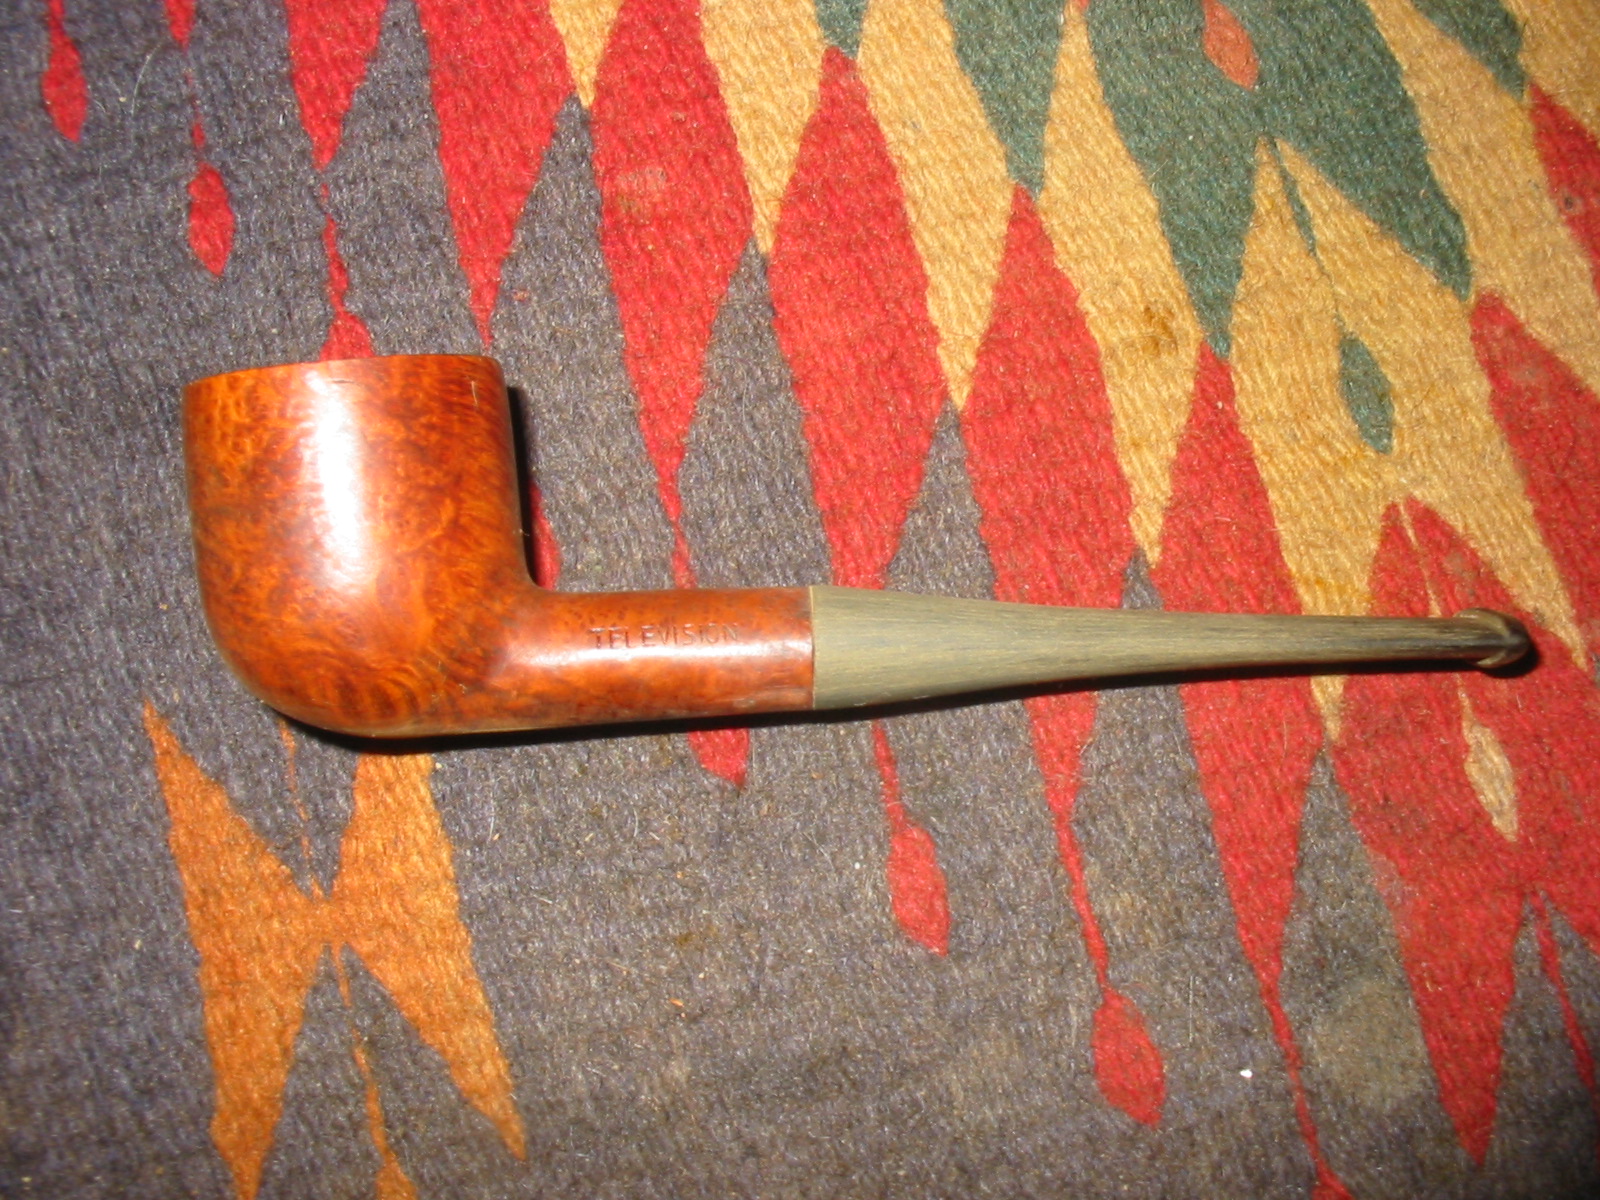 I decided to replace the large ugly fill on the right side of the bowl. It was a light brown/pink colour and stood out from the rest of a decently grained pipe. I picked it out with a dental pick and found that underneath the surface it was a white hard putty.
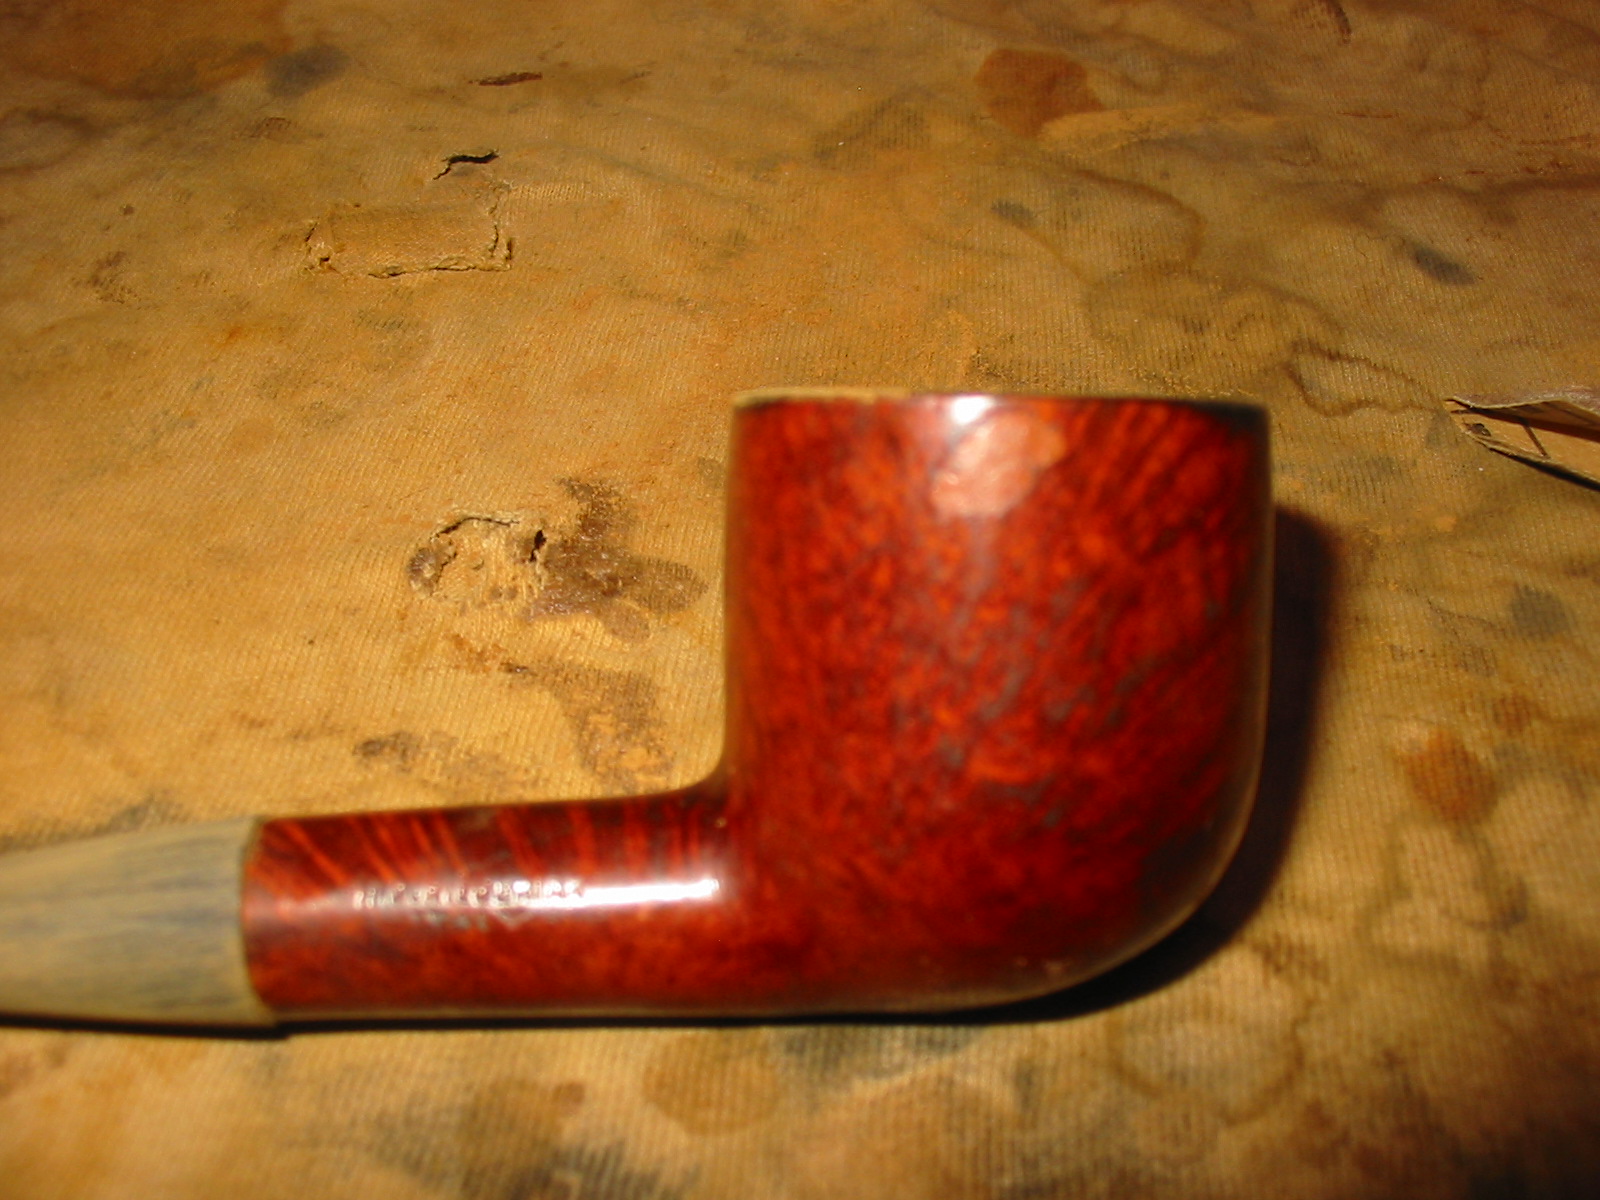
 There was also a fill on the underside of the bowl that I picked out and one on the rim. I decided to top the bowl to see how close to the side fill the top one was. I set up the sanding board and topped the bowl. Once it was topped I could see the fill on the rim and I decided to leave it as it was close to the inner edge of the bowl.
 I wiped off the surface of the bowl with isopropyl alcohol and spent time scrubbing the large fill on the side of the bowl. I then took some briar dust that I had and began to work on the patching material for the hole. I poured some Fiebings Dark Brown stain into the briar dust and mixed it until the briar dust was evenly stained a dark brown.
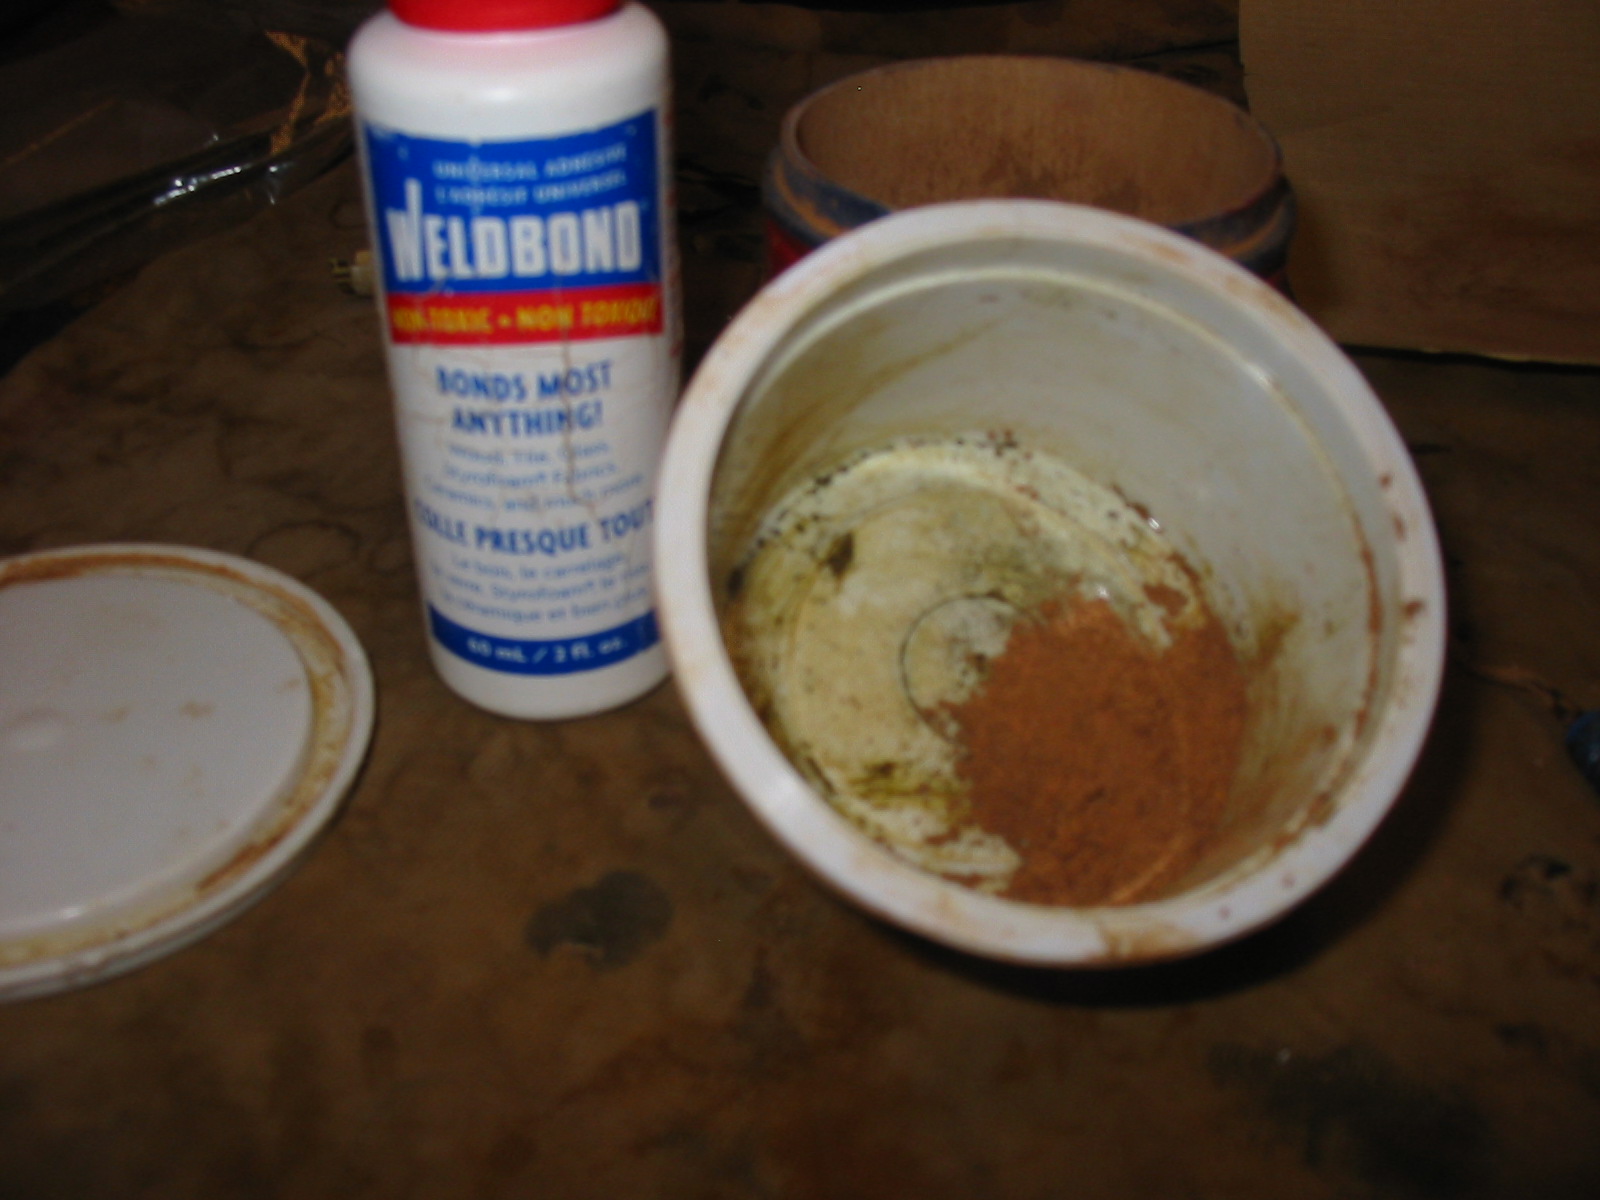

 I then mixed in some Weldbond multipurpose white glue into the stained briar dust. Once it began clumping I worked it into a dough and kneaded in the briar dust until it was evenly mixed.
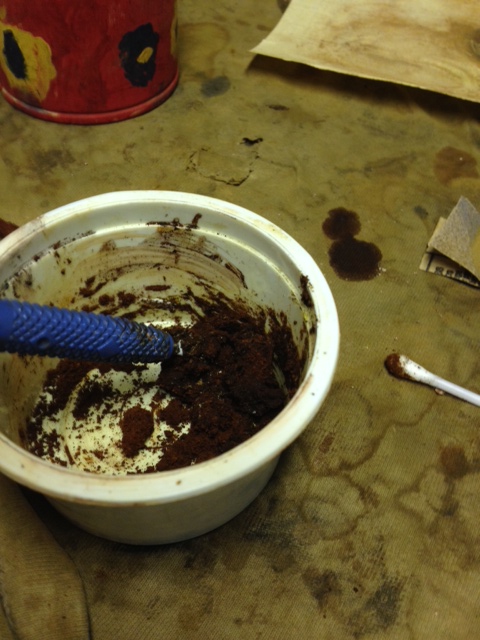
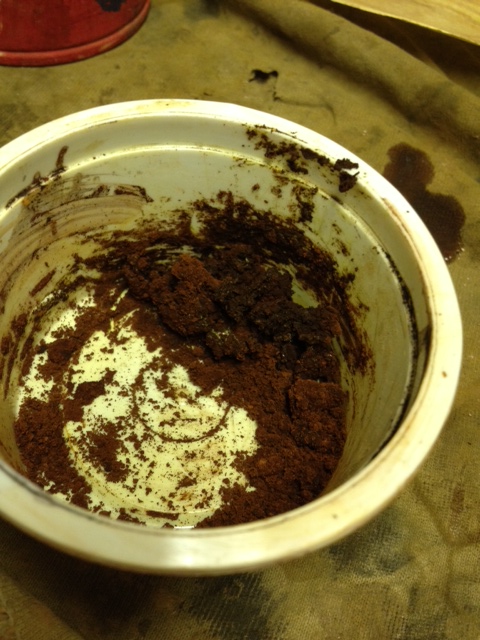 The mixture was tacky but not wet. I tamped it into the two repairs on the bowl, the bottom and the left side. I pushed it down into the deep parts of both fills with a dental pick and a pipe nail.
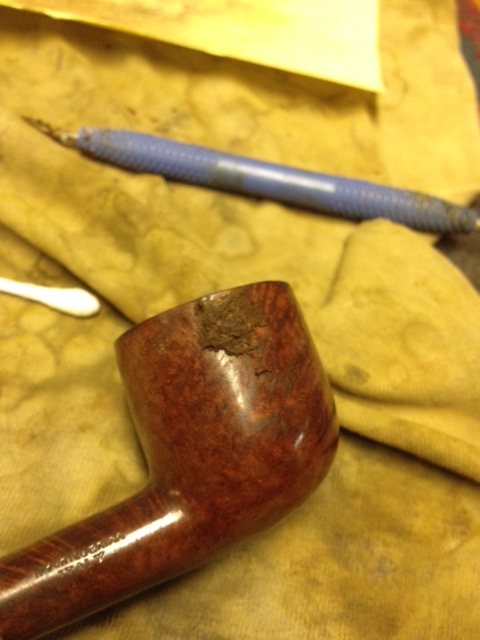
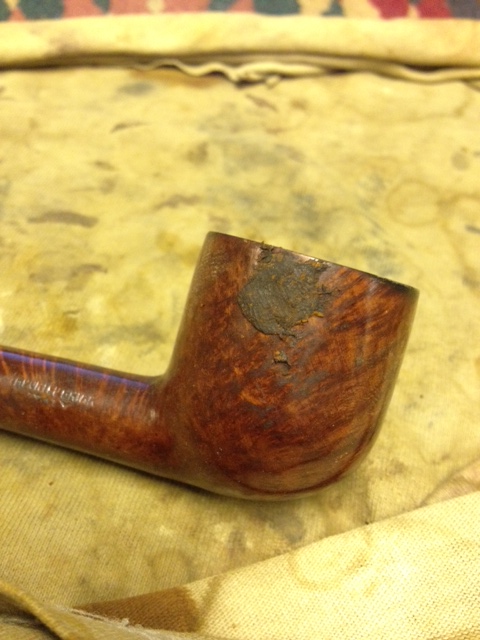 When the patch had cured overnight it looked like the photo below. It was a solid bump on the side of the bowl. It took a lot of sanding with 180 grit sandpaper and 220 grit sandpaper to reduce the footprint of the patch and level it with the surface of the briar. The next series of photos show the process of sanding the patch.
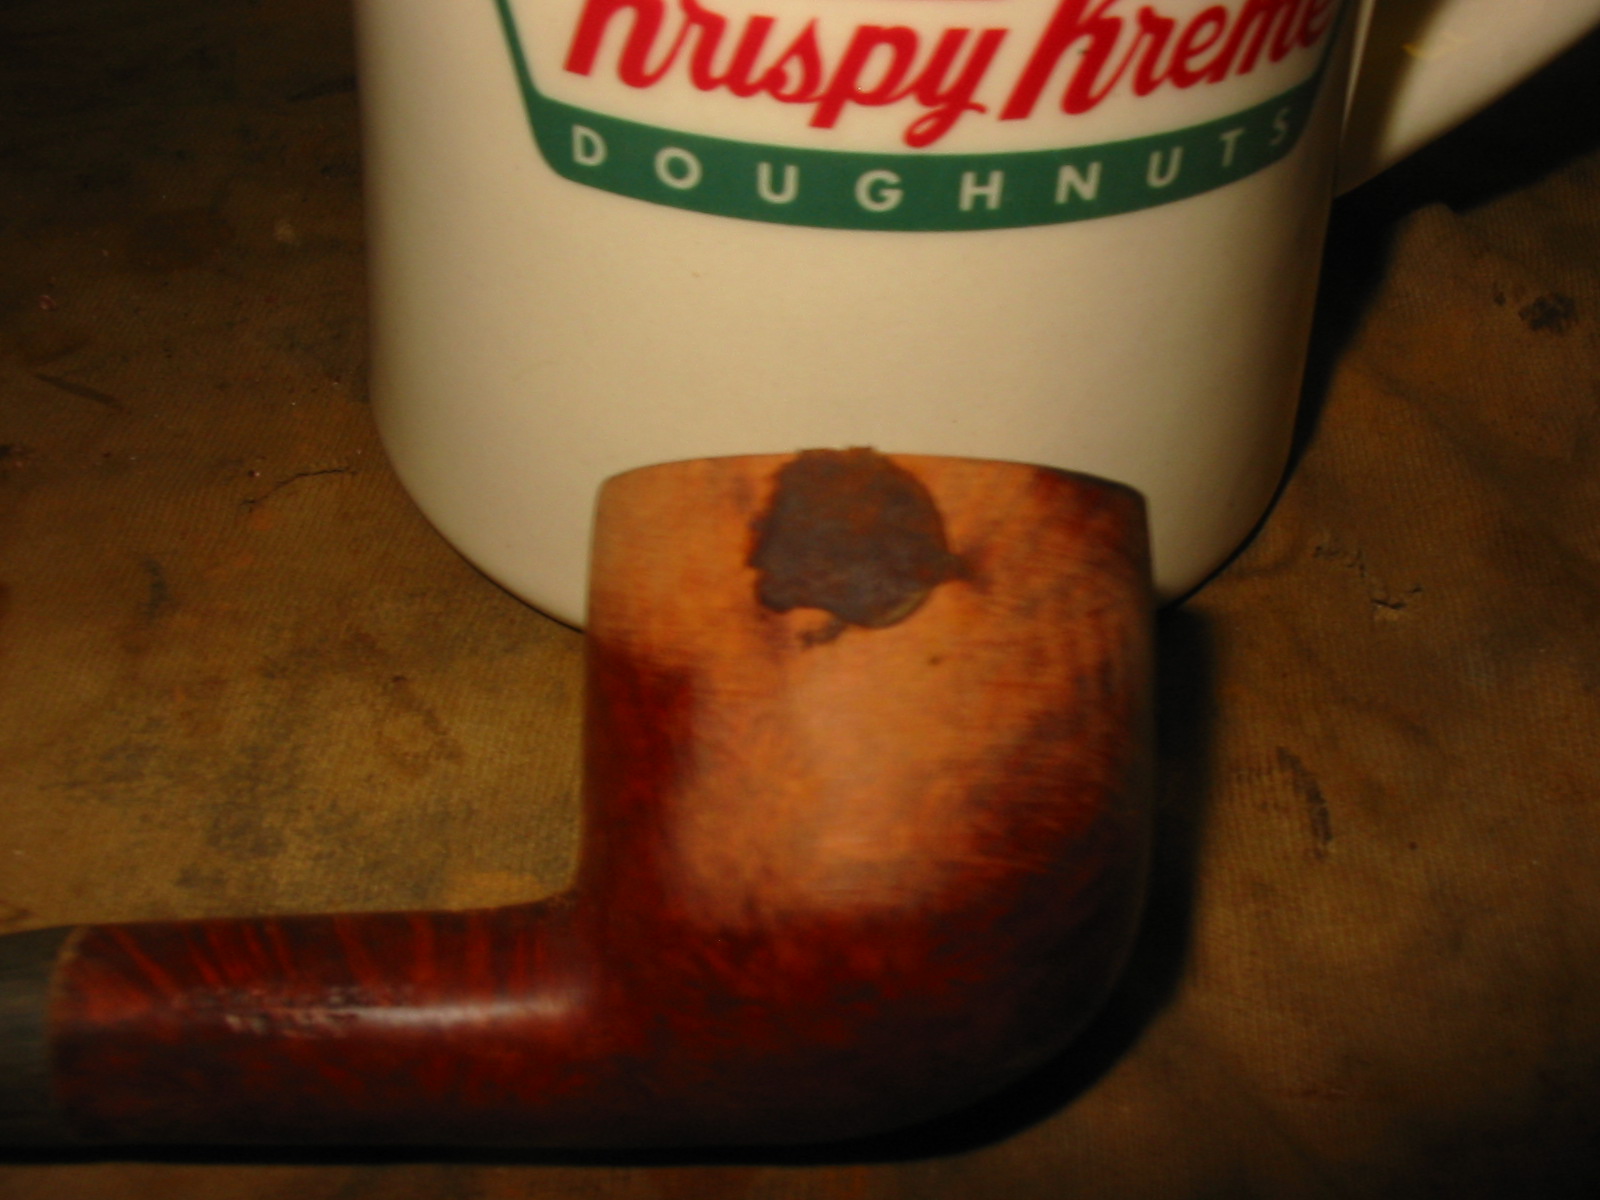
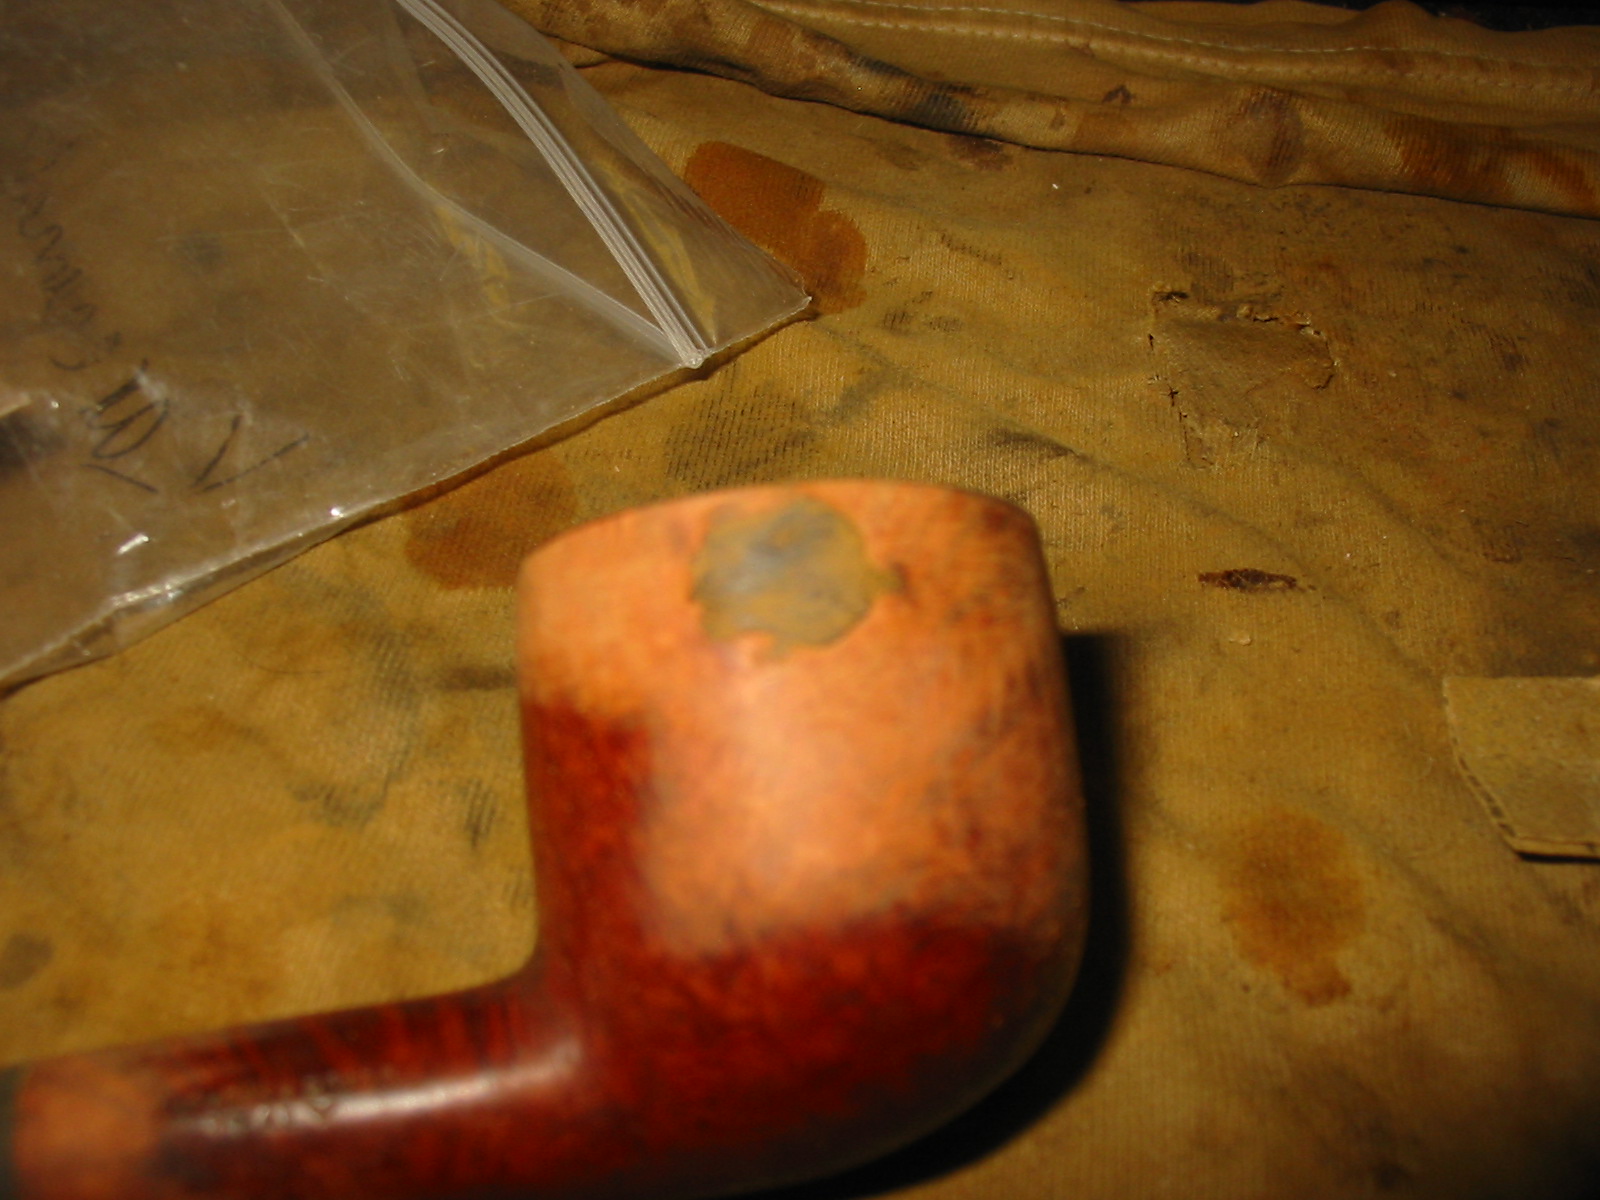
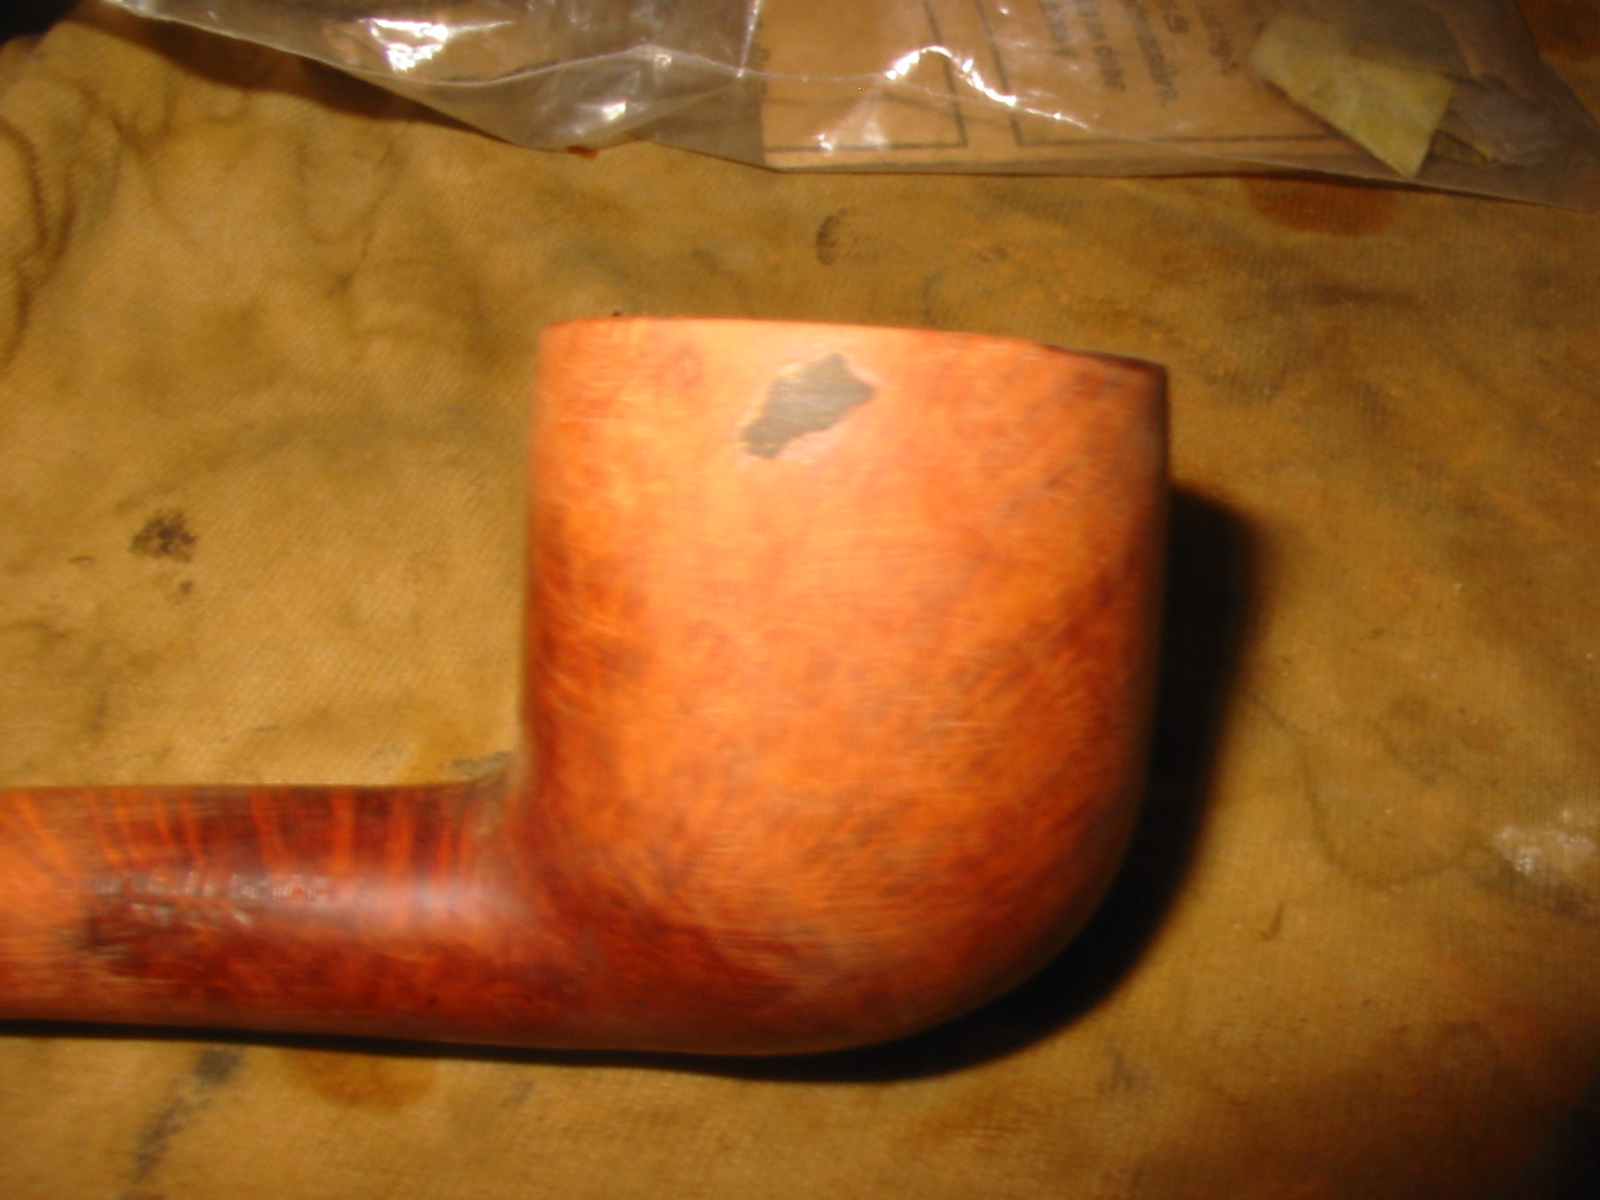 I also sanded the shank to smooth out the junction of the stem and the shank at the same time I worked on sanding the patch. I used 220 grit sandpaper and then sanded both the bowl and shank with medium and fine grit sanding sponges.

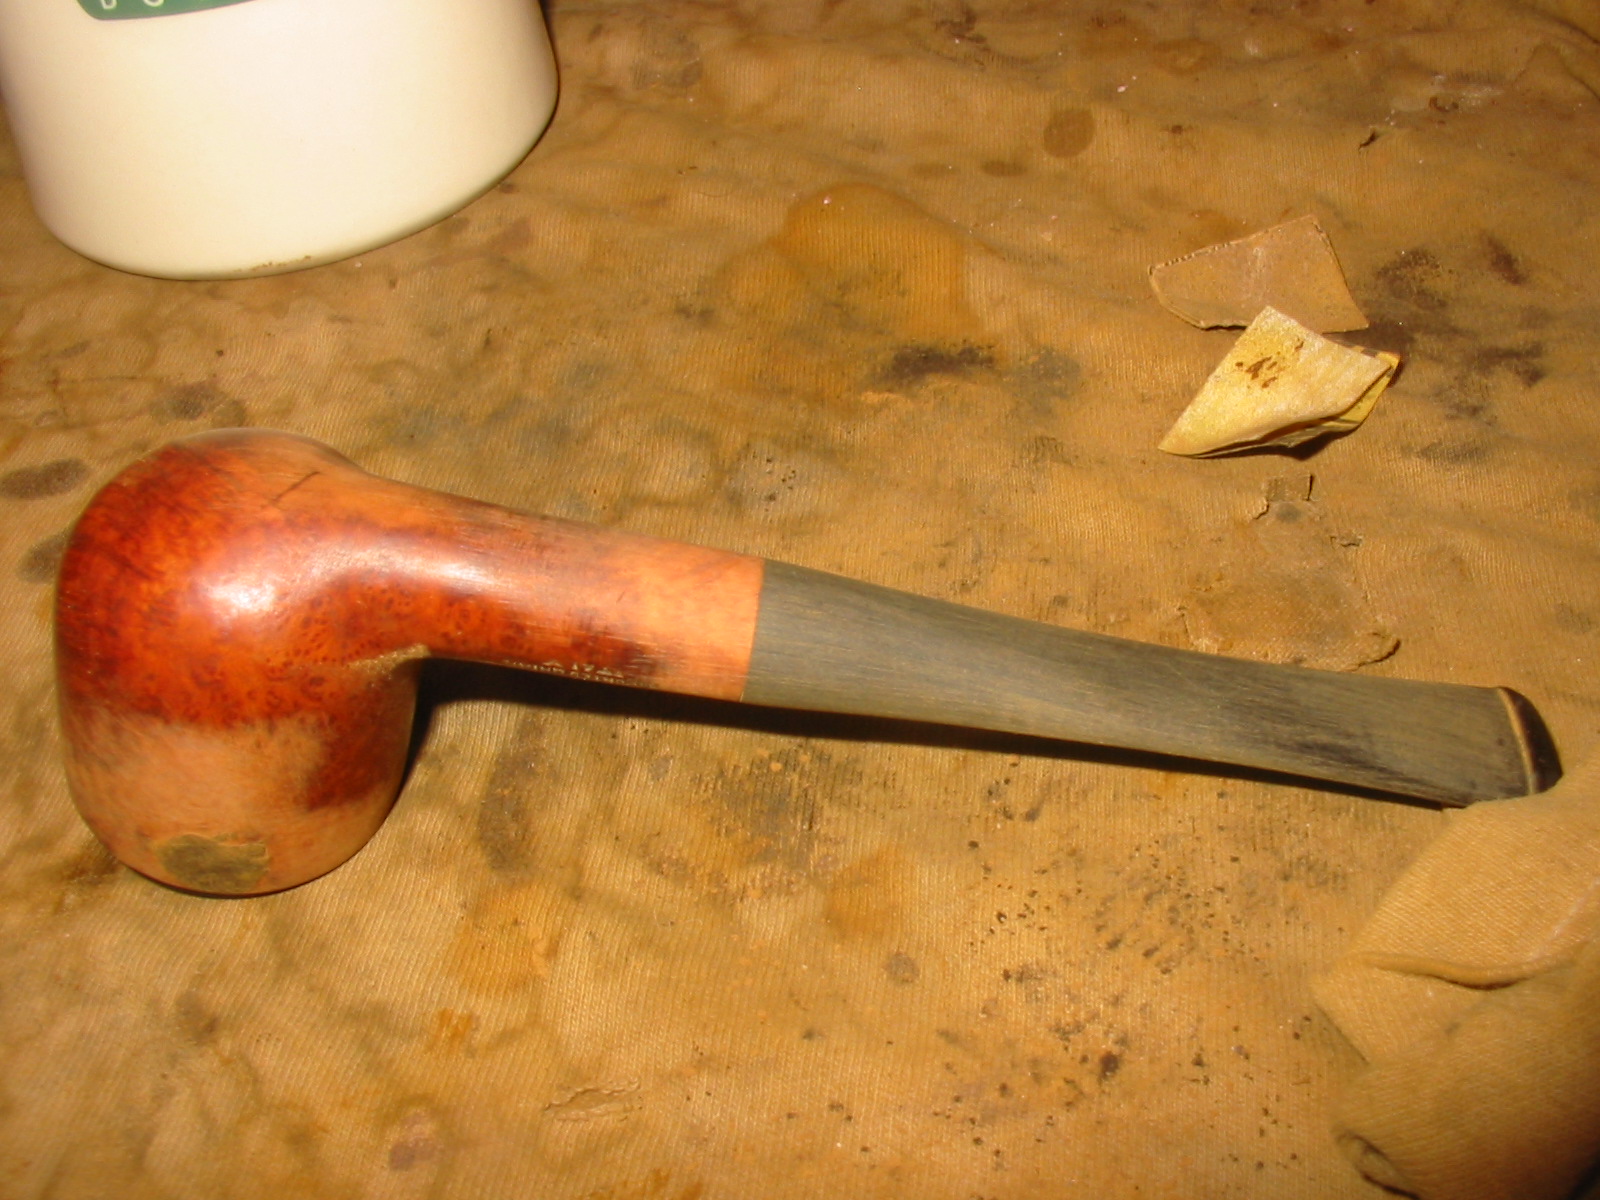
 When all the sanded areas were smooth I sanded them again with micromesh sanding pads – wet sanding with 1500-3200 grit pads and dry sanding with 3600-6000 grit pads. When the scratches no longer stood out I stained the bowl with a dark brown aniline stain (same colour I had used in the briar dust patch). I applied the stain and flamed it and repeated until the coverage was even. I wiped the bowl down with acetone and isopropyl alcohol on cotton pads to make it less opaque. It took quite a few wipes to get it to the colour I wanted. The next series of photos show the progress of the wipe down. (The stained briar dust and wood glue dough patch did not work well in terms of blending with the briar. It still stood out but now was a dark brown.)
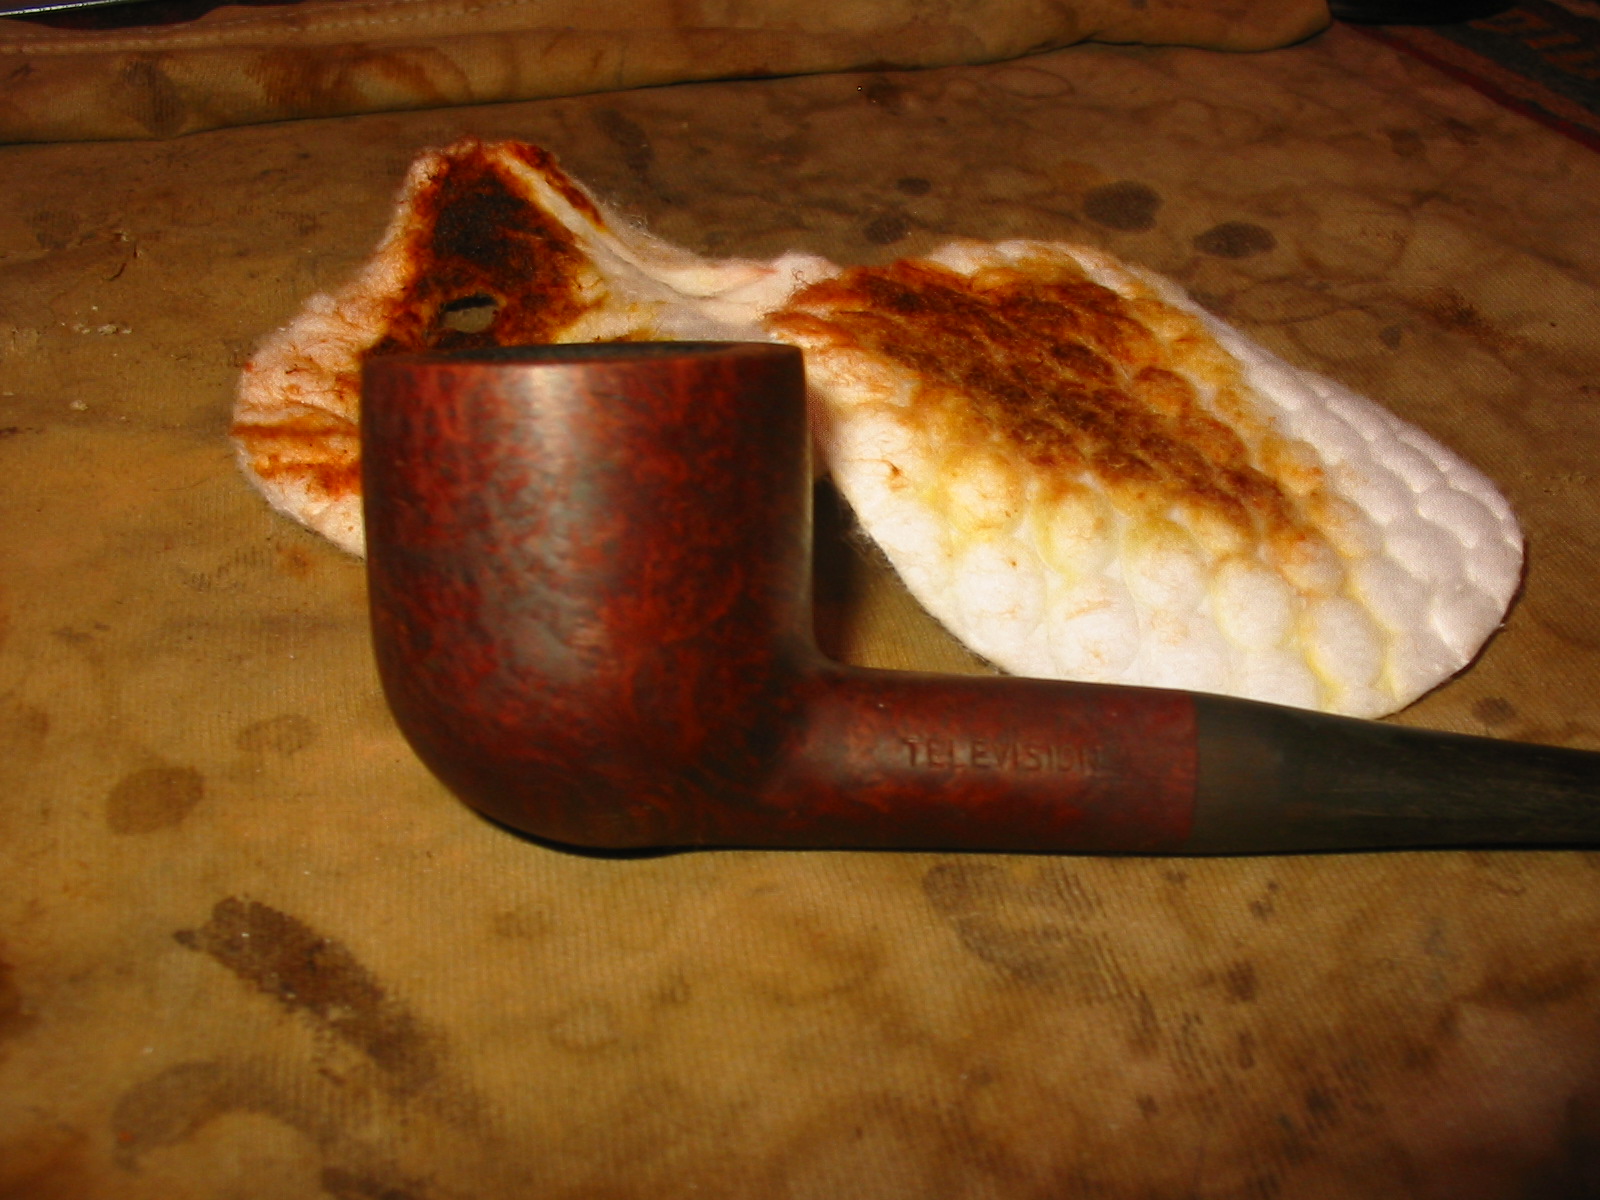
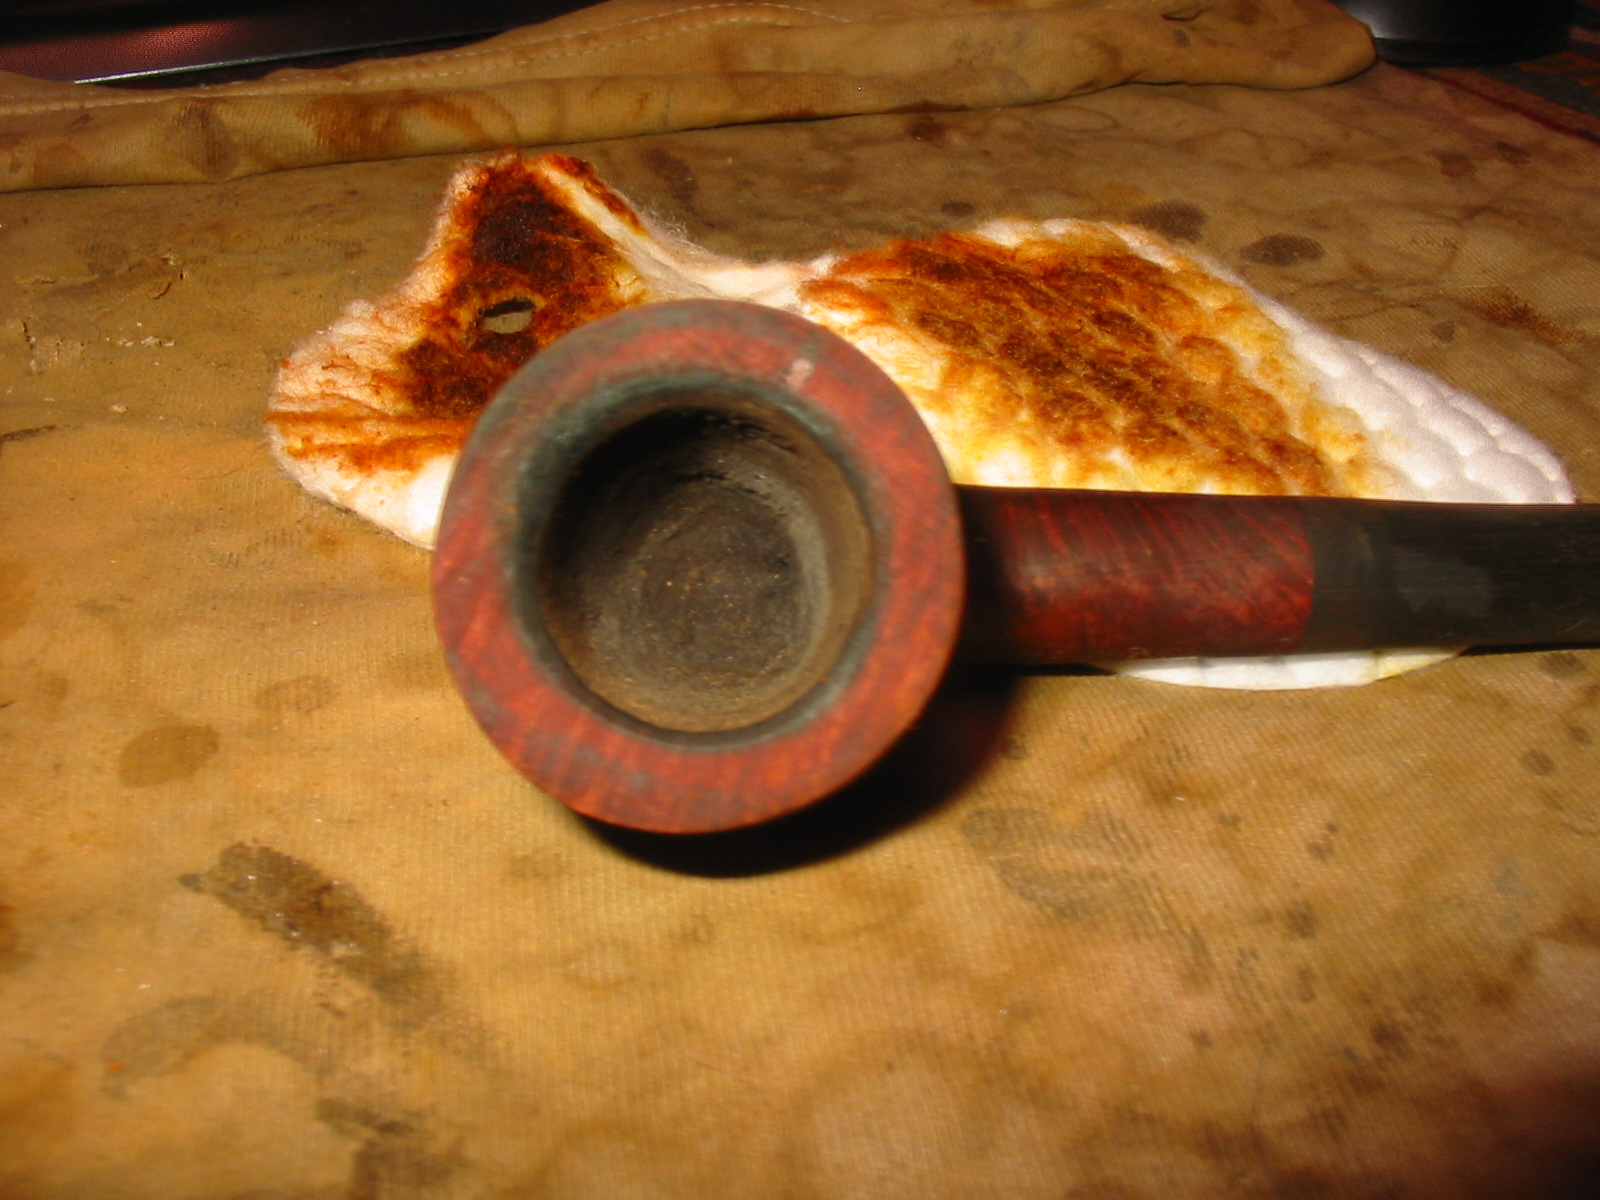
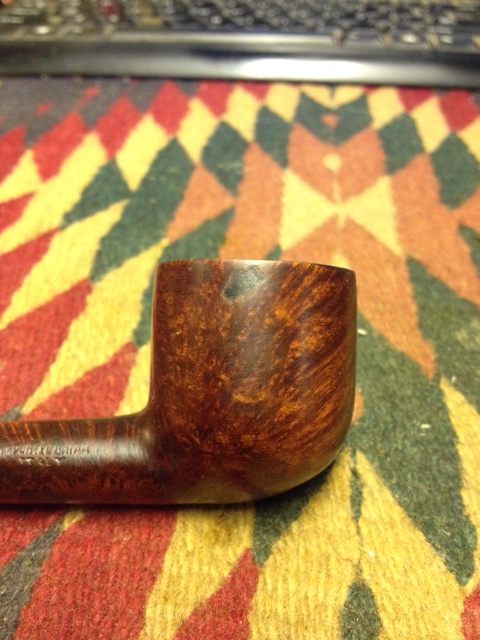
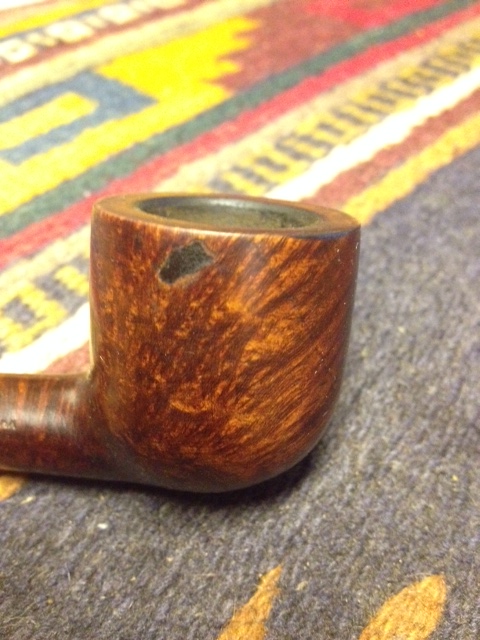 I still needed to do more sanding on the bowl – particularly in the area of the patch as it looked grainy. I wanted it to be smooth to the touch so I worked on it with the micromesh sanding pads and tried to blend it in more with the stain on the bowl. I also sanded the bowl and stem with the micromesh sanding pads. I wet sanded as usual with 1300-2400 grit pads and 3200-12,000 grit pads. I rubbed the stem down between each three grits of pads with Obsidian Oil.
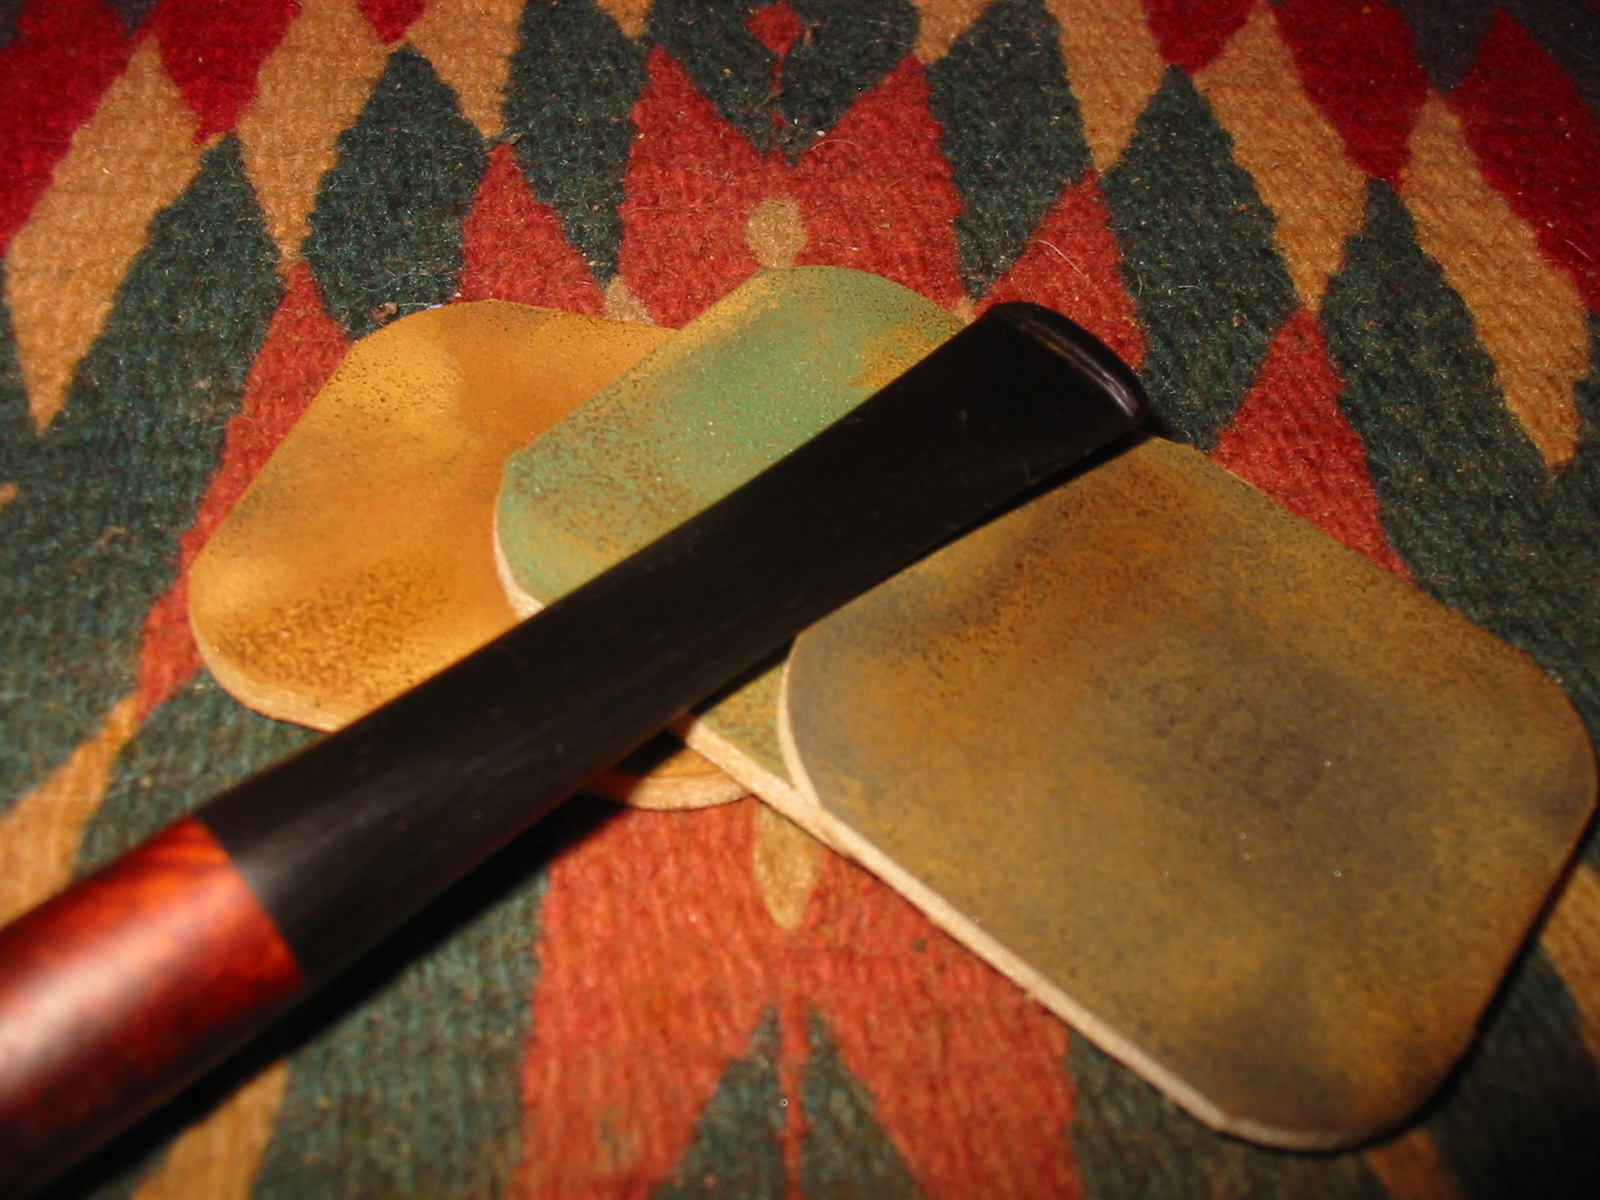
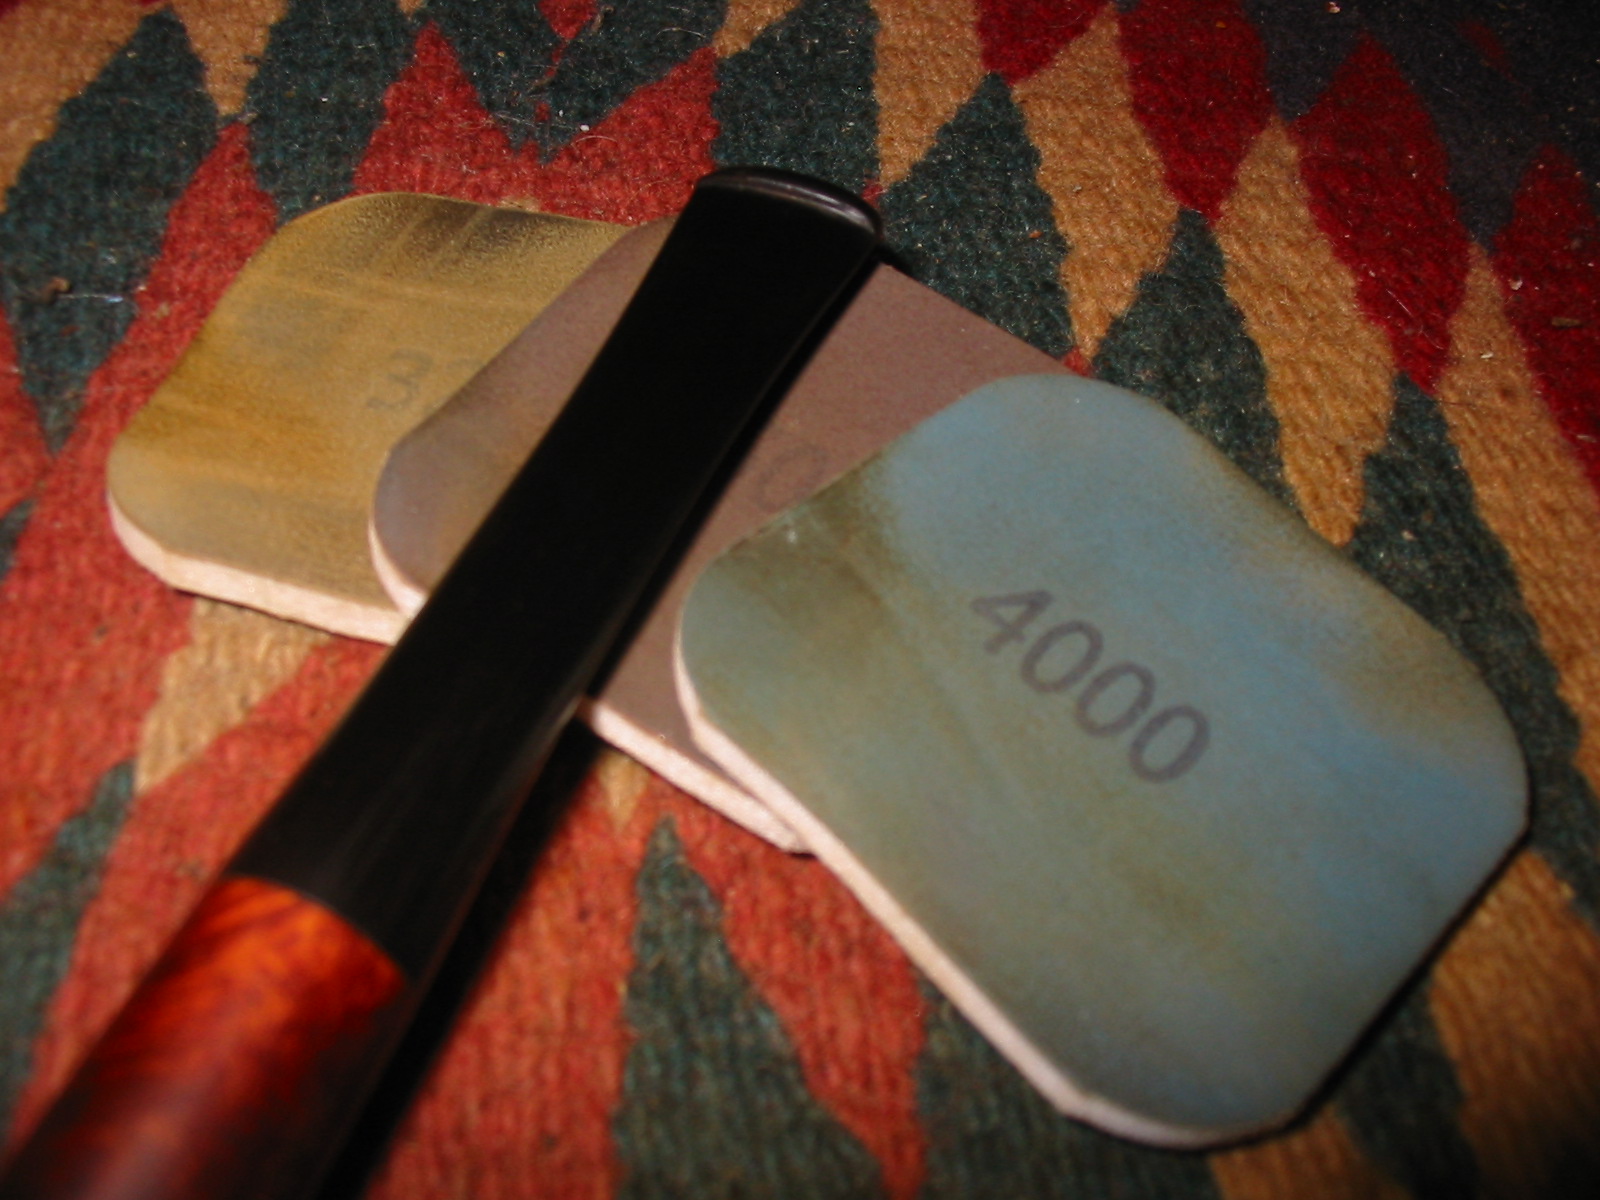
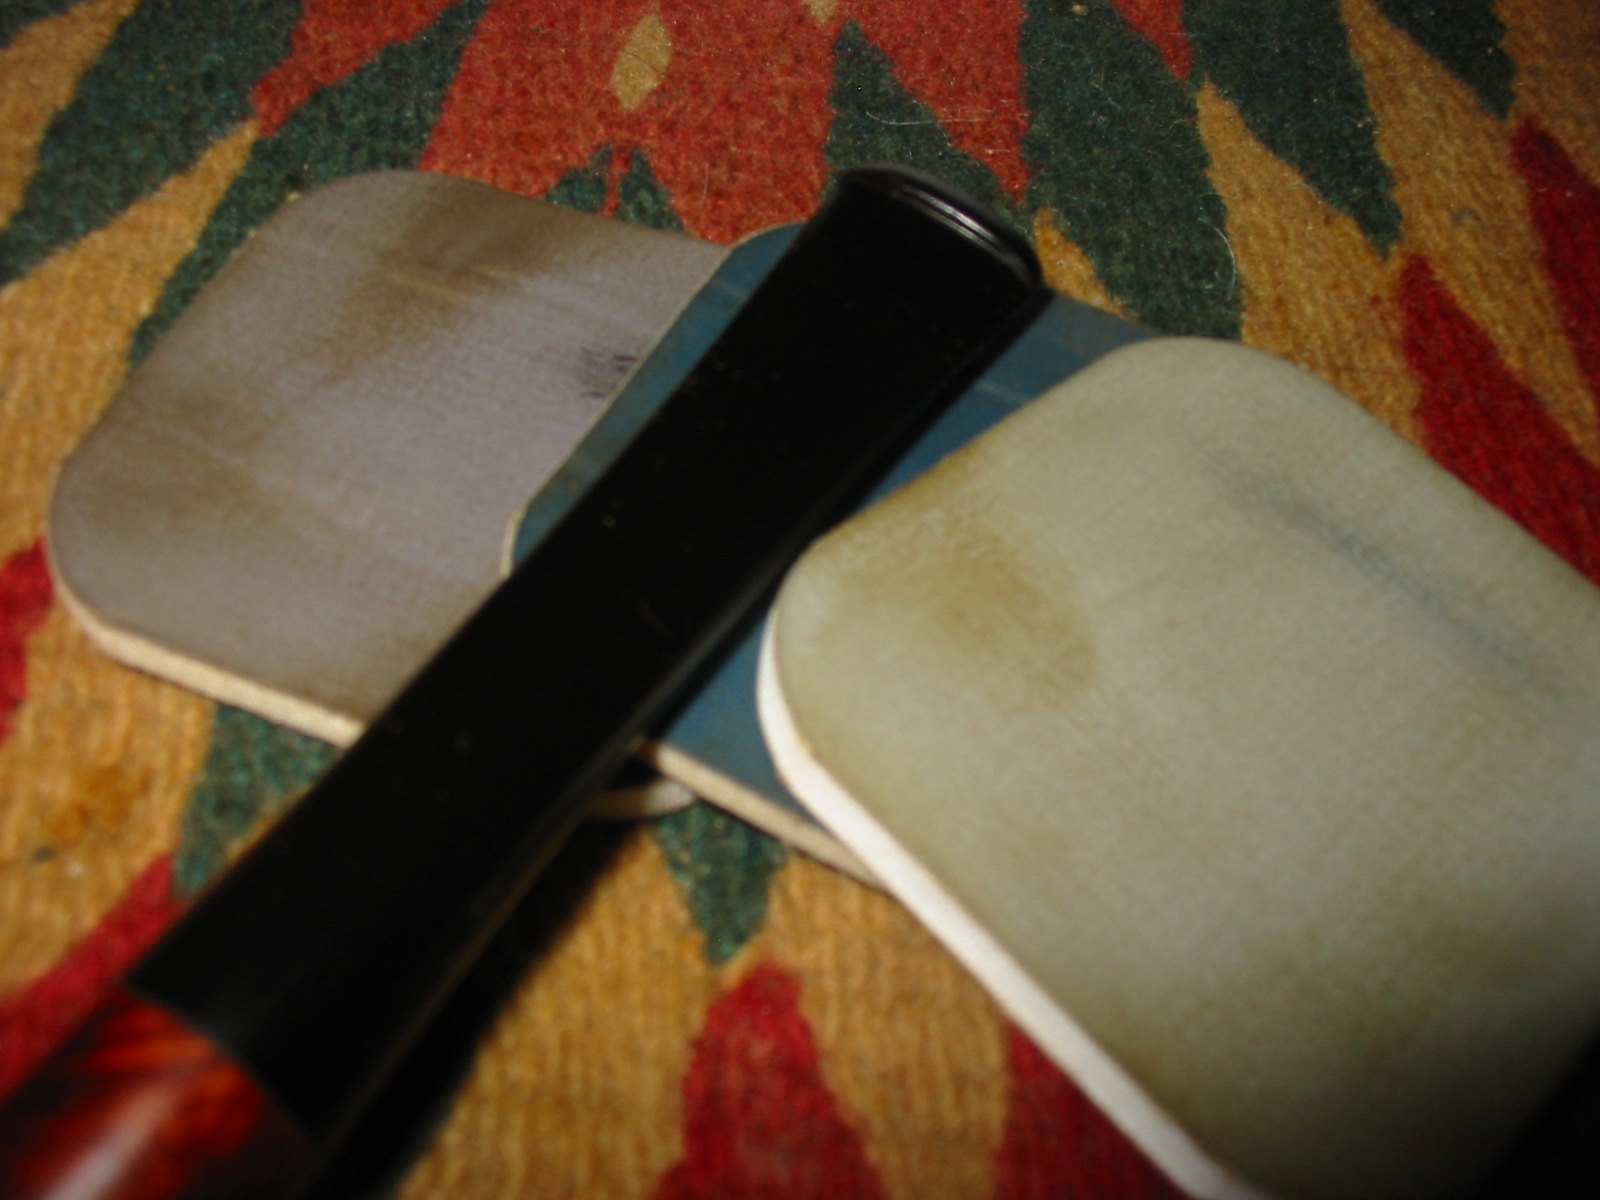 I decided to use a walnut stain and boiled linseed oil. I wiped it on the bowl and then wiped it down. I used a cork and candle stand to hold the bowl while I let the linseed oil dry. I put the stem back on the bowl and then buffed both the bowl and stem with White Diamond and gave them multiple coats of carnauba wax. I buffed with a soft flannel buffing pad between coats of wax to give it a deep shine. The finished pipe is shown in the photos below. It is ready to load and smoke an inaugural bowl of tobacco by whoever owns it next.