Tag Archives: banding

Reworking an Imperial Treble Zulu – Stainless Steel Tenon


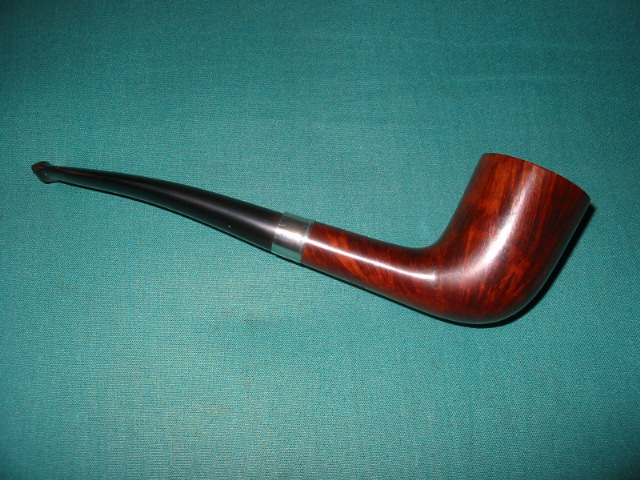
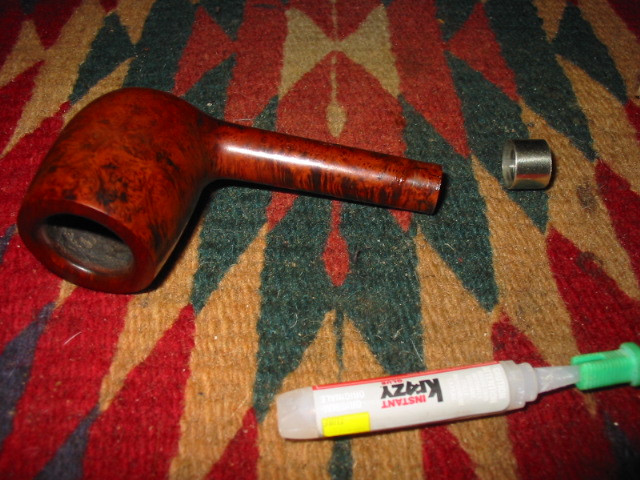
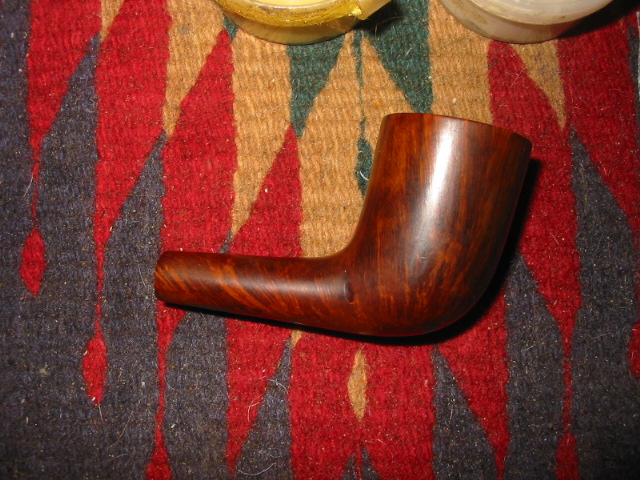
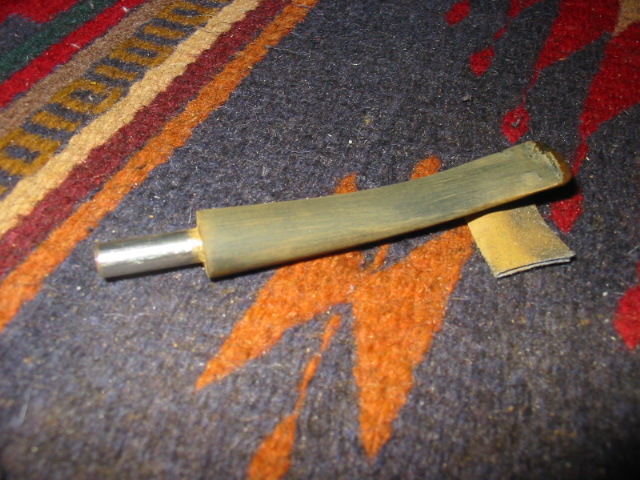
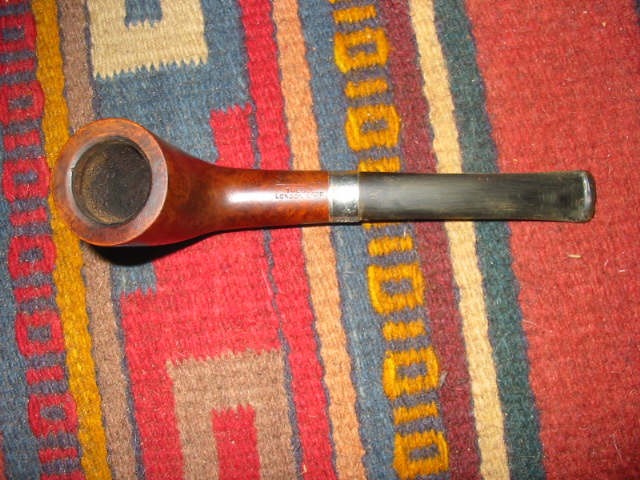
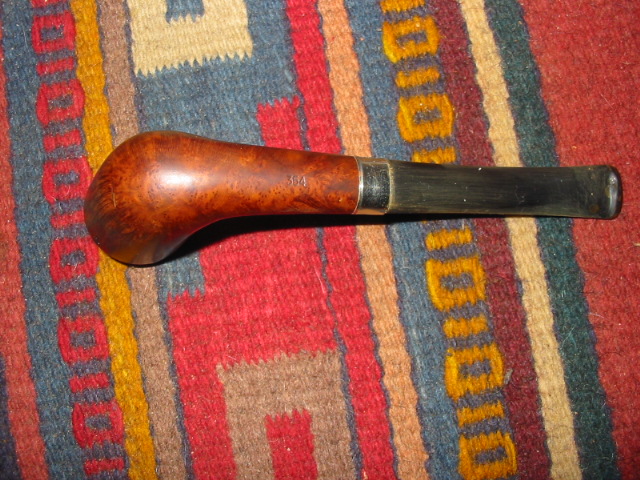
I picked up this older Imperial Tobacco Co pipe – a Zulu shape number 354. The shape number makes me wonder if the pipe was made by Comoy’s. Maybe someone here knows for sure. The number is missing on the Comoy’s shape number chart on Pipedia. The pipe is interesting to me for several reasons. It is the third in a group of three pipes by Imperial that came to me in an EBay lot. The first two were Two-Points and this one a Treble. I had not heard or seen this line before these came my way. The other reason is that several pipes in this lot had stainless steel tenons! The Treble has one and at first I thought it was original – the stem did not fit well as the tenon was stuck in the bowl and the stem would not seat all the way to the shank. The bowl was in pretty nasty shape. With lots of darkening and the grain virtually obscured under dirt. The rim was caked and tarred. The bowl was full of broken cake and cobwebs. The stem was gnawed with deep bite marks, the button destroyed and the tenon stuck in the shank.

I was able to remove the tenon from shank with a big pair of channel locks and some serious twisting and turning. I filed the end of the tenon and cut grooves in it so that the epoxy would have something to bite into when I pushed it into the stem. I then slid a pipe cleaner into the stem and threaded the tenon on the cleaner. When I got down to the stem I mixed some epoxy (two part mix) and painted it on the tenon. I let it set for a few moments and then pushed it into the stem. I wiped off the excess around the stem and tenon junction. I set it aside and worked on the bowl. ImageImage

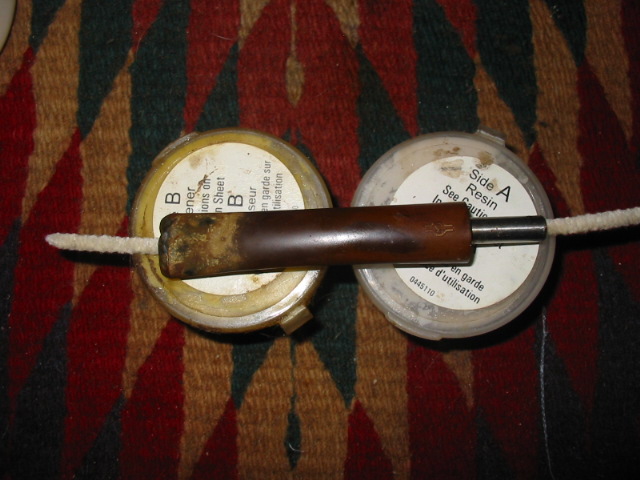
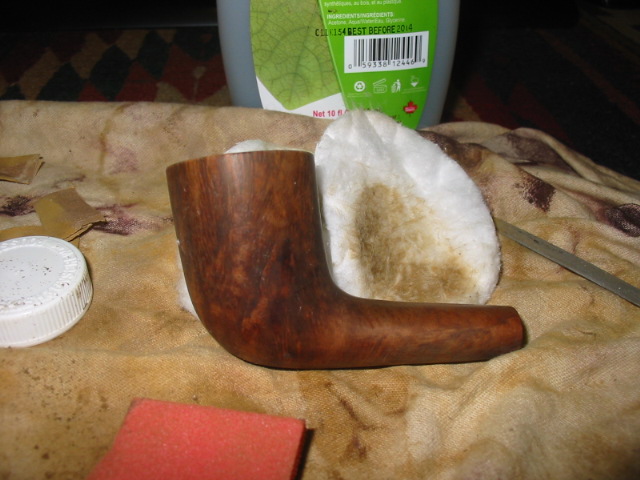
I reamed the bowl and cleaned both it and the shank. Then I used a fine grit sanding pad that I have here to work on the lava on the top of the bowl. Once that was done I wiped down the bowl with isopropyl alcohol to remove the grime and the finish. The next photos show the bowl after the initial cleanup. From there I put it in the alcohol bath and went back to work on the stem. ImageImageImage

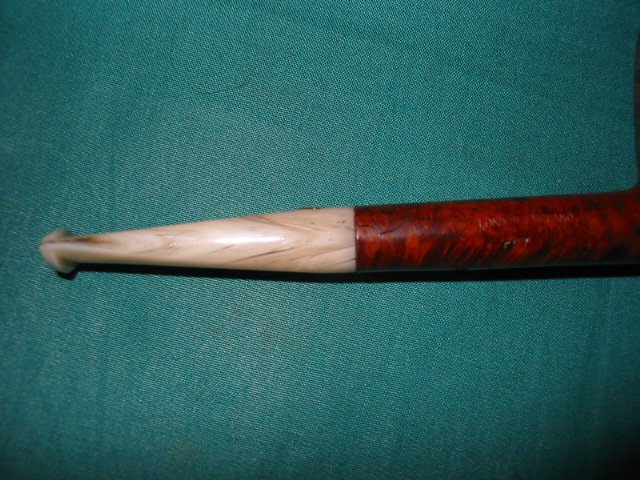
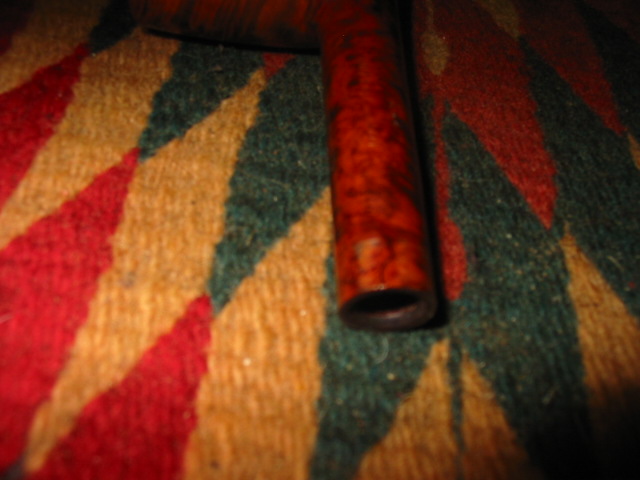
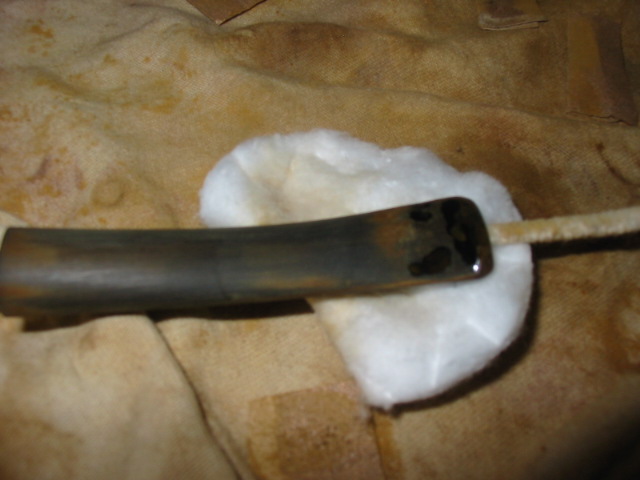
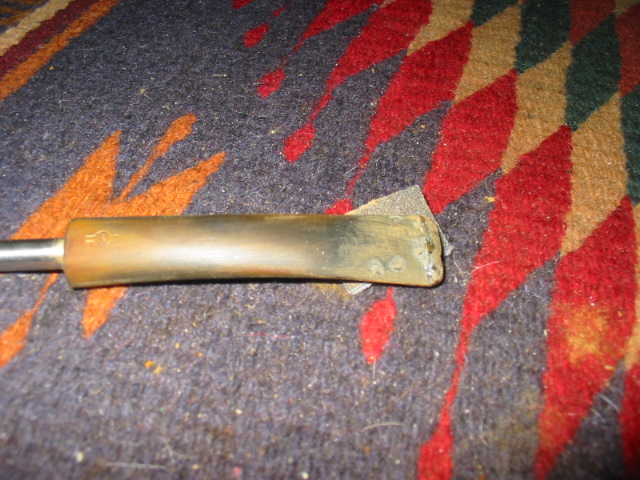
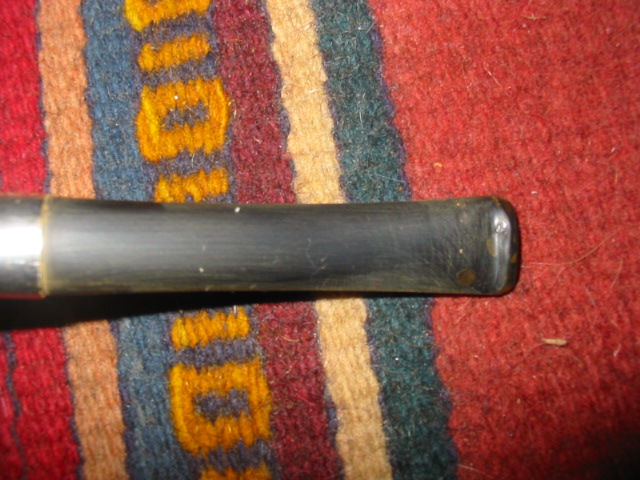
The next series of two photos show the bite marks on the stem and the state of the button. The bite marks were very deep and some were actually cuts in the stem material rather than just dents. I used my heat gun to raise the dents as much as possible but honestly they did not come up very much at all. This one would be a bit of a challenge. I used sanded the stem around the button and the dents with 240 grit sandpaper to get the oxidation off that area. I was going to use the superglue to repair these bite marks and needed a clean surface to work with. Once I had sanded the area clean I used a dental pick to pick away the brown left in the dents. I wanted to clean out the dents as much as possible and roughen the surface in the dent for a good bond with the glue. The first picture shows the top of the stem, the second shows the bottom. ImageImage

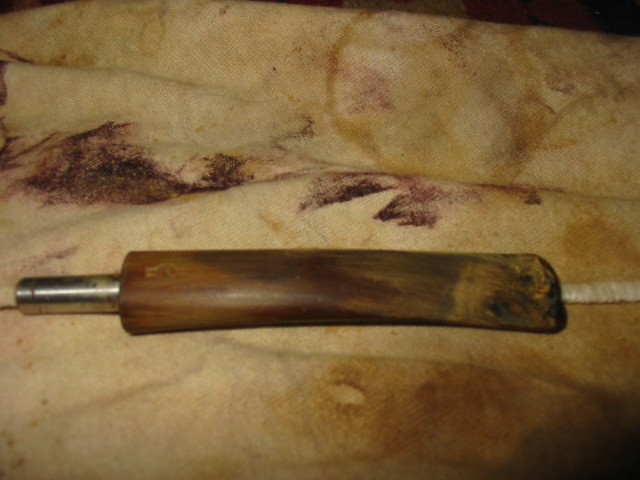
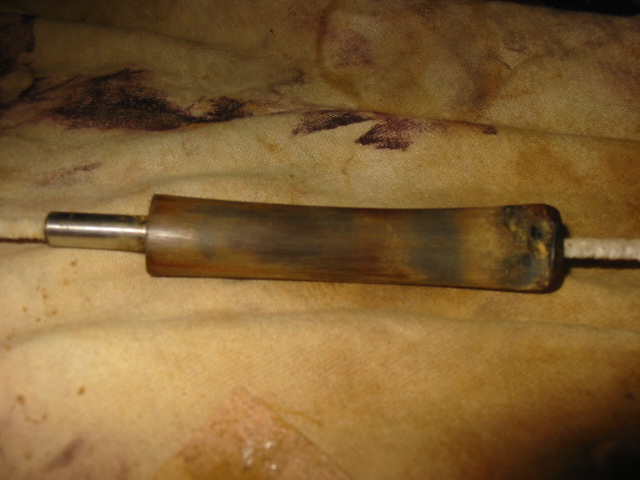
Once they were clean and ready I washed the area down with some isopropyl alcohol to remove any remaining sanding dust. Then I put drops of superglue in the holes on the underside of the stem first. Once they were dry I did the same with the dents on the top side of the stem. The three photos below show the glue in place – they appear as shiny black spots in the photos.ImageImageImage

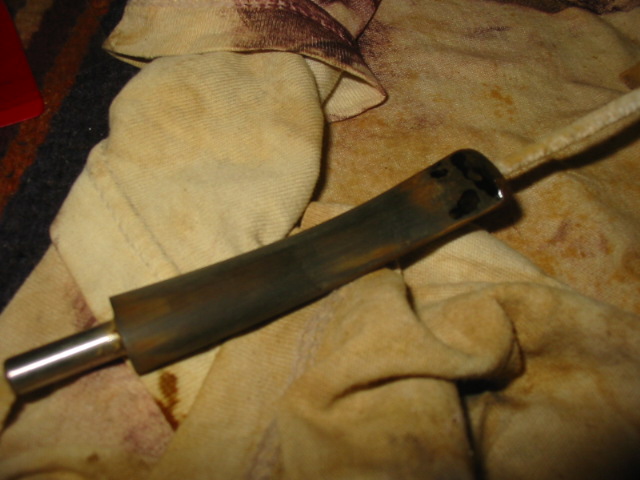
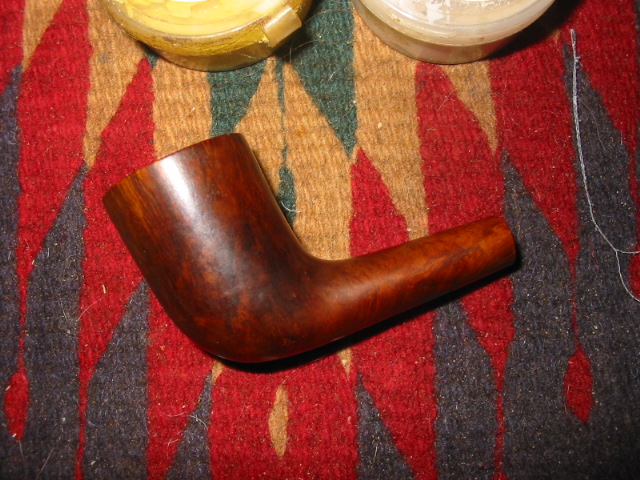
I set the pipe stem aside to thoroughly dry and took the bowl out of the alcohol bath. I dried it off and then sanded the top of the bowl with the fine grit sanding pads that I have. The top is showing some nice grain and the tars are coming off nicely. ImageImageImage

I wiped down the bowl and rim with acetone (fingernail polish remover) to remove the remaining finish and grime. The white cotton pads in the background of the next three photos show what still remained on the bowl after the alcohol wash. I wanted to get the bowl down to bare briar so that I could refinish it and then give it a new coat of stain. My goal was to highlight the beautiful grain on this one. ImageImageImage

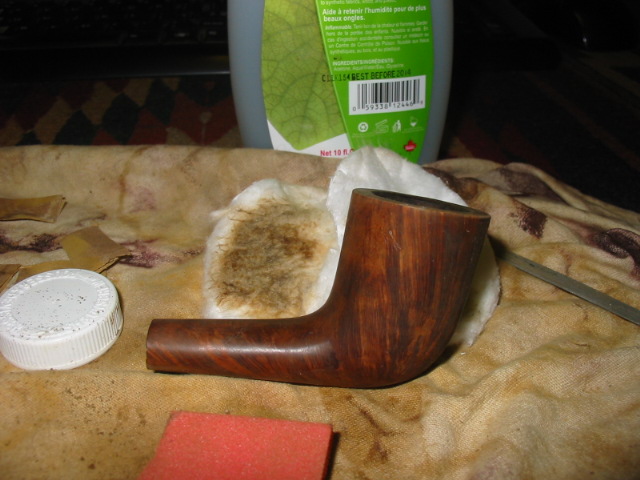
I guess I must get a bit bored doing the same thing or something, because I went back to the stem to sand the patches that I had made. I used emery cloth to get the patches even with the surface of the stem. The next series of three photos show the progress on cleaning up the stem and evening out the stem surface. The patches are beginning to fade and blend into the stem. ImageImageImage

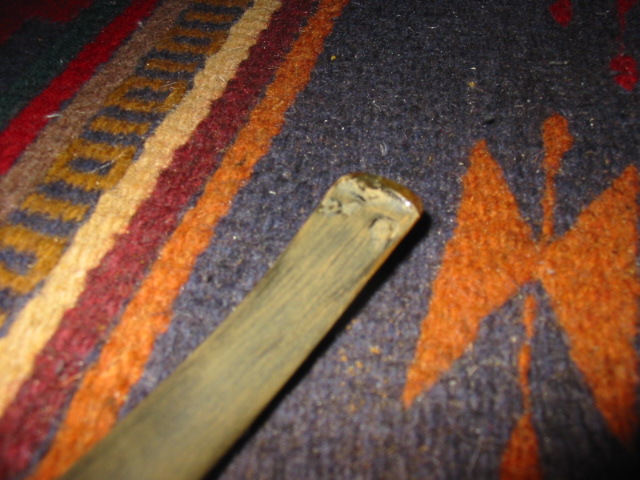
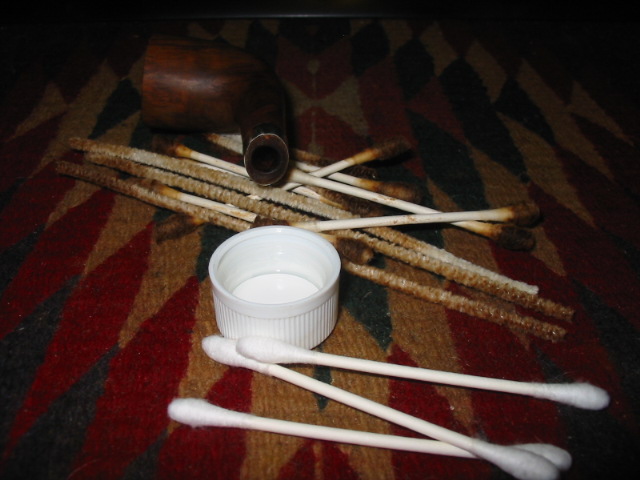
After sanding the stem I cleaned out the stem and the shank. It was a dirty process. The first picture below shows just a few of the many pipe cleaners and cotton swabs. I dip them in the cap filled with isopropyl that is pictured in the photos and swab out the stem and shank with them. ImageImage

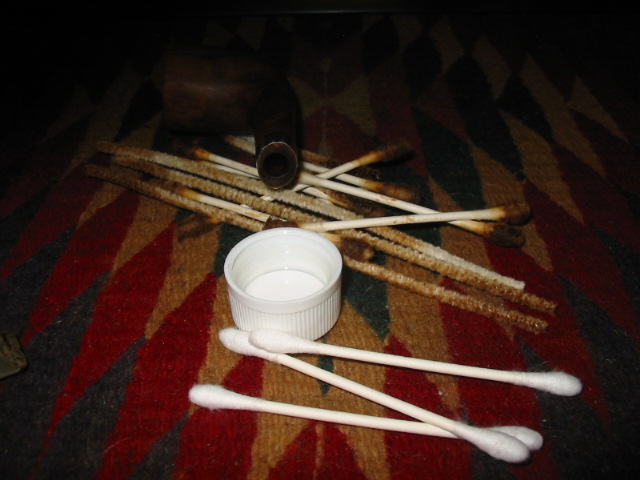
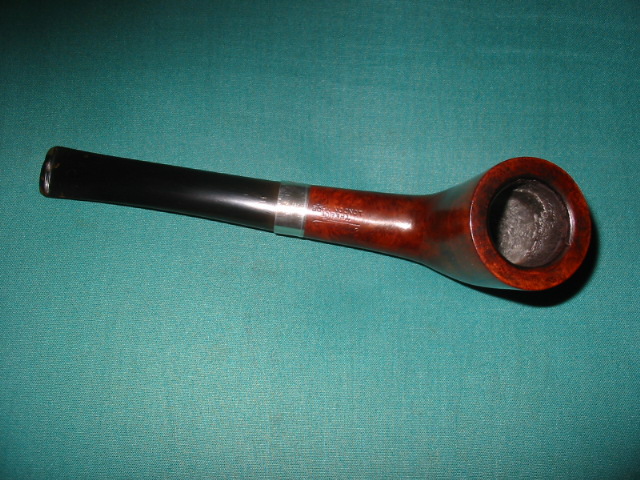
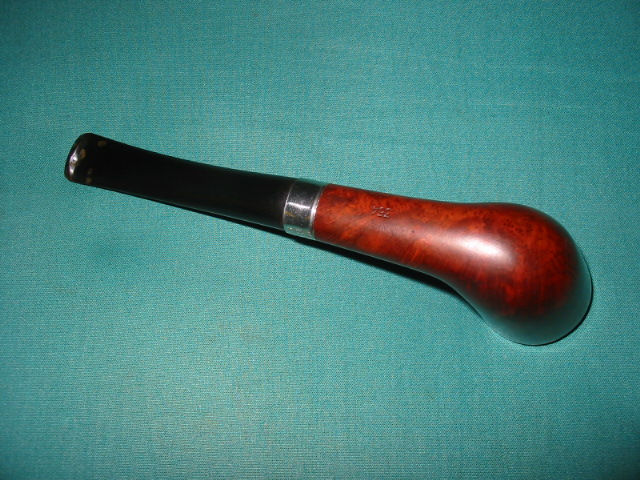
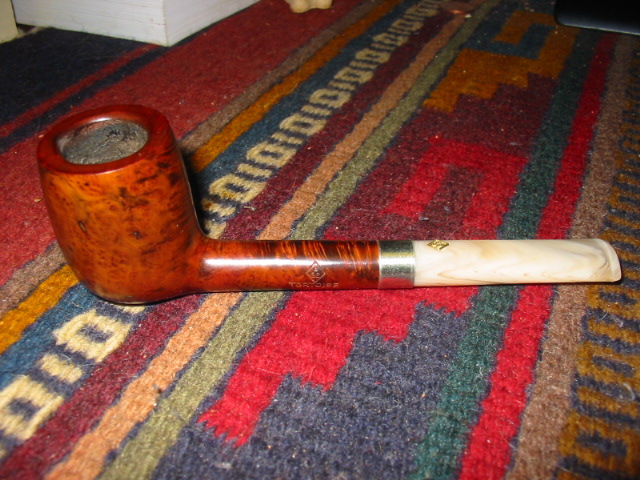
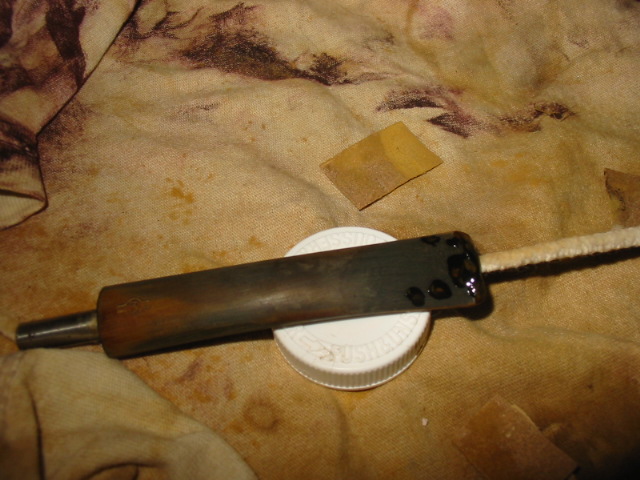
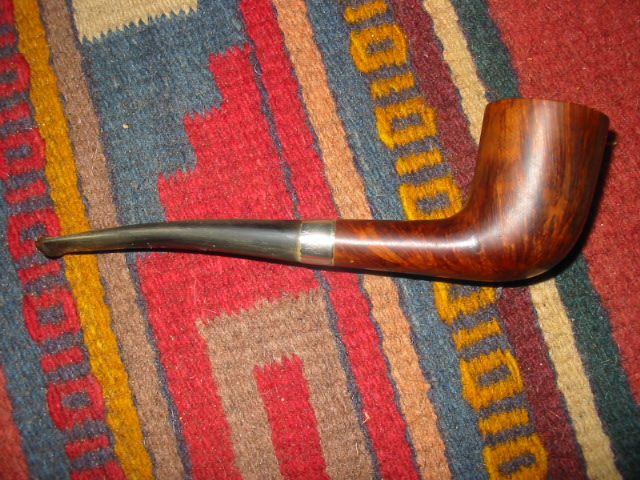
I reinserted the stem in the shank and wiped the entirety down with an alcohol soaked cotton pad. I wanted to see where I was at with the stem and the bowl. You will notice the addition of a band in the photos below. Once I refit the stem I could see that the stainless tenon was indeed a replacement and that it was misdrilled – it was set in the stem too high making the match at the tenon impossible. I decided to work on the shank rather than pull the tenon, redrill the hole in the stem and reinsert a bigger tenon. I could still do that should I desire. I sanded the shank a little to reduce the gap between the stem and shank. Then I pressure fit a band on it to guide the stem to the proper fit. It worked well actually and the stem lines up nicely now. ImageImageImageImage

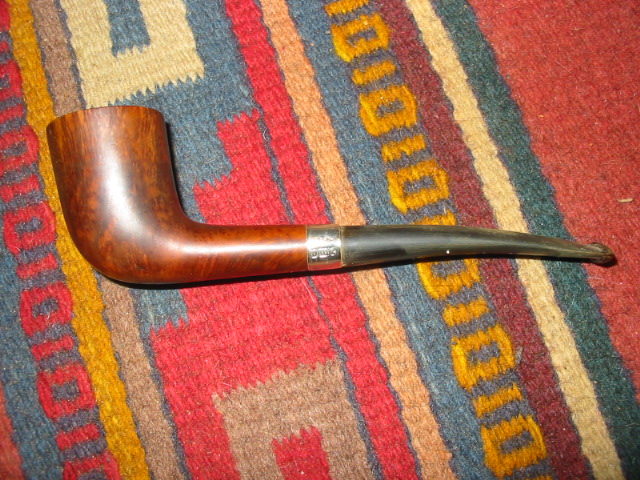
I took the next two photos to show the state of the stem patches at this point in the repair process. You can see that they are virtually invisible on the top of the stem and just slightly visible on the underside. At this point I continued to sand the stem and work at the area around the button to redefine it and to blend in the patches. I used a fine grit sanding pad and an extra fine grit pad to remove the scratches and to make the button area more defined. I then worked over the stem with the usual list of micromesh pads from 1500-6000 grit. ImageImage

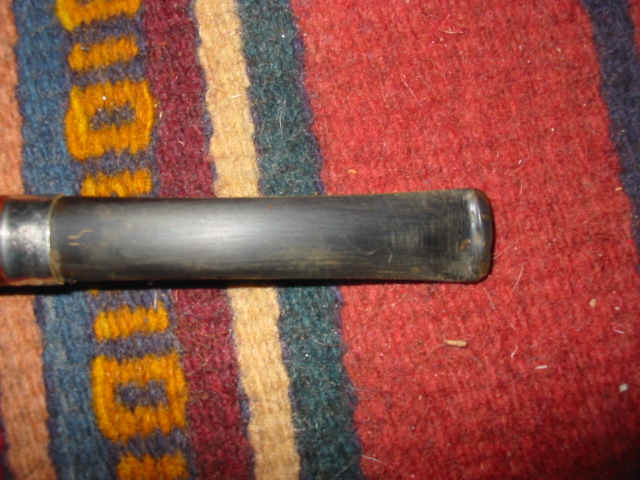
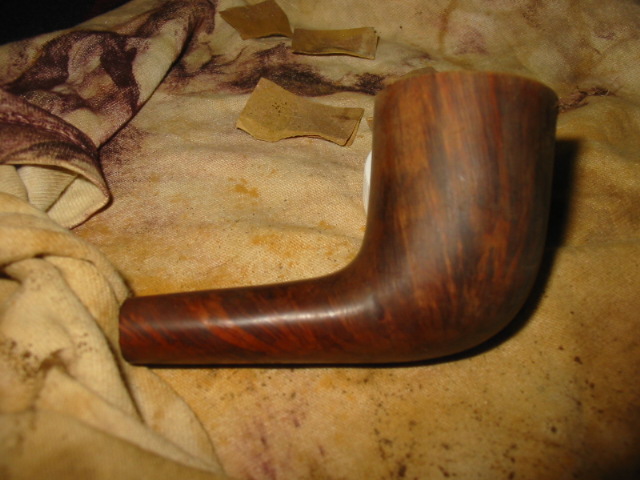
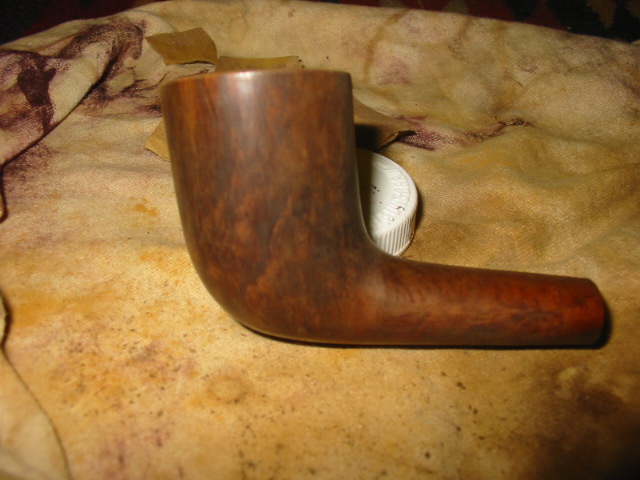
I restained the bowl with an oxblood stain and buffed the entirety with White Diamond and then gave the pipe several coats of carnauba wax and buffed with a soft flannel buff to bring out the shine to the pipe. You can see from the profile shots that the button is more clearly defined and the flow of the stem looks correct from the bowl to the button. The patches on the stem have blended quite well and though still visible if you look closely are smooth and black. ImageImageImageImage

Restoring a unique Peterson 10


I picked up this old Peterson shape number 10 at a flea market for about $12. This one needed cleaning inside and out as well as reaming. The finish was quite good. I just used a soft bristle tooth brush to get into the crevices. The shank had a crack in it so I banded it with a silver band. The bowl was caked and very narrow. I used a battery terminal brush and an old adjustable reamer to get inside of it. The stem on it was obviously not the original but a smaller diameter replacement stem that did not fit well. The shank had been sanded smooth but was not tapered to meet the misfit stem but it was perfect for setting the band. Before doing that I used some super glue to squeeze the crack in the shank together. I held it until it was dry. I then heated the band with my heat gun and pressure fit it on the shank. I flattened the bottom edge of the band to match the flat bottom where the stamping is. I fit and shaped a new stem. Once it was fit I bent it to a comfortable fit for the mouth. Then I sanded and polished it with my usual regimen of micromesh pads from 1500-6000 grit.

Barling Garnet Grain Small Bent Billiard 2034 Given New Life


Blog by Steve Laug

I picked up this little Barling (transition era pipe so the Barling stamping is missing the “s” and is a script) in a lot I bought on EBay. It had a broken stem that was also chewed through on the end and not repairable. The tenon was still in the shank and was exceptionally tight. I put the bowl in the freezer for about 30 minutes and then used a screw to remove the broken piece from the shank. The key here is to not screw in the screw too much or you can crack the shank. I was able to easily pull it out as can be seen in picture 3. The finish on the bowl was rough on the top with tars and some denting. The sides of the bowl also had some denting. I cleaned the top of the bowl and removed the tars. I steamed the dents out of the top and bowl sides.

ImageImageImage

I wiped down the bowl with acetone to remove the grime and the waxes that were on the finish. When I had finished I inspected the shank area because the drilling was off a bit in the shank and the walls were thin near the top left. There were small hairline cracks that went through several places and spidered up to about a 1/8 inch into the length of the shank. I glued those and pressure fit a nickel band on the shank.

I turned the tenon on a recycled stem I had here and fit it on the pipe. I used my Dremel to remove the excess material where the diameter of the stem was greater than that of the pipe. I kept the broken stem near at hand to match the diameter, the flow of the stem and the shape. I used it as a bit of a template to shape the new stem. The three pictures below show the process of shaping the stem from Dremel to hand sanding with 240 grit sandpaper.

ImageImageImage

In the picture below I have finished the initial shaping with the sandpaper and have a good fit. You will notice the lightening of the shank below the band – that is part of the process of sanding to fit the band to the shank. I place the original stem below the pipe in the picture for comparison sake. It is a bit thinner in profile than the new one in this photo. I continued to sand the stem with 400 and 600 grit wet dry sandpaper and water to remove the remaining scratches and grooves that the 240 grit sandpaper left. Once I had them removed I proceeded to use the micromesh pads – 1500, 1800 and 2400 grit to sand the stem smooth. When I finished with those I buffed the stem with Tripoli and White Diamond and finished by returning to the micromesh pads -3200, 4000 and 6000 to polish it. One more trip to the buffer with White Diamond finished the polishing. I gave the stem a coat of Obsidian Oil and removed it and set it aside. It was time to work on the finish of the bowl.

Image

I used an oxblood aniline stain to match the stain to the original Garnet Grain colour. I have done this in the past and compared it to a very nice original Garnet Grain and the colour is a perfect match. Before staining I polished the bowl with the 3200 and 4000 micromesh pads avoiding the stamping on the pipe. I applied the stain with a cotton swab and then wiped it off, applied and wiped it off until I got the colour I wanted. I then flamed it and set it aside to dry. Once it was dry I put the stem on it and took it to the buffer and gave it a buff with White Diamond and carnauba wax.

In the first picture below I put the original stem in to show the damage to the underside near the button. I also put a 1 cent piece, a penny in to give perspective on the size of this diminutive billiard. I am very pleased with the overall look of the pipe. The finish came out as a perfect match to the original Garnet Grain colour.

ImageImageImageImage

Repairing a cracked shank


Blog by Steve Laug

I received this older BBB Tortoise that was in pretty good shape. I did a topping on it and a restain that is posted in a separate blog posting. But in the cleaning process I also found that the shank had a crack in it. In the picture below you can see that the crack is quite long and is open. I know that others repair these with a shank insert and glue the crack together, but I have not ventured into that avenue as yet. On this kind of crack in the shank my normal process is to glue the crack with super glue and then band the pipe. In this essay I want to describe that process for you.

Image 

I removed the stem from the shank and cleaned out the shank with pipe cleaners and alcohol. I want the surface to be grime free. I also wiped down the crack with an alcohol wipe to make sure the outer surface was also grime free. I then pried the crack open by inserting my dental pick in the mortise and giving it a small bit of pressure to open the crack. The key at this point is not to apply to much pressure as it will continue to crack. Being gentle and taking your time is critical at this point or you will make the problem a bigger one. Once the crack is open I drip super glue into the crack and then hold it together with the stem removed in order for the glue to bind the crack. Once that is done I wipe off the outside of any excess glue that will extend beyond the width of the band and set it aside.

ImageImage

I heat the band with my heat gun and pressure fit it onto the shank of the pipe by pressing the band and shank into the piece of carpet pictured in the photos. It is important to keep the pipe absolutely vertical and straight as you press the band into place. You will want to press the band on the shank until the lower edge is flush with the end of the shank so that the stem fits properly. With the band heated this is not difficult to do. The band will pretty easily slide up the shank with the pressure you apply. Check for a good fit and then let it cool for a few moments.

Image 

Once it is cooled the stem can be fit to the shank. I find that with the band the tenon will need a slight bit of sanding to fit correctly. I use some 220 grit sandpaper to remove a little of the material. I make one pass with the paper and then try it for a fit. It should slide in snugly so you must be careful not to remove too much material. Often just one pass is enough and the stem should go in perfectly.

Image 

With the stem refit the pipe is ready for a buffing and polishing. Avoid buffing around the band on the buffer as it will cause the pad to go dark and leave a black/grey haze on the briar around the shank and band area. I buff the shank avoiding the band and then polish the entirety with a light touch on the carnauba wheel. Below is the banded and repaired pipe.

Image 

Refurb – A pair of Astleys 68s


Just finished the final buff on these two and thought I would post them. In researching the net for information on these pipes I found a 1968 catalogue that showed that they originally had saddle stems. I sorted through my stem box and found two saddle stems for these Astleys bowls. I fit these stems to the bowls. They are stamped Astleys 68 which is a pot shape. They also have the address on Jermyn Street London stamped on them. The bowls were reamed and cleaned. I then restained them with black stain, fired the stain to set it and then buffed with white diamond lightly before waxing with Halcyon wax.

The pipe with the band had a crack in the shank that I repaired and pressure fit with the nickel band. The blast on this pair is nicely done. Astleys called this their Crusty Briar line. Here are the pics. Thanks for looking.

ImageImageImage

Hot off the refurb desk


This is one that I just finished refurbishing. It came in a box of pipe bowls that I was given that needed re-stemming. I cleaned and reamed it and removed the tars on the rim. The shank had a small crack in it that needed to be fixed so before I re-stemmed it I cleaned the outside of the shank with a cotton swab of acetone to remove any finish that was on the area that the band would cover. I measured the outer diameter of the shank, picked out a nickel band. Just before placing the band I put some super glue in the crack and let it dry. Once done I dabbed a bit of all purpose glue where the band would go and then heated band so that I could pressure fit it in place. I re-stained the bowl with a dark brown aniline stain to give it a more even finish. I buffed it with Tripoli and White Diamond before giving it a coat of wax. Then I laid it aside.

I found an interesting stem blank that would give the pipe a pleasing look to my eye. I turned the tenon with a PIMO tenon turning tool until it was a close fit and then did the rest of the work on the tenon with sand paper by hand. Once I had the tenon fitting snugly I took my Dremel to the outer diameter of the stem to bring it as close as possible to the diameter of the shank of the pipe. I finished the exact fit by hand with varying grades of sand paper. Upon completion of the fit I used 240, 400 and 600 grit sand paper to remove the scratches and then 1500,1800, 2400, 3200,4000 and 6000 micro-mesh sanding pads to finish the polish on the stem. I put the stem on the pipe and then took it to the buffer and did a final buff with White Diamond buffing compound on a mixed felt/flannel wheel. Remember never buff a stem without it being in place on the bowl or you will round the edges at the stem/shank connection.

Once I had the stem as smooth as I wanted I gave it a coating of Obsidian Pipe Stem Oil and let it dry for half an hour and then buffed the entire pipe with a carnuaba wax buff.

Here is the finished product:

ImageImageImageImage