Tag Archives: article by Paresh Deshpande

Mumbai Bonanza: Stefano “Exclusive” Restoration…a month long project


Blog by Paresh Deshpande

I was on leave a few months back. Two days before I was to rejoin my work place, I received a call from a friend in Mumbai saying that he had come across a person who collects trash and unwanted items from all posh bungalows and apartments in the area and that he had a seen a few pipes, similar to the ones I restore, in his cart. This friend had taken down his contact number and shared it with me. Now the readers of this write up must understand that we do not have a “Pipe Culture”!! During colonial days, smoking a pipe was common and after the British left, in next few decades, it died its natural death. Today, pipes are not available here and neither is pipe tobacco!! So with this background, it came as a big surprise to me that a trash collector had pipes. I had nothing to lose by giving him a call and this is exactly what I did. While I was speaking to him, it dawned on me that this person did not know what he was selling, could not read or text me the stampings on the pipes. The conversation that I had with him in my local dialect was nothing short of being hilarious. I could not make out what I would be purchasing and he did not know what he was trying to sell!! He had 30 pipes for sale. I am very pathetic at any form of gambling and in such case bad luck follows me like a shadow. I shared this dilemma with Mr. Steve who suggested that I should go ahead and strike a deal. If nothing else, I shall have some spares!! That sounded logical and I struck a deal with the “kabadiwala” (this is what a trash collector is called here in local parlance) for all 30 pipes. The next day I joined my work place and the parcel reached Abha, my wife, after about 10 days. Here is what she received in the parcel. 
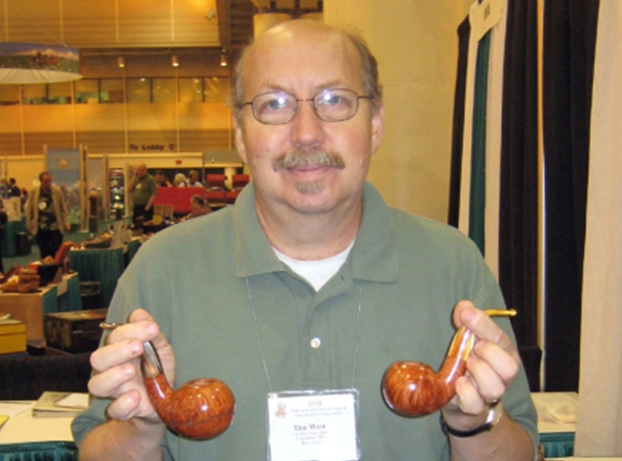
This parcel contained some very nice collectible pipes, a few well known brand pipes and some mediocre pipe brands. Overall, with seven Dunhills, a Preben Holm #1, a couple of Made in England Pete System pipes, Charatan’s and other assorted pipes, I would say that I had hit a huge jack pot!!! Hence, I like to call this find as “Mumbai Bonanza”.

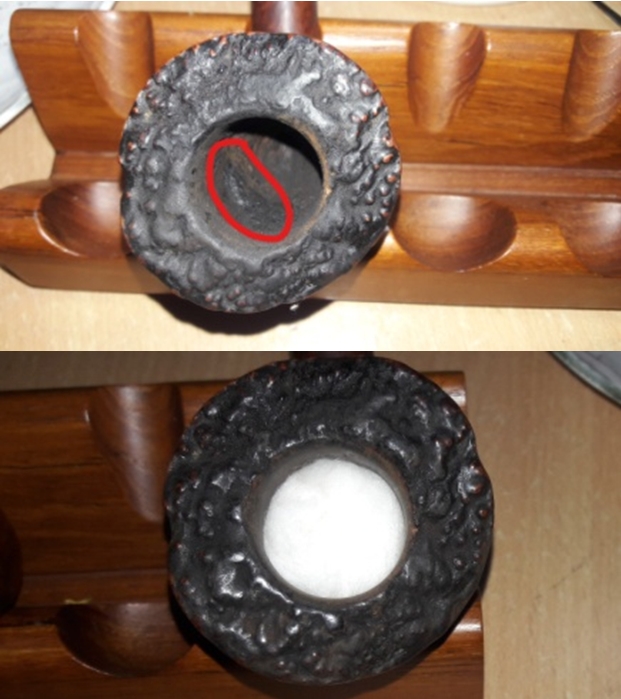
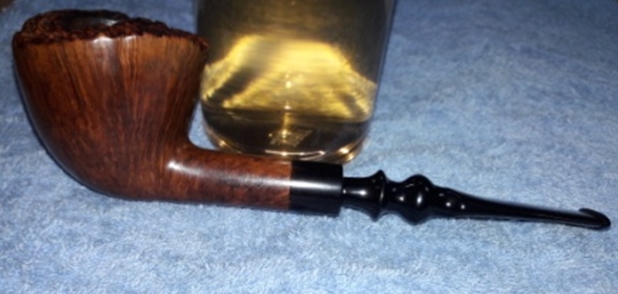
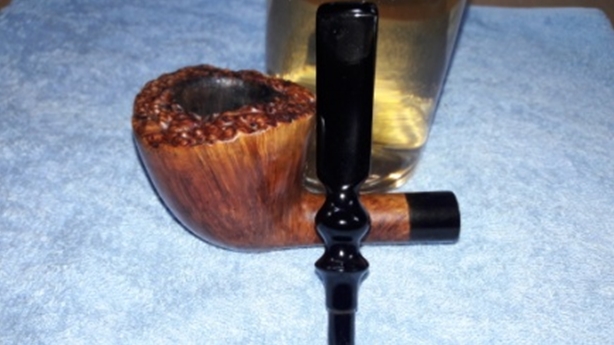
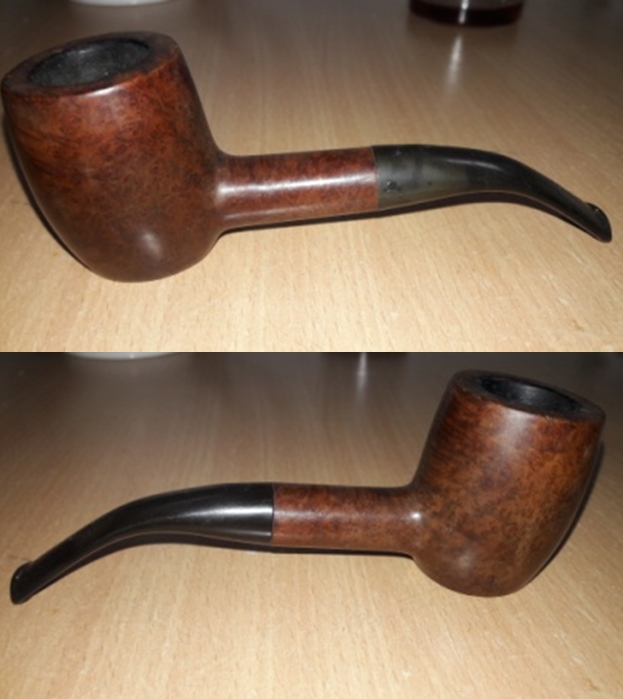
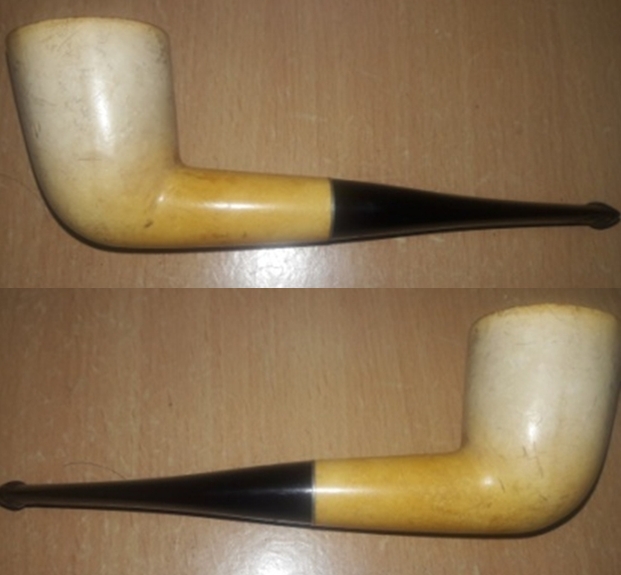
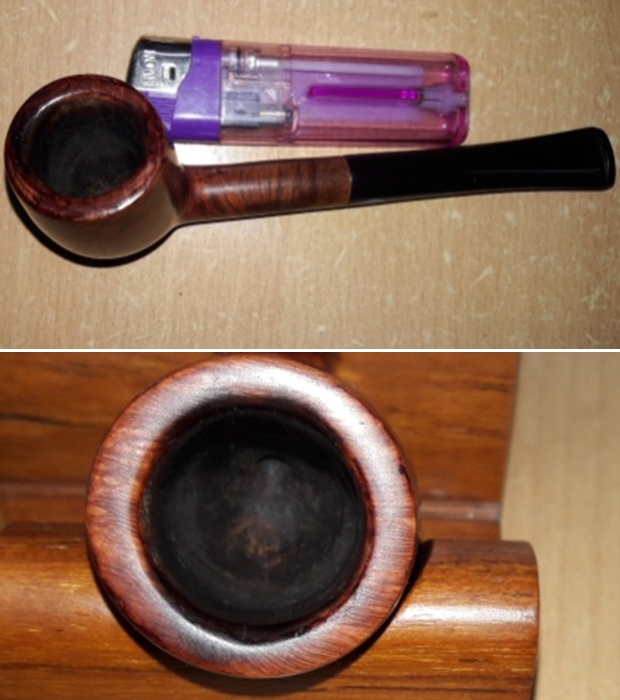
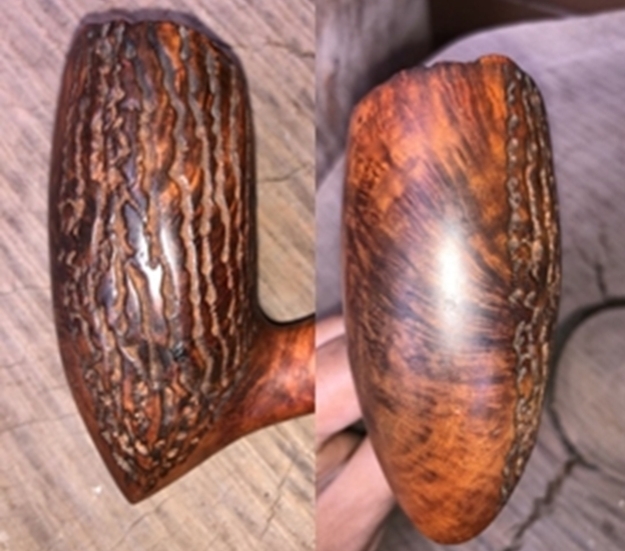
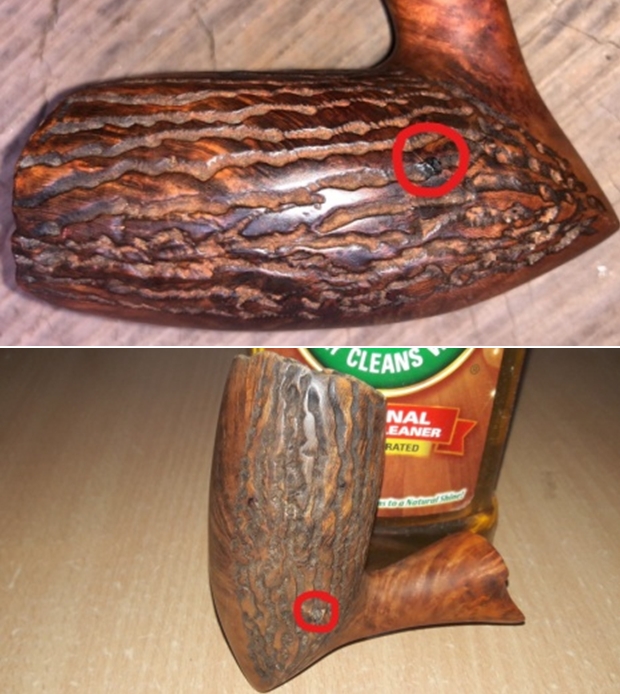
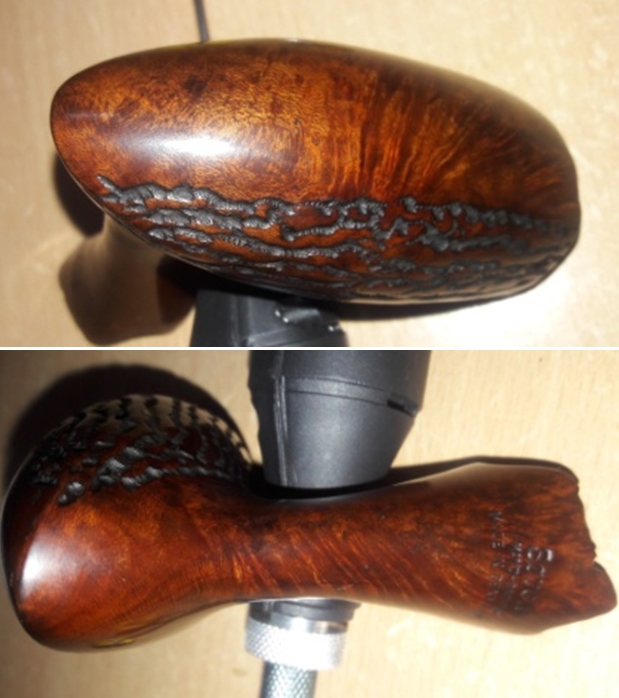
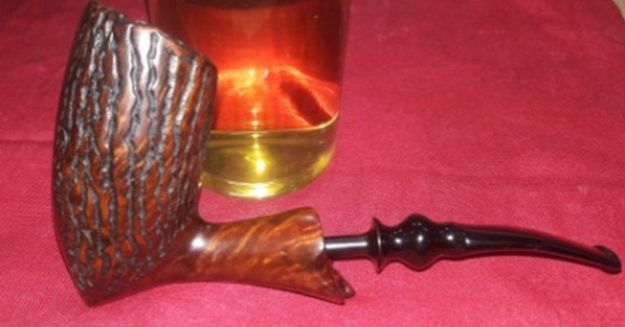
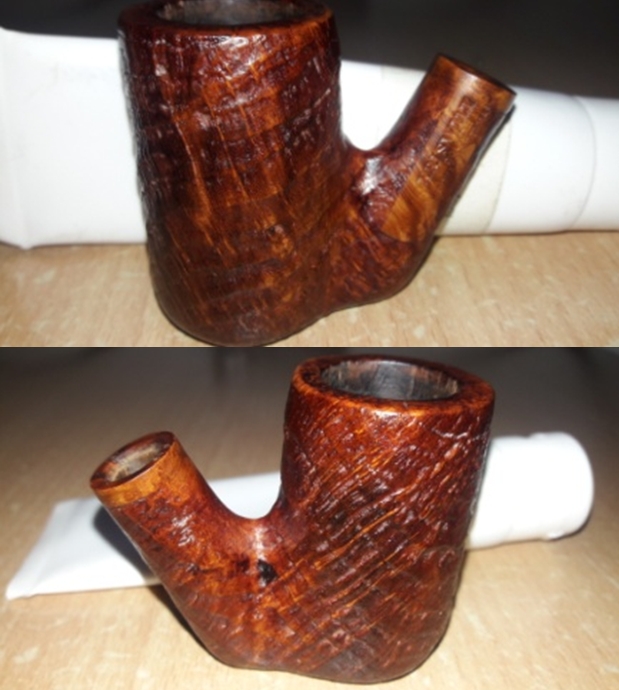
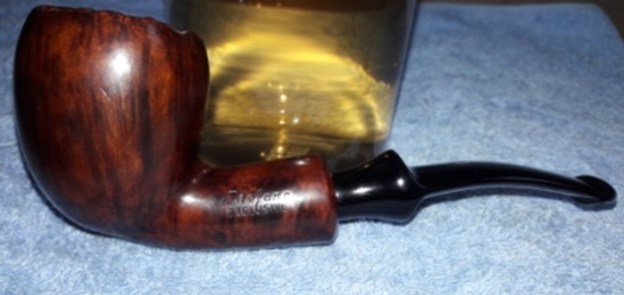
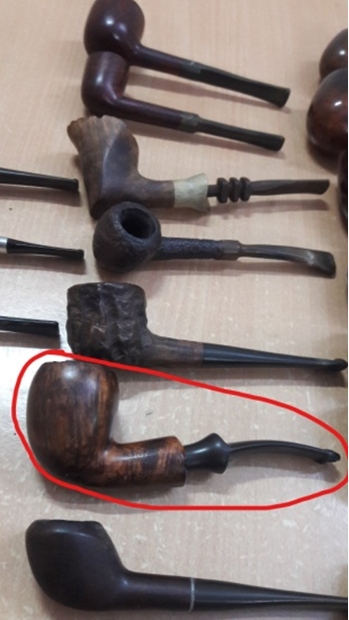
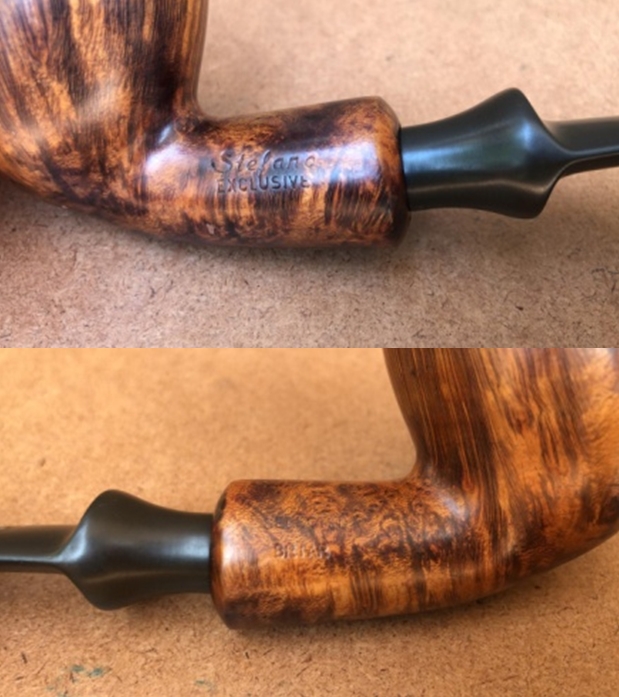
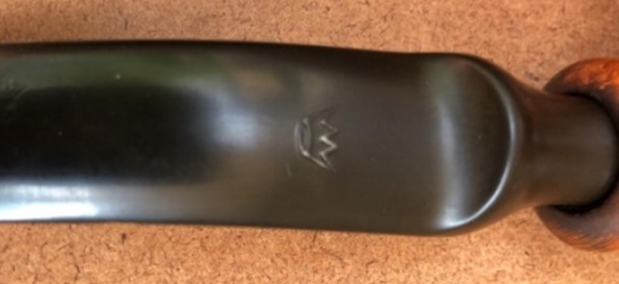
The pipe that I decided to work on is from this find and is marked in a red circle in the picture below (little did I know what I was getting in to at this point!!!). It’s stamped as “Stefano” in small italics over “EXCLUSIVE” in block letters on the left side of the shank and on the right side of the shank it is stamped as “SELECTED” over “BRIAR”. The stummel shows some lovely straight grain which contrasts with the rest of the swirls on the stummel surface. The quarter bent tapered saddle vulcanite stem bears the “crown” logo on the top surface and is designed to take a 9mm filter.

To research this pipe, I turned to pipedia.org and the search for “Stefano” led me to the page on Stefano Santambrogio,  here is the link to the page; https://pipedia.org/wiki/Santambrogio

The information gleaned from this page is that this is an Italian manufactured pipe by Santambrogio family who are in to pipe manufacturing since 1912!! The present owner, Mr. Stefano Santambrogio has been at the helm of affairs since 1981. What really baffled me was the stem logo which was very different to what I have on the pipe in front of me. I decided to narrow down my research for the stem logo and turned to another site which I frequent, pipephil.eu.

I specifically searched for stems with crown logo and there it was at the end of the list marked as “Stefano”. The match was perfect. One click on the link led me to http://www.pipephil.eu/logos/en/logo-s3.html#santambrogio

Here the information available was more or less similar to that on pipedia.org, however, it was mentioned that Stefano could be a Santambrogio second. Another click on Stefano took me to a page which had pipes with identical stamping on the shank and stem logo to the one I was working on. It was revealed that Stefano was indeed a Santambrogio export for the German market!!

With this information, I proceed ahead with the restoration of this handsome pipe.

INITIAL VISUAL INSPECTION
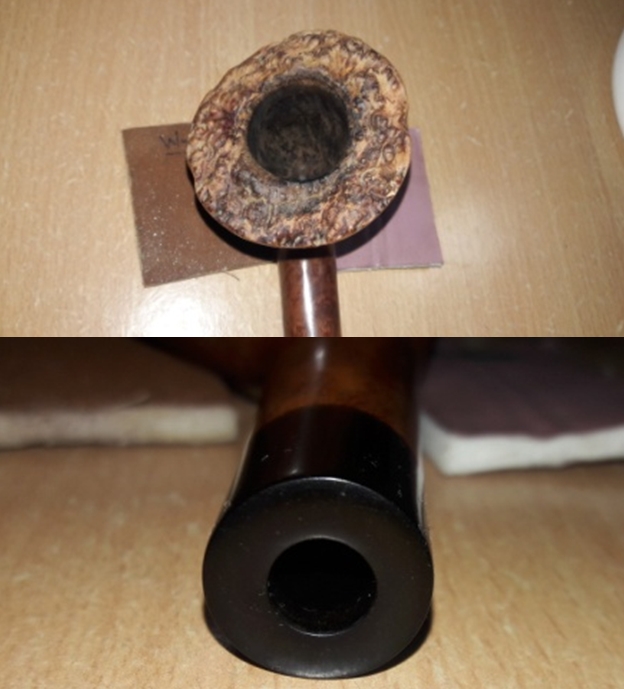
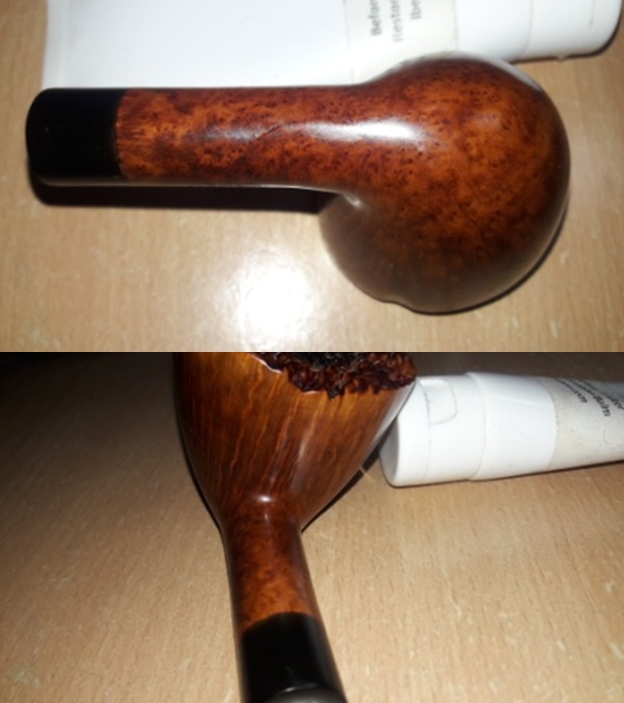
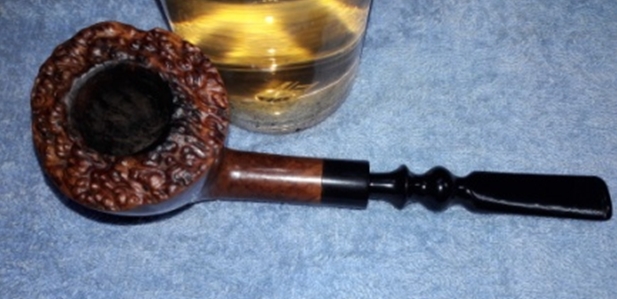
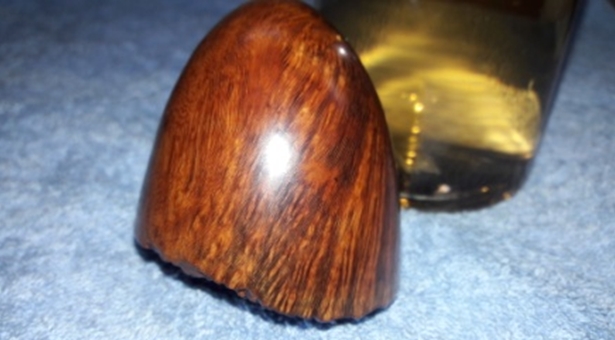
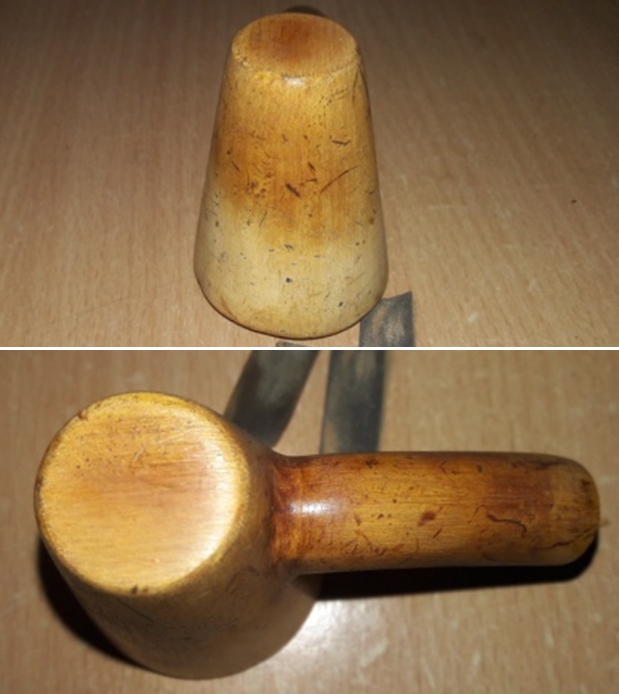
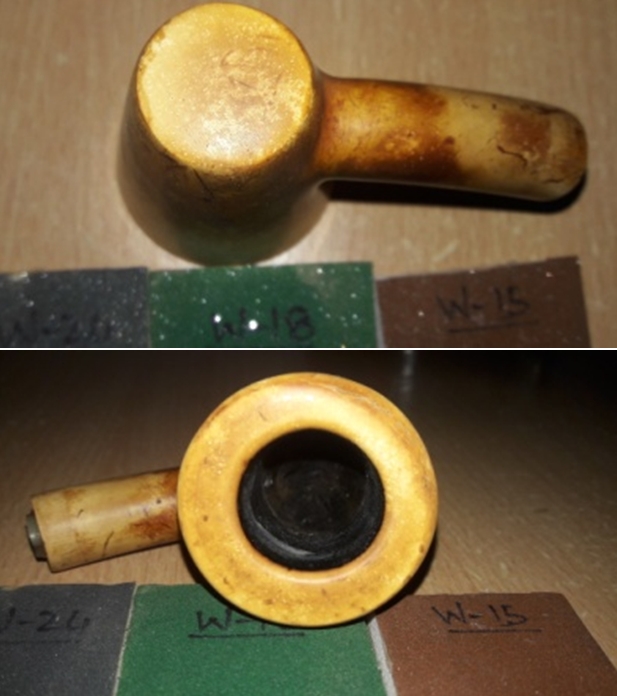
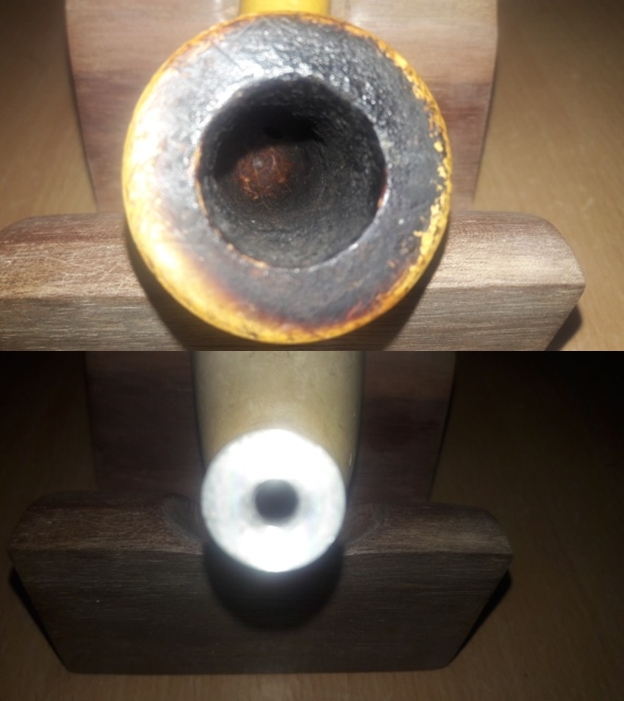
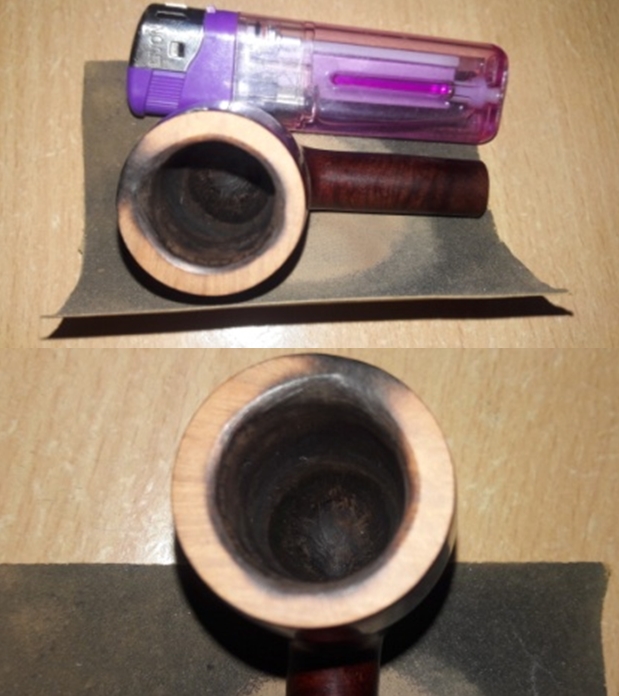
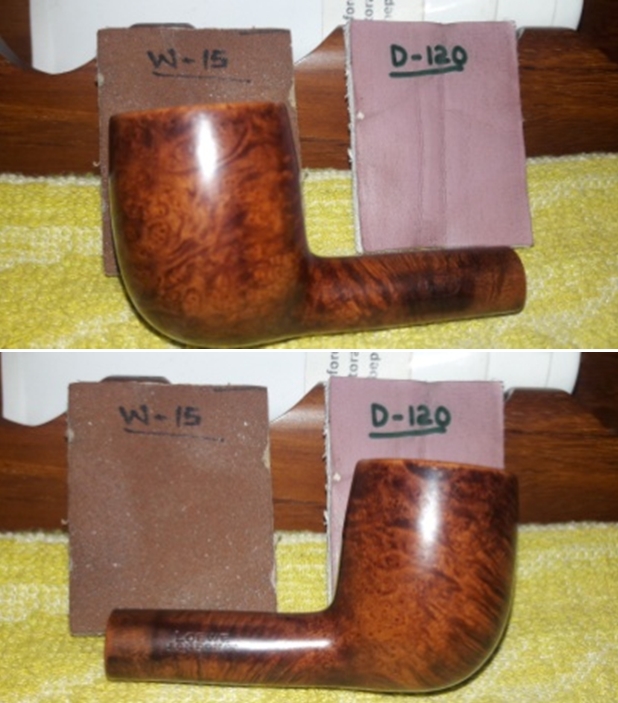
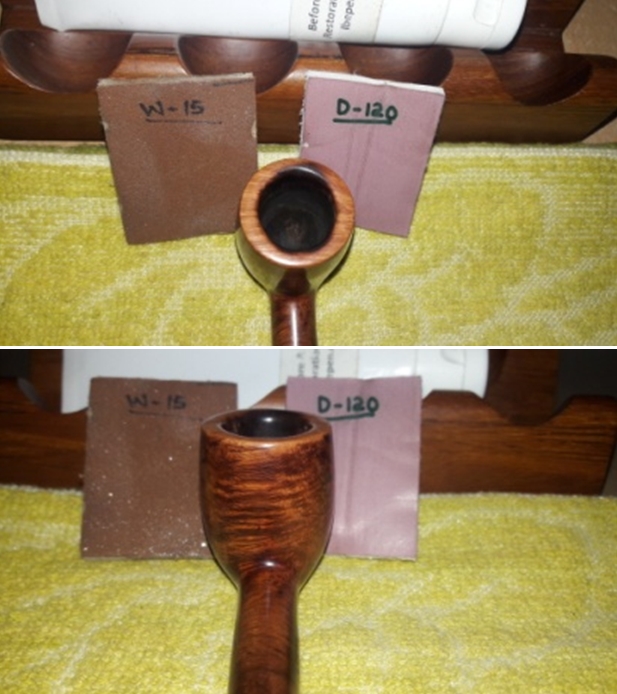
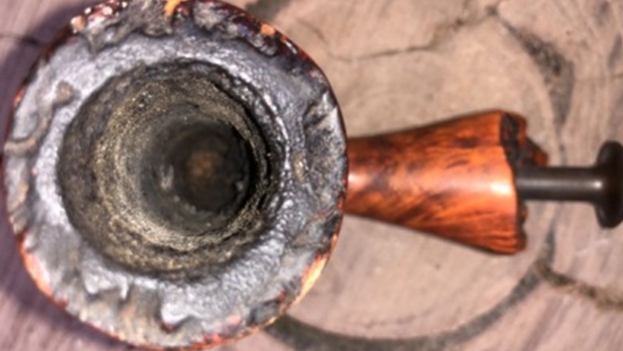
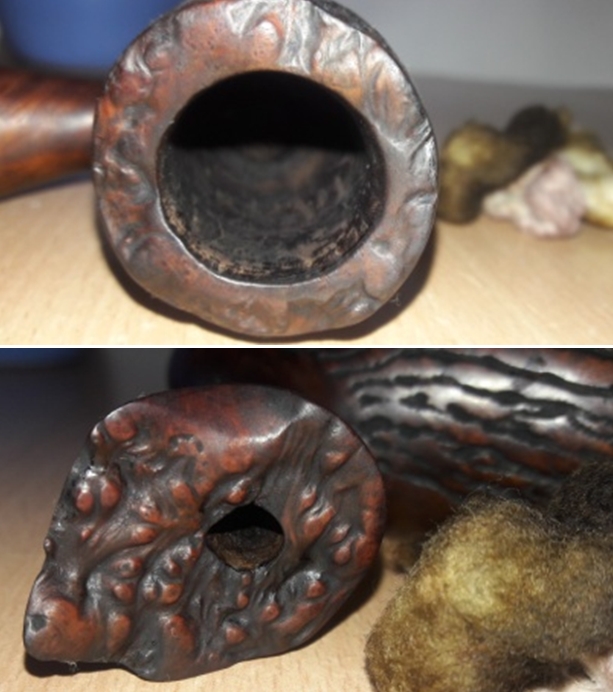
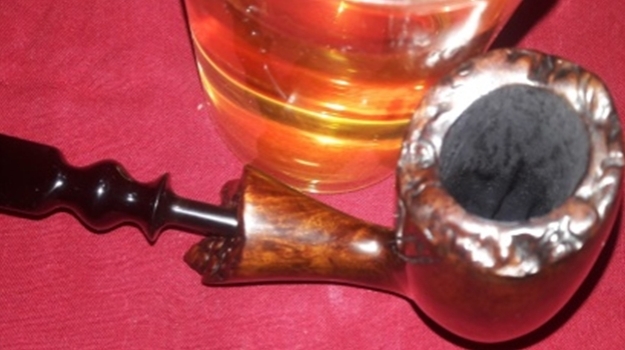
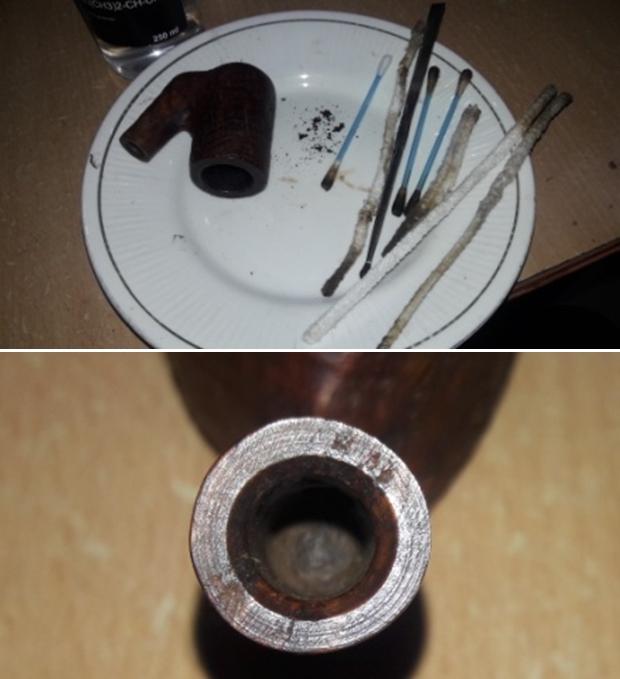
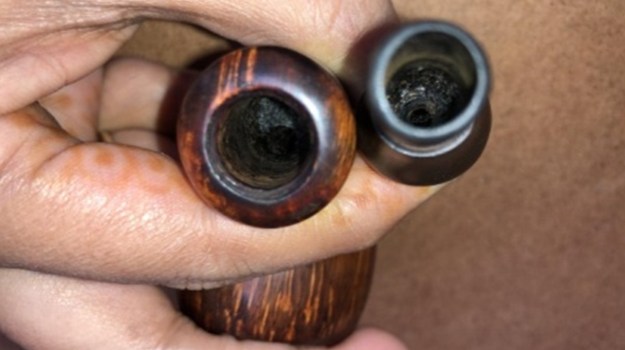
The chamber is clean with a thin layer of cake which pleases me no end as this would be a first for me. From what I can see, the chamber walls appear to be sans any damage. The chamber smells of a strong aromatic tobacco and needs to be addressed.The stummel is stained in an orange dye which has worn out in time. At places, it appears like a patch work. The stummel surface is peppered with numerous dents and dings, and a large number of huge fills on the right side of the stummel and the shank. These fills need to be refreshed. I intend to sand the stummel surface with grit papers with two-fold aim; first is to get rid of the orange stain color and second is to minimize the dents and dings from the surface. The plateau rim top surface has little traces of lava overflow and should be easy to deal with. The mortise is surprisingly filthy given how clean the chamber and the rim top appear to be. 
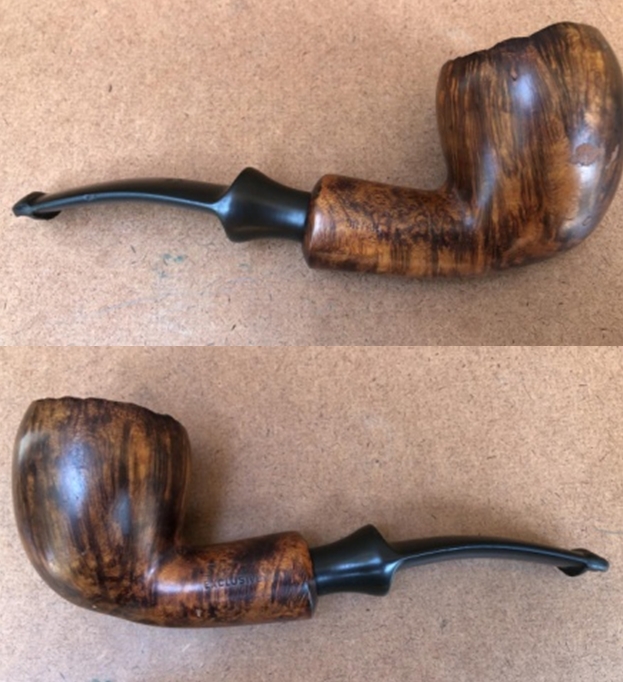
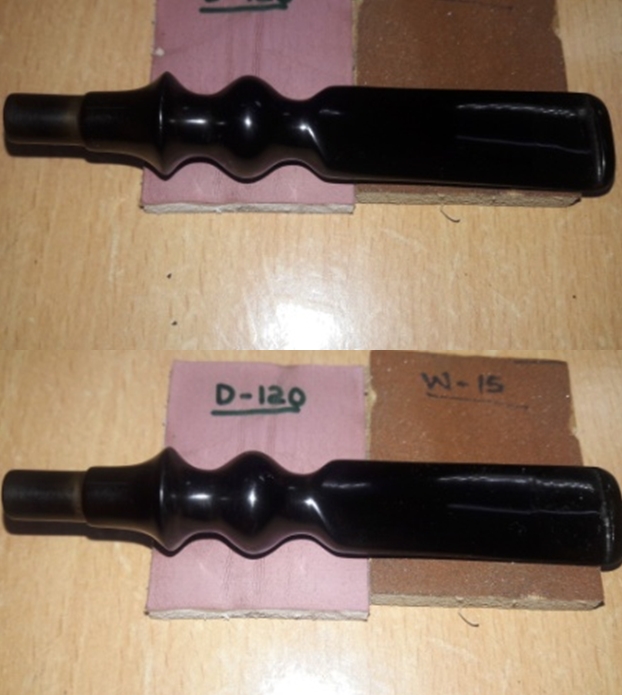
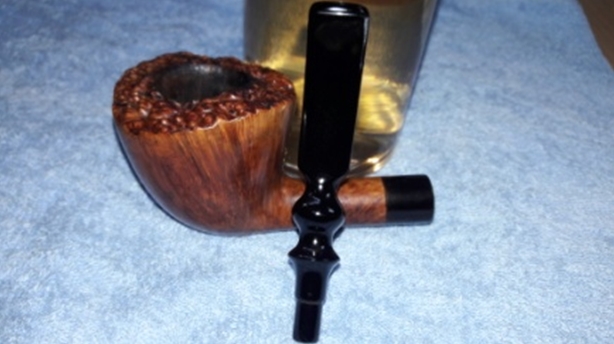
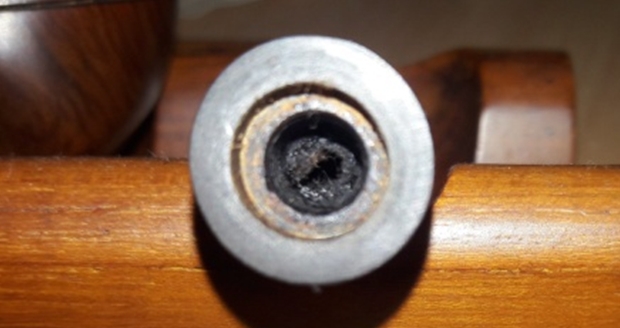
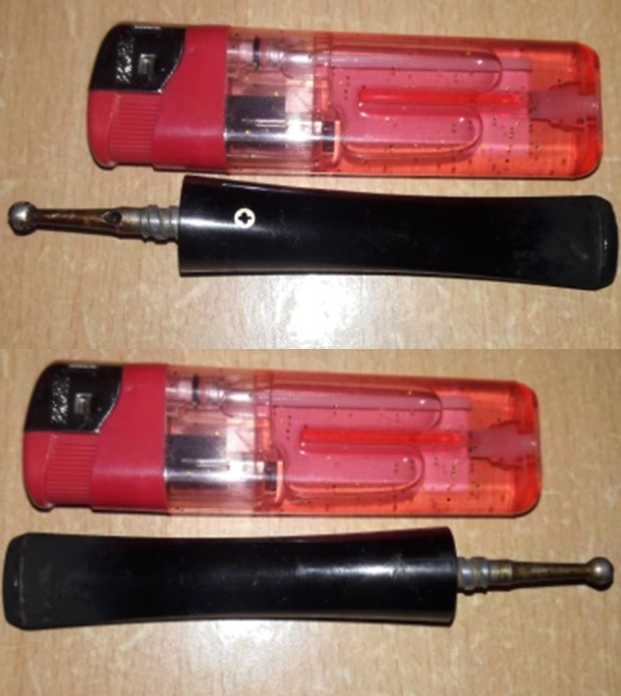
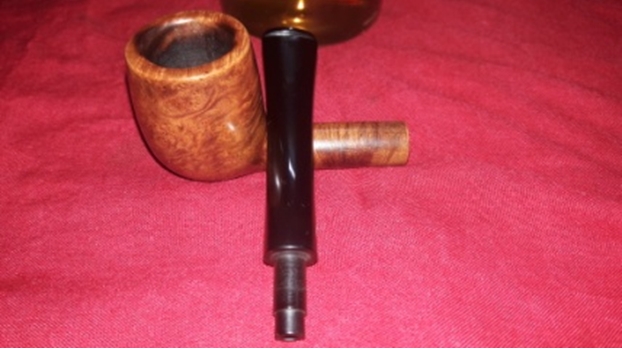
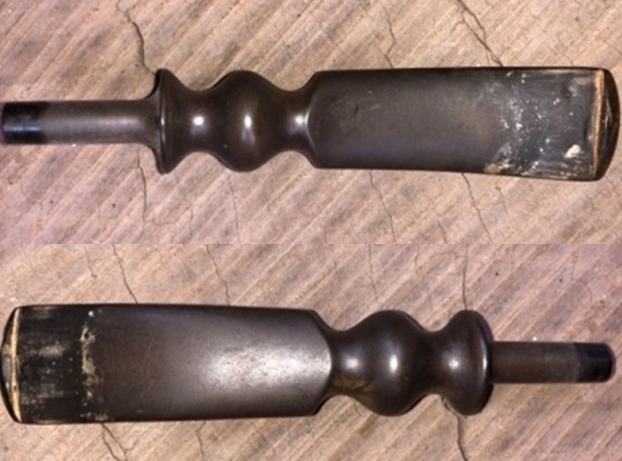
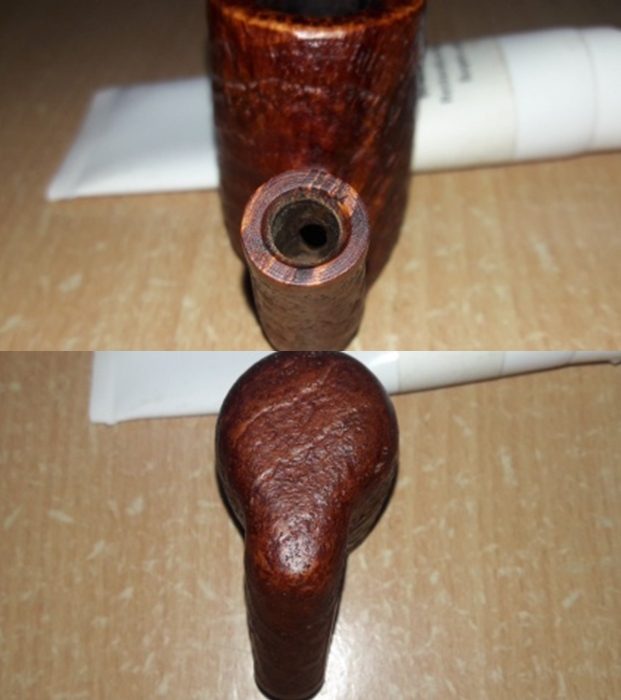
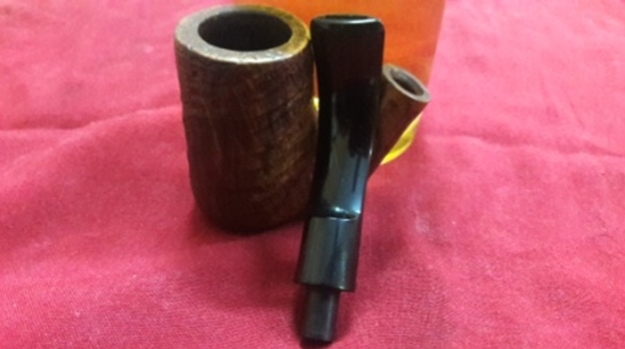
The vulcanite stem shows significant damage to the upper button, side wall and the round slot, but it is not oxidized. The pseudo p-lip style bit has a through and through hole exposing the airway. This will require major repairs. The quality of vulcanite is good.

THE PROCESS
Since the stem has significant damage, and from my experience of stem repairs this will be the most time consuming and laborious part of this restoration, I start this project by tackling the stem first. I was faced with two options in my approach to this stem repair; first was to recreate a new button around the broken part and maintain the existing stem profile with a round slot and the second option was to cut away the damaged button and reconstruct an entirely new button with a straight horizontal slot, sacrificing the P-lip shape. I decided to take the former approach. This decision was partly dictated by the fact that I do not have a rotary cutting blade to cut the damaged button end and partly to my innate desire to maintain the originality of any pipe.

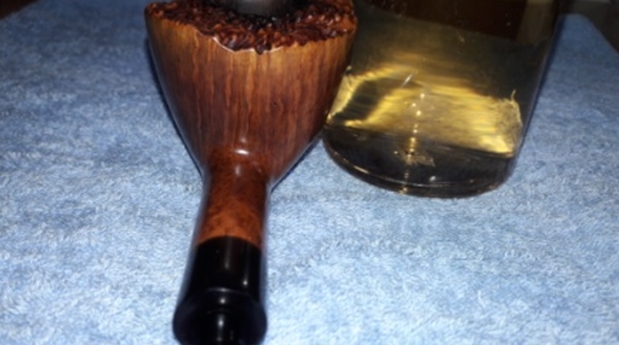
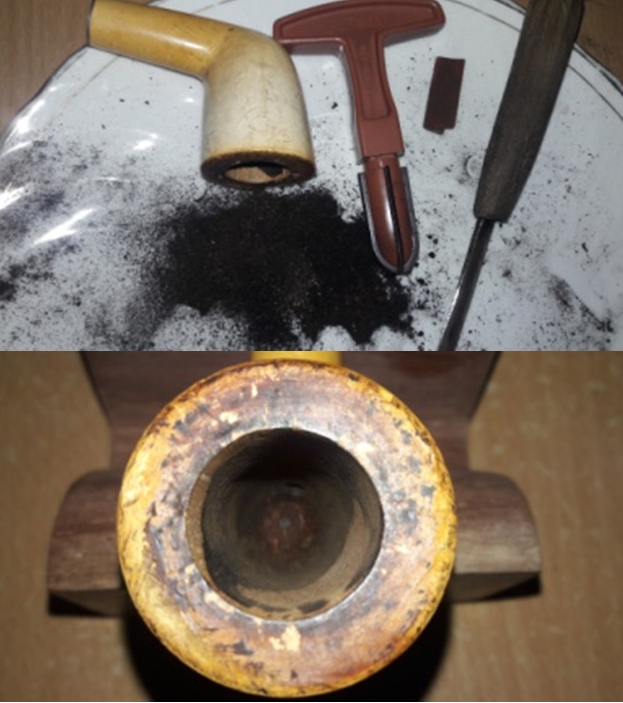
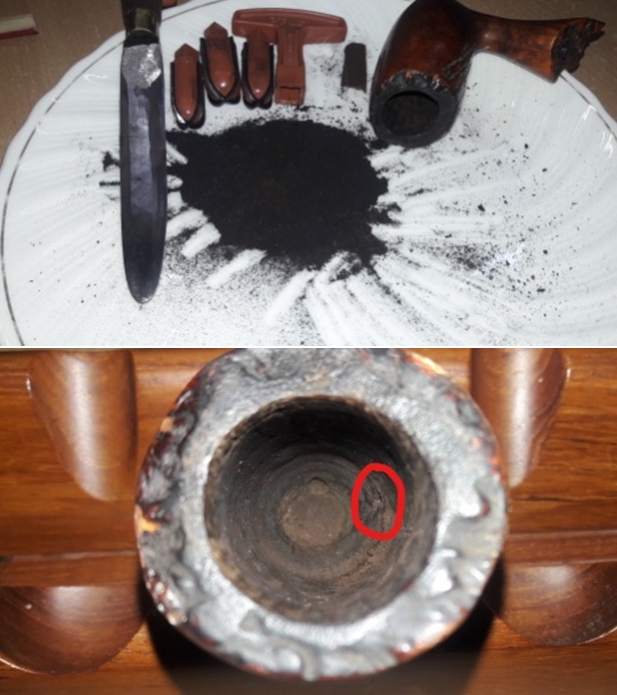
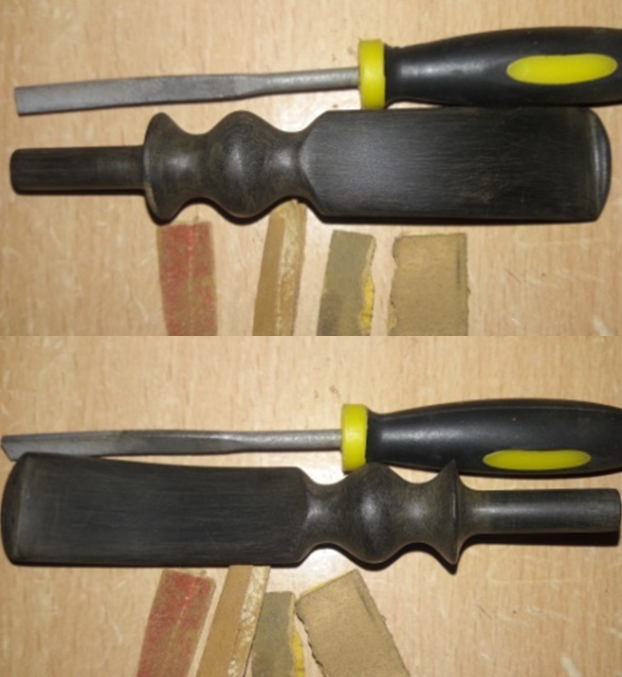
Now that I was clear about the path to be followed, I cleaned out the internals of the stem with hard bristled and regular pipe cleaners dipped in isopropyl alcohol. I also cleaned the wide tenon with q-tips dipped in alcohol. Once I was satisfied with the internal cleaning, I wiped the stem surface, particularly the damaged button end, with a cotton pad and alcohol to remove any traces of dirt and grime. To begin the stem repairs, I smeared a pipe cleaner with petroleum jelly and inserted it in to the stem airway. I prepared a mix of CA superglue and activated charcoal and generously applied it over the gaping hole in the button of the stem and set it aside for curing over night. Before moving ahead, I would like to mention here that I had applied this mix in layers, over the week, to achieve sufficient thickness which would help during the filing and sanding while shaping the button.While the stem repair was progressing at its own pace, I moved ahead to deal with the stummel repairs. Given the size of the chamber, I reamed the chamber with size 4 head of a PipNet reamer. I used my fabricated knife and scraped out all the remaining cake. The amount of cake reamed out of the chamber really surprised me as I was expecting minimum cake. I further used a folded piece of 180 grit sand paper to sand out the last traces of remaining cake and expose the walls of the chamber to ascertain that there are no cracks/ heat fissures. I wiped the chamber with a cotton pad dipped in isopropyl alcohol to remove the carbon dust left behind by all the reaming and sanding process. The walls of the chamber were solid with no damage. I gently scraped the plateau rim top surface with a sharp knife to remove the lava overflow. This was followed by cleaning the mortise with cue tips, pipe cleaners and shank brush dipped in isopropyl alcohol. This further eliminated traces of old smells from previous usage. The old smell was still strong, though. 
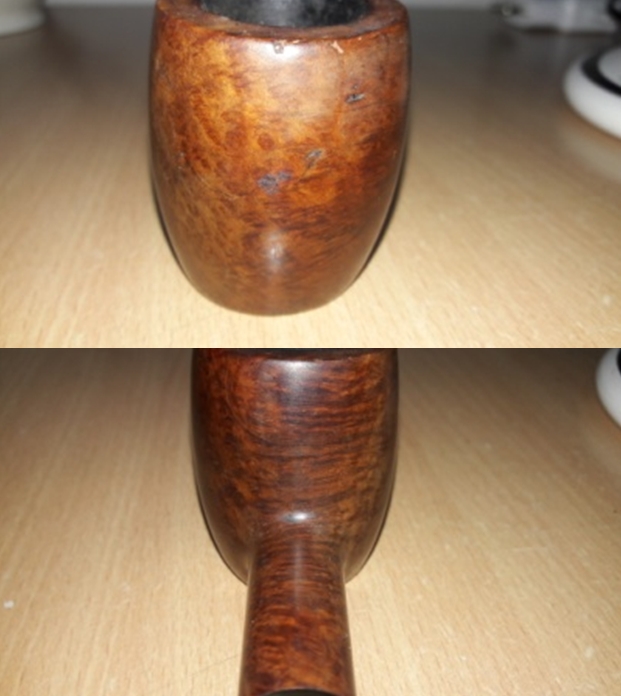
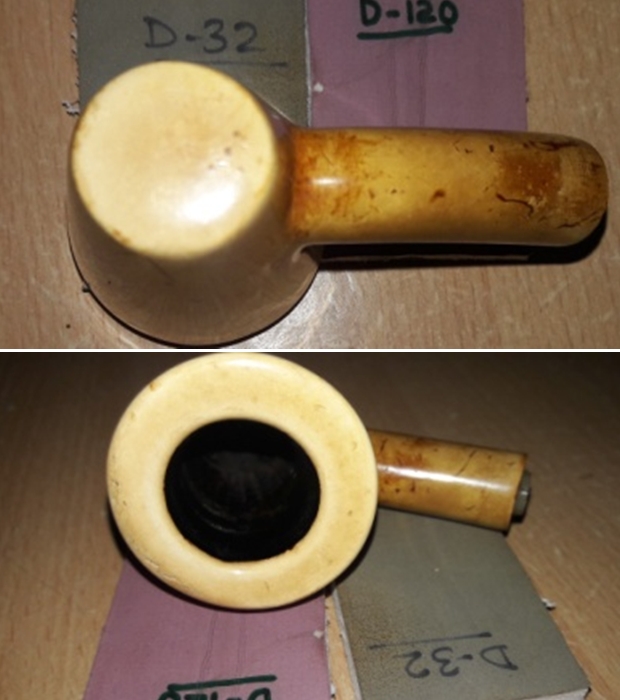
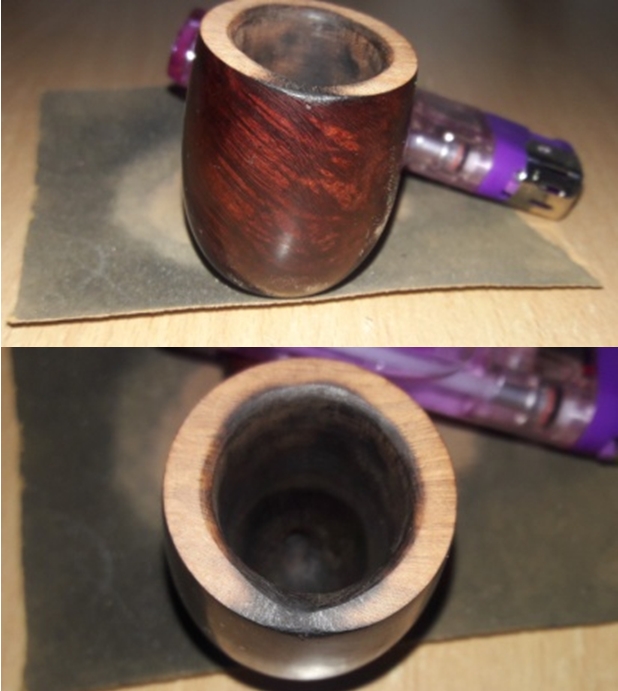
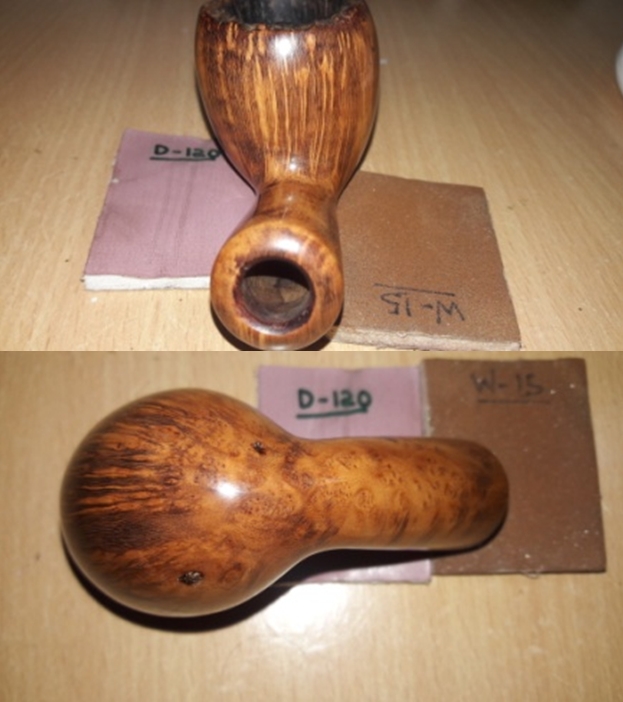
Continuing the cleaning regime, using a hard bristled tooth brush dipped in undiluted Murphy’s oil soap, I very deliberately scrubbed the surface of the stummel. I cleaned the plateau rim top with a brass wired brush. The original orange dye was also washed away to some extent. The stummel and rim top was dried using paper napkins and soft cotton cloth. The old fills are now clearly visible and appear like festering flesh wound, ugly in appearance. This will have to be addressed. I set the stummel aside to dry out naturally. 
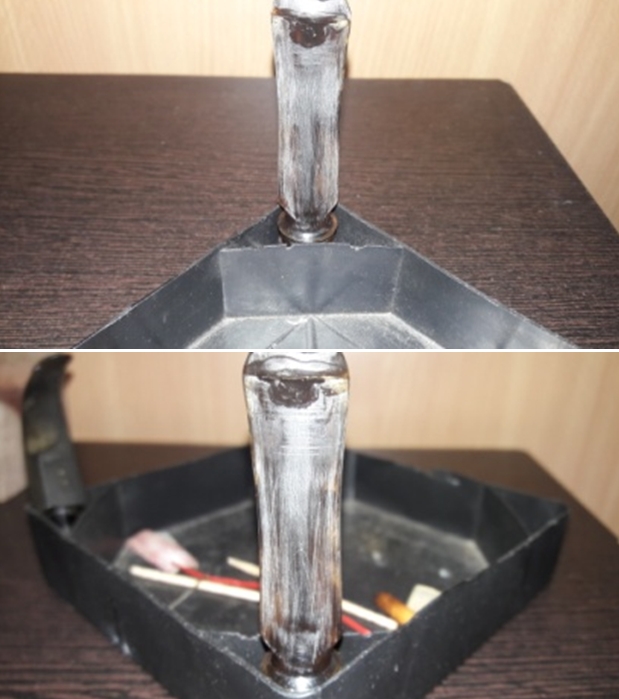
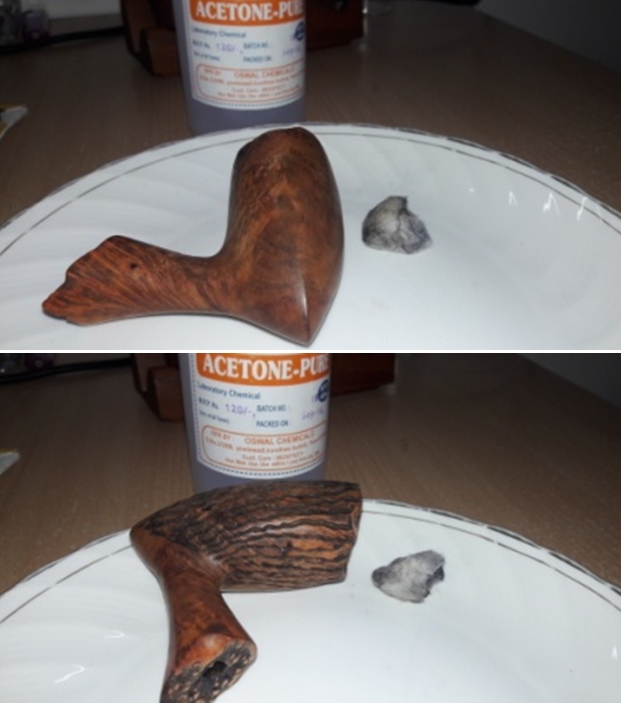
To completely eliminate the smell, I decided to resort to alcohol bath. I packed the chamber, just below the rim, with cotton balls. I stretched a cotton ball into a thick wick, tapering at one end, and inserted it in to the shank and pushed it as far inside as I could along with a regular pipe cleaner. I topped the bowl with isopropyl alcohol using a syringe. I know that it is generally a practice to use Kosher salt for this procedure, but since Kosher salt is not easily available here, and when available, it’s very expensive, I use cotton balls. I find that cotton balls work just fine in drawing out all the tars and smells from the mortise and the bowl. I topped the bowl with alcohol again after 30 minutes when the alcohol level had gone down and set it aside overnight for the cotton and alcohol to do its intended job. The next day, the cotton and alcohol had fulfilled its intended task. The pipe cleaner had also drawn out all the stain from within the mortise. I removed the cotton balls and ran pipe cleaners through the mortise to clean out all the loosened tars and gunk. The internals of the stummel is now clean and fresh and the ghost smells are history too.The stage is now set for repairs to the stummel surface. I address the fills, first by gouging out the old fills with a sharp knife and cleaning the surface with a cotton pad dipped in isopropyl alcohol. This was followed by filling these gouges with a mix of briar dust and CA superglue. I always over fill the gouges so that when I sand them down they are smooth and I can feather in the fills with the rest of the briar. I set the stummel aside to cure overnight. I would like to remind the readers that all these days, layering of the stem button with charcoal and superglue had been in progress and now I was satisfied with the thickness of the layering. Using a needle file, I sand the filling to match the surface of the stem. However, disaster struck within a few moments of filing!! The filling broke away from the intact portion of the button. It was, in all probability, due to higher content ratio of activated charcoal in the mix (though I am not convinced entirely) or could be lack of adequate curing (most likely). The bottom line remains that I had to repeat the entire layering process on the button end again…..frustrating to say the least, thus NO PICTURES OF THE DISASTER TAKEN!!
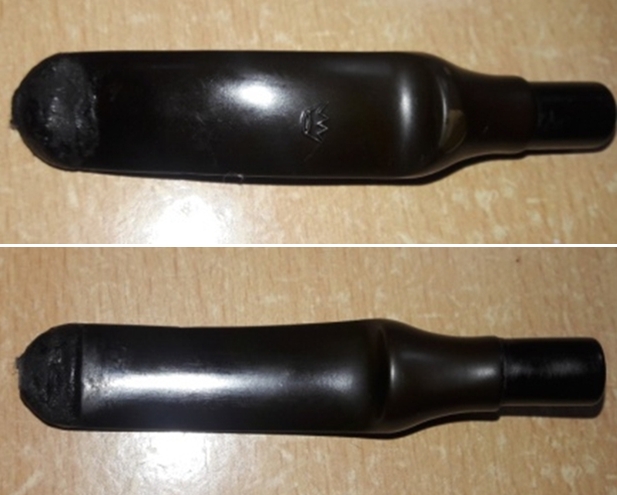
Well, what was to happen has happened!! Moving on, the stummel fills had cured and I proceeded to sand the fills with a flat head needle file and 180 and 220 grit sand papers to achieve a rough blend of the fills with the rest of the stummel.  For a better blending, I further sanded the entire stummel with 220 followed by 400 and 800 grit sand paper. This helps to reduce the sanding marks left behind by the more abrasive 220 grit paper. To bring a deep shine, I went through the complete set of micromesh pads, wet sanding with 1500 to 2400 grit pads and dry sanding with 3200 to 12000 grit pads. I wiped the stummel with a moist cloth after each wet pad. The fills are still looking ugly and somehow I have a gut feeling that this pipe is not yet done with me!! This pipe is really testing my skills and patience!! 
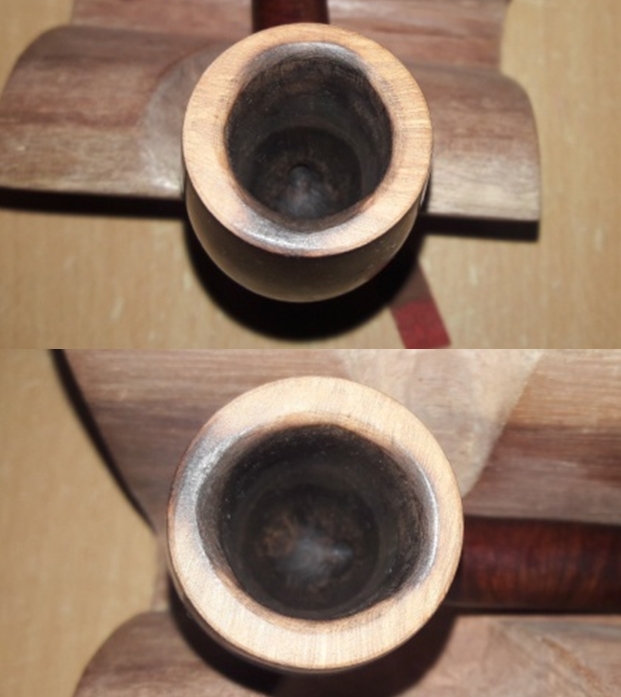
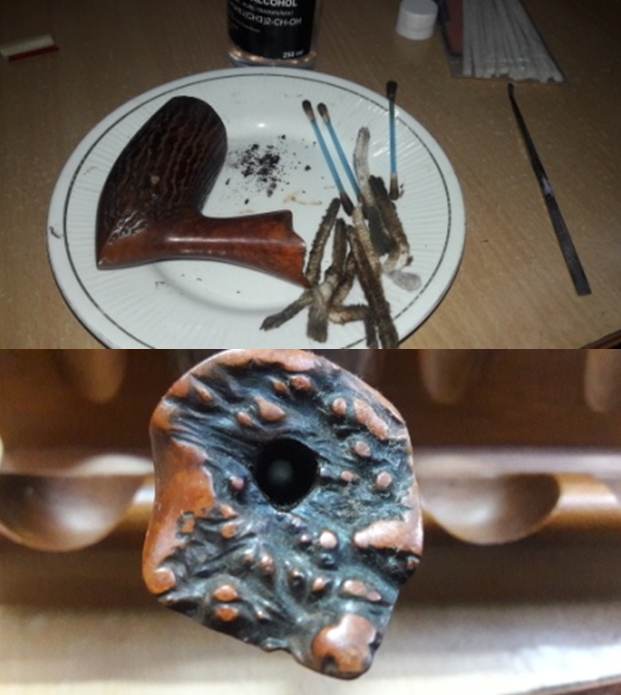
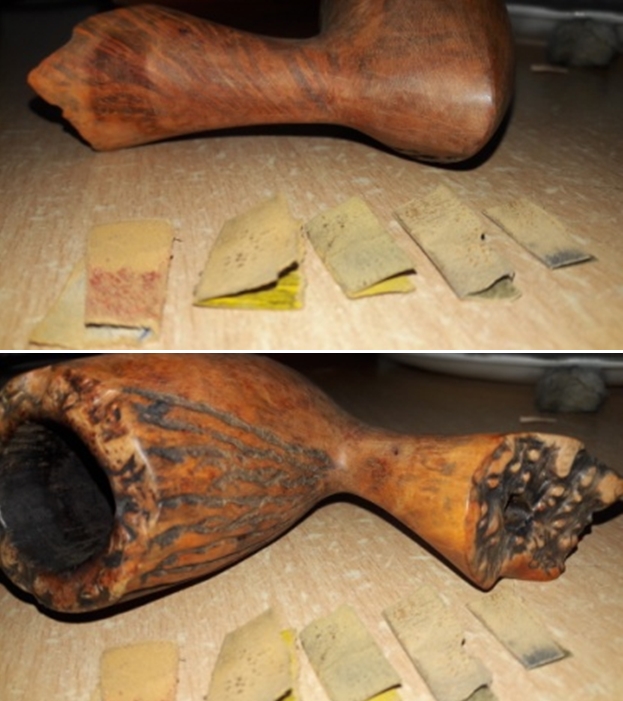
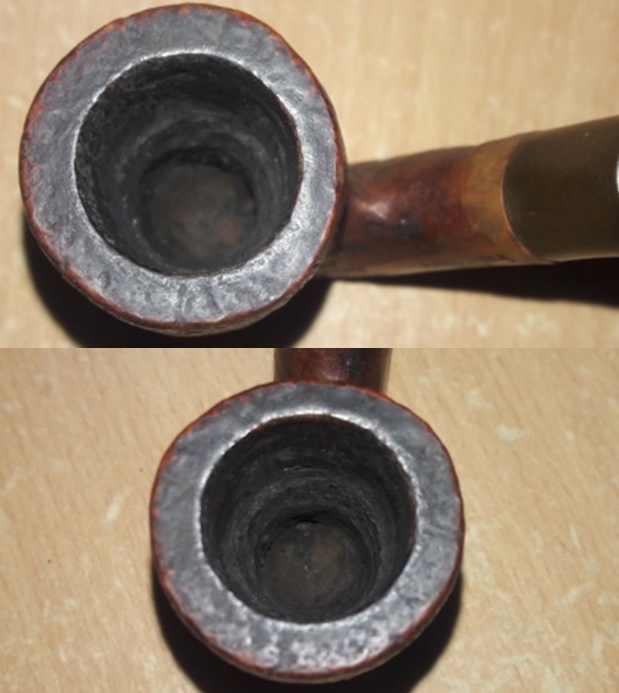
I rub a small quantity of “Before and After Restoration Balm” in to the briar with my finger tips and let it rest for a few minutes. The balm almost immediately works its magic and the briar now has a nice vibrant appearance. I further buff it with a horse hair shoe brush. This is when I observed that there are air pockets in two fills (marked in yellow circle) and the plateau rim top is still not clean! Aargh…both my faults, I know. I will address them all over again. I would like to remind the readers that all this while the layering of stem is still a work in progress!! I spot fill these air pockets with superglue and let it cure for complete two days. 
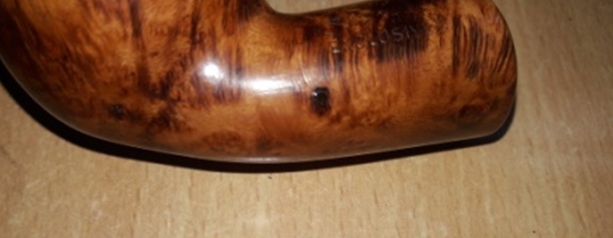
Finally, the button construction appears solid and I progress with filing with a flat head needle file and followed it up with sanding and finer shaping using 220, 320, 600 and 800 grit sand papers. I shaped the round slot by gentle use of a round needle file. I liberally rub some Extra Virgin Olive oil to rehydrate the vulcanite stem. But readers please do not rejoice just yet!! The repairs show a white edge in the repairs near the round slot indicating that the repair is not solid and likely to fall apart and also presence of the dreaded air pockets!! This pipe is just not willing to take repairs. It’s now becoming a fight of WILLS between us. 
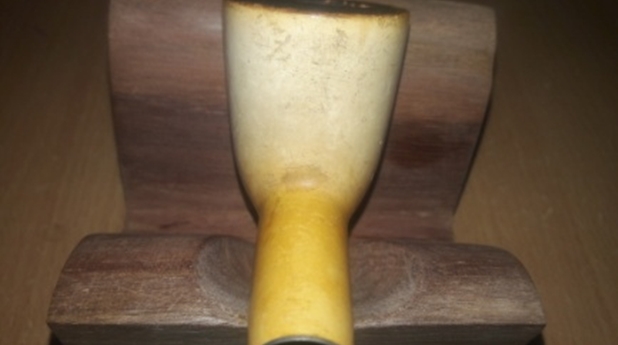
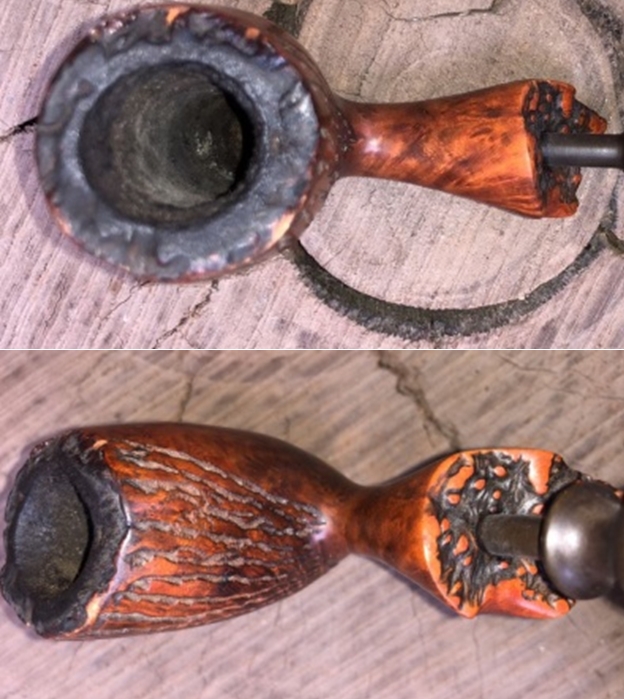
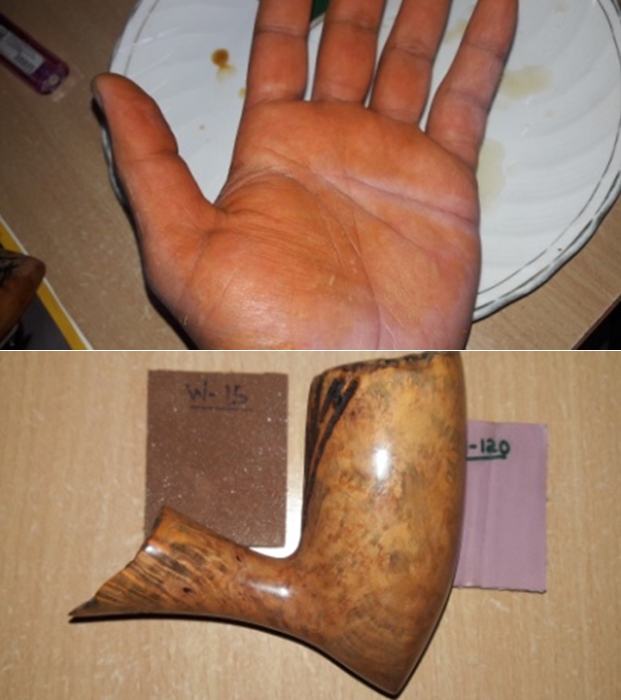
I kept up the self conviction and self confidence, which was constantly assuaged by the encouraging words of my mentor, Mr. Steve. I persisted with the repairs and filled these areas with clear superglue and keep it aside for curing. Not wanting to waste time, I picked up the stummel again and went through the complete process of filing and sanding the fills and ending with the micromesh cycle. The fills are nice, solid and even. I even cleaned up the plateau rim top by scrubbing it with a dry brass wired brush till clean. Here is the picture of the fill at this stage. Now the only thing that remains is to blend these fills with the rest of the stummel. I intend to stain it in dark brown dye.I use the powder variety of stain and mix it with 99% isopropyl alcohol. I heated the stummel surface with a heat gun and applied the stain with a folded pipe cleaner. As I paint the stummel with stain over sections at a time, I burn the dye using a Bic lighter that combusts the alcohol in the aniline dye and sets the dye pigmentation in the wood.  After fully saturating the stummel and covering the whole surface, including the plateau rim top, I set the stummel aside to rest for several hours. 
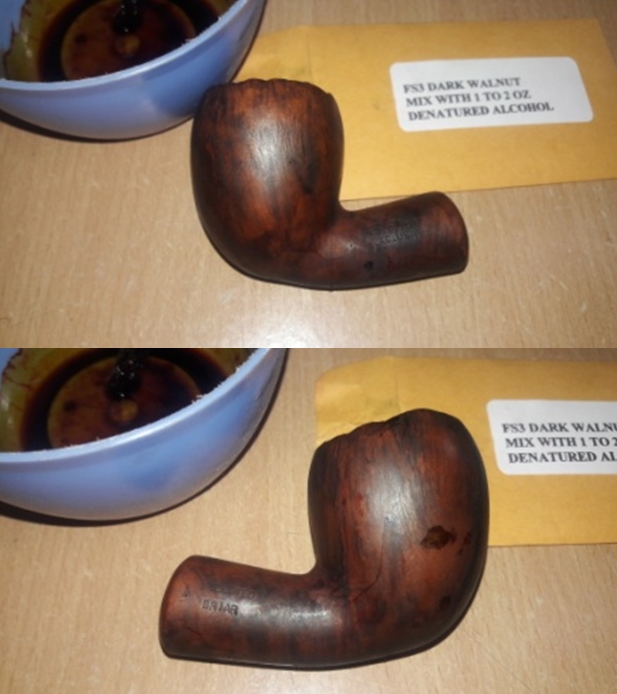
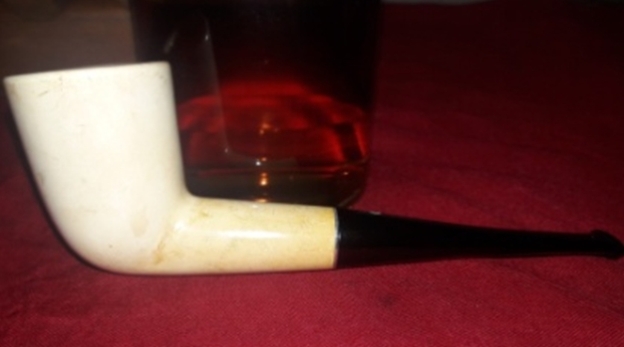
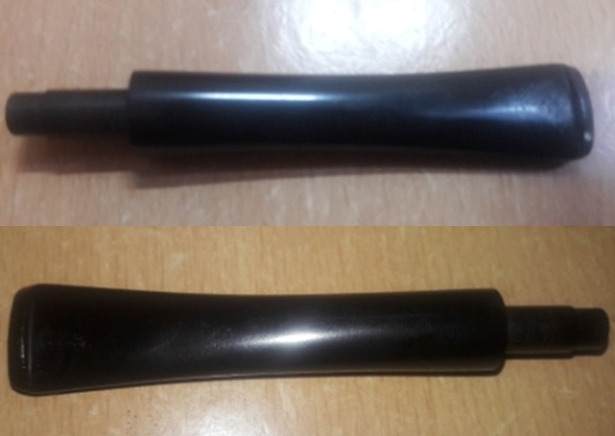
Now with the stummel surface absorbing the stain, I turn towards the stem repair again. I followed the complete regime, as previously described, till I reached the stage which required micromesh sanding to bring deep shine to the vulcanite. All looked good till this stage. I sand the entire stem with 220 followed by 400 and 800 grit sand paper. This helps to reduce the sanding marks left behind by the more abrasive 220 grit paper. To bring a deep shine, I went through the complete set of micromesh pads, wet sanding with 1500 to 2400 grit pads and dry sanding with 3200 to 12000 grit pads. I wiped the stem with alcohol after each pad and rubbed it down with Extra Virgin Olive oil. Once I was through with the micromesh cycle, this is what I saw…DO NOT LOOSE HEART, I kept reminding myself and proceed to redo the entire button repair again for… I do not even remember the number of times!!! After going through the entire stages again, these repairs turn out to be good enough. But I forgot to take pictures!!!

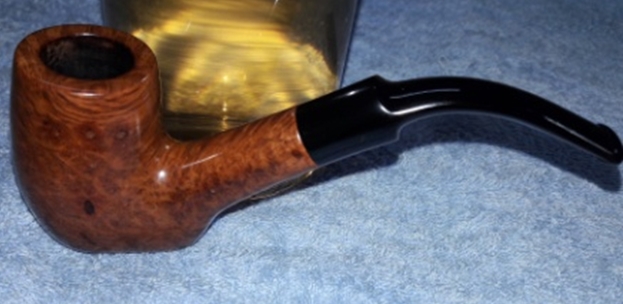
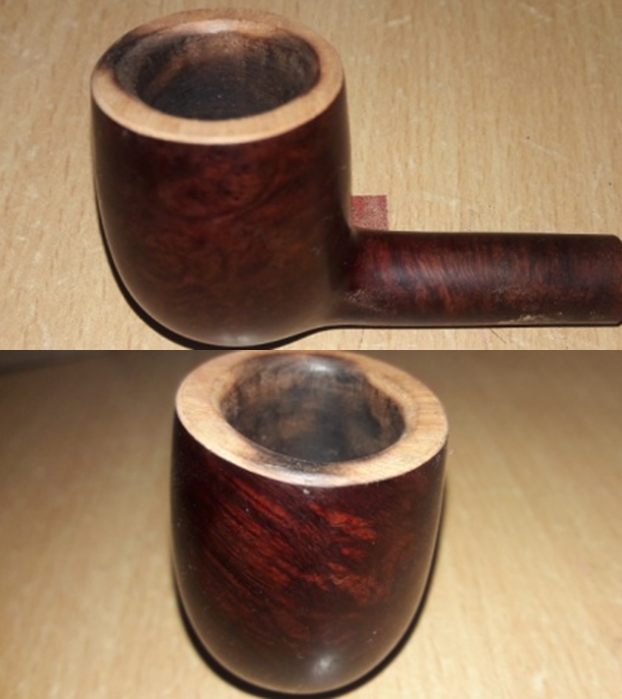
Once the stem repair was completed, I turned my attention to the stummel. The stain had set nicely. I mount a cotton cloth buffing wheel (because I do not have felt cloth buffing wheels!!) on the Dremel and set the speed at about 40% of full RPM and apply red compound to the stummel. This does help in revealing the grains gradually while masking the darker fills.

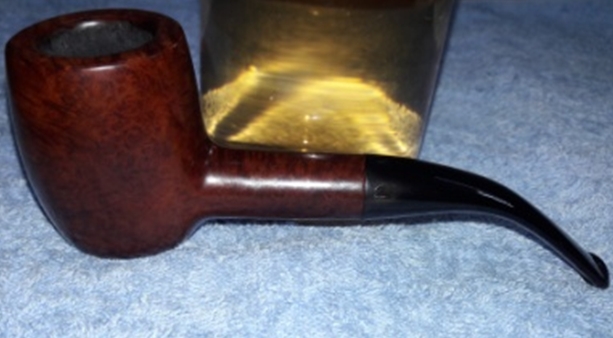
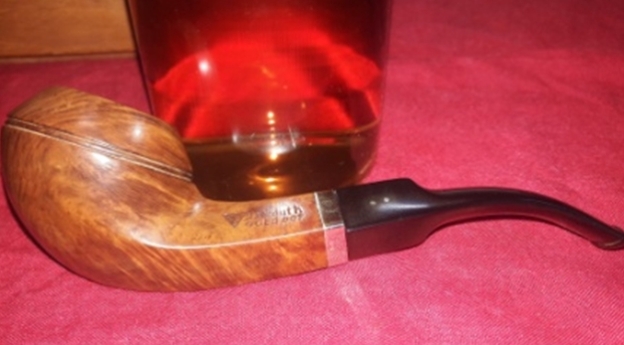
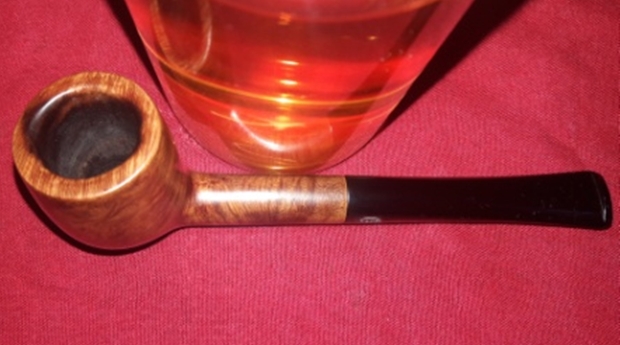
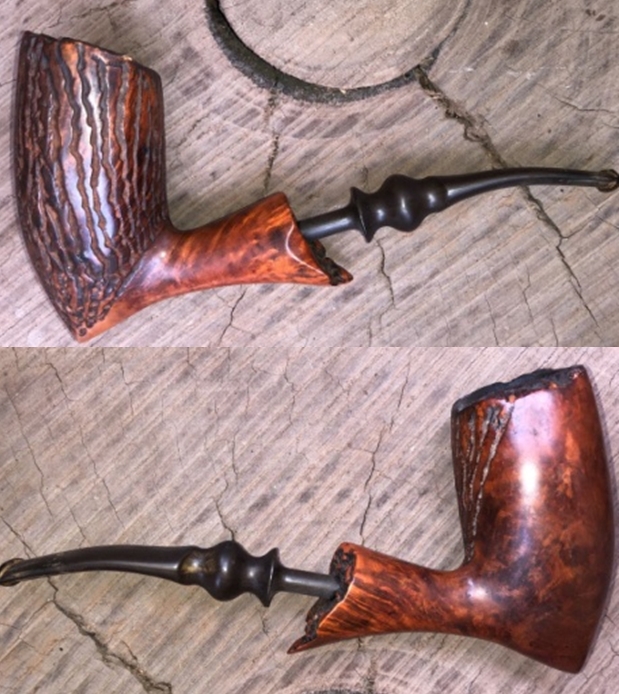
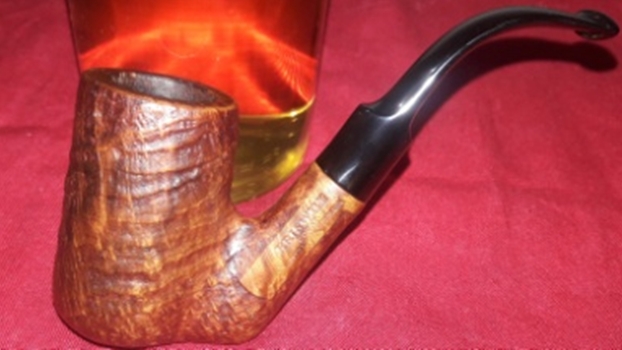
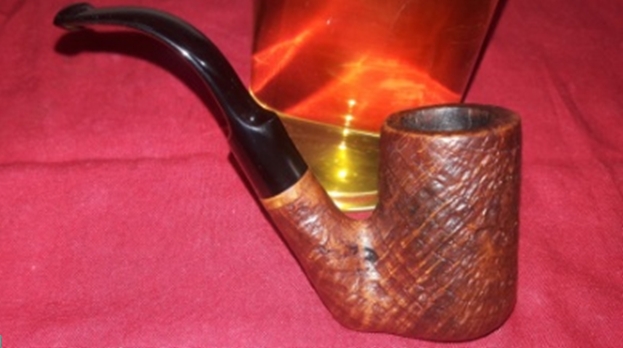
To finish, I re-attach the stem with the stummel. I mounted a cotton cloth buffing wheel to the Dremel (actually it is not the brand machine, but a local machine which is similar).  I set the speed at about half of the full power and applied White Diamond compound to the entire pipe. I wiped/ buffed the pipe with a soft cotton cloth to clear it of any leftover compound dust. I then mounted another cotton cloth wheel on to the polishing machine and applied several coats of carnauba wax. I finished the restoration by giving the entire pipe a rigorous hand buffing using a microfiber cloth to raise the shine further. The completed pipe looks lovely, fresh and vibrant; the photographs in this case, do not do justice to the appearance of this beautiful little pipe. Thank you for having the patience to reach this far while reading the write up, which I felt was boring and a drag while typing. So these thanks are well deserved for you. PS: – I agree with all who have observed that the stummel fills are still visible. I have observed it too, but no amount of stain pen usage, re-staining and polishing made any difference. Some fills just do not blend for whatever reason. An interesting definition of a Fill in glossary page on pipedia.org means: “A void, pit or flaw in the briar which is made level with the surface of the pipe with either putty or a mix of briar dust and cyanoacrylate glue and which, despite staining, is often visible on close inspection”.


Restoring a Tim West Pipe!!


Blog by Paresh Deshpande

Tim West with a couple of his pipes

This sure is going to be an embarrassing while being a challenging project. Why? It’s embarrassing because the pipe that I have decided to work on now is made by a living legendary pipe repairman and a pipe maker from USA and here I am one who has just embarked on a journey into the world of pipe restoration with minimum of equipment, materials, spares and experience!!! It’s challenging because he is very well known to my friend and mentor, Mr. Steve Laug and living up to their standards is always a huge challenge. The project that I have selected to work on is a huge freehand pipe from Tim West!!

No, this pipe did not come to me in inheritance, but was purchased on eBay about 9 months back. Boy, am I glad that I made this purchase!! It’s a huge and heavy piece of briar with beautiful straight grain all around, including on the shank, with a plateau rim top and a vulcanite shank extension in to which fits a fancy, straight vulcanite stem. It has a shiny ring insert (or so it appears) between the shank and the shank extension. The shank extension helps in breaking the monotony of the briar while easing the flow of the humongous stummel in to the stem. The pipe has minimalistic stamping with “TIM WEST” in a slight arch over “PIPE” on the left side of the shank.I was keen to know more about Tim West, the carver and repairman, his pipe making techniques and philosophy. I searched pipedia.com and there is a very nice write up on him. I reproduce snippets information available on pipedia.com from his interview in December 1995, for a quick read.

Tim made his first pipe in 1967 and went full-time as a pipe maker in 1975. Only the best quality fully cured natural Greek Briar goes into a Tim West Briar Pipe. Tim’s designer shapes are designed for eye appeal and a great smoke. All processes, step by step, are natural processes insuring a sweet cool smoke for every recipient of a Tim West Briar Pipe.

In 1980, Tim opened Tim West Pipes, a retail shop in the Ohio Center near downtown Columbus. He closed the shop in 1991 and moved the entire business to his home workshop to concentrate on wholesaling. The workshop takes up most of the basement of his house, but it isn’t very big–some tools, racks of briar blocks, cabinets full of stems and boxes of half-finished pipes. To this day, Tim believes that he is much less mechanized than most pipemakers he knows of. He does have a top turner and a frazer, but they’re not hooked up, and the top turner is his television stand.

Tim acknowledges that, as a pipemaker, he is entirely self-taught, having learned through trial and error. He believes that pipemakers who have had the chance to study pipemaking or to work with established pipemakers are lucky because ‘it just mystified me for years wondering how they did it–while I was doing it.” And though he does use some power equipment today to drill, shape, sand and buff, everything is still set up, guided and shaped by hand.

When I asked Tim about his philosophy of papermaking, he laughed for some time. We talked further about the changes in his pipemaking over the years, and he allowed as how, during his first year at Monkey’s Retreat, a good 50 percent of his pipes were sculptured (piano pipes, toilet pipes, guitar pipes, etc.) because he had lots of time and could take a week to carve a pipe for someone. It might be his only sale for a week but would still provide enough cash to keep him in business. As his popularity grew, he needed to make more pipes and thus increasingly produced smooth shapes, either freehand or standard.

The entire interview makes for a very interesting read and is a highly recommended. Here is the link to the interview: https://pipedia.org/wiki/West

INITIAL VISUAL INSPECTION
The stummel surface of this pipe boasts of beautiful straight grain all along the stummel surface as well as on the shank. The stummel surface is covered in heavy overflow of lava which in turn has attracted a lot of dust and grime and has a few dents and dings likely due to uncared for storage. The briar is dull and lifeless and has taken on a layer of aged patina, through which one can make out the beautiful grains all round. This beautiful piece of briar will definitely clean up nicely. This pipe must have been a favorite of the previous Steward (I really like this address of a pipe smoker as coined by Mr. Dal Stanton and his reasoning for calling them as ‘Steward’) and has seen considerable use as evidenced by the thick layer of cake in the chamber. The condition of the inner walls of the chamber can be ascertained only after the cake has been removed completely and taken down to bare briar. However, the bowl feels robust and solid to the touch from the outside. This issue should be a breeze to address. There is a very strong but pleasant smell in the chamber.The plateau rim top has darkened considerably, due to frequent lighting, on the back side of the rim. There is a very heavy overflow of lava on the plateau rim top and covers the surface completely. This can be seen in pictures above and below. The condition of the inner edge and rim top can be commented upon only once the rim has been cleaned. The vulcanite shank end extension is heavily oxidized and is also covered in oils and tars and grime from previous usage. The mortise does show heavy accumulation of dried oils, tars and remnants of ash, greatly restricting the air flow. The vulcanite stem on this pipe is where the maximum damage is seen. The previous Steward must have been very fond of clenching his pipes while smoking. This is apparent from the damage that is seen towards the end of the stem. The stem has significant damage in the form of deep bite marks and cinching on the upper stem surface near the edge of the lip, while the lower surface has a through hole, exposing the stem’s airway. The stem’s surface around the damaged portion has become very brittle and considerably thin. The tenon on stem is covered in dried oils and tars and so is the airway. The button end hole is completely blocked save for a small opening, greatly constricting the airflow. The air flow through the stem is laborious to say the least. The fit of this stem in to the mortise is very tight and the stem does not seat completely in to the mortise (marked in yellow circle). This issue may get addressed after the mortise and tenon have been cleaned. All in all, restoring the stem will be the biggest challenge in this project. THE PROCESS
I embarked on the journey of restoring this pipe by addressing the stem first since it was damaged the most and would take considerable time to repair. First thing to do was to clean up the external surface and the internals of the stem. Since the button hole was clogged up, I used all the tools available to me in clearing up the button hole. It was not surprising at all to see chunks of dried gunk which had accumulated in the airway coming out of the airway. Once satisfied with the internal cleaning, I wiped the external surface of the stem with a cotton pad dipped in isopropyl alcohol to get rid of all the dirt and grime accumulated over the surface. The number of pipe cleaners used does not tell the real story of how difficult it really was to get the internals of the stem cleaned up.I followed up this cleaning regime by gently removing the thin and cracked chips of vulcanite from around the damaged stem surface till I reached the solid vulcanite. I did so because I planned on anchoring the stem fill on solid surface. To begin the stem repairs, I smeared a pipe cleaner with petroleum jelly and inserted it in to the stem airway. I prepared a mix of CA superglue and activated charcoal and applied it over the gaping hole and cinched surface of the stem and set it aside for curing over night. For the discerning reader who would have noted that I did not resort to the trick of using the Bic lighter, the answer is that I was apprehensive that the heat from the flame of the Bic lighter would put additional stress on the expanding vulcanite resulting in greater damage to the stem. What followed this stage were endless hours and days spent in sanding, layering with a coat of charcoal and superglue mix and again following the same sequence till I achieved a solid fill. I am afraid that I have not taken enough pictures to show the progress as I had three beautiful pipes, all with their button end chewed off for about an inch and inch and a half, being worked on simultaneously. These projects were also proving to be very difficult and tedious.While the stem fillings were curing, I worked on the stummel. I started by reaming the chamber with size 4 head of PipNet reamer. The size of the chamber was so huge that I had to use the Kleen Reem reamer also. This is where I hit the second hurdle in the restoration of this pipe. There was a bump (circled in red) on the chamber walls that had hardened to an extent that the blades of the PipNet or Kleen Reem reamer could not cut through it. I began wondering with wrenching guts, if the bump is not a JB Weld repair. To further probe this bump, using my fabricated knife, I gouged at the corners and realized that it was not a JB Weld repair but just a very, very hard accumulation of cake.  I decided to soak the chamber in alcohol to loosen the cake. I packed a few cotton balls half way in to the chamber and soaked it in isopropyl alcohol for a few hours. A few hours later and the hardened cake came off easily. I used a 220 grit sand paper, pinched between my thumb and forefinger, to sand the inner walls of the chamber. Once I had reached the bare briar, I wiped the chamber with a cotton pad dipped in isopropyl alcohol. This removed all the residual carbon dust. However, in spite of the alcohol soak and removing all the cake, the ghosting was still all too pervading!! Hopefully after the completely choked mortise has been cleaned, the smells will also fade away to oblivion. I followed up the reaming by cleaning the mortise and air way of the pipe, using hard bristled and regular pipe cleaners, q-tips and shank brush dipped in alcohol. The mortise and the draught hole was so chock-a- block with all the dried tars, oils and gunk that I had to use my fabricated spatula and the drill bit from the Kleen Reem pipe reamer!!!! Chunks of the gunk that were removed from the mortise are a testimony to how badly this pipe was abused by the previous Steward. I gave a final clean with shank brushes dipped in alcohol and dried the mortise with a rolled paper napkin. The shank internals and the draught hole appear to be clean. But the strong ghosting still persists. I shall address this issue later by giving the chamber an alcohol bath.Before progressing any further, I had to get the stummel all cleaned up. Using a hard bristled tooth brush dipped in undiluted Murphy’s oil soap, I very deliberately scrubbed the stummel, cleaning the surface thoroughly. Special attention was paid to scrub out all the dirt, dust and lava from the crevices in the plateau rim top with a brass wired brush. The stummel and plateau rim top were dried using paper napkins and soft cotton cloth. To eliminate the ghost smells from the pipe, I had decided to treat it with salt and alcohol. I do not use Kosher salt as it is not readily available here and if available, it’s very expensive. I use cotton balls which is an at par substitute as I have realized over the last year or so. I draw out a wick from the cotton and along with a folded regular pipe cleaner; insert it in to the mortise and through the draught hole in the chamber. Thereafter, I pack the chamber with cotton balls to about quarter of an inch below the rim inner edge. I soak the cotton balls with isopropyl alcohol up to the brim. About half an hour later, the level of alcohol has gone down, having being absorbed by the cotton. I top it up once again and set it aside overnight. By next afternoon, the cotton and alcohol has drawn out all the remaining oils and tars from the chamber and mortise and the cotton and alcohol had fulfilled its intended task. I removed the cotton balls and ran pipe cleaners through the mortise to clean out all the loosened tars and gunk. My, was I surprised to see that the pipe cleaners come out all sticky, black and dirty. I persisted with the cleaning till the pipe cleaners came out clean!!!! The next set of pictures tells the story by themselves. Finally, after hours of toiling and large number of pipe cleaners, I can say that the mortise is now well and truly cleaned. Also the ghosting is now consigned to history.Now that the internals of the stummel are clean, I work the external surface. I sand the vulcanite shank extension with 220 and follow it up with 320 and 600 grit sand papers and got rid of all the oxidation. I wanted to further highlight the grain seen on the stummel. To achieve this aim, I sand down the stummel using micromesh pads, wet sanding with 1500 to 2400 grit pads and dry sanding with 3200 to 12000 grit pads. The stummel now has a deep shine with grains popping out with magnificent contrast. Though this part of restoration is the second most time consuming and laborious, the end results are also the most satisfying. The play of grains, the contrast and the smooth surface are well worth the efforts. I rub a small quantity of Extra Virgin Olive oil in to the shank extension and set the stummel aside for the oil to be absorbed by the vulcanite shank extension. I rub a small quantity of “Before and After Restoration Balm” in to briar and let it rest for a few minutes. I took some extra efforts to work the balm in to the plateau rim top of the bowl. The balm almost immediately works its magic and the briar now has a nice vibrant appearance. I further buff it with a horse hair shoe brush. With the stummel nice and clean and attractive, I worked the stem of the pipe. The fill on the stem had cured nicely and I sand it down with a flat head needle file. I sharpened the lip edges using a needle file and sand the entire stem with 220 followed by 400, 800 and 1000 grit sand paper. This helps to reduce the sanding marks left behind by the more abrasive 220 grit paper. To bring a deep shine to the vulcanite stem and the tenon, I went through the complete set of micromesh pads, wet sanding with 1500 to 2400 grit pads and dry sanding with 3200 to 12000 grit pads. I wiped the stem with alcohol after each pad and rubbed it down with Extra Virgin Olive oil. The pictures of the final results are shown below. What is not stated and pictured here is the fact that the fills on this stem had caved in thrice and that many times I had to rebuild it from the scratch. Every time I tried to match the fill to the surrounding surface, the fill area would get thinned out and break apart. In the end, I left the fill slightly higher than the rest of the surface and was better masked during the micromesh cycle. At this point, I check for the seating of the tenon inside the mortise the find that the stem sits flushed in the mortise. To finish, I re-attach the stem with the stummel. I mount a cotton cloth buffing wheel on to my local machine which is similar to a Dremel.  I set the speed at about half of the full power and applied White Diamond compound to each of the three pipes. I wiped/ buffed the pipe with a soft cotton cloth to clear it of any leftover compound dust. I then mounted another cotton cloth wheel on to the polishing machine and applied several coats of carnauba wax over the stummel and the stem of the pipe. I finished the restoration by giving the pipe a rigorous hand buffing using a microfiber cloth to raise the shine further. The completed pipe, with the dark brown hues of the stummel contrasting with the shiny black shank extension and stem, looks lovely, fresh and vibrant; the photographs speak for themselves. The beauty, size and shapes of this pipe make it one of my favorites and will find a place of pride in my modest collection. If only the pipe could tell some of the stories and techniques used by Mr. Tim West while carving pipes….Cheers!!


Restoring a Unique “House of Lords” Sitter


Blog by Paresh Deshpande

I am pretty angry and frustrated at myself!!!!! That’s a very strong and confusing sentiment against oneself, I admit. But that’s the truth. Let me explain.

I spent nearly two weeks working on three pipes; a Dunhill Bruyere, a Tim West Freehand and a Stefano Exclusive. These three had their lip end of the stem either chewed off for about an inch and a half or a through and through hole!!! It could be considered as a major stem repair project. I successfully rebuild the stem end, including the button, lip edges and the slot. Though, I was unable to shape the slot as perfectly as I would have liked on the Dunhill, the repair was perfect on the Tim West and the Stefano. I felt elated and supremely confident about my capabilities. The blending of the repairs appeared spot on and I blazed through the remaining restoration, clicking pictures of the progress without giving them a second look. When, at the end, I went through the pictures while doing the write up, to my horror, the repaired stem and stummel stared back at me with all their imperfections on display in form of scratches, brownish spots of oxidation and fillings showing through the stain!! This was embarrassing for me and I shared these images with Mr. Steve. In his characteristic method of pointing out my short comings, I shall quote his reply to me, “Takes lots of work… I am having a little trouble with that lately…. Trying to rush it. Pipe looks good”, unquote!! Readers of rebornpipes and those who know him would be smiling while reading this part. Well, to cut the banter short, I shall rework all these short comings later as I want to start on a fresh pipe!!

The pipe on my work table, from my inherited collection, is one large barrel shaped full bent (this aspect needs to be confirmed and will be cleared as we progress further) sitter with beautiful and very tightly packed birds’ eye grain on either side of the bowl and shank, extending over to more than half of the front of the stummel. Equally tightly packed cross grain are seen on the front left and back of the bowl and also on the upper and bottom surface of the shank. It is stamped on the left side of the shank as “HOUSE OF LORDS” over “MADE IN ENGLAND” in block capital letters. The right side of the shank bears the numeral “275”, probably the shape code, towards the bowl shank junction. The vulcanite saddle stem bears the Crown logo stamped on the left of the round stem. The stem logo and the shape code are slightly worn off. I have included a picture of the stem logo from pipephil.eu to show how it appears on this stem.To know more about the brand, the lines offered by the maker and attempt to date this pipe, I visited pipedia.org, which has wealth of information on almost all pipes. The only information available here was that this brand was by Samuel Gordon in the early 20th century and thereafter became a Sasieni second. My next go to site is pipephil.eu where the stampings and stem logos on a pipe are used for brand information and to date a pipe. Here is the link for information on the pipe currently on my work table:-

www.pipephil.eu/logos/en/logo-h3.html#houseoflords

This site also pointed to the same information gleaned from pipedia.org. Here is what was found on pipephil.eu.

Brand from Samuel Gordon. Maybe a Sasieni second (J.M. Lopes, op. cit.)

I further followed the link to “Gordon” and learned that Samuel Gordon had founded the brand “GORDON” in 1910-20 eras. This is the link for Gordon brand of pipes; www.pipephil.eu/logos/en/logo-g4.html#gordon

From the above information, it is assumed that this piece is from the early 20th century period. Wow!!!! This is really an old pipe. The pipe brands and its vintage, those that are in my grandfather’s collection, never cease to amaze me and there are some really collectible pipes that I have inherited.

INITIAL VISUAL INSPECTION

The chamber shows a nice even build up of a cake which makes it difficult to comment on the condition of the inner walls of the chamber. However, the general appearance of the stummel makes me believe that there will not be any major issues with the chamber walls. The rim top is clean with no overflow of lava and this is a big surprise coming from my inherited collection!! The chamber is out of round with the inner rim edges showing charring at 3 o’clock and 9 o’clock direction. It appears that this charred area of the inner edge was tried to get rid off in an amateurish way. The outer rim is also damaged and has a few chips and dents to the front, probably caused due to hitting the bowl against a hard surface to remove the dottle!! All in all, I would say that this was one of the few well cared for pipes from his collection!!The surface of the stummel is covered in dirt and grime accumulated over a period of time. The stummel surface is peppered with numerous dents and dings, more so towards the front of the bowl, probably caused due to careless and uncared for storage for the last 40-45 years and equal number of years of previous usage!!!! It will be a big decision whether to address these dents and dings by abrasive sanding method and loose the patina which has developed on the surface, or let them be. Well, I shall cross the bridge when I reach it. The mortise appears to be either clogged or has some obstruction as air flow through it is hard and laborious. The vulcanite stem is heavily oxidized. Some light tooth chatter is seen on both surfaces of the stem towards the lip. This issue should not be a major headache to address. The lip edge on both sides is crisp but lightly damaged. The quality of vulcanite is good.The thing that struck me odd was the bend on the stem. It was bent way too much than the normal. When I shared the pictures of this pipe with Mr. Steve, he too found the angle of the bend too rakish and very odd, to the extent that he felt it might not even be correct for the pipe. However, the stem logo confirmed otherwise. So, I am confronted with the controversial prospect between “PRESERVATION” and “RESTORATION”!! While I do not have as clear a mandate as Mr. Steve had, managing this conflict, for me, is more challenging. To me, this inheritance is a family heirloom and in this particular instance, I would rather maintain this profile instead of straightening it. Mr. Steve gave me a second perspective that the stem was bent during storage due to intense heat which is prevalent in India and may not be original as my grandfather had smoked!! Well, this could be true. The inner conflict continued while I proceed to clean and spruce up the pipe to its pristine condition (or at least make a sincere attempt at it)

THE PROCESS
I reamed the chamber with my fabricated knife and scraped out all the cake. With a folded piece of 180 grit sandpaper, I further sand out the last traces of remaining cake and expose the walls of the chamber. There are some very minor and insignificant webs of line on the chamber walls that can be seen to the front and above the drought hole. I wiped the chamber with a cotton pad dipped in isopropyl alcohol to remove the carbon dust left behind by all the reaming and sanding process. I gently scraped the rim top surface with a sharp knife to remove the lava overflow. Using the same knife, I gently scrapped out the charred briar from the inner rim edge till I reached solid wood. The following pictures show the inner rim edge after the removal of the charred wood from the 3 o’clock and 9 o’clock direction. Also seen is the earlier amateurish attempt at addressing the issue of out of round bowl. I shall address this issue by creating a bevel to inner edge. This was followed by cleaning the mortise with cue tips, pipe cleaners and shank brush dipped in isopropyl alcohol. With my fabricated spatula shaped knife, I scrapped out the dried oils and tars from the mortise. My, there were chunks of gunk in there and can be seen in the following pictures!! Finally after some diligent cleaning, the mortise is clean and this further completely eliminated traces of old smells from previous usage.The internals of the stummel is now clean and fresh. Now, it was the turn of the stummel to get cleaned up. Using a hard bristled tooth brush dipped in undiluted Murphy’s oil soap, I very deliberately scrubbed the surface of the stummel. I cleaned the rim too. The stummel and rim top was dried using paper napkins and soft cotton cloth. I am not very happy the way the rim top appears at this stage with all the charring and uneven inner and outer rim edges. This needs to be addressed. I set the stummel aside to dry out naturally. After cleaning the rim top with Murphy’s oil soap, the inner edge damage was even more evident, and begged to be addressed before I proceed any further. I topped the rim on a 220 followed by 320 and 600 grit sand paper, checking frequently till I was satisfied that the charred surface was greatly reduced. The inner edge is still uneven, though much better than before topping. With a folded piece of 180 grit sand paper pinched between my thumb and fore finger, I created a bevel on the inner edge. This addressed the issue of uneven and out of round inner edge. A couple of dents and chips are also seen to the outer rim edge and one (circled in red) in the newly created inner edge bevel. There were a few slightly deeper chips on the stummel surface. I gouged out the old and dried wood from these dents from the front of the stummel, inner rim edge and the heel and spot filled it with a mix of CA superglue and briar dust (believe you me gentlemen, making and thereafter applying this mix to fill the pits is not as easy as it appears!!!!!! The moment superglue comes into contact with the briar dust; it hardens even before you can blink. Maybe there is an issue with the glue that is available to me here, coupled with the prevailing climatic conditions or maybe one Mr. Dal Stanton could help!!). I always over fill the holes so that when I sand them down they are smooth and I can feather in the fills with the rest of the briar. I set the stummel aside to cure overnight. I had applied this mix of superglue and briar dust to the inner rim edge as it would not be coming in direct contact with heat from the burning tobacco leading to health issues. While the stummel was drying, I worked the stem. I covered the stampings on the stem with whitener using a whitener pen. I flamed the stem surface of the stem with a Bic lighter to raise the tooth indentations and scratches on the stem. The heat from the flame of Bic lighter causes the vulcanite to expand and regain its natural shape, reducing the marks. Using a needle file, I sharpened the lip edges. For a better blending, I further sanded the entire stem with 220 followed by 600, 400 and 800 grit sand paper. This helps to reduce the sanding marks left behind by the more abrasive 220 grit paper. To bring a deep shine to the vulcanite stem, I went through the complete set of micromesh pads, wet sanding with 1500 to 2400 grit pads and dry sanding with 3200 to 12000 grit pads. I wiped the stem with alcohol after each pad and rubbed it down with Extra Virgin Olive oil. The internals of the stem was cleaned out using alcohol and pipe cleaners. The finished stem is shown below. By the time I had worked on the stem, the fills on the stummel surface had completely cured. I sanded the fills using a flat head needle file and checked to see if I had missed any spots. I wanted the entire surface smooth to the touch. I sanded the spots down and blended them into the bowl surface using a folded 220 grit sand paper. I followed this step by sanding the entire stummel with a 220 grit sand paper followed by 600 and 800 grit sand papers. Once that was done I wiped the bowl down with a cotton cloth dampened with Isopropyl alcohol to remove any remaining dust. I wet sand the stummel with 1500 to 2400 grit pads and follow it up by dry sanding with 3200 to 12000 grit pads. Once I was through with the micromesh pad sanding, the fills showed in complete contrast with the rest of the stummel, as can be seen in the pictures below. I hope they will blend in better once I apply the balm and buff the stummel. I rub a small quantity of “Before and After Restoration Balm” in to briar and let it rest for a few minutes. The balm almost immediately works its magic and the briar now has a nice vibrant appearance. I further buff it with a horse hair shoe brush. The stummel, at this point in restoration, looks beautiful save for the fills which can still be seen in all their awfulness. To address this, I have the option to stain the stummel with a dark brown stain or I let it be as a being part of its journey thus far!! Thus, another conflict has been added to the existing one regarding the stem. I shall think about it once I reach that point in restoration. Before I proceed to final stage of polishing and applying carnauba wax coats, I want to address the superficial and insignificantly thin lines in the chamber as a precautionary measure. I mix activated charcoal and yogurt to the consistency of a thick porridge, not runny while being pliable. Inserting a folded pipe cleaner into the mortise till it peeps out of the draught hole, I apply an even coat of this mixture to the inner walls of the chamber with a modified bamboo frond and set it aside to dry out overnight. The next evening, the coat has completely dried out and is hard. Using a piece of folded 220 grit sand paper, I lightly run it over the coating to a smooth finish. I had a long look at the dark fills against the rest of the stummel and did not like it. I made a decision to stain the stummel in dark walnut stain. I use the powder variety of stain and mix it with 99% isopropyl alcohol. I heated the stummel surface with a heat gun and applied the stain with a folded pipe cleaner. As I paint the stummel with stain over sections at a time, I burn the dye using a Bic lighter that combusts the alcohol in the aniline dye and sets the dye pigmentation in the wood.  After fully saturating the stummel and covering the whole surface, I set the stummel aside to rest for several hours. Once the stain had set, I mount a cotton cloth buffing wheel on the Dremel and set the speed at about 40% full strength and apply red compound to the stummel. This does help in revealing the grains gradually while masking the darker fills. To finish, I re-attach the stem with the stummel. I mounted a cotton cloth buffing wheel to a locally manufactured machine which is similar Dremel.  I set the speed at about half of the full power and applied White Diamond compound to the entire pipe. I wiped/ buffed the pipe with a soft cotton cloth to clear it of any leftover compound dust. I then mounted another cotton cloth wheel on to the polishing machine and applied several coats of carnauba wax. I finished the restoration by giving the entire pipe a rigorous hand buffing using a microfiber cloth to raise the shine further.

The completed pipe looks lovely, fresh and vibrant; the photographs in this case, do not do justice to the appearance of this beautiful large barrel-shaped pipe. Thank you for having the patience to reach this far while reading the write up. And as usual, I request all those readers to please leave a comment as it will help me to improve further and hone my skills. PS: After the pipe restoration was completed, nearly 15 days later my guide and mentor, Mr. Steve casually asked me if I had decided to straighten the stem. This set me thinking that here is a gentleman who is still thinking about the bent stem and that he is still doing so as he is convinced that a straight stem would look nicer on the pipe and would be original to the pipe. This convinced me to re-straighten the stem to its original. I place a fluffy pipe cleaner through the airway to prevent it from collapsing due to heating and with a heat gun; I heat the stem till it is pliable and straighten out the stem just by eyeballing the shape till satisfied. Here are a few pictures after the stem was straightened. Yes, there are a few minor issues which is a direct result of the process like the alignment of the shank end with the tenon end and slight dullness in the shiny stem etc, but they will be addressed subsequently. The overall appearance of the pipe is much better and the shank flow into the stem is more fluid and even. Thanks Mr. Steve!!


Restoring a “Naturel” Bent Sitter


Blog by Paresh Deshpande

The next pipe on my work table is a beautifully grained sitter with a nice feel in hand and light weight to boot, with a fantastic balance when clenched (though I do not like to clench). This pipe has been with me for a very long time, awaiting its turn for restoration, in fact for so long that now I do not even remember how it ended up with me!! It’s definitely not from my inherited collection.

If anyone loves a briar pipe with tightly packed, distinct and beautiful bird’s eye grain at all, then this sitter will definitely attract such a smoker. It has lovely bird’s eye grains on either side of the bowl, extending towards the front from either sides but not quite joining. On the front part of the bowl and towards the rear, densely packed cross grain adds to the visual appeal of the stummel. The cross grain on the back of the bowl continues on to the top half and left bottom portion of the shank while the cross grain in the front extends to the bottom of the heel. I believe the following pictures will do far greater justice to the stummel visually than my limited descriptive powers!! This is one beautifully carved pipe where it appears that the grains dictated the end shape of the pipe and that the carver has done great justice to this beautiful art of nature!!!! It is stamped on the left of the shank as “NATUREL” while the right is stamped as “MADE IN LONDON” over “ENGLAND”. At the bottom surface of the shank, near the shank end, is stamped the numeral “300”, which could be the shape code. All my sincere and untiring efforts to search for information on this pipe have come to a naught. Any help to unravel the mysteries surrounding this pipe and pipe maker is welcome and would be highly appreciated.

INITIAL VISUAL INSPECTION
The chamber shows a nice even build up of a thick cake which makes it difficult to comment on the condition of the inner walls of the chamber. There is a light overflow of lava over the rim top. The inner rim edge of the rim has a number of minor dents which could easily be addressed by creating a slight bevel. The outer rim too has numerous dents and dings all around its circumference. The rim top also had an uneven surface, probably caused by negligent handling of the pipe by the previous owner.The surface of the stummel is covered in dust and grime giving it a dull and lackluster appearance. The stummel surface is peppered with numerous dents, dings and a couple of marks akin to a road rash, probably caused by rubbing against a hard surface during storage. There is one fill in the stummel on the left side. There are a number of small mysterious spots on the left and front side on the stummel. These spots are definitely not fills and neither are they water marks!!!! I shall try to learn more about these mysterious spots as I progress during the restoration. The mortise is surprisingly clean and air flow through it is open and full. The vulcanite saddle bent stem has an aluminum ridged stinger. Heavy tooth chatter is seen on both surfaces of the stem towards the lip with comparatively lighter bite marks on the upper surface. This issue should not be a major headache to address. The lip edge on both sides is crisp but lightly damage. The saddle portion of the stem has gouges on the left side and how did it get there? It’s a mystery!!!!! The finned torpedo shell shaped stinger is dirty and would need a thorough cleaning. The quality of vulcanite is good and should turn out beautifully.THE PROCESS
I reamed the chamber with size 1 PipNet reamer head. To reach the areas where the PipNet reamer could not reach to remove the carbon cake, I used my smaller fabricated knife and scraped out all the remaining cake. I further used a folded piece of 180 grit sand paper to sand out the last traces of remaining cake and expose the walls of the chamber to ascertain that there are no cracks/ heat fissures, and there were none. I wiped the chamber with a cotton pad dipped in isopropyl alcohol to remove the carbon dust left behind by all the reaming and sanding process. The walls of the chamber were solid with no damage. I gently scraped the rim top surface with a sharp knife to remove the lava overflow. This was followed by cleaning the mortise with cue tips and pipe cleaners dipped in isopropyl alcohol. I scraped out the now moistened gunk in the mortise with my fabricated spatula and followed it up with a second round of cleaning with pipe cleaners. This further eliminated traces of old smells from previous usage. However, the dents and dings to the rim top surface and edges are now clearly exposed. The internals of the stummel are now clean and fresh. Now, it was the turn of the external surface of the stummel to get cleaned up. Using a hard bristled tooth brush dipped in undiluted Murphy’s Oil Soap, I very deliberately scrubbed the surface of the stummel. I cleaned the rim too. The stummel and rim top was dried using paper napkins and soft cotton cloth. I am not very happy the way the rim top appears at this stage with all the dents, dings and uneven inner and outer rim edges. This will need to be addressed. But now that the stummel surface is nice and clean, the beautiful bird’s eye and cross grains on the stummel present themselves in all their glory. Can’t wait to see the grains in their resplendent beauty once I am done with final polishing and buffing!! After cleaning the rim top with Murphy’s oil soap, I had observed that the rim top surface, outer and the inner rim edge was uneven, presenting a very sorry appearance. I topped the rim on a 220 grit sand paper, checking frequently till I was satisfied that the uneven surface is completely addressed. The inner and outer rim edge is still uneven, though much better than before topping. Using a folded piece of 220 grit sand paper pinched between my thumb and fore finger, I shaped a light bevel on the inner edge and a slightly prominent bevel on the outer rim edge. I was careful while shaping the outer bevel as I did not want to greatly alter the overall shape of the pipe. The rim surface and both edges now look pristine. Subjecting the rim top and edges to a regime of micromesh pad polish will further enhance the finish and help in blending the bevel with overall shape of the stummel. Next, I decided to address the dents, dings, road rash marks, mystery spots and one fill on the stummel surface. As I have remarked earlier, the mystery spots were indeed baffling. I tried to erase them by spot cleaning these blemishes using acetone followed by alcohol and finally by sanding the stummel with sand paper, but to no avail. These buggers appear to keep winking at me mischievously!!!!! I turned to my mentor, Mr. Steve and shared pictures of these spots and tricks employed (though unsuccessfully at that) to address them. These spots baffled him too. He thought over it, researched and suggested that these could be “Root nodules”. This seemed a plausible explanation. My research on root nodules says that these are found on the roots of plants, primarily legumes that form a symbiosis with nitrogen-fixing bacteria, rhizobia. It is known that this process has evolved multiple times within the legumes, as well as in other species found within the Rosid clade (flowering plant species) and Erica arboria (briar wood) is a flowering plant which falls within the Rosid clade. Thus, these spots are most likely root nodules which have developed in this piece of briar and there is nothing that can be done to eliminate these spots. You cannot fight nature’s mysteries!!

With the mystery of the spots resolved, I proceed to refreshing the fill and addressing the road rash. I reduced the road rash by sanding and removed the old fill. I trowel a mix of briar dust and superglue in to this gouge and over the road rash marks and set it aside to cure. I overfill the gouges as it helps in subsequent blending of these fills with the rest of the stummel during the sanding process.While the fills were curing, I worked the stem. Using a Bic lighter, I flamed both the surfaces of the stem. The heat from the flame helps the vulcanite to rise to the surface and in the process addresses to a great extent all the issues of tooth chatter. I followed it by reshaping the lip edges with a flat needle file. I further sand the entire stem with 220 followed by 400, 600 and 800 grit sand paper. This helps to reduce the sanding marks left behind by the more abrasive 220 grit paper. To bring a deep shine to the vulcanite stem, I went through the complete set of micromesh pads, wet sanding with 1500 to 2400 grit pads and dry sanding with 3200 to 12000 grit pads. I wiped the stem with alcohol after each wet pad and rubbed it down with Extra Virgin Olive oil. The internals of the stem was cleaned out using alcohol and pipe cleaners. The fills had hardened by the next day and with a flat head needle file I proceeded to sand the fills to a rough match with the rest of the stummel. Further blending of the fills was achieved by sanding the entire stummel with 220, 320, 600 and 800 grit sand papers. I am pretty satisfied with the appearance of the fill and stummel at this stage.At this stage my aim was to bring a deep shine to the briar and highlight the lovely grain which is what had attracted me to this pipe in the first place. I wet sand the stummel with 1500 to 2400 grit pads and follow it up by dry sanding with 3200 to 12000 grit pads. I had wiped the stummel with a moist cloth after every wet sanding pad as it gives me an idea of progress being made. Save for the dark spot of the fill, the stummel now looks amazing with all the bird’s eye grain and cross grain peeking out of every inch of the stummel!! And this brings me to a difficult decision; should I stain it or let it be? I decide not to stain the stummel as it would take away the natural look of the briar while suppressing the appearance of the grain. Here is how the stummel looks at this point in restoration. I rub a small quantity of “Before and After Restoration Balm” in to briar and let it rest for a few minutes. The balm almost immediately works its magic and the briar now has a nice vibrant appearance. The balm works to rehydrate and revitalize the briar. I further buff it with a horse hair shoe brush to bring a deeper shine to the stummel. To finish, I re-attach the stem with the stummel. I mount a cotton cloth buffing wheel to the Dremel (actually it is not the brand machine, but a local machine which is similar).  I set the speed at about half of the full power and applied White Diamond compound to the entire pipe. I wiped/ buffed the pipe with a soft cotton cloth to clear it of any leftover compound dust. I then mounted another cotton cloth wheel on to the polishing machine and applied several coats of carnauba wax. I finished the restoration by giving the entire pipe a rigorous hand buffing using a microfiber cloth to raise the shine further. The completed pipe looks lovely, fresh and vibrant; the photographs in this case, do not do justice to the appearance of this beautiful pipe. Thank you for having the patience to reach this far while reading the write up.

Sprucing up the first of my WDC; a Demuth Gold Dot #77 Bulldog


Blog by Paresh Deshpande

There a quite a few WDCs that I have inherited from my old man and the one on my table now is a “Demuth, Gold Dot”. I love the classic Bulldog and Rhodesian shape in pipes and am naturally attracted to pipes with this shape. Thus, no surprise here that I chose to work on this WDC Demuth Gold Dot in a classic Bulldog shape!!

This is the first WDC from my grandfather’s collection, a smooth Gold Dot in an impressive Bulldog shape. The beautiful straight grain follow a circular pattern on the right and front of the bowl while linear pattern adorns the left side of the bowl and along the diamond shank, neatly divided by the spine on either side. The shank is stamped on the left with the trademark inverted equilateral triangle with letters “WDC” enclosed in it. This is followed by “Demuth” over “GOLD DOT” in block capital letters. On the right, the shank is stamped “IMPORTED” over “BRIAR ROOT” followed by the shape number “77” towards the bowl and shank joint. A half inch thick gold band adorns the shank end and is stamped on the left with the trademark WDC triangle over “14 K”, indicating the purity of the gold band. The ¾ bent saddle stem has two gold filled dots in the center of the saddle portion of the stem on the left side. I searched pipedia.com for more information on this pipe and attempt at estimating the vintage of this pipe. Here is what I have found on pipedia:-

William Demuth. (Wilhelm C. Demuth, 1835-1911), a native of Germany, entered the United States at the age of 16 as a penniless immigrant. After a series of odd jobs he found work as a clerk in the import business of a tobacco tradesman in New York City. In 1862 William established his own company. The William Demuth Company specialized in pipes, smoker’s requisites, cigar-store figures, canes and other carved objects.

The Demuth Company is probably well known for the famous trademark, WDC in an inverted equilateral triangle. William commissioned the figurative meerschaum Presidential series, 29 precision-carved likenesses of John Adams, the second president of the United States (1797-1801) to Herbert Hoover, the 30th president (1929-1933), and “Columbus Landing in America,” a 32-inch-long centennial meerschaum masterpiece that took two years to complete and was exhibited at the World’s Columbian Exposition in Chicago in 1893.

The Presidential series was the result of Demuth’s friendship with President James A. Garfield, a connoisseur of meerschaum pipes. Demuth presented two pipes to Garfield at his inauguration in 1881, one in his likeness, the other in the likeness of the President’s wife. Later, Demuth arranged for another figurative matching the others to be added to the collection as each new president acceded to the White House, terminating with President Hoover.

In early 1937, the City of New York notified S.M. Frank & Co. of their intent to take by eminent domain, part of the land on which the companies pipe factory was located. This was being done to widen two of the adjacent streets. As a result of this, Frank entered into negotiations to purchase the Wm. Demuth Co.’s pipe factory in the Richmond Hill section of Queens. It was agreed upon that Demuth would become a subsidiary of S.M. Frank and all pipe production of the two companies would be moved to DeMuth factory. New Corporate offices were located at 133 Fifth Avenue, NYC.

Demuth pipes continued to be made at the Richmond Hill plant till December 31. 1972. Then the Wm. Demuth Company met its official end as a subsidiary company by liquidation.

I came across an interesting advertisement on the same page on pipedia.com which shows the exact same pipe that I am now working on. It is the same pipe as the first pipe on the left. A close scrutiny of the picture confirms the following:

(a) The Gold Dot line of WDC pipes was offered sometime before 1941 as inferred from the bottom line of this flyer which encourages readers to “WRITE FOR NEW 1941 STYLE BOOKLET”, implying that this flyer was published prior to 1941!!!!!

(b) The Gold Dot line of WDC pipes was at the time their top of the line product as it is the most expensive of all the pipes advertised in the flyer, retailing at $10!!!Pipephil.eu too has the same pipe shown with shape # 77. Here is the link; http://www.pipephil.eu/logos/en/logo-w1.html

From the above gleaned information, it is safe to conclude that the pipe now on my worktable is of 1940s vintage and at that point in time was WDC’s top-of-the-line offering!!!!

INITIAL VISUAL INSPECTION
Age definitely shows on the stummel surface!!! The briar is dull and lifeless and has taken on a layer of aged patina, through which one can make out the beautiful straight grain patterns all around. There is a heavy overflow of lava all over the entire stummel surface. The bowl cap, bowl, shank and even the stem is covered in oils, tars and grime accumulated over the years of storage and is sticky to the touch. To be honest, the stummel is filthy to say the least. A thorough cleaning of the stummel followed by polish should accentuate the beautiful straight grain pattern seen on the stummel through all the dirt. The double ring that separates the cap from the rest of the bowl is even and undamaged; however, it is filled with dust, dirt and grime. The chamber exudes a strong, but not definitely unpleasant, smell. I hope that this will be addressed once the chamber has been reamed and internals of the shank and mortise is cleaned with isopropyl alcohol. There is heavy buildup of cake with a thick layer in the chamber. The buildup is such that I am barely able to squeeze my little finger in to the bowl. The condition of the inner walls of the chamber can be ascertained only after the cake has been removed completely and taken down to bare briar. The bowl however, feels robust and solid to the touch from the outside. The rim top has a thick layer of overflowing lava. The condition of the beveled inner and outer edge and rim top can be commented upon once the overflow of lava is removed and the chamber is reamed. The shank end of the pipe is clean. However, the mortise does show signs of accumulated dried oils, tars and remnants of ash, greatly restricting the air flow, or dare I say, completely restricting air flow. These issues should be a breeze to address, unless some hidden gremlins present themselves!! The vulcanite stem has deep tooth indentations and minor tooth chatter on the upper and lower surface. It is heavily oxidized and has traces of overflowing lava, dust, oils and tars on the saddle portion of the stem. The opening of the tenon is filled with dried oils and tars. The air flow through the stem is greatly restricted to say the least. The fit of the stem in to the mortise is very tight, which will loosen further after the mortise and tenon have been cleaned. The metal tenon has a slot like groove extending more than half way towards the stem end on either side; probably to securely seat the “changeable filter” as advertised in the flyer above (actually I was wondering the purpose of the metal tenon, which as it is, was new to me, with slots on either side. This doubt was cleared by the flyer!!). The overall condition of the pipe, with the thick build-up of cake in the chamber, clogged mortises and stem airway, overflowing of lava covering the entire stummel, makes me believe that this would have been one of my grandfather’s favorite pipes.

THE PROCESS
I started this project by reaming the chamber with size 2 and followed it up with size 3 head of PipNet reamer. I used a 220 grit sand paper, pinched between my thumb and forefinger, to sand the inner walls of the chamber of the pipe. Once I had reached the bare briar, I wiped the chamber with a cotton pad dipped in isopropyl alcohol. This removed all the residual carbon dust from the chamber. The walls of the chamber are nice and solid with no signs of heat fissures or cracks. I scrapped out the overflowing lava from the rim top with my fabricated knife. The inner and outer rim edges are pristine and that was a big relief.This was followed by cleaning the mortise and air way of the pipe using hard bristled and regular pipe cleaners, q-tips dipped in alcohol. The mortise and the draught hole were given a final clean with shank brushes dipped in alcohol. I dried the mortise with a rolled paper napkin. The shank internals and the draught hole are now nice and clean with an open and full draw. The gunk in the mortise had hardened to such an extent that I had to resort to using all the tools of the trade to get rid of the accumulated gunk, not to mention the time spent on cleaning it. The crud that was extracted from the mortise can be seen in the picture below. I had expected that the ghosting would be history by this stage. However, that was not to be the case. I had to resort to alcohol treatment to get rid of all the ghosting. I packed a few cotton balls in to the chamber. Drawing out a wick from one cotton ball, I inserted it in to the mortise of the pipe. Using a syringe, I topped the chamber with isopropyl alcohol and set it aside. Half hour later, I topped the chamber again with isopropyl alcohol as the level of alcohol had gone down from spreading inside the stummel. This process is usually done using Kosher salt as it leaves no aftertaste or smells. But here, in my part of the world, Kosher salts costs a huge bomb and from my personal experience, I have realized that cotton works equally well in drawing out all the oils and tars from the internals of the stummel exactly as Kosher salt does, but at a very economical cost. I set the stummel aside overnight to allow the alcohol to do its intended task. Next morning, I discard the wick and cotton balls from the stummel and wipe the bowl clean. Though the cotton balls and the cotton wick did not turn a dirty color as usual, the old smells were completely eliminated. While the stummel was soaking in the alcohol bath, I cleaned out the internals of the stem using hard bristled and regular pipe cleaners dipped in alcohol. Well, that sounds easier than actually done. From the amount of overflowing lava deposits on the stem, I had anticipated a difficult time in cleaning the stem internals. But what really confronted me was a nightmare of a time cleaning it. For starters, the pipe cleaners would not move an inch in to the airway from either ends!!! I soak the internals of the stem, after packing the slot with a pipe cleaner, by filling it with isopropyl alcohol using a syringe. This helped in loosening the hardened oils and tars in the air way. Thereafter began the tedious process of cleaning the stem internals with a straightened paper clip and scrubbing the aluminum tenon with the fabricated dental spatula. The blobs of accumulated gunk removed from the air way could not be photographed as my table and tray was cleaned out by my helper before I could take a few pictures!!!! After a great deal of struggle, time and lots of pipe cleaners, the air way is finally clean with an open draw.The deep bite marks on the stem were flamed using a Bic lighter. However, this did not work. From my experience, I have learnt that getting rid of the oxidation from and around the surface to be filled helps in subsequent better blending of the fill with the stem surface. With a folded piece of used 220 grit sand paper, I sand the area that is required to be filled. I cleaned the sanded portion of the stem with cotton pad dipped in alcohol and spot filled the damaged area with a mixture of activated charcoal and clear superglue. I set the stem aside for the fill to cure. Now, it was the turn of the stummel to get cleaned up. Using a hard bristled tooth brush dipped in undiluted Murphy’s oil soap, I very deliberately scrubbed the stummel, cleaning the surface thoroughly. I was very deliberate on the surface areas which were covered in overflowed lava over which dirt and grime had accumulated over the years. I rinsed the stummel under tap water, taking care that water does not enter the mortise or the chamber. I dried the stummel using cotton cloth and paper napkins. On close inspection, I observed a couple of dents and ding on the front portion of the crown. These would need to be addressed. Other than this, the stummel is now clean and devoid of any grime and dirt. It is really surprising that the rim top, inner bevel and edges and the stummel is in such pristine condition after so many years of storage and without a single fill. Speaks volumes about the quality of this line of pipes from WDC!! I addressed the dents and dings to the front portion of the crown by the steaming process. I heated my fabricated knife over a candle. I placed a soaked Turkish hand towel over the dents and placed the hot knife over the wet towel. The steam that was generated pulled the dents to the surface. The stummel is now without any blemishes.To further clean and highlight the grains, I sand the stummel with micromesh pads, wet sanding with 1500 to 2400 grit pads and dry sanding with 3200 to 12000 grit pads. I wiped the stummel after each wet pad with a moist cloth to remove the resulting dust. I rub a small quantity of “Before and After Restoration Balm” in to briar and let it rest for a few minutes. The balm almost immediately works its magic and the briar now has a nice vibrant appearance. I further buff it with a horse hair shoe brush. The pipe now looks lovely with beautiful grains showing off their beauty in all glory!! With the stummel nice and clean and attractive, I worked the stem of the “GOLD DOT” by sanding the fills with a flat heat needle to achieve a rough match with the surrounding stem surface. I sharpened the lip edges using a needle file and sand the entire stem with 220 followed by 400, 800 and 1000 grit sand paper to perfectly blend the filled surface with the rest of the stem surface. This helps to reduce the sanding marks left behind by the more abrasive 220 grit paper. By mere sanding itself, the minor tooth marks seen on stem surfaces were completely addressed. This process also eliminated the deep oxidation seen on the vulcanite stem. To bring a deep shine to the vulcanite stem, I went through the complete set of micromesh pads, wet sanding with 1500 to 2400 grit pads and dry sanding with 3200 to 12000 grit pads. I rubbed the stem down with Extra Virgin Olive oil after every three pads. I completed the restoration of the stummel by cleaning the grooves between the twin rings separating the crown from the rest of the stummel, of all the dust, grime and polishing compounds accumulated during the restoration process. Lucky me, there is no damage to the rings, which would have been a challenge to restore.To finish, I re-attach the stem with the stummel. I mount a cotton cloth buffing wheel on to my local machine which is similar to a Dremel.  I set the speed at about half of the full power and polished the entire pipe with White Diamond compound. I wiped/ buffed the pipe with a soft cotton cloth to clear it of any leftover compound dust. I then mounted another cotton cloth wheel on to the polishing machine and applied several coats of carnauba wax over the stummel and the stem. I finished the restoration by giving the pipe a rigorous hand buffing using a microfiber cloth to raise the shine further. The completed pipe, with the dark brown hues of the grains on the stummel contrasting with the shiny black stem, looks lovely, fresh and vibrant; the photographs speak for themselves. If only the pipe could tell some of my grand Old man’s stories and recount incidents witnessed while being smoked.…Cheers!! I am grateful to all the readers for their valuable time spent in reading this write up and joining me on this part of the journey in to the world of pipe restoration while I attempt to preserve a heritage and past memories of a part of me. 

…and the Old Warrior Survives for another Fight!!


Blog by Paresh Deshpande

I had two meerschaum pipes in my grandfather’s collection that I have inherited. One, an antique Kalmasch meerschaum pipe, was restored by my Guru, Mr. Steve. For those interested in the read, here is the link to that write up; https://rebornpipes.com/2018/04/17/pareshs-grandfathers-pipe-4-an-antique-kalmasch-meerschaum-pipe/

The second is a block meerschaum Kaywoodie in classic Dublin shape with a four holed aluminum stinger, which I want to restore. I had never restored a meer before and as such had no desire to ruin this inheritance piece. Thus began my earnest search for a cheap meer, with an equally lesser costs of shipping (which at times is more than the cost of the item itself!! LOL!). I came across this “Meerschaum Sitter” pipe on auction block on eBay. The cost of shipping was the lowest that I have ever come across on the site. The condition of the pipe in the pictures, advertised as a “No Name Meerschaum Sitter”, uploaded by the seller was convincing enough for me to be the only bidder and I won this pipe for a single digit!! A prolonged wait followed and the pipe arrived after two months.

As advertised, there were no marks of identification on the pipe and it was in a demoralizing condition (Abha, my wife, absolutely detested the shape and appearance of this pipe!!). But there was something about this pipe that stopped me from completely discarding it. Mr. Dal Stanton, a gentleman and a fellow pipe restore who also guides me, has a page “For Pipe Dreamers only” on his site https://thepipesteward.com/. I have commissioned pipes from this page and they received a 360 degree makeover at the expert hands of Mr. Dal and have turned out to be beautiful masterpieces. He did encourage me to look beyond the present condition and dream about its future potential!! And this no name meerschaum sitter pipe did have loads of potential. What remains to be seen is whether I could do justice to it while gaining hands on experience in restoring a meerschaum pipe.

INITIAL VISUAL INSPECTION
The following pictures show the condition of the pipe when it arrived at my door step. The surface of the meer stummel is covered in dirt and grime. There is overflow of lava which is seen as blackened portions of the stummel. There is not a single patch on the stummel which is not scarred with scratches, gouges, dents and dings. The grime has accumulated on these gouges and resembles the battle wounds which have healed over the years. The stummel has developed a beautiful coloration on the bottom of the bowl half way up to the rim and the shank.There is heavy buildup of cake in the chamber with a thicker layer seen at the bottom half of the chamber. The cake has dried and is crumbly due to prolonged storage. The condition of the inner walls of the chamber can be ascertained only after the cake has been removed completely. No apparent cracks or damage to the stummel surface is seen from the outside. The rim top has darkened due to thick overflow of lava. There are a large number of dings and chips to the rim top which are visible through the lava overflow. This will be a challenge to address. The entire left side of the outer edge of the rim is severely damaged, the result of striking the edge against a hard surface to remove dottle, presenting lop sided appearance to the rim on to the left. The inner edge of the rim is dented in a number of places and combined with the damaged left outer edge gives the appearance of out of round chamber. This issue can be ascertained only after the chamber has been reamed and the rim top is cleaned.The shank end has a Delrin tube insert which seats the push-pull Delrin tenon on the stem. The mortise does show signs of accumulated dried oils, tars and remnants of ash, greatly restricting the air flow. This should be easy to address.The brown translucent acrylic stem has beautiful swirls that can be seen on either side of the airway. The airway itself is a very dark brown/ black color. Is it due to accumulation of oils and tars needs to be ascertained? However, I was unable to blow through the stem. Both the upper and lower surfaces of the stem show deep tooth indentations and minor tooth chatter. The buttons on both surfaces has been chewed and with deep bite marks. The entire stem is covered in dirt and grime over which dust and dirt has accumulated and hardened. The fit of the stem in to the mortise is snug; however, the Delrin tenon has tooth marks, which was surprising. Why anyone would bite on the tenon, is a very perplexing question that comes to my mind? These issues will need to be addressed. Though the seller had advertised this pipe as a sitter but being top heavy with a narrow circular base, it is anything but a sitter. Looking at the condition of the rim top, rim edges, proliferation of the scratches, lacerations, dents and dings over the stummel and shank, blocked airways, and stem condition, to me, it appears as if the pipe has been through a war zone with its previous owner and then discarded as it had become unsmokable. Once cleaned up and restored, I am confident that it will turn out to be beautiful and functional pipe.

THE PROCESS
I started this project by reaming the chamber with size 1 followed by size 2 head of PipNet reamer. With my smaller fabricated knife, I scraped out all the carbon from difficult to reach areas. I used a 220 grit sand paper, pinched between my thumb and forefinger, to sand the inner walls of the chamber of the pipe. Once I had reached the bare walls, I wiped the chamber with a cotton pad dipped in isopropyl alcohol. This removed all the residual carbon dust and also rid the chamber of all ghost smells. The walls of the chamber are nice and solid with no signs of cracks. Using a sharp knife, I gently scraped out the overflow of lava from the rim top. The dents and chips on the rim surface are now clearly visible and so is the extent of damage to the outer edge of the rim. The inner rim edge too shows a few chipped spots along the edge.I followed up the reaming by cleaning the stummel surface. I sand the stummel with a folded piece of 220 grit sandpaper followed by 600 and 800 grit papers. This was done with utmost care and diligence as I did not want to sand away a lot of meerschaum material from the surface and also wanted to preserve the nice golden hued color taken on by the meer from being smoked. A few deeper lacerations and gouges were left unaddressed as it would have led to loss of lot of bowl material. Also these dents and dings appear like a soldier’s battle scars to be worn with pride!! Similarly, I worked the rim top and addressed the dents and scratches from the surface to an extent that was possible. I attempted to address the chipped inner and severely damaged outer edge was leveled by creating a bevel on either edge with 220 grit sandpaper. I realized that if attempted to top the rim to match the surface, there would be a significant loss of meerschaum material, greatly altering the stummel profile and size. I decide to let it be. This old warrior will limp, but walk he will and that is all that matters to me. I followed up the sanding of the external stummel surface by cleaning the mortise and air way of the pipe using hard bristled and regular pipe cleaners, q-tips dipped in alcohol. The mortise and the draught hole were given a final clean with shank brushes dipped in alcohol. I dried the mortise with a rolled paper napkin. The shank internals and the draught hole are now nice and clean with an open and full draw. This was easier said than done. The pipe cleaners would not pass through the draught hole for the love of money!! A great deal of poking and prodding with a straightened paper clip and drill bit got me there.I polished the top of the bowl and rim edges with micromesh sanding pads to remove all of the tar and lava that was on the surface. I wet sanded it with 1500-2400 grit pads and dry sanded with 3200-12000 grit pads. I wiped the bowl down with a damp cloth to remove the dust that was left behind by the sanding. While I was working on the bowl top I also worked over the sides and bottom of the bowl to polish them as well. I wanted to minimize the scratching but not necessarily remove them all. These lacerations and dings must have had a history and I wanted to preserve it. I set the stummel aside and worked on the stem. The acrylic stem was so chock-a-block with hardened oils and tars that a pipe cleaner would just not pass through. Even a straightened paper clip could not make any head way in to the airway!!!!! I decided to soak the airway in isopropyl alcohol. I inserted a folded pipe cleaner in to airway from lip end, to the extent possible and folded the pipe cleaner upwards. Using a syringe filled with alcohol, I filled the airway from the tenon end and set it aside to soak.Couple of hours later, I removed the pipe cleaner and wiped the stem clean. I tried to clean the saddle of the stem when suddenly the Delrin tenon turned in my hands. I carefully turned the tenon further until it came free. It was indeed a threaded Delrin tenon and the previous owner had tried to unscrew it while holding it between his teeth. Hence the bite marks on the tenon!! A mystery solved…. A closer inspection of the saddle churned my stomach; it was completely filled with hardened tars and gunk. Even the threads on the tenon were smeared in the now jelly like gunk due to soaking. Here is what I saw. What followed next were the most excruciating 6-8 hours of backbreaking and laborious time spent on cleaning the internals of this stem. It was a battle of will between the stem and self. A couple of more soaks and later, use of all the cleaning weaponry in my arsenal, I emerged victorious. I was able to pass a hard bristled pipe cleaner dipped in alcohol from one end through the other. I further cleaned out the internals of the stem using hard bristled and regular pipe cleaners dipped in alcohol. However, the dark coloration of the airway persisted. I consulted with my mentor, Mr. Steve and he suggested using a scouring cleanser like Vim paste or Comet cleaner.  I tried the Vim powder, but without success. He then suggested using toothpaste applied on a moist pipe cleaner and worked inside the air way till clean. Well, this did not work either and the dark coloration remained. This one is a true warrior and a fighter to the core; bugger would just never give up without a fight!!!! I thought I was missing some trick here; ideas, methods and tricks suggested by Mr. Steve never fail, and yet in this case, nothing seemed to work. I closely observed the entire stem under my table lamp and then it suddenly dawned on me. It was like Eureka moment for me!!!! It appeared that the Delrin screw-in tenon is seated in to the stem in a dark brown tube extending to the stem end slat and is covered in lighter shade of brown acrylic casing. What a relief. I can finally progress ahead and address the deep tooth marks.From my experience, I have learnt that getting rid of the oxidation from and around the surface to be filled helps in subsequent better blending of the fill with the stem surface. With a folded piece of used 150 grit sand paper, I sand the area that is required to be filled. I cleaned the sanded portion of the stem with cotton pad dipped in alcohol and spot filled the damaged area with clear superglue. I set the stem aside for the fill to cure.Once the fill had cured, I sand the fills to match the surrounding stem surface with a flat head needle file. I sharpened the lip edges using a needle file and sand the entire stem with 220 followed by 400, 800 and 1000 grit sand paper to achieve an exact match. This also helps to reduce the sanding marks left behind by the more abrasive 220 grit paper as well as eliminated the oxidation seen on the stem. I was so engrossed and preoccupied with the task at hand that I missed out on taking pictures of this process. To bring a deep shine to the stem, I went through the complete set of micromesh pads, wet sanding with 1500 to 2400 grit pads and dry sanding with 3200 to 12000 grit pads. I wiped the stem with alcohol after each pad and rubbed it down with Extra Virgin Olive oil.To finish, I re-attach the stem with the stummel. I mount a cotton cloth buffing wheel on to my local machine which is similar to a Dremel.  I set the speed at about half of the full power and applied White Diamond compound to each of the three pipes. I wiped/ buffed the pipe with a soft cotton cloth to clear it of any leftover compound dust. I then mounted another cotton cloth wheel on to the polishing machine and applied several coats of carnauba wax over the stummel and the stem. I finished the restoration by giving the pipe a rigorous hand buffing using a microfiber cloth to raise the shine further. The completed pipe, with the shining white and golden hued meerschaum stummel, contrasting with the shiny brown acrylic stem with swirls inside, looks lovely, fresh and vibrant; the photographs speak for themselves. Admiring the pipe, it made me wonder, did he really have a spirit which kept him ticking after having suffered the kind of abuse which was evident from all the lacerations, dents and dings and chips. But he has survived his past nonetheless and will continue on his warpath with me………..Cheers!!

Restoring a Kaywoodie Meerschaum Dublin


Blog by Paresh Deshpande

Another surprise pick from my grandfather’s collection is this pipe which I have selected to work on. John Bessai in Rhodesian shape, which I had recently restored, was also a surprise pick in his collection since he had never been to USA, let alone Cleveland, Ohio and this is where most of the Bessai pipes were sold. Well, this pipe now on my work table is a Kaywoodie made from block meerschaum!! I was aware that KBB made briar pipes with meerschaum insert, but block meerschaum pipes, that I was not aware of.

The meerschaum on my work table is a classic Dublin with a stout meerschaum shank and a vulcanite stem. The stummel is sans any stampings and the only way it can be identified as being a Kaywoodie is the trademark cloverleaf insert on the stem and the four holed stinger tenon. However, the cloverleaf insert in this stem differed from the other Kaywoodie stems that I have previously worked on in that here the stem is marked with a “black cloverleaf inside a white dot” as against the white cloverleaf in other Kaywoodie pipes.I searched the internet for more information on Meerschaum line of Kaywoodie pipes. I visited the website, brothersofbriar.com and came across this valuable piece of information from one member, kwguy, who probably, from his comment, appears to have worked for KBB. I have extracted below, the relevant portion of the thread.

“Kaywoodie Block Meerschaums were made from 1938 to the mid 1960’s. The meerschaum pipe business by Kaywoodie was revitalized when Paul Fischer was hired and emigrated from Austria to run the meerschaum pipe department. Kaywoodie meerschaums were available in earlier years but not as prominently as when Paul Fischer came on board. He left in 1960 to make meerschaums under his own name. We continued to make them for several years after he left until we could no longer import meerschaum from Turkey”. (http://www.brothersofbriar.com/t21079-kaywoodie-block-meerschaum)

Another piece of information was available on pipedia.com which I have reproduced below.

HINTS ON COLLECTING, DATING AND PRICING KAYWOODIES
Examine Logo, Stampings and Fitment. The pre-WWII Kaywoodies had elongated white cloverleaf logos and large screw-in fitments (with the possible exception of the pre-1925 and “export” Kaywoodies, which had no fitments). Some of the pre-1936 Kaywoodies were stamped (on the shank) with a cloverleaf around KBB. Sometime between 1936 and 1947, the better pipes were marked with a black cloverleaf inside a white dot. However, because many of the pipes in the 1968-69 catalog still show this type of logo, the black-in-white logo merely indicates a “post 1936” vintage.

Based on the information gleaned from the above sources, it is safely concluded that the Kaywoodie meerschaum pipe presently on my work table is from the period between 1936 to late 1960s.

INITIAL VISUAL INSPECTION
The stummel has developed a nice coloration on the surface, darker on the lower half of the stummel and darkest on the shank. The entire stummel is covered in minor nicks and scratches with slightly deeper ones seen on the front and behind the bowl. There is a patch, similar to what would be seen on a briar when exposed to water, on the front of the bowl. Since this would be my first inherited meerschaum pipe restoration, I shall tread very carefully in addressing these issues. There is thick build up of cake in the chamber with a thicker layer at the bottom half of the chamber. The condition of the inner walls of the chamber can be ascertained only after the cake has been removed completely. No apparent cracks or damage to the stummel surface is seen from the outside, save for a few scratches and nicks/ dents. The rim top has darkened due to thick overflow of lava. There are a large number of dings and chips to the rim top which are visible through the lava overflow. This will be a challenge to address. The inner and outer edge shows minor chips, the result of striking the edges against a hard surface to remove dottle. The shank end of the pipe has an aluminum threaded spacer ring which extends in to the mortise, separating the shank end from the stem end when threaded in. This spacer ring is in pristine condition. The mortise is blocked due to accumulated dried oils, tars and remnants of ash, greatly restricting the air flow.The vulcanite stem has deep tooth indentations and minor tooth chatter on upper and lower surfaces as well on both the button edges. The stem shows minimal signs of oxidation which really is surprising. The air flow through the stems is laborious to say the least. The four holed metal stinger tenon is covered in dried oils and tars with a blocked breather hole near the threads. The alignment of the stem logo and stummel is off center when the stem is fully threaded in to the mortise with a slight overturn. These issues will need to be addressed.THE PROCESS
I started this project by reaming the chamber with size 1 followed by size 2 head of PipNet reamer. With my smaller fabricated knife, I scraped out all the carbon from difficult to reach areas. I used a 220 grit sand paper, pinched between my thumb and forefinger, to sand the inner walls of the chamber of the pipe. Once I had reached the bare walls, I wiped the chamber with a cotton pad dipped in isopropyl alcohol. This removed all the residual carbon dust and also rid the chamber of all ghost smells. The walls of the chamber are nice and solid with no signs of heat fissures or cracks. Using a sharp knife, I gently scraped out the overflow of lava from the rim top. The dents and chips on the rim surface are now clearly visible.I followed up the reaming by cleaning the stummel surface. I sand the stummel with a folded piece of 220 grit sandpaper followed by 600 and 800 grit papers. This was done with utmost care and diligence as I did not want to sand away a lot of meerschaum material from the surface and also wanted to preserve the nice golden hued color taken on by the meer from being smoked. A few deeper chips and gouges were left unaddressed as it would have led to loss of lot of meerschaum material. Also these dents and dings appear like a soldier’s battle scars and worn with pride!! Similarly, I worked the rim top and addressed the dents and scratches from the surface. The chipped inner and outer edge was leveled by creating a slight bevel on either edge with 220 grit sandpaper. I cleaned the mortise and air way of the pipe using hard bristled and regular pipe cleaners, q-tips dipped in alcohol. The mortise and the draught hole were given a final clean with shank brushes dipped in alcohol. I dried the mortise with a rolled paper napkin. The shank internals and the draught hole are now nice and clean with an open and full draw.I polished the top of the bowl and rim edges with micromesh sanding pads to remove all of the tar and lava that was on the surface. I wet sanded it with 1500-2400 grit pads and dry sanded with 3200-12000 grit pads. I wiped the bowl down with a damp cloth to remove the dust that was left behind by the sanding. While I was working on the bowl top I also worked over the sides and bottom of the bowl to polish them as well. I wanted to minimize the scratching but not necessarily remove them all. I cleaned out the internals of the stem using hard bristled and regular pipe cleaners dipped in alcohol. The deep bite marks on the stem were flamed using a Bic lighter. However, this did not work. From my experience, I have learnt that getting rid of the oxidation from and around the surface to be filled helps in subsequent better blending of the fill with the stem surface. With a folded piece of used 150 grit sand paper, I sand the area that is required to be filled. I cleaned the sanded portion of the stem with cotton pad dipped in alcohol and spot filled the damaged area with a mixture of activated charcoal and clear superglue. I set the stem aside for the fill to cure. Once the fill had cured, I sand the fills to match the surrounding stem surface with a flat head needle file. I sharpened the lip edges using a needle file and sand the entire stem with 220 followed by 400, 800 and 1000 grit sand paper to achieve an exact match. This also helps to reduce the sanding marks left behind by the more abrasive 220 grit paper as well as eliminated the oxidation seen on the stem. I was so engrossed and preoccupied with the task at hand that I missed out on taking pictures of this process.

To bring a deep shine to the stem, I went through the complete set of micromesh pads, wet sanding with 1500 to 2400 grit pads and dry sanding with 3200 to 12000 grit pads. I wiped the stem with alcohol after each pad and rubbed it down with Extra Virgin Olive oil. It was at this stage that I addressed the issue of overturned four holed stinger by heating it with the flame of a Bic lighter. This loosens the glue and I under-turn the stinger. I let the stinger cool down and re-harden the glue. I re-heated the stinger and fitted the stem in to the mortise, tightening it till the stem and shank were perfectly aligned. I let the stinger sit in this position till it had cooled down and the glue had hardened again. Now the fit of the stem and the shank is perfectly aligned. To finish, I re-attach the stem with the stummel. I mount a cotton cloth buffing wheel on to my local machine which is similar to a Dremel.  I set the speed at about half of the full power and applied White Diamond compound to each of the three pipes. I wiped/ buffed the pipe with a soft cotton cloth to clear it of any leftover compound dust. I then mounted another cotton cloth wheel on to the polishing machine and applied several coats of carnauba wax over the stummel and the stem. I finished the restoration by giving the pipe a rigorous hand buffing using a microfiber cloth to raise the shine further. The completed pipe, with the shining white and golden hued meerschaum stummel, contrasting with the shiny black stem, looks lovely, fresh and vibrant; the photographs speak for themselves. Thanks for the read…………..Cheers!!

Restoring a Classic British Billiard, “Loewe & Co.” Pipe


Blog by Paresh Deshpande

I was surprised to find a pipe in my old man’s collection which was nicely reamed, free of any overflowing lava, clean stummel and mortise and only light tooth chatter on either surfaces of the stem. As with many of his pipes, or dare I say a majority, this one too was a billiard. I have also observed that most of his British made pipes are classic billiard shaped (though a few of his Danish made pipes are also billiard shaped!!!!). Well, at first glance itself I had anticipated this pipe to a London made and Boy was I correct! The pipe that I am now working on is an enigmatic British brand “LOEWE & Co”.

The first thing that amazed me was how light weight this pipe felt in my hands! The second aspect that I noticed was the beautiful cross grains, interspersed with tight Bird’s eye grains on either side of the bowl, that cover the entire stummel. It is stamped on the left side of the shank as “L & Co” in an oval over “STANDARD” in capital letters. On the right side of the shank, it is stamped as “LOEWE” over “LONDON W”. The bottom of the shank is stamped “KENTON”. The vulcanite stem is surprisingly black and shining and bears the stamp “L & Co” in an oval. These stampings are crisp and clear. To be very honest, I had never ever heard of Loewe & Co brand of pipes before this. Even while surfing eBay and other sites, I had not come across this brand. Now that I have one, I wanted to know more about this brand and establish the vintage of this pipe, if possible. As usual, I visited rebornpipes.com and Lo and behold, there was a very similar sized and shaped pipe that Mr. Steve had researched and worked on in Feb 2017. The similarities were to the extent that the condition of the chamber, the damage to the rim top and the stem condition were identical and matched to a “T”. Even the stamping matched to a great extent, the only difference being that the pipe I am working on bears the “KENTON” shape name on shank bottom and “STANDARD” below the oval enclosed “L&Co” on the left side. Here is the link to the write up by Mr. Steve  https://rebornpipes.com/2017/02 /22/refreshing-a-tiny-lco-billiard/

INITIAL VISUAL INSPECTION
The briar has taken on a layer of aged patina, through which one can make out the beautiful cross grains all around interspersed with tightly packed Bird’s eye. There are a few minor dents and dings on the stummel surface, probably due to rubbing against other pipes while being stored for more that 40 years. However, there is not a single fill in the entire stummel, signifying very high quality of pipe for which Loewe pipes were famous. In all probability, I shall let these minor dents and dings remain and avoid the process of sanding the stummel with sand paper in order to preserve the beautiful patina. Maybe, micromesh polishing will address a few of these dents and scratches. There is a very thin and even layer of cake in the chamber. I do not envisage any damage to the inner walls of the chamber. The rim top has darkened due to a slight overflow of lava. There is significant damage to both the inner and outer edge of the rim in 1 o’clock direction in the form of being badly scorched, a result of frequent, continuous and prolonged exposure to the flames of a lighter. The bowl is completely out of round, both inside and from outside, due to this damage. In addressing this issue, though I absolutely hate it unfortunately, I would be losing some briar estate, a price I am willing to pay to resurrect this beauty. The shank end of the pipe is clean and so is the mortise. The draw is smooth, full and open. The vulcanite stem has minor tooth chatter on the upper and lower surface. Both upper and lower button has minor tooth chatter. Surprisingly, the stem has minimum oxidation and is an even black. The step tenon is also clean and sits snugly in to the mortise with all the right noises. The air way is clear and draw is easy and smooth.THE PROCESS
I reamed the bowl with size 2 head of the PipNet reamer and followed it up with my fabricated knife to clean up the chamber of the bowl. The bowl had already been reamed and there were only slight remnants of a cake in the bowl. I gently scrapped away the remnants of lava overflow from the rim top. I used a 220 grit sand paper, pinched between my thumb and forefinger, to sand the inner walls of the chamber of the pipe. Once I had reached the bare briar, I wiped the chamber with a cotton pad dipped in isopropyl alcohol. This removed all the residual carbon dust and also rid the chamber of all ghost smells. The walls of the chamber are nice and solid with no signs of heat fissures or cracks.I followed up the reaming process by cleaning the mortise and air way of the pipe using hard bristled and regular pipe cleaners, q-tips dipped in alcohol. The mortise and the draught hole were given a final clean with shank brushes dipped in alcohol. I dried the mortise with a rolled paper napkin. The shank internals and the draught hole are now nice and freshened up.I cleaned out the internals of the stem using hard bristled and regular pipe cleaners dipped in alcohol. The bite marks on the stem were flamed using a Bic lighter to raise it to the surface. I sand the stem with a folded piece of 220 grit sandpaper to remove the oxidation, tooth marks and chatter. A little bit of sanding smoothed out the damage to the buttons. I polished the stem with micromesh sanding pads – wet sanding with 1500-2400 grit pads and dry sanding with 3200-12000 grit pads. I rubbed the stem down with Extra Virgin Olive Oil after each set of three pads. I set the stem aside to dry. I highlighted the stamping on the stem with a whitener pen. Now, it was the turn of the stummel to get cleaned up. Using a hard bristled tooth brush dipped in undiluted Murphy’s oil soap, I very deliberately scrubbed the stummel, cleaning the surface thoroughly. I was not satisfied with the rim top had cleaned up. I used a Scotch Brite pad and further cleaned the rim top. I dried the stummel with a cotton cloth a paper napkin. At this stage of restoration, there was only one issue remaining to be addressed, that of the charred front rim and one which I did not want to address as I simply detest loosing briar!!!! But as is known in a battle field, sometimes amputation, though painful and traumatic to a soldier as well as the Surgeon, is the only way to save his life. Thus, with a heavy heart, I began the process of topping the rim to reduce the charred surface and bring the bowl back to round. I use a square piece of 220 grit sand paper and firmly hold it with my hand on my work table. I work the rim top on the sand paper in circular motion, frequently checking the progress as I wanted to keep the briar loss to a bare minimum necessity. Once I was satisfied that the charred surface has been reduced and the roundness of the bowl has been restored to the extent possible, I created an inner edge bevel by pinching a folded piece of 180 grid sand paper between my thumb and forefinger and moving along the inner edge with a constant pressure, to minimize the charring on the inner edge of the rim. Similarly, I created a slight bevel on the outer edge of the rim. Thereafter, I moved to the next stage of polishing and revitalizing the entire rim top and the stummel. Before proceeding on to polishing, I steam out all the minor dents and dings by heating my fabricated knife on a candle and placing it on a wet towel covering the dents. The generated steam pulls the dents to the surface. I even out the discoloration and stummel surface by polishing with micromesh pads, wet sanding with 1500 to 2400 grit pads and dry sanding with 3200 to 12000 grit pads. I wiped the stummel with a moist cloth after each wet pad to see the progress. I rub a small quantity of “Before and After Restoration Balm” in to briar and let it rest for a few minutes. I took some extra efforts to work the balm in to the hand carved rustications of the bowl. The balm almost immediately works its magic and the briar now has a nice vibrant appearance. I further buff it with a horse hair shoe brush. After I was through with the polishing and buffing, I realized that the rim top surface was a lighter shade than the rest of the stummel. I used a Chestnut and a Dark Brown stain pen to blend the colors to match the color of the rest of the bowl. The finish turned out to be darker than the stummel!!!! I wiped of excess stain with a pipe cleaner dipped in alcohol to achieve a perfect match. This also helped to further mask the darkened rim surface. I would buff it and blend it in better once the stain dried. To finish, I re-attach the stem with the stummel. I mount a cotton cloth buffing wheel on to my local machine which is similar to a Dremel. I set the speed at about half of the full power and applied White Diamond compound to each of the three pipes. I wiped/ buffed the pipe with a soft cotton cloth to clear it of any leftover compound dust. I then mounted another cotton cloth wheel on to the polishing machine and applied several coats of carnauba wax over the stummel and the stem. I finished the restoration by giving the pipe a rigorous hand buffing using a microfiber cloth to raise the shine further. The completed pipe, with the beautiful grains on the stummel contrasting with the shiny black stem, looks lovely, fresh and vibrant; the photographs speak for themselves. If only the pipe could tell some of my grand Old man’s stories and why was it so clean as compared to other pipes in his collection.…………… Cheers!!

Refurbishing my Inherited Large “Soren” Pickaxe Freehand


Blog by Paresh Deshpande

It’s been two months since I had worked on a free hand pipe that was made in Denmark, the last being a “Soren” sitter. The next pipe that I decided to work on from my grandfather’s collection is again a “SOREN”, but this pipe is a monster sized Pick Axe with a humongous bowl!!

The large pick axe stummel has a combination of smooth and rusticated surface covering the bowl. The cascading water flow like hand carved rustication extends from the front left side of the bowl to the back while the smooth surface covers most of the front and complete right side of the bowl. Beautiful swirls of grains can be seen on the smooth surface interspersed with flame grains extending upwards from half way of the front of the bowl. The plateau shank end is flared towards the shank end and boasts of lovely flame grains on the right side of the shank. The flared shank end bears the only stamping seen on this pipe. It is stamped as “Soren”, name of the carver in script hand over “HAND-CARVED” over “MADE IN DENMARK” in block capital letters. The fancy vulcanite stem is devoid of any stampings.

While working on my Soren sitter free hand, I had referred to pipedia.com for information on this famous pipe carver from Denmark. I reproduce the information available on pipedia.com for a quick read.

 “Søren Refbjerg Rasmussen founded a company in 1969, which employed an average of 8 – 12 craftsmen in the 1970’s. The semi-freehands they produced were traded under his prename Søren. Rasmussen himself finished only the very best pipes. So his way of pipemaking closely resembled the ways of Preben Holm, Karl Erik Ottendahl or Erik Nørding. Altogether more than 1,000,000 pipes were sold.

Today he works alone as Refbjerg and manufactures only a small number of pipes in his workshop in DK-2860 Søborg, which are considered to be tremendously precisely executed. The dimensions mostly range from small to medium sized, corresponding to his personal preferences. The shapes adhere to the classical models, but often he gives them a touch of Danish flair. Refbjerg accepts minor faults but never uses any fillings. “Straight Grain” is the only grading, used for his very best pieces. He likes stem decorations made of exotic woods or metal rings.

As Rainer Barbi once stated “Refbjerg uses only briar from Corsica and more than that, he’s the one and only to import it from there, at least in Europe. He’s supplier to the vast majority of the Danish makers”.

From the above, it can be safely assumed that this pipe was made in the 1970’s as it bears the stamp of the carver’s prename “Soren”!!

INITIAL VISUAL INSPECTION
There is a thick layer of cake in the bowl. The external surface of the stummel feels solid to the touch and I think there are no issues with the condition of the chamber. However, there are always surprises when you least expect them!!! I have learnt my lessons!!! Thus, condition of the inner walls of the chamber will be ascertained once the chamber has been reamed and the cake is taken back to the bare briar. There is a strong sweet smell of tobacco which may reduce once the cake has been reamed out and chamber has been cleaned with isopropyl alcohol.The plateau rim top and shank end is covered in the overflow of lava, dirt and grime. This will have to be cleaned. The condition of the inner edge will be determined only after removing the cake. The air way in the shank is clogged with oils and tars and will require a thorough cleaning. The stummel is covered in a thick layer of dust, dirt, oils and grime. The stummel looks dull and lackluster. The grains on the smooth surface and the sandblast rustications are all covered in tars, oils and grime. To be able to appreciate these grains and rustications, the stummel will have to be cleaned. However, there is not a single fill to be seen on this large briar estate. A few minor dents and dings are seen on the stummel surface, a result of uncared for storage over a prolonged period. This issue can be sorted out by sanding the stummel surface with a sand paper, followed by micromesh sanding and polishing. The fancy quarter bent vulcanite stem is heavily oxidized and two deep bite marks can be seen on the lower surface of the stem. The lips on both upper and lower surface show significant damage due to bite marks and are out of shape. I hope to address these issues by simple heating of the stem with the flame of a Bic lighter. The air way in the stem appears to be clogged and the air flow is laborious to say the least. This will be addressed by thorough internal stem cleaning with pipe cleaners and alcohol. There is calcification seen on either surface about an inch from the button end. The bottom of lip edge shows significant deposition of dirt and oxidation. This will have to be cleaned.THE PROCESS
I started this project by reaming the chamber with size 2 and followed it up to size 4 head of PipNet reamer. I used a 220 grit sand paper, pinched between my thumb and forefinger, to sand the inner walls of the chamber of the pipe. Once I had reached the bare briar, I wiped the chamber with a cotton pad dipped in isopropyl alcohol. This removed all the residual carbon dust but this time not the ghost smells. This cleaning revealed the first (and pray it to be the last!!) surprise. There are a few very thin webs of line seen along the front and left side of the chamber walls and one slightly larger gash on the left side. This gash is highlighted in a red circle. I shall address this issue at the end of the restoration by coating the walls with a mixture of activated charcoal and yogurt. This coating will aid in quicker formation of a fresh cake.I followed up the reaming by cleaning the mortise and air way of the pipe using hard bristled, regular pipe cleaners and q-tips dipped in alcohol. The mortise and the draught hole was so chock-a- block with all the dried tars, oils and gunk that I had to use my fabricated spatula to scrape out all the muck from the mortise and the draught hole!!!! I gave a final clean with shank brushes dipped in alcohol and dried the mortise with a rolled paper napkin. The shank internals and the draught hole are now nice and clean with an open and full draw. The issue of sweet smells of old tobacco was also reduced to a very large extent.I cleaned out the internals of the stem using hard bristled and regular pipe cleaners dipped in alcohol. I scraped the dried oils and tars from the tenon with the sharp edge of my fabricated dental spatula. The deep bite marks on the stem and lip edges were flamed with the flame of a Bic lighter.  This helps to raise the bite marks to the surface. However, this did not work. From my experience, I have learnt that getting rid of the oxidation from and around the surface to be filled helps in subsequent better blending of the fill with the stem surface. With a folded piece of used 150 grit sand paper, I sand the area that is required to be filled. I cleaned the sanded portion of the stem with cotton pad dipped in alcohol and spot filled the damaged area with a mixture of activated charcoal and clear superglue. I set the stem aside for the fill to cure. Now, it was the turn of the stummel of the pipe to get cleaned up. Using a hard bristled tooth brush dipped in undiluted Murphy’s oil soap, I very deliberately scrubbed the stummel, cleaning the surface thoroughly. Special attention was paid to scrub out all the dirt and dust from the crevices in the rustication on the sides and front of the stummel as well as the plateau rim top and shank end. I was surprised to note that while rinsing the pipe under tap water, the water ran a bright orange color. Residual orange color can be seen on the stummel, probably due to a coating of shellac!!! I do not like it and will have to get rid of it, period. The stummel, plateau shank end and rim top were dried using paper napkins and soft cotton cloth. The cleaning of the stummel revealed the second surprise!! There was a sticky and soft spot present in the rusticated portion on the stummel; this has been marked in a red circle below. When I scrubbed the stummel, it was revealed that this fill had gone soft. I dug out the old and soft fill with my fabricated sharp knife. The alignment of this fill roughly matched with that of the larger gash observed on the left side of the chamber wall. I discussed this issue with my guru, Mr. Steve, after he had seen the pictures of the damage. It was decided that the fill would be refreshed and the inner walls of the chamber should be coated with a layer of activated charcoal and yogurt. There were three other very minor fills; two on the shank end and one in the rusticated portion of the stummel at the back of the bowl. These have been circled in red. Before progressing ahead with any further restoration, I decided to address the issues of “fills” in the stummel!!!!! I completely removed the old fills using a sharp, pointed and thin fabricated knife. I press a little briar dust and realizing what a precious commodity it is, I was very careful not to waste even a microgram. I packed it in to the gouges on the stummel, pressing it tightly with the back of a toothpick and spot applied CA superglue over it with the pointed end of the toothpick. I spot filled the shank end fills with only CA superglue as they were not large and deep. With this, I set the stummel aside for the fresh fills to cure.After the fills had cured, I sand these fills using a flat head and a round needle file to achieve a rough match with the surrounding surface. With a folded piece of 180 grit sand paper, I sand the fills in the rusticated portion to match it with the worm trails in the rustication. I wiped the entire stummel with a cotton swab soaked in acetone to remove the coating of shellac, but without the expected results. The stummel still has that orange coloration. I further sand the entire smooth surface of the stummel with a piece of folded 150, 220, 440, 600 and 1000 grit sand paper to perfectly match the fills with the rest of the stummel surface and also to achieve my aim of completely removing the shellac coating, but the coloration still persists. Hopefully, remnants of the shellac coat will be addressed during the micromesh sanding and polishing process. This use of sand paper, however, addressed all issues of the dents and dings from the stummel surface!! I wanted to remove the coating of shellac while highlighting the grains seen on the smooth portion of the stummel. To achieve this aim, I sand down the stummel using micromesh pads, wet sanding with 1500 to 2400 grit pads and dry sanding with 3200 to 12000 grit pads. I wiped the stummel with a moist cloth to clean the surface of all the dust after wet sanding. The orange coloration on the stummel can be gauged by the color of my hand. I was still not happy with the results of the micromesh sanding. Using a dark brown stain pen, I darkened the worm trails in an attempt highlight and add contrast against the raised portions in the rustication. I was not satisfied with the way the pipe looked at this stage. It was still “loud” and appeared gaudy. I rub a small quantity of “Before and After Restoration Balm” in to the briar and let it rest for a few minutes. I took some extra efforts to work the balm in to the hand carved rustications on the bowl. I hand buffed it with a horse hair brush to a deep shine. I had assumed that this would help improve the look of the stummel. Alas!! That was not to be the result. The bowl still appeared ugly and definitely did not measure up to my standards. I was lost for ideas when I shared pictures of the stummel with my guru, Mr. Steve. This is what he saw. In his characteristic style, Mr. Steve suggested that “I would first get rid of the dark stain in the worm trails by wiping the entire stummel and then re-staining it”. This is exactly what I did. I wiped the stummel with a cotton swab dipped in isopropyl alcohol and removed all the stain. Mr. Steve had sent me sachets of easy-to-use stain powder which just needed to be mixed in isopropyl alcohol and applied to the stummel surface. I chose the Walnut stain. Since this was the first time that I would be using a stain, I was a bit apprehensive. I mixed a little quantity of the stain powder and mixed it with a little quantity of 99.9% pure isopropyl alcohol to a liquid consistency. I have purposely not mentioned any specific quantity of each as I had mixed the two just by relying on feel and visual confirmation. I was fortunate that I got the mix spot on in the first attempt. There is a lot of leeway in this process in that if the stain appears too dark after application, desired transparency could be achieved by wiping the stummel with a cotton swab dipped in alcohol!!!! I folded a pipe cleaner and evenly applied the stain over the complete stummel, plateau rim and shank end. This was followed by burning excess of alcohol with the flame of a Bic lighter. This also helps the stain to set on the stummel surface. Just a word of caution to all first timers like me, please wear either plastic or latex rubber gloves if you wish to avoid the struggle of removing the stains from your hands later!!! I wiped the stummel surface with a cotton swab dipped in isopropyl alcohol as the stain was slightly darker and unevenly applied than I would have liked. This helped in bringing more transparency and evenness in the stain application. Once the stain had set, I mount a cotton cloth buffing wheel on to my local machine which is similar to a Dremel.  I set the speed at about half of the full power and applied White Diamond compound to stummel of the pipe. I wiped/ buffed the pipe with another clean cotton cloth buffing wheel to clear it of any leftover compound dust. I then mounted another cotton cloth wheel on to the polishing machine and applied several coats of carnauba wax over the stummel. I finished by giving the stummel a rigorous hand buffing using a microfiber cloth to raise the shine further. The grains on the stummel now look beautiful and peek through the stain. I shared the pictures of the stummel with Mr. Steve who appreciated the look of the stummel at this stage. With the stummel nice and clean and attractive, I worked the stem of the pipe. The fill on the stem had cured nicely and I sand it down with a flat head needle file. I sharpened the lip edges using a needle file and sand the entire stem with 220 followed by 400, 800 and 1000 grit sand paper. This helps to reduce the sanding marks left behind by the more abrasive 220 grit paper, while this process eliminated the deep oxidation seen on the vulcanite stem of the pipe. To bring a deep shine to the vulcanite stem, I went through the complete set of micromesh pads, wet sanding with 1500 to 2400 grit pads and dry sanding with 3200 to 12000 grit pads. I wiped the stem with alcohol after each pad and rubbed it down with Extra Virgin Olive oil. The internals of the stem was cleaned out using alcohol and pipe cleaners. The pictures of the process and final results are shown below. The only issue remaining to be addressed, before I could proceed with the final polish, was the deeper gash seen in the walls of the chamber. I mixed activated charcoal and yogurt to a consistency which would enable an even spread and applied it on the inner walls of the chamber and set it aside to cure it overnight.To finish, I re-attach the stem with the stummel. I mount a cotton cloth buffing wheel on to my local machine which is similar to a Dremel. I set the speed at about half of the full power and applied White Diamond compound to stummel of the pipe. I wiped/ buffed the pipe with a soft cotton cloth to clear it of any leftover compound dust. I then mounted another cotton cloth wheel on to the polishing machine and applied several coats of carnauba wax over the stummel and the stem. I finished the restoration by giving the pipe a rigorous hand buffing using a microfiber cloth to raise the shine further. The completed pipe, with the dark brown hues of the stummel contrasting with the shiny black stem, looks lovely, fresh and vibrant; the photographs speak for themselves. The beauty, size and shape of this pipe make it one of my favorite and will find a place of pride in my modest collection. If only the pipe could tell some of the stories and incidents that it has witnessed while my grand old man puffed away.…………… Cheers!!! PS: The oversized and shape of the stummel coupled with an equally proportionately long stem, posed a challenge while taking pictures of the complete finished pipe!!!! This is one of the many areas where I need to make a lot of progress. If I am unable to capture the beauty of the finished pipe and present it in an attractive manner, I feel my efforts are in vain.


A Fresh Lease on Life For a Tired Looking “Count”!


Blog by Paresh Deshpande

A few months back I had restored two Kriswill pipes from my grandfather’s collection; a “CHIEF” and a “GOLDEN CLIPPER”. Both these pipes were a big challenge to restore and took considerable time and effort. However, the end results on both these pipes were highly satisfying!! To those interested in reading the write up on both these pipes, here are the links; https://rebornpipes.com/2018/08/04/breathing-new-life-into-a-kriswill-chief-20/

https://rebornpipes.com/2018/08/11/restoring-a-kriswill-golden-clipper/

This is the third Kriswill from my grandfather’s collection, a sandblasted KRISWILL “COUNT” in an impressive Oom Paul shape. The sandblast follows the beautiful grain pattern on the stummel surface and on the steeply raking shank, save for the smooth portion on the left side of the shank which bears the only stamping visible on the pipe and is stamped as “KRISWILL” over “COUNT” over “HANDMADE IN DENMARK”. This smooth surface extends to the shank end and forms a smooth ring all around. When polished and revitalized, this ring will contrast beautifully against the glossy black of the vulcanite stem. The full bent vulcanite stem is devoid of any stamping.

While working on the Kriswill Chief and Golden Clipper, I had researched the brand and detailed information can be referred to on the links provided above.

INITIAL VISUAL INSPECTION
Age definitely shows on the stummel surface!!! The briar is dull and lifeless and has taken on a layer of aged patina, through which one can make out the beautiful sandblast patterns all around which follow the grains. There is a slight overflow of lava on to the stummel surface. A thorough cleaning of the stummel followed by polish will accentuate the sandblast pattern on the stummel. There is an uneven buildup of cake in the chamber with a thicker layer seen at the bottom half of the chamber. The condition of the inner walls of the chamber can be ascertained only after the cake has been removed completely and taken down to bare briar. The bowl feels robust and solid to the touch from the outside. This issue should be a breeze to address.The rim top has darkened on the due to a slight overflow of lava. This can be seen in pictures above. The condition of the inner and outer edge and rim top is pristine. The shank end of the pipe is clean. However, the mortise does show signs of accumulated dried oils, tars and remnants of ash, greatly restricting the air flow.The vulcanite stem has tooth indentations and minor tooth chatter on the upper and lower surface. It is heavily oxidized. The air flow through the stems is laborious to say the least. The fit of the stem in to the mortise is very loose, which will loosen further after the mortise and tenon have been cleaned. These issues will need to be addressed.THE PROCESS
I started this project by reaming the chamber with size 2 and followed it up with size 3 head of PipNet reamer. I used a 220 grit sand paper, pinched between my thumb and forefinger, to sand the inner walls of the chamber of the pipe. Once I had reached the bare briar, I wiped the chamber with a cotton pad dipped in isopropyl alcohol. This removed all the residual carbon dust and also rid the chamber of all ghost smells. The walls of the chamber are nice and solid with no signs of heat fissures or cracks. I followed up the reaming by cleaning the mortise and air way of the pipe using hard bristled and regular pipe cleaners, q-tips dipped in alcohol. The mortise and the draught hole were given a final clean with shank brushes dipped in alcohol. I dried the mortise with a rolled paper napkin. The shank internals and the draught hole are now nice and clean with an open and full draw.I cleaned out the internals of the stem using hard bristled and regular pipe cleaners dipped in alcohol. I scraped the dried oils and tars from the tenon with the sharp edge of my fabricated dental spatula. The deep bite marks on the stem were flamed using a Bic lighter. However, this did not work. From my experience, I have learnt that getting rid of the oxidation from and around the surface to be filled helps in subsequent better blending of the fill with the stem surface. With a folded piece of used 150 grit sand paper, I sand the area that is required to be filled. I cleaned the sanded portion of the stem with cotton pad dipped in alcohol and spot filled the damaged area with a mixture of activated charcoal and clear superglue. I set the stem aside for the fill to cure.Now, it was the turn of the stummel to get cleaned up. Using a hard bristled tooth brush dipped in undiluted Murphy’s oil soap, I very deliberately scrubbed the stummel, cleaning the surface thoroughly. Special attention was paid to scrub out all the dirt and dust from the crevices in the sandblast on the stummel and shank. I cleaned the plateau rim and shank end too. The stummel, plateau shank end and rim top were dried using paper napkins and soft cotton cloth. I rub a small quantity of “Before and After Restoration Balm” in to briar and let it rest for a few minutes. I took some extra efforts to work the balm in to the sandblast finish of the bowl. The balm almost immediately works its magic and the briar now has a nice vibrant appearance. I further buff it with a horse hair shoe brush. With the stummel nice and clean and attractive, I worked the stem of the “COUNT”. I sharpened the lip edges using a needle file and sand the entire stem with 220 followed by 400, 800 and 1000 grit sand paper. This helps to reduce the sanding marks left behind by the more abrasive 220 grit paper. By mere sanding itself, the minor tooth marks seen on stem surfaces were completely addressed. This process also eliminated the deep oxidation seen on the vulcanite stem. To bring a deep shine to the vulcanite stem, I went through the complete set of micromesh pads, wet sanding with 1500 to 2400 grit pads and dry sanding with 3200 to 12000 grit pads. I wiped the stem with alcohol after each pad and rubbed it down with Extra Virgin Olive oil. The internals of the stem was cleaned out using alcohol and pipe cleaners. The pictures of the process and final results are shown below. To finish, I re-attach the stem with the stummel. I mount a cotton cloth buffing wheel on to my local machine which is similar to a Dremel.  I set the speed at about half of the full power and applied White Diamond compound to each of the three pipes. I wiped/ buffed the pipe with a soft cotton cloth to clear it of any leftover compound dust. I then mounted another cotton cloth wheel on to the polishing machine and applied several coats of carnauba wax over the stummel and the stem. I finished the restoration by giving the pipe a rigorous hand buffing using a microfiber cloth to raise the shine further. The completed pipe, with the dark brown hues of the sandblast stummel contrasting with the shiny black stem, looks lovely, fresh and vibrant; the photographs speak for themselves. If only the pipe could tell some of my grand Old man’s stories and recount incidents witnessed while being smoked.…………… Cheers!!