A Review – A Cody Huey Moustache Man Pipe Tamper


Blog by Steve Laug

A few days ago during my lunch break I was glancing through my twitter feeds and came across a tweet by Cody Huey showing some tampers that he had carved that looked a lot like Tiki carvings. I was intrigued with his work and had not heard of him before so I tweeted him and asked the cost. He responded quickly with gracious thanks and sent me a link to his website and store. I scrolled through his tampers that were up for sale and placed an order for a new tamper. Here is a link to his website if you are interested in his work http://codyhuey.com/

tamper1

I am always interested in learning about the artisan that I am buying from so I read through his website with interest. I spent some time on the page where he wrote about his carving and his life. The part where he wrote about the connection to his granddad and his carving was fascinating to me. It seemed like he was truly continuing the family tradition. I have included his words and a picture of the two of them from his site below to give you an idea of the carver.

20130326-101255

“I started carving right after hurricane Ike. We were without power for 14 days so I had to find something to keep me occupied. I would carve fish, shamrocks, and hearts. My grandfather was a avid wood worker. I can remember him making me rubber band guns and yo-yos when I was just a youngster. He was always cutting pieces of wood and making beautiful things out of it. He made shelves, stools, and things like that. I was working on a Texas Star for him just before he passed away. After his passing I put it down for a couple of years. I have now finished it and it is in my shop. The mustache men came from me wanting to carve something a little more detailed. At the same time I was just getting back into pipe smoking and found that the faces I was carving fit perfectly into my pipe as a tamper. After talking to my dad and showing him some of my work he said that I have the talent of my grandfather but with a lot more creativity. I really enjoy carving because it is a way for me to relax and still feel somewhat connected to my PaPa.”

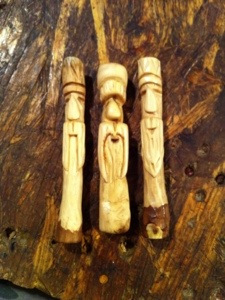
The picture below is one I copied from Twitter. It shows some of the tampers that he has carved – his daughter calls them the moustache men. There is a rustic and interesting quality to each of them that makes them unique.
tampers

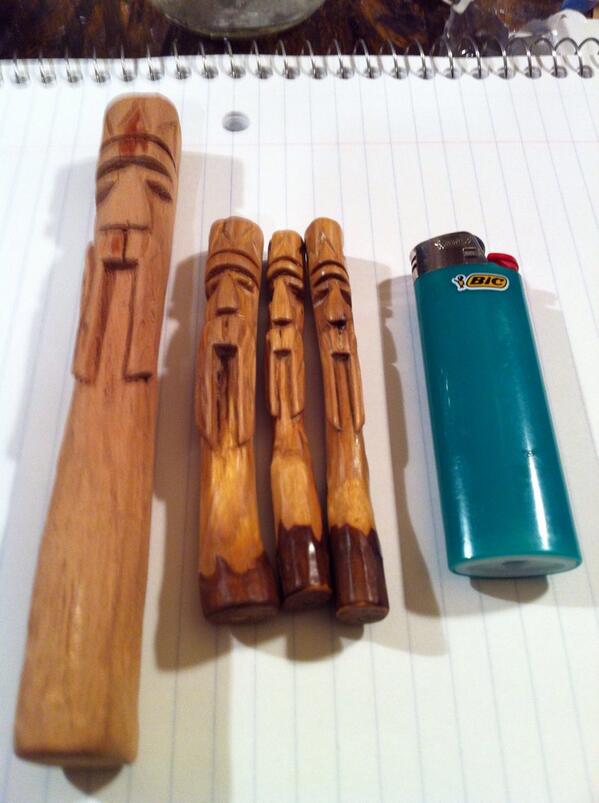
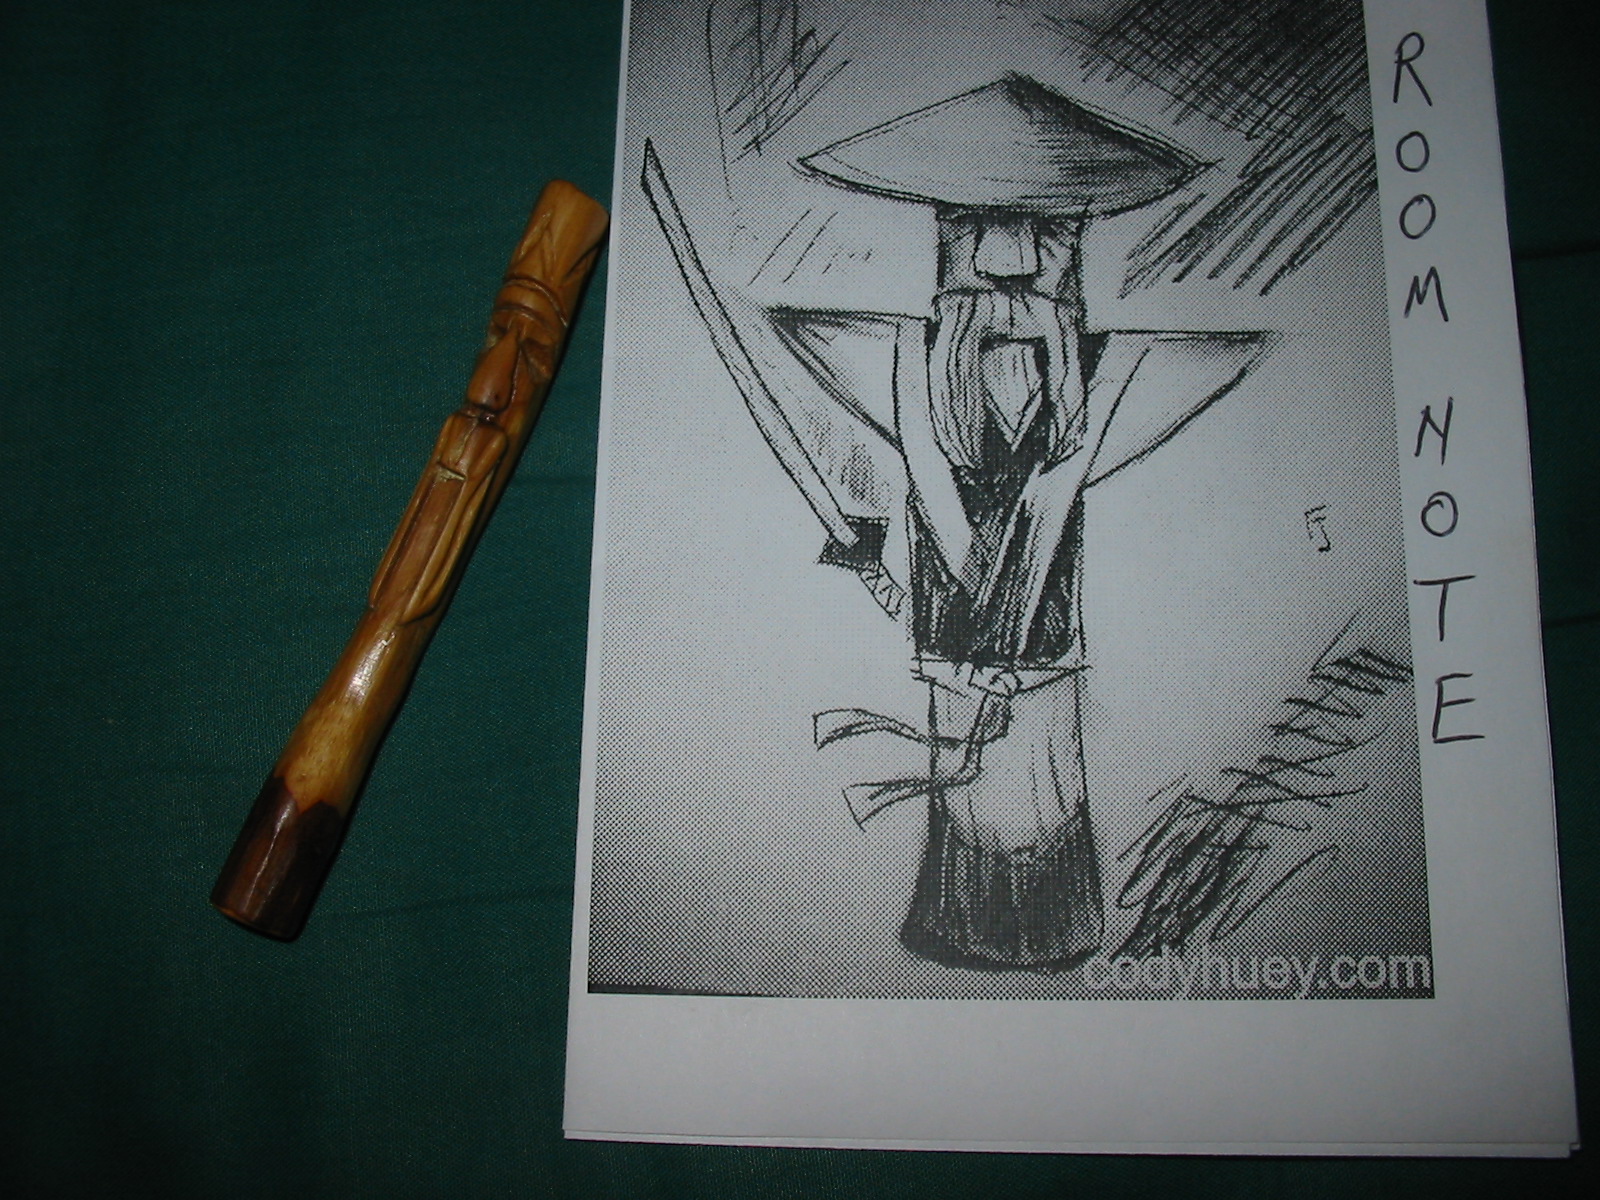
My tamper arrived yesterday and I have to say Cody packs a great package. He included a note card with a sketch of a Samurai tamper! It is very unique looking. He also included a handful of Werther’s Original Coffee flavoured toffees. He had no idea that those are one of my favourites. I then removed the well wrapped tamper to see which one he had sent me. I peeled off the wrapping and it revealed that he had sent the tamper on the far right in the above photo.
IMG_2682

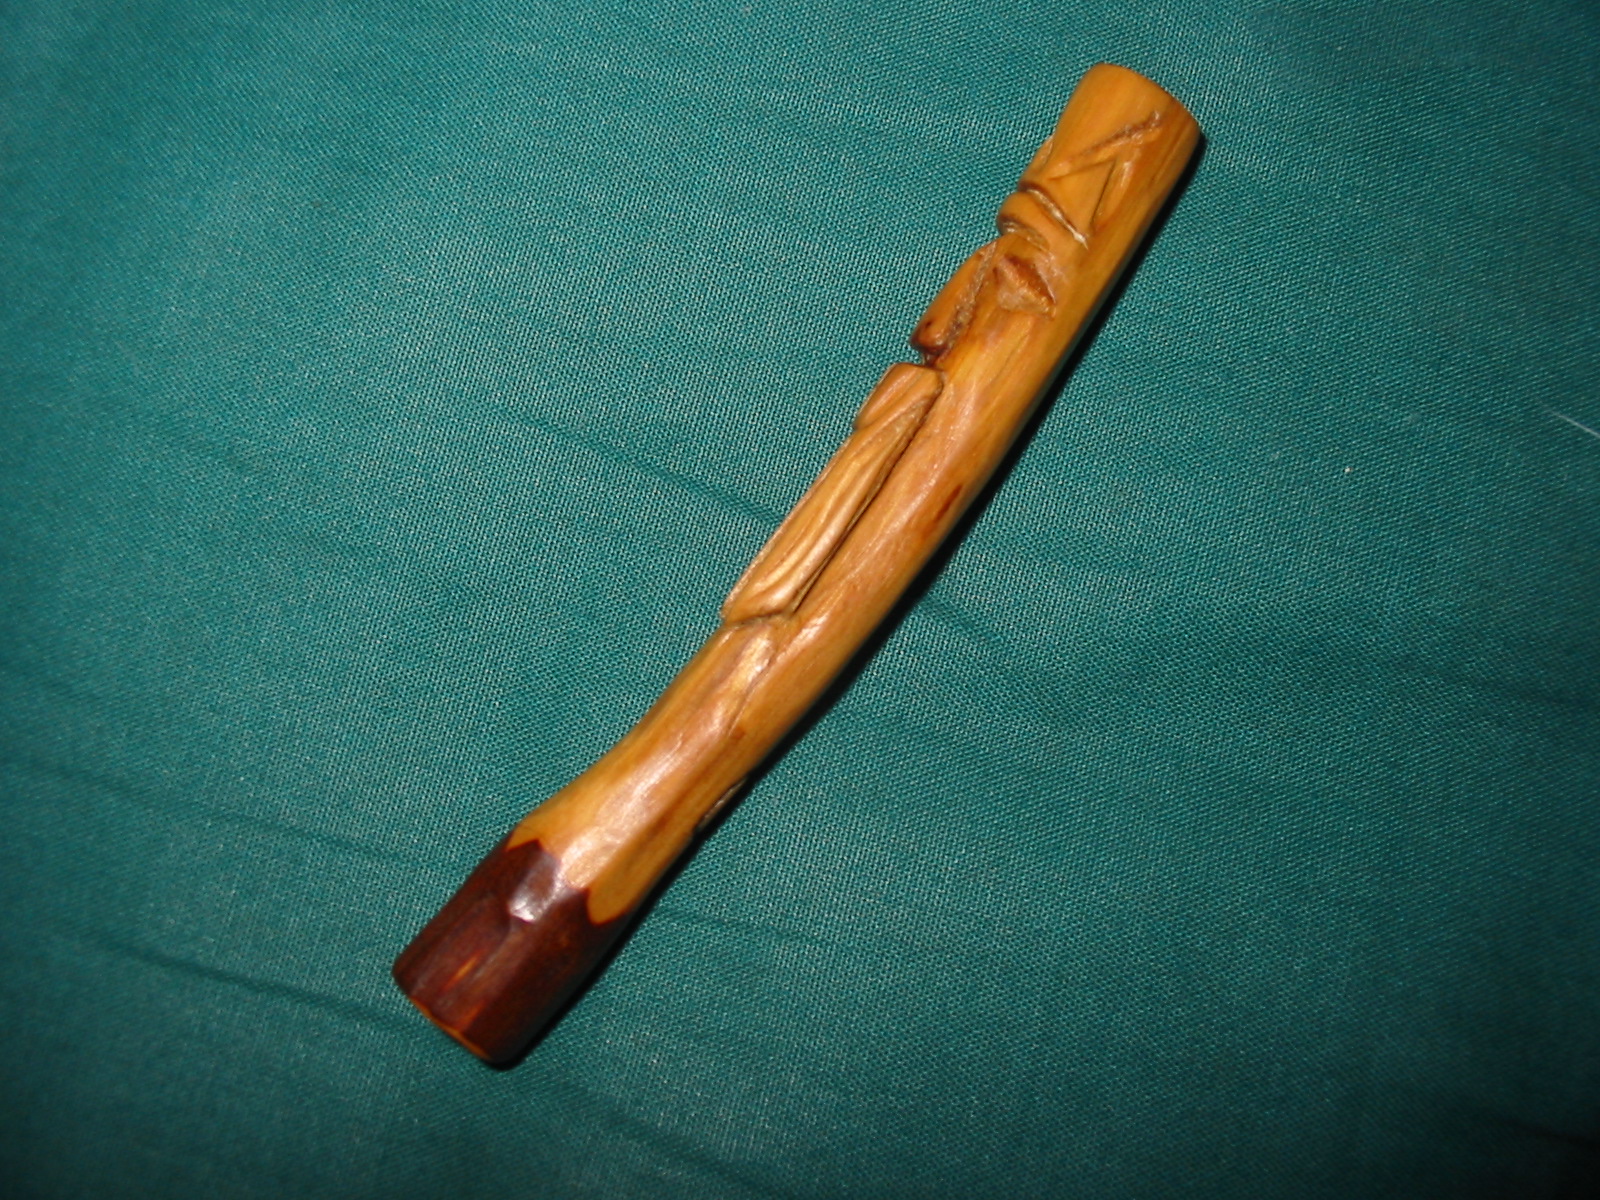
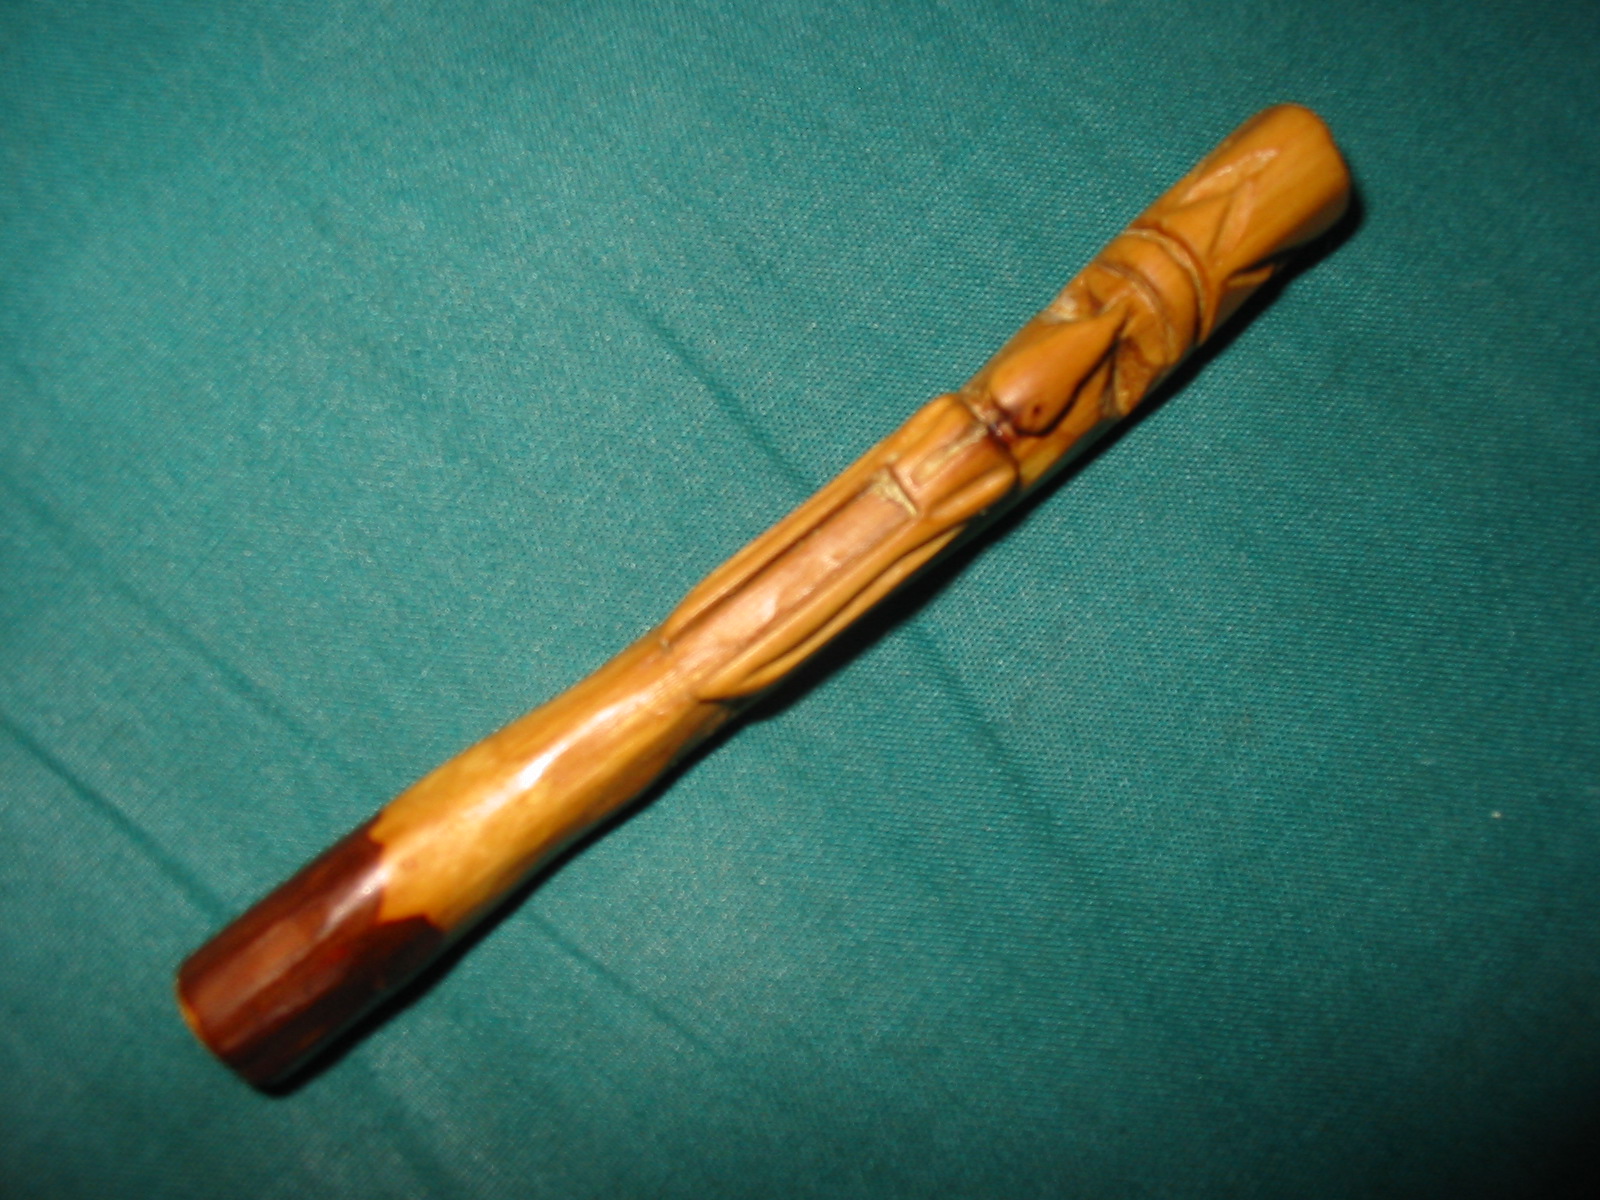
Through Twitter I asked him to include some information regarding the wood he used in these tampers. Cody sent along the following information. “Each tamper is hand carved out of Pecan trimmings. Each one is a little different depending on how the Pecan limb is. They are carved, lightly oiled and buffed with carnauba wax.”

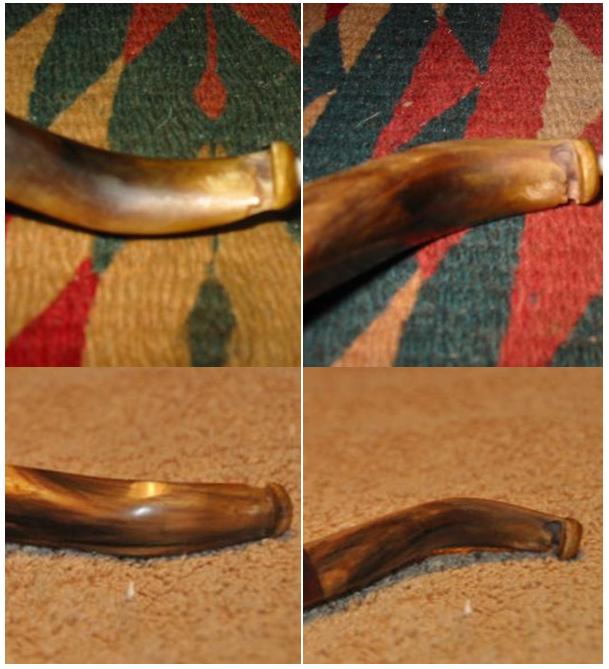
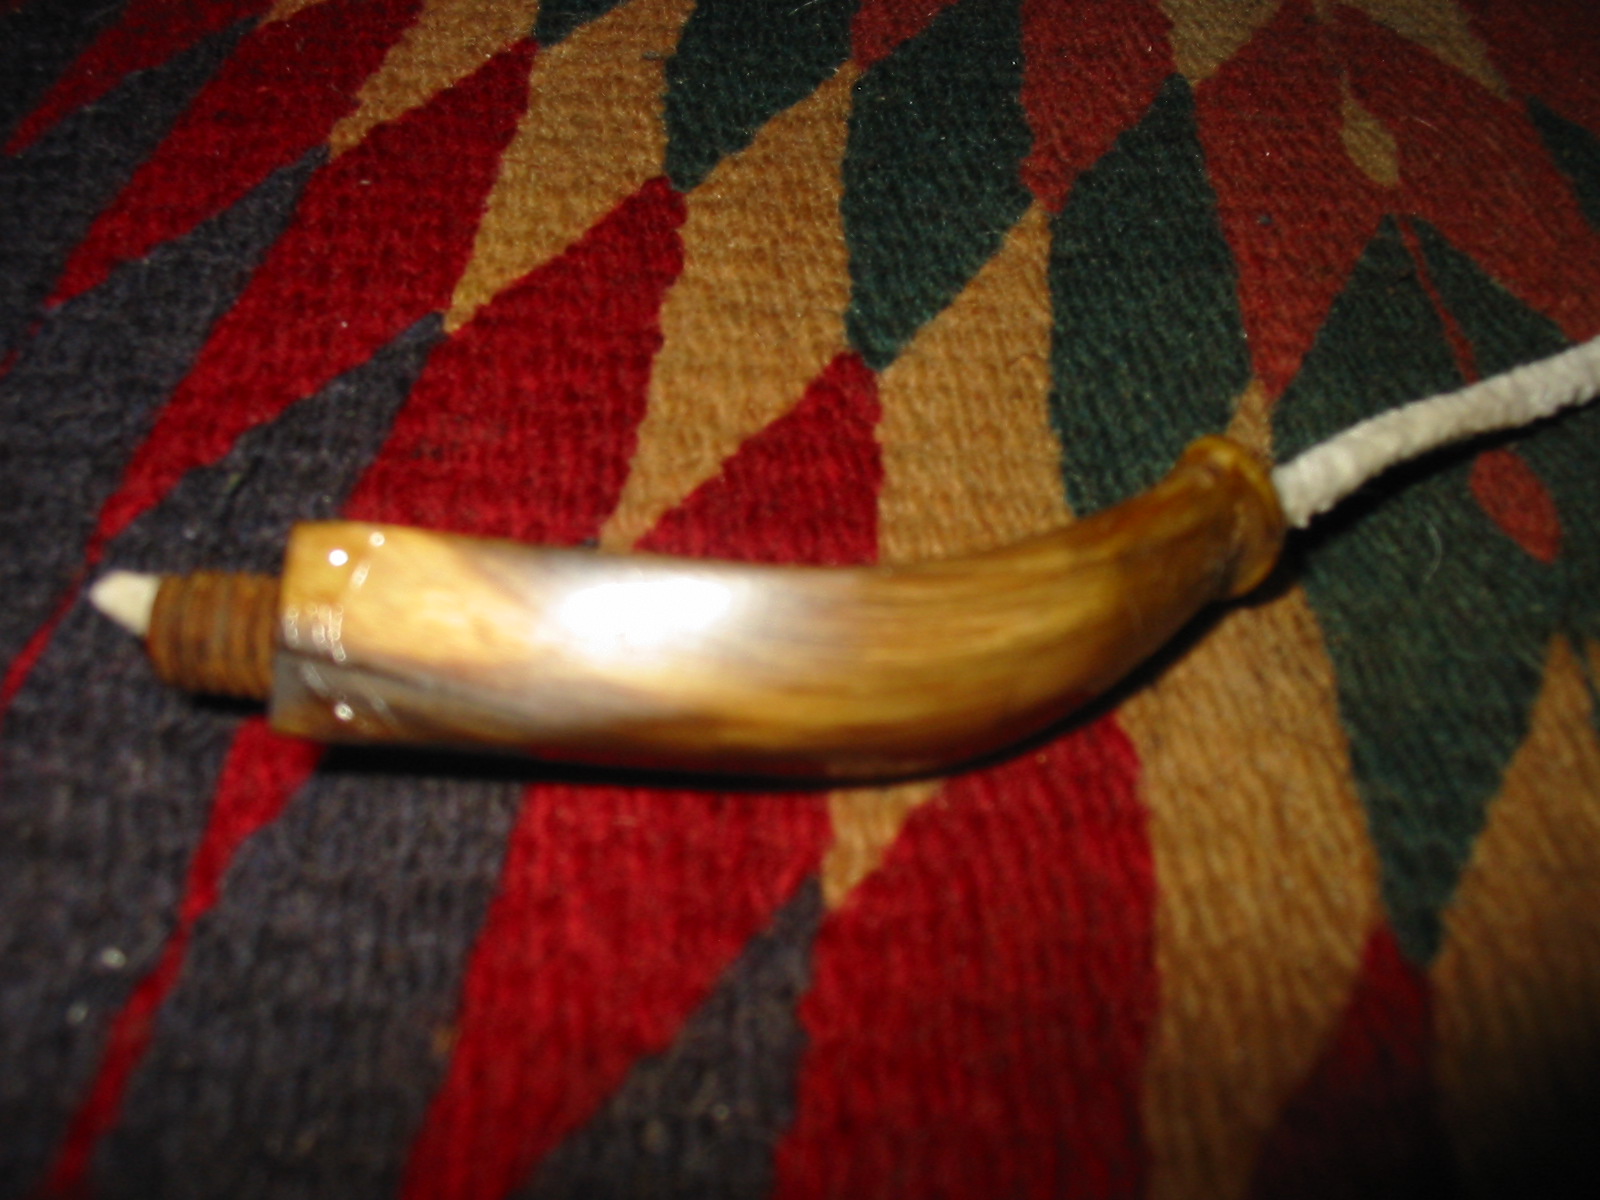
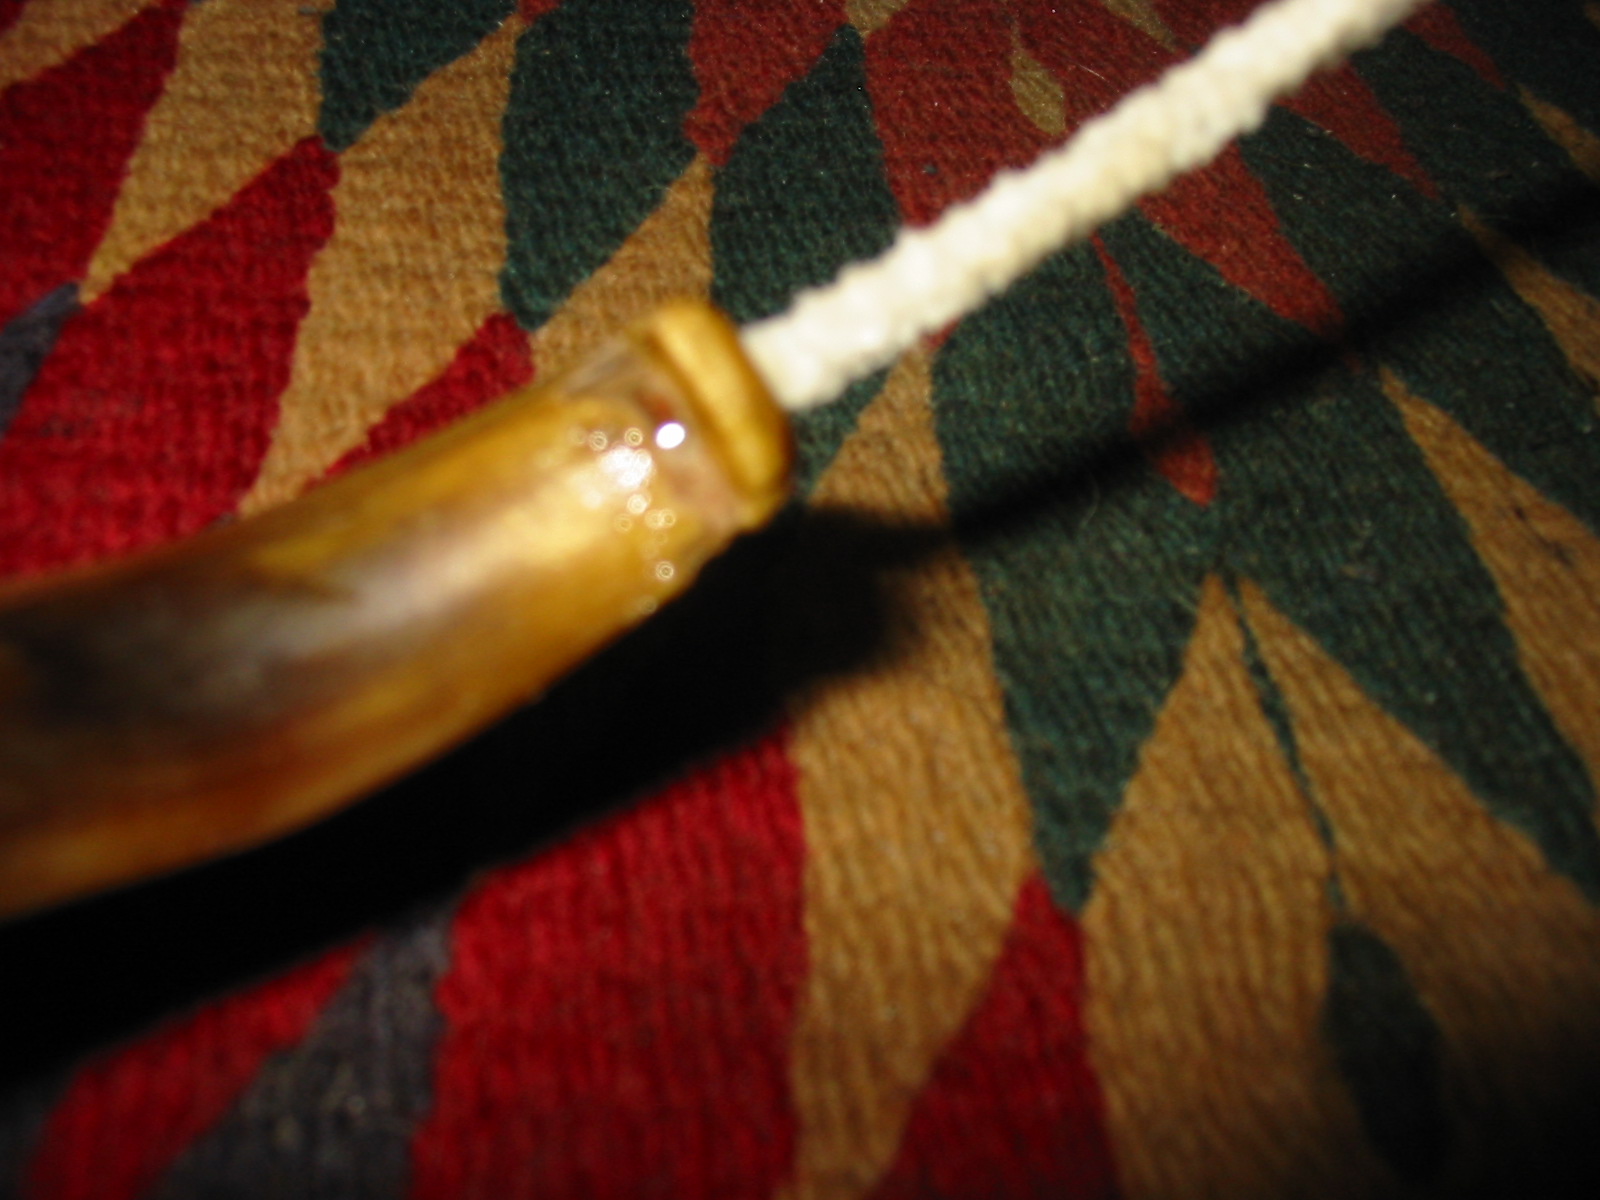
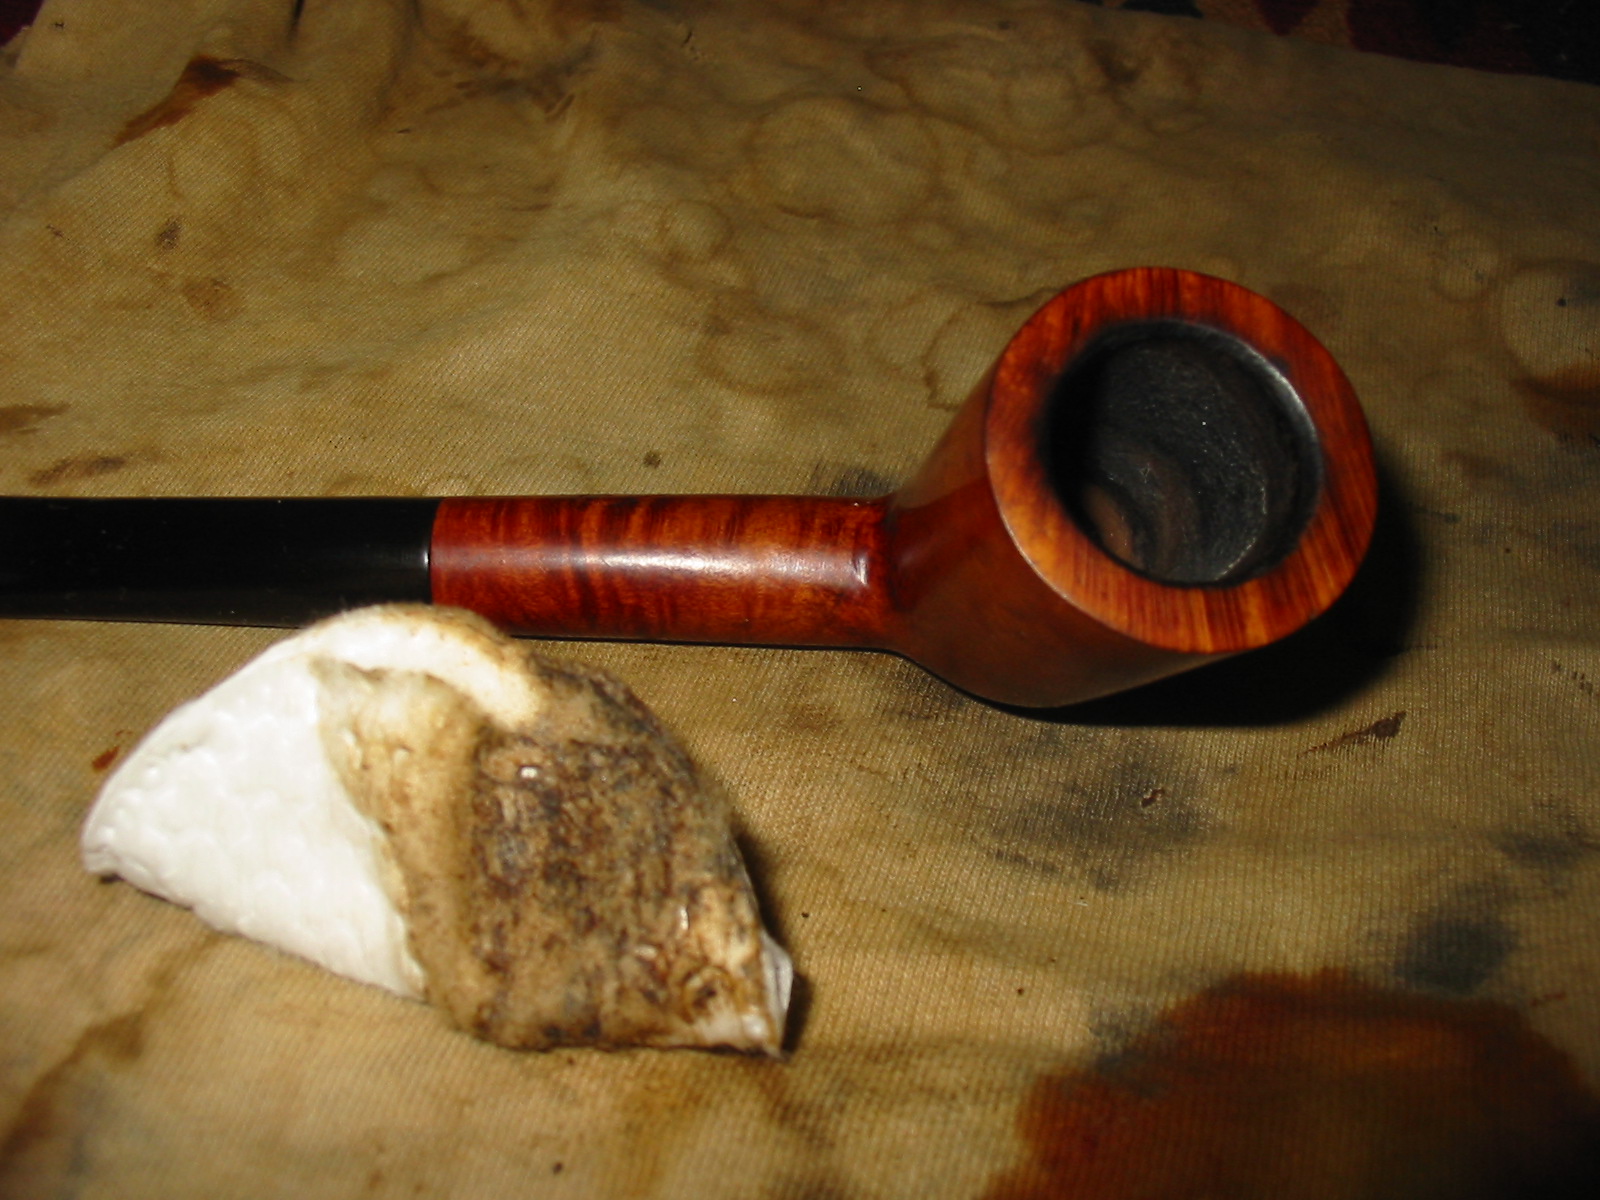
I could not be happier with my tamper. It fits well in my hand. The wood is gently curved with a slight notch below the moustache that fits perfectly against my finger when I holding it to tamp my pipe. The carving is well executed and is kind Cody’s take on Tiki carvings. The tamper is cleaned of the bark and then carved. The majority of the tamper is the clean yellowish wood that has been smoothed after carving. Cody left the layer under the bark on the last ¾ inches or so of the tamper at the bottom edge. It thus has the dark colour in the area that will spend its time in the bowl of my pipe. I think this is an ingenious idea as on my other wooden tampers this part darkens quickly due to the ash and tars of the burning tobacco.
IMG_2684

IMG_2683

Those who read this review have a look at Cody’s site and join me in enjoying these uniquely carved tampers. I know that you will not be disappointed.

Thank you Cody for a well made tamper with individualized and unique carving, nicely done! Your craftsmanship is evident in the finished product. Thank you for the nicely done finish on the piece and the well packed shipping. It came promptly through the mails without any problems. The card and the candies was a nice touch. I will enjoy this tamper for a long time to come. Glad to have been your first international order.

Restoring an Older GFB Three Star Horn Stem Bent Bulldog


Blog by Steve Laug

The pipe below is one I bought off EBay because it looked like a challenge, that and the fact that it was another GFB pipe. This is the third GFB that I have in my collection. I love the way they feel in the hand and the elegant look of the curves and angles they have. I went back and reread my previous two posts on the GFB pipes I had refurbished to remind myself of their history. There I described the process of hunting down information on the brand. I summarize that here for those may not have read the other two posts. (https://rebornpipes.wordpress.com/2013/06/07/restemming-and-reclaiming-an-older-unsmoked-gfb-briar-calabash/ , https://rebornpipes.wordpress.com/2013/04/01/restoring-a-gfb-bent-billiard-another-reclamation-project/)

The first thing I found was information that the GFB brand was an older French Trademark and that it came from Saint Claude, France. A more focused search for GFB French Briar Pipes led to information that the stamping GFB stood for Great French Briar – something about that did not seem right to me so I continued to look and finally came across the following advertisement from a Sears Catalogue. It shows a full page of GFB pipes and the header says GENUINE FRENCH BRIAR. That made much more sense to me, and all three of my GFB pipes match the pipes in the catalogue. It was good to be reminded of the old brand. I am pretty sure that all three of my GFB pipes come from either the late 1890’s or the early 1900’s.
genuine-french-briar-pipes-on-parade

This third pipe was a charmer to me. When I saw the photos I decided I would bid to win it. The elegance of the old pipe caught me. The bowl appeared to be in good shape and it had a horn stem. The striations and colour of the stem was beautiful even in its oxidized state. The three photos below were included in the EBay sale. The third photo shows the underside of the stem and the damage to the underside near the button. It looked to be more than tooth marks or chewing. It actually looked like “worm” damage. From the photos it appeared to be localized to that part of the stem and was worth a chance. Worst case scenario, I would sacrifice the stem and restem the old pipe with a vulcanite stem.
GFB1

GFB2

GFB3

I find that photographing stem damage is difficult and my photos can be out of focus. But I now have a tripod to help with the clarity of the photos (did not get it until after I had started the repairs on this stem. Ah well sorry about the clarity of some of these). When the pipe arrived I took it apart and examined the holes on the end of the stem. Under the lens it was clear that it was not a worm hole at all. Rather it had been bitten and the stem had crumbled in that area. It did not go through into the airway so I think that the previous owner had scraped out the crumbled area of the horn stem for cleanliness and just kept smoking it. That was encouraging to me as it meant that I could repair and not worry about an old “worm” somewhere in the horn stem chewing his way out later! The next two photos show the extent of the damage to the area
GFB4

I cleaned out the open area with cotton swabs and Everclear, careful to not use too much of the alcohol on the horn stem. Once it was clean of debris and dust I decided to fill the area with a superglue gel rather than the usual liquid superglue I generally use (Photo 1). My thinking was that the gel would sit better in the large area without running all over the stem. There were also nicks on the sharp edges near the shank that I also repaired with the superglue gel (Photo 2). I layered the glue into the hole to build it up gradually (Photo 3) as each previous layer dried.
GFB5

GFB6

GFB7

Once the glued cured over night I sanded the area with medium grit emery paper to remove the high spots and smooth out the surface (Photo 1). I refilled the low areas on the fill to further level out the area. There was also a deep nick on the sharp edge of the shank. I cleaned that out and used the superglue to fill that as well. It would dry black but with the staining of the bowl that could be minimized and I wanted it smooth to the touch rather than the sharp cut of the nick that was previously present (Photo 2).
GFB8

GFB10

With everything glued I set the bowl and stem aside and went to work for the day. I would work on the patched areas when I returned home in the evening.

When I returned in the evening, the patches were dry and the pipe was ready to be worked on. I reamed the bowl with the PipNet reamer. On this particular pipe the bowl was conical so it took three different cutting heads on the T handle to ream the bowl to the bottom. With down I cleaned the bowl, shank and stem with Everclear, pipe cleaners and cotton swabs. I wanted the pipe cleaned out before I worked on the exterior.
GFB11

GFB15

The next two photos show the stem after the patches had hardened. Though the photos are a bit blurry, the shininess of the spots where the superglue patches were applied is very clearly visible. Those areas would need to be sanded smooth to match the surface of the surrounding horn.
GFB12

GFB13

I sanded the patch on the shank of the pipe with 220 grit sandpaper and also medium grit sanding sponge to remove the excess glue from the patch. Then I wiped the bowl down with Everclear on a cotton pad. I decided not to use acetone as the stamping on the shank was filled with a gold paint and was still visible. I did not want to damage that stamping. I carefully worked the Everclear around the stamping so as not to get any in the grooves of the stars and GFB stamp.
GFB14

GFB16

GFB17

GFB18

I sanded the patch on the stem with 220 grit sandpaper and then a medium grit sanding sponge to smooth out the patch. I continued to sand it with the micromesh sanding pads. I wet sanded with 1500-2400 grit and dry sanded with the remaining grits up to 12,000.
IMG_2645

GFB19

I buffed the stem with White Diamond on the buffer and the finished stem is shown below. The patch still shows some small holes that need to be repaired with superglue. The sanding and polishing made them very apparent in the first photo below. The patch at the sharp edge near the shank came out very well and is invisible. The horn of the rest of the stem has a deep sheen to it after all the sanding and polishing.
GFB20

GFB21

I unscrewed the stem and set it aside while I stained the bowl. I used a medium walnut stain mixed with linseed oil to stain this pipe. The colour is a rich brown with a slight red in certain lights. It matches the colour of the other GFB pipes that are in my collection. I buffed the bowl with White Diamond on the buffing wheel. Then I gave it a coat of carnauba wax and set it aside to work some more on the stem.
GFB22

GFB23

GFB24

GFB25

I was not completely satisfied with the stem patch so I sanded it next to the button some more and cleaned it out. I put some more of the superglue in the low spots and set it aside to cure while I went to work for the day.
GFB26

GFB27

When I returned the glue was hard and the patch a solid bubble on the surface of the stem. I sanded it with the medium grit emery paper and then 220 grit sandpaper to remove the over fill. I always over fill the spots as the glue shrinks as it dries. I have learned that it is easier to remove the excess than to continue to fill and sand repeatedly. I sanded it with a medium grit sanding sponge and then went through the grits of micromesh sanding pads again from 1500-12,000 grit. When I had finished I rubbed the stem down with Obsidian Oil and set it aside to absorb. Once done I buffed it on the wheel with multiple coats of carnauba wax.
GFB28

After buffing and polishing the horn stem I buffed the entire pipe with White Diamond on the buffing wheel to polish it then gave it multiple coats of carnauba wax to restore and preserve the shine on the horn and the briar. The finished pipe is back to usable with the stem patch taking care of the deep holes that were previously in the stem. The striated horn stem looks like new and the colouration of the horn goes amazingly well with the medium brown walnut stain. Other than the slightly visible patch the pipe looks like new. I intend to enjoy a bowl of some aged tobacco in a pipe that is far older than I am. I look forward to the day when I pass it on in trust to the next pipeman who will care for and cherish it. Sentimental? I don’t think so, just a realist who knows that this pipe has lived and will live longer than I.
GFB29

GFB30

GFB31

GFB32

Restemming and Refurbishing an Arlington Imported Briar Pot


Blog by Steve Laug

I have a box with a few pipe bowls in it that need restemming. When I get low on pipes for refurbishing I take one of these bowls and restem it. Generally they are not even midrange pipes. Rather they are an odd assortment of no name bowls or low end bowls that I have picked up along the way somewhere. Each of these provides me with something to practice on in terms of staining, bowl topping, repairing fills, rustication or restemming. The one I worked on last evening is stamped Arlington over Imported Briar on the left side of the shank and no other numbers. The bowl was dirty and tarred with a thick and crumbly cake. The rim was tarred and dented but no roughening from hitting against something. The shank was full of tars and even a few cobwebs. The rustication was deep on the bowl toward the bottom at the bowl shank junction. The finish was gone and the briar was dirty.

There is not much information available on the brand. A search on Google did not turn up much other than some information from Pipedia. The Brooklyn, New York Company known as Arlington Briar Pipe Corporation mainly operated as a sub-contractor for other brands. Jobey pipes are said to be made by Arlington at an unknown point of time. Arlington’s own pipes are seldom seen. The article also included the following advertisement from the RTDA Catalogue.
Arlington_01

I used the PIMO tenon turning tool to fit a tenon on a stem blank that I had in my can of stems. I fine-tuned the fit with sand paper until it fit well.I took the next series of four photos to show the state of the pipe before I worked on it.
IMG_2597

IMG_2598

IMG_2599

IMG_2600

I cleaned the inside of the shank and bowl with cotton swabs and pipe cleaners dipped in Everclear. The alcohol removed the grime from the shank. I reamed the bowl with a PipNet reamer. The bowl is quite large – so I used the largest cutting head on the reamer. I wiped down the tars on the rim with alcohol wetted cotton pads to clean off the buildup as much as possible.
IMG_2602

To clean up the rim damage I lightly topped the bowl with a medium grit sanding block. I also sanded the burn spot on the side of the shank to try to minimize it and see how deeply the damage went. It was still hard and not too badly damaged but to remove it I would change the profile of the shank so I left it as a character mark.
IMG_2603

IMG_2604

After topping the bowl I wiped the entirety down with acetone on a cotton pad. I wanted to remove as much of the remaining finish as possible to make a match between the rim and the rest of bowl easier to achieve.
IMG_2605

I then sanded the stem to bring the diameter to match the shank. I also wanted to remove the entire casting overflow on the sides and the end of the stem. I used a Dremel with a sanding drum to remove the initial excess and to bring the diameter close to that of the shank. Then I used 220 grit sandpaper to finish the fitting. I cleaned up the scratches left behind by the sandpaper with a medium grit sanding sponge and then finally used a sanding block to sand the shank and stem to good smooth fit and flow. The next seven photos show the progress to a proper fit of the new stem.
IMG_2606

IMG_2607

IMG_2608

IMG_2609

IMG_2610

IMG_2611

IMG_2612

I stained the bowl with a medium walnut stain in a linseed oil base. I rubbed it on the bowl with a cotton pad and then wiped it off with a soft cloth. I reapplied the stain until I had good coverage to the bowl. The bowl has some great grain in places and the deep grooves looked good with the new stain coat. Once the stain was dry to touch I buffed it on the wheel with White Diamond and set it aside to work on the stem.
IMG_2613

IMG_2614

IMG_2615

IMG_2616

I sanded the stem with my usual stack of micromesh sanding pads from 1500-12,000 grit. I wet sanded with the first three grits of micromesh and dry sanded with the remaining grits. Once I had finished the sanding I gave the stem a coat of Obsidian Oil and rubbed it into the vulcanite.
IMG_2618

IMG_2619

IMG_2620

When I had finished with the stem I reinserted it in the shank and took the pipe to the buffer again. I buffed the pipe and stem with White Diamond and then gave the entirety multiple coats of carnauba wax. I buffed it with a clean flannel buff to give it a shine. The next four photos show the finished pipe.
IMG_2621

IMG_2622

IMG_2623

IMG_2624

A Book Review – Our Family Business by Mary Dunhill


Blog by Steve Laug

9dca8450e349c2007078376e9fa56ebdI just finished reading Our Family Business by Mary Dunhill (pictured to the left). The book is written in the style of personal reminiscences of the author. It is quite engaging. She starts with her memories of the family from birth and moves through the various business developments as they happened and as she saw them in her growing up years. She gives a brief glimpse at the history of the Dunhill family and their settlement and house building efforts that ran parallel to the family business. It is an inside glimpse of the making of the Dunhill business groups and the people and family behind the development.

After reading the book I believe that the words written on the fly-leaf of the cover summarize the book really well: “At the age of seventeen Mary Dunhill joined her father’s pipe making and tobacco business, starting at the bottom as an assistant cashier. 38 years later she became the chairman of the Dunhill group of companies, a job she held through fourteen years of international expansion. Her book demonstrates the demands that a professional career make on a woman as well as the skill that women can bring to the problems of management. Yet this is more than a career story, more than a history of an enterprise unlikely to be rivalled in the economic conditions of today. It is a candid portrait of the Dunhill family, of their beginnings as harness makers and of the very different personalities that went into the building of a rare quality and character.”

Like most books or reminiscence the book does not have a table of contents. There are no simple headings on the chapters to give the reader an idea of the content of that chapter. It is written in a flowing style that proceeds from the early years to the later years of the writer. It is as if the reader is taken inside the head of the writer and given an intimate glimpse of her life. Mary had done a masterful job in being transparent about what she when through in a way that I have seldom seen in personalities of this ilk.

To help potential readers make a decision on whether to purchase and read the book, I have summarized the content of each chapter below.

41Xh2VfDTLL._SY344_BO1,204,203,200_ Preface – pages 5-7 – a note from Mary Dunhill on the flow and content of the book as she tells the story of her life within the Family Business.

Chapter 1 – pages 9-13 – Mary’s birth into the Dunhill family in Edwardian London. The development of her father’s move into the tobacco business is introduced. The opening of the shop in Jermyn and Duke Street stocked with pipes, tobaccos and cigars.

Chapter 2 – pages 14-21 –The early history of the Dunhill family and the related trades and businesses they engaged in. The development of the Dunhill Motorities. The chapter ends with a description of the early work of Mary’s father prior to opening his tobacco shop.

Chapter 3 – pages 22-29 –The life of Mary’s family in Harrow before the WWI. The hard times of the tobacco business on Duke Street. Her father began to make a name as a blender of the My Mixture blends. She also introduces the reader to her mother.

Chapter 4 – pages 30-38 – The life in the new house in Woodlands with a look at her school and social events. She met Rex, the man she married forty years later. Inserted into this chapter are a collection of family photos. Each is labelled and gives a clear picture of life in those times.

Chapter 5 – pages 39-46 – The development of the Dunhill pipe and the rise of that pipe to fill the need for pipes that did justice to Alfred’s blends of tobacco. A brief history of briar pipes and the way Dunhill pipes were made and the number of pipe makers employed to meet the demand.

Chapter 6 – pages 47-54 – The prosperity of the Dunhill’s is explored and their move into a life of maids, cooks and butlers is described.

Chapter 7 – pages 55-61 –Mary’s life in boarding school and how it led her to leave school and enter the family business as a junior clerk.

Chapter 8 – pages 62-72 – Her work at the Notting Hill Gate factory. Notting Hill factory turned out several thousand Dunhill pipes per week. The history of the Dunhill lighter is introduced toward the end of the chapter.

Chapter 9 – pages 73-83 – Another move to another house – the “Barn” is described and detailed. Mary explains the start of her own small cosmetics business that introduced her to customer service and business management (later it became a lucrative part of the Dunhill label).

Chapter 10 – pages 84-92 – A second photo section. The details of business development in US, Canada, France and England are mentioned and some of the famous clients of Dunhill products. The chapter ends with the birth of her first daughter, Kay.

Chapter 11 – pages 93-102 – Beginning with the birth of her second daughter, Tessa and exploring the development of the Dunhill Company during Hitler’s rise to power in Germany and the war years. She describes the bomb damage to the Jermyn Street frontage of the Duke Street shop and the destruction of much stock. Reflections on how they survived the war years.

Chapter 12 – pages 103-109 – Post war growth of the Dunhill Company. The global developments of the business are detailed. The changes in the family are also noted with the deaths of many of the older Dunhill family members of Mary’s first husband Geoffrey.

Chapter 13 – pages 110-119 – Mary’s growing involvement in the work of the Board. Her responsibility of management of the struggles of the Company in the late 50s is detailed. Her line of Mary Dunhill cosmetics had expanded across the US. The chapter ends with her marriage to Rex.

Chapter 14 – pages 120-126 – Mary’s role as Chairman of the main Dunhill board beginning in 1961. This chapter details her role on the board and the changes and developments that occurred in the early years.

Chapter 15 – pages 127-133 – The Far East marketing of the Company with significant development in the Japanese Market added to a Far East boom period. The company was also in a boom in Europe and the US. As Dunhill continues to develop, Mary’s daughter Tessa killed herself in hospital.

Chapter 16 – pages 134-140 – Summarizes the business of the Dunhill Company from 1912 through 1975 when her nephew, Richard took over the company – pipes, tobacco, lighters and accessories, jewellery, leather goods, watches, writing instruments. A diversified portfolio of products was sold.

Chapter 17 – pages 141-146 – Summarizes some of the lessons learned in her life in the family business. She describes the happiness that she experienced in leading the company during its growth years.

This book is autobiographical in nature but at the same time given the length of Mary Dunhill’s involvement in the family business it gives an intimate picture of the history of the Dunhill Company with all of its constituent parts. The inner workings of the company and the development of the tobacco blending and later pipe making aspects are rich with history for the pipeman who loves to understand the ins and outs of his/her hobby. Well worth the read. The style and manner of the writing is clear, concise and also full of revelations about Mary’s own feelings and struggles both in life and as the head of a large company.

A Book Review – The Pipeman’s Companion by Ogden’s of Liverpool


74522My copy of this book was published by Interfocus Publishing, Bristol, England. It is marked a First Edition and dated 2000. The cover of this of my edition is seen to the left and is the publisher’s original illustrated card wrap cover [softback]. It contains 59 printed pages of text with colour illustrations and photographs throughout.

On the inside cover there is a dedication that reads: To Pipe Men Everywhere from Ogden’s of Liverpool.
Across the page from the dedication is a Welcome from the editors that reads as follows:

“The Pipeman’s Companion is an unashamed celebration of the pleasures of the pipe and pipe smoking. It is brought to you by Ogden’s of Liverpool – Britain’s leading pipe tobacco manufacturer, whose world renowned brands include Gold Block, Amphora and the best-selling St. Bruno. The Pipeman’s Companion is also an invaluable reference work that all discerning pipe men will want to return to time and again. We have attempted to cover every fascinating facet of the history and practice of pipe smoking, with the aim of enhancing every pipe smoker’s understanding and enjoyment of this most satisfying of pastimes – be they experienced by pipe men, or eager new recruits. Ogden’s of Liverpool, with its distinguished past, looks forward to remaining a trusted companion to pipe men for many years to come.”

A brief glance at the table of contents gives a clear idea of what is included in the pages of the book.
Chapter One – pages 2-11 – The Smoking Story, Five Hundred Years of Pipe Smoking
Chapter Two – pages 12-20 – The Tobacco Story, Blended to Perfection
Chapter Three – pages 22-33 – The Pipe Story, Crafted with Devotion
Chapter Four – pages 34-39 – The use and Maintenance Story, A Friend for Life
Chapter Five – pages 40-47 – The Ogden’s Story, Sweet Smell of Success
Chapter Six – pages 48-53 – The Antiques Story, Bringing the Past to Life
Chapter Seven – pages 54-57 – The World Story, Pipe Smoking Across the Globe
The Glossary – pages 58-59 – Pipe Smoking, Tobacco and Pipe Terminology

The book is a beautiful table top sized book filled with highly readable text and many photos of pipes, etchings, artwork and photos of antique pipe and tobacciana. The sidebars of each page are filled with historical pictures and short notes on all things pipe and tobacco related. These side bars run next to the main body of the text and are a pleasure to read by themselves. In Chapter Three there is a great photo spread and short side bar expanded over several pages about Bill Ashton Taylor and his Ashton pipes. It has some great photos of Bill turning bowls, filing stems and flaming stain on newly made pipes. Include are charts of pipe shapes and the anatomy of a pipe etc. The pipe chapter includes not just briar but also Clay and Meerschaum with some great photos of carving and shaping Meerschaum pipes.

Chapter Four on pipe maintenance is well written and includes material on pipe lighters, matches, pipe reamers and tampers. This chapter has charts on reaming correctly and on common pipe problems solved. It is interestingly written with a great wealth of information in the space of a few pages generously interspersed with colour photos of pipes and pipe tools.

Chapter Five is a history of Ogden’s of Liverpool from its beginning to the early years of the 2000’s. It is again richly written and there are some amazing photos included of tins from the Ogden Tobacco line as well as great photos of the factory and production floor. The side bars in this section continue the tradition of the previous chapters in including tidbits of information and historic photos and artwork. For instance there is a full page of advertisements and posters for St Bruno. These alone are fascinating.

Chapter Six is on Antique Pipes and gives a collection of photos of all kinds of pipes. There is a front spread of carved Meerschaum pipes that is beautiful. Some of the pipes are huge while others are delicate and unusual. There is for instance a cased set of a Victorian couple lying in bed – two pipe bowls inserted under the “Covers” with stems set in the cover of the pipe case.

Chapter Seven is a quick world tour through word and photographs of the state of pipe smoking. It is well written and captures the universal appeal of the pipe and tobacco.

The book ends with a useful glossary of terminology. It covers pipe shapes, pipe anatomy, pipe repairs and types of tobacco and cuts of tobacco. It also covers pipe accessories and how they are used. It is a helpful list with short definitions.

The Pipeman’s Companion is a well written book that is a great read and visual display of all things pipe related. It is easily a book that could be read as you smoke your favourite bowl of St. Bruno’s or as you sit and read by the fire on a cold winter’s evening. It will provide hours of enjoyment and is a great refresher to the long time pipeman as well as important information to the new pipe smoker. It truly welcomes us into the world of pipemen throughout history. Well done Ogden’s of Liverpool for a well crafted book on the world of the pipe. Thank you for your work in producing this book.

A Book Review – Barling’s International Exhibition, London 1851 Pipe Catalogue


Blog by Steve Laug

Barling Catalogue
I purchased this facsimile/reproduction catalogue of 28 pages on EBay a bit ago. It cost approximately $20 USD and the seller had quite a few available at the buy it now price.

They printed a run of 200 copies and this one is 010 of 200. It is copyrighted by Jesse Silver. There is an email address included inside the cover should you want to order a copy of the catalogue noblebrush53@yahoo.com

Included with the catalogue is a print of the Barling’s Factory. The inside is nicely done and indeed looks vintage. The type is in two colours – a reddish brown and a black. There are also nice etchings of the various pipes. Each page shows four pipes, each one number and named. The names are quite catching. Here are a few for interest sake: The Goodwood, Birkenhead, Savernake, Aberdeen, Nymph, Bent Army, Corinthian, Sydney, Elegant, Trojan and Victorian. The names don’t always reflect the shape of the pipe but sometimes do as in the Bent and the Straight Army. Some of the short chubby pipes also have unique names: The Gordon, Sporting, Hunt, Jap are just a few of the names. The overall feel of the book is like a trip back in time to a simpler and quieter era. The catalogue opens with the words: these are just a few of the many shapes that are available in Barling’s Celebrated Pipes.

I wanted to include the opening page of the catalogue for your reading pleasure. It is a note from B. Barling & Sons, London and reads as follows:

“We have much pleasure in presenting our New Catalogue illustrating some of the principal shapes and specialties in our celebrated EB/WB Briar Pipes.

Our pipes being so well and universally known (without artificial aid of advertisements), we will not here dwell on their perfection, but would ask you to kindly peruse this book, which will no doubt introduce to you some new patterns.

If you are not already a smoker of our pipes, we hope that it will lead to your giving them a trial and thus testing their quality and workmanship, we ourselves being confident of your ultimate judgment and satisfaction.

Every department of our factory being under our own practical and personal supervision, ensures every pipe turned out by us coming under our direct notice. This fact, coupled with the excellence of the materials used in their manufacture, has given our pipes a reputation second to none in the smoking world, a reputation we firmly intend to maintain and strengthen.”

I find the introduction to the catalogue a fascinating read and one that has proven to be true even in our day over 150 years later. Barling’s Pipes are still seen as quality pipes that deliver a great smoke. I have Pre-transition, Transition and Post-transition pipes and though there are certainly differences in quality of workmanship in the later pipes they nonetheless are good smokers. The pages of the catalogue are full of information both in the form of the photos and shape names and numbers but also in the stampings on the pipes and the linking of certain shapes to others with a note on the size. For instance, the Hunt, No. 344 a diamond shank billiard, is a parallel shape to shape #324 which is larger and shape #566 which is smaller.

After the main shapes portion of the catalogue the pages turn toward specialty items such as Crocodile and Morocco cases which are noted to be “unsurpassed for durability and finish” and can be obtained for any Barling pipes as a Single or a Companion case. There are several pages o of pipes with unique covers – with shapes from flat to domed, with hinges and with chains holding them in place. These are truly beautiful looking pipes. Something I was unaware of was that Barling’s made Meerschaum lined pipes as well. They show three examples with a note that they can be made for any shape of Barling’s pipes. I had to laugh at the note (so contrary to much I read today on the forums regarding meer lined pipes) that “Our Meerschaum Lined Pipes we can recommend for cool and sweet smoking. They are suitable for hard smokers and also for those who do not like briar…”

The catalogue ends with what for me has become a bit of a wish book – Specialties in Companions and Cased Amber Briars. These are the beautiful cased singles and pairs of pipes – one with a vulcanite stem and one with an amber stem on matching pipes. Others have a bent pipe and straight pipe with a military bit with two sets of stems – vulcanite and amber. Some have stem extensions made out of albatross wing bone and others have three pipes in a case. These cases are the Crocodile and Morocco cases spoken of above. The economy of size and shape make these great pocket cases for the pipes they contain. I am forever on the prowl for a set like these to add to my collection.

If you want to have a piece of history in the form of a catalogue that gives you a real feel for a time long gone you could not do better than pick up a copy of this facsimile. It is a treat for the Barling’s pipe collector and smoker and would also be a great piece for anyone who wants a nostalgic glimpse at the past.

A Book Comparison: Confessions of a Pipeman – 2nd Edition by Gary Schrier


Confession of a Pipeman CoverThis is not as much a review as a comparison of the first edition to the new second edition of the Confessions of a Pipeman by Gary Schrier. I have reviewed the Confessions, first edition on the blog previously and the review still stands. The book is truly a good read and will provide you an opportunity to pause and reflect on the hobby and lifestyle of being a pipeman. I enjoyed the second edition as much as the first. The link below will take you to the review of the first edition. https://rebornpipes.wordpress.com/2012/05/30/confessions-of-a-pipeman-first-edition-gary-b-schrier/
Gary released the second edition of his book, Confessions in September 2010. According to the advertisements on his site this edition has 50% more content than the first, 24 chapters and more illustrations, now all in color. This new, expanded edition, Schrier gives the pipeman more of that irreverent, much-needed counsel on being a better pipe smoker. I decided to do a bit of comparison for the sake of deciding if the purchase of the second edition would be worth the cost.

I checked out the website to see how Gary was marketing the book and how much that would help in explaining the additions and justify purchasing the new edition. The site has the following quote: “Not a “how to” book, but a lifestyle guide. As a cautionary note, I will warn the easily-offended and politically-correct person that this little book throws punches, though I believe all of them are above the belt. I hope you find my views amusing and thought provoking and that you enjoy reading my words as much as I enjoyed struggling to cobble them together professional-like. This book is unlike anything the pipeman has seen written about his treasured passion of the pipe, tobacco, and how he is to get on with it. For the beginner and knowledgeable alike.With a foreword by Marty Pulvers.”
The book sells for $20 and can be ordered directly through Briar Books Press. The web address is http://www.briarbooks.com/

I read the original edition of the book when it first came out and thoroughly enjoyed it. It delivers exactly what Gary promised. It is a book of essays that is interesting, amusing and provocative. Gary has no qualms about stating his opinions on the topic at hand regardless of whether he is the only one holding them. I find his approach refreshing and stimulating. I laughed as I read the book and more often than not found myself agreeing with his assessment of things. There were points in the book I found thought provoking even if in the end I did not agree. It is a great read. So after reading the press and doing some research on the two editions I decided to pick up a copy.

I made the chart below to compare the two editions and to clearly show the additional material and give you an idea of what is in the book. The first column is the material in the second edition while the second column is that found in the first edition. I know it is the opposite of what you would expect but that is why I am noting it for you. I further highlight the new material by the blue cells on the chart. These show the essays that were added in the second edition. These include the new Preface and the following essays/chapters: Dunhill is Dead – Long Live Dunhill, Cavendish, Heart of Hearts, What Others Have Said, You Might Be A Pipeman If and What If You Should Die. These chapters and the edits to the previous chapters make the purchase of the second edition worth the price – especially if you enjoyed the first edition.

Thanks Gary for the work you are doing making pipe books available and accessible to the well read pipeman. I for one greatly appreciate the work you are doing.

COMPARISON OF THE SECOND AND FIRST EDITIONS OF CONFESSIONS OF A PIPEMAN by Gary Schrier
Pipeman

A Dr. Grabow Special Rhodesian/Bulldog – A Makeover


The last of the pipes from the Ebay lot below was the one in the bottom left corner of the photo. It was stamped Dr. Grabow over Special over Imported Bruyere on the left side of the shank. The finish was a varnish or polyurethane coat over the briar. It was bubbling and crackling. There was water damage on the edges of the rim. The briar itself was in good shape with no dents or roughening on the rim. The rim was slightly darkened but no dents or dings. The bowl was slightly out of round from poor reaming but very workable. The stem was a mess with chew marks on the top and the bottom for about an inch up the stem from the button. The stem was made of nylon and not vulcanite. The tenon was a push style and not a screw in stem. There was a shovel like stinger in the end of the tenon. The stem was loose in the shank and there was significant debris and buildup in the shank and in the stem. The second photo below shows the pipe as it was in the pictures from the seller.
pipes1

pipes3

I took it to my worktable this evening and went to work on it. I took the stem out and began to sand on the bite marks on the top and bottom of it. The next series of five photos show the progress of smoothing out the stem by sanding. I began with 220 grit sandpaper and worked up to a medium grit sanding sponge. By the fourth and fifth photo the bite marks are gone and some sanding scratches remain that will need to be worked out with micromesh sanding pads. I recut the edge of the button on the top and bottom with a needle file to clean up the angles. That is also visible in the last two photos. I also removed the stinger and cleaned it with 0000 steel wool and then polished it with micromesh sanding pads.
IMG_2564

IMG_2565

IMG_2566

IMG_2567

IMG_2568

While I worked on the stem the bowl had been soaking in an alcohol bath to help loosen the varnish or urethane finish. My plan was to remove the finish totally and sand and restain the pipe once it was cleaned and sanded.
IMG_2569

IMG_2570

IMG_2571

The alcohol bath softened the finish so when I dried it off the finish was cloudy. I have found that with this kind of finish I can use acetone on a cotton pad afterward to further remove the softened finish. The next two photos show the bowl with the finish removed. There is some nice looking birdseye grain coming through. Once the briar was clean I reglued the metal decorative band back on the shank and let it dry.
IMG_2572

IMG_2574

I sanded the bowl with the medium grit sanding sponge and then with 1500-2400 micromesh sanding pads. The next series of four photos are a little out of focus but the cleaned surface of the briar is visible and the grain that was underneath the finish is quite nice. I was also able to remove the water marks/damage that was along the outer edge of the rim and down the side of the bowl in the process of the sanding. I also cleaned out the shank with cotton swabs and Everclear. I did the stem as well and cleaned until the cleaners and swabs came out clean and white.
IMG_2575

IMG_2576

IMG_2577

IMG_2579

While the glue dried I worked on the nylon stem. I was able to remove all of the tooth damage. I wet sanded it with 1500-2400 micromesh sanding pads and removed the majority of the scratches left behind by the sanding sponge. I continued to rework the stem with these sanding pads until all of the scratches were gone and the stem began to take on a shine. (Photos 1-2 below show a top and bottom view of the stem).
IMG_2581

IMG_2582

I dry sanded with the remaining grits of micromesh sanding pads from 3200-12,000 grit. The stem took on its original shine. The next series of four photos show the stem as it moves through each level of polishing.
IMG_2583

IMG_2584

IMG_2585

IMG_2586

I wiped the bowl down a final time with acetone on a cotton pad to remove the sanding dust and grit. I dried it carefully and then it was ready to stain. I decided to use a linseed oil and medium walnut stain on this pipe. I felt it would make the grain show well and give the bowl a good protective coat. I applied the stain and wiped it off, reapplied and wiped it until I got the coverage I wanted on the bowl. The next series of four photos show the stained bowl.
IMG_2587

IMG_2588

IMG_2589

IMG_2590

I buffed the bowl and shank on the buffing wheel lightly with Tripoli and then with White Diamond to give it a shine. I then buffed it with carnauba wax and gave it several coats to protect the wood. I did not buff the stem on the wheel as the nylon heats too quickly on the buffing wheel and melts. I have made a mess out of more than one nylon stem. It does not seem to matter how light a touch I use the wheel and the nylon stems do not work well together. I gave the stem a coating of Obsidian Oil and rubbed it into the stem. I then hand applied several coats of carnauba wax and hand buffed the stem with a shoe brush and a soft cotton cloth. The finished pipe is pictured below. All in all it is not a bad looking old Grabow. It is clean and should smoke very well.
IMG_2591

IMG_2592

IMG_2593

IMG_2594

Rejuvenating A Nicely Grained Merchants Service Apple


I bought a pair of older pipes on EBay for a good price. I have written about the refurbishment of the first – the ¾ bent Royal Falcon in an earlier blog post. This particular post is about the second pipe. It is pictured at the top of the first two photos below and on the left in the third photo. It is stamped on the left side of the shank with the words, Merchants over Service in block capital letters over London Made also in block caps though smaller stamp. There is a shape number stamped next to the above stamping and just prior to the stem – 519. The photos below were supplied by the seller in the EBay sale. The seller said that the finish on the pipe looked very good in the photos and the stem was in good shape without cracks, dents or tooth chatter. They also said that the bowl was clean but previously smoked.
MS pipe

While I waited for its arrival I did a bit of hunting on the web to find out what I could about the brand. There was not much information available and what was there was attached to Bing Crosby. What I found out about the brand on the internet turns out to have originally come from Jose Manuel Lopes great work called Pipes, Artisans and Trademarks. The Merchant Service Pipe was a former English brand of pipe made by Merchant Service Ltd. It was a firm created by Herbert Merchant (d.1944) and which later belonged to Holland Penny Limited. It turns out that the company was a favourite of the North American Entertainer Bing Crosby. That is not a lot of information and I would love to find some more. If anyone who reads this has more information please do not hesitate to post it in the response boxes below.

I took the pipe to my worktable this morning and worked on the stem. It was pretty clean though it had some oxidation on the left side next to the shank and some tooth chatter on the top and bottom of the stem next to the button. I sanded the stem with 1500 grit micromesh to remove the oxidation and to sand away the tooth chatter next to the button. I wet sanded with the micromesh pad until the finish was a matte black and free of oxidation and marks. The next four photos show the stem after this initial sanding.
IMG_2535

IMG_2536

IMG_2537
The underside of the bowl was covered with many fills of a pinkish coloured putty that showed through the finish.
IMG_2538

I decided to remove the largest of the putty fills and rework them with briar dust and superglue. To prepare the surface of the briar for reworking the fills I wiped down the surface of the bowl with acetone on a cotton pad. As I removed the grime and some of the dark buildup on the bowl a beautiful grain began to pop out on the briar. This one was going to be a beauty when I finished refurbishing it.
IMG_2539

IMG_2540

IMG_2541

IMG_2542

I cleaned out the inside of the pipe and stem before working on the fills. It took many pipe cleaners and cotton swabs to remove the buildup inside the stem and shank. The shank had a reservoir area below the airway and it had collected a lot of tars and build up. The stem was also dirty on the inside.
IMG_2543

When I had finished cleaning it I removed the stem and turned the bowl over on the worktable to begin to pick out the putty in the fills. Once I had the putty picked out I wiped the surface down with acetone once again to remove the debris that might be left behind in the flaws. I packed briar dust into the cleaned areas and tamped it down into the grooves. Once it was tightly packed I dripped clear superglue into the repaired area and pushed some more briar dust into the superglue surface. When it was dry, which takes very little time, I would sand down the surface to make it match the bowl surface.
IMG_2544

I sanded the superglue/briar dust fill with 220 grit sandpaper and a medium grit sanding sponge to remove the excess of the patch (I always overfill them as they tend to shrink as the glue dries). The third photo below shows the patch after the sanding has blended it into the surface of the bowl. I sanded it with micromesh sanding pads 1500-3200 grit to prepare the surface for the restaining. I wiped it down a final time with acetone on a cotton pad to remove all grit from the sanding. It was ready for a restaining.
IMG_2546

IMG_2547

IMG_2548

I applied a dark brown aniline stain mixed with two parts isopropyl alcohol to one part dark brown stain. I used a cotton swab to apply it to the newly sanded area of the repair and flamed it and restained until it matched the rest of the bowl. When that was finished I gave a light coat of stain and flamed it to the entire bowl to blend in the restain on the bottom even more. The next five photos show the restained bowl bottom and then the retouched remainder of the bowl.
IMG_2549

IMG_2550

IMG_2551

IMG_2552

IMG_2553

With the bowl finished and ready to go it was time to tackle the stem. I sanded it with micromesh sanding pads from 1500-12,000 grit. I wet sanded with 1500-2400 grit and dry sanded with the remaining grits. The next three photos below show the progressive shine building on the stem. Once it was finished I buffed it with White Diamond and then rubbed it down with Obsidian Oil to protect it. When it had dried I put it back on the pipe and took it to the buffer.
IMG_2554

IMG_2555

IMG_2556

I buffed the entirety (carefully around the stamping) with White Diamond a final time and then gave it multiple coats of carnauba wax and buffed it with a clean flannel buffing pad. Once it was finished I loaded up a bowl of Balkan Sobranie Virginian No. 10 and went for a long walk on a cool and dry fall day in Vancouver. It is a great smoking pipe and one that is one of my favourite shapes.
IMG_2557

IMG_2558

IMG_2559

IMG_2560

A Canadian Pipe Maker I had never heard of: Leonard Payne Pipes


Blog by Steve Laug

On a Saturday not too long ago I went on a pipe hunt in Vancouver. I began at the Vancouver Flea Market and worked my way back toward my home. I stopped a quite a few antique shops and “malls” in my hunt for old pipes. I found a few at the flea market and several old timers at the shops that I left behind. However, one pipe caught my eye. It was not a brand that I had seen before or heard of.It was a nicely shaped thick shanked apple that needed very little work. It had a bit of tarry build up on the rim, some tooth chatter on the stem and minor oxidation. It grabbed my attention. The stamping was Leonard Payne on the left side of the shank and Made in Canada on the right side. The stem bears a green dot in the centre of a white circle on the left side of the stem. I decided to do a bit of research on the web and found the following advertisement that highlighted the pipes.
Payne Pipes

Further digging with Google came up with this short note from alt.smokers.pipes forum. It was written by Mike Glukler of Briar Blues. I quote it below in full. (https://groups.google.com/forum/#!topic/alt.smokers.pipes/RrICLiVgE2o) “Leonard Payne was based in B.C. for many years. He came to Canada from England. He had shops in Surrey, B.C. and Kelowna, B.C.Interesting fellow. Gruff as the day is long. When you bought a pipe it was handed to you in a paper bag. No sock, no box. Most of his pipes carried a “carburetor” system at the shank / stem junction.Another Payne idea was his shanks. Almost all his pipes were two pieces. He’d turn the bowl and shank, then cut off the shank and reattach with glue (not always with the same piece of briar, so many did not match grains). His thinking was that the shank being the weakest link, if cut and glued would never break and thus “correcting”the weakest link.You may find his pipes on E-Bay on occasion listed as a Len Cayne. The P in his stamping looks more like a fancy upper case C.”

That is the extent of information that I could find on the pipe. It was a Canadian made pipe carved by an eccentric BC pipe carver. The one example I purchase was a single piece of briar without the broken and reglued shank that Mike mentions above. It is a light weight piece of briar and the fit of the stem and shank is very well done. The gap between the end of the tenon and the end of the mortise is very small – just enough to allow for expansion. The finish was very good and the stain well done.

My clean up on the pipe was very simple. I sanded out the tooth chatter on the stem near the button and polished the stem with micromesh sanding pads from 1500-12,000 grit. I then took it to the buffer and used red Tripoli and White Diamond on the buffing wheels to further polish the stem. I reamed the bowl and cleaned the tars off the rim and polished it as well with White Diamond. I am careful when buffing the shank area where the stamping is so that I do not harm the stamping. Once I was finished with the polishing I gave the bowl and the stem several coats of carnauba wax. I polished the pipe with a soft flannel buffing pad. The finished pipe is pictured below.
Payne1

Payne2

Payne3

Fast forward several months to a conversation had with a friend in Ontario via email. She had come across several Leonard Payne pipes and done the same research I did. She found the same information I did and sent me photos of the three pipes she found. We talked for a while and I offered to restem a pipe of hers. She sent me the pipe for work and then also the nice little Leonard Payne Zulu/Dublin pictured below.

She said that it needed some TLC but it was really in quite good shape. The finish was clean, though somewhat spotty. There were very few scratches or dings. There was a scuff mark on the bottom of the shank next to the stem and the stem was slightly scuffed in the same area. The rim was also clean. The bowl was already reamed and relatively clean. The bowl and shank smelled of Latakia but the pipe really seemed to be hardly smoked and certainly not broken in to the bottom of the bowl. The stem had some ripples in the surface near the button and in those were the remnants of tooth marks. The shoulders of the stem at the stem/shank junction were slightly rounded from sanding or buffing with the stem off the pipe. There were two small spots of oxidation around the logo.
IMG_2520

IMG_2521

IMG_2522

IMG_2523

I sanded the stems and shank with a fine grit sanding sponge and used a sanding block to reduce the rounding to the shoulders of the stem. I then sanded the stem with micromesh sanding pads from 1500-12,000 grit to polish the vulcanite. I rubbed stem down with Obsidian Oil and let it soak into the surface. Once it was dry I buffed it with White Diamond and then carnauba wax. The ripples in the stem are gone and the oxidation around the logo is also gone. My Black and Tan Cocker Spaniel decided to sit and “help” me this morning. He has learned that I generally have some dog chews at the work table but he gives me the illusion that he is really interested in what I am doing!
IMG_2524

IMG_2525

IMG_2526

IMG_2527

I set the stem aside and worked on the bowl. I found that though the finish was clean it was faded and spotty in places. I decided to give it a coat of medium walnut aniline stain mixed with linseed oil to even out the finish and give it a shine. I applied the stain with a cotton pad and then buffed it by hand with a cotton cloth when it was dry.
IMG_2528

IMG_2529

IMG_2530

I reinserted the stem and gave the entire pipe a buff with White Diamond and then gave it several coats of carnauba wax. I finished by buffing the entirety with multiple coats of carnauba wax. The finished pipe is pictured below. This nice little pipe is cleaned, restored and ready to smoke. It joins the other Leonard Payne pipe in my collection.
IMG_2531

IMG_2532

IMG_2533

IMG_2534