Recommissioning a Hefty Ben Wade Bent Billiard Made in London England


Blog by Dal Stanton

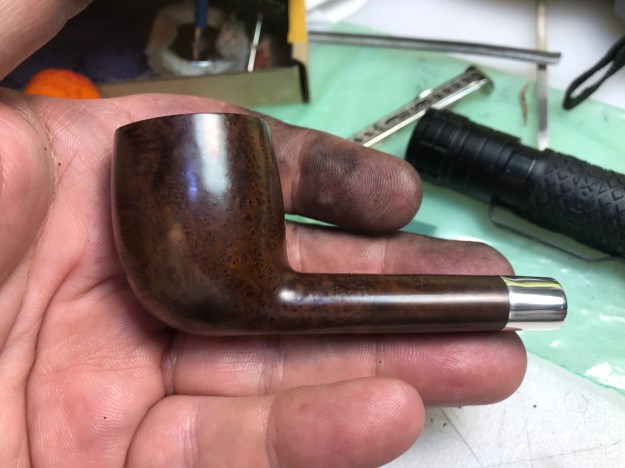
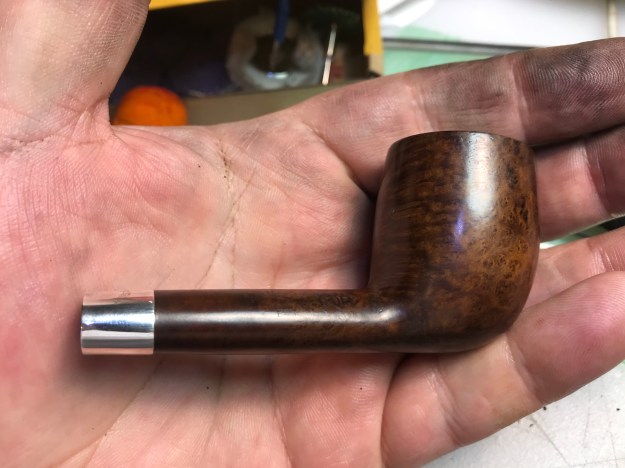
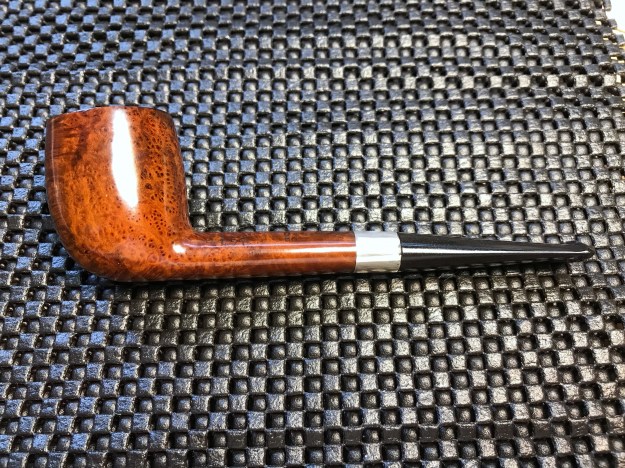
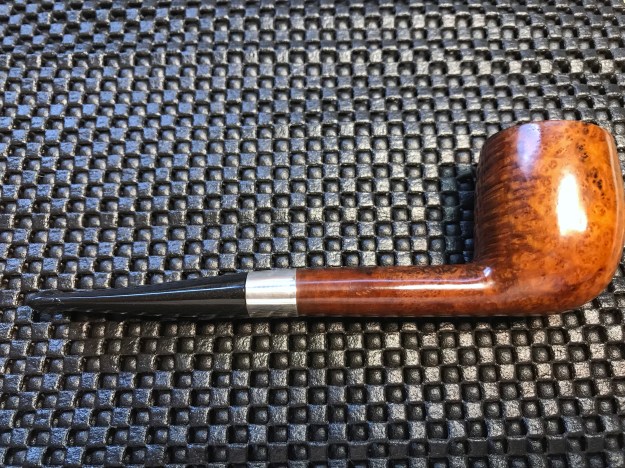
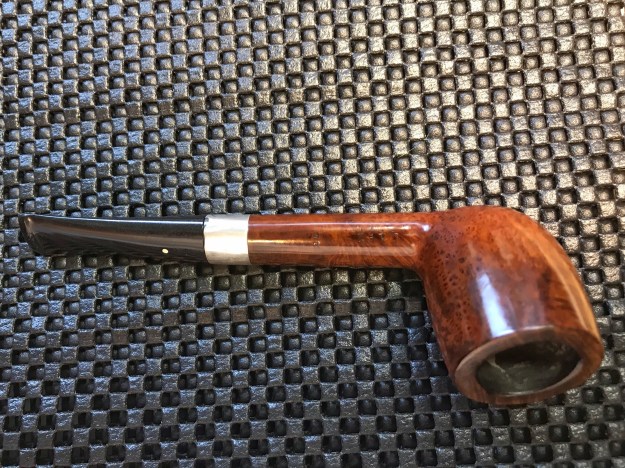
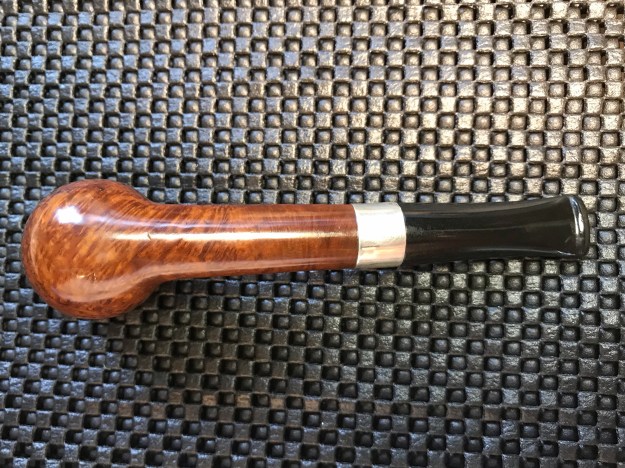
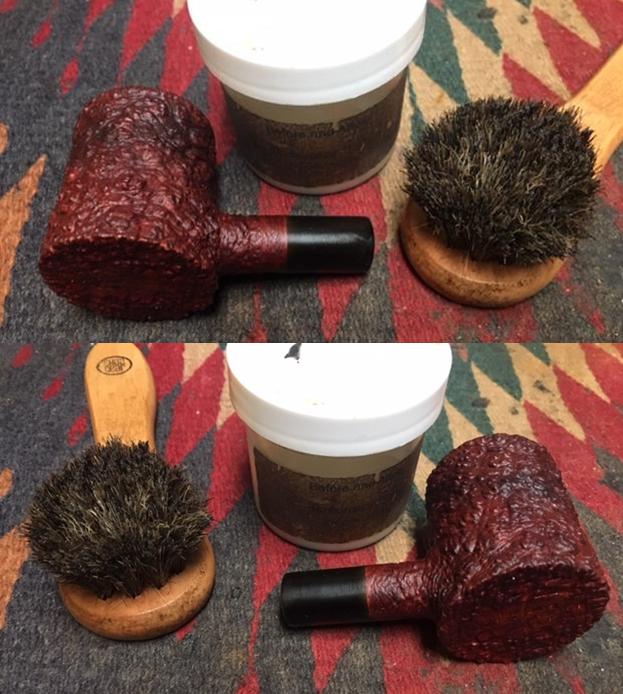
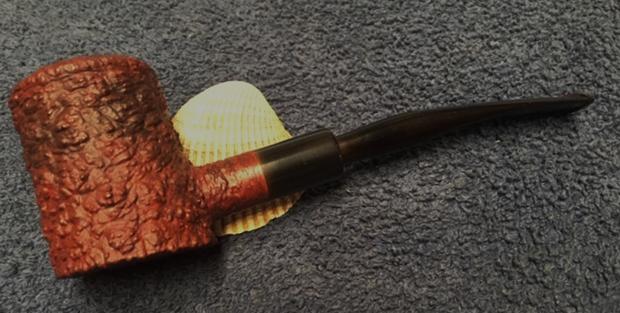
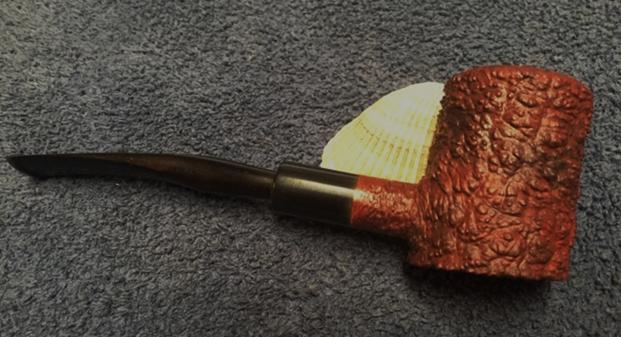
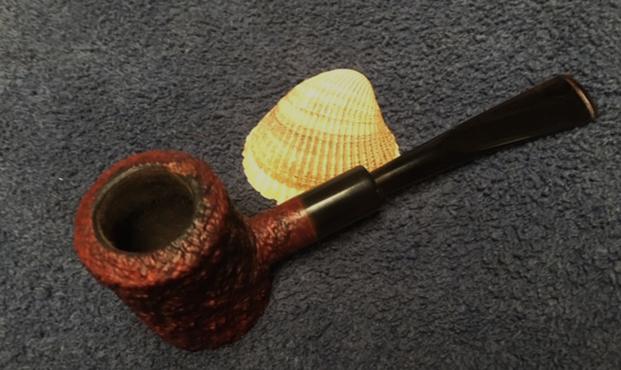
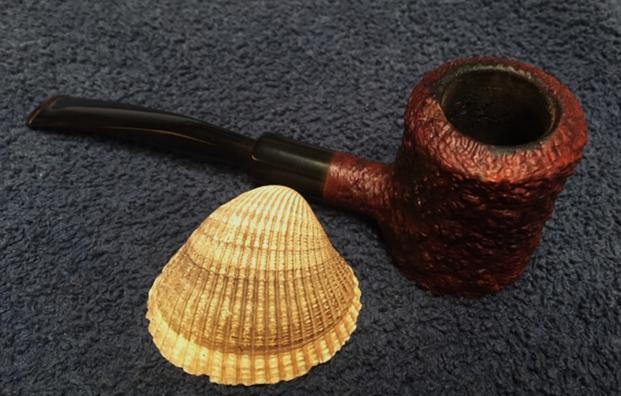
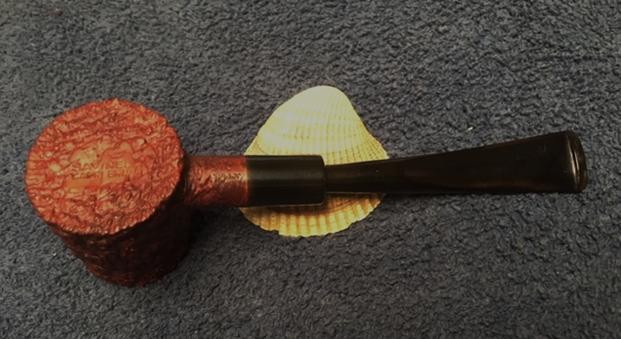
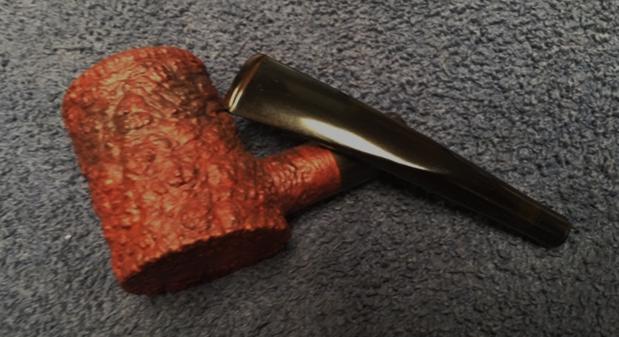
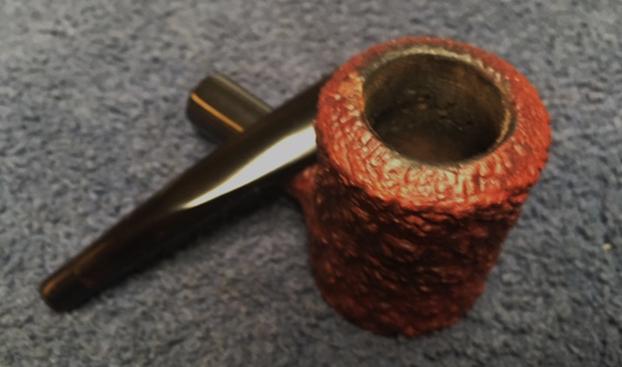
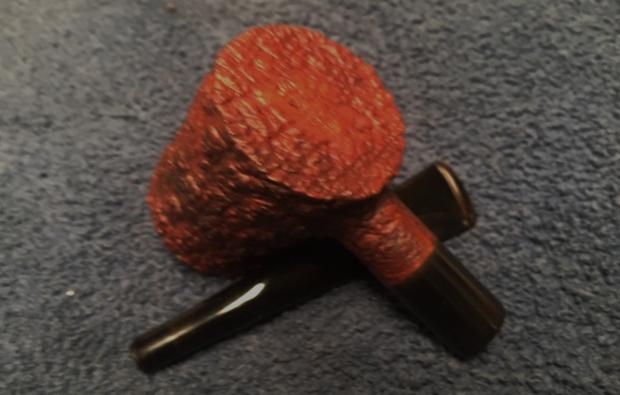
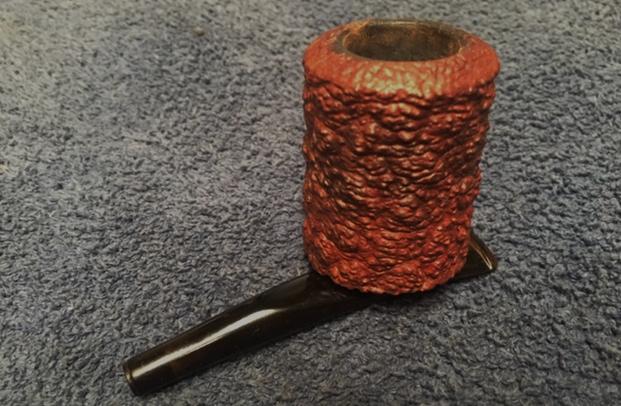
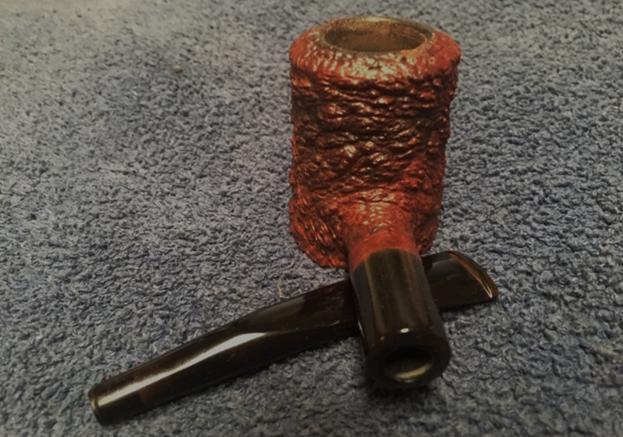
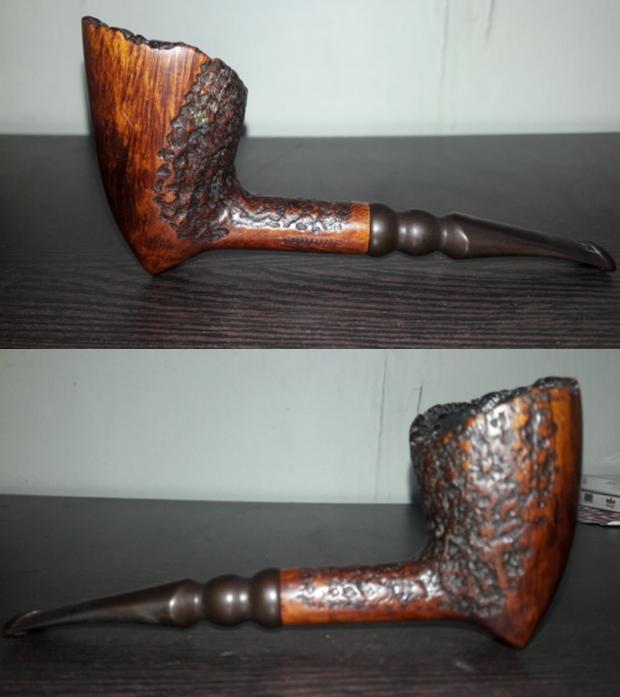
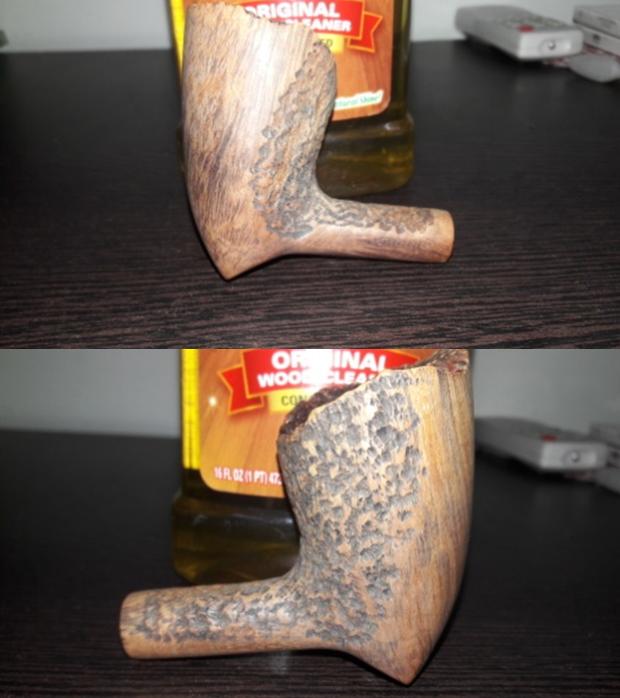
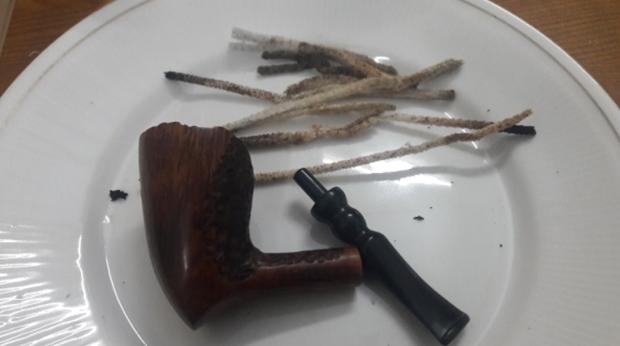
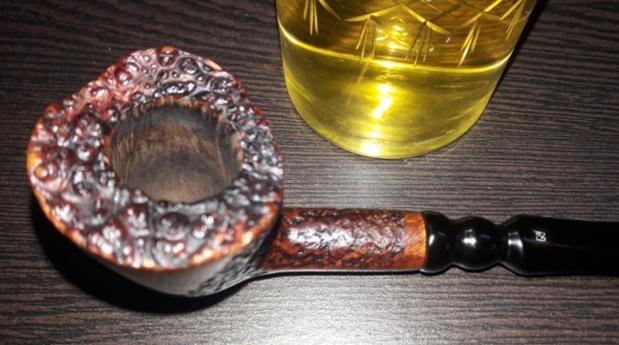
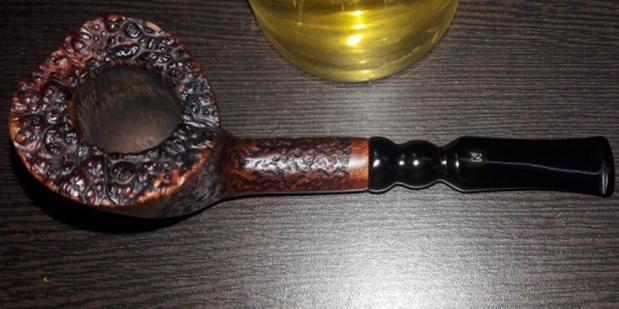
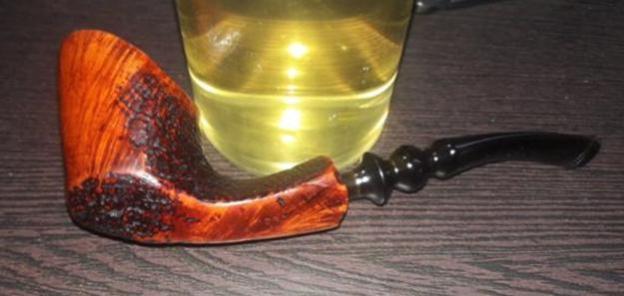
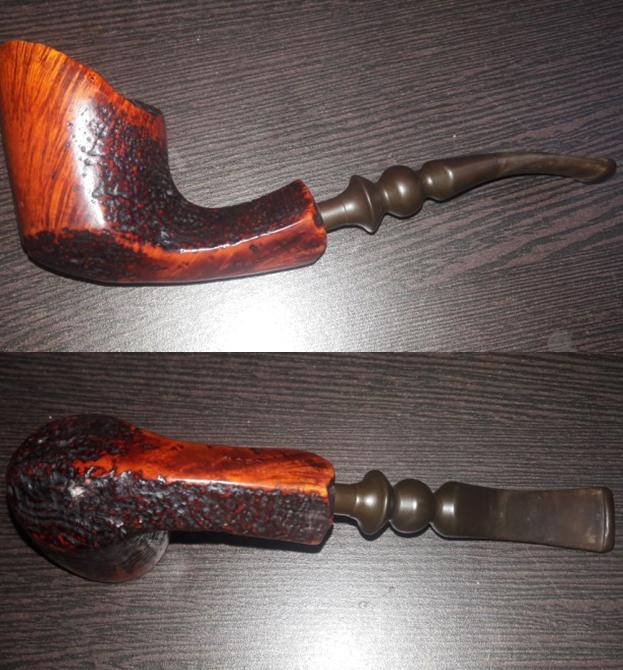
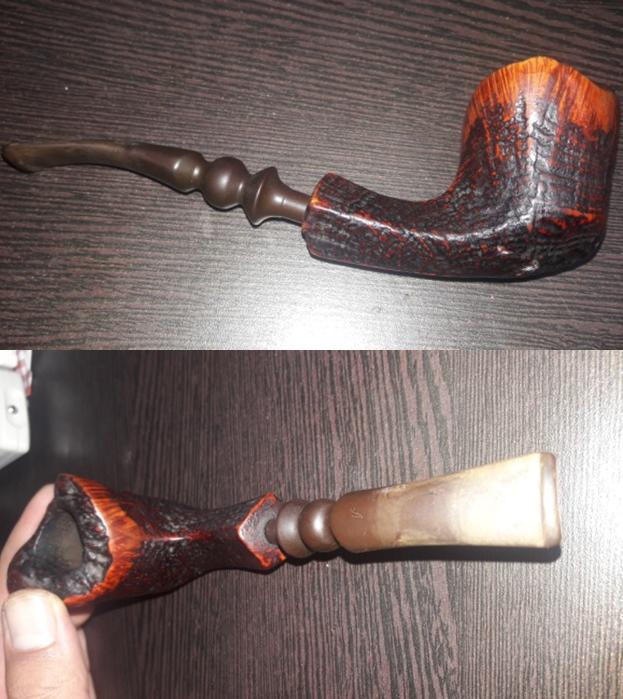
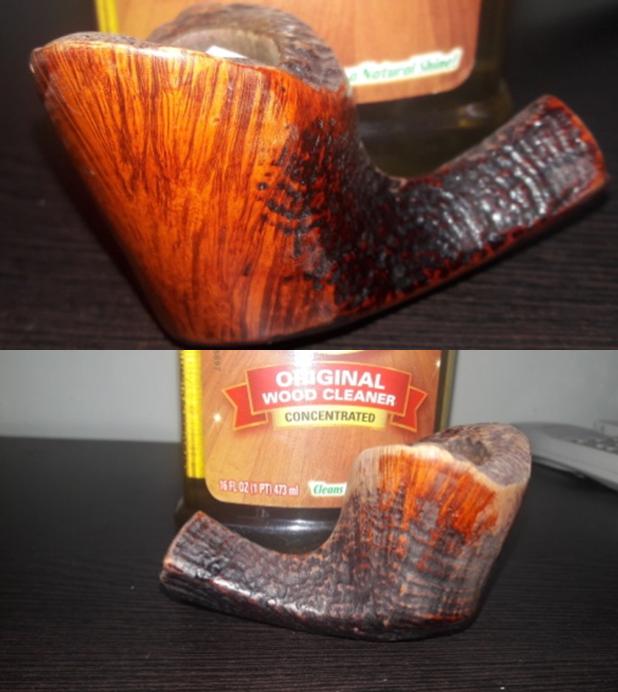
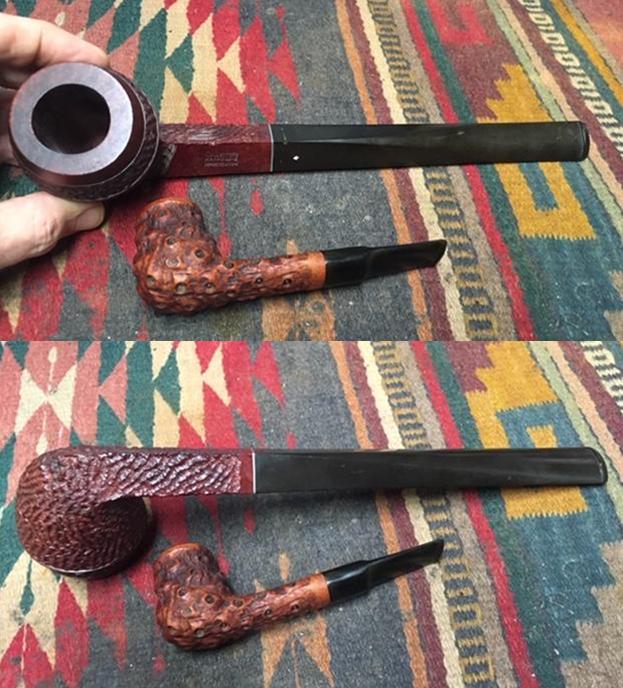
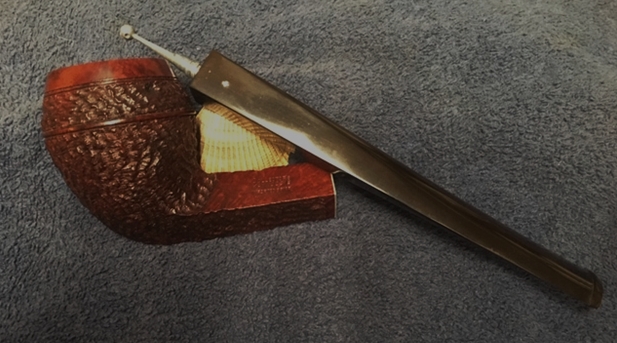
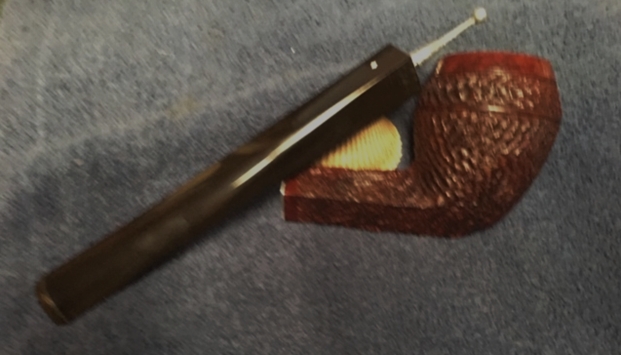
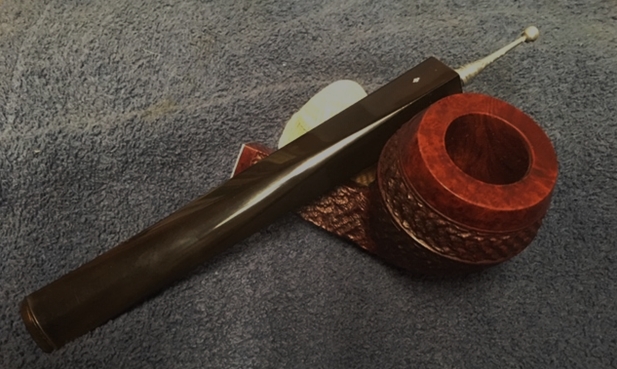
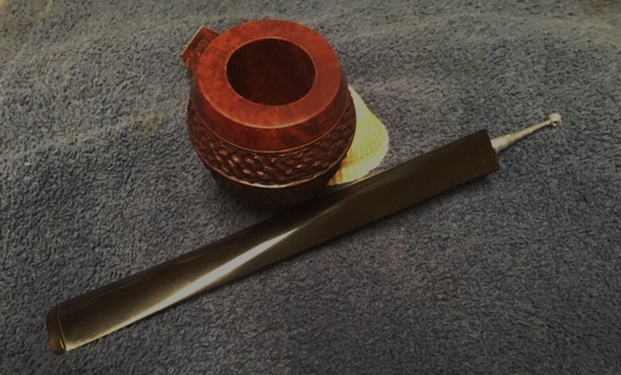
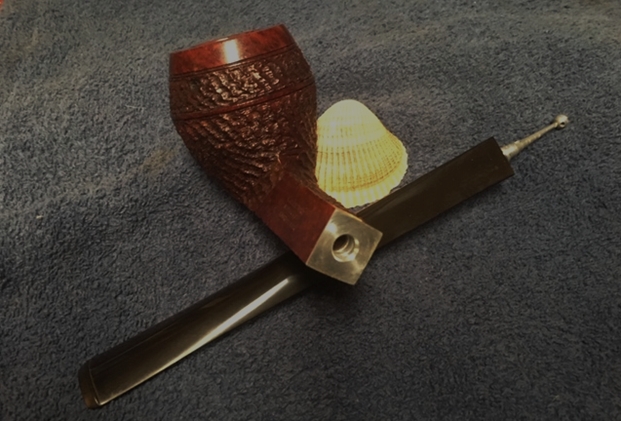
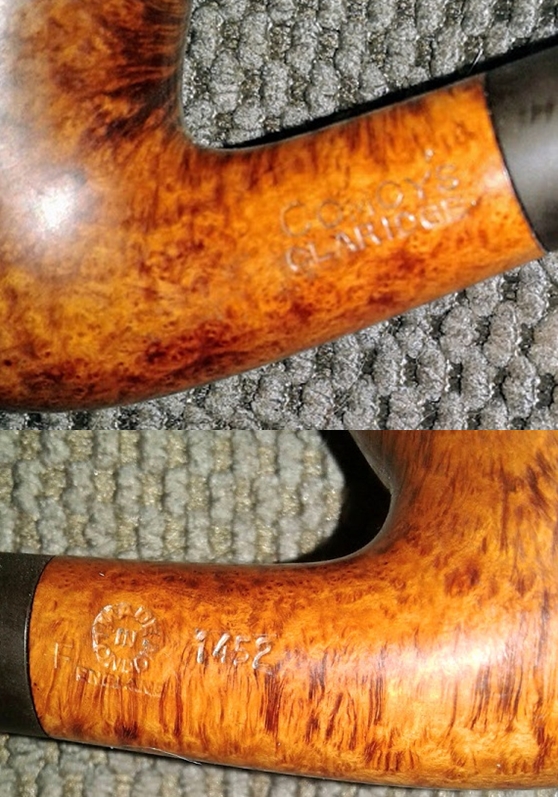
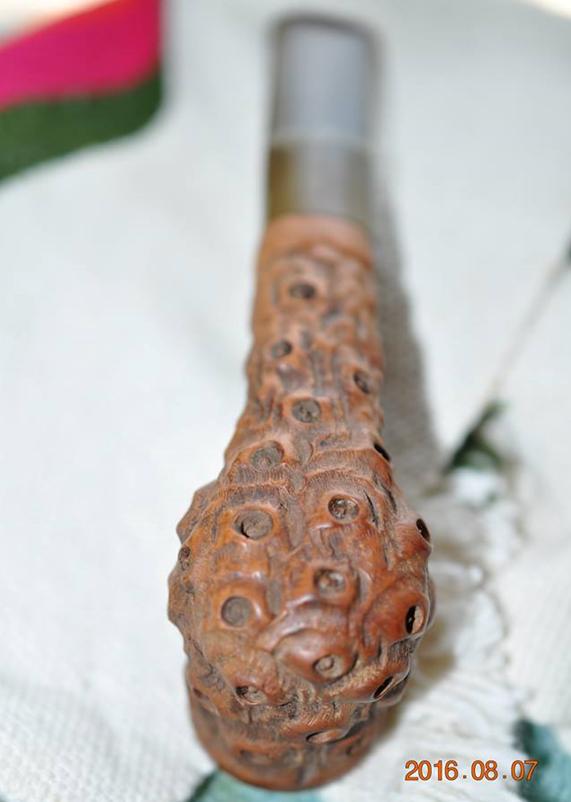
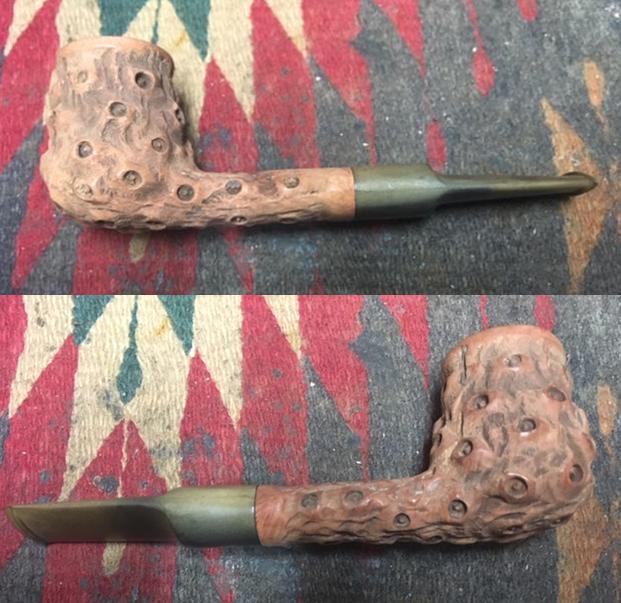
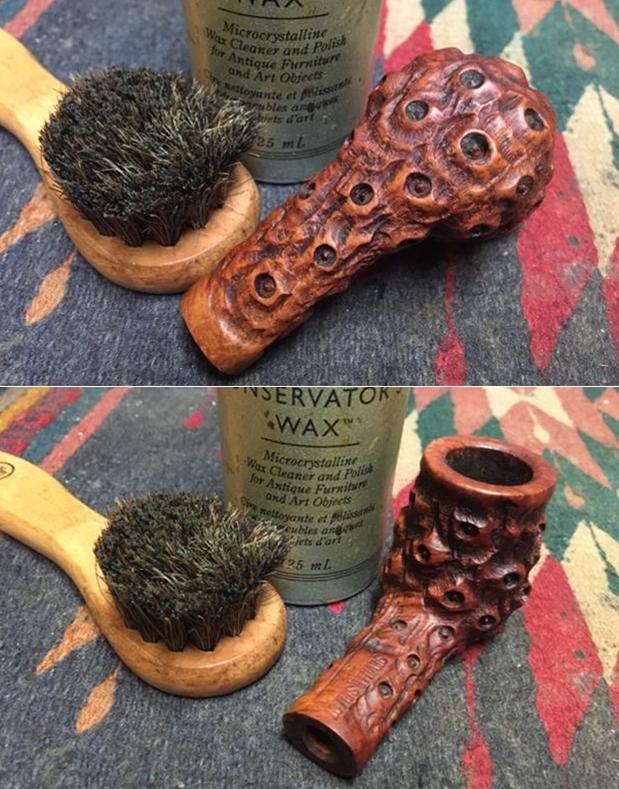
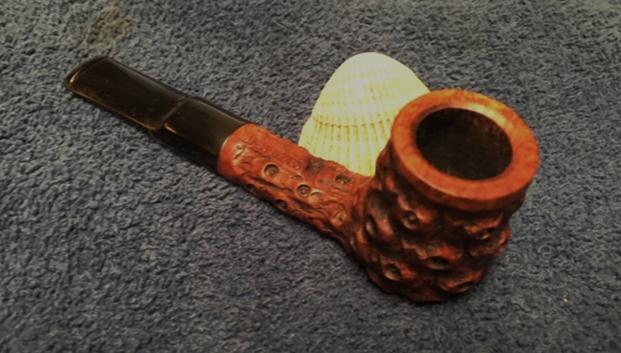
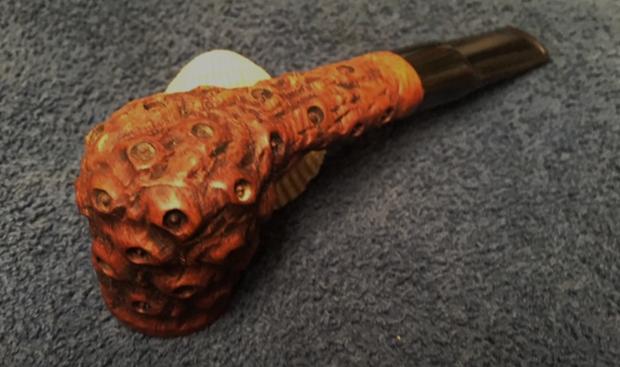
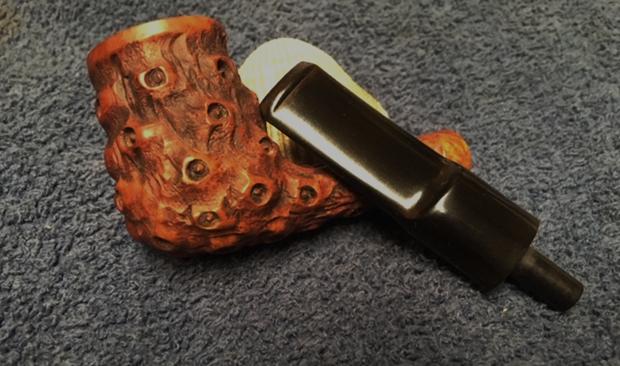
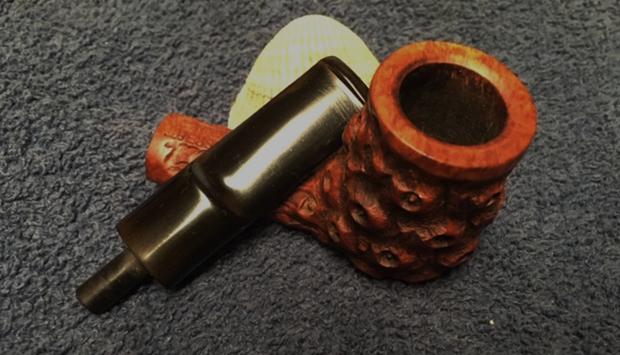
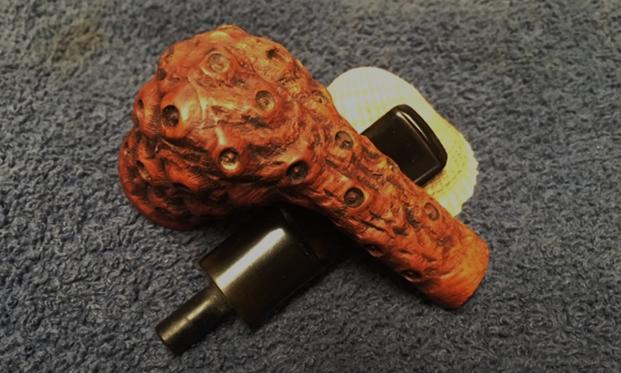
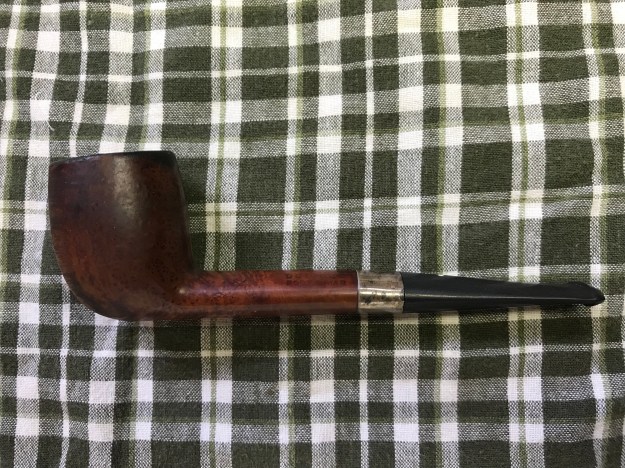
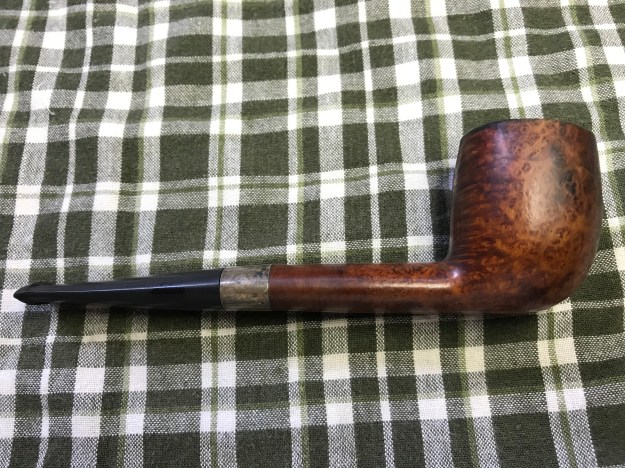
I saw this large Ben Wade Bent Billiard on the eBay auction block a few years ago and secured it with the winning bid.  This was the first time I had acquired a Ben Wade, so my initial thought was to add it to my own collection.  I noticed that Ben Wade stamped pipes usually attracted more than usual bidding attention and so I was looking forward to restoring it and learning more about the name.  In the end, I put him in the For ‘Pipe Dreamers’ Only! section on the Pipe Steward site and this is where Paresh saw it and commissioned it to add to his collection and this benefits the Daughters of Bulgaria.  The Ben Wade, without question, fits the profile of being a ‘hefty’ pipe fitting well in the hand.  Here are some of the pictures that got Paresh’s attention: 
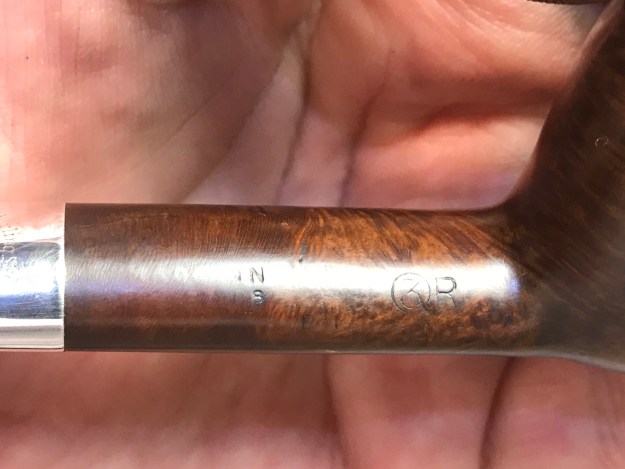
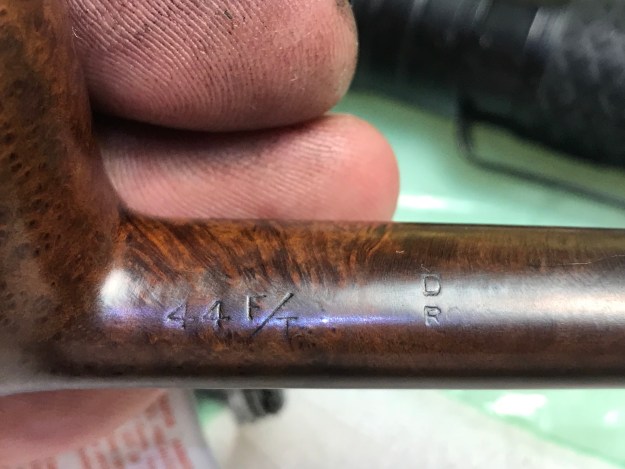
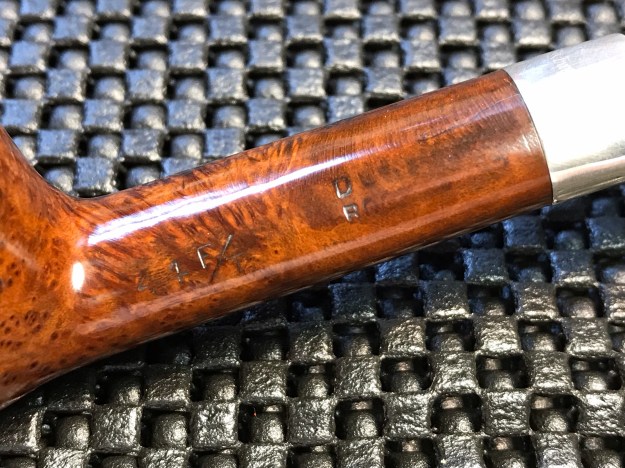
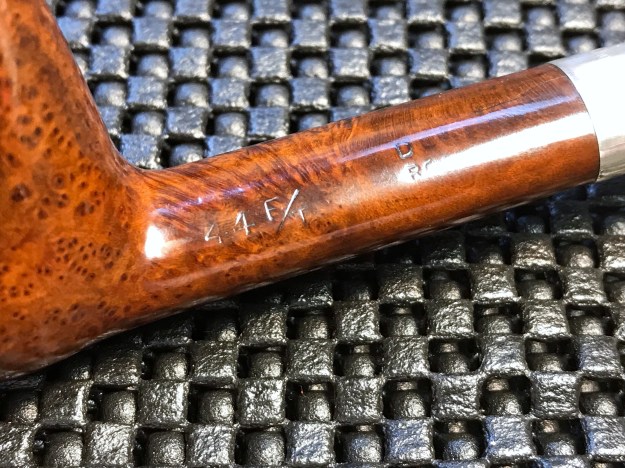
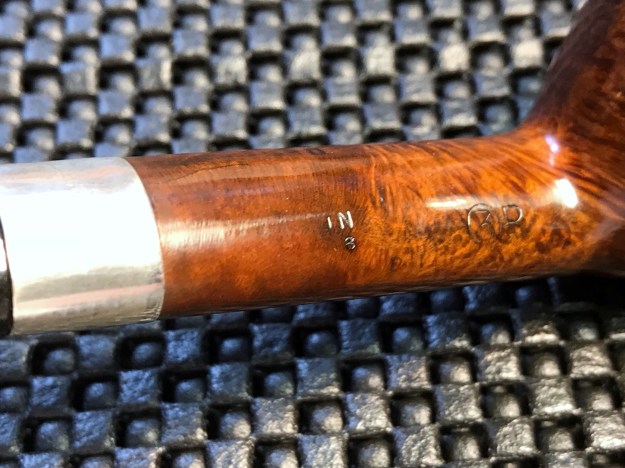
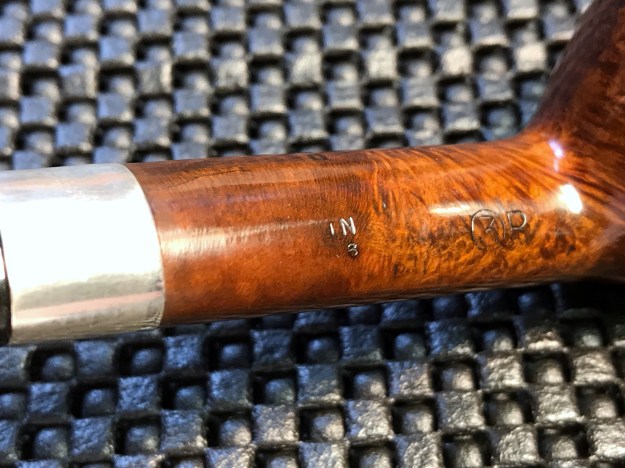
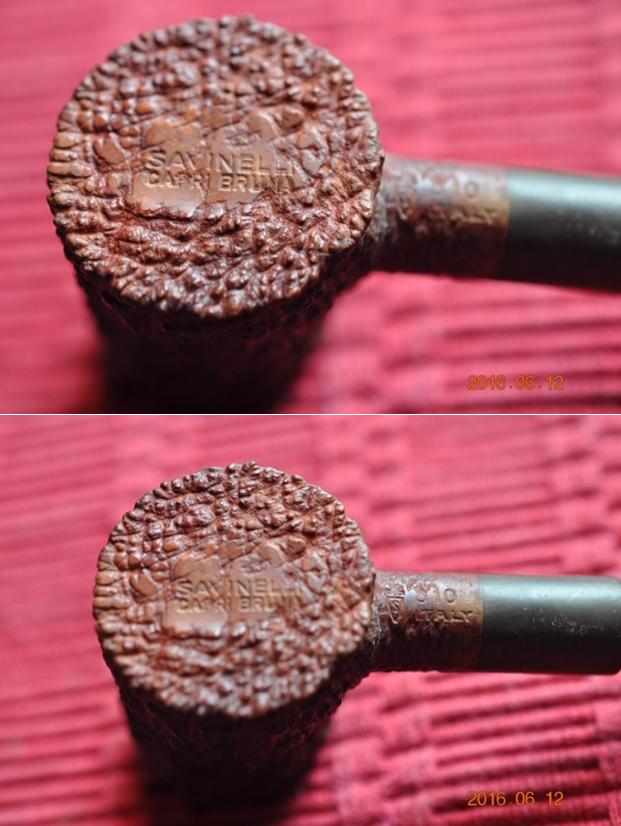
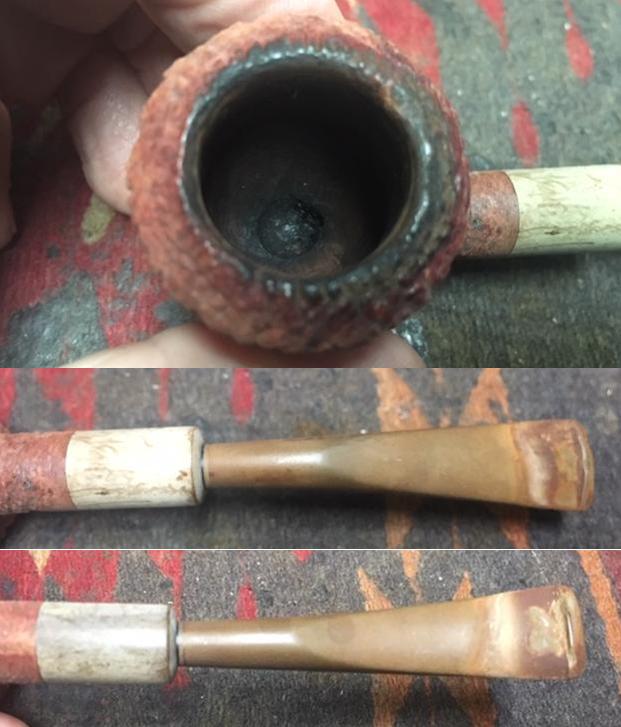
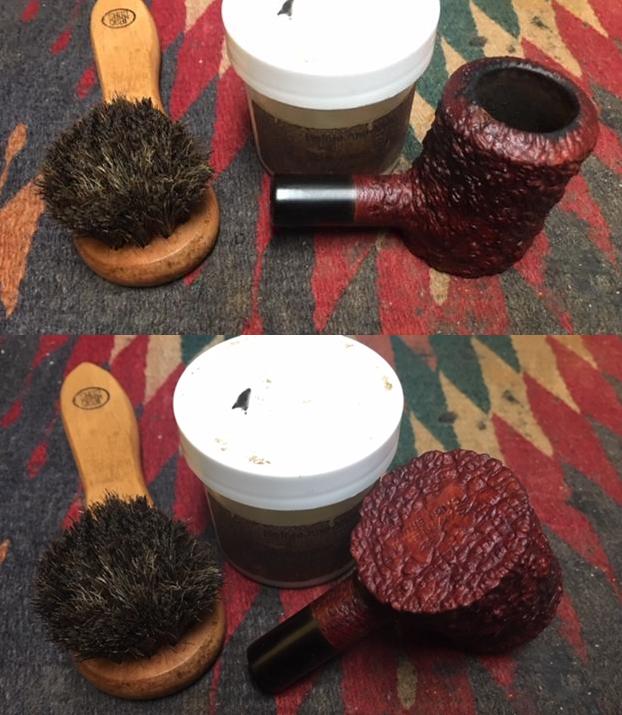
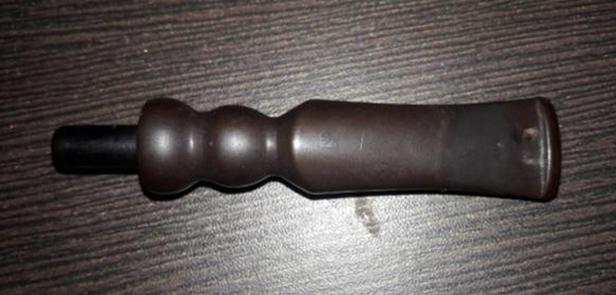
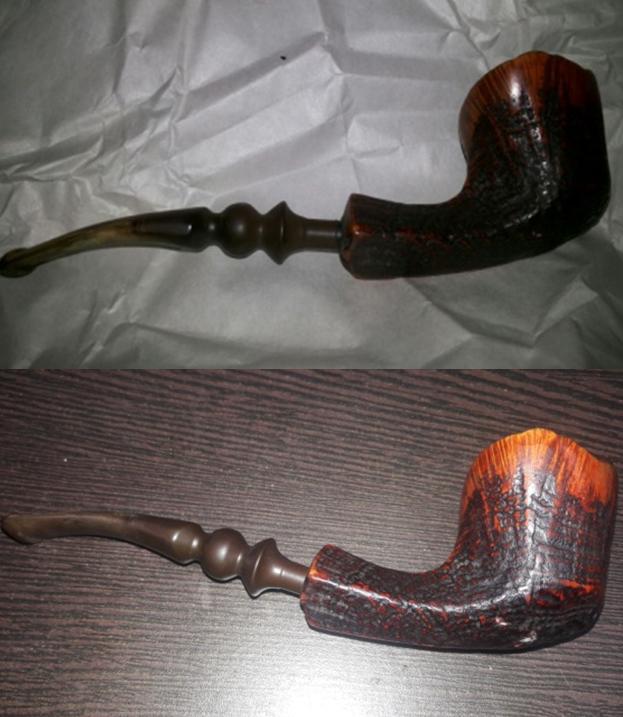
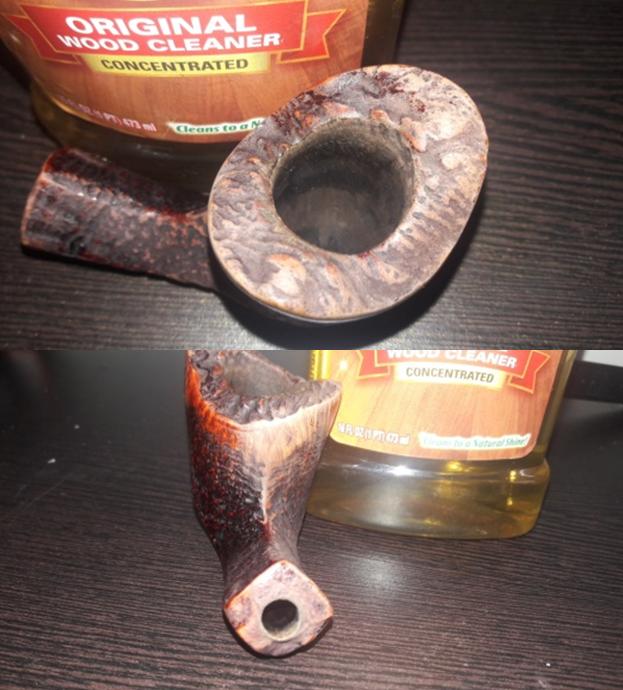
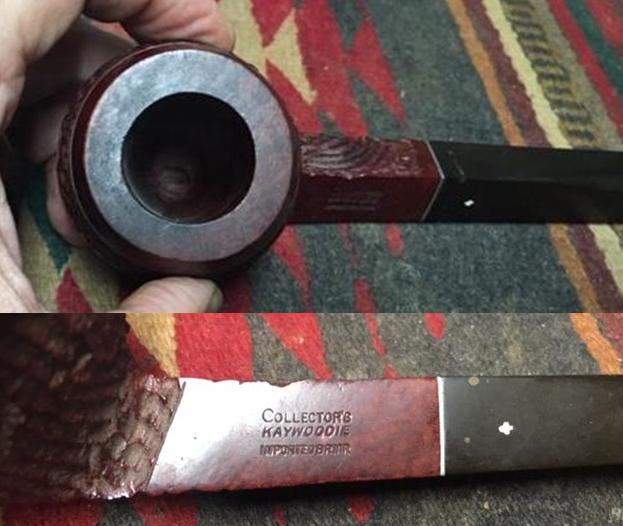
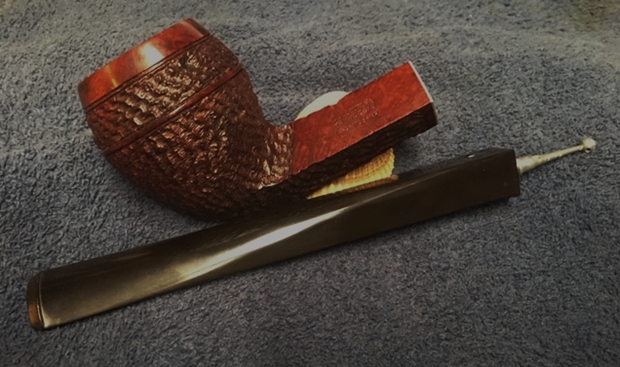
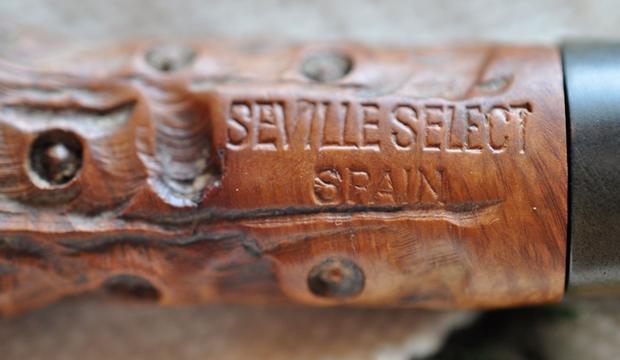
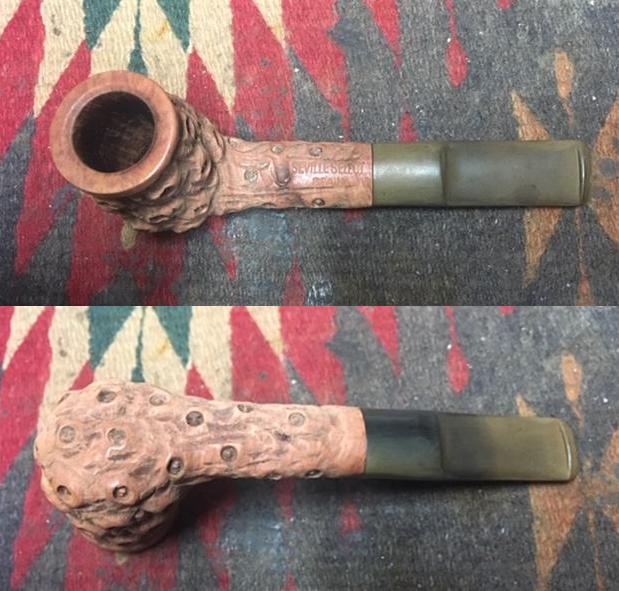
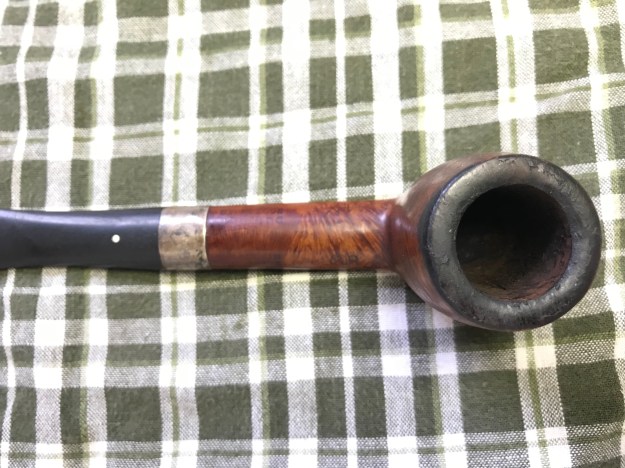
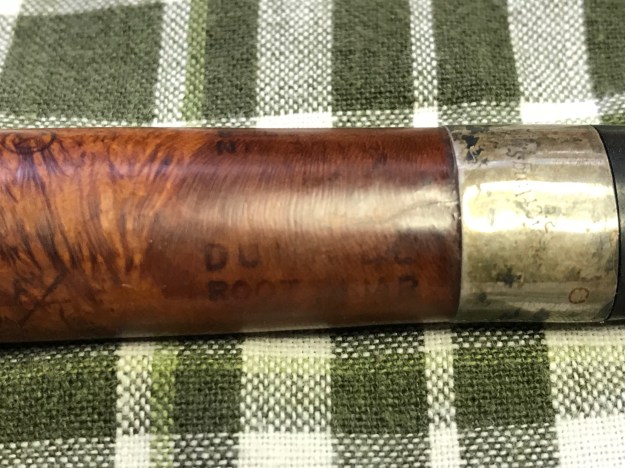
I take some additional pictures on my work table in Sofia, Bulgaria, looking at the stamping.  On the left shank is ‘Ben Wade’ in cursive script over MADE IN [over] LONDON ENGLAND.  The right shank side has 79 stamped – I’m assuming a shape number. The stem also has a BEN WADE stamp. Pipedia’s article on Ben Wade is interesting and very helpful in explaining the history.  The ‘Family Era” (1860 to 1962) is described as the ‘hay day’ of the British pipe maker:

The company was founded by Benjamin Wade in 1860 in Leeds, Yorkshire, where it was located for over a century. Ben Wade started as a pipe trader, but yet in the 1860’s he established a workshop to produce briar pipes. The pipes were made in very many standard shapes – always extensively classic and “very British”. Many models tended to be of smaller dimensions. Ben Wade offered a very high standard of craftsmanship and quality without any fills. Thus, the pipes were considered to be high grade and a major competitor to other famous English brands.

Along with most pipe manufacturers, the Second World War was a difficult time for Ben Wade.  German air raids destroyed the factory in Leeds, but the Ben Wade Co., quickly rebuilt after the war.  The Pipedia article gives several examples of the Ben Wade based in Leeds nomenclature during the Family Era (courtesy of Doug Valitchka):The ’Family Era’ ended when the business was sold in 1962:

…the owner family decided to leave pipe business and sell off the firm. The family went into negotiations with Herman G. Lane, president of Lane Ltd. in New York at about the same time as the Charatan family. Lane Ltd. bought both firms in 1962. Herman G. Lane had been Charatan’s US sole distributor since 1955 and Charatan always remained his pet child. But Ben Wade was treated in another way by its new owner. The fabrication of pipes was reduced and the factory in Leeds was closed in 1965 finally.  So this was the end of Ben Wade pipes stamped “Made in Leeds, England”.

The ‘Lane Era’ is described as a time when the historic quality of Ben Wade declined to a ‘second’ with reference to the production of standard shapes:

Alas the “new” Ben Wades were quite usual series pipes, copies of well-known standard shapes. The pipes often showed hardly masqued fillings and were processed quite coarsely with hardly polished pre-moulded Ebonite stems. Therewith Ben Wade degenerated definitively to a second brand.

According to the Pipedia article, after the death of Herman G. Lane, the business was sold to Dunhill Pipes Limited in 1978 and the new owner had no need to produce ‘seconds’ coming from the acquisition.  The Ben Wade Bent Billiard on my work table comes from the ‘Lane Era’ produced between 1965 and 1978 matching the nomenclature during this period.  “Made in London England” or just “London” replaced “Leeds” with the characteristic cursive script and ‘Ben Wade’ stem stamp (again courtesy of Doug Valitchka):I had one other question regarding the name ‘Ben Wade’ – the Danish connection? In 1971, the young, Danish pipe maker, Preben Holm, came to Lane with financial difficulties and in need of a new US distributer of his pipes made in Denmark.   The new partnership put the Ben Wade name on the Freehand production coming from the Danish factory into the burgeoning US ‘Freehand’ market with a commitment to quality rather than quantity.  The market grew through the 70s until 1985, when the market for these pipes fell resulting in the downsizing of the factory in 1986 but the production of Danish Ben Wade pipes came to an end in 1989 after the death of Preben Holm.  The Pipedia article concludes by describing the status of the Ben Wade name.  Duncan Briars purchased rights to the Ben Wade name from Dunhill Pipes in 1998 and continues to produce pipes at the same factory where Dunhill pipes are made:

The bowls are carved at the world famous 32 St. Andrews Road, Walthamstowe pipe factory, in London, England. The same factory where Dunhills are made. Every pipe is drilled spot on and exhibits a good blast and all have high quality German Vulcanite mouthpieces. Every pipe is stamped “Ben Wade, Made in London, England”. The craftsmanship and smokability have always been superb.

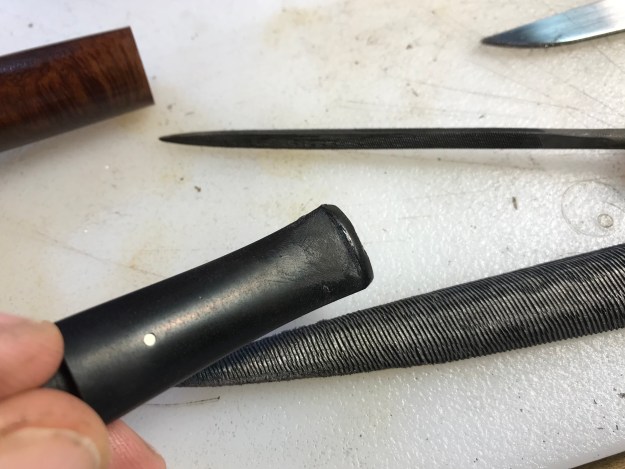
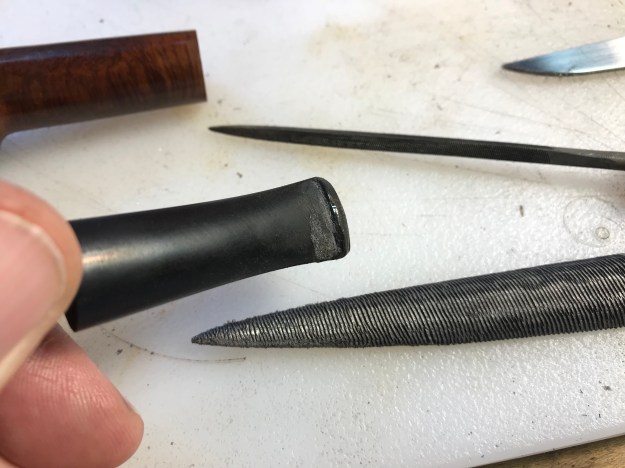
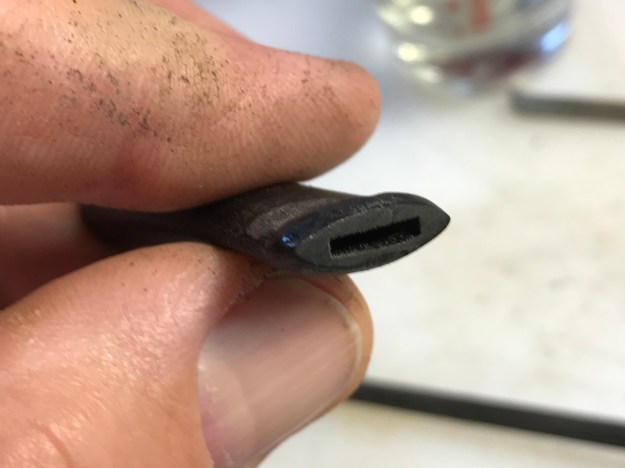
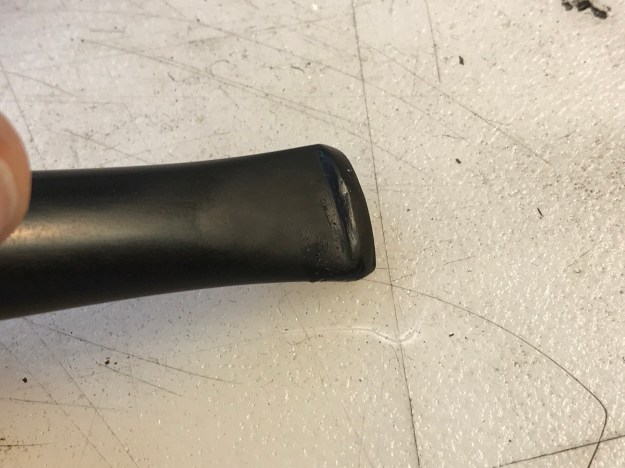
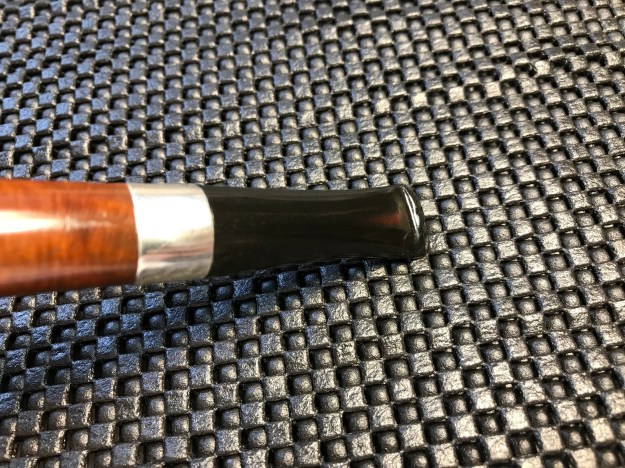
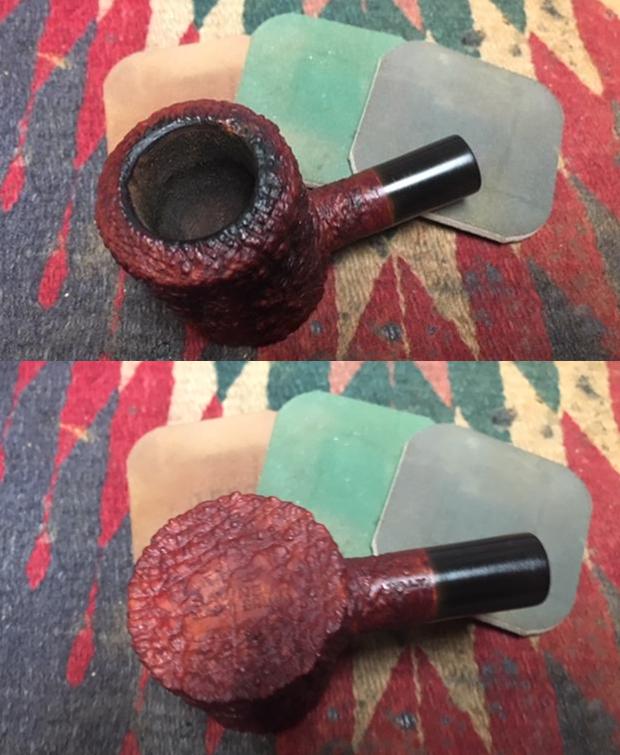
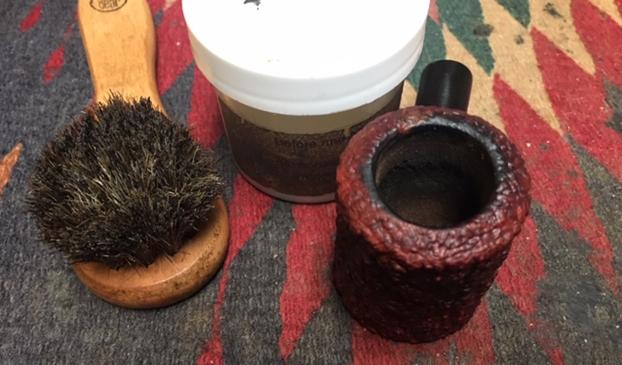
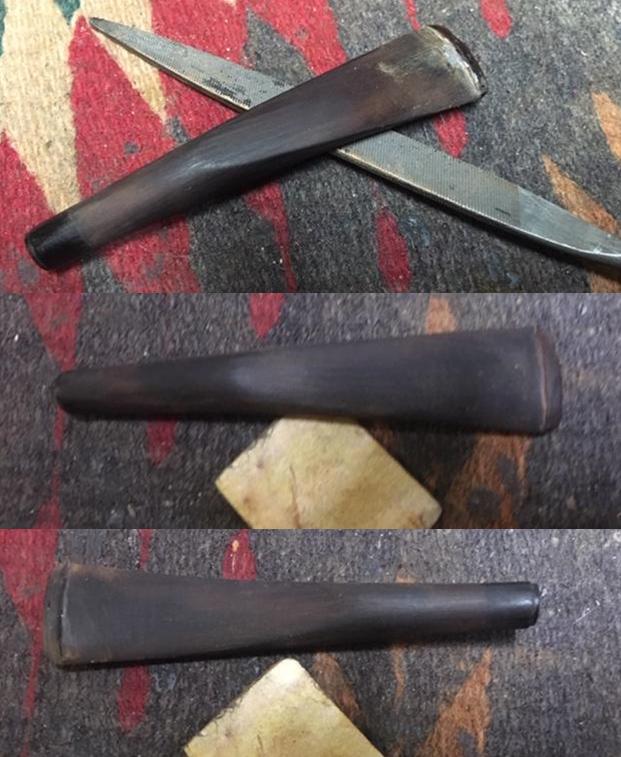
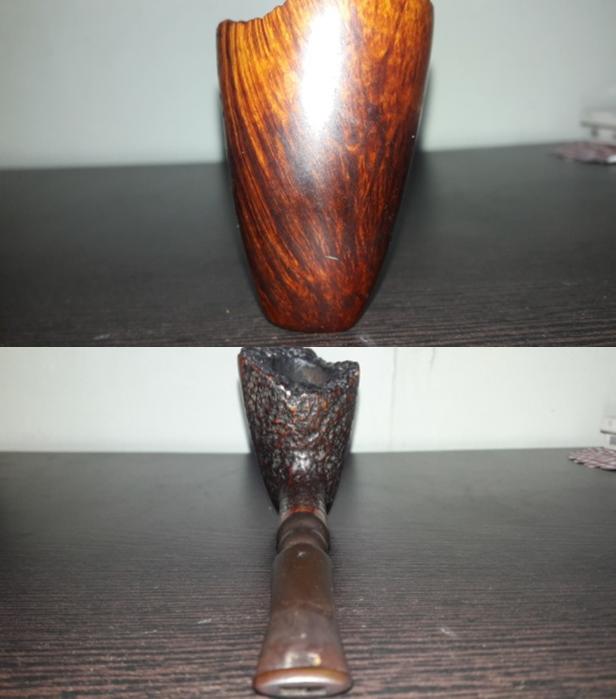
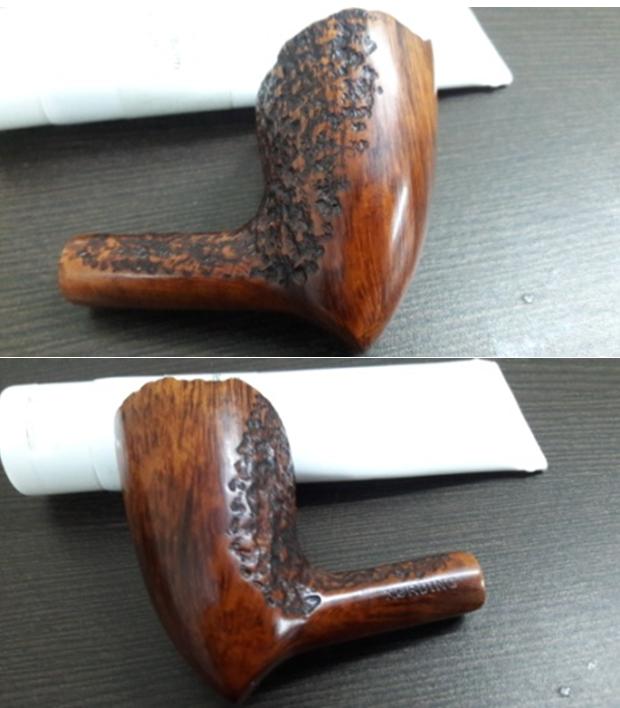
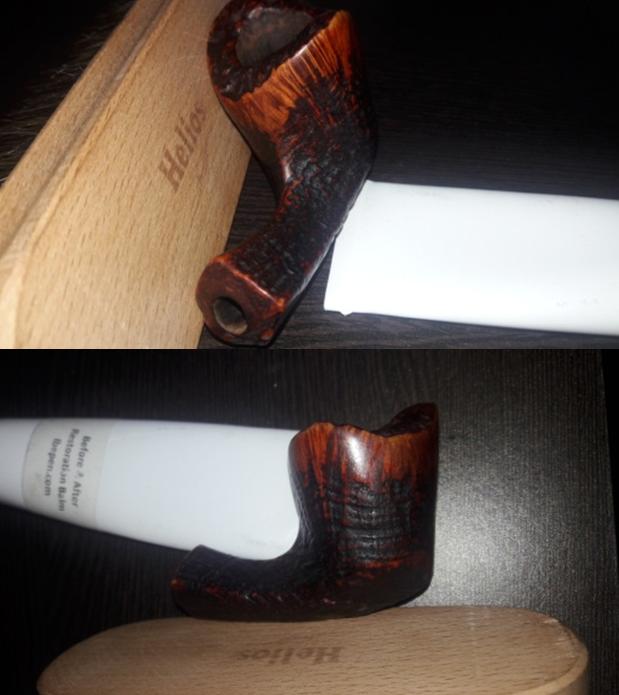
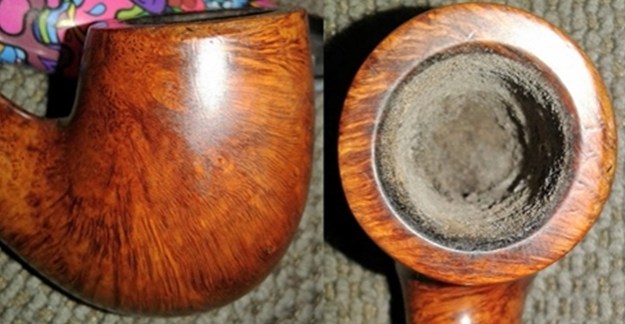
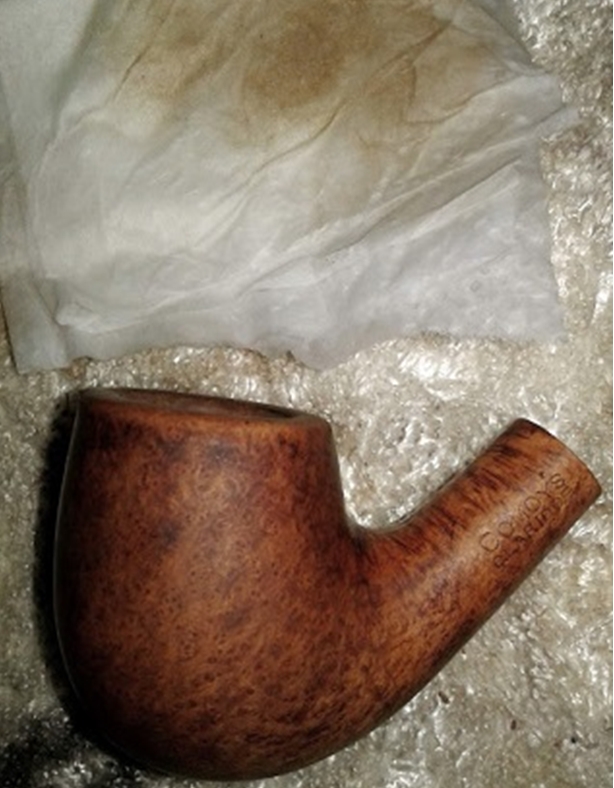
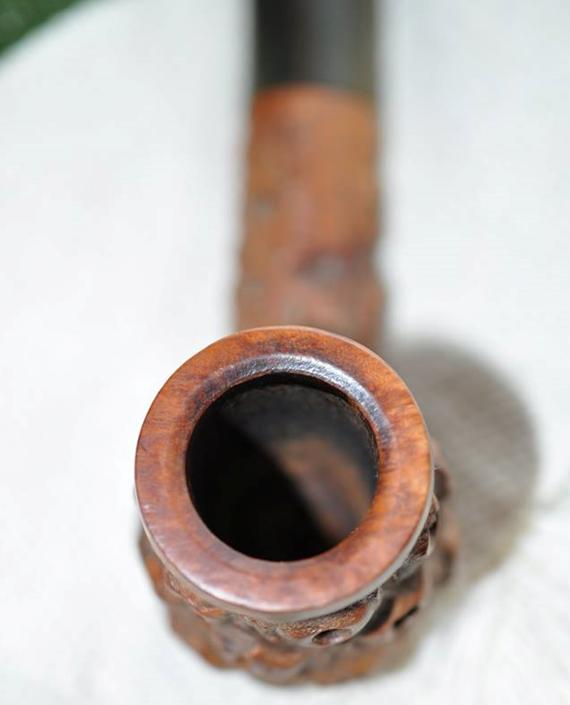
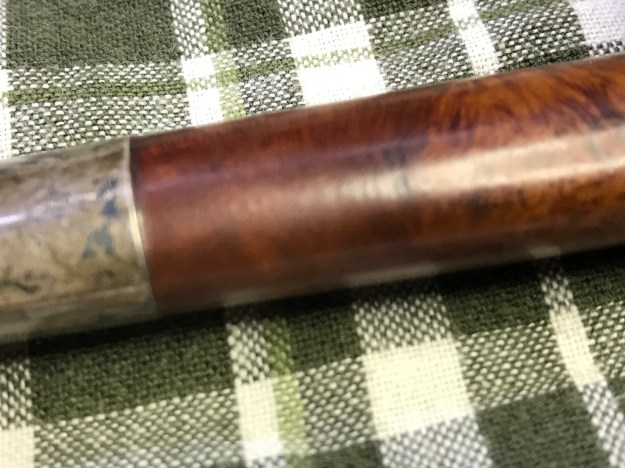
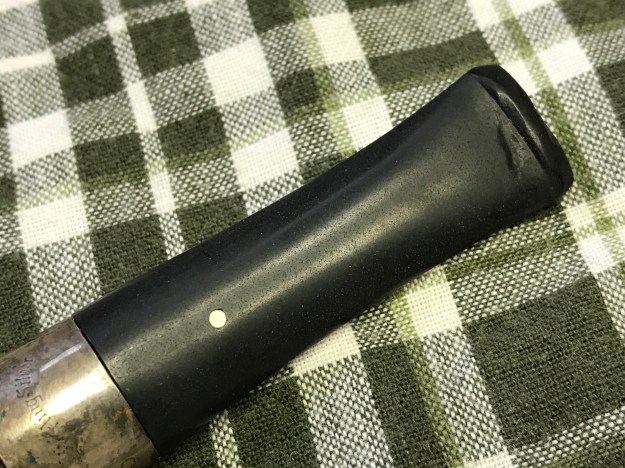
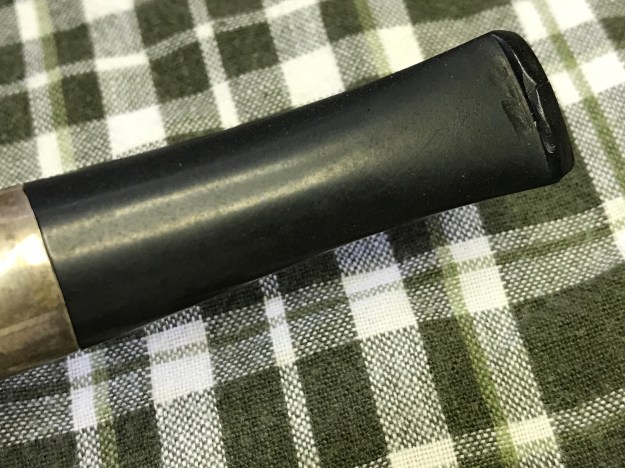
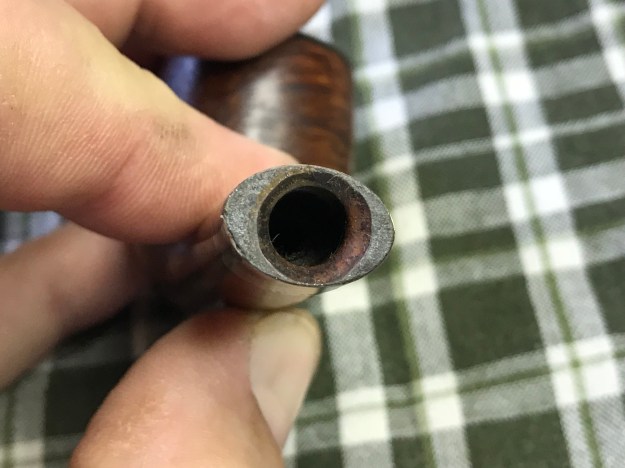
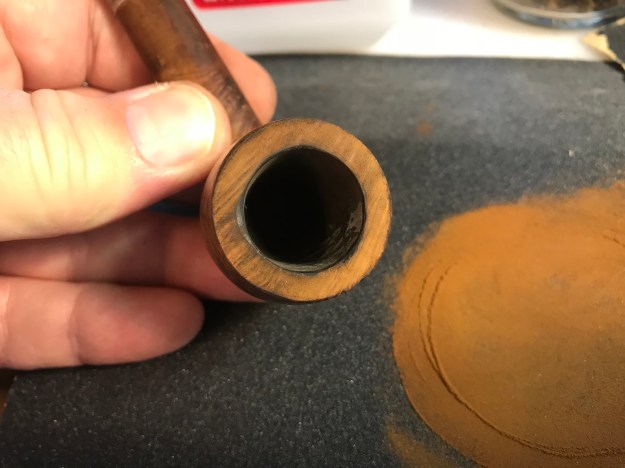
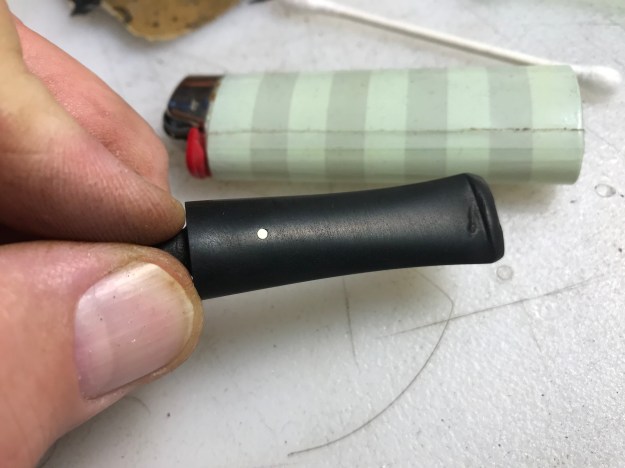
With a greater appreciation for the Ben Wade name, I take another look at the Ben Wade Bent Billiard on my worktable.  Even though the Pipedia article gave more of a negative view of traditional shapes of Ben Wades produced in the Lane Era, the pipe I’m looking at doesn’t reflect this.  The grain is beautiful, and I see no fills on the surface.  The chamber appears to have been cleaned and the briar surface is clean as well showing normal nicks and scratches.  The stem does have some minor oxidation and tooth dents on the button.  I also detect that there is a gap between the shank and stem – I’ll see if cleaning might correct this.  I take some close ups of these issues. 
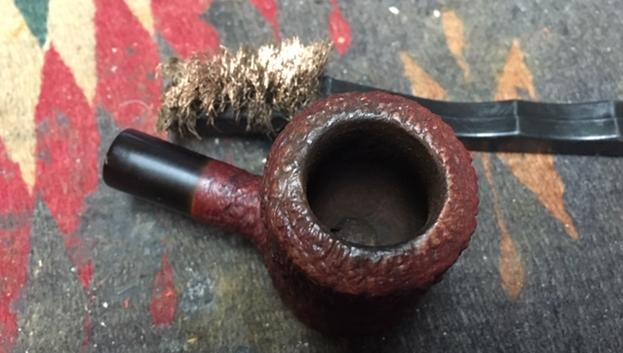
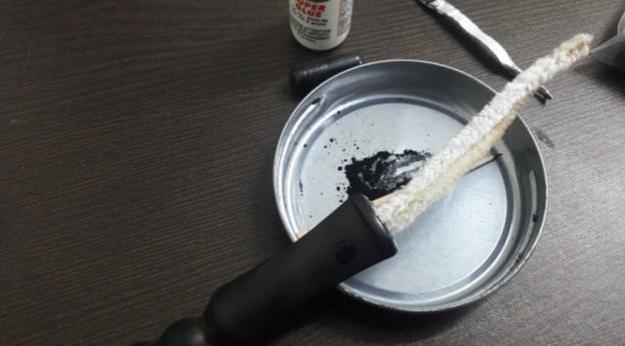
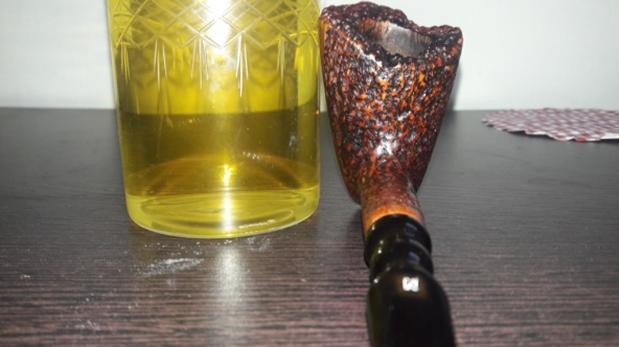
To begin the cleanup of the Ben Wade, I run a pipe cleaner dipped in isopropyl 95% through the stem.  Then, along with other pipes in the queue, I put the stem in a soak of Before & After Deoxidizer to remove the oxidation.  After a few hours, I remove the stem and wipe off the raised oxidation using cotton pads and light paraffin oil – mineral oil.  I also run another pipe cleaner through the airway to remove Deoxidizer. 
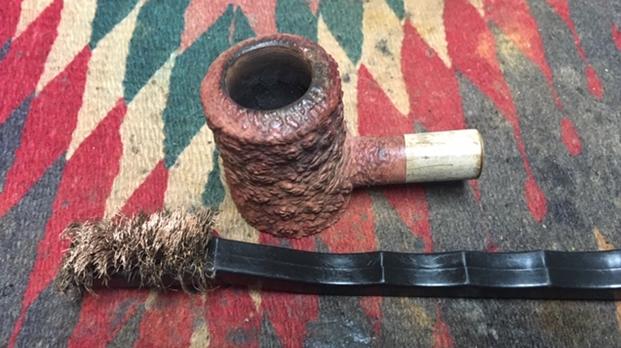
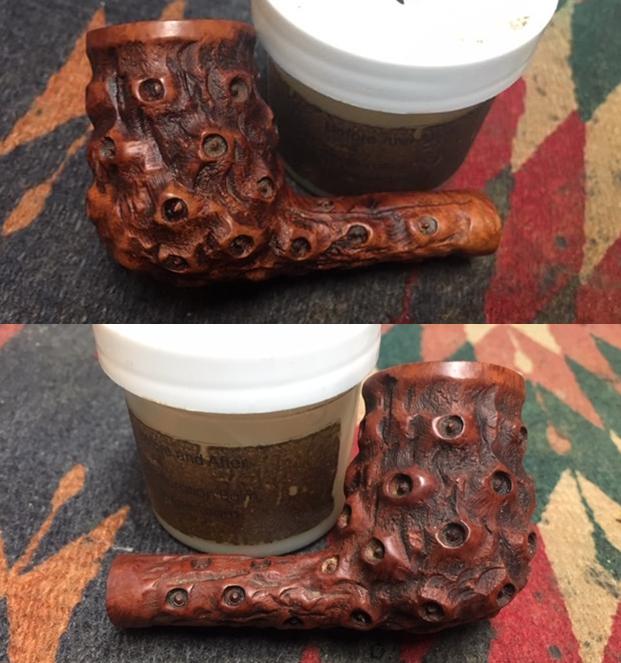
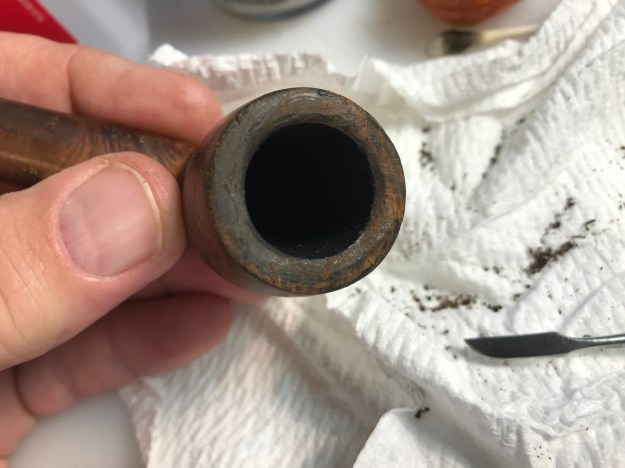
Turning to the stummel, I remove the very light cake in the chamber. With the chamber so large, I jump to the largest blade head from the Pipnet Reaming kit.  I follow this by using the Savinelli Fitsall Pipe Tool and scraping the chamber walls further.  I finish by sanding the chamber wall using 240 grit paper wrapped around a Sharpie Pen.  To remove the carbon dust residue, I wipe the chamber with a cotton pad wetted with isopropyl 95%.  The pictures show the progress. 
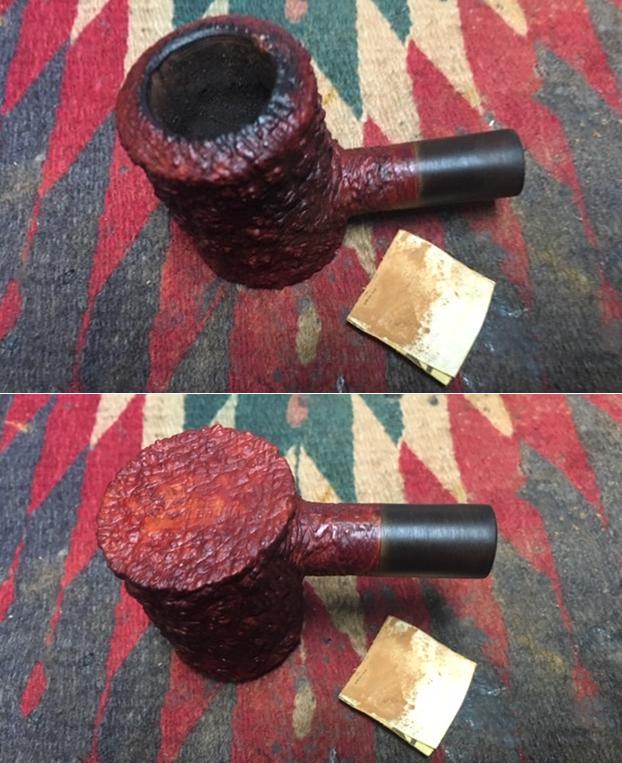
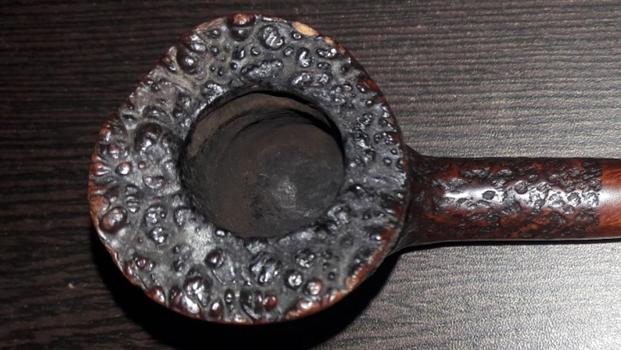
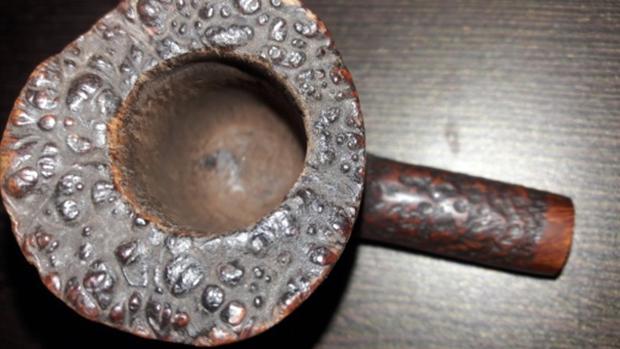
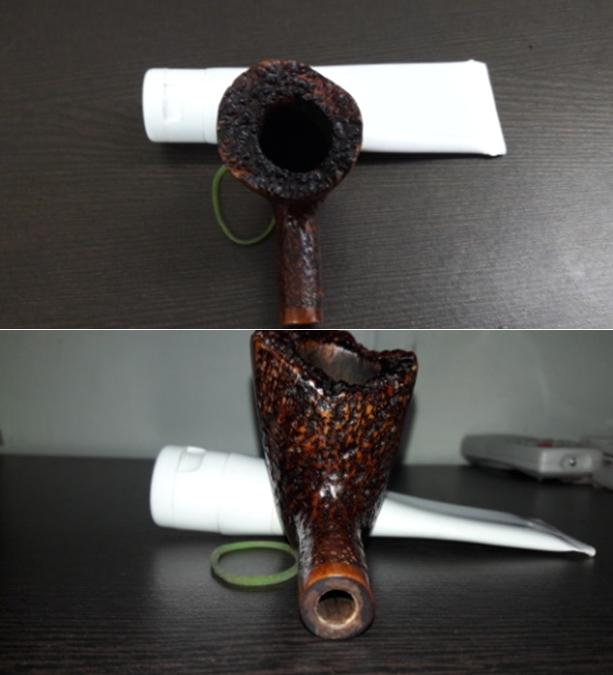
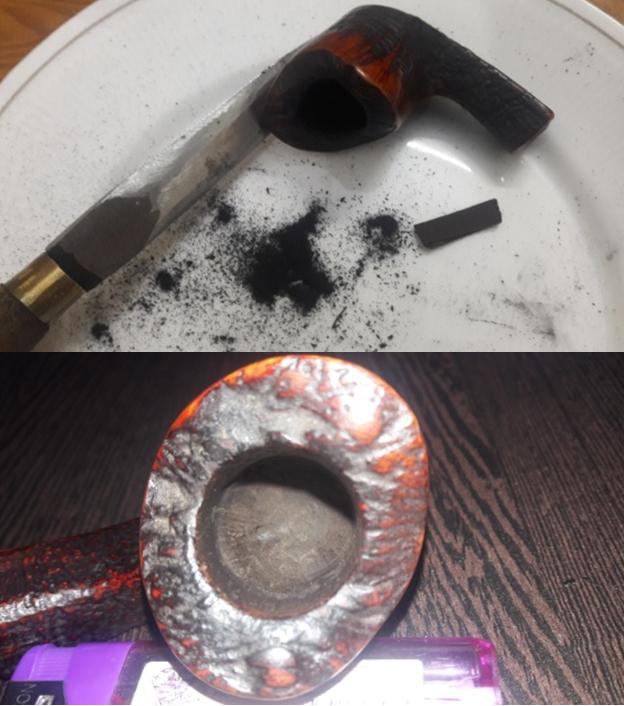
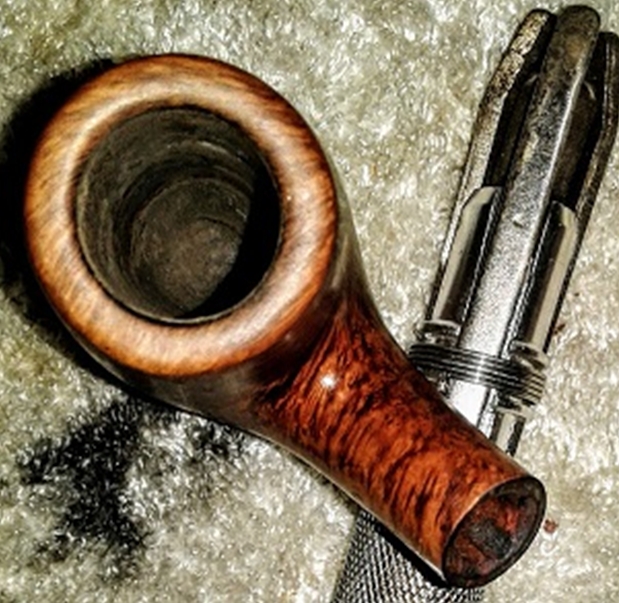
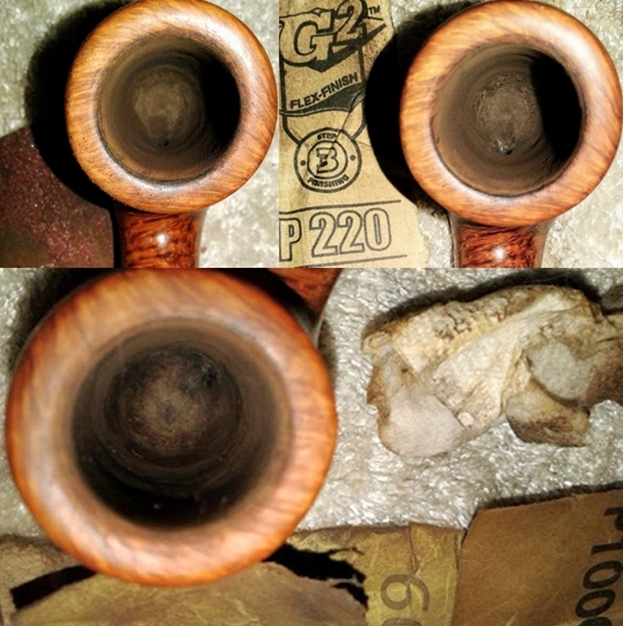
One of the purposes of removing the old cake to bring the chamber down to the briar, is not only for a fresh start.  When the carbon is removed the chamber can be inspected for problems usually pertaining to heat fissures and potential burn throughs.  Inspecting the Ben Wade, I detect on the forward part of the chamber a sloping indentation that is a little to pronounced to ignore.  Using the Savinelli Fitsall Tool again, I scrape carbon out of the indentation to make sure I’m getting down to the briar.  This reveals the full extent of the abnormal burning.  I take pictures to show what I see, but the picture doesn’t do too well.  Changing the aperture, the picture is lightened, and I outline the perimeter of the indentation in the final picture below.  I need to address this budding burn through later after cleaning the stummel.  Next, I clean the external stummel surface using undiluted Murphy’s Oil Soap and a cotton pad.  The stummel cleans up well but reveals a tired, lackluster, thin finish. 
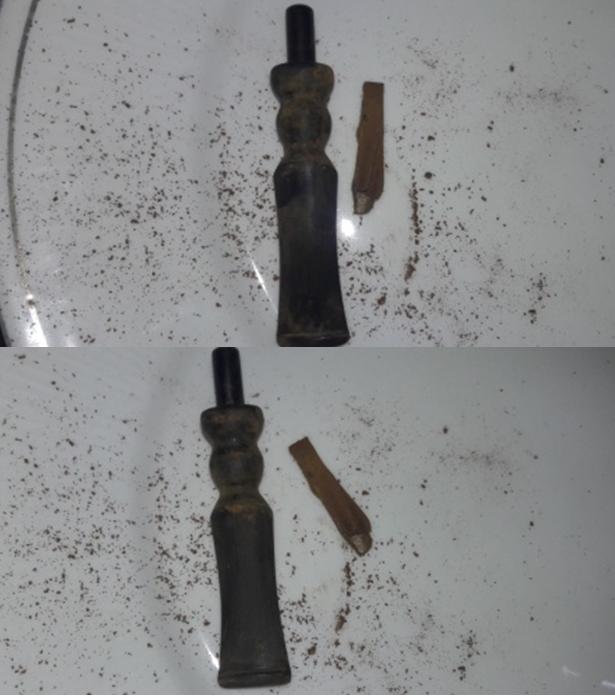
I then clean the internals of the stummel using cotton buds and pipe cleaners dipped in isopropyl 95%.  The grunge is thick, so I also employ a dental spatula to scrape the mortise walls as well as a drill bit to hand turn down the airway to excavate the old tars and oils.  To save on pipe cleaners I also utilize a long shank brush to scrub the airway.  Eventually, the tide begins to turn, and the buds and pipe cleaners are emerging less soiled.   I take a picture of the tools I use.To continue cleaning the internals, I use a kosher salt and alcohol soak.  I like to do this additional step in cleaning to further clean the tars and oils out of the internal briar and to freshen the pipe.  I use kosher salt because it doesn’t leave an aftertaste.  I stretch and twist a cotton ball to form a wick that I then insert down the mortise and airway pushing it with a straight, stiff wire.  I then fill the bowl with kosher salt and place the stummel in an egg crate to keep it stable.  With a large eyedropper, I fill the bowl with isopropyl 95% until it surfaces over the salt.  I put the stummel aside to soak for several hours.
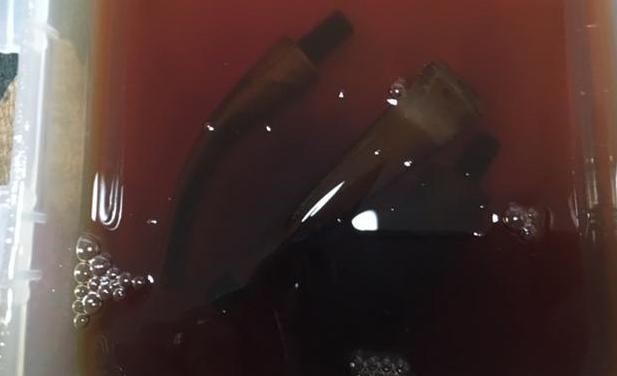
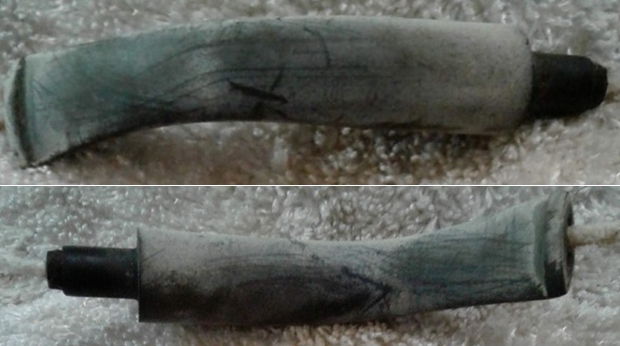
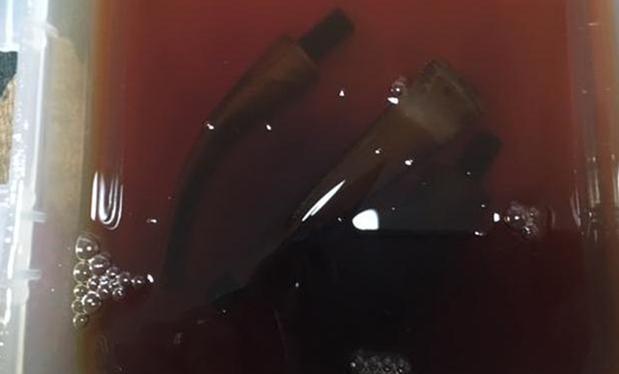
Again, I look closely at the stem that had already soaked in the Before & After Deoxidizer and I see that there remains deeper oxidation.  Instead of going directly to sanding out the oxidation, I decide to put the stem in the OxiClean bath to let it soak overnight – to see if more oxidation would be raised.  I put a small bit of petroleum jelly over the Ben Wade stem stamping and I put the stem in the OxiClean and turned out the lights.  Another day is finished.The next morning the soak had done the job. After tossing the expended salt in the waste, I wipe the chamber with paper towel and blow through the mortise to clear any residual salt crystals. I also use a long shank brush down the mortise.  To make sure the internals are clean, I finish by using a cotton bud and pipe cleaner dipped in isopropyl 95% down the mortise and airway.  They come out clean.
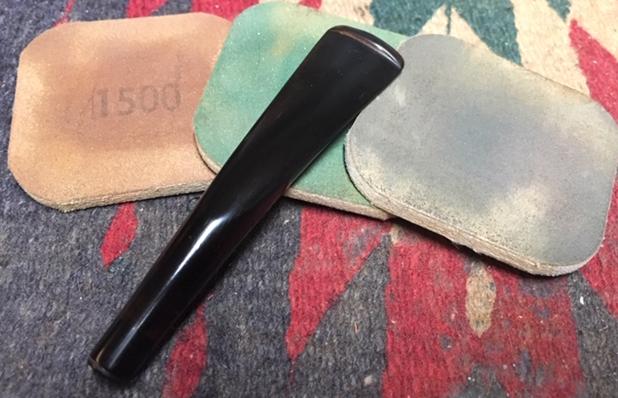
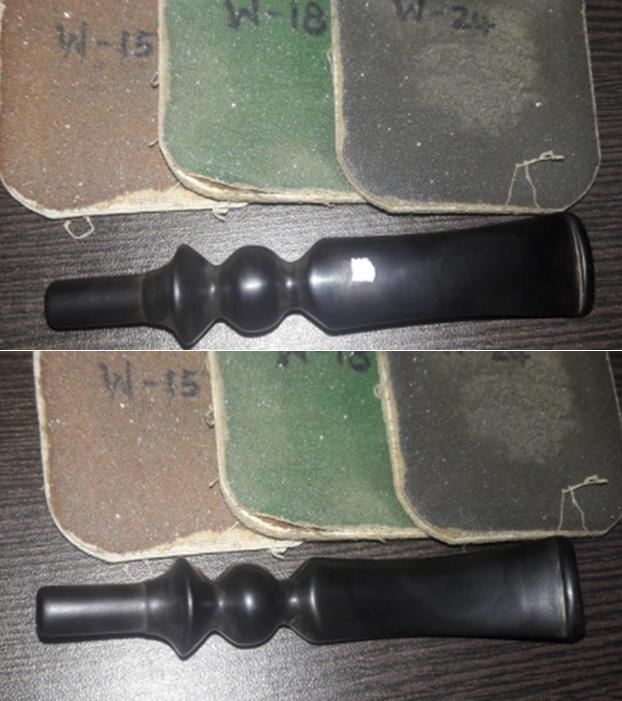
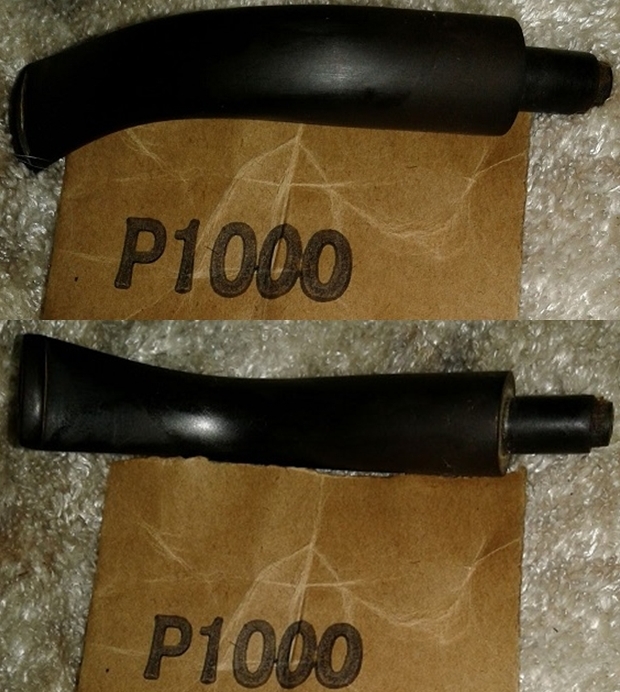
Next, I fish the stem out of the OxiClean where it has been soaking through the night.  More oxidation has surfaced.  I begin sanding the entire stem using 240 grit paper careful to protect the Ben Wade stamping and shouldering the stem.  I focus on the bit area removing the minor tooth chatter.  Using a flat needle file, I freshen the button edges.  I follow by wet sanding with 600 grit paper and then 0000 steel wool.  The oxidation appears to be removed for the larger part except for some around the Ben Wade stamping which I won’t sand for the sake of preserving the stamp. 
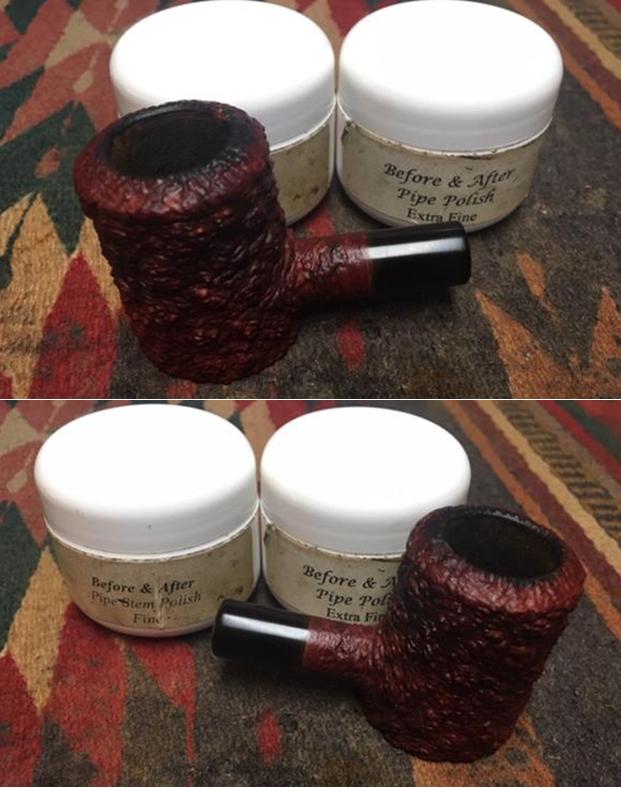
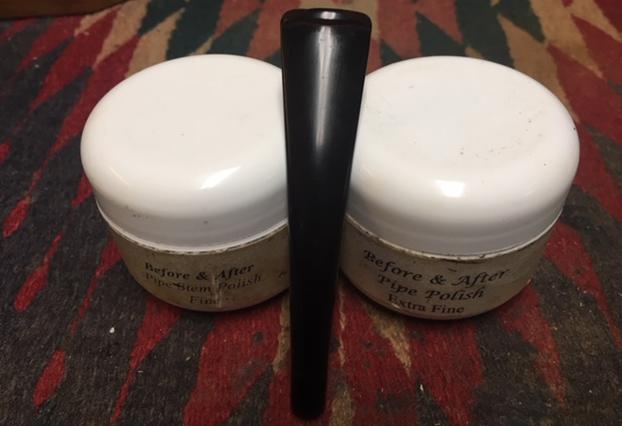
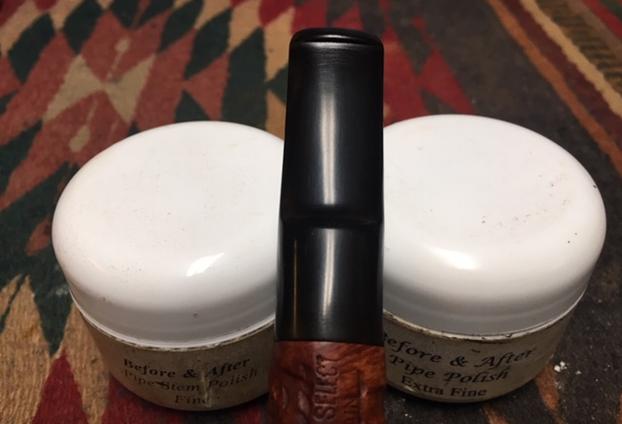
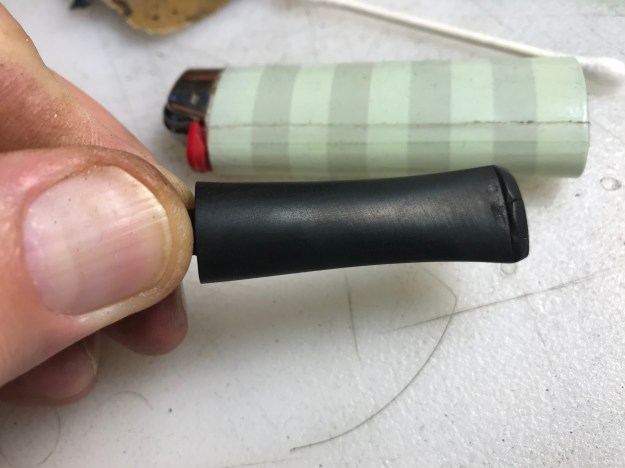
Taking it one step further, using Before & After Fine and Extra Fine Polish, I rub each into the vulcanite in succession.  Putting some on my finger, I work the polishes into the vulcanite and let the stem sit for a time to absorb the polish.  The polishes are advertised not only to revitalize vulcanite but also to continue to remove the oxidation.  After each polish is absorbed, I then wipe the stem down with a cotton pad.  The pictures show the progress.Putting the stem aside for now, I work on the budding burn through in the chamber.  Previously, I dug out any remaining charring in the indentation.  To make sure the area is fully clear, I sand the area again and wiped the chamber with a cotton pad wetted with isopropyl 95% to clean the chamber.  As far as chamber burn throughs go, this one is minimal.  It has not progressed far and the size and the thickness of the bowl means that there was never any imminent danger.  Yet, for the long-term view and use of this beautiful Ben Wade Bent Billiard, I repair the problem where it is before it grows and becomes a worse problem.  I mix a small batch of J-B Kwik Weld on an index card.  After combining the two components, ‘Steel’ and ‘Hardener’, I have about 4 minutes to apply the mixture before it starts setting. I use a flat dental spatula as a trowel and apply the J-B Weld to the indentation in the chamber.  I put the stummel aside to allow the J-B Weld to thoroughly cure. 
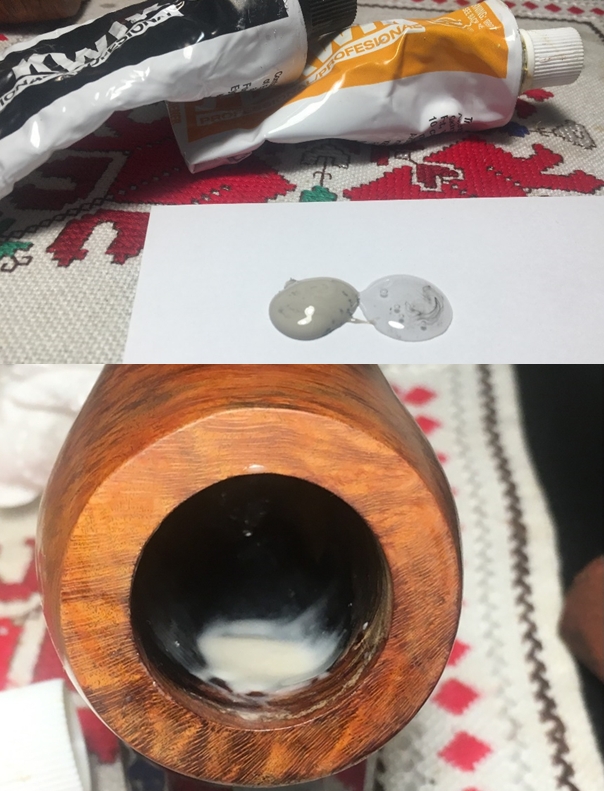
After it cures, I use a sanding drum mounted on the Dremel to sand the excess.  I follow this using the Sharpie Pen wrapped with 240 grit paper to leave the chamber smooth and shaped. I’m pleased with the results and glad I went the extra mile to arrest the potential burn through.  Later, I’ll apply a coat of activated charcoal and sour cream mixture to the chamber wall to improve the aesthetics and to aid formation of a new protective cake. 
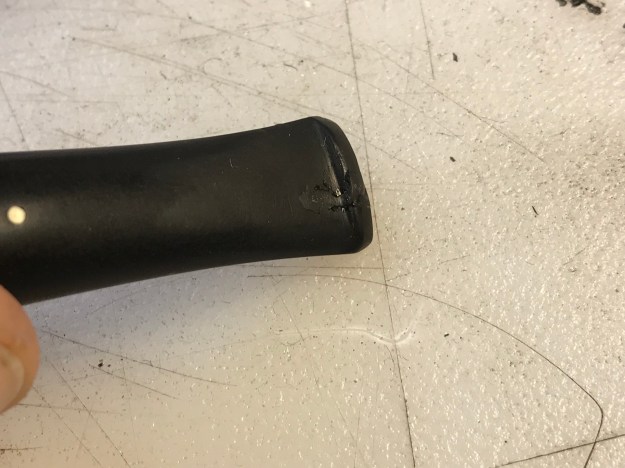
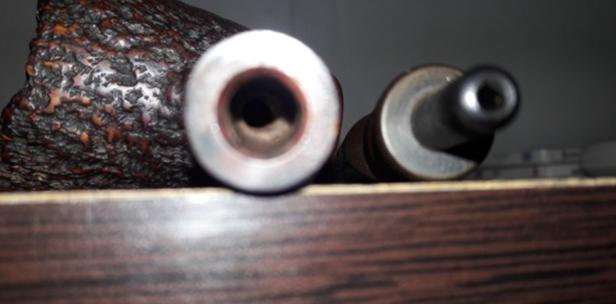
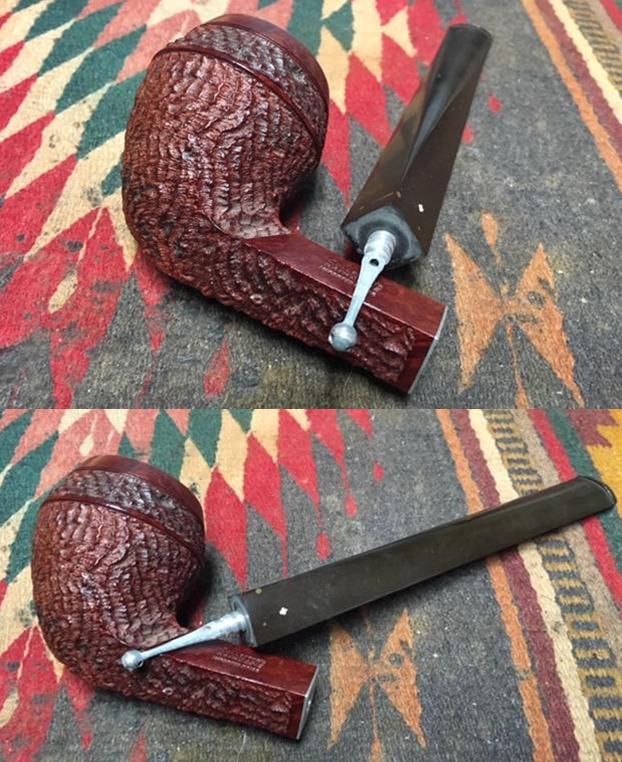
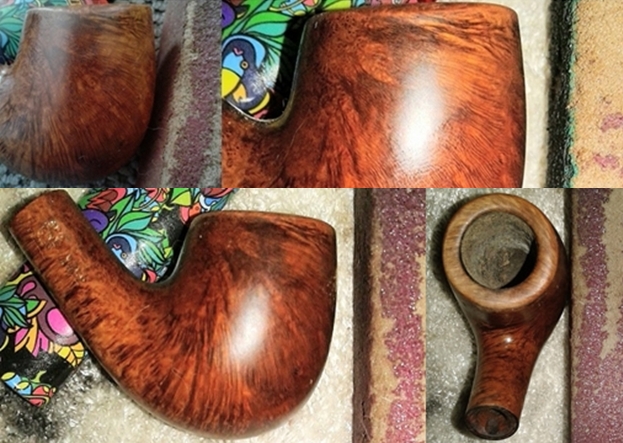
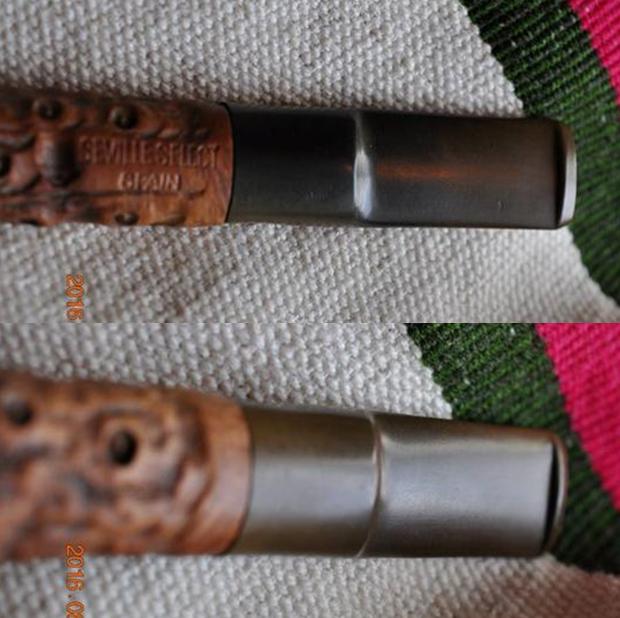
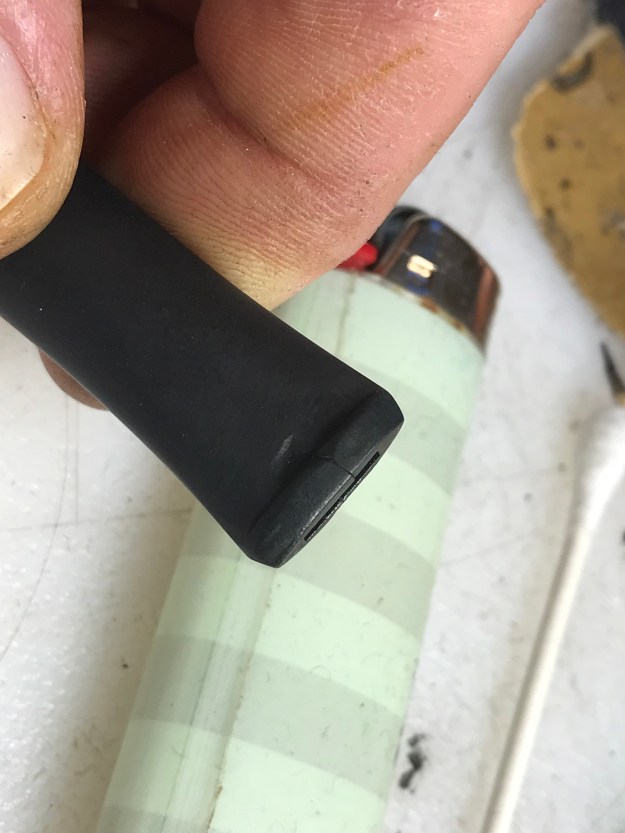
Before continuing, I reunite the stem and stummel to examine the shank junction.  Earlier I saw a gap between the shank and the stem.  Often, after cleaning these problems are resolved.  I find that this indeed was the case as the stem is now seated as it should be.  Pictures are before and after.
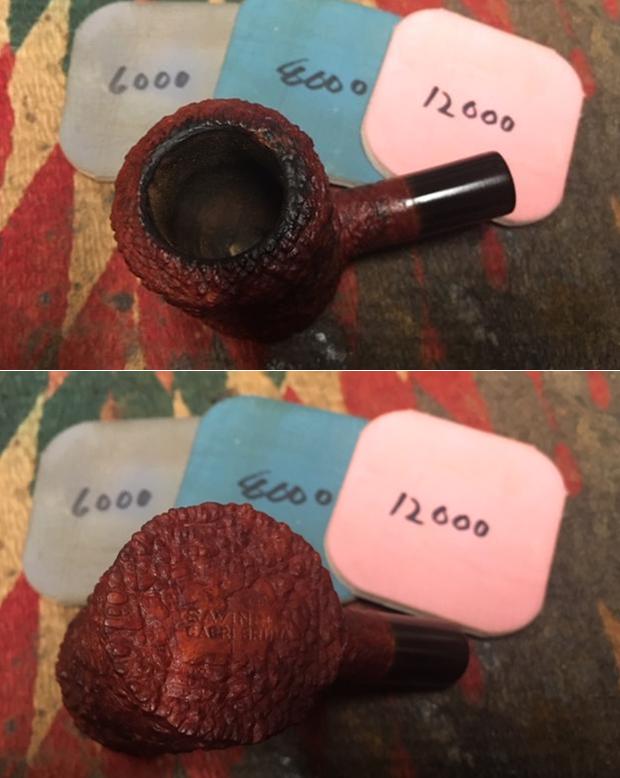
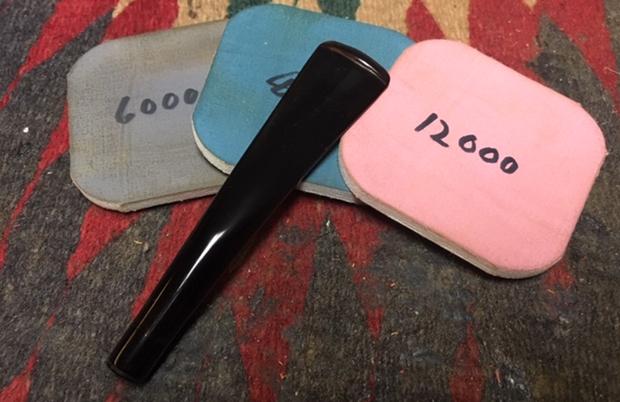
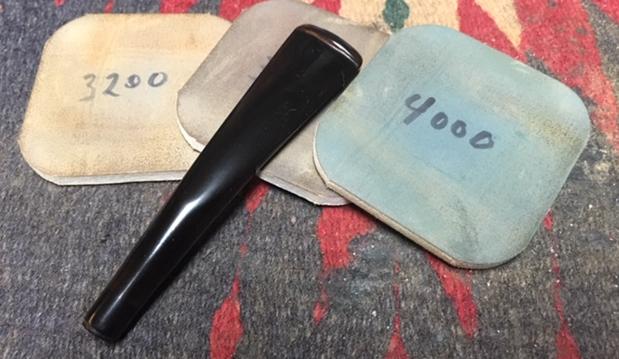
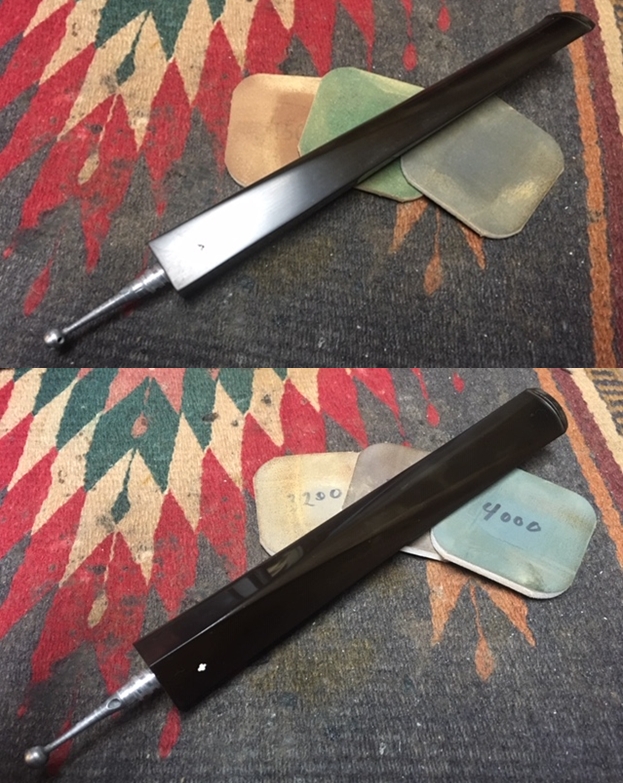
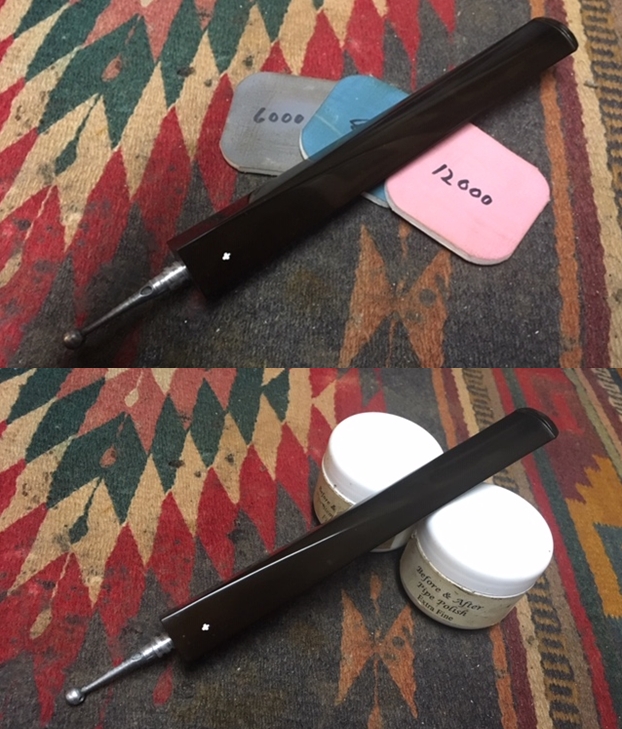
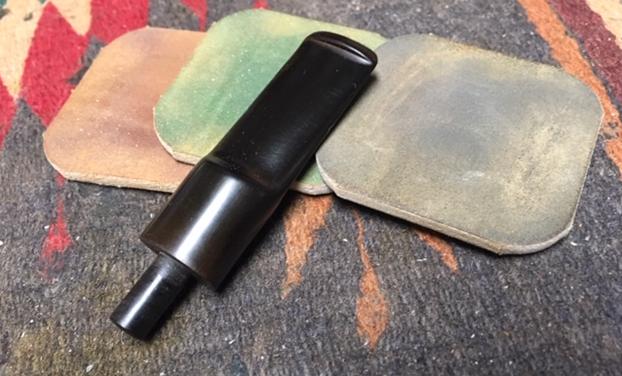
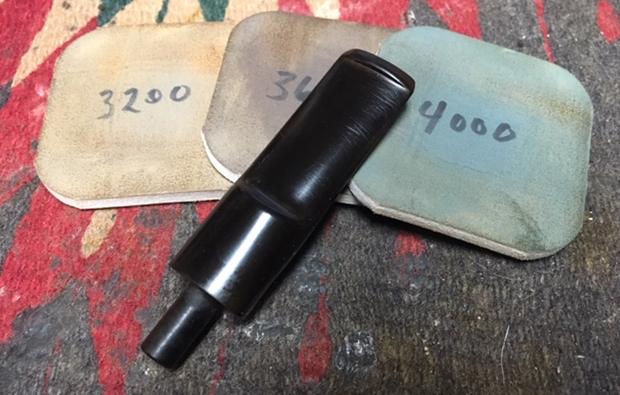
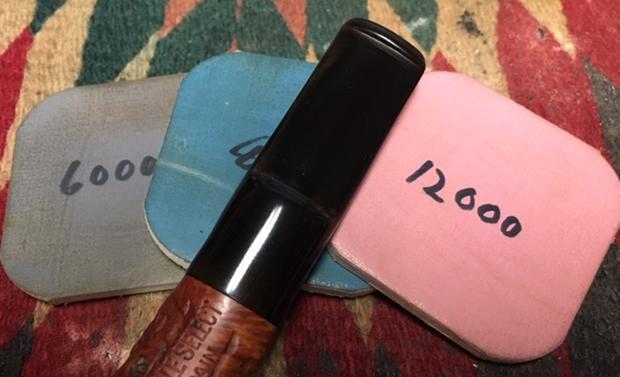
With the stem now properly seating, I turn again to the stem and using micromesh pads 1500 to 2400 I wet sand the stem.  Following this, I dry sand using pads 3200 to 4000 and 6000 to 12000.  Following each set of three pads, I apply a coat of Obsidian Oil to revitalize the stem.  I love the glassy pop of a micromeshed stem! 
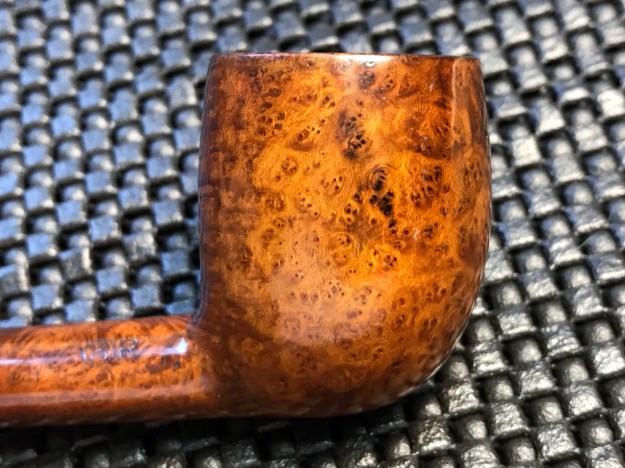
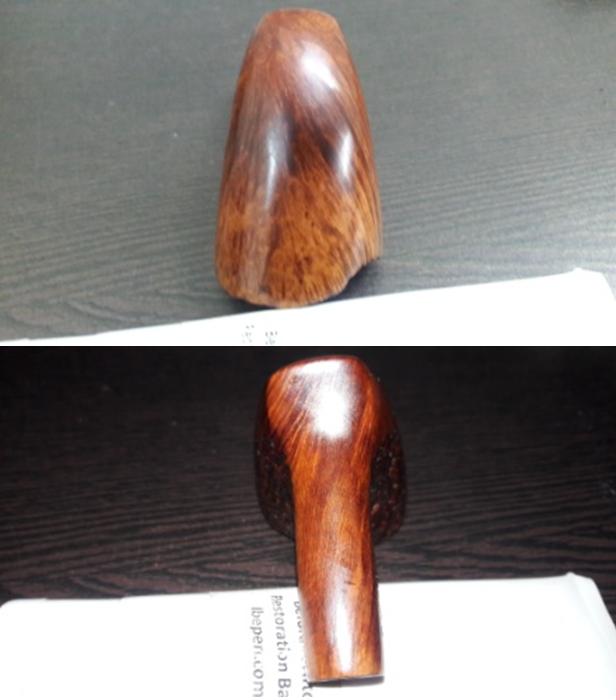
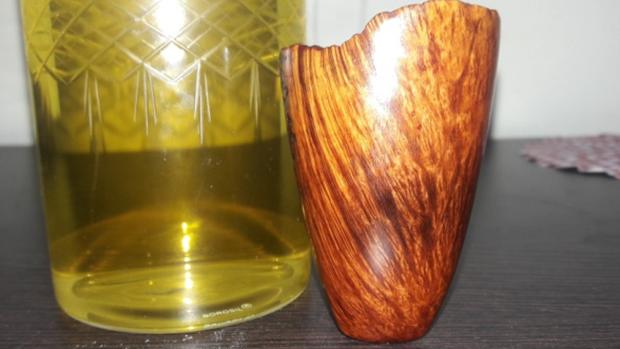
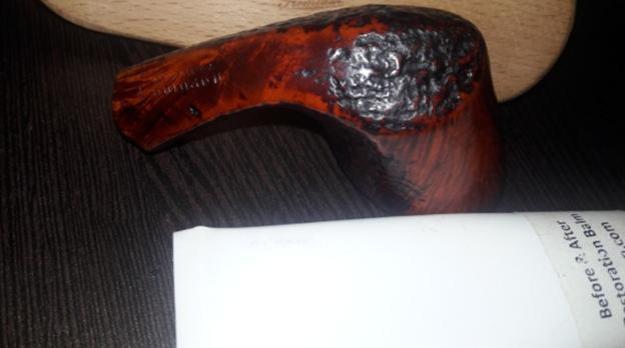
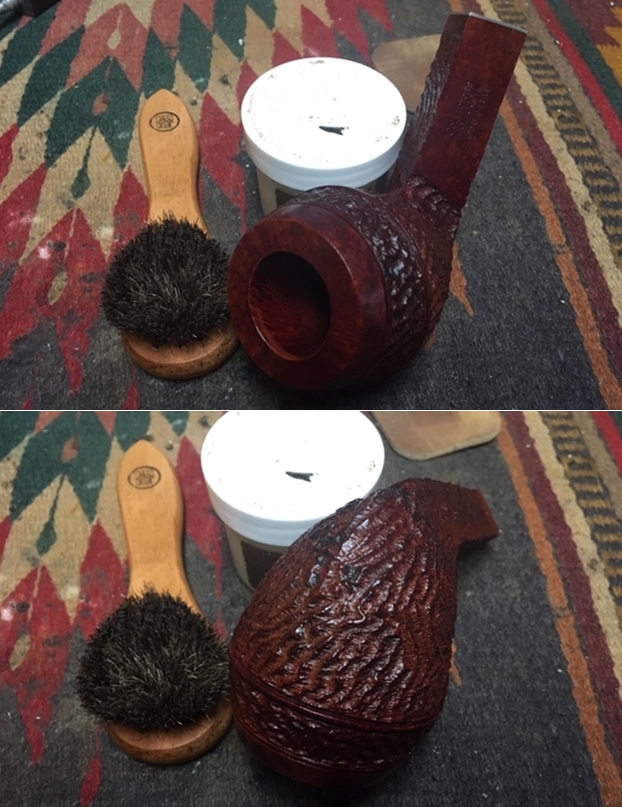
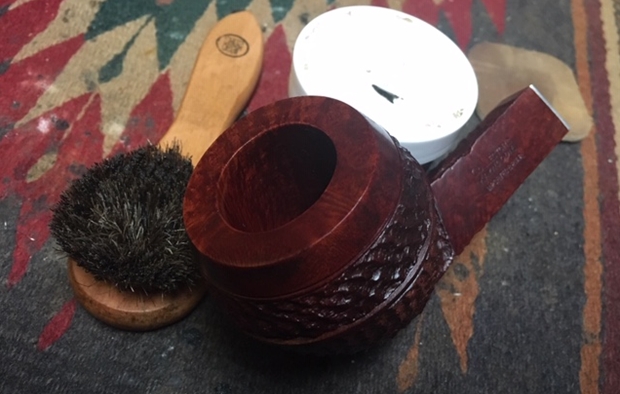
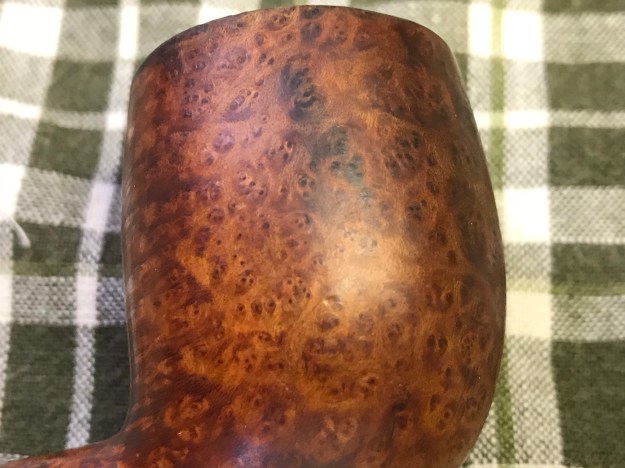
Turning now to the external surface of the stummel, I take a closer look at the condition of the briar.  I identify some very small fills which are solid except for one, which is pitted.  Along with normal dents and scratches from wear, there is a small skin mark on the forward outer lip of the rim.  For the pitted fill, I dig out more of the old fill with a sharp dental probe.  Since I will put clear CA glue on the pitted fill, I color the fill with a walnut dye stick to aid in blending.  I then spot drop CA glue on the area and set the stummel aside allowing the glue to cure. After a full work day, the CA glue patch I applied this morning is fully cured.  I remove the CA glue mound starting with a flat needle file.  The key is to stay on the mound and gradually bring it down close to the briar surface.  I don’t want to impact any surrounding briar.  I follow the filing by using a tightly rolled piece of 240 grit paper to bring the glue down until it’s flush with the briar surface.  My rule of thumb is to sand until I can feel no roughness.  The patch looks good – blending well with the briar.To address the rim nicks, I decide to give the rim a very light topping.  Using a chopping board as my topping board, I place a sheet of 240 grade paper on the board.  Inverting the stummel, I rotate the stummel a few times on the board to freshen the rim lines and remove the nicks.  I follow with a few rotations on 600 grade paper.  The pictures show the progress. Next, to address the briar surface, I use in succession rough, medium and light grade sanding sponges to work out the cuts and nicks in preparation for the micromesh pads.  I find that using sanding sponges on smooth briars helps clean the surface of the old, tired finish without being greatly invasive.  The sponges also smooth and soften the rim lines after the topping.  I enjoy watching the grain begin to take center stage through the process.Next, using micromesh pads 1500 to 2400 I wet sand the stummel.  I follow by dry sanding with pads 3200 to 4000 and 6000 to 12000.  I forgot to take a picture of the first set of 3 pads.  The grain is coming through nicely. 
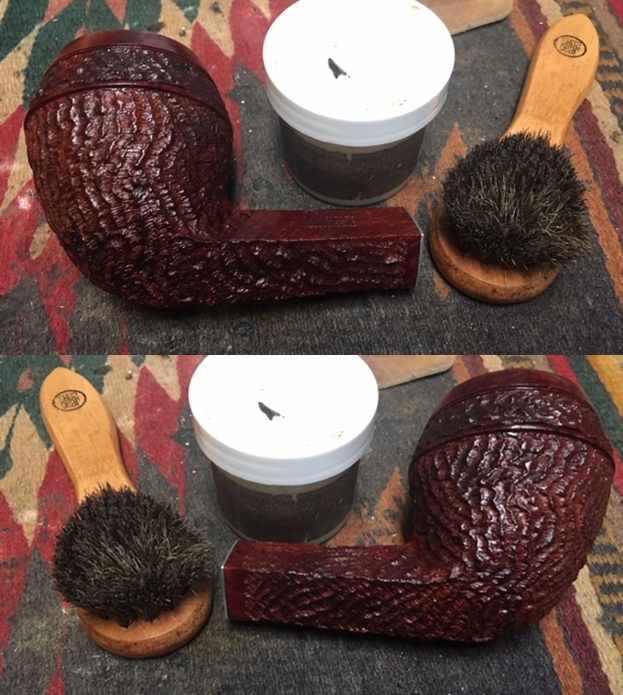
Rejoining stem and stummel, I mount a 1-inch cotton cloth buffing wheel to the Dremel set at about 40% full power and apply Blue Diamond compound to the entire pipe.Before applying carnauba wax to the stem and stummel, I need to touch up the Ben Wade stem stamping with the hope there’s enough tread left in the ‘Wade’ portion of the stamp to hold the paint.  Using white acrylic paint, I apply paint over the stamping and sponge off the excess while still wet and allow the paint to dry. After dry, I gently scrape the excess with the flat edge of a toothpick.  I’m less than satisfied.  I try reapplying more paint and wiping while still wet.  After working with it for some time, I’ve come to the best I can do.  The ‘Wade’ part of the stamping simply does not have enough depth left to fully hold paint.  The picture shows my less than hoped for results. One more project to finish before the final waxing.  After completing the chamber repair using J-B Weld and sanding, to aid the aesthetics and to provide a starter layer for developing a protective cake, I mix together sour cream or natural yogurt with activated charcoal to form an application to cover the walls of the chamber.  When I first heard about this mixture from Steve on rebornpipes, I was a bit doubtful then, but no longer.  I have used this application many times and after applying and drying, the result is a very sturdy layer.  After the pipe goes into service, the only caution is when cleaning out the bowl after use do not scrape the chamber with a pipe tool.  I simply use a folded bristled pipe cleaner to scrape the wall after dumping the ash.  This has worked well for me.  I place a pipe cleaner in the draft hole to keep the airway open.  Here in Bulgaria, yogurt is very plentiful, so I scoop some natural yogurt in a small bowl and add some activated charcoal powder and mix it.  After it mixes and thickens enough so it won’t be runny, I trowel the mixture into the chamber with a pipe nail tool and spread it evenly.  After it’s distributed well, I set the stummel aside for a time to allow the charcoal/yogurt mixture to cure. 
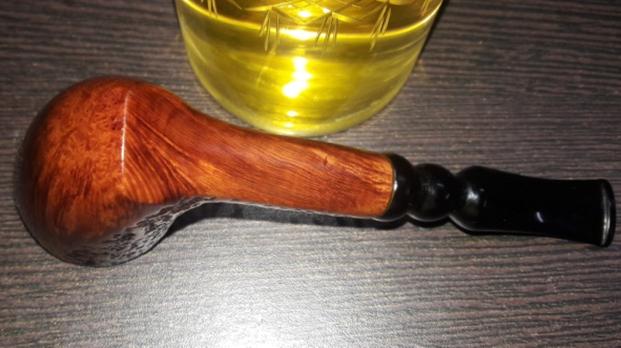
After the Charcoal/Yogurt coating sets, I reunite stem and stummel.  Using the Dremel, I mount another cotton cloth wheel, leaving the speed at about 40% and apply carnauba wax.  After a few coats of wax, I give the pipe a rigorous hand buffing with a microfiber cloth to raise the shine.

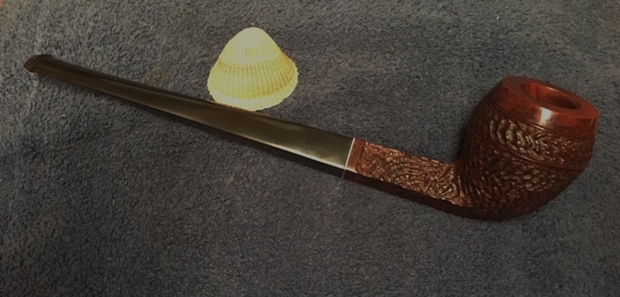
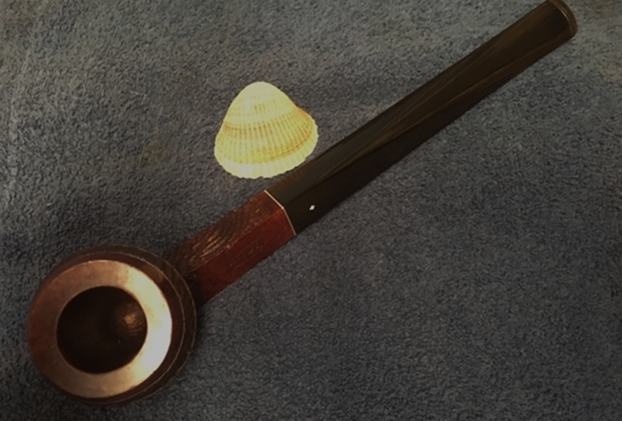
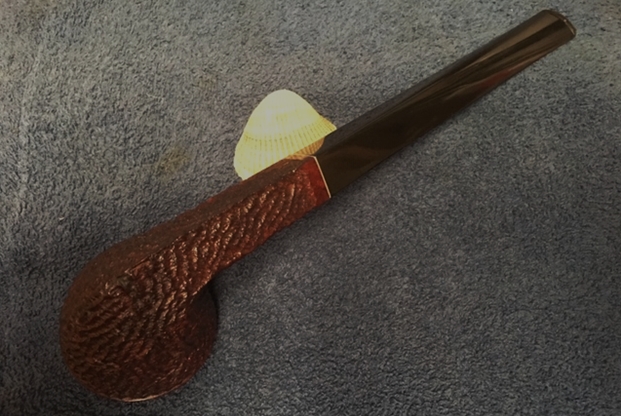
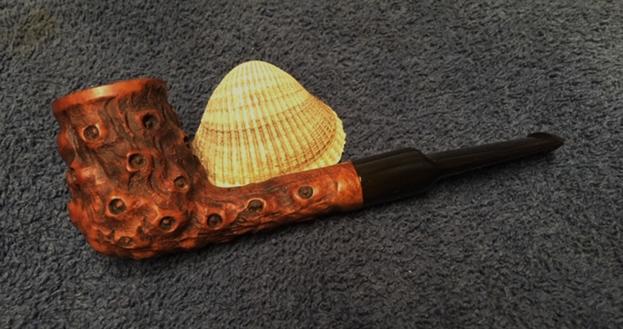
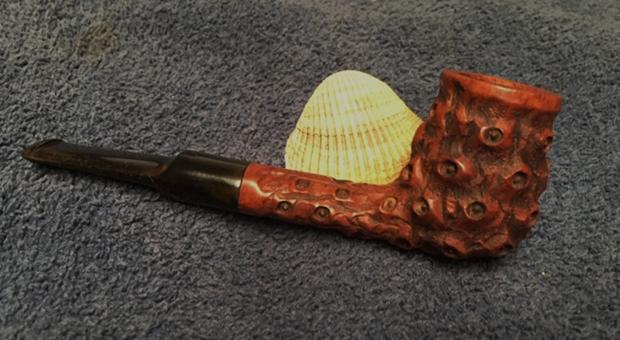
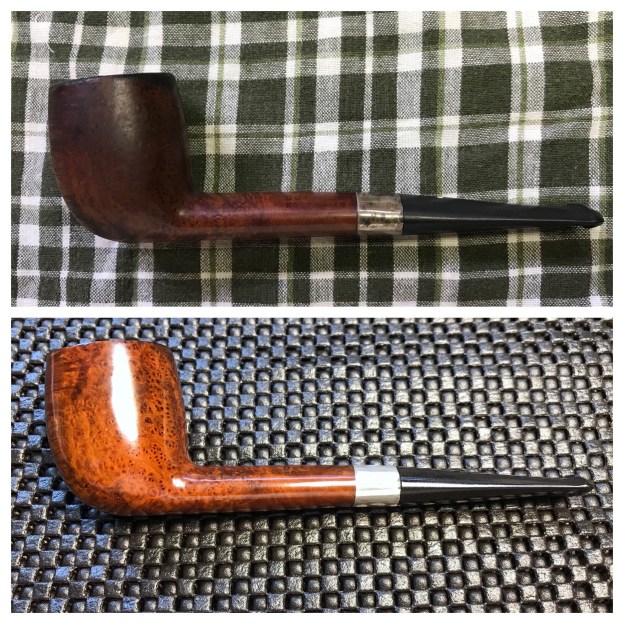
This hefty Ben Wade Made in London England Bent Billiard turned out very well.  The horizontal grain on the huge stummel flows in a striking picture and is joined by large bird’s eye pools. The bowl rests very nicely in the palm and will provide its new steward with much enjoyment. Paresh commissioned this Ben Wade and will have the first opportunity to acquire it from The Pipe Steward Store.  This pipe benefits the Daughters of Bulgaria – helping women and girls who have been trafficked and sexually exploited.  Thanks for joining me!


Restoring a Collector’s Kaywoodie Massive War Club


Blog by Steve Laug

This is one big pipe that came to me in an estate that I purchased from a fellow in Arizona. When I looked over the pipes he was selling with my brother I don’t think the size of this brute really registered with us. It was just another larger Kaywoodie Bulldog. The stamping on the left side of the shank which read Collector’s Kaywoodie Imported Briar did not mean anything to me at this point in the process. It had a rugged sandblast finish that was a large and craggy as the pipe itself. It had a smooth rim top, a smooth top ring and sandblast ring between that and a second ring around the bowl. The bowl was dusty but I was amazed that it was unsmoked and showed a well grained and STAINED bowl interior. There was a spacer on the shank that separated the bowl from the stem and contained the threaded mortise insert for a Kaywoodie threaded stinger. The stem was lightly oxidized and had some water spots that had oxidized spots on the stem. There was some light tooth chatter on the button end on both sides that must have come from people “trying the pipe on”. It had the Kaywoodie Club insert on the left side of the stem. When I unscrewed the stem it had a large four hole stinger. The aluminum was dull from having been sitting. I took photos of the pipe before I started my cleanup process to show the condition it was in when we received it. I included the moon rock finished pipe that I just finished in the photo to give a sense of the massiveness of this pipe. The moon rock is a little over 5 ½ inches long and 1 ¾ inches tall. It is an average sized pipe that is dwarfed by this monster. The Kaywoodie is truly one I would call a magnum pipe. I was unfamiliar with the Collector’s line so I did some digging and had Jeff do the same to see what we could come up with on the brand. I found it listed on the Pipephil site but the pipe shown was obviously a newer one and I found a matching pipe on eBay that showed that it had a three hole stinger. That one was dated as a 1960s era pipe which fits the stinger arrangement on the threaded tenon.

Jeff found a listing on eBay for a 10 inch long Collector Billiard that bore the same stamping as the one I have and had a four hole stinger. The seller described it as “One Very Rare Magnum and a True Kaywoodie Collectors 10 Inch Long pipe.” He went on to say that even to see a Kaywoodie Magnum Smooth Cross Cut Swirled Smooth Grained that is an Extra Large Series of the Collector’s Billard is rare. He dates the pipe to 1951-1954 which is where I would place the one that I have in my hand. This pipe is new – truly NOS that is in excellent condition and though it is large, it feels light and well balanced in the hand. The sandblast finish is very tactile and feels good but I think it would even feel more amazing with fire in the bowl. This huge magnum is 11 inches long and over 3 inches tall. It is a true Magnum Sized pipe. The craggy grained sandblast finish holds a perfectly drilled and centered airway in the bottom of the bowl. The long, large Drinkless Balled Kaywoodie 4 Hole Stinger System is flawless and the stem aligns perfectly.

I took a photo of the top of the bowl to show the condition of the rim and the unsmoked bowl. The rim top had a bit of grime from sitting unused for the past 64+ years. The photos of the stamping and Kaywoodie Club logo show the condition of the rest of the pipe. The nomenclature is crisp and readable. The Club is in good condition. The photos of the stem show the light oxidation and what I called tooth chatter from people “trying on the pipe”. I unscrewed the stem from the mortise to have a look at the stinger and tenon apparatus. I took photos of the set up to show the condition of the internals of the pipe.I started my restoration of this pipe by rubbing the bowl down with Before & After Restoration Balm to deep clean the briar bowl and the rim top as well as the briar shank. The product works to clean, enliven and protect the briar. I hand rubbed it with my fingers, working it into the exterior of the pipe. I worked it into the sandblasted surface of the briar with a horsehair shoe brush. After it had been sitting for a little while, I buffed it with a soft cloth to polish it. The pipe really began to have a rich shine. I took some photos of the bowl at this point to mark the progress in the restoration. I worked over the vulcanite stem with micromesh sanding pads to remove the marks, scratches and oxidation – wet sanding with 1500-2400 grit sanding pads and dry sanding it with 3200-12000 grit sanding pads. I wiped it down after each sanding pad with some Obsidian Oil. I polished the stem with Before & After Pipe Polish – Fine and Extra Fine polishes. I wiped the stem down with a final coat of Obsidian Oil and set it aside to dry. I the polished stem and bowl with Blue Diamond to polish out the remaining small scratches and stubborn patches of oxidation. It also does a great job raising a shine in the hard rubber stems. I gave the bowl several coats of Conservator’s Wax and the stem several coats of carnauba wax and buffed the pipe with a clean buffing pad to raise the shine. I hand buffed it with a microfiber cloth to deepen the shine. The pipe polished up pretty nicely. This turned out to be a beautiful pipe in terms of shape and finish for one that is so large. The finished pipe is shown in the photos below. This huge magnum from 1951-1954 is 11 inches long and over 3 inches tall. The outside diameter of the bowl is 2 inches and the chamber diameter is 1 inch. It is a true Magnum Sized pipe. The craggy grained sandblast finish holds a perfectly drilled and centered airway in the bottom of the bowl. The long, large Drinkless Balled Kaywoodie 4 Hole Stinger System is flawless and the stem aligns perfectly. The fact that the inside of the bowl has been sanded smooth and has a light stain coat is just proof of the NOS (New Old Stock) condition of this beauty. Thanks for walking through the restoration with me as I worked over this older Collector’s Kaywoodie. I am still undecided what I am going to do with this pipe. In all my years of pipe restoring I have never come across a Collector’s Edition pipe like this and probably never will again. That alone makes me hesitate in selling it too soon. Thanks for looking.

Love at First Sight for a Comoy’s Claridge Easy-Bent Billiard


Blog by Robert M. Boughton

Copyright © Reborn Pipes and the Author except as cited
https://www.roadrunnerpipes2k.com/
https://www.facebook.com/roadrunnerpipes/

Something in the way she moves
Attracts me like no other lover
Something in the way she woos me
I don’t want to leave her now
You know I believe and how

— “Something,” by George Harrison, The Beatles, 1969

INTRODUCTION
Mark Oberman is one of the best men I’ve ever known, a man of true faith who walks the way he talks, in a calm, quiet search for his own meaning and place in the world.  He works as a private psychologist in the community and for the local police department’s crisis intervention unit, meaning he puts his life on the line to help desperate folks avoid doing things that might harm themselves or others, but he never talks about that unless there’s a need.  I only found out not long ago, eight years after we met, when someone I know well had been a subject of what police call constant involvement for violent psychological behavior during the previous year and was upgraded to an official investigation.  Mark has helped me under far less serious scenarios, and I consider him to be a good friend.  I’ll have to tell him that sometime.

Mark signaled me, near the end of our monthly pipe club meeting last week, that he wanted a word in private.  Curious, I stepped aside with him, and noticed he appeared uncertain how to get to the point.  I could sense his mind grasping for the right words, and it made me nervous.  At last, he spoke.

“Do you do stem work?” he asked.  I have to say, it was the last thing I expected, and my face might have betrayed me, or maybe my initial silence.  “Could you clean up a few stems and pipes?”

I smiled, knowing full well he didn’t need to ask and not yet understanding where he was going.

“I could do that,” I said.

I think Mark’s hands must have been behind his back, because I was almost startled by the suddenness with which he produced three pipe sleeves that weren’t empty.  Really, he could have been a magician.  We were already whispering when his voice dropped another notch, lest someone else hear his plan.

“I have these three pipes I’d like to donate for the next raffle,” Mark continued before making an inexplicable return to his original question, still avoiding whatever was on his mind.  “Could you clean up the stems, the pipes?”

I knew he wasn’t asking whatever question was most important to him and didn’t get it, and so I responded with my same original answer that, when repeated with a slight twist of emphasis, became ambiguous.

“I could definitely do that.”

This is getting bizarre, I thought, and felt the sudden need to retrieve a Brigham sandblasted pot sitter (#118) as corroboration.  I had restored the stummel and inappropriate three-dot stem with which it came.  The stem should have had only one dot, corresponding with the 100 series of the shape, and also appeared to have been pummeled and lacerated until the top lip was weak and the bottom masticated into nothingness. A hole on the bottom gave poignant testimony to its treatment.  I handed the whole thing to Mark, who couldn’t tell where the stem hole and weak lips once were, and it was shiny black again.  [I’m still looking to trade it for a one-dot, BTW.]

Mark just looked at me, his eyes piercing.  It was as though he beamed the thought to me, and I grokked him.

“I’ll be happy to do it,” I said with a grin.  “To give something back to the club for everything it’s done.”

Mark took a deep breath and smiled in relief.  I guess there was something he didn’t know about me, also.

In that night’s raffle, for example, for three tickets at a dollar a piece, I won a nice corncob and a 100-gram bag of some leafy stuff called Spilman Mixture by the E. Hoffman Company.  Mark donated both of them and more.

And that was when I had my first sight of a smooth easy-bent billiard that grabbed my heart on the spot, even though I didn’t yet know it.  I recognized at a glance its obvious British pedigree but was still surprised by the clean, crisp Comoy’s nomenclature on either side of the shank.

Claridge, I learned when I was home with the three pipes and could examine them in good light, is sometimes listed as a Comoy’s second.  I’m not so sure.  After all, parent companies don’t tend to stamp their own names on their children’s pipes, and when they do, it’s more in the way of introducing a special line, as in Bing’s and Clark’s Favorites, each a “Savinelli Product,” but not considered a second.

The Claridge easy-bent billiard #1452 that wooed me as I worked out its small kinks with slow, gentle rubbing and left it radiant and refreshed again has the following nomenclature: on the left shank, COMOY’S above CLARIDGE; on the right, a small F (for fishtail, indicating that was the original stem type) followed by the much larger, famous round mark with MADE over the top, IN snug in the middle, LONDON completing the circle and ENGLAND straight below it, then 1452.

As a final note on the pipe and its line designation, this billiard was named for two people, a man and woman, husband and wife: William and Marianne Claridge of Mayfair, London, who owned a small hotel there in the mid-19th century.  Wishing to expand, they did so in style, buying the five adjacent properties in 1854 and, two years later, opening Claridge’s London.  In a short time, the hotel became “London’s hotel,” according to the first issue of Baedeker Guide.  Today it is still sometimes called the “annex to Buckingham Palace” because of the frequency of royal visits.

RESTORATION Other than the need for minor cleaning, I didn’t notice anything wrong with the Claridge until I took it home and examined it close-up in good light.  That’s when I spotted the small but insidious furrow starting at the top outer right edge of the rim and extending down the side of the bowl. My heart leapt at the sight of the blemish.  I considered ignoring the relative trifle.  After all, I reasoned, Mark only asked me to clean the pipes and stems!  I had made three previous attempts at repairing uneven rims, all of them very grave cases, and two with what I’d call success.  The other was the best I could do under the circumstances.  All of them involved filing to begin, and I knew I would never subject this beauty to such an invasive procedure.  While I pondered the problem I suppose is obvious I couldn’t help tackling, I put the stem in an OxiClean bath.Hoping to get rid of the dent and make the rim more uniform by sanding, I started slow, patient brushing, front to back, left to right and crosswise, using a 150-/180-grit pad.That part took about an hour, but at the end of it I was surprised and pleased with the results thus far.  The chamber needed to be cleared of carbon buildup and smoothed, so I commenced that stage with my Senior Reamer.  I thought it might help equalize the rim diameter a little more, also, and it did.Then I turned to 150-git paper before 220.  Sometimes that will be enough, but this pipe needed to progress almost all the way up from there: 320-, 400-, 600- and 1000-grit papers.  All of that done, I soaked a small piece of paper cloth in alcohol and cleaned the remaining soot and wood powder from the chamber.Seeing what looked like a single scratch on the left side of the bowl, I was afraid I might have to put some paper to it for a spot-sand, and I really wanted to do this job in as minimalist a way as possible.  After all of that gripping and turning of the beautiful piece of bird’s-eye briar in dirty hands, I washed mine in the sink and used a little purified water on a paper towel to clean the outer stummel.I can only assume that what I saw and felt as a scratch was in fact only a tiny piece of detritus transferred to the wood from my hands that had become somewhat grubbier than usual.

At this point, I started going back and forth between the stem and stummel.  Removing the stem from its bath, I rinsed it, stuck a pipe cleaner through the airhole and let it dry.  Thanks to some lessons from my friend Don Gillmore (dba Don Warren, or dwpipes) concerning how to refinish a pipe in dress black, after five years working on pipes the idea occurred to me to see if 1000-grit paper would clear away the leftover white coat of whatever residual substance remains.  And indeed it did.  If anyone can tell me what that stuff is, by the way, please do so! Then I prepped the shank with alcohol-soaked pipe cleaners and a nylon brush before retorting the pipe. Back to the stem, I did a full wet micro mesh progression with my old pads followed by a full dry run with my newer kit.  The difference can be seen even with these cell phone pics.After only about an hour and a half of concerted effort, I was ready to take the stem and stummel to the electric buffer wheels.  For the ebonite, I used red and white Tripoli, and for the briar I chose White Diamond and carnauba. CONCLUSION
As soon as I finished the Claridge, I emailed Mark the photos of the finished pipe and confessed my predicament, that I’d fallen for the lovely, graceful billiard.  The half of my mind that could reason knew Mark and therefore assured me he would accept my plea to sell me the pipe and allow me to donate one of my own to the raffle in its place.  The other half, alas, was louder, and so for the two days before Mark replied all I could do was look at and sometimes hold in my hands and covet the pretty thing.

When at last Mark replied, all he wrote was, “Absolutely it is yours.”  Of course I was more than happy and relieved, and I dashed off a reminder to him to think of a price before the 1st of November, when I would pay him.  I knew it would be a good deal but never expected his answer.

“Here is a fair price: $0.00.  I expect it at the next meeting. 😊”

Now, that’s an offer I can’t refuse.  But I’m still going to donate a pipe to next month’s raffle – and it’s going to be a good one.  I’m also going to keep my eye out for a Claridge fishtail stem with one of these logos, courtesy of Pipephil.


SOURCES
http://www.pipephil.eu/logos/en/logo-comoy.html
https://www.worthpoint.com/worthopedia/savinelli-clarks-favorite-semi-churchwarden-brand
http://www.pipephil.eu/logos/en/logo-savinelli1.html
https://pipedia.org/wiki/Comoy%27s_Shape_Number_Chart
https://www.claridges.co.uk/about-the-hotel/history-heritage/

Brigham Shape Chart v1.2 Now Live!


Here is the link to the latest update that Charles has done for Brigham shape list. I really appreciate your work on this Charles. Thank you

Charles Lemon's avatar

As promised, here is the latest version of the Official Unofficial Brigham Shape Chart, v1.2!

This iteration of the Chart includes a few more pipe shapes gathered over the last 6 months or so and a LOT more pictures linked to specific shape numbers. I’ve also updated the PDF version for download. Pics are not embedded in the PDF, but the links will probably work if you are reading it on an internet-connected device.

If there are any errors or issues with the new chart, please let me know, and as always, if you’ve got a Brigham in your rack that is not included in the chart, please contact me with pictures to have it added to the collection!

To keep things simple, I’ve updated the Shape Chart on its existing page, so if you’ve already bookmarked it, you’re good to go!

Find the Official Unofficial Brigham Shape Chart here. 

View original post

Breathing New Life into a Spanish Made Seville Brandy


Blog by Steve Laug

This is yet another pipe that I don’t remember where Jeff picked it up. It has a shape and finish that I like to work on. The cratered, almost moon surface type of finish on the shank and bowl are unique and I have only seen them on these Spanish made pipes. Other than being dirty and dusty in all of the craters on the finish the pipe was in decent condition. The rim top had a little bit of lava and darkening but nothing serious. There was a light cake in the bowl that would come out fairly easy. The stem was oxidized with light tooth chatter near the button on both sides. The pipe was stamped on the topside of the oval shank in a smooth panel. It was in great condition and I could read Seville Select over Spain. Jeff took photos of the pipe before he started his cleanup process to show the condition it was in when he found it. He took photos of the pipe from various angles to show the rustication pattern. It really is a unique rustication that has an easily identifiable look to it that says “Spanish” when I see one. The next photo shows the clear and readable stamping on the top of the shank.The stem photos show a lightly oxidized stem with little damage other than light tooth chatter on both the top and undersides.Jeff had scrubbed the exterior of the bowl with a tooth brush Murphy’s Oil soap to work into the rustication pattern and remove all of the dust and grime that had accumulated in the moon crater style rustication. The finish looked dry and tired but the rustication was in very good condition once it had been scrubbed. The rim top looked very good with some minor darkening remaining on the back inner edge of the bowl. He reamed the bowl with a PipNet reamer and cleaned it up with a Savinelli Fitsall Pipe Knife. He cleaned the interior of the mortise and the airway in the shank and the stem with alcohol, cotton swabs and pipe cleaners. The pipe came to me clean and ready to do the restoration. The cleaning had raised more oxidation on the stem. I took some photos of the pipe to show the condition at this point in the process. I took some photos of the rim top to show what it looked like when it arrived. It was almost pristine with little darkening on the beveled edge of the rim. I also took close up photos of the stem to show the oxidation. The stem had some light tooth chatter and marks on the surface near the button. I did not know much about the brand so I did a bit of research on the internet to see if I could ferret out any information. The first spot I turned was the pipephil logos and stampings website (http://www.pipephil.eu/logos/en/logo-s5.html). There I learned to my surprise that the brand was a line of Mastercraft pipes. The stamping on the shank in the photo above  looks similar to the second and third stamping photo below.I turned to the next site I generally turn to for information – Pipedia to see if there was additional information (https://pipedia.org/wiki/Mastercraft).

It doesn’t appear it was ever a manufacturer and bought pipes from multiple factories — mostly French and English. It survived briefly the post war recovery and then was acquired by Grabow…

United States Tobacco (UST) (Skoal and Copenhagen) bought Grabow in 69′ from the Lavietes family. In 74′ they bought M/C from Bernard Hochstein and moved it into the EXACT facility Grabow occupied. I was named “operations manager” and we were in the basement of a 4 story building in Sparta, NC…

M/C was STRICTLY an importer of pipes and pipe related merchandise. In 74′ when M/C moved from NYC to NC the inventory of finished goods was stored in a facility in Winston Salem, NC. Lentz Moving and Storage. Stacked 10 feet high the inventory covered 180,000 square feet….FINISHED…

I’ll just list a few Manufacturers/names of their inventory. England…Parker/Hardcastle (Dunhll), Orlik. France…Jeantet, Jima, Cherrywoods. Italy…GIGI pipe, Radici, Rossi, Federico Rovera, Santambrogio, Brebbia. Meerschaums from Austria….Strambach. Lighters from Japan….Pouches and accessories from Hong Kong…and the Israeli pipes from Mr. Hochstein’s sons. Trust me…This is only a small sample of the things M/C had, and bought into inventory.

Now the connection. Since M/C and Grabow shared a building, and I was an employee of Grabow we compared notes. Grabow copied a BUNCH of M/C items fully with my help and some skills I had developed…

Now the other way. Grabow to Mastercraft. M/C never really had a source of continuing supply. The foreign manufacturers would make a line for a while and then quit. Never do it again, no matter how well it sold, no matter the demands we put on em’. Grabow gave M/C a source of stability, and a nice profit for both companies. A lot of these you will not have heard of, but maybe….Seville, for M/C all smooth, for Grabow all rustic Hillcrest…. Freehand, For M/C Andersen and (a few Mastersen), for Grabow, Freehand with a DRB tampon. New finishes…New shapes, New bits…..Mastercraft showed Grabow how to use LUCITE for stems… Royalton. Again these are just examples.

I back sourced the above information to the Dr. Grabow group on Tapatalk where Ted who contributed the above information to Pipedia answered a question about the Seville Line of pipes (https://www.tapatalk.com/groups/drgrabows/is-seville-grabow-t5171.html).

Ted is the expert on this…because of the fact that Seville pipes were distributed by Mastercraft during Ted’s tenure there. Mastercraft shared the same building with Grabow in Sparta…and Ted has about a million very interesting stories and recollections from his days there.

Quoting Ted from an earlier post: “Mastercraft started importing Seville from GIGI PIPE in Varese in the late 70’s or early 80’s. The Seville became one of the most popular pipes M/C sold. They came in several versions, Regular, Filter, Convertible, and Lucite. They were so popular that Grabow started making some for M/C. This gave M/C a steady source of supply, and allowed Grabow to make some fancier shapes for their regular lines. I think Grabow was making most all of them by the mid 80’s.”

I believe the Sparta-made Sevilles would NOT say ‘Italy’ on them…as those stamped Italy would have been made by GIGI.  Ted can verify that. Ted has also confirmed that a few of the Seville shapes were added to the Hillcrest line. A couple are very close, and 2 or 3 are identical, from what I’ve seen.

I have learned from my internet excursion that the pipe was most likely made in Spain by a pipe maker there. The brand later became a sub-brand or line from the Grabow factory. It is interesting to note in all of the above there is no identification of the pipe maker in Spain and no mention of the brand being made in Spain… ah well yet another mystery of pipe repair and refurbishing.

I started my restoration of this pipe by rubbing the bowl down with Before & After Restoration Balm to deep clean the briar bowl and the rim top as well as the briar shank. The product works to clean, enliven and protect the briar. I hand rubbed it with my fingers, working it into the exterior of the pipe. I worked it into the rusticated surface of the briar with a horsehair shoe brush. After it had been sitting for a little while, I buffed it with a soft cloth to polish it. The pipe really began to have a rich shine. I took some photos of the bowl at this point to mark the progress in the restoration. I applied some Conservator’s Wax and worked it into the surface of the rustication with my fingertips. I worked it over with a horsehair shoebrush to further get it into the pits and buff it to a shine. I buffed it with a microfibre cloth to deepen the shine. I had removed the stem when I was working on other pipes and put it, along with two other stems to soak in a Before & After Deoxidizer bath. I left them in the bath for about 4 hours to soak and break through the oxidation. I took the stems out of the bath and rinsed them under running water and scrubbed them dry with a coarse piece of cloth. I took photos of the three stems before I continued my work. I broke up the residual oxidation on the stem surface with 220 grit sandpaper. I worked on it until all the oxidation and the light tooth chatter was removed.I polished the stem with micromesh sanding pads – wet sanding with 1500-2400 grit pads and dry sanding with 3200-12000 grit sanding pads. I wiped the stem down with Obsidian Oil after each pad. I polished it with Before & After Pipe Polish – both Fine and Extra Fine and gave it a final coat of Obsidian Oil. I set the stem aside to dry. I polished stem and the bowl with Blue Diamond polish on the buffing wheel. I gave the bowl multiple coats of Conservator’s Wax and the stem multiple coats of carnauba wax. I buffed the pipe with a clean buffing pad to raise the shine. I hand buffed it with a microfiber cloth to deepen the shine. The pipe polished up pretty nicely. The rustication came alive with the buffing and worked well with the polished black vulcanite stem. Together the pipe looks much better than when I began and has a rich look. The finished pipe is shown in the photos below. The shape, finish and flow of this Spanish Made pipe and stem are very well done. The dimensions are Length: 5 1/4 inches, Height: 1 3/4 inches, Outside diameter of the bowl: 1 3/16 inches, Chamber diameter: 3/4 of an inch. I will be adding this interesting Seville Select Spanish made pipe to the rebornpipes store shortly if you are interested in adding it to your collection and carrying on the trust. Thanks for walking through the restoration with me as I worked over yet another unique and interesting old pipe. I really like the look and feel of this finish.


The Resurrection Special: Part 1


A few years back there was a thread on Pipes Magazine’s repair and restoration forum about three lots of pipes a member was giving away. The first lot was a very easy “beginner” lot, the second was slightly more challenging, and the last was called The Resurrection Special and had the most challenges. No information was given about the pipes or (as far as I recall) their issues.

The first two lots were spoken for fairly quickly but the third sat there, unloved, for a little while. After looking at the post for as long as I could stand I sent a PM to the original poster and said “I’ll bite; send them my way and I’ll see what I can do”.

When the long, medium sized box arrived on my doorstep I was excited to see what I had gotten myself into. I took them straight to the kitchen table (my wife wasn’t home so I could do that lol) and cut open the box. The contents were carefully packed in newspaper which held three bubble wrapped pipes. I was like a kid on Christmas morning getting ready to open each one!

The first pipe I opened was a lovely old Tracey Mincer Bulldog -type shape. I had seen photos of and read about Mincer’s different pipes but had never held or owned one yet.

The second pipe turned out to be a Peterson System pipe, my first both of this historic marquee and type. It was hallmarked 1973 and looked every day of it. I was a little intimidated by the work this one would take.

As I unwrapped the third pipe my mind was still on the Peterson and what a great pipe I hoped it would be after a lot of work went into it. The last pipe was just over medium in size I noted as the bubble wrap was peeled away. A silver band was the first thing to catch my attention, looking at the pipe upside down when it was finally out of its protective shroud.

I rolled the pipe over to look for it’s stamping. That’s when I saw it: A White Dot in the stem! “Surely not”, I thought to myself, “this can’t be a Dunhill, can it?” The nomenclature was very worn but readable enough to see it was a Dunhill. I immediately went to get my loupe to see what year the pipe was made, if possible. Looking it over under magnification I found two things I’d not yet seen: enough stamping to date the pipe and that the silver band was a repair for a cracked shank.

The discovery of the crack slowed me down a bit. I went to get a flashlight to inspect the pipe closer. The crack seemed to be well repaired with the band; that was a good find. But looking at the bowl I realized there was a pretty big crack in it, too. So much for my bit of relief … I decided to check the year of the pipe’s manufacture and leave the repair thoughts aside for now.

After a quick internet search I came up with a link to a Dunhill dating chart on Pipephil’s site. It took only a moment or so to find the results but it took a bit longer for the results to sink in. If I was reading everything right, this pipe dated to 1968, which is my birth year! I was giddy as a schoolgirl at this moment… and nervous as a cat at the same time.

At this point I had not worked on any pipe as (potentially) valuable as these. I also hadn’t tried to undertake any repairs as extensive as these looked to be. After a lot of debate, I finally decided to put the lot away until I’d tackled a few more repairs and had more experience under my belt and tools in my arsenal. Over time as I repaired and restored more pipes I began to raise my confidence levels. Each project I completed had as the goal getting me ready for the Resurrection Special lot.

About when I felt it was time to take on these challenges life threw a few curveballs at me, personal issues that put most of my hobby time on hold. Fast-forward a few years, it’s time to get to the Resurrection Special lot.

Looking more closely at the pipe when I unpacked it again I saw that much of my past inspection was correct: the shank repair and band were tight and holding well with no “feel” when I rubbed a fingernail over it, the pipe did date to 1968 as I thought, and the bowl would need work, though not as much as I thought. The pipe was very dirty, the rim being covered in a thick layer of lava. The stem had a little oxidation and some tooth dents. The silver band was tarnished.

I began with the rim; I had no idea of it’s condition under the lava and I wanted to see what I was dealing with. I used alcohol dipped cotton swabs to begin breaking down the thick layer. Once it was softened up some I used a knife-blade wax carving tool to scrape away the gunk. The rim was damaged under the lava, as I expected it to be; it would need to be topped. I decided here that I would take off as little wood as possible when I topped the bowl since I wanted to keep the shape as true as possible. I also decided that this wouldn’t be an attempt to make the pipe perfect; it (like me) had battle the scars of it’s life and I wanted to retain that character, too.

The bowl had been reamed before I received the pipe, most likely when the issue was discovered. What I had thought was a crack actually was heat fissures; they didn’t go all the way through the bowl. The outside of the bowl did have what appeared to be burns though; more on these in a bit.

I had read how Charles Lemon of Dad’s Pipes had done several successful bowl repairs with JBWeld and his own bowl coating. I messaged Charles and also looked up his article on bowl coating to try it myself. The recipe is simple: coat the bowl with maple syrup, fill it with activated charcoal powder, and wait for it to dry. (Actually there are a couple more steps, like putting a pipe cleaner in the stem, so make sure you read Charles’ article if you’re interested in trying this method.)

I mixed up some JBWeld and coated the area where the fissures were, using a toothpick to push the epoxy back into the cracks, after inserting a pipe cleaner in the shank through the air hole to keep it open. I used a pipe cleaner and my finger to smooth the repair out as well as I could. Then I sprinkled some activated charcoal powder on the wet repair and set the bowl aside for the epoxy to cure until the next day.

After the repair was dry I sanded it a little smoother with 220-grit paper. Unfortunately this took out most of the carbon I had applied so the full bowl coating would have to be done. But I waited until after all the work was completed to do that. I also topped the bowl to remove most of the rim damage using 220-grit paper.

While the bowl repair was curing I worked on the stem. I started with painting the stem with a Bic lighter to raise the dents as much as possible. 
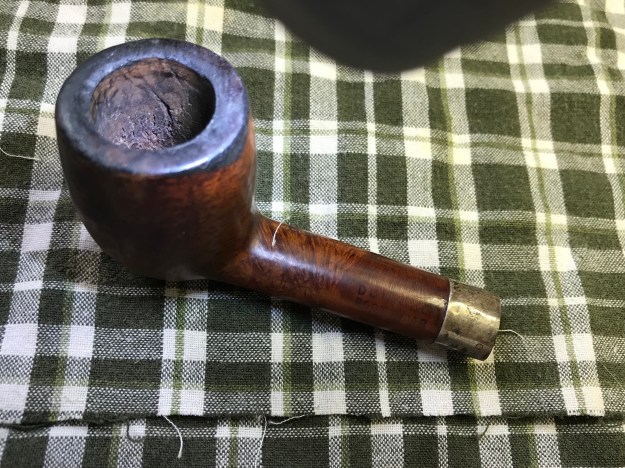
You can see in the photos that there were still significant dents after flaming the stem. A crack in the underside of the button also appeared after the flaming. I began filling the dents and repairing the crack/button with black CA glue at this point. The climate has been very humid here so the CA glue cured extremely slowly.

I worked on the stem in multiple sessions over a period of days to complete it due to the slow curing time. Multiple patch layers were applied and shaped with needle files, a vulcrylic file, and sandpaper until I had an acceptable repair.

The next step was to wet sand the stem with the full range of micro mesh pads. Then I used both the fine and extra-fine Before and After Stem Polish. I buffed the stem with blue compound using a 1″ cotton wheel on my Dremel at about 13k RMP. While the stem wasn’t “perfect” it was very improved, definitely something I could live with and what I thought would go well with my goal for this restoration. It was time to get back to the stummel now.

I cleaned the surface of the briar with cotton pads and alcohol, removing the grime covering its surface. I decided to see what the pipe would look like with a gentle sanding. With 400-grit wet/dry paper I began with the rim, sanding out the scratches from topping the bowl. I began to work around the bowl with the 400- grit paper and noticed the burn mark on the side of the heat fissures seemed to be lightening so I started working at that spot. In short order the burn was all but gone. Apparently it wasn’t a burn at all but some kind of stain on the briar. As I sanded the stummel I avoided the nomenclature, and effectively the entire shank. The stamping was already terribly weak and I was not going to make it worse.

Avoiding the stamping presented another challenge: Now the shank was a different color than the bowl. I didn’t want to re-stain the pipe so I applied Before and After Restoration Balm to the wood and set it aside to work its magic for a bit.

I was surprised how well the wood blended in color after I hand buffed the balm off. It was now uniformly darkened, even the topped rim.

I had an idea that had been in the back of my head for a little while that I wanted to try on this pipe. The nomenclature being so weak, I wanted to try to enhance it if I could. But I didn’t want to try to deepen the stamping or anything of that sort. What I decided to try was applying some Rub’N Buff ebony wax. This was a brand new idea (to me) and I really didn’t know if it would work or not.

I put a small amount of the ebony wax on the shank and spread it thinly over the entire shank, continuing to buff it with my thumb until the color went from opaque to translucent. I then applied a couple of coats to the rest of the pipe until I had even coverage.

I was really happy with the results. The color was even and highlighted the grain a bit. The stamping was also strengthened I think, much better than it had started out. While still not “strong” (I don’t think that can ever be restored) it was more readable.

I buffed the stummel with Tripoli and then white diamond, both using the Dremel and 1″ cotton wheels at about 13k RMP. I then put the stem back on the pipe and gave the entire pipe several coats of Carnuaba Wax, again with the Dremel and a 1″ cotton wheel at about 15k RPM. (I find the slightly faster speed does a far better job for the Carnuaba Wax.)

I’m still waiting for the bowl coating to cure so I’ve yet to christen the pipe. But I’m very happy with the results of this project. While it may not be a perfect specimen nor hold a lot of monetary value, to me it is a prize possession; my first Dunhill, and a birth-year Dunny to boot!

New Life for a Savinelli Capri Bruna 310 Cherrywood


Blog by Steve Laug

I don’t remember where Jeff picked up this old pipe but it is a shape that I like to work on. It was a mess with lava overflowing a thickly caked bowl and filling in rusticated rim top. The rusticated finish was very dirty and had darkened around the bowl where the hand had held it and where the flame of the lighter had touched the rim in the lighting process. The pipe had a classic Capri Sea Rock style rustication that was very dirty. The stem was a mess with oxidation, calcification near the button and tooth chatter and marks ahead of the button on both sides. The stem was stuck in the oxidized vulcanite shank extension due to the buildup of tars and oils. The pipe was stamped on the underside of the bowl and shank and under a bright light with magnification I could read Savinelli over Capri Bruna on the bottom of the bowl. On the shank it was stamped with the Savinelli S shield and next to that 10 (shape number) over Italy. The pipe was a oldtimer and had seen a lot of use. It was obvious to me that this pipe was some pipeman’s favourite smoker. Jeff took photos of the pipe before he started his cleanup process to show the condition it was in when he found it. The next photos show the stamping on the heel of the bowl and the shank.Jeff had scrubbed the exterior of the bowl with Murphy’s Oil soap and removed the dust and grime that had accumulated in the sea rock style rustication. The finish looked dry and tired but the rustication was in very good condition once it had been scrubbed. He had been able to remove the grime and oils from the sides of the bowl leaving it clean and evenly coloured. The rim top looked much better though some darkening remained in the grooves along the inner edge of the bowl and rim top toward the back. He reamed the bowl with a PipNet reamer and cleaned it up with a Savinelli Fitsall Pipe Knife. He cleaned the interior of the mortise and the airway in the shank and the stem with alcohol, cotton swabs and pipe cleaners. The pipe came to me clean and ready to do the restoration. The stem and shank extension were heavily oxidized. I took some photos of the pipe to show the condition at this point in the process. I took some photos of the rim top to show the darkening to the surface of the rim that I would need to spend some time on. There seemed to be some deeply ground in tars and oils almost filling in the grooves of the rustication on the top surface toward the back of the bowl. I also took close up photos of the stem and vulcanite shank extension to show the oxidation of those areas. The stem had some tooth chatter and marks on the surface near the button. There were some tooth marks in the surface of the top and underside of the button edge.I began my clean up work with the rim top. I scrubbed at the surface of the rim with a brass bristle wire brush and was able to remove much of the lava build up in the rustication. It was still darkened but looked much better.I sanded the oxidation on the shank extension with a folded piece of 220 grit sandpaper to break it down and reveal the black vulcanite underneath the surface. In handling the bowl the briar began to darken from the oils of my hands. The pipe was beginning to show some promise. I polished the vulcanite shank extension with micromesh sanding pads – wet sanding with 1500-2400 grit pads and dry sanding with 3200-12000 grit pads. I wiped the extension down after each pad with Obsidian Oil to enliven the rubber. I polished the vulcanite shank extension with Before & After Pipe Polish – both Fine and Extra Fine to give a deeper shine to the rubber. As I photographed the bowl for the above photos I could see that the rim top needed more attention. I scrubbed the top of the bowl with the brass bristle brush to remove move of the lava on the rim top. The photo shows the cleaner top surface. There is still some darkening on the right side inner edge and the back inner edge of the bowl.I rubbed the bowl down with Before & After Restoration Balm to deep clean the briar bowl and the rim top as well as the briar shank. The product works to clean, enliven and protect the briar. I hand rubbed it with my fingers, working it into the exterior of the pipe. I worked it into the rusticated surface of the briar with a horsehair shoe brush. After it had been sitting for a little while, I buffed it with a soft cloth to polish it. The pipe really began to have a rich shine. I took some photos of the bowl at this point to mark the progress in the restoration. I had removed the stem when I was working on other pipes and put it, along with two other stems to soak in a Before & After Deoxidizer bath. I left them in the bath for about 4 hours to soak and break through the oxidation. I took the stems out of the bath and rinsed them under running water and scrubbed them dry with a coarse piece of cloth. I took photos of the three stems before I continued my work. The military style bit was much cleaner and the oxidation had broken down. I flamed the surface of the vulcanite to minimize the tooth marks. It worked very well. I used some black super glue to build up the top and underside of the button and fill in the remaining tooth mark on the underside of the stem near the button. Once it had cured I filed the edge of the button with a needle file to clean that up and smooth out the sharp edge. There was some residual oxidation on the stem surface so I sanded it out with 220 grit sandpaper. I worked on it until all the oxidation and the light tooth chatter was removed.I polished the stem with micromesh sanding pads – wet sanding with 1500-2400 grit pads and dry sanding with 3200-12000 grit sanding pads. I wiped the stem down with Obsidian Oil after each pad. I polished it with Before & After Pipe Polish – both Fine and Extra Fine and gave it a final coat of Obsidian Oil. I set the stem aside to dry. I polished stem and the bowl with Blue Diamond polish on the buffing wheel. I gave the bowl multiple coats of Conservator’s Wax and the stem multiple coats of carnauba wax. I buffed the pipe with a clean buffing pad to raise the shine. I hand buffed it with a microfiber cloth to deepen the shine. The pipe polished up pretty nicely. The rustication and the vulcanite shank extension came alive with the buffing and work well with the polished black vulcanite stem. Together the pipe looks much better than when I began and has a rich look. The finished pipe is shown in the photos below. The shape, finish and flow of the pipe and stem are very well done. The dimensions are Length: 6 inches, Height: 2 inches, Outside diameter of the bowl: 1 3/8 inches, Chamber diameter: 3/4 of an inch. I will be adding this beautiful Capri Bruna Cherrywood Sitter to the rebornpipes store shortly if you are interested in adding it to your collection and carrying on the trust. Thanks for walking through the restoration with me as I worked over another Savinelli Capri. I really like the look and feel of this finish.

Restoring a Nording “Pick Axe” Freehand Pipe


Blog by Paresh Deshpande

I had just finished restoring a 1940s-1960s Kaywoodie Bent Billiard with a 4 holed stinger, also from my grandfather’s collection. I am always fascinated by “Free Hand” pipes. I feel these freehand shapes let the creativity and imaginations of a carver run riot without the bindings of the exacting demands of a classical shapes and finish.

Over a period of time, I have collected a number of freehand pipes during my not-so-long journey in to the pipe world and have realized that these freehand pipes invariably have a nice hand fit, sitting snugly in to the hands of the smoker with a nice heft to them. The most fascinating aspect of a freehand, I feel, is the carver’s desire to highlight the grains in the briar block and shape the pipe accordingly to highlight these grains.

I was fortunate to come across four estate freehand pipes, one Soren, one Ben Wade Spiral, one Nording #4 and one Nording Pick Axe shaped pipe. I discussed with my mentor and guide, Mr. Steve Laug, and after his approval on the aspects of collectability and the price point at which they were available, I purchased them about a year back!!!! Since then, these were waiting for me to work on and now that I feel slightly more confident in doing justice to these lovely pipes, I decided to work on them. The first of these pipes that is now on my work table is the Nording Pick Axe shaped freehand.

This beautiful pipe has the classical pick-axe shape with a plateau rim top. The stummel has a smooth surface with densely flame grains extending from the mid way on right side and extending mid way on left side while the remaining surface on the stummel has beautiful rustication. The smooth portions extend to the sides such that when held in the palm, all the fingers are holding the stummel along the smooth surface and one can admire the fine delicate rustications on the back while sipping your favorite tobacco. Blissful!!!!!!!!! Similarly, the top surface of the shank is rusticated extending half way through on either side while the bottom is smooth with straight grains extending from the tip of the axe towards the end of the shank.  The only stamping, “NORDING” in block capital letters, is seen on the smooth portion of the shank. The stamping is clear, crisp and easily readable. The fancy stem has a slight bent towards the lip and helps the pipe to balance straight on a table. There is the letter “N” in block capital letter, stamped on the top surface. But it is faint and hidden under the heavy oxidation.I searched the internet for detailed information on Nording pipes and this pipe shape in particular shape. Though I did not find anything particularly about this pipe, it was interesting to read how young Mr. Nording got in to the business of pipe making. It makes for a very interesting read. We must not forget to thank one Mr. Skovbo, who had a major contribution in introducing Mr. Nording in to this business!!!!!!  I have a couple of SON pipes in my grandfather’s collection which I will restore at a later date since I now know about the historical importance of these pipes!!!!!!!!!!! Here is the link for easy reference of those interested: https://pipedia.org/wiki/Nørding 

INITIAL VISUAL INSPECTION
The stummel is covered in dust, oils and grime giving a dull and lackluster appearance to the bowl. The rustications on the back of the stummel are, likewise, filled with dust, dirt and grime. This will need to be thoroughly cleaned. On close scrutiny, I saw some minor superficial dents and dings on the smooth surface. Will I address it or keep it as it is as a characteristic feature of this pipe’s past life? Hell yes, I will address it!!!!! I want it to be as perfect as I can make it for its next innings with me!!!!!! The chamber is clean with a very uneven and thin layer of cake. The plateau rim top is covered with overflow of lava. The inner rim edge is crisp, even and intact. The chamber is odorless and dry to the touch. The inner wall condition of the chamber will be ascertained once the chamber has been completely reamed. However, I foresee no issues at all as the bowl feels solid to the touch.The fancy stem is heavily oxidized with tooth chatter and bite marks on both surfaces and some calcification can be seen towards the lip. There is a significant damage to the lip end in the form of a bite through hole on the upper surface and some deep bite marks on both upper and lower surface of the stem. The airway in the stem is slightly blocked. These issues will have to be addressed. On close observation, the upper surface of the stem bears the stamp “N” in block capital letter. However, this stamp is very faint and covered in thick layer of oxidation. I will attempt to restore and save this stamp.The shank, mortise and the airway is relatively clean and will only need to be sanitized.THE PROCESS
The first step that I usually follow is the reaming of the bowl. However, in this project, since the only significant damage appreciated is to the stem and would be a time consuming process to repair, I started this restoration by addressing the stem first by sanding the stem surface with a 220 grit sand paper followed by 1500 grit micromesh pad. This serves two purposes. Firstly, it evens out the surface for a fresh fill during stem repairs and secondly, I have experienced that any fill in a stem repair turns distinctly brown after micromesh sanding if the oxidation from the stem surface was not removed prior to the application of the fill. Once I was through with the sanding, I wiped the stem clean with cotton pad dipped in isopropyl alcohol. This was followed by flaming both the surfaces of the stem with a Bic lighter, concentrating more around the hole on the upper surface and the deeper bite marks on the lower surface. This helps in raising all the tooth chatter and dents to the surface.I inserted a pipe cleaner coated with Vaseline in to the stem airway before applying the fill. This helps in preventing the fill from entering and blocking the airway. I prepared a mixture of superglue and activated charcoal and applied it as evenly as possible over the hole and deep bite marks and set it aside to cure for 48 hours since the climate here is very wet and humid. While the glue was curing, I worked on the stummel, reaming out the cake with a Kleen Reem reamer, followed by a pipe reaming knife that I had fabricated. I brought the cake down to the bare briar. To further remove any traces of old cake and smooth the inner walls of the chamber, I sanded the inner wall surface with a 220 grit sand paper. As observed during initial visual inspection, I had decided to remove all the dents and dings in the stummel. I cleaned the stummel with Murphy’s oil soap, paying special attention to the plateau rim which was scrubbed with 000 grade steel wool to remove all the overflow of lava. Thereafter I sanded the smooth surfaces of the bowl with a 220 grit sand paper. Once all the dings and dents were evened out and the surface made smooth, this was followed by micromesh polishing pads, wet sanding with 1500 to 2400 grit pads. Again, I wiped the bowl with a moist cotton cloth after each pad. Thankfully there were no fills in the stummel. Once I was through with the wet sanding pads, I used the 3200 to 12000 grit pads to dry sand the stummel to a nice shine. I set the stummel aside to let it dry out naturally. I rubbed some “Before and After Restoration” balm deeply in to the stummel with my fingers. This balm helps in rejuvenating and protecting the briar wood. The immediate and incredible transformation that takes place is a worthy reward for all the efforts!!! The mixed grain can now be clearly appreciated. I let the balm be absorbed by the briar for about 15-20 minutes and then polished it with a soft cotton cloth. The bowl now looks fresh and attractive with the grains popping out any which way you look at the briar. Turning my attention to the stem, using a flat head needle file I sanded out all the fills to match the surface of the stem. I further matched the fills by sanding it with a 220 grit sand paper. I had to spot fill clear superglue into small fills which were exposed during the sanding and repeat the entire process twice. To finish the stem I went through the complete set of micromesh pads, wet sanding with 1500 to 2400 pads and dry sanding with 3200 to 12000 grit pads. I wiped the stem with a cotton swab dipped in alcohol after each pad and rubbed olive oil into the stem after every three pads. The stem looks crisp, shiny and like new. Having addressed the “appearance” aspects of this beauty, I turned my attention to the “performance” aspects to ensure that this beauty smokes as well as it looks. I thoroughly cleaned the shank internals using shank brush, pipe cleaners, qtips and isopropyl alcohol. The stem airway was cleaned using regular pipe cleaners and also bristled ones dipped in alcohol. The airway is now clean and the draw is full and open.To complete the restoration, I rubbed a minute quantity of PARAGON WAX on the smooth stummel and the stem and HALCYON WAX II on the rusticated surface. After a few seconds, using muscle power and a microfiber cloth, I polished the entire pipe to a lovely shine. The finished pipe is shown below. This one shall soon find a place in my rotation. Thank you for your valuable time spent in reading this chronicle of my journey.

Restoring a Nording # 4 Freehand


Blog by Paresh Deshpande

I had purchased four freehand pipes about a year back, and now after having worked on 30 plus pipes, and restored them to acceptable standards, I feel confident of tackling restoration of these pipes. Along the way, I learned a few techniques and honed and practiced my skills in these processes, made a few good friends and acquaintances and most importantly, have been able to preserve and restore memories of my Grand Old Man, which I cherish the most.

This Nording #4 now on my table is a large pipe with beautiful straight grains extending from the base of the bowl to the rim top on left 1/3 portion of the stummel and the rest 2/3 is sandblasted. The rim top curves upwards in 11 ‘O’ clock and 5 ‘O’ clock direction and forms plateau on the rim top. There is a smooth ring of briar on the bowl just below the rim top. The ring is asymmetrical and follows the shape of the rim top. The square shank is rusticated on three sides and smooth on the left side. This smooth surface bears the stamp “NORDING” over “MADE IN DENMARK” followed by a prominent number “4”. The fancy stem bears the stamp “N” in a fancy decorative and cursive hand.I was surfing the net for some additional information on this particular Nording and found that this piece closely resembles the NORDING’S RUSTIC pipe. Here is the link to Nording shapes and finishes on Tobacco Pipes. (https://www.tobaccopipes.com/nording-history/)  

INITIAL VISUAL INSPECTION
The plateau on the rim was dirty with dust and tars in the grooves of the plateau. The grooves of the sandblast were also dusty and dirty. The inside of the bowl appeared to be in good condition under the thin cake. There is an uneven build up of cake with bottom half having more cake as compared to the upper half of the bowl.The rustications on the shank and stummel is also dusty and filled with dirt and grime. The smooth portion of the stummel appears dull and lackluster due to dust and grime coating the stummel. The plateau shank end was also dirty with tars and dirt. Air does not flow freely through the shank and the mortise appears to be clogged. The stem does not seat completely in to the mortise. This will have to be cleaned.The stem is vulcanite and was oxidized and had some calcification on each side of the stem for the first inch ahead of the button. Apparently at some point in its life, it had a rubber Softee bit on the stem to protect it from tooth marks and chatter. It had done its job and there were no tooth marks or chatter on the surface of the stem. The stamping on the stem, though faded and covered under heavy oxidation, is visible and it will be my attempt to restore and highlight it to the extent possible.All in all, this appears to be a simple and straight forward clean up and polishing project, unless some gremlins and demons are unearthed during the process!!!!

THE PROCESS
I reamed the bowl with a Kleen Reem pipe reamer to take the cake back to bare briar. I cleaned up the remnants of cake in the bowl with my fabricated knife. I was careful not to be over zealous using the knife in order to prevent the walls from being gouged. I finished the cleaning of the inside of the bowl with 220 grit sandpaper wrapped around my finger. I turned it in the bowl until the bowl was smooth and clean.I scrubbed the exterior of the bowl with a tooth brush and Murphy’s Oil Soap. I scrubbed the plateau rim top with a brass bristle brush to remove the tars and oil in the grooves. I rinsed the bowl with water in the sink while scrubbing the finish with the tooth brush to remove the dust and grime. I scrubbed out the mortise with a dental spatula. I cleaned the airway in the shank and stem with pipe cleaners, cotton swabs dipped in alcohol. Once the grime was removed the pipe smelled good and looked good.I rubbed some Before & After Restoration Balm into the surface of the briar to enliven, clean and preserve it. I rubbed it in with my fingertips working it into the briar. I worked it into the plateau rim, shank end, smooth portion of the stummel and the sandblast on the sides of the shank and the bowl. I buffed it into the finish with a horsehair shoe brush. I set it aside for a little while to let the balm do its work. I buffed it off with a cotton cloth and a shoe brush. I set the bowl aside and turned my attention to the stem. I flamed the surfaces of the stem with a Bic lighter to raise very minor tooth chatter to the surface as well loosen the oxidation from the stem surface. This was followed by sanding the oxidation and the calcification on the stem with 220 grit sandpaper. I was able to remove the oxidation and the calcification.

I polished the stem using micromesh sanding pads – wet sanding with 1500-2400 grit pads and then dry sanded the stem with 3200-12000 grit pads to further polish it. After each pad I wiped it down with Extra Virgin Olive Oil to protect and enliven the stem. When I finished with the final pad I gave it the stem another coat of oil and set it aside to dry. These fancy stems, though looks fabulous and helps in accentuating overall look and shape of a freehand, are a pain to clean up and remove all the oxidation!!!! I finished this restoration by applying a small quantity of PARAGON Wax on the stem and smooth briar surface and HALCYON II wax on the rusticated surface. I let it set for a few seconds and thereafter polished it with a soft cotton cloth. The finished pipe looks nice and with the shiny black fancy vulcanite stem, the red and dark hues of the pipe are further accentuated. The finished pipe is shown below.

Kathy’s Dad’s Pipes – Beautiful Grained Malaga Bent Billiard


Blog by Steve Laug

The next pipe on the work table is also from George Koch’s estate. It is a Malaga Semi Rusticated Bent Billiard. It has some great grain on the smooth portions and an interesting rustication pattern of spots around the bowl and shank. The rim top was beveled inward and looked very good.  The pipe was another one of many that came to my brother and me in several shipments of pipes from George’s daughter Kathy. When Jeff got each box the pipes were well wrapped and packed. Jeff unwrapped them and took the following photo to give an idea of the volume of the pipes that we purchased. The Malaga came in mixed in a box of pipes much like the one pictured below.In each of the previous blogs that I have written on the restoration of George’s pipes I have told his story. To me it is important to keep the story attached to the pipes that came from his collection. Each pipe I work on I remind myself of the man and in the work give a remembrance to the pipeman who owned these pipes. Having held a large number of his pipes in my hand and having a pretty good feel for the shapes, colour and stems that he liked, I can almost imagine George picking out each pipe in his collection at the Malaga shop in Michigan. He loved Malagas and the majority of his collection was Malaga pipes of various shapes, sizes and finishes. I am including Kathy’s brief bio of her father and a photo of her Dad enjoying his “Malagas”. Here is George’s bio written by his daughter.

Dad was born in 1926 and lived almost all his life in Springfield, Illinois. He was the youngest son of German immigrants and started grade school knowing no English. His father was a coal miner who died when Dad was about seven and his sixteen year old brother quit school to go to work to support the family. There was not much money, but that doesn’t ruin a good childhood, and dad had a good one, working many odd jobs, as a newspaper carrier, at a dairy, and at the newspaper printing press among others.

He learned to fly even before he got his automobile driver’s license and carried his love of flying with him through life, recertifying his license in retirement and getting his instrumental license in his seventies and flying until he was grounded by the FAA in his early eighties due to their strict health requirements. (He was never happy with them about that.) He was in the Army Air Corps during World War II, trained to be a bomber, but the war ended before he was sent overseas. He ended service with them as a photographer and then earned his engineering degree from University of Illinois. He worked for Allis Chalmers manufacturing in Springfield until the early sixties, when he took a job at Massey Ferguson in Detroit, Michigan.

We lived in Livonia, and that’s where his love for Malaga pipes began. After a few years he returned to Allis Chalmers and we moved back to Springfield. I remember that when we went back to Michigan to visit friends, Dad had to go to the Malaga store and acquire a few new pipes. Many a year I wrote to Malaga and they picked out a pipe for me to purchase that I could give Dad for a Christmas or birthday present. He was always pleased. His favorites were the straight stemmed medium sized bowl pipes, but he liked them all. 

He had some other pipes, but the Malagas were his favorites. I remember him smoking them sitting in his easy chair after work, with feet up on the ledge by the fire burning in the fireplace.  Growing up it was my job to clean them and he liked the inner bowl and stem coated with Watkins vanilla, leaving a little of that liquid in the bowl to soak in when I put them back on the rack. Dad quit smoking later in life and so they’ve sat on the racks for many years unattended, a part of his area by his easy chair and fireplace. Dad passed when he was 89 years old and it finally is time for the pipes to move on. I’m very happy they are being restored by you and your brother and hope they find homes who enjoy them as much as Dad did. Thank-you for your care and interest. — Kathy, the oldest daughter

Once again, I want to thank Kathy for providing this beautiful tribute to her Dad. Jeff and I appreciate your trust in allowing us to clean and restore these pipes. We are also trusting that those of you who are reading this might carry on the legacy of her Dad’s pipes as they will be added to the rebornpipes store once they are finished.

The next the pipe is a nicely shaped bent Billiard with a vulcanite stem. It has beautiful grain all around the bowl – birdseye on the sides of the bowl and cross grain on front and the back. The rusticated spots on the sides of the bowl and shank are black and have a tight rustication pattern. The rim top is beveled inward and has rich cross grain in the briar.  The reddish brown stain really looks good with the black spots around the bowl. There was a light cake in the bowl and some lava on the beveled rim top. The stamping on the top side of the shank read MALAGA with a line under it. The black vulcanite stem was deeply oxidized but here were no tooth dents and chatter on the top and the underside near the button. Jeff took these photos before he started the cleanup work on the pipe. Jeff took some photos of the bowl sides and rim to show the condition of the pipe and finish. The bowl really was in good condition other than general dirtiness.The rim top shows some lava build up on the rim toward the front of the bowl. The inside of the bowl has a light cake and shreds of tobacco on the walls of the bowl. The inside of the bowl was dirty.The left side of the shank is clearly stamped with an underlined MALAGA.The stem was oxidized, had some paint spots on it and tooth chatter and worn edges on the button. There were no deep spots so it was clean other thank oxidized. Jeff has picked up quite pipes of this brand over the past year along with the ones from Kathy’s Dad’s estate. All of the pipes were made by the Malaga Pipe Shop in Royal Oak, Michigan in the USA. The more I work on the brand the more I am impressed by the quality of the craftsmanship and beauty of the pipes that came from the shop. I have written an earlier blog to give a little history of the Malaga Brand if you are interested: https://rebornpipes.com/tag/malaga-pipes/. That blog also includes links to a catalogue and the history of the pipemaker George Khoubesser). Follow the link to get a feel for the brand and the pipemaker.

Jeff had reamed the bowl with a PipNet pipe reamer and followed up with a Savinelli Fitsall pipe knife to remove the cake. He scrubbed out the mortise and the airway in the shank and the stem with alcohol, cotton swabs and pipe cleaners. He scrubbed the exterior of the bowl, rim, shank and stem with a tooth brush and Murphy’s Oil Soap to remove the oils and tars on the rim and the grime on the finish of the bowl. He rinsed it under running water. He dried it off with a soft cloth. The rim was thoroughly cleaned and looked virtually undamaged. Without the grime the finish looked really good. The bowl looked very clean and also was unchecked or damaged. The tapered vulcanite stem would need to be worked on but I really like the profile it cast. I took photos of the pipe to show its condition before I started my work on it.  I took a close up photo of the bowl and rim top along with both sides of the stem to show the condition of the pipe after Jeff cleaned it up.I removed the stem and put it, along with two other stems to soak in a Before & After Deoxidizer bath. I left them in the bath for about 4 hours to soak and break through the oxidation. I took the stems out of the bath and rinsed them under running water and scrubbed them dry with a coarse piece of cloth. I took photos of the three stems before I continued my work. There was some residual oxidation on the stem surface so I sanded it out with 220 grit sandpaper. I worked on it until all the oxidation and the light tooth chatter was removed.I polished the stem with micromesh sanding pads – wet sanding with 1500-2400 grit pads and dry sanding with 3200-12000 grit sanding pads. I wiped the stem down with Obsidian Oil after each pad. I polished it with Before & After Pipe Polish – both Fine and Extra Fine and gave it a final coat of Obsidian Oil. I set the stem aside to dry. I rubbed down the briar with Before & After Restoration Balm. I worked it into the smooth surface and the rusticated patches on the briar with my fingertips to clean, enliven and protect it. I let the balm sit for a little while and then buffed with a cotton cloth to raise the shine. The following photos show the bowl at this point in the restoration process. I polished stem and the bowl with Blue Diamond polish on the buffing wheel. I gave the bowl and the stem multiple coats of carnauba wax. I buffed the pipe with a clean buffing pad to raise the shine. I hand buffed it with a microfiber cloth to deepen the shine. The pipe polished up pretty nicely. The grain really came alive in both the rusticated portions and the smooth panels with the buffing and works well with the polished black vulcanite stem. Together the pipe looks much better than when I began and has a rich look. The finished pipe is shown in the photos below. The shape, finish and flow of the pipe and stem are very well done. The dimensions are Length: 5 ¼ inches, Height: 2 1/8 inches, Outside diameter of the bowl: 1 ¼ inches, Chamber diameter: 3/4 of an inch. I will be putting this newly finished Malaga pipe on the rebornpipes store shortly if you are interested in adding it to your collection and carrying on the trust. Thanks for walking through the restoration with me as I worked over another one of Kathy’s Dad’s Pipes.