
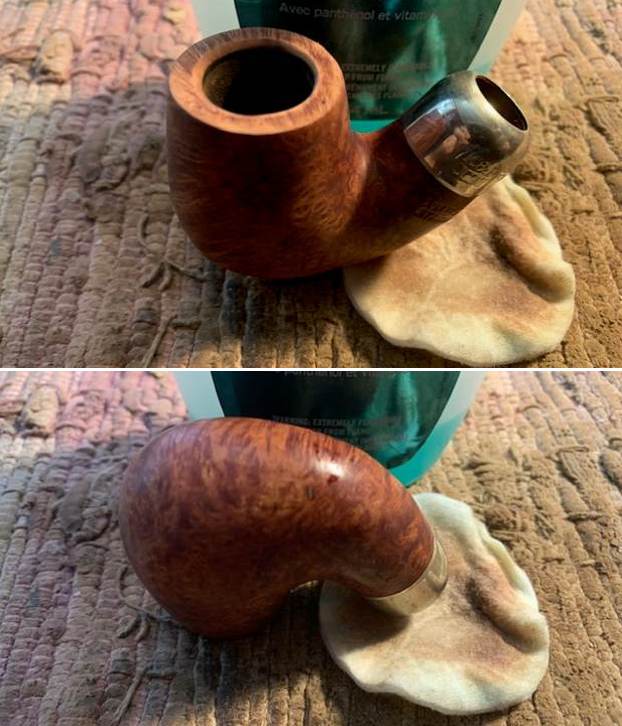
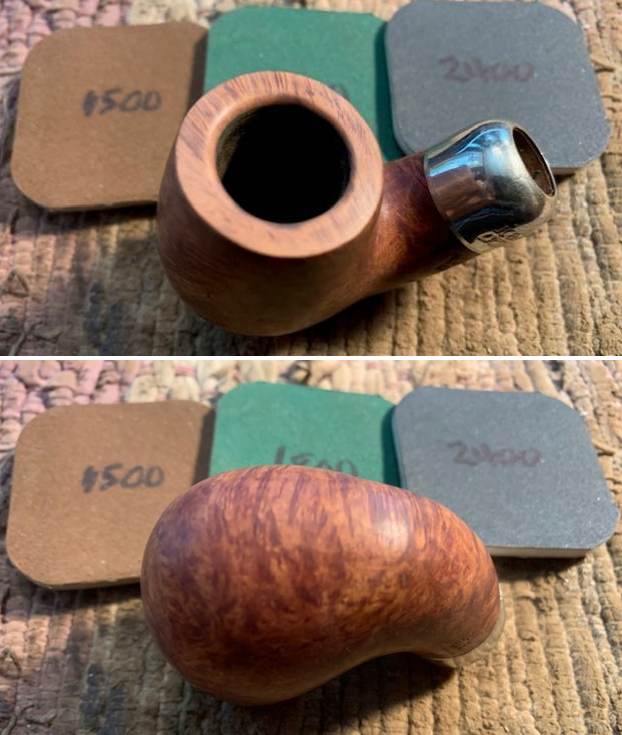
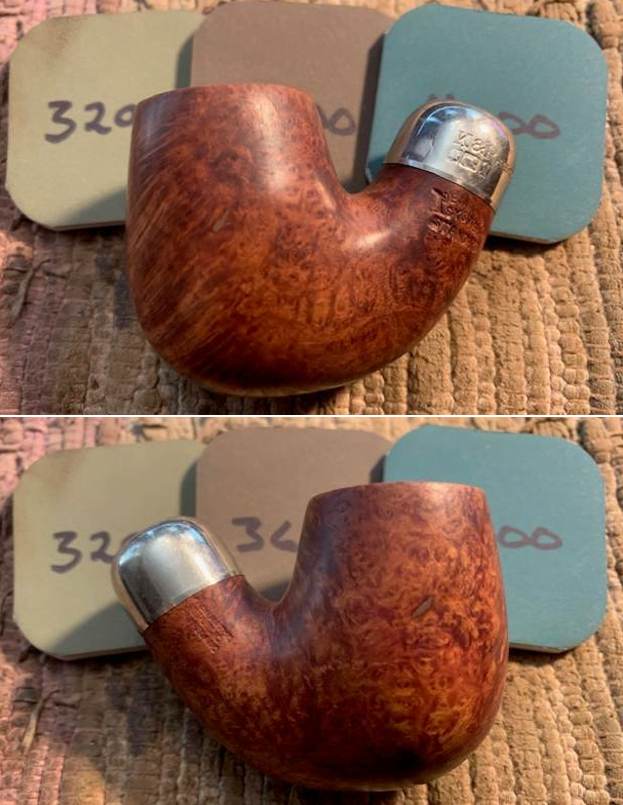
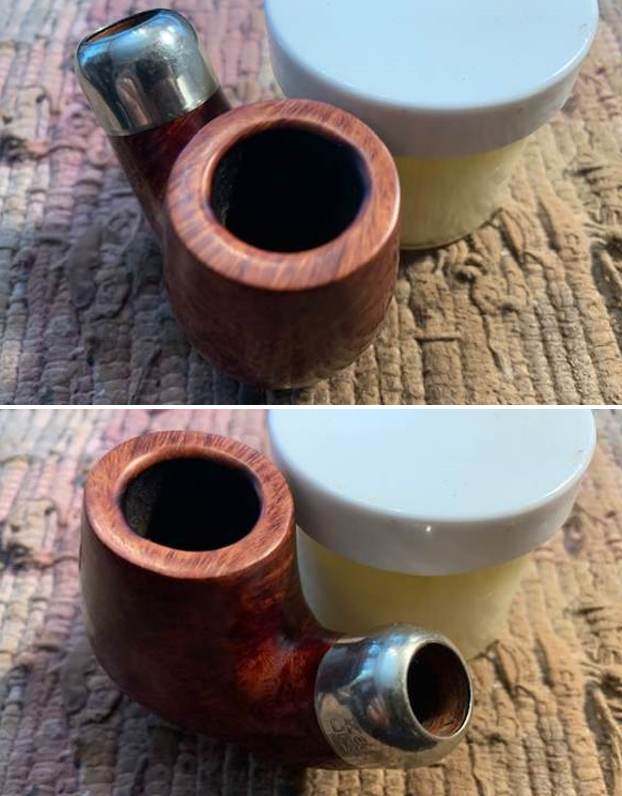
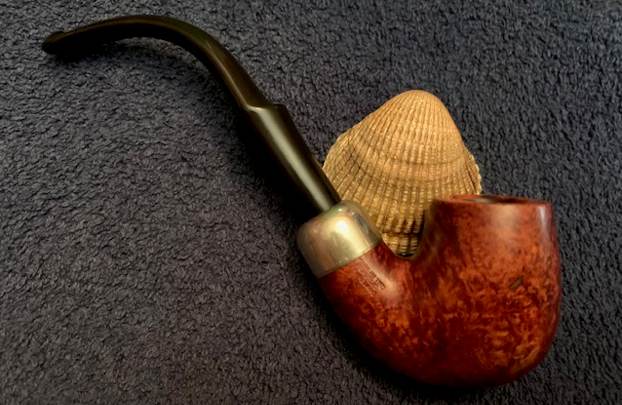
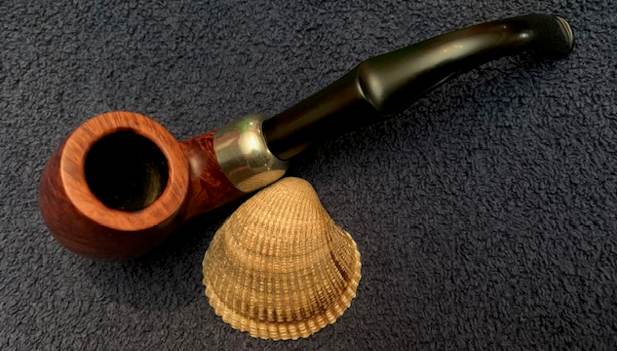
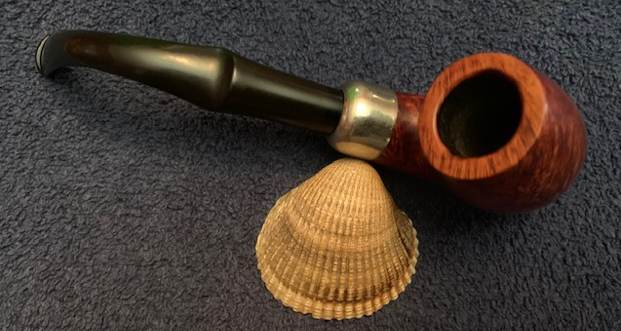
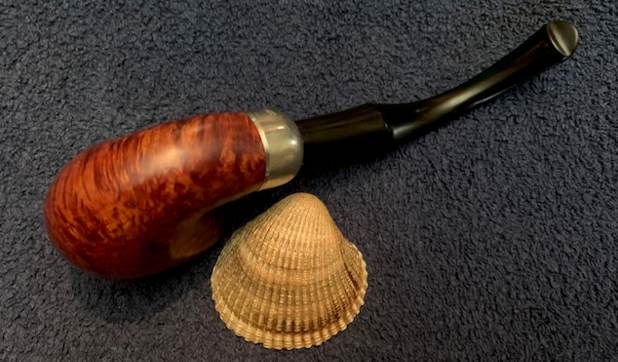
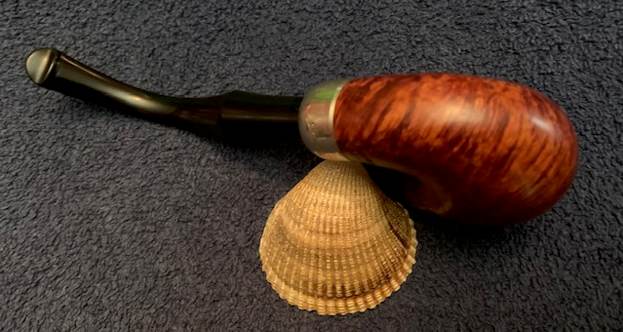
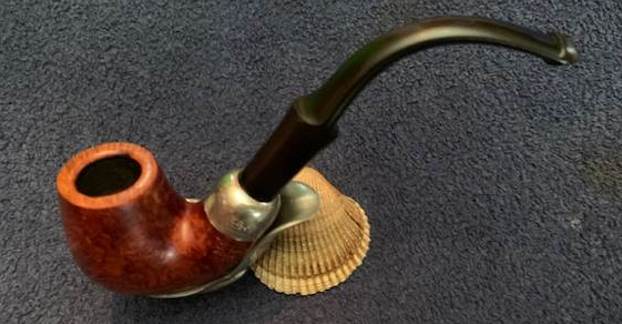
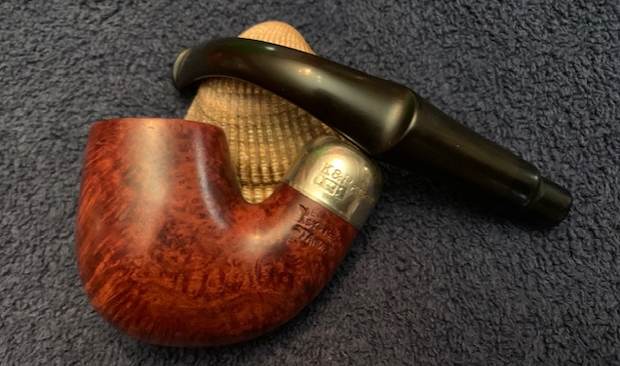
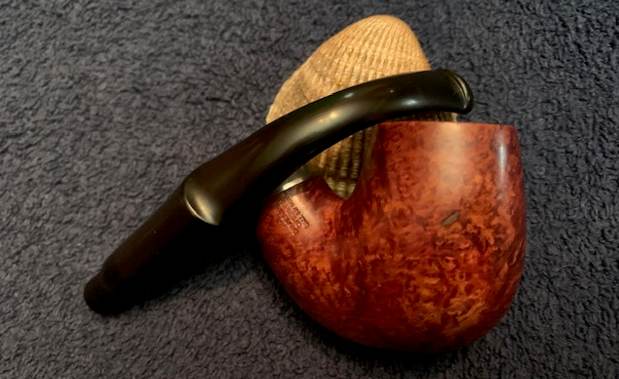
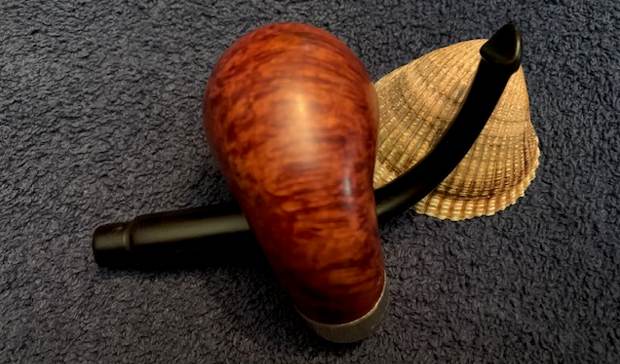
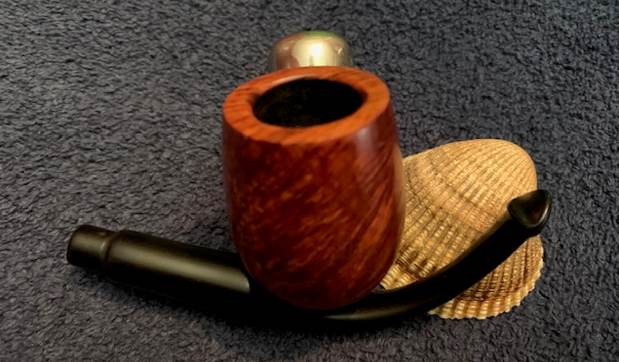
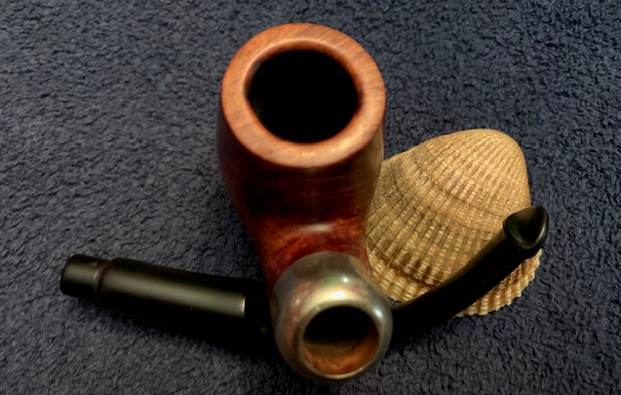
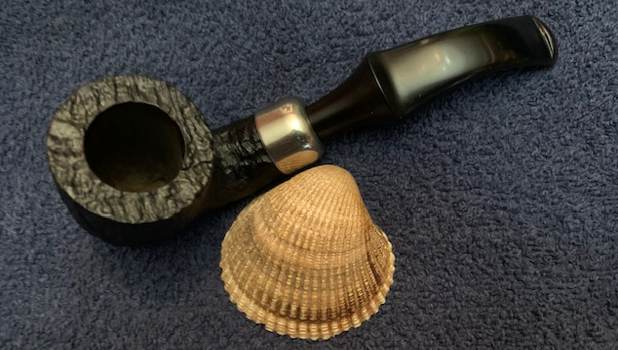
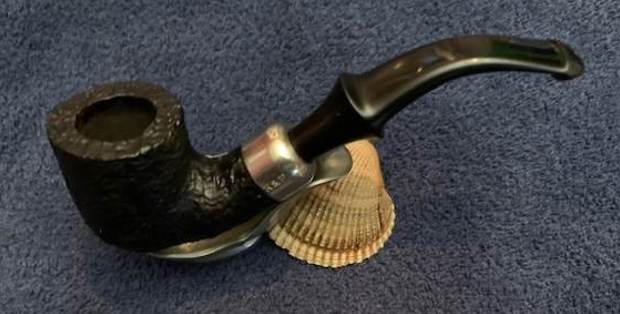
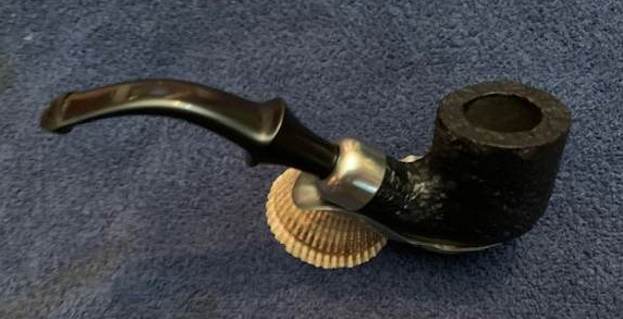
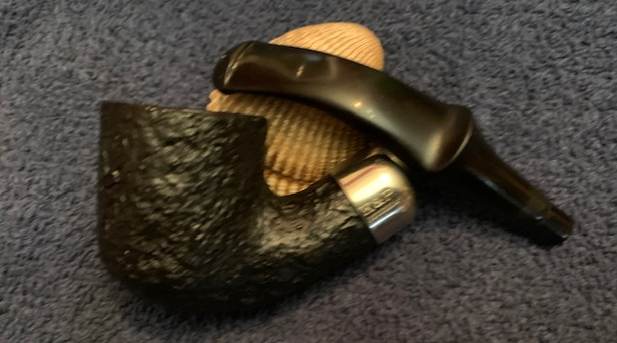
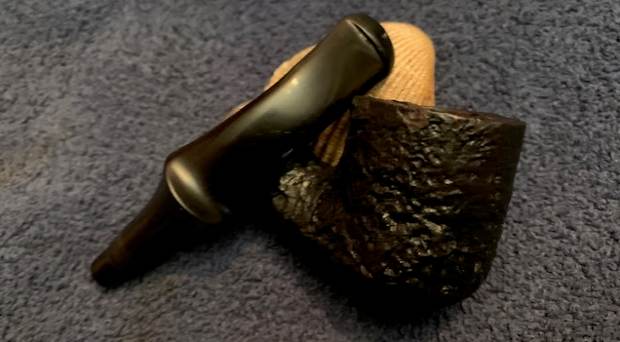
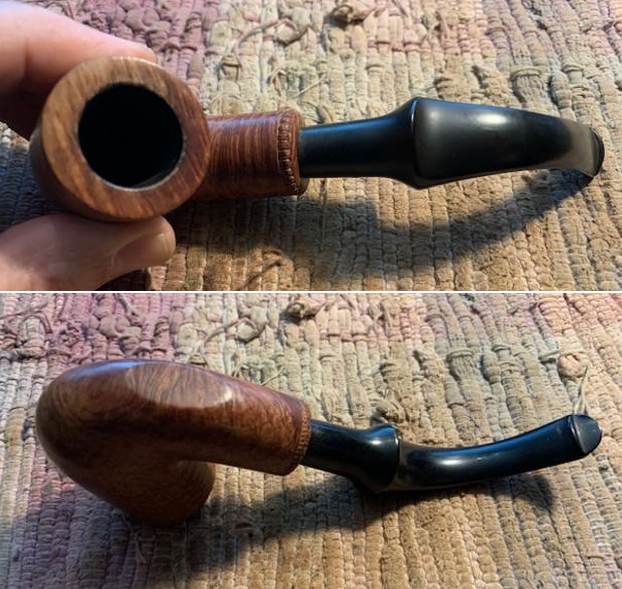
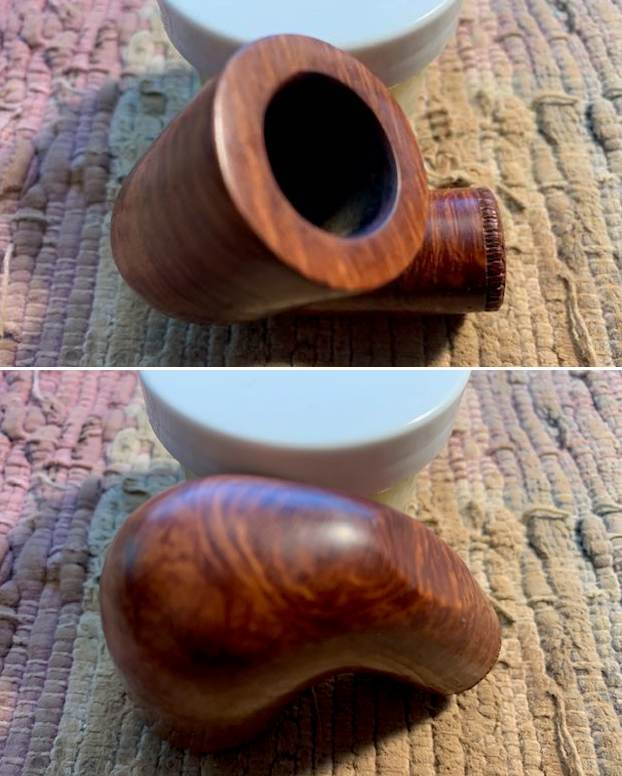
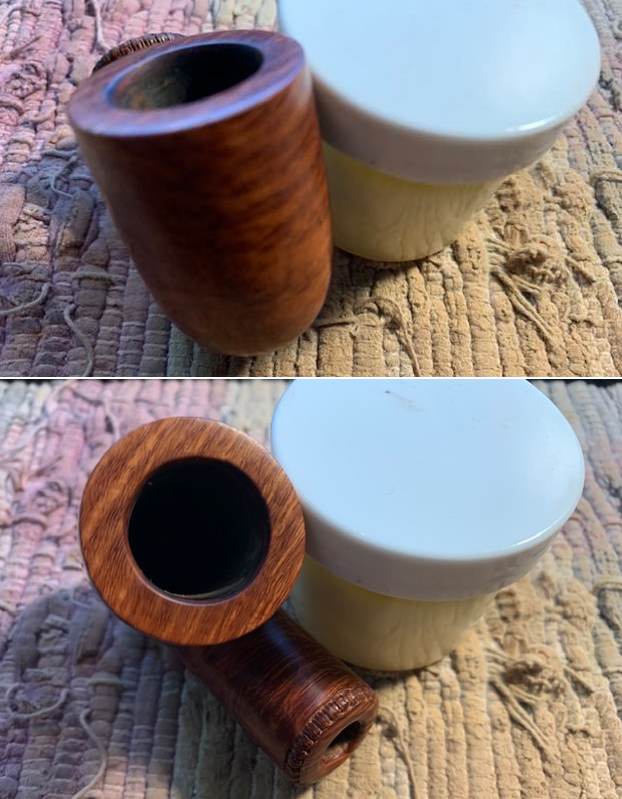
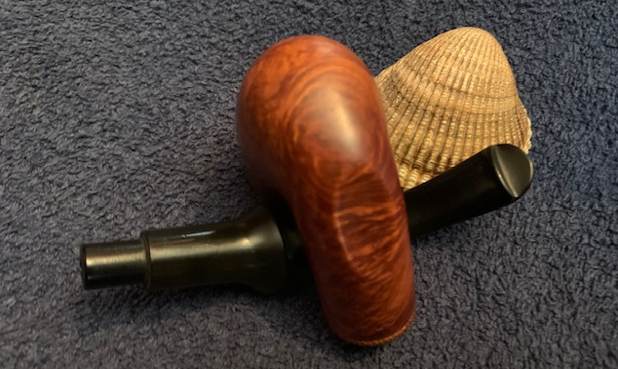
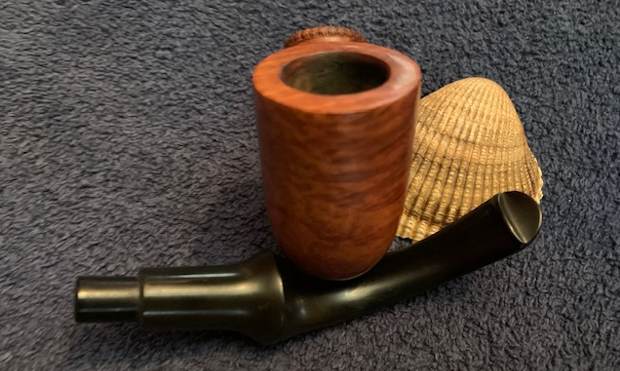
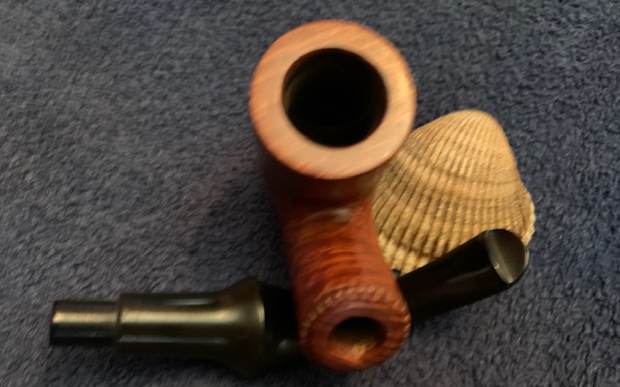
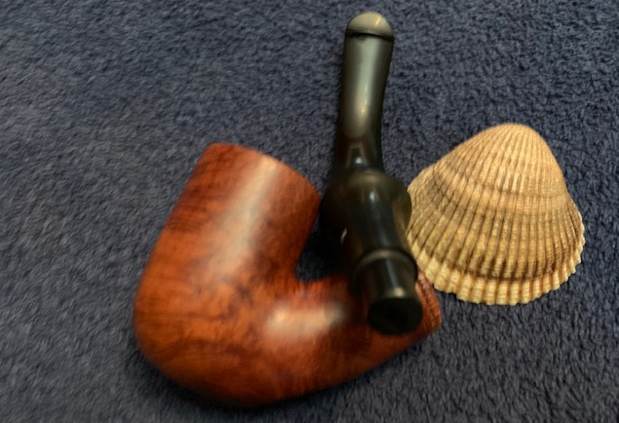
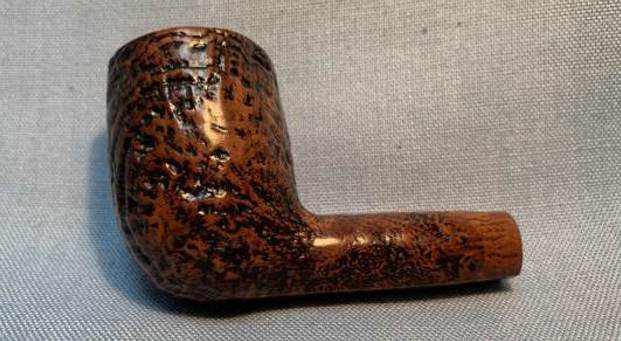
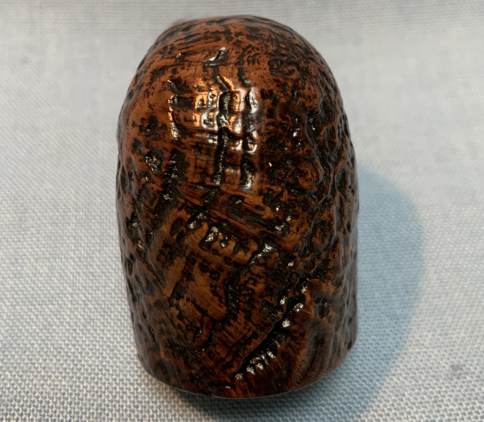
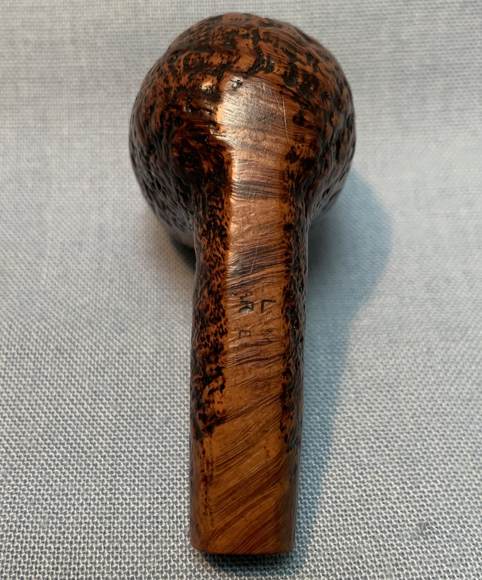
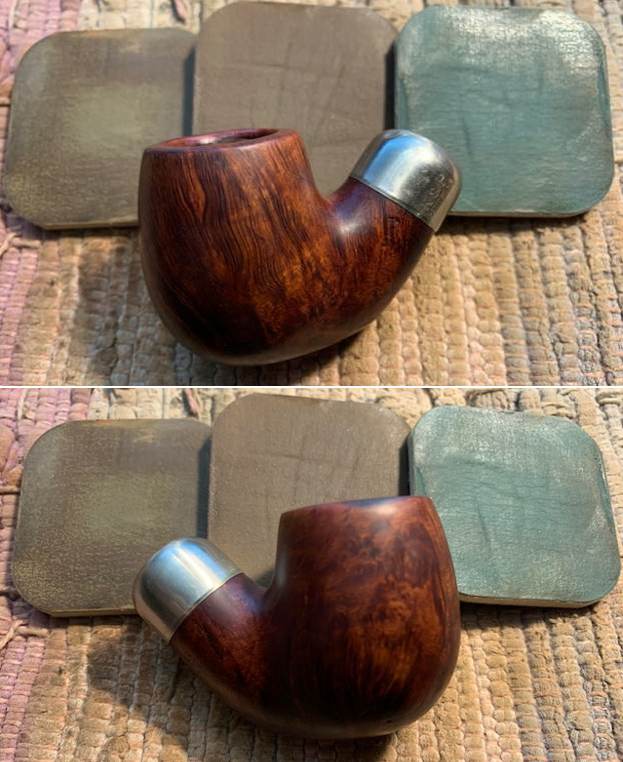
After taking on a number of more complicated restorations lately, it was a nice change to see this Charatan’s Make Special cross the worktable. An …
A Quick Refresh for a Charatan’s Make Special Chubby Pot
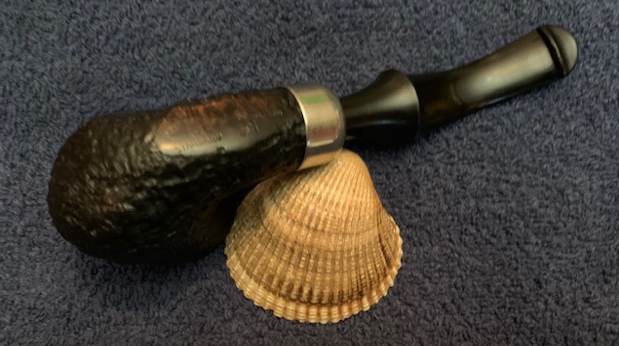
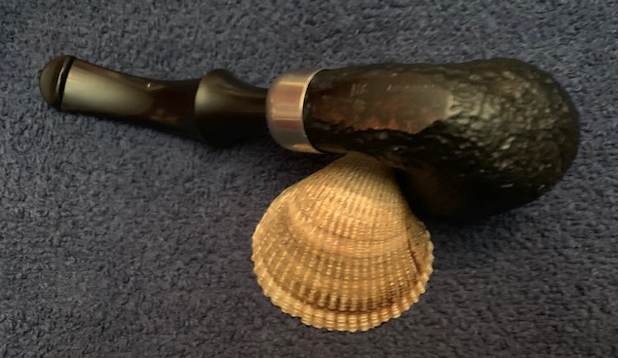
Great job on this one as usual Charles
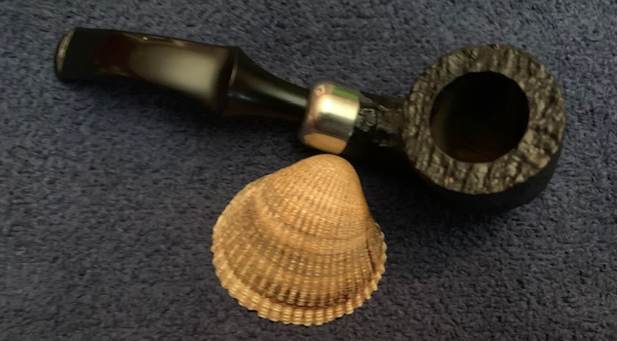
After taking on a number of more complicated restorations lately, it was a nice change to see this Charatan’s Make Special cross the worktable. An …
A Quick Refresh for a Charatan’s Make Special Chubby Pot
Great job on this one as usual Charles

Blog by Steve Laug
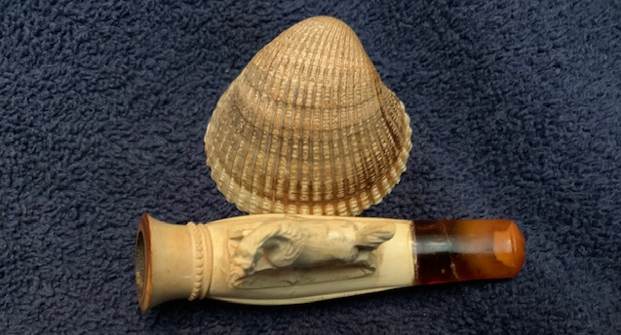
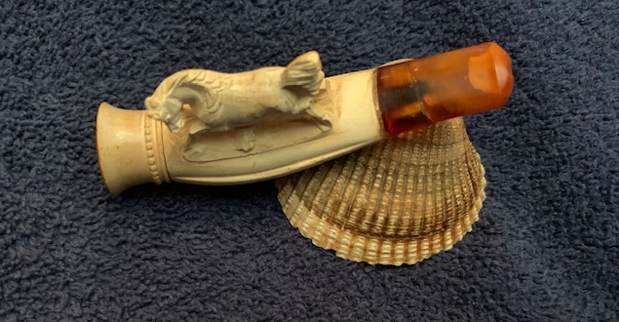
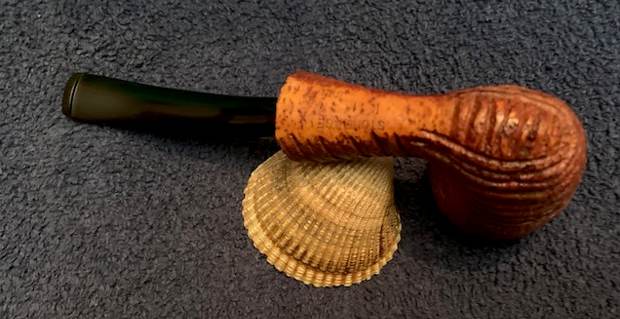
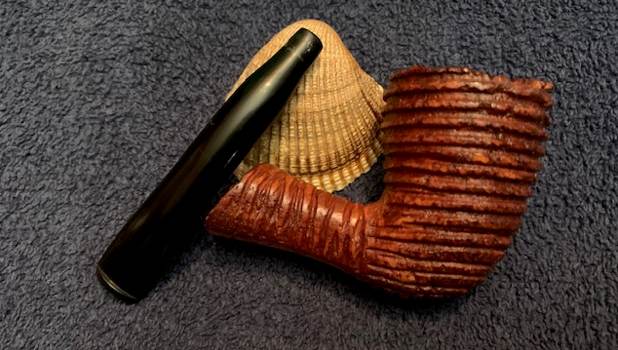
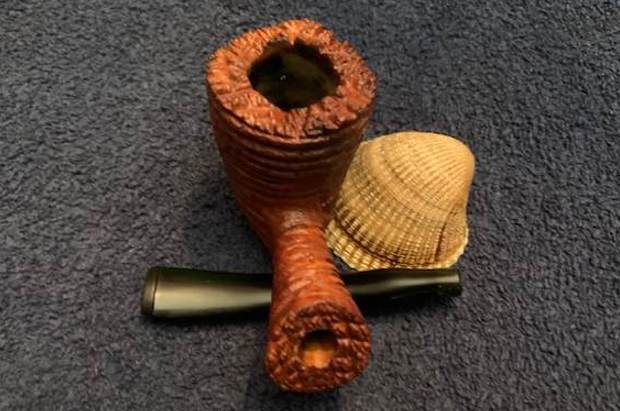
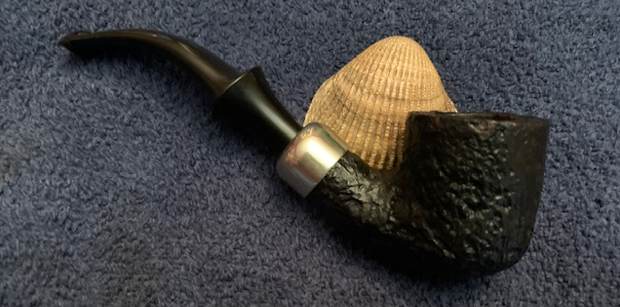
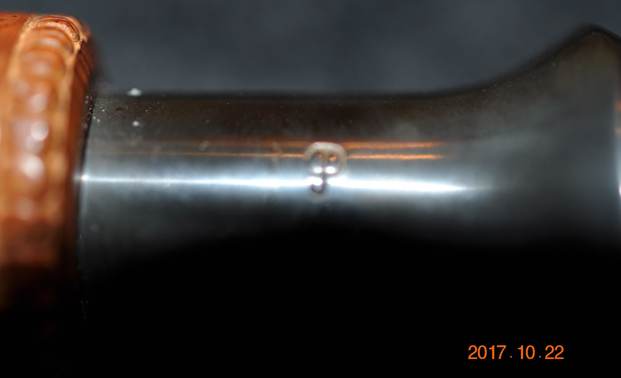
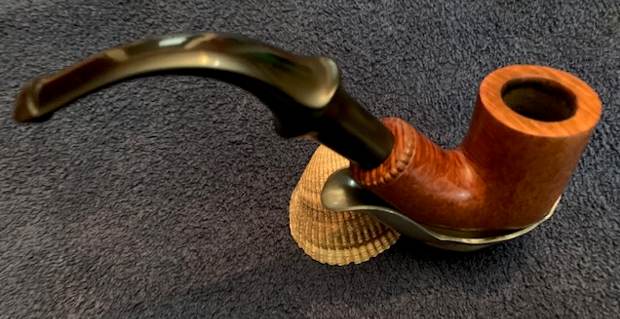
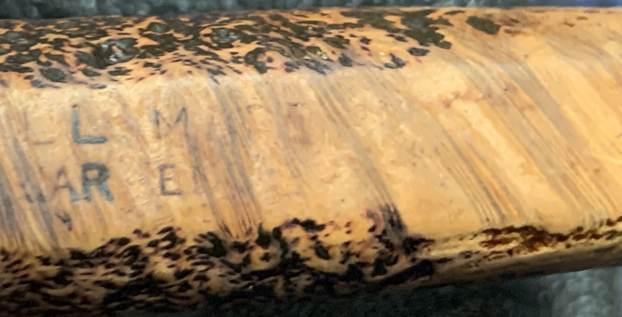
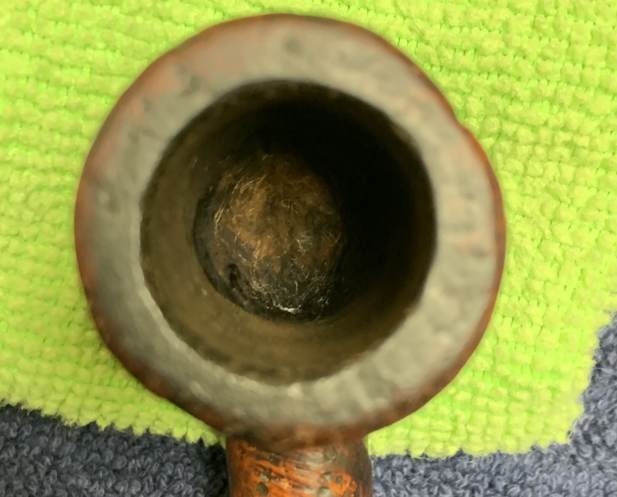
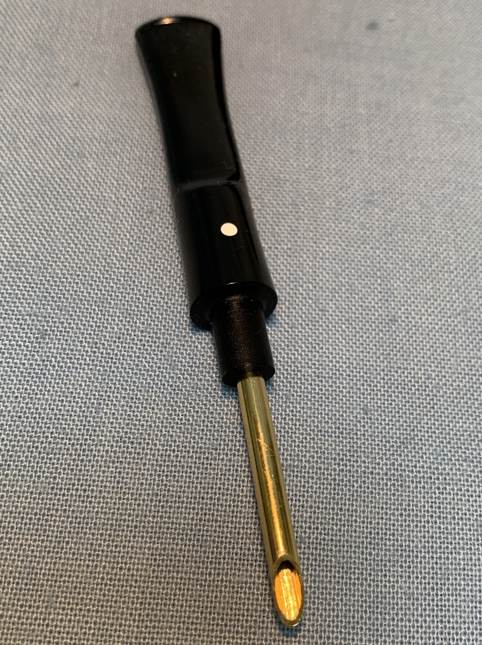
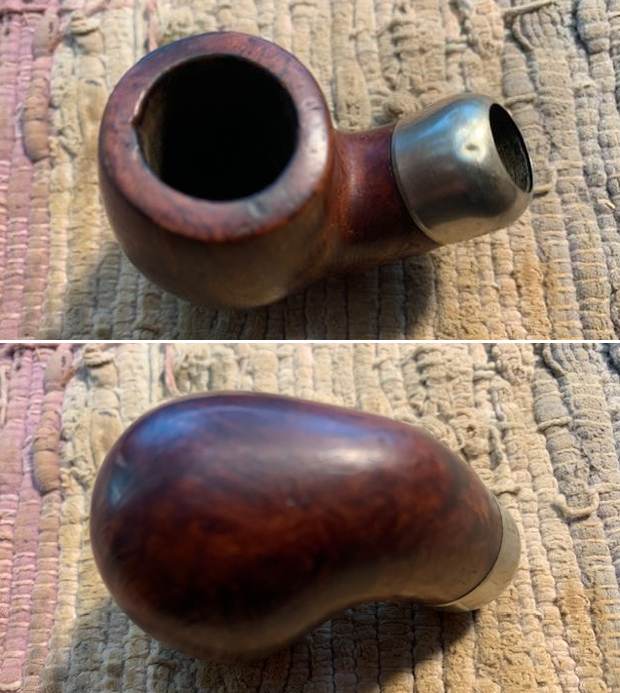
I was gifted this damaged Meerschaum Cheroot holder by a fellow we have purchased a lot of pipes from. We have a good rapport with each other and have exchanged a lot of emails. He wrote that he had a small Cheroot holder he wanted to gift to me that was quite unique. It had a carved horse on the top of the shank. The horse was in great condition but the amber stem was crookedly glued to the shank and had broken in half. I gave the end of each piece of the stem a thin coat of glue to hold the pieces together. I put a greased pipe cleaner in and glued the parts and let it cure. I removed the pipe cleaner and took the following photos of the Cheroot holder. It was an interesting looking piece that had some great history if it could only speak to us. The airway in the stem was clear and but the bowl was clogged with tars and the rim top had a tar coat build up on the rim top. The airway was clogged with no draught.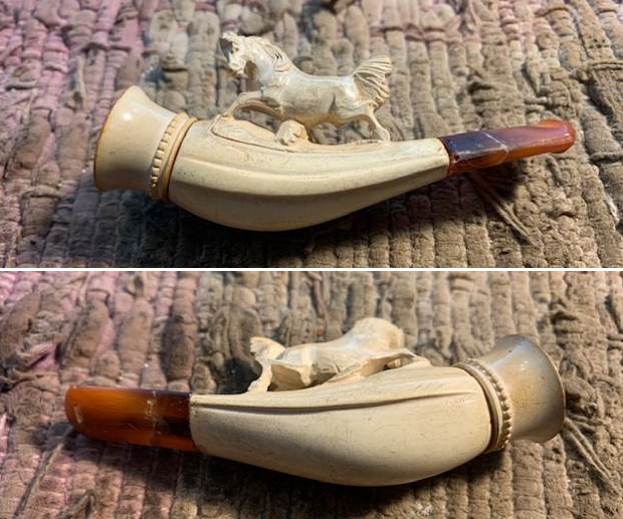
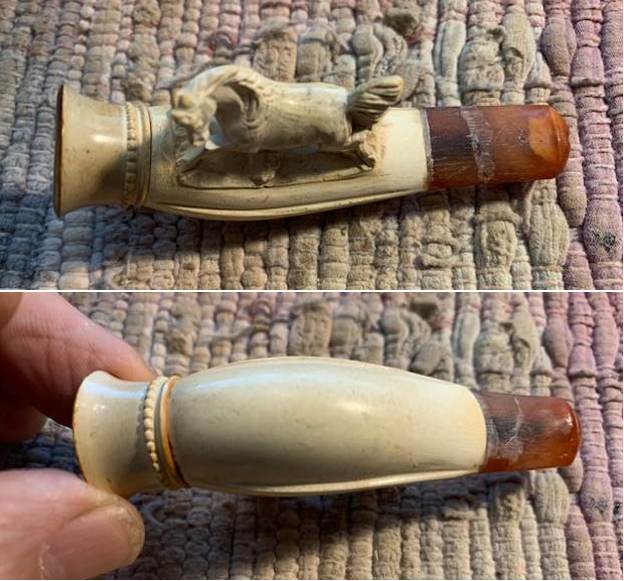
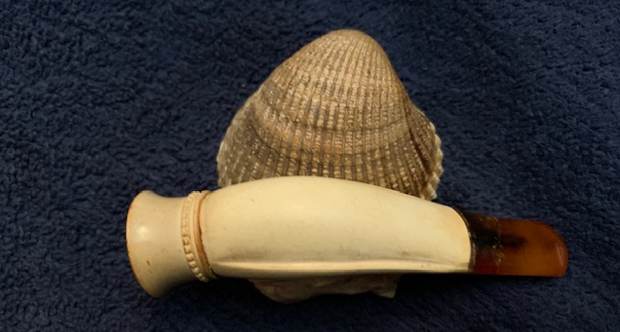
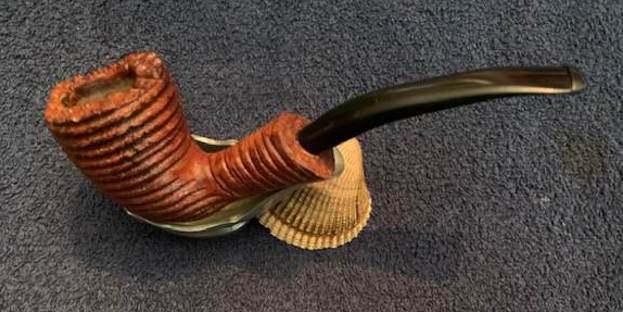
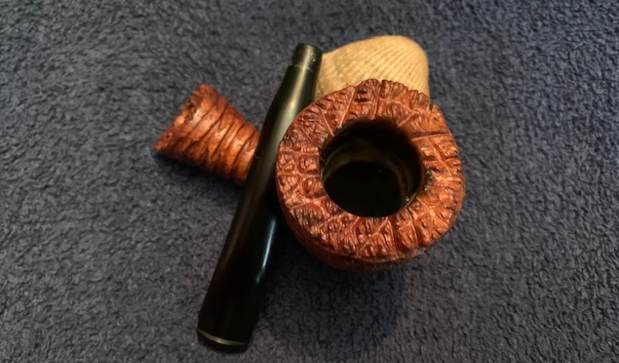
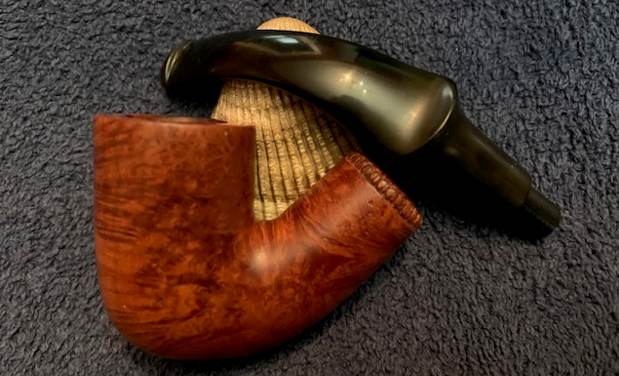
 I took a photo of the glued stem to show the fit of the parts and also the fit of the stem to the shank. The pieces fit very well together but the fit of the stem to the shank was way off. You can see the gap at the top of the second photo below. The stem was crooked on the shank.
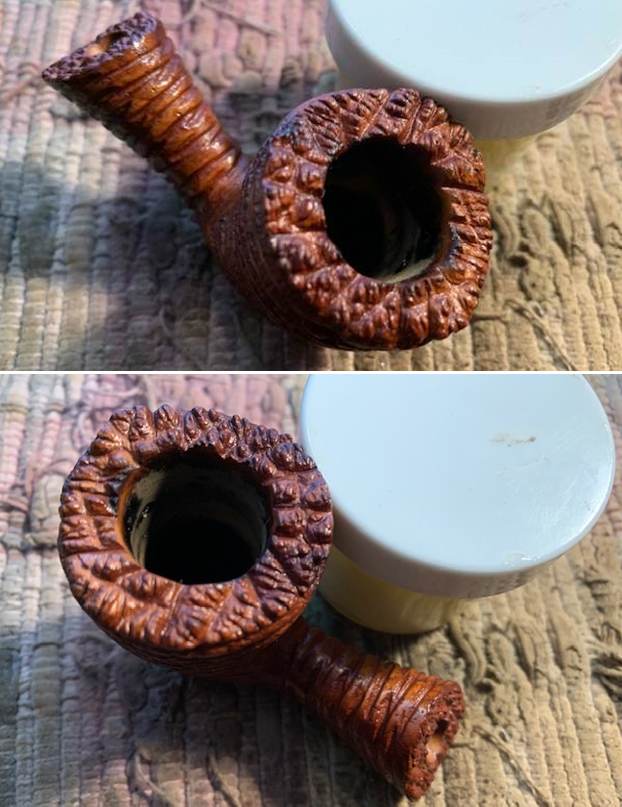
 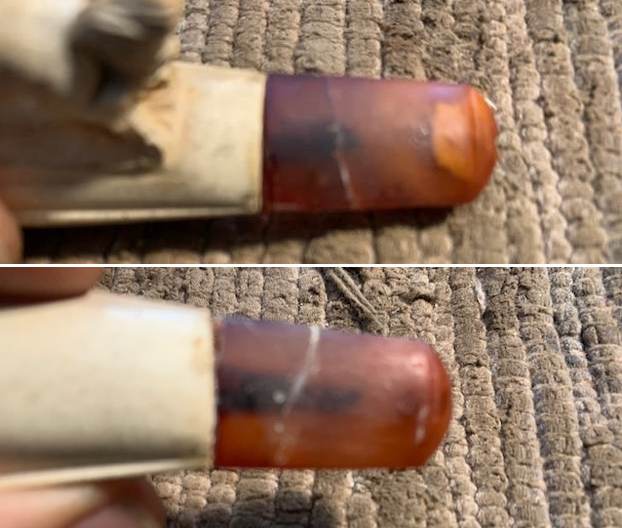 I used a folded piece of 220 grit sandpaper to remove the tar build up on the rim top. It looked much cleaner. There was some colour to the rim top. It looked much better.
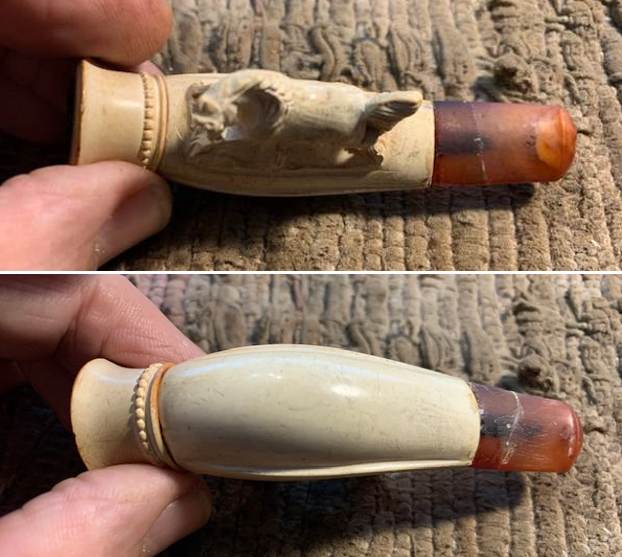
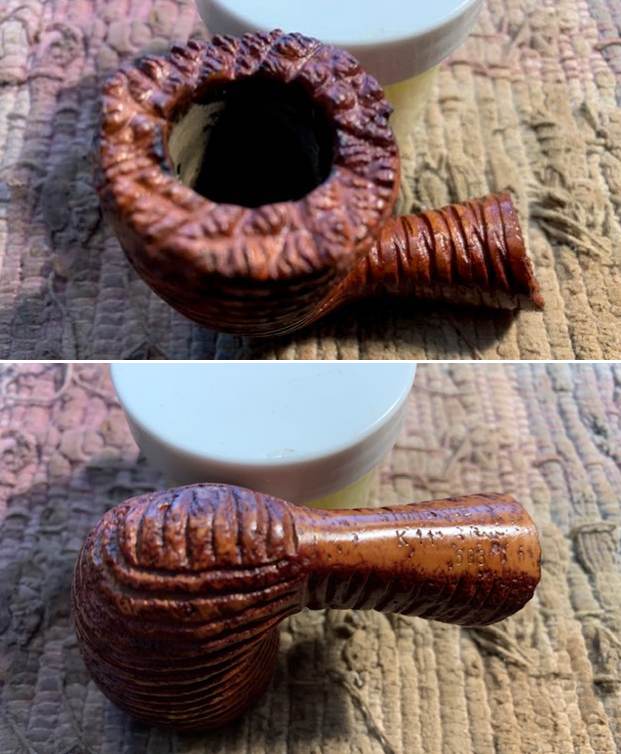
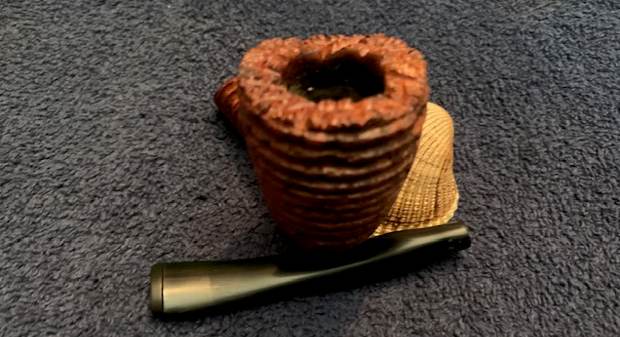
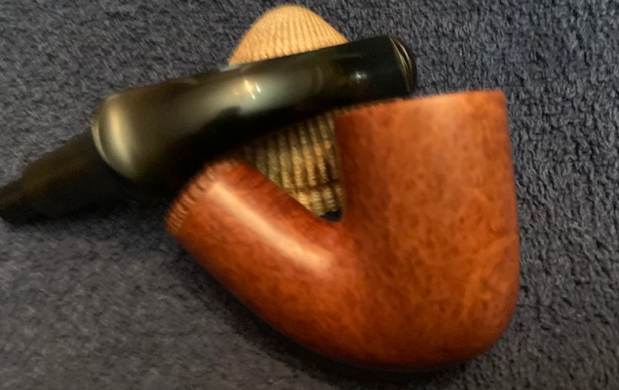
 I used a tooth pick and a pipe cleaner to clean out the airway in the inside of the bowl. When I removed the pipe cleaner the bowl came off without damage and I was able to further clean it on the inside of the bowl and the shank of the Cheroot holder. Whatever was clogging it was rock hard. Once cleaned the bowl fit tightly into the shank. It was now clean to the shank end from both directions.
 I did a quick Google search for small carved animal Cheroot holder with amber stems and possibly a case. I looked through the various carved holders and found a carved Fox with the same bowl insert as the one I was working on and the same style amber stem as the one I was working on and also was broken at the end (http://www.keilsantiques.com/antiques/objets-dart/antique-carved-meerschaum-fox-cheroot-holder). I saved photos of the pipe from the site both outside and inside the case. You can see the similarities between the two carvings. Unfortunately there was no real information on the carver or age of the piece.
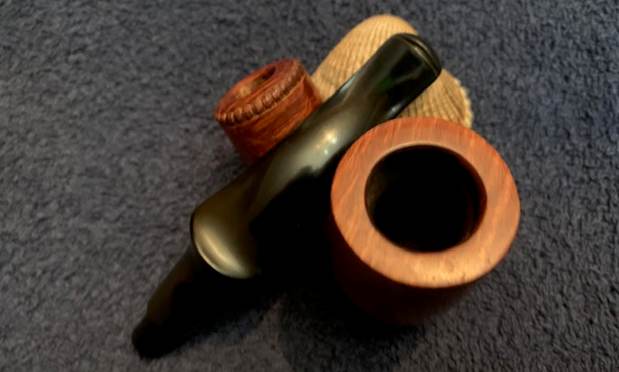
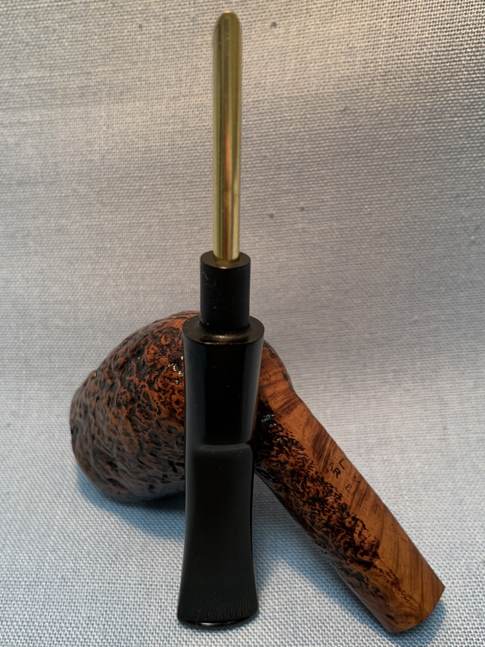
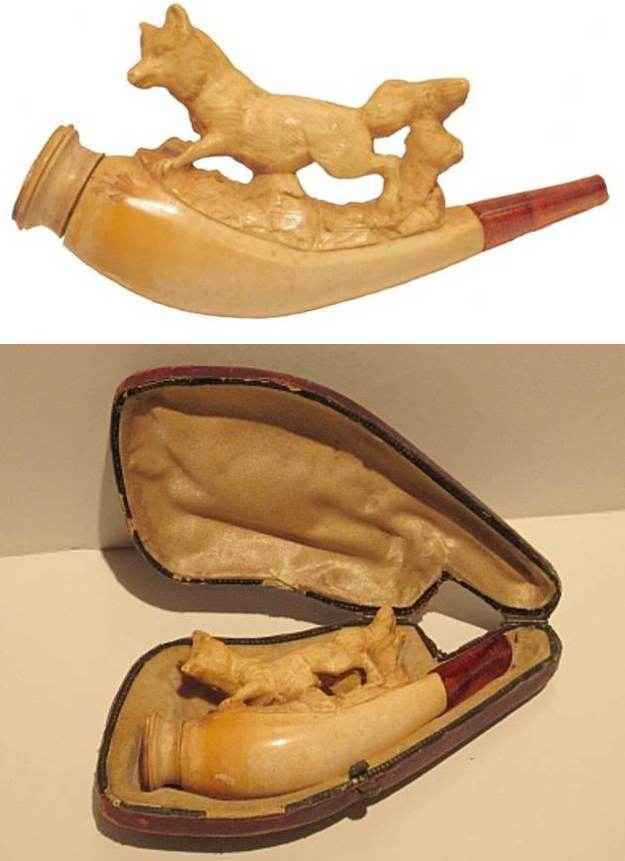 While I was cleaning the stem the glue came loose at the stem/shank joint. Nothing broke in the amber which I was happy for but the glue let loose. I was actually very glad because I could adjust the fit of the stem to the shank. The problem was that the shank had been filled in with the super glue and was rock hard. The shank was so thin that I would not be able to drill it out so I was now faced with the facts that the pipe was not going to be usable. I flattened out the end of the stem and the shank with a topping board to make a clean junction. I reglued it with clear CA glue and held the surfaces flat against each other until the glue hardened. You can see the look and fit of the newly refit stem in the photos below.
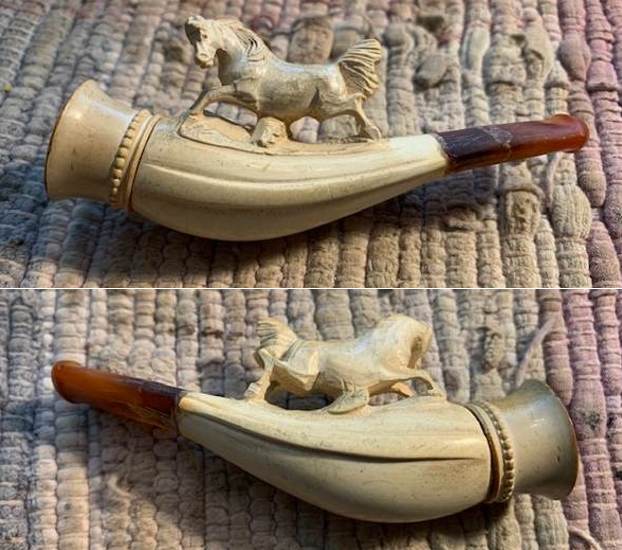
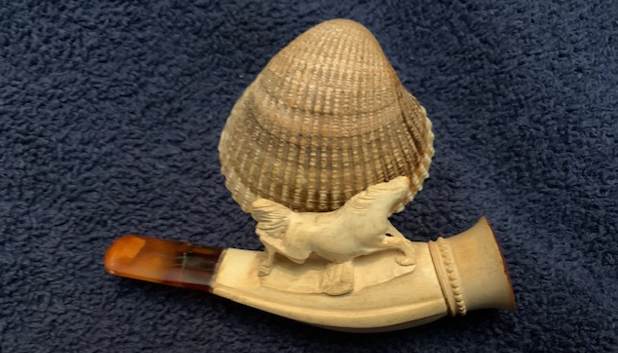
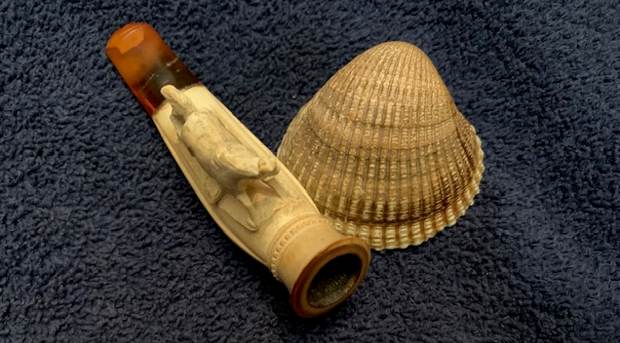
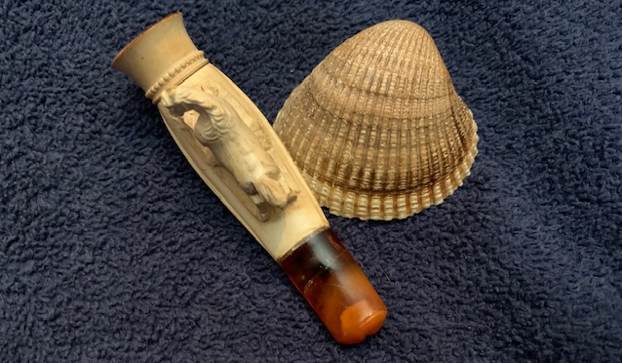
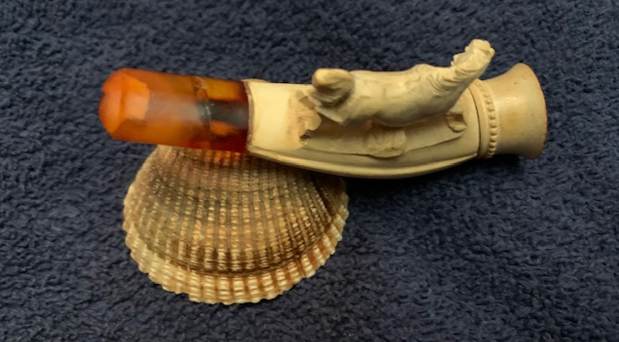
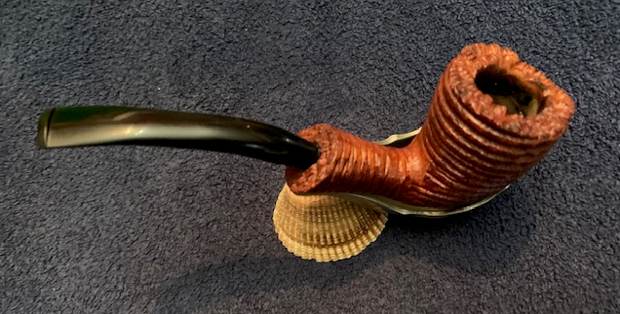
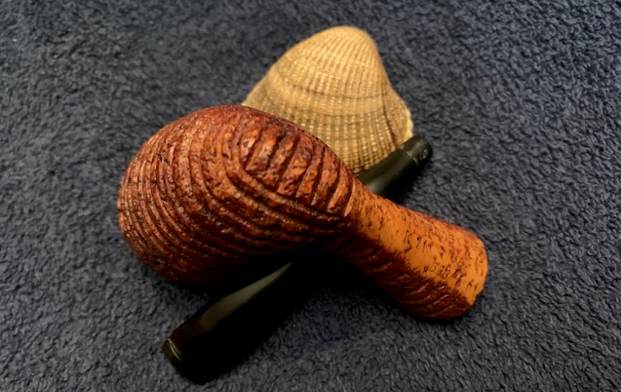
 I took a photo of the carved prancing horse on the top of the cheroot holder. It is actually well carved and in good condition.
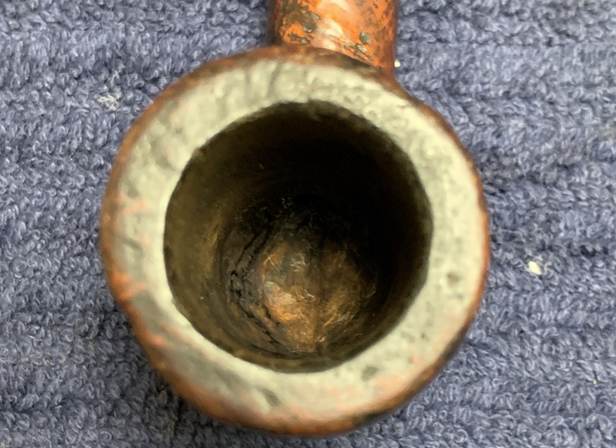
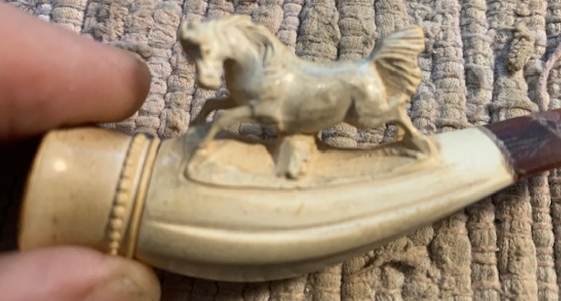 I took photos of the bowl and rim top and stem. You can see the clean bowl and rim top. It looks very good. The fit of the stem is very good. The repair is visible but should lessen with polishing. It is an interesting piece and a shame that it is not usable or fixable.
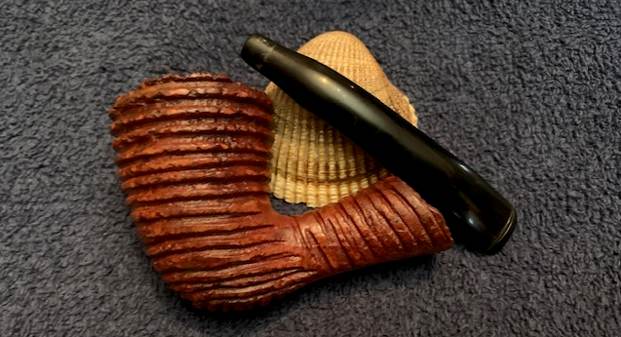
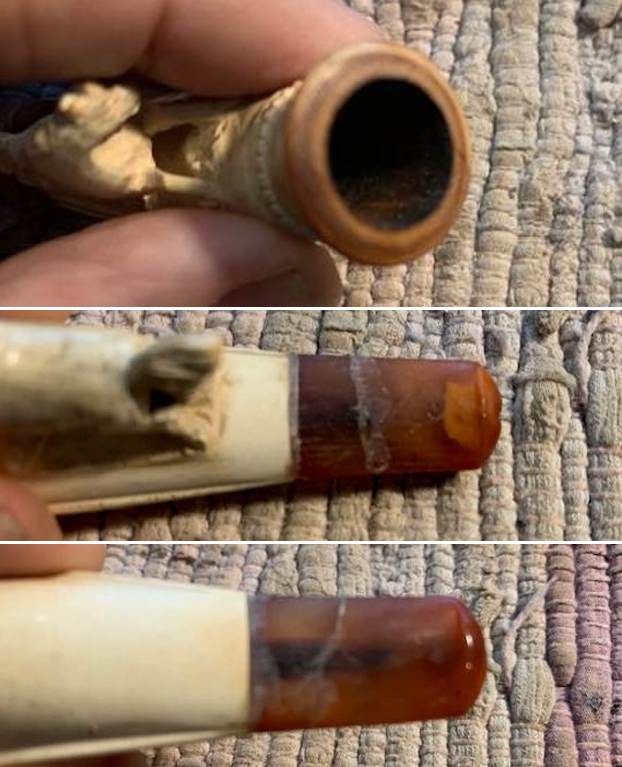 I sanded the repairs with a folded piece of 220 grit sandpaper to further smooth them out and blend them into the surrounding amber. It is looking better.
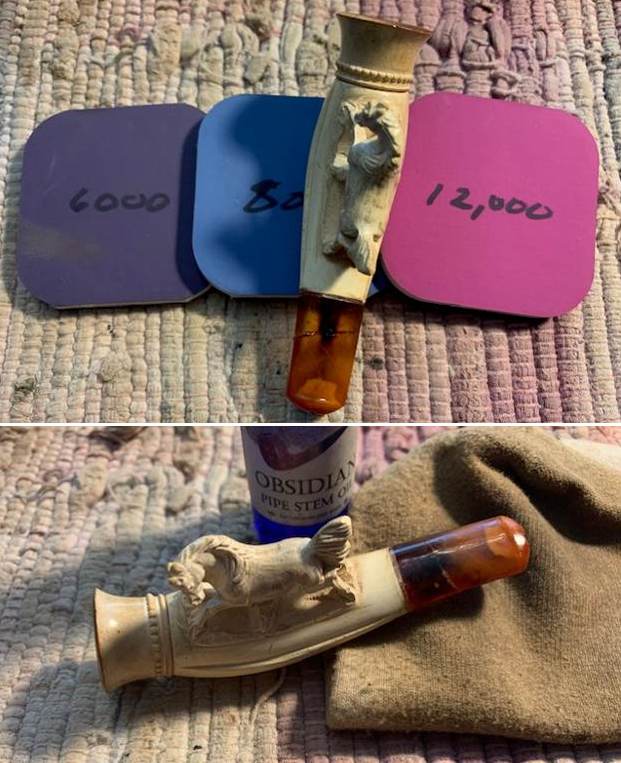
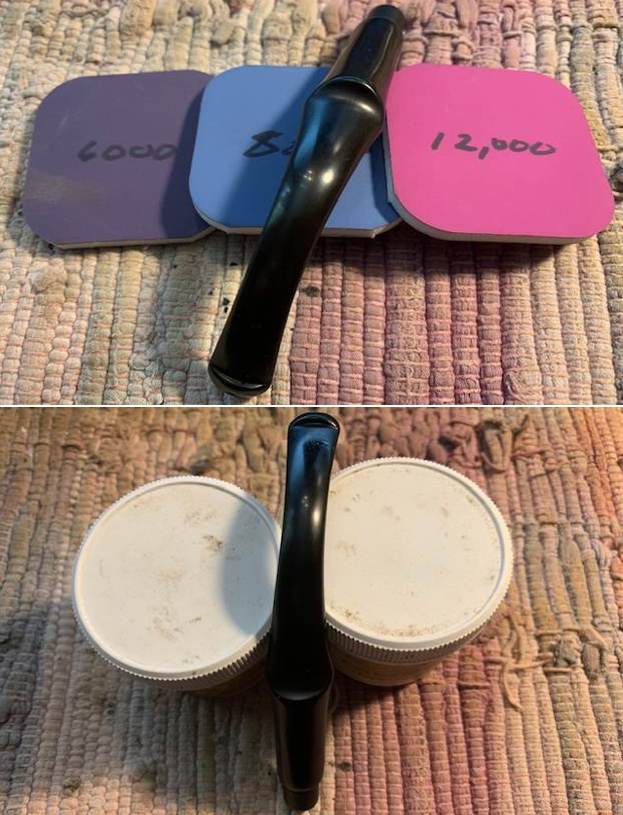
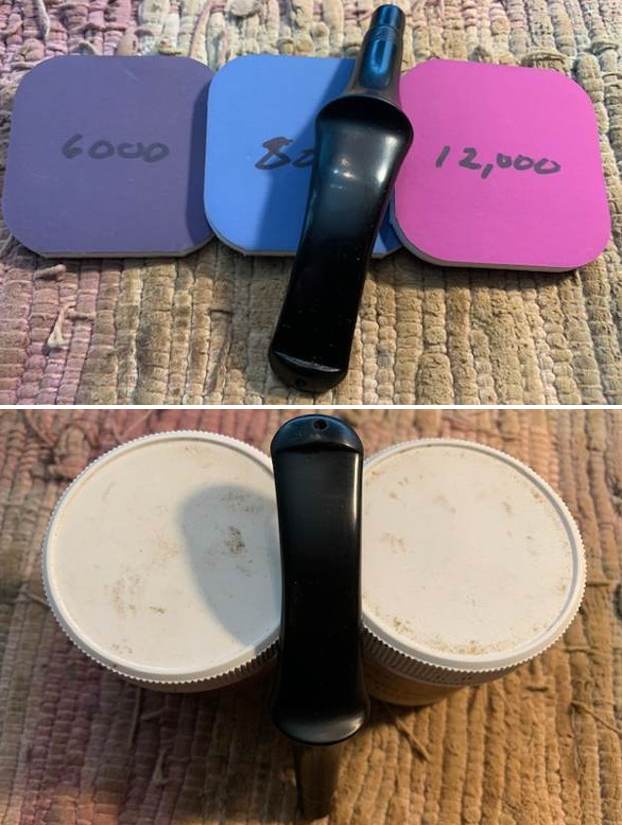
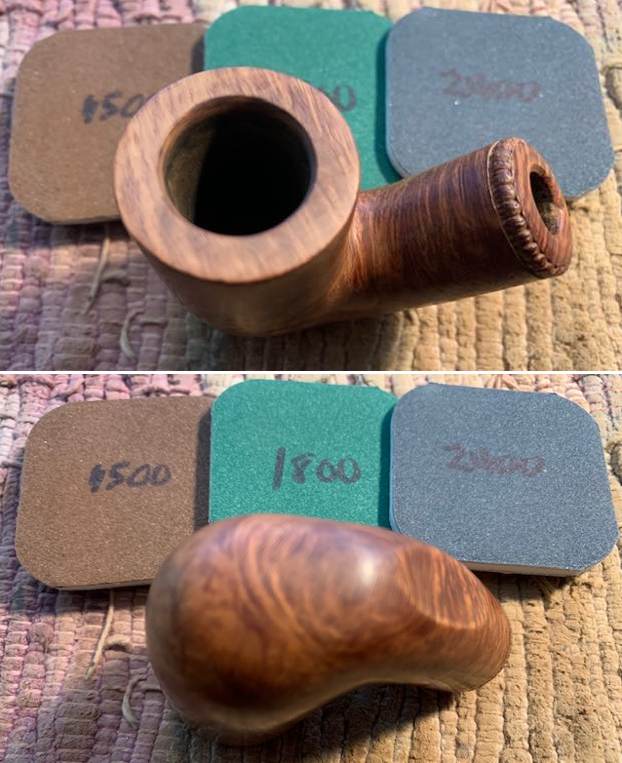
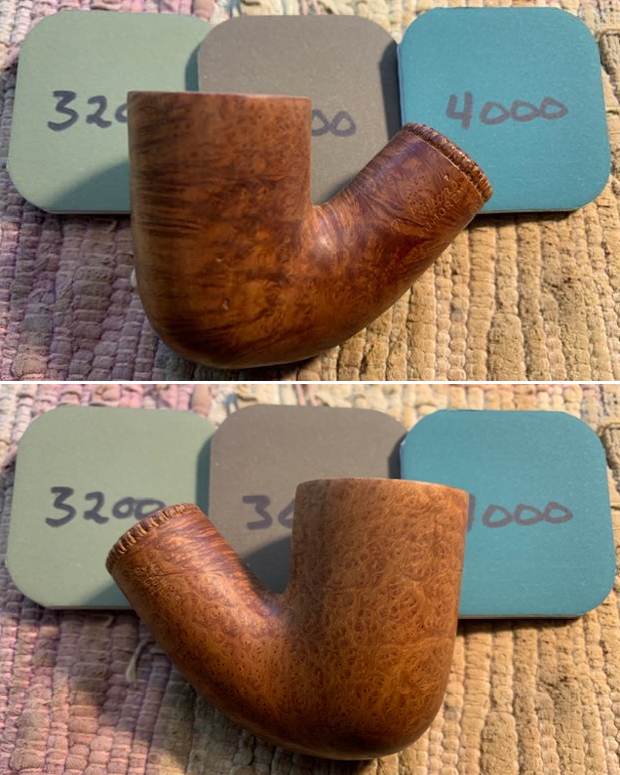
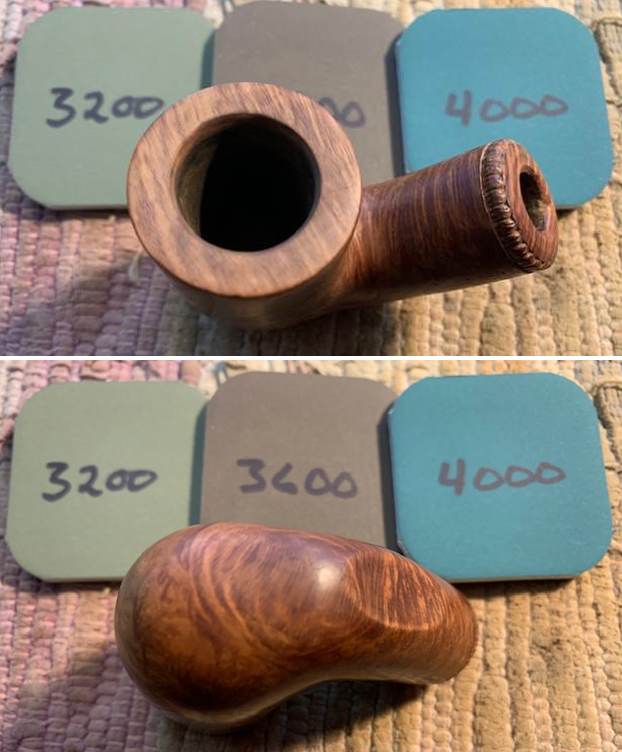
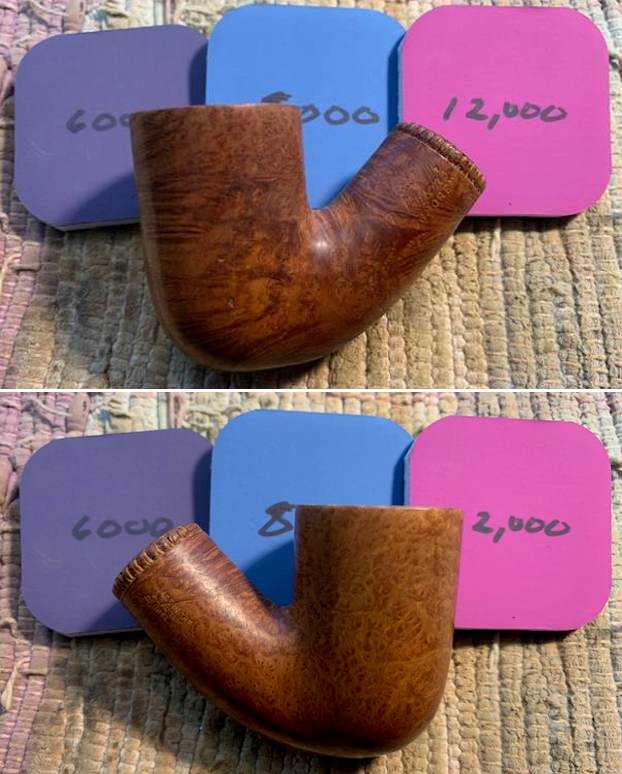
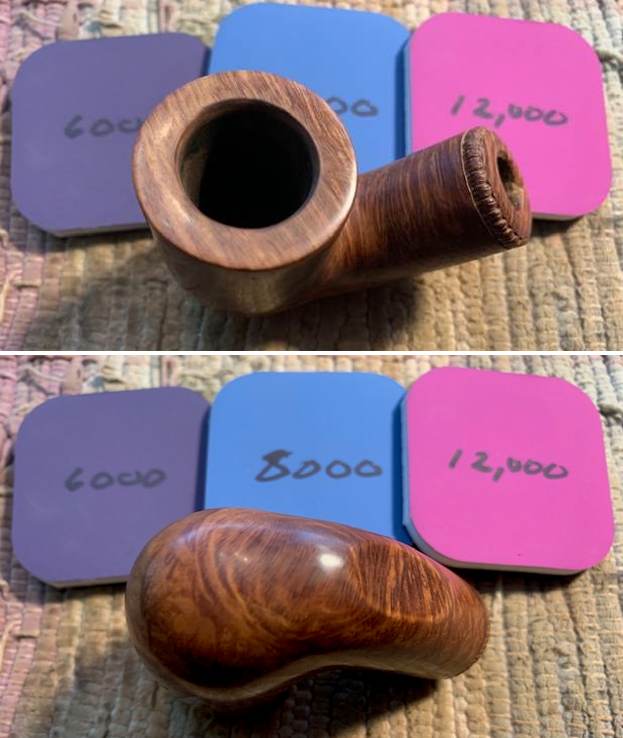
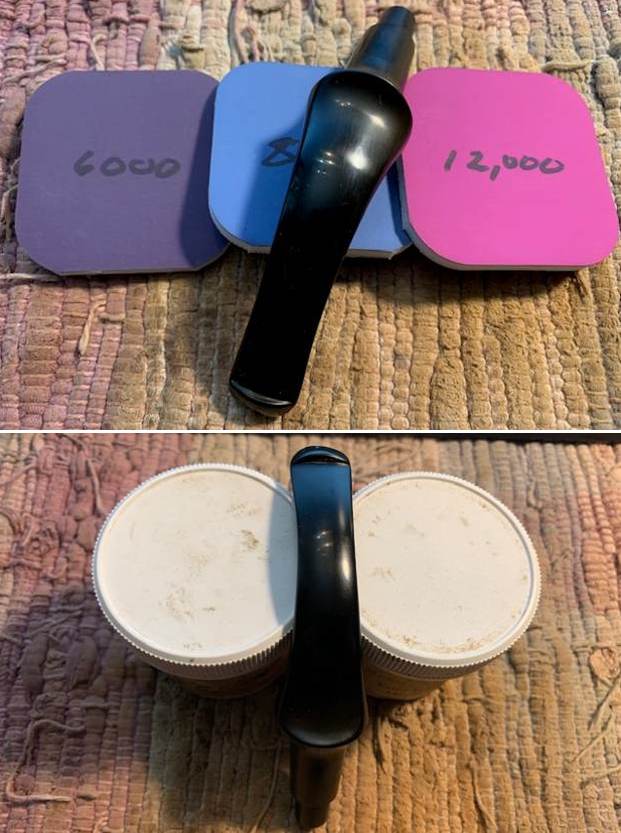
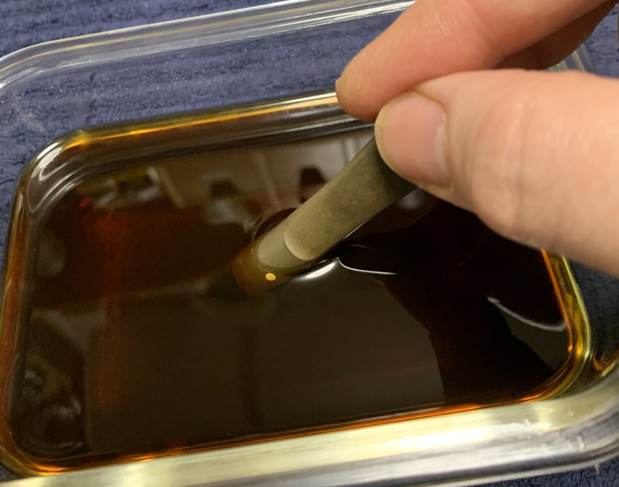
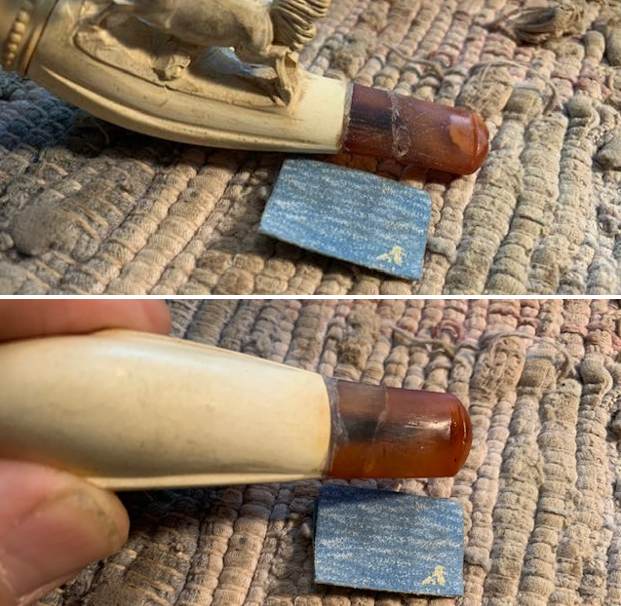 I polished the bowl and stem with micromesh sanding pads – wet sanding with 1500-12000 grit pads and wiping down the stem after each pad with a cloth impregnated with Obsidian Oil. It is starting to look very good.
 I gave the bowl and stem a coat of Clapham’s Beeswax. I carefully put it on the bowl and the stem to protect and preserve it. I carefully polished it with a soft cloth. The last thing I wanted to do was break it again. The dimensions of the cheroot holder are Length: 3 ½ inches, Height: 1 inch, Bowl diameter: ¾ of an inch, Chamber diameter: ½ of an inch. The weight of the piece is .49 ounces/14 grams. It is a great piece of tobacciana history and one that I will enjoy having in my collection for display. Once I have my office back in shape it will sit on top of a pipe cabinet on my desk top. Thanks for giving the blog a read. I appreciate all of you follow rebornpipes. Thank you.
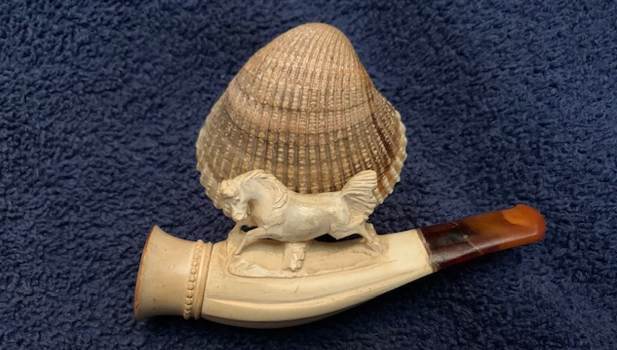

Blog by Steve Laug
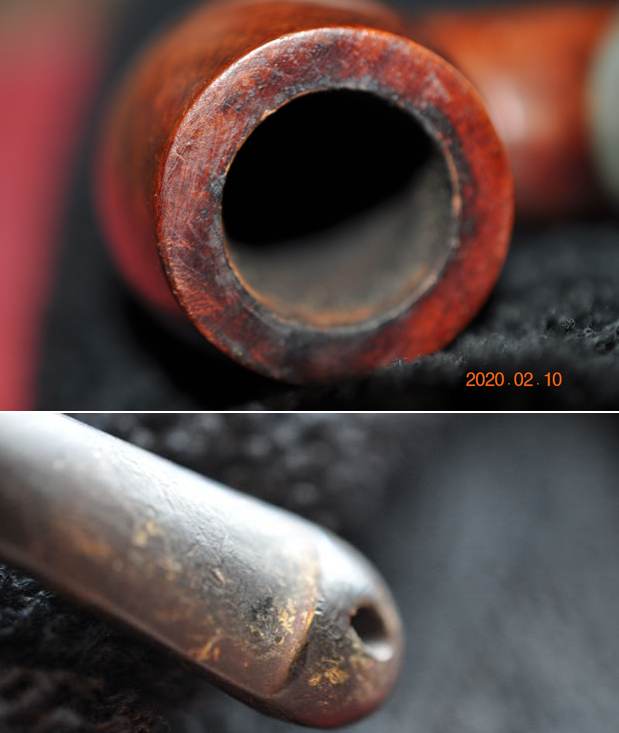
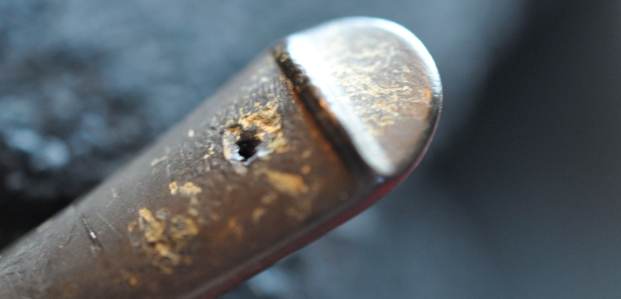
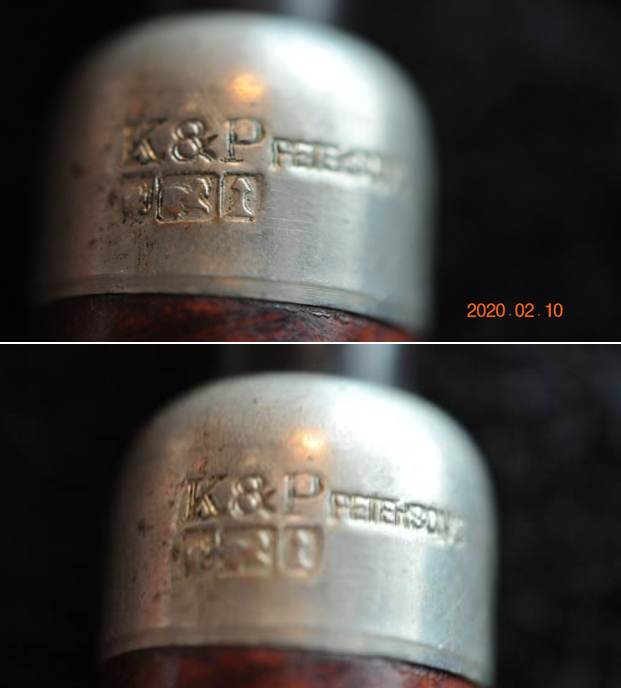
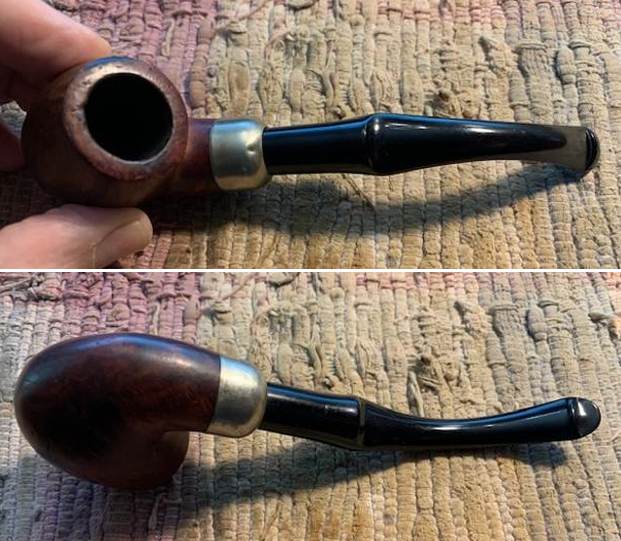
The next pipe I removed from box of Peterson’s Pipes that I have to work on was a Peterson’s System Standard pipe. It was purchased from an online auction on 09/12/2019 in Front Royal, Virginia, USA. It had a smooth finish. It was stamped on both sides of the shank. On the left side it read Peterson’s [over] System [over] Standard. On the right side it was stamped Made in the Republic of Ireland (3 lines) and under that was the shape number 312. The nickel ferrule was in great condition and was stamped K&P [over] three Faux Hallmarks followed by Peterson. There was a thick coat of lava in the bowl and an overflow of lava on the rim top. The inner rim had some darkening and is damaged and slightly out of round. The vulcanite stem was lightly oxidized and had tooth marks and chatter near the button on both sides. There was also a hole in the underside of the stem so a decision would need to be made whether to replace it. Jeff took photos of the pipe before he started his clean up work on it.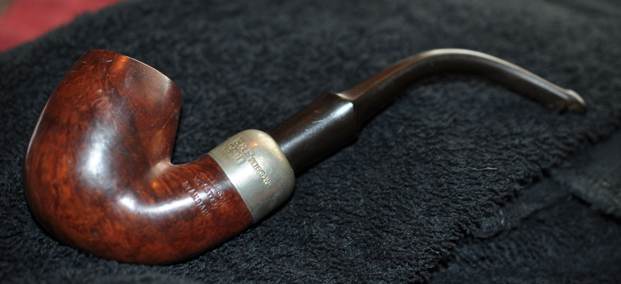
 Jeff took close up photos of the bowl and rim top to show the condition of the bowl and the darkening and damage to the inner edge as well. You can also see the thick cake in the bowl and the light lava on the rim top. He also took close up photos of the stem to show its condition as mentioned above.
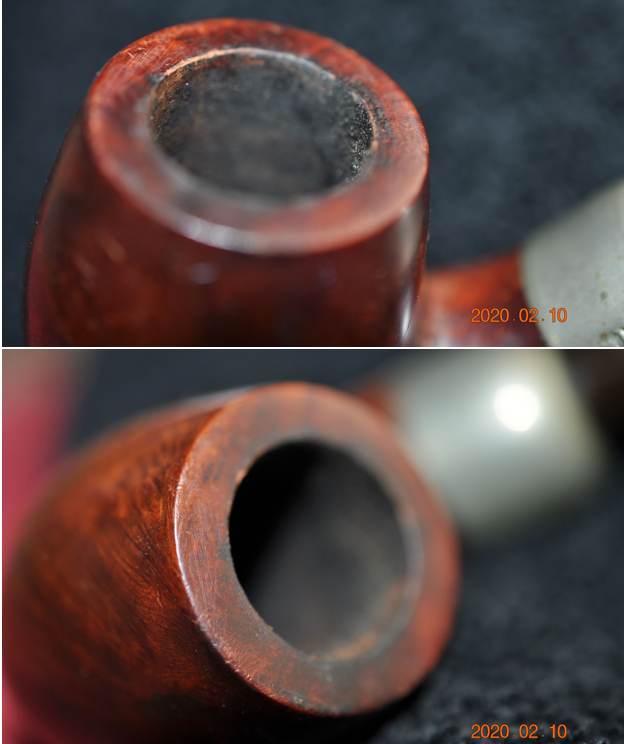
 He took photos of the stamping on both sides of the shank. On the left side it reads Peterson’s [over] System [over] Standard. On the right side it read Made in the Republic of Ireland (three lines) over the shape number 312. The nickel ferrule stamping is very readable and undamaged.
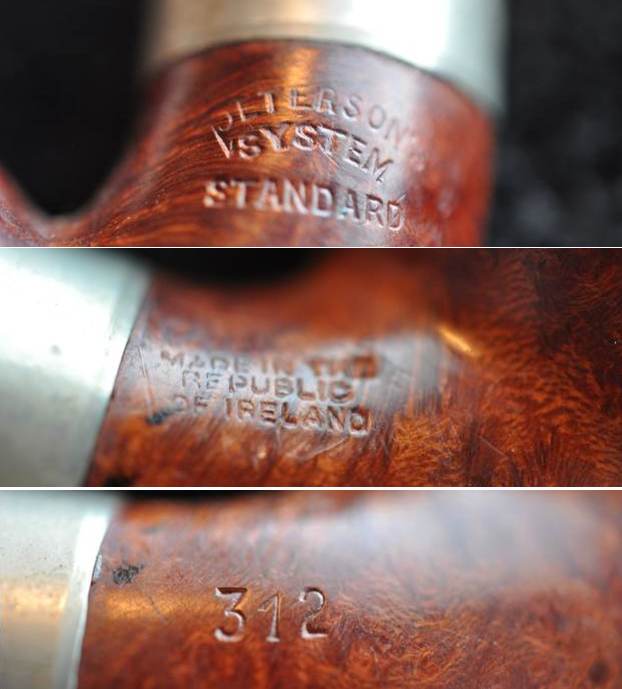
 He took photos of the sides and heel of the bowl to show the sensational grain on this pipe. It is a real beauty that has a shape that follows the grain.
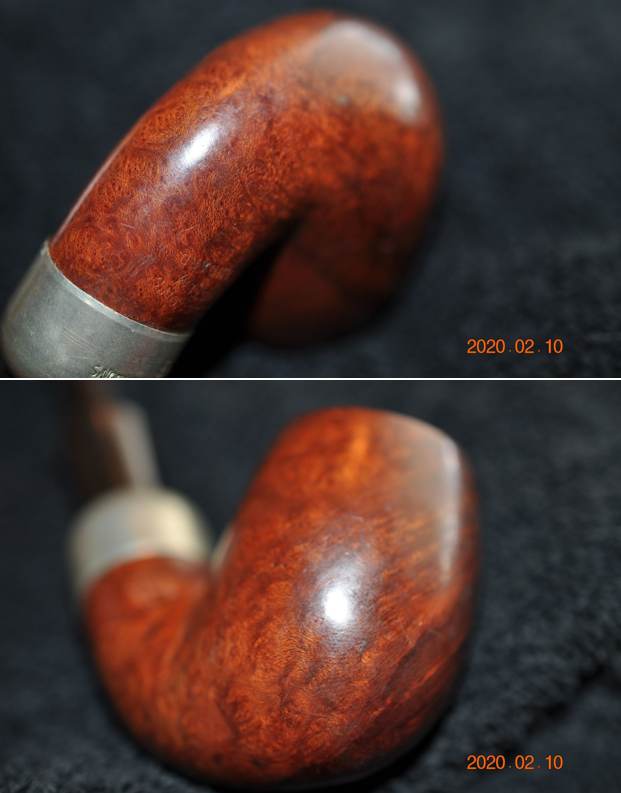
 I have included the information on the shape number on this pipe that I picked up on researching the other pipes. It is a Peterson’s System Standard pipe with a 312 shape number. I started my hunt for information by turning to a Peterson Catalogue that I have on rebornpipes and looked up the System Standard pipes (https://rebornpipes.com/tag/peterson-hallmark-chart/). I have put a red box around the 312 shown in the catalogue page shown below. That should give a clear picture of the size and shape of the pipe.
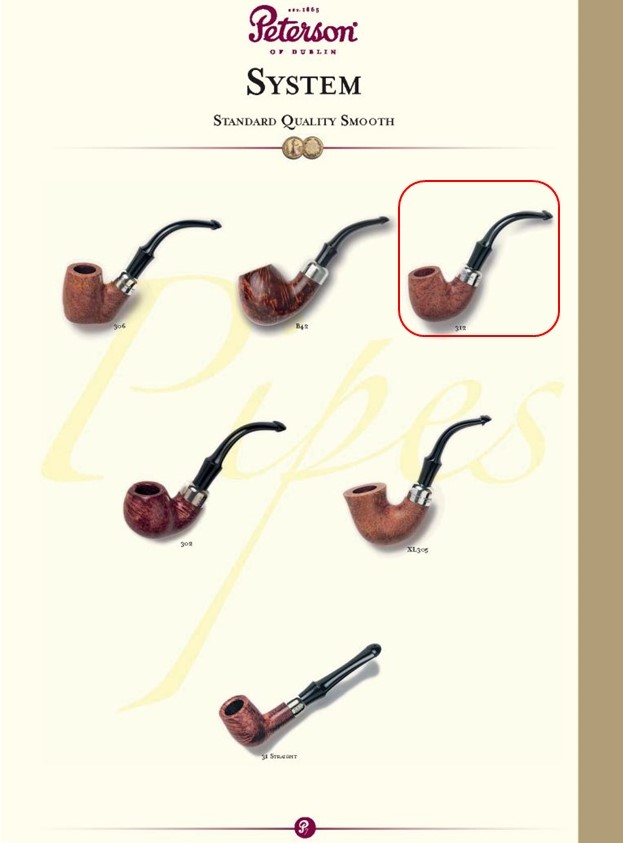 I am also including the information from Pipedia’s article on Peterson pipes. It is a great read in terms of the history of the brand (https://pipedia.org/wiki/Peterson). I have included a bit of the pertinent history here.
1950 – 1989 The Republic Era – From 1950 to the present time, the stamp for this era is “Made in the Republic of Ireland” in a block format generally in three lines but two lines have been used with or without Republic being abbreviated.
During the 1950’s and 60’s the Kapp & Peterson company was still in the ownership of the Kapp family. However 1964 saw the retiral of the company Managing Director Frederick Henry(Harry) Kapp.
Pipedia also included a section of information on the System pipes including a diagram of the sytems look (https://pipedia.org/wiki/Peterson#Republic_Era_Pipes). I quote a section of the article in part and include a link to another article on Pipedia on the System pipe.
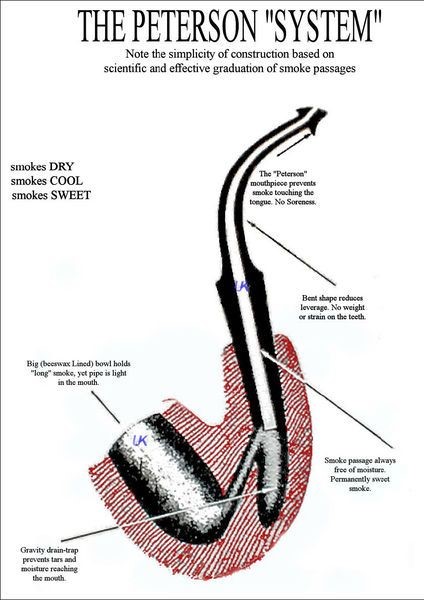 The Peterson System pipes are the standard bearers of the Peterson pipe family, famous for the excellent smoking pleasure they provide. Often imitated but never equaled, the Peterson System smokes dry, cool and sweet, thanks to the scientific effectiveness of the original design. The heart of the System is the unique graduated bore in the mouthpiece. This makes the suction applied by the smoker 15 times weaker by the time it reaches the tobacco chamber. The result is that all the moisture flows into the reservoir and, thus cannot reach the smoker’s mouth. The Peterson Lip further enhances the effectiveness of the graduated bore by directing the flow of smoke upwards and away from the tongue. This achieves a uniquely even distribution of smoke and virtually eliminates any chance of tonguebite or bitterness. Furthermore, the shape is contoured so that the tongue rests comfortably in the depression under the opening. Each “PLip” mouthpiece is made from Vulcanite. For the Peterson System pipes to work properly, the stem/tenon has to have an extension, the tip of which will pass by the draft hole from the bowl and into the sump. Upon the smoker drawing in smoke, this extension then directs the smoke down and around the sump to dispense a lot of the moisture before the smoke enters the extension and stem. On the System Standards and other less expensive systems, this extension with be made of Vulcanite turned integrally with the stem. On the more expensive System pipes this extension will be made of metal which screws into the Vulcanite stem. This extension on the earlier pipes will be of brass and the newer pipes will be of aluminium. Most smokers not knowing this function of the metal extension, assumes that it is a condenser/stinger and will remove it as they do with the metal condensers of Kaywoodie, etc. Should you have a System pipe with this metal extension, do not remove it for it will make the System function properly and give you a dryer smoke (https://pipedia.org/wiki/A_closer_look_at_the_famous_Peterson_Standard_System_Pipe).
With that information in hand I knew what I was dealing with in terms of the stamping and the age of this pipe. I knew from the information that the pipe was made during the Late Republic Era between 1950 and the present day. Personally I think this is probably a 60s-70s pipe. Now it was time to work on the pipe.
With that information at hand I turned to work on the pipe itself. Jeff had thoroughly cleaned up the pipe. He reamed the pipe with a PipNet Pipe Reamer and cleaned up the remnants with a Savinelli Fitsall Pipe Knife. He scrubbed the bowl with undiluted Murphy’s Oil Soap with a tooth brush. He rinsed it under running warm water to remove the soap and grime. He cleaned out the inside of the sump in the shank and the airway in the stem with alcohol, cotton swabs and pipe cleaners. He scrubbed the exterior of the stem with Soft Scrub to remove as much of the oxidation and calcification as possible. He soaked the stem in Before & After Deoxidizer and rinsed it off with warm water. The hole in the stem was big enough that I chose not to keep it. Fortunately last weekend I was gifted some new replacement stems for Peterson’s pipes that came from the factory. I had the perfect stem that was the same size, shape and style, a veritable twin of the damaged stem so I replaced the stem with a hole. I took photos of the pipe and the new stem before I started to work on it. 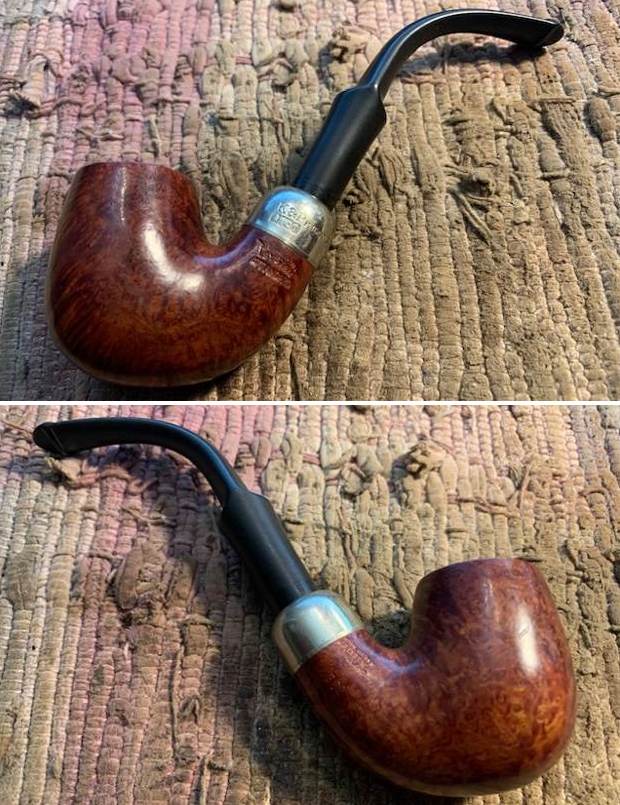
 I took close up photos of the bowl, rim and the new stem. You can see the reamed bowl and the darkening, remaining lava and damage on the rim top and the inner edge. The new stem is in perfect condition and will only need to be polished.
 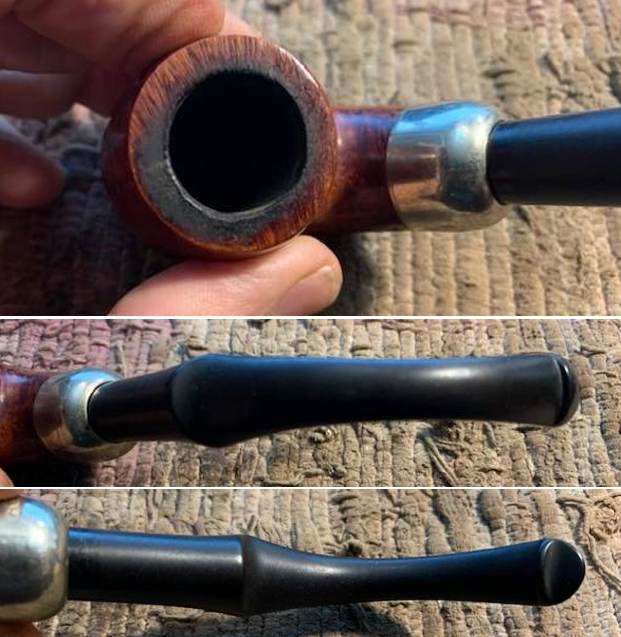 I took photos of the stamping on the sides of the shank and the nickel ferrule. All are clear and readable as noted above.
 I removed the stem from the shank and took a photo to give a sense of the proportions of the pipe. It is really quite nice looking.
 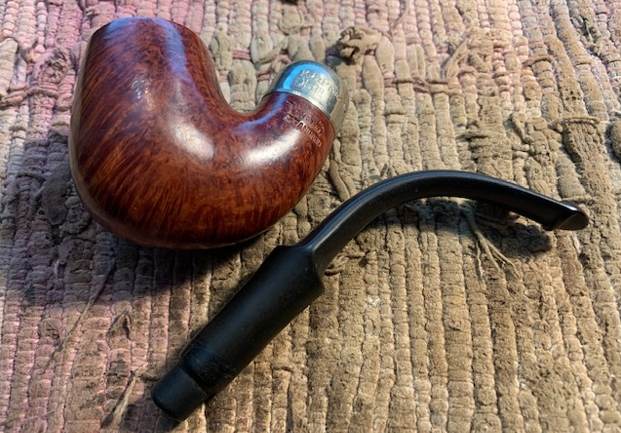 I decided to start my work on this one by reworking the inner edge of the rim with a folded piece of 220 grit sandpaper. I wanted to try and bring it back into round and smooth out the rim top and edges.
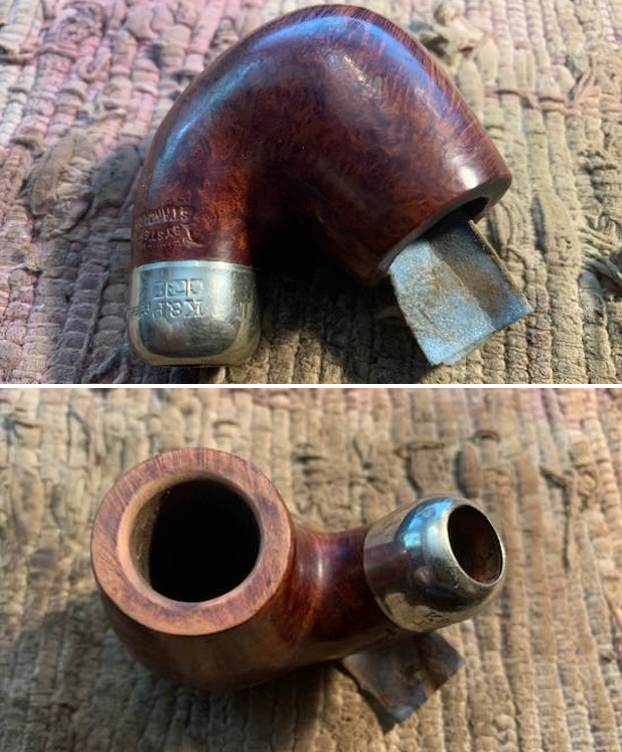 I wiped off the varnish coat with acetone and a cotton pad to remove the spotty finish and to also blend in the sanded rim top.
 I polished the briar and the rim top with micromesh sanding pads – 1500-12000 grit pads. I wiped the bowl down after each pad with a damp cloth. You can see a few of the flaws in the sides of the bowl and shank in the photos below. The bowl looks great though.
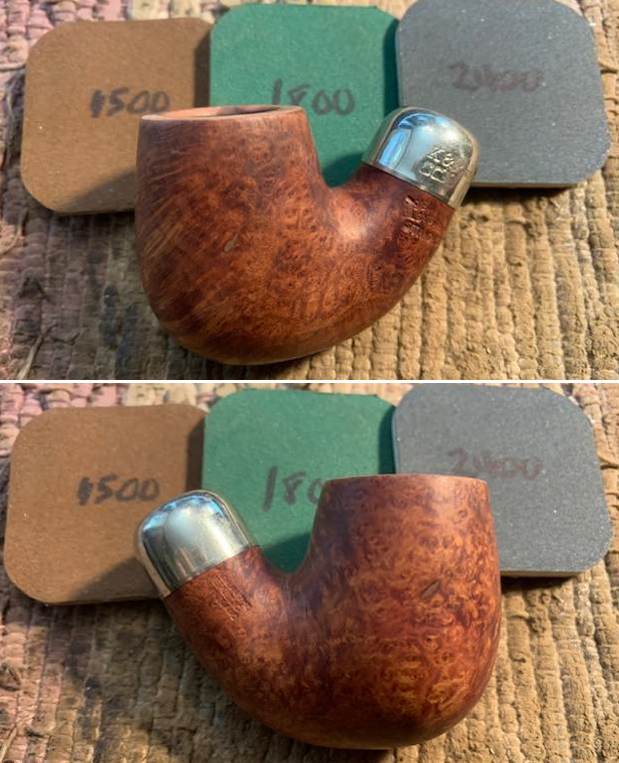


 I rubbed the bowl and shank down with Before & After Restoration Balm. I worked it into the surface of the bowl sides and shank with my fingertips to clean, enliven and protect the briar. I let the balm sit for a little while and then buffed with a cotton cloth to raise the shine.
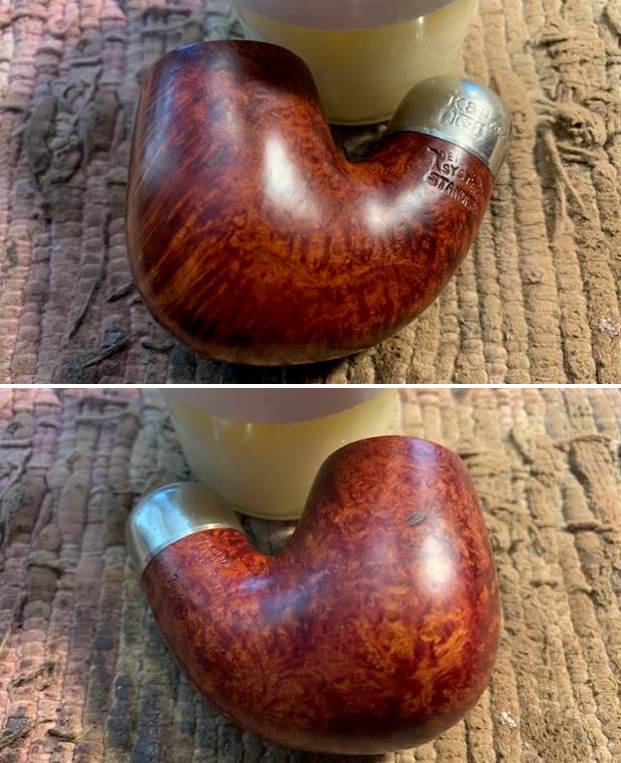

 I polished the vulcanite stem with micromesh sanding pads – 1500-12000 grit pads. I wiped it down with a damp cloth after each sanding pad. I used Before & After Pipe Polish – both Fine and Extra Fine to further polish the stem.
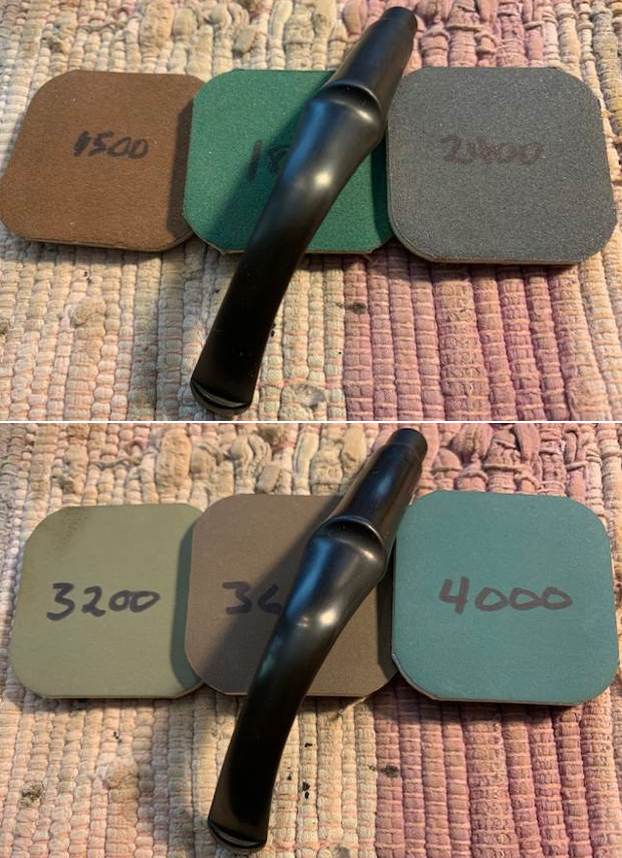
 This nice looking Peterson’s System Standard 312 and a classic Peterson’s P-lip vulcanite stem looks much better now that it has been restored and restemmed. The rim top and edges cleaned up very well. The rich brown stain on the bowl came alive with the polishing and waxing. I put the stem back on the bowl and carefully buffed the pipe with Blue Diamond on the buffing wheel using a light touch on the briar. I gave the bowl and the stem multiple coats of carnauba wax on the buffing wheel and followed that by buffing the entire pipe with a clean buffing pad. The polished nickel ferrule looked great. I hand buffed the pipe with a microfiber cloth to deepen the shine. The finished Peterson’s System Standard 312 is a beauty and fits nicely in the hand and looks very good. Give the finished pipe a look in the photos below. The dimensions of the pipe are Length: 6 inches, Height: 2 inches, Outside diameter of the bowl: 1 ¼ inch, Chamber diameter: ¾ of an inch. The weight of the pipe is 61grams/2.15 ounces. I will be adding it to the rebornpipes store in the Irish Pipemakers Section soon. If you are interested in adding this pipe to your collection send me a message or an email. Thanks for reading this blog and my reflections on the pipe while I worked on it.
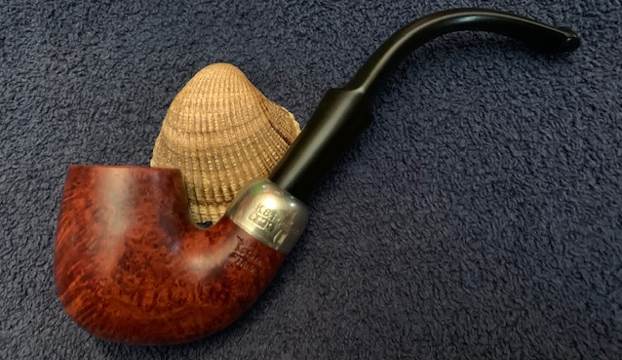


Blog by Steve Laug
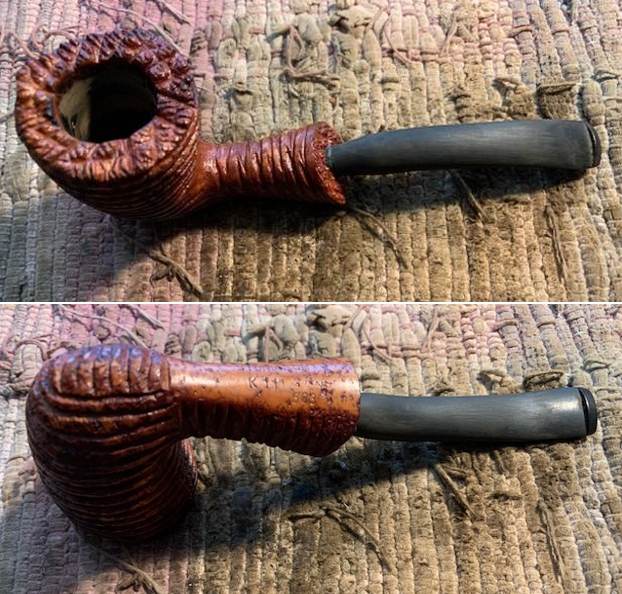
The next pipe on the table was a bowl sans stem that a reader sent to me after reading my blog on a similar pipe – a Stone Age K11 [over] shape number 609 followed by Italy. His pipe is stamped on the underside of the shank and reads Stone Age K11 [over] shape number 603. From my previous work on one of these I knew that I was dealing with a Savinelli product. The pipe had been reamed and cleaned by the sender and looked good. The rim top had some light darkening around the inner edge but otherwise was clean. The finish had been scrubbed and cleaned so it looked good just a bit lifeless. Last evening while going through my collection of stems I found one that would work on the pipe. It would need some shaping and tapering but the size and shape were perfect to start with. It has a very unique rustication that is quite different – both rugged and spun that reminds me of a honey swizzle stick. The flared shank and rim top both look like rusticated plateau – faux or real, I am unsure. Overall it is a pretty pipe. I took some photos of the bowl before I worked on it and the new stem.
 The next two close up photos show the condition of the bowl, rim top and shank end. You can see the darkening on the front and back inner edge of the bowl and in the rustication of the rim top and shank end.
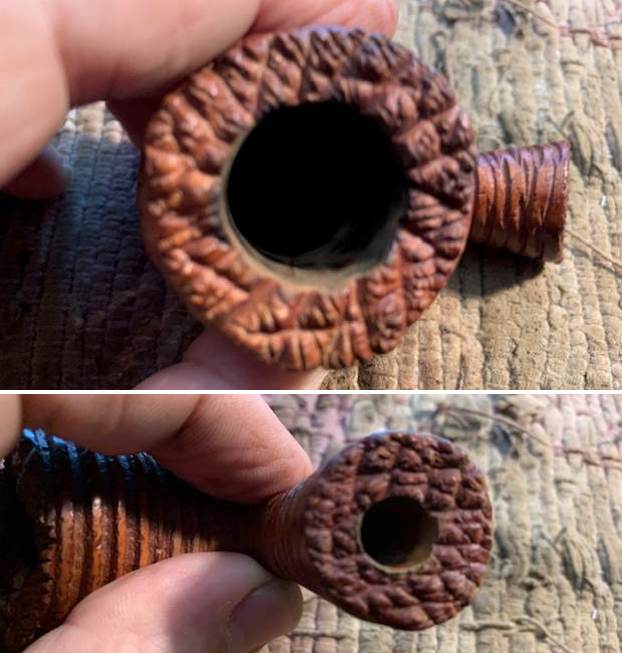 The stamping is readable but faint on the underside of the shank. It reads as noted above.
 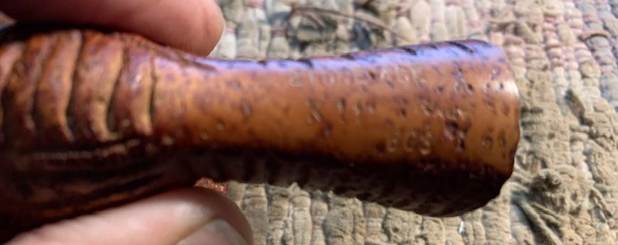 I turned to Pipedia (https://pipedia.org/images/4/41/Sav_Shape_Chart_2017.jpg) and found a shape chart and the listing for the 603 shape. It shows up as a saddle stem bent billiard. The shape of this pipe is more of a Dublin shape so I do not know how to explain the shape chart. I have included the chart below.
 I decided to start my work on restoring the pipe by addressing the debris and darkening on the rim top. I used a brass bristle brush and scrubbed the surface of the rim top and shank end working on removing debris and darkening from the grooves of the plateau and rustication.
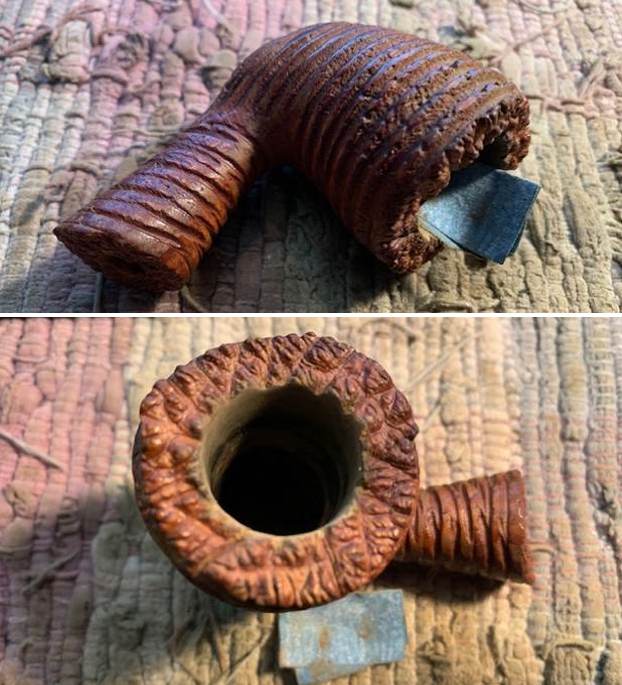 I used a folded piece of 220 grit sandpaper to address the darkening on the inner edge of the bowl. I carefully sanded out the darkening to give it a cleaner look. It looked much better than when I started.
 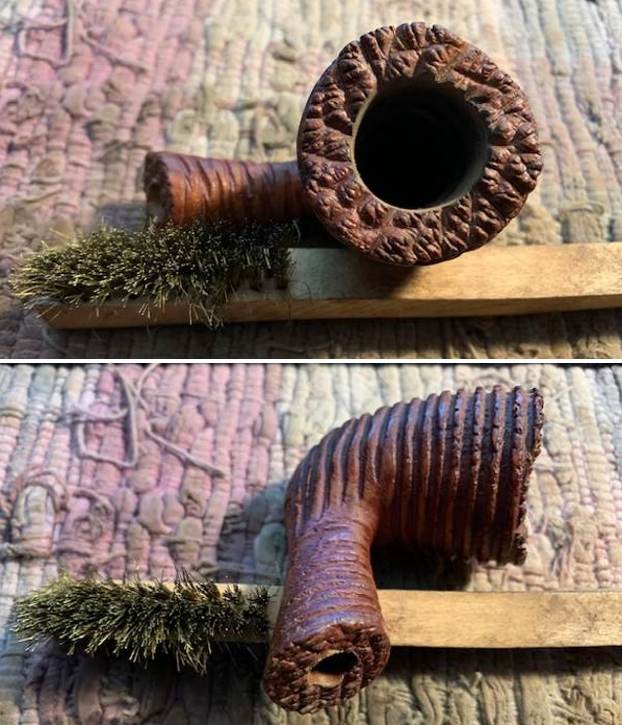 I rubbed the briar down with Before & After Restoration Balm. I worked it into the briar and the grooves around the bowl and shank with my fingertips and a horsehair shoe brush. The product works to clean, enliven and preserve the briar. I let it sit for 15 minutes while I worked on the stem. After the time passed I buffed it with a cotton cloth to deepen the shine. The briar really comes alive with the balm.
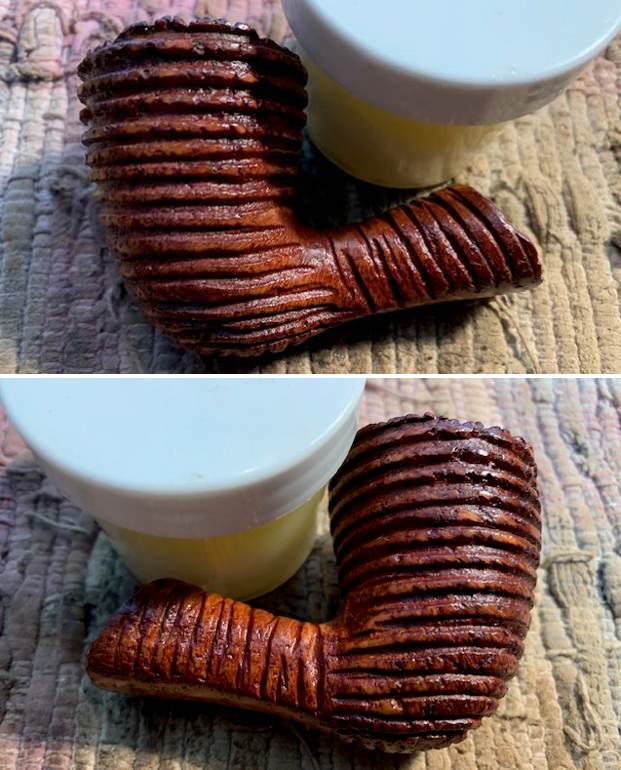
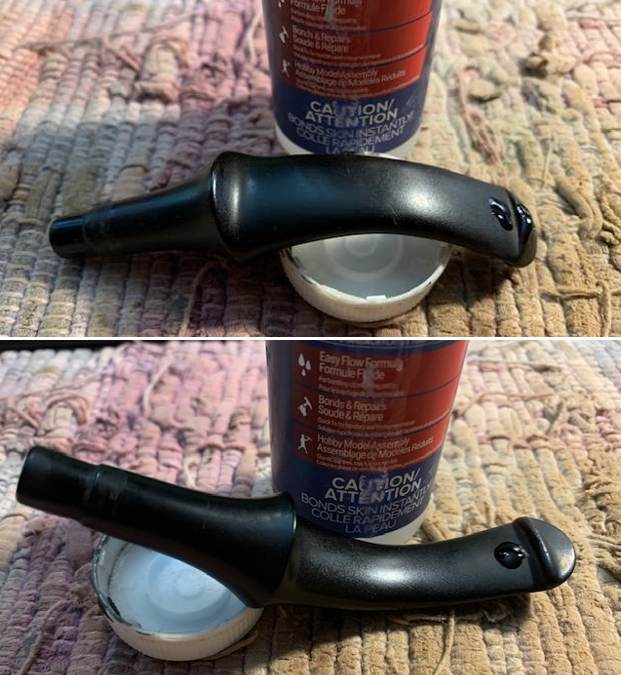
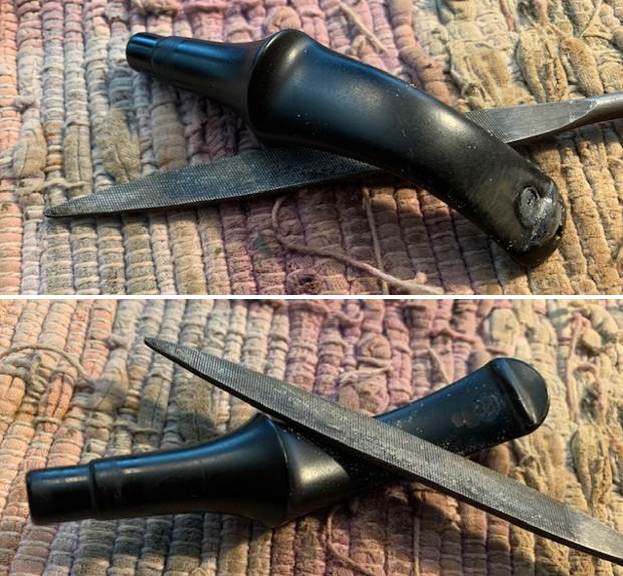
 The stem had a broken tenon that I removed with a Dremel and sanding drum. I flattened the stem end. I used the Dremel to shape the stem end into a tapered cone. It was rough but the shape was getting there. I cleaned up the roughened stem end with a small flat file to further shape it. I sanded it with a folded piece of 220 grit sandpaper to shape it more. It is starting to take shape at this point. There was a gouge on the top side of the stem mid stem that almost looked like a crack but was not one. I sanded the area smooth with the 220 grit sandpaper at the same time.
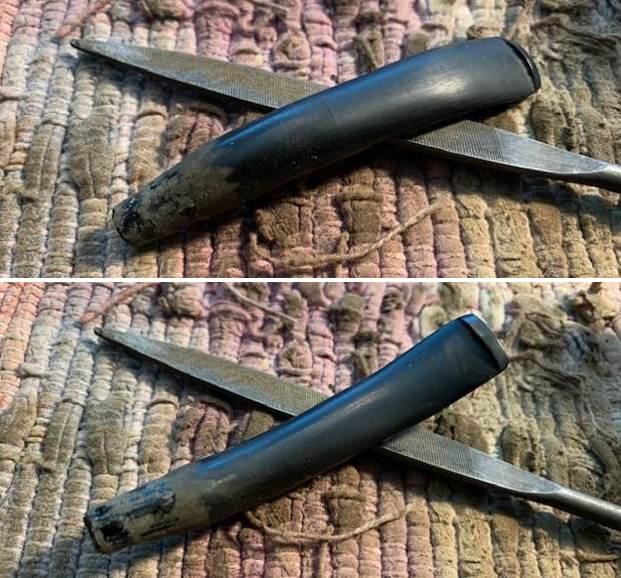
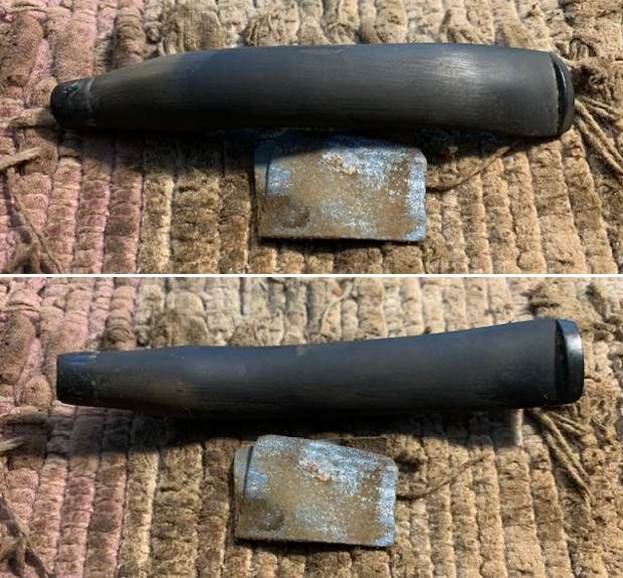 Now it was time to straighten the bend I the stem to match the flow of the pipe. Instead of using my heat gun I painted the stem surface with the flame of a Bic lighter until the vulcanite became flexible. I straightened it out to the angles I wanted for the pipe.
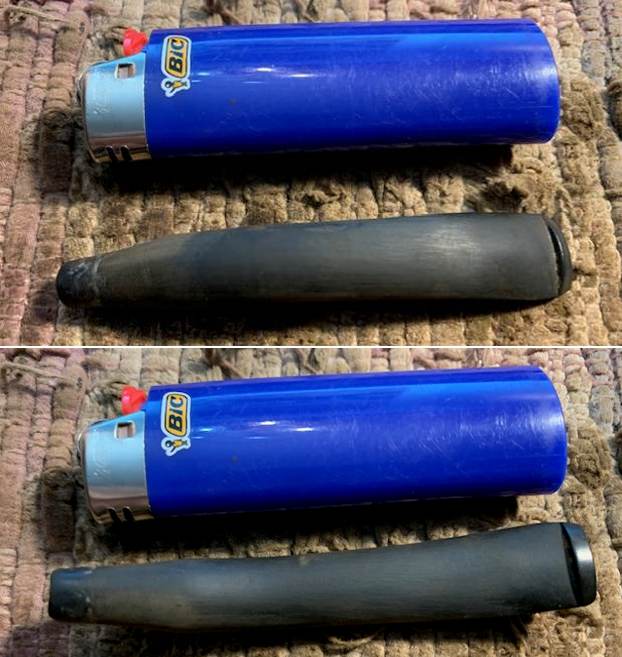
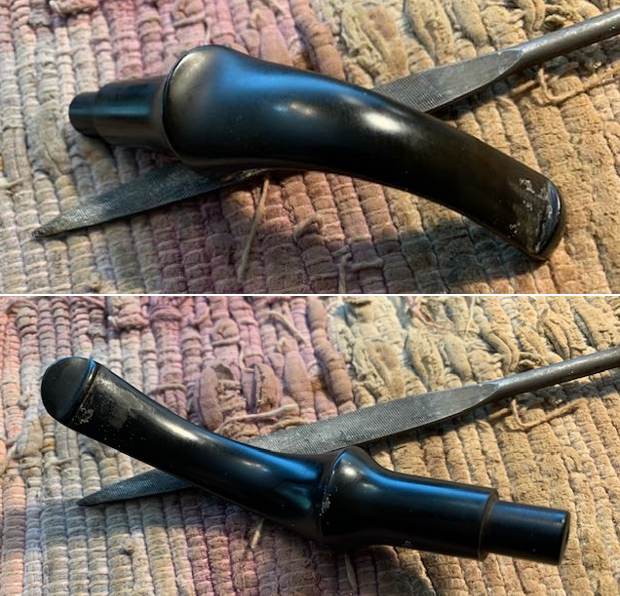
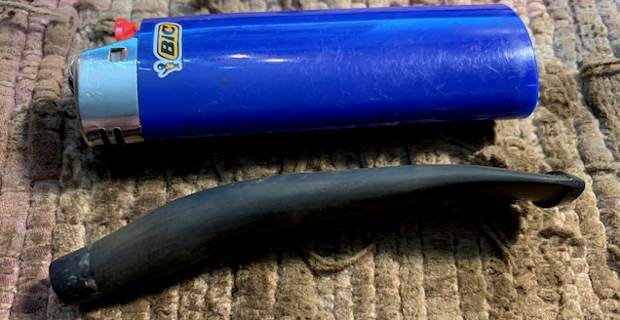 I put the stem in the bowl and took photos of it at this point in the process to get a sense of the overall look of the pipe. It is looking pretty good to me at this point!
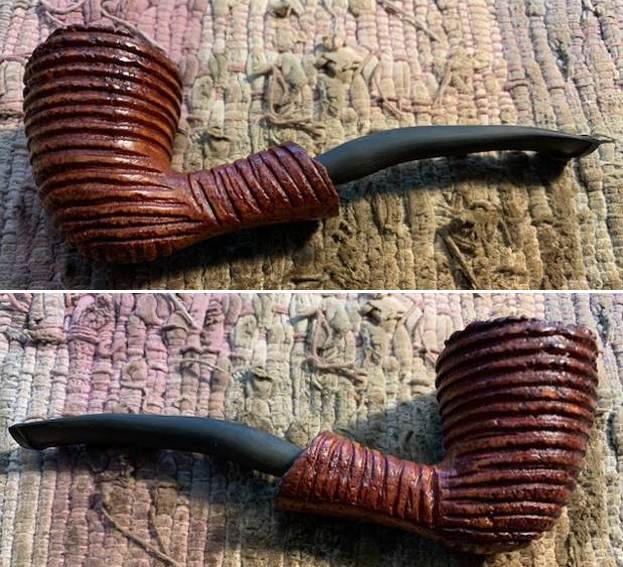
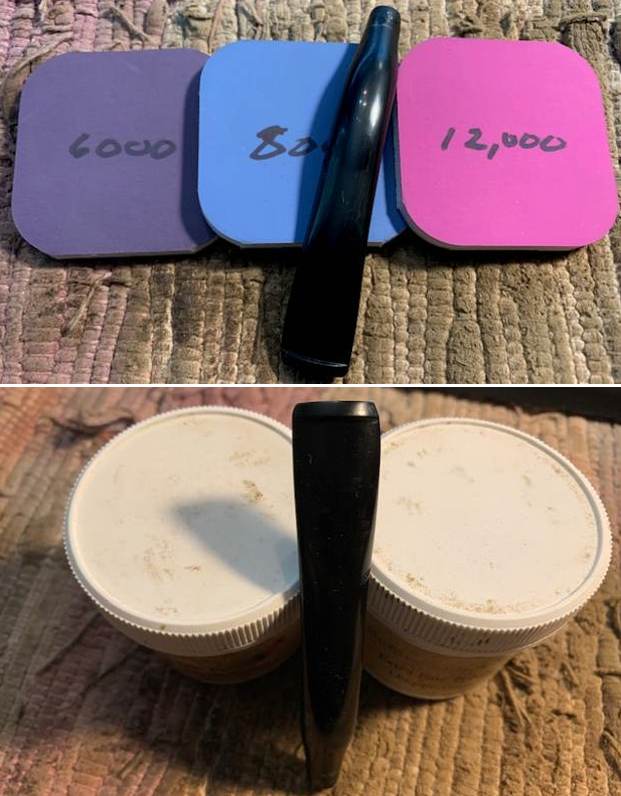
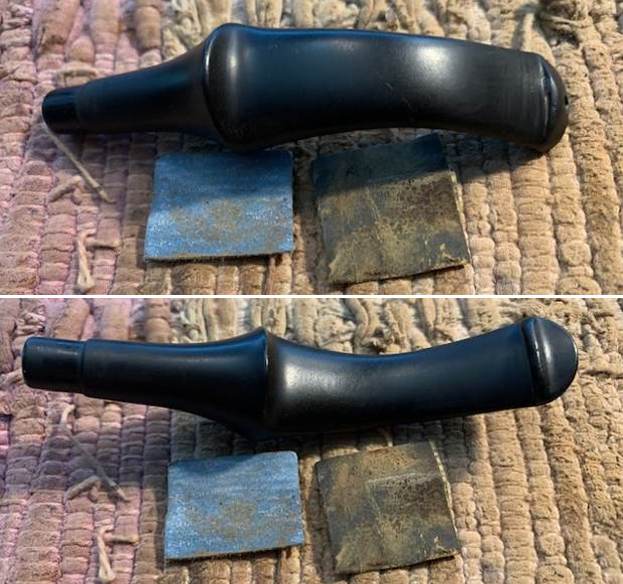
 I polished the vulcanite with micromesh sanding pads – 1500-12000 grit pads. I wiped it down with Obsidian Oil after each sanding pad. I used Before & After Pipe Polish – both Fine and Extra Fine to further polish the stem.
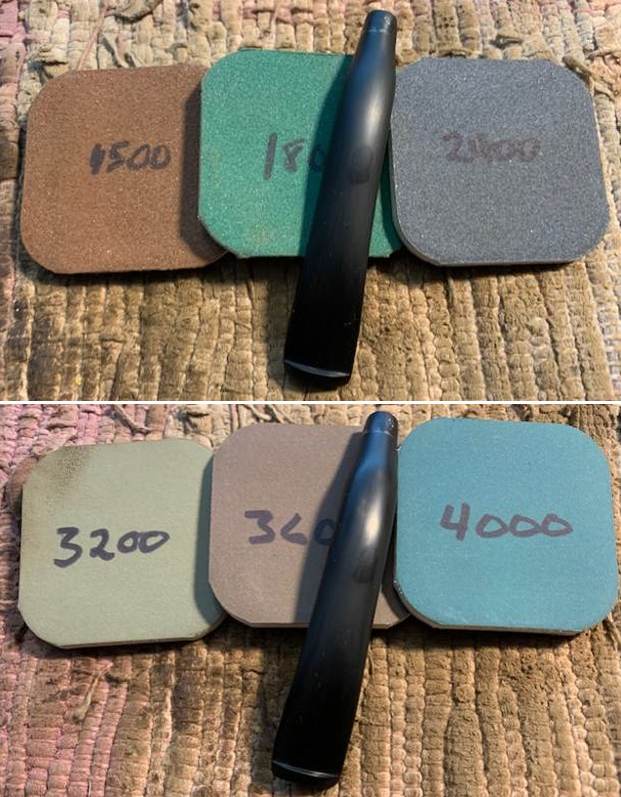
 This restemmed, rusticated Savinelli Made Stone Age K11 603 Italian Freehand is a beautiful looking pipe that combines a rusticated finish with a unique shaped. The brown stains on the bowl work well to highlight the finish. I put the newly finished stem on the bowl and buffed it with Blue Diamond on the buffing wheel being careful to not buff the stamping. I gave the bowl multiple coats of Conservator’s Wax and the stem multiple coats of carnauba wax on the buffing wheel and followed that by buffing it with a clean buffing pad. I hand buffed the pipe with a microfiber cloth to deepen the shine. The finished pipe is quite nice and feels great in the hand. Give the finished pipe a look in the photos below. I can only tell you that like the other pipes I am working that it is much prettier in person than the photos capture. The dimensions of the pipe are Length: 6 inches, Height: 2 inches, Outside diameter of the bowl: 1 ½ inches, Chamber diameter: ¾ of an inch. The weight of the pipe is 54grams/1.90ounces. It will soon heading back to the pipeman who sent it to me. Thanks for walking through the restoration with me as I worked over another beautiful pipe. Remember we are not pipe owners; we are pipemen and women who hold our pipes in trust until they pass on into the trust of the next generation.
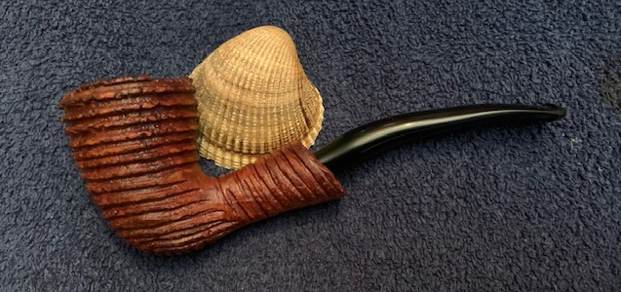

Blog by Steve Laug
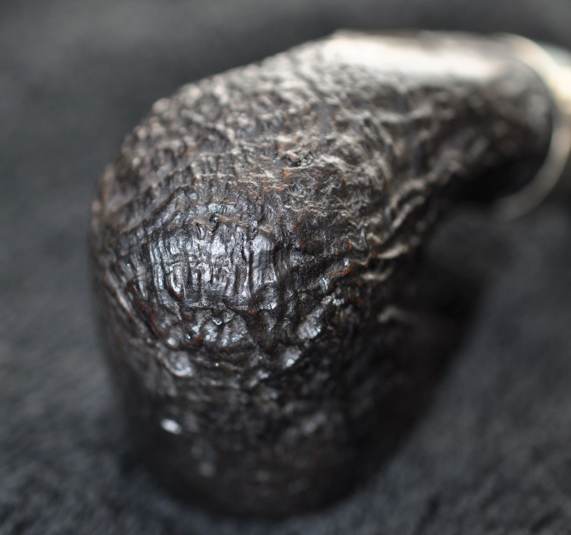
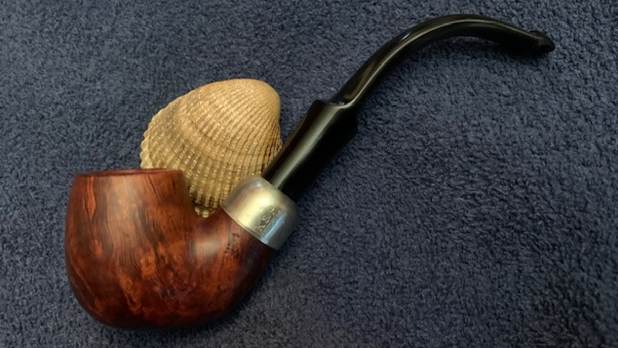
The next pipe on the table was purchased from an antique store on 09/09/2017 in Salt Lake City, Utah, USA. It is stamped on the underside of the shank and reads Peterson’s [over] System [over] Standard. That is followed by Made in the Republic of Ireland (3 lines) over the shape number 301. It was someone’s favourite pipe as could be seen from the thick cake in the bowl and the lava build up on the rim top. The sandblast finish looked good underneath all of the grime and debris that was ground into the bowl sides and heel. The polished nickel ferrule was in excellent condition. The stem was in excellent condition with some deep tooth marks and chatter on both sides ahead of the p-lip. Jeff took photos of the pipe before he started his clean up work on it. It is a pretty pipe!
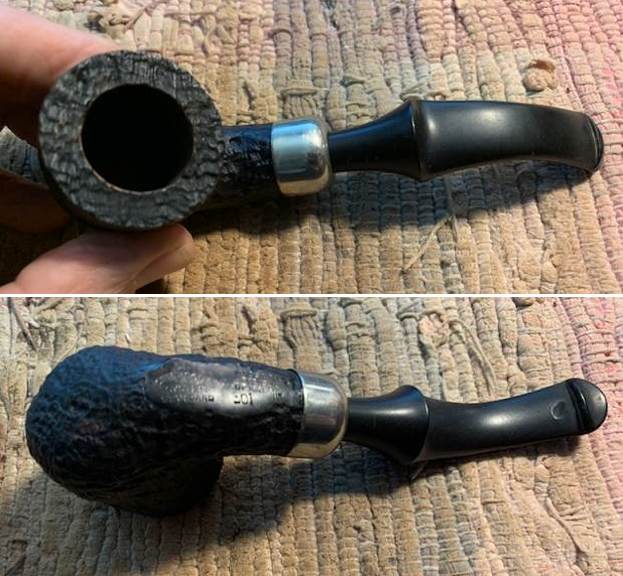
 The next photos show the bowl and rim top as well as the stem condition. The bowl was lightly caked and there was lava build up in the blast on the rim top. The edges of the bowl looked very good. The stem had some tooth marks and tooth chatter on both sides ahead of the button.
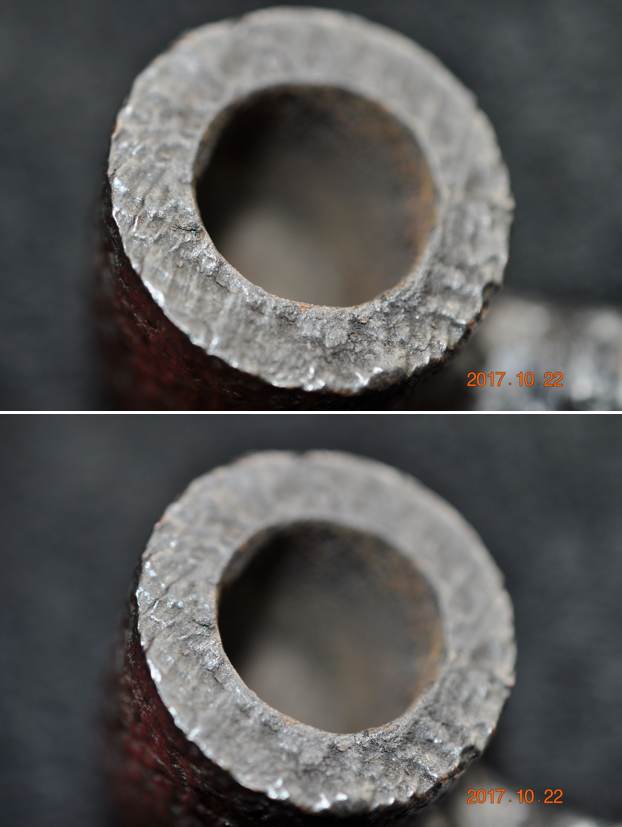
 Jeff took photos of the side and the heel of the bowl to show the swirling patterns of the grain in the briar. It is unique and quite beautiful. I can’t wait to see it once it is cleaned and polished.
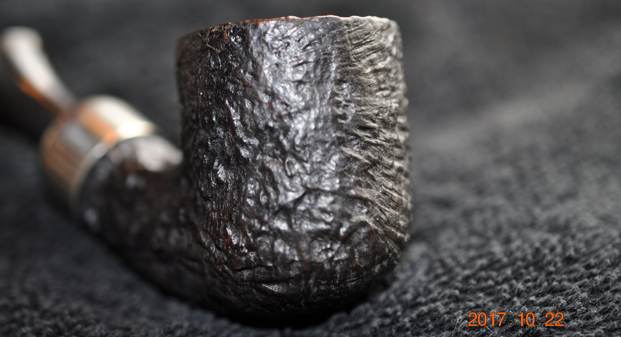
 The stamping on the underside of the shank was very readable and read as noted above. It had been buffed but was not overly damaged.
 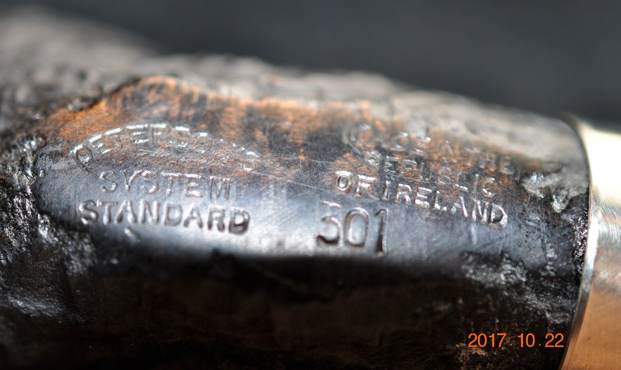 I am including the link to the Pipedia’s article on Peterson pipes. It is a great read in terms of the history of the brand (https://pipedia.org/wiki/Peterson).
I turned to “The Peterson Pipe” by Mark Irwin and Gary Malmberg to get some background on the Peterson’s System Line. On page 314 it had the following information.
Peterson’s over System – Pipes stamped Peterson’s System have been documented as early as 1920. A ’20 brochure is the earliest printed reference to the Peterson System. The pipe came in three quality grades (no mark, 2, or 3) until 1959, thereafter as De Luxe (no mark), Premier (the old 2) and Standard (the old 3).
Peterson’s over System over Standard (c1945-)
I learned previously that the shape 301 was not introduced until 1975. Considering the Republic stamp, this one would likely date between 1975 and 2000. My guess is that the pipe was made somewhere between 1975 and mid-80s. Now it was time to work on the pipe.
With that information at hand I turned to work on the pipe itself. Jeff had thoroughly cleaned up the pipe. He reamed the pipe with a PipNet Pipe Reamer and cleaned up the remnants with a Savinelli Fitsall Pipe Knife. He scrubbed the bowl with undiluted Murphy’s Oil Soap with a tooth brush. He rinsed it under running warm water to remove the soap and grime. He cleaned out the inside of the shank and the airway in the stem with alcohol, cotton swabs and pipe cleaners. He scrubbed the exterior of the stem with Soft Scrub to remove as much of the oxidation and calcification as possible. He soaked the stem in Before & After Deoxidizer and rinsed it off with warm water. I took photos of the pipe once I started to work on it. 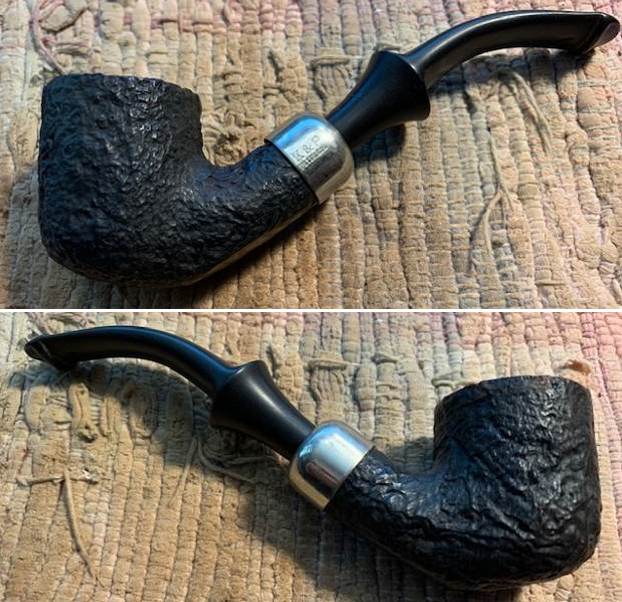
 I took close up photos of the bowl and the stem. You can see the reamed bowl and the darkening and damage on the rim top and the edges. The stem surface was clean but there are light tooth marks and chatter on both sides on and ahead of the button.
 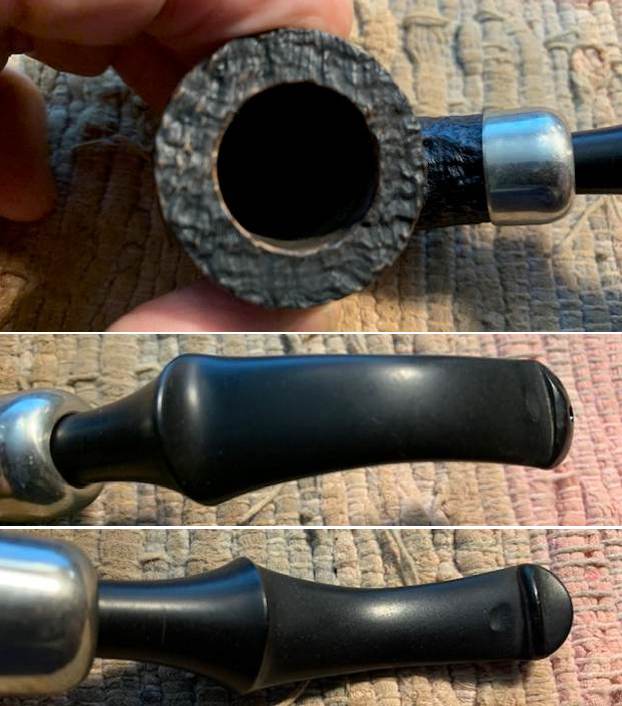 I took a photo of the stamping on the underside of the shank. It is clear and readable as noted above.
 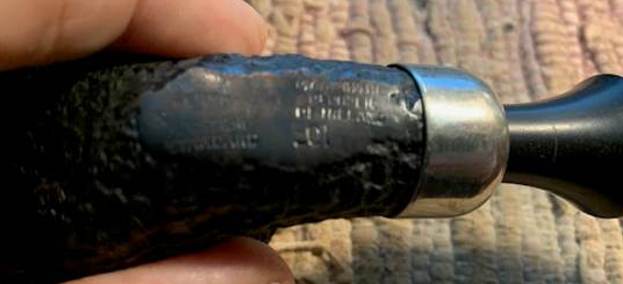 I removed the stem from the shank and took a photo to give a sense of the proportions of the pipe. It is really quite nice looking.
 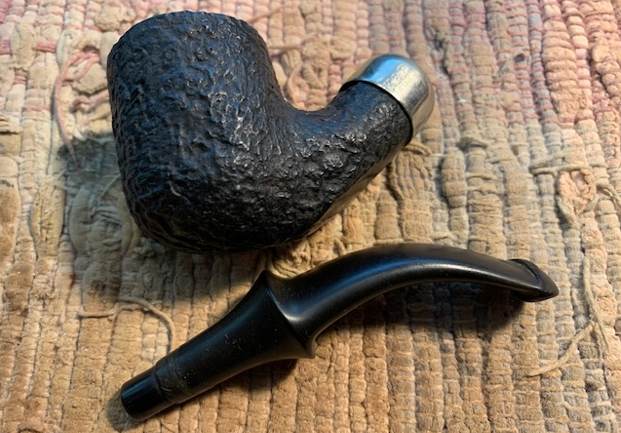 The briar was in such good condition that I rubbed the bowl and shank down with Before & After Restoration Balm. I worked it into the surface of the bowl sides and shank with my fingertips to clean, enliven and protect the briar. I let the balm sit for a little while and then buffed with a cotton cloth to raise the shine.
 I “painted” the tooth marks on the stem with the flame of a Bic lighter to lift them. I was able to lift them a lot. I filled in what remained with clear CA glue. Once the repairs cured I used a small file to flatten them and sanded them smooth with 220 grit sandpaper. I started polishing the stem with 400 grit wet dry sandpaper.
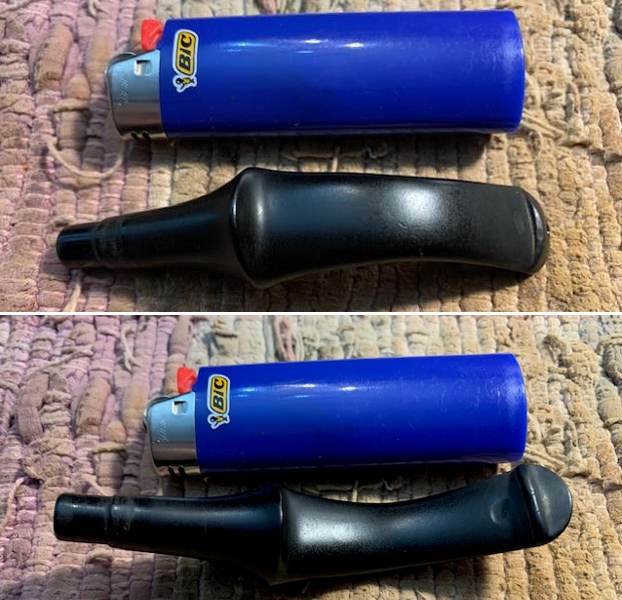
 I polished the vulcanite stem with micromesh sanding pads – 1500-12000 grit pads. I wiped it down with a damp cloth after each sanding pad. I used Before & After Pipe Polish – both Fine and Extra Fine to further polish the stem.
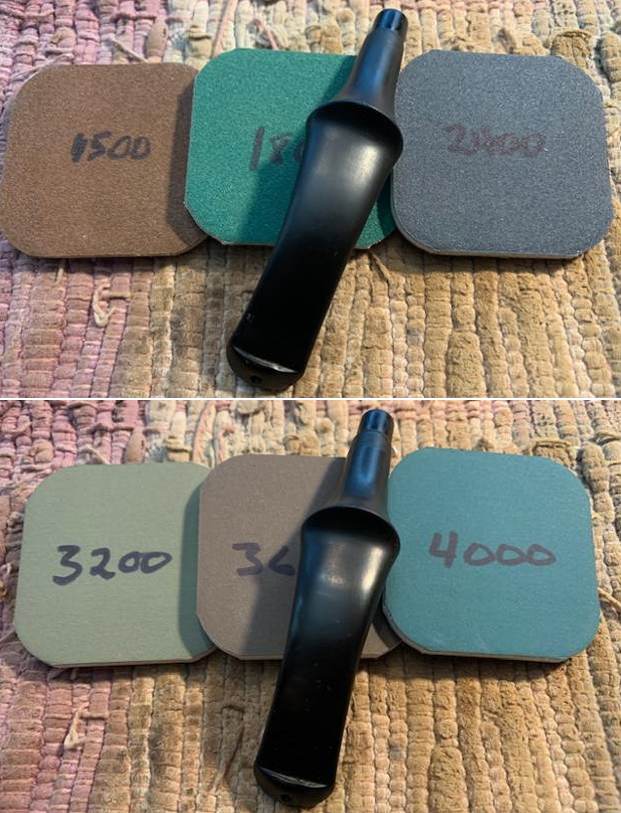
 This nice looking Peterson’s System Standard 301 Sandblast Bent Pot with a classic Peterson’s P-lip vulcanite stem looks much better now that it has been restored. The rim top and edges cleaned up very well. The dark brown stains on the bowl came alive with the polishing and waxing. I put the stem back on the bowl and carefully buffed the pipe with Blue Diamond on the buffing wheel using a light touch on the briar. I gave the bowl multiple coats of Conservator’s Wax and the stem multiple coats of carnauba wax on the buffing wheel and followed that by buffing the entire pipe with a clean buffing pad. I hand buffed the pipe with a microfiber cloth to deepen the shine. The finished Peterson’s System Standard is a beauty and fits nicely in the hand and looks very good. Give the finished pipe a look in the photos below. The dimensions of the pipe are Length: 5 ½ inches, Height: 1 ¾ inches, Outside diameter of the bowl: 1 ½ inch, Chamber diameter: ¾ of an inch. The weight of the pipe is 50 grams/1.76 ounces. If you are interested in adding this pipe to your collection send me a message or an email. Thanks for reading this blog and my reflections on the pipe while I worked on it. There are many more to come!
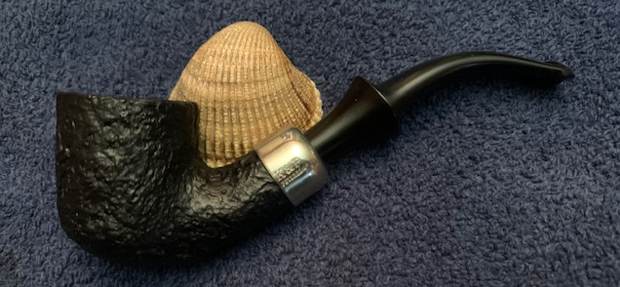


Blog by Steve Laug
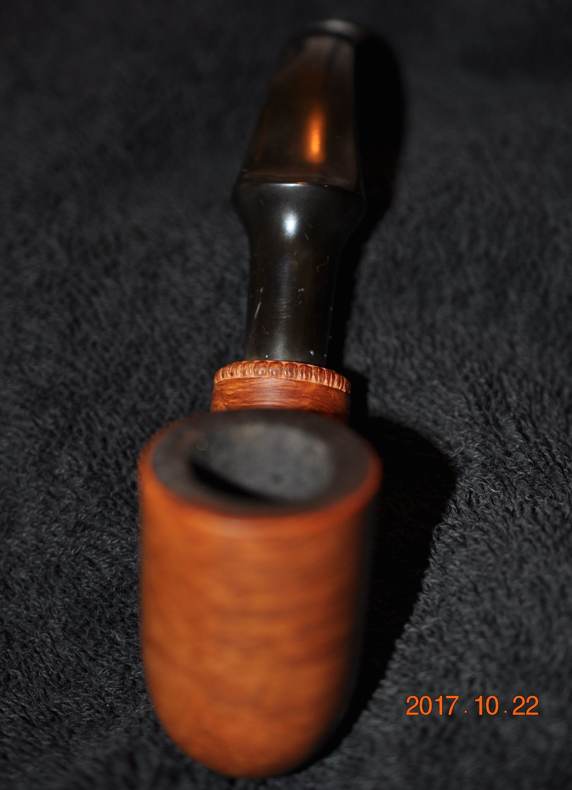
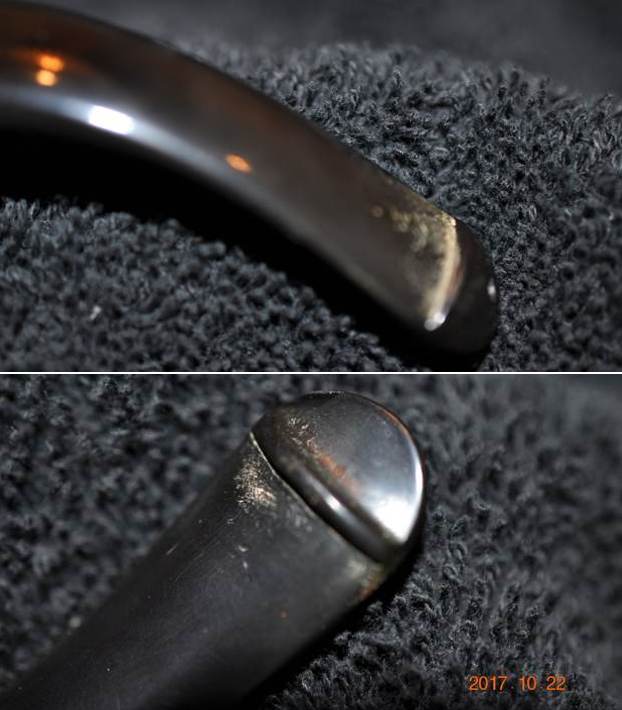
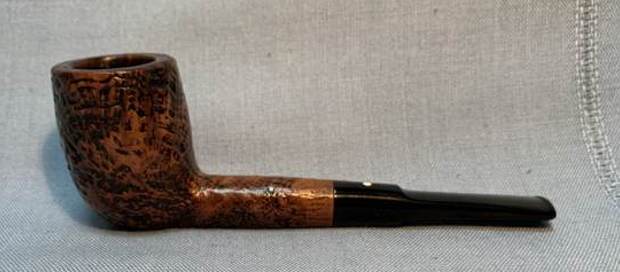
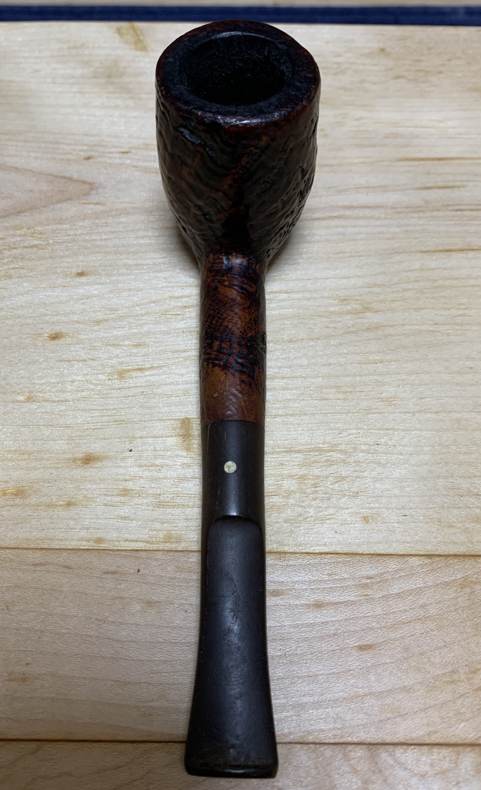
The next pipe on the table was purchased from an antique store on 10/20/2017 in Pocatello, Idaho, USA. It is stamped on the left side of the shank and reads Peterson’s [over] “Dunmore”. On the right side it is stamped Made in the Republic of Ireland followed by the shape number 79. It was someone’s favourite pipe as could be seen from the thick cake in the bowl and the lava build up on the rim top. The finish looked good underneath all of the grime that was ground into the bowl sides and heel. The beaded decoration on the shank end is in excellent condition. Like other Dunmore’s I have worked on it had a flattened shank and the pipe functioned as a sitter. The stem was in excellent condition with some very light tooth marks and chatter on both sides ahead of the p-lip. The “P” stamp on the left side of the stem was clear and just needed to be touched up otherwise it looked good. Jeff took photos of the pipe before he started his clean up work on it. It is a pretty pipe!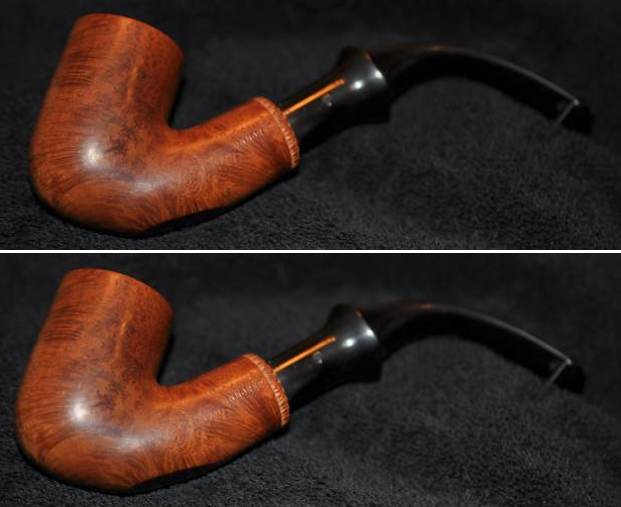
 The next photos show the bowl and rim top as well as the stem condition. The bowl was clean and ready to fire up. The rim edge was out of round and showed some damage and darkening. The rim top also had some darkening. The stem looked very good with some light tooth chatter and scratches.
 Jeff took a photo of the heel of the bowl and shank to show the swirling patterns of the grain in the briar. It is unique and quite beautiful. I can’t wait to see it once it is cleaned and polished.
 The stamping on the shank sides was very readable and read as noted above. It had been buffed but was not overly damaged.
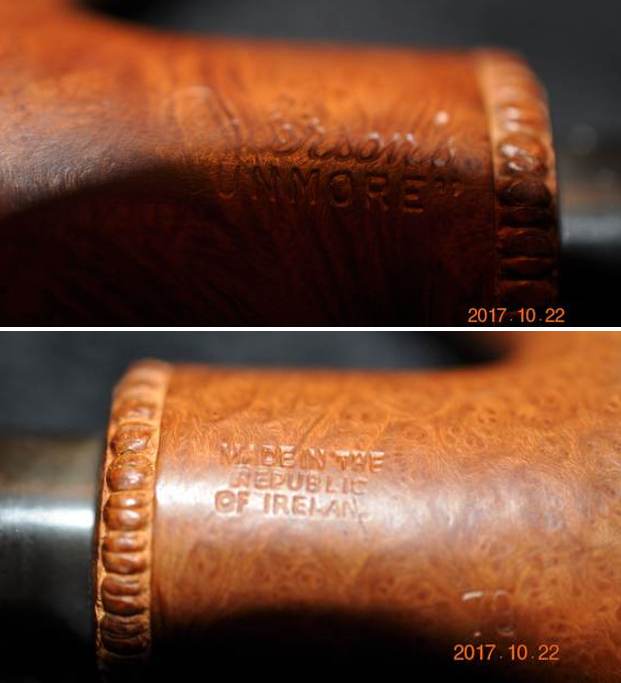
 I turned to a previous blog on the Dunmore I had worked on and reread it before starting my work (https://rebornpipes.com/2019/08/18/restoring-a-petersons-dunmore-70-bent-apple-sitter-from-bob-kerrs-estate/). I quote from the blog on the Dunmore line below.
I then turned to the book I should have consulted first, The Peterson Pipe, by Mark Irwin and Gary Malmberg. On page 298 there is an entry for Dunmore pipes. It reads as follows:
Dunmore (1971-c.1984 2006-10). Appeared first as Iwan Ries & Co. exclusive line “Dunmoor,” a Premier-grade in light-brown smooth or rustic red in all System shapes, with beading at the shank. Documented in the Associated Imports Catalog from 1973. Classic Range Dunmore shapes from ’78. A third Dunmore line (’06-10) featured standard and some B shapes, with beading around bowl instead of at shank-face, produced for European market.
On page 165 there were also photos of pages from a catalogue with the description: The unmounted Dunmore Premier debuted in both System and Classic Range shapes circa 1973 with a final appearance in the 1981 catalogue.
The information blurb on each page read: “Dunmore Briars.” Beautifully grained best quality briar in light-brown, matt or rustic finish. Often described as “Petersons Unmounted System” has all the advantages of the system range. Ten models each fitted with the Peterson Lip mouthpiece.
With that information in hand I knew what I was dealing with in terms of the stamping on the pipe. It is a Late Republic era pipe. It showed up in Peterson Catalogue in 1973. Now it was time to work on the pipe.
With that information at hand I turned to work on the pipe itself. Jeff had thoroughly cleaned up the pipe. He reamed the pipe with a PipNet Pipe Reamer and cleaned up the remnants with a Savinelli Fitsall Pipe Knife. He scrubbed the bowl with undiluted Murphy’s Oil Soap with a tooth brush. He rinsed it under running warm water to remove the soap and grime. He cleaned out the inside of the shank and the airway in the stem with alcohol, cotton swabs and pipe cleaners. He scrubbed the exterior of the stem with Soft Scrub to remove as much of the oxidation and calcification as possible. He soaked the stem in Before & After Deoxidizer and rinsed it off with warm water. I took photos of the pipe once I started to work on it. 
 I took close up photos of the bowl and the stem. You can see the reamed bowl and the darkening and damage on the rim top and the edges. The stem surface was clean but there are light tooth marks and chatter on both sides on and ahead of the button.
 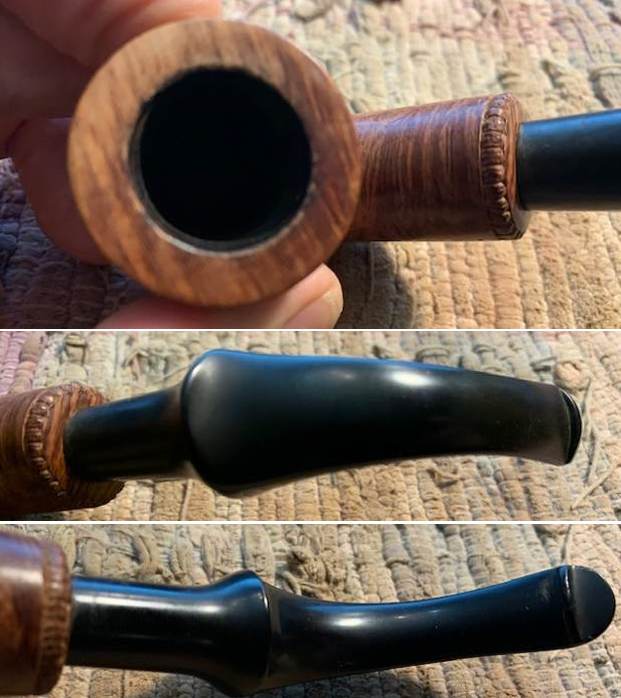 I took a photo of the stamping on the sides of the shank. It is clear and readable as noted above. There is also a “P” stamp on the right side of the stem.
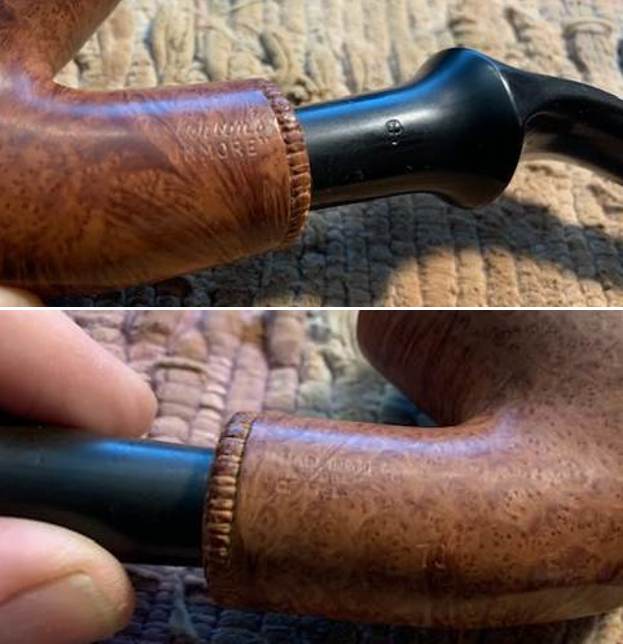 I removed the stem from the shank and took a photo to give a sense of the proportions of the pipe. It is really quite nice looking.
 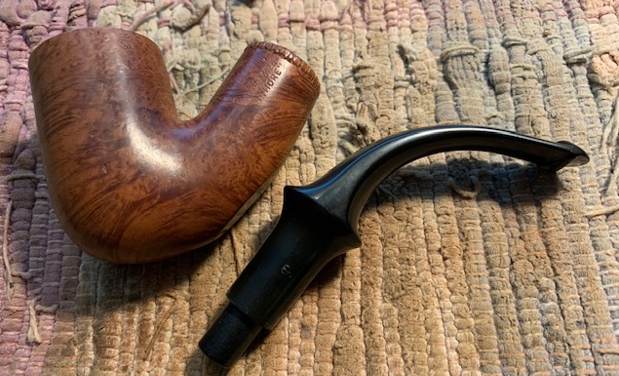 I decided to start my work on this one by reworking the inner edge of the rim with a folded piece of 220 grit sandpaper. I wanted to try and bring it back into round and smooth out the jagged condition.
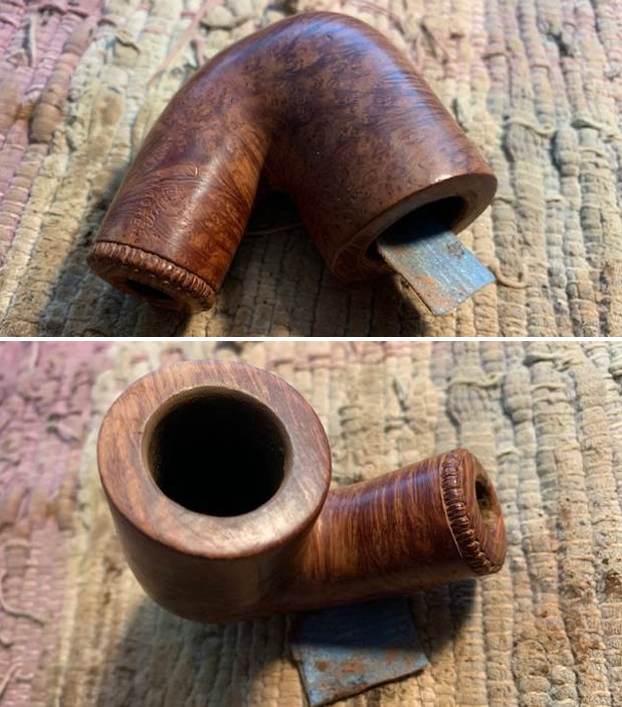 I polished the briar and the rim top with micromesh sanding pads – 1500-12000 grit pads. I wiped the bowl down after each pad with a damp cloth. You can see a few of the flaws in the sides of the bowl and shank in the photos below. The bowl looks great though.
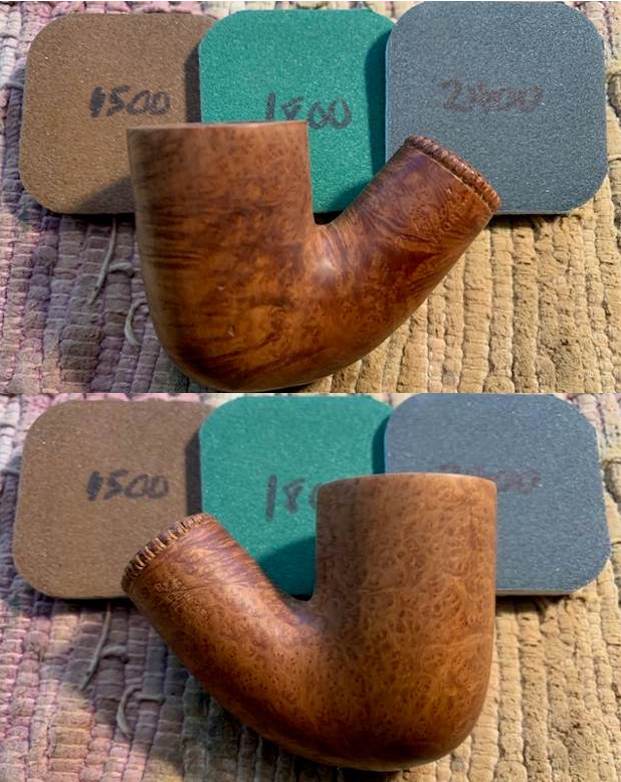
 I rubbed the bowl and shank down with Before & After Restoration Balm. I worked it into the surface of the bowl sides and shank with my fingertips to clean, enliven and protect the briar. I let the balm sit for a little while and then buffed with a cotton cloth to raise the shine.
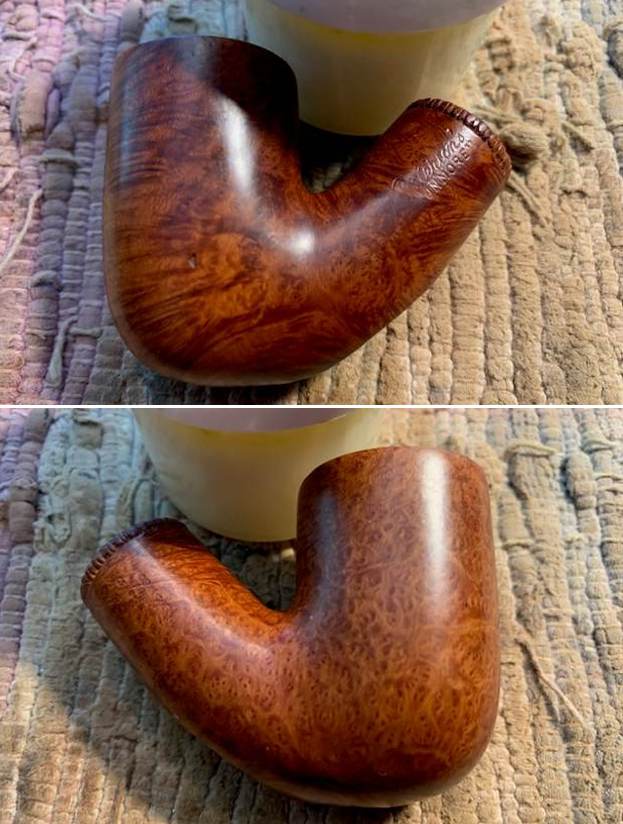
 I touched up the “P” stamp on the left side of the flared saddle stem with white acrylic fingernail polish. I applied it and worked it into the stamp with a tooth pick. Once it cured I scraped off the excess. It is definitely better though the stamp is faint in some spots.
  I “painted” the tooth marks on the stem with the flame of a Bic lighter to lift them. I was able to lift them a lot. I filled in what remained with clear CA glue. Once the repairs cured I used a small file to flatten them and sanded them smooth with 220 grit sandpaper. I started polishing the stem with 400 grit wet dry sandpaper.
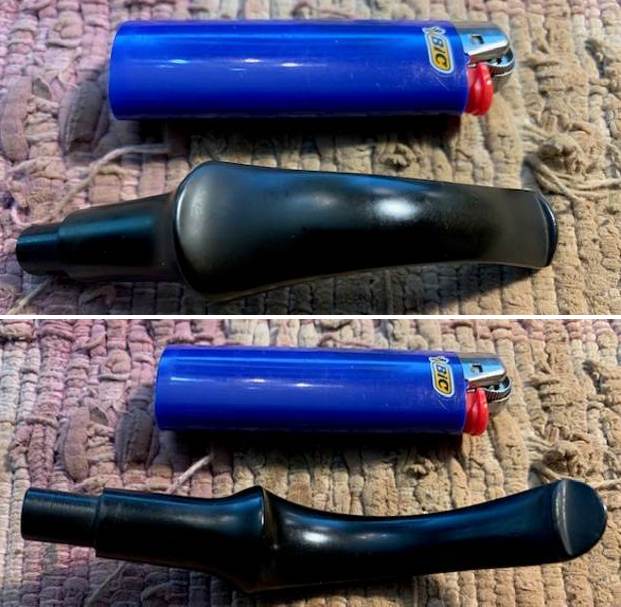
 I polished the vulcanite stem with micromesh sanding pads – 1500-12000 grit pads. I wiped it down with a damp cloth after each sanding pad. I used Before & After Pipe Polish – both Fine and Extra Fine to further polish the stem.
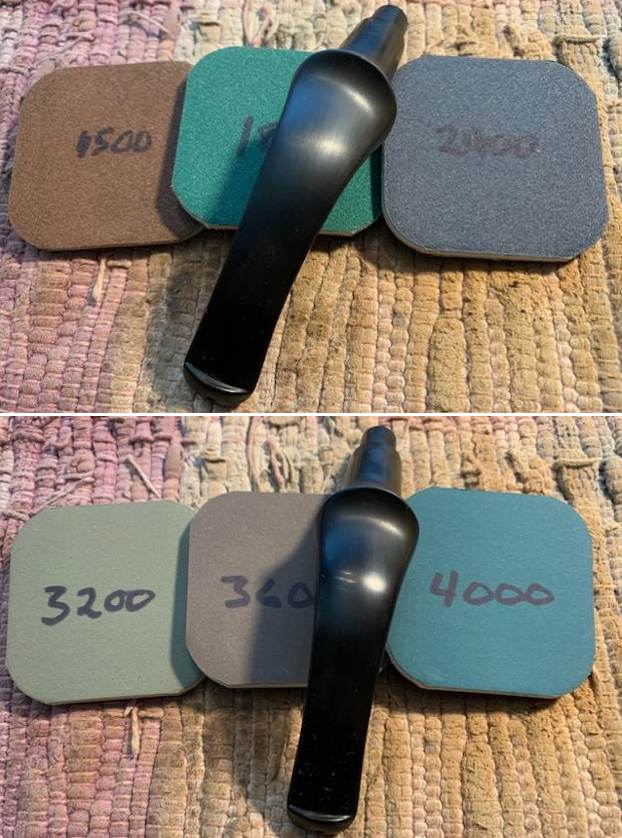
 This nice looking Peterson’s Dunmore 79 Bent Billiard and a classic Peterson’s P-lip vulcanite stem looks much better now that it has been restored. The rim top and edges cleaned up very well. The rich brown stains on the bowl came alive with the polishing and waxing. I put the stem back on the bowl and carefully buffed the pipe with Blue Diamond on the buffing wheel using a light touch on the briar. I gave the bowl and the stem multiple coats of carnauba wax on the buffing wheel and followed that by buffing the entire pipe with a clean buffing pad. I hand buffed the pipe with a microfiber cloth to deepen the shine. The finished Peterson’s Dunmore is a beauty and fits nicely in the hand and looks very good. Give the finished pipe a look in the photos below. The dimensions of the pipe are Length: 6 inches, Height: 2 inches, Outside diameter of the bowl: 1 ¼ inch, Chamber diameter: ¾ of an inch. The weight of the pipe is 59 grams/2.08 ounces. If you are interested in adding this pipe to your collection send me a message or an email. Thanks for reading this blog and my reflections on the pipe while I worked on it. There are many more to come!
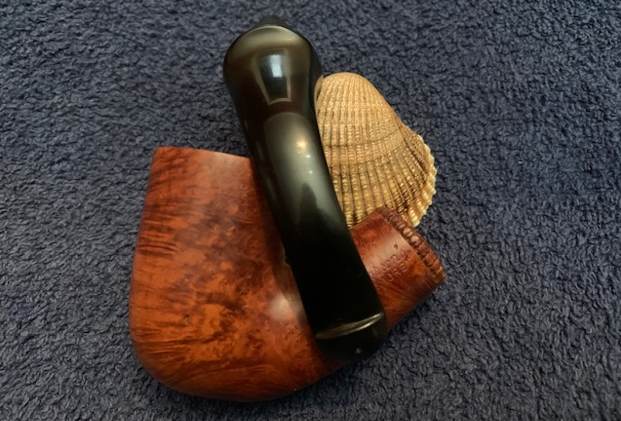
Blog by Kenneth Lieblich
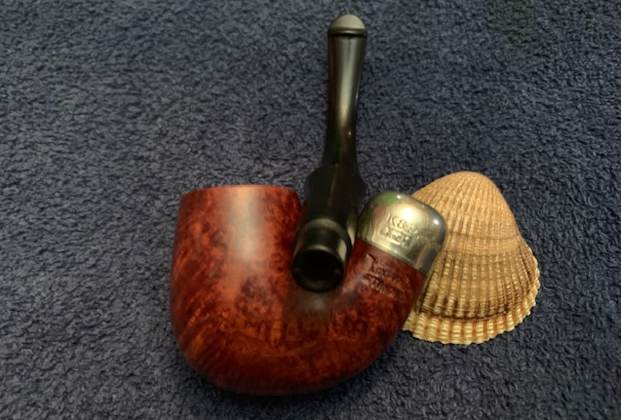
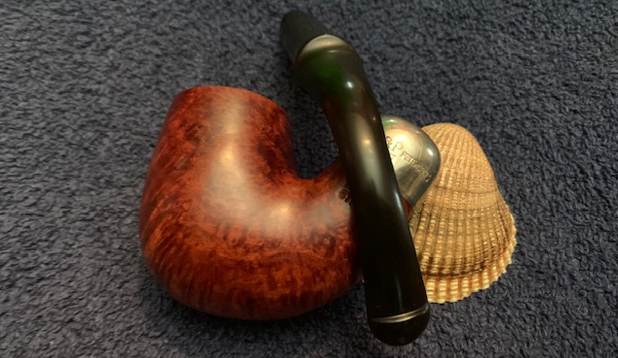
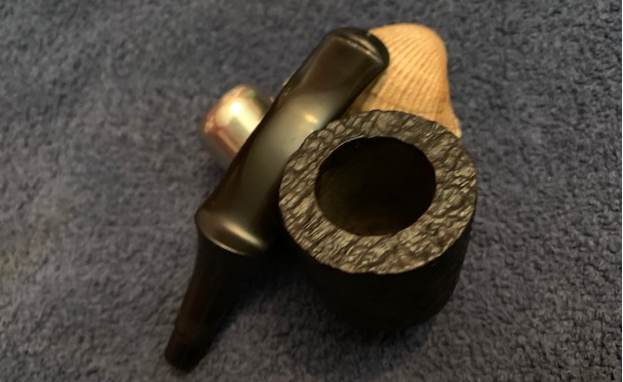
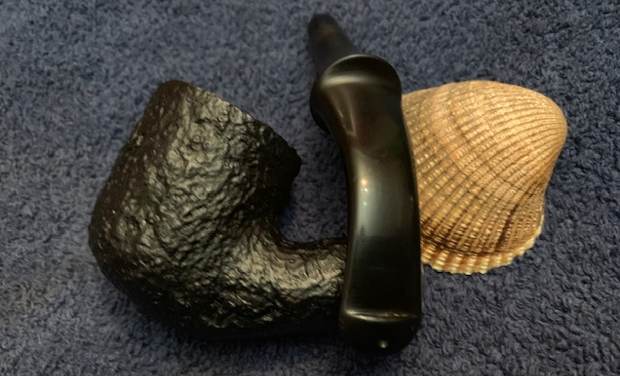
Ah, Dunhill. It is a name that inspires awe and warms the cockles of the hearts of many pipe smokers worldwide. Today, I am pleased to show the restoration of a wonderful shell briar. I acquired it in an auction on the Canadian Prairies. Other than that, I don’t know much of its provenance. What I can say definitively is that this must have been a great smoker and a much-loved pipe – it had been very thoroughly used. Rightly or wrongly, I instinctively have a certain respect for Dunhill pipes, and I am especially keen to restore this one so that the next smoker can enjoy it. 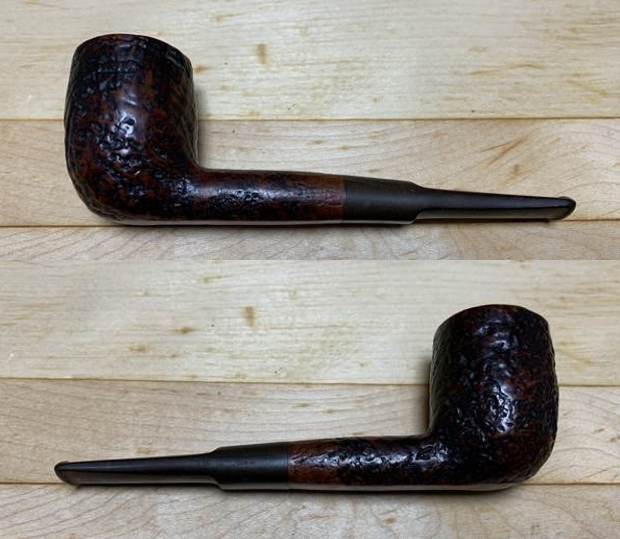

 As I mentioned this is a Dunhill Shell Briar and the markings confirm this. It is a beautiful, classic billiard shape. One of the ways I can tell that this was a much-loved pipe is that the markings on the underside of the shank were quite worn. As you can see, I can only make out so much. On the left-hand side is the model number, 39. Immediately to the right of this is Dunhill [over] Shell Briar. Then, to the right of that, is Made in [over] England. I cannot make out the year suffix, but my instincts tell me that it’s probably from the 1960s. Steve concurs with this. Additionally, this is a size three pipe. Normally, there would be an encircled 3, followed by an S. In this case, these marks are not visible, but I compared it with other Dunhills of size three and they are identical.
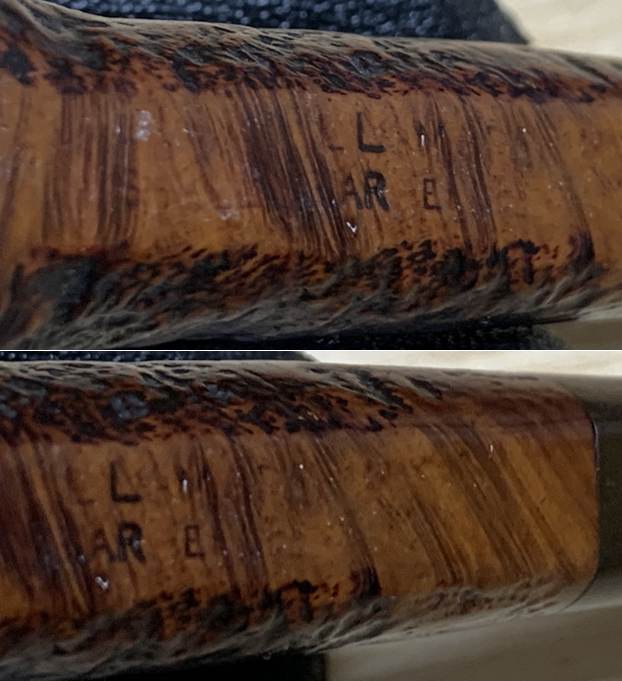 The image below from Pipephil seems to confirm my suspicions about this pipe. The history of Dunhill’s shell briar pipes is fascinating. If you are interested in learning more, have a read of this article from Pipedia.
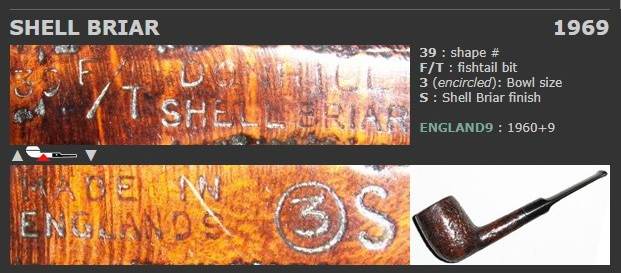 This pipe was pretty darn filthy. As you can see, the stem had the usual wear-and-tear – some scratches, etc. There were no notable tooth dents, which pleasantly surprised me. There was some calcification, but not much oxidation. I figured the inside would be dirty because the inner tube certainly was!
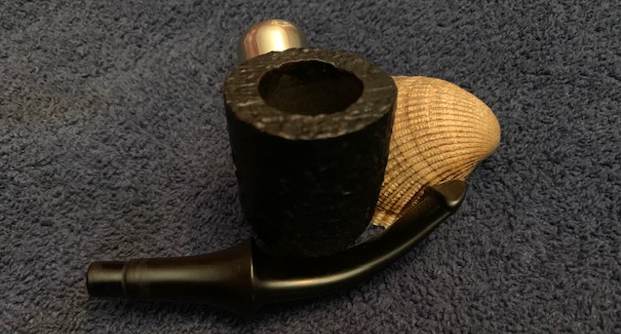
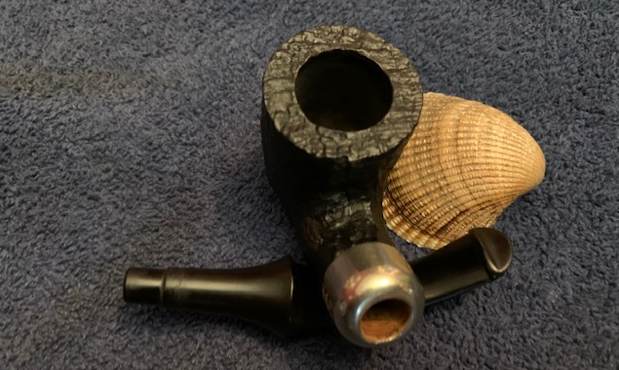
 Meanwhile, the stummel was in lovely condition, but very dirty inside. The shank was dark and dank, and the bowl had lots of cake and lava. Who knows what horrors I might find inside? Spoiler alert: it wasn’t good.
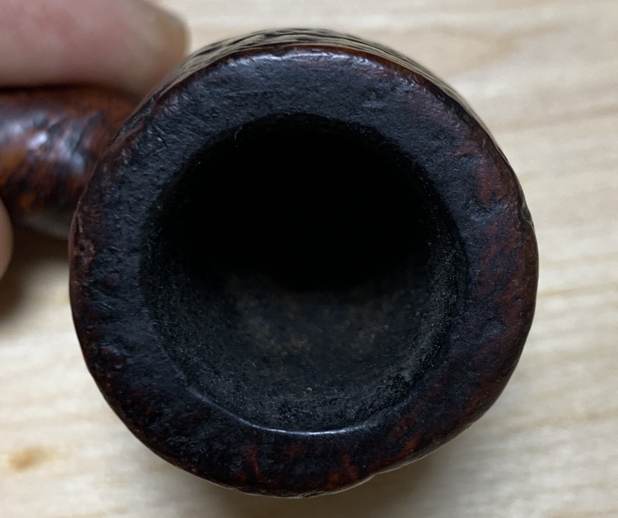
 The inner tube was first on my list. It was being quite stubborn about coming out of the tenon, so I opted to warm the stem and inner tube with my heat gun. This provided just enough softening of the internal goo to allow me to pull it out. It then went for a soak in some lemon-infused isopropyl alcohol. I let it sit for several hours and then cleaned it off and it looked much improved. I then finished it with a quick polish and moved on.
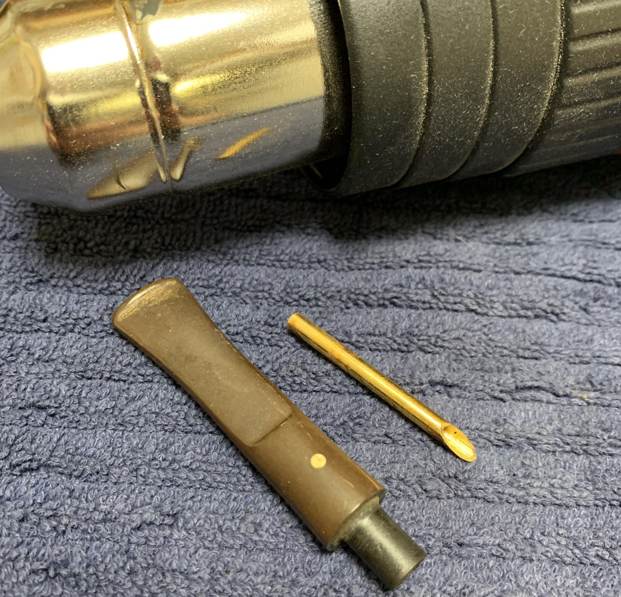
 I wiped the stem with Murphy’s Oil Soap on some cotton pads. There was calcification there and I needed to remove it. Fortunately, although the stem was pretty dirty inside, it was not as bad as I had feared. I had no problem cleaning out the inside with pipe cleaners and isopropyl alcohol.
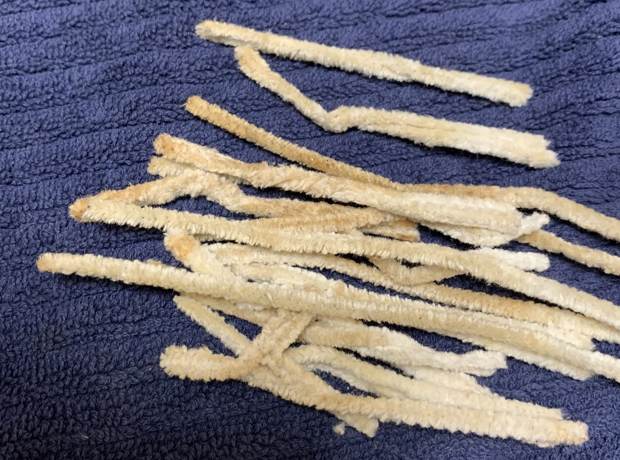 I then wiped down the stem with SoftScrub cleaner to remove some surface oxidation. Once this process was done, the stem went for an overnight soak in the Pipe Stem Oxidation Remover. As the name suggests, this liquid removes oxidation, but, more than anything, it helps draw oxidation to the surface of the vulcanite. This allows me to clean the oxidation off in a couple of ways: both by applying a mild abrasive cleaner to the surface, then by sanding the stem.
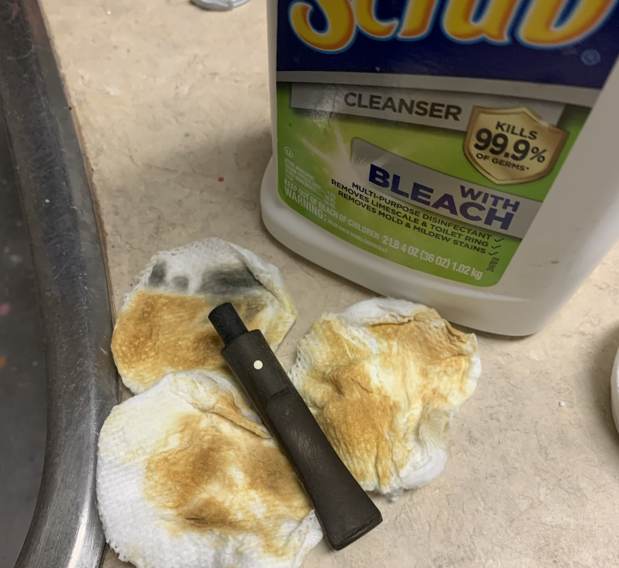
 The following day, I cleaned all of the de-oxidizing mess off with alcohol, pipe cleaners, et cetera. The oxidation had migrated to the surface and would be fairly straightforward to remove. I scrubbed with SoftScrub on some cotton pads to remove the leftover oxidation.
 Then I used a set of nine Micromesh pads (1,500 through 12,000 grit) which gradually erased the ravages of time and brought out the stem’s lovely black lustre. For the last five pads, I also lightly coated the stem with Obsidian Pipe Stem Oil in between each scrubbing. At last, I set the finished stem aside.
  Off to work on the stummel! It was pretty dirty after all these years, so I used cotton rounds and some Murphy’s Oil Soap to scrub the outside of the stummel and a toothbrush with Murphy’s for the lava on the rim of the pipe. This had the benefit of revealing a bit more of the markings on the underside of the shank.
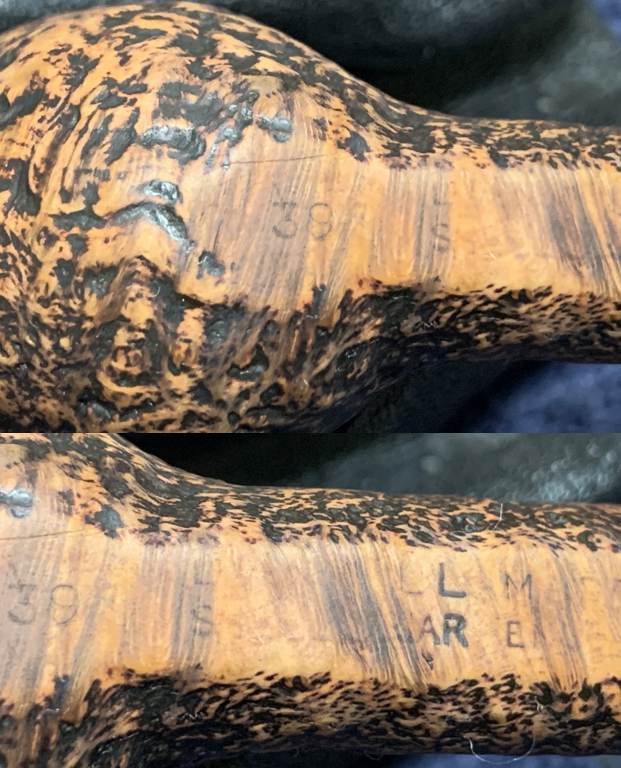
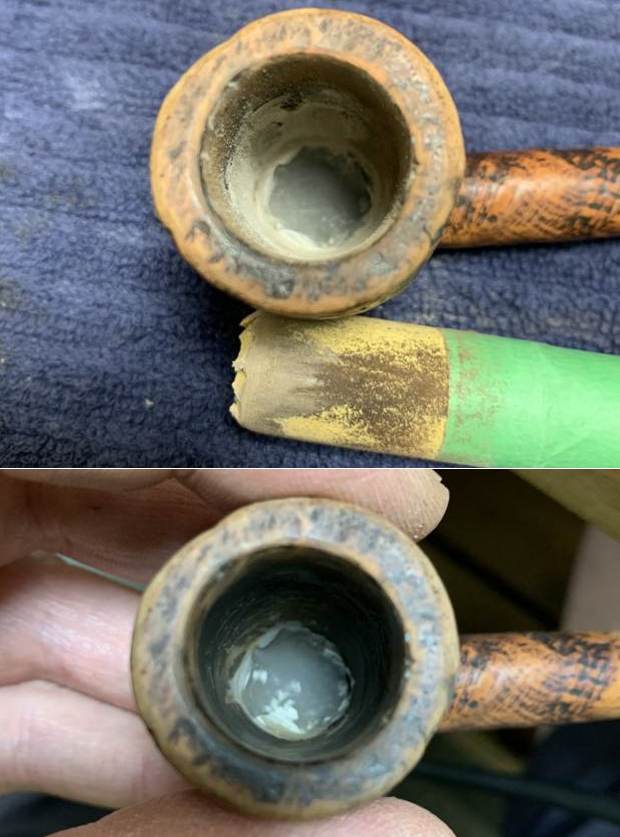
 The bowl needed a thorough reaming, so I used the KleenReem to scrape off the built-up cake and I followed that with 220-grit sandpaper taped to a dowel to eliminate as much as possible. Generally, I prefer to sand the chamber down to bare briar. When restoring, it is important to ensure that there is no damage to the briar in the bowl, under the cake. Normally, there is none, but today…
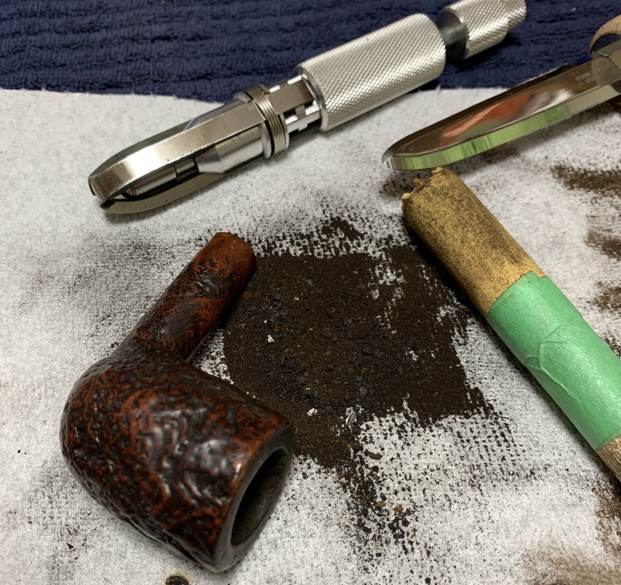 The walls of the pipe were just fine, but – horror of horrors! – the previous owner had clearly cleaned the bottom of the bowl with a jackhammer. There were some deep gouges in the heel. The gouges are hard to make out in the photos, so take my word for it. This is a straightforward fix, just time-consuming.
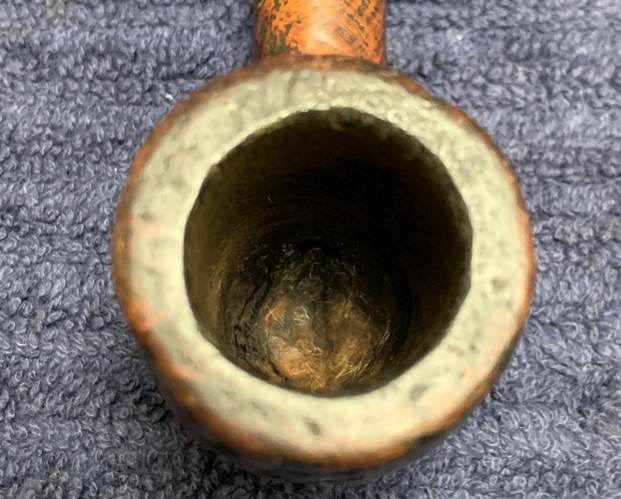
 However, before I addressed that issue, I needed to clean the shank and bowl thoroughly. I proceeded to use Q-tips, pipe cleaners, and lemon-infused isopropyl alcohol. Holy moly – this was an incredibly dirty pipe. Not sure it had ever seen a pipe cleaner before. Just look at the pile of Q-tips and pipe cleaners below!
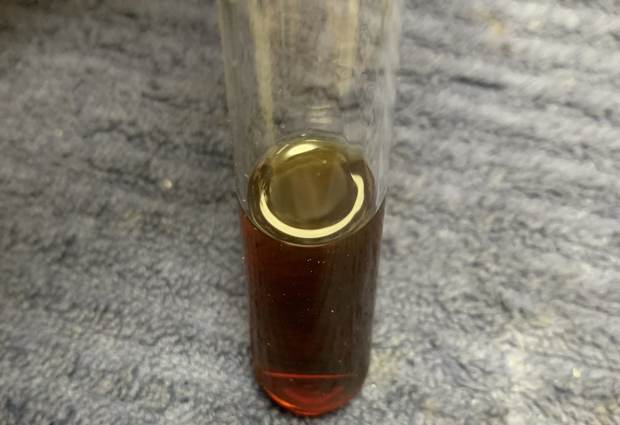
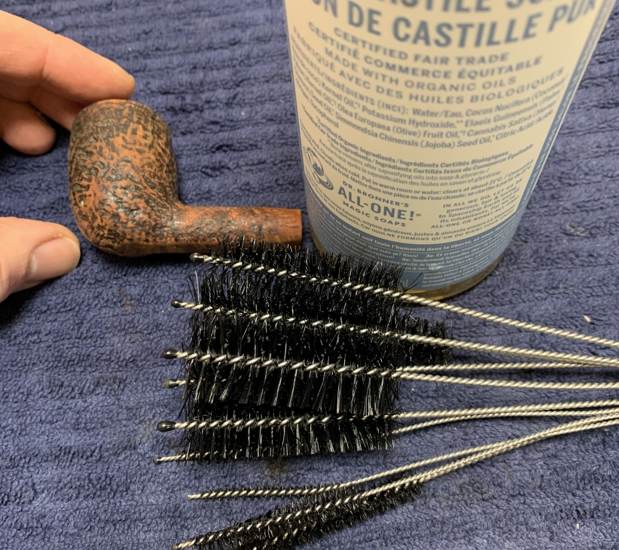
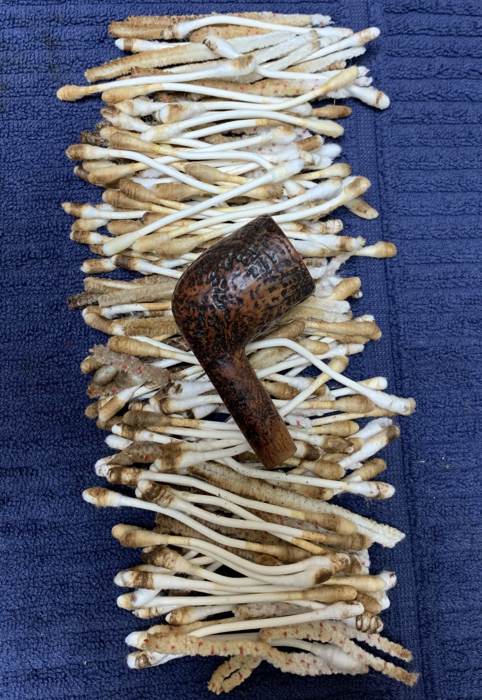 Then, to further clean the inside of the pipe, I put the stem and stummel back together and used my pipe retort system. This system uses boiling isopropyl alcohol and a vacuum (i.e. a void, not the household appliance) to clean the interior of a pipe. As you can see by the brownish colour of the alcohol, the retort worked well. I managed to extract lots of otherwise inaccessible filth from inside the pipe. Once I followed that up by cleaning the insides with some Castile soap and tube brushes.
 Now for the reconstructive surgery. I prepared some J.B. Weld epoxy for the purposes of filling the gouges in the briar. The great thing about J.B. Weld is that, once cured, it is totally inert, heat resistant to well beyond pipe temperatures, and hard as rock. I used a folded pipe cleaner and awkwardly smeared the stuff into the breach – then left it to cure overnight.
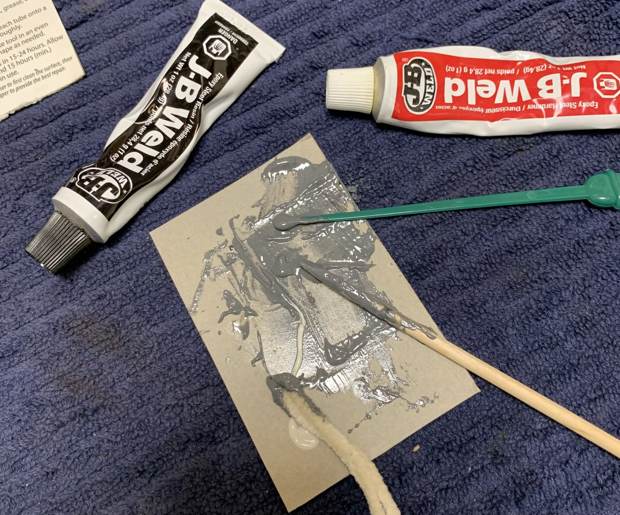
 On the morrow, I needed to remove all the excess epoxy from the bowl. I only wanted epoxy in the repair and nowhere else. This is a tricky and tedious exercise, but I used a combination of techniques to accomplish it. First, I used my Dremel (with different attachments) to remove most of the excess material. Second, I went back to my 200-grit sandpaper on a dowel to sand it down to where I wanted it. Naturally, the bottom of the bowl was much narrower than the top, so I acquired a couple of thinner dowels in order to sand where I needed to. I am very pleased with the results. The repair is exactly as big as it needs to be – and no bigger.
 After the pipe’s use over the years (and my restoration), the rim had lost some of its colour. I opted to use my furniture stain pens to match the colour of the rest of the stummel. Voilà! Looks terrific.
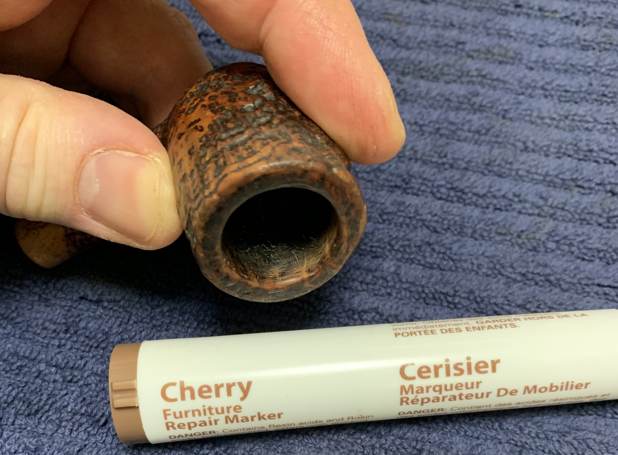 At this point, I rubbed some Before & After Restoration Balm into the briar and left it to sit for 15 minutes or so. I brushed it with a horsehair brush and buffed it with a microfibre cloth. The BARB does wonderful things to the wood, and I really like the sheen on the sandblast.
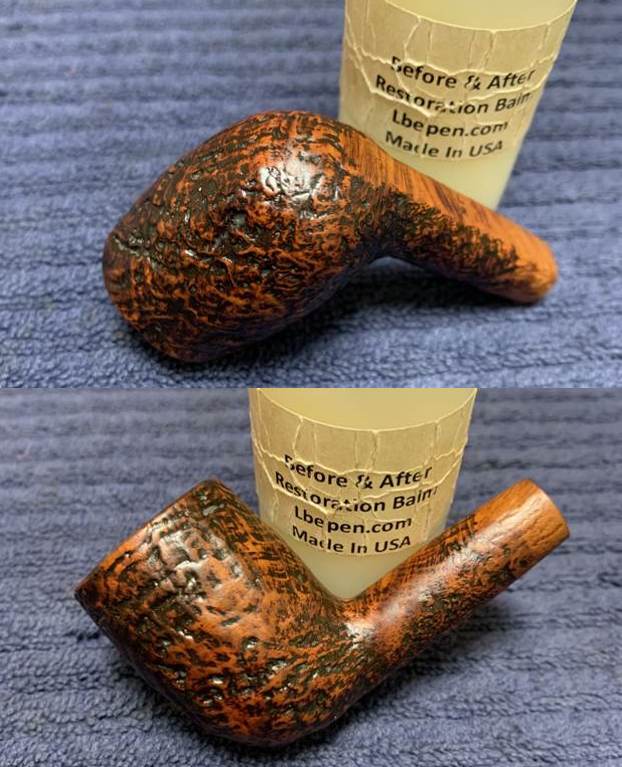
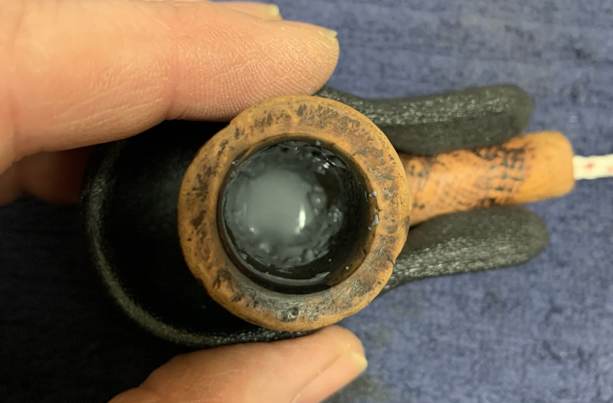
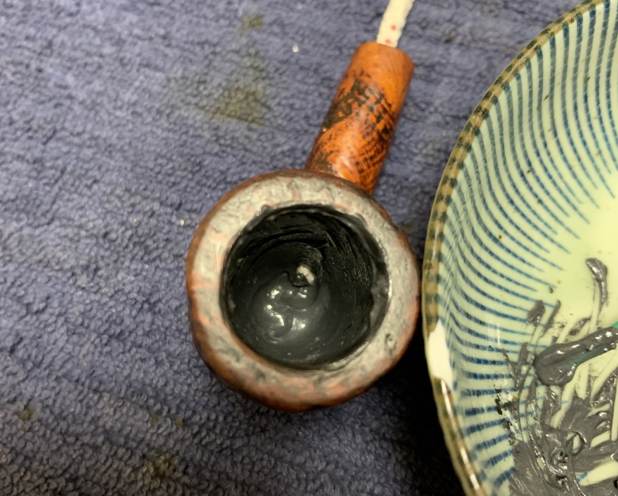
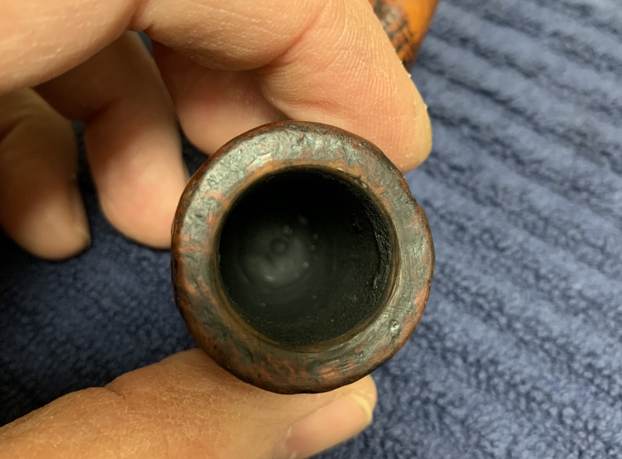
 I then coated the entire inside of the bowl with a thin coat of a mixture of activated charcoal and my wife’s homemade yogurt. It hardens overnight and provides a good, slightly rough surface for a new cake to build. Now, the bowl can be used again as if nothing happened.
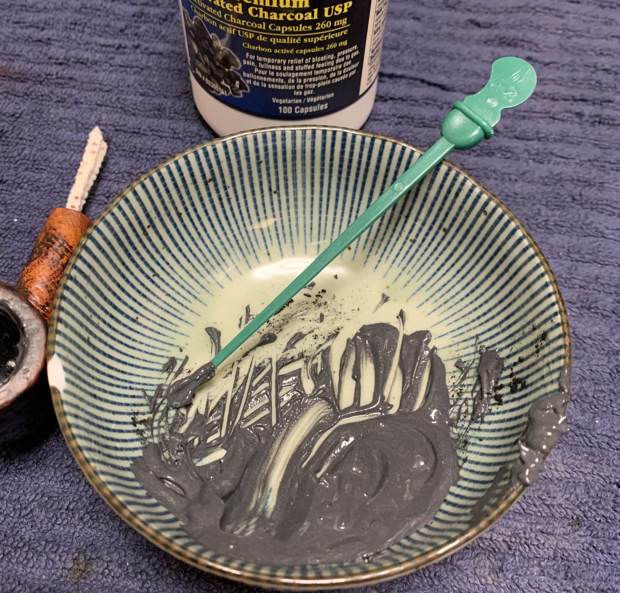
 Then it was off for a trip to the bench polisher. A few coats of Conservator’s Wax (from Lee Valley) were just what this pipe needed. Boy – that wax really makes this pipe pop! The lovely shine made the wood look absolutely beautiful. The sandblast looks fantastic and is ready to be enjoyed again by the next owner.
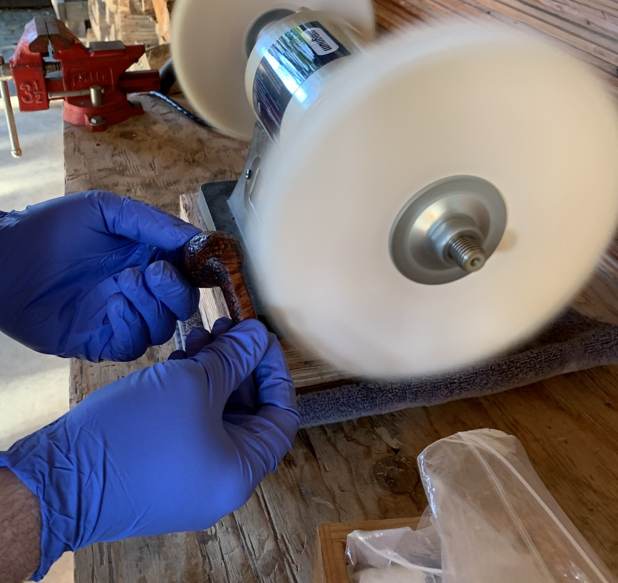
 I thoroughly enjoyed bringing this Dunhill Shell Briar 39 Billiard back to life and I am pleased to announce that this pipe is for sale! If you are interested in acquiring it for your collection, please have a look in the “British” Pipe Section of the store here on Steve’s website. You can also email me directly at kenneth@knightsofthepipe.com. The approximate dimensions of the Dunhill are as follows: length 5 in. (125 mm); height 1¾ in. (43 mm); bowl diameter 1⅛ in. (29 mm); chamber diameter ¾ in. (19 mm). The weight of the pipe is ⅞ oz. (25 g). I hope you enjoyed reading the story of this restoration as much as I enjoyed restoring it. If you are interested in more of my work, please follow me here on Steve’s website or send me an email. Thank you very much for reading and, as always, I welcome and encourage your comments.

Blog by Steve Laug
 Jeff and I often purchase pipe bowl/stummels of brands that we like and want to restore. These have included a lot of different bowls. If you have followed us for long you know that some of these have included Peterson’s, Dunhill’s, and a wide range of Danish and English pipes. Awhile ago Jeff and I were sorting through the bowls in our collection and pulled out eight Peterson’s bowls that were dirty and stemless. A friend referred us to a contact named Silas Walls, of Walls Pipe Repair in Wallace, Idaho, USA as he seems to have a good supply of original Peterson’s stems. Our friend has had him fit stems for some of his Petes and was very happy with the work. We made contact with him and sent him eight bowls for restemming.
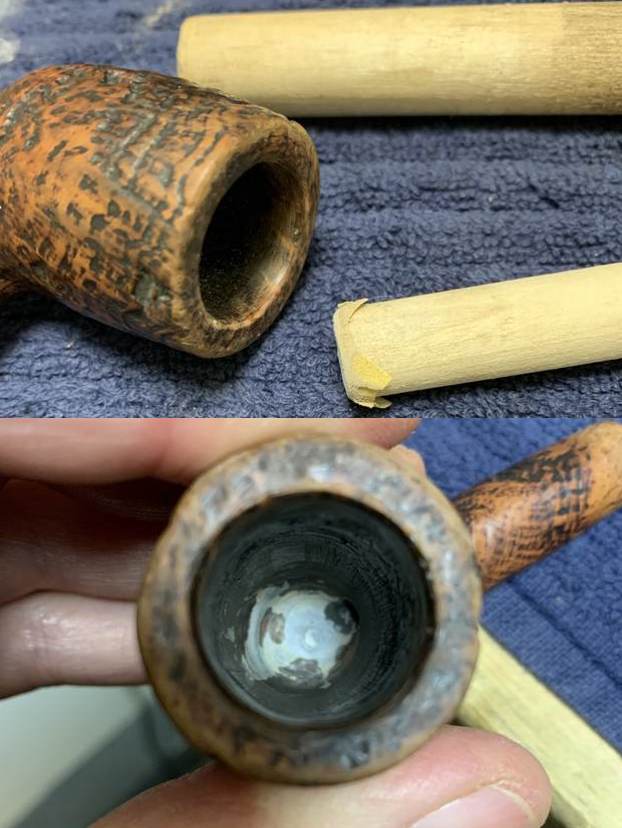
In the photo above I show the 8 restemmed pipes. I have marked the 7 I have worked on already with a red X). This eighth one that we cleaned up before mailing them out was a bowl that we received on 06/05/21 from a friend in Chicago, Illinois, USA. It is stamped on the left side of the shank and reads Peterson’s [arched over] System [over] Standard. On the right side of the shank it is stamped Made in the Republic of Ireland (three lines) over the shape number 314. The ferrule is stamped K&P [over] Peterson’s. The before photos of this bowl were on a corrupted memory card and are gone. But needless to say the pipe was just as bad as the rest of this lot.
As with the others before this one I turned to Pipedia (https://pipedia.org/wiki/Peterson) and read through the article before starting on my work. I found an interesting note in the middle of the page. I quote the pertinent section below and have highlights some important information in red below.
From 1950 to the present time, the stamp for this era is “Made in the Republic of Ireland” in a block format generally in three lines but two lines have been used with or without Republic being abbreviated.
During the 1950’s and 60’s the Kapp & Peterson company was still in the ownership of the Kapp family. However 1964 saw the retiral of the company Managing Director Frederick Henry(Harry) Kapp.
Since I found a new stem it was now it was time to work on this final bowl of the lot. Jeff had done a great job cleaning up the pipe as usual. He reamed the pipe with a PipNet reamer and cut back the cake back to the bare briar. He cleaned up the walls with a Savinelli Fitsall Pipe Knife. He scrubbed the interior of the bowl and shank with pipe cleaners, cotton swabs and alcohol to remove the tars and oils. He scrubbed the exterior of the pipe with Murphy’s Oil Soap and a tooth brush to remove the grime from the finish. He worked on the rim top lava and darkening with the soap and tooth brush. It looked much better. I took pictures of the bowl without the new stem. It is a great looking piece of briar even with the gouges and marks on sides, top and heel of the bowl. The nickel ferrule has a few dents but otherwise looks very good. 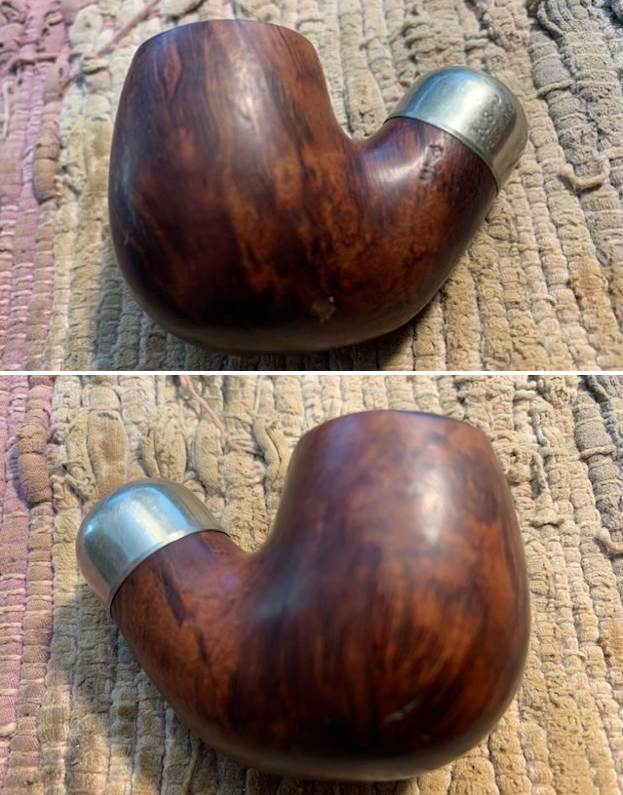
 When the pipes came back to Jeff with their new stems they looked great. When the pipes arrived here I checked them out. Here is what I found. The first six pipes from the lot were flawless and quite beautiful. The last two – this 314 and a 313 I reworked previously, looked great at first glance but upon further examination it was clear that the stems were not Peterson’s style stems. The draught on the P-lip portion of the stem is on the top of the stem, but in the case of these two stems the airway came straight out the end of the stem like a Wellington pipe. I was not happy with them. I have already replaced the stem on the 313 and this 314 was the only one I still needed a stem for. Today I was gifted some Peterson’s P-lip stems and one was what I was looking for. It fit well but I would need to give it a bit more of a bend for a perfect look.
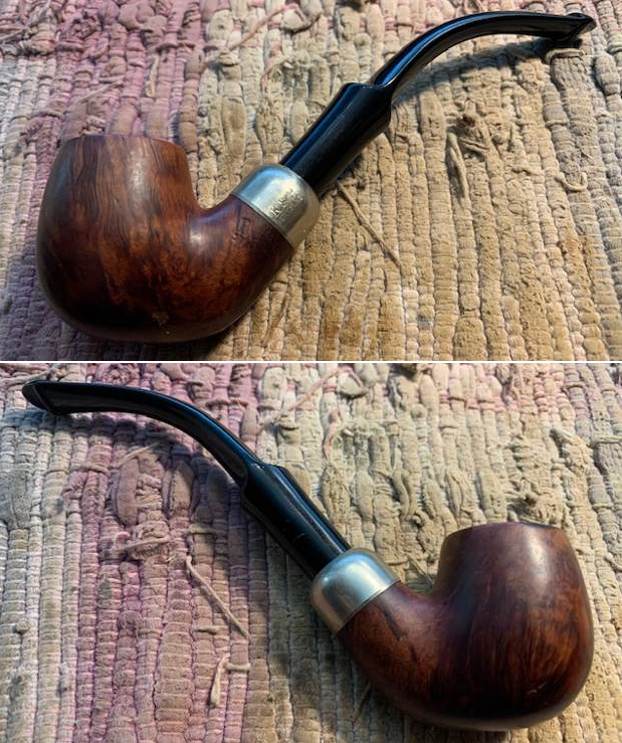
 With the new stem chosen, I turned to work on the damage on the top and the inner edge of the bowl. I used a folded piece of 220 grit sandpaper to clean up the inner bevel of the rim and remove the damage on the rim top. Once I had finished I think that it looked much better.
 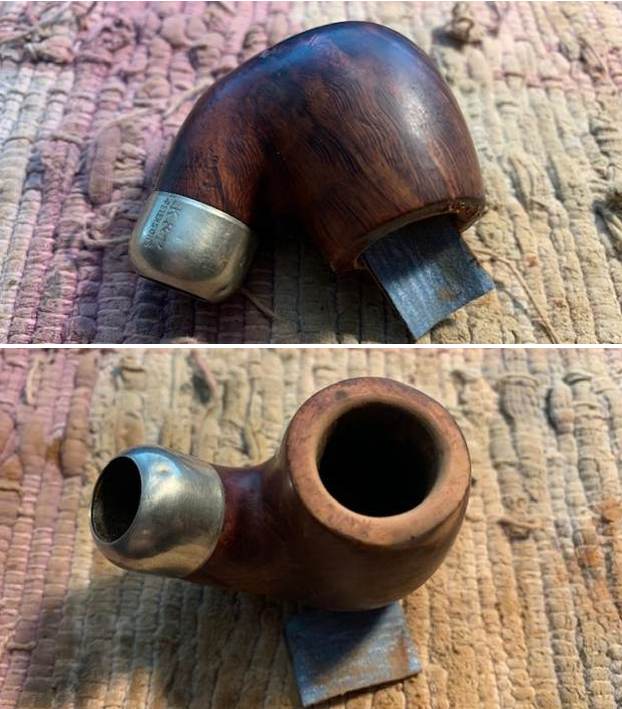 I filled in the deep gouges in the bowl on the right heel and the underside of the heel with CA glue and also briar dust. I sanded them smooth with 220 grit sandpaper to blend them in. They looked significantly better.
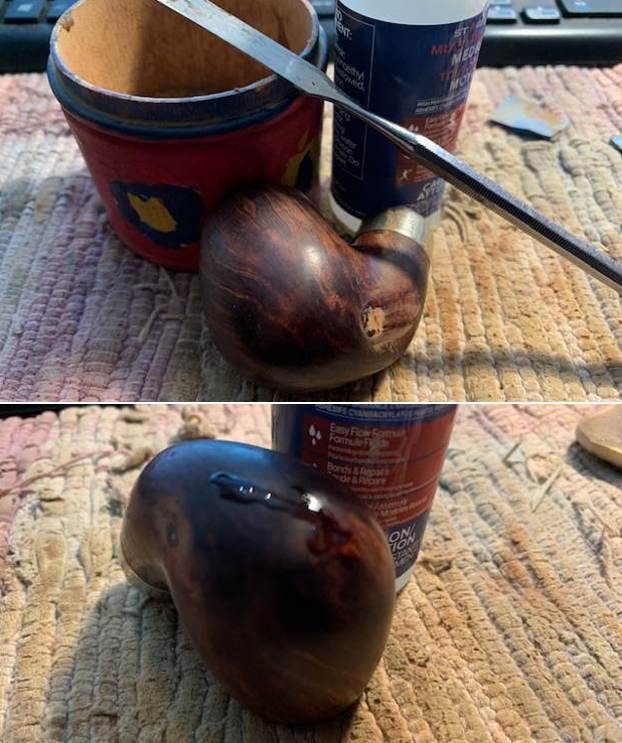
 I stained the sanded areas with a Cherry stain pen to match the surrounding area around the rest of the bowl sides, top and heel.
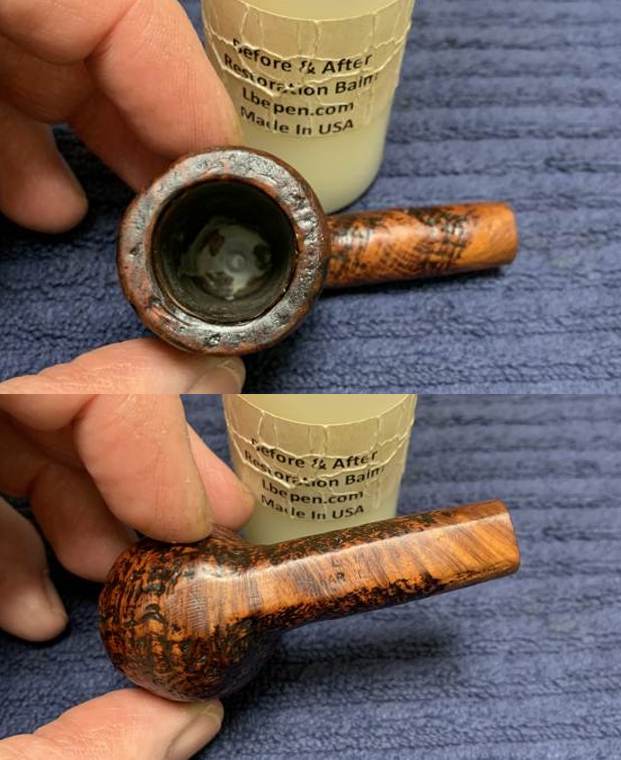
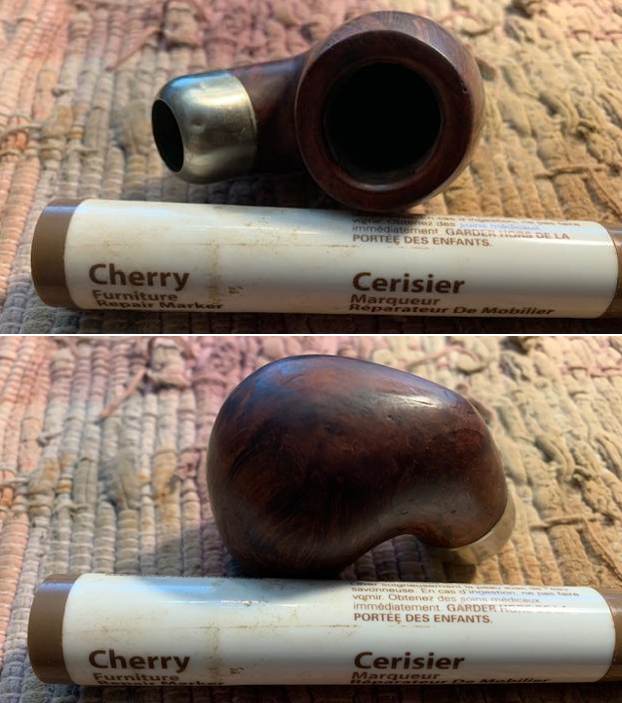 I polished the briar with micromesh sanding pads – dry sanding with 1500-12000 grit pads. I wiped the bowl down after each pad to remove the grit. The bowl began to take on a rich shine. It is going to be a beauty.
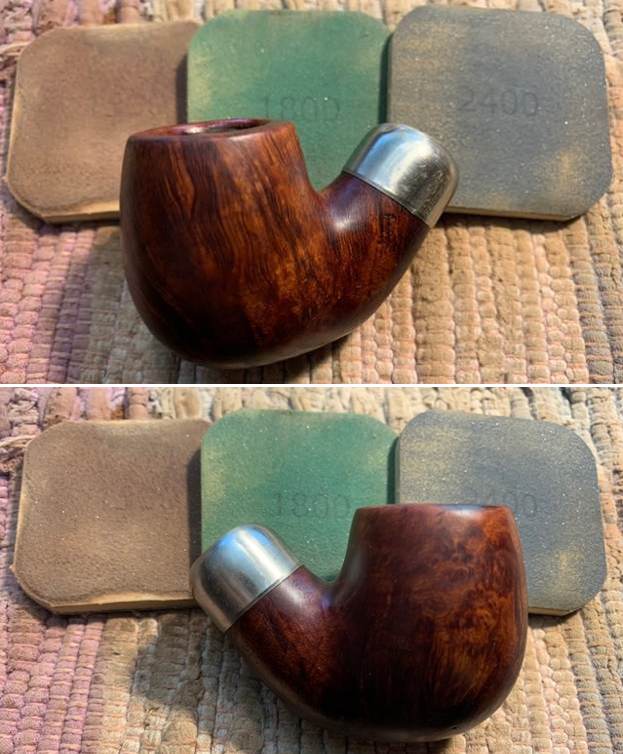
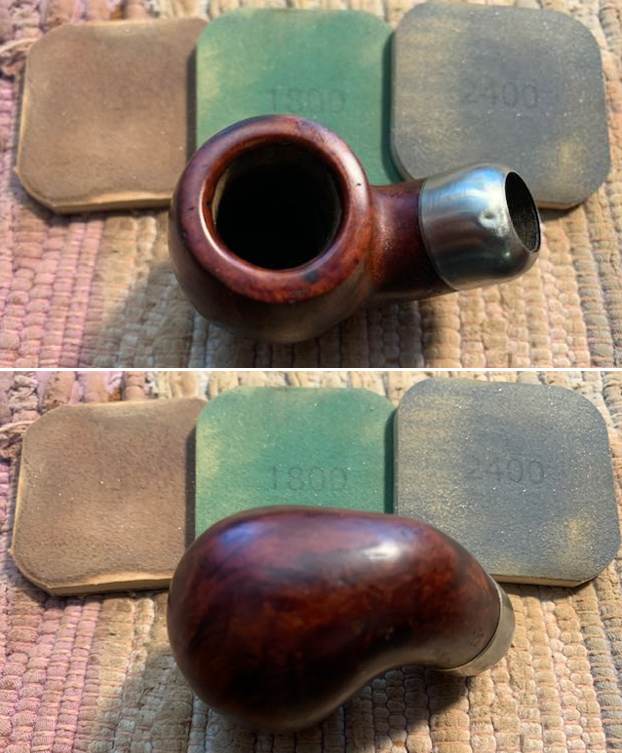
 I rubbed the bowl down with Before & After Restoration Balm. I worked it into the briar with my finger tips. I let it sit for 10 minutes and the Balm did its magic. It enlivens, cleans and preserves the briar. It certainly brought this bowl back to life. I buffed it off with a clean cloth and took the following photos.

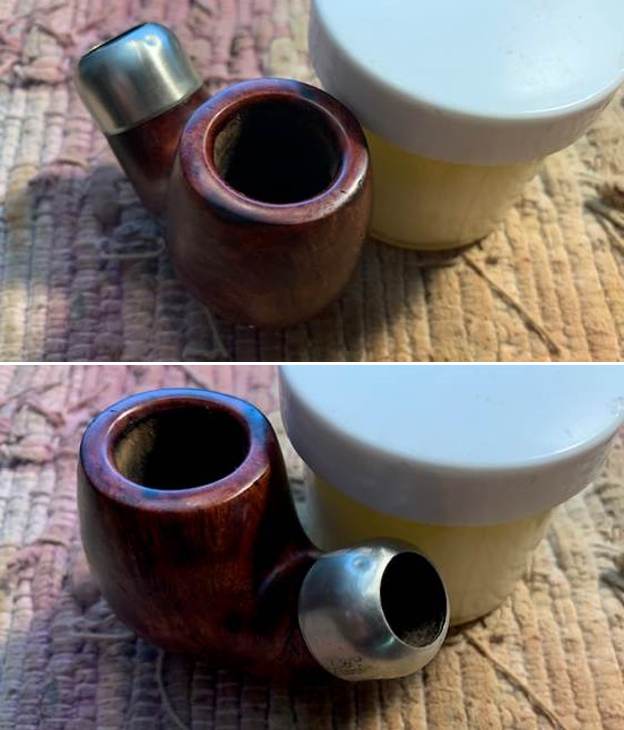 I set the bowl aside and turned my attention to the stem. Since it was a new stem I did not need to polish it. The stem was looking very good. I heated the stem with a lighter to soften the vulcanite and bent it to the shape that it needed to be for the shape of the bowl. I held it in place to let it cool and set the shape. It looked very good.
 This Republic Era Ireland Peterson’s System Standard Bent 314 with a Nickel Ferrule and a vulcanite P-lip stem is a great looking pipe now that it has been restored. The beautiful grain that shines through the polished finish is stunning. As the pipe is smoked the patina should develop and look even better. I put the stem back on the bowl and carefully buffed the pipe with Blue Diamond on the buffing wheel. I gave the bowl and the stem multiple coats of carnauba wax on the buffing wheel and followed that by buffing the entire pipe with a clean buffing pad. I hand buffed the pipe with a microfiber cloth to deepen the shine. The finished Peterson’s System Standard 314 Bent Billiard fits nicely in the hand and feels great. Give the finished pipe a look in the photos below. The dimensions of the pipe are Length: 5 ¾ inches, Height: 1 ¾ inches, Outside diameter of the bowl: 1 1/8 inches, Chamber diameter: ¾ of an inch. The weight of the pipe is 44 grams/1.55 ounces. I will be adding the pipe to the Irish Pipe Makers Section of the rebornpipes store. If you are interested in purchasing this pipe send me a message or an email. Thanks for reading this blog and my reflections on the pipe while I worked on it.
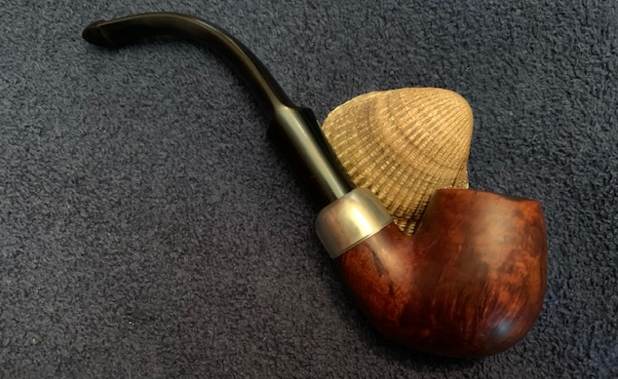
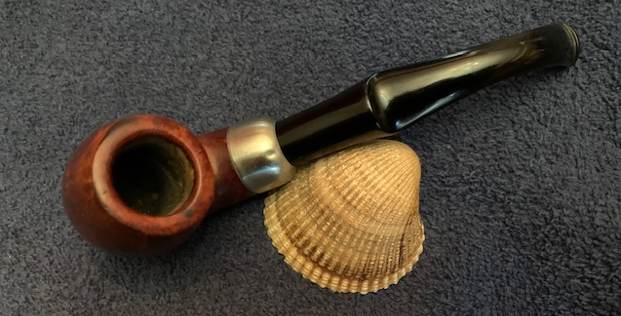
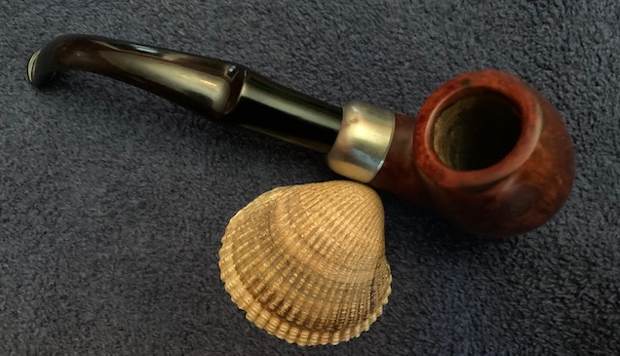
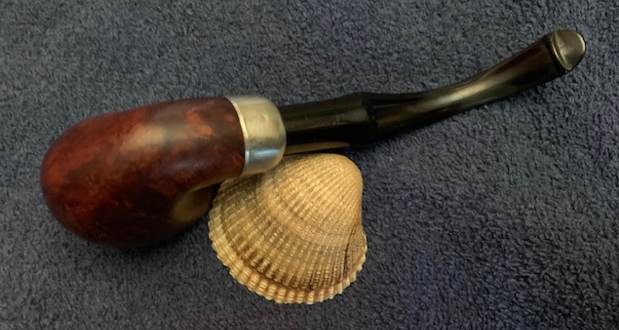
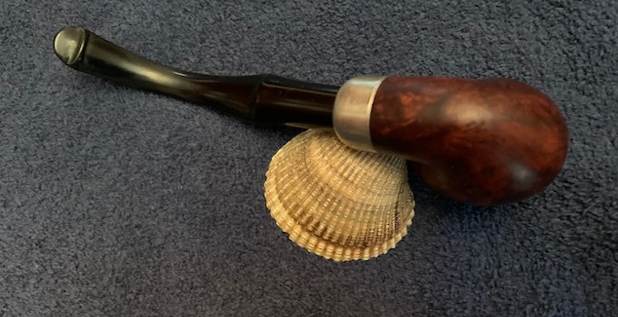
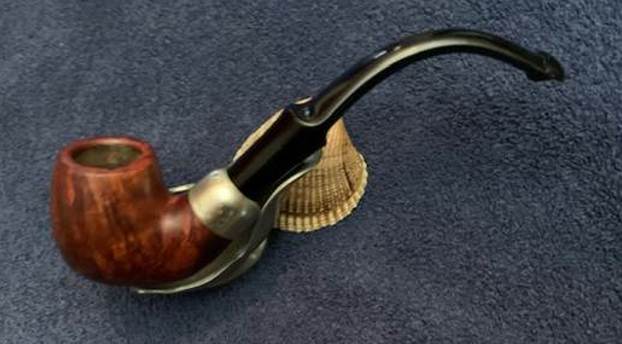


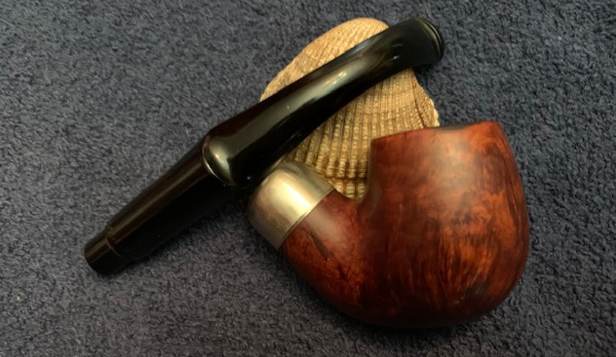
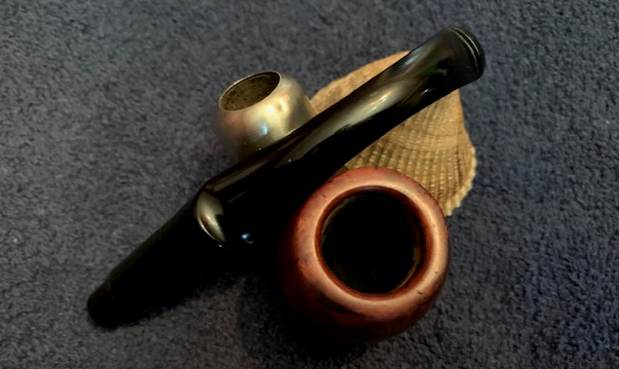
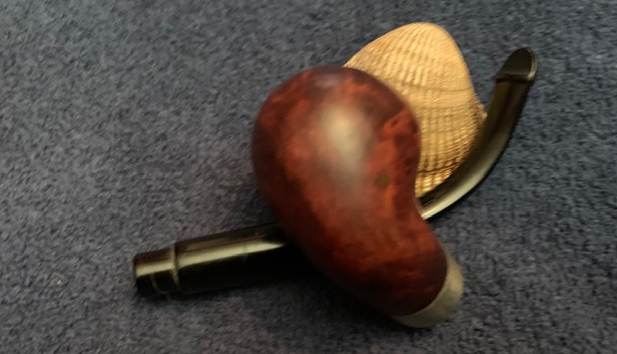
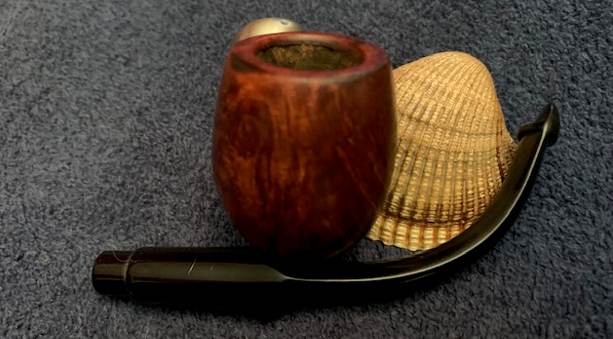
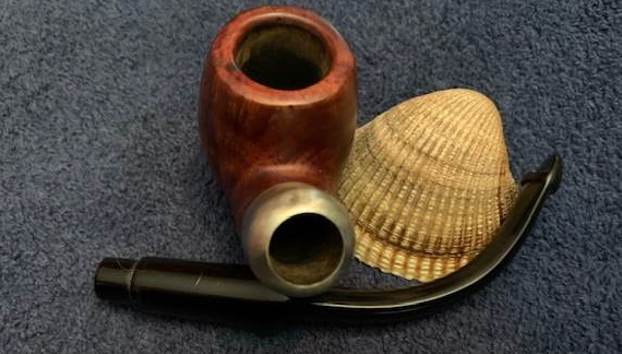

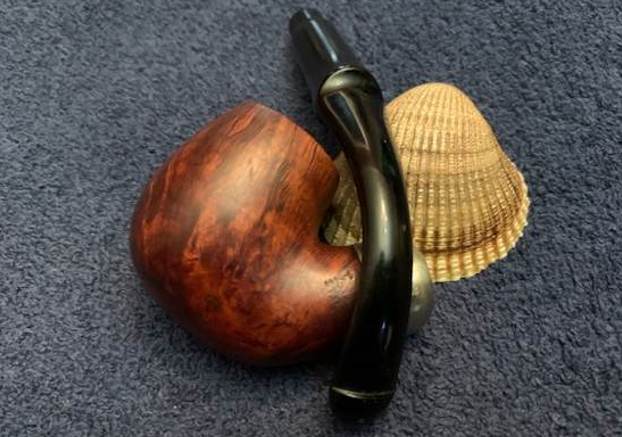
Blog by Steve Laug
The next pipe I have chosen is a smooth Peterson’s Bent Pot. I am not sure where it came from or when we might have picked it up. This Bent Pot came with a nice nickel band on the shank end that was factory fitted to the stamping on the shank. The grime was ground into the finish on the bowl sides. The contrast of the brown stains gave the grain a sense of depth. It was stamped on the left side of the shank and read Peterson [over] of Dublin [over] Aran. The right side had the shape number 01 stamped toward the bowl. The nickel band was stamped Peterson [over] a stylized P [over] Of Dublin. There was a moderate cake in the bowl and a light overflow of lava on the rim top. The stem was oxidized, calcified and had tooth marks, chatter on the top and underside on and near the button. I took photos of the pipe before I started my cleanup work. They tell the story and give a glimpse of the promise that we see in this pipe.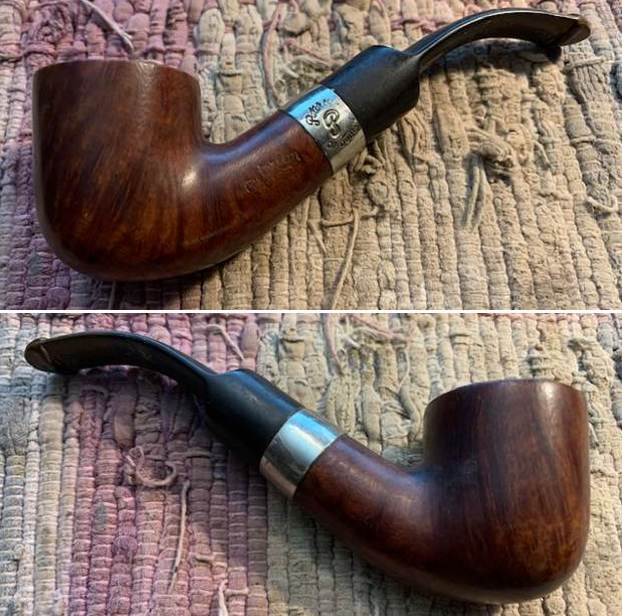
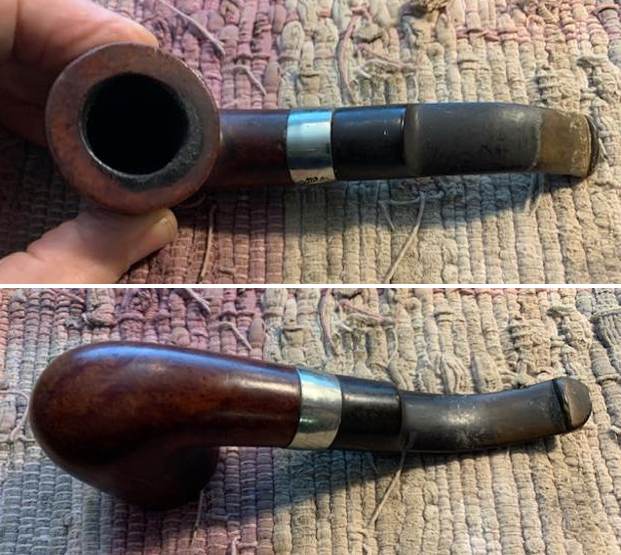 I took photos of the rim top and stem to show the general condition of the pipe. The bowl is moderately caked and the rim top and back edges have a thick lava overflow. The photos of the stem show that it was oxidized, calcified and has light tooth marks on the top and underside near the button.
  I took a photo of the stamping on the left side of the shank and the band. It is faint but readable and reads as noted above. The right side stamping is also faint but readable. The photo of the band shows how it was stamped on the nickel – centered and clean. There was some oxidation and sticky substance on the underside of the band next to the shank.
 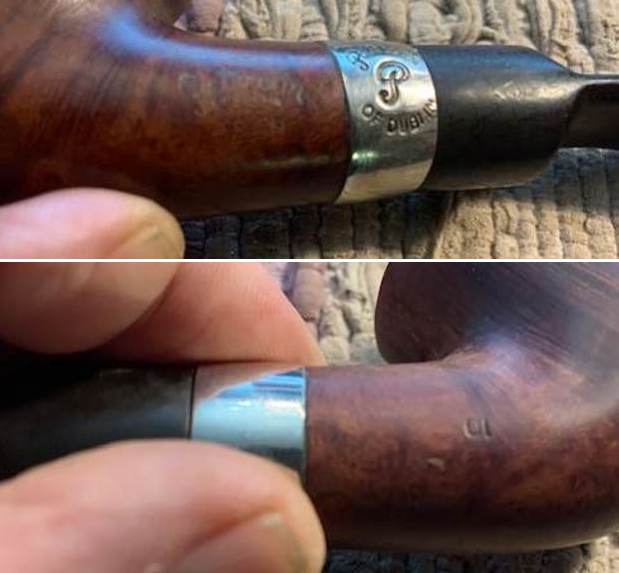 I took the stem off the shank and took a photo of the look of the pipe to show the relation of the size of the parts. It is a nice looking pipe.
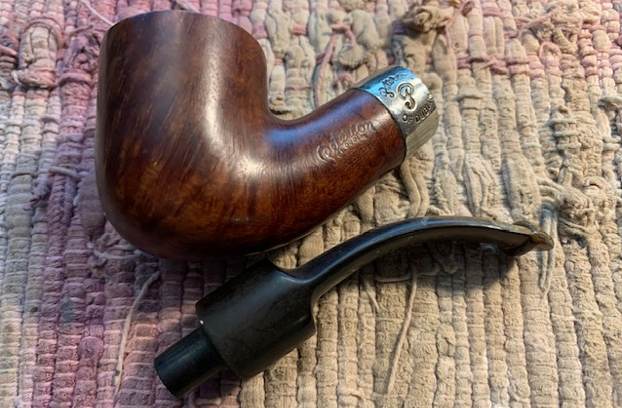 I turned to “The Peterson Pipe” by Mark Irwin and Gary Malmberg to get some background on the Aran line. On page 294 it had the following information.
Aran (1965-) First issue of line described as “handhewn” (rusticated) with black semi-matte finish, in P-lip and fishtail mouthpiece. Second issue 1975, red sandblast, XL shapes. Third issue circa ’97, gold hot-foil P stamped on the mouthpiece, brown semi-matte smooth finish, no band. Fourth issue after 2010, with nickel band, no P stamped on the mouthpiece. Mounted and unmounted versions are available concurrently.
I knew that I was dealing with an Aran from the Fourth Issue of the Aran line that came out after 2010 because of the nickel band and unstamped stem. As such it was a newer pipe. Now it was time to work on the pipe. (Applicable information noted in red above.)
I started my work on the pipe by reaming it with a PipNet reamer and cut back the cake back to the bare briar. I cleaned up the walls with a Savinelli Fitsall Pipe Knife. I sanded the bowl walls with 220 grit sandpaper wrapped around a piece of dowel.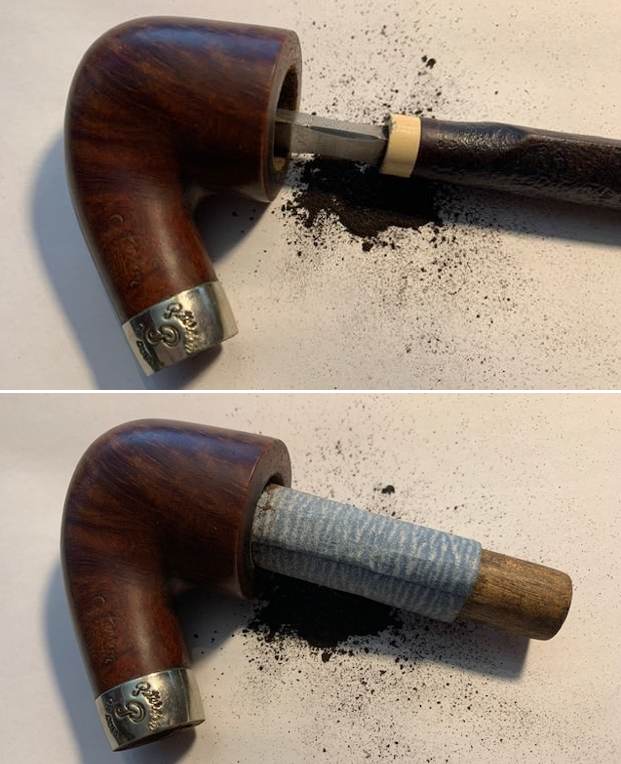 I scrubbed the exterior of the pipe with Murphy’s Oil Soap and a tooth brush to remove the grime from the finish. I worked on the rim top lava and darkening with the soap and tooth brush. I used a shank brush to clean out the inside. I rinsed the pipe with warm water and dried it off.
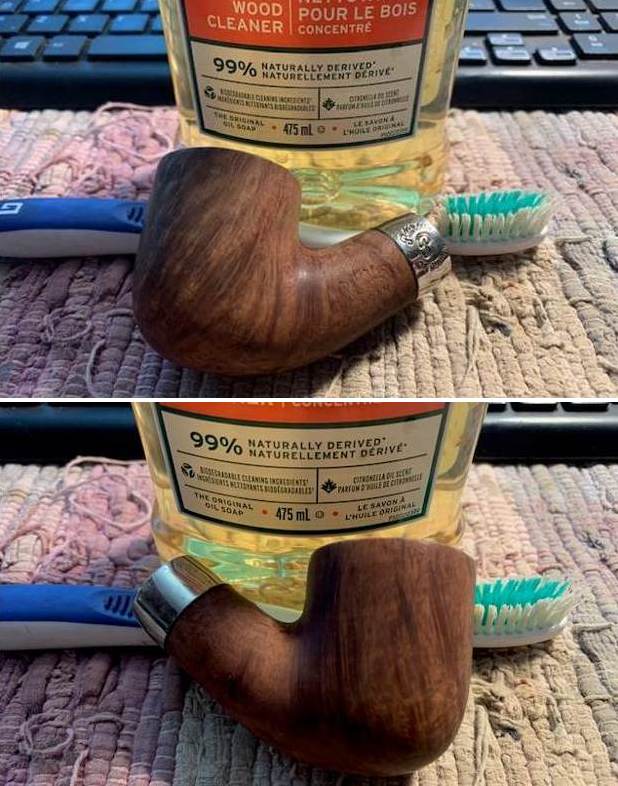
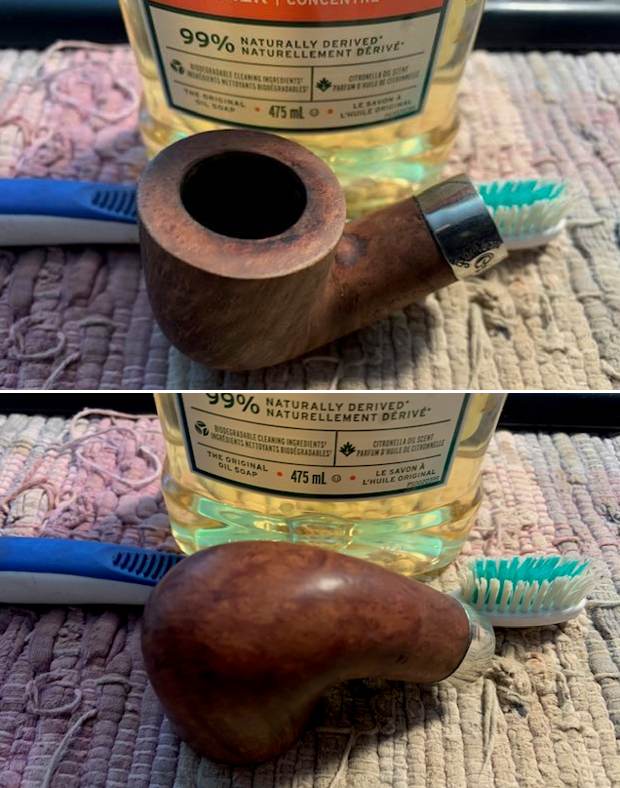 I scraped out the inside of the shank with a dental spatula to remove the thick build up of tars and oils. Once I had removed that I scrubbed the inside of the shank with alcohol, cotton swabs and pipe cleaners. I cleaned the airway in the stem at the same time.
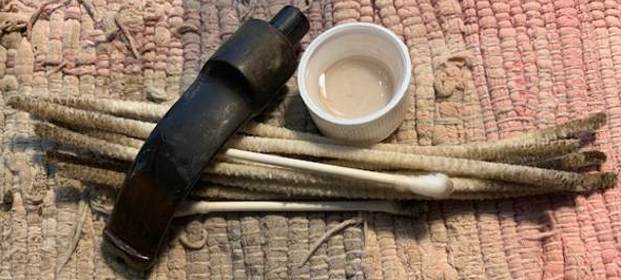 I cleaned up the darkening on the rim top and the inner edge with a folded piece of 220 grit sandpaper until it was clean and undamaged.
  I polished the briar bowl and shank with micromesh sanding pads. I dry sanded it with 1500-12000 grit pads and wiped it down with a damp cloth after each pad.
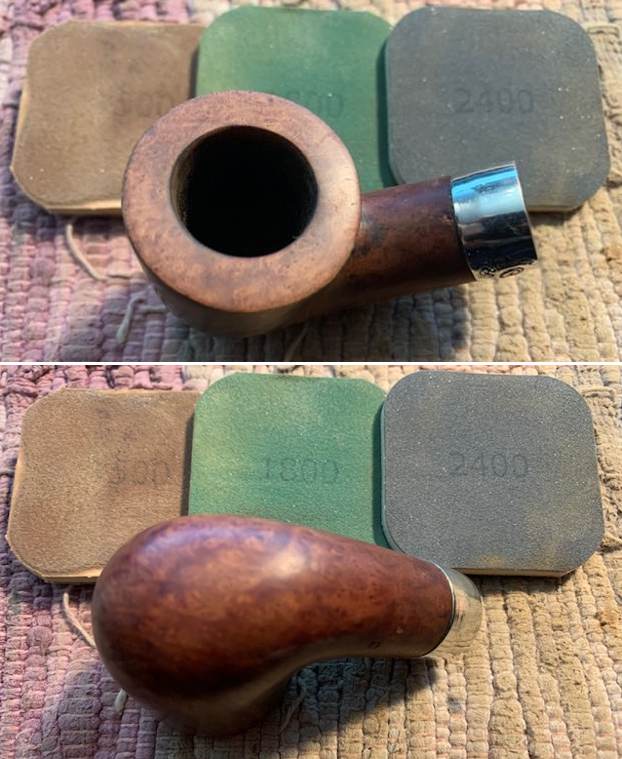

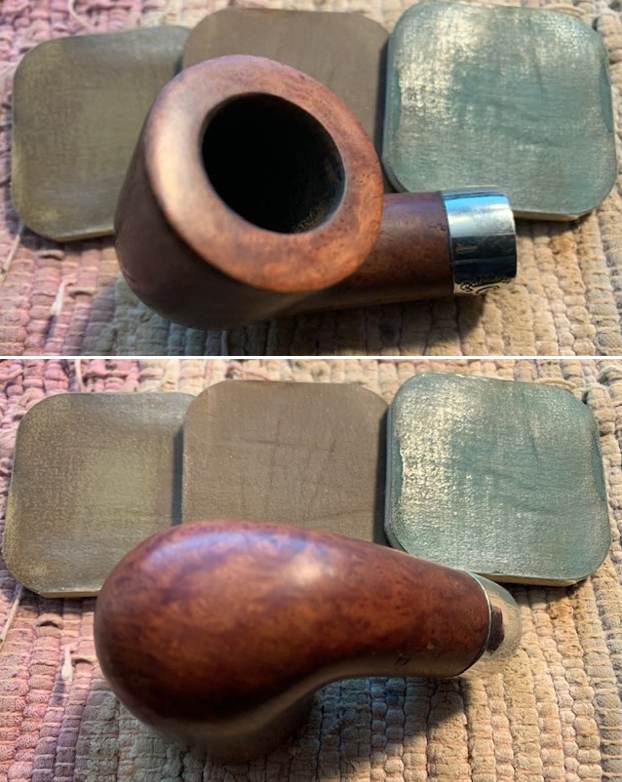

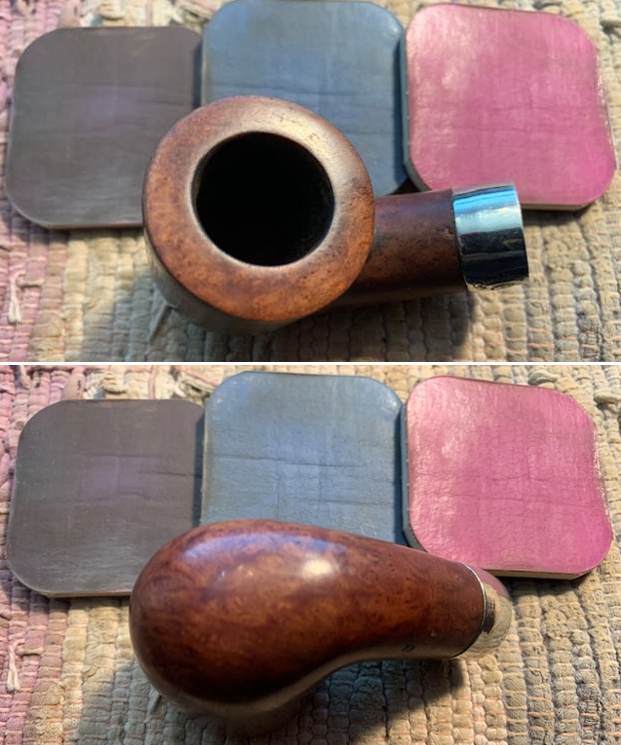 I worked some Before & After Restoration Balm into the surface of the briar with my fingertips to clean, enliven and protect the briar. I let the balm sit for 15 minutes and then buffed with a cotton cloth to raise the shine. The photos show the bowl at this point in the restoration process.
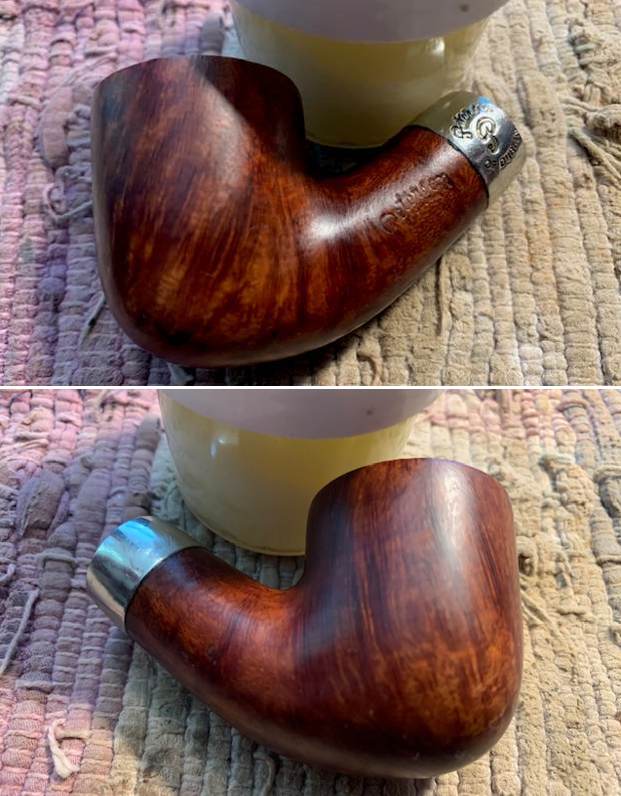
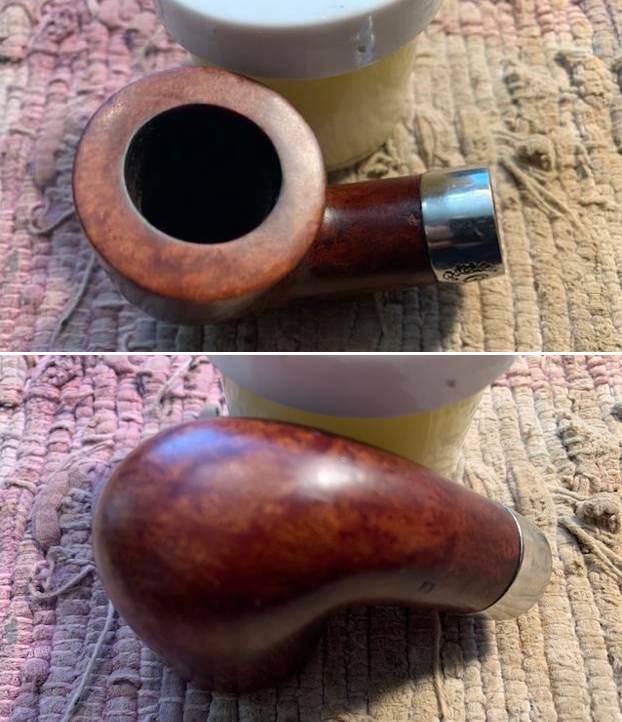
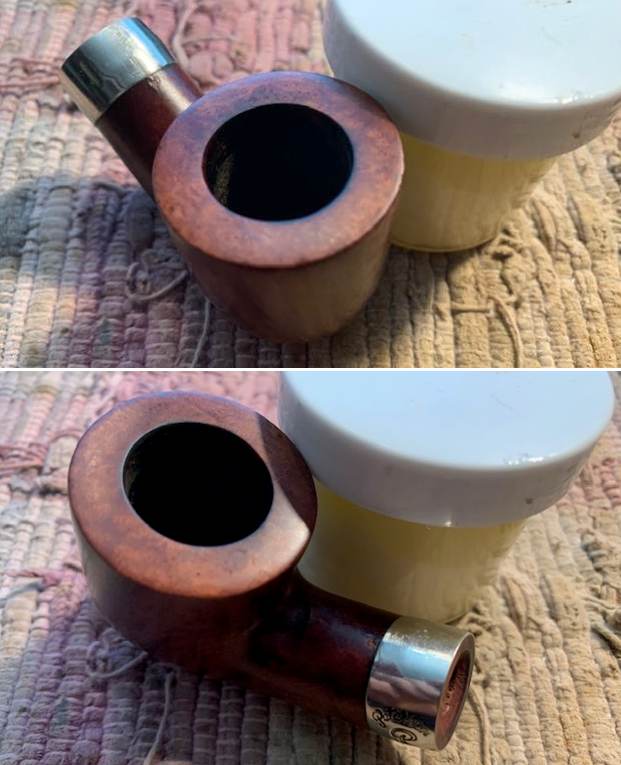 I polished the nickel band with a jeweler’s cloth to remove the tarnish and oxidation as well as add some protection to the band.
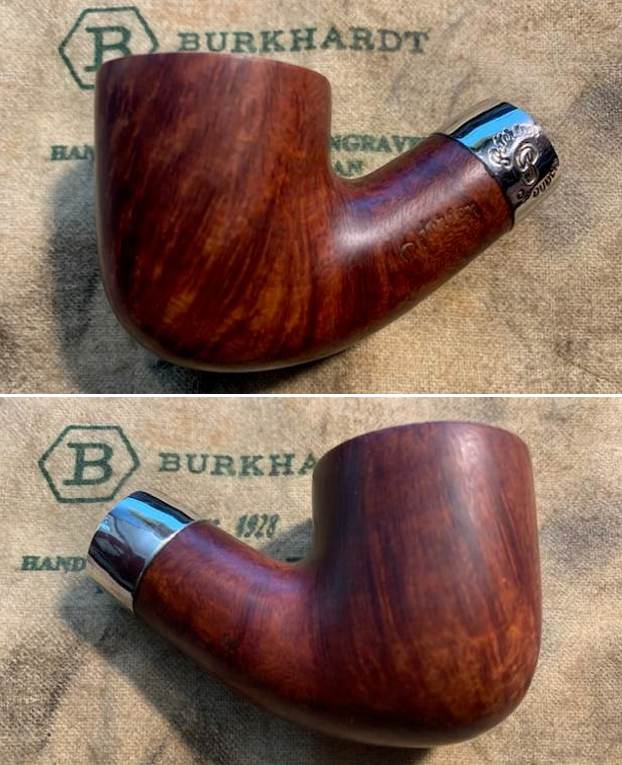
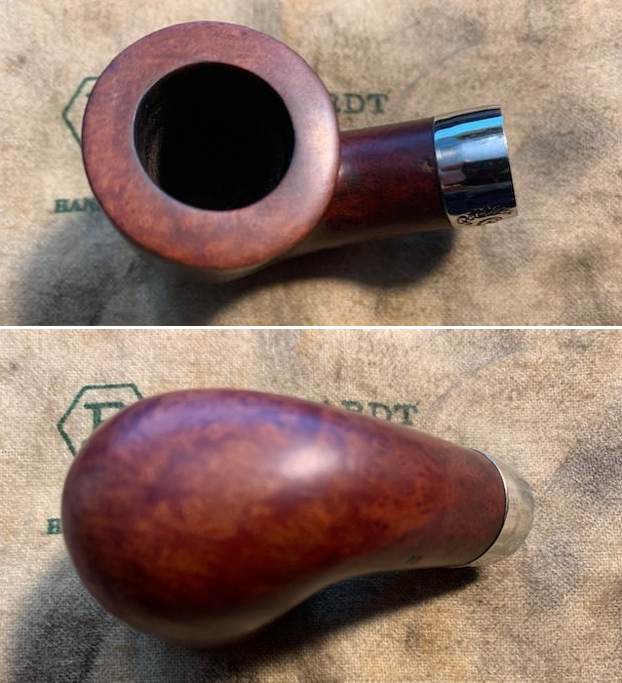 I set the bowl aside and turned my attention to the stem. I rebuilt the button with black super glue. I flattened and reshaped it with a small flat file.
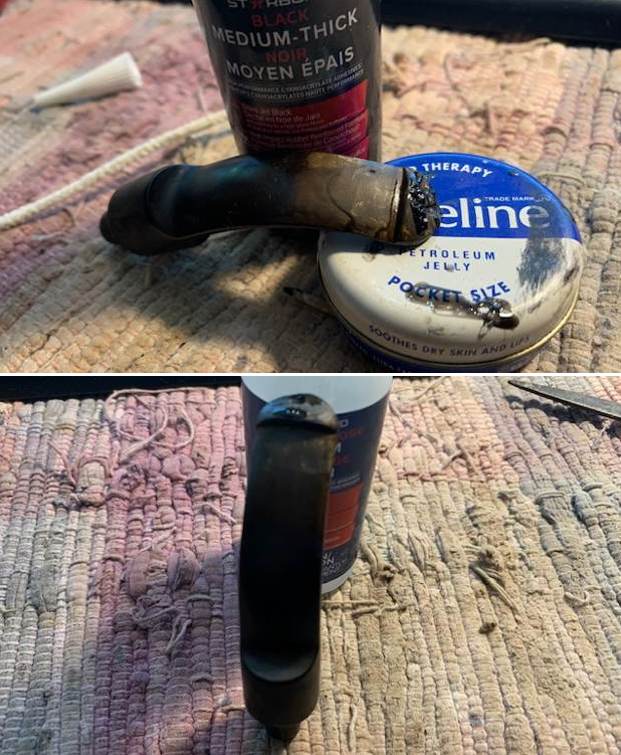
 I finished reshaping the button surface and end and sanded out some tooth marks on the stem surface with 220 grit sandpaper. I started the polishing the stem with 400 grit wet dry sandpaper. I wiped it down with some Obsidian Oil.
 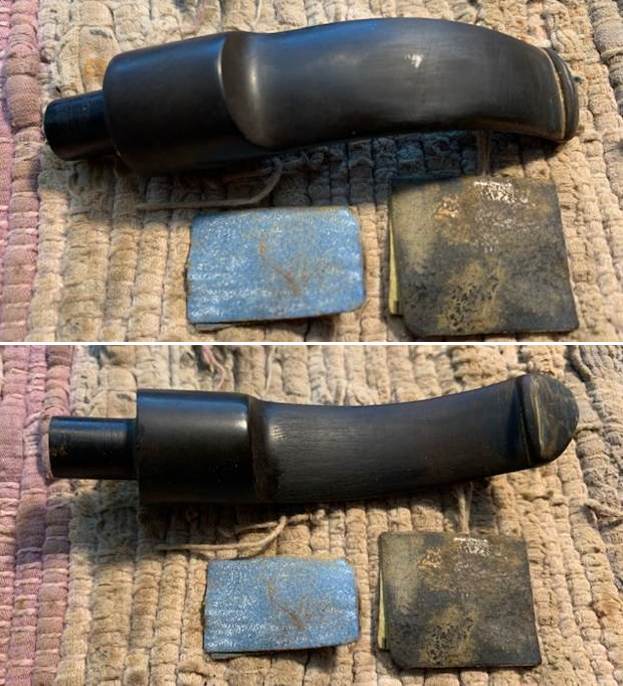 I polished the stem with micromesh sanding pads – wet sanding with 1500-12000 grit sanding pads. I wiped it down after each sanding pad with Obsidian Oil. I polished it with Before & After Pipe Stem Polish – both Fine and Extra Fine.
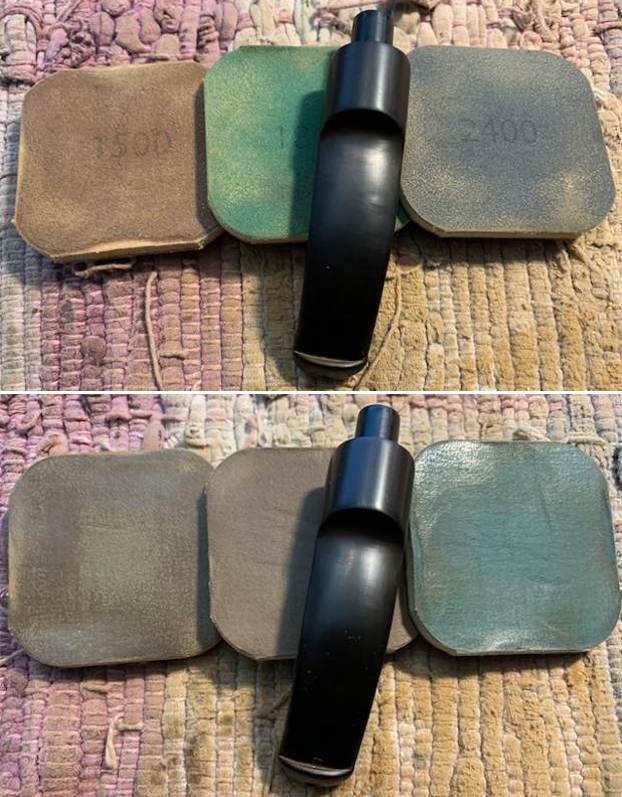
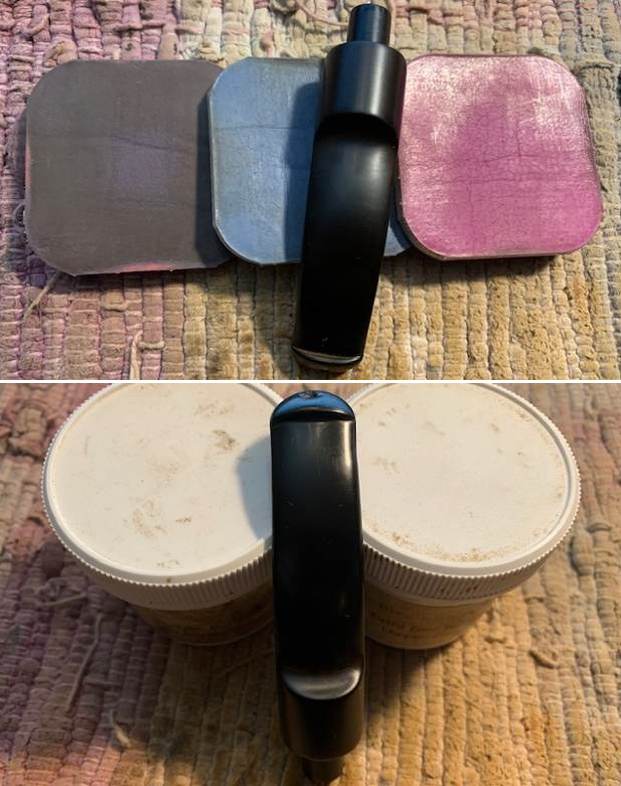 I am excited to finish this Peterson of Dublin Aran 01 Bent Pot. I put the pipe back together and buffed it with Blue Diamond on the buffing wheel. I gave the bowl and stem multiple coats of carnauba wax. I hand buffed the pipe with a clean buffing pad to raise the shine and hand buffed it with a microfibre cloth to deepen the shine. It is fun to see what the polished bowl looks like with the polished nickel band and the black vulcanite stem. This Classic looking Peterson’s Aran Bent Pot is one of my favourite shapes and it feels great in my hand. It is light and well balanced. Have a look at it with the photos below. The dimensions are Length: 5 ½ inches, Height: 1 ¾ inches, Outside diameter of the bowl: 1 ½ inches, Chamber diameter: ¾ of an inch. The weight of the pipe is 52 grams/1.83 ounces. It is a beautiful pipe and one that will be on the Irish Pipe Makers Section of the rebornpipes store soon. If you are interested in adding it to your collection let me know. Thanks for walking through the restoration with me as I worked over this pipe. Thanks to each of you who are reading this blog.
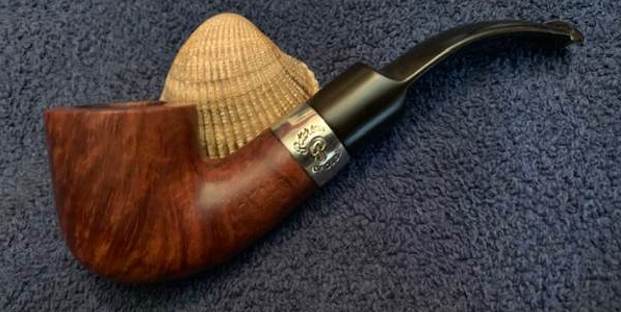
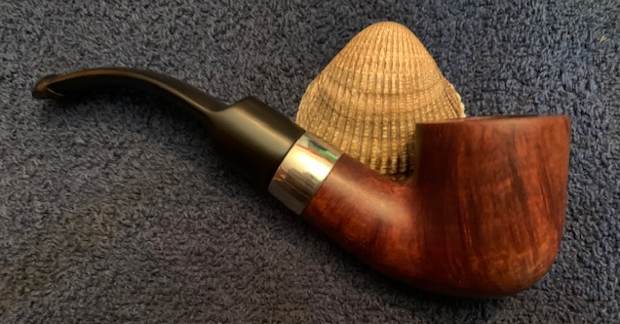
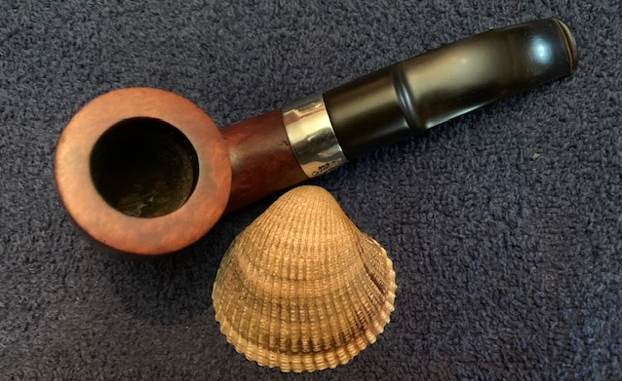
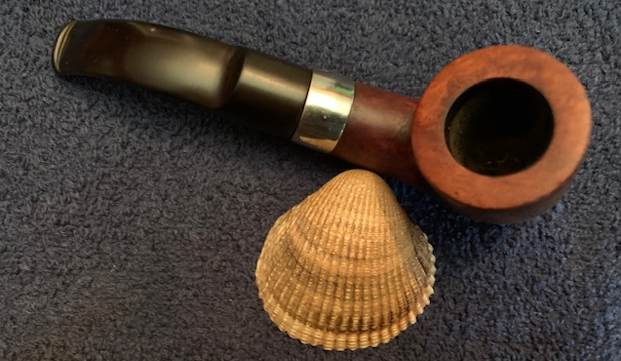
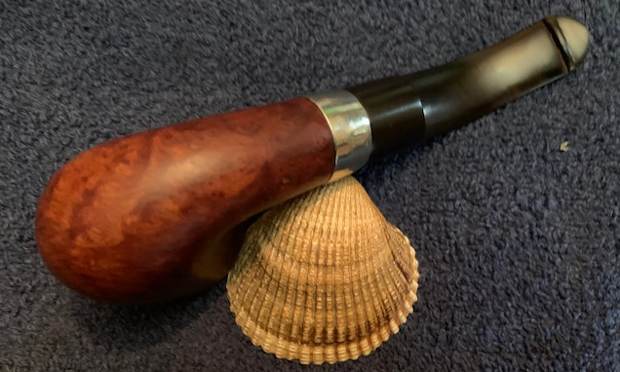
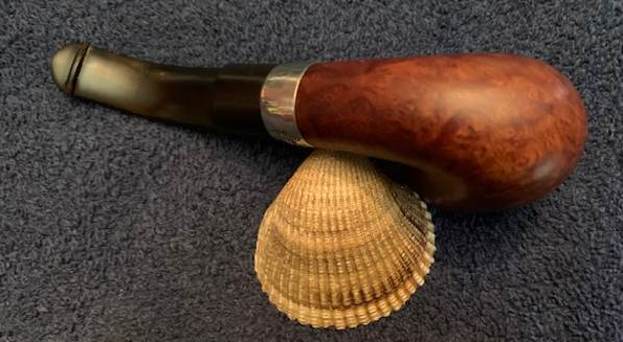
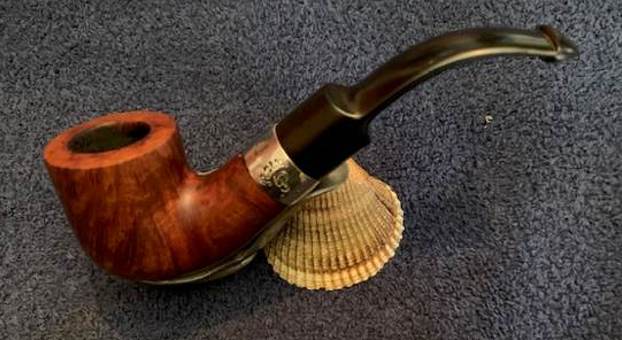
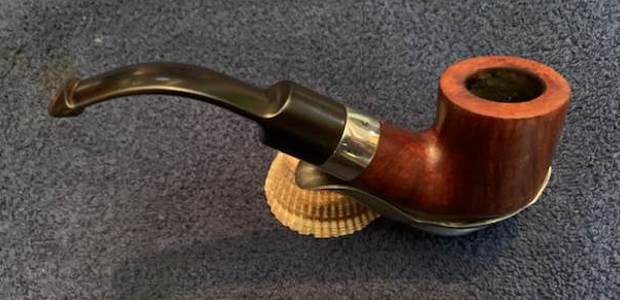
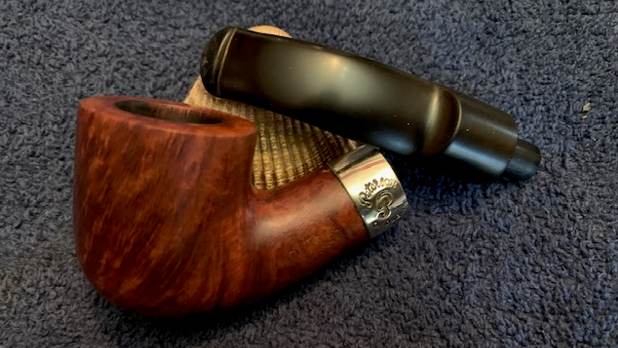

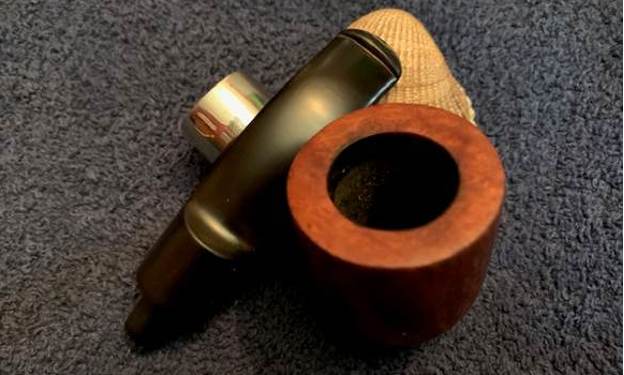
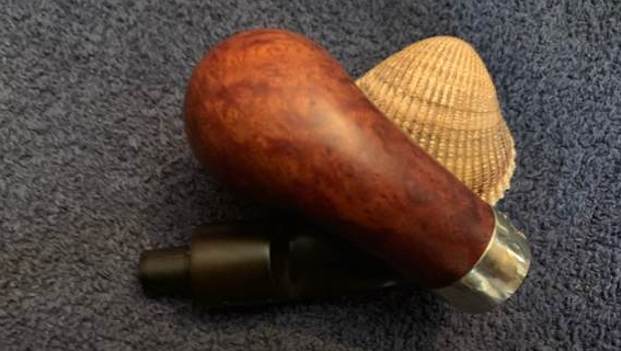
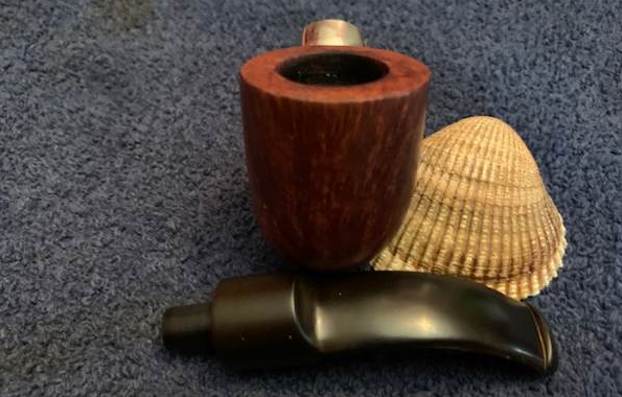
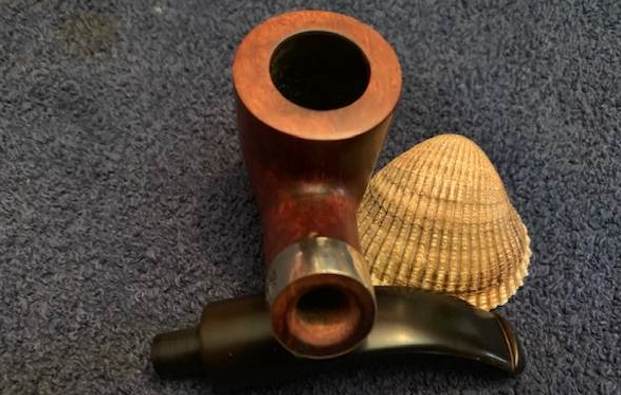
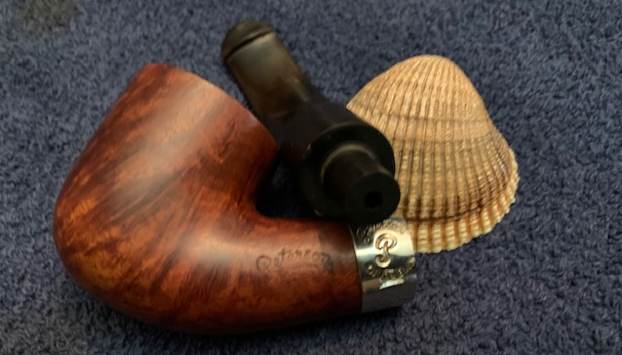
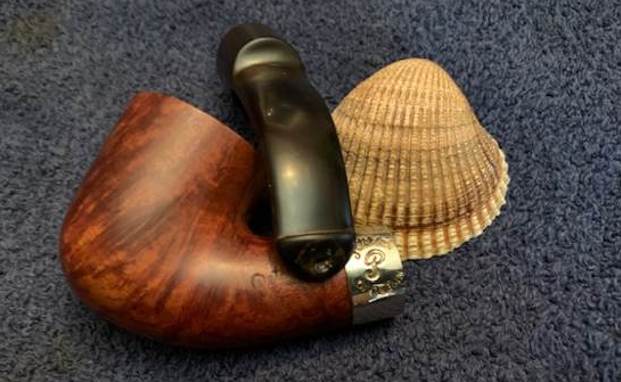
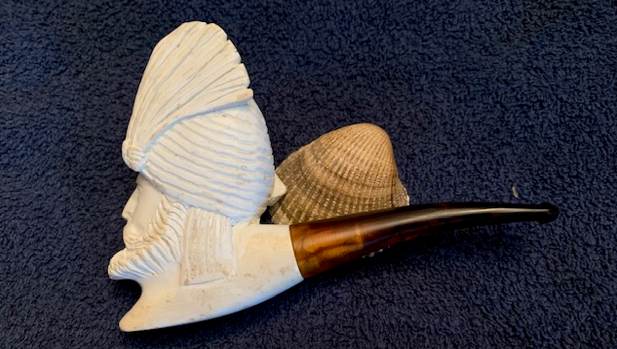
Blog by Steve Laug
The next pipe I chose to work on is an unsmoked New Old Stock Meerschaum Sheik that Jeff and I picked up in a lot somewhere. Neither of us have any memory of where or when we picked it up. It had a lot of dust and debris in the grooves and on the smooth surface of the shank and bowl sides as well as the heel. It was dirty but unused. The bowl was clean on the top and inside. The stem was also clean and unused but still had stickiness on the top near the shank from the price tag that must have “graced” its surface somewhere in its life. There were no tooth marks or chatter on the stem and the pipe smell clean. I took photos of the pipe before I started my work on to try and capture the condition it was in when I brought it to the table. I include those below.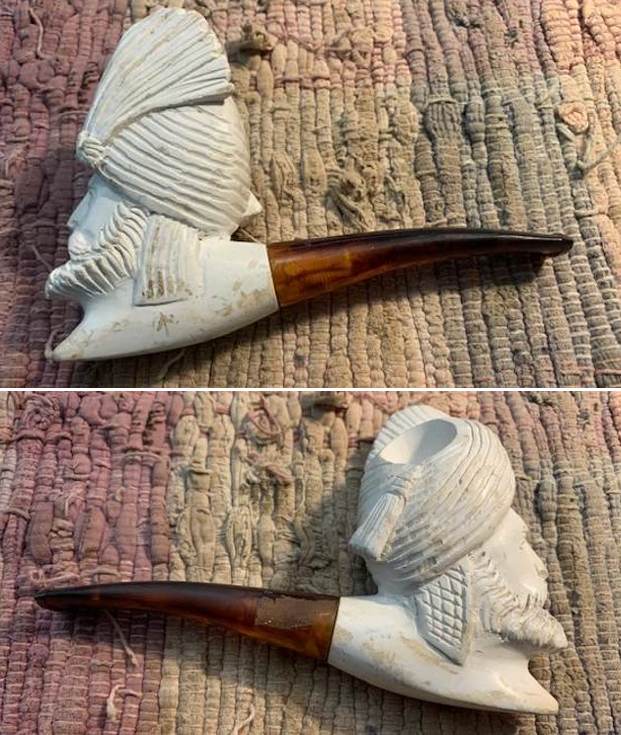
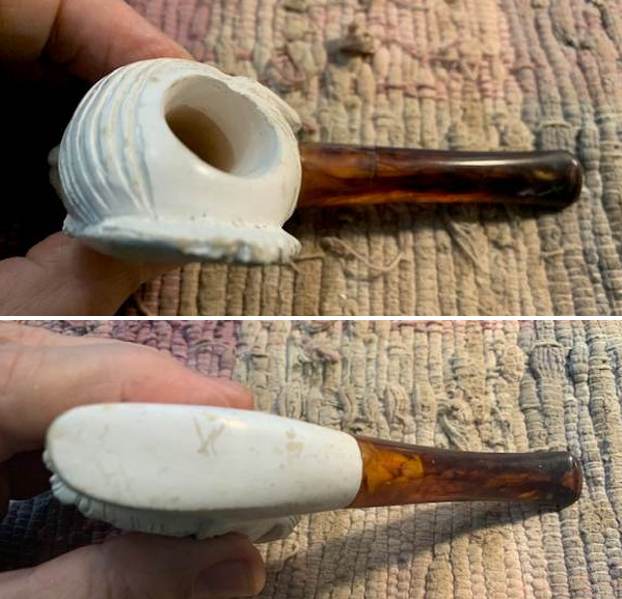 I took a photo of the rim top and the stem to show the condition of them both. The bowl and rim are clean and with a bit of polishing should clean up. The stem was dirty – it had sticky substances on the top and underside of the stem just ahead of the button.
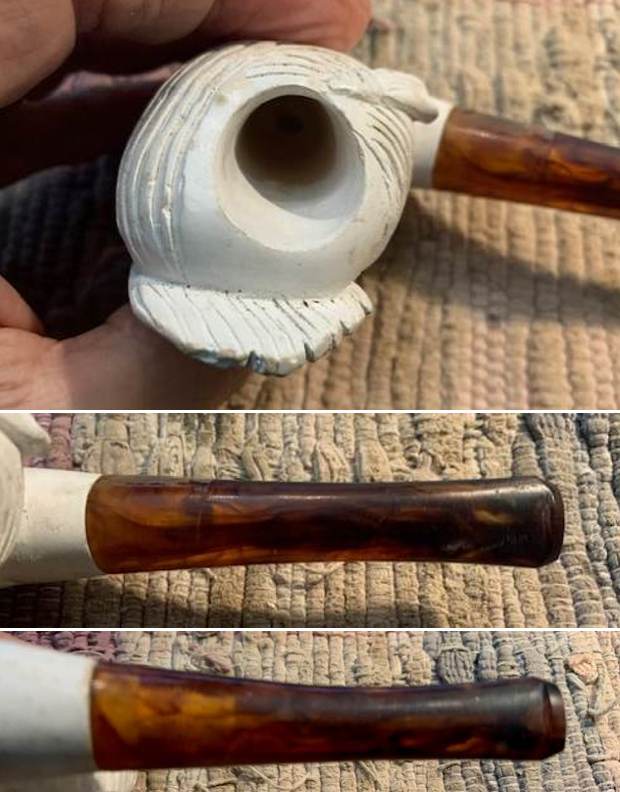 I took photos of the carving on the bowl from the front and from both sides. It is a nicely done carving of a sheik with a tall turban and feather.
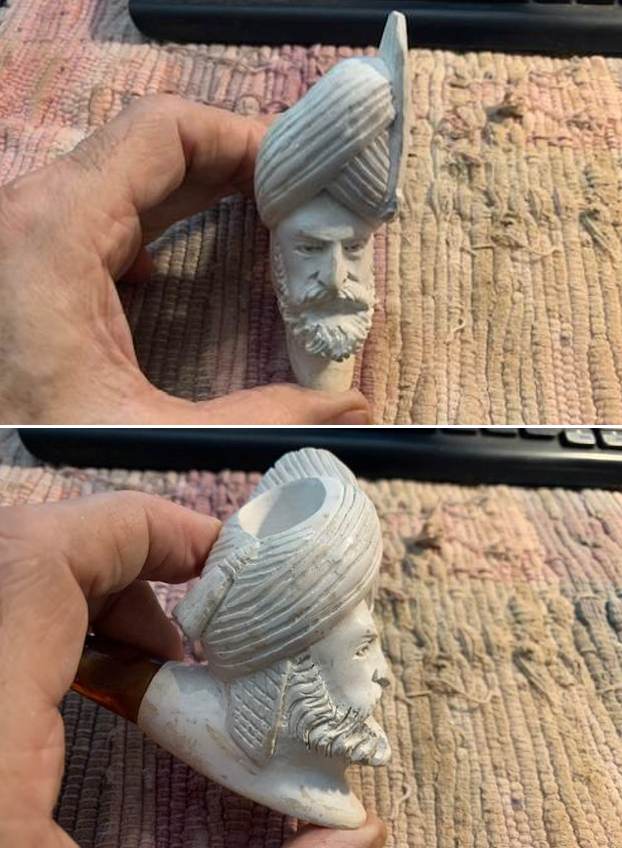
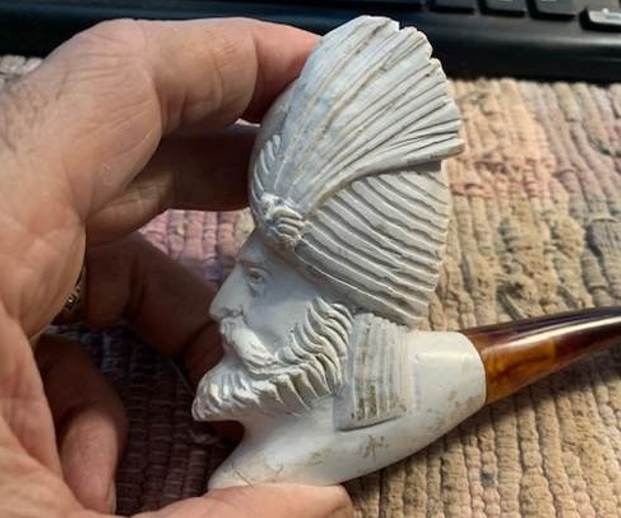 I removed the stem from the shank and took a photo of the pipe as a whole to show the overall look of the bowl and the proportions of the pipe.
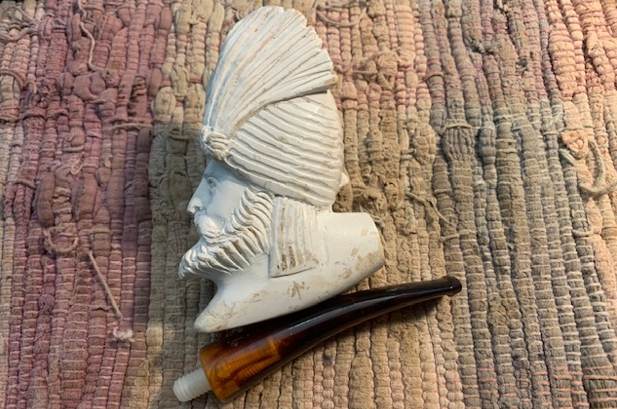 I polished the meerschaum with micromesh sanding pads – 1500-12000 grit pads. I wet sanded the grime that was on the sides of the bowl and shank. It was marked and a little dirty on the surface of the bowl.
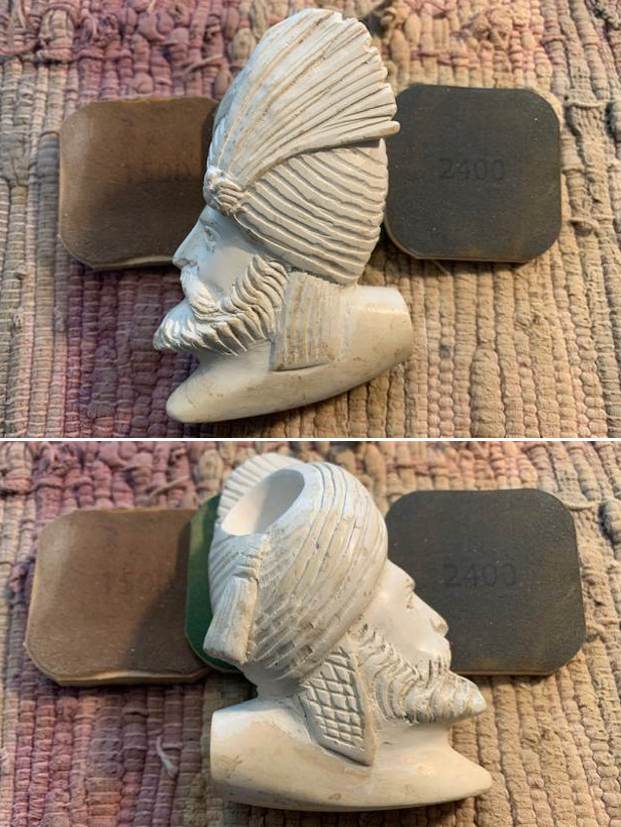
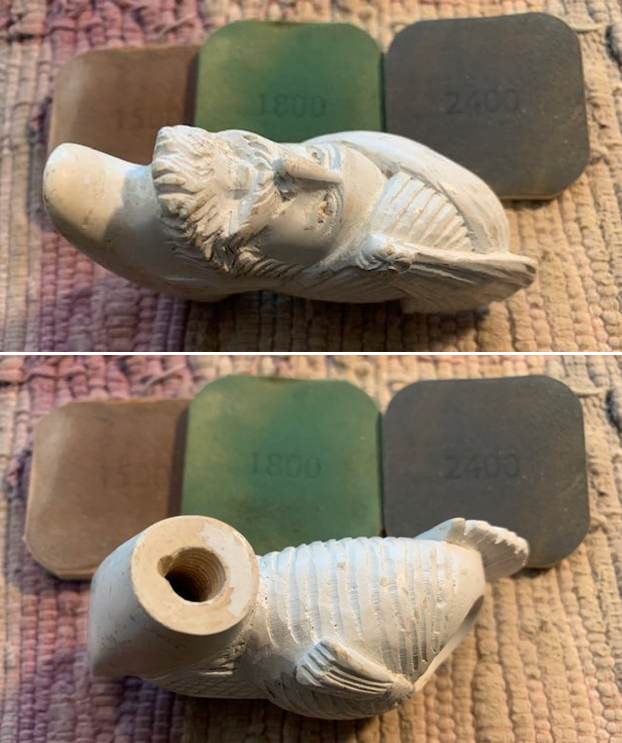
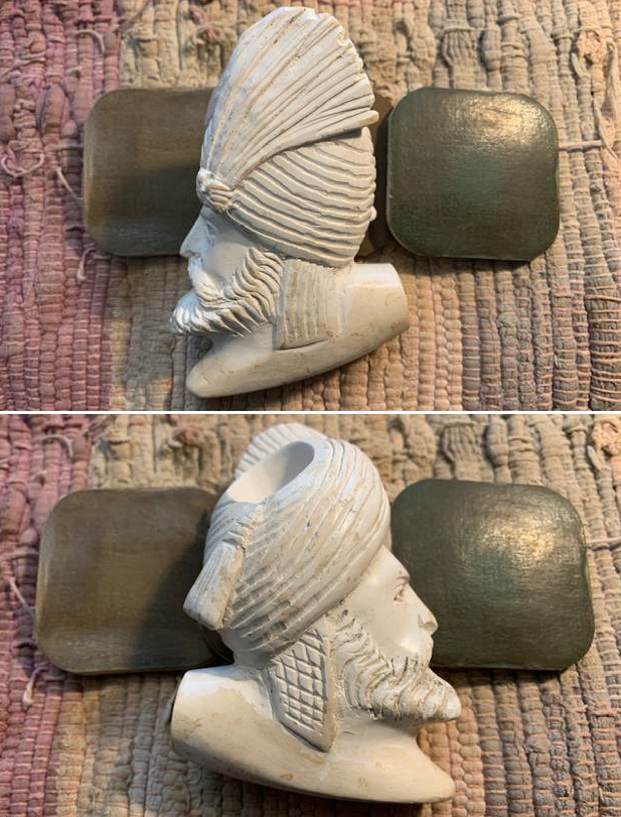
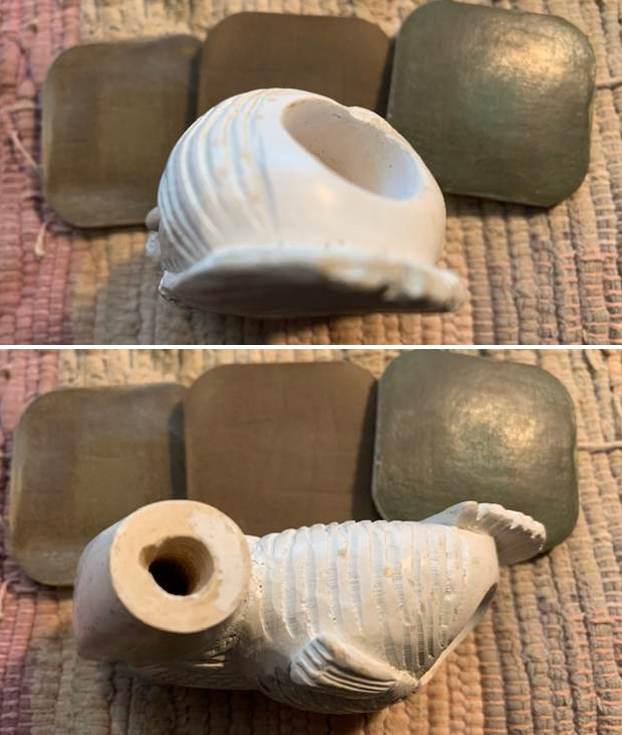
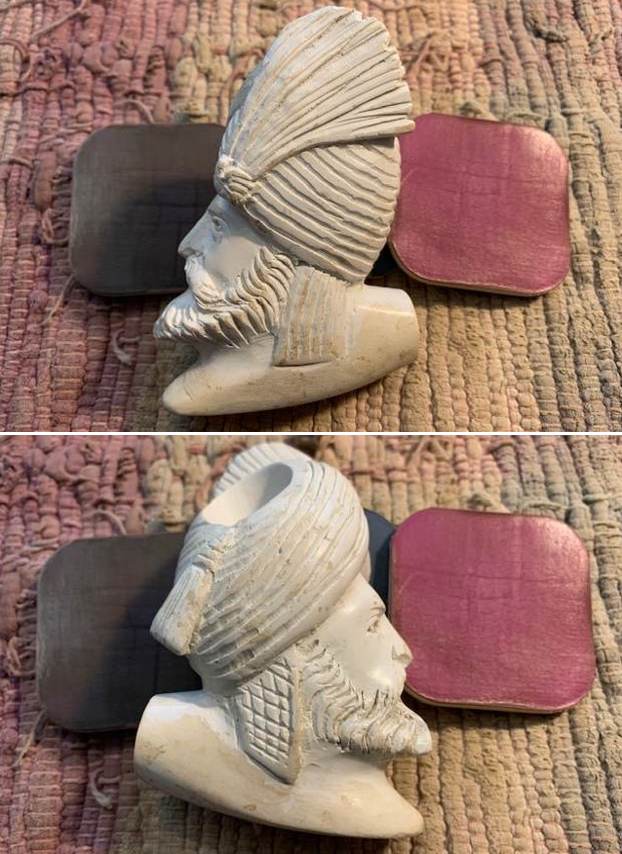
 I worked several coats of Clapham’s Beeswax/Carnauba Mixture wax into the meerschaum and let it sit for 20 minutes. I buffed it with a soft cloth and repeated the process several times until the finish looked and felt right.
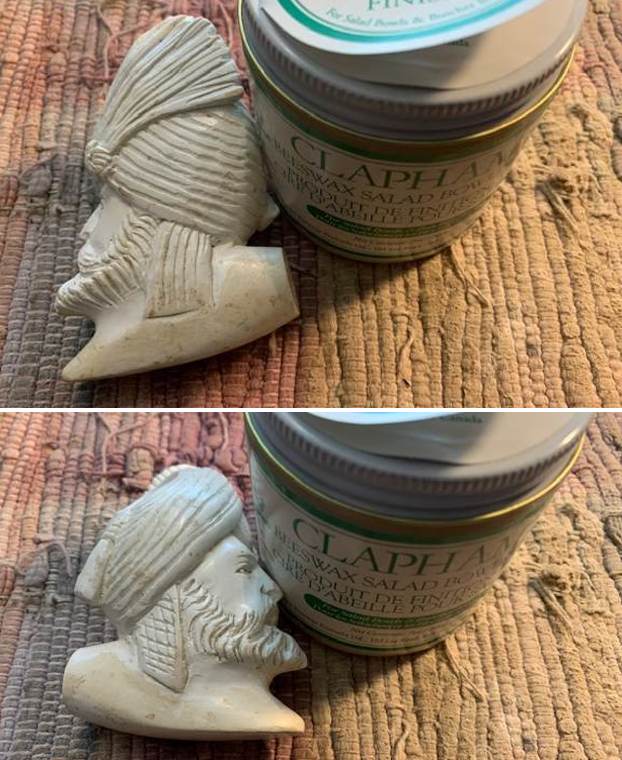

 I polished the tortoise shell acrylic stem with micromesh sanding pads – dry sanding with 1500-12000 grit pads. I wiped it down after each pad with a cloth impregnated with Obsidian Oil. I polished it with Before & After Fine and Extra Fine stem polish and buffed it out with a soft cloth.
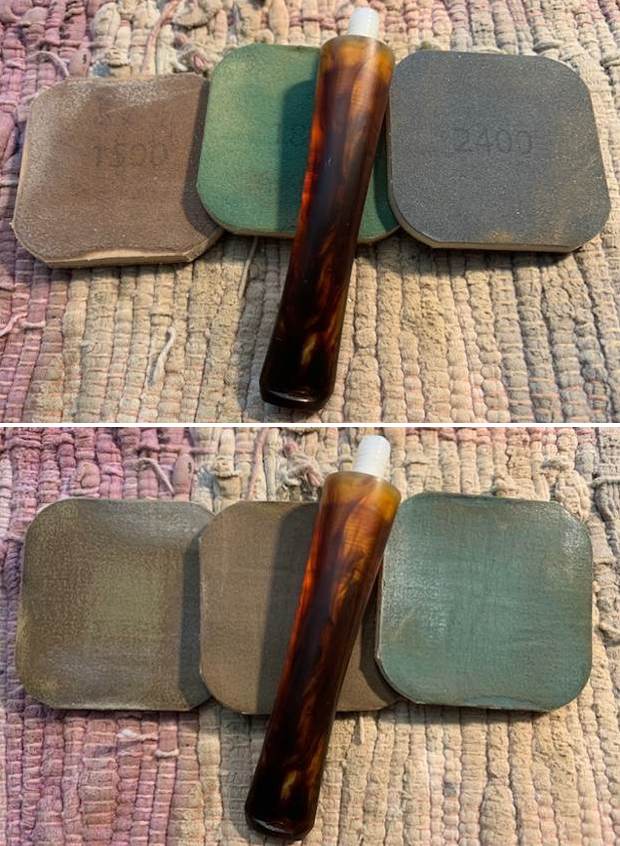
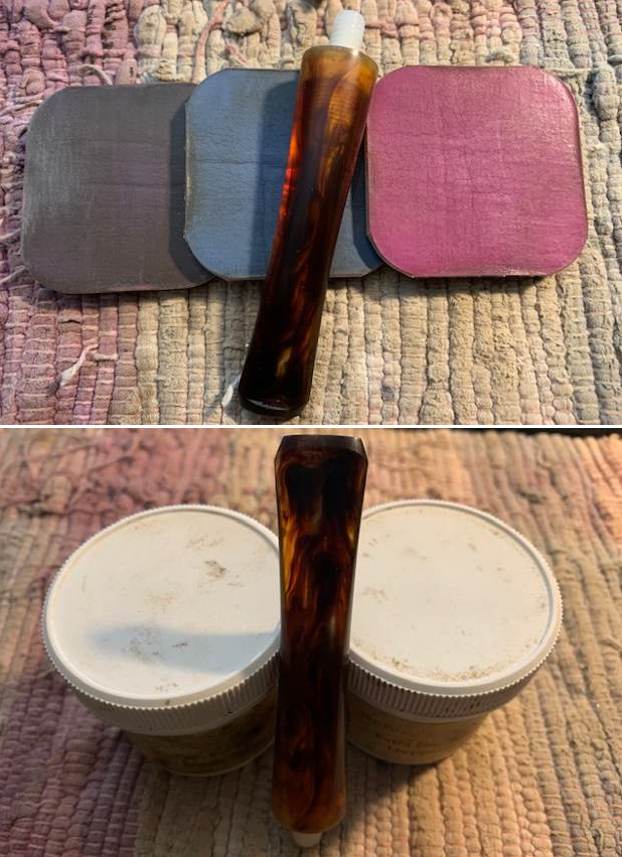 I don’t know if I would say that I am excited to be on the homestretch. But I do look forward to the final look when it is put back together, polished and waxed. I put the bowl and stem back together. I hand buffed the bowl and stem with a soft cloth to polish the waxed bowl and stem. The pipe polished up pretty nicely. The meerschaum looks much better with the wax and polish. The shiny tortoise shell acrylic stem is a beautiful contrast to the white of the bowl and thick shank. This Carved Sheik Figural Meerschaum was an interesting pipe to work on. The pipe is actually quite comfortable pipe to hold in the hand. The finished pipe is shown in the photos below. The dimensions of the pipe are Length: 5 ½ inches, Height: 3 ½ inches, Outside diameter of the bowl: 1 ½ inches, Chamber diameter: ¾ of an inch. The weight of the pipe is 2.15 ounces/61 grams. I will be putting this pipe on the rebornpipes store in the Ceramic & Meerschaum Pipes section. Thanks for reading this blog and my reflections on the pipe while I worked on it.

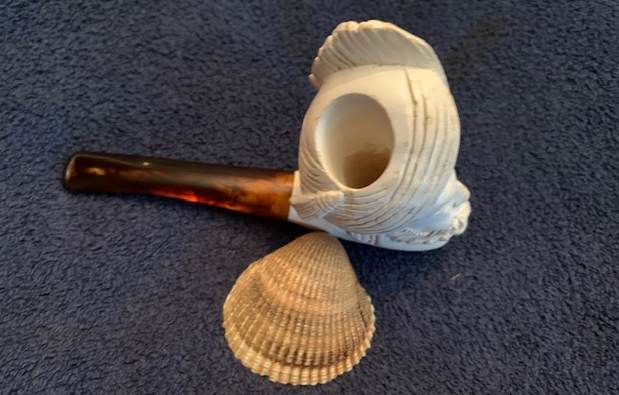
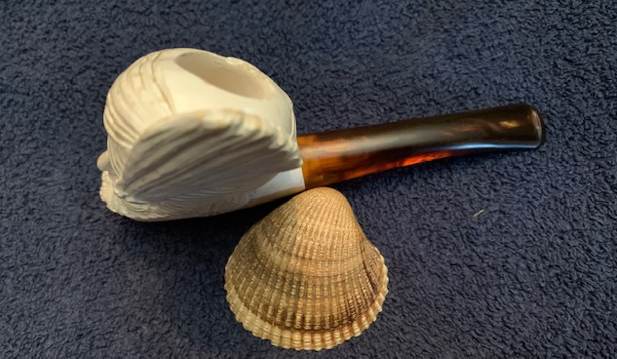
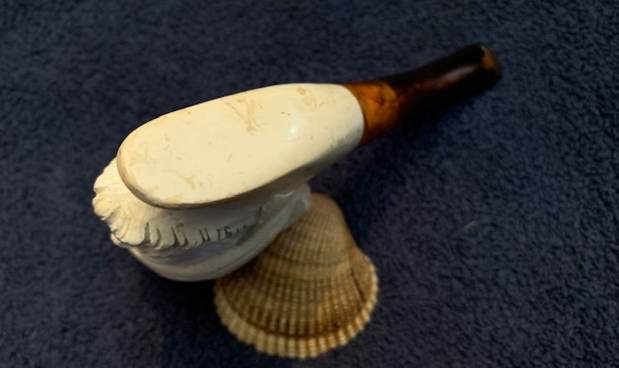


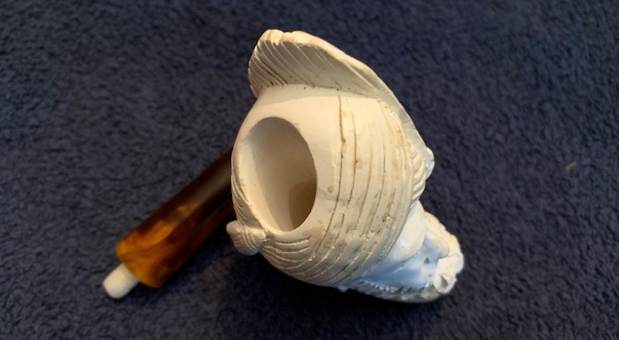
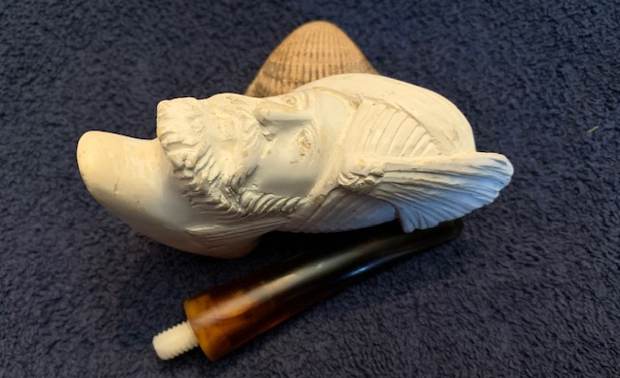
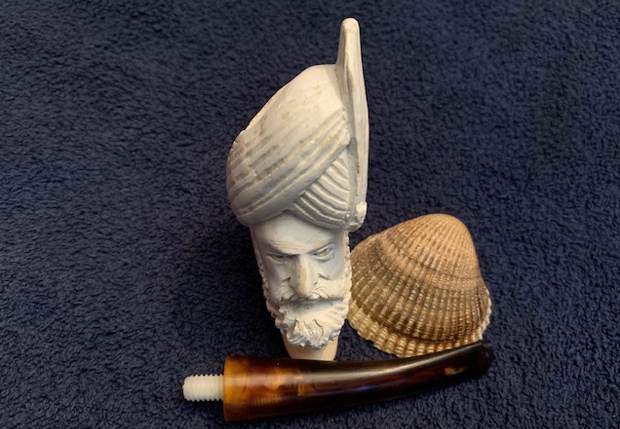
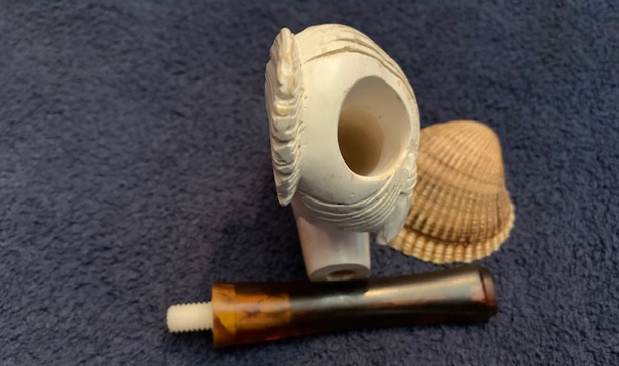
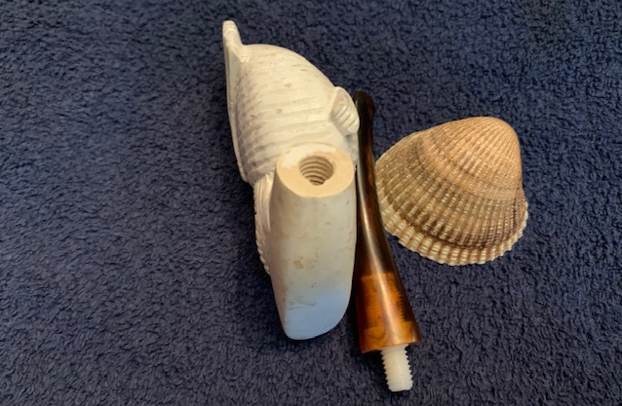
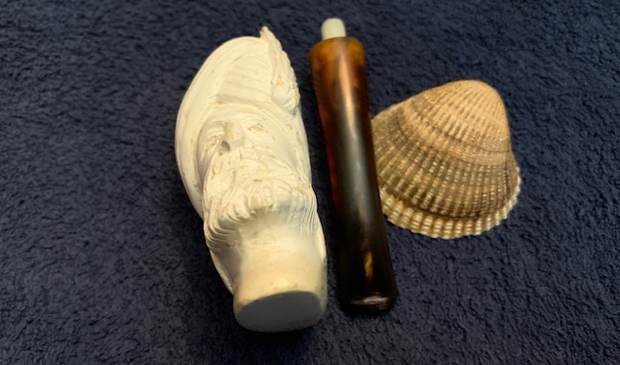
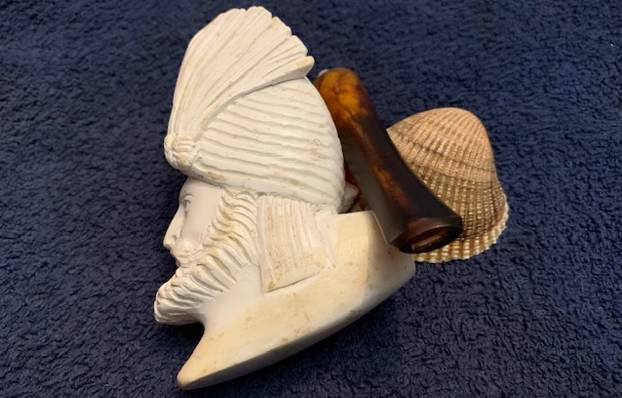
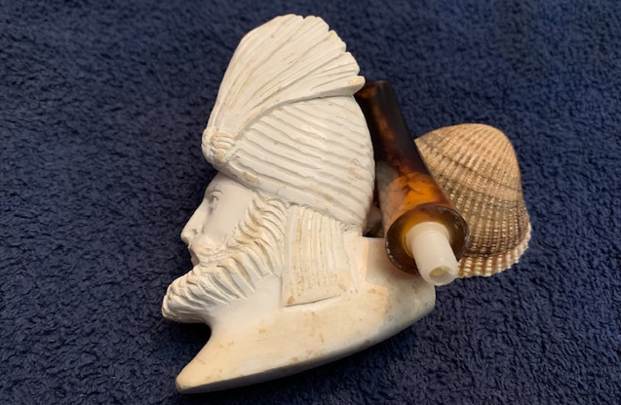
