by Kenneth Lieblich
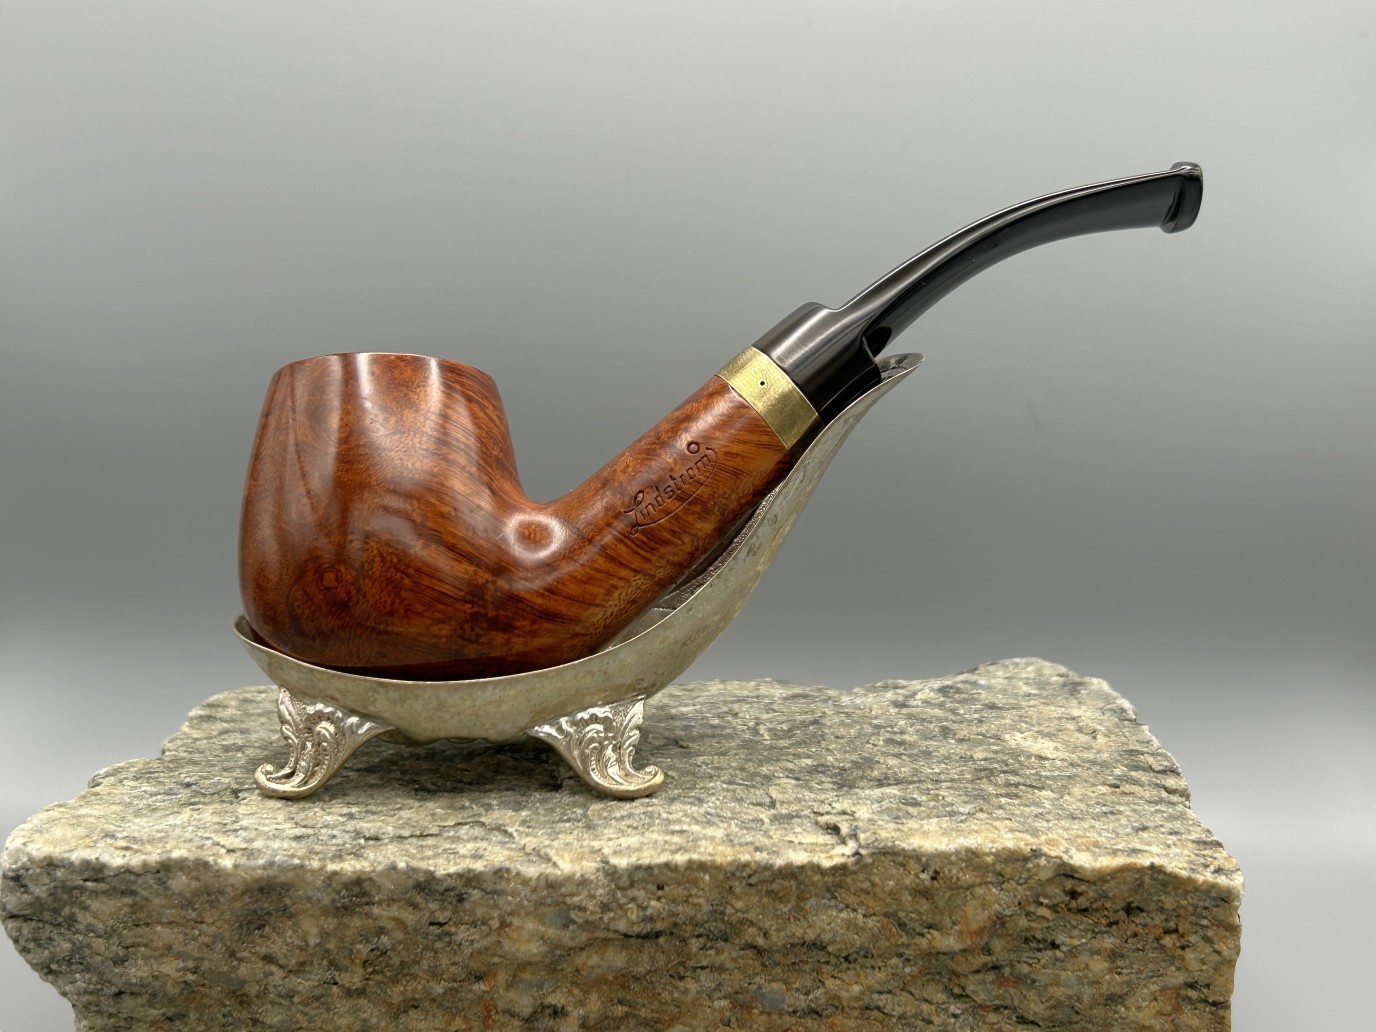
Are you intrigued by unusual and idiosyncratic pipe systems? Well, have I got a pipe for you! This is a Lindström System Model 3 bent billiard. It’s got a handsome hunk of briar with a distinguished beveled edge on the rim. I really like the vulcanite saddle stem: the saddle is crisp and blunt, and there is a wide tenon for a filter. What is of particular note, of course, is the thick brass band in the middle. This band has four, small circular holes of varying diameters in it, which allow you to control the amount of air added to the smoke. By all counts, it works well! More about that in a bit.
A quick note about the photos in this blog post. I actually started this restoration with two different Lindström pipes and intended to write their story together. However, some issues came up with the other pipe, so I excised it from this post. In some cases, I cropped out the jettisoned pipe, but in some cases not. So, you will see another pipe in some photos – just ignore it.


The markings on the pipe were quite straightforward. On the left side of the shank, we see the word Lindström. There is also a diamond logo on the stem, which also serves as a marker for where you are to align the holes in the band. Finally, on the brass band itself, there is a cursive L – indicative of the Lindström name.


Pipephil didn’t have any useful information about Lindström, other than what is displayed in this screenshot:

There was precious little written about Lindström at Pipedia. What information they did have was lifted from an old thread on alt.smokers.pipes. The following is my own merging of the two entries:
Lindström was a German company which started in the late 1950s and invented the brass ferrule patent. Lindström was a pseudonym and was probably chosen because Danish and Scandinavian pipes had this ‘special flair’ in those days. The ring had one hole, or sometimes up to four holes of different sizes, which you could turn, matching over an airhole in the stem. An arrow on the stem marked the place where they match. In this way you could regulate the amount of air to add to the smoke, resulting in a dry and cool smoking pleasure.
The thing that frustrates me about this sort of research is that all of this information may be perfectly correct – but how do we know? Where are the references? Where are the citations? I can’t find any corroborating evidence. However, what I did find was the following fantastic advertisement from 1980 in an Australian publication:

The most hilarious part of this is the money-back guarantee:
If you do not agree with us, break the pipe into pieces with a hammer and return the pieces to us within 30 days and we will refund your money.
What on earth?! Curiously, the German equivalent of this ad does not contain such a ‘savage’ refund guarantee. The same section of the ad (highlighted in red) reads as follows:
We promise you a truly exceptional smoking experience with the Lindström pipe. No cigarette, no cigar, and hardly any other pipe can offer you a purer tobacco flavour or greater smoking pleasure. However, should you not be satisfied after a 30-day trial – something we simply cannot imagine, given our customers’ experiences – simply return the pipe to us. You will receive a full refund of the purchase price immediately. How many manufacturers are that confident in their product?

Either way, it’s a decent return policy. It’s hard to know how old this pipe is, but my gut tells me that it’s probably about 50 years old.
Let’s examine the pipe. The stem has some oxidation and calcification. There is also a little tooth chatter and minor dents. The rim of the pipe is in good shape: only minor wear and the bevel is even and solid. The bowl is soiled, but it has some nice grain and a couple of minor fills. The inside of the bowl is dirty and heavily reamed, but remains thoroughly sound.


I used isopropyl alcohol on a few cotton rounds and wiped down the stem to provide an initial cleaning of filth before moving on to the next steps. The primary cleaning came next. I disinfected the inside of the stem with both pipe cleaners and cotton swabs dipped in lemon-infused 99% isopropyl alcohol. I scrubbed thoroughly to make sure the interior was very clean. It was fairly dirty, but not when I was done with it!


The goal of the next step is the removal (or minimization) of oxidation. Going to my sink, I used cream cleanser, cotton rounds, and a toothbrush, and scoured the stem to remove as much surface oxidation as possible. As the photos show, the result was a hideous, ochre-coloured mess – but better off the stem than on it.

Once the stem was reasonably clean, I soaked it overnight in some Briarville Stem Oxidation Remover. This solution works to draw oxidation in the stem to the surface of the vulcanite. This is a major aid and an important step in ensuring a clean stem. The following day, I drew out the stem from its bath and scrubbed the lingering fluid with a toothbrush. Due to the severity of the oxidation, I then repeated the scrubbing with the cream cleanser for maximum effect. There will always be a hint of oxidation remaining deep in the vulcanite.

As the stem was now clean and dry, I set about fixing the marks and dents in the vulcanite. This was done by filling those divots with black cyanoacrylate adhesive, impregnated with carbon and rubber. I left this to cure and moved on. After this, I painted the diamond logo on the stem with some enamel nail polish. I restored the logo carefully and let it fully set before proceeding.

The penultimate step for the stem is sanding. First, with my set of needle files, I reduced the bulk of the cyanoacrylate repairs. I removed the excess adhesive as near to the surface as possible, without cutting into the vulcanite. Following that, I used all nine of the micromesh sanding pads (1,500 through 12,000 grit) to sand out flaws, even out the vulcanite, and provide gentle polishing of the finished surface. I also applied pipe-stem oil while using the last five micromesh pads. There was a wonderful, deep black shine to the stem when I was done.


As the stem was (nearly) complete, I moved on to the stummel. The first step was to ream out the bowl – that is to say, remove all the cake inside the bowl. This accomplished a couple of things. First (and most obviously), it cleaned the bowl and provided a refurbished chamber for future smoking. Second, when the old cake was removed, I could inspect the interior walls of the bowl and determine if there was damage or not. I used a reamer, a pipe knife, and a piece of sandpaper taped to a wooden dowel. Collectively, these ensured that all the debris was removed.

Similar to the stem, I then cleaned the stummel with both pipe cleaners and cotton swabs dipped in lemon-infused 99% isopropyl alcohol. With a pipe this dirty, it took quite a while and much cotton to clean.

I then decided to ‘de-ghost’ the pipe – that is to say, exorcize the remaining filth from the briar. I filled the bowl and the shank with cotton balls, then saturated them with 99% isopropyl alcohol. I let the stummel sit overnight. This caused the remaining oils, tars and smells to leach out into the cotton.

To tidy up the briar, I wiped down the outside, using a solution of a pH-neutral detergent and some distilled water, with cotton rounds. I also used a toothbrush in the crevices. This did a good job of cleaning any latent dirt on the surface of the briar. The last step of the cleaning process was to scour the inside of the stummel with the same mild detergent and tube brushes. This was the culmination of a lot of hard work in getting the pipe clean.

I spent some time filling in all of the fills with clear cyanoacrylate adhesive. This made them smooth and hard. This turned out very well.

I used all nine micromesh pads (1,500 through 12,000 grit) to sand the outside of the stummel and finish it off. This sanding minimizes flaws in the briar and provides a beautiful smoothness to the wood. I rubbed some LBE Before & After Restoration Balm into the briar and let it sit for 30 minutes or so. The balm moisturizes the wood and gives a beautiful depth to the briar. I then buffed the stummel with a microfibre cloth.


For the final step, I took the pipe to my bench polisher and carefully buffed it – first with a blue diamond compound, then with some carnauba wax. This procedure makes the pipe look its best – the stummel sings and the stem glows.
All done! This Lindström System Model 3 bent billiard looks fantastic again and is ready to be enjoyed by its next owner. I am pleased to announce that this pipe is for sale! If you are interested in acquiring it for your collection, please have a look in the ‘Various Makers’ section of the store here on Steve’s website. You can also email me directly at kenneth@knightsofthepipe.com. The approximate dimensions of the pipe are as follows: length 5 in. (127 mm); height 1¾ in. (45 mm); bowl diameter 1½ in. (38 mm); chamber diameter ¾ in. (20 mm). The weight of the pipe is 1⅜ oz. (41 g). I hope you enjoyed reading the story of this pipe’s restoration as much as I enjoyed restoring it. If you are interested in more of my work, please follow me here on Steve’s website or send me an email. Thank you very much for reading and, as always, I welcome and encourage your comments.