Monthly Archives: October 2023

Breathing Life into a Refbjerg Handmade Denmark RPK 2010 Canadian


Blog by Steve Laug

The next pipe on the work table is a very Danish looking Canadian shaped pipe that we received from our contact in Copenhagen, Denmark on 01/26/2023. It was stamped on the underside of the shank near the shank/stem union and read Refbjerg [over] Hand Made [over] in Denmark [over] R.P.K. [over] 2010. There is a faint cursive R logo on the top of the taper stem. It has a smooth finish around the bowl and shank that has a lot of oils, debris and grime ground into it. The bowl had a light cake and the rim top was very clean. The rim top and the inner edge of the bowl looks very good though there is some light lava on the back inner edge and rim top. There was a very beautiful pipe underneath the grime of use. The stem was a short vulcanite taper as expected on a Canadian. It had light tooth marks and chatter on both sides ahead of the button. Jeff took photos of the pipe before he started his cleanup work on it. Jeff took photos of the bowl and rim top to show the light cake in the bowl and the light lava build up on the rim top and the edges of the bowl. The rim top and edges looked very good. Jeff also took photos of the top and underside of the stem showing the light tooth chatter and marks surface of the stem ahead of the button. Jeff took photos of the sides and heel of the bowl to show the condition of the finish. You can see the grain peaking through the grime on the finish.  Jeff took photos of the stamping on the underside of the shank. It took a few to capture all the stamping on the shank. The R stamp on the stem was far lighter than it appears in the photos. I did a bit of research on the Refbjerg brand to try to gather the background on it. I knew that the maker was the same carver who had made Soren pipes. I turned first to Pipephil’s site (http://www.pipephil.eu/logos/en/logo-r3.html) and did a screen capture of the information there as well as the notes that were included in the side bar.

Artisan: Søren Refbjerg Rasmussen (retired). Pipes for the European market are mostly stamped “Refbjerg” while those for US are stamped “Søren“. I also followed the lead from that information to the site’s information on the Soren pipe brand (http://www.pipephil.eu/logos/en/logo-s10.html). I did a screen capture of the information on the brand as well as the side bar for this as well.

Artisan: Søren Refbjerg Rasmussen. Pipes for the European market are mostly stamped “Refbjerg” while those for US are stamped “Soren”.I then turned to Pipedia (https://pipedia.org/wiki/Refbjerg) for more information. I include the pertinent information below.

Søren Refbjerg Rasmussen founded a company in 1969, which employed an average of 8 – 12 craftsmen in the 1970’s. The semi-freehands they produced were traded under his prename Søren. Rasmussen himself finished only the very best pipes. So his way of pipemaking closely resembled the ways of Preben Holm, Karl Erik Ottendahl or Erik Nørding. Altogether more than 1,000,000 pipes were sold.

Today he works alone as Refbjerg and manufactures only a small number of pipes in his workshop in DK-2860 Søborg, which are considered to be tremendously precisely executed. The dimensions mostly range from small to medium sized, corresponding to his personal preferences. The shapes adhere to the classical models, but often he gives them a touch of Danish flair. Refbjerg accepts minor faults but never uses any fillings. “Straight Grain” is the only grading, used for his very best pieces. He likes stem decorations made of exotic woods or metal rings.

Jeff had done a great job cleaning up the pipe as usual. He reamed the pipe with a PipNet reamer and cut back the cake back to the bare briar. He cleaned up the walls with a Savinelli Fitsall Pipe Knife. He scrubbed the interior of the bowl and shank with pipe cleaners, cotton swabs and alcohol to remove the tars and oils. He scrubbed the exterior of the pipe with Murphy’s Oil Soap and a tooth brush to remove the grime from the finish. He worked on the rim top lava and darkening with the soap and tooth brush. He scrubbed the inside of the stem with alcohol and pipe cleaners. He scrubbed the exterior of the stem with Soft Scrub and then soaked it in Briarville’s Pipe Stem Deoxidizer. He washed it off with warm water to remove the Deoxidizer. The pipe looked far better when it arrived.I took some close up photos of the rim top and also of the stem surface. I wanted to show how well it had cleaned up. The rim top and edges look very good. I also took close up photos of the stem to show the light tooth marks on the surface near the button.I took a photo of the stamping on the underside of the shank. You can see that it is stamped as noted above. It is faint but still readable. I took the pipe apart and took a photo of the pipe. It is a good-looking Canadian.I decided to start my work on the pipe polishing the rim top and the rest of the bowl and shank as it was in such good condition. I polished it with micromesh sanding pads – dry sanding with 1500-12000 grit sanding pads. I wiped the bowl down with a damp cloth after each sanding pad. The briar began to come alive. The bowl looked very good. I worked some Before & After Restoration Balm into the surface of the briar with my fingertips. It works to clean, enliven and protect the briar. I let it sit for 15 minutes then buffed it off with a soft cloth and raised the shine. The bowl looks great at this point. I set the bowl aside and turned my attention to working on the stem. I polished the stem with micromesh sanding pads – dry sanding it with 1500-12000 grit pads. I wiped the stem down with Obsidian Oil after each pad.I finished the hand polishing of the stem with Before & After Pipe Polish – both the Fine and Extra Fine polishes. I gave it a final coat of Obsidian oil and set it aside to dry. 
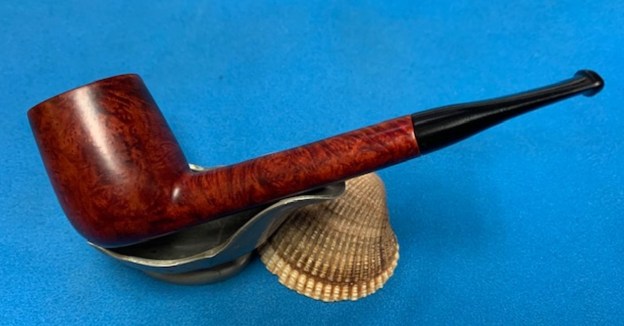
I am excited to finish this Refbjerg Hand Made in Denmark R.P.K. 2010 Canadian. I put the pipe back together and buffed it with Blue Diamond on the buffing wheel. I gave the bowl and the stem multiple coats of carnauba wax. I hand buffed the pipe with a clean buffing pad to raise the shine. It is fun to see what the polished bowl looks like with beautiful straight and birdseye grain all around it. Added to that the black vulcanite stem was beautiful. This Refbjerg Hand Made R.P.K. 2010 Canadian is great looking and the pipe feels great in my hand. It is light and well balanced. Have a look at it with the photos below. The dimensions are Length: 5 ½ inches, Height: 1 ¾ inches, Outside diameter of the bowl: 1 ¼ inches, Chamber diameter: ¾ of an inch. The weight of the pipe is 38 grams/1.34 ounces. It is a beautiful pipe and one that I will be adding to the rebornpipes store in the Danish Pipemakers Section soon. Thanks for walking through the restoration with me as I worked over this pipe. Thanks to each of you who are reading this blog.

As always, I encourage your questions and comments as you read the blog. Thanks to each of you who are reading this blog. Remember we are not pipe owners; we are pipe men and women who hold our pipes in trust until they pass on into the trust of those who follow us.

Fresh Life for a Republic Era Peterson’s “Donegal” Rocky 608S Saddle Stem Pot


Blog by Steve Laug

The next pipe on the work table is a sandblast Peterson’s Rusitcated Pot shaped pipe that we purchased from an auction in Manorville, New York, USA on 07/28/2022. It was stamped on the underside of the shank and read Peterson’s [over] “Donegal” Rocky [over] Made in the Republic of Ireland (in three lines) followed by the shape number 608S. There is a band on the shank that is stamped on the left side and reads K&P in shields [over] Sterling Silver. Under those stamps there are three hallmarks – Hibernia seated, Crowned Harp for country of manufacture and a date letter in this case an oddly shaped upper case “S”. It has a rusticated finish around the bowl and shank that has a lot of oils, debris and grime in the finish. There was a thick cake in the bowl and a heavy lava overflow in the rustication on the rim top. The inner edge of the bowl looks to have significant damage on the left front under the tars and lava. There was a very beautiful pipe underneath all of the buildup of years of use. The stem was a Peterson’s style P-Lip Saddle Stem. It had light tooth marks and chatter on both sides ahead of the button. Jeff took photos of the pipe before he started his cleanup work on it. Jeff took photos of the bowl and rim top to show the thick cake in the bowl and the heavy lava build up on the rusticated rim top and the edges of the bowl. The rim top and edges looked rough but a proper clean up would tell the full story. At this point the inner edge of the left side of the bowl looked to be out of round. Jeff took photos of the top and underside of the stem showing the tooth chatter, scratching, calcification and oxidation on the stem surface and wear on the edges of the button. More would be visible once Jeff cleaned it up. Jeff took photos of the sides and heel of the bowl to show the condition of the finish. You can see the grime and what looks to be white paint around the sides of the bowl and shank in the rusticated finish. It seems to fill in the grooves in the rustication. Jeff took photos of the stamping on the underside of the shank. The stamping was faint but readable as you can see from the photos. It read as noted above. The Sterling Silver ferrule is actually clearly stamped and readable. The hallmarks are light but readable.

I am including the information from Pipedia’s article on Peterson pipes. It is a great read in terms of the history of the brand (https://pipedia.org/wiki/Peterson). I have included a bit of the pertinent history here.

1950 – 1989 The Republic Era – From 1950 to the present time, the stamp for this era is “Made in the Republic of Ireland” in a block format generally in three lines but two lines have been used with or without Republic being abbreviated.

During the 1950’s and 60’s the Kapp & Peterson Company was still in the ownership of the Kapp family. However 1964 saw the retiral of the company Managing Director Frederick Henry(Harry) Kapp.

I turned to the hallmarking chart on one of the blogs on rebornpipes to lock down the date for the pipe (https://rebornpipes.com/wp-content/uploads/2015/05/peterson-cataloguecomp_page_27.jpg). The chart defines the meaning of each hallmark. The first one of the seated woman with a harp is known as the Hibernia stamp and identifies the pipe as made in Ireland. The second stamp is a crowned harp which is a fineness mark denoting the high quality of silver that was used. The third stamp is an oddly shaped S. I have included a larger screen capture of the chart in the lower left of the photo below.

I have drawn a RED CIRCLE around the date letter below. What appeared to be an upper-case S actually is a very stylized G as seen in the circled letter below. It identifies the date of this Peterson’s pipe to 1974.I knew that I was dealing with a Republic Era pipe made between 1950 and the present. The hallmarks date the pipe to 1974. Now it was time to work on the pipe.

Jeff had done a great job cleaning up the pipe as usual. He reamed the pipe with a PipNet reamer and cut back the cake back to the bare briar. He cleaned up the walls with a Savinelli Fitsall Pipe Knife. He scrubbed the interior of the bowl and shank with pipe cleaners, cotton swabs and alcohol to remove the tars and oils. He scrubbed the exterior of the pipe with Murphy’s Oil Soap and a tooth brush to remove the grime from the finish. He worked on the rim top lava and darkening with the soap and tooth brush. He scrubbed the inside of the stem with alcohol and pipe cleaners. He scrubbed the exterior of the stem with Soft Scrub and then soaked it in Briarville’s Pipe Stem Deoxidizer. He washed it off with warm water to remove the Deoxidizer. The pipe looked far better when it arrived. The silver tarnished once again and would need to be polished because it had been sitting here for awhile. I took some close up photos of the rim top and also of the stem surface. I wanted to show how well it had cleaned up. The rim top and edges look quite good though the bowl was very out of round with damage to the left side toward the front of the bowl. I also took close up photos of the stem to show the light tooth marks on the surface near the button. I took a photo of the stamping on the underside of the shank and the band. You can see that it is stamped as noted above. It is faint but still readable. I took the pipe apart and took a photo of the pipe. It is a good-looking pipe and has a rugged rustication around the bowl. I started my work on the pipe by addressing the damage on the inner edge of the rim and the top. I built up the damaged edge with clear CA glue and briar dust. The initial start looks pretty awful but follow through the photos. I used a brass bristle brush to clean up the rusticated rim top. I worked over the inner edge of the rim with both a folded piece of 220 grit sandpaper and a piece of dowel wrapped with 220 grit sandpaper. The rim top and edges looked significantly better after the clean up. I touched up the inner edge and the rim top with a Walnut stain pen to match the stain on the briar around the bowl. I worked some Before & After Restoration Balm into the surface of the briar with my fingertips and a horsehair shoe brush to clean, enliven and protect the briar. I let the balm sit for 10 minutes and then buffed with a cotton cloth to raise the shine. The photos show the bowl at this point in the restoration process. I polished the Sterling Silver band on the shank with a jeweller’s cloth to remove the tarnish and polish it. I “painted” the surface of the stem with the flame of a Bic lighter to lift the light tooth marks on both sides. I was able to lift all of them. I followed that by sanding it with a folded piece of 220 grit sandpaper. I started the polishing of the stem with 400 grit wet dry sandpaper. I wiped it down with some Obsidian Oil. I polished the stem with micromesh sanding pads – wet sanding with 1500-12000 grit sanding pads. I wiped it down after each sanding pad with Obsidian Oil. I polished it with Before & After Pipe Stem Polish – both Fine and Extra Fine. I gave it a coat of Obsidian Pipe Stem Oil. It works to protect the stem from oxidizing. I set it aside to dry. I am excited to finish this Republic Era Peterson’s “Donegal” Rocky 608S Pot. I put the pipe back together and buffed it with Blue Diamond on the buffing wheel. I gave the bowl multiple coats of Conservator’s Wax and the stem multiple coats of carnauba wax. I hand buffed the pipe with a clean buffing pad to raise the shine. It is fun to see what the polished bowl looks like with the rugged rustication all around it. Added to that the polished Sterling Silver band and the black vulcanite stem was beautiful. This rusticated Classic Peterson’s “Donegal” Rocky Pot is nice looking and the pipe feels great in my hand. It is light and well balanced. Have a look at it with the photos below. The dimensions are Length: 5 ½ inches, Height: 1 ½ inches, Outside diameter of the bowl: 1 ¼ inches, Chamber diameter: 7/8 of an inch. The weight of the pipe is 29 grams/1.06 ounces. It is a beautiful pipe and one that will be on the Irish Pipe Makers Section of the rebornpipes store soon. If you are interested in adding it to your collection let me know. Thanks for walking through the restoration with me as I worked over this pipe. Thanks to each of you who are reading this blog.

As always, I encourage your questions and comments as you read the blog. Thanks to each of you who are reading this blog. Remember we are not pipe owners; we are pipe men and women who hold our pipes in trust until they pass on into the trust of those who follow us.

New Life Sandblast Republic Era Peterson’s System Standard 312


Blog by Steve Laug

The next pipe on the work table is a sandblast Peterson’s System pipe that we purchased from our connection in Copenhagen, Denmark on 01/26/2023. It was stamped Peterson’s [over] System [over] Standard on the underside of the shank followed by Made in the Republic of Ireland (in three lines) [over] the shape number 312. It has a sandblast finish around the bowl and shank that is covered with a shiny coat of varnish it appears over a lot of oils, debris and grime. There was a moderate cake in the bowl and a light lava overflow in the sandblast on the rim top. The top and edges of the rim looked good under the tars and lava. There was a very beautiful pipe underneath all of the buildup of years of use. The nickel ferrule on the shank end was oxidized and is stamped on the top and left side K&P Peterson’s [over] the three common hallmarks on System pipes – a shamrock, a wolf hound, and a tower. The stem was a Peterson’s style P-Lip. It was well polished and shiny with light tooth marks and chatter. Jeff took photos of the pipe before he started his cleanup work on it. Jeff took photos of the bowl and rim top to show the moderate cake in the bowl and the light lava build up on the sandblast rim top and the edges of the bowl. The rim top and edges looked pretty good and a proper clean up would tell the full story. Jeff took photos of the top and underside of the stem showing the tooth chatter, scratching, calcification and oxidation on the stem surface and wear on the edges of the button. The stem looks far better in the photos than it does in person. The button edge was very worn and was in tough condition. The edges were damaged enough for me to want to replace this stem. More would be visible once Jeff cleaned it up. Check the later photos. Jeff took photos of the sides and heel of the bowl to show the condition of the finish. You can see the grime around the sides of the bowl and shank under the spotty looking shiny coat on the finish. It seems to fill in the grooves in the blast. Jeff took photos of the stamping on the underside of the bowl and shank. The stamping was faint but readable as you can see from the photos. It read as noted above. The Nickel Ferrule is actually clearly stamped and readable. The hallmarks are light but readable. I am including the information from Pipedia’s article on Peterson pipes. It is a great read in terms of the history of the brand (https://pipedia.org/wiki/Peterson). I have included a bit of the pertinent history here.

1950 – 1989 The Republic Era – From 1950 to the present time, the stamp for this era is “Made in the Republic of Ireland” in a block format generally in three lines but two lines have been used with or without Republic being abbreviated.

During the 1950’s and 60’s the Kapp & Peterson company was still in the ownership of the Kapp family. However 1964 saw the retiral of the company Managing Director Frederick Henry(Harry) Kapp.

Pipedia also included a section of information on the System pipes including a diagram of the systems look (https://pipedia.org/wiki/Peterson#Republic_Era_Pipes). I quote a section of the article in part and include a link to another article on Pipedia on the System pipe.

The Peterson System pipes are the standard bearers of the Peterson pipe family, famous for the excellent smoking pleasure they provide. Often imitated but never equaled, the Peterson System smokes dry, cool and sweet, thanks to the scientific effectiveness of the original design. The heart of the System is the unique graduated bore in the mouthpiece. This makes the suction applied by the smoker 15 times weaker by the time it reaches the tobacco chamber. The result is that all the moisture flows into the reservoir and, thus cannot reach the smoker’s mouth. The Peterson Lip further enhances the effectiveness of the graduated bore by directing the flow of smoke upwards and away from the tongue. This achieves a uniquely even distribution of smoke and virtually eliminates any chance of tonguebite or bitterness. Furthermore, the shape is contoured so that the tongue rests comfortably in the depression under the opening. Each “PLip” mouthpiece is made from Vulcanite. For the Peterson System pipes to work properly, the stem/tenon has to have an extension, the tip of which will pass by the draft hole from the bowl and into the sump. Upon the smoker drawing in smoke, this extension then directs the smoke down and around the sump to dispense a lot of the moisture before the smoke enters the extension and stem. On the System Standards and other less expensive systems, this extension with be made of Vulcanite turned integrally with the stem. On the more expensive System pipes this extension will be made of metal which screws into the Vulcanite stem. This extension on the earlier pipes will be of brass and the newer pipes will be of aluminum. Most smokers not knowing this function of the metal extension, assumes that it is a condenser/stinger and will remove it as they do with the metal condensers of Kaywoodie, etc. Should you have a System pipe with this metal extension, do not remove it for it will make the System function properly and give you a dryer smoke (https://pipedia.org/wiki/A_closer_look_at_the_famous_Peterson_Standard_System_Pipe).

I have included the information on the shape number on this pipe that I picked up on researching the previous pipes. This is the second of two Peterson’s System pipes marked with the 312 shape number that I have worked on in the past few days. I have included a page from a Petersons Catalogue that I have on rebornpipes (https://rebornpipes.com/tag/peterson-hallmark-chart/). I have put a red oval around the 312 shown in the catalogue page shown below. That should give a clear picture of the size and shape of the pipe.I knew that I was dealing with a Republic Era pipe made between 1950-1989. It was a Sandblast Peterson’s System Standard 312 Billiard with an interesting blast finish. The bowl was stained with a combination of brown stains. Now it was time to work on the pipe.

Jeff had cleaned it thoroughly. He had reamed it with a PipNet reamer and cleaned that up with a Savinelli Fitsall Pipe Knife. He had scrubbed the exterior of the briar with undiluted Murphy’s Oil Soap. He removed the shiny coat on the briar with acetone on cotton pads. He cleaned out the interior of the shank, sump and airway in the shank and stem with alcohol, pipe cleaners and cotton swabs. He scrubbed the stem with Soft Scrub to remove the oxidation and calcification on the surface. He soaked it in Before & After Deoxidizer to remove the oxidation. He removed it from the Deoxidizer and rinsed it off with warm water. I took some photos of the pipe before I started my part of the work. I took some close up photos of the rim top and also of the stem surface. I wanted to show what an amazing job Jeff did in the cleanup of the rim top. The rim top was and inner edge were in good condition. I also took close up photos of the stem to show the condition of the vulcanite. It was still oxidized and the tooth marks on the button and on the stem ahead of the button were very visible in the photos. The button edge of the stem was worn down to almost nothing on both sides.One of the things I appreciate about Jeff’s cleanup is that he works to protect and preserve the nomenclature on the shank of the pipes that he works on. The stamping on this one was very faint to start with so I was worried that it would disappear altogether with the cleanup. He was not only able to preserve and maintain its condition in the process. I took some photos to show the clarity of the stamping. I have noticed that many restorers are not careful to protect the stamping in their cleaning process and often by the end of the restoration the nomenclature is almost destroyed. I would like to encourage all of us to be careful in our work to preserve this as it is a critical piece of pipe restoration! I took the stem off the shank and took a photo of the pipe to capture the look of the pipe as a whole. The pipe bowl was very clean and the sandblast looked great. I rubbed the bowl and rim down with Before & After Restoration Balm. I worked it into the sandblast surface of the briar with my fingertips and a horse hair shoe brush to clean, enliven and protect it. I let the balm sit for 10 minutes and then buffed with a cotton cloth to raise the shine. I really like watching the Balm do its magic and bring the briar alive. With briar polished with the Restoration Balm I moved onto the metal. I polished the Nickel Ferrule with a jewellers cloth to raise the shine and to protect it from further oxidation. I set the bowl aside and turned my attention to the stem. I went through my stems and found a perfect unused replacement that I had picked in a batch I stems I received from a local pipe shop. It was the exact shape, and length as the original but the diameter of the tenon end would need to be reduced by sanding.    I worked on the diameter of the tenon with a folded piece of 220 grit sandpaper. I would not need to remove much but just enough to make the fit snug in the shank. Once finished the fit in the shank was perfect.I polished the stem with micromesh sanding pads – wet sanding with 1500-12000 grit pads. I wiped the stem down after each sanding pad with Obsidian Oil. I polished it with Before & After Pipe Stem Polish – both Fine and Extra Fine. I gave it a coat of Obsidian Pipe Stem Oil. It works to protect the stem from oxidizing. I set it aside to dry. Once again at this point in the restoration process I am excited to be on the homestretch. I look forward to the final look when the Republic Era Sandblast Peterson’s System Standard 312 is put back together, polished and waxed. I put the bowl and stem back together. I lightly polished the bowl and the replacement stem with Blue Diamond. I gave the bowl and the newly fit stem multiple coats of carnauba wax. I buffed the pipe with a clean buffing pad to raise the shine. I hand buffed it with a microfiber cloth to deepen the shine. The pipe polished up pretty nicely. The depths of the sandblast really pop with the wax and polish. The shiny new black vulcanite stem is a beautiful contrast to the browns of the bowl and thick shank and Nickel ferrule. This Republic Era Peterson’s Sandblast System Standard 312 Bent Billiard was another fun pipe to work on. It really is a quite stunning piece of briar whose shape follows the flow of the briar. The pipe feels great in the hand will be better when warmed up while smoking. The finished pipe is shown in the photos below. The dimensions of the pipe are Length: 6 ½ inches, Height: 1 ¾ inches, Outside diameter of the bowl: 1 ¼ inches, Chamber diameter: ¾ of an inch. The weight of the pipe is 1.76 ounces/49 grams. I will be putting it on the rebornpipes store in the Irish Pipemakers Section if you would like to add it to your rack and carry on the previous pipeman’s legacy. This is an interesting estate to bring back to life.

As always, I encourage your questions and comments as you read the blog. Thanks to each of you who are reading this blog. Remember we are not pipe owners; we are pipe men and women who hold our pipes in trust until they pass on into the trust of those who follow us.

Restoring a Smooth, Republic Era Peterson’s System Star 307 Sterling Silver Ferrule


Blog by Steve Laug

The next pipe on the work table is Peterson’s System pipe that we purchased from and estate in Plano, Texas, USA on 03/30/2022. It was stamped Peterson’s [over] System [over] Star on the left side of the shank vertically below the silver ferrule. On the right it is stamped Made in the Republic of Ireland (in three lines) [over] the shape number 307. It has a smooth finish around the bowl and shank that is covered with a lot of oils, debris and grime. There was a thick cake in the bowl with remnants of tobacco stuck on the walls. There was a lava overflow on the rim top that was heavier toward the back side. The top and edges of the rim were well hidden under the tars and lava. There was a very beautiful pipe underneath all of the buildup of years of use. The ferrule on the shank end was oxidized and is stamped on the top and left side Peterson [over] Dublin. That is followed by Sterling [over] Silver. On the underside there are three hallmarks – Hibernia seated, Crowned Harp for country of manufacture and a date letter in this case a lower case “m”. There is a small dent on the underside of the ferrule. The stem was a Peterson’s style P-Lip. It was oxidized and calcified toward the end with some tooth marks and chatter. There were tooth marks on the button itself as well. Jeff took photos of the pipe before he started his cleanup work on it. Jeff took photos of the bowl and rim top to show the thick, hard cake in the bowl with remnants of tobacco stuck on the walls of the bowl. There was a lava build up on the top of the rim and the edges of the bowl. The rim top looked pretty good but it was hard to know for sure if there was damage under the thick lava. Only clean up would tell the full story. Jeff took photos of the top and underside of the stem showing the tooth chatter, scratching, calcification and oxidation on the stem surface and wear on the edges of the button. Jeff took photos of the sides and heel of the bowl to show the condition of the finish. You can see the grime around the sides of the bowl and shank. Even under the dirt and debris of the years it looked very good. Jeff took photos of the stamping on the underside of the bowl and shank. The stamping was faint but readable as you can see from the photos. It read as noted above. The Sterling Silver Ferrule is actually clearly stamped and readable. The hallmarks are light but readable. I have not seen the System Star stamp before so this new stamping made me once again turn to The Peterson Pipe by Mark Irwin & Gary Malmberg. I looked up the System Star in the book and on page 315 it includes this information:

Peterson’s over System over Star (c1979-c.1985, 2010) A high-quality line between the De Luxe and Premier, in smooth burgundy finish with sterling domed mount.

I have included the information on the shape number on this pipe that I picked up on researching the previous pipes. This is the second of two Peterson’s System pipes marked with the 307 shape number that I have worked on in the past few days. I have included a page from a Petersons Catalogue that I have on rebornpipes (https://rebornpipes.com/tag/peterson-hallmark-chart/). I have put a red box around the 307 shown in the catalogue page shown below. That should give a clear picture of the size and shape of the pipe. I am also including the information from Pipedia’s article on Peterson pipes. It is a great read in terms of the history of the brand (https://pipedia.org/wiki/Peterson). I have included a bit of the pertinent history here.

1950 – 1989 The Republic Era  – From 1950 to the present time, the stamp for this era is “Made in the Republic of Ireland” in a block format generally in three lines but two lines have been used with or without Republic being abbreviated.

During the 1950’s and 60’s the Kapp & Peterson company was still in the ownership of the Kapp family. However 1964 saw the retiral of the company Managing Director Frederick Henry(Harry) Kapp.

Pipedia also included a section of information on the System pipes including a diagram of the systems look (https://pipedia.org/wiki/Peterson#Republic_Era_Pipes). I quote a section of the article in part and include a link to another article on Pipedia on the System pipe.

The Peterson System pipes are the standard bearers of the Peterson pipe family, famous for the excellent smoking pleasure they provide. Often imitated but never equalled, the Peterson System smokes dry, cool and sweet, thanks to the scientific effectiveness of the original design. The heart of the System is the unique graduated bore in the mouthpiece. This makes the suction applied by the smoker 15 times weaker by the time it reaches the tobacco chamber. The result is that all the moisture flows into the reservoir and, thus cannot reach the smoker’s mouth. The Peterson Lip further enhances the effectiveness of the graduated bore by directing the flow of smoke upwards and away from the tongue. This achieves a uniquely even distribution of smoke and virtually eliminates any chance of tonguebite or bitterness. Furthermore, the shape is contoured so that the tongue rests comfortably in the depression under the opening. Each “PLip” mouthpiece is made from Vulcanite. For the Peterson System pipes to work properly, the stem/tenon has to have an extension, the tip of which will pass by the draft hole from the bowl and into the sump. Upon the smoker drawing in smoke, this extension then directs the smoke down and around the sump to dispense a lot of the moisture before the smoke enters the extension and stem. On the System Standards and other less expensive systems, this extension with be made of Vulcanite turned integrally with the stem. On the more expensive System pipes this extension will be made of metal which screws into the Vulcanite stem. This extension on the earlier pipes will be of brass and the newer pipes will be of aluminium. Most smokers not knowing this function of the metal extension, assumes that it is a condenser/stinger and will remove it as they do with the metal condensers of Kaywoodie, etc. Should you have a System pipe with this metal extension, do not remove it for it will make the System function properly and give you a dryer smoke (https://pipedia.org/wiki/A_closer_look_at_the_famous_Peterson_Standard_System_Pipe).

I have written many times about the hallmarks on Peterson’s Pipes and have included date charts in the past. Here is another date chart (https://rebornpipes.com/wp-content/uploads/2015/04/peterson-hallmark-chart.jpg). I spelled out the details of the hallmarks in the opening paragraph above but now want to specifically address the date of the pipe. It has a lower case “m” in the cartouche on the silver. Using the chart below the lower case “m” dates the pipe as being made in 1978. I have drawn a red box around the pertinent letter in the screen capture below. With that information in hand I knew what I was dealing with in terms of the stamping and the age of this pipe. I knew from the information that the System Star pipe was made during the Republic Era in 1978. Now it was time to work on the pipe.

Jeff cleaned this filthy pipe with his usual clean up process. This one was a real mess and I did not know what to expect when I unwrapped it from his box. He reamed it with a PipNet pipe reamer and cleaned up the reaming with a Savinelli Fitsall Pipe Knife. He scrubbed out the internals with alcohol, pipe cleaners and cotton swabs until the pipe was clean. He scrubbed the exterior of the bowl with Murphy’s Oil Soap and a tooth brush to remove the grime and grit on the briar and the lava on the rim top. The finish looks very good with great looking grain around the bowl and shank. Jeff soaked the stem in Briarville’s Pipe Stem Deoxidizer to remove the oxidation on the vulcanite. When the pipe arrived here in Vancouver for the second stop of its restoration tour I was amazed it looked so good. I removed the incorrect stem and replaced it with a correct P-Lip stem for a 307 that I had here in my box of stems. The bonus was that the tenon had a brass chimney in the end that was correct for this pipe. I took some close up photos of the rim top and also of the stem surface. I wanted to show what an amazing job Jeff did in the cleanup of the rim top. The rim top was and inner edge were in good condition. There was some darkening and slight damage to the inner edge. The rim top also had some nicks and marks. I also took close up photos of the stem to show the condition of the vulcanite. It was quite clean  and the tooth marks on the button and on the stem ahead of the button were very visible in the photos.One of the things I appreciate about Jeff’s cleanup is that he works to protect and preserve the nomenclature on the shank of the pipes that he works on. The stamping on this one was very faint to start with so I was worried that it would disappear altogether with the cleanup. He was not only able to preserve and maintain its condition in the process. I took some photos to show the clarity of the stamping. I have noticed that many restorers are not careful to protect the stamping in their cleaning process and often by the end of the restoration the nomenclature is almost destroyed. I would like to encourage all of us to be careful in our work to preserve this as it is a critical piece of pipe restoration! I took the stem off the shank and took a photo of the pipe. I decided to start my work on the pipe by cleaning up the rim top and inner edge of the bowl with a folded piece of 220 grit sandpaper. I removed the damage on the inner edge and the nicks on the rim top. It looked significantly better.  I polished the briar with micromesh sanding pads – dry sanding it with 1500-12000 grit sanding pads. I wiped it down with a damp cloth after each sanding pad to remove the dust. The briar was really shining by the final pad. I rubbed the bowl and rim down with Before & After Restoration Balm. I worked it into the surface of the briar with my fingertips to clean, enliven and protect it. I let the balm sit for 10 minutes and then buffed with a cotton cloth to raise the shine. I really like watching the Balm do its magic and bring the briar alive. With briar polished with the Restoration Balm I moved onto the metal. I polished the Sterling Silver ferrule with a jewellers cloth to raise the shine and to protect it from further oxidation. I “painted” the stem surface with the flame of a Bic lighter to lift the tooth marks. I was able to lift them a bit but not totally. I filled in the deep marks that remained with clear CA glue and sit it aside to cure. Once it cured I used a file to flattened the repairs and redefine the button edge. I sanded the stem with 220 grit sandpaper to further blend in the repairs. I started polishing it with 400 grit wet dry sandpaper. I scrubbed the stem with SoftScrub to remove the oxidization left in the vulcanite of the saddle stem. I was able to remove a significant amount of oxidation that was on the saddle portion of the stem. It looked significantly better at this point.I touched up the “P” logo on the left side of the saddle stem with white acrylic fingernail polish. I let it dry then I polished off the excess with a worn 1500 grit micromesh sanding pad. Once the excess was removed the stamp looked much better.I polished the stem with micromesh sanding pads – wet sanding with 1500-12000 grit pads. I wiped the stem down after each sanding pad with Obsidian Oil. I polished it with Before & After Pipe Stem Polish – both Fine and Extra Fine. I gave it a coat of Obsidian Pipe Stem Oil. It works to protect the stem from oxidizing. I set it aside to dry. Once again at this point in the restoration process I am excited to be on the homestretch. I look forward to the final look when the Peterson System Star 307 is put back together, polished and waxed. I put the bowl and stem back together. I lightly polished the bowl and stem with Blue Diamond to polish out the scratches in the briar and the vulcanite. I gave the bowl and the stem multiple coats of carnauba wax. I buffed the pipe with a clean buffing pad to raise the shine. I hand buffed it with a microfiber cloth to deepen the shine. The pipe polished up pretty nicely. The depths of the rustication really pop with the wax and polish. The shiny black vulcanite stem is a beautiful contrast to the browns of the bowl and thick shank and Sterling Silver ferrule. This Republic Era Peterson’s System Star 307 Bent Billiard was another fun pipe to work on. It really is a quite stunning piece of briar whose shape follows the flow of the briar. The pipe feels great in the hand will be better when warmed up while smoking. The finished pipe is shown in the photos below. The dimensions of the pipe are Length: 6 ½ inches, Height: 2 inches, Outside diameter of the bowl: 1 ¼ inches, Chamber diameter: ¾ of an inch. The weight of the pipe is 2.43 ounces/70 grams. I will be putting it on the rebornpipes store in the Irish Pipemakers Section if you would like to add it to your rack and carry on the previous pipeman’s legacy. This is an interesting estate to bring back to life.

As always, I encourage your questions and comments as you read the blog. Thanks to each of you who are reading this blog. Remember we are not pipe owners; we are pipe men and women who hold our pipes in trust until they pass on into the trust of those who follow us.

New Pipe Storage Solution


By Al Jones

For the past 10 years, my ever-expanding pipe collection has been stored and displayed in a old, oak bow-front cabinet. My wife indulges mea and this sits in our formal living room. The oak cabinet has been a wonderful solution. Guest to our home are always drawn to it and it allows me to talk about my collection and hobby. Neighbors and relatives usually stop by to see what is new in my collection. I added several puck style LED lights and I’ll often turn on the light and admire the collection, before going upstairs to bed at night.

Over a period of several years, I found a number of “Fairfax” six-pipes stands and one 12-pipe stand that fit perfectly on the back of each shelf. Those were modified from top “O” holes to u-shape stem holders, to better suit my mostly bent, larger pipes. We had two beloved Westie’s in our family, and I slowly acquired a large group of “Scottie” style pipe stands for my most cherished pipes (on the top two shelves). At point, this cabinet held close to 100 pipes. As we get ready to transition to a smaller retirement home, I’ve slowly been selling some pipes and I’m now down to around 60, which is still a bit too many. I knew moving the oak bow front cabinet was not going to be wise.

Below is the oak cabinet. The wood carvings on the top were purchased by my father, from Oberammergau, Germany, which is home to many wood carvers.

Scanning thru classified listings on Facebook Marketplace, I determined that a “Bachelors Chest” would best suit my needs. I found this one at a local antique store. It has four drawers of the right height and the footprint was idea. It had some scratches on top, but I knew it would refinish nicely. Below is the cabinet as found.

I stripped the top, sides and drawer fronts. A red mahogany stain was chosen that matched up well with the factory finish. I did want it to have a darker stain color. After several applications of stain, a satin finish polyurethane finish was sprayed on. Below are pictures of the stripped pieces and then re-stained. We have a tent to spray on the finish. My wife has the right touch for the spray on poly, so she had that task.

I didn’t want to reuse the old fashioned looking hardware, and I found a set of less busy, antique bronze replacements on eBay. On Amazon, I found a roll of 1/8″ thick foam padding with a sticky back that was used in each drawer, to keep the pipes in place and provide a cushion surface for the them.

Here is the finished cabinet, with my pipes and decorative items moved over. It easily holds my collection, with a little room to grow for the inevitable “must have”. I’m that moving forward, this cabinet will serve me well.

Below are the racks and stands that I have collected. I’ll eventually sell them on the PipesMagazine classifieds forum. I have the oak-bow front cabinet for sale locally, thru Facebook Marketplace. The wood stands are mostly Duck-it and I also have brass and Syroco stands.