Blog by Mike Belarde
Hello, I hope everyone is doing well. I’m grateful to finally have an easy going Sunday to clean up a pipe. This GBD Tomato is not a shape that I have encountered often, and I was excited to win the online auction.
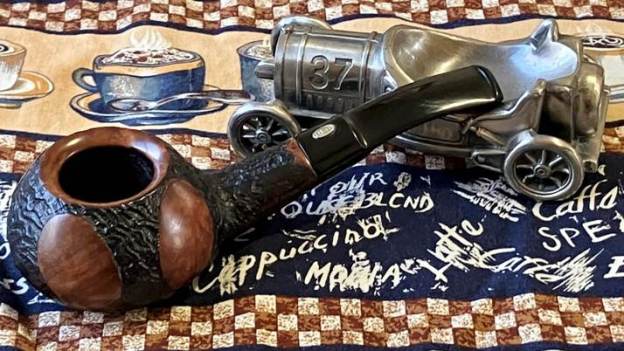
The pipe is an impressive piece of briar with a very wide and squat bowl. When I received it, I was pleased that it was in fairly good condition. The stummel had been cleaned and waxed, but the pipe still looked a little grimy and dull. The chamber and rim had a light build up of carbon. Thankfully, the stem still had a nice crisp button and was only lightly oxidized. Below are photos of the initial condition. As you can see from the photos, it is a great looking pipe. I really like GBD’s Fantasy and Tapestry lines with their whimsical geometric smooth panels over a black or brown sandblast. The stamping on this pipe is still crisp. The markings include the Colossus stamp, and the linear London England stamp. Below these, are the GBD in an oval over the Fantasy stamp with the shape number of 9643.
The Colossus stamp indicates that this was part of GBD’s line of supersized pipes. The linear London England stamp, paired with the brass GBD rondel, dates this pipe prior to 1981 or 1982. My guess is this pipe was made sometime in the 1970s. Eager to clean the pipe up and add it to my collection, I placed the stem in a small Tupperware to soak overnight in Briarville’s Pipe Stem Oxidation Remover solution. I then set to cleaning up the stummel. Realizing all my pipe reamers were too small for the width of the chamber, I wrapped a piece of 220 grit sandpaper around a highlighter to remove the built-up carbon.
 After this was done, I took the stummel to the sink and washed the exterior with Oil soap and an old toothbrush. A light lava build up was present on the rim so I used an old green scouring pad to scrub it away. With the chamber and the exterior clean, the Tomato was looking really nice. The chamber seemed to be in good condition once the light cake had been removed.
 Thankfully the internals of this pipe were fairly clean and required minimal work on my part. I have to admit that cleaning the draught is my least favorite part of restoring estate pipes! I first used a 3mm wire brush to gently clean out the shank. Once done, I cleaned the internals with a handful of pipe cleaners dipped in 99% Isopropyl alcohol.
 After the interior of the pipe was cleaned to a satisfactory level, I prepared the pipe for de-ghosting. I put two fluffy pipe cleaners down the shank to act as a wick and then placed two cotton balls in the chamber. I soaked each cotton ball with alcohol, as I placed them one at a time in the chamber. To let the alcohol, work its magic and draw out more of the old tar and grime, I let it sit overnight.
  The next day I took the stem out of the Briarville solution and scrubbed the surface with a green scouring pad and some Soft Scrub. The stem looked great, but I ran into a problem – for some reason the brass rondel came off. I’m not really sure what went wrong, but it would have to be fixed.
  I reattached the rondel by applying a small amount of Super Glue and used a soldering iron to apply heat. Hopeful that the heat would soften the vulcanite under the rondel and allow it to reattach as the vulcanite cooled. The process seemed to work, but I’m going to keep an eye on the rondel for possible problems down the road.
With that done, I sanded the stem with some 220 grit sandpaper and polished it with the series of micropads (1500-12000). Between each pad I wiped the stem down with stem oil. In the final step, I applied some Before and After Extra Fine Stem polish. I think the results turned out pretty well and am happy with how the stem looked. I may go back and rework some of the area around the rondel, but I am leery of disturbing the area too much and dislodging it again. Satisfied with the progress on the stem, I turned my attention to the stummel. I polished the rim and smooth panels with the progression of micromesh pads (1500-12000), wiping the areas with a damp paper towel after each pad. I lightly polished the sandblast areas with the 6000-12000 pads to avoid removing any of the original black stain. After I cleaned the stummel, I noticed a few areas that needed to be re-stained. You’ll notice the areas where the brown stain was showing through on the sandblast in the pictures below. I also noticed the transition between the shank and stem was darkened like it had been stained over with black dye. On other Fantasy pipes that I own, this transition is usually stained brown giving the pipes a nice highlight on the shank.
  I lightly sanded the rim with a piece of 220 grit sandpaper to remove some lingering darkening. I also lightly sanded the smooth panels and shank transition to remove some of the dark stain there. After this was done, I mixed a 1-to-3 ratio of Medium Brown and Black dyes with alcohol to thin them down. I like to apply the stain with a small hobby brush as I find the brush helps me to coat the stummel evenly. Once the stain was applied, I used a candle to fire the briar and set the dye. I let the stummel sit for 10 or 15 minutes and then removed some of the excess stain with a folded paper towel dampened with alcohol.
 I began to polish the stummel with the micromesh pad series (1500-12000), wiping the briar down with a damp paper towel between each pad. Once finished with the micro pads, I worked some Before and After Restoration Balm into the stummel, let it sit for about 10 minutes, and then buffed it with a cotton cloth. At this point I was very pleased with the results – the pipe looked great!

 For the last step, I buffed both the stummel and stem with Red Tripoli and Blue Diamond. I gave both several coats of Carnauba wax and buffed them with a cotton cloth.
I’m really happy how this pipe turned out! It is a great shape and the size of the bowl just dominates one’s palm. The overall length of the pipe is 5.25”, with the outside diameter of the bowl coming in at 2.13”. The chamber itself is a generous 1”, while the entire bowl stands at a modest 1.13”. The pipe weighs a noticeable 2.20oz, and its haft and size just feel nice in one’s hand. It should be a nice smoking pipe, and I’m happy that I can add it to my collection. Thank you for taking the time to read this blog!


