Blog by Paresh Deshpande
I am pretty angry and frustrated at myself!!!!! That’s a very strong and confusing sentiment against oneself, I admit. But that’s the truth. Let me explain.
I spent nearly two weeks working on three pipes; a Dunhill Bruyere, a Tim West Freehand and a Stefano Exclusive. These three had their lip end of the stem either chewed off for about an inch and a half or a through and through hole!!! It could be considered as a major stem repair project. I successfully rebuild the stem end, including the button, lip edges and the slot. Though, I was unable to shape the slot as perfectly as I would have liked on the Dunhill, the repair was perfect on the Tim West and the Stefano. I felt elated and supremely confident about my capabilities. The blending of the repairs appeared spot on and I blazed through the remaining restoration, clicking pictures of the progress without giving them a second look. When, at the end, I went through the pictures while doing the write up, to my horror, the repaired stem and stummel stared back at me with all their imperfections on display in form of scratches, brownish spots of oxidation and fillings showing through the stain!! This was embarrassing for me and I shared these images with Mr. Steve. In his characteristic method of pointing out my short comings, I shall quote his reply to me, “Takes lots of work… I am having a little trouble with that lately…. Trying to rush it. Pipe looks good”, unquote!! Readers of rebornpipes and those who know him would be smiling while reading this part. Well, to cut the banter short, I shall rework all these short comings later as I want to start on a fresh pipe!!
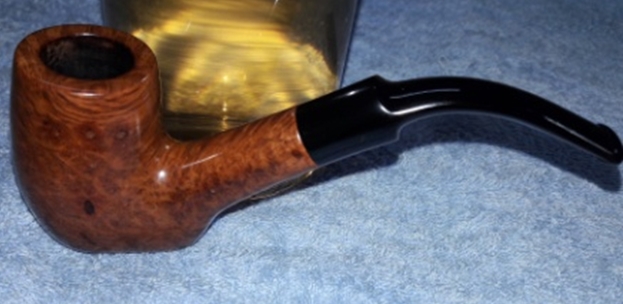
The pipe on my work table, from my inherited collection, is one large barrel shaped full bent (this aspect needs to be confirmed and will be cleared as we progress further) sitter with beautiful and very tightly packed birds’ eye grain on either side of the bowl and shank, extending over to more than half of the front of the stummel. Equally tightly packed cross grain are seen on the front left and back of the bowl and also on the upper and bottom surface of the shank. It is stamped on the left side of the shank as “HOUSE OF LORDS” over “MADE IN ENGLAND” in block capital letters. The right side of the shank bears the numeral “275”, probably the shape code, towards the bowl shank junction. The vulcanite saddle stem bears the Crown logo stamped on the left of the round stem. The stem logo and the shape code are slightly worn off. I have included a picture of the stem logo from pipephil.eu to show how it appears on this stem.
 To know more about the brand, the lines offered by the maker and attempt to date this pipe, I visited pipedia.org, which has wealth of information on almost all pipes. The only information available here was that this brand was by Samuel Gordon in the early 20th century and thereafter became a Sasieni second. My next go to site is pipephil.eu where the stampings and stem logos on a pipe are used for brand information and to date a pipe. Here is the link for information on the pipe currently on my work table:-
www.pipephil.eu/logos/en/logo-h3.html#houseoflords
This site also pointed to the same information gleaned from pipedia.org. Here is what was found on pipephil.eu.
Brand from Samuel Gordon. Maybe a Sasieni second (J.M. Lopes, op. cit.)
I further followed the link to “Gordon” and learned that Samuel Gordon had founded the brand “GORDON” in 1910-20 eras. This is the link for Gordon brand of pipes; www.pipephil.eu/logos/en/logo-g4.html#gordon
From the above information, it is assumed that this piece is from the early 20th century period. Wow!!!! This is really an old pipe. The pipe brands and its vintage, those that are in my grandfather’s collection, never cease to amaze me and there are some really collectible pipes that I have inherited.
INITIAL VISUAL INSPECTION
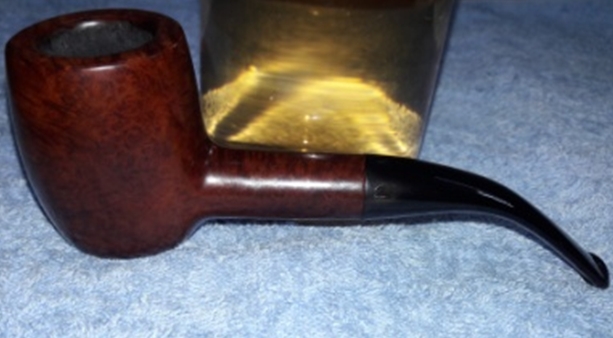
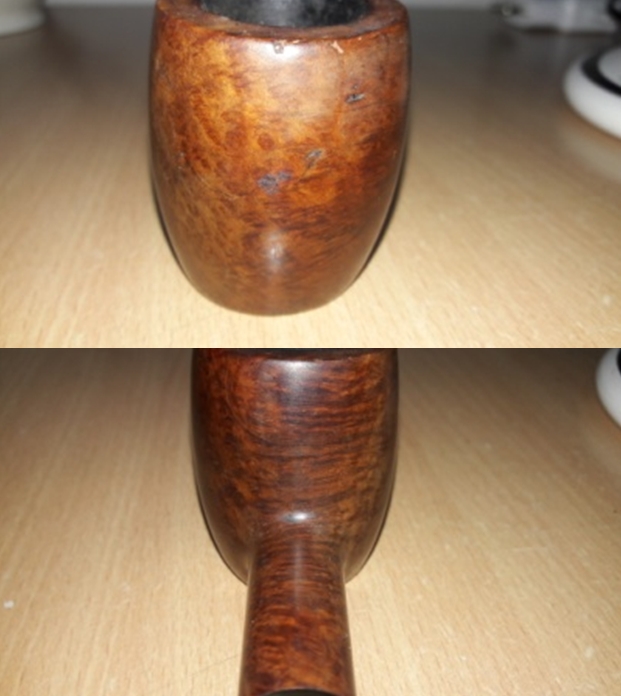
The chamber shows a nice even build up of a cake which makes it difficult to comment on the condition of the inner walls of the chamber. However, the general appearance of the stummel makes me believe that there will not be any major issues with the chamber walls. The rim top is clean with no overflow of lava and this is a big surprise coming from my inherited collection!! The chamber is out of round with the inner rim edges showing charring at 3 o’clock and 9 o’clock direction. It appears that this charred area of the inner edge was tried to get rid off in an amateurish way. The outer rim is also damaged and has a few chips and dents to the front, probably caused due to hitting the bowl against a hard surface to remove the dottle!! All in all, I would say that this was one of the few well cared for pipes from his collection!! The surface of the stummel is covered in dirt and grime accumulated over a period of time. The stummel surface is peppered with numerous dents and dings, more so towards the front of the bowl, probably caused due to careless and uncared for storage for the last 40-45 years and equal number of years of previous usage!!!! It will be a big decision whether to address these dents and dings by abrasive sanding method and loose the patina which has developed on the surface, or let them be. Well, I shall cross the bridge when I reach it. The mortise appears to be either clogged or has some obstruction as air flow through it is hard and laborious.
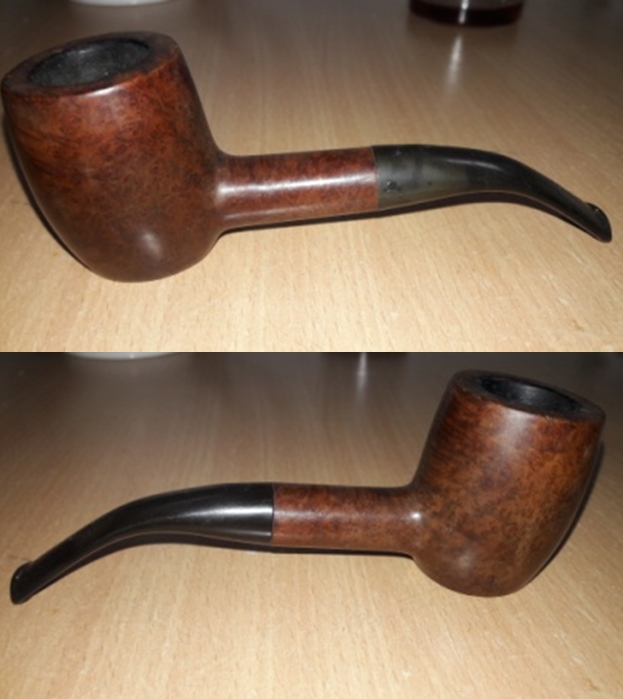
 The vulcanite stem is heavily oxidized. Some light tooth chatter is seen on both surfaces of the stem towards the lip. This issue should not be a major headache to address. The lip edge on both sides is crisp but lightly damaged. The quality of vulcanite is good.
 The thing that struck me odd was the bend on the stem. It was bent way too much than the normal. When I shared the pictures of this pipe with Mr. Steve, he too found the angle of the bend too rakish and very odd, to the extent that he felt it might not even be correct for the pipe. However, the stem logo confirmed otherwise. So, I am confronted with the controversial prospect between “PRESERVATION” and “RESTORATION”!! While I do not have as clear a mandate as Mr. Steve had, managing this conflict, for me, is more challenging. To me, this inheritance is a family heirloom and in this particular instance, I would rather maintain this profile instead of straightening it. Mr. Steve gave me a second perspective that the stem was bent during storage due to intense heat which is prevalent in India and may not be original as my grandfather had smoked!! Well, this could be true. The inner conflict continued while I proceed to clean and spruce up the pipe to its pristine condition (or at least make a sincere attempt at it)
THE PROCESS
I reamed the chamber with my fabricated knife and scraped out all the cake. With a folded piece of 180 grit sandpaper, I further sand out the last traces of remaining cake and expose the walls of the chamber. There are some very minor and insignificant webs of line on the chamber walls that can be seen to the front and above the drought hole. I wiped the chamber with a cotton pad dipped in isopropyl alcohol to remove the carbon dust left behind by all the reaming and sanding process. I gently scraped the rim top surface with a sharp knife to remove the lava overflow. Using the same knife, I gently scrapped out the charred briar from the inner rim edge till I reached solid wood. The following pictures show the inner rim edge after the removal of the charred wood from the 3 o’clock and 9 o’clock direction. Also seen is the earlier amateurish attempt at addressing the issue of out of round bowl. I shall address this issue by creating a bevel to inner edge.
 This was followed by cleaning the mortise with cue tips, pipe cleaners and shank brush dipped in isopropyl alcohol. With my fabricated spatula shaped knife, I scrapped out the dried oils and tars from the mortise. My, there were chunks of gunk in there and can be seen in the following pictures!! Finally after some diligent cleaning, the mortise is clean and this further completely eliminated traces of old smells from previous usage.
 The internals of the stummel is now clean and fresh. Now, it was the turn of the stummel to get cleaned up. Using a hard bristled tooth brush dipped in undiluted Murphy’s oil soap, I very deliberately scrubbed the surface of the stummel. I cleaned the rim too. The stummel and rim top was dried using paper napkins and soft cotton cloth. I am not very happy the way the rim top appears at this stage with all the charring and uneven inner and outer rim edges. This needs to be addressed. I set the stummel aside to dry out naturally.

 After cleaning the rim top with Murphy’s oil soap, the inner edge damage was even more evident, and begged to be addressed before I proceed any further. I topped the rim on a 220 followed by 320 and 600 grit sand paper, checking frequently till I was satisfied that the charred surface was greatly reduced. The inner edge is still uneven, though much better than before topping. With a folded piece of 180 grit sand paper pinched between my thumb and fore finger, I created a bevel on the inner edge. This addressed the issue of uneven and out of round inner edge. A couple of dents and chips are also seen to the outer rim edge and one (circled in red) in the newly created inner edge bevel.
 There were a few slightly deeper chips on the stummel surface. I gouged out the old and dried wood from these dents from the front of the stummel, inner rim edge and the heel and spot filled it with a mix of CA superglue and briar dust (believe you me gentlemen, making and thereafter applying this mix to fill the pits is not as easy as it appears!!!!!! The moment superglue comes into contact with the briar dust; it hardens even before you can blink. Maybe there is an issue with the glue that is available to me here, coupled with the prevailing climatic conditions or maybe one Mr. Dal Stanton could help!!). I always over fill the holes so that when I sand them down they are smooth and I can feather in the fills with the rest of the briar. I set the stummel aside to cure overnight. I had applied this mix of superglue and briar dust to the inner rim edge as it would not be coming in direct contact with heat from the burning tobacco leading to health issues.
  While the stummel was drying, I worked the stem. I covered the stampings on the stem with whitener using a whitener pen. I flamed the stem surface of the stem with a Bic lighter to raise the tooth indentations and scratches on the stem. The heat from the flame of Bic lighter causes the vulcanite to expand and regain its natural shape, reducing the marks. Using a needle file, I sharpened the lip edges. For a better blending, I further sanded the entire stem with 220 followed by 600, 400 and 800 grit sand paper. This helps to reduce the sanding marks left behind by the more abrasive 220 grit paper. To bring a deep shine to the vulcanite stem, I went through the complete set of micromesh pads, wet sanding with 1500 to 2400 grit pads and dry sanding with 3200 to 12000 grit pads. I wiped the stem with alcohol after each pad and rubbed it down with Extra Virgin Olive oil. The internals of the stem was cleaned out using alcohol and pipe cleaners. The finished stem is shown below.

 By the time I had worked on the stem, the fills on the stummel surface had completely cured. I sanded the fills using a flat head needle file and checked to see if I had missed any spots. I wanted the entire surface smooth to the touch. I sanded the spots down and blended them into the bowl surface using a folded 220 grit sand paper. I followed this step by sanding the entire stummel with a 220 grit sand paper followed by 600 and 800 grit sand papers. Once that was done I wiped the bowl down with a cotton cloth dampened with Isopropyl alcohol to remove any remaining dust.
 I wet sand the stummel with 1500 to 2400 grit pads and follow it up by dry sanding with 3200 to 12000 grit pads. Once I was through with the micromesh pad sanding, the fills showed in complete contrast with the rest of the stummel, as can be seen in the pictures below. I hope they will blend in better once I apply the balm and buff the stummel.

 I rub a small quantity of “Before and After Restoration Balm” in to briar and let it rest for a few minutes. The balm almost immediately works its magic and the briar now has a nice vibrant appearance. I further buff it with a horse hair shoe brush. The stummel, at this point in restoration, looks beautiful save for the fills which can still be seen in all their awfulness. To address this, I have the option to stain the stummel with a dark brown stain or I let it be as a being part of its journey thus far!! Thus, another conflict has been added to the existing one regarding the stem. I shall think about it once I reach that point in restoration.

 Before I proceed to final stage of polishing and applying carnauba wax coats, I want to address the superficial and insignificantly thin lines in the chamber as a precautionary measure. I mix activated charcoal and yogurt to the consistency of a thick porridge, not runny while being pliable. Inserting a folded pipe cleaner into the mortise till it peeps out of the draught hole, I apply an even coat of this mixture to the inner walls of the chamber with a modified bamboo frond and set it aside to dry out overnight. The next evening, the coat has completely dried out and is hard. Using a piece of folded 220 grit sand paper, I lightly run it over the coating to a smooth finish.
 I had a long look at the dark fills against the rest of the stummel and did not like it. I made a decision to stain the stummel in dark walnut stain. I use the powder variety of stain and mix it with 99% isopropyl alcohol. I heated the stummel surface with a heat gun and applied the stain with a folded pipe cleaner. As I paint the stummel with stain over sections at a time, I burn the dye using a Bic lighter that combusts the alcohol in the aniline dye and sets the dye pigmentation in the wood. After fully saturating the stummel and covering the whole surface, I set the stummel aside to rest for several hours. Once the stain had set, I mount a cotton cloth buffing wheel on the Dremel and set the speed at about 40% full strength and apply red compound to the stummel. This does help in revealing the grains gradually while masking the darker fills.

 To finish, I re-attach the stem with the stummel. I mounted a cotton cloth buffing wheel to a locally manufactured machine which is similar Dremel. I set the speed at about half of the full power and applied White Diamond compound to the entire pipe. I wiped/ buffed the pipe with a soft cotton cloth to clear it of any leftover compound dust. I then mounted another cotton cloth wheel on to the polishing machine and applied several coats of carnauba wax. I finished the restoration by giving the entire pipe a rigorous hand buffing using a microfiber cloth to raise the shine further.
The completed pipe looks lovely, fresh and vibrant; the photographs in this case, do not do justice to the appearance of this beautiful large barrel-shaped pipe. Thank you for having the patience to reach this far while reading the write up. And as usual, I request all those readers to please leave a comment as it will help me to improve further and hone my skills.


 PS: After the pipe restoration was completed, nearly 15 days later my guide and mentor, Mr. Steve casually asked me if I had decided to straighten the stem. This set me thinking that here is a gentleman who is still thinking about the bent stem and that he is still doing so as he is convinced that a straight stem would look nicer on the pipe and would be original to the pipe. This convinced me to re-straighten the stem to its original. I place a fluffy pipe cleaner through the airway to prevent it from collapsing due to heating and with a heat gun; I heat the stem till it is pliable and straighten out the stem just by eyeballing the shape till satisfied. Here are a few pictures after the stem was straightened. Yes, there are a few minor issues which is a direct result of the process like the alignment of the shank end with the tenon end and slight dullness in the shiny stem etc, but they will be addressed subsequently. The overall appearance of the pipe is much better and the shank flow into the stem is more fluid and even. Thanks Mr. Steve!!