Blog by Dal Stanton
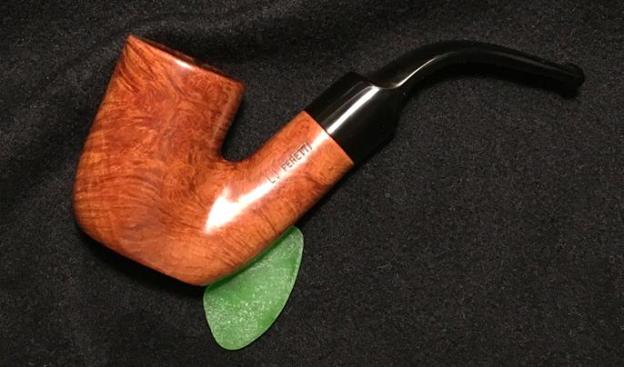
After restoring my first two Oom Pauls (see: LINK) from the L. J. Peretti Co., Tobacconist of Boston, this is the next Oom Paul that came to Bulgaria in the Peretti Lot of 10 I acquired off the eBay auction block. I posted the picture of the 10 (below) on my favorite Facebook pipe groups (The Gentlemen’s Pipe Smoking Society, Old Codgers Smoking Pipe, Pipe Smokers of America, and Tobacco Pipe Restorers) letting interested pipe men and women know that except for one, the Oom Pauls would be available for personal collections. All the Perettis restored and placed with new stewards benefit the Daughters of Bulgaria, an effort to help women and girls (and their children!) who have been trafficked and sexually exploited. This L. J. Peretti Oom Paul Sitter from the Lot of 10 has been commissioned by a pipe man in neighboring Romania, just to the north of Bulgaria. After restored, he will have first dibs on this Peretti now on my worktable!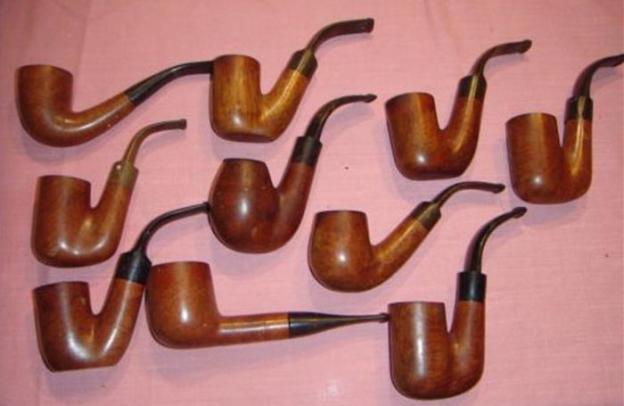 Along with the large stummel, what makes this Peretti stand out is the fact that it is a Sitter – a very nice feature when one is at the table enjoying friends and board games or a hand of cards! I wish that the L. J. Peretti Co., had put out a shape chart in the past – if they had, I haven’t been able to find it! This pipe, with another Sitter in the Lot of 10, might be just a bit shy of full bent status which is the technical norm for Oom Pauls according to Bill Burney’s description of the Oom Paul in Pipedia, but it is clear that Peretti used the same tall, long, full stummel with the Sitters, but widened the bend a bit, perhaps to allow the better balance as the Sitter is seated. My call is that it is very close and either way, will serve his new steward well! Here are pictures I took of the Peretti Oom Paul Sitter on my worktable here in Bulgaria.


 The left side of the shank is stamped with L. J. Peretti with no other markings on the stummel or stem. Along with his brothers and cousins in the Peretti Lot of 10, this Oom Paul Sitter shares the thick carbon cake in the chamber and the rim abuse of incessant lighting over the side of the rim. The extent of the erosion to the briar around the rim due to this scorching I’ll know after the reaming and cleaning of the stummel/rim. The bowl shows normal nicks, scratches and grime that has darkened and obscured the briar. I detect no fills on the surface, but the Sitter’s heel has a large, lightened blotch/fill to be addressed along the way. The stem has moderate oxidation, but the bit is chewed up like all his Peretti brothers and cousins. The former steward liked to chew on his Perettis! The upper/lower bit and button lip have sustained compression dents.
I start the restoration process by addressing the oxidation of the stem. Previously, along with several other stems of pipes in the queue, the Sitter’s stem went into a soak using ‘Before and After Deoxidizer’ to remove the oxidation from the vulcanite stem. I first had cleaned the internals of the stem with isopropyl 95% and pipe cleaners. The stem stayed in the soak for several hours and after removing it from the Deoxidizer, I wiped it down with cotton pads and mineral spirits (in Bulgaria, light paraffin oil). The oxidation wipes off as a nasty brown on the cotton pads. I continue to wipe with cotton pads and paraffin oil until it cleans and is buffing up. The Before and After Deoxidizer does a good job.
 To continue the Before and After process, I now apply first the Fine Polish by putting some on my finger tips and working it into the vulcanite. The polish starts off thick and gritty, but liquifies as I work it around and absorbs into the vulcanite. After a while, I buff off the polish with a cotton pad and then, in the same manner, apply the Extra Fine Polish. I take a picture of the stem after I worked this polish in but before buffing it off. You can make out the texture of the polish on the surface. I then buff it off with a cotton pad. The stem looks clear of oxidation and has a deep black hue.
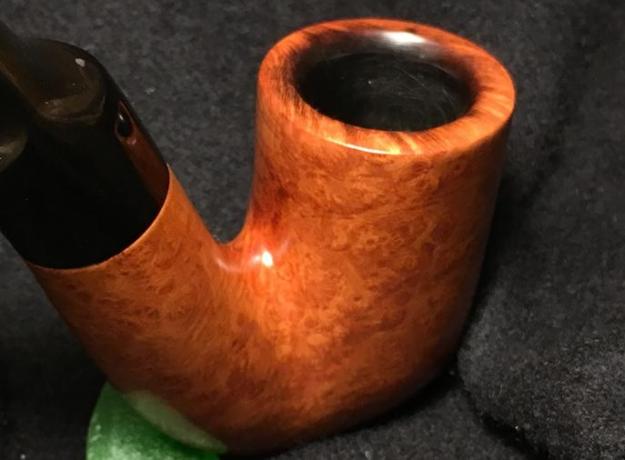
 I look now to the stummel. I begin by reaming the heavily caked Oom Paul chamber. I also work on the rim surface with very thick, crusted lava flow. There is no way to determine the condition of the chamber wall or the rim until the cake is removed. This is a consistent characteristic of all the L. J. Peretti Lot of 10. I use the Pipnet Reaming kit to begin the job starting with the smallest blade over a paper towel to minimize clean up! I use 3 of the 4 blades available. I then use the Savinelli Fitsall Tool to continue to remove carbon from the chamber walls by scraping the chamber wall and reaching the difficult areas. When I detect the walls are scraped smoothly – no more crunching of carbon, I sand the chamber using 240 grit paper wrapped around a Sharpie Pen. Finally, after sanding I wipe the chamber with cotton pads wetted with isopropyl 95% to remove the carbon dust. Looking into the chamber, I see no cracks or crevices. It looks good! I take pictures along the way.

 Now, to attack the thick gunk on the rim, I use undiluted Murphy’s Oil also to clean the entire stummel which is darkened by the grime. I use a cotton pad and Murphy’s and the grime is coming off. I’m pleasantly surprised to see what I thought was a fill on the heel of the stummel disappear! It too was simply gunk on the briar surface. The rim put up some resistance! I first use the cotton pad but quickly utilized a brass brush to scrub the lava over the rim. I also used my pen knife to scrape gently the rim surface. To complete the cleanup, I rinse the stummel and rim with cool tap water. The stummel surface looks good – it cleaned up well and I can see some impressive grain patterns lurking underneath. As with the other Peretti Oom Pauls I’ve restored, the plane of the rim is dropping a bit to the left of perpendicular with the shank, but I’ll leave it as is. I also note that the left side of the rim has eroded somewhat because of the practice of lighting the tobacco over the edge. The result is that there is an inconsistent rim width around the circumference. I’ll seek to correct this, or at least help it along by creating an internal rim bevel.
 Since I like working on clean pipes, I turn to the internal cleaning of the stummel using a shank brush, pipe cleaners and cotton buds dipped in isopropyl 95%. I also utilize a dental spatula to scrape the sides of the mortise to remove old tars and oils. After the frontal assault on the gunk, I decide to employ the stealthier approach – a kosher salt and alcohol soak. This approach helps to freshen the internals as well as remove more latent tars and oils. I fill the stummel with kosher salt, cup the chamber with my palm and give the stummel a shake to displace the salt. I then create a wick with a cotton ball by pulling and twisting it. I stuff the wick down the mortise and through the draft way. Then I place the stummel in an egg carton to stabilize it and fill the bowl with isopropyl 95% until it surfaces over the salt. I wait a few minutes and top it off again. The day is late, and I set the stummel aside to let it soak through the night.
 The next morning, I discover that the salt had not discolored much but the wick had been successful drawing out the oils. I clean out the stummel getting rid of the expended salt and wiping the chamber with a paper towel. I run a long shank brush through the mortise and draft hole to clear the remnants of salt. Now, a clean stummel!
 Now, to the rim. I take a closer look and take a couple close ups to mark the starting point. The damage is not as extensive as I’ve seen on some of his Peretti brothers. Cleaning the scorched briar on the rim and creating an internal bevel in order to remove the damaged wood is the goal – fresh, healthier briar to form the rim. Starting, I gently top the stummel with 240 sanding paper on a chopping board only removing what is necessary. Rotating the inverted stummel on the board I discover that I don’t need to take off much. I then switch to 600 grade paper and smooth the rim – lightly topping it more. The pictures show the progress.

 The topping went well. Now, to cut the internal bevel, I roll a piece of 120 grade paper tightly around a hard wood disk to provide a flat, firm backing to help with a crisper b. I then work the paper around the internal rim circumference edge to cut the initial bevel. In the same way, I sand with 240 grade paper and finish it off with 320 and 600 grade papers. I think the rim looks great.
  I’m enjoying how this Peretti in cooperating. The stummel surface has normal nicks and minor dents which this Peretti has received over the years. To remove these, using sanding sponges on the surface is my usual approach. I start by employing a rougher grade sponge, middle grade and then finish going over the surface with a light grade sanding sponge. I am careful to protect the L. J. Peretti nomenclature on the shank as I sand.
 After the sanding sponges I transition to using micromesh pads to sand out the briar surface more using finer sanding surfaces. I begin by wet sanding with pads 1500 to 2400 then dry sanding from 32000 to 4000 and then 6000 to 12000. I enjoy watching the grain start to show through the micromesh pad cycles. The L. J. Peretti is looking good as I look at it now. The pictures show the progress.

 Turning now to the stem, I take another look at the bit showing tooth chatter and dents. I first use a flame from a Bic lighter to paint the area expanding the vulcanite. As the vulcanite expands as the natural result of heating it, I’m hopeful that the dents and chatter might rise and make for less sanding. I believe the process helped but did not fully remove the dents. I took before and after pictures first with the upper bit comparison, then the lower bit.
 To address the dents, after wiping the area with alcohol to clean the surface, I apply drops of Black Medium KE-150 CA glue to the dents. I start on the upper bit. I put CA glue on the 2 main dents and run more glue along the button to fill in the chatter there. I then wait for an hour or so for the CA glue to set, so that I can flip the stem and apply glue on the lower bit.
  After the Black CA glue has cured, I start the process of filing and sanding the patch down to the vulcanite surface and sanding out the chatter. Starting with the flat needle file and 240 sanding paper I do the initial sanding and refreshing the buttons of both the upper and lower bit with the file. I follow by sanding with finer grades, 470 then 600. I finish this phase by buffing the entire stem with 0000 grade steel wool. The pictures show the progress finishing out the bit repairs.

 With this initial stem repair and sanding completed, I now use micromesh pads to continue sanding the stem with even finer sanding grades. I begin wet sanding with pads 1500 to 2400, then dry sanding with pads 3200 to 4000 followed by pads 6000 to 12000. After each set of 3 pads I apply Obsidian oil to revitalize the vulcanite. I love to see the vulcanite’s glassy pop! The pictures show the progression.
 Now, I take another look at the Peretti Oom Paul Sitter seated on my worktable! I like that characteristic of this large stummel. I study the attractive grain patterns that have started to emerge through the sanding process. To enhance the grain further, I mount a felt buffing wheel on the Dremel and I apply the coarser Tripoli compound with the lowest speed setting. Before I start the sanding process, I purge the wheel with the Dremel’s metal tightening wrench. I apply the compounds by rotating the wheel over the surface of the briar. I don’t apply too much lateral pressure on the buffing wheel, but I allow the speed, wheel and compound to do the work. After asking nicely, my wife takes a picture of me applying the Tripoli compound with the Dremel. After the Tripoli compound, I apply the less coarse compound Blue Diamond. I apply it in the same manner as Tripoli but with a cotton cloth buffing wheel instead of a felt wheel. When completed, I wipe the stummel with a cotton cloth to remove residue compound dust.
 The next step is to apply Before and After Restoration Balm to the Peretti’s briar surface. With the other restorations I’ve done with the Peretti Lot of 10, I have been very pleased with the results of applying the Restoration Balm. I very much like the natural briar look and the original Peretti motif has the lighter, natural patina. The Balm seems to take the natural briar grain and deepen and enrich it. I take a before and after picture of the stummel to show the difference. I’m afraid the lighting of the pictures does not show the subtle deepening that I perceive with the naked eye. To apply the Balm, I squeeze a little Balm on my fingers and work it into the briar surface. As I do this, the Balm progressively thickens to almost a wax-like consistency. I take a picture of the Balm on the stummel as I allow it to sit for a few minutes to give an idea of its consistency. I then use a cotton cloth rag to wiping it off at first, and then buffing it as the surface is exposed. I then use a micromesh cloth to give the stummel a hand buffing. The pictures show to process comparing each side in succession.

 I remember that I forgot to apply Blue Diamond compound to the stem. So, I attach the stem to the stummel and apply Blue Diamond compound to the stem and then wipe the entire pipe with a felt cloth to remove excess compound dust. Now, applying the carnauba wax, I mount a cotton cloth wheel to the Dremel, increase the speed to about 40% full power and apply the carnauba to the stem and stummel. After applying a few coats, I use a micromesh cloth to give the pipe a rigorous hand buffing to raise the shine even more.
This Peretti Oom Paul Sitter cleaned up very well – I’m pleased with the results. After restoring several Peretti pipes and I’ve concluded that not only have I found them to be good smokers, but the briar used for the production of these pipes seems to be of a higher quality and very pleasing to the eye on the whole. The grain on this Peretti has not disappointed. The large stummel showcases well the lateral grain on the lower regions and then bird’s eye grain dominates the opposite side of the bowl. Codruț, a pipe man in neighboring Romania, saw this Peretti when I posted several Peretti Oom Pauls that were to be restored and made available. He commissioned this Peretti and he will have first dibs on it when it goes into The Pipe Steward Pipe Store. This Peretti Oom Paul Sitter benefits the Daughters of Bulgaria, our work here in Bulgaria helping women and girls (and their children) who have been trafficked and sexually exploited to find a new life. Thanks Codruț(!), and thank you for joining me in this restoration!


Another meticulous restoration, Dal. Looks fabulous. I’m sure the new steward will love it!
LikeLike
Thanks, Charles. Yep, he’s happy and the pipe is on the way to Romania. I’m having fun.
LikeLike
…very nice!
LikeLike
Thanks, Harry! It turned out well.
LikeLike
Reblogged this on The Pipe Steward.
LikeLike