Monthly Archives: December 2017

Refreshing a Damaged CAO Lattice Meerschaum Pipe


Blog by Steve Laug

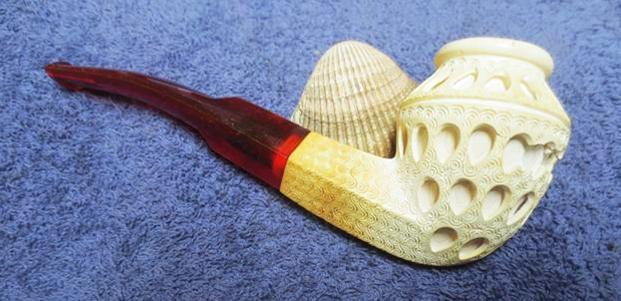
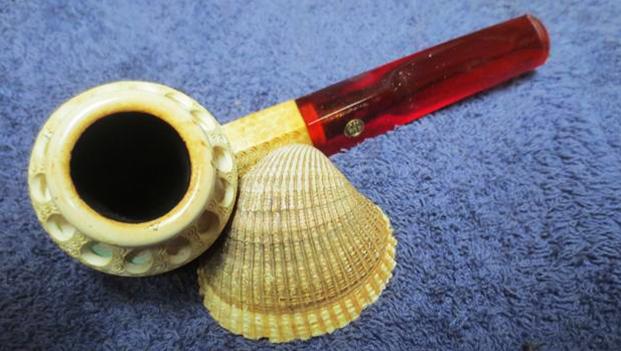
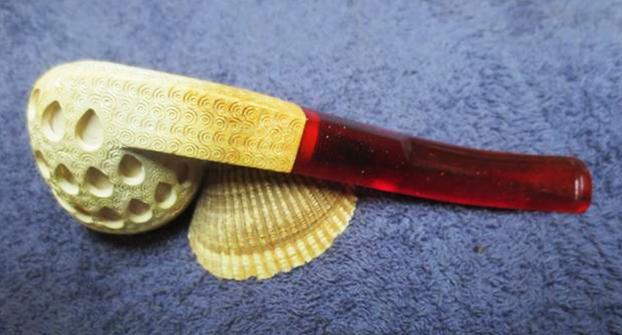
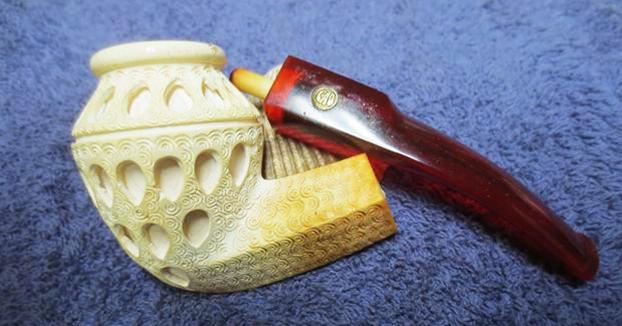
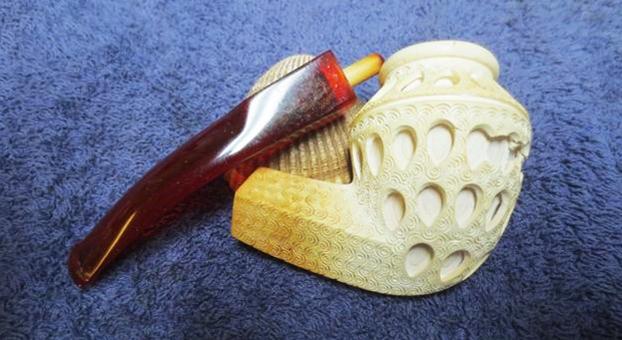
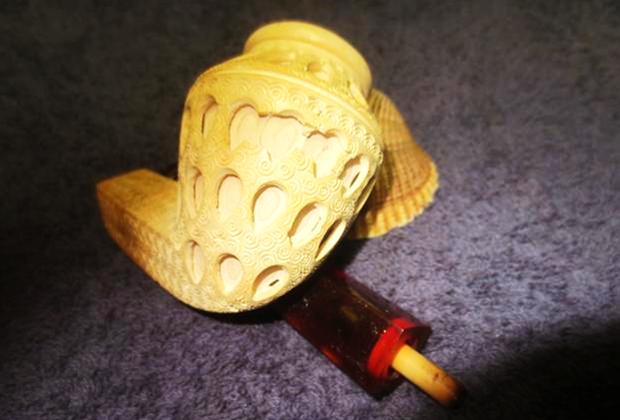
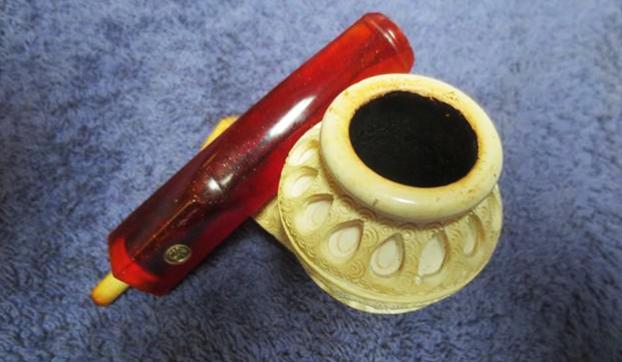
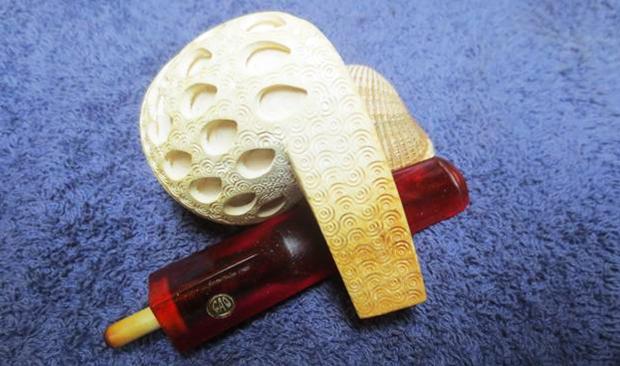
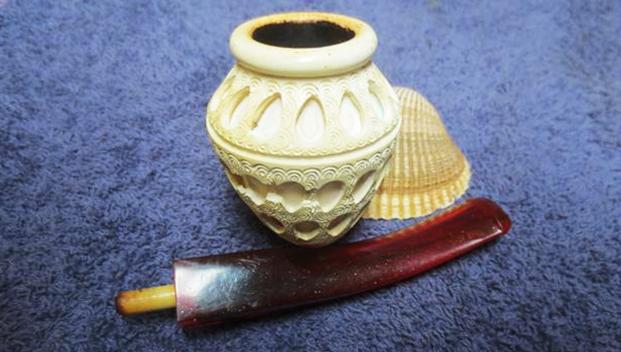
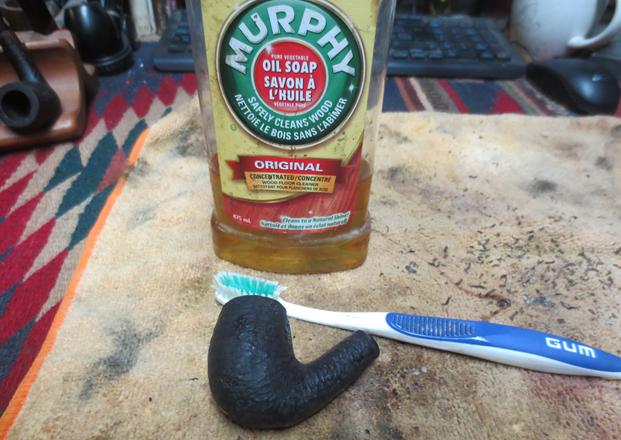
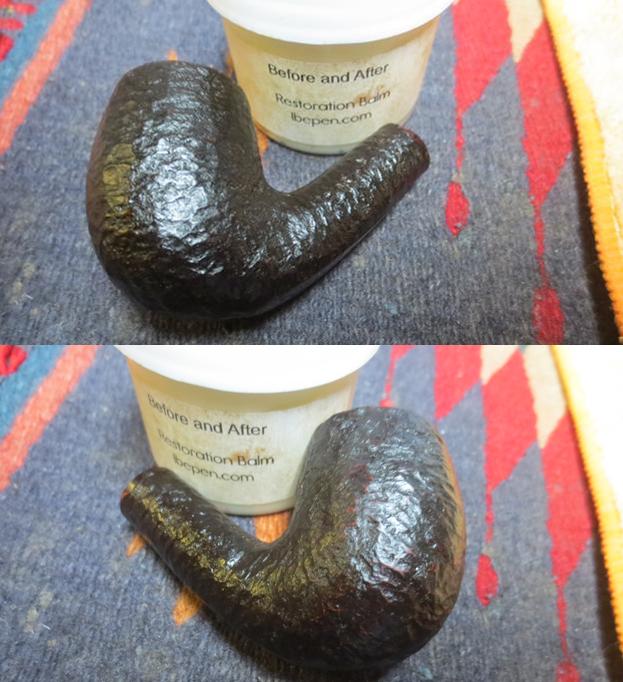
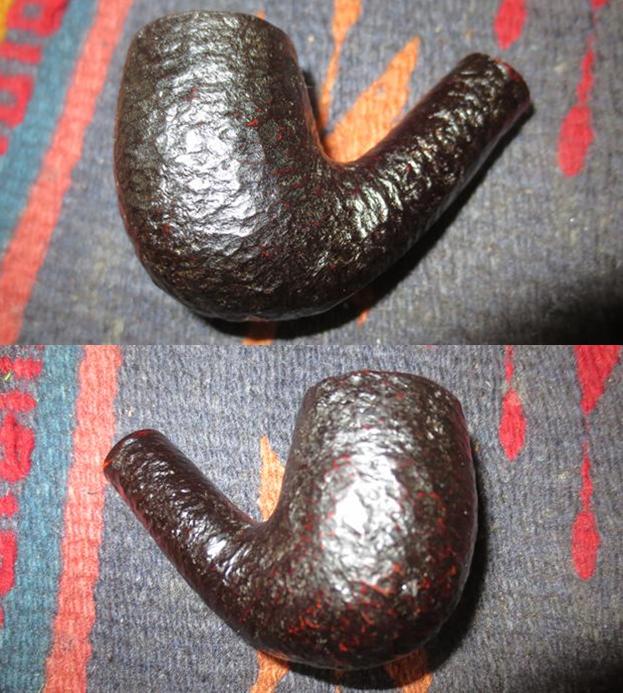
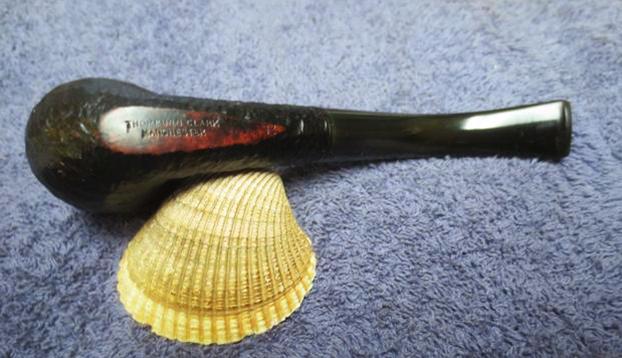
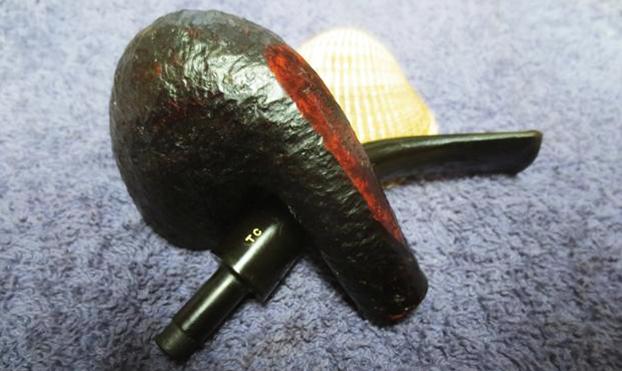
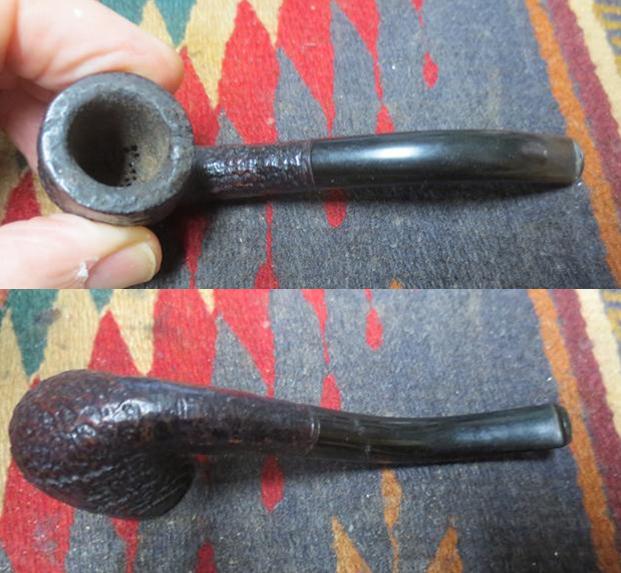
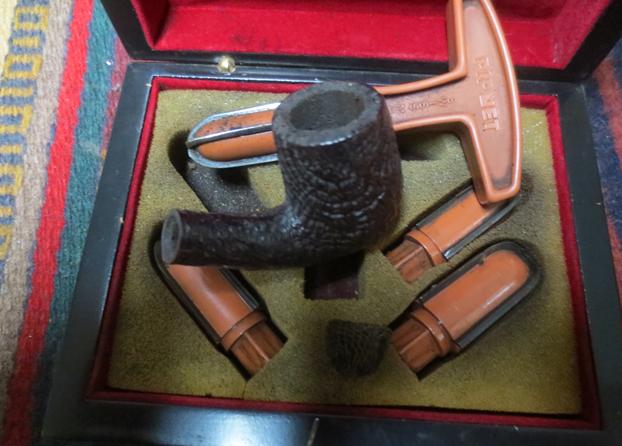
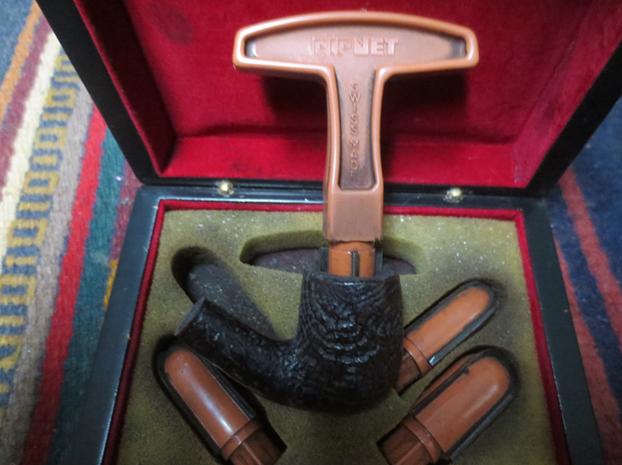
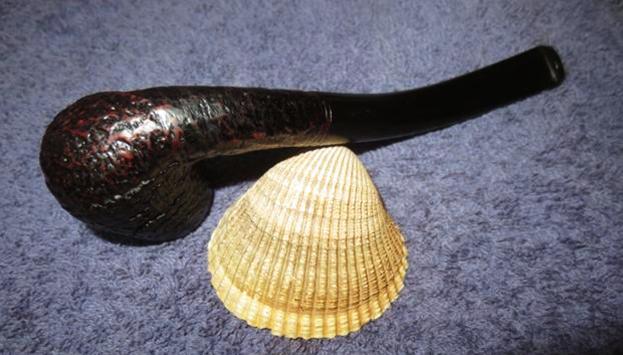
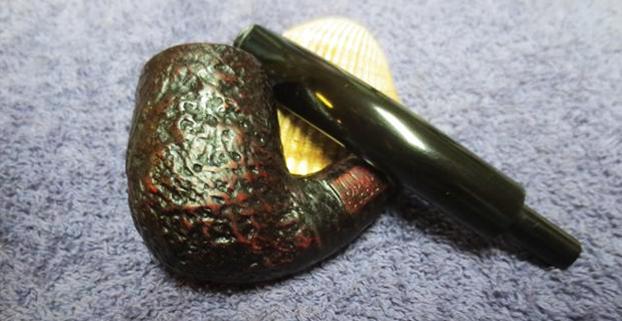
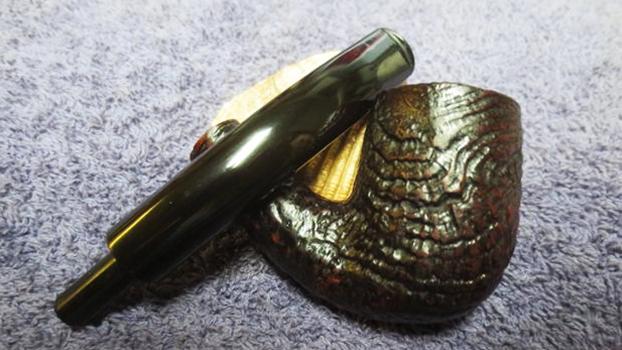
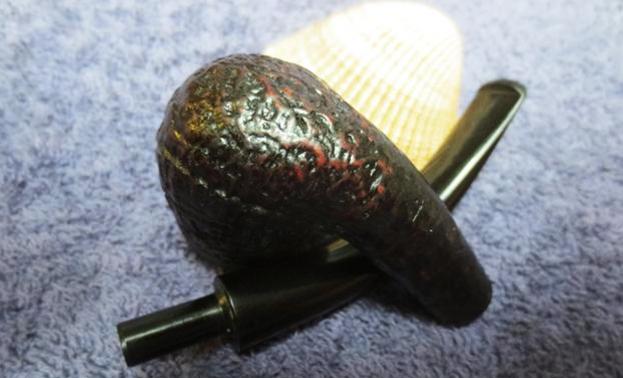
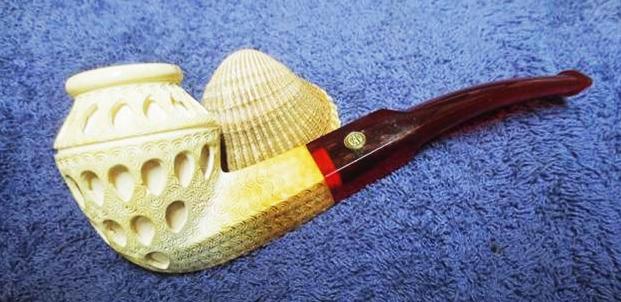
We probably paid too much for this beautiful meerschaum pipe but the shape and the carving are so unique that we had to buy it. It is made by CAO and is a shape I would call a Grecian urn. It has lattice carving around the bowl side and the rim is smooth. The shank has a pattern that looks a lot like scales and swirls. There was some very nice colouring happening on the shank and lightly on the bowl sides and rim. There was a cake in the bowl and some lava overflow on the rim top. There were some missing separators between two of the lattice windows but otherwise the bowl was undamaged. The stem was Lucite and had a round brass CAO logo on the top left side of the saddle. The stem had metallic gold flecks mixed in with the Lucite so that it had a natural sparkle to the reddish amberlike stem. There were not any tooth marks or dents on the stem surface but there were small scratches in the Lucite. There was also some wear and tear to the sharp edge of the button that would need to be cleaned up. Jeff took some photos of the pipe before he started the cleanup. 
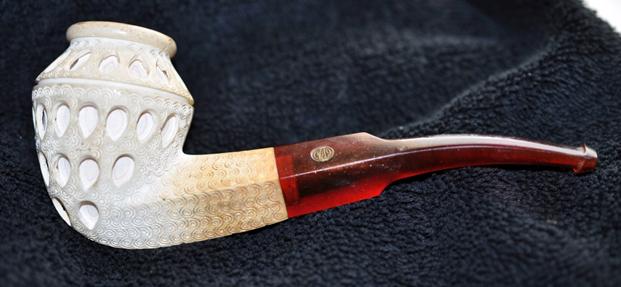
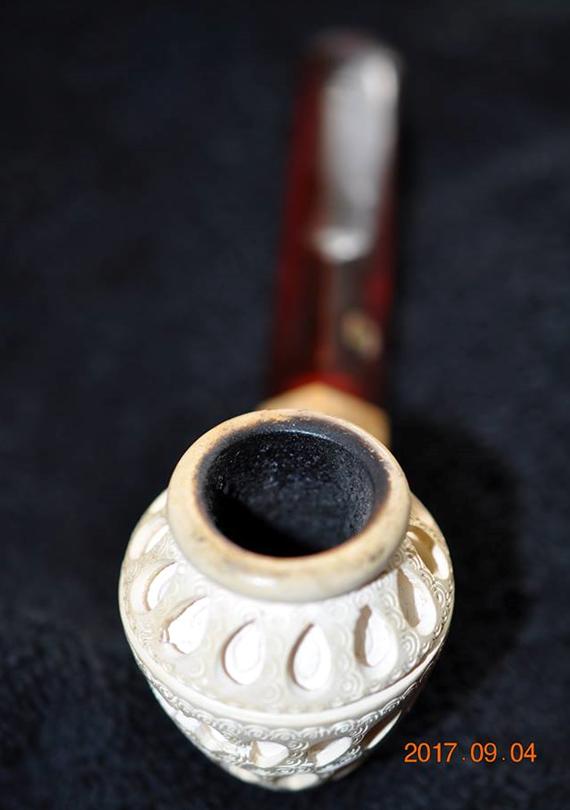
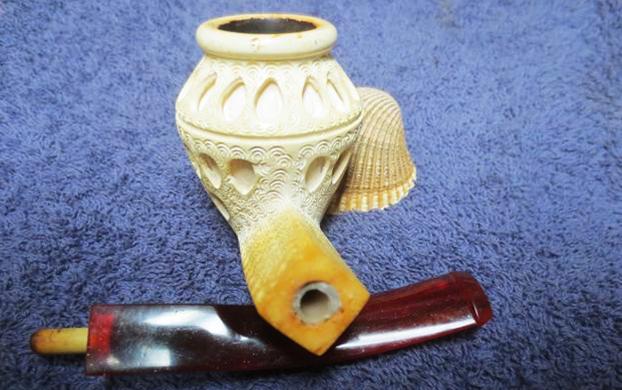
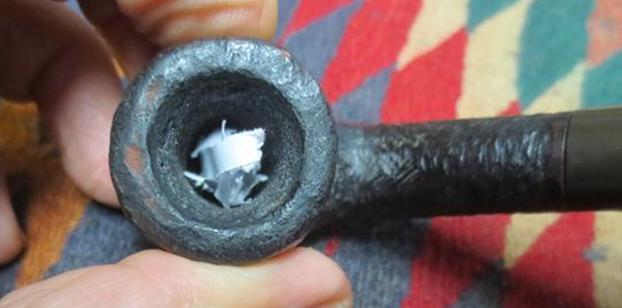
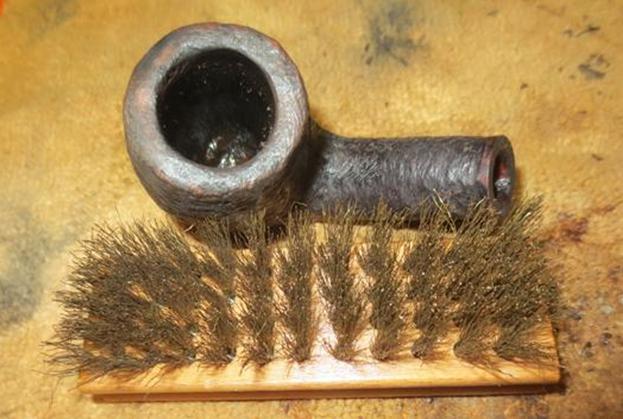
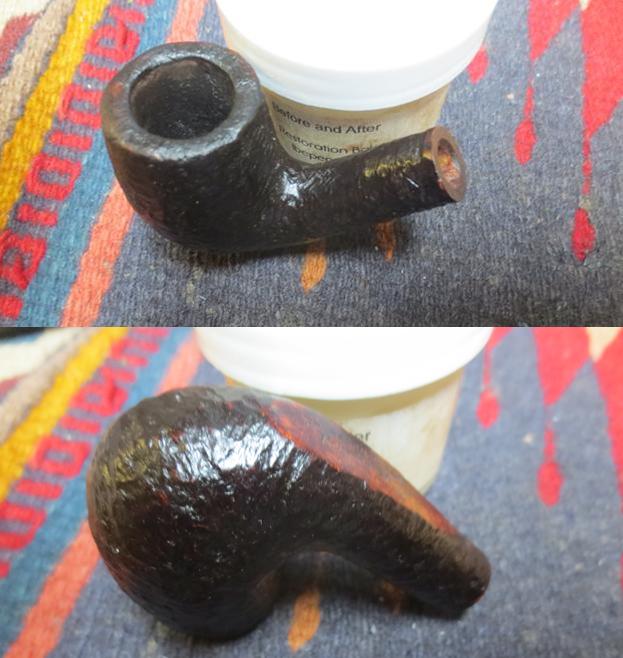
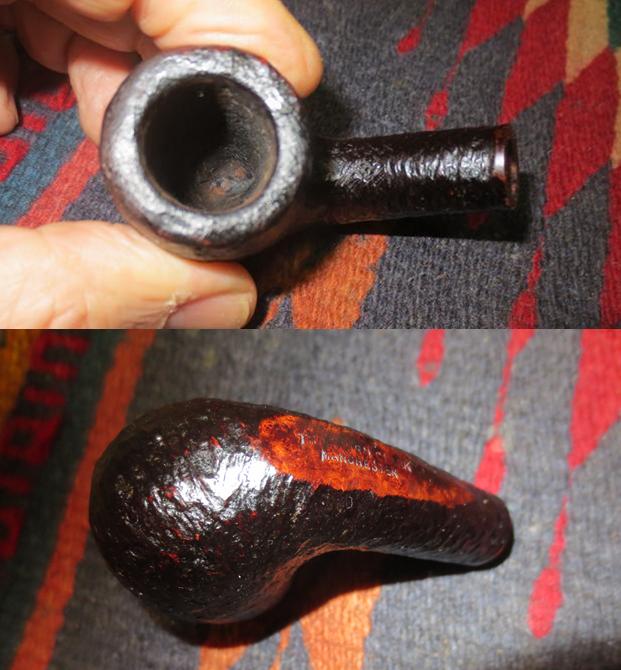
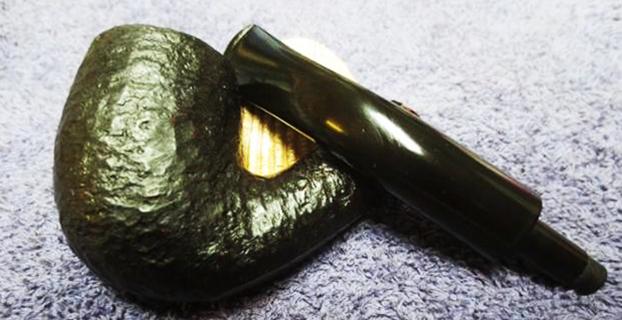
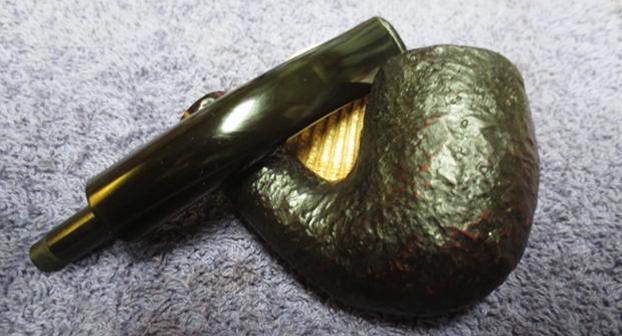
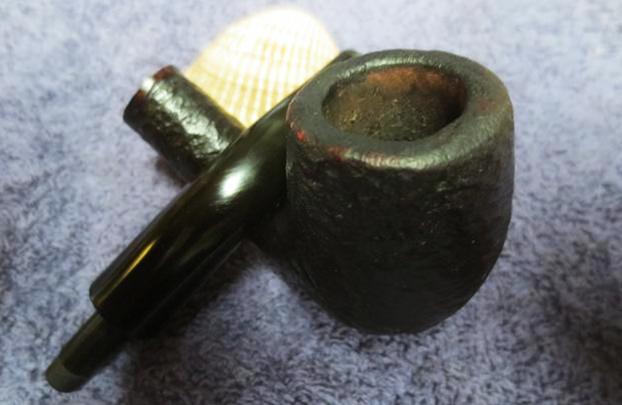
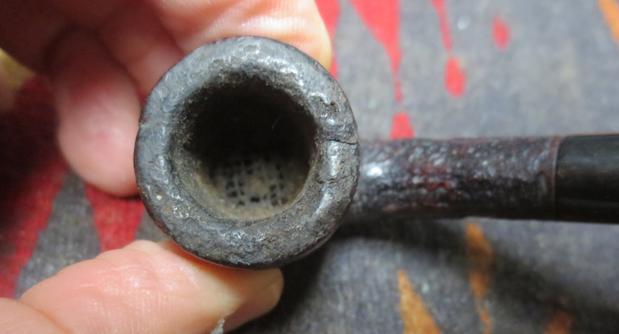
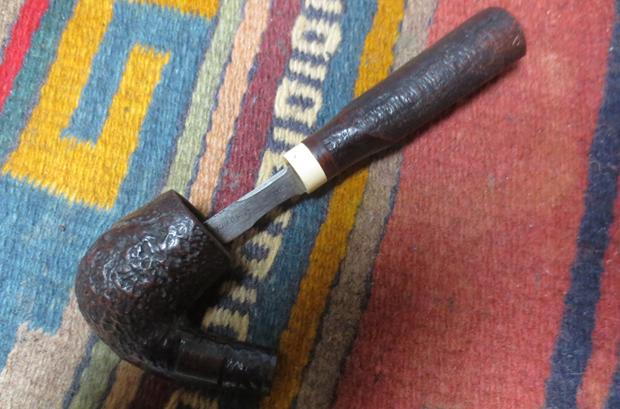
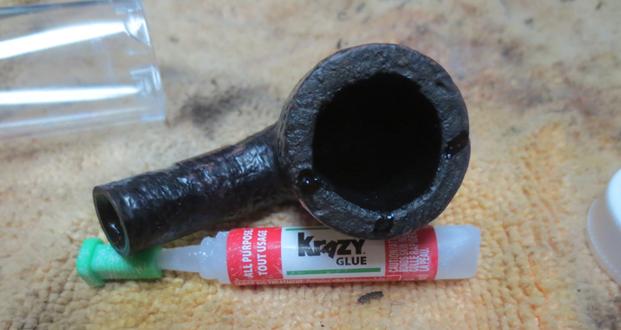
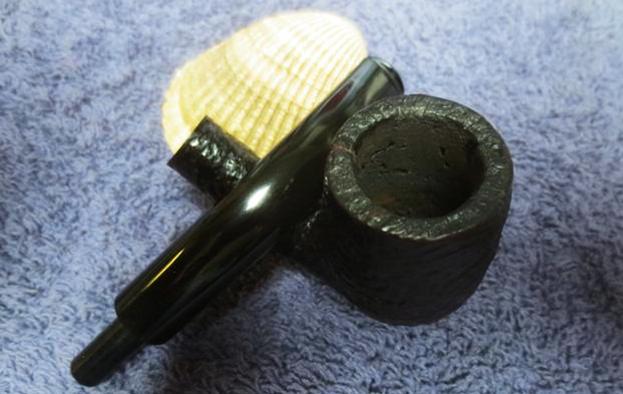
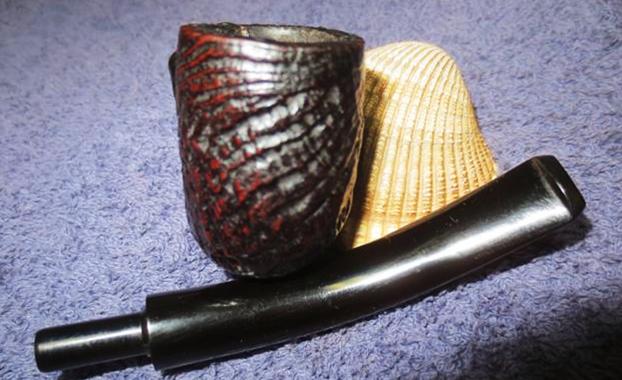
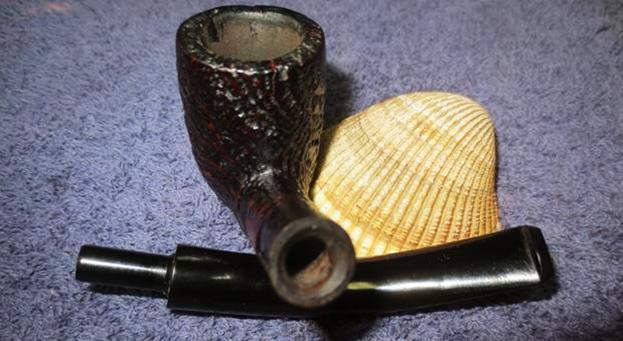
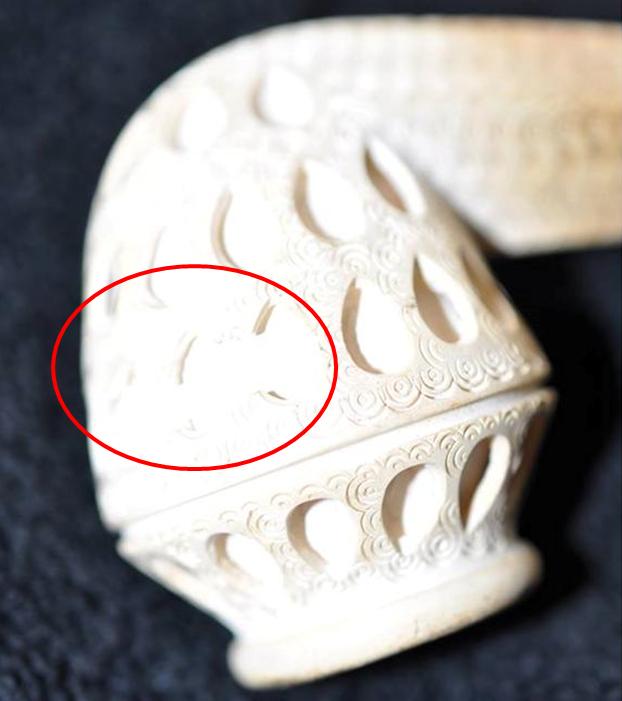
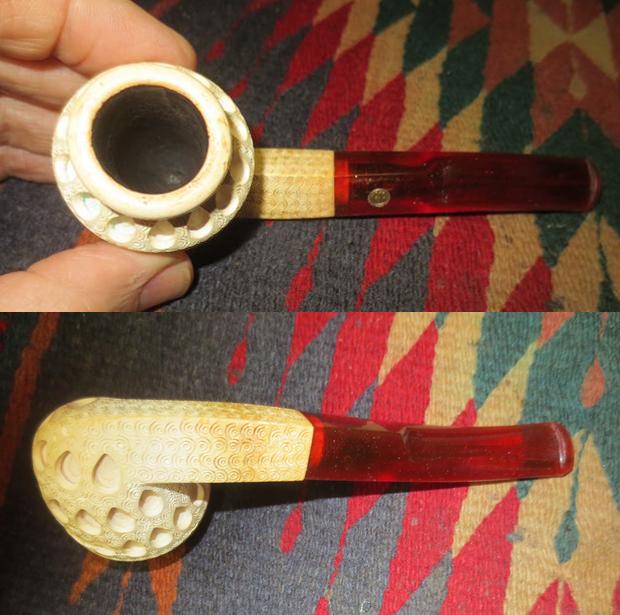
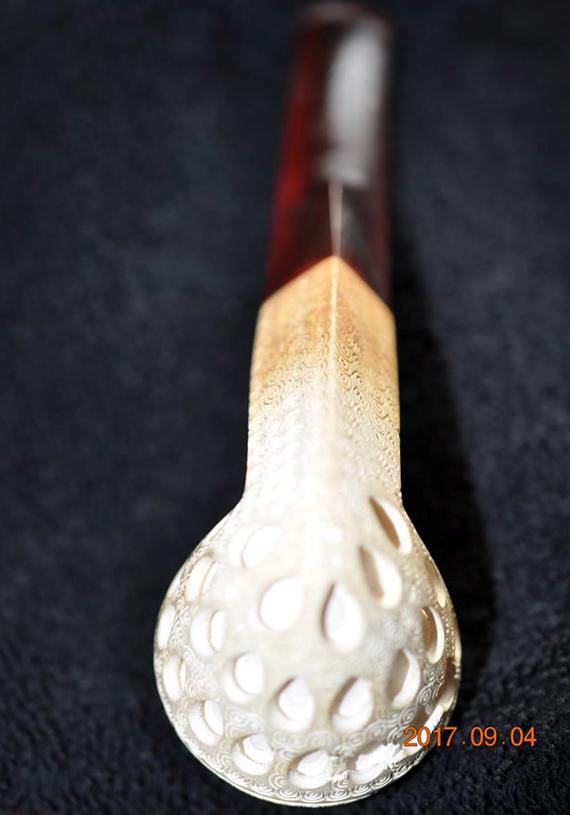
The next series of close up photos show the condition of the bowl and rim and the overall condition of the bowl sides. You can see the bowl and cake with the overflow of lava on the rim top. There is also some fuzz that has attached to the cake. It was a dirty bowl. The sides of the bowl look very good other than the damage to the separators between three of the tear drops in the lattice work on the front of the bowl. The second, third and fourth photos below show the damaged portion circled in red. 
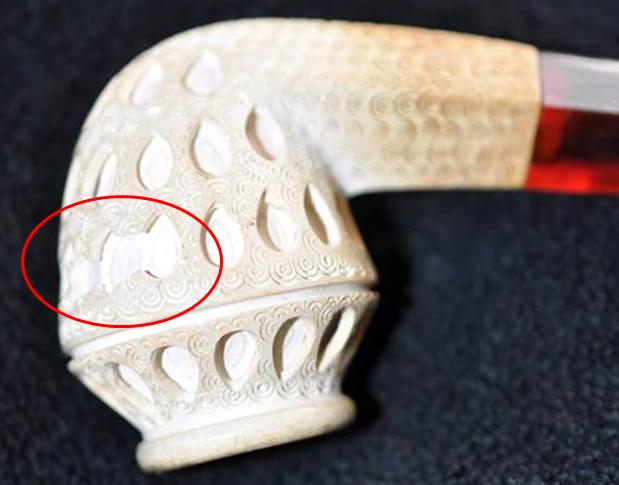
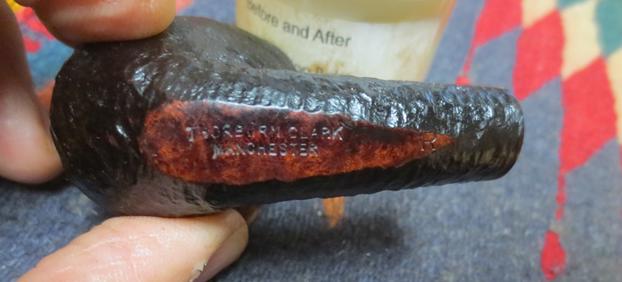
Other than that damage to the front of the bowl the rest of the carving is in excellent condition. The pipe, though imperfect will nonetheless be a beautiful addition to someone’s collection. They will just have to overlook the damaged area and enjoy the pipe.
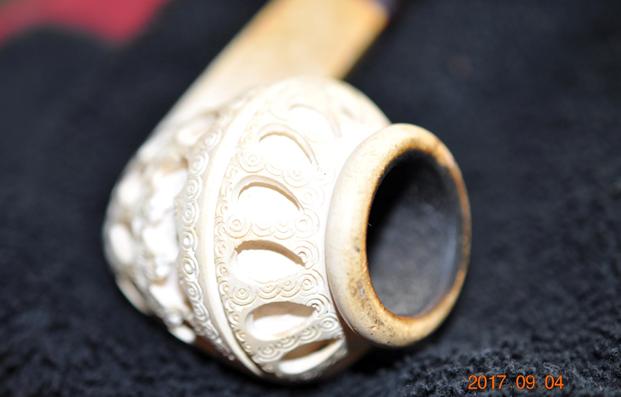
The connector between the shank and stem is a push tenon. There is a Delrin insert in the shank of the pipe and a Delrin tenon threaded into the end of the stem. It is dirty and stained but is undamaged.
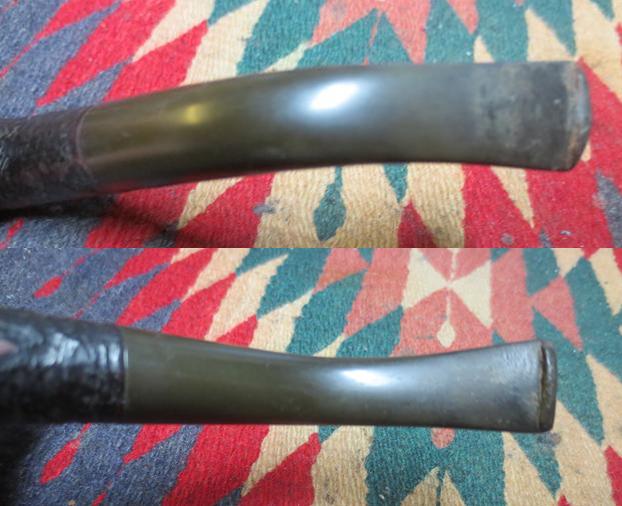
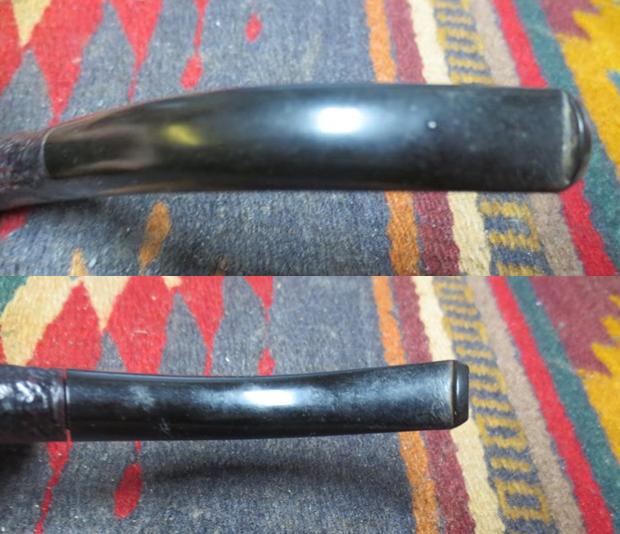
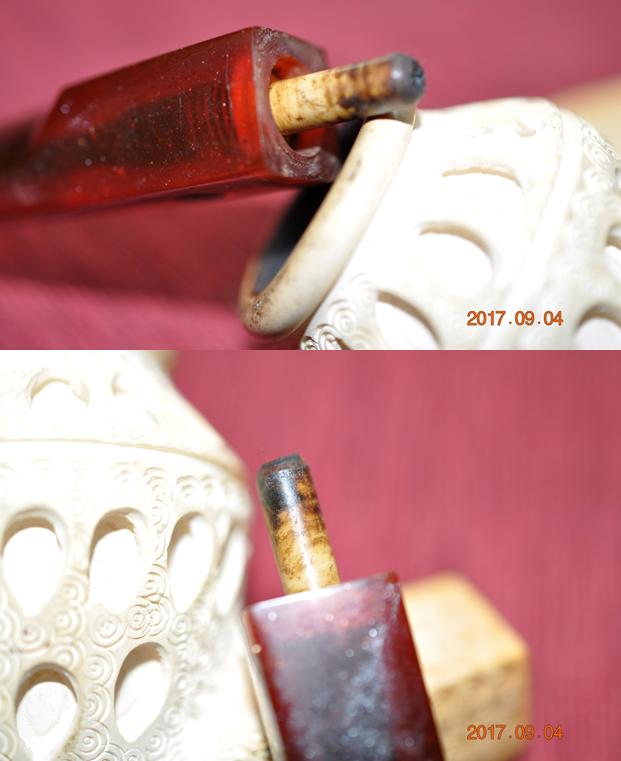
The round brass logo is dirty but it is undamaged. It is inset into the left topside of the saddle stem. The surrounding stem is quite dirty but there is no damage.
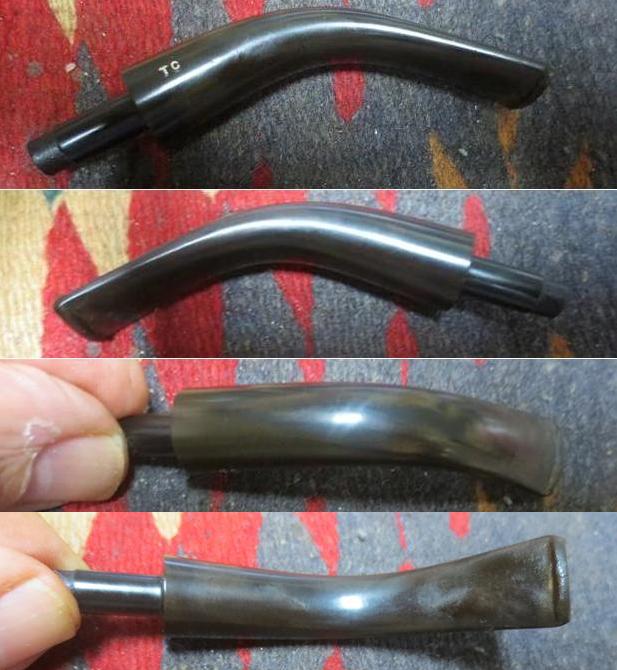
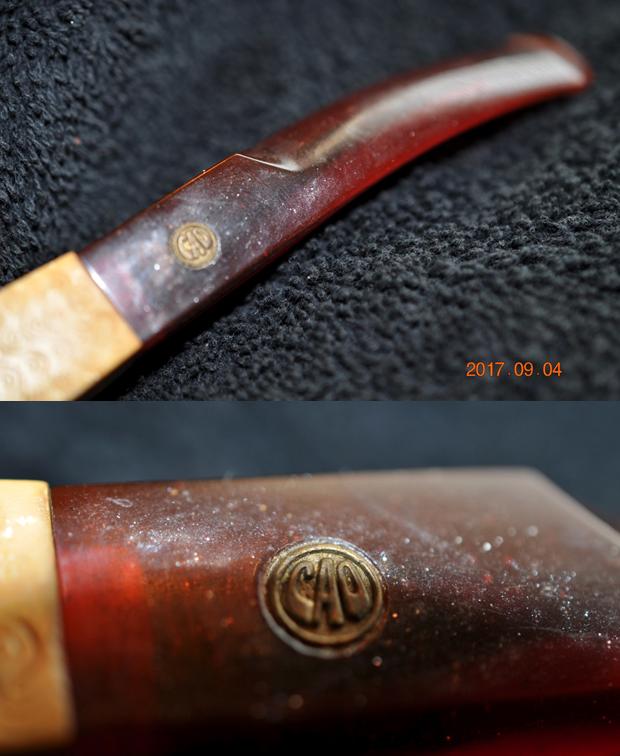
The next two photos show the condition of the top and underside of the stem. You can see the metallic sparkles in the saddle portion and the scratches in the Lucite.
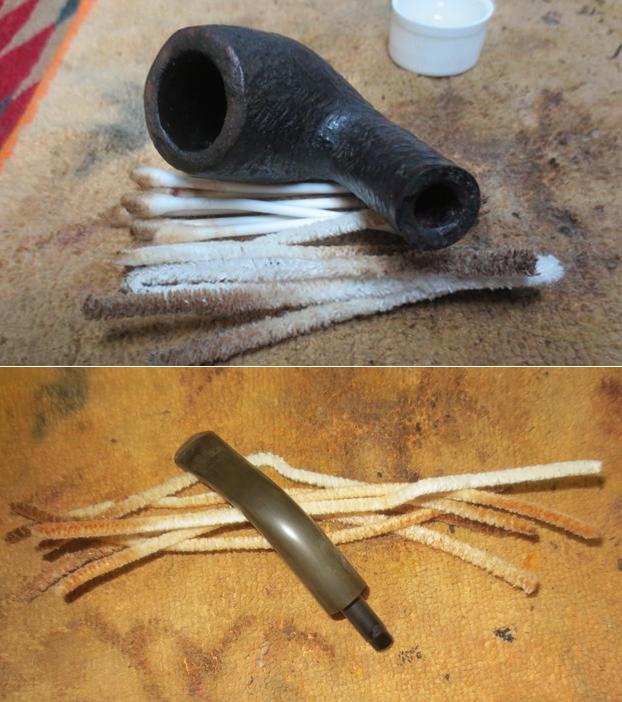
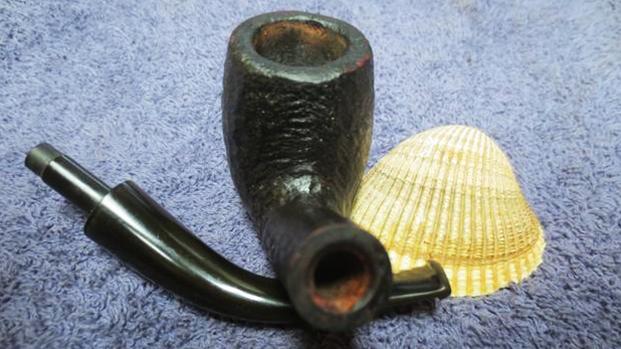
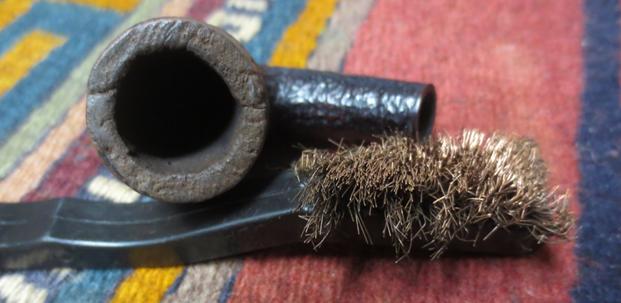
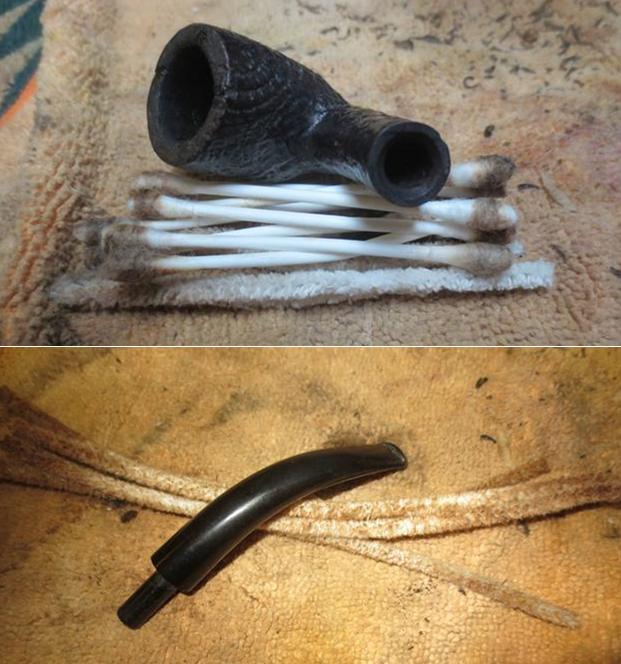
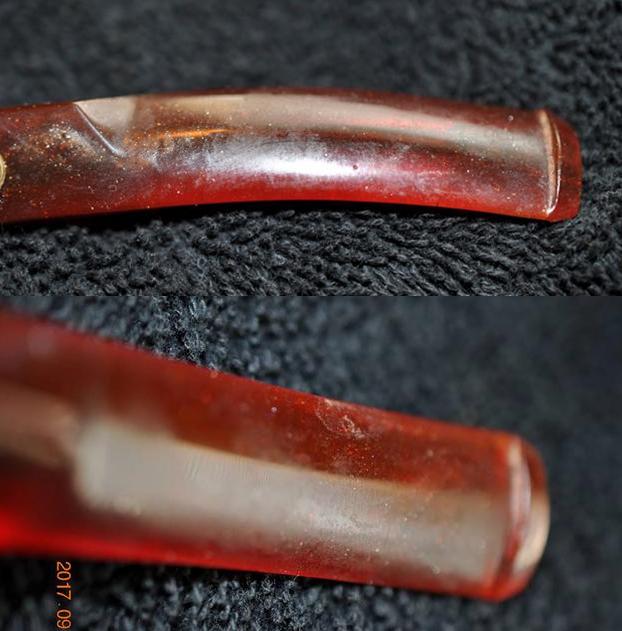
Jeff carefully reamed out the bowl with a Savinelli Fitsall Pipe Knife and took it back to the bare meerschaum walls. He scrubbed the rim top and scraped off the lava on the surface with a knife. He carefully cleaned the exterior of the bowl with a damp cloth to avoid further damage to the front of the bowl. He cleaned out the shank and airway in the bowl and stem with alcohol and pipe cleaners. He cleaned out the recessed area around the inset tenon in the stem with alcohol and cotton swabs. He washed the exterior of the stem with clean water. I took photos of the pipe when I brought it to my work table to show the condition of the pipe after Jeff’s work and before I polished it. 
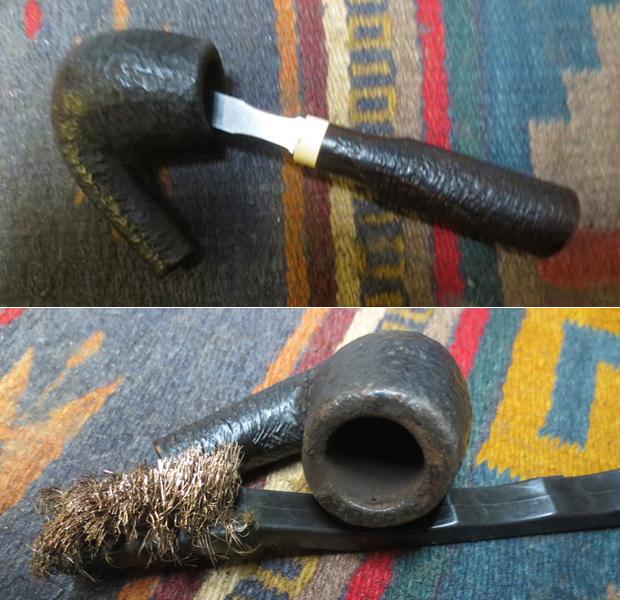
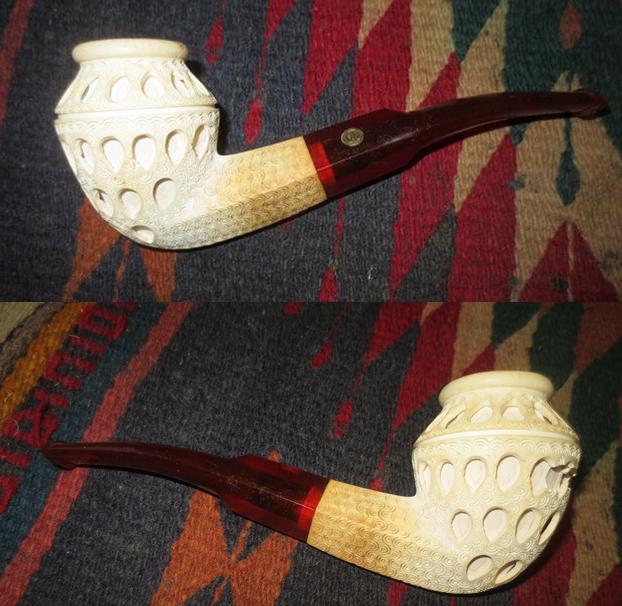
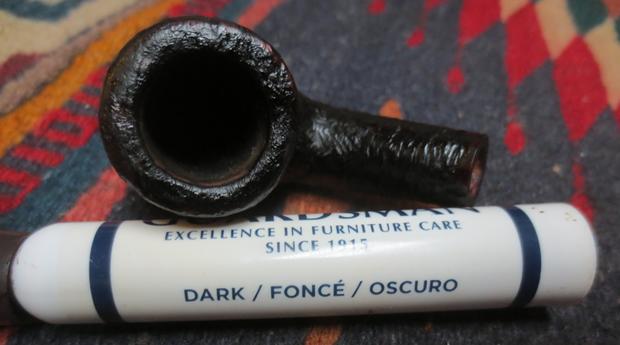
I took a photo of the rim top to show how well it cleaned up. Jeff did a great job getting rid of the lava overflow. I also took a photo of the cleaned up damaged area of the bowl.
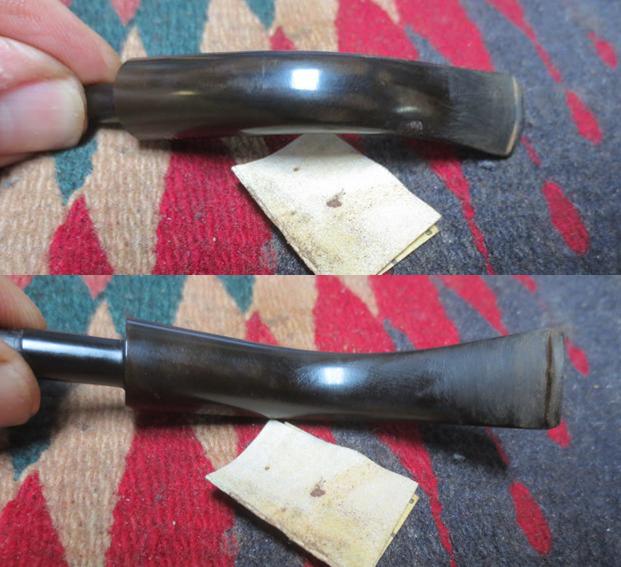
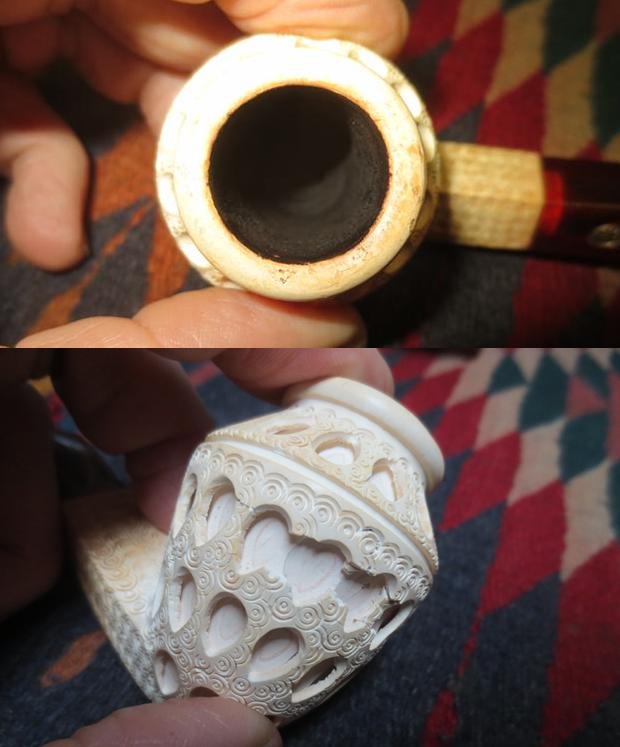
The stem cleaned up really nicely. The gold flecks in the Lucite really stand out now and the gold/brass logo inset looks really good now. The stem should polish up nicely.
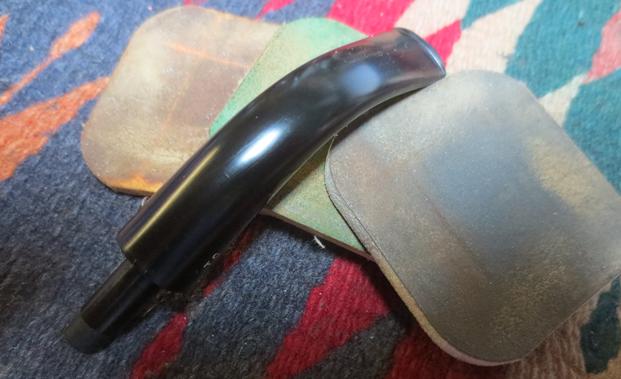
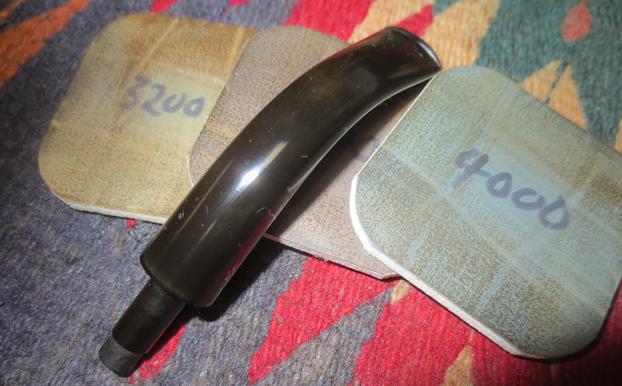
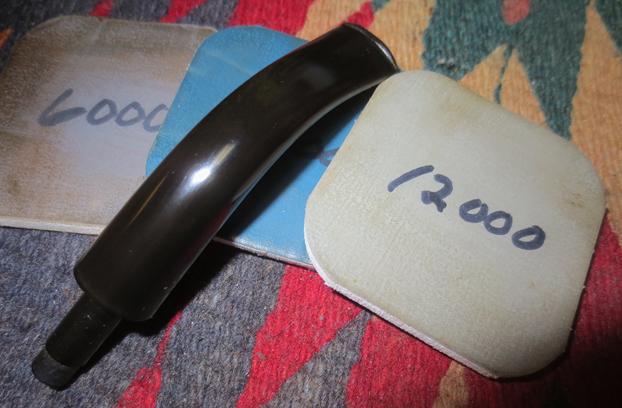
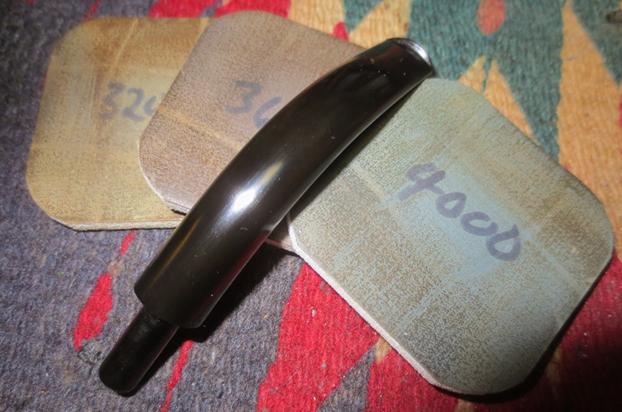
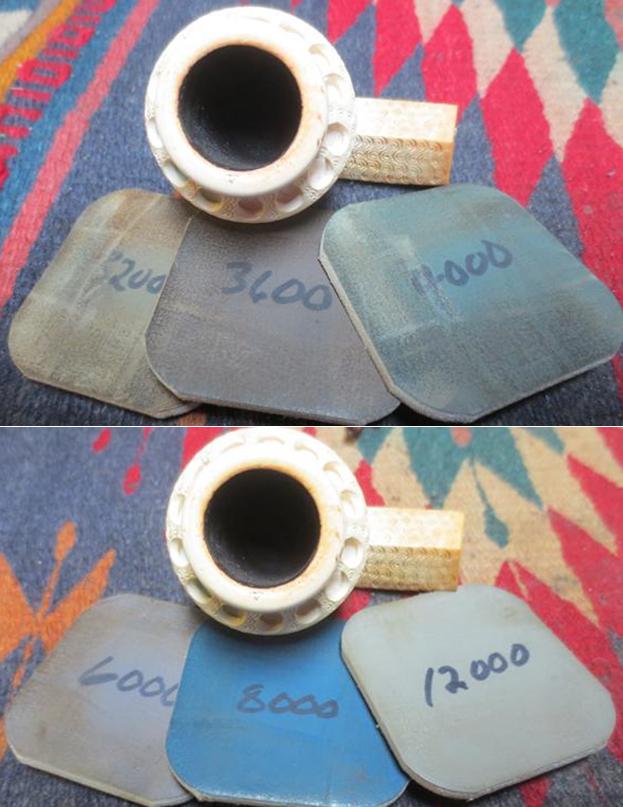
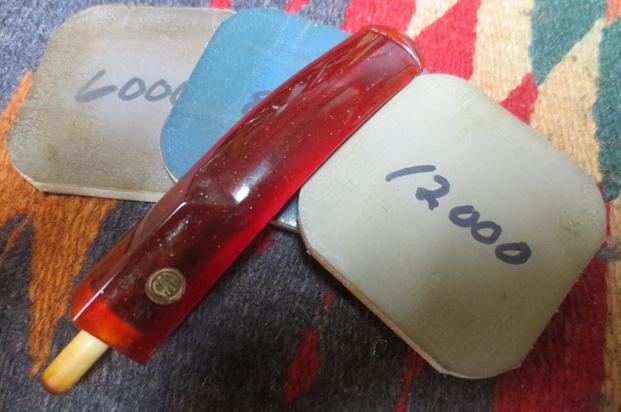
The mortise insert in the shank had a ragged edge to it. I used a sharp knife and a pen knife to clean up the ragged end. I wanted a smooth fit in the shank. Once I had finished that part of the shank and sanded it down I worked on polishing the rim and ring on the top of the bowl. I polished it with micromesh sanding pads – wet sanding with 1500-2400 grit pads and dry sanding with 3200-12000 grit pads. I wiped the rim down after each pad with a damp cotton pad. 
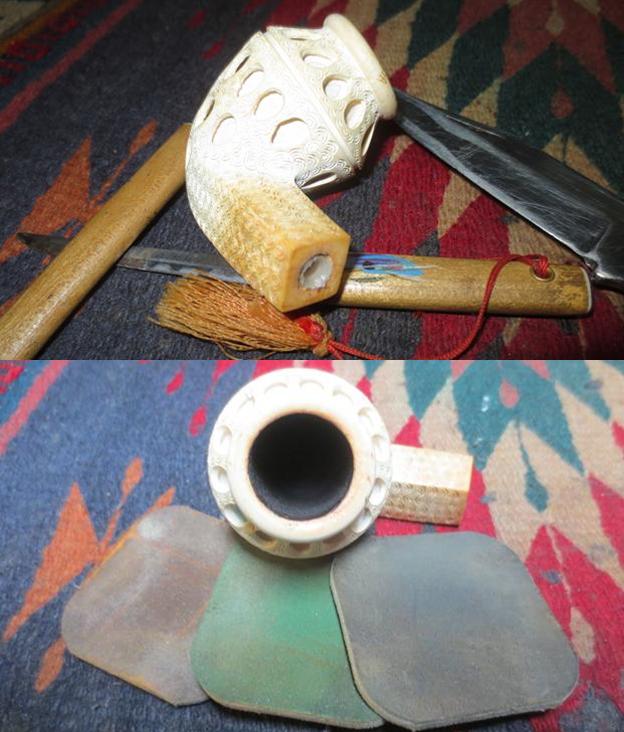
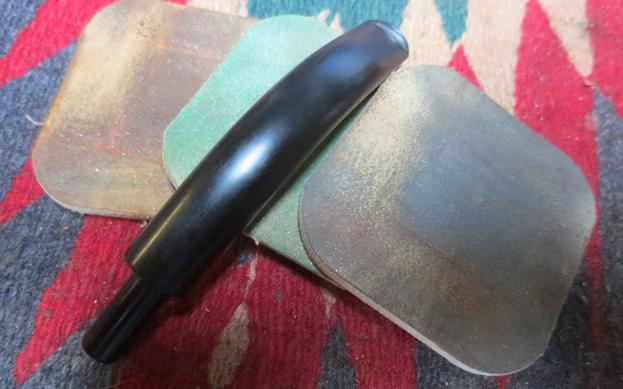
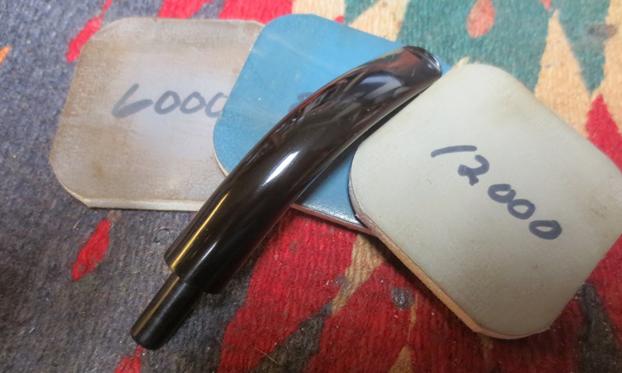
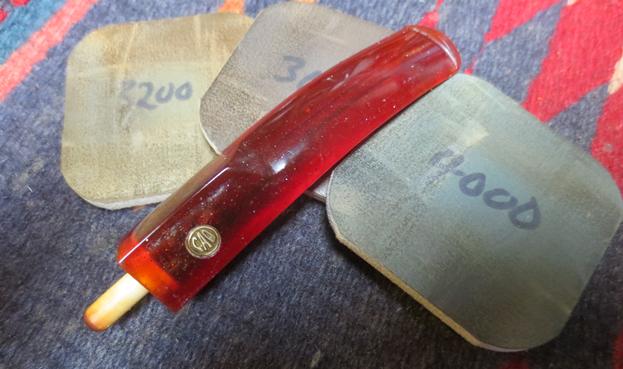
I polished out the scratches and marks in the metallic Lucite stem with micromesh sanding pads – wet sanding it with 1500-2400 grit pads and dry sanding it with 3200-12000 grit pads. I wiped the stem down with a damp cotton pad after each sanding pad. I lightly buffed the stem with Blue Diamond on the buffing wheel. After the final pad I wiped it down with a damp pad and rubbed it down with a final coat of oil and set it aside to dry. 
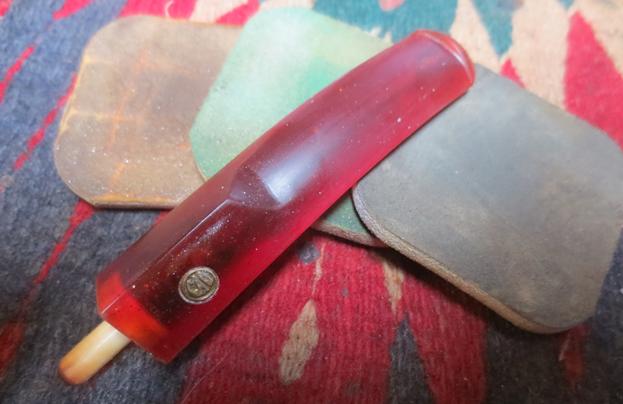
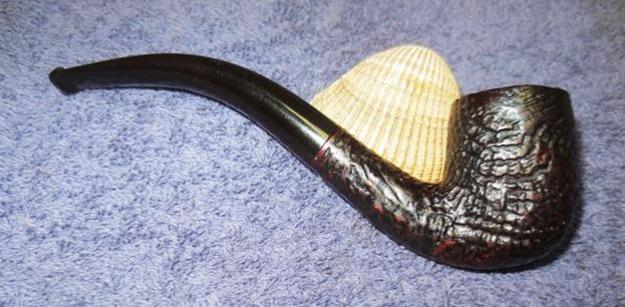
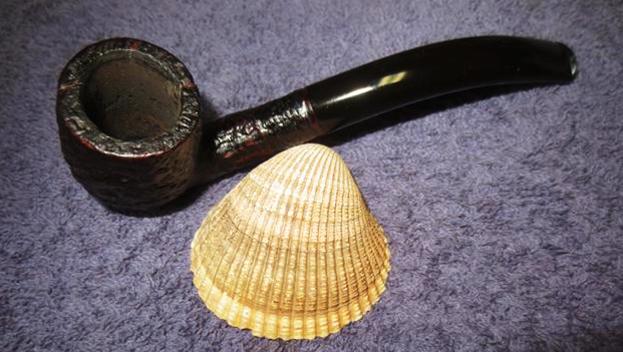
I put the stem back on the bowl and carefully worked the pipe on the buffing wheel with a clean pad. I used a gentle touch on both the meerschaum and the Lucite stem so as not to damage either of them. I gave the meerschaum bowl multiple coats of Conservator’s Wax and hand buffed it with a shoe brush and a microfiber cloth to deepen the shine. The finished pipe is shown in the photos below. Even with the damaged area on the front of the bowl it still looks better than it did in the beginning. The unique shape and lattice work carving work together to make this a beautiful pipe. The dimensions of the pipe are: Length: 6 inches, Height: 2 ½ inches, Diameter of the bowl: 1 1/8 inch, Diameter of the chamber: 3/4 inches. I will be adding this one to the rebornpipes store shortly if you are interested in adding it to your collection. It will make a fine addition to the rack. If you are interested email me at slaug@uniserve.com or send me a message on Facebook. Thanks for looking.

Restoring a Thorburn Clark Rusticated Bent Billiard


Blog by Steve Laug

This is another pipe from one of the eBay sellers that I follow and check out their shops regularly. Yet again this favourite seller in England put up a pipe that I really like. I don’t have any idea how many of them I have purchased from him but this one caught my eye. This one is a small rusticated bent billiard that is another featherweight. Its diminutive size and delicate shape are a lot like the Orlik Dugout I bought from him as well. The rusticated finish has a textured and almost sandblast look to it. The contrast of dark and medium brown stains really worked well with the shape of the pipe. The pipe was stamped in a smooth box on the underside of the shank and reads THORBURN CLARK over MANCHESTER with the letter R at the shank end of the smooth portion. The photos below are the seller’s photos. They show the overall condition of the pipe and what it was that caught my eye. I looked up the brand on Pipephil’s site – http://www.pipephil.eu/logos/en/logo-t5.html. I found out that the brand was carved by a tobacconist in Manchester, England. The owner of the shop used to carve his own pipes. The shop closed in the 1970s. I clipped the pertinent section from the site and included it below. The stamping on the stem of the one I have is the same as the pipe in the second photo below.I did some more digging into the brand to see what I could find out and found a link to a blog about the brand. I quote in part from the blog: https://pipesmokersjournal.wordpress.com/tag/thorburn-clark/

“This is an intriguing pipe, and a little piece of obscure British pipe making history. Thorburn Clark was, from what I can deduce, from my extensive online Sherlocking, Manchester-based tobacconists from the 1920s until the 1980s/90s. Behind their shop was a small pipe workshop, where a tiny workforce of craftsmen toiled to create a range of beautiful handmade pipes, each stamped upon the stem with their distinctive logo of an intertwining T and C.”

Another link brought a bit more information and some confirmation to the puzzle http://pipesmokerunlimited.com/archive/index.php/t-3749.html

“Thorburn Clark was a tobacconist based in Bridge Street, Manchester, a side street off Deansgate for those who know the area. Unlike most outlets of its kind, which shipped in pipes from outside makers and then branded them with the shop name, it seems that they had a small workshop attached to the premises where they crafted their own pipes.”

It was interesting to know that the pipe I had in hand was a pipe shop made pipe that came from Manchester. It was made in the small workshop in the back of the shop. I had learned that there were several carvers that worked there so I would not be able to know who made it. The pipe was obviously carved between the 1920s and the time the shop closed in the 1970s. Judging from the shape of the pipe and stem and the fact that it came with the Orlik made me put its date in the late 20s to early 30s.

I had the seller ship this pipe with the Orlik Dugout. When the pipes arrived I brought them to my worktable. I completed work on the Dugout then turned my attention to this pipe. I took photos of it to show its condition before I began to work on it. The finish looked to be in good repair under the grime and dust that was in the grooves of the rustication. The rim top was covered with lava that had overflowed from the cake in the bowl. The cake was quite thick and the bowl choked with carbon. The packing material from the shipping box was jammed into the bowl. The stem was lightly oxidized and it still bore the TC stamp on the left side. The fit of the stem to the shank was tight and it did not sit against the shank end. That told me that the interior of the shank must be quite dirty with tars and oils. I wonder if both of these pipes came from the same pipeman. I took a close up photo of the rim top to show the thickness of the cake in the bowl and overflow of lava on the rim. There were some worn spots on the rim where the finish was damaged. It looked like the inner and outer edges of the bowl were undamaged but I would know for sure once I had reamed it.While the stem was lightly oxidized the only damage to it was on the top and underside edge of the button and some light tooth chatter on both sides. The TC stamp was readable and the stamping was deep enough to be cleaned without damage.I reamed the bowl with the smallest cutting head on the PipNet pipe reamer. I took the cake slowly back to the bare briar. I wanted to see if there was cracking in the inside of the bowl. The cake was thick and hard so it took some steady and careful work to cut the cake back. I touched up the reaming of the bowl with t a Savinelli Fitsall Pipe Reaming Knife. I took what remained of the cake back to smooth, bare walls. I used a brass bristle wire brush to loosen the debris from the rim top. It was thick enough that it would take some work to get it off and clean out the grooves of the rustication.I scrubbed the briar with a tooth brush and Murphy’s Oil Soap to remove the dust and grime on the surface of the bowl and the grit that I had loosened on the rim top. I rinsed the bowl under warm water to remove the dust and scrubbed it with the brush under water. The results are shown in the photo below.I used a finer bristle brass brush to work over the grooves on the rim top. This extra step took more of the grime off the surface and left the rim top very clean.I cleaned out the inside of the shank with cotton swabs, pipe cleaners and alcohol to remove all of the tars and oils on the inside walls of the mortise. I cleaned out the airways in the shank and in the stem with pipe cleaners and alcohol.I put the stem in a soak of Before & After Pipe Stem Deoxidizer. I left it to soak for several hours while I worked on the bowl.I turned my attention back to the bowl. I rubbed the bowl down with Before & After Restoration Balm. The product worked to lift the grime and debris out of the grooves of the briar. I rubbed it down and scrubbed it deeper into the grooves of the briar with a shoe brush. I polished the briar with a soft cloth to remove the balm from the briar. I took a photo of the stamping on the shank because it was so clear and with the balm really stood out.I touched up the worn spots on the rim top and edge with a dark brown stain pen. I buffed the rim top with a soft cloth to even out the stain coverage.I rubbed the bowl down with several coats of Conservator’s Wax and buffed it with a shoe brush. The briar began to take on rich warmth. The feel of the bowl in the hand was comfortable and tactile. I think this would be a good smoking pipe. I set the bowl aside and turned back to the stem. I removed it from the soak in the Before & After Deoxidizer and wiped it down. I cleaned out the inside of the airway with alcohol to remove the product from the stem. I polished the stem with a soft cloth to remove all of the deoxidizer and give it a bit of a shine. It had removed much of the light oxidation and left the stamping intact on the stem side. There was still some spots of oxidation that needed to be addressed and the button needed to be reshaped on both sides. The photos below show what it looked like at this point.I used a folded piece of 220 grit sandpaper to work on the tooth chatter and to reshape the edge and surface of the button.  I worked over the spots of oxidation with the sandpaper at the same time to remove it from the surface of the hard rubber stem.I polished out the sanding scratches and marks in the vulcanite with micromesh sanding pads – wet sanding it with 1500-2400 grit pads and dry sanding it with 3200-4000 grit pads. I wiped the stem down with Obsidian Oil after each sanding pad. I buffed the stem with Blue Diamond on the buffing wheel. I brought it back to the table and sanded it with the final three 6000-12000 grit pads. After the final pad I gave it a final coat of oil and set it aside to dry. I put the stem back on the bowl and worked the pipe over on the buffing wheel using Blue Diamond to polish the bowl and shank. I used a gentle touch on the briar when I was buffing it so that the grooves of the rustication would not be filled in and make more work for me. I buffed the stem with a harder touch to raise the gloss on the rubber. I gave the bowl multiple coats of Conservator’s Wax and gave the stem multiple coats of carnauba wax. I buffed the pipe with a clean buffing pad to raise the shine. I hand buffed it with a microfiber cloth to deepen the shine. The finished pipe is shown in the photos below. It looks better than it did in the beginning. It is a beautiful pipe. The dimensions of the pipe are: Length: 5 ½ inches, Height: 2 inches, Diameter of the bowl: 1 inch, Diameter of the chamber: 5/8 inches. I will be adding this one to the rebornpipes store shortly if you are interested in adding it to your collection. It will make a fine addition to the rack. If you are interested email me at slaug@uniserve.com or send me a message on Facebook. Thanks for looking.

Sasieni Four Dot Danzey XS Restoration.


By Al Jones

My buddy Dave made a smart grab with this Sasieni Danzey XS. The Danzey is one of several Sasieni bulldog shapes. He has been looking for this shape for a while so I was glad he finally located a fine example. The pipe was in great shape and I knew it would be an easy restoration. Tnis one sports the “Rustic” finish which is hand carved and follows the grain. The Rustic finish is my personal favorite offered by Sasieni.

The Danzey is also known as the Shape 79. This one has the S for the saddle stem. All Danzey’s have the XS stamp which Pipephil says stands for a premium priced pipe. Below is the chart showing the Sasieni bulldog shapes. The Sasieni logo dates this one from 1946 to 1979.

Below is the pipe as it was received, the stem was oxidized but free of any teeth marks. There was a very mild cake and little build-up on the bowl top. Even in unrestored condition, you can see that this pipe has the beautiful pale blue dots. My cheap point and shoot digital camera don’t capture this well.

I used a worn piece of scotch brite to remove the bowl top build-up then the cake was removed. The bowl was in terrific shape. The stem was soaked in a mil Oxy-Clean solution. Following the soaks, the stem was mounted and oxidation removed first with 800 grit paper, than 1,500 and 2,000 grades. Next up was 8,000 and 12,000 micromesh sheets. The stem was buffed with White Diamond and Meguiars plastic polish. I hand waxed the briar with Halycon wax.

The one challenging aspect of the pipe was that it had an aluminum stinger tube (slip-fit). You can just see it the bowl top photo below. Dave said it was stubborn and he wasn’t kidding. Typically, a soak in alcohol frees these pieces. But, after a soak, this one still wouldn’t budge. I used a pair of pliars to try and twist it out, which of course only collapsed the tube and then it tore. Note for next time: Insert a tooth pick or similar in the tube to give it some support! With a ragged piece of aluminum sticking out of the tenon, I pondered just filing it smooth. I decided to try some drill bits from my index box. Two of my smaller bits looked to be the right size. I mounted the larger of the two bits in my bench top vise and screwed tenon onto the bit. The aluminum twisted right out in two strips. This left a very thin piece of aluminum further into the tenon. The next larger bit worked out the remaining piece. I worked very carefully as I obviously didn’t want to break the tenon on my friends pipe. The draw on the stem without the tube is much improved, so I think it was worth the risk and effort.

Below is the finished pipe, soon to be heading back to Dave.

Restoring an older Orlik Dugout Bent Billiard


Blog by Steve Laug

There are a few eBay sellers that I follow and check out their shops regularly. One of my favourite sellers in England seems to regularly put up pipes that I really like. I don’t have any idea how many of them I have purchased from him but this one caught my eye. It is a small Orlik that I would have called a featherweight. Its diminutive size and delicate shape with a thin pencil shank and well-formed bowl caught my eye. The sandblast finish was rugged and the contrast of dark and medium brown stains really worked well with the shape of the pipe. The pipe was stamped in a smooth box on the left side of the shank and read ORLIK over DUGOUT. There was no other stamping on the shank but I was familiar with the brand as I have another DUGOUT that I have written about previously. The pipe is definitely older and a good companion to this pipe (https://rebornpipes.com/2015/03/28/a-restored-orlik-dugout-billiard/). The photos below are the seller’s photos. They show the overall condition of the pipe and what it was that caught my eye. When the pipe arrived and I brought it to my worktable I took photos of it to show its condition before I began to work on it. The finish looked to be in good repair under the grime and dust that was in the grooves of the sandblast. The rim top was covered in a lava that had overflowed from the cake in the bowl. The cake was quite thick and there appeared to be something in the bottom of the bowl because I could see many small perforations on the bowl bottom (seen in the third photo below). The stem was in good condition and there was very little oxidation. There were a few nicks and scratches in the vulcanite. The fit of the stem to the shank was tight and it did not sit against the shank end. That told me that the interior of the shank must be quite dirty with tars and oils. I took a close up photo of the rim top to show the thick cake in the bowl and the heavy overflow of lava on the rim itself. There appears to be some small cracks on the back right side of the rim but I will not be able to tell for sure until the rim is clean and the bowl is reamed. The perforations at the bottom of the bowl look like a screen. I wonder if there is a screen ball that was placed in the bottom of the bowl in order to deal with moisture during the smoke. Cleaning it will reveal what is there.The stem seemed to have been made out of very high quality vulcanite or hard rubber. It did not show oxidation and the marks and scratches on the surface seemed very minor.I reamed the bowl with the smallest cutting head on the PipNet pipe reamer. I took the cake slowly back to the bare briar. I wanted to see if there was cracking in the inside of the bowl. I was also interested in figuring out what was in the bottom of the bowl. After I reamed the bowl I used a dental pick to pick out the screen ball in the bottom of the bowl. It was dirty and there were some worn areas on the screen. It obviously was not original to the pipe but was added by the pipeman the pipe had belonged to in ages past.With the screen removed I finished reaming the bowl with the PipNet reamer and cleaned up the remaining cake with a Savinelli Fitsall Pipe Reaming Knife. I took the cake back to smooth, bare walls. I scoured the rim top with a brass bristle brush to clean off the lava buildup. I wanted to get it all off and be able to see the condition of the rim top. I wanted to know if there were indeed some cracks in the rim top that did not show.I scrubbed the briar with a tooth brush and Murphy’s Oil Soap to remove the dust and grime on the surface of the bowl and the grit that I had loosened on the rim top. I rinsed the bowl under warm water to remove the dust and scrubbed it with the brush under water. The results are shown in the photo below.There were indeed some small surface cracks in the rim top that followed the flow of the sandblast. They did not seem to go down the outside of the bowl though it appeared that they may well extend slightly into the interior of the bowl. I dried off the surface of the briar and used some minute drops of clear super glue to fill in the cracks along the rim top and the small, short hairline cracks along the first 1/8 inch of the inside of the bowl.I cleaned out the inside of the shank with cotton swabs, pipe cleaners and alcohol to remove all of the tars and oils on the inside walls of the mortise. I cleaned out the airways in the shank and in the stem with pipe cleaners and alcohol.I polished out the scratches and marks in the vulcanite with micromesh sanding pads – wet sanding it with 1500-2400 grit pads and dry sanding it with 3200-4000 grit pads. I wiped the stem down with Obsidian Oil after each sanding pad. I buffed the stem with Blue Diamond on the buffing wheel. I brought it back to the table and sanded it with the final three 6000-12000 grit pads. After the final pad I gave it a final coat of oil and set it aside to dry. I put the stem back on the bowl and worked the pipe over on the buffing wheel using Blue Diamond to polish the bowl and shank. I used a gentle touch on the briar when I was buffing it so that the grooves of the sandblast would not be filled in. I buffed the stem with a harder touch to raise the gloss of the rubber. I gave the bowl multiple coats of Conservator’s Wax and gave the stem multiple coats of carnauba wax. I buffed the pipe with a clean buffing pad to raise the shine. I hand buffed it with a microfiber cloth to deepen the shine. The finished pipe is shown in the photos below. It looks better than it did in the beginning. It is a beautiful pipe. The dimensions of the pipe are: Length: 5 inches, Height: 1 1/2 inches, Diameter of the bowl: 1 inch, Diameter of the chamber: 5/8 inches. Thanks for looking.


A Surprise awaited when I visited Smitty’s Cigar & Tobacco in Gainesville, Georgia


Blog by Steve Laug

This past weekend I was in Gainesville, Georgia, near Atlanta for work. It was a long weekend and we put in a lot of hours doing an assessment for a new project. We arrived on Friday, worked all day Saturday, Sunday and Monday. Then on Tuesday we took the day off to kind of catch up on rest and also check out some of the places in the area on my list. We went to a couple of antique malls looking for pipes – I found a few. But I also had it on my list visit a local pipe shop. On a previous trip my friend had taken me to visit Smitty’s Cigar and Tobacco, located at 975 Dawsonville Hwy. I really wanted to go back and pick up some tobacco for a friend and add a few tins to my own cellar. Since they are open from 10am-8pm Monday through Saturday I was hoping to find some additions.

I was a bit worried about the shop still being there. The last time I was in town I visited the shop and met with Smitty. He had been proudly open for more than 20 years – serving the local people of Gainesville, Georgia, and those passing through. We had a great visit and chatted for over an hour as the shop was empty. We enjoyed a great visit and talked about the past age of pipe glory, the great time we had at pipe shows and all of the common friends we have had and still have in the hobby, both dead and living. He showed me photos with quite a few of the noteworthy pipe makers – Eric Nording, Jess Chonowitsch and others who he had hosted in his shop over the years. He showed me some of his Chonowitch pipes and a few of his others from his collection that he was selling. Looking around that day I honestly thought that the shop would be closed the next time I visited. The shop was worn and tired looking, the stock was dwindling, the tobacco options were low and the cigar market was no longer sustaining the shop. It had the look of a place heading toward closure in the very near future. I purchased several pouches of Smitty’s own blends – a Virginia/Cavendish and his own English tobacco. I enjoyed them throughout the past year and was hoping to replace them on this visit – if the shop still was open.

Can you imagine my surprise when we pulled into the parking lot on Tuesday afternoon? I sure did not know what to expect when we drove up. I am a bit of a pessimist so I was prepared to find the place either empty, a new business in the building or a For Lease sign in the window. What I was not prepared for was what sat in the strip mall parking lot. We drove into the McEver Shopping Plaza past Kohl’s and Bed Bath & Beyond and were greeted with the sight shown in the photo to the left. There were some blue tables and chairs on the patio outside the shop providing a spot for smokers to relax and enjoy a bowl or cigar. There were lights on in the shop, an open door and lots of folks visiting and staff serving them. The place was a living and thriving entity.

We went through the open door into the shop and were immediately greeted by the staff and the customers. The interior had been redecorated and it had a warm inviting look. My friend commented that he loved the smell of the shop. The folks smoking cigars laughed and blew some smoke towards him. They were standing, or sitting in the comfortable chairs along the window. We walked in on some story telling of some sort that always fills the air of pipe shops no matter where they are. The staff and guests welcomed us and continued to smoke their cigars and visiting.In the centre of the shop they had some soft leather chairs and tables for smokers to sit comfortably and enjoy a pipe or cigar. There was an old cigar store Indian standing next to the humidor on the right side of the shop. He had his hand on various boxes of cigars and was a great reminder of days long gone when these figures stood outside the shops welcoming guests into the respite of the tobacco shop. In today’s anti-tobacco/anti-smoking climate walking into the shop was like stepping back into time. Folks were sitting comfortably in chairs smoking cigars and the aromas of the smoke filled the place. My friend commented that the shop smelled good.  To me the smells and the sight of the place reminded me of how much we have lost in our anti culture. These old time tobacco shops are becoming things of history. On the right as you walked past some of the chairs there was a counter with a variety of cigar cutters, pipe racks and humidors. There were magazines and of course the cash register. Just past that was the humidor – it was a large room lined with a wide range of cigars. I am not much of a cigar guy but from what I could see there was a large variety of top cigar brands that included Davidoff, Arturo Fuente, Opus X, Tatuaje, Illusione, La Flor Dominicana, Aging Room, Casa Magna Domus Magnus Montecristo, Royal Butera Vintage, Padron, Griffin, Ashton, and Diamond Crown. Across from the humidor, on the left wall were the display cases of pipes and tobaccos. In terms of pipes they carried both lower end shop pipes and a full range of Peterson pipes. They no longer had the estate pipes that were present the last time I visited the shop. There were some other brands but I did not pay a lot of attention to them as I was looking for tobacco this time around.I looked through the bulk tobaccos on the sideboard to the left of the door and made my way to the jars and tins. They had a full range of Briarworks tobaccos in the small 2 ounce canning jars. They had an assortment of McClelland Virginias – numbers 22-27 and Frog Morton blends. They had a lot of Gregory Pease’ tobaccos and some Dunhill and C&D blends. The prices on the tins averaged around $15-17 dollars which is still cheaper than what I pay in Canada. The clerk and I laughed over the taxes in Georgia on tobacco as compared with those in Vancouver.In the back of the shop along the right wall they had added a bar with wine and craft beers as well as soft drinks to accompany the smoke and add to the experience. I made my way to the back of the shop to have a look at it. They had done a great job on it. The top of the bar was made of a slab of polished and sealed wood. The wall behind was lined with the options that were available for libations and there was a stock cooler filled with craft beers.

I went to use the washroom in the back and on the way saw a rack of the clerk’s pipes, some of the tobaccos that he was smoking and a full buffing kit with buffers, polishes and wax. It seemed that they did some pipe polishing. I did not see any restoration tools so I am guessing they send that out. I went back to the front part of the shop and visited with two of the younger staff that day and we talked a lot about the various tobaccos they carried. One of the guys smoked a pipe and had some recommendations on the tobaccos they carried. I revisited the jarred and tinned tobacco and went through the various shop blends they had available to see what I would take home. The limitations on my purchase were two fold – dollars and the amount of tobacco I was allowed to carry back to Canada with me. I sorted through some of the tins and asked questions of the young pipeman who was sitting in the chair next to the tobacco. I picked the tobaccos I wanted to purchase as well as pipe cleaners took them to the counter on the front right side of the shop.I stood and talked a bit with one of the customers who was enjoying a nice Cuban Cohiba cigar. He was a friendly guy who helped give the shop a welcoming air.I took a photo of my purchases – they were put in a nice cord handled shopping bag and the clerk threw in a few pens, a sticker and a business card. I bought two bags of pipe cleaners, a tin of Pease Stonehenge Flake and a tin of McClellands Virginia No. 22. The photo also shows the pipes I picked up earlier that day at the antique malls. It was a great day of pipe hunting and the shop visit was a bonus. We ended our day with a great meal at Ted’s for Bison burgers, meatloaf and drinks. All in all it was a great end to our trip to Gainesville.When I got home I read through their website (http://www.smittyscigars.com/) and enjoyed the way it was set up and the photos. The site gives a great view of the shop and I can only say that it truly represents what is there. I also found this short video and have included it here as it introduces the new owner and gives a good idea of what the shop looked like the day I visited. Have a look.

As I close this shop visit blog I want to encourage you to visit this great tobacco shop that will bring back memories of an old time tobacconist you won’t want to miss this place. If you are too young to remember the old time tobacco shops then a visit here is even more important. Shops like this are becoming a thing of the past as time goes on. If you are in the Gainesville area for a visit or live nearby be sure to check them out. Plan on sitting and enjoying a cigar or a pipe, sip your favourite libation and jaw a while with the guests and staff. It is a great place.

1937 GBD Chubby Rhodesian (R9239) Restored


By Al Jones

I’ve had a great year for acquiring GBD pipes. I started the year in January by finding a 9242 Sandblast at the NYC Pipe Show.  And later, another 9242 New Standard. I can’t think of a better way to cap off 2017 than with this hallmarked R9239.

This shape is a bit of a GBD mystery. In the past six years, I’ve seen three of these come up on Ebay (one was unsmoked!). All of them have the R9239 designation, with a London hallmarked band that dates to 1937 (B date code). I have two other hallmarked 1930’s era GBD’s and each has the R code in front of the four digit shape number. The 9239 is referenced no where else in any GBD catalogs or literature that I’ve encountered. I speculate that the R must have signified a silver hallmarked band, but unfortunately that detail is lost to time.

Winning this auction was a battle with 12 other bidders and I eked out a victory by a few dollars. I studied the sellers photos carefully before bidding and I had plenty of apprehension until it was delivered. As you can see below, the photos were either altered digitally or the flash made some odd patterns on the briar. The rest of the pipe looked solid enough to allow me to bid. On delivery, all of my fears disappeared. The briar and vulcanite were in terrific condition. The stem fitment was snug with zero bite marks on the oxidized stem. The odd shadow was just that, a flash mark or other.

Below are my photos of the pipe as it was received. The stem was mildly oxidized and there were several handling marks on the bowl. The bead lines were mint and the bowl and shank interior showed little use.

I reamed the very slight cake from the bowl and soaked it with alcohol and sea salt. After the soak, I used a silver polish to remove the tarnish on the silver band, which was a bit stubborn. I mounted the stem with a plastic collar and removed the first layer with 400 grit, then 800 grit wet paper. This was followed by 1,500 and 2,000 grade paper, then 8,000 and 12,000 micromesh sheets. The stem was then buffed with White Diamond and Meguiars Plastic Polish.

I was able to remove several of the handling marks on the bowl with an electric iron and a wet cloth. The bowl was then buffed with White Diamond and several coats of Carnuba wax.

Below is the finished pipe.

?

?

Creating a Churchwarden from a Stanwell Rustic Paneled Horn


Charles offered a creative use of stems to convert this paneled horn into a beautiful churchwarden. Well done. Let’s see if some of you have also done the same…

Charles Lemon's avatar

I thought I’d squeeze another pipe onto the DadsPipes Store shelves in time for the Holiday buying season. This Stanwell is one of the last survivors of the Danish Lot of 30 or so estate pipes I purchased about a year and a half ago. It had been sitting in the refurb box for quite some time as I prioritized other projects ahead of what I figured would be an easy cleanup.

When I brought the pipe to the worktable, it was in decent overall shape. I was dirty, of course, and the stem and vulcanite shank extension were well oxidized, but the chamber had only a thin layer of cake and some debris to contend with. There was a bit of lava flowing from the chamber onto and over the crowned rim, but the stem was free of larger tooth dents, with only a little bit of chatter visible.

View original post 791 more words

Repairing a cracked shank on an older Brigham 117 Patent Rhodesian


Blog by Steve Laug

Not long ago I received a message on the blog from a pipeman in Alberta regarding an older Brigham pipe that he had that was in great shape and had a long hairline crack in the shank from the bottom of the left side up through the stamping into the middle of “i” in Brigham. It caused the stem to be loose and he was worried about it continuing to crack across the rest of the shank. I was pretty certain it could be fixed but would need to be banded. The pipe is stamped Brigham over Can. Pat. 372982 on the left side of the shank and shape number 117 on the flattened underside of the shank near the bowl/shank junction. He sent me the following three photos to show the position of the crack in the shank. He circled them in red to make them clear. He took photos of the side of the shank against a green and a black background to make the crack very visible. He also sent an end shot to show the crack from that vantage point. Almost incidentally he also did made the patent number also visible in his photos. I wrote Charles Lemon of Dadspipes as he is my go to source for all things Brigham and asked him about the pipe. He said that the patent stamp dates it between 1938-1955. Based on it being a one dot and a smooth finish, he said it was probably closer to 38 than 55. He also said that the shape 17 (or in this case 117) is what Brigham called a round Bulldog. I took photos of the pipe when I took it out of the box. It was well restored and very clean. The finish was in great shape. The stamping was very clear with a little wear at the middle of the Brigham stamp. The single brass dot on the stem side was clear. The vulcanite stem looked very clean and polished. There was a little rounding to the side of the stem at the stem/shank union but it was really pretty clean. There were some small tooth dents in the stem but the stem looked good. The rim top was clean and the entire pipe was clean and ready to smoke. I took photos of the bowl/rim top and the stem to show the condition it was in when it arrived. It really looks good. You can see the damaged areas on the inside edge of the rim and the marks on the stem but it still is very nice. I took two photos to show the crack as it appeared without a lens. The first shows the end of the shank. It is on the lower left side of the photo. The second shows it on the side of the shank. I circled them in red to highlight the location.Looking it over in a bright light with a lens I knew that I would need to drill a small hole at the end of the crack. The hard thing was that the end of the crack was in the letter “i” on Brigham. I would also need to band the shank to keep it from splitting and fortify the shank when the stem was inserted. I took a band that was the right diameter for the shank out of my box of bands.I used the end of a small screw, pressed into the end of the crack to mark the pilot hole for the drill. I inserted a tiny microdrill bit in the chuck of my Dremel and set the speed to 5. I started the drill and slowly drilled the hole in the middle of the letter to stop the crack from spreading further.I used the tip of a dental pick to place a small drop of Krazy Glue (CA) in the hole I had drilled in the shank. It was a tiny hole so it did not take too much glue to fill in the hole. I put a tiny drop of glue on the crack that was going to be covered by the band and pressed it together to bind the crack and seal it.I used a very small sanding stick to spot sand the repair on the shank. I was able to smooth out the repair without damaging the surrounding letters on the stamping. I put a little all-purpose glue on the surface of the shank that would be covered by the band and pressed the band in place. I pressed it far enough onto the shank to provide the strengthening of the shank but did not cover up any of the stamping on the side of the shank. I used the Dremel and sanding drum to sand the excess length of the band back until it extended just beyond the end of the shank. I topped the band edge with the topping board to smooth it out. I used micromesh sanding pads to smooth out the sharp edge of the band and to polish the band. I took a photo of the shank end and repair after the band had been pressed in place. The crack on the shank end is invisible now. The crack on the shank side and up into the Brigham stamp is pressed tightly together making it less visible.The repair was finished. The stem now fit snug in the shank. The new band on the shank looked really good and dressed up the pipe. I polished the pipe on the buffing wheel using Blue Diamond to remove scratches on the bowl, shank, band and stem. I gave the bowl and stem multiple coats of carnauba wax and buffed the pipe with a clean buffing pad to raise the shine. I hand buffed it with a microfiber cloth to deepen the shine. The finished pipe is shown in the photos below. It looks better than it did in the beginning. The pipe is finished and I will be sending it back to Alberta a little later this week. I am hoping the pipeman there enjoys it. Thanks for looking.