Blog by Steve Laug
Last week I received a text from Robert about restoring three pipes his brother had found in Eastern New York. There were two Kaywoodies and a Churchill. The Kaywoodies included a small apple stamped Campus and an octagonal pipe stamped Kaywoodie Standard. The Churchill 999 Pot shaped pipe. He sent along two photos of the pipes. You can see the condition of the three pipes. They are dirty and worn. The last pipe in the photo, the Campus has what appears to be a broken shank and a potential repair. It looks to be poorly done. Robert said that he was fairly certain that the stem was glued onto the shank with the repair.
 On Saturday he brought the pipes by for me to look at. I now had three more pipes to clean up and repair. The Churchill 999 Pot and the Kaywoodie Standard Oxagonal 44 Apple were dirty but were in good repair. I had finished the little KW Campus repair and the pipe looked good (https://rebornpipes.com/2024/04/21/repairing-and-restoring-a-kaywoodie-campus-apple/). I looked second Kaywoodie, the Octagonal Apple over carefully and this is what I saw. There was a thick cake in the bowl with tobacco debris. There was a coat of lava on the rim top that was quite thick but the inner edge looked very good. The outer edge had some damage on the back side above the shank bowl union. The finish was dirty but otherwise showed some nice grain underneath. The stem was dirty with light tooth chatter on both sides ahead of the button.
Dal had worked on a Kaywoodie Standard, but shape 33 and done a fair bit of research on the pipe (https://rebornpipes.com/2020/03/23/new-life-for-a-kaywoodie-standard-apple-for-a-special-pipe-woman/). I have included the link above if you would like to read it. I have copied the pertinent portion on the 2 digit shape numbers and dating of the pipe below.
The next picture in this set shows the Kaywoodie shape number ‘33’ on the right flank of the shank which points to the designation of a ‘Large Apple’ from the US production of Kaywoodie pipes (LINK). According to this discussion on Tapatalk.com, the 2-digit system, employed from 1927 to 1972 when the system was changed to a 3-digit system, was when pipe production (for Kaywoodie, Yello-Bole and Medico) was moved to the Medico factory in Richmond Hill Queens NY as plans for new plant were in process. The 3-digit numbers was used during this period for all Kaywoodie and Medico pipes, from 1972 to 1980. The same article indicated that the 2-digit numbers were only for Kaywoodies produced in the US – that Kaywoodie of London (Cadogan) had their own three-digit system. Putting all the information together, this Kaywoodie Apple is most likely a 1960s vintage. According to the Kaywoodie Discussion at MyFreeForum the ‘Standard’ line of Kaywoodie started in the 1950s, but with the 2 digit shape number and the 3 hole stinger, the evidence points to the 1960s dating.
I included a portion of the shape number chart from Pipedia and the link to the chart as well (https://pipedia.org/wiki/Kaywoodie_Shape_Numbers). I did a screen capture of the section with the shape 44 number. It is interesting in that the shape was available for only a few years – 1965 to 1970. That helps narrow down the date on the pipe I am working on. It also identifies it as an Octagon Apple. I also have included a portion of a chart with the pipe line names and the approximate date of manufacture below (https://pipedia.org/images/3/3d/Kaywoodie_Pipe_Names.pdf). It identifies the date of the Standard line production between 1950 and the present.
 I learned that the line was introduced in 1950 and the specific shape I had in hand was made between 1965 and 1970. The tenon/stinger was a typical Drinkless type and was threaded to screw into the fitment in the shank. From that I knew that I was working on an older pipe.
I took photos of the pipe when I brought it to the worktable. I wanted to show the general condition of the pipe before I started my work on it. You can see the cake in the bowl and the lava on the rim top. The damage on the back edge of the rim top is also visible. The stem is dirty and lightly oxidized as noted and light tooth marks are on the top and underside ahead of the button.
 I took some close up photos of the rim top and the stem surface. I wanted to show the condition of both more closely. The rim top and the inner and outer edges of the bowl heavily cake in lava and you can see the marks on the back outer edge. I also took close up photos of the stem to show the general dullness of the stem and the light tooth marks on the stem surface.
  I took a photo of the stamping on the left side of the shank and it is clear and readable. It is stamped as noted above. The right side has the shape number but it is almost filled in with dirt. It is still readable but I could not capture it in a photo. I removed the stem for the shank and took a photo of the bowl and stem to give a picture of what it looked like.
 Now it is time to clean up the pipe. I reamed the bowl with a PipNet pipe reamer and the second cutting head. It cleaned up most of the cake. I used a Savinelli Fitsall Pipe Knife and cleaned up the remaining cake leaving bare briar. I sanded the bowl walls with 220 grip sandpaper wrapped around a piece of dowel. I smoothed out the bowl walls and they looked very good. There was no heat damage or checking on the walls.
 I scrubbed out the shank and the stem with pipe cleaners, cotton swabs and alcohol. I cleaned up the stinger with pipe cleaners, cotton pads and alcohol.
 I scrubbed the exterior of the bowl and shank with a tooth brush and undiluted Murphy’s Oil Soap. It works exceptionally well to remove unwanted oils from the briar and also the grime on the rim and the bowl sides. I rinsed it in warm water while scrubbing with the tooth brush. The pipe looks very good at this point. The rim top is clean enough to know the condition it is in and what I need to do to deal with it.
 I gently topped the bowl to remove the damage on the rim top and to minimize it on the rear edge where the most damage was. I used a topping board and 220 grit sandpaper.
 I repaired the outer edge of the rim at the back with clear CA glue and briar dust. I sanded it smooth with a folded piece of 220 grit sandpaper to start blending the repair into the rest of the briar. It was smooth to touch and did not stand out as a dark repair.
 I sanded the bowl and rim top to clean up the damage and repairs to the edge using 320-3500 grit sanding pads. I wiped the bowl down with a damp cloth after each pad. It really began to take on a shine.
 I polished the briar with micromesh sanding pads – dry sanding with 1500-12000 grit pads. I wiped it down after each sanding pad with a damp cloth to remove the sanding debris on the surface.


 I rubbed the bowl down with Before & After Restoration Balm. I worked it into the surface of the briar with my fingertips to clean, enliven and protect it. I let the balm sit for a little while and then buffed with a cotton cloth and shoe brush to raise the shine.

 I set the bowl aside and turned to address the stem issues. I “painted” the stem surface with the flame of a lighter. I filled in the deep tooth marks with black CA glue. Once it cured I sanded it flat to the stem surface with a folded piece of 220 grit sandpaper. It looked much better at this point.
 To blend the repairs into the surface of the vulcanite I sanded it with 320-3500 grit sanding pads. I wiped it down after each sanding pad with a damp cloth. By the final 3500 grit sanding pad the rim top had a shine.
  The stem was in good condition so I polished the vulcanite with micromesh sanding pads – 1500-12000 grit pads. I wiped it down with Obsidian Oil after each sanding pad. I used Before & After Pipe Polish – both Fine and Extra Fine to further polish the stem. I gave it a final coat of Obsidian Oil and set it aside to dry.
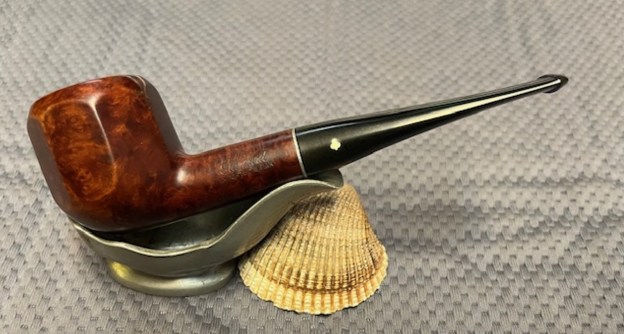
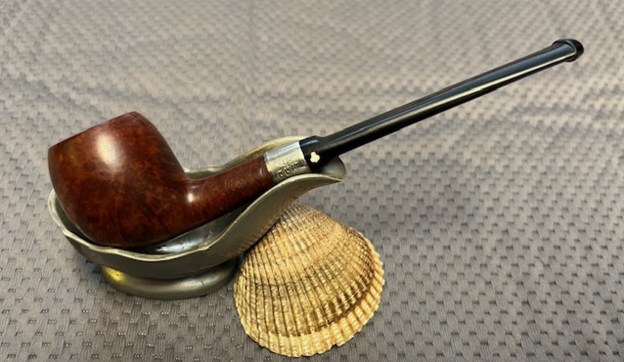
 This Kaywoodie Standard Imported Briar 44 Octagonal Apple cleaned up really well and looks very good. The Before & After Restoration Balm brought the colours and grain out in the smooth finish on the pipe. It works well with the polished oval vulcanite taper stem. I put the stem back on the bowl and carefully buffed the pipe with Blue Diamond on the buffing wheel. I gave the bowl and the stem multiple coats of carnauba wax on the buffing wheel. I followed that by buffing the entire pipe with a clean buffing pad. I hand buffed the pipe with a microfiber cloth to deepen the shine. The finished Kaywoodie Standard 44 Octagonal Apple fits nicely in the hand and I think it will feel great as it heats up with a good tobacco. Give the finished pipe a look in the photos below. The dimensions of the pipe are Length: 5 ½ inches, Height: 1 ½ inches, Outside diameter of the bowl: 1 ¼ inches, Chamber diameter: ¾ of an inch. The weight of the pipe is 1.34 ounces/38 grams. I know Robert is going to enjoy this second pipe of the three once I return it to him with the other pipes he dropped off. Thanks for reading this blog and my reflections on the pipe while I worked on it.


