Blog by Steve Laug
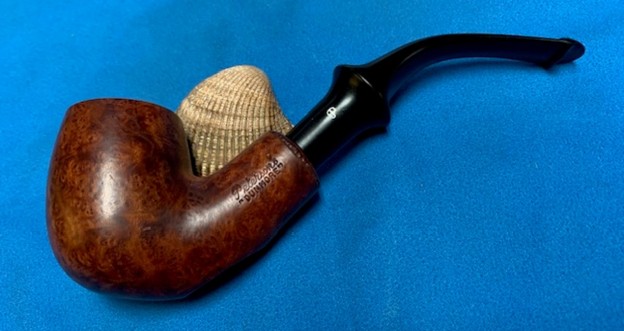
The next pipe I have chosen is a large saddle stem Apple with a smooth finish that was stained with a rich brown colour around the bowl and shank. It was stamped on the left side of the shank and reads FRIAR [over] London Made [over] By Sasieni. The right side of the shank is stamped with the shape number next to the bowl that reads 52SG. Next to the shank end it read Made in England. The stamping was readable. The pipe was purchased as part of an estate from Australia on 07/27/2020. It was dirty with grime ground into the finish around the bowl and shank. The bowl had a moderate cake with darkening on the inner edge of the bowl and an overflow of lava on the rim top. It was heavier on the backside of the rim top. There were some nicks on the front rim top. The stem was oxidized, calcified and had some chatter and deep tooth marks on the top and underside near the button. There was a logo stamped on the left side of the saddle that bore a faint shield with an “F” in it. Jeff took photos of the pipe before he started his clean up work.
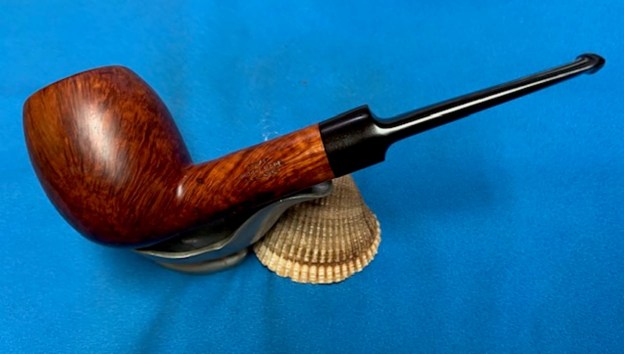
 He took photos of the bowl and rim top to show their general condition. You can see the cake in the bowl and the thick lava coat on the top of the rim and inner edge of the bowl. The finish on the bowl is very dirty with grime and oils ground into the bowl, but still very stunning. The round saddle stem is oxidized, calcified and has chatter and tooth marks on the top and underside ahead of the button.

 Jeff took some photos of the sides and heel of the bowl to give an idea of the grain around the bowl and shank. It is amazing and I cannot wait to see what it looks like once it is polished and waxed.
 He took some photos of the stamping on the sides of the shank to capture it for me. It is clear and readable as noted above. He also included a photo of the faint shield F logo on the left side of the saddle stem.
 I turned to Pipedia (https://pipedia.org/wiki/Sasieni) to see what I could find out about the Friar line of pipes by Sasieni. The write up there is a concise history of the brand that gives a sense of the background and development of the Sasieni brand. I quote a section of the article that specifically refers to the Friar line. I have highlighted that in bold text.
Through the post war years, Sasieni added shapes and lines. While the Four Dot remained their most famous product, the company also sold lines of “seconds” under various names, such as Mayfair, Fantail, Olde English, and Friar. These were pipes made of good wood, but possessed of some flaw, usually filled with putty. Pipes that were almost, but not quite, good enough to be a Four Dot were sold as Two Dots. I have two of these pipes in my collection. Both pipes are quite striking, exhibiting exquisite shapes and exceptional grain. At first I wondered why they were not Four Dots. Eventually, after long inspection, I discovered each pipe contained one very small filled flaw. In spite of this they remain two of my favorite pipes. However, it is clear Sasieni was determined to put the Four Dot logo on only the most perfect pipes.
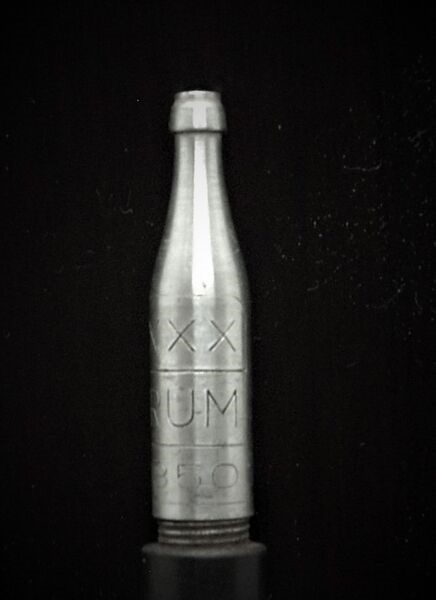
Caption: Sasieni Friar Stinger marked ‘RUM 850’, and shaped like a Rum bottle. Some Sasieni pipes including this one were Rum cured. Courtesy Brian Robertson collection.
I also have included a shape chart that was included. The number 52s in the chart below is a Hurlingham. The pipe I am working on is a 52SG which I cannot find on the charts. I am thinking that because of the size of the pipe the 52 is an apple shaped pipe, the “S” is possibly a notation for a Saddle style stem. The “G” is possibly the notation for a Giant or a large sized pipe. There was also an interesting photo of the Sasieni Friar pipe and a comment about it being a rum cured pipe. It had a bottle shape stinger apparatus in the tenon. The pipe I am working on does not have that apparatus and the logo on the stem top of that one is quite different. I am including them for reference. Here is the link: (https://pipedia.org/wiki/File:Sasieni-Friar-Stinger-Rum850.jpg).
Caption: Sasieni Friar Stinger marked ‘RUM 850’, and shaped like a Rum bottle. Some Sasieni pipes including this one were Rum cured. Courtesy Brian Robertson collection.
The pipe I am working on is stamped with a unique 52SG shape number as noted above. It is a Sasieni that was called a second but for the life of me the grain on this one is quite beautiful and there are possibly some fills. Now it was time to work on the pipe.
Jeff had thoroughly cleaned up the pipe. He reamed the pipe with a PipNet Pipe Reamer and cleaned up the remnants with a Savinelli Fitsall Pipe Knife. He scrubbed the bowl with undiluted Murphy’s Oil Soap with a tooth brush. He rinsed it under running warm water to remove the soap and grime. He cleaned out the inside of the shank and the airway in the stem with alcohol, cotton swabs and pipe cleaners. He scrubbed the exterior of the stem with Soft Scrub to remove the grime. He soaked the stem in Briarville’s Pipe Stem Deoxidizer and rinsed it off with warm water. The pipe looked very good when it arrived here in Vancouver.
 I took a photo of the bowl and rim top to show how clean the bowl and the rim top and inner edges of the bowl. You can see the darkening around the inner edge and on the crowned rim top. I took photos of the stem surface to show the condition and tooth marks and chatter on both sides ahead of the button.
 I took photos of the stamping on the sides of the shank. It is clear and readable as noted above. I removed the stem from the shank and took a photo of the pipe parts. It is quite a stunning piece.
 I started my work by cleaning up the darkened inner edge of the rim and burned area on the back of the rim top with a folded piece of 220 grit sandpaper. The crowned rim top cleaned up nicely.
  I polished the bowl and the rim top with micromesh sanding pads – dry sanding with 1500-12000 grit pads. I wiped the bowl down after each pad with a damp cloth to remove the grit. The bowl began to take on a rich shine. It is a beauty.


 I rubbed the bowl down with Before & After Restoration Balm. I worked it into the surface of the briar with my fingertips and a shoe brush to get it in the grooves. It works to clean, restore and preserve the briar. I let it do its magic for 15 minutes then buffed it off with a cotton cloth. The pipe looks incredibly good at this point in the process.

 I set the bowl aside and turned my attention to the stem. I painted the tooth marks in the vulcanite with the flame of a Bic lighter to lift them. I was able to raise them a little. What remained, I filled in with black rubberized CA glue. Once it hardened I flattened the repairs out with a small file. I sanded the stem with 220 grit sandpaper to blend them into the rest of the vulcanite stem and started the polishing them with 600 wet dry sandpaper.


 I polished the stem with micromesh sanding pads – 1500-12000 grit pads. I wiped it down with Obsidian Oil after each sanding pad.
 I finished polishing it with Before & After Pipe Stem Polish – both Fine and Extra Fine and buffed it off with a cotton cloth. I gave it a coat of Obsidian Oil to preserve and protect the stem.
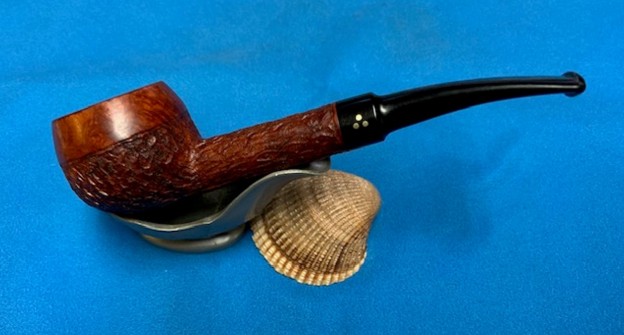
  This Friar London Made by Sasieni 52SG Made in London Apple is a great looking pipe now that it has been restored. The brown stains really highlight the grain on the smooth portion and the rusticated portion. Once it was polished the finish is stunning. I put the stem back on the bowl and carefully buffed the pipe with Blue Diamond on the buffing wheel. I gave the bowl and the stem multiple coats of carnauba wax on the buffing wheel and followed that by buffing the entire pipe with a clean buffing pad. I hand buffed the pipe with a microfiber cloth to deepen the shine. The finished Sasieni Made Friar 52SG Apple fits nicely in the hand and feels great. Give the finished pipe a look in the photos below. The dimensions of the pipe are Length: 6 inches, Height: 2 inches, Outside diameter of the bowl: 1 ¼ inches, Chamber diameter: 7/8 of an inch. The weight of the pipe is 67 grams/2.36 ounces. I will be adding the pipe to the British Pipe Makers Section of the rebornpipes store. If you are interested in purchasing this pipe send me a message or an email. Thanks for reading this blog and my reflections on the pipe while I worked on it.
As always, I encourage your questions and comments as you read the blog. Thanks to each of you who are reading this blog. Remember we are not pipe owners; we are pipe men and women who hold our pipes in trust until they pass on into the trust of those who follow us.


