Tag Archives: Savinelli Dry System Pipes

Resurrecting a Savinelli Dry System


by Kenneth Lieblich

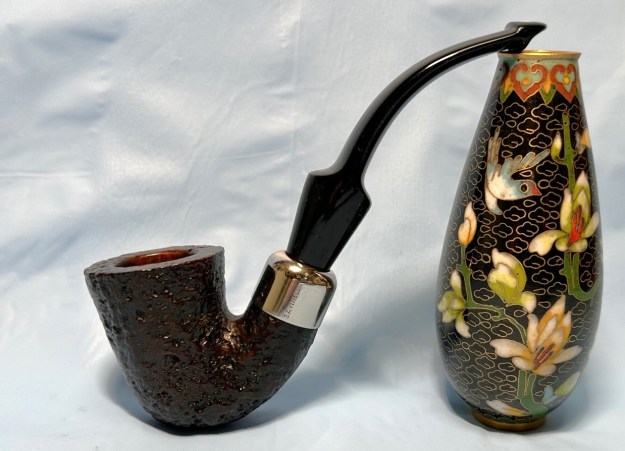
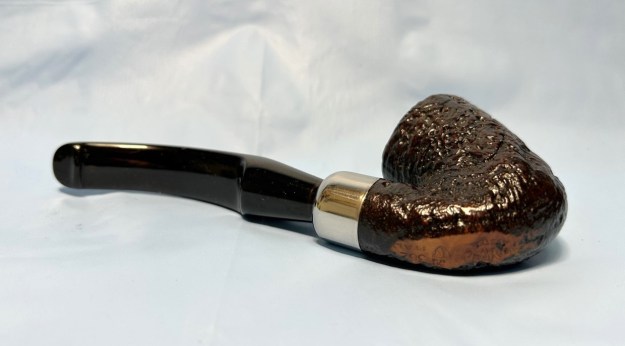
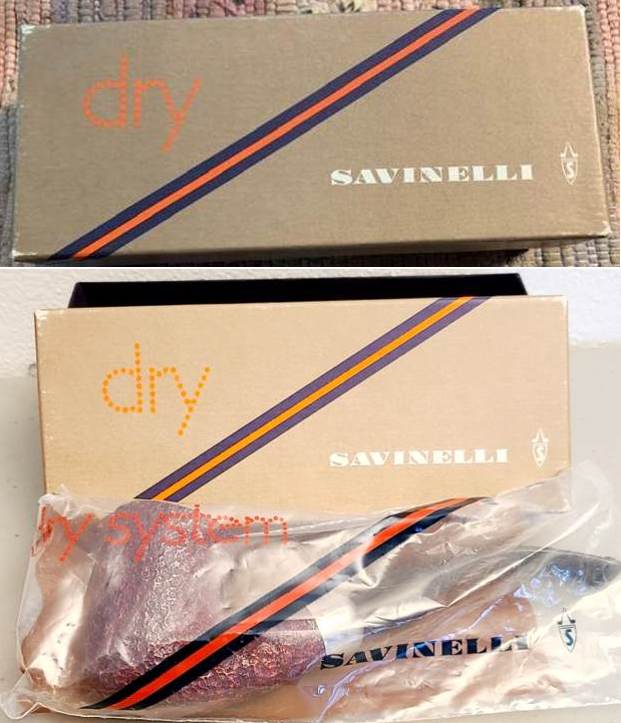
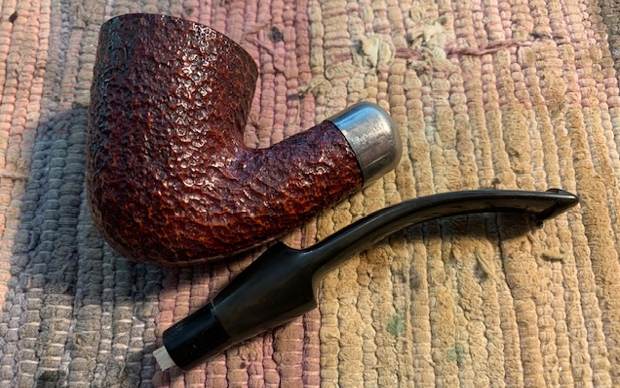
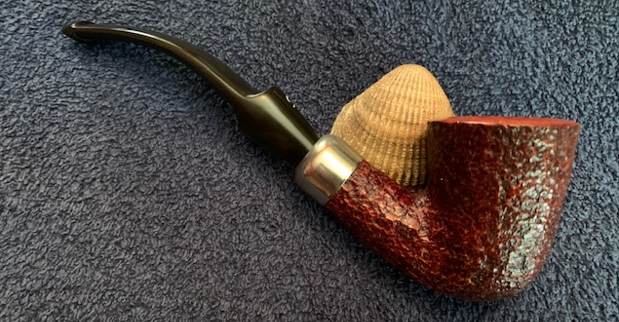
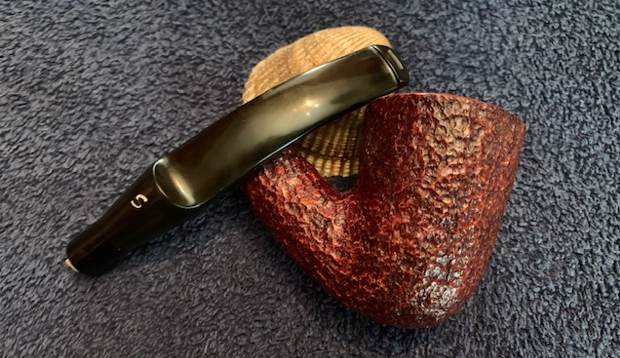
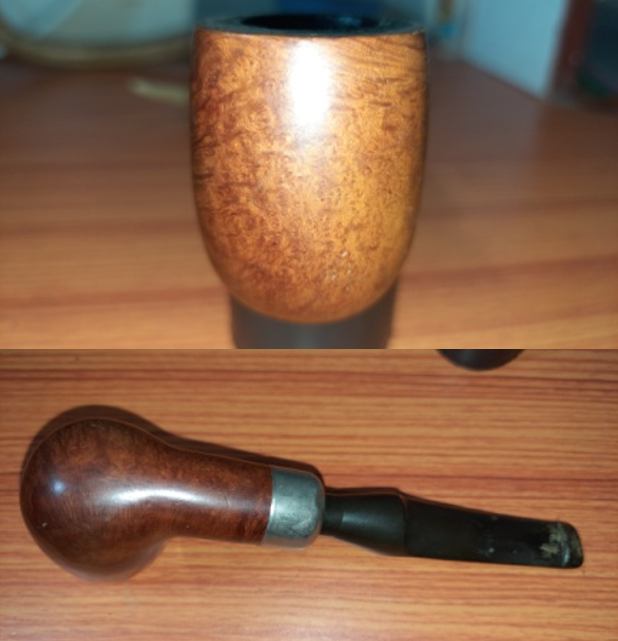
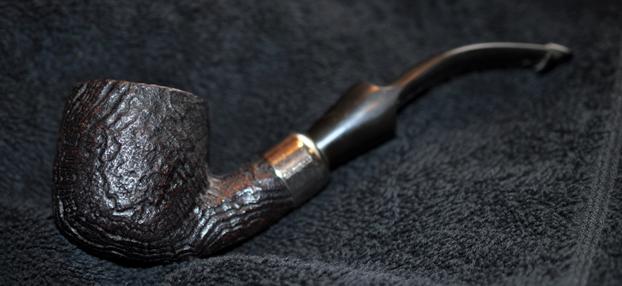
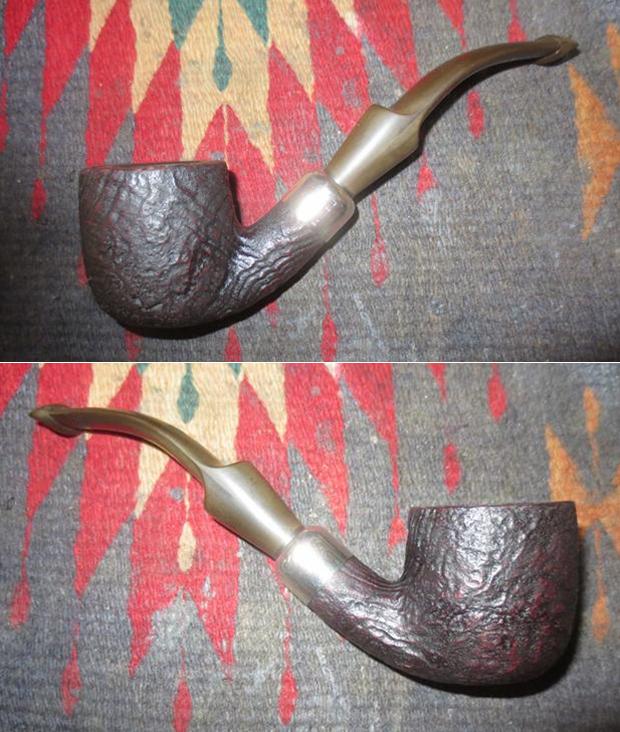
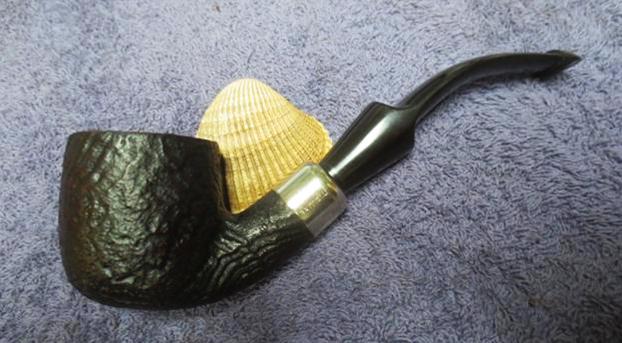
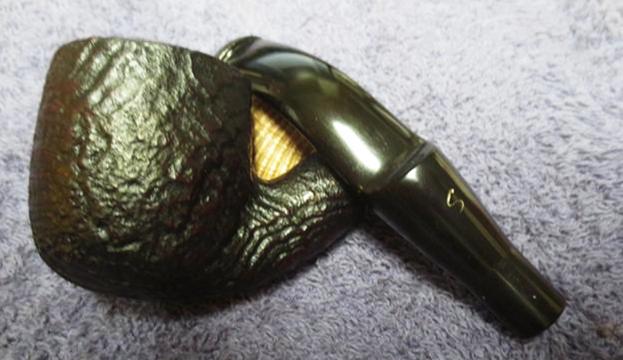
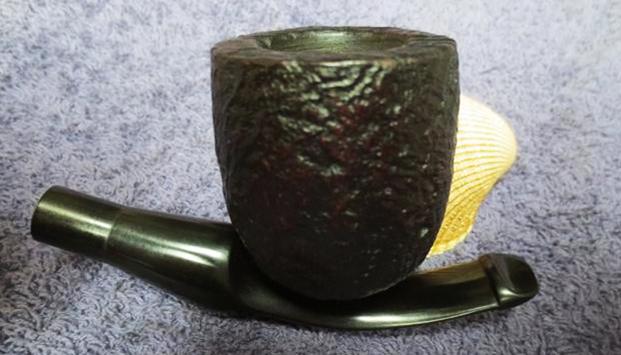
Next on the old chopping block is a wonderful Savinelli Dry System 3621 Bent Dublin. It’s a really good-looking pipe and I understand that this is a popular and well-loved series. I got it recently in a lot of pipes and it called out to me for some help. I suppose this pipe is meant to be reminiscent of the Peterson system pipes – it even has a sort of P-lip button! It’s a terrific-looking pipe, with a bit of a rough history. 
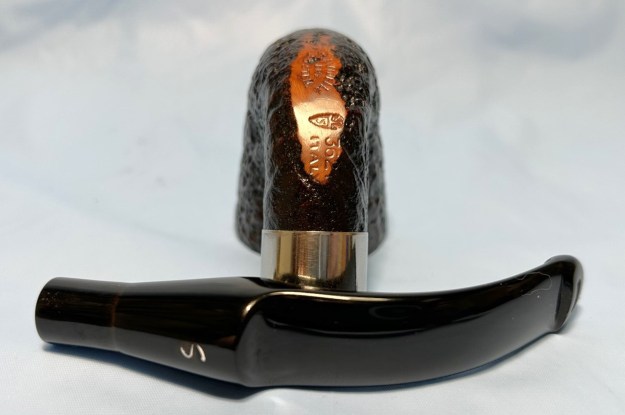
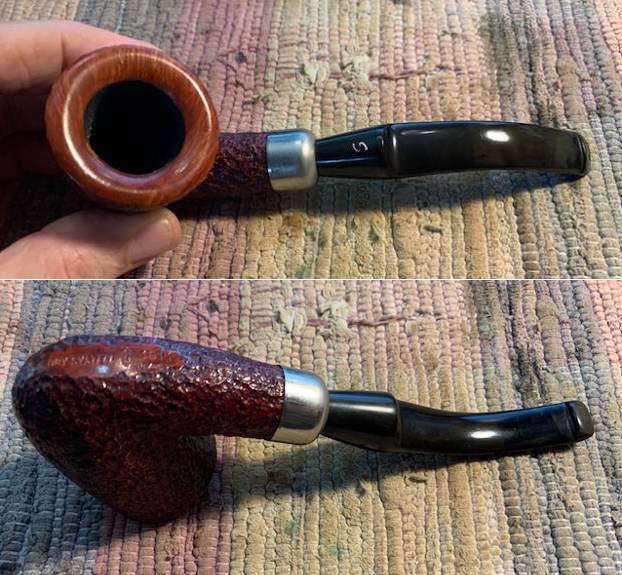
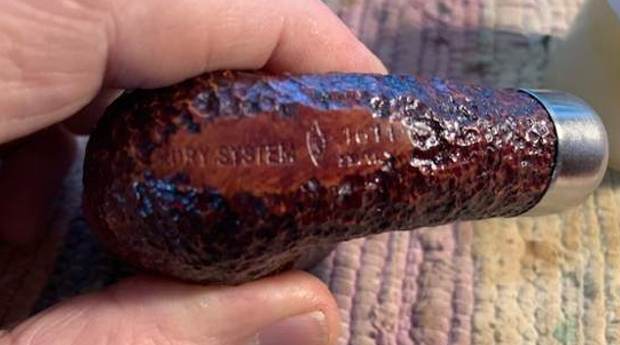
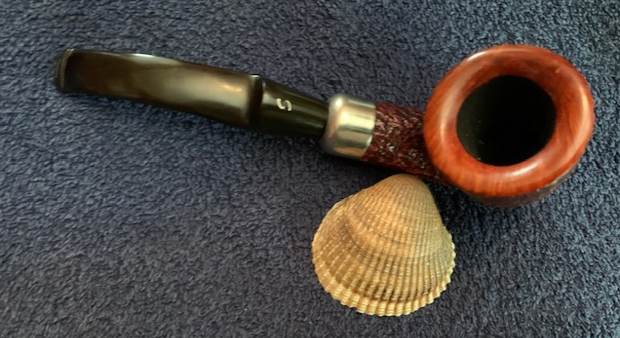
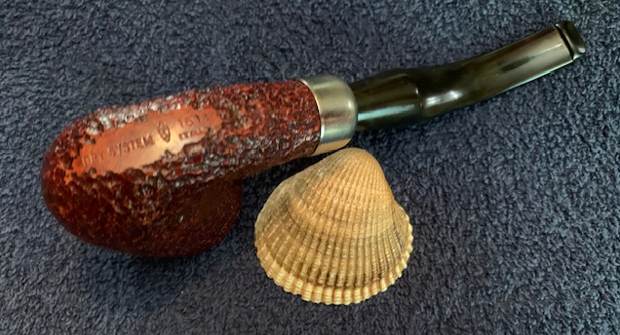
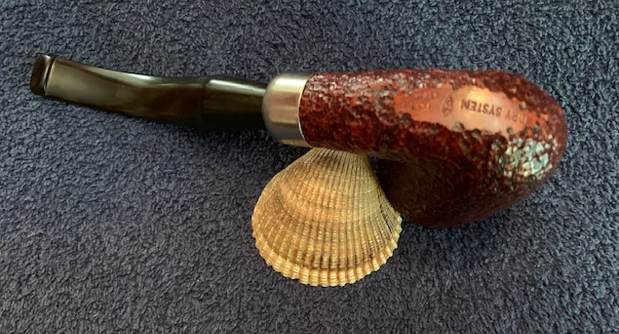
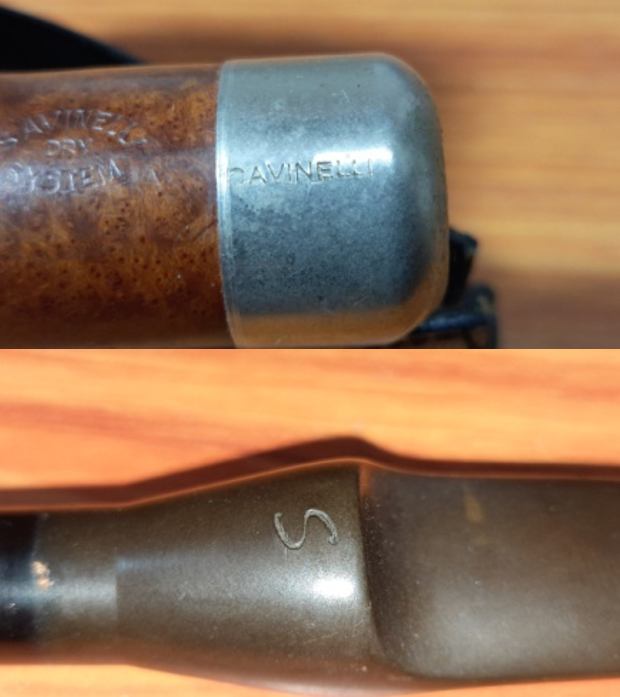
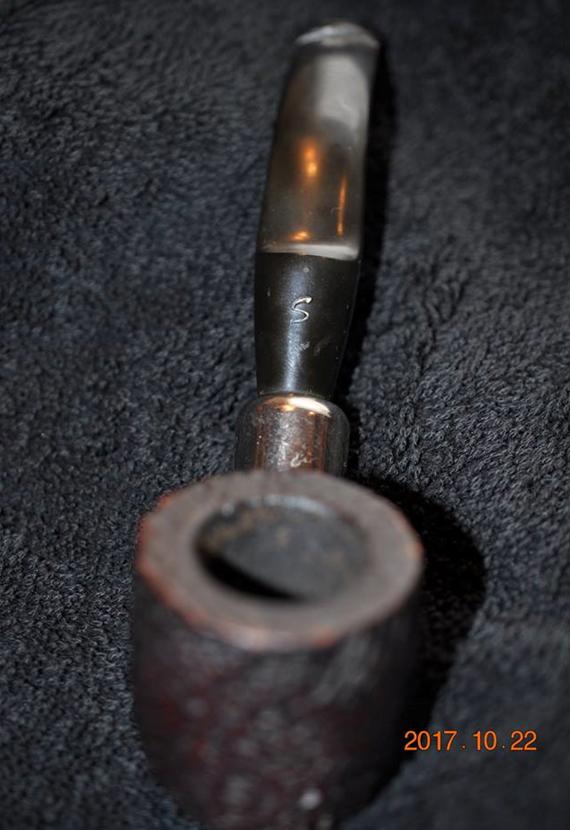
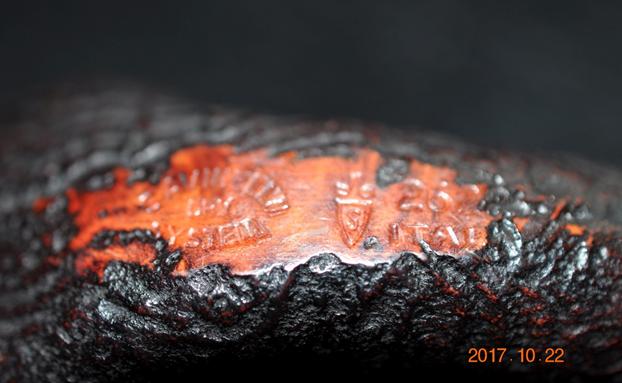
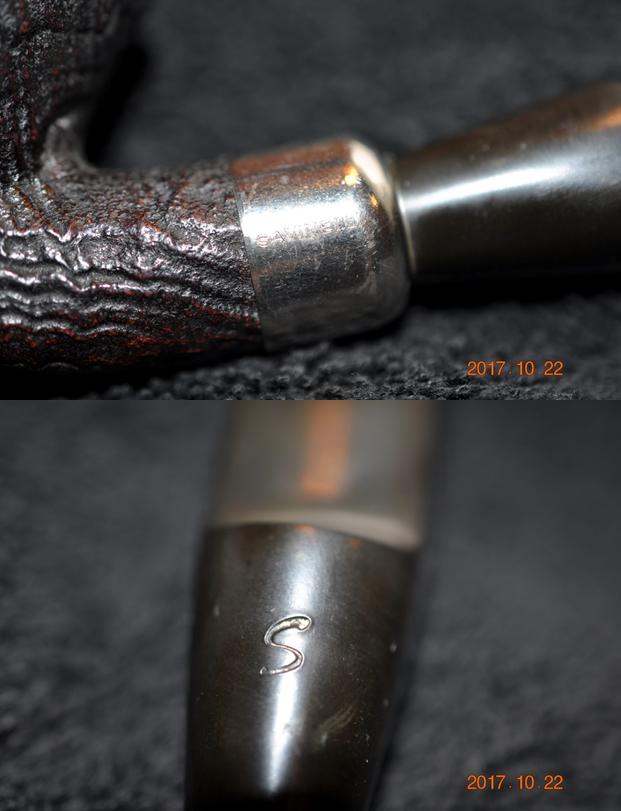
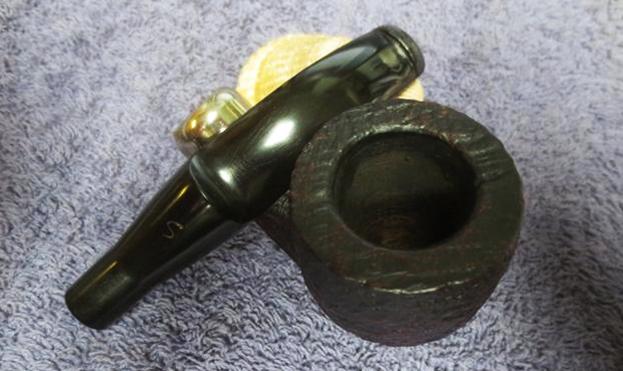
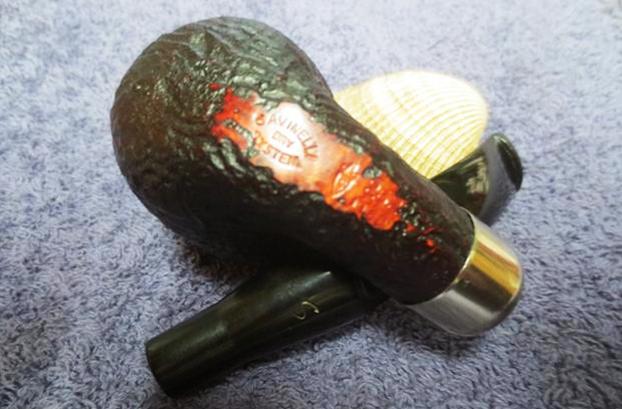
The main markings of the pipe are on the underside of the stummel. On the left it reads Savinelli [over] Dry [over] System. Next to that is the Savinelli crown and “S” logo. And next to that is 3621 [over] Italy.  The shank has a nickel cap with Savinelli stamped on it. Finally, the stem has a worn, but still readable, stylized “S” on the top.
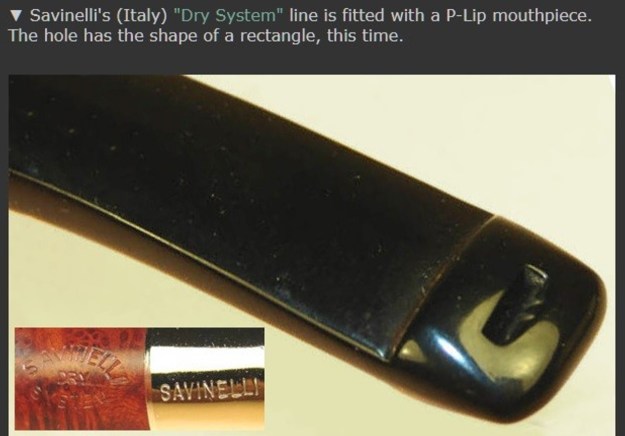
Savinelli is one of the most recognized names in pipe smoking and they have a long and storied history. You can read about them from their own website or from Pipedia’s article about them. However, I was particularly interested in learning more about the Dry System. Sadly, Pipedia had nothing on this subject. I checked with Pipephil and they did have a bit of information which I provide here below:
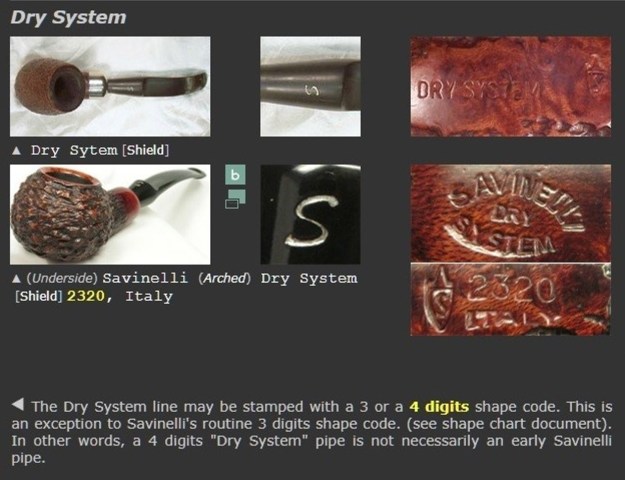
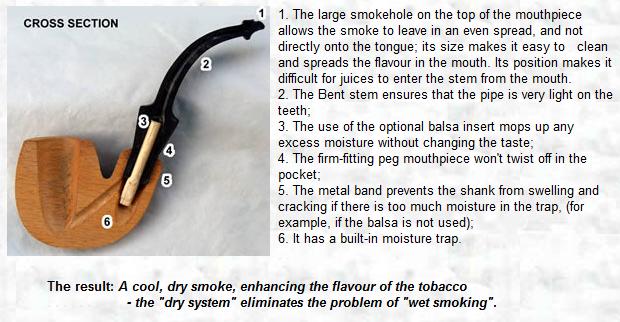
However, the definitive word on the Dry System comes from Savinelli’s own website. It provided some very useful information.

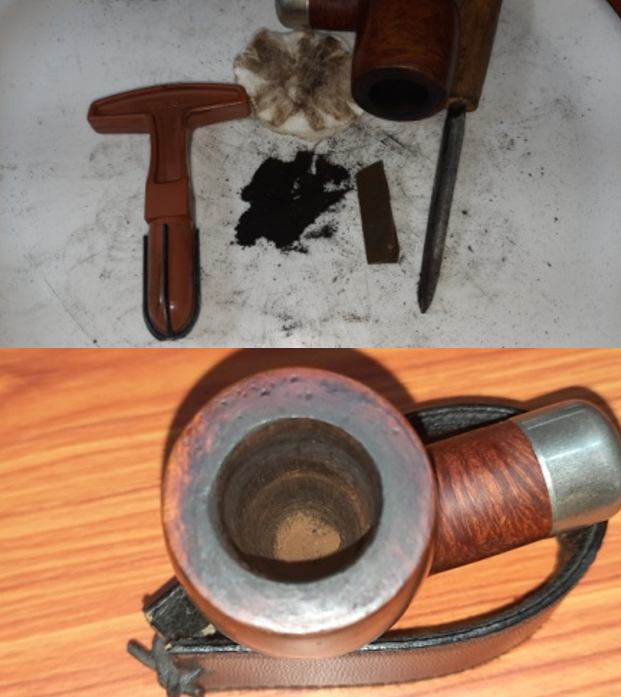
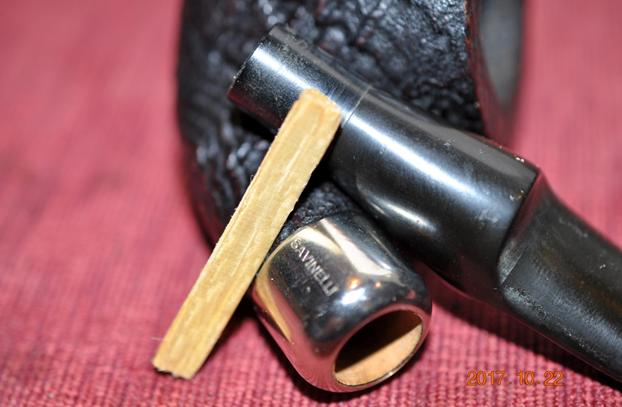
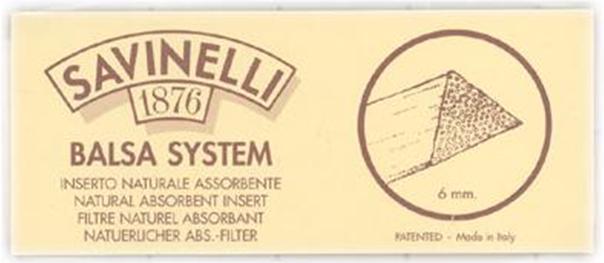
In 1981, after several years of research, Savinelli launched the “Dry System”, combining trap and filter. The name “Dry” comes from the introduction of the balsa “filter” into the traditional system pipe – the “System” being the presence of the built-in moisture trap in the shank. The balsa mops up the moisture in the smoke hence the term “Dry” system, and if the pipe is smoked without the balsa all that will happen is that this moisture will condense and collect in the trap. It can then either be mopped up with a folded pipe cleaner, or flicked out.

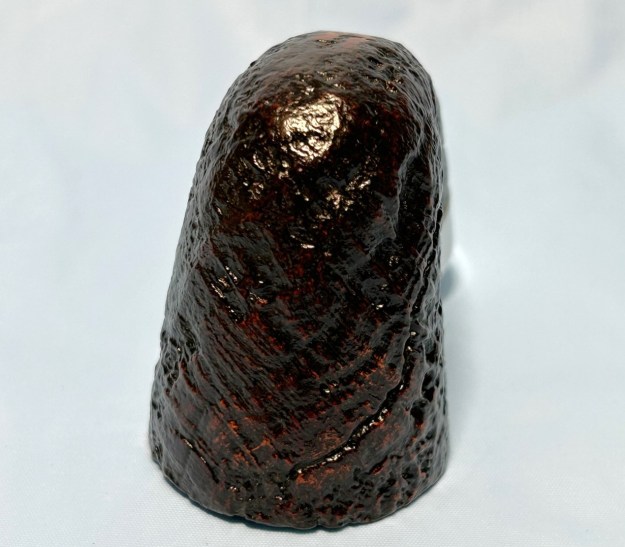
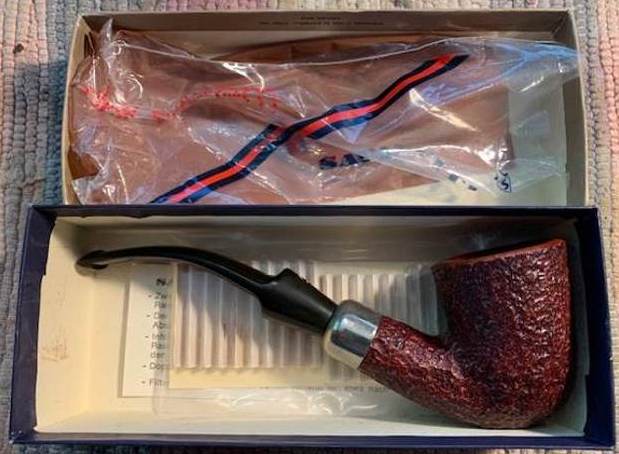
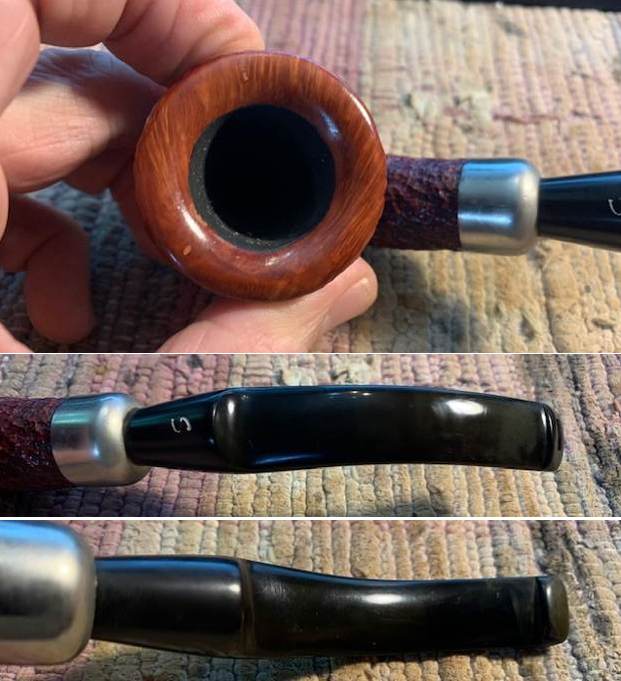
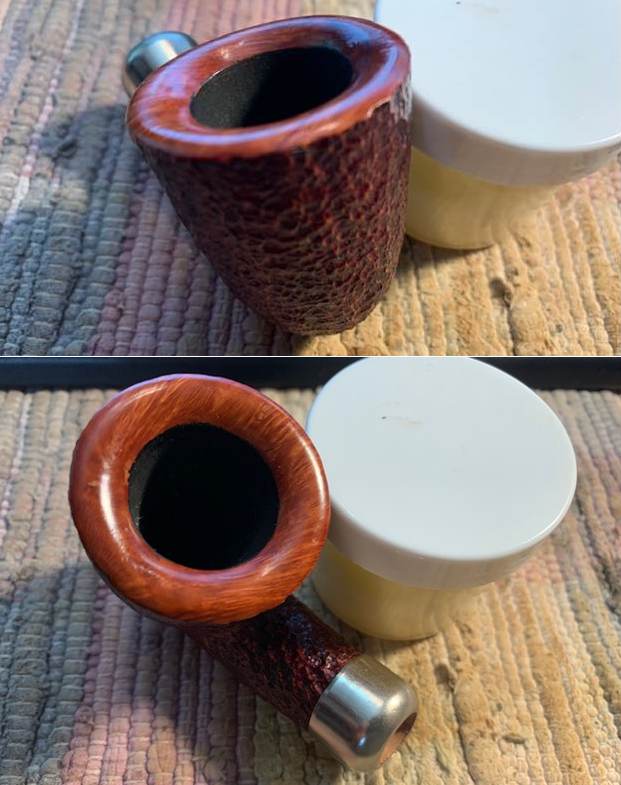
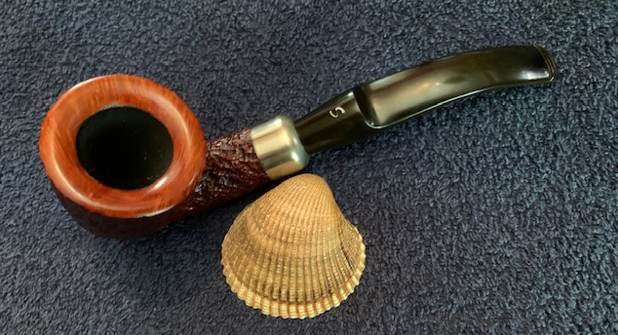
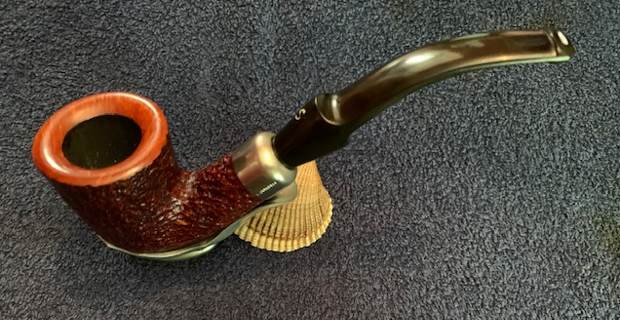
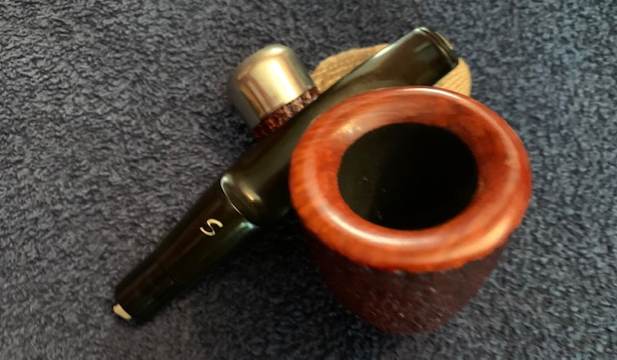
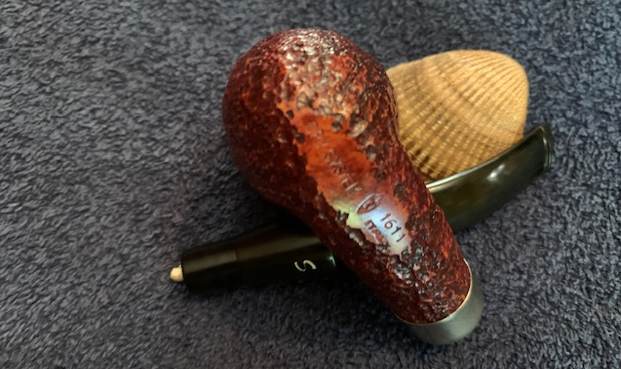
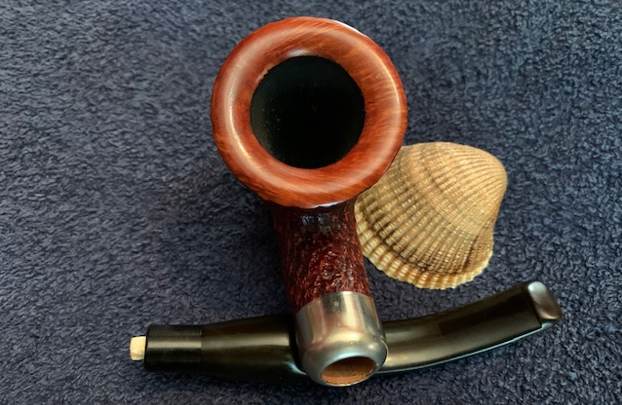
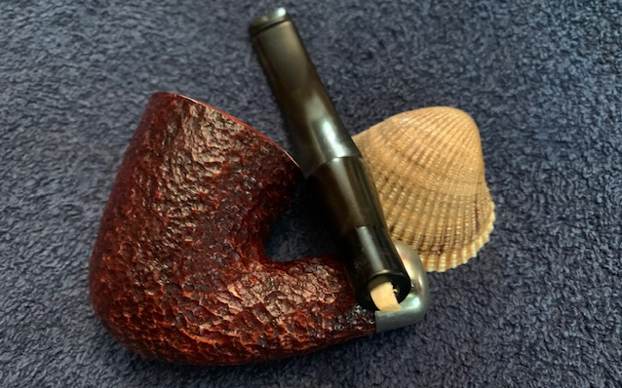
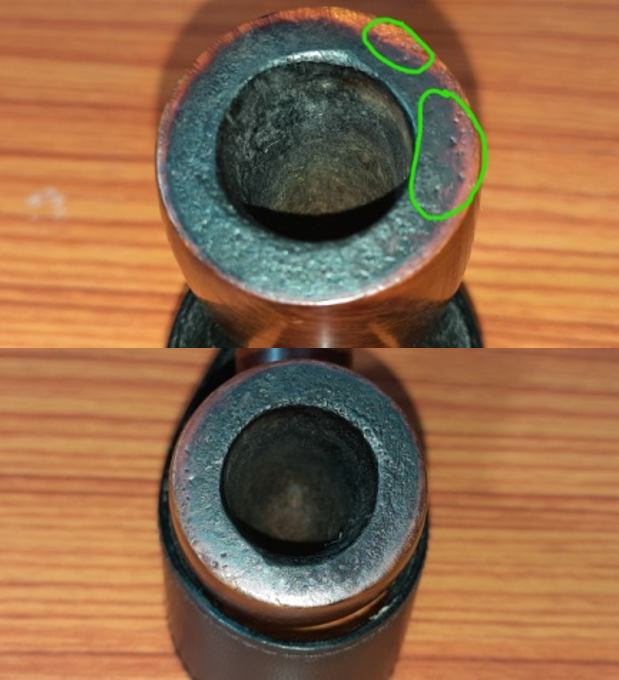
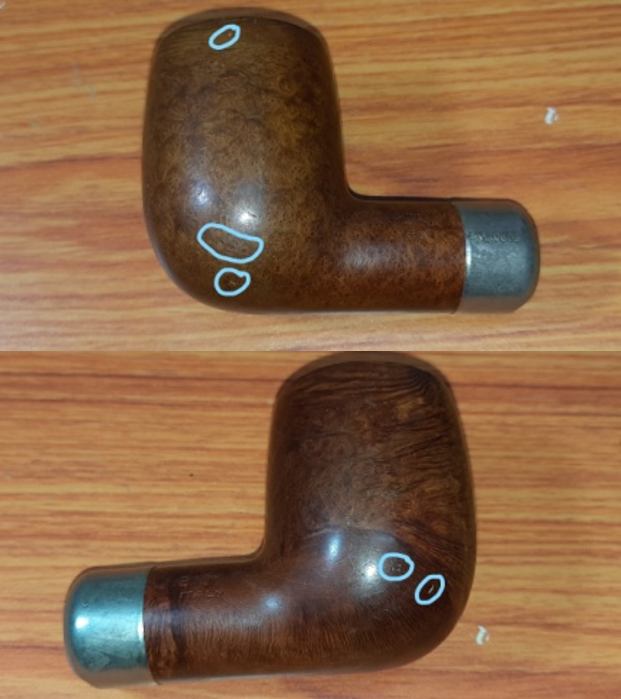
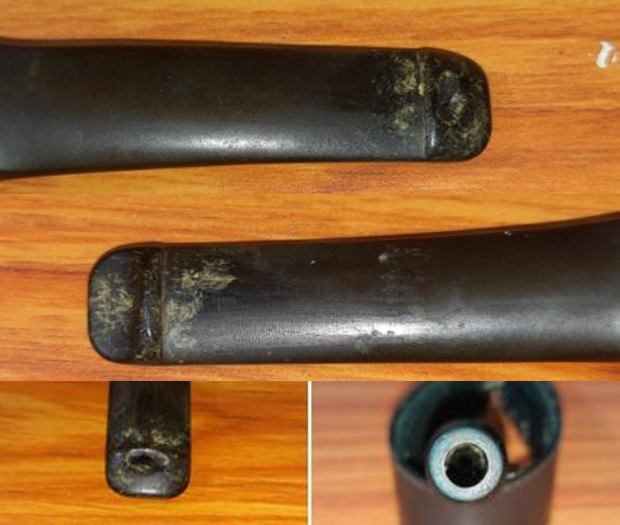
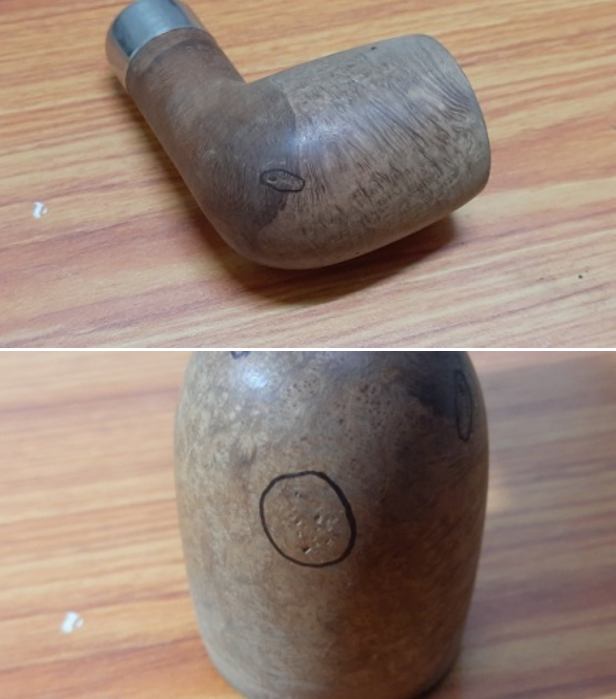
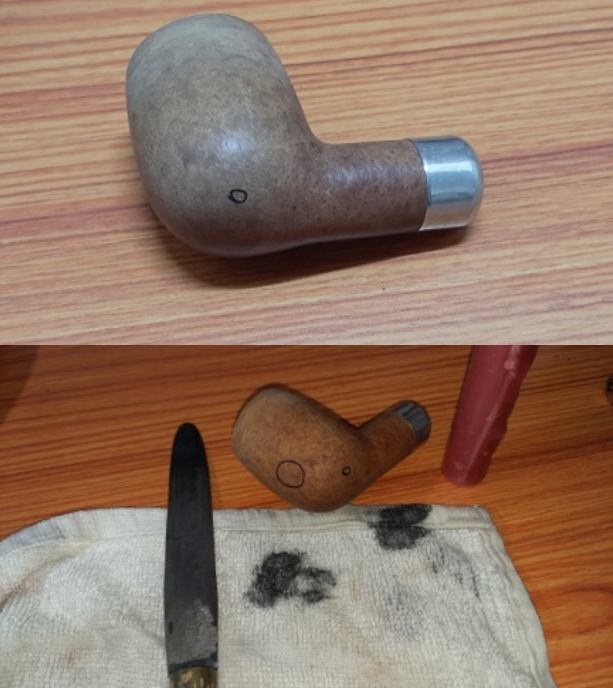
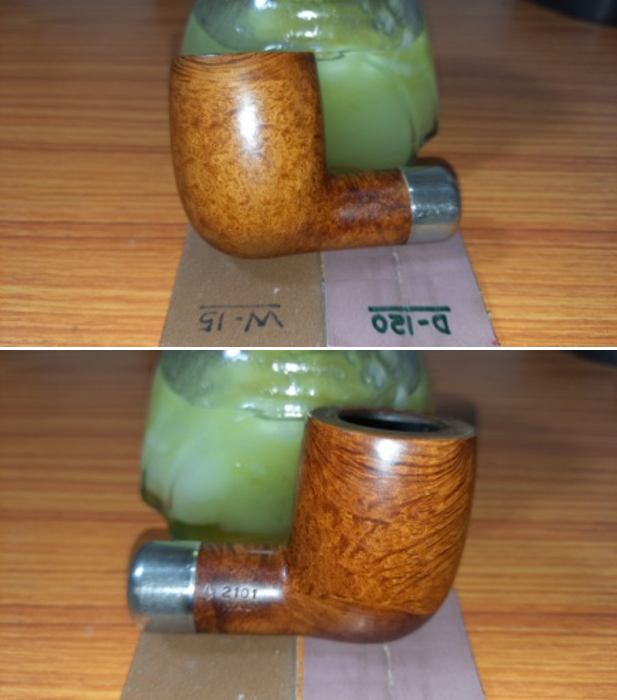
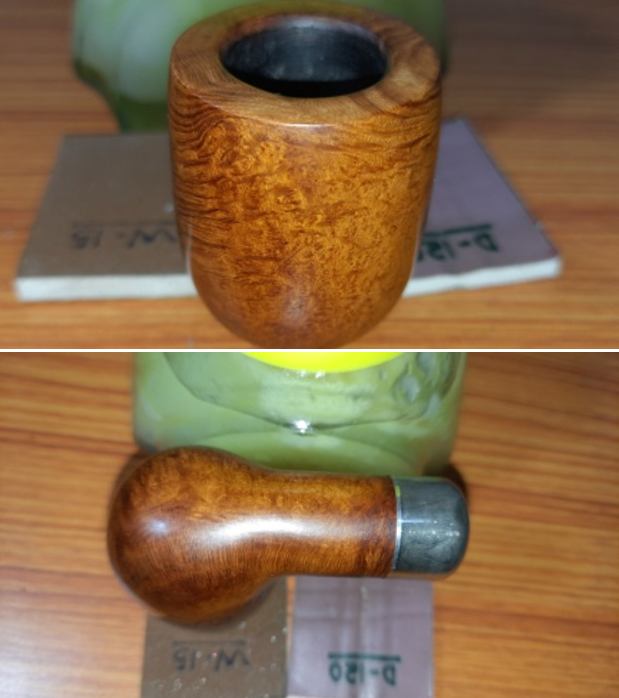
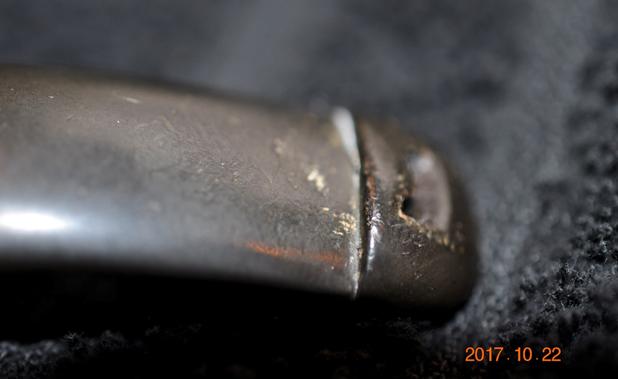
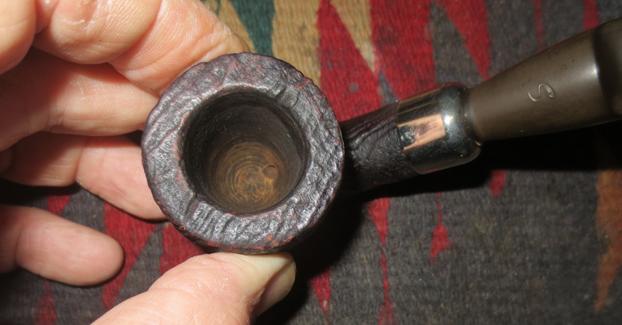
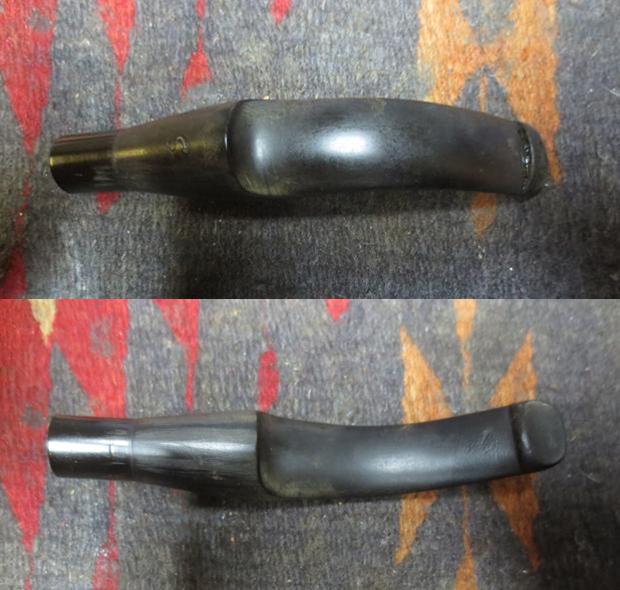
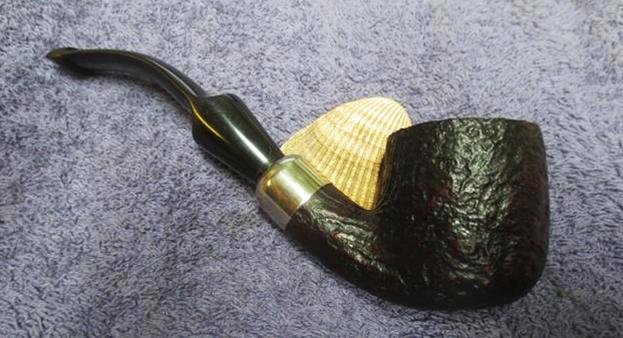
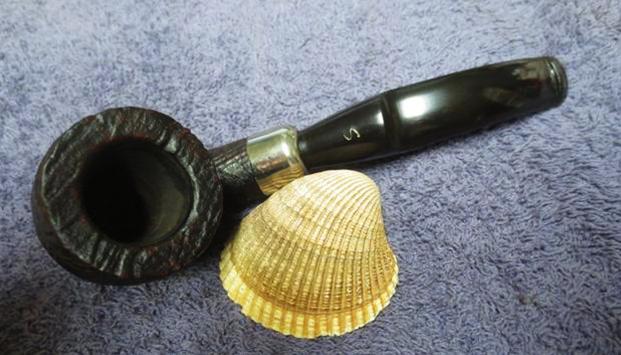
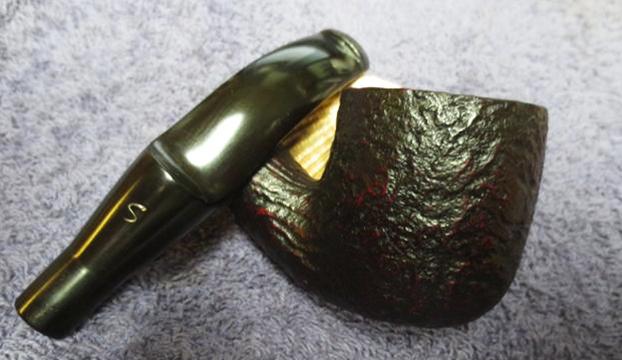
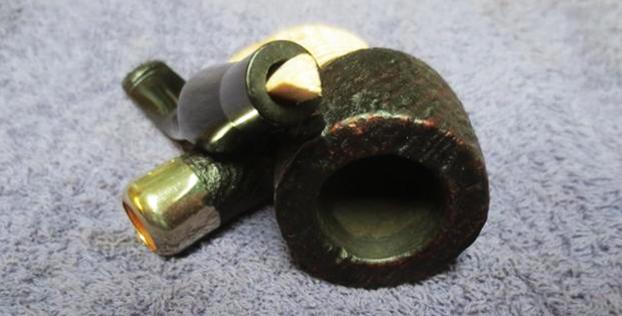
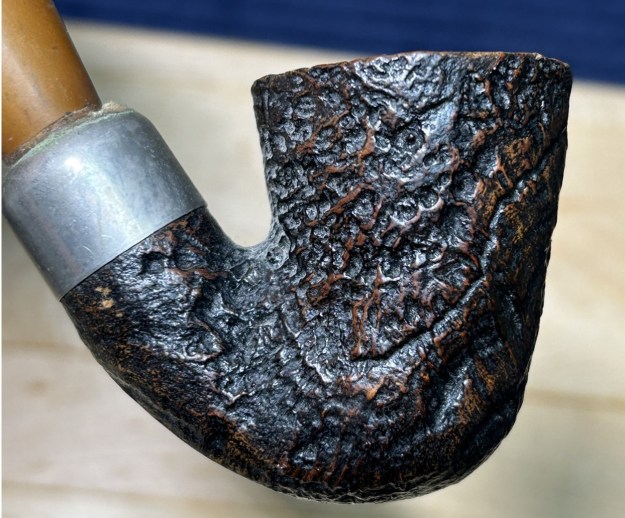
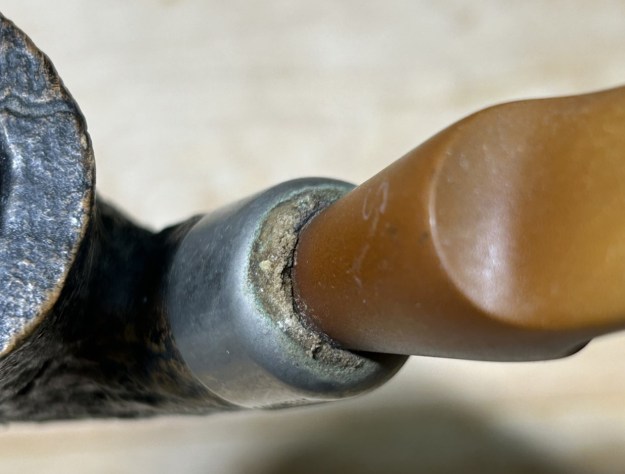
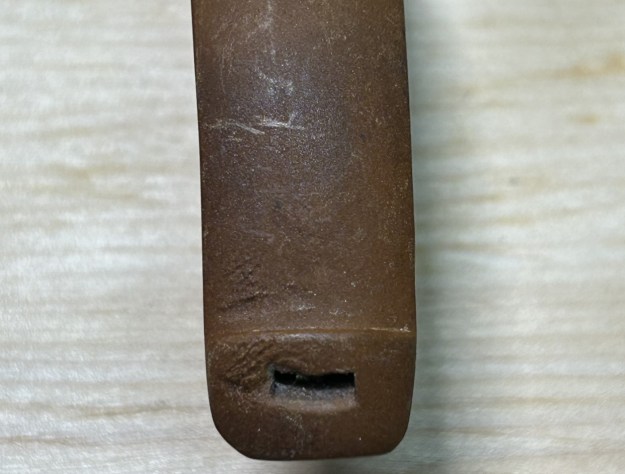
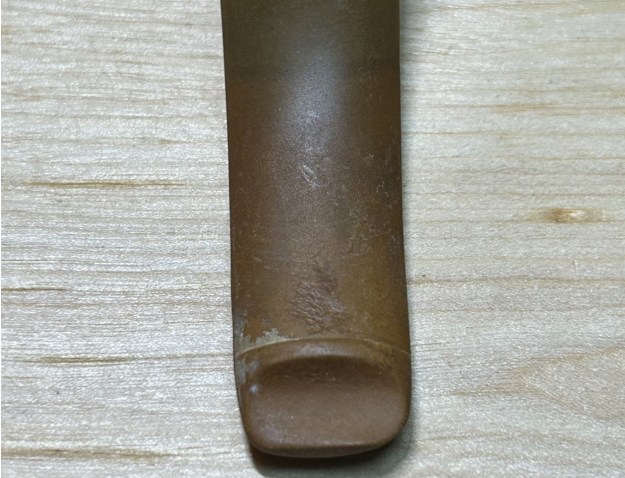
Finally, here’s an image of the pipe from an old Savinelli shape chart:
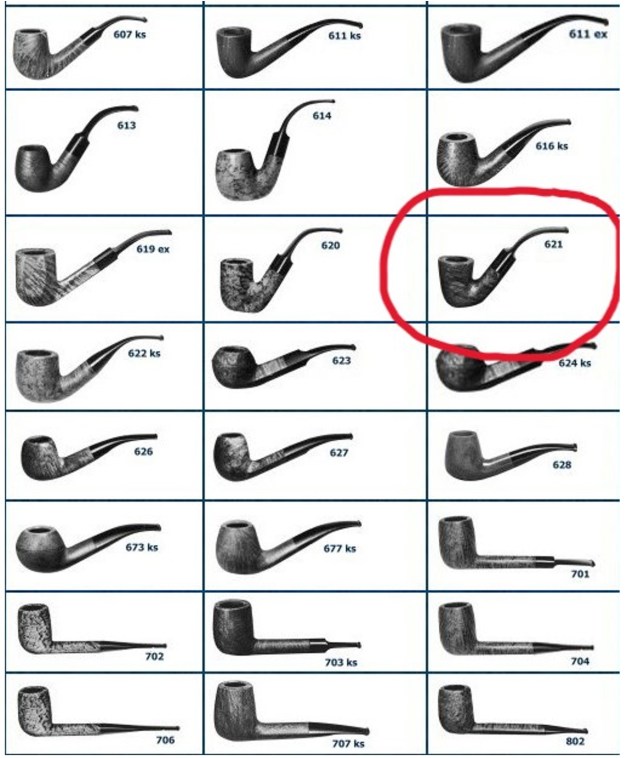
This was obviously a terrific smoker, as the wear and tear on this pipe shows. The stummel was quite dirty – both inside and out – and even appeared to have some dust-bunnies inside the bowl (not to mention all the cake). The finish was well worn and would need to be addressed. The nickel cap had some mess on it too. The stem, however, was from another planet. Have you ever seen such oxidation on a pipe stem? In fact, my wife asked me if the stem was actually meant to be brown. “No” was my emphatic answer! Aside from that, the stem had some tooth marks and nicks. I could tell that this stem was going to be a bear to deal with. 
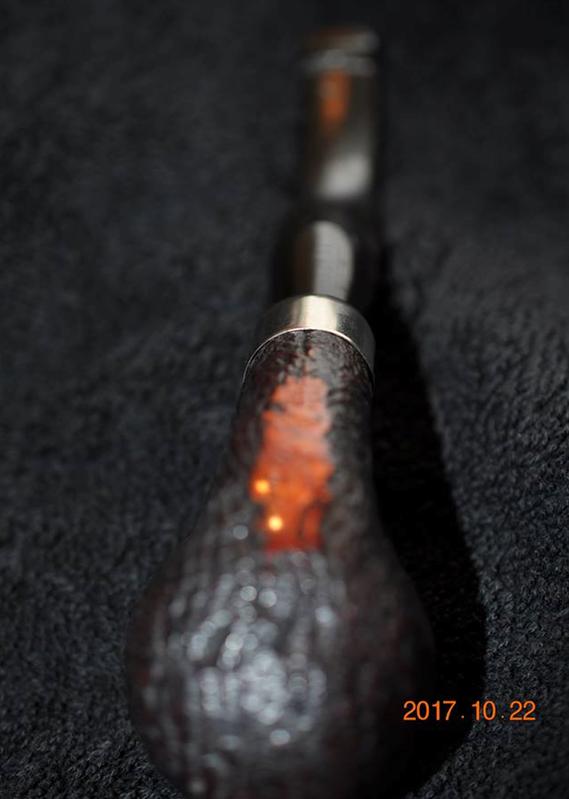
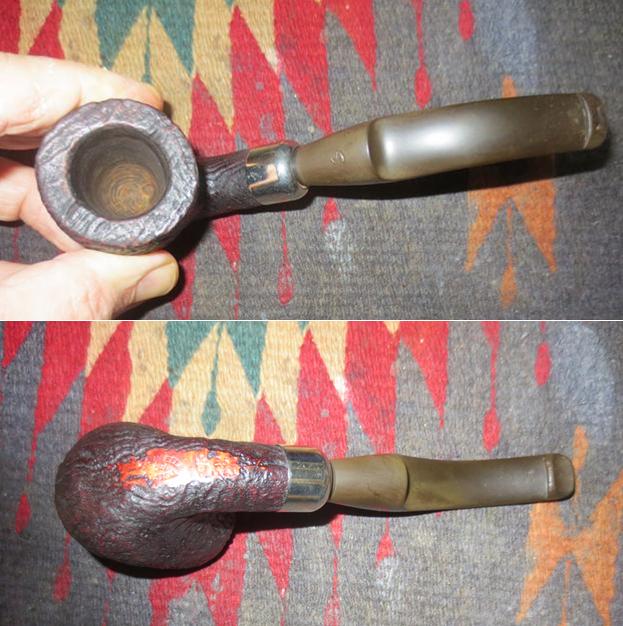
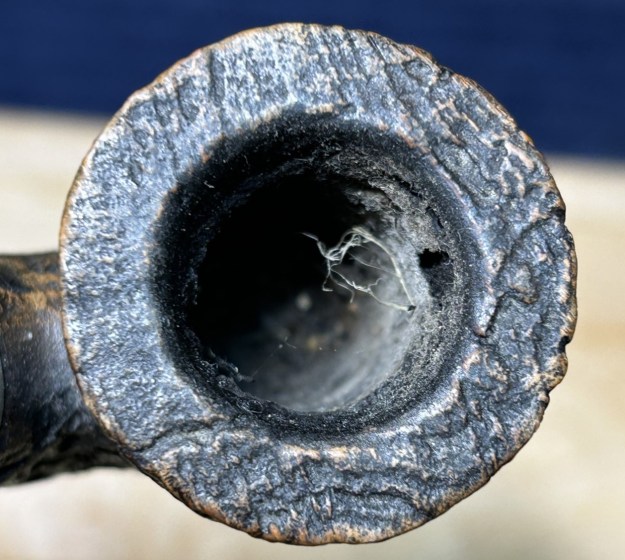
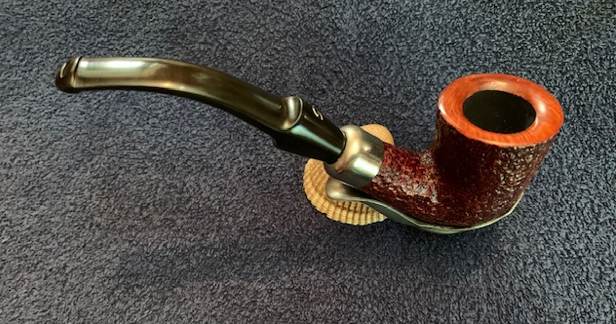
This pipe is always going to retain some marks from its hard life, but it is my job to make sure this pipe looks as good as possible. It’s a wonderful pipe and it deserves to be part of someone’s collection again.

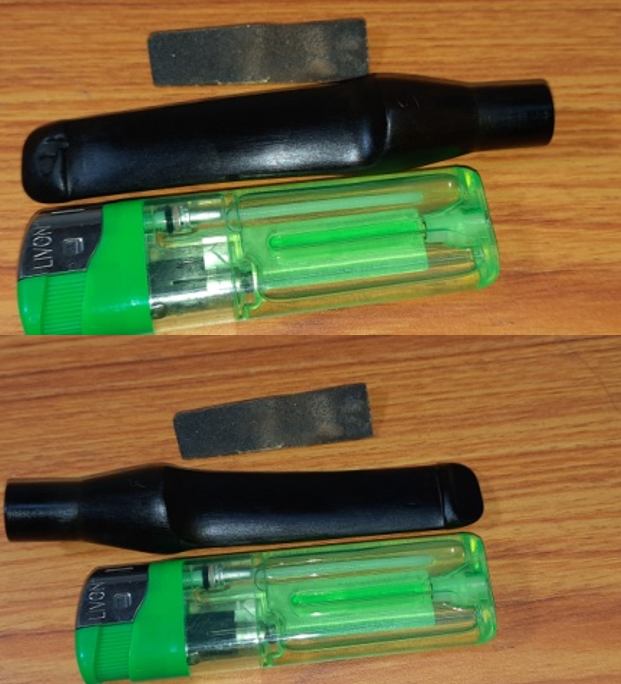
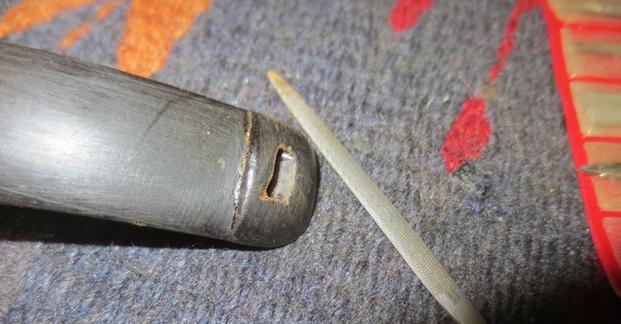
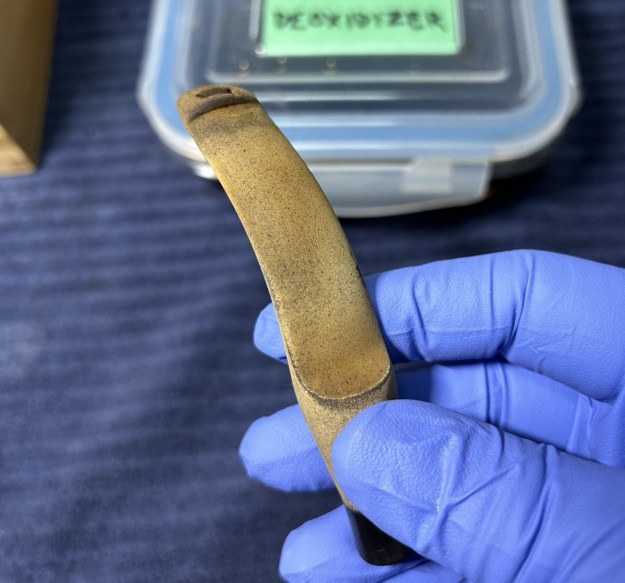
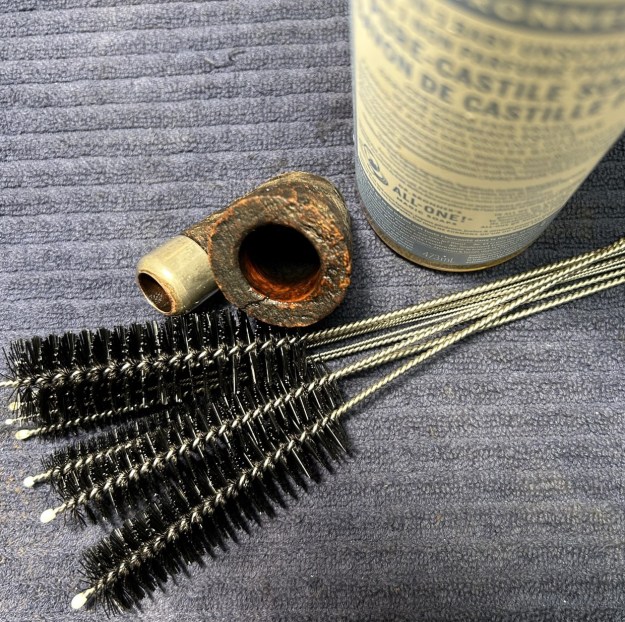
The stem is going to take a lot of work, so let’s get started. I took up the stem and cleaned it off with Murphy’s Oil Soap. It was quite dirty and needed some scrubbing. I then cleaned out the insides of the stem with pipe cleaners and lemon-infused isopropyl alcohol, and, as you can see, if was pretty dirty inside. I also took a BIC lighter and ‘painted’ the stem with its flame in order to lift the tooth marks. This was only moderately successful in raising the dents.Now to tackle the epic oxidation. Next, I scrubbed (and scrubbed and scrubbed) the stem with some SoftScrub cleanser and then put the stem in my container of deoxidizing fluid overnight. This works to draw the oxidation to the surface of the stem, so that it can be cleaned off again with more SoftScrub. As you can see, this worked in the sense that it drew out the oxidation, but there remained a lot of labour ahead. In fact, I repeated the process of scrubbing and soaking overnight, because the situation was so dire. Eventually, I got to a point where the stem was something I could work with. 
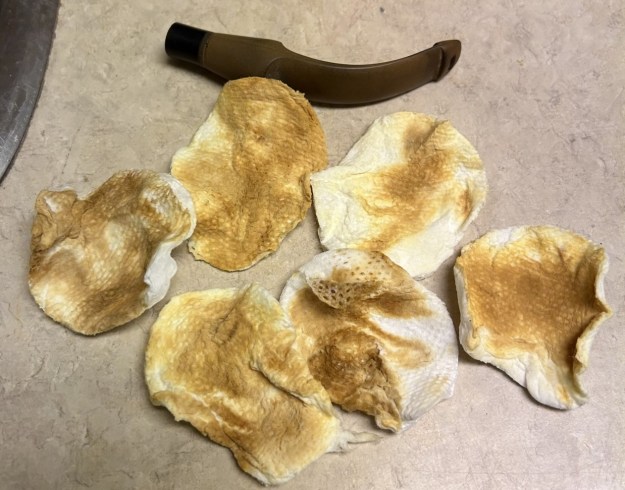
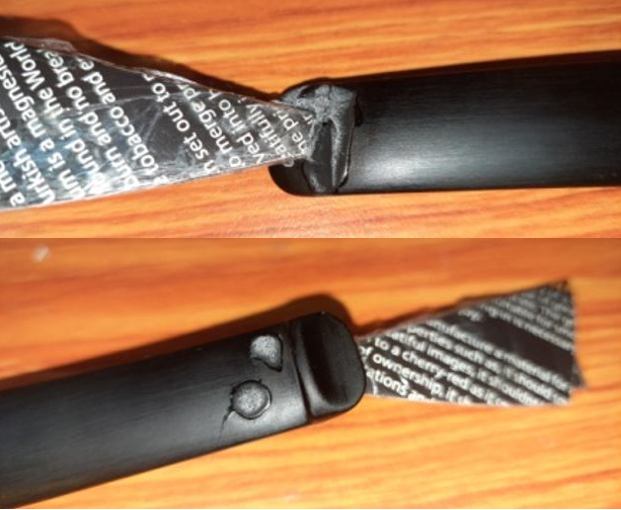
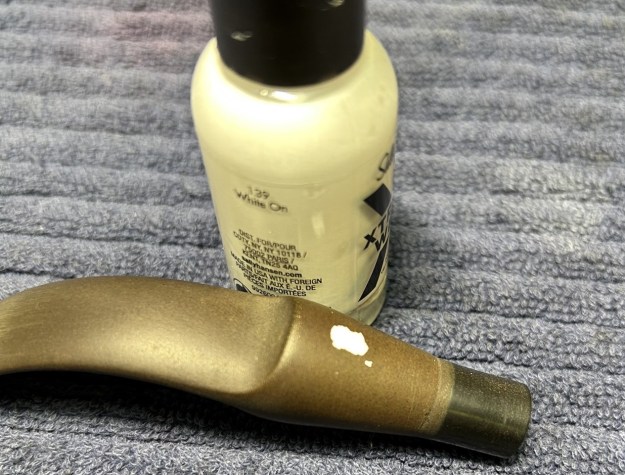
Before I moved on to sanding, I built up the tooth marks on the stem with black cyanoacrylate adhesive and let them fully cure. I then sanded them down with sandpapers to merge a bit better into the stem. I also added some nail polish to the ‘S’ on the stem. 
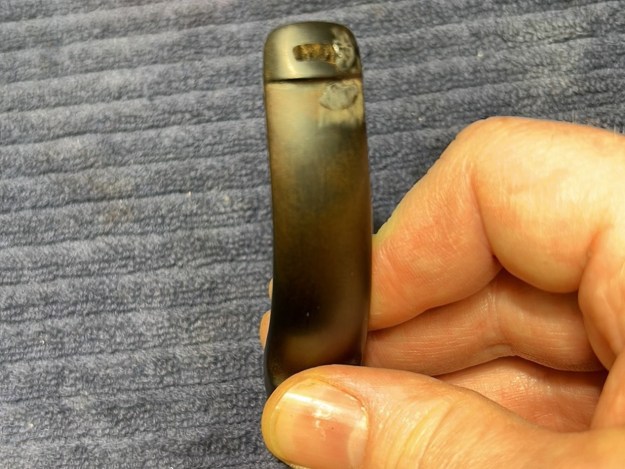
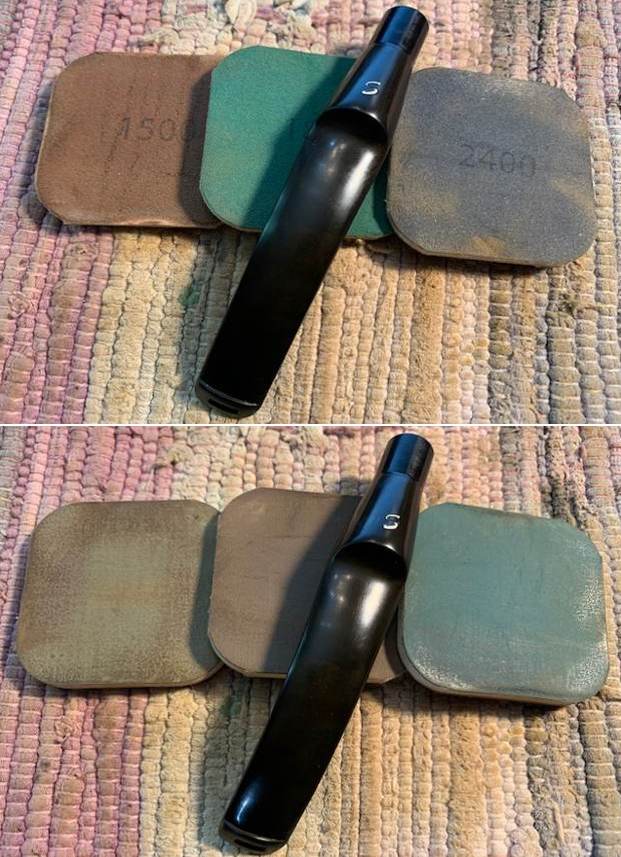
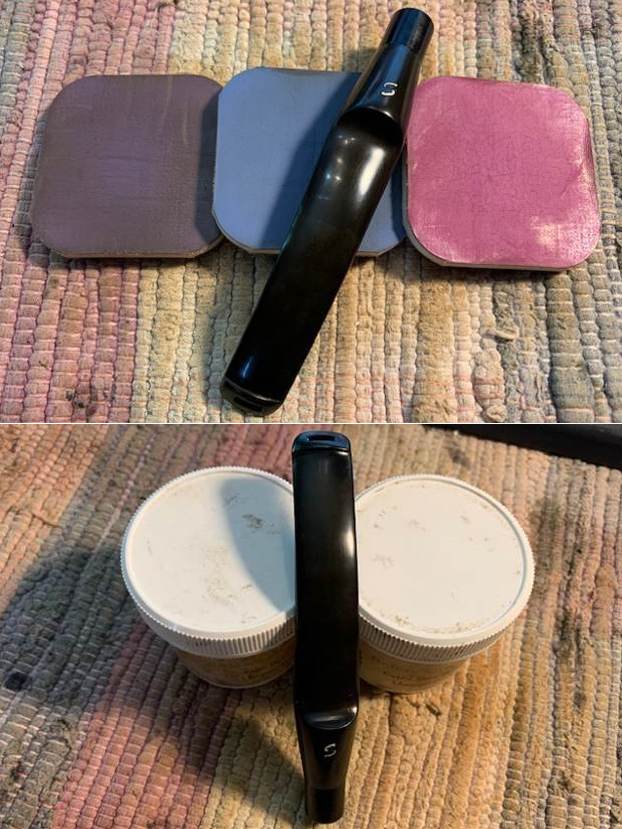
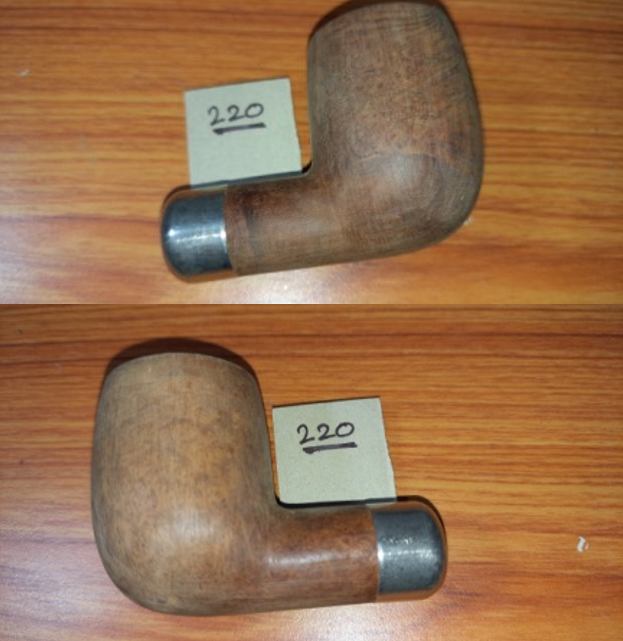
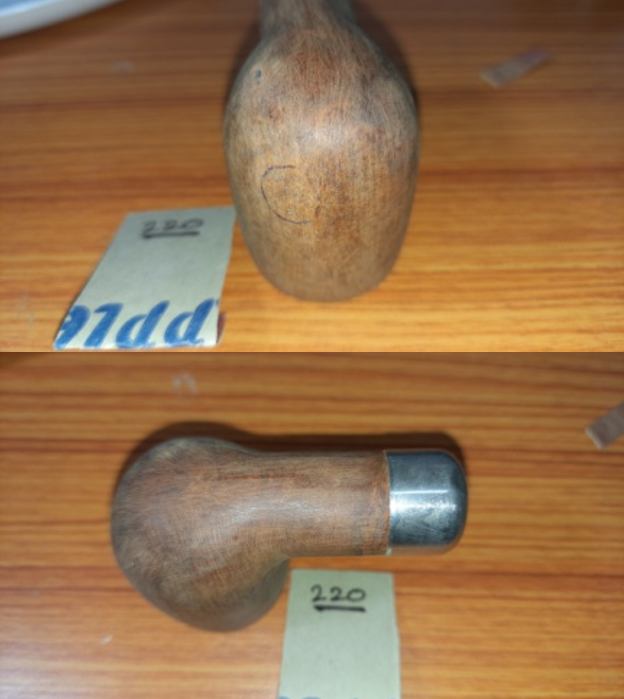
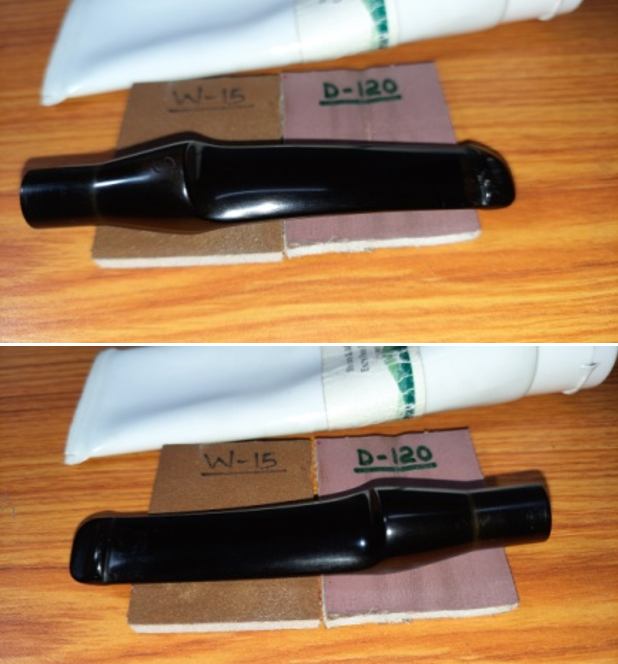
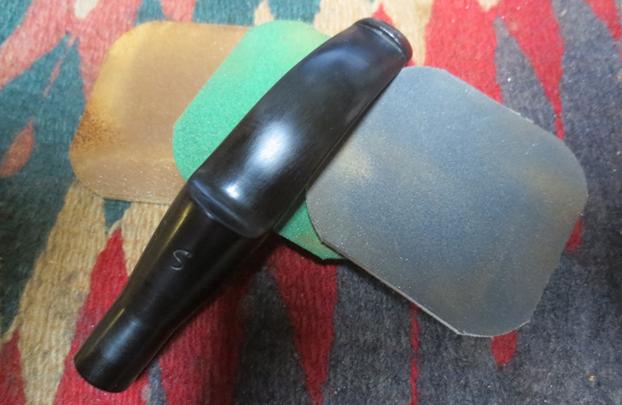
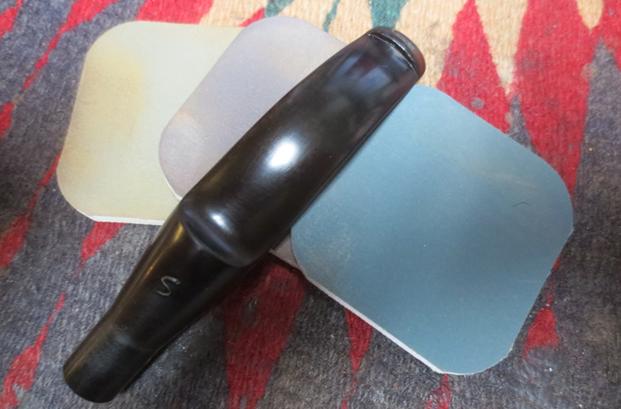
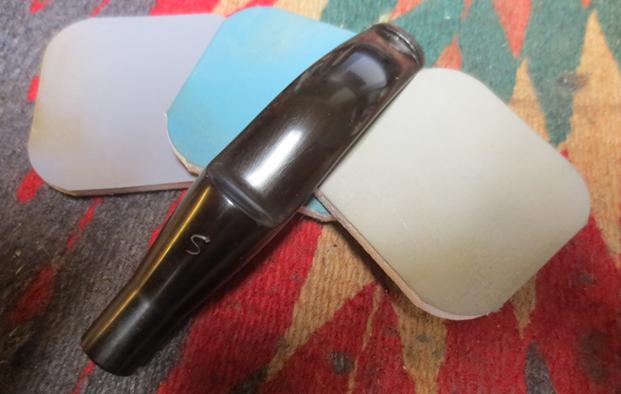
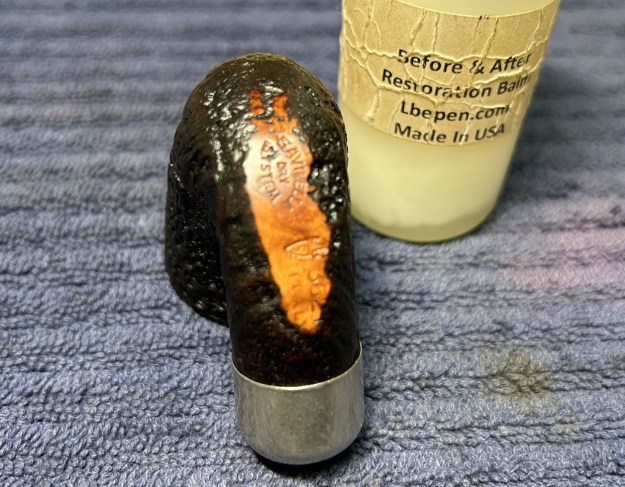
At this point, it was clear that more than the ‘usual’ sanding was going to be required here. I took two sanding sponges (220- and 320-grit) and worked the stem hard. I needed to sand out the remaining oxidation to get this stem the best chance of looking decent again. I then used all nine Micromesh pads (1,500 through 12,000 grit) to bring out the lovely black lustre. I also used Obsidian Pipe Stem Oil in between each pad scrubbing. As I mentioned before, there are still hints of its past life, but I’m pretty pleased with how the stem came out. 
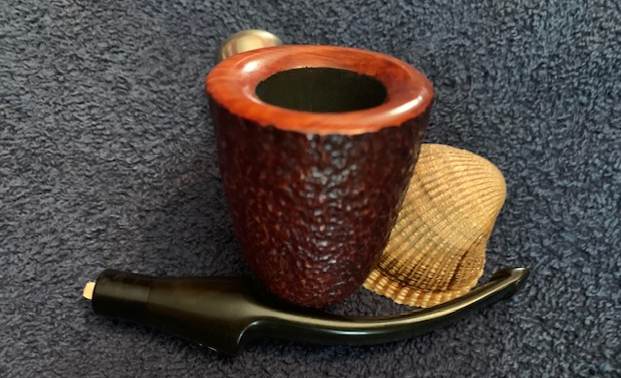
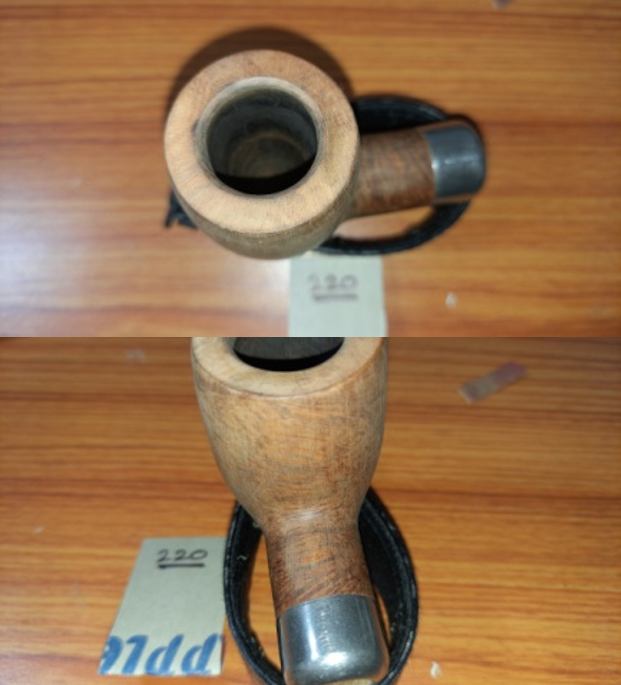
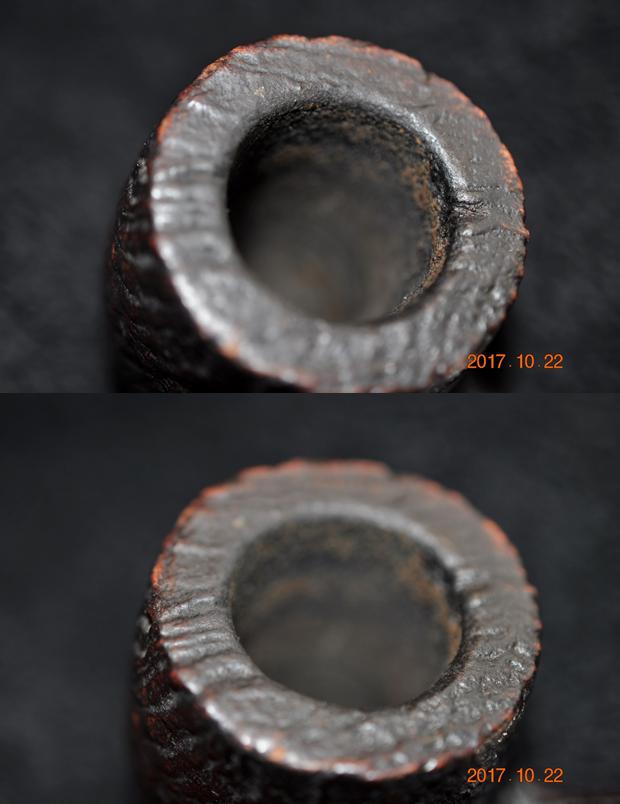
On to the stummel and the usual cleaning procedures were in order for this pipe. I used the KleenReem to remove the cake in the bowl and I followed up by sanding the walls down with some 220-grit sandpaper attached to a wooden dowel. I took it down to bare briar, as I wanted to see if there were any issues in the walls of the bowl. There was some charring and some slight fissures, but nothing serious. I then proceeded to clean out the insides of the shank with Q-tips, pipe cleaners, and isopropyl alcohol. There was some nastiness inside this stummel and it took a lot of cotton to get this thing clean. 
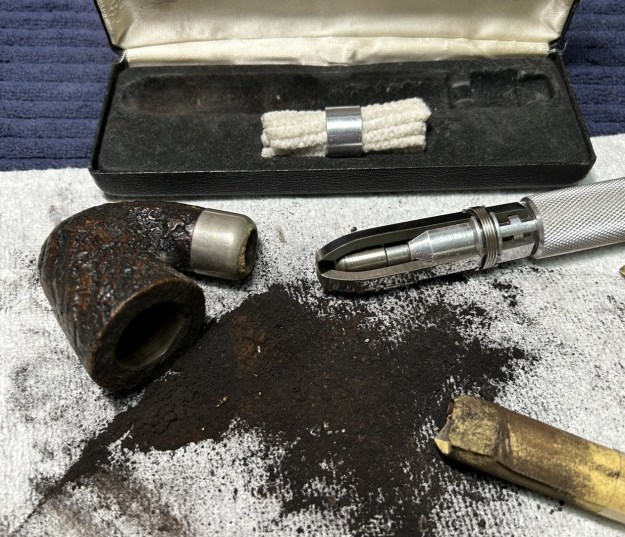
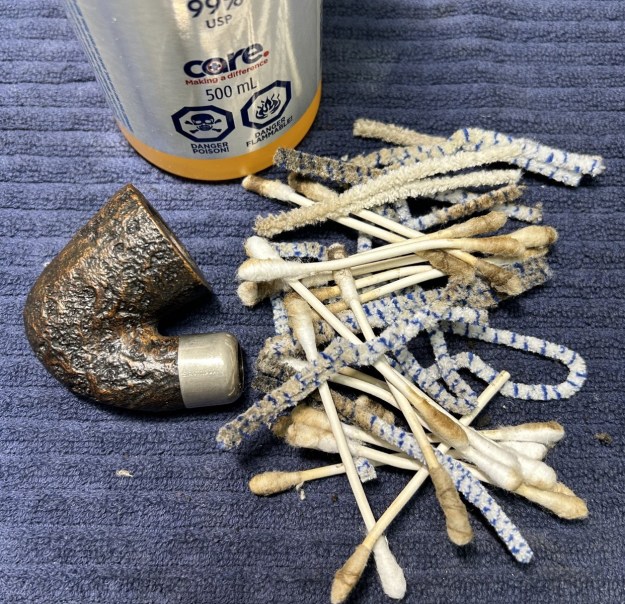
I decided to de-ghost the bowl to be on the safe side. I thrust some cotton balls into the bowl and the shank and saturated them with 99% isopropyl alcohol. I let the stummel sit overnight. This caused any remaining oils, tars and smells to leach out into the cotton. 
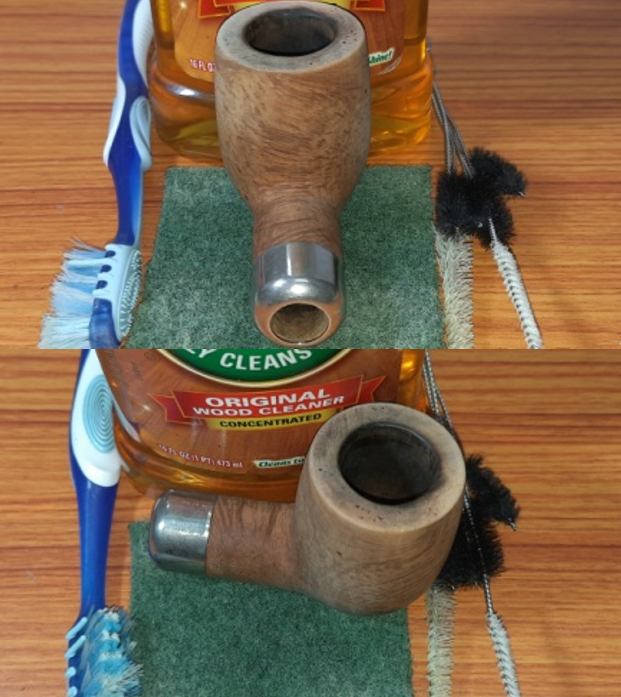
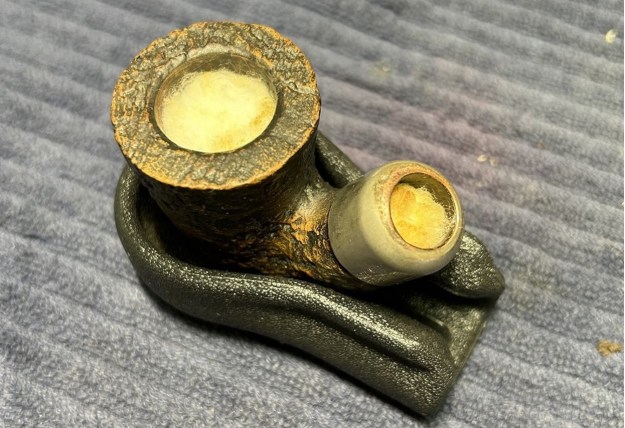
I then moved on to cleaning the outside of the stummel with Murphy’s Oil Soap and a toothbrush. What a difference that made! I followed that up by cleaning the insides with some dish soap and tube brushes. As I mentioned earlier, there were some minor issues to fix inside the bowl. The solution to this problem is an excellent one: epoxy. I prepared some J.B. Weld epoxy and smeared the walls, ensuring that the epoxy was evenly spread. Once done, a good 24 hours was needed to ensure that the epoxy was properly cured. After that, I gently sanded the inside of the bowl to provide a rough surface for what was to come later. I coated the entire inside of the bowl with a mixture of activated charcoal and my wife’s homemade yogurt. Once hardened, this provides a good, slightly rough surface for a new cake to build. 
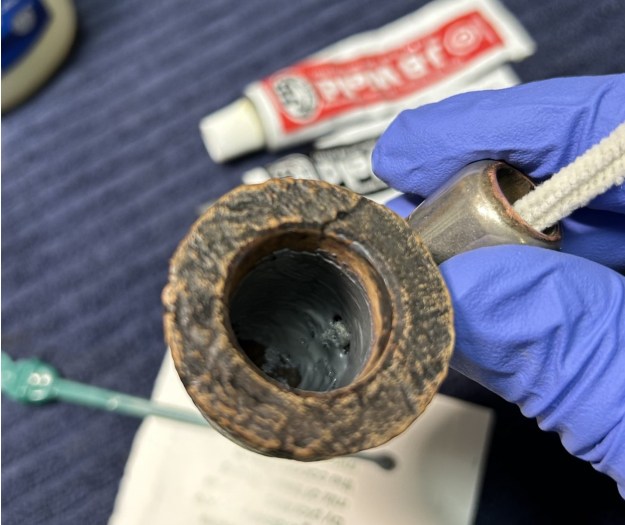
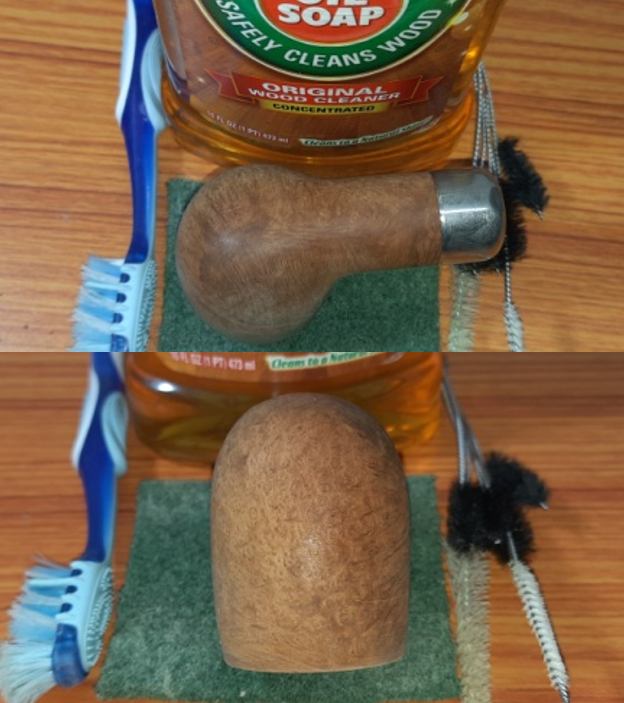
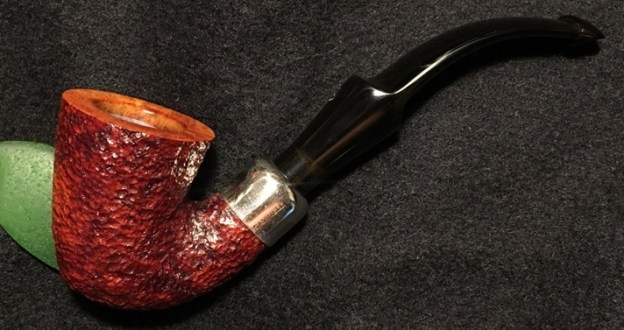
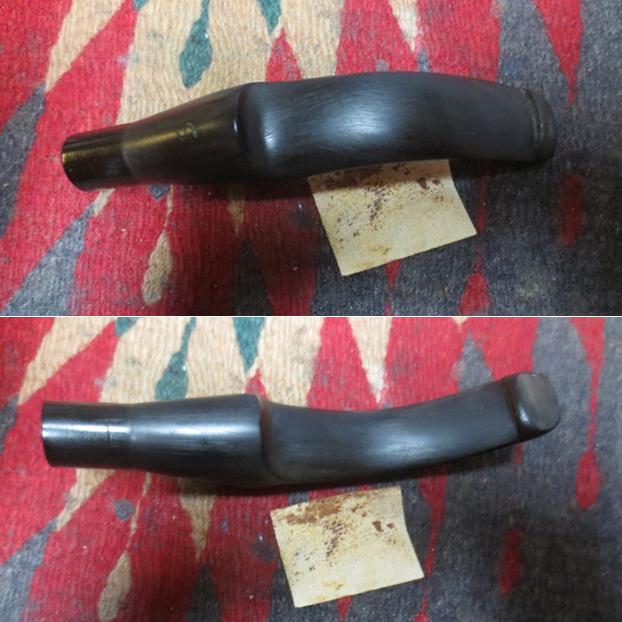
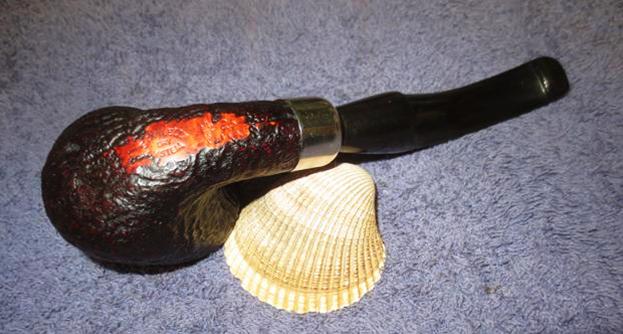
Due to the pipe’s hard life, it was clear to me that the pipe needed to be stained. I applied some Fiebing’s Dark Brown Leather Dye. I flamed it with a BIC lighter and let it set. I then removed the excess with isopropyl alcohol on a cotton round. It looked so much better after this. 
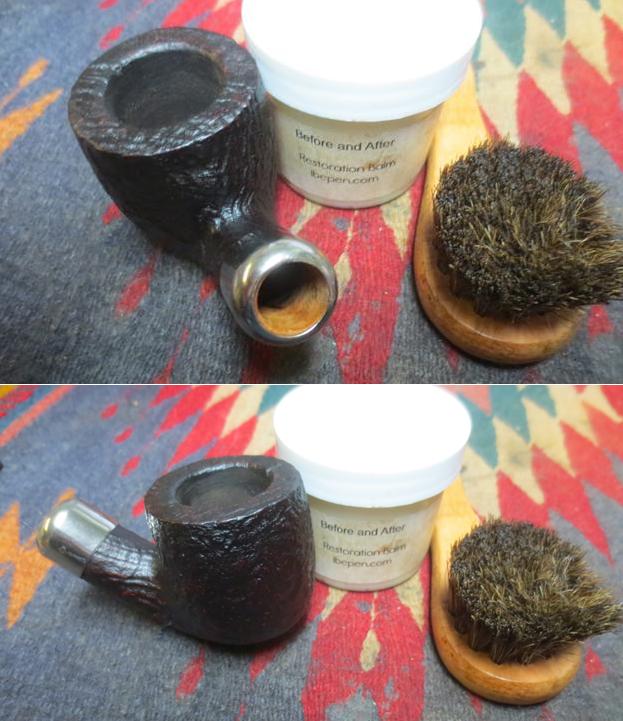
I then rubbed some Before & After Restoration Balm into the wood. I gently brushed it into the rustication grooves and let the balm sit for fifteen minutes or so. The BARB works so well at bringing out the best in the wood. I brushed it with a horsehair brush and buffed it with a microfibre cloth. Beauty! 
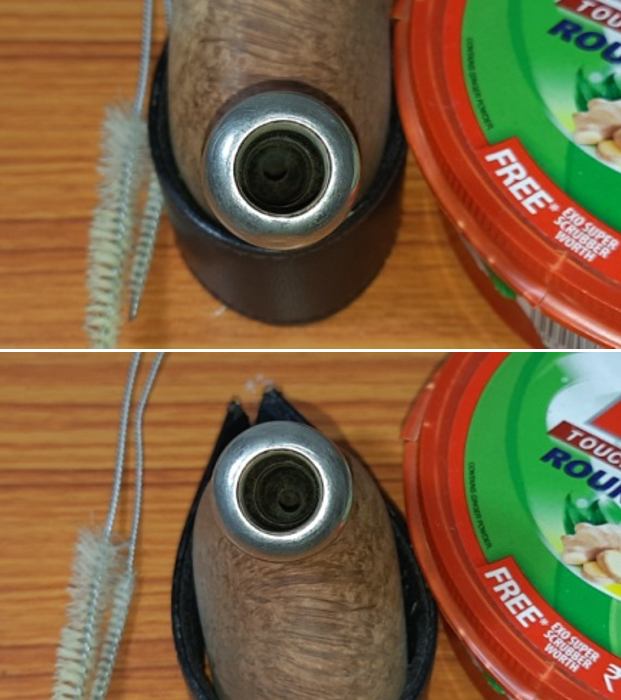
I rubbed the nickel band with 0000 steel wool. This is the least abrasive grade of steel wool and I wouldn’t use anything harsher than that. I then used a few MicroMesh pads to make the metal shine. 
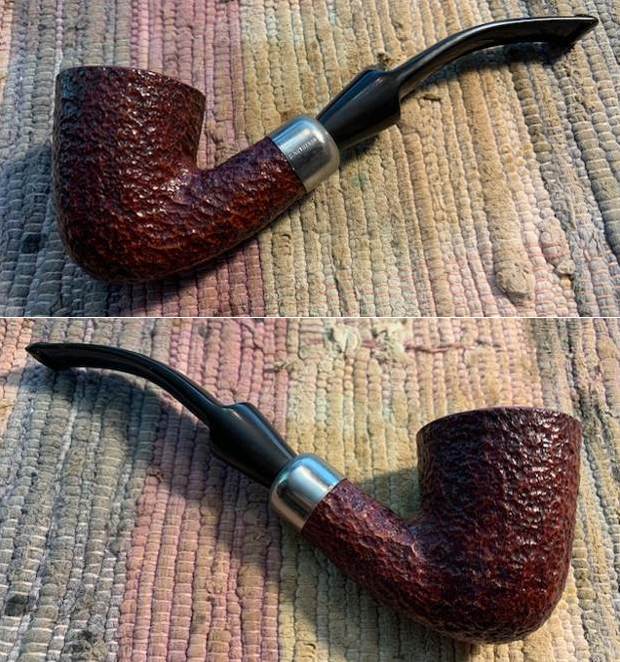
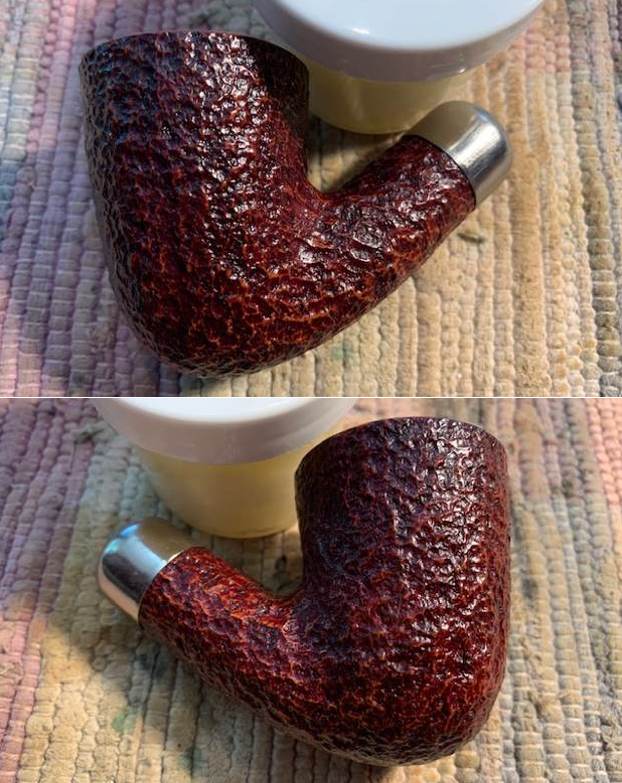
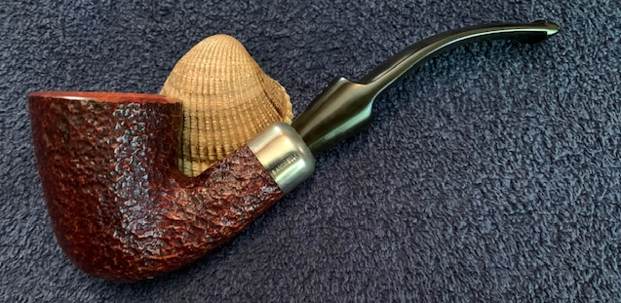
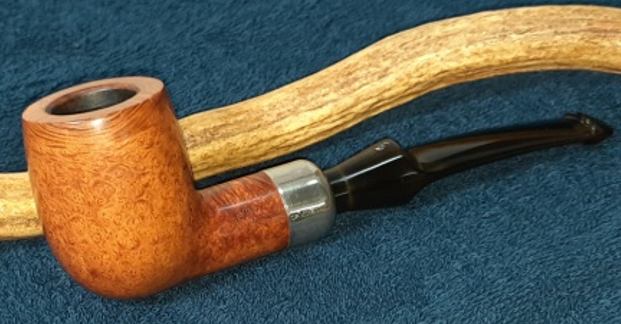
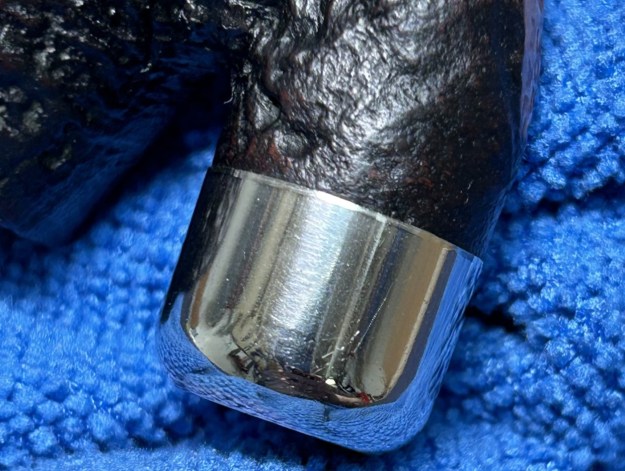
Later, I went to the bench buffer and applied some White Diamond to the stummel and stem. Then the final polish! The rusticated surface meant that I didn’t use carnauba wax – it gets gummed up in the grooves. Instead, I used Lee Valley Conservator’s Wax which worked like a charm. This was a nifty restoration and I had fun with it. I think the result is terrific and it’s a very handsome pipe once again. I am pleased to announce that this pipe is for sale! If you are interested in acquiring it for your collection, please have a look in the “Italy” pipe section of the store here on Steve’s website. You can also email me directly at kenneth@knightsofthepipe.com. The approximate dimensions of the Savinelli Dry System 3621 Bent Dublin are as follows: length 5 in. (126 mm); height 4 in. (101 mm); bowl diameter 1⅜ in. (36 mm); chamber diameter ¾ in. (19 mm). The weight of the pipe is 1⅛ oz. (35 g). I hope you enjoyed reading the story of this restoration as much as I enjoyed restoring it. If you are interested in more of my work, please follow me here on Steve’s website or send me an email. Thank you very much for reading and, as always, I welcome and encourage your comments.

Polishing a New Old Stock (NOS) Unsmoked 1611 Savinelli Dry System Bent Dublin


Blog by Steve Laug

Jeff picked up this unsmoked New Old Stock Savinelli Dry System 1611 Bent Dublin a while ago from an online auction on 02/02/22 from Cottage Grove, Minnesota, USA. It has a Savinelli Balsa Filter in the tenon and a characteristic Dry Smoke drilling on the P-lip style stem. The airway came out on top like a Peterson but instead of a round hold this one has a rectangular slit. It came with the box, plastic bag, sock and package of Balsa Filters. All of the paperwork that may have come with it was included as well. The box was worn on the corners but it was in great condition otherwise. The stem showed some light oxidation from the light when it was on display. It also had some gummy substance just ahead of the button on both sides where it looked like there had been a price tag. There was a new Balsa filter in the stem. The pipe smelled musty. I took photos of the box before I removed the lid and then after I removed it to show what I saw.   I removed it from the box along with the filters and the papers. I took a photo of the pieces in the box. It is a pretty pipe with a polished nickel ferrule.I took the pipe out the box and took pictures of this beauty. It is a nice looking pipe with a nice rustication that works well on the bowl and goes well with the smooth crowned rim top. I took some close up photos of the rim top and stem to show the condition of the pipe. There were a couple of small fills on the rim top – right side and left side both toward the front. They are solid and not loose at all.I took a photo of the stamping on the underside of the shank. It reads Dry System on the heel of the bowl followed by S in a shield (Savinelli Logo) followed by 1611 (shape number) over Italy. There was a Savinelli stamp on the left sad of the nickel ferrule and an S on the top of the saddle stem. I removed the stem from the shank and took a photo of the look of the pipe to show the nice shape and flow of the pipe.I rubbed the bowl down with some Before & After Restoration Balm. I worked it into the rustication on the bowl and the smooth rim top with my finger tips to clean, revive and preserve the wood. It really brings the grain alive once again. I let it sit for 15 minutes then buffed it off with a soft cloth. The grain really pops at this point in the process.  I set the bowl aside and turned my attention to the stem. I polished the stem with micromesh sanding pads – 1500-12000 grit pads. I wiped the stem down after each pad with a cloth impregnated with Obsidian Oil. I finished the polishing with some Before & After Pipe Stem Polish – both Fine and Extra Fine. I wiped it down a final time with Obsidian Oil. The stem looked very good.    I put the UNSMOKED, NOS Savinelli Dry System 1611 Bent Dublin back together and buffed it with Blue Diamond on the buffing wheel. I gave the bowl multiple coats of Conservator’s Wax and the stem multiple coats of carnauba wax. I buffed the pipe with a clean buffing pad and hand buffed it to raise the shine. It is fun to see what the polished bowl looks like with the grain popping through on the smooth rim top and the variety of colour in the rustication. Added to that the polished nickel ferrule and the vulcanite saddle stem was a beautiful touch. It is light and well balanced. Have a look at it with the photos below. The dimensions are Length: 6 ½ inches, Height: 2 ¼ inches, Outside diameter of the bowl: 1 ¾ inches, Chamber diameter: 7/8 of an inch. The weight of the pipe is 68 grams/2.40 ounces. It is a beautiful pipe and one that will be on the rebornpipes store in the Italian Pipe Makers Section. If you are interested in breaking in a new unsmoked Savinelli Dry System and adding it to your collection let me know. Thanks for walking through the restoration with me as I worked over this pipe. Thanks to each of you who are reading this blog. I want to keep reminding us of the fact that we are not pipe owners; we are pipemen and women who hold our pipes in trust until they pass on into the trust of the next pipeman or woman.

Refurbishing System Pipe From Savinelli…A “Dry System” # 2101


Blog by Paresh Deshpande

Since the time I completed the pipes selected by Karthik, last of the lot was a lattice design meer (Refurbishing Karthik’s Second Selection – A Stacked Lattice Design Meerschaum | rebornpipes), I have completed another 13 odd pipes that had reached me for repairs and restoration. Each had its own set of challenges which were relatively easy to overcome. What was difficult, however, was dealing with the owner’s instructions as to how I should carry out the repairs, which were very frustrating. Just imagine, a beautiful Brakner that required a tenon replacement to maintain its originality and value and the owner wanted me to replace the stem as it would be cheaper and faster!! Of course, the heart of a restorer won over the mind of repairman and I did a tenon replacement.

Moving on, the next pipe that I chose to work on came to me from Steve!! SURPRISED? Well, the truth is that I was on a lookout for a Savinelli Dry System pipe as I was keen to try one and experience the difference between the Pete System pipe and the Savinelli System pipe. Steve and Jeff had been on a road cum pipe hunting trip and had come up with a rich haul of some cool pipes. We worked out a mutually beneficial deal and just when Steve was to send the parcel, COVID happened….. A wait of more than a year and the parcel with selected pipes reached me when I was under shifting to present location. Another wait of settling down period and the pipe finally made its way to my work table.

I love classic shaped pipes and this one has a classic Billiard shape with a substantial sized chamber and thick walls. Save for a bald patch that is seen at the lower half over the right side of the stummel, the stummel boasts of plenty of Bird’s eye and cross grain across the surface. It is stamped on the left side over the shank as arched “SAVINELLI” over “DRY” over reverse arched “SYSTEM” forming the shape of a rugby ball. The right side of the shank bears the shape code # 2101 over the COM stamp “ITALY” towards the bowl while the Savinelli trademark “S” in shield is to the left of the shape code towards the ferrule end. The nickel ferrule is stamped on the left as “SAVINELLI” in capital letters. Letter “S” adorns the top face of the saddle of the vulcanite stem. The stampings are all crisp and easily discernible. I searched rebornpipes to see if I could find any information on this pipe, as I invariably always do, to save time in digging out information about the brand. And true enough, my friend Dal Stanton, aka The Pipe Steward, had worked on a Dry System pipe from Savinelli, albeit a sandblasted one. The research done by Dal is always very detailed and comprehensive to an extent that there is hardly any information that he has missed out. To avoid the proverbial reinvention of the wheel, I have included the link here for those interested in knowing more about this offering from Savinelli (and a big thank you to Dal goes without saying!)

Recommissioning a Smart Savinelli Dry System 3621 Bent Dublin | rebornpipes

With a better understanding of this line from Savinelli, I move ahead with my visual inspection of the pipe.

Initial Visual Inspection
The first thing that you notice is the size and heft of the pipe in hand; it’s a lot of pipe for sure! The chamber walls are nice and thick with a thin layer of cake in the chamber. The rim top surface has thick layer of lava overflow, which given the layer of cake in the chamber is mystifying. The flow of air through the pipe is not very smooth and full. The interestingly grained stummel surface is covered in dirt, dust and grime with a number of dents and dings signifying extensive and uncared for usage. The vulcanite saddle stem is heavily oxidized with damage to the button and in the bite zone. The following pictures will give the readers a rough idea to the general condition of the pipe. Dimensions Of The Pipe
(a) Overall length of the pipe: –          6 inches.

(b) Bowl height: –                               1.9 inches.

(c) Inner diameter of chamber: –         0.7 inches

(d) Outer diameter of chamber: –        1.3 inches

Detailed Inspection Of The Pipe And Observations
The chamber has a thin crust of carbon over the chamber walls suggesting that the chamber had been reamed in the recent past. The chamber walls are sans any damage and has years of smoke left in it. However, the thick layer of lava crust over the rim top surface has me surprised as it is an indicator of heavy usage while the chamber is neatly reamed! Through the lava crust, suspected charring to the inner rim edge is observed in the 12 and 6 o’clock direction (encircled in yellow). A number of dents are visible over the rim top surface (encircled in green), probably a result of knocking against a hard surface edge. The exact extent of damage and the condition of the rim surface will be apparent once the lava crust is completely eliminated from the top surface. The geometry of the pipe is spot on with the draught aperture in dead center and at the bottom of the chamber and that makes me believe that it should smoke smoothly. The ghost smells of the previous tobacco is not very strong and should be completely eliminated once the cake has been removed and the shank internals are thoroughly cleaned. The substantial briar estate is sans any fills and boasts of beautiful Bird’s eye grain to the sides and cross grain to the front and aft of the stummel. The only sore spot over the entire stummel surface is the bald patch that is seen to the right bottom portion. There are numerous dents/ dings over the surface (encircled in pastel blue); a testimony of all the falls this pipe has endured during its existence. The surface is mired in grime and dirt and appears dull and lackluster. The well and mortise is not very dirty and should clean up easily. The nickel ferrule has absolutely no damage but is oxidized with age. This should clean up nicely. The high quality vulcanite stem is so heavily oxidized that it appears dirty green in color! Some minor tooth chatter and deep bite marks are seen on either surfaces of the stem in the bite zone. This issue should not be a major headache to address. The upper surface edge of the large horizontal slot appears damaged, extent of which can be ascertained after the clogged slot has been cleaned up. The lip edge on both sides has bite marks and would need to be reconstructed and reshaped. The wide tenon that houses a 6mm Balsa filter has accumulated oils and tars that have dried out on the inside. The bite zone has calcium deposits which will have to be cleaned. The Process
I started the restoration of this pipe by first reaming the chamber with size 2 head of a PipNet reamer followed by scraping with my fabricated knife to remove the carbon deposits. I scraped off the crusted lava from the rim surface with the fabricated knife. Once the cake was scraped back to the bare briar, I used a 220 grit sand paper to remove all the traces of remaining cake and also to smooth out the inner walls of the chamber surface. Finally, to remove the residual carbon dust, I wiped the chamber with a cotton pad wetted with 99.9% pure isopropyl alcohol. The chamber walls are in pristine condition. The char to the inner rim edge in the 12 o’clock direction is severe and would need to be addressed. The smells from the chamber have greatly reduced. The walls are nice and stout and should provide a cool smoke. The dents/ dings to the rim surface are now amply evident and the best way to address this would be to top the surface.This was followed by cleaning the mortise with pipe cleaners and q-tips dipped in isopropyl alcohol. I scraped the walls of the mortise with my dental tool to remove the dried oils and tars. The mortise needs further cleaning with anti-oil dish washing detergent and shank brush and will be done once the external surface of the stummel is cleaned. This helps me in saving a heap of pipe cleaners, which is a very precious commodity here in India.Next, I cleaned out the stem internals. I ran a couple of pipe cleaners dipped in isopropyl alcohol through the stem air way. Unfortunately the pipe cleaner couldn’t pass through completely. I realized that the large slot on the upper surface was clogged and the airway compressed due to tooth indentation. Using a dental tool, I tried prying out the blockage from the slot and realized that there was broken edge of the slot that was glued back and the reason for the blockage. With a bit of effort and lots of care, the broken piece was removed. I would now have to rebuild the top surface of the large horizontal slot. I would later try to open the airway by heating and thus expanding the compressed area with the flame of a lighter.I sanded the entire stem surface with a 220 grit sand paper in preparation for subjecting it to the deoxidizer solution treatment. It has been our experience that the deoxidizer solution works most efficiently in removing oxidation when a stem has been sanded prior to immersion in the solution. I immersed the stem in the deoxidizer solution developed by Mark and set it aside overnight for the solution to do its intended job.The next step was to clean the exterior surface of the stummel. I generously applied Murphy’s oil soap with a hard bristled tooth brush and scrubbed the stummel and rim top with the soap. I washed the stummel under running warm water with anti oil dish washing detergent till the stummel surface was clean and dried it using paper towels and a soft cotton cloth. I deliberately cleaned the rim top with a piece of Scotch Brite pad and set the stummel aside to dry out naturally. The stummel surface has cleaned up nicely with the intricate grain patterns on full display. The brown hues of the rest of the stummel contrast beautifully with the black of the briar grains. These contrasting hues will be further accentuated once the briar is rehydrated and rejuvenated using the balm and subsequent wax polishing. I simultaneously cleaned the shank internals with the detergent and hard bristled shank brush. The ghosting is completely eliminated and the pipe now smells fresh and clean.Staying with the stummel, I decided to address the issues with the rim top surface. The first issue to be addressed was the numerous dents and dings over the rim top. I rotated the rim top on a piece of 220 grit sand paper, checking ever so frequently for the progress being made. Once, I was satisfied that the rim top was an even and smooth surface, I stopped. This topping also helped in reducing the charred surface over the inner rim edge. Here is how the rim top appeared at this stage in restoration.The charring to the inner rim in 12 o’clock direction was still evident, albeit greatly reduced and lent the chamber an out of round appearance. To correct this, I created a bevel to the inner edge with a 220 grit sand paper.The third issue with the stummel was that of the numerous dents and dings over the surface which I have marked over the stummel. I steamed out all these dents and dings by heating my fabricated knife on a candle and placing it on a wet towel covering the dents. The generated steam expands the wood fibers and fills the dents up to, or as close as possible to the surface. The steam leaves behind a discolored surface as compared to the rest of the stummel surface. To address this issue and also to even out and match the raised dings with the rest of the surface, I sanded the entire stummel with a folded piece of 220 grit sandpaper. This also evened out the other minor scratches and dings from the surface. I set the stummel aside and turned to address the stem repairs. I removed the stem from the deoxidizer solution and scrubbed it with a Scotch Brite pad followed by a 0000 grade steel wool scrub. This helps to remove the oxidation that is raised to the surface by the solution. Patches of deep seated oxidation over the stem surface could still be seen as dirty brownish green color and would be addressed by subjecting the stem to further sanding by progressively higher grit sand papers.Next, I used a 220 grit sand paper to sand the stem and removed all the oxidation from the surface. Using a lighter, I flamed the surface of the stem. This helped in raising some of the tooth chatter and bite compression from the slot to the surface as vulcanite has a property to regain its original shape on heating. I wiped the stem with Murphy’s Oil soap on a cotton swab. This cleaned up the stem surface while removing the loosened oxidation.I reconstructed the broken slot end with a filling of CA superglue and activated charcoal after I had inserted a folded plastic coated visiting card. This prevented the fill from seeping in to the air way and clogging it once it had cured. I set the stem aside for the fill to harden before I could proceed with the sanding, shaping and polishing of the stem. While I worked the stem, Abha polished the stummel with micromesh pads, wet sanding with 1500 to 12000 pads. She polished the freshly topped rim surface to a nice luster, wiping the surface with a soft cloth at the end of the micromesh cycle. The stummel looks amazing with a deep shine and beautiful grains popping over the stummel surface. She massaged a small quantity of “Before and After Restoration Balm” with her fingers into the briar. The immediate and incredible transformation that takes place is a worthy reward for all the efforts!!! She let the balm sit on the surface to be absorbed in to the briar for about 20 minutes. The bowl now looks fresh and attractive with the grains popping out any which way you look at the briar. She polished off the balm with a soft cloth to a lovely shine. I am surprised that the rim top surface has the same deep brown coloration as the rest of the stummel surface and that the use of a stain pen was not required. With the stummel rejuvenation almost complete, save for the final wax polish, I worked the stem. The fills had cured and with a flat head needle file, I worked on the fill till I had achieved a rough match with the surrounding surface and had sufficiently sharpened the button edges. For a better blending, I further sand the entire stem with 220 followed by 400, 600, 800 and 1000 grit sand paper. This helps to reduce the scratch marks left behind by the more abrasive 220 grit paper. Even the best of my efforts at the repairs, these did not blend in to the rest of the stem surface and can be noticed with a keen eye. There are stems which do not take to repairs easily and seamlessly and this definitely is one of those.To bring a deep shine to the vulcanite stem, I went through the complete set of micromesh pads, wet sanding with 1500 to 2000 grit sandpapers and dry sanding with 3200 to 12000 grit pads. At the end of micromesh cycle, I polished the stem with “Before and After Fine & Extra Fine” paste. The finished stem is shown below.This now gets me to that part of the process where I get to savor the fruits of our labor until this point. The final polishing with Blue Diamond and Carnauba wax!

I began the final polishing cycle by mounting a cotton cloth buffing wheel on to my hand held rotary tool and applied a coat of Blue Diamond to the stummel and the stem to polish out the minor scratches.With a cotton buffing wheel that I use for carnauba wax, I applied a coat of carnauba wax and continued to work on it till the complete coat of wax had been polished out. I mounted a clean cotton cloth buffing wheel and gave the pipe a once over buff. I finished the restoration by giving the entire pipe a rigorous hand buff using a microfiber cloth to raise the shine further. The finished pipe is as shown below 🙂 P.S. I enjoyed working on this pipe alongside my wife, Abha. Her expertise and dedication in polishing the stummel and stem lends a finish that I always seek in all my restorations. And not to forget her editing of the write up to eliminate all the spelling and grammatical errors!

Well, as for this handsome pipe, I am not very sure if I want to hold on to it as since receiving this Savinelli System pipe from Steve, I have acquired another similar pipe with a Cumberland stem. Do let me know if this pipe interests you and we can take it further from thereon.

I wish to thank each one for sparing their valuable time to read through this write up while also praying for the health and safety of entire mankind. Stay home…stay safe!!

Refreshing a Savinelli Dry System 362


Blog by Dal Stanton

I acquired a pair of Savinelli Dry System pipes on the eBay auction block from a seller in Poughkeepsie, New York.  I initially was attracted by the ‘Peterson-like’ description of the pair – ‘Dry System’.  I also liked the tight bend and the ‘Dublin-esque’ bowls.  Both are ¾ bent with a conical bowl – a tight configuration that I liked immediately.  They almost seemed identical, but one had the shape number 362, the one on my worktable now, and the other had 3621.  When I unpacked them here in Bulgaria and took a closer look, I could see the differences.  Both have identical shapes but the 362 is a lighter rusticated finish with a smooth rim.  The 3621 is a darker blasted finish with a blasted rim.  These pictures show the differences.A friend of mine here in Bulgaria, Teo, saw the Savinelli pair on my website in the ‘For “Pipe Dreamers” Only!’ collection and inquired about them.  I was very happy that he commissioned the 362 to add to his collection which will benefit our work here in Bulgaria with the Daughters of Bulgaria – women and girls who have been trafficked and sexually exploited. Pipe smoking is very rare here in my adopted country of Bulgaria.  In the 13 years we have lived and worked in Bulgaria, I can count on one hand how many times I have seen a Bulgarian smoking a pipe!  After restoring the pipe, and if Teo decides to adopt it (it’s not obligatory for those who commission – they have the first opportunity to acquire it), I’ll look forward to sharing a bowl with him!  Here are more pictures of the Savinelli Dry System 362 on my worktable. The smooth underside panel holds the nomenclature.  To the left is stamped ‘DRY SYSTEM’ then the Savinelli ‘S’ logo.  To the right of the logo is 362 [over] ITALY.  The nickel shank cap is stamped on the left side with ‘SAVINELLI’ along with ‘S’ on the topside of the military stem. I found nothing about the Dry System on Pipedia but Pipephil.eu came through with some very helpful information – especially about the shape number differences.  Looking at the Savinelli shapes chart on Pipedia’s Savinelli article, shapes 362 or 3621 were not among those listed.  Pipephil provided this on the Savinelli Dry System with the information that the Dry System could be stamped with either 3 or 4 digits for the shape number:The panel above also references a link comparing Savinelli’s Dry System P-Lip stem with the Peterson standard. I found the most information about the Savinelli Dry System on another site as I broadened my online search.  A South African based tobacconist, Wesley’s  (See LINK), provided a gold mine of information about the Savinelli Dry System:

Launched in 1981, it had taken several years of research into the negative points of existing system pipes, in order to improve on them. Perseverance paid off – by combining trap and filter, and enlarging the smoke hole, Savinelli achieved the “Dry System”, which in our opinion is the best answer to “Wet Smoking” so far developed.

Especially for new pipe smokers, the Savinelli Dry System pipe incorporates everything needed to provide a cool, dry smoke.

The name “Dry” comes from the introduction of the Balsa “filter” into the traditional system pipe – the “System” being the presence of the built-in moisture trap in the shank, linked with the “smokehole on the top” mouthpiece. The balsa mops up the moisture in the smoke hence the term “Dry” system, and if the pipe is smoked without the balsa all that will happen is that this moisture will condense and collect in the trap. It can then either be mopped up with a folded pipe cleaner or flicked out. Just be careful where you flick it!

Put this all together and you can see why we say these are technically our best designed pipes. But the technical qualities are not all these pipes have to offer. Extra bonuses are the feel, the finishes and the balance.

This information marks the genesis of the Savinelli Dry System line in 1981. Added to this information, Wesley’s included the following benefits of the Savinelli system with a helpful cut-away showing the internals:The description of the ‘smokehole’ of the mouthpiece, is interesting in the way it disperses the smoke so that it avoids tongue burn as well as keeping moisture entering the stem from the mouth. The trademark filtering system is also optional – use of the balsa insert which I use with great satisfaction with some of my own Savinellis.  Yet, even if you do not utilize the absorbing qualities of the balsa insert, the built-in moisture trap will hold the moisture for clean-up after smoking.  Sounds good!

Wesley’s Tobacconist also included this helpful Shapes Chart for the Savinelli Dry System pipes. The description for the 3621 suggests:

Regular shapes 3613 & 3621 are ideal for the new pipe smoker or for a short smoke for anybody.

As I look at the Savinelli Dry System 362 now on my worktable, I’m wondering if it too is actually a 3621 and the craftsman applying the rustication was a bit overzealous.  I take a close-up to show that the latter half of ‘ITALY’ also succumbed to the rustication!Notwithstanding, this 362* is a sharp looking pipe in relatively good condition.  The chamber shows moderate cake build-up and the smooth, internally beveled rim is darkened with some lava buildup.  The rustication process is very tight and attractive and only needs some cleaning of the normal grime buildup.  The nickel shank cap will shine up nicely.  The Savinelli P-Lip stem has a good bit of oxidation and the P-Lip button shows almost no biting damage.  Overall, I’m hopeful of a smooth cleanup!  I begin the restoration by cleaning the airway of the stem with a pipe cleaner dipped in isopropyl 95% and then I place the stem in a soak of Before & After Deoxidizer along with other pipes in the queue.   My wife captured this Pipe Steward cameo appearance at the worktable! After several hours in the soak, I fish out the Savinelli stem and wipe it down with cotton pads wetted with alcohol to remove the raised oxidation.  I also run pipe cleaners through the airway to clear the excess Deoxidizer.  I can attest to the fact that this P-Lip stem is easier to clean than the Peterson version!To begin rejuvenating the vulcanite, a coat of paraffin oil on the stem does the job and I put the Savinelli P-Lip aside to absorb the oil.The chamber has a moderate cake build up and removing it to give the briar a fresh start and to inspect the chamber walls is the next step.Using only the smallest blade head of the Pipnet Reaming Kit, it becomes clear very soon how quickly the canonical chamber narrows toward the floor.  I do not force the blade downward with much pressure to avoid digging into the lower chamber wall to form a reaming ledge. This has been evident on several pipes where I’ve seen the results of overzealous reaming.  Utilizing the Savinelli Fitsall tool next, the blade is better suited to the contours of the chamber wall.  To remove the final carbon residue from the chamber wall, sanding the walls with a Sharpie Pen wrapped with 240 grade paper does the job well.  Finally, the chamber is cleaned of carbon dust with a cotton pad wetted with isopropyl 95%. Inspection of the chamber walls reveals a very healthy block of briar.Moving now to cleaning the external briar surface, undiluted Murphy’s Oil soap is applied to a cotton pad to scrub the rim and rusticated surface.  A bristled toothbrush also works well on the rough surface freeing it of dirt and grime.  Utilizing both a brass bristled brush and the sharp edge of the Winchester pocketknife, the darkened areas on the rim give way.  With a very gentle touch with the blade, the excess carbon gives way on the rim and the sharp internal bevel.  Taking the stummel to the sink and using warm water the cleaning continues with anti-oil dish soap and shank brushes to clean the internals.  After thoroughly rinsing, the internal cleaning continues at the worktable with pipe cleaners and cotton buds wetted with isopropyl 95%. As cotton buds are dipped in and out of the mortise, the schematic of the internals included above comes to mind.  Without doubt, the trap system works!  What a muck of gunk is excavated from the trap as dental spatula and spoon are utilized to scrape the mortise walls and trap.  Finally, cotton buds and pipe cleaners start emerging lighter and I move on with clean internals left behind.Before moving on to the stem, I decide to apply the coup de grâce to the internal cleaning process first.  While working on the stem, a kosher salt and alcohol soak will continue the cleaning passively and freshen the bowl for the new steward.  I form a mortise ‘wick’ first by pulling and stretching a cotton ball.  I guide the end of the wick into the airway cut-away with the help of a stiff wire.  Following this, more of the cotton wick is stuffed down into the trap.  With the wick in place, after kosher salt is added almost filling the chamber, the stummel is placed in an egg crate providing stability to the operation.  Using a large eye dropper, isopropyl 95% is then added to the bowl until it surfaces over the salt.  After a few minutes the alcohol is absorbed, the bowl is topped off with alcohol once again and the bowl is set aside to allow the soak to do its thing. Moving now to the stem, closeups of the upper- and lower-bit area show little tooth compression damage but the condition of the vulcanite is very rough.This is addressed by sanding the entire stem with 240 and 470 grade papers followed by wet sanding with 600 grade paper and finishing by applying 000 steel wool – throughout, care is given to sand around the Savinelli ‘S’ stamping on the upper side. Straight away, using the full regimen of micromesh pads, with pads 1500 to 2400 I wet sand, followed by dry sanding with pads 3200 to 4000 and 6000 to 12000.  Between each set of 3 pads an application of Obsidian Oil further rejuvenates the vulcanite.  The stem looks great and I put it aside and turn to the bowl. The stummel has benefited from a kosher salt and alcohol soak through the night.  The soiled salt and wick reveal the extricating process of drawing the tars and oils out of the internal briar.  After clearing the used salt to the waste and blowing through the bowl and wiping it out with paper towel, to make sure all is cleaned and refreshed, another pipe cleaner and cotton bud are wetted with isopropyl 95% and inserted.  They reveal almost no soiling.  All is clean and I move on.Looking at the smooth rim, it is attractive and shows very nice potential of contrasting rough briar and smooth briar grain.  I appreciate contrasting briar textures in a pipe’s presentation.The rim has scratches and residual discoloration. To address this, both 240 and 600 grade papers are utilized to sand the rim and freshen the distinctive internal bevel.  Sanding very lightly, the patina is preserved while still cleaning the top surface.To now fully bring out the grain, I sand the rim with the full battery of micromesh pads – wet sanding with pads 1500 to 2400 and from 3200 to 12000 dry sanding does the job.  I’m really liking how this Savinelli Dry System is shaping up!I take another close look at the Savinelli rusticated surface. I’m attracted to the tight, distinct pattern of the rustication.  The reddish hue stands out nicely. I always look forward to the application of Before & After Restoration Balm to briar surfaces – both smooth and rough.  The effect of deepening of the hues subtly is why I like this product.  I apply some of the Balm to my fingers and rub it in very thoroughly over the rustication and rim.  As I’ve described before, the Balm starts with a cream-like viscosity and gradually thickens into a wax-like consistency as it is worked into the briar surface.  After the application of Balm is completed, it stands for about 20 minutes ( the next two pictures below) and then using a cloth I wipe off the excess and buff up the surface with a microfiber cloth.  I love the results! Before moving on with the next stage, the nickel shank cap needs addressing.  It is somewhat colored and dirty with fine scratches.  It will shine up nicely.To do the initial cleaning, Tarn-X is a product I acquired in the US and it works well.  After applying some of the solution with a cotton pad and scrubbing the nickel, I rinse it with tap water and dry. I’m careful to keep the solution off the briar.  It does a great job.After the cleaning with Tarn-X is complete, there remains the roughness of wear and tear shown in the picture below.To address this, a dedicated cotton cloth buffing wheel is mounted onto the Dremel with a speed set at about 40% full power and I apply Blue Diamond compound to address the scratches and fine lines in the nickel.  I’m careful to keep the wheel over the nickel and not overrun on the briar.  This process can stain the briar very easily with a blackish hue.  Not good.The results are great providing Savinelli shank cap bling!Moving on with Blue Diamond compound, I mount another cotton cloth buffing wheel to the Dremel, maintain the same speed and apply the compound to the smooth briar rim and stem.  I do not apply the compound to the rusticated briar surface.  I’m afraid it will gum-up the surface and be a bear to clean.Looking more closely at the stem…, well, my OCD pipe restoration tendencies would not allow me to ignore some residual oxidation making an appearance as I fine tune the buffing with the compound.  The next picture, lightened to show what I’m seeing, reveals the oxidation around the ‘S’ stamping as well on the edges of the hump of the stem rise.   The stamping was intentionally protected from sanding to preserve the Savinelli ‘S’.  Yet, I’m not satisfied with the wide birth of oxidation that I’ve left!  And the residue on the sides – just will not do.I begin a more conservative approach to remove these vestiges of oxidation.  I start with Mr. Clean Magic Eraser with little success.Then I use Before & After Fine and Extra fine polishes which are supposed to continue the oxidation removal process.  I apply the polishes successively, rubbing in then wiping off.  The polishes may have helped marginally. Not satisfied, sanding with 470, then 600 following again by applying 000 steel addresses the oxidation.As before, the full regimen of micromesh pads from 1500 to 12000 precedes applying Blue Diamond compound with the Dremel.  I’m satisfied with the results this time around! The oxidation encompassing the ‘S’ stamping is much tighter now and the oxidation spots that were on both sides of the hump have been eradicated. I move on.Before applying the final touch of polishing with carnauba wax, I freshen the Savinelli ‘S’ stem stamping using white acrylic paint. I spread some paint over the stamping and daub it with a cotton pad to remove the excess.  Using a toothpick, I very lightly scrape the paint removing the excess leaving the ‘S’ somewhat filled.  I repeated this process a few times to get it as right as possible.  The paint grips but not perfectly and the final ‘S’ isn’t as solid as I like, but it’s better than it was! To complete the restoration of this nice looking Savinelli Dry Air System 362, after a cotton cloth buffing wheel is mounted onto the Dremel and speed set and 40 percent full power, I apply carnauba wax to the stem and rim.  In applying carnauba to the rusticated surface, I increase the speed to about 60% full power.  This aids the heating and assimilation of the wax into the rougher surface.  After applying a few coats, I give the pipe a rigorous hand buffing with a microfiber cloth to raise the shine.

This Savinelli Dry System came out well.  The rustication is striking, and the deep reddish hues of the finish are a very nice contrast to the smooth briar rim.  The tight bent Dublin-esque fits well in the hand.  I appreciated learning more about the enhancements that Savinelli made to its Dry System and I look forward to hearing whether it truly does provide a step toward the pipe smokers holy grail – a dryer and cooler smoke! Teo commissioned this pipe which benefits the Daughters of Bulgaria – women and girls who have been trafficked and sexually exploited, and he will have the first opportunity to acquire it in The Pipe Steward Store.  Thanks for joining me!

Restoring a Savinelli Dry System 2622 Bent Pot


Blog by Steve Laug

The next pipe I chose to work on was one my brother found one of his pipe hunting trips in Southern Idaho. It is a nice sandblasted Savinelli pipe. It is stamped on the underside of the shank and reads Savinelli over Dry over System. To the right of that the shape number 2622 is stamped along with the Savinelli shield and Made in Italy. The finish was very dirty and the bowl thickly caked. There was a buildup of lava overflowing onto the top of the rim. It was hard to know if there was damage to the inner edge or the top of the rim because of the buildup. The finish was very dirty with grime and dust of the years. The nickel ferrule was in very good shape with some scratching that could easily be polished out. The stem was oxidized and there were tooth marks on both sides at the button. The airway on the top of the P-lip style button was a slot and it was damaged along the top edge. The S stamp on the top of the saddle part of the stem was faded but deep enough that it would be easy to refill. It was a nice looking pipe under the grime and wear. Jeff took photos of the pipe before he started his cleanup work. The next two photos give and idea of the thickness of the cake in the bowl and the overflow of lava on the rim from two different angles. It is quite thick in the bowl and the lava overflow is also thick.Jeff took a photo of the underside of the bowl and shank showing the stamping. It is pretty clear stamping though the photo is a little blurry.When he took the stem off the bowl there was a Savinelli balsa filter in the stem. The inside of the shank looked really clean. I am assuming the seller cleaned up the shank and put a new filter in the shank to help sell it.The nickel ferrule on the end of the shank is in good shape. It is dirty and also scratched but would polish up nicely. The S stamp on the stem top was faded but in good condition otherwise.The stem was in good condition, lightly oxidized, tooth marks on the top and underside of the shank and some minor damage to the slotted airway in the top of the P-Lip stem.I did some research on the Dry System pipe to understand how it was designed. The stem was designed to hold triangular shaped Balsa filters. They are still readily available for the pipes.I also found a cross section diagram of the pipe. I have included that below with the explanation of how the system works with all pieces in place. The photo has a key attached with defines all the parts of the system. It is almost an Italian version of the Peterson System pipe with an added Balsa filter in the stem.Jeff did a thorough cleanup on the bowl and stem. He reamed the bowl with a PipNet pipe reamer and cleaned up the last bit of cake with a Savinelli Fitsall reamer. He cleaned the internals with alcohol, pipe cleaners and cotton swabs – spending extra time scrubbing out the mortise and sump as it was very dirty. He scrubbed the exterior of the pipe with Murphy’s Oil soap and a tooth brush and was able to remove all of the tars and oils built up on the briar. He was able to remove all of the tars and lava on the rim top and left it looking very clean. He soaked the stem in an Oxyclean bath to raise the oxidation to the surface of the vulcanite. When it arrived it looked like a different pipe. I took some photos of it to show how it looked before I did the restoration. He did a great job removing the cake in the bowl and the lava on the rim top. The rim looks really good and it was in very good condition with no damage to the edges of the rim.The oxidation came to the surface of the stem after the soak in Oxyclean. The bite marks are visible on the top and underside near the button. You can also see the damage on the edge of the slot toward the front of the stem.I was excited to start working on it so I pulled the stem off and put it in a bath of Before & After Pipe Stem Deoxidizer and left it to soak overnight. In the morning I removed the stem from the deoxidizer and wiped off the excess deoxidizer from the surface of the stem with a paper towel. I cleaned out the airway in the stem with pipe cleaners and alcohol to remove any remnants of the bath from that part of the stem. The photos below show the stem after the soak and rub down. The oxidation was pretty much gone and what remained would be easily dealt with. The tooth marks are visible on the top and underside of the stem in the photos.I used a small needle file to reshape the slot in the top of the button. I was able to square it up and remove the damaged area on the front side of the slot.I sanded the stem with 220 grit sandpaper to remove the oxidation from inside the tooth marks, reshape the button on both sides and wiped down those areas with alcohol to remove the sanding dust. I painted the tooth marks with the flame of a Bic lighter to lift them and they rose to the surface and I was able to sand them smooth.I polished out the sanding scratches and marks in the vulcanite with micromesh sanding pads – wet sanding it with 1500-2400 grit pads and dry sanding it with 3200-4000 grit pads. I wiped the stem down with Obsidian Oil after each sanding pad. I buffed the stem with Blue Diamond on the buffing wheel. I brought it back to the table and sanded it with the final three 6000-12000 grit pads. After the final pad I gave it a final coat of oil and set it aside to dry. I used a cotton swab to apply some European Gold Rub’n Buff into the S stamp on the top of the stem. I wiped off the excess with a cotton pad and buffed the stem with a bit of Obsidian Oil on an old cloth.I rubbed the bowl down with Before & After Restoration Balm to deep clean the nooks and crannies of the sandblast finish, enliven and protect the briar. I hand rubbed it with my fingers and wiped it off with a soft cloth. I buffed the bowl on the wheel with a horsehair shoe brush to polish it. It really began to have a deep shine in the briar. I took some photos of the bowl at this point to mark the progress in the restoration. I polished the nickel ferrule with a jeweler’s cloth to remove the tarnish and the scratching. I put the stem back on the bowl and worked the pipe over on the buffing wheel using Blue Diamond to polish the bowl and shank. I buffed the bowl with a light touch so as not to get any of the buffing compounds in the grooves of the sand blast. I buffed the stem to raise the gloss on the vulcanite. I gave the bowl multiple coats of Conservator’s Wax and gave the stem multiple coats of carnauba wax. I buffed the entire pipe with a clean buffing pad to raise the shine. I hand buffed it with a microfiber cloth to deepen the shine. The finished pipe is shown in the photos below. The dark and medium brown stains on the sand blast pot shaped bowl works well with the rich black of the vulcanite stem. The polish and the reworking of the stem material left this a beautiful and well-made pipe. The dimensions of the pipe are: Length: 6 ½ inches, Height: 2 inches, Outside Diameter: 1 5/8 inches, Diameter of the chamber: 1 inch. I will be adding this one to the rebornpipes store shortly if you are interested in adding it to your collection. It will make a fine addition to the rack. If you are interested email me at slaug@uniserve.com or send me a message on Facebook. Thanks for looking.