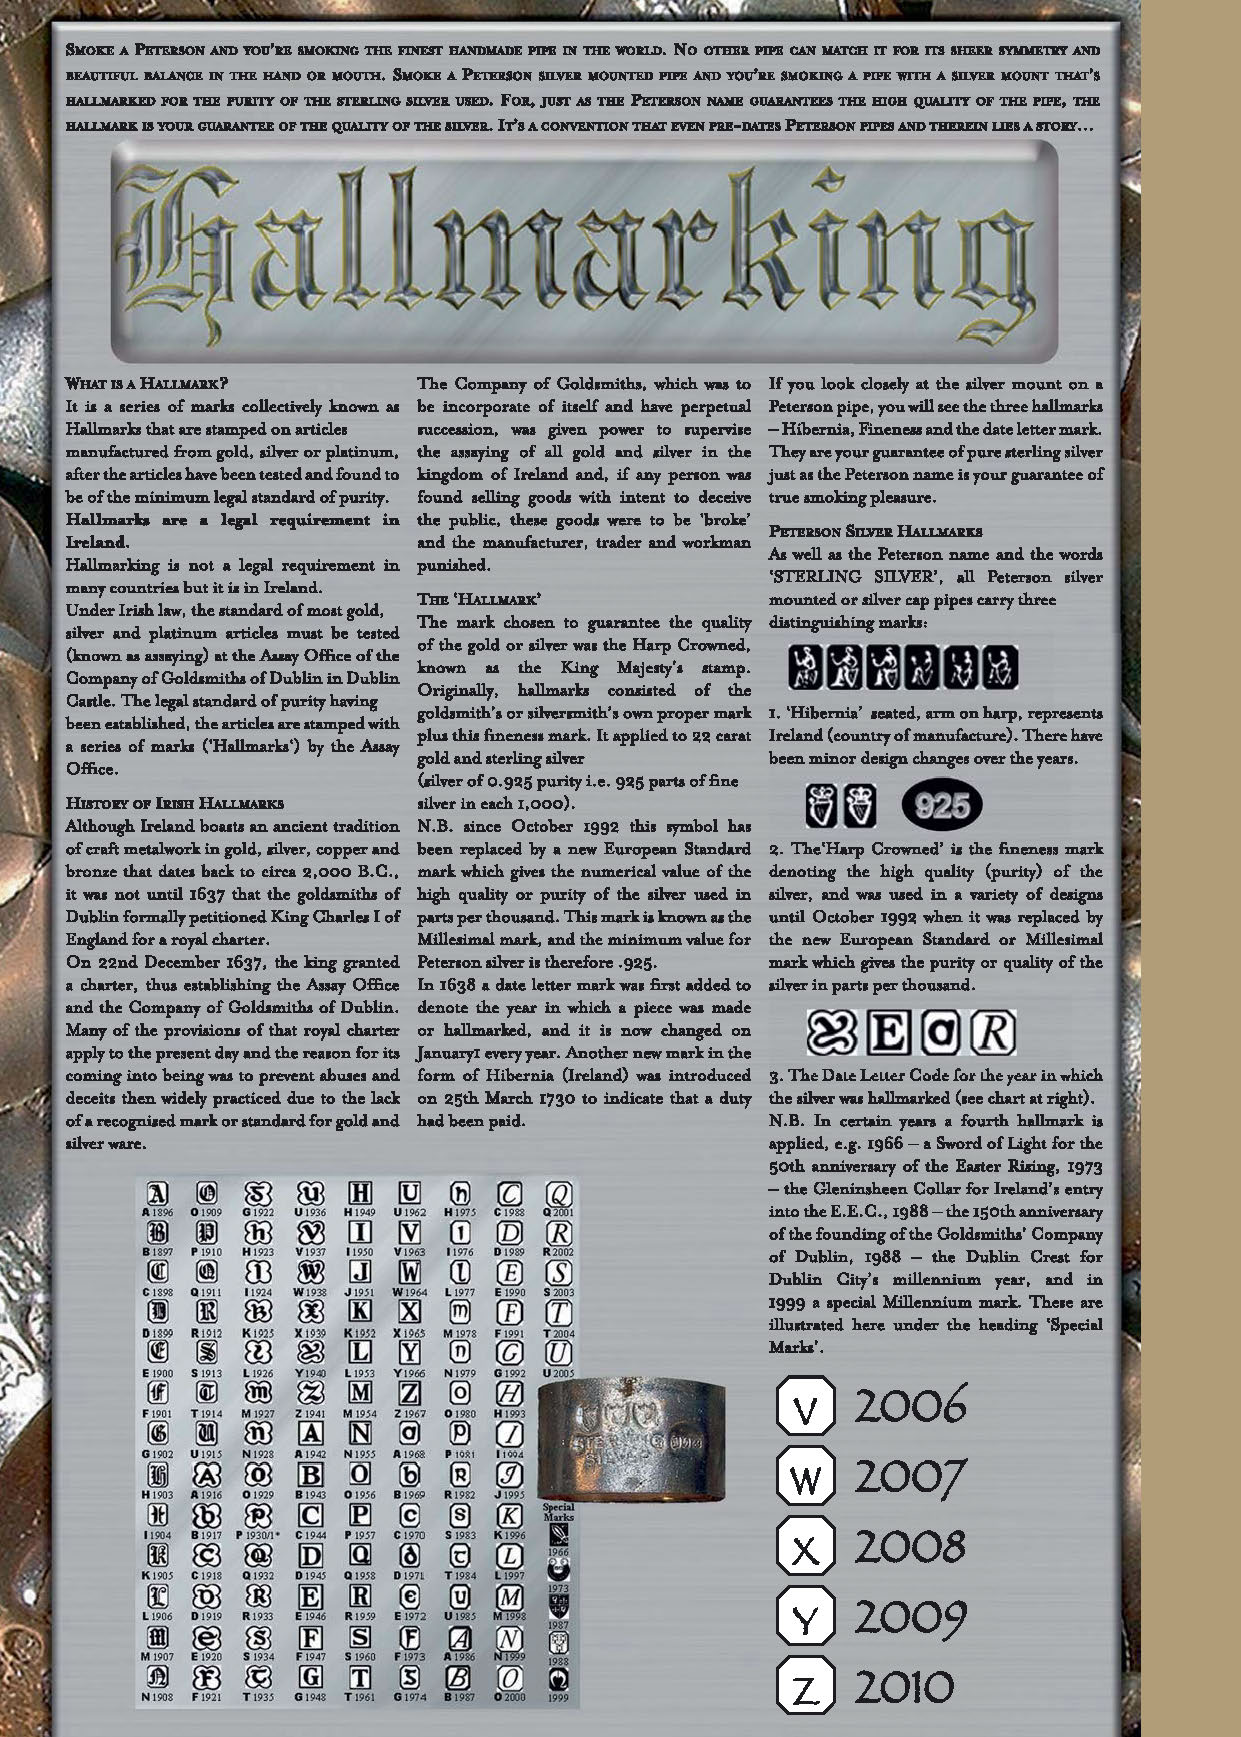
Tag Archives: Republic Era System Standard Pipes

Cleaning up a Pineapple Style Rusticated Peterson’s of Dublin System Standard 312


by Steve Laug

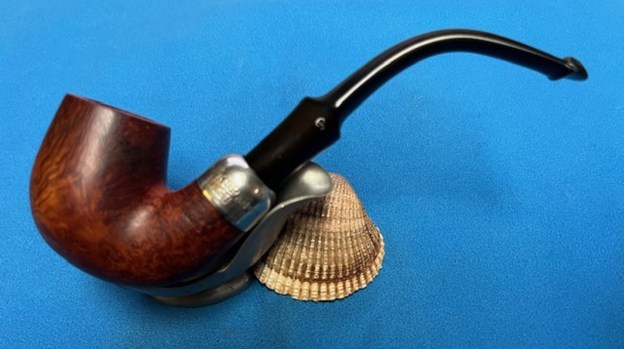
I finally finished the heavy group of pipes that I was working on for the wife of an old pipe man in Ontario. There were some amazing pipes there and with the restoration they came out looking very good. I will be mailing them out to him early in the week ahead. Now it was time to work on other pipes awaiting restoration. The first of those on the table is a Peterson’s of Dublin System Standard 312 with a pineapple style rustication and an acrylic fishtail stem. I received an email before my trip to Idaho to visit my father. In it a friend Matthew wrote about a pipe he had picked up that needed my attention. I have included the email below.

Steve, The Peterson is heading your way.  I probably would not have even purchased the Pete, except it is an example of the “pineapple” rustication that Peterson used to employ.  They’re getting hard to find and I do not know if it from rarity (not many made) or that Peterson did not sell many because the rustication did not appeal to pipe smokers. Please examine the Pete and give me your diagnosis. Thank you. Matthew

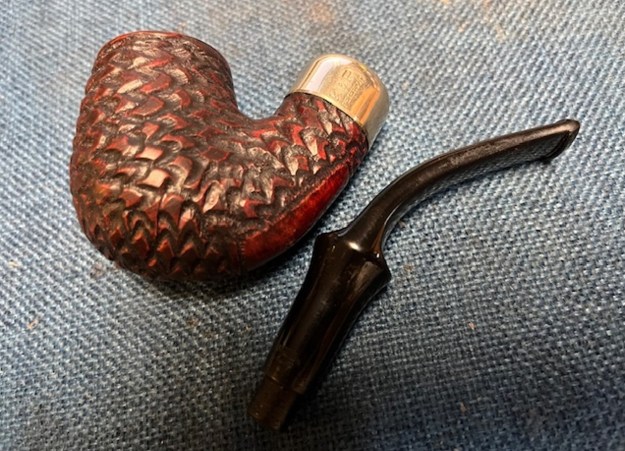
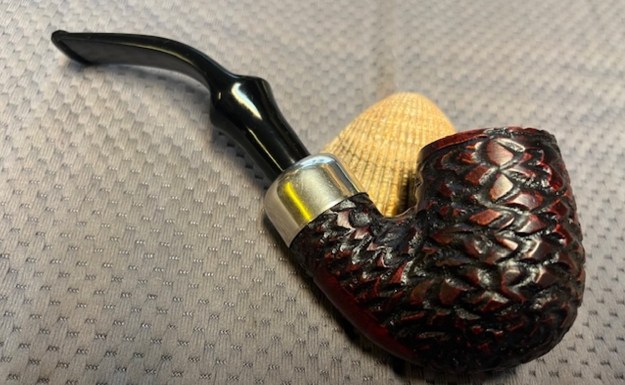
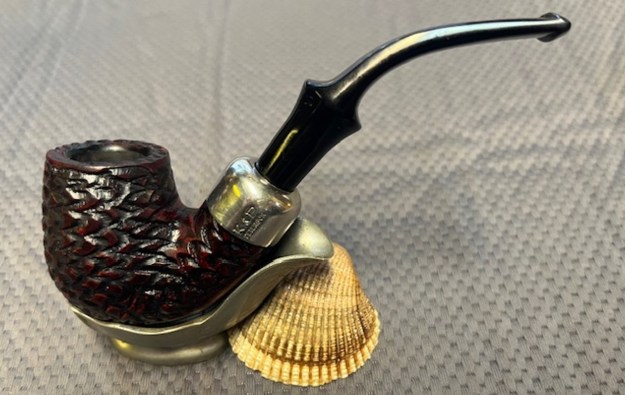
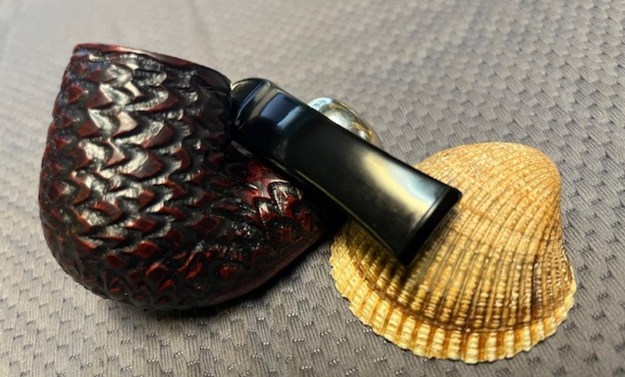
This afternoon I opened the box Matthew shipped the pipe in and found a nice looking green Peterson’s box inside. I opened the box and found a Peterson’s 312 inside and the original green pipe sock it came in. It was a great looking pipe. 
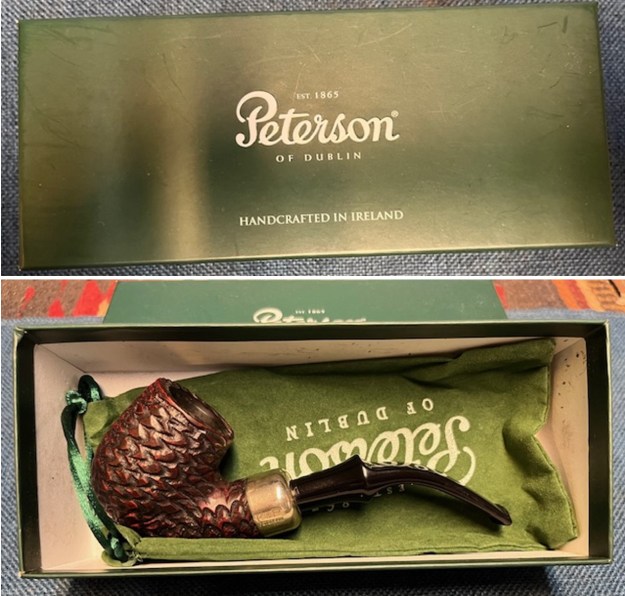
The smell in the box was a heavy English/Latakia smell that filled the room when I opened the box. The finish on the pipe was quite clean with just some dust in the rustication grooves. The polished nickel ferrule was in excellent condition with no dents or tarnish. The bowl had a thick cake on the walls of the bowl and the shank had a lot of tar and oil sludge filling the sump, the mortise and the airway in the shank and the stem. The stem was acrylic and was a fishtail style stem. I believe it is a Peterson’s made fishtail stem that came with the pipe but I am not sure. The fir in the shank is perfect which seems to point this direction. There is no P stamp on the saddle portion of the stem but that is not abnormal as many of their stems did not have the stamp. Overall it is a beautiful pipe with a unique finish. I am looking forward to working on it. I took photos of the pipe before I started. 
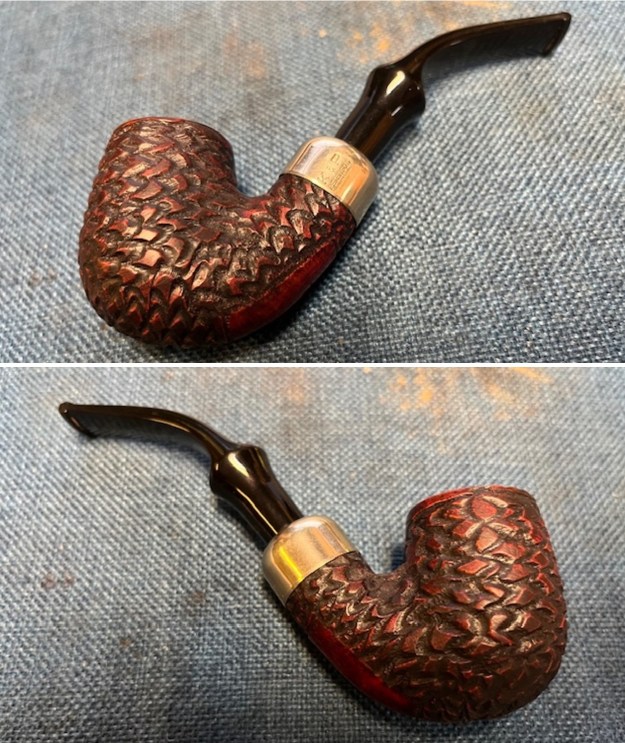
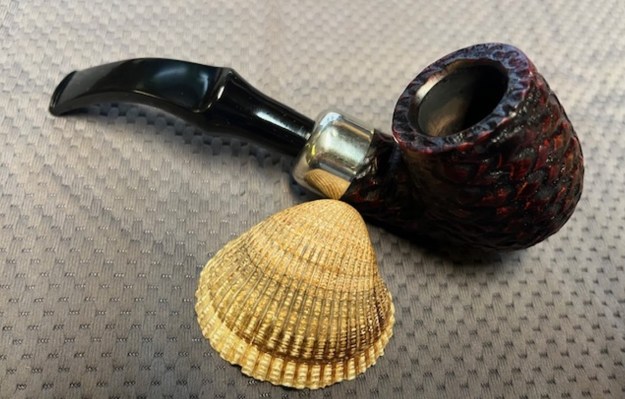
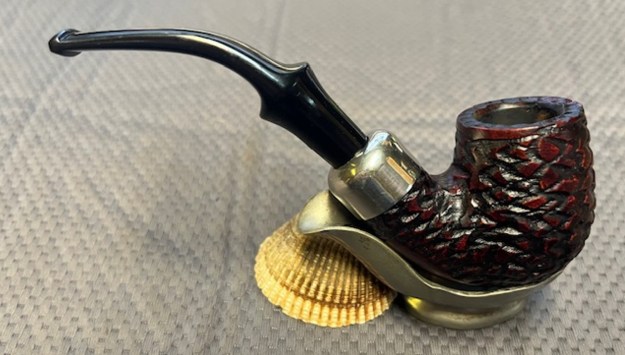
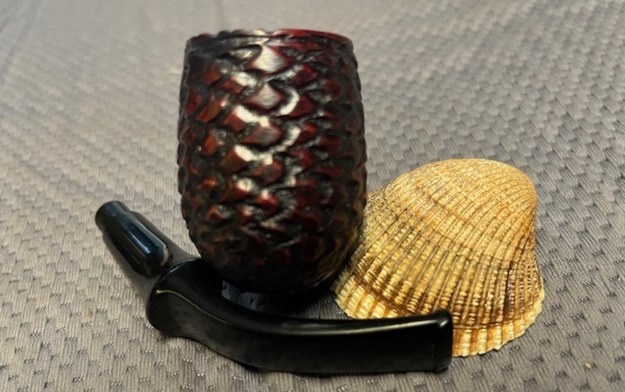
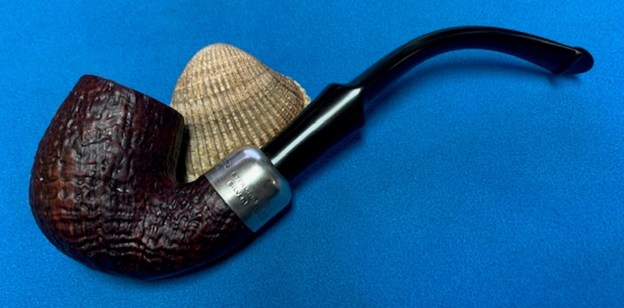
I took a close-up photo of the bowl and rim top to show its condition. The inside of the bowl was heavily caked with debris in the bottom of the bowl. The rim top looked very good with just some grime in the rustication. There was a polished nickel ferrule on the shank end that was in decent condition with no nicks. The acrylic stem was dirty and had some light tooth marks and chatter on the top and underside ahead of the button.
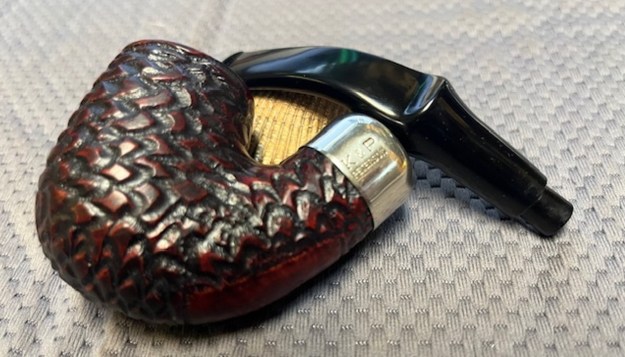
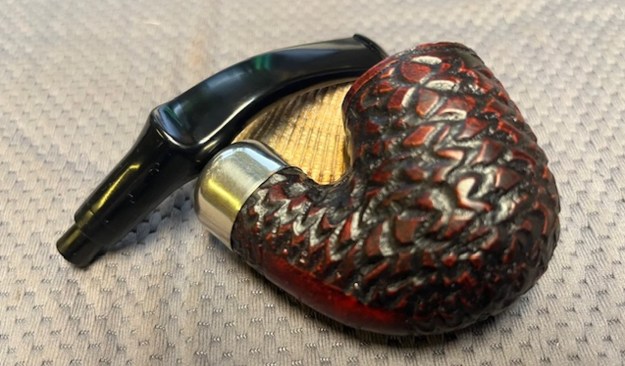
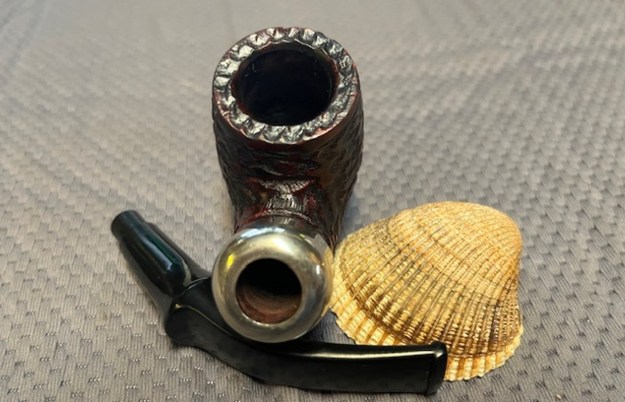
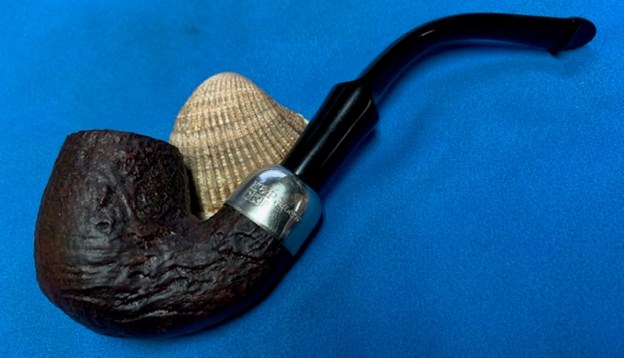
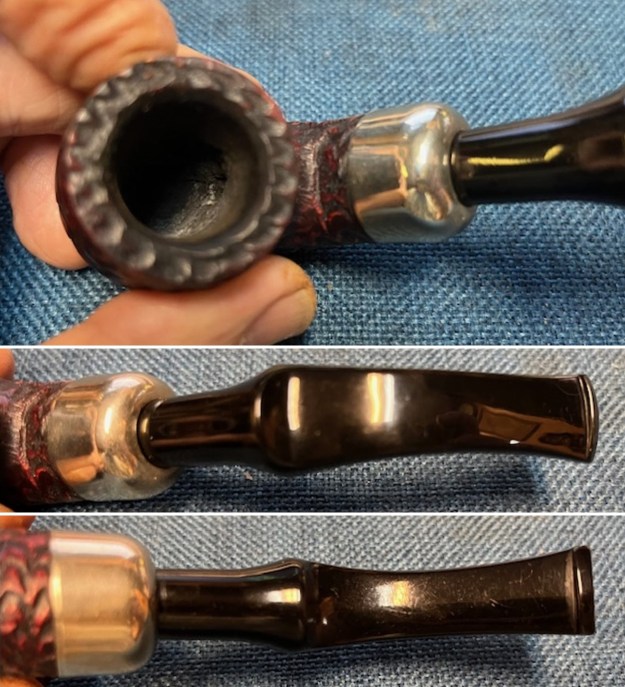
I took photos of the stamping on the smooth panel on the underside of the shank. It is faint but readable as noted above. I also took a photo of the stamping on the left side of the nickel ferrule and it is also very clear. I also removed the stem from the shank and took a photo of the pipe. 
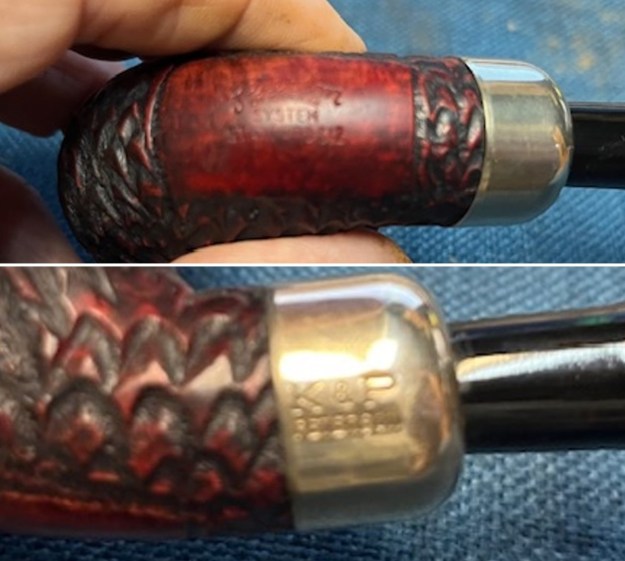
I reamed the bowl with a PipNet reamer to remove the cake. I cleaned up what remained with a Savinelli Fitsall Pipe Knife. I sanded the walls of the bowl to remove any remnants of cake with 220 grit sandpaper wrapped around a piece of dowel. Once finished the inside of the bowl was smooth. 
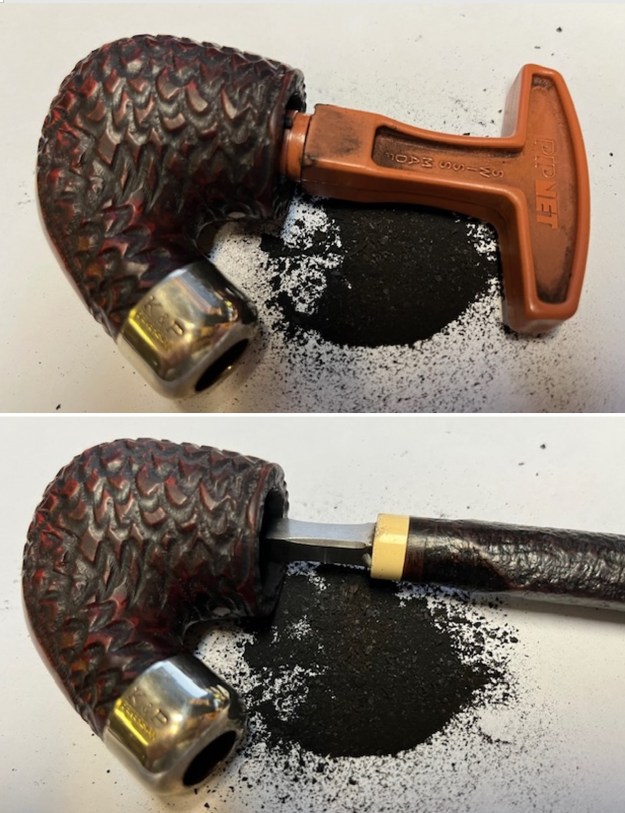
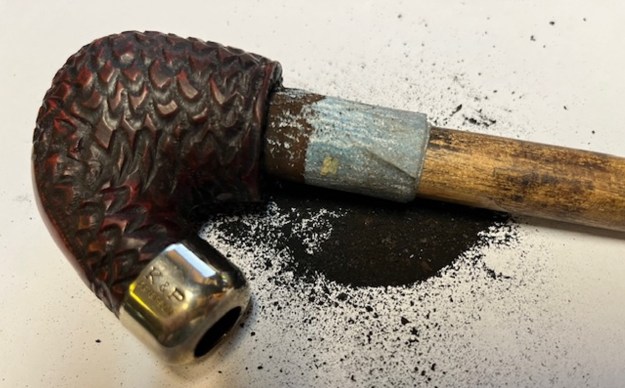
Once the pipe was reamed and clean I took the opportunity to work on the internals – the sump, mortise and airway in the shank and stem. I cleaned out the airway to the bowl, the mortise and the airway in the stem with pipe cleaners, cotton swabs and alcohol. 
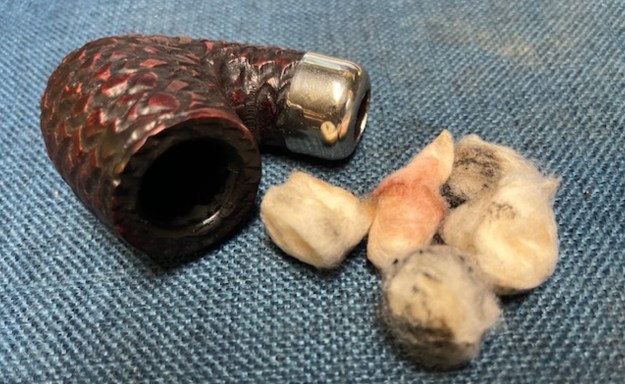
The stink in the pipe was still strong so I decided to exorcise the stink. I stuffed the bowl with cotton bolls and twisted a cotton boll and stuffed it in the sump and mortise. I used an ear syringe to fill the bowl with 99% isopropyl alcohol and set the bowl aside to let the oils wick out of the briar. I let the pipe sit overnight. In the morning the second and third photos show what I found. The shank plug cotton had wicked out tars, oils and some stain! It smells far better than when I started the process. I will let it dry out and check it again to see if I need to repeat the process. 
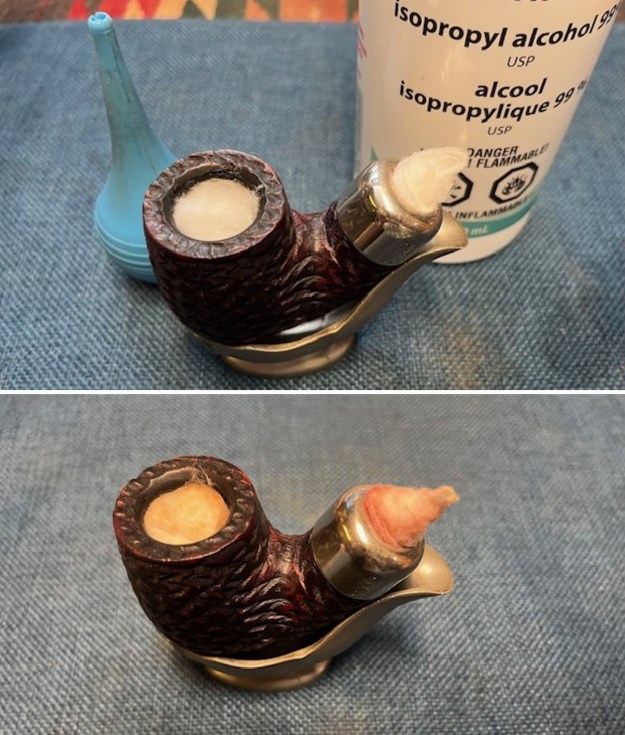
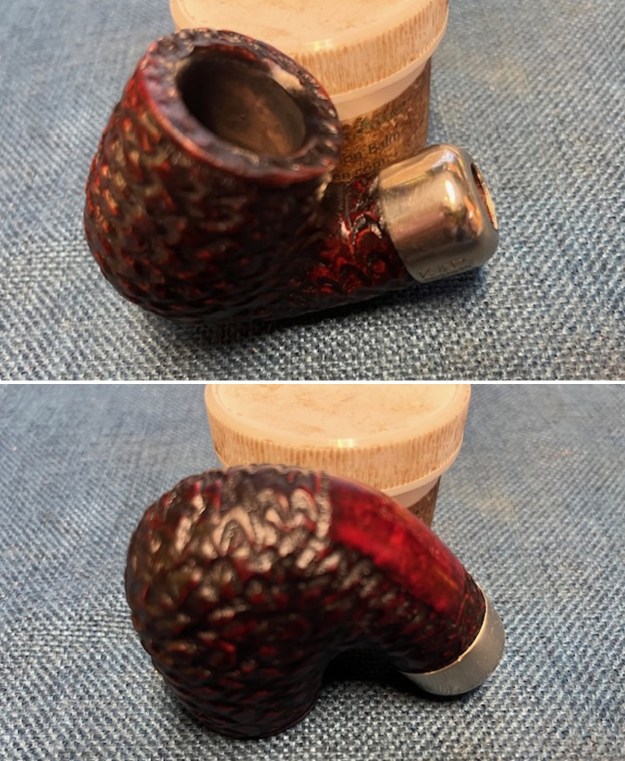
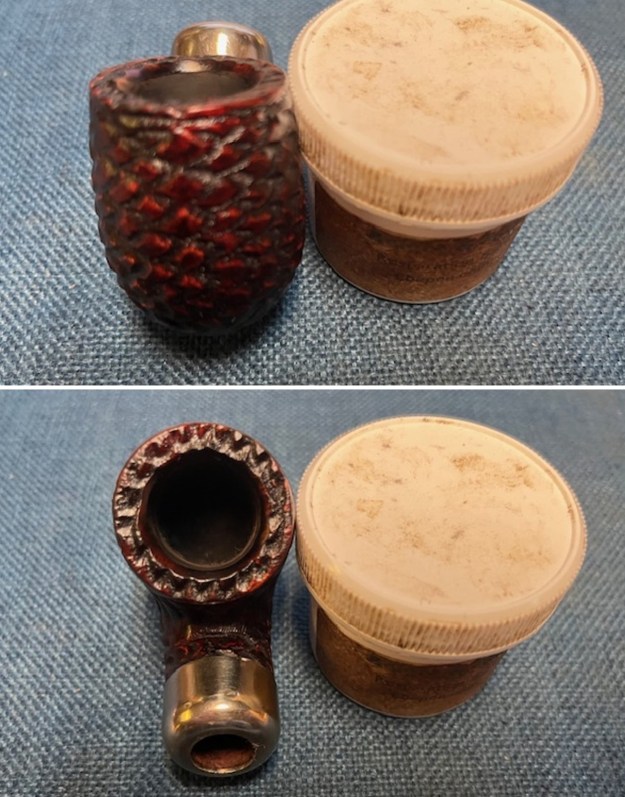
I cleaned up the rim top a bit with some Before & After Briar Cleaner. I worked it into the rim top surface with a tooth brush and then buffed it off with a cotton pad. It looked much better at this point in the process. 
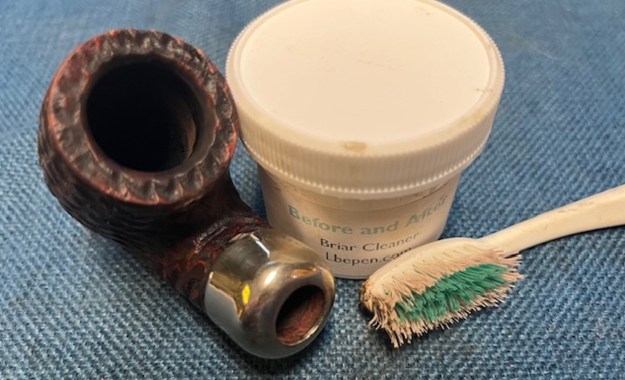
I rubbed the bowl down with Before & After Restoration Balm. I worked it into the surface of the briar with my fingertips and a shoe brush to clean, enliven and protect it. I let the balm sit for ten minutes then buffed with a cotton cloth to raise the shine. Mark Hoover’s Balm is a product that I have come to appreciate and one I use on every pipe I have been working on. I sanded the stem with 320-3500 grit sanding pads to break up the remaining oxidation. I wiped it down after each sanding pad with a soft cloth. It began to look good. 
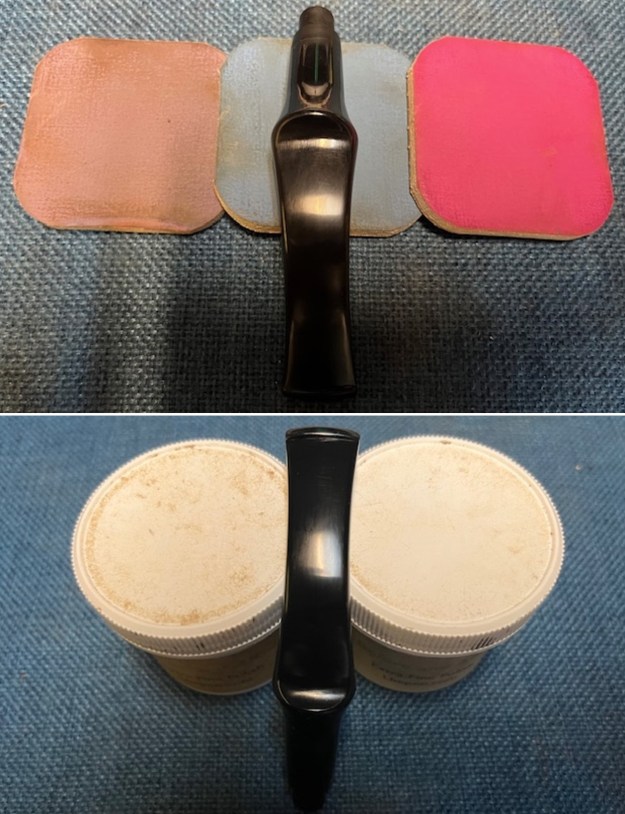
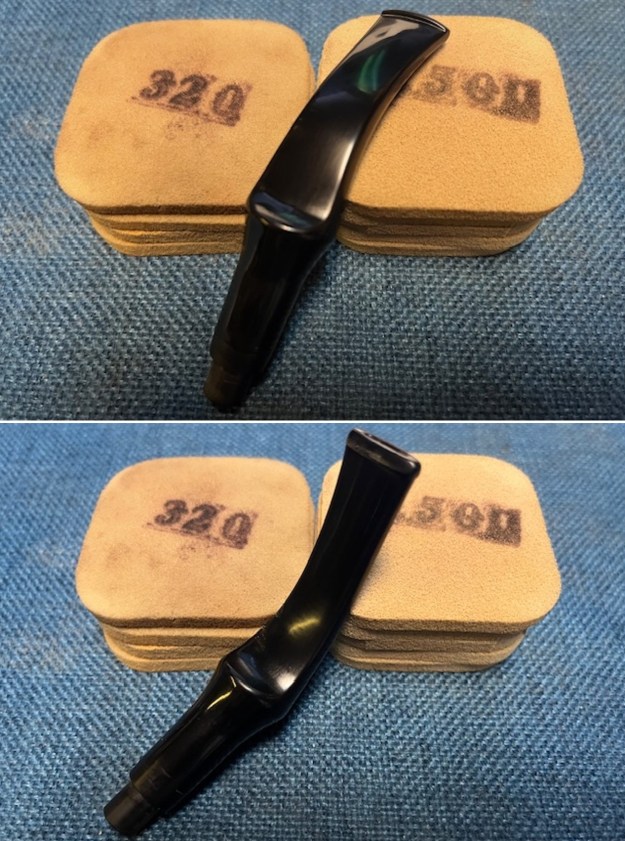
I polished the stem with micromesh sanding pads – dry sanding with 1500-12000 grit pads. I wiped the stem down after each sanding pad with Obsidian Oil. I polished it with Before & After Pipe Stem Polish – both Fine and Extra Fine. Once I had finished the polishing I gave it final coat of Obsidian Oil and set it aside to dry. 
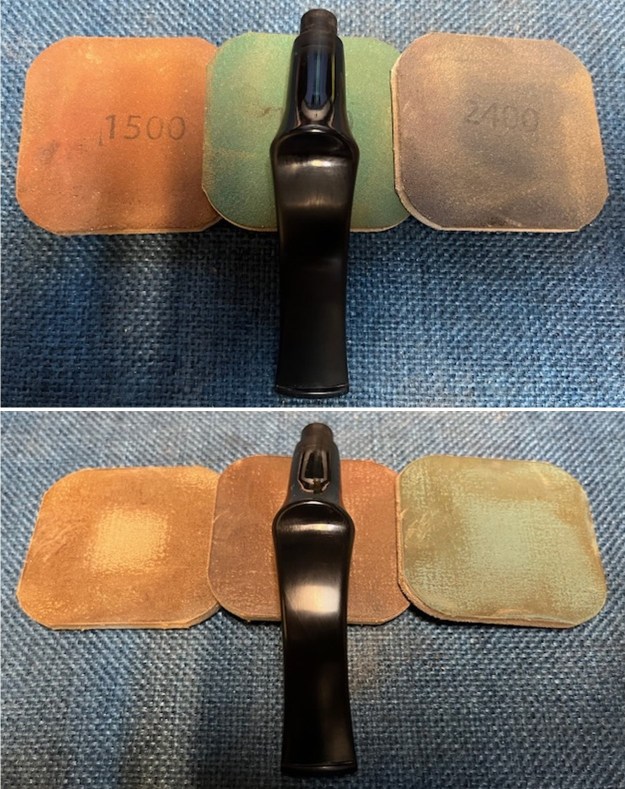
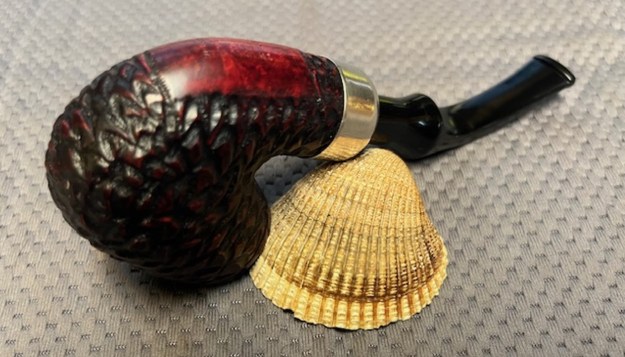
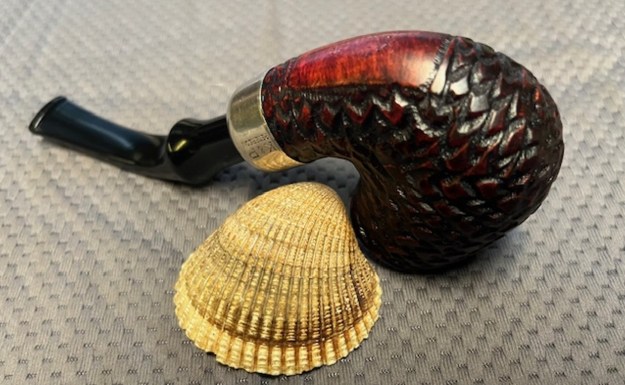
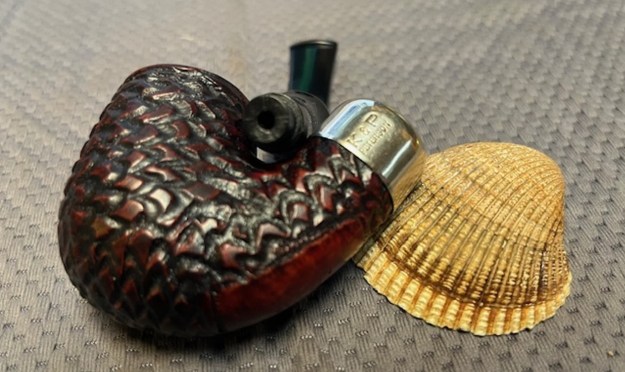
Matthew’s beautifully shaped K&P Peterson’s of Dublin System Standard 312 was a fun one to work on. It has unique Pineapple Rustication beauty that the Peterson’s System Pipes have ceased to use. I put the bowl and stem back together. I polished the bowl and stem with Blue Diamond to blend in the stain and to polish out the scratches in the briar and the vulcanite. I gave the bowl multiple coats of Conservator’s Wax and the stem multiple coats of carnauba wax. I buffed the pipe with a clean buffing pad to raise the shine. I hand buffed it with a microfiber cloth to deepen the shine. The pipe polished up pretty nicely. The rusticated finish is well done and the polished smooth finish on the shank end and rim top look really good with the black vulcanite stem. This Peterson’s of Dublin System Standard 312 was a fun pipe to clean up. It is a comfortable pipe to hold in the hand. The finished pipe is shown in the photos below. The dimensions of the pipe are Length: 5 ½ inches, Height: 2 inches, Outside diameter of the bowl: 1 ¼ inches, Chamber diameter: ¾ of an inch. The weight of the pipe is 51 grams/1.80 ounces. Thanks for reading this blog and my reflections on the pipe while I worked on it. This interesting Peterson will be going back to Matthew to fire up and enjoy! Thanks for reading this blog and walking through the restoration with me.
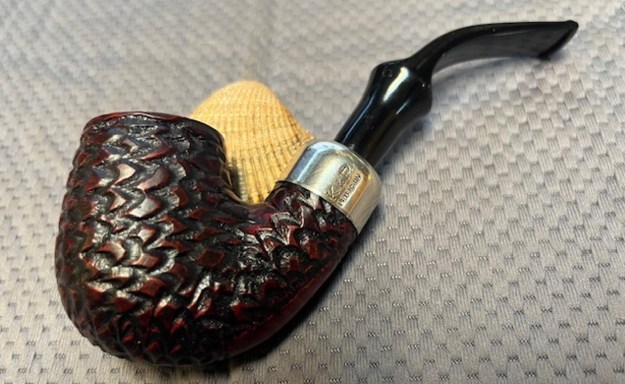
Fresh Life for a Petersons System Standard 312


Blog by Steve Laug

The next pipe on the work table is a lovely Peterson’s style System Standard pipe. We purchased it from our contact in Copenhagen, Denmark on 01/08/2024. It is a classic Peterson’s System Standard pipe. It has a sandblast, rich brown stained bowl that really highlights the grain in the briar. The bowl is dirty with grime in the finish. There is a moderate cake in the bowl and a light lava overflow on the rim top and edges. The stamping on the pipe is clear and readable and on the underside of the bowl and shank. It reads Peterson’s [arched over] System [over] Standard. Following that it reads Made in the Republic of Ireland (three lines). Underneath both and centered in the smooth panel is the shape number 312. The nickel ferrule is stamped K& P [over] three Makers Marks – a shamrock, a wolfhound and tower with no doorway. To the right of that it is stamped Peterson’s. The stem is unstamped and is lightly oxidized, calcified and has tooth chatter and marks on both sides ahead of the P-lip button. Jeff took photos of the pipe before he started his cleanup. Jeff took photos of the rim top and stem to show the general condition of the pipe. The bowl is moderately caked and the rim top and edges have a light coat of lava overflowing on to them. The stem is lightly oxidized, calcified and has tooth chatter and tooth marks on the top and underside near the button. Jeff took photos of the bowl sides and heel to show the condition of the finish around this bowl. It has a rugged sandblast that is quite nice and shows the underlying grain well. He took photos of the stamping on the heel of the bowl and underside of the shank. You can see that it is clear and reads as noted above. The stamping on the nickel ferrule is also clear. I am including the information from Pipedia’s article on Peterson pipes. It is a great read in terms of the history of the brand (https://pipedia.org/wiki/Peterson). I have included a bit of the pertinent history here.

1950 – 1989 The Republic Era – From 1950 to the present time, the stamp for this era is “Made in the Republic of Ireland” in a block format generally in three lines but two lines have been used with or without Republic being abbreviated.

During the 1950’s and 60’s the Kapp & Peterson company was still in the ownership of the Kapp family. However 1964 saw the retiral of the company Managing Director Frederick Henry(Harry) Kapp.

Pipedia also included a section of information on the System pipes including a diagram of the systems look (https://pipedia.org/wiki/Peterson#Republic_Era_Pipes). I quote a section of the article in part and include a link to another article on Pipedia on the System pipe.

The Peterson System pipes are the standard bearers of the Peterson pipe family, famous for the excellent smoking pleasure they provide. Often imitated but never equaled, the Peterson System smokes dry, cool and sweet, thanks to the scientific effectiveness of the original design. The heart of the System is the unique graduated bore in the mouthpiece. This makes the suction applied by the smoker 15 times weaker by the time it reaches the tobacco chamber. The result is that all the moisture flows into the reservoir and, thus cannot reach the smoker’s mouth. The Peterson Lip further enhances the effectiveness of the graduated bore by directing the flow of smoke upwards and away from the tongue. This achieves a uniquely even distribution of smoke and virtually eliminates any chance of tonguebite or bitterness. Furthermore, the shape is contoured so that the tongue rests comfortably in the depression under the opening. Each “PLip” mouthpiece is made from Vulcanite. For the Peterson System pipes to work properly, the stem/tenon has to have an extension, the tip of which will pass by the draft hole from the bowl and into the sump. Upon the smoker drawing in smoke, this extension then directs the smoke down and around the sump to dispense a lot of the moisture before the smoke enters the extension and stem. On the System Standards and other less expensive systems, this extension with be made of Vulcanite turned integrally with the stem. On the more expensive System pipes this extension will be made of metal which screws into the Vulcanite stem. This extension on the earlier pipes will be of brass and the newer pipes will be of aluminium. Most smokers not knowing this function of the metal extension, assumes that it is a condenser/stinger and will remove it as they do with the metal condensers of Kaywoodie, etc. Should you have a System pipe with this metal extension, do not remove it for it will make the System function properly and give you a dryer smoke (https://pipedia.org/wiki/A_closer_look_at_the_famous_Peterson_Standard_System_Pipe).

I have included the information on the shape number on this pipe that I picked up on researching previous pipes. I have included a page from a Petersons Catalogue that I have on rebornpipes (https://rebornpipes.com/tag/peterson-hallmark-chart/). I have put a red oval around the 312 shown in the catalogue page shown below. That should give a clear picture of the size and shape of the pipe.I knew that I was dealing with a Republic Era pipe made between 1950-1989. It was a Sandblast Peterson’s System Standard 312 Bent Billiard with an interesting blast finish. The bowl was stained with a combination of brown stains. Now it was time to work on the pipe.

Jeff had cleaned it thoroughly. He had reamed it with a PipNet reamer and cleaned that up with a Savinelli Fitsall Pipe Knife. He had scrubbed the exterior of the briar with undiluted Murphy’s Oil Soap. He cleaned out the interior of the shank, sump and airway in the shank and stem with alcohol, pipe cleaners and cotton swabs. He scrubbed the stem with Soft Scrub to remove the oxidation and calcification on the surface. He soaked it in Before & After Deoxidizer to remove the oxidation. He removed it from the Deoxidizer and rinsed it off with warm water. I took some photos of the pipe before I started my part of the work. I took some close up photos of the rim top and also of the stem surface. I wanted to show what an amazing job Jeff did in the cleanup of the rim top. The rim top was and inner edge were in excellent condition. I also took close up photos of the stem to show the condition of the vulcanite. It was in excellent condition with light tooth marks and chatter on the stem ahead of the button on both sides.One of the things I appreciate about Jeff’s cleanup is that he works to protect and preserve the nomenclature on the shank of the pipes that he works on. The stamping on this one was very faint to start with so I was worried that it would disappear altogether with the cleanup. I took some photos to show the stamping. I have noticed that many restorers are not careful to protect the stamping in their cleaning process and often by the end of the restoration the nomenclature is almost destroyed. I would like to encourage all of us to be careful in our work to preserve this as it is a critical piece of pipe restoration! I took the stem off the shank and took a photo of the pipe to capture the look of the pipe as a whole.The pipe bowl was very clean and the sandblast looked great. I rubbed the bowl and rim down with Before & After Restoration Balm. I worked it into the sandblast surface of the briar with my fingertips and a horse hair shoe brush to clean, enliven and protect it. I let the balm sit for 10 minutes and then buffed with a cotton cloth to raise the shine. I really like watching the Balm do its magic and bring the briar alive. With briar polished with the Restoration Balm I moved onto the metal. I polished the nickel ferrule with a jeweller’s cloth to raise the shine and to protect it from further oxidation. I sanded the stem down with 320-3500 grit sanding pads to remove the tooth chatter and marks on the stem surface. I wiped it down after each sanding pad with damp cloth to remove the grime from sanding.I polished the stem with micromesh sanding pads – wet sanding with 1500-12000 grit pads. I wiped the stem down after each sanding pad with Obsidian Oil. I polished it with Before & After Pipe Stem Polish – both Fine and Extra Fine. I gave it a coat of Obsidian Pipe Stem Oil. It works to protect the stem from oxidizing. I set it aside to dry. Once again at this point in the restoration process I am excited to be on the homestretch. I look forward to the final look when the Republic Era Sandblast Peterson’s System Standard 312 is put back together, polished and waxed. I put the bowl and stem back together. I lightly polished the bowl and the replacement stem with Blue Diamond. I gave the bowl and the newly fit stem multiple coats of carnauba wax. I buffed the pipe with a clean buffing pad to raise the shine. I hand buffed it with a microfiber cloth to deepen the shine. The pipe polished up pretty nicely. The depths of the sandblast really pop with the wax and polish. The shiny new black vulcanite stem is a beautiful contrast to the browns of the bowl and thick shank and Nickel ferrule. This Republic Era Peterson’s System Standard 312 Bent Billiard was another fun pipe to work on. It really is a quite stunning piece of briar whose shape follows the flow of the briar. The pipe feels great in the hand will be better when warmed up while smoking. The finished pipe is shown in the photos below. The dimensions of the pipe are Length: 6 inches, Height: 1 ¾ inches, Outside diameter of the bowl: 1 ¼ inches, Chamber diameter: ¾ of an inch. The weight of the pipe is 1.94 ounces/55 grams. I will be putting it on the rebornpipes store in the Irish Pipemakers Section if you would like to add it to your rack and carry on the previous pipeman’s legacy. This is an interesting estate to bring back to life.

As always, I encourage your questions and comments as you read the blog. Thanks to each of you who are reading this blog. Remember we are not pipe owners; we are pipe men and women who hold our pipes in trust until they pass on into the trust of those who follow us.

Refreshing a Peterson’s System Standard Smooth Made in the Republic of Ireland 312


Blog by Steve Laug

The next pipe on the work table is Rusticated Peterson’s System pipe that we purchased from and estate in Plano, Texas, USA on 03/30/2022. It was stamped Peterson’s System Standard on left side of the shank and reads Peterson’s [over] System [over] Standard. On the right side it reads Made in the Republic of Ireland (in three lines) [over] the shape number 312. It has nice grain around the bowl and shank that has oils, debris and grime ground into the finish. There was a thick cake in the bowl with remnants of tobacco stuck on the walls. There was a lava overflow on the rim top that was heavier toward the back side. The top and edges of the rim were well hidden under the tars and lava. There was a very beautiful pipe underneath all of the buildup of years of use. The nickel ferrule on the shank end was oxidized and is stamped on the top and left side K&P [over] three hallmarks – a harp, a wolf hound and a tower. That is followed by Petersons. It small dents in the nickel ferrule on the right side. The vulcanite stem is a Peterson’s style P-Lip with a “P” logo on the left side of the saddle stem. It was oxidized and calcified toward the end with some tooth chatter. There were also some tooth marks on both sides of the stem ahead of the button. Jeff took photos of the pipe before he started his cleanup work on it. Jeff took photos of the bowl and rim top to show the thick, hard cake in the bowl with remnants of tobacco stuck on the walls of the bowl. There was a lava build up on the top of the rim and the edges of the bowl. The rim top looked pretty good but it was hard to know for sure if there was damage under the thick lava. Only clean up would tell the full story. Jeff took photos of the top and underside of the stem showing the tooth chatter, scratching and oxidation on the stem surface and wear on the edges of the button. Jeff took photos of the sides and heel of the bowl to show the condition of the finish. You can see the grime in finish around the sides of the bowl and shank. Even under the dirt and debris of the years it looked very good. Jeff took photos of the stamping on the sides of shank. The stamping was readable as you can see from the photos. It read as noted above. The nickel ferrule on the shank end is stamped on the top and left side K&P Peterson’s over three Peterson marks. I have included the information on the shape number on this pipe that I picked up on researching the previous pipes. This is the second of two Peterson’s System Standard pipes in Bob’s collection marked with the 312 shape number. I have included a page from a Petersons Catalogue that I have on rebornpipes (https://rebornpipes.com/tag/peterson-hallmark-chart/). I have put a red box around the 312 shown in the catalogue page shown below. That should give a clear picture of the size and shape of the pipe. I am also including the information from Pipedia’s article on Peterson pipes. It is a great read in terms of the history of the brand (https://pipedia.org/wiki/Peterson). I have included a bit of the pertinent history here.

1950 – 1989 The Republic Era  – From 1950 to the present time, the stamp for this era is “Made in the Republic of Ireland” in a block format generally in three lines but two lines have been used with or without Republic being abbreviated.

During the 1950’s and 60’s the Kapp & Peterson company was still in the ownership of the Kapp family. However 1964 saw the retiral of the company Managing Director Frederick Henry(Harry) Kapp.

Pipedia also included a section of information on the System pipes including a diagram of the systems look (https://pipedia.org/wiki/Peterson#Republic_Era_Pipes). I quote a section of the article in part and include a link to another article on Pipedia on the System pipe.

The Peterson System pipes are the standard bearers of the Peterson pipe family, famous for the excellent smoking pleasure they provide. Often imitated but never equaled, the Peterson System smokes dry, cool and sweet, thanks to the scientific effectiveness of the original design. The heart of the System is the unique graduated bore in the mouthpiece. This makes the suction applied by the smoker 15 times weaker by the time it reaches the tobacco chamber. The result is that all the moisture flows into the reservoir and, thus cannot reach the smoker’s mouth. The Peterson Lip further enhances the effectiveness of the graduated bore by directing the flow of smoke upwards and away from the tongue. This achieves a uniquely even distribution of smoke and virtually eliminates any chance of tonguebite or bitterness. Furthermore, the shape is contoured so that the tongue rests comfortably in the depression under the opening. Each “PLip” mouthpiece is made from Vulcanite. For the Peterson System pipes to work properly, the stem/tenon has to have an extension, the tip of which will pass by the draft hole from the bowl and into the sump. Upon the smoker drawing in smoke, this extension then directs the smoke down and around the sump to dispense a lot of the moisture before the smoke enters the extension and stem. On the System Standards and other less expensive systems, this extension with be made of Vulcanite turned integrally with the stem. On the more expensive System pipes this extension will be made of metal which screws into the Vulcanite stem. This extension on the earlier pipes will be of brass and the newer pipes will be of aluminium. Most smokers not knowing this function of the metal extension, assumes that it is a condenser/stinger and will remove it as they do with the metal condensers of Kaywoodie, etc. Should you have a System pipe with this metal extension, do not remove it for it will make the System function properly and give you a dryer smoke (https://pipedia.org/wiki/A_closer_look_at_the_famous_Peterson_Standard_System_Pipe).

With that information in hand I knew what I was dealing with in terms of the stamping and the age of this pipe. I knew from the information that the pipe was made during the Republic Era between 1950 and 1989. My guess is that the pipes is a 1960s era System pipe. Now it was time to work on the pipe.

Jeff cleaned this filthy pipe with his usual clean up process. This one was a real mess and I did not know what to expect when I unwrapped it from his box. He reamed it with a PipNet pipe reamer and cleaned up the reaming with a Savinelli Fitsall Pipe Knife. He scrubbed out the internals with alcohol, pipe cleaners and cotton swabs until the pipe was clean. He scrubbed the exterior of the bowl with Murphy’s Oil Soap and a tooth brush to remove the grime and grit on the briar and the lava on the rim top. The finish looks very good with great looking grain around the bowl and shank. Jeff soaked the stem in Briarville’s Pipe Stem Deoxidizer to remove the oxidation on the vulcanite. When the pipe arrived here in Vancouver for the second stop of its restoration tour I was amazed it looked so good. The stem showed some damage on the button edge and surface. The bonus was that the tenon had a brass chimney in the end that was correct for this pipe. I took some close-up photos of the rim top and also of the stem surface. I wanted to show what an amazing job Jeff did in the cleanup of the rim top. The rim top and inner edge had darkening and damage. There was damage to the inner edge on the back of the bowl. I also took close up photos of the stem to show the condition of the vulcanite. It was quite clean and the tooth marks and damage to the button edge and stem surface is visible in the photos below.One of the things I appreciate about Jeff’s cleanup is that he works to protect and preserve the nomenclature on the shank of the pipes that he works on. He was able to preserve and maintain its condition in the process. I took some photos to show the clarity of the stamping. I have noticed that many restorers are not careful to protect the stamping in their cleaning process and often by the end of the restoration the nomenclature is almost destroyed. I would like to encourage all of us to be careful in our work to preserve this as it is a critical piece of pipe restoration! I took the stem off the shank and took a photo of the pipe. I decided to start my work on the pipe by cleaning up the rim top and inner edge of the bowl. I started by working over the edge and the rim top with a folded piece of 220 grit sandpaper. I minimized the damage on the inner edge and rim top. It looked significantly better. I polished the briar with micromesh sanding pads – dry sanding it with 1500-12000 grit sanding pads. I wiped it down with a damp cloth after each sanding pad to remove the dust. The briar was really shining by the final pad. I rubbed the bowl and rim down with Before & After Restoration Balm. I worked it into the surface of the briar with my fingertips to clean, enliven and protect it. I let the balm sit for 10 minutes and then buffed with a cotton cloth to raise the shine. I really like watching the Balm do its magic and bring the briar alive. I polished the nickel ferrule with a jewellers cloth to remove the remaining tarnish and to protect the surface from further tarnishing. The shine was quite nice. I set the bowl aside and turned my attention to the stem. There were several issues that I needed to deal with to secure a good fit. The brass chimney was stuck in the tenon and I could not remove it. I heated the chimney with a lighter and was finally able to unscrew it from the stem end. I cleaned out the threaded area on the stem and the threads on the chimney and greased it with Vaseline. I screwed it back in the stem.The fit of the stem in the shank was canted to the left and the brass chimney hit against the wall of the mortise. As I examined it I saw that the drilling in the shank was more worn on the right side than the left. I smoothed out the walls of the left side of the shank with small half circle needle files. I also sanded the right side of the stem to adjust the seat in the shank. Once I had completed the process the fit was perfect in the shank.I fit the stem in the shank and the adjustments straightened out the cant of the stem. I took photos of it to show the new fit in the shank.I rebuilt the top edge of the button with black CA glue. I filled in the tooth marks on the top and underside of the stem. Once the repair hardened/cured I used a small file to reshape the edge of the button and flatten the repairs. I reshaped the top of the button with the file at the same time. I sanded the repairs with 220 grit sandpaper to blend them into the surface of the vulcanite. I started polishing the stem with 600 grit wet dry sandpaper to further smooth it out. I touched up the “P” logo on the left side of the saddle stem with white acrylic fingernail polish. I let it dry then I polished off the excess with a worn 1500 grit micromesh sanding pad. Once the excess was removed the stamp looked much better. There were some weak spots on the leg and tail of the “P” stamp.I polished the stem with micromesh sanding pads – wet sanding with 1500-12000 grit pads. I wiped the stem down after each sanding pad with Obsidian Oil. I polished it with Before & After Pipe Stem Polish – both Fine and Extra Fine. I gave it a coat of Obsidian Pipe Stem Oil. It works to protect the stem from oxidizing. I set it aside to dry. Once again at this point in the restoration process I am excited to be on the homestretch. I look forward to the final look when the Republic Era Peterson’s System Standard 312 is put back together, polished and waxed. I put the bowl and stem back together. I lightly polished the bowl and the stem with Blue Diamond. I gave the bowl and the stem multiple coats of carnauba wax. I buffed the pipe with a clean buffing pad to raise the shine. I hand buffed it with a microfiber cloth to deepen the shine. The pipe polished up pretty nicely. The grain really pops with the wax and polish. The shiny black vulcanite stem is a beautiful contrast to the browns of the bowl and thick shank and nickel ferrule. This Republic Era Peterson’s System Standard 312 Bent Billiard was another fun pipe to work on. It really is a quite stunning piece of briar whose shape follows the flow of the briar. The pipe feels great in the hand will be better when warmed up while smoking. The finished pipe is shown in the photos below. The dimensions of the pipe are Length: 5 ½ inches, Height: 1 ¾ inches, Outside diameter of the bowl: 1 ¼ inches, Chamber diameter: ¾ of an inch. The weight of the pipe is 2.01 ounces/57 grams. I will be putting it on the rebornpipes store in the Irish Pipemakers Section if you would like to add it to your rack and carry on the previous pipeman’s legacy. This is an interesting estate to bring back to life.

As always, I encourage your questions and comments as you read the blog. Thanks to each of you who are reading this blog. Remember we are not pipe owners; we are pipe men and women who hold our pipes in trust until they pass on into the trust of those who follow us.

Restoring a Republic Era Sandblast Peterson’s System Premier 312


Blog by Steve Laug

The next pipe on the work table is a sandblast Peterson’s System pipe that we purchased from an estate sale from Plano, Texas, USA on 03/30/2022. It was stamped Peterson’s [over] System [over] Premier on the underside of the shank followed by Made in the Republic of Ireland (in three lines) [over] the shape number 312. It has a sandblast finish around the bowl and shank that is covered with a shiny coat of shellac it appears over a lot of oils, debris and grime. There was a thick cake in the bowl and a thick lava overflow in the sandblast on the rim top. The top and edges of the rim looked good under the tars and lava. There was a very beautiful pipe underneath all of the buildup of years of use. The Sterling Silver ferrule on the shank end was oxidized and is stamped on the top and left side Peterson’s [over] Dublin. That is followed by Sterling [over] Silver. After that there were hallmarks – Hibernia seated, Crowned Harp for country of manufacture and a date letter in this case an upper case stylized “F”. The stem was a Peterson’s style P-Lip. It was well polished and shiny with light tooth marks and chatter. Jeff took photos of the pipe before he started his cleanup work on it. Jeff took photos of the bowl and rim top to show the thick cake in the bowl and the heavy lava build up on the sandblast rim top and the edges of the bowl. The rim top and edges looked pretty good and a proper clean up would tell the full story. Jeff took photos of the top and underside of the stem showing the tooth chatter, scratching, calcification and oxidation on the stem surface. More would be visible once Jeff cleaned it up. Jeff took photos of the sides and heel of the bowl to show the condition of the finish. You can see the grime around the sides of the bowl and shank under the shiny coat on the finish. It seems to fill in the grooves in the blast. Jeff took photos of the stamping on the underside of the bowl and shank. The stamping was faint but readable as you can see from the photos. It read as noted above. The Sterling Silver Ferrule is actually clearly stamped and readable. The hallmarks are light but readable. I am including the information from Pipedia’s article on Peterson pipes. It is a great read in terms of the history of the brand (https://pipedia.org/wiki/Peterson). I have included a bit of the pertinent history here.

1950 – 1989 The Republic Era – From 1950 to the present time, the stamp for this era is “Made in the Republic of Ireland” in a block format generally in three lines but two lines have been used with or without Republic being abbreviated.

During the 1950’s and 60’s the Kapp & Peterson company was still in the ownership of the Kapp family. However 1964 saw the retiral of the company Managing Director Frederick Henry(Harry) Kapp.

Pipedia also included a section of information on the System pipes including a diagram of the systems look (https://pipedia.org/wiki/Peterson#Republic_Era_Pipes). I quote a section of the article in part and include a link to another article on Pipedia on the System pipe.

The Peterson System pipes are the standard bearers of the Peterson pipe family, famous for the excellent smoking pleasure they provide. Often imitated but never equaled, the Peterson System smokes dry, cool and sweet, thanks to the scientific effectiveness of the original design. The heart of the System is the unique graduated bore in the mouthpiece. This makes the suction applied by the smoker 15 times weaker by the time it reaches the tobacco chamber. The result is that all the moisture flows into the reservoir and, thus cannot reach the smoker’s mouth. The Peterson Lip further enhances the effectiveness of the graduated bore by directing the flow of smoke upwards and away from the tongue. This achieves a uniquely even distribution of smoke and virtually eliminates any chance of tonguebite or bitterness. Furthermore, the shape is contoured so that the tongue rests comfortably in the depression under the opening. Each “PLip” mouthpiece is made from Vulcanite. For the Peterson System pipes to work properly, the stem/tenon has to have an extension, the tip of which will pass by the draft hole from the bowl and into the sump. Upon the smoker drawing in smoke, this extension then directs the smoke down and around the sump to dispense a lot of the moisture before the smoke enters the extension and stem. On the System Standards and other less expensive systems, this extension with be made of Vulcanite turned integrally with the stem. On the more expensive System pipes this extension will be made of metal which screws into the Vulcanite stem. This extension on the earlier pipes will be of brass and the newer pipes will be of aluminium. Most smokers not knowing this function of the metal extension, assumes that it is a condenser/stinger and will remove it as they do with the metal condensers of Kaywoodie, etc. Should you have a System pipe with this metal extension, do not remove it for it will make the System function properly and give you a dryer smoke (https://pipedia.org/wiki/A_closer_look_at_the_famous_Peterson_Standard_System_Pipe).

I have included the information on the shape number on this pipe that I picked up on researching the previous pipes. This is the second of two Peterson’s System pipes marked with the 312 shape number that I have worked on in the past few days. I have included a page from a Petersons Catalogue that I have on rebornpipes (https://rebornpipes.com/tag/peterson-hallmark-chart/). I have put a red oval around the 312 shown in the catalogue page shown below. That should give a clear picture of the size and shape of the pipe.I knew that I was dealing with a Republic Era pipe made between 1950-1989. It was a Sandblast Peterson’s System Standard 312 Billiard with an interesting blast finish. The bowl was stained with a combination of brown stains. Now it was time to tighten down the date on the pipe from the hallmarks on the Sterling Silver ferrule.

I turned to the hallmarking chart on one of the blogs on rebornpipes to lock down the date for the pipe (https://rebornpipes.com/wp-content/uploads/2015/05/peterson-cataloguecomp_page_27.jpg). The chart defines the meaning of each hallmark. The first one of the seated woman with a harp is known as the Hibernia stamp and identifies the pipe as made in Ireland. The second stamp is a crowned harp which is a fineness mark denoting the high quality of silver that was used. The third stamp is an italic upper case “F”. I have included a larger screen capture of the chart in the lower left of the photo below.I have drawn a RED CIRCLE around the date letter below. It is a stylized “F” as seen in the circled letter below. It identifies the date of this Peterson’s pipe to 1973. I knew that I was dealing with a Republic Era pipe made between 1950 and the present. The hallmarks date the pipe to 1973. Now it was time to work on the pipe.

Jeff had cleaned it thoroughly. He had reamed it with a PipNet reamer and cleaned that up with a Savinelli Fitsall Pipe Knife. He had scrubbed the exterior of the briar with undiluted Murphy’s Oil Soap. He removed the shiny coat on the briar with acetone on cotton pads. He cleaned out the interior of the shank, sump and airway in the shank and stem with alcohol, pipe cleaners and cotton swabs. He scrubbed the stem with Soft Scrub to remove the oxidation and calcification on the surface. He soaked it in Before & After Deoxidizer to remove the oxidation. He removed it from the Deoxidizer and rinsed it off with warm water. I took some photos of the pipe before I started my part of the work. I took some close up photos of the rim top and also of the stem surface. I wanted to show what an amazing job Jeff did in the cleanup of the rim top. The rim top was and inner edge were in excellent condition. I also took close up photos of the stem to show the condition of the vulcanite. It was in excellent condition with light tooth marks and chatter on the stem ahead of the button on both sides. One of the things I appreciate about Jeff’s cleanup is that he works to protect and preserve the nomenclature on the shank of the pipes that he works on. The stamping on this one was very faint to start with so I was worried that it would disappear altogether with the cleanup. I took some photos to show the clarity of the stamping. I have noticed that many restorers are not careful to protect the stamping in their cleaning process and often by the end of the restoration the nomenclature is almost destroyed. I would like to encourage all of us to be careful in our work to preserve this as it is a critical piece of pipe restoration! I took the stem off the shank and took a photo of the pipe to capture the look of the pipe as a whole.The pipe bowl was very clean and the sandblast looked great. I rubbed the bowl and rim down with Before & After Restoration Balm. I worked it into the sandblast surface of the briar with my fingertips and a horse hair shoe brush to clean, enliven and protect it. I let the balm sit for 10 minutes and then buffed with a cotton cloth to raise the shine. I really like watching the Balm do its magic and bring the briar alive. With briar polished with the Restoration Balm I moved onto the metal. I polished the Sterling Silver ferrule with a jewellers cloth to raise the shine and to protect it from further oxidation. I set the bowl aside and turned my attention to the stem. I “painted” the tooth marks on both sides of the stem with the flame of a Bic lighter and was able to lift them all. I sanded the areas smooth with 220 grit sandpaper and started polishing with 600 grit wet dry sandpaper. I polished the stem with micromesh sanding pads – wet sanding with 1500-12000 grit pads. I wiped the stem down after each sanding pad with Obsidian Oil. I polished it with Before & After Pipe Stem Polish – both Fine and Extra Fine. I gave it a coat of Obsidian Pipe Stem Oil. It works to protect the stem from oxidizing. I set it aside to dry. Once again at this point in the restoration process I am excited to be on the homestretch. I look forward to the final look when the Republic Era Sandblast Peterson’s Premier System 312 is put back together, polished and waxed. I put the bowl and stem back together. I lightly polished the bowl and the replacement stem with Blue Diamond. I gave the bowl and the newly fit stem multiple coats of carnauba wax. I buffed the pipe with a clean buffing pad to raise the shine. I hand buffed it with a microfiber cloth to deepen the shine. The pipe polished up pretty nicely. The depths of the sandblast really pop with the wax and polish. The shiny new black vulcanite stem is a beautiful contrast to the browns of the bowl and thick shank and Nickel ferrule. This Republic Era Peterson’s Premier System 312 Bent Billiard was another fun pipe to work on. It really is a quite stunning piece of briar whose shape follows the flow of the briar. The pipe feels great in the hand will be better when warmed up while smoking. The finished pipe is shown in the photos below. The dimensions of the pipe are Length: 6 ½ inches, Height: 1 ¾ inches, Outside diameter of the bowl: 1 ¼ inches, Chamber diameter: ¾ of an inch. The weight of the pipe is 1.69 ounces/48 grams. I will be putting it on the rebornpipes store in the Irish Pipemakers Section if you would like to add it to your rack and carry on the previous pipeman’s legacy. This is an interesting estate to bring back to life.

As always, I encourage your questions and comments as you read the blog. Thanks to each of you who are reading this blog. Remember we are not pipe owners; we are pipe men and women who hold our pipes in trust until they pass on into the trust of those who follow us.

New Life Sandblast Republic Era Peterson’s System Standard 312


Blog by Steve Laug

The next pipe on the work table is a sandblast Peterson’s System pipe that we purchased from our connection in Copenhagen, Denmark on 01/26/2023. It was stamped Peterson’s [over] System [over] Standard on the underside of the shank followed by Made in the Republic of Ireland (in three lines) [over] the shape number 312. It has a sandblast finish around the bowl and shank that is covered with a shiny coat of varnish it appears over a lot of oils, debris and grime. There was a moderate cake in the bowl and a light lava overflow in the sandblast on the rim top. The top and edges of the rim looked good under the tars and lava. There was a very beautiful pipe underneath all of the buildup of years of use. The nickel ferrule on the shank end was oxidized and is stamped on the top and left side K&P Peterson’s [over] the three common hallmarks on System pipes – a shamrock, a wolf hound, and a tower. The stem was a Peterson’s style P-Lip. It was well polished and shiny with light tooth marks and chatter. Jeff took photos of the pipe before he started his cleanup work on it. Jeff took photos of the bowl and rim top to show the moderate cake in the bowl and the light lava build up on the sandblast rim top and the edges of the bowl. The rim top and edges looked pretty good and a proper clean up would tell the full story. Jeff took photos of the top and underside of the stem showing the tooth chatter, scratching, calcification and oxidation on the stem surface and wear on the edges of the button. The stem looks far better in the photos than it does in person. The button edge was very worn and was in tough condition. The edges were damaged enough for me to want to replace this stem. More would be visible once Jeff cleaned it up. Check the later photos. Jeff took photos of the sides and heel of the bowl to show the condition of the finish. You can see the grime around the sides of the bowl and shank under the spotty looking shiny coat on the finish. It seems to fill in the grooves in the blast. Jeff took photos of the stamping on the underside of the bowl and shank. The stamping was faint but readable as you can see from the photos. It read as noted above. The Nickel Ferrule is actually clearly stamped and readable. The hallmarks are light but readable. I am including the information from Pipedia’s article on Peterson pipes. It is a great read in terms of the history of the brand (https://pipedia.org/wiki/Peterson). I have included a bit of the pertinent history here.

1950 – 1989 The Republic Era – From 1950 to the present time, the stamp for this era is “Made in the Republic of Ireland” in a block format generally in three lines but two lines have been used with or without Republic being abbreviated.

During the 1950’s and 60’s the Kapp & Peterson company was still in the ownership of the Kapp family. However 1964 saw the retiral of the company Managing Director Frederick Henry(Harry) Kapp.

Pipedia also included a section of information on the System pipes including a diagram of the systems look (https://pipedia.org/wiki/Peterson#Republic_Era_Pipes). I quote a section of the article in part and include a link to another article on Pipedia on the System pipe.

The Peterson System pipes are the standard bearers of the Peterson pipe family, famous for the excellent smoking pleasure they provide. Often imitated but never equaled, the Peterson System smokes dry, cool and sweet, thanks to the scientific effectiveness of the original design. The heart of the System is the unique graduated bore in the mouthpiece. This makes the suction applied by the smoker 15 times weaker by the time it reaches the tobacco chamber. The result is that all the moisture flows into the reservoir and, thus cannot reach the smoker’s mouth. The Peterson Lip further enhances the effectiveness of the graduated bore by directing the flow of smoke upwards and away from the tongue. This achieves a uniquely even distribution of smoke and virtually eliminates any chance of tonguebite or bitterness. Furthermore, the shape is contoured so that the tongue rests comfortably in the depression under the opening. Each “PLip” mouthpiece is made from Vulcanite. For the Peterson System pipes to work properly, the stem/tenon has to have an extension, the tip of which will pass by the draft hole from the bowl and into the sump. Upon the smoker drawing in smoke, this extension then directs the smoke down and around the sump to dispense a lot of the moisture before the smoke enters the extension and stem. On the System Standards and other less expensive systems, this extension with be made of Vulcanite turned integrally with the stem. On the more expensive System pipes this extension will be made of metal which screws into the Vulcanite stem. This extension on the earlier pipes will be of brass and the newer pipes will be of aluminum. Most smokers not knowing this function of the metal extension, assumes that it is a condenser/stinger and will remove it as they do with the metal condensers of Kaywoodie, etc. Should you have a System pipe with this metal extension, do not remove it for it will make the System function properly and give you a dryer smoke (https://pipedia.org/wiki/A_closer_look_at_the_famous_Peterson_Standard_System_Pipe).

I have included the information on the shape number on this pipe that I picked up on researching the previous pipes. This is the second of two Peterson’s System pipes marked with the 312 shape number that I have worked on in the past few days. I have included a page from a Petersons Catalogue that I have on rebornpipes (https://rebornpipes.com/tag/peterson-hallmark-chart/). I have put a red oval around the 312 shown in the catalogue page shown below. That should give a clear picture of the size and shape of the pipe.I knew that I was dealing with a Republic Era pipe made between 1950-1989. It was a Sandblast Peterson’s System Standard 312 Billiard with an interesting blast finish. The bowl was stained with a combination of brown stains. Now it was time to work on the pipe.

Jeff had cleaned it thoroughly. He had reamed it with a PipNet reamer and cleaned that up with a Savinelli Fitsall Pipe Knife. He had scrubbed the exterior of the briar with undiluted Murphy’s Oil Soap. He removed the shiny coat on the briar with acetone on cotton pads. He cleaned out the interior of the shank, sump and airway in the shank and stem with alcohol, pipe cleaners and cotton swabs. He scrubbed the stem with Soft Scrub to remove the oxidation and calcification on the surface. He soaked it in Before & After Deoxidizer to remove the oxidation. He removed it from the Deoxidizer and rinsed it off with warm water. I took some photos of the pipe before I started my part of the work. I took some close up photos of the rim top and also of the stem surface. I wanted to show what an amazing job Jeff did in the cleanup of the rim top. The rim top was and inner edge were in good condition. I also took close up photos of the stem to show the condition of the vulcanite. It was still oxidized and the tooth marks on the button and on the stem ahead of the button were very visible in the photos. The button edge of the stem was worn down to almost nothing on both sides.One of the things I appreciate about Jeff’s cleanup is that he works to protect and preserve the nomenclature on the shank of the pipes that he works on. The stamping on this one was very faint to start with so I was worried that it would disappear altogether with the cleanup. He was not only able to preserve and maintain its condition in the process. I took some photos to show the clarity of the stamping. I have noticed that many restorers are not careful to protect the stamping in their cleaning process and often by the end of the restoration the nomenclature is almost destroyed. I would like to encourage all of us to be careful in our work to preserve this as it is a critical piece of pipe restoration! I took the stem off the shank and took a photo of the pipe to capture the look of the pipe as a whole. The pipe bowl was very clean and the sandblast looked great. I rubbed the bowl and rim down with Before & After Restoration Balm. I worked it into the sandblast surface of the briar with my fingertips and a horse hair shoe brush to clean, enliven and protect it. I let the balm sit for 10 minutes and then buffed with a cotton cloth to raise the shine. I really like watching the Balm do its magic and bring the briar alive. With briar polished with the Restoration Balm I moved onto the metal. I polished the Nickel Ferrule with a jewellers cloth to raise the shine and to protect it from further oxidation. I set the bowl aside and turned my attention to the stem. I went through my stems and found a perfect unused replacement that I had picked in a batch I stems I received from a local pipe shop. It was the exact shape, and length as the original but the diameter of the tenon end would need to be reduced by sanding.    I worked on the diameter of the tenon with a folded piece of 220 grit sandpaper. I would not need to remove much but just enough to make the fit snug in the shank. Once finished the fit in the shank was perfect.I polished the stem with micromesh sanding pads – wet sanding with 1500-12000 grit pads. I wiped the stem down after each sanding pad with Obsidian Oil. I polished it with Before & After Pipe Stem Polish – both Fine and Extra Fine. I gave it a coat of Obsidian Pipe Stem Oil. It works to protect the stem from oxidizing. I set it aside to dry. Once again at this point in the restoration process I am excited to be on the homestretch. I look forward to the final look when the Republic Era Sandblast Peterson’s System Standard 312 is put back together, polished and waxed. I put the bowl and stem back together. I lightly polished the bowl and the replacement stem with Blue Diamond. I gave the bowl and the newly fit stem multiple coats of carnauba wax. I buffed the pipe with a clean buffing pad to raise the shine. I hand buffed it with a microfiber cloth to deepen the shine. The pipe polished up pretty nicely. The depths of the sandblast really pop with the wax and polish. The shiny new black vulcanite stem is a beautiful contrast to the browns of the bowl and thick shank and Nickel ferrule. This Republic Era Peterson’s Sandblast System Standard 312 Bent Billiard was another fun pipe to work on. It really is a quite stunning piece of briar whose shape follows the flow of the briar. The pipe feels great in the hand will be better when warmed up while smoking. The finished pipe is shown in the photos below. The dimensions of the pipe are Length: 6 ½ inches, Height: 1 ¾ inches, Outside diameter of the bowl: 1 ¼ inches, Chamber diameter: ¾ of an inch. The weight of the pipe is 1.76 ounces/49 grams. I will be putting it on the rebornpipes store in the Irish Pipemakers Section if you would like to add it to your rack and carry on the previous pipeman’s legacy. This is an interesting estate to bring back to life.

As always, I encourage your questions and comments as you read the blog. Thanks to each of you who are reading this blog. Remember we are not pipe owners; we are pipe men and women who hold our pipes in trust until they pass on into the trust of those who follow us.