Blog by Steve Laug
I am in the midst of a particularly labour intensive restoration of a Royal Danish 33 Bulldog. It was in very rough shape but having met the old timer who it originally belonged to I decided to make the extra effort to bring it back to life. It was obviously a favourite pipe of his and he as much as said so. I think it was the only one of the lot that he felt bad about letting go of when he sold me the lot. Often I will take time to read some of my favourite blogs during lunch break at work or even when I come home to help me unwind from a long day. I read before I pick up a pipe to work on or restore and find that it helps focus my attention. Yesterday at lunch I came across an article by Alan Chestnutt on his blog on his website Reborn Briar Estate Pipes that really resonated with what I was feeling as I worked on the particular pipe. He called the work he does as a pipe restorer – “saving the pipes”. I think that is a particularly poignant description of the work on this Royal Danish 33 Bulldog that I picked up in the lot from craigslist. It is shown in the first photo below at the bottom middle of the photo. In the second photo it is in the right hand column at the bottom of the photo.
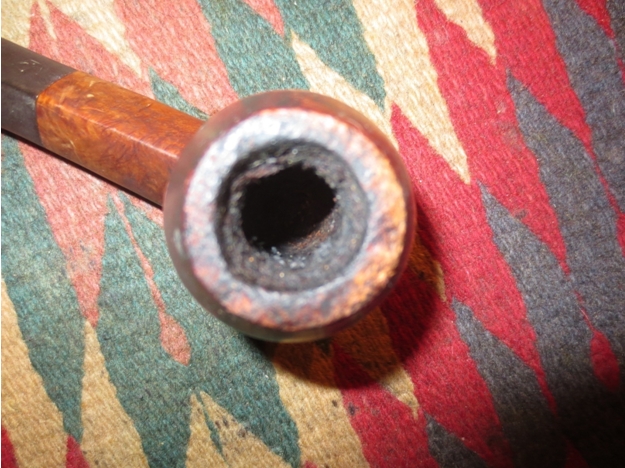
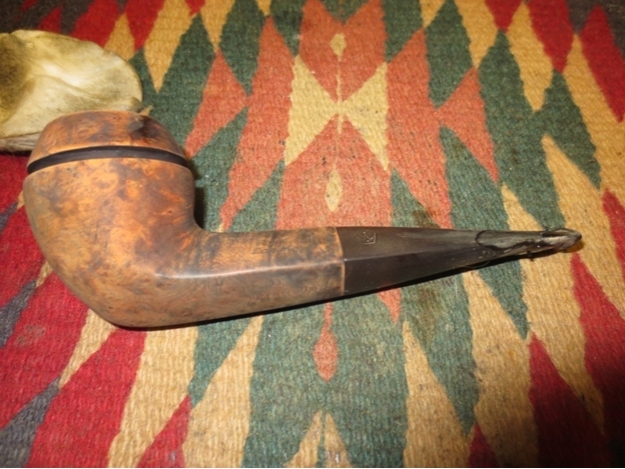
 The old timer was a well loved pipe and obviously a good smoking pipe. It was in rough shape. In fact it was in the roughest shape of the lot. The photos below show the state of the pipe when I brought it to the work table. The finish was rough and dirty with lots of scratches and dents in it. The rim was shot. The front side was worn down from beating out dottle when the smoke was finished. The drop from the height at the back of the bowl to the height at the front was over ¼ inch and the surface was chewed up. The outer edge of the bowl on the front was obliterated. The rim surface was beat up as well. There were thick marks of tar or oil on the sides of the bowl and rim that were sticky. The bowl was heavily caked. The double ring around the bowl was damaged. Over ½ of the briar between the rings was broken and missing. The stem was oxidized and chewed. The topside of the stem had deep dents near the button that went up almost a half an inch. On the underside the tooth marks were even deeper and there was a hole in the stem where it had been gnawed through. Around the stem was calcification that is common pipes that have had a softie bit on the stem. I think the old timer who had this pipe slipped the softie bit over the damage so he could keep smoking his favourite pipe.
 The next series of photos show the thickness of the cake, the extent of the damage to the rim and the missing pieces of the briar between the double rings around the cap of the bowl.
 I reamed the bowl with a PipNet reamer starting with the smallest cutting head and working up to a head that was almost the same diameter as the bowl. I took the cake back to a very thin layer on the bowl.
 I decided to sacrifice some of the height of the bowl to give back some dignity to the tired bowl. I topped the bowl in stages on a topping board. The back side of the rim was significantly higher than the front of the bowl so I started by leveling out the bowl height all the way around the bowl. I brought the back side down to the same height as the damaged portion.
 Once the height was even all the way around the bowl it was time to work on the front edge damage. At this point in the topping process I pressed the bowl down on the topping board with even pressure front and back and moved it on the sand paper in a circular motion.
 I continued sanding until the damage on the front top of the rim was minimized. There was still damage on the front of the bowl that would need to be addressed to smooth out the damage to the bowl. I wiped the bowl down with acetone on a cotton pad to remove the sticky oils and tars spots on the bowl sides. I also cleaned up the damaged area on the front of the bowl so that I could repair it.
 I dripped some super glue into the damaged surface and then pressed briar dust into the glue. I then gave it a top coat of super glue as well. In the photo below you can see the repaired edge and the repair to the gouges and damage on the bowl front.
  I sanded the repaired area with 220 grit sandpaper and then with a medium and a fine grit sanding sponge to blend the repair into the surface of the briar. The next photo shows the same spot on the bowl after sanding the repair. The second photo below shows the top view of the rim repair. The dark/shiny edge at the bottom of the photo is the super glue repair.
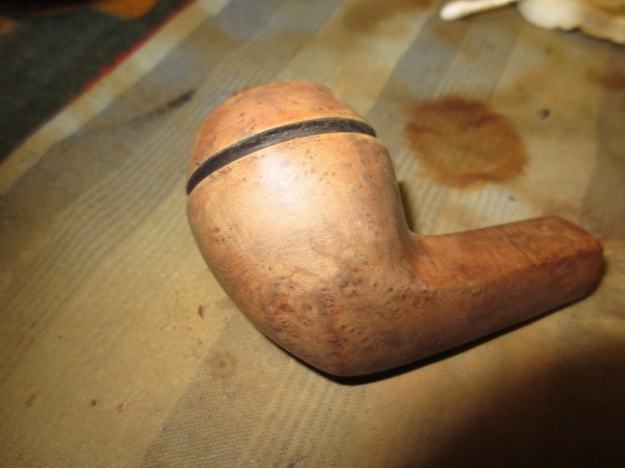
 I tried to fill in the damaged briar between the double rings around the bowl. I filled in the areas with briar dust and super glue but when I tried to re-score the two lines the fills fell out of the ring. After several failed attempts to build up the centre I finally decided to remove the centre from between the two rings. I used a sharp knife to lift out the centre portion all the way around the bowl. With that gone I used a folded piece of 220 grit sandpaper to sand the surface smooth in the groove. I also sanded it with the sanding sponges to remove the scratching.
 I decided to stain the groove to highlight it rather than hide it. I used a black aniline stain and applied it, flamed it and repeated the process until I had the coverage in the groove that I wanted.
 I sanded the bowl sides around the groove to remove the spillage of the stain. I worked on the bowl until the black was confined to the groove and the top and bottom edges. The more I sanded the bowl the more I liked the grain that I was seeing come through. There was some great flame grain, birdseye and mixed grain on the bowl and shank.
 I decided to do a contrast stain on the rest of the bowl to highlight the grain and contrast with the black stain in the groove. I heated the briar and stained it with a black aniline stain. I applied it and flamed it, and repeated it a second time. Once it was dry to touch I wiped the bowl down with alcohol and then with acetone on cotton pads to remove the black stain from the surface of the briar and leave it in the grain.
 I set the bowl aside to dry for awhile so I could work on the damage to the stem. I sanded the stem with 220 grit sandpaper to remove the oxidation and to clean up the calcification around the damaged areas of the top and underside of the stem.
 I wiped the stem down with alcohol to clean the surface of the stem so I could apply the superglue patch. I used a dental pick to remove debris and damage vulcanite. I greased a pipe cleaner with Vaseline and inserted it in the button underneath the hole in the stem. I built up the area around the hole with black super glue. I sprayed it with an accelerator to allow me to add a second and third coat to the repair to the hole. I then flipped the stem and repaired the deep tooth marks on the top of the stem. I filled them and also sprayed them with the accelerator.
 Once the stem patch was dry to touch I put the stem back in place on the bowl and sanded the bowl with a medium and a fine grit sanding sponge to remove more of the black stain. I also used a fine grit sanding block. The next four photos show the bowl with the black removed and the grain patterns highlighted.
 I set the pipe aside for the night and let the stem repairs cure over night. In the morning I sanded the patched areas with 220 grit sandpaper and with a medium and fine grit sanding sponge. I rubbed the bowl down with a light coat of olive oil to see what contrast would look like. I really liked the overall look of the bowl with the contrast. Seeing this I knew what contrast stain colour I would use on the next stain coat.
 There were still small pits in the patches on the top and bottom repairs. I find that when I use an accelerator the spray causes these bubbles that once dry pop and leave pits in the surface of the finish. I sanded the stem surface some more with 220 grit sandpaper to smooth it out and then added another coat of black super glue. When it dried I sanded it again to bring it smooth. In the next two photos you can still see some small pits in the finish.
 I repeated the process of filling in the pits and then finished by using some clear super glue which dries more quickly and brushing it over the pitted areas on the stem. Once I had that done I sanded the stem with micromesh sanding pads. I wet sanded with 1500-2400 grit pads. The surface was significantly smoother but the patches still showed through the finish.
 I dry sanded with 3200-4000 grit micromesh pads and rubbed the stem down with Obsidian Oil. Once it dried I repeated the sanding with the same pads. The patches are still visible but are gradually blending into the surface of the vulcanite.
 I buffed the stem with red Tripoli to remove the scratches in the rubber and to further blend the patches. I then took it back to the work table and dry sanded it with 6000, 8000 and 12,000 grit micromesh pads. I rubbed it down with another coat of Obsidian Oil and set it aside until it was absorbed.
 I rubbed the stem down with Scratch X2.0 to polish the scratches. It is a plastic polish and blemish remover that is used on acrylic/plastic headlamps. It worked wonders in removing the remaining scratches in rubber stem material. I then buffed the stem with Blue Diamond on the buffing wheel and gave it several coats of carnauba wax. I buffed it with a clean flannel buff to raise the shine shown in the next two photos.
 After finishing the stem it was time to give the bowl its contrast coat of stain. I used an oxblood aniline stain. I applied it with a folded pipe cleaner to keep it out of the groove around the bowl. I flamed it, reapplied it to the briar and flamed it again.
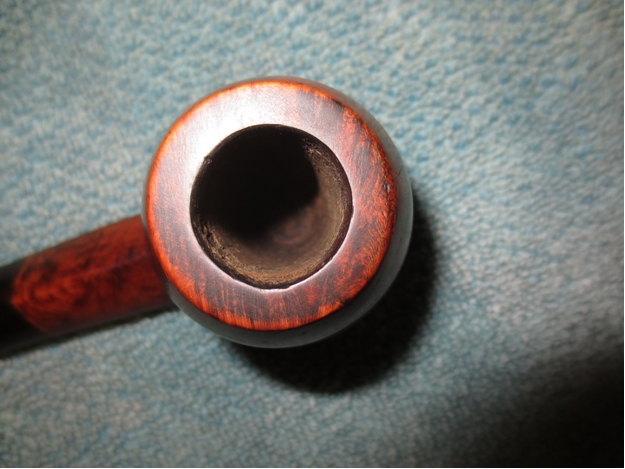
 I buffed the stem and bowl with Blue Diamond and then gave the entire pipe several more coats of carnauba wax. I buffed the pipe with a clean flannel buff. The finished pipe is shown below. I think that Alan Chestnutt’s definition of the restoration process as Saving the Pipe accurately describes the work that went into restoring this beauty. The finished pipe ready to fire up and be enjoyed for many more years to come.


