Blog by Paresh Deshpande
This pipe has been in my possession for so long that details of how, when and where of this pipe have faded away from my memory. However, years after procrastinating on the restoration of this pipe, it’s finally on my work table.
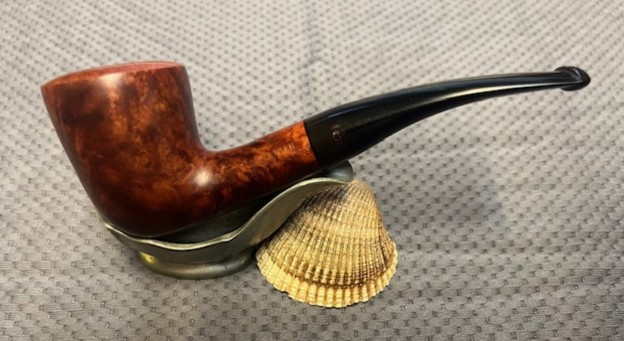
This is a partially rusticated straight Rhodesian with smooth side panels and a smooth shank bottom that bears the stampings of this pipe. The rustications are worn down and at some places the rustications have completely smoothed out, signifying that it had been in regular use of the previous pipe man/ woman and has been extensively used. Though the stampings are quite worn, they are easily discernible under bright light and magnification. It is stamped towards the shank end as “BRIGHAM” in script at an upwards angle moving from left to right over “CANADA” in straight capital letters. Towards the bowl end, faint shape code # “417” can be seen. The left of the stem towards the tenon end and shrouded beneath all the oxidation and grime, four dots arranged in a diamond shape are visible.
 I have a post-patent era (1956- 1969) Brigham that I had got from Steve and had read through the entire write up. It provided a deep insight in to the genesis, history and the dating of Brigham pipes. Here is the link to the write up and is highly recommended read.
https://rebornpipes.com/2019/01/13/restoring-pipe-16-from-bob-kerrs-estate-a-brigham-3-dot-canadian-691/
Next to ascertain the date and significance of the dots, I visited pipedia.org and went through the complete article written by well known to me pipe restorer, researcher and author of an authoritative book on Brigham pipes, Charles Lemon of Dad’s Pipe. I have reproduced an extract of relevant information related to the pipe that I am working on.
 “I have dubbed the decades between 1980 and 2000 the Late Canadian Era, a period that saw several changes at Brigham that are of note to the collector. First, the traditional 8-grade pinning system (the famous Brigham “Dots” which denoted the quality of the pipe) was changed to a 7-grade system to simplify pinning (more on this below), and the Norsemen and Valhalla series were merged to form the President Series, which represented the very finest pipes coming out of the Toronto factory. Early pipes from this era (left, below) are stamped with a shape number and “Brigham” over “Canada”; later pipes (late 1980s+, on right below) are stamped simply with a shape number and the Brigham logo.”
The Original Brigham Dot System 1938 – 1980
Brigham pipes are reknown in the pipe world for their famous “Brigham Dots”, a system of brass pins inset in the stem to denote the grade of each pipe. The original 8-grade pinning system, used for 42 years between 1938 and 1978 (spanning the Patent, Post-Patent and Canadian Eras) looked like this: The pipe on my work table, thus, is from the early 1980s and a “Director” grade Brigham.
With the provenance of the pipe now established, it was time to move ahead with the initial/ detailed inspection and restoration.
Initial Inspection
The pipe, as it sits on my work table, does not present a very promising picture. However, having worked on a couple of hundred pipes, some in much worse condition that this one, I am sure with some TLC and repairs, the beauty of this pipe can be restored to its former glory. The smooth rim top shows damages consistent with having been knocked against hard edges and is covered with overflowing lava. The partially rusticated stummel surface is covered in dirt and grime giving the surface a dull and lacklustre appearance. The rustications are worn down at places to nearly a smooth surface. The vulcanite stem is deeply oxidized and is missing a chunk of vulcanite from the bite zone on the lower surface. The seating of the stem in to the mortise is loose. The following pictures will give you a clear idea to the condition of the pipe as I start the restoration work.

 Detailed Inspection
The stummel is smooth towards the tapered upper ½ inch and extends over the rim top surface. The rim top surface is uneven, a result of being knocked against a hard edge of a table. I suspect that this damage is more severe on the left side between 6 and 9 o’ clock direction (encircled in green). The cake is thick and hard and overflowing over the rim top surface. It is also observed that the cake is thicker towards the upper half of the chamber and has a strong sweet molasses like smell permeating from the pipe. The condition of the chamber walls is hidden beneath the thick cake and will be ascertained only after the cake has been taken down to the bare briar. However, after careful external examination of the surface, I am confident that there is no damage to the chamber walls as the stummel surface is hard and solid all around. The partially rusticated stummel surface is covered in dirt, dust and grime giving the surface a dull, dirty and lifeless appearance. The nooks and crannies of the rustications shows accumulated oils, tars and dust that have darkened over time. There are flecks of white paint embedded within these crevices of the rustications. These rustications have worn down significantly and have smoothed out at many places. The stummel surface is solid to the touch signifying less likelihood of any chamber damage. The stummel has taken on a nice dark patina from 40 years of heavy usage and I would like to preserve it through all the cleaning and polishing. The mortise is relatively clean as expected since the long metallic tenon housing the trademark maple wood filter sits close to the mortise face.
 The vulcanite stem is deeply oxidized and appears dirty green. The lower surface of the stem has a large chunk of vulcanite missing from the bite zone, including the button. The four brass dots are covered in oxidation and would need to be cleaned and polished. Once the stem has been cleaned and polished, these brass dots will add an element of dazzle to the entire pipe. The long aluminum tenon which houses the Brigham trademarked Maple wood filter is covered in dried oils and tars. The filter is completely stuck in to the tenon and wouldn’t budge and the sweet smell too is very strong.
 The Process
The first issue that I tackled was that to separate the maple filter from the aluminum tube tenon. I chucked the stem in to the freezer for a couple of hours. Thereafter, I gently and lightly heated the tenon with a Bic lighter. This loosened the oils and tars and gunk that held the filter in to the tenon. Using a pair of nose pliers, I gently pulled out the maple wood filter. The following pictures will give you an idea as to how filthy and dirty the filter was and made me ask myself whether the filter was ever replaced/ cleaned. In preparation for immersing the stem in to the oxidation remover solution, I cleaned out the aluminum tenon and stem airway using dish washing soap and shank brushes. I further cleaned the stem airway using hard and regular pipe cleaners and alcohol. The stem internals are now clean and ready for further processes.
 I immersed it in “Before and After Deoxidizer” solution along with the stems of other pipes in line for restoration. This solution works to draw out all the deep seated oxidation from the surface making its subsequent cleaning and polishing a breeze. I would definitely recommend this product as it saves on to time and efforts. The pipe has been marked with a blue arrow for easy identification. At this stage, I called it a day as it was well past midnight.
 The next afternoon, I removed the stems that had been soaking in the deoxidizer solution overnight. I cleaned the stem and the stem airway under running warm water and scrubbed the raised oxidation from the stem surface using a Scotch Brite pad and the airway with thin shank brush. I further removed the oxidation by scrubbing the stem with 0000 grade steel wool and applied a little olive oil to rehydrate the stem. I used the steel wool to clean the aluminum tenon and it did make a world of difference to the appearance of the tenon.
 Continuing with the stem repair, I inserted a triangulated index card covered in transparent tape in to the slot. The tape prevents the mix of superglue and charcoal from sticking to the index card. I mixed superglue and activated charcoal powder and generously applied it over the bite zone, including over the buttons and set it aside for the fill to cure.
 Once the repairs had hardened, I shaped the button and the bite zone using a flat needle file. I roughly matched the freshly shaped surface with the rest of the stem by sanding the patch with a folded piece of 220 grit sand paper. At this stage, I noticed air pockets in the patch on the upper surface of the stem (encircled in red) and also the horizontal slot needed a rebuild.
 I mixed a fresh batch of activated charcoal and superglue and rebuilt the entire bite zone on the upper surface and also the horizontal slot. I set the stem aside for the fills to cure.
  While the stem repairs were set aside to cure, I moved on to reaming the chamber with my PipNet pipe reamer. I started the reaming process with head size 1 of the PipNet reamer blade and progressed through to head size 2. I used my fabricated knife to remove cake from areas inaccessible to the reamer blades and completed the process of removing the cake by sanding the walls smooth with a folded piece of 180 grit sandpaper. I wiped the chamber with a cotton swab wetted with alcohol to clean the residual carbon dust. The chamber walls are solid and the hard layer of cake had worked well to protect the chamber walls.
 Next, I cleaned the mortise by scraping out all the dried oils and tars from the walls with a dental tool. I further cleaned the mortise using bristled and regular pipe cleaners dipped in alcohol.
  Continuing with the internal cleaning of the chamber and mortise, I subjected it to a salt and alcohol bath. I used cotton balls which is an at par substitute as I have realized over the years. I drew out a wick from the cotton and along with a folded regular pipe cleaner; inserted it into the mortise and through the draught hole and further into the chamber. Thereafter, I packed the chamber with cotton balls to about quarter of an inch below the rim inner edge and soaked the cotton balls with isopropyl alcohol up to the brim. About half an hour later, the level of alcohol had gone down, having being absorbed by the cotton. I topped it up once again and set it aside overnight. By next afternoon, the cotton and alcohol had drawn out all the remaining oils/ tars from the chamber and mortise and loosened out any residual cake and tar build up, fulfilling it’s intended task. I removed the cotton balls and ran pipe cleaners through the mortise to clean out all the loosened tars and gunk. Using my fabricated tool, I scraped out the entire loosed gunk from the mortise and further cleaned it with alcohol and q-tips. The large blobs of now moistened gunk that was removed from the mortise should give the readers an idea of how filthy the mortise was when I started the process of cleaning. The chamber now smells clean and fresh.
 I cleaned the external surface of the stummel with undiluted Murphy’s oil soap and a hard bristled toothbrush. I cleaned the smooth rim top surface with the soap and Scotch Brite pad. I scrubbed the rim top surface with a wire brush to remove the lava overflow and followed it up with a scrub using Scotch Brite pad. The stummel was dried using paper towels and soft cotton cloth. The clean rim top presents charred surface between 6 and 9 o’clock and in 12 o’clock direction (encircled in yellow) and also a couple of dents with thinning of the rim (encircled in red).

 I simultaneously cleaned the mortise with dish washing soap and shank brushes till all the loosened oils, tars and gunk, a result of the salt and alcohol bath, were completely removed. I dried the shank internals using paper towels and pipe cleaners.
 The external cleaning had revealed all the issues to the stummel surface that needed to be addressed and I decided to tackle the darkening and dents/ dings to the rim top surface. To address the rim top damage, I topped the rim top on 220 grit sandpaper till the surface was nice and even. I hate losing any briar and restrict it to the barest minimum that is required. The damage to the inner rim edge, though greatly eliminated, can still be seen to the back and left side of the rim edge (encircled in green) and the chamber too appeared to be out of round. These issues would be addressed next.
  To get the chamber back to round and address the still visible chipped surfaces over the inner rim edge, I created a bevel over the inner and outer edge with a folded piece of 220 grit sand paper. I am pretty pleased with the progress being made thus far.
  Next, I subjected the smooth surfaces over the stummel to a complete cycle of micromesh polish, wet sanding with 1500 to 12000 grit pads. I wiped the stummel with a moist cloth after every grit pad to remove the sanding dust left behind by the pads. This also helps in monitoring the progress being made and ensures early corrective action. I am happy with the progress being made until now.
 I massaged a small quantity of “Before and After Restoration Balm” into the briar surface with my finger tips and worked it deep into the surface and let it rest for a few minutes. The balm almost immediately works it’s magic and the briar now has a nice vibrant appearance with the beautiful bird’s eyes and cross grain patterns on full display.

 Now that the stummel repairs are completed, I turned my attention back to the stem repairs. The second attempt fills were well cured and I moved ahead with the process of filing and shaping the button end with a flat head needle file. With a flat needle file, I reshaped the horizontal slot end. For a better blending, I further sanded the entire stem with a folded piece of 220 grit sandpaper. The few minor air pockets that are visible will be completely eliminated as I progress with the sanding and polishing process.
 I continued to work on the stem and progressed to wet sanding the entire stem with a folded piece of 320 followed by 600, 800, 1000, 1500 and 2000 grit sand papers. Thereafter, I polished the stem by dry sanding the stem with 3200 to 12000 grit micromesh pads. I strictly avoided running the lower grit sand papers over the four brass dots, polishing them with 6000 to 12000 grit micromesh pads. I rubbed a small quantity of EVO into the stem surface and set it aside for the vulcanite to absorb and hydrate.
 Before moving on to final polishing of the entire pipe using polishing compounds, there was one aspect, though not critical, but important and that was to clean the gaps between the two rings separating the cap from the rest of the stummel. I used a sharp dental tool to clear out all the debris that had lodged between the rings.
 To complete the restoration, I mounted a cotton cloth buffing wheel on to my hand held rotary tool and polished the stummel and stem with Blue Diamond compound. This compound helps to remove the minor scratch marks that remain from the sanding. I wiped/ buffed the pipe with a soft cotton cloth to clear it of any leftover compound dust.
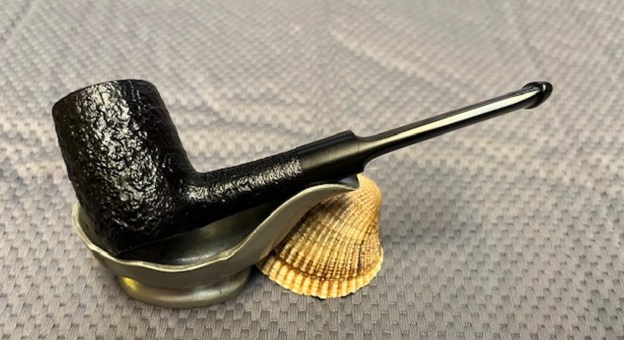
  With a cotton buffing wheel that I use for carnauba wax, I apply a coat of carnauba wax and continue to work on it till the complete coat of wax had been polished out. I mount a clean cotton cloth buffing wheel and give the entire pipe a once over buff. I finished the restoration by giving the entire pipe a rigorous hand buffing using a microfiber cloth to raise the shine further. The finished pipe looks beautiful and is ready to join my other Brigham that I had received from Steve. Looking forward to enjoying my leisure time with this beautiful and gorgeous looking pipe, smoking my favorite tobacco!!


 P.S.: No Brigham pipe is complete without it’s trademark Maple wood filter. I replaced the old and clogged filter with a fresh filter and now it’s truly ready to deliver it’s unique smoking experience that I have come to appreciate after smoking the one in my collection. I storngly recommend that every pipe smoker must experience the pleasures of smoking a Brigham pipe at least once.

 Jeff took photos of the rim top, bowl and the surfaces of the stem to give a sense of the condition of the pipe. The walls of the bowl had a thick cake which overflowed over the rim edges and onto the rim top making a mess. The stem is lightly oxidized and there is a mark on the stem where it appears that it had a Softee Bit on the end to protect it. There are light tooth marks on both sides ahead of the button.

 He took photos of the sides and heel of the bowl to give a clear picture of the depth of the sandblast. It really is a great looking blast that shows the grain underneath very well.
 He took photos of the stamping on the underside of the bowl and the shank. It is clear and readable and read as noted above. The five dots on the stem are clear and undamaged as is the 925 stamp on the silver band.
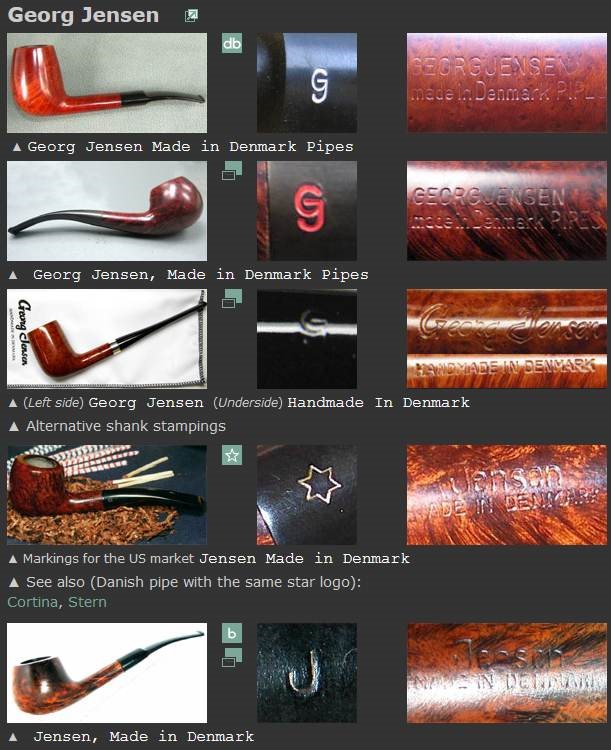
 I turned to Pipephil’s site to see what I could find about the Sasieni 5 Dot pipes and get some idea of where they fit in terms of the hierarchy (http://www.pipephil.eu/logos/en/logo-sasieni.html). I also wanted to know about a potential date for the pipe. I quote below what I found there. I quote from the side bar below and include a screen shot of the 5 Dot:
 I Googled for information that I could find and came across some on the smokingpipes.com website (https://www.smokingpipes.com/pipes/estate/england/moreinfo.cfm?product_id=78680). It included several freehand versions of the 5 Dot but I found the description given by them for one of the pipes really informative. I have quoted it below for the information it includes.
 I took photos of the bowl and the rim top as well as both sides of the stem to show the condition of the pipe before I started my work. The rim top was very clean and the edges looked good. The clean up had removed some of the stain on the top the outer edges of the bowl. It really looked remarkably good.
 I took a photo of the stamping on the shank. The photo of the stamping is clear and readable. I also removed the stem and took a photo of the parts of the pipe. It is a unique piece of pipe history.
 The bowl was in such good condition that I had to do some minimal work with it. I used a Walnut Stain pen to touch up the rim top and edges of the bowl to match the rest of the bowl. I looks amazingly good.
 I rubbed the briar down with Before & After Restoration Balm. I worked it into the briar with my fingertips and a horsehair shoe brush to work it into the nooks and crannies of the sandblast finish. The product works to clean, enliven and preserve the briar. I let it sit for 10 minutes then I buffed it with a cotton cloth to deepen the shine. The briar really comes alive with the balm.

 I waxed the bowl down with some Conservator’s Wax and set it aside to let the wax harden. I buffed it with a soft cloth to raise the shine. It is a beautiful sandblast that shows depth in the finish.

 I set the bowl aside and turned my attention to the stem. I sanded the surface of the stem smooth with 320-3500 grit sanding pads. It worked well to smooth things out and remove remnants of oxidation. When finished the stem looked much better.
 I polished the vulcanite with micromesh sanding pads – 1500-12000 grit pads. I wiped it down with Obsidian Oil after each sanding pad. I used Before & After Pipe Polish – both Fine and Extra Fine to further polish the stem.
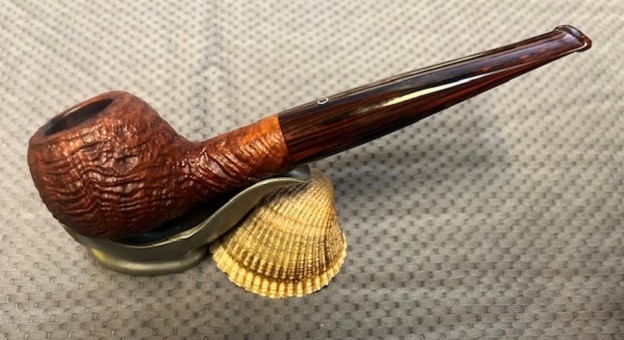
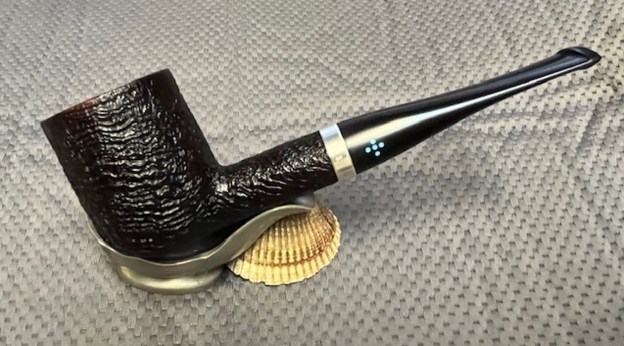
 This Silver Banded Sasieni 5 Dot Billiard has a beautiful, Sandblast finish that is very tactile. The rich walnut brown/black finish highlights some great grain around the bowl and shank. The polished vulcanite taper stem adds to the mix. I put the stem back on the bowl and carefully buffed the pipe with Blue Diamond on the buffing wheel. It is critical to avoid buffing the stamping and to have a lighter touch on the sandblast briar. I gave the bowl multiple coats of Conservator’s Wax and the stem multiple coats of carnauba wax on the buffing wheel and followed that by buffing it with a clean buffing pad. I hand buffed the pipe with a microfiber cloth to deepen the shine. The finished Sasieni 5 Dot Billiard is quite stunning and feels great in my hand. Give the finished pipe a look in the photos below. The dimensions of the pipe are Length: 6 ½ inches, Height: 2 inches, Outside diameter of the bowl: 1 ¾ inches, Chamber diameter: 7/8 of an inch. The weight of the pipe is 2.82 ounces/80 grams. Thanks for walking through the restoration with me as I worked over another beautiful pipe. I am going to add it to the rebornpipes store in the British Pipemakers Section. If you would like to add it to your collection let me know. Thanks for your time.