Tag Archives: Petersons Pipes

Breathing Life into a Peterson’s 2012 St. Patrick’s Day 80S Bent Bulldog


by Steve Laug

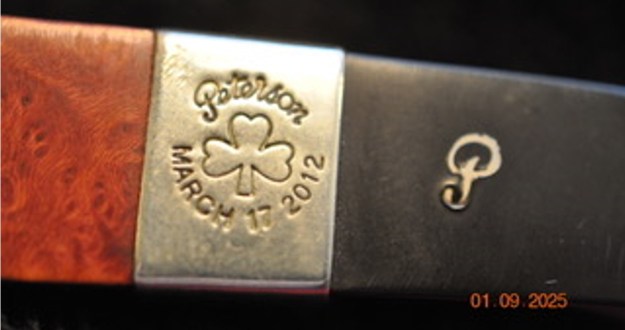
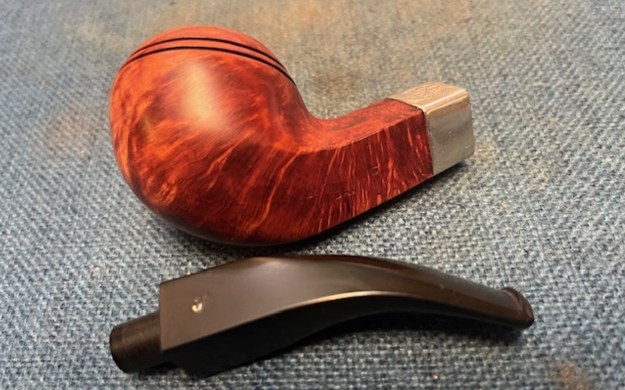
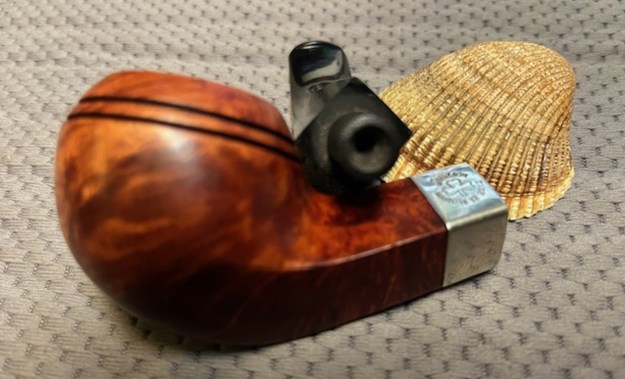
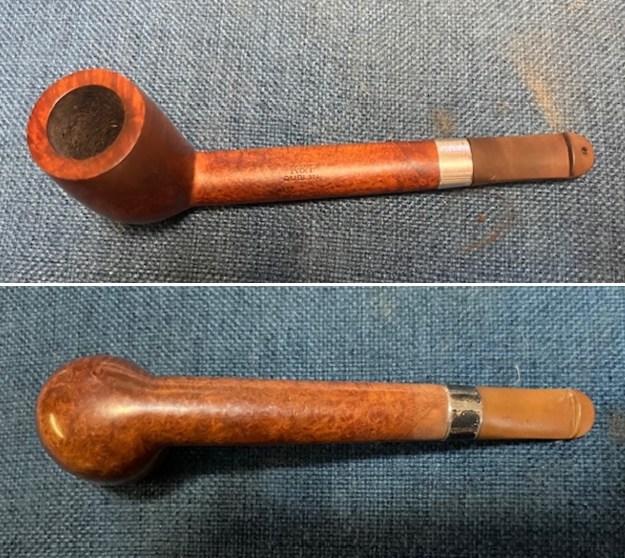
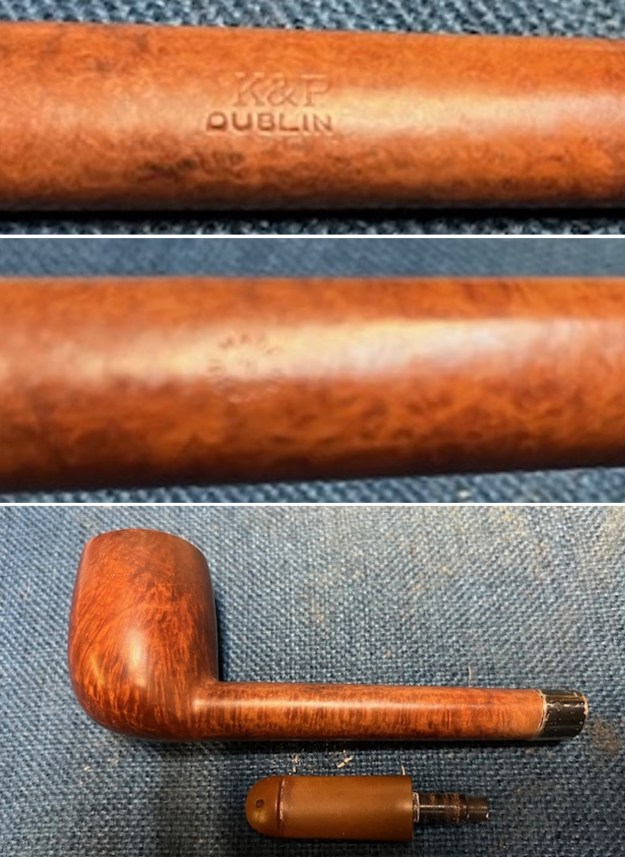
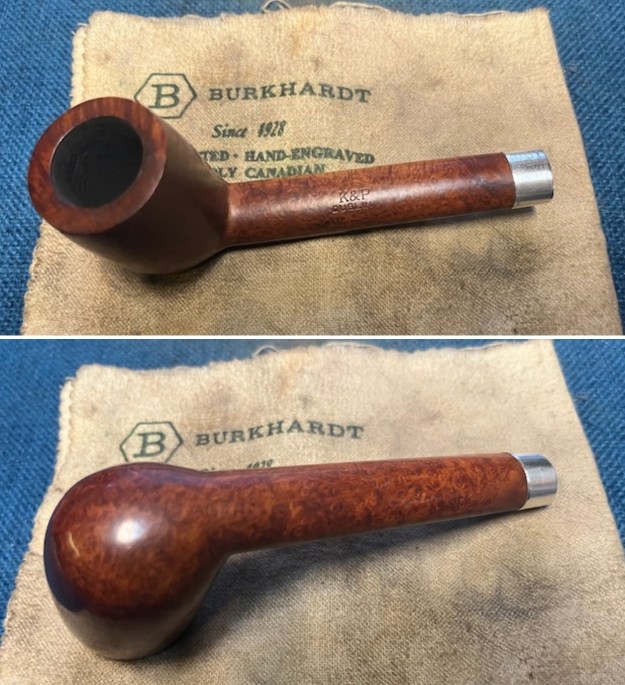
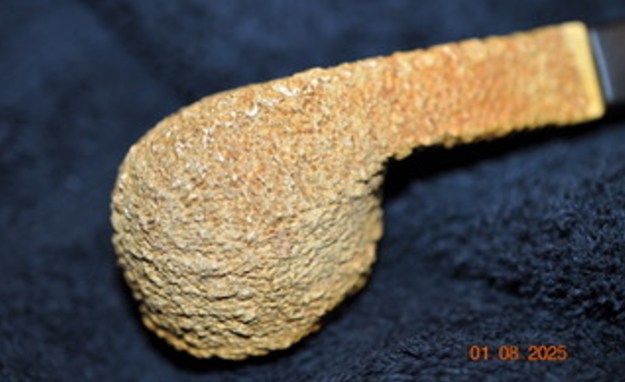
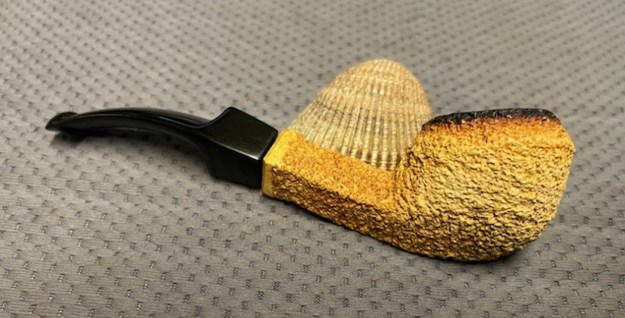
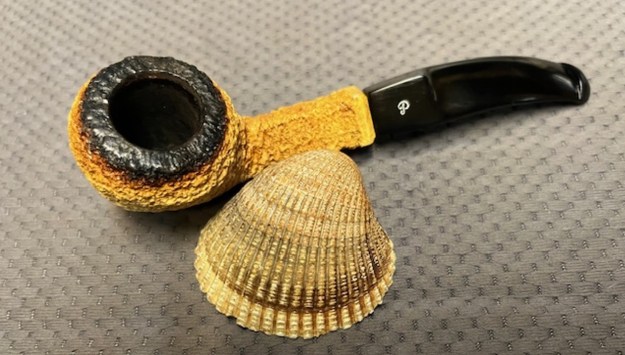
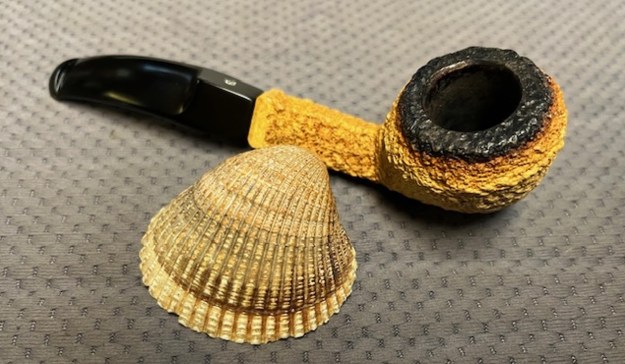
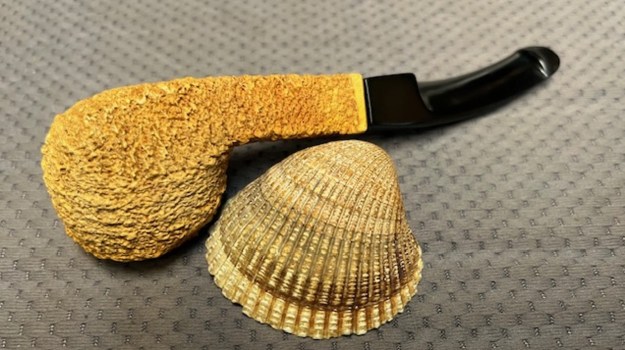
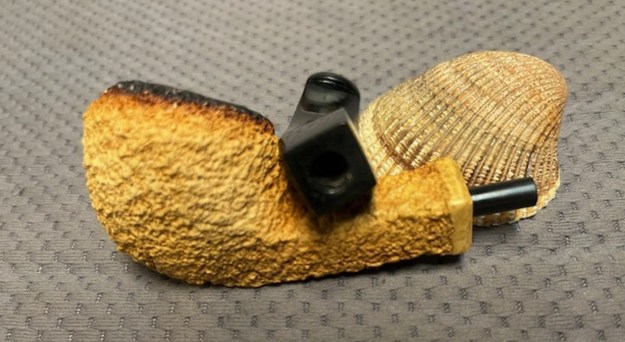
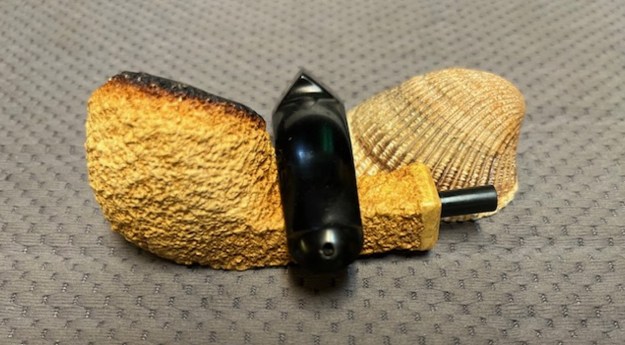
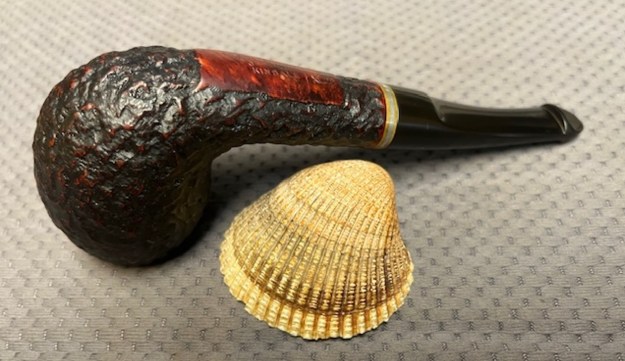
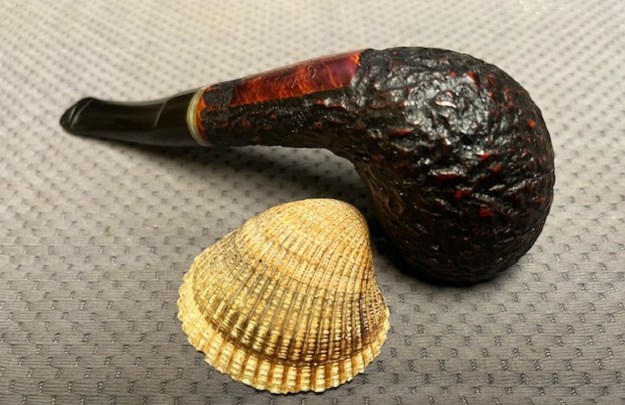
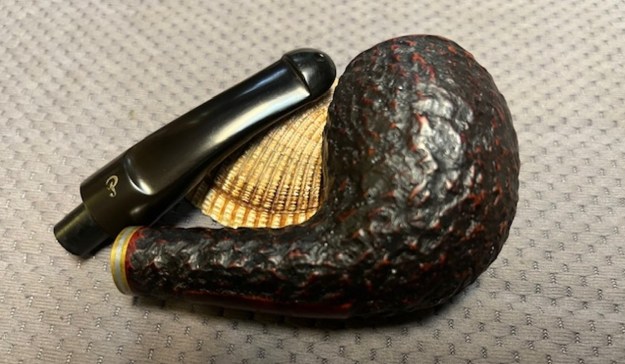
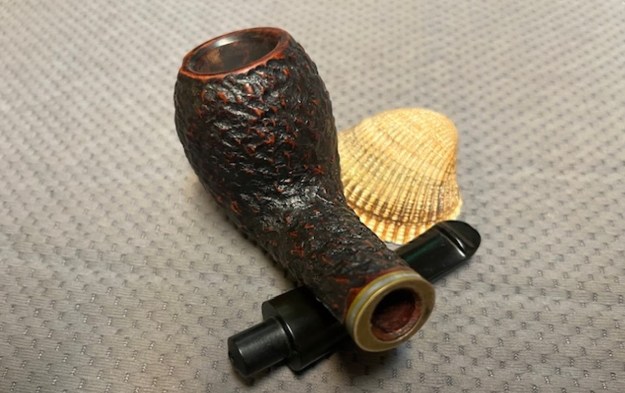
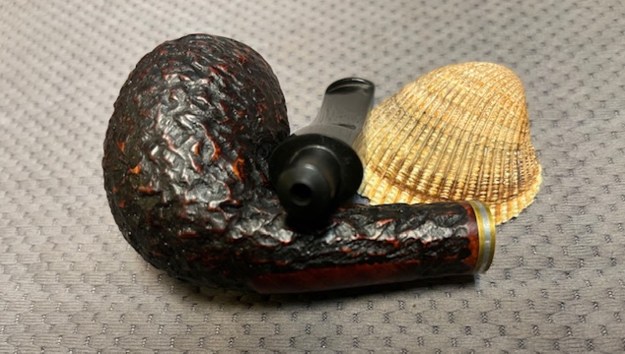
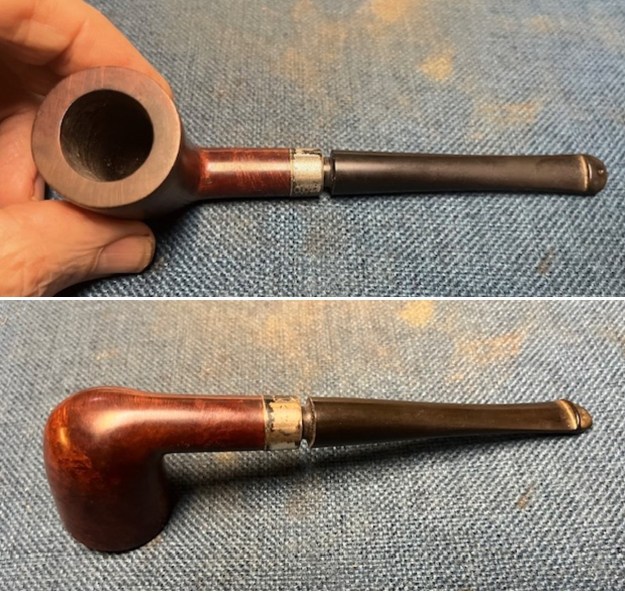
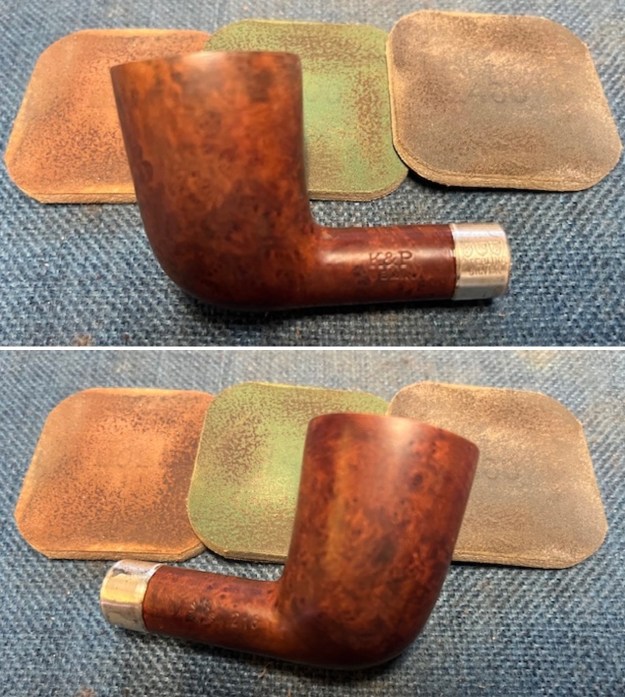
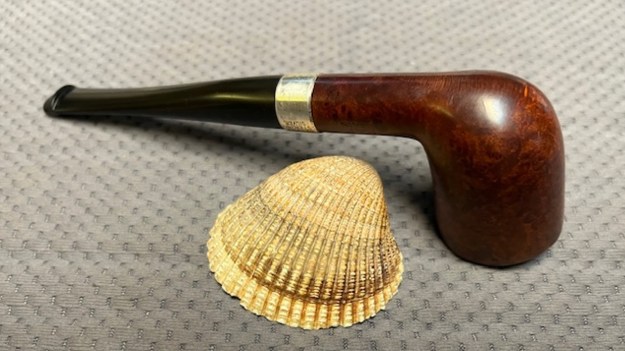
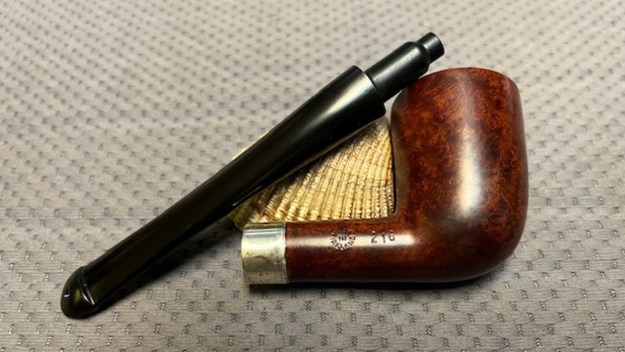
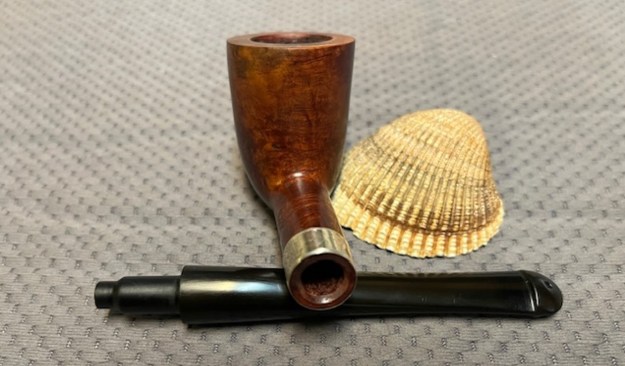
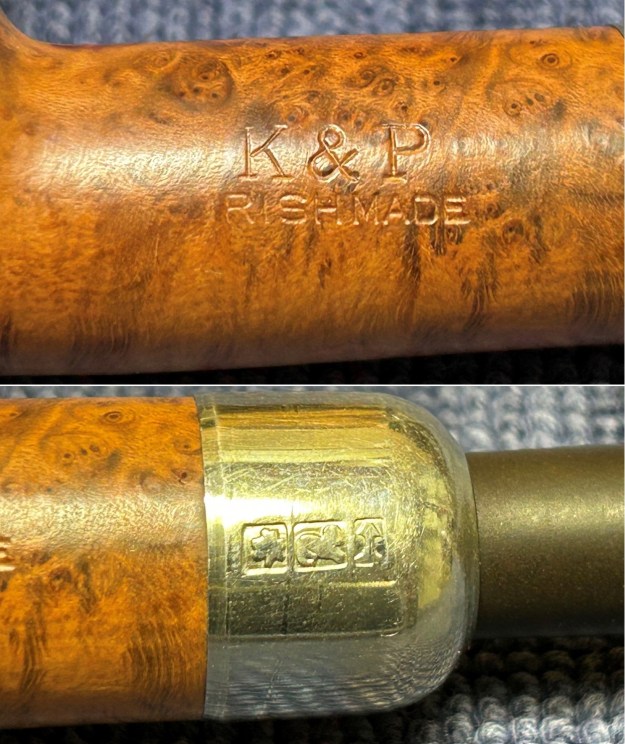
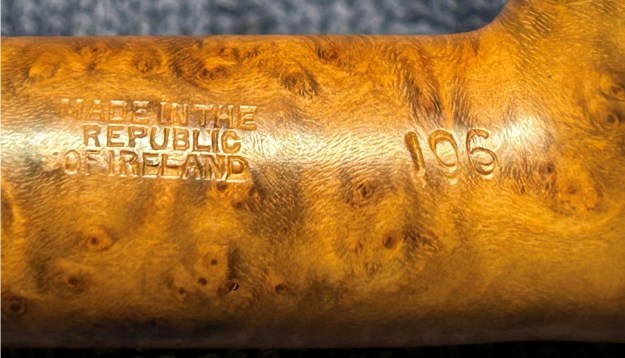
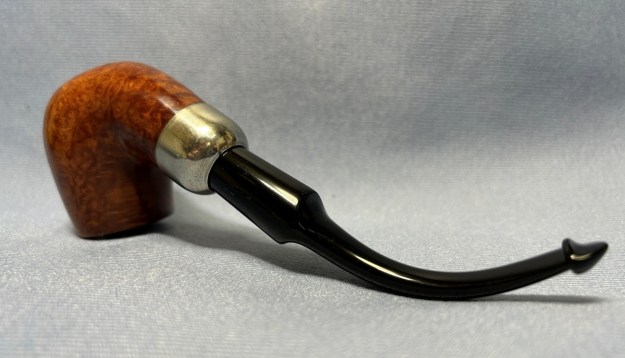
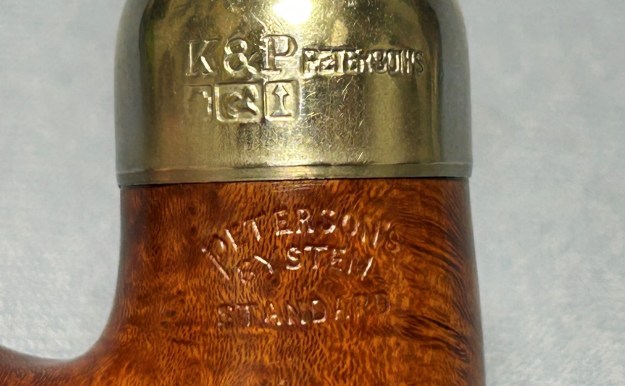
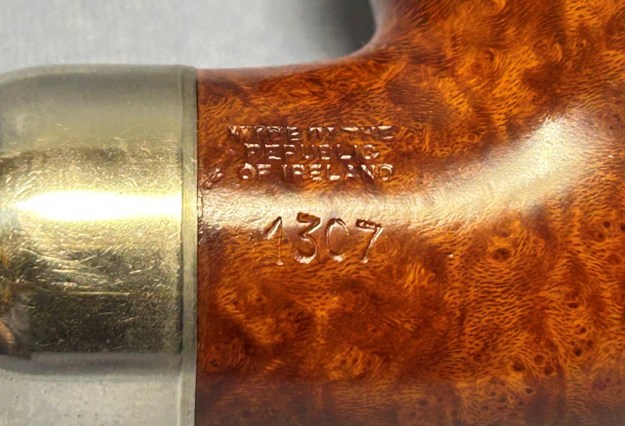
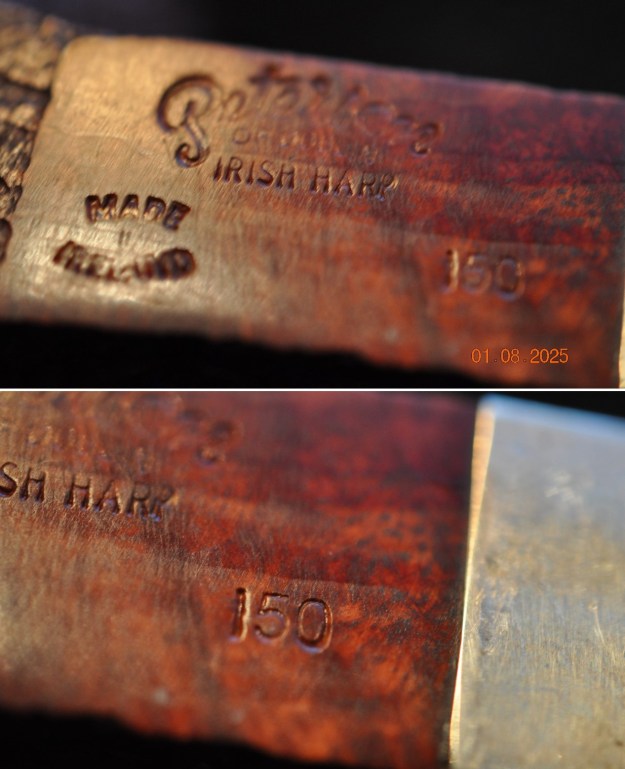
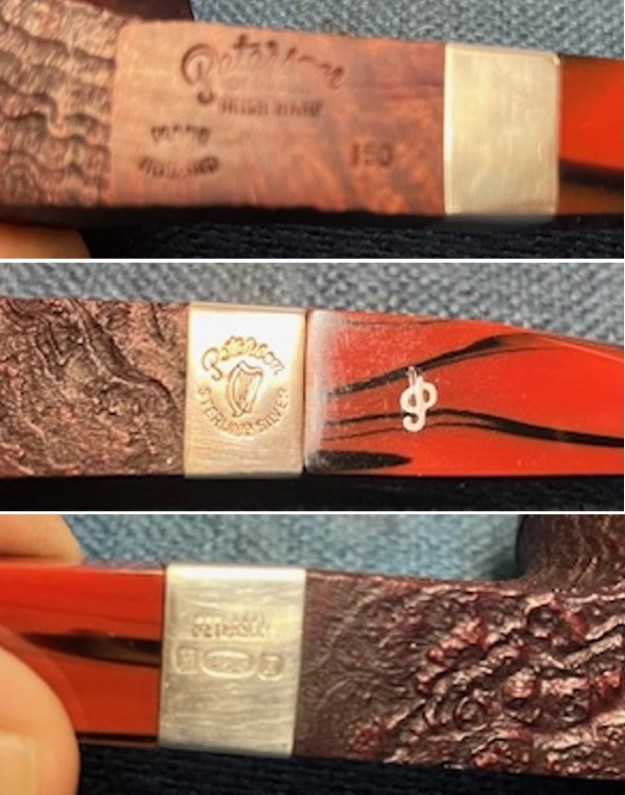
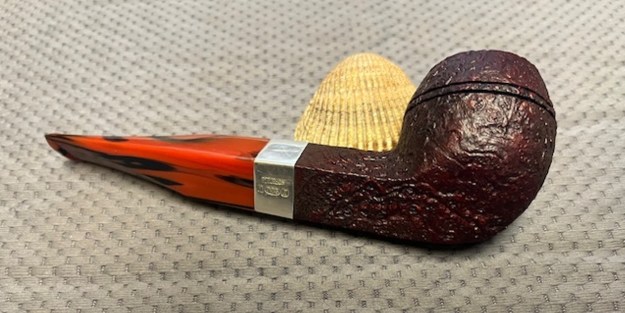
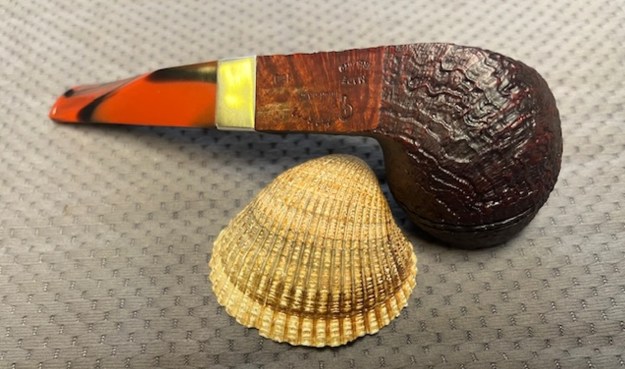
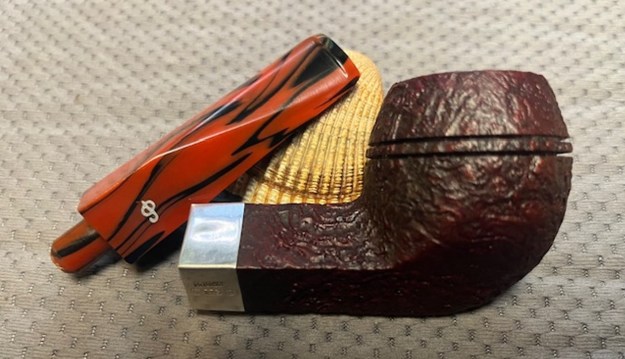
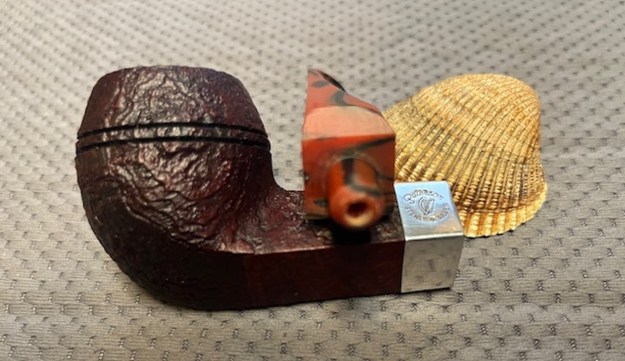
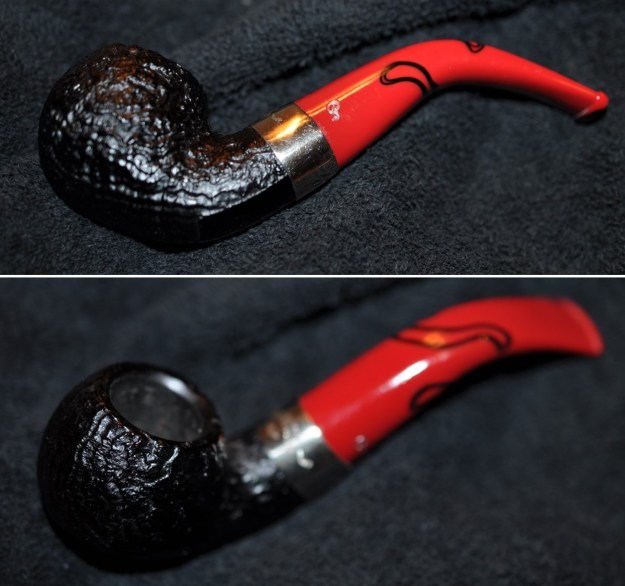
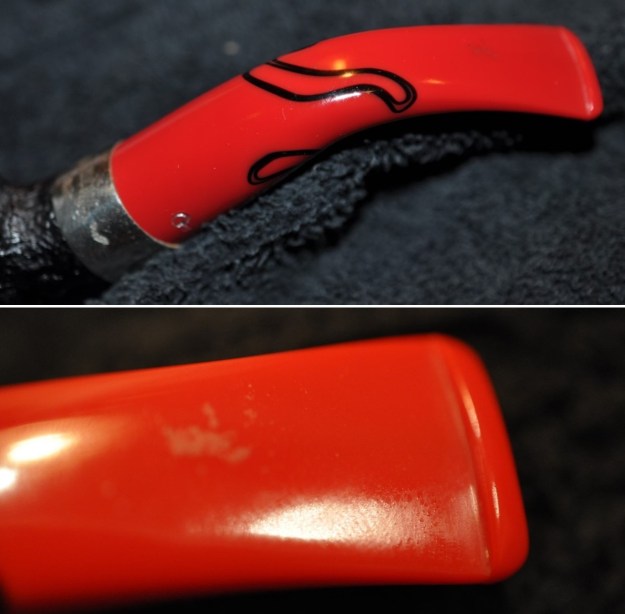
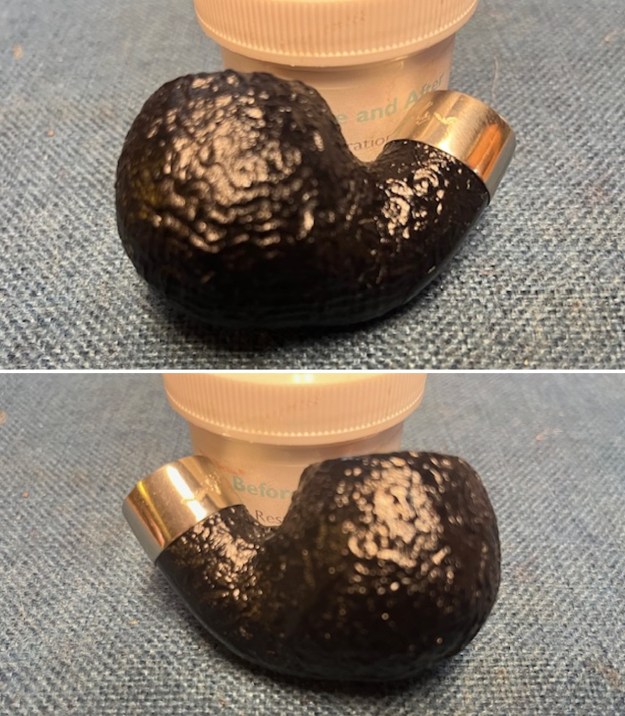
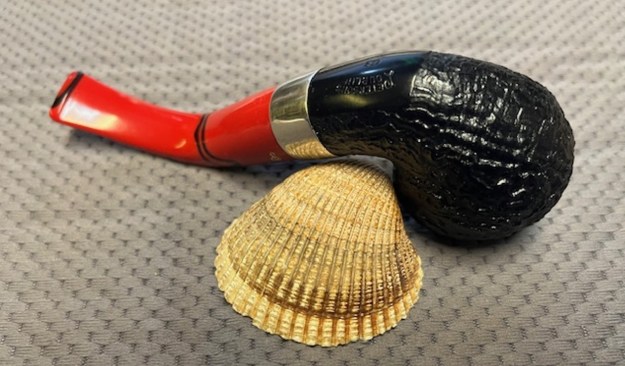
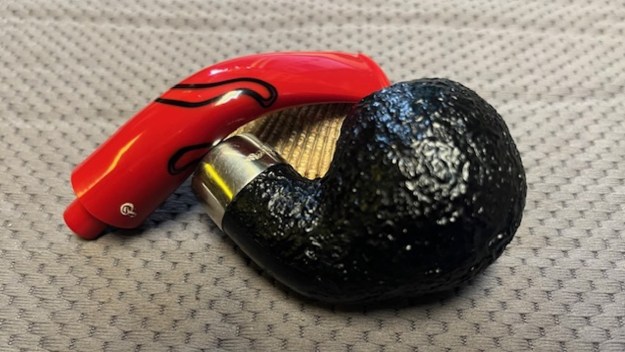
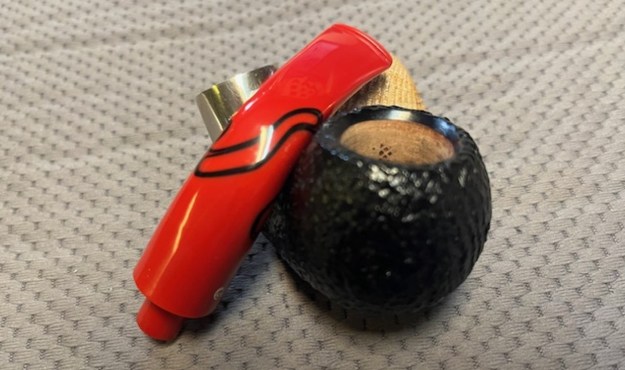
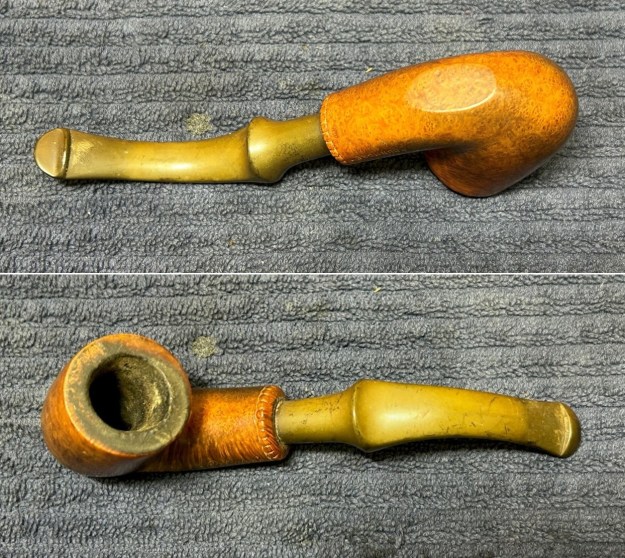
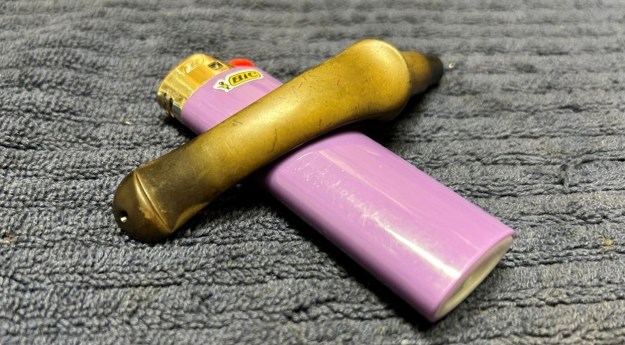
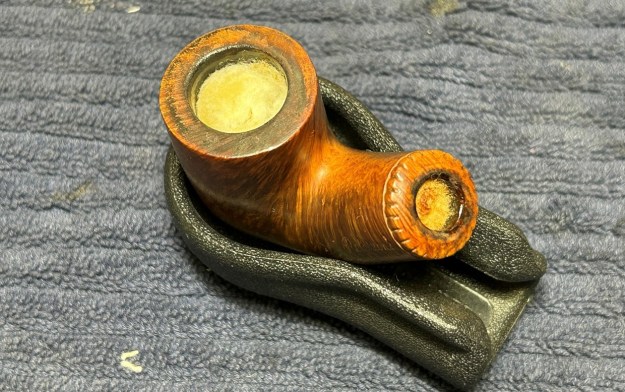
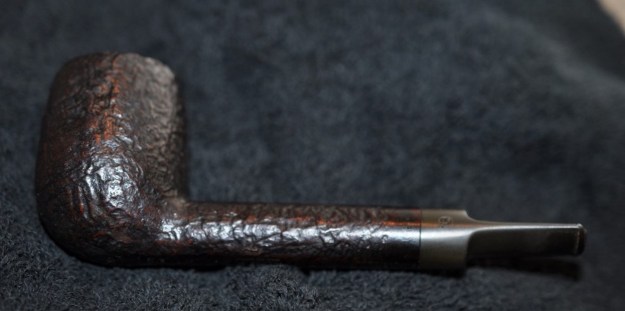
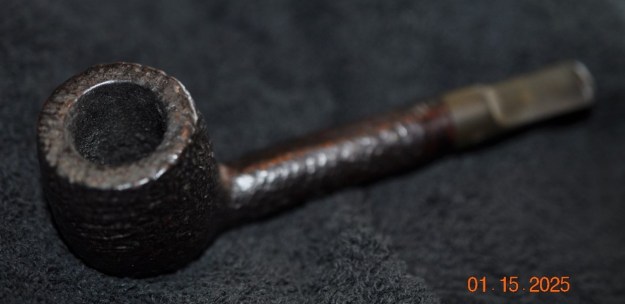
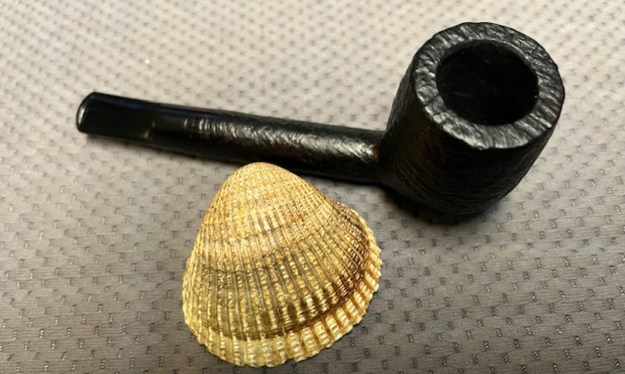
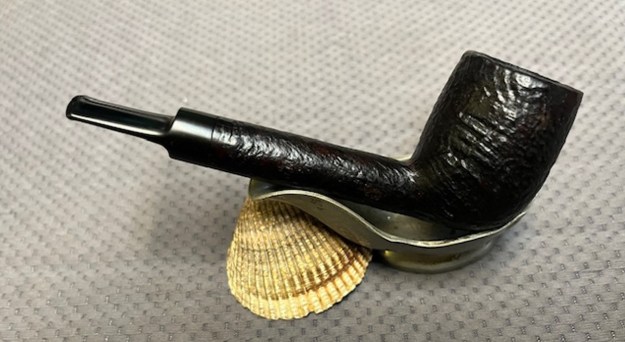
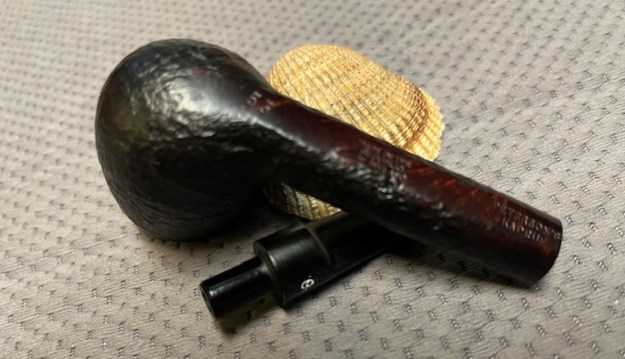
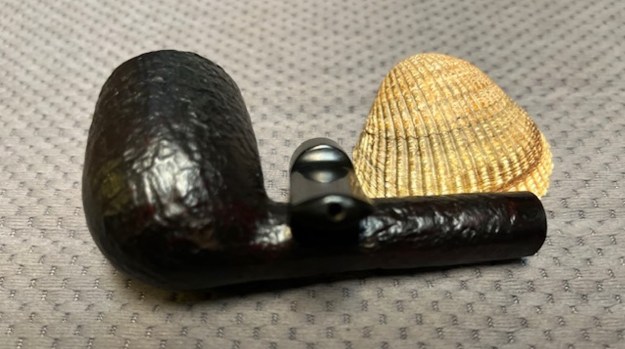
The next pipe on the table is another Peterson’s Pipe. We recently purchased it from a seller in Wellsville, Kansas, USA on Facebook Pipe Exchange on Facebook on 12/09/2024. It is a nicely grained Bent Bulldog with mixed grain on the sides and birdseye on the front and the back of the bowl. The capped rim top also had mixed grain across the top. It is stamped on the left underside of the diamond shank and reads St. Patrick’s [over] Day and on the right underside it is stamped with the shape 80S. The nickel band is stamped with a shamrock on the left side and around the outside of the leaf it is stamped Peterson arched over the top and the date March 17, 2012 arched underneath. There was a moderated cake in the bowl and some darkening around the inner edge and light lava spots on the rim top. The mortise smelled of oils and tars but surprisingly there was little darkening in it. The stem had some oxidation, some white/sludge built up ahead of the edge of the button. There were some light tooth marks or chatter on the top and underside ahead of the button. Jeff took photos of the pipe before he started his cleanup work. They tell the story and give a glimpse of the promise that we see in this pipe. 
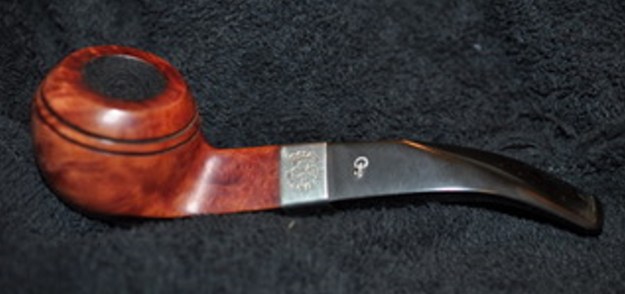
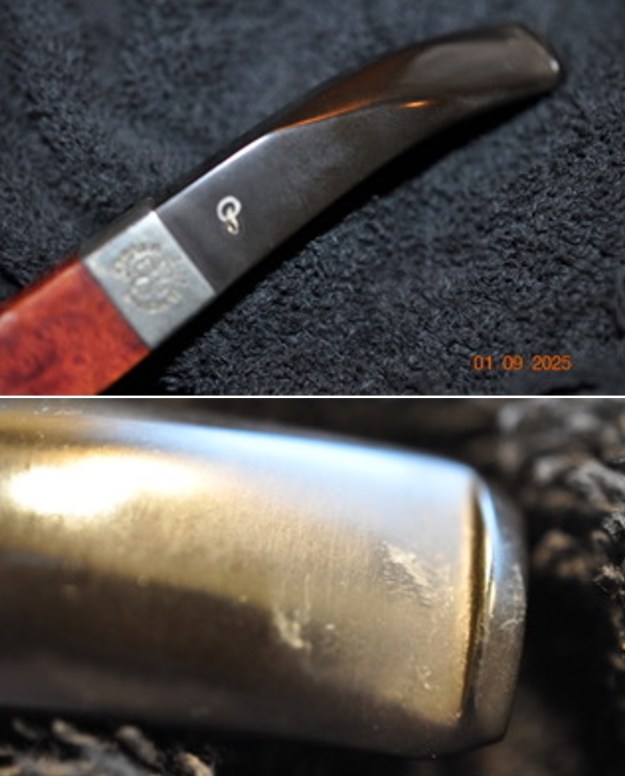
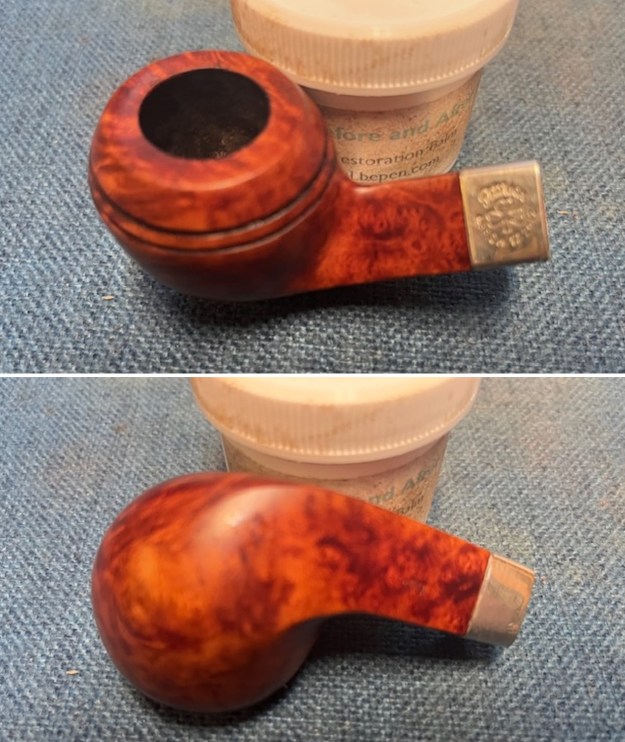
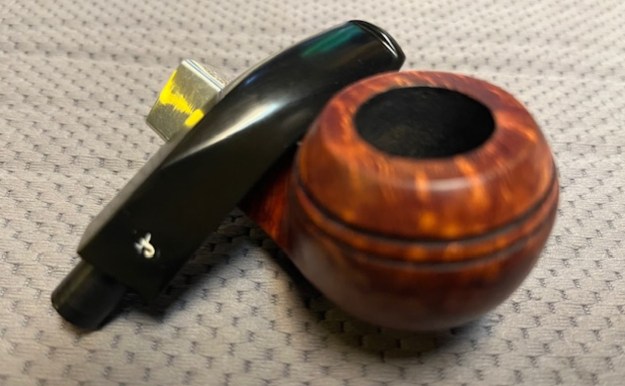
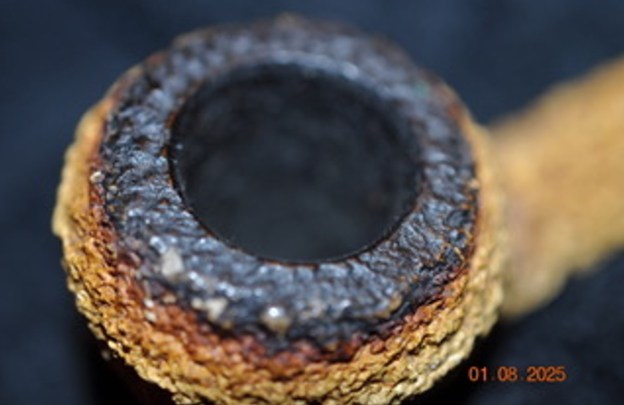
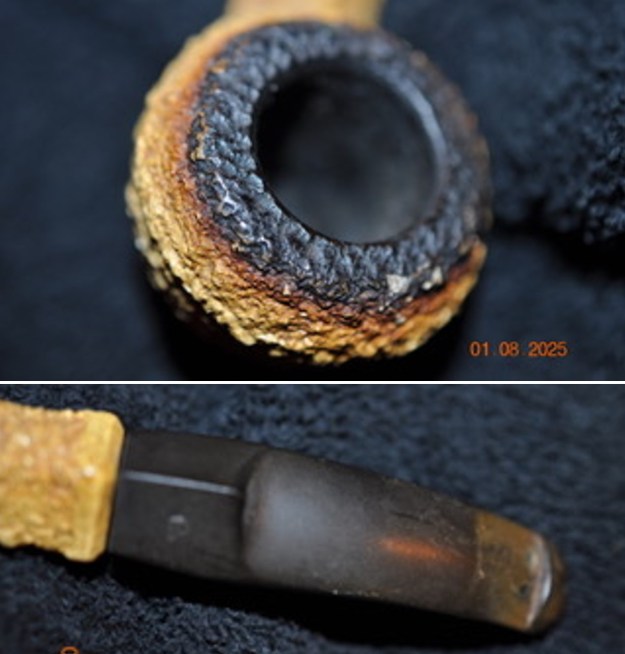
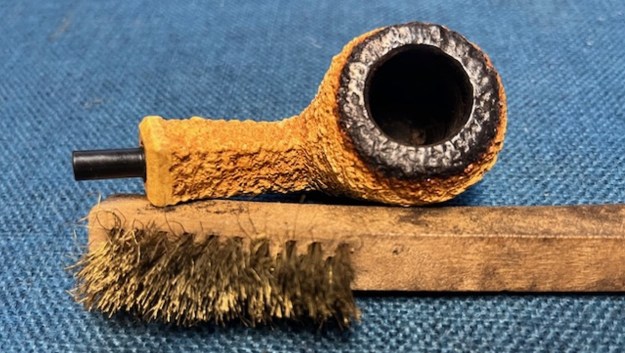
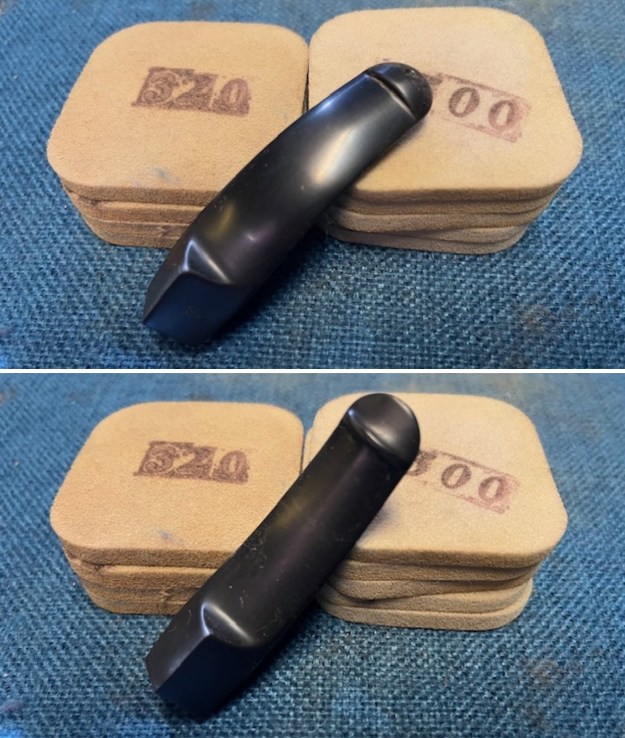
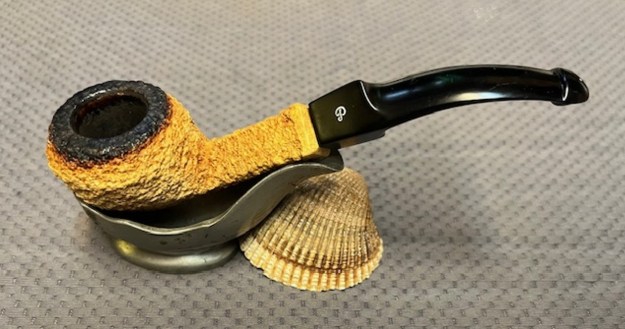
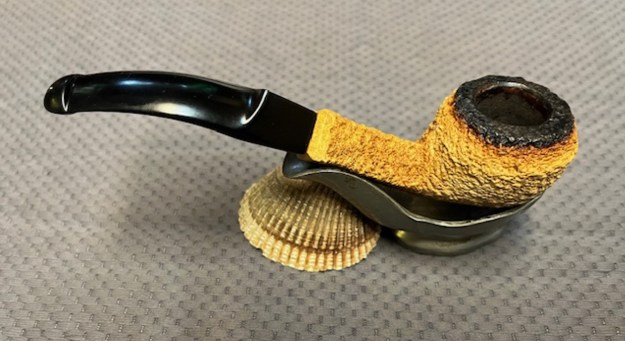
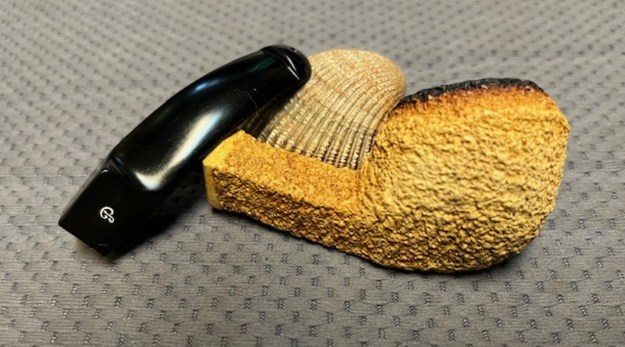
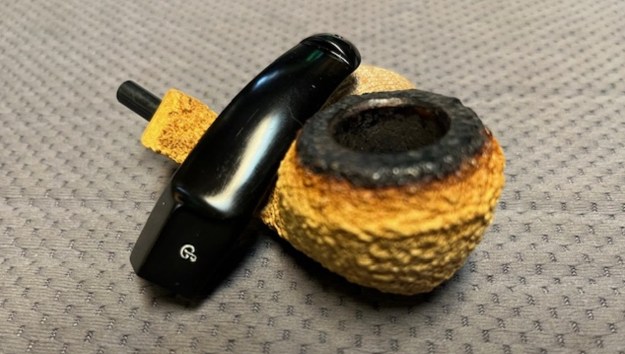
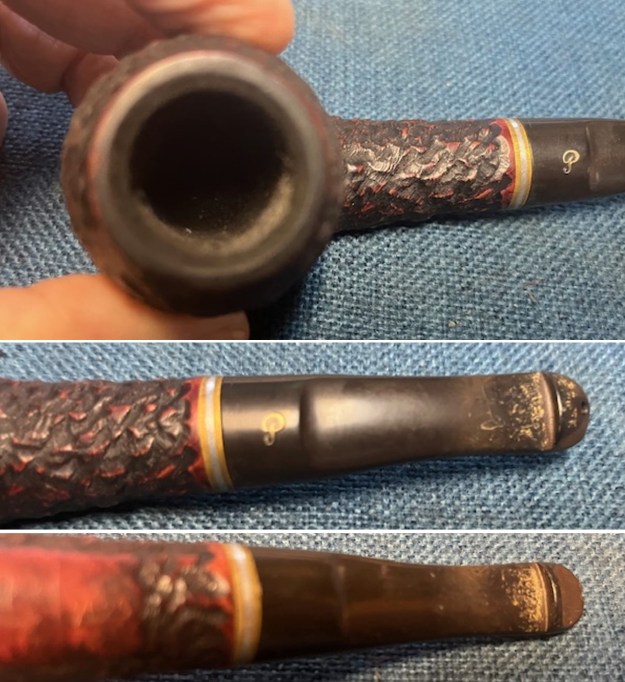
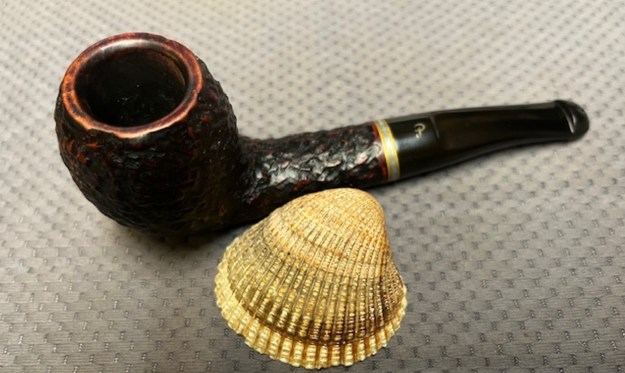
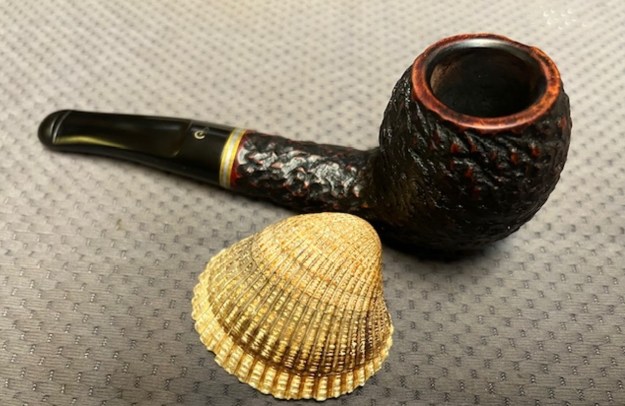
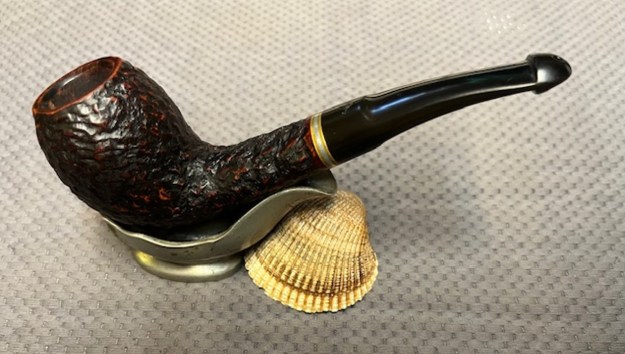
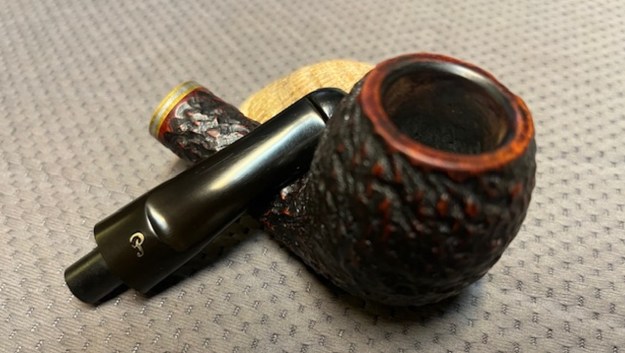
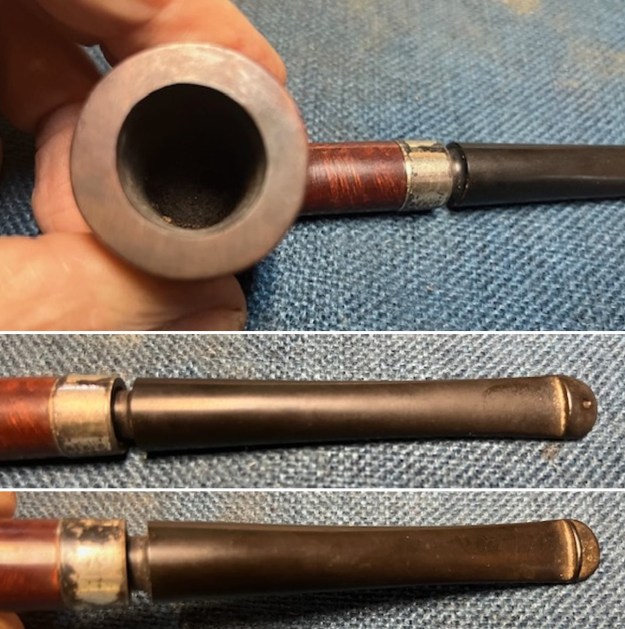
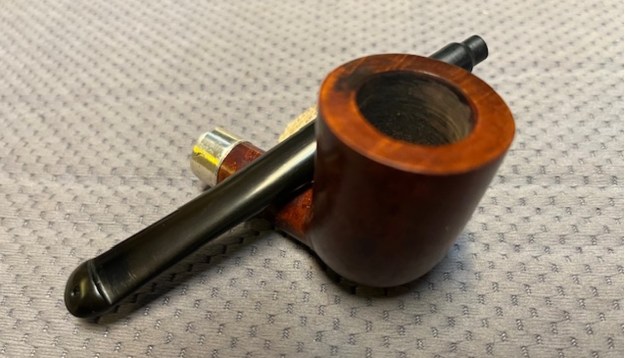
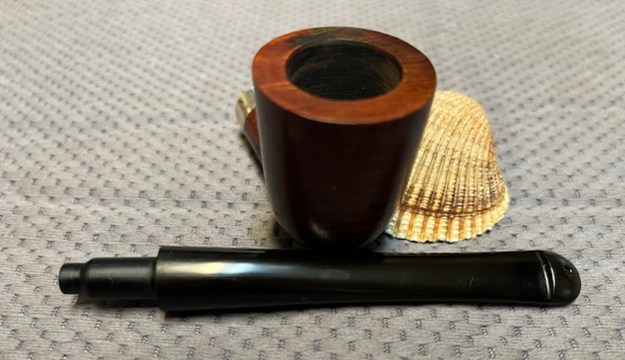
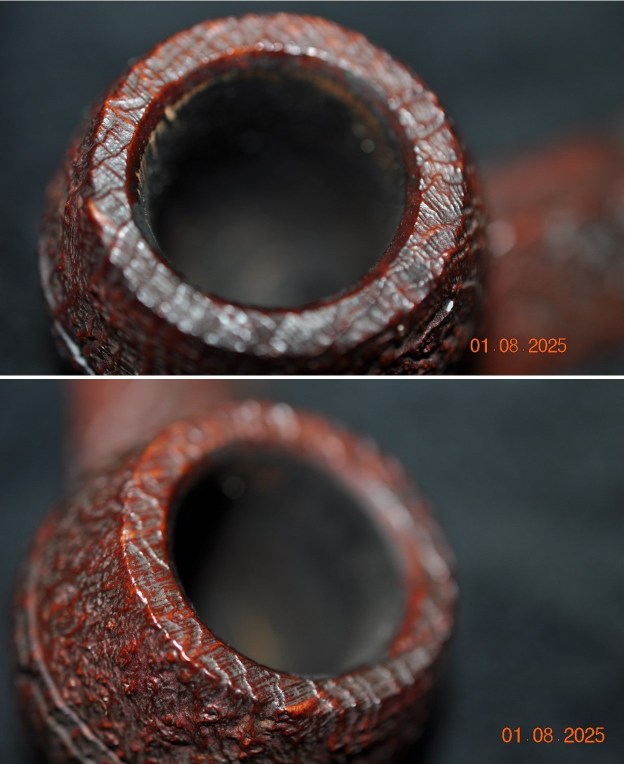
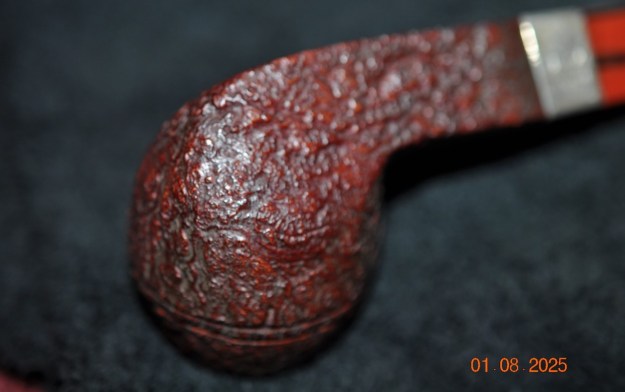
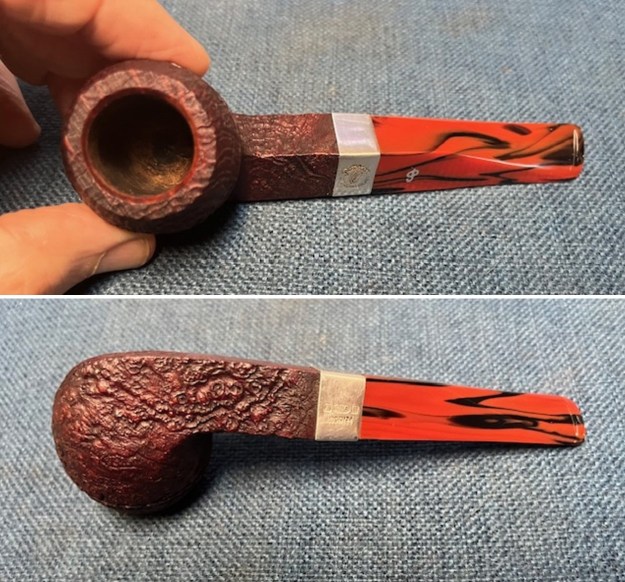
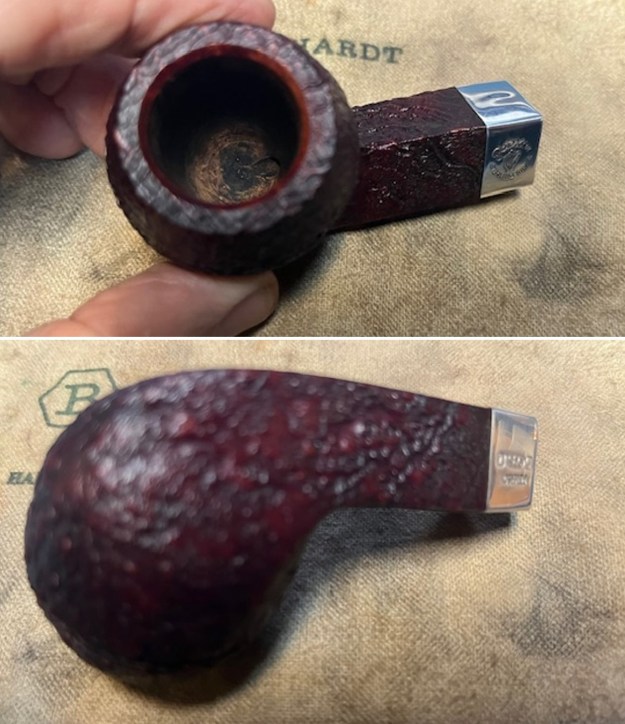
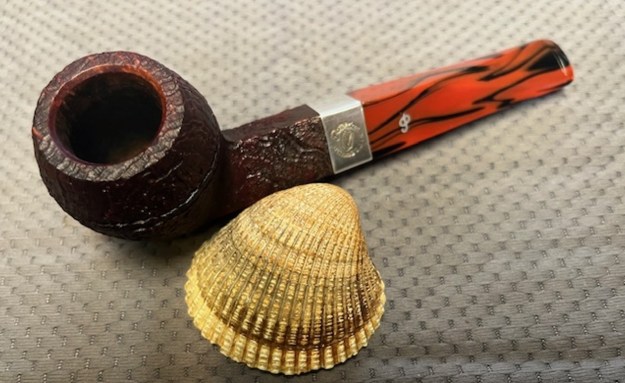
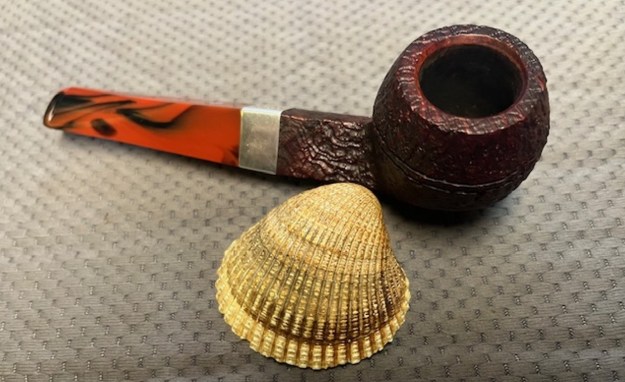
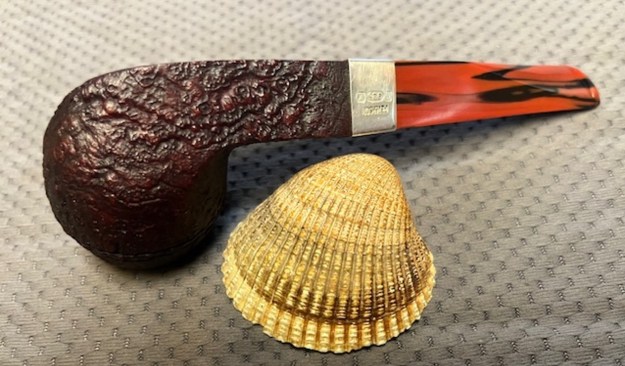
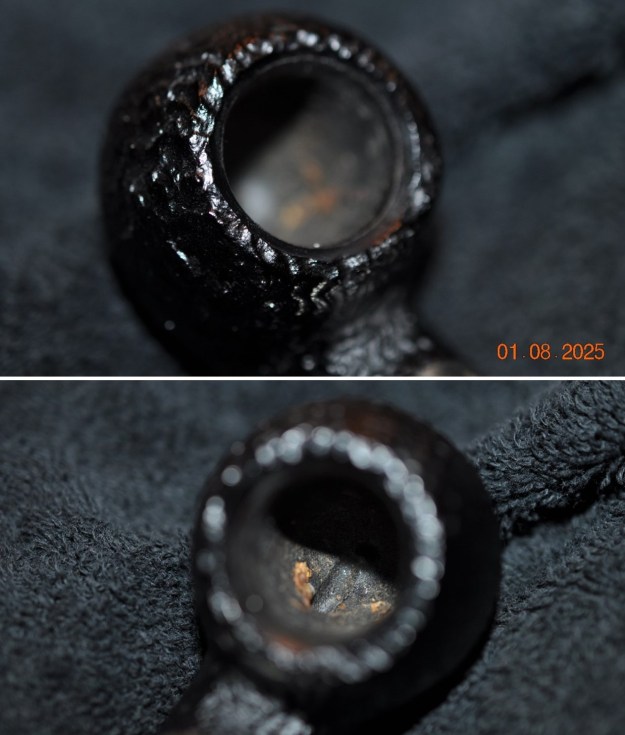
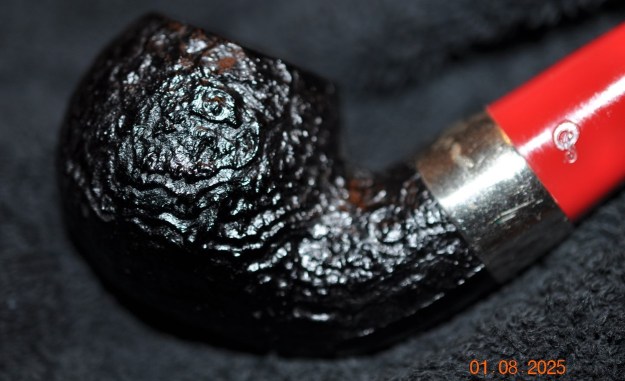
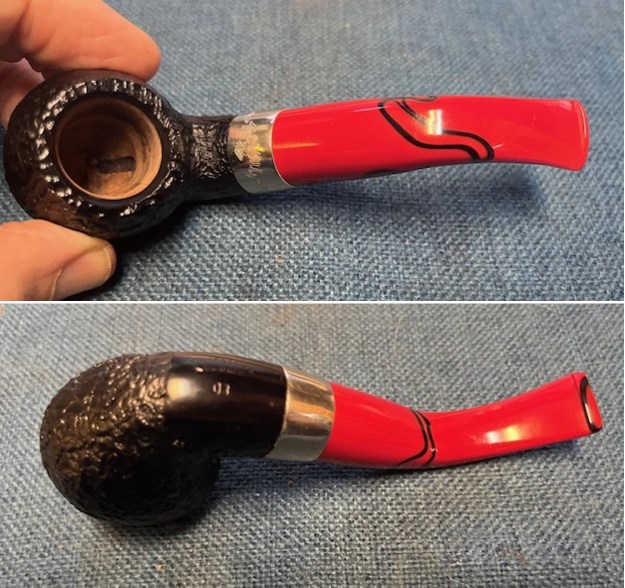
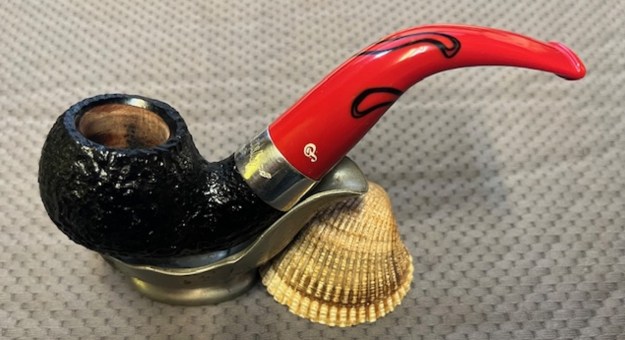
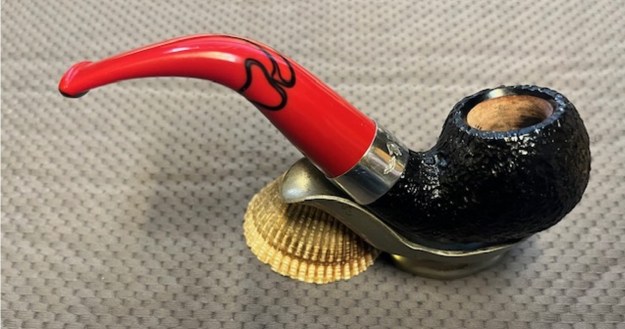
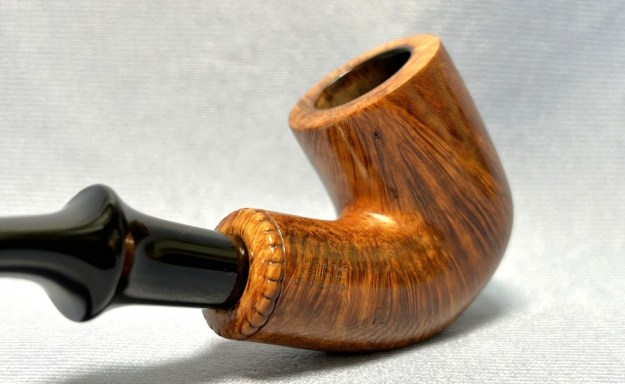
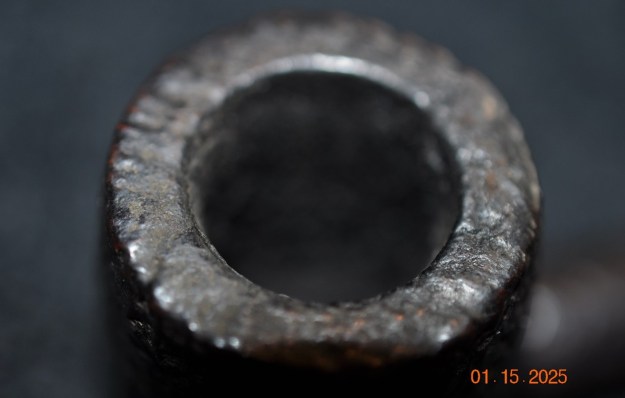
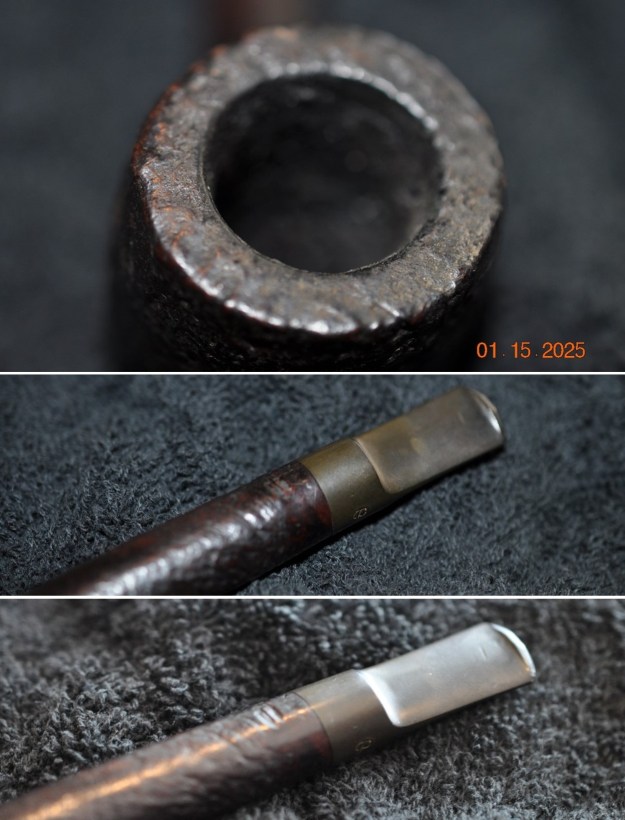
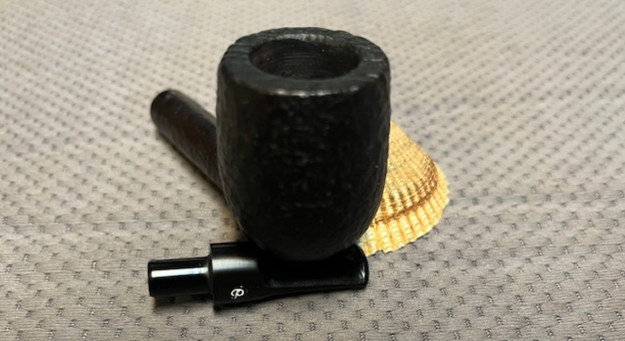
He took a photo of the rim top and bowl to show the current condition. The inner edge and the rim top showed darkening and spots of lava as mentioned above. The photos of the bowl walls show the moderate cake on the walls. The stem photos show the oxidation and light marks on the rim top on both sides. 
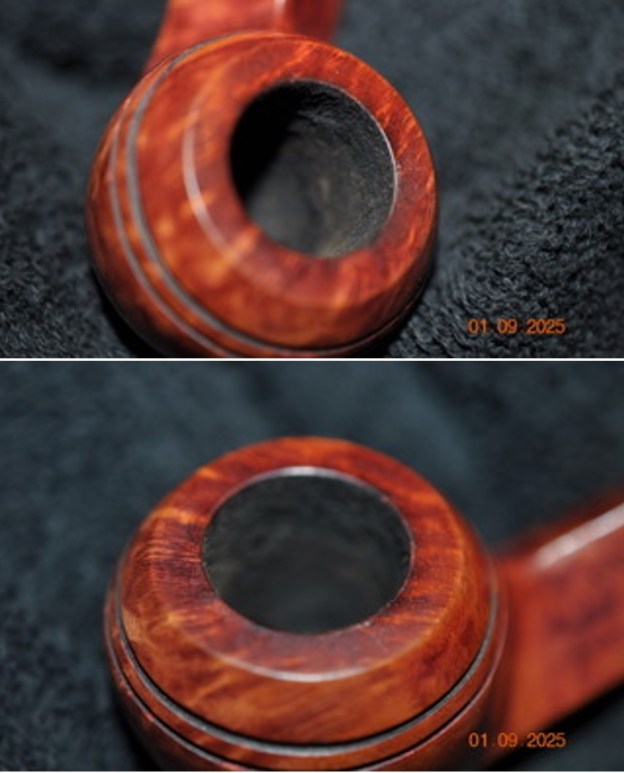
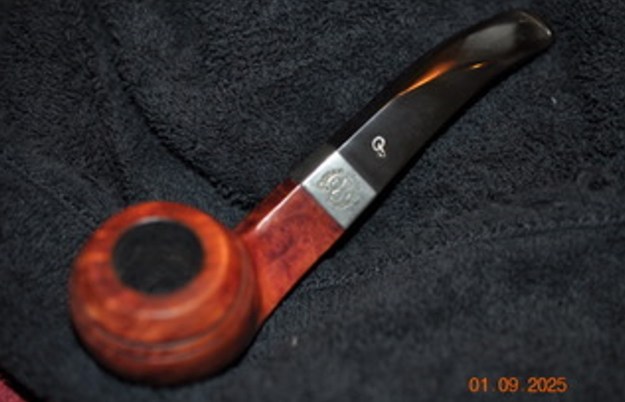
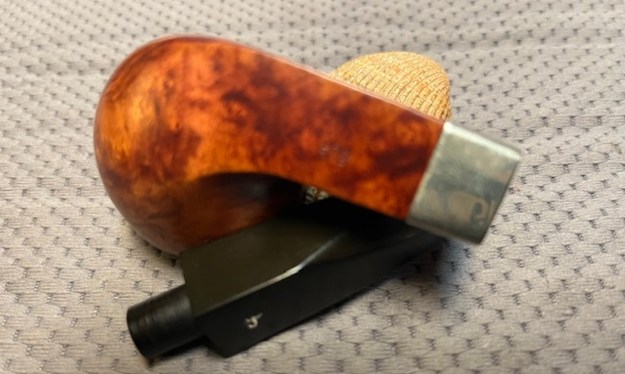
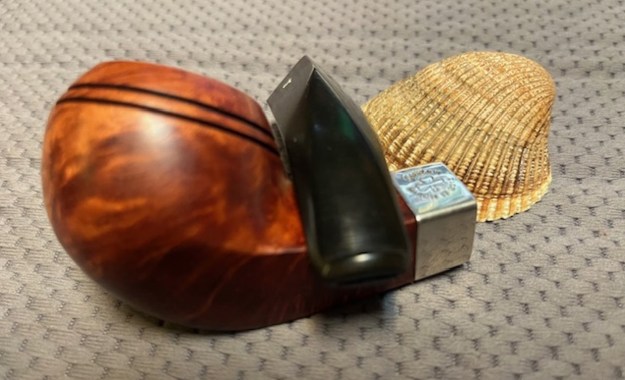
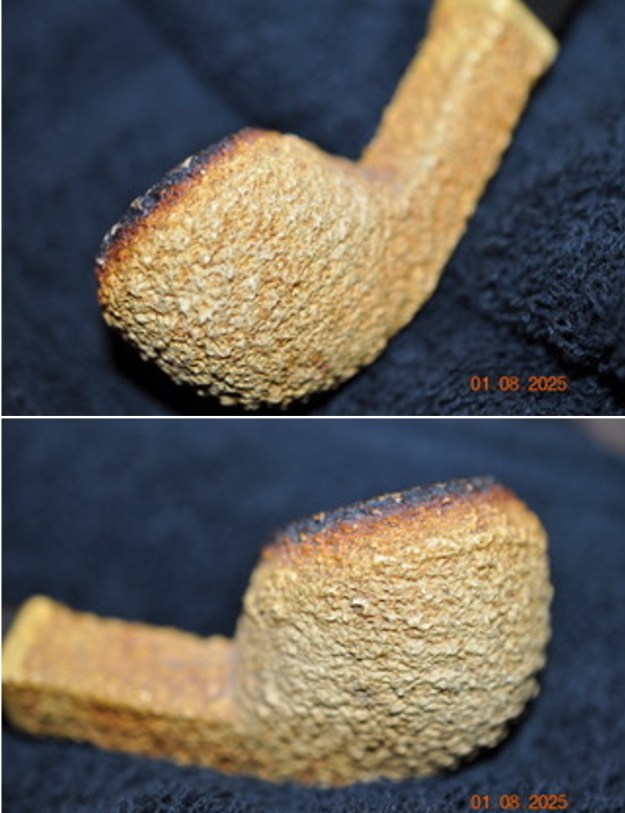
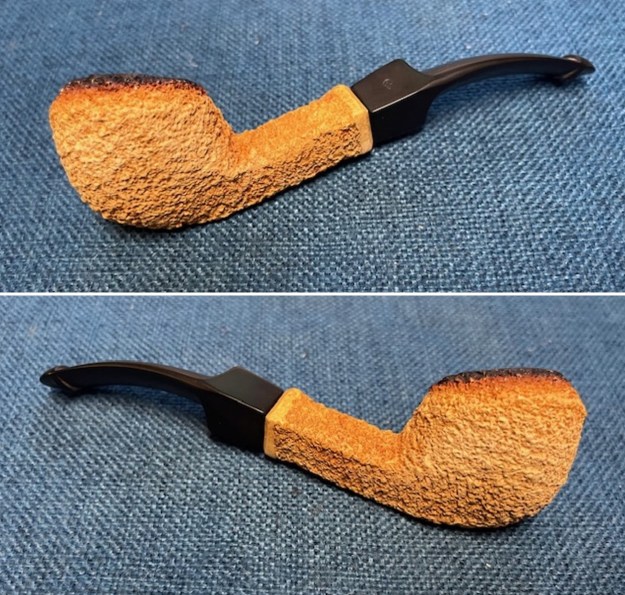
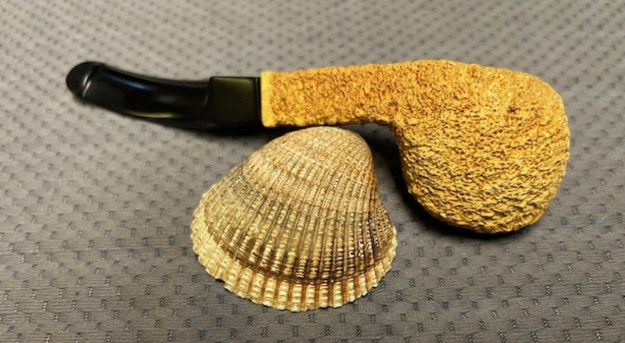
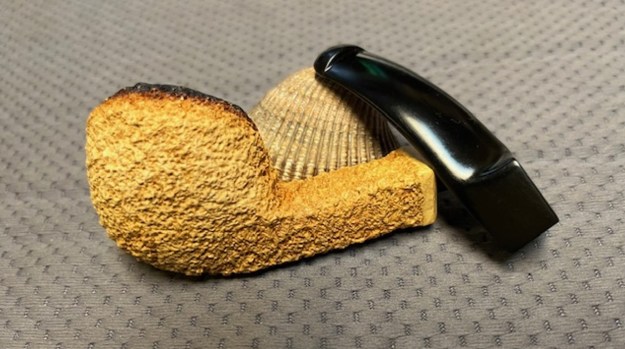
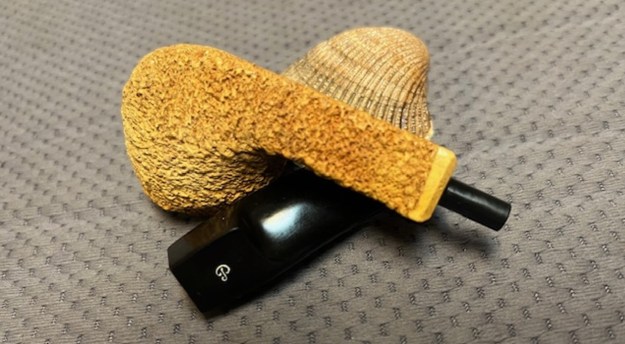
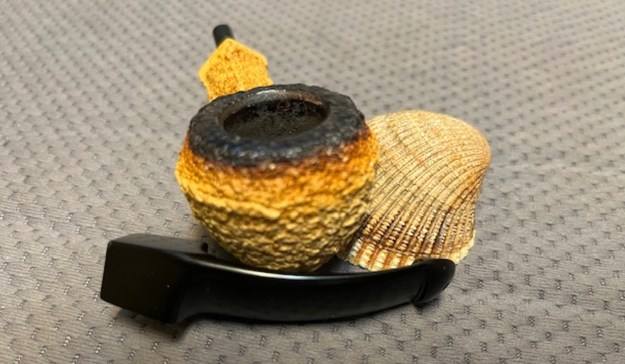
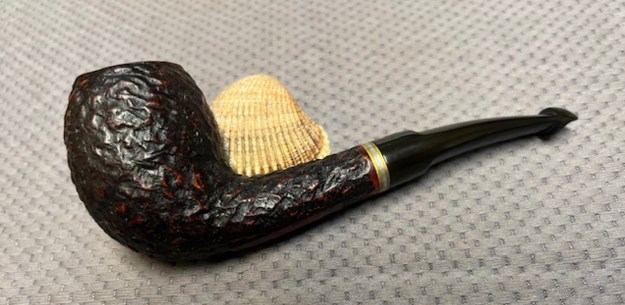
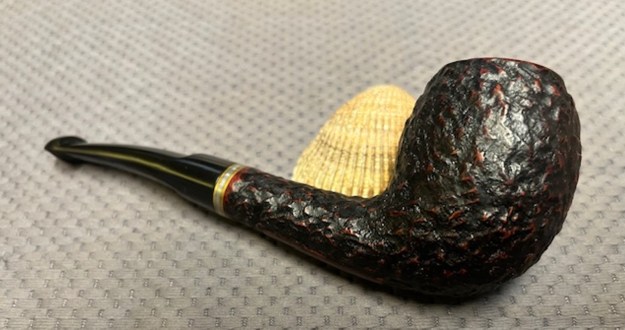
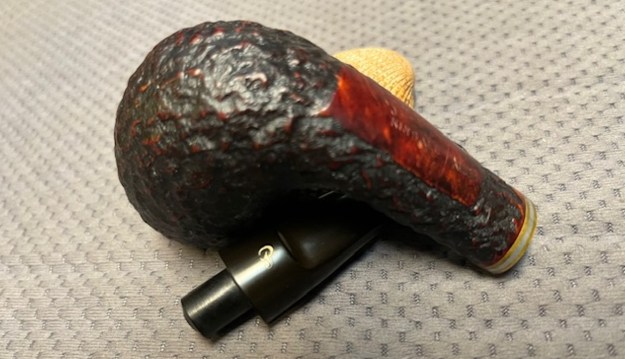
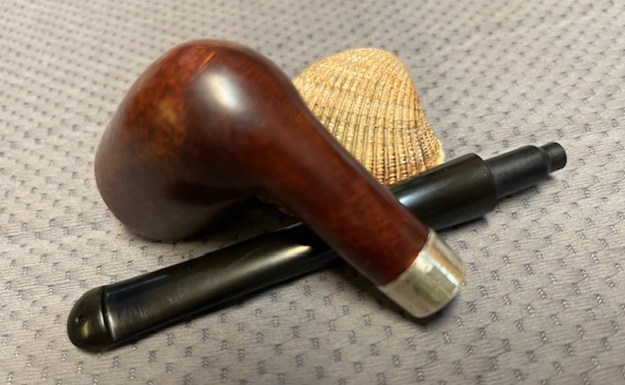
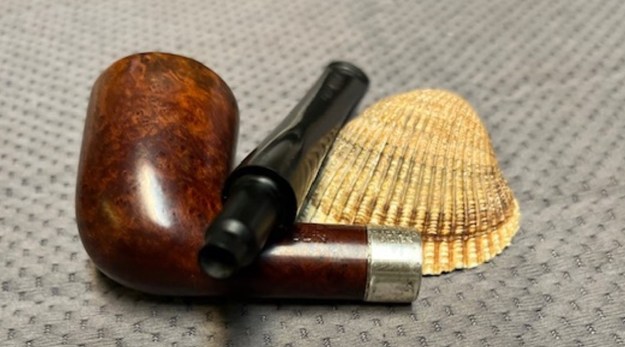
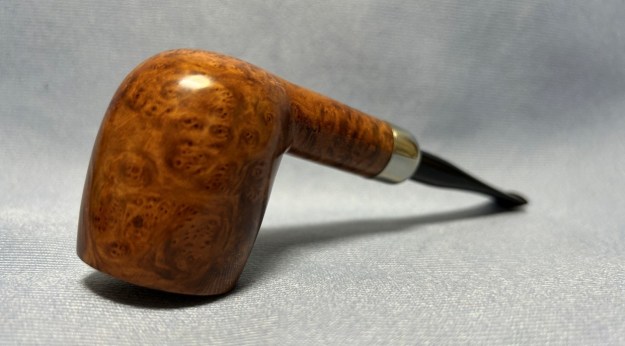
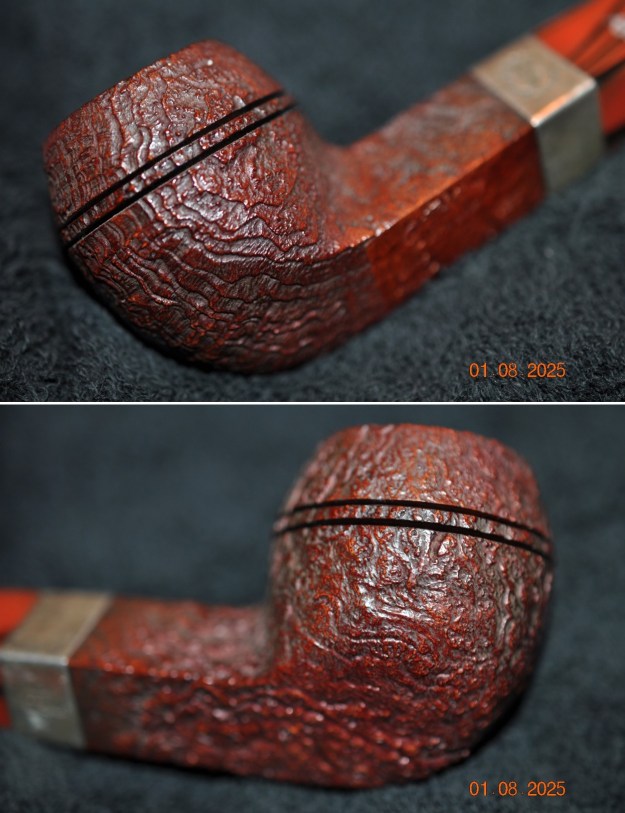
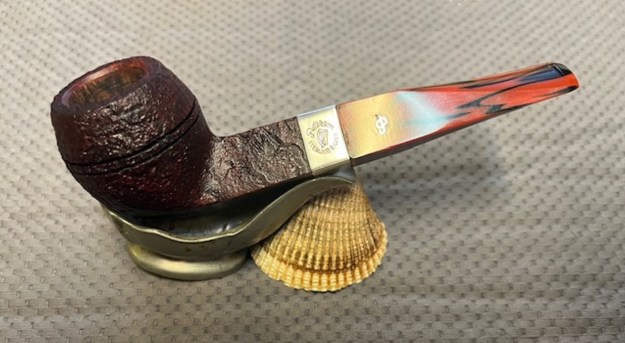
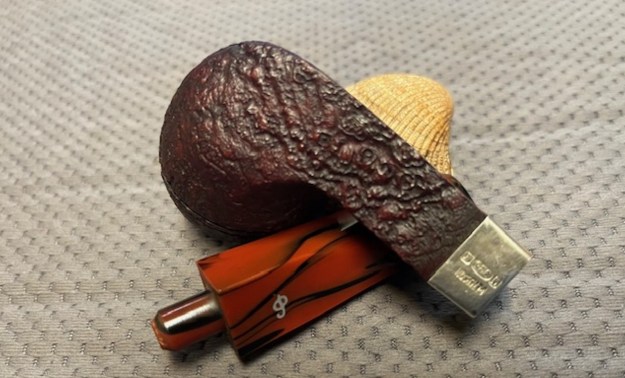
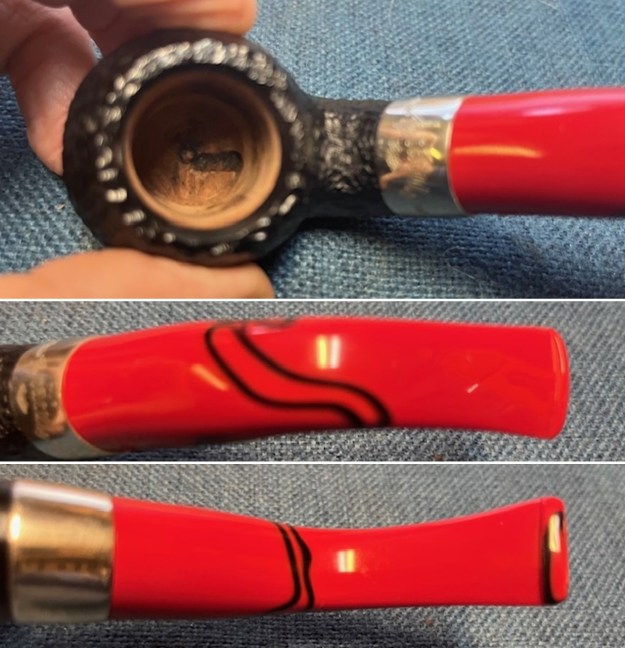
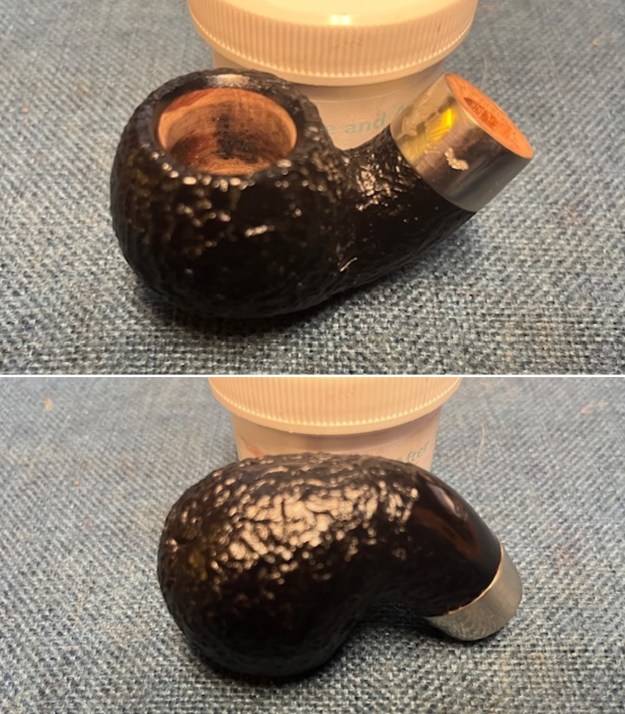
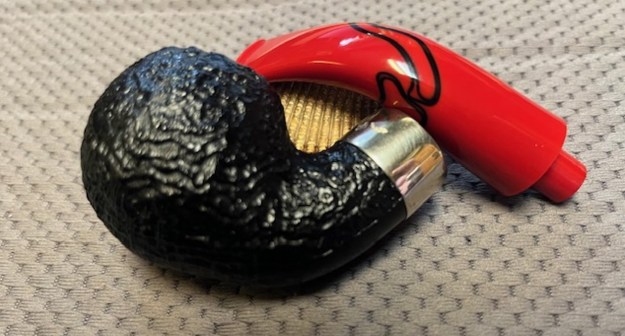
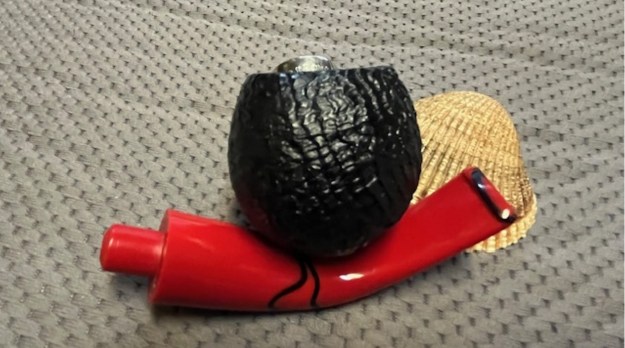
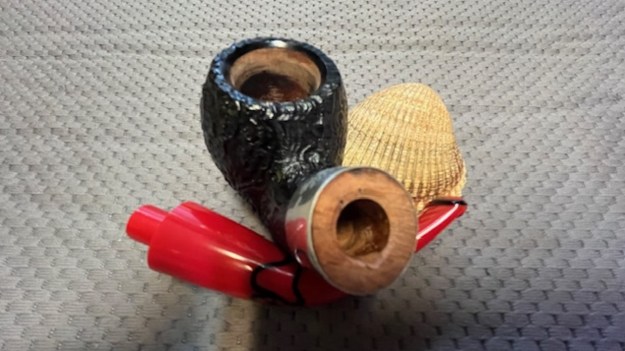
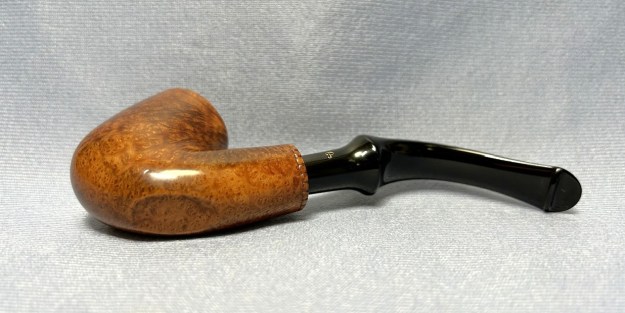
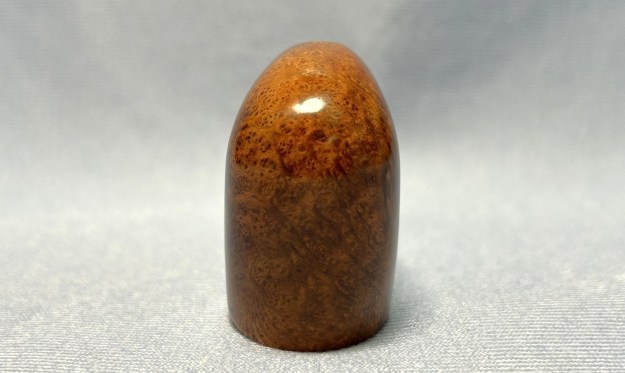
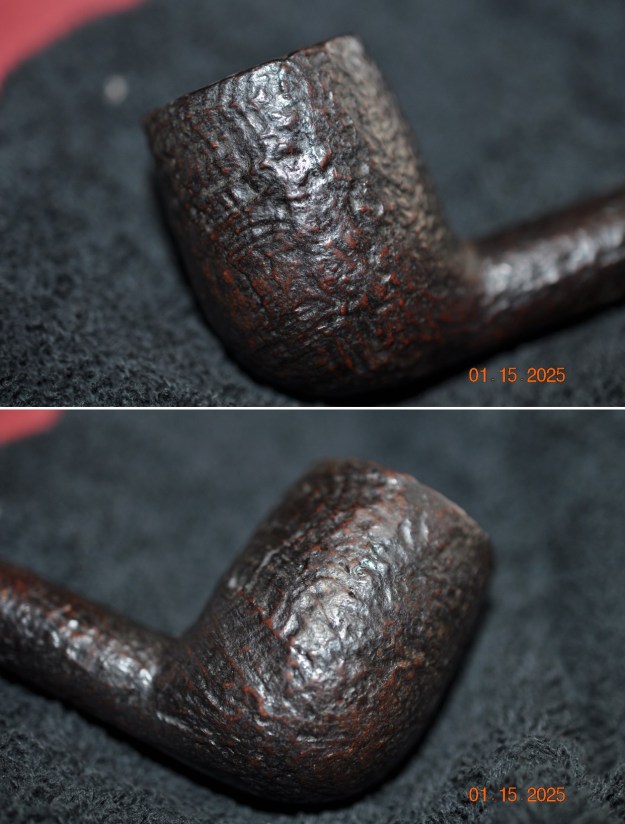
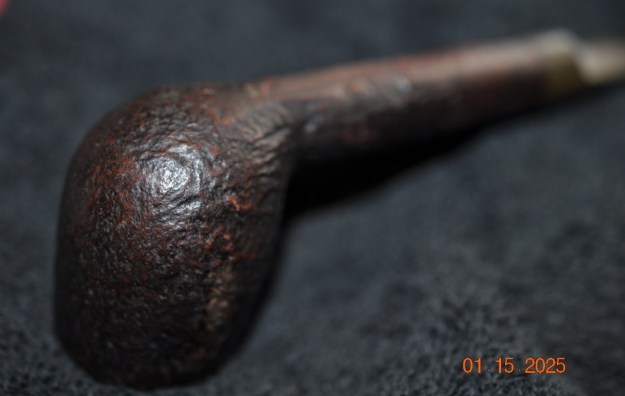
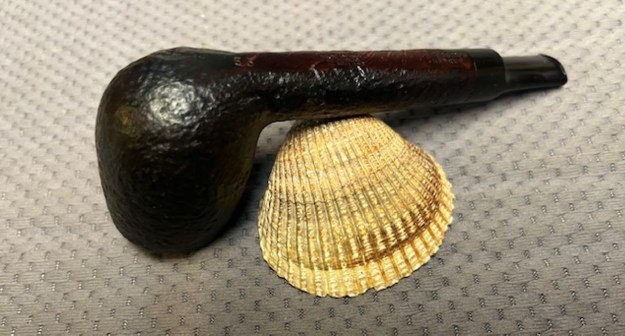
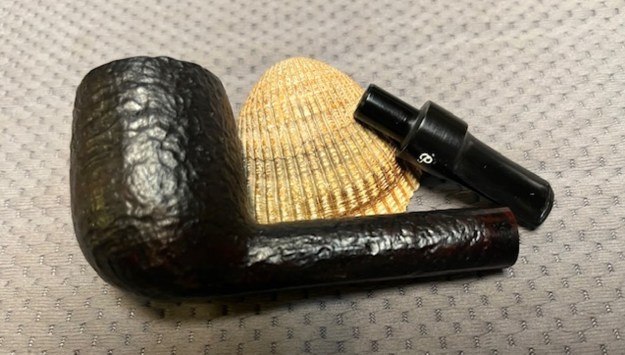
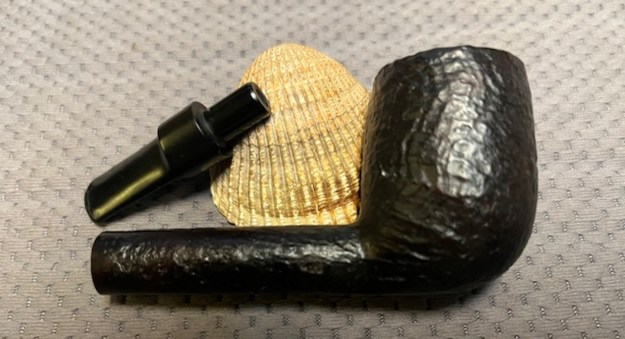
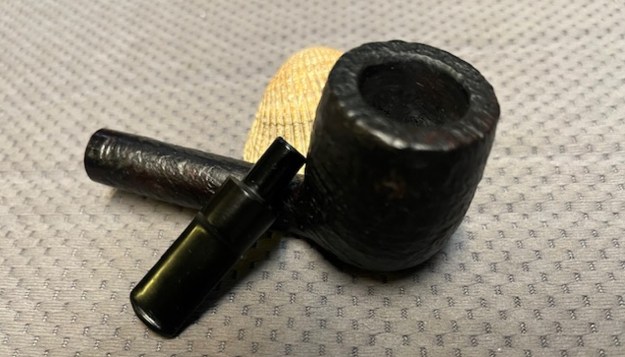
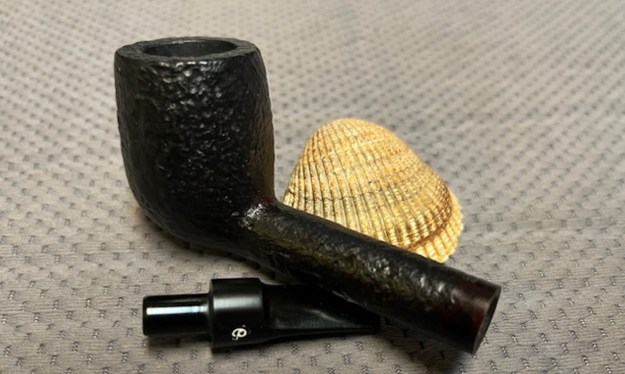
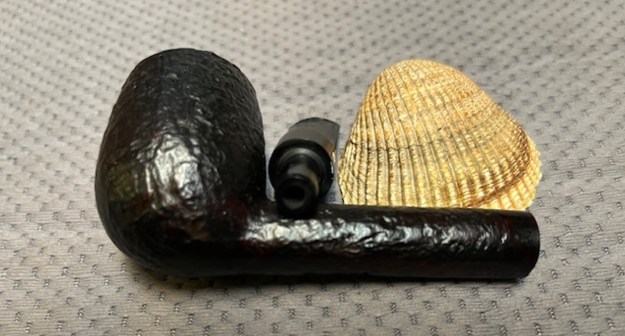
Jeff took photos of the sides and heel of the bowl to give a sense of the condition of the bowl and the grain around the bowl. It is a beauty.
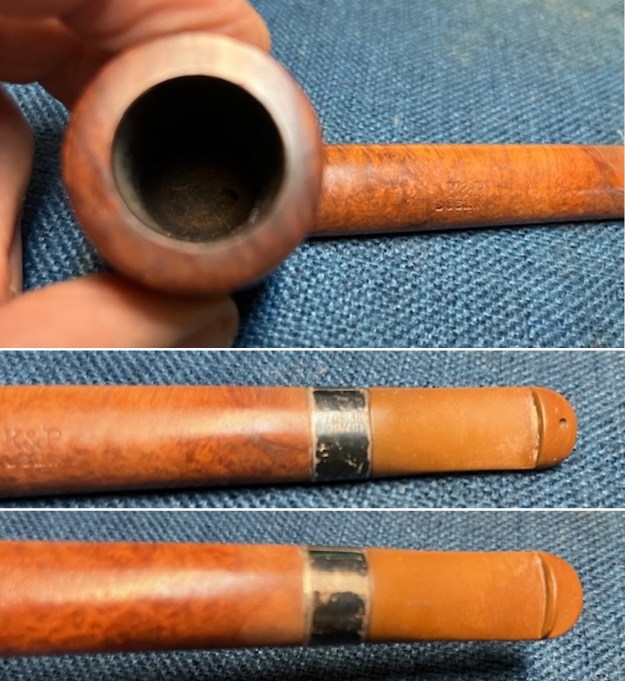
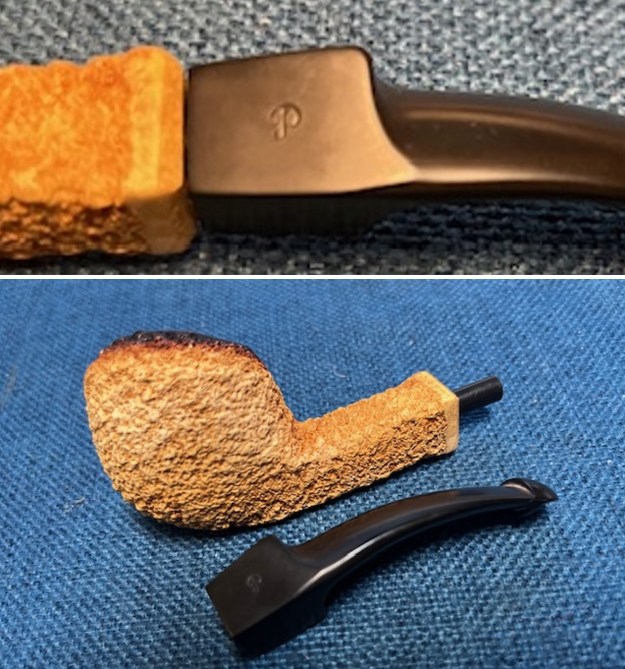
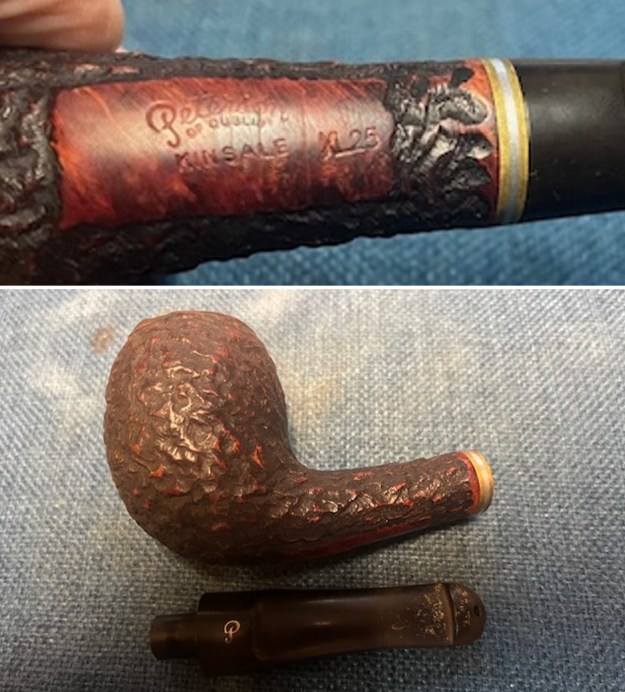
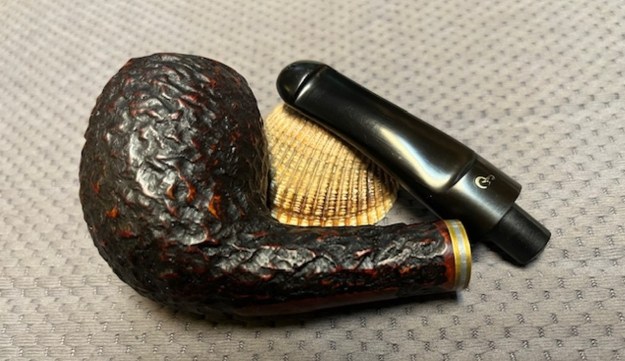
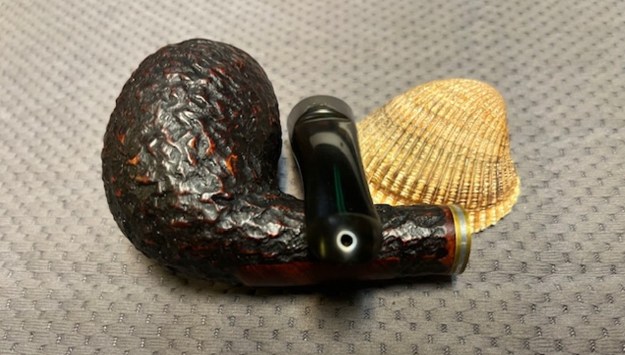
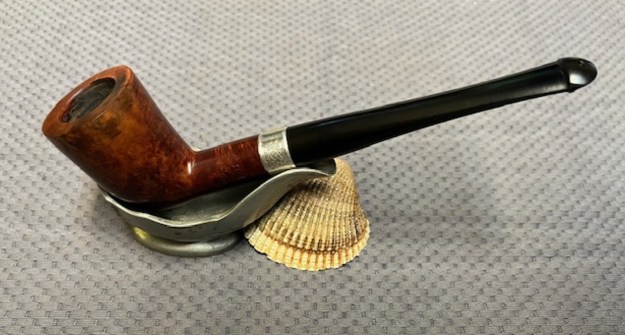
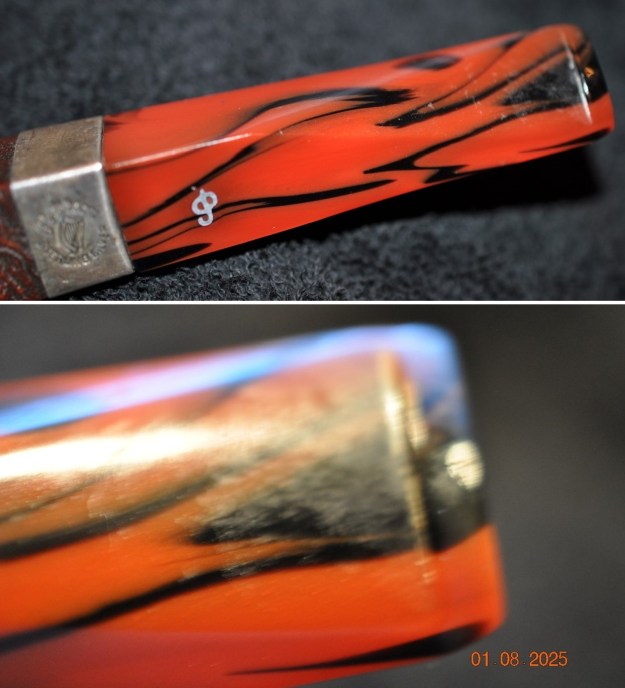
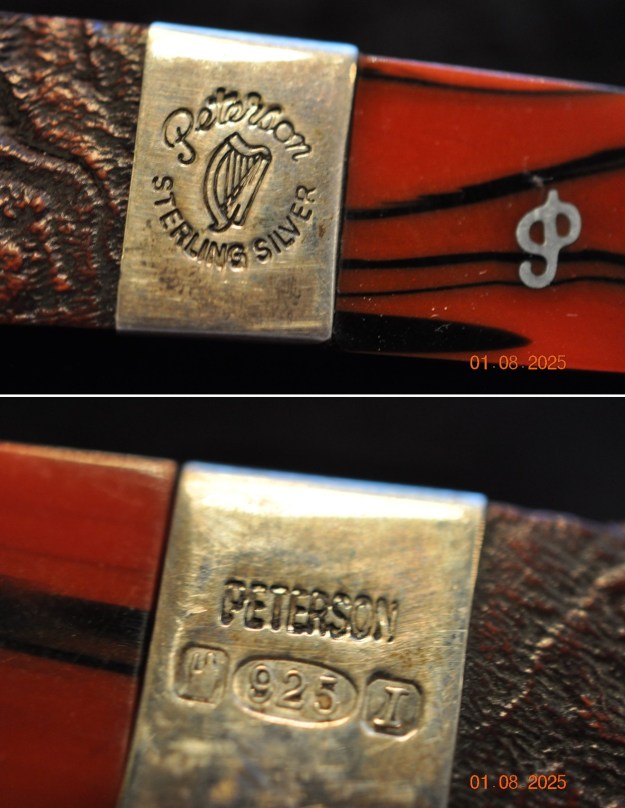
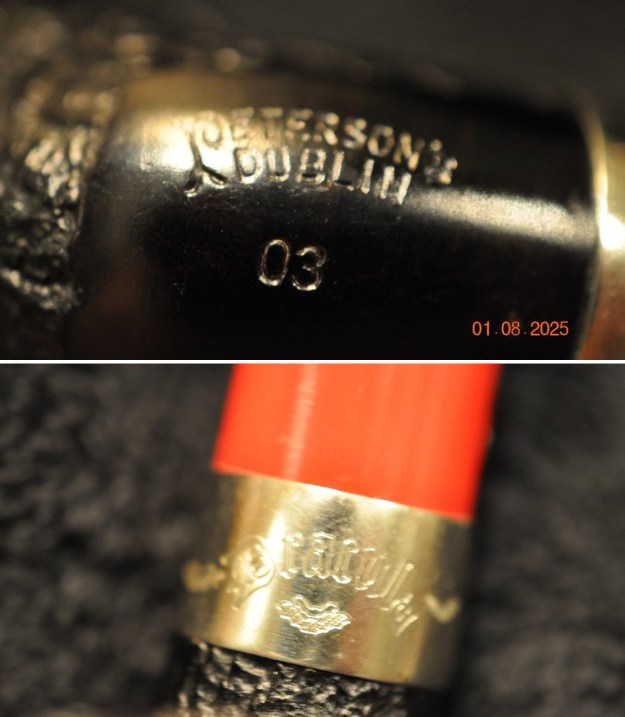
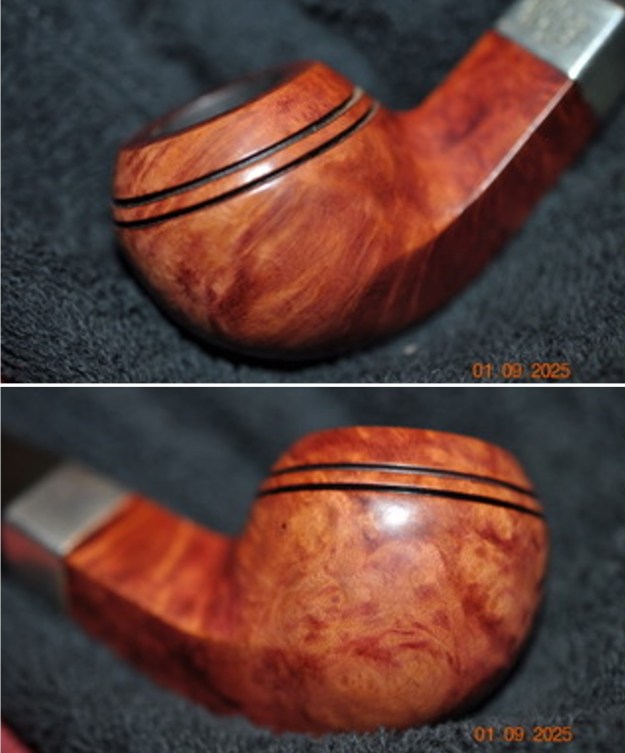
He took photos of the shank sides to capture the stamping on the shank and the band. The white “P” logo on the left side of the stem is also very clean. 
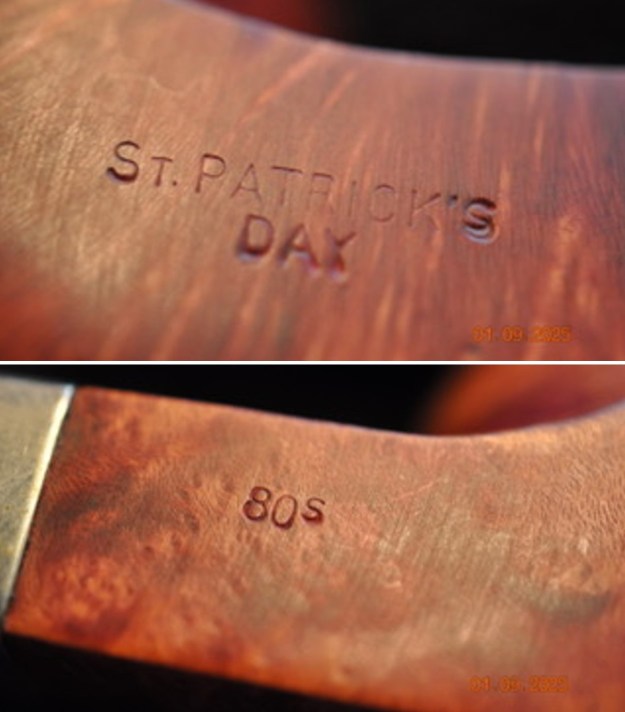
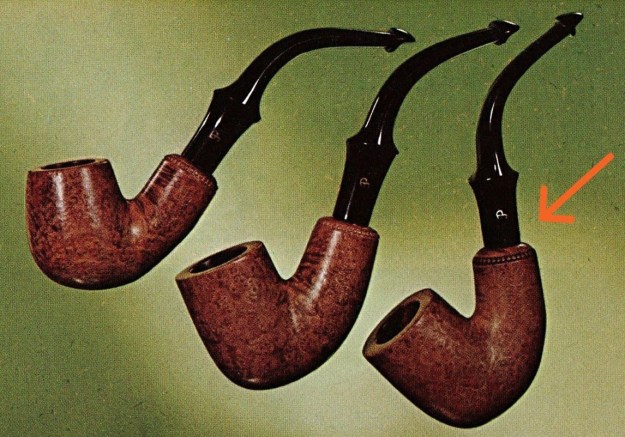
On Mark Irwin’s Petersonpipenotes blog he gives a great history of the St. Patrick’s Day pipes. It is a great read and includes a pictorial tour of the line. It is very helpful. Here is the link (https://petersonpipenotes.org/84-a-visual-history-of-the-st-patricks-day-pipes-1998-2018/).

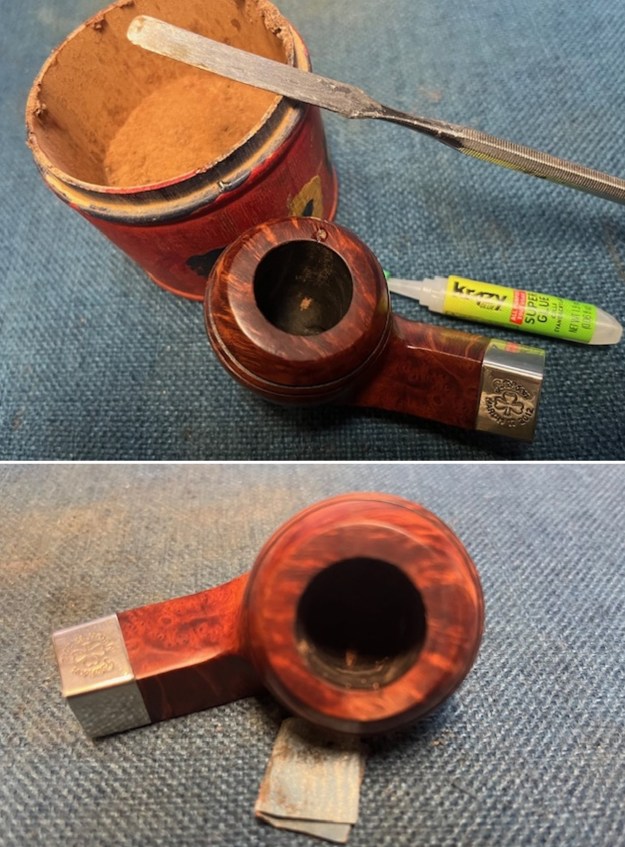
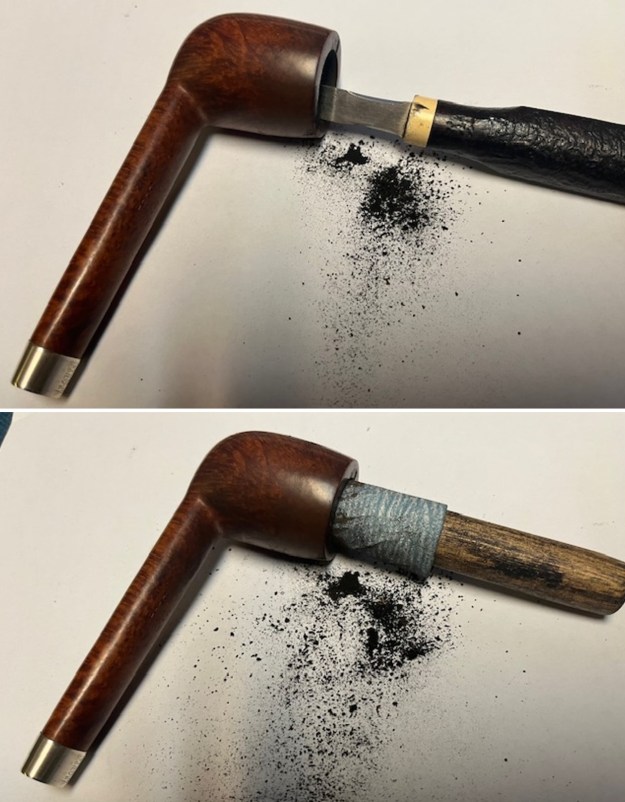
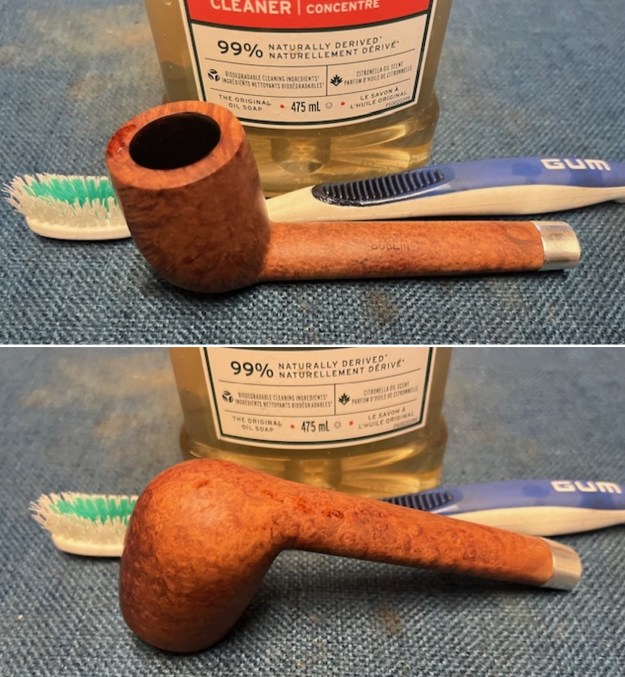
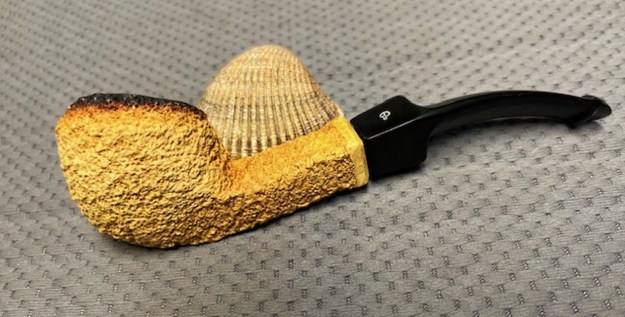
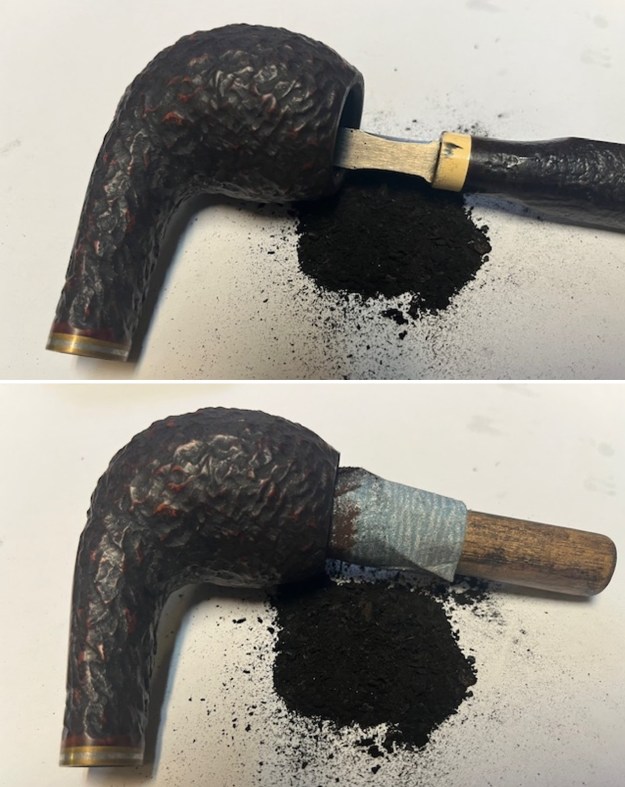
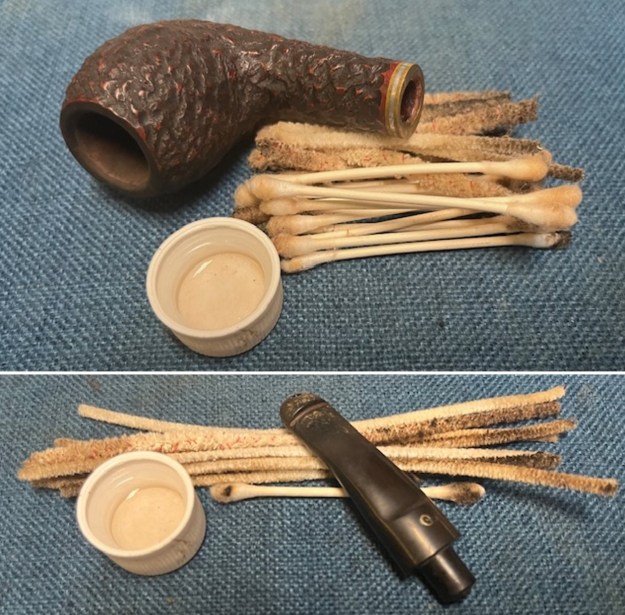
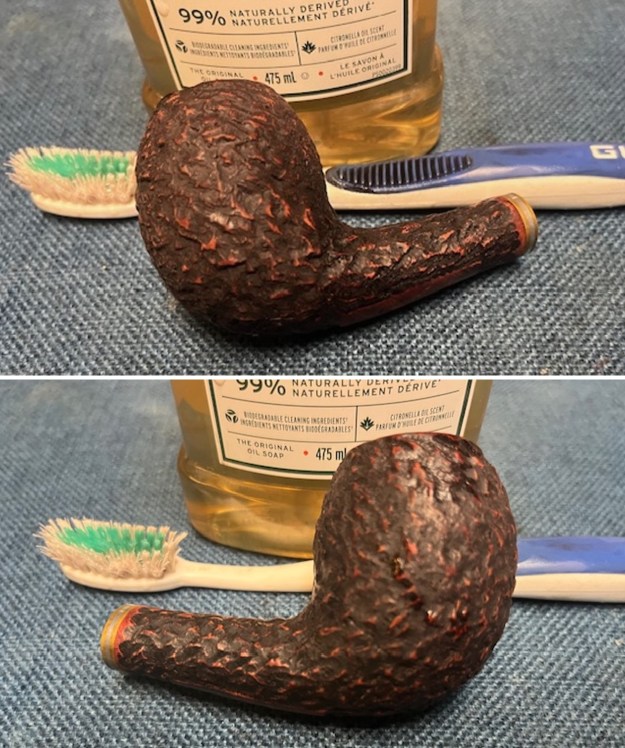
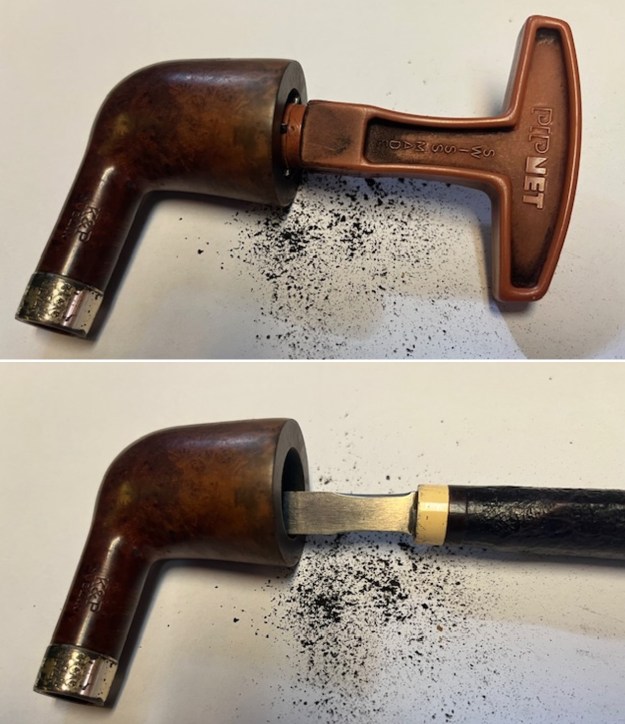
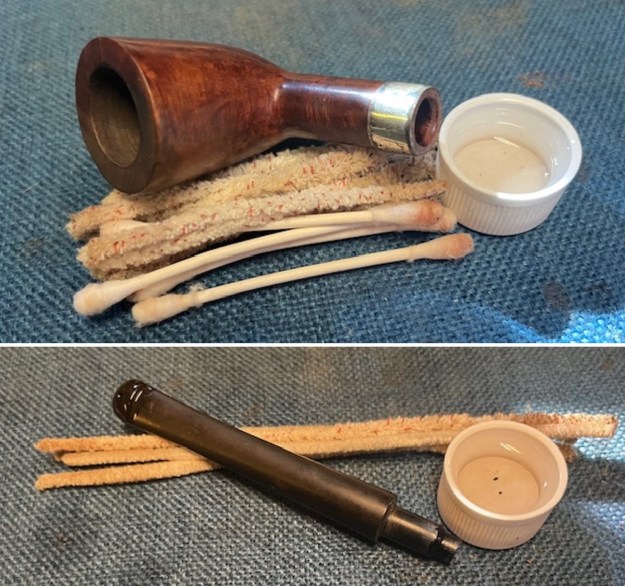
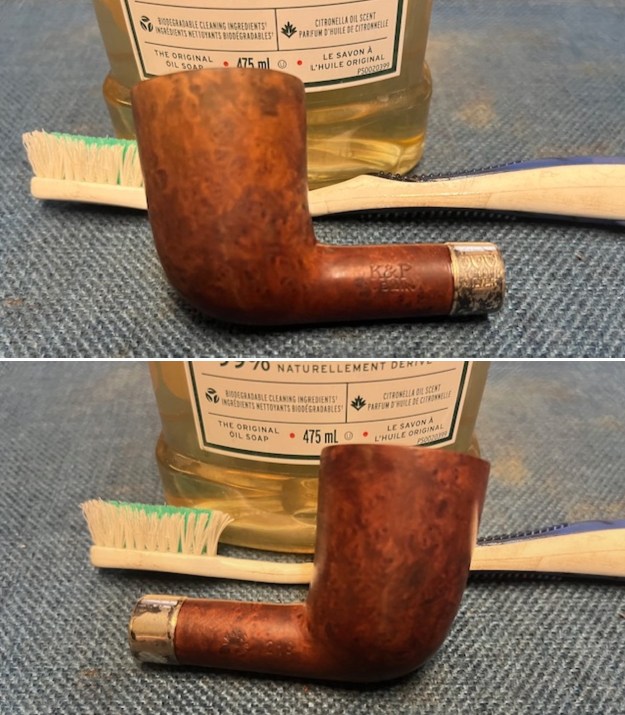
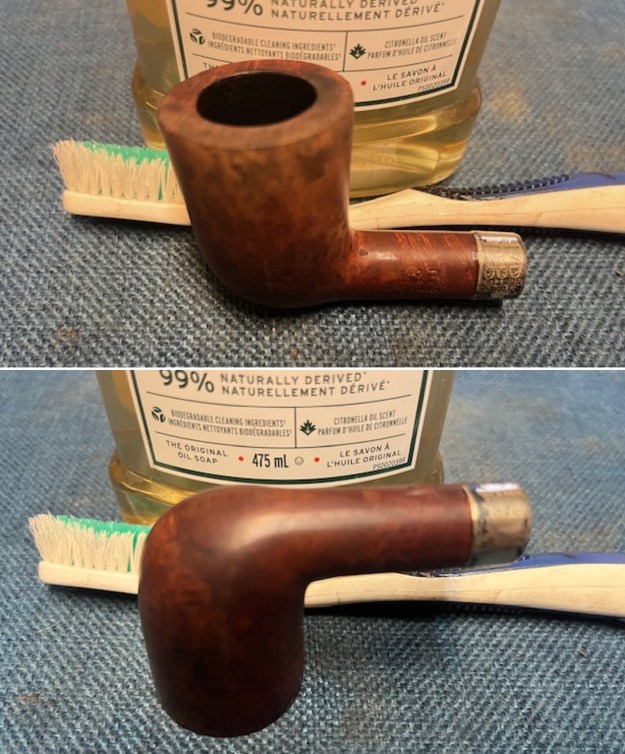
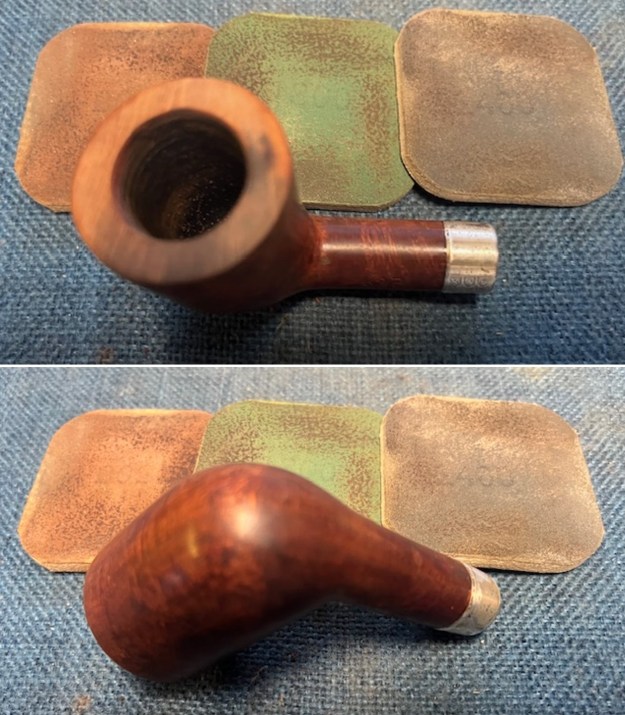
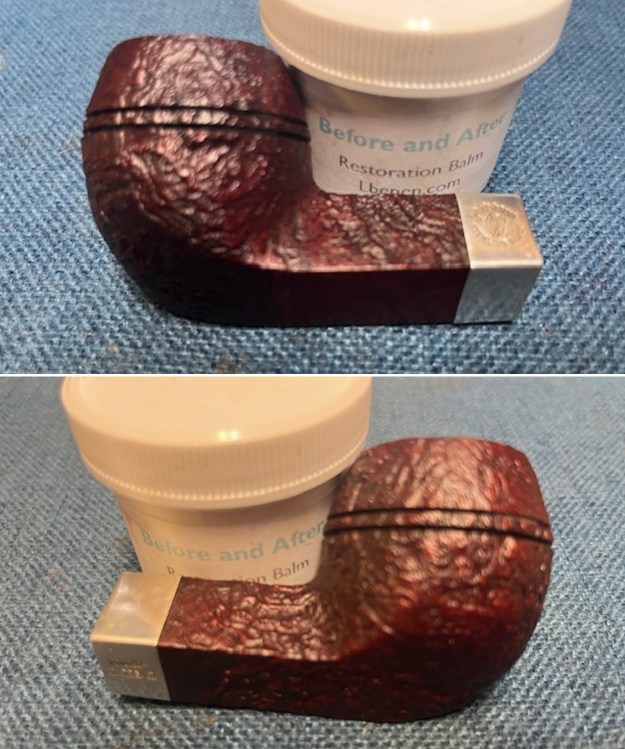
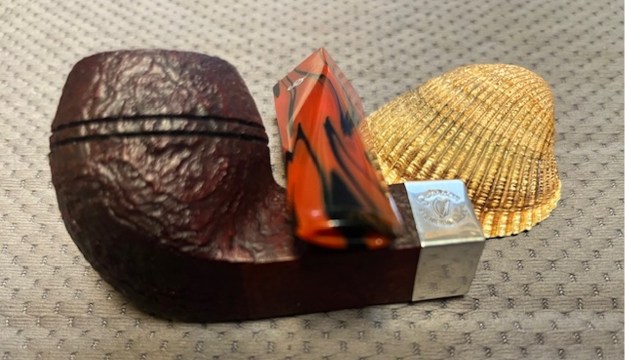
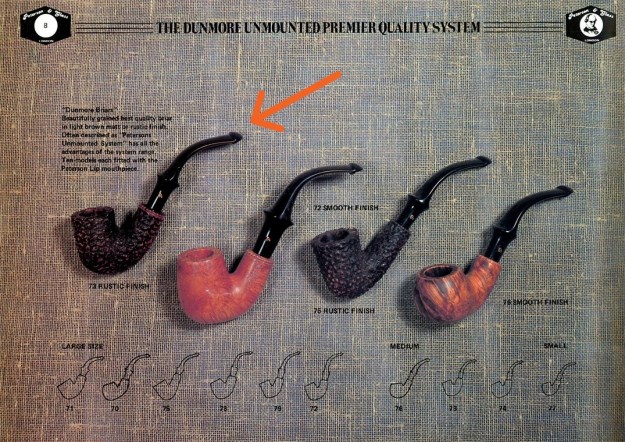
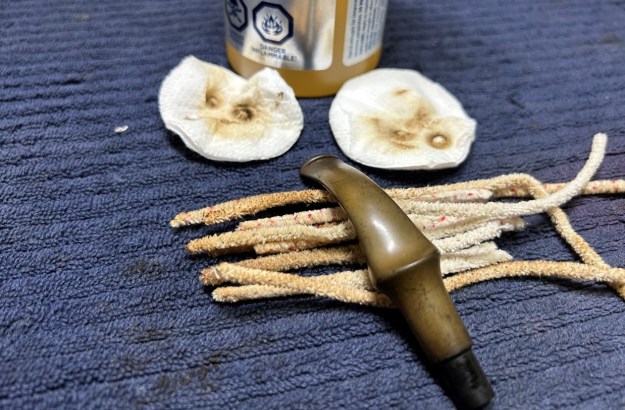
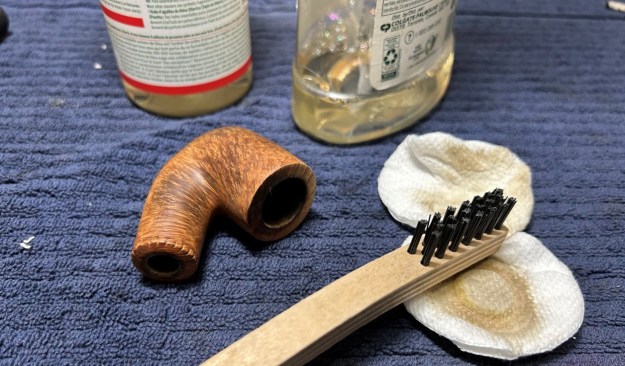
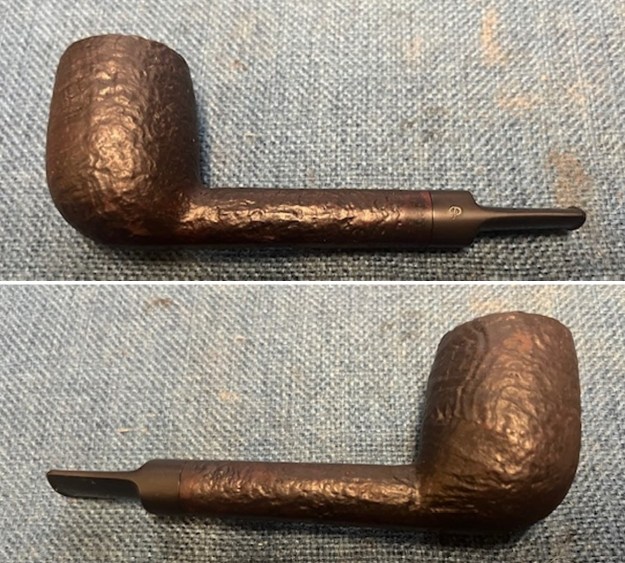
He includes the following information and a photo of the pipe that is very similar to the 80S I am working on. It is notable that he comments that the shape is a classy, English-style 80s bent bulldog: perfect for your favorite Latakia bomb!
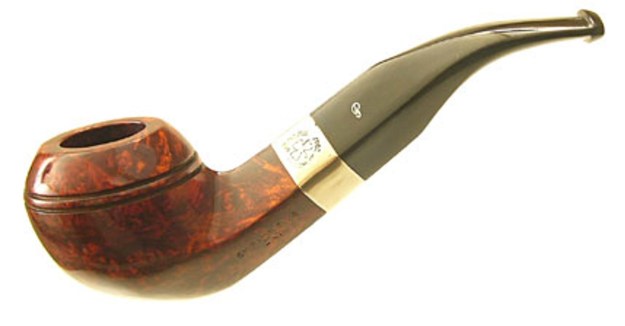
Now it was time to work on the pipe. Since Jeff always follows the same pattern of work in his cleanup we do not include photos but rather just a simple summary. Jeff reamed the bowl with a PipNet pipe reamer and followed up with a Savinelli Fitsall pipe knife to remove the cake. He scrubbed out the mortise and the airway in the shank and the stem with alcohol, cotton swabs and pipe cleaners. He scrubbed the exterior of the bowl, rim, shank and stem with a tooth brush and Murphy’s Oil Soap to remove the oils and tars on the rim and the grime on the finish of the bowl. He rinsed it under running water. He dried it off with a soft cloth. He was able to remove the spotty lava build up on the rim top and you could see the damages to the top and edges of the rim. I think this pipe may well been before we worked with Mark Hoover’s Before & After Deoxidizer so he cleaned the internals and externals. The stem was clean but lightly oxidized. I took photos of what the pipe looked like when I brought to my worktable. 
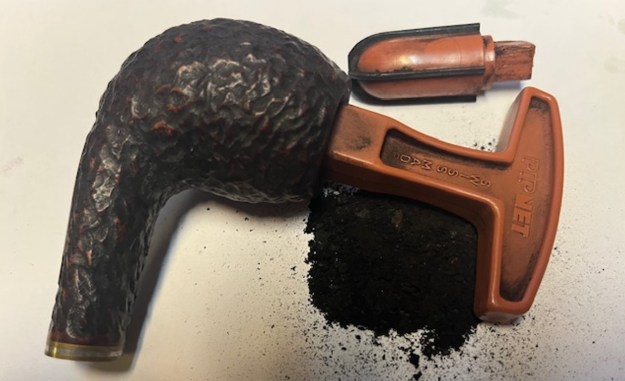
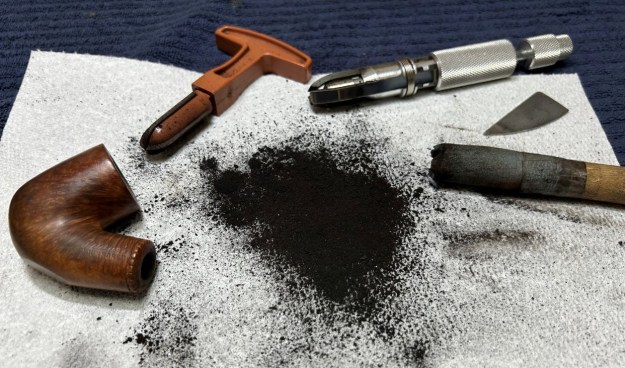
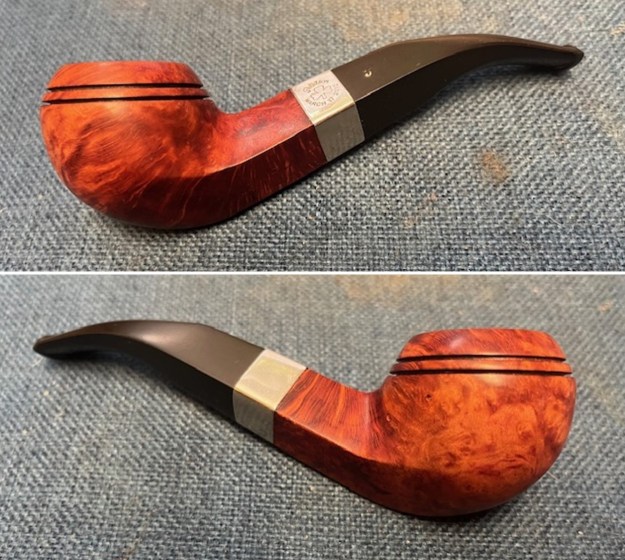
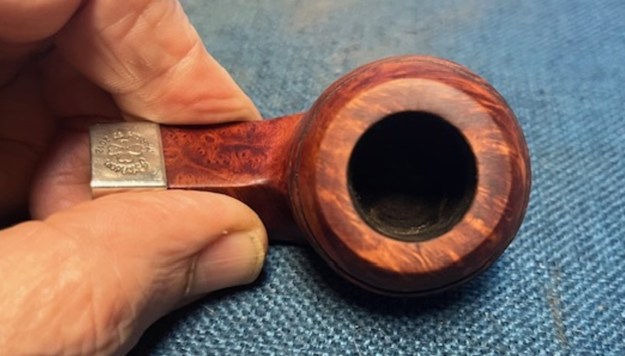
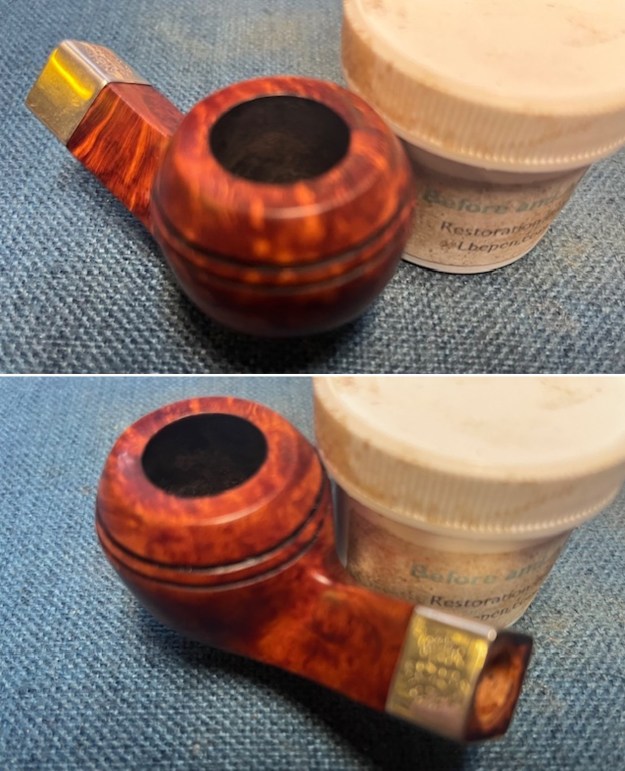
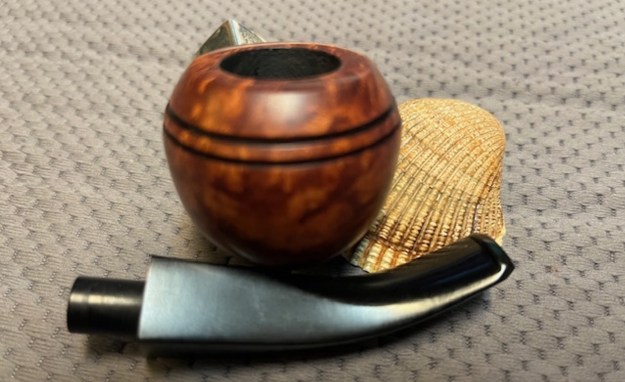
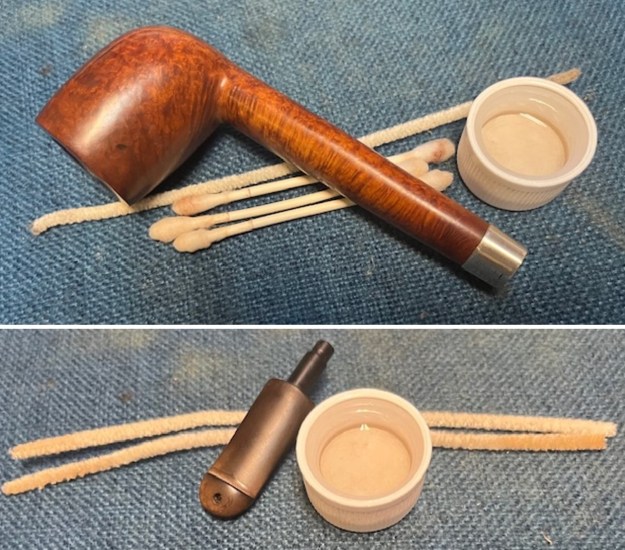
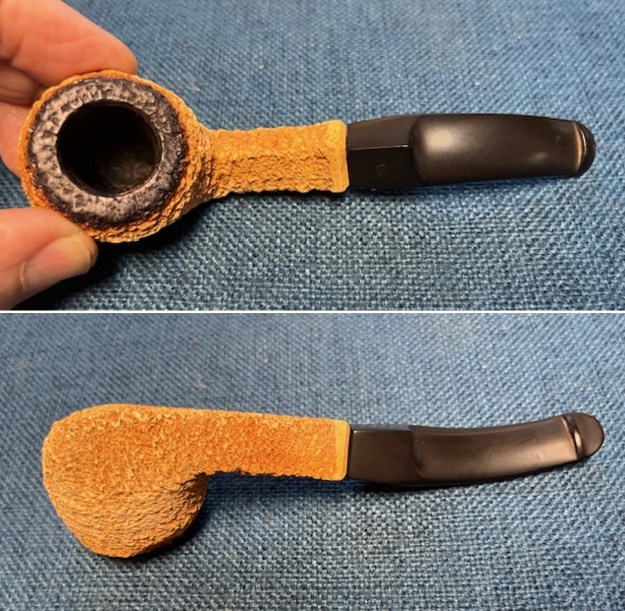
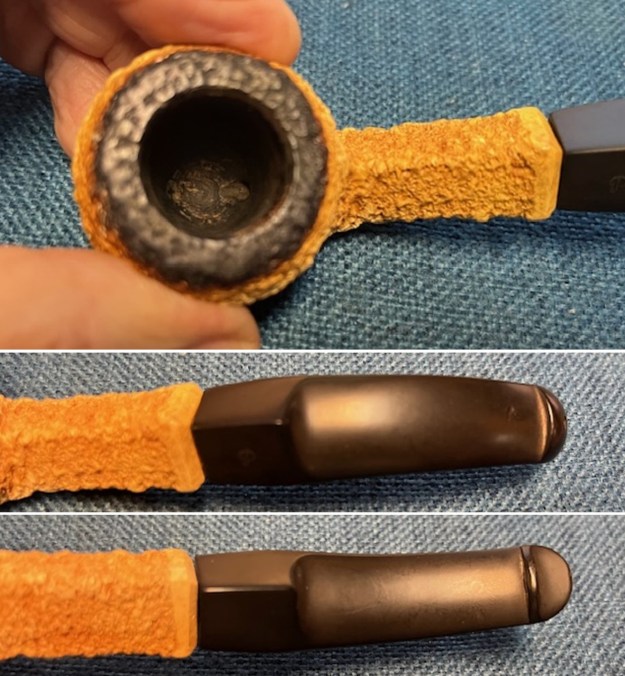
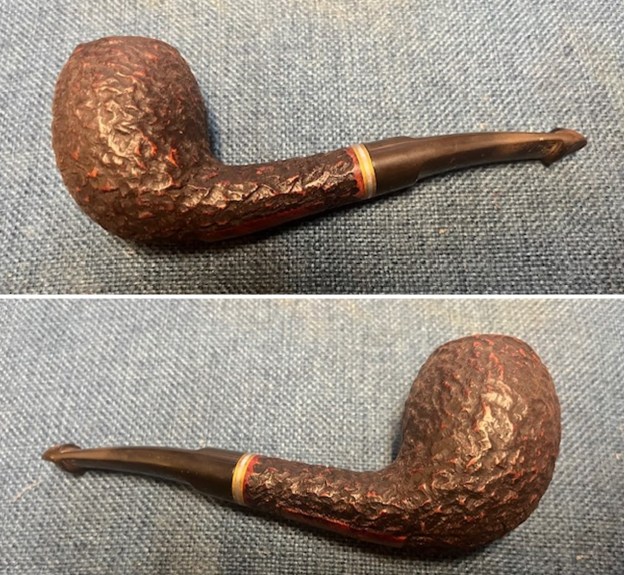
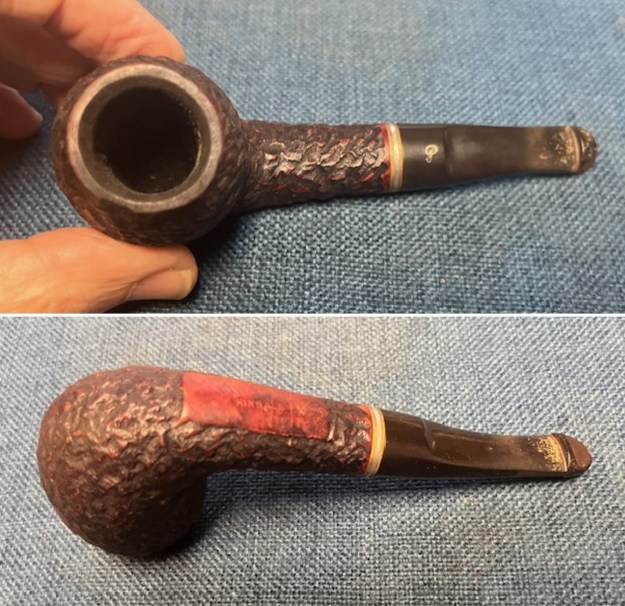
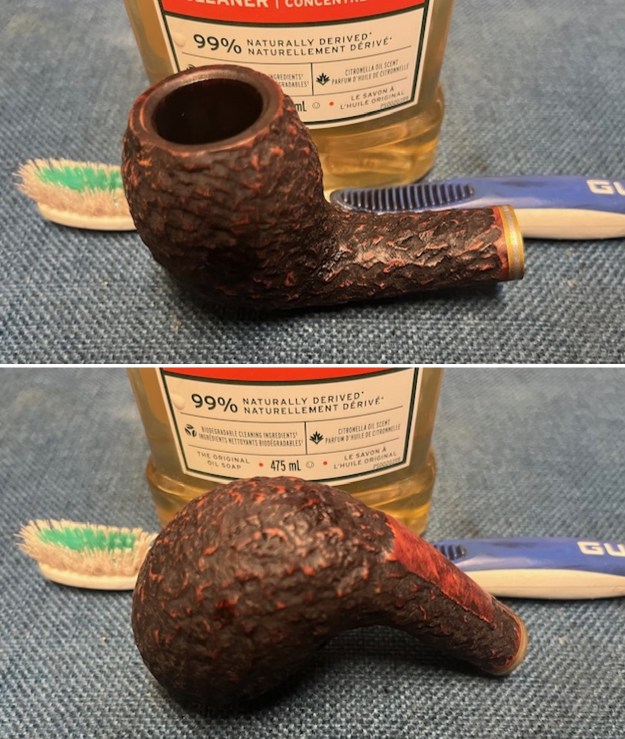
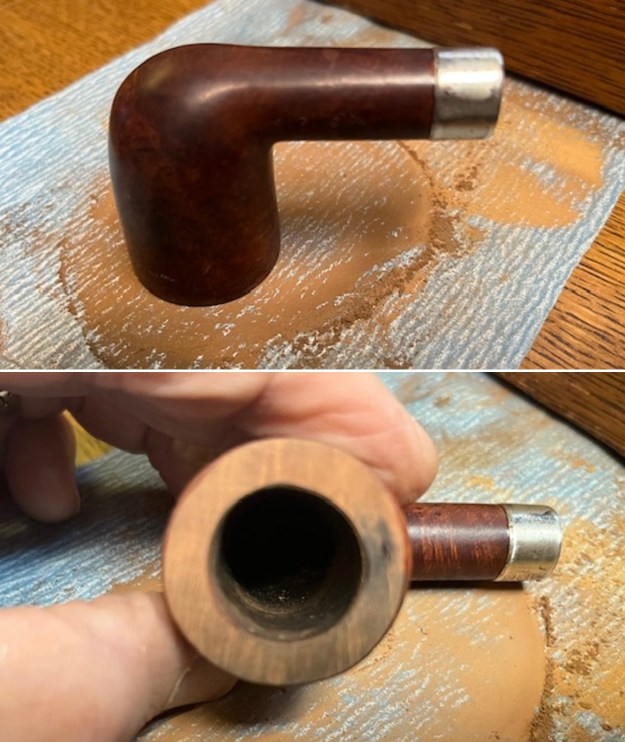
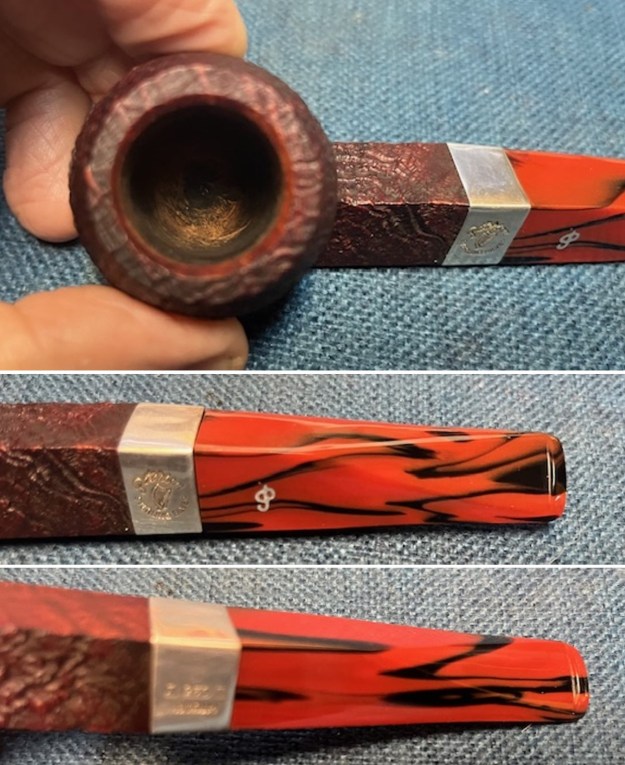
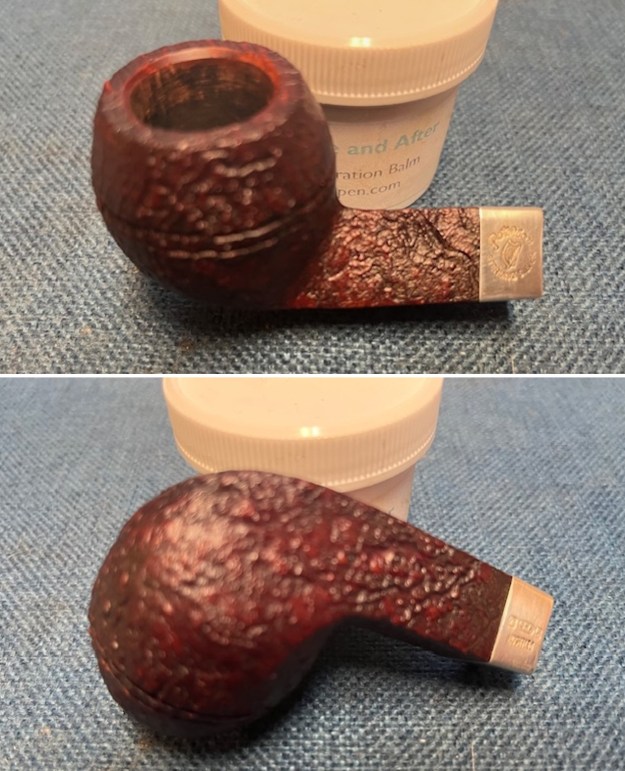
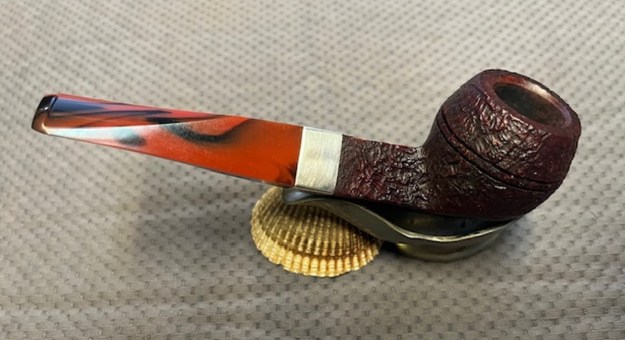
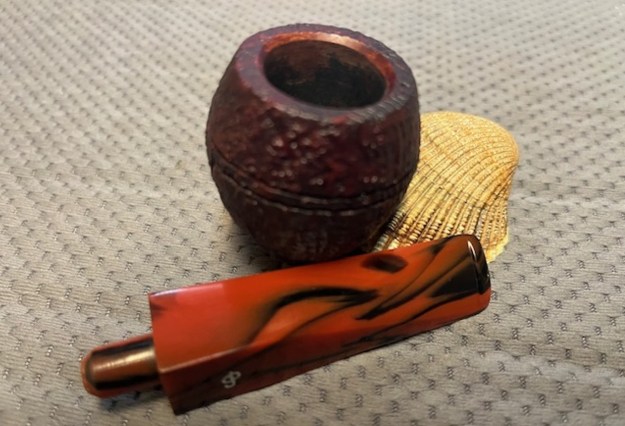
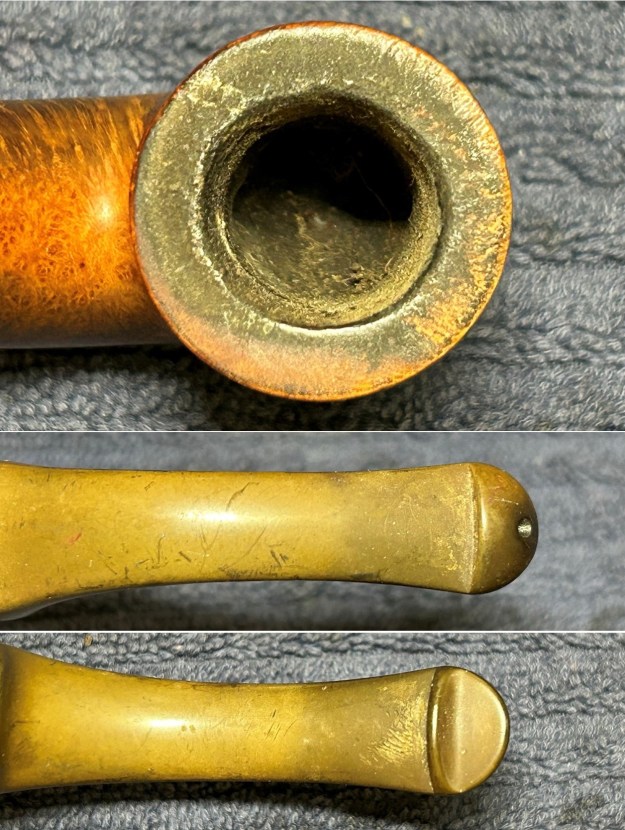
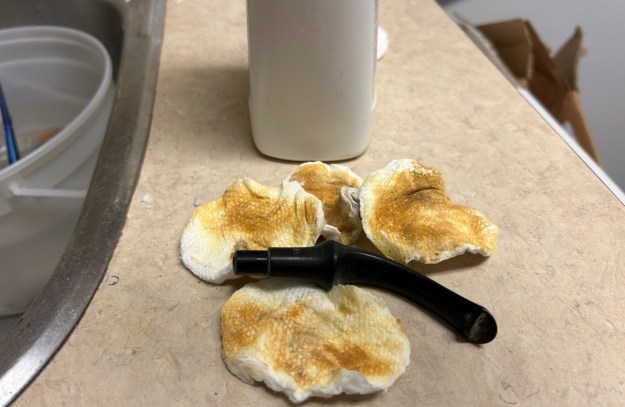
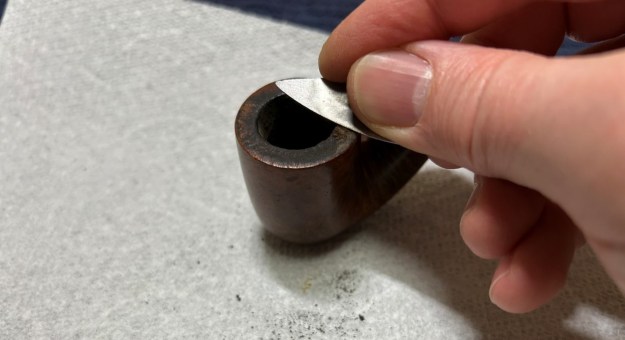
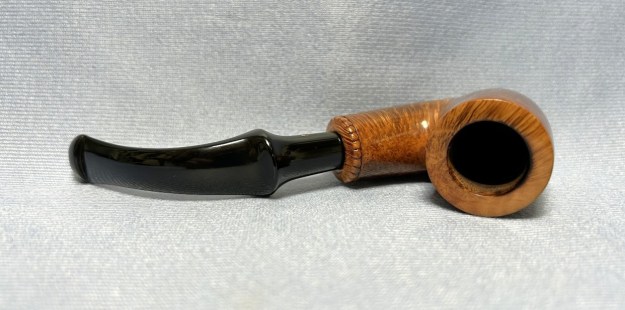
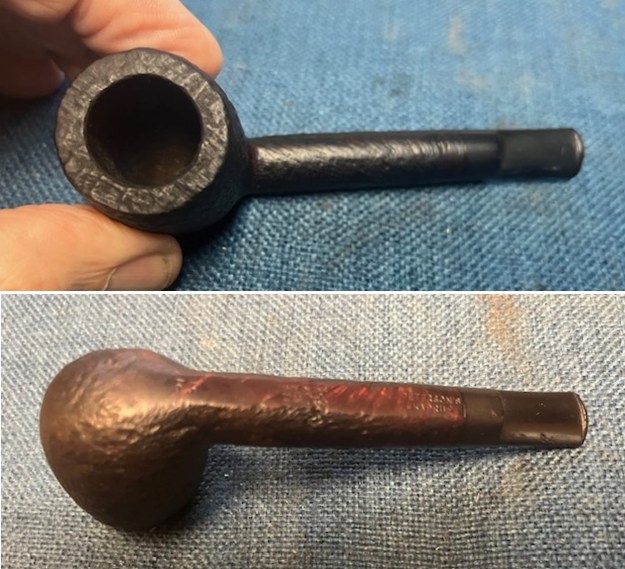
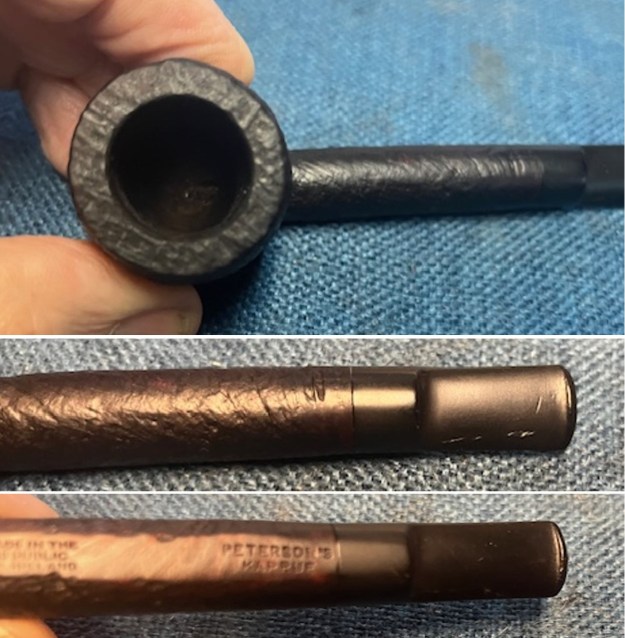
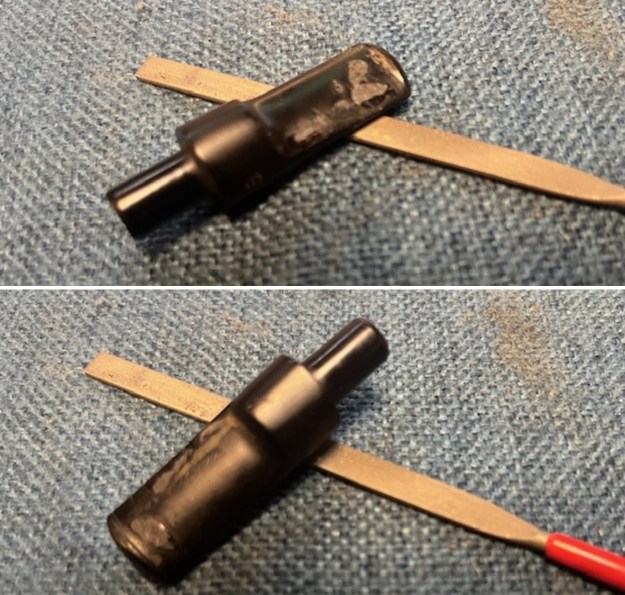
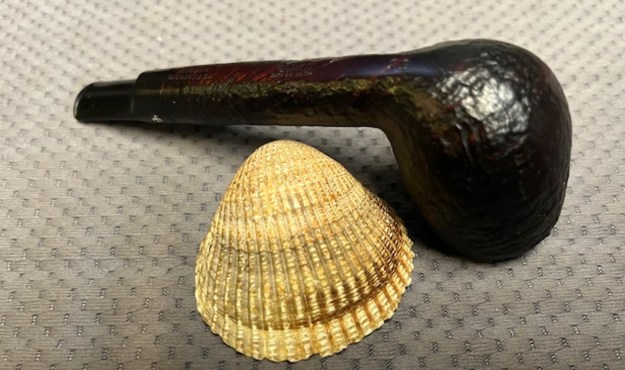
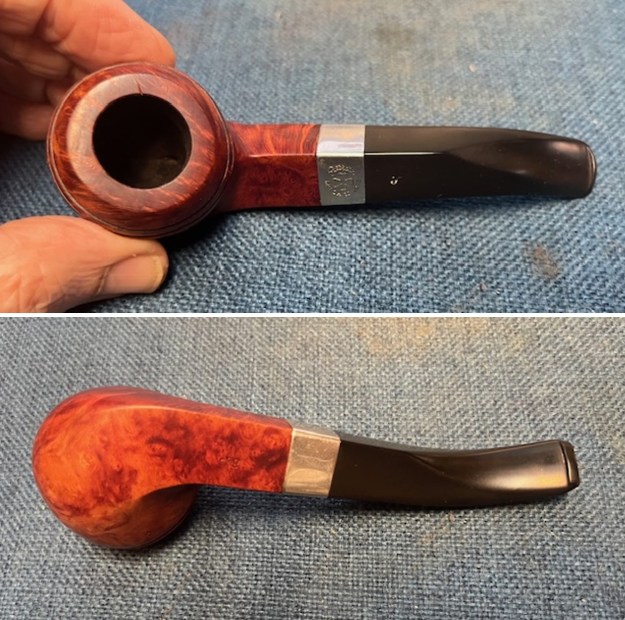
I took close up photos of the bowl, rim top and stem to show how clean the pipe was. The bowl was clean and the rim top and the inner edge looked good. On the rim top on the right side there was a nick that upon examination was a spot where a fill had come out. I breathed a sigh of relief as when I first saw it I though it was a crack! I am thankful that is the case. The stem was clean and there were light tooth marks on the top and underside of the stem.
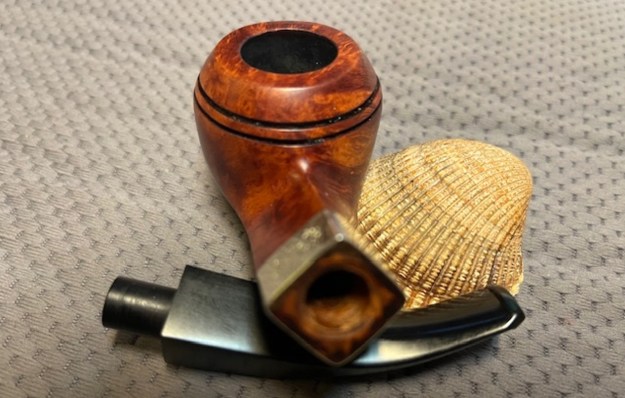
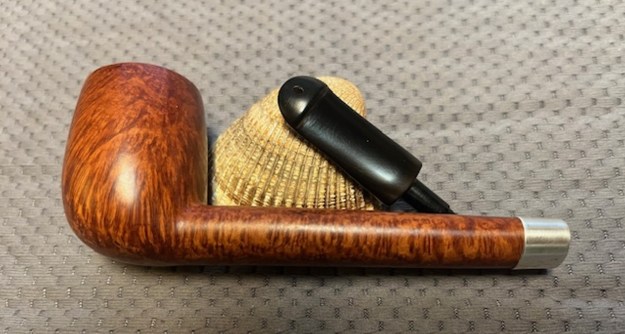
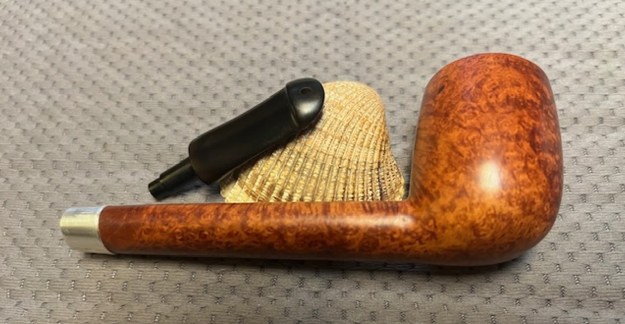
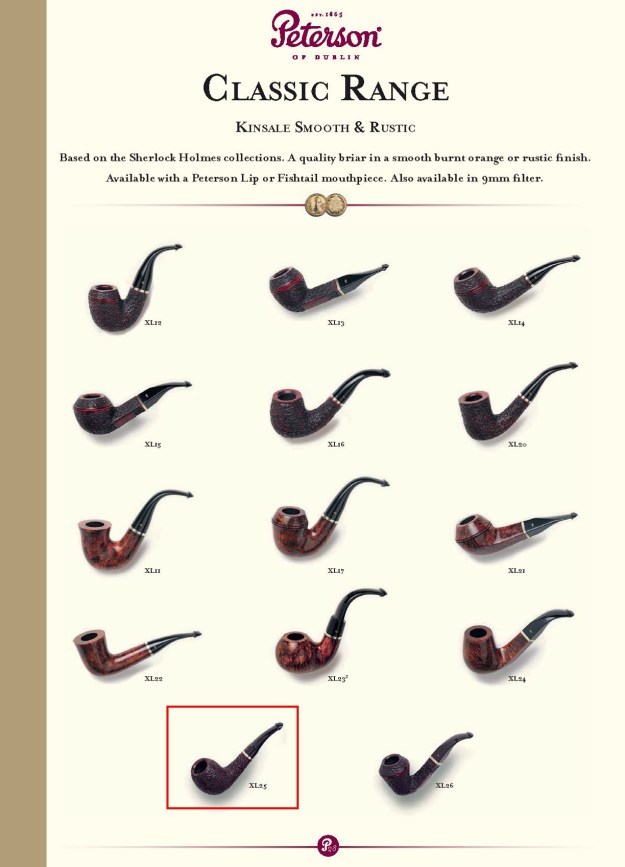
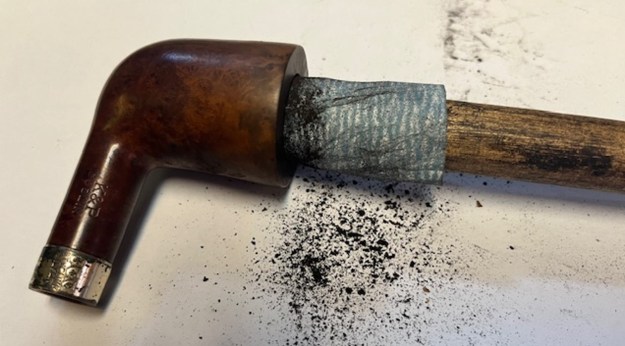
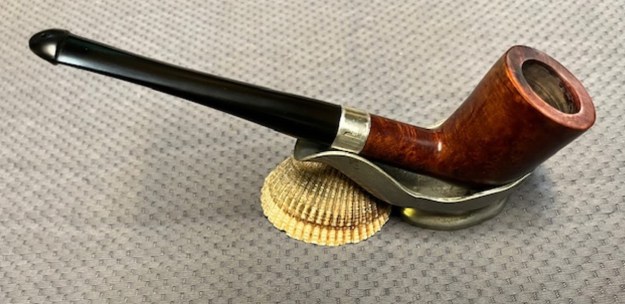
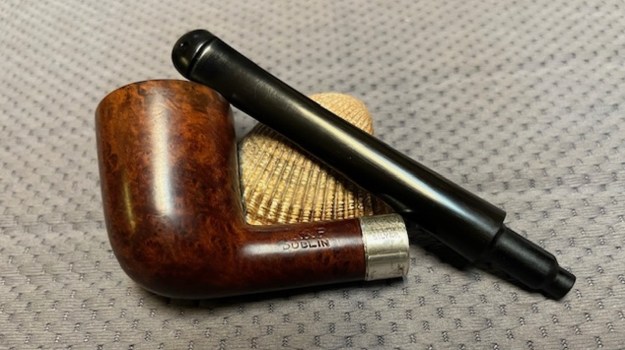
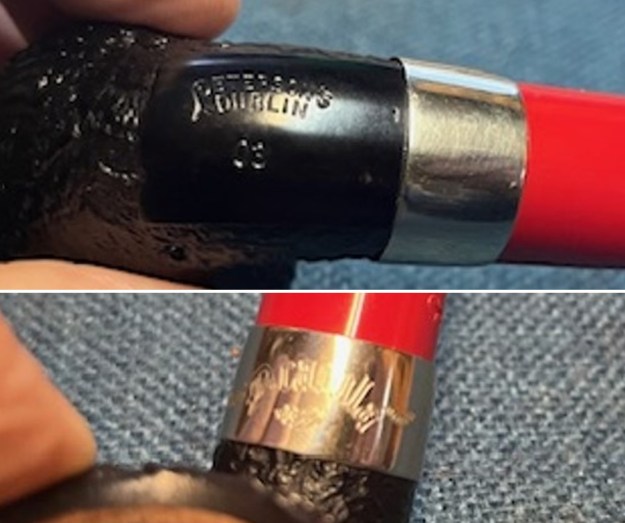
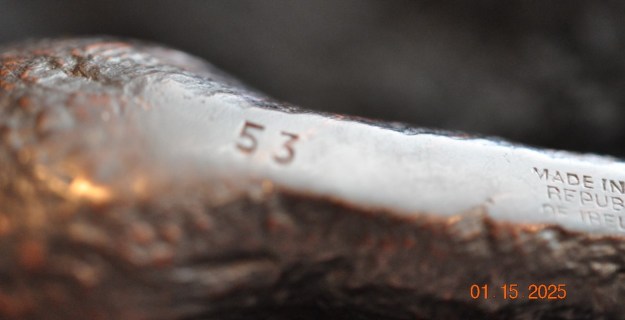
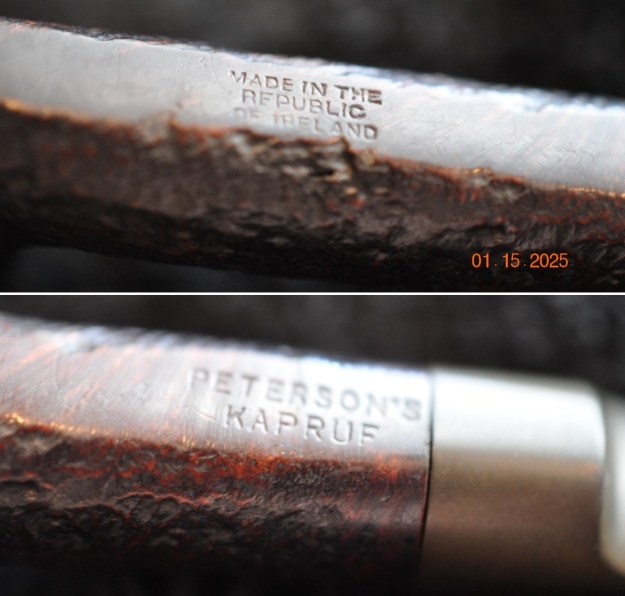
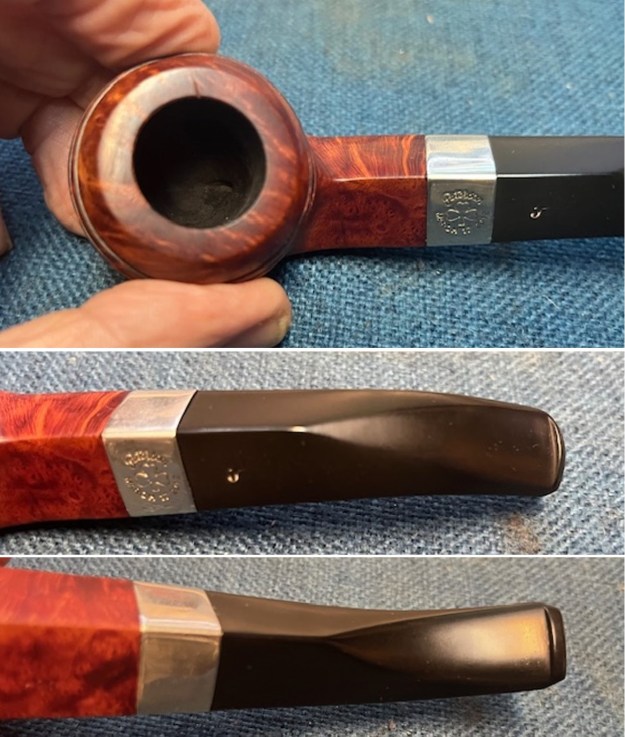
I took photos of the stamping on the sides of the shank. It is faint in spots but still readable and read as noted above. I also removed the stem from the shank and took photos of the pipe to show the look of the parts. 
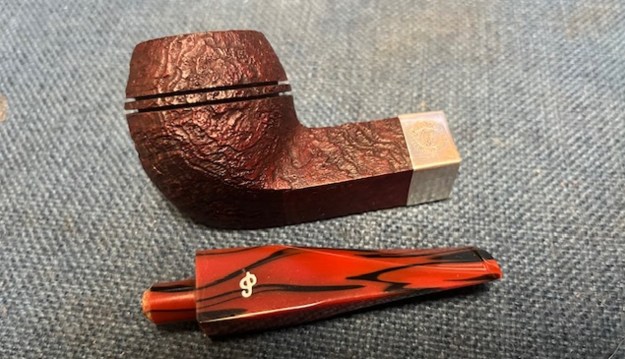
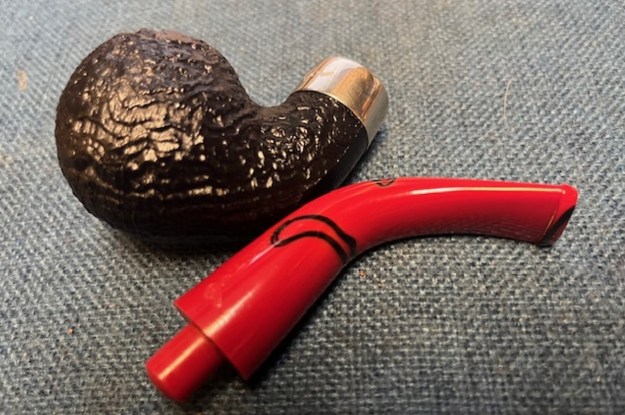
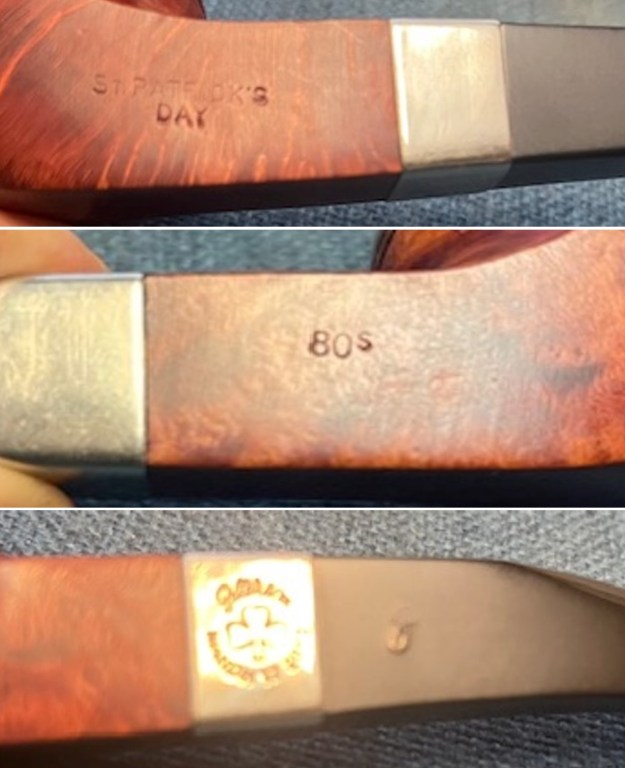
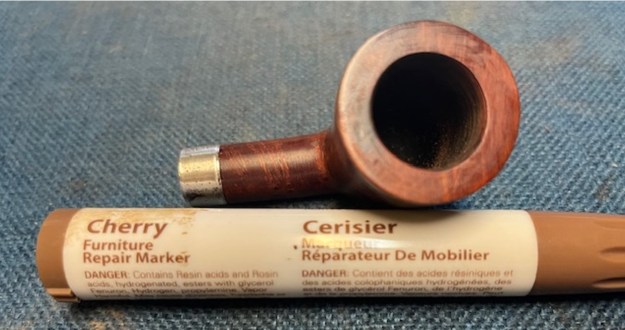
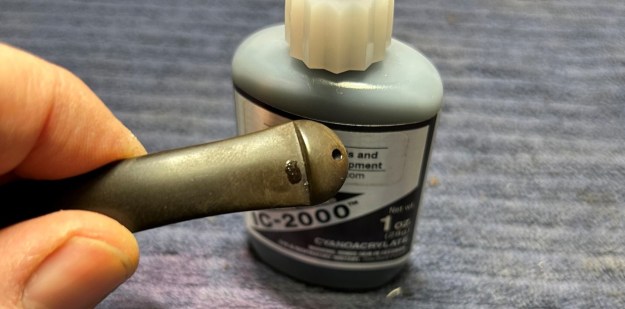
I decided to deal with the flaw, or missing fill on the right side of the rim top first. It was very clean so I blew out any dust or debris the put a spot of CA glue and some briar dust in the area. I sanded it smooth with a small piece of 220 grit sandpaper. 
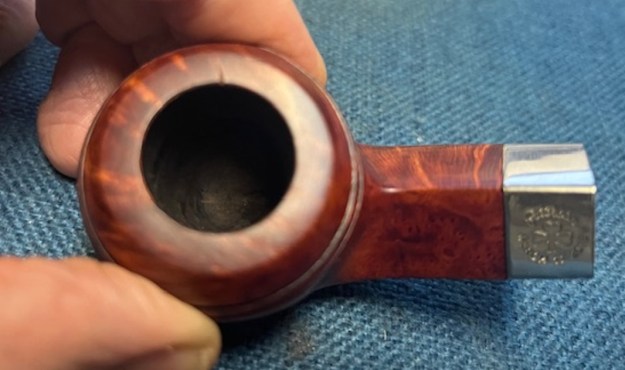
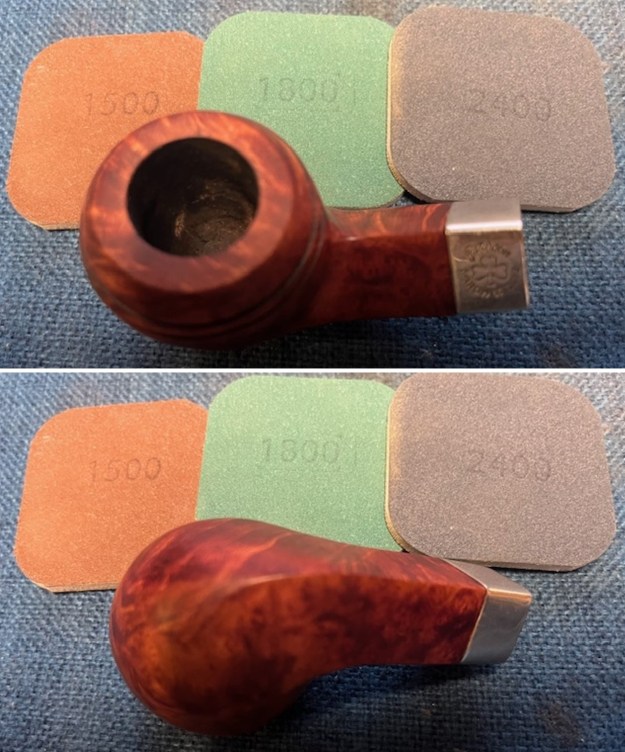
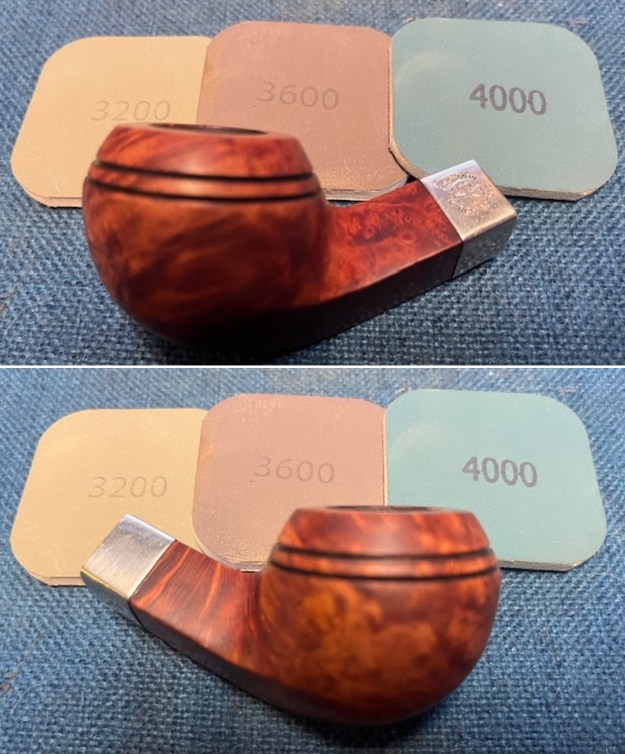
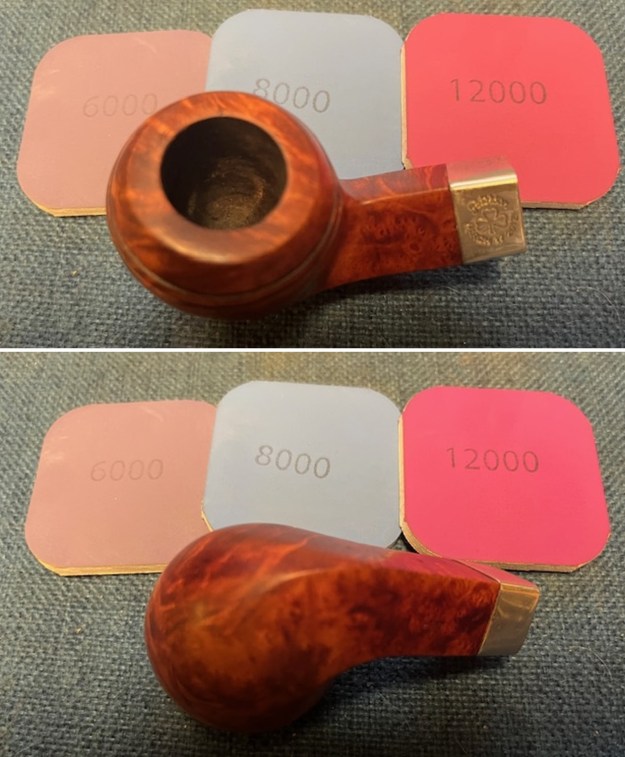
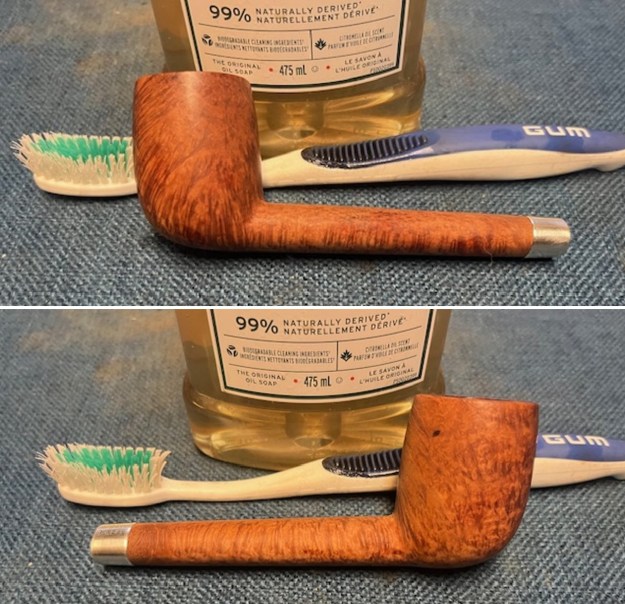
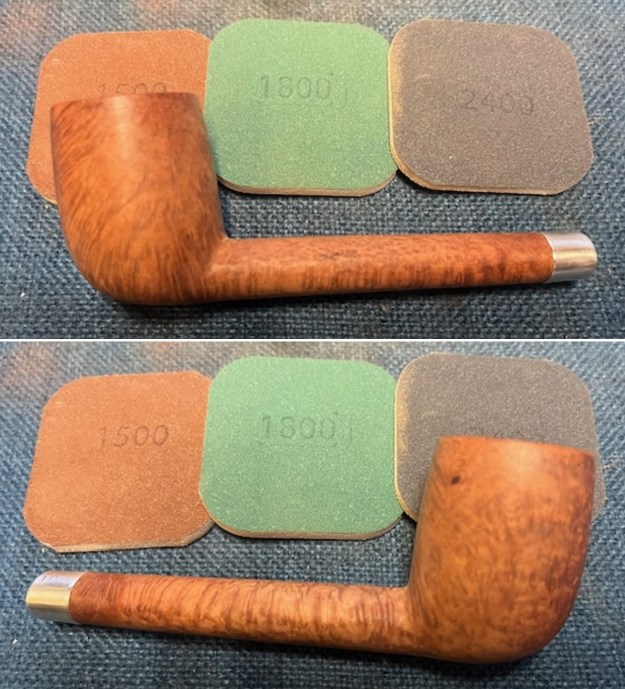
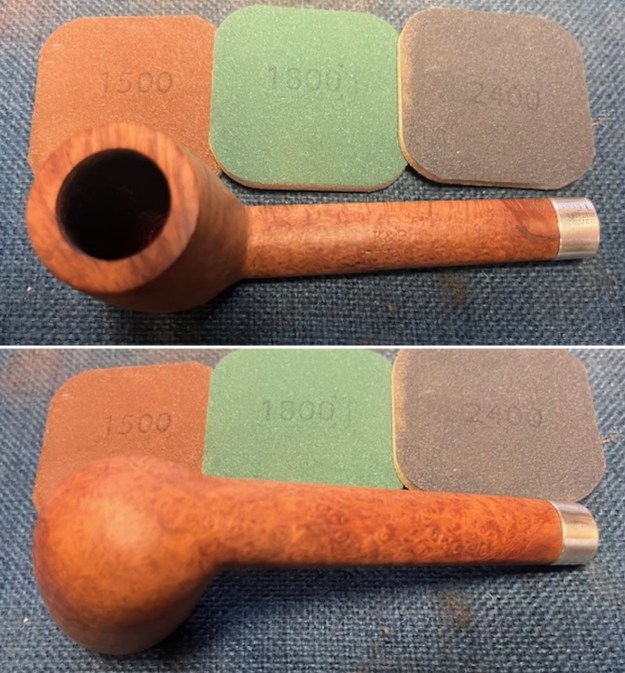
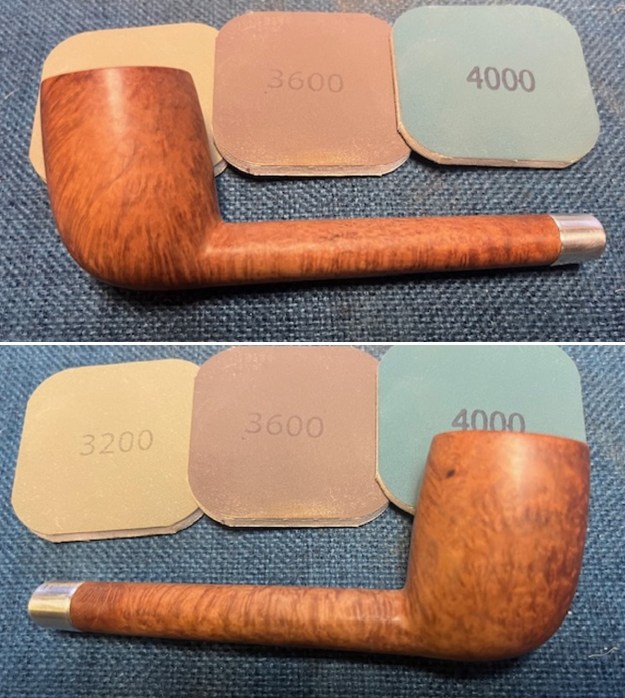
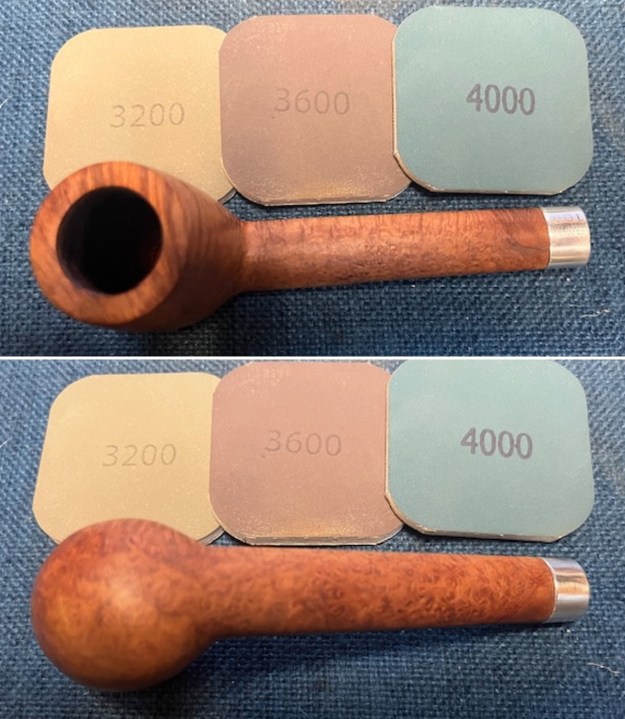
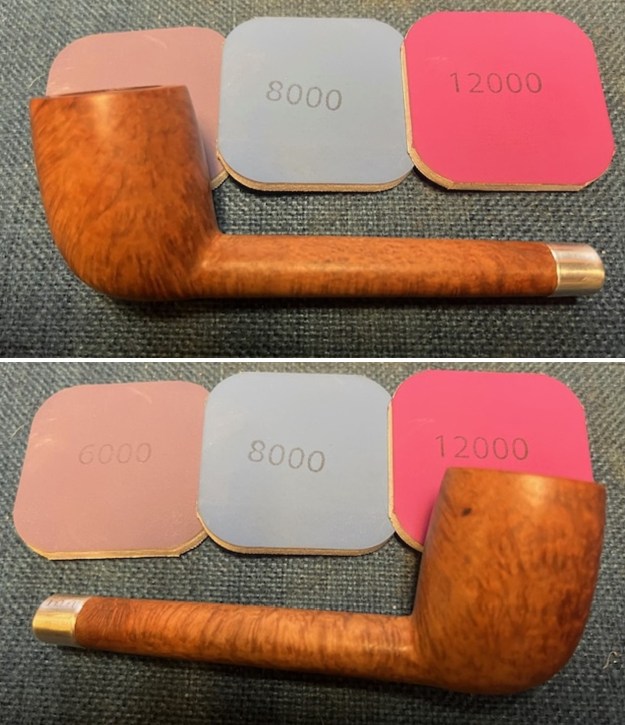
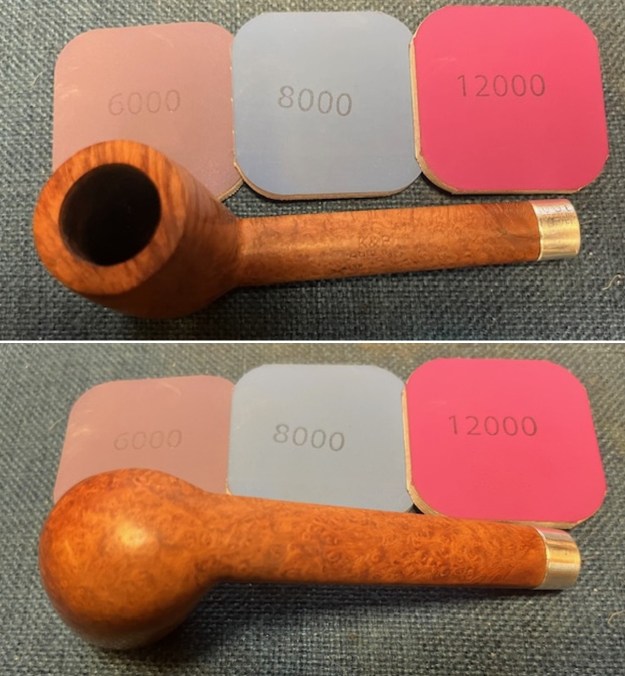
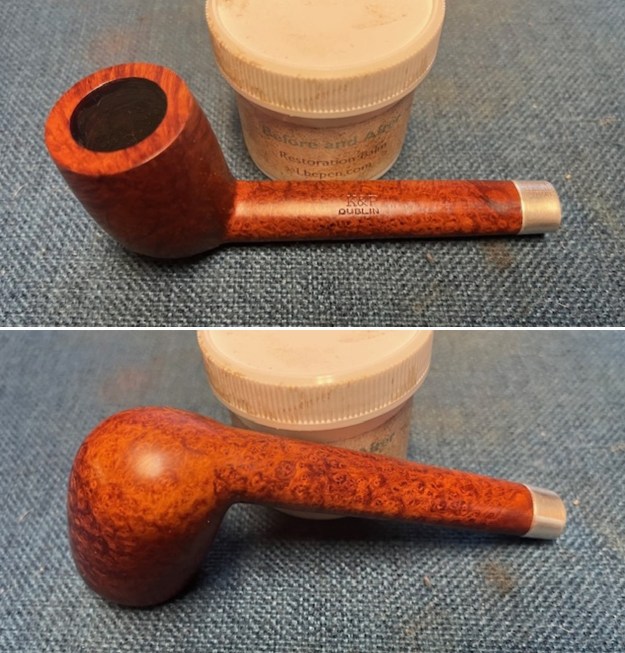
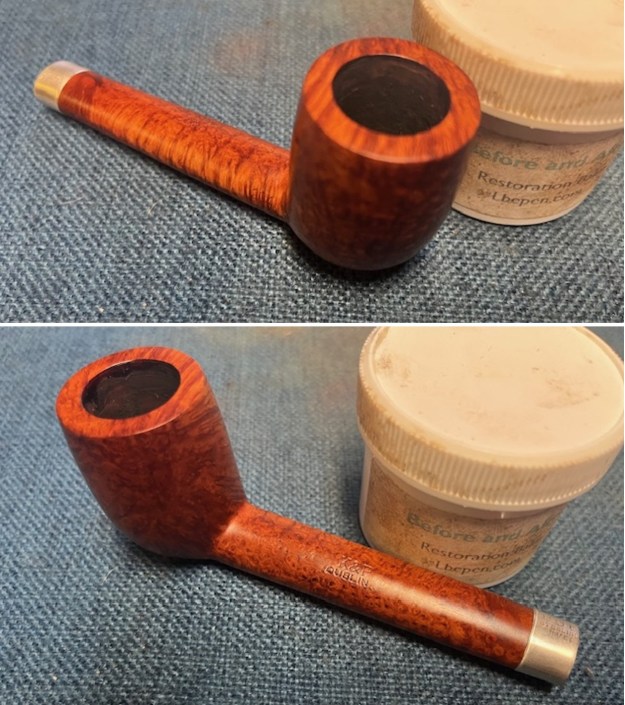
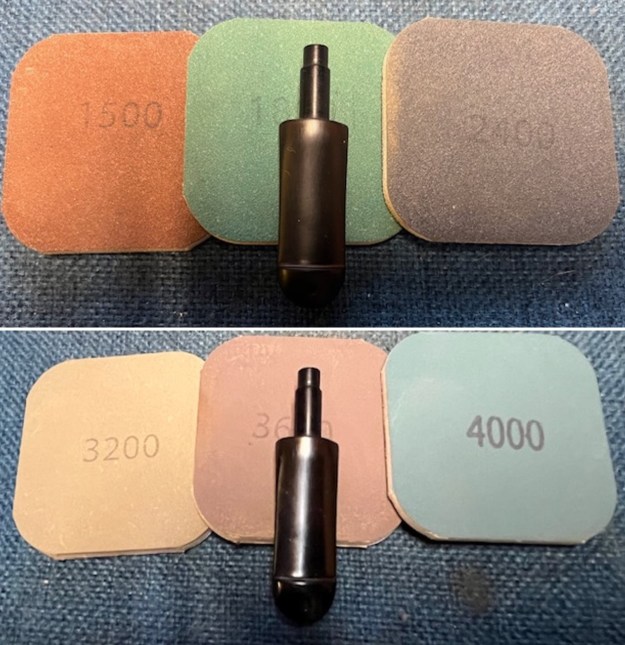
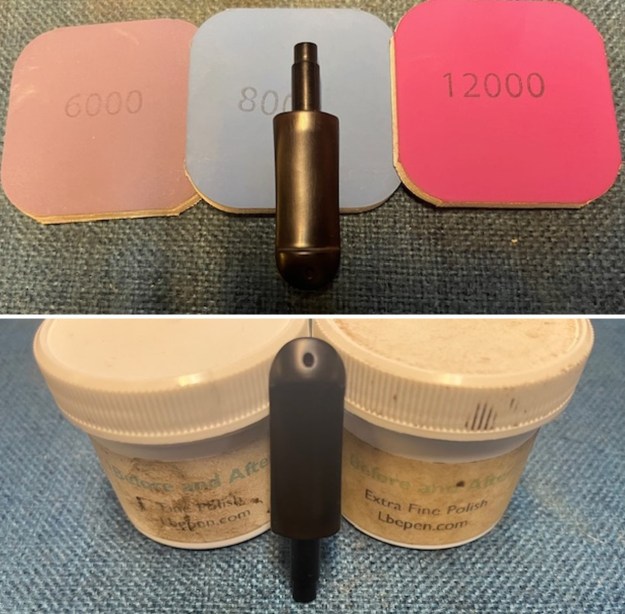
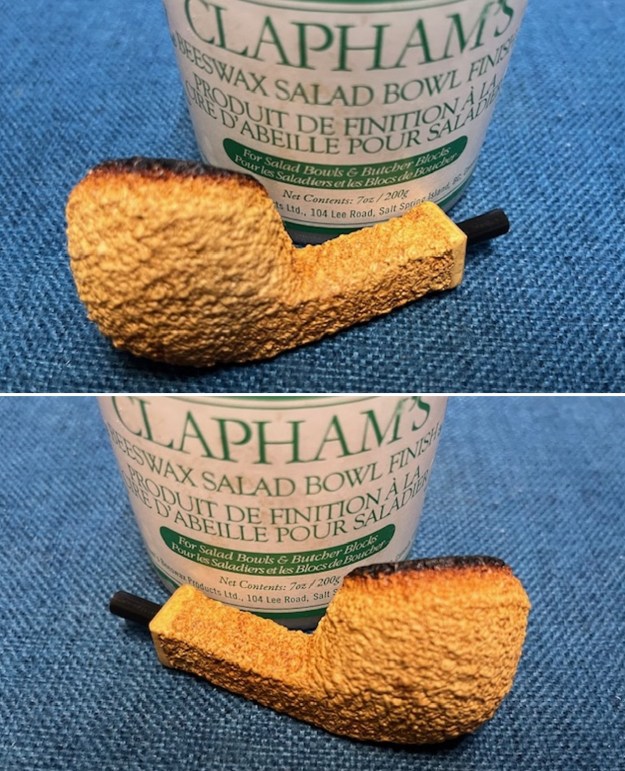
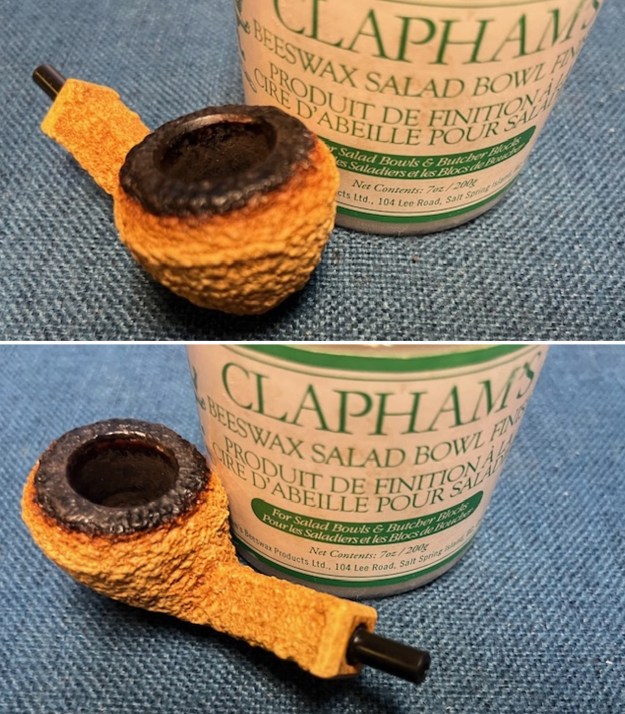
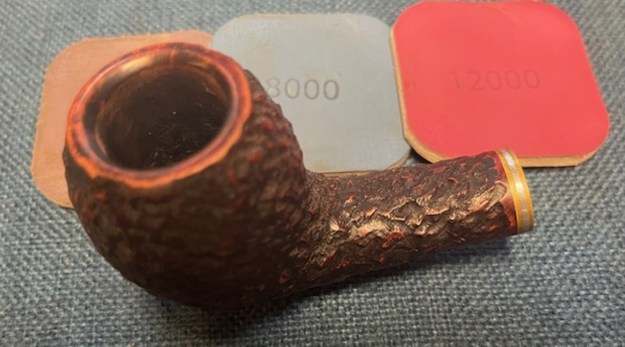
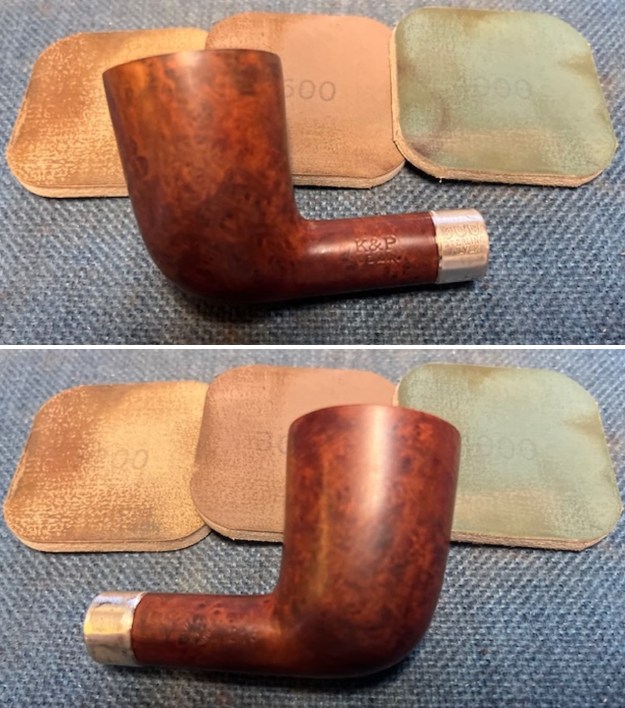
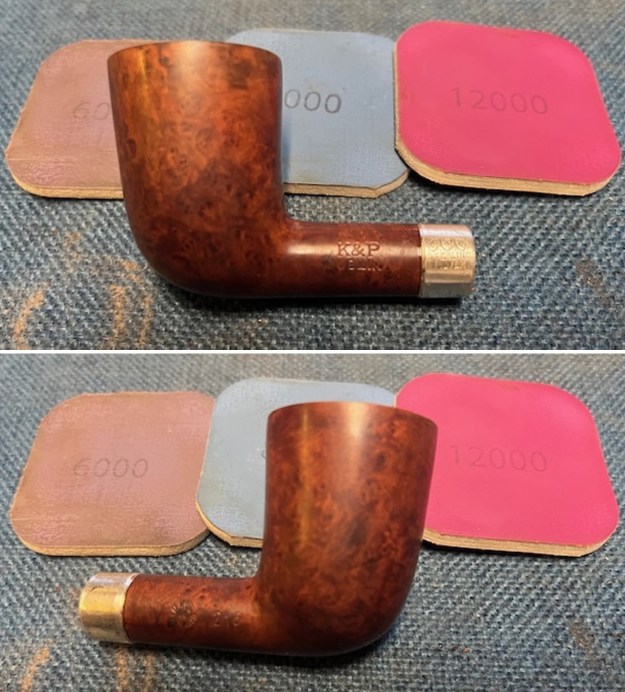
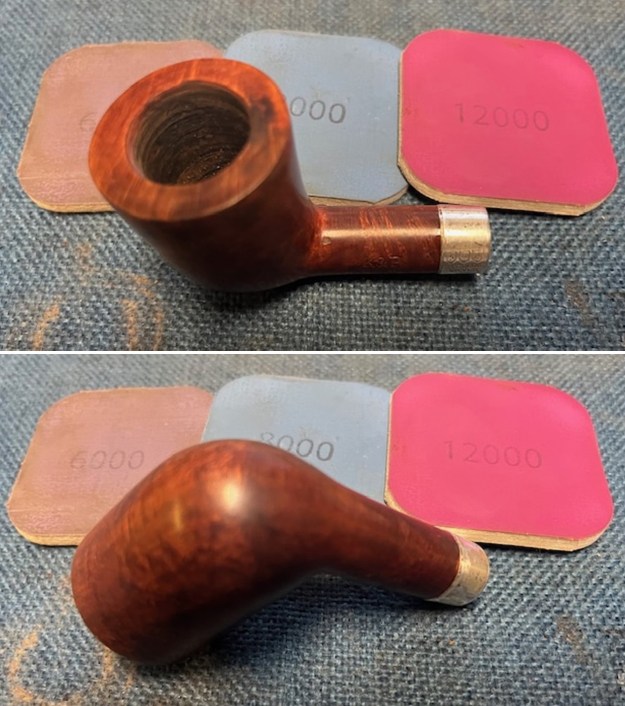
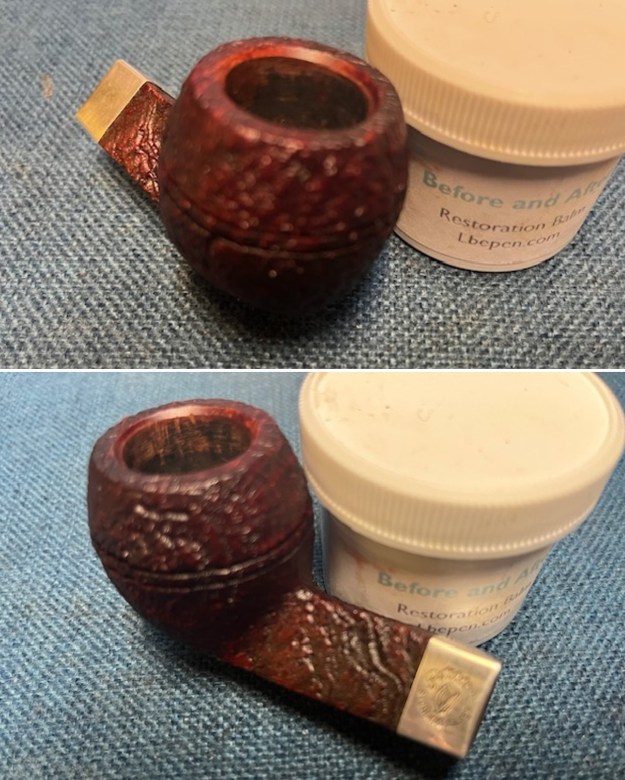
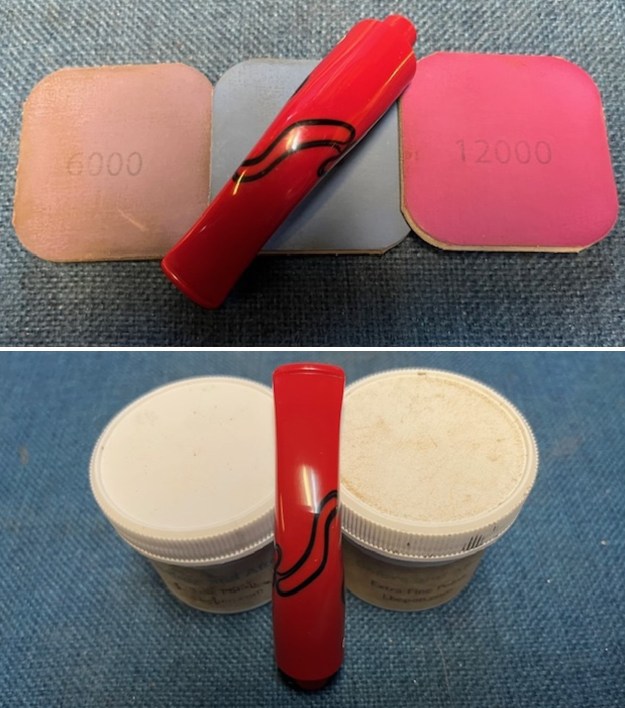
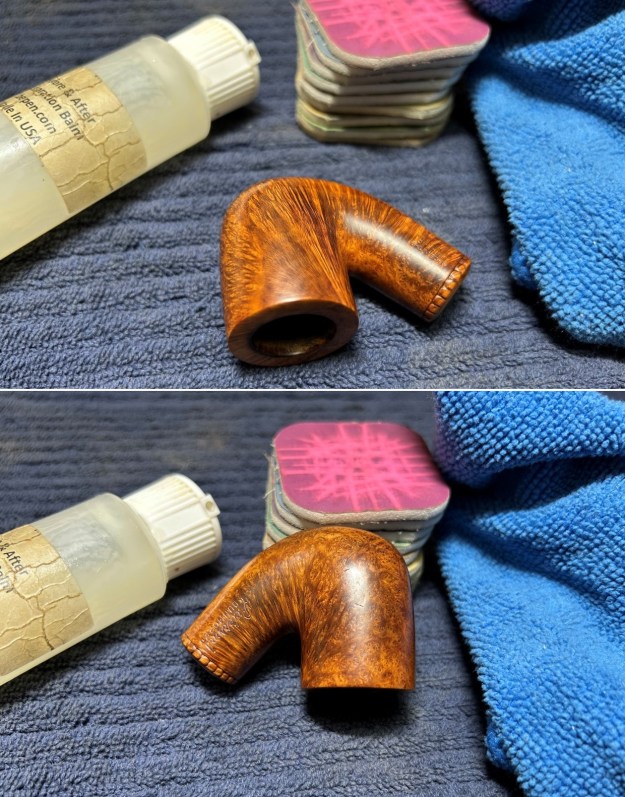
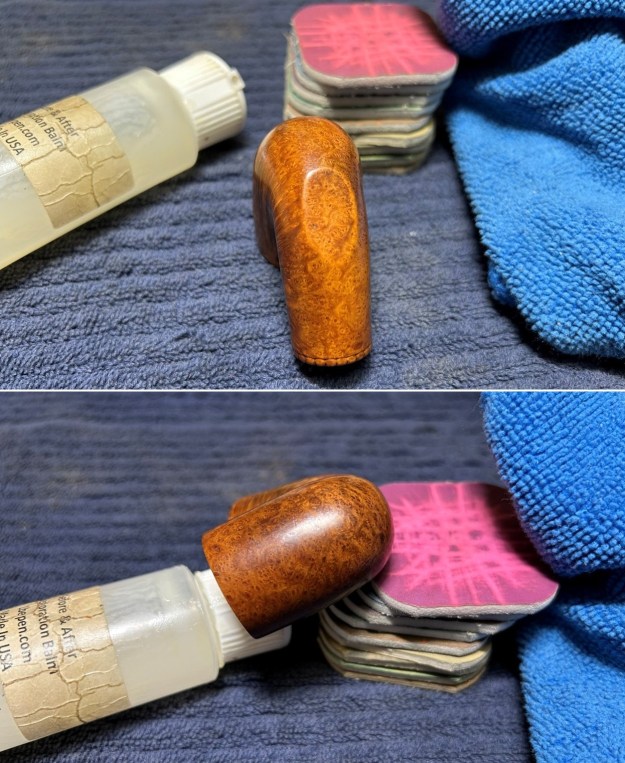
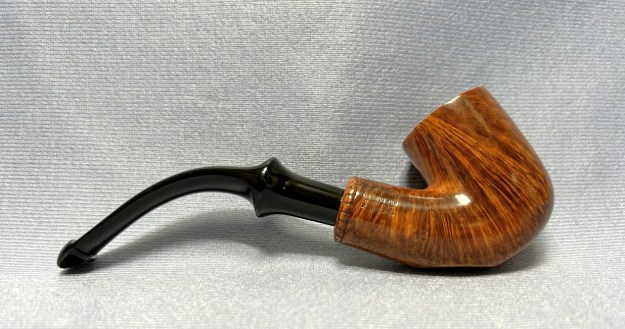
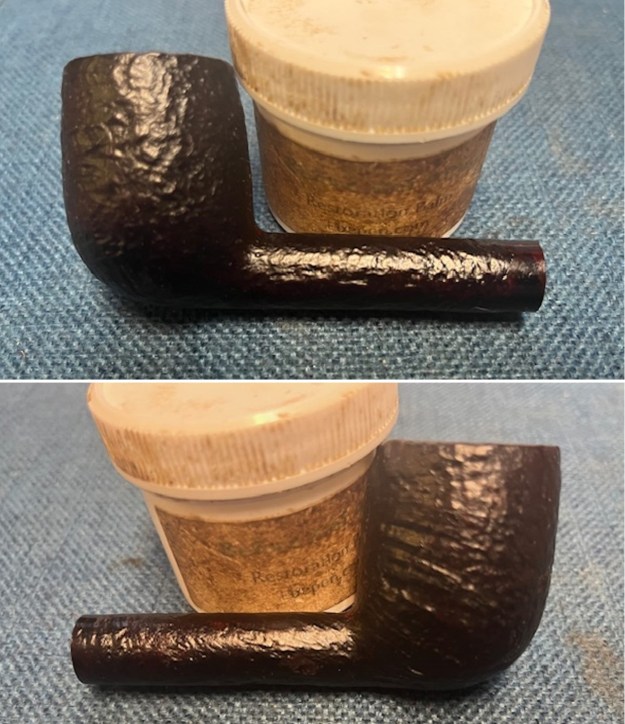
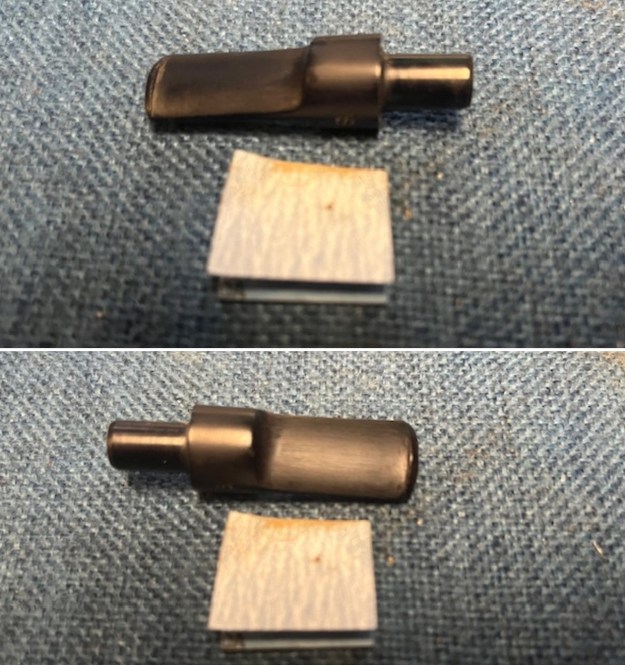
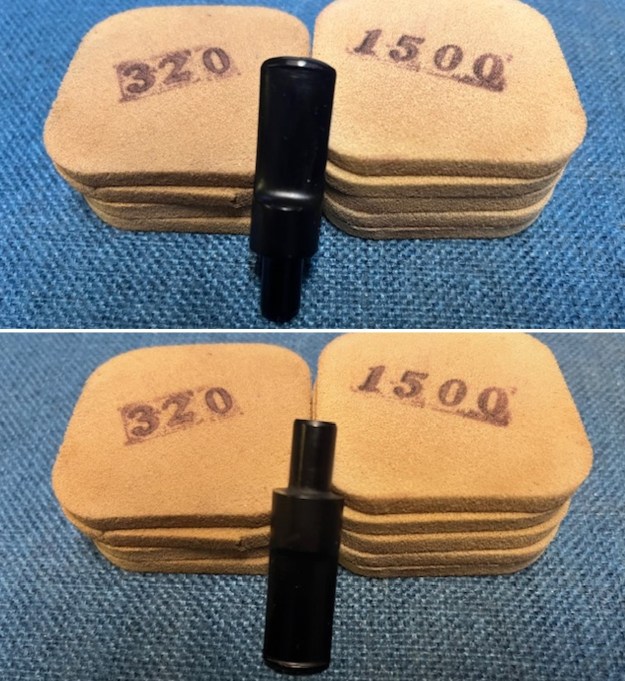
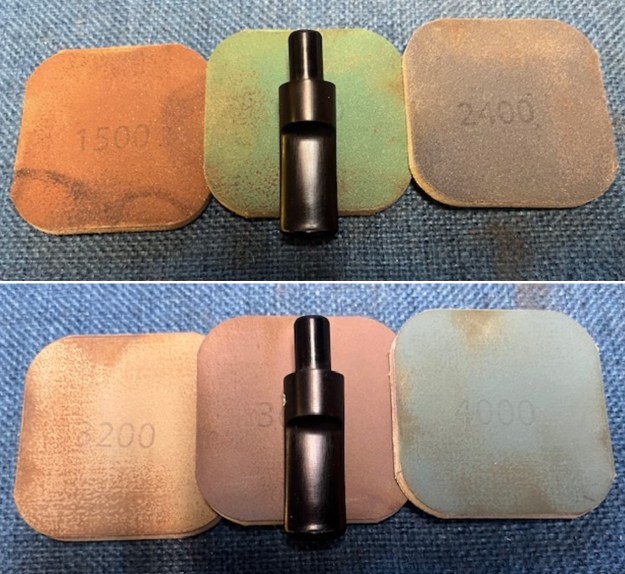
I polished the briar with micromesh sanding pads – 1500-12000 grit sanding pads. I wiped the bowl surface down with a damp cloth after each sanding pad to remove the sanding dust. Once I finished the exterior of the briar was clean and the grain really stood out. 
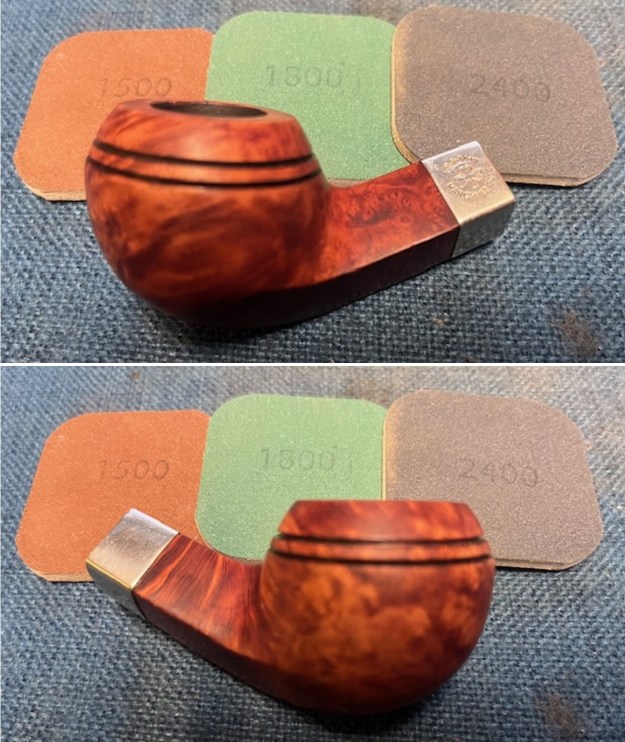
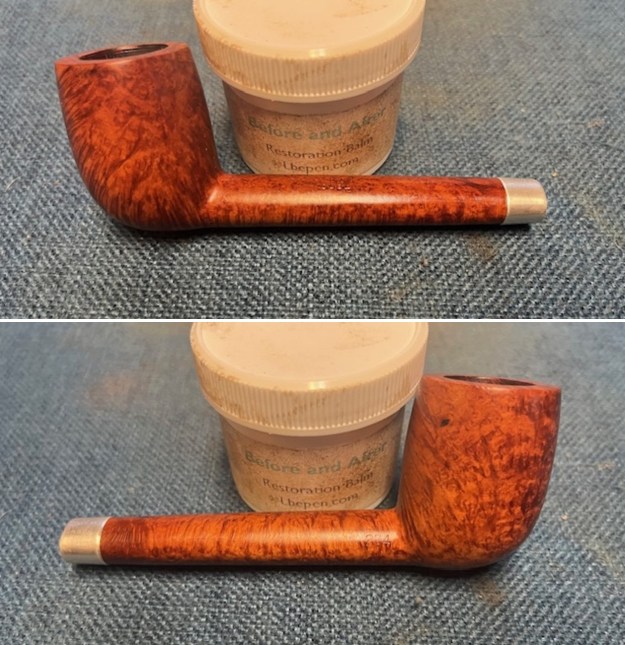
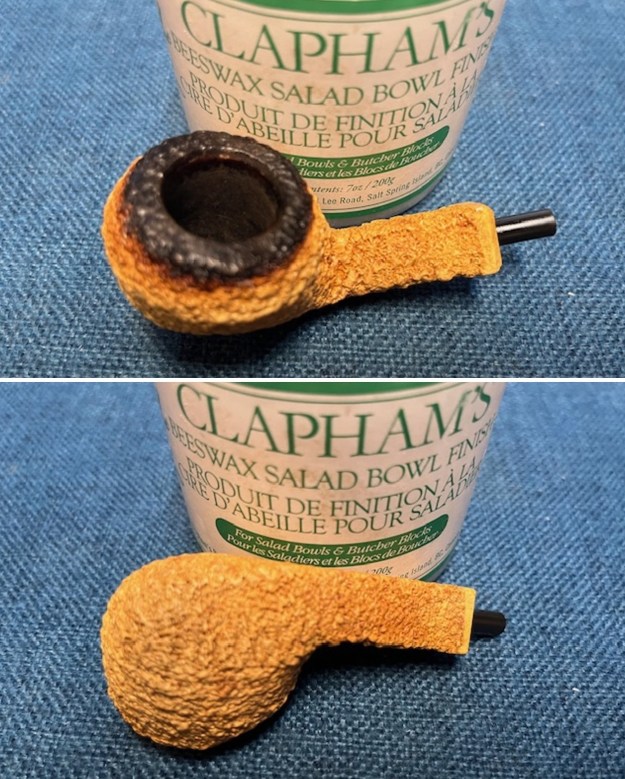
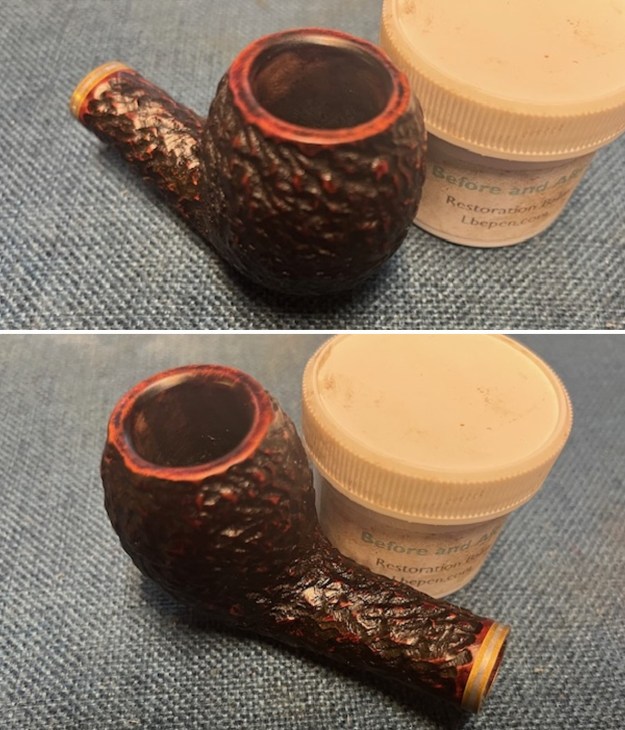
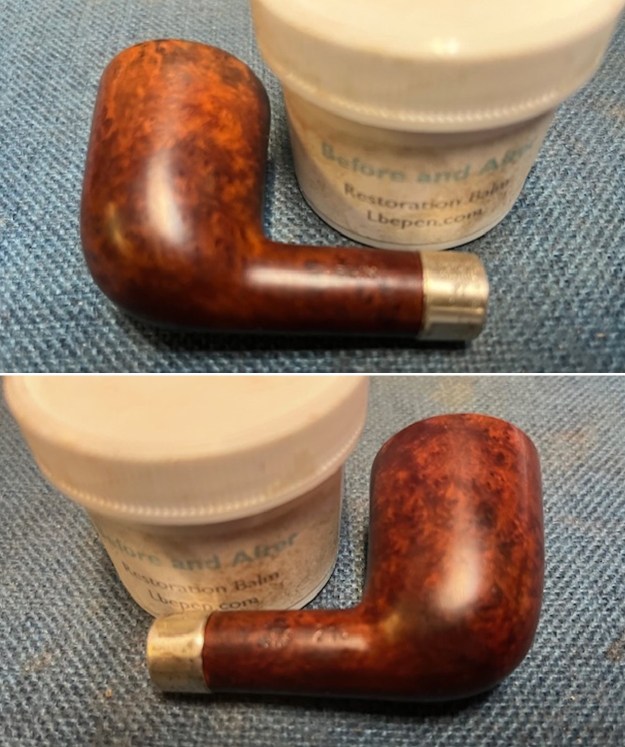
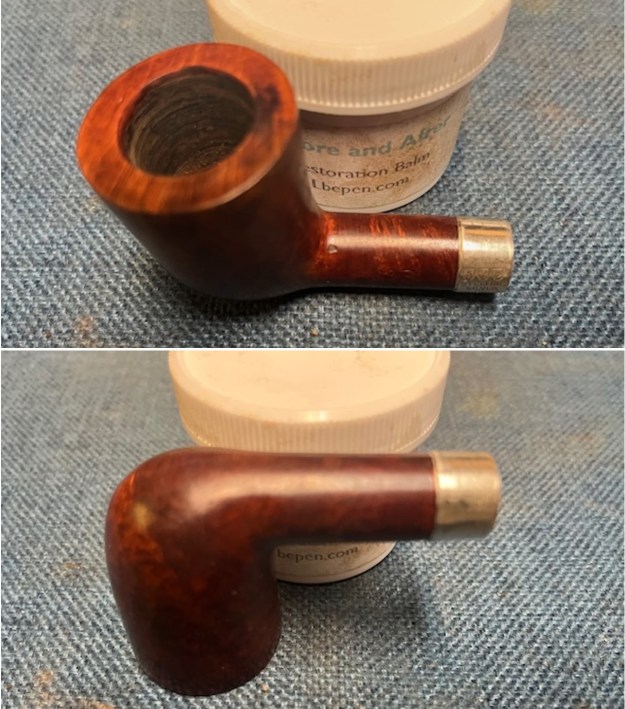
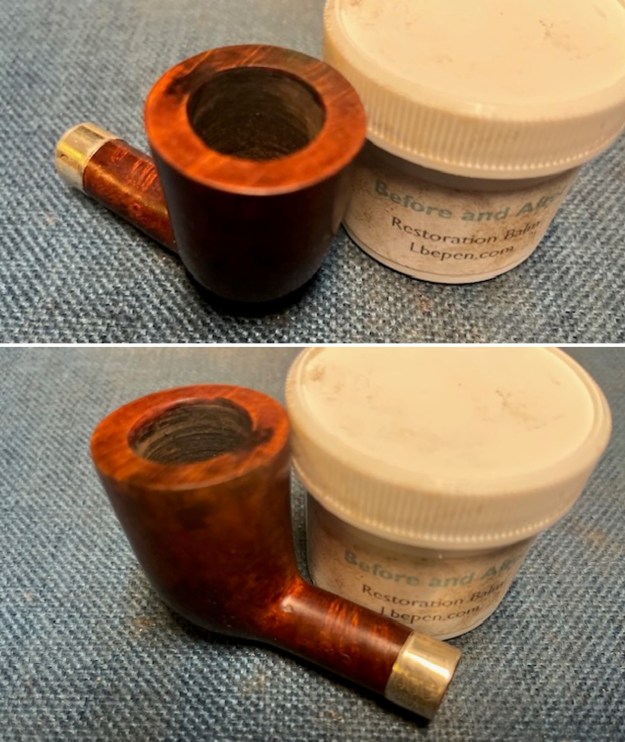
I worked some Before & After Restoration Balm into the surface of the briar with my fingertips to clean, enliven and protect the briar. I let the balm sit for 15 minutes and then buffed with a cotton cloth to raise the shine. The photos show the bowl at this point in the restoration process. 
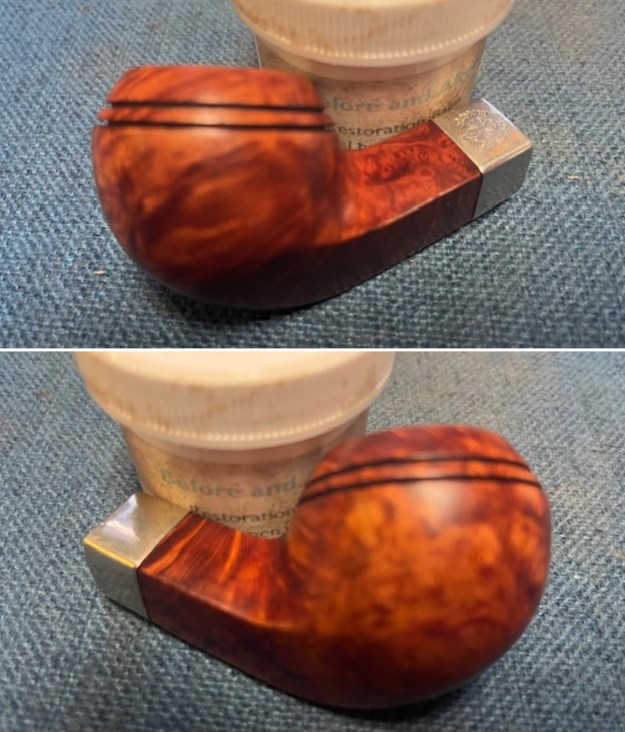
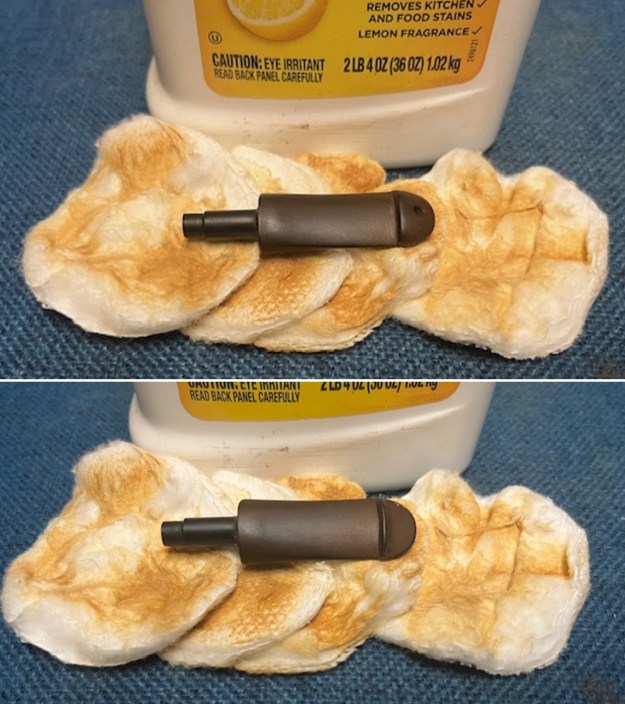
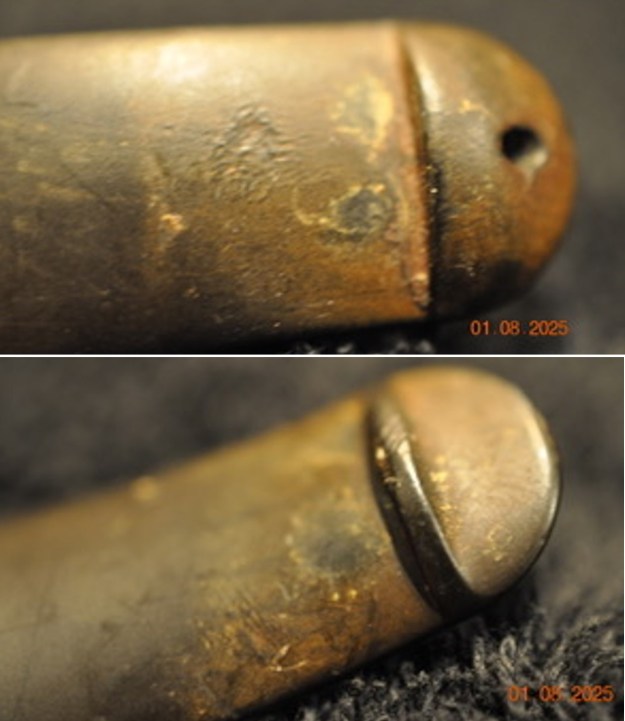
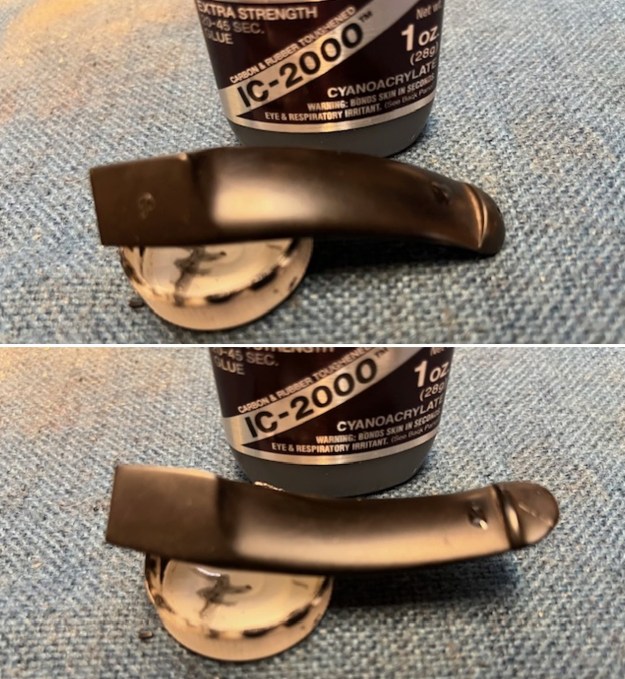
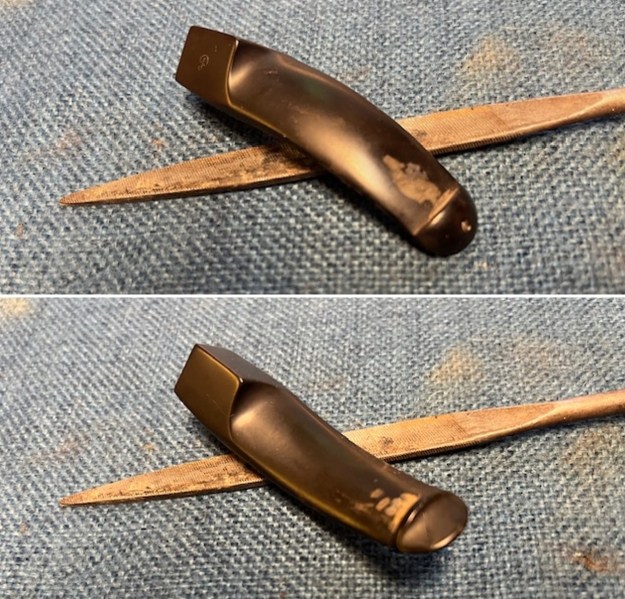
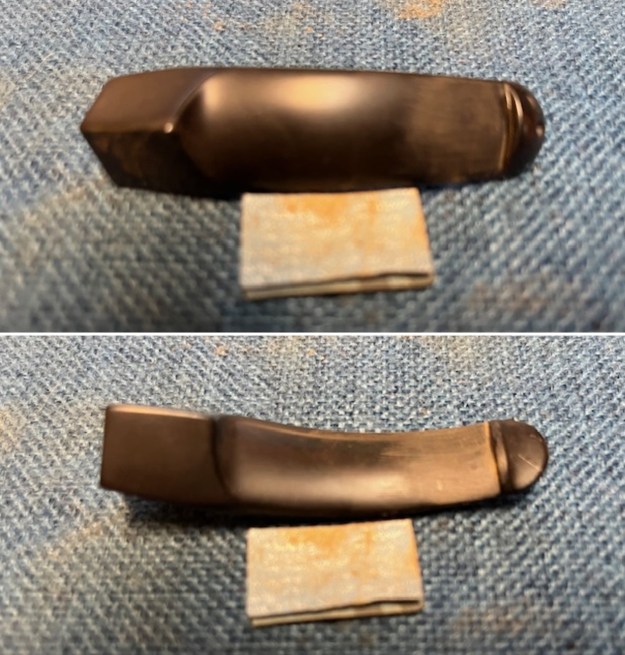
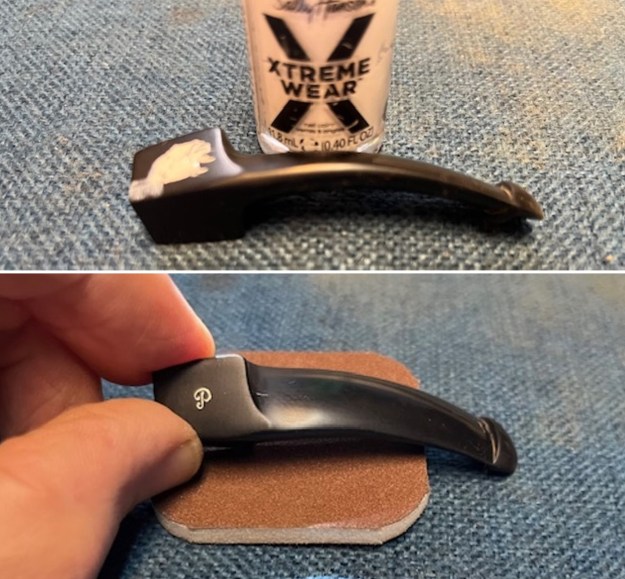
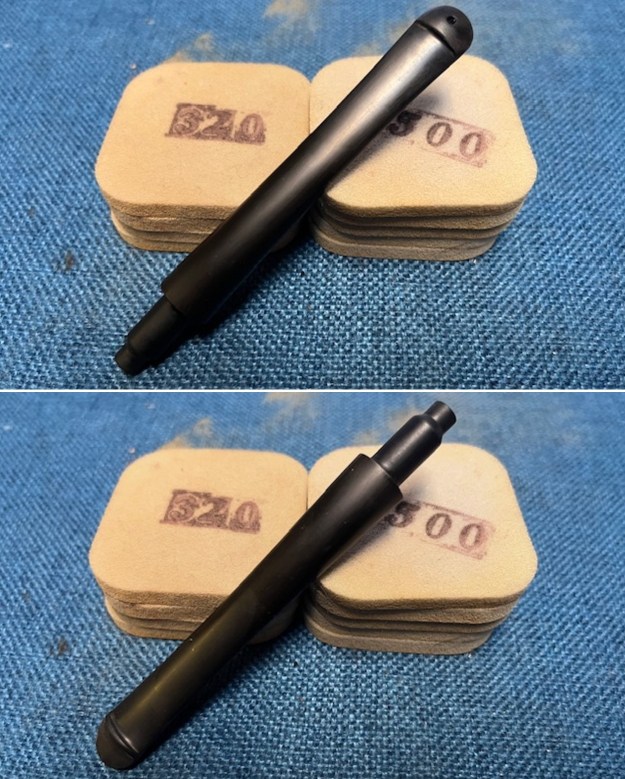
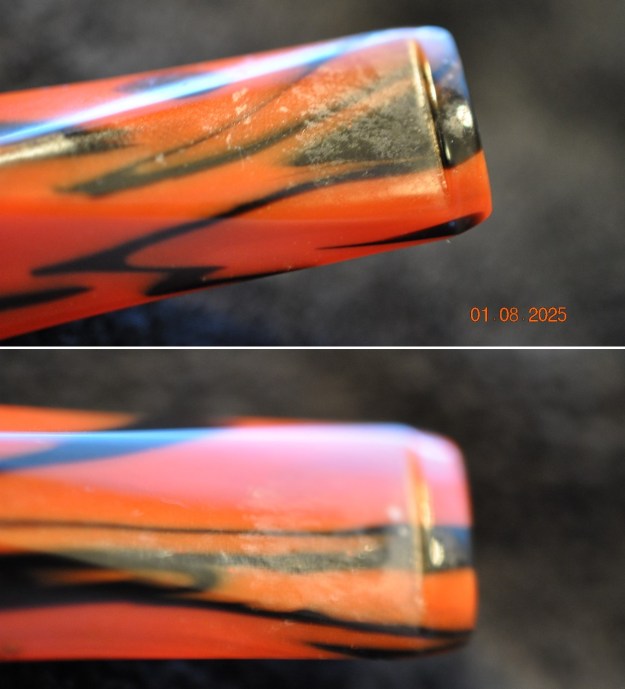
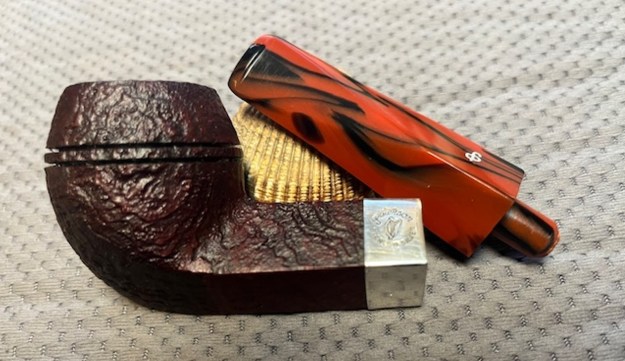
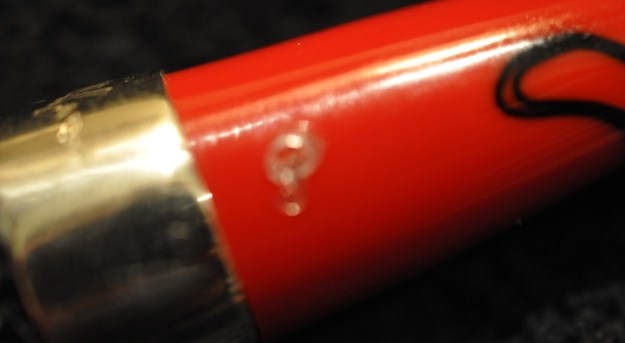
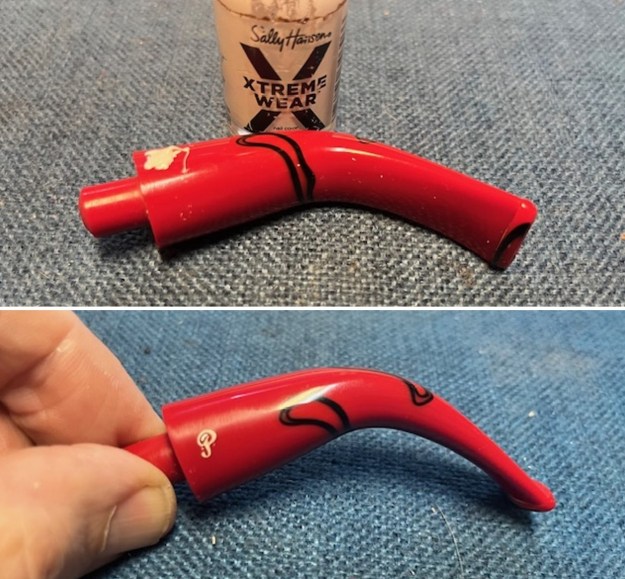
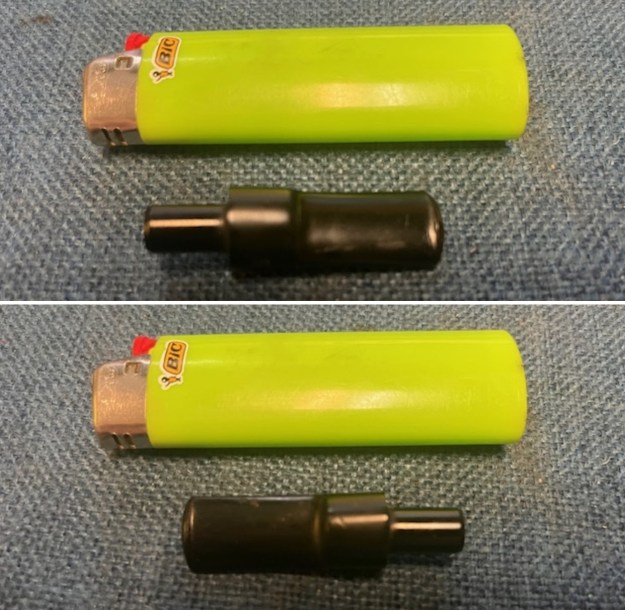
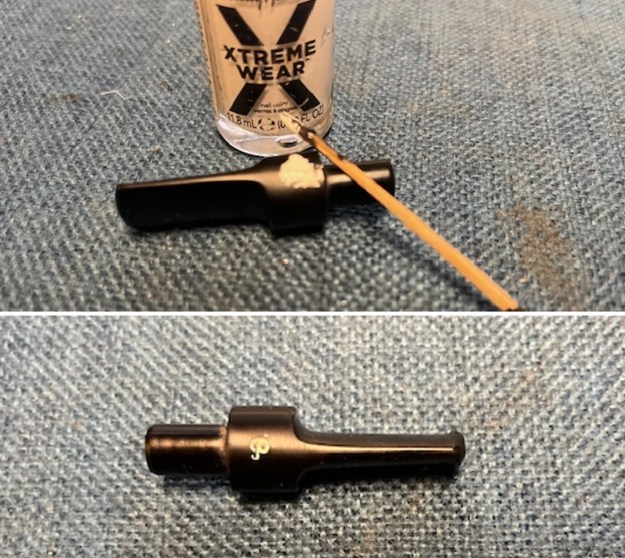
I turned my attention to the stem. I touched up the stamp on the left side of the stem with white acrylic fingernail polish. I scraped the excess off. The stamp looked much better however, part of the P is missing on the right side. The pictures below show what it looks like.
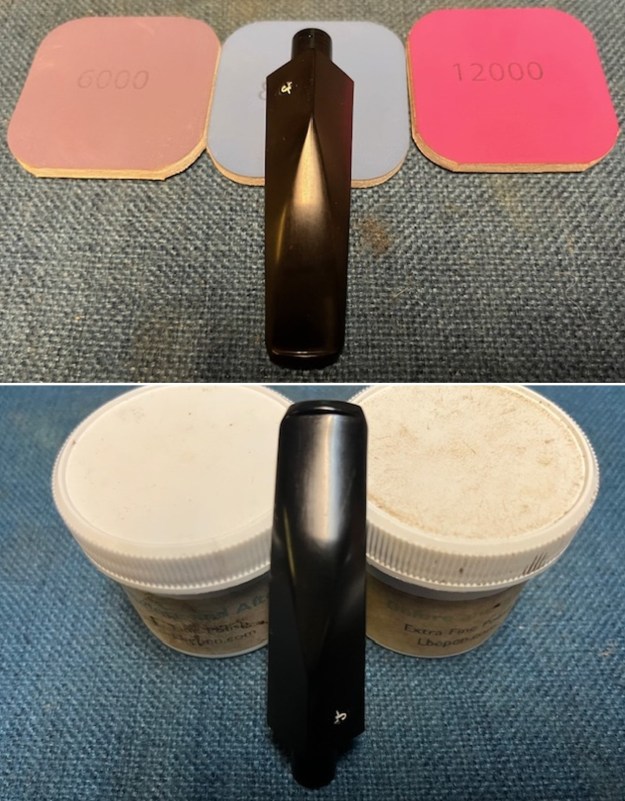
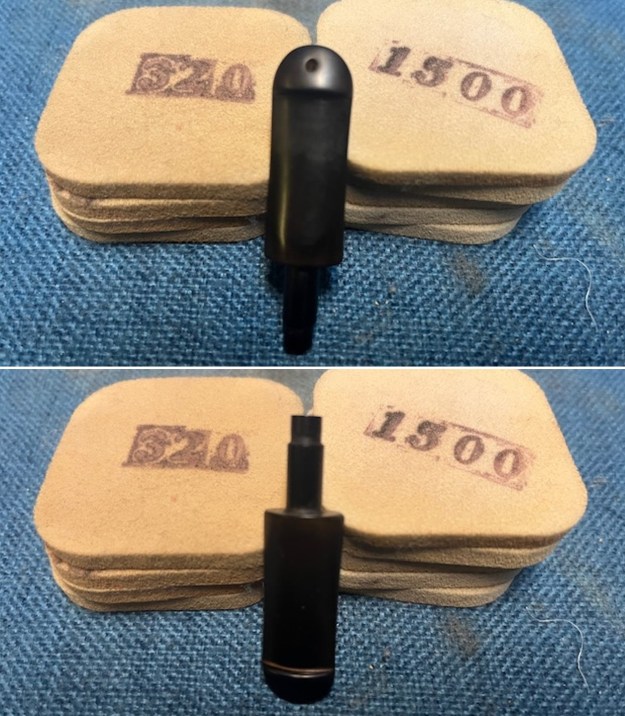
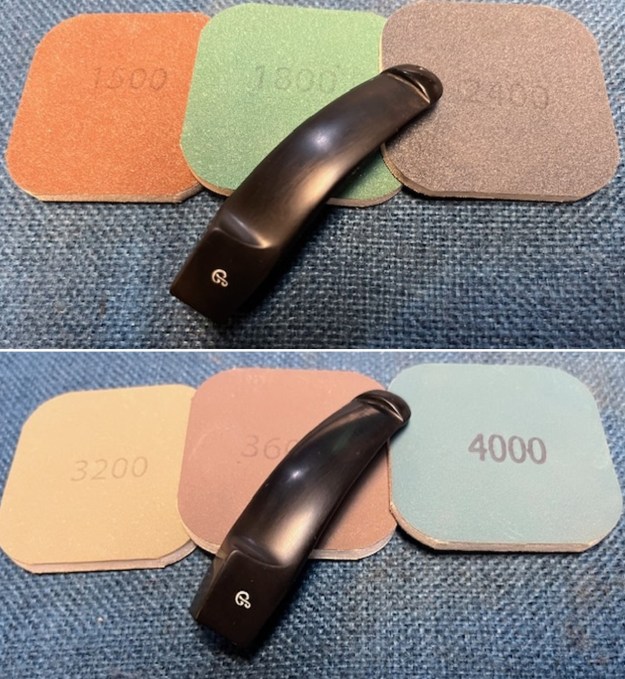
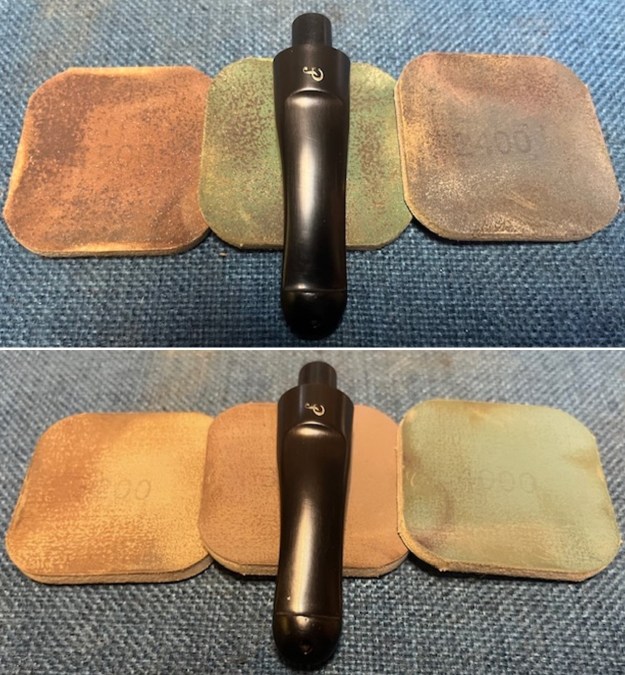
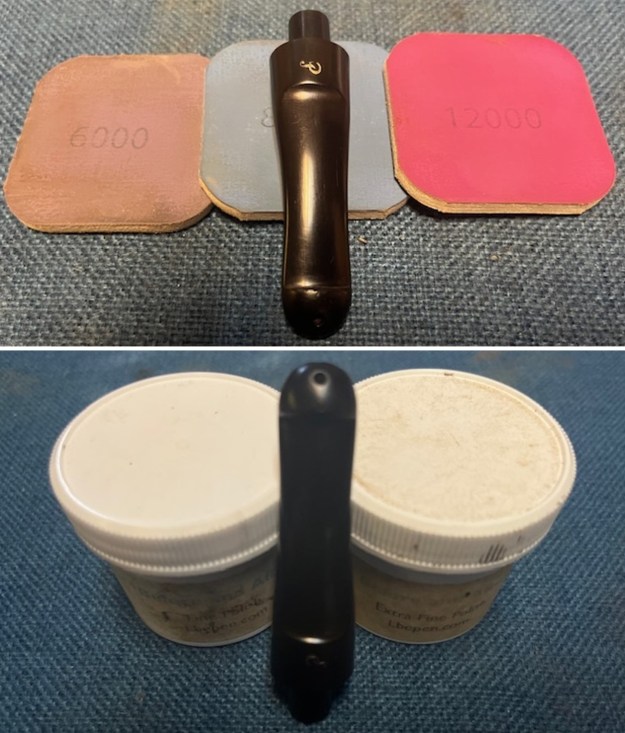
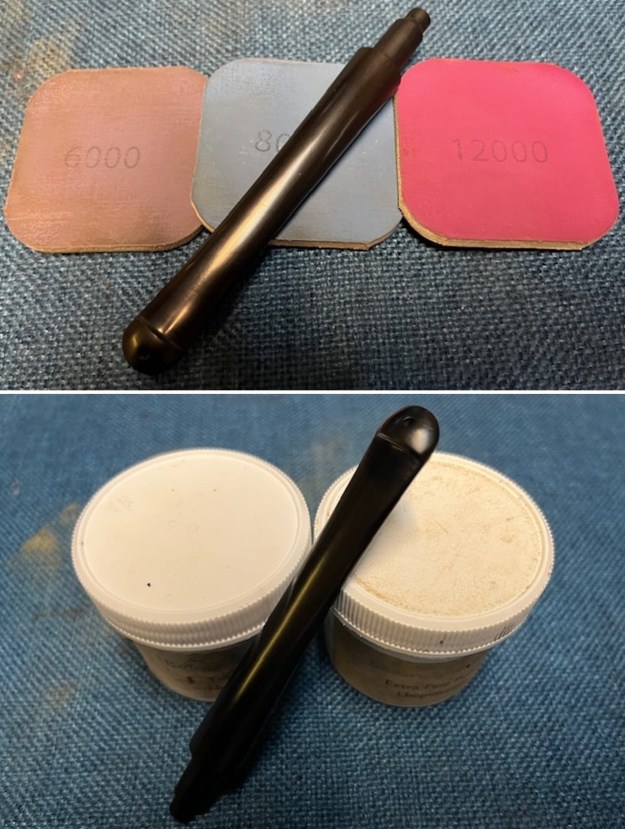
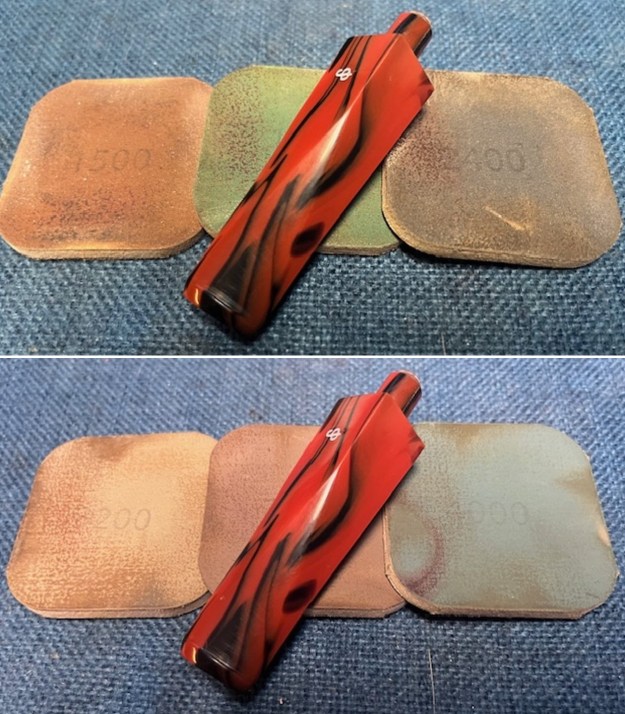
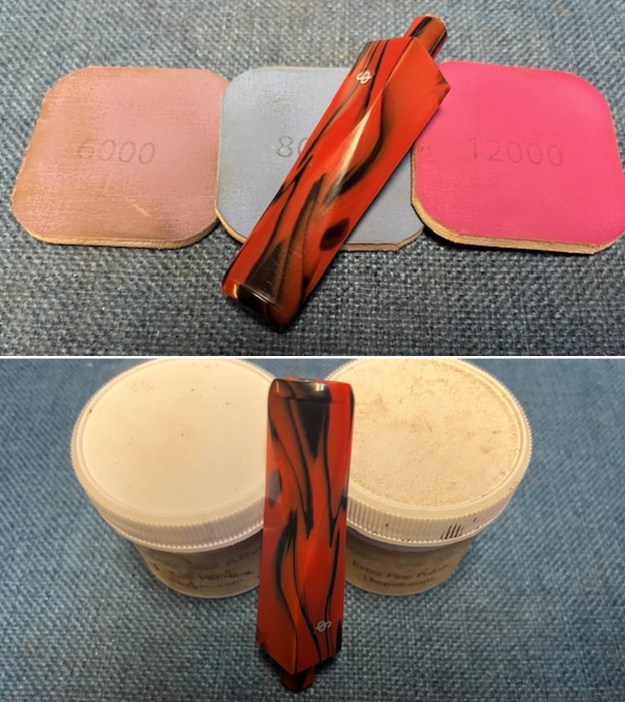
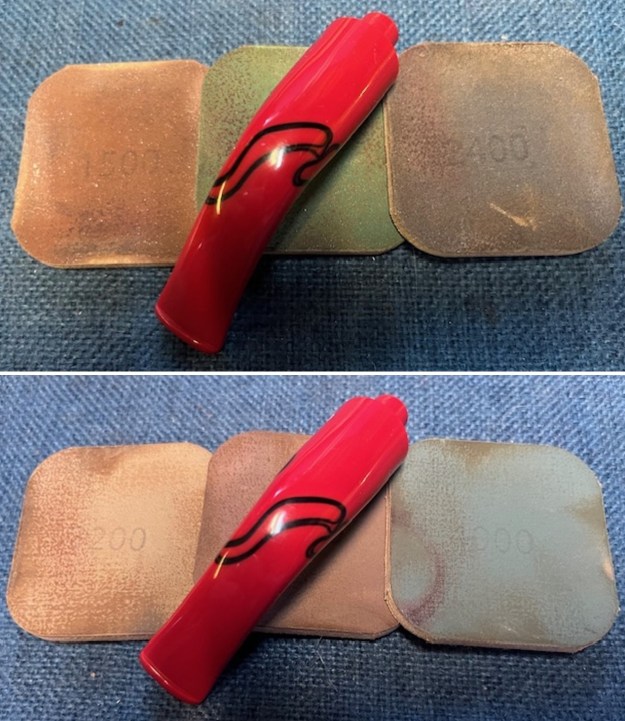
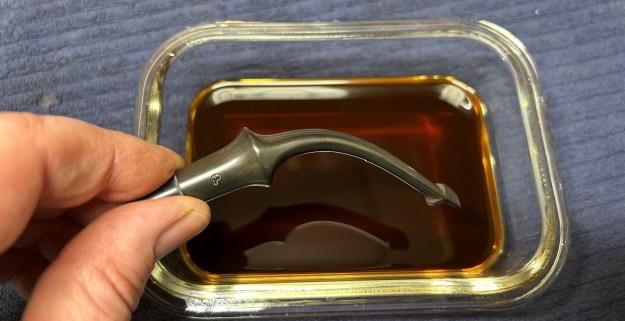
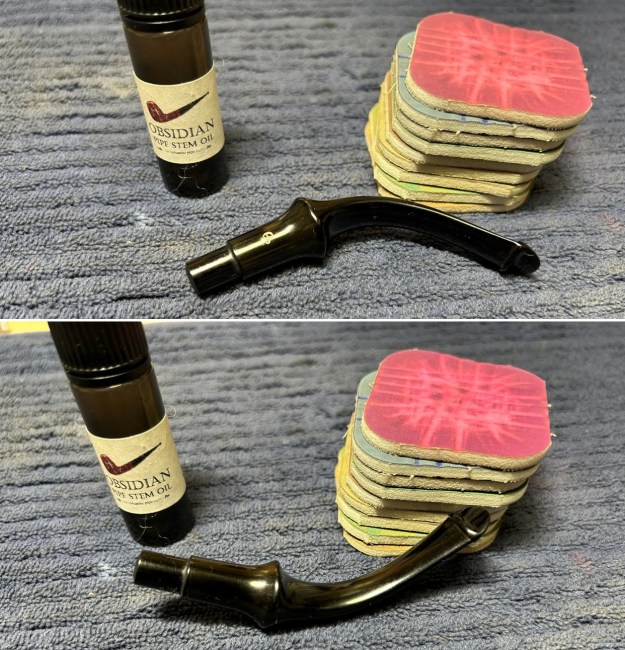
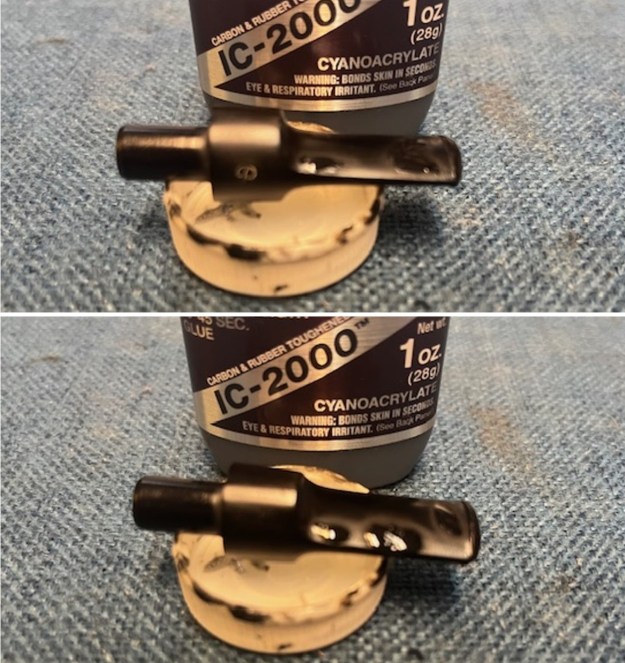
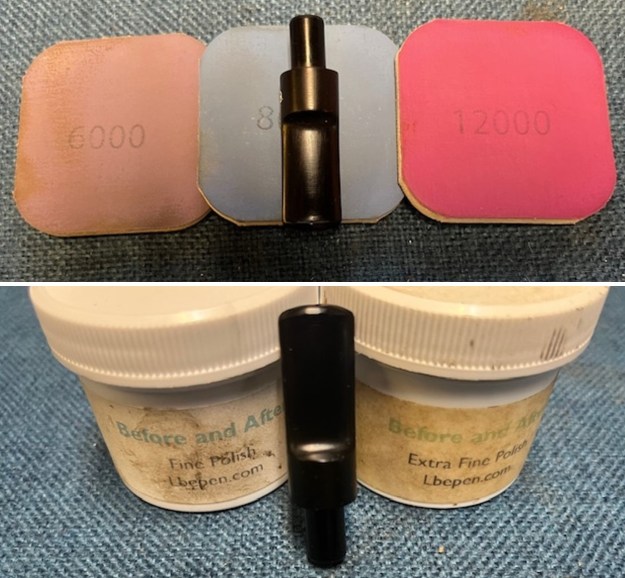
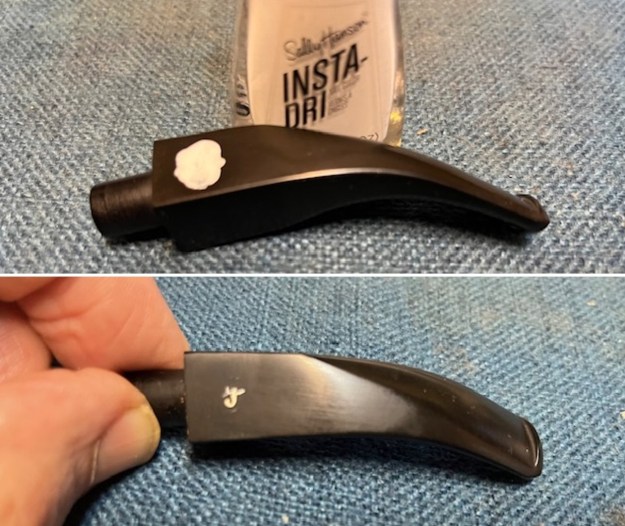
I set the bowl aside and turned to the stem. I polished the stem with micromesh sanding pads – wet sanding with 1500-12000 grit pads. I wiped the stem down after each sanding pad with Obsidian Oil. I polished it with Before & After Pipe Stem Polish – both Fine and Extra Fine. Once I had finished the polishing I gave it final coat of oil and set it aside to dry. 
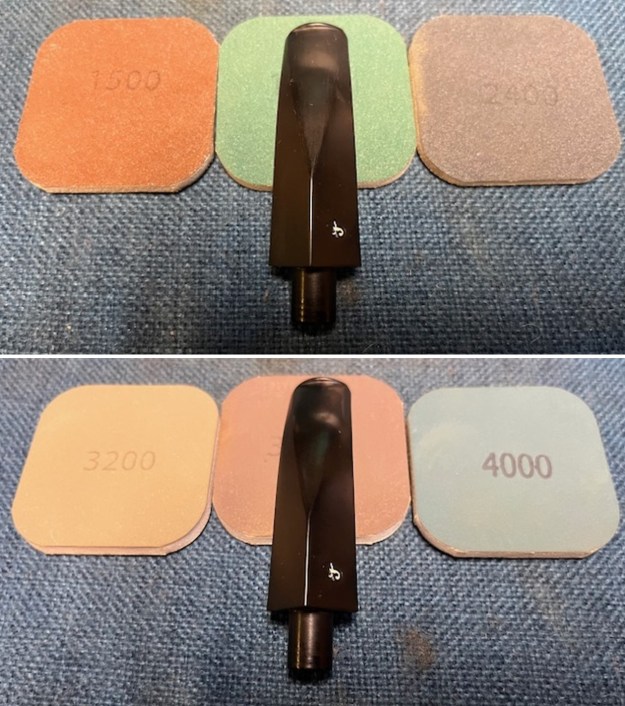
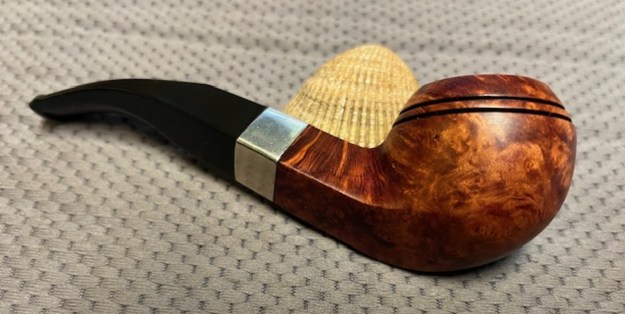
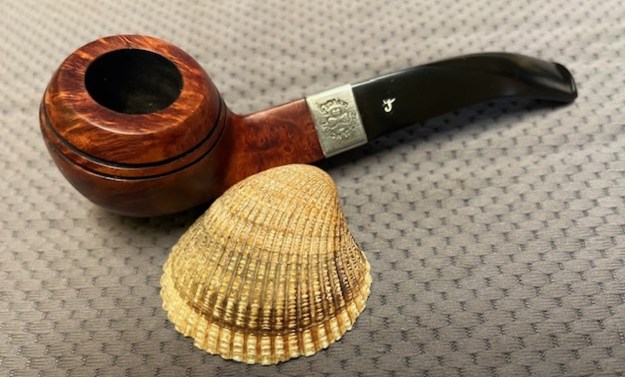
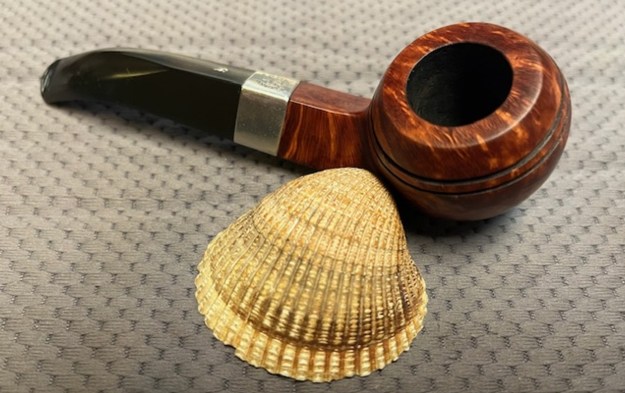
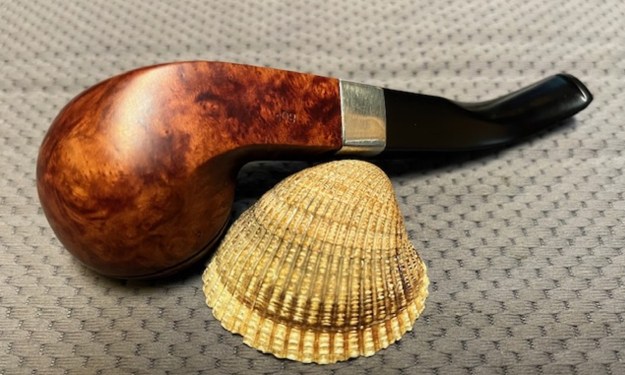
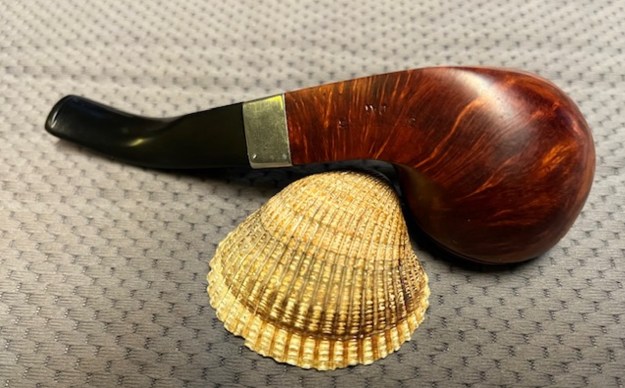
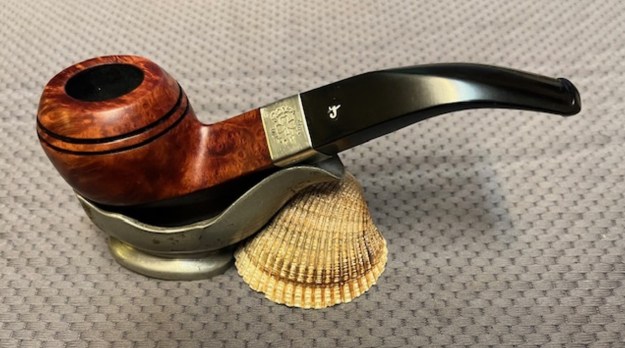
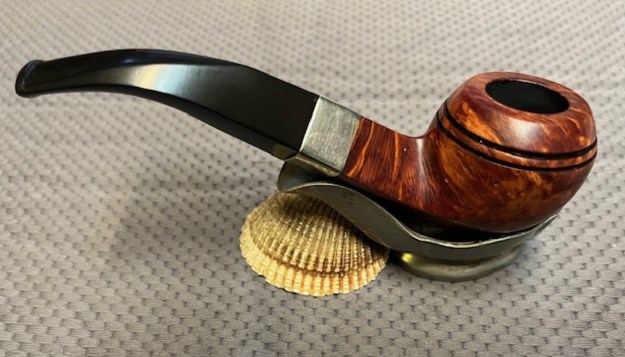
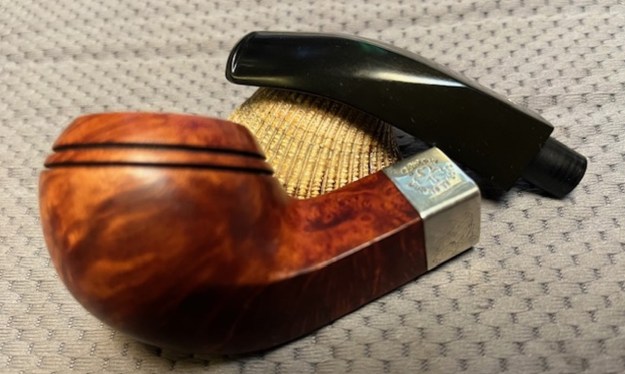
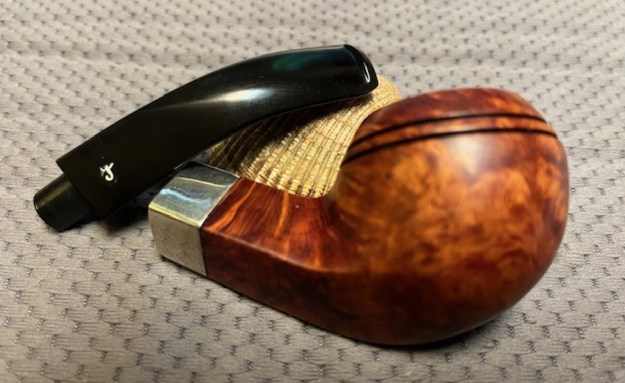
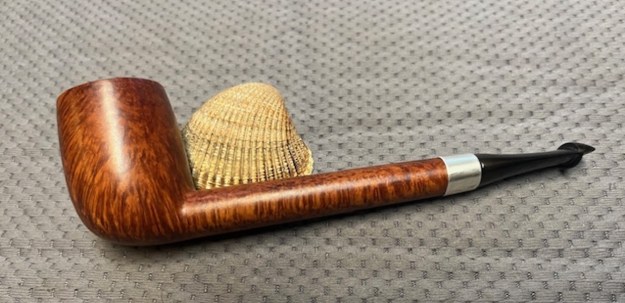
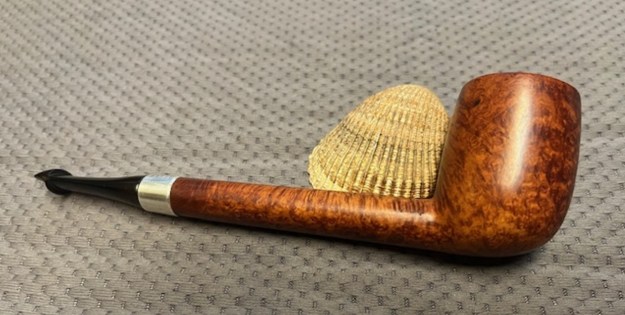
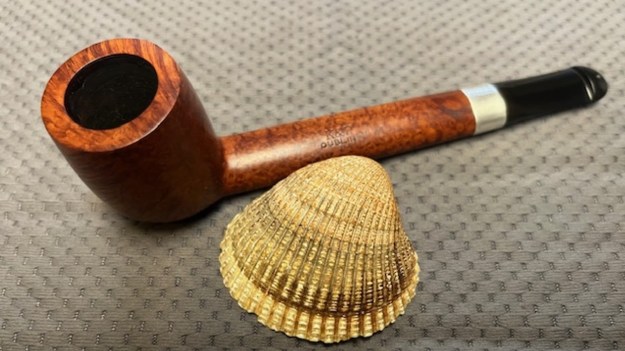
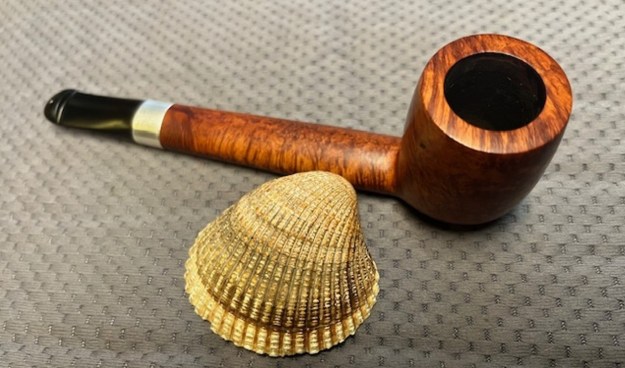
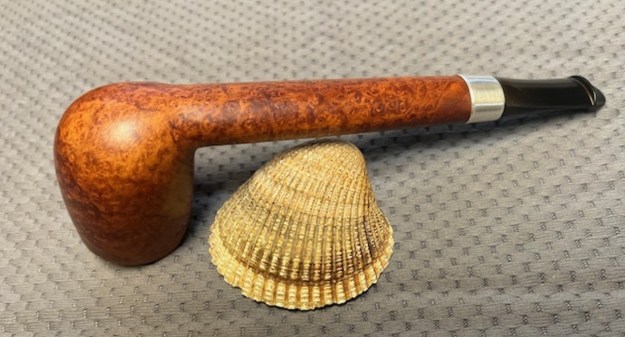
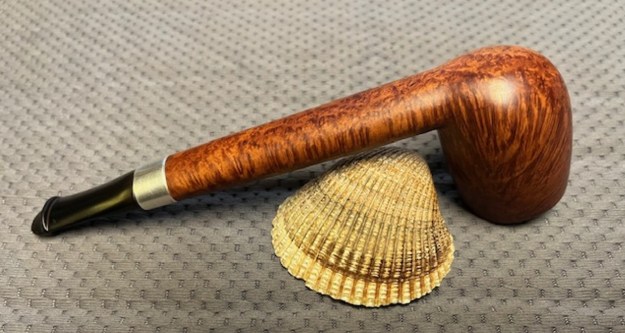
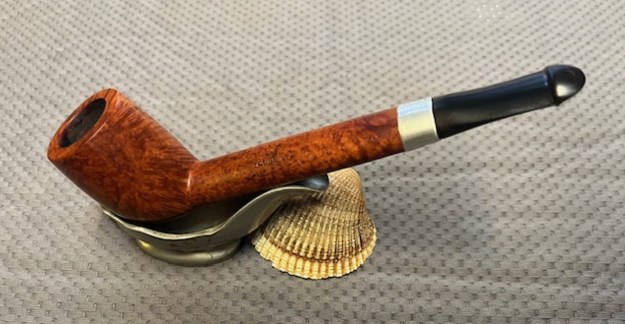
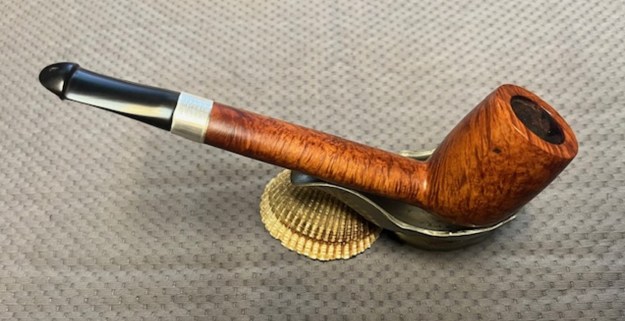
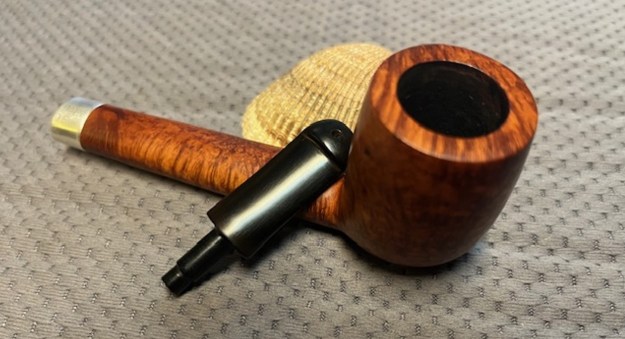
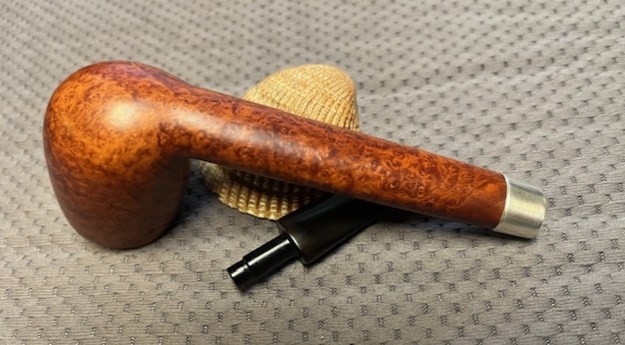
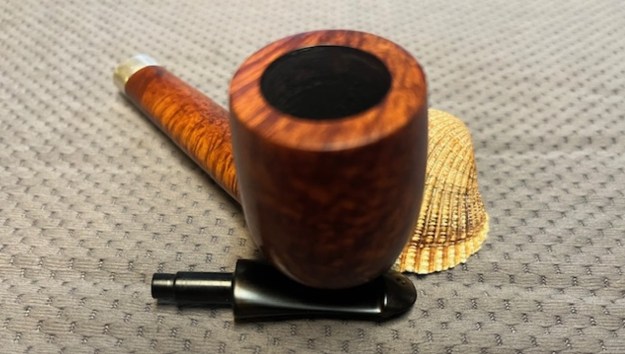
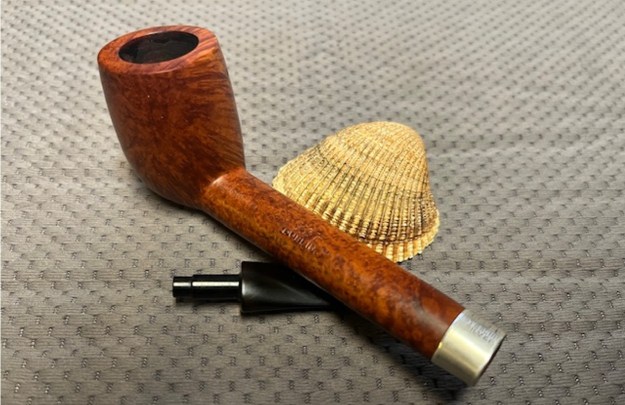
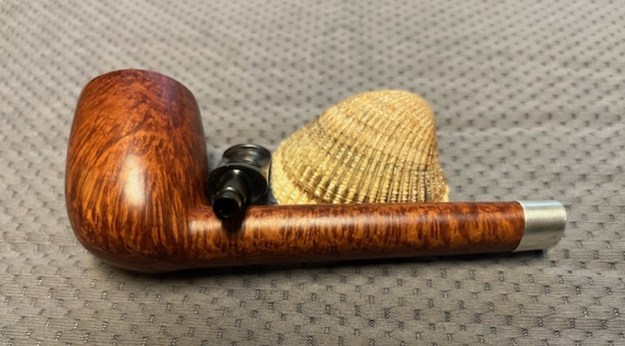
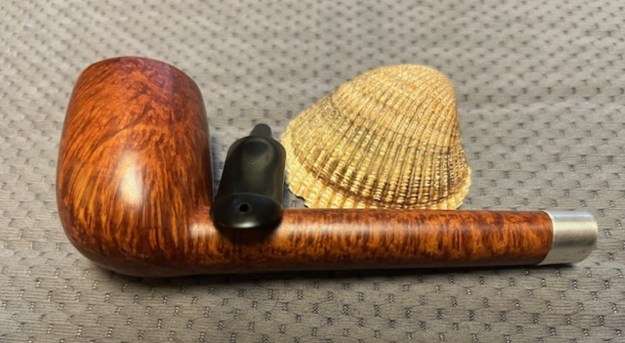
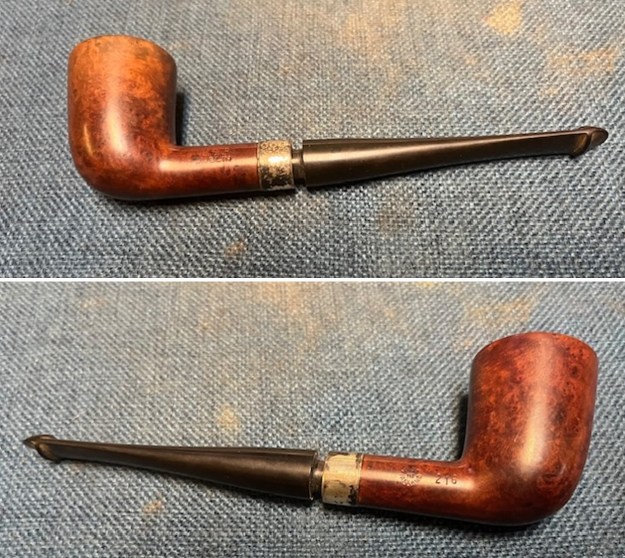
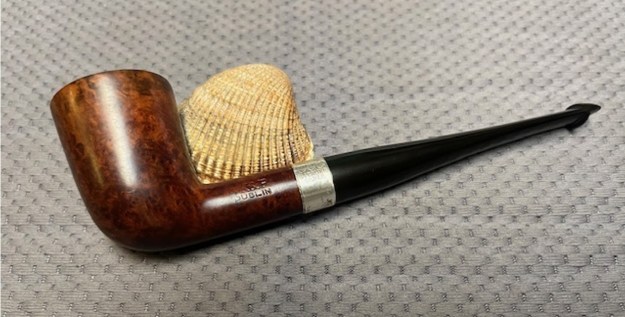
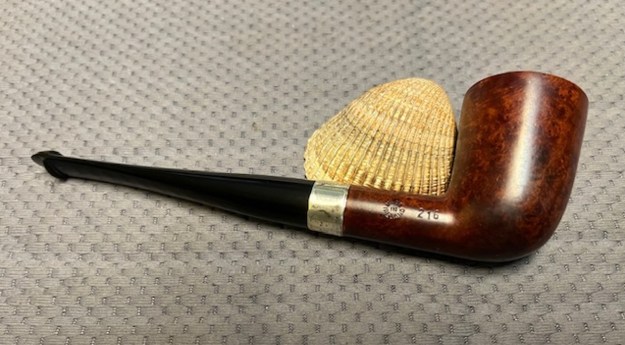
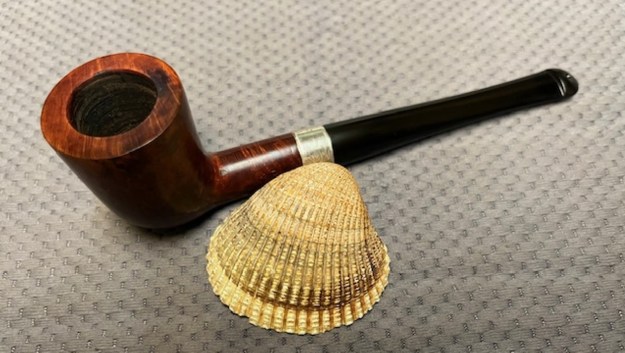
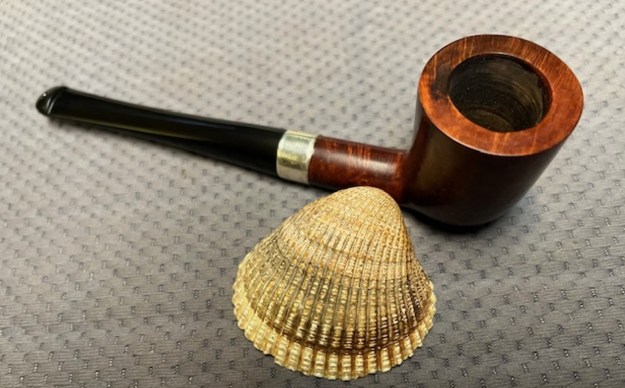
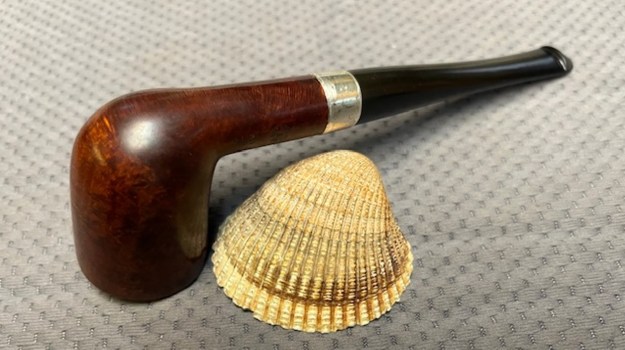
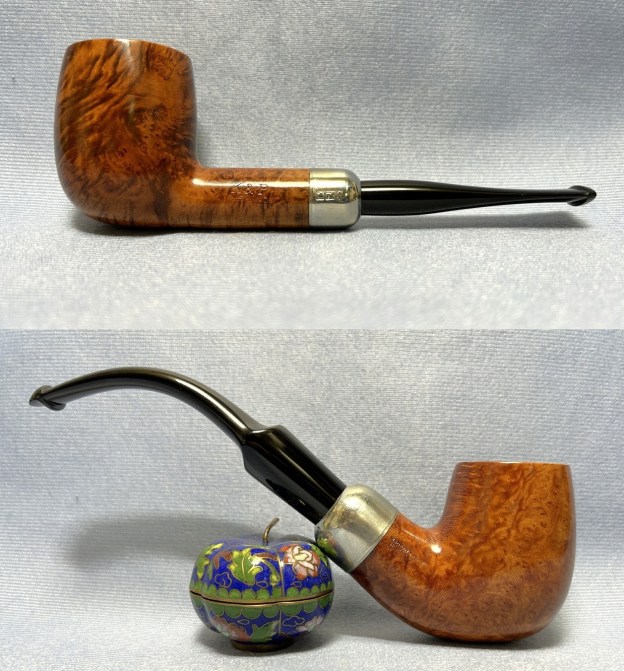
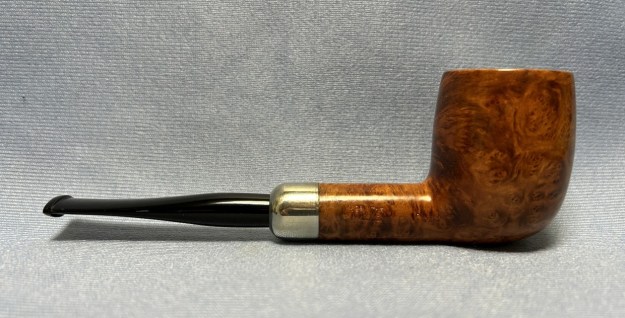
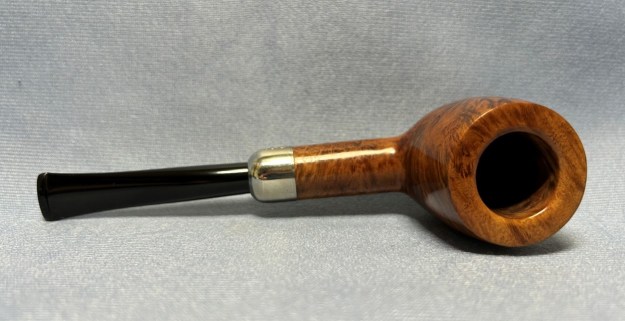
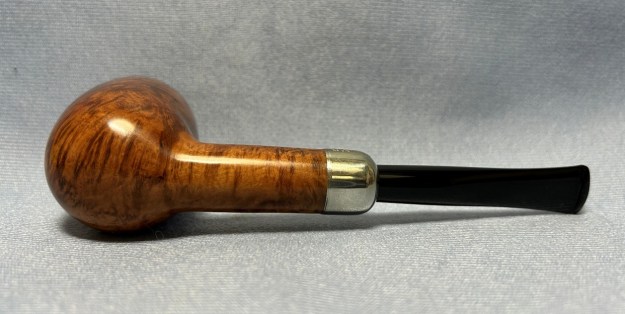
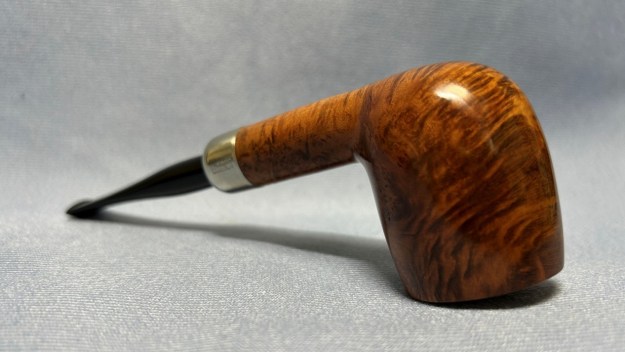
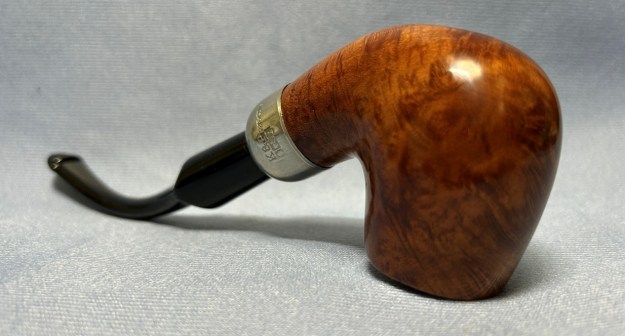
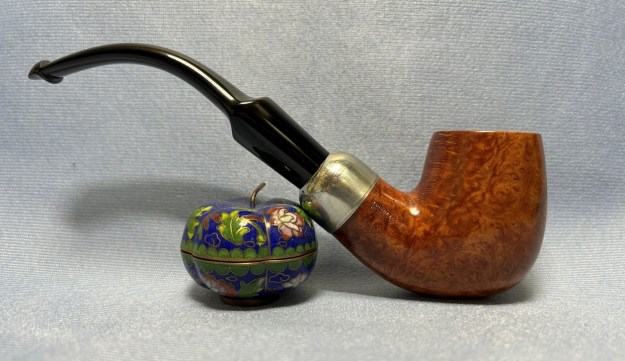
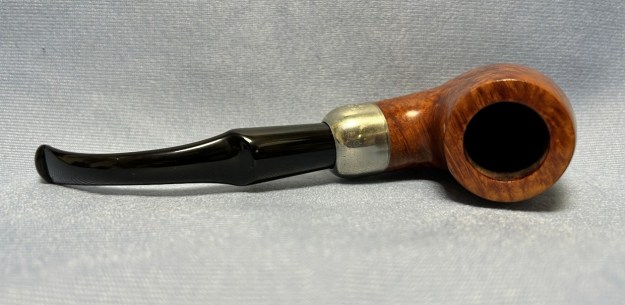
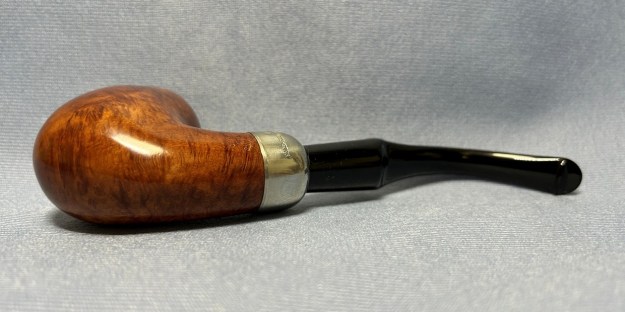
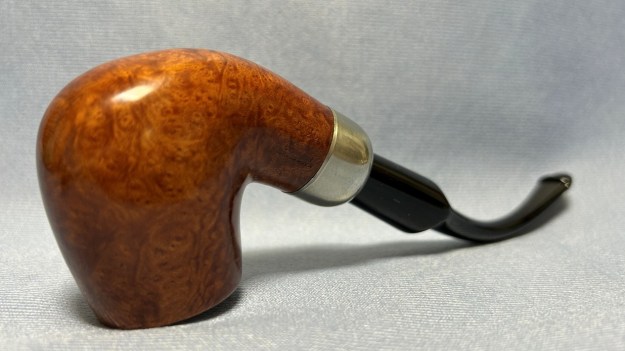
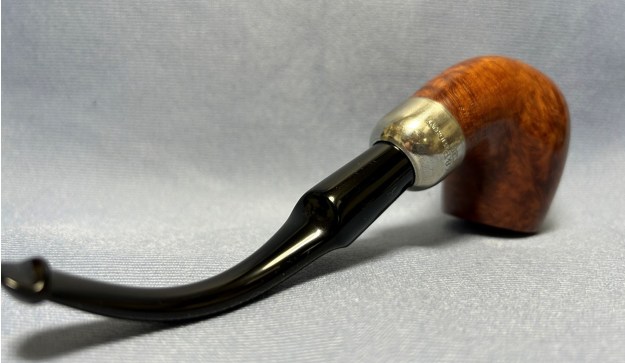
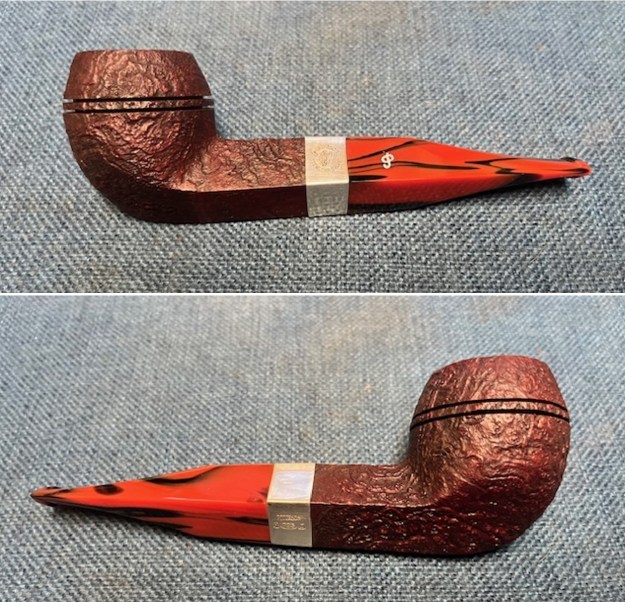
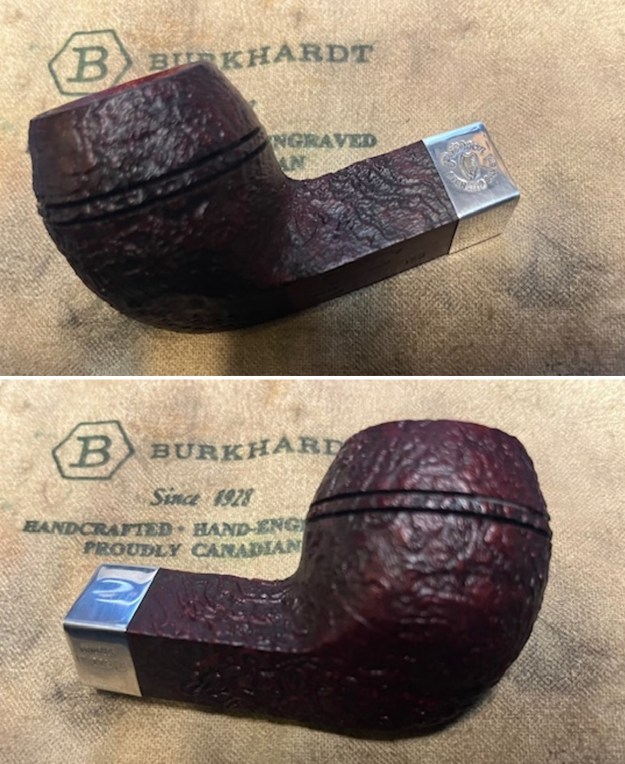
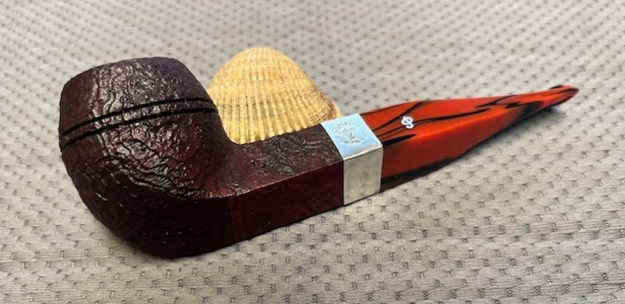
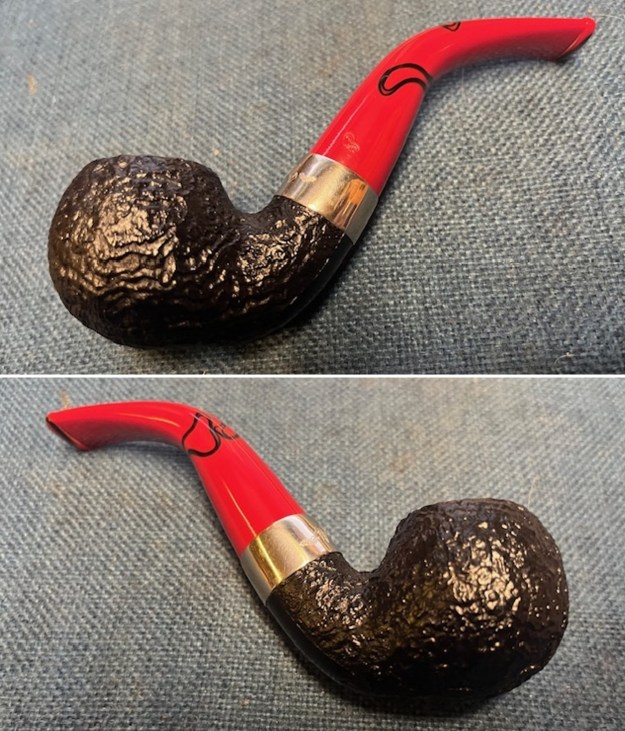
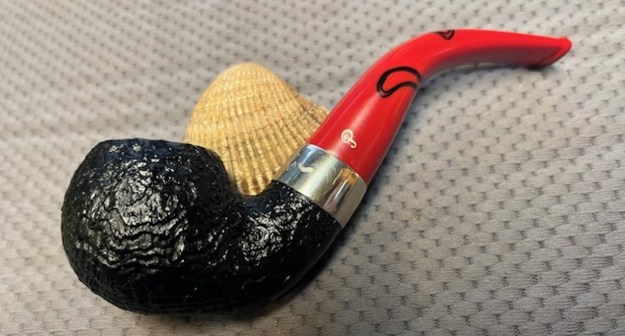
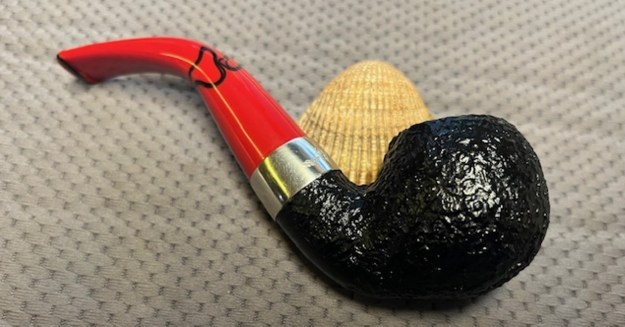
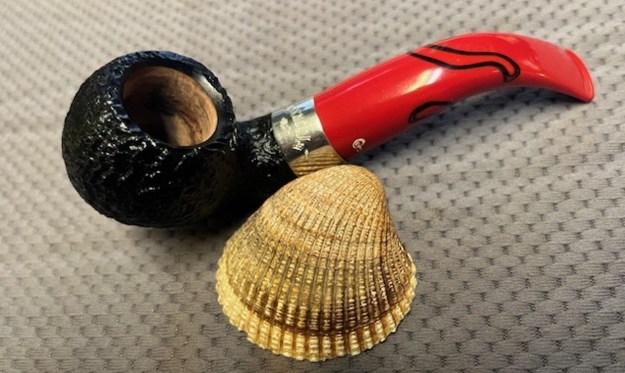
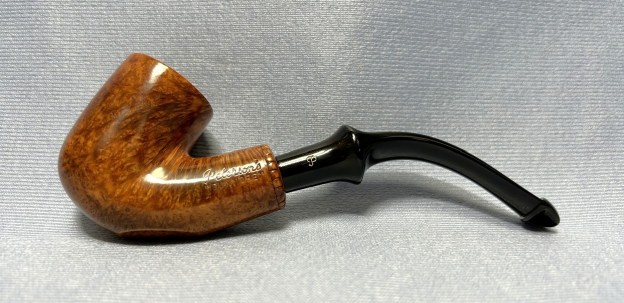
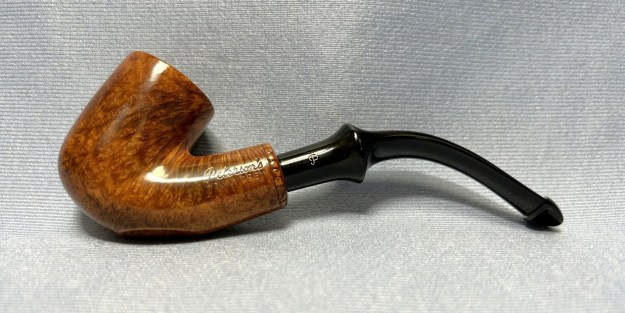
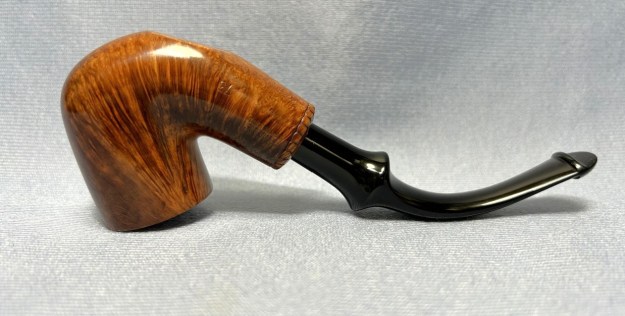
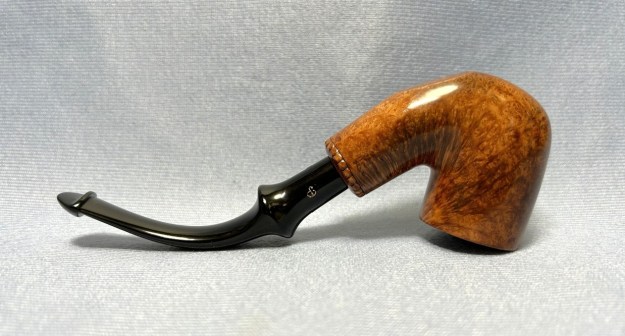
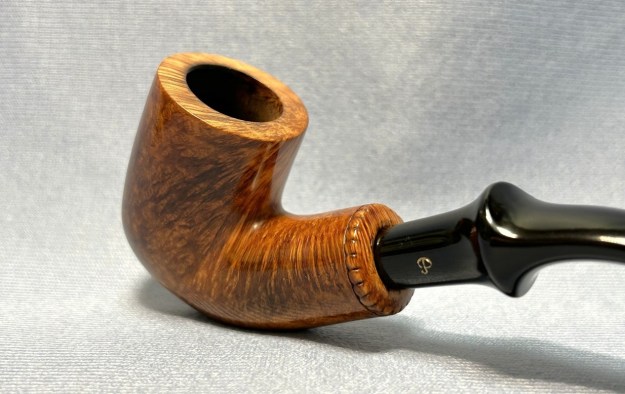
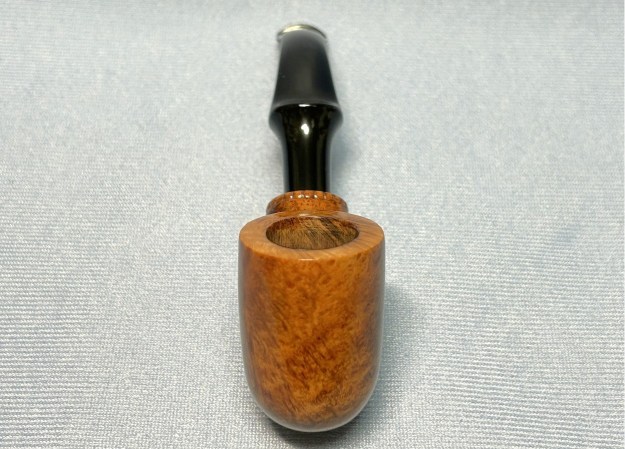
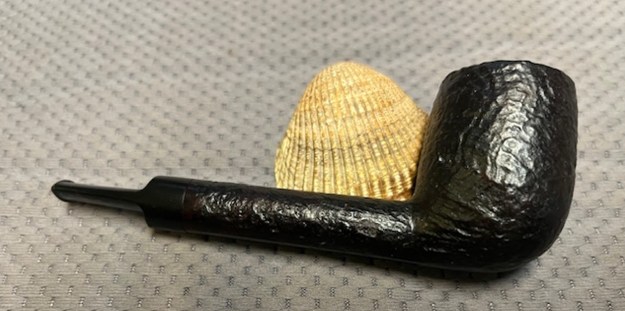
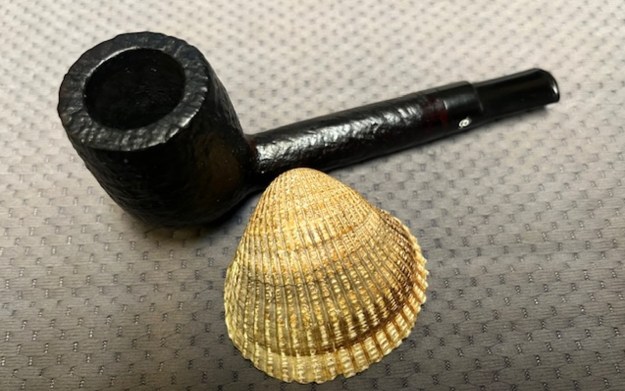
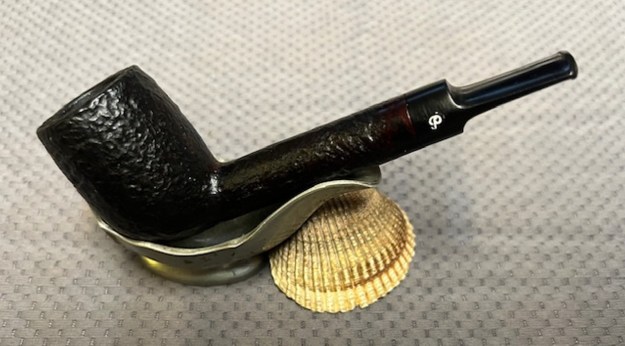
I am excited to finish this Peterson’s 2012 St. Patrick’s Day 80S Classic Bent Bulldog with a polished nickel band and a taper vulcanite stem. I put the pipe back together and buffed it with Blue Diamond on the buffing wheel. I gave the bowl and the stem multiple coats of carnauba wax. I hand buffed the pipe with a clean buffing pad to raise the shine. It is fun to see what the polished bowl looks like with beautiful birdseye and cross grain on the sides of the bowl. Added to that the polished nickel band and the black vulcanite stem was beautiful. This smooth Peterson’s St. Patrick’s Day 2012 80S Bent Bulldog is great looking and the pipe feels great in my hand. It is light and well balanced. Have a look at it with the photos below. The dimensions are Length: 5 ½ inches, Height: 1 ½ inches, Outside diameter of the bowl: 1 ¼ inches, Chamber diameter: ¾ of an inch. The weight of the pipe is 50 grams/1.76 ounces. It turned out to be a beautiful pipe. I will be putting it on the rebornpipes store in the Irish Pipe Makers section. If you are interested in adding it to your rack let me know by message or by email to slaug@uniserve.com. Thanks for your time reading the blog. I appreciated it.
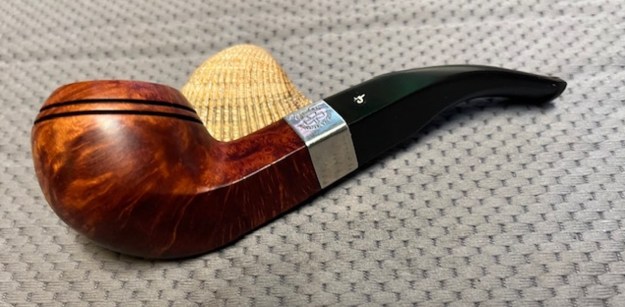
Restoring a Peterson’s K&P Dublin Made in Ireland Canadian


by Steve Laug

Last weekend Kenneth and I went to an antique show in New Westminster, BC. It is our third year going but still we have no idea what we are going to fine each time we go. It is always a part of the fun to wander through the various stalls and see what the vendors are offering on their tables. There are always surprising things – items that I grew up with that are now called antiques or at least collectibles. If only my foresight had been as good as my memory is now I could have sold many of the things I played with and ate from! But I digress. Back to the pipe hunting. We saw the usual offerings of things Grabow and Medico that were in very rough shape. I think we both have become much more selective over time and we passed on spending time with them. I did a few items that I picked up to restore. I took a picture of the group of fout pipes. In the left column from top to bottom there was a Peterson’s System Standard 1307 (Canadian number on a 307 shape), a Bulldog that was stamped Fraser Valley Made in Canada with a white dot stem and at the bottom was another Peterson – a K&P Dublin Made in Ireland Canadian with a Sterling Silver Band. The one on the right side is an older GBD Nosewarmer with an orific button on the short stem. Not a bad group of pipes to bring to the work table.The first of them I chose to bring to the table was the K&P Canadian at the bottom of the above photo. It is a pretty pipe and bears the stamping on the top of the shank that reads K&P [over] Dublin. On the underside the COM stamp is Made in Ireland in a circle. That format for the stamp made the pipe one that was made between 1945-1972. On the worn and oxidized Silver band it is stamped K & P in three shields [over] Sterling [over] Silver. The bowl has a light cake but the rim top and edges are very clean. The shank looks to be clean also. The stem is heavily oxidized and will take some work to bring it back to black. There does not appear to be any stamping or logo on the stem. It is an original P-lip style stem and it is in surprisingly good condition under the oxidation. I took photos of the pipe before I started my clean up work on it. I took a close-up photo of the rim top to show the condition of the bowl and inner edge of the bowl and the stem. You can clearly see the cake in the bowl and the darkening and lava on the rim top. The stem photos show the deep oxidation on the stem and the silver band.I took a photo of the stamping on the sides of the shank. It is clear and readable as noted above. I removed the stem and took a photo of the parts of the pipe. It is a pretty little pipe.Now it was time to work on the pipe. I cleaned up the silver band with a jeweller’s cloth so that I could read the stamping clearly. It read as noted above and the characters were slightly worn under the oxidation. But it is a great addition to the pipe. I reamed the pipe with a Savinelli Fitsall Pipe Knife to remove the thin cake in the bowl and check the bowl walls. I sanded the bowl with a piece of dowel wrapped with 220 grit sandpaper. It looked much better at this point.I moved on to clean up the internals. I cleaned out the airway and mortise with pipe cleaners, cotton swabs and alcohol. I cleaned out the airway in the stem at the same time. I was surprised at how clean the internals were. I scrubbed the externals of the pipe with undiluted Murphy’s Oil Soap and a tooth brush to remove the grime in the finish and on the rim top. I worked on it until it looked much better and then rinsed it off with warm water. I dried it off with a soft cloth. I polished the bowl with micromesh sanding pads – dry sanding with 1500-12000 grit sanding pads. I wiped it down between pads with a damp cloth. It really began to take on a deep shine. There is a dark spot on the right side of the bowl. It is solid so it is not a fill. My guess is that it is where a root or such came out of the briar. The exterior of the bowl looks better after sanding. I worked some Before & After Restoration Balm into the briar with my finger tips. I let it sit on the bowl for 10 minutes and then buffed it off with a paper towel and soft cloth. The product is a great addition to the restoration work. It enlivens, enriches and protects the briar while giving it a deep glow. It is a product I use on every pipe I restore. I set the bowl aside and turned my attention to the stem. I scrubbed the stem with Soft Scrub and cotton pads to remove the oxidation. I was able to rid the surface of the majority of the brown and what was left would be able to be sanded off.There were no deep marks or chatter so I sanded the stem with 320-3500 grit sanding pads and wiped it down with Obsidian Oil to remove the sanding dust.I polished the stem with micromesh sanding pads – dry sanding with 1500-12000 grit pads. I wiped the stem down after each sanding pad with Obsidian Oil to further protect the vulcanite surface. I finished the polishing with Before & After Pipe Stem Polish – Fine and Extra Fine. I wiped the stem down a final time with Obsidian Oil and a cloth. It really looks very good. I am always excited to finish working on a pipe. This K&P Dublin Made in Ireland Canadian made between 1945-1972 is no exception. I put the pipe back together and buffed it with Blue Diamond on the buffing wheel. I gave the bowl and the stem multiple coats of carnauba wax. I buffed the pipe with a clean buffing pad to raise the shine and hand buffed it with a microfibre cloth to deepen the shine. It is fun to see what the polished bowl looks like with polished silver and the black vulcanite taper stem. This Classic looking Peterson’s K&P Dublin Canadian feels great in my hand. It is light and well balanced. Have a look at it with the photos below. The dimensions are Length: 6 inches, Height: 1 ¾ inches, Outside diameter of the bowl: 1 ¼ inches, Chamber diameter: ¾ of an inch. The weight of the pipe is 31 grams/1.09 ounces. I will be putting it on the rebornpipes store shortly in the Irish Pipe Makers Section if you are interested in it. Thanks for walking through the restoration with me as I worked over this pipe. Thanks to each of you who are reading this blog.

Fresh Life for a Peterson’s Meerschaum Bulldog


by Steve Laug

The next pipe on the table is a Peterson Rusticated Meerschaum Bulldog. We picked the pipe up from a seller in Ogden, Utah, USA on 12/12/2024. Probably the fact that it is a meerschaum and that it bore the P stamp on the stem caught our eye. There is no stamping on the shank or anywhere else on the pipe. It is the shape and the P stamp on the stem that tell us that it is a Peterson pipe. It is great looking rusticated pipe that is commonly seen on these meerschaums. The bowl appears to be lightly caked and quite clean. The inner edge and the top show some light lava overflow. And let’s talk about that stem. It is oxidized and calcified which is quite normal for what I see. There are some tooth marks and chatter on the stem surface and button. The P stamp on the top left side of the saddle is deep but has lost the colour. Jeff took some photos of the pipe to show the general condition of the pipe before he started his clean up. Jeff took photos of the rim top and stem to show the general condition of the pipe. The bowl is lightly caked and the rim top and edges have lava overflowing on to them. There are also some spots where the finish is worn off. The stem is oxidized, calcified and has tooth chatter and tooth marks on the top and underside near the button. Jeff took photos of the bowl sides and heel to show the condition of the rusticated finish around this bowl. It is a nice looking pipe. He took a photo of the “P” stamping on the left side of the saddle stem. It is clear and readable but has lost the colour that was originally there. I took some time to remind myself of the provenance of these Peterson’s Dublin Meerschaum pipes. I am pretty sure the pipe was made by the Laxey Pipe Ltd. on the Isle of Man for Peterson’s in Ireland (https://pipedia.org/wiki/Laxey_Pipes_Ltd). I quote from the Pipedia article in full:

Laxey Pipe Ltd. resided in a historical 19th century four-storey Man stone building at The Quay, Old Laxey, Isle of Man, which thankfully has been preserved. The company specialized in the production of Meerschaum Pipes using the Meerschaum mined by the Tanganyika Meerschaum Corporation in the Amboseli basin in Tanganyika (since 1964 part of the United Republic of Tanzania). Please note: you may often find names like “Manx Pipes Ltd.”, “Man Pipe Co.” and others more, but there is no indication of another Isle of Man pipe producer other than Laxey Pipe Ltd. at any time!

Laxey Pipe Ltd. marketed own brands like “Manxpipe”, “Manxman”, “Manxland” e.c. Names like “John Bull”, “White Knight” (unwaxed), “Domino” (black, or lined) indicated some shapes / colours of Laxey’s own series. The stems either showed the astronomical sign for “male” or “man” (circle + arrow), or the crest of the Isle of Man, the 3-legged X in a circle. Manxpipes and Laxey’s other brands were available through pipe retailers in general, but also were sold (mainly) to tourists through their own shop in Laxey.

Furthermore Laxey Pipe Ltd. manufactured the meer bowls for Peterson, Barling, Nørding and others from the later 1960’s until 2001. Man Pipe e.g. was a brand distributed by Comoy’s. The bowls usually showed no nomenclature indicating the orderer. “Genuine Block Meerschaum” was engraved frequently. Often, just the stems were different, while bowls were the same.

Supply of meer from East Africa run out (Kenya / Tanzania exhausted, Somalia inaccessible), and thus the last Laxey meers were supplied to trade in May, 2001. Laxey Pipe Ltd. tried to survive continuing with briar pipes – mainly in the Danish style -, but to no success. It closed down business in July, 2002.

I know that the pipe was made on the Isle of Man by Laxey Pipe Ltd. out of African Meerschaum. It was made for export for Peterson’s of Dublin. The flumed top on the bowl and the rustication around the bowl and shank make me think that it is a 1970s era pipe. That was as much as I could figure out.

Jeff had done a great job cleaning up the pipe as usual. He reamed the pipe with a PipNet reamer and cut back the cake back to the bare meerschaum. He cleaned up the walls with a Savinelli Fitsall Pipe Knife. He scrubbed the interior of the bowl and shank with pipe cleaners, shank brushes, cotton swabs and alcohol to remove the tars and oils. He scrubbed the exterior of the pipe with Murphy’s Oil Soap and a tooth brush to remove the grime from the finish. He worked on the rim top lava and darkening with the soap and tooth brush. He scrubbed the inside of the stem with alcohol and pipe cleaners. He scrubbed the exterior with Soft Scrub and then soaked it in Briarville’s Pipe Stem Deoxidizer. He washed it off with warm water to remove the Deoxidizer. The pipe looked very good when it arrived. I took close up photos of the rim top and the stem surface. I wanted to show how well it had cleaned up. The rim top and edges looked very good. There was still some debris in the rustication on the rim top. I took photos of the stem to show the condition it was in. There was light chatter on both sides ahead of the button.I took a photo of the stamping on side of the stem. You can see that it is stamped as noted above and is clear and readable. I took the pipe apart and took a photo of the pipe. It is a good looking pipe with great grain.I used a brass bristle wire brush to cleanup the debris in the rustication on the rim top. I knocked out the debris with the brush and the top looked much better and the rustication showed clearly.I worked some Clapham’s Beeswax/Carnauba wax into the finish of the bowl. I used a horsehair show brush to work it into the rusticated finish. I set it aside to allow the wax to dry. I buffed the pipe with a soft cotton cloth to raise the shine on the meerschaum. I set the bowl aside and turned my attention to the stem. I “painted” the stem with the flame of a lighter to try and lift the tooth marks. I was able to lift some of them. I filled in the remaining tooth marks in the stem surface with black CA glue. I set the stem aside to let the repairs cure. Once the glue cured I used a small file to flatten the repairs on the surface of the stem. I used a piece of 220 grit sandpaper to blend them into the surrounding vulcanite. I sanded the stem with 320-3500 grit sanding pads to remove the tooth marks and chatter against the button edge and sand the logo. It worked well on the tooth marks but did little on the logo on the stem top.I touched up the P stamp on the saddle side with white acrylic fingernail polish. I worked it into the stamp with a tooth pick. Once it cured I scraped off the excess then ran some 1500 grit micromesh over the surface. It looked very good.I polished the stem with micromesh sanding pads – dry sanding with 1500-12000 grit sanding pads. I wiped it down after each sanding pad with Obsidian Oil. I polished it with Before & After Pipe Stem Polish – both Fine and Extra Fine. I put the stem back on the Rusticated Peterson’s Block Meerschaum Bulldog and took it to the buffer. I buffed the stem with Blue Diamond to polish the vulcanite. Blue Diamond does a great job on the smaller scratches that remain on the surface. I gave the bowl multiple coats of Clapham Wax and the stem several coats of carnauba wax and buffed the pipe with a clean buffing pad to raise the shine. I hand buffed it with a microfiber cloth to deepen the shine. I am amazed at how well it turned out. The finished pipe is shown in the photos below. This is a beautiful Peterson’s Genuine Meerschaum Bulldog with a rusticated finish and the vulcanite saddle stem has a great look. The dimensions of the pipe are Length: 5 ½ inches, Height: 1 ½ inches, Outside diameter of the bowl: 1 ¼ inches, Chamber diameter: ¾ of an inch. The weight of the pipe is 1.31 ounces/37 grams. This is another pipe that I will be putting on the rebornpipes online store in the Irish Pipemakers Section shortly, if you are interested in adding it to your collection. Thanks for walking through the restoration with me on this beauty!

As always, I encourage your questions and comments as you read the blog. Thanks to each of you who are reading this blog. Remember we are not pipe owners; we are pipe men and women who hold our pipes in trust until they pass on into the trust of those who follow us.

Restoring a much loved Peterson’s of Dublin Kinsale XL25


by Steve Laug

Sunday afternoon Auke stopped by with a pipe he wanted me to work on for him. It was obviously a favourite pipe of his. It was a Peterson’s shape that I have worked on before and one that was in the Sherlock Holmes series and labelled as a Strand. This one however was stamped on the underside of the shank in a smooth band and read Peterson’s [over] of Dublin [over] Kinsale. To the right of that it was stamped with the shape number XL25. It is a large rusticated pipe that is quite beautiful. This one was dirty with a moderate cake in the bowl smelling of the aromatics that Auke smoked. There was a lava build up on the rim top covering the smooth surface. The finish was a bitty sticky with the grime and dirt. Otherwise it was in good shape. The three stacked bands were a little tarnished on the shank end. The stem was very tight from the build up of tars and oils in both. Auke said the draw was quite constricted and was hard to pull air through – a symptom of a dirty, gummy airway in the shank and stem. The vulcanite stem is also very dirty. There was oxidation, calcification and some light tooth damage on both sides ahead of the button. The gold “P: stamp on the left side of the stem was in good shape – just a bit tarnished. I took photos of the pipe before I started my work on it. I took a closeup photo of the rim top and bowl to give a sense of the dirty condition of the pipe and the thickness of the cake and lava on the bowl top. The rim top and edges look to be under the lava coat but the cleanup will reveal the facts. I also took photos of the stem to show the top and underside ahead of the button.I took photos of the stamping on the underside of the shank. It was readable through the grime and debris. It read as noted in the above paragraphs. I also took the stem off the shank and took a photo of the look and proportion of the pipe.I turned to a Catalogue I have on the blog that has a section on the Classic Range Kinsale Smooth and Rustic finishes. It says that it is based on the Sherlock Holmes collections. A quality briar in a smooth burnt orange or rustic finish. Here is the link (https://rebornpipes.com/wp-content/uploads/2015/05/peterson-cataloguecomp_page_30.jpg). I have included a copy of the page below.I started my work on the pipe by reaming the cake in the bowl. I used a PipNet pipe reamer with the second and third cutting heads to take back the cake. I used a Savinelli Fitsall Pipe Knife to scrape the remainder of the cake out of the bowl and clean up the bottom of the bowl. I sanded the bowl walls with 220 grit sandpaper wrapped around a piece of dowel. With the bowl cleaned out I was able to see that the bowl walls and bottom were in great condition. There was no checking or damage. I cleaned the airway in the shank and stem with pipe cleaners, cotton swabs and isopropyl alcohol. Many pipe cleaners later that airway was clean and once again wide open.I scrubbed the externals of the bowl and shank with undiluted Murphy’s Oil Soap and a tooth brush. I rinsed it with warm running water and repeated the scrubbing and rinsing process until the pipe was clean and looked better. I polished the rim top with micromesh sanding pads to clean up the darkening on the smooth surface and inner bevelled edge. It looked much better. I rubbed the briar down with Before & After Restoration Balm. I worked it into the briar with my fingertips and a horsehair shoe brush to work it into the finish. The product works to clean, enliven and preserve the briar. I let it sit for 10 minutes then I buffed it with a cotton cloth to deepen the shine. The briar really comes alive with the balm.I polished the stem with micromesh sanding pads – dry sanding with 1500-12000 grit pads. Once again, I wiped it down between each pad with Obsidian Oil. I further polished it with Before and After Stem Polish – both Fine and Extra Fine. It looked very good. This Rusticated Peterson’s of Dublin Kinsale XL25 with an oval Taper Stem has a beautiful rusticated finish that has a new lease on life. The medium brown/black/mahogany finish gives depth to the rustication around the bowl and shank. It has a classic look of a Peterson’s pipe. The rebuilt and polished black vulcanite taper stem adds to the mix. I put the stem back on the bowl and buffed the pipe with Blue Diamond on the buffing wheel being careful to not buff the stamping. I gave the bowl multiple coats of Conservator’s Wax and the stem multiple coats of carnauba wax on the buffing wheel and followed that by buffing it with a clean buffing pad. I hand buffed the pipe with a microfiber cloth to deepen the shine. The finished Peterson’s of Dublin Kinsale XL25 is quite nice and feels great in the hand. Give the finished pipe a look in the photos below. The dimensions of the pipe are Length: 6 inches, Height: 2 inches, Outside diameter of the bowl: 1 ¼ inch, Chamber diameter: ¾ of an inch. The weight of the pipe is 1.83 ounces/52 grams. Thanks for walking through the restoration with me as I worked over another beautiful pipe. Auke will pick up his pipe on the weekend. I am looking forward to seeing what he thinks of it.

Restoring a K & P Dublin Made in Ireland 216 Dublin with a P-Lip stem


by Steve Laug

The next pipe on the work table is the 2nd of three pipes sent to me by a fellow near Vancouver for restoration. It is a Peterson’s Dublin shape with a Sterling Silver band. It is stamped on the left side of the shank and reads K&P [over] Dublin and on the right side Made in Ireland in a circle followed by the shape number 216. The silver band is stamped with K & P in shields [over] Sterling [over] Silver. The bowl had a light cake and a light overflow of lava on the rim top and inner edge. There was some darkening on the top and what looked like a fill on top at the back of the bowl. The finish was oily and light in spots on the left side near the top.  The silver band was tarnished but should clean up well. The P-lip stem was a vulcanite taper that was lightly oxidized and had light tooth marks and chatter on both sides ahead of the button. The stem did not seat properly in shank because of tars and oils in the mortise. It should be a straightforward clean up. I took photos of the pipe before I started my cleanup work. I took a close-up photo of the rim top to show the condition of the bowl and inner edge of the bowl and the stem. You can clearly see the cake in the bowl and the darkening and lava on the rim top. The stem photos show the light tooth marks on both sides ahead of the button.I took a photo of the stamping on the sides of the shank. It is clear and readable as noted above. I removed the stem and took a photo of the parts of the pipe. It is a unique and strangely pretty little pipe. Now it was time to work on the pipe. I reamed the pipe with a PipNet reamer using the first and second cutting head. I took the cake back to bare briar. I cleaned up the reaming with a Savinelli Fitsall Pipe Knife to remove the remnants. I sanded the bowl with a piece of dowel wrapped with 220 grit sandpaper. It looked much better at this point. I moved on to clean up the internals. I cleaned out the airway and mortise with pipe cleaners, cotton swabs and alcohol. I cleaned out the airway in the stem at the same time. It was a dirty pipe but after this cleanup it was much better.I scrubbed the externals of the pipe with undiluted Murphy’s Oil Soap and a tooth brush to remove the grime in the finish and on the rim top. I worked on it until it looked much better and then rinsed it off with warm water. I dried it off with a soft cloth. I smoothed out the inner edge of the bowl and worked on the rim top with a folded piece of 220 grit sandpaper. It was beginning to look much better. Once I had cleaned the top there was a darkened spot on the top toward the back that showed a small fill. I topped it on a topping board with 220 grit sandpaper. I polished the bowl with micromesh sanding pads – dry sanding with 1500-12000 grit sanding pads. I wiped it down between pads with a damp cloth. It really began to take on a deep shine. The dark spot on the rim top is where the fill is still in place. Before going further with the sanding/polishing process I touch up the stain on the rim top and inner edge with a Cherry Stain Pen. It matched very well with the rest of the briar. Once it dried I finished the polishing process with the micromesh pads. The exterior of the bowl looks better after sanding. I worked some Before & After Restoration Balm into the briar with my finger tips. I let it sit on the bowl for 10 minutes and then buffed it off with a paper towel and soft cloth. The product is a great addition to the restoration work. It enlivens, enriches and protects the briar while giving it a deep glow. It is a product I use on every pipe I restore. I set the bowl aside and turned my attention to the stem. There were no deep marks or chatter so I sanded the stem with 320-3500 grit sanding pads and wiped it down with Obsidian Oil to remove the sanding dust.I polished the stem with micromesh sanding pads – dry sanding with 1500-12000 grit pads. I wiped the stem down after each sanding pad with Obsidian Oil to further protect the vulcanite surface. I finished the polishing with Before & After Pipe Stem Polish – Fine and Extra Fine. I wiped the stem down a final time with Obsidian Oil and a cloth. It really looks very good. I am always excited to finish working on a pipe. This K&P Dublin Made in Ireland 216 Dublin is no exception. I put the pipe back together and buffed it with Blue Diamond on the buffing wheel. I gave the bowl and the stem multiple coats of carnauba wax. I buffed the pipe with a clean buffing pad to raise the shine and hand buffed it with a microfibre cloth to deepen the shine. It is fun to see what the polished bowl looks like with the black vulcanite taper stem. This Classic looking Peterson’s K&P Dublin 216 Dublin feels great in my hand. It is light and well balanced. Have a look at it with the photos below. The dimensions are Length: 6 inches, Height: 1 ¾ inches, Outside diameter of the bowl: 1 ¼ inches, Chamber diameter: ¾ of an inch. The weight of the pipe is 31 grams/1.09 ounces. I will be putting it on the rebornpipes store shortly in the Irish Pipe Makers Section if you are interested in it. Thanks for walking through the restoration with me as I worked over this pipe. Thanks to each of you who are reading this blog.

A Pair of Pretty Petes for your Perspicacious Perusal


by Kenneth Lieblich

I have a couple of Peterson pipes that came my way recently and I decided to clean them up and get them ready. Not much of a restoration story on these – just some beautiful pipes. I gave them a quick (and thorough) once over and now it’s time to turn them over to you. Both have been hardly used (once, maybe twice) and they are very handsome. If you’re interested in adding one or both to your collection, be sure to drop me a line.

First is a Peterson K&P Irishmade 106 billiard with nickel military mount. Gorgeous pipe. If you are interested in acquiring it for your collection, please have a look in the “Irish” pipe section of the store here on Steve’s website. You can also email me directly at kenneth@knightsofthepipe.com. The approximate dimensions of the Peterson Irishmade 106 are as follows: length 6 in. (152 mm); height 2 in. (51 mm); bowl diameter 1½ in. (40 mm); chamber diameter ¾ in. (20 mm). The weight of the pipe is 1⅝ oz. (48 g). Have a look below. Thanks. Next is a Peterson System Standard 1307 (same as 307) bent billiard. Another lovely pipe. If you are interested in acquiring it for your collection, please have a look in the “Irish” pipe section of the store here on Steve’s website. You can also email me directly at kenneth@knightsofthepipe.com. The approximate dimensions of the Peterson System Standard 1307 are as follows: length 6½ in. (165 mm); height 2⅛ in. (54 mm); bowl diameter 1½ in. (40 mm); chamber diameter ⅞ in. (21 mm). The weight of the pipe is 2⅜ oz. (67 g). Have a look below. Thanks.

Restoring a Made in Ireland Peterson’s of Dublin Irish Harp 150 Straight Bulldog


by Steve Laug

The next pipe on the work table is another Peterson’s pipe with a red and black swirled acrylic stem. We picked the pipe up from a seller in Ogden, Utah, USA on 12/12/2024. It is stamped on a smooth panel on the left underside of the diamond shank and reads Peterson’s [arched over] of Dublin [over] Irish Harp. To the left of that it is stamped Made in Ireland and to the right the shape number 150. The Sterling Silver band is stamped on the left topside of the diamond shank and reads Peterson [arched over] a Harp with Sterling Silver arched underneath. On the right underside it bears the Peterson silver Hallmarks. It reads Peterson [over] the first hallmark, Hibernia seated arm on a harp for the country of manufacture. That is followed by .925 which help to date the pipe as after 2003 and designates the sterling quality. The final Hallmark is the date stamp and in this case is an italic upper-case I which dates it as made in 2019. The finish is a rich reddish-brown sandblast that is a stark contrast to the silver band the red and black streaked fishtail stem. The bowl had been recently reamed and there was tobacco debris in the bottom of the bowl. It was also lightly smoked. The fish tail stem was red acrylic with black swirls and was a tapered. The stem was lightly soiled and had light chatter on both sides There was an inlaid silver Peterson’s “P” logo on the left topside of the diamond taper. Jeff took some photos of the pipe to show the general condition of the pipe before he started his clean up.He took some photos of the rim top and bowl from various angles to give me a clear picture of the condition of the rim top and bowl. You can see the tobacco debris in the bowl and the light cake. The next photos show the top and underside of the stem. It is looks very good. Jeff took photos of the sides and heel of the bowl to show the condition of the finish on the pipe. The photos showed a great sandblast. It is a pretty piece of briar. He took some photos of the stamping on the underside of the shank and the silver band and its hallmarks. The stamping was clear and readable as noted above. He also took a photo of the “P” logo on the left side of the taper stem. Before doing my part of the work on the pipe I turned to see what I could find out about the line. I turned first to the Peterson’s website to see what they had listed. I quote below from that site (https://www.peterson.ie/pipes/premium/irish-harp/moreinfo.cfm?pd_product_Id=950).

One of the warmest finishes in our portfolio, the Irish Harp debuted in 2002 and combines an array of our Classic range shapes with deep, ruby-tinged walnut stains, cumberland-patterned acrylic fishtail stems, and bright bands of sterling silver, applied by the hands of our most experienced silversmiths.

I then turned to La Pipe Rit – St. Claude for their description of this particular Peterson’s line of pipes (https://www.smokingpipes.com/pipes/new/peterson/moreinfo.cfm?product_id=608936). I quote from the description by Truett Smith l below.

Peterson’s “150” straight Bulldog is a pert, upright rendition that fits in perfectly with the Irish firm’s characteristically muscular shaping style. It’s quite the forthright take on the classic English shape, but in keeping with the marque’s tradition, it features an incredibly robust, crisp diamond shank… Marked by a concise sandblast, dark walnut stain, and acrylic stem to match, the Irish Harp line from Peterson poses an elegant aesthetic, the bowl and mouthpiece separated by a generous band of sterling silver. Peterson’s craftsmen spend years training under the factory’s senior smiths, and the Irish marque is esteemed for its use of sterling silver. In the Irish Harp series, Peterson pays tribute to one of Ireland’s most iconic symbols: the Celtic harp or cláirseach in Irish. The traditional instrument is here emblazoned on the silver accent, celebrating Peterson’s Irish origins while simultaneously showcasing their superlative silverwork.

Jeff did his usual thorough job cleaning the pipe which I really appreciate because of the freedom it gives me in dealing with pipes. He reamed it with a PipNet pipe reamer and got rid of the cake. He cleaned up the reaming with a Savinelli Fitsall Pipe Knife so that we could see the walls of the bowl and assess for damage. He cleaned the internals of the shank and stem with alcohol, pipe cleaners and alcohol. He scrubbed the exterior with undiluted Murphy’s Oil Soap and a tooth brush. He rinsed the pipe under warm water. He dried it off with a cloth and then let it air dry. The stem was scrubbed with Soft Scrub and had a soak in Before & After Deoxidizer to remove the oxidation. One it was rinsed off, it came out looking very good. The finish on the bowl and the rim top cleaned up nicely. I took pictures of the pipe to show how it looked when I unpacked it. I took a close up photo of the bowl and rim top to show how clean the pipe was. The bowl was very clean and showed that the pipe was very lightly smoked. The stem looked good with no tooth marks or chatter. Overall the pipe is a beautiful looking piece.I took a photo of the stamping on the underside of the shank. It read as noted above. It is very clear and readable. I also took a photo of the stamping on the shiny nickel band. It was readable and clear. I also removed the stem from the shank and took photos of the pipe to show the look of the parts. The bowl was in excellent condition. I did not need to sand or do anything in preparation on the pipe. I set the stem aside and worked some Before & After Restoration Balm into the briar with my finger tips and a horsehair shoe brush. I let it sit on the bowl for 10 minutes and then buffed it off with a paper towel and soft cloth. The product is a great addition to the restoration work. It enlivens, enriches and protects the briar while giving it a deep glow. It is a product I use on every pipe I restore. I polished the silver with a jeweller’s cloth to protect and polish the silver and keep the tarnish at bay. It looks very good at this point. I set the bowl aside and turned to the stem. There were no deep tooth marks and very little chatter on the stem surface so I polished it with micromesh sanding pads – dry sanding with 1500-12000 grit pads and wiping the surface down after each sanding pad. It is really shining. I am excited to finish this one and look forward to seeing the 2019 Made in Ireland Peterson’s of Dublin Irish Harp 150 Bulldog put back together, polished and waxed. I put the bowl and stem back together and lightly polished the bowl and stem with Blue Diamond to polish them. I gave the bowl multiple coats of Conservator’s Wax and the stem multiple coats of carnauba wax. I buffed the pipe on the wheel with a clean buffing pad to raise the shine. I hand buffed it with a microfiber cloth to deepen the shine. The depths of the sandblast really pop with the wax and polish. The shiny red and black swirled acrylic stem is a beautiful contrast to the rich brown/red stain on the bowl, thick shank and Sterling Silver Band. This Peterson’s Dublin 03 Dracula Apple was a fun pipe to work on. The pipe is tactile in the hand and should feel great as it is warmed up when smoking. The finished pipe is shown in the photos below. The dimensions of the pipe are Length: 5 ½ inches, Height: 2 inches, Outside diameter of the bowl: 1 ¼ inches, Chamber diameter: ¾ of an inch. The weight of the pipe is 1.69 ounces/48 grams. I will be putting this one on the store in the Irish Pipemakers Section soon. Let me know if you wish to add it to your collection.

As always, I encourage your questions and comments as you read the blog. Thanks to each of you who are reading this blog. Remember we are not pipe owners; we are pipe men and women who hold our pipes in trust until they pass on into the trust of those who follow us.

A Refresh of a Peterson’s Dublin 03 Dracula Bent Apple


by Steve Laug

The next pipe on the work table is a Peterson’s pipe with a red and black swirled acrylic stem. We picked the pipe up from a seller in Ogden, Utah, USA on 12/12/2024. It is stamped on the underside of the shank and reads Peterson’s [arched over] Dublin [over] 03. The bright nickel band is stamped Dracula in a banner on top with a Bat before and after the name as well as underneath it. The finish is a dark coloured, almost black sandblast that is a stark contrast to the silver band the red and black streaked fishtail stem. The bowl was lightly caked and there was a tobacco debris in the bottom of the bowl. The fish tail stem was red acrylic with black swirls and was a tapered. The stem was very clean with no tooth damage. There was a white or silver Peterson’s “P” logo on the left side of the taper. Jeff took some photos of the pipe to show the general condition of the pipe before he started his clean up.He took some photos of the rim top and bowl from various angles to give me a clear picture of the condition of the rim top and bowl. You can see the tobacco debris in the bowl and the light cake. The next photos show the top and underside of the stem. It is looks very good. Jeff took a photo of the side of the bowl to show the condition of the finish on the pipe. The photos showed a great sandblast. It is a pretty piece of briar.He took some photos of the stamping on the underside of the shank and the nickel band. The stamping was clear and readable as noted above. He also took a photo of the “P” logo on the left side of the taper stem. Before doing my part of the work on the pipe I turned to see what I could find out about the line. I turned first to the Peterson’s website to see what they had listed. I quote below from that site (https://www.peterson.ie/pipes/classic/dracula-sandblasted/moreinfo.cfm?pd_product_Id=303).

The Dracula line started as a special commemorative line of pipes, first released in 2012, celebrating the death centennial of fellow Irishman and esteemed author Abraham “Bram” Stoker. Characterised by jet-black sandblasted finishes, bright nickel bands, and black-and-red-swirled acrylic fishtail stems, the Dracula Sandblasted appeals not only to fans of gothic horror, but of quality classic pipes in bold presentations.

I then turned to La Pipe Rit – St. Claude for their description of this particular Peterson’s line of pipes (https://www.pipe.fr/en/peterson-dracula-pipes-417). I quote in full below.

Peterson must be the most famous pipe brand in the world. Since the late 19th century, the company began to hire and train Irish men and women (whereas some other manufacturers used to hire French craftspeople from Saint-Claude). Nowadays, Peterson pipes are made with a real know-how thanks to a team of passionate craftspeople that share their expertise. The company “Kapp & Peterson” creates traditional pipes of great quality. On this webpage, we present you the incredible “Dracula” collection. First released in 2012, this series was designed to pay tribute to the Irish writer Abraham “Bram” Stoker to mark the centenary of his death. With the red and black stem, this must be one of the favorite pipes of horror stories readers, and more generally Peterson pipe enthusiasts. To stick to the spirit of the novel, the pipe is designed with a black finish (lacquered or sandblasted), a “bloody” acrylic stem, and is decorated with a nickel band (on which is stamped “Dracula”)

Jeff did his usual thorough job cleaning the pipe which I really appreciate because of the freedom it gives me in dealing with pipes. He reamed it with a PipNet pipe reamer and got rid of the cake. He cleaned up the reaming with a Savinelli Fitsall Pipe Knife so that we could see the walls of the bowl and assess for damage. He cleaned the internals of the shank and stem with alcohol, pipe cleaners and alcohol. He scrubbed the exterior with undiluted Murphy’s Oil Soap and a tooth brush. He rinsed the pipe under warm water. He dried it off with a cloth and then let it air dry. The stem was scrubbed with Soft Scrub and had a soak in Before & After Deoxidizer to remove the oxidation. One it was rinsed off, it came out looking very good. The finish on the bowl and the rim top cleaned up nicely. I took pictures of the pipe to show how it looked when I unpacked it. I took a close up photo of the bowl and rim top to show how clean the pipe was. The bowl was very clean and showed that the pipe was very lightly smoked. The stem looked good with no tooth marks or chatter. Overall the pipe is a beautiful looking piece.I took a photo of the stamping on the underside of the shank. It read as noted above. It is very clear and readable. I also took a photo of the stamping on the shiny nickel band. It was readable and clear. I also removed the stem from the shank and took photos of the pipe to show the look of the parts. The bowl was in excellent condition. I did not need to sand or do anything in preparation on the pipe. I set the stem aside and worked some Before & After Restoration Balm into the briar with my finger tips and a horsehair shoe brush. I let it sit on the bowl for 10 minutes and then buffed it off with a paper towel and soft cloth. The product is a great addition to the restoration work. It enlivens, enriches and protects the briar while giving it a deep glow. It is a product I use on every pipe I restore. I set the bowl aside and turned my attention to the stem. I touched up the “P” logo with some white acrylic nail polish. I applied it with the brush and once it cured sanded off the excess with a 1500 grit micromesh sanding pad.There were no deep tooth marks and very little chatter on the stem surface so I polished it with micromesh sanding pads – dry sanding with 1500-12000 grit pads and wiping the surface down after each sanding pad. It is really shining. I am excited to be on the homestretch and look forward to seeing the Peterson’s Dublin 03 Dracula Bent Apple put back together, polished and waxed. I put the bowl and stem back together and lightly polished the bowl and stem with Blue Diamond to polish them. I gave the bowl multiple coats of Conservator’s Wax and the stem multiple coats of carnauba wax. I buffed the pipe on the wheel with a clean buffing pad to raise the shine. I hand buffed it with a microfiber cloth to deepen the shine. The depths of the sandblast really pop with the wax and polish. The shiny red and black swirled acrylic stem is a beautiful contrast to the black stain on the bowl, thick shank and Polished Nickel Band. This Peterson’s Dublin 03 Dracula Apple was a fun pipe to work on. The pipe is tactile in the hand and should feel great as it is warmed up when smoking. The finished pipe is shown in the photos below. The dimensions of the pipe are Length: 5 inches, Height: 1 ½ inches, Outside diameter of the bowl: 1 ¼ inches, Chamber diameter: ¾ of an inch. The weight of the pipe is 1.80 ounces/ 50 grams. I will be putting this one on the store in the Irish Pipemakers Section soon. I remember reading Dracula in High School so I had to pause and think about letting this one go, before putting on the store. Let me know if you wish to add it to your collection.

As always, I encourage your questions and comments as you read the blog. Thanks to each of you who are reading this blog. Remember we are not pipe owners; we are pipe men and women who hold our pipes in trust until they pass on into the trust of those who follow us.

Restoring a Handsome Peterson Dunmore 73


by Kenneth Lieblich

Lá Fhéile Pádraig sona duit!

As it is the feast of Saint Patrick, I thought I would post an Irish pipe today – even though I have no Irish heritage myself. No matter! Petersons are very popular, so why not put some spit and polish on this handsome devil. I nabbed this beauty a couple of years ago and, unaccountably, it’s been sitting around waiting for me to clean it up. Let’s look at the markings. On the left side of the shank are the words Peterson’s [over] “Dunmore”. On the right side of the shank are the words Made in the [over] Republic [over] of Ireland. Then down and to the right of that is the shape number, 73. Finally, on the left side of the stem, is the stylized letter P of the Peterson Pipe Company.I’ve always found the scalloped edge at the end of Dunmore shanks to be quite attractive. Let’s investigate the Dunmore line a bit more. Mark Irwin of the Peterson Pipe Notes blog has a great article about Dunmores, which you should read here. Allow me to quote a few passages:

The line originated in collaboration with Iwan Reis in 1971. How it came about is anyone’s guess at this point. Chuck Levi, the man who more than any other was responsible for bringing the great Danish artisan pipes to the US, was working with the creative minds at K&P to bring something new to the IRC catalog, and this was one of about a dozen K&P lines that debuted as exclusives in the Iwan Reis catalogs of that era.The concept was to modernize the System pipe by removing what was perceived as the old-fashioned nickel mount. And old-fashioned it was—if you look at pipe catalogs from the 1940s on through most of the rest of the 20th century, nickel ferrules and even bands were almost non-existent. K&P was virtually the only hold out, using sterling bands on the Sterling Silver Classic line and on the Premier & De Luxe Systems. A bead was then carved around the stummel at the mortise end…

But there were two more ingredients to the original Dunmore aesthetic…. Paddy Larrigan, K&P’s master-craftsman, was always striving to push the envelope in pipe engineering, and one of the things he dearly loved was a pipe that would sit, so he shaved off the bottom of the shank to allow the Dunmore System to sit on its shank and button, which gives it its uniqueness in the catalog. The downside of this is that I am not convinced that all the Dunmore reservoirs, being slightly smaller than the traditional System, are quite as effective. 

The third distinguishing mark of the original Dunmore lines is the stem. Both the System and Classic versions utilized the wide-shoulder “Comfort Lip,” with a painted  gold P on the stem. This doubtless helps the System sit as well as giving it a more muscular visual balance, strength being a long-standing concept in the design language of the company. While it gives the illusion of being an army “push” mount, of course it isn’t, but is a traditional tenon-mortise or “navy mount” as the old hands at K&P used to call it.Based on Mark’s information on his website and in his book, The Peterson Pipe Book, I can estimate that this pipe is from the mid- to late-70s – something like 50 years old. Many thanks to Mark for his help.On to the work! The pipe was in good shape and – boy-oh-boy – it had been smoked a lot! Things were dirty, rather than damaged – which is much preferred. The stem was oxidized and had a few tooth marks, but nothing deep or large. The stummel was loaded with cake and had substantial lava on the rim.I used a disposable lighter and ‘painted’ the stem with its flame. The gentle heat of the flame can cause the dents in the vulcanite of the stem to expand back into shape. In this case, it actually worked reasonably well and there was a bit of lift.I used oil soap on a few cotton rounds and wiped the stem down to provide an initial cleaning of filth before moving on to the next steps. The primary cleaning comes next. I cleaned the inside of the stem with both pipe cleaners and cotton swabs dipped in 99% lemon-infused isopropyl alcohol. I scrubbed thoroughly to make sure the interior was clean. I used quite a few pipe cleaners and cotton swabs – more than the photo shows.The goal of the next step is the removal (or minimization) of oxidation. Going to my sink, I used cream cleanser, cotton rounds, and a toothbrush, and scoured the stem to remove as much surface oxidation as possible. As the photos show, the result is a hideous brownish mess – but better off the stem than on it. Once the stem was reasonably clean, I soaked it overnight in some Briarville Stem Oxidation Remover. This solution works to draw oxidation in the stem to the surface. This is a major aid and an important step in ensuring a clean stem. The following day, I drew the stem out from its bath and scrubbed the lingering fluid with a toothbrush. Now that the stem is clean and dry, I set about fixing the marks and dents in the vulcanite. This is done by filling those divots with black cyanoacrylate adhesive, impregnated with carbon and rubber. I left this to cure and moved on. After this, I painted the logo on the stem with a gold-coloured metallic wax finish. I restored the logo carefully and let it fully set before proceeding.The penultimate step for the stem is sanding. First, with my set of needle files, I reduce the bulk of the cyanoacrylate repairs. I want to remove the excess adhesive as near to the surface as possible, without cutting into the vulcanite. Following that, I use all nine of the micromesh sanding pads (1,500 through 12,000 grit) to sand out flaws, even out the vulcanite, and provide gentle polishing of the finished surface. I also apply pipe-stem oil while using the last five micromesh pads. There was a wonderful, deep black shine to the stem when I was done.Now that the stem is (nearly) complete, I can move on to the stummel. The first step for me is to ream out the bowl – that is to say, remove all the cake inside the bowl. This accomplishes a couple of things. First (and most obviously), it cleans the bowl and provides a refurbished chamber for future smoking. Second, when the old cake is removed, I can inspect the interior walls of the bowl and determine if there is damage or not. I used a reamer, a pipe knife, and a piece of sandpaper taped to a wooden dowel. Collectively, these ensure that all the debris is removed.My next step was to remove the lava on the rim. For this, I took a piece of machine steel and gently scraped the lava away. The metal’s edge is sharp enough to remove what I need, but not so sharp that it damages the rim. Similar to the stem, I then cleaned the stummel with both pipe cleaners and cotton swabs dipped in 99% lemon-infused isopropyl alcohol. With a pipe this dirty, it took quite a while and much cotton to get clean. It was so, so dirty.I then decided to ‘de-ghost’ the pipe – that is to say, exorcize the remaining filth from the briar. I filled the bowl and the shank with cotton balls, then saturated them with 99% isopropyl alcohol. I let the stummel sit overnight. This caused any remaining oils, tars and smells to leach out into the cotton.To tidy up the briar, I also wiped down the outside with some oil soap on cotton rounds (and a toothbrush). This does a good job of cleaning any latent dirt on the surface of the briar. I also used a nylon brush on the rim. The last step of the cleaning process is to scour the inside of the stummel with some soap and tube brushes. This is the culmination of a lot of hard work in getting the pipe clean.I used all nine micromesh pads (1,500 through 12,000 grit) on the outside of the stummel to finish it off. This sanding minimizes flaws in the briar and provides a beautiful smoothness to the wood. I rubbed some Before & After Restoration Balm into the briar and let it sit for 20 minutes or so. The balm moisturizes the wood and gives a beautiful depth to the briar. I then buffed it with a microfibre cloth. For the final step, I took the pipe to my bench buffer and carefully polished it – first with a white diamond compound, then with three coats of carnauba wax. This procedure makes the pipe look its best – the stummel sings and the stem glows.

All done! This Peterson Dunmore 73 looks fantastic again and is ready to be enjoyed by its next owner. I am pleased to announce that this pipe is for sale! If you are interested in acquiring it for your collection, please have a look in the ‘Irish’ section of the store here on Steve’s website. You can also email me directly at kenneth@knightsofthepipe.com. The approximate dimensions of the pipe are as follows: length 5¼ in. (133 mm); height 3 in. (76 mm); bowl diameter 1⅛ in. (30 mm); chamber diameter ⅝ in. (18 mm). The weight of the pipe is 1¼ oz. (36 g). I hope you enjoyed reading the story of this pipe’s restoration as much as I enjoyed restoring it. If you are interested in more of my work, please follow me here on Steve’s website or send me an email. Thank you very much for reading and, as always, I welcome and encourage your comments.

Restoring a Republic Era Peterson’s Kapruf Sandblast Lovat 53


by Steve Laug

Today is cold and snowy day in Vancouver. I know in comparison to where many of you live it is not cold but to us it is. I am preparing for a trip to Asia for work so this is likely the last pipe I will work on for a while. I have chosen a Peterson’s Lovat. It is a sandblast pipe that came to us from our contact in Copenhagen, Denmark on 04/11/2024. There was grime ground into the sandblast finish on the bowl sides. I love the way the contrast of the brown and black stains gave the blast a sense of depth. It was stamped on the flat underside of the shank and had the shape number 53 on the heel of the bowl followed by Made in the Republic of Ireland (three lines). To the right of that it is stamped Peterson’s [over] Kapruf. This pipe must have been a favourite of the pipe man who used it as it had been well smoked. There was a thick cake in the bowl and some lava overflowing onto the sandblast rim top. The inner edge of the bowl looked good. The stem is an original fishtail style but the slot is merely a single opening like an old style orific button. Strange but original! The stem was oxidized and there were light tooth marks and chatter on the top and underside ahead of the button on both sides. Jeff took photos of the pipe before his cleanup work. Jeff took photos of the rim top and stem to show the general condition of the pipe. The bowl is thickly caked and the rim top and edges look to be in good condition despite the lava overflow in the sandblast of the rim top. The photos of the stem show the oxidation and the light tooth marks on the top and underside near the button. Jeff took a photo of the bowl sides and heel to show the blast that was around this bowl. It is a great sandblast and the choice of stain adds depth to the appearance of the bowl. He took photos of the stamping on the underside of the shank. It is clear and readable and reads as noted above. I turned to “The Peterson Pipe” by Mark Irwin and Gary Malmberg to get some background on the Kapruf line. On page 306 it had the following information.

Kapruf and “Kapruf” (c.1922-87) Sandblast (hence the name, Kapp-rough) P-lip or fishtail mouthpiece, in catalogs from 1940-87. Early documented specimens stamped IRISH over FREE STATE, no Eire specimens documented. Mid-century specimens may be stamped LONDON MADE [over] ENGLAND or MADE IN ENGLAND forming a circle or MADE IN [over] IRELAND, all dating no later than 1970. Those of recent vintage stamped MADE IN THE [over] REPUBLIC [over] OF IRELAND.

I knew that I was working on a KAPRUF that was made between 1970-1987 as it is stamped MADE IN THE REPUBLIC OF IRELAND as noted above. Now it was time to work on the pipe.

Jeff had done a great job cleaning up the pipe as usual. He reamed the pipe with a PipNet reamer and cut back the cake back to the bare briar. He cleaned up the walls with a Savinelli Fitsall Pipe Knife. He scrubbed the interior of the bowl and shank with pipe cleaners, cotton swabs and alcohol to remove the tars and oils. He scrubbed the exterior of the pipe with Murphy’s Oil Soap and a tooth brush to remove the grime from the finish. He worked on the rim top lava and darkening with the soap and tooth brush. He scrubbed the inside of the stem with alcohol and pipe cleaners. He scrubbed the exterior with Soft Scrub and then soaked it in Briarville Pipe Stem Deoxidizer. He washed it off with warm water to remove the Deoxidizer. The pipe looked far better when it arrived. I took some close-up photos of the rim top and the stem surface. I wanted to show how well it had cleaned up. The rim top and the inner and outer edges look very good. I also took close up photos of the stem to show the light chatter and marks on the surface near the button.I took a photo of the stamping on the underside of the shank. You can see that it is stamped as noted above. It is faint but readable. I took the pipe apart and took a photo of the pipe. It is a good looking pipe and has an interesting sandblast on the bowl.I worked some Before & After Restoration Balm into the surface of the briar with my fingertips and a horse hair shoe brush to clean, enliven and protect the briar. I let the balm sit for 15 minutes and then buffed with a cotton cloth to raise the shine. The photos show the bowl at this point in the restoration process. I set the bowl aside and turned my attention to the stem. I “painted” the stem surface with the flame of a lighter to try and lift the marks. It did not do much. I repaired the tooth marks and deep scratches in the surface with black CA glue. Once they cured I used a small file to flatten them and then sanded them further with 220 grit sandpaper. I sanded the stem with 320-3500 grit sanding pads. I wiped it down after each sanding pad with an Obsidian Oil impregnated cloth. It really began to take on a shine.I paused the polishing to touch up the P stamp on the left side of the saddle stem with some acrylic fingernail polish. I worked it into the stamp with a toothpick and then scraped off the excess once it had dried.I polished the stem with micromesh sanding pads – wet sanding with 1500-12000 grit sanding pads. I wiped it down after each sanding pad with Obsidian Oil. I polished it with Before & After Pipe Stem Polish – both Fine and Extra Fine. I wiped the stem down with Obsidian Oil and set it aside to dry. I am always excited to finish working on a pipe. This Peterson’s Made in the Republic of Ireland Kapruf 53 Lovat is no exception. I put the pipe back together and buffed it with Blue Diamond on the buffing wheel. I gave the bowl and the stem multiple coats of carnauba wax. I buffed the pipe with a clean buffing pad to raise the shine and hand buffed it with a microfibre cloth to deepen the shine. It is fun to see what the polished sandblast bowl looks like with the black vulcanite saddle stem. This Classic looking Peterson’s Kapruf Sandblast 53 Lovat feels great in my hand. It is light and well balanced. Have a look at it with the photos below. The dimensions are Length: 4 ¾ inches, Height: 1 ¾ inches, Outside diameter of the bowl: 1 ¼ inches, Chamber diameter: ¾ of an inch. The weight of the pipe is 28 grams/.95 ounces. I will be putting it on the rebornpipes store shortly in the Irish Pipe Makers section if you are interested in it. Thanks for walking through the restoration with me as I worked over this pipe. Thanks to each of you who are reading this blog.