Blog Dal Stanton
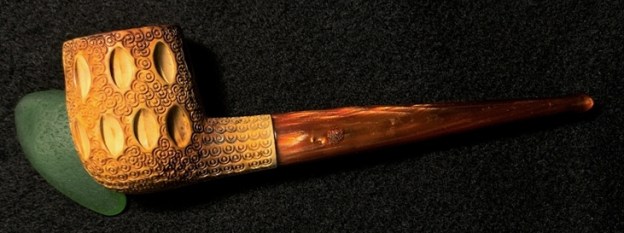
I just completed an Aldo Velani from what I’ve called the St. Louis Lot of 26 (See: Refreshing a Saucy Italian Aldo Velani Trio Bent Apple) and the next pipe in queue is also from this Lot. The Meerschaum just above the giant Champion Churchwarden’s bowl is on the worktable now. My son, Josiah found this lot in an antique shop in St. Louis where he was studying. He sent me a text here in Bulgaria about his find with pictures. We went in together to purchase the lot with the provision that my son’s part of the purchase would be for me to pick a pipe out of the lot as a Christmas present from him. I chose the giant Champion Churchwarden! Other pipe men and women have chosen other pipes from this lot of treasures which are posted in the online collection, For “Pipe Dreamers” Only! . This is where Jeremiah, from the state of California, saw the Meerschaum and commissioned him back when my wife and I were enjoying the Black Sea during our summer R&R. I appreciate Jeremiah’s patience as his pipe worked up the queue! Here are more pictures taking a closer look at the Meerschaum Teardrop Lattice Billiard.


 There are no markings on the pipe. The size of the Billiard shape is Length 5 5/16 inches, Height 1 5/8 inches, Rim width 1 1/8 inches, Chamber width 3/4 inches, Chamber depth 1 3/8 inches. What is unique about this Meerschaum Teardrop Lattice design are the size of the tear drops, or the egg-shaped carvings – they are large. The fine circular scallop carvings are in comparison, small and tight. The Meer is set-up with a basic push/pull tenon which appears to have a crack in the mortise insert (pictured above). The tenon insert is worn and discolored. The pipe itself appears to be in great shape in need of cleaning. The chamber has some carbon build up which is not needed or desired in a Meer chamber. One of the great things about Meerschaums is that they do not need to rest between uses as with briars. There is a bit of the coveted patina developing around the scalloped shank and climbing toward the back of the bowl. This is good. This brief description from Meerschaum.com that I’ve previously cited is helpful to understand the nature of Meerschaum:
Meerschaum is a very rare mineral, a kind of hard white clay. Light and porous structure of the pipe keeps the smoke cool and soft. The pipe itself is a natural filter which absorbs the nicotine. Because of this peculiarity, meerschaum pipes slowly change their colors to different tones of gold and dark brown. This adds an esthetic enjoyment to its great smoking pleasure. The longer a pipe is smoked the more valuable it becomes due to the color change. Today many old and rare meerschaums have found a permanent place in museums and private collections.
I begin the restoration of this Meerschaum by disassembling the component parts. This helps with the cleaning. I also plan to replace the push/pull tenon. With the help of a pair of needle nose pliers, the push/pull components are easily removed. Taking the stummel in hand, the chamber has moderate carbon cake build up which will be removed.
 I don’t use the reaming kit with Meerschaum because it produces too much indiscriminate torque on the Meer chamber wall. A more gentle and strategic approach is the use of the Savinelli Fitsall tool. I’m able to scrape the chamber walls with the tool in a way that removes carbon buildup but is mindful of the Meerschaum.
 Following the wall scraping, the chamber wall is sanded with 240 grade paper wrapped around a Sharpie Pen. This does a good job of removing the last vestiges of carbon build up. A Meerschaum chamber does not need a cake protection like a briar chamber.
 An inspection of the chamber after cleaning looks good. The Meer is still colored but it is clean and smooth to the touch.
 Cleaning the external surface of the Meerschaum starts with the rim which has lava caked on it, especially on the aft quadrant where most of the lighting occurred. Using undiluted Murphy’s Oil Soap, I begin on the rim to soften and break up the lava without damaging the scalloped rim carvings. I am patient to allow the solvents to break up the cake on the rim. I also gently utilize a brass wired brush on the rim but most of the scrubbing is done with a bristled toothbrush. I use the toothbrush to clean the rim as well as work into all the carvings of the bowl. I take the bowl to the kitchen sink and continue cleaning with a cotton pad and toothbrush under warm water. Not pictured is something I tried for the first time. I have a Soft-Scrub product here in Bulgaria called CIT which has a gentle bleach and abrasion composition. I put a small amount on a cotton pad and continue to work on the rim’s darkened condition. After a thorough rinsing with warm water, the stummel returns to the worktable.
 I’m very pleased with the cleaning results. The stummel will lighten more because it’s still damp from the cleaning. The rim cleaned up very nicely. One blackened area remains on the extreme edge of the aft rim quadrant. Later, I may be able to clean this with very strategic sanding. The patina gathering at the bowl/shank crook remains through the cleaning.
 Moving now to cleaning the internals, I use cotton buds and pipe cleaners dipped in isopropyl 95%. I also employ a small dental spoon to scrape the internal walls of old oils and tars. The more excavated, the faster the cotton buds can clean. In time the buds emerge in a lightened state and the job is completed.
 It took no time to dispatch the internal cleaning of the acrylic stem.
 Focusing now on the stem repairs, I like the brown tone acrylic. It will clean up well. The stem bit has significant biting damage to both upper and lower bit that will require patches from the start. The button is damaged as well. It appears this stem was the victim of mauling, not just biting. There is also what appears to be a burn on the side of the stem – that’s the only thing I can think it would be. It is rough to the touch so sanding should help this blemish later.
 I use regular CA glue to fill the compressions on one side first. An accelerator is also used to hold the glue in place and to quicken the curing process.
 After the CA glue cures, I use the flat needle file to remove the excess patch material and to shape and refresh the button lips – both upper and lower. The first two pictures are the upper.
 Next the lower.
 Next, with the filing completed, I continue to sand with 240 grade paper on the upper and lower bit.
 From the bit, I also sand the entire stem and focus on the burn or blemish on the side of the stem.
 As I look at the mark on the side of the stem, I believe now it’s simply a blemish in the acrylic. It is not just surface but seems to go deeper. I can only sand it out as much as possible.
 After sanding with 240 paper, I transition to wet sanding the entire stem with 600 grade paper then the 000 grade steel wool fine tunes the acrylic stem – it’s looking great.
 Transitioning now to the full regimen of micromesh pads, I wet sand with pads 1500 to 2400 and follow with dry sanding with pads 3200 to 4000 and 6000 to 12000. Between each set of 3 pads Obsidian Oil is applied. I like the fire in this acrylic stem.
 I want to strategically sand the burn spot on the extreme back of the inner rim edge. I use a very light 240 grade paper and follow with a dry 1500 micromesh pad.
 I think it looks good. The darkness is not erased but it is reduced.
  To enrich and encourage the coveted patina in the Meerschaum, the age-old approach is a beeswax treatment. Using a hot air gun, the beeswax in the Mason jar is heated until it liquefies. I also heat the Meer bowl with the gun and then apply the liquefied beeswax to the stummel – painting thoroughly all the nooks and crannies of the sculpting. During the painting process, I have the hot air gun propped in such a way as to continue to blow hot air on the stummel as I’m painting it. This helps to keep the wax thin and it is more easily absorbed into the porous Meerschaum.
 After the stummel is thoroughly coated in beeswax, I put it aside for the stummel to cool.
 After cooling, I buff the stummel with a microfiber cloth to remove excess wax and to raise the shine. The Meerschaum literally drank in the beeswax!
 I decided earlier to replace the old push/pull tenon system with a new set. The shank acrylic fitment and the stem tenon both screwed in with no problem.
  When I tried inserting the tenon into the shank receptor, the fit was very tight – too tight to fit without me being nervous about cracking something. To remedy this, I hand turn a drill bit just a bit larger than the hole and it bores out a slightly more comfortable fit. This works like a charm.
 With the stem and stummel reunited, after mounting a cotton cloth buffing wheel to the Dremel and set the speed at 40% full power and Blue Diamond compound is applied only to the acrylic stem. Following the compound, after wiping the stem with a felt cloth to clean it of compound dust, the same procedure is followed with another cotton cloth buffing wheel and carnauba wax is applied to the acrylic stem. After this, the entire Meerschaum Teardrop Lattice Billiard is hand buffed to raise the shine.
The design of this Meerschaum is a classic carvers’ template in this genre of pipe. The patina on the Meerschaum has a good start with the honey honed hues which complement beautifully the fire waves of the acrylic stem. Jeremiah wanted to add a Meerschaum to his growing collection, and he will have the first opportunity to add this Teardrop Lattice Billiard from The Pipe Steward Store benefiting the Daughters of Bulgaria – women and girls who have been trafficked and sexually exploited. Thanks for joining me!


