Tag Archives: Bowl – refinishing

Recommissioning an Interesting Trent Lev-O-Lator Bent Billiard


Blog by Dal Stanton

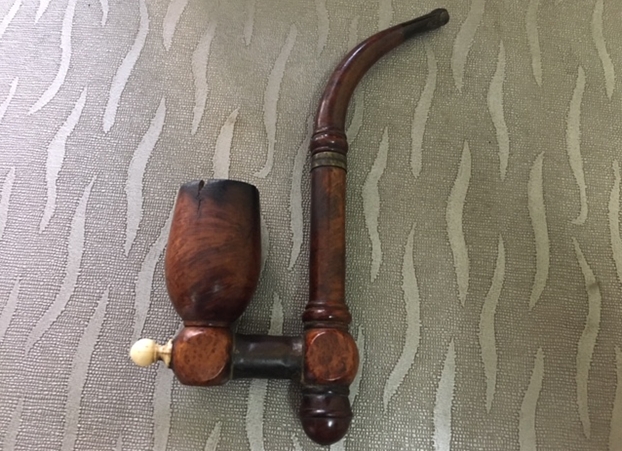
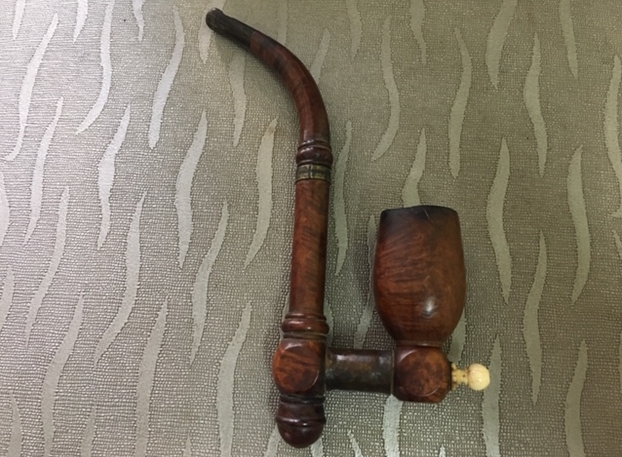
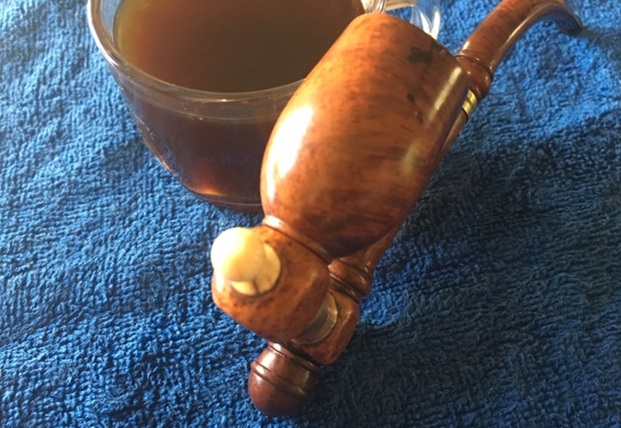
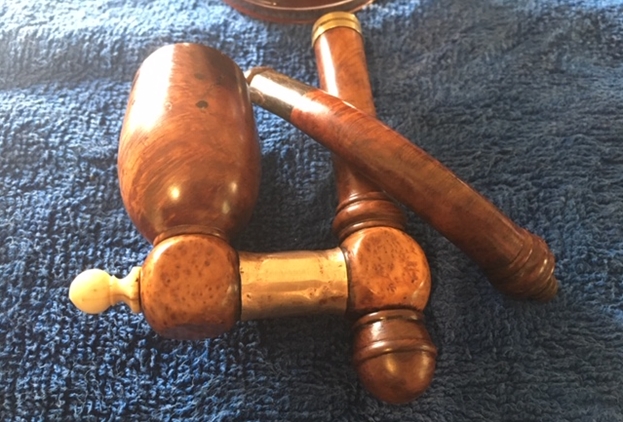
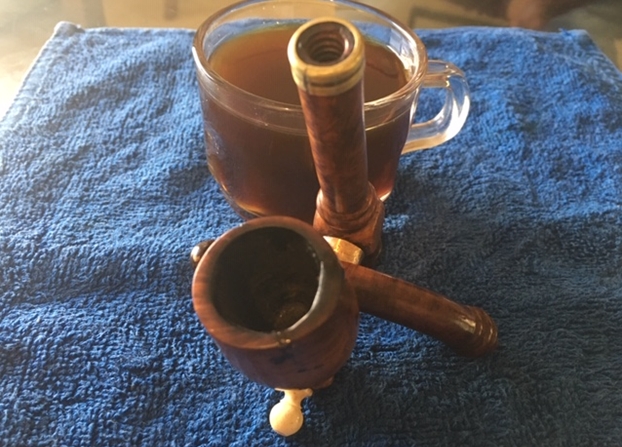
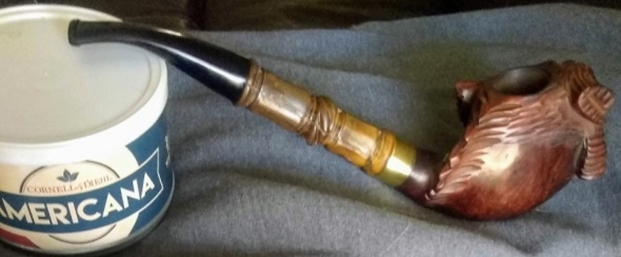
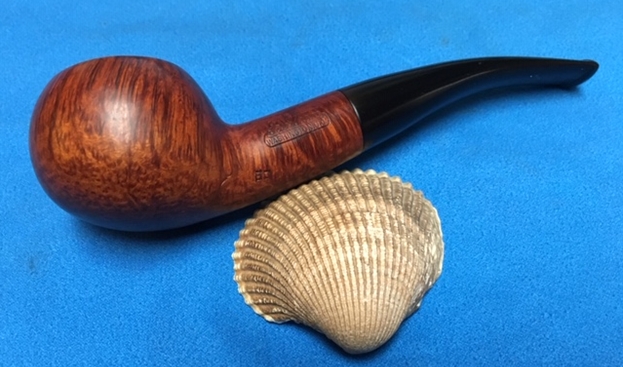
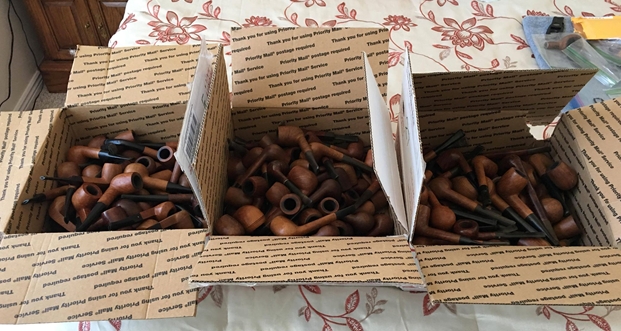
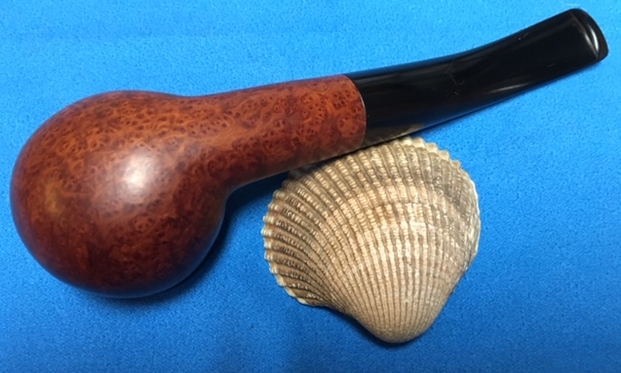
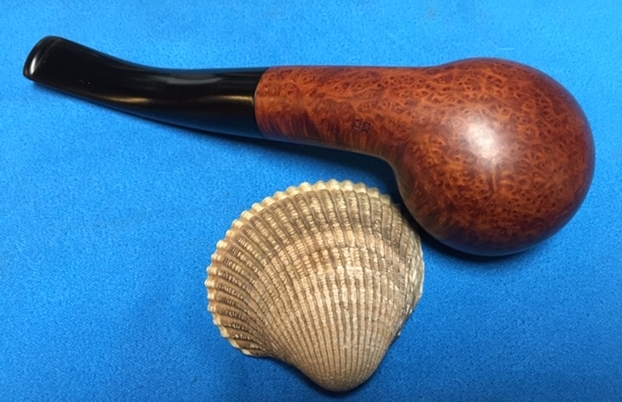
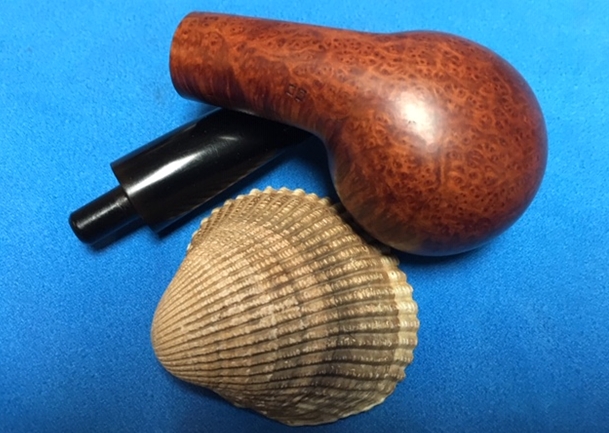
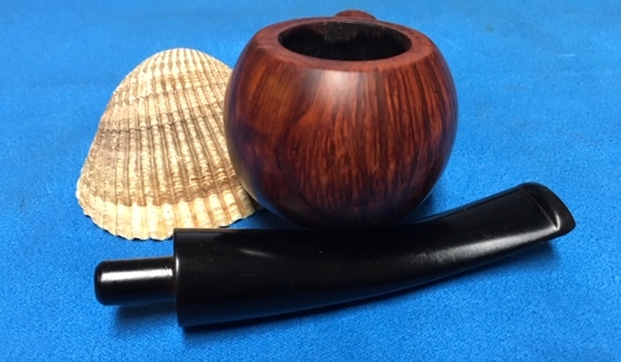
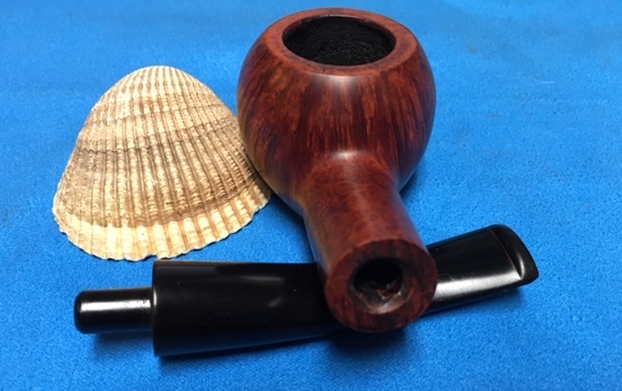
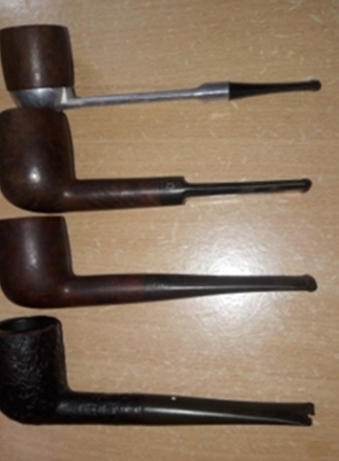
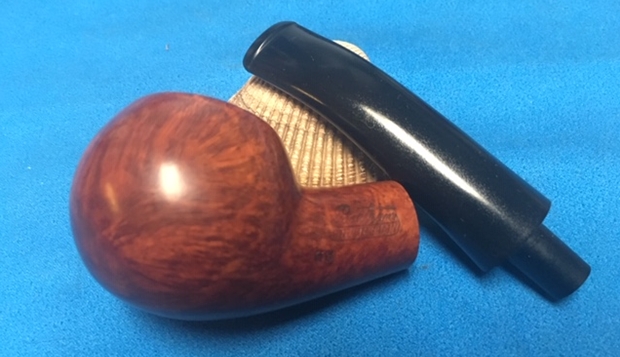
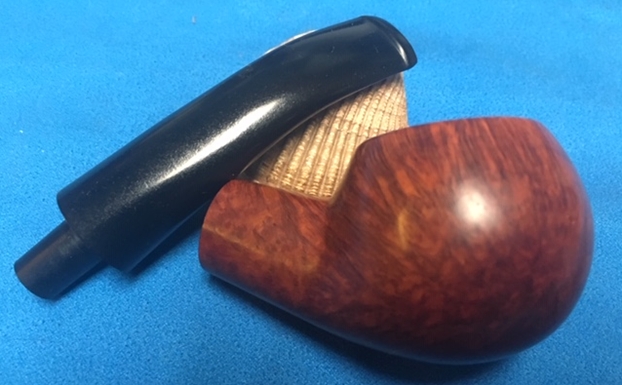
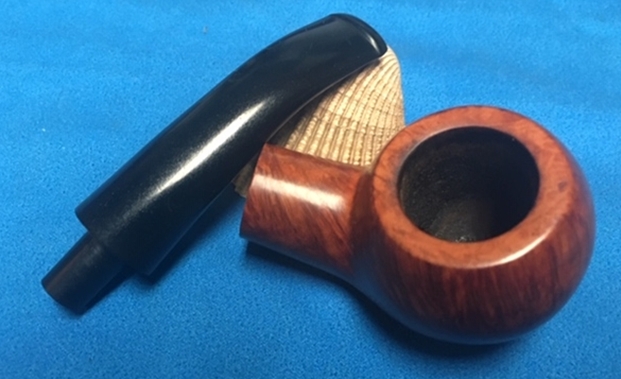
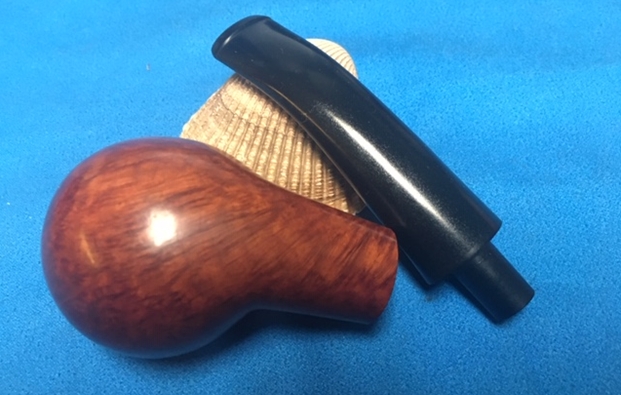
This interesting Trent Lev-O-Lator came to me in a lot from Craig’s list.  One of the great things about friends and family knowing that I restore pipes for the Daughters of Bulgaria is that I have eyes all over the world watching for pipes!  Jon, a colleague working in the same organization, was in the US for a time of furlough after working in Ukraine and was in the Philadelphia area.  This lot of several pipes came up on Craig’s List in his locality and he sent me an email concerning them.  He went to look at them and gave me some descriptions, and many of the pipes were beyond a state of being restored, but for the price being asked, the remaining pipes would make it worthwhile.  Here is picture of the Craig’s List Lot that Jon acquired for me.  As a bonus, the pipe racks would be nice to have here in Bulgaria!They finally made it to Bulgaria where I sorted them and posted many of them online in my For “Pipe Dreamers” Only! collection where pipe men and women can commission a pipe to be restored that ‘speaks’ to them.  Andy has commissioned pipes before and is a return patron of The Pipe Steward.  Before my wife and I moved to Europe with our family over 25 years ago, Andy and his wife, were part of a church in Maryland that I helped start.  Previously, I restored a very nice Monarch Pat. 1989069 – 1074H Bent Ball for Andy as well as create a Churchwarden from a repurposed bowl and had fun with the write-up calling it, Fashioning a Churchwarden from a Forlorn, Throw away Billiard – a story of the Phoenix.  Andy returned to the ‘Dreamers!’ collection and another pipe spoke to him, a Trent Lev-O-Lator, part of the Craig’s List Lot from Jon.  Here are pictures of the pipe that got Andy’s attention. 
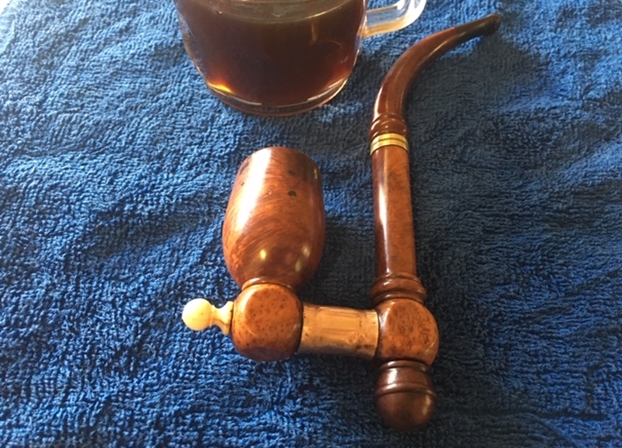
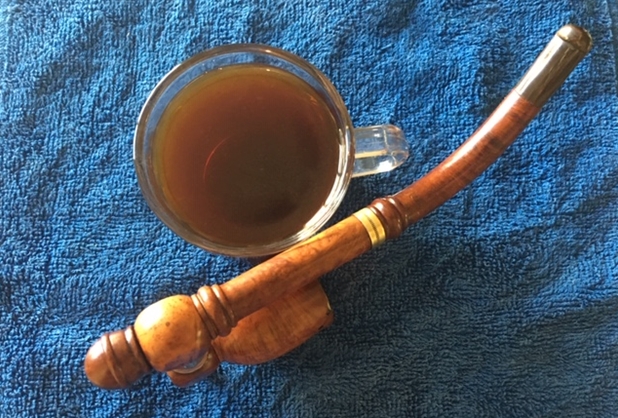
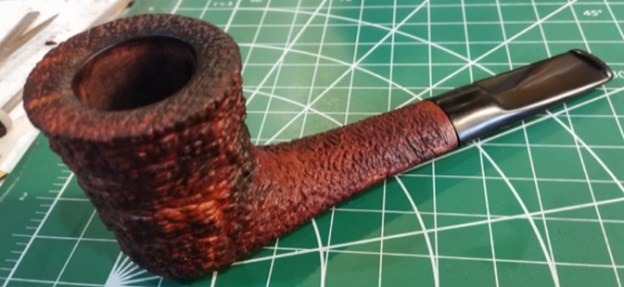
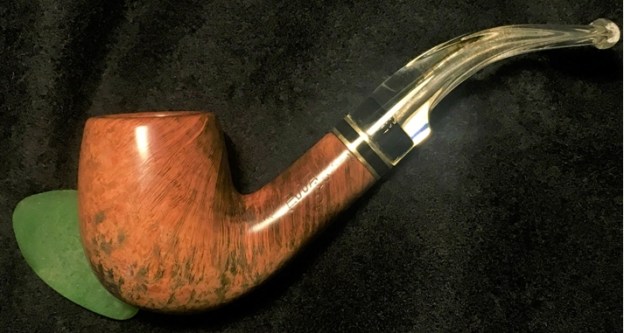
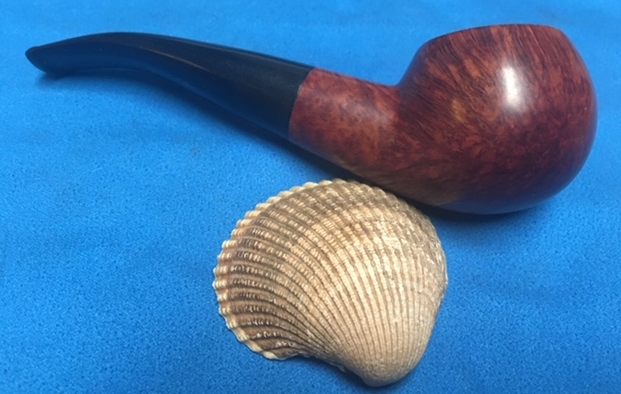
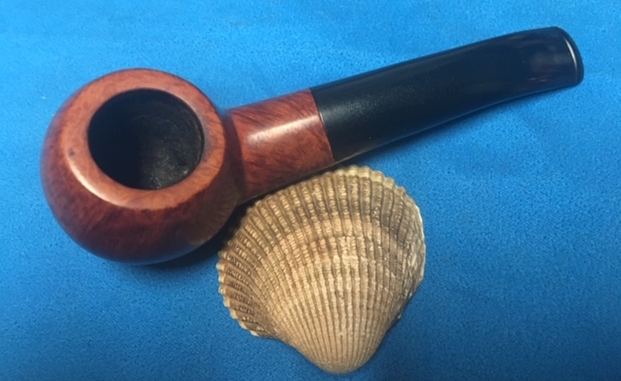
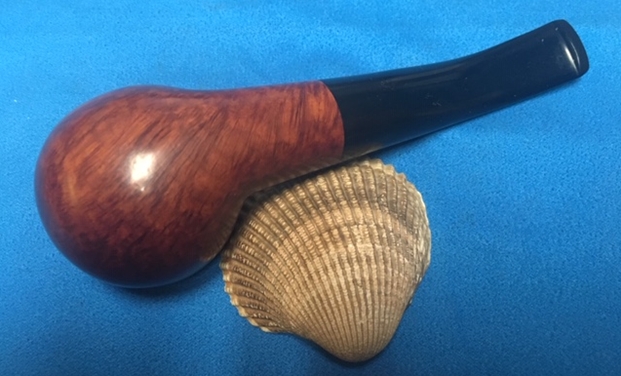
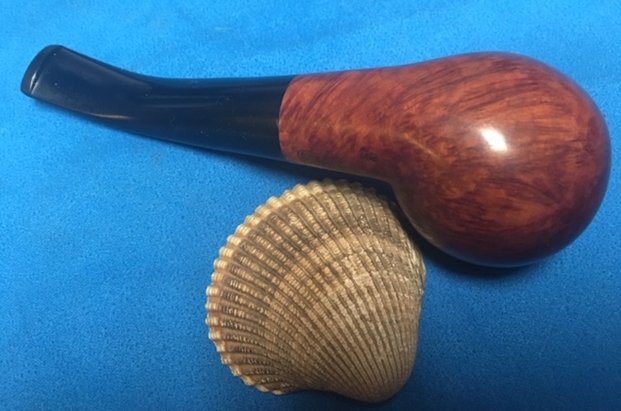
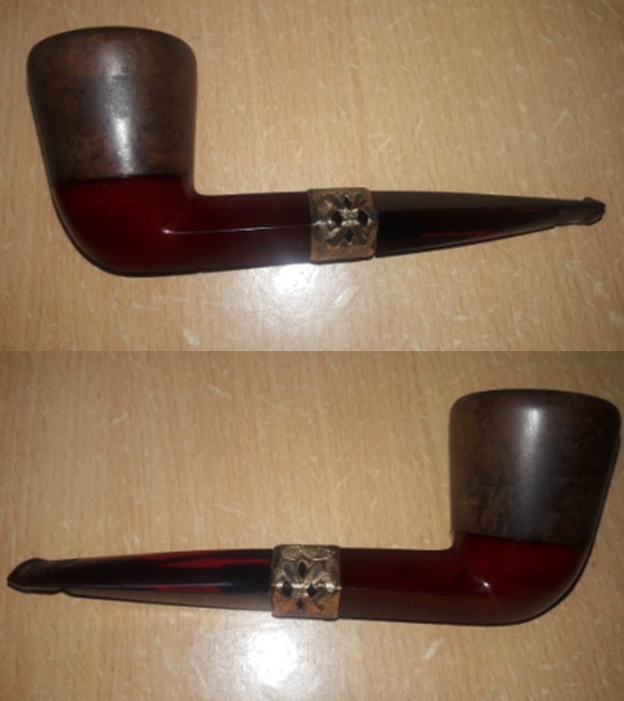
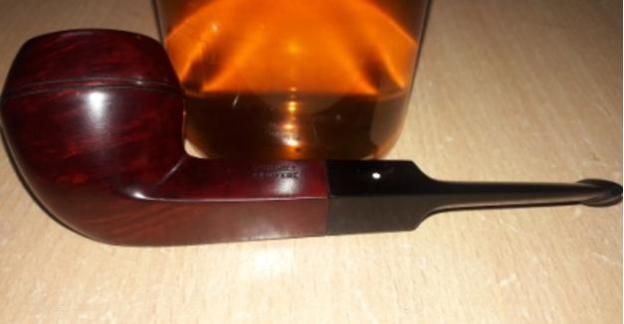
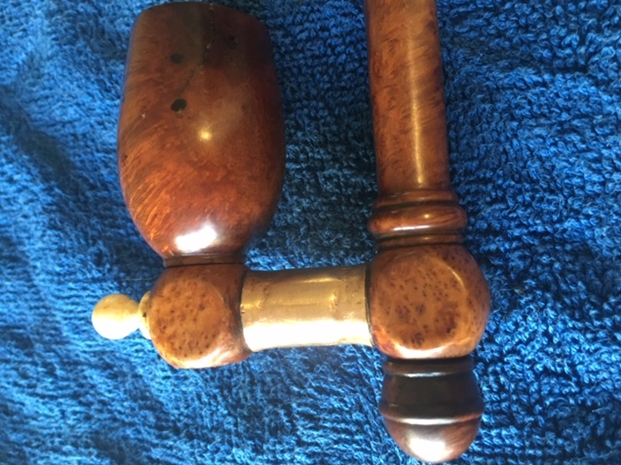
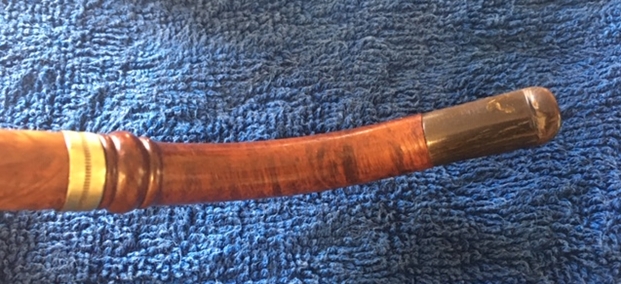
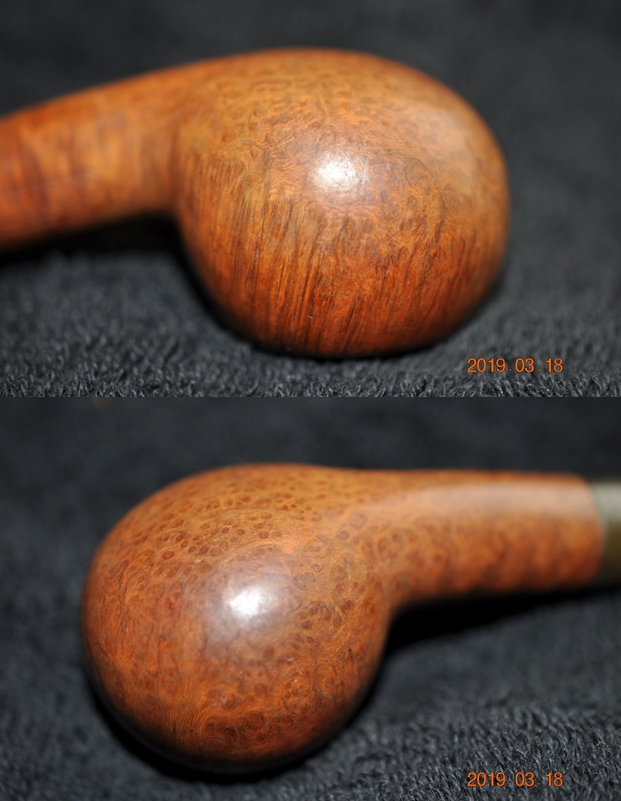
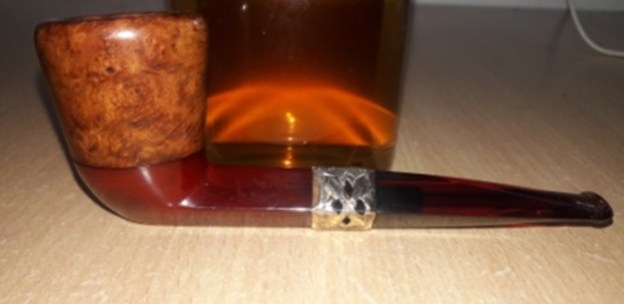
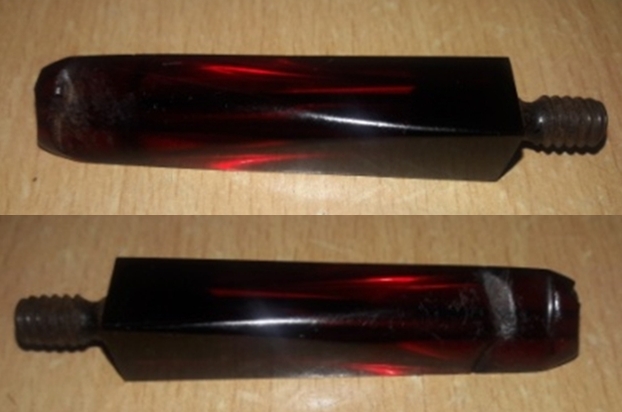
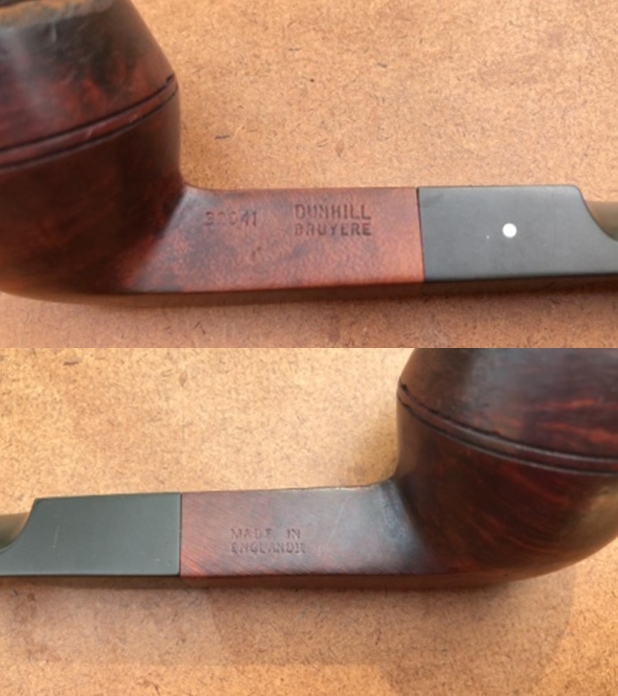
The nomenclature stamped on the left flank of the shank is ‘TRENT’ [over] ‘LEV-O-LATOR’.  The right side of the shank is stamped ‘IMPORTED BRIAR’ [over] ‘SERIAL 49W-5’.I had never seen this name on a pipe, and I had no idea was a ‘Lev-O-Lator’ was.  My first queries to Pipedia and Pipephil.eu, my regular first stops for information and research, came up empty.  A quick look in my copy of ‘Who Made That Pipe?’ by Wilczak & Colwell, also came up empty.  When I searched more broadly in Google, I came up with two helpful threads.  The first was from Pipes Magazine Forums where another person was asking the same question in 2015 – had anyone any information about a pipe marked ‘Trent Lev-O-Lator’?  He had acquired a Zulu with this nomenclature and was hoping to understand better its provenance.  One helpful response in the thread from ‘eJames’ started to build a road map:

Bruce Peters pipes (and a couple of others) were made by HLT for the Penn Tobacco Co. If this is a Bruce Peters it was most likely made before HLT bought Grabow, probably in the 1940’s.

Taking this information, I returned to Pipedia and found ‘Bruce Peters’ listed among American pipe makers:To understand more about the Henry Leonard & Thomas Inc., I look at the Pipedia article about HLT:

Henry Leonard & Thomas, Inc. (HLT) was founded in Ozone Park, Queens, New York by Henry J. Lavietes and two partners on May 31, 1938. The company patented a stem design for pipes and cigarette holders designed by Henry on March 9, 1943. Henry was the son of David Lavietes, who moved to Sparta, North Carolina in the early 1940s to purchase laurel and rhododendron burl to ship back to his son and HLT. Lavietes decided to stay in Sparta and founded the D&P Pipe Works with his other son Paul, originally as a 15-person operation. David Lavietes was the inventor of the Ajustomatic feature incorporated into Dr. Grabow pipes even today.

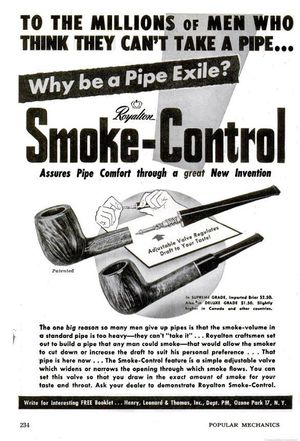
There is no mention of “Trent” or “Lev-O-Lator” but there is mention above of David Lavietes’ invention called the ‘Ajustomatic’ which later became a feature of Dr. Grabow pipes when in 1953 (same article) HLT acquired Dr. Grabow.  In the same article, the Popular Mechanics advertisement (LEFT – Courtesy of Doug Valitchka) describes the ‘Ajustomatic’ technology which looks much like the Lev-O-Later.  Here is the text enlarged:I continue to search for more leads and I find one additional thread that shed more light on the path.  This time the thread was from Tapatalk.com, in the “Dr. Grabow Pipes” Thread.  The thread started in 2017 when ‘SpadeFan’ asked:

Found this nice 86 from HL&T stamped BRUCE PETERS and LEV-O-LATOR.  Anyone know what the term LEV-O-LATOR means? Sound like I should plug it in and make coffee or something.Responses in this thread speculated that the ‘Ajustomatic’ and ‘Lev-O-Lator’ were one and the same:

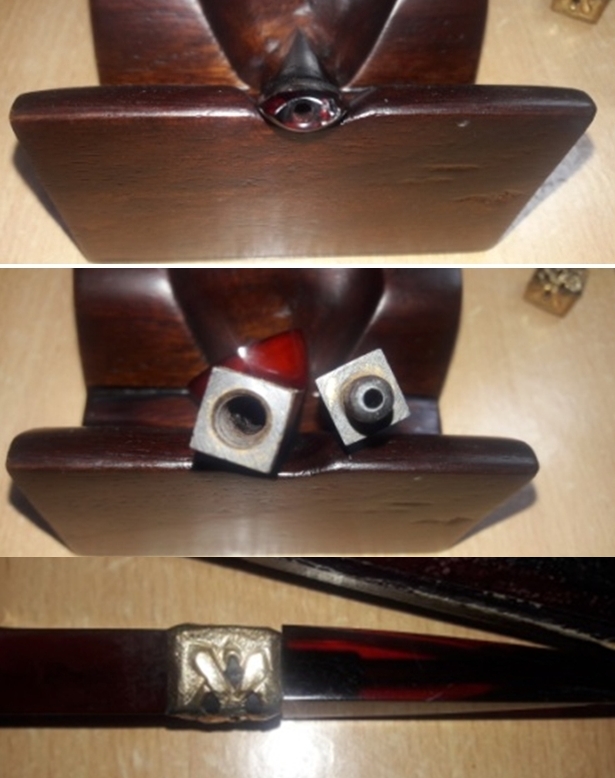
JoeMan: That fitment sure looks a lot like an ajusto…and the cleaner may be identical to that of a Van Roy…and that logo looks a LOT like the Van Roy logo too.  I wonder if it’s a Van Roy production pipe which was then branded as a Bruce Peters.  If so…and if it is Ajusto…then I bet Lev-o-lator is their fancy name for the ajusto function.  

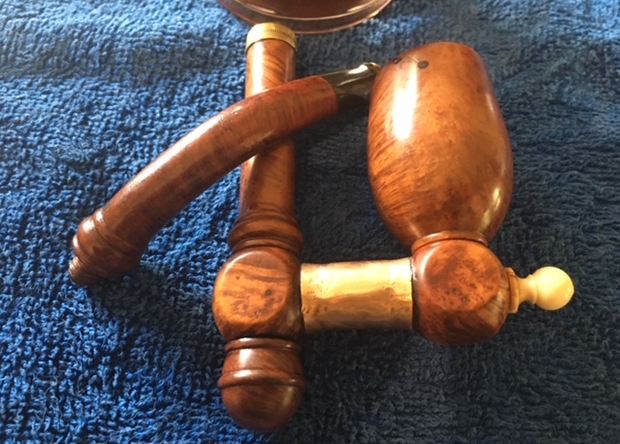
Pipesbywhitney:  I sold one a while back and here are my notes on it; This is a Trent Lev-O-Lator “Serial 49W-5” longer stem pear also stamped “Imported Briar.”  I can find no provenance for Trent pipes but the Import Briar stamping tells us it was most likely American made. The Lev-O-Lator system seems to be a metal drinkless mechanism attached to the tenon similar to many used in various American pipes during the mid-20th Century. I can find a Trend pipe similar to this one made around the same time by the Wm. Demuth Co. in New York so there could be a connect.I could find no additional information specifically placing the ‘Trent’ name in a time-line, but what I can deduce is that the ‘Trent Lev-O-Lator’ is the same ‘Ajustomatic’ internal technology that is traced back to before Dr. Grabow was acquired by HLT in 1953.  Without any specific reference to ‘Trent’, it’s difficult to say much more with certainty.  The Trent Lev-O-Lator on my worktable has the feel of being dated from the 40s to the 60s but this is only speculation.  I would need to find the Trent in a catalog to place it more specifically.
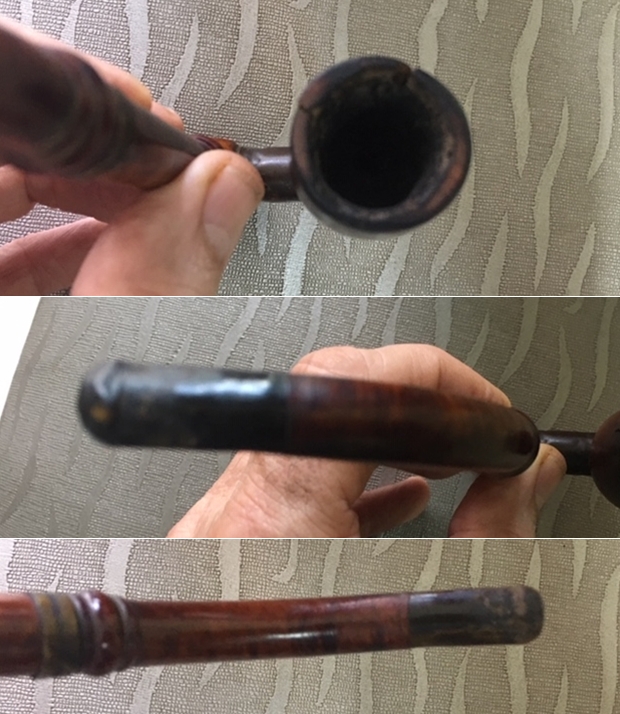
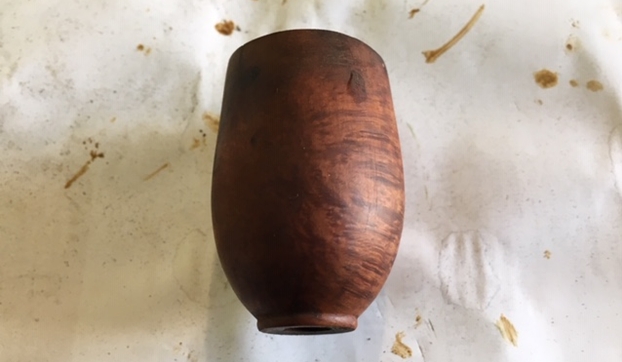
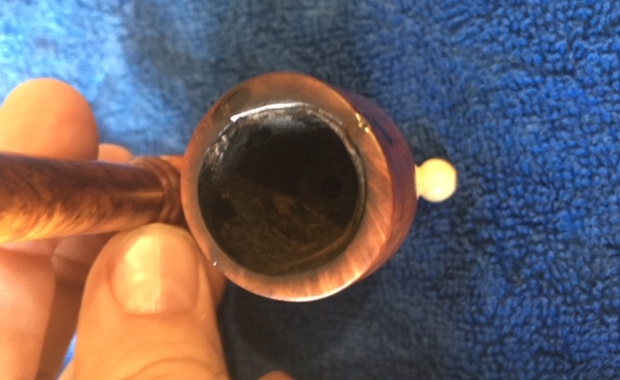
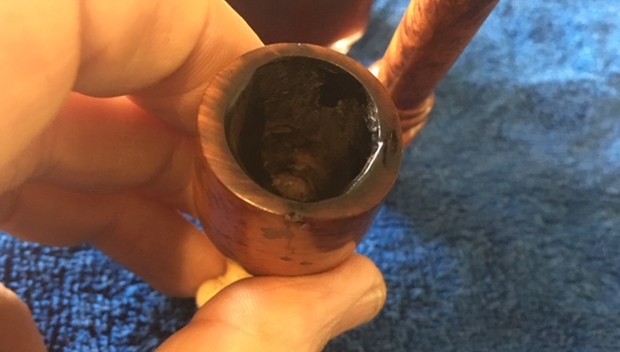
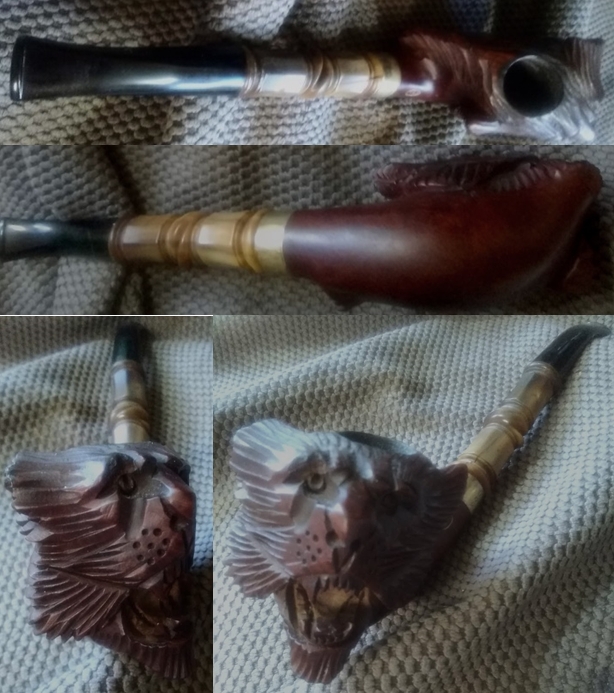
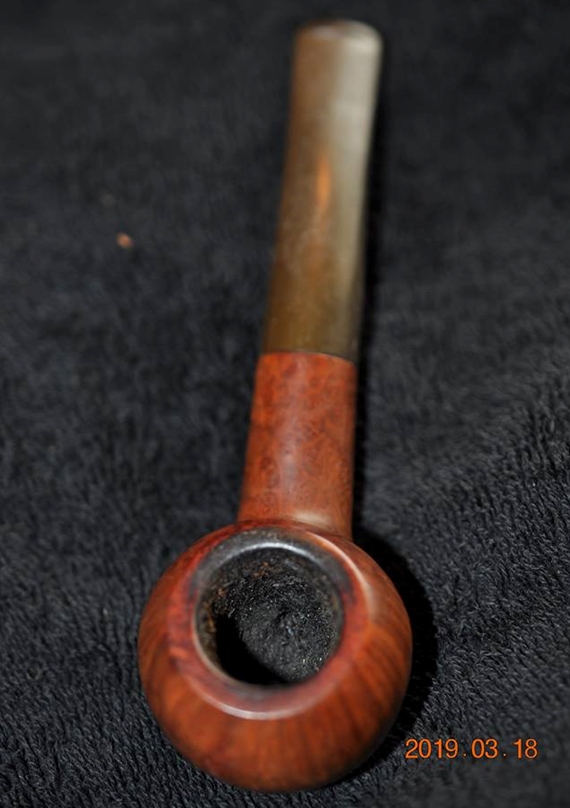
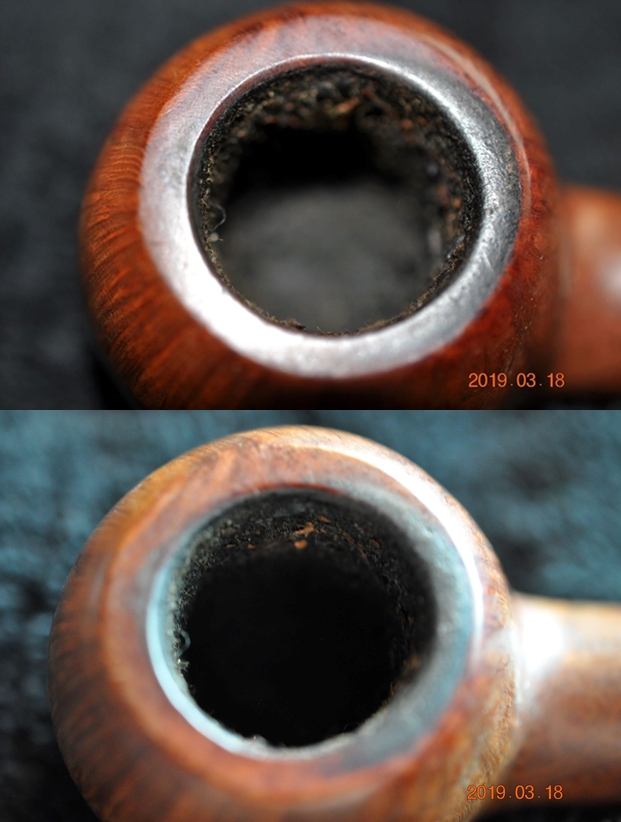
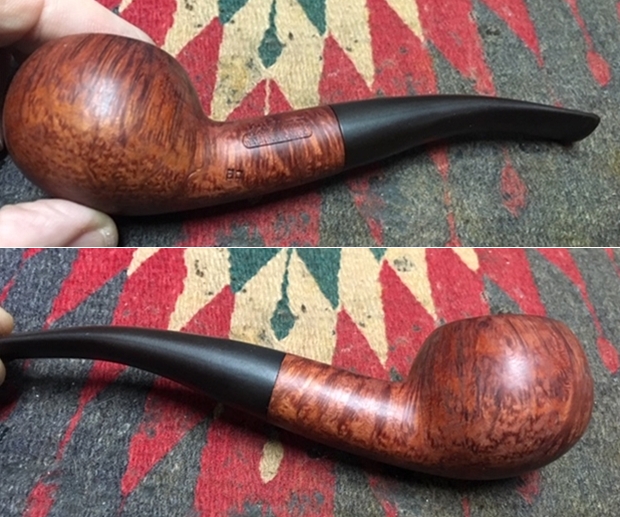
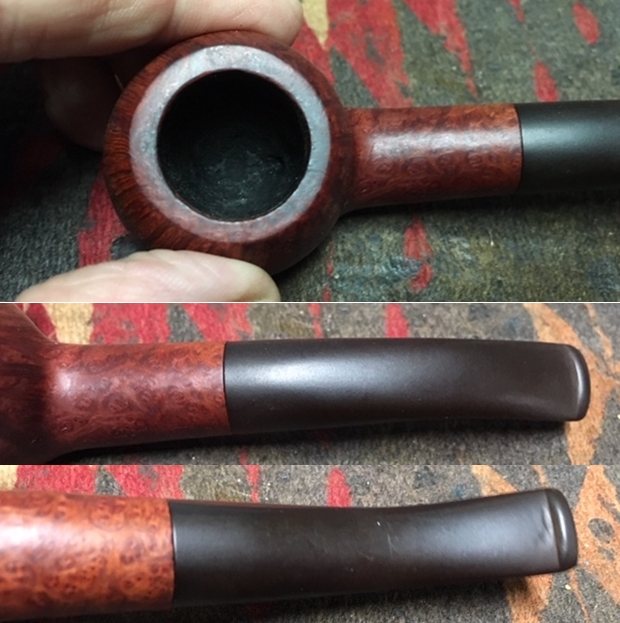
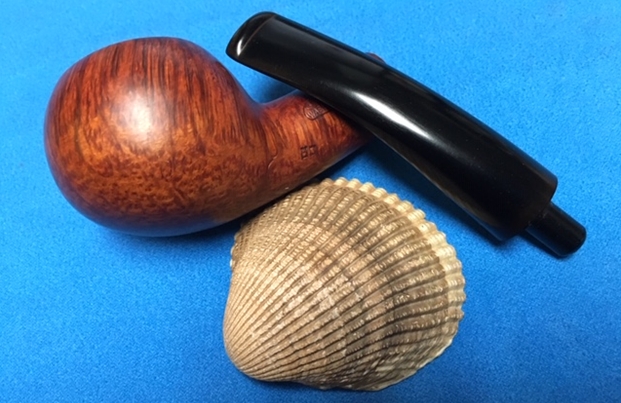
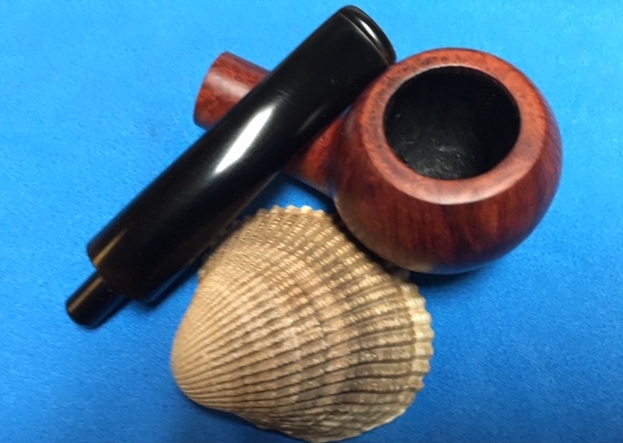
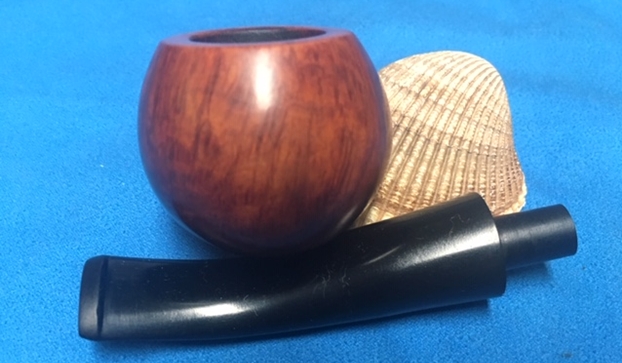
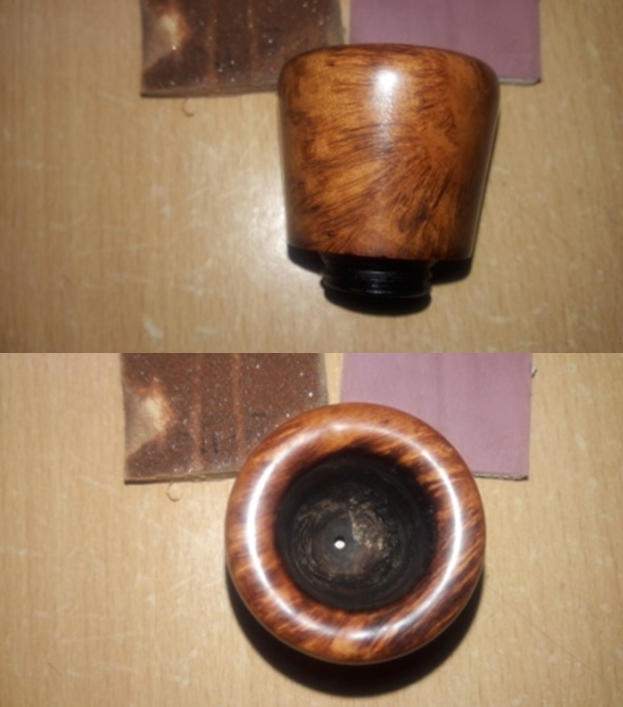
Looking at the pipe itself, it’s a very nice half-bent Billiard.  The chamber has some thick cake build-up with the rim showing thick lava flow.  The rim also has two dents on the forward and rear internal edge. The stummel is darkened from grime and age.  I can see a few fills and dents on the briar surface which will require some work.  The stem has oxidation, which is moderate, but the good news is that the bit has little tooth chatter.

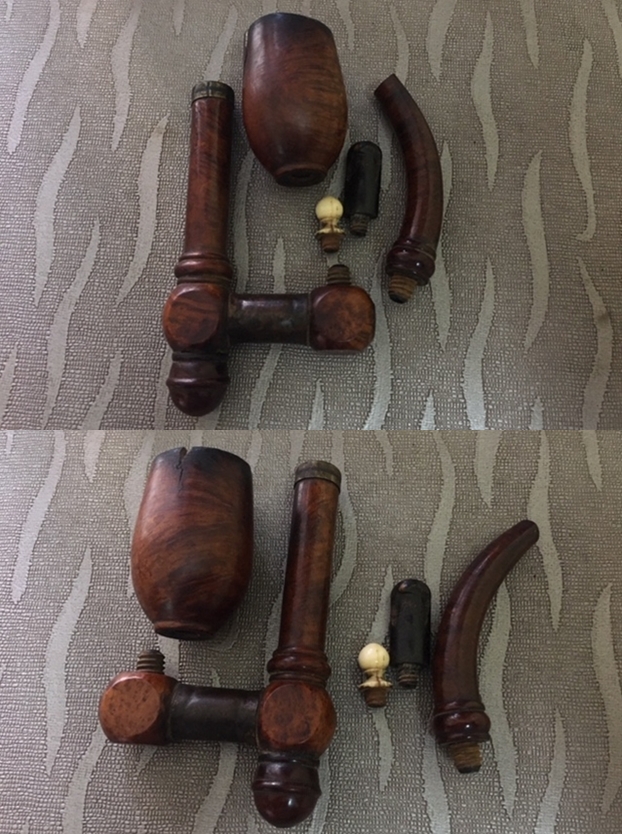
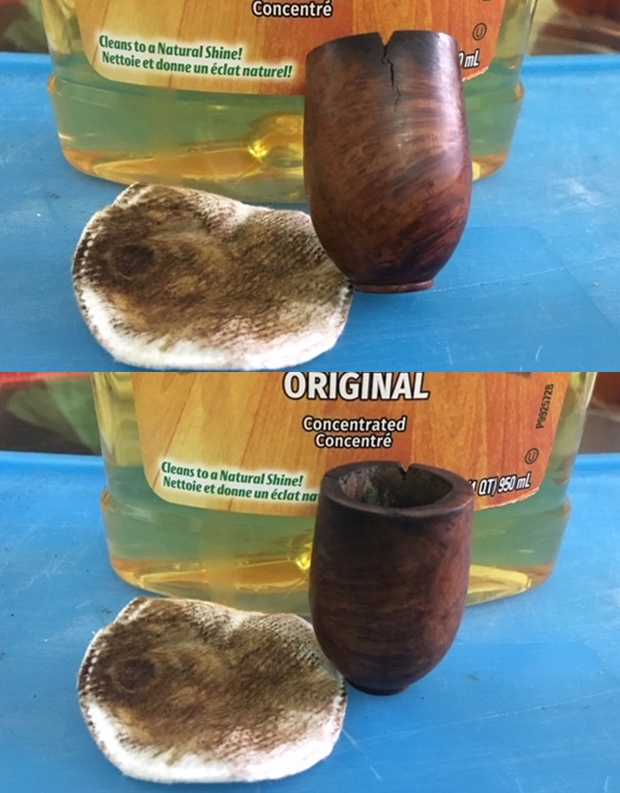
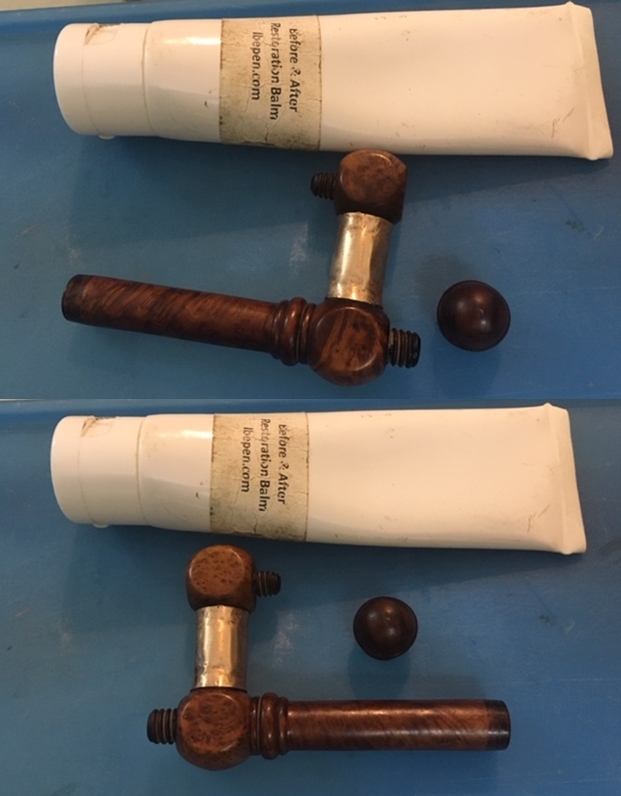
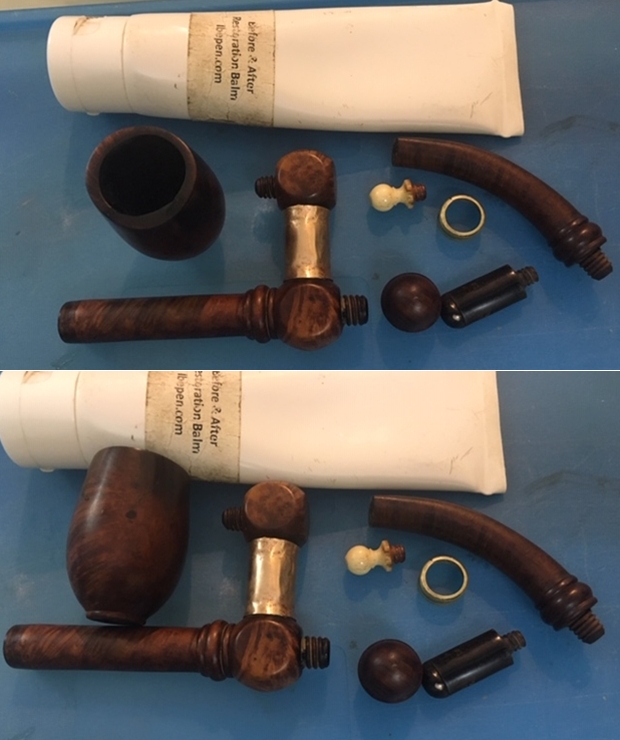
True confession is good for the soul: The research that I have just completed examining the ‘Ajustomatic’ technology was done AFTER I started working on the restoration!  With my practice of putting a batch of stems in the Before & After Deoxidizer soak to remove oxidation, I started on this before doing the research.  Unfortunately, I did not realize that the tip of the ‘Lev-O-Lator’ would come off.  This fitment serves as an air regulator which is cool.  Without realizing that it would come off making my attempt to clean the airway with a pipe cleaner wetted with isopropyl 95% much easier, I decided to remove it.  The shank ring was already loose, and I felt I could remount the metal ‘stinger’ the same way I took it off.I heated the entire metal tenon with a Bic lighter.  After it heated up, I wrapped a cotton pad around the tenon and gently applied a little torque with a pair of plyers and voila!  The vulcanite loosened its grip and the Lev-O-Lator came out.  I still didn’t realize the end regulator could be removed.
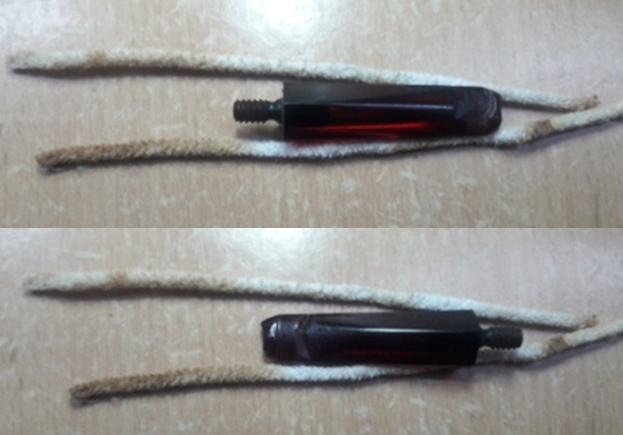
Along with other pipes in queue, I clean the Trent’s stem with pipe cleaners wetted with isopropyl 95% before placing the stems in the soak with Before & After Deoxidizer. After some hours, I fish the Trent’s stem out of the Deoxidizer and let it drain. I then use a cotton pad wetted with alcohol to wipe off the oxidation that had surfaced.  I also work on the cavity of the vacated metal Lev-O-Lator with cotton buds wetted with isopropyl 95% as well with pipe cleaners clearing the airway of the Deoxidizer.I then apply paraffin oil, a mineral oil, to the stem to begin the revitalization of the vulcanite.Now, with an understanding of the research I did previously, I remove the air adjustor of the Lev-O-Lator after I reheat the tenon, insert it into the cavity and then screw the stem to the right to tighten it in the mortise.  When it tightens, I’m able to continue rotating the stem to the right because the metal is still hot.  I rotate the stem clockwise until aligned and then let it cool. The ajusto air regulator is totally clogged with what looks like mud.  I use a dental probe to clean it and wipe it down with a cotton pad and alcohol.I apply a few drops of CA glue to the inside facing of the shank ring and attach it to the stem.  This should hold it in place.Next, I use the Pipnet Reaming Kit and starting with the smallest blade I go to work on the thick cake.  This was the hardest cake build up I think I’ve experienced in any of my previous restorations!  Oh my, it took a good bit of time for the smallest blade head to work through the brick hard cake.  I was careful not to force the blade too aggressively for fear of breaking the blade head.  The blade head finally broke through to the floor of the chamber and I switch to the next larger blade.  I use only 2 blade heads of the 4 available in the Kit and then transition to scraping the chamber using the Savinelli Fitsall Tool which fine tunes reaching to the areas that the blades would not.  Finally, I sand the chamber using 240 grade paper wrapped around a Sharpie Pen and then clean the chamber using a cotton pad wetted with isopropyl 95%.  After completing the chamber inspection, I detect some small heating cracks running on the chamber wall.  To remedy this, later I’ll coat the chamber wall with pipe mud to provide a layer that will help restart a healthy protective cake.Next, to clean the external surface and work on the lava flow over the rim, I use undiluted Murphy’s Oil Soap on a cotton pad.  I also use a brass wire brush to work on the thick lava flow on the rim.  The grime is thick, and the rim does a good job coming clean, but it’s in pretty rough shape.  I take some pictures to inventory the issues I see on the bowl and rim.  The rim is beat up.  There are divots out of the briar on opposite sides of the rim.  The outer edge of the rim is also dinged and skinned.There are several old fills that are soft and drawn up.  Often this happens after the cleaning and the stummel is wet. I move methodically to each of the fills and excavate the old fill material using a sharp dental probe. To fill these holes, I use briar dust mixed with a thick CA glue.  I put a small mound of briar dust on an index card and I put some CA glue next to the mound.  Using a toothpick, I gradually pull briar dust into the CA glue mixing as I do.  I continue to create the putty until it reaches the thickness of molasses and then I apply small amounts of the briar dust putty to each of the holes including on the rim.  After doing this, I set the stummel aside allowing the patches to cure. 
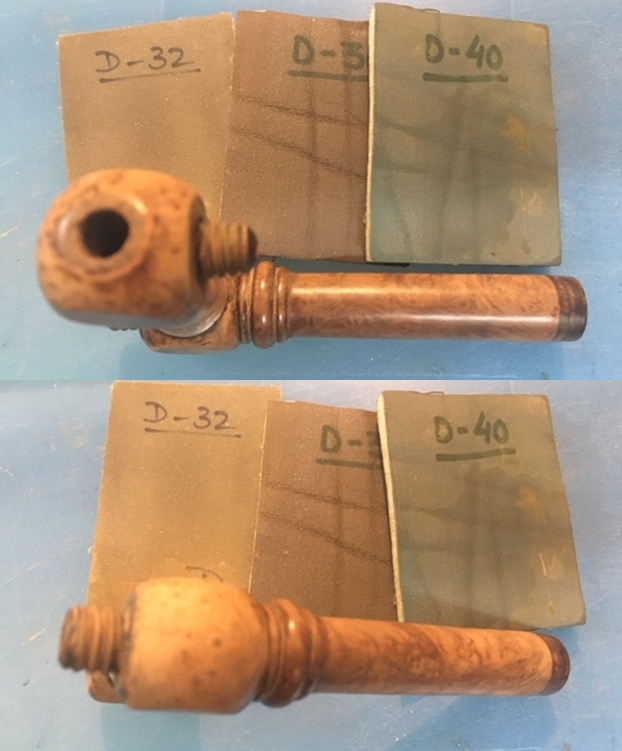
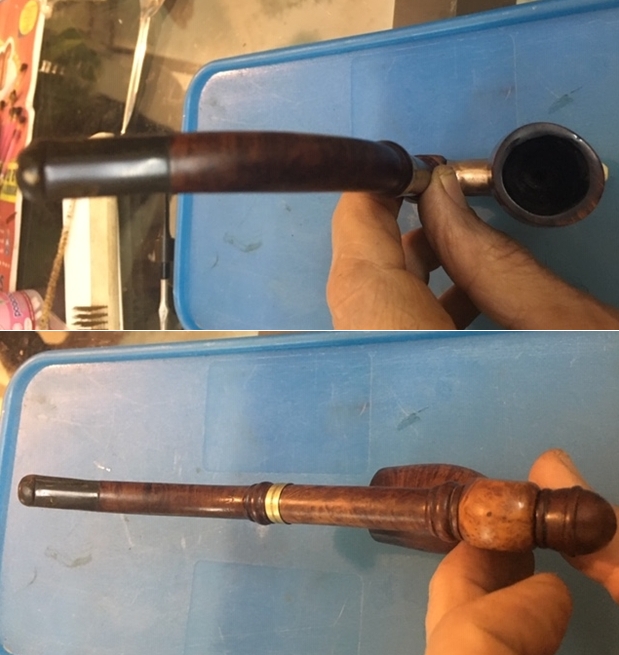
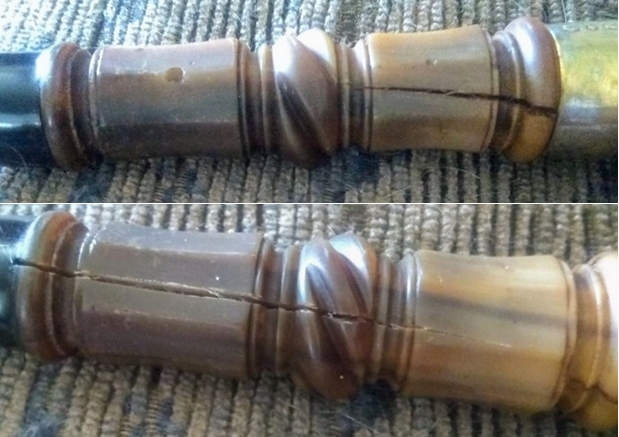
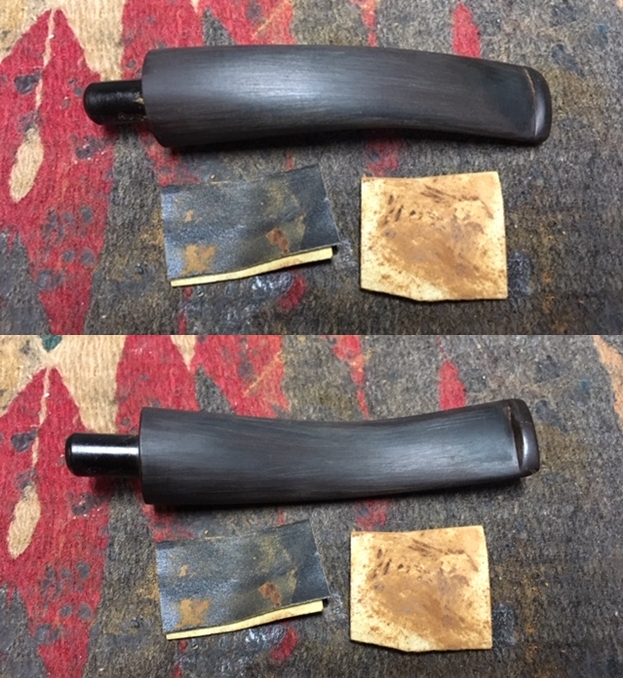
Now, turning to the stem, I take some additional pictures to get a closer look.  The upper and lower bit has very little tooth chatter and the button is in relatively good shape.  What stands out about the stem is the very rough surface that remains over the entire stem after the soaking in the Before & After Deoxidizer. To remove any remaining oxidation and to address the rough surface texture, I sand using 240 grade paper.  I also focus on the sharpening and freshening the button area.
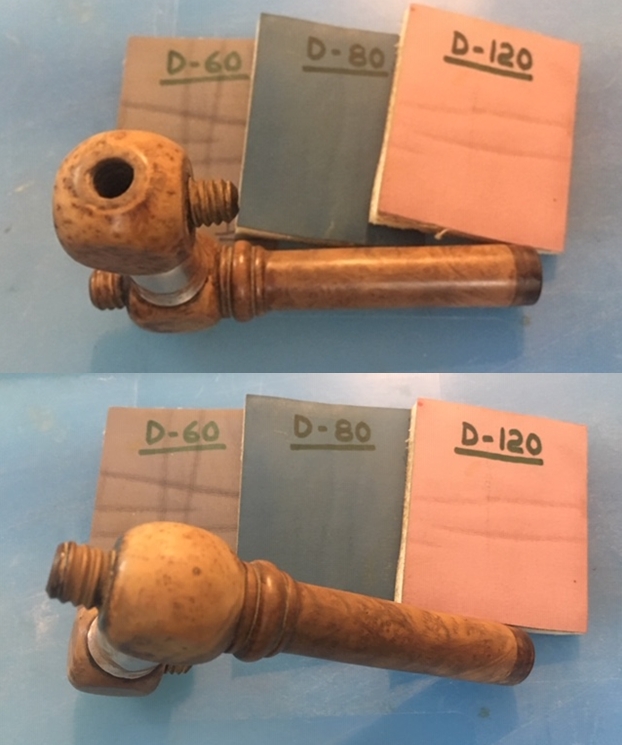
I then transition to the sink with 600 grade paper and wet sand the entire surface.  Well, during this process, the shank ring that I had attached with CA glue popped off and went down the drain.  Fortunately, after immediately turning off the water, I was able to unattach the trap underneath the sink and retrieve the ring!  I follow wet sanding using 000 grade steel wool.  The stem looks great.
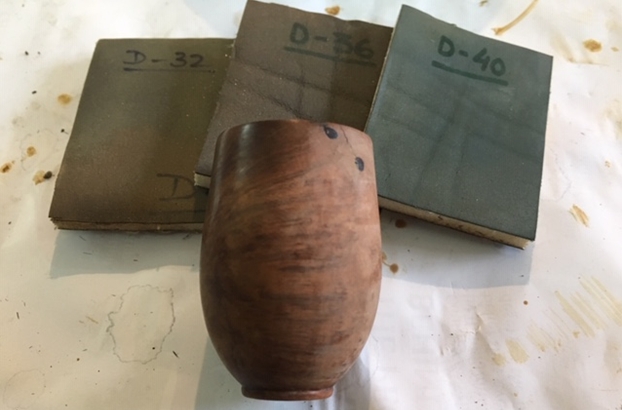
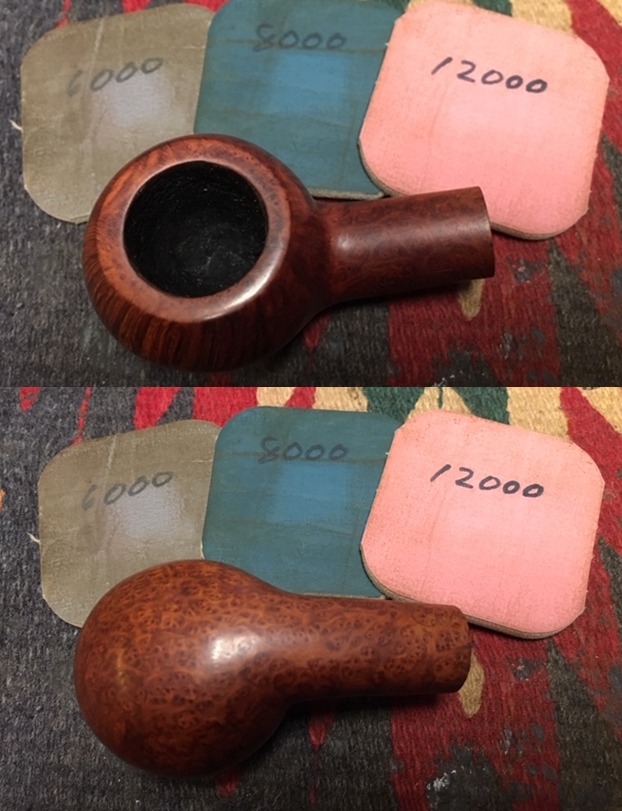
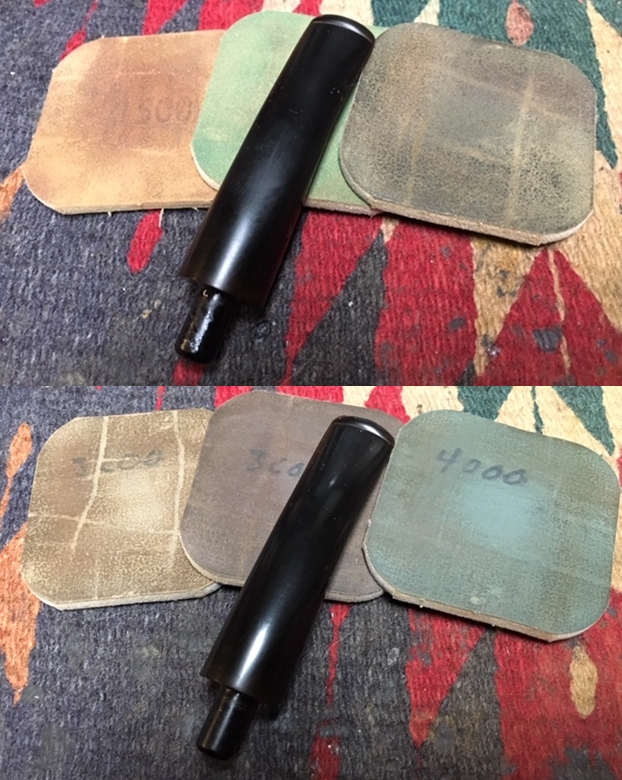
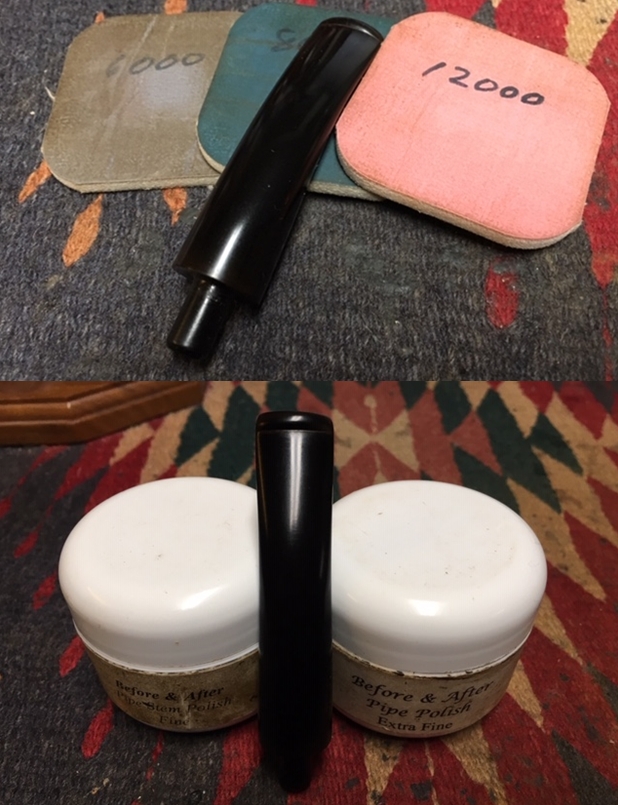
On a roll with the stem, I apply the full regimen of micromesh pads to the stem.  First, I wet sand with pads 1500 to 2400 then dry sand with pads 3200 to 4000 and 6000 to 12000.  Between each set of 3 pads, I apply Obsidian Oil to rejuvenate the vulcanite and record that phase with a picture to show that newly polished vulcanite pop!  I then put the stem aside allowing it to dry. With the stem on the sidelines, I look back to the stummel.  The briar dust putty filling the several holes on the rim and stummel surface has cured.  I begin to file each fill mound down with a flat needle file – bringing the mounds down almost to flush with the briar surface.After the filing is complete, I transition to sanding each fill site with 240 grade paper to bring the patches flush with the briar surface and removing all the excess fill material. 
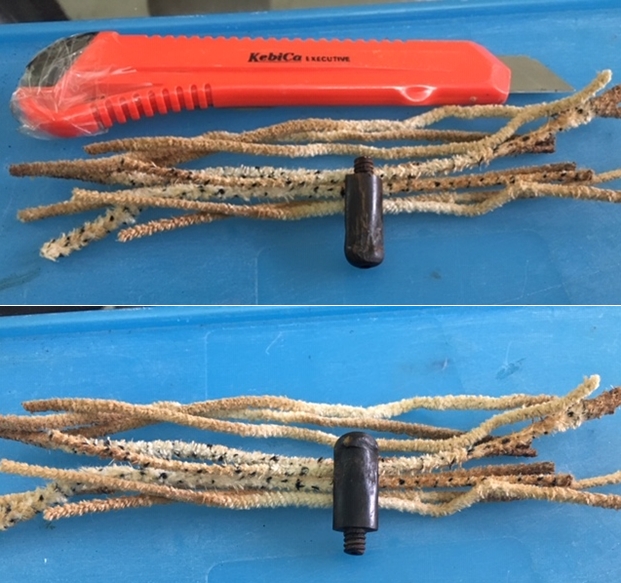
My normal process order is a little out of order but the grime on the inside of the mortise and airway is patiently waiting.  Using many cotton buds and pipe cleaners dipped in isopropyl 95%, I attack the internals.  I also employ the full arsenal of dental probes, spoons and shank brushes.  At the end of the carnage pictured below, I have yet to come to a place of declaring the internals clean enough to satisfy me. With the frontal assault paused, I use the slower, more passive approach to continue the cleaning through the night.  Using kosher salt and isopropyl 95% I let it soak and work on the internals.  I first pull and twist a cotton ball to form a wick that I stuff down the mortise and airway with the help of a stiff wire.  The cotton wick serves to draw out the tars and oils.  I then fill the bowl with kosher salt and set the stummel in an egg crate to stabilize it.  I then fill the chamber with isopropyl 95% until it surfaces over the salt.  I wait a few minutes as the alcohol recedes and then top it off once more.  I set the stummel aside to soak.The next morning, the salt is not soiled in a great way, but the wick is what is what I want to see.I follow again with a renewed frontal attack using cotton buds and pipe cleaners wetted with alcohol as well as additional scraping the mortise walls with a dental spoon.  Eventually, the buds start surfacing lighter and I call it, ‘Cleaned!’ and move on.
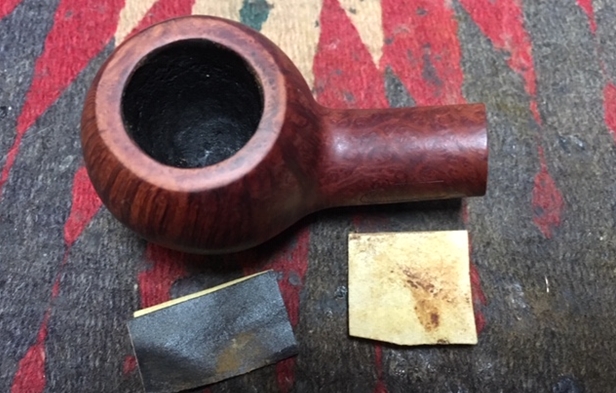
With the internals clean, I now focus on the external surface restoration.  I start from the top with the rim by topping the rim using 240 grade sanding paper on the chopping board.  With the damage on the rim, and the briar dust fills on the rim, the topping will give the rim a fresh start with new lines and surface.The half-bent shank reach extends beyond the parallel plane of the rim, so I need to hang the shank over the edge of the board while I top.  With the stummel inverted on the 240 grade paper, I do a tight rotation of the stummel on the corner of the topping board.  I check after a few rotations until it looks clean.I then switch the 240 grade paper with 600 grade paper and rotate the stummel several more times.  I like what I see. Even after the topping, there remains some roughness on the external edge of the rim.  The former divots in the internal rim edge are all but gone, but there are still some slight indents where the briar dust patches are. 
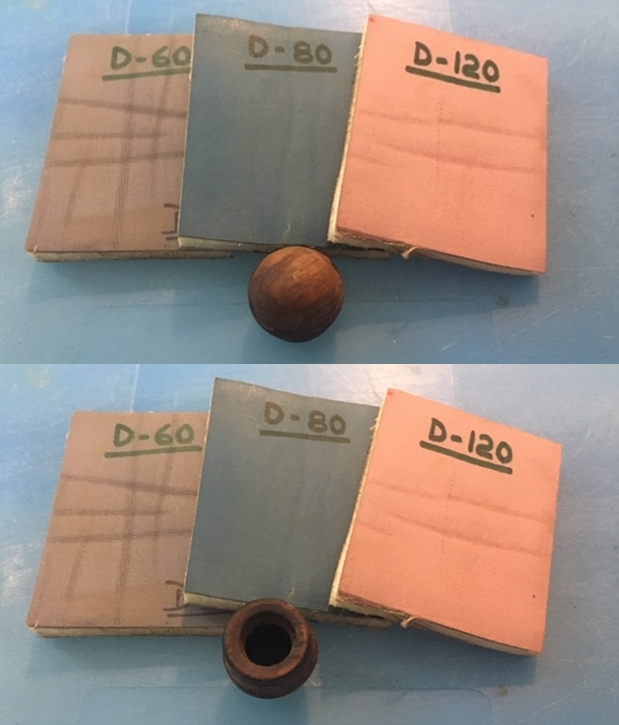
To remedy this, I create an internal rim bevel.  I start on the internal rim edge using a coarse rolled piece of 120 paper to cut the initial bevel.  I follow this by using 240 and 600 grade papers tightly rolled.  My method of creating the bevel is to pinch the paper against the internal rim edge with my thumb pressing the paper while my index finger puts consistent counter pressure on the external side of the rim and then rotate consistently around the circumference of the rim.  This usually provides a consistent result. I do the same with the external rim edge, but not with the same intent of creating a bevel.  My goal is simply to clean the rim as much as needed.  The result is not only to clean the rim, but to soften the rim presentation. 
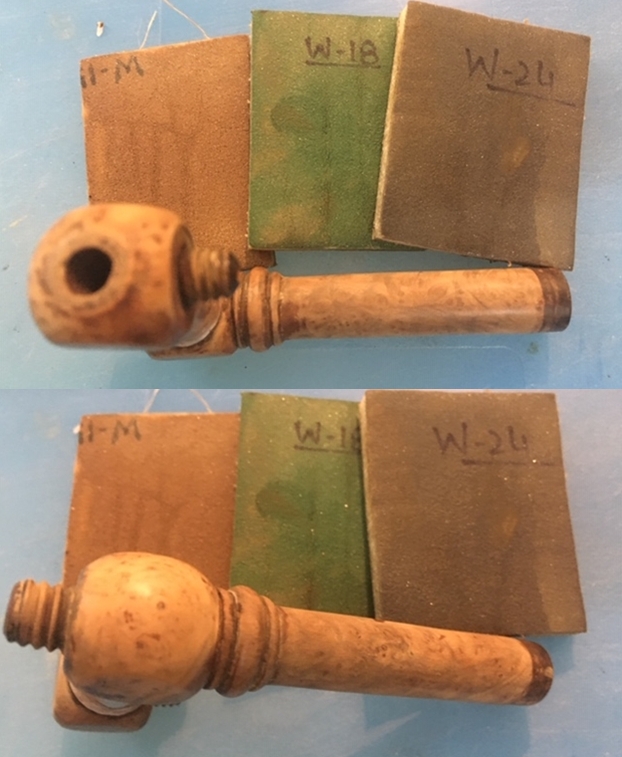
With the rim repair and initial sanding complete, I use sanding sponges for the next phase.  I use coarse, then medium and light grade sponges in that order.  I’m careful to guard the nomenclature during the sanding phases. 
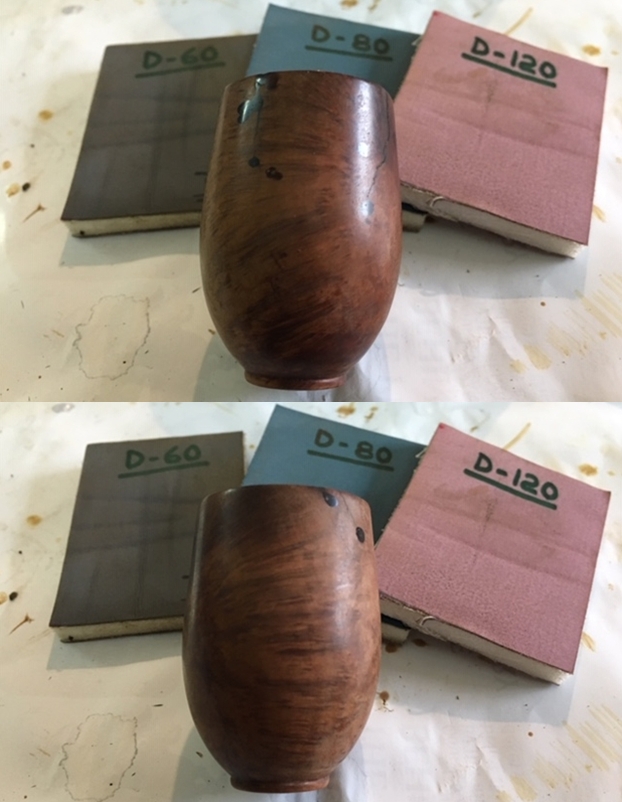
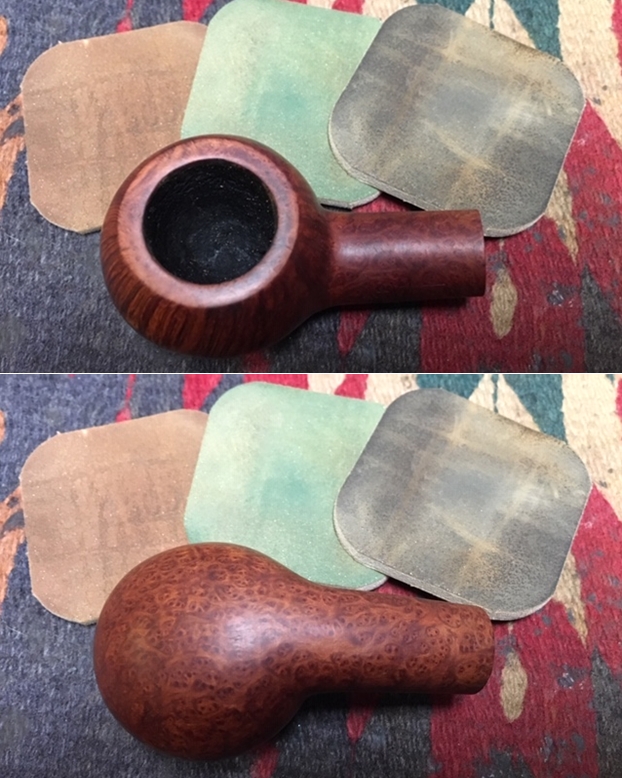
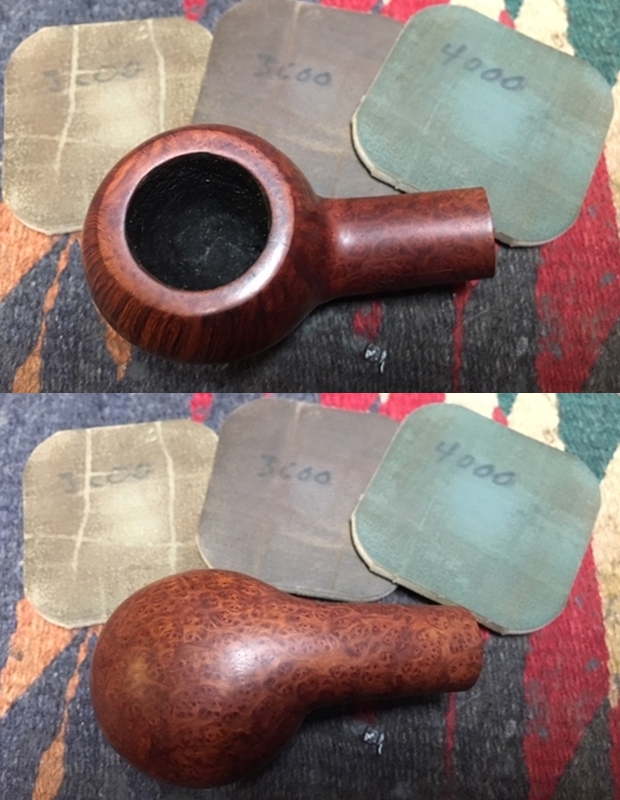
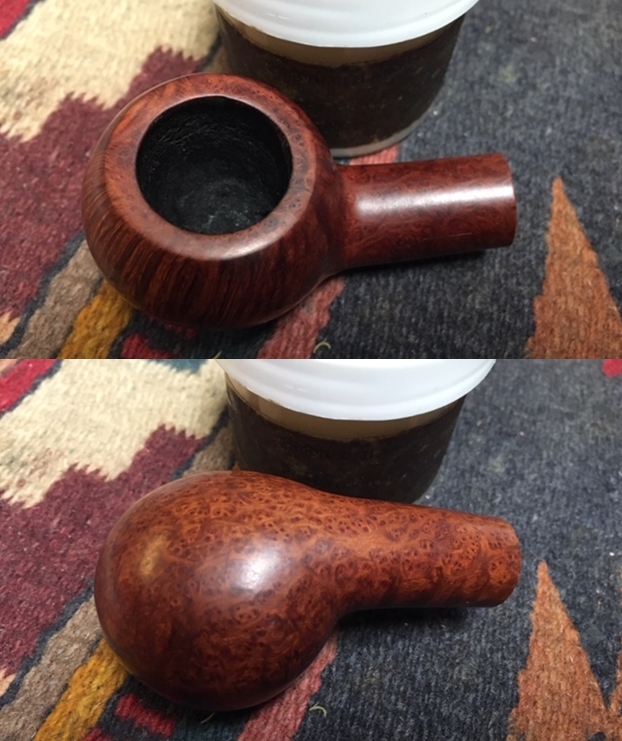
After completing the sponge sanding, I go directly to sanding with the full regimen of micromesh pads.  I begin by wet sanding with pads 1500 to 2400 then follow by dry sanding with pads 3200 to 4000 and 6000 to 12000. I love the way the grain emerges during the micromesh process. I now reach a decision point which is not in limbo too long.  I decide to apply a darker brown dye to the Trent stummel primarily to aid in masking the fills which are dark on the briar landscape.  I will use Fiebing’s Dark Brown Leather Dye with the flexibility to lighten the aniline dye if I choose. I assemble my desktop staining tools with the Dark Brown Leather Dye in a shot glass to apply with a bent over pipe cleaner.  I begin by wiping the stummel with a cotton pad wetted with alcohol to clean.  I then warm the stummel using a hot air gun.  This heats the briar and expands the grain allowing the dye pigment to have a better reception.When heated, I use the pipe cleaner applicator to paint the stummel with the Dark Brown Leather Dye in sections and then with each painted section I flame the wet aniline dye with the lit candle.  This immediately combusts the alcohol in the dye which flames off with a ‘poof’ and the dye pigment sets in the grain.  I do this methodically around the stummel until the entire stummel is thoroughly covered with the fire crusted dye.  When it’s completed, I set the stummel aside for at least 6 hours to allow the new dye to settle.  This ‘rest’ helps guard against the dye later coming off on the steward’s hands after the first few uses of the pipe when the stummel is heated.  I put the stummel aside and wait.After several hours, I’m ready to unwrap the fired stummel.
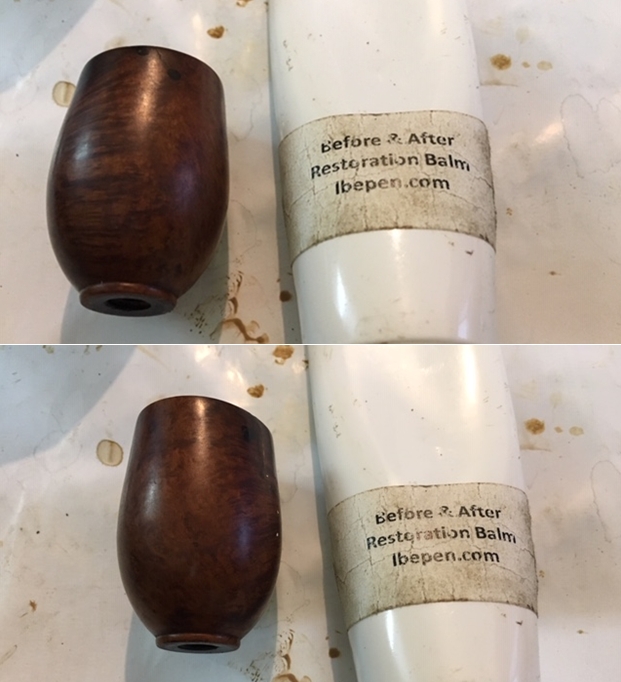
I mount the felt cloth buffing wheel to the Dremel and set the speed at the lowest RPMs.  This is to reduce the heat generated by the coarser felt wheel as I apply the coarser Tripoli compound.
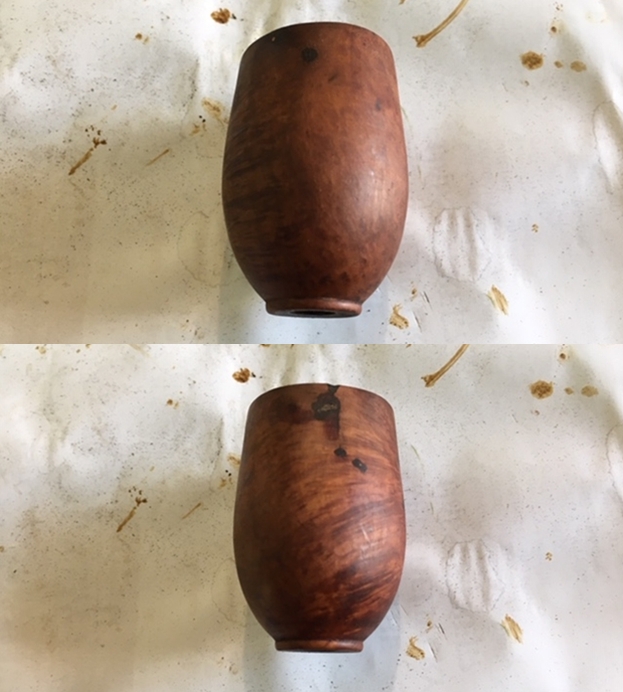
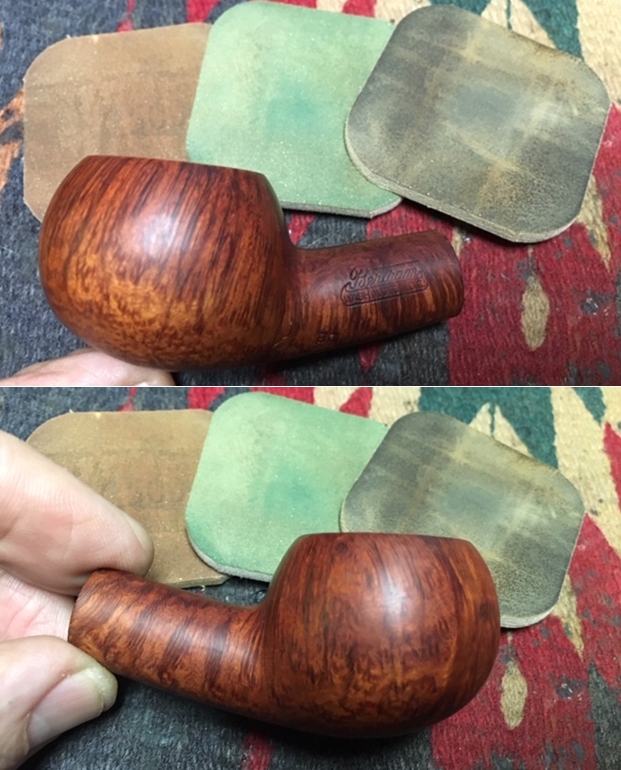
With my wife’s assistance, she takes a few pictures as I ‘unwrap’ the stummel revealing the results of applying Fiebing’s Dark Brown Leather Dye to the stummel.  After completing the first round applying Tripoli compound with the felt buffing wheel, I change to a cotton cloth buffing wheel and increase the speed to about 40% full power.  I again apply Tripoli using the cotton cloth wheel which can reach into the crook of the bowl and shank which is not possible with the felt wheel.  After doing this, I go over the entire stummel once more with the cotton cloth wheel using Tripoli compound. This pass using the cotton cloth wheel sharpens the grain lines – making them very distinctive and almost seeming to be luminescent. After completing the application of Tripoli compound, I wipe the stummel with a cotton pad wetted with alcohol not so much to lighten it, because I like the dark shade of the briar, but to blend the new dye and to dissipate possible dye clumps that collected on the surface.After reuniting the Trent stummel and stem once more, I mount the Dremel with another cotton cloth pad, maintaining 40% full power, and apply the finer Blue Diamond compound to the pipe – stem and stummel.  When finished, I buff the pipe with a felt cloth to remove the compound dust from the surface.  Before applying the wax, I have one project left to accomplish.  Earlier I noted that there were some heating cracks in the chamber which were not severe enough to warrant the use of J-B Weld but could be addressed though applying a pipe mud. Pipe mud is the mixture of cigar ash and water to form a ‘mud’ that provides a hard, protective coating over the chamber walls and serves as a starter layer to develop a healthy dime width protective cake.  With gratitude to my colleague, Gary, living in the nearby city of Plovdiv, I have cigar ash that he provides me periodically from his passion of smoking Romeo cigars.  I clean the ash through a sifter and it works very well.I mix small amounts of ash and water until I get a mud-like texture.  After putting a pipe cleaner in the airway to block the draft hole from closing, I use a small dental spoon to scoop the mud and deposit it on the chamber wall.  I also use the spoon to spread the mud so that it disperses evenly. After applying the pipe mud, I set the stummel in an egg carton and let the mud dry and harden through the night. The next morning, the mud transformed into the hardened protective layer as hoped.  If Andy is the next steward of this Trent, he should know not to use a metal tool to clean the chamber during the initial stages of use.  After using the pipe, stir the resulting ash carefully and after dumping it, take a folded over pipe cleaner and rub the chamber wall to loosen the debris.  This avoids scraping the new protective layer which will help encourage a new protective cake to develop.
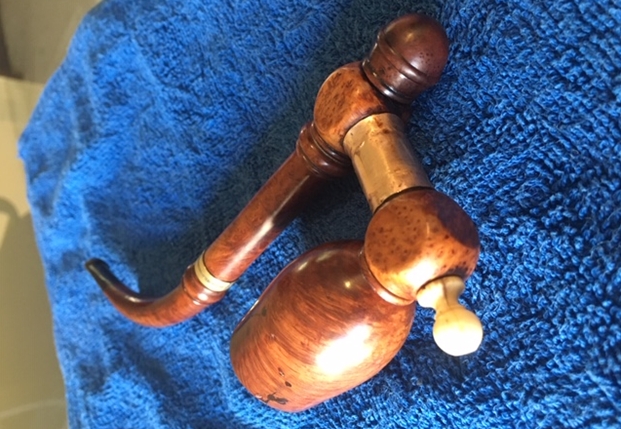
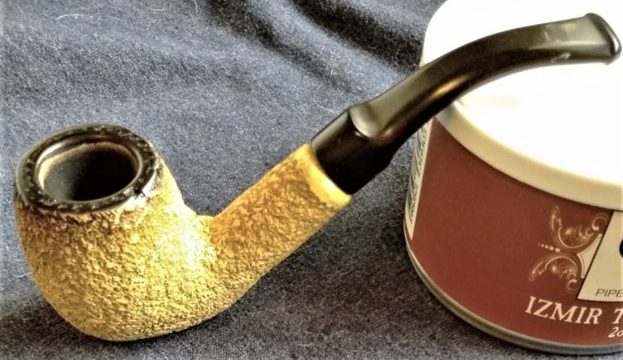
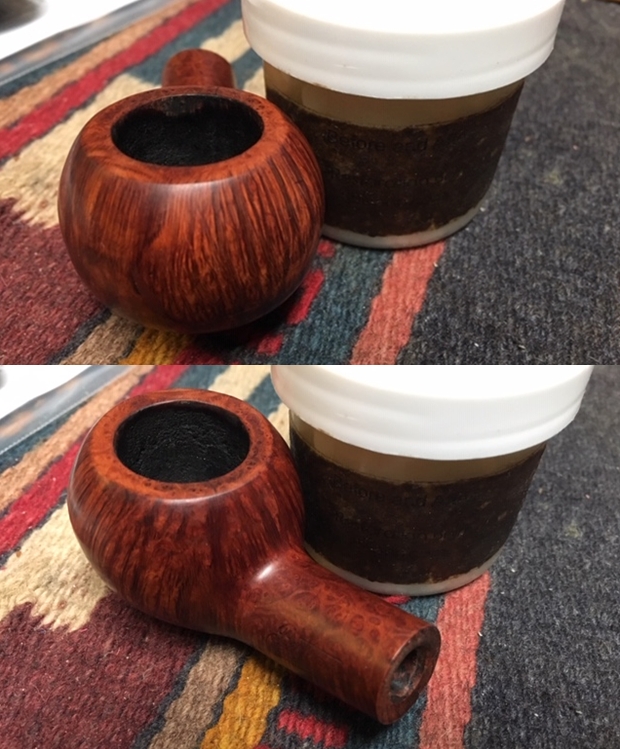
Now the homestretch.  I mount another cotton cloth buffing wheel on the Dremel, maintain about 40% full power speed, and apply a few coats of carnauba wax to the Trent Lev-O-Lator Bent Billiard – stem and stummel.  After application of the wax, I give the pipe a hearty hand buffing with a microfiber cloth to disperse any collected wax and to raise the shine.

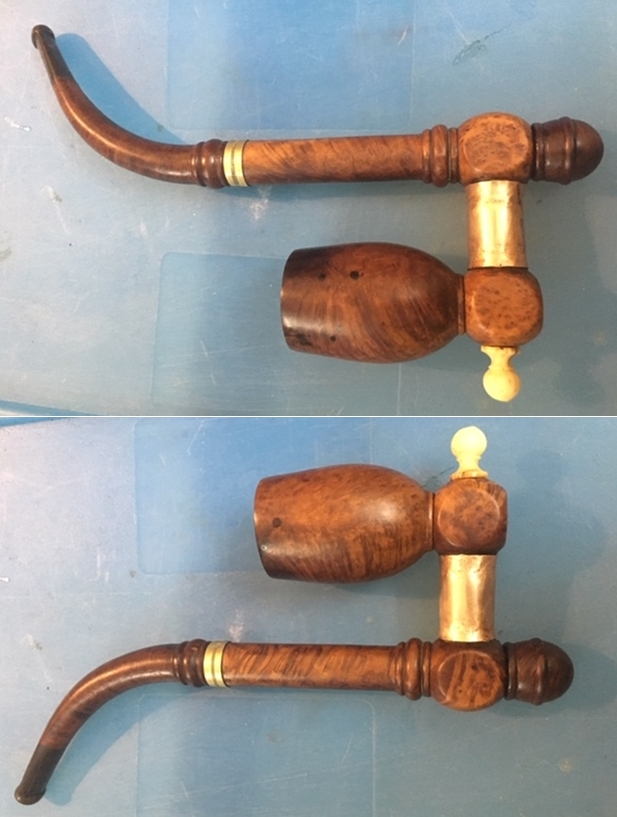
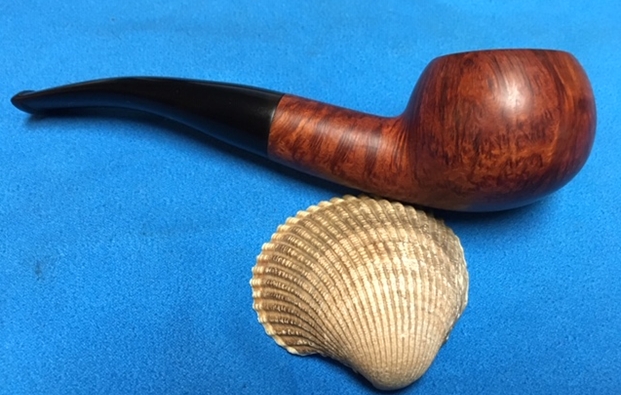
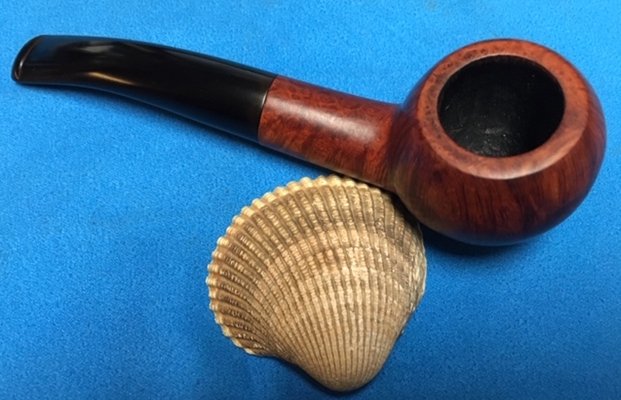
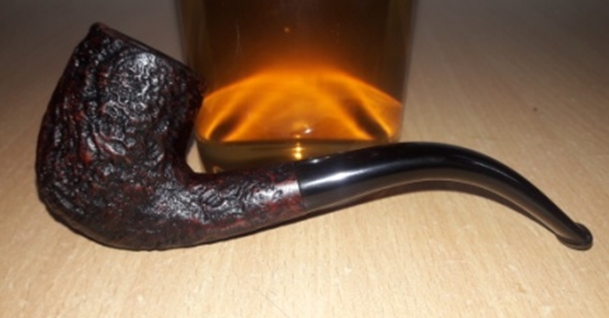
When I started this restoration, I had never heard of the ‘Lev-O-Lator’ adjustment fitment.  It would be interesting to play with the movable adjuster valve to see what the difference in the experience would be.  The grain on the Trent half-bent Billiard came out very well with the thick, dark grains masking well the fill repairs.  I did not re-glue the shank ring in place – I will leave that to the new steward to determine according to his preferences.  Andy commissioned this Trent Lev-O-Lator Half Bent Billiard from the For “Pipe Dreamers” Only! collection and will have the first opportunity to acquire it at The Pipe Steward Store.  This pipe benefits the Daughters of Bulgaria, our work here in Bulgaria among women and girls who have been trafficked and sexually exploited.  Thank you for joining me!


The Final Restoration while in Pune, India – a no name Cavalier


Blog by Steve Laug, Jeff Laug, Paresh, Abha and Pavni Deshpande

The final restoration project with Paresh and his family was this tired and worn Cavalier pipe. When we looked at it together we were all pretty certain that it was never going to amount to much no matter how much we worked on it. We purposely saved this pipe to the end of the visit to use it to pull together all that we had learned over the week together. The only sad part of the restoration was that Dal Stanton had already left to go back to Bulgaria. It was yet another East and West adventure in pipe restoration. As I mentioned in the previous blog on the Preben Holm, my brother Jeff and I had traveled to Pune, India where we met Dal Stanton of Pipe Steward and had an incredible visit with Paresh Deshpande, his wife Abha and his daughters Mudra and Pavni. With that cast of players – from the US, Canada, Bulgaria and India it was a special and memorable week of fellowship and pipe restoration. Each of us (minus Dal) played a role in this restoration. I will try to include the contribution of each in the story as it unfolds.

Lest you might think that all we did was work on pipes, I must remind you you that while staying in Pune we enjoyed the sights of the city, fellowship and great food along with working on pipes together even after Dal left. Paresh and his family did a magnificent job of hosting the event and making us all feel like we were part of his family. The hospitality, the amazing food provided by Abha and the joy and laughter of Mudra and Pavni were all part of making this an unforgettable visit. In the next weeks there will be several blogs written about the pipes that we worked on. Dal is working on a blog about the restoration of a BBB bent billiard that had belonged to Paresh’s grandfather that was a real group effort. Both Paresh and I will also be posting blogs on some of the other pipes that we worked on together including meerschaums and briars. We thoroughly enjoyed the time together while smoking our pipes and sharing beer and scotch to celebrate each restoration and to close each day. We exchanged tips and processes that we used. It was a time of sharing and learning for all of us.

The blog I am writing now was on the restoration of a worn and tired Cavalier that came from Paresh’s Grandfather’s collection. Like the rest of the pipes in his Grandfather’s collection the pipe was very dirty but to me it showed some promise. I had never seen a pipe like this with detachable briar parts, a metal shank and a horn stem. It was an interesting piece that showed an interesting grain under the grime. The stain colour was a contrast of browns and the brass band on the top of the shank was a nice addition. The rim top was almost destroyed. There were cracks and a portion of the top was burned away. The bowl was out of round and had a thick cake. The inner and outer edge of the bowl showed the damage of burning and poor reaming. The exterior of the bowl and shank showed a lot of wear and dirt. There was a metal tube pinched on between the bowl and the upright shank. It was hard to know what the tube was and if it matched the brass band. There was also a bone ball cap on the end of the shank in front of the bowl that was worn but still whole. The horn stem had some tooth marks and chatter on the top and underside and some wear on the button edge but otherwise it should clean up nicely. Paresh, Abha, Pavni and Jeff and I all turned the pipe over in our hands wondering what we were going to do with it. It needed a lot of work and would never be flawless. But we decided to go ahead with the restoration anyway and see what we would get. We took photos of the pipe at this point in the process to show the parts and the condition. I took a photo of the top of the bowl to capture the damage to the rim top and the cracks in the bowl radiating down the sides. I took photos of the shank extension and the horn stem on the end to show its condition as well. The shank extension and stem were in decent condition so that was a blessing to be thankful for at this point in the process. I took photos of the sides of the bowl to show the cracks that surrounded the pipe – both width and depth. We took the pipe apart and took photos of all of the parts. It later became clear that the cap on the bottom of the shank also was removable but at this point it was solidly in place and could not be removed.I started the cleanup process by topping the bowl on this old timer before Paresh and his family arrived at the apartment for the day. I topped it on topping board with 220 grit sandpaper. I scrubbed the exterior of bowl with undiluted Murphy’s Oil Soap and a cotton pad to remove the grime. I rinsed it off with warm water to remove the soap and grime. About that time Paresh and his family arrived for the day’s work. He and Abha looked the bowl over and Pavni agreed to sand it out on the inside. But before any of that could happen we needed to drill small holes at the end of each crack. Paresh used his magnifying glass and a black permanent marker to put spots on the end of each of the holes. These would guide us as we drilled each of them. It turned out that each crack had several branches radiating from them and would require a lot of drilling. After marking each crack Paresh drilled a small hole in the end of each one. I wiped the holes down with a cotton swab and alcohol to remove the debris. We filled in each of the holes and the cracks with clear super glue and briar dust. We packed the glue into the holes, repeated the glue and added more dust as necessary to build up the repairs. When the repaired areas had dried I used a needle file to smooth out the repair and blend it into the surface of the briar. I sanded the repaired areas with a folded piece of 220 grit sandpaper to further blend them into the surface of the surrounding briar. Overall the patches and repairs were looking pretty good. I was surprised by how good the pipe looked.

While I was working on the bowl Paresh addressed the issues with the stem. He cleaned the interior with pipe cleaners and alcohol and scraped the buildup on the stem surface with the blade of an exacto knife. He cleaned up the straight edges of the button with a needle file and reshaped the surface of the button at the same time. He followed that by sanding it with a folded piece of 220 grit sandpaper to smooth out the file marks. He filled in the deep tooth marks on the stem surface and on the button top with clear super glue. When the repair had dried he sanded it with 220 grit sandpaper to smooth it out. While Paresh was working on the stem, I finished the repairs and sanding on the bowl. Then I turned my attention to the shank piece. I cleaned it out with alcohol, cotton swabs and pipe cleaners. I wiped down the outside of the shank with Murphy’s on cotton pads. I finished this section about the same time that he finished the stem work.I worked on that and simultaneously to Paresh and my work, Jeff was working on the shank portion. He scrubbed the briar and the metal with oil soap. He worked over the metal shank piece with 0000 steel wool and we were all surprised with the copper that was under the oxidation. The shank band was also loose so he cleaned that as well. It was brass. Abha and Jeff went to work on cleaning the inside of the parts of the shank. Many pipe cleaners, cotton swabs and alcohol later the interior was pretty clean. They tried to remove the knob at the end of the shank but it did not come loose at all. No matter how much they worked on it the knob was still tightly in place.Paresh decided to give the knob a try. He painted the edges around the know with alcohol and scraped the crud that was built up around the joint between the two parts. He kept at it and then low and behold the knob turned and came off in his hands. What was revealed was a lot more of the crud that Jeff and Abha had been removing. Abha cleaned out the inside of the cap and the threads with cotton swabs and alcohol. Once the inside was cleaned and the threads were cleaned they were able to finish cleaning out the inside of the shank.I put the shank pieces together and glued the clean brass band on the top of the shank. The pipe shank and parts were looking pretty good at this point. There was still a lot of polishing to go but the  Cavalier was going to look very good. We took the pipe apart and began the process of polishing the briar and stem. I worked on the shank and stem. For ease of sanding I put the stem on the shank and  polished the stem and shank with micromesh sanding pads – wet sanding with 1500-12000 grit pads and wiping it down with a cloth after each pad. Paresh carefully reamed the bowl with a Castleford Reamer. We worried as he turned the cutting heads that the bowl would split but all remained intact as he cleaned it out. Pavni polished the inside of the bowl with 220 grit sandpaper to smooth out the walls and give them a shine. Paresh polished the bowl with micromesh sanding pads – wet sanding with 1500-12000 grit pads. He wiped it down with a cloth after each set of pads. The photos show the growing shine of  the bowl. I polished the cleaned knob with micromesh sanding pads – wet sanding with 1500-12000 grit sanding pads. Paresh polished the shank  parts with micromesh sanding pads – wetsanding with  1500-12000 grit pads. The briar began to come alive again. With all the parts polished it was time to take the next step. We rubbed down all of the parts with Before & After Restoration Balm. We buffed it by hand with a microfibre cloth. We put all the polished and “balmed” pieces together on a background and showed what the pipe looked like now.We put the pieces back together and took photos of the pipe at this point. We called it a day and Paresh took the pipe home with him. He wanted to polish it and wax it with his Dremel. He buffed it with White Diamond and gave it multiple coats of carnauba wax. When he brought it back the next morning it was a beauty. We took pictures of the finished pipe to show its beauty. The pipe really looked more alive, with the grain popping through. We decided not to stain it but left it as it stood after using the balm. The polished wax made the grain stand out. What started out as a possibility now became a reality. Paresh could now smoke and enjoy both the history of the pipe and carry on its legacy. The photos below tell the story. Thanks for looking.

Light in April


Blog by Robert M. Boughton
Copyright © Reborn Pipes and the Author except as cited
https://www.roadrunnerpipes2k.com/
https://www.facebook.com/roadrunnerpipes/

“The past is never dead.  It’s not even past”
— William Faulkner, Requiem for a Nun, 1951

As another loose and humble homage – some of which have been received well, others less so – I offer this tribute to the great American author and Southerner William Faulkner (1897-1962).  Perhaps as an inducement to those who may at least entertain the notion of reading on from beginning to end, I also tender a reward: one fine African meerschaum bent billiard of unknown make to the first person who identifies the names of a few of Faulkner’s magnificent literary works contained within this story blog as simple text.  Anyone willing to take the challenge, if such it may be called, need only reply at the end with the titles uncovered.MONDAY, APRIL 15
Perched on a whitewashed planter flecked with dirt and displaying dead flowers, the man smoked a pipe that was carved when his great-grandfather was young, thinking about the never-ending drudge of life but knowing he was not awake enough to keep the idea going.  The camouflaged cinderblock showpiece for the all but disintegrated yarrow, yellow marigold and other forgotten floral detritus, almost as common to the area as weeds and sagebrush and the five local seasons – spring, summer, fall, winter and wind – was prominent between the fractured cement driveway and stylish stone garden that had a proprietary name few locals knew other than perhaps a few grizzled flyboy retirees who flocked to this high desert town to spend their final years and paychecks. Still, the house he rented would always be the mansion to his way of thinking.

He heard the first of many coffee pots, percolating on the stove, that would goad him through the spring day, telling himself out loud how each of them would make him a little more sociable as the warm April sunlight he regarded as somehow less special that the light in August came and went in the course of the day.  The gurgle and flush of the old thing made him crankier, thinking the piñon nuts mixed with the dark ground beans would never taste as good as he thought he remembered before the whole enchilada started breaking bad.  He said, “I hope a cupful will give me a minimum of contentment.”

His parents gave him a name, but he liked to be called Bert, which was a half-baked sort of diminishment of his official designation inscribed on a certificate somewhere, but he was alright with that, thinking, names don’t amount to a hill of pinto beans, and since this one was given to me I can toss it in the river if I want..

Having gotten along in years to the condition where he remembered being a boy like it was yesterday but was hogtied to dredge up a word he wanted or where he saw someone the day before, Bert would tell himself he was no hoary, broken-down wraith of the sad, amusing sort of flags in the dust he saw ambling down bedraggled, pot-holed, sage brush-strewn roads in the hamlet where he lived.  Feeling shackled to call the place home by the antiquated convention of the vague class known as society, all Bert could think was, “That’s Tamalewood, huh.”  The town was no sanctuary to him, if it ever was.  The problem was recollecting the particulars of the fancies that flashed inside his mercurial stream of consciousness that was not as sharp as Hatch chile like it used to be.  He was long since at peace in that respect.

When he was a boy he grabbed hold of the early-onset codger in him as though it were something dear he might lose, knowing in later life he was not as old as most of that breed of character, thinking maybe I’m a curmudgeon but hoping better and pushing the notion out of his head as he would flick mosquitoes from his arm with the nail of a calloused finger.

Trying to piece together how he came to be in frequent contact with a fellow pipe restorer by the name of Benjamin Loveless of Tennessee, Bert’s first thought was how the name evoked a character from some might-have-been Dickens novel – an attorney maybe, or someone else with a good education anyway.  Then, jarring back to reality, he recalled the first encounter was an email from this Loveless in early February, asking for information on Colossus Pipe Factory pipes.  Little more than a week later, he sent a photograph of a rare peculiar wooden pipe in the style named after those who kept watch over churches in years long past, with the head of a tiger cocked to the left.  Seized by a powerful lust from that first gander at the fine old smoker, even if it was a bit what he called froufrou, he had but two words for his chance of ever affording whatever Loveless wanted for it, “Eeee!” followed by “Oraley!” and resented the tease.  If he really wanted to burn that bridge he would have told Loveless to bounce.

Bert knew a thing or two about CPF pipes and wanted that one in the worst way, and being a codger if not a curmudgeon he never counted on Loveless’ proffered hospitable and charitable ways.  In fact he still did not altogether trust the hope sparked inside his chest by the offer Loveless made him.   One way or another, the two men cut a deal on trust that Bert would come through with a reasonable monthly installment until the debt was paid.  The whole while, Bert thought it sounded too good to be true, like ordering from the Sears & Roebuck catalog, based on no more than his pledge.  In all truthfulness, they both knew the end price fixed upon was a good deal higher than anything the regular market would support, but that’s the nature of the pipe hunger beast.for you.  Bert had heard tell of four others he could have bought for the price of the one, if he had the cash on hand that is, but to his eyes they were all Walgreens quality by comparison.  Bert knew, Some day as I lay dying, God willing not before I’ve had time to enjoy it, I’ll never forget the favor Loveless cut me!  The amazing pipe arrived by express mail two days later and was in Bert’s own disbelieving hands.

PRESERVATION
Bert heard tell later from a source of unassailable integrity that Briarville Pipe Repair LLC, thinking of its motto, “Pipe Repair as Close as Your Mailbox” ™, replaced the horn extension with a shiny black bit fixed in place.  Having assisted Briarville in finding the answer to an intriguing old pipe question before, he decided to telephone the business and determine what if any work the excellent operation indeed performed.  The restorer was relieved he did so, as the answers the owner sent back prove why fact-checking is imperative for all types of writing, whether investigative journalism or much simpler pipe restoration blogging.   Indeed, Bert had more than the one questions wanting answers.

    1. Did Briarville provide a replacement extension and bit, and if so, what model was used to choose the very appropriate look? Briarville did not replace anything but instead repaired a single crack in the extension.
    2. What materials formed the extension and bit? Knowing the query might sound somewhat daft given the obvious horn appearance of the extension, he had never worked with the alternative accessory and wanted to be sure it was what it appeared to be.  Also, the bit looked to be something he thought was not invented until after 1915 when CPF closed shop.  The answer was that the extension in fact was horn as it seemed and Bert’s original source suspected, and the bit was Vulcanite as he had guessed.  And so, researching the date Vulcanite was patented, he found US3633A by Charles Goodyear dated June 6, 1844, shown below.  That was excellent news, suggesting the two combined parts were original.
    3. From what type of wood was the stummel carved? The reply to that was briar, but with all due respect to Briarville, Bert had serious doubts about that for several reasons: the extreme darkness of the wood that lightened very little after an extensive soak in alcohol, the somewhat tiger-like grain, and the unique taste of the wood that melded quite well with the tobacco.  Some of the photos that follow will demonstrate Bert’s point, but in the end he emailed photos to his artisan pipe maker friend Don Gillmore in hope of settling the issue.  Don is known for his use of alternative woods such as walnut, maple and pecan, and still others more exotic including bog wood (a.k.a. morta, ebony wood, black wood and abonos wood), and trusted if anyone he know could identify the genus, it was he   From the darkness of the wood, Bert suggested cherry.  Don shot that down, noting the grain and lack of iridescence were not present.  He noted “the color is within the range of walnut,” but as it turned out he was only going by Bert’s conviction it wasn’t briar.  When Bert responded that it was heavy and dense, Don’s final conclusion was “probably briar.”  And so Bert saw no choice but to join the consensus, however contrary the necessity.
    4. What time frame would the pipe’s manufacture date be? The guess was early 20th century. That may very well be the case, Bert knew, and there was no way to pinpoint it, but in this case stuck to his guns and argued his pipe’s creation to be in the late 1800s, with cause having nothing to do with a desire to make it older than it was.  Since 2013, when Bert first heard of CPF, he was confident to a point just short of calling himself an expert that he had researched the brand and its pipes – wood and meerschaum – as thoroughly as anyone.  He never before set eyes on any ornate wooden CPF like the tiger’s head.  More to the point, when Kaufman Brothers & Bondy bought CPF in 1883, the shift from ornate to more traditional models began and continued until the company’s end, and by the time 1900 was rung in by turn-of-the-century revelers, ornate wood pipes were all but phased out.  Nevertheless, when it comes to arguing the potential difference in age from 119 to 136 years, Bert said again out loud he was not going to quibble.  He hated that species of know-it-all more than anything.  His “newest” pipe was an antique with more than enough years to spare, whatever its date of creation.

To give a better perspective of the actual size of the CPF shown in Loveless’ beautiful photo that isn’t apparrent below (even with the lovely Peterson dwarfed by it), the length was 10 1/2”, the bowl height 2” and the chamber diameter a unique ⅞” x 2”.  Bert chose unique because of the peculiar straight evenness of the depth, which accommodated far more tobacco than his favorite Ben Wade by Preben Holm Danish freehand that sported a 1” x 2” tapered chamber.  The second photo shows the same tobacco needed to fill both the CPF and the PH, left to right.  Despite the trick of the angle, both lids were identical in size, but the left held about five good pinches, and the right three. The tiger’s head needed no cleaning and was unblemished by any apparent damage to the horn extension.  Bert, of course, following his nature, tried it out and enjoyed it so much he made it the only pipe he smoked for a couple of days.  Then, to his horror, he observed the sudden appearance of two cracks in the horn that could only be described as honking.  To make it clear right off, he was not blaming anyone for the weirdness of the manifestation.  He suspected it was due to the extreme age of the horn and long disuse, and may very well require ongoing attention. For the edification of those whose personal values (which are formed by family, social and peer forces as by clay with all of the potential for works of art or bricks or quagmires of mud and possess the same qualities of steady hardening into solids that can nevertheless be shattered) deny them the sublime enjoyment of reading the dry legalese of patents, the second paragraph describes Goodyear’s idea of “combining sulphur and white lead with the india rubber” and heating in such a way that the result is both heat- and cold-resistant, thereby making Vulcanite less apt to soften and crack, although Vulcanite is never mentioned by name.

Illustrated next is the rest of the phenomenal pipe when Bert decided to fix the cracks and re-do the stain, only to satisfy his own quirky druthers. The only real CPF expert Bert knew told him the hallmarks on the brass-coated nickel band were meaningless for dating or other helpful purposes, but they looked impressive.

Commencing his journey to salvation, Bert gave the stummel, extension and bit a quick wipe with a paper towel and purified water, then reamed and sanded the chamber with 220- and 320-grit papers and pre-cleaned the inner shank and air hole with cleaners dipped in Everclear he would have found refreshing for his own consumption in earlier years. He then bathed the extension/bit in an OxiClean solution as though it were a hot natural spring water cure ordered by a physician and got the retort out of the way with his newer laboratory grade kit, which, fueled with Isopropyl alcohol, makes an impressive and mighty flame that should be respected but does boil the Everclear through the rounded Pyrex tube with great speed and efficiency.Concluding there was no time like the present to tackle the only repair needed, Bert confronted the crack with the determination of David against Goliath but an approach that required two applications of Super Glue rather than a sling and stones, the initial one clamping the cracks shut long enough to dry afterward and the other just filling in remaining gaps again before sanding and buffing smooth. In his work of fine-tuning, Bert did not record the multiple buffing steps.  As for the stummel, he had set his mind on as much of a two tone as he could achieve to give the stunning, intricate carving of the tiger’s head a more lifelike color and leave the smooth area darker but still showing a hint of the grain.  After a long Everclear soak, he let it dry and used super fine “0000” steel wool to lighten the color. The remainder of the trek was a blur, and again he failed in his usual obsessive observance of details.  The almost final steps were micro meshing from 1500-12000 and staining the smooth area with Lincoln Brown Leather Dye and the carved part with something a little different: Fiebing’s British Tan.So close to the end and almost delirious, Bert went over the top in obsessiveness making the regal, proud, all-but-lifelike head light enough to suit his exacting taste, using steel wool again and even light sanding with a double-sided 220-320-grit pad.  In almost all cases of waxing carved surfaces of pipes, Bert employed a white, hand-applied concoction, but not this time.  He buffed the carved part on the electric wheel with carnauba alone and the smooth with red Tripoli and carnauba.  In a moment of blinding revelation, the sound and the fury of the experience came together in an epiphany that left him dazed. AFTERWORD
Bert remained one of the unvanquished, believing that so long as the past is remembered and preserved, it never goes away.

SOURCES
https://briarville.com/
https://patents.google.com/patent/US3633?oq=3633a
http://www.teltinc.com/
https://www.etsy.com/shop/DonWarrenPipes
https://rebornpipes.com/2013/04/14/some-reflection-on-the-historical-background-on-cpf-pipes/
https://rebornpipes.com/2019/02/22/reflecting-on-a-few-of-my-cpf-pipes-colossus-pipe-factory-pipes/

The 5th of a collection of Bertrams – a Bertram 60 Author


Blog by Steve Laug

As I mentioned before, once in a while I get emails through the blog about pipes that someone wants to sell. These can be estates or they can be a collection that an older pipeman has decided to get rid of by passing it on to someone who can work on them and see that they get into the hands of another pipe smoker. In this case I received an email from a fellow who wanted to sell me a collection of Bertram pipes. We met over FaceTime and he showed the pipe collection to both Jeff and me. We discussed their condition and arrived at a price for the pipes. The majority of the pipes in the collection were Bertrams but there were also some other brands that were known to me. We struck a deal on the lot and he shipped them to Jeff. Jeff took some photos of the collection when it arrived in Idaho. He unwrapped each of the 200+ pipes and filled the three boxes that they were mailed in, and then took a photo to show the size of the collection we had purchased. To be honest it was a bit overwhelming to see all of the collection in boxes. We were looking at a lot of work to bring these back to life.Jeff chose a group of pipes from the collection and began his work on them He sent me a box with some of the pipes he had cleaned up. I chose another one of the Bertrams from the lot to be the fifth pipe that I would work on. The smooth finish was dirty but the grain shone through showing me that this was a beautiful pipe. It was an Author shaped pipe with a straight shank and a ¼ bent tapered stem. There was a cake in the bowl and light lava overflowing on to the rim top. The rim top also had dents and dings and a slight darkening on the rear inner edge. The stem showed some light oxidation and some chatter on the top and underside. The photos below tell the story and give a glimpse of this interesting pipe. Jeff took 2 close up photos of the bowl and rim to capture the condition of the pipe before he started his cleanup work. The rim top had some light lava and some darkening on the back rim top.He also took a photo of the right and left side of the bowl and shank to show the interesting grain on the bowl and the heel. The finish is very dirty but this is another interesting pipe.Jeff took a photo to capture the stamping on the left side of the shank. The photo shows stamping which read Bertram over Washington, D.C. The stamping on this pipe is clear and readable. The second photo shows the stamping on the left side at the shank bowl junction. It read number 60 which shows the quality of the pipe. The next two photos show the stem surface. They show the oxidation and the chatter on both sides near the button. There are also tooth marks on the underside next to the button and wear on the button edge itself.I will continue to include the link to Bertram history and information. I would recommend that if you don’t know much about them do some research on them. I include a link to the write up on Pipedia (http://pipedia.org/wiki/Bertram). Bertram pipes were based out of Washington DC. They were popular among famous politicians and celebrities of the time. They made many products for them from FDR’s cigarette holders to Joseph Stalin’s favorite pipe. They were considered some of the best America had to offer till they finally closed their doors in the 70s. They graded their pipes by 10s, the higher the grade the better. Above 60s are uncommon and 80-90s are quite rare. I’ve never heard of or seen a 100 grade. I have several blogs that I have written on rebornpipes that give some history and background to Bertram pipes. (https://rebornpipes.com/2015/06/16/an-easy-restoration-of-a-bertram-grade-60-217-poker/).

I have included the following link to give a bit of historical information on the pipe company. It is a well written article that gives a glimpse of the heart of the company. http://www.streetsofwashington.com/2012/01/bertrams-pipe-shop-on-14th-street.html#

I am also including this photo of the shop in Washington D.C. and a post card of the shop.

From this information I have learned that the shape and grade Bertram I have in front of me now was made before the closure of the shop in the 1970s. I also learned that this interesting little author is a grade 60 pipe so it is just above the mid-range mark.

Jeff reamed the bowl with a PipNet pipe reamer and followed up with a Savinelli Fitsall pipe knife to remove the cake. He scrubbed out the mortise and the airway in the shank and the stem with alcohol, cotton swabs and pipe cleaners. He scrubbed the exterior of the bowl, rim, shank and stem with a tooth brush and Murphy’s Oil Soap to remove the oils and tars on the rim and the grime on the finish of the bowl. He rinsed it under running water. He dried it off with a soft cloth. He was able to remove the lava build up on the rim top and you could see the great condition of the bowl top and edges of the rim. He soaked the stem in Before & After Deoxidizer to remove the oxidation. I took photos of the pipe before I started my work on it. I took a close up photo of the rim top to show the condition of the bowl and rim top after Jeff had cleaned up the darkening at the front and rear of the rim. It looked really good though there was still some darkening. Both the inner edge and the outer edge of the rim look really good. The stem photos show that the oxidation is gone. The light tooth chatter is hard to see but I should be able to sand it out quite easily. The tooth marks on the underside next to the button are not too deep so they should be easy to smooth out.I also took a photo of the stamping on the top of the left side and the remainder of the left side of the shank showing how the stamping was laid out.I started my part of the restoration by sanding out the dark spots on the front and back of the rim top with 220 grit sandpaper and then polishing it with 400 grit wet dry sandpaper. It did not too much work to remove the damage to the rim top.I polished the bowl and rim top with micromesh sanding pads – wetsanding it with 1500-2400 grit pads and dry sanding it with 3200-12000 grit pads. I wiped the bowl down with a damp cloth after each pad to remove the sanding debris. After the final sanding pad I hand buffed it with a cotton cloth to raise a shine. I worked some Before & After Restoration Balm into finish of the briar with my fingertips to clean, enliven and protect it. I let the balm sit for a little while and then buffed with a cotton cloth to raise the shine. The pipe really looks good at this point and the grain stands out beautifully. I set the bowl aside and turned my attention to the stem. I used a folded piece of 240 grit sandpaper to blend the tooth marks and chatter into the surface of the stem. Once the surface was smooth I sanded out the scratch marks and started the polishing of the stem with a folded piece of 400 grit sandpaper. I wiped the stem down with Obsidian Oil and took the following photos.I polished the stem with micromesh sanding pads – wetsanding it with 1500-2400 grit pads and dry sanding it with 3200-12000 grit pads. I wiped the stem down with Obsidian Oil after each pad. I polished it with Before & After Pipe Polish – both Fine and Extra Fine and gave it a final coat and set it aside to dry. I put the stem and bowl back together and buffed the pipe with Blue Diamond on the buffing wheel. I polished the briar and the minute scratches still in the vulcanite of the stem until there was a rich shine. I love the look of this pipe. Once buffed the pipe the briar came alive and the mixture of grain – straight, flame and birdseye popped with polishing. The black vulcanite stem had a rich glow. The finished pipe is a beautiful straight grain Author that is my kind of pipe. It fits well in the hand and sits right in the mouth. Have a look at it with the photos below. The dimensions are Length: 5 1/2 inches, Height: 1 3/8 inches, Outside diameter of the bowl: 1 1/2 inches, Chamber diameter: ¾ of an inch. I think this one will stay with me at least for a while as it ticks all the boxes for me. Thanks for walking through the restoration with me as it was a pleasure to work on.

Restoring a 1965 Dunhill Shell Briar # 56 F/T 3/4 Bent Billiard


Blog by Paresh Deshpande

I had just finished restoring the fifth Dunhill from my Mumbai Bonanza find, a 1962 DUNHILL SHELL #196 F/T and now this is the sixth. I am left with only one Dunhill pipe to complete from the Mumbai Bonanza, a smooth finish LB.

I was fortunate enough to have heeded to the advice of my dear friend and mentor, Mr. Steve, and struck a deal with a trash collector from Mumbai. He did not know what he was selling and I did not know what I was buying as we reside in different cities!! The argument that Mr. Steve presented was that if not anything, I shall at least have some spares and this was logical. I struck a deal and here are pictures of the pipes that I received in this lot. This lot contains some very nice collectible pipes, a few well known brands and some mediocre brands. Overall, with seven Dunhills, a Preben Holm #1, a couple of “Made in England” Pete System pipes, Charatan’s, Custom-Bilt, Stanwell and other assorted pipes, I would say that I had hit a huge jack pot!! Hence, I like to call this find the “Mumbai Bonanza”.

The pipe that I decided to work on from this find is another Dunhill, a 1965 Shell Briar 3/4 bent billiard, and is marked in pastel pink circle in the picture below. It is stamped on the underside of the shank with the shape number 56 followed by F/T followed by DUNHILL over Shell Briar followed by the COM stamp Made in over England 5 (underlined) which dates it as being made in 1965. This is followed by Group size number 4 in a circle and letter S for Shell. Dunhill White Dot adorns the top of the vulcanite stem. The stampings are very slightly worn out and easily readable.In this short journey of mine in to the world of pipe refurbishing, this particular pipe has one of the deepest and beautiful sandblast patterns that I have come across. The sandblast on this pipe speaks volumes about the skills of the pipe carver. With this thought, I move ahead with the restoration of this beautiful medium sized sandblasted Dunhill bent billiard and restore it to its glory.

INITIAL VISUAL INSPECTION
The chamber is clean with a decent and even thick layer of cake. From what I can see, the chamber walls appear to be without any damage. The chamber is odorless. There is an overflow of lava on the sandblasted rim top surface. The inner and outer rim edges are undamaged. The walls appear to be thin. Is this a case of over reaming or is it because the carver decided to compromise the wall thickness for deeper sandblast patterns?The stummel boasts of some beautiful sandblast pattern of mix of straight and cross grain all around. It is dirty with grime, oils and tars filling in much of the craggy finish. The briar looks lifeless and dull. The mortise shows minor accumulation of dried tars mixed with ash and remnants of tobacco. This will have to be cleaned and refreshed. The vulcanite stem shows a minor damage to the button end with minor chatter on the lower surface. The lip edges have a few bite marks and will have to be reshaped and made crisp. The stem is oxidized; however, the quality of vulcanite is good. The white dot on the upper surface has faded in some places but is still distinctly visible. This cannot be helped and status quo has to be accepted.There are no major issues to address here on this pipe; just a little TLC and the pipe should be good to go…nah, find a place of pride on my rack!!

THE PROCESS
I start this project by tackling the stem first. I sand the stem with a folded piece of 220 grit sand paper to erase the minor tooth chatter on the lower surface, get rid of the oxidation and provide a smooth surface for the intended fill to reconstruct the button edges. I cleaned out the internals of the stem with hard bristled and regular pipe cleaners dipped in isopropyl alcohol. Once I was satisfied with the internal cleaning, I wiped the stem surface, particularly the damaged button end, with a cotton pad and alcohol to remove any traces of dirt and grime. I prepared a mix of CA superglue and activated charcoal and carefully applied it over the damaged lip and set it aside for curing over night. Before moving ahead, I would like to mention here that I had applied this mix in sufficient thickness which would help during the filing and sanding while shaping the button and achieving the correct lip edge profile.While the stem repair was set aside to cure, I moved ahead to deal with the stummel cleaning. With size 3 head of a PipNet reamer, I took the cake down to bare briar. Using a folded piece of 180 grit sand paper, I sand out the last traces of cake and expose the walls of the chamber to ascertain that there are no cracks/ heat fissures. I wiped the chamber with a cotton pad dipped in isopropyl alcohol to remove the carbon dust left behind by all the reaming and sanding process. The walls of the chamber were solid with no damage. This was followed by cleaning the mortise by scraping away at the dried gunk with my fabricated spatula and followed it up with further cleaning using cue tips, pipe cleaners and shank brush dipped in isopropyl alcohol. This eliminated all traces of old smells from previous usage. I followed up the internal cleaning with external. Using a soft brass wired brush I gently scraped away the thick lava coat in the blast of the rim. With a hard bristled tooth brush and dipped in undiluted Murphy’s oil soap, I very deliberately scrubbed the sandblast finish on the stummel and the rim top. The stummel and rim top was dried using paper napkins and soft cotton cloth and set it aside to dry out naturally. The stummel looks fresh and clean. Next, I rub a small quantity of “Before and After Restoration Balm” in to the briar with my finger tips and let it rest for a few minutes. The balm almost immediately works its magic and the briar now has a nice vibrant appearance with the beautiful contrasting hues colors that are unique to this sandblast pipe, on full display. I further buff it with a horse hair shoe brush. I set the stummel aside and turned my attention to the stem repair. The fill had cured nicely and I moved ahead and began the process of filing and shaping the button end with a flat head needle file. For a better blending, I further sand the entire stem with 220 followed by 400, 600 and 800 grit sand paper. This helps to reduce the sanding marks left behind by the more abrasive 220 grit paper. To bring a deep shine to the vulcanite stem, I went through the complete set of micromesh pads, wet sanding with 1500 to 2400 grit pads and dry sanding with 3200 to 12000 grit pads. I wiped the stem with alcohol after each pad and rubbed it down with Extra Virgin Olive oil to rehydrate the vulcanite. The repairs have blended in very well and the stem now looks shiny black and beautiful. The internals of the stem was once again cleaned out using alcohol and pipe cleaners to clear the airway of all the debris resulting due to the sanding. The finished stem is shown below. To finish, I re-attach the stem with the stummel. I mounted a cotton cloth buffing wheel to my local machine which is similar to the Dremel.  I set the speed at about half of the full power and applied White Diamond compound to the entire pipe. I wiped/ buffed the pipe with a soft cotton cloth to clear it of any leftover compound dust. I then mounted another cotton cloth wheel on to the polishing machine and applied several coats of carnauba wax. I finished the restoration by giving the entire pipe a rigorous hand buffing using a microfiber cloth to raise the shine further.The completed pipe looks lovely, fresh and vibrant; the pictures speak for themselves. I really enjoyed working on this pipe and hope that readers too enjoyed walking with me through this restoration. If only this old warrior could share its past life with all of us…if only!! Cheers.


Restoring and Restemming a Savinelli Capri 915


Blog by Lee Neville

Over the past few months I have been continuing my correspondence with Lee via email. He picked up a couple of pipes for me at a local antique shop in Edmonton, Alberta, Canada and sent them to me. We have fired emails back and forth on restoration questions and issues. He also included Charles Lemon of Dad’s Pipes in the conversations and we had a great time. Earlier this week he sent Charles and me an email about a restoration of another pipe that he restemmed. Charles and I spoke with him of the style and size of stem to use. He did a great job on the restemming and the description of the work so I asked him if I could post it on rebornpipes. He was glad to have me do so. Thanks Lee for your work and this second write up. It is great to have you on rebornpipes as a contributor once again! – Steve

Thought I would share my pipe rehabilitation effort of a Savinelli Capri 915.  It showed up in the Winnipeg Ebay lot as a dirty stummel with a snapped-off stem tenon wedged into its shank. Alas, the original stem was not included in the lot.

This is a “Birks” pipe – Henry Birks & Sons, or what it’s now known by these days – “Maison Birks”, is a Montreal-based jewellery/glassware/fine leather goods/timepieces/ silver & gold flatware / object d’art firm in business here in Canada since the late 1800s.  It appears Birks would commission pipes from manufacturers and stamp them with their house name and offer them for sale during special promotions – Christmas, Father’s Day etc.  This Savinelli is the first of two “Birks” pipes I’ve got on my bench to restore.The plan is to clean this stummel up to the natural briar,  treat it to a wax protective finish and fit a replacement stem.  This will be fun as I just received the PIMO stem tenon cutter tool which will make short work of fitting a properly sized tenon on a replacement stem blank.

Stummel clean up
The bowl was in good shape. The rim showed minor discolouration from lighting.  The rim was not obscured by any lava. The previous owner was not a dottle-knocker – luckily no dents or chips on the bowl rim.  I reamed the bowl out with my newly arrived Pipnet set – I started with the smallest head, applying light twisting force and allowing the tool to make its way into the bowl.  This was repeated by the following two larger reaming heads to remove existing cake close to briar.  This was followed by twists with a dowel covered with 220 grit sandpaper to remove the remaining cake, then more twists with 320 / 400 grits to finish the bowl interior smooth. There are no cracks or burnouts in the bowl. The shank cleaned up with a few runs of alcohol-soaked pipe cleaners and q-tips.

I attacked the stummel with a soft toothbrush and Murphy’s Oil Soap to remove the rim discolouration and surface dirt/grease. The accumulated grunge lifted right off after two scrubbing sessions.  I was delighted to see the proprietary sandblasting/rustication is scarcely worn – the deep relief is quite attractive.

The stummel was then covered with masking tape. I clamped the padded stummel in my dremel vise and using a drill bit sized just over the ID of the snapped off stem tenon, ran it in a smidge gently, then reversed the drill and the tenon remnant came out with the drill bit.  This revealed a very fine crack in the mortise end of the stummel.  Using thin CA glue, I lightly dabbed the crack, watching it wick into the crack, then sprayed accelerant to instantly set the glue.  I lightly sanded the mortise face and mortise with 1000 grit paper to ensure any glue squeeze-out was removed before attempting to fit replacement stem

Fitting a new stem
I viewed the Savinelli web site to glean pipe proportions (stummel to stem) as well as canvassing yourselves for your thoughts on replacement stem length. I also found a high-definition image of a Capri 915 online.  Applying some ‘Edmonton Windage’, I ordered an oval tapered stem blank in a 2.25″ length from Vermont Freehand Pipes.

The stem blank on arrival was a bit wider than the stummel shank, so there was some filing and final sanding required to match the stem to the shank profile.

I mounted the replacement stem into the vise and drilled the stem draught hole to accept the guide rod of the PIMO stem tenon cutting tool.  I then mounted the PIMO stem tenon cutting tool and gently took a succession of cuts to arrive with a couple of thou of tenon final size.  I used a strip of 320 grit sandpaper to work the circumference of the tenon to a snug fit into the stummel mortise.  I used a variety of tools to flatten the stem tenon face so it would meet up with stummel mortise surface properly – needle files, sandpaper, a few licks with a very small chisel – all under a magnifier lens working the stem mating surface – testing fit/working it/test fit/working it until I got the proper fit.

Rough file work was then required to narrow the stem.  This took about an hour.  I then worked in the round with a file to shape the circumference of the stem to match the stummel profile. Last steps were using 220 sandpaper to work the circumference down as close to the final dimension. I followed that with 400 and 600 grit sandpaper.  I was now a scant hairs-width proud on the stem.  I then replaced the masking tape covering the stummel shank with clear scotch tape and brought the stem into line with the shank profile with 1500 and 1800 micro mesh pads.I filed the stem button into shape and from that point on, it was just applying a succession of micro mesh pads to 12000 to polish the replacement stem. Here is the clean stummel and new stem before finishing.Finishing the Pipe 
I treated the stummel to a coat of Howards Feed and Wax (beeswax, carnauba and citrus oils), let it sit for 30 minutes, then wiped off the excess, followed with a thin coating of carnauba wax over the whole pipe and a rub in with a polishing brush.  Using a cotton buff on my Dremel at 4000 rpm, I ran the buff over the entire pipe to bring out the shine. This pipe cleaned up very nicely and is a joy to hold.  I had fun fitting a new stem that is in proportion to the stummel and I think it’s a close resemblance to the stem originally fitted to the pipe.

Thank you Charles and Steve for your help on stem selection.

Onward and upwards!

Lee 

Rejuvenating the Amazing Grain of an EWA Trophee of St. Claude, France 909


Blog by Dal Stanton

Next on my worktable is another pipe I acquired from a ‘Lot of Treasures’ I found on French eBay.  This French Lot of 50 has rendered some real keepers with historic interest and collectability.  The EWA Trophee I’m now looking at is a classic Bent Billiard with a flare – the acrylic stem, banding and picturesque briar holds out great potential, but it come with some challenges as well.  Pipe man, Scott, commissioned the EWA – a friend on FB and regular contributor on different Face Book Groups, and a former US Navy man who I appreciate very much.  Scott reached out to me on FB Messenger and had been looking at the pipes available for commission in my For “Pipe Dreamers” Only! collection and there were 5 pipes he was dreaming about that he had seen, but settled on one, the EWA Trophee.  I appreciate Scott’s patience in the speed of my pipe restoration production line!  His patience is now paying off, and his commission benefits the Daughters of Bulgaria – our work here in Bulgaria helping women and girls who have been trafficked and sexually exploited.  Here are the pictures that drew Scott’s attention. I can see why this pipe got Scott’s attention.  I have worked on several French named pipes, and this was the first with ‘EWA’ stamped on the left shank flank.  Underneath and at an angle is stamped ‘TROPHEE’.  The acrylic stem also is stamped with a distinct EWA.  The right side of the shank is stamped ‘BRUYERE’ [over] ‘ST. CLAUDE’ [over] ‘FILTRE’.  Tucked on the lower side of the shank is stamped the shape number, ‘909’.  Information about this nomenclature was readily available in the Pipedia article on EWA pipes and with this being my first look at the EWA name of St. Claude, I include more of this article.

From Pipes, Artisans and Trademarks, by José Manuel Lopes

EWA is a French brand of Pipe EWA-Ets. Waille SARL. Launched in the 1970s by Michel Waille, the brand began in the Waille factory founded in 1860 by Horace Waille., and has been passed down from generation to generation ever since. He was succeeded by his son, René (1902-1932), his grandson Adré — who obtained the rank of ‘CAP de Pipier’ in 1926 and was in the company from 1920 to 1974 — and his great grandson, Michel Waille.

Michel, ‘Meilleur Ourrier de France’ but retired today, is currently President of the Pipe Club de Saint-Claude. He joined his father in 1968 and was at the head of the firm until 2002, when the brand was sold, first to Mr. Gigandet, and later to Denis Blanc, of Ad Hoc Pipe. [link is dead]

The company specialises in the production of horn, acrylic and cumberland stems, and today is the only maker in Saint-Claude producing horn and Lucite stems. It also makes the Terminus system pipes, employs half a dozen people and export 25% of its production. From site Ad Hoc Pipe [link is dead]

Horace Waille, the great-grandfather was a pioneer in the history of Pipe story of Saint Claude and created in 1860 a pipe workshop.  Rene Waille, his son, has continued the activity from 1902 to 1932 and was specialized in the initial shaping.

Andre Waille, son of Rene, obtained a “CAP de pipier” (Pipe maker degree) in 1926 and has pursued the activity of the familial company from 1932 to 1974. He is the only pipe maker, who obtained a Pipe maker degree. In 1968 Michel, son of Rene, actual Manager of EWA pipe joint the familial company and transform in 1974 the company in SARL PIPE EWA.

The information I gain from Pipedia that is useful – the Waille name is long-standing in France’s pipe center of Saint Claude.  I’m especially interested in the information that the company has historically specialized in the production and use of horn, acrylic and Cumberland stems which is relevant for the pipe on the worktable.  Pipephil.eu was my next stop and information there clarified the age of this EWA Trophee and the meaning of EWA.  The name was changed in 1979 from simply Waille to EWA from “Etablissement WAille” (English: Establishment).  So, the acrylic stemmed Billiard on my table dates at the earliest starting at 1979 with the genesis of the EWA stamp.With a better appreciation of the heritage and age of this EWA Trophee of St. Claude, I look more closely at the pipe itself.  The grain and classy acrylic stem and banding/shank ring shows promise, but there are also some issues and challenges in bringing this pipe back to a more presentable state.  I take several more pictures to catalogue the issues I see.  The fittings of the pipe have come apart.  As I disengage the stem and stummel, the 8mm filter sleeve is unattached to the stem and needs to be reattached.  The shank ring is also loose. The pipe has been heavily smoked and loved and the cake in the chamber is substantial.  By lightening the picture, you can see how the cake expands as it descends into the chamber.  There is no way to assess the health of the chamber wall until this cake is removed to allow the briar a fresh start and to inspect the wall for heat fissures or cracks.The rim corresponds to the lack of maintenance and cleaning of the chamber.  Thick lava has flowed over the rim and must be removed and cleaned to liberate the briar rim presentation.I like the grain on the stummel – very expressive.  What I don’t care for is the thick shellac finish that was used on this stummel – my classic ‘candy apple’ finish.  I love shine, but briar shine not chemical shine!  I will need to strip this stummel down to the raw briar to allow the grain I see to breathe again.There is a deep gouge on the left side of the shank that creeps toward the shank end where there is another dent next to the edge. The heel of the stummel has seen better days!  There are a few good-sized dents and divots that must be addressed.Probably the most fun will be cleaning the acrylic stem.  The external acrylic surface will not be difficult, but the discolored airway is another thing altogether coupled with the issue of not being able to use the normal cleaning attack with the use of alcohol.On close examination, my concern grows for the cleaning of the airway as I can see microscopic veins splaying from the airway – mainly at the bend of the stem. This next picture is looking into the mouth of the stem that the 8mm filter sleeve has vacated.  This needs to be cleaned thoroughly making way to reattach the filter and afterwards, the ring.We have work to do!  To begin the restoration of Scott’s choice of this EWA Trophee Bent Billiard of St. Claude, I start with the cleaning of the stummel by reaming the chamber which is nearly closed by the growth of the cake.  I take another picture to mark the start and then, starting with the smallest of the blade heads of the Pipnet Reaming Kit, I begin the cleaning process.  To help in the cleanup I first put down paper towel. The cake is hard and stubborn and takes some time and effort for the smallest blade to penetrate to the floor of the chamber.  I take a picture about three quarters of the way down the chamber. I use 3 of the 4 blades available and then switch to using the Savinelli Fitsall Tool to scrape chamber walls.  Finally, I sand the chamber with 240 grit paper wrapped around a Sharpie Pen.  To clean the chamber of the carbon dust, I wipe it thoroughly with a cotton pad wetted with isopropyl 95%.  The picture below shows the huge pile of carbon that was removed from the chamber. After inspection, the chamber appears to be in good shape.  What I notice after the reaming is complete is the rim width imbalance that is now evident after the cake was removed.  The left side of the rim (bottom in the picture) is thinning where fire was drawn over the rim during the lighting. Next, to clean the exterior surface of the stummel, I use undiluted Murphy’s Oil Soap on a cotton pad to scrub.  I also use a brass wire brush to work on the lava crusted on the rim as well as gently scraping it with a knife edge.  The cleaning helps, but the rim remains darkened from the lava and the ‘candy apple’ finish is still very much in place. To complete the stummel cleaning regimen, I use pipe cleaners and cotton buds wetted with isopropyl 95% to clean the internals. After many pipe cleaners and cotton buds, and scraping the mortise walls with a dental spatula, the color of the buds started coming out less soiled.  I decide to stop at this point – the internals were clean enough at this point.In order to strip the ‘candy apple’ finish I put the stummel in a soak of acetone. This should strip the stummel of all the old finish.  I leave it in the soak overnight. Turning to the acrylic stem, before I started on the restoration and as I was thinking about my approach, something in the recesses of my memory was ringing a warning concerning the approach to cleaning the clear, acrylic stem, but I wasn’t sure what it was. I decided to send Steve an email with the stem’s picture and my questions.  With his vast rebornpipes experience, as always, his response was helpful to help chart a course:

Hey Dal

The clear stems like that (if on a GBD are Perspex and early acrylic) are not resistant to alcohol. They can shatter or at least craze. I will often use lemon juice to start with and also liquid cleanser or soft scrub with bristle pipe cleaners or shank brushes. Sometimes you can use a needle file to work the insides. The airways are often rough inside so they need to be smoothed out. It is pretty labour intensive to clean out the stains as originally the airways were clear…

Steve

In a subsequent note he also added this:

Ok… the GBD brand was originally a ST Claude Brand. Perspex is an early acrylic. It was on GBD Prehistoric pipes… Lucite is another brand name for acrylic… both are acrylic.

I have soaked the stems and it does help some, but I have also put the cleanser on a pipe cleaner and let it soak as well. I have even used comet cleanser… big thing is no alcohol if at all possible. Too risky.

I have read of guys chucking a pipe cleaner in their drill like a drill bit and spinning it in the stem but have not tried that myself…  Anyway..,

 Enjoy

Steve

To begin the ‘enjoyment’ in tackling what proves to be a very stubborn project, I take a picture to mark the starting block.Using a sharp dental spoon, I work on digging gunk out of the slot cavity and scraping the hard stain buildup there.In Bulgaria we do not have ‘Soft Scrub’ but we have a product in the same genre called CIF that I next use to begin addressing the rough stains in the bent stem airway.  I use a bristled pipe cleaner and dip it in the cleanser and go to work.  With the pipe cleaner serving as a back drop I can see that microscopic veins are already evident in the airway lining. This is the ‘crazing’ effect that Steve mentioned in his note.  Removing stain from these will be an effort.  The veins are concentrated at the bend of the stem.To up the ante a bit, I decide to try the technique that Steve described that others had tried – to chock a pipe cleaner in a hand drill and utilize the high-speed rotation to enhance the cleaning process of the acrylic airway.  In order to increase the diameter of the pipe cleaner ‘bit’ I twist and wrap an additional pipe cleaner that I had already used.  I then insert this into the chuck and tighten it down.  I use another bristled pipe cleaner as the ‘drill’ and dip it in CIF cleanser.  I then insert the end of the pipe cleaner into the shank side of the stem and start the drill rotation gradually as I slowly insert the pipe cleaner into the airway – I haven’t done this before so I’m watching to see what happens!  It works like a charm.  As I insert the pipe cleaner, I increase the speed of the rotation and there is no wobble at all.  With the drill speed rotation engaged, I then push and draw the stem back and forth to create more cleaning movement.  I do this also with a soft pipe cleaner and cleanser.  The pictures show the pipe cleaner drilling.Well, I hoped for perfect results, but as feared, the stains in the veins remain visible and these are concentrated at the outer bend of the stem.  Because of this, it is evident that these veins have been here a while.  The rest of the airway is looking good.Next, from Steve’s suggested assault options, I squeeze lemon juice into a dish.  I will use the natural acids of the lemon to work on the airway.  I use the pipe cleaner too, but since the night is late, I settle at this point to put the stem into the lemon juice to soak through the night.  With the stummel soaking in the acetone and the stem in the lemon juice, I turn off the lights and end another day. The next morning, I use a pipe cleaner on the stem again.  The lemon soak through the night did seem to work, but the veins and the discoloration in the veins remain.  A reminder that we live in a fallen world where perfect pipes and restorations do not exist.  I accept this and decide to move on, but I decide to leave a pipe cleaner wet with CIF cleanser in the airway to continue to work on the stains while I turn to the stummel.The stummel has been soaking in acetone through the night to remove the ‘candy apple’ finish.  I fish it out of the acetone and the first appearance is that it still has the sheen showing that old finish was still present.  The finish has been greatly softened through the soak and with the gentle help of 0 grade steel wool I remove the finish without difficulty.  With the old thick finish removed, I examine the shank and the heel areas again where I saw significant dents and pits and discover that these are not as pervasive as they appeared before.  Most of the visible damage was to the thick finish and not to the briar.  Well, that’s one argument in favor of thick finishes!  The second picture below of the close-up of the grain – the bird’s eye grain is fantastic! Looking at the rim, it is thinner on the left side (bottom in the picture) and that edge is deteriorated.  The entire rim presentation needs freshening and to try to improve the width balance some. To address this, I take out the chopping board and put 240 grade sanding paper on it.  I give the stummel a minimal topping to give the rim a fresh start.After taking as much briar off the rim as will be helpful, I switch the board to 600 grade paper and rotate the stummel a few more times to smooth and blend.After the topping, the thinning on the left side of the stummel (bottom in picture above) remains thinner and more topping will not improve this because the stummel width descending in the chamber is thinned because of burning and lighting on that side.  To top until the rim width starts evening out would require too much briar real estate.  The way to mitigate against this, but not fully remove it, is to create an internal rim lip bevel.  On the ‘fatter’ side of the rim I increase the amount of bevel somewhat to help even out the round of the chamber.  I use a coarse 120 grade paper to begin, then follow with 240 and 600 grade papers.  The results I believe have improved the rounding, but again as with the stem airway, perfection is not achieved but it is looking very good none the less! Again, looking at the dent on the stummel heel and on the shank, just below the Trophee stamping, I examine the dents and how to repair them.  I go out on our 10th floor balcony, which is my ‘Man Cave’, and use the steaming method to raise the dent that’s on the heel of the stummel.  I wet a cotton cloth with water, and using my wife’s iron, I apply heat to the wet cloth.  When I do this, the moisture in the cloth evaporates and creates steam which is forced into the area of the briar compression.  The porous composition of wood expands with the forced heat and moisture and the result is the dent hopefully shrinks as the wood reclaims its original state.I apply the hot iron to the wet cloth over the dent.The results are excellent.  If I look hard at the place, I can still see an imprint but there is no longer a compression of the wood.I do the same to the small compression on the edge of the shank and the results are equally as good. To clean the entire stummel of the minor nicks and scratches, I utilize the less invasive approach of sanding sponges.  I use a coarse grade, then follow with a medium and light grade sponges.  I like using sponges because they can find the hard to get places as sponges, but they help remove the small nicks and pits in the briar surface.  The grain on this stummel is amazing – the dark grains appear almost cloudy as they cluster. Next, I take out the micromesh pads and wet sand utilizing pads 1500 to 2400. After finishing the wet sanding, I notice a fill on the underside of the shank next to the shape number that doesn’t look solid. Using a sharp dental probe, I test it and it doesn’t take much to remove it.  Before continuing with the micromesh process, I need to refill the pit left behind.I wipe the area with a cotton pad wetted with alcohol and mix a small amount of thick CA glue and briar dust.  I place a small amount of briar dust on an index card then drop some CA glue next to it.  Using a toothpick, I gradually pull briar dust into the CA glue until it thickens to the consistency of molasses. I then apply a small amount of the putty over the patch area, careful not to go over the shape number.  I put the stummel aside for the putty to cure.Several hours later, the patch has cured, and I begin the process of filing the patch down with a flat needle file.I’m careful to remain on the patch as I file avoiding collateral damage with nearby briar.After bringing the patch mound down almost to flush with the briar surface, I switch to using the sharp edge of a piece of 240 grade sanding paper to bring the patch down to the briar surface.  Again, keeping the sanding process tightly confined to the patch area.When the patch is smooth to touch, I then switch to 600 grade paper to smooth the patch and blend further.When the 600 grade has finished its work, I catch up the patch area in the micromesh process utilizing pads 1500 to 2400.With the patch completed, I continue by dry sanding using pads 3200 to 4000 and 6000 to 12000.  I love the thick grain on this stummel!There is no question in my mind about whether this grain can stand on its own!  At this point I apply Before & After Restoration Balm to the briar surface.  The B&A Restoration Balm does a great job simply deepening the richness of the natural briar.  I apply some to my fingers and rub it into the briar surface.  As I rub it in, it thickens to a wax-like consistency.  After I apply it thoroughly, I let it stand and absorb for about 20 minutes then I wipe off the excess and buff up the surface with a microfiber cloth.  I’m loving the grain!With the stummel on the side, I now turn to the clear Lucite stem. I begin by washing the stem with dish soap and warm water.  Looking closely at the bit area, the top lip of the button is compressed.  I take a picture of it but it’s not easy to see!  There is also roughness from tooth chatter.The lower bit has a tooth compression as well as tooth chatter.I apply clear CA glue to the lower tooth compression and spray the CA glue with an accelerator to hold the glue in place and to quicken the curing process.To deal with the compression on the top button lip, I simply sand it out using 240 grad paper.  I smooth out the tooth chatter as well.I then use 240 grade paper to sand and smooth the patch on the lower side as well as to remove the tooth chatter and roughness of the bit and button.  I follow the 240 sanding by wet sanding the entire stem with 600 grade paper to take out the small nicks and scratches.Following the 600 grade paper, I sand/buff the entire stem with 0000 steel wool.Following the steel would I wet sand the stem using micromesh pads 1500 to 2400 and then dry sand with pads 3200 to 4000 and 6000 to 12000.  After each set of three pads I apply a coat of Obsidian Oil to the stem. The stem is ready to go.  I take the nickel shank ring and clean it with Tarn-X.  It does a great job shining up. Now it’s time to reattach the 8mm filter sleeve.  I want to make sure its straight and seats accurately in the mortise.  I first slip the ring over the sleeve without attaching it with CA glue.  I want to simply use it as a spacer for the first step of reattaching the sleeve.  With the ring over the sleeve, I apply CA glue around the end of the sleeve that is inserted into the stem cavity. After I insert the sleeve into the cavity, before the CA glue sets up, I quickly seat the filter sleeve into the mortise with the ring compressed between the shank and stem.  I hold the stem firmly in place with proper orientation until the CA glue sets.With the sleeve properly seated, I then apply a few drops to the stem side of the ring and then reattach it, again seating the stem into the mortise.  It looks good – no gaps and a straight snug fit.To spruce up the EWA stem stamping, I apply Rub ‘n Buff European Gold.  I apply a little over the stamping and simply wipe it lightly off with a cotton pad.  The stamp is a little thin, but the Rub ‘n Buff holds well, and it looks good.Now the home stretch.  I mount a cotton cloth buffing wheel to the Dremel set at about 40% of full speed and apply Blue Diamond compound to the stem and stummel. I then separate the stem and change to another cotton cloth wheel dedicated to applying Blue Diamond to nickel and I buff up more shine on the shank ring.  After reuniting the stem and stummel again, I then wipe the pipe with a felt cloth to clean off the compound dust in preparation of the application of the wax.  I then change to another cotton cloth wheel with the same speed and apply a few coats of carnauba wax to stem and stummel and then finish with a rigorous hand buffing to raise the shine.

The unique grain cluster constellation that I see in the EWA Trophee is amazing.  The heel grain pattern shows color, swirls and vortexes that remind me of pictures of the planet Jupiter.  It is truly amazing and mesmerizing to look at.  The Lucite stem came out well – it is classy with the complimentary gold and black band ring providing a nice transition.  My only wish is that I could have purged the stem airway totally of the discoloration in the crazed veins that will remain as a reminder of this pipes battle scars from its past!  Even so, the EWA Trophee of St. Claude, is a beautiful Bent Billiard and Scott did well in seeing the potential of this pipe when he commissioned it.  As the commissioner, he has the first opportunity to acquire it in ThePipeSteward Store.  This pipe benefits the Daughters of Bulgaria – women and girls who have been trafficked and sexually exploited.  Thank you for joining me!

Pipe #2 from a collection of Bertrams – a Bertram 1/4 Bent Author 60


Blog by Steve Laug

Once in a while I get emails through the blog about pipes that someone wants to sell. These can be estates or they can be a collection that an older pipeman has decided to get rid of by passing it on to someone who can work on them and see that they get into the hands of another pipe smoker. In this case I received an email from a fellow who wanted to sell me a collection of Bertram pipes. We met over FaceTime and he showed the pipe collection to both Jeff and me. We discussed their condition and arrived at a price for the pipes. The majority of the pipes in the collection were Bertrams but there were also some other brands that were known to me. We struck a deal on the lot and he shipped them to Jeff. Jeff took some photos of the collection when it arrived in Idaho. He unwrapped each pipe and filled the three boxes that they were mailed in, and then took a photo to show the size of the collection we had purchased. To be honest it was a bit overwhelming to see all of the collection in boxes. We were looking at a lot of work to bring these back to life.Jeff chose a group of pipes from the collection and began his work on them He sent me a box with some of the pipes he had cleaned up. I chose another one of the Bertrams from the lot to be the second pipe I would work on. The smooth finish was dirty but the grain shone through showing me that this was a beautiful pipe. It had a thick shank and a ¼ bent tapered stem. There was a cake in the bowl and some lava overflowing on to the rim top. The rim top also had dents and dings and a slight burn mark on the front inner edge. The stem showed some wear on the button edge and tooth marks and chatter in the top and underside. The photos below tell the story and give a glimpse of this interesting pipe. Jeff took 2 close up photos of the bowl and rim to capture the condition of the pipe before he started his cleanup work. The rim top had some thick lava overflow and made it hard to know what the inner edge looked like under the grime and lava.He also took a photo of the right and underside of the bowl and shank to show the interesting grain on the bowl and the heel. The finish is very dirty but this is another interesting pipe.Jeff took a photo to capture the stamping on the left side of the shank. The photo shows stamping which read Bertram over Strate Grain. The stamping on this pipe is clear and readable. The second photo shows the double stamped number 60 showing the quality of the pipe. The next two photos show the stem surface. They show the tooth marks and chatter on both sides near the button. There are also some nicks on the outer edge of the button. The stem is lightly oxidized and scratched.If you don’t know much about them I recommend doing a little research on them. I include a link to the write up on Pipedia (http://pipedia.org/wiki/Bertram). Bertram pipes were based out of Washington DC. They were popular among famous politicians and celebrities of the time. They made many products for them from FDR’s cigarette holders to Joseph Stalin’s favorite pipe. They were considered some of the best America had to offer till they finally closed their doors in the 70s. They graded their pipes by 10s, the higher the grade the better. Above 60s are uncommon and 80-90s are quite rare. I’ve never heard of or seen a 100 grade. I have several blogs that I have written on rebornpipes that give some history and background to Bertram pipes. (https://rebornpipes.com/2015/06/16/an-easy-restoration-of-a-bertram-grade-60-217-poker/).

I have included the following link to give a bit of historical information on the pipe company. It is a well written article that gives a glimpse of the heart of the company. http://www.streetsofwashington.com/2012/01/bertrams-pipe-shop-on-14th-street.html#

I am also including this photo of the shop in Washington D.C. and a post card of the shop.

From this information I have learned that the shape and grade Bertram I have in front of me now was made before the closure of the shop in the 70s. I also learned that it was a grade 60 thus it was on the higher end of the spectrum just above mid-grade. Jeff reamed the bowl with a PipNet pipe reamer and followed up with a Savinelli Fitsall pipe knife to remove the cake. He scrubbed out the mortise and the airway in the shank and the stem with alcohol, cotton swabs and pipe cleaners. He scrubbed the exterior of the bowl, rim, shank and stem with a tooth brush and Murphy’s Oil Soap to remove the oils and tars on the rim and the grime on the finish of the bowl. He rinsed it under running water. He dried it off with a soft cloth. He was able to remove the lava build up on the rim top and you could see the great condition of the bowl top and edges of the rim. He soaked the stem in Before & After Deoxidizer to remove the oxidation. I took photos of the pipe before I started my work on it. I took a close up photo of the rim top to show the nicks and dents in the top as well as the burned area toward the front of the bowl on the inner rim. Other than those issues it was in great condition. Otherwise both the inner edge and the outer edge of the rim look really good. The stem photos show the light tooth marks and the damage to the button surface on both sides. The surface of the stem is also pitted. The tooth marks are the same as those on the first Bertram I worked on.I also took a photo of the stamping on the right side of the shank showing how the stamping was laid out.I cleaned up the rim top and the inner edge of the rim to address the nicks and the burn damage to the front inner edge. I used a folded piece of 220 grit sandpaper to smooth out the damage on the rim top and to deal with the burn damage.I polished the rim top and the rest of the briar with micromesh sanding pads – wetsanding it with 1500-2400 grit pads and dry sanding it with 3200-12000 grit pads. I wiped the bowl down with a damp cloth after each pad to remove the sanding debris. After the final sanding pad I hand buffed it with a cotton cloth to raise a shine. I worked some Before & After Restoration Balm into finish of the briar with my fingertips to clean, enliven and protect it. I let the balm sit for a little while and then buffed with a cotton cloth to raise the shine. The pipe really looks good at this point and the grain stands out beautifully. I am very happy with the results. I set the bowl aside and turned my attention to the stem. I used a folded piece of 240 grit sandpaper to blend the tooth marks and chatter into the surface of the stem. I sanded out the scratch marks and started polishing the stem with a folded piece of 400 grit sandpaper. I wiped the stem down with Obsidian Oil and took the following photos.I polished the stem with micromesh sanding pads – wetsanding it with 1500-2400 grit pads and dry sanding it with 3200-12000 grit pads. I wiped the stem down with Obsidian Oil after each pad. I polished it with Before & After Pipe Polish – both Fine and Extra Fine and gave it a final coat of Obsidian Oil and set it aside to dry. I put the stem and bowl back together and buffed the pipe with Blue Diamond on the buffing wheel. I polished the briar and the vulcanite stem until there was a rich shine. The polished briar came alive with buffing and the straight, swirled and birdseye grain just popped with polishing. The black vulcanite stem developed a rich glow. The finished pipe is a thick shanked ¼ bent author shaped pipe that really is a comfortable handful of briar. Have a look at it with the photos below. The dimensions are Length: 5 1/2 inches, Height: 1 1/2 inches, Outside diameter of the bowl: 1 1/4 inches, Chamber diameter: ¾ of an inch. I will be putting this one on the rebornpipes store sometime in the days ahead. If you are looking for a Bertram of a unique shape then this ¼ bent author might be what you are looking for. Let me know if you are interested. Thanks for walking through the restoration of this with me it was a pleasure to work on.

Sprucing up another WDC: A Cased Bakelite & Briar Dublin


Blog by Paresh Deshpande

There a quite a few WDCs that I have inherited from my old man and the one on my table now is “WDC BAKELITE” in its original case. I loved the deep red color of the Bakelite shank and the fiery transparent red of the stem. Thus, no surprise here that I chose to work on this WDC Bakelite Dublin shaped pipe!!

This is the third WDC from my grandfather’s collection, WDC Bakelite in an impressive Dublin shape. The dark brown briar bowl, Bakelite base and translucent Bakelite stem looks attractive. The gold filigree at the shank end adds a classy bling, breaking the red monotony of the stem and shank.  I dare say that this pipe does not boast of only beautiful bird’s eye or cross or straight grains but nevertheless distinct swirls of grains can be seen which are eye-catching to say the least!!  The shank and stem is devoid of any stamping, however, the only stamping to identify this pipe to be a WDC is seen on the top lid of the leather covered case. The case is internally lined with a soft silky felt cloth in light green color and bears the trademark inverted equilateral triangle in red with letters “WDC” over “BAKELITE” in gold. Gold ribbons flow from either sides of the triangle and bears the words “FRENCH” on the left ribbon and “BRIAR” on the right. The quality of the case, its felt lining and the stamping simply shouts QUALITY!! I searched pipedia.com for more information on this pipe and attempt at estimating the vintage of this pipe. Though I could not find any information about this pipe in particular or a connection between WDC and Bakelite material, here is what I have found on pipedia.org about the brand:

William Demuth. (Wilhelm C. Demuth, 1835-1911), a native of Germany, entered the United States at the age of 16 as a penniless immigrant. After a series of odd jobs he found work as a clerk in the import business of a tobacco tradesman in New York City. In 1862 William established his own company. The William Demuth Company specialized in pipes, smoker’s requisites, cigar-store figures, canes and other carved objects.

The Demuth Company is probably well known for the famous trademark, WDC in an inverted equilateral triangle. William commissioned the figurative meerschaum Presidential series, 29 precision-carved likenesses of John Adams, the second president of the United States (1797-1801) to Herbert Hoover, the 30th president (1929-1933), and “Columbus Landing in America,” a 32-inch-long centennial meerschaum masterpiece that took two years to complete and was exhibited at the World’s Columbian Exposition in Chicago in 1893.

The Presidential series was the result of Demuth’s friendship with President James A. Garfield, a connoisseur of meerschaum pipes. Demuth presented two pipes to Garfield at his inauguration in 1881, one in his likeness, the other in the likeness of the President’s wife. Later, Demuth arranged for another figurative matching the others to be added to the collection as each new president acceded to the White House, terminating with President Hoover.

In early 1937, the City of New York notified S.M. Frank & Co. of their intent to take by eminent domain, part of the land on which the companies pipe factory was located. This was being done to widen two of the adjacent streets. As a result of this, Frank entered into negotiations to purchase the Wm. Demuth Co.’s pipe factory in the Richmond Hill section of Queens. It was agreed upon that Demuth would become a subsidiary of S.M. Frank and all pipe production of the two companies would be moved to DeMuth factory. New Corporate offices were located at 133 Fifth Avenue, NYC.

Demuth pipes continued to be made at the Richmond Hill plant till December 31. 1972. Then the Wm. Demuth Company met its official end as a subsidiary company by liquidation.

I came across an interesting catalog on the same page on pipedia.org which shows the exact same pipe that I am now working on. It is the same pipe as the first pipe on the left in second row. A close scrutiny of the picture confirms the following:

(a) Bakelite material was being newly introduced by WDC as WDC Bakelite line. This can be inferred from the Note on the flyer “BAKELITE IS A NEW PATENT COMPOSITION……….NOT BURN”.

(b) The pipe before me is model number 24718 and was at the time their second most expensive of all the pipes advertised in the flyer, retailing at $8!!

(c) The catalog was published by “John V Farwell Company, Chicago”. John V. Farwell & Co. was a department store in Chicago, Illinois, United States. The store’s history traces back to 1836, when the Wadsworth brothers came to Chicago to sell goods. John V. Farwell & Co. was the most successful store in the city until the 1871 Great Chicago Fire. The store continued to operate after the fire, but faced stiff competition from former partners Marshall Field and Levi Leiter. It was purchased by Carson, Pirie & Co. in 1926. (https://en.wikipedia.org/wiki/John_V._Farwell_%26_Co.) I visited rebornpipes.com and came across an interesting article on materials used in pipe making (https://rebornpipes.com/2014/08/09/hard-rubber-and-other-early-plastic-used-in-pipes-ronald-j-de-haan/)

It is here that I found the following information on “BAKELITE”:

These qualities made Bakelite the most successful synthetic material in the first half of the 20th century. From 1928 it was also produced as molded resin. Both the pressed and the molded forms were suitable for the pipe making industry. Pipes were made from Bakelite and molded phenol-resin. Complete pipes of Bakelite are very rare because of its lack of heat resistance. Phenol-resin however was frequently used for pipe mouthpieces and cigarette holders because it imitated amber.

From the above gleaned information, it is safe to conclude that the pipe now on my worktable is of 1920s and early 1930 vintage and at that point in time was WDC’s new offering retailing at $ 8!!

INITIAL VISUAL INSPECTION
The leather covered case in which the pipe was safely ensconced for many years has borne the maximum brunt of uncared for storage. The leather has weathered while being exposed to the extreme climate and has cracked at a number of places. However, the hinges and the lock mechanisms are intact and function smoothly. I shall just be giving a nice wipe with a moist cloth and applying a neutral shoe polish coat which is rich in wax content. The lining within has stained near the bowl/ Bakelite base joint and near the rim top. This needs to be cleaned up. Age definitely shows on the stummel surface!! The briar is dull and lifeless and has taken on a layer of aged patina, through which one can make out the beautiful grain patterns all around. There is a heavy overflow of lava all over the entire stummel surface. The bowl is covered in oils, tars and grime accumulated over the years of storage and is sticky to the touch. To be honest, the stummel is filthy to say the least. A thorough cleaning of the stummel followed by polish should accentuate the beautiful mixed grain pattern seen on the stummel through all the dirt. The Bakelite base of the stummel is dirty and sticky. Few scratches are also seen on close observation. The bowl (‘Real Walnut Bowl’ as specified in the flyer above!!) screws-in directly on to the Bakelite base. There is no brass or any metal separator between the bowl and the base, which is surprising. The threads on the bowl and the Bakelite base are covered in oils, tars and gunk. The bowl has one small hole at the heel through which the smoke passes in to the shank. The heel of the Bakelite base shows traces of old oils and tars. This will need a thorough cleaning.There is heavy buildup of cake with a thick layer in the chamber. The condition of the inner walls of the chamber can be ascertained only after the cake has been removed completely and taken down to bare briar. The bowl however, feels robust and solid to the touch from the outside. The rim top has a thick layer of overflowing lava. The condition of the smooth rounded inner and outer edge and rim top can be commented upon once the overflow of lava is removed and the chamber is reamed. The shank end of the pipe is clean. These issues should be a breeze to address, unless some hidden gremlins present themselves!!The diamond Bakelite stem has a rounded orifice which also points to its vintage. It is a rich reddish color that is translucent and the light really plays through. I cannot wait to see the stem clean up. Deep tooth indentations and minor tooth chatter is seen on the upper and lower surface. The pointed corner edge of the lip on the left is broken and will either have to be reconstructed or filed away to a straight profile. The lip edges have also been chewed off and greatly deformed. The screw-in tenon appears to be a Delrin tenon (or is it bone?) and is covered with dried oils and tars. The fit of the stem in to the mortise is very loose and the alignment is overturned. This will be a first for me as I have corrected metal threaded stingers, but never a Delrin or bone. The mortise does show signs of accumulated dried oils, tars and remnants of ash, greatly restricting the air flow. As I was dismantling the pipe, the gold filigree band also separated from the diamond squared Bakelite shank.The overall condition of the pipe, with the thick build-up of cake in the chamber, clogged mortises, overflowing of lava covering the entire stummel and the deep bite marks to the stem makes me believe that this would have been one of my grandfather’s favorite pipes.

THE PROCESS
As is always the case, I prefer to start my restoration with part that has the most significant damage. In this case it was the stem. I first cleaned out the internals of the airway with pipe cleaners dipped in alcohol. This was followed by cleaning the surface and the deep tooth marks with cotton pads dipped in alcohol. This helps to remove all the dirt, oils and grime from the surface before proceeding with fills. Since the tooth indentations are deep, I shall resort to the layering technique for the fills. Having cleaned the bite marks and the stem surface, I fill these with clear superglue and set it aside to dry. The fills had shrunk once the glue had cured, exposing the damage. I gave a second layer of superglue fill and set it aside to cure. I had decided to address the issue of broken corner of the lip edge by reconstructing it afresh using superglue (God, why can’t I simply straighten the edges which would have been way simpler than reconstructing the concave shaped lip edges!!). I went about this task by placing a big drop of superglue and holding the stem such that a droplet was formed at the broken edge. Once this was done, it was all about twisting, turning and blowing so that the droplet does not fall to the ground while remaining at the broken edge. After the droplet has hardened, I repeated the process till I had more than enough well cured and hardened large edge which then could be filed and shaped as required.While the stem fills were curing, I addressed the thick cake in the chamber. I started by reaming the chamber with size 2 and followed it up with size 3 and 4 head of PipNet reamer. I used a 220 grit sand paper, pinched between my thumb and forefinger, to sand the inner walls of the chamber of the pipe. Once I had reached the bare briar, I wiped the chamber with a cotton pad dipped in isopropyl alcohol. This removed all the residual carbon dust from the chamber. The walls of the chamber are nice and solid with no signs of heat fissures or cracks. I scrapped out the overflowing lava from the rim top with my fabricated knife. The inner and outer rim edges are pristine and that was a big relief.I cleaned the threads and the heel of the Bakelite base with cotton and alcohol. This was followed by cleaning the mortise and air way of the pipe using hard bristled and regular pipe cleaners, q-tips dipped in alcohol. The mortise and the draught hole were given a final clean with shank brushes dipped in alcohol. I dried the mortise with a rolled paper napkin. The shank internals and the draught hole are now nice and clean with an open and full draw.Using a hard bristled tooth brush dipped in undiluted Murphy’s oil soap and brass wire brush, I scrubbed the stummel, cleaning the surface thoroughly. I was very deliberate on the surface areas which were covered in overflowed lava over which dirt and grime had accumulated over the years. I rinsed the stummel under tap water, taking care that water does not enter the mortise or the chamber. I dried the stummel using cotton cloth and paper napkins. On close inspection, I observed a couple of minor dents and ding on the front portion of the stummel. These would need to be addressed. I also cleaned and removed the entire accumulated and now moistened gunk from the threads and base if the bowl with my fabricated dental spatula and the brass wired brush. The stummel is now clean and devoid of any grime and dirt. It is really surprising that the rim top, round edges and the stummel is in such pristine condition after so many years of storage and without a single fill. Speaks volumes about the quality of this line of pipes from WDC!! To further clean and highlight the grains, I sand the stummel with a folded piece of 220 grit sand paper followed by 600 grit sand paper. For a deeper shine and to remove the scratches left behind by the coarse grit papers, I followed it up by sanding with the micromesh pads, wet sanding with 1500 to 2400 grit pads and dry sanding with 3200 to 12000 grit pads. I wiped the stummel after each wet pad with a moist cloth to remove the resulting dust. I rub a small quantity of “Before and After Restoration Balm” in to briar and let it rest for a few minutes. The balm almost immediately works its magic and the briar now has a nice vibrant appearance. I further buff it with a horse hair shoe brush. The pipe now looks lovely with beautiful grains showing off their beauty in all glory!! While the bowl was absorbing the balm, I worked the Bakelite base. I cleaned the surface with a cotton pad dipped in acetone and with horror I realized that I could see some swirls like marks on the shank. This got me worried and I immediately conferred with Mr. Steve, my mentor. He informed me that the Bakelite needs to be cleaned only with soap water!! Ah, well, what’s done is done. He suggested that I use the balm and see if it helps and it did but not to the full extent. I bashed on regardless, going through the complete micromesh pad cycle. It was then that I realized that the so called spots were from within and not external! Whew, what a relief. The Bakelite base looks absolutely stunning with a deep red color. With the bowl and Bakelite base now nice and clean and attractive, I worked the stem of the WDC.  Just to let the readers know, that all the while that I was working the bowl and base, I was simultaneously adding layers of superglue to the tooth indentations and chatter and the broken corner edge of the lip. Once I was satisfied with the thickness of the fill (I prefer over filling which can be evened out during sanding), I began by sanding the fills with a flat heat needle to achieve a rough match with the surrounding stem surface. I sharpened the lip edges using a needle file and sand the entire stem with 220 followed by 400, 800 and 1000 grit sand paper to perfectly blend the filled surface with the rest of the stem surface. This helps to reduce the sanding marks left behind by the more abrasive 220 grit paper. By mere sanding itself, the minor tooth marks seen on stem surfaces were completely addressed. I was especially careful while shaping the broken corner edge of the lip. Finally, after long hours at the table, I was able to achieve a satisfactory reconstruction of the lip along with the proper concave around the orifice. To bring a deep shine to the Bakelite stem, I went through the complete set of micromesh pads, wet sanding with 1500 to 2400 grit pads and dry sanding with 3200 to 12000 grit pads. The only part begging for attention was also the most attractive and costly item on this pipe; the gold filigree band!! This band was easily detached from the shank end and this made the cleaning job very easy. I use Colgate tooth powder to clean all the silver and gold bands and embellishments on pipes, a trick I learned from Abha, my wife. Some readers may find it surprising, but believe you me gentlemen, please at least give a try to see if it suits you. The band cleaned up nicely. I carefully applied a very small quantity of superglue along the shank end edges and stuck the band firmly over the shank end.Before moving on to polishing and buffing, the only issue that remained to be addressed was that of the overturned tenon. I discussed with Mr. Steve who suggested that I should try using clear nail polish coat over the threaded tenon and once the nail polish had completely dried, I should try the fit. I did just that and, viola!! The fit and alignment of the stem and shank was perfect!!

To finish, I re-assembled the entire pipe. I mount a cotton cloth buffing wheel on to my local machine which is similar to a Dremel.  I set the speed at about half of the full power and polished the entire pipe with White Diamond compound. I wiped/ buffed the pipe with a soft cotton cloth to clear it of any leftover compound dust. I then mounted another cotton cloth wheel on to the polishing machine and applied several coats of carnauba wax over the bowl, Bakelite base and the Bakelite stem. I finished the restoration by giving the pipe a rigorous hand buffing using a microfiber cloth to raise the shine further. The completed pipe, with the dark brown hues of the grains on the bowl contrasting with the shining deep red Bakelite base and the translucent Bakelite stem, looks lovely, fresh and vibrant; the photographs speak for themselves. The leather covered case was cleaned and polished with wax rich neutral shoe polish. If only the pipe could tell some of my grand Old man’s stories and recount incidents witnessed while being smoked.…………… Cheers!! I am grateful to all the readers for their valuable time spent in reading this write up and joining me on this part of the journey in to the world of pipe restoration while I attempt to preserve a heritage and past memories which eternally shall remain a part of me. 

Refurbishing a Battered Dunhill Bruyere #32041


Blog by Paresh Deshpande

I had just finished restoring three pipes from my inheritance; a WDC Stratford, The Doodler and a Barling # 2639. Save for the WDC, these were easy projects and it helped that Abha, my wife, had done all the initial cleaning. I finished these pipes in real quick time.

Now I turned my attention once again to the pipes from my “Mumbai Bonanza”. I have restored three pipes; two Dunhill and a Stefano Exclusive from this lot of 30 and each one has been, well, to put it mildly a royal pain where you wouldn’t like it!!  How did I land up with this lot makes for an interesting read and about one which I have written in the restoration of the Stefano Exclusive (https://rebornpipes.com/2019/03/11/mumbai-bonanza-stefano-exclusive-restorationa-month-long-project/).

Here are pictures of the pipes that I received in this lot. This lot contains some very nice collectible pipes, a few well known brand pipes and some mediocre pipe brands. Overall, with seven Dunhills, a Preben Holm #1, a couple of “Made in England” Pete System pipes, Charatan’s and other assorted pipes, I would say that I had hit a huge jack pot!!! Hence, I like to call this find as “Mumbai Bonanza”.

The pipe that I decided to work on is from this find and is marked in a red circle in the picture below. It’s the third Dunhill from this lot, a Bruyere in a classic bulldog shape. The stummel surface boasts of some beautiful densely packed cross grain on the stummel, cap and also the shank top, bottom and side surfaces. It is stamped with “# 32041” towards the bowl and followed by “DUNHILL” over “BRUYERE” on the left side of the shank while the right side bears the COM stamp “MADE IN” over “ENGLAND” followed by underlined numeral “18”. Dunhill White Dot adorns the top of the vulcanite stem. The stampings on either side is deep, crisp and clear.The dating of this pipe is very straight forward and dates to 1978 (1960+18). Deciphering the shape code, “32041” is equally straight forward with the first digit 3 identifying this pipe as being Group size 3, second numeral, 2, identifies the style of mouthpiece as being a saddle stem and the digits 04 indicates Bulldog shape. With this information, I proceed ahead with the restoration of this handsome pipe.

INITIAL VISUAL INSPECTION
The chamber is clean with a thin layer of cake which indicates that the pipe has been kept clean by its previous Steward; however, the reaming has been done unevenly. From what I can see, the chamber walls appear to be without any damage. The chamber is odorless. It is the rim top, including the outer and inner rim edge that shows significant damage on the left side in 11 o’clock and 7 o’clock directions. This must have been caused due to hammering of the edge against a hard surface to remove dottle!! There is not even a millimeter of surface on the rim top surface which does not show signs of severe damage. All in all, it appears like this pipe’s rim top was used by the previous Steward as a hammer while giving vent to his/ her anger, and if this is true by any stretch of imagination, HE/ SHE SHOULD ENROLL FOR ANGER MANAGEMENT TREATMENT!! Darkening of the outer rim edge is also seen all along the left half of the rim top, most significantly in 11 o’clock and 7 o’clock directions. I just hope that it does not go deep in to the briar!!  Being a Dunhill, any issue of fills is never to be expected and hold true for this pipe too. However, there are a number of scratches and dents that can be seen on the stummel surface. These dents and ding are probably caused due to uncared for storage by the previous Steward and further contributed to by the trash collector who had sold the pipes to me. The stummel is covered in dirt and grime. The briar looks lifeless and dull which is nothing serious to address.I am very pleased with the condition of the stem. The diamond saddle type vulcanite stem shows minor damage to the button end and the lip edges. Light scratches can be seen extending upwards from the button end towards the saddle. The quality of vulcanite is good. These issues should be an easy fix. The mortise is clogged and will have to be cleaned. In this project, repairs to the damaged outer edge and rim top surface will be a major challenge. While restoring the Dunhill Bruyere # 51671 (https://rebornpipes.com/2019/03/13/reconstructing-a-broken-stem-on-dunhill-bruyere-51671/), I had faced difficulties in blending the repairs to the outer rim edges and these could be seen even after I had stained the stummel. Similar set of difficulties are envisaged on this pipe too!!!! I have learned my lesson and will follow the advice and suggestion received from readers of rebornpipes.com.

THE PROCESS
Since the stummel has significant damage, I start this project by tackling the stummel repairs first. I reamed the chamber with size 2 head of a PipNet reamer. The cake was thicker at the bottom and using my fabricated knife, I scraped out all the remaining cake. I further used one folded piece of 180 grit sand paper to sand out the last traces of remaining cake and expose the walls of the chamber to ascertain that there are no cracks/ heat fissures. I wiped the chamber with a cotton pad dipped in isopropyl alcohol to remove the carbon dust left behind by all the reaming and sanding process. The walls of the chamber were solid with just very fine superficial web of lines seen on one side. This was followed by cleaning the mortise by scraping away at the dried gunk with my fabricated spatula and followed it up with further cleaning using cue tips, pipe cleaners and shank brush dipped in isopropyl alcohol. With the thin sharp edge of my fabricated spatula, I cleaned in between the edges of the cap ring separating the cap from the rest of the stummel. Continuing with the cleaning regime, using a hard bristled tooth brush dipped in undiluted Murphy’s oil soap, I very deliberately scrubbed the surface of the stummel and the rim top. The original reddish dye was also washed away to some extent. The dirt and grime on the stummel surface was so stubborn that I had to resort to using a scotch-brite pad to get rid of it. While scrubbing the stummel, I paid special attention to areas where significant darkening was seen just below the rim outer edge. Thankfully, the burn marks were superficial and cleaned out nicely. However, a dark spot was revealed just below the cap ring and is marked in a red circle. The damages to the outer rim edge, uneven inner rim edge and stummel dents and dings are now clearly visible in the above pictures after the cleaning. I had a close, hard look at the darkened spot seen and marked in red. The briar on and around the spot was hard and solid with no deep heat fissures on the corresponding inner surface of the chamber. This ruled out the possibility of a burn out!!!! Phew, what a relief this was!!!! This external darkening, most probably, appears to have been caused when the pipe was placed in an ash tray alongside a smoldering cigarette butt, just a hypothesis!!! This will be addressed (hopefully!) when I sand the stummel surface to get rid of all the scratches and dents.

With the stummel now dried out, I got around to address the rim top and outer rim damage. The extent of the dip or trough caused due to banging the rim edge against a hard surface was deep and would necessitate heavy topping off of the rim surface, and I for one, absolutely wish to avoid any loss of briar!!!!! So, I decided to try out something different. I planned on first filling up the deep troughs on the rim edge using briar dust and superglue to roughly match the rim surface and some more and then topping it to achieve a smooth surface. Theoretically, this sounded logical.

I resorted to the layering method again; first I layered superglue over the damaged surfaces on the front and back outer rim edges, followed by sprinkling of briar dust, another layer of superglue followed by a final layer of briar dust. This final layer of briar dust reduces the probability of air pockets. In the last picture, you can see that the layering has been done to the level of the rim surface so that it sits evenly on a flat surface without showing any gaps. I set the stummel aside to cure. While the stummel fill was being set aside to cure, I tackled the stem repairs by first flaming the surface with a Bic lighter flame to raise the bite marks to the surface. This was followed by sanding the stem surface with a folded piece of 220 grit sand paper. This step has a twofold purpose; firstly, it helps to roughly blend the raised bite marks with the rest of the stem surface and brings to fore the spots which require filling and secondly, it helps to rid the oxidation from the stem surface which helps subsequently in better finish after polishing. I cleaned out the surface with a cotton pad dipped in alcohol to remove all the dirt and grime. Once the surface was clean, the lip edges and the bite marks were filled with a superglue and activated charcoal mix and set aside to cure overnight. The fill repair to the outer rim edges had cured by this time and with a flat head needle file, I roughly sand the fills to match the surrounding surface. Using a folded piece of a 220 grit sand paper, I further blended the outer filled edges with the rest of the edge and created a slight bevel to mask the uneven inner rim edges. The rim top surface was topped on a piece of 220 grit sand paper to further blend and even out the rim top, checking frequently the progress being made. Personally, I prefer to avoid topping as I do not appreciate loosing even one mm of briar estate, but in this instance, I was left with no recourse but to top the rim. I lightly top it on 600 grit sand paper to reduce the sanding marks left behind by the 220. However, a few air pockets revealed themselves (marked in red-orange circle) at this stage which necessitated reapplication of briar dust and super glue. Sorry, missed out taking pictures of this stage!! While the second fill to the rim outer edge was curing, I turned my attention to work on the cured stem fills. Using a flat head needle file, I roughly matched the fills with the rest of the stem surface. For a better blending, I further sanded the entire stem with 220 followed by 400, 600 and 800 grit sand paper. This helps to reduce the sanding marks left behind by the more abrasive 220 grit paper. To bring a deep shine to the vulcanite stem, I went through the complete set of micromesh pads, wet sanding with 1500 to 2400 grit pads and dry sanding with 3200 to 12000 grit pads. I wiped the stem with alcohol after each pad and rubbed it down with Extra Virgin Olive oil to rehydrate the vulcanite. The repairs have blended in very well and the stem now looks a shiny black and beautiful. The internals of the stem was cleaned out using alcohol and pipe cleaners. The finished stem is shown below. The next evening, the repairs to the edge had completely cured and I move ahead by filing and rough shaping with a flat head needle file. I further fine tune the blending by sanding it down with 220, 320, 600 and 800 grit sand papers. Here is how the repaired area appears at this stage. I am very pleased with the way this repair progressed. I sand the entire stummel using 220, 400, 600 and 800 grit sand papers. The little dents and dings that remained on the stummel and outer rim edge were also evened out under this sanding process. This was followed by polishing with micromesh pads. I wet sand the stummel with 1500 to 2400 grit pads and follow it up by dry sanding with 3200 to 12000 grit pads. I wiped the surface with a moist cotton cloth after every wet pad to check the progress. The repaired rim edge appears, in picture, as though it is patchy with air pockets. However, that is not the case. The fill is smooth and solid and should get masked after I have stained it. I rub a small quantity of “Before and After Restoration Balm” in to the briar with my finger tips and let it rest for a few minutes. The balm almost immediately works its magic and the briar now has a nice vibrant appearance. I further buff it with a horse hair shoe brush. I had hoped that the balm would work its magic on the filled area and help in blending it a bit, and that did happen!! I am very pleased with the way these repairs have turned out. And now on to staining and polishing… After Mr. Steve had uploaded my write up on the Dunhill Bruyere Horn shaped pipe (https://rebornpipes.com/2019/03/13/reconstructing-a-broken-stem-on-dunhill-bruyere-51671/), the feedback and responses were very educative and I had decided to incorporate these suggestions while working this project. Mr. Roland Borchers brought out that the original color of Bruyere was achieved by first staining with Dark Brown stain followed by Cherry red stain. Mr. Steve also concurred and then there was no turning back!! I stained the stummel in DB stain first. I use the powder variety of stain and mix it with 99% isopropyl alcohol. I heated the stummel surface with a heat gun and applied the stain with a folded pipe cleaner. As I paint the stummel with stain over sections at a time, I burn the dye using a Bic lighter that combusts the alcohol in the aniline dye and sets the dye pigmentation in the wood.  After fully saturating the stummel and covering the whole surface, including the rim top, I set the stummel aside to rest for several hours. By next evening, the stain had set nicely. I mount a cotton cloth buffing wheel (because I do not have felt cloth buffing wheels!!) on the Dremel and set the speed at about 40% of full RPM and apply white compound to the stummel. This does help in revealing the grains gradually. This time around, the repaired area had blended very nicely in to the rest of the stummel surface. Here is another lesson that I have learned; it is advisable to use white compound after staining and not red Tripoli as I used to, for the reason that the red Tripoli compound is more abrasive and does not make sense to use after polishing by 12000 grit micromesh pad!! I followed this polish by re-staining the stummel with Cherry red stain. I set it aside to let the briar pores absorb the stain pigments. To finish, I re-attach the stem with the stummel. I mounted a cotton cloth buffing wheel to my local machine which is similar to a Dremel, set the speed at about half of the full power and applied White Diamond compound to the entire pipe. I wiped/ buffed the pipe with a soft cotton cloth to clear it of any leftover compound dust. I then mounted another cotton cloth wheel on to the polishing machine and applied several coats of carnauba wax. I finished the restoration by giving the entire pipe a rigorous hand buffing using a microfiber cloth to raise the shine further. The completed pipe looks lovely, fresh and vibrant; the photographs in this case, do not do justice to the appearance of this beautiful pipe. I cannot thank enough my friends and gentlemen who painstakingly identified my mistakes and suggested remedial measures after reading the write up for helping me to hone my skills while gaining experience.