Tag Archives: Bowl – refinishing

Restoring an interesting 1902 LKL Amber Stemmed Cutty


Blog by Steve Laug

If you have followed rebornpipes for long you will know that I am a sucker for older pipes and that if I have restored pipes for you in the past I will definitely be available to you for future restorations. One such example of this is an interesting JW Straight Shank Bulldog that I restored for Ray in Australia in May about a year ago. I have included the link to the write up of the restoration if you are interested:  https://rebornpipes.com/2019/05/19/restoring-a-cased-1906-jw-straight-shank-amber-stemmed-bulldog/. Once in a while I get an email from Ray about the old timers that he picks up along the way. Ray seems to pick up some interesting older pipes so I am always glad to hear from him. Not too long ago I received an email from him about an old pipe that he picked up. I have included his email below.

Dear Steve,
I got this pipe and another a few days ago and they both need rescuing. This one is a 1902 Cutty with silver mount by Charles Maxwell Kinnear of Manchester. The issue with this is a humongous chunk of rim is missing on the right, plus 2 “pits” on the right flank. No other issues I can see. The stem fits well.

Best Regards
Ray

He attached some photos of the pipe to his email so I could see what he was speaking about. I have included them below. 
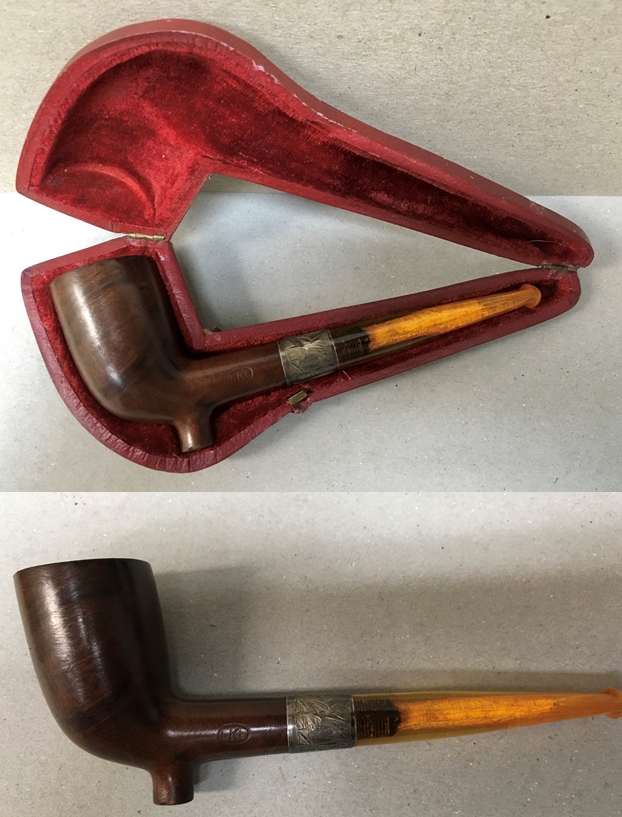
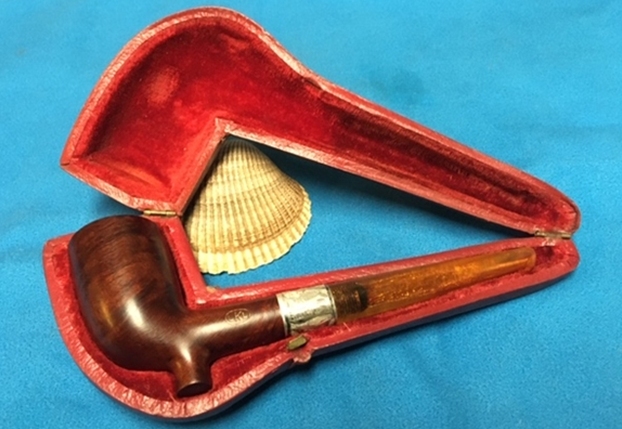
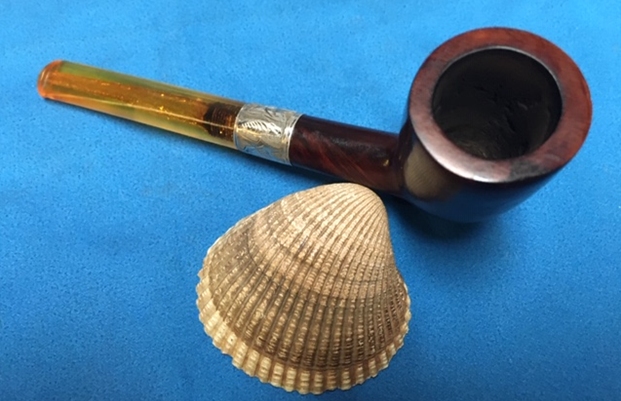
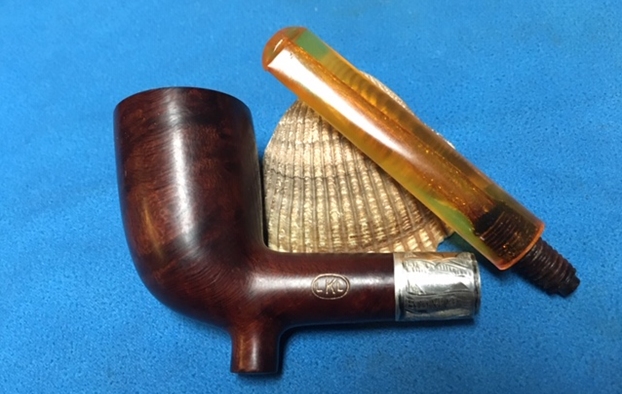
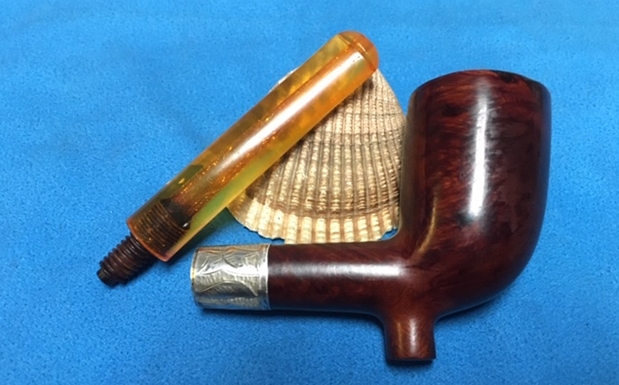
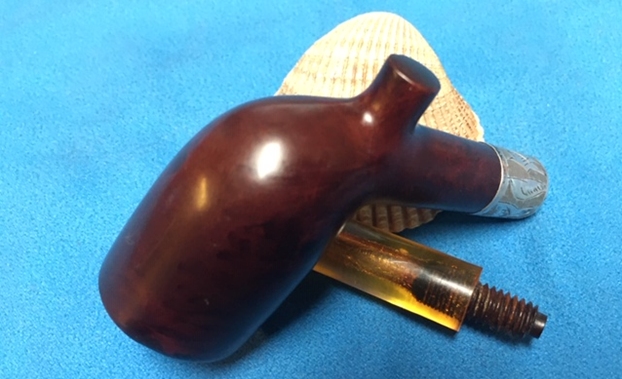
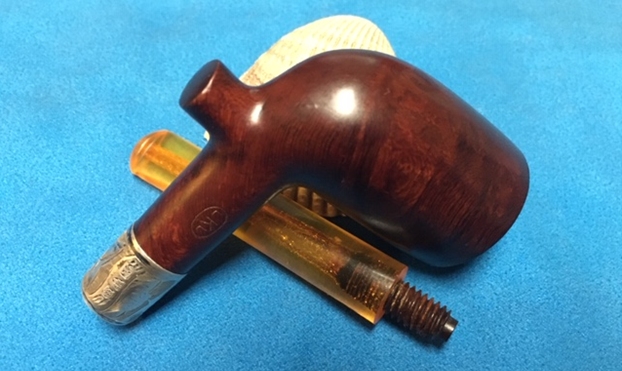
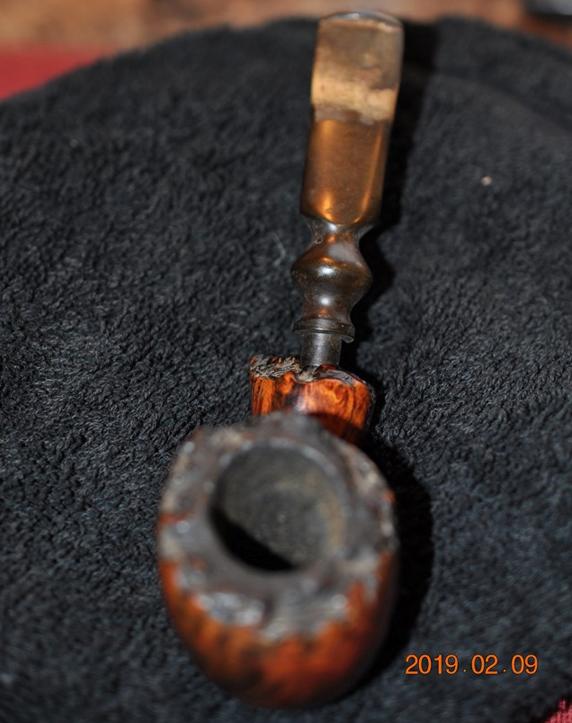
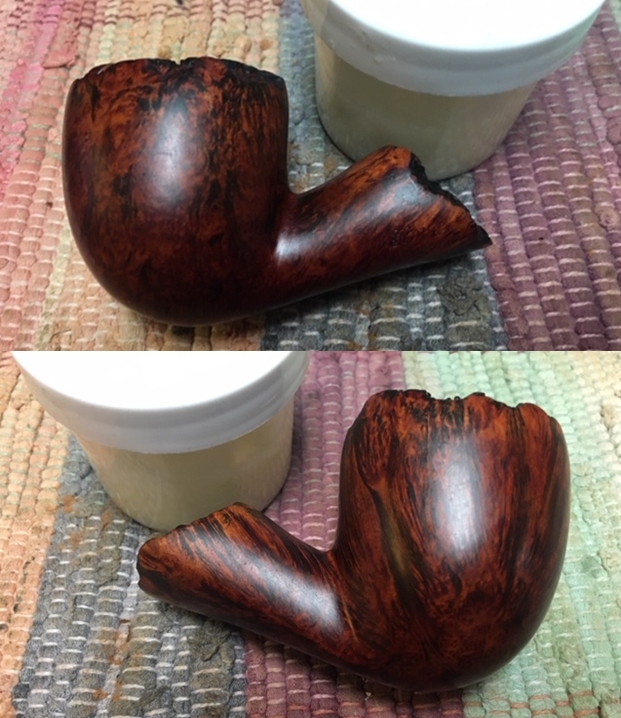
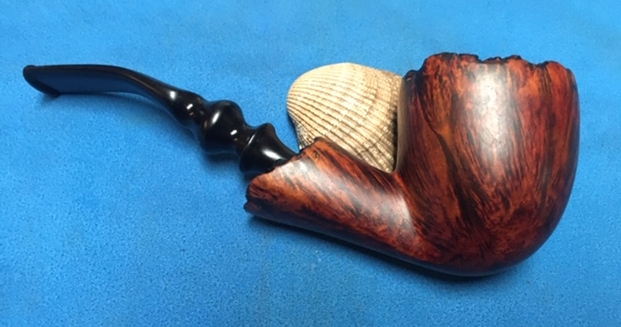
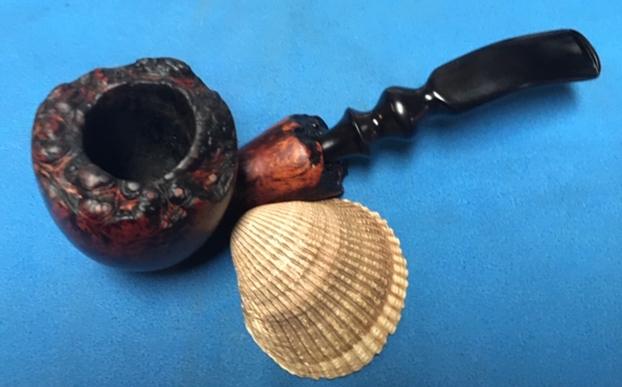
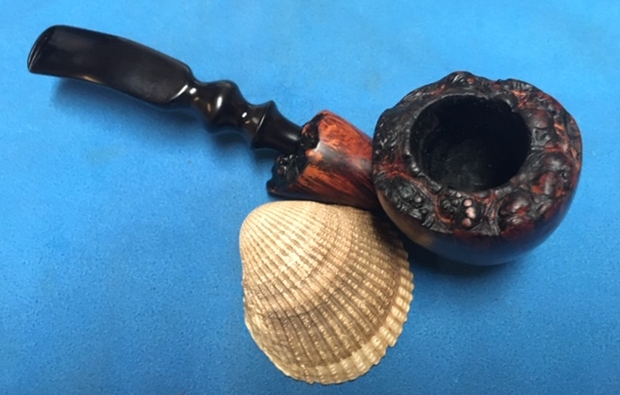
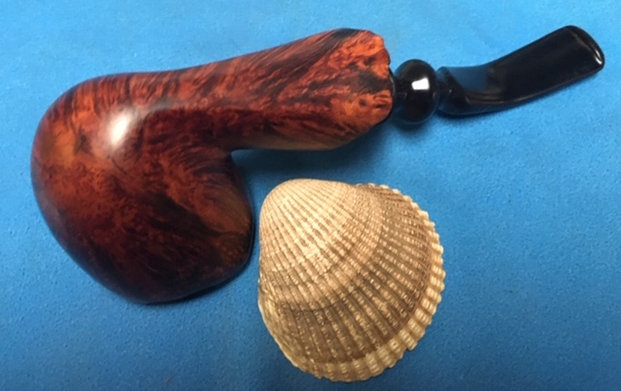
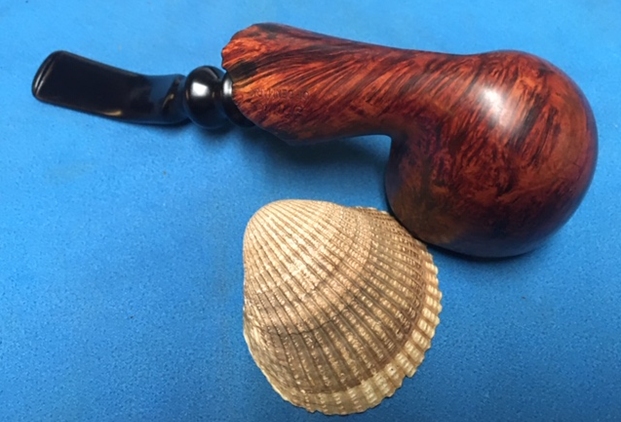
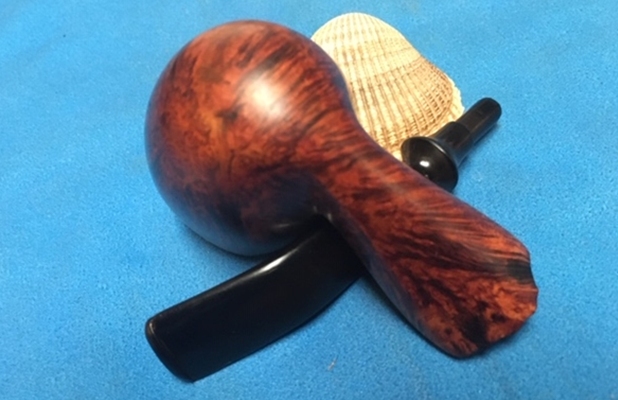
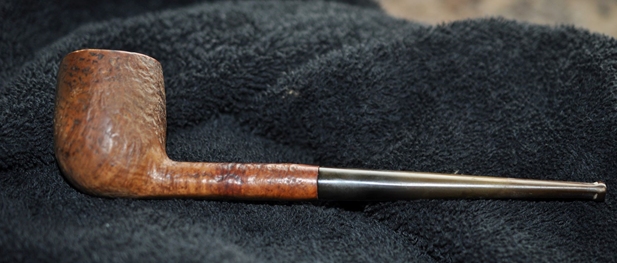
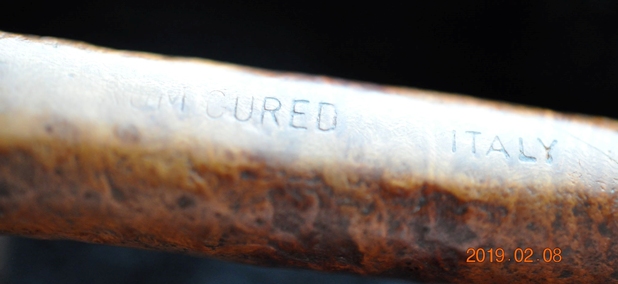
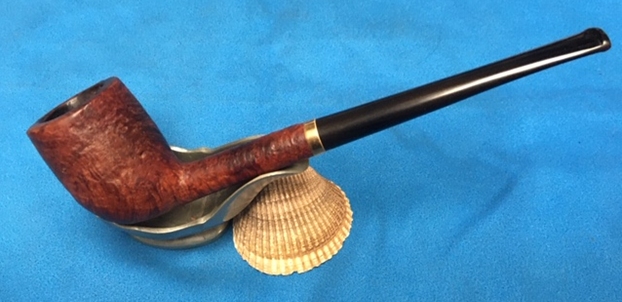
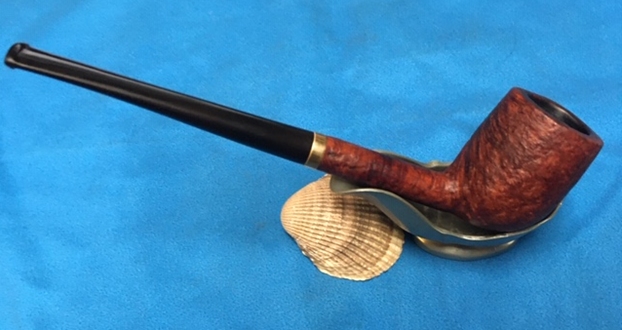
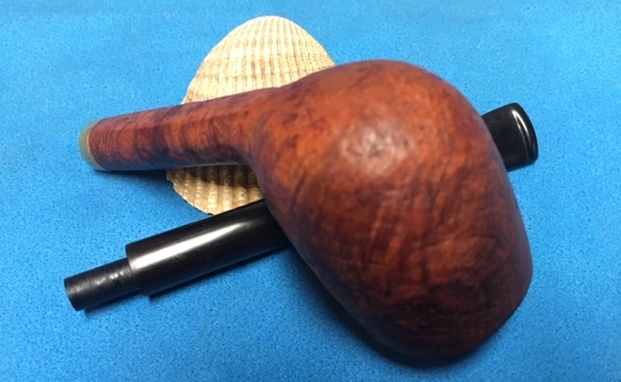
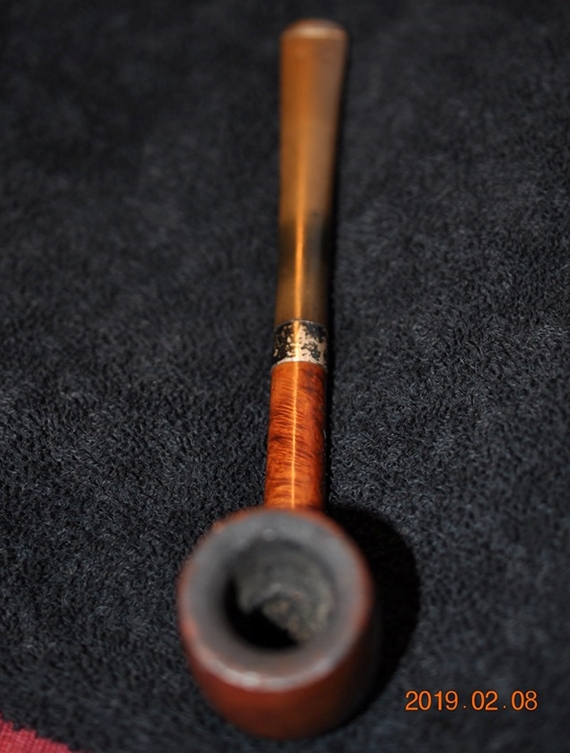
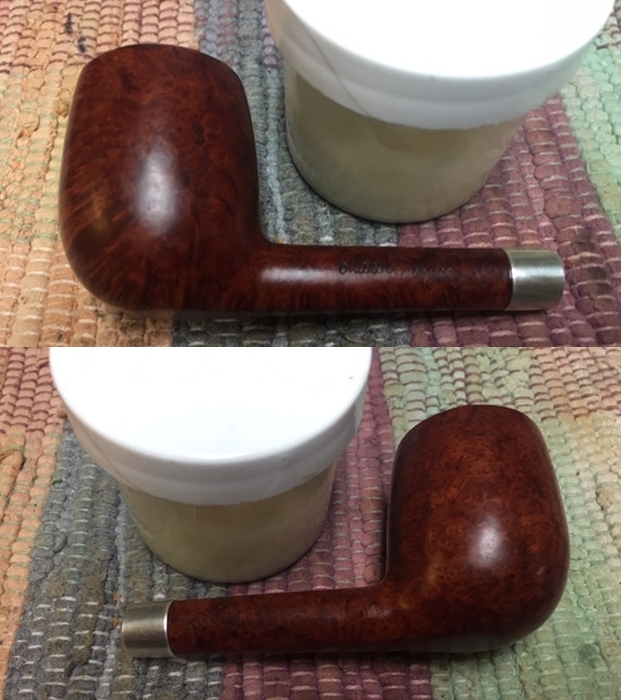
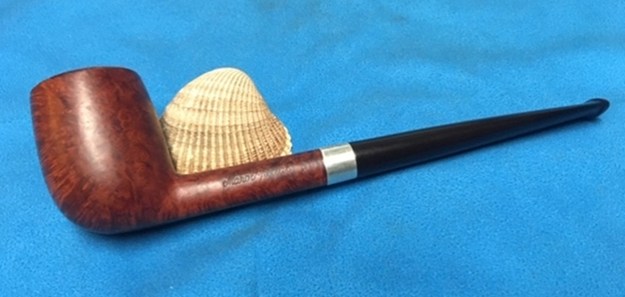
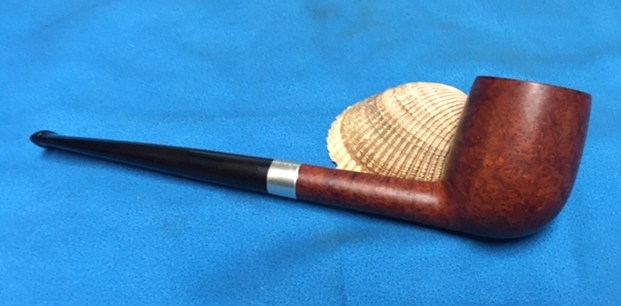
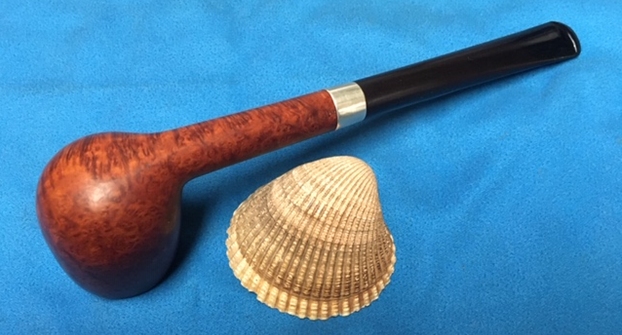
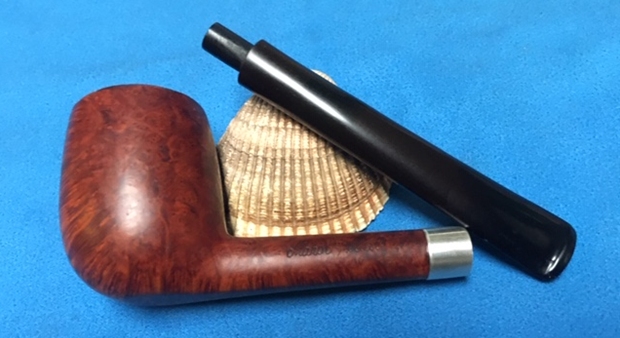
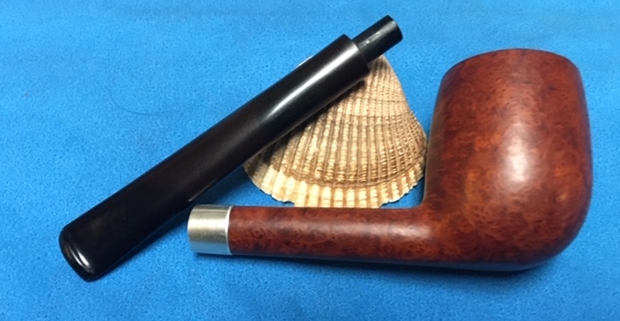
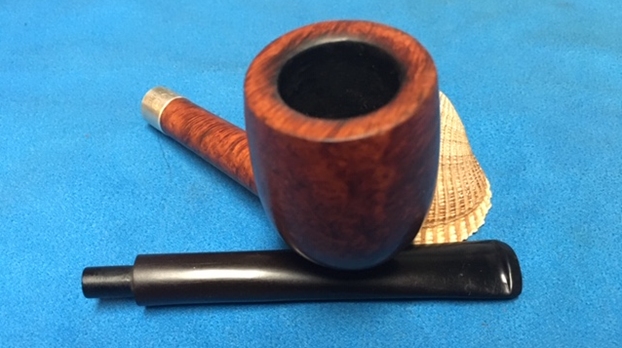
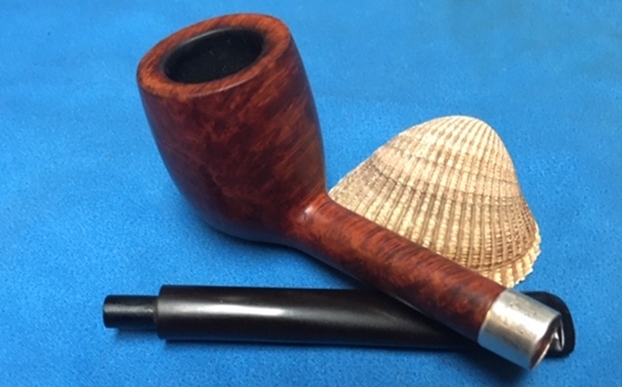
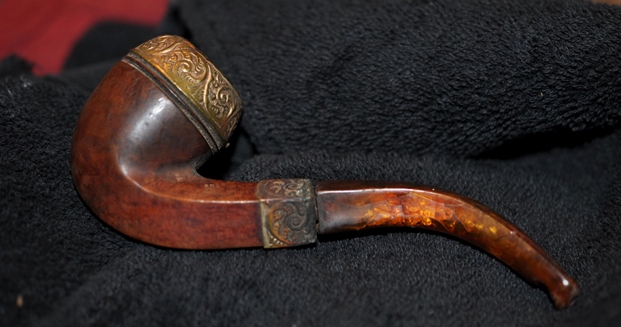
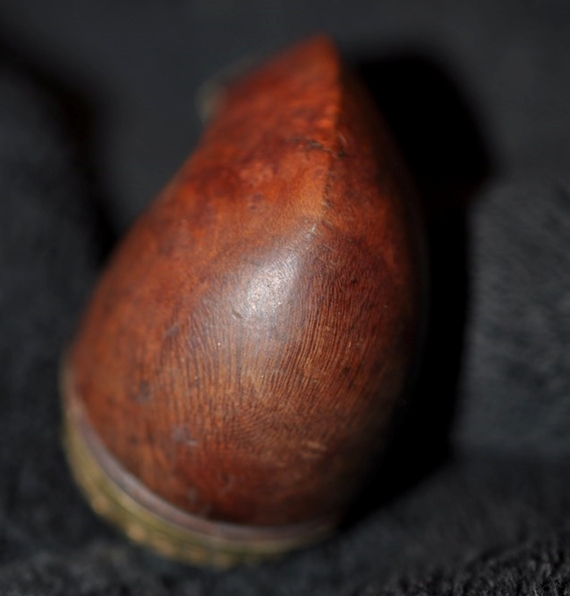
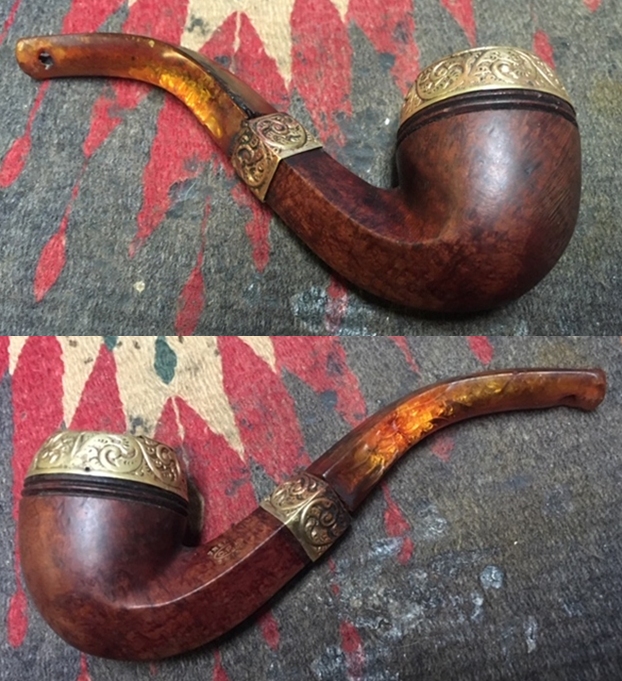
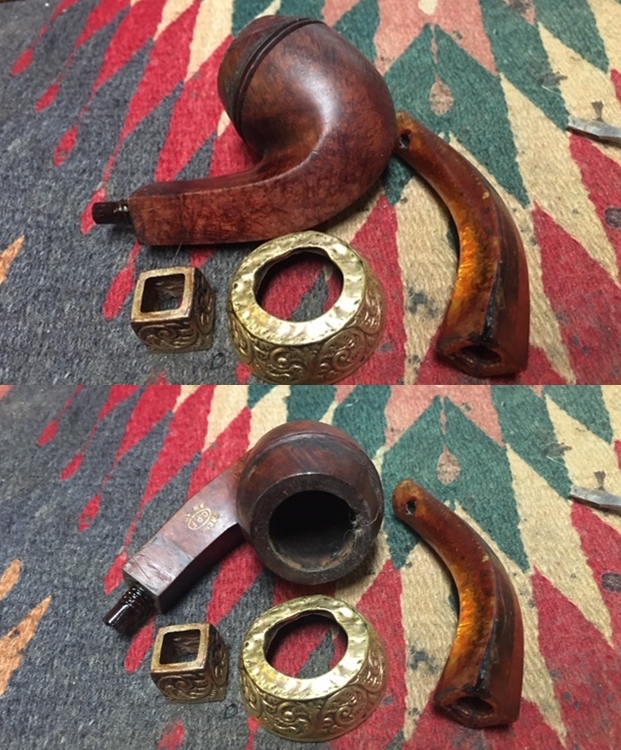
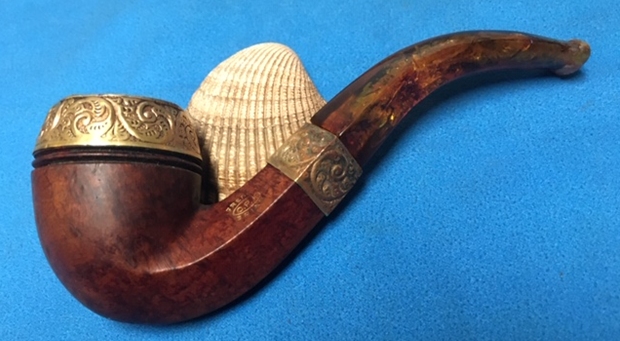
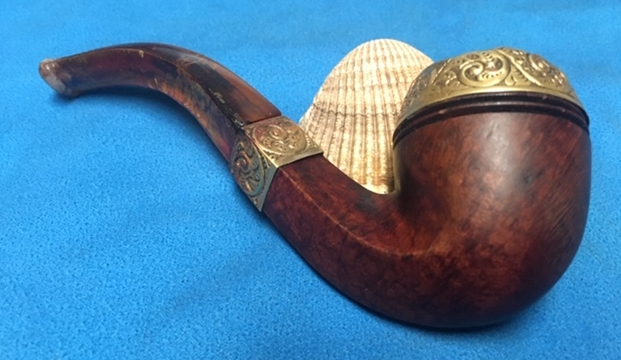
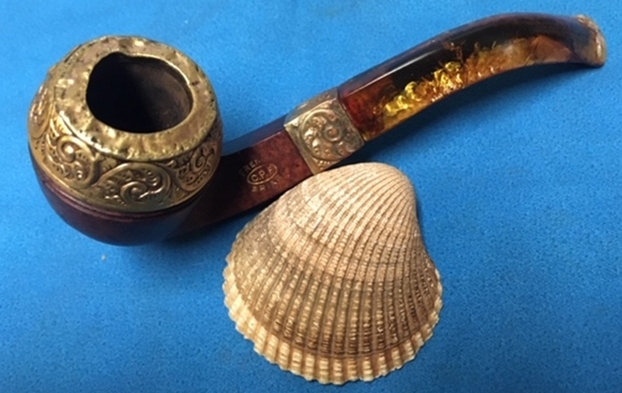
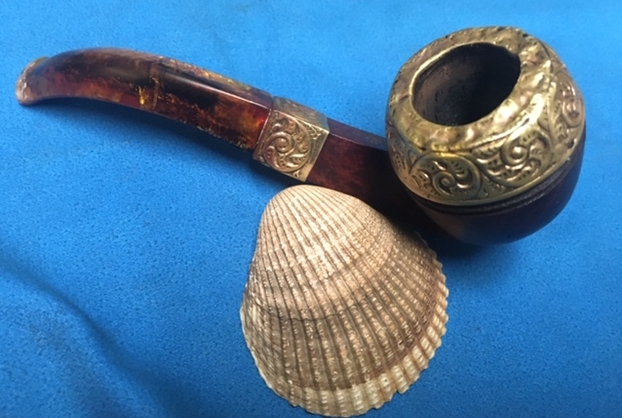
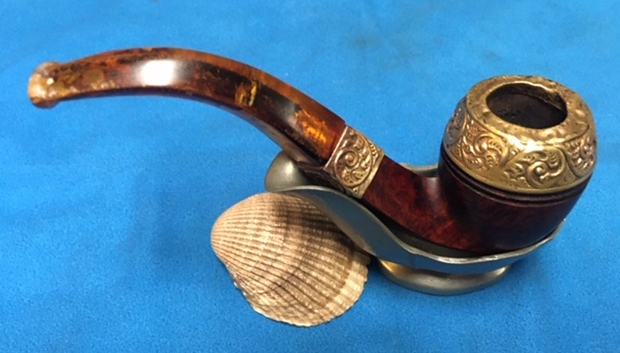
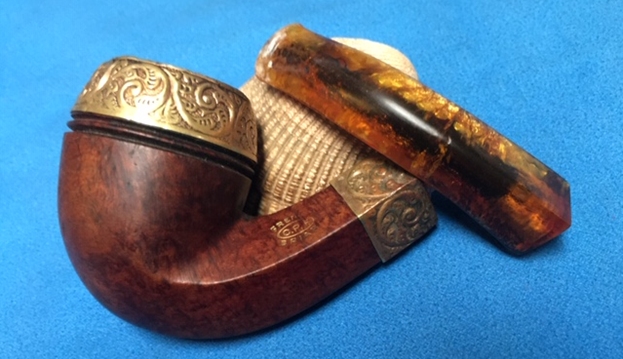
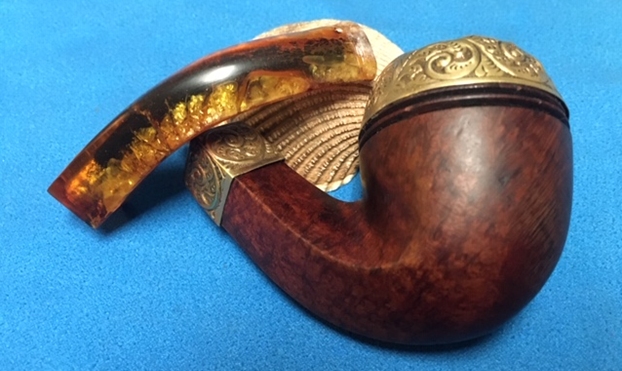
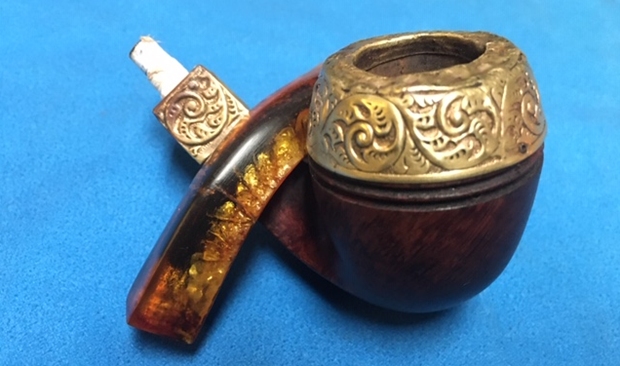
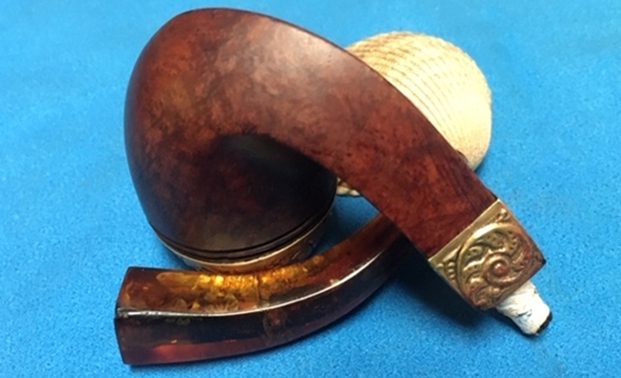
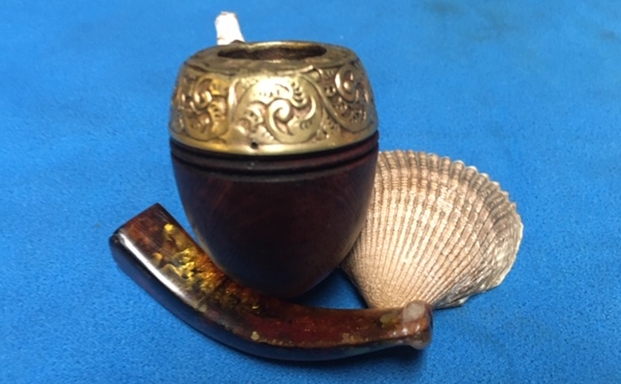
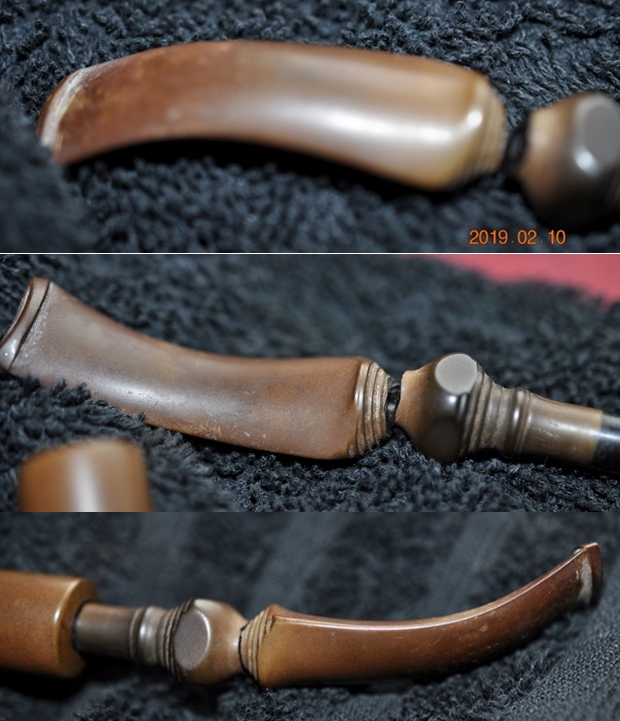
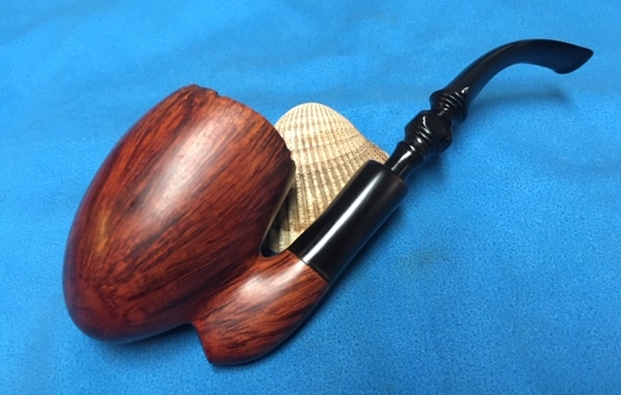
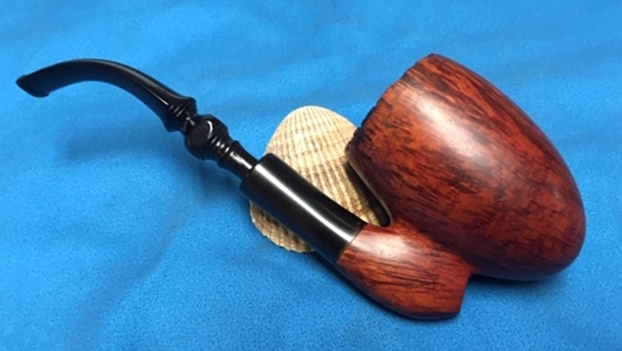
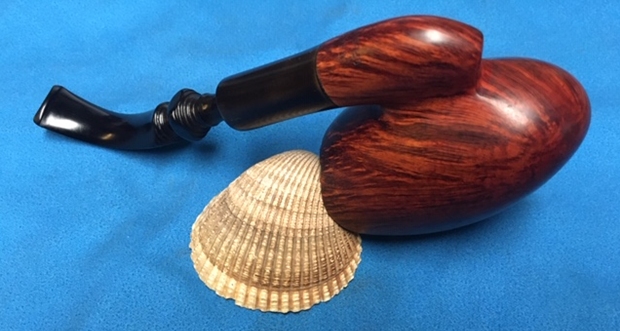
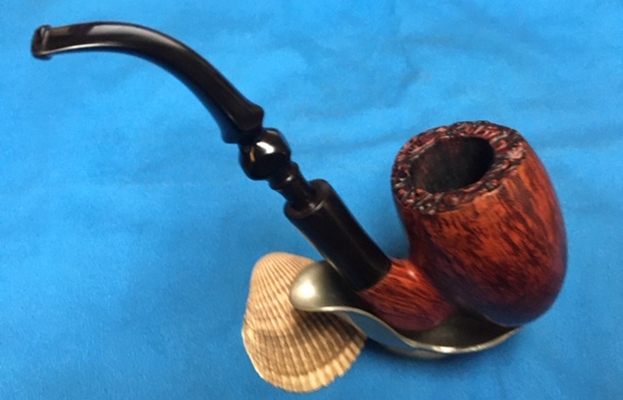
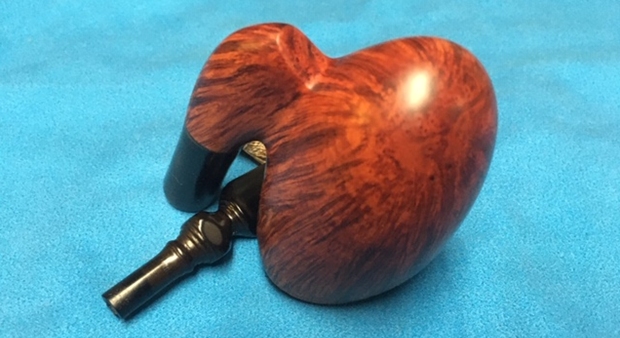
The photos that he included showed the pipe that he had picked up. It was a cased, amber stemmed Cutty that was marked LKL in an oval on the left side of the shank. The bowl was hardly smoked and the amber stem looked very good. There was some light crazing internally around the airway in the stem. The tenon was perfect. The alignment of the stem on the shank was perfect as well. It was in great shape. The bowl itself was where the issues were. There were some chips out of the bowl on lower, middle and top outer edge as can be seen in the above photos. The lower ones looked like fills that had fallen out of the briar. The one on the rim top and edge was more extensive and actually looked like fills had fallen out of that area as well. The edges were too smooth and the shape too smooth for it to be damage caused by dropping it. Other than these issues it appeared to be a beautiful pipe in a well made case.

Ray put the pipe in the mail and in short order it arrived in Vancouver. I opened the well packed box and was pleased that Ray had carefully packed the pipe for safe shipping. He added and item that I did not expect. He included a folded document that gave me the information that he had found in his research on the brand and silver stamping. I set the papers aside and carefully unwrapped the pipe from the internal box. I was surprised to see a red, leather covered, fitted case for the pipe. There was some light wear on the surface and the edges of the case but it was still in great condition for a pipe of this age. I took photos of the case and pipe before I started my work on it as part of the documentation on the restoration.I opened the case to have a look at the pipe. The inside of the case was in good condition. There was some wear on the lining but it was obvious that the case was designed with this pipe in mind.
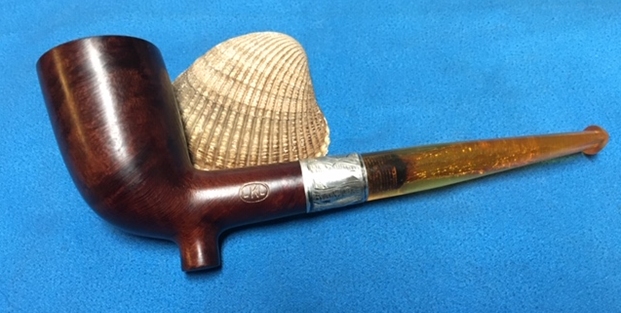
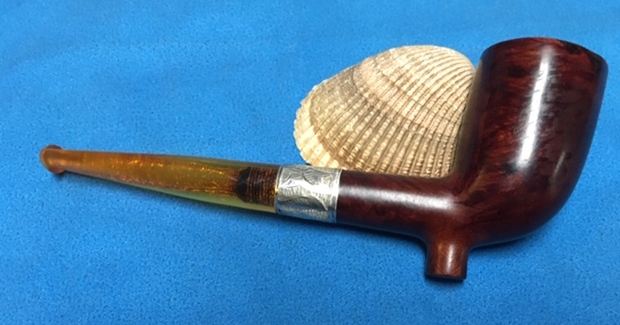
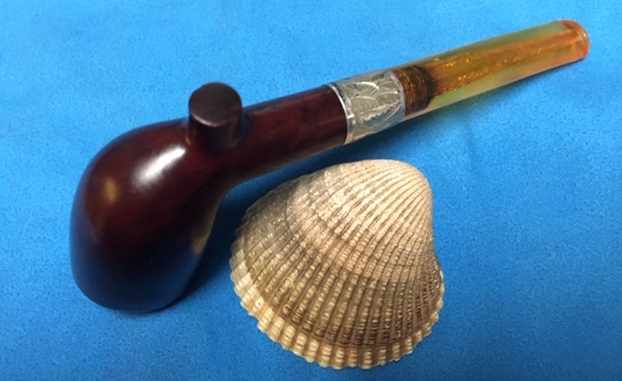
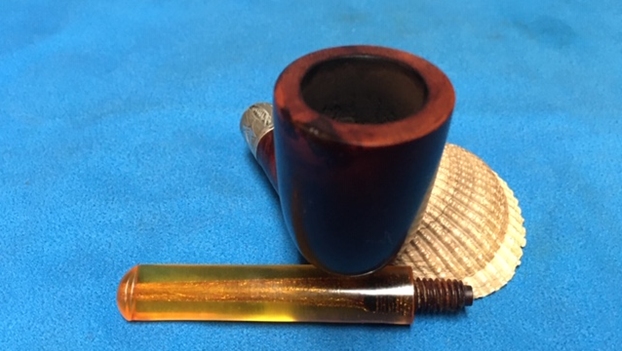
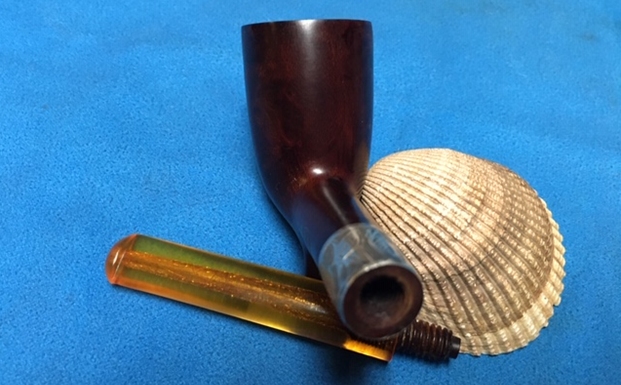
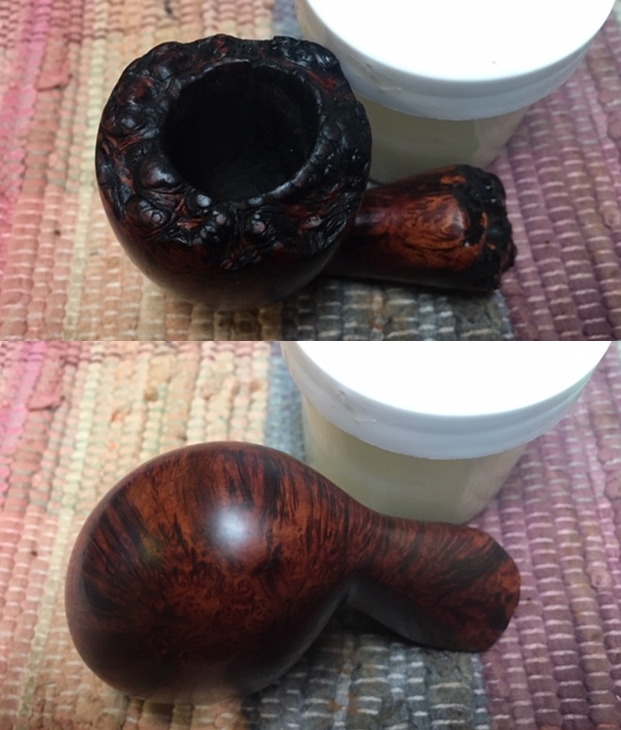
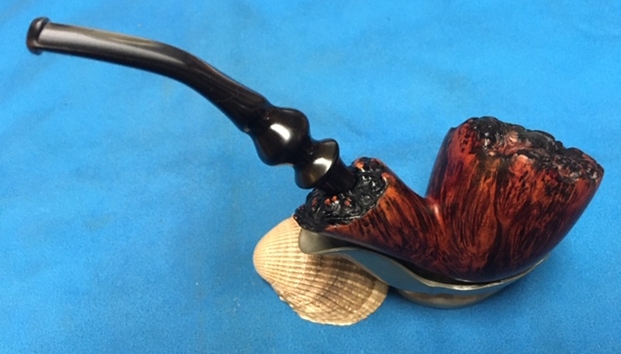
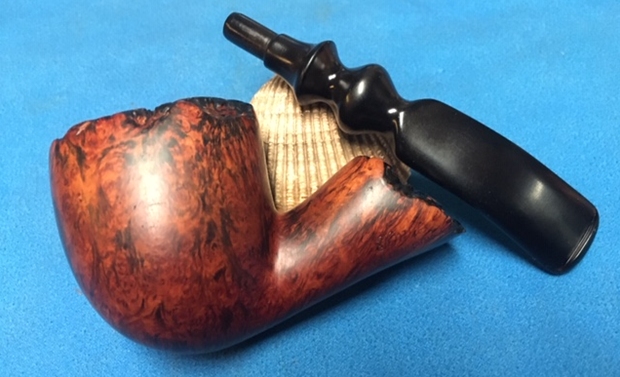
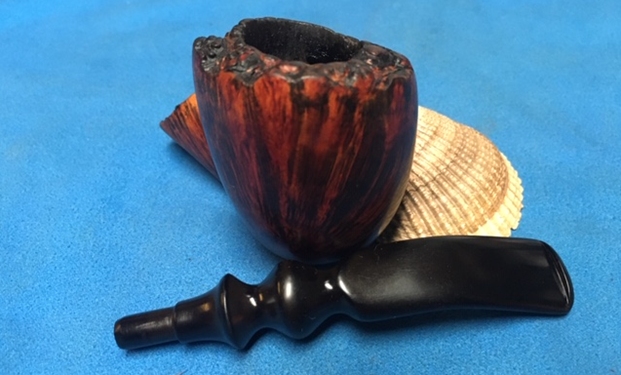
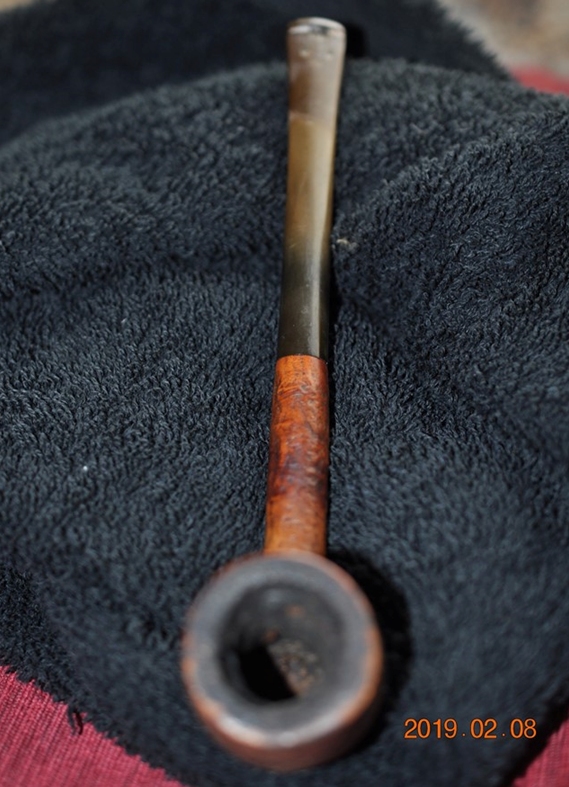
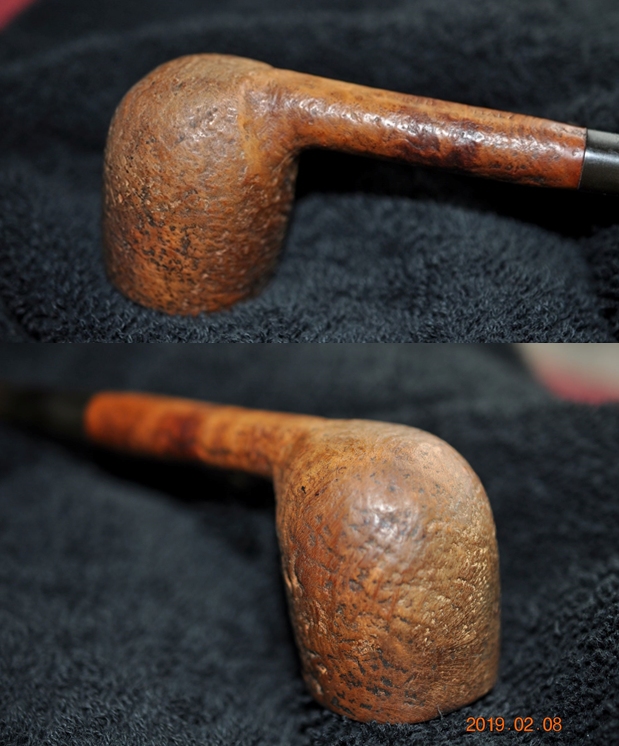
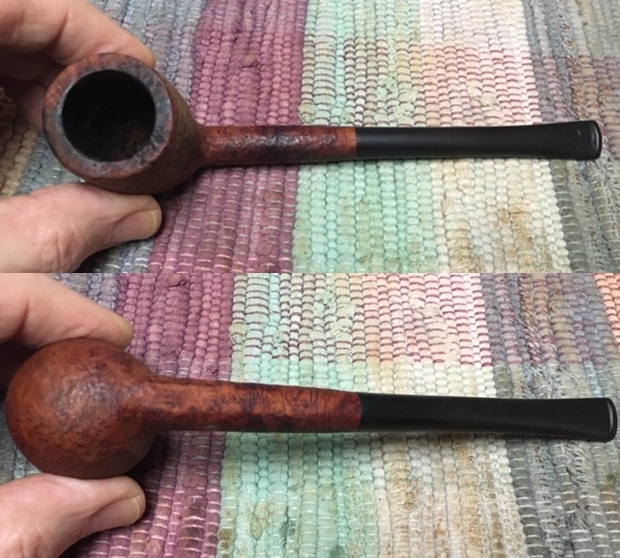
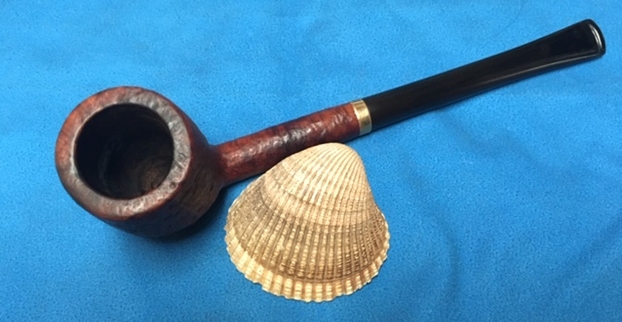
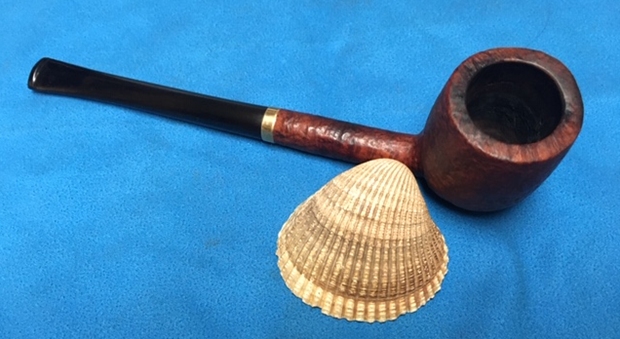
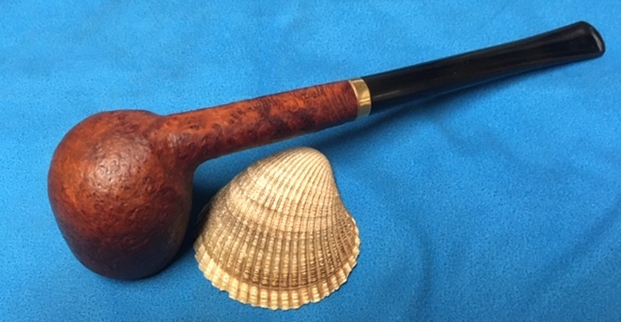
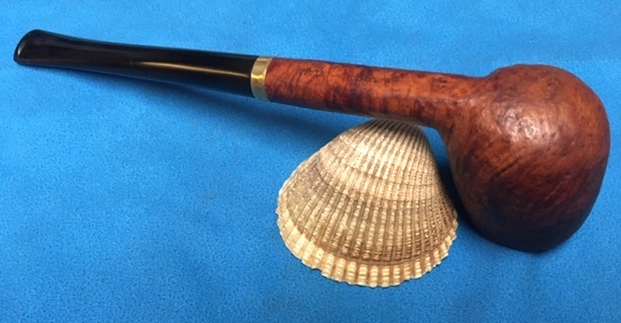
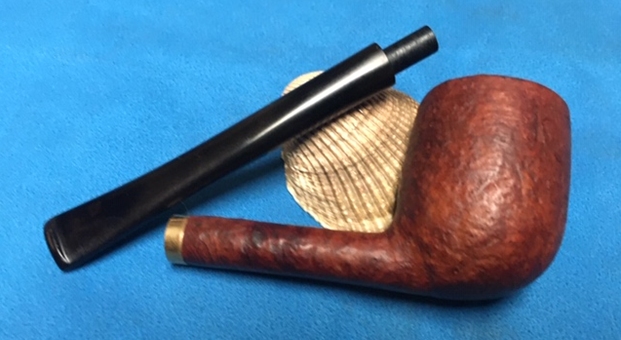
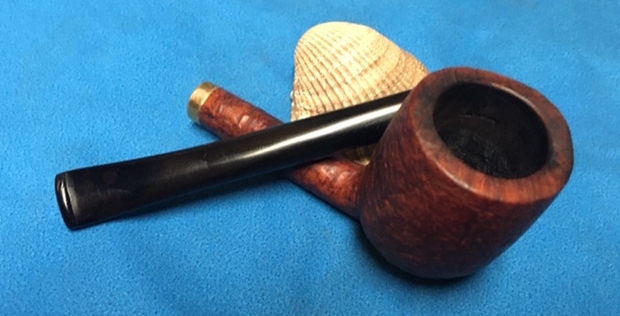
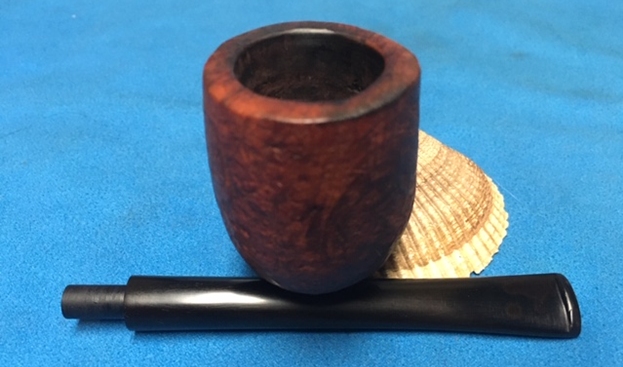
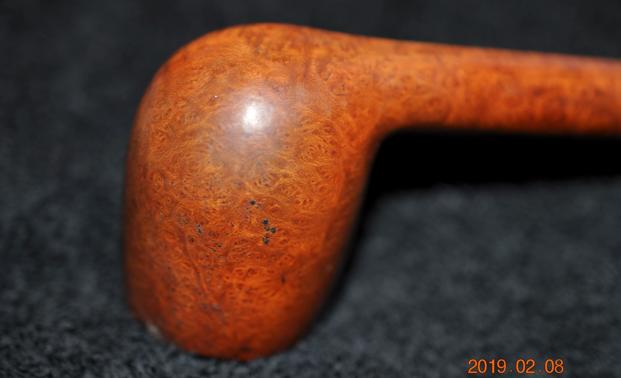
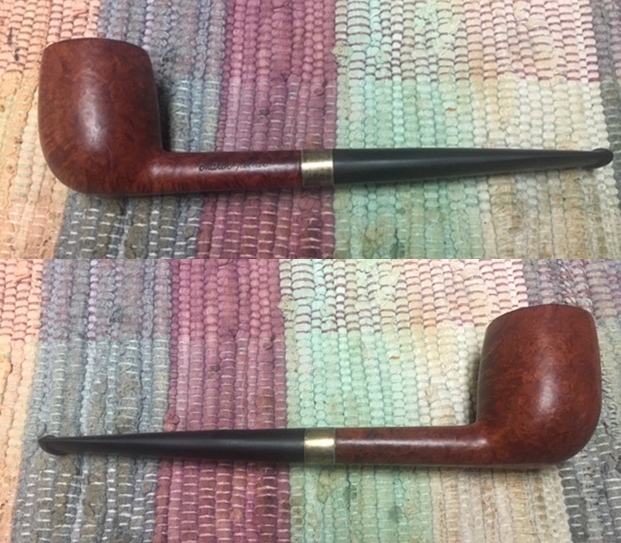
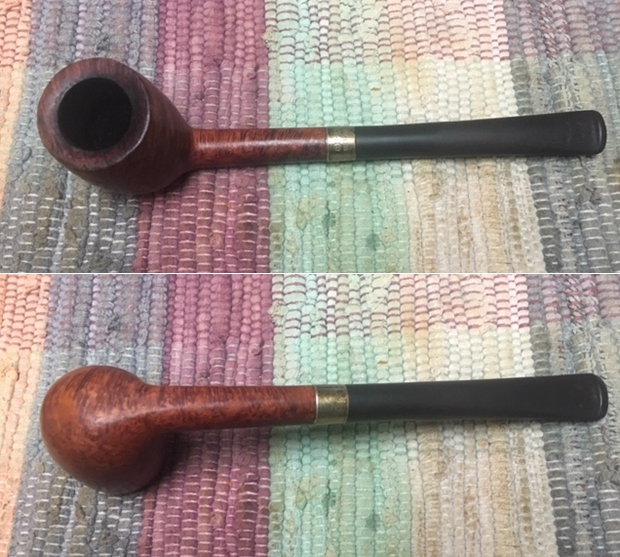
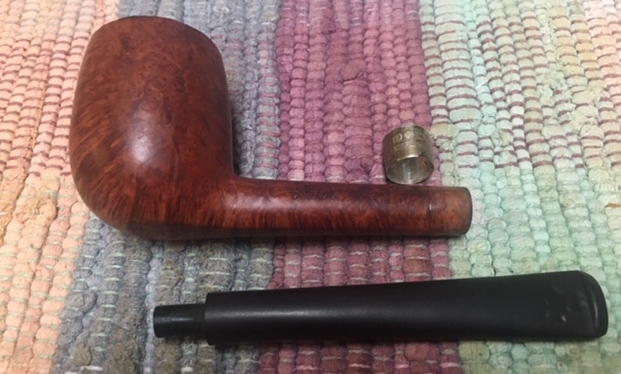
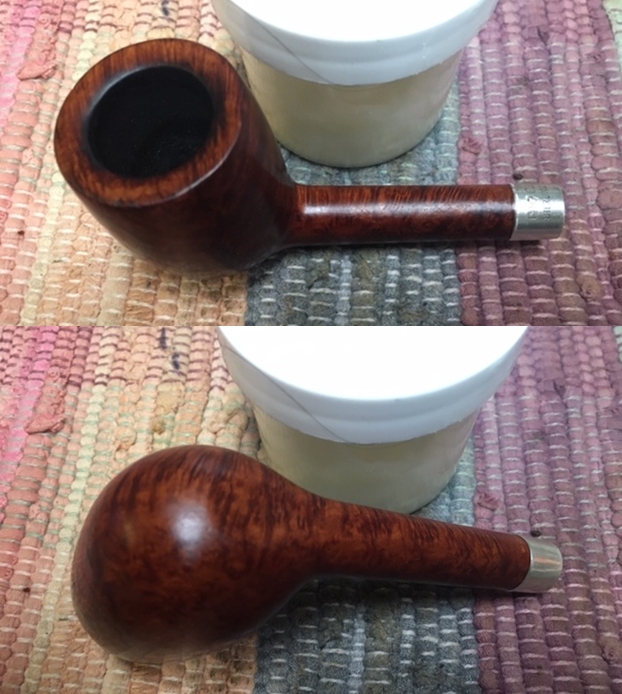
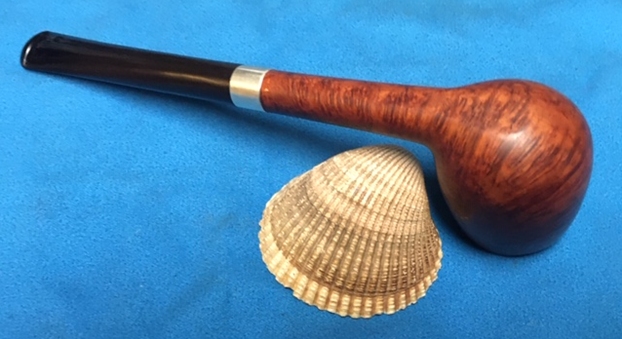
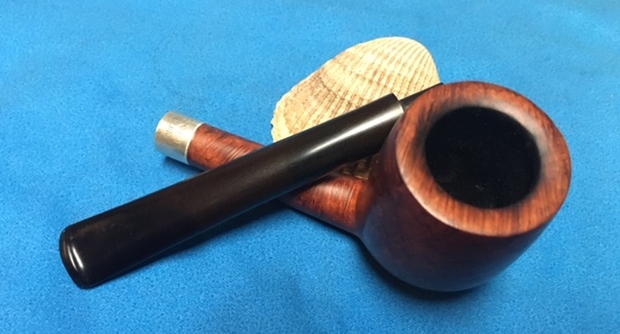
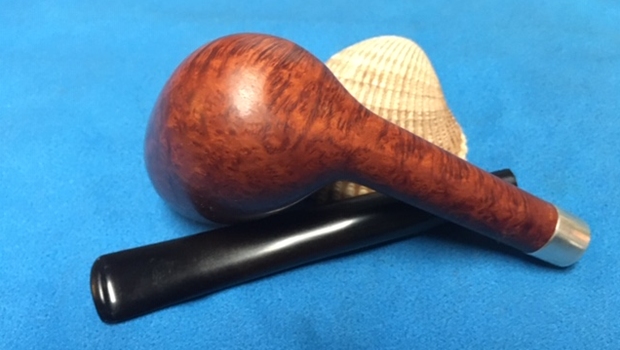
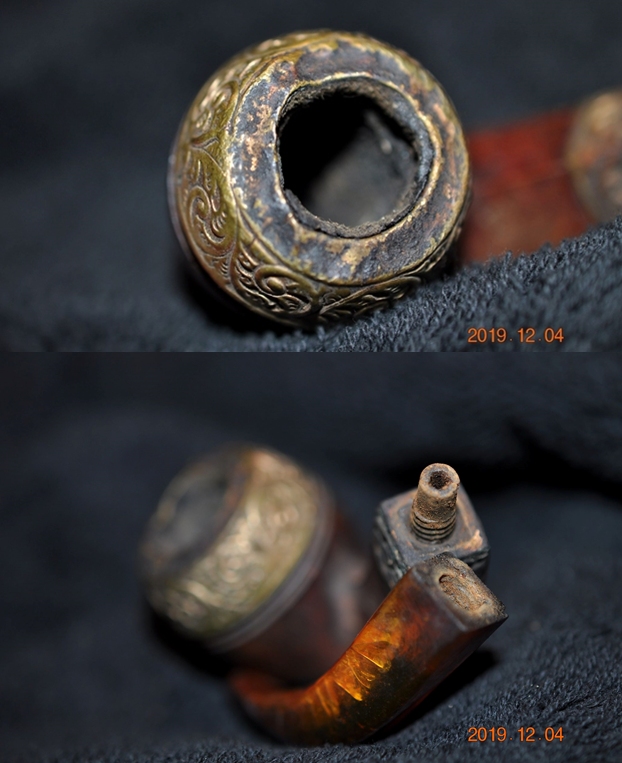
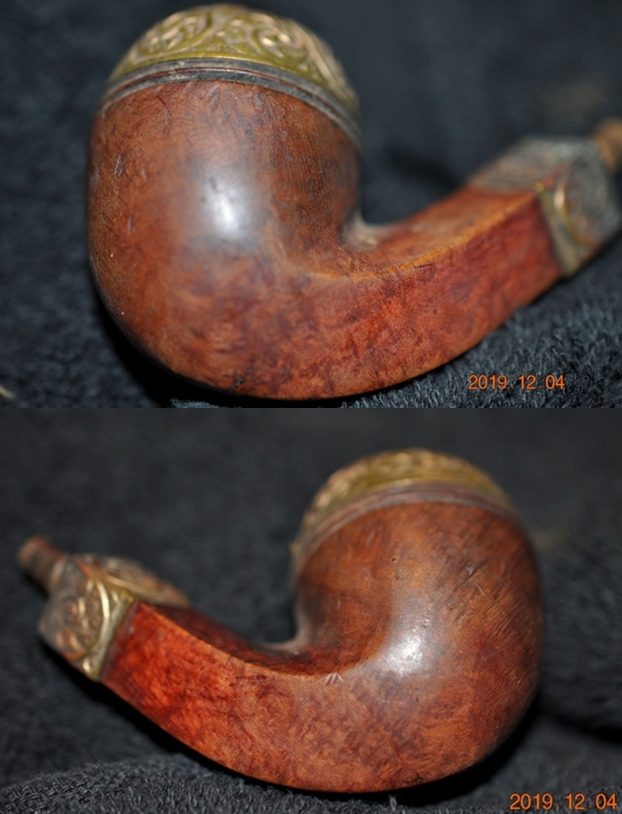
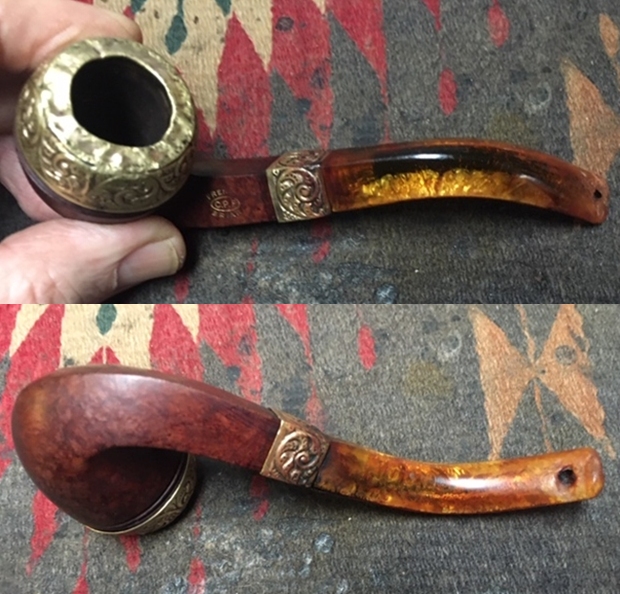
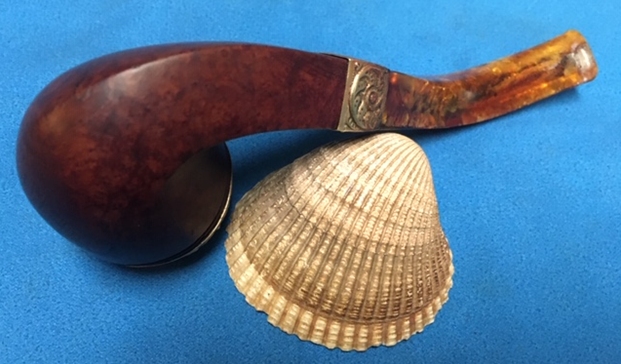
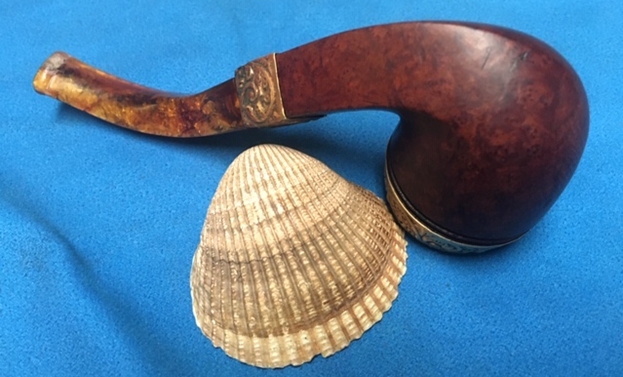
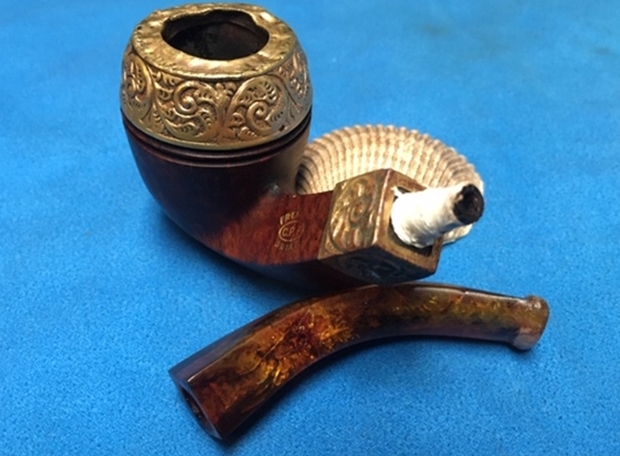
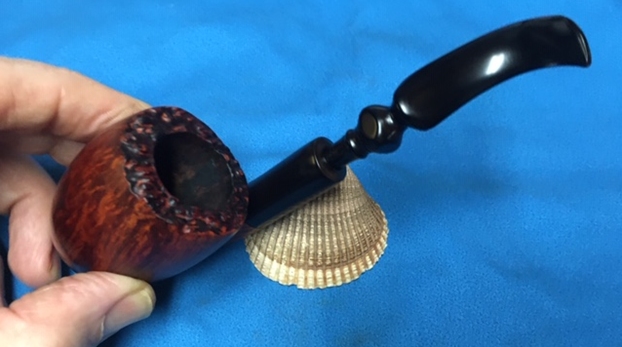
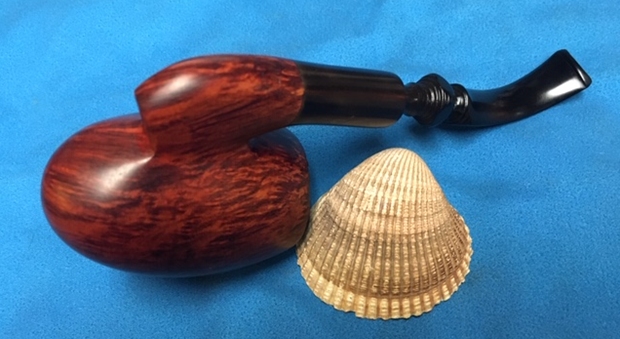
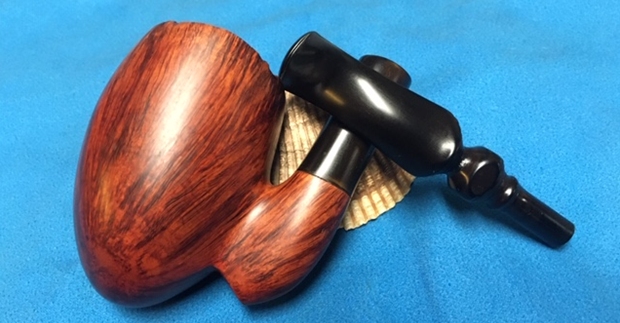
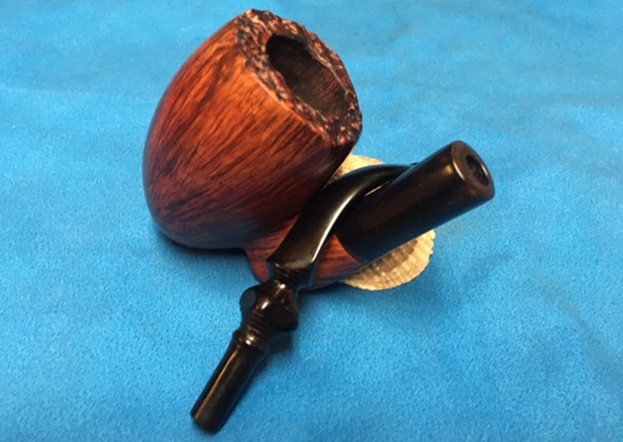
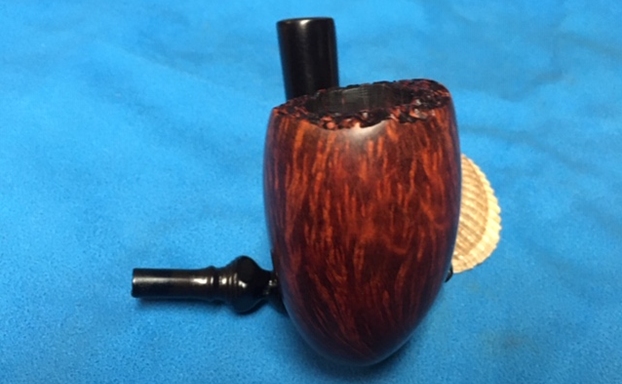
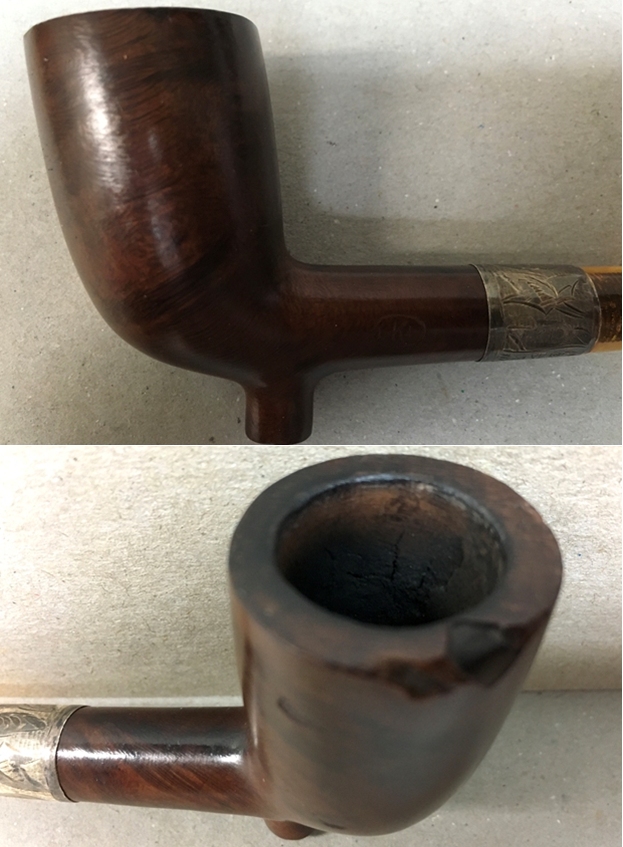
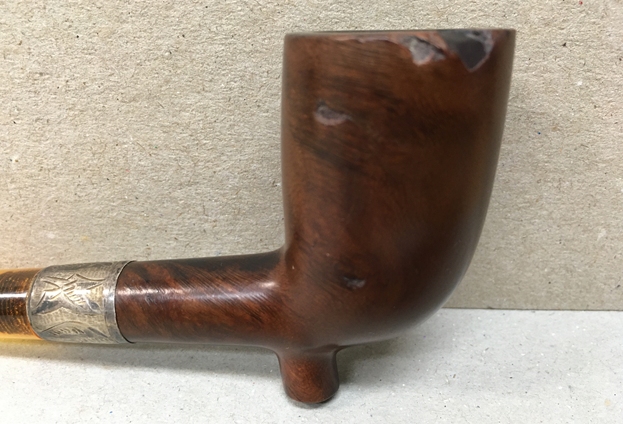
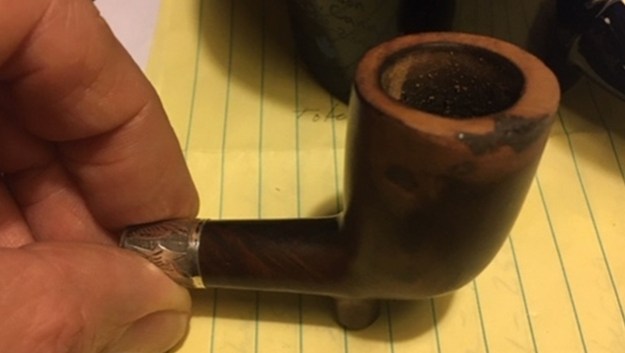
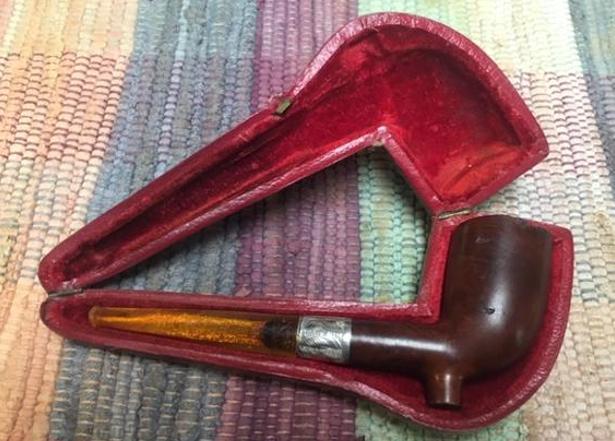
I took the pipe out of the case and took photos of the pipe from all sides to give an idea of the overall condition of the piece. Ray’s earlier photos had captured the essence of the damage on the rim top and right hand side of the bowl. The briar looks good from the left and underside. The rim top shows a damaged inner edge that is out of round. There is also damage to the surface of the rim on the right side as well. It is almost like a large fill had become dislodged. On the right side of the bowl there were large spots where fills had also come out and left pits on the lower and middle portion of the bowl. The silver looks pretty good. It is worn and tarnished and unreadable as it is. 
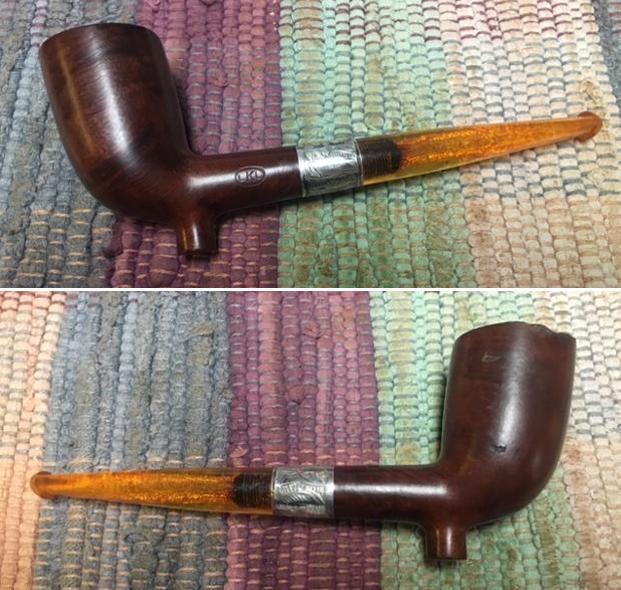
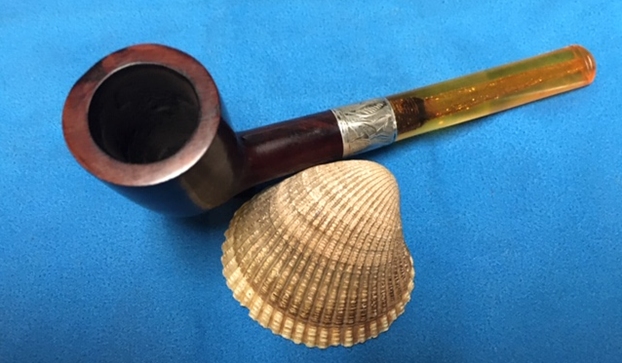
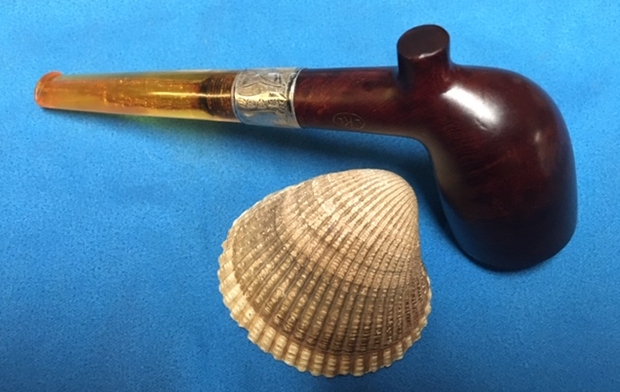
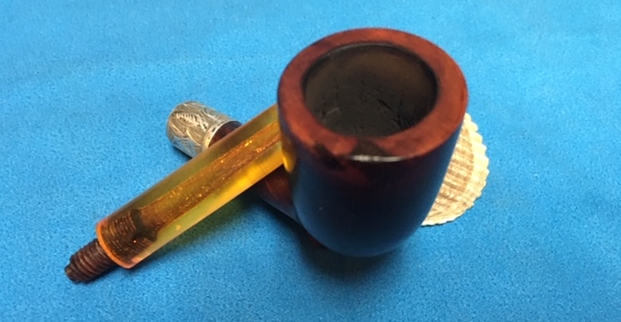
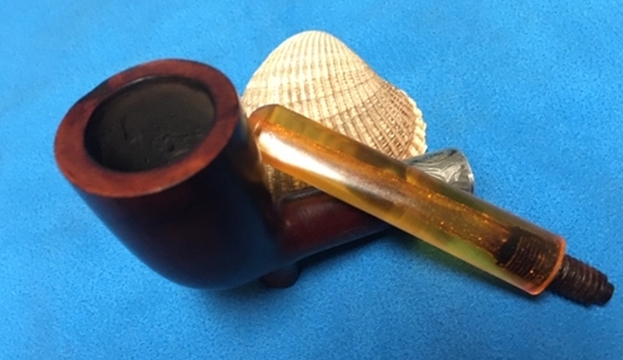
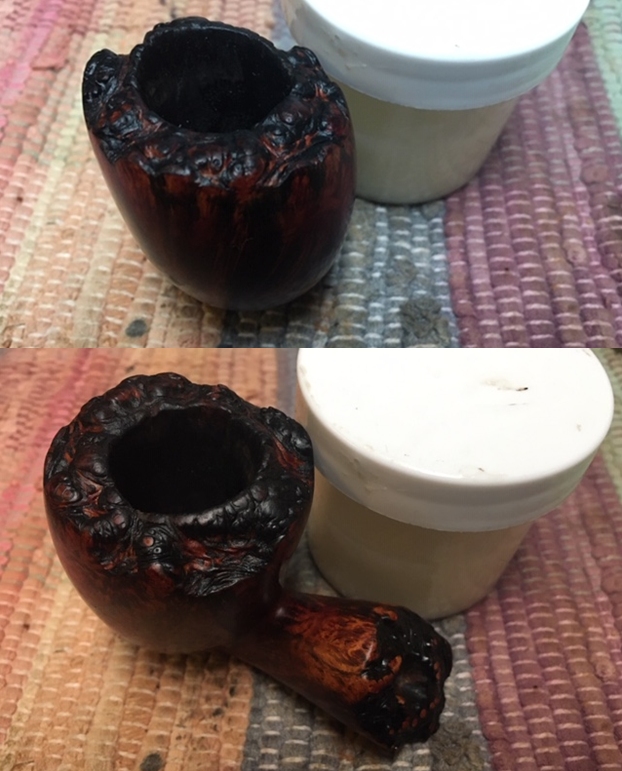
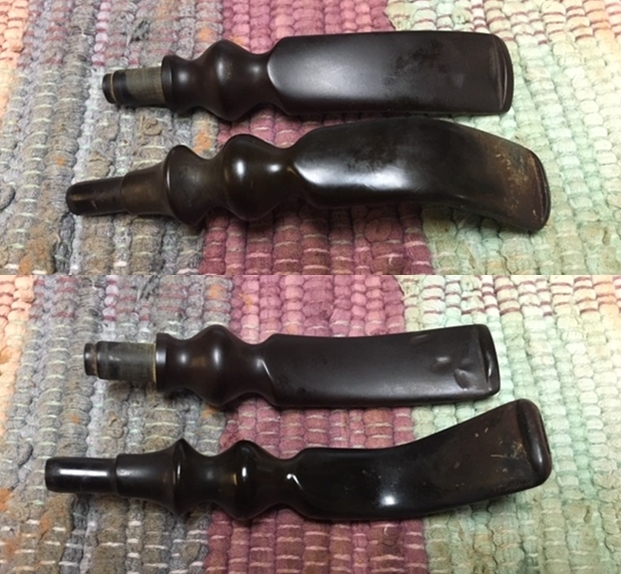
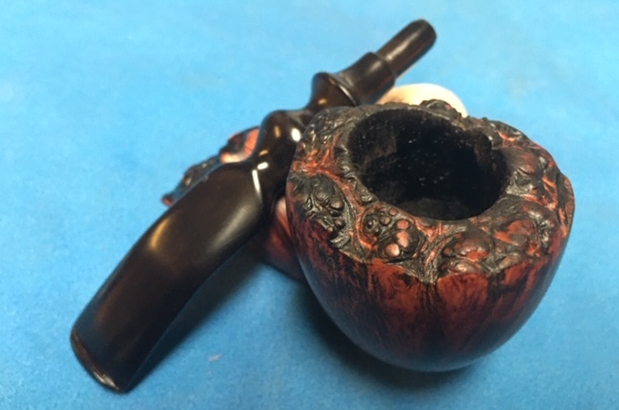
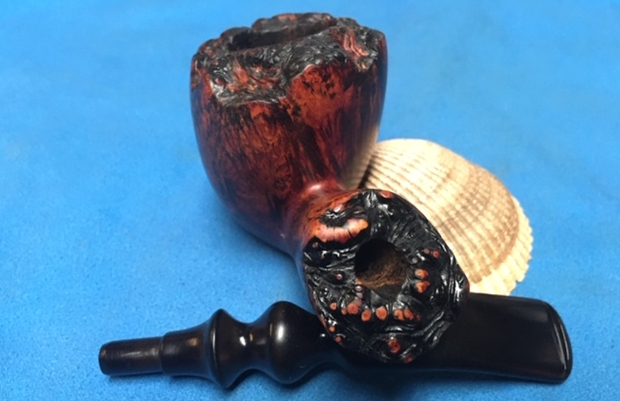
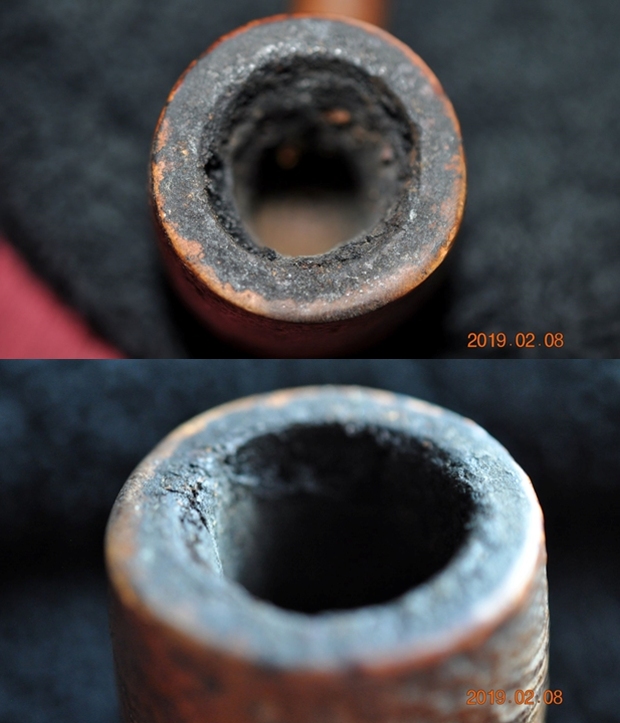
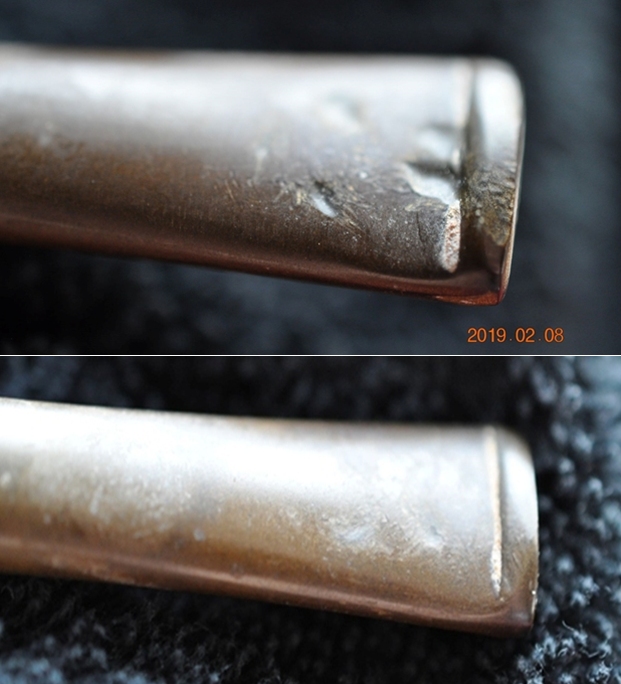
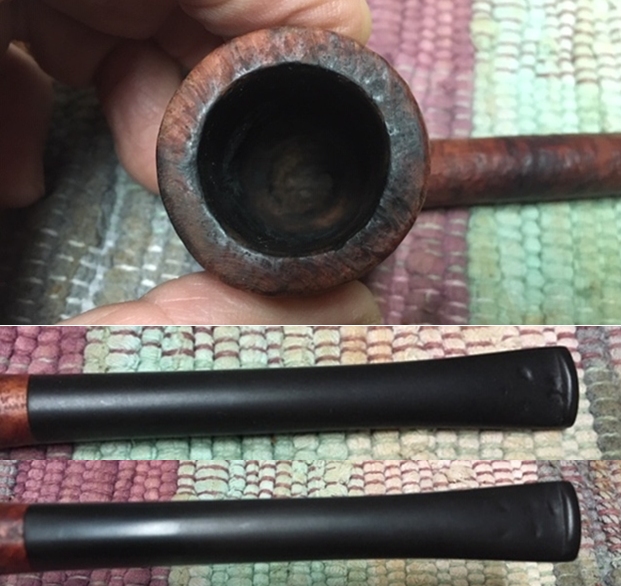
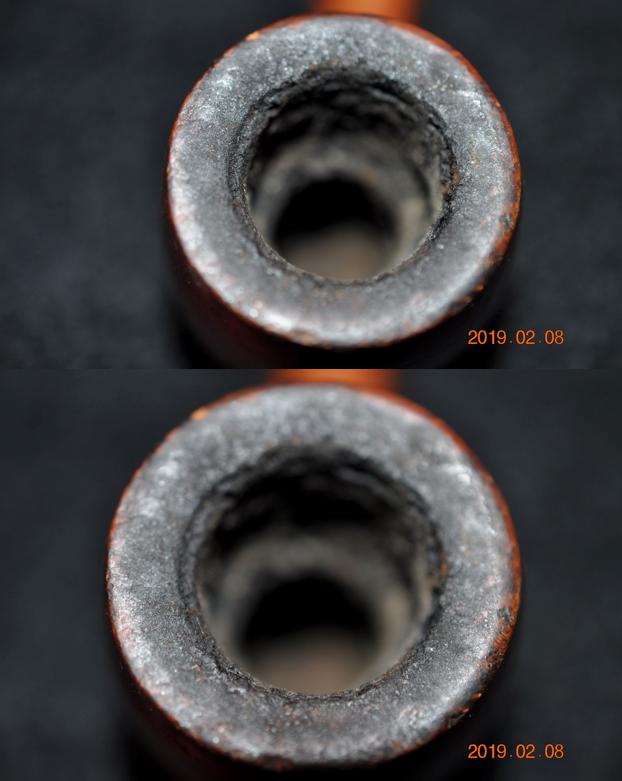
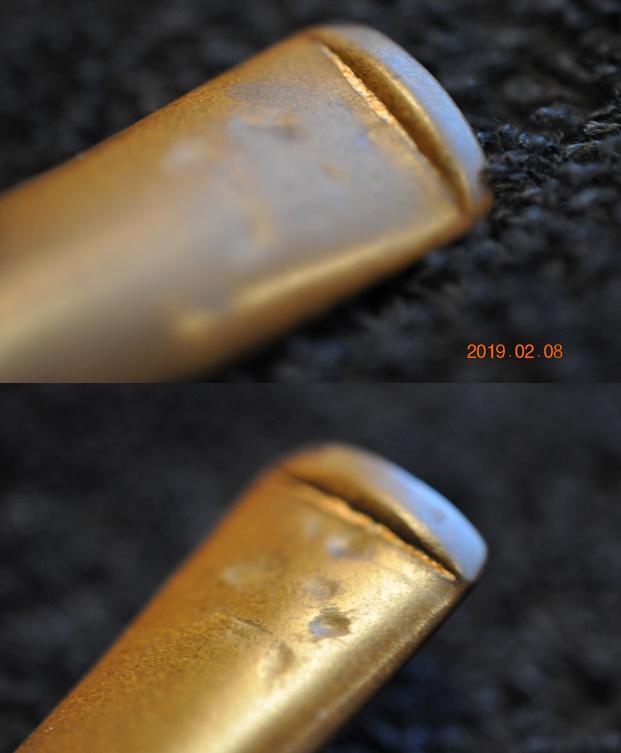
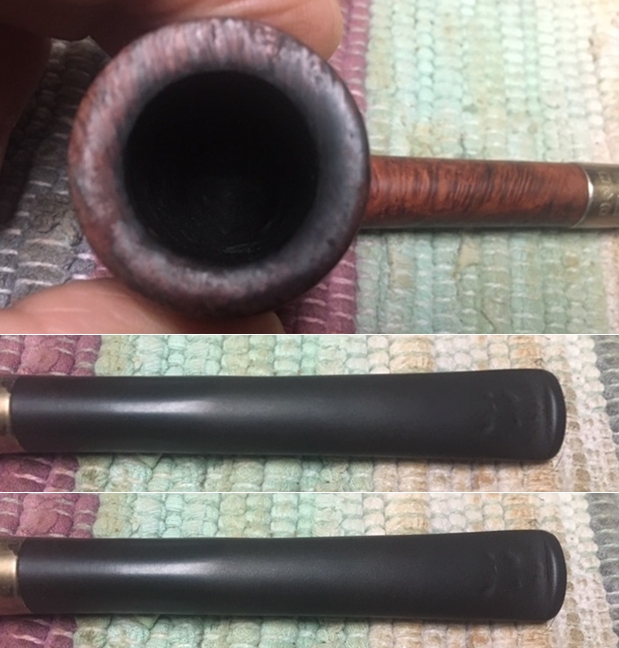
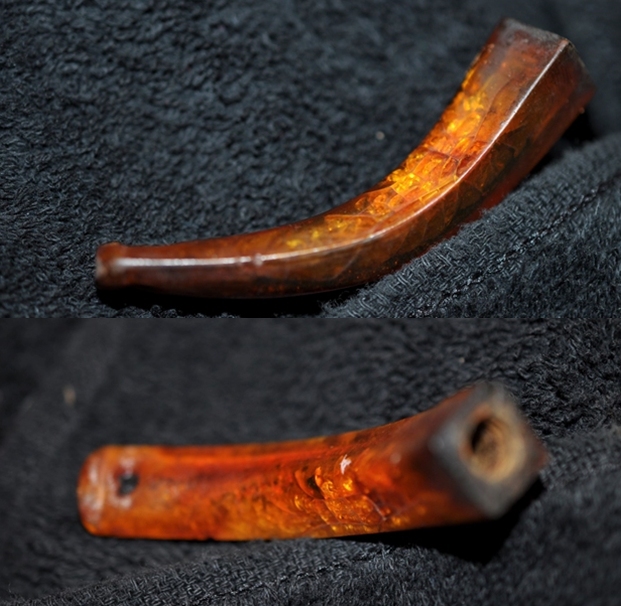
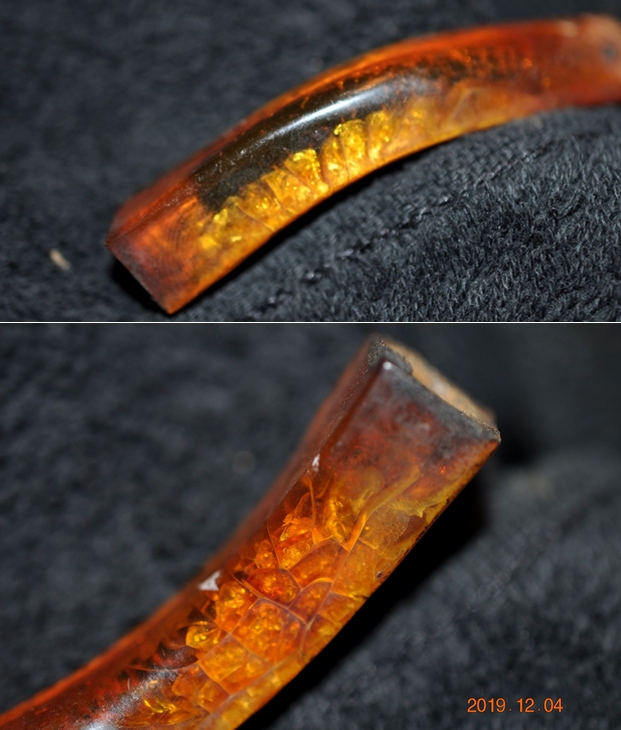
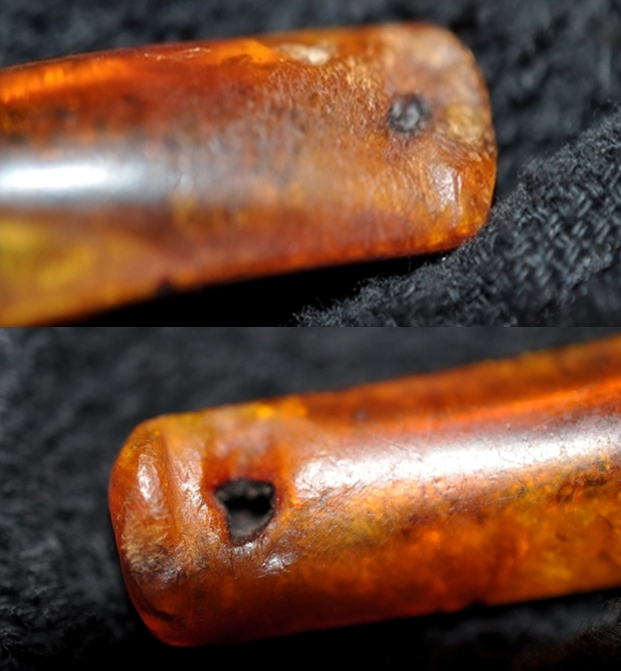
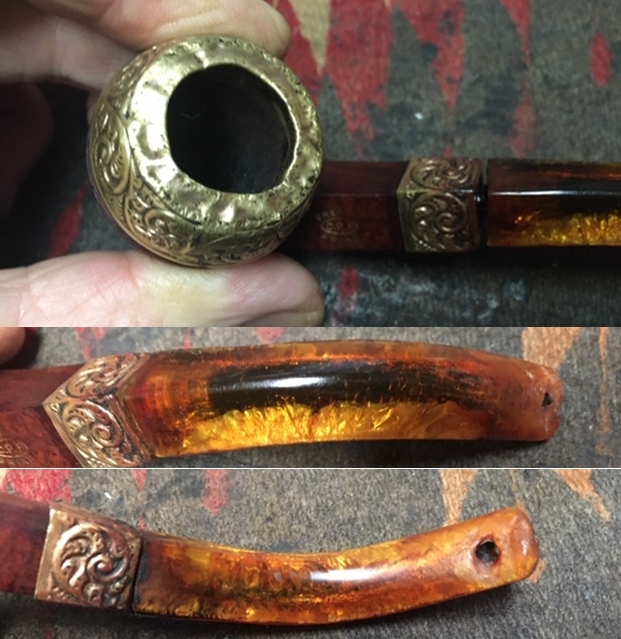
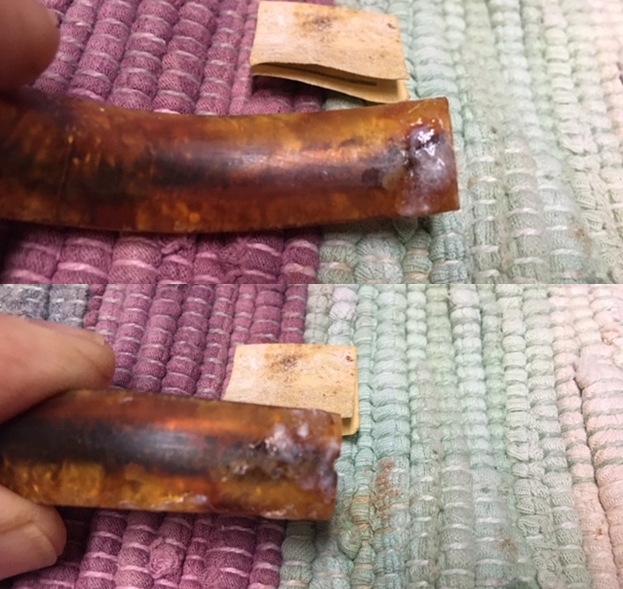
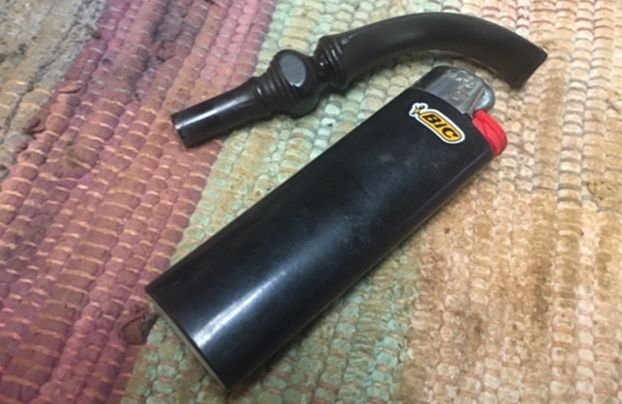
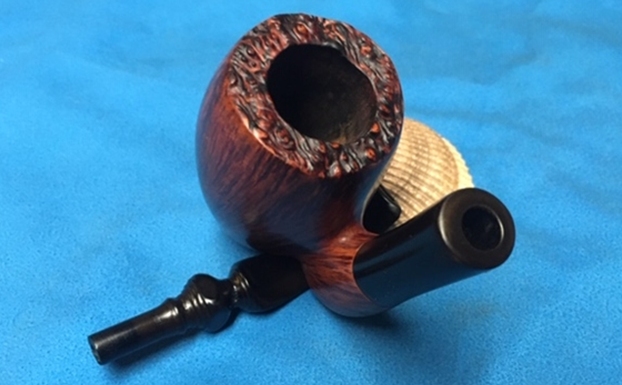
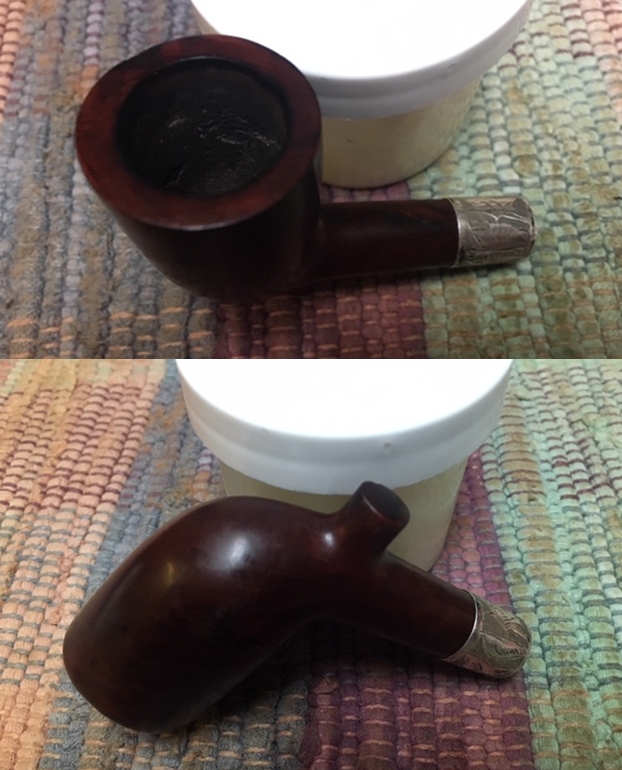
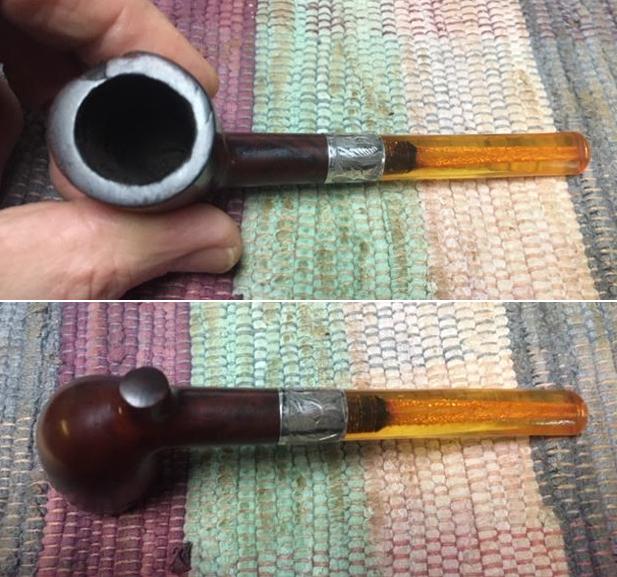
I took a close up photo of the rim top to show the missing fill. I also took photos of the stem showing the overall condition of the surfaces on both sides. There appeared to be some crazing around the airway in the stem. There was also some tooth chatter and light tooth marks on the surface near the button that is hard to see in the photos. But overall it looked very good. 
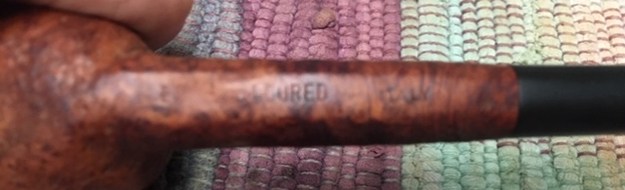
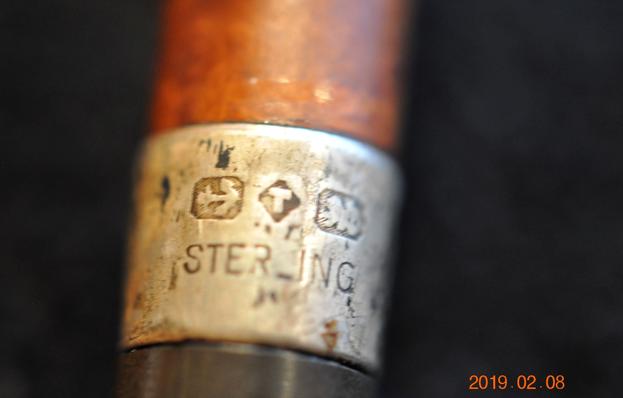
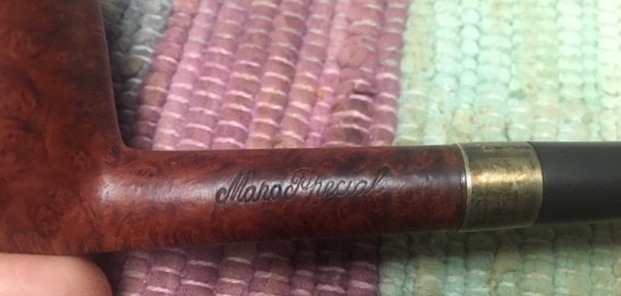
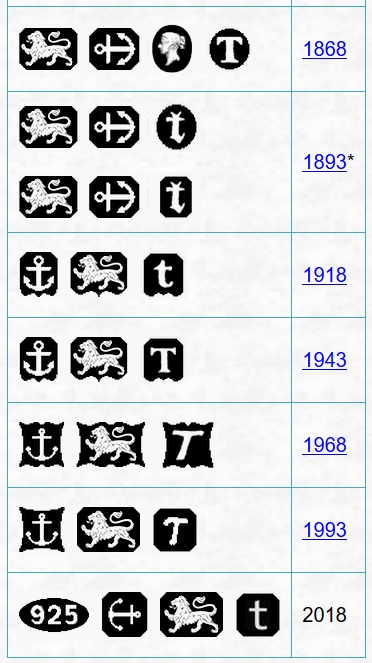
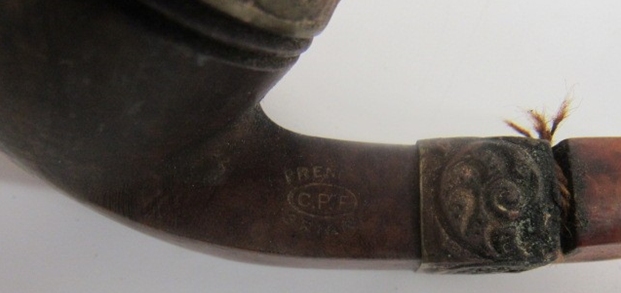
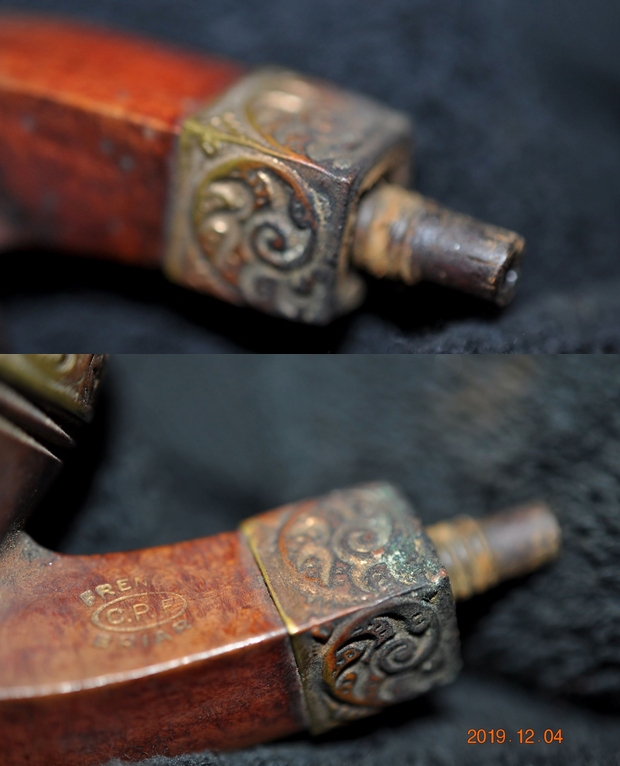
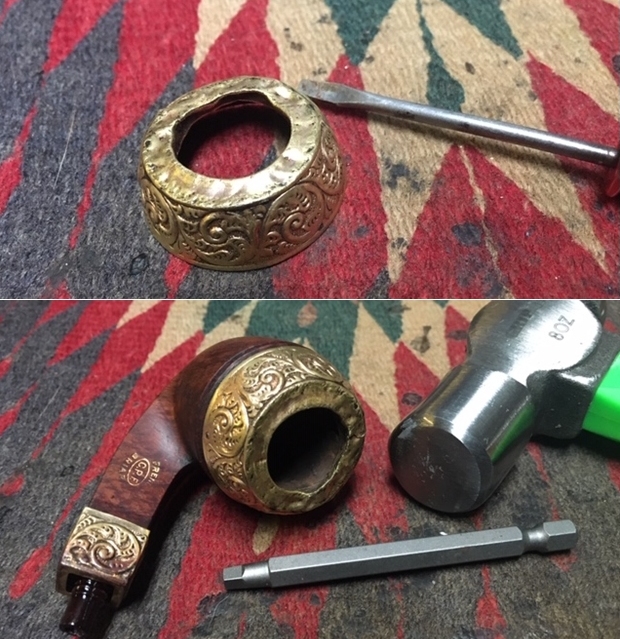
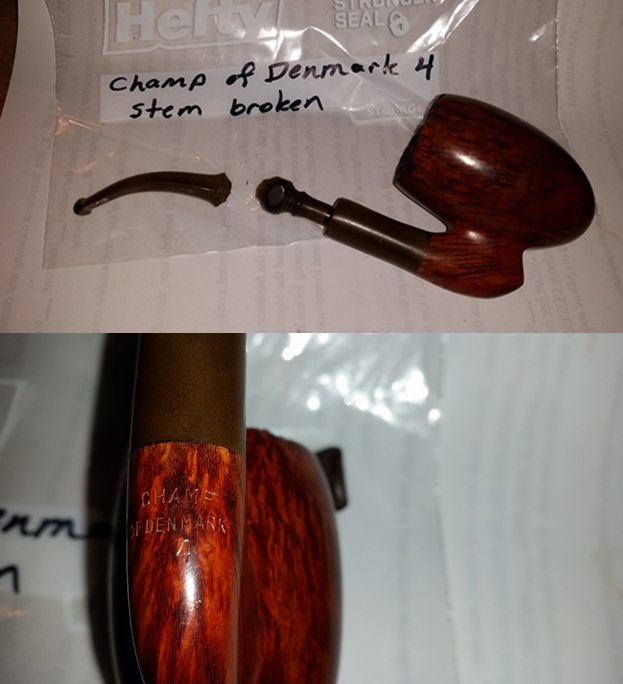
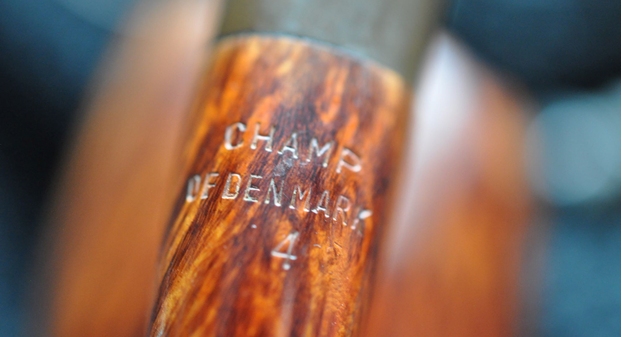
The stamping on the pipe reads LKL in an oval on the left side of the shank. On the left side of the silver band it reads KLd in an oval with the hallmarks underneath. The KLd and the hallmarks are clearly visible with a lens. They are from left to right – a rampant lion followed by the seal that is used to indicate Chester, England and on the far right is a cursive letter B signifying that the pipe was made in 1902.Ray included the following papers in his package. The first of them is a document entitled Tobacconists Pipe Makers Pipe Mounters Silver Hallmarks. I followed the web address on the bottom of the document to the original page and have included a screen capture. That document has a highlighted portion on the bottom identifying the markings on the silver band on this pipe. It is KLd in an oval which identifies  Charles Maxwell Kinnear trading as Kinnear Ltd. – Manchester as the mother company. It further shows that the group worked as Pipe Mounters in Chester starting in 1901. http://www.silvercollection.it/DICTIONARYTOBACCONISTK.htmlRay also sent along a paper with the dates for pipes made in Chester that had the hallmarks that this pipe had on the silver. I have included a photo of that below. You can see that he has highlighted the markings for a 1902 pipe.
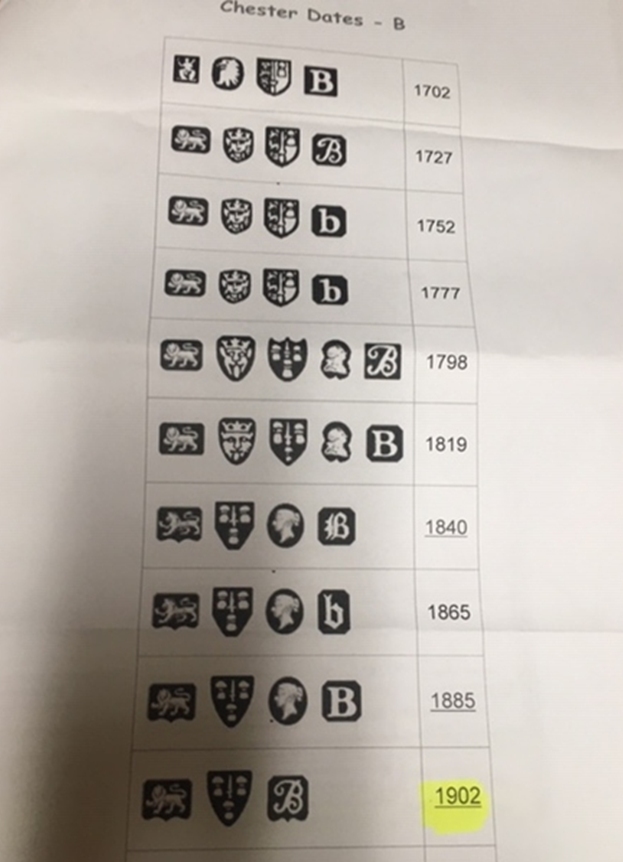
He also cut out that section of the chart, rolled it and inserted it in the bowl.
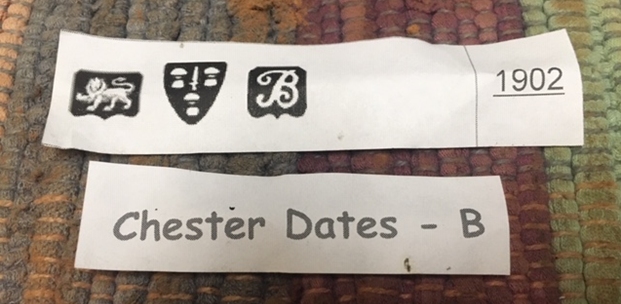
Now I clearly knew when the pipe was made and banded. The KLd stamp on the band was also now a Pipe Mounting Company in Chester. The one thing that was not clear to me yet was who LKL was that had carved the bowl. I checked on Pipedia and Pipephil’s site and neither one had a listing for either the LKL stamp or the KLd stamp on the silver. I took a chance on the stamping that it may well have read KLL since the K was larger than the L’s on either side and did a search for Kinnear pipes. That lead to a link on Pipemagazine’s forums where a fellow quote Jon Guss’ response to a fellow posted a pipe similarly stamped to this one. Here is the link to the full thread (https://pipesmagazine.com/forums/threads/1901-kinnear-restoration.61696/). I have quoted the pertinent part for the pipe I am working on.

…I think a much better candidate is Charles Maxwell Kinnear (b. Edinburgh 1872, d. Liverpool 1939), who’s involvement in the tobacco trade was a) documented, b) encompassing exactly the right time period (all his hallmarks were registered in 1901-1902), and c) at the right place (his hallmarks were registered in Chester). See: http://www.silvercollection.it/DICTIONARYTOBACCONISTK.html.

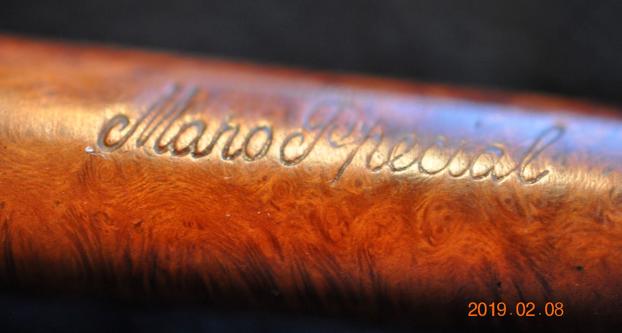
The Wikipedia entry for Kinnear’s father (a famous architect; see: https://en.wikipedia.org/wiki/Charles_Kinnear)  states that his son Charles became a tobacco manufacturer, and this was clearly true for at least 14 years. As a young man in 1891 the census lists him as apprenticed to his maternal uncle, an “american produce merchant”. What exactly that means is unclear. But by 1896 Kinnear pops up in Manchester trading as Leon Marcus & Co, a cigarette and tobacco manufacturer. He bought the business about that time from its founders, Leon Marcus Sogolowitch (1860-1919; a man who was a travelling salesman in the cigar and cigarette business both before and after his brief foray as a manufacturer), and Joseph V Lester. By 1900 Kinnear had relocated to Liverpool and was doing business under his own name as Kinnear Ltd at 49-57 Park Lane West.

About a decade later Kinnear left the tobacco business to enter into partnership in an enterprise called Dorn, Harding & Co, effective January 1, 1911. They were rubber brokers and merchants. This evidently failed since by the end of that same year the partnership was dissolved. What happened to Kinnear over the next 28 years before dying outside Liverpool at the age of 66 in 1939 is unknown to me. – Jon Guss

I think that I have now nailed down the provenance of this pipe as a Kinnear Ltd. made Cutty. Thus linking Kinnear not only to the Chester band but also to the manufacture of the pipe itself. With that done it was time to work on the pipe.

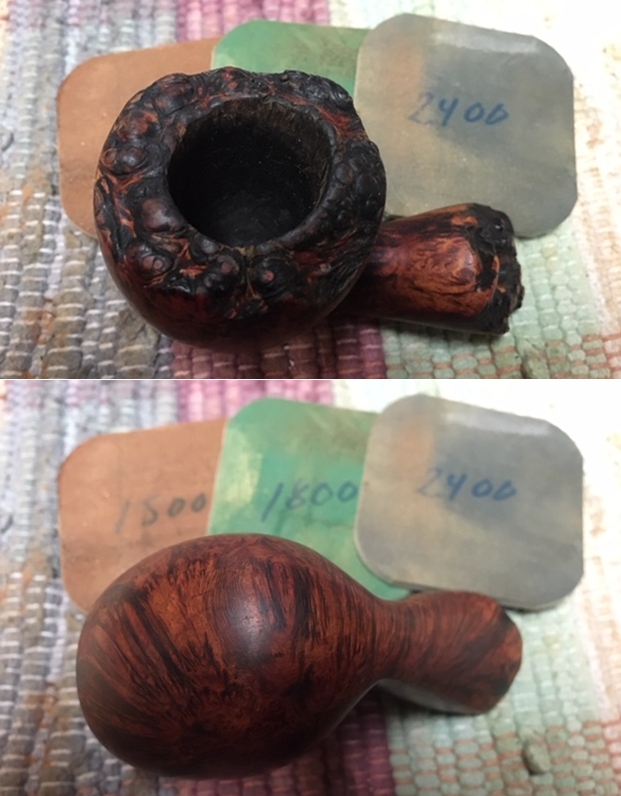
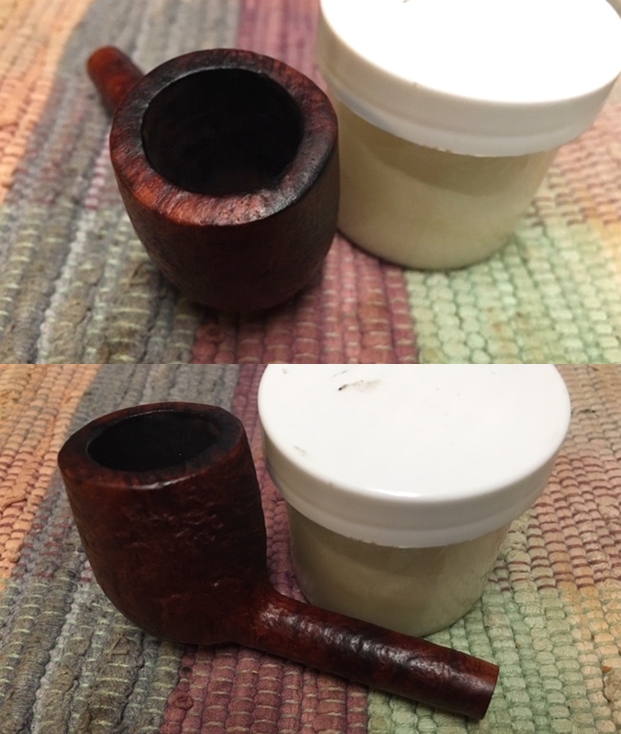
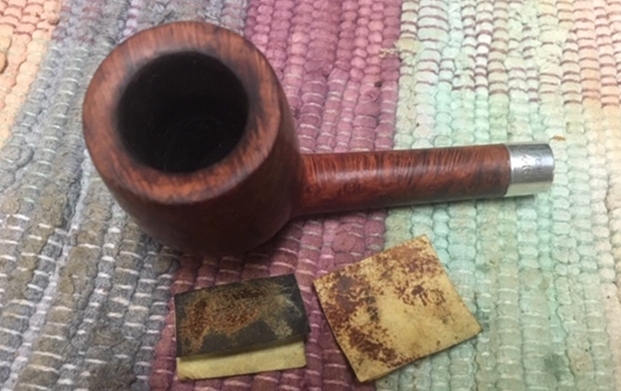
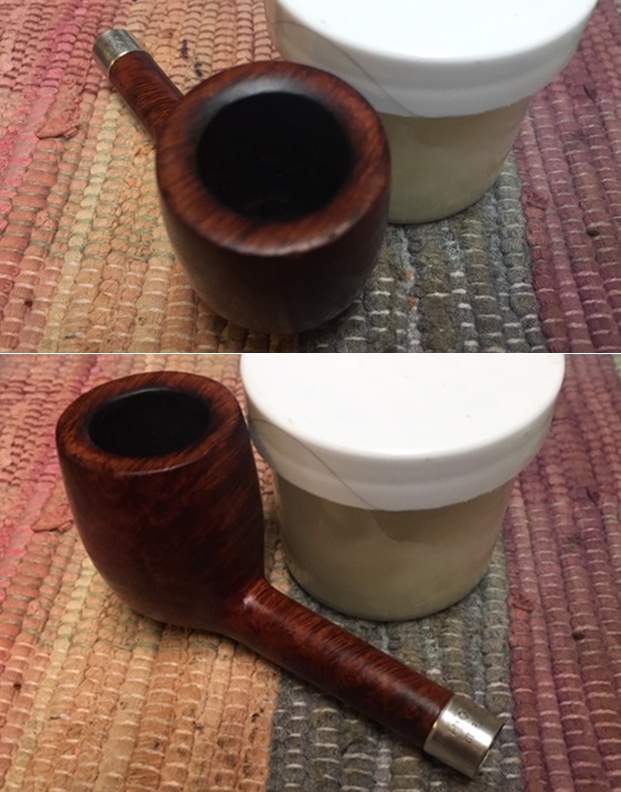
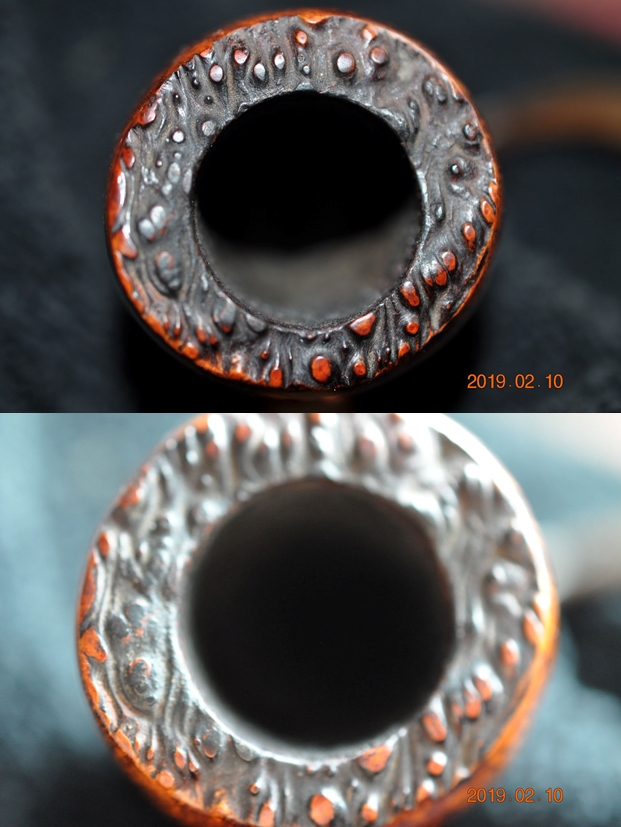
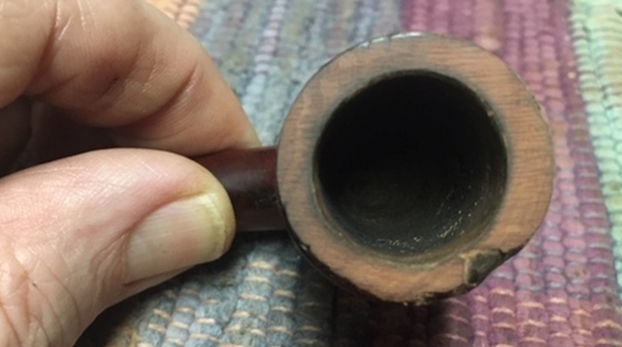
I started with the issues at hand with the pipe – the out of round inner edge of the bowl and the missing fills on the side and rim top. I began by taking a couple of photos of the bowl to show the damage that needed to be addressed.I started my work on the bowl with the out of round inner edge of the rim. I used a folded piece of 220 grit sandpaper to clean up the rim edge. To prepare the top of the rim for the work that needed to be done I lightly topped the surface of the rim to make it clean and smooth. The added benefit was that the out of round edge was also much better between the sanding and the topping. The third photo below shows the cleaned up rim top and inner edge of the bowl. There is some progress on reshaping and repairing this pipe. 
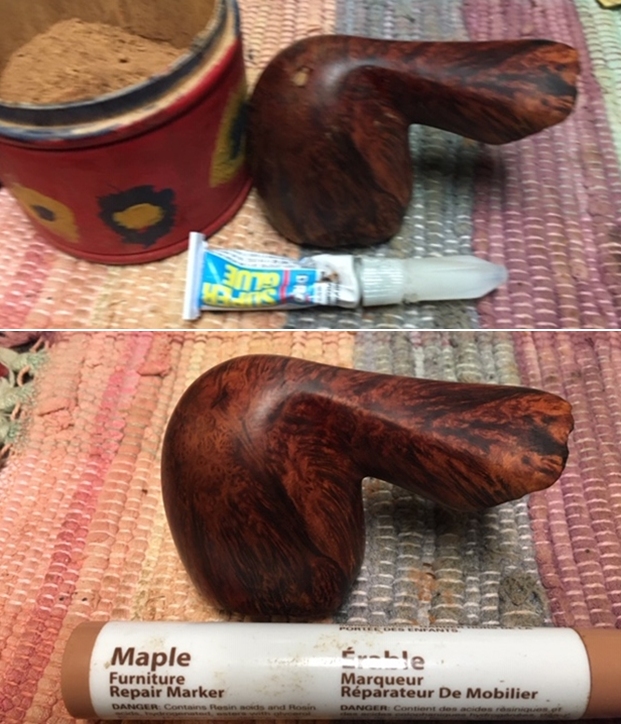
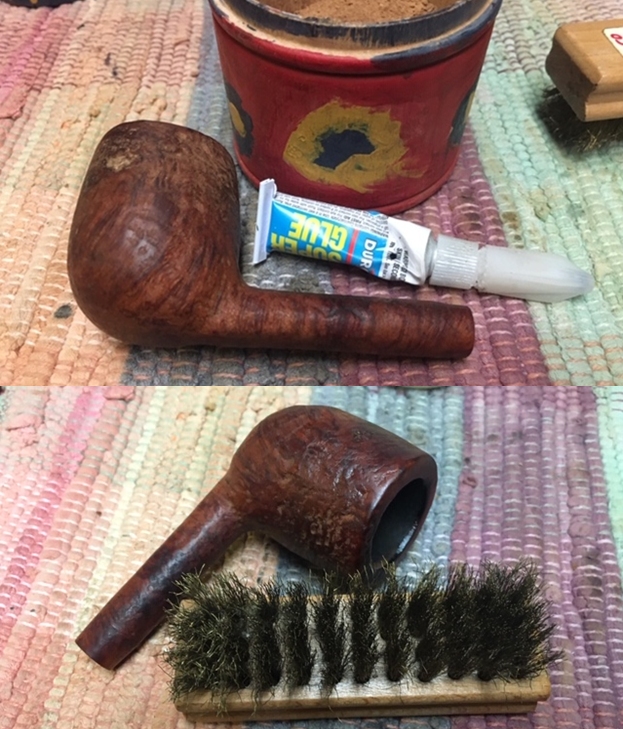
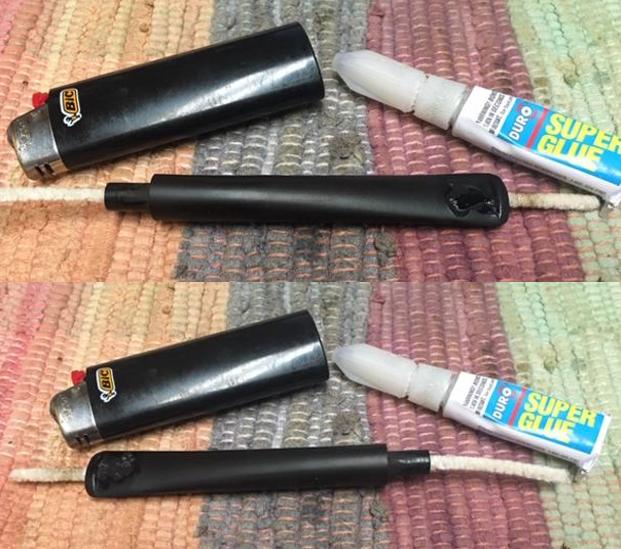
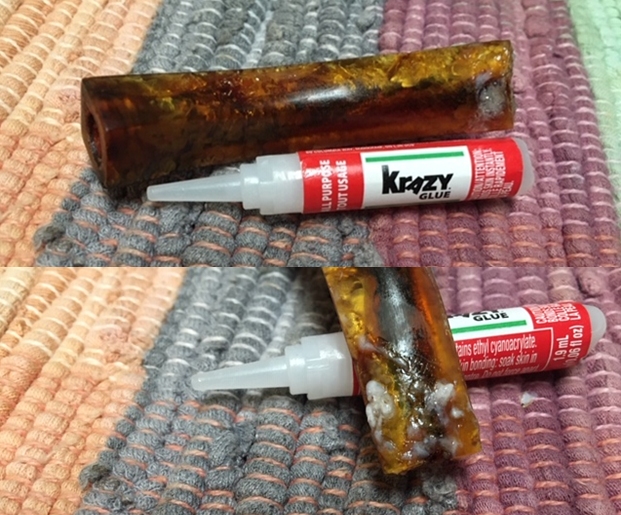
The rim looked much better at this point in the process. The inner edge looked much better and was round again. Now it was time address the issue of the missing fills. I am pretty convinced that the damage to the rim top and bowl side did not come from a drop or damage but rather was the result of an old putty fill falling out along the way. I have found that in many of the old briar pipes from the early 1900s that I have worked on that the fills will dry out and drop out somewhere along the journey. I decided to rebuild the fills but instead of using putty to use Krazy Glue and briar dust. I put a drop of glue in each damaged fill and press briar dust into the glue. I repeated the process until the holes were filled in. I used this method on both the rim top and the right side of the bowl. The pictures below show the process.
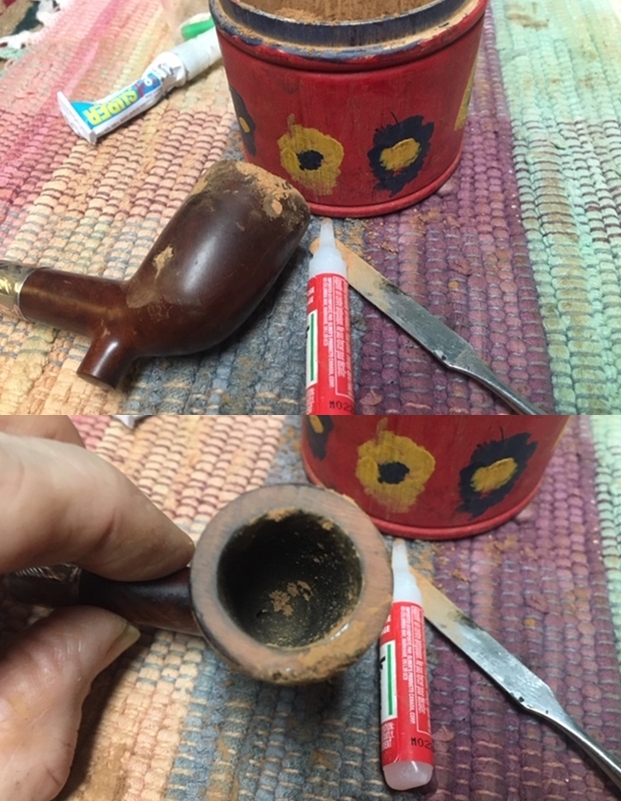
I sanded the repaired areas with 220 grit sandpaper once the fill had cured. The first step of the repair was complete. The repairs were smooth with the surface of the surrounding briar. I needed to a lot more sanding and blending but it was getting there.
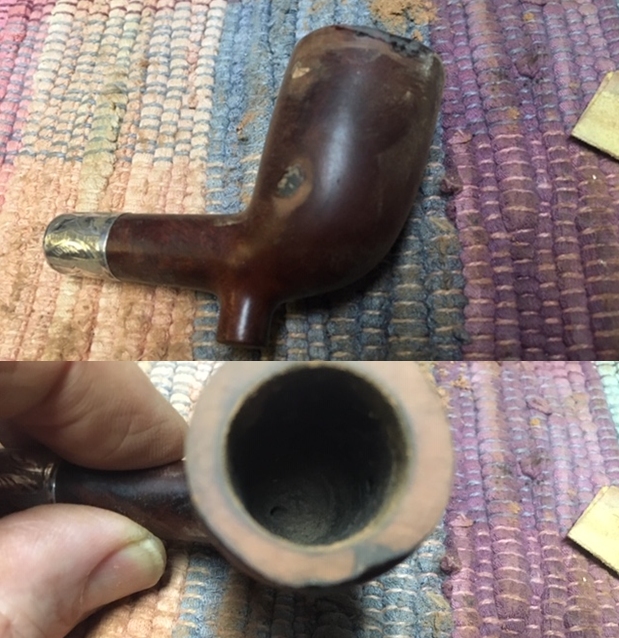
I did some more sanding with 220 grit sandpaper and took some progress photos. 
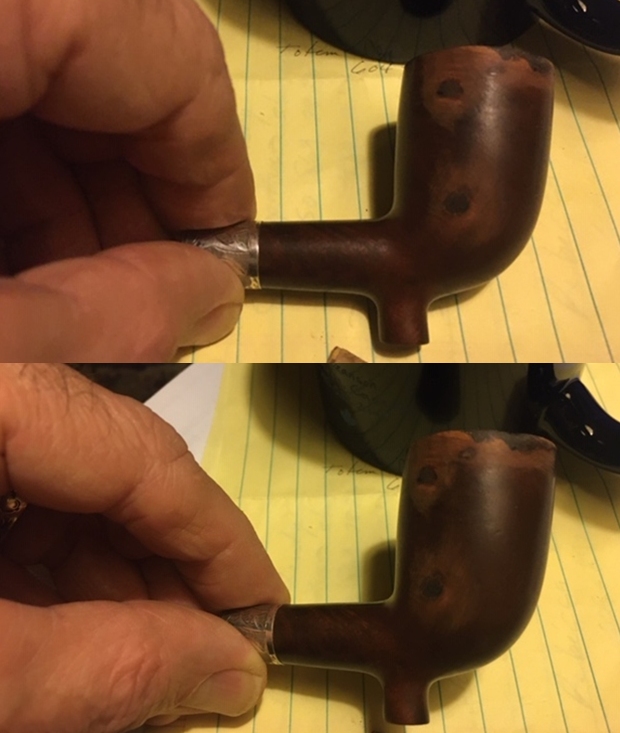
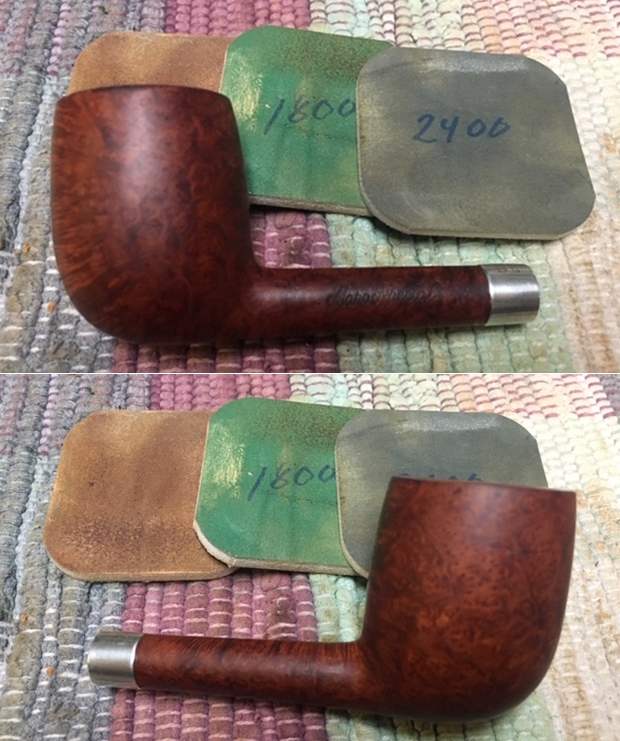
I continued to sand the repaired areas with 400 grit wet dry sandpaper. I wiped the areas down with a damp cloth and took the photos.
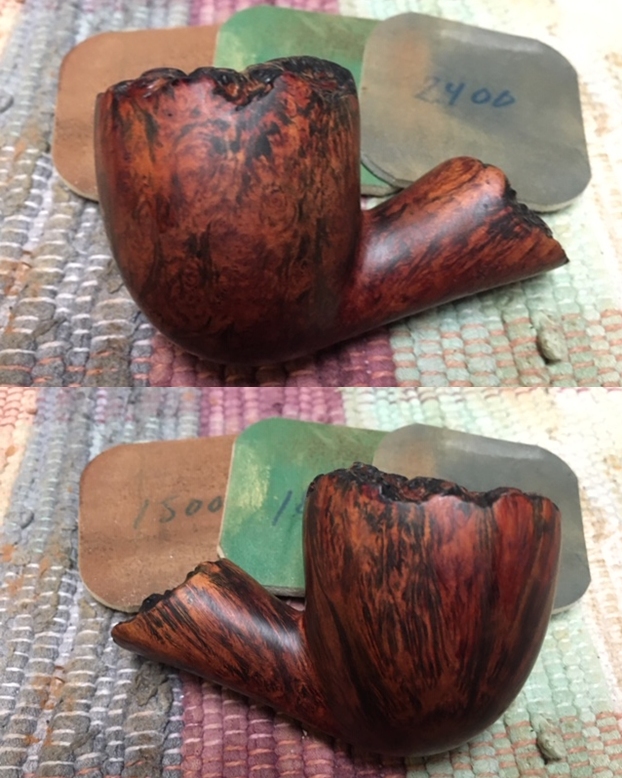
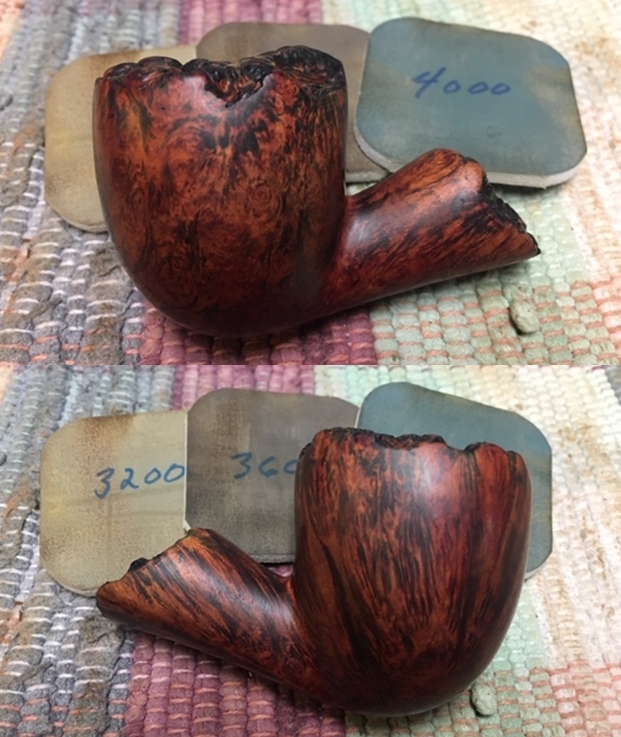
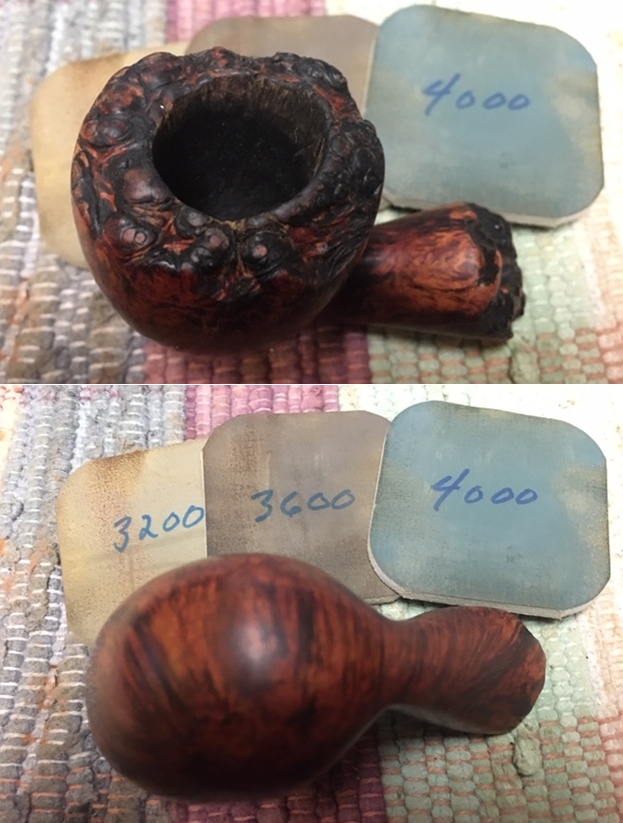
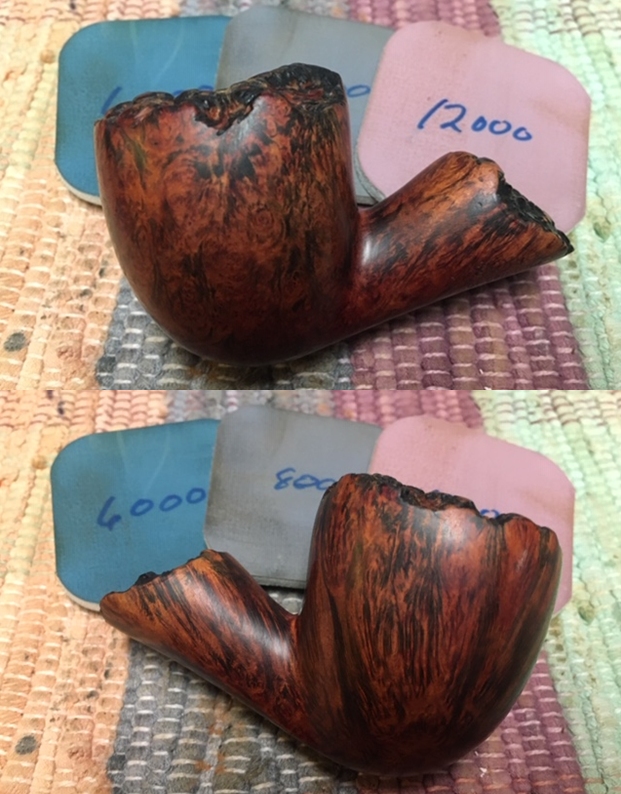
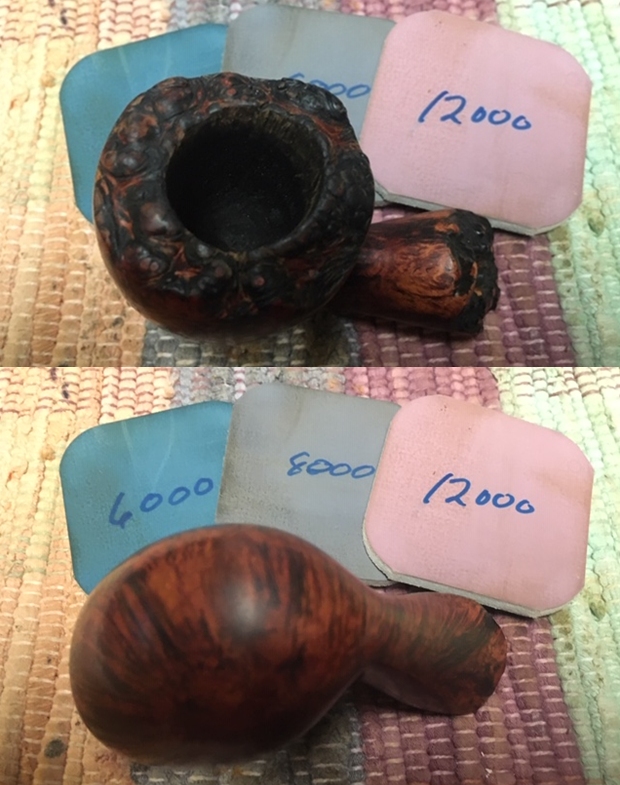
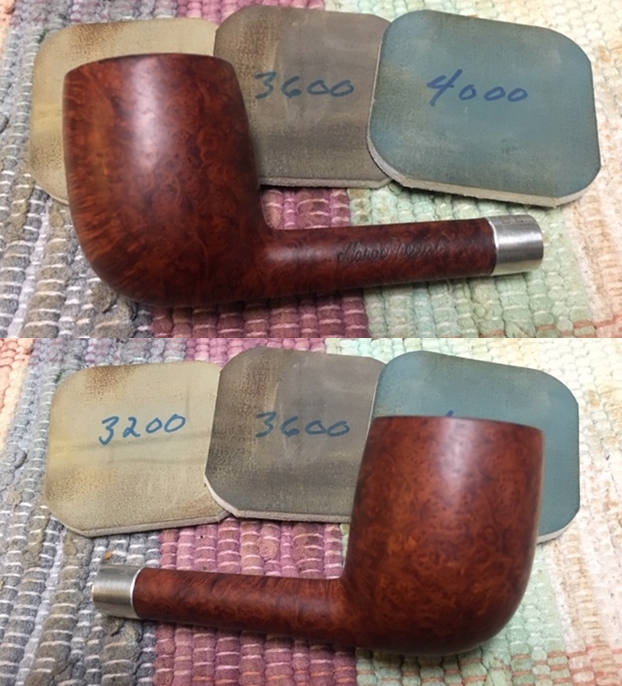
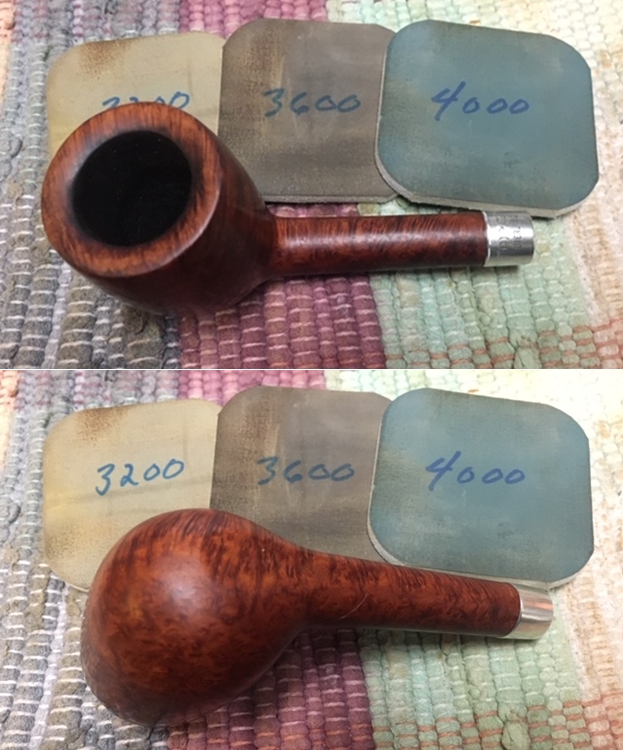
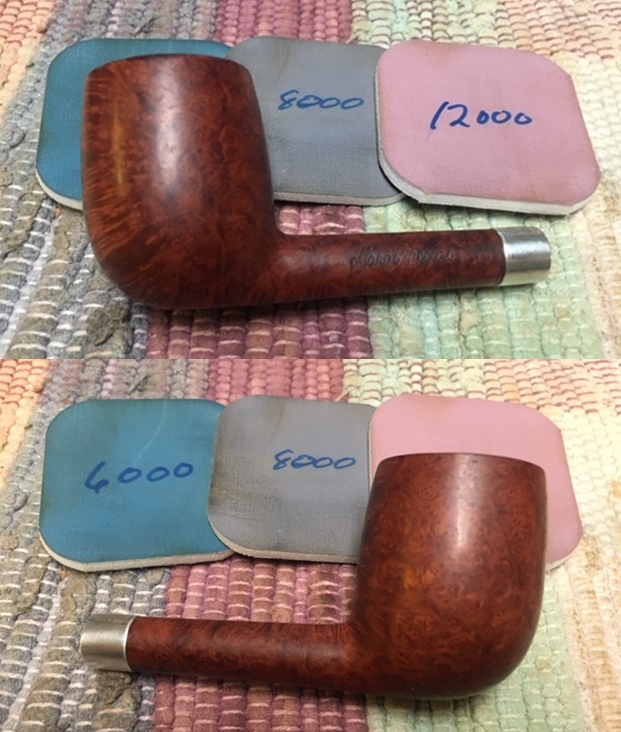
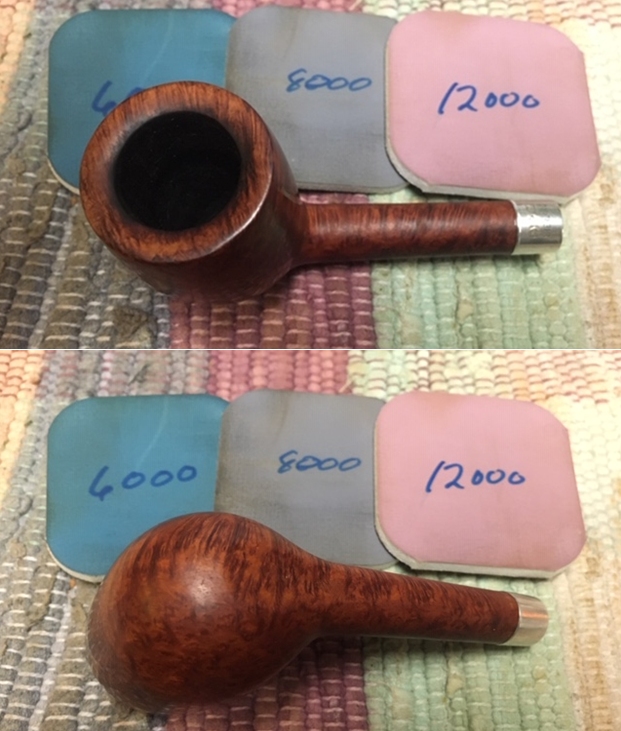
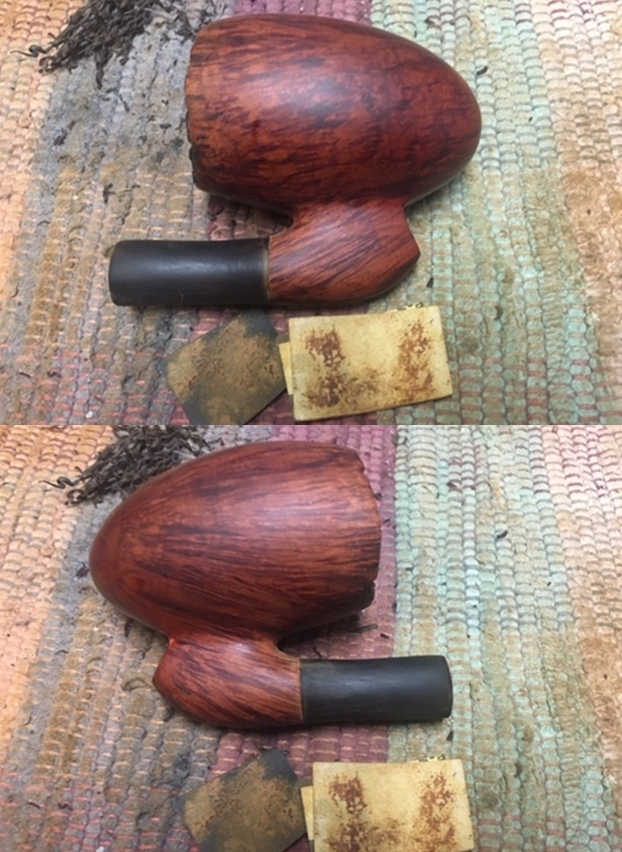
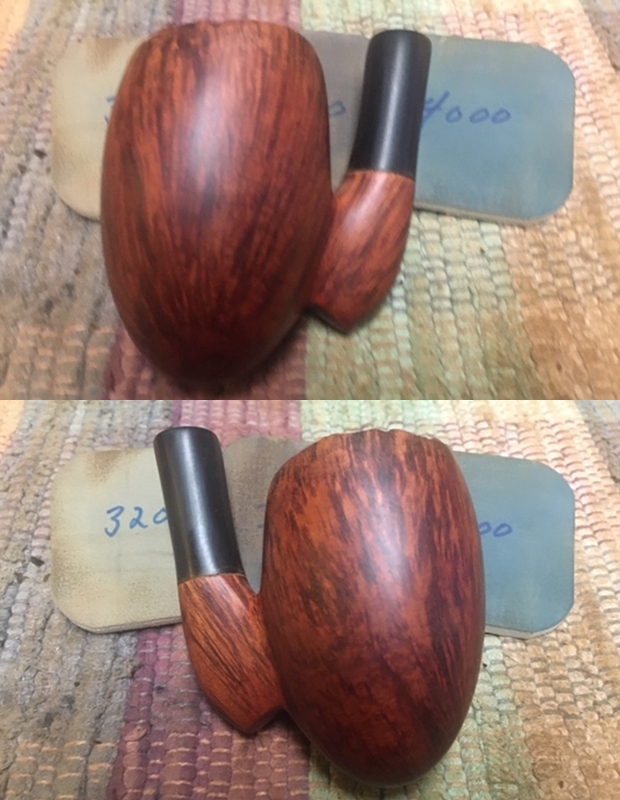
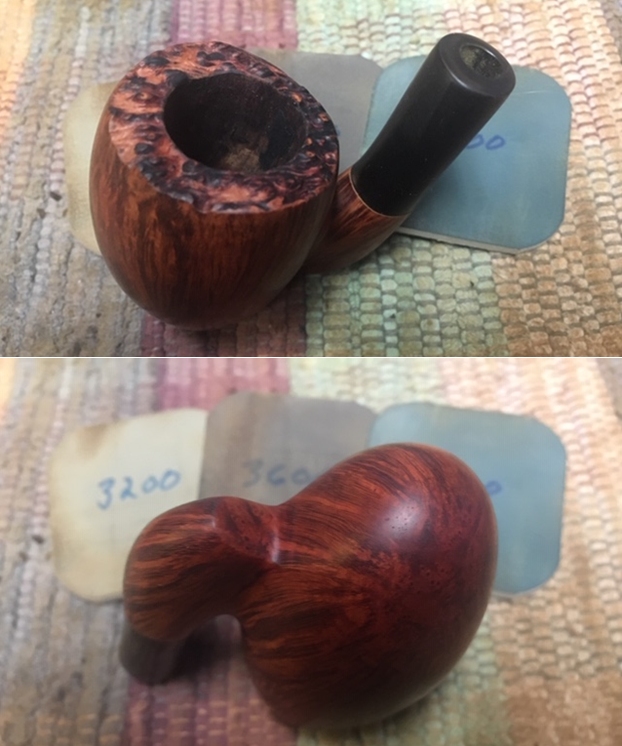
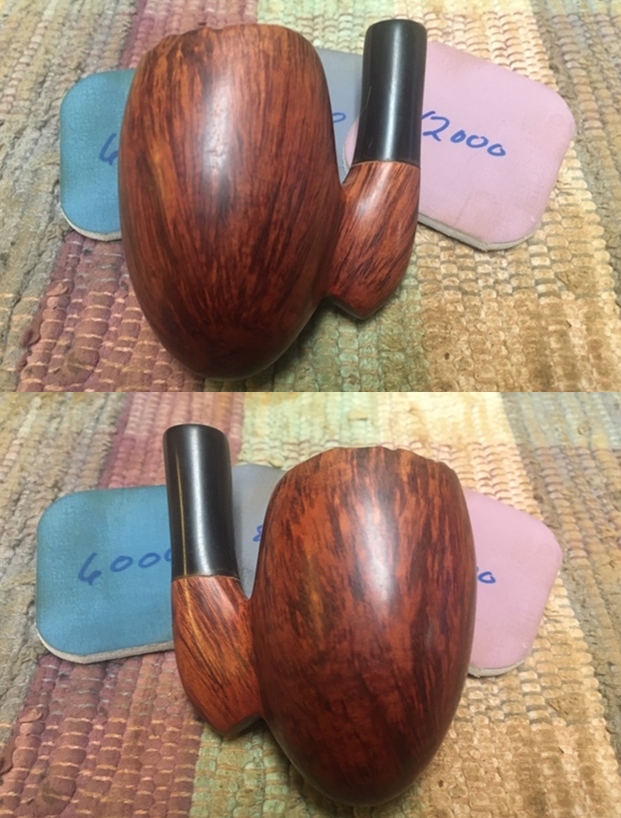
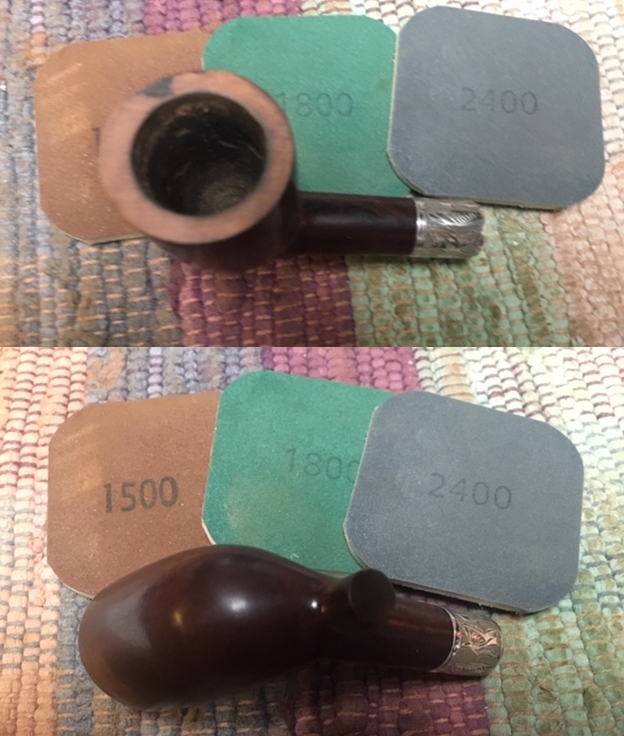
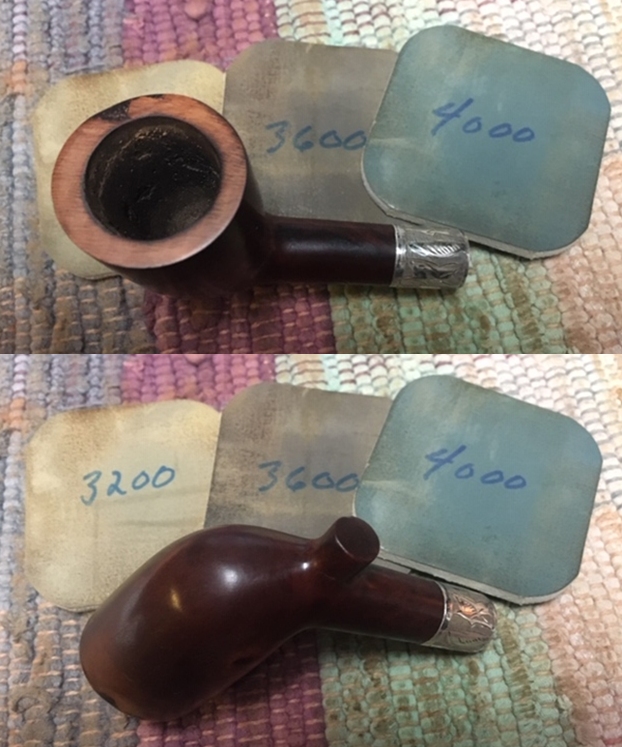
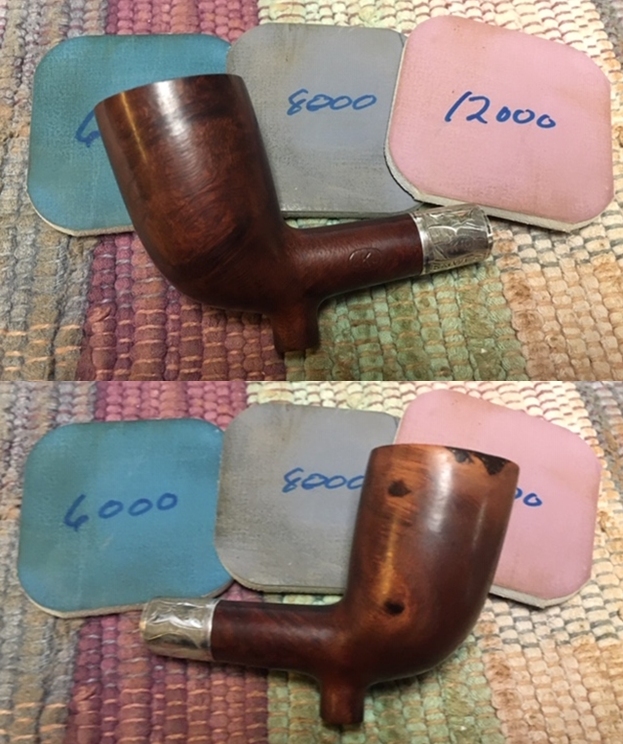
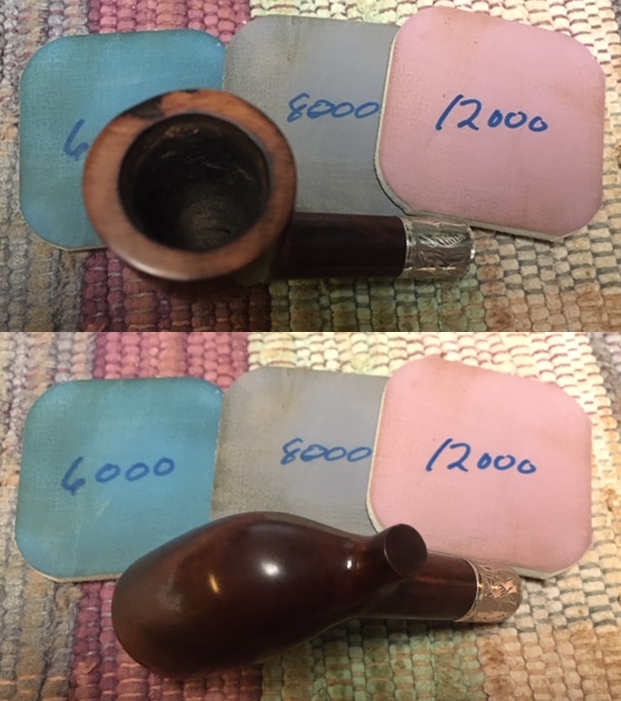
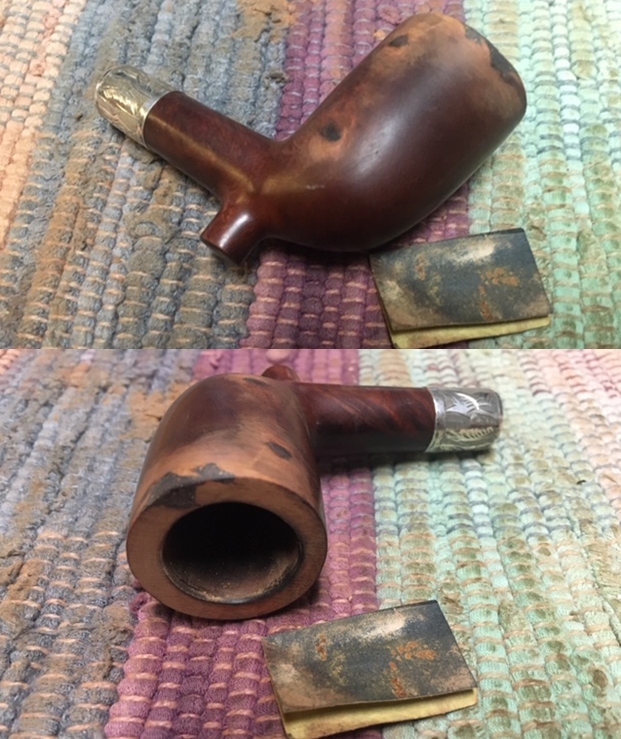
I polished the repaired areas and the rest of the bowl with micromesh sanding pads – wet sanding with 1500-12000 grit sanding pads. I wiped the bowl down after each sanding pad with a damp cloth to remove the sanding debris. 
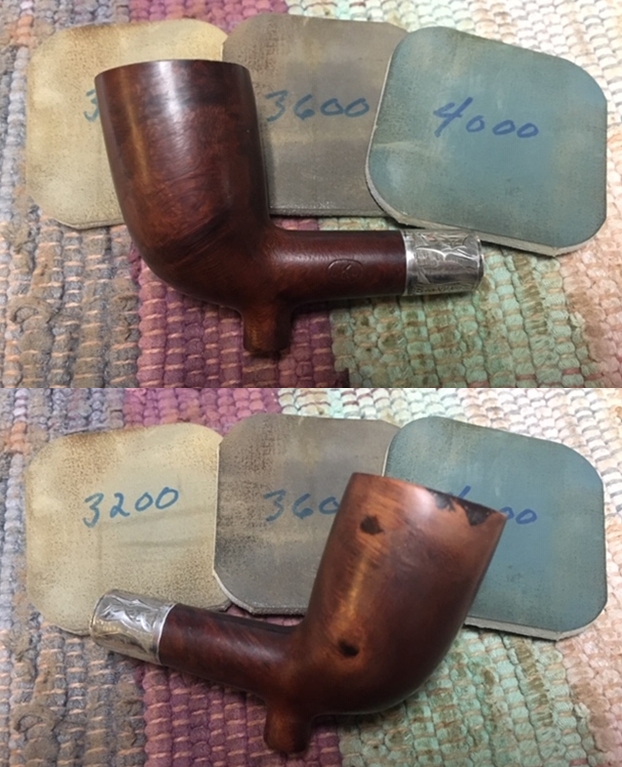
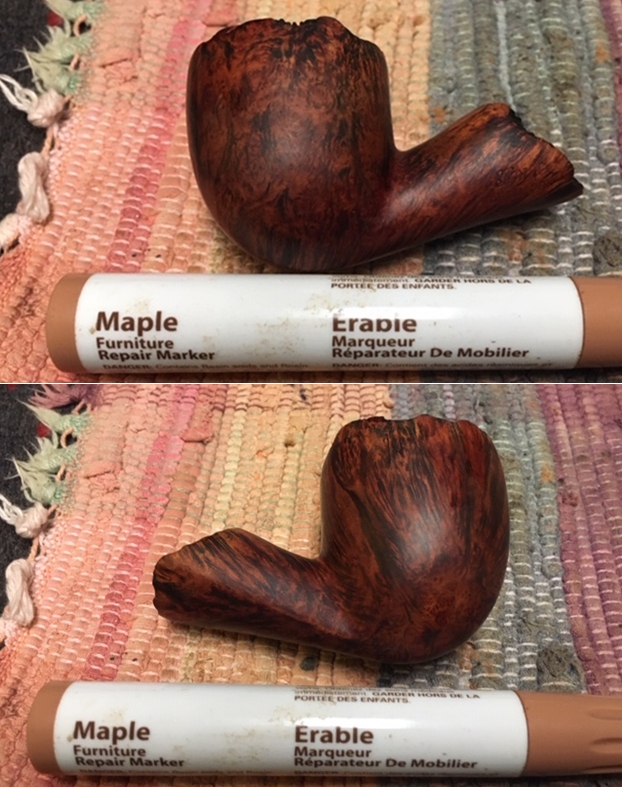
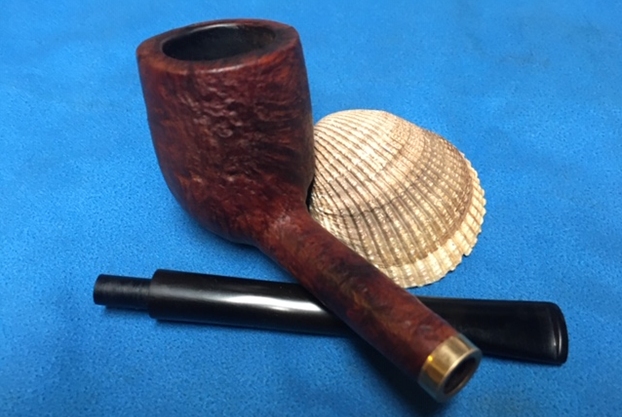
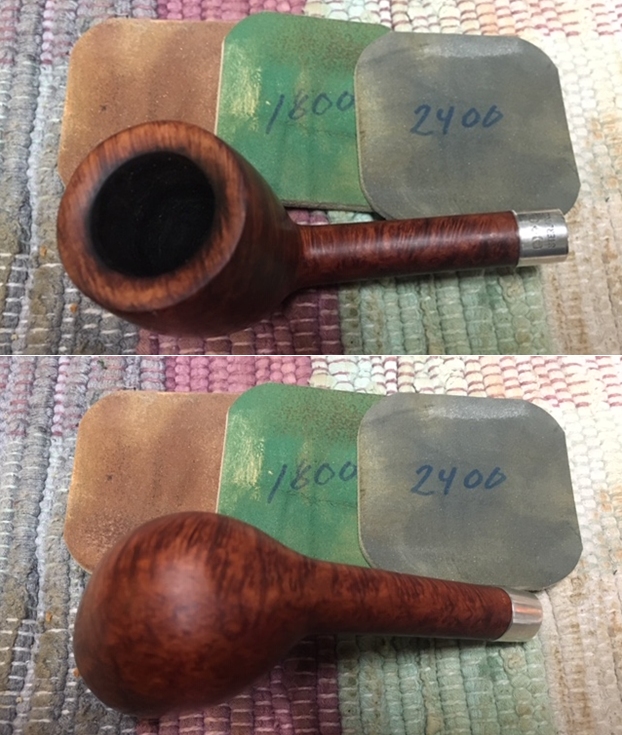
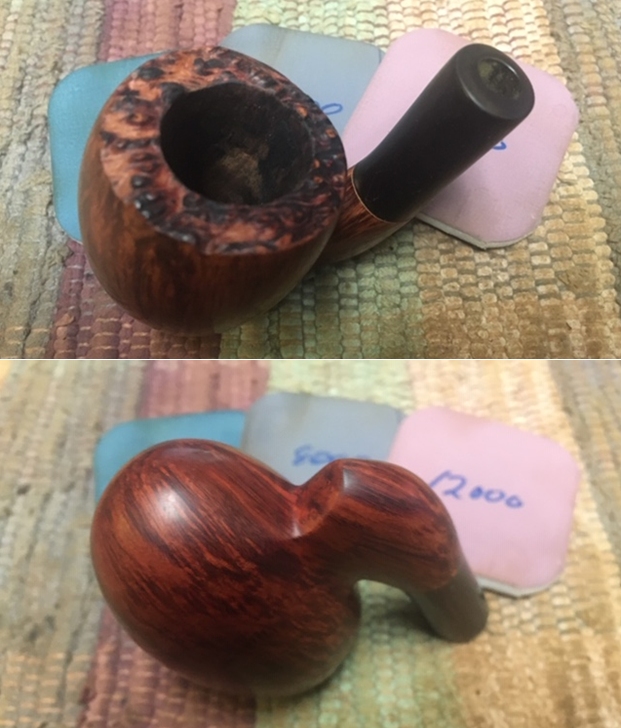
I used a Cherry and a Maple stain pen blended together on the side of the bowl and the rim top to match the colour of the rest of the bowl. Once it had dried I buffed it with a soft cotton cloth.
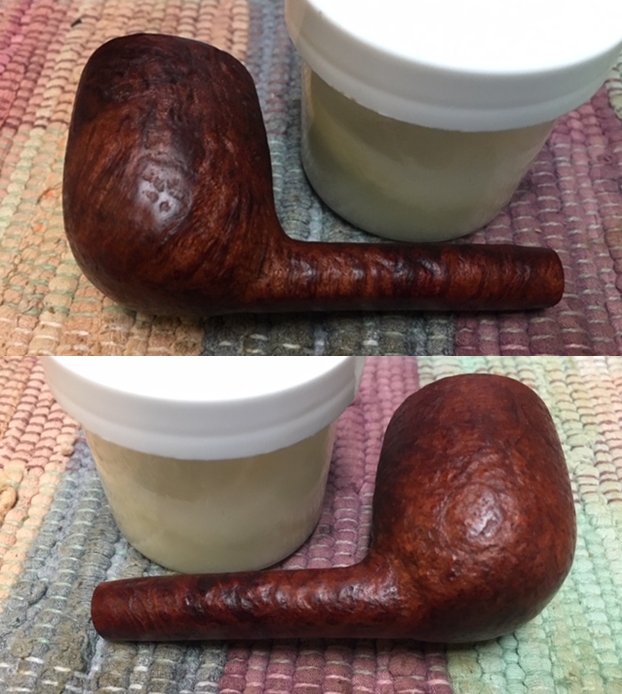
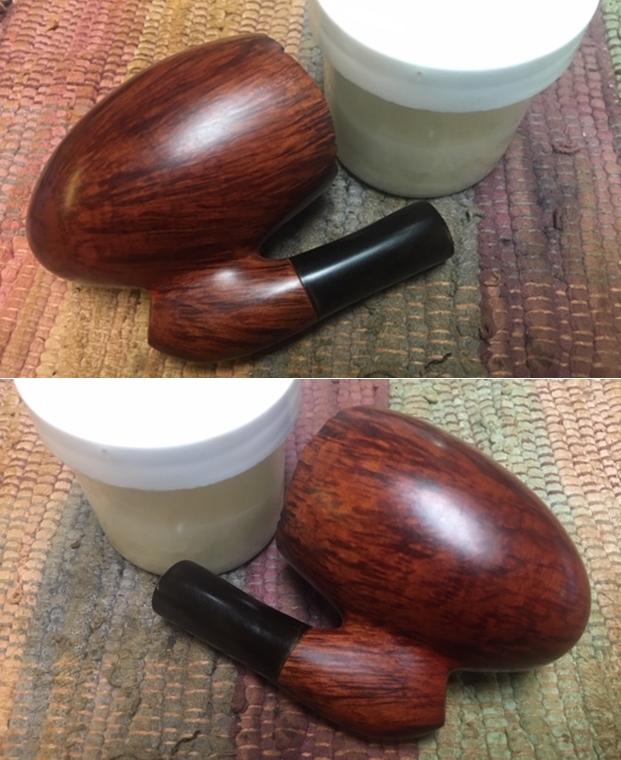
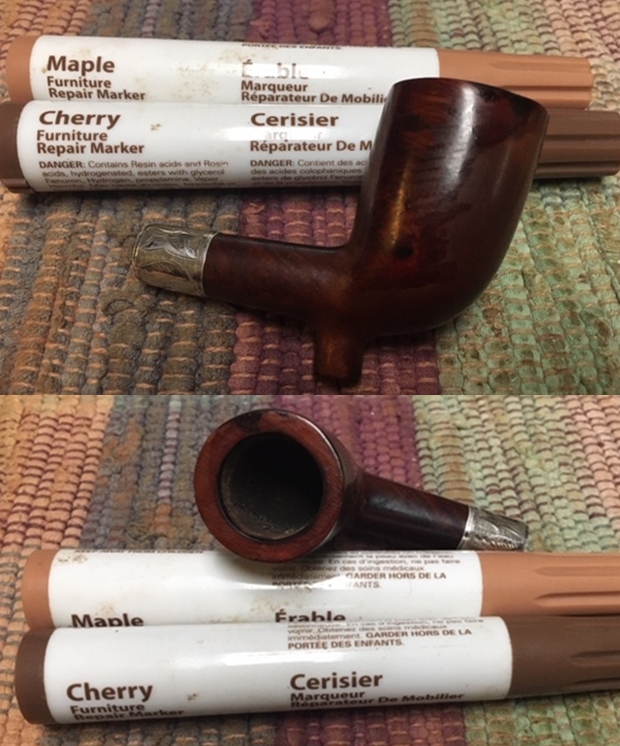
I worked some Before & After Restoration Balm into the briar with my fingertips to clean, enliven and protect it. I find that the balm really makes the briar come alive again. It also works well to blend the restained areas of the bowl with the rest of the pipe. The contrasts in the layers of stain really made the grain stand out. I let the balm sit for a little while and then buffed with a cotton cloth to raise the shine. The pipe really looks good at this point. I am very happy with the way the pipe is looking at this point in the process. 
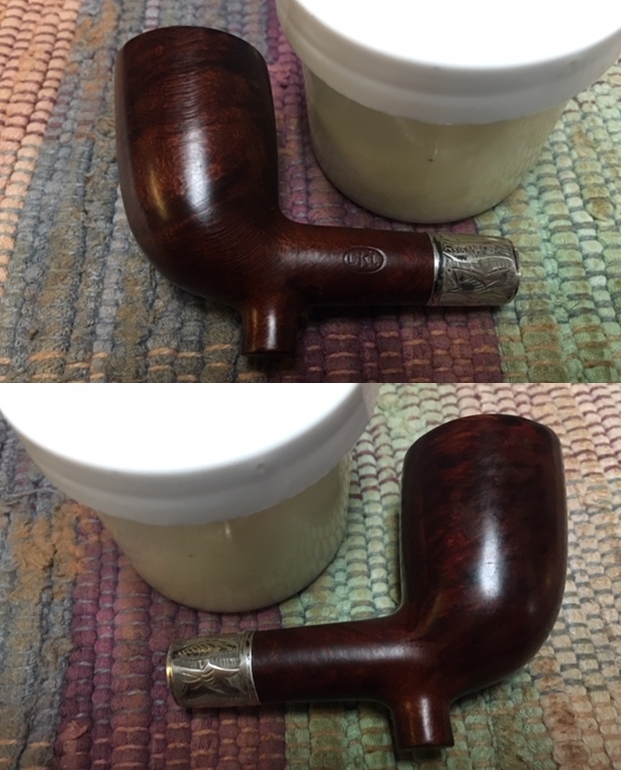
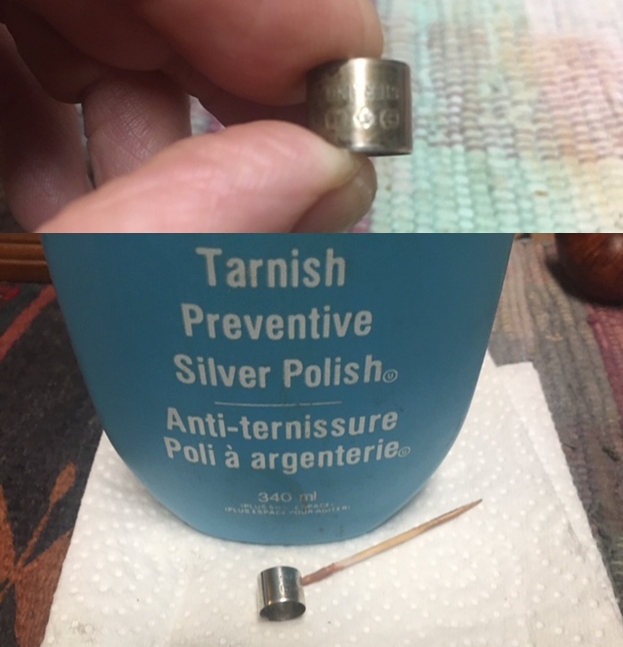
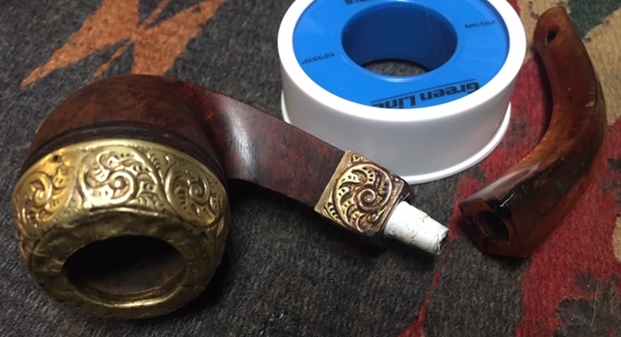
While I was hand buffing the bowl I noticed that the silver band was loose on the shank and rotated freely. I removed the band and put some all-purpose glue on the shank and pressed the band into place. I turned it to align the stamping on the band with the stamping on the shank. It set quite quickly and I polished the silver band with a jeweler’s cloth.
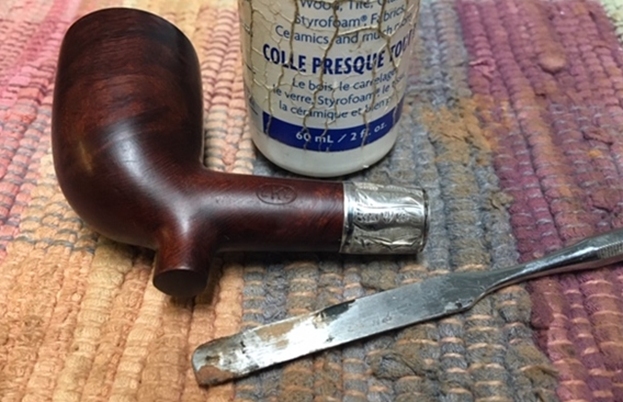
At this point I wrote Ray an email and sent a few pictures of the current state of the pipe. I asked him a few questions about the next steps in the process. I was also curious about whether he had reamed and cleaned the pipe. I did not want to do that if it had already been done and I was also uncertain about whether he wanted me to refresh the gold in the stamp on the shank. I sent the email and called it a night. In the morning I received this response.

Hi Steve,

The gold foil sound great – I have not seen that before, but I usually don’t bother much with the nomenclature. Perhaps I should.

 No, I have not done any cleaning of the pipe at all – sent to you, as received.

 It came from Jason… he usually cleans up the pipes, but he is more a conservator than a restorer. William (who sold Jason the pipe)… gives them a buffing before sending them out, but not much more.

 My feeling is that the pipe has hardly been smoked. I have not tried cleaning the shaft or stem with pipe cleaners and alcohol, so I am just guessing.

The bowl is already looking really good. I’m afraid I was too afraid to take on the repair of the rim and the chips on the side of the bowl. As for matching the stain/colour – I am colour-blind, so goodness knows what shade the pipe will have ended up with…- Ray

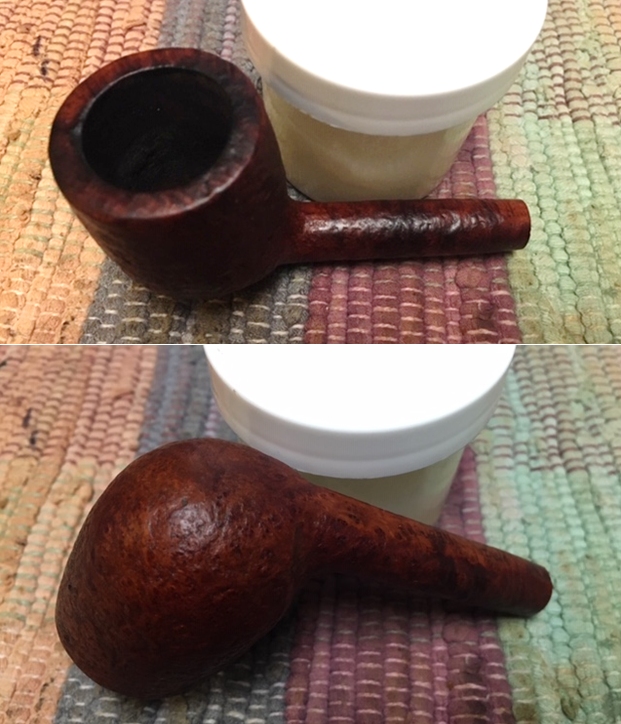
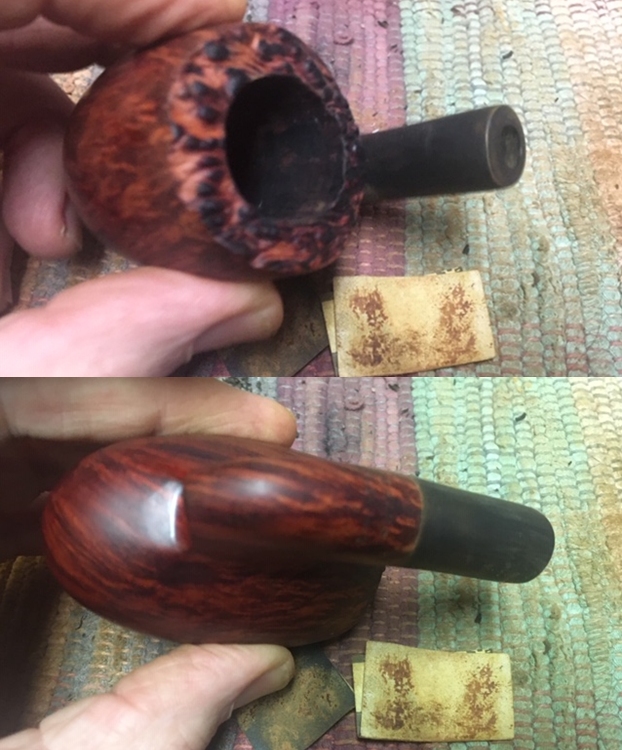
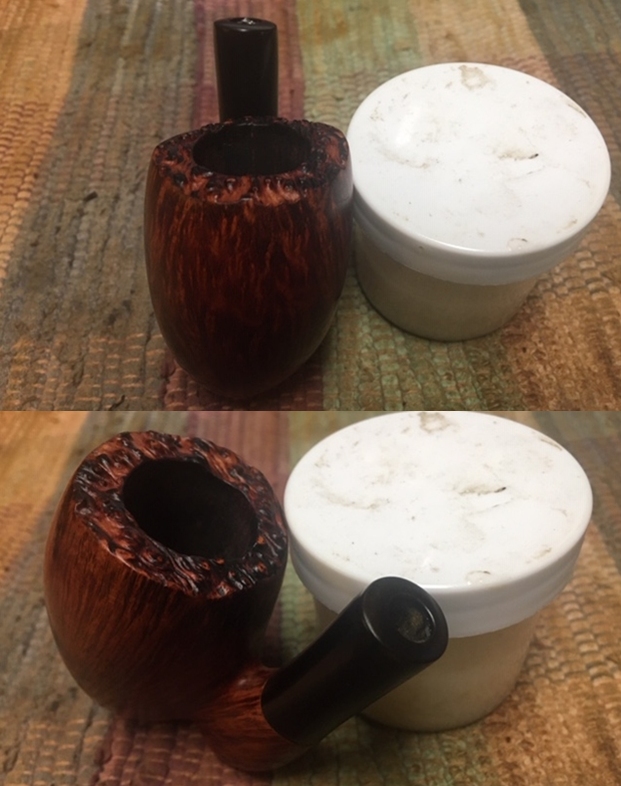
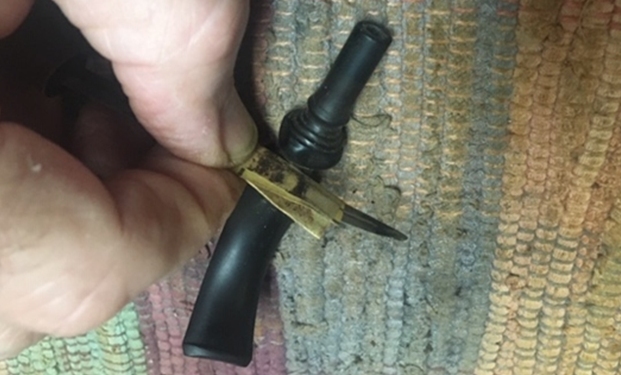
Now I had some direction. I decided to finish my work on the bowl before proceeding to the stem. I used some Rub’n Buff Antique Gold to rework the gold stamping on the shank. I apply it with a tooth pick to work it into the grooves of the stamp. It is an oily product so once it is applied the idea is to “rub” it off with a soft cloth. The photos show the process.
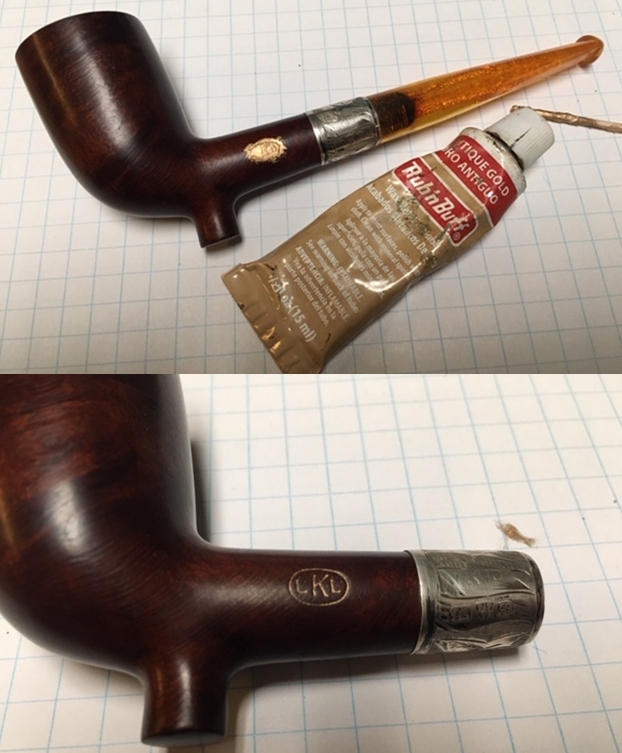
Now to back step a bit… It is always easier to do the internal cleaning before the repairs and buffing of the externals but it still had to be done – so I carefully worked on the bowl walls without damaging the inner edge of the rim. I examined the inside of the bowl with a light and I could see what looked like checking on the walls. Looking closer It appeared that there was a light cake in the areas that looked checked. The cake was not even on the walls of the bowl so it had to go! I used a Savinelli Fitsall Pipe Knife to scrape of the cake on the bowl walls. I then used a piece of dowel with 220 grit sandpaper wrapped around it to smooth out the walls. Viola! The checking was gone and the bowl walls looked very good!
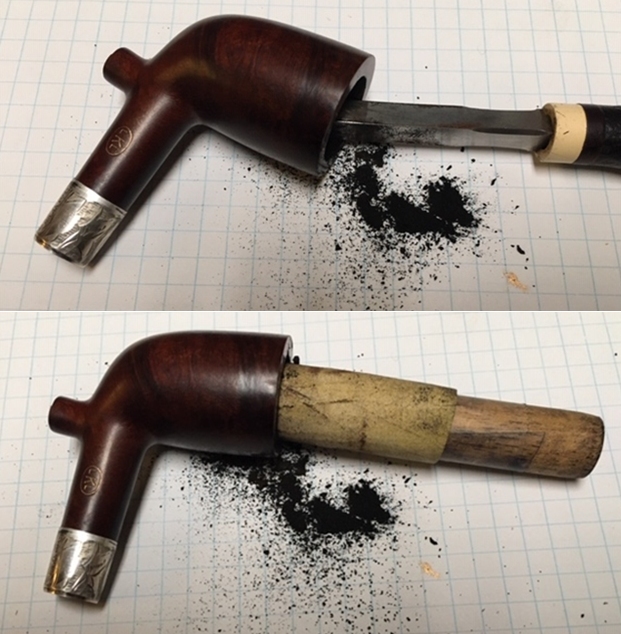
I still wanted to clean out the internals of the mortise, shank and airway in the shank and stem. I cleaned mortise and shank with alcohol, cotton swabs and pipe cleaners. Because of the pre-existent crazing in the stem I used water to clean out the inside of the stem. The pipe was quite clean as can be seen in the photos of the pipe cleaners and swabs. I agree with Ray it was indeed either lightly smoked or very well cared for.
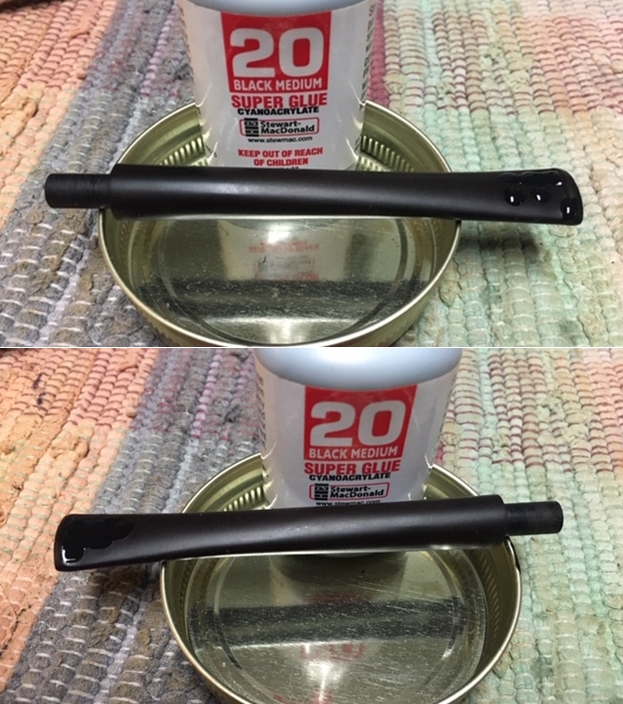
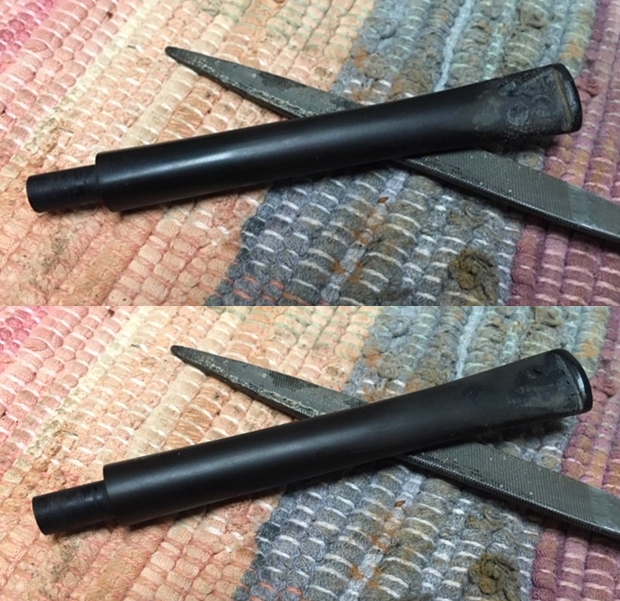
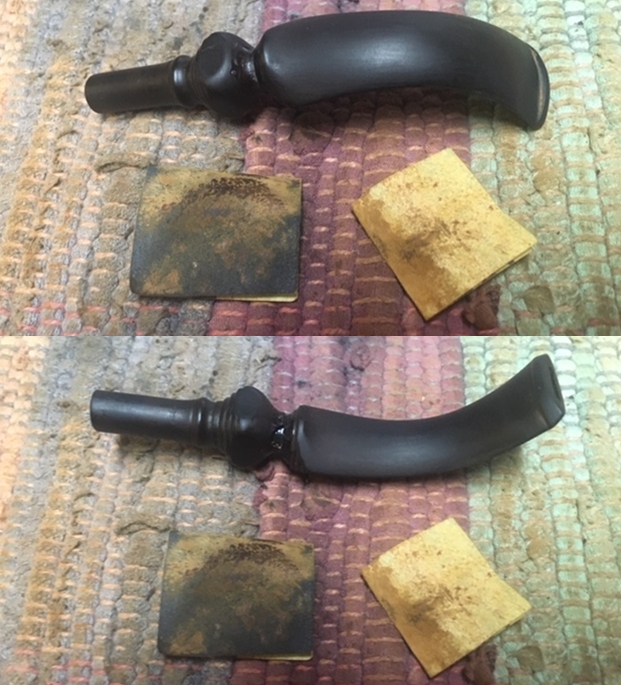
With the bowl finished it was time to address the tooth chatter and marks on the stem. I sanded them out with a folded piece of 220 grit sandpaper and followed that with a piece of 400 grit wet dry sandpaper. It did not take too much sanding for the surface to be smooth.
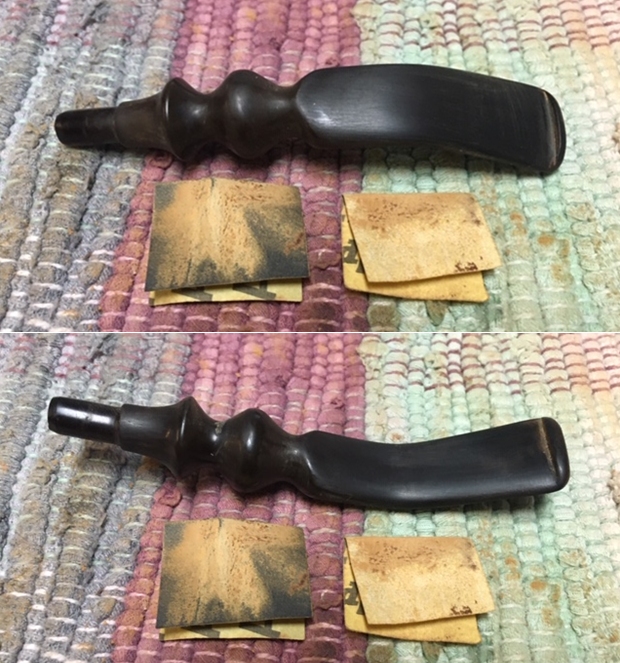
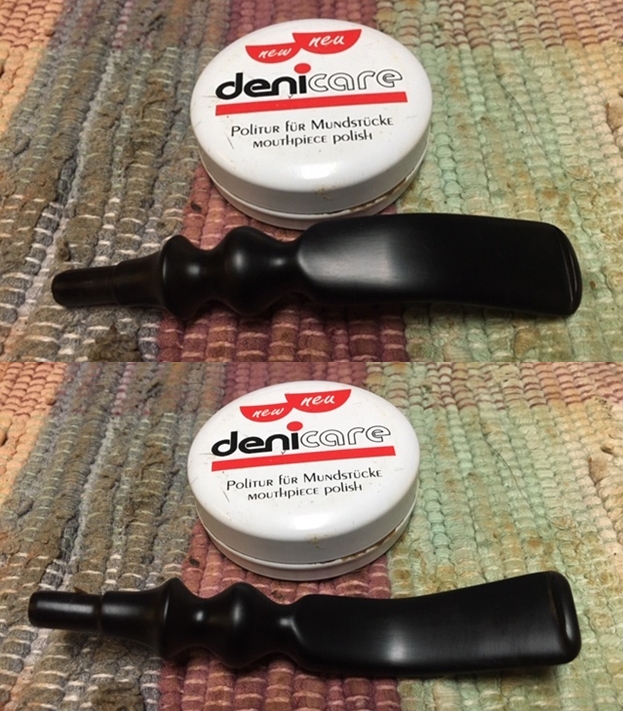
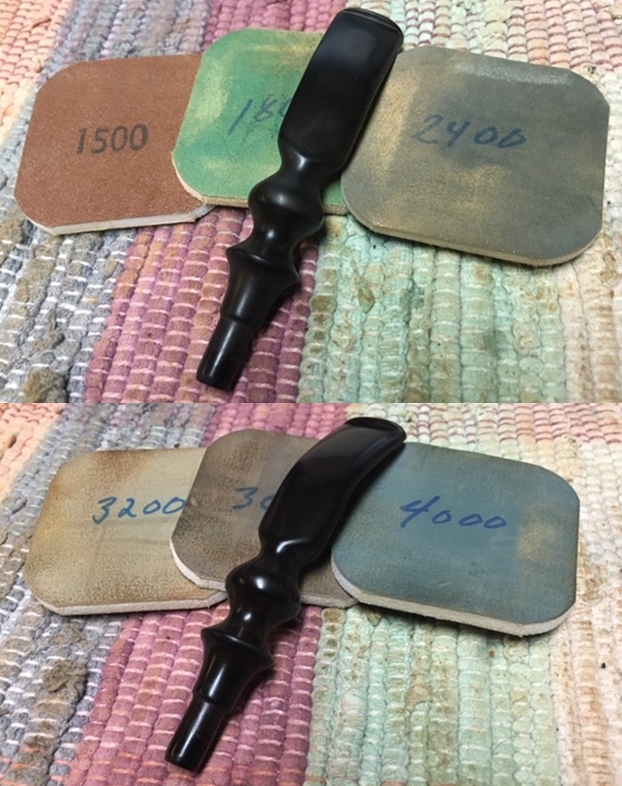
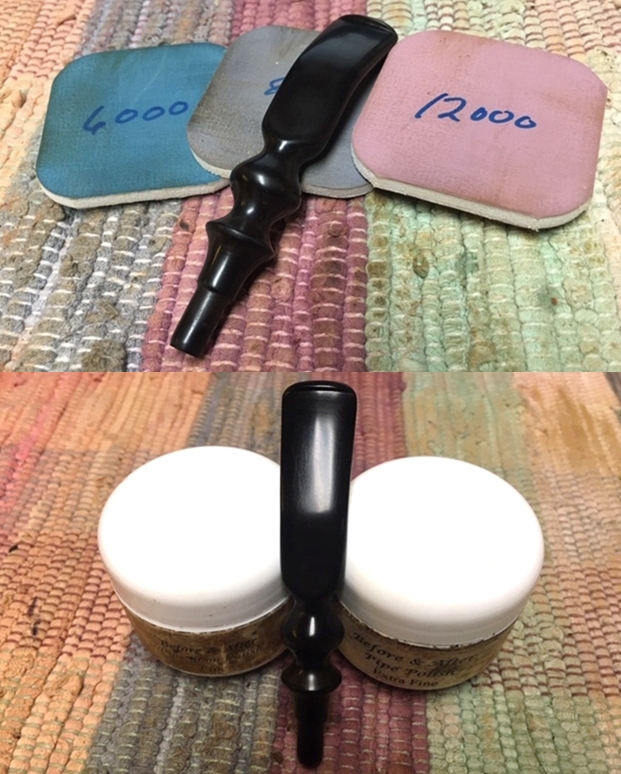
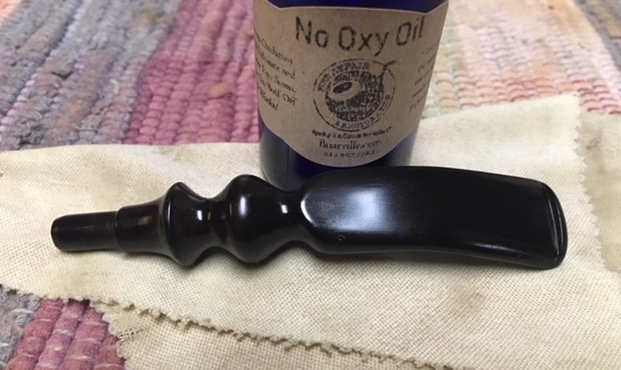
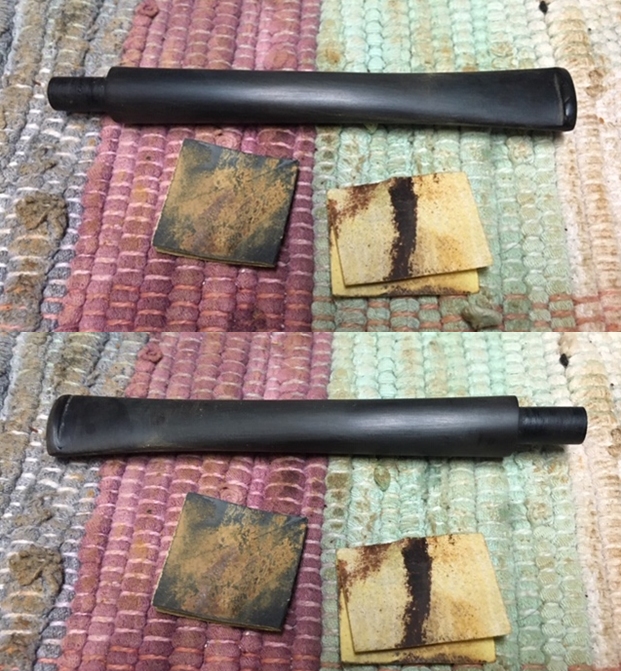
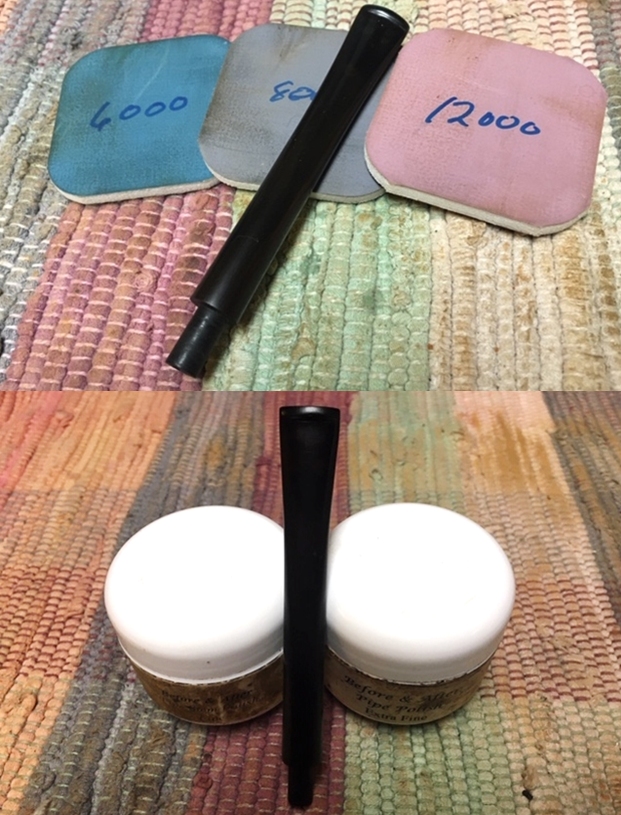
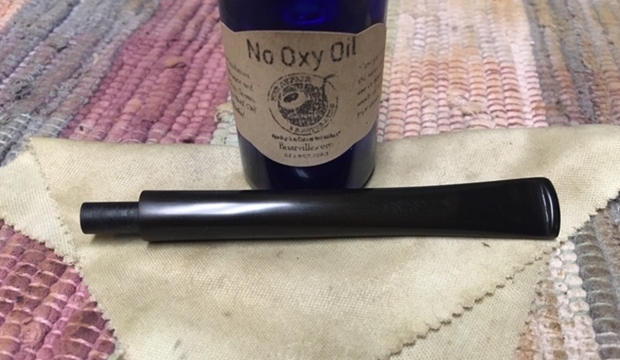
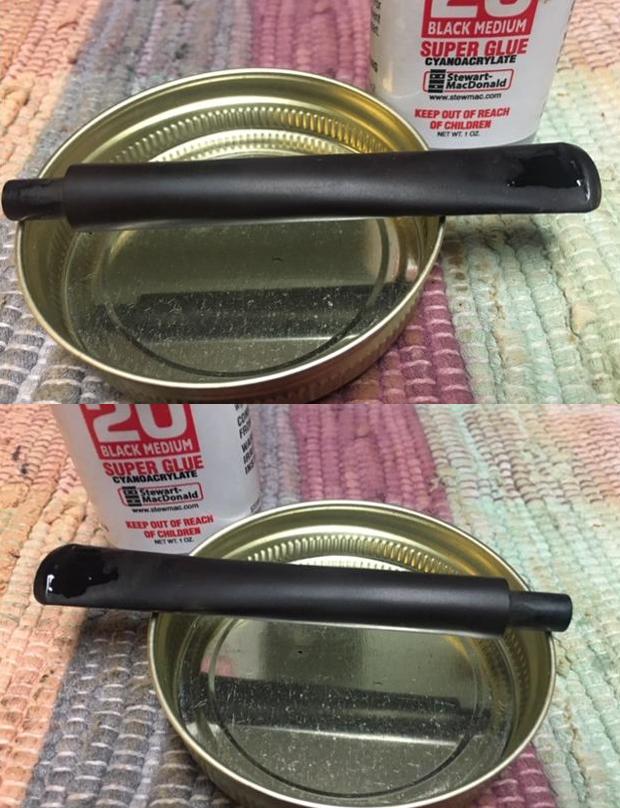
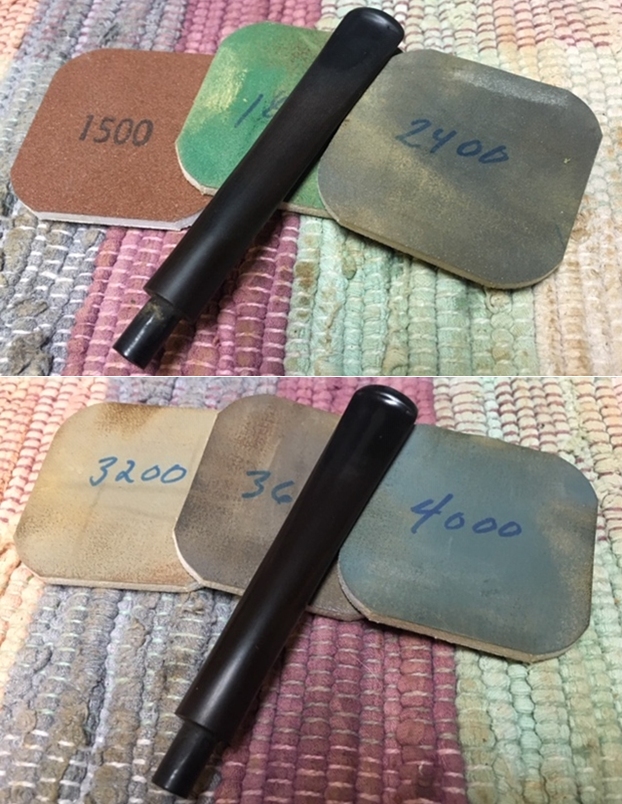
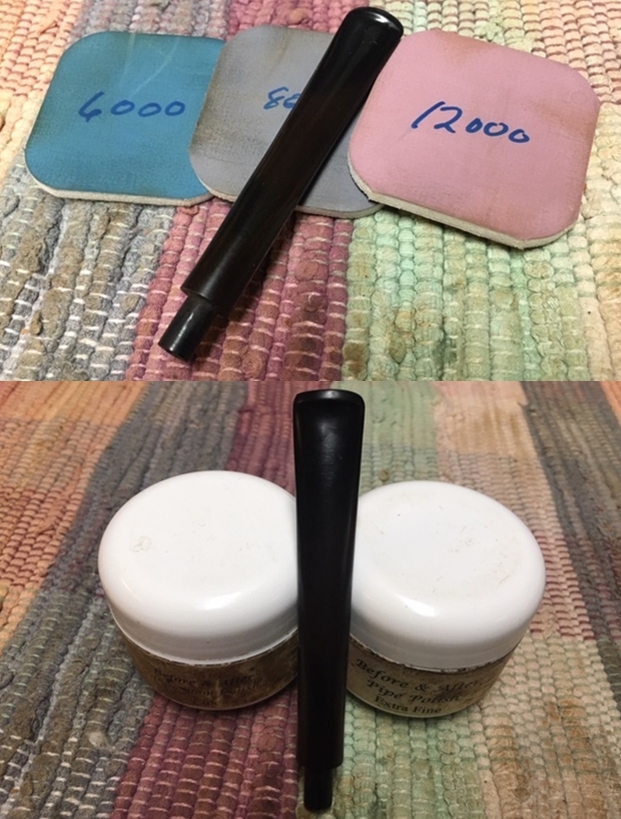
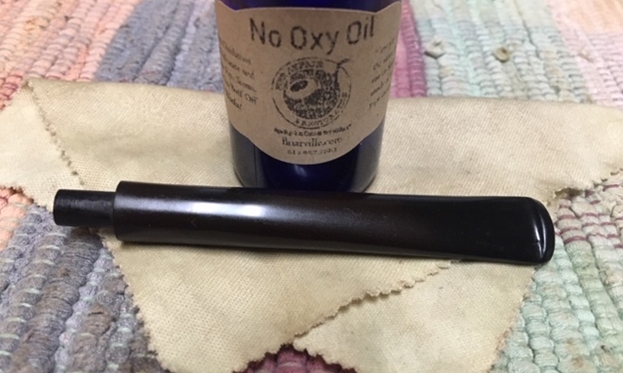
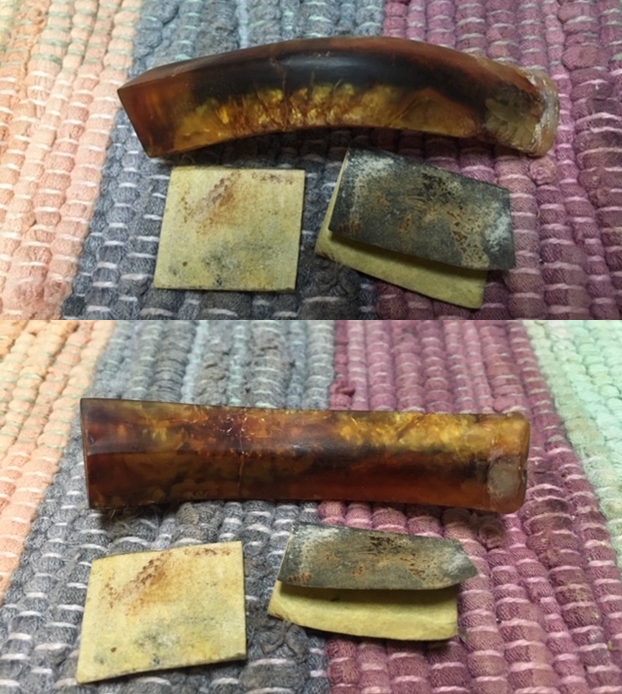
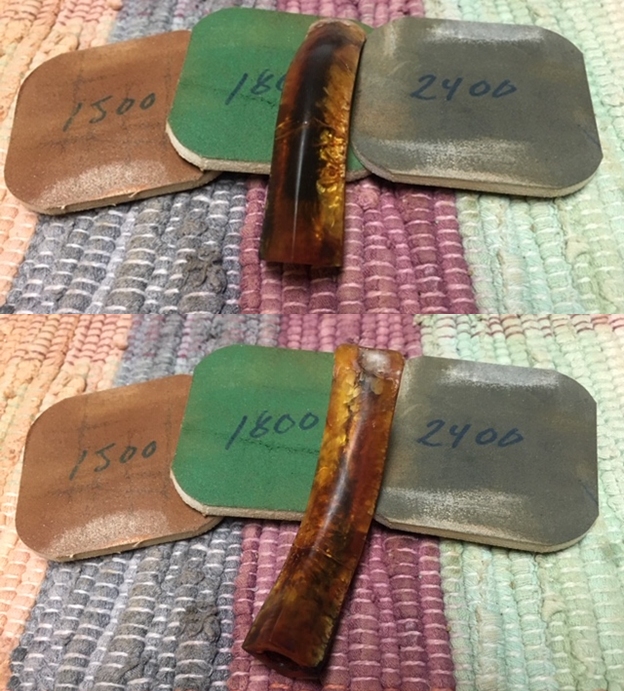
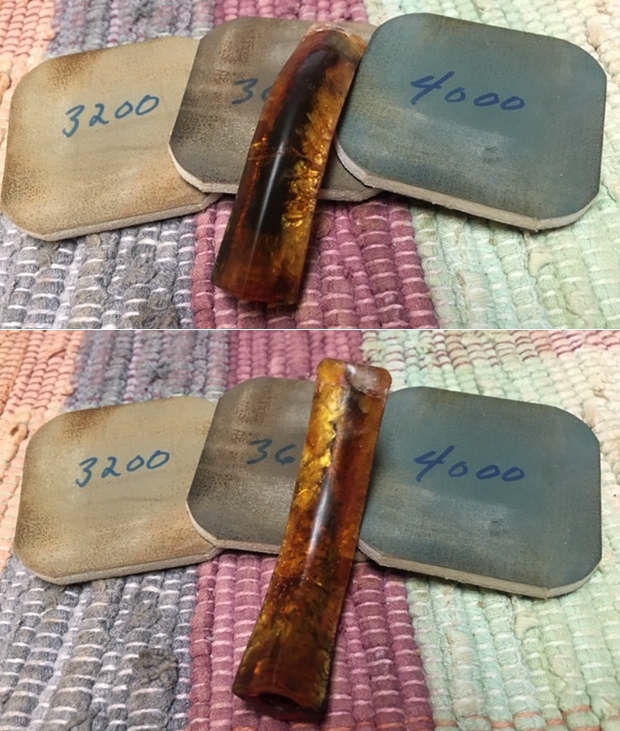
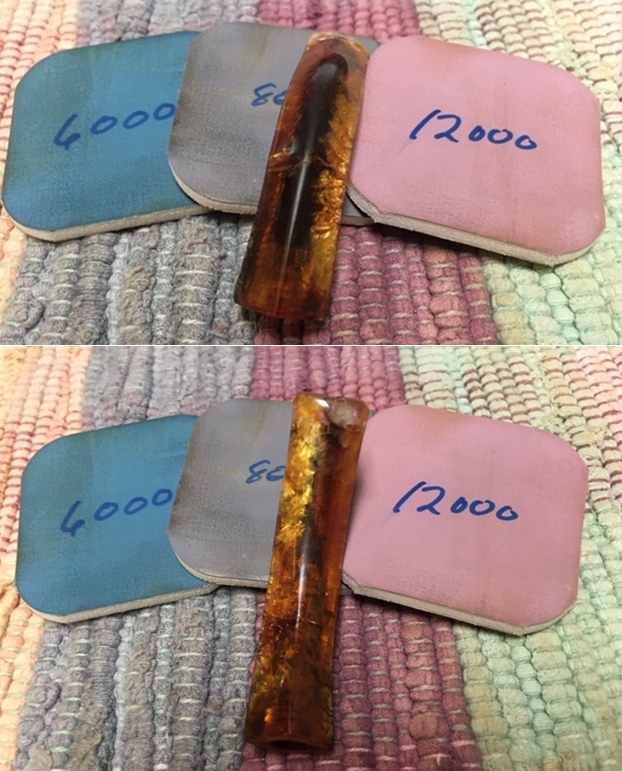
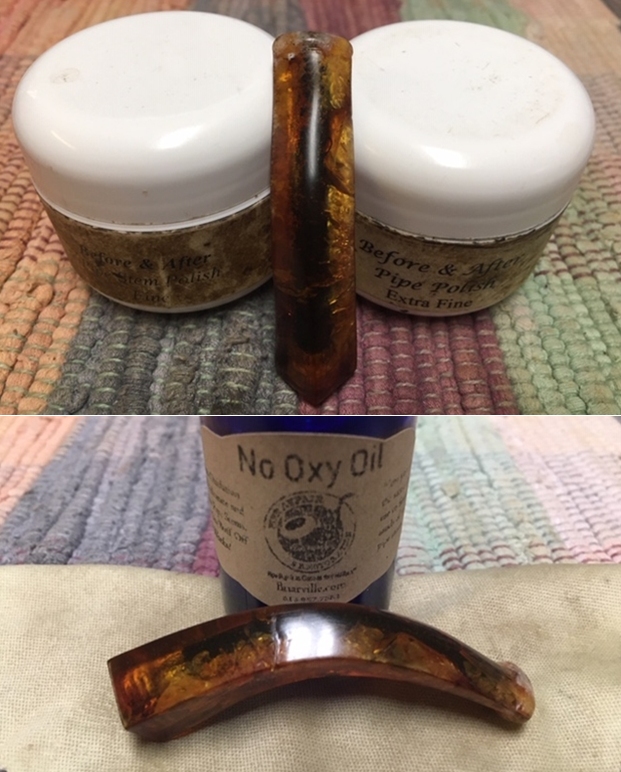
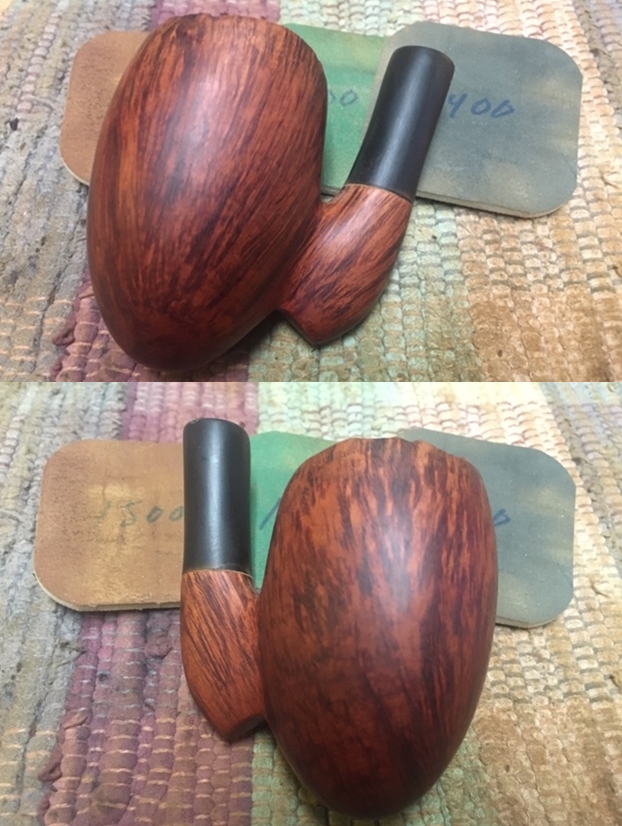
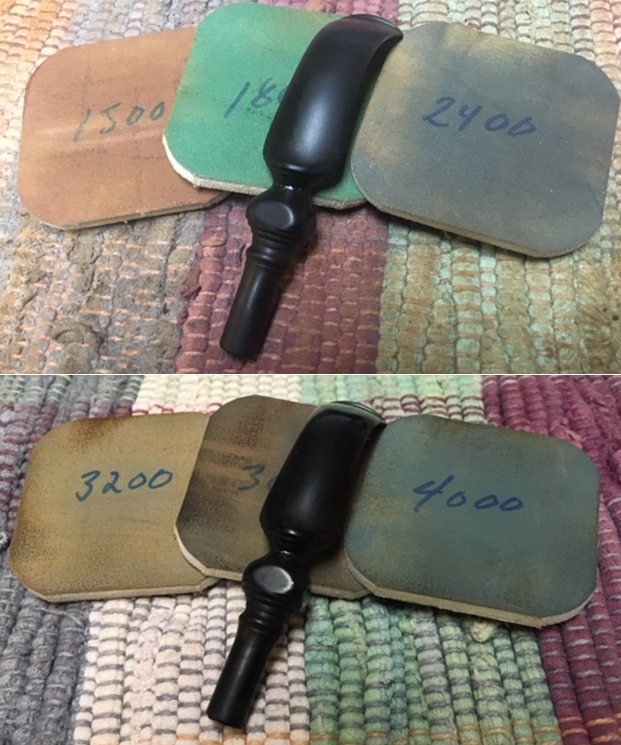
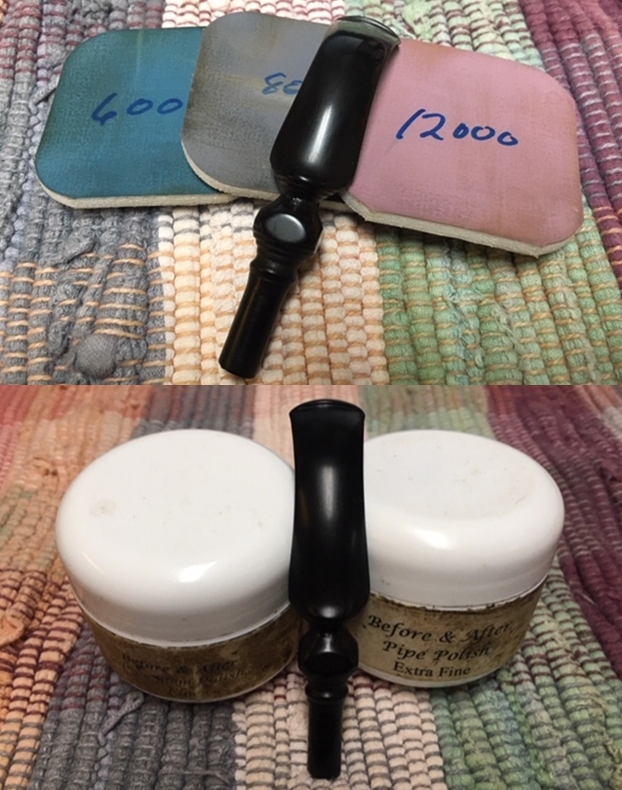
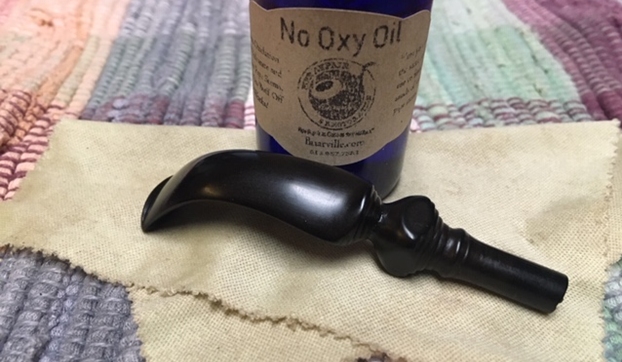
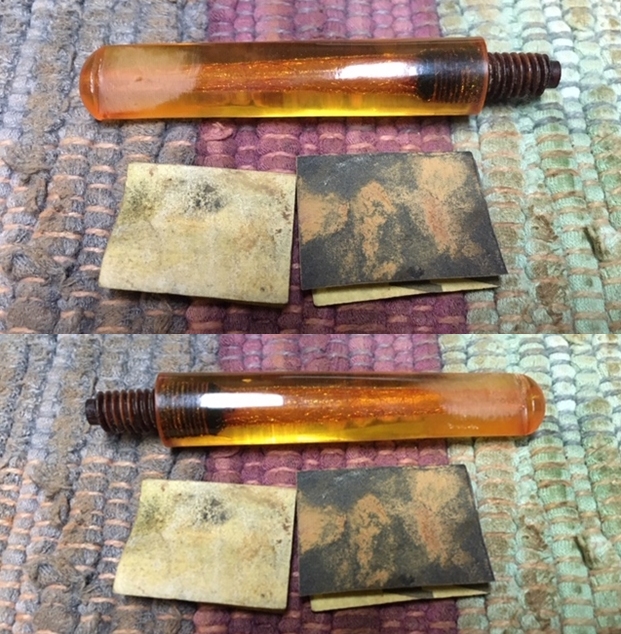
I polished the sanded areas of the stem with micromesh sanding pads – wet sanding with 1500-12000 grit pads. I wiped the stem down after each pad with a damp cloth. I polished it with Before & After Pipe Polish – Fine and Extra Fine. I finished by buffing the stem with Briarville’s No Oxy Oil. 
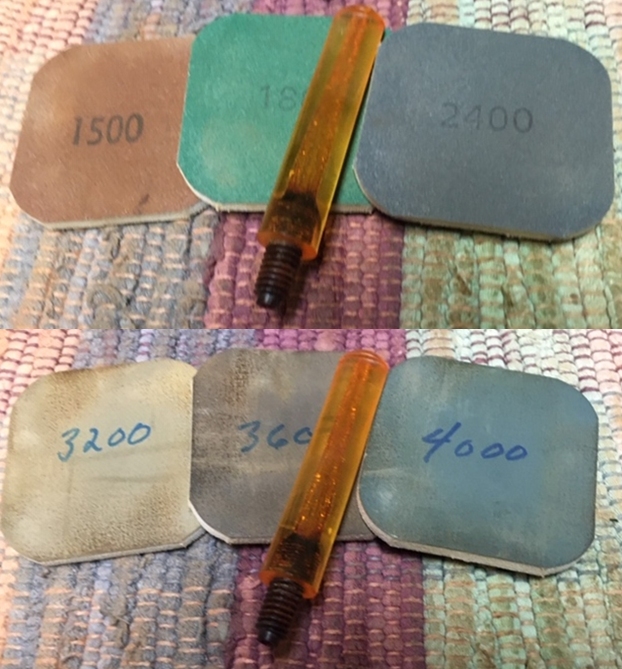
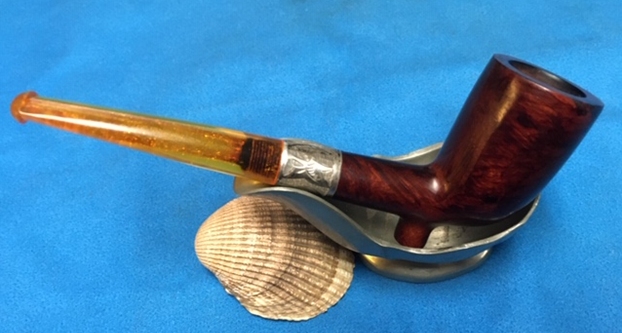
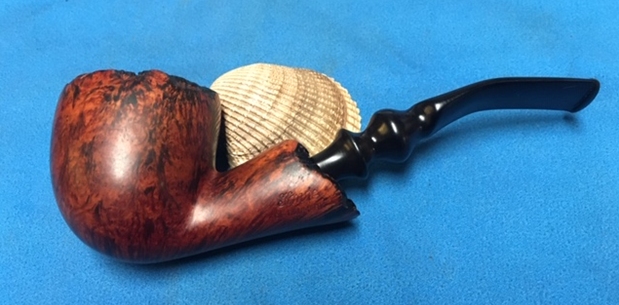
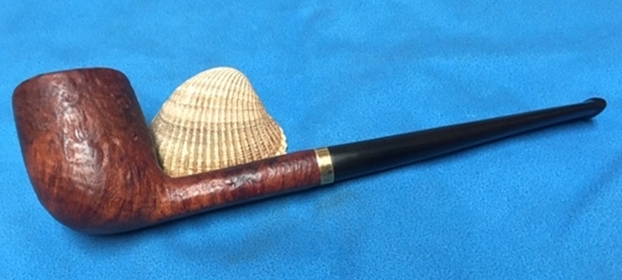
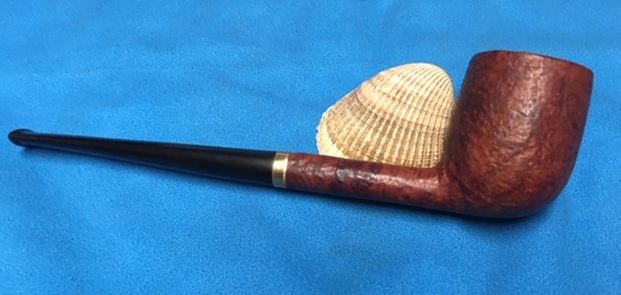
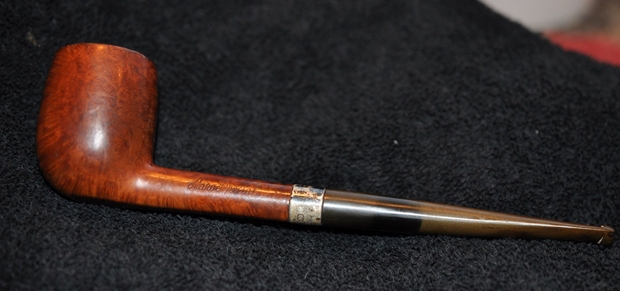
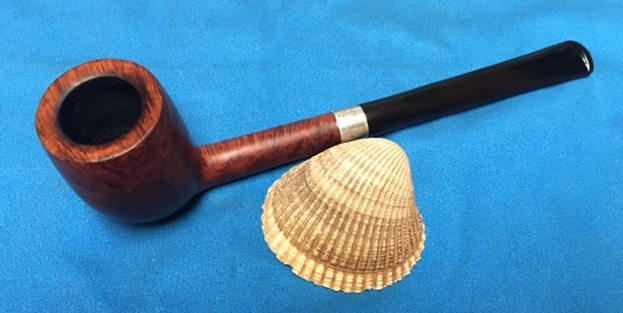
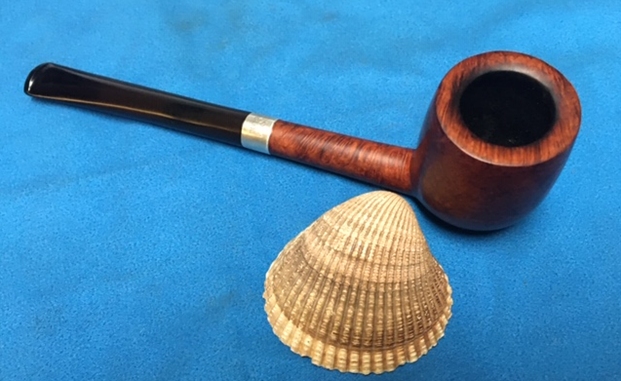
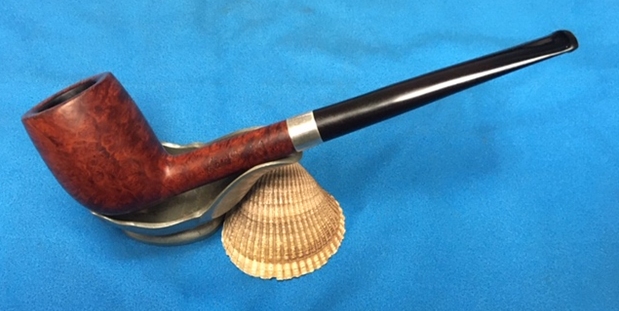
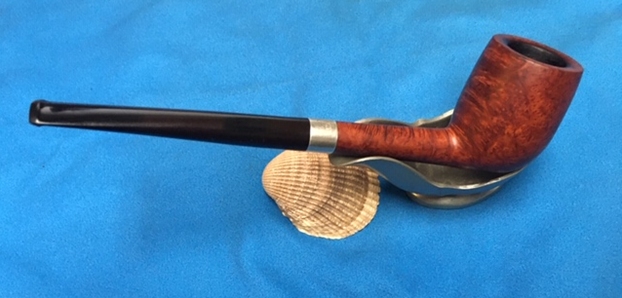
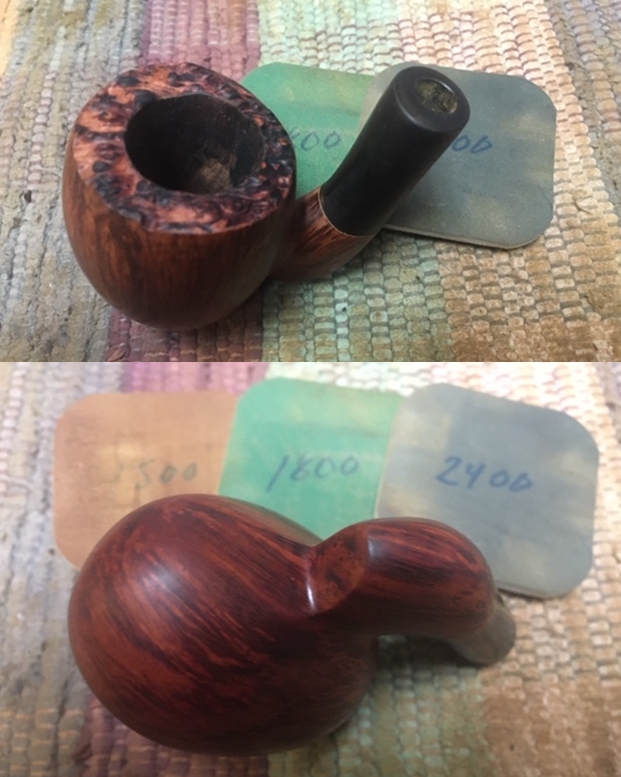
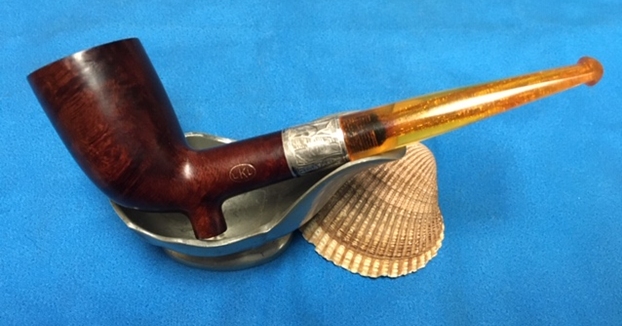
I am happy to see this pipe finished. Later today I will pack it up and send it back to Ray in Australia. It was a fun one to work on – I love old pipes. This one has a lot of character and charm that just got my attention as I am sure it did Ray’s. I put it back together and buffed it with Blue Diamond on the wheel being careful to not let the wheel snatch it away from me. I gave the bowl several coats of carnauba wax and the stem several coats of Conservator’s Wax. The pipe looked really good. I could not wait to hear what Ray thought of the pipe once he saw it. The dimensions of the pipe are Length: 5 ¼ inches, Height: 1 3/4 inches, Diameter of the bowl: 1 1/8 inches, Chamber diameter: ¾ of an inch. I am happy with the way the repairs to the fills turned out. The pipe is a real beauty and should be a great smoker for Ray. It will soon be on its way back to Australia. Thanks for walking through this restoration with me. It is a great example of the trust we carry on as pipemen and women. This pipe has passed through many hands before coming to Ray. It will have a long useful life ahead of it as Ray carries on the trust… for this season. Cheers.  


Giving New Life and Stem Alignment to a Made in London England Diplomat


Blog by Dal Stanton

When I put this pipe in the For “Pipe Dreamers” Only! online collection, I identified it as a Squat Apple. It came to me from the lot my son helped me to procure from an antique shop in St. Louis.  When Andy chose this as his next pipe after commissioning the probable Preben Holm Danish Freehand which I just finished restoring (See: Recommissioning a Mysterious Freehand, Made in Denmark – Preben Holm?) I fished it out of the ‘Help Me!’ basket and put it on the table and the ‘Squat Apple’ sort of fit, but not quite.  Volcano?  No, too rounded.  Here are the pictures of the ‘Squat Apple’ that got Andy’s attention. The only markings are found on the lower side of the oval shank, MADE IN LONDON [over] ENGLAND.  Below the COM is what I assume is a shape number, ‘140’.   Not a lot to go on to determine origins.The ‘Squat Apple’ wasn’t sitting well with me so I looked at Bill Burney’s great Pipe Shapes Chart on Pipedia and found the shape classification that worked better – Diplomat.  Interestingly, my ‘Squat Apple’ designation was used by Bill Burney to describe the Diplomat.  I clipped the panel to show the description of the Diplomat:The English Diplomat now on my worktable is not a bad looking pipe but has a few issues.  The Diplomat’s chamber has a thick layer of cake and the lava flow on the rim is thick – it needs some cleaning as well as the stummel.The after section of the rim reveals the darkening of the briar that has been scorched through the lighting practices of the former steward.As the following three pictures show, the stummel is darkened from grime and oils on the surface.  You can see some very nice grain lurking beneath.  There are also dings and scratches on the stummel from normal wear. The acrylic stem is attractive, but I’m guessing that it’s a replacement stem.  My first observation looked like the stem simply didn’t fit with a wobble and gaps showing between the shank and stem facings.  When I removed the stem the acrylic tenon was stuck in the mortise and not attached to the tenon.  It didn’t take much to dislodge the rogue tenon but after inserting it into the tenon and trying the fit again, the wobble and looseness is evident and if I’m able to reattach the acrylic tenon and keep the stem facing flush with the shank facing before the CA glue sets, it should do well.I then noticed the darkened airway through the translucent acrylic.  As I suspected, after inserting a pipe cleaner into the airway from the shank side, I discover that there is blockage in the stem. In the picture below, I’ve placed my fingers roughly where the inserted pipe cleaner stops and the blockage begins.  This can be a pain!  The following picture with the slot view shows blockage very near to the opening.I decide to try to ‘bull’ through the blockage with a pipe cleaner and to my surprise, the pipe cleaner was able to break through and not a lot of gunk came out.  Good to go.Before moving toward re-attaching the tenon to the acrylic stem, I’ll first do the cleaning.  I’m trying a ‘Soft-Scrub-like’ product we have here in Bulgaria called Cif brand to try to clean the darkened internal airway.  The label describes micro-crystals and a bleach component as the active agents.  I’m using Jeff Laug’s recommendations from his blog (Got a filthy estate pipe that you need to clean?).Holding the translucent acrylic stem up to the light provides a good Xray of the airway and how it’s darkened.  We’ll see how much the cleaning removes the internal buildup and lightens the airway. I go to work with the Cif product and start by using bristled pipe cleaners dipped in Cif to begin breaking up the tars and oils that have crusted inside the airway. At first there was no noticeable progress except for the darker discoloration of the pipe cleaners which meant something was happening.  I add after the pipe cleaners shank brushes.  I transferred the shank brushes, Cif and stem to the kitchen sink where using hot water, I continued the cleaning with the Cif and brushes.  At this point, progress was evident.  A combination of the brushes and cleaner AND the hot water helps break down the crud.Back to the worktable, the follow-up light Xray shows the results.  Nice!  I move on.I put the stem aside and move to the stummel cleaning before I start on the repairs to the stem and tenon.  Not only do I prefer working on cleaned pipes, but often the cleaning process can change the mortise environment because we are working with wood.  Cleaning often loosens tenon fittings.  So, before moving to more permanent repairs, it’s a good principle to get the cleaning done first.  Looking again at the chamber, the cake is moving from moderate to thick cake.  Using the Pipnet Reaming Kit I start with the smallest blade head and end up using 3 of the 4 blade heads available in the Kit. The Savinelli Fitsall Tool works well to follow by doing fine-tune scraping of the chamber walls.  I complete the cleaning by wrapping 240 grade paper around a Sharpie Pen which provides the leverage as I sand the chamber to remove the final vestiges of carbon cake to expose fresher briar to have a clean start. After wiping the chamber with a cotton pad wetted with alcohol to clean the carbon dust, I take a picture as I examine the chamber walls for heating damage.  All looks great. Moving now to the external cleaning of the stummel, I employ undiluted Murphy’s Oil soap on a cotton pad to scrub the surface and rim covered by lava flow.  In the immediate picture below, the sharp-edged pocketknife is helpful to remove the caked crusting.  You can see the progress being made as the blade is carefully scraping the rim top without cutting into the wood.  After the knife edge, the brass bristled brush cleans the rim further without damaging the wood.After working on the rim and stummel surface, I take the stummel to the kitchen sink using hot water and clean the internals using shank brushes and anti-oil dish soap liquid.  After thoroughly rinsing the stummel with water, back on the worktable a picture records the present cleaning state.Again, focusing on the internals, now using cotton buds and pipe cleaners wetted with isopropyl 95%, cleaning continues.  Also employed is a dental spoon to scrape the mortise walls – which produces very little.  A shank brush wetted with isopropyl 95% is used saving on pipe cleaners.  When the pipe cleaners and buds start emerging lighter and cleaner, I call this phase completed to be continued later using a kosher salt and alcohol soak.Now looking again at the tenon repair of the acrylic stem.  The tenon that was part of the Diplomat was not attached and since it’s not, fitting it to see how it will work is not easy – it shifts and moves.  The first two pictures below show the result when I insert the tenon tightly into the stem cavity to test it out.  The first picture is from the top perspective.  Notice that the stem is offset to the right (top of the picture) so that the stem is overhanging on the top and the shank is overhanging the bottom of the picture.Now looking at the underside of the fit, the offset is augmented by the gapping that is evident.Not only do the pictures reveal the seating difficulties of the tenon, but the drilling through the tenon for the airway is not centered.  This has potential challenges on at least two fronts.  First, it potentially creates a hang-up lip as pipe cleaners are pushed through.  This is not huge as usually simply twisting the pipe cleaner in the airway solves this hindrance.  Secondly, is that if the tenon needs to be expanded, I will not use the heating method to expand it.  The reason for this is that the offset drilling has created a very thin wall of acrylic which will probably split if expansion is attempted.  The alternative will be to simply paint the exterior of the tenon with acrylic clear polish or CA glue.  This builds out the tenon circumference.As I was fiddling with the tenon trying to figure out the best approach, another issue surfaced.  On a hunch, the question came to mind, ‘Is the acrylic stem facing flat?’  I took out the chopping board that serves as a topping board and I placed the stem facing flat against it.  I discover that there is a dance in it – a microscopic rocking.  Just to be on the safe side for comparison, I also place the shank facing down on the board and find that its rock solid. You can see from the second picture the culprit looks to be around the airway – old glue protruding.  I decide to address this straight away by placing 240 grade paper on the board and ‘top’ the stem facing to flatten it – carefully!  Instead of rotating like I would if it were a stummel being topped, I drag laterally along the paper.  After a few ‘drags’ on the topping board, another test on the flat chopping board is much better.  The stem facing is now flush with no rocking.I again do a test fitting with the unglued tenon in place, reengage the stem to bring the facings flush.  To see if a pipe cleaner would snag on the tenon, I insert one through without problem.If I can glue the tenon and achieve this much, I’ll be satisfied.  Sanding can address the overhangs where the shank and stem do not line up.A lot of time has elapsed thinking and testing, now it’s time for action!  I use BSI Extra Thick Maxi-Cure CA glue.  Using a piece of 240 grade sanding paper, I sand the part of the tenon that will be inserted into the mortise.  I want it round and smooth. After cleaning the area with alcohol, I place a small amount of glue around the circumference of the tenon just above where the tenon will be inserted into the mortise.  In this way I hope to avoid glue getting into the airway on the end of the tenon. Yet, I don’t put a lot of glue on it to avoid CA glue being forced out the top onto the stem facing.  After placing the glue, I insert the glued part of the tenon partially into the stem cavity and then insert the mortise side of the tenon into the mortise and engage the parts.  In this way, while the glue is still pliable, the tenon gives way to the flush orientation of the shank and stem facings. After doing this, I leave the pipe for several minutes allowing the CA glue to cure and hopefully hold the tenon in place! I’m hopeful for a solid and snug seating. I decide to move forward with working on the acrylic stems button.  The top button lip has been compressed on the left side and the lower lip has also been chewed.  The tooth compressions on both upper and lower sides need filling. I use regular CA glue combined with an accelerator.  Starting on the topside and apply CA to the problem areas – also on the lip to build it.  I do the same for the lower bit and button lip.  With each application of CA glue, I use the accelerator to hold the patch in place and cure the glue more rapidly. I next use a flat needle file to file the CA glue patches over the tooth compressions down to the stem surface on both the upper and lower bit.  I file and shape the button repair as well.To remove the scratches left by the file, 240 grade paper is used on the bit and button but also on the whole stem.Focusing the sanding on the junction now, I sand out the edges that were hanging over the shank and stem facings.  I first cover the nomenclature with masking tape to protect it. The sanding moves around the circumference of the junction and I like the way the stem and shank now are in alignment and the union is flush.Next, I wet sand the entire stem with 600 grade sanding paper and follow with applying 000 steel wool. I’m on a roll with the stem, which I normally like to get out of the way so I can work on the stummel!  Next, I apply the full battery of 9 micromesh pads to the acrylic stem.  First, I wet sand using pads 1500 to 2400 and follow by dry sanding with pads 3200 to 4000 and 6000 to 12000.  Even though I don’t believe it makes a difference but seems to enrich the acrylic surface.  I love the pop of the stem – almost luminescent. After reuniting stem and Diplomat stummel, I get a sense of where things are.  I’m liking what I see!  While the stem was probably not the original, I like the combination and thinking now about how to finish the bowl to take advantage of the striking hues of the acrylic stem. At this point, if the micromesh process brings out the grain well and there is no nuanced lightening of the wood on the shank where the major sanding was, I’ll leave it in the natural briar state.  If there is indication that the shank sanding stands out, I’ll apply a stain.  The briar patterns are very nice – time to bring it out!Next, to freshen the rim and to remove the darkened old finish, I take the stummel to the topping board.Not much is needed – only a cosmetic topping.  With the stummel inverted on 240 grade paper, I give the stummel a few rotations to clean things up.Then switching to 600 grade paper, the stummel is rotated several more times.With the rim refreshed, sanding sponges will address the tired finish on the bowl and the normal nick and dents.  I see no major issues to address on the stummel surface – no fills.With the ‘Made in London, England’ covered by masking tape to protect it, I make sure that the sanding sponges address the shank area well.  I want to blend the lightened area that was sanded.  Using a coarse sanding sponge to do the initial heavy sanding, it removes the minor nicks and old tired finish.  After using the coarse sponge, I remove the masking tape covering the nomenclature for the application of the medium and light graded sponges.  The sponges are not rough enough to impact the nomenclature which is healthy.To fine tune further, the full set of micromesh pads are applied by first wet sanding with pads 1500 to 2400.  Following this, dry sanding with pads 3200 to 4000 and 6000 to 12000 bring out the grain which is beautiful. On a roll, and very enthused by the richness of the honey brown hue emerging and the detailed grain, I apply Mark Hoover’s product (www.ibepen.com), Before & After Restoration Balm which does a great job teasing out the deeper natural hues of the briar.  With some Balm on my fingers, I work it into the briar well and then set it aside for about 20 minutes for the Balm to be absorbed by the wood.  I then wipe off the excess with a cotton cloth dedicated to this and then buff the stummel with microfiber cloth.The day is coming to its close and I continue the internal cleaning using a kosher salt and alcohol soak.  This further cleans as well as freshens the bowl for the new steward.  I first fashion a ‘wick’ by stretching and twisting a cotton ball which is then inserted into the mortise and airway with the help of a stiff wire.  This wick helps to draw out the tars and oils from the internal chamber walls.I then fill the chamber with kosher salt which does not leave an aftertaste and place the bowl in an egg carton for stability.Using an eyedropper, isopropyl 95% fills the chamber until it surfaces over the salt.  After a few minutes the alcohol is absorbed, and the alcohol is topped off.  I let the soak work on the cleaning through the night.The next morning the salt and wick are soiled revealing the added cleaning of the chamber and mortise.  After dumping the expended salt and wiping the chamber with paper towel, I blow through the mortise to loosen and remove salt crystals remaining.To make sure all is clean, I follow with some pipe cleaners and cotton buds.  This is a good step in the cleaning process because the dirty pipe cleaners revealed that the airway was still in need of more cleaning.  After more pipe cleaners wetted with isopropyl 95%, the pipe cleaners were emerging cleaner and lighter.  I declare after a time, ‘Clean!’ and I move on.After reuniting the stem and stummel and mounting a cotton cloth buffing wheel on the Dremel, setting the speed at about 40%, the fine abrasive Blue Diamond is applied to the entire pipe.  After completing this, I use a felt cloth to buff the pipe to remove compound dust in preparation for applying the wax.Finally, after changing to another cotton cloth buffing wheel, carnauba wax is applied to the pipe and I after this, I give the pipe a hand buffing using a microfiber cloth to raise the shine.The grain on this Made in London England Diplomat is superb.  I’m extremely pleased with the repair to the acrylic stem.  It is now beautifully seated in the mortise, straight balanced and snugly secure.  The waves in the acrylic pop and the Diplomat shape, with the broad heal, makes for a very nice feel in the palm.  Andy from Maryland commissioned this English Diplomat and will have the first opportunity to acquire him in The Pipe Steward Store.  This pipe benefits the Daughters of Bulgaria.  Thanks for joining me!

Breathing Life into a Brigham Exclusive Bent Dublin


Blog by Steve Laug

Not too long ago I received an email from a fellow in Kitchener, Ontario regarding some pipes he needed cleaned up. He had been referred to me by my local pipe and cigar shop. While I am not currently adding more pipes to my queue of repairs I have made a commitment to the shop to work on pipes for their customers. Generally they have one or two pipes that need a bit of work. This fellow sent me the following email:

I just came across my smoking pipes that I’ve had in storage for about 40 years. I’m wondering what you’d charge to have them refurbished. There are 17 in total (11 are Brighams and 6 are various).

It turns out he said he had 17 pipes. That was certainly more than I expected but I communicated that there was a large queue ahead of him and I would have to fit them in as I could. He was fine with whatever time it took. He sent me the following photos of his collection that he wanted restored. The first photo shows his eleven Brigham pipes – all very interesting shapes. The second photo shows the six various pipes in the collection – A Republic Era Peterson’s System 1312 (Canadian Import), A Bjarne Hand Carved Freehand, a Comoy’s Everyman London smooth billiard, a GBD Popular Dublin 12, an English made Kaywoodie Rustica 72B, a Kriswill Bernadotte 60 with a broken tenon. When the box arrived there were two additional pipes included for a total of 19 – a Ropp 803 Deluxe Cherrywood Poker and a Comoy’s Sandblast Everyman Canadian 296. It was a lot of pipes! I have been randomly choosing the next pipe to work on and chose the Brigham that have drawn a red box around in the first photo below. When I unwrapped it the pipe it was a Brigham Exclusive Bent Dublin and was stamped on the left side in a smooth panel, it read Brigham in script over Can. Pat. 372982. It had a rusticated lower half of the bowl and shank with a smooth top half. The rim top had some darkening and lava, out of round and a thick cake in the bowl. It was very dirty. The finish appeared to be very good under the grime. Perhaps the lava on the rim top had protected that as well. I would see when I cleaned it. The 3 Dot tapered stem is oxidized, tooth marks and chatter near the button, some calcification. It was oxidized and had tooth chatter and marks on both sides just ahead of the button. I took close up photos of the bowl and rim top to show the condition of the bowl and rim as well as the thick cake and lava overflowing onto the rim top. I also took close up photos of the stem to show its condition as mentioned above. I took a photo of the stamping on the left side of the shank to show what I was speaking about above. It is very clear and readable. The second photo shows the Can. Pat. stamp 372982. I removed the stem from the shank to reveal the aluminum tube/tenon that held the Rock Maple Distillator. The Distillator was stuck in the tube so I had to carefully twist it free with a pair of pliers. Once it was free you could see the grime and grit on the metal cap. I turned to a chart that Charles Lemon of Dad’s Pipes sent to me on the patent era Brighams. There were made from 1938-1980. As the pipe I am working on is a Patent pipes, it’s more accurate to refer to its grade by name (the post 1980 grading scheme refers to Dots). Here is the  chart that Charles sent me. The pipe I am working on is thus a Brigham Exclusive with the brass pins arranged in a triangle. The pipe I have in hand does not appear to have a shape number.It is helpful having this chart and getting a quick picture of where the pipe fits in the Brigham line. Now it was time to work on the pipe.

I reamed the bowl with a PipNet pipe reamer using the second and third cutting head to take the cake back to bare briar so I could inspect the walls. I cleaned up the remnants with a Savinelli Fitsall Pipe Knife. I sanded the bowl walls with 220 grit sandpaper on a piece of dowel to smooth them out and further examine them. I was happy that the walls looked very good. I cleaned up the rim edge and the rim top with a folded piece of 220 grit sandpaper. I was able to remove the damage on the edge and all of the lava from the rim top. The briar looks pretty good on the rim and edges. With the bowl reamed and the rim top cleaned off it was time to scrub the exterior of the pipe. I used a tooth brush and Murphy’s Oil Soap to scrub out the grime in the rustication and the bit that remained on the rim edges and top. I rinsed the bowl under running water and dried it off with a cotton cloth.  I cleaned out the mortise area and airway to the bowl and the interior of the metal tube and airway in the stem with pipe cleaners, cotton swabs and alcohol. I wet sanded the rim top and the smooth portions on the bowl sides with micromesh sanding pads – 1500-12000 grit sanding pads. I wiped the bowl surface down with a damp cloth after each sanding pad to remove the sanding dust. Once I finished the bowl looked good. I rubbed the bowl and shank down with Before & After Restoration Balm. I worked it into the surface of the gourd with my fingertips and a horsehair shoe brush to clean, enliven and protect it. I let the balm sit for a little while and then buffed with a cotton cloth to raise the shine. Mark Hoover’s Balm is a product that I have come to appreciate and one I use on every pipe I have been working on. I set the bowl aside and turned my attention to the stem. I sanded out the tooth chatter, marks and oxidation with 220 grit sandpaper and started the polishing with 400 grit wet dry sandpaper. I polished the stem with micromesh sanding pads – wet sanding it with 1500-12000 grit pads. I wiped the stem down after each sanding pad with a cotton pad to remove the sanding debris. Before I finished the last polishing touches on the stem I decided to fit it with a new Rock Maple Distillator. I finished polishing the stem with Before & After Pipe Stem Polish – both fine and extra fine. I finished by wiping it down with Briarville’s No Oxy Oil and buffing it to a shine.  I always look forward to this part of the restoration when all the pieces are put back together. I put the pipe back together and buffed the pipe with Blue Diamond on the buffing wheel. I gave the bowl and the stem multiple coats of carnauba wax. I hand buffed the pipe with a clean buffing pad to raise the shine. It is fun to see what the polished bowl looks like with the smooth portion and the rusticated portion contrasting well and added to that the polished black vulcanite stem with the shining brass pins. This Brigham Exclusive Bent Dublin is nice looking and feels great in my hand. It is light enough that it is one that could be clenched and smoked while doing other things as it is very light weight and well balanced. It must have been a fine smoking pipe judging from the condition it was when I received it. Have a look at it with the photos below. The dimensions are Length: 5 ½ inches, Height: 2 ¼ inches, Outside diameter of the bowl: 1 ½ inches, Chamber diameter: 7/8 of an inch. This is the second of the pipes sent to me from Eastern Canada for restoration. I am looking forward to what the pipeman who sent it thinks of this restoration. Lots more to do in this lot! Thanks to each of you who are reading this blog. Remember we are not pipe owners; we are pipemen and women who hold our pipes in trust until they pass on into the trust of the next pipeman or woman.

A New Beginning for Jennifer’s Dad’s Karl Erik Knute of Denmark Freehand


Blog by Steve Laug

I decided to change things up a bit and work on another of Jennifer’s Dad’s pipes. For the next pipe from the estate of George Rex Leghorn I have chosen a nicely shaped Knute of Denmark Freehand. You may not have read about this estate before, so I will retell the story. I received an email from Jennifer who is a little older than my 64+ (65 now – sheesh, I forget how old I am) years about whether I would be interested in her Dad’s pipes. My brother Jeff and I have been picking up a few estates here and there, so I was interested. Here is the catch – she did not want to sell them to me but to give them to me to clean up, restore and resell. The only requirement she had was that we give a portion of the sales of the pipes to a charity serving women and children. We talked about the organization I work for that deals with trafficking and sexual exploitation of women and their children and she decided that would be a great way to carry on the charitable aspect of her Dad’s character. With some great conversation back and forth she sent the pipes to Jeff and he started the cleanup process on them. Once he had finished cleaning them all he sent them to me to do my work on them.

The Knute Freehand pipe with plateau on the rim top and shank end is stamped on the left side of the shank Knute of Denmark. The bowl had nice grain on the sides and cross grain on the front and back and rugged plateau on the rim top and shank end. The finish is very dirty making it hard to see beyond that to the nice grain underneath that. There was a thick cake in the bowl and it had overflowed with lava onto the inward beveled rim top. It was a dirty and tired looking old pipe. The stem was badly oxidized and there were George’s usual tooth marks and chatter on both sides just ahead of the button. The button was also damaged. The other issue with the stem is that it did not really fit the pipe. The tenon was a bit large and I just had a feeling it was the wrong stem. The pipe had been sitting in boxes for a lot of years and it was time to move ahead with the restoration. Jennifer took photos of the pipes she was sending. I have included the two photos of this pipe below.When the box arrived from Jennifer, Jeff opened it and took photos of each pipe before he started his cleanup work on them. This Knute Freehand was a nicely shaped pipe and we have both worked on quite a few Knute pipe. This was going to be an interesting restoration. Knute pipe are well made and I have found that they not mentioned much in the online pipe communities that I frequent. I enjoy working on them. The shape on the Knute seems to really capture the flow of the grain on the briar. The briar appeared to be in good condition underneath the grime. The finish looked intact under the grime and oils on the bowl sides from George’s hands. The bowl had a thick cake that had hardened with time. The lava overflow on the rim top filled in much of the plateau. It was very thick but it could very well have protected the rim from damage. We won’t know what is under it until Jeff had cleaned it off. The stem was oxidized and also had some calcification on the surface. There were deep tooth marks on both sides just ahead of the button. Jeff took photos of the pipe before he started working on it. I include those below. Jeff took photos of the bowl and rim top to show the cake in the bowl and the lava build up on the plateau rim top and dust and grime in the shank end as well. It was thick and hard but hopefully it had protected the rim and edges from damage. The lava coat looks horrible but it points to a well-used, favourite smoking pipe. George must have enjoyed this old timer a lot judging from the condition of the pipe. Jeff took a photo of the side and heel of the bowl to show the condition of the finish – the grime and grit all over the sides and bottom of the bowl. The was also a deep gouge in the heel on the right side. It is a dirty pipe but it has a stunning grain around the bowl sides and cross grain on the front and back.Jeff took a photo of the stamping on the left side of the shank. It is very clear and readable. It reads Knute of Denmark.Jeff took photos of the top and underside of the stem showing the scratching, oxidation and tooth marks on the stem surface. The tooth marks are quite deep on both sides of the stem. I turned to Pipedia to refresh my memory regarding the brand (https://pipedia.org/wiki/Knute). I had recollections that the pipe was made by Karl Erik Ottendahl as one of his sub brands so I wanted to confirm that. I quote from that article below:

Knute of Denmark pipes are said to be made by Karl Erik, see his listing herein.

Karl Erik Ottendahl was born in Aalborg in 1942, just a few miles from the very northernmost tip of Denmark. He began his career as a Lithographer as an apprentice in the craft at the age of 16. While working as an apprentice he began hand carving pipes as a hobby and to give as gifts to his more senior colleagues. He began his career making pipes for various labels in Denmark and the United States. Often he would make the higher grade pipes for a well known brand that was known for their midrange or low end pieces such as Wally Frank. While doing this he administered a factory of fifteen craftsmen. During this period he did make of some of his own handmade pipes, but he felt that the responsibility of managing the factory did not give him the freedom he wished he had.

Other brands confirmed to be from Karl Erik are: Champ of Denmark, HTL, Jobey Dansk, Knute, Golden Danish, Lars of Denmark, Larsen & Stigart (Copenhagen pipe shop), Shelburne, Sven Eghold and Wenhall (for Wenhall Pipes, New York), some Ben Wade and pipes marked IS and IIS.

I could start my restoration of this beautiful freehand with the knowledge that I was dealing with a Karl Erik Ottendahl made freehand. But before I get on to restoring the pipe I thought I would once again include the tribute that Jennifer wrote to her Dad for the blog. She also sent some photos and an article that her Dad wrote for Jeff and me to be able to get a feel for him. I have included those below. Note in each of them that he is holding a pipe in his left hand. I asked her to also send me an email with a brief tribute to her Dad. Here is her tribute from an email to me.

Steve, I want to thank you again for accepting my dad’s pipes.  They were so much a part of my dad’s life that I could not simply discard them. But as his daughter, I was not about to take up smoking them either. *laughing* I think my dad would like knowing that they will bring pleasure to others.  I know that I do.

I’m not sure what to say about his pipes. I always remember Daddy smoking pipes and cigars.

First a bit about my dad. Though my father, George Rex Leghorn, was American (growing up in Alaska), he managed to join the Canadian Army at the beginning of WWII, but in doing so lost his American citizenship.  He was fortunate to meet a Canadian recruiting officer who told him the alphabet began with “A” and ended with “Zed” not “Zee”, and also told him to say that he was born in a specific town that had all its records destroyed in a fire.  When the US joined the war my dad, and thousands of other Americans who had made the same choice*(see the link below for the article), were given the opportunity to transfer to the US military, and regain their citizenship.

After WWII, my dad, earned his degree at the University of California Berkeley and became a metallurgist. There is even a bit about him on the internet.

He loved taking the family out for a drive, and he smoked his cigars on those trips. (As a child, those were troubling times for my stomach.)

I most remember my father relaxing in his favorite chair with a science fiction book in one hand and a pipe in the other… Sir Walter Raleigh being his favorite tobacco… and the pipes themselves remind me of him in that contented way.  If I interrupted his repose, he’d look up, with a smile on his face, to answer me.

It seemed he smoked his Briarwood pipes the most, though he had others.  At the time, it was only the Briarwood I knew by name because of its distinctive rough shaped bowl.  And it was the Anderson Free Hand Burl Briar, made in Israel, which I chose for his birthday one year, because I thought he might like that particular texture in his hand.

At least two of his pipes, he inherited from his son-in-law, Joe Marino, a retired medical laboratory researcher (my sister Lesley’s late husband)… the long stemmed Jarl (made in Denmark), and the large, white-bowled, Sherlock Holmes style pipe.  I believe Joe had others that went to my dad, but Lesley was only sure about those two.

The Buescher, corncob pipe my older sister Lesley bought for Daddy while on one of her travels around the States.

A note on the spelling of my sister’s name…

My dad met my mother, Regina, during WWII and they married in Omagh, Ireland.  My mother was English and in the military herself.  The English spelling of Lesley is feminine, and Leslie masculine, in the UK… just the opposite of here in the United States.  I guess my mom won out when it came to the spelling of the name…

This pipe was a real mess just like the other ones in the collection. I did not know what to expect when I unwrapped it from his box. He reamed it with a PipNet pipe reamer and cleaned up the reaming with a Savinelli Fitsall Pipe Knife. He scrubbed out the internals with alcohol, pipe cleaners and cotton swabs until the pipe was clean. He scrubbed the exterior of the bowl with Murphy’s Oil Soap and a tooth brush to remove the grime and grit on the briar and the lava on the rim top. The finish looked really good when I got it. The rim top looked much better but had scratches and nicks in the surface and some darkening on the inner and outer edges. The silver band was oxidized and tarnished. Jeff had cleaned the internals and scrubbed the exterior of the stem and soaked them in Before & After Deoxidizer bath to remove the oxidation. The stem looked very good other than the deep tooth marks in the surface. When the pipe arrived here in Vancouver for the second stop of its restoration tour it looked very good. I took photos of the pipe before I started my part of the restoration. I was so pumped to get started on this Karl Erik made Knute that I totally forgot to take photos of what it looked like when it arrived.

I jumped in and addressed the gouge in the briar on the heel of the pipe. I filled it with briar dust and super glue. Once it cured I sanded it smooth with 220 and 400 grit sandpaper. I restained the sanded spot and the light spots around the rim and shank end of the bowl with a Maple stain pen to match the colour of the bowl and shank. I polished the bowl and the high spots on the plateau rim with micromesh sanding pads. I wet sanded it with 1500-12000 grit pads and wiped it down between pads with a soft cotton cloth. You can see the progress in the shine as you go through the photos. I worked some Before & After Restoration Balm into the finish of the bowl and the plateau rim top and shank with my fingertips and a horsehair shoe brush to clean, enliven and protect it. I find that the balm really makes the briar come alive again. The contrasts in the layers of stain really made the grain stand out. I let the balm sit for a little while and then buffed with a cotton cloth to raise the shine. The pipe really looks good at this point. I am very happy with the way the pipe is looking at this point in the process.  I set the bowl aside and turned my attention to the stem. I examined the diameter of the tenon and the mortise. The tenon was not the right length for the mortise. It was too short and stubby. The way that the tenon was turned also did not allow the stem to seat correctly against the plateau shank end. I went through my can of stems and found one that was the perfect fit. The length and diameter of the tenon was correct and the way the stem sat against the shank end was perfect. The length of the stem also worked better with the look of the pipe. The stem was bent a bit too much but that is easily corrected.  I put a pipe cleaner in the stem to keep the airway from collapsing or kinking. I heated the stem slowly and carefully with a candle until the vulcanite was pliable and then straightened out the bend to match the flow of the rim top of the pipe.I used running water to cool the stem and set the new bend. I sanded the stem to remove the oxidation that was on the surface with a folded piece of 220 grit sandpaper and a piece of 400 grit wet dry sandpaper. At this point the stem is looking better and I don’t have to deal with George’s tooth marks. I rubbed the stem down with Denicare Mouthpiece Polish and a cotton pad to remove remnants of oxidation and to further blend in the sanding. The stem was showing some promise at this point in the process.  I polished the stem with micromesh sanding pads – wet sanding it with 1500-12000 grit pads. I polished it further with Before & After Pipe Stem Polish – both fine and extra fine. I finished by wiping it down with Briarville’s No Oxy Oil and buffing it to a shine. I always look forward to this part of the restoration when all the pieces are put back together. I put the pipe back together and buffed the bowl and stem with Blue Diamond on the buffing wheel. I gave the bowl and the stem multiple coats of carnauba wax. I buffed the pipe with a clean buffing pad to raise the shine. I hand buffed it with a microfiber cloth to deepen the shine. It is fun to see what the polished bowl looks like with the grain popping, the plateau on the rim and shank end contrasting well and finally the newly fitted black vulcanite stem almost glowing. This Karl Erik made Knute Freehand is beautiful and feels great in my hand. It is one that could be clenched and smoked while doing other things as it is very light weight and well balanced. It must have been a fine smoking pipe judging from the condition it was when we received it from Jennifer. There should be a lot of life left in this Knute Freehand. Have a look at it with the photos below. The dimensions are Length: 6 inches, Height: 2 inches, Outside diameter of the bowl: 1 ½ inches, Chamber diameter: 7/8 of an inch. This is one that will go on the rebornpipes online store shortly. If you want to carry on the pipe trust of George Rex Leghorn let me know. Thank you Jennifer for trusting us with his pipes. Thanks to each of you who are reading this blog. Remember we are not pipe owners; we are pipemen and women who hold our pipes in trust until they pass on into the trust of the next pipeman or woman.

A New Beginning for Jennifer’s Dad’s E—-rum Cured Italy Crosby Long Billiard


Blog by Steve Laug

I decided to change things up a bit and work on another of Jennifer’s Dad’s pipes. For the next pipe from the estate of George Rex Leghorn I have chosen another long shank/stem Billiard (Crosby style) with a sandblast finish. You may not have read about this estate before, so I will retell the story. I received an email from Jennifer who is a little older than my 64+ years about whether I would be interested in her Dad’s pipes. My brother Jeff and I have been picking up a few estates here and there, so I was interested. Here is the catch – she did not want to sell them to me but to give them to me to clean up, restore and resell. The only requirement she had was that we give a portion of the sales of the pipes to a charity serving women and children. We talked about the organization I work for that deals with trafficking and sexual exploitation of women and their children and she decided that would be a great way to carry on the charitable aspect of her Dad’s character. With some great conversation back and forth she sent the pipes to Jeff and he started the cleanup process on them. Once he had finished cleaning them all he sent them to me to do my work on them.

Using a lens and a bright light I could see that the mystery long shank/stem billiard is stamped on a smooth panel on underside of the shank E—–RUM CURED  ITALY. The bowl had nice grain on the sides, front, back and rim top that is visible through the sandblast finish. The finish is very dirty making it hard to see beyond that to the nice grain underneath that. There was a thick cake in the bowl and it had overflowed with lava onto the rim top. It was a dirty and tired looking old pipe. The stem was badly oxidized and there were George’s usual tooth marks and chatter on both sides just ahead of the button. The button was also damaged. It had been sitting in boxes for a lot of years and it was time to move ahead with the restoration. Jennifer took photos of the pipes she was sending. I have included the three photos of this pipe below.   When the box arrived from Jennifer, Jeff opened it and took photos of each pipe before he started his cleanup work on them. This mystery long stem/shank billiard was a nicely shaped pipe and that caught our attention. This was going to be an interesting restoration. When I work on pipes that I can find little information about the mystery adds a different element to the pleasure of working on them. The shape on the mystery pipe seems to really capture the flow of the grain on the briar. The briar appeared to be in good condition underneath the grime. The finish looked intact under the grime and oils on the bowl sides from George’s hands. The bowl had a thick cake that had hardened with time. The lava overflow on the rim top was very thick but it could very well have protected the rim from damage. We won’t know what is under it until Jeff had cleaned it off. The stem was oxidized and also had some calcification on the surface. There were deep tooth marks on both sides just ahead of the button. Jeff took photos of the pipe before he started working on it. I include those below. Jeff took photos of the bowl and rim top to show the cake in the bowl and the lava build up on the plateau rim top and dust and grime in the shank end as well. It was thick and hard but hopefully it had protected the rim and edges from damage. The lava coat looks horrible but it points to a well-used, favourite smoking pipe. George must have enjoyed this old timer a lot judging from the condition of the pipe.Jeff took photos of the sides and heel of the bowl to show the condition of the finish – the grime and grit all over the sides and bottom of the bowl. It is a dirty pipe but it has a stunning grain around the bowl sides and cross grain on the front and back. Jeff took a photo of the stamping on the underside of the shank. Half of it is blurred and worn. The readable part looks like it reads Rum Cured Italy. There is a capital E on the front of the stamp but the rest is unreadable.Jeff took photos of the top and underside of the stem showing the scratching, oxidation and tooth marks on the stem surface. The tooth marks are quite deep on both sides of the stem.I did as much digging as I could in Pipedia, Pipephil and Who Made That Pipe and came up empty handed. This one was truly a mystery. But even though I had no information I could start my restoration of this beautiful long billiard. But before I get on to restoring the pipe I thought I would once again include the tribute that Jennifer wrote to her Dad for the blog. She also sent some photos and an article that her Dad wrote for Jeff and me to be able to get a feel for him. I have included those below. Note in each of them that he is holding a pipe in his left hand. I asked her to also send me an email with a brief tribute to her Dad. Here is her tribute from an email to me.

Steve, I want to thank you again for accepting my dad’s pipes.  They were so much a part of my dad’s life that I could not simply discard them. But as his daughter, I was not about to take up smoking them either. *laughing* I think my dad would like knowing that they will bring pleasure to others.  I know that I do.

I’m not sure what to say about his pipes. I always remember Daddy smoking pipes and cigars.

First a bit about my dad. Though my father, George Rex Leghorn, was American (growing up in Alaska), he managed to join the Canadian Army at the beginning of WWII, but in doing so lost his American citizenship.  He was fortunate to meet a Canadian recruiting officer who told him the alphabet began with “A” and ended with “Zed” not “Zee”, and also told him to say that he was born in a specific town that had all its records destroyed in a fire.  When the US joined the war my dad, and thousands of other Americans who had made the same choice*(see the link below for the article), were given the opportunity to transfer to the US military, and regain their citizenship.

After WWII, my dad, earned his degree at the University of California Berkeley and became a metallurgist. There is even a bit about him on the internet.

He loved taking the family out for a drive, and he smoked his cigars on those trips. (As a child, those were troubling times for my stomach.)

I most remember my father relaxing in his favorite chair with a science fiction book in one hand and a pipe in the other… Sir Walter Raleigh being his favorite tobacco… and the pipes themselves remind me of him in that contented way.  If I interrupted his repose, he’d look up, with a smile on his face, to answer me.

It seemed he smoked his Briarwood pipes the most, though he had others.  At the time, it was only the Briarwood I knew by name because of its distinctive rough shaped bowl.  And it was the Anderson Free Hand Burl Briar, made in Israel, which I chose for his birthday one year, because I thought he might like that particular texture in his hand.

At least two of his pipes, he inherited from his son-in-law, Joe Marino, a retired medical laboratory researcher (my sister Lesley’s late husband)… the long stemmed Jarl (made in Denmark), and the large, white-bowled, Sherlock Holmes style pipe.  I believe Joe had others that went to my dad, but Lesley was only sure about those two.

The Buescher, corncob pipe my older sister Lesley bought for Daddy while on one of her travels around the States.

A note on the spelling of my sister’s name…

My dad met my mother, Regina, during WWII and they married in Omagh, Ireland.  My mother was English and in the military herself.  The English spelling of Lesley is feminine, and Leslie masculine, in the UK… just the opposite of here in the United States.  I guess my mom won out when it came to the spelling of the name…

This pipe was a real mess just like the other ones in the collection. I did not know what to expect when I unwrapped it from his box. Jeff reamed it with a PipNet pipe reamer and cleaned up the reaming with a Savinelli Fitsall Pipe Knife. He scrubbed out the internals with alcohol, pipe cleaners and cotton swabs until the pipe was clean. He scrubbed the exterior of the bowl with Murphy’s Oil Soap and a tooth brush to remove the grime and grit on the briar and the lava on the rim top. The finish looked really good when I got it. The rim top looked much better but had some darkening on the inner and outer edges. There was a small fill on the left side of the bowl high and toward the front. It would need to be dealt with (I circled it in red in the photo below). He had cleaned the internals and scrubbed the exterior of the stem and soaked them in Before & After Deoxidizer bath to remove the oxidation. The stem looked very good other than the deep tooth marks in the surface. When the pipe arrived here in Vancouver for the second stop of its restoration tour it looked very good. I took photos of the pipe before I started my part of the restoration.    I took close up photos of the rim top and bowl to show the condition of the bowl and the darkening on the rim top. You can see the light damage on the front inner edge of the bowl that was covered by the thick lava coat. The stem looks much better but the tooth marks are visible in the vulcanite. The button looks very good.I took a photo of the stamping on the shanks as it looks the same even after Jeff’s cleanup work.I decided to address the damage to the top of the bowl first. I sanded the inner edge of the rim top with a folded piece of 220 grit sandpaper to give the rim a slight inward bevel. The slight bevel took care of the charring on the front inner edge and cleaned up the rest of the inner edge as well.I picked out the small fill on the bowl with a dental pick. The fill was bright white and it just stuck out too much for me. Once I had cleaned out the pit I filled it in with clear super glue and briar dust. When the fill cured I used a brass bristle wire brush to blend it into the surface of the surrounding briar. The second photo shows the area that is filled. It is virtually invisible.I worked some Before & After Restoration Balm into the finish of the bowl and the rim top and shank with my fingertips and a horsehair shoe brush to clean, enliven and protect it. I find that the balm really makes the briar come alive again. The contrasts in the layers of stain really made the grain stand out. I let the balm sit for a little while and then buffed with a cotton cloth to raise the shine. The pipe really looks good at this point. It was getting late so I set the bowl aside and turned my attention to the stem. The sharp edges of the tooth marks made it clear that heat would not lift them so I decided to repair them instead. I filled them in with black super glue and set the stem aside to dry over night. The next morning when the repair had cured, I used a needle file to redefine the sharp edge of the button and begin to flatten out the repaired areas.  I sanded the stem with 220 grit sandpaper and 400 grit wet dry sandpaper to smooth out the repair and blend it into the stem surface. I rubbed the stem down with Denicare Mouthpiece Polish and a cotton pad to remove remnants of oxidation and to further blend in the sanding. The stem was showing some promise at this point in the process. At this point in the process I wanted to see how the stem looked on the bowl. I picked up the bowl and lightly buffed it with a cloth. In doing so I noticed what looked like a hairline crack on the topside of the shank. I examined it with a lens and sure enough there was a tiny crack in the groove of a sand blast groove. It was not large and extended about 1/8 of an inch up the shank (I have inserted a red arrow to identify the crack in the shank). I went through my small brass/rose gold coloured bands thinking that if I had one it would be a perfect look on this pipe. I found the perfect band shaped to cover the shank end as well! I cleaned the shank end with a cotton pad and alcohol and put a thin coat of all-purpose glue on the shank and end. I pressed the band in place and wiped off the excess glue with a damp cloth. The photos show the process. I set the bowl aside once again to let the glue set and went back to the stem. I polished it with micromesh sanding pads – wet sanding it with 1500-12000 grit pads. I polished it further with Before & After Pipe Stem Polish – both fine and extra fine. I finished by wiping it down with Briarville’s No Oxy Oil and set it aside to dry.  I always look forward to this part of the restoration when all the pieces are put back together. I put the pipe back together and buffed the bowl and stem with Blue Diamond on the buffing wheel. I gave the bowl multiple coats of Conservator’s Wax and the stem multiple coats of carnauba wax. I buffed the pipe with a clean buffing pad to raise the shine. I hand buffed it with a microfiber cloth to deepen the shine. It is fun to see what the polished bowl looks like with the grain popping, the new band on the shank shining and the black vulcanite almost glowing. The long stemmed billiard is beautiful and feels great in my hand. It is one that could be clenched and smoked while doing other things as it is very light weight and well balanced. It must have been a fine smoking pipe judging from the condition it was when we received it from Jennifer. There should be a lot of life left in this old mystery pipe. The band adds a touch of understated elegance to the long shank and stem. Have a look at it with the photos below. The dimensions are Length: 6 ¾ inches, Height: 1 7/8 inches, Outside diameter of the bowl: 1 ¼ inches, Chamber diameter: 7/8 of an inch. This is one that will go on the rebornpipes online store shortly. If you want to carry on the pipe trust of George Rex Leghorn let me know. Thank you Jennifer for trusting us with his pipes. Thanks to each of you who are reading this blog. Remember we are not pipe owners; we are pipemen and women who hold our pipes in trust until they pass on into the trust of the next pipeman or woman.

New Life Jennifer’s Dad’s Maro Special Crosby Style Pipe


Blog by Steve Laug

I decided to change things up a bit and work on another of Jennifer’s Dad’s pipes. For the next pipe from the estate of George Rex Leghorn I have chosen a nicely shaped Maro Special long shank billiard. You may not have read about this estate before, so I will retell the story. I received an email from Jennifer who is a little older than my 64+ years about whether I would be interested in her Dad’s pipes. My brother Jeff and I have been picking up a few estates here and there, so I was interested. Here is the catch – she did not want to sell them to me but to give them to me to clean up, restore and resell. The only requirement she had was that we give a portion of the sales of the pipes to a charity serving women and children. We talked about the organization I work for that deals with trafficking and sexual exploitation of women and their children and she decided that would be a great way to carry on the charitable aspect of her Dad’s character. With some great conversation back and forth she sent the pipes to Jeff and he started the cleanup process on them. Once he had finished cleaning them all he sent them to me to do my work on them.

The Crosby style pipe with the Sterling silver band is stamped on the left side of the shank Maro Special in script. This was different than Jennifer had marked on the bag containing the pipe. There were no other markings on the briar. The silver band was stamped Sterling and had three hallmarks – an anchor, a letter “T” in a diamond shaped cartouche and a rampant lion. These will enable me to date the pipe as I restore it. The bowl had birdseye grain on the sides and cross grain on the front and back. The shank matched the grain pattern. The sterling band was oxidized and loose on the shank and had turned over. The finish is very dirty. There was a thick cake in the bowl and it had overflowed with lava onto the inward beveled rim top. It was a dirty and tired looking old pipe. The stem was badly oxidized and there were George’s usual tooth marks and chatter on both sides just ahead of the button. The button was in good shape. It had been sitting in boxes for a lot of years and it was time to move ahead with the restoration. Jennifer took photos of the pipes she was sending. I have included the three photos of this pipe below.When the box arrived from Jennifer, Jeff opened it and took photos of each pipe before he started his cleanup work on them. There were two long shank Crosby style billiards in the lot. The first was this smooth Maro and the second one a sandblast that has worn stamping. Both are the same shape and size and both have the thin pencil shank and long stem that I have come to associate with the Crosby shape. There is something about these long billiards that I like. I enjoy working on them. The shape on the Maro seems to really capture the flow of the grain on the briar. The briar appeared to be in good condition underneath the grime. The finish looked intact under the grime. The bowl had a thick cake that had hardened with time. The lava overflow on the rim top was very thick but it could very well have protected the rim from damage. We won’t know what is under it until Jeff had cleaned it off. The stem was oxidized and also had some calcification on the surface. There were tooth marks on both side just ahead of the button. Jeff took photos of the pipe before he started working on it. I include those below. Jeff took photos of the bowl and rim top to show the cake in the bowl and the lava build up on the rim top. It was thick and hard but hopefully it had protected the rim and edges from damage. The lava coat looks horrible but it points to a well-used, favourite smoking pipe. George must have enjoyed this old timer a lot and turned to this old, light weight long billiard for a cool smoke.Jeff took a photo of the side and heel of the bowl to show the condition of the finish – the grime and grit all over the sides and bottom of the bowl. It is a dirty pipe but it has a stunning birdeye grain around the bowl sides and cross grain on the front and back. Jeff took a photo of the stamping on the left side of the shank. It is very clear and readable. It reads Maro Special. There is no other stamping on the pipe. You can also see the characters on the Sterling silver band in the second photo below. Jeff took photos of the top and underside of the stem showing the scratching, oxidation and tooth marks on the stem surface. The tooth marks are quite deep on both sides of the stem.I turned to Pipedia to see what I could learn about the brand. I looked under the English pipe brands section first to see if I could find anything that would tie it to the Sterling Silver band on the shank. There were no makers from Great Britain with that name. On a hunch I checked the American maker section (https://pipedia.org/wiki/American_Pipe_Brands_%26_Makers_L_-_M) and sure enough under MARO found that the brand was made or at least attributed to the distributor Hollco International. I turned to the page on that brand to see if there was any more information (https://pipedia.org/wiki/Hollco_International). I quote in full from that site:

Hollco International of Chatsworth, California, formerly known as Hollco-Rohr, purchased the Wally Frank company in 1969 and at the same time became the US importer for Castello, Comoy, and the producer of Pioneer and other pipes. For more information see Wally Frank.

At this point the contradictions start rolling in. On Smokingpipes.com they listed the pipe as a French Made brand and showed a pipe remarkably similar to the one I am working on now. Here is the link to the pipe that they sold: (https://www.smokingpipes.com/pipes/estate/france/moreinfo.cfm?product_id=30391).

Smokingpipes.com had a second one listed under French Estates that is stamped the same as the one I am working on: Maro Special Billiard. Here is the link to the pipe and their description: (https://www.smokingpipes.com/pipes/estate/france/moreinfo.cfm?product_id=219942). I am including the photo as it was posted on the site. Quite a trim and slender take on the Billiard shape, this piece from Maro bears a striking resemblance to those long-stemmed Billiards favored by Bing Crosby. It’s finished in a warm walnut contrast stain with a bright metal band to accent.

I traced down quite a few Maro pipes online and all were attributed to France. So it appears I am dealing with one of several possibilities here. Either 1 – the pipe was made by Maro in France and sold through Hollco International or Wally Frank as the US distributor  or 2 – the pipe is legitimately a French made pipe that George Leghorn got a hold of somewhere in his journeys. Personally I am inclined to 1 – the pipe is a Hollco International import. Now I had some idea of the provenance of the pipe I could start with reasonable assurance that I was dealing with a French made briar. But before I get on to cleaning up the pipe I thought I would once again include the tribute that Jennifer wrote to her Dad for the blog. She also sent some photos and an article that her Dad wrote for Jeff and me to be able to get a feel for him. I have included those below. Note in each of them that he is holding a pipe in his left hand. I asked her to also send me an email with a brief tribute to her Dad. Here is her tribute from an email to me.

Steve, I want to thank you again for accepting my dad’s pipes.  They were so much a part of my dad’s life that I could not simply discard them. But as his daughter, I was not about to take up smoking them either. *laughing* I think my dad would like knowing that they will bring pleasure to others.  I know that I do.

I’m not sure what to say about his pipes. I always remember Daddy smoking pipes and cigars.

First a bit about my dad. Though my father, George Rex Leghorn, was American (growing up in Alaska), he managed to join the Canadian Army at the beginning of WWII, but in doing so lost his American citizenship.  He was fortunate to meet a Canadian recruiting officer who told him the alphabet began with “A” and ended with “Zed” not “Zee”, and also told him to say that he was born in a specific town that had all its records destroyed in a fire.  When the US joined the war my dad, and thousands of other Americans who had made the same choice*(see the link below for the article), were given the opportunity to transfer to the US military, and regain their citizenship.

After WWII, my dad, earned his degree at the University of California Berkeley and became a metallurgist. There is even a bit about him on the internet.

He loved taking the family out for a drive, and he smoked his cigars on those trips. (As a child, those were troubling times for my stomach.)

I most remember my father relaxing in his favorite chair with a science fiction book in one hand and a pipe in the other… Sir Walter Raleigh being his favorite tobacco… and the pipes themselves remind me of him in that contented way.  If I interrupted his repose, he’d look up, with a smile on his face, to answer me.

It seemed he smoked his Briarwood pipes the most, though he had others.  At the time, it was only the Briarwood I knew by name because of its distinctive rough shaped bowl.  And it was the Anderson Free Hand Burl Briar, made in Israel, which I chose for his birthday one year, because I thought he might like that particular texture in his hand.

At least two of his pipes, he inherited from his son-in-law, Joe Marino, a retired medical laboratory researcher (my sister Lesley’s late husband)… the long stemmed Jarl (made in Denmark), and the large, white-bowled, Sherlock Holmes style pipe.  I believe Joe had others that went to my dad, but Lesley was only sure about those two.

The Buescher, corncob pipe my older sister Lesley bought for Daddy while on one of her travels around the States.

A note on the spelling of my sister’s name…

My dad met my mother, Regina, during WWII and they married in Omagh, Ireland.  My mother was English and in the military herself.  The English spelling of Lesley is feminine, and Leslie masculine, in the UK… just the opposite of here in the United States.  I guess my mom won out when it came to the spelling of the name…

Jennifer

*https://www.thestar.com/news/world/2013/10/22/the_americans_who_died_for_canada_in_wwii.html

I am getting more and more spoiled on working on pipes that Jeff cleaned up. So much so that when I have to clean them it is a real chore! This pipe was a real mess just like the other ones in the collection. I did not know what to expect when I unwrapped it from his box. He reamed it with a PipNet pipe reamer and cleaned up the reaming with a Savinelli Fitsall Pipe Knife. He scrubbed out the internals with alcohol, pipe cleaners and cotton swabs until the pipe was clean. He scrubbed the exterior of the bowl with Murphy’s Oil Soap and a tooth brush to remove the grime and grit on the briar and the lava on the rim top. The finish looked really good when I got it. The rim top looked much better but had scratches and nicks in the surface and some darkening on the inner and outer edges. The silver band was oxidized and tarnished. Jeff had cleaned the internals and scrubbed the exterior of the stem and soaked them in Before & After Deoxidizer bath to remove the oxidation. The stem looked very good other than the deep tooth marks in the surface. When the pipe arrived here in Vancouver for the second stop of its restoration tour it looked very good. I took photos of the pipe before I started my part of the restoration. I took close up photos of the rim top and bowl to show the condition of the bowl and the damages to the rim top. You can see the nicks and scratches in the briar that were under the thick lava coat. The stem looks much better but the tooth marks are visible in the vulcanite. The button looks very good.I took a photo of the stamping on the shanks as it is very clear and readable even after Jeff’s cleanup work.I took the stem off the bowl and the Sterling Silver band slid off in my fingers. I took a photo of the pipe taken apart.I polished the silver band with Silver polish to remove the tarnish and polish out the scratches in the metal. The band definitely looks better.

The order of the hallmarks from left to right are an Anchor (identifying the city of the hallmark as Birmingham, England), T (which gives the year code) and the last one is the rampant lion (identifying the silver as Sterling). The letter T is in a diamond shaped cartouche. From what I can find it seems to fit somewhere between 1943 and 1968. None of the stamps is identical but they are close. So now I knew that the band was made in Birmingham, England between 1943 and 1968. Now the issue was clear to me – according to everything I had found the Maro Special was made in France and the band was made in England. It seems the band was added later. All of the photos I have found of the Maro Special showed the pipe with a silver band but none of them had Birmingham hallmarks so it seems that George had the original band replaced with this one. It might also explain why it had been glued on the shank upside down with the hallmarks on the bottom of the shank. There are no cracks in the shank so it is not a repair band.

Knowing that I now knew that I had a mystery in my hands and that I would likely never fully know how the band and the pipe met! Ah well such is the life of working on estate pipes. Now on to the restoration work.

Once the band was polished I put it back on the end of the shank and lined up the hallmarks with the top edge of the shank. I decided to address the damage to the top of the bowl first. I sanded the rim top with a folded piece of 220 grit sandpaper to remove the scratches and pits in the surface of the rim. I polished it further with a piece of 400 grit wet dry sandpaper. I wiped the rim down with a damp cloth and took the photo below.I polished the bowl and rim with micromesh sanding pads. I wet sanded it with 1500-12000 grit pads and wiped it down between pads with a soft cotton cloth. You can see the progress in the shine as you go through the photos. I worked some Before & After Restoration Balm into the finish of the bowl and the rim top and shank with my fingertips to clean, enliven and protect it. I find that the balm really makes the briar come alive again. The contrasts in the layers of stain really made the grain stand out. I let the balm sit for a little while and then buffed with a cotton cloth to raise the shine. The pipe really looks good at this point. I am very happy with the way the pipe is looking at this point in the process.  I set the bowl aside and turned my attention to the stem. I inserted a pipe cleaner in the stem to protect the airway from collapsing when I heated it. I painted the surface of the stem with the flame of a BIC lighter to raise the tooth marks in the surface. I was able to bring the marks up with the heat. I filled them in with super glue and set it aside to dry.Once the repair had cured I used a needle file to smooth out the surface of the stem. I could see that there were still areas that needed a bit more glue to fill them in. I used a thin coat of black super glue to fill in the remaining dents and nicks and set the stem aside overnight to cure. The surface looked much better once the repair had cured. Rather than sanding it down with 220 grit sandpaper I decided to go straight to the micromesh sanding pads. I wet sanded the stem with 1500-12000 grit pads. I polished it further with Before & After Pipe Stem Polish – both fine and extra fine. I finished by wiping it down with Briarville’s No Oxy Oil and set it aside to dry. I always look forward to this part of the restoration when all the pieces are put back together. I put the pipe back together and buffed the bowl and stem with Blue Diamond on the buffing wheel. I gave the bowl and the stem multiple coats of carnauba wax. I buffed the pipe with a clean buffing pad to raise the shine. I hand buffed it with a microfiber cloth to deepen the shine. It is fun to see what the polished bowl looks like with the grain popping, the silver shining and the black vulcanite almost glowing. The long stemmed billiard is beautiful and feels great in my hand. It is one that could be clenched and smoked while doing other things as it is very light weight and well balanced. It must have been a fine smoking pipe judging from the condition it was when we received it from Jennifer. There should be a lot of life left in this French made Maro Special. Have a look at it with the photos below. The dimensions are Length: 6 ¾ inches, Height: 2 inches, Outside diameter of the bowl: 1 ¼ inches, Chamber diameter: ¾ of an inch. This is one that will go on the rebornpipes online store shortly. If you want to carry on the pipe trust of George Rex Leghorn let me know. Thank you Jennifer for trusting us with his pipes. Thanks to each of you who are reading this blog. Remember we are not pipe owners; we are pipemen and women who hold our pipes in trust until they pass on into the trust of the next pipeman or woman.

Recommissioning a Mysterious Freehand, Made in Denmark – Preben Holm?


Blog by Dal Stanton

I came into possession of this attractive Danish Freehand when I acquired what I call the St. Louis Lot of 26 which my son, Josiah, helped me secure when he was a student in St. Louis.  He texted me from St. Louis about this box of pipes that were for sale at an antique shop he found.  Josiah wanted to split the cost of the Lot with me so that I could pick out a pipe in the Lot that would join my personal collection and would be his gift to me. The rest of the pipes would benefit the Daughters of Bulgaria – our work here in Bulgaria with women and girls who have been trafficked and sexually exploited.  It was a win/win proposition!  I chose as his gift to me the Champion Churchwarden in the center of the picture below.  The rest of the Lot of 26 went to my online collection I call For “Pipe Dreamers” Only! where pipe men and women can choose a pipe – or a pipe chooses them – to be commissioned for restoration.

Andy has commissioned pipes from The Pipe Steward before and I love it when pipe men (and women) keep coming back!  The pipe calling his name from the St. Louis Lot of 26 is the Danish Freehand marked in the picture below.As a return patron of The Pipe Steward which benefits the Daughters of Bulgaria, Andy’s contribution has been appreciated.  His first commission was a striking Monarch Bent Ball (see: Link) and then a Churchwarden I fashioned from a throw-away bowl (see: Link) which was on his list to add to his personal collection.  Andy came back again and commissioned a Trent Lev-O-Lator Half Bent Billiard (see: Link) that turned out beautifully.  His three previous restorations are pictured below. Now, the striking Danish Freehand now on the worktable. Here are pictures of the Freehand that got Andy’s attention. When I first acquired this Lot of 26 and it made its way here to Bulgaria, I was anxious to get a closer look at this Freehand.  When I first saw it in the pictures that Josiah sent, I thought that it might be a Karl Erik.  When I finally looked at the Freehand on the worktable here in Sofia, I had to work hard to find any identifying markers.  With the help of a magnifying glass and carefully angled lighting, I could only make out with certainty extremely ghosted lettering, ‘Made in Denmark’.  The next two pictures show this ghosted lettering.Yet, in the two pictures following with the light angled differently, the second picture being a blow-up of the first, I can make out just above the ‘Made’, I think I can see two letters: ‘N’ and possibly another ‘N’ or a ‘W’?  And to the far right, possibly the number ‘5’ or another letter?  Often these are phantom letters that form from the grain and our desire to see something that’s not there!  Phantom or not, there’s not a lot to go on.With this meager information I looked at Pipephil.eu where you can search by country.  I clicked on Denmark and as you might expect, several options surfaced of Danish pipe names and carvers.  With the possibility of the phantom ‘N’ being the first letter of a name, I looked at the N section to see if any of the names and pipes made by these might resemble the Danish Freehand on my worktable – reaching at straws!With no leads, I sent a note and pictures of this Freehand off to Steve with his rebornpipes.com depth of experience to draw upon again!  Perhaps there was something he would see in the pipe that would lean toward a Danish style and maker.  The next day I received Steve’s reply which was encouraging:

It has the look of a Preben Holm… under the pipes he made is a group of them – freehands labeled Monte Verde I wonder if that is not what is there.

Steve included the Pipephil.eu link that took me to the Monte Verde panel attributed to Preben Holm.  Wow! Again, I look at the lettering on the lower panel of the Freehand and it could be….  The ‘Made in Denmark’ looks like the same, all cap letters.  With Steve’s input the likelihood of Freehand being a Preben Holm is enhanced.Not long ago, wishing to add to my personal collection a Freehand with Preben Holm’s name on it, I landed on eBay a beautiful piece of his workmanship. This Freehand is still in need of restoration but putting it along side of the smaller Freehand on my worktable, one can easily see why Steve says that it has the ‘look of a Preben Holm’.  Looking at the curves, the angles of the cuts, even the grain pattern presentation – the resemblance is there. I’m looking forward to restoring this big boy one of these days!The Pipedia ‘Preben Holm’ article is full of information and examples of his work.  The opening paragraph is enough to capture the impact that his work has had – why, like me, adding a Preben Holm Freehand to one’s collection checks a box on most pipe men and women’s pipe bucket list:

Preben Holm (1947 – 1989) has set some marks in pipe history. Just before his 16th birthday in 1963 he sold pipes to the legendary Pipe-Dan shop and at the age of only 22 he headed 45 employees. He was among the first Danish artisans who made “Danish pipe design” famous in the USA in the 1960’s. More than that he was one of the very first carvers who exceeded this moderate Danish design which based on the classical shapes. “Chaising the grain” they turned out wild and dramatic fancy pipes. Combining smooth with blasted surfaces, showing big areas of the original bark at the top of the bowl and at the end of the stem, these pipes were quite shocking to many elder and more conservative pipesmokers.

When he started to sell his pipes to Lane Ltd. under the Ben Wade label, he caused a hype fairly beyond comparison. Especially in the U.S., as most of his pipes were sold there.

Looking now more specifically at the ‘possible’, perhaps probable, Preben Holm on my worktable, the 1 5/8-inch-deep chamber has a light to moderate layer of cake and the plateau is full of grime and lava flow.I am struck by the vertical grain that the carver took advantage of as he shaped the pipe. In the Pipedia Preben Holm article quoted above, I took special note of the phrase, ‘“Chaising the grain” [sic].  Breaking out of the classic shape mold where shape dictated the pipe, in the Freehand movement Preben Holm revolutionized, ‘chasing the grain’ challenged the carver to allow the grain to shape the pipe’s presentation.  This Freehand definitely chased the grain!  The large briar landscape of the peaked stummel is dirty with thick grime as well as some minor dings and scratches from normal use. The fancy stem has deep oxidation and calcium build-up on the bit.  The bit and button have been mercilessly chewed like cud!  The former steward saved money on not purchasing bite guards but it’s obvious this pipe was loved!  To smoke the pipe hands-free would require this kind of clenching with the size of the stummel.To begin the restoration, using pipe cleaners wetted with isopropyl 95%, the fancy stem airway is cleaned.With the oxidation so thick and with calcium caked on the mouthpiece, before putting the stem into a soak of Before & After Deoxidizer, I decide to get a head start on breaking up the crud.  I use 000 grade steel wool on the stem.  I recently read Jeff Laug’s rebornpipes blog on his cleaning methods (Got a filthy estate pipe that you need to clean?) which is very helpful.  One thing he mentions about stem cleaning is to use ‘Soft Scrub’ which unfortunately I didn’t have for this stem.  I used alcohol with the steel wool, but next time I’ll try to find a comparable product to use here in Bulgaria.After attacking the oxidation and calcium build-up with the steel wool, I’m hopeful that the Before & After Soak will prove to be more productive than in the past with heavily oxidized stems.  The Danish Freehand joins other stems of pipes in the queue for a soak of several hours.After soaking for some time, I use a stiff wire to fish the fancy stem out of the Deoxidizer and allow the fluid to drain.  Notice that I have surgical gloves on – I squeegee the excess fluid off the stem with my fingers.I then wipe/scrub the surface with a cotton pads wetted with isopropyl 95% to remove the raised oxidation.  The Before & After Deoxidizer seems to have done a good job after prepping the oxidation first with the steel wool.At this point, I apply paraffin oil to the stem to begin the rejuvenation of the vulcanite.  I put the stem aside and turn to the stummel.With the stummel in hand, I take a closer look at the conical chamber and the minor/moderate carbon cake build-up.  I’m not sure how well the Pipnet Reaming Tool’s blade heads will fit this chamber, but I’ll give it a go. I use the first two smaller blade heads, but as I suspected, the chamber narrows too much for the blades to reach the floor of the chamber, so I use the blades simply to scrape the walls. It was then that I remembered a reamer that I picked up a few years ago at a flea market somewhere in Kentucky when my wife and I were in the States.  The Kleen Reem Pipe Tool has some years on it.  I remember when I found it, I thought that it might come in handy. I love old boxes and paraphernalia.  The company printed underneath the name is W. J. Young Co. Peabody.  A quick look on the internet revealed that Peabody is in the US state of Connecticut.  The reamer is in a case with several shortened pipe cleaners.  I’m not sure what the function is of the pipe cleaners. Taking a closer look at the reamer I discover the smaller knob on the end unscrews and sheathed inside I withdraw a drill bit.  As I rotate the end knob of the reamer, the three blades expand in unison as a metal cylinder pushes the blades open.  The workings are solid. With my curiosity piqued, I dig a bit more on the internet to see if I can find more information.  I find a classic owner’s leaflet (See: LINK) extolling the benefits of keeping one’s pipe clean and the benefits of the Kleen Reem Pipe Tool. Below the text, a schematic of the reamer clearly describes the critical working parts.The next page of the leaflet solved the mystery of the miniature pipe cleaners.  The picture shows a pipe cleaner hooked on the end of the shank reamer.  I look at mine and discover that its not a hook, but a small hole through the pipe cleaner is threaded.  I would imagine that it puts a lot of torque on the crud in the airway when the shank reamer is rotating. After reading the ‘Directions for Use’ below, I decide to see for myself if the claim holds true: ‘The Kleen Reem Pipe Tool fits any pipe….’ The claim held true, at least for this Danish Freehand!  The end of the reamer blades reached down to the floor of the chamber and I expanded the blades gradually as I rotated the reamer moving up the chamber.  A great debut for this vintage old boy Kleen Reem Pipe Tool!  I follow the Kleen Reem by scraping the walls further with the Savinelli Fitsall Tool and finish by sanding the chamber with 240 grade paper wrapped around a Sharpie Pen. After wiping the chamber with a cotton pad wetted with alcohol to clean the carbon dust, I inspect the chamber walls to find everything looking great.Transitioning to cleaning the external briar surface, using undiluted Murphy’s Oil Soap, I scrub the surface using a cotton pad as well as a bristled toothbrush on the plateaus – rim and shank. I then transfer the stummel to the kitchen sink where I continue the cleaning using shank brushes with anti-oil dish liquid soap (out of Jeff Laug’s Playbook!) and using warm to hottish water, I clean the mortise and airway.  I also use the brass wire brush on the rim plateau where the lava overflow is still hanging on.  After the cleaning, a few pictures show the results.  The plateau is cleaned of the caked crud and most of the dark color is gone.  The old wax build-up and finish, if there was much of a finish, seems now to be gone.  Fresh briar. Continuing the internal cleaning, pipe cleaners and cotton buds wetted with isopropyl 95% go to work on the mortise and airway. I also employ a small dental spoon to scrape the mortise walls.  When I was doing this I suddenly thought, ‘Why am I not testing out the Kleen Reem shank reamer?’  I pull it out of the Kleen Reem case again and rotate it into the airway.  The reamer grabs with traction and begins to move slowly through the airway as I rotate the reamer.  It makes it through to the draft hole and I retract it without difficulty.  It works!I decide to drink the Kool Aide and try out the miniature pipe cleaners.  I thread one through the hole on the tip of the reamer per the directions I read earlier.  I’m wondering to myself, how is all of this going to fit and move through the airway??  I decide to wet the pipe cleaner some with isopropyl 95% as I do regular pipe cleaners.  I push it into the mortise and the halves of the pipe cleaner fold back like slanted wings as I begin rotating the reamer as I did before.  As before, the reamer grabs and gains purchase while the rotation of the reamer pulls the tool into the airway.  It makes it to the draft hole and as before, before trying with the pipe cleaner, I retract it without trouble.I am amazed!  When I extract the reamer, I discover that the pipe cleaner was neatly embedded in the troughs of the reamer – sweet!  The pipe cleaner provides a slightly expanded ‘brushing’ activity while the reamer does the plowing with its blades.  The second picture below shows the pipe cleaner unwrapped a bit.  I’m impressed with the engineering of this tool. After several more cotton buds and pipe cleaners, they begin to emerge lighter and cleaner and I call it ‘cleaned’ for the moment.The hour is late and before the lights go out, I’ll continue the internal cleaning with a kosher salt and alcohol soak.  This both continues to clean the internal briar walls, but also refreshes the bowl for the new steward’s enhanced enjoyment!  I first fashion a mortise ‘wick’ by pulling and twisting a cotton ball.  The wick serves to help draw the tars and oils out of the briar. I then guide the wick down the mortise into the airway with the aid of a stiff wire.  With the wick in place, the chamber is filled with kosher salt.  Kosher salt leaves no aftertaste unlike iodized salt. With the bowl in an egg crate to keep it stable, I add isopropyl 95% to the chamber with a large eyedropper until it surfaces over the salt.  After a few minutes the alcohol is drawn into the pipe and I again add some alcohol to top it off.  I put it aside, turn out the lights and let it soak through the night! The next morning the soak has done the job.  The soiling of the wick and salt indicates the absorbing action of drawing the tars and oils out of the briar.  After tossing the expended salt in the waste, a paper towel and blowing through the airway clears the pipe of salt crystals.I put the stummel aside to address the chewed-up stem.  I take a few pictures to show the upper, lower then a lateral view of the button.  The results of the biting and clenching are not only the severe teeth damage but also that the button is so compressed, there’s essentially no lip left to hang the pipe normally.  This is not good even when you’re not a clencher.  My approach will first seek to expand and raise the tooth compressions and chatter as much as possible on the upper and lower bit.  I’ll attempt this using the heating method with a Bic lighter.  I don’t believe there’s any way to avoid having to rebuild the button to restore a proper lip to hang the Freehand.  First, using a Bic lighter, I paint the upper and lower bit with the flame.  My hope is to minimize the compressions so that sanding is all that will be necessary on the bit. I take a start picture of upper and lower, then after using the Bic lighter for comparison.

I believe the process did minimize the damage as the heated vulcanite expanded toward its pre-damage condition, but we’re a long way from where we need to be! The button was so thin on the top that the flame burned a small bit of the upper lip in the center and it broke off leaving a divot in the middle of the upper lip. To rebuild the button, I mix activated charcoal with BSI Extra Thick Maxi-Cure CA glue.  To help in cleaning, I put scotch tape down on a plastic disk that serves as my mixing pallet, and then clean the bit with a cotton pad and alcohol.  I place a small pile of charcoal on the disk and then a dollop of the glue next to it.  I gradually mix as I pull charcoal into the glue using a toothpick.As the mixture thickens, I trowel the charcoal/CA mixture onto the button to build a mound over the repair site for the button and on the bit area to fill tooth compressions remaining in the vulcanite.  An accelerator is used on each side of the bit to quicken the curing time.After cleaning up, the flat needle file is first used to begin the rough shaping of the button.Starting with the upper side, I file and gradually shape the button.After making progress on the upper bit and button, the patch just above the small air slot that was thin earlier and burned some, is not adequately filled.  With a magnifying glass I see a gap in the patch.To do a quick patch fill above the slot, I fashion a piece of index card into a sharp point that will fit into the slot to form a mold barrier.  I cover the tip of the card stock with a piece of scotch tape to keep the glue from sticking. Using a medium-thick black CA glue, I spot drop the glue in the center above the slot and spray it with accelerator.After waiting a few minutes for the black CA glue to thoroughly cure, I wiggle the card stock out of the slot with no problems of sticking.  The patch above the slot looks good and I continue filing.I finish the roughing out of the upper button with the flat needle file.I transition to filing and shaping the lower button and bit.With the lower roughing out completed, I transition to 240 grade paper and sand to smooth more and to erase the scratching left from the file. Next, using 600 grade paper, I wet sand the entire stem.  I follow this by applying 000 grade steel wool to the entire fancy stem.  It takes some time to work sand in the grooves and around the bulges of the stem.Stem work is the most time consuming and meticulous part of a pipe’s restoration, usually.  I look at the possible Preben Holm Freehand stummel waiting for attention and I would rather put the stem aside and switch to the ‘milk and honey’ part of a restoration, but I press on with the stem applying the full battery of micromesh pads starting with wet sanding with pads 1500 to 2400.  I follow this by dry sanding with pads 3200 to 4000 and 6000 to 12000.  In between each set of 3 pads, I apply Obsidian Oil which helps rejuvenate the vulcanite stem as well as helping retard the development of oxidation. After finishing the micromesh process, I note that the button rebuild patch material has air pockets showing.  This happens often with this repair. To remedy this, I use clear acrylic nail polish to paint the button with the small brush that comes with the bottle.  The acrylic fills the pockets.  After applying, I put the fancy stem aside for the acrylic polish to cure.With the stem on the side, I now take another look at the Danish Freehand stummel.  The grain is beautiful, and the surface is in very good shape but shows normal nicks and scratches from normal wear. I will use micromesh pads to refresh the briar surface but first I cover the area of the last vestiges of the nomenclature.  I do not wish to contribute to its demise.Using pads 1500 to 2400, I wet sand the surface.  Following this, using pads 3200 to 4000 and 6000 to 12000, I dry sand the large briar landscape.  It’s exhilarating to see the metamorphosis of the grain through each minute gradation of grade provided by each successive micromesh pad.  It’s as if the grain is coaxed out.  I love the grain on the Danish Freehand.  If this is indeed a work of Preben Holm, it is truly ‘chasing the grain.’ To tease out further the natural hues of the briar, Mark Hoover’s product (www.ibepen.com), Before & After Restoration Balm, does the job well. After putting some Balm on my fingers, I work it into the briar surface including the rim and shank plateaus.  I then put the stummel aside for about 20 minutes, then wipe/buff the excess using a microfiber cloth dedicated to this. I follow with another microfiber cloth to buff the surface further.Next, I use another product of Mark Hoover, Before & After Fine and Extra Fine polishes.  Not only does the polishes revitalize the vulcanite, Mark says that it also has properties that continue to fight or remove oxidation.  Starting with the Fine polish, like the Balm, after placing a small amount on my finger, I work it into the vulcanite and let it set for a few minutes.  With the polishes, I like removing the excess initially with a paper towel – it absorbs and is a bit rougher which seems to help in the polishing at this stage.  I follow the Fine with the Extra Fine polish in the same manner.  The stem looks great.Next, I address the plateaus of rusticated briar – a hallmark characteristic of many Freehand pipes.  This Freehand appears to have had a darkened plateau originally and I use a fine point black Sharpie Pen to do the highlighting and darkening. I also darken and freshen the straight highlight carvings on the heel. I focus on the inner two thirds of the rim plateau intentionally leaving some of the rustication on the outer edge natural briar – I like contrasting and texturing.  I do the same with both plateaus and the heel sculpting. In order to ‘weather’ the freshly darkened plateaus so that the black doesn’t look new, I lightly sand the plateaus with the roughest micromesh pad, 1500 grade.  What this also does is lighten the peaks of the rustication giving more depth of contrast – I like this! The home stretch – after mounting a cotton cloth to the Dremel with the speed set at about 40% full power, Blue Diamond compound is applied to stem and stummel. Following Blue Diamond, another cotton cloth buffing wheel is mounted on the Dremel, and maintaining the same speed, carnauba wax is applied to the Freehand.  After applying the wax, I use a microfiber cloth to give the pipe a rigorous hand buffing to raise the shine.If this Danish Freehand is not a Preben Holm, it’s an excellent facsimile.  The vertical grain is mesmerizing.  It reaches up the 2 1/2 inch height of the Freehand’s front bowed bowl section and culminates in the classic rusticated plateau.  The plateau measures 1 3/4 inches across surrounding a 1 3/4 inch deep chamber that will hold an ample load of tobacco.  The length from the front point to the button is 5 3/4 inches.  The button re-build came out well – I’m pleased.  Andy commissioned this Made in Denmark Freehand and will have the first opportunity to claim it in The Pipe Steward Store benefiting the Daughters of Bulgaria.  Thanks for joining me!

A Resurrection for a C.P.F. Fancy Bulldog


Blog by Steve Laug

Back in November of 2019 I received an email from a fellow pipe man and restorer who I regularly communicate with regarding a C.P.F. pipe. He keeps an eye out for these as he knows that I have a love of the old American brand. He sent the email below and piqued my interest in the pipe.

Steve, I just picked up a CPF pipe that needs some TLC.  Will send to you if you are interested.  No strings attached.  Marked French Briar CPF with some Brass fitments.  Half-3/4 bent bulldog shape.  Bowl looks solid from the outside but can’t really tell what it looks like from the inside.  Might have an amber stem that is pretty much shot – complete, but has problems that probably cannot be repaired – holes near button, crack near shank. – Curtis

I asked him to send me some photos of the pipe but he had already put it in the mail to my brother Jeff. He did however send the photos from the EBay seller that I have included below. Curtis certainly has a gift for understatement… TLC is definitely not all that will be needed with this old timer. But I have a soft spot for hopeless old pipes and this was a C.P.F. as well so it would need to get some attention. At least it could be an ongoing project for me to fiddle with while working on pipes for others. It would be one that stayed in my C.P.F. collection so there was no rush.

You can see some of the issues that came with this old pipe in the photos below. The rim cap and shank end cap are brass and they were oxidized and the grooves and filigree of the pieces were filled in with grime and some rust as well. The rim cap had been hammered almost completely out of shape which will show up later in the photos Jeff took when he received the pipe. The bowl itself had a thick cake in it and an overflow of lava onto the rim cap. The finish was tired and dirty with many small scratches. The C.P.F. oval with French Briar around the oval was still readable but worn. The issues with the stem were many. First appearances show that it is held onto the tenon with thread wound around the tenon. The amber is crystallized and cracked. There is a split on the right side of the shank end. There are two bite throughs – one on the top and one on the bottom. These bite throughs do not align. Patching them will be a challenge. The button itself is worn as well with chips and nicks. The airway is filled with tars that have caused it to turn black. This old pipe will need a lot of work but I can see potential. Curtis shipped it to Jeff so that he could do the cleanup work on it before sending it on to me in Canada. Jeff took photos of the pipe to give me a better idea of the condition before he started his cleanup. The first photo shows the look of the pipe and for me shows the promise I saw in the tired old timer.Jeff also took a photo of the rim top and bowl to show the thick cake and the damage to the brass cap. The second photo shows the bone tenon in the shank and the stem with the string wrap removed to show the issues with the size of the airway into the stem that would have originally been threaded to accommodate the tenon. The threads were long gone and the opening was now cavernous.He took some photos of the sides and heel of the bowl to shows the scratches and nicks in the finish and gives a good picture of what will need to be done to bring the finish back to life. Jeff took photos of the shank cap to give an idea of the condition of the oxidation and the darkening on the surface of the carvings in the brass. It was still solid even with the debris and oxidation.He took a series of photos of the stem to show the crystallization and cracks in the surface as well as the bite through areas and damage to the airway. The stem almost looked to be a lost cause but I had a few ideas and nothing to lose. I am getting more and more used to Jeff cleaning up the pipes before I work on them. So much so that when I have to clean them it is a real chore! The above photos told the story of the condition of the pipe when Jeff received it so I did not know what to expect when I unwrapped it from his box. II was pretty amazed at what I saw. Yes it had a lot of issues but it was CLEAN! He removed the bowl cap and reamed the bowl with a PipNet pipe reamer and cleaned up the reaming with a Savinelli Fitsall Pipe Knife. He scrubbed out the internals with alcohol, pipe cleaners and cotton swabs until the pipe was clean. He scrubbed the exterior of the bowl with Murphy’s Oil Soap and a tooth brush to remove the grime and grit on the briar and the lava on the rim brass rim cap and shank cap. The finish looked surprisingly good once it was clean. The brass rim cap showed its damage clearly and I was not sure how much of that I could remove but I would give it a try. He cleaned the stem internals and scrubbed the exterior and the result looked very good. The airway and bite through holes were clean but the crystallization was very evident. I have to say that when the pipe arrived here in Vancouver for the second stop of its restoration tour it was impressive. I took photos before I started my part of the work. I took some close up photos of the rim cap and shank cap. I wanted to show what an amazing job Jeff did in the cleanup of the caps. Even though they were damaged there were quite nice. The briar also cleaned up very nicely and you could see the grain! I also took close up photos of the stem to show condition it was in. It would not take a lot of work – stabilizing the crazing or crystallizing of the amber and also repairing the bite throughs.I took the pipe apart so I could work on the various components. You can see the bowl, the rim and shank cap and the stem in the photos. Each piece needed special attention.I used a small ball-peen hammer and a screwdriver and a Robertson head to tap out as many of the dents as I could.I used a brass bristle wire brush to polish the shank and rim cape and then glued them both in place on the shank and rim top respectively. I tapped the top of the rim cap with the hammer and was able to flatten it slightly. I knew that I would never get the bone tenon out of the shank and that the interior of the stem was far too big to receive the tenon. I wrapped the end of the tenon with Teflon tape to get a good fit on the stem.I coated the exterior of the stem with clear Krazy Glue to stabilize the crazing of the amber. I let it dry and then the stem was ready to sand. I tried to repair the bite through marks on both side of stem with the normal procedure of a greased pipe cleaner in the airway and building the hole up with the glue. It did not work this time at all.I used my Dremel and sanding drum to take off the damaged button. I was able to remove the majority of the bite through on the top side. Having that completed, I then was able to repair the one on the underside. I put the greased pipe cleaner in the stem and filled in the hole on the underside. This time it held. I also was able to build up the area just ahead of where the button had been on the topside. It truly looks ugly at this point in the process but would look better when I was finished.I sanded the surface on both sides of the stem with a folded piece of 220 grit sandpaper and then filled in some of the pits in the repair with more Krazy Glue.With that repair done I started to build up the glue around the stem end to make a new button. I layered on the glue and sprayed it with an accelerator and re-layered and resprayed until the button edge was present. I used a needle file to cut a sharp edge on the new button. Once it was clearly defined I sanded the button and stem surface with 220 and 400 grit wet dry sandpaper to smooth out the surface and blend it into the stem.I polished the stem with micromesh sanding pads – wet sanding it with 1500-12000 grit pads. I wiped it down with a damp cloth after each pad to remove the sanding debris. I polished it further with Before & After Pipe Stem Polish – both fine and extra fine. I hand buffed it with a cloth. I wiped it down with Briarville’s No Oxy Oil to protect and preserve the stem. The progress on both sides of the stem is clear in the next series of photos. Curtis was correct in telling me that this would be a challenging pipe to work on. Jeff had done the heavy work in cleaning it so that was a major boost for me. Once I was finished I put the repaired amber stem back on the bowl and polished it by hand with a microfiber cloth. I gave the bowl and stem multiple coats of Conservator’s Wax and buffed the pipe with a shoe brush to raise the shine. I hand buffed it again with a microfiber cloth to deepen the shine. The pipe has come a long way from where it was when Jeff received it. Thank you Curtis, for believing that I could do something with this one. That kept me moving forward during some rough moments with the restoration. The pipe polished up really well. The polished amber stem seemed to truly come back to life with the buffing. This little pipe feels great in my hand and I am sure that it will feel even better radiating the heat of a good smoke. It must have been a fine smoking pipe judging from the condition it was when we received it. Have a look at it with the photos below. The dimensions are Length: 5 inches, Height: 2 inches, Outside diameter of the bowl: 1 ¼ inches, Chamber diameter: ¾ of an inch. This is interesting piece of late 1890s early 1900s history and even with the warts and wrinkles has beauty that is eye catching. I will be putting it in my C.P.F. Collection. Thanks to each of you who are reading this blog. Remember we are not pipe owners; we are pipemen and women who hold our pipes in trust until they pass on into the trust of the next pipeman or woman. This is the push behind the work I do.

Transforming a Hornless Sculpted Bull’s Head into a Churchwarden with Horns


Blog by Dal Stanton

I would have never come up with this on my own.  Seth already commissioned the restoration of a French GEFAPIP 500 Bent Bulldog which he found calling his name in the online collection of pipes I call, For “Pipe Dreamers” Only!.  The Bulldog needed a lot of stem work which included deep oxidation, a button rebuild and re-seating the stem/shank fit.  I was pleased with the results of that transformation pictured below.While I was working on the GEFAPIP Bulldog, Seth emailed me with a question – could he commission a Churchwarden project by repurposing another pipe’s bowl listed in For “Pipe Dreamers” Only!.  A Sculpted Bull’s Head with a bent stem had gotten his attention and with a little ‘dreaming’ applied, Seth could envision the Bull’s Head mounted on a Warden stem.  I found the Bull’s Head in the inventory and pulled it out to look at through Seth’s eyes… Yep!  I could see it, too.  What was missing in the mix were the Bull’s horns.  I responded that we could do this and after working out the details, I added the Bull’s Head CW project to follow the Bulldog project! Here are pictures of the Sculpted Bull’s Head which got Seth’s attention: The Bull’s profile is detailed and a bit on the whimsical side, especially with his missing horns.  He seems to be smiling in the picture above.  There are no identifying marks on the pipe.  When the Bull made it to the worktable, the question that came to my mind was how would I fashion the missing horns?  I took this question to ‘Google search’ to find other sculpted bull heads to get some ideas.  I clipped a screen shot of the search results and you can see that the horns are not uniform which is true of real bulls.  I looked through the pictures to see if I could find a bull that resembled Seth’s Bull, but I could not.  The interesting thing was that I found that many bull heads were from Italy.  What I noticed as well, was the similarities and differences between the pipes.  The eyes were made of differing materials and also the shaping of the ears situated behind the horns were distinctive and showed bulls sculpted by the same ‘school’ or carver.  After concluding the online search, I decided that I would send a note to Seth asking him to do the same search and to let me know what horns looked best – with the understanding this Bull’s Head will be mounted at the front end of a Churchwarden stem.  I’m thinking about the balancing and general look.  After sending the email, I place the Bull’s Head stummel with a Warden stem to get an overall sense of proportion.  I like it!I begin the Sculpted Bull’s Head Churchwarden project with the general cleaning of the stummel before fashioning the stem.  I take a picture of the chamber showing very little cake buildup, but I do see vestiges of the former steward’s tobacco.  I use the Savinelli Fitsall Tool to scrape the walls of the narrower than usual chamber.  After wrapping 240 grade paper around a Sharpie Pen, sanding the chamber removes more carbon.  I finish this phase by wiping the chamber with a cotton pad wetted with isopropyl 95%.  After inspecting the chamber, I determine that all looks good. Moving to the cleaning of the external surface, using undiluted Murphy’s Oil Soap and a bristled tooth brush I go to work scrubbing all the crevasses of the sculpting.From the worktable, I transfer the Bull’s Head to the kitchen sink where I rinse the surface with warm water as well as clean the internals.  Using anti-oil dish soap, long shank brushes scrub the internals.  Afterwards, the stummel is rinsed thoroughly – inside and out.The appearance of the Sculpting is realistic, especially the carving around the eyes. I continue cleaning the internals using cotton buds and a pipe cleaner – all dipped in isopropyl 95%.  The internals are good, and I move on.With the stummel clean, it’s time to begin fashioning the Warden stem.  The first step is to take some measurements using my German made electronic caliper – one of the best additions to the toolbox I’ve made.  I measure the internal diameter of the mortise to establish the target size of the tenon.  The measurement is 6.80mm.  Next, after mounting the drill bit provided by the PIMO Tenon Turning Tool set, the airway is drilled out to receive the Guide Pin of the TTT. After drilling the airway, the TTT is mounted.  The first cut of the tenon is intentionally larger to act as a starting point for the measurement.  In the picture below the guide pen is in the now enlarged airway.  In the past, I’ve learned the hard way that it’s critically to cut the tenon of the precast Churchwarden stem all the way to and through the raw stem facing.  I’ve put an arrow at the facing that is shouldered coming from the casting.  If this shoulder is not removed, it simply migrates to the pipe which is not good.I do the initial cut of the tenon through the ‘shoulder’ so that a sharp 45-degree angle is left which will be able to seat more exactly with the shank facing.Again, I measure and the tenon after the initial cut and it is 8.92mm.  The difference between the starting cut and the target size of the tenon (6.80mm) is 2.12mm. In order to approach the target size conservatively through sanding, 40mm is added to the target size of the tenon to create a ‘fat’ target – to leave a bit of sanding to be able to customize the fit.  Adding .40mm to 6.80mm gives a fat target of about 7.20mm.  This is what I aim for with the PIMO Tenon Turning Tool before transitioning to sanding the raw tenon.After a few cuts closing in on the ‘fat’ target, I settle for 7.31mm.  I now transition to sanding. Using a coarse 120 grade, I pinch the paper around the tenon as evenly as possible and rotate the stem while holding the paper stationary.  My goal is to size down the tenon evenly so that the whole tenon is maintaining contact snuggly on the mortise walls once seated.  Progress is patient as I sand and test the fit. As the progression moves closer to completion, I transition to 240 grade paper to do the final sanding.The tenon is fitting well – snug but not too tight.  The pictures below show the seated stem.  The stem is almost perfectly flush with the upper shank, but the stem is fat on the lower quadrant.After taping the shank with a layer of masking tape to buffer the briar from the heavy sanding, I attack the fat lip of the lower stem using coarse 120 grade sanding paper.  The goal is to sand the excess vulcanite to form a uniform shank/stem union.After achieving a good union at the shank, I continue the sanding with the 120 paper over the entire precast Warden stem.  The stem, even though it is new, has the casting seam down both sides that needs sanding and uneven rippling that needs smoothing. After the 120 grade paper, I follow by sanding the entire stem with 240.After the stem proper has been sanded, I switch the focus to the rough precast button.  Pictures of the upper and lower raw button show the imperfections that are first filed using a flat needle file.After doing the major shaping with the file, I follow with 120 and 240 sanding papers to fine tune the button shaping.Without a doubt, the least pleasing aspect of fashioning Churchwardens is sanding the stems and dealing with all the rubber dust!  I’m thankful to move to the fine sanding stage by wet sanding with 600 grade paper followed by applying 000 grade steel wool to the entire stem.Next, with the stummel and stem united, I remove the masking tape to begin sanding with micromesh pads.  At this point, I focus the sanding on the stem/shank junction and the stummel.  Sanding the shank with the stem engaged keeps the junction edges from shouldering.  I also sand the stummel to clean it up.  There’s no doubt that this Bull’s Head sculpting will remain ‘rough’ and rustic, but I want to sand the smooth briar points of the Bull’s head: shank, underside, muzzle and the high points of the sculpting ridges.  Pictures of the landscape show the smooth briar patches that will be the focus of the micromesh pads. I begin by first wet sanding with pads 1500 to 2400, followed by 3200 to 4000 and 6000 to 12000. Next, I address the stummel’s hue.  The original pictures of the Sculpted Bull’s Head indicate an original darker stummel.  What I believe will look good is to darken the stummel again and then lightly sand the peaks of the sculpting to bring out highlights giving the overall appearance more depth and contrast. The crevasses of the sculpting will hold on to the darkened hue while the peaks will lighten.  I’ll use Fiebing’s Dark Brown Leather Dye to do the job.  After removing the stem, I clean the stummel using a cotton pad and isopropyl 95%. It takes a bit of time as I get into each crevasse of the sculpting.I assemble the staining station and use the hot air gun to warm the stummel before applying the stain. This opens the briar to help its receptivity to the dye. Unlike my normal approach of flaming the aniline dye after painting it on the briar surface, with the rough texture I apply a simple dye wash and allow it to dry and set. I use the bent over pipe cleaner to apply dye in all the crevasses of the sculpted surface.  After applying the leather dye, I let the stummel rest for several hours.With the stummel resting now, I turn back to the stem.  Before, with the stummel attached, I have already applied micromesh to the junction area.  Now I continue with the rest of the stem starting with wet sanding with micromesh pads 1500 to 2400 then dry sanding with pads 3200 to 4000 and 6000 to 12000.  Between each set of 3 pads, Obsidian Oil is applied to the stem.  Steve did an informative blog on comparing Obsidian Oil with Briarville’s, No Oxy Pipe Stem Oil (See LINK).  His conclusion was that both seemed to be equally good products.  What I didn’t know before reading Steve’s blog was about the anti-oxidation properties of Obsidian Oil.  It doesn’t remove oxidation if already present, but it hinders the growth of oxidation.  As a result, I’ve started using Obsidian Oil for the maintenance of my own pipes in rotation. Putting the stem aside for the time, I take up the stummel which has been resting for several hours after applying the dye.  I use a cotton pad wetted with alcohol to give the stummel a wipe to remove excess dye. Next, I mount a cotton cloth buffing wheel to the Dremel with the speed set at about 40% full power.  I apply a light application of Blue Diamond compound and I intentionally keep the compound light because I want to avoid caking in the crevasses.  My focus is primarily buffing on the smooth briar and the peaks of the sculpting.After application of the compound, I use a felt cloth to give the stummel a rigorous buffing to remove the compound dust from the surface.  I very much like the results.  The effect I was shooting for with the contrast between the smooth briar peaks and the darker crevasses is evident. The rough, rustic texture is preserved but the smooth briar pops in comparison.  I’m surprised also by the mahogany leaning hue resulting from the dark brown dye that I applied.  The following pictures show what I see. I decide to condition the dried Sculpted Bull’s Head stummel using Before & After Restoration Balm. I place some Balm on my fingers and work it well into the crevasses of the sculpting and over the smooth briar surfaces.  During this process, I note that the dye applied to the stummel earlier is coloring the Balm somewhat as it’s worked into the briar.  I also see some coloring on my fingers.  After working the Balm in well, I place it aside to allow the Balm to do its thing and then I use a cotton cloth that I will discard to wipe the excess Balm which is also colored somewhat with the fresh brown dye that is lifting off the stummel. To address the leaching dye issue, which is normal for newly dyed woods – briar is no exception, is to heat the stummel with the hot air gun which helps the dye to fully leach.  When the stummel is heated, I wipe it first with a cotton cloth and then with a paper towel.  The hopeful result of this is after the pipe reaches his new steward, when the steward fires it up for the first few uses, dye will not leach on his hands from the heated stummel – or be minimized greatly!Next: bending the Warden stem.  After reuniting the stem and stummel I place the pipe on a piece of paper to sketch the angle of curve needed to help as a template.  I first draw a horizontal line to serve as the plane of the plateau.  I use the horizontal shelf behind the angled chamber stack to line up with the horizontal plane.  After outlining the unbent angle, I sketch the bend to bring it into alignment with the horizontal to serve as my template.Even though the bend needed is not great, a pipe cleaner is inserted into the end of the stem to guard the airway integrity during the bend.  Using the hot air gun, the middle of the stem is heated because this is where I want the bend to be so that the end of the stem resolves nicely along the horizontal plane.  I remove the stummel so that I can place the stem flat on the template after it is heated so that the stem is not angled or twisted to the left or right during the vulcanite’s supple stage.As the stem heats, I’m careful to keep ‘up’ up, so that the fit of the stem in the mortise isn’t accidentally flipped!  As the rubber heats, I gently apply pressure to the bend area.  When the heating has sufficiently warmed the vulcanite, I bring the stem to the template and create the bend according to the template and hold it in place for a few minutes as the rubber cools and the bend is held in place.  The first attempt renders perfect results!  I move on.With the stem now bent, I catch it up with the stummel by applying Blue Diamond compound to the entire stem.  After mounting a cotton cloth buffing wheel onto the Dremel and with the speed set at about 40% full power, I apply compound to the stem.  After finishing the application, I wipe/buff the stem with a felt cloth to remove the leftover carbon dust.I’m very pleased how things are shaping up.  Before the final polishing, I have one project left which is a little daunting: the horns.  I’ve been thinking throughout (and even before starting!) the restoration how I was going to address the fashioning of the horns.  The sides of the Bull’s head have holes which provide the diameter of the horn mass.  As I looked at many examples on the internet of sculpted Bull’s heads, I found that there are a several varieties of horn style which is true with real life bulls!  To narrow in on a style, I described sending Seth an email asking him to do some online research.I received his reply stating that he liked the shorter, stockier horns that turn up slightly on the ends.  He also sent a couple pictures to illustrate his desires which were very helpful.  As I’ve thought about this part of the project, fashioning one horn is not the greatest challenge, but fashioning two is!  The challenge is to match the two but in reverse orientation – left and right horns!  The pictures Seth provided are helpful, but there is a contrasting complexity even between the two examples he sent.  The picture on the left shows the horns set on a vertical platform shaped on the side of the bull’s head to allow the visible horn to have more mass with (I’m assuming) a smaller peg inserted into the holes.  Whereas, the example on the right, more like what I have on my worktable, the horn diameter and mass are confined to the diameter of the hole.  It seems to be that the general proportion of the examples Seth sent below and many of the online examples I’ve seen is that the visible horn is about half the width of the bull’s head. Unfortunately, in my 10th floor flat in the formerly Communist period apartment block, I do not possess much in the way of precision wood working equipment, like a lathe!  Shaping the horns will be by hand using a Dremel, files and sanding paper.  I plan to use cherrywood as the material for the horns.  Cherry trees grow almost everywhere in Bulgaria and there are several in the green area in front of our block.  A couple years ago I harvested a couple very straight branches from a cherrywood tree in the front green area to dry out and to use with a project of restoring a French made cherrywood Ropp stummel and stem.  I trimmed them down and they’ve been in my bucket waiting for some time – now, very much dried and ready.  The Ropp project will continue to wait! I begin with horn number one.  First, I cut a length of the cherrywood stem the width of the bull’s head.  I know that roughly half of this will be the horn.  The other half will be what is eventually inserted in the hole which is the ‘peg’ side.In order to give a center orientation for the peg, I use a small sanding drum to trace a guide circle.After drawing a line around the piece of wood to mark the extent of peg shaping, I use a sanding drum in a circular motion around the end  and gradually shape out the peg. As I was progressing on shaping the horn peg, I notice the line of a grain crack – ugh.  I decide to see if it might work after some sanding and filing, but the crack will be a problem.  I’m hoping that this is not characteristic of this wood! I move on and start over.With the second start, I decide not to cut the short piece of cherrywood but to shape the horn peg first.  I do this so that I can save wood if I must cut it off again and restart.  Again, I mark the center horn peg template and use the sanding drum mounted on the Dremel to shape the peg.I sanded and tested the fit a few times until the horn peg finally found home in the side of the bull’s head! Next, I cut off the smaller piece measuring to leave a little more than half the width of the Bull’s head.  I leave extra length to enable me to sand down to a good fit.Next, with the picture that Seth sent to me showing the horn style he likes, I draw a horn template on the cherrywood inserted into the hole.  The most critical thing at this point is to have a guide to help me stay within close parameters of proportion as I shape the horn step by step.Remembering that the first horn is easier than the second, I use the rounded angle of the sanding drum to create a consistent angle for the upswing of the horn tip.  I’ll do the same for the second horn to minimize differences.  With the Dremel set to slow, I press the drum into the wood to create the horn tip upswing angle. I then remove the remaining excess wood on the upper side of the horn bringing the top parallel with the upper side of the peg. Next, I turn the horn shaping over, with the horn tip facing down, to now work on the bottom of the horn. The hand saw cuts the excess off the cherrywood piece so that the cut is very close to the end of the horn.  This saves on sanding.Again, using the sanding drum mounted on the Dremel, I begin to take wood off the lower side of the horn piece.  I start by sanding a horizontal base-line which identifies the horn’s lower side.As the sanding moves toward the end of the cherrywood – toward the horn tip that is facing downwardly, I curve the sanding so that the angled underside of the horn is shaped toward the inverted horn tip.The roughing out of the upper and lower horn is looking good and it resembles a paddle at this stage.  The next 3 pictures show the horn from the different angles and the excess wood on the end identified by the template is still needing to be sanded to better define the horn tip. I insert the rough horn into the bull head to make sure I’m tracking in a good direction.  I’m looking for good proportions. So far, very nice – but again, the first horn is easier!I transition to a smaller sanding drum to begin the removal of the excess wood on the front and back portions of the rough horn.  The horn starts to emerge very nicely during this part of the sanding which is patient – I am very careful sculpting with the sanding drum.  I can’t replace wood!After patient shaping, I test the emerging horn and it looks great!  The proportions are good on both the horizontal and vertical axis.With the challenge of now replicating the roughed-out horn, but in reverse, I try to emulate the same process and patiently move step by step.  I draw the peg template and again use the drum to shape out the peg.When the peg arrives in time with a good fit, I use the finished horn to draw a template on the second horn piece.Again, using the sanding drum, the angle is notched out creating the pitch toward the horn tip.As before, I then remove the excess on the top bringing it roughly parallel to the upper side of the peg.  With this done, I cut the cherrywood for a more manageable piece.To shorten this part of the write-up, after much careful sanding, shaping and test fittings, I arrive at two roughed-out horns.They aren’t identical but close enough to pass for the real deal!To leave the horns in semi-rough condition with some texture, I sand both with 240 and 600 grade papers.  This smooths the cherrywood but keeps the horns more rustic.I’m not sure what it will do with the raw cherrywood, but I apply Before & After Restoration Balm to see what happens.  After applying the Balm with my fingers, I let the Balm do its thing for about 20 minutes.  The light cherrywood didn’t change much, but there is a more of a ivory-like hue to it now. Not bad.Almost in the home stretch.  Using BSI Maxi-Cure Extra Thick CA glue, I glue the horns in place.  After placing a drop in each hole, with a toothpick, I spread the glue around the circumference of the hole.  I then insert each horn and pitch it up as Seth requested.Now the home stretch.  All that is lacking is applying carnauba wax to the pipe.  After reuniting stem and stummel, I mount a cotton cloth buffing wheel to the Dremel and set the speed to about 40% full power.  I apply carnauba wax to the stem and Sculpted Bull’s Head stummel and horns.  I’m careful to go light on the wax in the sculpting staying primarily on the smooth briar and peaks. After application of the wax, I give the Churchwarden a rigorous hand buffing with a microfiber cloth to raise the shine.Oh my!  I love it, and I trust that Seth will as well.  His idea of turning this Sculpted Bull’s Head into a Churchwarden is a winner hands down.  The sculpting cleaned up nicely and the dark brown dye with the contrast highlighting with smooth briar is attractive, but the rustic air of the pipe is preserved.  I’ve never fashioned horns in a restoration before this project, but I believe the Bulgarian cherrywood looks good and does a good job emulating the horns.  Fashioning the horns wasn’t easy, but I’m pleased with the outcome. As the commissioner of this project, Seth will have the first opportunity to acquire this Sculpted Bull’s Head Churchwarden from The Pipe Steward Store.  This pipe benefits the Daughters of Bulgaria, women and girls who have been trafficked and sexually exploited.  Thanks for joining me!

Rebirthing a Stem for Jennifer’s Dad’s Second Champ of Denmark 4 Freehand


I decided to change things up a bit and work on another of Jennifer’s Dad’s pipes. For the next pipe from the estate of George Rex Leghorn I have chosen a nicely shaped Champ of Denmark Freehand. This one has been sitting for a while now while I debated what to do about the broken stem. I find that sometimes the best solutions come to me when I wait! You may not have read about this estate before, so I will retell the story. I received an email from Jennifer who is a little older than my 64+ years about whether I would be interested in her Dad’s pipes. My brother Jeff and I have been picking up a few estates here and there, so I was interested. Here is the catch – she did not want to sell them to me but to give them to me to clean up, restore and resell. The only requirement she had was that we give a portion of the sales of the pipes to a charity serving women and children. We talked about the organization I work for that deals with trafficking and sexual exploitation of women and their children and she decided that would be a great way to carry on the charitable aspect of her Dad’s character. With some great conversation back and forth she sent the pipes to Jeff and he started the cleanup process on them. Once he had finished cleaning them all he sent them to me to do my work on them.

The Champ of Denmark pipe is stamped on the underside of the shank CHAMP over of Denmark and below that is the number 4. It came to us with a broken stem about an inch, inch and ½ above the tenon. The beautiful straight and flame grain around the bowl and up the shank is visible through the very thick coat of grime. It seemed like it had a dark stain but hard to tell. There were oil stains from George’s hands on both sides of the bowl obscuring the grain. It was so dirty that it was hard to see the colour well. There was a thick cake in the bowl and it had overflowed with lava into the plateau on the bowl top and shank end. It was a dirty and tired looking old pipe. The stem was badly oxidized but there were not any tooth marks or chatter on the surface. The button was in good shape. It had been sitting in boxes for a lot of years and it was time to move ahead with the restoration. Jennifer took photos of the pipes she was sending. I have included two she included from this pipe. I had some decisions to make regarding this stem. Should I replace it or should I fiddle with a repair? I would have to think that through.When the box arrived from Jennifer, Jeff opened it and took photos of each pipe before he started his cleanup work on them. There were two Champ of Denmark Freehands in the box – both were in bags and both had broken tenons and stems. There is something about classic Danish Freehands that is intriguing and I like working on them. The shapes seem to really capture the flow of the grain on the briar and this second pipe is no exception. The briar appeared to be in good condition underneath the grime. The finish looked intact under the grime. The bowl had a thick cake that had hardened with time. The lava overflow on the plateau rim but it could very well have protected the rim from damage. We won’t know what is under it until Jeff had cleaned it off. The stem was broken in the middle between the turned four sided decorative bead and the blade. It looked as if it had snapped when George was trying to remove a stuck stem. But that was a piece of the history of the pipe I would never know for certain. Jeff took photos of the pipe before he started working on it. I include those below.Jeff took photos of the bowl and rim top to show the cake in the bowl and the lava build up on the plateau rim top and on the shank end as well. It was thick and hard but hopefully it had protected the rim and edges from damage. The lava coat looks horrible but it points to a well-used, favourite smoking pipe. George must have enjoyed this old timer and when the stem broke he must have been frustrated.Jeff took photos of the sides and heel of the bowl to show the condition of the finish – the grime and grit all over the sides and flat bottom of the bowl. It is a dirty pipe. Jeff took a photo of the stamping on the underside of the shank. It is very clear and readable. It reads as noted above.Jeff took photos of the top and underside of the broken stem showing the scratching, oxidation and tooth chatter on the stem surface. You can also see where the stem snapped – it is a very clean break and it is totally fixable. I will need to see if I have a small piece of tenon that can serve to join the two parts of the stem.When I worked on the previous Champ of Denmark back in June of 2019 I had done some research on the brand (https://rebornpipes.com/2019/06/22/restoring-jennifers-dads-champ-of-denmark-4-freehand/). I turned to that previous blog and quote that here in full:

I looked on the Pipephil site to get a quick overview of the brand. In the back of my mind I remembered a connection to Karl Erik. I could not remember the details of the connection (http://www.pipephil.eu/logos/en/logo-c4.html). I did a screen capture of the section on the brand that was shown on the site. I have included it below.In summary it says that the brand was distributed by Larsen & Stigart a tobacconist in Copenhagen, Denmark. The warehouse had a workshop that had such famous carvers as Soren Eric Andersen, Karl Erik Ottendahl and others.

I turned then to Pipedia (https://pipedia.org/wiki/Champ_of_Denmark) to see if I could get a bit more information. I quote in full from that site:

“Champ of Denmark” were made for and distributed by Larsen & Stigart by Karl Erik Ottendahl. Larsen & Stigart had some indoor carvers at certain times, too (e.g. Søren Eric Andersen) and among other things they managed to supply Dunhill with wild Danish fancy pipes.

In an endnote under the article on Karl Erik (https://pipedia.org/wiki/Karl_Erik) I found some more information. I quote the endnote in full.

¹ It is almost impossible to draw a sharp line between some of these brands… Larsen & Stigart – once a famous Copenhagen pipe shop, now almost forgotten – offered pipes produced by KE stamped “Larsen & Stigart” as well as pipes stamped “Larsen & Stigart” + “Champ of Denmark” or “Larsen & Stigart” + “Shelburne”. Almost needless to say, there are pipes stamped “Champ of Denmark” or “Shelburne” only. And the only reason is inconsistent stamping??? (BTW Larsen & Stigart employed own indoor carvers for appr. one decade – e.g. Søren Eric Andersen. They even managed to supply Dunhill with wild Danish fancy pipes.)

Now I had the verification of the link to Karl Erik Ottendahl. The pipe was most probably made by him for the pipe shop in Copenhagen. Before I get on to cleaning up the pipe I thought I would once again include the tribute that Jennifer wrote to her Dad for the blog. She also sent some photos and an article that her Dad wrote for Jeff and me to be able to get a feel for him. I have included those below. Note in each of them that he is holding a pipe in his left hand. I asked her to also send me an email with a brief tribute to her Dad. Here is her tribute from an email to me.

Steve, I want to thank you again for accepting my dad’s pipes.  They were so much a part of my dad’s life that I could not simply discard them. But as his daughter, I was not about to take up smoking them either. *laughing* I think my dad would like knowing that they will bring pleasure to others.  I know that I do.

I’m not sure what to say about his pipes. I always remember Daddy smoking pipes and cigars.

First a bit about my dad. Though my father, George Rex Leghorn, was American (growing up in Alaska), he managed to join the Canadian Army at the beginning of WWII, but in doing so lost his American citizenship.  He was fortunate to meet a Canadian recruiting officer who told him the alphabet began with “A” and ended with “Zed” not “Zee”, and also told him to say that he was born in a specific town that had all its records destroyed in a fire.  When the US joined the war my dad, and thousands of other Americans who had made the same choice*(see the link below for the article), were given the opportunity to transfer to the US military, and regain their citizenship.

After WWII, my dad, earned his degree at the University of California Berkeley and became a metallurgist. There is even a bit about him on the internet.

He loved taking the family out for a drive, and he smoked his cigars on those trips. (As a child, those were troubling times for my stomach.)

I most remember my father relaxing in his favorite chair with a science fiction book in one hand and a pipe in the other… Sir Walter Raleigh being his favorite tobacco… and the pipes themselves remind me of him in that contented way.  If I interrupted his repose, he’d look up, with a smile on his face, to answer me.

It seemed he smoked his Briarwood pipes the most, though he had others.  At the time, it was only the Briarwood I knew by name because of its distinctive rough shaped bowl.  And it was the Anderson Free Hand Burl Briar, made in Israel, which I chose for his birthday one year, because I thought he might like that particular texture in his hand.

At least two of his pipes, he inherited from his son-in-law, Joe Marino, a retired medical laboratory researcher (my sister Lesley’s late husband)… the long stemmed Jarl (made in Denmark), and the large, white-bowled, Sherlock Holmes style pipe.  I believe Joe had others that went to my dad, but Lesley was only sure about those two.

The Buescher, corncob pipe my older sister Lesley bought for Daddy while on one of her travels around the States.

A note on the spelling of my sister’s name…

My dad met my mother, Regina, during WWII and they married in Omagh, Ireland.  My mother was English and in the military herself.  The English spelling of Lesley is feminine, and Leslie masculine, in the UK… just the opposite of here in the United States.  I guess my mom won out when it came to the spelling of the name.

I’ll send you photos of my dad soon, along with his WWII experience story.

Jennifer

*https://www.thestar.com/news/world/2013/10/22/the_americans_who_died_for_canada_in_wwii.html

I am getting more and more spoiled on working on pipes that Jeff cleaned up. So much so that when I have to clean them it is a real chore! This pipe was a real mess just like the other ones in the collection. I did not know what to expect when I unwrapped it from his box. He reamed it with a PipNet pipe reamer and cleaned up the reaming with a Savinelli Fitsall Pipe Knife. He scrubbed out the internals with alcohol, pipe cleaners and cotton swabs until the pipe was clean. He scrubbed the exterior of the bowl with Murphy’s Oil Soap and a tooth brush to remove the grime and grit on the briar and the lava on the rim top. The finish looked really good when I got it. The rim top plateau looked lifeless but clean. We were not sure what I would do with the stem so Jeff cleaned the internals and scrubbed the exterior in case I chose to try to repair it. When the pipe arrived here in Vancouver for the second stop of its restoration tour it looked very good. I actually forgot to take many photos before I started my part of the work but I did have one with the pipe and the broken stem. The briar is beautifully grained and clean. The rim top plateau is cleaned as well. It looked good. The shank extension was vulcanite and it was badly oxidized and would need to be sanded and polished.My first thought was to replace the broken stem with another freehand stem. I went through my stems and chose the one that is shown in the photo below. The length was right and the tenon was close. I set up my cordless drill with the PIMO tenon turner and adjusted the diameter of the tenon to fit the shank extension. I put it in the pipe and took a photo of the pipe to get a sense of how it looked. I actually did not like the shape of the stem or the way it looked. I would need to think through how to address the snapped stem. I was not happy with the look of the new stem. It was too think and clunky looking to me to fit the style of the pipe. I decided not to use it so I did not even bother bending it. I turned back to the broken stem and thought long and hard about it. I went upstairs and had a coffee and a short nap before I finally came up with a plan. I headed back downstairs and dug through my parts boxes for broken tenons. I even keep those around when I pull them from a shank. I have a good assortment of them in various diameters. I picked two possibilities and laid them out. From the two I chose the smaller one. Now the plan was beginning to take shape. I was going to drill out the two parts of the stem and rejoin them together with the piece of tenon. (Forgive the blurry photo but you get the idea. I would drill a hole in each end and use the tenon to rejoin them.I started opening the airway in both halves of the stem with a drill bit slightly larger than the airway. I worked my way up to the bit that is shown in the photos. It was the slightly smaller than the piece of tenon that I was going to use for the joint.I reduced the diameter of the short tenon piece with a Dremel and sanding drum. I worked on it until the fit in the drilled airway was perfect. Once that was done I used the Dremel and sanding drum to take down the diameter a bit more on the second half of the tenon. I topped it on the topping board using the blade side as a handle. Once the fit was right on both sides I glued it in the blade side with clear Krazy Glue and pressed it into the hole.  I cleaned up the end of the tenon and coated it with a layer of clear Krazy Glue. I pressed the second half of the stem in place on the tenon insert and aligned the four sided bulb on the tenon end of the stem.I set the stem aside to let the repair cure and turned my attention to the oxidized shank extension. I sanded the oxidation off with a folded piece of 220 grit sandpaper. I started the polishing with 400 grit wet dry sandpaper. The third photo shows the plateau top and how the nooks and crevices look on the rim top. I polished the bowl and rim with micromesh sanding pads. I wet sanded it with 1500-12000 grit pads and wiped it down between pads with a soft cotton cloth. You can see the progress in the shine as you go through the photos. I worked some Before & After Restoration Balm into the finish of the bowl and the plateau on the rim top and shank end with my fingertips and a horsehair shoe brush to clean, enliven and protect it. I find that the balm really makes the briar come alive again. The contrasts in the layers of stain really made the grain stand out. I let the balm sit for a little while and then buffed with a cotton cloth to raise the shine. The pipe really looks good at this point. I am very happy with the way the pipe is looking at this point in the process.  Jeff’s clean up of the rim top looked very good. I decided to leave the darkened areas and darken the remaining valleys in the plateau with a Black Sharpie Pen to give the rim top a contrast look with the high smooth spots. It also gives the plateau more definition and gives it a clean look. The finished rim top looks very good.I set the bowl aside and turned my attention to the stem. I inserted a pipe cleaner in the stem to protect the airway from collapsing when I heated it. I painted the surface of the stem with the flame of a BIC lighter until the vulcanite was soft. Once it was pliable I bent it to match the angle of the bowl top. I held it at that angle and cooled it under cool water to set it.I sanded the stem with 220 grit sandpaper and 400 grit wet dry sandpaper to smooth out the repair in the middle of the stem and to remove the oxidation that remained on the stem surface. I smoothed out the repair in the mid-section of the stem with a piece of 220 grit sandpaper on the edge of my pen knife blade. I followed that with the 400 grit wet dry sandpaper.  I rubbed the stem down with Denicare Mouthpiece Polish and a cotton pad to remove remnants of oxidation and to further blend in the sanding. The stem was showing some promise at this point in the process.I polished the stem with micromesh sanding pads – wet sanding it with 1500-12000 grit pads. I polished it further with Before & After Pipe Stem Polish – both fine and extra fine. I finished by wiping it down with Obsidian Oil after each pad and set it aside to dry. I carefully buffed the stem with Blue Diamond on the buffing wheel and did the same for the bowl and vulcanite shank extension. I gave the bowl and the stem multiple coats of carnauba wax separately as the angle of the stem and shank made buffing this a bit tricky. I buffed the pipe with a clean buffing pad to raise the shine. I hand buffed it with a microfiber cloth to deepen the shine. The polishing of the briar makes the grain really pop. The polished black vulcanite bit seemed to truly come alive with the buffing. This Freehand feels great in my hand and is what I would call and Egg/Oom Paul. It is one that could be clenched and smoked while doing other things as it is very light weight for a pipe this size It must have been a fine smoking pipe judging from the condition it was when we received it from Jennifer. There should be a lot of life left in this Champ of Denmark by Karl Erik. Have a look at it with the photos below. The dimensions are Length: 6 ¼ inches, Height: 2 ½ inches, Outside diameter of the bowl: 1 ½ inches, Chamber diameter: 7/8 of an inch. This is one that will go on the rebornpipes online store shortly. If you want to carry on the pipe trust of George Leghorn let me know. Thank you Jennifer for trusting us with his pipes. Thanks to each of you who are reading this blog. Remember we are not pipe owners, we are pipemen and women who hold our pipes in trust until they pass on into the trust of the next pipeman or woman.