Tag Archives: article by Anthony Cook

Ship-Shape: Refurbishing a Mokin Corsaire 7087


Blog by Anthony Cook

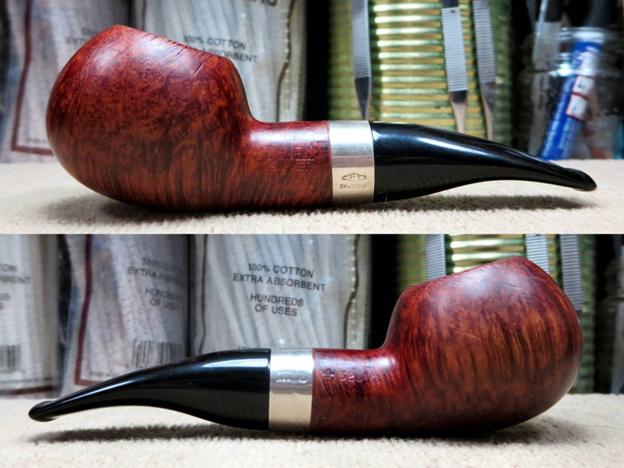
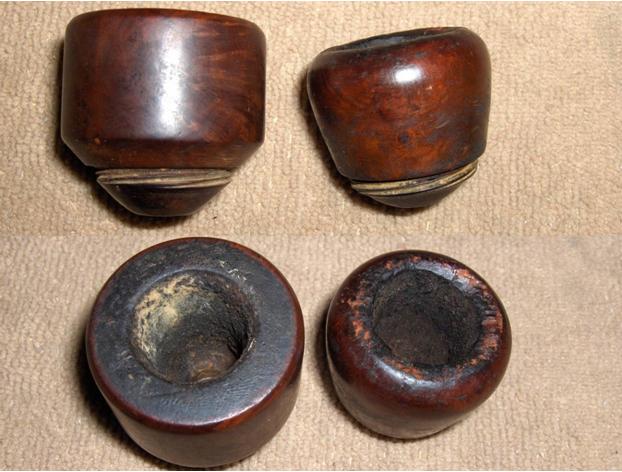
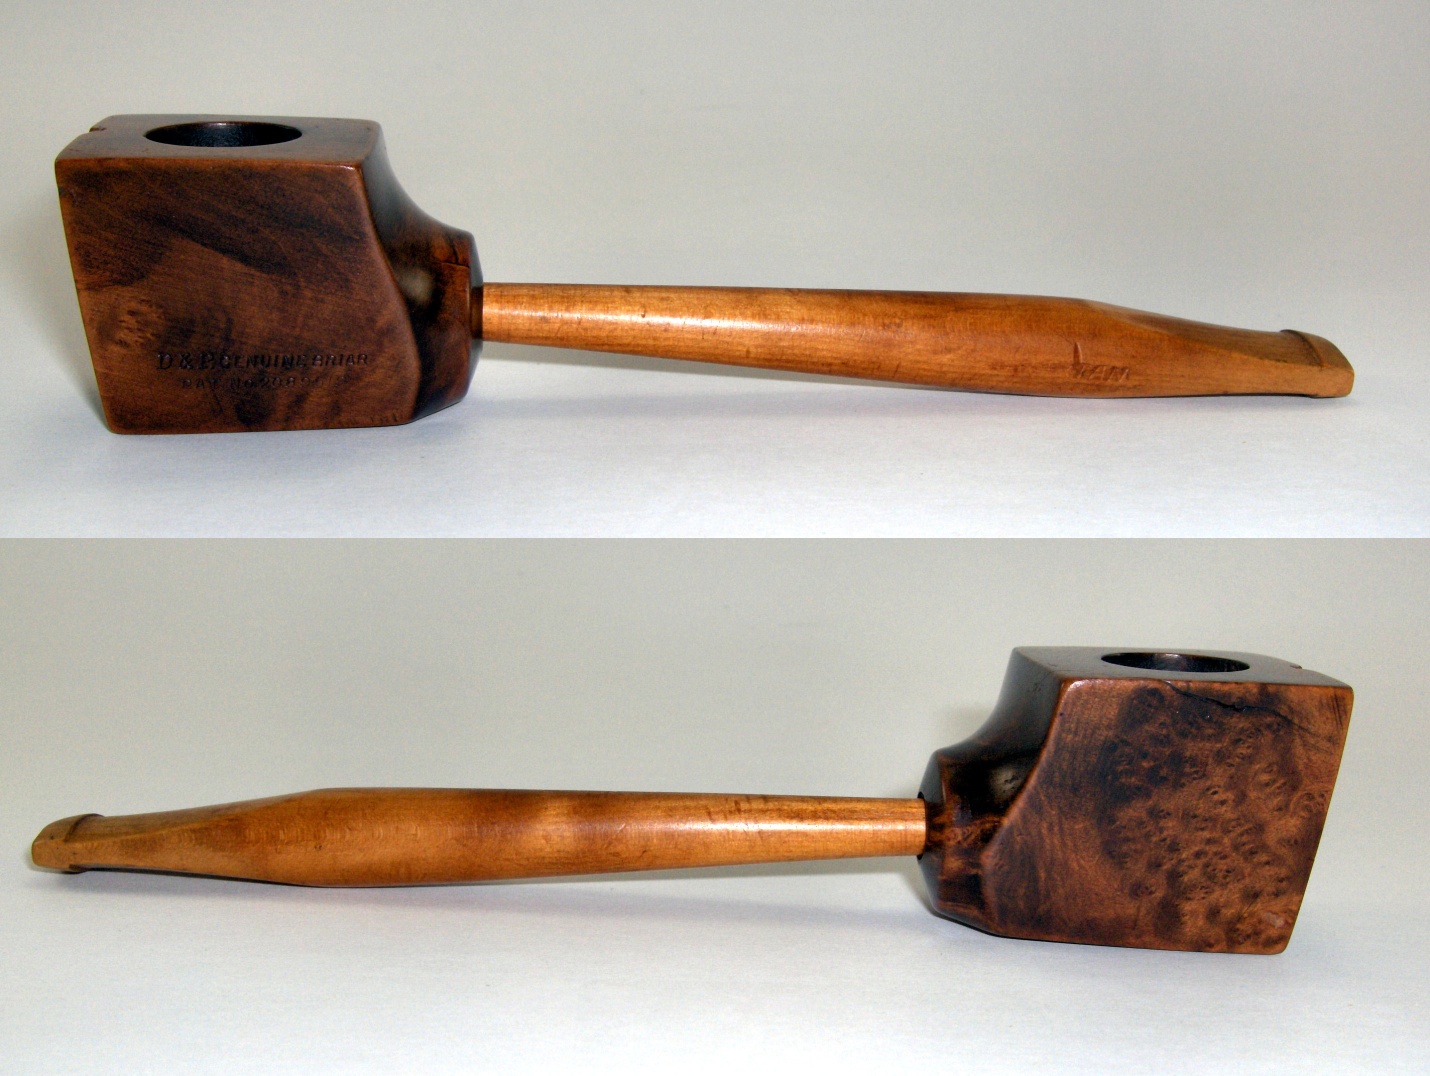
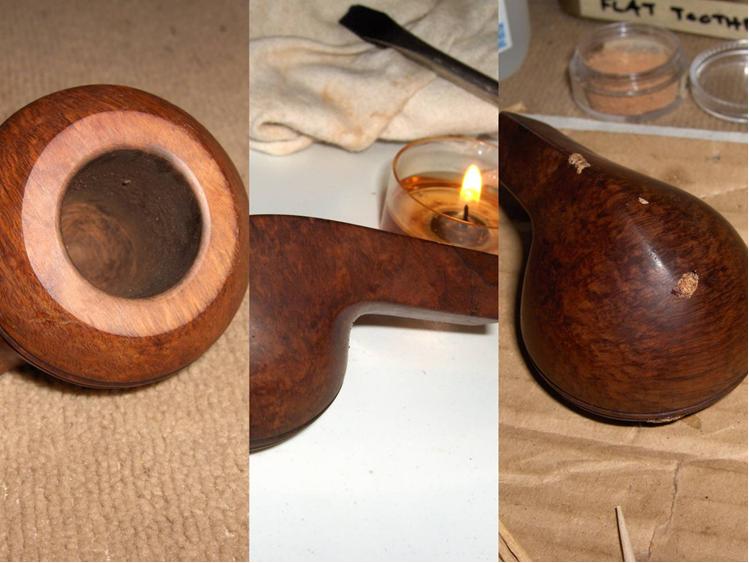
The second pipe sent to me by my PSU friend for some work is a unique one. Let me introduce you to the Mokin Corsaire 7087. It’s a small pipe, just shy of five inches in length and about one and a quarter inches tall at the bowl. It has an author-ish shape, except that there is a spine that runs along the bottom like the keel on a ship. I suppose that’s where the “Corsaire” comes from, but despite the masculinity in that name, to my eye there is something distinctly feminine in the shape.Mokin1 The condition of this one was rough to put it mildly. The stummel had some fairly heavy scratches and dents. The rim was scorched and there was a divot on one side where the wood had been burned away. The briar was unstained but covered in a thick, tinted lacquer coating. I suppose this was done to help hide the many fills, but the lacquer wasn’t thick enough to prevent the black stain on the bottom from seeping through into the grain. Oh, did I mention the beautiful horn stem with the busted face and a crack that ran along half the length on the underside? Yeah, like I said, rough.

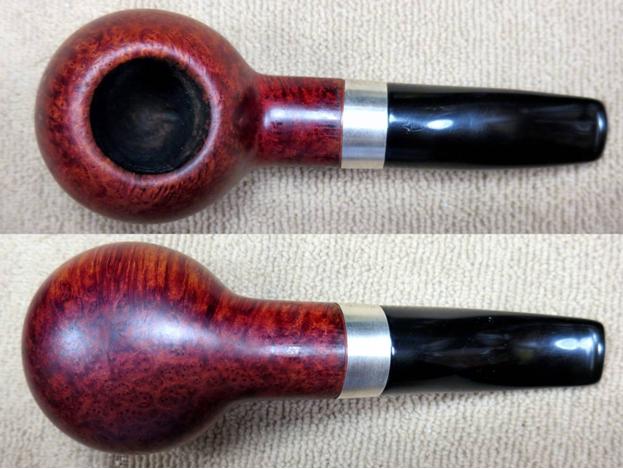
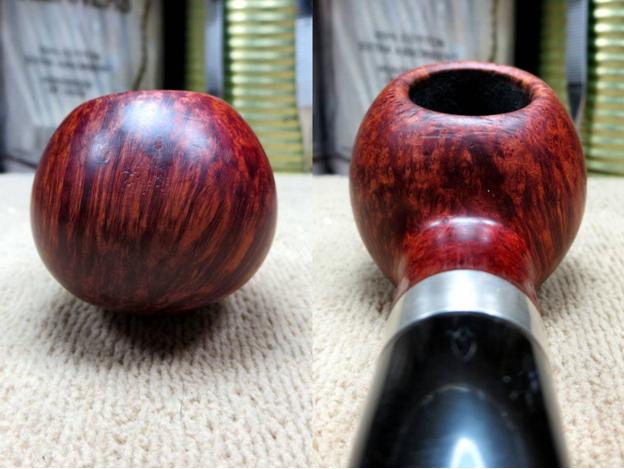
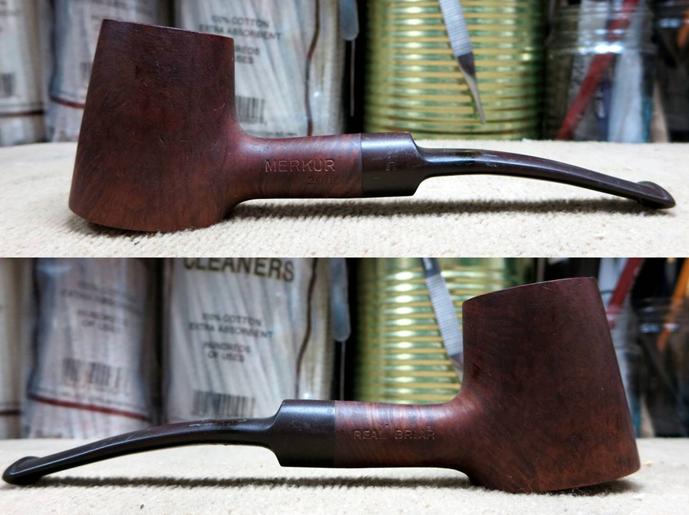
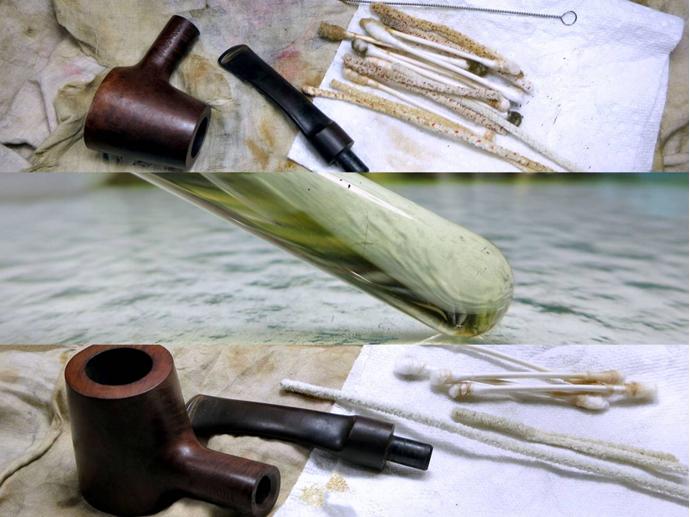
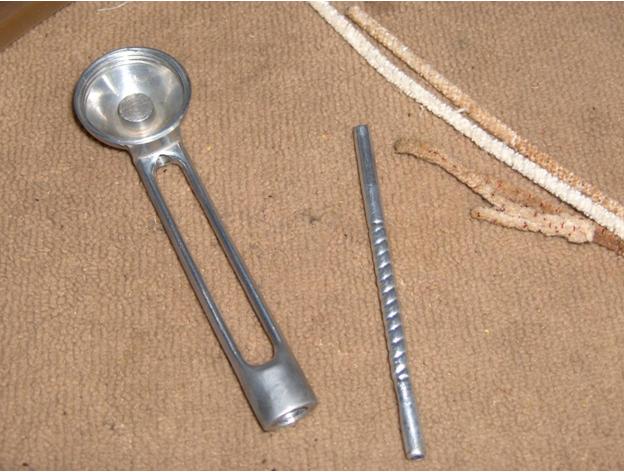
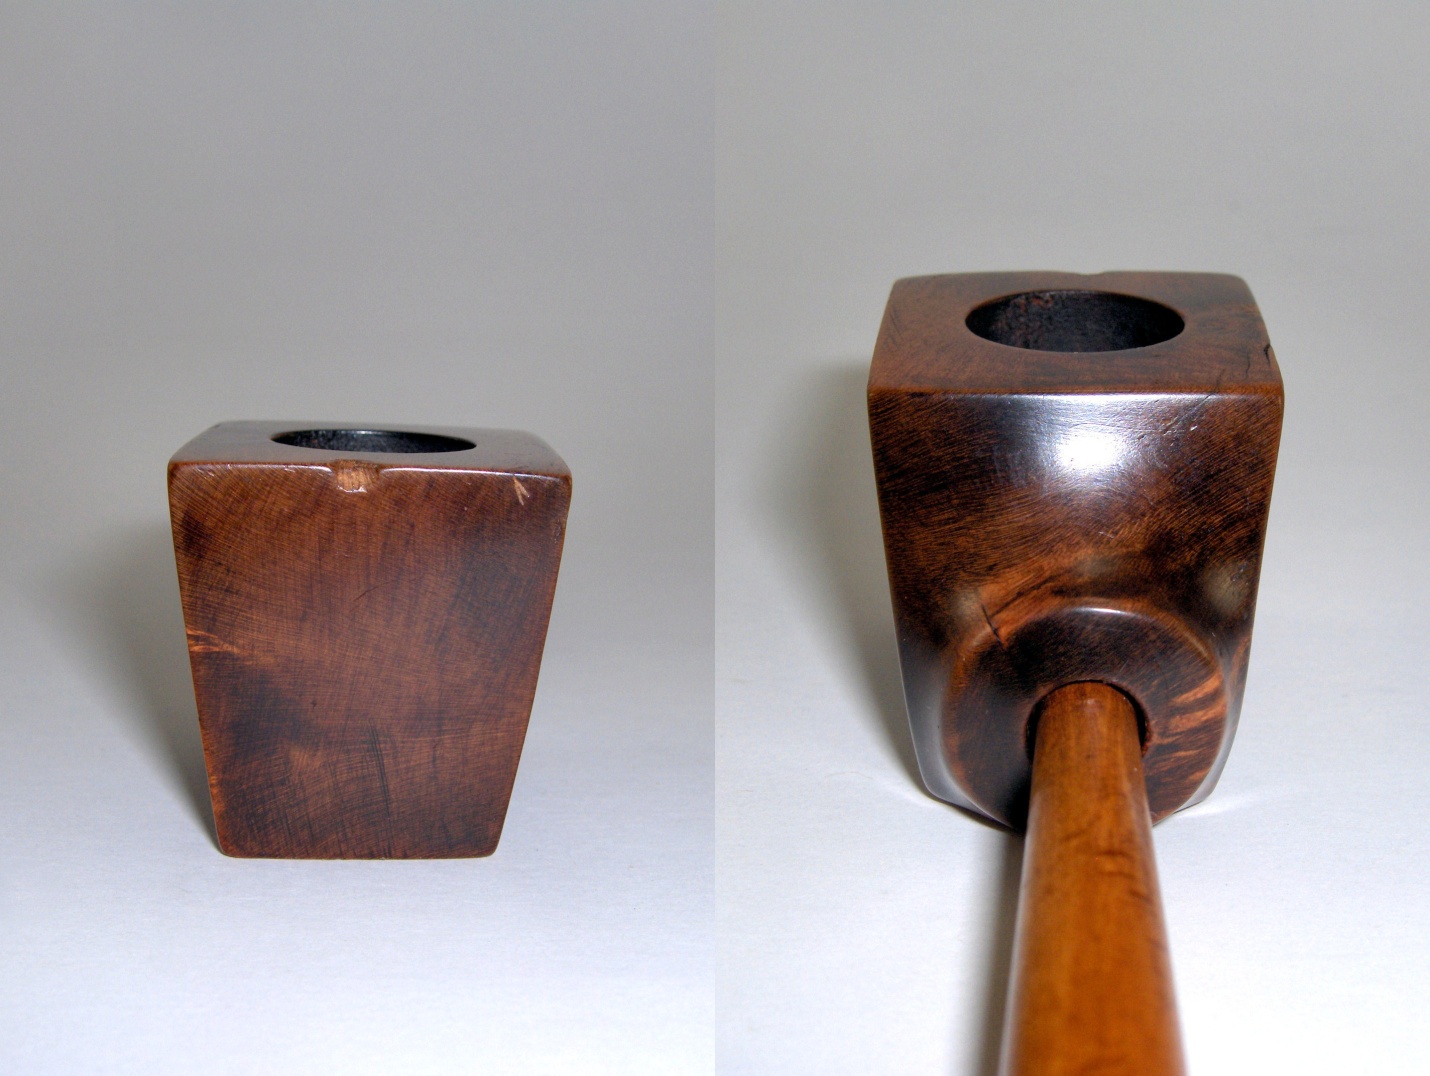
Here are some more triage photos:
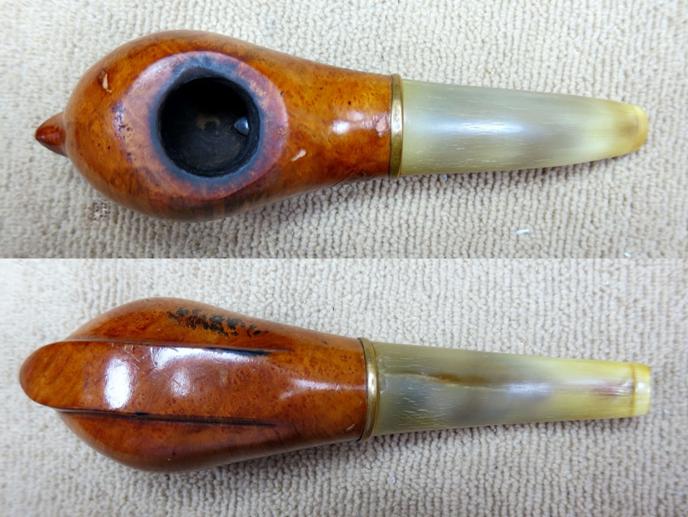
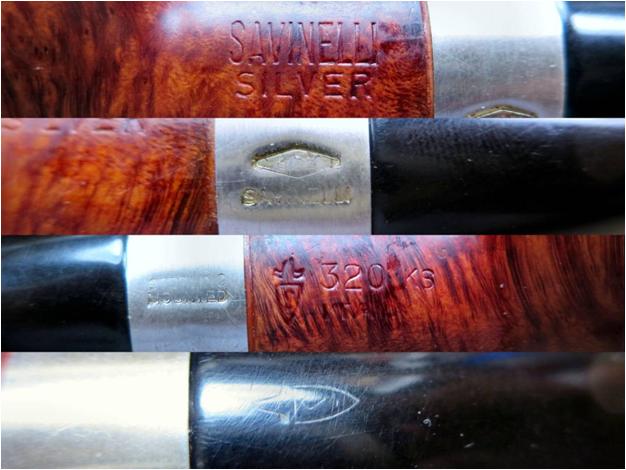
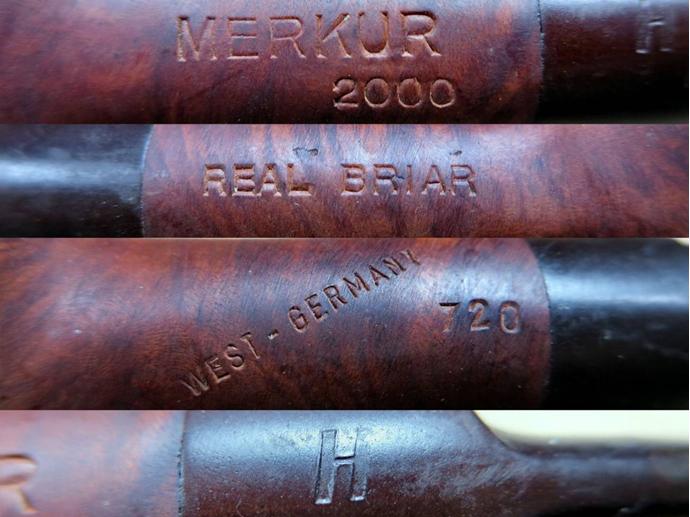
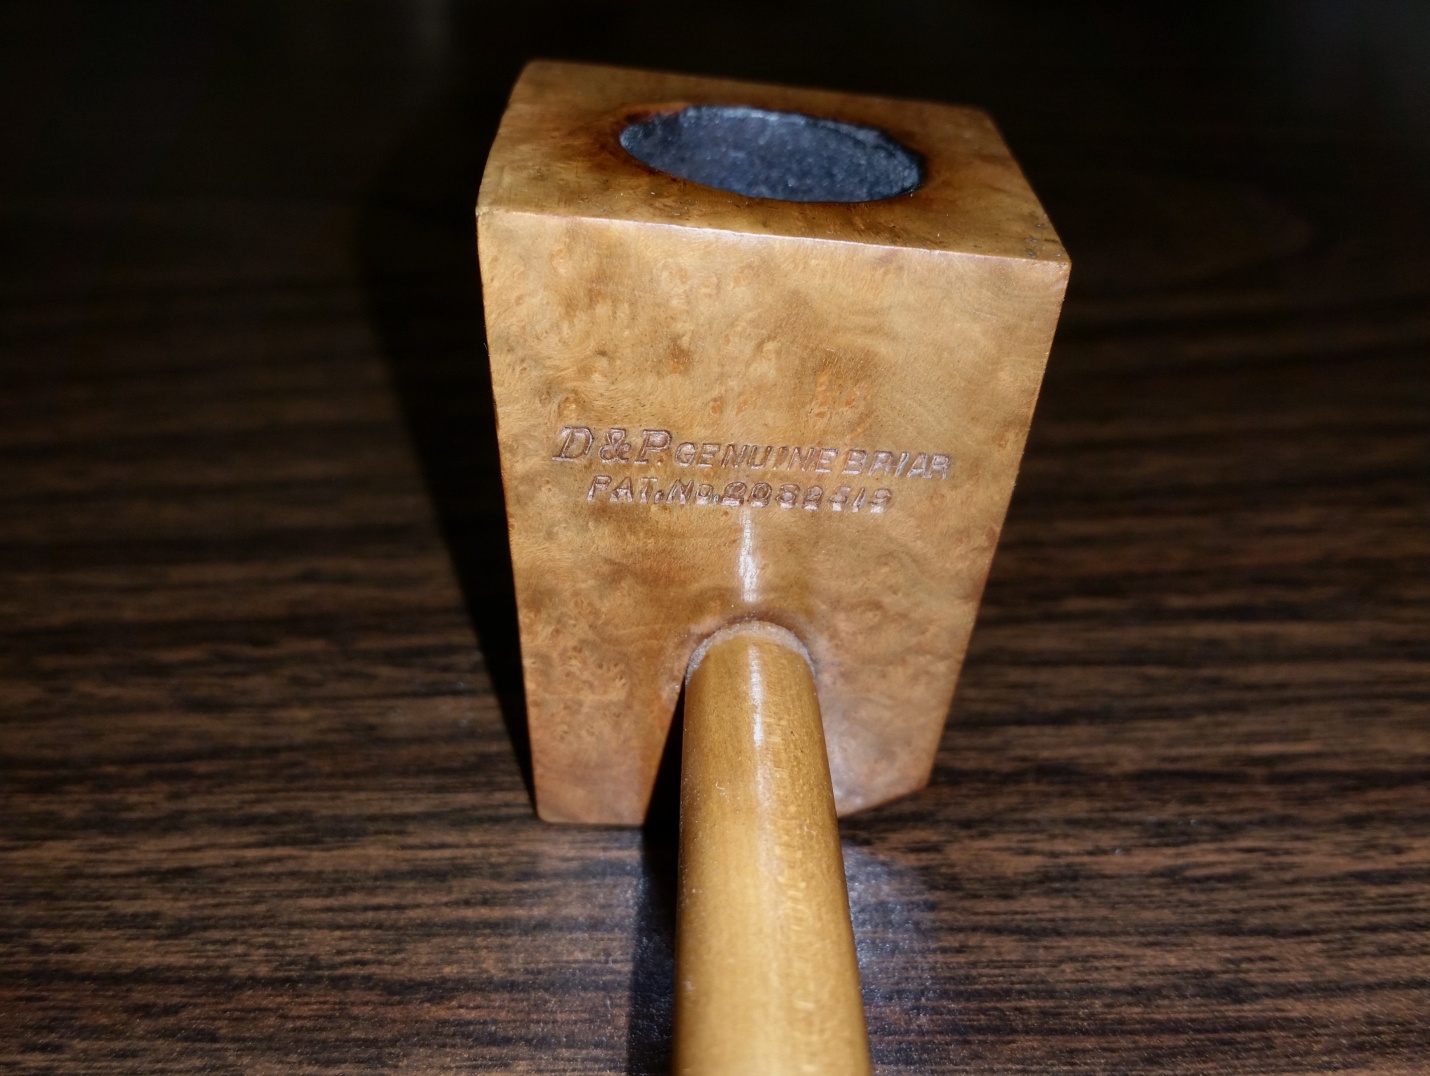
Mokin2

Mokin3

Mokin4

Mokin5 Stamping detail:Mokin6 
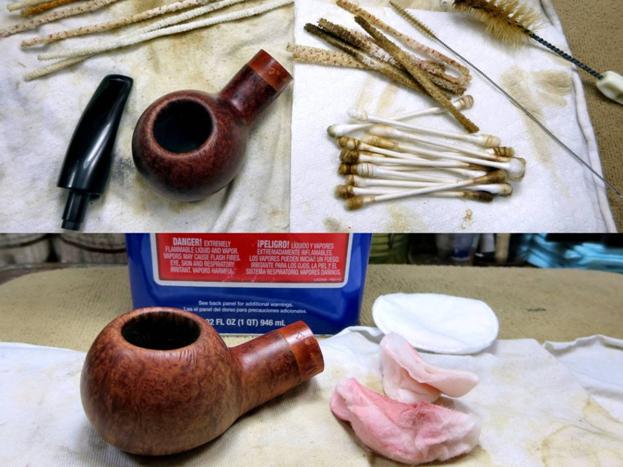
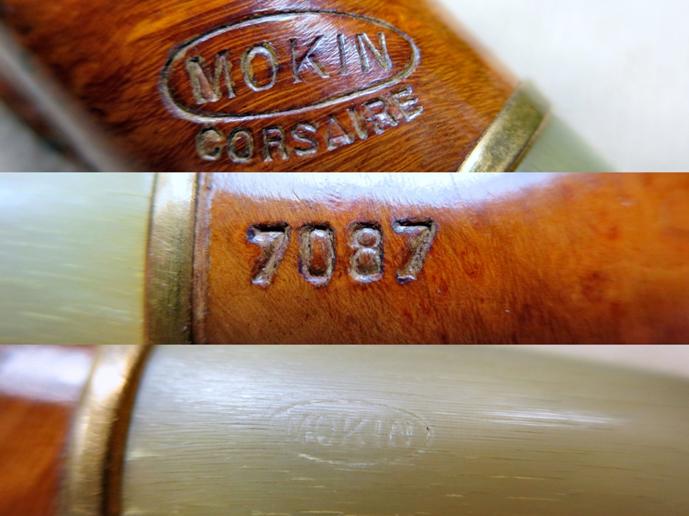
I gave the pipe a thorough internal cleaning, and then stripped off the lacquer finish with acetone and cotton pads. The lacquer lifted easily but it was a mess. It turned into a thick, sticky residue when it came into contact with the acetone. Once the stummel was clean, the grain became more apparent and it was stunning! I’m a bit of a grain-hound. So, I already knew that I was going to have to work that up as best I could.

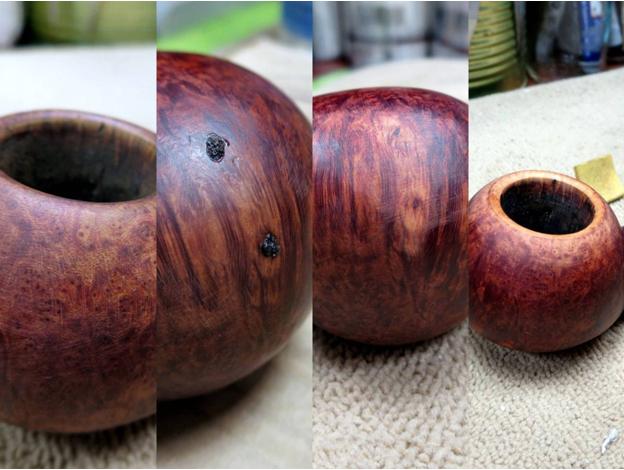
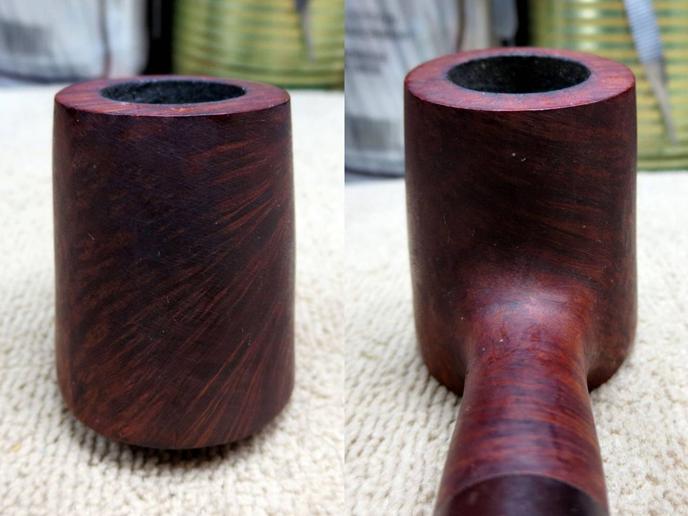
I scrubbed at the dark stain on the bottom with the same acetone dampened pads to try to lift it or at least lighten it, but the attempt was in vain. The acetone didn’t even put a dent in it. I was fresh out of ideas and thought that I would probably have to sand them out, but before I did that, I shot Steve an email explaining the problem. He suggested that I try lemon juice. It seemed counterintuitive to me. What could lemon juice do to a stain that acetone couldn’t touch? Anything is worth a shot when you’re desperate though. So, I gave it a try and it worked amazingly well! The only stain that remained was what had set into the softest grain and that was something that I could work with.Mokin7 With the tinted lacquer removed, the fills were more evident than ever. There were seven of them in all and a couple of them were quite large. That’s a lot for any pipe, but especially so for a stummel this small. I picked each of them out and patched the pits with CA and a mix of fine briar dust and course briar file shavings. I find that the course shavings take the stain better, but the fine dust is a better mix with the CA. When mixed together, the resulting patch is still dark but it is mottled with lighter areas that will accept stain well.

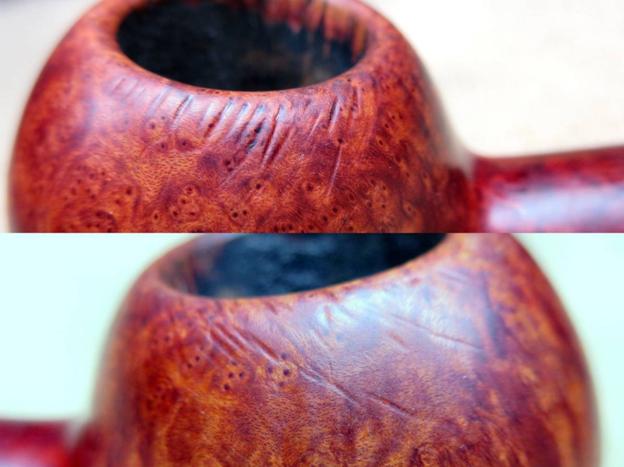
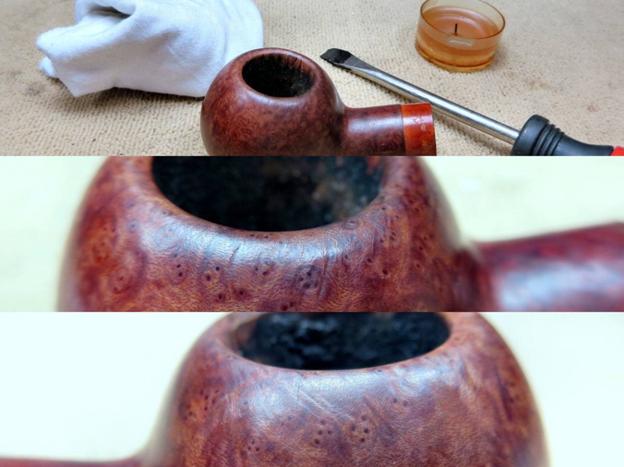
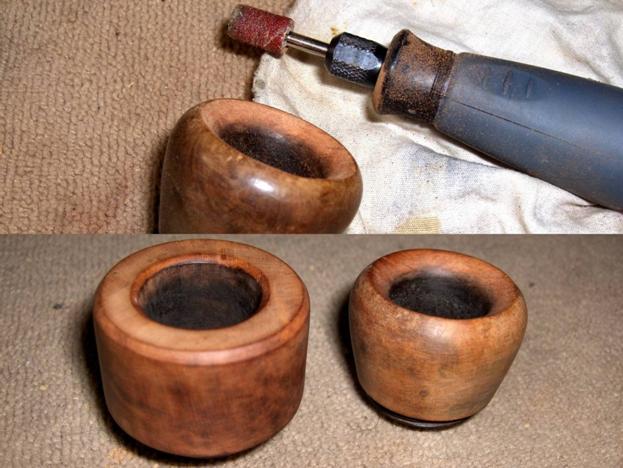
I sanded out each of the patches with 220-grit and 320-grit paper and topped the bowl with the same grits until the majority of the burned wood around the rim was removed. Then, I gave a slight chamfer to the inner rim to soften the edge and lightly sanded the entire stummel with 320-grit paper to remove most of the scratches.

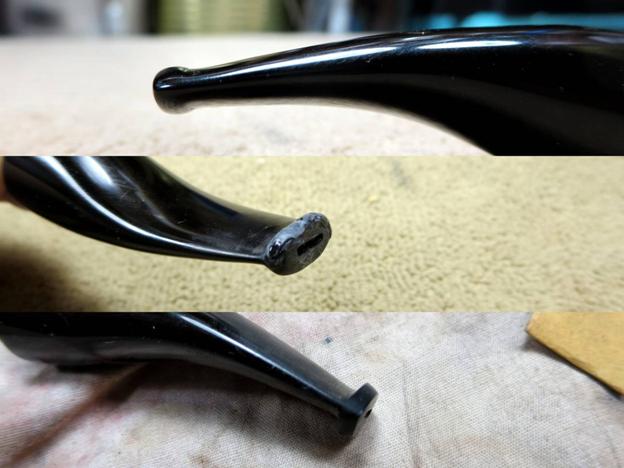
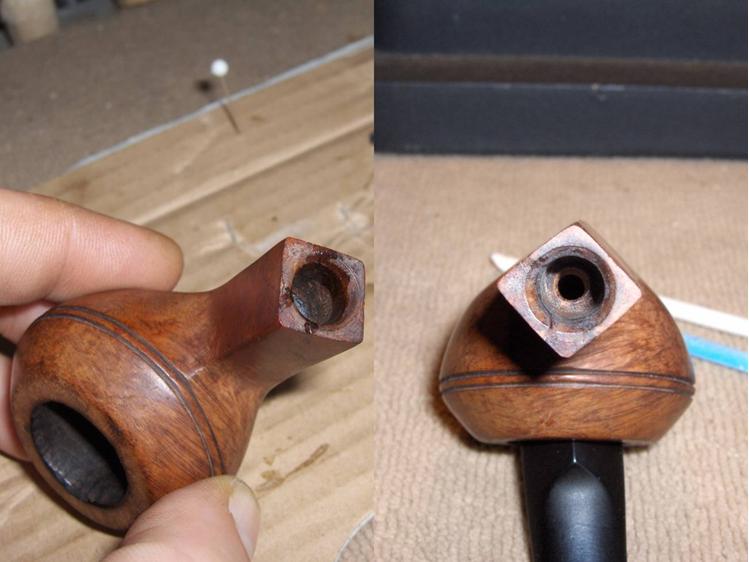
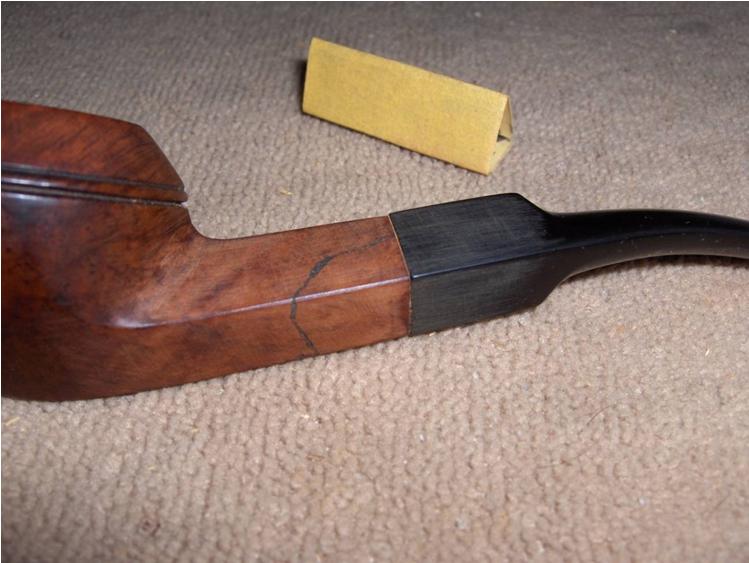
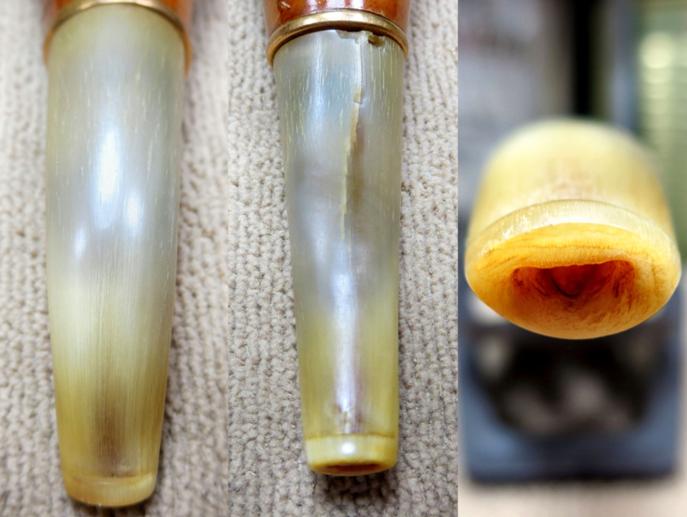
It was while I was sanding the stummel that I noticed that the carving was a little sloppy. The left side of the stummel was noticeably less rounded than the right, which made the stummel appear a little lopsided. It was obvious that it wasn’t intentional, but I debated with myself whether to try to correct it or preserve it as part of the personality of the pipe. In the end, I chose to split the difference and round off the upper and lower areas of the left side for a better match with the right.Mokin8 The stummel was ready for finishing. So, I moved on to address the damage to the stem. Usually, I would drill a small hole at the end of the crack to stop the run. In this case, however, that wasn’t really an option. The main crack that extended up from the stem face fractured into several short, stair-step cracks at the end. I decided that it would be best to just seal and stabilize them and hope for the best.

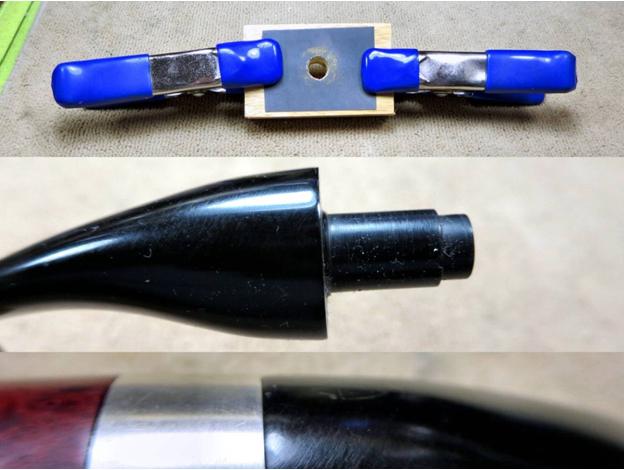
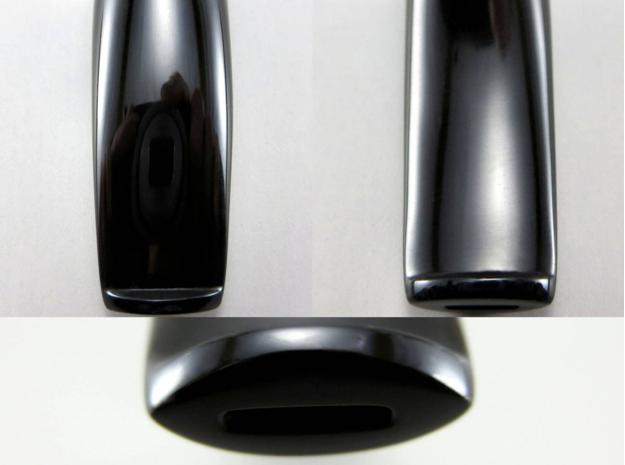
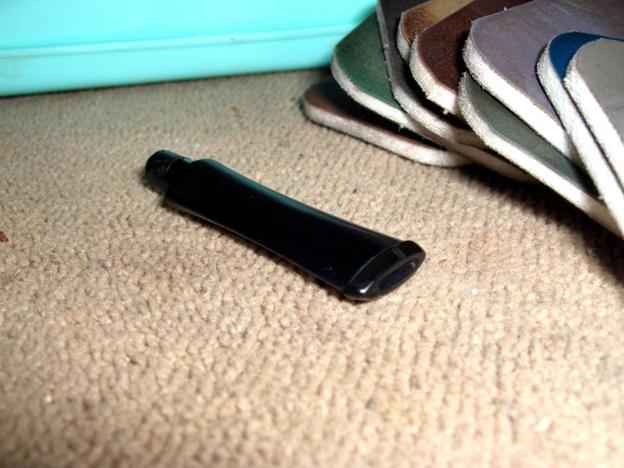
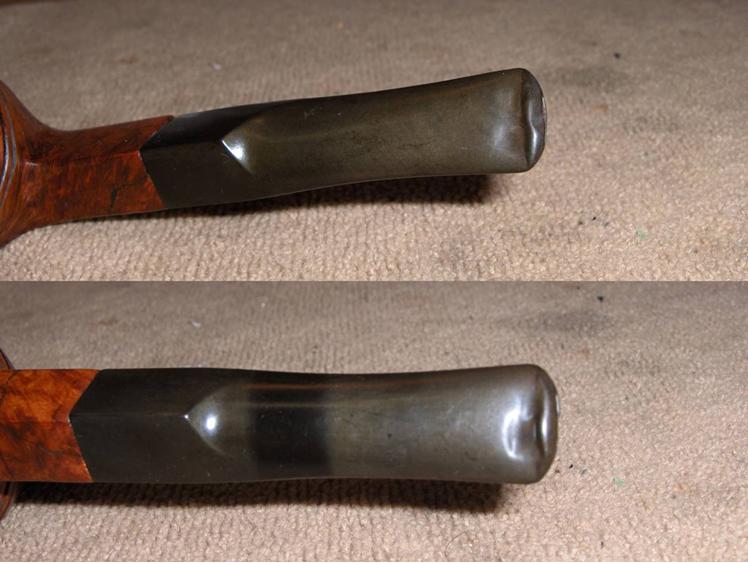
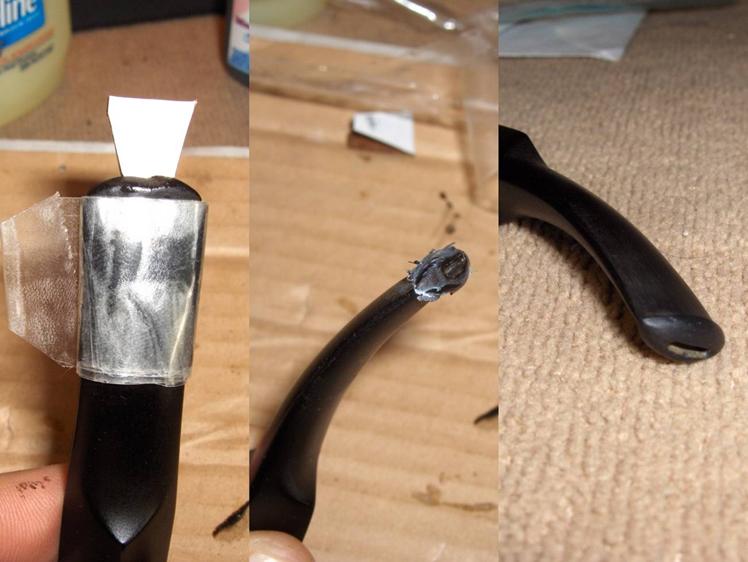
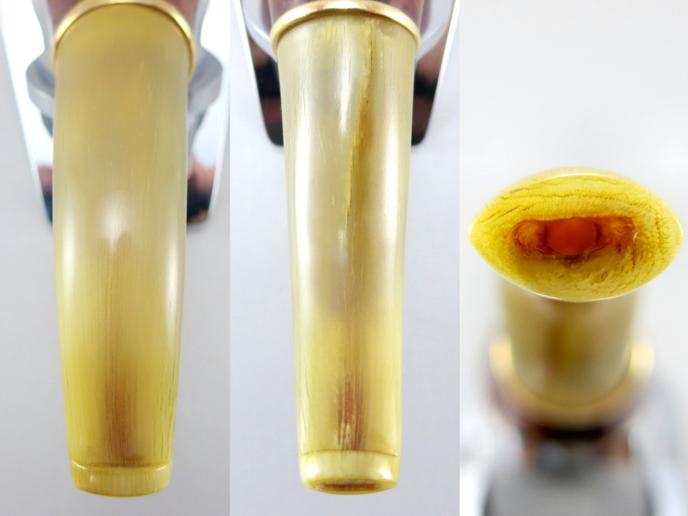
I wrapped clear tape around a thin bit of cardboard and cut a hole for the tenon to push through. This little contraption would serve a dual purpose as both a method for keeping the patched area of the stem face relatively flat and even, and also as stand to support the stem while the patches dried. I patched the cracks and holes with baking soda and CA in the same manner that I would apply a briar dust and CA patch on the stummel. I use super-thin CA for patches. It has about the same viscosity as milk and I think that it penetrates better into the dust than standard CA. It can be tricky to work with until you get used to it. Even though I’ve kind of gotten a handle on it by now, you can see in the photo below that it still got away from me a bit in the bend of the stem.Mokin9 I also filled a couple of bite marks on either side of the stem and when all the patches were fully dry, I sanded them out with 220-grit and 320-grit paper. The cracks were fairly tight. So, I didn’t get as much baking soda worked into them as I would have liked and they appear dark in the photo below. They are sealed and smooth to the touch though.

I continued to sand with 400, 600, and 1200-grit paper to smooth the surface. I used a drop of mineral oil between each grit. The oil allows the sanding dust to collect as slurry on the stem rather than build up on the paper. It also moisturizes the horn, which keeps the ends of the fine fibers from raising and splintering. A good polish with the full range of Micro-Mesh pads finished up the work on the stem.Mokin10 
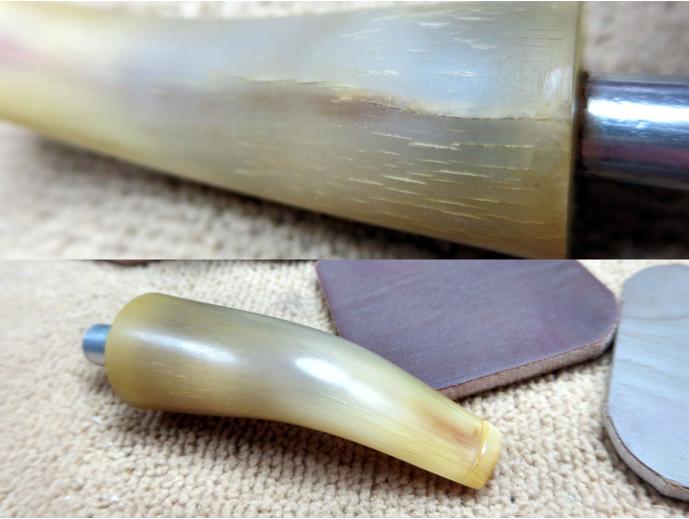
I knew from the beginning that I couldn’t leave the finish natural. There were just too many fills for that. I also knew that I couldn’t completely hide them. So, I hoped that I could give the grain enough “pop” with a bit of stain to draw the eyes away from them.

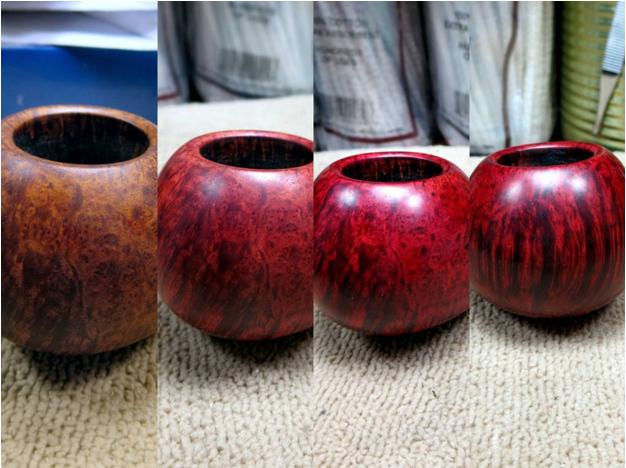
I applied four stains in all; dark brown, medium brown, light brown, and British tan. The first three were thinned with three parts isopropyl alcohol to one part stain. The last stain was thinned by eye until it was just a light wash. I applied the first stain, and then sanded with 400-grit paper. The second stain was applied before sanding with 600 and 1200-grit paper. After the third stain, I polished the stummel with 1500 through 4000-grit Micro-Mesh pads and gave the stummel a Tripoli buff on the buffing wheel. Then, I applied the stain wash and finished up the work on the stummel with the remaining Micro-Mesh grits. All sanding up to 3600-grit Micro-Mesh was wet sanded and the stummel was hand-buffed with a soft cloth after each stain to remove any excess.

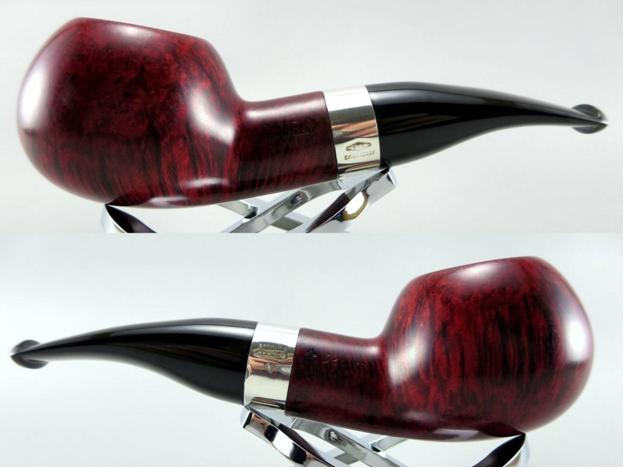
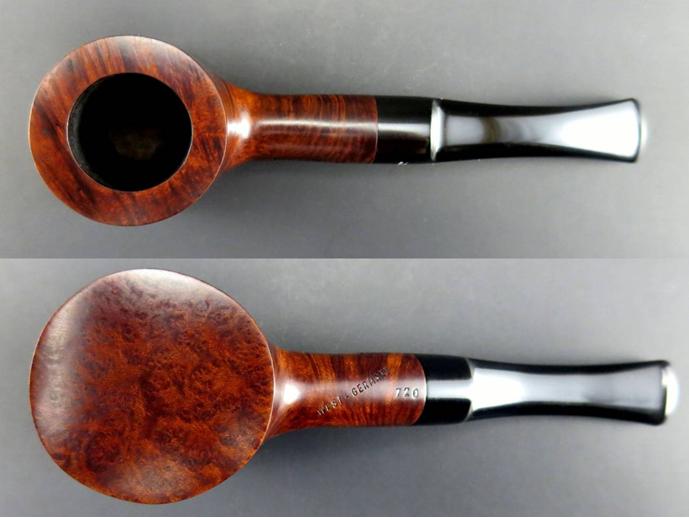
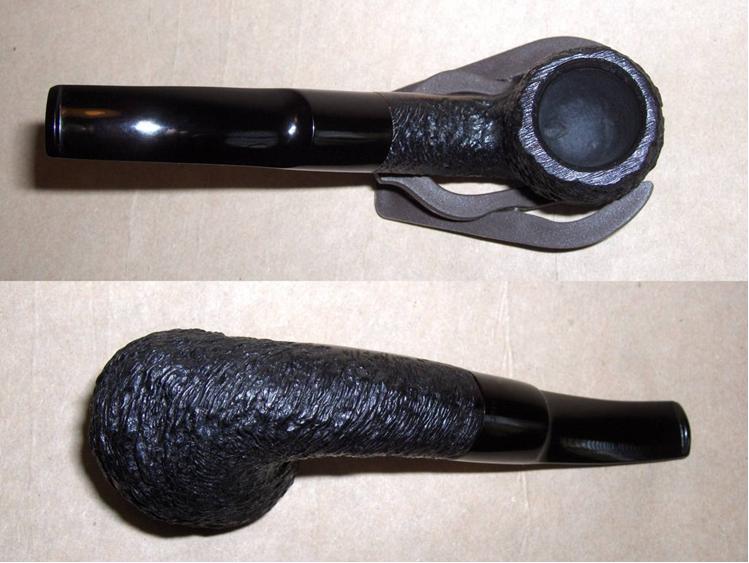
Finally, I polished up the brass ferrule with Semichrome polish and used a bit of epoxy to affix it to the stummel. All that remained after that was to buff the pipe with White Diamond and apply several coats of carnauba wax before it was time for some photos.Mokin11

Mokin12

Mokin13

Mokin14 
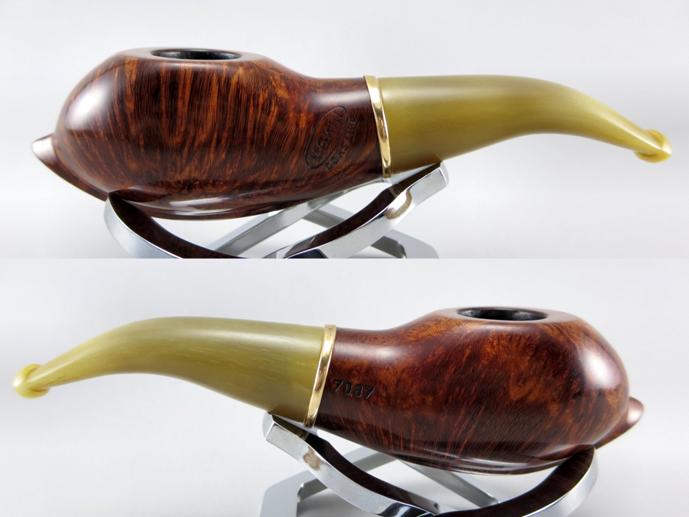
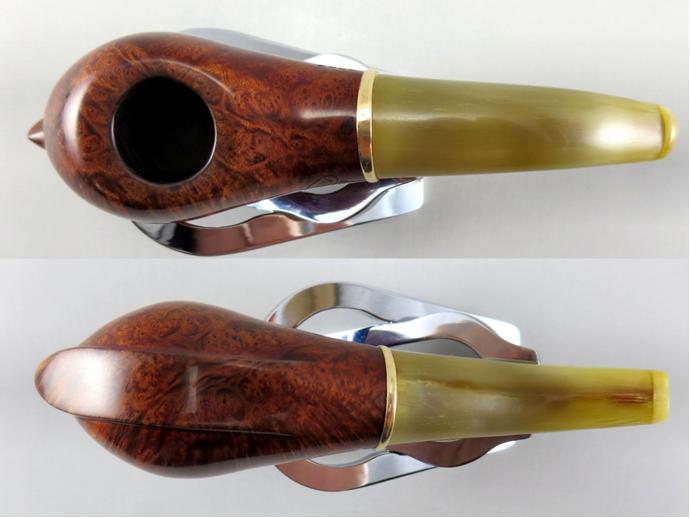
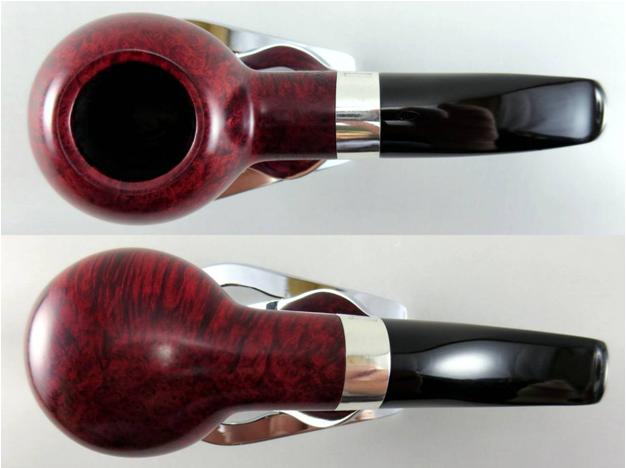
I know that many may regard this one as just a novelty pipe, but despite the rough edges, it may be my favorite refurbishment work to date. The photos barely do justice to the color or the grain on this pipe. The credit for the transformation is not really mine though. This was one of the most cooperative pipes that I’ve ever worked with. It set on the bench and said, “Make me a star.” I was charmed and did the best that I could.

Silver Linings: Restoring a Savinelli Silver 320KS


Blog by Anthony Cook

A friend from the Pipe Smoker Unlimited forum recently gifted me a batch of pipes that need a little TLC. In exchange, I offered to do some repair and restoration work on a couple of their own pipes. Believe me when I say that I received the better end of that deal. So, I wanted to go the extra mile on these if I could.

The first of my friend’s pipes that I chose to work on was this Savinelli Silver 320KS. I love the shape of the 320. When I hear “Savinelli,” this is the shape that I think of. Unfortunately, somebody had gotten to this one before me and it wasn’t better for it.

The initial request was just to repair the deep scratches that ran all the way around the rim. However, as I looked the pipe over, I could see that it had a few additional issues. The bowl rim was uneven and looked like it had been heavily buffed. The pipe should have had a deep, cherry red stain from the factory, but this one appeared to have been partially stripped and the stain was uneven and closer to the color of red clay. The silver shank band was loose and it had a couple of small dents on the right side. Finally, the shoulders of the stem face had been rounded with a buffer, which created a thin trench all the way around the stem where it met the band.

Oh, there was one more thing, but for reasons that I can’t explain, I hadn’t noticed it yet. I’m sure that you’ll see it in these photos of the pipe as it was on arrival.Astrid1

Astrid2

Astrid3 Nomenclature and logo details (notice the “trench” on the stem next to the band):Astrid4 This 320 appeared to be pretty clean, but there’s no such thing as a pipe that’s too clean. So, I gave the internals of the stem and stummel a bit of a scrub with isopropyl alcohol, pipe cleaners, cotton swabs, a shank brush, and a percolator cleaner (the fat brush in the upper right). I’m glad that I did. As you can see below, there was still grime to be removed. After that, I gave the surface of the stummel a scrub with acetone on cotton pads to remove the old, spotty finish.Astrid5 I took a few photos of the rim damage, and after seeing them enlarged a few hundred times on the big screen, I noticed that the edges of the marks were rounded. That seemed to indicate that they were more like dents than scratches.Astrid6 So, I decided to see what a little bit of steam would do for them. I used a tea candle to heat the end of a flat-head screwdriver. Then, I placed a wet cloth over the dents and pressed it into the cloth. The steam worked well on the marks, although I had to repeat the process several times to lift the deeper ones. After I had worked my way all the way around the bowl, the rim was in much better shape. It would still need some sanding, but not nearly as much as it would have taken before to get it smooth.Astrid7 I sanded out the remaining dents with 220-grit paper before addressing a couple of small pits that were possibly missing fills on the bottom front of the stummel. I refilled them with a mixture of briar dust and CA, and then sanded them out with 220-grit as well. Three more fills were present on the front of the bowl, but they looked like they were in good shape and I had confidence that they would blend in with the final stain.
Next, I topped the bowl to level it out and chamfered the inner rim to match the original, factory shape with 220-grit paper. Then, I started cleaning up some of the light scratches and blemishes on the stummel with 320-grit.Astrid8 I then heated the stummel to open the grain and prep it for the first stain. I applied a mahogany stain thinned 3:1 with isopropyl alcohol. Mahogany is a nice dark color that gives contrast to the grain and it would play well with the red tones that would come later. After flaming the stain, I hand-buffed it with a soft cloth to remove the excess, and then wet sanded the stummel with 400-grit to remove most of the stain except for what had set into the soft grain.

To start bringing in those red tones I mentioned, I applied a 50/50 oxblood and medium brown stain thinned to the same ratio as the previous application. I again flamed and hand-buffed before lightly wet sanding with 600-grit and 1200-grit paper, and then polishing with Micro-Mesh pads 1500-2400.

I applied a third stain, red this time, and hand-buffed before giving the pipe a Tripoli buff on the buffing wheel. Then, I polished with Micro-Mesh pads 3200-4000. At that point, I didn’t like how bright the red was. So, I decided to darken it up with a thin stain wash. I can’t tell you the exact mix, because I just eyeballed it until it was what I wanted. I can say that it was at least 50% red mixed with a small amount of oxblood for richness and an even smaller amount of dark brown to darken it. I thinned it until it was about the same color density as Kool-Aid and applied it with cotton swab. After that, I hand-buffed the excess off and continued polishing with the remaining grits of Micro-Mesh pads.Astrid9 That finished up the work on the stummel. So, I thought I’d try to do something about those rounded shoulders on the stem face. In a scrap piece of wood, I drilled a hole large enough to easily accommodate the tenon. Then, I clamped a strip of sandpaper over the block and cut a matching hole with an X-Acto knife. I inserted the tenon into the hole and rotated it while applying firm but gentle pressure to keep the plane level. I started removing material with 220-grit and worked up to 600-grit. All in all, I probably removed 1/16 of an inch or less from the end of the stem. It wasn’t enough to completely correct the problem, but it did make it a great deal less obvious. The shoulders were nice and sharp again and I didn’t compromise the flow of the joint by creating a “step” down to a smaller diameter stem. You can see for yourself in the photos below.Astrid10 To be honest, I thought I was done at that point. It wasn’t until the pipe was reassembled and I was preparing to give it the final buff and wax that I noticed the glaring damage that I’m sure you’ve already seen. For the life of me I can’t figure out how it had escaped my attention, especially since I had just done work on the stem, but the button had been severely worn away by overbuffing. There was barely a button left at all. Of course, that wouldn’t do at all. So, after getting permission from the pipe’s owner to do some extra work, I began to create a new button.

I used 220-grit paper to rough up the surface of the damaged button and also a bit of the surrounding area. Next, I applied thin layers of black CA glue to the button to build it up. I lightly sanded between each layer with 220-grit to roughen them and ensure that the next layer had a good surface to cling to. Once the mound of CA was slightly higher than I wanted the button to be, I used 220-grit paper to start shaping the button, needle files and sanding files to carve a sharp edge at the back, and 320-grit paper to refine the shape.Astrid11 I continued to refine the shape and smooth the surface through 400, 600, and 1200-grit paper. Then I polished the button and the rest of the stem with the full range of Micro-Mesh pads and applied a drop of Obsidian oil to wrap up the stem work.

Before reassembling the pipe, I tried to lift the dents in the silver band by placing it over a wooden dowel, pressing firmly, and rotating it from side to side. My attempt was mostly in vain though. I was able to lift them slightly, mostly the one at the edge, but stopped when I began to worry about raising the stamping or tearing the band. I polished the band with Semichrome polish and placed it back on the shank with a small drop of CA to fix the looseness.

Finally, I put the pipe back together and buffed it with White Diamond on the buffing wheel. After buffing again with a clean wheel to remove any excess compound, I gave the pipe several coats of carnauba wax to complete the work on the pipe. The end results can be seen in the photos below.Astrid12

Astrid13

Astrid14

Astrid15 I think the lines of a 320 are iconic and it is a fine example of the author shape. I’m glad that I was able to restore this one to at least a bit of its former glory and get it back into rotation. Thanks for looking!

A West German Mystery: Refurbishing a Merkur 2000 720


Blog by Anthony Cook

A friend from the Pipe Smoker Unlimited forums recently picked up a volcano-shaped Merkur 2000 pipe as a birthday gift to himself (we all know that those are the best gifts). He was drawn to the shape and the bit of nice grain that he could make out beneath the grime and dark stain. He mentioned in a comment that it was going to need a little cleaning up. So, I offered to take care of that for him and he accepted.

I gave the pipe a good look over when the pipe arrived some time later. I was immediately impressed by how light it was for its size. It appeared to be in good, clean condition too. The stem had barely any tooth chatter, but it had some reddish oxidation that almost matched the stummel stain and there were strange bands of raised vulcanite in some areas. My best guess is that something had lain across the stem for a very long time to cause the warping. The stummel appeared to have a few scratches, including one on the rim that was the most pronounced, but they were small and looked shallow. So, I was confident that they could be easily removed.

Here’s the pipe as it was on arrival:Merk1 In the photo below, I don’t know what that is in the chamber. It’s best not to think about it too much.Merk2

Merk3

Merk4 The actual manufacturer of this pipe is a bit of a mystery to me. It’s stamped “MERKUR 2000” along the left shank, “REAL BRIAR” along the right, “WEST-GERMANY” and “720” along the bottom, and there is a slanted “H” logo on the stem. Pipephil has a listing for a Blackwood pipe with a matching stem logo and “2000” in the same location and typeface. It’s my guess that neither Merkur nor Blackwood is a manufacturer brand name, but rather they are either model names or shop-branded names. Whatever the case may be, the “WEST-GERMANY” stamping is a clear indication of the country of origin and that the pipe was made sometime before the 1990 German reunification.

Here are a few detail photos of the stamping in question and also the Blackwoods pipe from pipephil:Merk5

Merk6 When I asked my friend what he wanted done with the pipe, he said that he would like me to lighten the color a bit and make the grain “pop.” So, to begin, I wiped the stummel down with acetone and cotton pads to remove the grime and lift some of the old stain.Merk7 I think a good, internal cleaning is the foundation of any estate pipe work. So, I scrubbed out the stem and stummel with a few pipe cleaners, cotton swabs, and a shank brush. Next, I set up the retort for some deep cleaning (kind of like steam cleaning the carpet). I flushed the stem and shank 10-12 times with the boiling alcohol, let the pipe rest for about 10 minutes, and the flushed it 10-12 times again with fresh alcohol. After the second retort the alcohol in the vial was almost as clear as when it was fresh (the debris seen in the photo is bits of carbon build-up on the outside of vial from the candle flame). So, I gave the pipe a final scrub to remove anything left behind from the retort.Merk8 The stem was dropped into a bath of Oxyclean and warm water for about an hour, and then I removed the softened oxidation by scrubbing with cubes cut from a Magic Eraser pad. I sanded down the tooth chatter and warped bands on the stem with a progression of 220, 320, and 400-grit paper and the entire stem was lightly sanded with 600-grit paper to get rid of the pitting and smooth the surface.

I already knew that I couldn’t completely restore the stem logo; the upper-right portion of the “H” was almost entirely worn away. I thought that it would look better with something there though. So, I painted over the logo with a grout pen, let the paint dry, and then very carefully sanded away the excess with 1200-grit paper to reveal the partially restored logo. Then, I sanded the rest of the stem with 1200-grit and polished with the full range of Micro-Mesh pads to wrap up the stem work.Merk9 The scratch on the rim didn’t seem too deep. I thought that I would be able to remove it with just a light topping. It didn’t take much sanding with 220-grit before I noticed that the “scratch” was widening and realized that it wasn’t a scratch at all, but a small pit. I thought that it might still be shallow enough that I could sand it out, but when the pit was still there after a bit more sanding I decided to cut my losses and patch it with a briar dust and CA glue patch. Then, I topped the bowl with 320-grit to even everything out.

Unfortunately, that pit wasn’t the last one that I encountered while working on this pipe. At least two more revealed themselves along the rim and a few more on the rest of the stummel.Merk10 Now, before I tell you about how I did the rest of the stummel I have to issue an apology. I failed to take any more photos before finishing up the pipe. I’ll lay the blame on the previously mentioned pits that kept cropping up, which caused me to backtrack at almost every stage and redo sections of the work. However, I’m sure that you can follow along with no problems. I won’t detail any of the pits, since they were all addressed in the same way as the one above.

In order to honor the request to make the grain “pop,” I heated the stummel with a heat gun to open the grain and applied a dark brown stain thinned to one part stain to three parts isopropyl alcohol. After flaming the stain to set it into the grain, I hand-buffed with a soft rag to remove the excess, and then sanded the stummel with 400-grit. This removed most of the light scratches as well as much of the surface stain, which gave the grain some nice contrast.

I heated the stummel again before applying a medium brown stain thinned the same as before. I flamed and hand-buffed again before lightly sanding with 600-grit and 1200-grit papers. I also began polishing with Micro-Mesh 1800-grit to 2400-grit.

Next, I applied a light brown stain, flamed, hand-buffed, and reattached the stem to give the stummel a Tripoli buff on the buffing wheel. I don’t buff the stem with Tripoli, but it’s good to have it in place to prevent the buffer from rounding the shoulders of the stem and shank faces. I use a rubber tourniquet tightly wrapped around the end of the stem to protect it from the wheel.

I polished the stummel with 3200-grit through 4000-grit paper before giving it one final stain of British tan thinned by eye until it was just weak wash. Then, I polished with the remaining Micro-Mesh grits before buffing the entire pipe with White Diamond and applying several coats of carnauba wax to finish up the pipe.

The final results are pictured below.Merk11

Merk12

Merk13

Merk14 I think the pipe will now be a proud addition to my friend’s collection and I’m sure that it will serve him well for many more birthdays to come. Thanks for looking.

First in Flight: Refurbishing and Restemming a Falcon #4


Blog by Anthony Cook

I had never smoked a metal pipe before, but I was curious. I liked the idea of interchangeable bowls, especially when dealing with stronger and “ghostlier” blends (I’m looking at you, Lakelands). So, when this Falcon #4 showed up on eBay I put in a low bid that luckily turned out to be the winning one. I knew from the seller’s photos that the pipe was going to need a bit of work to get it into shape, but I was still in for a few surprises.

When it arrived, I could see that the aluminum frame was in good shape. There were several small dents and scratches, but nothing that would affect the smoking qualities of the pipe. The nylon stem (or, “bit” in Falconese), however, must have really suited someone’s taste because had been chewed so badly that it was crushed and the airway was almost completely closed. The larger, pot-shaped bowl was in fair condition with some tar build-up and a few scratches on the rim, but the smaller Dublin/apple-shaped bowl was charred and almost beaten to death around the rim. Luckily, the threads on both bowls were still in good shape and they would screw tightly to the frame.

Here are a few photos of the pipe as it was when it arrived:Falcon1

Falcon2

Falcon3 The first order of business was to remove the stem, since there was no way that it would work in its condition. Thankfully, Al (upshallfan) offered to send me another one that was in better shape. Removing a Falcon stem is easier said than done though. They’re intended to be a permanent part of the pipe.

I turned to the forums in the hope of finding someone who had done it before and had developed a reliable removal method. I received several suggestions and tried them all with no luck. In desperation, I decided to try to heat the stem in boiling water. I knew from past experience that nylon would blister and burn all too easily when exposed to high heat, but I thought that this method might heat the stem slowly and gently enough to avoid that risk. Surprisingly, it worked like a charm! After about 20 minutes of submerging the stem in boiling water, not only was I able to remove the stem, but the aluminum smoke tube came out as well. That would make cleaning and polishing the frame much easier.Falcon4 After soaking the frame in alcohol for about 30 minutes, I cleaned out the interior. Without a doubt, this was the easiest cleanup job that I have ever done on a pipe. That’s not to say that it wasn’t dirty. This was obviously a well smoked pipe, but the grime came away easily from the nonporous aluminum. It took only three pipe cleaners (two for the airway and another folded one to scrub the cup) and an old toothbrush (for the threads) to completely clean the frame.Falcon5 The bowls were next on my to-do list. I reamed them both back to bare wood so that I could see what I was dealing with, and then I placed them in a jar of isopropyl alcohol to soften the build up on the rim and strip the finish. An hour or so later, I removed them and used a soft cloth to scrub away the remaining finish and grime.

I set up my topping surface to sand out the scratches on the rim of the larger bowl and level the uneven rim of the smaller one. I lightly topped the larger bowl first with 220-grit paper, and then with 320-grit until the scratches were gone. I started to top the smaller on the smaller one, but the condition of the rim was so bad that chunks of it began to fall out as I worked. I could see that was going to be a losing battle and decided that if I couldn’t beat ‘em, I’d join ‘em.

I used a Dremel with a sanding drum to bevel the inner rim of the smaller bowl back as far as the deepest gouge. I was only doing some rough shaping at that point to create the general depth and angle of the bevel. Then, I used 220-grit and 320-grit paper to clean things up and further refine the shape. After that, I lightly sanded the surface of both bowls with 220-grit and 320-grit paper to remove most of the scratches and dings.Falcon6 Once the heavy lifting was complete on the bowl cosmetics, I turned my attention back to the stem. The stem that Al had sent me was in much better shape than the original, but it was still badly chewed. It also wouldn’t pass a cleaner, which seems to be an issue with Falcon pipes in general. They make thinner cleaners specifically for Falcons, but I don’t like the idea of having to buy something else just to overcome a design flaw. So, I decided to try an experiment to see if I couldn’t open up the airway and remove much of the chatter all in one shot.

I had noticed earlier that the boiling water had not only loosened the original stem, but it also appeared to raise the dents to some degree. It wasn’t enough to save it, but I found it surprising all the same since I’d had no luck lifting dents in nylon with heat previously. I thought I’d try it again with the replacement stem. I rigged up a simple suspension mechanism with some string, a hex nut, and a wooden spoon, and then put the stem into a pot of boiling water. After nearly about 40 minutes of being submerged, there was some slight improvement but not enough to make much difference. So, I called an end to the experiment and decided that the method wasn’t worth the effort. I have a suspicion that there was some harm done to the stem with this method however, and I’ll talk more on that later.Falcon7 The constriction in the airway extended about ¼” behind the button. So, I decided to drill the airway out from the slot end. The airway was so tight that I had to start cutting through with a 3/64” bit and work my way up to a 3/32” bit. I tested the draw and it was good, and then I tested with a cleaner and it would pass, but it still needed a bit of force to get through the tight area. The stem wouldn’t take a larger bit, however, and I had to be satisfied with what I had. I finished up the work on the airway by cleaning up the slot and giving it a slight funnel with some sandpaper, needle files, and sanding needles.

In the photo below, you can see one of the drill bits chucked into a Dremel, but I never actually used the motor. That would likely have been a disaster. Instead, I used the Dremel to stabilize the bit while I turned the stem over it.Falcon8 The mechanics of the stem had been addressed and it was time to start working on the cosmetics. I used a course, flat needle file to score the surface of the stem, applied black CA glue to the indentations, and sanded it back with 220-grit paper once it was dry. Then, I began to rebuild the button. I wrapped clear tape around the area behind the button to create a sharp edge and applied more CA to the button to build up the surface. I used 220-grit paper to sand the CA back and start shaping the button after it had completely dried. When the shape was vaguely buttonish, I began to clean the edges and remove more chatter from the stem, first with 320-grit, and then with 400-grit paper.Falcon9 I lightly sanded the entire surface of the stem with 600-grit and 1200-grit paper to smooth it out and remove the seams and molding artifacts from the sides. Then, I polished the stem with Micro-Mesh pads 1500-grit through 12000-grit and used a drop of mineral oil to lubricate the stem between every three grits.

Remember when I mentioned something about the heat of the boiling water doing harm to the stem? This is where that comes into play. I had noticed that the stem felt different under the paper as I was sanding it. The higher the grit, the more noticeable it became. The surface felt normal to the touch, but it kind of grabbed at the sandpaper and pads and gave some resistance as they slid across, almost like it was gummy. It was unlike any nylon stem that I had ever worked with before and I believe that submerging it in boiling water changed the surface in some way. I’m just making a guess, of course, but in the end I wasn’t able to achieve the level of glossy shine that I had with previous nylon stems and I doubt that I’ll be trying the boiling method again. You can see the finished stem in the photo below.Falcon10 The stem was out of the way. So, it was time to get back to the bowls and start wrapping this pipe up. I wanted each bowl to have a slightly different color. So, I used a heat gun to heat the briar and open the grain, and then applied a 3:1 mix of isopropyl alcohol and Fiebing’s dark brown dye to the larger bowl and the same ratio with mahogany dye to the smaller bowl. After hand buffing with a soft cloth and sanding the surface of both bowls with 400-grit and 600-grit paper to remove most of the dye except for what was in the grain, I gave the larger bowl a medium brown stain and the smaller one an oxblood stain using the same ratio of stain to thinner as before. Then, I hand buffed again and sanded each bowl with 1200-grit and gave them both a light Tripoli buff. Both bowls received one final stain; buckskin for the larger one and British tan for the smaller. They were hand buffed again to remove the excess stain, and then polished with Micro-Mesh pads 3200-grit to 12000-grit.

Before reassembling the pipe, I polished the frame with Semichrome polish and buffed the stem and bowls with White Diamond compound on the buffer. I put everything back together (it went easily) and applied several coats of carnauba wax with the buffer. Finally, I applied a bowl coating to both bowls to give them some protection until they could build a little cake. You can see the completed pipe in the photos below.Falcon11

Falcon12

Falcon13

Falcon14 And here are a couple of shots of the other bowl…Falcon15 I’m still not happy with the stem on this one and I’m sure that I’ll be replacing it sometime in the future when there aren’t other pipes that need attention. For now, though, it serves its purpose well. I’ll admit that I was a little skeptical of the metal pipe concept, but this pipe smokes wonderfully and I can see many more Falcon bowls and a few more metal pipes in my future. Thanks for checking it out!

Bullets, Sawdust, and Rhododendrons: The Story of the D&P Spartan


Blog by Anthony Cook

I love old pipes with stories to tell and I recently acquired a couple of very unique, American-made pipes that appear to fit that bill nicely. For those of you unfamiliar with the brand and the pipes (and I’m betting that’s the most of you), let me make the introduction. Meet the D&P Spartan… Spartan1 Spartans were made from 1942 until at least 1945. The majority of them were produced for distribution to U.S. troops overseas during WWII, but some were available domestically as well. The pipe pictured above is one that I acquired and it was probably made in mid-to-late ’43. The stem is made from maple, and although the bowl is stamped “GENUINE BRIAR”, that’s not really true. It’s most likely mountain laurel and possibly even rhododendron (they made do with what they had on hand when briar was tough to get during the war). The stamped patent number (2089519) on the side of the bowl refers to a method of curing wood with boric acid for better heat resistance.

The shape of the Spartans evolved during the course of production. The earliest were simply a wood block with a hole drilled for the tobacco chamber and another on the backside that the stem fit into. It’s very similar to the design of a cob pipe. Those were made from 1942 to mid-1943. I don’t have one of this design on hand, but Tim (oldredbeard) from the Dr. Grabow Collector’s Forum, graciously sent me a couple of photos of one that is in his collection.Spartan2

Spartan3 Notice that Tim’s pipe has the same patent stamp on the bowl as the one pictured above it. The patent was issued in March of 1943. So, this pipe is probably from one of the last production runs for this design.

Sometime around mid-1943 the design of the Spartan was changed. The new version was slightly less utilitarian and added a few aesthetic curves to the back of the bowl. It also grew a nub of a shank and utilized a patented (1888462) pressure fit for the stem. My mid-to-late ’43 Spartan is an example of this design.Spartan4

Spartan5

Spartan6 The design was again changed near the end of the war. I suppose the idea was to give it more appeal as D&P began to rely more on the domestic market. The new look was more traditional, but still rather roughly shaped. The paneled bowl received a few more angles, the shank was further extended, and the maple stem was replaced with one of vulcanite. The second Spartan that I picked up is an example of this design. It would have probably been made somewhere around late-’44 to ’45. I’m not aware of any further changes to the design, and in fact, I don’t believe that D&P continued to produce Spartans for very long after the end of the war.Spartan7

Spartan8

Spartan9

Spartan10 D&P was created in 1942 by David and Paul Lavietes. They were, respectively, the brother and father of Henry Lavietes who was part owner of the better known HLT located in Ozone Park, New York (Henry was the “H”). David Lavietes was also the inventor of the “Ajustomatic” stem fitting.

From the December, 1945 issue of Popular Mechanics

From the December, 1945 issue of Popular Mechanics

Originally, D&P was a sawmill and basically a supplier for HLT. They were located in Boone, North Carolina and purchased mountain laurel locally, which they then cut into blocks to be shipped to Ozone Park to be made into HLT pipes. I’m not sure, but I don’t believe that the D&P stamped pipes were ever sent to HLT. I think that they were carved in North Carolina. In 1944, D&P relocated the sawmill to Sparta, North Carolina and HLT relocated there soon after. In the early ‘50s, D&P became known as the Briarshop. They continued to carve blocks for HLT, although they were located in a different building and still regarded as a separate company. I’ve found no evidence that they ever again marketed pipes under the either the D&P or Briarshop names.

In 1953, HLT acquired the name and assets of the Dr. Grabow Pipe Company. The Briarshop ceased to be a separate company somewhere within the same timeframe and was rolled into HLT. The operation still produced stummels, but now they were doing it for both the HLT and Dr. Grabow brands. HLT has since ceased to exist, but Dr. Grabow pipes are still being made to this day in Sparta, North Carolina.

So, there you go. A couple of old pipes with stories worth telling. To me it doesn’t get much better than that.

I’d like to give special thanks to Dave Whitney and Tom Douglas for helping me put all of these pieces together. Sometimes, things get a little muddy out there in Sparta. Also, thanks to Tim for providing me with photos of a 1st-gen Spartan. You know where to reach me when you’re ready to let it go, Tim.

Late Breaking News Update!

Okay, not so late breaking, since the news is more than 70 years old, but here it is anyway…

Tom contacted me shortly after the write up was posted and told me that Appalachian State University has a yearbook titled, aptly enough, “The Rhododendron.” The 1942 and 1945 editions have D&P advertisements in them. Both of the yearbooks are available for viewing online here: http://bit.ly/asuyearbooks . I’ve cropped out the D&P ads and you can see them here:

1942: https://lh3.googleusercontent.com/-VqKwuNNXRjo/VZ7dMvMyeVI/AAAAAAAABic/386oDL1_swE/s800-Ic42/asuyb1942-p133.jpg

1945: https://lh3.googleusercontent.com/-7PyicjIL6nQ/VZ7dMzP2UqI/AAAAAAAABig/bM3Xw9a0poM/s800-Ic42/asuyb1945-p101.jpg

You’ll notice that the ’42 and ’45 ads refer to both Boone and Sparta. This leads me to believe that the Sparta location was part of the D&P operation from the beginning. When D&P relocated in ’44 it must have been a headquarters move only. The Boone location appears to have remained in operation after the move, but I have no idea for how long. I’m going to do some more digging around Boone and see what turns up.

Midterm Exam #4: Re-Refurbishing an Unknown Bulldog


Blog by Anthony Cook

It’s time for the fourth and final midterm exam! This one is an “unknown” bent bulldog that I picked up from eBay. I snagged it because I liked the shape and it was cheap. What I didn’t know at the time, but became immediately apparent when the pipe arrived, was that the end of the shank had been shattered into at least three pieces and glued back together. There was no stamping on the pipe, but I don’t think that was always the case. It was likely sacrificed during the shank repair. The repair is fairly obvious in my photos below, but I assure you that it was not nearly so in the seller’s. The right combination of lighting and angles can cover up a multitude of sins, folks. Caveat emptor.

The exposed cracks weren’t the worst part of the story though. The repair did as much damage to the pipe as the crack did. An alarming amount of material had been taken off while sanding out the excess glue. It’s difficult to see in the photos, because from any one angle everything looked correct. However, if you held the pipe in hand and rolled it around you would notice that no two faces on the shank were equal. The shank was no longer a diamond shape; it was a trapezium. The repairman hadn’t paid much attention to keeping the surfaces level either. So, there was a subtle undulation to the line of the shank as it went from thick to thin and back again several times along its length. There was also very little effort made to blend the repaired area into the rest of the pipe, and several shallow “steps” were visible where the two surfaces met. There was at least an attempt to match up the stem to the shank, but that only gave the stem the same odd angles and even they didn’t quite match up to the ones on the shank. All in all, it was a bit of a travesty. Here are a few photos taken just after it arrived.Anthony1

Anthony2

Anthony3 That was all far more than my tender, noobie hands could handle at the time. So, I cleaned the internals of the pipe and put it away for later, but not before adding a bit of bend to the stem that it seemed to have lost over time.
I’ve finished up work on all the rest of the pipes in that first batch. So, this week it was time to put a collar on that dog and turn in my final midterm.

I started (or restarted I should say) by dropping the stummel into an alcohol bath for a couple of hours to soften any coating that might be on the pipe. I had quite a surprise when I removed it later on. It looked fine when it was fresh from the bath, but a hazy, white glaze began to form on the surface as it dried. I hadn’t seen anything like this before and I’ll admit to a brief moment of panic. I assumed that this was probably the result of some type of coating reacting to the alcohol. So, I wiped the stummel down with acetone taking extra care around the shank repair, since acetone will break down superglue. That did the trick and the stummel cleaned up nicely.Anthony4 I set up the retort to see if I could remove any more tar buildup from the pipe. I flushed the shank about 10 times with boiling alcohol before allowing the pipe to cool. I noticed that the vial appeared to be losing a lot of liquid during the retort. The cotton wasn’t discolored. So, it wasn’t gassing out through the bowl. It really had me scratching my head until I saw a spot of moisture on the shank when I was removing the retort. For some reason, it wasn’t sealing well at the mortise and I’d need to look into that before I went much further.Anthony5 I gave the pipe a post-retort scrub of the stem and shank, and then inspected the crack repair for gaps. The surface of the glue joints looked airtight, but I noticed that the glue hadn’t penetrated very deep. The joints left shallow fissures inside the mortise and along the shank face. I used a small pushpin to place a little super-thin CA glue directly into the fissures, and then used a toothpick to apply a thin layer of the CA around the end of the mortise to create a seal inside as well as out.

When the glue was dry, I sanded out the interior patches with sanding needles and a piece of 400-grit sandpaper wrapped around a small dowel. I refaced the shank on my topping surface in a manner similar to how I would top a bowl (pressing lightly into the paper and using a circular motion). The following pictures show the patches when fresh and after they had been sanded out. You can also get some idea of the irregularities in the shank by comparing the differences in the face angles and wall thickness around the mortise.Anthony6 After that, I reattached the stem and ran a retort through it again to test for leaks. The outside of the stem and shank stayed dry as a bone through the whole process. So, I began addressing the pipe’s cosmetic issues.

I lightly topped the bowl and chamfered the inner rim to remove the scratches and dings. Then, I steamed a few dents out of the finish by pressing a screwdriver that had been heated over a tea candle into a wet cloth placed over the dents. Finally, I used CA glue and briar dust to patch a few, small gouges and missing fills and sanded them out with 220-grit and 320-grit sandpaper.Anthony7 While I worked on the stummel, the stem had been soaking in an Oxyclean bath. I removed it and scrubbed it down with a Magic Eraser to remove any oxidation. I used black CA glue to fill the tooth dents on the top and bottom of the stem. Once that had dried I sanded it down with 220-grit paper.Anthony8 The stem button needed to be rebuilt since it was worn and dented. I wrapped several layers of clear tape around the stem just below the button to create a form to make a crisp edge and also inserted a Vaseline smeared wedge of cardboard into the slot to seal it. Then, I applied thick, black CA glue in several layers to the end of the stem to begin building the new button. It wasn’t a pretty thing to look at when I removed the tape, but the edge was sharp and there was enough material to work with. I trimmed away the glue artifacts created by the tape molding with an X-Acto blade and rough-shaped the new button with 220-grit paper.Anthony9 Once the button started taking shape, it was time to do something about the other end of the stem and also the deformity of the shank. This was the part of the exam that I had not been looking forward to. Up to this point, everything had been the equivalent to multiple-choice or fill-in-the-blank questions. There were a couple of challenges, but nothing too rough. The next part was more like the essay section.

After a lot of thought, I finally decided that there just wasn’t enough material left around the stem to square everything back up. So, I thought I’d try some trickery of my own. If I couldn’t make everything right, maybe I could use a little more finesse and subtlety than the original repairman did to make it at least look “righter”. If ya can’t beat ‘em, join ‘em.

I used 220-grit sandpaper to start carefully nudging the edges of the shank and stem saddle this way and that to give them an appearance of alignment. All the while I paid special attention to keep the faces as level and even as I could. There was very little technical skill involved. I was basically just freehanding. Once I had corrected the lines as much as I could, I began blending the reworked areas into the rest of the pipe with 320-grit. The photo below shows the progress somewhere early in the reshaping phase. Honestly, I was at this for a while and kind of lost myself in the middle of it. So, I didn’t get many photos.Anthony10 When I was as satisfied as I was likely to be with the shape of the shank and saddle, I went back to work on the rest of the stem to finish it up. I continued shaping the button with 320-grit and 400-grit paper. Then, I smoothed the entire surface by lightly sanding with 600-grit and 1200-grit paper. Finally, I polished the stem with micro-mesh pads 1500-12000.Anthony11 The stem work was wrapped up. So, it was time to do the same for the stummel. The off-kilter shape of the shank made it difficult to find a band that would fit well. It took three attempts before I found one that would work. I used a method for shaping a round band for the diamond shank similar to what Steve has previously written about here, but it took quite a bit of reworking to get it to conform to the now strange dimensions of the shank. I’m still not quite happy with how it fits, but I’m not sure what I could have done differently.Anthony12 There was nothing left to do at that point but to address the finish of the stummel. I wanted the final color to be close to the original but a little darker to help hide the bit of crack repair that was still visible. I heated the stummel over the heat gun to open the grain and then applied Fiebing’s black dye to the stummel. I then sanded down the surface with 400-grit paper to remove the remaining scratches and most of the black stain, except for what had set in the grain and recesses of the rings. Next, I applied a mahogany stain before sanding with 600-grit and 1200-grit paper. I took the stummel to the buffer and gave it a quick Tripoli buff, and then applied a final stain of British Tan.

The stummel was polished with micro-mesh pads starting with 3600-grit and working through to 12000-grit. I then buffed the entire pipe with white diamond compound and gave it several coats of carnauba wax to finish it up.

I leaned back in my chair and checked the clock on the wall. There were only minutes to go and most of the other seats were already empty. I had to admit that this was really as good as it was going to get. So, with a sigh, I stood up from my chair, gathered my exam materials, and delivered them to the desk at the front of the room…Anthony13

Anthony14

Anthony15

Anthony16

Midterm Exam #2: Repairing the Leaky Airway on a Champion Deluxe


Blog by Anthony Cook

It’s exam day again. I didn’t get much sleep, but I did have a good breakfast of Pop-Tarts and leftover ramen. So, let’s do this! This time, the exam is based on a bent brandy shaped Champion Deluxe.

PipePhil provides a little info on the Champion brand:Champ1 The pipe I’m working with has shank stamping and a stem logo that is identical to the middle pipe in the above graphic. The country of origin for the brand is listed as Switzerland, but there must be some French connection. The word “FRANCE” is stamped across the bottom of the shank-end of the stem on my pipe. You can see the pipe for yourself in the photos below, which were taken shortly after its arrival.Champ2 I was really pleased with this one when it arrived. I really liked the size, shape, and rustication pattern. As I turned it over in my hands, it seemed to be in pretty good condition. There were no major cracks or gouges, only a generous amount of grime on the stummel, one or two nicks on the rim, and a little oxidation on the stem. I thought it would clean up nicely and was beginning to look forward to working on it.

Then, I pulled the stem out to check the internals and cringed…Champ3 The airway was drilled so high that it actually penetrated the top of the mortise and only a very thin layer of briar remained between it and the surface of the shank. In fact, the wood was so thin that it had either cracked from heat/moisture expansion or had been punctured by the rustication tool. If you look closely, you can see in the second image that the alcohol from a dampened pipe cleaner would seep out of the airway to the surface of the shank.

I didn’t have the confidence at the time to attempt to repair something as essential and delicate as an airway. So, I reamed the bowl, scrubbed the inside of the shank and stem clean, and then dropped it back into the box where it’s been withering away for several months. So, today I pulled it back out for my second midterm exam.

The airway needed to be sealed before doing anything else. If that wasn’t successful any other work would be pointless. So, I clamped the stummel upside-down in my bench vise using a couple of foam strips to cushion it. I tried to make sure that the airway was as level to the ground as possible. Then, I applied super thin CA inside the airway with an applicator bulb. Since I couldn’t really see inside the shank and bowl, I had previously measured the length of the airway and marked it off on the applicator with a strip of tape. This, along with a slow and steady hand, kept me from dribbling the CA into the bowl.Champ4 Once I was sure that the glue was completely dry, I used 240-grit and 320-grit sanding needles to smooth out any lumps and bumps that the glue may have created in the airway. Then, I prepared my initial test of the patch. I dampened a pipe cleaner with alcohol and inserted it into the airway. I couldn’t see any seepage, but just to be sure I pulled out my jeweler’s loupe to give it a closer inspection. Still nothing. The patch had passed its first test.Champ5 I set up a retort for the next test. If there were any open fissures in the shank, the evaporation from the boiling alcohol would surely seep through. I flushed the shank 10-12 times before setting the pipe aside to cool. The color of the alcohol in the tube is a testament to the merits of a retort. It’s not filthy by any means, but remember, this is a pipe that I once thought was clean.

While the pipe rested, I closely inspected the shank to see if the patch had held. Success! I found no moisture seepage at all. The patch was doing its job and the worst part of the exam was over!Champ6 After another dozen or so flush with the retort the alcohol in the tube was almost completely clean. I let the pipe cool, and then gave it a final, quick scrub the wrap up the internal cleaning.Champ7 I placed the stem into a bath of warm water and Oxyclean and let soak for about an hour before I scrubbed it down with cubes cut from a Magic Eraser pad to remove the oxidation. Once the stem was clean, I applied a black CA glue patch to the remaining dents. I put a drop of activator on the patches to speed up the drying and they were ready to be worked again in about ten minutes. I sanded out the patches with 220-grit (the bottom image in the picture below), 320-grit, and 400-grit paper. Then, I gave the entire stem a light sanding with 600-grit paper to remove any minor scratches.Champ8 The paint in the stem logo was cracked and flaking. So, I picked out the loose paint, and then I began to fill in the area around the logo with a grout pen begin restoring the logo. I was a little worried about how well this was going to turn out since the recessed stamp was very narrow and shallow. I let the “paint” dry for about 20 minutes before carefully sanding it down with 1200-grit paper and I thought that it came out surprisingly well in the end. I finished up work on the stem by lightly sanding it with 1200-grit paper to even everything out, and then polished with micro-mesh pads 1500-12000.Champ9 The stem was finished and the clock on the wall was ticking. Some of the other guys were already turning in their papers. So, it was time to start wrapping things up. I mixed up a 3:1 stain solution of isopropyl alcohol and Fiebing’s black dye and applied it to the stummel. Then I buffed the entire stummel with red Tripoli before sanding out the scratches around the stamping with 400-grit, 600-grit, and 1200-grit sandpaper.Champ10 Then, I applied a 3:1 dilution of Fiebing’s cordovan before polishing the stamping area with micro-mesh pads 3200-12000. I reattached the stem and gave the entire pipe a light buff with white diamond, and waxed the pipe with Halcyon II for the stummel and a few coats of carnauba for the stem. Finally, I applied a bowl coating to promote cake growth, and then turned the exam in with my fingers crossed.

The photos below show how it finally turned out. For some reason, in these photos the cordovan and black blend together in the rusticated areas making them appear much darker. When you have the pipe in hand the cordovan is much more evident. I don’t know why that is. Man, I hope we aren’t being graded on our photography skills as well.Champ11

Champ12

Champ13

Champ14

Champ15 But, wait..!

Okay, I realize that this is a little unusual for an exam, but I’d like to make a bit of a revision. You see, when I ran my first bowl through this Champion the draw was extremely poor and it gurgled so badly that it sounded like an aquarium. To be honest, this wasn’t unexpected. The misalignment of the airway between the mortise was so extreme that it couldn’t help but create a lot of turbulence, and therefore a lot of moisture. I couldn’t let that stand. So, I took the stem back to the worktable to tweak it a little.

I clamped the stem in the vice and used a Dremel to cut off the stepped end of the tenon. You can see the piece I removed lying on top of the vice in the photo below.Champ16 After that, I sanded the face of the tenon smooth and level, and then used a tapered abrasive point in the Dremel to begin funneling the airway. I kept the airway lubricated with mineral oil to prevent the friction from burning or melting the vulcanite. The abrasive point opened up the end of the airway to a 3/16” diameter but transitioned it down to the 1/8” diameter of the original airway. Then, I used 240-grit and 320-grit sanding needles to make sure the transition was smooth. Finally, I used a round abrasive point to create a ¼” diameter chamfer on the tenon face around the airway and the sanding needles again to round off any of the sharp edges. In the picture below, the left image shows the step that I removed balanced on top of the stem for comparison; the right image shows the completed tenon after being reworked.Champ17 I was eager to try it out and the results were amazing for such a simple modification. The bowl smoked all the way to the bottom with no gurgle at all; even when I intentionally tried to build up steam by puffing rapidly (it was for the sake of science). After the pipe had cooled, I removed the stem and found a lot of moisture in the mortise. So, the extra space below the airway was acting like the sump/well of a system pipe. Very cool. The pipe was once again looking good and smoking well. My second exam was in the bag.