Blog by Steve Laug
The next pipe on the table is the third of three pipes that came to me for restoration from a friend in the US. I finished the restoration of two of them – a 1913 GBD 347 Straight Apple (https://rebornpipes.com/2023/09/23/breathing-life-into-a-1913-mrco-gbd-london-england-347-apple/) and the Preben Holm made Ben Wade Connoisseur Collection First Edition Danish Style Canadian (https://rebornpipes.com/2023/09/24/breathing-new-life-into-a-stunning-ben-wade-danish-canadian/). All the pipes are gorgeous examples of pipe craft and all were incredibly dirty and showed various issues with their finishes. I am turning to the final one he sent, an interesting Ivarsson 389 Product Apple. In the email that he sent to me about the pipes he included this interesting tidbit of information. I thought it was interesting enough to include it here.
The Ivarsson was quite a surprise. I almost sold this one in a lot with 36 other pipes on Ebay before I got suspicious of all the emails wanting pics and a Buy it Now price. I did some research and pulled the auction when I realized my mistake. The retail price of these pipes is crazy. I believe it may been made by Sixten himself as Nanna and Lars both carve their initials next to the nomenclature (per Pipedia: Lars’ and Nanna’s pipes carries the same stamp, but can always be identified by their initial letters or names on the pipes as well (L.I. and N.I.). Not 100% on this, but a classic pipe nevertheless. You may notice that the bottom of the bowl is a little rougher than the sides. When I initially saw the pipe, the bottom was lighter than the top, indicative of moisture (I am assuming since I work with walnut, teak, rosewood furniture). I put a coat of mineral oil on the entire stummel, but that part may need to be lightly buffed to give it a smoother finish like the sides. But, of course, take care of the nomenclature (I’m sure you know that but just worth mentioning 🙂).
I turned the pipe over in my hands and examined it carefully to get a sense of the condition of the pipe. I turned first to the stamping noted above. It reads as follows. On the underside of the shank it read An Ivarsson Product in a circle with a dot between each word. In the centre of the circle is the shape number 389. Under that number is another stamp that looks like an I with a bar next to it. The pipe was in dirty condition. The finish on the bowl and shank were worn and dirty with grime and darkening ground into the surface all around the bowl and shank. The underside of the bowl (heel) were worn and the finish gone. As noted above it appeared to be water damage. The cake in the bowl was very thick but broken and soft. The lava flowed over the rim top and inner and outer edges of the bowl. It seemed to be in fair condition under the lava but cleaning would tell the story. The grain under the filth was beautiful. The acrylic saddle stem had no logos or marks. It was dirty and had deep tooth marks and chatter on both sides ahead of the button. I took photos of the pipe before I started my clean up work on it to give a clear picture of the condition of the pipe before I started my work.
 I took a photo of the bowl and the rim top. The bowl had a very thick cake on the walls and bottom. There was tobacco debris in the bowl as well on the sides. I wondered what the inside of the bowl walls would look like once the cake was gone but I was a bit nervous because of the softness of the cake. The lava coat on the rim top and the inner edge of the bowl made it hard to know what it looked like underneath. The acrylic stem shows some deep tooth marks and chatter on both sides ahead of the button as mentioned above. The fit against the shank is also not smooth or clean. The pipe showed some real promise but it was dirty!
 I took photos of the shank sides to try to capture the stamping on the briar. I took photos of the stamping on the right top side, underside and right top side of the diamond shank. It was clear and readable. I removed the stem from the shank and took a photo to get a sense of the length of the shank and overall look of the pipe. It is a beauty!
 I turned to Pipedia and read through the various articles on the Ivarsson’s pipes – Sixten, Lars and Nana (https://pipedia.org/wiki/Ivarsson,_Sixten). It is a great read and well worth the time to work through the three articles. The stamping on each involves the “An Ivarsson Product” circle but all are slightly different. The stamping on this one is clearly like the one the is shown in the article on Sixten’s pipes. I copied the section on the Nomenclature of his pipes and included it below.
Sixten’s Nomenclature:
After Sixten became independent, Sixten’s pipes were always stamped with “an Ivarsson product”, written in a ring. Lars’ and Nanna’s pipes carries the same stamp, but can always be identified by their initial letters or names on the pipes as well (L.I. and N.I.). According to Lars, until about 1965, Sixten also stamped his pipes with at least 2 figures inside the ring. The first (one or two) figure(s) was referring to the price. When he started, the cheapest pipe cost 35 Danish kroner (about 5 $). This was marked with a 1-figure. From 35 dkr. the price was added by 5 kroner for each step (40-45-50-55….) and the figure was added 1 for each step. The last figure was referring to the year of production starting from 1950. So a pipe stamped 55 cost (35 + (5X5)) = 60 kroner and was made in 1955. Pipes sold to the USA were often stamped with a figure outside the ring referring to the bill on which the pipe was included. I guess Sixten could not imagine the sky high prices for his pipes later on, when he created his system of stamping. From the middle of the 60’ies, he just stamped the year, e.g. 1982.
Given that background information it was time to work on the pipe.
I started my work on the pipe by reaming the bowl with a PipNet pipe reamer to remove the thick cake on the walls so I could see what they looked like. Once again, I touched the cake with the tip of the cutting head and the cake crumbled out onto the paper. It was very soft and crumbly and the entire cake come out of the bowl with the first touch of the reamer. I followed that with a Savinelli Fitsall Pipe Knife to scrape off the bits of remaining cake on the bowl walls. There was some burn damage toward the bottom of the bowl sides. There were fissures though they were not too deep in the briar. I sanded the walls of the bowl until they were smooth with 220 grit sandpaper wrapped around a piece of dowel. The bowl walls looked much better at this point though I would need to do more sanding to remove more of the damage.
 I took a photo of the large mountain of carbon that came out of the bowl with the reaming. It seemed like there was a lot of carbon.
  I rolled a piece of 180 grit sandpaper and inserted it in the bowl and sanded the walls smooth to further remove the checking on the bowl sides. I tried to capture the bowl walls to show the damage to the inside toward the bottom right side of the bowl.
  I cleaned out the airway and mortise in the shank and the airway in the stem. I used 99% isopropyl alcohol, pipe cleaners and cotton swabs to remove the tars and oils. It was extremely dirty and once cleaned smelled and looked better.
 I scrubbed the exterior of the briar with a tooth brush and undiluted Murphy’s Oil Soap to remove the build up on the surface of the briar and clean off the lava on the rim top. I scrubbed it and then carefully rinsed the bowl with warm water. I dried it with a soft cotton cloth. It certainly looked significantly better and the patina remained in the wood.
 I decided to deal with the remaining buildup and darkening to the rim top and inner edge of the bowl next. I used a 1500 grit micromesh sanding pad to work over the rim top and the inner edge. I wetted the briar and then worked the pad over the surface. I was able to remove the lava on the top and inner edge. There were still some burn marks on the inner edge that I needed to deal with but it looked better.
 I steamed out the dents in the heel of the bowl and on each side with a steam iron and a wet cloth. I put the wet cloth on the briar and put the hot iron on the top of the cloth to steam out the dents in the briar. I was able to raise the dents in the briar significantly. There was one small one that remained on the lower left side of the bowl. The ones on the right side of the bowl all steamed out. The dents on the heel looked much better. There were two small cut marks in the briar that would not raise with steam.
 I used a tooth pick and a drop of clear CA glue to fill in the cuts in the briar on the heel of the bowl. Once the glue cured I used a small piece of 220 grit sandpaper (worn) to smooth out the repairs and reduce them to the size of the cut. It is shown in the second photo below. I touched up the stain on the heel of the bowl with a Cherry stain pen to match the rest of the bowl. Once the stain cured I polished it with a 1500 grit micromesh sanding pad. It looked significantly better.
 I worked on the finish around the rim top and bowl with micromesh sanding pads – 1500-12000 grit sanding pads to dry sand the briar. I wiped it down after each sanding pad with a damp cloth after each sanding pads.


 I rubbed the bowl and shank down with Before & After Restoration Balm. I have been using it for quite a few years and really appreciate the product. I worked it into the surface of the bowl sides and shank with my fingertips. The product works to clean, enliven and protect the briar. I let the balm sit for ten minutes and then buffed with a cotton cloth to raise the shine.

 I set the bowl aside and turned my attention to the stem. I painted the stem surface with the flame of a Bic lighter to lift the tooth marks. I was able to lift them some but not enough for blending them in. I repaired what remained with some light spots of CA. I would have left them but the marks were large and needed to be addressed. I sanded out the repairs and blended them into the surface with 220 grit sandpaper. I started polishing the stem with 600 grit wet dry sandpaper.

 I polished the stem surface with micromesh sanding pads – 1500-12000 grit pads. I wiped it down Obsidian Oil on a cotton cloth. I know that it is said not to work with acrylic but I find that it adds some additional bite for the sanding pads and helps a deeper shine to develop.
 I finished my polishing with Before & After Pipe Stem Polish – both Fine and Extra-Fine polishes. I wiped it down with a final coat of Obsidian Oil and set aside.
  I set the stem aside and moved on to address to checking and damage on the bowl walls. I mixed up a batch of bowl coating – a mixture of sour cream and charcoal powder. I stirred the mix with a dental spatula to blend to two together. I inserted a pipe cleaner in the airway to keept the mix out of the shank. I folded a pipe cleaner and painted the walls of the bowl with the mixture to fill in the fissures in the bowl walls. I spread it evenly on the walls and repeated the process. I set it aside to let the coating cure. In the morning I buffed the pipe.
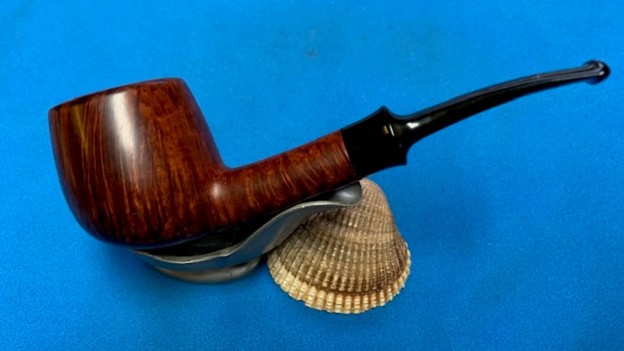
 I am excited to finish the restoration of my first Ivarsson restoration – An Ivarsson Product 389 Apple. I put the pipe back together and buffed it with Blue Diamond on the buffing wheel. I gave the bowl and the stem multiple coats of carnauba wax. I hand buffed the pipe with a clean buffing pad to raise the shine. It is fun to see what the polished bowl looks like with beautiful mixed grain all around it. I love the look of the polished grain on the pipe with the polished black acrylic stem. This smooth, beautiful Ivarsson Product 389 Apple is great looking and the pipe feels great in my hand. It is quite light for its size and well balanced. Have a look at it with the photos below. The dimensions are Length: 5 ½ inches, Height: 1 ¾ inches, Outside diameter of the bowl: 1 ½ inch, Chamber diameter: 7/8 of an inch. The weight of the pipe is 50 grams/1.76 ounces. It turned out to be a stunningly, beautiful pipe. I will be sending it back to the pipeman who sent it to me now that I have finished this last pipe. Thanks for reading this blog and my reflections on the pipe while I worked on it.
As always, I encourage your questions and comments as you read the blog. Thanks to each of you who are reading this blog. Remember we are not pipe owners; we are pipe men and women who hold our pipes in trust until they pass on into the trust of those who follow us.


