Dunhill Pipe Shapes – collated by Eric W. Boehm


Blog by Eric Boehm

This collated information was collected by Eric Boehm and Permission was granted to include it here on the blog. Many thanks to Eric for the information he has collected for us.

Briar & Leaf Followers,

For years, I have been interested in collecting and smoking Dunhill pipes. During this time, I have been an avid follower of the late John C. Loring, his collections, and his writings on the subject of Dunhill pipes. I have also tried to collect all of the published Dunhill catalogs. Despite the occasional listings of Dunhill pipe shapes in various catalogs, books and on the web, I had yet to come across a single complete list of published Dunhill pipe shapes. Thus, the impetus for the current listings.

The tables below follow a set pattern for each shape entry. First, the shape category is listed in bold, then, for each entry, I have provided the shape number, a short descriptor, group number estimate, size (inches), catalog presence, and the modern shape number equivalent.

Image

Shape Descriptor Group Size Catalog(s) Modern #
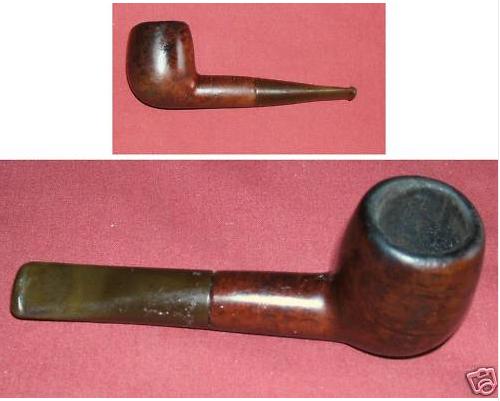
Billiards

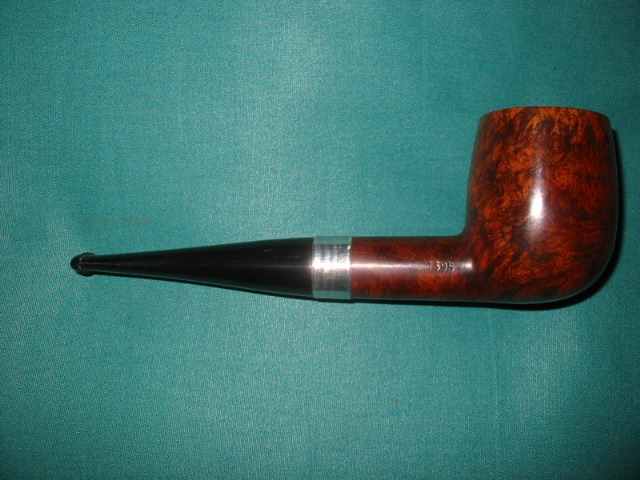
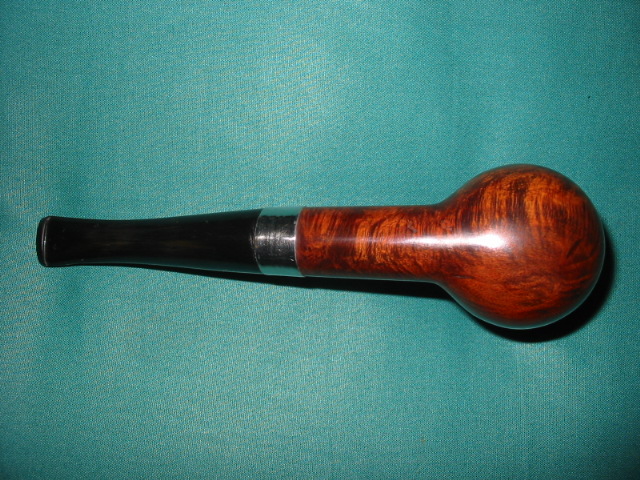
31 Billiard, tapered bit 1 4¾” 1928, 1950 3
32 Billiard, tapered bit 1 5″ 1928, 50, 60, 69 3
34 Billiard, tapered bit (Dental) 2 5½” 1928, 50, 60, 69 3
35 Billiard, tapered bit (Dental) 3 5½” 1928, 50, 60, 69 3
35 Airstream billiard, tapered 3 5″ 1950, 1969 3
39 Billiard, saddle bit 3 5½” 1950, 1969 3
41 Billiard, tapered bit 1928 3
44 Billiard, oval shank, tapered 3 5¾ 1928, 50, 60, 69 3
57 Army mount billiard 3 6½” 1928, 50, 69 3
59 Billiard, tapered bit 4 5¾” 1928, 50, 69 3
60 Billiard, tapered bit 4 5½” 1928, 50, 60, 69 3
59 Bamboo billiard 4 5¾” 1950, 1969 3
60 Bamboo billiard 4 5½” 1950, 1969 3
59 Airstream billiard, tapered bit 4 5¾” 1950, 1969 3
60 Airstream billiard (Dental) 4 5½” 1950 3
64 Billiard, tapered bit 1 5½” 1950, 1969 3
66 Billiard, tapered, stand-up 1928
70 Army mount billiard 2 1928, 50, 69 3
72 Billiard, canted, oval, tapered 1928
92 Army mount billiard 4 1950, 1969 3
94 Army mount billiard (Dublin?) 1928
104 Billiard, canted, oval, tapered 4 5½” 1928,1950, 1969 3
105 Billiard, tapered bit 1 5¼” 1950, 1969 3
111 Billiard, tapered bit 3 5¼” 1950, 1960, 1969 3
113 Billiard, long tapered bit 2 5½” 1928, 50, 60, 69 3
114 Billiard, extended tapered bit 1 5¼” 1928, 50, 69 3
116 Billiard, extended tapered bit 1928
126 Billiard, tapered bit 1928
131 Billiard, diamond shank, tapered 1928
164 Billiard, tapered, stand-up 1928
171 Billiard, tapered, stand-up 1928
196 Billiard, tapered bit 4 5½” 1928, 1950, 1969 3
197 Billiard, extended tapered bit 4 6½” 1950, 1969 3
248 Billiard, tapered bit 1 5¼” 1950, 1960, 1969 3
249 Billiard, tapered bit 1 5¾” 1950, 1969 3
250 Billiard, long tapered bit 2 5¾” 1960, 1969 3
250 The Windscreen Pipe 2 5¾” 1960 3
251 Billiard, tapered bit (Relief bit) 3 5¾” 1950 3
251 Airstream billiard, tapered bit 4 5¾” 1950 3
251 The Windscreen Pipe 5 5¾” 1950, 1969
252 Billiard, tapered bit 4 5¾” 1950, 1969 3
253 Billiard, tapered bit 4 57/8″ 1950, 1969 3
260 Billiard, tapered bit 2 5½” 1950, 1969 3
305 Riding or Sport 2 3¼ 1928, 1950, 1969 3
332 Billiard, canted, oval 1928
335 Billiard, canted, oval 1928
576 Billiard, saddle bit 1 5″ 1950, 1960, 1969 3
577 Billiard, saddle bit 2 4¾” 1950, 60 (5″), 69 3
632 Billiard, saddle bit 1 5¼” 1950, 1969 3
634 Billiard, saddle bit 2 5¼” 1950, 1969 3
635 Billiard, saddle bit 3 5¾” 1950, 1969 3
635 The Windscreen Pipe 3 1969 3
659 Billiard, saddle bit 4 5½” 1950, 1969 3
660 Billiard, saddle bit 4 5½” 1950, 1969 3
710 Billiard, tapered bit 4 5½” 1950, 1969 3
715 Scandinavian billiard 2 5″ 1950, 1969 3
LB Billiard, large, tapered bit 4 5¾” 1928, 1950, 1969 3
LBS Billiard, large, tapered bit 4 6½” 1950, 1969 3

Bent Billiards

50 Bent billiard army shank 1928 2
51 Bent billiard army shank 1928 2
52 Bent billiard, short cut bowl 1928 2
53 Bent billiard 3 5¼” 1928, 50, 60, 69 2
53 Bent Windscreen Pipe 3 1969
54 Bent billiard 2 4¾” 1928, 1950, 1969 2
56 Bent billiard 4 5½” 1928, 50, 60, 69 2
120 Bent billiard, large 4 6″ 1950, 1969 2
121 Bent billiard, oval shank 2
132 Bent billiard, straight sided bowl, 1928 2
306 Bent billiard, large round brandy 1928 2
321 Bent billiard, large flat bowl, 2
329 Bent billiard, large round apple bowl 1928 2
LC Bent billiard, very large, quaint shape 1928 2

Apples

67 Apple triangular shank stand-up, angled tapered bit 1928 1
85 Apple, round shank, reg. tapered bit 1928 1
97 Army mounts (silver) straight apple 1928 1
98 Army mounts (silver) straight apple 1928 1
107 Apple, tapered bit 3 5¼ 1928, 1950, 1969 1
110 Apple, long tapered bit 1 5½” 1928, 1950, 1960 1
112 Apple, tapered bit 2 5¾” 1928, 1950, 1960 1
115 Apple, canted, extended tapered 1928 1
191 Apple, beveled, short shank, extended tapered bit 1928 1
256 Apple, long saddle bit 2 5¼” 1950, 1960 1
308 Apple Army Mount (Silver) push bit 1928 1
309 Apple Army Mount (Silver) push bit 1928 1
310 Apple Army Mount (Silver) push bit 1928 1
311 Apple Army Mount (Silver) push bit 1928 1
376 Apple, bowl canted forward, extended tapered bit 1928 1
K Apple, tapered bit 4 5¼” 1950, 1960 1

Pots

463 Pot, long tapered bit 2 5¾” 1950, 1960, 1969 6
501 Pot, tapered bit 3 5¾” 1950, 1969 6
R Pot, tapered bit, “Quaint” 4 5¼” 1928, 50, 60, 69 6

Princes

258 Prince, apple-like, long straight
tapered bit 1 5¾” 1950, 1960, 1969 7
314 Prince, slightly bent tapered 2 6¼” 1950, 1969 7
315 Prince, straight tapered bit 2 6¼” 1950, 1969 7
FE Prince, large, squat apple-like bowl (Quaint in 1928) 4 6½” 1928, 1950, 1969 7
FET Prince (upright) large squat applelike bowl (Quaint in 1928) 4 6¼” 1928, 50, 60, 69 7

Canadians

335 Canadian, oval shank, short tapered bit 3 5¾” 1928, 1950, 1969 9
EC Canadian, oval shank, short tapered bit (Quaint in 1928) 4 5½” 1928, 1950, 1969 9
850 Canadian, over-sized OD850, Giant, short tapered bit 8¾ 1950, 1969 9

Liverpools

33 Liverpool, tapered 2 5¼” 1928, 50, 60, 69 10
36 Liverpool, large, tapered 4 5½” 1928, 50, 60, 69 10
331 Liverpool, long shank, tapered 3 6″ 1950, 1969 10

Lovats

37 Lovat, short, thick, saddle 1928 11
38 Lovat, long shank, saddle bit 3 4¾” 1928, 50, 60, 69 11
40 Lovat, long shank, saddle bit 4 5″ 1928, 1950, 1969 11
481 Lovat, long shank, saddle bit 1 5″ 1950, 1969 11

Dublins

42 Dublin, tapered bit 3 5½” 1928, 50, 60, 69 5
43 Dublin, tapered bit 2 4¾” 1928, 50, 69 5
65 Dublin, tapered bit 1928
73 Dublin, tapered bit 1928
77 Dublin, tapered bit 1928
130 Dublin, long tapered bit 1 6¼” 1928, 1950, 1969 5
137 Dublin, long tapered bit 4 6¼” 1950, 1969 5
140 Dublin, peg, round shank 1928
142 Dublin, tapered bit 4 5¾ 1928, 1950, 1969 5
143 Dublin, long tapered bit 1928
178 Dublin full bent 1928

Bulldogs & Rhodesians

45 Bulldog, ringed, diamond shank, straight saddle 1928 4
46 Bulldog, +/- ringed, diamond shank, straight tapered 2 5″ 1950, 1960, 1969 4
47 Bulldog, +/- ringed, diamond shank, straight tapered 3 5″ 1928, 1950, 1969 4
48 Bulldog, +/- ringed, diamond shank, straight saddle 4 5¼” 1928, 50, 60, 69 4
OX Bulldog, ringed, diamond shank, straight saddle 4 5¼” 1928, 50, 69 4
69 Bulldog, ringed, diamond shank, short saddle bit 1928 4
88 Bulldog, non-ringed, diamond shank, tapered bit 1928 4
146 Bulldog, ringed, diamond shank, slight bent tapered bit 1928 4
148 Bulldog, ringed, diamond shank, straight saddle 3 5¼” 1950, 1969 4
156 Bulldog, ringed, diamond shank, tapered bit 1928 4
189 Bulldog, non-ringed, large, tall bowl, diamond shank, tapered bit 1928 4
190 Bulldog, non-ringed, large, short bevelled bowl, diamond shank, tapered 1928 4
721 Scandinavian Bulldog, elevated bowl, 3-ringed, extended bent, saddle bit 5¼” 1950, 1969

?O Straight Rhodesian, ringed, diamond shank, tapered bit 4 5″ 1928, 50, 60, 69 17
P Bent Rhodesian, ringed, diamond shank, tapered bent bit 4 5¾” 1928, 50, 69 8
PO Rhodesian, slightly bent, tapered, non-ringed 3 51/2 ? ?
6P Bent Rhodesian, ringed, diamond shank, bent saddle bit 5½” 1960 8
145 Straight Rhodesian, ringed, short diamond shank, tapered bit 1928 17
334 Bent Rhodesian, ringed, diamond shank, bent saddle bit 1928 8
344 Rhodesian, ringed, squat bowl, diamond shank, extended bent tapered bit (Prince) 1928 7?
580 Straight Rhodesian, non-ringed, squat bowl, saddle bit 4 1969 17

Pokers

90 Poker “Stand-up” 2 4¾” 1928, 1950, 1969 22
95 Poker “Stand-up” Army bit 1928
475 Friendly 4 5½” 1960
6475 Friendly (=475?) 4 5½” 1950, 1969
483 Poker with cane stem 6½ 1960

Zulus

49 Zulu, straight round stem, tapered bit 1928 21
83 Zulu, oval shank, slightly bent tapered bit 3 5½” 1928, 1950, 1969 21

Miscellaneous

320 Evening Dress (Pot) 4 4½” 1950, 1960, 1969
misc. Dri-way billiard (screw bowl) 4 5¼” 1950, 1960
misc. Cavalier shape 4 6¼” 1950, 1960
misc. Calabash 7″ 1950
misc. Churchwarden 4 10¼” 1950, 1960
misc. “The Bamboo Bent”, bent saddle bit 7½” 1960
misc. “The Bijou”, small bowl, long tapered bit 5″ 1960
misc. Leather covered 4 1950, 1969

Letter Shapes

SS “Quaint Shape” Billiard hexagonal shank & tapered bit 1928
EC “Quaint Shape” Canadian, oval shank, short tapered bit 1928
FR “Quaint Shape” Octagonal panel billiard, round shank, extended tapered bit 1928
OE “Quaint Shape” Octagonal panel billiard, square shank, angled tapered bit 1928
EK “Quaint Shape” Hexagonal panel billiard, square shank, angled tapered bit “Stand-up” 1928
VT “Quaint Shape” tirangular panel billiard, tirangular shank and bit “Stand-up” 1928
SA “Quaint Shape” octogonal tall panel billiard, hexagonal shank, angled bit “Stand-up” 1928
GD “Quaint Shape” Circular tall billiard, ringed low at bowl base, round shank and bit 1928
PK “Quaint Shape” Four sided panel billiard, diamond shank and bit 1928
PL “Quaint Shape” Four sided panel billiard,triangular shank and bit 1928
EL “Quaint Shape” Four sided panel billiard, triangular shank and bit 1928
FJ “Quaint Shape” Cutty, canted round bowl, extended tapered bit 1928
KS “Quaint Shape” Apple, flattened bowl support peg “Stand-up” 1928
K “Quaint Shape” Round Apple, converging rim, round shank, tapered bit 1928
FE “Quaint Shape” Apple, large squat bowl, round shank, extended tapered bit 1928
FET “Quaint Shape” Apple, large squat bowl, round shank, extended tapered bit 1928
E “Quaint Shape” Army mount (silver) large squat bowl, round shank, extended tapered bit 1928
ET “Quaint Shape” Army mount (silver) large squat bowl, round shank, extended tapered bit 1928
EK Paneled billiard 1950, 1969

343 Inverted low-slung bowl, narrow rim, round shank and tapered bit 1928

ODA Shapes (From: John C. Loring, http://loringpage.com/pipearticles/ODchart.htm)

801 Belge, Cocked bowl (5) large for shape – early dating, rare
802 Bent Antique, spur (4) ‘70s/’80s with non ODA #s – early dating, rare
803 Odd Bent (4) – early dating, rare
804 Odd Bent (4) – early dating, rare
805 Skater (4) CH shape – early dating, rare
806 Apple, Tapered Bit
818 Oom Paul (5) – early dating, rare
821 Danish Bent (4) ‘70s/’80s with non ODA #s – early dating, rare
824 Brandy Glass – early dating, rare
827 Rhodesian, Small – early dating, rare
830 Liverpool – early dating extremely rare
831 Bent, Cocked bowl (4) ‘70s/’80s with non ODA #s – early dating, rare
832 Lovat – early dating quite rare
833 Danish Style Bent – early dating, rare
834 Prince – early dating quite rare
835 Billiard, Tapered Bit
836 Square Panel
837 Bulldog
838 Straight Rhodesian – early dating, rare
839 Qtr Bent Rhodesian – early dating, rare
840 Bent Billiard – (= 846?) early dating, rare
841 Lovat – early dating, rare
842 Apple, Saddle Bit –early dating, rare- (later stamped 6806)
843 Billiard, Saddle Bit -early dating, rare – (later stamped 6835)
844 Poker – early dating , rare
845 Canadian, Large Bowl
846 Bent Apple, Saddle – (= 840?) early dating rare
847 Rhodesian, Quarter Bent, Round Shank – early dating, rare
848 Dublin
849 Stacked Billiard – less thin & shorter than 856 – early dating, rare
850 Canadian, Small Bowl
851 Canadian, Small Bowl, Extra Long – early dating, rare
853 Pot – early dating rare
854 Rhodesian, Full Bent – early dating, rare
855 Canadian, Large Bowl, Extra Long – early dating, rare
856 Stack Billiard – is thinner & taller then the 856 – early dating, rare
857 Bent Brandy – early dating quite rare
861 Angled Squat Panel Bowl, Tapered Square Shank – early dating, rare
862 Dublin Panel – early dating, rare
863 Squat Panel, Front Bottom Curve (4) – early dating extremely rare
865 Angled Convex Rectangular Panel (5) – ‘70s/’80s in Shell finish, rare
866 Square Bowl (4) – early dating, rare

Two Alternative Pipe Woods – Robert M. Leverette


Blog by Robert Mike Leverette

A dear friend of mine penned this article on alternative pipe woods before he died. I know it has been posed elsewhere but I wanted to pass on what he has written as I have found it informative and helpful as I navigate alternative woods. In honour of Mike’s memory I post this article that he wrote 21 Dec. 2006.

Throughout tobacco history, there has been a bewildering number of materials used for making pipes.  Among these materials are; stone, clay, porcelain, glass, various metals and of course woods, such as briar; the burl of the Erica Arborea or White Heath.  Woods of different species have been used for centuries from reeds used by the American Indian, as well as, young boys for their first smoking experiences, (such as my first reed pipe I made and smoked when only 13 years old in 1952) to many different hard woods.  Some of the well known woods used as alternatives to briar are wild olive and black thorn by Johann Slabert, bog oak by Peterson and Morta by Trever Talbert, Rosewood by the Exotic Pipe Company and now peach root pipes by modern Russian makers.

Several alternative woods are discussed in “Pipes In Other Woods” by T. C. Fuller (Fuller 2005) with pipes of some of these woods found on his web site www.tcfullerpipes.com.  Mr. Fuller lists the following woods along with some of his observations:  Cherry; Apple; Olive; Hawthorn root; Maple burl; Black Palm; Myrtle; Walnut; Curly Ash; Ebony; and Pawlonia.  Mr. Fuller states that his olive wood pipes sweated tobacco juices by quoting a friend of his;
“He has smoked the pipe extensively and had this to say about it: “This particular olive has very thin walls.  During the pipe’s breaking in, I noticed that residue was seeping through its walls, (…).”

I have not had an olive wood pipe to sweat, maybe because I like my tobaccos on the dry side.  Mr. Fuller and I have had the same experience with Black Walnut; it gives a pleasing nutty flavor to your smoke.
Another excellent article on alternative woods is Ben Rapaport’s “Un-Briars” (Rapaport 2001) in which he lists 29 woods, from Acacia to Walnut, used primarily by early European pipe makers and peoples who, by my thoughts, are probably still using these woods for personal pipes.

Then too, there is the article by Chuck Stanion “From Beechwood to Briar” (Stanion 2001) in which, by giving the history of Stanwell pipes, he writes of Poul Nielsen making pipes of Beechwood in 1942 due to the war shortage of briar.  These Beechwood pipes were under the name of Kyringe pipes.

Why haven’t these woods, or at least a few of these woods, gained as much popularity as has briar?  The general consensus is that they are not as durable as briar.  Well, what is it about briar that gives its durability?  Again the general consensus is briar owes its durability to its hardness but we all know there are woods mentioned above that are harder than briar by the Janka and other scales.

There are two woods that I think can compete with the durability of briar, or at least, very close, and they are Manzanita and Mountain Laurel.  A briar pipe may last several life times while pipes of these two woods may last half a life time shorter, but only if  they are taken care of as lovingly as briar pipes.  Both of these woods were used in the United States during World War II when briar was impossible to obtain.  Pipes of these two woods that I have come across are excellent smokers and are in excellent condition considering that over sixty years have elapsed since they were made. I expect they will last for many more years.  These two alternative woods are more thoroughly reviewed below.

Manzanita or Mission Briar

Though Manzanita was used for pipes during World War II and for a couple of years after that conflict; Wikipedia does not list smoking pipes as one of its usages.  Wikipedia gives the following description for the wood (http://en.wikipedia.org/wiki/Manzanita):
“The Manzanitas are a subgenus of the genus Arctostaphylos. They are evergreen present in the chaparral biome of western North America, where they occur from southern British Columbia in Canada, Washington to California and New Mexico in the United States, and throughout much of northern and central Mexico. They are characterized by smooth, orange or red bark and stiff, twisting branches. There are about 60 species of manzanita, ranging from ground-hugging coastal and mountain species to small trees up to 6m tall. Manzanitas bloom in the winter to early spring and carry berries in spring and summer. The berries and flowers of most species are edible, though not particularly tasty.”

Bill Feuerbach in his excellent article on the history of “S. M. Frank & Co., Inc.” (Feuerbach 1977) had this to say about Manzanita:
“During World War II, getting briar imported into this country was not easy. Italian and French briar couldn’t be had until very late in the war. Kaywoodie was able to import 1400 5-gross bags of briar (about 1,000,000 blocks) out of North Africa in 1943 after the German army was defeated there. Early in 1941, Kaywoodie embarked on a project of domestically grown briar wood, called Mission Briar. This wood is botanically the same as Mediterranean briar. The Pacific Briarwood Company, a KBB subsidiary, began harvesting the burl type wood growing on the slopes of the Santa Cruz Mountains of California. However, the smoking characteristics were not quite as good and the project was abandoned after the war.”

We do know that there were at least three brands of pipes using Mission Briar, a marketing ploy for manzanita to capitalize on the name briar.  They were; Kaywoodie, Monterey and Reiss Premium pipes.  Though Mr. Feuerbach does not actually say that Kaywoodie pipes were made from Mission Briar during those years, it is implied in his history.  Monterey Pipes were also owned and made by Kaywoodie.  Within my collection, I have two Monterey Specimen Grain Mission Briar pipes; a bulldog and a billiard; both great smokers though I am not a fan of metal condensers; thus leaving me at a loss to understand his comment, “However, the smoking characteristics were not quite as good (…).”  Maybe it is just my old abused pallette coming into play!

Mountain Laurel

Mountain Laurel was also used for pipes during the war and for a couple of years after that conflict; and again, Wikipedia does not list smoking pipes as one of its usages.  Wikipedia gives the following description for the wood (http://en.wikipedia.org/wiki/Mountain_Laurel):

“Kalmia latifolia (Mountain-laurel) is a flowering plant in the family Ericaceae, native to the eastern United States, from southern Maine south to northern Florida, and west to Indiana and Louisiana. It is an evergreen shrub growing to 3-9 m tall. The leaves are 3-12 cm long and 1-4 cm wide. Its flowers are star-shaped, ranging from red to pink to white, and occurring in clusters. It blooms between May and June. All parts of the plant are poisonous.  The plant is naturally found on rocky slopes and mountainous forest areas. The plant often grows in large thickets, covering large areas of forest floor.  It is also known as Ivybush, Calico Bush, Spoonwood (because native Americans used to make their spoons out of it), Sheep Laurel, Lambkill and Clamoun.”

Though Wikipedia states that “All parts of the plant are poisonous,” other botanical sources state that only the leaves are poisonous, and here poisonous would be in reference to cattle and sheep eating the leaves with fatalities depending on the quantity consumed.  The milk from cows will also be toxic, though not necessarily fatal, to humans drinking said beverage.

There were at least three pipe brands made from the Mountain Laurel; Trapwell, Breezewood and Custombilt.  Trapwell pipes were made by D & P Pipe Works beginning on or before 1943.  D & P Pipe Works, owned by D. P. Levitas (Ross 2005), began making pipes in 1938 (Wilczak and Colwell 1997) probably in New York City but relocated to Sparta, Alleghany County, North Carolina in 1943 (Sparta/Alleghany CoC 2006), in order to be closer to the huge population of Mountain Laurel in the area.  Later, this company changed their name to Sparta Pipe Works and still later to Sparta Industries.  I have one Trapwell World’s Best Briar  pipe in my collection, a small billiard, and here again, it is a great little smoker.  World’s Best Briar was their marketing ploy for Mountain Laurel.  Trapwell’s ‘trap’ is a highly complicated condensing system when compared to most regular metal condensers.  After the war, Trapwell pipes were made from regular briar wood, or “imported briar” until their demise.

According to a 1942 Life magazine advertisement, Breezewood pipes were made by The Breezewood Pipe Company, located at 630 Fifth Avenue, New York City, though Wilczak and Colwell state the Breezewood pipes were made by Kaufmann Brothers & Bondy (KB&B) beginning in 1941 (Wilczak and Colwell 1997).  The Breezewood Pipe Company may have been a subsidiary of KB&B.  To quote the 1942 Life magazine advertisement;  “There, deep in the Great Smoky Mountains, they found it – found an uncharted virgin forest of burls, great old burls that had been growing there uncounted years.  And from these old burls, pipes of astonishing lightness of weight are made – their name: Breezewood.”

At the present time, this is all I have been able to find on the history of Breezewood pipes.  Here again, the one Breezewood pipe, a small billiard, I have in my collection is a great little smoker.  I am not overly fond of metal condensers and this Breezewood pipe has a simple tube condenser similar to Dunhill’s “innertube.“

It would be pure speculation on my part, for I have found no history of such, but Dr. Grabows could also have been made from the Mountain Laurel burls during the early World War II years.  I can find no exact date but Mary Linkman and Company (MLC) moved their Dr. Grabow operations to Charlotte North Carolina probably sometime in the 1940s.  Later in 1955, MLC sold Dr. Grabow pipes to Sparta Pipe Works which may indicate a past relationship of Dr. Grabow pipes with Mountain Laurel.  {emphasis mine — RJM}

In the Autumn 97 – Winter 1998 issue of “The Pipe Smoker’s Ephemeris is a 1979 letter from Claude L. Stuart, owner of Tracy Mincer pipes, to Mr. Fred C. Janusek in which he writes the following;
“The “convertible” pipe was made during World War II when briar was not available and was made largely from scrap briar. The word “imported briar” was deleted from some of the Custombilt pipes from this period because some of the pipes were made from rhodium found in the southern part of the United States. This was used until briar again became available from the Mediterranean Sea area.”

Though Mountain Laurel is not a rhododendron, some people in the south refer to it by rhododendron and the above ‘rhodium’ is probably a misspelling of the word.

Comparisons – My Personal Observations

In comparing pipes of the two woods (Manzanita and Mountain Laurel), the manzanita pipes appear to be heavier in weight and darker in coloring than the mountain laurel pipes though both manzanita conditions could be from heavier smoking resulting in more tobacco juices absorbed in the wood.  Coloring of course could also depend on the stain used.  I readily admit that all of my pipes of these two woods were purchased on the estate pipe market, so I have no idea as to how much each pipe was smoked before they came into my possession.  They both smoke equally great with my briars in that department.  As to durability; pipes of these woods may not be as durable as briar but I am sure they will last a couple of life times if taken care of properly.

In comparing the grain of the two woods to that of briar, they have as pretty and as interesting grain as briar though the birds-eye is not as tight. Both the Mission Briar and the Mountain Laurel pipes smoke Latakia blends (my favorites), Virginia and Virginia-perique tobaccos as well as my briars and olive woods, but again, this could be due my pallette.  In summary, it is puzzling to me why Manzanita and Mountain Laurel loss so much favor in the pipe making world.  Makers bowing to the demand for briar can be the only answer though I am sure pipes of these woods would still sell to the dyed-in-the-wool pipe smokers and collectors of today.

References Cited:
Feuerbach III, Bill – 1977; http://www.smfrankcoinc.com/history/index.htm
Fuller, T. C.- 2005, April issue; “The Pipe Collector” See also, www.tcfullerpipes.com
Rapaport, Ben – 2001, Spring issue; “Pipes and Tobaccos”
Ross, Stephen A. – 2005, Spring issue; “The Doctor is In,” Pipes and Tobaccos
Sparta NC Chamber of Commerce – 2006; http://sparta-nc.com/chamber/history.htm
Stanion, Chuck – 2001, Summer issue; “Pipes and Tobaccos”
Wilczak, Herb and Tom Colwell – 1997; “Who Made That Pipe?”

Appreciation
I would like to express my appreciation to the following for their help:
Benjamin Rapaport; The Nicotian Network & Nexus (Antiquarian Tobbaciana Publication)
Jim Wagner with the Wyoming County NY Sheriff’s Department
James J. Shive of Legacy Consulting Services; Contract Archaeologist

Banding a cracked shank – Pressure fitting a metal band on a pipe shank


Blog by Steve Laug

There are many options in terms of the bands that can be used to repair a cracked shank or to give a cosmetic facelift to a pipe shank. Pipe Makers Emporium carries nickel, silver and gold bands in both short and long lengths. They also carry end caps should you want to use an end cap on a pipe or do a repair on a Peterson pipe. I have included pictures of the options that you can choose with regard to bands. I personally purchased the nickel banding assortment that is in the first photograph. It gives you a wide range of diameter bands that can be used. From this I then replenished the areas that I needed more and also added some silver, gold and end caps to the lot. This set up has worked for me for many years and I just add as necessary.
Bands1

Bands2

Bands3

Bands4

Pipe Makers Emporium also sells a banding tool that they advertise as making banding more simple. I have not used the tool as I find that my method works well for me. I will detail my procedure below and include photos of the process.
Bands5

My process for banding a pipe will be seen in the following photos and the accompanying description of the work.

The pipe that I needed to band had a crack in the shank at the top. You can see the length of the crack. I always clean it out with a dental pick and drip some superglue into the crack and squeeze it together with a clamp that has rubber on the teeth. Once the glue is dry – which is actually very quick – I choose a proper band (in the case of the pipe that I picture below it is a 13.5mm nickel band). The ideal choice is a band that is approximately the same size as the diameter of the shank. You do not want it too large as it will slide when the pipe is disassembled or heated. You also want one that will bind together the crack in the shank. The 13.5mm was perfect and matched the size of the shank.
Bands6

Bands7

Bands8

I place the band on the end of the shank – in this case it only fit minimally along ¾ of the band. One edge was too tight to fit. I heat the band with a heat gun, being careful not to burn wood – this generally only takes a few moments.
Bands9

Bands10

I then pressed the shank into the band on a piece of soft carpet that is on a solid table top. Do not force the fit as a heated band will tear. Reheat it until it is pliable enough to fit the shank well. When you are satisfied as to the fit and placement of the band, cool the band slowly before proceeding to work on the edges. I use room temperature water and dip the end of the shank with the band into the water. If you use the tool here you can press the end into the bowl at the end of the tool to round the edges and make for a nice fit. I use a piece of tightly woven wool carpet and twist the end of the banded shank into the carpet. In my opinion this does the same thing as the shank tool.
Bands13

When the band is in place the pipe is ready for the stem to be refitted. Often the tenon will need to be reduced in diameter to fit the tightened shank. In the case of this pipe I needed to fit a stem as the bowl did not come to me with its stem. I used sandpaper to turn the tenon down to size on an older stem that I had in my jar of stems. The next series of photos show the band in place on the shank. It is pressure fit and it is tight and immovable. The third photo shows the top view of the shank and you will notice that the crack that was very visible before is now no longer visible. The fourth and fifth photos show an end view of the fit of the band. It is flush with the end of the shank so that the new stem will fit snugly in place.
Bands14

Bands15

Bands16

Bands17

The next series of four photos show the new stem that is fitted to the pipe. There is still some oxidation that needs to be removed from it but you can see the fit and finish of the stem and the banded shank.
Bands18

Bands19

Bands20

Bands21

Restemmed a Couple of Interesting Smaller Uniques


I am posting pictures of two pipes that I finished up that needed new stems. I am putting them into one post as I did the two of them at the same time. The first is unique in terms of cut and shape of the bowl. The second is unique in terms of its size.

The first is a no name spiral cut piece of briar that is unique in terms of the cut and shape. It is almost like a cylinder on a motor in terms of defusing the heat from the bowl. I have smoked it and it does not heat up at all no matter how I puff on it. I used a pre-moulded stem that I turned the tenon on and cut to fit with a Dremel. I chose the saddle stem because of the look of the profile. I sanded it with 280 grit sandpaper until smooth and then followed up with my usual combination of 400 and 600 grit wet dry sandpaper and micromesh pads from 1200-12000 grit.
IMG_5723

This is the second pipe that I restemmed in this series of pipes. It also is a no name brand. There is no stamping on the bowl. It is 4 inches in length but has a full sized bowl. It is a great little pocket pipe. It has a beautiful sandblast that is rustic and deep. I also used a pre-moulded stem that I turned the tenon on and cut to fit with a Dremel. I chose the saddle stem because of the look of the profile. I sanded it with 280 grit sandpaper until smooth and then followed up with my usual combination of 400 and 600 grit wet dry sandpaper and micromesh pads from 1200-12000 grit. Once it fit well I heated it with my heat gun and bent it with a slight downward angle.

Both pipes were buffed with White Diamond (most attention to the stem) and then given multiple coats of carnauba to the stems. I used Halcyon II wax on the sandblast bowl and carnauba on the finned bowl to give them a sheen.

ImageImageImage

New Life for a BBB Ultima Thule Pocket Billiard


Blog by Steve Laug

I picked up this little BBB in the same lot as the little BBB bulldog that I posted about recently. It is a similar pocket size (4 and ½ inches) and needed a bit of work. It is stamped BBB in the standard diamond and over that Ultima Thule. (According to Wikipedia the name refers to any distant place beyond the known world.) Under the diamond it is stamped Own Make. The first two pictures are the EBay seller’s photos. When the pipe arrived I can honestly say that the seller did a great job on taking honest photos. The pipe was solid but in rough shape. The rim was slanted toward the front and round all the way around with many nicks and dents in it from tamping the pipe out. It was still round on the inner edge which is pretty amazing on these old timers. This was a pretty well cared for pipe other than the tamping. The finish was dirty and spotty – lighter in some places than others – with a mottled look to it. The stem was oxidized and the edge/ shoulder at the shank junction was rounded and no longer a good smooth fit. There were no bite marks on the stem and the surface was smooth under the oxidation. This would not be a bad clean up.
ult1

I separated the stem and bowl and reamed the bowl. I wiped the exterior with acetone to remove the remaining finish and the grime. Then I placed the bowl in the alcohol bath to soak while I worked on the stem.

The stem actually was relatively easy to clean up. I wiped it down with a damp magic eraser and removed the majority of oxidation. Then I sanded it with 400 and 600 grit wet dry sandpaper followed by 1200-6000 grit micromesh sanding pads. I gave it a coating of Obsidian Oil and set it aside to dry. Once the bowl was finished I would buff them together. I did not want to chance rounding the edges even more. I also did not want to lose any more of the button on the pipe stem by over buffing.

I removed the bowl from the alcohol bath after 1 hour of soaking. I dried it off and cleaned out the shank with pipe cleaners, shank brush and cotton swabs soaked in isopropyl alcohol. I worked those until they came out clean. I used sandpaper on the interior of the bowl to smooth out the remaining cake and clean the surface. I wiped it down with cotton swabs and isopropyl afterwards. I used the sanding board and paper to top the bowl and bring it back to a flat and even condition. I did not have to remove very much of the top but I wanted it to be straight and not slanted toward the front. I used my normal variety of sandpapers (280, 400 and 600) to do this and finished it with micromesh sanding pads 1200-6000 to remove the remaining scratches. I wiped down the bowl with a cotton pad dampened with acetone to remove any sanding dust and remnants of the topping process. I restained this bowl with an oxblood stain thinned with isopropyl to arrive at the original colour. I flamed the stain and when dry took it to the buffer and gave it a buff with White Diamond.

I reinserted the stem and the gap and roundness of the shoulders on the stem made a smooth fit impossible to attain. I decided to use an old BBB band that I had in my box and heated it and pressure fit it to the shank. I liked the finished look of the pipe. I gave the entirety several coats of carnauba wax and a polishing buff with a clean flannel buffing pad. The pictures below show the finished product.
ult2

ult3

Refurbished – A Stunning New Look for a Butz Choquin Billiard


I picked up this old Butz Choquin in a lot I was given by a friend and it was in very rough shape. I somehow neglected to take any pictures of what the pipe looked like when it arrived. But it came stem less and the rim was ruined. It had been hammered on concrete or something like that as it was stippled and rough. The inner rim was ruined as it seemed to have been reamed with a pocket knife and it was cut and grooved at all different angles. To have topped it I would have had to lose almost a half an inch on the pipe. In my opinion that would have ruined the billiard profile and created a pot shape. I decided to try something different on this one. The finish was shot as well and the stain was gone. It was a dull brown with much dirt and grime ground into the surface of the briar.

I reamed the pipe with a PipNet reamer (like a Castleford T handle reamer) to even the sides of the bowl and smooth out the inner surface. I wiped the bowl down with acetone to clean off the grime and grit. Once it was clean I hunted down a stem blank that would work on a pipe with this sized shank. I cut the tenon with my Pimo tenon turner and shaped the stem to a clean fit with my Dremel. Then I took the bowl and dropped it in the alcohol bath while I worked on the stem. I sanded the stem to remove the scratches left by the Dremel. I also shaped the button a bit to change the shape and open up the slot to an oval.

I took the bowl out of the bath and dried it off. I gave it another wipe down with the acetone to give me a clean surface to work on. I then went to work on the rim. I wanted to chamfer the rim inward toward the bowl to remove the damaged material and give it a different look. I topped the bowl first to get a smooth and even surface. From there I sanded the inner edge of the rim with a folded piece of sandpaper (280 grit). I use a one inch square piece of sandpaper folded into quarters. Then I set the angle I want to have on the chamfer by the way I hold the paper. I sanded it until I got it at the angle I wanted and removed the damaged material. Once I had the angle right I then changed the grade of sandpaper sanding it with 400 and 600 grit wet dry and then with the micromesh sanding pads from 1500 to 6000 grit.

At that point I put the stem back on the pipe and sanded it until the transition between the shank and the stem was smooth. I wanted it to be a fit that appeared to be seamless. Once I had that done and had sanded the stem smooth with the various grades of micromesh sanding pads I took it to the buffer to give the stem a shine. I brought it back to my work table and sanded the bowl and shank until they were also smooth. I did not sand around the nomenclature as I wanted that to be intact.

I decided that I would give the bowl a contrasting stain finish. I heated the briar with a blow dryer to warm it up and open the grain on the bowl. Once it was warm I stained it with a black aniline stain. I flamed the stain and let it dry. I took it to the buffer and buffed it with Red Tripoli to remove the black stain from the surface of the briar. This takes off the extra black and leaves it in the softer grain of the briar. I sanded it again with 600 and 800 grit wet dry sandpaper and then buffed it again with White Diamond. I wanted contrast between the black that was deeply set in the grain and the harder smooth surfaces. Once that was done I wiped the bowl down with acetone to tone down the blacks and to clean off the surfaces that did not have the stain set in them. I restained the pipe with a Medium Brown aniline stain and flamed it as well. Once it was dry I buffed it with White Diamond to polish it. The whole pipe was then given multiple coats of carnauba wax and a finish buff with a soft, clean, flannel buffing pad.

While I liked the look of the pipe at this point I decided that it needed a bit of bling to finish it off. I have a box of bands here and found one the correct size – a nickel band that would add just the touch I was looking for. I heated the band with my heat gun and pressure fit it on the shank of the pipe. The finished product is in the photos below. This pipe found a new home with a friend on one of the online forums. I am sure he has enjoyed it as it was a great smoking machine.

The verdict is yours is the new look stunning or not?
bc1

bc2

bc3

bc4

bc5

New Life for a BBB Short Dog


I picked up this little BBB Bulldog on EBay and knew it would take some work. In the photo below you can see the cut in the stem – a groove or channel that served as a dental grip for the pipe. It is just in front of the button. There was some minor oxidation on the stem as well. The button had an orific opening (round hole in the button) rather than a slot. The rim and sides of the bowl were dirty and there was some darkening around the edges. The bowl was caked with a thick cake that would need to be reamed. The photo below is the one that was on EBay.
BBB1

When the pipe arrived it was smaller than I had imagined. No problem there as I like these pocket sized pipes. The stamping on the shank only had the BBB logo in the diamond. No name or other identifying marks were on either side of the shank. The stem did not have the BBB stamp or roundel. The finish was not too bad. The majority of work would need to be done on the rim and the top edges of the bulldog bowl. The stem was going to take some work to get rid of the trough that had been cut in it by a previous owner as a kind of dental bit. The bowl was not as caked as it had appeared in the original picture but had been over reamed and was out of round. The walls at the top appeared to be thinner than normal on a pipe of this shape.
bbb2

bbb3

You can see the size of the pipe from the photos above with the ruler. It is four inches long and delicate in the hands. I went to work on the stem first with my needle files and sandpaper to remove the trough on the top of the stem and the underside of the stem. This took some work as it could have radically changed the slope of the stem. I worked to keep the angle looking right from the saddle to the button. It took quite a bit of time to remove the excess vulcanite and reshape the blade of the stem. I sanded the stem smooth and then progressed through the micromesh grits 1500 through 12000. I put it back on the pipe and took it to the buffer and buffed it with White Diamond until it shone. Then I removed the stem and set it aside while I worked on the bowl.

The bowl needed most of the work on the area of the rim and the edges following down the bowl. There was lava and also darkening. I worked on the rim and the darkening with acetone on a soft cloth. It removed the majority of the darkening and grime. I decided to top the bowl minimally to smooth out the surface. I chamferred the inner rim with a folded piece of sandpaper to minimize the chatter from the over reaming. The pipe was given a coat of medium brown aniline stain, flamed and then buffed gently with White Diamond. The entirety was given multiple coats of carnauba wax and buffed with a soft clean flannel buff. The final picture below has a Canadian penny included to give an idea of size. This will be helpful to those who are familiar with US and Canadian money. To others who are not you can refer to the photos above with a ruler. This is a nice little pipe that smokes very well. It also fits nicely into a coat pocket or shirt pocket!
bbb4

bbb5

bbb6

bbb7

Do something crazy, I dare ya! – Piet Binsbergen, 27 October 2012


Well I am a painter by trade. www.art.co.za/peterbinsbergen

I have not painted in some time as I have taken time out to work on a PhD in the field of art. I must admit, the timing is good as I kind of painted myself into a corner over the last 10 years. My passion is pipes. For some years I have been learning the trade of repair which was born from the need to be self-sufficient. I came to learn that imitating textures on canvas has become limiting. I surround myself with exotic woods and various metals which have tickled my senses and opened doors. I have no idea where I will be going in future but my research may reveal the way ahead.  For now I am having fun, and here is my way of expression.

It started in the form of Hot Rods. Pipes I could express myself with and push the boundaries. I have still felt that I am holding back. I spend much time with the South African pipe maker Jean du Toit, aka Jan Pietenpauw (www.pietenpauw.co.za). We get into interesting debates about pipes and pipe lore and I have learnt much from him over the past few years. Sometimes we collaborate, sometimes argue about shape and form but in essence the man is a sculptor. For this reason I will not carve pipes from scratch. I simply cannot compete with master carvers of our time. Besides, my interests lie elsewhere.

While working on my Hot Rod pipes I came to realise that I may be dabbling in art of some sort. The conceptualization process is the same, the medium differs. I decided that the pipes need to tell a story, places I have been, found objects I may have collected while being out and about. This idea came to me while making up the S.A.Y. 15 Plumbing pipe after a visit to my father-in-law out of town. I have nothing to lose; the pipes belong to me and not my clients.

I admire Ollie Sylvester for doing what he does. Steven Downie is the Guru. These are people who are really pushing the boundaries. In no way do I compare myself to these people; I just set about doing what I do.

Here is my “Davey Jones” pipe inspired by watching “Pirates of the Caribbean”, I noticed that “Mr. tentacles” himself smokes a real basic pipe. Here is my version.

This is a collaboration piece between Jan Pietenpauw and myself. He is in the process of carving the BIPS form 2013 poy’s. This stummel was misjudged on his part while in the jig on the lathe. The shank cracked in the process and it landed up in his trash box. Now I love his trash box. I have lifted many “Not good enough” stummels from that box in the past. Nothing wrong with them at all, they just do not fit the master’s creative bill, but they sure fit mine at times.

The shank ring is aluminum. It was polished at first but it looked to new so that too ended up under the Dremel. The idea was to create something that looked like it came from Davey Jones’ locker, polished and cleaned. It is the first time I have taken a Dremel to a stem. This is a pre-moulded stem with an olive shank ring added. I went crazy trying to create the same texture as on the pipe so it would eaten or drift wood rotten. The contrast between the textured area and the high polished stem was a little close so I got the needed contrast by adding an oil paint white wash to the textured are before polishing the stem. Finally, to add to the craziness I heated the stem and formed the bend.

Here is the craziest pipe I have ever done!

Enjoy.
crazy1

crazy2

crazy3

crazy4

crazy5

Polishing Stems (PART 1) Piet Binsbergen


I have had some questions about polishing stems.

I must warn that I will not be held responsible for any damage you may cause to pipes following this method. The process is relatively fail safe but certain circumstances that may be beyond my control, I simply cannot be held accountable for. I do suggest that you do a couple of trial runs using old or broken stems before you attempt this process with your beloved birth year Dunhill.

I will share with you my process. Please bear in mind that there are many ways to skin this cat, this is my way of doing things but this does not mean that I reject any other processes that other pipe repairman use.

I use two approaches. Firstly it is important when doing up a pipe to try and save the stems at all costs. So process 1 involves cleaning and polishing stems that have tarnished.

Secondly, especially when it comes to hotrods, I use pre-moulded stems. I am able to hand cut stems from rod stock but I find the process way to involved and time consuming for what I am doing. Call me a cheat but I find this works really well for me. My preferred medium is vulcanite and ebonite but I do not turn down Lucite stems if they come my way. Lucite is problematic in the sense that it has little give and little room for error. On the up side of it Lucite does not tarnish.

Part 1

Saving Original stems

As most of you know vulcanite is compressed rubber, the same stuff your car tyres are made of to a point. This rubber is just compressed way more. I have found different qualities of the stuff over the years and have notice some being more superior to others.

I do not have much to add here due to the fact that Steve Laug is doing some ground breaking work with regards to original stem repair. He manages to remove teeth marks and patch holes in bits. I have studied his technique but will need to pick his brain a little more before I perfect this process. For me, as soon as a stem has a hole in the bit, I replace it with a pre-moulded stem. (This process of his is archived on this blog.) I love tapered stems. There seems to be more ‘meat’ to work with and more ‘meat’ means there is room to open up the draft holes, file out teeth marks and restore the stem as good as new. Saddle stems prove to be a bit of a challenge due to the fact that there is not much room to move.

Most stems look like this, and believe me these are good ones!
Stems1

What I usually do is drop them into a bleach bath. Household bleach does the trick for me. Here in RSA I use a product called ‘Domestos ‘.
Stems2

WARNING: Be sure to coat the tenon and nomenclature (If any, like say the GBD rondelle) with Vaseline (Petroleum Jelly).
Stems3

This protects the stem material from coming into contact with the bleach. If you do not do this you will end up needing to resize the tenon as the bleach may eat away at it. As soon as the needed parts are coated, I drop the stem into the bleach. It will bubble a little and you will immediately notice the liquid turning brown. Depending on the extent of tarnish and the quality of the vulcanite will depend how long I leave the stem in the bleach.  A good average for me is 20 min.

Below is a picture of the stem in the bleach for a minute or so. It looks scary I know, but it works.
Stems4

Remove the stem from the bleach and rinse in warm water. Wipe off the Vaseline from the tenon. This process has an added bonus as it tends to eat the muck out of the draft hole in the process.

PROBLEM: But fear not. If you draw on the stem you will taste 2 things. Firstly, you are going to get a strong taste of bleach, secondly, you may taste the left overs from the ghosting of the previous owners blend. If it were aro’s you will really taste it. This is easy to get rid of.

The next step involves scrubbing out the daft hole. I use bristle brushes and bristle pipe cleaners. If I choose to open the stem to my preferred 4mm, I do it at this stage.

Interesting Observation: I have had clients complain that a pipe ghosts flavours of tobacco even when the bowl has been well refinished. Did you know that vulcanite is porous and will hold the ghost in the same way the bowl does. If you do not believe me remove a stem from an old pipe and draw on it, you will taste the ghost! The bleach bath cures this problem to a point. Further manual scrubbing aids the removal of the ghost.

The picture below shows how much dirt and grime is loosened and scrubbed out of the draft hole during this process.
Stems5

In order to remove all ghosting of tobacco, bleach and in order to sanitize the stem, I soak the stem in alcohol for an hour. I use Isopropyl alcohol (96%). Now this stuff is poisonous in a big way if ingested but research has proven that as soon as it has evaporated it is harmless. This is the same stuff used by hospitals to clean and sanitize operating theatres and equipment so go figure. After an hour remove the stem from the alcohol bath and rinse with clean water.

Here is a picture of the colour of the alcohol once the stem has come out a soaking for an hour.
Stems6

Notice the stem may turn white, light green or matte black depending on the type of vulcanite used by the manufacturer. I have noticed that most Peterson stems for example turn white. If you draw on the stem at this stage will taste nothing. I will be as good as new.

Sanding and polishing: You may notice the following, the stem may be smooth with colouration or it may look matt black and be rough textured. Start sanding. I use 400 and work my way up to 800 grit sand paper. This is a time consuming process, do not take any short cuts here. The last thing you want is a stem with a high polish that is full of surface scratches.

By the time I reach 800 grit I move to the buffer. I use Tripoli (Brown wax) which is equivalent to 800 grit sand paper and move onto White Diamond which is the same as 1200 grit. If you do not own a buffer, you can still get the same finish but the process will just take longer as you will hand sand up to 1200 grit and beyond.

The pictures below show the buffing process. Note that the picture of the stem on the right is not the finished product but shows what the stem looks like after buffing.
Stems7

By this stage the stem should shine and you should be able to see your reflection in the material. If not revert back to sanding, you have taken short cuts!

Depending on the type of material, as vulcanite differs in hardness, I continue hand sanding with 1500, 1800, and finally 2000 grit. Here you may notice the stem may start to dull a bit. The final polishing stages involves Brillo, or what we call Silvo here in RSA.  Silvo is a jewellery polish. Polishing is now done by hand using a soft duster cloth.
Stems8

Finally, and you may laugh, but, I use tooth paste as the final step. This is a trick I learnt from a flute maker who high polish silver. Think about it, it really is quite logical. Toothpaste is a fine, very fine, rubbing compound. This process is also done by hand using a soft duster cloth.
Stems9

A final word of advice: Vulcanite is light and air sensitive. The more light the faster the tarnishing process will start. To avoid further tarnishing I run the stem including the bowl over a slow spinning buffer using carnauba wax. This forms a protective layer on the vulcanite keeping the oxidation process at bay. When done smoking your pipe, wipe the bit clean with a soft cloth. Saliva (Ph levels) mixed with the smoke is what makes pipes so yukky around the bit area. My stems are always clean and oxidation free. Besides standard cleaning after smoking I run the stem over the buffer to seal them up again from time to time.

Here are a couple of pictures to wet your stem polishing appetite. These are a herd of refurbished GBD that belong to “Muddler”. Stems can look better than new if you take the time and put in the effort.
Stems10

A Peterson Kildare.

Before and after
Stems11

Stems12

Good Luck and enjoy!

Leah’s Gift – A Handmade Pipe from China


A good friend of mine was in China visiting her grandparents for a month. She emailed me from there with an update of her trip and ended with PS. The PS had my attention as soon as I read the first words – “I discovered a pipe shop! And found you a Chinese handmade pipe by a local company called “Brothers” started up by two brothers.” Anytime I get an email like this one I get a bit excited. A gift pipe from a good friend is always special. And I cannot wait to hear why she chose the pipe she did. To me that makes the choice very personal and even more unique. I know some folks struggle with other people picking out pipes for them but I have found that when I remember why they picked it out, what the pipe is like really does not make that much difference.  She picked the pipe out because for some reason she thought about me and wanted to do this for me. She knows I love the pipe and she wanted to acknowledge that! I find that an amazing thing.

I am the kind of person that likes to connect a pipe to a place, so once I read her email I did a Google search for the Two Brothers Tobacco Shop. I wanted to see the place she found the pipe. I like seeing first hand that kind of thing and I love collecting photos of the shops I have visited or friends have visited for me. It gives me a sense of place for the pipe once it arrives. I still had no idea what the pipe would look like or whether it would even be briar. All I knew was that it was a handmade Chinese pipe. Fairly quickly I found what I was looking for and saved the following picture. I emailed her the picture and asked if this was the shop. She laughed and said it was indeed the place where she purchased it. She was amazed that I had found the shop. At that point my wait began. I would not get to see the pipe she had picked out until she returned later in October.
china1

She also sent me a link to the painting below. She said the painting inspired her to go hunting for a Chinese pipe for me. I found that interesting so I went to the website she sent and read about the painting. It is called Ode to the Red Candle and was painted by Wen Lipeng, a Chinese painter who was the son of a freedom fighter, poet and scholar named Wen Yiduo. Yiduo is the author of the poem The Red Candle. In this poem, he expressed his genuine love for the country, and his hatred, and protested against the corrupted rule of KMT. He was killed by KMT because of anti-civil war in 1946. Wen Lipeng is the son of Wen Yiduo. He portrayed Wen Yiduo, a figure with the elegance of scholar and the spirit of a freedom fighter. The contrast between red and black, stillness and movements endows the picture with charisma beyond ordinary figure paintings. The burning candles, fierce fire, and other symbolic language highlights Wen’s spirit of serving the country and fight for the truth. I really like the painting and thought I would pass it on in this post.
china2

A month went by quite quickly and we exchanged a few updates on her trip and her work throughout the time she was away. We did not talk about the pipe at all. Then on the weekend I got an email from her. She was back in Vancouver and had caught up from her case of jetlag. She wanted to connect so she could give me the pipe. I have to say I was looking forward to seeing what she had found. It would be good to reconnect with her and catch up AND to see the pipe of course.

We met for dinner and caught up on her trip.  It was good to hear how the trip had gone and how her family in China were doing. As we settled in to wait for dinner she took my gift from her purse and handed it to me. It was in a beautiful deep blue box with pipes stamped on the outside. When I opened the box there was a suede pipe bag that had the pipe inside. I love it when pipes are wrapped this way – a bag within the box – as it is like opening two presents! I took the pipe out of the pipe bag and it was beautiful. It was made out of a Chinese wood that I later learned was called Chicken Wing wood and its shape is a hexagon. My friend loves bees and chose this pipe because the hexagon shape reminded her of bees. So combined with the impetus of the painting and the desire to gift me this pipe was the shape that her passion caused her to choose. The pipe is stamped on the left side of the shank with the same Chinese characters that appear on the sign in the photo of the shop. I believe they read Two Brothers. On the stem there are two hands facing each other with thumbs up in white. On the right side of the shank it is stamped 0009/1000 and Handmade in China. It is comfortable in the hand and the mouth.

When I returned home I contacted a friend who confirmed the kind of wood the pipe was made of and then I did a bit of hunting on the net to see what I could find out about it. The wood is evidently used in furniture and also smaller boxes and gift items. I even found an Iphone cover in Chicken Wing wood. I also found this lot with similar grain on EBay. They are not as nice as the one I received as the finish on mine is very smooth. http://www.ebay.com/sch/sis.html?_nkw=Beautiful%20Natural%20Chicken%20Wing%20Wood%20Smoking%20Tobacco%20Pipes%20filter%209mm%20J80636&_itemId=140797543935

I found this description of Chicken Wing Wood. It is an interesting Chinese hardwood.
China3I brought it to work with me and I will load up a bowl of a favourite tobacco and give it an inaugural smoke. Thanks Leah for the thoughtful gift. It is indeed well chosen and a pipe that I will enjoy and take pleasure in for a long time.
china4china5china6china7Here are some photos of the nomenclature close up

I just received these two photos from pipephil that he has composed for his site on pipe logos and stamping http://www.pipephil.eu/