Blog by Steve Laug
Last week I received a call from a fellow pipeman, Keith here in Vancouver who had been referred to me by City Cigar, a local pipe and cigar shop in the city. He was a soft spoken gentleman who had a request for me. In January this year his Dad died and he had three of his Dad’s pipes that he wanted restored in memory of his Dad. He also was a pipe smoker so he fully intended to enjoy them for a long time as he smoked them in his Dad’s honour. I told him to send me some photos of the pipes so I would know what I was dealing with.
I received the email below from Keith that included the photos of the pipes that he wanted me to work on. He even went to the trouble of marking the trouble with each of the pipes that needed work.
Hi Steve,
Glad your call back today, my name is Keith, I got your contact from City Cigar. My dad has three pipes include two Dr Plumb DINKY and one not sure brand. My dad passed this year January and I looking for fix those pipes which had broken and cracked, understand they are not expensive pipes but for me is priceless memory…
…Have a wonderful day!
Best regards
Keith
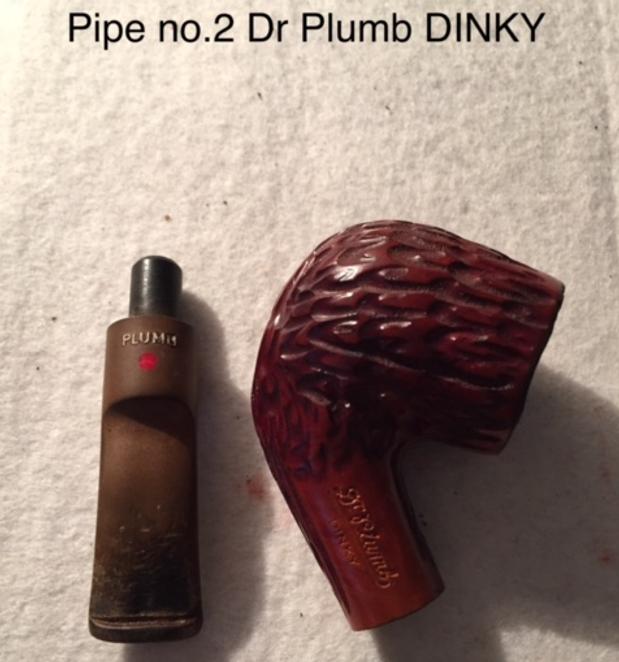
I called him as soon as I received the photos and talked over what I saw when I looked them over. We struck a deal and he dropped them off to me late on Friday afternoon and I started to work on them a bit over the weekend. All three pipes needed varying degrees of work on them. Two were Dr. Plumb Dinky Bent Billiards and one was a Real Briar Dublin. I decided to work on them in the order of the photos that he sent me. I completed the restoration of the first one and posted the blog (https://rebornpipes.com/2021/03/16/repairing-a-trio-of-his-dads-pipes-for-a-fellow-here-in-vancouver-part-one/). I finished the second Dr. Plumb Dinky Bent Billiard as well (https://rebornpipes.com/2021/03/17/repairing-a-trio-of-his-dads-pipes-for-a-fellow-here-in-vancouver-part-two/). Give them a read.
The third of them is Real Briar Straight Billiard. It was in rough shape with burn damage on the rim top and inner edge as well as many fills that were damaged around the bowl. There was a crack in the shank on the top side. The rim top was damaged on both the front side and there was a thick cake in the bowl. In the first two photos show what the pipe looks like as a whole. You can see the damage on the outer edge of the rim on both as well as the damage at the stem shank junction. The third photo Keith included show the damage to the rim top – he identifies it as ring damage. The crack in the top of the shank is also visible in the photo.
 I took pictures of the pipe when Keith dropped it off before I started my clean up work. The rim top was darkened and damaged with burn and charring on the front left rim top and inner edge. It appeared to also have been lit with a torch lighter. There were chips around the outer edge of the bowl and shrunken fills in the finish. You can also see the crack in the topside of the shank at the end of the shank.
 I took a close up photo of the rim to show the condition of the bowl and the rim. You can see the thick cake in the bowl and the damage to the rim top and inner edge of the bowl as noted above and shown in the photo below. The cracked shank is also visible. I also took photos of the stem to show the general condition as noted above.
 I took a photo of the stamping on the left side of the shank – it was clear and readable (though double stamped) and read REAL BRIAR.
 I removed the stem from the shank and took a photo of the pipe. There is something quite winsome about this pipe though it was a little bigger than the two Dr. Plumb Dinky Bent Billiards.
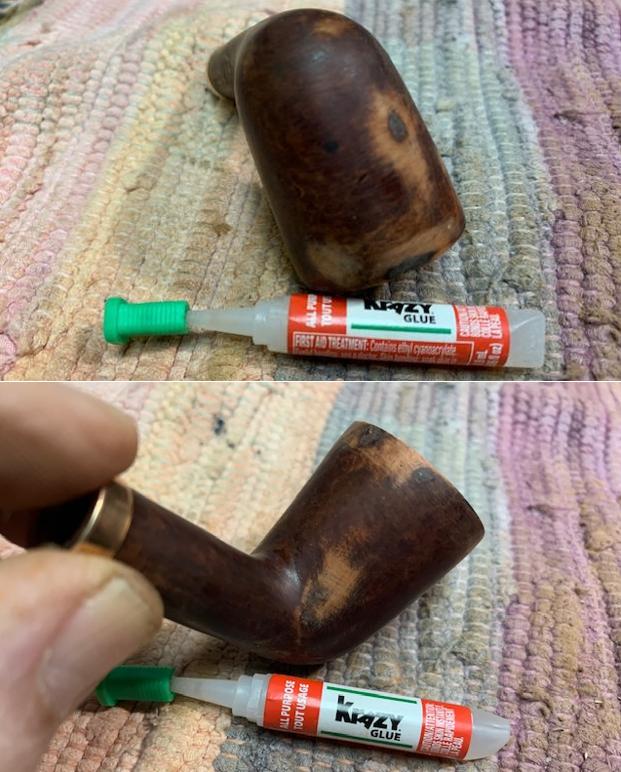
  I took a photo of the crack and damaged shank. It was missing a piece of briar and was a significant issue. The stem had been held in place with a build up of wax or white glue around the tenon. Fortunately it had dried before being put on the shank.
 I decided to address the cracked shank first. Interestingly it turned back on itself so it was not going further up the shank. The missing chip was the other side of the crack. That made this quite simple. I squeezed the shank together and pressed some briar dust into the crack. While holding it I dribbled some CA glue in the crack and held it until the glue cured. I filled in the spots on the shank again with CA and more briar dust until they were smooth. I put a small bead of glue around the shank end and pressed the band I had chosen for the shank onto it. It was a snug fit and the glue would guarantee the fit to the shank. That was the end of the crack.
 I topped the bowl on a topping board using 220 grit sandpaper. I wanted to remove the damage to the rim top and minimize the damage to the inner and outer edges.
 I paused and took photos of the banded shank to give an idea of that it looked like repaired and banded.
 I finished topping the bowl and gave the inner edge a bevel to minimize the damage on the front inner edge. The pipe was beginning to look very good.
 I reamed the bowl with a PipNet pipe reamer and cleaned up the reaming with a Savinelli Fitsall pipe knife. I took the cake back to bare briar and the bowl looked to be in good condition under the cake.
 I filled in the badly damaged fills around the bowl with clear CA glue and then sanded them smooth to blend them into the surface of the briar.
 I sanded the bowl with 1500-2400 micromesh sanding pads to remove the shiny varnish coat and then restained the bowl with a light brown stain. I applied the stain then flamed it to set in the briar. I repeated the process until the coverage was acceptable. I set the bowl aside for an hour and let the stain coat cure.
 Once the stain had cured I wiped it down with a cotton pad and alcohol to make it more transparent. There was not a lot of grain around the bowl but I really wanted to give the bowl a sense of depth.
 I polished the briar with micromesh sanding pads – dry sanding with 1500-12000 grit pads. I wiped the bowl down after each pad with a damp cloth. As the finish becomes more transparent I like what I see.


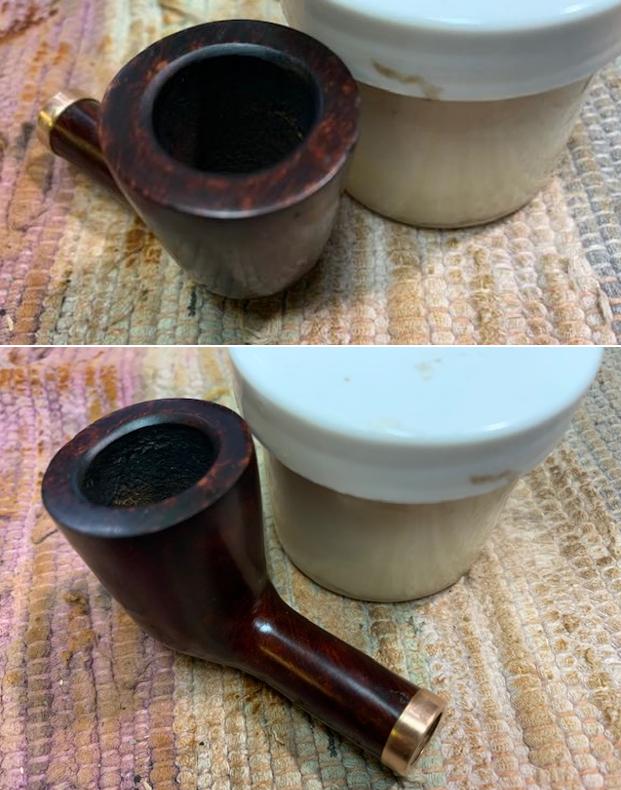
 I worked some Before & After Restoration Balm into the surface of the bowl and shank with my fingertips to clean, enliven and protect the briar. I let the balm sit for 15 minutes and then buffed with a cotton cloth to raise the shine. The photos show the bowl at this point in the restoration process.

 I set the bowl aside and turned my attention to the stem. Earlier, when I was working on the first Dinky pipe I had taken the stem out of the Briarville Pipe Stem Deoxidizer Bath and dried it off with a cotton pad. It looked better. I scrubbed the softened oxidation with Soft Scrub All Purpose Cleaner and removed the remaining oxidation. I cleaned out the stem with alcohol and pipe cleaners and it was surprisingly clean. I went back and did the same with the shank and it also was relatively clean other than the debris from when I reamed the bowl.
 I polished the stem with micromesh sanding pads – dry sanding with 1500-12000 grit sanding pads. I wiped it down after each sanding pad with Obsidian Oil. I polished it with Before & After Pipe Stem Polish – both Fine and Extra Fine. I gave it a final coat of Obsidian Oil.
 With the bowl and the stem finished I put the third pipe – a Real Briar Straight Dublin, back together and buffed it on the wheel using Blue Diamond to give it a shine. I gave the bowl and the stem multiple coats of carnauba wax on the wheel. I buffed the pipe with a clean buffing pad to raise the shine. I hand buffed it with a microfiber cloth to deepen the shine. It really is a great looking pipe. The dimensions of the pipe are – Length: 5 inches, Height: 1 ½ inches, Outside diameter of the bowl: 1 ¼ inches, Chamber diameter: ¾ inch. The weight of this small pipe is .88 ounces /25 grams. This third pipe from the estate is a small Real Briar Dublin that will be another great reminder for Keith of his Dad’s pipe smoking and one that he can enjoy for a long time. With the completion of the last of the pipes I am sure he will want to pick them up soon. Once he does he will be excited to load them with a memorable tobacco and slip back into the memories of his Dad. Thanks for walking through the restoration with me.