Blog by Dal Stanton
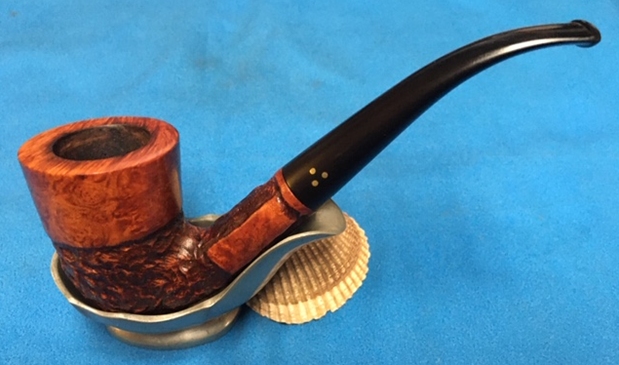
When I put this pipe in the For “Pipe Dreamers” Only! online collection, I identified it as a Squat Apple. It came to me from the lot my son helped me to procure from an antique shop in St. Louis. When Andy chose this as his next pipe after commissioning the probable Preben Holm Danish Freehand which I just finished restoring (See: Recommissioning a Mysterious Freehand, Made in Denmark – Preben Holm?) I fished it out of the ‘Help Me!’ basket and put it on the table and the ‘Squat Apple’ sort of fit, but not quite. Volcano? No, too rounded. Here are the pictures of the ‘Squat Apple’ that got Andy’s attention.


 The only markings are found on the lower side of the oval shank, MADE IN LONDON [over] ENGLAND. Below the COM is what I assume is a shape number, ‘140’. Not a lot to go on to determine origins.
 The ‘Squat Apple’ wasn’t sitting well with me so I looked at Bill Burney’s great Pipe Shapes Chart on Pipedia and found the shape classification that worked better – Diplomat. Interestingly, my ‘Squat Apple’ designation was used by Bill Burney to describe the Diplomat. I clipped the panel to show the description of the Diplomat:
 The English Diplomat now on my worktable is not a bad looking pipe but has a few issues. The Diplomat’s chamber has a thick layer of cake and the lava flow on the rim is thick – it needs some cleaning as well as the stummel.
 The after section of the rim reveals the darkening of the briar that has been scorched through the lighting practices of the former steward.
 As the following three pictures show, the stummel is darkened from grime and oils on the surface. You can see some very nice grain lurking beneath. There are also dings and scratches on the stummel from normal wear.

 The acrylic stem is attractive, but I’m guessing that it’s a replacement stem. My first observation looked like the stem simply didn’t fit with a wobble and gaps showing between the shank and stem facings. When I removed the stem the acrylic tenon was stuck in the mortise and not attached to the tenon. It didn’t take much to dislodge the rogue tenon but after inserting it into the tenon and trying the fit again, the wobble and looseness is evident and if I’m able to reattach the acrylic tenon and keep the stem facing flush with the shank facing before the CA glue sets, it should do well.
 I then noticed the darkened airway through the translucent acrylic. As I suspected, after inserting a pipe cleaner into the airway from the shank side, I discover that there is blockage in the stem. In the picture below, I’ve placed my fingers roughly where the inserted pipe cleaner stops and the blockage begins. This can be a pain! The following picture with the slot view shows blockage very near to the opening.
 I decide to try to ‘bull’ through the blockage with a pipe cleaner and to my surprise, the pipe cleaner was able to break through and not a lot of gunk came out. Good to go.
 Before moving toward re-attaching the tenon to the acrylic stem, I’ll first do the cleaning. I’m trying a ‘Soft-Scrub-like’ product we have here in Bulgaria called Cif brand to try to clean the darkened internal airway. The label describes micro-crystals and a bleach component as the active agents. I’m using Jeff Laug’s recommendations from his blog (Got a filthy estate pipe that you need to clean?).
 Holding the translucent acrylic stem up to the light provides a good Xray of the airway and how it’s darkened. We’ll see how much the cleaning removes the internal buildup and lightens the airway.
  I go to work with the Cif product and start by using bristled pipe cleaners dipped in Cif to begin breaking up the tars and oils that have crusted inside the airway.
  At first there was no noticeable progress except for the darker discoloration of the pipe cleaners which meant something was happening. I add after the pipe cleaners shank brushes. I transferred the shank brushes, Cif and stem to the kitchen sink where using hot water, I continued the cleaning with the Cif and brushes. At this point, progress was evident. A combination of the brushes and cleaner AND the hot water helps break down the crud.
 Back to the worktable, the follow-up light Xray shows the results. Nice! I move on.
 I put the stem aside and move to the stummel cleaning before I start on the repairs to the stem and tenon. Not only do I prefer working on cleaned pipes, but often the cleaning process can change the mortise environment because we are working with wood. Cleaning often loosens tenon fittings. So, before moving to more permanent repairs, it’s a good principle to get the cleaning done first. Looking again at the chamber, the cake is moving from moderate to thick cake. Using the Pipnet Reaming Kit I start with the smallest blade head and end up using 3 of the 4 blade heads available in the Kit. The Savinelli Fitsall Tool works well to follow by doing fine-tune scraping of the chamber walls. I complete the cleaning by wrapping 240 grade paper around a Sharpie Pen which provides the leverage as I sand the chamber to remove the final vestiges of carbon cake to expose fresher briar to have a clean start.
  After wiping the chamber with a cotton pad wetted with alcohol to clean the carbon dust, I take a picture as I examine the chamber walls for heating damage. All looks great.
  Moving now to the external cleaning of the stummel, I employ undiluted Murphy’s Oil soap on a cotton pad to scrub the surface and rim covered by lava flow. In the immediate picture below, the sharp-edged pocketknife is helpful to remove the caked crusting. You can see the progress being made as the blade is carefully scraping the rim top without cutting into the wood. After the knife edge, the brass bristled brush cleans the rim further without damaging the wood.
 After working on the rim and stummel surface, I take the stummel to the kitchen sink using hot water and clean the internals using shank brushes and anti-oil dish soap liquid. After thoroughly rinsing the stummel with water, back on the worktable a picture records the present cleaning state.
 Again, focusing on the internals, now using cotton buds and pipe cleaners wetted with isopropyl 95%, cleaning continues. Also employed is a dental spoon to scrape the mortise walls – which produces very little. A shank brush wetted with isopropyl 95% is used saving on pipe cleaners. When the pipe cleaners and buds start emerging lighter and cleaner, I call this phase completed to be continued later using a kosher salt and alcohol soak.
 Now looking again at the tenon repair of the acrylic stem. The tenon that was part of the Diplomat was not attached and since it’s not, fitting it to see how it will work is not easy – it shifts and moves. The first two pictures below show the result when I insert the tenon tightly into the stem cavity to test it out. The first picture is from the top perspective. Notice that the stem is offset to the right (top of the picture) so that the stem is overhanging on the top and the shank is overhanging the bottom of the picture.
 Now looking at the underside of the fit, the offset is augmented by the gapping that is evident.
 Not only do the pictures reveal the seating difficulties of the tenon, but the drilling through the tenon for the airway is not centered. This has potential challenges on at least two fronts. First, it potentially creates a hang-up lip as pipe cleaners are pushed through. This is not huge as usually simply twisting the pipe cleaner in the airway solves this hindrance. Secondly, is that if the tenon needs to be expanded, I will not use the heating method to expand it. The reason for this is that the offset drilling has created a very thin wall of acrylic which will probably split if expansion is attempted. The alternative will be to simply paint the exterior of the tenon with acrylic clear polish or CA glue. This builds out the tenon circumference.
 As I was fiddling with the tenon trying to figure out the best approach, another issue surfaced. On a hunch, the question came to mind, ‘Is the acrylic stem facing flat?’ I took out the chopping board that serves as a topping board and I placed the stem facing flat against it. I discover that there is a dance in it – a microscopic rocking.
  Just to be on the safe side for comparison, I also place the shank facing down on the board and find that its rock solid. You can see from the second picture the culprit looks to be around the airway – old glue protruding.
  I decide to address this straight away by placing 240 grade paper on the board and ‘top’ the stem facing to flatten it – carefully! Instead of rotating like I would if it were a stummel being topped, I drag laterally along the paper.
  After a few ‘drags’ on the topping board, another test on the flat chopping board is much better. The stem facing is now flush with no rocking.
 I again do a test fitting with the unglued tenon in place, reengage the stem to bring the facings flush. To see if a pipe cleaner would snag on the tenon, I insert one through without problem.
 If I can glue the tenon and achieve this much, I’ll be satisfied. Sanding can address the overhangs where the shank and stem do not line up.
 A lot of time has elapsed thinking and testing, now it’s time for action! I use BSI Extra Thick Maxi-Cure CA glue. Using a piece of 240 grade sanding paper, I sand the part of the tenon that will be inserted into the mortise. I want it round and smooth.
  After cleaning the area with alcohol, I place a small amount of glue around the circumference of the tenon just above where the tenon will be inserted into the mortise. In this way I hope to avoid glue getting into the airway on the end of the tenon. Yet, I don’t put a lot of glue on it to avoid CA glue being forced out the top onto the stem facing. After placing the glue, I insert the glued part of the tenon partially into the stem cavity and then insert the mortise side of the tenon into the mortise and engage the parts. In this way, while the glue is still pliable, the tenon gives way to the flush orientation of the shank and stem facings.
  After doing this, I leave the pipe for several minutes allowing the CA glue to cure and hopefully hold the tenon in place! I’m hopeful for a solid and snug seating.
  I decide to move forward with working on the acrylic stems button. The top button lip has been compressed on the left side and the lower lip has also been chewed. The tooth compressions on both upper and lower sides need filling.
  I use regular CA glue combined with an accelerator. Starting on the topside and apply CA to the problem areas – also on the lip to build it. I do the same for the lower bit and button lip. With each application of CA glue, I use the accelerator to hold the patch in place and cure the glue more rapidly.
  I next use a flat needle file to file the CA glue patches over the tooth compressions down to the stem surface on both the upper and lower bit. I file and shape the button repair as well.
 To remove the scratches left by the file, 240 grade paper is used on the bit and button but also on the whole stem.
 Focusing the sanding on the junction now, I sand out the edges that were hanging over the shank and stem facings. I first cover the nomenclature with masking tape to protect it.
  The sanding moves around the circumference of the junction and I like the way the stem and shank now are in alignment and the union is flush.
 Next, I wet sand the entire stem with 600 grade sanding paper and follow with applying 000 steel wool.
  I’m on a roll with the stem, which I normally like to get out of the way so I can work on the stummel! Next, I apply the full battery of 9 micromesh pads to the acrylic stem. First, I wet sand using pads 1500 to 2400 and follow by dry sanding with pads 3200 to 4000 and 6000 to 12000. Even though I don’t believe it makes a difference but seems to enrich the acrylic surface. I love the pop of the stem – almost luminescent.
 After reuniting stem and Diplomat stummel, I get a sense of where things are. I’m liking what I see! While the stem was probably not the original, I like the combination and thinking now about how to finish the bowl to take advantage of the striking hues of the acrylic stem. At this point, if the micromesh process brings out the grain well and there is no nuanced lightening of the wood on the shank where the major sanding was, I’ll leave it in the natural briar state. If there is indication that the shank sanding stands out, I’ll apply a stain. The briar patterns are very nice – time to bring it out!
 Next, to freshen the rim and to remove the darkened old finish, I take the stummel to the topping board.
 Not much is needed – only a cosmetic topping. With the stummel inverted on 240 grade paper, I give the stummel a few rotations to clean things up.
 Then switching to 600 grade paper, the stummel is rotated several more times.
 With the rim refreshed, sanding sponges will address the tired finish on the bowl and the normal nick and dents. I see no major issues to address on the stummel surface – no fills.
 With the ‘Made in London, England’ covered by masking tape to protect it, I make sure that the sanding sponges address the shank area well. I want to blend the lightened area that was sanded. Using a coarse sanding sponge to do the initial heavy sanding, it removes the minor nicks and old tired finish. After using the coarse sponge, I remove the masking tape covering the nomenclature for the application of the medium and light graded sponges. The sponges are not rough enough to impact the nomenclature which is healthy.
 To fine tune further, the full set of micromesh pads are applied by first wet sanding with pads 1500 to 2400. Following this, dry sanding with pads 3200 to 4000 and 6000 to 12000 bring out the grain which is beautiful.
 On a roll, and very enthused by the richness of the honey brown hue emerging and the detailed grain, I apply Mark Hoover’s product (www.ibepen.com), Before & After Restoration Balm which does a great job teasing out the deeper natural hues of the briar. With some Balm on my fingers, I work it into the briar well and then set it aside for about 20 minutes for the Balm to be absorbed by the wood. I then wipe off the excess with a cotton cloth dedicated to this and then buff the stummel with microfiber cloth.
 The day is coming to its close and I continue the internal cleaning using a kosher salt and alcohol soak. This further cleans as well as freshens the bowl for the new steward. I first fashion a ‘wick’ by stretching and twisting a cotton ball which is then inserted into the mortise and airway with the help of a stiff wire. This wick helps to draw out the tars and oils from the internal chamber walls.
 I then fill the chamber with kosher salt which does not leave an aftertaste and place the bowl in an egg carton for stability.
 Using an eyedropper, isopropyl 95% fills the chamber until it surfaces over the salt. After a few minutes the alcohol is absorbed, and the alcohol is topped off. I let the soak work on the cleaning through the night.
 The next morning the salt and wick are soiled revealing the added cleaning of the chamber and mortise. After dumping the expended salt and wiping the chamber with paper towel, I blow through the mortise to loosen and remove salt crystals remaining.
 To make sure all is clean, I follow with some pipe cleaners and cotton buds. This is a good step in the cleaning process because the dirty pipe cleaners revealed that the airway was still in need of more cleaning. After more pipe cleaners wetted with isopropyl 95%, the pipe cleaners were emerging cleaner and lighter. I declare after a time, ‘Clean!’ and I move on.
 After reuniting the stem and stummel and mounting a cotton cloth buffing wheel on the Dremel, setting the speed at about 40%, the fine abrasive Blue Diamond is applied to the entire pipe. After completing this, I use a felt cloth to buff the pipe to remove compound dust in preparation for applying the wax.
 Finally, after changing to another cotton cloth buffing wheel, carnauba wax is applied to the pipe and I after this, I give the pipe a hand buffing using a microfiber cloth to raise the shine.
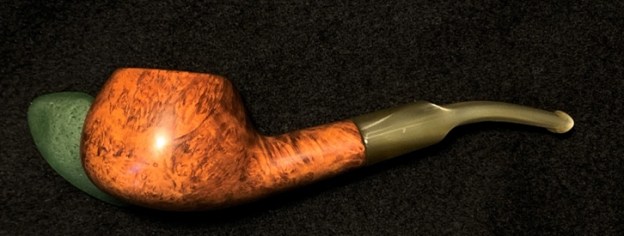
 The grain on this Made in London England Diplomat is superb. I’m extremely pleased with the repair to the acrylic stem. It is now beautifully seated in the mortise, straight balanced and snugly secure. The waves in the acrylic pop and the Diplomat shape, with the broad heal, makes for a very nice feel in the palm. Andy from Maryland commissioned this English Diplomat and will have the first opportunity to acquire him in The Pipe Steward Store. This pipe benefits the Daughters of Bulgaria. Thanks for joining me!