Blog by Dal Stanton
The Butz Choquin Camargue came to me via an antique store in St. Louis, Missouri. Last December, my son Josiah, who was studying there, and now currently works there, came upon this lot for sale in an antique store. He did the right thing – he called…, rather, he texted his father in Bulgaria with pictures asking the question, ‘What do you think, Dad?’ We didn’t think too long about the purchase and split the cost for the St. Louis Lot of 26. Why did we split? The jumbo French Champion Church Warden in the center of the picture below was to be my Christmas gift from Josiah and so he paid that part of this very nice trove of pipes he found! Many of the pipes of the St. Louis Lot of 26 are still available in ‘For “Pipe Dreamer” Only!’ online collection. Pipe men and women can peruse the online ‘Help Me!’ baskets and commission an unrestored vintage pipe. Of course, this benefits our work here with the Daughters of Bulgaria – women and girls who have been trafficked and sexually exploited.  One pipe man, Alex, who is from our neighbor to the north, Russia, saw and commissioned the BC as well as a Harvey Rusticated Dublin, which was first in line to be restored (See: Recommissioning a Mysterious Harvey London Paris New York Meerschaum Lined Rusticated Dublin).
 Next, the Butz Choquin Camargue is on the worktable. I take some additional pictures.
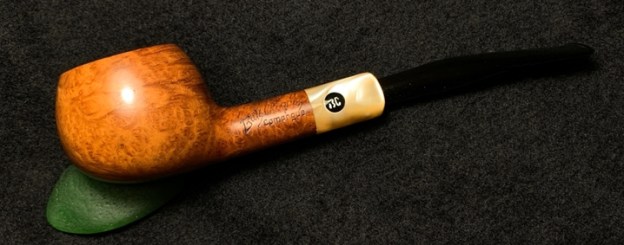
 Stamped on the left shank flank is the fancy lettering, ‘Butz-Choquin’ [over] ‘Camargue’. The acrylic shank extension houses an inlaid rondel, with ‘BC’ in silver lettering. The right side is stamped, ‘St. Claude’(arched) [over] FRANCE [over] 1683, which I assume is the shape number.
  I’ve worked on several Butz Choquin pipes which is based in the French pipe center of St. Claude. Here is a brief overview of the BC history from Pipephil.eu:
The origin of the brand reaches back to 1858 when Jean-Baptiste Choquin in collaboration with his son-in-law Gustave Butz created their first pipe in Metz (France). Since 1951 Butz-Choquin Site officiel Butz Choquin, pipes de Saint-Claude Jura. BC pipe de bruyere luxe is a brand of the Berrod-Regad group (Saint-Claude, France).
Jean Paul Berrod managed the company from 1969 to 2002 when he retired and sold the corporate to Mr Fabien Gichon. Denis Blanc, allready owner of EWA, took over the S.A. Berrod-Regad in 2006.
The BC line, ‘Camargue’ is not an old line as a simple search on the internet turns up several examples of classic pipe shapes with the ‘Camargue’ stamp, but unique to each is the acrylic shank extension and the military mounted stem. This example is a Dublin shape from Smokingpipes.com: I saw no other examples of what I’m calling a ‘Fancy Prince’ on my worktable – the BC shape number 1683. The name of the line, ‘Camargue,’ I discovered is a treasured nature reserve on the southern coast of France between Montpellier and Marseille – two beautiful venues which I’ve had the opportunity to visit. A Wiki article was very helpful in describing the area that this BC line is commemorating (Pictures are from the same article):
 With an area of over 930 km2 (360 sq mi), the Camargue is western Europe’s largest river delta. It is a vast plain comprising large brine lagoons or étangs, cut off from the sea by sandbars and encircled by reed-covered marshes. These are in turn surrounded by a large cultivated area.
Approximately a third of the Camargue is either lakes or marshland. The central area around the shoreline of the Étang de Vaccarès has been protected as a regional park since 1927, in recognition of its great importance as a haven for wild birds. In 2008, it was incorporated into the larger Parc naturel régional de Camargue.
The Camargue is home to more than 400 species of birds and has been identified as an Important Bird Area (IBA) by BirdLife International.[8] Its brine ponds provide one of the few European habitats for the greater flamingo. The marshes are also a prime habitat for many species of insects, notably (and notoriously) some of the most ferocious mosquitos to be found anywhere in France. Camargue horses (Camarguais) roam the extensive marshlands, along with Camargue cattle (see below).
The native flora of the Camargue have adapted to the saline conditions. Sea lavender and glasswort flourish, along with tamarisks and reeds.
Without doubt, a place my wife would love to visit! With a better understanding of the pipe on my worktable, I take a closer look at the obstacles of restoring this Fancy BC Camargue of St. Claude. The chamber has some thick carbon cake which needs to be removed for the briar to have a fresh start. The rim has thick lava flow which also will be addressed. The Prince stummel surface is dirty from normal wear and the smooth briar surface has small fills that need to be checked out as well as some rough places. The acrylic shank extension is nice and will shine up very well. The Fish Tail Military Mount stem shows significant oxidation as well as tooth chatter and bites, especially on the lower bit.
To begin the recommissioning of the BC Camargue, I first clean the stem with a pipe cleaner wetted by isopropyl 95% and then add it to a soak of Before & After Deoxidizer along with other pipes and stems in the queue.
 After a few hours in the soak, I remove and drain the BC stem of the Deoxidizer fluid and then wipe it down with a cotton pad wetted with isopropyl 95% to remove the raised oxidation, which is a lot! I also run another pipe cleaner dipped in alcohol through the airway of the stem to clear it of B&A Deoxidizer.
 To begin the revitalization of the vulcanite stem, I give it a coat of paraffin oil with a cotton pad and put it aside to absorb.
 Turning now to the stummel, after putting paper towel down to ease the cleanup, I use the Pipnet Reaming Kit to begin the process of removing carbon cake from the chamber to give the briar a fresh start and to inspect the chamber wall for heating damage. I take a picture of the chamber to mark the start.
  I use three of the four blade heads in the Pipnet Reaming Kit – this chamber is broader than I expected. Next, I transition to scraping the chamber using the Savinelli Fitsall tool and find that the lava flow on the rim is flaking off with the tool. I finish by sanding the chamber with 240 grade paper wrapped around a Sharpie Pen to give leverage.
  After cleaning the chamber with a cotton pad wetted with isopropyl 95%, I inspect the chamber and there are no indications of heating problems. It looks great. I move on.
 Transitioning now to the external surface, I use undiluted Murphy’s Oil Soap and cotton pads to clean. After scrubbing with Murphy’s, I transition the stummel to the sink to continue scrubbing the internals using anti-oil dish washing liquid and shank brushes to scrub with warm to hot water. After scrubbing, the bowl is rinsed thoroughly and returns to the worktable.
  The internal cleaning continues using cotton buds and pipe cleaners wetted with isopropyl 95%. A small dental spatula is used to scrape tars and oils off the mortise walls. Excavating the gunk saves a lot of time by bringing out large amounts at a time. In time, the buds and pipe cleaners start emerging lighter and the cleaning is done for now. Later, a kosher salt and alcohol soak will continue the internal cleaning and refreshing.
 With the internals cleaning completed until later, a closer look at the BC Camargue Prince stummel is next. The grain of the bowl is very expressive – very nice bird’s eye as well, but there are also some issues.
 The rim cleaned up well and it sports a sharp internal bevel which needs refreshing. Darker briar on the aft of the rim remains after the cleaning – the section where the former steward lit his favorite blend.
 The right side of the bowl is pitted with old fills which have lightened and stand out and have shrunk so that the surface is not smooth.
 One fill, somewhat larger, is on the face of the bowl – situated very nicely between the converging flows of grain which was probably the reason for the pit in the briar bole. I’m impressed with the grain – it will spruce up very nicely.
 The right side of the bowl has some rough, skin marks – probably from a hard surface.
  The night is growing late, and I would like to do two things before turning out the lights: renew the fills in the briar surface and a kosher salt and alcohol soak. I begin the first project by using a sharp dental probe carefully to remove the old fill from the pits. What is handy about using ‘real’ dental probes is that they are not just sharp on the ends, but they also have very small spurs that allow a simple twist of the instrument to grab and pull material out of the pits. I clean the large set of pits on the side of the bowl as well as the one on the front.
 Using briar dust putty to replace the old fills, I first prepare the working pallet. I use a plastic disk that came off a cosmetics cream container belonging to my wife. I put scotch tape down on this surface only to quicken the cleanup after making the putty.
 After cleaning the pitted areas of the bowl with a cotton pad wetted with alcohol to clean the area, a small pile of briar dust is placed on the taped pallet.
  Then a small amount of BSI Maxi-Cure Extra Thick CA glue is placed next to the mound of briar dust.
 Using a toothpick as a mixer and a trowel, briar dust is pulled into the CA glue and is mixed. As the dust is pulled into the mixture, it starts thickening. The picture below shows the mixture in the early stages – still too thin, giving me time to take the picture. If it takes too long to apply the putty it will harden in an instant. Or, if too much briar dust is introduced into the CA glue and thickens too quickly, it will harden immediately. This has happened to me a few times – when it hardens, the chemical reaction sends up smoke!
  When the putty begins to reach the viscosity of molasses, the putty is troweled onto the pits with the toothpick. With the pits being so small and close, I cover all of them with two larger globs which when cured will be sanded down. The front pit is also filled with briar dust putty.
 After a quick clean up, the putty has had enough time to set up (I’ll let the patches cure through the night) and I am able to handle the stummel with no problems. Next, I transition to the second project before lights out – a kosher salt and alcohol soak to continue the internal cleaning and refreshing. A ‘mortise wick’ is fashioned by stretching and twisting a cotton ball. The wick helps to draw the oils out of the internal briar cavity.
  Then, using a stiff wire (a piece of wire from a clothes hanger) I guide and push the wick through the mortise close to the draft hole.
 The bowl is then filled with kosher salt. Kosher salt is used because it doesn’t leave an aftertaste and freshens the internals for the new steward. The stummel is placed in an egg carton for stability and to situate the stummel so that the top of the bowl and the end of the shank are roughly level. This allows the alcohol fully to saturate the wick. Then, using a large eyedropper, isopropyl 95% is added to the chamber until alcohol fills and surfaces over the salt.
  After a few minutes, the liquid is absorbed, and a little more alcohol is added to top it off. The stummel is set aside to soak through the night. Both projects completed – lights out!
 The next morning, the salt and wick show the signs of soiling as tars and oils are absorbed. After dumping the expended salt in the waste and wiping the bowl with a paper towel to remove salt crystals, I also blow forcefully through the mortise to clear any remaining crystals.
 To make sure all is clean, a few cotton buds and pipe cleaners dipped in isopropyl 95% are expended to clean up any residual oils. All looks good.
 The briar dust patches on the stummel surface have cured and I use a flat needle file to file each down close to the briar surface. I stay on top of the patches with the file as much as possible to avoid collateral impact on the briar.

 After filing, 240 sanding paper is employed to bring the patches down to briar level.

 Following the 240 grade paper, dry sanding with 600 grade paper serves to smooth the patch area out more by removing the scratches of the 240 sanding.
 Next, the rim. The rim is darkened from lighting practices but is not damaged. There are also minuscule nicks on the outer rim edge.
 I use 240 grade paper to clean up the internal bevel of the rim.
 Next, the stummel visits the topping board with 240 grade paper on top. The topping will refresh the lines of the rim and help restore a crisp bevel transition. The topping is for cosmetic purposes but will also help to remove the nicks on the edges. I invert the stummel and give it a few rotations on the board. Not much is needed.
 After the sanding paper is transitioned to 600 grade paper, I give the stummel several more rotations as well as hand sand the bevel. The results are good. The lines have been restored and the cross-cut briar grain is coming through nicely.
 From working on the rim, sanding sponges are used to address the nicks and cuts on the briar surface. Sponge sanding is not as invasive as regular sanding paper and it will help blend the sanded patch areas. I start with a coarse sponge, then medium and finish with a light grade sponge. The sponges are also used on the acrylic shank extension which helps to shine it up quite nicely!
 After the sanding sponges, to again refresh the lines of the rim, I take the stummel back to the topping board for a few rotations on 600 grade paper. Nice.
 After the topping board, a small imperfection on the rim gets my attention. It is not major but enough for a small detour.
 To address the problem, I spot drop clear CA glue on the small pit. It does not take long for the CA glue to set up and I carefully sand the excess patch with 240 grade paper. Then another trip for the stummel to the topping board with 600 grade paper to finish the repair.

 On a roll, and anxious to coax the grain out on the BC Prince stummel, the full regimen of micromesh pads is used. As with the sanding sponges, micromesh pads are used on the acrylic shank extension. Using pads 1500 to 2400, I wet sand followed by dry sanding with pads 3200 to 4000 and 6000 to 12000. I’m liking what I’m seeing.
 Wow – I love the pop on this bowl with the acrylic extension contrasted. To improve on what is already a good situation, to bring out the subtle hues of the grain more, Before & After Restoration Balm is applied to the stummel.
  Placing a small amount on my finger, the Balm is worked into the briar surface. It starts off with a crème-like texture but then thickens as it is applied to the briar. I set the stummel aside while the Balm does its thing. In about 20 minutes, the excess Balm is wiped off and I also buff up the surface. The pictures show the 20-minute absorbing period and after buffing.
 With stummel to the side, I now turn to the waiting stem. The upper bit has a few minor bite marks but the lower is more significant. I first apply the heating method with the use of a Bic lighter. With the lighter, I paint the bit with flame thus heating and expanding the rubber compound, vulcanite. The physics involved encourages the rubber to reclaim it’s original disposition or at least lessen the damage. After painting with the Bic lighter, the upper bit looks good and can be finished with simple sanding, but the lower bit needs additional help. Before and after pictures show the results.
 I use Black Medium-Thick CA glue to repair the tooth compressions on the lower bit. After cleaning the area with a cotton pad wetted with alcohol, I spot drop the CA on the needed area and utilize an accelerator to quicken the curing process.
 The cured patch has collapsed which is normal. I believe the fill is sufficiently covered.
 First, using the flat needle file, excess patch material is removed and the button is freshened.
 Following the file, I use 240 grade paper on the lower bit repair and expand the sanding to remove residual oxidation and nicks to the entire upper and lower fishtail stem surface.
 Following the 240 sanding, using 600 grade paper I wet sand the entire stem and follow this using 000 grade steel wool.
 A close up of the lower bit repair shows the results of the work. The patch is barely visible if you know its there, but for the most part, it will be invisible.
 Moving straight on to the micromesh phase, I wet sand using pads 1500 to 2400 and dry sand with pads 3200 to 4000 and 6000 to 12000. Between each set of three pads I give the fishtail stem an application of Obsidian Oil to continue the rejuvenation of the vulcanite. I love the pop of newly sanded vulcanite!
 On the home stretch – after rejoining stem and stummel and mounting a cotton cloth buffing wheel to the Dremel setting the speed at 40% full power, Blue Diamond compound is applied to the entire pipe. Compound is also applied to the acrylic shank extension and it really pops!
 After using a felt cloth to wipe off residual compound dust, I change the Dremel’s cotton cloth buffing wheel to one dedicated to applying carnauba wax. Maintaining the same speed, I apply a few coats of wax to the entire pipe and finish by giving the pipe a rigorous hand buffing to raise the shine.
 I called this Butz Choquin Camargue a ‘Fancy’ Prince shape and truly he is fancy. Wow – the grain generally moves in a horizontal fashion around the bowl and tightens as it moves downwardly to the heel. Large swoops of bird’s eye grain also punctuate the landscape. Adding to the ‘Fancy’ is the acrylic shank extension with the embedded BC rondel transitioning to the gentle bend of the fishtail stem which splays outwardly. Alex commissioned this French BC Camargue Fancy Prince of St. Claude and will have the first opportunity to claim him from The Pipe Steward Store benefitting the Daughters of Bulgaria. Thanks for joining me!


