Yearly Archives: 2017

Comoy’s Pebble Grain Billiard Restoration


By Al Jones

The Comoy’s “Pebble Grain” line was introduced in the 1970’s, and to my eye, is similar to the “Granitan” line from GBD. The finish is sandblasted and buffed down to give it a “worn” appearance, and perhaps a bit like stonewashed denim. This one is the shape 186, a classic straight billiard. It is described on a 1975 shape chart as “Largest Billiard – Tapered Stem”. The pipe sports the drilled, three piece, “C” stem logo of the pre-Cadogan era (prior to 1981). Another feature of the Pebble Grain line is the beveled, polished bowl top, which I find particularly appealing. Despite the size of the pipe, it only weighs 35 grams.

From the sellers photos, the pipe appeared to need only a minor clean-up. There was some build-up on the polished top and the stem was mildly oxidized with one small tooth mark.

Using heat from a lighter flame, I was able to lift the tooth dent, but only slightly. I put a dab of grease on the “C” soaked the stem in a mild Oxy-clean solution for several hours. While the stem was soaking, I turned my attention to the bowl. Using a worn piece of scotch-brite, I was able to remove all of the build-up on the polished bowl top. A piece of 2,000 grit wet paper removed most of the darkening that remained, without damaging the stain. I removed the mild cake with my Pipenet reamer set. The bowl was then filled with sea salt and alcohol to soak overnight.

Following the bowl soak, the polished top was buffed with White Diamond and several coats of Carnuba wax. The shank was cleaned and stem mounted. I attempted to fill the small tooth indention with black superglue, but it was too shallow to adhere well, so I left well-enough alone. I removed the heavy layer of oxidation with 800 grit wet paper, followed by 1,5000 and 2,000 grade paper. This was followed by 8,000 and 12,000 grade micromesh sheets. The stem was buffed with White Diamond rouge and Meguiars Plastic Polish. The bowl was hand polished with Halycon wax.

Below is the finished pipe.

Update:  After a few days, I was unhappy with the way the tooth indention looked.  I had been using a very old bottle of the Stew-Mac superglue and it definitely wasn’t as viscous as when it was new.  I opened up a new bottle and it worked 100% better.  So, if you have really old glue, my bottle was at least six years old, it might be time for an update.

Below is an updated stem picture.  The patch on the indention is now flush and it has only a slightly different sheen than the vulcanite.

Comoy's_186_Pebble_Grain_Finish6

One Seriously Frustrating Refurb – a Broken Down Hilson Fantasia 206 Dublin


Blog by Steve Laug

The last of Steve’s pipes the remained for me to work on was a Hilson Fantasia. It is a Dublin shaped pipe made of resin with a meerschaum insert. It has a yellow coloured bowl and shank with swirls of green that are scattered throughout the pipe. When Steve sent me the box of pipes to work on I told him this one was not worth the effort to clean it up. It was in really rough shape on both the stem and the bowl insert. But in the end I decided to clean it and the Pipe just so he could see what these resin bowl pipes were like. I have cleaned a few of these up over the years that have almost psychedelic patterns in the resin. They are really a product of the 60s and 70s in my opinion. I took the following photos of the pipe before I started the clean up to show the general condition and give you some idea why I said the pipe was not worth cleaning up. The pipe really was in rough condition. The meerschaum bowl was not readily identifiable and there was major damage to the rim top. There chunks of the inner bowl missing from the top at the back edge of the bowl. There was a seriously thick cake in the bowl that was fuzzy with dust and debris. The outer resin bowl was covered with a layer of lava. The stem would not fit in the shank the way it was supposed to which signaled that the shank was cake with about as much debris and the bowl. The stem was oxidized and there were tooth marks on both the top and the underside at the button. The button itself was worn away and no longer clearly defined. The outer resin bowl was in pretty good shape with no deep scratches or gouges. I was hoping that once I reamed the bowl it would be intact lower down. I was basing that hope on the fact that Hilson used block meerschaum and not pressed meerschaum for their bowls. That made the quality of the lining far better and I have rarely seen a Hilson meerschaum lining cracked or broken.The next two photos show the stamping on the pipe. On the underside of the shank it is stamped Belgium and on the right side it is stamped with the shape number 206. The normal stamping on the stem was long gone. So it no longer read Hilson Fantasia. For the identity I am going with the stamping that is visible, the shape and material of the pipe for calling it a Hilson Fantasia.The photos of the stem show the condition of the oxidation and tooth marks on the surface as well as the worn condition of the button.I had previously researched the Hilson Fantasia for a blog I already did on a previous restoration. (https://rebornpipes.com/2016/07/05/is-it-really-a-plastic-smoking-pipe-what-is-a-hilson-fantasia/) On that blog I wrote of what I had found out about the brand. I had learned that the Hilson Fantasia was made in Belgium as this one was stamped. It originally came out as a meerschaum lined pipe with an outer bowl made of a new material that they called pipenite. From what I can find out about the material they call pipenite, it was a specially designed polyester resin. It was light weight and fairly indestructible. The block meerschaum insert was something that Hilson turned into a specialty. I had found a catalogue page on Chris’ Pipe pages, http://pipepages.com/hilson.htm that confirmed my guess regarding the 60s/70s look of the pipe. I have once again included a catalogue page from a 1962 Wally Frank Catalogue that was on the pipepages site. The write up on the Hilson Fantasia is entertaining to read in terms of the sales pitch that is delivered.I have also written about some of the history of the brand on a previous blog on Hilson Double Ecume pipes. If you are interested in reading about the history of the brand click on the following link: https://wordpress.com/post/rebornpipes.com/40547. In addition the following link on the Estervals Pipe House website gives a good summary of the history of the brand for those of you who want to read more: http://www.tecon-gmbh.de/info_pages.php?pages_id=70.

Now for the cleanup of the Fantasia! I carefully reamed the bowl with the smallest cutting head of the PipNet pipe reamer and cleaned up the inside of the bowl with a Savinelli Fitsall Pipe knife. I say carefully because I did not want to damage the meerschaum insert in the bowl but I wanted to remove the rock hard cake in the bowl.I topped the bowl carefully using a medium and a fine grit sanding pad. I wanted to smooth out the surface of the rim and remove the lava that was on top. I wanted to remove the lip of lava that had formed on the top of the bowl. The second photo below shows the cleaned rim top and also the damage that was very evident at the back edge of the bowl and around the sides. I cleaned out the shank of the pipe with a thin pen knife to scrape away the hardened tars that lined the inside walls. I followed that with a sanding stick and many pipe cleaners, cotton swabs and alcohol before the shank was clean.The inner edge of the bowl was pitted and uneven so I sanded it with a piece of 220 grit sandpaper to smooth it out and to clean up the damaged area at the back of the bowl. It was not perfect but it looked better than when I started.I took the stem out of the Before & After Pipe Stem Deoxidizer and wiped it down with a cotton pad. I cleaned out the inside of the stem with pipe cleaners and alcohol to remove the left over deoxidizer. The photos below show that it removed most of the oxidation but there were some stubborn spots left. The tooth dents are also very clear in the next photos of the stem. I wiped the stem down with alcohol and filled in the dents with a black super glue. I set the stem aside to let the repairs cure. When the glue had cured I worked on the fit of the stem in the shank. The tenon was still too big for the stem to sit properly in the shank so I sanded it down with 220 grit sandpaper. There were some high spots on the tenon that needed to be rounded out and cleaned up. Once that was completed the stem fit perfectly.Once the fit of the stem was correct, I turned to work on the stem itself. I wanted to blend the patched areas into the surface of the stem and also recut and redefine the button with needle files. I used a knife-edge needle file to redefine the sharp edge of the button and give it form. I also used it to flatten out the repaired areas on both sides of the stem.I smoothed out the repairs with 220 grit sandpaper and worked to blend them into the surface of the stem. I was a little concerned in that the repairs seemed to look almost red against the surface of the still oxidized vulcanite. I would have to work that to see if I could blend it in more. At worse the repairs will show but the pipe will be smokable.Now the frustration heightened – I really should have listened to my initial thoughts on this pipe. It was not worth working on. But I did not listen and now one of the reasons became more apparent. I polished the stem with micromesh sanding pads. The more I polished them the more the two repaired spots on the top of the stem showed a red colour. I have never had that happen before. I cleaned the stems before patching them with alcohol and dried them off. I used black super glue for the repairs, like I have many times before. Yet this time the repairs show a red tint. I have no idea what is going on with this repair. Fortunately it is one that I am calling finished. It was just a quick clean up on a badly damaged pipe. The stem is functionally very good just those spots are irritating. I used micromesh sanding pads to polish the stem – wet sanding with 1500-2400 grit pads and dry sanding with 3200-12000 grit pads. I rubbed the stem down with Obsidian Oil after each pad and set it aside to dry after the 12000 grit pad. I was irritated with the way the pipe looked – both bowl and stem. They were ragged looking still and even though they were better they were not what I like to see in a finished pipe. I was finished though as I decided that more work would not improve the damaged pipe. I buffed the bowl and stem with Blue Diamond on the buffing wheel. I hoped that the buffing might blend the repairs into the surface of the stem. While they certainly looked better they still showed. The overall look of the pipe was much better than when I started. The damage to the back side top edge of the meerschaum bowl liner was significant but the pipe was still able to be smoked. It was clean and would certainly make a workable yard pipe. I have boxed the pipe with the rest of Steve’s pipes and have them packed and ready to send to Dawson Creek. I am hoping he enjoys the lot and gives them a good workout in the days ahead. Thanks for looking.


Realizing my dream for a rebornpipes community


Blog by Steve Laug

Over the years of my dabbling in pipe restoration and refurbishing I have experienced many helpful individuals who took time to school me in the work that I do. Both repair people and pipe makers took time to answer my questions as they arose. They would do so by email, phone or in person. I never ran into a situation where they were not willing to be interrupted to help me out with what to me was an “urgent” question. They often would follow-up on what I had asked to see if it had worked out or if I had further questions. I experienced a great sense of community with them in our common love of the pipe. When I could visit them, I did so and enjoyed a bowl together. The comradery was unequaled to other experiences I have had both in the hobby and outside the hobby in my various jobs.

When I started dreaming and working on the concept for rebornpipes it was early in 2012. I knew that I wanted to create an online community of pipe refurbishers – both amateur and those who make a living at it. I wanted that community to be like the one I continue to experience to this day. When I run into questions and want some advice from someone who has already done the repair I just reach out with an email or a phone call. I wanted to create a place where folks who refurbish pipes could share their expertise and methods with one another and continue to learn new ways of working on the briar we love. I wanted it to be a judgmental free forum of methods and ideas of restoration. I wanted it to be a place were a beginner and a veteran refurbisher would find a forum of ideas and methods. What I am speaking of is quite simply an interactive community where there are no “dumb questions”. All of us can reach forward to someone who knows more than we do and back to someone who is just beginning. I was hoping that kind of place would be possible to start.

When I began the blog in May of 2012, I had no idea whether it would fly or whether I would be closing up shop soon after opening. I knew that I was putting together a repository of the methods of restoring pipes that I had collected over years of working on my own pipes. I have always recorded the process of restoration as I often posted them on the various pipe forums that I frequented at that time. I had a backlog of files with photos and step-by-step procedures that I had taken on each pipe I worked on. I established a template for the writing style and the form of each piece I had written. At that point in time, I could find no one who was doing anything remotely like I wanted to do, so I had to invent it myself.

I researched the web to find some kind of place to build the site I had in mind. I knew that I did not want a website or a forum. I wanted something that did not limit the number of photos or the number of words I wrote in a post. I wanted something that would grow with time and be able to incorporate the work of others, not just myself. I wanted the site to have the capacity for discussion and interaction on each post. I had a lot of ideas that needed to be available for the site to work for me. My youngest daughter, Sarah had started a blog on WordPress and suggested that a blog might be the right kind of format for what I wanted to do. I went on the WordPress site and read through everything they had on setting up a blog on their site.

I worked through the site and everything I looked at seemed like it was perfect for my demands. I took the plunge and registered for a free blog on WordPress. I knew next to nothing about setting up a blog and adding text or photos. I knew next to nothing about inviting others to use the blog. I had no idea how to monitor it and screen out the incessant spam that comes with any internet adventure. I was as green as could be with regard to the world of blogging. I knew how to write and I had a large backlog of pieces that I could post. The adventure began. I don’t remember how many posts I put online before I advertised it on Smokers Forums and other Forums – maybe 25 or so. I did not know at that time how to link it to Facebook or Twitter for a larger reach. I just dived in and went from there. Not long after I began, a friend from England on Smokers Forums drew a header image for the new blog. Kirk sent me the following piece that he had put together. I grace the top of every page of the site for several years. I have included it below, because even that was a foretaste of the community I was dreaming would form around rebornpipes.I will never forget the moment that Neill Archer Roan read a couple of pieces on the blog (maybe more) and recommended my blog on his Passion for Pipes site. That is where things really took off for rebornpipes. Traffic increased over time. I asked Al Jones (upshallfan) if he would consider writing for the blog about his restoration work. I started haunting the restoration and refurbishing sections on the forums and asking people to contribute to the blog. Slowly at first, then with increasing momentum, new contributors were added and the blog began to come alive. The one piece I had yet to unravel was how to get readers to interact with the writers of each blog. I invited them and emailed others to kind of seed the idea but nothing seemed to work. I laid that aside and hoped that one day it would just happen.

The years have actually flown by and I can hardly believe that five years have already passed. Much of what I dreamed would happen has happened. New people write regularly thanking me for starting this blog. Others post on Facebook, Twitter, and the forums referencing to rebornpipes and thanking the writers and contributors of blogs to the site. The interaction between readers and  writers grows every month and new followers are added daily. A growing and vibrant community of refurbishers provides the knowledge base to folks who are just beginning to explore the world of pipe refurbishing. Questions are asked, comments are made and recommendations are given through the comment feature on the blogs. A store, selling refurbished pipes is also available and links to other refurbishers who are selling their work are regularly provided in the pieces that they  write. I am thrilled with the life that rebornpipes has now as it is daily growing into the place that I dreamed it would be.

On June 1, 2017 I wrote a blog reflecting on rebornpipes fifth year in existence. You can read the entire blog at this link: https://rebornpipes.com/2017/06/01/rebornpipes-is-five-years-old-thank-you/. I want to quote just a part of it here as it illustrates how my original dream is being fulfilled. Today at the five-year mark, I look back and the blog has taken on a life of its own. It has grown from just my own posts to those of over 20 contributors. Al Jones (upshallfan) has been with me from the beginning and I am thankful for his support and friendship. Throughout the years, other contributors have come and gone and new ones are added regularly. Each one brings their own flavor and flair to the work of refurbishing. Their style and innovations leave me excited to read the next post… I thank each one of you who have contributed to the blog so far and remind the readers that the door is always open for you to make your own contributions to the hobby. Email me at slaug@uniserve.com for information on post formats and details.

What does the future hold for rebornpipes? To be honest it is just now coming to life in the way I had dreamed it would. Out of it, others have created their own blogs that contribute to the love of pipe restoration. Some of them certainly could speak for themselves how rebornpipes contributed or has not contributed to their own blog and I will leave that to them if they choose to do so. I have no idea where the blog will go or what its life expectancy will be but I am committed to continue to post and pay the bills to keep it going as long as I am able. It remains a major part of each day to read and do the housekeeping on the blog. I have the app on my iPad and my iPhone so I can do the work wherever I am at the moment. My morning begins with a cup of coffee and reading what others have posted and commented from around the world while I slept.

Once again I want to thank you all – those dreamers among you who contribute your own work, those of you who read and comment faithfully now, those of you who read and email to let me know how much you are enjoying the blog and all who are loyal readers and enjoy the blog on your own. Thank you to each of you who send questions and now contact me through the contact button on the front page for help in your own restorations. It is a pleasure to be able to help you as you work on your own restorations and repairs. It is a joy for me to see my dream coming to pass. It is a joy to be a part of the community that has formed around rebornpipes.

I raise my pipe to each of you who love the work of refurbishing, bringing old pipes back to life and passing on the trust that is symbolized in a briar that outlives each of us. It is because of that commonality that I continue to work and continue to post. Thank you all.

Cleaning up a sad “the Pipe” Billiard


Blog by Steve Laug

I have hinted at the fact that my friend Steve from Dawson Creek included two pipes in his box of pipes for me to refurbish that I had relegated to a “not worth doing” category. One of these was a Hilson Fantasia – Resin bowl and shank with a meerschaum lining and a plastic pipe stamped “the Pipe” that has a pyrolytic graphite bowl lining and a phenolic resin exterior. When I was working on the last one, the Kriswill made Danish Crown pipe I thought I would just do a clean up on these two just to be able to send a clean batch of pipes back to Steve.

I decided to begin working on the pipe labeled “the Pipe”. I have never paid attention to these pipes and have actually never had one in hand until this moment. I have avoided buying them or even being gifted one of them. I just was not interested in this combination of phenolic resin and pyrolytic graphite at all. I am generally intrigued by the unusual as those of you who follow the blog know, but this one had no draw for me. It was a bit of a mess. The bowl had a crumbling cake that was uneven. It had flowed over the rim top leaving it a mess. The outer edge of the bowl had been knocked against hard surfaces to empty the bowl leaving behind characteristic dents and chips. The right side of the bowl and the entire shank was scratched with deep scratches that carried on up the stem. The top and underside of the stem was also covered with bite marks and tooth chatter. The pipe looked pretty sad with all of the damage. I wondered if I could make it look any better and to be honest, if there was a point to doing so.

I took photos of the pipe before I started for comparison sake. Once I was finished I could look back and see if my work had made any difference at all. I wanted to get a quick education regarding the manufacture and date of this brand of pipes. My gut feel was that it was a product of the 60s and 70s. I looked up the brand on Pipedia and found that it began in 1963. There was a good summary of the history of the brand there. The Super-Temp Corporation who started making plastic pipes with pyrolytic graphite bowl liners made it. They called them “the Pipe”. In 1965, Super-Temp contracted to market their unique pipes through Venturi, Inc., the company that sold Tar Gard cigarette filters. Colors and stripes were added to the pipes that were offered circa 1967. About 1970, THE SMOKE pipes were added to the line – they were non-traditional shapes with a less expensive bowl liner. Venturi pipes were added around 1972 – they had no liner in the bowls at all. The pipes were out of production by 1975 (https://pipedia.org/wiki/Super-Temp). If you would like to read more about the brand, including a comprehensive history visit Dr. Billie W. Taylor’s site http://www.thepipe.info/. He is a collector of the Super-Temp Corporation pipes. He is a source of incredible information if you want to tap into it.

I took a close up photo of the bowl and the rim top to show the condition of both. The cake is heavy in the bowl and overflowing onto the black rim. It is hard to see because both the bowl insert and the exterior of the pipe are black. You can also see the damage on the outer edges of the bowl.The stem damage was one of the most worrisome parts of this restoration. The scratches running both the length of the stem and across the stem had left deep marks. Underneath and on top of those scratches there was a lot of small tooth marks and chatter that would need to be sanded out. The scratches extended up the top side and partly up both the right and left side of the shank. There were even scratches on the right side of the bowl. It was almost as if the pipe had road rash from being dragged across concrete or asphalt. The stem was not vulcanite so it would be hard to polish. It was going to be an interesting part of the work on this pipe. The stamping on the left side of the shank was very clear and readable. It was deeply embossed and no amount of sanding to remove the scratching would damage it. The stem was held snug in the shank by a rubber grommet that fit over the tenon. This was replaceable as the rubber wore out and air leaked by. I reamed the bowl with a PipNet pipe reamer and carefully took the cake back to the graphite bowl insert. I left a little cake to protect the insert and cleaned it up with a Savinelli Fitsall Pipe Knife. Using the knife I scraped the bowl back to bare walls and scraped the rim top free of the buildup of lava that was there.I scraped the top of the bowl with the edges of the Savinelli Fitsall Knife to remove the lava build up. Once I had the majority of it off I polished the rim with 1500 grit micromesh sanding pads to polish both the bowl insert and the rim top. I sanded the outer edges of the bowl to smooth out the damage to the edge of the bowl.I polished the entire bowl with 1500-2400 grit micromesh sanding pads. I wiped the bowl down after each pad using a damp cotton pad. I worked on the left side of the bowl and the top and left side of the shank where there were a lot of deep scratches running both vertically and horizontally on both. I polished the shank and bowl with 3200-12000 grit pads. I wiped it down after each pad with the damp cotton pad. When I finished with the 12000 grit pad I buffed the bowl on the buffing wheel using Blue Diamond to polish it further. The photos below tell the story. With the bowl finished for now, I turned to work on the horrendous damage to the stem. It was in rough shape as was seen in the above photos. I sanded the surface of the stem with 220 grit sandpaper to remove the scratches. It took a lot of sanding but I was able to remove almost all of them on the top and underside of the stem. I ran a pipe cleaner through the stem to clean out any debris that might have been in the airway before continuing on the stem. I used black super glue to fill in the small tooth marks on the top and underside of the stem at the button. I sanded the repaired areas with 220 grit sandpaper until the repairs blended into the surface of the stem. I polished the stem with micromesh sanding pads – wet sanding it with 1500-2400 grit pads and dry sanding with 3200-12000 grit pads. I rubbed the stem down with Obsidian Oil after each pad. After the final 12000 grit pad I gave it a last coat of the Obsidian Oil and set it aside to dry. I had already spent quite a few hours working over the badly gouged and scratched stem and I was able to remove many of the scratches. I tried to lightly buff the pipe to remove more of them but the nylon stem resists buffing too much as it heats quickly and melts. I decided to call the pipe finished at this point. It was not going to get much better without many more hours of work that I am unable to give it. I buffed the bowl on the buffing wheel with Blue Diamond to buff out some more of the scratches on the shank and right side. I gave the bowl a buff with a clean buffing pad. I polished the stem with Before & After Pipe Polish – both fine and extra fine. I did not bother giving the stem a carnauba coat as it is plastic and the wax does not do much. I hand waxed the stem with Conservator’s Wax to polish it more. The finished pipe is far from perfect but it is better than when I started. I will box it up later this week when I finish the Hilson Fantasia I have left and then mail it back to Steve in Dawson Creek, BC. Thanks for looking.


Comoy’s Sandblast Billiard Restoration


By Al Jones

This is the second Comoy’s Sandblast shape 28 that has found its way onto my workbench in 2017. This one looked like such a simple restoration, I couldn’t resist. The seller didn’t include a lot of pictures, but on arrival, I found the pipe to be in fantastic condition. The stem was only oxidized with a hint of teeth abrasions. The polished, beveled bowl top had just a bit of build-up. I was excited to get started on this one, so the “before pictures” below were taken after that build-up was removed. The drilled, 3-piece “C” stem logo was in perfect condition, as was the button. I love working on Comoy’s stems, particularly tapered stems, which are a breeze.

The nomenclature and stem logo show  that this pipe was made from the late 1940’s to 1981. (pre-Cadogan)

The bowl had very little cake and was easily reamed. The interior was in terrific condition. I used a little Fieblings Medium Brown stain to fresh up the bowl top, which was lightened just a tad during the cleaning process. The build-up was removed with a piece of worn scotch-brite pad. I soaked the bowl with alcohol and sea salt. After the soak, the shank was cleaned with paper towels and a soft bristle brush. The briar only required a hand wax with Halycon wax and a cloth.

The stem was soaked in a mild solution of Oxy-Clean for several hours, than mounted on the briar. The oxidation was removed with 800, 1,500 and 2,000 grade wet paper, followed by 8,000 and 12,000 grade micromesh sheets. The stem was polished with White Diamond and then Meguiars Plastic polish. The stem is literally like new.

Below is the finished pipe.

A Review – Before & After Pipe Stem Deoxidizer and Fine and Extra Fine Polishes


Blog by Steve Laug

Before I write a review of a product I commit myself to use it for at least a month on a variety of pipes that have the issues that it was designed to address. I figure that during this time I will either have good reason to reject it as not helpful or to be sold on it enough to add it to my normal pipe cleaning and restoration routine. I clean and refurbish quite a few pipes each month so a product that says it will do such and such a job better deliver or it goes into the waste can. I don’t have time for products that do what I already can do at least as well with what I have.

So committed to giving the product a solid trial, I purchased a small bottle of the Pipe Stem Deoxidizer and a jar of each of the Polishes. I have to admit up front, that I purchased this product with low expectations. I fully expected it to fit the “I already have products that work this well” category or that it would not deliver at all. I have tried a lot of stem polishes and deoxidizers over the years and they sit in the drawer wasting away with neglect. I was dubious from the start with this one, but I was committed to varying my routine and trying it out.

I begin the review with a little background information on the product, the cost and a few added instructions. I include the latter category because I missed it the first time around and it almost caused me to miss out on using a product that works well.

Background

I became acquainted with the Before & After Pipe Stem Deoxidizer and Polishes from posts on Facebook. For several months, I followed the work of Mark Hoover on the Gentlemen’s Pipe Smoking Society group on Facebook. He posted some of the most oxidized stems and then posted what they looked like after he used a product that he developed originally for working on pens. I kept reading and looking and just did not bite. I have used many different people’s concoctions for removing oxidation from stems and really none of them actually did it any better than a lot of elbow grease and time. But there was something about the work he posted that caught my eye and kept me looking. I think the thing that hooked me was that he did a stem and his product cleaned up the stem and left the logo stamp intact. It did no harm the paint in the stamp and it did not need any protection on the stamp before the product was used.

Product and Cost

I wrote Mark using Facebook Messenger and asked him about the product and its availability in Canada. He wrote back almost immediately and said that he had shipped quite a few bottles to Canada and had no difficulties with it. He had some available in two different sizes – 8 ounces and 16 ounces. He said that each bottle had slightly more than the label said as he overfilled them. He said that each bottle would do quite a few stems depending on the level of oxidation. He figures that an 8 ounce bottle will do at least 15-20 stems heavily oxidized stems. The less oxidation on the stems the greater the number of stems that can be done.

The cost of the product was $20 USD for an 8 ounce bottle and $40 USD for a 16 ounce bottle. He also sold a Fine and an Extra Fine Pipe Stem Polish. The price of each jar of the polish was $12 USD. He said that a jar of polish can take care of between 40 and 50 stems. He said that it was available on his pen website, http://www.lbepen.com/ and that there were instructions for using it on the home page of the pen site. The product is label as Hard Rubber Deoxidizer on the site but it is the same thing. We wrote a few messages back and forth and we struck a deal. I quickly made a payment via PayPal and the product was on its way to Vancouver.

Added Instructions

Once I made the order Mark wrote and suggested I pick up a few items to have on hand when the product arrived.

1. Mineral oil, as it is what he used to clean the stem after using the product. He also added that I not use water as it is not good for rubber (that is already a given for me). He used medical grade mineral oil as all the impurities have been removed.

2. Old T-shirts to use as rags for cleaning the stems.

3. An airtight container for the product as it will dry out if left open. Use the product as it is when it arrives, just pour it into the container.

He added some additional notes that I also found helpful.

1. The product is reusable and can be left in the airtight container. He did say that eventually the product will not work as well of course and should be replaced.

2. He suggested that I could soak around 10-15 at a time as it will save on the product that I need to use.

3. If the stems are very oxidized put them in for about 45 minutes, pull them out and rub them down then put them back in.

4. For very minor oxidation they might only need to soak for 15 minutes.

Learning to use the Deoxidizer – or before using, read the directions.

I received the package from Mark quite quickly considering it had to cross the Canadian/US border and clear customs. When it arrived, I tried using it by painting it onto lightly oxidized stems and found that it made no significant difference to my work load. Using it the way I was merely added one more step to my process of dealing with oxidation. I used this method for almost a month. I applied the deoxidizer to the stems with a cotton pad and scrubbed the stems repeatedly trying to remove the oxidation. I was less than impressed with the product at this point and laid it aside for a month. It sat on the corner of my work table irritating me for the month.After a month of misfires due to my lack of reading the instructions, I was ready to pitch the product in the can and call it a bust. It just was not delivering what I saw in Mark’s posts. Even on the lightly oxidized stems, it did not deliver. However, because I had spent the money and had the product in hand I decided to contact Mark. I am after a cheap skate and I had spent money on this stuff. I wrote and asked him some follow-up questions regarding how he used the product. I figured that I had nothing to lose.

Mark was gracious and highlighted what he had written to me before. He reminded me that the instructions were on his website. I ashamedly acknowledged that I had not read the instructions – something my wife and daughters will tell you is a common malady of mine. I immediately went back and reread his instructions. I printed a copy off his website so I had a hard copy. I found an airtight container and poured the Deoxidizer solution into it. I read that Mark said to maximize the solution by putting in multiple stems at a time to soak. I thought I would push it and put in a whopping five stems. 😉

I followed the instructions religiously this time so as not to repeat the earlier fiasco. He said to leave them in the solution for 45 minutes so I did just that. After 45 minutes, I removed them from the bath. I wiped them down with an old cloth and ran pipe cleaners through the airway to clean them. I had no mineral oil so I used some 99% isopropyl alcohol and it worked really well to remove the sticky solution from the stem. I rubbed the stem quite vigorously to remove the solution from the surface and found that it did a great job of removing the oxidation. The lighter the oxidation the more quickly it came off and left the stem clean of oxidation.

I did a bit of experimenting with the product, took five of my more heavily oxidized stems, and left them in the container of solution overnight. I come from the school of “if one pill is enough then more is better, right”. In the morning, I did not quite know what to expect. I opened the air tight container and peered inside. I was not sure if I would see my stems dissolved into blobs of rubber or worse yet still horribly oxidized. I fished them out of bath and was surprised at how black they looked and at how brown the solution in the container was. I rubbed them down with a cloth and if you were there, you would have heard my exclamation of surprise. The oxidation was gone and the stems were black. They were a little dull but they were black. The ugly oxidation was gone. Even more interesting was that several of them had embossed logo stamping on the stem side. The product did not damage the stamping at all and when I wiped the stems down the embossed stamp remained unscathed.

Okay, at this point I was beginning to get the picture. I could have saved a lot of frustration if I had read Mark’s instructions. This product worked like a champ. It removed the oxidation with little effort on my part other than wiping down the stems and rubbing them dry. I cleaned them before I put them in the solution as part of my routine. After discovering that the product worked that well I started putting in 5-7 stems at a time. At this point I have soaked close to 30 stems in the solution. It is beginning to turn brown but it still works very well. I intend to push it to the limit and see exactly how many stems I can run through the solution before it begins to fail.

After putting the Deoxidizer through a workout for the past two months I am pleased with the product. I recommend the product with no reservations. It works better than any of the other products I have used. It is non-toxic and does not damage the stamping or logos on the stems. It has saved me quite a bit of time and while the stems soak, I can restore the bowls. It is worth the investment I made in it. I intend on ordering a larger jar of the Deoxidizer so I have it on hand when the current batch fails.

 Before & After Pipe Polish – Fine and Extra FineI ordered a jar of the Fine and Extra Fine Pipe Polish at the same time I ordered the Deoxidizer. I decided to use them as Mark intended them to be used. On his website he describes the polishes. I begin this review of the polishes with his own description (on the website he speaks of using the polish on pens but the same polish is used for stems as they were designed for use on rubber).

Though these polishes are specifically designed for hard rubber and celluloid they do work well on other types of pen plastics. All of our polishes are made using the highest quality products.  These products are designed to not only recondition your pen but also to provide a layer of protection. All of the products used in these polishes are non-toxic and environmentally friendly.  There are two different polishes. Fine and Extra Fine. We recommend both as some pens will show more wear then others. Often one will work on a pen using the Fine polish and finish with the Extra Fine. The polishes are be sold in 2 ounce jars. The cost is 12.00 per jar. The number of pens one can restore will of course vary depending on the wear that each pen shows. I have restored from 75-150 pens per jar.

I have been using the polishes to polish the stems that come out of the Deoxidizer bath. They work very well and because they are not heavily gritty they do not scratch vulcanite or acrylic stems. They also dissolve quite quickly leaving a light oil on the surface of the stem which can be rubbed in with a cotton pad or cloth. I use the Fine Polish first and apply it to the stem with a finger and then scrub the stem with a cotton pad to polish it. I wiped it down and remove the oil on the surface. I use the Extra Fine Polish next and repeat the process.

I have found that the two polishes each remove residual oxidation from the stem that the Deoxidizer leaves behind. Often this oxidation cannot even be seen with casual observation. It shows up when I look at the cotton pads I am using. The pads always come out with the residue of the dark, grey-black polish and a lot of brown oxidation around the edges. The polish goes a lot further than the Deoxidizer. As Mark said on his website regarding pens, I can affirm regarding stems. I have used the product on over 60 stems so far and I have a lot of polishing compound left in each jar.

Mark also has a Hard Rubber Balm that I have not tried. I think it will be in my next order to get a feel for how that product works on the pipe stems. Over all I am very pleased with Mark’s products – the Deoxidizer and the Fine and Extra Fine Polishes. They deliver what he promised they would deliver and in doing so have made my work on stems a lot easier. They are a significant contribution to the pipe refurbishing tool box. You should really try some out and see for yourself. Thanks Mark.

His website is www.lbepen.com and the product can be ordered from the site or you can send him a message on Facebook to Mark Hoover.

Comoy’s 484B Grand Slam Restoration


By Al Jones

The 484B Billiard with saddle stem is a classic in the Comoy’s shape chart and is described as a “Large Billiard”. This pipe is a Grand Slam, which means it originally came with a metal stinger and leather washer system. Most smokers discarded this apparatus for a more open draw. The Grand Slam was introduced in the early 1930’s and was seen into the 1970’s. The round “Made in London, England” stamp and drilled, 3 piece C stem logo indicate that it was made between somewhere from the late 1940’s to the mid-70’s. The pipe arrived in very good condition, with some buildup on the bowl top and an oxidized, but otherwise undamaged stem.

The cake was removed with my reamer set, than the bowl interior finished with a small piece of 320 grade sandpaper wrapped around a smaller bit. The bowl was filled with sea salt and alcohol and soaked overnight. After the soak, the shank was cleaned with some small bristle brushes and paper towels. I soaked the stem in a mild Oxy-Clean solution with a dab of grease over the stem logo. Following the soak, the stem was mounted and oxidation removed with 800, 1,500 and then 2,000 grade wet paper. The stem was finished with 8,000 and 12,000 grade micromesh sheets. I removed the tars on the bowl top with a worn piece of scotch-brite (wet) and then touched up with 2,000 grade wet paper. The bowl top still had the beveled edge and interior was in excellent condition.

The briar was polished with White Diamond rouge, than several coats of carnuba wax. The stem was finished by buffing with White Diamond rouge and then Meguiars Plastic polish. The button is quite crisp on this one, so the previous owner must have been very careful when smoking the pipe.

Below is the finished pipe

The Solitary Pipe Smoker Revisited


Blog by Steve Laug

This drawing came to me from Bill Cumming as a gift. He found it on his journeys. To me the illustration captures the solitary nature of the ritual of the pipe.

A few years ago, I wrote a blog called The Solitary Pipe Smoker in which I spoke of my own predilection toward being a solitary pipe smoker. I wrote it with no disrespect for the community of pipe smoking folks – male and female with whom I have had the pleasure of communing while enjoying my pipe. Rather, I wrote it because in my life I need time that is not filled with “noise” – good, bad or neutral – to recentre and refocus my life. I wrote of how the pipe is able to give me space and time to do just that. The ritual of the pipe is almost sacramental, in that it creates the space in my head and in my life to step away and regroup. The link to the original blog is (https://rebornpipes.com/2012/05/29/the-solitary-pipe-smoker/). For me, the fact that I have to pay attention to the ritual and move through the steps of loading, packing, lighting and tamping my pipe in itself pulls my thoughts into the circle of the bowl.

Like others, I thoroughly enjoy the comradery of a group of pipe folks – sharing tobaccos, while swapping stories and pipes is a pleasure I don’t take lightly. Several years have gone by since I wrote that blog and I thought it was time to revisit my thinking. I have bought, sold and traded quite a few pipes over that period. I have had great visits with pipe folk around the world over a pint or a coffee while enjoying a favourite bowl together. I wondered with the passage of time if my understanding of the solitary habit of my pipe smoking had changed at all. Had my need for space and time alone made any radical shift since I wrote that? Have I become more social in my pipe smoking and less solitary? These and other questions ran through my mind. Yes, it is time revisit my thinking on the solitary dimension of my pipe smoking.

I set aside some time over the past weeks to think about the questions that I posed above. I have reflected on my thoughts from the previous blog and have read others who have written on the communal aspect of pipe smoking. I wanted to compare my earlier thinking with what others have written about the communal nature of the pipe. Some of them have gone so far as to say that pipe smoking is best as a communal experience. For me that has not necessarily been true in the past. Therefore, to check my experience I have taken time for introspection and self-examination; I have to say that I have become even more committed to the time of solitude with my pipe since I wrote the earlier blog. The solitary nature of pipe smoking is sacred to me. It addresses a need in my life for time that is free of the interruption of speech or noise.

Why is that true for me? My every day work life is crowded with people and conversations. I spend 8-12 a day, 5-6 days a week talking with people face to face, on the internet, or the phone. By the end of my day, I am certain that I have used my quota of words. I am talked out and have nothing left to say. I long for the quiet of solitude. No sounds, no talking, no music, no need to respond or pay attention to another person – just quiet, alone time.

However, this is where the problem comes into focus for me. I am not a hermit who lives alone in his cabin in the woods. I live in community with my wife of 40+ years and 3 of our adult daughters. When we get home from work in the evenings, everyone wants to engage and be family – except me. I want to disappear and I get that haunted look in my eyes of a captive who cannot hide. What am I supposed to do? Do I just ignore the needs of the family and selfishly cling to my own needs – real or imagined? Do I stuff my need for quiet and just man up and do the work? Do I come up with an alternative that works for all of us in my family?

Together my wife, daughters and I came up with a workable solution for us – it allows me some solitude before I engage with my family. It is simple and it gives me the space I need and gives them the Husband and Dad they want. When I get home from work, I go to my workshop and fiddle with restoring pipes or have a bowl of tobacco on my front porch or maybe both. By the time dinner is ready my equilibrium has been restored and I can be present in the family. The time with the pipe – either puffing it or restoring it or both gives me the separation that I need to leave the talking of the day behind me. It gives me the solitude that is so necessary for the introverted me to be able to be ready to re-engage with my family. This solution has worked for us for many years now and I find that relieves a lot of pressure that they or I can impose on myself for not being able to listen well to my family after spending a day listening to others.

My reflections confirm that solitude is important not only for my own spiritual and emotional health but for my ability to engage fully in the events of my life and enjoy the present. However, I have also learned that no matter how important solitude is for me, it remains elusive in my life if I do not make space for it. My life filled with noise, busyness and the intrusion of the internet will always take precedence if I do not challenge it. It is hard to leave the noise behind and spend time alone. Many people do not like to spend time alone. They find it uncomfortable and hard to do. To take the time to be alone is actually countercultural and challenging. To maintain a routine of solitude is even harder.

Solitude – where all external communication, noise and internal noise and chaos stops is becoming a fading memory for most people I know. The idea of stopping the doing and just being is becoming harder for folks to imagine. However, I have found that it is a necessity that if neglected has consequences for me. Those consequences range from malaise and weariness that can easily progress to burn out to being so busy that I forget to care for myself with all of the accompanying issues that arise from that. So how do I ensure that I take the time to be solitary? How do I maintain this needed respite?

I have learned that this is where my pipe can facilitate the introspective, quiet time that I require. It is a pleasure that I enjoy and a past time that provides me with the quiet I long for. When I settle on the porch or shop with my pipe and a favourite tobacco the move into solitude begins. The smell of the unpacked pipe begins the process of transporting me into quiet. The feel of the pipe in my hand is inviting. I open the tin or pouch of tobacco and inhale deeply of the aroma. I love that moment when the components of the blend spin around and come together with a delightful pouch note. I slowly breathe out, exhaling the stress of my life. I put the pipe bowl in the pouch or the tin and push the tobacco into the bowl with a finger or thumb. If it is a flake tobacco, I rub it out between my fingers and thumb or on the palm of my hand until it is the right consistency for a smoke. I pack the bowl almost unthinkingly now as I have done it so long. I am often far away in my thoughts as I load the pipe. I use my thumb to test the pack of the bowl. All of these minute steps cause me to focus on a singular task and leave behind the events of my day.

When the flame is put to the smoke and the slight draw of smoke flows into my mouth it is like a sipping a good wine. I savour the flavor of the tobacco as it swirls around my mouth. I sip on the pipe, slowly setting a cadence to the smoke. A good smoke has to be unhurried and uninterrupted if it is going to be a quiet place for me. I find that when my wife or daughters talk with me in the process of the smoke, I lose the cadence and the magic is gone. That slow sipping of smoke into the mouth and letting it slowly leave through the mouth brings focus and quiet. As the smoke ascends and wreaths my head, reaching to the ceiling of my porch I sense the pipe drawing me into the circle of solitude. It is this moment where I could stay forever. Pipe smokers speak of a magic smoke, but for me each smoke that transports me to a peaceful spot is magic.

I have tried to move to that quiet place with others present on my porch. My son in law will join me for a pipe periodically and it is never quite the same. It is nothing he says or does, as often it is quiet.  It may be that my mind moves from that place of being unengaged to having to think about another person. I am not sure why but I know that doing that takes my focus off the moment and immediately makes it another social event for me. While it is often a pleasant experience for me, it still does not meet the need I feel for solitude.

I have found that it is only alone that I experience the magic of the pipe. I don’t think I have ever had the experience in the company of pipemen. No matter how convivial the gathering or how enjoyable the experience it is never the same. I think that the experience of the magic is linked to the solitude. I think that is why some have called pipe smoking sacramental. The pipe has the ability to transport the pipeman from the mundane of the day into a sacred place where the soul is at rest and prayer can happen without thinking. The wafting of smoke is not unlike the incense used in places of worship that lift the worshiper to a higher plane and out of their daily routine. The ritual of pipe smoking – the tamping, relighting and puffing slowly all work together the same way to lift me out of the day to day wrestling to a place of quietude.

As the last tamp is done and the last sip of smoke is drawn into my mouth I find myself moving back into the present. The pipe and the smoke have prepared me for re-entry into my home life. It makes the transition into the life of my family somehow more natural and less forced. I tap the bowl against the heel of my hand and tip the ashes into the flower bed below my front porch. I run a pipe cleaner through the stem and bowl and blow air through to remove any bits of tobacco in the bowl. Each step is part of the re-entry. The taste of the tobacco on the inside of my lips and the lingering smoke in my beard are reminders of the place of quiet I am leaving.

All that being said, I guess I am still a solitary pipe smoker most of the time. I am not a recluse or particularly anti-social but I long for and enjoy the quiet times alone with my pipe. The closest thing that provides me the same kind of moment is a pipe on a good walk. Each Sunday I walk to church with my wife and daughters. It is about a 30-40 minute walk and it provides a perfect opportunity to enjoy a bowl and some quiet. I dawdle along with a pipe in my mouth enjoying the day. If it is sunny so much the better and if it is raining it is not a deterrent.


On Bending and Straightening Amber Stone Stems


Blog by Robert M. Boughton

Copyright © Reborn Pipes and the Author except as cited

No amount of experimentation can ever prove me right.  A single experiment can prove me wrong.

— Albert Einstein (1879-1955), German-born theoretical physicist and winner of the 1921 Nobel Prize for his discovery of the law of the photoelectric effect, received in 1922 (don’t ask why – the answer in some ways is more complex than Relativity)

THE POWER OF PERSUASION

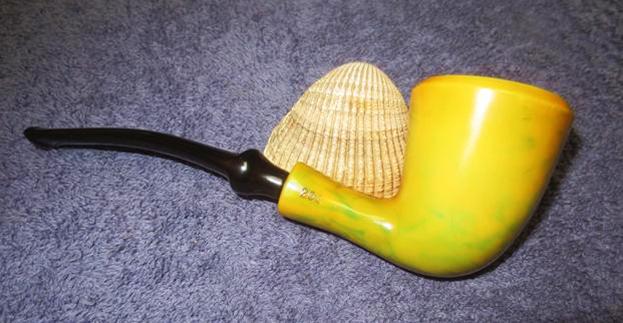
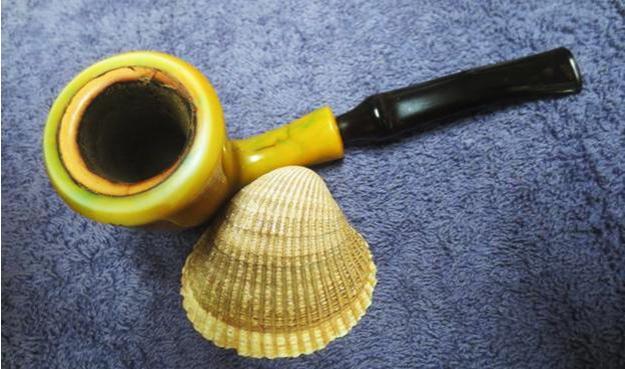
This is the most difficult pipe restoration blog I’ve ever written, for the things about which it is not.  It is not about an antique gold-banded KB&B Blue Line Bakelite, c. 1910-1914.  A friend of mine won that distinguished, classic shaped pipe from the pre-Kaywoodie era for a very low price on eBay, and I offered, for a small fee, to restore it.  It is not about the still older gold band CPF Best Make turned lion’s head meerschaum, c. 1898, that only lacked a bone tenon to be complete.  As much as I dislike the cliché, I poured my heart and soul into that pipe since 2013 in a true labor of love to return the 19th century treasure to its original structural form.  The simple act of restoration was – and remains – intended as a tribute to the man most of the readers here know as my good friend and mentor, Chuck Richards, who gave it to me.

It is not about either of these things, or the writing between the lines as it were, but some choice details are relevant.  For example, the connection between the two pipes named above is their stems.  The Blue Line’s is Bakelite, the world’s first synthetic plastic, which could be colored dark brownish red.  The Best Make’s genuine dark red amber stem comes from wholly organic-based resins from exotic, extinct trees that were washed away by large bodies of water and fossilized into mineral form 10-100 million years ago.

The focal point of this blog is the immediate but temporary solution to a series of events that still has not been resolved.  Never in my wildest apprehensions, during the last several years of taking some truly ruined pipes and making them whole again, did I conceive that something seeming to be simple could become so bloody banjacked , as the Irish might put it with good cause.  At first, I intended to include the details as usual, in a single account of the finished project.  And so, with a little help from a friend, I adapted my thinking, draft after draft, to write this aspect of the overall restoration into a single blog.  To be brief, here is what happened.

My friend (the one who owns the Blueline, Daryl Loomis), holds the status of co-top buyer of my pipes, numbering five so far, with someone else who came and went in short order.  Daryl also let me restore one of his own pipes before, a gorgeous Redmanol Socket system pipe related to this one by its maker, KB&B, and the Redmanol of its construction that was consumed by the General Bakelite Co. in 1922.  Thereafter, Redmanol was classed as Bakelite despite certain superior qualities.  For extensive details on Bakelite’s origins and development, see the fourth link in my Sources.

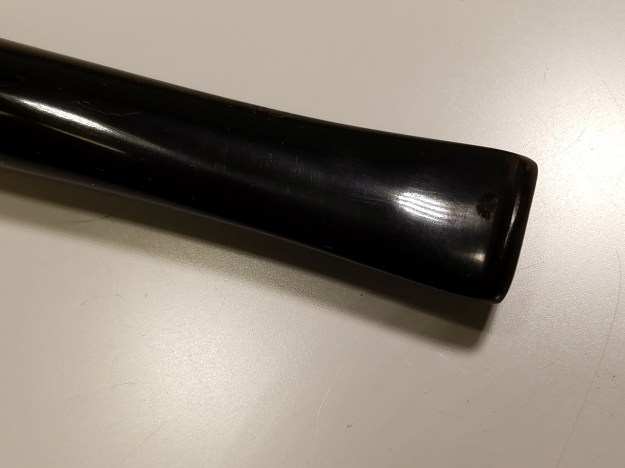
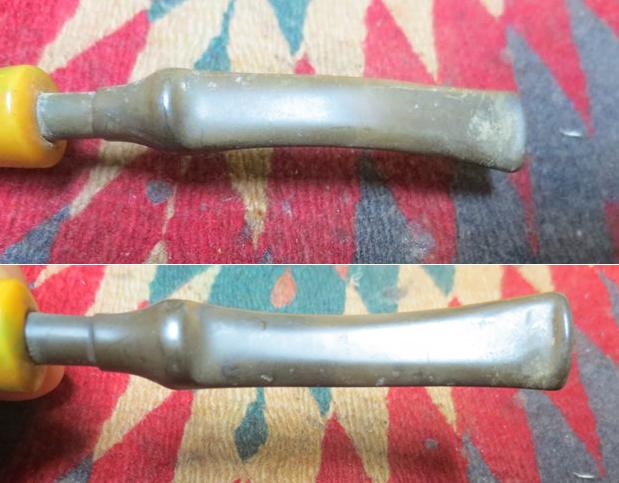
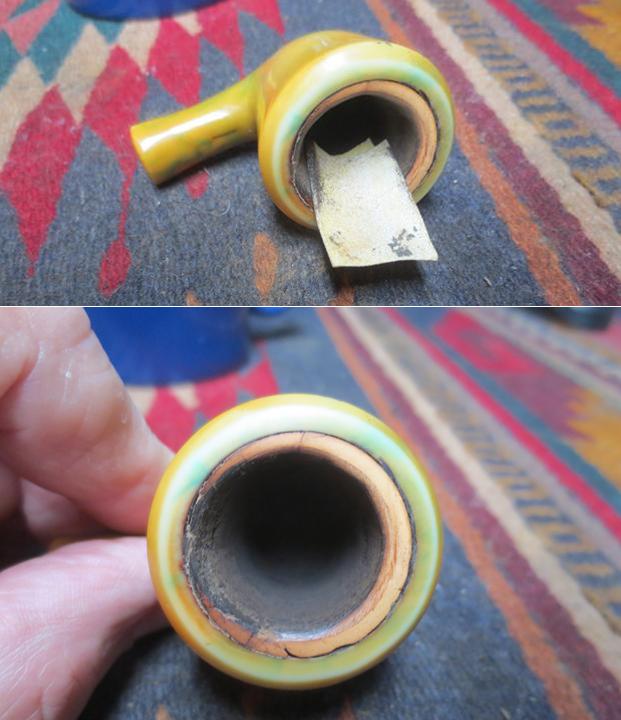
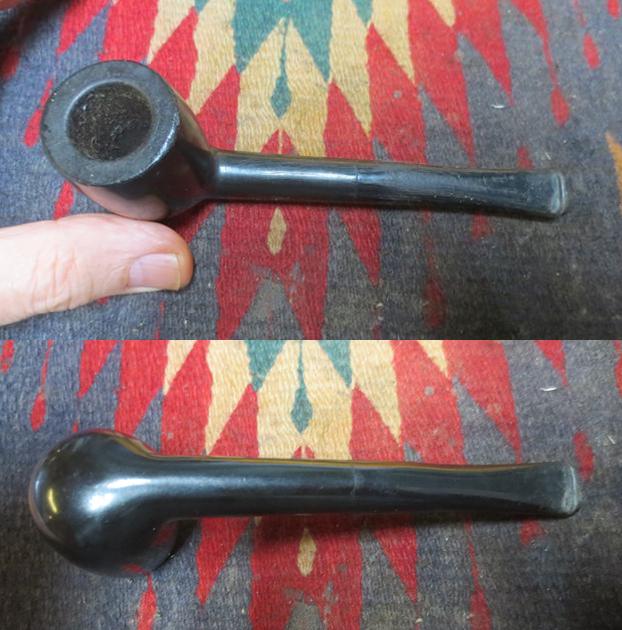
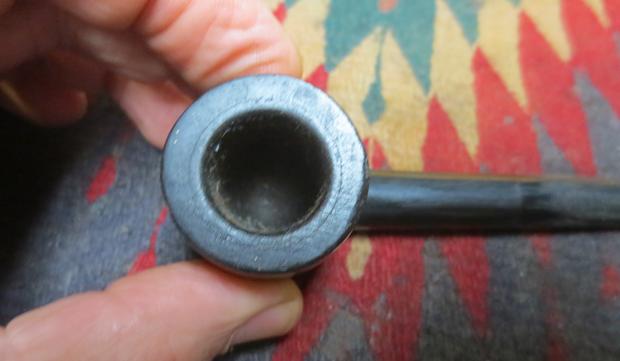
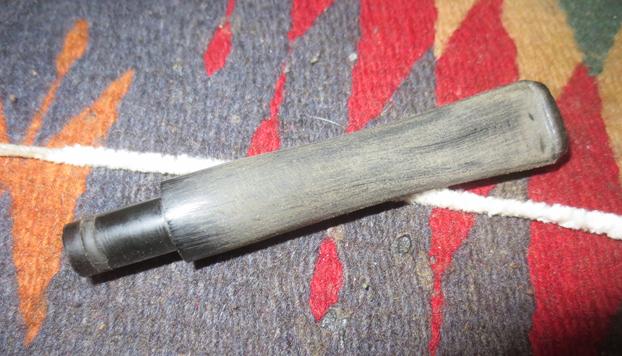
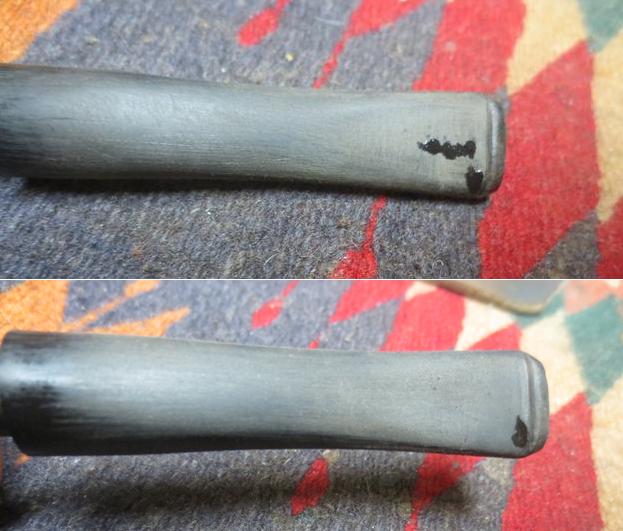
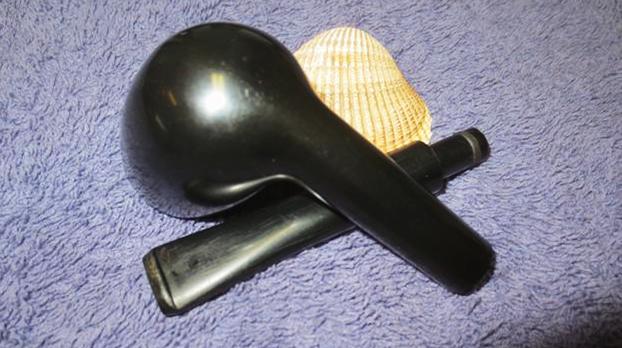
At any rate, without going into details that will be covered in my eventual blog on the full restoration of the Blueline, there was a mishap – oh, the understatement! – wherein the bone tenon was crushed.  The photo below was taken after I Super Glued the bits and pieces of the shank end of the tenon, minus the powdered remains, as best I could.
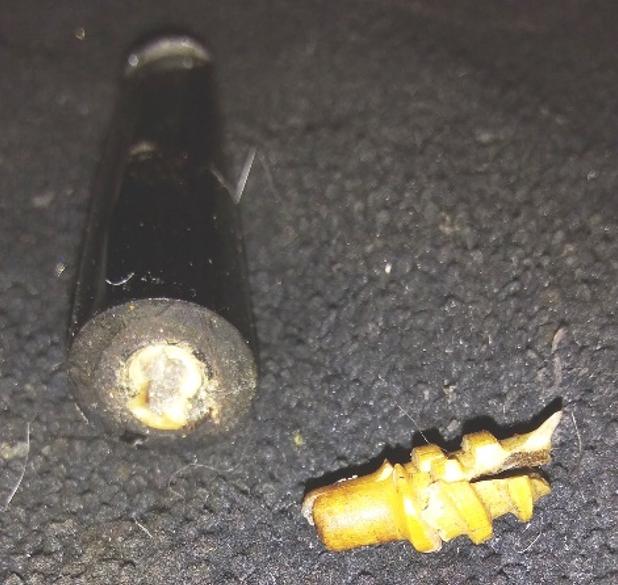
This catastrophe was followed close on its heels by a second calamity that left the Bakelite stem ruined, as far as I am concerned., other than for use with some unforeseeable shop pipe.  There is no way I will place a stem I broke, or anyone else did for that matter, on a paid restoration, even though, for obvious reasons, I’m refunding the small fee.  And so, with the immediate goal being to return the Blueline in a condition that it can be smoked as soon as possible, I am left with no alternative than using the genuine cherry red amber stem from my Best Make pending the acquisition of a Bakelite replacement.  Here is the Bakelite stem after I was done with it, in the negative sense of the expression.

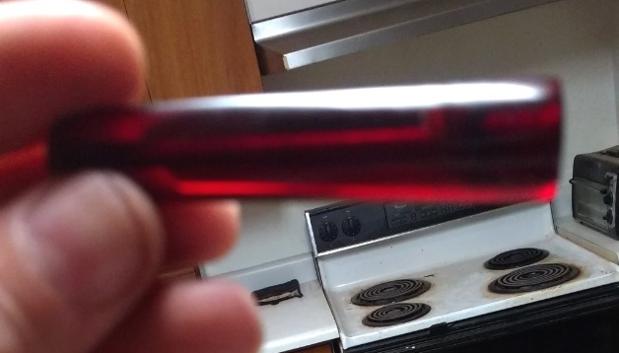
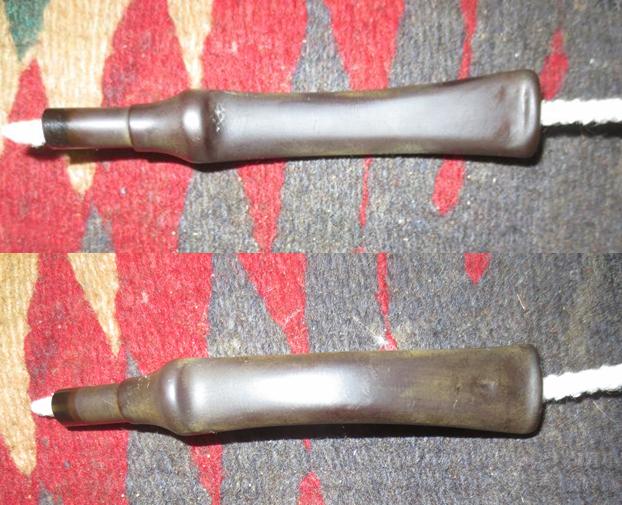
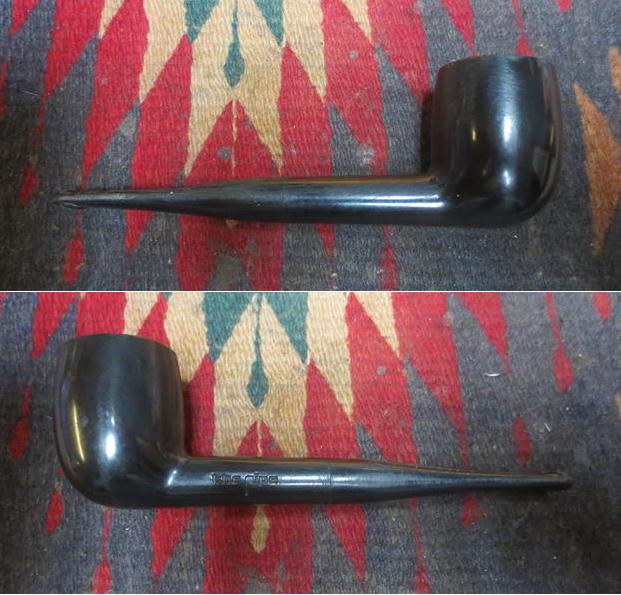
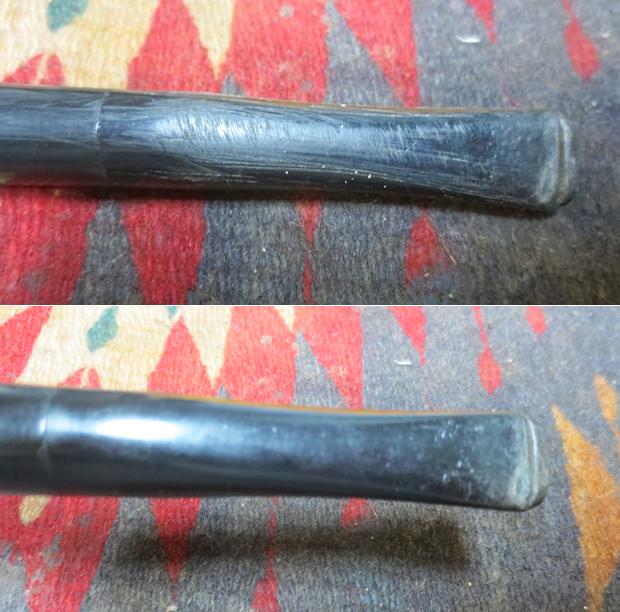
Top view Bakelite stem

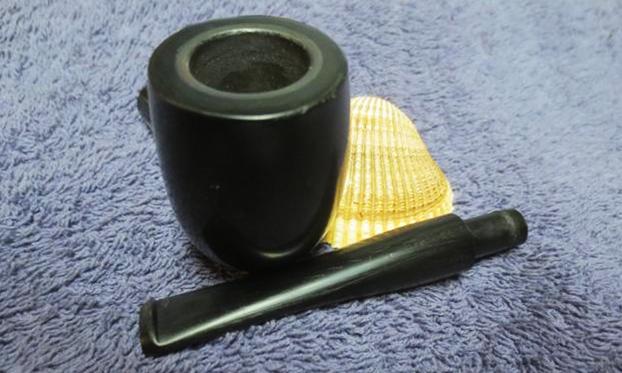
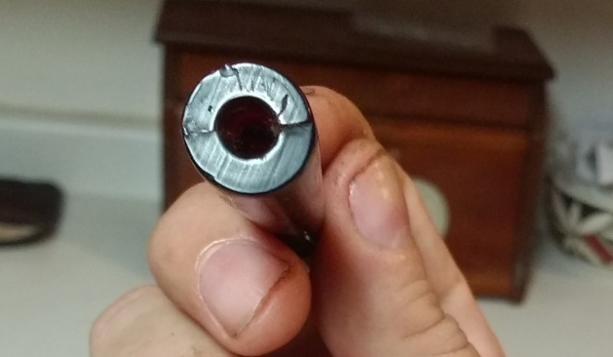
Bottom of Bakelite stem, broken

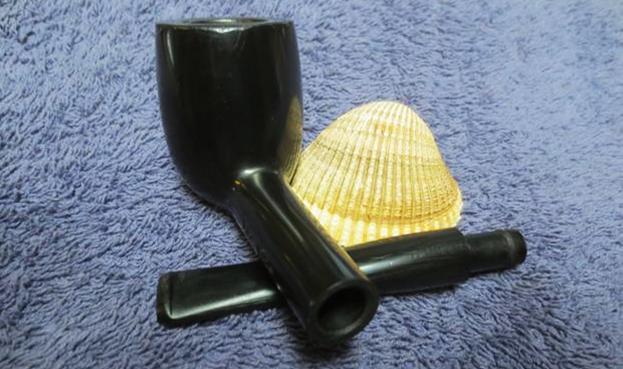
Open end with both sides of the break shown on either side

Steve wrote an excellent blog called “What Is the Amber Used in Pipe Stems and How Do You Bend It?” in 2013, but had never tried the theoretical guidelines proposed.  He still has not had occasion to attempt the unusual process.  In other words, it occurred to me, I would be the guinea pig to test the theories.  The prospect was not appealing given the potential for destroying my 119-year-old amber stem for the sake of “progress” in this obscure field of pipe restoration.  Steve’s blog is a trove of information about amber in general and the article from Scientific American on how amber stems were once custom-crafted and bent per the specifications needed for a specific pipe.  Steve raised some good questions in his fine blog that can be read at the third link below.

ABOUT BENDING AMBER

Having spent a great deal of time pouring over every word of Steve’s piece as it related to bending amber, from the viewpoint of having an immediate job to do so, I was left with still more troubling questions.  The key concerns were:

  1. Since amber stems were made and shaped for specific pipes, could they be re-bent later for replacements on other pipes? After all, bending a stem once is one thing, while bending it back is another.
  2. If so, what might be the effect of age, which tends to make amber more brittle, on a stem?
  3. Was my hope that the answers to the first two questions just that, wishful thinking, or put more plainly, a crock?

WARNING AND DISCLAIMER: The method I am about to describe, although it worked beyond my wildest dream, does not follow the better, safer steps set forth in the article upon which Steve’s blog is based.  Read his blog and, if you already possess or have the means to acquire the equipment described, or the wherewithal to fashion your own versions, please do so.  Also follow the other procedures described.  I am taking responsibility for my own mistake(s) that made this drastic measure necessary but will not be responsible for anyone else’s misfortunes!

Having abandoned myself to the certainty that my efforts would either turn out well or the whole thing would go awry in the most hideous way, I didn’t bother re-visiting Steve’s blog when I reached the desperate state of mind necessary to go through with the “experiment.”  Instead, I winged it.  The following pic shows my beloved 1898 amber stem not only in the bent form in which it was hand-fashioned by some unknown but master CPF meerschaum crafter late in the century before the one preceding the current, but as I still feared would be the last time I saw it in any recognizable form.
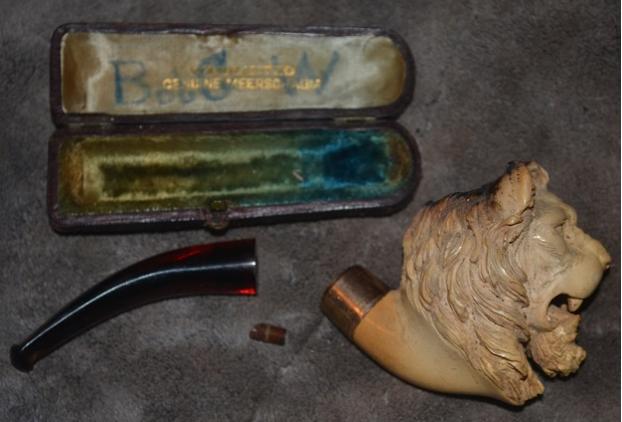
OK, here’s what I did.  Pre-heating the oven, instead of the 210° or 220° F. temperature I’ve always used for regular stems, on a whim, if you will (since I was throwing everything else to the wind), I cranked it up to 335°.  Steve’s blog states that the process does not even involve an oven and the softening temperature of amber is about 150° C. ((302° F.). I just now confirmed that he was, no surprise, correct.

Therefore, 335° F., or 168° C., was a little high.  Placing the stem on a piece of aluminum foil, I forgot to put anything through the airway to prevent more than likely collapse until about a minute after I closed the oven door on it. 

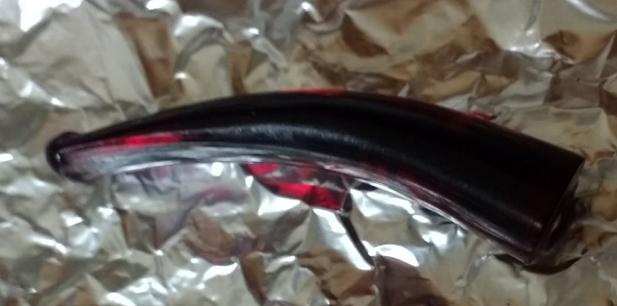
Snapping to my terrible lapse of memory, I grabbed a regular pipe cleaner and bolted to the oven, where I found the stem very hot already but the airway still intact, and inserted the cleaner through it.

I also checked after only 10 minutes more (thank God), and found the amber stem had straightened itself!  Not only that, but when I touched the stem on the piece of aluminum, it had a bizarre limpness to it.  My heart was racing as I removed the aluminum foil with the stem from the oven and placed it on the counter.  Picking up the stem with care using both hands on either end of the cleaner, I saw the middle sag downward with gravity.

Sure for a few seconds that I would become ill and have to rush to the sink to vomit, I got a hold of myself and moved my hands to both ends of the stem, at which time I found it was so soft it reminded me of the hilarious old cartoons with Bugs Bunny or whatever Toon character flopping a broken arm about like a cooked noodle.  Of course, I didn’t play with the stem, but rushed it to the aforementioned sink and ran cold water over the whole thing until it was firm again and cool.
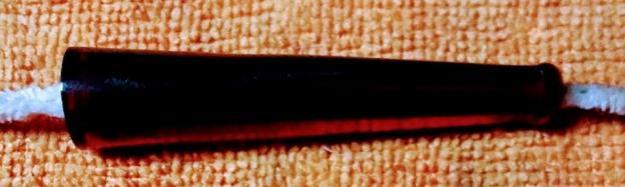
The cleaner came out with no resistance.  Needless to say, I sighed in relief and wiped the sweat from my brow.  The experiment was a success!

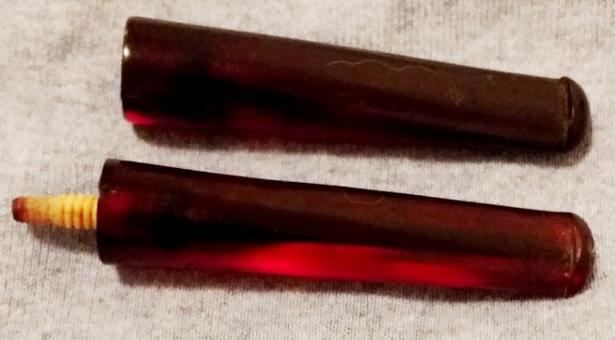
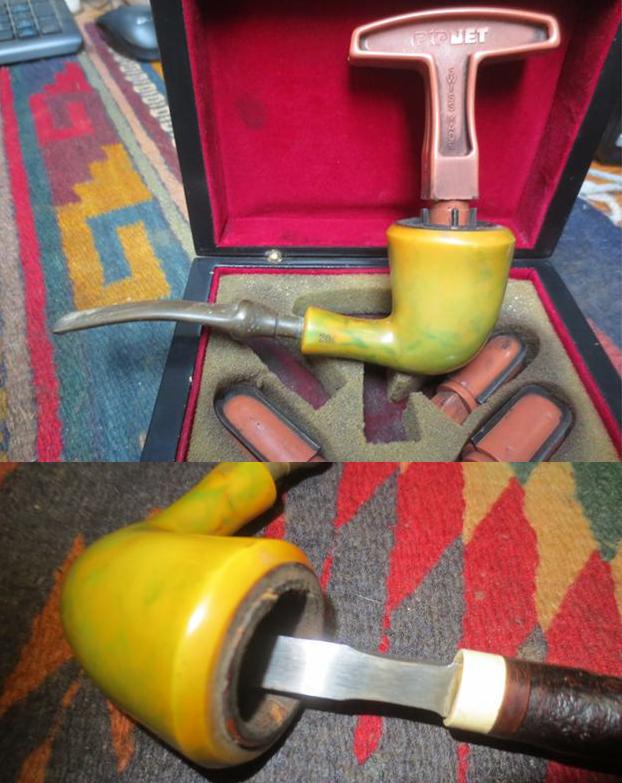
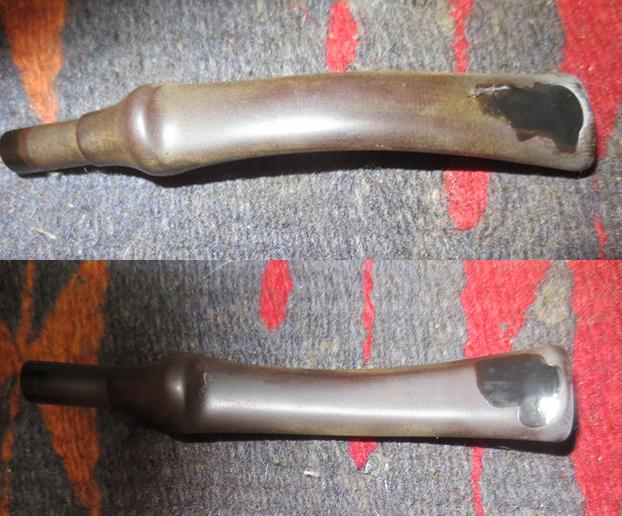
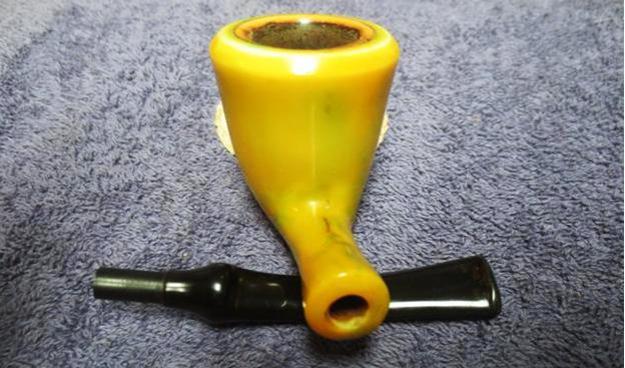
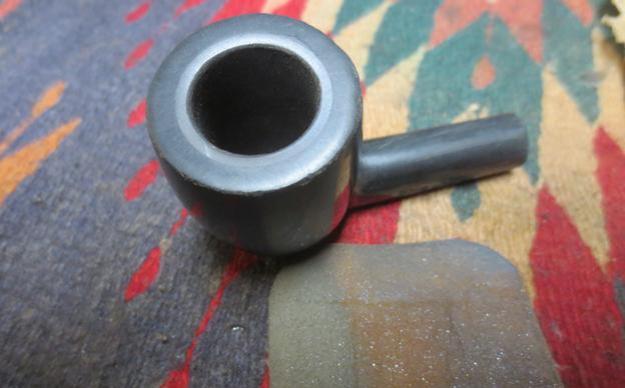
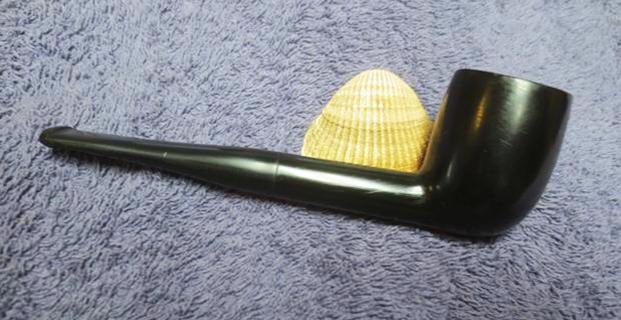
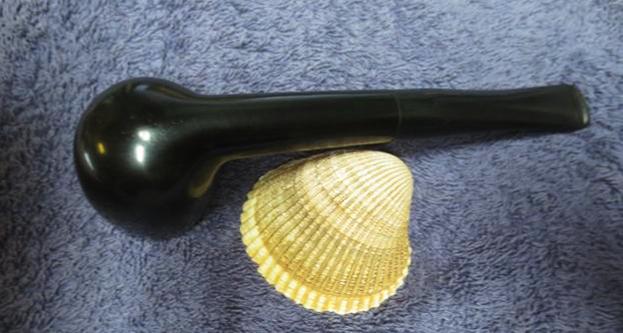
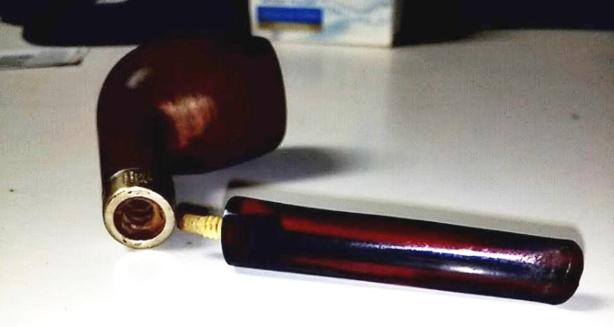
Bakelite above, amber below. I know the bone tenon is backward!

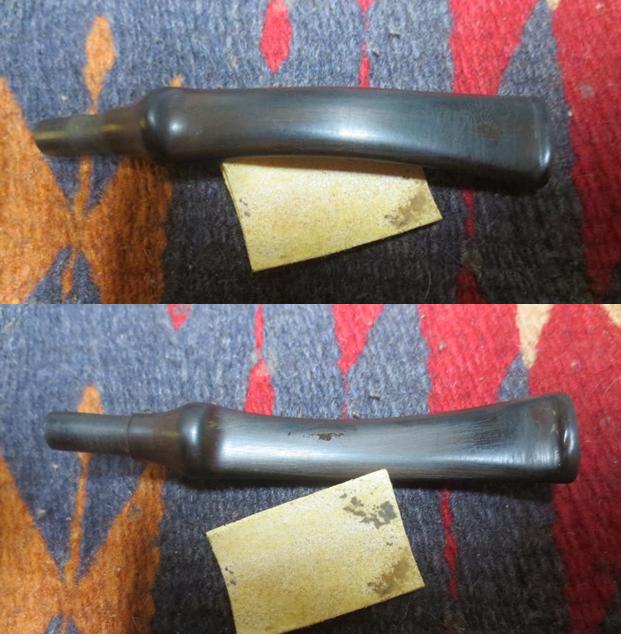
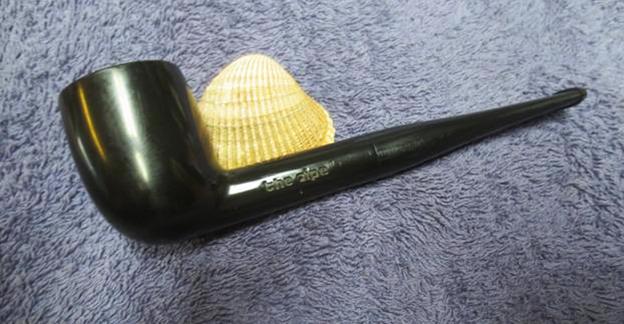
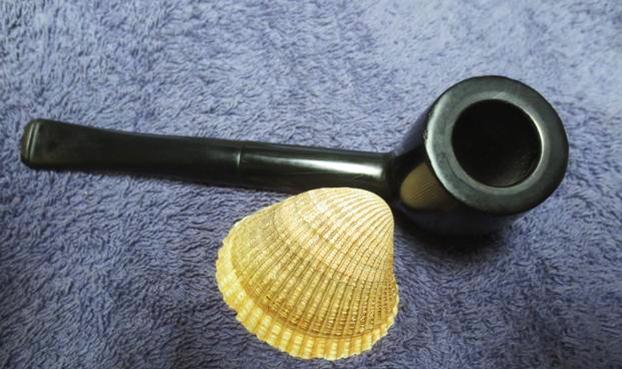
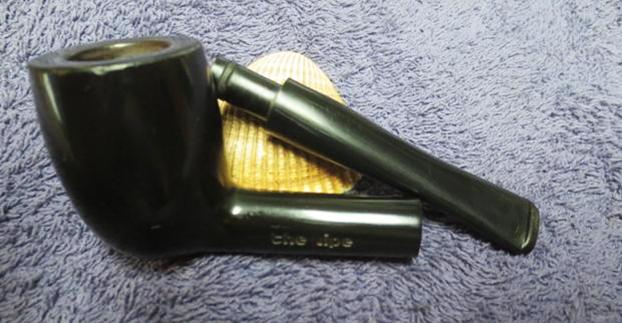
And the amber stem with the KB&B Blueline stummel that’s ready for the temporary amber substitute as soon as I have a suitable new tenon.

CONCLUSION

In my most recent, exultant email to Steve, I wrote: “As the attached pics show, I finally got the gumption to go for it, and believe it or not it was the easiest bending material I’ve ever worked with.  Lucite was a dog when I re-stemmed the BW Preben Holm, but 10 minutes in the oven and the amber not only straightened itself but was like Gumby to the touch — no, like a children’s cartoon of someone with a broken arm!”  I attached a couple of photos.

His immediate, doubtful reply told me I was correct in my assumption that Steve didn’t really know what would happen, either.  He wrote, with apparent doubt, “Was the stem a true amber stem or is it the Bakelite one that you sent pictures of?”

I responded that the stem I baked was without doubt amber, then sent this added comment: “PS: I decided to crank the temp up to 335, also, on a hunch.  It may

have been reckless, but it worked perfectly.  I’m planning on writing the process up in my blog on the Blueline.”

Steve wrote back the following words a short time later, and I appreciate them very much, although I don’t know for sure that I “discovered” the process, other than my own oven method.  “Thanks for experimenting, Robert.  That is an incredible discovery.  Do a separate write up on just the bending of amber.  I think that alone will be a must read for those of us who love to restore old pipes.  Thank you for being reckless.”

Until then, I didn’t understand just how risky this little exercise in stem repair was.  But Steve’s power of persuasion being formidable, I took his advice for the blog.

I found the following quote, from a September 1924 Time magazine write-up on Bakelite, amusing in its revelation of the fantastic and egotistic personality of Bakelite’s founder, Leo H. Baekeland, not to mention the influence his company’s PR department must have had in its writing.

“From the time that a man brushes his teeth in the morning with a Bakelite-handled brush, until the moment when he removes his last cigarette from a Bakelite holder, extinguishes it in a Bakelite ashtray, and falls back upon a Bakelite bed, all that he touches, sees, uses, will be made of this material of a thousand purposes.  Books and papers will be set up in Bakelite type.  People will read Bakeliterature, Bakelitigate their cases, offer Bakeliturgies for their dead, bring young into the world in Bakelitters.”

Hubris? Indeed!  But still, it’s amazing stuff.  By the way, the lawyers at Bakelite know something about Bakelitigating from their 1922 Patent infringement suit against the Redmanol Chemical Products Co. and the Condensite Co.

Last, but not least, I wish to thank Steve for his blog and invaluable help throughout the ordeal of my collapsing Blueline restoration, and Troy Wilburn for his wonderful blog on another Blueline and its dating.

SOURCES

http://www.elvenkrafte.com/bakelite%20presentation.htm

https://rebornpipes.com/2015/06/06/spiffing-up-a-kbb-blue-line-bakelite-poker-1908-1914/

https://rebornpipes.com/2013/02/23/what-is-the-amber-used-in-pipe-stems-and-how-are-they-bent/

https://rebornpipes.com/2016/07/05/the-scintillating-antique-kbb-redmanol-pipe/