Tag Archives: Savinelli Pipes

Restoring a Unique Savinelli Autograph 4 Freehand


Blog by Steve Laug

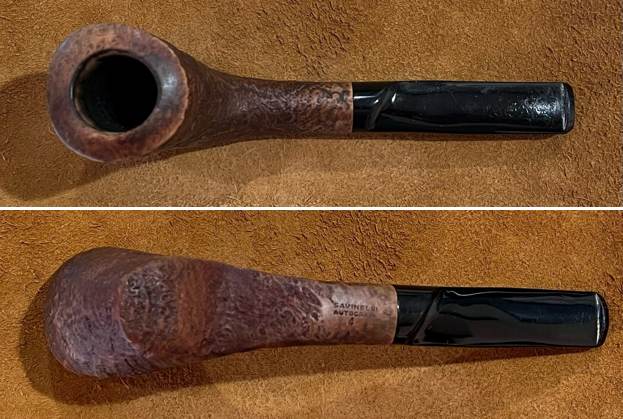
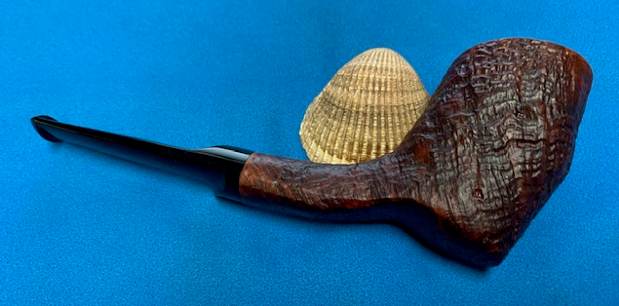
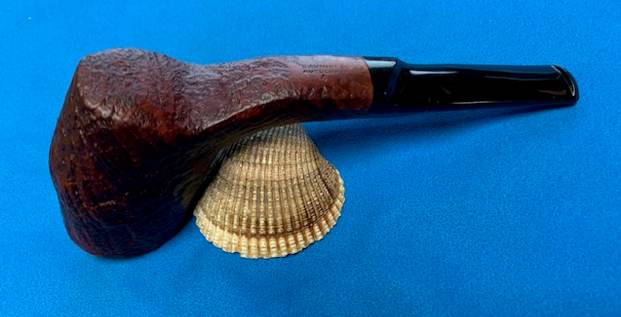
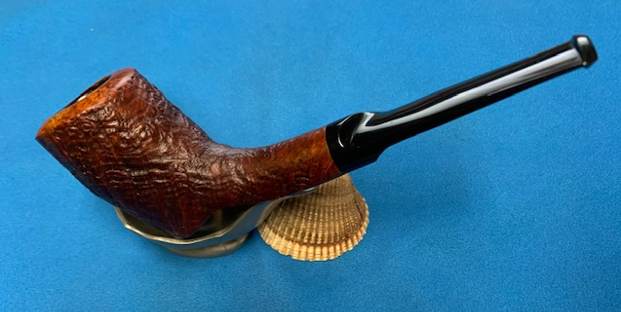
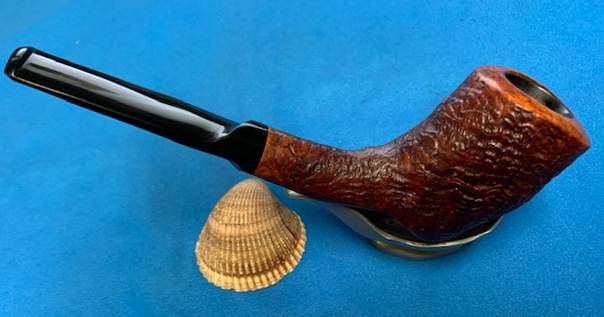
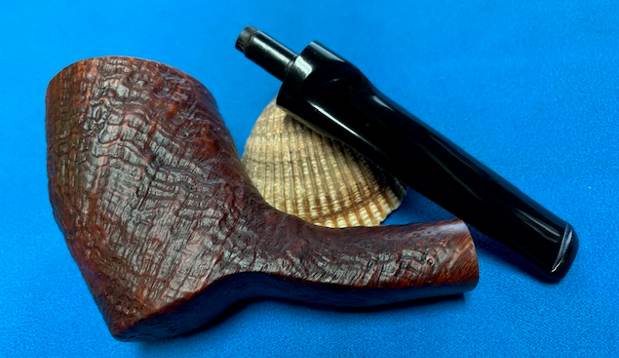
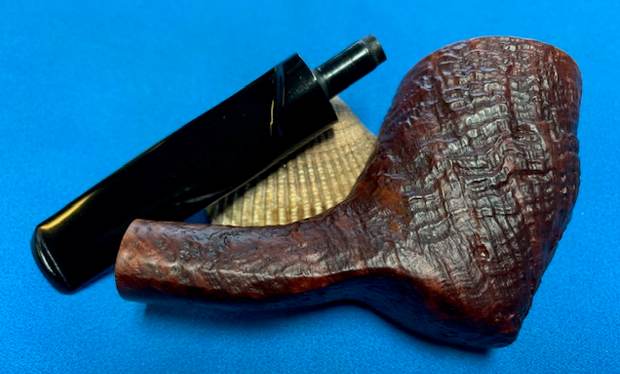
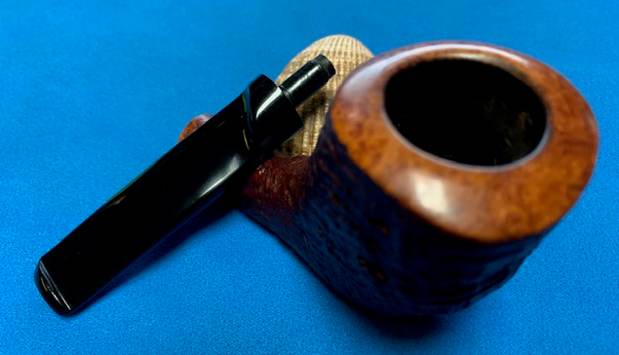
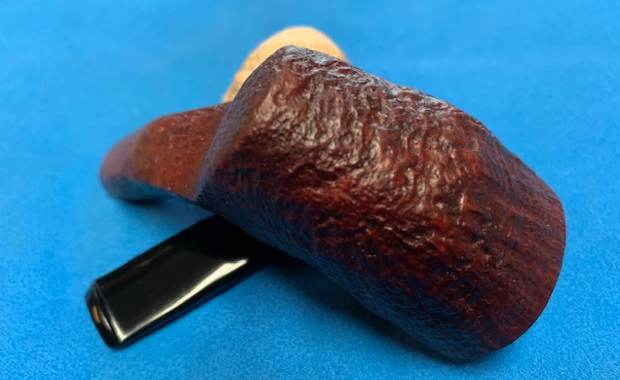
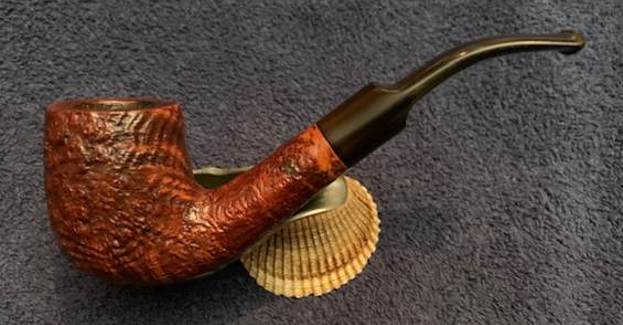
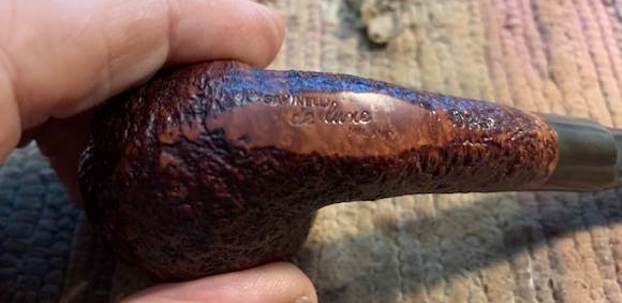
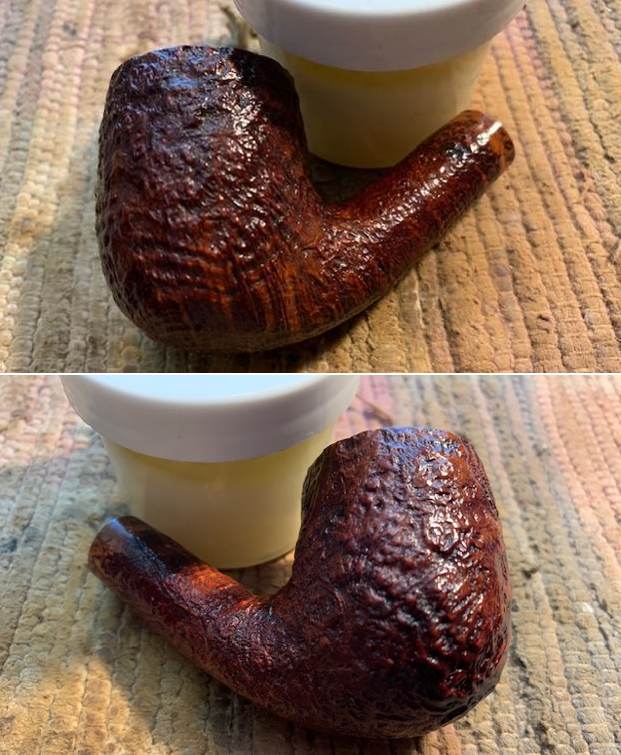
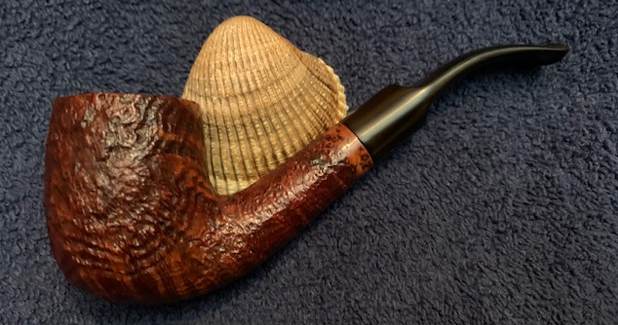
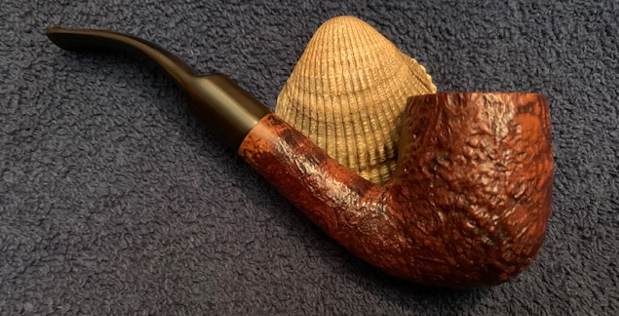
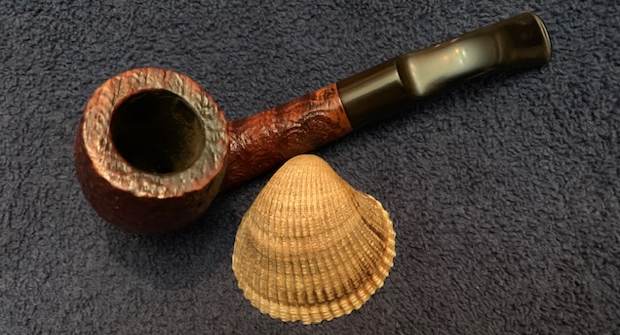
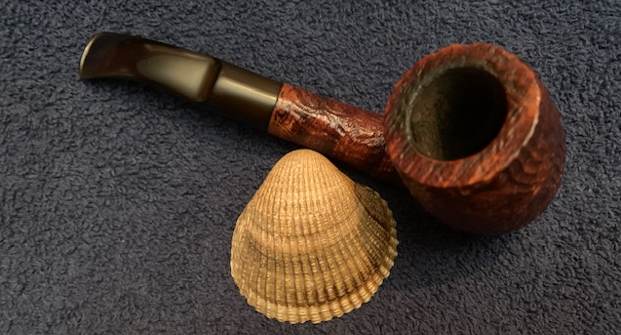
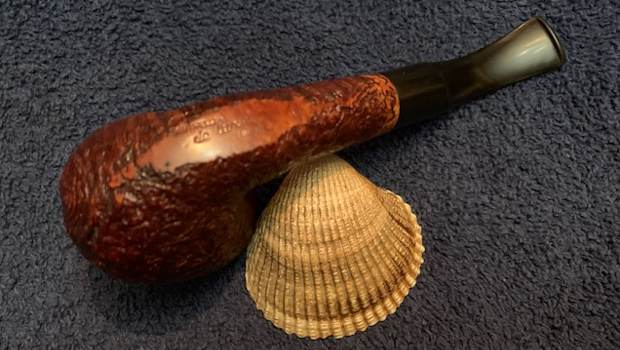
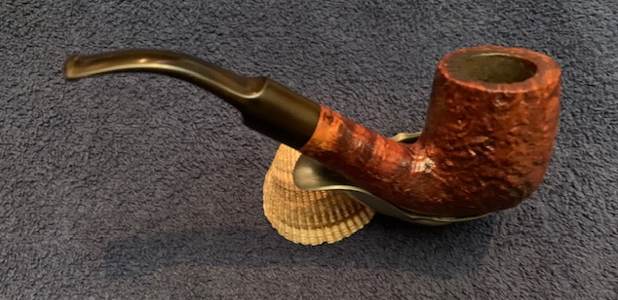
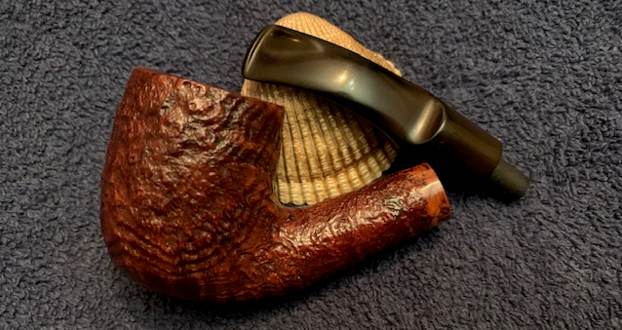
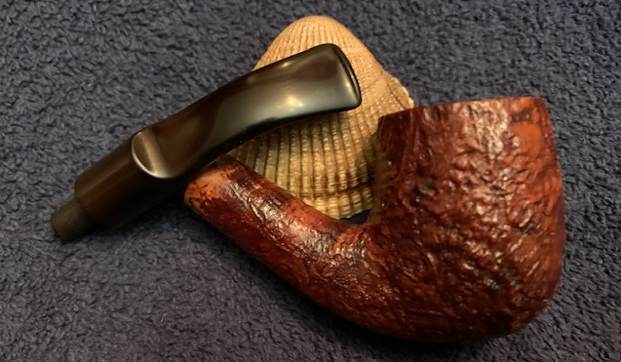
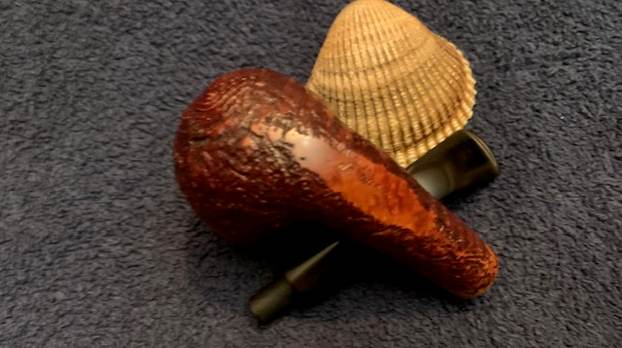
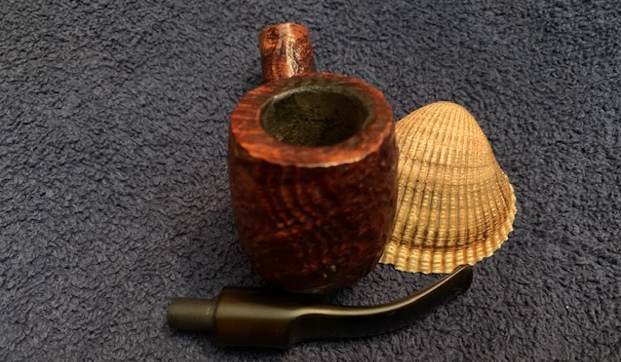
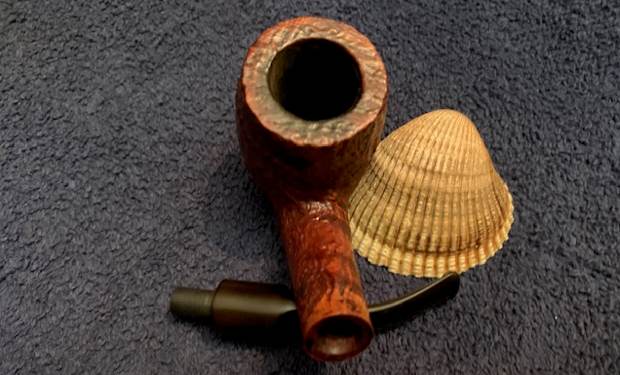
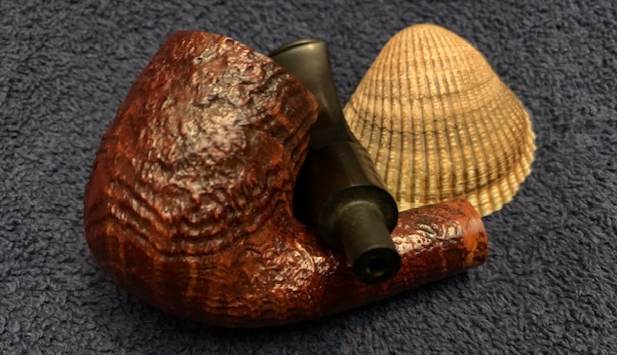
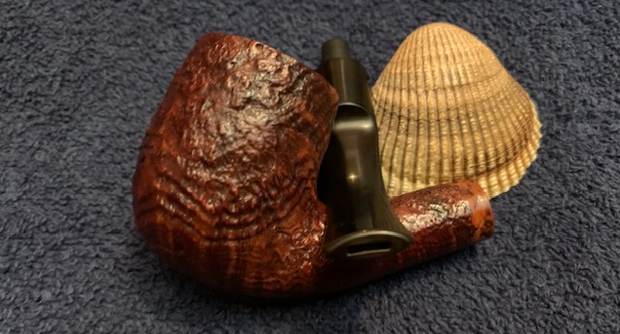
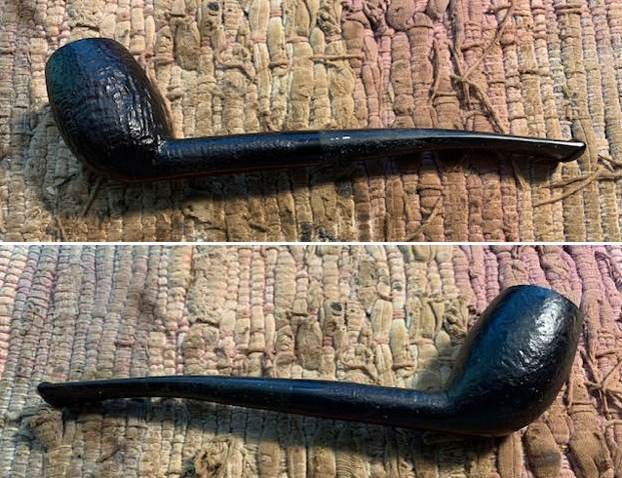
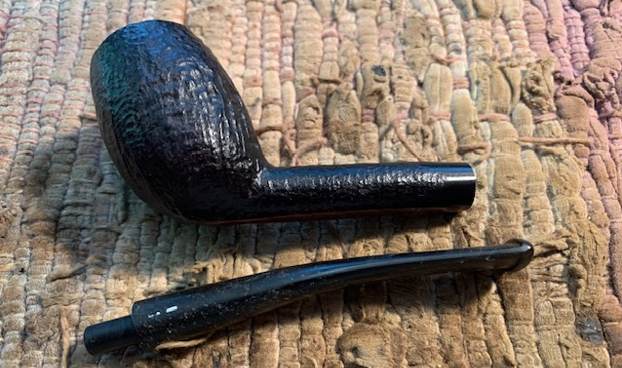
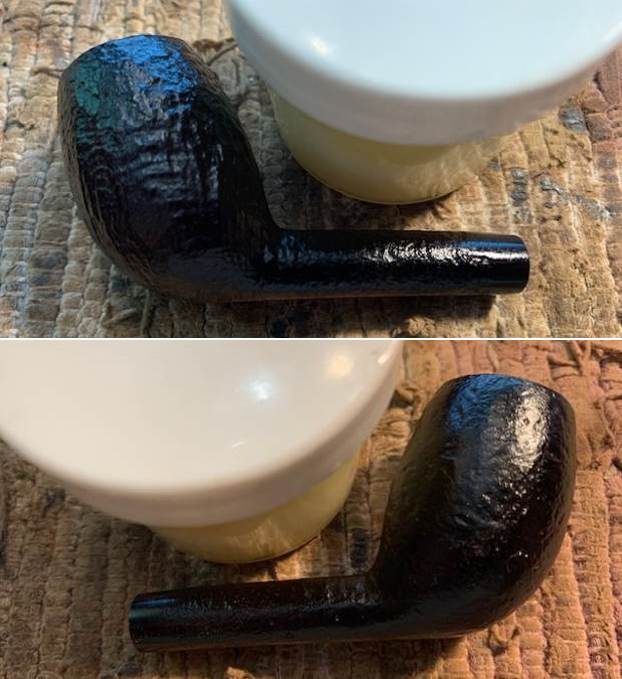
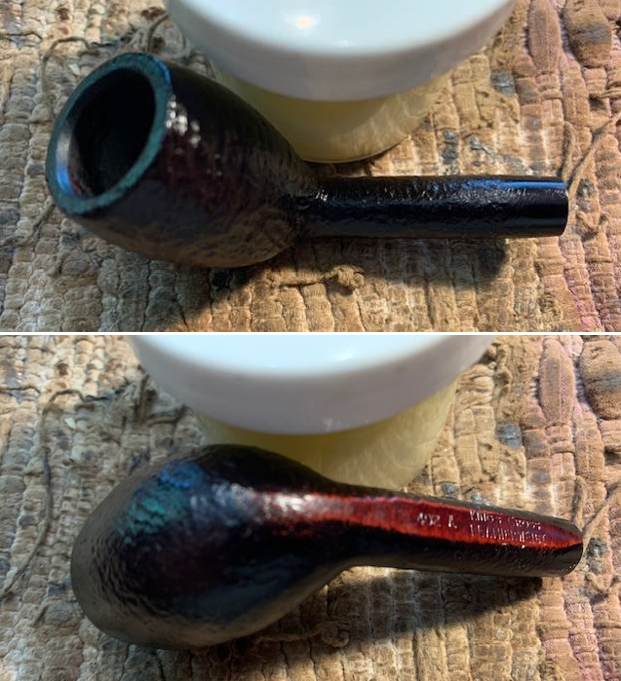
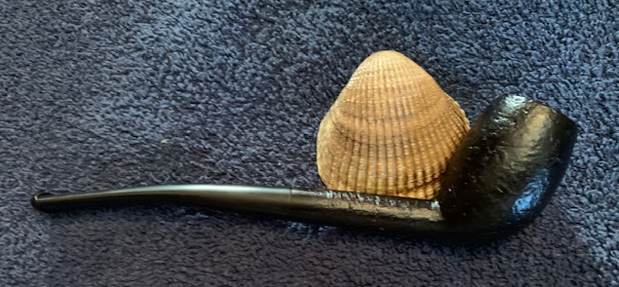
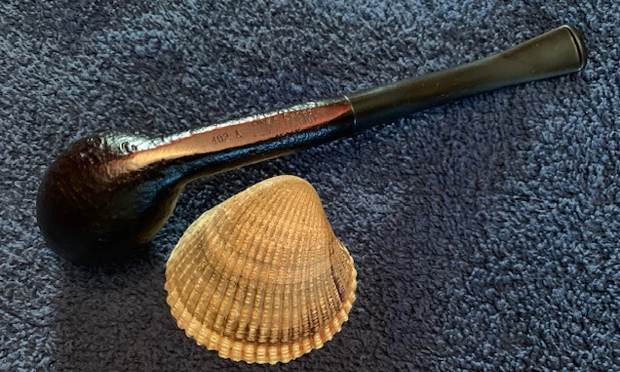
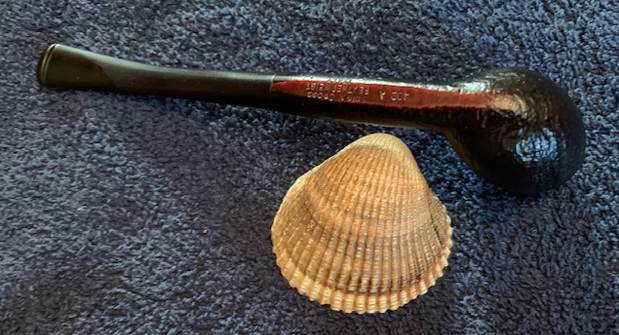
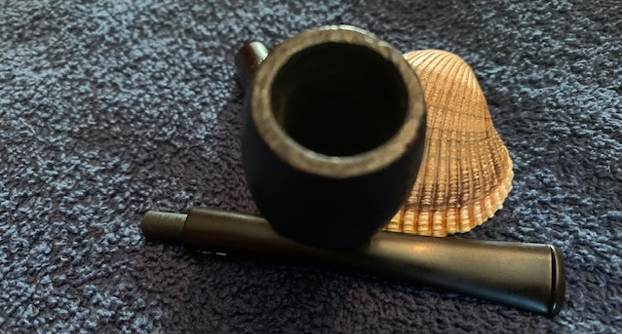
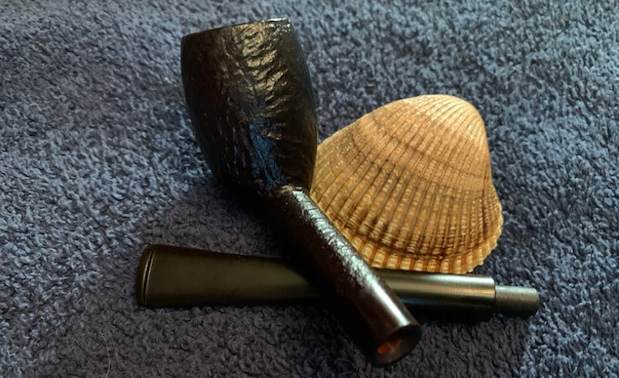
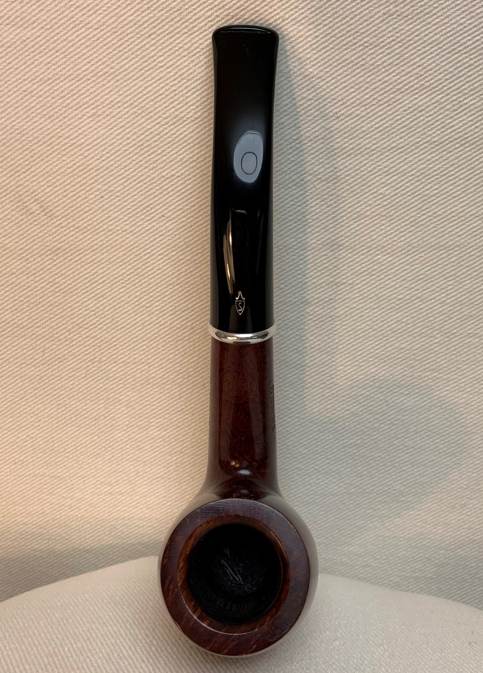
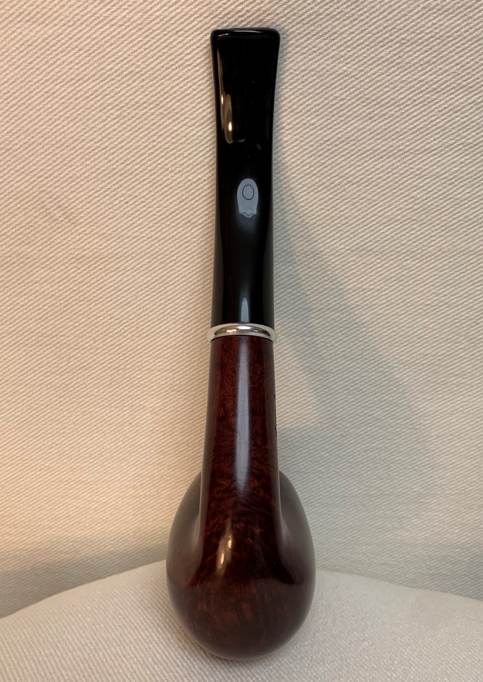
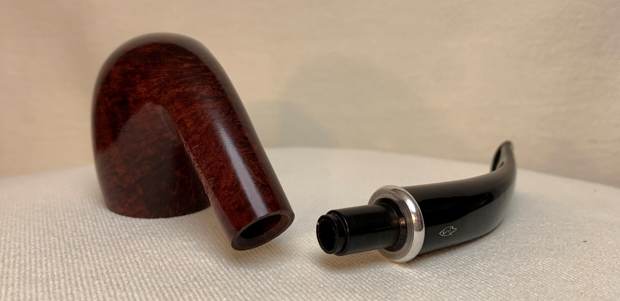
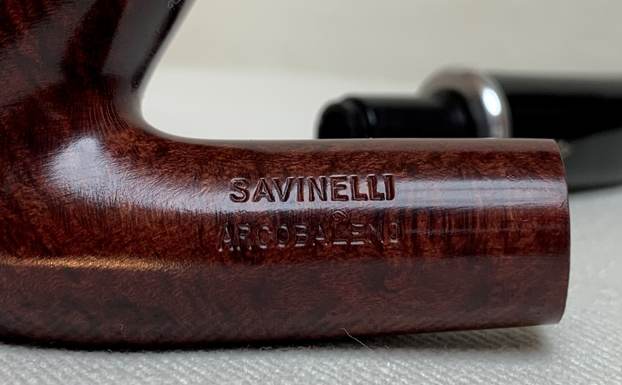
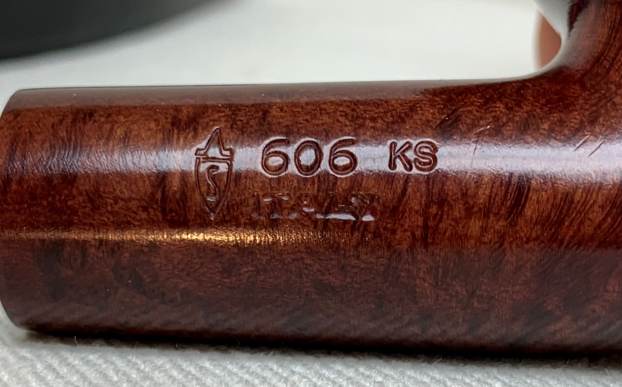
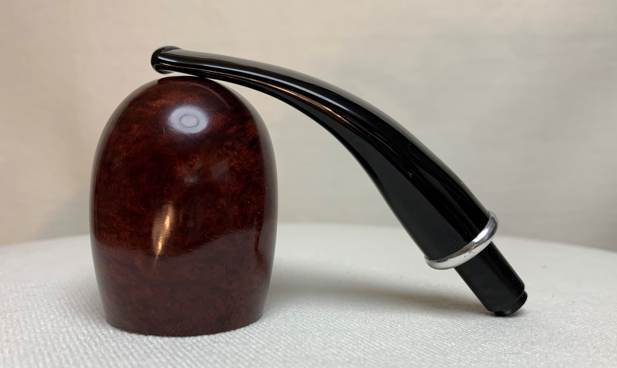
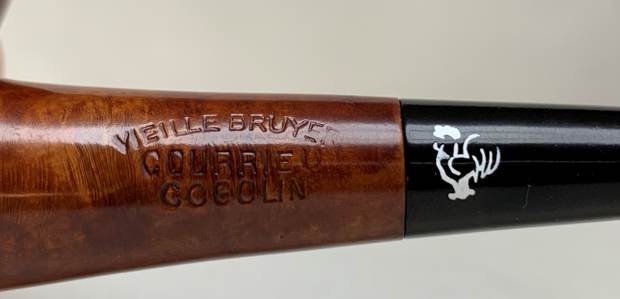
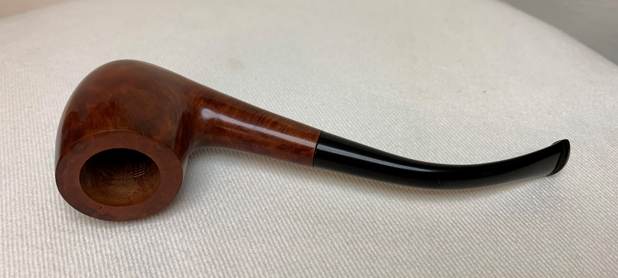
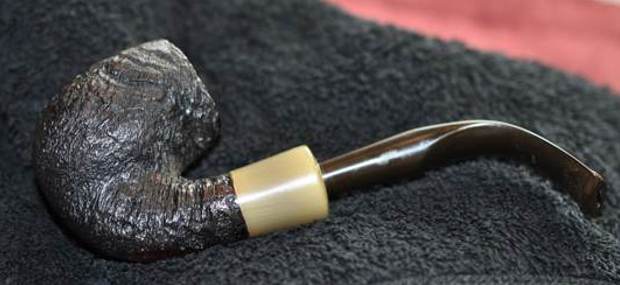
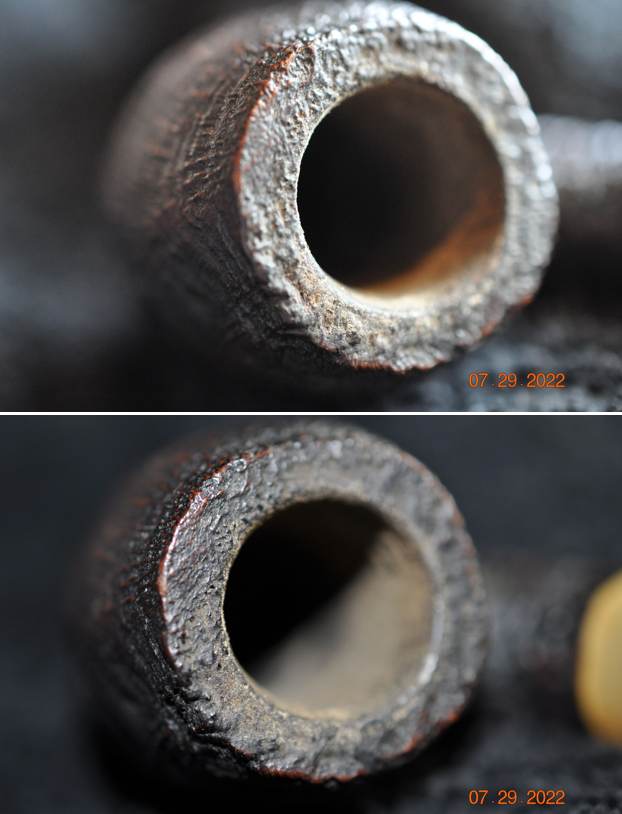
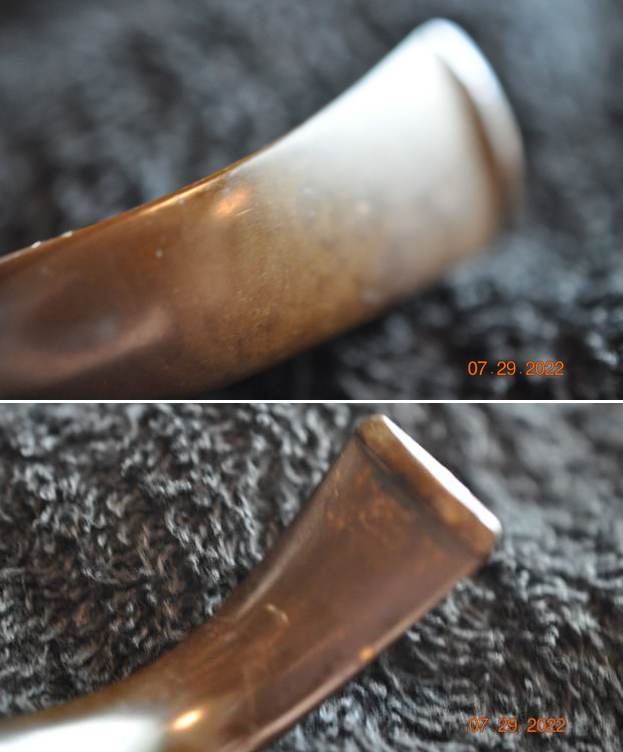
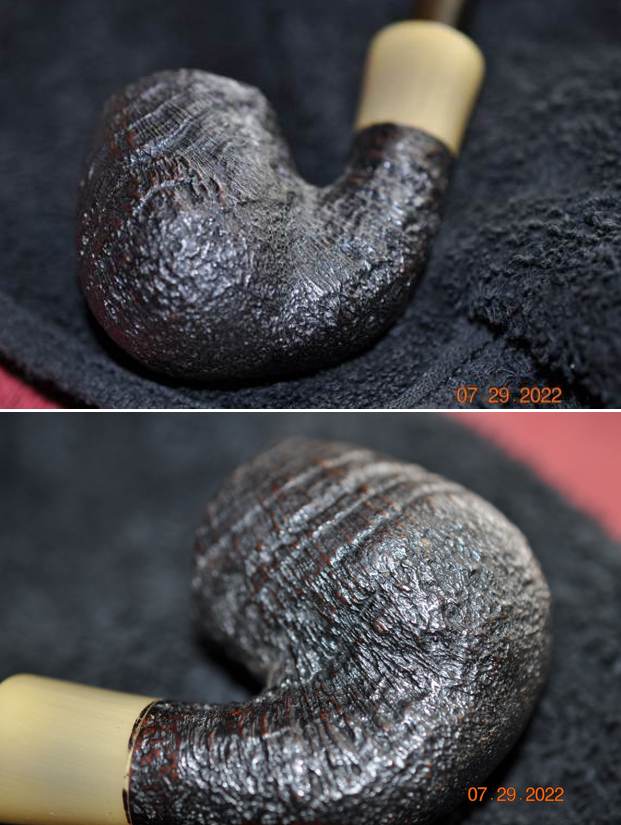
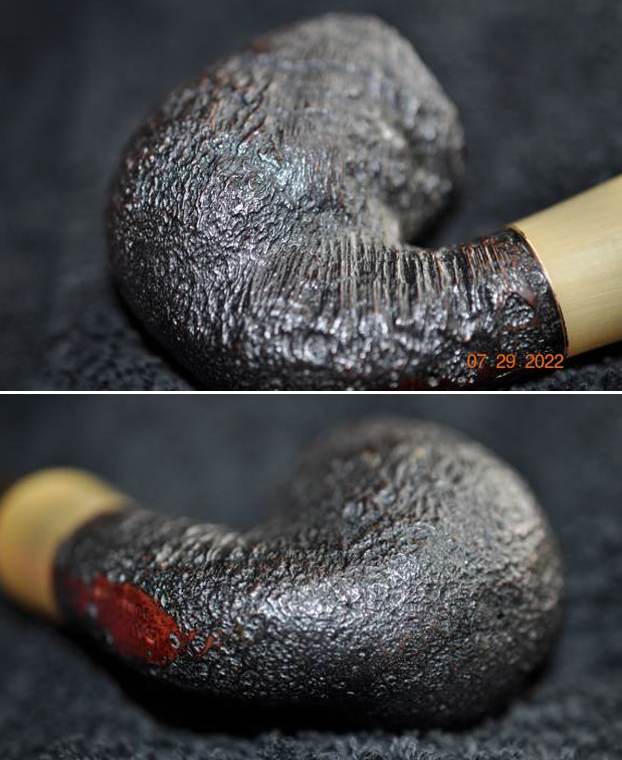
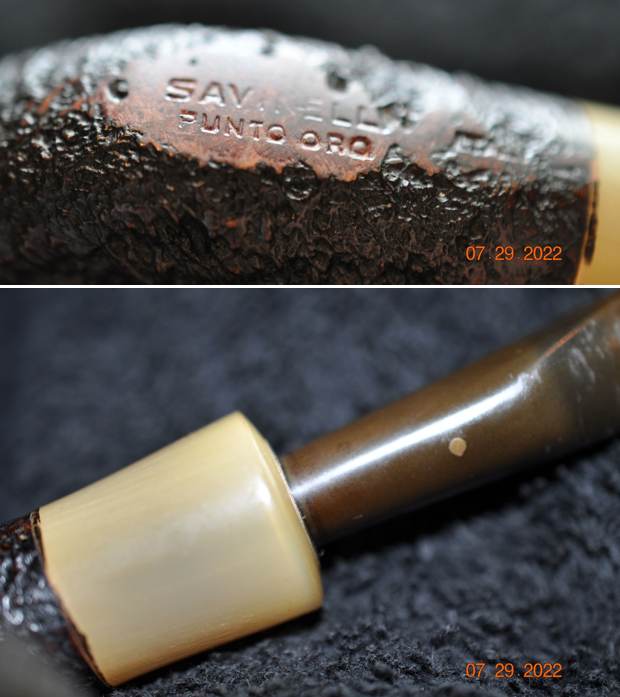
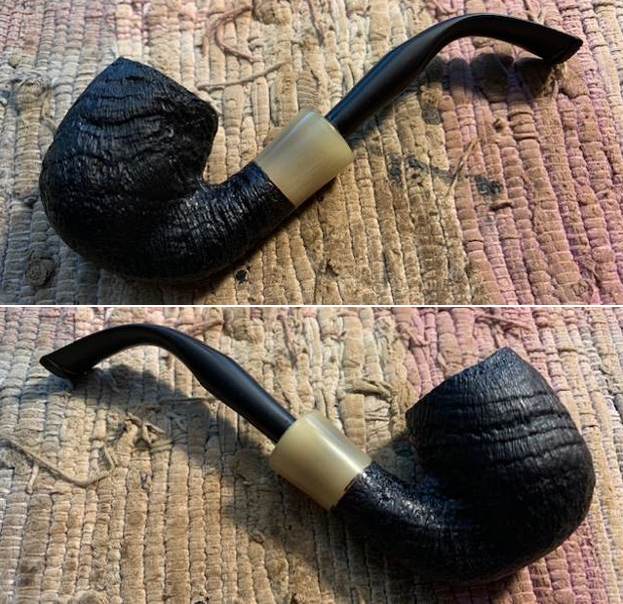
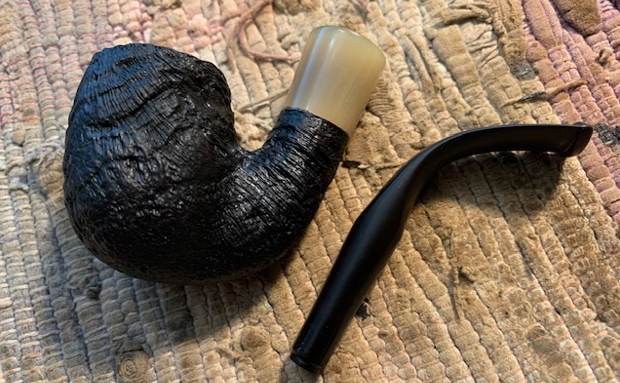
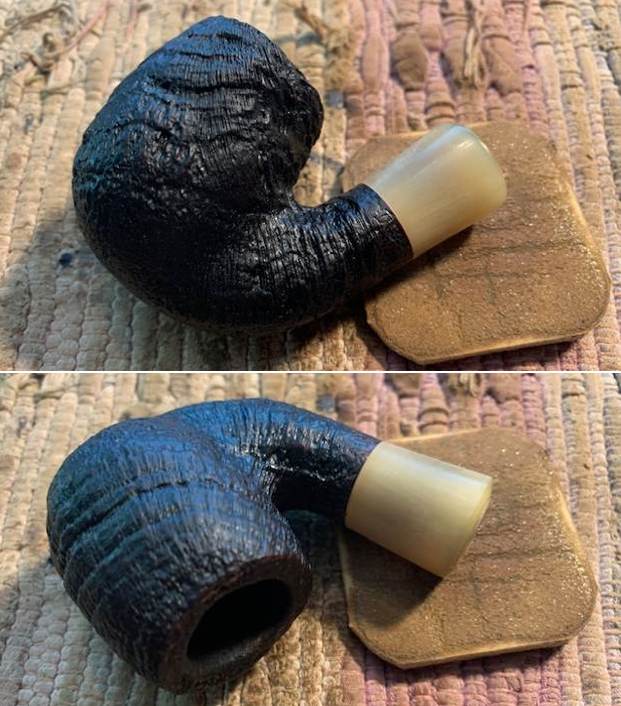
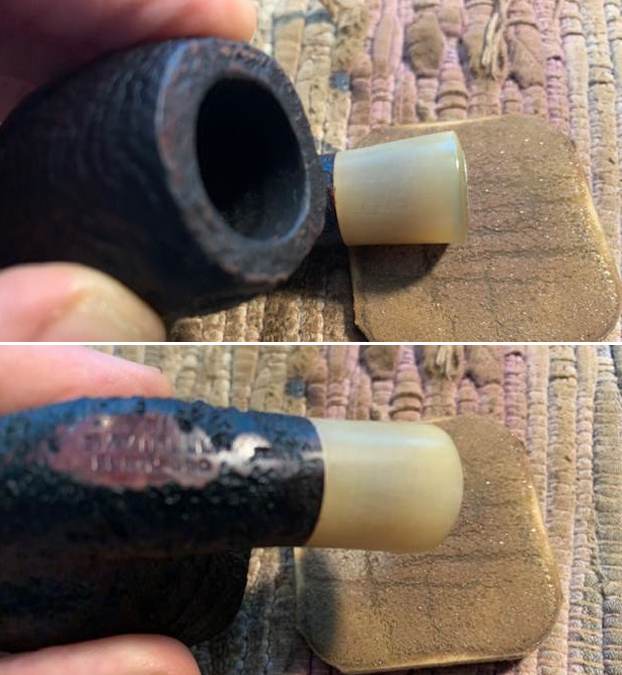
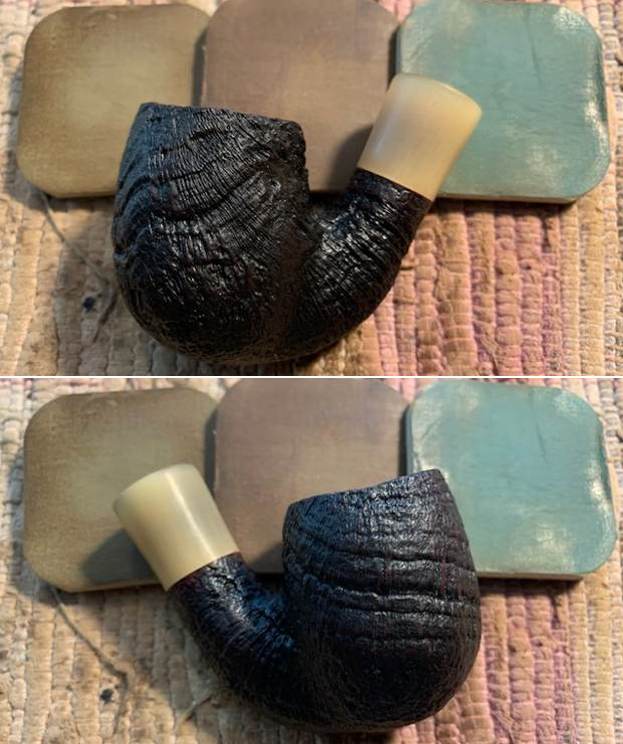
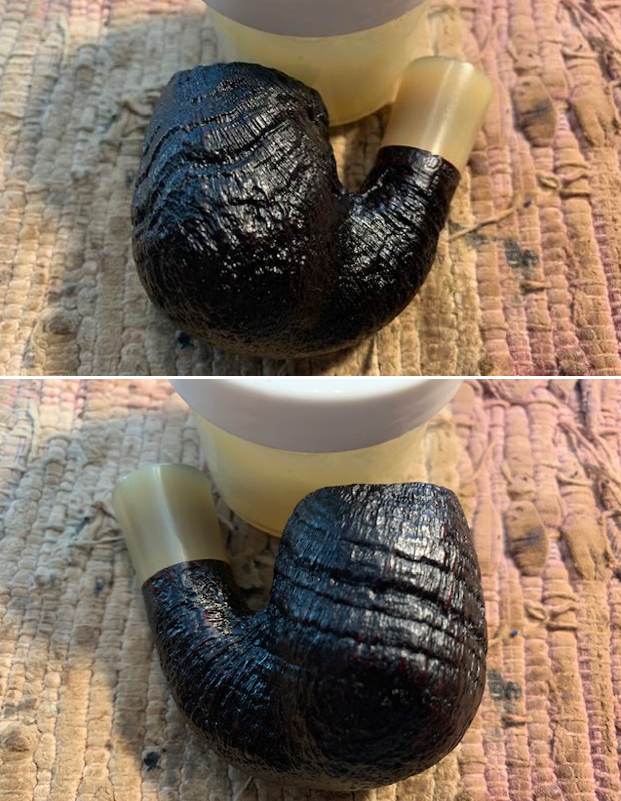
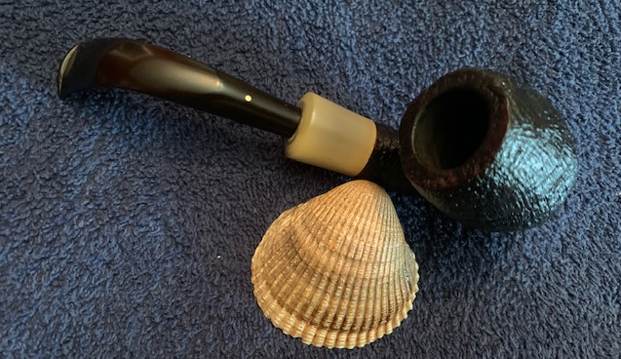
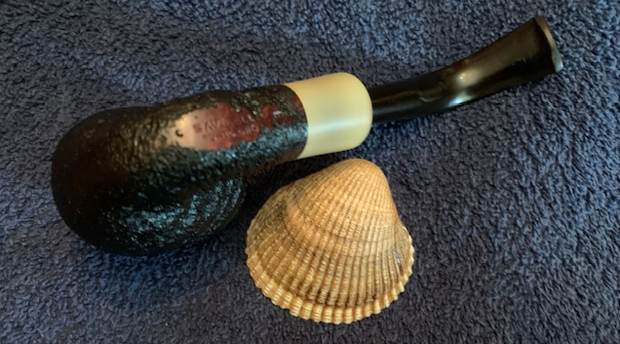
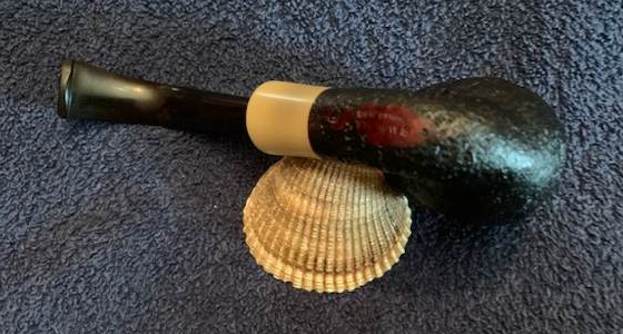
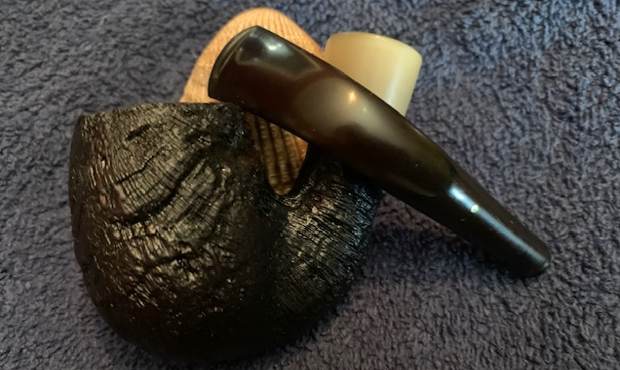
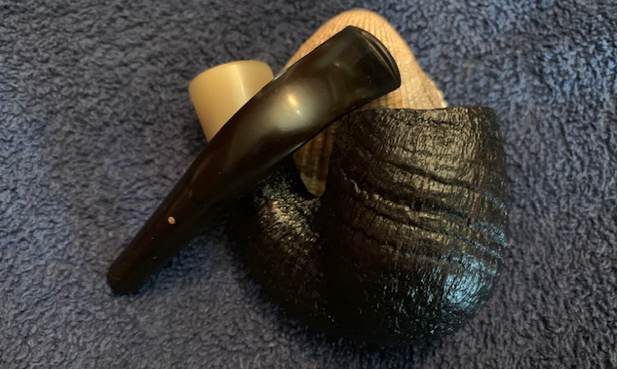
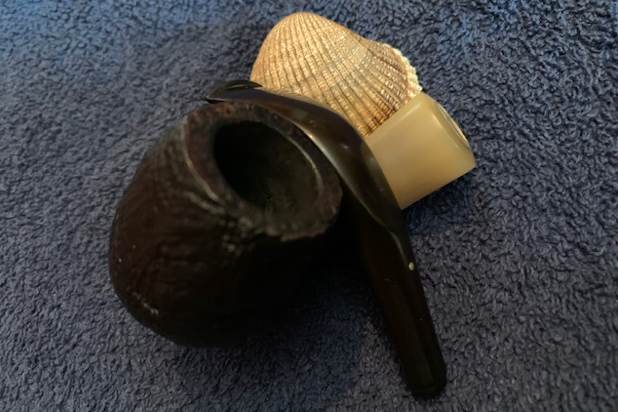
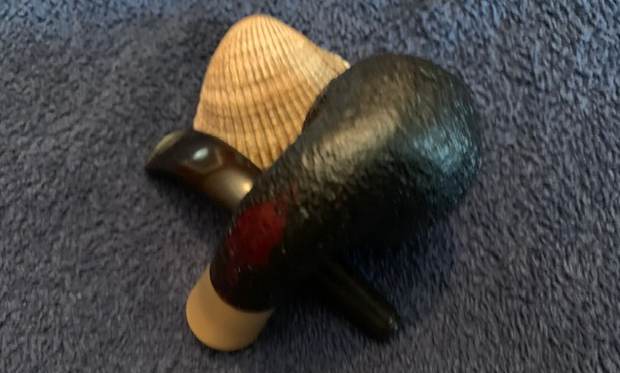
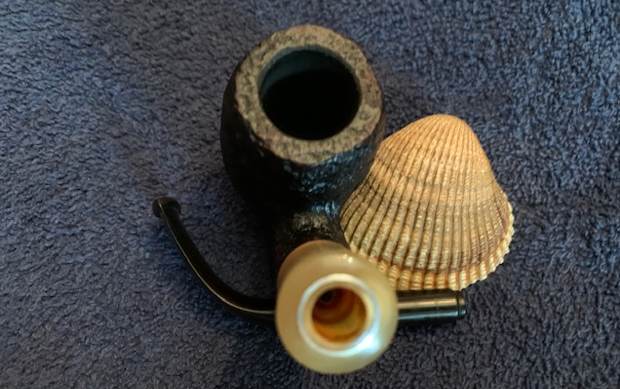
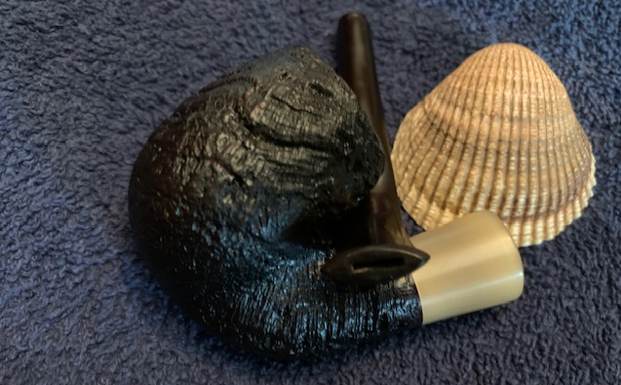
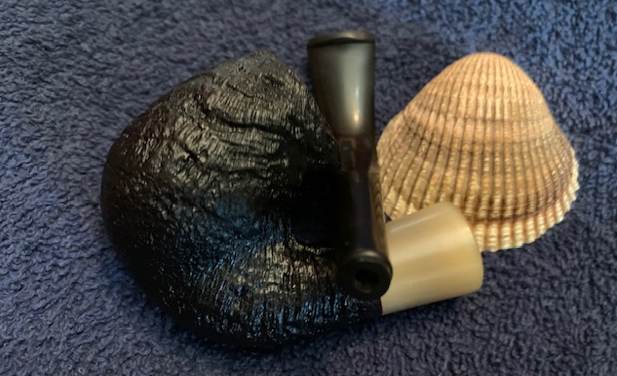
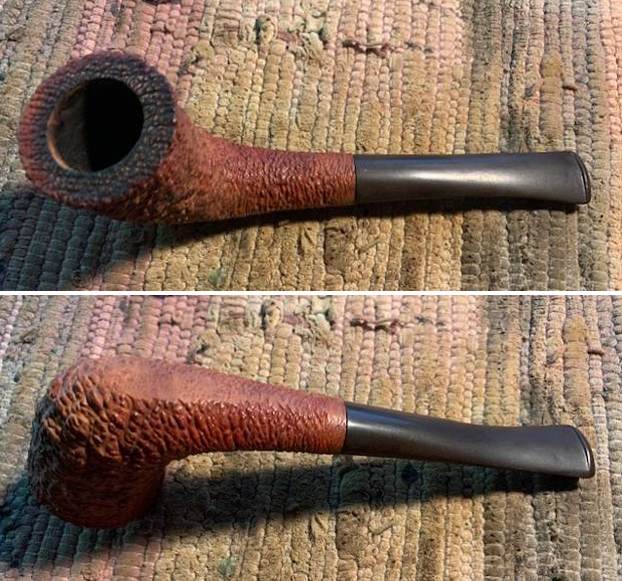
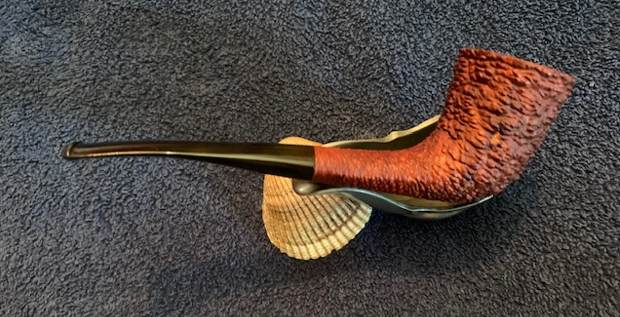
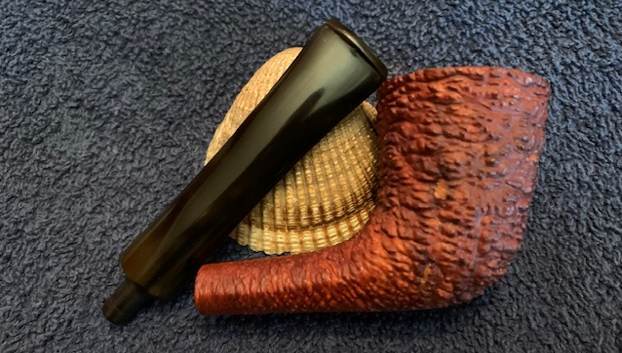
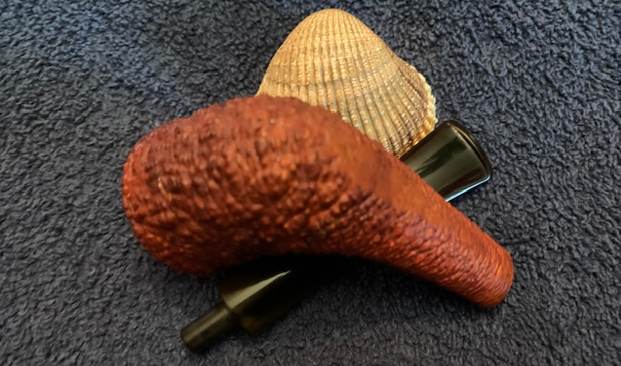
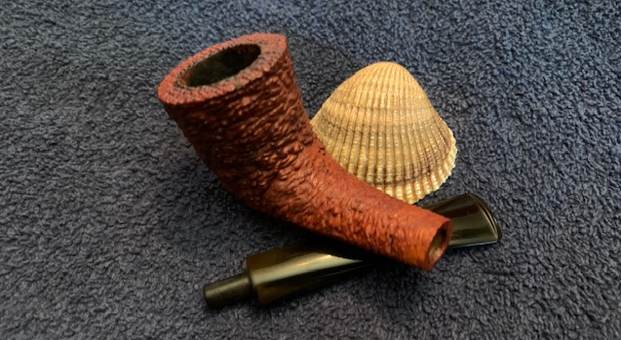
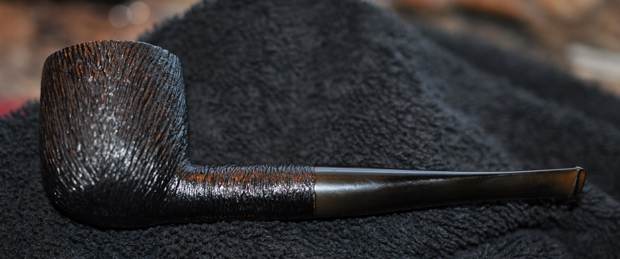
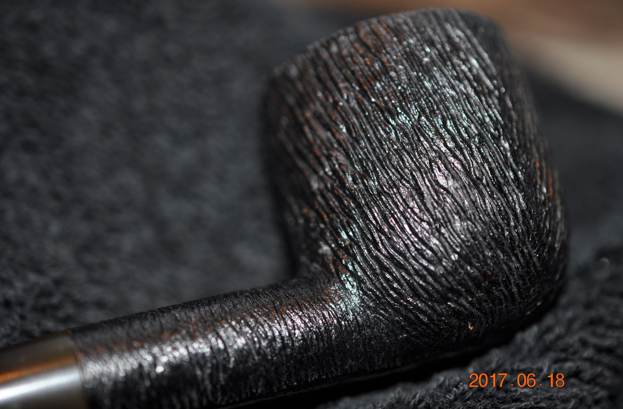
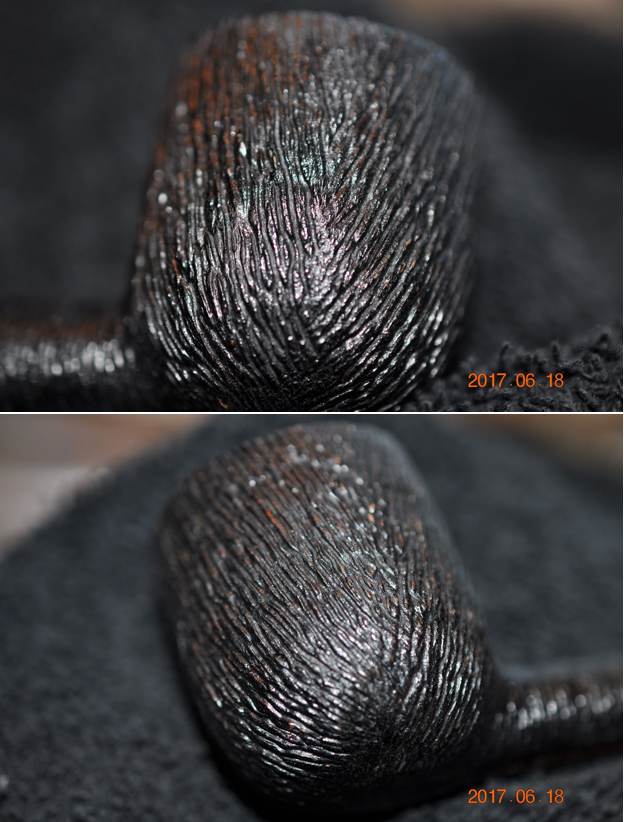
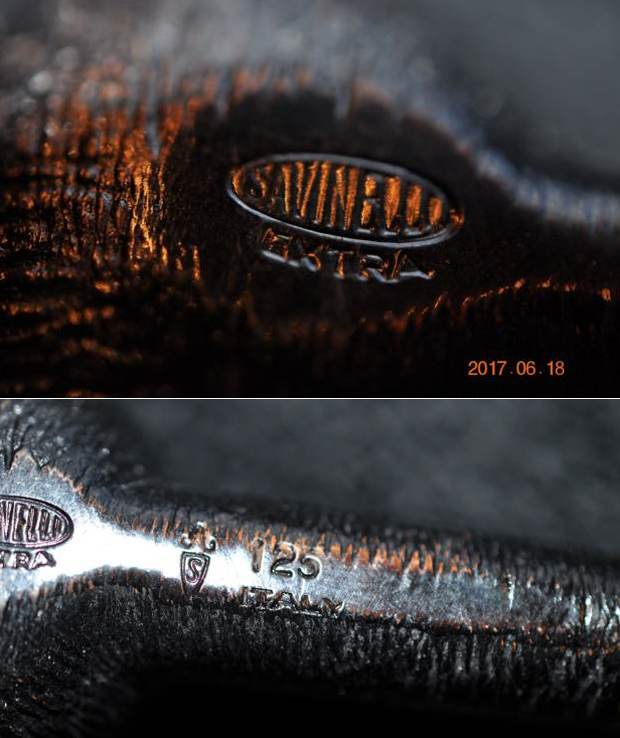
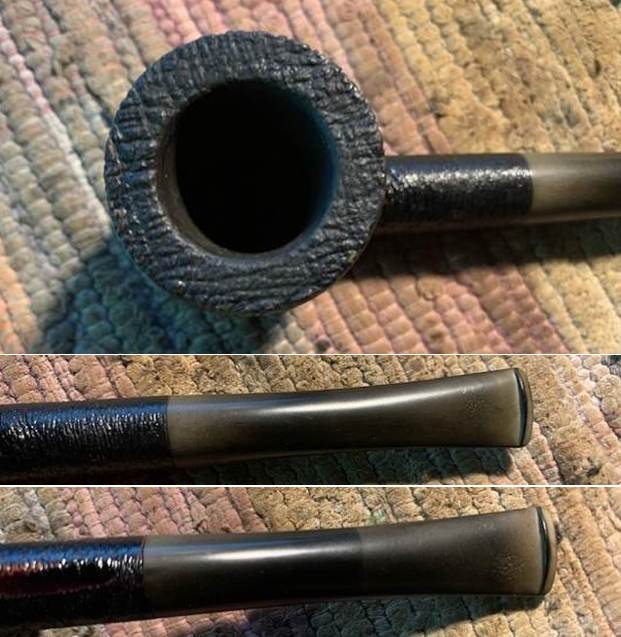
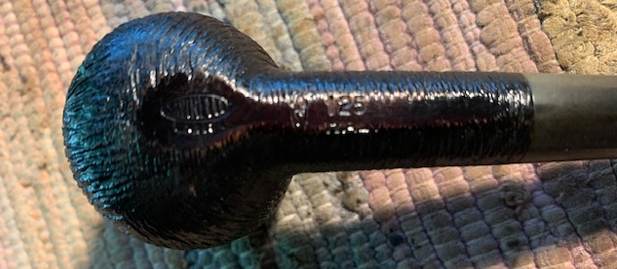
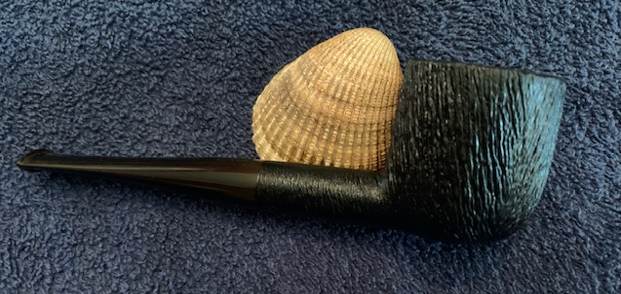
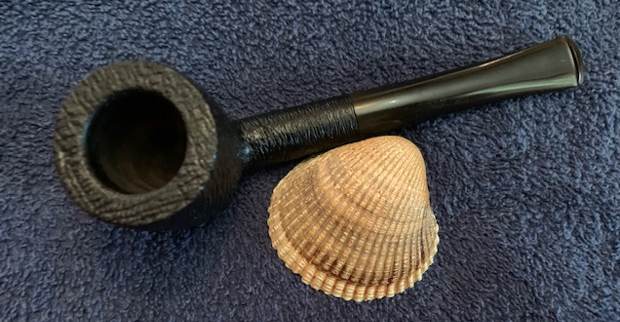
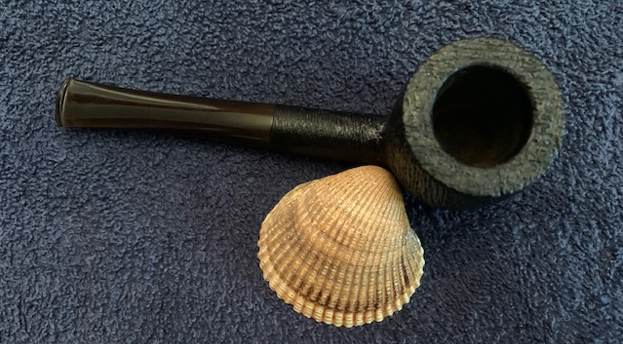
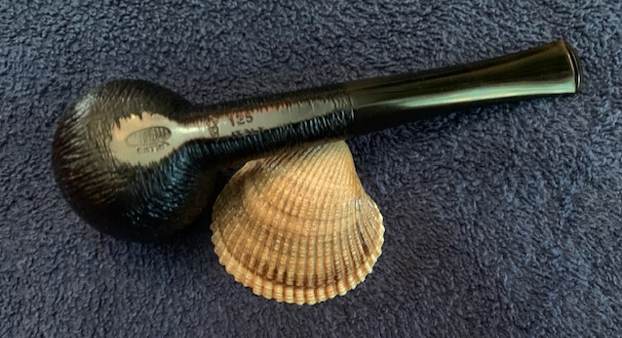
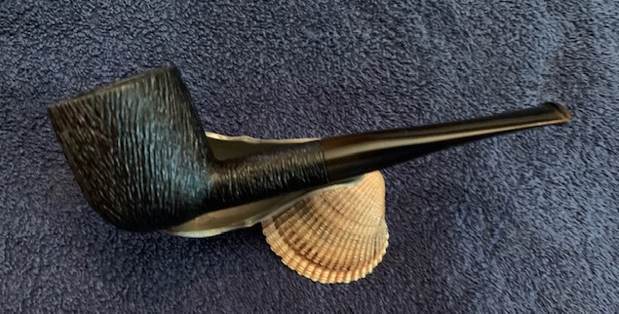
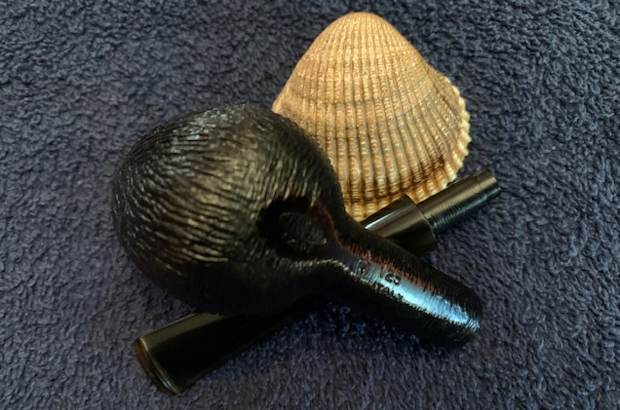
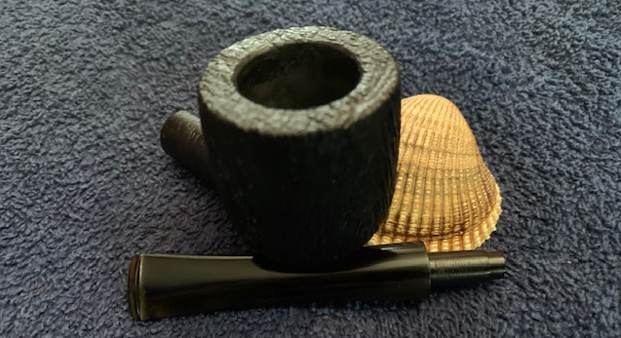
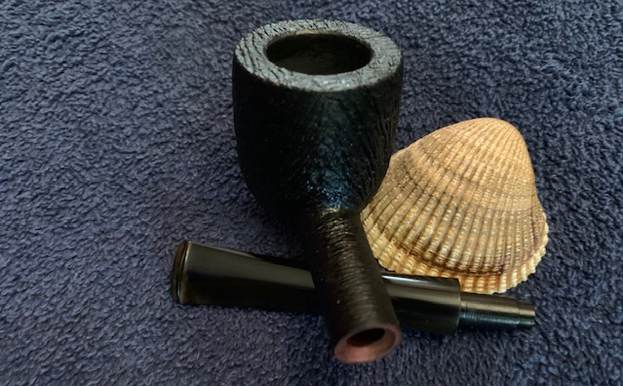
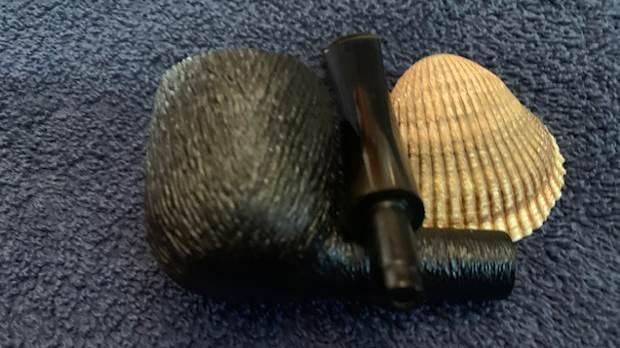
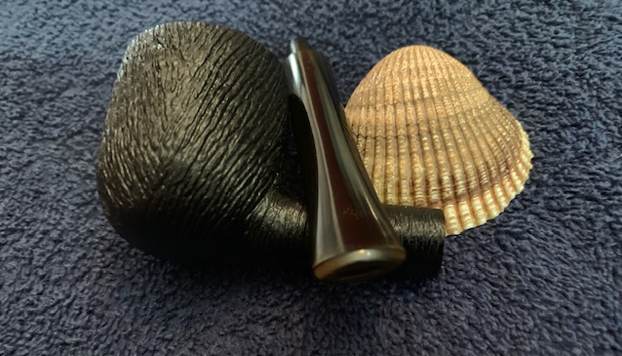
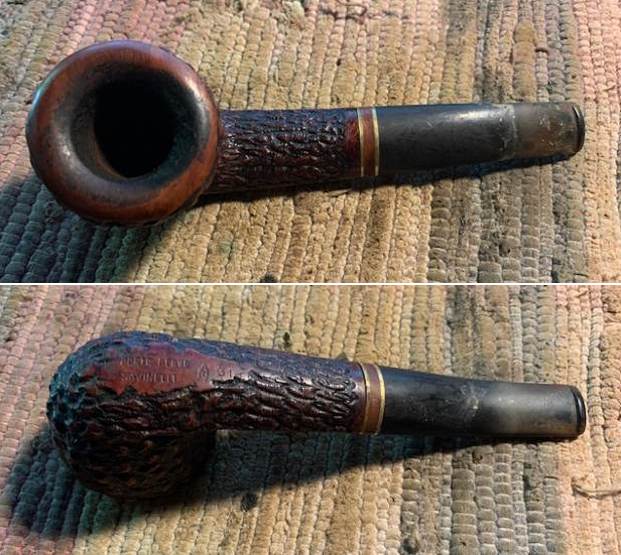
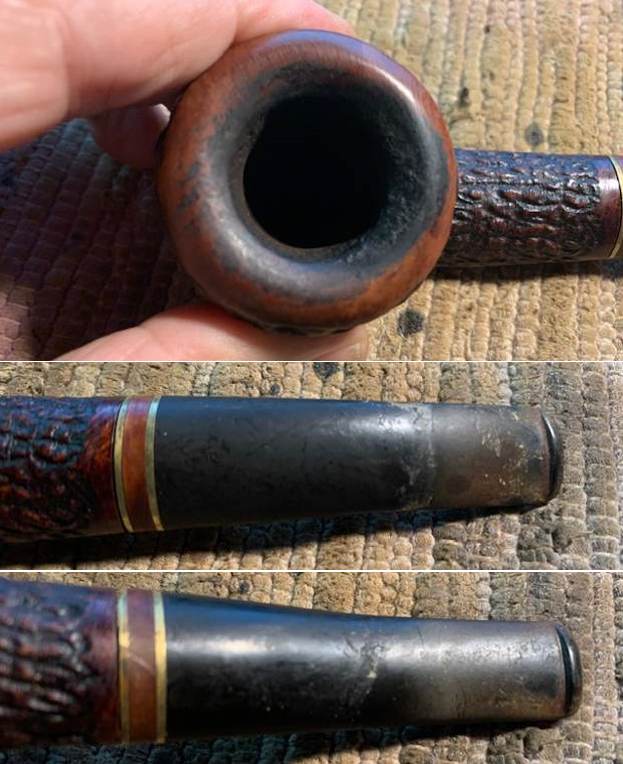
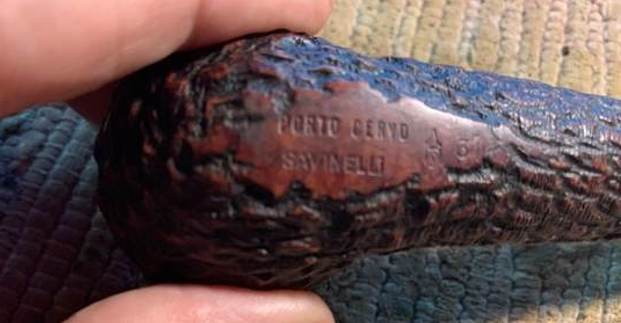
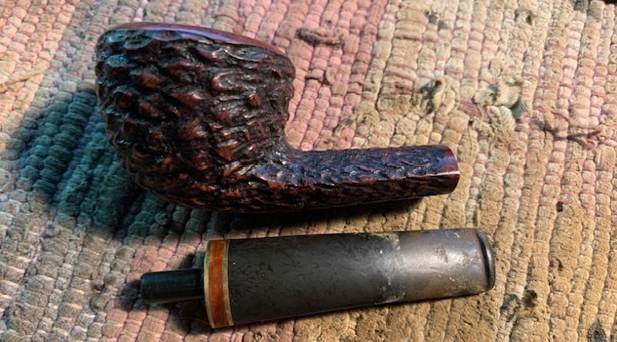
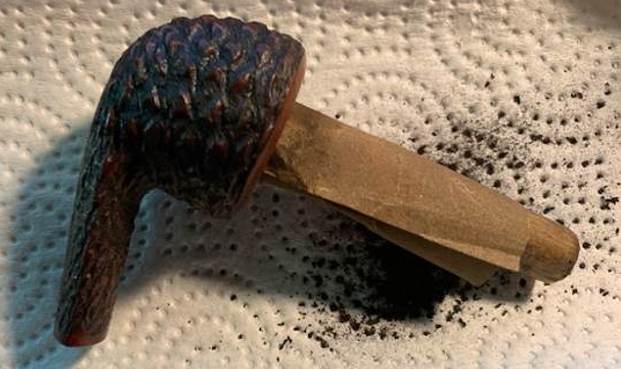
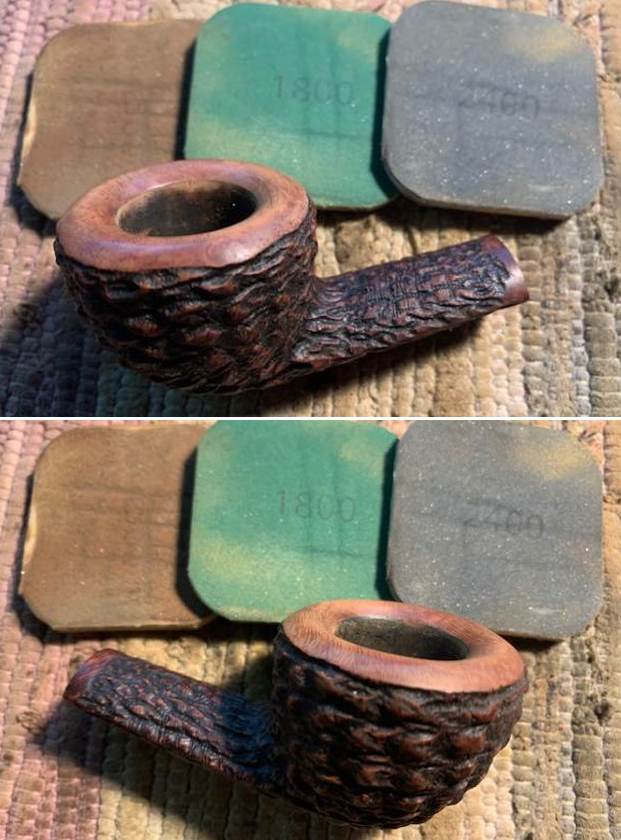
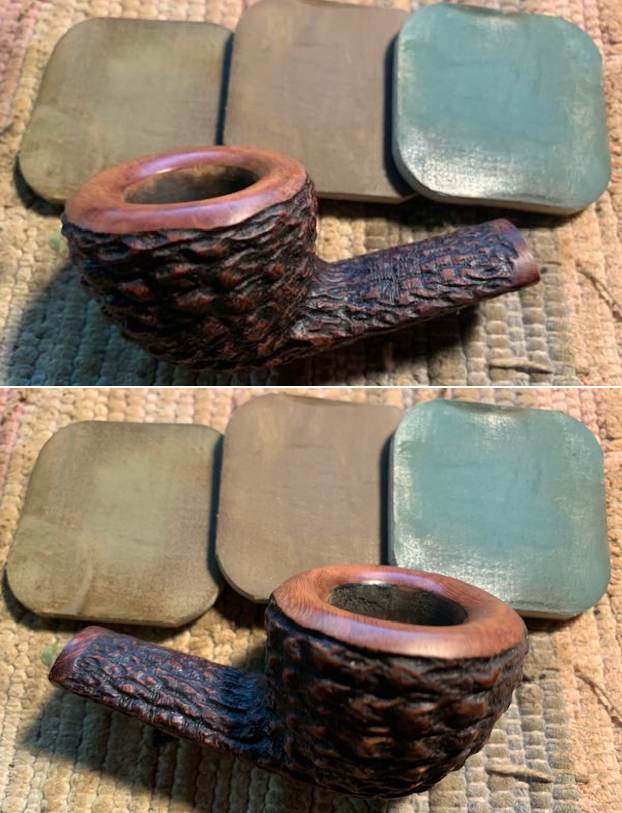
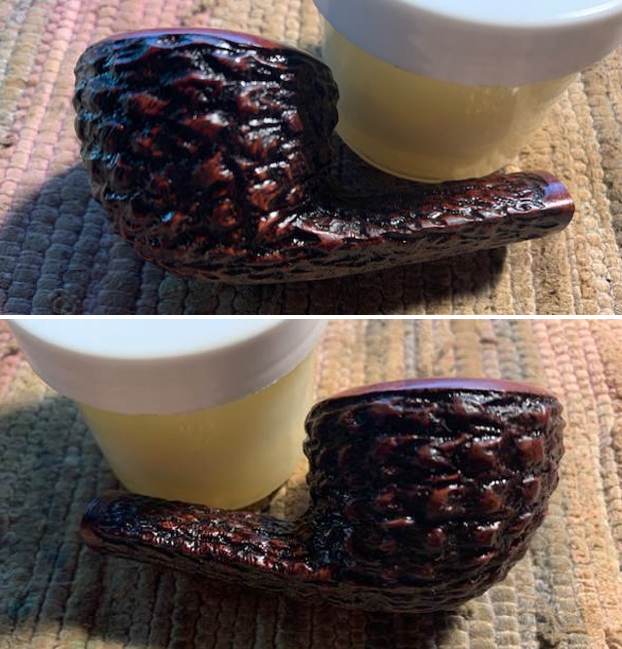
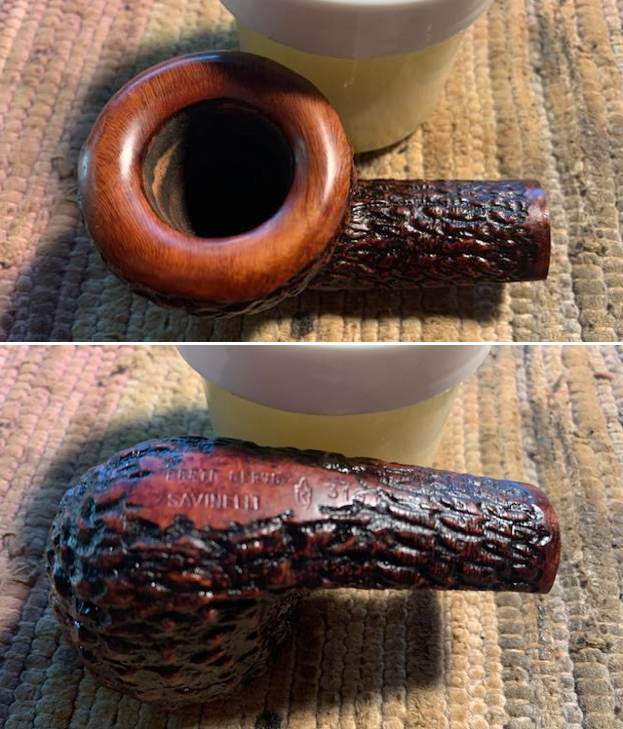
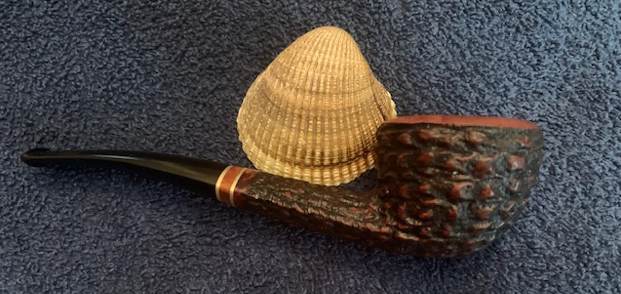
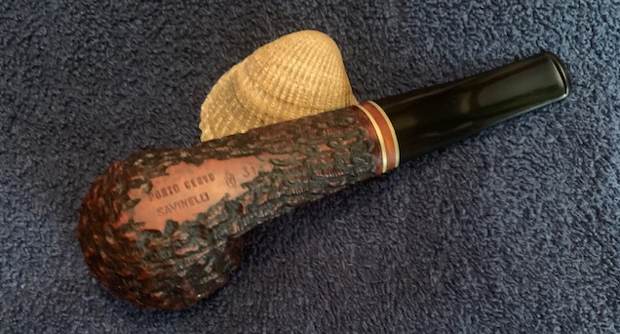
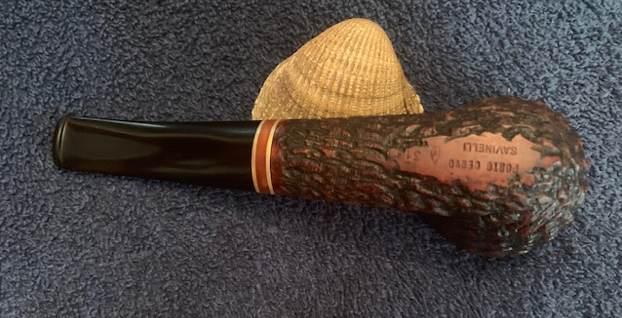
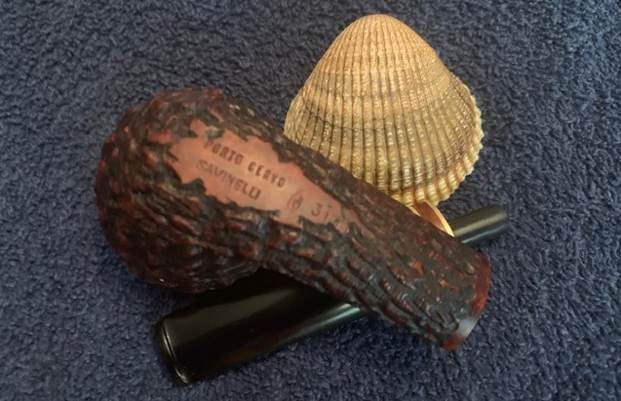
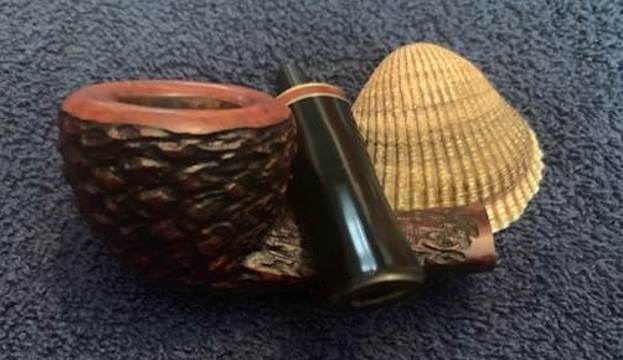
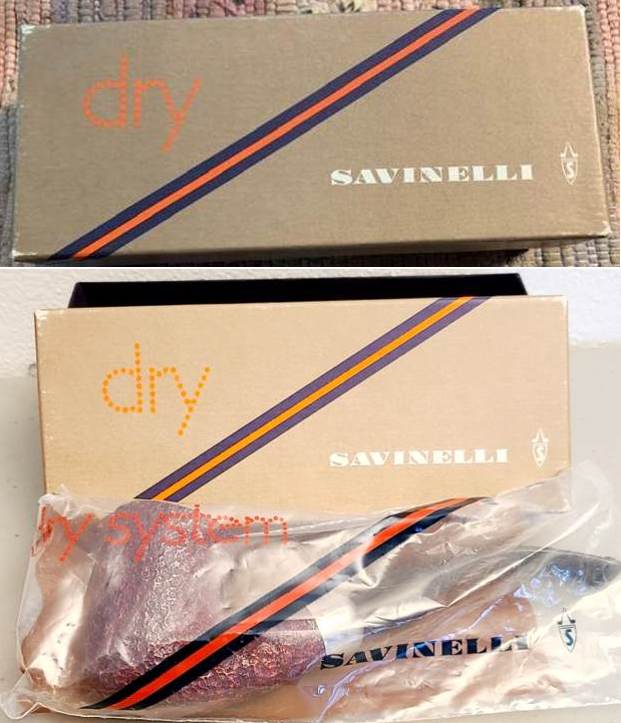
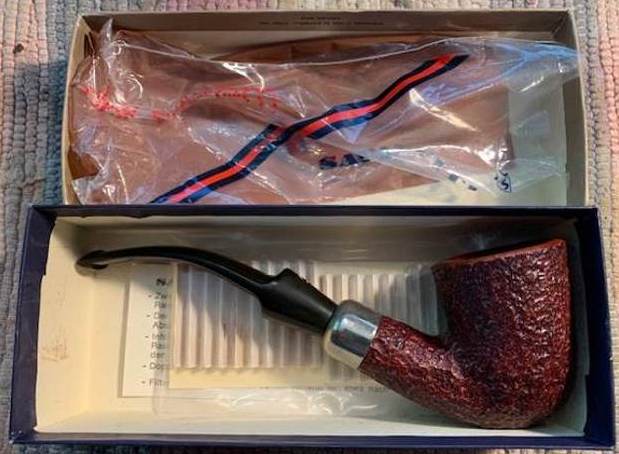
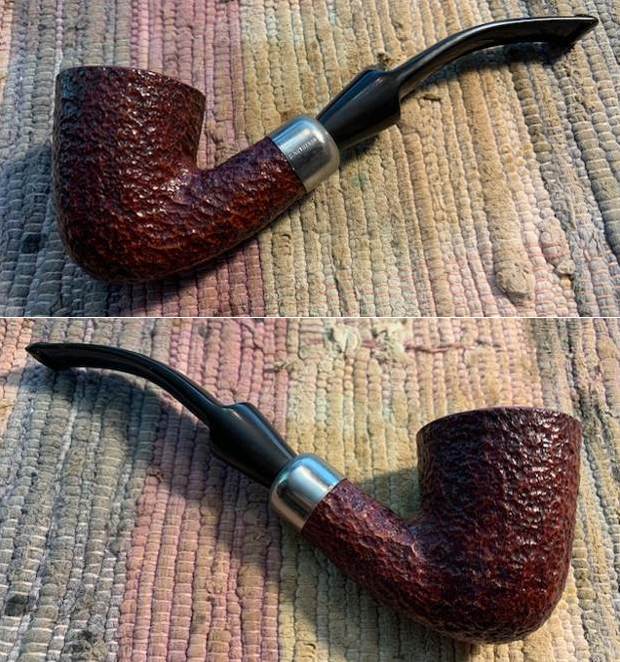
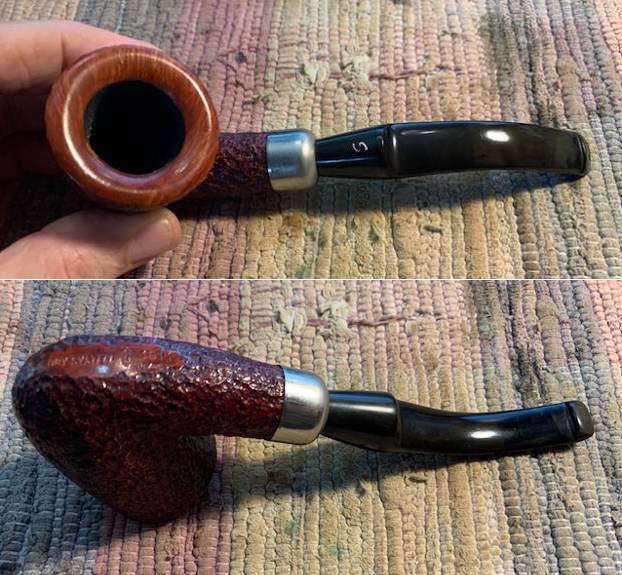
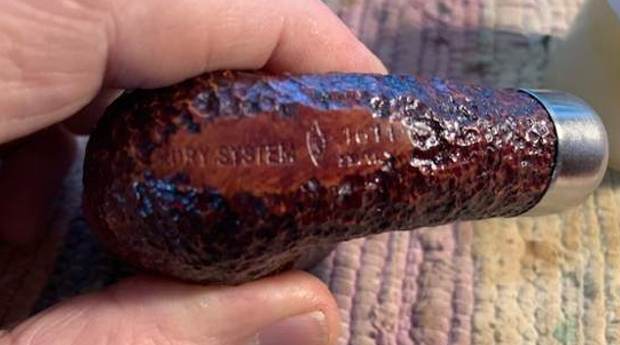
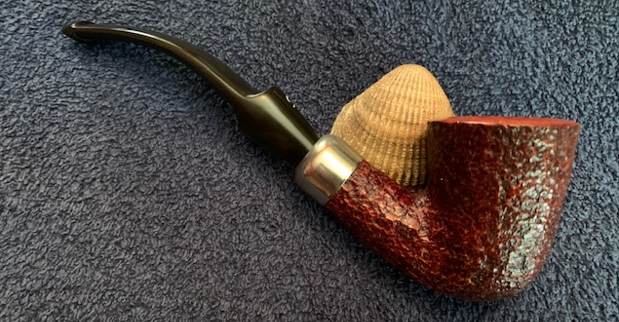
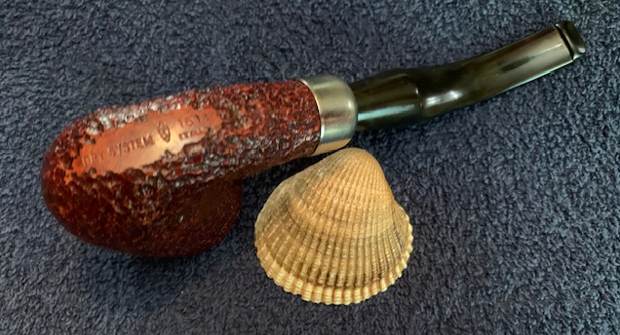
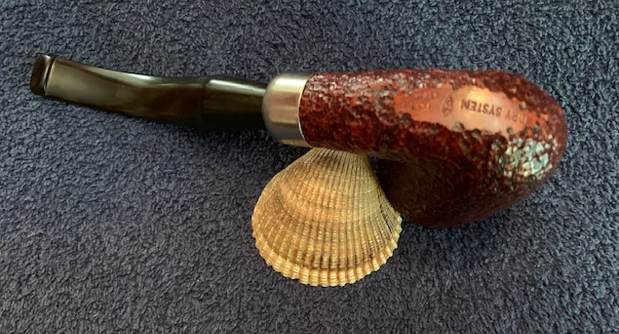
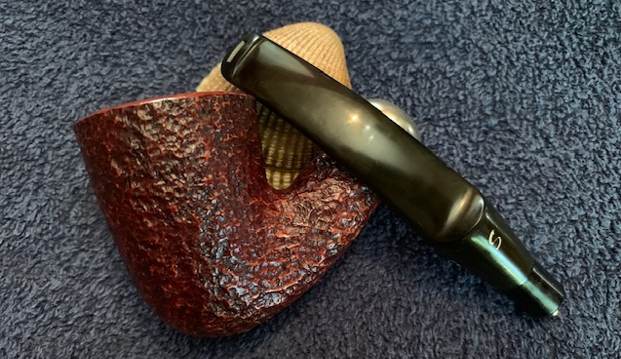
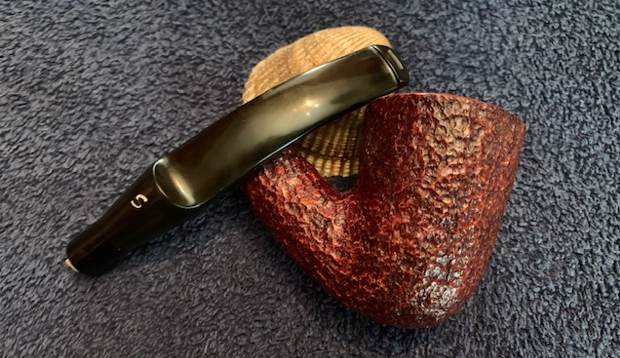
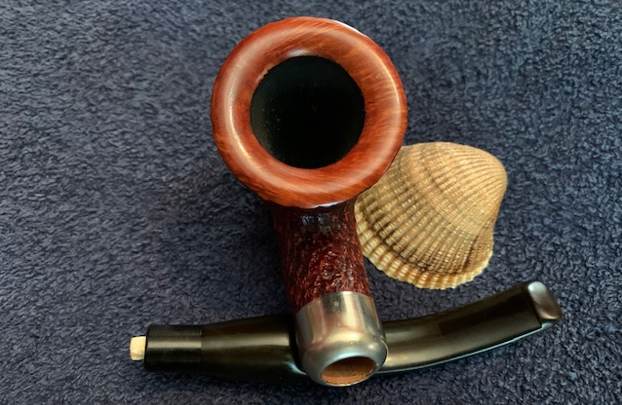
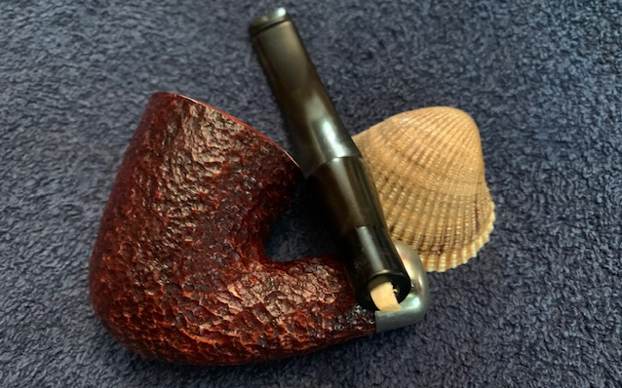
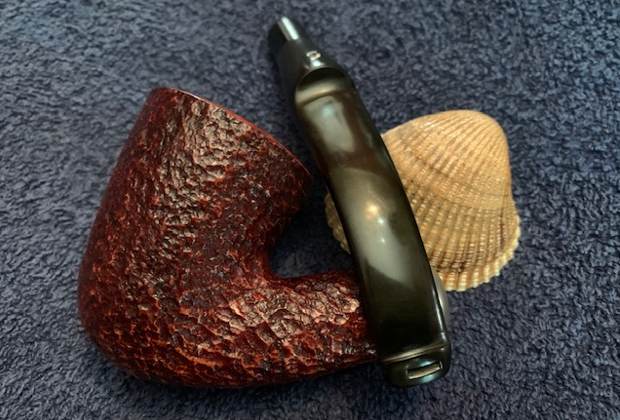
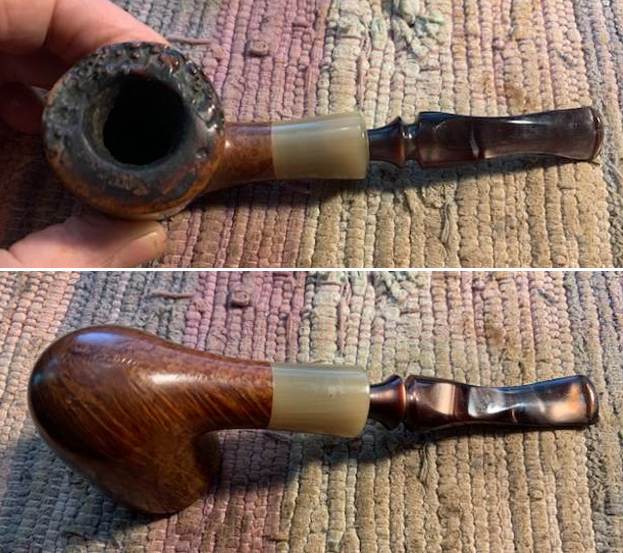
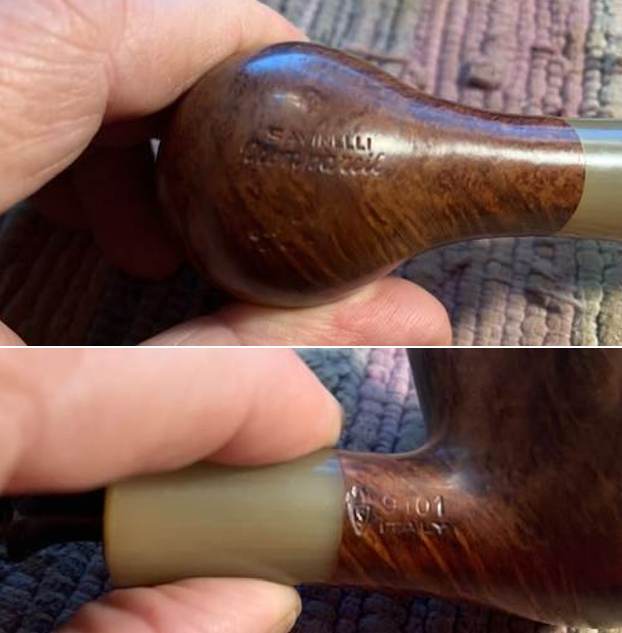
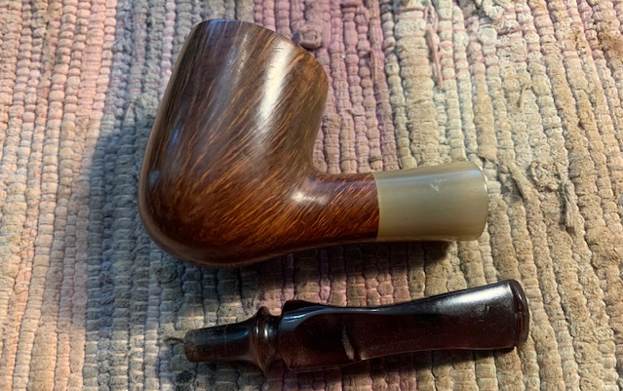
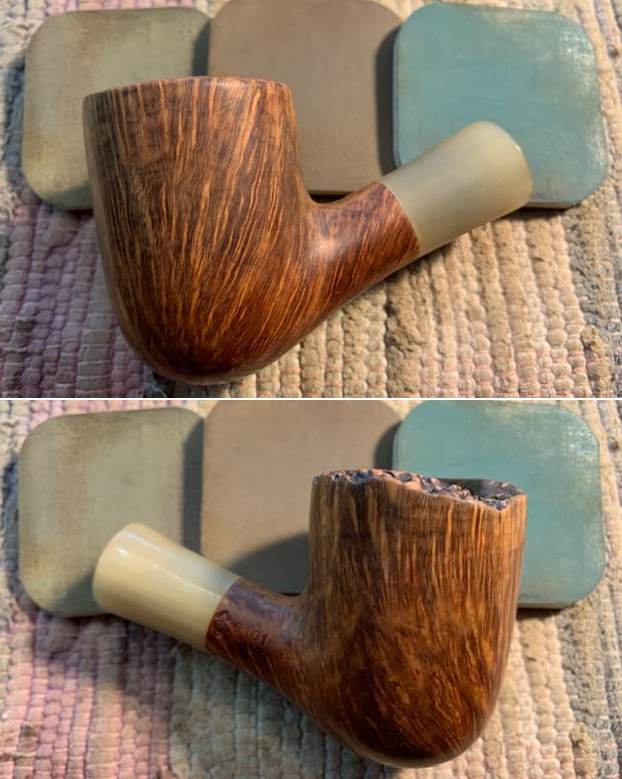
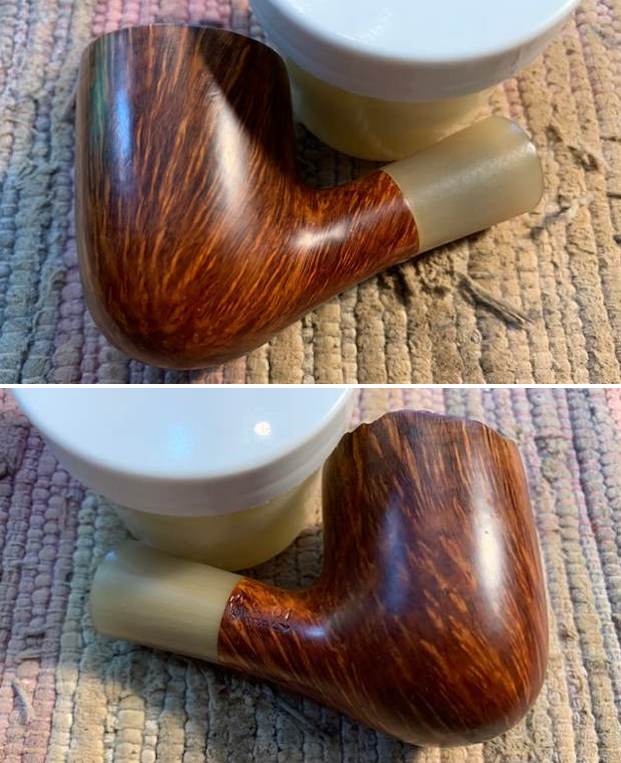
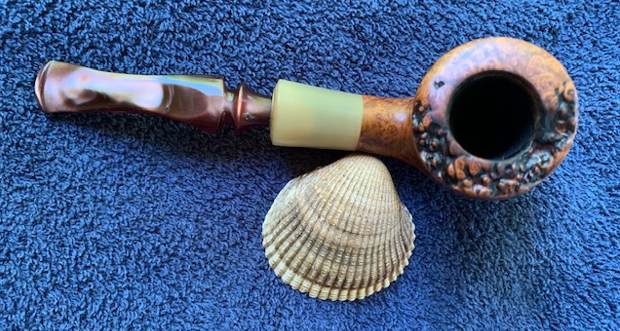
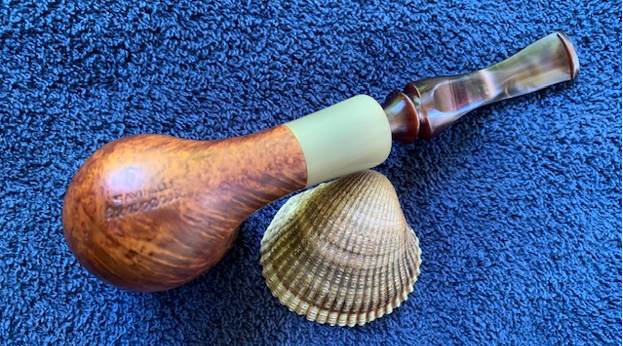
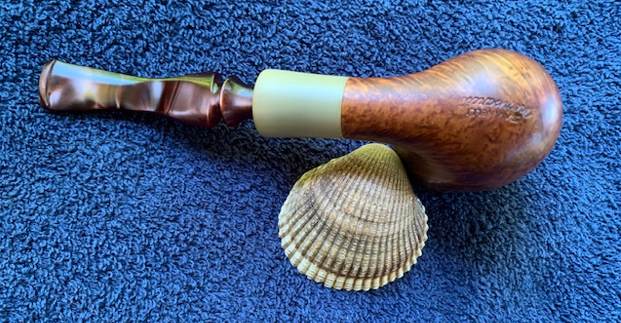
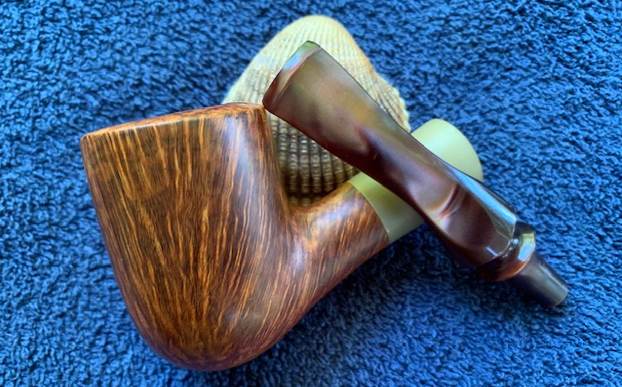
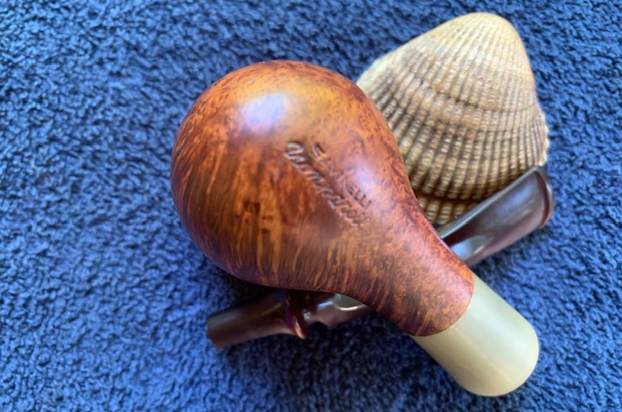
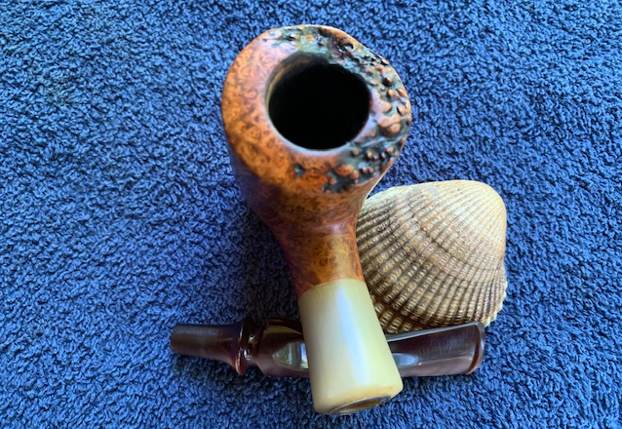
The next pipe on the table is one that was sent to me for a restoration. I am not taking on too many more pipes from outside Canada but the shape and finish of this one caught my eye. It is a Savinelli Autograph 4 with an unusual shape and a great sandblast finish. It is dirty but still very eye catching. It is stamped on the underside of the shank and reads Savinelli [over] Autograph [over] 4. The shank is round but has a flat bottom that allows the pipe to be a sitter. The bowl had been partially reamed and the top half had scraped away some briar on the inner edge of the bowl. The bottom half was very full of a thick cake that had not been touched with the reamer. The pipe smelled of old tobacco but did not seem to be a heavy aromatic. The shank was dirty with oils and tars. The acrylic stem is almost certain a replacement. It does not have the characteristic autograph/signature on the side of the saddle though it is very well made and the fit to the shank is perfect. There were light tooth marks and chatter in the surface on both sides. The button surface was clean but the slot had been filled in with debris leaving a very small airway. I am including the photos of the pipe that were sent by the person who is the steward of the pipe below. I think that you can see what attracted me to this one. 
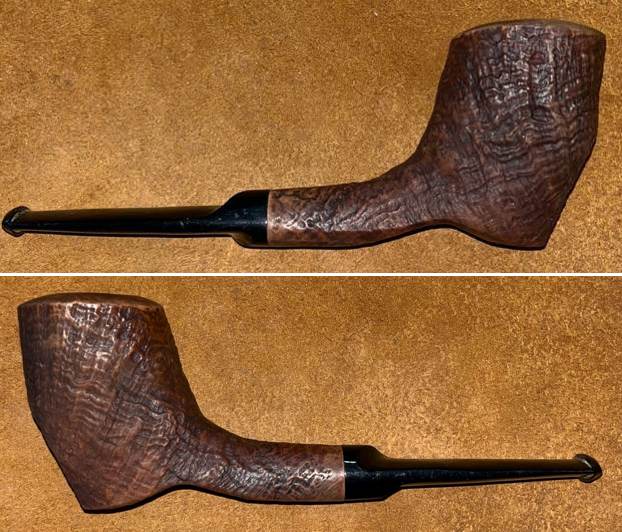
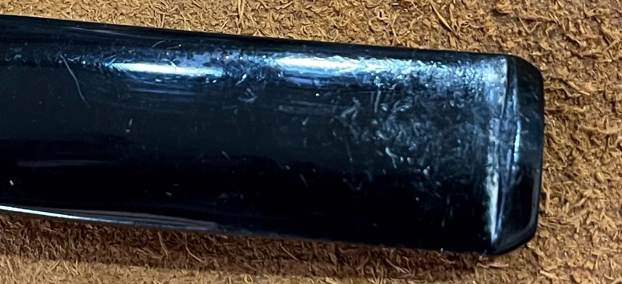
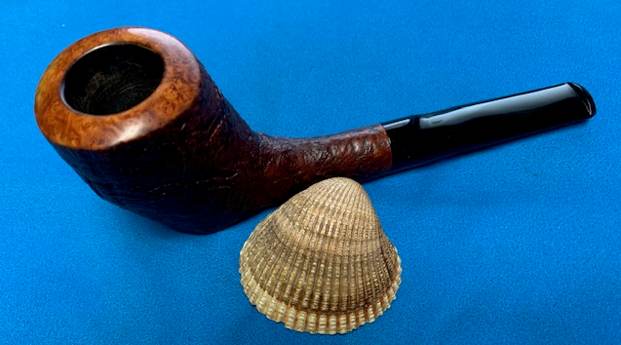
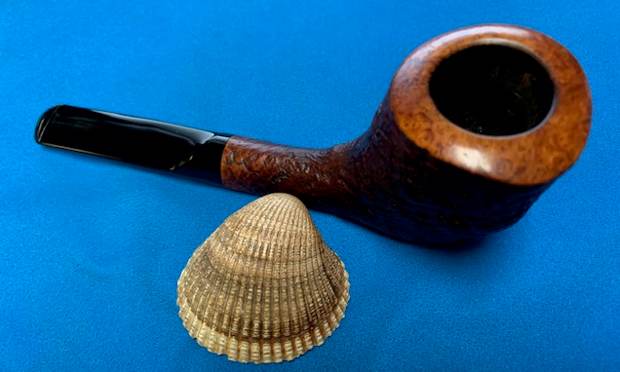
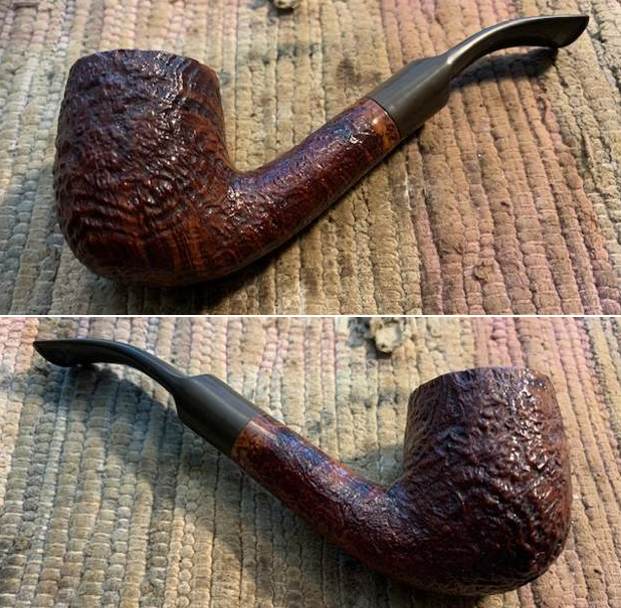
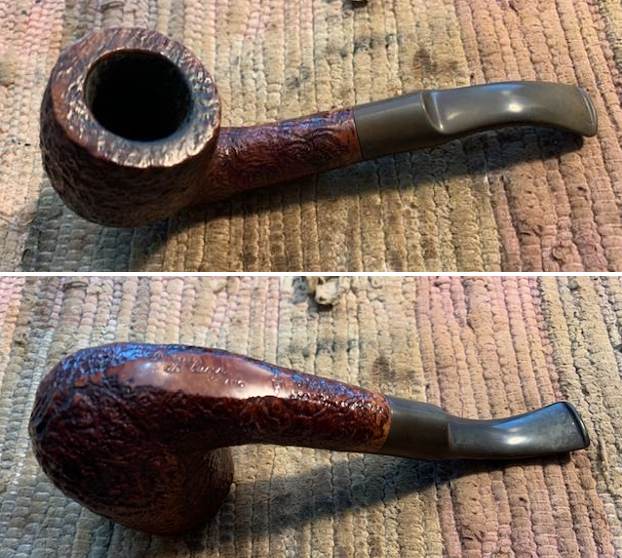
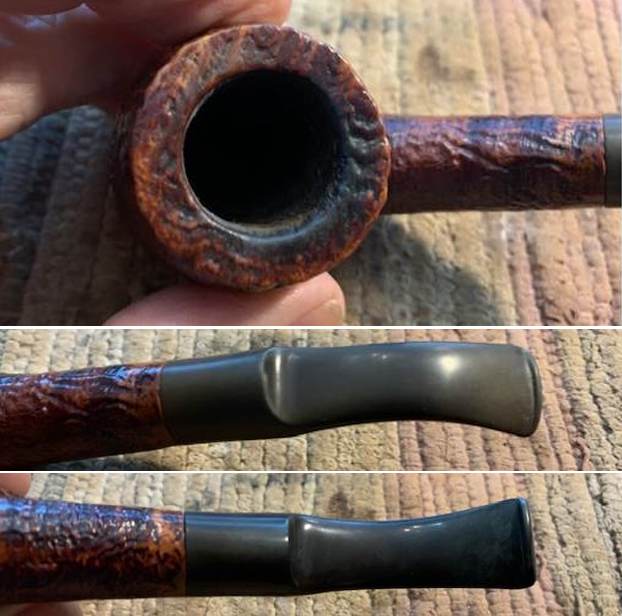
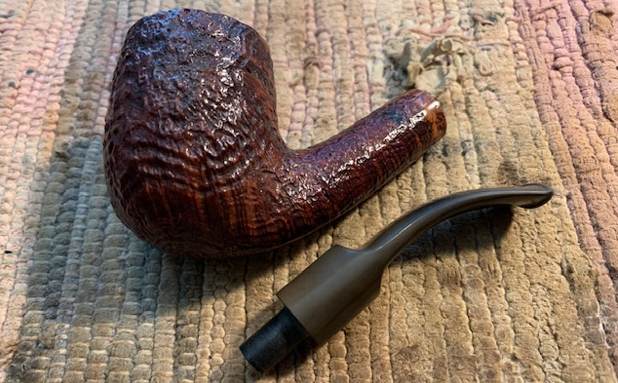
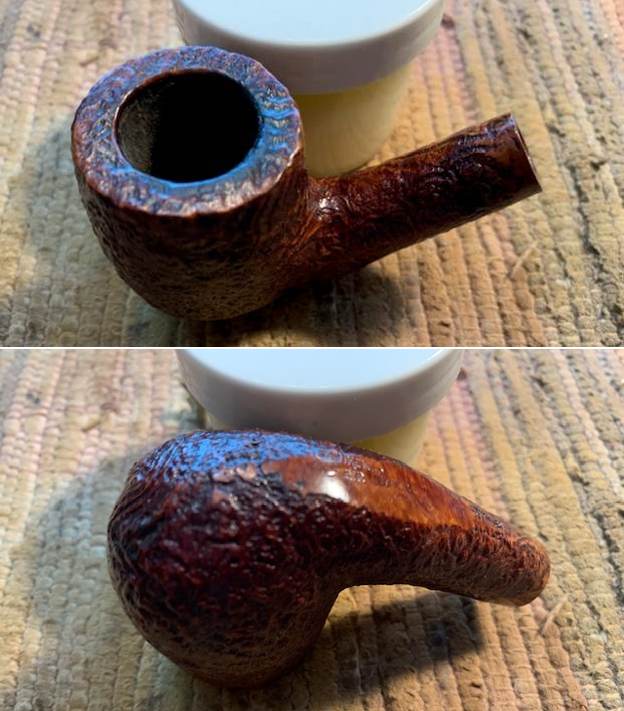
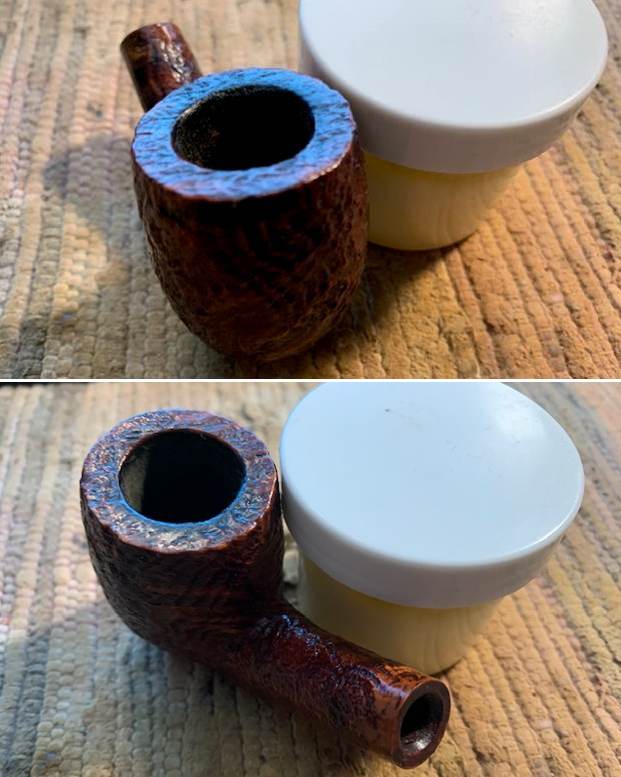
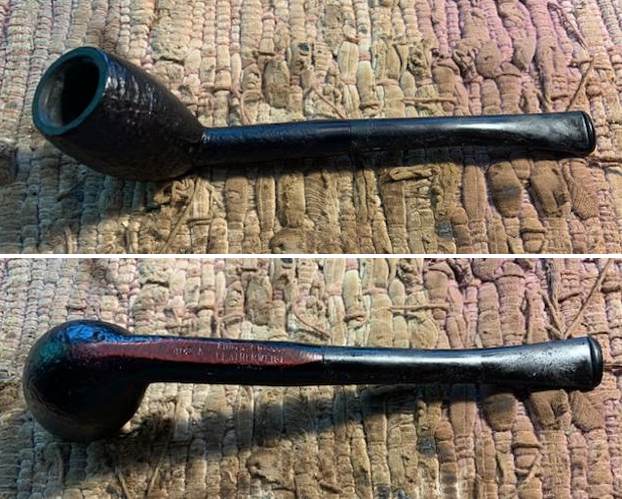
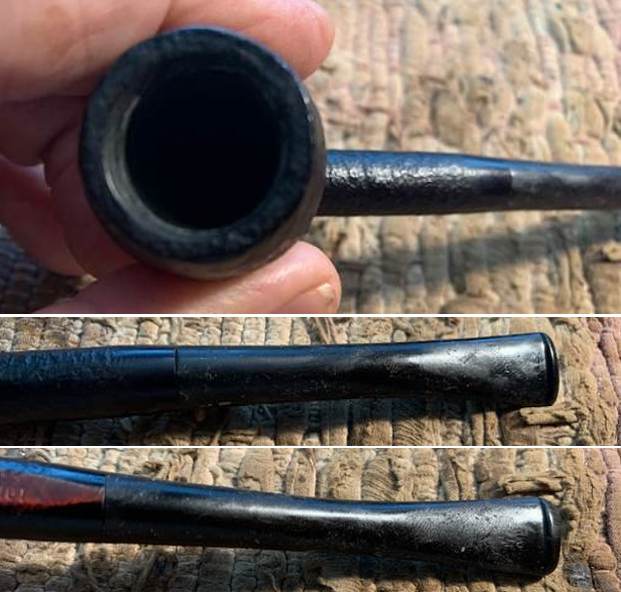
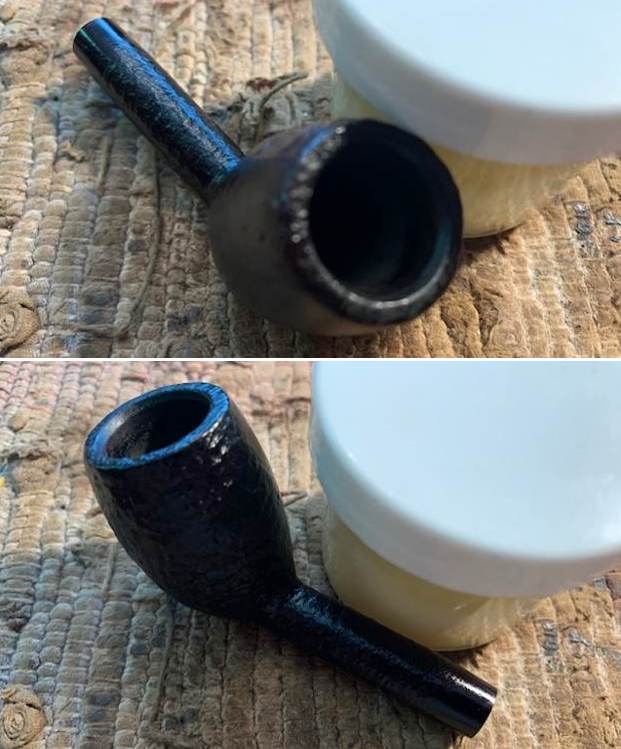
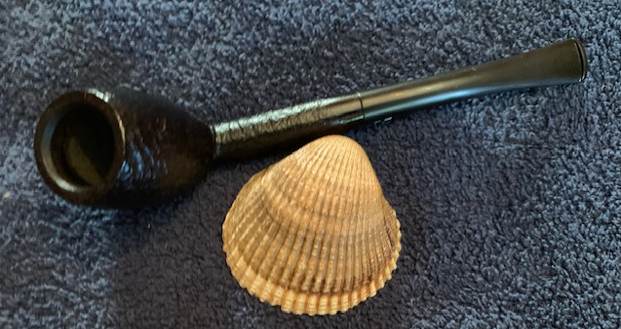
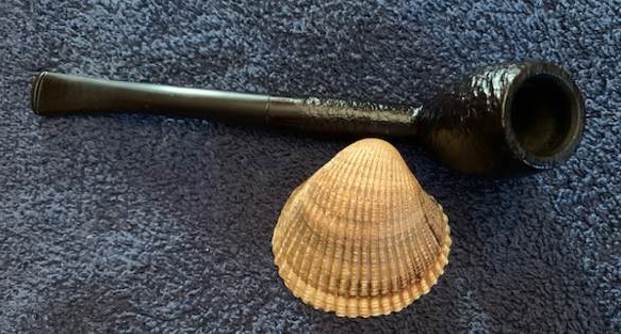
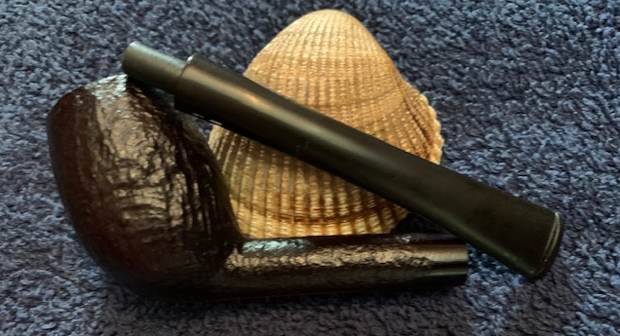
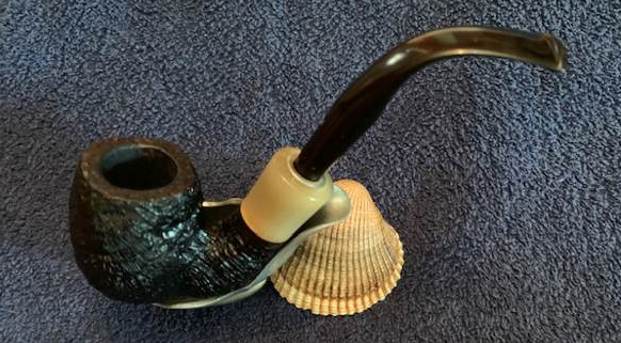
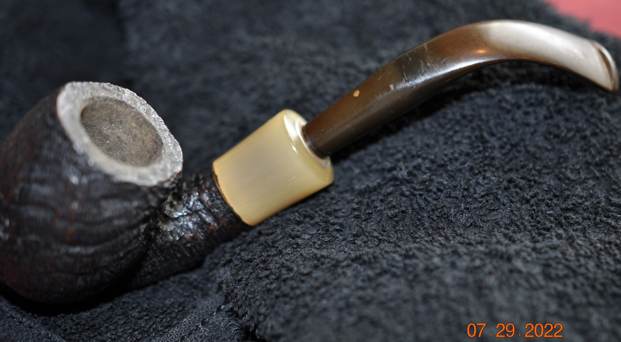
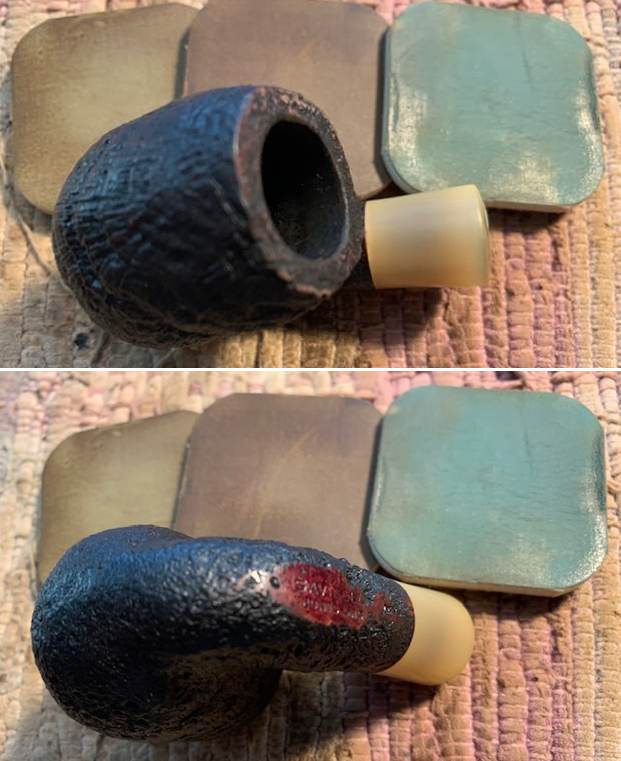
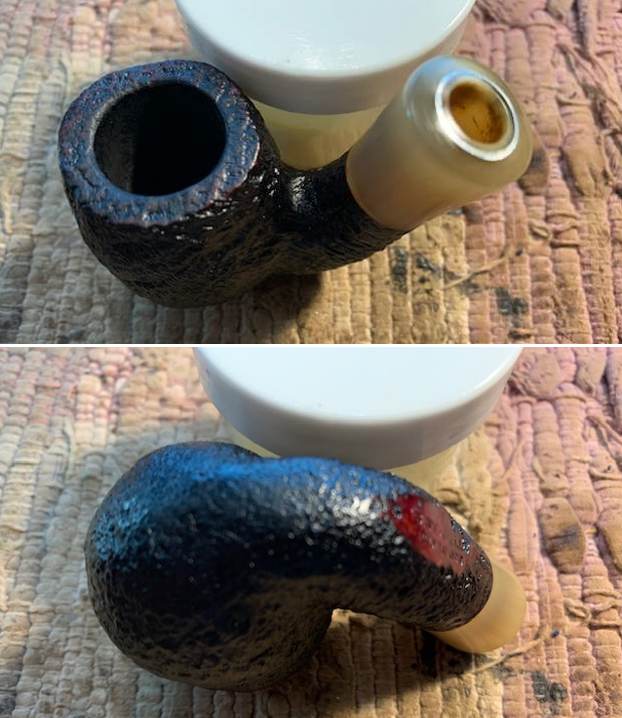
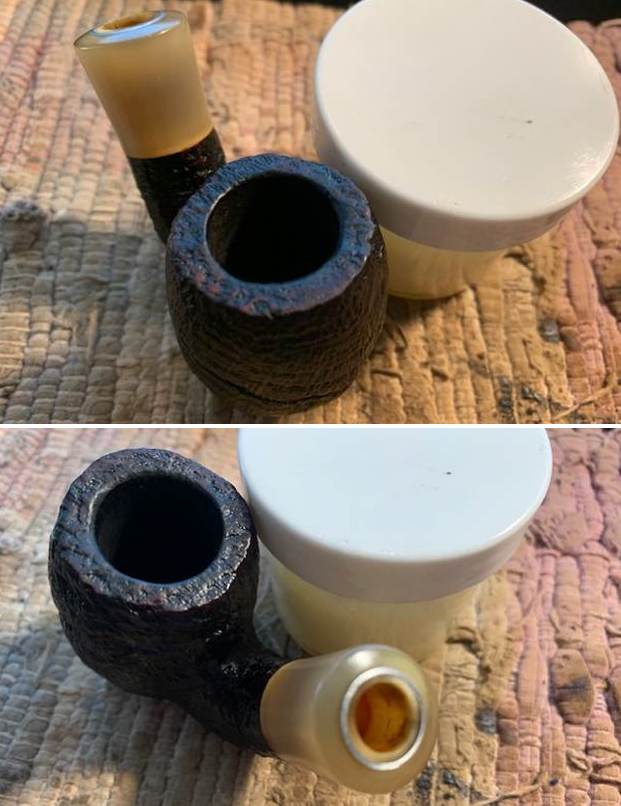
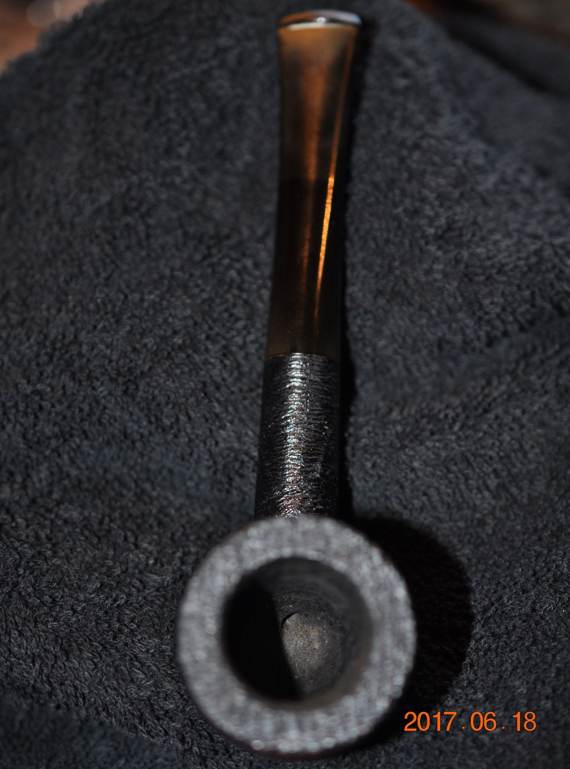
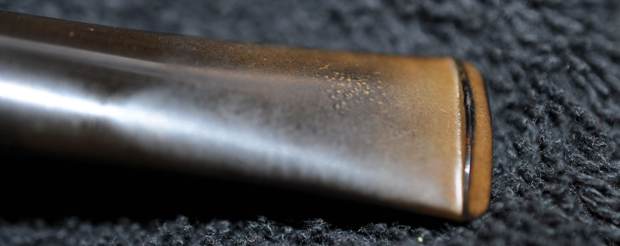
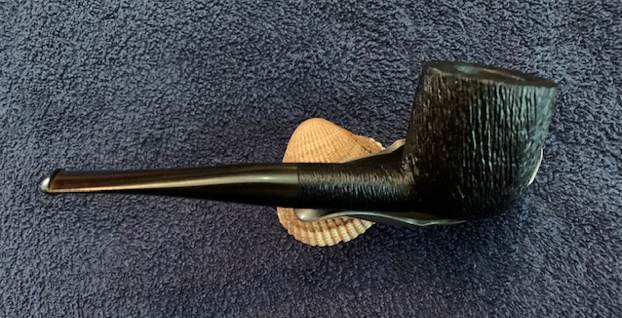
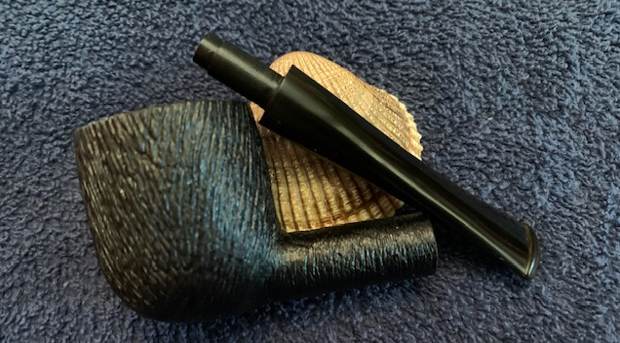
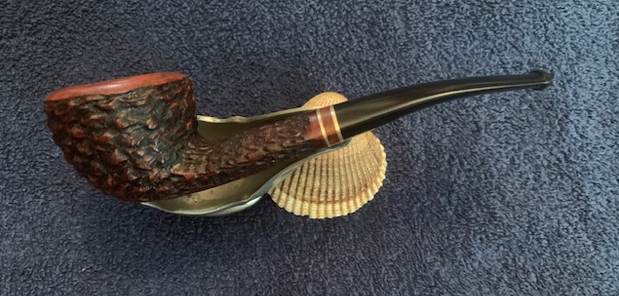
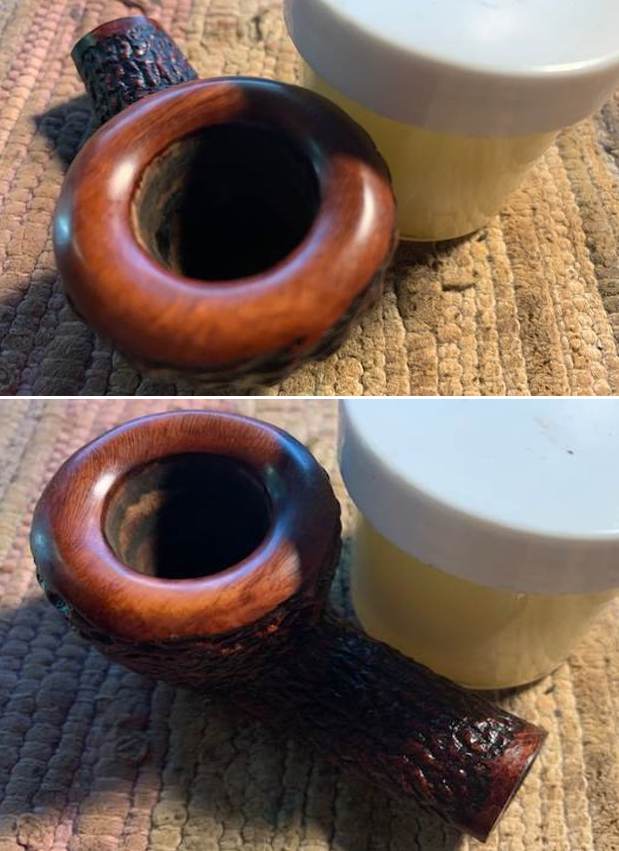
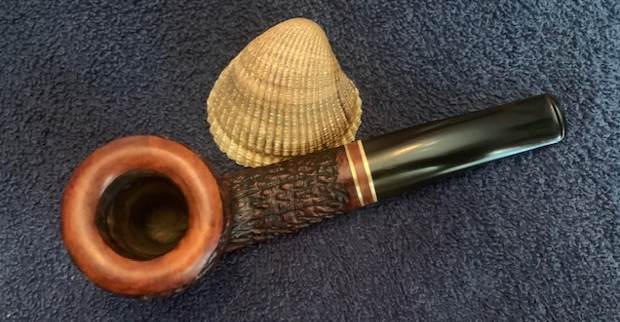
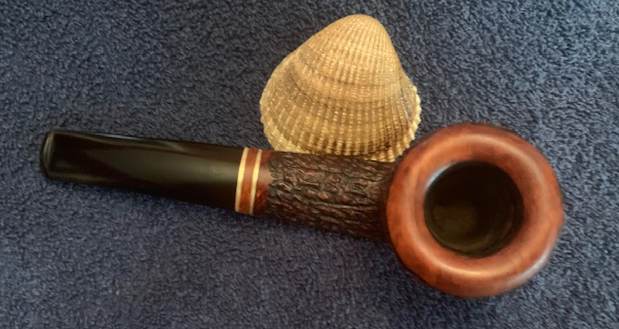
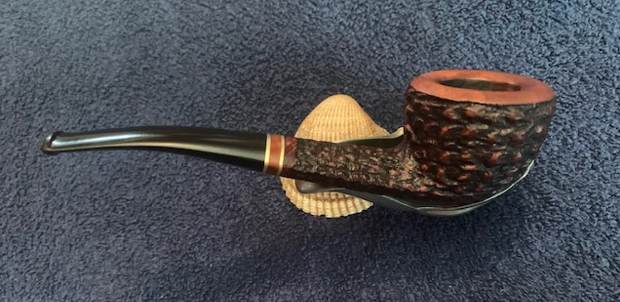
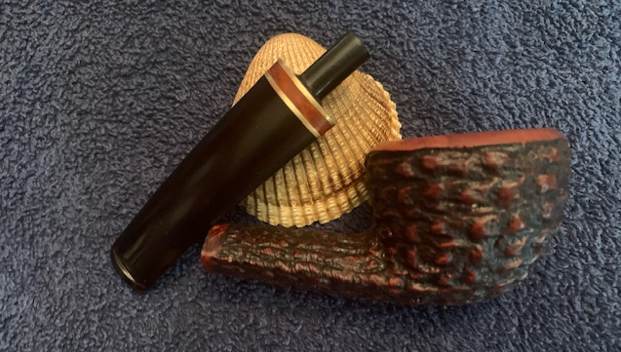
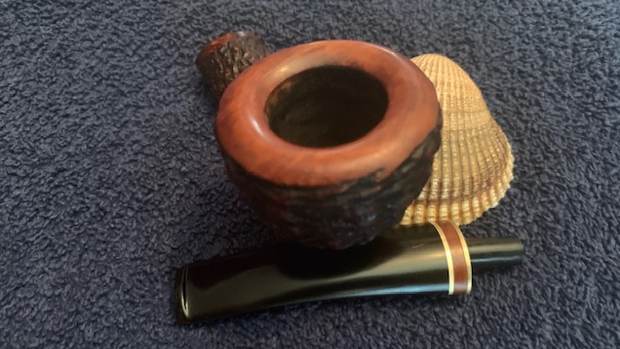
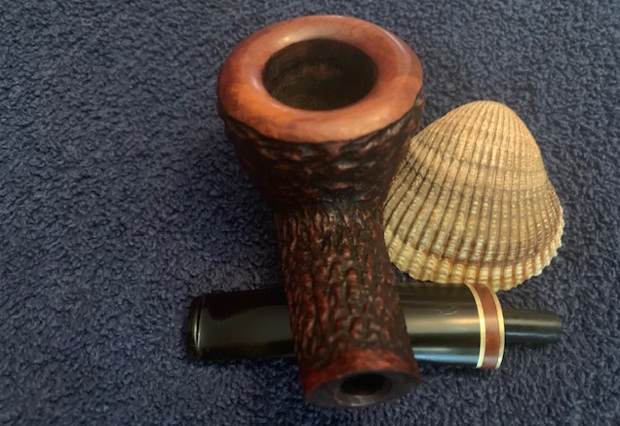
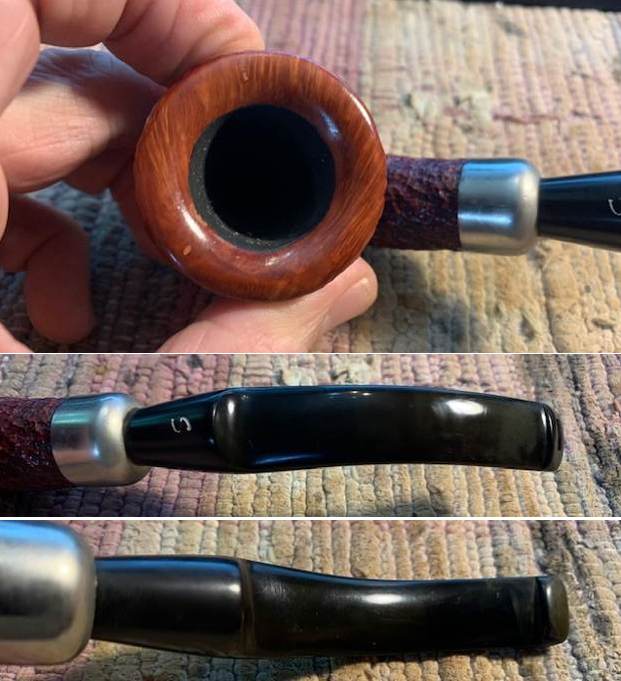
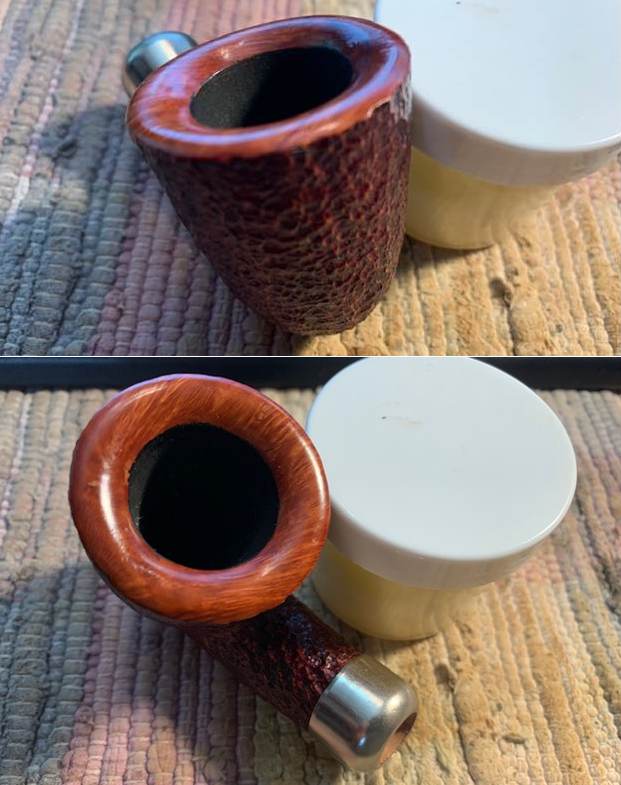
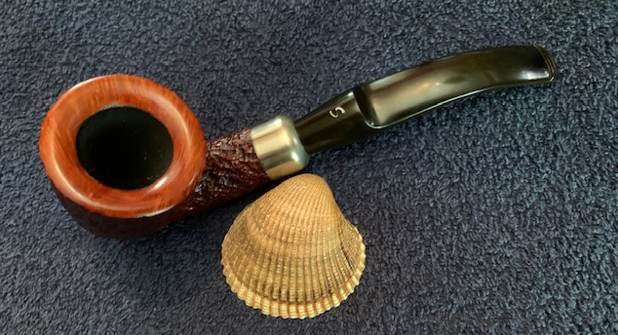
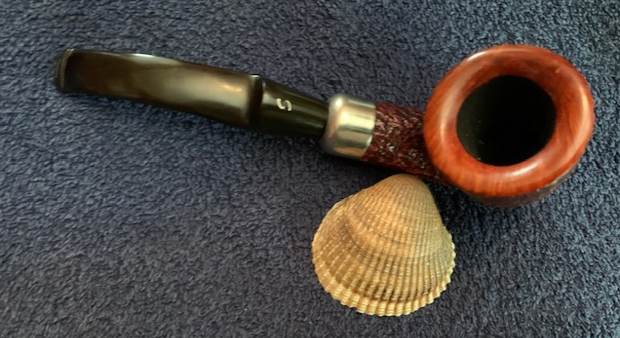
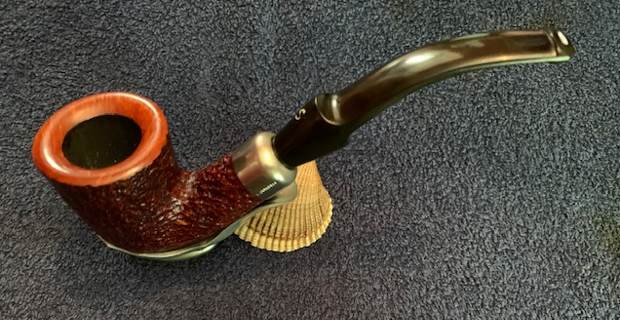
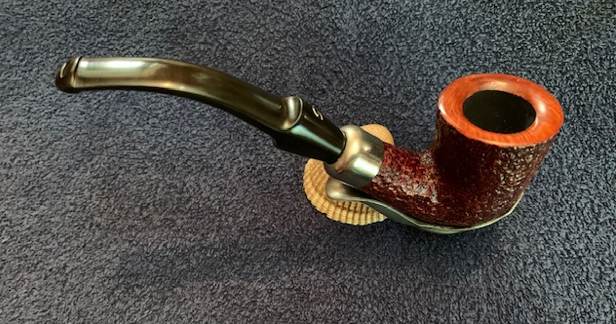
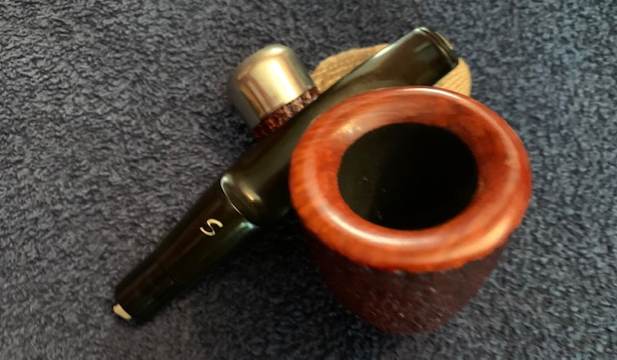
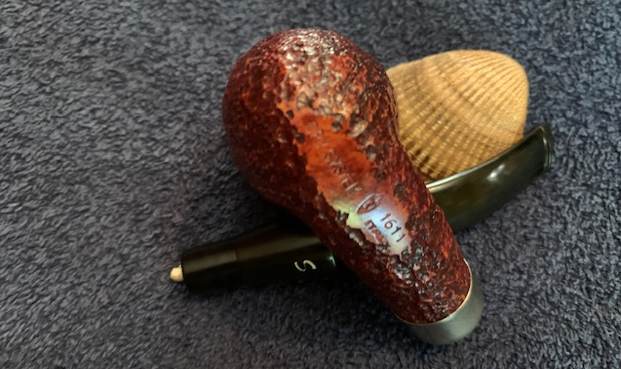
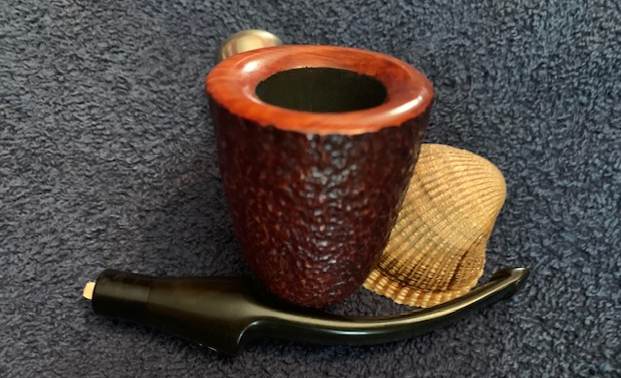
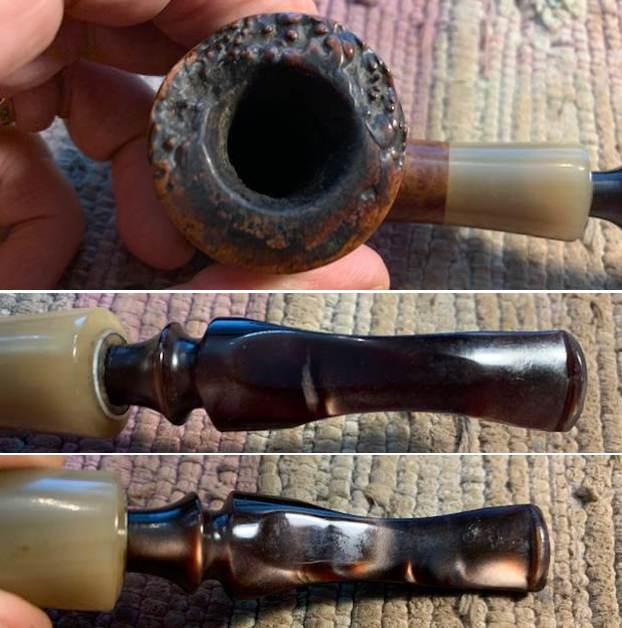
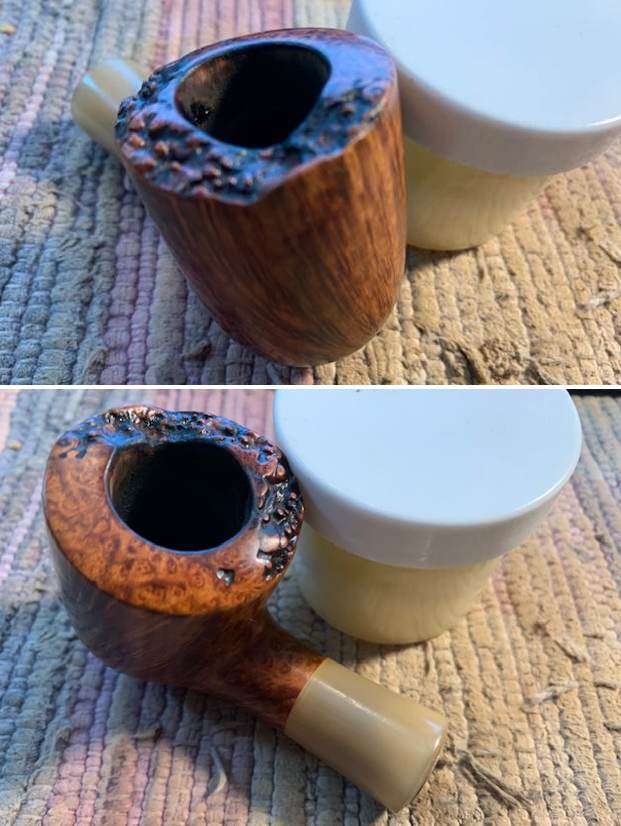
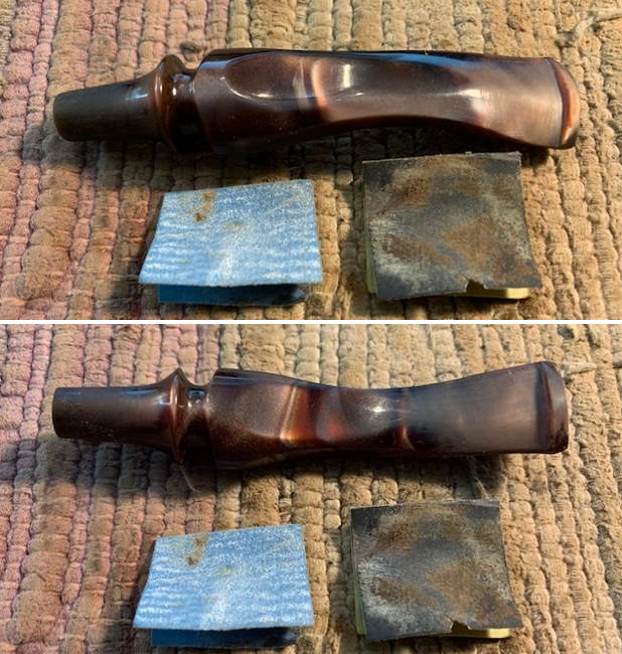
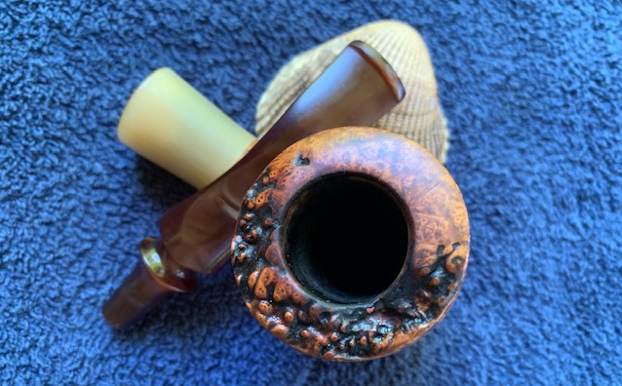
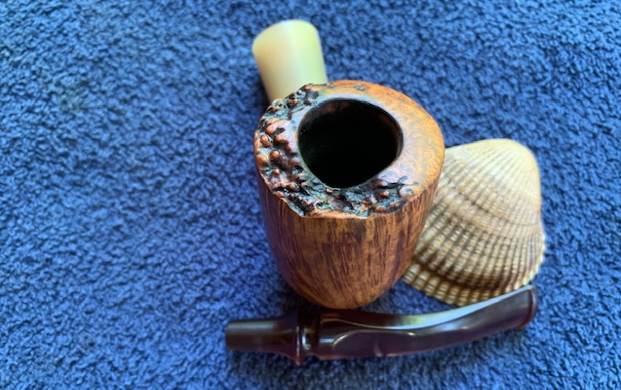
The email also included photos of the rim top to show its condition. There was some damage to the finish on the rim top and some damage to the inner edge of the rim. The acrylic stem photos show the scratches, chatter and tooth marks. Overall the pipe looked impressive even in its unrestored state. 
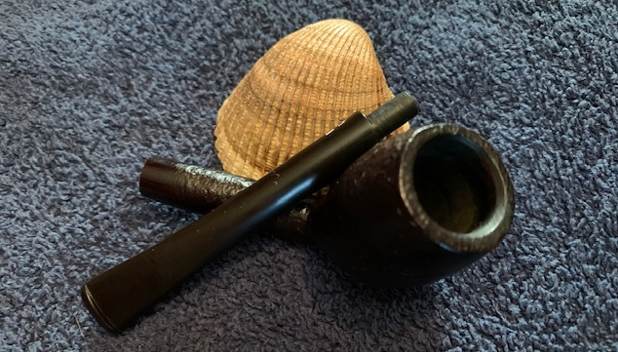
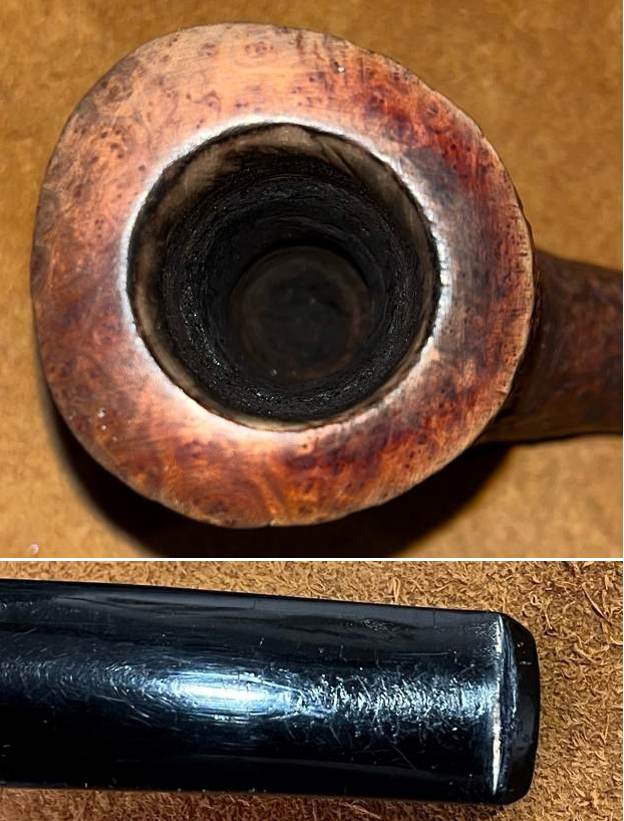
I wanted to remind myself a bit about the Autograph line from Savinelli so I reread a blog I had written on a previous Autograph restoration (https://rebornpipes.com/2019/01/05/restoring-a-savinelli-autograph-3-rhodesian-dublin-long-shank/). I quote that portion of the blog now:

I turned first to the Pipephil website (http://www.pipephil.eu/logos/en/logo-savinelli1.html) to get a brief overview of the Autograph line. There I found out that the Autographs were hand made and unique. The Autograph Grading system is ascending: 3, 4, … 8, 0, 00, 000.

I turned then to Pipedia to get a more background on the Autograph line. I had the outline I needed from pipephil for the pipe but wanted more (https://pipedia.org/wiki/Savinelli). I quote in part from the article on that site.

While Savinelli’s serially produced pipes account for around 98% of annual production, the marque also creates a number of artisanal, handmade pieces as well. The Autographs, the Creativity line, and the Mr. A. line are all the result of Savinelli’s unique handmade process, with the Autographs reflecting the larger Freehand aesthetic, the Creativity line delving into more complex hand carving, and the Mr. A. line sidestepping the standard shape chart for remarkable and unusual pipes.

All of the briar for Savinelli’s Autographs and other freehand pipes is sourced specifically for those pieces. While the majority of the marque’s serial production is made from extra grade ebauchon blocks, Savinelli keeps a separate supply of Extra Extra plateau blocks for Freehands. This variety of briar is much larger, and of a higher quality, which explains why so many Autographs and Savinelli handmades are naturally larger designs.

These handmade pieces are shaped much like traditional Danish Freehands: they are shaped first and drilled second. Using this method, Savinelli’s team of artisans is able to showcase their own creativity, as it maximizes flexibility and facilitates a more grain-centric approach to shaping. The resulting Freehand designs are at once both a departure from the marque’s classical standard shapes, yet very much still “Savinelli” in their nature—i.e. proportioned so that the bowl is the visual focus when viewed from the profile, juxtaposed by the comparatively trim lines of the shank and stem. To provide a little more insight into the differences between Savinelli’s standard production and freehand lines, Luisa Bozzetti comments:

“When we choose to make Freehand pipes we must stop production on the standard shapes. The process for Freehands is much more involved and takes much more time. Finding the best people from the production line and pulling them to make Freehands is challenging since it’s not an assembly line, but rather a one or two man operation.

After the rough shaping of the stummel, we must get together and brainstorm which style of stem will be paired before the pipe can be finished since we do not use pre-shaped stems. All accents and stems for the Freehands are cut from rod here in the factory. A lot of care goes into the few pieces lucky enough to make the cut; to end up with a certain number of Autographs, for instance, means that many, many more will be made, and only the few will be selected.”

The quality control process for Savinelli handmades is even more rigorous than that employed in the standard lineup. Many blocks are started and later discarded because of pits or defects. While Savinelli’s briar sourcing is a constant process, working with some of Italy’s top cutters to ensure only the finest and most suitable blocks make their way to the factory, it’s impossible to source plateau briar that’s completely free from flaws. That’s just nature. Savinelli creates the standard for quality by working through the rough (a very high-quality rough, mind you) to find that shining diamond with the potential to become a Savinelli handmade.

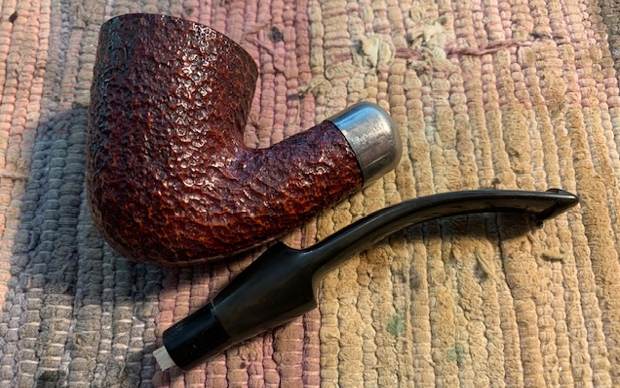
It looks like the Autograph 4 I am working is pretty high in the hierarchy of the line. Like other autographs I have worked on in the past this one has a unique twist to the stem.

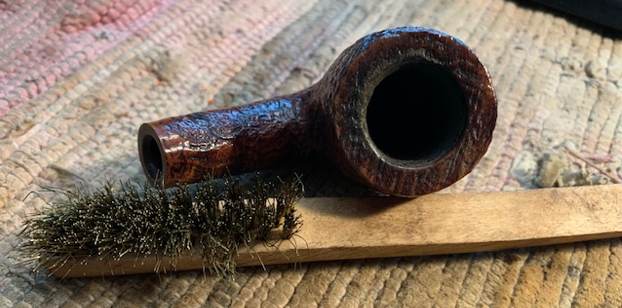
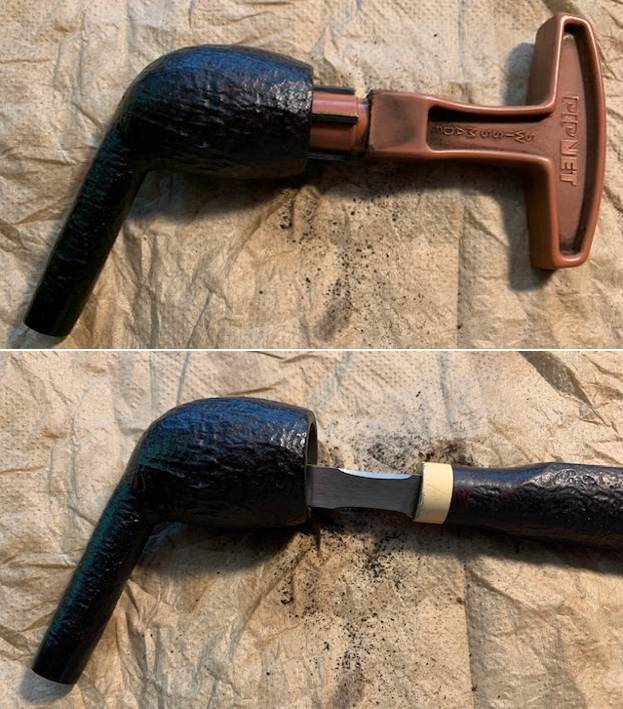
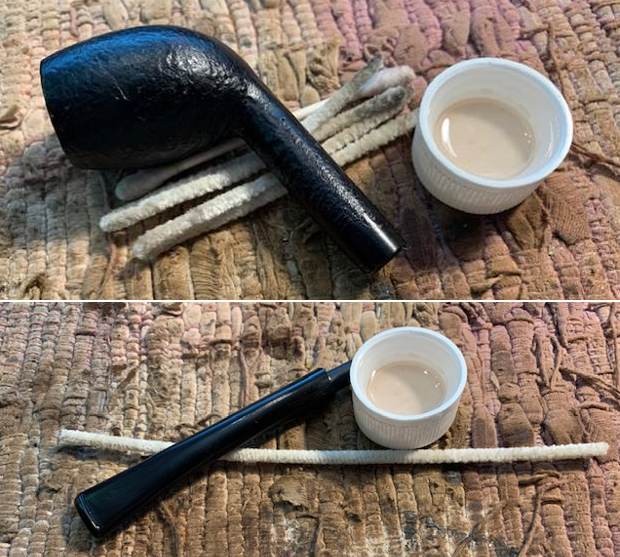
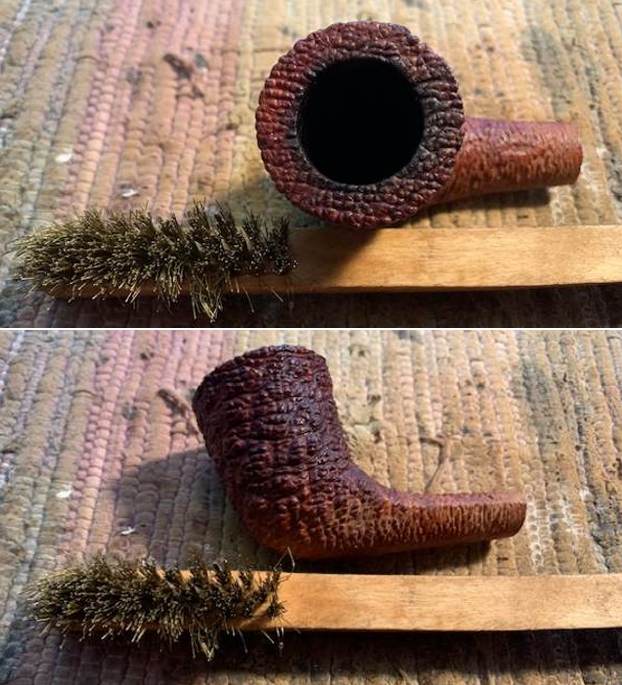
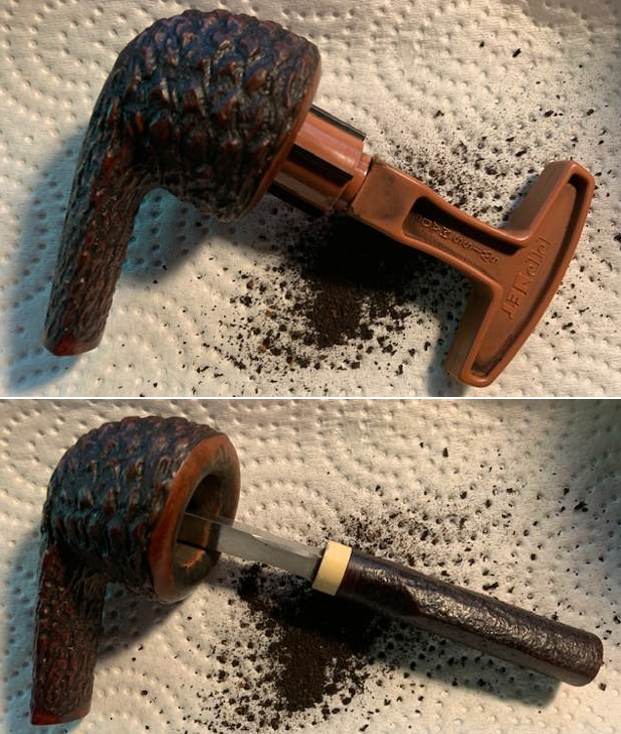
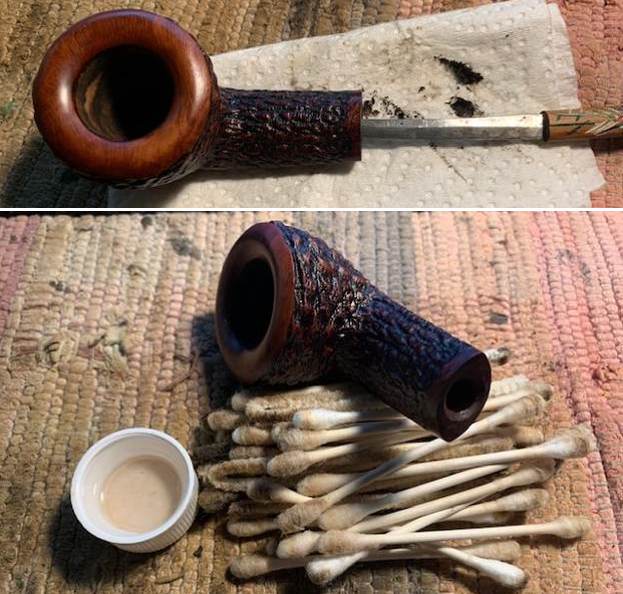
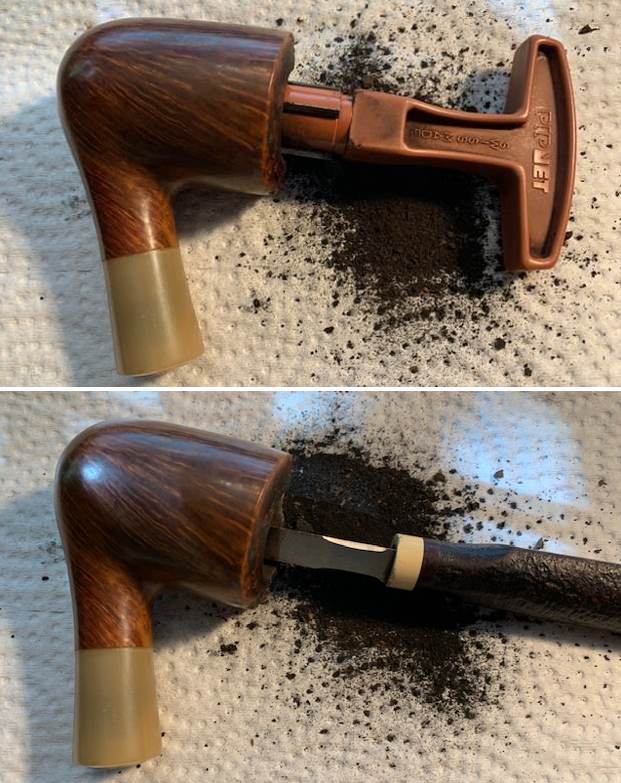
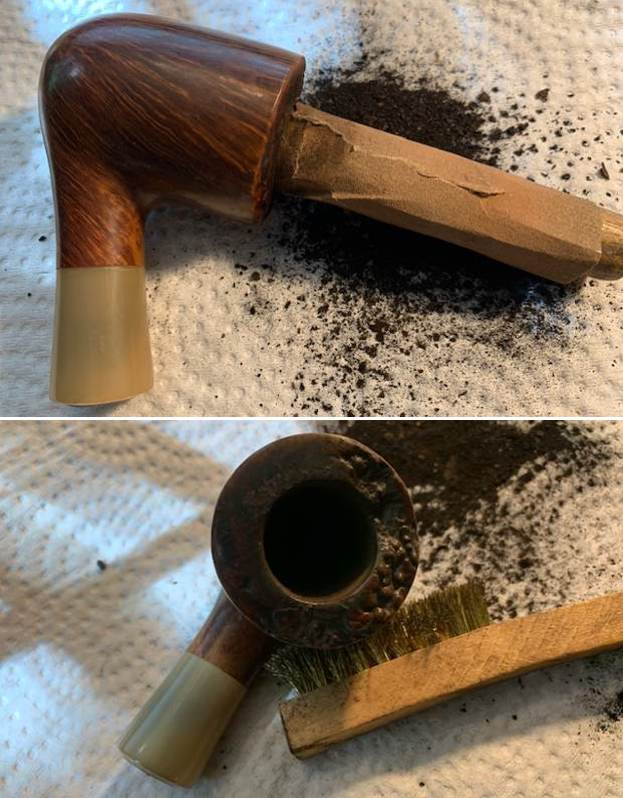
I started my work on the pipe by reaming it with a PipNet pipe reamer and got rid of the cake. I cleaned up the reaming with a Savinelli Fitsall Pipe knife. I then sanded the walls smooth and wiped it down with a cotton pad so that I could see the walls of the bowl and assess for damage. 
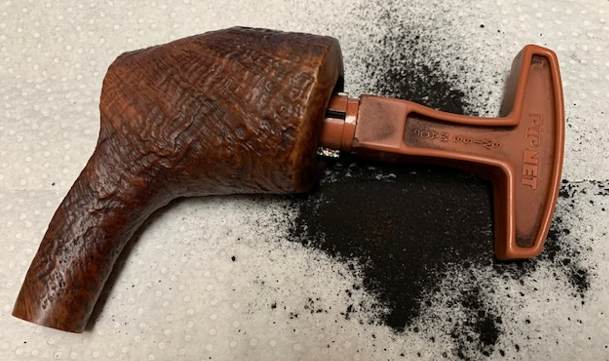
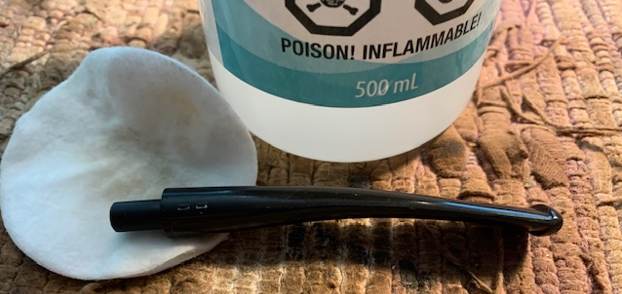
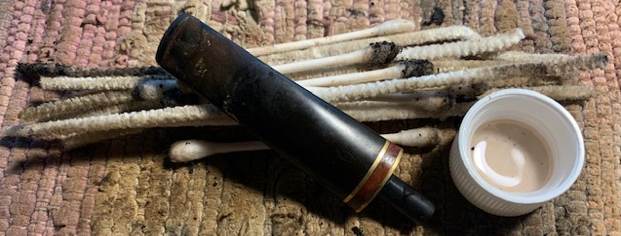
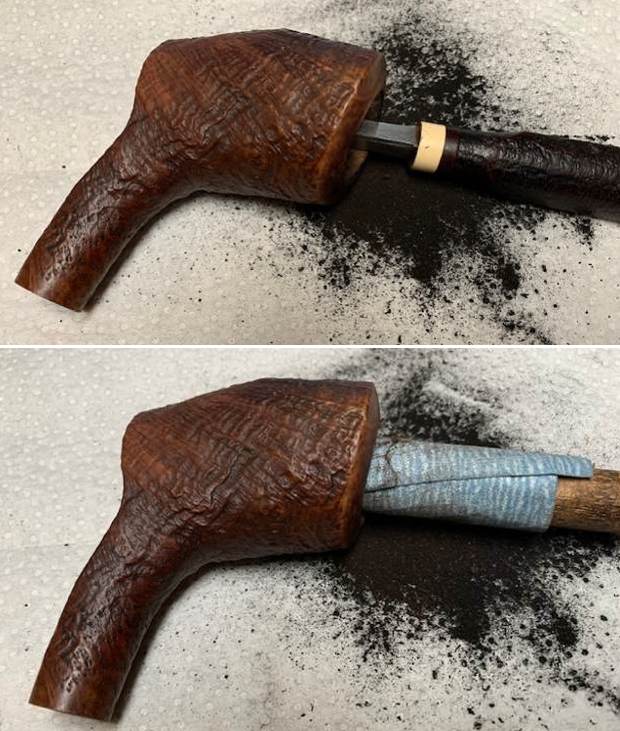
I scraped the mortise walls with a pen knife and was able to remove a lot of tarry/oily buildup. Once I had scraped it clean, I scrubbed the internals of the shank, mortise and the airway in the shank and stem with alcohol, pipe cleaners and alcohol. It smelled considerably cleaner at this point in the process. 
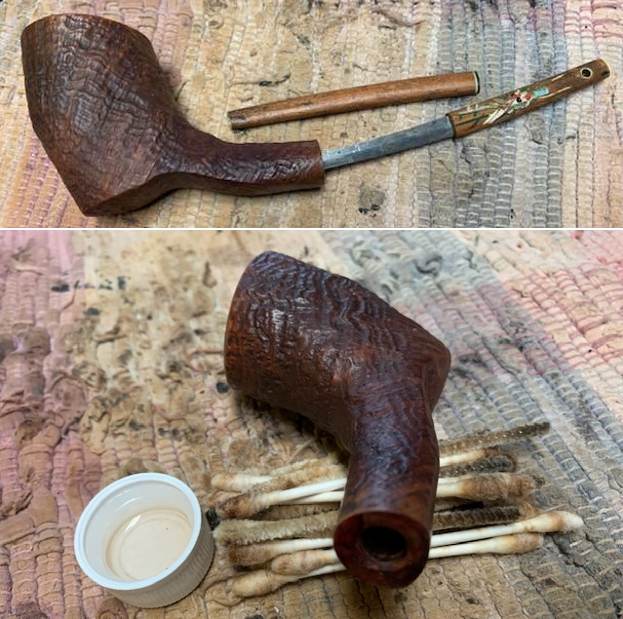
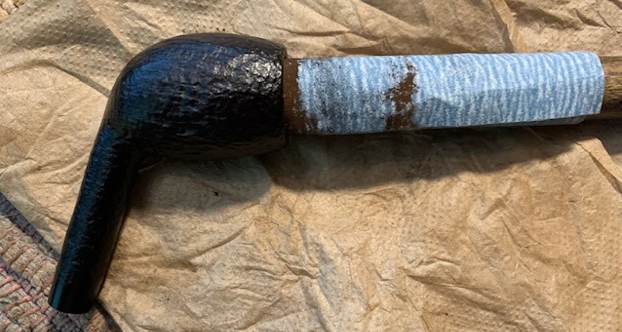
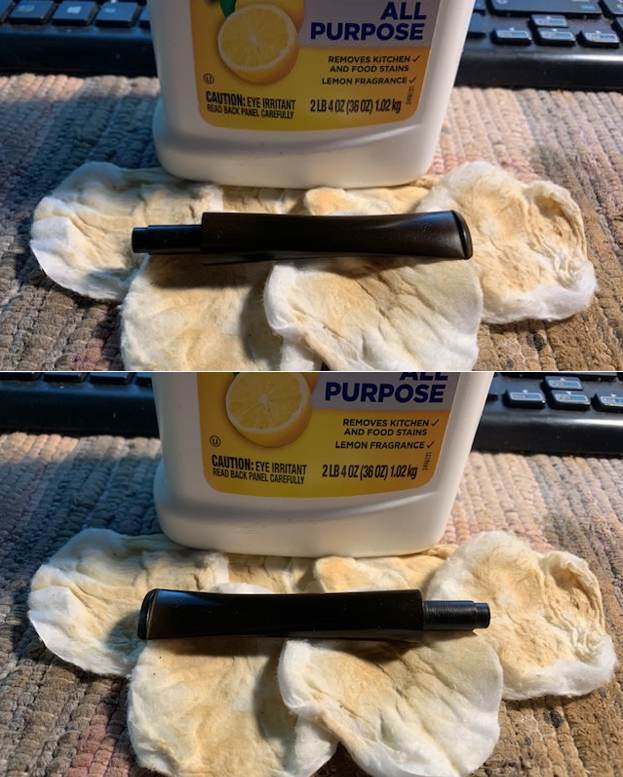
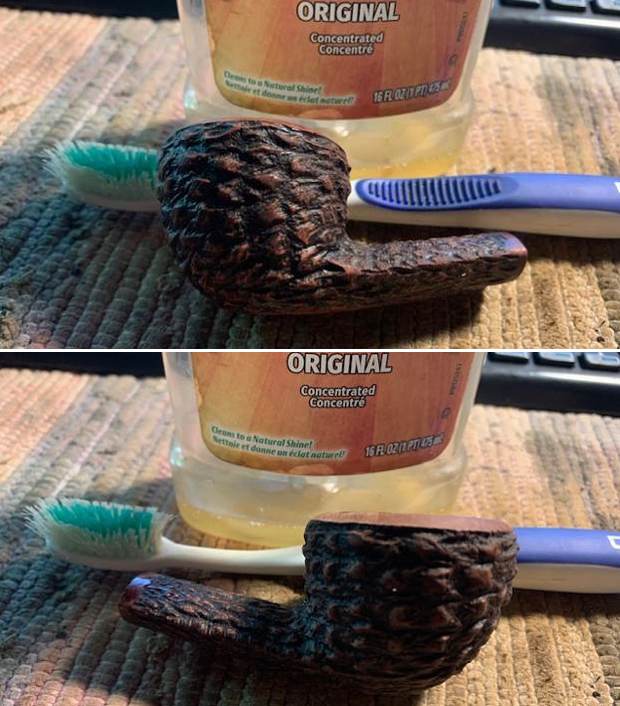
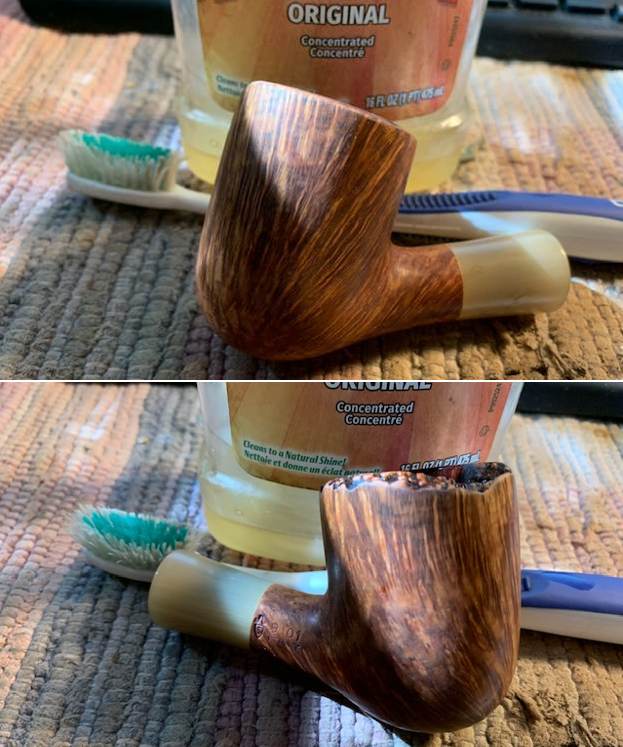
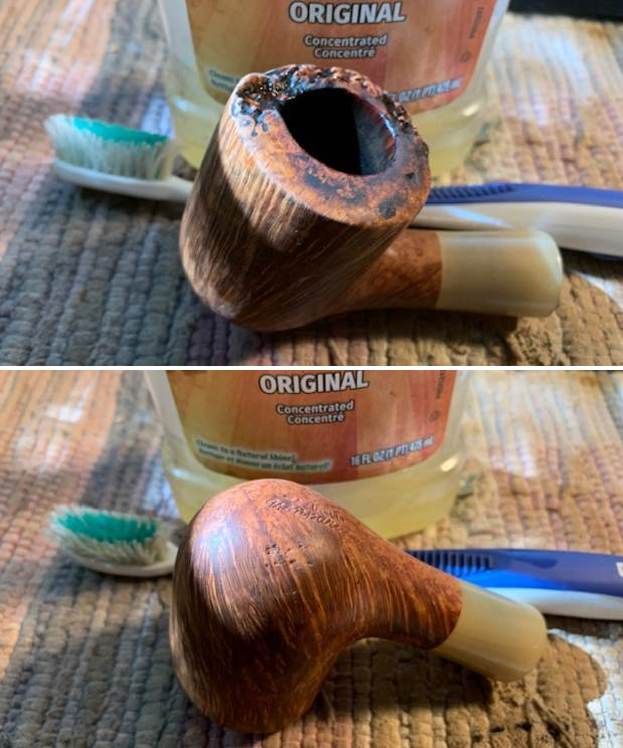
I scrubbed the exterior with undiluted Murphy’s Oil Soap and a tooth brush to get into the grooves and valleys of the sandblast. I worked on the rim top and edges of the bowl to remove some of the tars and darkening there. I rinsed the pipe under warm water. He dried it off with a cloth and then let it air dry. 
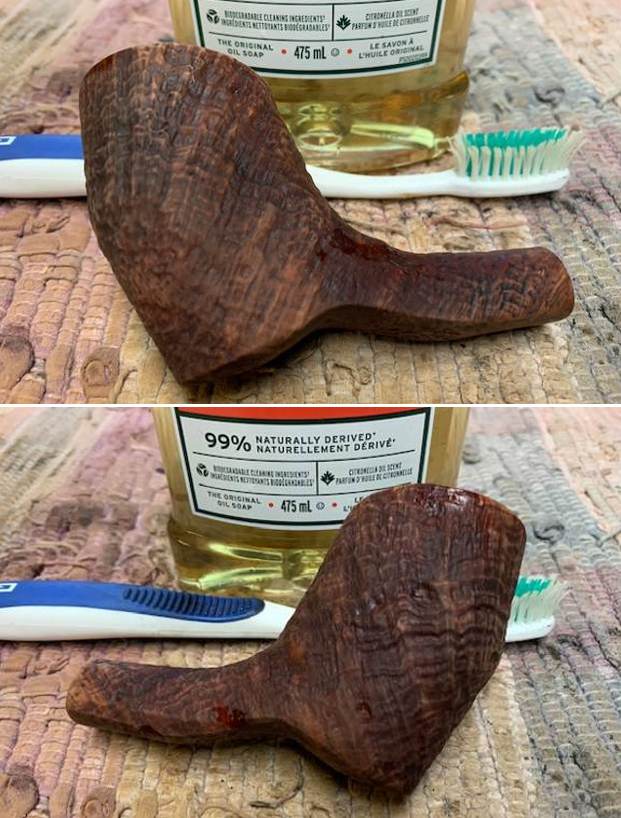
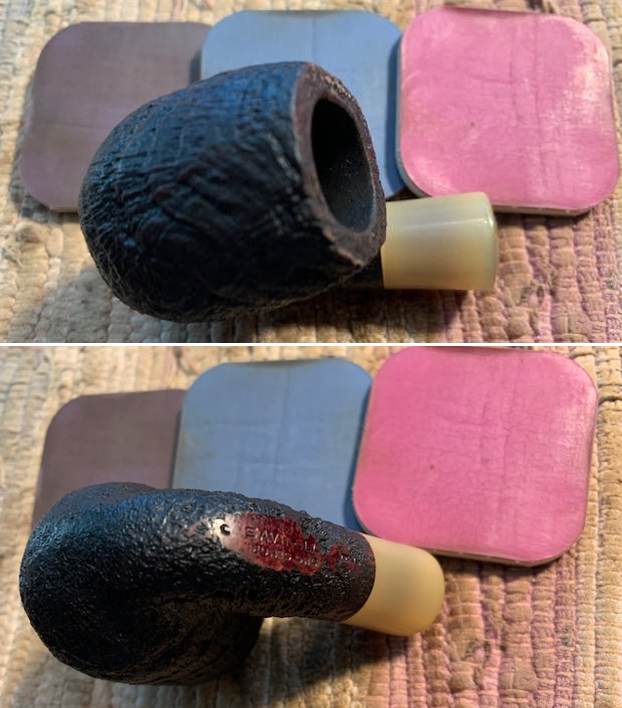
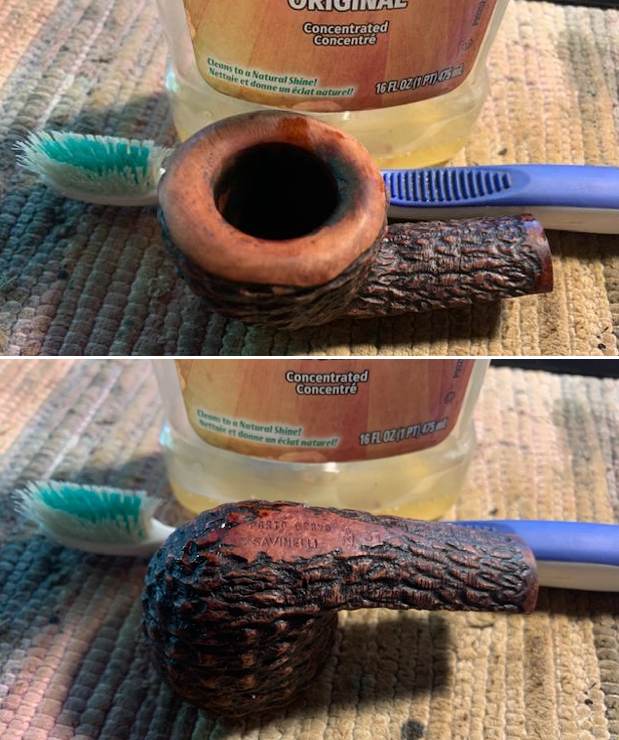
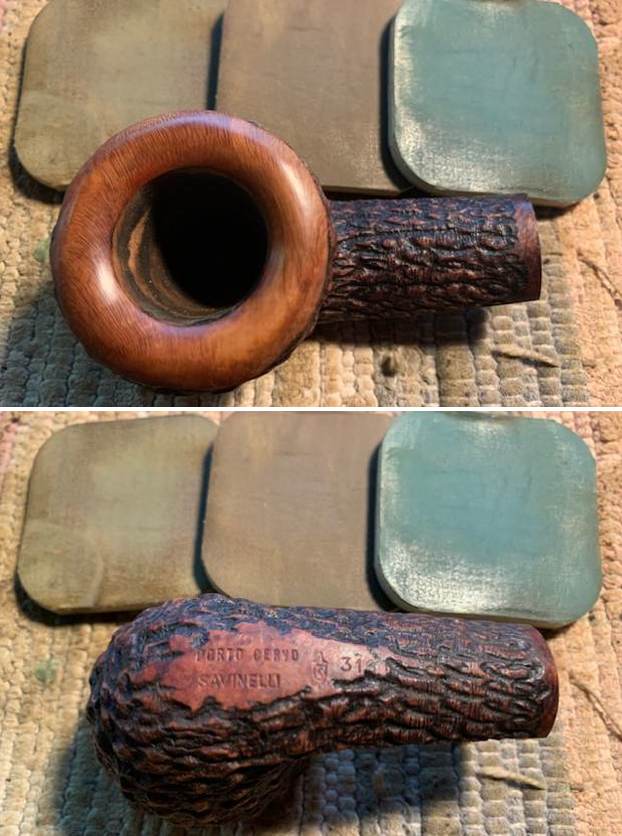
I decided to address the damage to the inner edge of the rim. I used a wooden ball and a piece of 220 grit sand paper to give the inner edge a slight bevel to take care of the damage and burn marks. I cleaned it up lightly with a folded piece of 220 grit to smooth out the notches from the reaming work done before it arrived here. I was able to minimize the damaged area. 
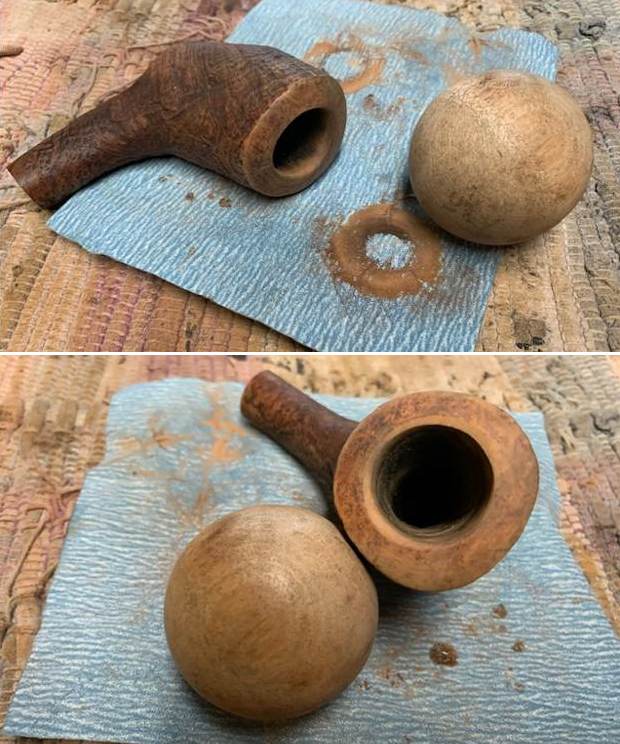
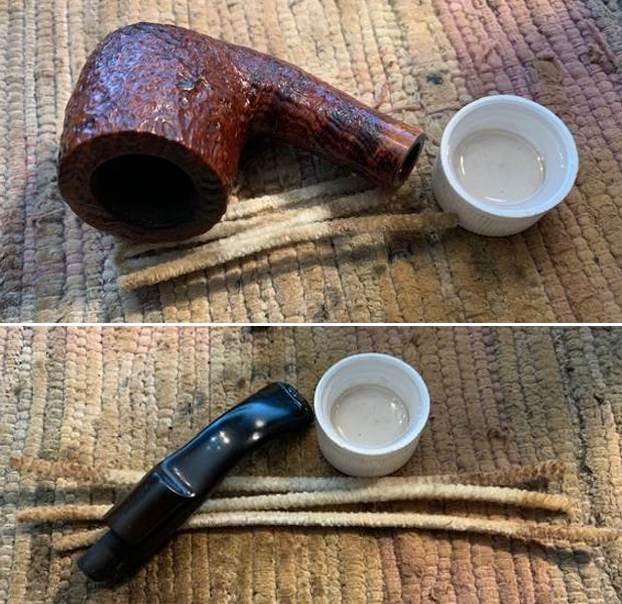
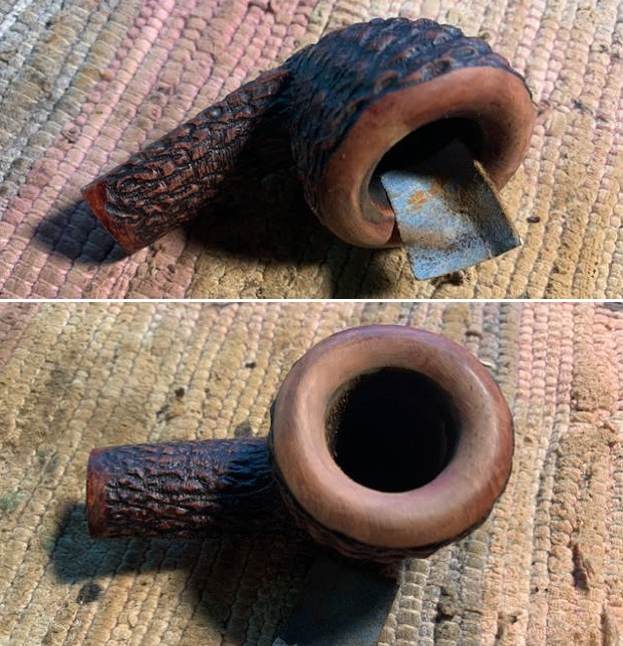
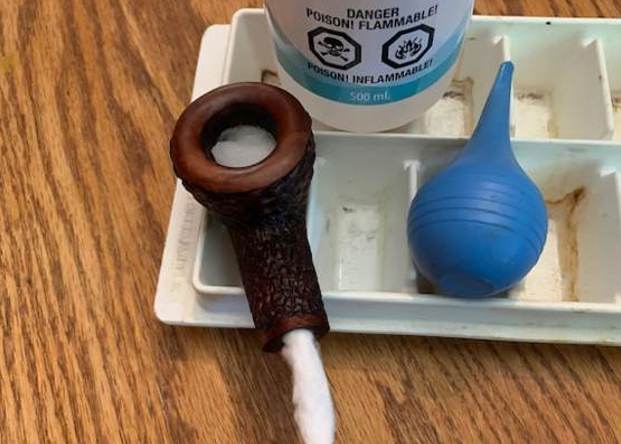
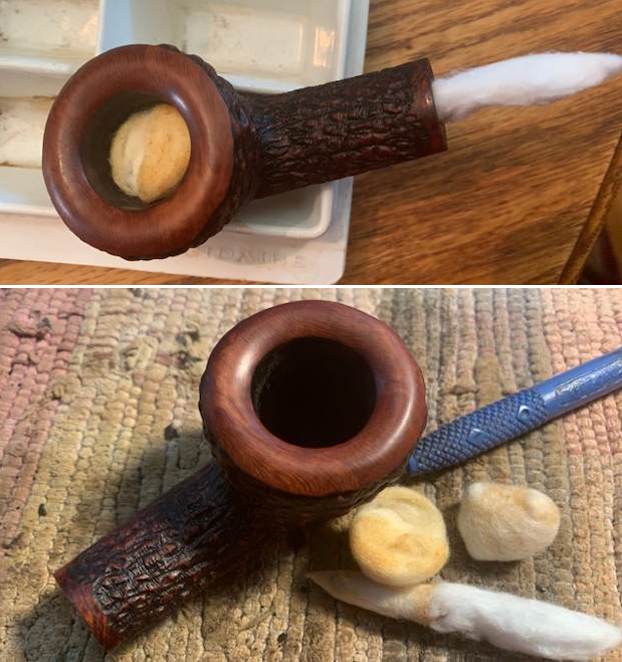
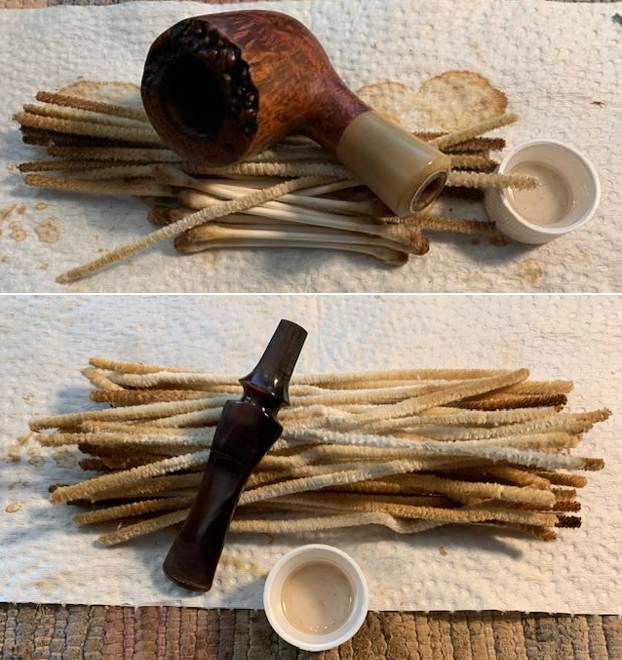
Before I called it a night I stuffed the bowl with some cotton bolls, plugged the shank end and filled it with 99% isopropyl alcohol to leach out the oils and tars in the bowl and shank that gave it a bit of a funky smell. I set it aside for the night to do its magic. When I came back to the work table in the morning the cotton had darkened all the way down the bowl and the plug. The pipe smelled considerably better.
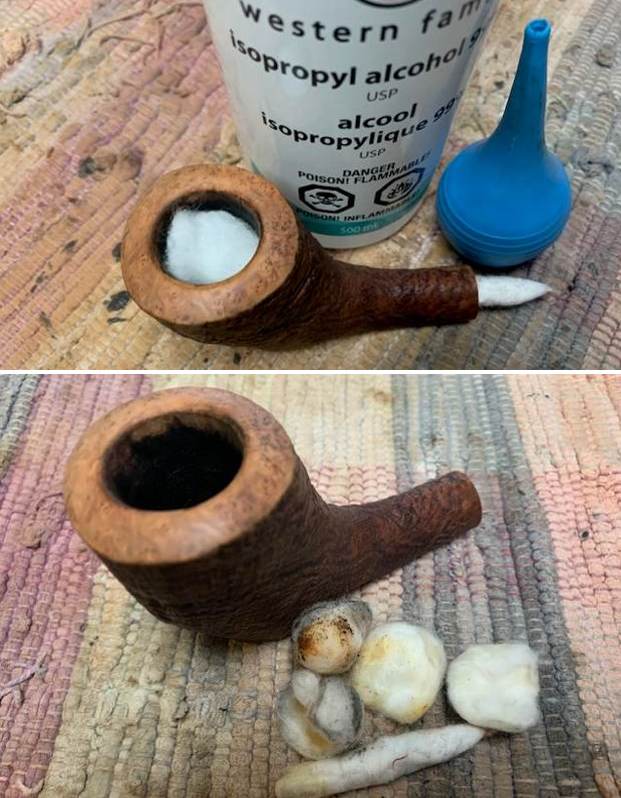
I ran some pipe cleaners through the shank and dried the bowl edges. I used a black stain pen to stain the inner edge of the bowl to blend it into the bowl and give definition to the rim top. I like the way this looks on a cleaned pipe.
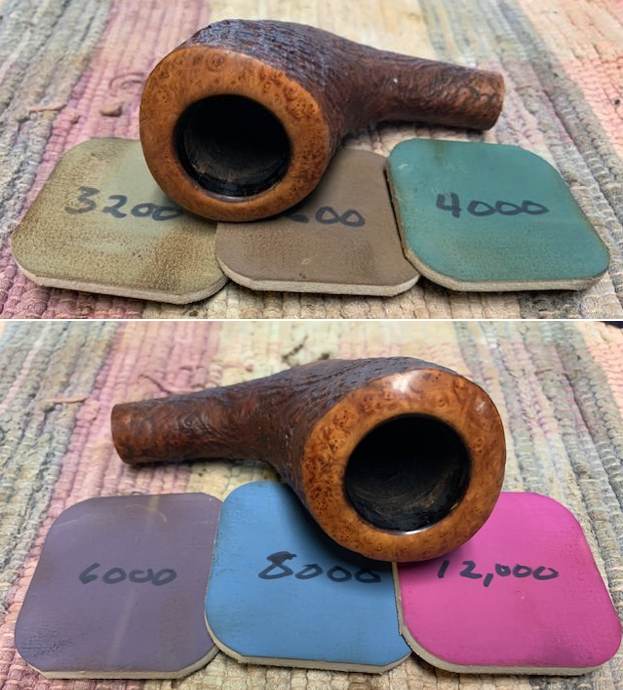
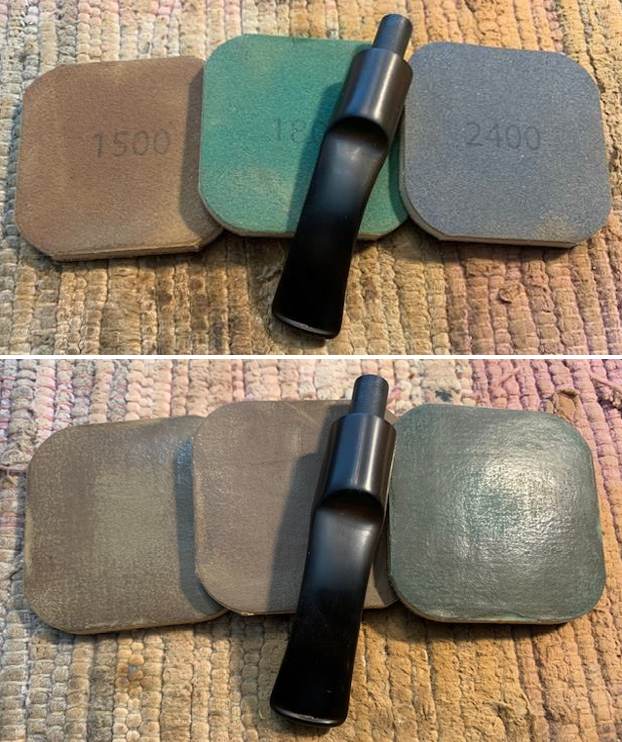
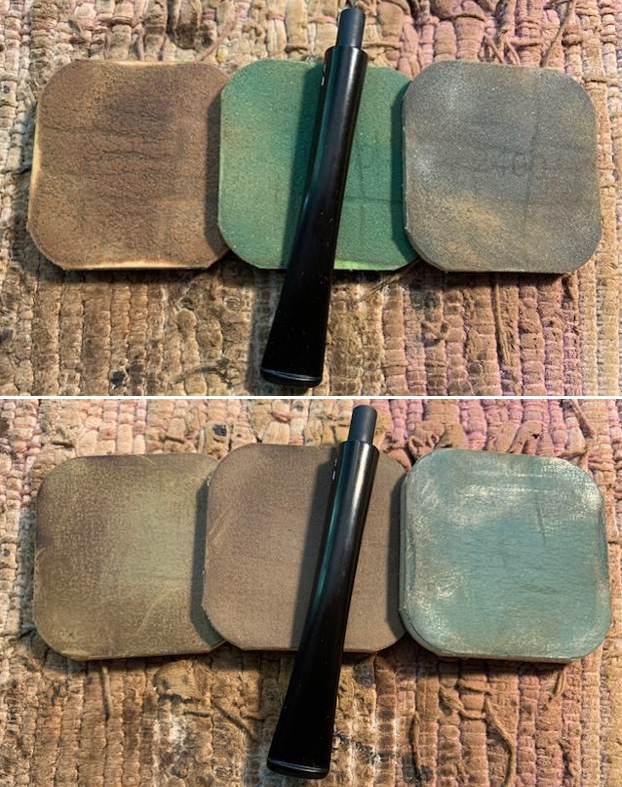
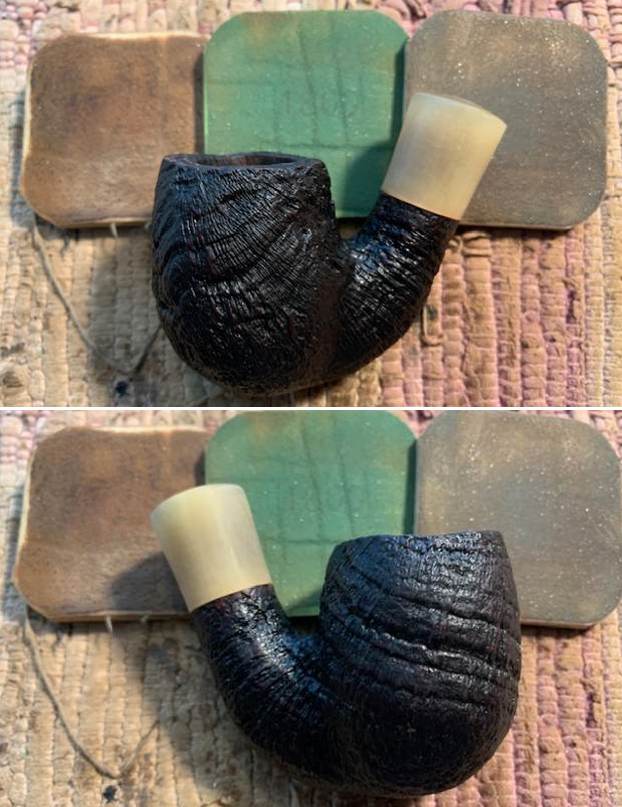
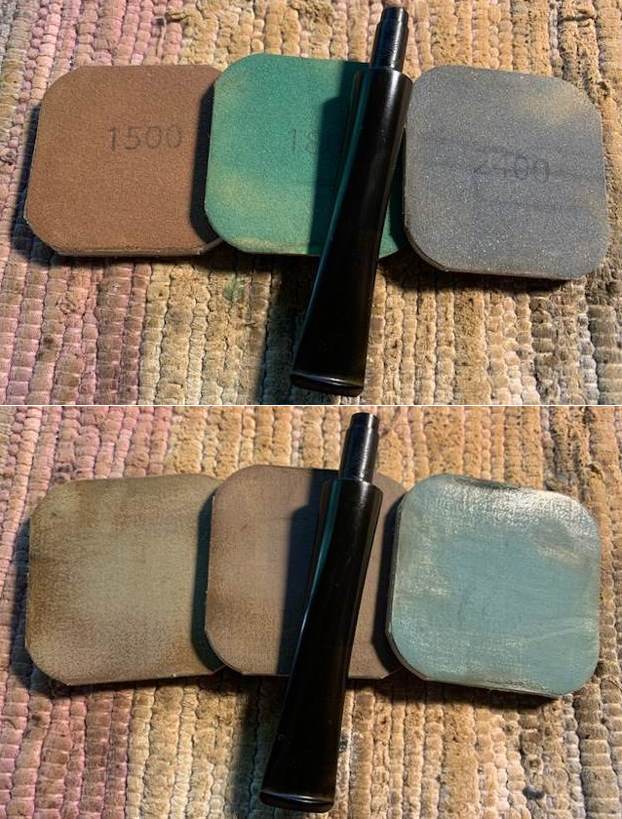
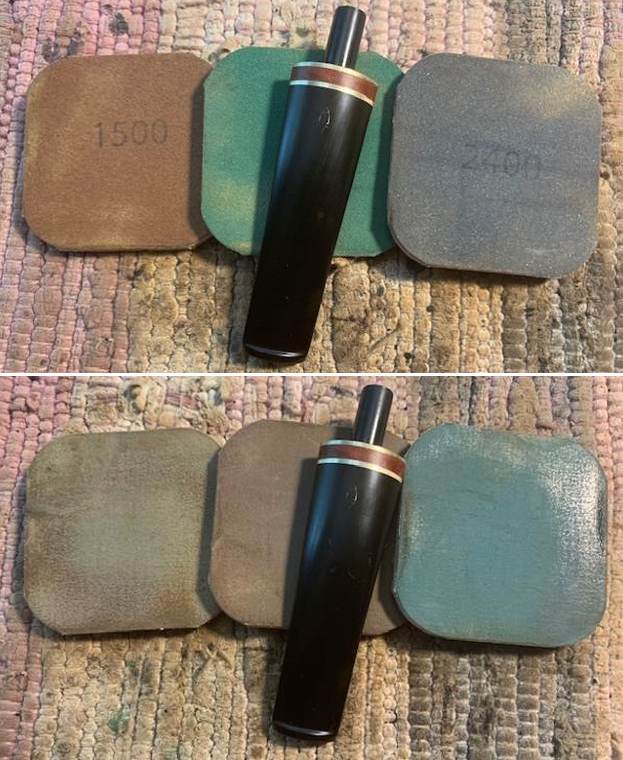
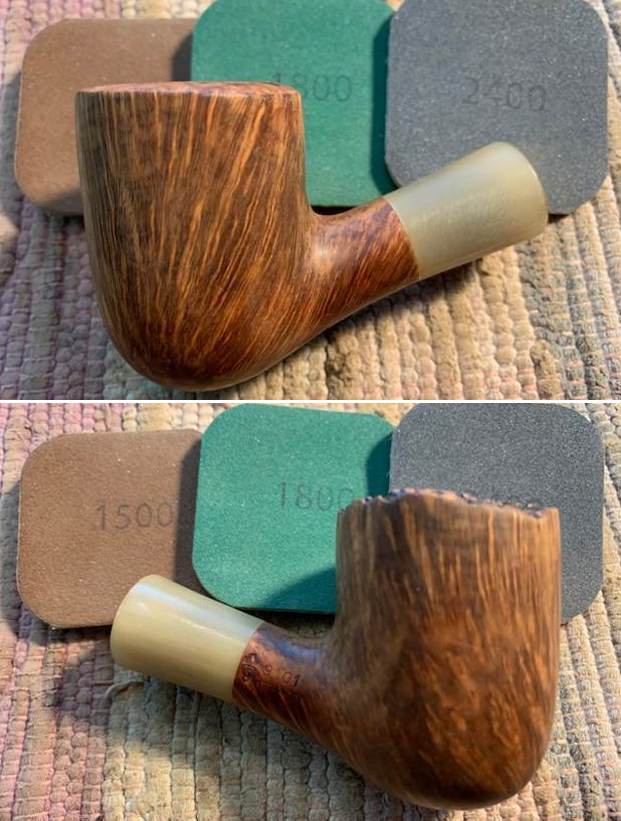
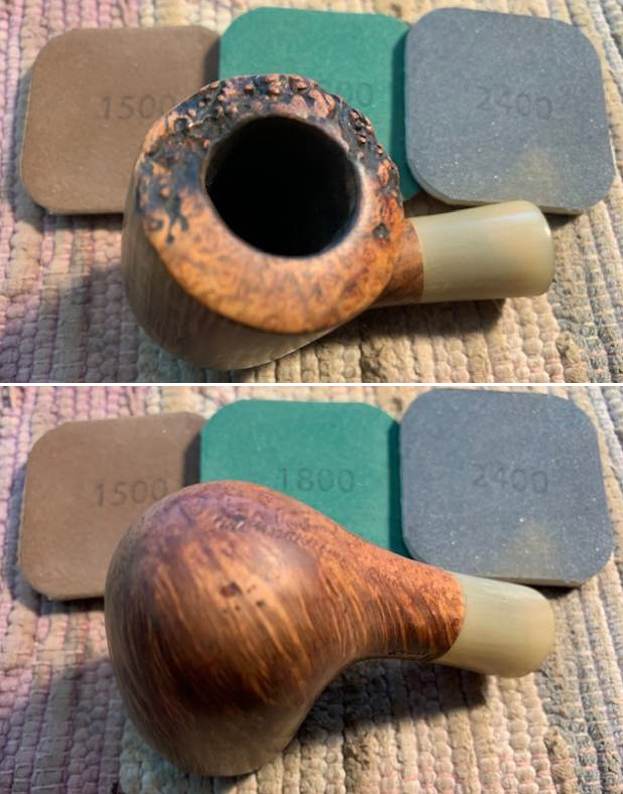
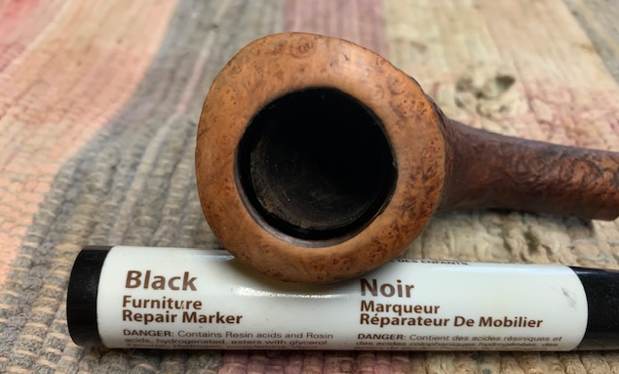
I polished the rim top with micromesh sanding pads – wet sanding with 1500-12000 grit pads. I wiped the bowl down after each pad with a damp cloth. The grain really began to pop and stand out on the polished briar. 
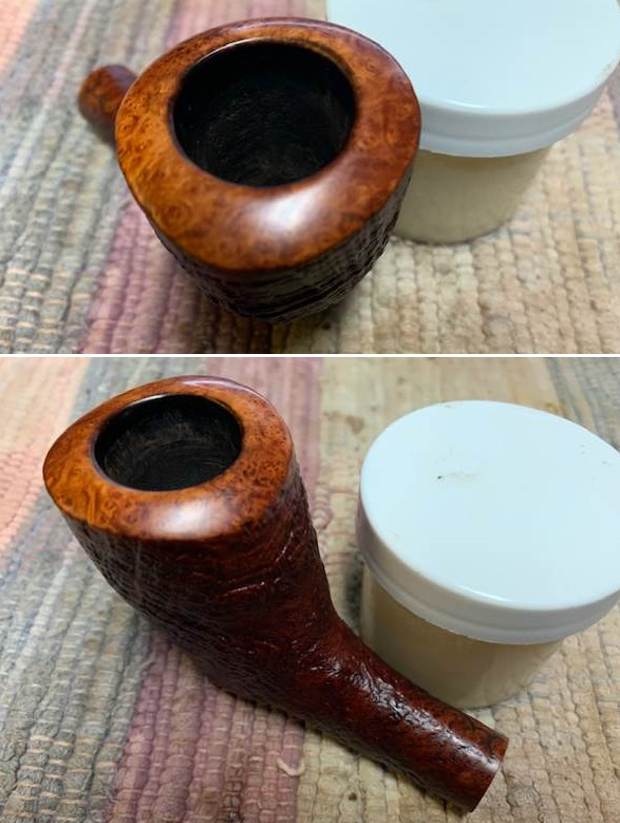
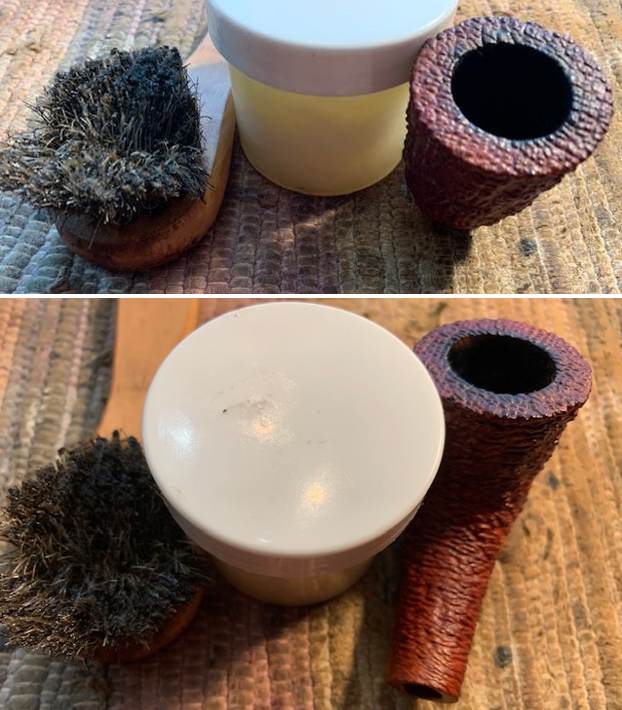
I worked some Before & After Restoration Balm into the briar with my finger tips and a horsehair shoe brush. The product is a great addition to the restoration work. It enlivens, enriches and protects the briar while giving it a deep glow. It is a product I use on every pipe I work on. 
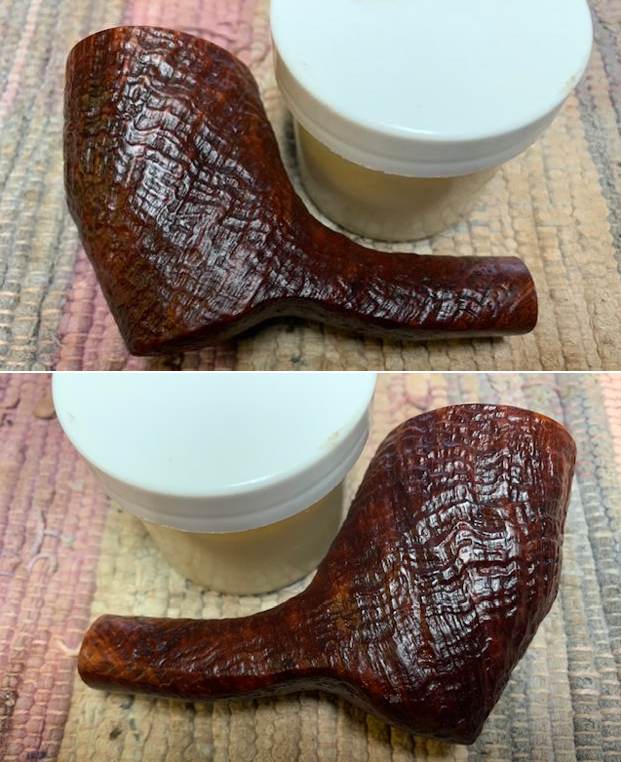
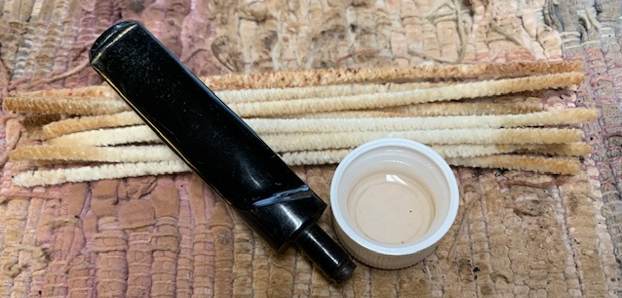
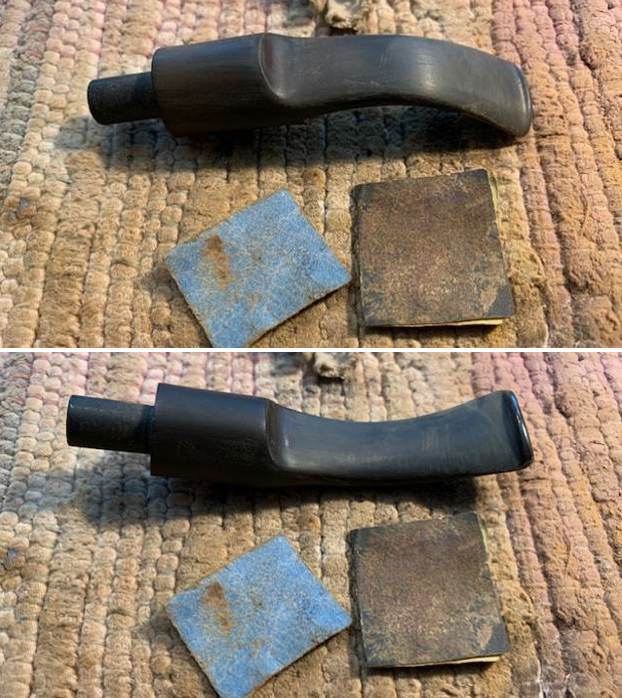
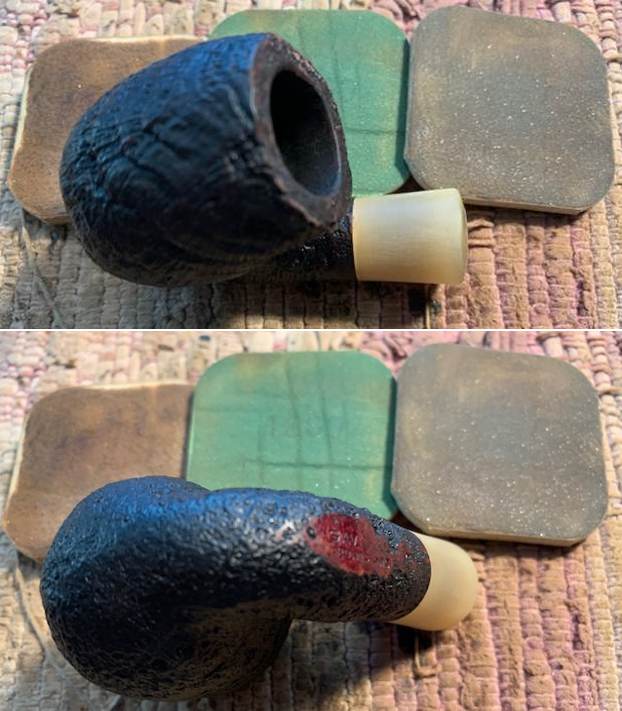
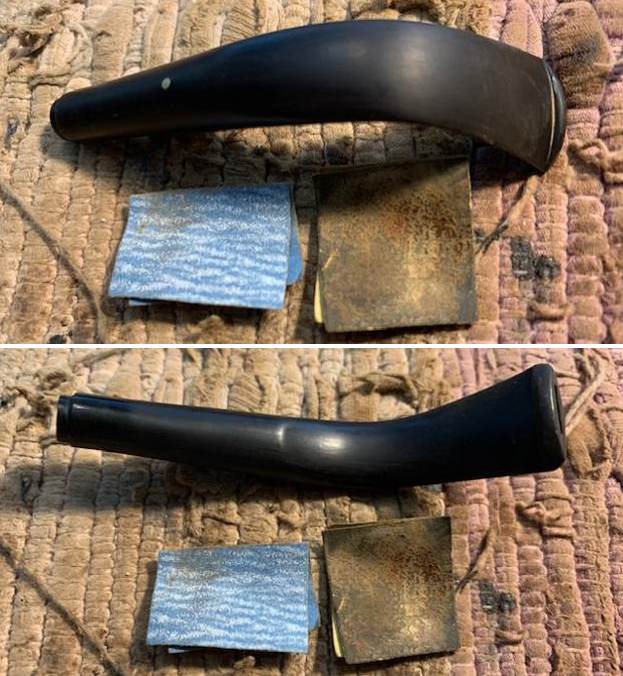
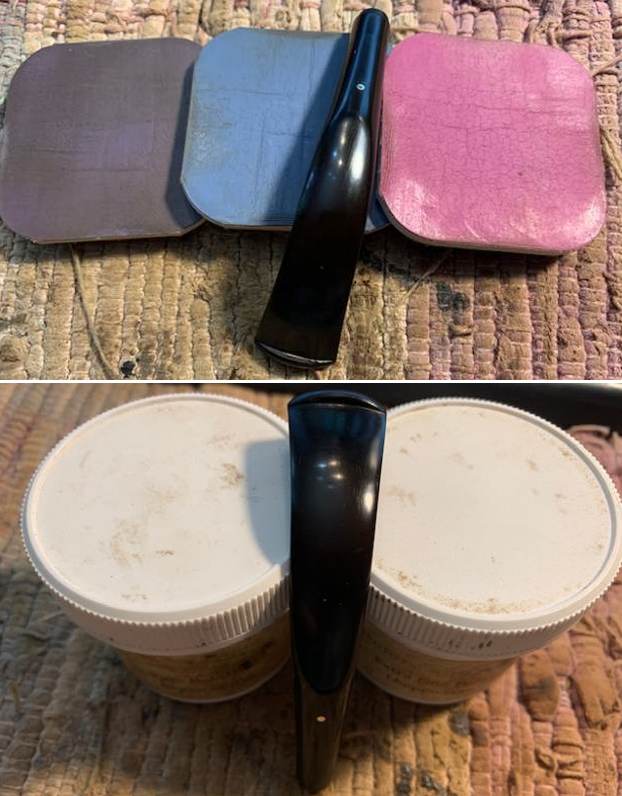
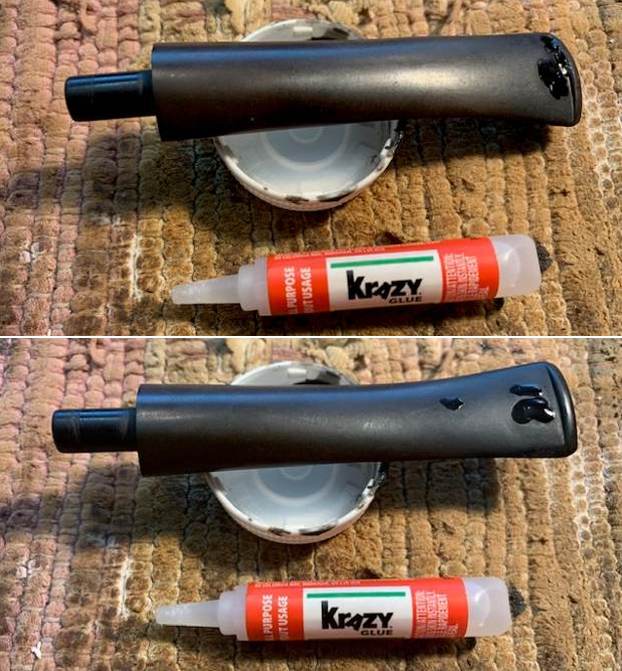
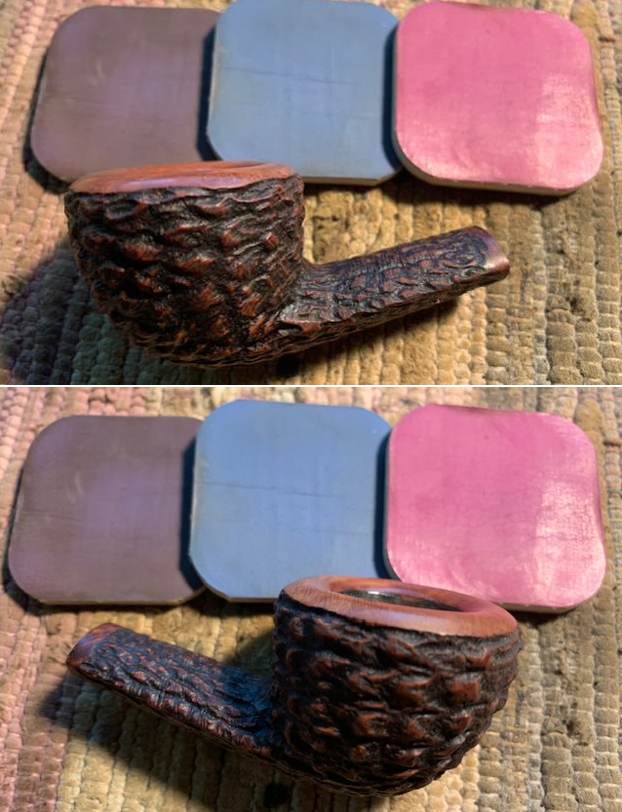
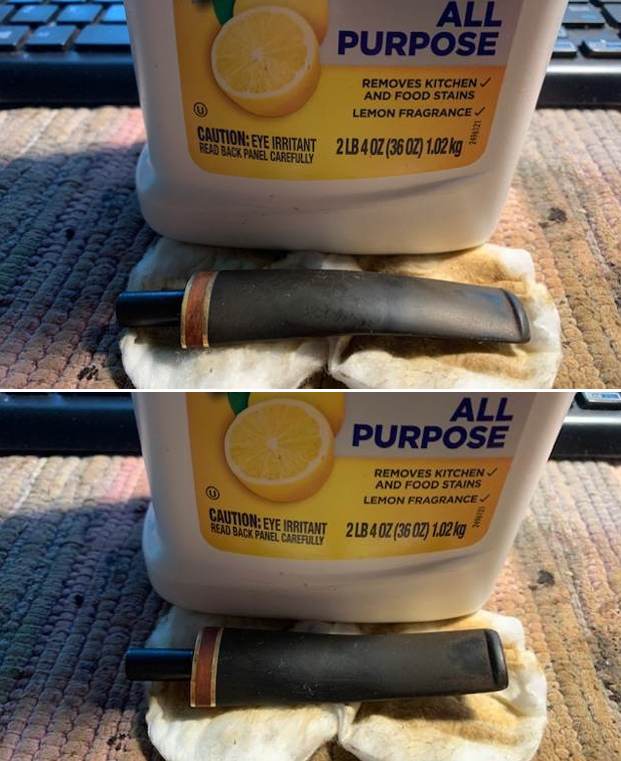
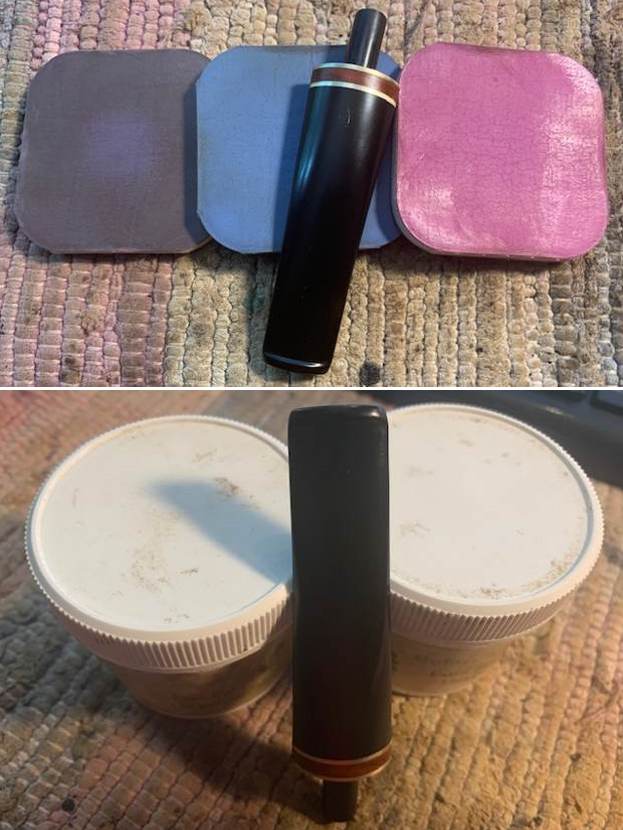
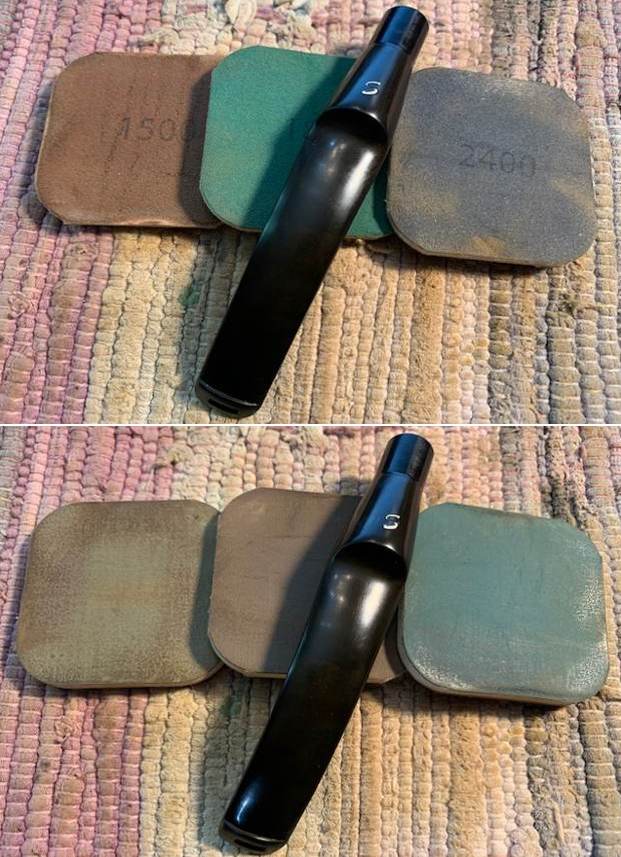
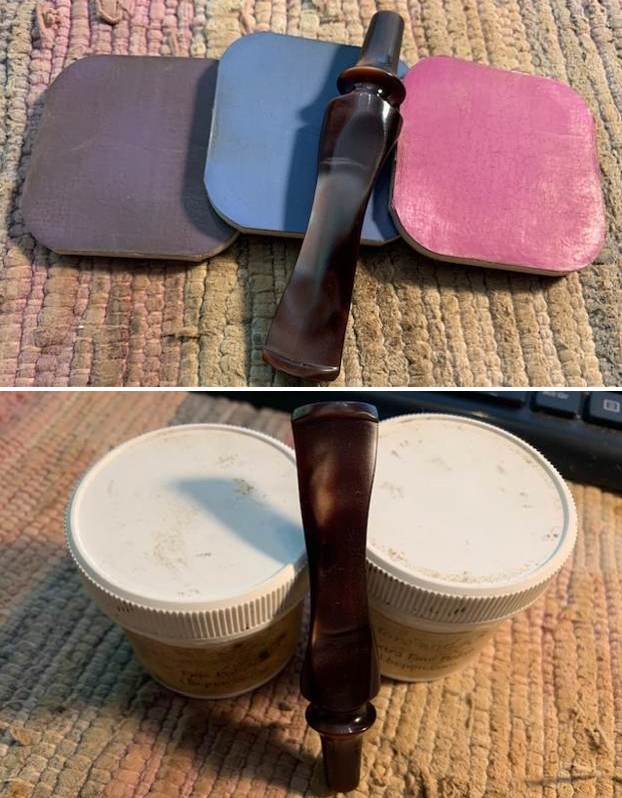
I set the bowl aside and turned to address the stem issues. I sanded out the tooth marks and chatter on the acrylic stem with a folded piece of 220 grit sandpaper to blend them into the surface of the stem. I polished out the scratching and marks left behind from the 220 grit sandpaper by wet sanding it with a 600 grit wet dry sandpaper.
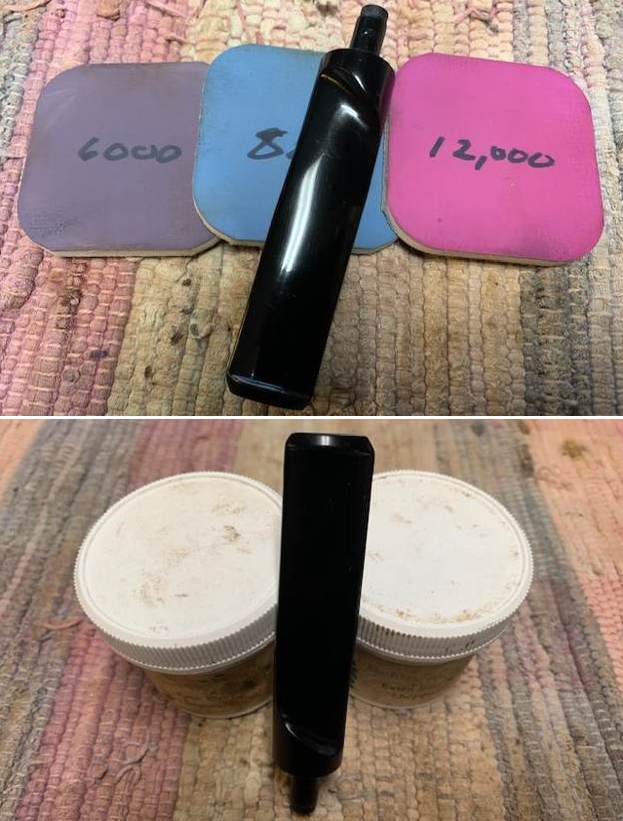
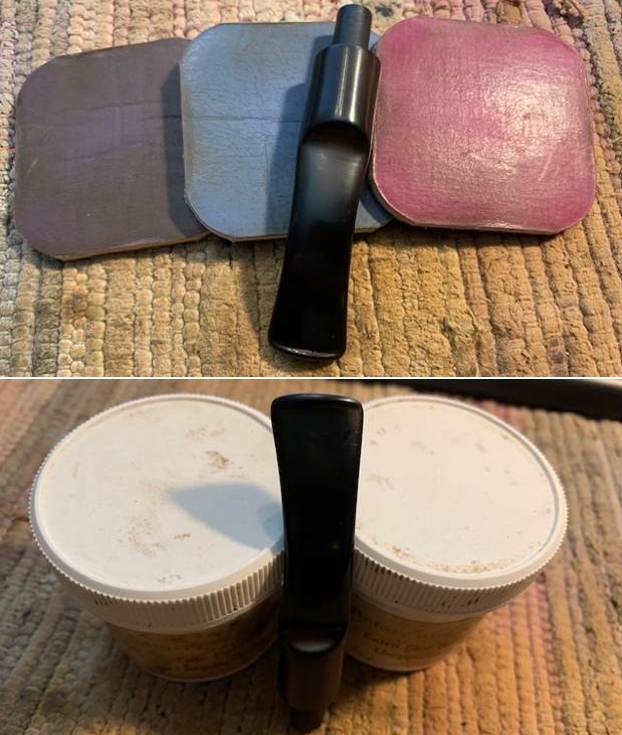
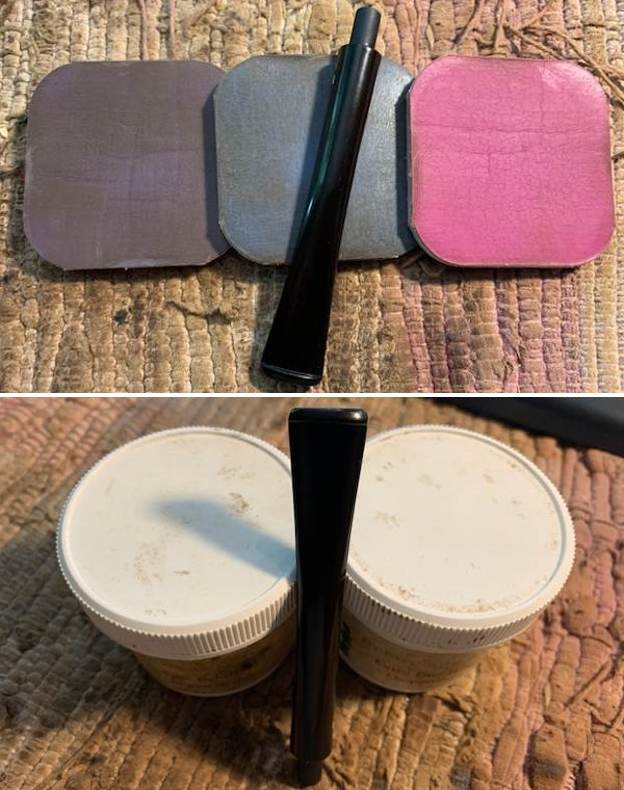
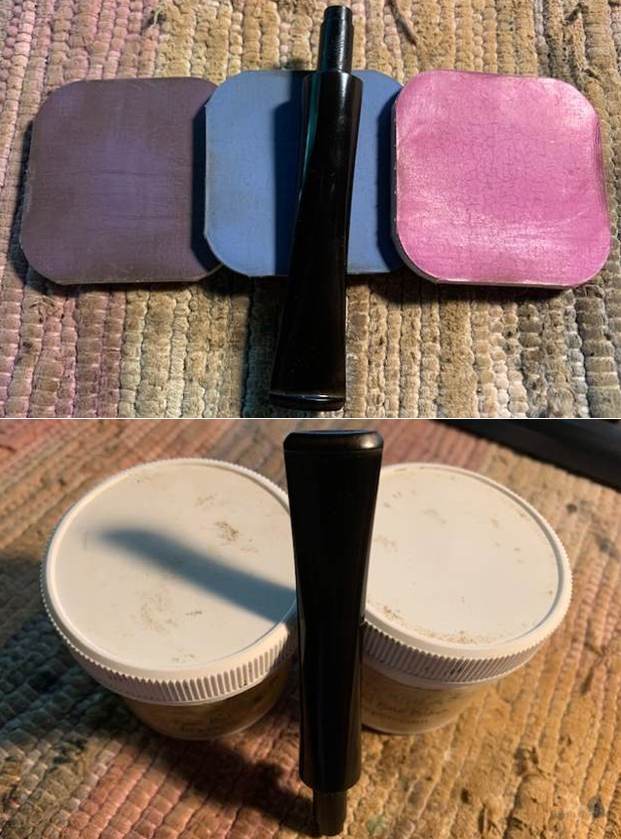
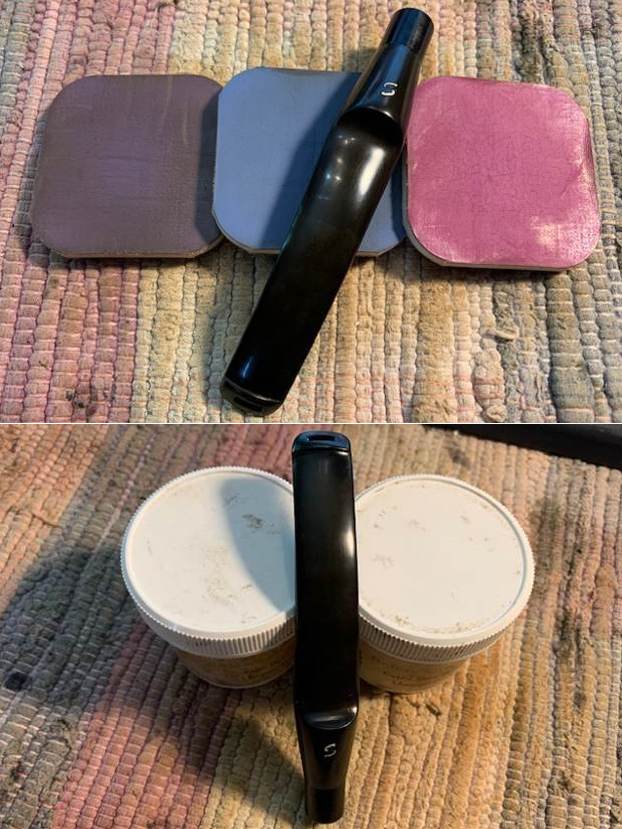
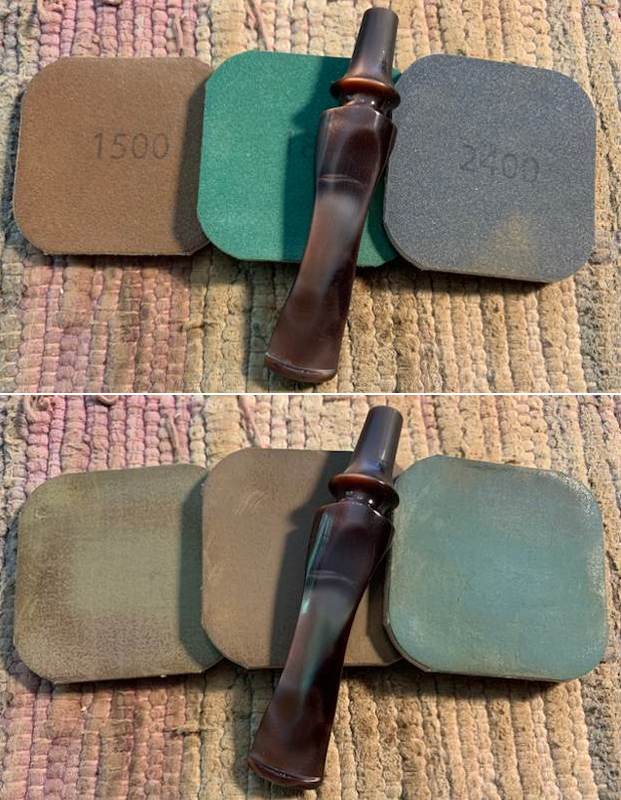
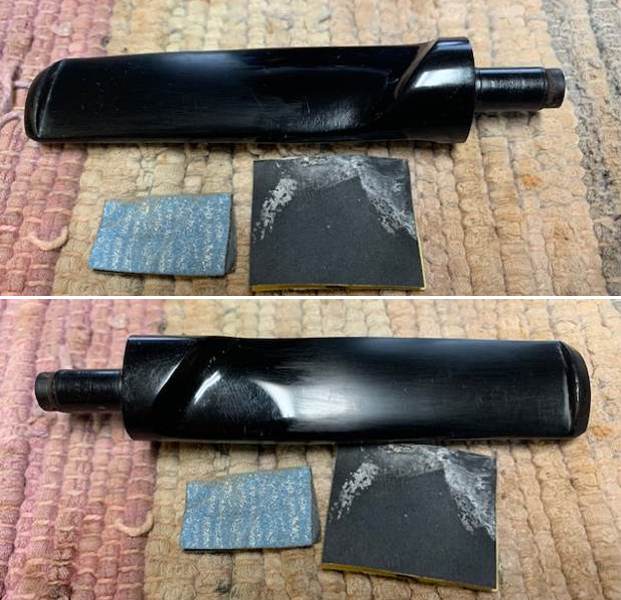
I polished the acrylic with micromesh sanding pads – 1500-12000 grit pads. I wiped it down with Obsidian Oil after each sanding pad. I used Before & After Pipe Polish – both Fine and Extra Fine to further polish the stem. 
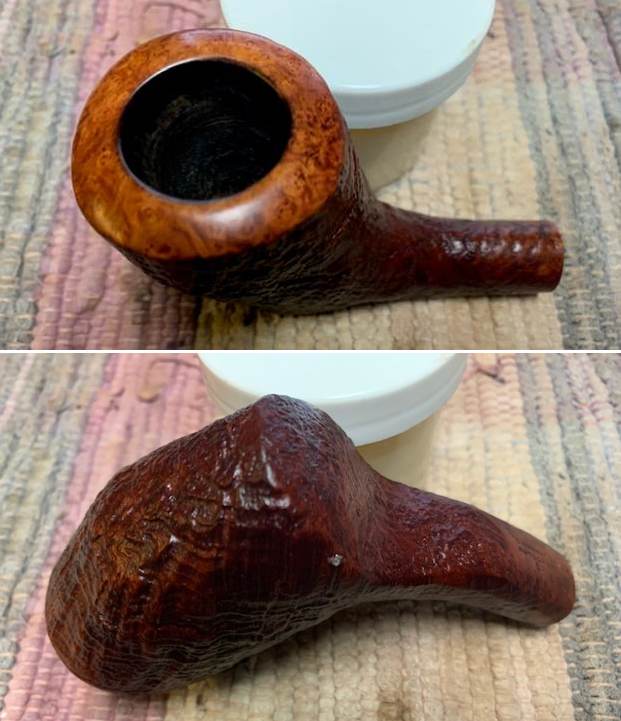
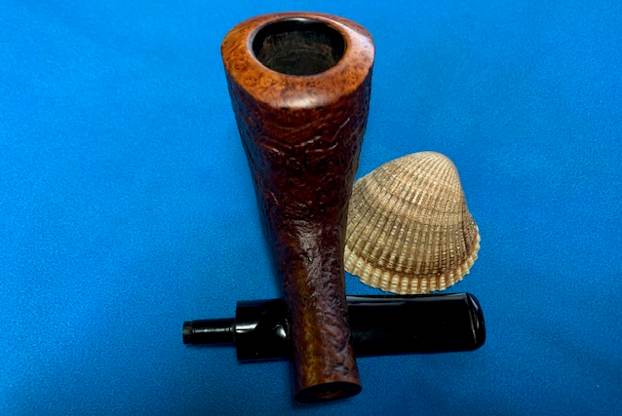
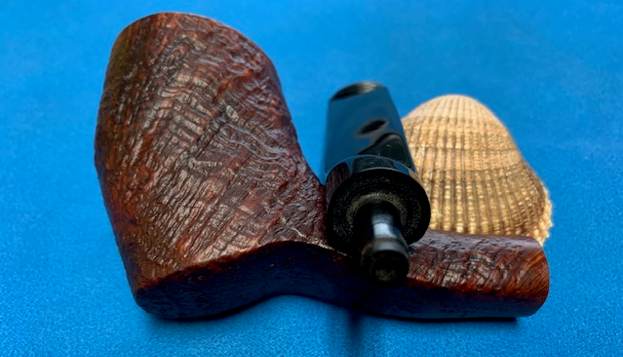
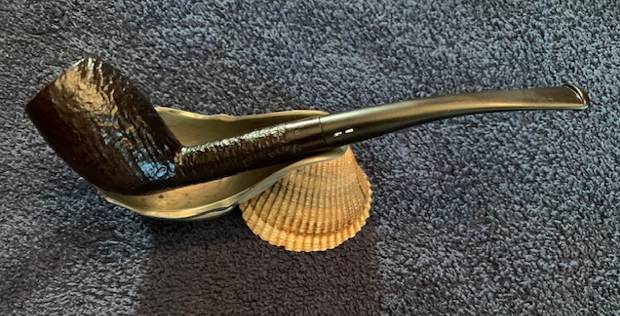
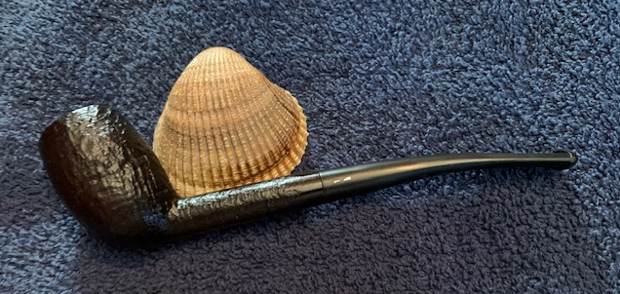
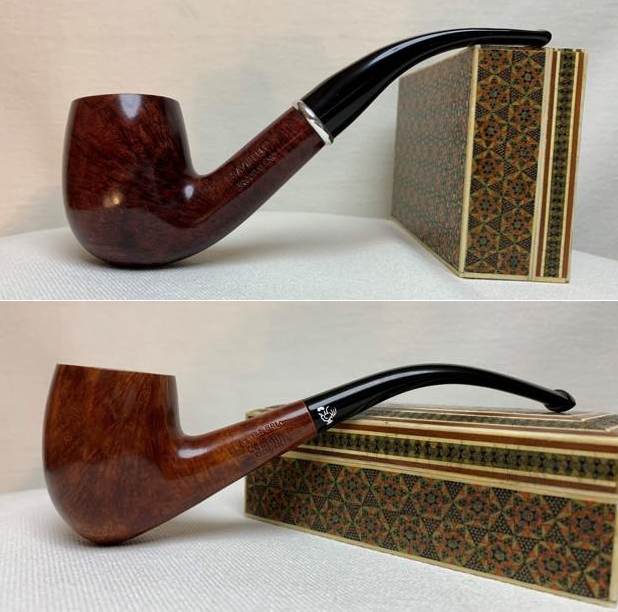
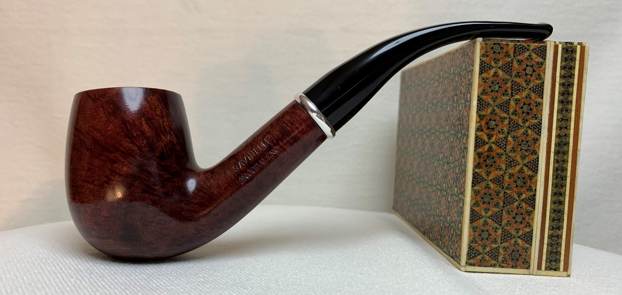
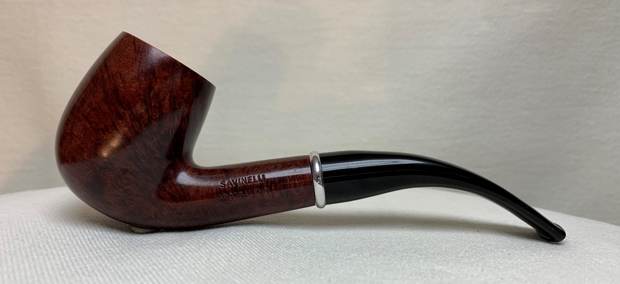
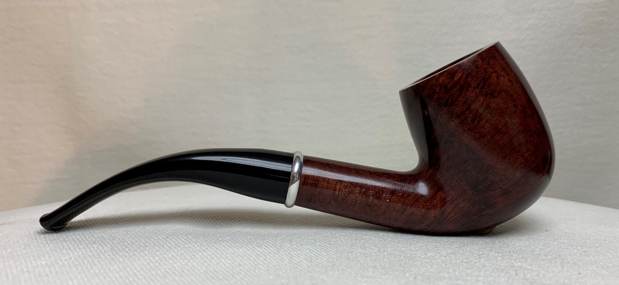
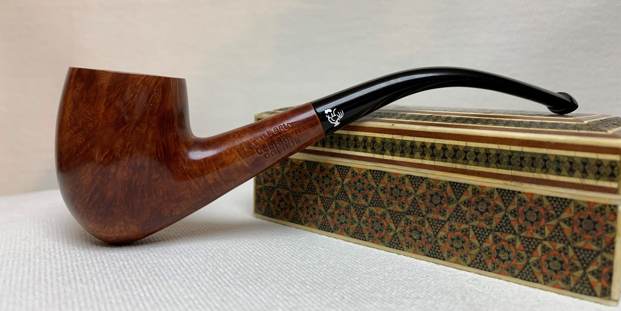
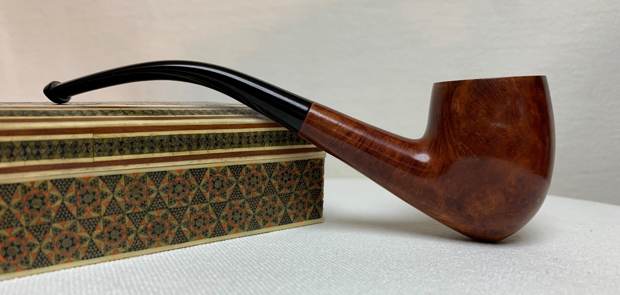
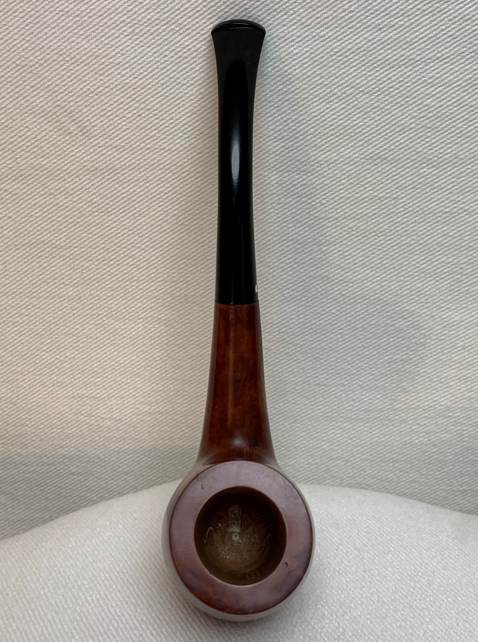
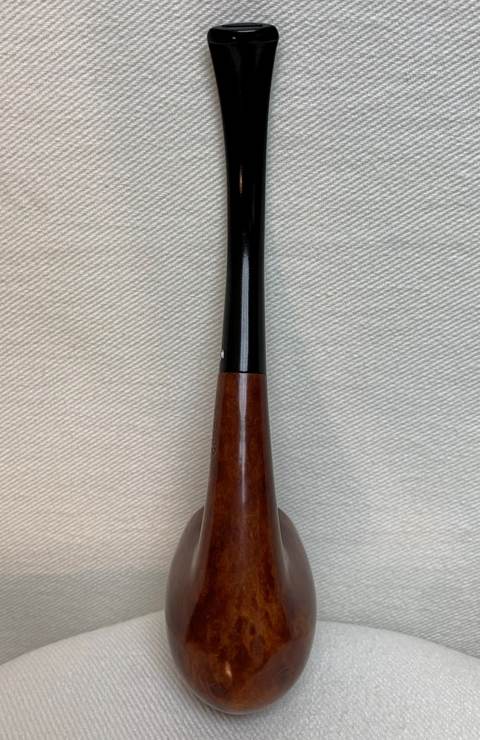
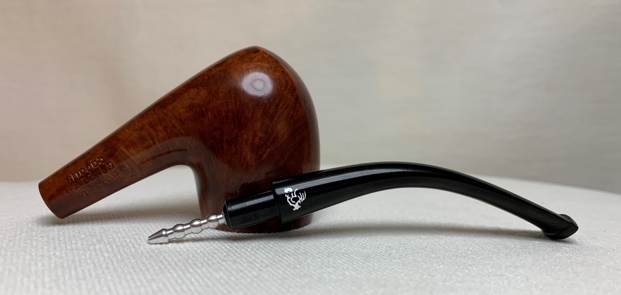
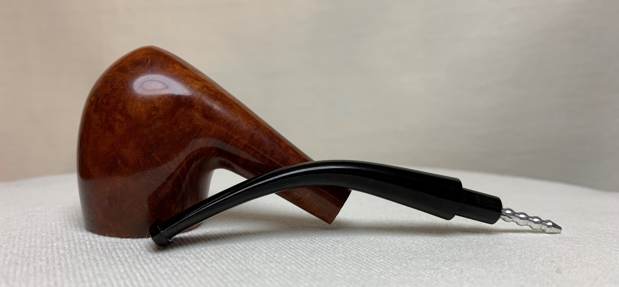
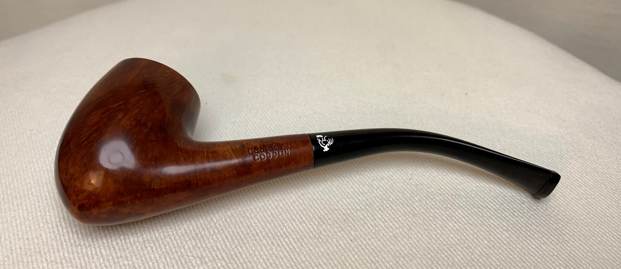
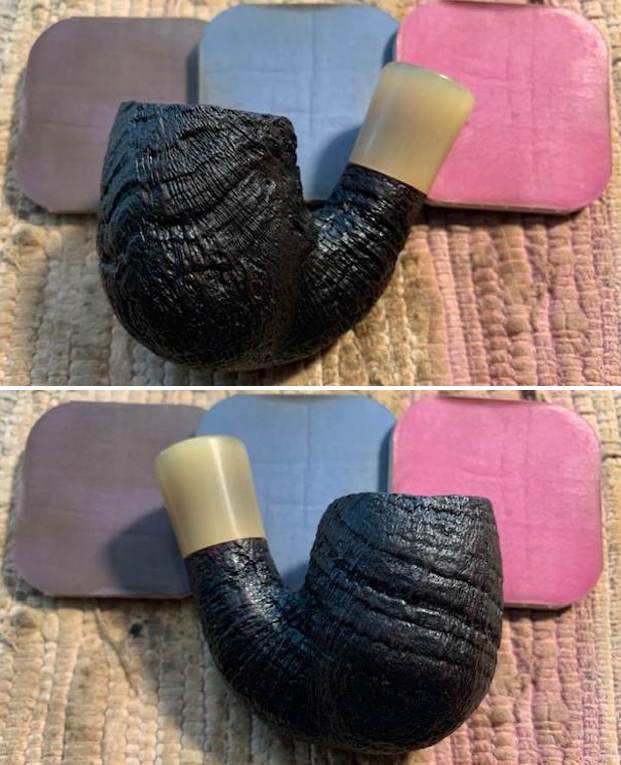
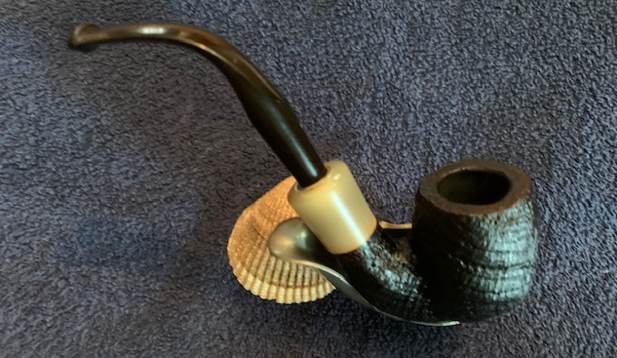
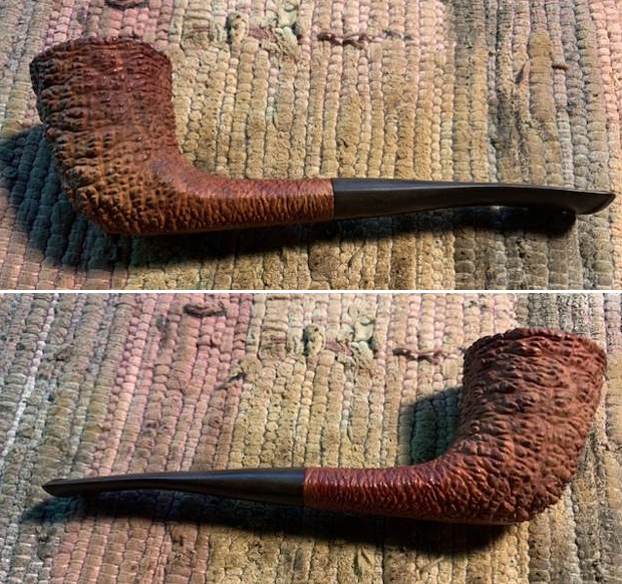
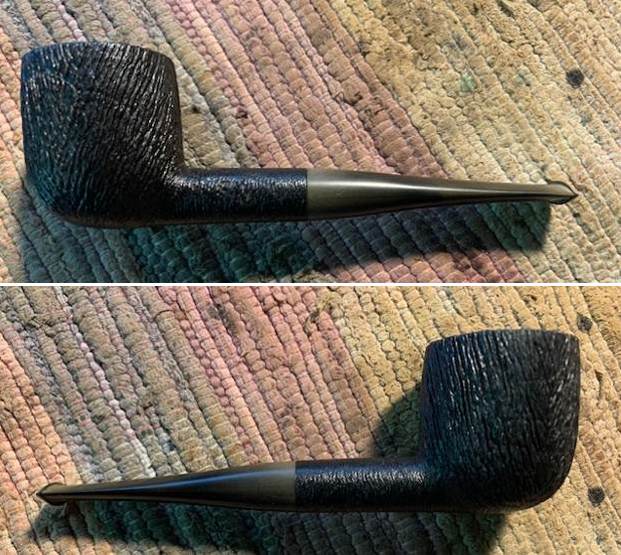
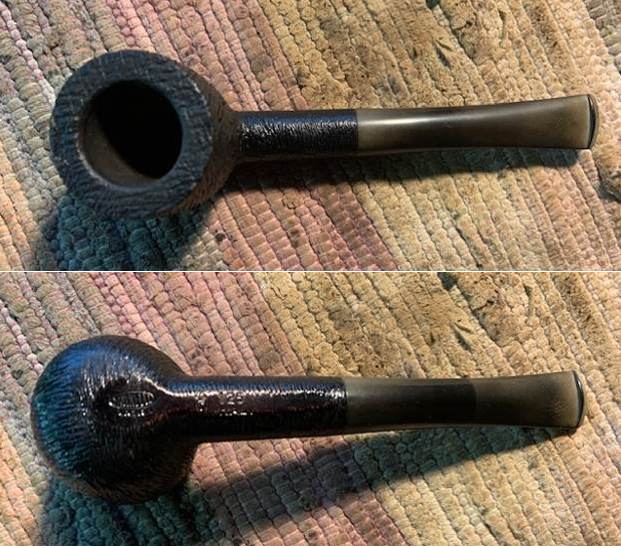
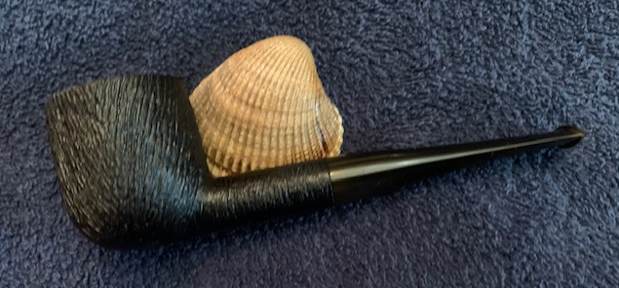
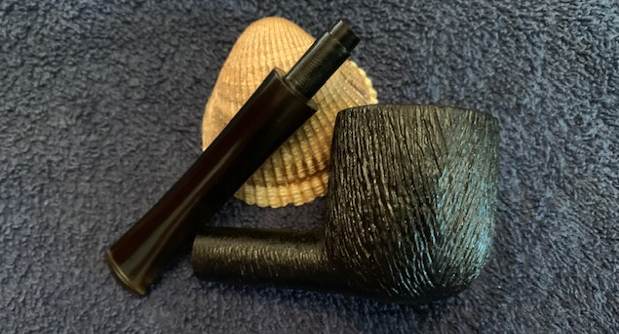
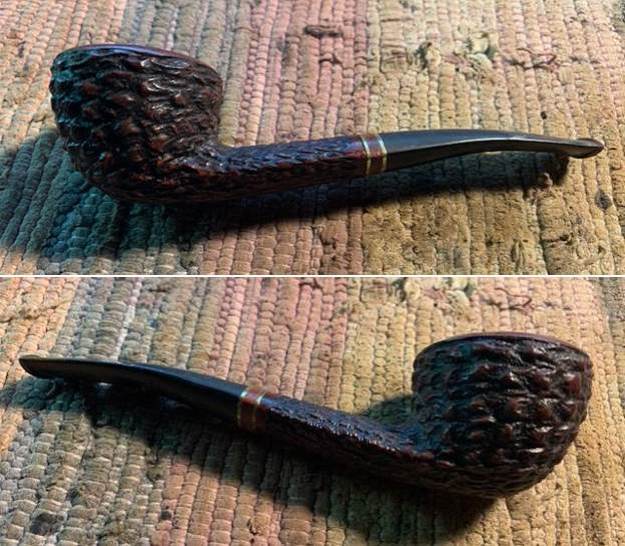
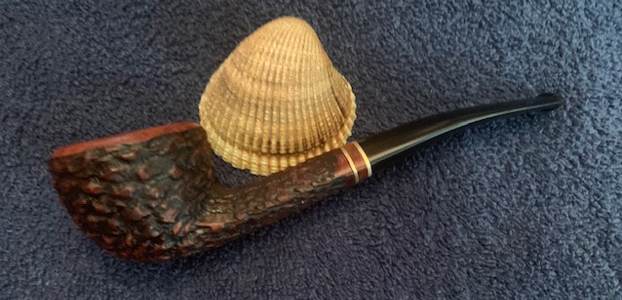
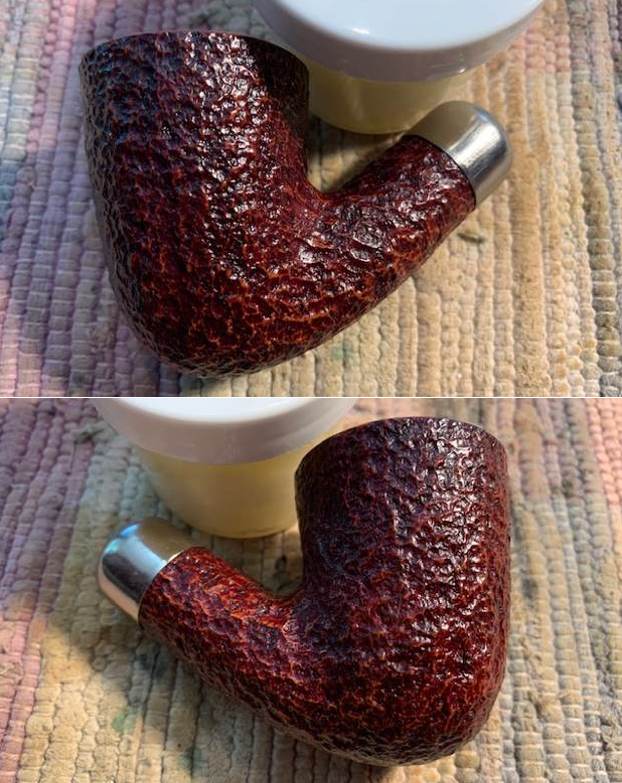
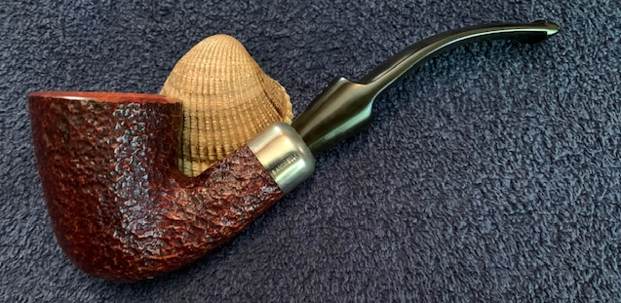
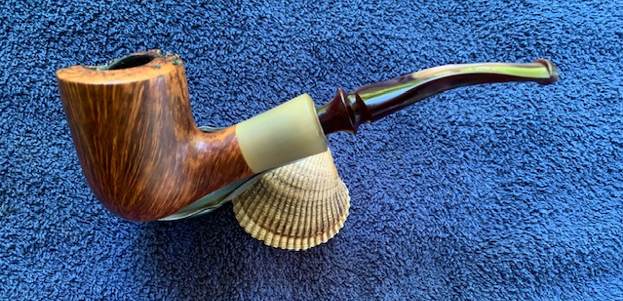
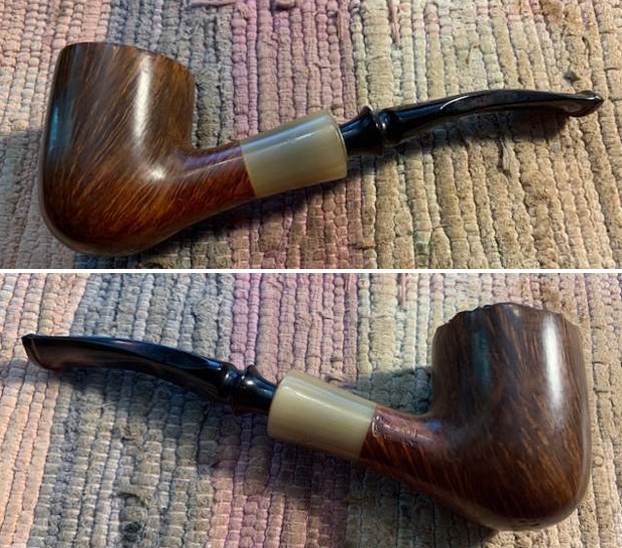
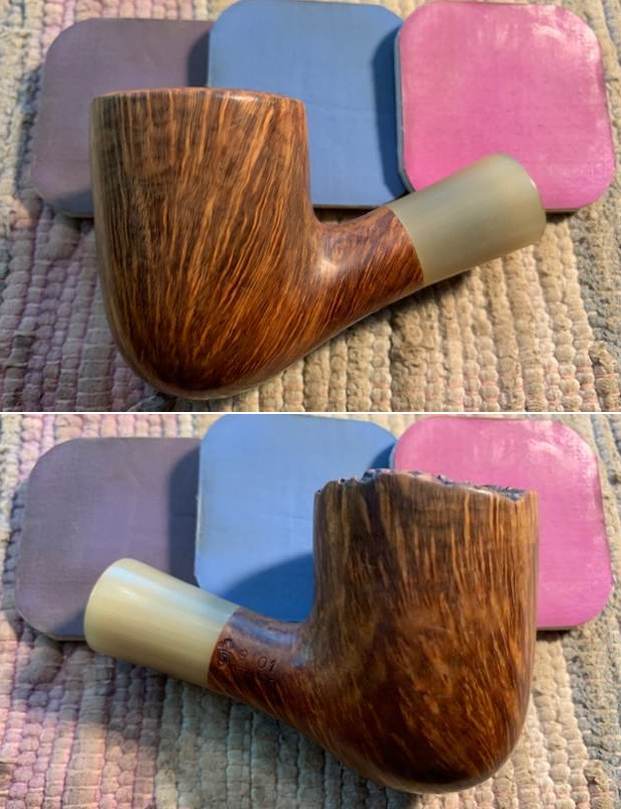
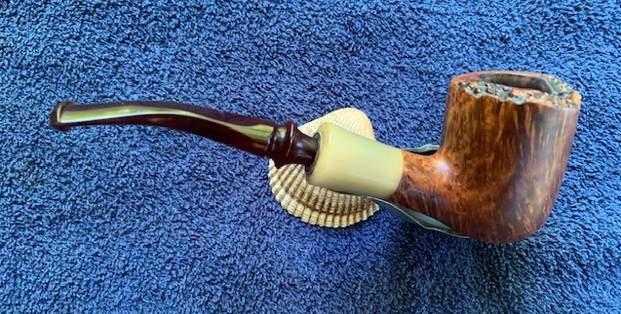
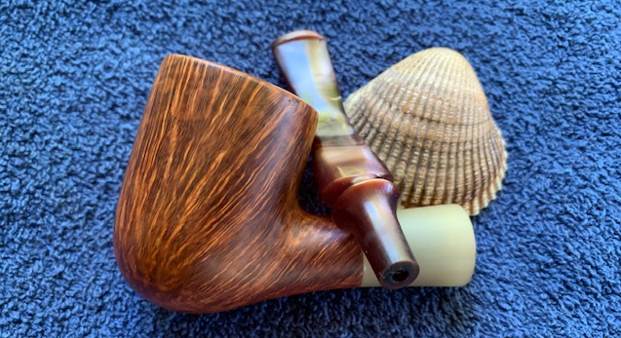
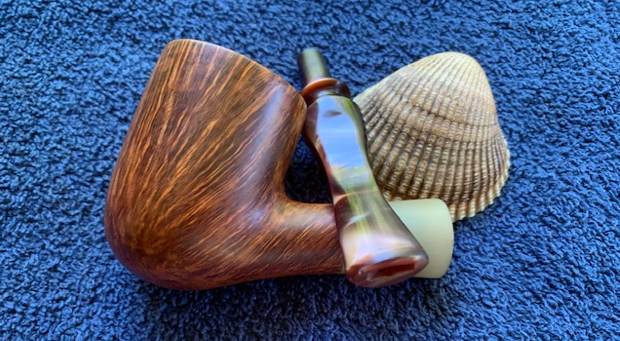
This Savinelli Autograph 4 Sitter with a Fancy Acrylic Stem has a beautiful sandblast finish around the bowl and shank and a smooth rim top that has some great grain. The polished light briar highlights some great grain around the pipe. The polished black acrylic fancy stem adds to the mix. I put the stem back on the bowl and buffed the pipe with Blue Diamond on the buffing wheel being careful to not buff the stamping. I gave the bowl multiple coats of Conservator’s Wax and the stem multiple coats of carnauba wax on the buffing wheel and followed that by buffing it with a clean buffing pad. I hand buffed the pipe with a microfiber cloth to deepen the shine. The finished Savinelli Autograph 4 Sitter is quite nice and feels great in the hand. Give the finished pipe a look in the photos below. The dimensions of the pipe are Length: 6 ½ inches, Height: 2 ½ inches, Outside diameter of the bowl: 1 ½ inches x 1 ¾ inches, Chamber diameter: 1 inch. The weight of the pipe is 2.43 ounces/70 grams. I will be boxing it up and shipping it to its current steward to enjoy and care for. Thanks for walking through the restoration with me as I worked over another beautiful pipe.
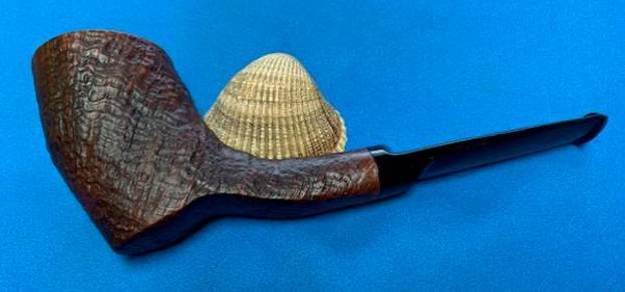
New Life for a Savinelli de luxe Milano Sandblast 607KS Bent Billiard


Blog by Steve Laug

I have a few pipes that I am working on for local folks who either have dropped them off or who are friends that I am catching up with. The next pipe on the worktable belongs to an old friend of mine who is in the process of moving. He stopped by and asked me to clean up a couple of his favourite pipe. This first one I have chosen to work on is a deep craggy, sandblast Bent Billiard. It is stamped on the underside of the shank Savinelli [over] de luxe [over] Milano. That is followed by the Savinelli S shield then the shape number 607KS [over] Italy. I believe the vulcanite saddle stem is a replacement. The pipe was in good condition with a light cake in the bowl and some darkening on the back side of the rim top. The stem was lightly oxidized and had some tooth chatter and tooth marks on both sides of the stem at the button.  I took photos of the rim top and the stem to show their condition. The top looked quite good with some light to moderate cake in the bowl and some darkening and grime on the back top side. The stem had oxidation and light tooth chatter on both sides near the button. I took photos of the stamping to capture the clarity and readability. The brand and the shape number are very readable. I removed the stem from the bowl and took a picture of the pipe to show the general look and proportion of the pipe.The interior and exterior of the bowl was clean and in good condition when my friend dropped the pipe off. I decided to give the rim top a good scrubbing with a dry brass bristle brush to knock of some of the darkening in the valley’s of the sandblast on the rim top. I was able to get it a little bit cleaner and ready for the next step.I scraped out the ragged thin cake with a Savinelli Fitsall Pipe Knife and wiped out the bowl with a pipe cleaner and alcohol and cleaned out the shank and the airway in the stem with the same. Both were quite clean so I moved on to treat the finish. I rubbed the bowl and shank down with Before & After Restoration Balm to deep clean the finish on the bowl and shank. The product works to clean, enliven and protect the briar. I worked it into the sandblast finish with my fingers to get it into the nooks and crannies. After it sat for a little while I wiped it off with a soft cloth. I buffed the bowl with a horsehair shoe brush to polish it. The briar really began to have a rich shine. I took some photos of the bowl at this point to mark the progress in the restoration. It is a beautiful bowl. I set the bowl aside and worked on the stem at this point in the  process. I sanded tooth chatter and all of the oxidation with folded pieces of 220 to remove the marks and the brown colouration on the stem surface. I sanded them with 400 grit sandpaper until the marks were gone and the oxidation was gone.  I polished the stem with micromesh sanding pads – wet sanding with 1500-2400 grit pads and dry sanding with 3200-12000 grit pads. I wiped the stem down after each pad with a damp cloth to remove the sanding dust. I used the Before & After Pipe Polish to remove the small minute scratches left in the vulcanite. I finished by wiping the stem down with a final coat of Obsidian Oil and set it aside to dry.   I put the stem back on the pipe and worked the stem over with Blue Diamond to polish out the remaining small scratches. I gave the bowl several coats of Conservator’s Wax and the stem several coats of carnauba wax and buffed the pipe with a clean buffing pad to raise the shine. I hand buffed it with a microfiber cloth to deepen the shine. The pipe polished up really well with the repairs disappearing into the new finish. The finished pipe is shown in the photos below. The style of the blast and the look of the stain colours remind me of some of the Dunhill Shell Briar pipes or Tanshell pipes that I have repaired and restored over the years. It is quite stunning. The photos just do not capture the textures. The polished black vulcanite looks really good with the browns of the briar. The dimensions of the pipe are Length: 5 ½ inches, Height: 2 inches, Outside diameter of the bowl: 1 ¼ inches, Chamber diameter: ¾ of an inch. The weight of the pipe is 1.48 ounces/42 grams. I have a second pipe to clean up for my friend then they will be going back to him to enjoy in his new place. Thanks for walking through the restoration with me as I worked over this beautiful sandblast billiard made by Savinelli. It was a fun one to work on.

Restoring a Antique Show Find – a Savinelli Made King’s Cross Featherweight 402A Cutty


Blog by Steve Laug

This morning two of my daughters and I met Kenneth and went on a hunt for pipes at an Antique and Collectible sale not far from here. We arrived when they opened the doors and the girls went off on their own hunt. Kenneth and I wandered row by row through the sale. We saw a lot of pipes for sale on the tables and the majority of them were worth far less than the seller was expecting. There were Kaywoodies, Grabows, Lorenzos and other odds and ends all priced between $50-70 dollars. It was discouraging to say the least. We finally came to one table where the seller was far more reasonable. Kenneth picked up two old timers – a Boer War trench art pipe and a Custombilt bent. I picked up a Kings Cross Cutty. We met my daughters and they had found a nice Brigham they took me to see. It had a shape number for a Billiard but it was preceded by the letter “P”. It also had an oval shank but all those made me want to add it to my list. With a bit of negotiation I picked up that Brigham as well. That closed out our hunt and we came home with our finds.

The sandblast bowl looked good on the outside and was clean. The sandblast finish was not deep but it was very tactile. The rim top and edges were in very good condition and showed no damage. The bowl was stamped on the underside of the shank and had the shape number and brand information clear and readable. It reads 402A (shape number) followed by Kings Cross [over] Featherweight [over] Italy. The stem had a sticky taped on price tage that left a lot of debris and “goop” on the stem surface. There were 2 white bars on the left side of the stem. There was light tooth chatter and marks on both sides near the button. I took photos of the pipe when I brought it home. I took some closeup photos of the rim top and the stem to show the condition. The rim top and edges are in good condition. They are dirty but still look good. There is a light bevel to the inner edge of the bowl and looks good. The stem had a lot sticky goop on it from the sales label that was on the stem. There was no oxidation and minimal tooth chatter or marks on the surface ahead of the button. It looked quite good underneath the goop. I took a photo of the stamping on the shank and the white bars on the left side of the stem. The stamping is clear and readable as noted above. I removed the stem and took a photo of the pipe to give a sense of the side view. It is a great looking pipe from this vantage point. The canted bowl and pencil shank and taper stem look good. It has been awhile but I believe I have worked on one of these in the past. It is a lighweight that I am pretty certain was made by Savinelli. I decided to turn to Pipephil’s site and see what was listed there under Savinelli (http://pipephil.eu/logos/en/logo-savinelli2.html). Sure enough there was a listing for Kings Cross Featherweight. I have included a screen capture of the section below.I then turned to Pipedia to find more (https://pipedia.org/wiki/Savinelli#Savinelli_made_sub-brands.2C_seconds_.26_order_productions). I found the listing under the section entitled Savinelli made sub-brands, seconds & order productions. I have included a section of the list of brands below. It says that the Kings Cross was Distributed in the US.There was also an advertisement for the Kings Cross Featherweights that has a great description of the brand. It reads:

Time out for that Coffee Break. Not too large and not too small. Just right for that short enjoyable smoke.

Fitted with comfortable mouthpiece. Ideal for the Young in Heart or the Old Timer having troubles with his dentures.I reamed the pipe with a PipNet pipe reamer using the smallest cutting head to take the cake back to bare briar. I cleaned up the bowl walls with a Savinelli Fitsall Pipe Knife and removed the remaining spots of cake. I sanded the bowl walls with a piece of 220 grit sandpaper wrapped around a piece of briar. The bowl interior looked very good and the walls showed no damage. I cleaned out the interior of the shank and the stem with alcohol, pipe cleaners and cotton swabs. I worked over the interior until the cleaners came out clean. The pipe smelled and looked clean.  I worked some Before & After Restoration Balm into the briar with my finger tips. The product works to clean, revive and protect the briar. I let it sit on the pipe for 10 minutes then buffed it off with a soft cloth.   I wiped the stem down with isopropyl alcohol to remove the sticky label substance on the stem surface.I touched up the two white bars on the left side of the stem with white acrylic fingernail polish. Once the acrylic dried I scraped off the excess and polished it with a 1500 micromesh pad. I polished out the tooth marks and chatter on the stem with micromesh sanding pads – dry sanding it 1500-12000 pads. I wiped it down with some Obsidian Oil each pad to remove the dust and polishing debris. I polished it with Before After Pipe Polish – both Fine and Extra Fine. I gave it a final coat of Obsidian Oil and set it aside to dry.  This is another pipe that I am really happy about the look of the finished restoration. This reborn Savinelli Made Kings Cross Featherweight 402A Cutty turned out really well. I think that it is a great looking pipe with a great sandblast. The polished black of the stem works well with the rich dark stains of the finish. Buffing makes the finish come alive with the polishing and waxing. I put the stem back on the bowl and buffed the pipe with Blue Diamond on the buffing wheel. I gave the bowl and the stem multiple coats of carnauba wax on the buffing wheel. I buffed the pipe with a clean buffing pad to raise the shine. I hand buffed the pipe with a microfiber cloth to deepen the shine. The finished Kings Cross Featherweight Cutty really feels great in the hand and it looks very good. Give the finished pipe a look in the photos below. The dimensions of the pipe are Length: 6 inches, Height: 1 ½ inches, Outside diameter of the bowl: 1 inches, Chamber diameter: ¾ of an inch. The weight of the pipe is 25 grams/.88 ounces. The pipe will be going on the rebornpipes store soon. It will be in the Italian Pipe Makers Section if you would like to add it to your collection. Thanks for reading this blog and my reflections on the pipe while I worked on it. It was a fun one to work on!

New and Almost New for You


Blog by Kenneth Lieblich

I have two pipes that came my way recently and I am happy to offer them to you for sale. No restoration story on these ones – just two beautiful pipes. I gave them a quick (but thorough) once over and now it’s time to turn them over to you. One pipe has never been smoked and the other has only been smoked once or twice by the look of it.

First, is a Savinelli Arcobaleno 606KS bent billiard filter pipe. This one is very close to new. It was smoked once, maybe twice at the most, I’m guessing. Gorgeous pipe. If you are interested in acquiring it for your collection, please have a look in the “Italian” pipe section of the store here on Steve’s website. You can also email me directly at kenneth@knightsofthepipe.com. The approximate dimensions of the Savinelli Arcobaleno 606KS are as follows: length 6 in. (152 mm); height 3 in. (76 mm); bowl diameter 1¼ in. (32 mm); chamber diameter ¾ in. (19 mm). The weight of the pipe is 1⅝ oz. (48 g). Have a look below. Thanks. Next is a French oldtimer – never smoked, brand new. It is beautiful bent acorn from the Courrieu company in Cogolin, France. Lovely, elegant pipe. If you are interested in acquiring it for your collection, please have a look in the “French” pipe section of the store here on Steve’s website. You can also email me directly at kenneth@knightsofthepipe.com. The approximate dimensions of the Courrieu Cogolin are as follows: length 5½ in. (140 mm); height 2¼ in. (57 mm); bowl diameter 1⅛ in. (29 mm); chamber diameter ¾ in. (19 mm). The weight of the pipe is 1⅛ oz. (33 g). If you are interested in more of my work, please follow me here on Steve’s website or send me an email. Thank you very much for reading and, as always, I welcome and encourage your comments.

Fresh Life for a Savinelli Punto Oro Bent Billiard


Blog by Steve Laug

The next pipe on the table was purchased on 05/24/22 from an antique mall in Aurora, Oregon, USA. This Savinelli Full Bent Punto Oro has a rugged, swirling sandblast finish with lots of nooks and crannies in the briar. It is a beauty! The pipe is stamped on a smooth panel on the underside of the shank and reads Savinelli over Punto Oro. That is followed by the shape number that has a 6 but the other numbers are not clear [over] Italy. The shape number is buried in the sandblast finish so I will need to do some hunting online to identify the shape number. The valleys and ridges of the sandblasted grain showing through the grime and dirt are a mixture that leaves a rich texture. It had rich dark and medium contrasting brown stains that do not look too bad. There was a thick cake in the bowl with remnants of tobacco stuck on the walls. There was a lava overflow filling in the blast on the rim and covering the inner edge. It looked quite good. It was a beautiful pipe that was dirty and tired looking. The stem was oxidized and calcified toward the end. There were tooth marks and chatter on the stem near the button on both sides and some on the surface of the button as well. There is a small gold dot on the top of the stem identifying it as a Savinelli Punto Oro. Jeff took photos of the pipe before he cleaned it up. He took photos of the bowl and rim top to show the cake in the bowl and the lava build up on the rim top and edges of the bowl. It was thick and hard but hopefully it had protected the rim and edges from damage. It was hard to know for sure from the photos. Jeff took photos of the top and underside of the stem showing the tooth chatter, scratching and oxidation on the stem surface and wear on the edges of the button. Jeff took photos of the sides and heel of the bowl to show the condition of the finish. You can see the beautiful swirls of the sandblast. There is a lot of dust and grime filling in the valleys. There was also some dark strips of stain along the joint of the horn and the briar. It looked a bit ragged. He took a photo of the stamping on the smooth panel on the underside of the bowl and shank. The stamping was readable as you can see from the photos and read as noted above.   I turned to Pipephil’s site to get a feel for the Punto Oro line. I have worked on both smooth and sandblast finish Punto Oro pipes in the past. This was another sandblast one – this time a dark one rather than natural. Here is the link (http://www.pipephil.eu/logos/en/logo-savinelli3.html). I have included a screen capture of the pertinent information on the line below. It appears the line came out in both smooth and sandblast finishes. I turned to Pipedia to look at what information they had on the brand. I found a catalogue page on the Punto Oro which confirmed what I had surmised about the line having both smooth and sandblast finished pipe (https://pipedia.org/images/d/db/Sav_Punto_Oro.jpg). I have included a screen capture of the page below. It says that the line was available in 2 distinct finishes – a rich Mahogany smooth finish and a genuine sandblast. The shape of the pipe matches most closely to the Savinelli shape number 614 on the Savinelli Shape Chart on Pipedia. It is close but the pipe in the chart is a standard mount with a saddle stem so my identification is not certain. I have included a screen capture of the chart below (https://pipedia.org/images/4/41/Sav_Shape_Chart_2017.jpg). I have drawn a red box around the 614 shape in the shape chart below.However the shape chart did not have one with a military style bit in full bent pipe with a horn shank extension (whether faux or genuine horn is not clear to me. I did a bit of further digging and found a pipe that was very similar on the smokingpipes.com site and have included the link (https://www.smokingpipes.com/pipes/estate/italy/moreinfo.cfm?product_id=44171). The description reads:

Italian Estates: Savinelli Punto Oro Sandblast Bent Billiard (615) Tobacco Pipe

The noble Savinelli Punto Oro (Gold Dot). This “615” is a decently sized, rather English shape chart oom-paul…

From the pipe pictured on the link I am pretty certain I am dealing with a Savinelli 615 Oom Paul shaped pipe rather than a 614. The shape matches the one I am working on and the stem and shank extension are similar.

Now it was time to work on the pipe. Jeff reamed it with a PipNet pipe reamer and cleaned up the reaming with a Savinelli Fitsall Pipe Knife. He scrubbed out the internals with alcohol, pipe cleaners and cotton swabs until the pipe was clean. He scrubbed the exterior of the bowl with Murphy’s Oil Soap and a tooth brush to remove the grime and grit on the briar and the lava on the rim top. The finish looks very good with good looking sandblast around the bowl and shank. Jeff scrubbed the stem with Soft Scrub and soaked it in Briarville’s Pipe Stem Deoxidizer to remove the oxidation on the vulcanite and rinsed it with running water. He dried it off with a coarse cloth to further help remove the remaining oxidation. When the pipe arrived here in Vancouver for the second stop of its restoration tour it looked a lot better. The stem still had some light oxidation. I took photos before I started my part of the work. I took some close up photos of the rim top and also of the stem surface. I wanted to show what cleaned bowl and rim top looked like. The rim top and edges looked very good. There was some wear on the stain on the right front rim top but otherwise the sandblast finish is very nice. I also took close up photos of the stem to show the light tooth marks and the remaining oxidation on the stem surface. Both are hard to see in the photos but they are present and will need to be dealt with in the restoration process.I took a photo of the stamping on the underside of the shank and it is clear and readable for the most part. As noted above the shape number is stamped in the sandblast and therefore is very hard to read. My work above notes that the shape is a 615 though so that is good.I took the stem off the shank and took a photo to give a clear picture of the pipe from the left side profile and the top looking down. It is a really pretty pipe.I decided to start my work on the pipe by dealing with the dark stain that was on the edge of the horn/acrylic shank extension where it joined the briar. It was sloppy and there were spots that you can see in some of the earlier photos that make it very apparent. I sanded the horn with a 1500 grit micromesh sanding pad and was able to remove all of the sloppy stain on it. Here are some photos of the polished extension. Is it horn or acrylic? I polished the extension with micromesh sanding pads – dry sanding with 1500-12000 grit pads. I wiped the surface off after each pad to remove sanding debris. It is becomes more shiny with each sanding pad.  I rubbed the bowl down with Before & After Restoration Balm. I worked it into the surface of the briar with my fingertips and a horsehair shoe brush to clean, enliven and protect it. I let the balm sit for 10 minutes and then buffed with a cotton cloth and shoe brush to raise the shine. Mark Hoover’s Balm is a product that I have come to appreciate and one I use on every pipe I have been working on. I set the bowl aside and turned my attention to the still oxidized stem. I worked over the rest of the remaining oxidation and the tooth marks with 220 grit sandpaper. I started polishing the stem with 400 grit wet dry sandpaper. At this point it is starting to look much better.I polished the vulcanite with micromesh sanding pads – 1500-12000 grit pads. I wiped it down with a damp cloth after each sanding pad. I used Before & After Pipe Polish – both Fine and Extra Fine to further polish the stem. This Savinelli Punt Oro 615 Full Bent Sandblast turned out to be a great looking pipe. The mix of dark stains highlights the sandblasted grain around the bowl sides, top and bottom. The “horn” shank extension works very well with the dark finish on the bowl and the polished vulcanite military style bit. I put the stem back on the bowl and carefully buffed the pipe with Blue Diamond on the buffing wheel using a light touch on the briar. I gave the bowl multiple coats of Conservator’s Wax and the stem multiple coats of carnauba wax on the buffing wheel. I buffed the entire pipe with a clean buffing pad followed by hand buffing with a microfiber cloth to deepen the shine. The finished full bent Savinelli Punto Oro fits nicely in the hand and feels great. Give the finished pipe a look in the photos below. The dimensions of the pipe are Length: 5 ½ inches, Height: 1 ¾ inches, Outside diameter of the bowl: 1 ¼ inches, Chamber diameter: ¾ of an inch. The weight of the pipe is 1.59 ounces/45 grams. If you are interested in carrying on the pipeman’s legacy with this pipe send me a message or an email. Thanks for reading this blog and my reflections on the pipe while I worked on it.

A Rebirth for a Savinelli Capri Root Briar 411 Zulu


Blog by Steve Laug

The next pipe on the table has one of my favourite finishes – a deeply rusticated one with what appears to have originally been a natural finished. We purchased this one on eBay on 10/06/16 from a fellow in Onalaska, Washington, USA. It is a Savinelli Capri Root Briar Zulu with a rusticated finish (looks a lot like the Castello Sea Rock finish). The coral like rustication around the bowl and shank was filled in with dust and debris. The natural finish was dirty and the high spots are darkened by hand oils and grime ground into briar. The pipe was stamped on underside of the shank. It is stamped Savinelli Capri [over] Root Briar followed by Savinelli “S” shield logo followed by Italy over the shape number 411. There was a thick cake in the bowl and lava overflow on the inner edges and the rim top. The vulcanite stem was oxidized and had tooth marks and chatter ahead of the button on both sides. Jeff took photos of the pipe to show its general condition before he did his cleanup.As I mentioned above the exterior of the pipe was very dirty – grime and grit ground in from years of use and sitting. The rim top was covered with a coat of thick lava that overflowed from the thick cake in the bowl. It was hard to know what the rim edges looked like because of the lava. The stem was dirty, calcified and oxidized with tooth chatter and marks on the top and underside of the stem at the button. Jeff took a photo of the right side and the heel of the bowl to give a better feel for the condition of the briar around the bowl. It is a great looking piece of briar with a deep rustication.The next photo show the stamping on the underside of the shank and it is very readable. It reads as noted above.I have always like the Savinelli Capri Root Briar finish so I was glad to be working on this one. Jeff had reamed it with a PipNet pipe reamer and cleaned up the reaming with a Savinelli Fitsall Pipe Knife. He scrubbed out the internals with alcohol, pipe cleaners and cotton swabs until the pipe was clean. He scrubbed the exterior of the bowl with Murphy’s Oil Soap and a tooth brush to remove the grime and grit on the briar and the lava on the rim top. The finish looks better but there is still darkening on the sides of the bowl and shank. There is also some darkening on the rim top as well. Jeff scrubbed the stem with Soft Scrub and soaked it in Before & After Deoxidizer to remove the oxidation on the rubber. When the pipe arrived here in Vancouver for the second stop of its restoration tour it looked a lot better. I took photos before I started my part of the work.  I took some close up photos of the rim top and the stem surface. I wanted to show what cleaned bowl and rim top looked like. The rim top and the inner and outer edges of the bowl were in excellent condition. The top of the bowl was quite dark around three sides. I also took close up photos of the stem to show the tooth marks and the remaining oxidation on the stem surface.  I took photos of the stamping on the underside of the shank and it is clear and readable. It is stamped as noted above.I removed the stem for the shank and took a photo of the bowl and stem to give a picture of what it looked like. The remaining oxidation is very visible.I started my work on the pipe by addressing the darkening of the rim top. I used a brass bristle wire brush and some common dish soap to de-grease the bowl and the rim top. I worked over the bowl and the top with the brush and was able to remove the grime and much of the darkening.  I rubbed the bowl down with Before & After Restoration Balm. I worked it into the surface of the briar with my fingertips and a horse hair shoe brush to clean, enliven and protect it. I let the balm sit for a little while and then buffed with a cotton cloth and shoe brush to raise the shine.     I set the bowl aside and turned my attention to the stem. I used a Bic lighter to “paint” the surface of the stem with the flame to lift the tooth marks on both sides of the stem. The heat lifted many of the marks. I filled in what remained with clear CA glue and set it aside to harden.   Once the repairs cured on the top and underside of the stem I filed them flat and recut the button edge with a small file. I sanded them with a folded piece of 220 sandpaper. I started polishing the stem with 400 grit wet dry sandpaper.   I polished the vulcanite with micromesh sanding pads – 1500-12000 grit pads. I wiped it down with a damp cloth after each sanding pad. I used Before & After Pipe Polish – both Fine and Extra Fine to further polish the stem.  I left a little oxidation around the stamp so as not to damage it more.  This Savinelli Capri Root Briar 411 Zulu cleaned up really well and looks very good. The Before & After Restoration Balm brought the colours and grain out in the rusticated finish on the pipe. It works well with the polished oval vulcanite taper stem. I put the stem back on the bowl and carefully buffed the pipe with Blue Diamond on the buffing wheel using a light touch on the briar. I gave the bowl multiple coats of Conservator’s Wax and the stem multiple coats of carnauba wax on the buffing wheel. I followed that by buffing the entire pipe with a clean buffing pad. I hand buffed the pipe with a microfiber cloth to deepen the shine. The finished Capri Root Briar 411 Zulu fits nicely in the hand and I think it will feel great as it heats up with a good tobacco. The tactile finish will add to the experience. Give the finished pipe a look in the photos below. The dimensions of the pipe are Length: 6 inches, Height: 1 ¾ inches, Outside diameter of the bowl: 1 ½ inches, Chamber diameter: ¾ of an inch. The weight of the pipe is 1.20 ounces/34 grams. If you are interested in carrying the previous pipeman’s legacy with this pipe send me a message or an email. I will be adding it to the rebornpipes store in the Italian Pipe Makers Section. Thanks for reading this blog and my reflections on the pipe while I worked on it.

Restoring a Wire Brushed Savinelli Extra 125 Pot


Blog by Steve Laug

The next pipe on my work table a wire rusticated Bent Billiard shaped pipe. It is stamped on the heel of the bowl and the underside of the shank and reads Savinelli [over] Extra followed by the Savinelli shield S then the shape number 125 [over] Italy. The straight taper vulcanite stem is has a very faint Crown stamp on the left side. The briar has a wire rusticated finish around the bowl and shank. This pipe was purchased as part of a lot from an online auction service on 06/07/17 from Lakewood, Colorado, USA. The finish was dirty dusty on the rim edges and sides of the bowl but the shape was good looking. The rim top had some lava in the rustication on the rim top but the edges looked very good. There was a moderate cake in the bowl and some tobacco debris. The shank and stem airway was very dirty. The stem was lightly oxidized, calcified and had tooth marks and chatter on both sides ahead of the button. There was a faint crown stamp on the left side of the taper stem. Jeff took photos of the pipe before he started his clean up. He took photos of the rim top and bowl to show the cake in the bowl, and the lava on the top and inner edge. The stem photos show the oxidation, calcification and tooth chatter and marks very well. Jeff took photos of the sides of the bowl to highlight the rustication around the bowl sides and heel. He captured the stamping on the heel of the bowl and the underside of the shank in the next photos. They are clean and readable as noted above. The stem also had a faint crown stamped on the left side. I turned to Pipephil (http://www.pipephil.eu/logos/en/logo-savinelli2.html) to get a quick view of the Extra Line. I did a screen capture of the site’s information and have included that below. I turned to Pipedia (https://pipedia.org/wiki/Savinelli) for a quick read. The site is worth reading the history of the Savinelli brand and its philosophy of pipemaking. There was a photo of a brochure that included the Extra (https://pipedia.org/wiki/File:Sav_Extra.jpg) that came from Doug Valitchka.Jeff cleaned up the pipes with his usual thoroughness – reaming the bowl with a PipNet pipe reamer and cleaning up the reaming with a Savinelli Fitsall Pipe Knife. He scrubbed the internals of the shank and the stem with alcohol, cotton swabs and pipe cleaners. He scrubbed the exterior with Murphy’s Oil Soap to clean off the dust and grime on the finish. When he sent it the pipe was ready to restore. I could not believe how good the rim top looked in comparison to what it was when he started. I took photos of the pipe when I unpacked it. The briar was clean and the rustication quite unique. The finish was in great condition overall and shone. I took a close up photo of the bowl and rim top after Jeff had cleaned it up. The look of the rim top and edges is very good. He had been able to remove the cake and the lava very well. The bowl was spotless. The stem is also shown and was very clean. He had scrubbed it with Soft Scrub but there was still some oxidation on both sides. There was tooth chatter and deep marks still remaining.I took a photo of the stamping on the heel and the underside of the shank. It is clear and readable as noted above.I removed the stem from the shank and took a photo of the pipe to show the look of the pipe. It is a real beauty.The bowl was very clean and the briar looked good. I decided to rub the briar down with Before & After Restoration Balm. I worked it into the briar with my fingertips and a horsehair shoe brush. The product cleans, enlivens and preserves the briar. I let it do its magic. It sat for 10 minutes and then I buffed it off with a cotton cloth. The bowl really is looking good at this point. I set the bowl aside and turned my attention to the stem. I scrubbed the stem down with Soft Scrub to remove the deep oxidation on the stem surface. I was able to remove much of what was present. Once I worked it over with micromesh it would be better.  I polished the stem with micromesh sanding pads – dry sanding with 1500-12000 grit pads. I wiped the stem down after each pad with a cloth impregnated with Obsidian Oil. I polished it with Before & After Stem Polish – both Fine and Extra Fine then gave it a final coat of Obsidian Oil and set it aside to dry.  There is something about this finish that make this a beautiful pipe. This wire rusticates Savinelli Extra 125 Pot looks great. The swirling wire etching of the rustication on the pipe is quite nice with the dark finish. I put the stem on the shank and buffed the pipe with Blue Diamond on the wheel (being careful of the stamping so as not to damage that). I gave the bowl multiple coats of Conservator’s Wax and the stem multiple coats of carnauba wax and buffed the pipe with a clean buffing pad to raise the shine. I hand buffed it with a microfiber cloth to deepen the shine. The dimensions of this pipe are – Length: 5 ½ inches, Height: 1 ¾ inches, Outside diameter of the bowl: 1 ½ inches, Chamber diameter: 7/8 of an inch. The weight of the pipe is 1.41 ounces/40 grams. It is a great looking pipe and one that will be going on the rebornpipes store in the Italian Pipe Makers Section. If you want to add it to your collection let me know via email to slaug@uniserve.com or by message. Thanks for walking through the restoration with me.

New Life for a Very Savinelli looking Porto Cervo 316KS


Blog by Steve Laug

This is another one of those pipes that has been here for a long time and I have no memory where it came from. I had not been cleaned so it is not one that ever went to Jeff for clean up. It was a mess. The bowl has a moderate cake (mainly in the top half of the bowl) and a heavy lava overflow on the smooth, crowned rim top. The edges look very good. The rusticated finish is rugged and deep and is nice in the hand. It is dirty with grime and grit deep in the rustication. The pipe stinks like heavily cased aromatics. The brass band is part of the stem and is dull and oxidized. The stem is oxidized, calcified and has tooth marks and chatter on both sides ahead of the button. It looks like the stem had a Softee Bit at some point as the discolouration gives that sense. The tenon is drilled for a 6mm filter or a Balsa Filter. I took some photos of the pipe before I started my work on it. I took close up photos of the bowl and the stem. You can see the thick lava build up on the rim top and down into the bowl. It is really a mess. The stem surface has the mark from a Softee Rubber Bit Guard that is clear and there is calcification and oxidation on the stem. There are also tooth marks and chatter on both sides ahead of the button.I took a photo of the stamping on the underside of the bowl and shank. It is clear and readable as noted above.I removed the stem from the shank and took a photo to give a sense of the proportions of the pipe. It is really quite nice looking.I reamed the bowl with a PipNet pipe reamer using all four cutting heads. I cleaned up the reaming with a Savinelli Fitsall Pipe Knife to remove all debris. I sanded the bowl with 220 grit sandpaper wrapped around a piece of dowel to smooth out the wall of the bowl. The bowl was in excellent condition with no fissures or checking.  I scrubbed the exterior of the bowl with a tooth brush and undiluted Murphy’s Oil Soap to remove the debris from the grooves and to soften and try to remove the lava overflow on the rim top. Once it was finished it looked much better. Polishing with micromesh would remove the rest of the debris and raise a shine. I dried it off with a towel and decided to address the remaining lava and darkening on the crowned rim top. I used a folded piece of 220 grit sandpaper to work on the top and inner edge until it was clean.   I polished the rim top and edges with micromesh sanding pads – dry sanding with 1500-12000 grit pads to raise a shine. I wiped it down with a damp cotton pad to wipe off the debris after each sanding pad.   I worked some Before & After Restoration Balm into the surface of the rusticated briar with my fingertips. I worked it over with a shoe brush to get it deep into the grooves and crannies of finish. I let it sit for 15 minutes then buffed it off with a soft cloth and raised the shine. The bowl looks great at this point.   I cleaned out the inside of the shank and the airway into the bowl and the stem. I scraped the shank out with a small pen knife to remove the thick tars. I then cleaned it with a isopropyl alcohol, cotton swabs and pipe cleaners until it was clean. To rid the bowl of the tars and oils that made the bowl still stink I stuffed it with cotton bolls and twisted a boll into a wick that I threaded into the shank. I used an ear syringe to fill the bowl with isopropyl alcohol and set it in an old ice tray over night  to let it wick out the tars and oils.This morning when I went back to the pipe to work on it I took a photo of the cotton to show how the tars and oils had wicked into the pipe. I removed it from the bowl and took photos of the cotton to show how dirty it was.  To begin the process of removing the oxidation from the stem surface I scrubbed it with Soft Scrub All Purpose cleanser. It worked quite well to remove a large part of the oxidation.I polished the stem with micromesh sanding pads – dry sanding it with 1500-12000 grit pads. I wiped the stem down with Obsidian Oil after each pad. I polished it with Before & After Pipe Polish – both Fine and Extra Fine and gave it a final coat and set it aside to dry.    I touched up the Savinelli Shield S on the stem top with Rub’n Buff Antique Gold. I worked it into the stamping with a tooth pick. I buffed it off with a cotton pad and then rubbed it down with some Obsidian Oil.I put the stem back on the Savinelli Porto Cervo 316KS Oval Shank Rusticated Dublin and buffed the pipe with Blue Diamond on the buffing wheel. I polished the briar and the vulcanite of the stem until there was a rich shine. This classic Savinelli shape and finish really highlights a proportionally well carved pipe. Once I buffed the pipe the briar came alive and the variety of colours in the nooks and crannies of the rustication popped with polishing. The black vulcanite stem with the twin brass bands had a rich glow. This Porto Cervo 316KS fits well in the hand and sits right in the mouth. Have a look at it with the photos below. The dimensions are Length: 6 inches, Height: 1 ½ inches, Outside diameter of the bowl: 1 ¾ inches, Chamber diameter: 7/8 of and inch. The weight of the pipe is 1.45 ounces/41 grams. This beauty will be going on the rebornpipes online store in the Italian Pipemakers Section. If you are interested let me know. Thanks for walking through the restoration with me as it was a pleasure to work on.

Polishing a New Old Stock (NOS) Unsmoked 1611 Savinelli Dry System Bent Dublin


Blog by Steve Laug

Jeff picked up this unsmoked New Old Stock Savinelli Dry System 1611 Bent Dublin a while ago from an online auction on 02/02/22 from Cottage Grove, Minnesota, USA. It has a Savinelli Balsa Filter in the tenon and a characteristic Dry Smoke drilling on the P-lip style stem. The airway came out on top like a Peterson but instead of a round hold this one has a rectangular slit. It came with the box, plastic bag, sock and package of Balsa Filters. All of the paperwork that may have come with it was included as well. The box was worn on the corners but it was in great condition otherwise. The stem showed some light oxidation from the light when it was on display. It also had some gummy substance just ahead of the button on both sides where it looked like there had been a price tag. There was a new Balsa filter in the stem. The pipe smelled musty. I took photos of the box before I removed the lid and then after I removed it to show what I saw.   I removed it from the box along with the filters and the papers. I took a photo of the pieces in the box. It is a pretty pipe with a polished nickel ferrule.I took the pipe out the box and took pictures of this beauty. It is a nice looking pipe with a nice rustication that works well on the bowl and goes well with the smooth crowned rim top. I took some close up photos of the rim top and stem to show the condition of the pipe. There were a couple of small fills on the rim top – right side and left side both toward the front. They are solid and not loose at all.I took a photo of the stamping on the underside of the shank. It reads Dry System on the heel of the bowl followed by S in a shield (Savinelli Logo) followed by 1611 (shape number) over Italy. There was a Savinelli stamp on the left sad of the nickel ferrule and an S on the top of the saddle stem. I removed the stem from the shank and took a photo of the look of the pipe to show the nice shape and flow of the pipe.I rubbed the bowl down with some Before & After Restoration Balm. I worked it into the rustication on the bowl and the smooth rim top with my finger tips to clean, revive and preserve the wood. It really brings the grain alive once again. I let it sit for 15 minutes then buffed it off with a soft cloth. The grain really pops at this point in the process.  I set the bowl aside and turned my attention to the stem. I polished the stem with micromesh sanding pads – 1500-12000 grit pads. I wiped the stem down after each pad with a cloth impregnated with Obsidian Oil. I finished the polishing with some Before & After Pipe Stem Polish – both Fine and Extra Fine. I wiped it down a final time with Obsidian Oil. The stem looked very good.    I put the UNSMOKED, NOS Savinelli Dry System 1611 Bent Dublin back together and buffed it with Blue Diamond on the buffing wheel. I gave the bowl multiple coats of Conservator’s Wax and the stem multiple coats of carnauba wax. I buffed the pipe with a clean buffing pad and hand buffed it to raise the shine. It is fun to see what the polished bowl looks like with the grain popping through on the smooth rim top and the variety of colour in the rustication. Added to that the polished nickel ferrule and the vulcanite saddle stem was a beautiful touch. It is light and well balanced. Have a look at it with the photos below. The dimensions are Length: 6 ½ inches, Height: 2 ¼ inches, Outside diameter of the bowl: 1 ¾ inches, Chamber diameter: 7/8 of an inch. The weight of the pipe is 68 grams/2.40 ounces. It is a beautiful pipe and one that will be on the rebornpipes store in the Italian Pipe Makers Section. If you are interested in breaking in a new unsmoked Savinelli Dry System and adding it to your collection let me know. Thanks for walking through the restoration with me as I worked over this pipe. Thanks to each of you who are reading this blog. I want to keep reminding us of the fact that we are not pipe owners; we are pipemen and women who hold our pipes in trust until they pass on into the trust of the next pipeman or woman.

Restoring a Savinelli Nonpareil 9101 Plateau Freehand


Blog by Steve Laug

The next pipe is another one that has been here for a long time  – so long in fact that I cannot remember where I picked it up. I know it came to me from a trade or my own hunt because it had not been cleaned or reamed by Jeff. There was a thick cake in the bowl and lava overflowing on to the plateau and the smooth portion of the rim top and inner edge of the bowl. The exterior of the pipe was dirty but the grain really shone through the grime. The pipe was stamped on the heel of the bowl and read Savinelli [over] Nonpareil. The left side of the shank is also stamped and had a Savinelli S shield followed by the shape number 9101 [over] Italy. The vulcanite taper stem had a single brass dot on the left side. Here is the pipe! I took close up photos of the rim/bowl and stem. The cake in the bowl was thick and there was a thick coat of lava overflow on the rim top and edge. The valleys of the plateau were quite filled in. The stem was dirty and had light tooth marks on the top and underside near the button. I took photos of the stamping on the underside of the bowl and the left side of the shank. It is clear and readable as noted above.  I removed the stem from the shank and took a picture of the pipe. It is quite an attractive shape and should clean up well. I turned to Pipephil (http://www.pipephil.eu/logos/en/logo-savinelli3.html) to get a quick view of the Nonpareil Line. I did a screen capture of the site’s information and have included that below. I am also including a screen capture of the Shape and code chart introduction that is link in the above capture.It appears that the Nonpareil 9101 that I am working on is made before 1970 so it is at least 50+ years old. It is in great shape. I am not sure what the exception noted above is about.

I turned to Pipedia (https://pipedia.org/wiki/Savinelli) for a quick read. The site is worth reading the history of the Savinelli brand and it philosophy of pipemaking. There was nothing specific on the Nonpareil line however so it was time to work on the pipe.

I used a PipeNet pipe reamer (first 3 cutting heads) to strip back the cake to bare briar. I cleaned up the remnants with a Savinelli Fitsall pipe knife. I sanded the bowl with a dowel wrapped with 220 grit sandpaper to smooth out the walls. I worked on the lava in the rim top plateau with a brass bristle wire brush. I was able to remove much of the lava with that. Scrubbing it would remove the rest. I scrubbed the externals of the bowl and rim top with a tooth brush and some undiluted Murphy’s Oil Soap. I rinsed it off with warm water and dried it off with a soft cloth. Now it was time to scrub the inside of the shank and rid it of the tars and oils. I scrubbed the mortise and the airway in the shank and the stem with pipe cleaners, cotton swabs and 99% isopropyl alcohol. There was some stain in the inside of the shank that came out.   I polished the briar on the rim top with micromesh sanding pads – dry sanding it with 1500-12000 grit pads. I wiped the briar down with a damp cloth to remove the sanding dust. The briar really took on a rich shine with the polishing.    I rubbed the bowl down with some Before & After Restoration Balm. I worked it into the briar with my finger tips and a horse hair shoe brush on the plateau rim top to clean, revive and preserve the wood. It really brings the grain alive once again. I let it sit for 15 minutes then buffed it off with a soft cloth. The grain really pops at this point in the process. I set the bowl aside and worked on the stem. I smoothed out the tooth marks on the stem and button surface with 220 grit sandpaper and started polishing the stem with 400 grit wet dry sandpaper. It was starting to look better.  I polished the stem with micromesh sanding pads – dry sanding with 1500-12000 grit pads. I wiped the stem down between each pad with some Obsidian Oil. I finished polishing it with Before & After Pipe Stem Polish – both Fine and Extra Fine to deepen the shine. I gave it a final wipe down with Obsidian Oil.      I put the Savinelli Nonpareil 9101 Plateau Freehand back together and buffed it with Blue Diamond on the buffing wheel. I gave the bowl and the stem multiple coats of carnauba wax. I buffed the pipe with a clean buffing pad and hand buffed it to raise the shine. It is fun to see what the polished bowl looks like with the grain popping around the bowl and shank. Added to that the polished acrylic variegated brown stem was a beautiful touch. It is light and well balanced. Have a look at it with the photos below. The dimensions are Length: 6 inches, Height: 2 inches, Outside diameter of the bowl: 1 ½ inches, Chamber diameter: ¾ of an inch. The weight of the pipe is 65 grams/2.29 ounces. It is a beautiful pipe and one that will be on the rebornpipes store in the Italian Pipemakers section. If you are interested in adding it to your collection let me know. Thanks for walking through the restoration with me as I worked over this pipe. Thanks to each of you who are reading this blog. I want to keep reminding us of the fact that we are not pipe owners; we are pipemen and women who hold our pipes in trust until they pass on into the trust of the next trustee.