Tag Archives: removing tooth marks

Doing a Clean up and Restoration of a Kaywoodie Super Grain 5 Medium Billiard


Blog by Steve Laug

The next pipe on the work table is one that a fellow just dropped by. He had written to me earlier this week about a pipe he found. He wanted to drop it off and have me clean it up for him. Here is his first email.

Steve, found a Kaywoodie medium billiard that I’d like to get cleaned up. Can I drop it off this weekend? Take care, Robert

I replied to him as follows:

Drop it by. Can you send me a photo of the pipe so I can see it? Thanks – Steve

We made an appointment for Saturday or Sunday.

After viewing the photo and talking with Mike about the pipe when he dropped it off I knew what I was dealing with. He found it when he was visiting his parents in New York. I took photos of the pipe once it was dropped off before I worked on it. My evaluation of the pipe included the following observations. The pipe was actually quite clean. The bowl had been reamed quite recently and the internals were clean. The rim top and the inner edge of the bowl showed some damage. There were some nicks and marks on the surface and edge. The walls of the bowl seemed be to quite smooth and did not show any checking or damage from heat or fire. The finish was dark but quite clean. There were just a few nicks and scratches in briar. The stamping was faint but read Super Grain [over] Kaywoodie on the left side. On the right side the numeral 5 was stamped. There was a inlaid white Kaywoodie Shamrock inlaid in the briar on the right top of the shank. The shank was quite long and had a shorter stem. Kaywoodie called the shape a Medium Billiard. The Kaywoodie threaded tenon and stinger had been clipped and filed smooth. The stem was vulcanite and quite clean but had tooth marks on the top and heavier ones on the underside. It is a great looking pipe that I really like the looks of and I think that once it is cleaned up it will be a real beauty. I took photos of the bowl and rim top as well as the stem. The rim top shows the damage and nicks on the top and the inner edge of the bowl. It is uneven and quite messed up. You can see the tooth marks and chatter on both sides ahead of the button.I took a photo of the stamping on the underside of the shank. It is faint and hard to read but with a bright light and lens it reads as noted above. The pipe is quite nice with the stem removed. You can see the flow of the design and the look of the parts.The inlaid white shamrock/club on the shank side/top was a clear clue to the age of the pipe. I turned to Pipedia to an article entitle Guide to Kaywoodie Pipes to see what I could find that would help date it (https://pipedia.org/wiki/Collector%27s_Guide_to_Kaywoodie_Pipes). I quote a section of the article below. I have highlighted the portions that apply to this particular pipe in red.

THE 1936 KAYWOODIE LINE OF PIPES

The 1936 Kaywoodie catalog lists only four grades of pipes (Table 1). These four grades, however, were available in 140 shapes (see Appendix). These 140 shapes included many that differed only in size (small, medium, large). For example, the “In-Between”, “Colt” and “Freshman” shapes listed in the Appendix were merely smaller versions of the standard shapes, and the “E-Z-Set” shapes were “flat-bottom” versions of the standard shapes.

Table 1: Kaywoodie Pipe Grades and Prices (1936)

  • Straight Grain: $10.00
  • Super Grain: $5.00
  • Carburetor: $4.00
  • Drinkless: $4.00

As shown in Table 1, the Straight-Grain pipe was Kaywoodies’ top-of-the­-line, selling for $10.00 in 1936. The Straight Grain pipe did not appear again in the catalogs reviewed in this research until 1968-69 (see Section 3.4).

The 1936 catalog shows 3 Super Grain models, selling for $5.00 each. One model is introduced as the “New Banded” Super Grain. The banded Super Grain had the white Kaywoodie cloverleaf logo in the bit and a wide metal band. The non-banded (“original”) Super Grain had the white Kaywoodie cloverleaf logo in the shank of the pipe and was offered in two finishes, virgin and miami (slightly darker than virgin). Due to the gap in catalogs used in this research, it is not known precisely when the practice of putting the cloverleaf in the shank of the Super Grains was discontinued (the 1947 catalog shows the cloverleaf on the bit). The Super Grain was later downgraded and many new grades appeared above it (see subsequent sections of this Chapter). The early (original) Super Grains are particularly interesting not only because they were high quality briars, but because they were the only Kaywoodies (in the author’s knowledge) to have the logo inlaid in the shank of the pipe…

Thus, I knew that the pipe in hand was a Super Grain with the inlaid Kaywoodie cloverleaf was done in 1936 and we do not know when it ceased. It had the darker finish called Miami (a darker stain). It was time to work on the pipe.

I started my work on this pipe by reaming the bowl. I cleaned out the remaining cake with a Savinelli Fitsall Pipe Knife. I took it back to bare briar to carefully examine the walls of the bowl. I finished by sanding the walls of the bowl with 220 grit sandpaper wrapped around a piece of dowel to smooth out the interior of the bowl. It was quite clean and undamaged. I cleaned out the internals of the bowl, shank and the airway in the stem with alcohol, cotton swabs and pipe cleaners until they were clean. Next, I addressed the damage to the inside edge and top of the bowl. I used a folded piece of 220 grit sandpaper to clean up the inner edge and give it a slight bevel. I smoothed out the damage and once done I wiped it down with a damp cloth to remove the sanding debris. It looked much better than when I started.I polished the briar with micromesh sanding pads – dry sanding with 1500-12000 grit sanding pads. I wiped the bowl down after each sanding pad with a damp cloth to remove the sanding debris. The bowl began to take on a rich glow. I rubbed down the bowl and shank with Before & After Restoration Balm. It is a paste/balm that is rubbed into the surface of the briar. The product works to deep clean the finish, enliven and protect the briar. I worked it into the briar with my finger tips. I let it sit for 10 minutes then wiped it off with a soft cloth then buffed it with a cotton cloth. The briar really began to have a deep shine in the briar and the grain shines through. The photos I took of the bowl at this point mark the progress in the restoration. It is a gorgeous pipe.  I set the bowl aside and turned to the stem. It was in good condition but had some buffed tooth marks on the surface and what looked like a repair on the underside next to the button. I painted the surface of the stem with the flame of a Bic lighter to try and lift the marks. I lifted them some but they were still distinctly present. I filled in the marks with black rubberized CA glue and set it aside to cure. Once cured I flattened the repairs with a file and then followed that up with a piece of 220 grit sandpaper. I started the polishing the stem with 600 grit wet dry sandpaper. It looked much better. I polished the stem with micromesh sanding pads – 1500-12000 grit sanding pads and water to wet sand the stem. I wiped it down after each sanding pad with Obsidian Oil on a cotton rag after each sanding pads. I know that many say Obsidian Oil does nothing for acrylic stems, but I find it does two things – first it gives some protection to the stem from buildup and second it give the sanding pads bite in the polishing process. I like to use Before & After Fine and Extra Fine stem polish as it seems to really remove the fine scratches in the vulcanite. I rub the Fine Polish on the stem and wipe it off with a paper towel and then repeat the process with the Extra Fine polish. I finish the polishing of the stem down with a final coat of Obsidian Oil and set the stem aside to let the oil absorb. This process gives the stem a shine and also a bit of protection. The final steps in my process involve using the buffer. I buffed the bowl and stem with Blue Diamond to polish out the light scratches in the briar and the vulcanite. I gave the bowl and the stem multiple coats of carnauba wax. I have found that I can get a deeper shine if I follow up the wax buff with a buff with a clean buffing pad. It works to raise the shine and then I hand buff with a microfiber cloth to deepen the shine. It is always fun for me to see what the polished bowl looks like with the polished stem. It really is a nice pipe. The smooth finish around the bowl sides and shank looks great. The vulcanite taper stem works well with the pipe. The Kaywoodie Super Grain 5 Medium Billiard feels great in my hand. It is a well-balanced pipe. Have a look at it with the photos below. The dimensions are Length: 5 ½ inches, Height: 1 ¾ inches, Outside diameter of the bowl: 1 ¼ inches, Chamber diameter: ¾ of an inch. The weight of the pipe is 1.13 ounces/32 grams. It is a beautiful pipe that I will soon be giving back to Robert who dropped it off for restoration. I am sure he will enjoy it and it will give many more years of service to him.

As always, I encourage your questions and comments as you read the blog. Thanks to each of you who are reading this blog. Remember we are not pipe owners; we are pipe men and women who hold our pipes in trust until they pass on into the trust of those who follow us.

Breathing Life into an Older Choquin A Metz Egg with a Wing Bone Shank Extension and Horn Stem


Blog by Steve Laug

The next pipe on the table was in a box of Danish pipes that Jeff and I had put aside. I actually had no idea (nor did Jeff) why we had put it in that box. The stamping was completely worn off and unreadable. I could make out a faint ghost of a stamp. But the shape reminded me of a Choquin A Metz Origine made by the company that came to be known as Butz-Choquin. The pipe was in rough condition. The finish on the bowl and shank were worn and dirty with spotty grime spots on the surface all around the bowl sides. There was a large, solid fill on the left side toward the bottom of the bowl. Under the tars the rim top and inner and outer edges of the bowl had darkening and light burn damage. The shank end had a metal shank cap that was tarnished looking and I was not sure what the metal was underneath. Inserted in the shank cap was a tube that was made of an albatross wing bone. It fit in the shank cap and was discoloured for the first half inch. The other end of the shank tube was also darkened for the same distance ahead of end cap that was attached to the horn stem. The metal had the same pattern as the previous one. The stem and cap fit snug on the wing bone extension. The horn stem was dirty and had tooth marks and chatter on both sides ahead of the orific button. I took photos of the pipe before I started my clean up work on it to give a clear photo of the condition of the pipe before I started my work. I took a photo of the bowl and the rim top. The bowl had a thick cake on the bowl walls and there was tobacco debris in the bottom of the bowl. The rim top was dirty and had darkening and some burn damage on the inner edge of the bowl. The shank cap and stem cap were tarnished and dirty. The horn stem shows the tooth marks and chatter on both sides ahead of the button as mentioned above. It had promise but it was dirty!I took photos of the shank sides to try to capture the faint stamping on the briar. If you look closely you can see something there. It is unreadable as it is so faint but on the left side it looks like it possibly reads Choquin [over] A Metz [over] Origine. Because I expected this I can faintly see it. The stamping on the right side is not readable at all.I was able to remove the stem from the albatross bone shank extension. I set it aside and dribble some alcohol with a pipe cleaner on the shank cap that held the other end of the extension tightly in place. It took a little work but I was able to wiggle it free. I took a photo of the parts of the pipe to show the overall size and ratio of the parts. It is going to be a pretty pipe!I had worked on two of the Second Generation A Metz Origine in the past. These had an acrylic stem and an acrylic shank extension. I have included the links to those blogs below for your information and for a quick review of the shape and the differences with the one I have in hand now.

https://rebornpipes.com/2020/04/13/new-life-for-a-second-generation-butz-choquin-a-metz-origine/

https://rebornpipes.com/2021/05/28/what-an-interesting-sandblast-butz-choquin-2nd-generation-a-metz-origine/

Back in 2018 I had worked with Paresh on Facetime on a First Generation Choquin A Metz. It was very different than the previous two. It had a horn stem and an albatross wing bone as a shank extension (https://rebornpipes.com/2018/11/17/a-challenging-restoration-of-vintage-era-first-choquin-a-metz/). Given that information, I knew that I was looking at another First Generation A Metz. It had the horn stem and the albatross wing bone shank extension. The pipe on my worktable brings back a lot of fond memories for me. I remember walking through the restoration of Paresh’s Grandfather’s A Metz Origine with him. We chatted on Facetime many times during this particular restoration. Paresh had determined that this pipe was very old. I quote below and also have included a photo:

From all the input that I have gathered, the flat bottom bowl, the stamping, the sterling silver adornments, the bone shank extension and horn stem, I can safely place this piece as being one of the first A Metz pipes from the 1858 era! That was the first memory of Paresh’s A Metz Origine. The second memory is also one I cherish. On a trip to India to visit Paresh and Abha and their daughters Mudra and Pavni in 2019, Jeff and I had the privilege of not only seeing this pipe up close but I also was the first one to smoke it since the restoration. What a privilege to be able to smoke Paresh’s Grandfather’s pipe. It was so light weight in hand and it was an amazing smoke. It was cool and dry to the end of the bowl. I cannot thank Paresh enough for letting me fire up this old timer. Dal wrote about this in a great blog about the trip called West meets East in India (https://rebornpipes.com/2019/05/30/west-meets-east-in-india-to-restore-a-grandsons-treasure-an-1846-bbb/). I quote Dal as he so ably described this experience and have also included a photo panel from the blog:

As we had planned, in celebration of the completion of the restoration together we smoked 3 unbelievable vintage pipes with albatross shank extensions and horn stems – all from the 1800s.  Oh my…. We each thoughtfully packed our bowls with our choice of blends and lit up and, well….  What a treat for Paresh to share the treasure trove of pipes left to him by his grandfather.  Jeff did the honor of commemorating this event with pictures. (Photo from Dal)I had written a previous blog on a restoration of a second generation Butz-Choquin A Metz Origine (https://rebornpipes.com/2020/04/13/new-life-for-a-second-generation-butz-choquin-a-metz-origine/). It was a smooth briar pipe but the information that I included was helpful and applicable. I am including some of that below.

I turned to Pipephil (www.pipephil.eu/logos/en/logo-butzchoquin.html) to get a bit of background on the brand and found this write up and photo of the second or the modern version of the Origine pipe. I have included a screen capture of the pertinent section below. (Interestingly the notes below the photo speak of the one that I have in hand.)On the GQ Tobaccos site I found some interesting information about the brand and this particular pipe. The link is: http://www.gqtobaccos.com/pipes/butz-choquin-origine-sandblasted/. I quote in full from the website.

The Butz Choquin Origine pipes represent one of the first designs created by Jean-Baptiste Choquin and Gustave Butz in the mid 1800’s. The Original Origine made use of an albatross wing bone, for the long, extended stem. The deep billiard style bowl, sports a slight foot on the base and is finished sandblasted with a brown stain. The stem extender is made from Acrylic (faux bone effect) and fitted with a nickel spigot and matching band near the mouthpiece. The black acrylic mouthpiece is curved, making this demi warden/reading pipe ideal for hands free smoking. The spigot fitting makes the use of the common 9mm filter impossible, but it can be used without easily.

Butz Choquin started life back as a tobacconist in Metz, during 1850’s run by Jean-Baptiste Choquin. One of Jeans longest serving members of staff was a young Gustave Butz who had a desire to not only sell pipes, but also create them. In 1858 Gustave married Jeans eldest Daughter Marie and become an actual part of the family.

The pair set about creating a unique and distinct pipe, the now world famous “BC Origine” was first created in same year. This flat bottomed bowl was fitted with a long albatross bone shank and dual silver rings. To this day this pipe is one of the most iconic from Butz Choquin range, although sadly it no longer has the natural shank, replaced with acrylic.

Over the years the pair created a large range of pipes which not only sold within their own, but exported all over Europe and further field. The popularity of the pairs pipes grew and grew and by the 1951 the Berrod-Regad company brought out the family company. Production continued in Metz until 2002 when the whole operation was shifted to the mountain community St Claude. This picturesque village had been the centre of the worlds Briar trade for generations and the local craftsmen continued to produce high quality pipes.

To this day Butz Choquin are renowned for their desire of making more interesting and left field colour schemes. Using high quality briar, original equipment and colourful dyes/acrylic rods.

With that information I turned to work on the pipe. Looking at the bowl it is very different from the photos of the ones that I have seen online. The extension is not the white acrylic and the plumbing for holding it all together is very different from the current photos. It makes me wonder the age of the pipe. We purchased it from the fellow in Denmark that we have purchased many pipes from.

I started my work by reaming the bowl with a Savinelli Fitsall Pipe Knife. I scraped the bowl walls back to bare briar so that I could examine the walls for damage. I followed that by sanding the walls of the bowl until they were smooth with 220 grit sandpaper wrapped around a piece of dowel. The bowl walls showed no checking or cracking which is remarkable.I cleaned out the airway and mortise in the shank, the airway in the wing bone tube and the airway in the horn stem. I used 99% isopropyl alcohol, pipe cleaners and cotton swabs to remove the tars and oils. It was extremely dirty and once cleaned smelled and looked better.I cleaned up the rim top and the inner and outer edge of the bowl with a folded piece of 220 grit sandpaper. Once finished it looked much better. The finish would need to be removed to deal with the grime and the large fill on the left side of the bowl. (Note I had also used some worn sandpaper to remove some of the tarnish on the band).I stripped off the finish with acetone on cotton pads. I wiped it down repeatedly until the shiny finish was removed and the briar was clear and clean. I polished the briar and the albatross wing bone shank extension with micromesh sanding pads – dry sanding with 1500-12000 grit pads. After each pad I wiped the bowl down with a damp cloth to remove the sanding debris. It really took on a shine by the last three sanding pads. The fill is still visible but it is solid. I decided to polish it out and leave it. I rubbed the bowl and wing bone shank down with Before & After Restoration Balm. I worked it into the surface of the briar and the bone where it works to clean, restore and preserve them. I let it do its magic for 15 minutes then buffed it off with a cotton cloth. I put the wing bone tube back on the shank after polishing. The pipe looks incredibly good at this point in the process. I filled in the deep tooth marks on the top and underside of the horn stem with clear CA glue. I set it aside to cure. Once the repairs cured I flattened out the repairs with a small needle file to blend them into the stem surface. I continued the process by sanding it with 220 grit sandpaper and started polishing it with 600 grit wet dry sandpaper. It looked very good at this point. I set the bowl aside at this point and turned my attention to the stem. I polished the stem and cap with micromesh sanding pads – 1500-12000 grit sanding pads and water to wet sand the stem. I wiped it down after each sanding pad with Obsidian Oil on a cotton rag after each sanding pads. I find that Obsidian Oil does two things for all stems – first it gives some protection to the stem from buildup and second it gives the sanding pads bite in the polishing process. I have found that Before & After Fine and Extra Fine stem polish works well to remove the fine scratches in the horn stems. I rub the Fine Polish on the stem and wipe it off with a paper towel and then repeat the process with the Extra Fine polish. I finish the polishing of the stem down with a final coat of Obsidian Oil and set the stem aside to let the oil absorb. This process gives the stem a shine and also a bit of protection. I am excited to finish restoration of this late 19th/early 20th century, First Generation Choquin A Metz Egg. I put the pipe back together and buffed it with Blue Diamond on the buffing wheel. I gave the bowl and the stem multiple coats of carnauba wax. I hand buffed the pipe with a clean buffing pad to raise the shine. It is fun to see what the polished bowl looks like with beautiful mixed grain all around it. I decided to leave the filled flaw on the left side intact as it is a real part of the story of the pipe. I love the look of the polished grain on the pipe with the bone shank extension and horn stem.  This smooth Older Choquin A Metz Egg with an Albatross Wing Bone shank extension and a horn stem is great looking and the pipe feels great in my hand. It is light and well balanced. Have a look at it with the photos below. The dimensions are Length: 7 inches, Height: 2 ¼ inches, Outside diameter of the bowl: 1 1/8 inch, Chamber diameter: ¾ of an inch. The weight of the pipe is 38 grams/ 1.34 ounces. It turned out to be a beautiful pipe. I will be adding this to my collection of older pipes. Thanks for your time reading this blog. If you have any questions or insights into the pipe and its age and making please feel free to ask.

Restoring an Old Malaga Canadian


by Kenneth Lieblich

Next on the chopping block is a beautiful and unusual, long, partially-rusticated, Canadian-shaped pipe from the old Malaga Pipe Shop in Royal Oak, Michigan. I acquired it from eBay for a reasonably good price because it is technically a Malaga “second” – although I know from Steve that Malaga “seconds” are frequently indistinguishable in quality from their firsts. Truth be told, I’m not a fan of the rustication on this pipe, but the actual shape of the pipe itself was so charming to me that I knew I had to add it to my collection. The slightly-canted, apple-shaped bowl, attached to the long oval shank is particularly beautiful. The only markings on the pipe are on the underside of the shank. They read “Malaga” M-2. The M-2 indicates that this is a second, as I mentioned above. Steve has worked on quite a few Malaga pipes and blogged their restorations over the years, so rather than repeat previous blogs, I am including the link to one that gives some of the history of the Malaga brand and the Malaga Pipe Shop in Royal Oak, Michigan in the USA from a catalogue: https://rebornpipes.com/2013/02/09/george-khoubesser-and-malaga-pipes/. I assume (but don’t know) that the name from comes from the Spanish port city of Málaga – a place I visited in my youth. The founder of the company, George Khoubesser, is of Turkish ancestry and, given Málaga’s importance to the ancient Caliphate of Córdoba, I wonder if there is a distant connection. But I digress…

My pipe is very similar, but not identical, to the one in the image below from the Malaga catalogue. The pipe must have been a favourite of the previous owner, as it was heavily and lovingly smoked. The stem had little oxidation but was well-chewed and dented. It would require some considerable attention. The stummel was in good shape, albeit dirty; there was the odd scratch and nick, but nothing problematic. The rim of the pipe had a substantial burn. We’ll see how much of that can be repaired. The insides of both the stem and the stummel were pretty filthy, and STUNK very badly of some sort of aromatic tobacco. As usual, I wiped the stem down with Murphy’s Oil Soap on some cotton pads. Then I cleaned out the inside with pipe cleaners and isopropyl alcohol. As you can see, this one had a lot of filth in it! I also took a BIC lighter and ‘painted’ the stem with its flame to lift the few bite marks and dents. This was quite successful in raising the dents, but the tooth damage was significant enough to need more work. I then wiped down the stem with SoftScrub cleaner to remove surface oxidation. Once this process was done, the stem went for an overnight soak in the Pipe Stem Oxidation Remover. This allows me to clean the oxidation off in a couple of ways: by applying a mild cleaner to the surface and sanding the stem. The next day, I used SoftScrub again with some cotton rounds. I built up the dents on the stem and repaired the button with black cyanoacrylate adhesive and let them fully cure. I then sanded the adhesive down with 220- and 400-grit sandpapers to meld seamlessly into the stem. I then used all nine Micromesh pads (1,500 through 12,000 grit) to bring out the lovely black lustre on the stem. I also used Obsidian Pipe Stem Oil in between each pad scrubbing. Moving on to the stummel. Firstly, I decided to ream out the bowl. I used the PipNet Reamer to remove the built-up cake and followed that with 220-grit sandpaper taped to a dowel to eliminate as much as I could. I took the chamber down to bare briar, as I wanted to ensure there were no hidden flaws in the wall. As it turns out, there were several heat fissures which I’d have to deal with later. I started to do my normal cleaning procedures on the shank, but the shank was completely blocked with debris and filth. I resorted to using a drill bit (by hand) and a dental tool to clear it out. Just look at the debris! Then I carried on cleaning out the insides of the shank with Q-tips, pipe cleaners, and lemon-infused isopropyl alcohol. I followed that up by cleaning the insides with some dish soap and tube brushes. I thrust some cotton balls into the bowl and the shank and saturated them with 99% isopropyl alcohol. I let the stummel sit overnight. This caused any remaining oils, tars and smells to leach out into the cotton. After this, it was clean alright, but most certainly not de-ghosted. I mentioned earlier that the ghost in this pipe was quite disgusting and very strong. This step turned out to be only one of several steps to remove the smell.Leaving the ghost for the moment, I used cotton rounds and some Murphy’s Oil Soap to scrub the outside of the stummel and a toothbrush with Murphy’s for the lava on the rim of the pipe. At this point, it seemed sensible to set up a retort and further clean this whole pipe out – in hope of scaring out the ghost. I put the stem and stummel back together and used my pipe retort system. This system uses boiling isopropyl alcohol and a vacuum (a void, not the household appliance) to clean the interior of a pipe. I forgot to take photos of this, but the retort worked. I managed to improve the state of the pipe.

Back to this obstinate Ghost of Tobaccos Past. I was frustrated. The stench still lingered and was really getting on my nerves. I remembered some time ago that Steve told me about a technique that Greg Pease used to remove especially stubborn ghosts. One might call this the exorcism technique. The procedure is as follows: First, warm your oven to its lowest baking temperature (in my case, 170° F). Second, place the stummel (no stem) in the oven for three hours to warm up and allow the pores of the wood to open. Third, pull the stummel out, fill it with activated charcoal and place it back in the oven for another three hours. This will (hopefully) remove the remaining smells into the charcoal. Once the three hours are up, dump out the activated charcoal and you’re done. Here is a link to the original article by Greg Pease: http://glpease.com/Articles/Spot.html.With all that done, I could address the burn on the rim. I took some oxalic acid, used several Q-tips, and rubbed and rubbed and rubbed. The burn improved quite a bit, though there are still some signs of it left.Alas, as I mentioned earlier, there were some small cracks inside the bowl. The solution to this problem is always a tricky one: epoxy. I prepared some J.B. Weld epoxy and filled the cracks, ensuring that the epoxy was evenly spread. Once done, a good 24 hours was needed to ensure that the epoxy was properly cured. After that, I gently sanded the inside of the bowl to provide a rough surface for what was to come next. I coated the entire inside of the bowl with a mixture of activated charcoal and my wife’s homemade yogurt. Once hardened, this provided a good, slightly rough surface for a new cake to build. I took a solid wooden sphere, wrapped a piece of 220-grit sandpaper around it, and sanded the inner side of the chamber. This achieved two things: first, it removed some of the burn marks on the inner edge of the rim; and second (and more importantly), the circular shape and motion of the sphere gradually returned the edge to a perfect circle. Then, I took my entire set of Micromesh pads to finish off the sanding of the stummel. After that, a light application of Before & After Restoration Balm brought out the best in the stummel’s grain. Finally, it went off to the bench polisher. In the photograph, I show White Diamond and carnauba wax, but after taking the photo, I realized that Conservator’s wax would be better suited to the purpose. So that’s what I used. This is a wonderfully crafted pipe and has a very handsome feel to it. It took some work, but I am proud of it and the final product suits me to a T. It retains some wounds from battle, but, as Steve would say, they are part of this pipe’s story. This is one pipe that I am keeping for myself and adding to my collection. I am sure that I will be enjoying this one for many years to come. The approximate dimensions of the pipe are as follows: length 6⅝ in. (168 mm); height 1⅞ in. (48 mm); bowl diameter 1⅝ in. (41 mm); chamber diameter ¾ in. (20 mm). The weight of the pipe is 1¾ oz. (53 g). I hope you enjoyed reading the story of this pipe as much as I did restoring it. If you are interested in more of my work, please follow me here on Steve’s website or email me directly at kenneth@knightsofthepipe.com. Thank you very much for reading and, as always, I welcome and encourage your comments.

A Simple Refurbishing Of A Meerschaum Bulldog From Renowned Turkish Pipe Carver Ismet Bekler


Blog by Paresh Deshpande

I had completed the restoration and repairs of an early (probably 1920s) cased pair of meerschaum pipes with Amber stems and had sent this pipe out to its new owner. Though the end results were very satisfying, this pair had proved to be more than handful and had tested all my skills and patience. Well, all’s well that ends well! The feedback I got from my friend as to the smoking qualities and aesthetics was greatly satisfying.

From amongst the pile of 10 odd Meerschaum pipes that awaits restoration, I selected a cased Meerschaum pipe that appeared to be in great condition requiring minimal work. That being one reason for selecting this particular pipe, the second and important reason was the classic Bulldog shape which I am quite fond of (in fact I just love all the classic British shapes). This is a large sized meerschaum pipe with a tortoise shell acrylic stem that is beautifully cut, most likely hand cut. The following picture is of this meerschaum with a group 4 sized Dunhill Bulldog and should give you an idea of the size of this pipe.The only stamping that could be seen on this pipe is on the left shank surface and is stamped as “I. BEKLER”. The stem is devoid of any stampings.This is the first time that I have worked on a pipe that is stamped as such. Curious to know more about this pipe maker, I visited pipedia.org and a search on this site lead me to a Turkish pipe company, CAO. (https://pipedia.org/wiki/CAO)

It was revealed that Ismet Bekler was a pipe carver who had carved many meerschaum pipes for CAO. I have reproduced certain relevant snippets of information from that article on pipedia.org.

C.A.O International, Inc. is the producer of one of the country’s top lines of premium cigars, cigar accessories, Meerschaum pipes, and pipe tobaccos. CAO’s Meerschaum pipes are smoked by presidents, senators, actors and other dignitaries. CAO was founded in 1964 by Cano A. Ozgener. Using his initials as the company logo.

Cano Ozgener’s interest in tobacco began on the banks of the Bosporus. Born on January 19, 1937, Ozgener was raised in his birthplace of Istanbul, Turkey, by his Armenian parents. His father was a jeweller, his mother a homemaker. He studied at a Jesuit French grammar school before being accepted into the American-run Roberts College in Istanbul, from which he received a bachelor’s degree in mechanical engineering in 1960.

As a student in Turkey, Ozgener enjoyed smoking pipes, especially those made from meerschaum.

Graduating from Columbia in 1964 with a professional engineering degree, Ozgener was recruited by DuPont to work in the firm’s Kinston, North Carolina, plant. It was during his stint in the textile division at the age of 27 that he came across some imperfect Turkish meerschaum pipes. In his spare time, he decided to use his engineering abilities to improve the pipes.

As Cano and the tobacconists were not happy with the quality of Turkish meerschaum, he decided to take the meerschaums and change the stems, make modifications and work with the carvers to improve them,” One day a tobacconist from Wilmington, Delaware, asked him where had he found the meerschaum, that he had never seen such quality. Cano told him that he had modified them. The tobacconist then ordered a dozen or two. That was just the beginning.

Ozgener kept his engineering job as he built his company. He worked constantly; his vacations from DuPont were spent attending tobacco conventions, which left little time to relax with his wife and two young children. Finally, in 1977, he left his engineering position to devote more attention to his growing business and to spend more time with his family.

The preceding article is reprinted here with the permission (forth coming) of Bennington Tobacconist

Ismet Bekler carved many meerschaum pipes, which were signed by him and sold by CAO, beginning in 1977. CAO actually trademarked his last name for use in 2001. Other carvers also provided pipes to CAO, and at least one other, Kural, also signed pipes made for CAO.

I surf the net to know more about the pipe carver Ismet Bekler. I chanced upon a website that had some beautiful pipes on sale and most prominently, had many un-smoked meerschaum pipes carved by Ismet Bekler. Here is the link to the website. I have also noted some information about Ismet Bekler which is given in the introduction on this website.

https://www.therightpipe.com/meerschaum-pipes/ismet-bekler-c382.html

Ismet Bekler was a prolific and popular carver. He began carving in the early 1970’s. Bekler is known as one of the best carvers in the history of Turkish Meerschaum. Master carver Bekler passed away in 2018 at the age of 84.

In 1980, the CAO Meerschaum Company contracted with Bekler to sell all of his carvings to them. CAO wanted to make Bekler a more well-known carver in the US and it was at this time he began signing his pipes.

Thus, from the above, my guess would be that this pipe is from the period post 1980 but could be pre- 2001 since it is signed in full. However the lack of CAO in brass logo on the stem makes matters murky. Any inputs on this would definitely help me and other readers to know more about this pipe maker whose demise has left a void in the pipe carver’s community.

Initial Visual Inspection
The pipe, as compared to the many pipes that I have worked on till date, is in excellent condition. The case that housed this pipe and the green velvet inner lining is also in good condition. The chamber has a thick layer of cake with the rim top surface covered in overflowing lava. The stummel is in pristine condition with just a few hand stains and dust covering the stummel. The meerschaum has started coloring at the shank end. The stem too is in pristine condition with just faint traces of accumulation of old oils and tars on the metal tenon. Here are a few pictures of the pipe as it sits on my worktable. Overall, this pipe is in excellent condition and should be an easy refurbishment project.

Detailed Inspection
There is a heavy build up of cake in the chamber with a thicker layer seen at the bottom half of the chamber. The cake has dried and is crumbly due to prolonged storage. The condition of the inner walls of the chamber can be ascertained only after the cake has been removed completely. The rim top has darkened due to thick overflow of lava. This should be a fairly simple cleaning of the chamber.The stummel, likewise, is in good shape. There a few specs of dirt and grime on the surface that have accumulated due to oils on the human palms. These should clean up easily by wiping the stummel with oil soap. There are a couple of very light scrub marks on the base of the stummel. The mortise is not visible due to the small opening in to which fits the brass metal tenon. This would need to be cleaned using bristle and regular pipe cleaners and isopropyl alcohol. The stem is a beautiful acrylic tortoise shell with beautiful transparency, sharp buttons and a nice slot end. The bite zone in the stem shows slight calcification with no tooth chatter. There is a slight build up of oils and tars in the stem airway that can be seen. The brass tenon too has traces of dried oils and tars. This stem should clean up clean up easily and I just can’t wait to see the stem after all the cleaning and polishing process.The Process
I started the refurbishing of this gorgeous pipe by cleaning the stem first. I cleaned the brass tenon and stem surface with isopropyl alcohol and cotton swabs. I ran a few bristled and regular pipe cleaners, also dipped in alcohol, through the stem airway till it was clean and transparent.I followed this cleaning up with internal cleaning of the chamber. Using my fabricated knife, I carefully scraped the accumulated cake from the walls of the chamber. I avoid using a pipe reamer while cleaning the chamber as the rotational movements of the reamer head exerts outward longitudinal forces on the walls of the chamber and may damage the walls of the chamber. Next, I used a 220 grit sand paper, pinched between my thumb and forefinger, to sand the inner walls of the chamber of the pipe. Once I had reached the bare walls, I wiped the chamber with a cotton pad dipped in isopropyl alcohol. This removed all the residual carbon dust and also rid the chamber of all ghost smells. The walls of the chamber are nice and solid with no signs of cracks. Using a sharp knife, I gently scraped out the overflow of lava from the rim top. Though the lava flow over the rim top surface had been scraped out, the darkening persisted. I would further clean out the rim surface while I cleaned the stummel surface using oil soap.Next, I cleaned out the mortise and shank airway using shank brush and pipe cleaners. I started the process with cleaning the shank internals using shank brush dipped in isopropyl alcohol (I use only 99.9% pure alcohol). I ran this shank brush wetted with alcohol through the shank a few time and thereafter ran a couple of bristled pipe cleaners through the shank to draw out the loosened gunk. I continued the cleaning of the shank internals with pipe cleaners and alcohol till the pipe cleaners came out clean.I cleaned the surface of the stummel with cotton swab and Murphy’s oil soap. I also cleaned the rim top with the soap on a cotton swab. I further wiped the surface with a moist soft cotton cloth till all the traces of the soap were removed from the stummel surface. Thereafter I dried the stummel with a soft dry cotton cloth and set it aside to dry out naturally. The dark areas on the rim surface are still visible and would need to be addressed using higher invasive methods. While the stem was drying out naturally, I worked the stem. I began the process of polishing the stem by wet sanding the stem surface with 600, 800, 1000, 1500 and 2000 grit sandpapers. I wiped the surface with a moist cloth and wiped the surface with a little EVO just to clean and bring a shine to the stem surface.I addressed the darkening over the rim surface by sanding the rim with a folded piece of 320 grit sandpaper. I sand the rim surface with minimum force as my intent was only to remove the dark stains and not removal of any meerschaum material from the surface. The rim looks much better now at this stage in restoration. I polished the stummel and specifically the rim, dry sanding with 1500 to 12000 grit micromesh pads. I wiped the stummel regularly with a dry soft cloth. I like the pristine look of the stummel after this polishing. Thereafter, I polished the stem by wet sanding the surface with 1500 to 12000 grit micromesh pads. The last item that required cleaning was the leather covered case that housed this pipe. Using a hard bristled toothbrush and soap water, I cleaned the velvet lining on the inside of the case. I dried the lining with paper napkins. Next, I cleaned the external surface with a moist cloth and polished the surface with a neutral color shoe polish. Once the wax was absorbed, I polished the surface with a horse hair shoe brush.Since this Meerschaum pipe is now looking fresh and the coloration is not too developed, I decided to forego the step of polishing the stummel with beeswax. I gave a final rub down to the entire pipe with a microfiber cloth to deepen the shine. This is one gorgeous looking pipe which I am happy to include in my personal collection. Here are a few pictures of the finished pipe.

Restoring a ¾ Bent Bari Pearl 7075 with a Bamboo Shank


Blog by Steve Laug

When I visited my Father a few weeks ago I also visited with Jeff and his wife. I went through the pipes that we had boxed there and pulled out several Bamboo shank pipes. I have worked on quite a few over the past week and this is another one. It was a ¾ Bent Apple with a patinaed Bamboo shank. It had a vulcanite spacer between the briar and the one knuckle piece of bamboo and another one at the shank end. It was a nice Apple shaped pipe with some great grain around the sides and shank. I had a thick coat of varnish on the bowl that made it very shiny. The bowl was dirty and the top had some darkening and slight damage on the thin top and inner edge. The bowl had a moderate cake in it and the pipe smelled dirty. There was some grime and grit ground into the sides and bottom of the bowl. It was hard to know whether it was over or under the varnish coat. Under light the shininess had some dull spots in it. The pipe was stamped on the left side of the shank and read BARI [over] PEARL. On the right side it was stamped Made In [over] Denmark and on the under side it was stamped with the shape number 7075. The bamboo had a nice patina to it that showed that it had been someone’s favourite and had been well smoked. The shank end was smooth and had a tight fit. The stem had some oxidation, calcification and some light tooth chatter on both sides. I took photos of the pipe when I brought it to the work table. I took a photo of the rim top and edges to show the condition. You can see that it is darkening on thin top and edges. You can also see the shiny cake in the bowl. The stem looks good with light chatter on both sides ahead of the button.I took a photo of the stamping on the sides of the shank. It read as noted above. It is clear and readable under the varnish coat. I also removed the stem from the shank and took a photo of the parts to give a sense of the flow of the pipe. It is truly a unique pipe and the grain shows well in the photo. I turned to Pipephil to see if I could find information on the Pearl model but there was nothing there on the model (http://pipephil.eu/logos/en/logo-b1.html). I quote from the sidebar below and also have included a screen capture of the information.

Brand founded by Viggo Nielsen in 1950 and sold to Van Eicken Tobaccos in 1978. At this time Age Bogelund managed Bari’s production. The company has been bought in 1993 by Helmer Thomsen. Bari’s second: Don, Proctus.  I then turned to Pipedia for some history of the brand and also to see if there as information on the Pearl model (https://pipedia.org/wiki/Bari). I have included the history below. There was also a photo that was done by Smoking Pipes.com and had a copyright so I did not include it. It did help me determine the kind of stem to use on the pipe.

Bari Piber was founded by Viggo Nielsen in Kolding around the turn of 1950/51. Viggo’s sons Kai Nielsen and Jørgen Nielsen both grew into their father’s business from a very young age and worked there till 1975.

Bari had very successfully adapted the new Danish Design that had been started mainly by Stanwell for it’s own models. When Viggo Nielsen sold Bari in 1978 to Joh. Wilh. von Eicken GmbH in Hamburg Bari counted 33 employees.

From 1978 to 1993 Åge Bogelund and Helmer Thomsen headed Bari’s pipe production. Thomson bought the company in 1993 re-naming it to Bari Piber Helmer Thomsen. The workshop moved to more convenient buildings in Vejen. Bogelund, who created very respectable freehands of his own during the time at Bari got lost somehow after 1993.

Bari’s basic conception fundamentally stayed the same for decades: series pipes pre-worked by machines and carefully finished by hand. Thus no spectacular highgrades but solid, reliable every day’s companions.

The most famous series are the smooth “Classic Diamond” and the blasted “Wiking”.

With that information reviewed, it was time to work on the pipe. I decided to remove the shiny finish from the bowl with acetone and cotton pads. I wanted to remove the surface coat and also the grim that was both under and over the varnish coat.  I used a Savinelli Fitsall Pipe Knife to scrape the cake out of the bowl. I took it back to bare briar. I sanded the bowl walls with 220 grit sandpaper wrapped around a piece of dowel.I cleaned out the internals of the pipe – the airway in the shank, the mortise and the airway in the stem. The shank was quite dirty and many pipe cleaners, cotton swabs and 99% isopropyl alcohol removed the dirt and oils and left the pipe smelling clean and fresh.I polished the briar with micromesh sanding pads – dry sanding with 1500-12000 grit pads. After each pad I wiped the bowl down with a damp cloth to remove the sanding debris. It really took on a shine by the last three sanding pads. I rubbed the bowl down with Before & After Restoration Balm. I worked it into the surface of the briar where it works to clean, restore and preserve the briar. I let it do its magic for 15 minutes then buffed it off with a cotton cloth. The pipe looks incredibly good at this point in the process. I set the bowl aside at this point and turned my attention to the stem. I polished the stem with micromesh sanding pads – 1500-12000 grit sanding pads and water to wet sand the stem. I wiped it down after each sanding pad with Obsidian Oil on a cotton rag after each sanding pads. I know that many say Obsidian Oil does nothing for acrylic stems, but I find it does two things – first it gives some protection to the stem from buildup and second it gives the sanding pads bite in the polishing process.I have found that Before & After Fine and Extra Fine stem polish works well to remove the fine scratches in the vulcanite. I rub the Fine Polish on the stem and wipe it off with a paper towel and then repeat the process with the Extra Fine polish. I finish the polishing of the stem down with a final coat of Obsidian Oil and set the stem aside to let the oil absorb. This process gives the stem a shine and also a bit of protection. I am excited to finish restoration of this Bari Pearl 7075 Bamboo Shank ¾ Bent Apple. I put the pipe back together and buffed it with Blue Diamond on the buffing wheel. I gave the bowl and the stem multiple coats of carnauba wax. I hand buffed the pipe with a clean buffing pad to raise the shine. It is fun to see what the polished bowl looks like with beautiful mixed grain all around it. The polished grain on the pipe looks great with the black vulcanite stem. This smooth Bari Pearl Bamboo Shank Bent Apple is great looking and the pipe feels great in my hand. It is light and well balanced. Have a look at it with the photos below. The dimensions are Length: 5 ½ inches, Height: 1 ½ inches, Outside diameter of the bowl: 1 inch, Chamber diameter: ¾ of an inch. The weight of the pipe is 39 grams/ 1.38 ounces. It turned out to be a beautiful pipe. I will be putting it on the rebornpipes store in the Danish Pipemakers Section soon. If you would like to add it to your collection let me know by email or message. Thanks for your time reading this blog  and as usual feel free to ask any questions in the comments below.

Restoring a Wilson Pipe Studio Roadtown Hand Made Bamboo Shank Poker


Blog by Steve Laug

The next pipe on my work table is an interesting Bamboo style Poker/Sitter. We purchased it on 04/09/2022 from a fellow in Valley, Alabama. It has a three knuckle piece of bamboo joined to the shank with a black acrylic spacer and a metal tenon allowing it to be flush mounted. There stem is also held in place on a metal tenon fixed in the acrylic stem. The stamping on the heel of the bowl reads Roadtown [over] Hand Made. The airway in the shank is the same diameter from the shank end to its entry into the bowl with stainless tubing on both ends. The draught on the pipe is open and unhindered. The design is definitely made to create a very cool smoke. The bowl had a moderate cake and there was lava and darkening on the rim top and inner edge on the back of the bowl. The airway and mortise are full of tars and oils both in the shank and stem. It was dirty. The acrylic saddle stem has light chatter on the top and underside of the stem ahead of the button. There is an acrylic spacer attached to the end of the bamboo. I am including photos of the pipe to show what it looked like when I brought it to the work table. I took photos of the rim top and stem. You can see the cake in the bowl and the darkening on the rim top and on the front and back inner edge of the bowl. The stem had some chatter on both sides ahead of the button. I took a photo of the stamping on the heel of the bowl. It is clear and readable as noted above. I also removed the stem from the shank and took a photo of the part to give a sense of the flow of the pipe. It is truly a unique pipe and the grain shows well in the photo.I turned to Pipedia to have a look at the history of the brand as I was unfamiliar with Road Town Pipes (https://pipedia.org/wiki/Road_Town). Here is the information from the article.

Road Town pipes are made in China, apparently by various makers and distributed though Wilson Pipe Studio. There is very little information associated with this brand aside from the following description in eBay auctions.

Brand founder, Wilson is a former architect who was once a world-renowned pipe agent. Since the establishment of “Wilson pipe studio” in 2011, we have been learning traditional pipemaking methods and developing our unique style at the same time. At present, we have more than 20 professional pipemaker. We are committed to creating beautiful, interesting and easy to use pipe works for the customers.

There are two series under HS Studio:

  • “Classic” series, inscribed as “HS STUDIO / ROAD TOWN”, Make the traditional style of pipe.
  • “FREEHAND”series, inscribed as “HS STUDIO / HAND MADE”, Make freestyle pipe.

A thread on PipesMagazine.com indicates they smoke well and are attractive for the price, but there is some concern about the nature of the bowl coating. roadtown-pipes on PipesMagazine.com.

I started my work on this pipe by scraping it out with a Savinelli Fitsall Pipe Knife to remove the cake. I sanded the bowl walls with a piece of dowel wrapped with 220 grit sandpaper. I took the cake back to smooth bowl walls. I cleaned out the mortise and the airway in the shank and the stem with alcohol and pipe cleaners. It was quite dirty but once cleaned smelled better.I cleaned out the mortise and the airway in the shank and the stem with alcohol and pipe cleaners. It was quite dirty but once cleaned smelled better.I polished the smooth portions of the bowl with micromesh sanding pads – dry sanding with 1500-12000 grit sanding pads. I wiped the bowl down after each sanding pad with a damp cloth to remove the sanding debris. The bowl began to take on a rich glow. I rubbed down the bowl and shank with Before & After Restoration Balm. It is a paste/balm that is rubbed into the surface of the briar. The product works to deep clean the finish, enliven and protect the wood. I worked it into the briar with my finger tips. I let it sit for 10 minutes then wiped it off with a soft cloth then buffed it with a cotton cloth. The pipe really began to have a deep shine and the grain shines through. The photos I took of the bowl at this point mark the progress in the restoration. It is a gorgeous pipe. I set the bowl aside at this point and turned my attention to the stem. I polished the stem with micromesh sanding pads – 1500-12000 grit sanding pads and water to wet sand the stem. I wiped it down after each sanding pad with Obsidian Oil on a cotton rag after each sanding pads. I know that many say Obsidian Oil does nothing for acrylic stems, but I find it does two things – first it gives some protection to the stem from buildup and second it gives the sanding pads bite in the polishing process.I have found that Before & After Fine and Extra Fine stem polish works well to remove the fine scratches in the vulcanite. I rub the Fine Polish on the stem and wipe it off with a paper towel and then repeat the process with the Extra Fine polish. I finish the polishing of the stem down with a final coat of Obsidian Oil and set the stem aside to let the oil absorb. This process gives the stem a shine and also a bit of protection. The final steps in my process involve using the buffer. I buffed the bowl and stem with Blue Diamond to polish out the light scratches in the wood and the remaining surface oxidation in the stem. I gave the bowl and the stem multiple coats of carnauba wax. I have found that I can get a deeper shine if I follow up the wax buff with a buff with a clean buffing pad. It works to raise the shine and then I hand buff with a microfiber cloth to deepen the shine. It is always fun for me to see what the polished bowl looks like with the polished stem. It turned out to be a nice pipe. The interesting tight grain around the bowl sides and shank looks great. The vulcanite saddle stem polished very well and looks good with the bowl. The Roadtown Hand Made Bamboo Poker feels great in my hand. It is a well-balanced pipe. Have a look at it with the photos below. The dimensions are Length: 6 inches, Height: 2 inches, Outside diameter of the bowl: 1 ¼ inches, Chamber diameter: ¾ of an inch. The weight of the pipe is 1.16 ounces/32 grams. It is a beautiful pipe and the bamboo shank is well fitted to the bowl. The black acrylic shank end spacer and the saddle stem is well chosen and work well with the bowl. It you are interested in adding the pipe to your rack let me know. It will be going on the rebornpipes store in the  Various Makers Section soon. Thanks to each of you who are reading this blog. Remember we are not pipe owners; we are pipe men and women who hold our pipes in trust until they pass on into the trust of those who follow us.

Restoring an American Made JSP 7 Bamboo Shank Poker


Blog by Steve Laug

The next pipe on my work table is an interesting Bamboo style Poker/Sitter. It has a three knuckle piece of bamboo joined to the bowl with a metal tenon allowing it to be flush mounted. There stem is also held in place on a metal tenon fixed in the mortise end of the bamboo. The stamping on the heel of the bowl reads JSP over 7. The airway in the shank is the same diameter from the shank end to its entry into the bowl with stainless tubing on both ends. The draught on the pipe is open and unhindered. The design is definitely made to create a very cool smoke. The bowl had a moderate cake and there was lava and darkening on the rim top and inner edge on both the front and the back of the bowl.  The airway and mortise are full of tars and oils both in the shank and stem. It was dirty. The stem has some light tooth chatter on the top and underside of the stem ahead of the button. There is also a carving in the left side of the stem that matches the grooves in the bamboo. There is an red acrylic spacer fixed to the end of the bamboo. I am including photos of the pipe to show what it looked like when I brought it to the work table. I took photos of the rim top and stem. You can see the cake in the bowl and the darkening on the rim top and on the front and back inner edge of the bowl. The stem had some tooth marks and chatter on both sides ahead of the button. I took a photo of the stamping on the heel of the bowl. It is clear and readable as noted above. I also removed the stem from the shank and took a photo of the part to give a sense of the flow of the pipe. It is truly a unique pipe and the grain shows well in the photo. I turned to Pipedia to have a look at the history of the brand. I was pretty sure it was made by Joel Shapiro but needed confirmation (https://pipedia.org/wiki/JS_Pipes). Here is the information from the article.

Welcome to JS Pipes! http://www.jspipes.com

Let me introduce myself. My name is Joel Shapiro, and I live in Rancho Cordova, California. I offer a limited number of handmade briar pipes for sale.

The type of briar (Grecian, Italian, etc.) will be noted for each pipe made, along with further details concerning stem type (ebonite, lucite, cumberland, etc.) and shank extensions. A complete size description will be included with each pipe posted for sale.

I do not fill any flaws in the briar, so the buyer will see exactly what is offered with nothing to hide. All pipes are finished with a buffed in coat of carnauba wax over the stain. Stains are all alcohol based and will not seal the wood, so won’t alter the smoking experience or the breathing qualities of the briar.

In addition, I also offer a unique tamper design. My tampers are hand turned from quality hardwoods and the foot is cut at an angle to aid in mounding the tobacco and keeping the ember banked. I have found that this design results is fewer relights for a more enjoyable smoke. I can make these in any custom size and in most hardwoods, including some exotics. If you’d like a custom size (for very large pipes for example) or material, please contact me at jspipes@jspipes.com. All tampers are priced at $24.95, unless the material chosen is particularly expensive or difficult to work.

If you’d like to buy a pipe or tamper, but prefer to pay by money order or check, please e-mail (jspipes@jspipes.com) for my mailing address.

Would you like an email when new pipes are posted? Send me an e-mail and request to be on the JS Pipes mailing list! jspipes@jspipes.com

I started my work on this pipe by scraping it out with a Savinelli Fitsall Pipe Knife to remove the cake. I sanded the bowl walls with a piece of dowel wrapped with 220 grit sandpaper. I took the cake back to smooth bowl walls. I cleaned out the mortise and the airway in the shank and the stem with alcohol and pipe cleaners. It was quite dirty but once cleaned smelled better. I worked on the darkening on the back inner edge of the rim top and on the top itself. I was able to polish it out with a worn 1500 grim micromesh sanding pad.I polished the bowl with micromesh sanding pads – dry sanding with 1500-12000 grit sanding pads. I wiped the bowl down after each sanding pad with a damp cloth to remove the sanding debris. The bowl began to take on a rich glow. I rubbed down the bowl and shank with Before & After Restoration Balm. It is a paste/balm that is rubbed into the surface of the briar. The product works to deep clean the finish, enliven and protect the briar. I worked it into the briar with my finger tips. I let it sit for 10 minutes then wiped it off with a soft cloth then buffed it with a cotton cloth. The briar really began to have a deep shine in the briar and the grain shines through. The photos I took of the bowl at this point mark the progress in the restoration. It is a gorgeous pipe. I set the bowl aside at this point and turned my attention to the stem. I polished the stem with micromesh sanding pads – 1500-12000 grit sanding pads and water to wet sand the stem. I wiped it down after each sanding pad with Obsidian Oil on a cotton rag after each sanding pads. I know that many say Obsidian Oil does nothing for acrylic stems, but I find it does two things – first it gives some protection to the stem from buildup and second it gives the sanding pads bite in the polishing process. I have found that Before & After Fine and Extra Fine stem polish works well to remove the fine scratches in the vulcanite. I rub the Fine Polish on the stem and wipe it off with a paper towel and then repeat the process with the Extra Fine polish. I finish the polishing of the stem down with a final coat of Obsidian Oil and set the stem aside to let the oil absorb. This process gives the stem a shine and also a bit of protection. The final steps in my process involve using the buffer. I buffed the bowl and stem with Blue Diamond to polish out the light scratches in the wood and the remaining surface oxidation in the stem. I gave the bowl and the stem multiple coats of carnauba wax. I have found that I can get a deeper shine if I follow up the wax buff with a buff with a clean buffing pad. It works to raise the shine and then I hand buff with a microfiber cloth to deepen the shine. It is always fun for me to see what the polished bowl looks like with the polished stem. It turned out to be a nice pipe. The interesting tight grain around the bowl sides and shank looks great. The vulcanite saddle stem polished very well and looks good with the bowl. The Joel Shapiro (JSP) Bamboo Poker feels great in my hand. It is a well-balanced pipe. Have a look at it with the photos below. The dimensions are Length: 5 inches, Height: 2 inches, Outside diameter of the bowl: 1 1/8 inches, Chamber diameter: ¾ of an inch. The weight of the pipe is .99 ounces/28 grams. It is a beautiful pipe and the bamboo shank is well fitted to the bowl. The ruby shank end spacer and the taper stem is well chosen and work well with the bowl. It you are interested in adding the pipe to your rack let me know. It will be going on the rebornpipes store in the American Pipe Makers Section soon. Thanks to each of you who are reading this blog. Remember we are not pipe owners; we are pipe men and women who hold our pipes in trust until they pass on into the trust of those who follow us.

A Simple Refurbishing Of An Early Caminetto Business #149 Sitter


Blog by Paresh Deshpande

I am always on a look out for old and collectible estate pipes, especially those related to important evolving pipe history, to be added to my personal collection and this pipe on my work table precisely meets the above criteria.

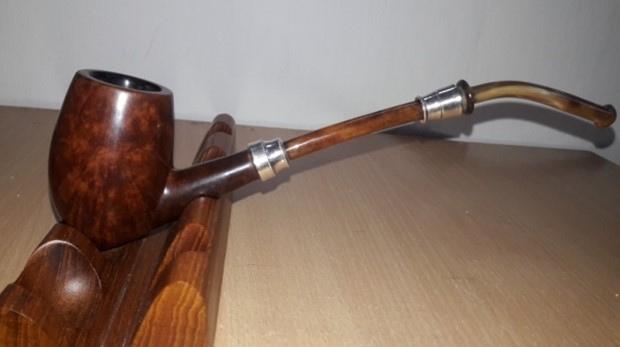
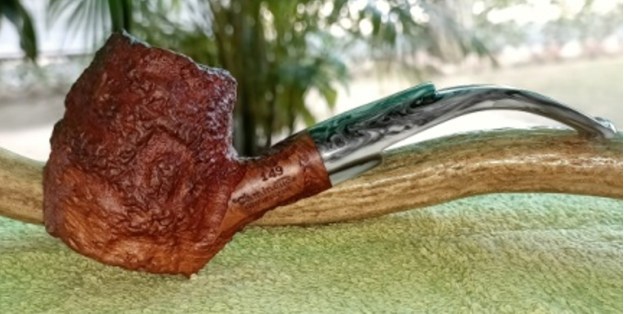
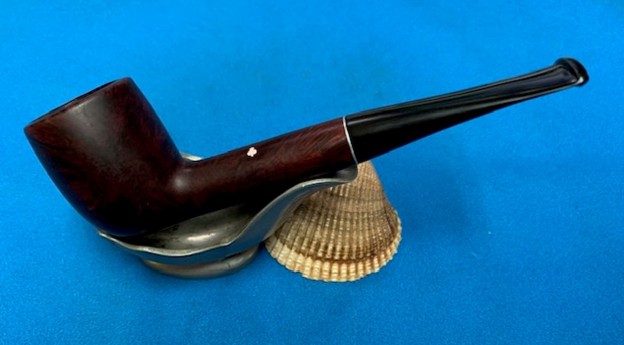
The pipe that I selected to work on next is a deeply rusticated robust sitter with smooth surface on left and right side of the shank and a unique asymmetric acrylic saddle stem. It is stamped on the left smooth panel with model code “149” over “CAMINETTO” in inverted commas and in running italics over “BUSINESS” in block capital letters. The right side of the shank bears the stampings “ASCORTI” over “RADICE” over “CUCCIAGO” over “CANTU- ITALY”. The upper surface of the asymmetric saddle stem bears the logo of MOUSTACHE that resembles a bird in flight. I have worked and researched Caminetto pipes earlier and from what I recollect, Ascorti and Radice moved away from Castello and jointly made Caminetto pipes for a few years before separating to establish their own brands Ascorti and Radice respectively. Thus, pipes that bore the stamp of both Ascorti and Radice are early pipes and are highly collectible and fetch top dollars. For detailed information, I visited pipedia.org and have reproduced the relevant information below (https://pipedia.org/wiki/Caminetto).

Caminetto’s history started in 1959 when Guiseppe Ascorti, from Cucciago, and known to his friends as “Peppino”, was hired by Carlo Scotti to work at Castello, located in nearby Cantu. Since it’s foundation in 1947 Castello had contributed substantially to regained glory for Italian pipemaking. Talent and assiduity soon made Ascorti one of Scotti’s most notable pipemakers – a man he counted on for the future. But, Ascorti had his own far reaching plan: He wanted to work as a self-employed pipemaker! After his wife, Paola, had taken over her parent’s small greengrocery in the early 1960’s this plan became more concrete. The additional income from the shop enabled him to buy tools and machines little by little to furnish his own workshop. By the end of 1968 he was ready and left Castello. Ascorti also persuaded his co-worker, the young and highly-talented pipemaker Luigi Radice (born 1939), to join him – the two were neighbors in Cucciago. Carlo Scotti, whom is known as a perfect gentleman, is reported to have spoken unreservedly about this development.

Ascorti & Radice started to manufacture pipes on their own. One of the first who agreed to market their pipes was Gianni Davoli, proprietor of a tobacco shop in Milan. The situation was perfect–two pipemakers in search of a distributor, and a pipe merchant in search of a mainstay brand to market. Davoli – via friends and relations in the States – had made flourishing contacts with US pipe wholesalers and traders. He shipped some pipes across the pond for inspection and received excellent feedback for the very high quality of the pipes. He, shortly after, offered to be the sole distributor worldwide, and Ascorti & Radice happily accepted.

Then came the legendary evening when Ascorti, Radice and Davoli gathered around the fireplace after a hard day’s work enjoying their pipes, a glass of wine, and humorous conversation. Davoli is said to be the one who associated the pipes with the fireplace or chimney, which is “camino” in Italian. Hence “Caminetto”, the diminutive (smaller) singular version of camino, was coined as the brand’s name. Ascorti, Radice and Davoli later became famous as “I tre Camini” – the three chimneys. Maybe, they had more than one glass of wine each, but it’s not certain whether the distinctive mustache logo on the stem and the Caminetto slogan “La Pipa del Baffo” – “the pipe with the moustache” – was created the same night. In fact, Ascorti and Radice both wore impressively large moustaches, and a pharmacist in the neighborhood had been kidding them about that. (Davoli, for reasons of corporate identity, later wore a big moustache, too.)

Now, Davoli concentrated on marketing the Caminetto brand in the United States. His strategy was as simple as it was brilliant. There was a remarkable Castello hype at the time. Castello pipes were highly sought after but hard to get due to limited production. Davoli filled the gap, promoting the Caminetto to be absolutely equal to the Castello in terms of quality, while asking only half the price. And best of all: the Caminetto pipes were consignable! The Tinder Box International would be under contract with successful nationwide distribution. The brand’s success was overwhelming – far beyond any expectation, with the rusticated Business line becoming the most popular.

The boom continued strongly – especially in the US. Production increased steadily, from 3,000 to 5,000 and then 7,000 pipes being made per year, placing Caminetto at the top of US sales in their market segment. The 1974 Tinder Box catalog celebrated Gianni Davoli as “master pipe maker and designer” and “sole creator of Caminetto” without a single mention of Ascorti or Radice!

Caminetto prospered throughout the 1970’s. Everyone was hard at work, and sales continued to increase, but soon disagreements occurred among the three principles, marking the beginning of the end.

First, Luigi Radice became increasingly discontent with the factory-like production. Pipes were made by standard shape numbers, and there was no longer room for his own creative pipemaking and personal development. He was also afraid that the increased production would eventually lead to a reduction in quality. Radice started quarreling with Ascorti about the future course of Caminetto, and they were unable to find a solution. Radice, being an employed pipemaker, rather than a partner, could not assert himself. Ascorti shared Radice’s concerns about maintaining quality in the face of the higher production, but Davoli had gained almost total control by this time, and insisted on the higher production numbers.

The next controversy was regarding Roberto Ascorti. The young man had visited a school of arts and also completed his service in the army. Roberto did not want to attend a university, and instead started helping in the workshop with pipe repairs and making his first few pipes. His father wanted to hire him on as a full-time pipemaker, but Davoli refused, being afraid to lose influence to the potentially strong alliance between father and son.

The situation worsened in 1979. The foreseen quality issues occurred–there were complaints from the US. And, there is some indication that Carlo Scotti considered legal actions, asserting that Caminetto had copied some of Castello’s successful shapes too exactly. At this point Ascorti wanted to sever ties with Davoli, but Davoli was able to assert himself and maintained control.

‘I tre Camini’ disbanded in December of 1979, when Luigi Radice left, without prospects, knowing not where or how he would continue as a pipemaker. A clear indication that he had very strong feelings as to his future with Caminetto.

Ascorti vs. Davoli continued for a few more months. The Ascorti family offered to buy the brand, but they couldn’t afford it at the time. So, Guiseppe Ascorti hastily equipped a new workshop, and then he left company which was essentially his own. But the complete crew whom he had trained in the old Caminetto workshop followed him. And thus they were able to re-start making pipes within a few weeks in 1980. For three months they sold pipes under the name Sergio. Only 800 to 1,000 Sergio pipes were released. Then Giuseppe Ascorti and his son Roberto founded a new company under their own last name. – For the further history see Ascorti!

Gianni Davoli, last chimney standing, stayed behind, now owning a pipe workshop without any pipemakers. Strangely enough, the old Caminetto workshop caught fire shortly afterward and burned down to ashes.

At the end of this article, there is another link to Brothers of Briar forum where Joshoowah has written his further research of Caminetto, dating guide and shape codes. Here’s a link to the write up

https://pipedia.org/wiki/The_History_of_Caminetto_(shapes,_stamping,_articles,_etc.)

He picks up from the point where the Caminetto workshop was burned down to ashes after December 1980. He notes:-

It is at this point where details become hazy, as the brand Caminetto seems to have disappeared all but entirely from the market. Some claim Peppino continued to make pipes under the name Caminetto on into the 80s (see smokingpipes.com), but this is fairly unclear and uncertain, particularly because Divoli owned the Caminetto brand and the shop burning down between 1979-1981.

The story picks back up in late 1985 and early 1986, where Roberto Ascorti re-opens the line of Caminetto. Though the “Business” rustication changed somewhat, the original shapes and finishes have largely been left unchanged. From what I can gather, Roberto bought the name Caminetto sometime in 1985. “From who?” is the question, perhaps Divoli himself. Roberto revitalized the once great Caminetto line in memory of his father and the legacy of Caminetto in the Italian pipe industry, as well as to show his capability of producing high quality masterpieces. In saying such, Roberto has been his “flavor” on many of the Caminetto models over the years, stretching and adjusting some shapes to his own liking and style. It seems, by most accounts, he has done well in continuing the Caminetto legacy. One thing that has changed, however, are the prices of the newer lines, which sometimes reach the prices of Castello’s themselves.

That is the history of Caminetto as far as I have found in my years of appreciating the brand. It is key to note the particular brands that came out of the fall-out of the original Caminetto that now have a bit of good standing behind them:

  1. Luigi Radice — We all know Radice’s work. It is marvelous, fairly unique, and full of passion and heart for the art of pipe making.
  2. Roberto Ascorti — We, too, are familiar with Ascorti, which has produced quality pieces for a number of years, which resemble some of the later years of Caminetto (i.e. 1976-1981).
  3. Caminetto — This, too, is Roberto’s work but carries a different flavor to his Ascorti line, resembling some of the work of his father, Peppino, and the original Caminetto, which includes the wax-drip and new dear finish.
  4. Enzo Galluzzo — This is one many may not know about, particularly because the company closed in 1991. In the fallout of Ascorti, Radice, and Divoli, there was another aspiring pipe maker among them who went his own way — Enzo Galluzzo. Galluzzo invented a new line of pipes in which he branded “Capitello.” Capitello took on the character of Caminetto, including some of its shapes and finishes, but Galluzzo produced some real nice pieces for a fraction of the cost of Caminetto, Castello, and even Ascorti. One interesting fact is that Capitello’s were the only oil-cured pipes of the 80s, essentially carrying on the tradition of the oil-cured pipe of Caminetto. The company ran from 1982-1991.

Stampings and dating

First off, dating earlier Caminetto’s is nearly impossible. Nevertheless, there were three phases, some in which were much earlier, of development that occurred in the stamping process of Caminetto. Before that though, every pipe had the stamp of Caminetto in one of two ways: Caminetto in script or Caminetto within quotation marks in block letters (I do not know how it was decided which pipe got which stamp, as I have had EARLY Caminetto’s with both). The stampings:

ASCORTI

RADICE

CUCCIAGO

CANTU- ITALY

There are two other variations to the stampings, but I have not included them as they are irrelevant to the pipe that I am currently working on for the sake of brevity. Another aspect useful for dating Caminetto pipes is the style of moustache stamped on the stem. Joshoowah comments on this aspect as under:-

In addition to the above stampings, there was always the trademark mustache on the stem. The earlier models (1968/69-1974/75) had the iconic gold, sometimes white, “bird-in-flight” mustache and the later models (1975-1979/80/81) had a gold, or white, “double comma” mustache.

Pipes stamped like #1 are the most valuable Caminetto’s as they are the earliest production of the brand, as well as what some would claim the most perfect of Ascorti and Radice’s work.

The shape code chart that has been uploaded on this page is reproduced below and the pipe that I am working on is indicated by a red arrow.Thus, from the above, it is certain that the pipe currently on my work table is an earliest production of the brand made during the period 1968 to 1975.

Initial Visual Inspection
This deeply rusticated and perfectly proportioned sitter has a medium thick layer of cake in the chamber with darkening over the also rusticated rim top surface. The beautifully rusticated stummel surface is covered in dust and grime. This grime and dirt can be seen in the deep rustications and lends a dull and lifeless appearance to the pipe. The stummel sides are stained with the grime and hand oils from previous usage. The mortise is relatively clean and would be cleaned further during the refurbishing process. The grey acrylic stem with swirls of black and it’s golden bird-in-flight stem logo is also in decent condition. There is some light tooth chatter in the bite zone on either surface while the buttons are intact. Overall, the pipe is in very good condition requiring only a little TLC to get it back to its pristine condition. The following pictures will aid in your visual inspection too. Detailed Inspection
This pipe has a large bowl with a depth of 2 ¾ inch. The chamber has an even layer of thick hard cake. There is a heavy overflow of lava over the rim top surface. The rim top has darkened considerably. The condition of the inner walls of the chamber and the inner edge can be commented upon after the cake has been taken down to the bare briar. The ghost smells in the chamber are very strong.The deeply rusticated stummel surface has a very beautiful texture and hand feel to it. The stummel has a very natural Virgin stain and supposed to darken as it is smoked. The surface is covered in dust and grime. The fact that the rustications are dusty and filled with dirt is accentuated more due to the dark stains on the stummel sides on account of hand oils and sweat. The briar looks lifeless and bone dry and has taken on dull hues. The mortise is relatively clean with slight darkening of the mortise wall. The ghost smells are pretty strong and should reduce once the chamber and mortise is cleaned up. The asymmetrical saddle variegated acrylic grey stem with swirls of black beautifully compliments the stummel. There is minor tooth chatter on either surface of the stem. The moustache gold stem logo is in pristine condition. The tenon opening and the horizontal slot shows accumulated dried gunk and grime. The button edges are crisp and the slot end is undamaged.The Process
I began the process of refurbishing this pipe by reaming the chamber with a PipNet reamer tool, using the second and third head. Using my fabricated knife; I further took the cake down to the bare briar. With a 150 grit sand paper, the walls of the chamber were rid of all the remnants of the cake, revealing smooth chamber walls. I further wiped the chamber with a cotton swab wetted with isopropyl alcohol to completely remove the residual carbon dust. The inner rim edge appears darkened all around but more so on the left side of the chamber. There are a few minor heat lines crisscrossing the chamber walls. It is my experience that such fissures are usually addressed after a salt and alcohol treatment and subsequent sanding of the chamber walls since these are indicative of very thin layer of hard cake which is moistened during alcohol treatment and easily removed thereafter by sanding. I scraped the shank internals with a fabricated tool to remove all the crud that had accumulated along the shank walls and further cleaned it with bristled and regular pipe cleaners dipped in isopropyl alcohol.I continued the cleaning of the chamber and shank internals with a salt and alcohol bath. I use cotton balls which is an at par substitute as I have realized over the years. I draw out a wick from the cotton and along with a folded regular pipe cleaner; insert it in to the mortise and through the draught hole in to the chamber. Thereafter, I packed the chamber with cotton balls to about quarter of an inch below the rim inner edge and soaked the cotton balls with isopropyl alcohol up to the brim. About half an hour later, the level of alcohol had gone down, having being absorbed by the cotton. I topped it up once again and set it aside overnight. By next afternoon, the cotton and alcohol had drawn out all the remaining oils and tars from the chamber and mortise, fulfilling its intended task. I removed the cotton balls and ran pipe cleaners through the mortise to clean out all the loosened tars and gunk. Using my fabricated tool, I scraped out the entire loosed gunk from the sump and further cleaned it with alcohol and q-tips. The chamber now smells clean and fresh. I set the stummel to dry out naturally.While the chamber was soaking in the salt and alcohol bath, I worked the stem, starting with cleaning the internals of the stem using thin shank brush and anti oil dish washing soap. I scrubbed the tenon end and the horizontal slot with soap and Scotch Brite pad till clean. Once the stem internals were clean, I ran a couple of pipe cleaners through the stem airway to get rid of any remaining soap as well as to dry it out. Next, I move to clean the exterior of the stummel. I generously applied Murphy’s oil soap with a hard bristled tooth brush and scrubbed the stummel and rim top with the soap. I washed the stummel under running warm water with anti oil dish washing detergent till the stummel surface was clean and dried it using paper towels and soft cotton cloth. I deliberately cleaned the rusticated rim top with a soft brass wired brush, Scotch Brite and soap. The stummel surface has cleaned up nicely with the robust rusticated patterns looking splendid. I simultaneously cleaned the shank internals with the detergent and hard bristled shank brush. I dried the mortise using paper towels and set the stummel aside to dry out naturally.While the stummel was set aside to dry out, I worked on the stem. Using a flat head needle file, I lightly sand the inner edge of the buttons on either surface to a crisp sharpness. I further sand the entire bite zone with a folded piece of 220 grit sandpaper. This helps to even out the minor tooth chatter and also reduce the filing marks left behind by the needle file. The sanding marks will be further addressed during the sanding and polishing process.Next, I dry sanded the entire stem with 600 and 800 grit sand papers followed by wet sanding using 1000, 1500 and 2000 grit sand papers. This progressive use of higher grit sandpapers helps to, firstly,  reduce the sanding marks left behind by the more abrasive ones, secondly, completely eliminate the dullness from the years of use and imparting a clean shine to the stem surface. I went through with the micromesh polishing cycle by dry sanding the surface with 3200 to 12000 grit micromesh pads. I applied a little EVO and set the stem aside for a few minutes. This stem, as the rest of the pipe, is a real beauty. I completed the polishing regimen by polishing the surface with a cotton wheel mounted on to my hand held rotary tool and Blue diamond followed by food grade carnauba wax polish.By the time I was done working on the stem refurbishment, the stummel had completely dried out. I decided to address the darkened inner rim edge by creating a slight bevel using a folded piece of 220 grit sandpaper pinched between fingers and running it along the rim edge. The rim edge looks much better at this stage.Next, I rubbed a small quantity of “Before and After Restoration Balm” into the briar with my finger tips and let it rest for a few minutes. The balm almost immediately works it’s magic and the briar now had a nice vibrant appearance with the beautiful rustication patterns on full display. I have been using this balm ever since I embarked on this journey and it is this part of restoration that I always look forward to. I further buffed it with a horse hair shoe brush. This pipe really oozes of a very high quality. I completed this project by hand polishing the stummel with Halcyon II wax. I rubbed this polish deep into the rustications and after a couple of minutes, vigorously hand buffed the stummel with a microfiber cloth to a deep shine. This is a gorgeous looking pipe and will be an integral part of pipe history in my collection. P.S.– Delving deep in to history of this pipe took me through the labyrinth of interconnectivity of Italian pipe carvers and marquees that have dominated our pipe world and given pipe smokers the world over some of their favourite smokers.

I wish to thank each one for sparing their valuable time to read through this write up and praying for the health and safety of you and your loved ones.
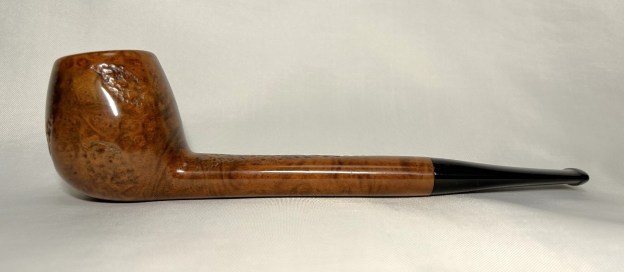
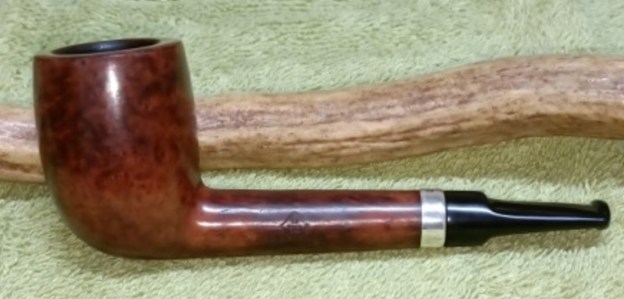
Restoring a Carved Bamboo Lovat stamped UNX UNT Quality Pipe


Blog by Steve Laug

The next pipe on my work table is an interesting Bamboo style Lovat. It is a single piece rather than one joined with a shank extension. The stamping on the heel of the bowl reads UNX UNT over Quality Pipe. The pipe has some unique and interesting grain around the bowl and shank that makes we wonder what the wood is. Is it possible that it is Bamboo? The bottom of the bowl and a portion of the two knuckle bamboo style shank are rusticated with a great pattern and are stained with a dark brown stain. The stem is fit in the shank end snugly and there is no gap. The airway in the shank is the same diameter from the shank end to its entry into the bowl. The draught on the pipe is open and unhindered. The design is definitely made to create a very cool smoke. The bowl had a moderate cake and there was lava and darkening on the rim top and inner edge toward the back of the bowl.  The airway and mortise are full of tars and oils both in the shank and stem. It was dirty. The stem is oxidized, calcified and has some deep tooth marks on the top and underside of the stem ahead of the button. I am including photos of the pipe to show what it looked like when I brought it to the work table. I took photos of the rim top and stem. You can see the cake in the bowl and the darkening on the rim top and on the back inner edge of the bowl. The stem had some tooth marks and chatter on both sides ahead of the button. It was oxidized and there was some calcification on the surface. I took a photo of the stamping on the heel of the bowl. It is clear and readable as noted above. I also removed the stem from the shank and took a photo of the part to give a sense of the flow of the pipe. It is truly a unique pipe and the grain shows well in the photo.The bowl is quite small so I scraped it out with a Savinelli Fitsall Pipe Knife to remove the cake. I sanded the bowl walls with 220 grit sandpaper wrapped around my finger. I took the cake back to smooth bowl walls. I cleaned out the mortise and the airway in the shank and the stem with alcohol, pipe cleaners and cotton swabs. It was quite dirty but once cleaned smelled better.I worked on the darkening on the back inner edge of the rim top and on the top itself. I was able to sand it out with 220 grit sandpaper and give it a slight inward bevel. I scrubbed the exterior of the bowl and shank with undiluted Murphy’s Oil Soap and a tooth brush. I rinsed it off with warm running water to remove the grime and debris in the finish of the rustication and on the smooth portions. I worked over the sanded rim top at the same time. I polished the smooth portions of the bowl with micromesh sanding pads – dry sanding with 1500-12000 grit sanding pads. I wiped the bowl down after each sanding pad with a damp cloth to remove the sanding debris. The bowl began to take on a rich glow. I rubbed down the bowl and shank with Before & After Restoration Balm. It is a paste/balm that is rubbed into the surface of the bowl and shank. The product works to deep clean the finish, enliven and protect the wood. I worked it into the surface with my finger tips. I let it sit for 10 minutes then wiped it off with a soft cloth then buffed it with a cotton cloth. The bowl really began to have a deep shine and the grain shines through. The photos I took of the bowl at this point mark the progress in the restoration. It is a gorgeous pipe. I took photos of the grain on the rim top and around the bowl and shank to get a clear picture of the wood that was used. The small straight birdseye style pattern on the rim top reminds me of the pattern in Bamboo. The flow of the grain around the bowl sides and the shank sides looks also a lot like Bamboo. The shank end also shows the same birdseye pattern as the rim top. I set the bowl aside at this point and turned my attention to the stem. I cleaned up the deep tooth marks and filled them in with black CA glue. I used a small file to flatten the repairs to the stem. I sanded repairs on the button surface and on both sides of the stem ahead of the button with 220 grit sandpaper. I also sanded the rest of the stem to remove the oxidation that was present. I started polishing the stem with 600 grit wet dry sandpaper. I polished the stem with micromesh sanding pads – 1500-12000 grit sanding pads and water to wet sand the stem. I wiped it down after each sanding pad with Obsidian Oil on a cotton rag after each sanding pads. I know that many say Obsidian Oil does nothing for acrylic stems, but I find it does two things – first it gives some protection to the stem from buildup and second it give the sanding pads bite in the polishing process. I have found that Before & After Fine and Extra Fine stem polish works well to remove the fine scratches in the vulcanite. I rub the Fine Polish on the stem and wipe it off with a paper towel and then repeat the process with the Extra Fine polish. I finish the polishing of the stem down with a final coat of Obsidian Oil and set the stem aside to let the oil absorb. This process gives the stem a shine and also a bit of protection. The final steps in my process involve using the buffer. I buffed the bowl and stem with Blue Diamond to polish out the light scratches in the wood and the remaining surface oxidation in the stem. I gave the bowl and the stem multiple coats of carnauba wax. I have found that I can get a deeper shine if I follow up the wax buff with a buff with a clean buffing pad. It works to raise the shine and then I hand buff with a microfiber cloth to deepen the shine. It is always fun for me to see what the polished bowl looks like with the polished stem. It turned out to be a nice pipe. The interesting tight grain around the bowl sides and shank looks great. The vulcanite saddle stem polished very well and looks good with the bowl. The UNX UNT Quality Pipe Bamboo Lovat feels great in my hand. It is a well-balanced pipe. Have a look at it with the photos below. The dimensions are Length: 5 ½ inches, Height: 1 ¾ inches, Outside diameter of the bowl: 1 inch, Chamber diameter: 5/8 of an inch. The weight of the pipe is .74 ounces/21 grams. It is a very unique pipe and no information can be found on the stamping. Once again can any of you help me out with some identification advice on this one? It would be much appreciated. Thank you.

As always, I encourage your questions and comments as you read the blog. Thanks to each of you who are reading this blog. Remember we are not pipe owners; we are pipe men and women who hold our pipes in trust until they pass on into the trust of those who follow us.

Refurbishing an Inherited c.1908 BBB Own Make Lovat


Blog by Paresh Deshpande

I absolutely love my classic BBB pipes that I have inherited and one such pipe is now on my worktable. This classic Lovat has some beautiful cross grains on the front, back and shank surface with beautiful bird’s eye grains on the sides that can be made out under the grime and dust covering the stummel surface. It is stamped on the left side of the shank as “BBB” in a rhombus with “OWN” and “MAKE” on either side of the rhombus. The Sterling silver ferrule at the shank end is stamped as “AF & Co.” in a rectangle followed by three cartouche bearing hallmarks. Starting from the left, the first cartouche bears the stamp of an “Anchor” for the Birmingham Assay Office followed by the “Lion Passant” certifying the silver quality and the last cartouche bears the Date letter “i” which is quite worn out and the outline of the letter can be made out only under close scrutiny under a magnifying glass. The vulcanite saddle stem is devoid of any stem logo. The stampings are clear and easily discernible except the date code letter. BBB – Pipedia has detailed information on the origins of the brand, it’s transition to the Cadogan group making this article a good read for those interested. I would like to highlight that, quote “At the beginning, BBB produces two qualities. One, BBB Own Make, became finally BBB Best Make, other pipes being simply estampillées BBB. There are reasons to believe that Own Make in fact were produced in London (Reject pipes cuts year R stamped one them.), whereas the simple BBB were imported, and this, to the paddle of the 20th century. However, if all that is not very clear, it is probable that the lines low-of-range were an import of Saint-Claude” un-quote.

Now coming on to the most interesting and satisfying part of the research on this piece of briar and that is establishing the probable date of manufacture of this pipe. I prefer to follow English silver marks: the guide to hallmarks of London sterling silver (silvercollection.it)  while establishing the dates on the basis of the date letter in the hallmarks. The Anchor points to the Birmingham Assaying Office. Thereafter, I followed the link to the dating guide of the Birmingham Assay Office to date this pipe. I have included a hallmark chart for dating the pipe and have put a red mark around the letter for 1908. It is the same style of “i” and the cartouche that holds the letter stamp.Thus it is with certainty I say that this BBB was made in 1908, give or take a year as the ferrules were assayed in bulk and used as required. The stamp of Own Make designates this as the finest quality pipe that was made in London for the local market in limited quantities.

Initial Visual Inspection
This 115 year old pipe flaunts it’s age with great dignity and élan. There is a decent layer of cake in the chamber that is even throughout. The rim top surface is covered in a layer of lava overflow. Underneath this crud and grime, the inner rim edge damage is apparent. The outer rim edge has a number of dents and dings. The stummel surface, though covered in dirt, dust and grime, has developed a nice patina. The stem has a chunk of vulcanite missing from the button and rounded orifice. The following pictures will give the readers a general idea as to the condition of the pipe as it sits on my worktable. Detailed Visual Inspection
As brought out earlier, the chamber has an even layer of hard and brittle cake. It appears that the cake was being regularly reamed to maintain the correct bare minimum thickness. The condition of the chamber walls will be ascertained after the cake has been taken down to bare briar. The rim top surface is uneven and covered in a layer of overflowing oils and tars. Also the condition of the rim inner edge is indicative of it being subjected to an amateurish use of a sharp knife to remove charred surface from the edge. The end result is an uneven and an out of round chamber. The outer rim edge too has a number of dents and dings, most likely caused due to striking against a hard surface to remove the dottle. I intend to address the issue of uneven rim top surface by topping the rim surface. It will also help to address the damage to the inner and outer rim edges to an extent and what damage remains; will be masked by creating a bevel.The stummel is covered in a layer of dirt and grime from years of uncared for storage. The sides and front of the bowl appears considerably darker due to accumulation of grime over the hand oils from over a period of 115 years. However, beautiful cross grains on the front, back and shank surface with beautiful bird’s eye grains on the sides can be made out under the grime and dust covering the stummel surface. There are no scratches/dings or dents over the stummel surface. The briar has developed a beautiful dark patina over the years and it will be my endeavor to maintain it through the restoration process. The mortise is clogged with old oils, tars and ash; however, the shank face is sans any crack or deformation. This also confirms that the band is not a repair band but is original to the pipe. There is no reason to sand the stummel surface to address any dents / dings as there are none. I shall dry sand the bowl with micromesh pads to bring out the grains and impart a shine to the surface while preserving the patina. The period correct vulcanite saddle stem with a round orifice has a quality feel to it. It is oxidized and is missing a chunk of vulcanite from the bite zone including the button and the round slot. The area around the damaged portion has deep tooth indentations. The step tenon is covered in accumulation of old oils, tars and grime. I will rebuild the damaged portion of the stem using activated charcoal and CA superglue and thereafter match the repaired portion with the stem profile and the rest of the stem surface. After the cleaning and polishing regimen, the repairs should blend in well with the stem surface. The Process
I began the repair and refurbishing process with cleaning of the stem internals. Using thin shank brushes and anti-oil dish washing soap, I cleaned the stem airway. I have modified this process of cleaning the stem airway by doing away with pipe cleaners and alcohol as it saves me a ton of pipe cleaners, which is a precious commodity for me here in India. I continued this cleaning till only white clean foam came out of the stem airway, indicating that the airway was nice and clean. I ran a couple of pipe cleaners dipped in alcohol through the airway to dry it out and make sure that there are no traces of soap and gunk hidden in the airway.With the stem internals now clean, I moved to external cleaning of the stem surface by dunking the stem into “Before and After Deoxidizer” solution developed by Mark Hoover. The solution helps to draw out heavy oxidation to the surface making it’s further removal a breeze, while the minor oxidation is eliminated to a very great extent. I usually dunk stems of few pipes that are in-line for restoration and this BARLING’S MAKE is marked in yellow arrow. I generally allow the stems to soak in this solution overnight for the solution to do its work.While the stem was soaking in the De-oxidizer solution, I reamed the chamber with size 2 head of the PipNet pipe reamer. I removed the carbon from the areas where the reamer head could not reach with my fabricated knife. To completely remove the residual carbon from the walls of the chamber and smooth out the walls, I sanded the chamber walls with a folded piece of 220 grit sandpaper followed by cleaning the chamber with a cotton swab wetted with isopropyl alcohol. The chamber walls are in pristine condition. I gently scrapped off the lava build up over the rim top using a sharp knife to avoid damage to the surface.I cleaned the mortise and shank airway using a dental pick and hard / soft bristled pipe cleaners dipped in isopropyl alcohol. I shall continue with further cleaning of the shank internals once I clean the external stummel surface.Next, I decided to subject the chamber and mortise to cotton and alcohol bath. I packed the chamber with cotton and drew out a wick from the cotton and along with a folded regular pipe cleaner, inserted it into the mortise and through the draught hole into the chamber. I tightly packed cotton balls into the remaining portion of the mortise. Thereafter, I soaked the cotton balls with isopropyl alcohol up to the brim. About half an hour later, the level of alcohol had gone down, having being absorbed by the cotton. I topped it up once again and set it aside overnight. By next afternoon, the cotton and alcohol had drawn out all the remaining oils and tars from the chamber and mortise. I removed the cotton balls and the dirt can be gauged by the appearance and coloration of the cotton balls and the pipe cleaner. With my fabricated knife and dental tools, I spent the next hour scrapping out the entire loosened gunk from the mortise. I ran pipe cleaners through the mortise and draught hole to clean out all the loosened tars and gunk that was lodged in the draught hole and mortise. The chamber and mortise now smelled clean, fresh and looked it too. I set the stummel to dry out naturally. Once the internals of the chamber and shank were cleaned, I cleaned the external surface of the stummel with Murphy’s Oil soap and cotton swabs followed by scrubbing the surface with a toothbrush and dish washing soap. This rid the stummel surface of all the accumulated dust, dirt and grime. Using a piece of Scotch Brite scrub, I deliberately cleaned the rim top and removed the crud from the surface. The damage to the rim edges is, thankfully, not as severe as I had anticipated. I also cleaned the shank internals with dish washing soap and a shank brush. I set the stummel aside to dry out naturally while I worked the stem.By the time I was done with internal and external cleaning of the stummel, the stem had been in the deoxidizer solution for nearly 24 hours. I cleaned the stem and the stem airway under running warm water and scrubbed the raised oxidation from the surface using a Scotch Brite pad and the airway with a thin shank brush. I further removed the oxidation by scrubbing the stem with 0000 grade steel wool. Once the stem was dried with paper towels, I applied a little olive oil to rehydrate the stem.I wiped the stem surface, particularly the damaged button end, with a cotton pad and alcohol to remove any traces of dirt and grime. To begin the stem repairs, I first wound a scotch tape around the tapered portion of a pipe cleaner and inserted it into the stem airway. I prepared a mix of CA superglue and activated charcoal and generously applied it over and extending beyond the broken surface and set it aside for curing over night. The tape will help prevent the mix from clogging the stem airway.While the stem fills were curing, I addressed the damage to the rim top surface by topping the rim to reduce the charred surface and bringing the bowl back to round. I always use a square piece of 220 grit sand paper and firmly hold it with my hand on my work table. I work the rim top on the sand paper in circular motion, frequently checking the progress as I want to keep the briar loss to a bare minimum necessary. The inner rim edge damage has not been addressed entirely with a few dings and uneven surface visible on the sides (encircled in red) and charred surface to the front of the bowl (encircled in green). Also a few minor dents and chipped surfaces are visible along the outer rim edge. These issues were addressed next. In order to mask the still visible damage to the inner rim edge, I created an inner edge bevel by pinching a folded piece of 180 grit sand paper between my thumb and forefinger and moving along the inner edge with a constant pressure, to minimize the charring on the inner edge of the rim. Similarly, I created a slight bevel on the outer edge of the rim to address the minor dents and chipped areas.Next, I subjected the stummel to a complete cycle of micromesh polish, wet sanding with 1500 to 12000 grit pads. I wiped the stummel with a moist cloth after every grit pad to remove the sanding dust left behind by the pads. This also helps in monitoring the progress being made and ensures early corrective action. I am happy with the progress being made until now. I massaged a small quantity of “Before and After Restoration Balm” into the briar surface with my finger tips and worked it deep into the surface and let it rest for a few minutes. The balm almost immediately works it’s magic and the briar now has a nice vibrant appearance with the beautiful bird’s eyes and cross grain patterns on full display. It was at this stage that I polished the sterling silver with a jeweller’s cloth to a nice shine. By the time I was through with the stummel polishing, the stem fills had completely cured.  I moved ahead with the process of filing and shaping the button end with a flat head needle file. With a round needle file, I reshaped the round orifice at the slot end. For a better blending, I further sanded the entire stem with a folded piece of 320 grit sandpaper. I continued to dry sand the entire stem with a folded piece of 400 followed by 600 and 800 grit sandpaper and further progressed to wet sanding with 1000, 1500 and 2000 grit sand papers. I rubbed a small quantity of EVO into the stem surface and set it aside for the vulcanite to absorb and hydrate. To bring a deep shine to the vulcanite stem, I went through the complete set of micromesh pads, wet sanding with 1500 to 12000 grit pads. I wiped the stem with moist cloth after working each pad and rubbed it down with Extra Virgin Olive oil to rejuvenate the vulcanite.To complete the restoration, I mounted a cotton cloth buffing wheel on to my hand held rotary tool and polished the stummel and stem with Blue Diamond compound. This compound helps to remove the minor scratch marks that remain from the sanding. Next, I mounted another cotton buffing wheel that I have earmarked for carnauba wax and applied several coats of the wax. I finished the restoration by giving the entire pipe a rigorous hand buffing using a microfiber cloth to raise the shine further. The finished pipe looks amazingly beautiful and is ready to join my collection. I only wish it could share with me it’s story of the past years while I enjoy smoking my favorite Virginia blend in it or maybe an English blend or maybe just keep admiring it!! The finished pipe is as shown below:- A note of thanks to all the readers who have joined me in this journey that has been such a pleasure! You and your loved ones are always in our prayers…