Tag Archives: Rebuilding a broken button with super glue and charcoal powder

A Pipe of Distinction


Blog by Kenneth Lieblich

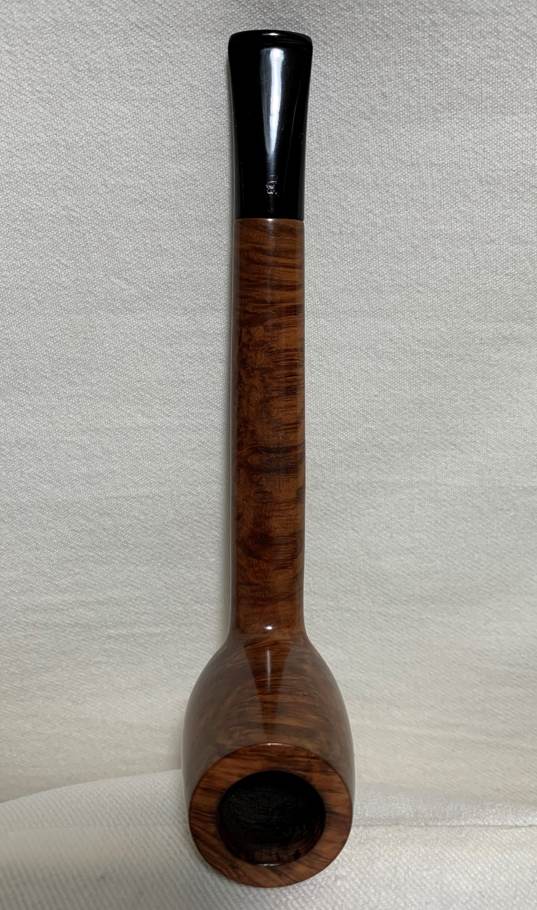
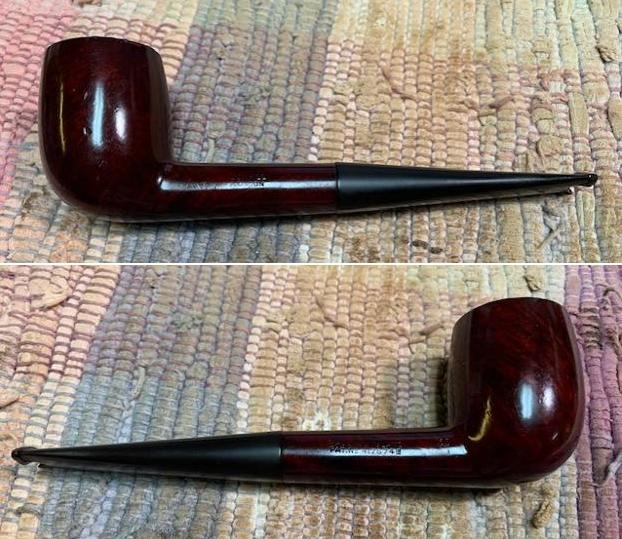
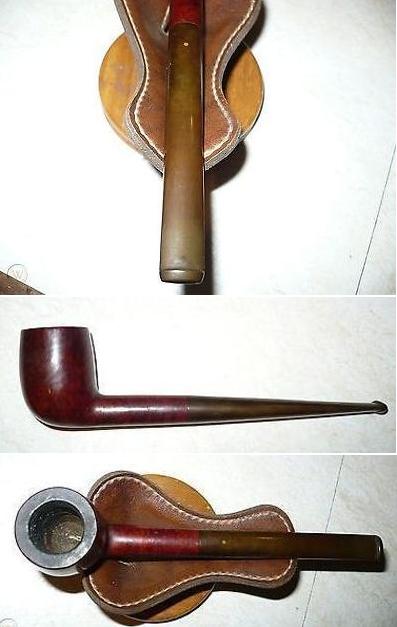
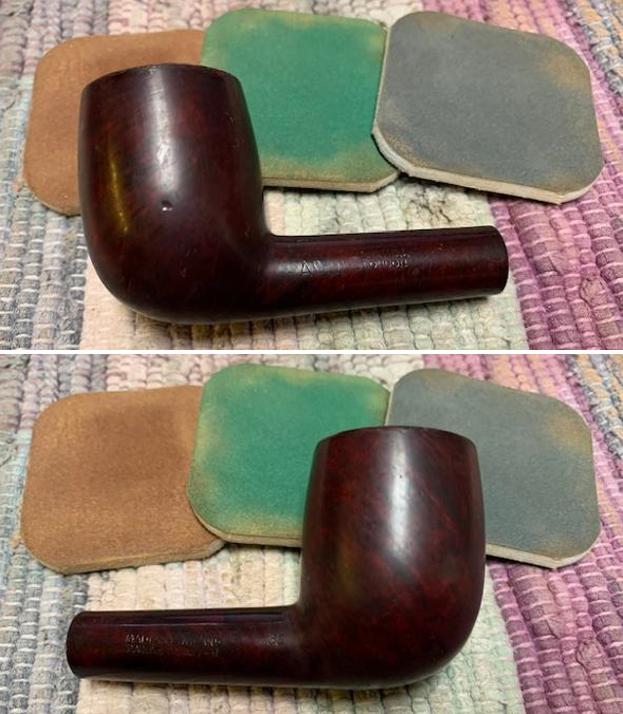
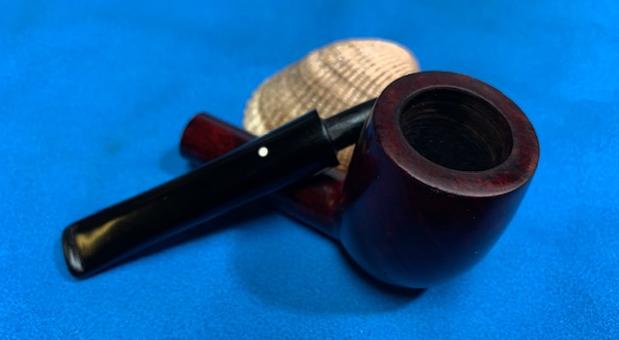
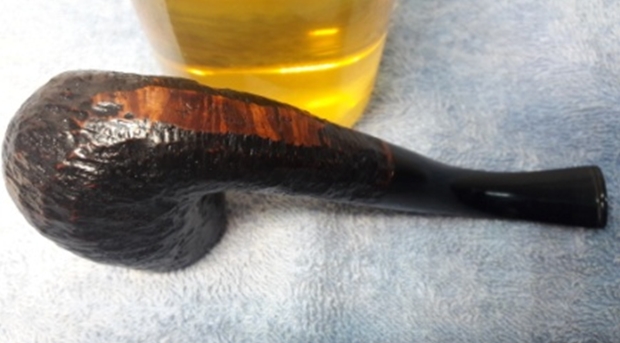
Next on the chopping block is a very personal pipe – and one that is staying in my collection. The photo you see below is of my late grandfather, in the early 1970s, smoking a charming Bewlay Canadian pipe. It is this pipe’s restoration that I am recounting today. I do not know where my grandfather acquired it (or under what circumstances), but I suppose it does not ultimately matter. My grandfather was an enthusiastic pipe smoker and he clearly enjoyed this one. I am definitely looking forward to cleaning this one up. It has a value well beyond dollars.
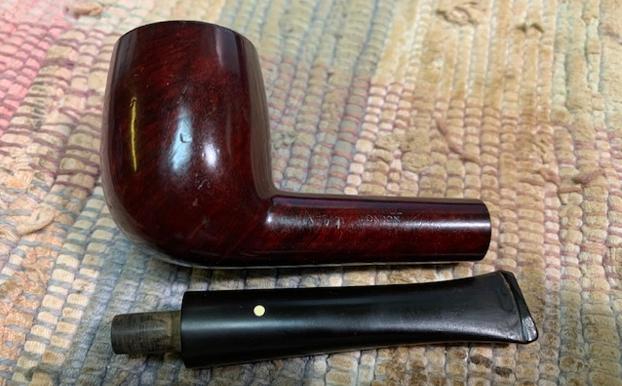
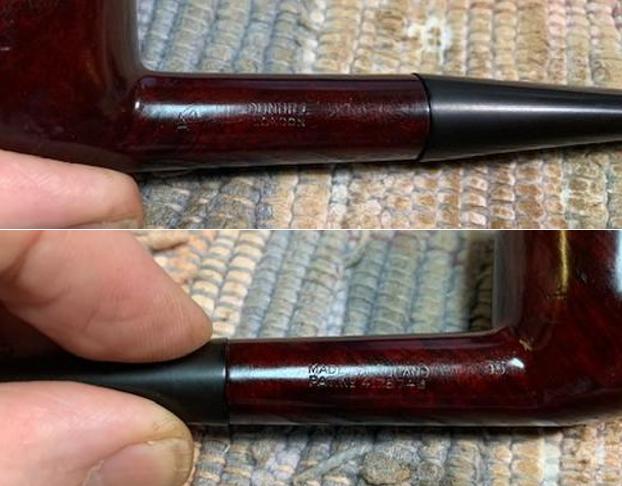
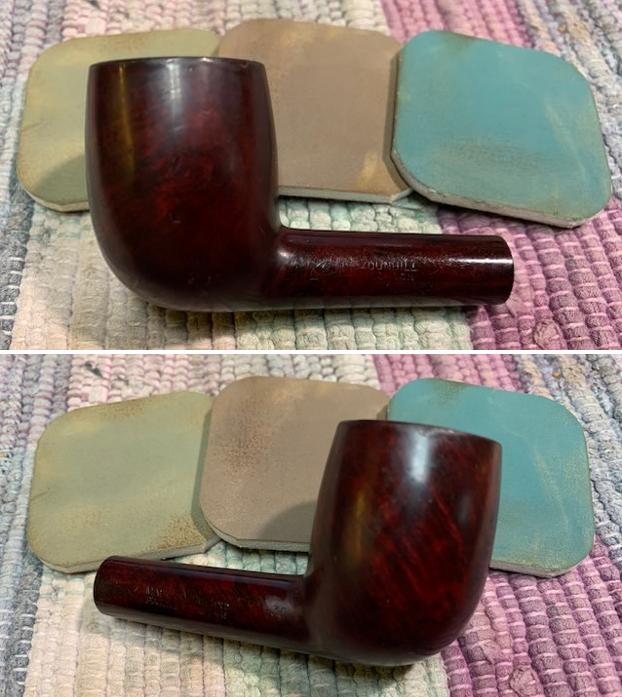
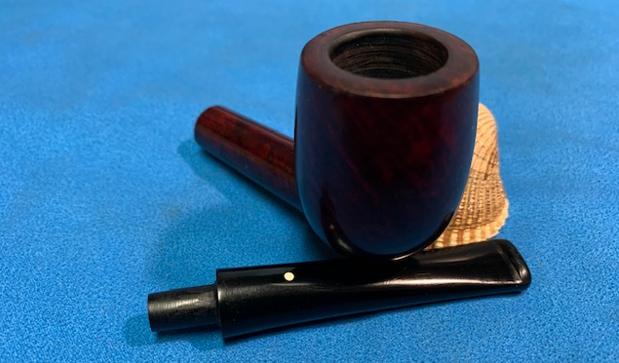
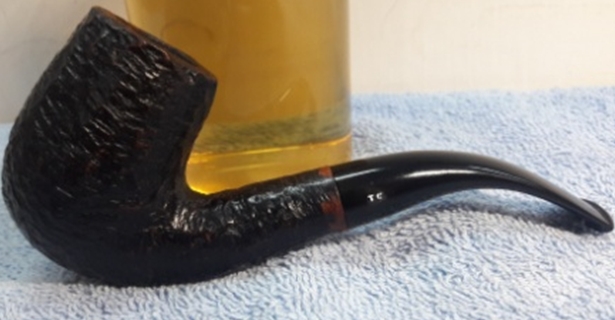
The pipe is from The House of Bewlay and is a Canadian shape. What a charming and elegant pipe! In order to read the markings correctly, I used my old trick of rubbing chalk over them (like a gravestone) and that helped a lot. The pipe’s markings read Bewlay [over] Twenty. The other side of the pipe shows the shape number, 003 [over] London Made. This sort-of corresponds with a Bewlay catalogue from the late 60s, as you can see in the photos. I say, “sort-of”, because the brochure shows shape numbers 001 and 002. I do not know the exact date of the pipe, but it is likely from the late-1960s or early-1970s. Let us read a bit more about Bewlay from the Pipedia article:

The English brand of Bewlay & Co. Ltd. (formerly Salmon & Gluckstein Ltd.), was in business from the early 20th century until the 1950s. The brand ended up being sold and taken over by Imperial Tobacco Co. The shop chain closed in the 1980s but there seems to be one shop still in business on Carr Lane in the city of Hull. Bewlay pipes were made by prestigious firms. Notably Barling, Charatan, Loewe & Co., Sasieni, Huybrecht, and Orlik. So understandably, the English considered a Bewlay pipe a quality pipe.

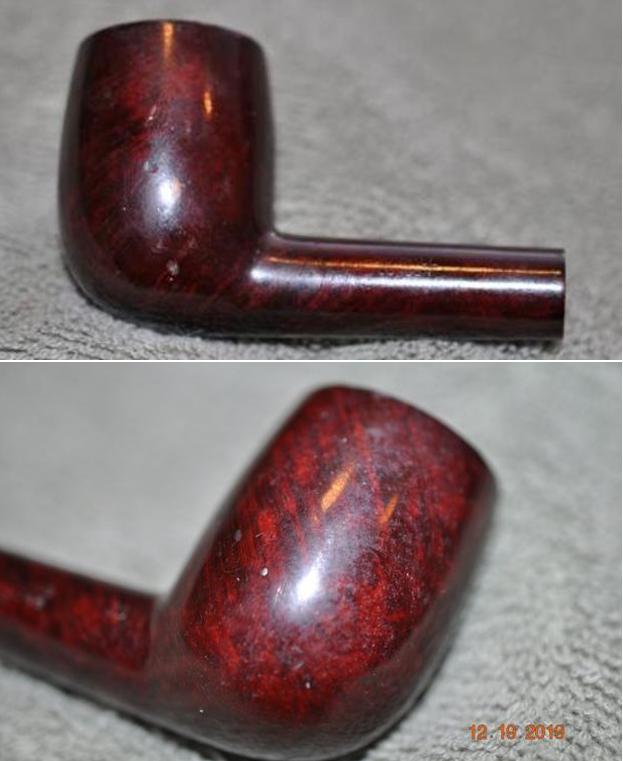
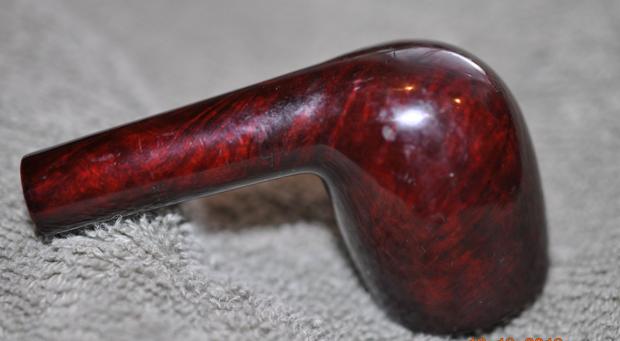
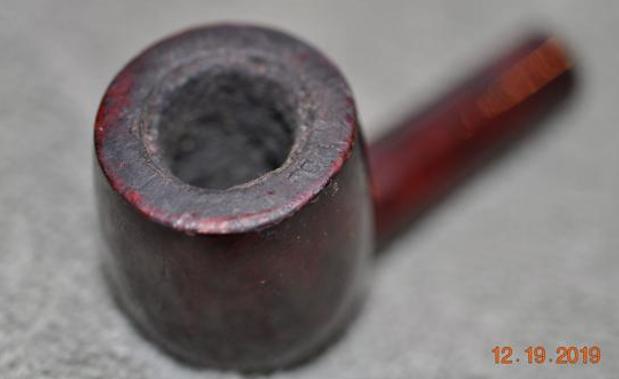
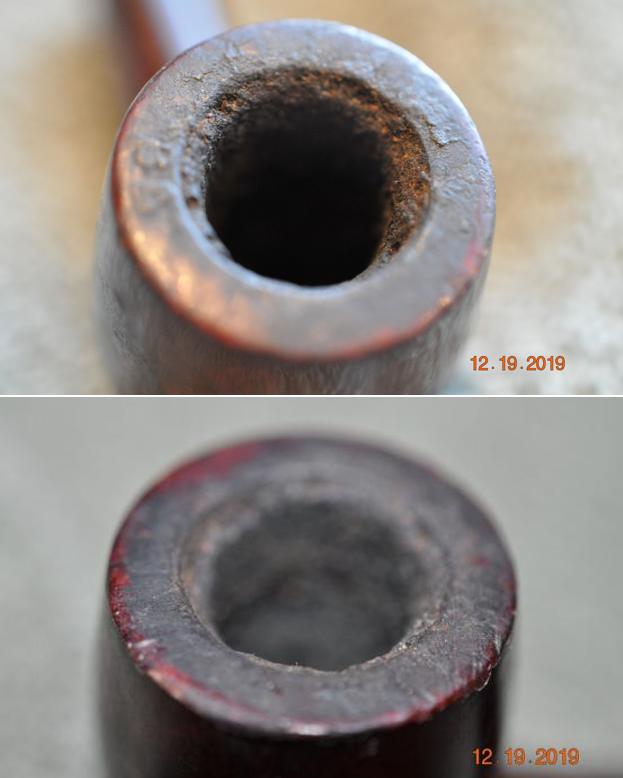
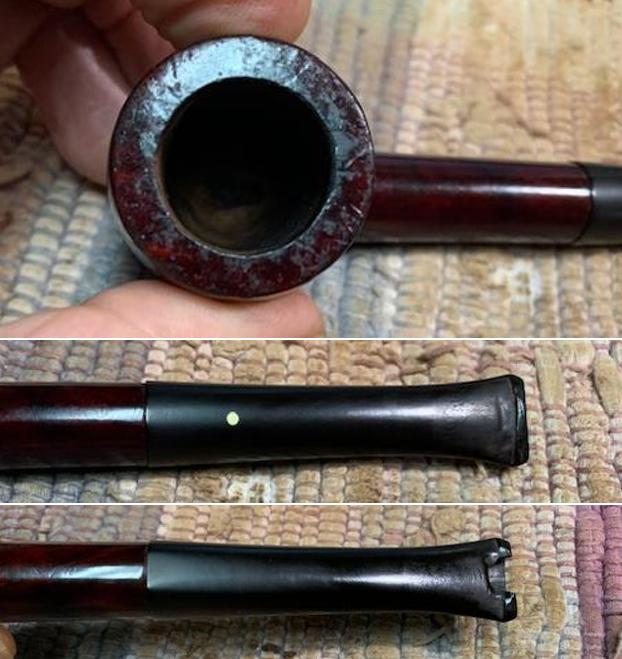
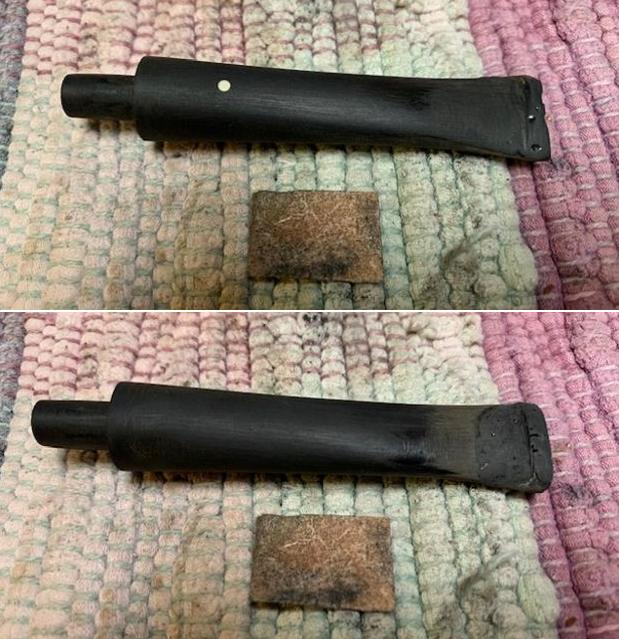
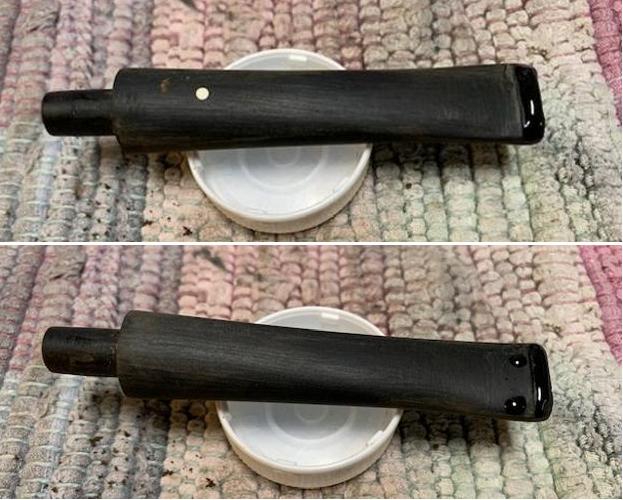
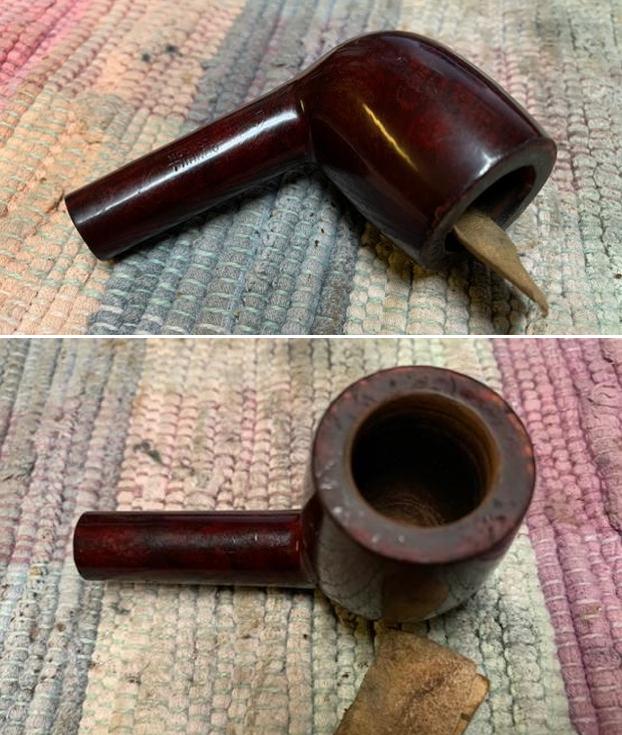
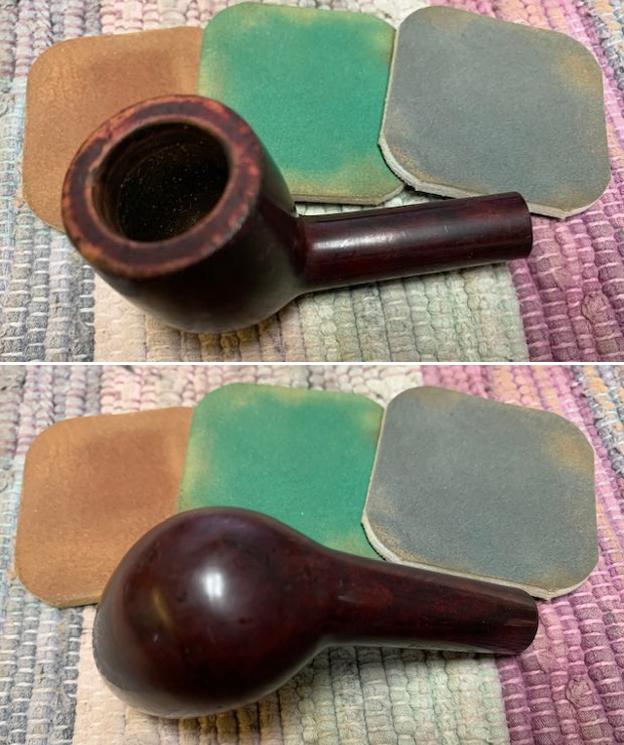
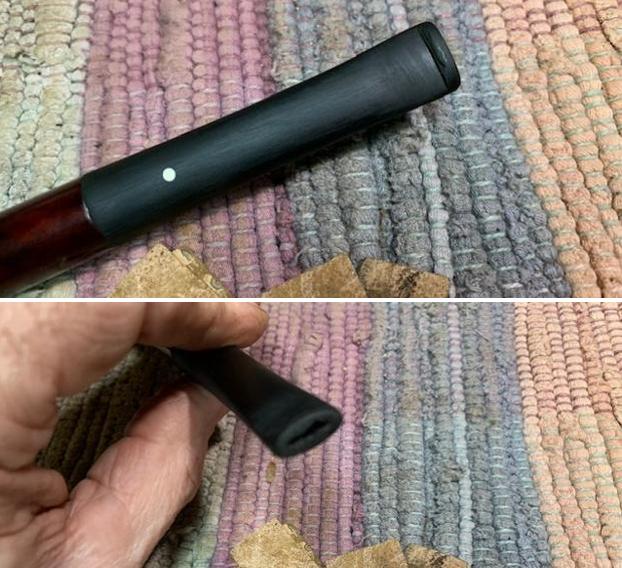
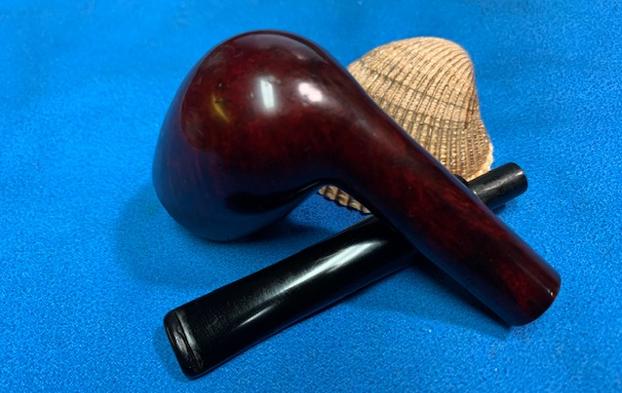
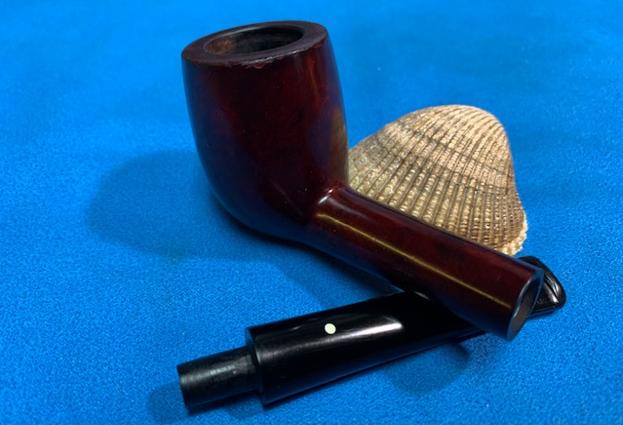
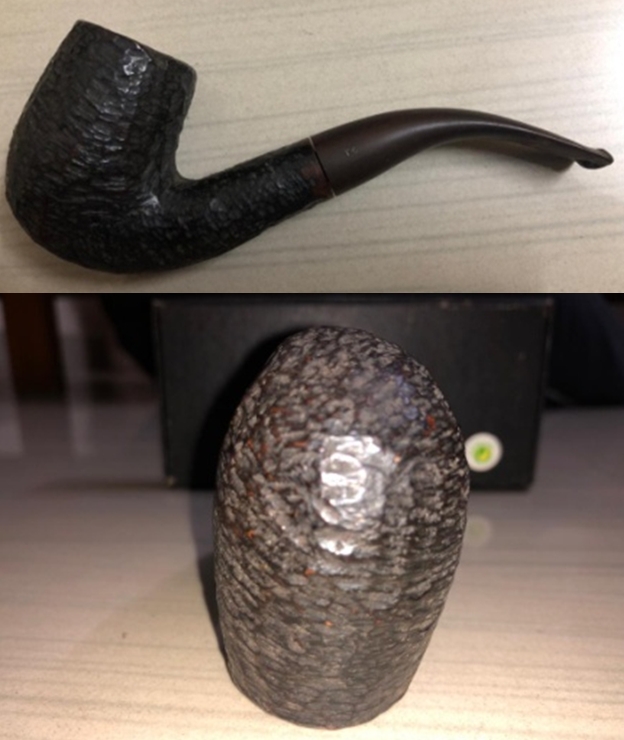
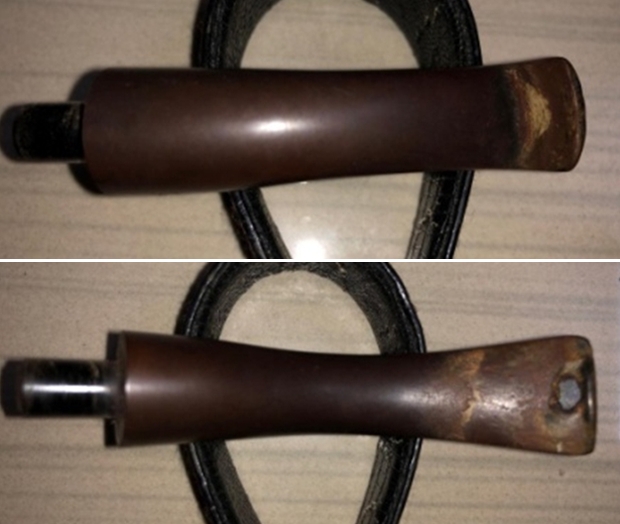
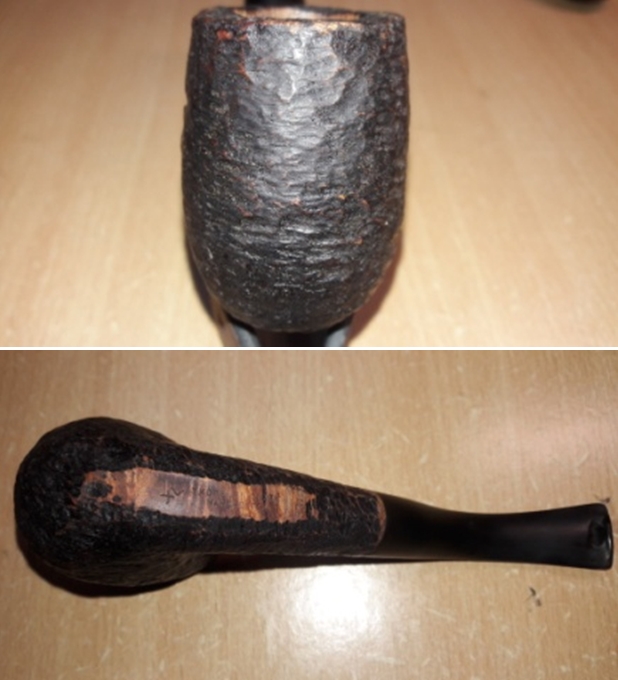
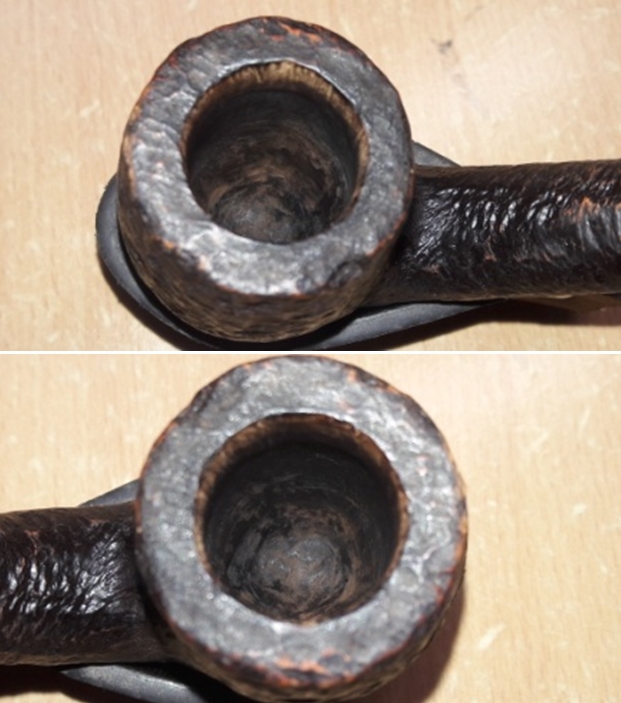
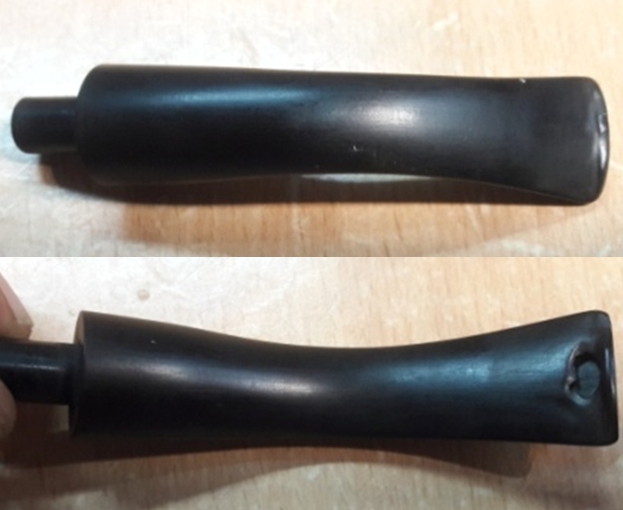
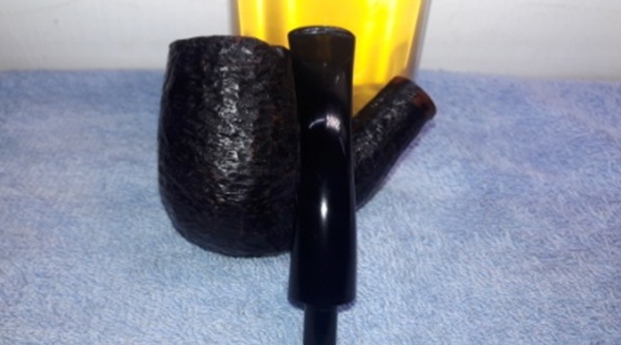
Anyway, on to the pipe – and what a beauty it was. However, it was not without its issues. The stummel had the following problems: lava on the rim, a notable burn to the rim, plenty of cake in the bowl, a couple of nicks to the bowl, and a tired, worn-out colour of wood. By the way, the strange “stains” to the bowl are, in fact, old bits of newspaper. After my grandfather died, the pipes were wrapped in newspaper and stuck in a box. The newspaper got wet at some point in the intervening years. Meanwhile, the stem had its own set of problems: some oxidation and calcification, minor tooth marks and dents, a filthy stinger, the ‘B’ logo was a bit worn, and (worst of all) a large chunk of vulcanite missing from the bit! This pipe was going to be a bit tricky, and I needed to be especially careful to ensure the missing vulcanite would be repaired properly – so it could be used for many years to come. The stem was first on my list. This stem has a stinger in it – and it was being quite stubborn about coming out of the tenon! I opted to warm the stem and stinger with a hair dryer and this provided just enough softening of the internal goo to allow me to pull it out. The stinger then went for a soak in some lemon-infused isopropyl alcohol. I let it set for several hours and then cleaned it off and it looked much improved. I then finished it with some metal polish and moved on. I wiped down the outside of the stem with Murphy’s Oil Soap on some cotton pads. I also took a BIC lighter and ‘painted’ the stem with its flame in order to lift the bite marks and dents. This was fairly successful in raising the damage. Then, I cleaned out the insides with pipe cleaners and isopropyl alcohol. Once this process was done, the stem went for an overnight soak in the Before & After Hard Rubber Deoxidizer. The following day, I cleaned all of the de-oxidizing sludge off with alcohol, pipe cleaners, et cetera. The oxidation had migrated to the surface and would be fairly straightforward to remove. I scrubbed vigorously with SoftScrub on cotton pads to remove the leftover oxidation. I also built up some tiny dents on the stem with cyanoacrylate adhesive and let it fully cure.
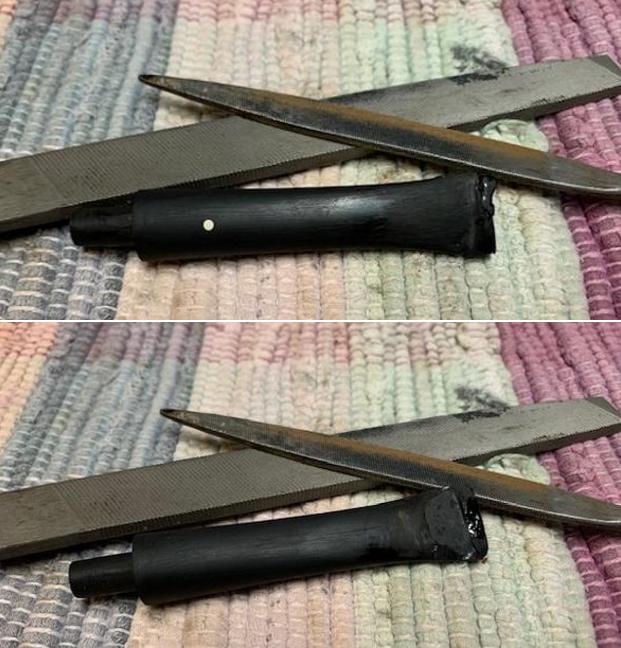
Now it was time to make a patch for the missing chunk of vulcanite. This patch was made with a mixture of cyanoacrylate glue and activated charcoal powder. This created a black, resilient mush that would be very hard-wearing when cured and would work perfectly for this repair. Thanks to Steve’s instruction, I first plugged up the stem’s draught hole with a pipe cleaners coated in petroleum jelly. This ensured that any of the cyanoacrylate and charcoal mush would not accidentally plug up the air passage in the stem. This was a tricky business and it took some real patience and effort to make it work. As the photos show, after I applied the cyanoacrylate and charcoal mush, it looked pretty darn ugly, but I was expecting that. I also managed to get some of the bits of pipe cleaner bristles into the repair! No big deal – those were quickly excised. After the curing, I pulled out the Dremel rotary tool and began to remove the excess material. This was also the preliminary step in shaping the button. To carry this process on, after the Dremel, I used a miniature file to further shape the button and make it suitable for sanding. I used another file on the inside to ensure there were no rough edges in the bore. 
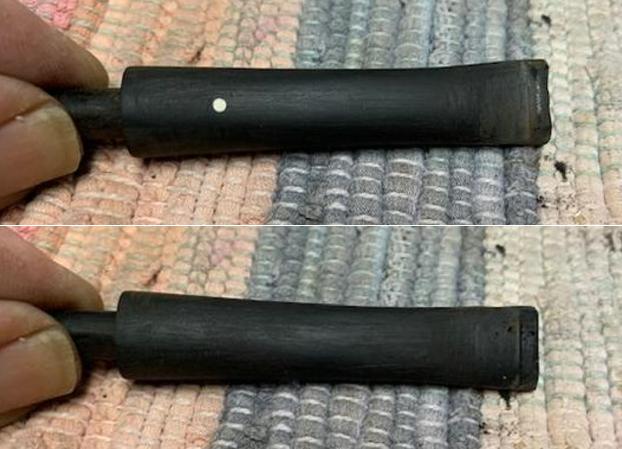
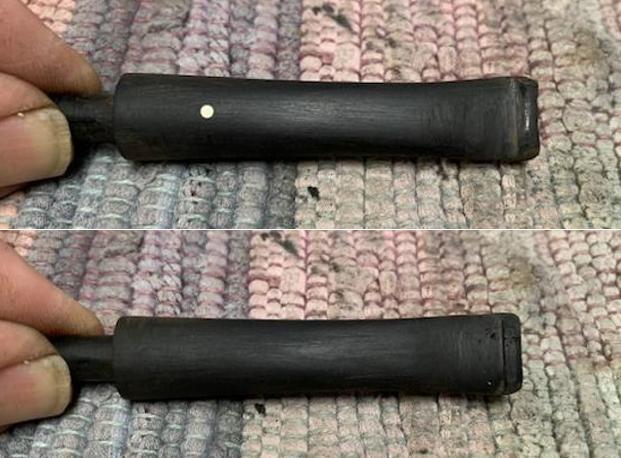
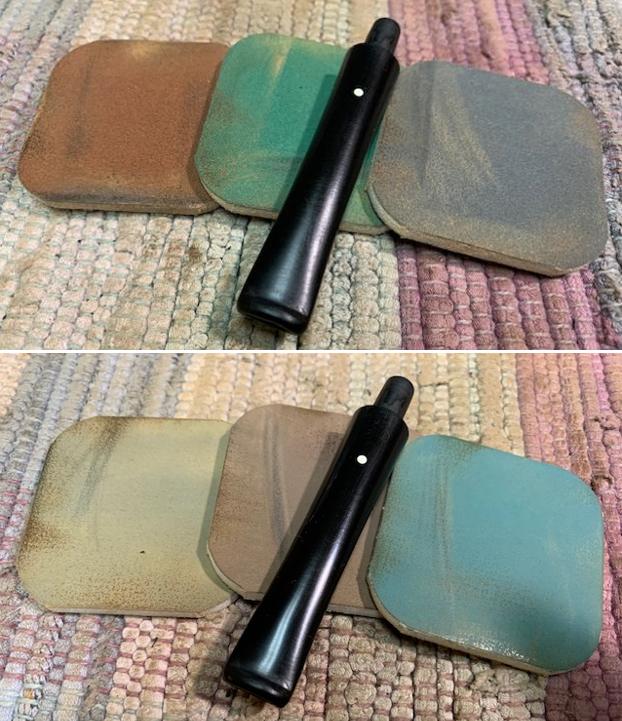
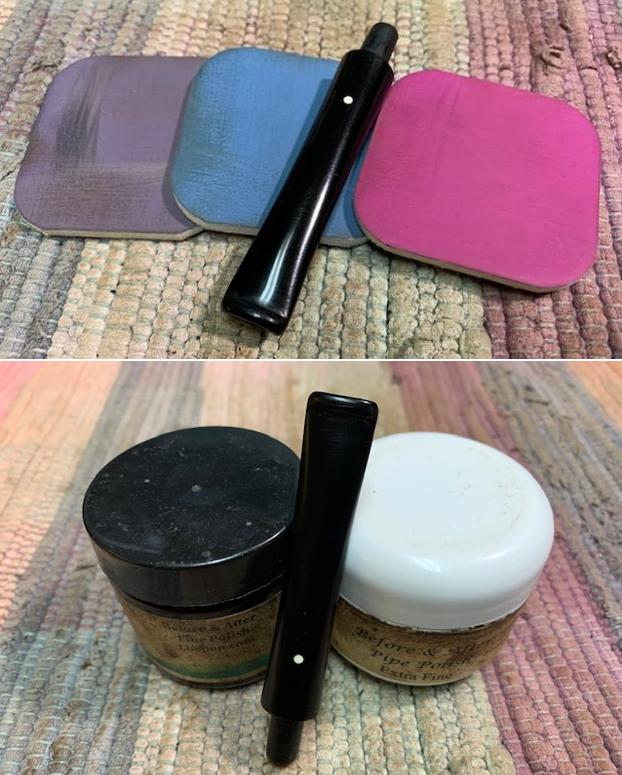
I then sanded the stem down with 220-, 400-, and 600-grit sandpapers to meld seamlessly into the stem. This ensures that it keeps its shape and looks like it should. I then used all nine Micromesh pads (1,500 through 12,000 grit) to bring out the lovely black lustre on the stem. I also used Obsidian Pipe Stem Oil in between each pad scrubbing. It is worth noting that a repair this big on a stem will never be completely invisible, but I was very pleased with how I managed to make the stem of my grandfather’s pipe look so good. 
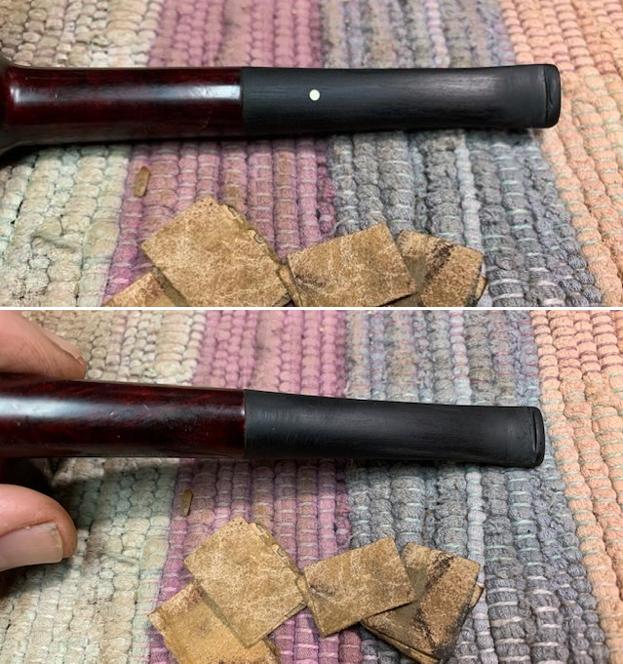
Just before finishing with the Micromesh pads, I took the opportunity to repair the “B” logo on the stem. It had faded – both by loss of paint and also by fingers inadvertently smoothing out the “B” over time. So, I added some acrylic paint with a paint brush, let it dry, and buffed it to make it look good. The “B” is back, but, as later photos reveal, a little bit has disappeared into history.
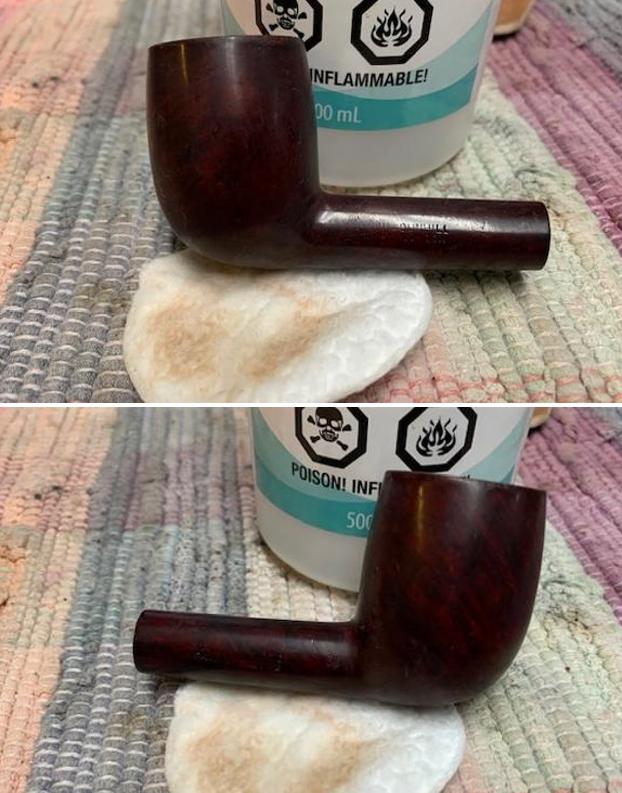
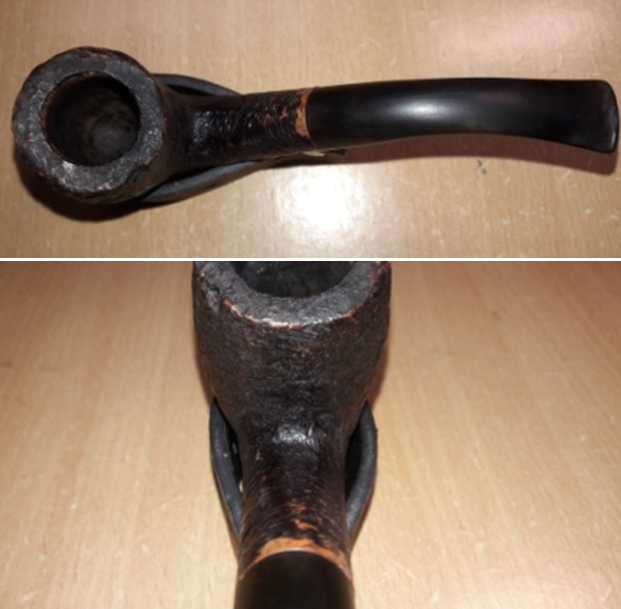
On to the stummel, and the usual cleaning procedures were in order for this pipe. I used both the PipNet Reamer and the KleenReem to remove the built-up cake, and followed that with 220-grit sandpaper to remove as much as I could. I wanted to take the bowl down to bare briar to ensure there were no hidden flaws in the walls of the bowl. Fortunately, there were none. I then proceeded to clean out the insides of the shank with cotton swabs, pipe cleaners, and isopropyl alcohol. There was quite a bit of filth inside this stummel – it took many pipe cleaners et cetera to clean it out.
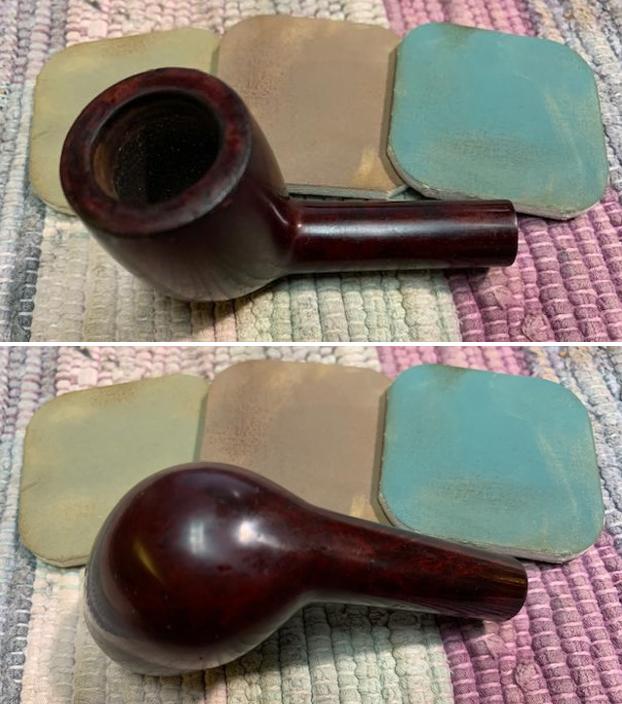
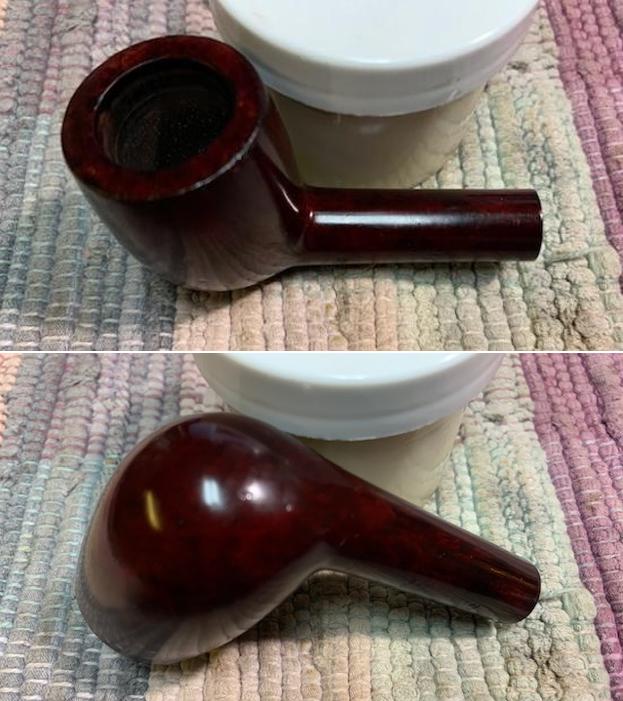
I followed that up by cleaning the insides with some dish soap and tube brushes. I then moved on to cleaning the outside of the stummel with Murphy’s Oil Soap and some cotton pads. That removed the bits of aforementioned newspaper and any remaining dirt. I also soaked the rim in Murphy’s for a while just to loosen up the lava. 
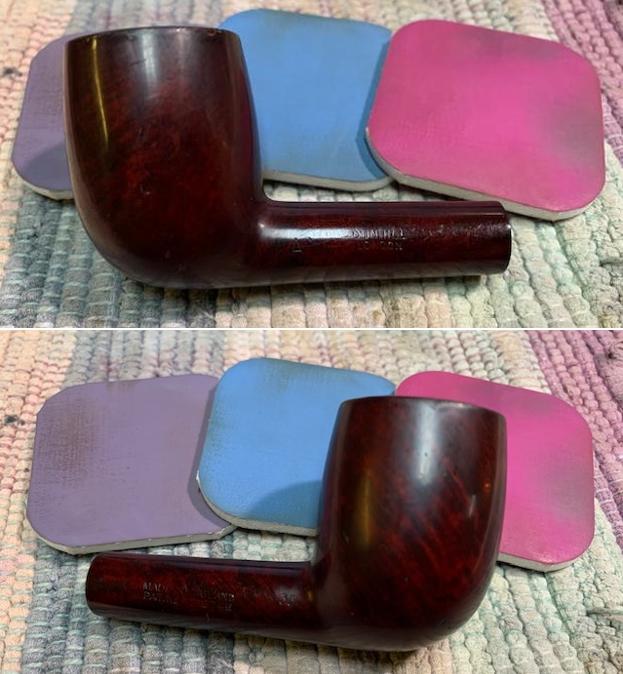
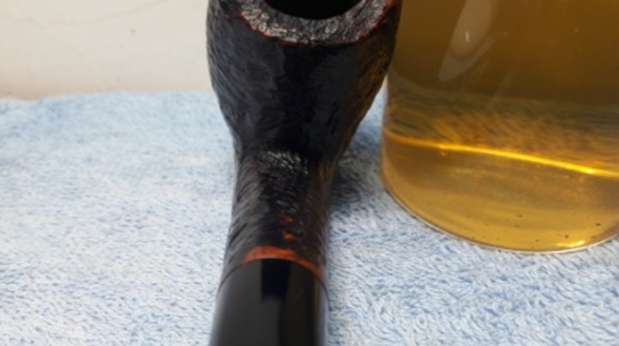
In order to remove the lingering bits of lava and fix any nicks on the rim, I “topped” the pipe – that is to say, I gently and evenly sanded down the rim on a piece of 220-grit sandpaper. This effectively removed the lava, without altering the look of the pipe. After that, a light application of Before & After Restoration Balm brought out the best in the stummel’s grain. What a difference that made! There is some beautiful wood under the grime! 
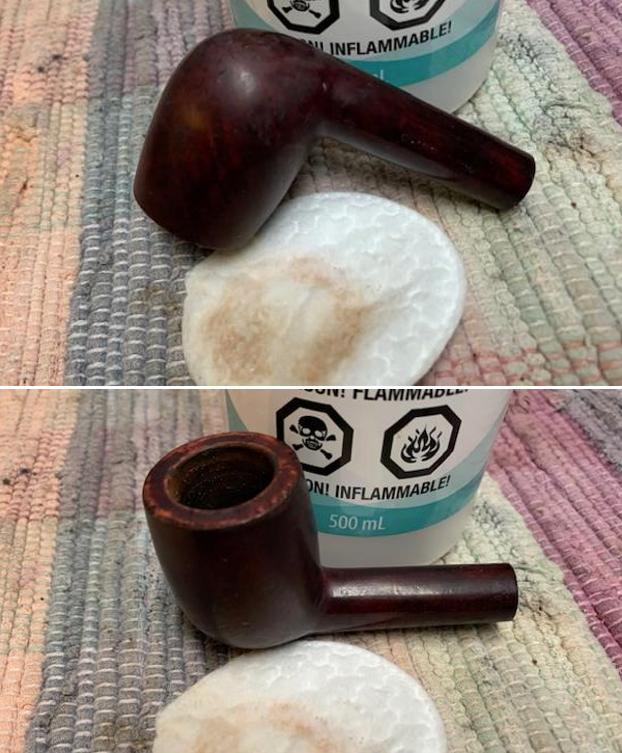
Having completed that, I was able to address the small nicks on the stummel. I dug out my iron and a damp cloth to try and raise the nicks. The hot and moist steam can often cause the wood to swell slightly and return to shape. There was some movement – not a lot, but it was better than doing nothing. I filled the remaining divots with cyanoacrylate adhesive and let it cure. Now, with the nicks filled, it was time to sand down the stummel. I used all nine Micromesh pads (1,500 through 12,000 grit) to wet/dry sand everything smooth. Then I added a bit more Before & After Restoration Balm. 
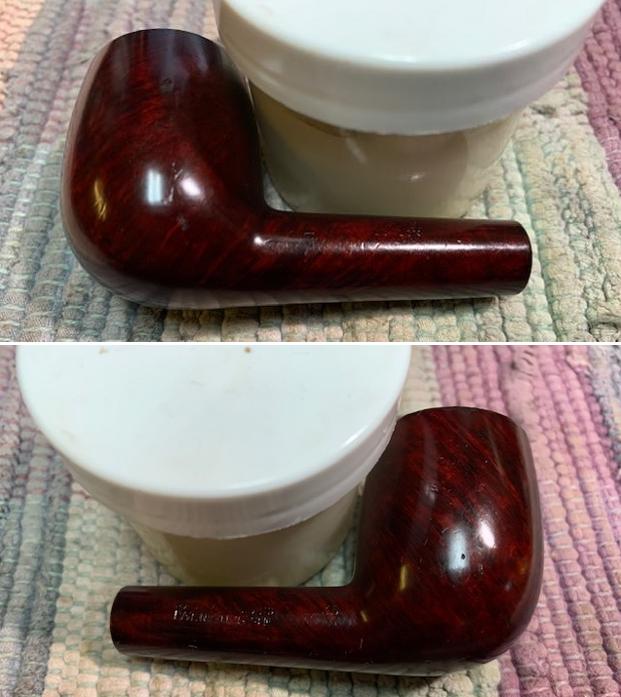
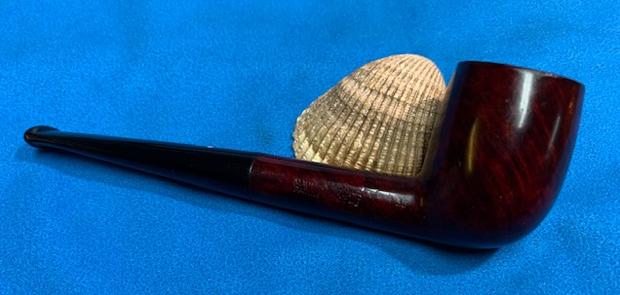
Then it was off for a trip to the buffer. A dose of White Diamond and a few coats of carnauba wax were just what this pipe needed. The lovely shine made the wood look absolutely beautiful. 
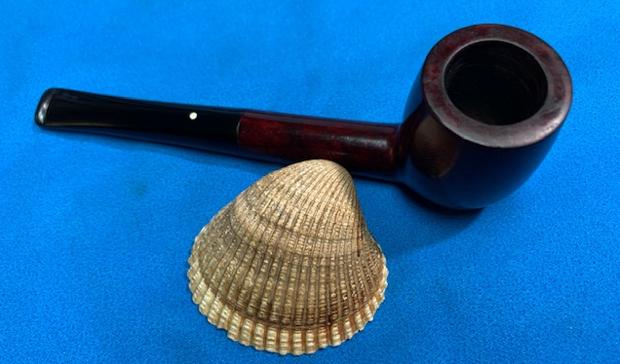
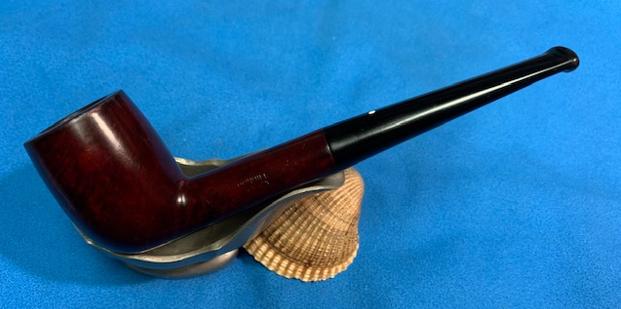
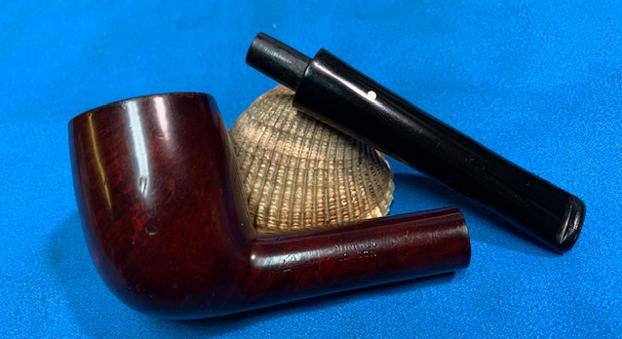
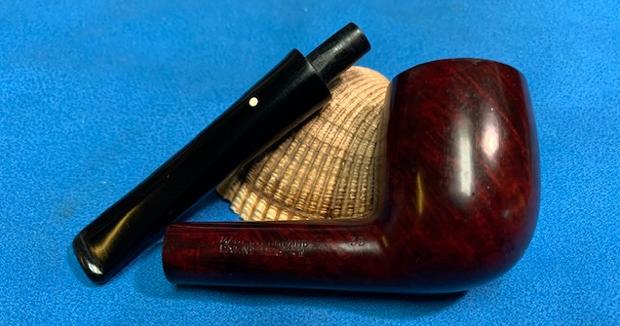
This is a wonderfully crafted pipe and has a very elegant feel to it. It took a lot of work, but I am proud of it and the final product is (hopefully) worthy of my beloved grandfather’s memory. Obviously, this is one pipe that I am keeping for myself and adding to my collection. I am sure that I will be enjoying this one for many years to come. I hope you enjoyed reading the story of this pipe as much I as I did restoring it. If you are interested in more of my work, please follow me here on Steve’s website or email me directly at kenneth@knightsofthepipe.com. Thank you very much for reading and, as always, I welcome and encourage your comments.

Restemming a Dunhill Pipe – A Patent Era 1936 Dunhill Bruyere 35 Billiard


Blog by Steve Laug

This Dunhill Billiard was one of five other Billiards that came to us in the same lot as the 1922 Dunhill Bruyere Reading Pipe, a cracked shank 1962 Dunhill Shell Briar Pot and the 1905 BBB Calabash Reading Pipe and 1911 BBB Glokar Poker. It was a great looking Bruyere Billiard that had a Yello-Bole stem instead of the original Dunhill stem. The pipe is stamped on the left side of the shank with the letter A next to the bowl and the was followed by DUNHILL [over] LONDON. On the right side of the shank it was stamped MADE IN ENGLAND [over] PAT. NO 41757416 that is followed by the shape number 35.

It was another filthy pipe with a thick cake in the bowl and a heavy lava overflow on the rim top. It looked like it had a shiny coat of varnish or shellac on the bowl that would need to be removed so I could work on the rim top and nicks in the bowl sides. The stem would need to be replaced so Jeff and I would look over what he had there in terms of stems we had set aside. Perhaps there would be one in the lot that would work. Jeff removed the Yello-Bole stem from the shank and took photos of the bowl before he did his clean up work.  He took photos of the bowl and rim to give a picture of the thickness of the cake and lava on the rim top. This must have been a favourite pipe to have gone through a Dunhill stem and then pressing a Yello-Bole stem into service. I would need to find a Dunhill stem for it but it had promise even under the thick cake in the bowl.  Jeff took photos of the stamping on the sides of the shank but they are quite blurry because of the refection of the shiny varnish/shellac coat. I am including them anyway here as the give a sense of where the stamp was on the shank sides.I turned to Pipedia’s section on Dunhill Root Briar Pipes to get a bit of background on the Dunhill finishes (https://pipedia.org/wiki/Dunhill#Root_Briar). I quote:

Bruyere

The original finish produced (usually made using Calabrian briar), and a big part of developing and marketing the brand. It was the only finish from 1910 until 1917. A dark reddish-brown stain. Before the 1950s, there were three possible finishes for Dunhill pipes. The Bruyere was a smooth finish with a deep red stain, obtained through two coats, a brown understain followed by a deep red.

There was a link on the above site to a section specifically written regarding the Bruyere finish (https://pipedia.org/wiki/Dunhill_Bruyere). I turned there and have included the information from that short article below.

Initially, made from over century-old briar burls, classified by a “B” (denoted highest quality pipe); “DR” (denoted straight-grained) and an “A” (denoted first quality), until early 1915. After that, they became a high-end subset to the Dunhill ‘Bruyere’. The DR and B pipes, a limited production, they should be distinguished as hand-cut in London from burls as opposed to the Bruyere line which was generally finished from French turned bowls until 1917, when the Calabrian briar started to be used, but not completely. Only in 1920 Dunhill took the final step in its pipe making operation and began sourcing and cutting all of its own bowls, proudly announcing thereafter that “no French briar was employed”.

Bruyere pipes were usually made using Calabrian briar, a very dense and hardy briar that has a modest grain but does very well with the deep red stain.

“Before the 1950s, there were three possible finishes for Dunhill pipes. The Bruyere was a smooth finish with a deep red stain, obtained through two coats, a brown understain followed by a deep red. The Shell finish was the original sandblast with a near-black stain (though the degree to which it is truly black has varied over the years). Lastly, the Root finish was smooth also but with a light brown finish. Early Dunhill used different briars with different stains, resulting in more distinct and identifiable creations… Over the years, to these traditional styles were added four new finishes: Cumberland, Dress, Chestnut and Amber Root, plus some now-defunct finishes, such as County, Russet and Red Bark.”

There was also a link to a catalogue page that gave examples and dates that the various finishes were introduced (https://pipedia.org/wiki/File:Dunnypipescatalog-1.png).I turned to Pipephil’s dating guide to show how I arrived at the date of manufacture for this pipe (http://www.pipephil.eu/logos/en/dunhill/cledat-en1.html). I am including two charts that are provided there for the dating a pipe. I have drawn a red box around the pertinent section in each chart. Since the pipe I am working on has a suffix 16 that is raised superscript it points to 1920+ 16 for a date of 1936 on the charts below. I now knew that I was working on a Bruyere that came out in 1936 because of the date stamp 16. The shape of the pipe was one of many Billiards that Dunhill put out and the #35 was a normal billiard shape with a taper stem. That helped me figure out the kind of stem I would need to restem the pipe.

I turned to work on the pipe itself. Jeff had carried out his usual thorough cleanup of the pipe. He had reamed it with a PipNet reamer to remove the cake and cleaned the reaming up with a Savinelli Fitsall Pipe Knife. He scrubbed the internals of the bowl and stem with alcohol, cotton swabs and pipe cleaners. He scrubbed the externals with undiluted Murphy’s Oil Soap and rinsed the bowl off with running water. He had included a stem that we thought could work with the pipe and had soaked it in Before & After Deoxidizer and once it had soaked rinsed it off with warm water to remove the residual solution. He dried it off and scrubbed it down with Soft Scrub All-Purpose cleaner to remove any oxidation that was still on the stem. The biggest issue with the stem was the large chunk of vulcanite missing on the button on the underside but I thought we could make it work. The stem was from the wrong era and the button was the wrong shape but it would work until the proper stem was located. The pipe looked very clean when I received it. I took a photo of the bowl and the stem I was planning on using. I sanded the tenon to slightly reduce the diameter and leave a snug fit in the shank. It did not take too much to get a nice fit. Note that the diameter of the stem is slightly larger than the shank and it is flattened on the bottom. Since it is larger the flatten portion will not be an issue and with a little work the stem will be a perfect fit.  The fourth photo of the underside of the stem shows the damage to the button that will need to be repaired. I took a photo of the rim top to show the condition. You can see the darkening, scratches and damage on the rim top. It is roughened and slightly out of round. The varnish/shellac coat is peeling on the top. The stem came out looking quite good. There are tooth marks and chatter on the top side near the button and a large chunk of the button missing on the underside. 

I took photos of the stamping on both sides of the shank to try to capture it better than the photos above. It is better and is readable it reads as noted above. Also not the variation in the diameter of the stem that will need to be addressed.It was time to work on the stem. I decided to tackle the repair to the missing part of the button on the underside of the stem first. I would also need to work on the diameter of the stem at the shank and the shape of the stem to match the year it was made. There was a lot of work to do on the stem.

I got the repair station set up. I use a piece of cardboard with two strips of packing tape to mix the putty. I used Loctite 380 rubberized Black CA glue and three capsules of charcoal powder. I made a cardboard wedge covered in packing tape to fit in the slot and keep me from filling the slot in with the mixture.  I put a pool of the glue on the middle of the cardboard base so I could mix the charcoal powder into it.I mixed the powder and the glue together with a dental spatula. I stirred it until I got a thick putty like paste. I used the spatula to place the mixture on the top of the stem and fill in the missing chunk. I always overfill the area as I can easily remove the excess with the Dremel and files. I sprayed the repair with accelerator to harden the surface so I could remove the cardboard wedge. I took out the wedge and took a photo of the stem at this point in the process.I let the repair cure overnight and in the morning I used a rasp and file to begin to shape the stem surface and flatten the repair. It was a good solid repair and with a lot of shaping and sanding it would work well.I continued to shape the stem surface with 220 grit sandpaper to the button and stem surface smooth. I also worked on the diameter of the stem and removed the flattened bottom. Lots more work to do but it is getting there.I knew that the 1936 stem would not have had the flared fishtail look but probably would have been more of a straight taper. I did a search on Google for a 1936 Dunhill Bruyere in a shape 35 to see if I could find one that would provide a pattern for the shaping of this replacement stem. I found one (https://www.worthpoint.com/worthopedia/1936-dunhill-bruyere-grade-billiard-490781280). I copied several of the photos to get a pattern to work with.

You can see from the photos to the left that the stem was significantly different in shape than the fishtail stem that I was working with. The taper on the sides from the shank to the button was far more gentle and almost straight. The taper on the top and bottom the stem is very similar to what I have. The biggest difference was in the last half inch of the stem and button. I would need to remove the horns or fish tail edges from the button and smooth out the transition on the button end so that it is not flared.

It took some work but I used the Dremel to roughly shape the stem like the sides of the stem and the button edges. I took off a lot of vulcanite and when I was done it was very close. I think the rest of the work would be done with sandpaper.I continued shaping it with 220 grit sandpaper. It is looking very good at this point. I still have work to do on the repair to take care of air bubbles but I am happy with how it is coming out so far.I filled in the air bubbles on the stem and button surfaces with black super glue and set the stem aside for the repairs to cure.I turned my attention to the bowl. I decided to start the restoration on it by working on the damage on the inner edge of the bowl. It had darkening and some damage to the edge. There were burn and reaming damage marks on the edge. I worked it over with a folded piece of 220 grit sandpaper to give the edge a light bevel and remove and minimize the damage on the edge. When I finished with it, the bowl and the rim top looked much better.I wiped down the bowl with alcohol on a cotton pad to remove the shellac/varnish coat. It removed a lot of the shiny coat but the polishing with micromesh will remove the rest of it. I polished the rim top and bowl with micromesh sanding pads – dry sanding with 1500-12000 grit sanding pads. I wiped the bowl down with a damp cloth after each sanding pad. The briar began to take on a shine.    I paused the sanding with the micromesh to stain the rim top with a Mahogany Stain pen to match the colour around the bowl. Afterwards I picked up the micromesh pads 3200-12000 and completed the cycle to polish the bowl. I rubbed the briar down with Before & After Restoration Balm. I worked it into the briar with my fingertips. The product works to clean, enliven and preserve the briar. I let it sit for 15 minutes while I worked on the stem. After the time passed I buffed it with a cotton cloth to deepen the shine. The briar really comes alive with the balm. I was excited to be finishing this pipe. I still had work to do but thought I would take a look at the stem and pipe together. I put the stem in place and tried I tried to blow through it and only got read in the face. I tried to put a pipe cleaner through the button and it went into the area of the repair and stopped. I tried to push a wire through the blockage and it would not budge. My stem repair had sealed off the airway!!!!. I usually do a stem repair with a folded greased pipe cleaner in the airway. This time I tried the cardboard wedge that both Dal and Paresh have used many times with no issues, thinking this stem would be a great candidate for that. I made a wedge and fit it in place but it must have had a small opening at the end that allowed the repair material to go past it. The airway was sealed tight and hard as a rock! I set the stem aside and went to the Post Office to mail a package. While I waited for the clerk I had an idea. When I got home I tried it. I put the smallest drill bit I had in the chuck of my cordless drill and carefully drilled it through. I up the bit to the second smallest one and the airway was clear! Whew… but even more amazing is that with all the drilling and fussing at the button lip the repair did not chip or loosen. The repair was solid. That at least was very good news in the midst of this mess.I worked on the stem some more fine tuning the fit against the shank and the shape of the button and stem to get as close as possible to the pictures that I found and included above. I sanded and shaped and sanded and shaped… did I say sanded and shaped?? It seemed almost endless. I polished the vulcanite with micromesh sanding pads – 1500-12000 grit pads. I wiped it down with Obsidian Oil after each sanding pad. I used Before & After Pipe Polish – both Fine and Extra Fine to further polish the stem.  This Dunhill A Bruyere 35 Patent Billiard from 1936 is a beautiful looking piece of briar that has a shape that follows grain. It is a great looking pipe that came out looking even better after the cleanup and restemming. The Bruyere is an early finish that Dunhill specialized in making. The finish on the pipe is in excellent condition. The red and brown stain on the bowl works well to highlight the grain. The polished black vulcanite taper stem that I repurposed to replace the Yello-Bole stem adds to the mix. It is not the 1936 stem but I reshaped it to a close approximation. It will work until I find the proper era stem. I put the stem back on the bowl and buffed the pipe with Blue Diamond on the buffing wheel being careful to not buff the stamping. I gave the bowl and the stem multiple coats of carnauba wax on the buffing wheel and followed that by buffing it with a clean buffing pad. I hand buffed the pipe with a microfiber cloth to deepen the shine.

The finished Bruyere 35 Billiard is quite nice and feels great in the hand. Give the finished pipe a look in the photos below. I can only tell you that like the other pipes I am working that it is much prettier in person than the photos capture. The dimensions of the pipe are Length: 5 ½ inches, Height: 1 ¾ inches, Outside diameter of the bowl: 1 ¼ inches, Chamber diameter: 5/8 of an inch. The weight of the pipe is 31grams/1.06oz. Thanks for walking through the restoration with me as I worked over another beautiful pipe. Remember we are not pipe owners; we are pipemen and women who hold our pipes in trust until they pass on into the trust of the next generation.


Restoring a Thorburn Clark XL Rusticated Pipe


Blog by Paresh Deshpande

The next pipe that I picked up for restoration is a massive sized classic full bent Billiards shaped pipe that feels robust in the hands with a nice and comfortable feel in the mouth when clenched. It has the classic British shape which oozes excellent craftsmanship, very high quality of briar and vulcanite and screamed “VINTAGE”. No wonder then that this beauty had found its way in my grandfather’s rotation (seeing the condition that it was in) in the past and now will surely be part of my rotation too!!

The stummel of this pipe appears to be a combination of rustication and sandblast!! It is unique and it sure does feel good to run your fingers over the surface of the stummel. There is a thin strip of smooth briar surface at the bottom of the shank which bears the stampings on this pipe. It is stamped as “THORBURN CLARK” over “MANCHESTER”. To the left of this stamp towards the foot of the stummel, it is stamped as “XL” at an angel and to the right towards the shank end it is stamped with the letter “R”. The set of stampings on this pipe are all crisp and in block capital letters. The vulcanite stem bears the logo “TC”, in separate capital letters.While researching any pipe, the first site that I visit is rebornpipes.com since this is one site where I usually find well researched information on any brand that has anything, even remotely related, to pipes!! Now, till the time I got this pipe on my work table, I had not heard or read anything on this pipe maker and now that I have decided to work on it, rebornpipes does have a write up by Steve on a similar shaped pipe, though considerably smaller and with same rustication pattern as the one on my work table, from this carver. He had thoroughly researched this pipe and makes for an interesting read. Here is the link to the write up: https://rebornpipes.com/2017/12/03/restoring-a-thorburn-clark-rusticated-bent-billiard/

From the information that I read and the fact that this pipe came from my grandfather’s collection, this one could be dated from the period 1930s to 1940s.

INITIAL VISUAL INSPECTION
As observed with maximum of my inherited pipes, this too has a thick layer of cake in the chamber with overflow of lava on the rim top. The inner rim edge appears sans any damage and would be confirmed once the chamber has been reamed. The condition of the walls of the chamber can be commented upon once the cake has been taken down to the bare briar. However, the external surface of the stummel feels and looks solid and hence I do not foresee any major issues surprising me later. The ghost smells are very strong in the chamber.The rim top surface on this pipe as also rusticated like the rest of the stummel. As is commonly seen on rusticated or sandblasted pipes with some serious age on them, the crevices in these are always filled with dust, dirt, oils, tars and grime from all the years of smoking and storage. This one is no exception to this observation. The grooves of the sandblast are filled with dust while the small smooth bottom of the shank which bears the stamping is covered in dust and grime. The fact that the textured patterns of the rustications are dusty and filled with dirt is accentuated more due to the contrast of dark and medium brown stains on the stummel and the shank. The briar is looking lifeless and bone dry and has taken on black dull hues. The mortise is full of oils, tars and gunk and air flow is restricted. As usual, it is the stem that has suffered the maximum damage. Heavy oxidation, calcification in the bite zone, chewed and deformed button edges, heavy tooth chatter and a large through hole near the button edge on the lower surface are some of the common issues I have observed on maximum pipes in my inheritance. This is no exception. The tenon and slot on this stem is clogged with dried gunk making for a very laborious draw. The following pictures speak for themselves. INITIAL CLEANING BY ABHA…
The initial cleaning on this pipe was done by Abha, my wife (she has cleaned up around 40-50 pipes and these have now reached me for further restoration). She reamed out the complete cake and further smoothed out the chamber walls with a folded piece of 220 grit sand paper. She further cleaned out the internals of the shank with pipe cleaners and alcohol and cotton buds. She followed the internal cleaning of the shank with external cleaning of the stummel using Murphy’s Oil soap and hard bristled tooth brush and dried it with paper napkins and cotton cloth.

Next she cleaned out the internals of the stem air way and immersed it in “Before and After Deoxidizer” solution along with the stem of other pipes in line for restoration. Once the stem had soaked overnight, she cleaned the stem under running warm water and scrubbed the raised oxidation from the stem surface using scotch brite pad. She further removed the oxidation by scrubbing the stem with 0000 grade steel wool and applied a little olive oil to rehydrate the stem.

ONCE THE PIPE IS ON MY WORK TABLE…
The cleaned up pipes presents a very clear picture of what needs to be done to restore this pipe to a decent and smokable condition. I really cannot thank Abha, my wife, enough for all the help and support that she extends me in my pursuance of this hobby. I proceed to carry out my appreciation of the work that needs to be done on this pipe to restore it.

As with all the cleaned pipes that Abha packs, there was a note in the zip lock pouch with issues that she had observed in the pipe. The first point was that she was not happy with the way the stummel had cleaned up. Here are the pictures of the pipe as I had received. To be honest, the pipe had cleaned up nicely. What she thought is grime in the rustications is in fact the old stain which had loosened up. A simple wipe with Murphy’s Oil soap will clear out the loosened stain leaving behind a well set coat of darkened stain.

The second point was that the chamber has developed heat fissures. Close scrutiny of the chamber walls made me realize that there is still a very thin layer of cake in the chamber and it is my experience that this gives an appearance of heat fissures! Only after the cake has been completely removed will I be able to confirm presence of heat fissures or otherwise. There are traces of lava overflow deeply embedded in the rustications of the rim top surface. I now know what I should be gifting Abha for our forthcoming Anniversary (of course, a soft brass bristled wire brush as she does not have one…LoL!!). The outer and inner rim edges are in good condition. However, the ghost smells are still all pervasive. This would necessitate a more invasive internal cleaning of the shank and the chamber. The draught hole is dead center and at the bottom of the heel and should be a fantastic smoker. The stummel is clean with no traces of dust or dirt embedded in the nooks and crannies of the rustications other than what I have explained earlier. The stummel surface is solid and robust without any issues. The contrast of dark and medium brown stains looks gorgeous and should polish up nicely. This is really a well made pipe and the craftsmanship is right up in the ally of some really expensive and renowned brands. The mortise is clean. As expected, the stem is where major repairs are required. The button on the upper surface has completely worn down with deep bite marks as seen. The lower surface has a large gaping through hole very close to the edge of the button, exposing the stem’s air way. The button is completely worn out on the right side. Though an easy repair, it is time consuming. THE PROCESS
I embarked on the journey of restoring this pipe by addressing the stem first since it was damaged the most and would take considerable time to repair. Abha had done a fantastic job of cleaning the stem both internally and externally and this facilitated me to straight away heat the stem surface with the flame of a lighter which helps to raise the tooth indentation to the surface.I sand the stem surface with a 220 grit sand paper to even out the raised tooth indentation and remove what little oxidation that had remained on the surface. I follow it up by cleaning the surface with a cotton swab and alcohol. I wipe the stem with a cotton swab and Murphy’s oil soap to deep clean the surface. The stem surface is now ready for a fill.I appropriately folded an index card and covered it with a transparent tape which prevents the superglue and charcoal mix from sticking to the card. This is how it appears and fits in to the broken stem.I mix activated charcoal and superglue and fill the hole and the tooth indentations on the buttons and in the bite zone. I prefer to paint the entire bite zone with the mix and always apply a thick layer. This helps me in subsequent better blending of the fill with the rest of the stem surface by sanding it down. I set the stem aside for the fill to cure overnight.While the stem fill was curing, I worked the stummel surface. With my fabricated knife, I scraped out all the remaining cake from the chamber walls and followed it up by sanding with a 180 grit sand paper. This ensured that the cake was taken down to bare briar. I wiped the chamber with a cotton swab and alcohol to remove all the fine cake dust that was left behind. The amount of cake that was reamed out and that was after Abha had reamed and sanded it was surprising. But I was happy to note that there are no heat fissures in the walls of the chamber.With this reaming of the chamber, I had expected the ghost smells to be eliminated or at the least, considerably reduced. But that was not to be. I decided to address the issue of old odors in the chamber and shank by subjecting it to a cotton and alcohol bath. I wrapped some cotton around a folded pipe cleaner, keeping the tip of the pipe cleaner free of wrapped cotton as this would be inserted through the draught hole in to the chamber. This would form the wick for the shank. I tightly packed the chamber with cotton balls and filled it with 99% pure isopropyl alcohol using a syringe and set it aside. By next day, the cotton and alcohol had drawn out the tars and oils from the chamber and max from the shank. With tools at my disposal, I scraped out the entire loosened gunk (second picture) from the mortise and the airway leading to the draught hole. Am I glad that Abha’s fears of heat fissures in the walls were unfounded!! Next, I scrub the rusticated rim top surface and the stummel, cleaning it with a brass wired brush. This helped to dislodge the little overflow lava from rim top and the dried and loosened stain particles which previously were visible. I wiped the stummel surface with a cotton swab and Murphy’s oil soap. Next, I rub a small quantity of “Before and After Restoration Balm” in to the stummel surface with my finger tips and let it rest for a few minutes. I worked the restoration balm deep in to the textured rustications. The balm almost immediately works its magic and the briar now has a nice vibrant appearance. The stummel looks very handsome with the contrasting dark and light brown hues. Now that the stummel was nearly complete, I turned my attention to the stem refurbishing. The stem fill had cured well. Using a flat head needle file, I reshaped the button and roughly matched the fills with the rest of the stem surface. However, things rarely happen as you want them to happen and in this case, a few air pockets were revealed on both surfaces as I was sanding the fill with 220 grit sand paper. This is one phenomenon that I never want to see as it is involves a refill (time penalty) and still it is not always possible to address them completely!!I cleaned the surface with cotton swab and alcohol again and applied a fresh mix of activated charcoal and superglue. I set the stem fill aside to cure.Second round of sanding the stem and the end results… The air pockets are still visible in all their ugliness!! This was revealed when I had reached the end of my routine of sanding with ascending grit of sandpapers. Third round of fill and later sanding with 220, 400, 600, 800 and finishing with 0000 grade steel wool, I am happy with the results.I completed the polishing cycle of the stem by wet sanding the surface with 1500 to 12000 girt pads. The stem looks great with the fills nicely matched with the rest of the surface. I gave a final rub with “Before and After Extra Fine” stem polish compound to remove fine scratches from the stem surface. I rub a little quantity of Extra Virgin Olive oil in to the stem surface and set it aside to be absorbed by the vulcanite. The stem polished up nicely and the repairs appear good.To complete the restoration, I mount a cotton cloth buffing wheel on to my hand held rotary tool and applied a coat of Blue Diamond to the stummel and the stem to polish out the minor scratches.I refreshed the stem logo with a white correction pen and a tooth pick. The letter C appears slightly worn at the ends.With a cotton buffing wheel that I use for carnauba wax, I apply a coat of carnauba wax and continue to work on it till the complete coat of wax had been polished out. I finished the restoration by giving the entire pipe a rigorous hand buffing using a microfiber cloth to raise the shine further. The completed pipe looks fresh, vibrant and ready for its next innings with me. This piece of briar feels fantastic in hands with its textured rustications, classic size and will find a place of pride in my collection as a part of the memories left behind by my grand old man. If only it could tell me stories it had witnessed and what tobacco did my grandfather smoke in this pipe!! Thank you to all esteemed readers for joining me and walking with me through this restoration. Cheers!!