Blog by Eric Fleming
Eric and I have chatted about pipe restoration for some time now and when he picked up this Dunhill I asked him to keep me posted on his work on it. I have to say, he went far beyond anything I have done and really, what I expected when I saw the pipe. It is a very creative and innovative restoration that I thought you might all enjoy! Without further introduction or discussion, Eric will walk us through his process in the following pages. Thanks Eric for allowing me to post it on rebornpipes!
As a student of history and all things of antiquity I am a sucker for an old Tobacco Pipe. And as a result, when I ran into this poor old and somewhat disabled Patent era Dunhill I couldn’t resist the temptation to “try” to rehabilitate it. Configuring a plan of attack based solely on pictures is usually riddled with surprises and this plan was the usual. The damage was as adequately represented as an image can be but holding a thing in one’s own hands and soaking in the magnitude of it is another thing entirely. Upon unboxing, it was obvious that my plan was slightly premature.
The moment I concluded my purchase I moved straight on to Pipedia to confirm some of what I already knew (Dunhill Bruyere – Pipedia.html). This old boy was a Dunhill (shape 52) Inner Tube patent# 1130806/15 (1924-1926) Ao Bruyere. The history of the early Bruyere is interesting. By 1920 Dunhill was making all of their stummels in house and the Bruyere of this time was “usually” made of Calabrian briar due to its physical traits and ability to take on a deep red stain (Pipedia Dunhill Dating Guide – Pipedia.html).
Here are the Before pics. The Dunhill had some things going for it. The original Vulcanite stem had already been polished and exhibited very little external wear. There are a few indentations near the tenon that a previous owner decided, rightly, to leave alone rather than reduce the diameter where it matches up to the stummel. This pipe is almost 100 years old. A little original wear is, in my opinion, a mark of character. Proof of a past existence if you will. The tenon to mortice fit was surprisingly tight. Extreme care was taken to remove it. This will have to be remedied before it is re-inserted. The stem’s draft hole was heavily caked in tar.

 The stummel was in reasonably good shape everywhere but the rim. This poor old boy survived many violent blows over the years, Severe mushrooming and on one side it chipped out at some point. A crude epoxy fill was employed to fill the damage. The rest of the stummel had almost no original finish and was clean internally and sooty externally. The factory stampings were difficult to read, rather thin but enough to make out. I was hopeful that cleaning would bring them back some. The bottom of the bowl was hard to make out since a very thick bowl coating had been applied. Shining a light into the bowl revealed that the bottom of the bowl was eroded below the draft hole. This pipe might have been someone’s favorite. It has been smoked heavily.
 It was now time for deep cleaning. Aiming towards the low hanging fruit, I decided to deal with the stem first. The draft hole had an impressive build up. The first alcohol soaked bristle cleaner was tough to push through and many were employed to finish the job. Toward the end I couldn’t help but wonder if I was removing the end result of a fine smoke that took place nearly 100 years ago.
 Now on to the stummel. Because it was quite clean already I decided to skip the soapy water scrub and just scrub the outside with Murphy’s oil soap concentrate and a toothbrush. This action effectively revealed the briar under the grime and I was quite happy to see that the stampings were clearer and more visible. Still light but legible.
Next was the issues with the inside of the bowl. The coating was hiding much of the real condition of the pipe. Cotton balls were inserted into the bowl and wadded up tissue pressed into the mortice. 99% alcohol then poured in to perform its overnight magic. The next morning the coating had been dissolved, easily removed with a wipe. Now the real condition is revealed and it wasn’t all that good. The epoxy fill was deep and the side of the bowl had light erosion from the many smokes this pipe had delivered. The erosion at the bottom of the bowl was deeper than originally perceived. Not near burnout, but about 1/8” below the draft hole. At this point a decision had to be made as to how to proceed. The epoxy fill was poorly done and would likely cause future problems if left alone. The mushrooming of the rim was unlikely to be steamed out and the height of the rim was obviously below it’s original state. After a day of rolling it around in my mind I decided that there was no other acceptable option but to remove the offending rim and replace it. The erosion would also need to addressed.
For me the easiest way to remove the top of the rim is with my old manual knee mill. Using the disc sander an even flat is ground on the top of the rim. The stummel is then placed in the machine vise with protective strips of leather. The leather not only protects the briar from indentation but it also adds some traction for the jaws to grip. A dial indicator is then used to indicate the flat on the top of the rim. This operation could have been done with the disc sander alone but I am partial to the control allowed by the mill. After the mill the refreshed rim is lightly sanded by hand to 400 grit on a sanding block.
 To fabricate a new rim a small piece is cut from a chunk of briar left over from another build and sanded flat on one side then milled flat and parallel on the knee mill. The only references I had to estimate the correct height of the bowl were the measurements taken before the rim removal and an image found online of a 52 shape Dunhill.
By the way, The shape 52 is listed as a Bent Low Pot. My measured estimation is that once the rim was removed there needed to be .200 added back. This is not an exact science. The .200 thick block of briar then has two diameters marked with a compass for outside diameter and inside diameter, leaving a little extra on each of course, and taken to the scroll saw to be roughed out.  Glue up comes next. All briar surfaces to be bonded are wiped with alcohol to remove dust and or oil residue. The epoxy I have grown fond of is West Systems G Flex 2 part epoxy. It is incredibly durable, neutral when cured and easy to work with. Since it is undesirable to have an epoxy filled bowl, I have found it advantageous to mix the epoxy, wait 45 minutes (the listed pot life) and then apply to both briar surfaces. At this point the epoxy is gel like and will not run. The stummel is clamped in a vise and remains for 24 hours.
  Once the rim replacement has cured the tedious hand work begins. Extra material is removed with aggressive hand files. Then small needle files are used to bring the profile close to finished. To match and blend the two surfaces at the end a ¾” wood dowel wrapped in 150 grit sandpaper is used to mate the inside diameters while a small thin sanding block with 150 grit is used to mate the outside diameter. The entire stummel (except for the stampings) are at this point sanded from 250 grit thru 2400 grit micro mesh. The stamped parts of the stummel sanded 1500 thru 2400 grit micro mesh only.
 The erosion damage to the bottom of the bowl is the next focus. I have used “pipe Mud” with success in the past but it can be precarious and doesn’t always stay put long term. I wanted a more permanent fix and didn’t feel the need to bore a hole through the bottom of the stummel for a plug. So, I shot a call to my pipe making and repair mentor Mark Tinsky of American Smoking Pipe Co. Mark has been making Artisan Pipes longer than I have been alive, tolerates my frequent calls and emails, and is an all around great guy and wealth of knowledge. Upon presenting my Dunhill issue he shared with me one of his bowl bottom repair tricks. A mixture of Elmer’s multi purpose glue, Briar dust and Charcoal dust mixed into a black paste. This was a new one to me. When I asked Mark “why not Pipe Mud”? He replied… “I don’t smoke Cigars”. Apparently, Elmer’s glue is an organic material and when mixed with both briar and charcoal holds up to the temperature and general abuse well. The Briar dust was left over from the rim removal and the charcoal dust was made from Willow Charcoal sticks easily found at an art store. The mixture is easy to adjust for texture and also easy to apply. The draft hole of the stummel was plugged with a pipe cleaner and the mixture slowly scooped in to the desired level which was almost to the top of the cleaner. The stummel was then set aside to cure for 24 hrs. The next day I had a high and flat surface at the bottom of the bowl. A ¾” wood dowel was taken to the disc sander and slowly profiled to my desired radiused bowl bottom. This took several attempts. Then a small diameter was cut from a sheet of 80grit sandpaper and glued to the radius of the dowel. I used super glue for it’s fast adhesion. The bottom of the bowl was then sanded with the abrasive dowel until the desired depth was achieved. The result was surprisingly good. The shiny dark color was noticeable but very uniform to the bowl.


 All that was then necessary to complete the repairs to the inside of the bowl was to address the light erosion to the sides. Since they were shallow It was decided that Pipe Mud would be a good solution. A nice Maduro was sacrificed to fulfill my pipe repair needs. You owe it to yourself to employ a “good” cigar for this purpose. Not only is it a nice change of pace but a fine cigar actually produces a higher quality ash. Using a dropper, I slowly added water to the ash. This can easily be overdone. If the mixture becomes shiny, you have added too much water and need to add more ash. If the mixture is too dry it wont stay put. I experimented before using it the first time. I am glad I did. The Pipe Mud was then scooped into the bowl, not allowing it to settle in the bottom and then worked into the erosion with a finger. The Dunhill was again set aside for the day.
 With the Dunhill repaired, sanded and ready for dye I had reached a point of concern. How do I blend this light colored briar to the rest of the stummel without it looking like a repair? I had previously researched the old Bruyere finish used in this era Dunhill. Apparently, it consisted of a light brown dye under a dark red dye. A few examples were found online and saved for comparison. The light briar of the repair then received 6 coats of dark brown dye lightly polishing each back until it was darker than the original briar color. The rest of the original stummel received one coat of light brown dye and polished back. At this point I tried to blend the light into the dark for a seamless look. Then the dark red was lightly received and polished back. The result was not great. The original part of the stummel looked nearly identical to the sample images I had found but the repair was still obvious.


 With no other option I gave the repair many coats of dark red overlapping onto the original briar to try to create a pure dark red blending into the lighter dark red. This took several tries and applications. In the end, I was not able to perfectly match my sample images due to the very dark rim, but I think it’s better than having a obvious mismatch that would surely stand out. Indoors the repair is almost invisible. Outside in sunlight it can be faintly seen. Because I was a little hesitant to mess with this time consuming and difficult dye job, it was decided to take the light-handed approach to waxing the stummel. Crystal Clear Paste Wax was lightly rubbed on with a soft clean cloth and polished off. Letting it sit for 30 minutes, polished again and re-applied 3 times. This approach is probably not as durable as pure carnuba wax applied with a buffer but I was not willing to risk spoiling the hard won appearance.


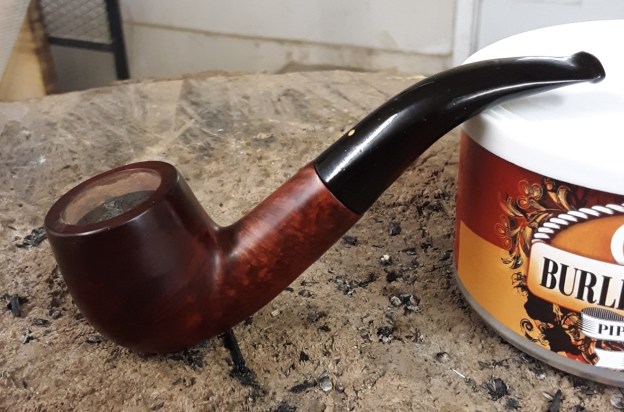
 Normally I would call this repair complete but there had been so much work done to the inner bowl I was uneasy to leave it as is. There are many versions of Bowl Coatings but from what I have read and heard they all server the same purpose. To protect the inner bowl from heat damage. At this point I had a glue concoction for a bottom and pipe mud lightly coating the sides and epoxy joint. That is worth protecting. I decided to go with another of Mark Tinsky’s suggestions and use the honey/charcoal version of the bowl coating. A couple drops of honey were placed in a small bowl. Water was mixed in with it 1 part honey to 3 parts water to create a very thin yet sticky liquid. I still had charcoal dust laying around from earlier. Using a pipe cleaner bent in half It was dipped into the honey water and lightly swabbed on the entire inside of the bowl. The charcoal then dumped into the bowl, a piece of cardboard held over the rim and a good blow into the draft hole to scatter the charcoal and clear the draft hole. It was then let sit for a few hours and the charcoal dumped and blown out. This Old Dunhill has been rehabilitated and is ready for a few more years of service.
 I learned a lot from this project. It is the most involved pipe repair I have attempted to date and has opened my eyes to the possibilities from this point on. Because I know this project could not have been a success without the incredible depth of knowledge that was shared with me I would like to thank those individuals for their giving nature.
I have been reading rebornpipes for years and have structured much of my method after Steve Laug’s style of pipe repair. I don’t think I would have started refurbishing pipes if it were not for this Blog and am honored to be a part of it.
A shout out to Mark Tinsky as well. I doubt there is any aspect of pipe repair or pipe making that this man has not experienced. His patience with me has been instrumental and is greatly appreciated.
Eric Fleming
Boise Idaho
