Tag Archives: Oxidation

Refurb on the London Made


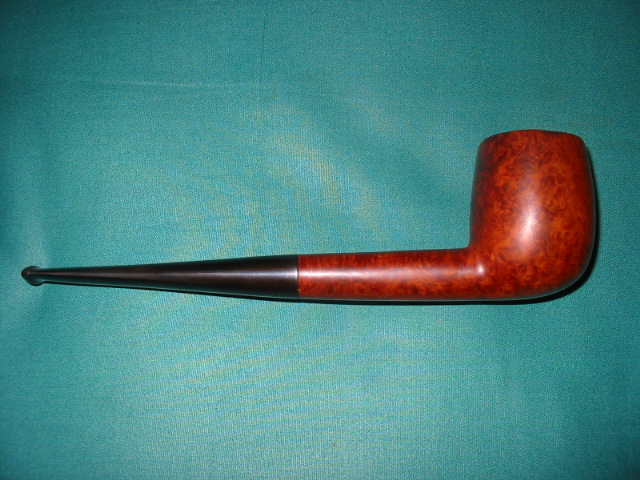
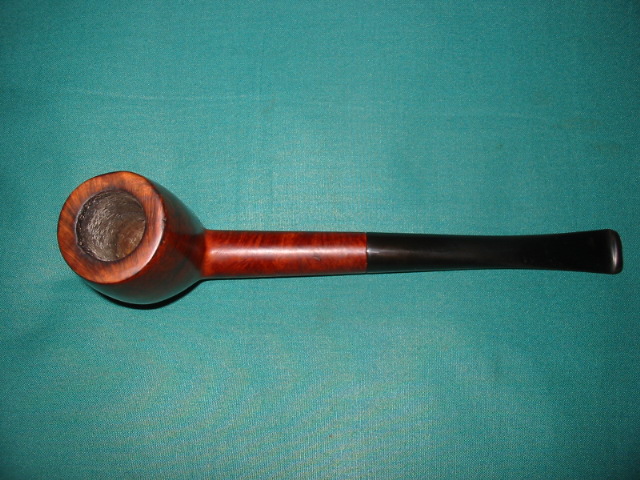
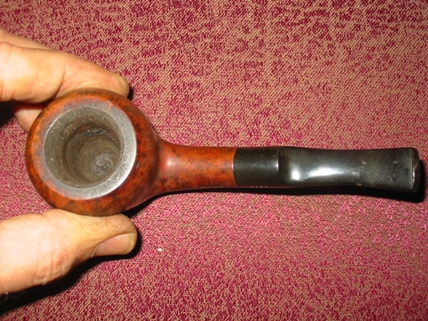
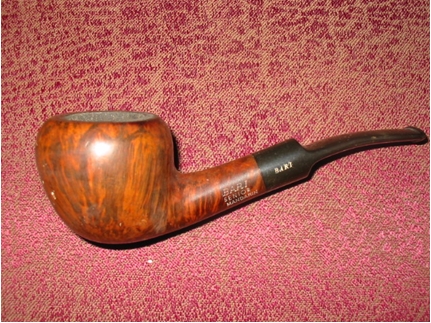
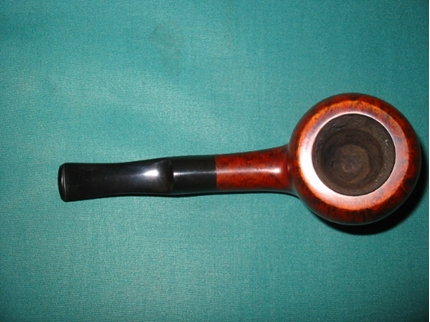
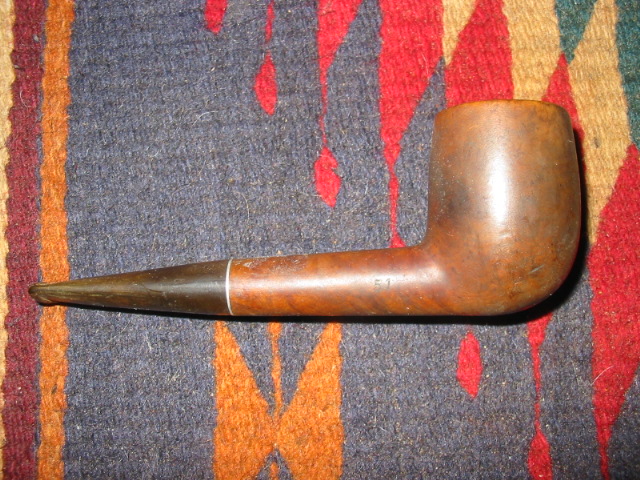
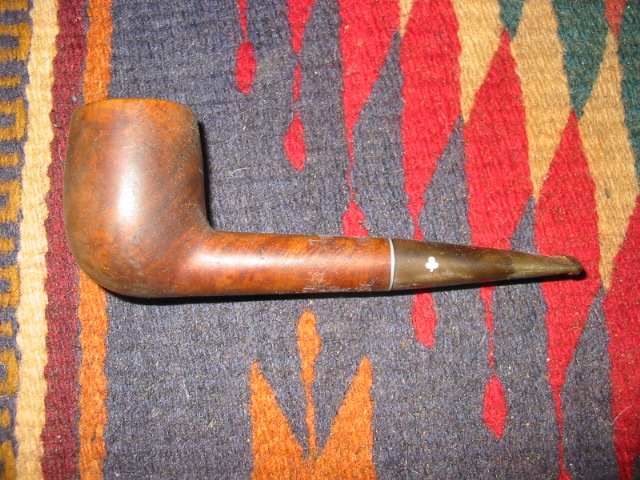
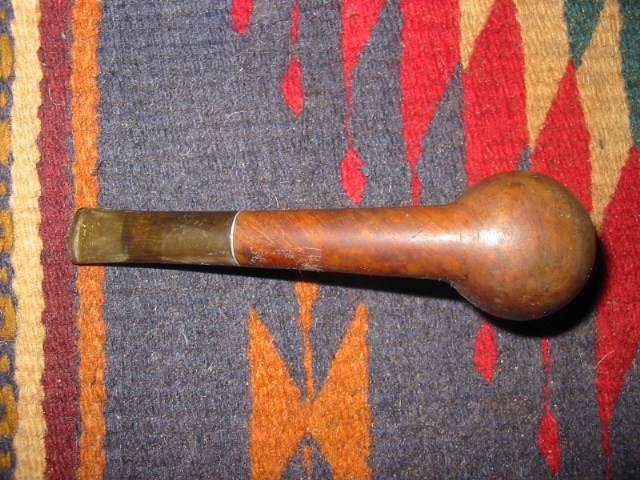
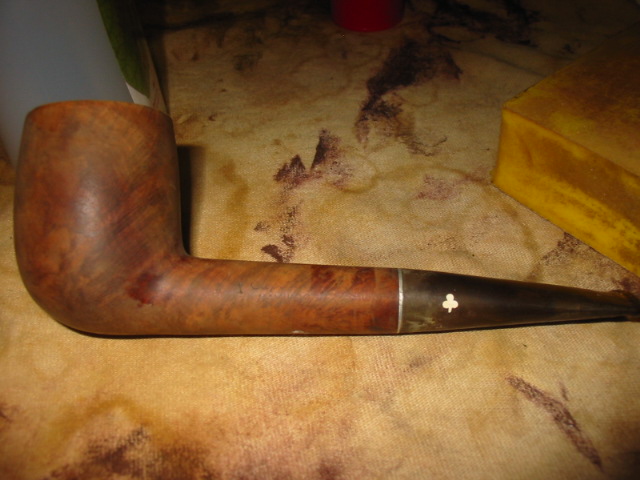
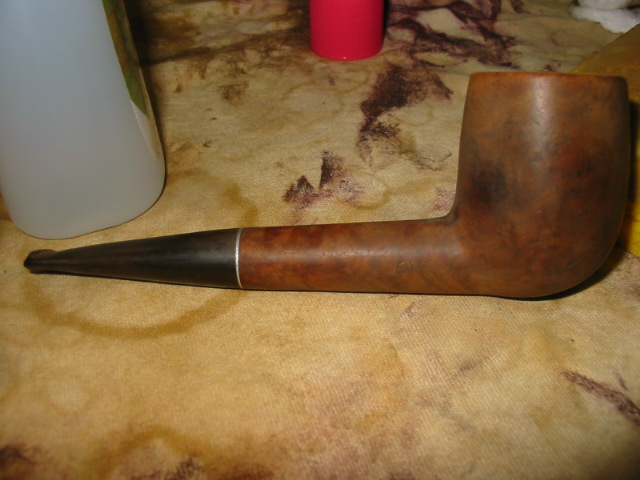
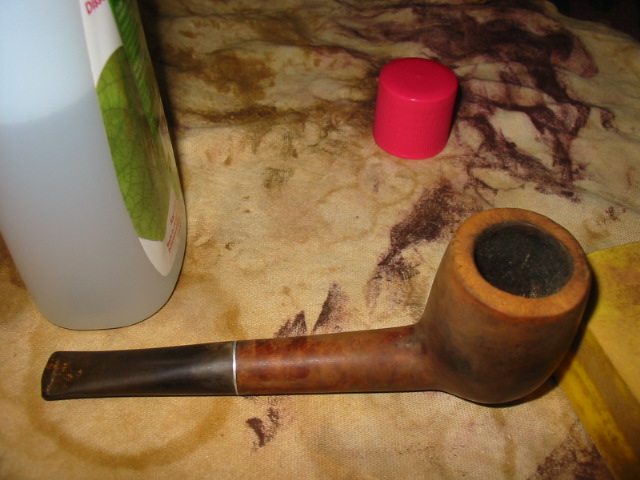
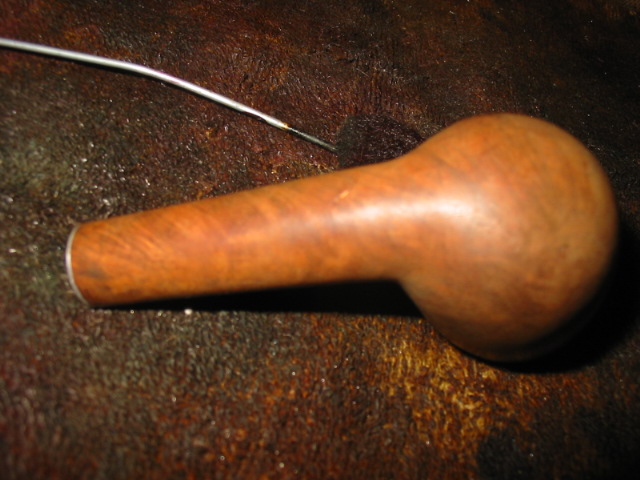
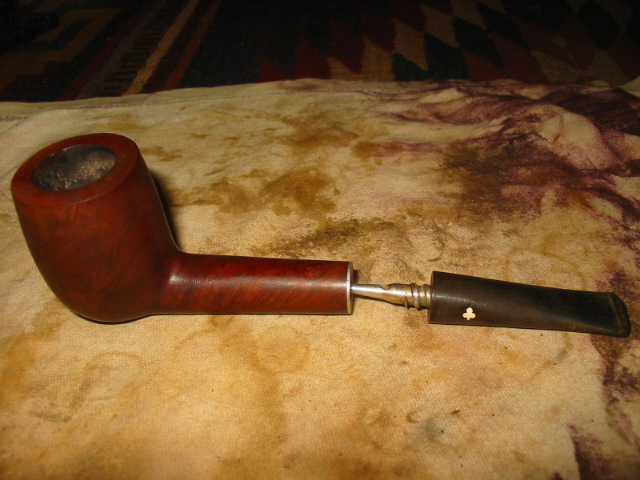
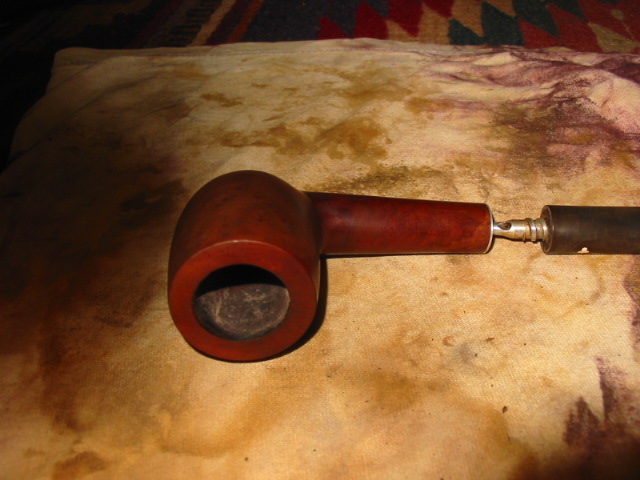
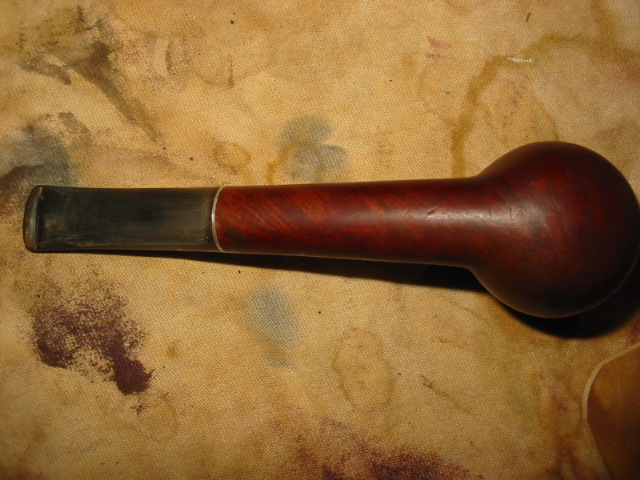
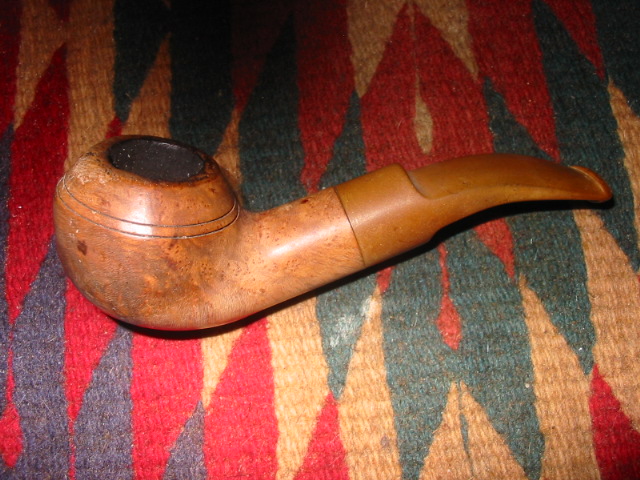
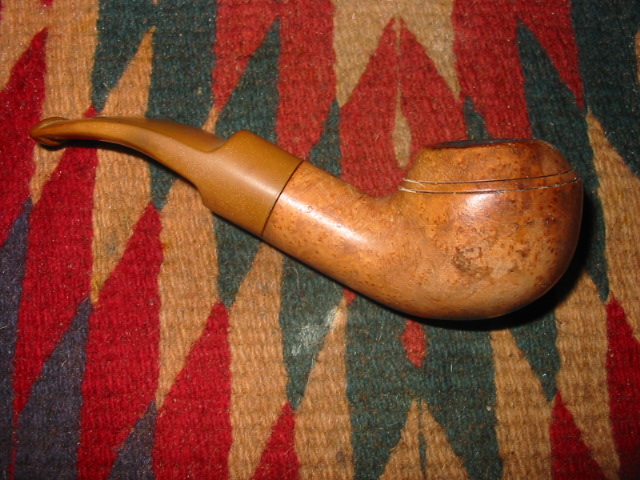
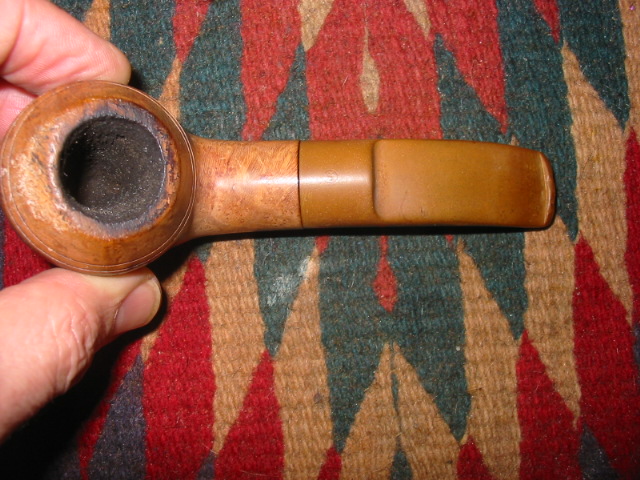
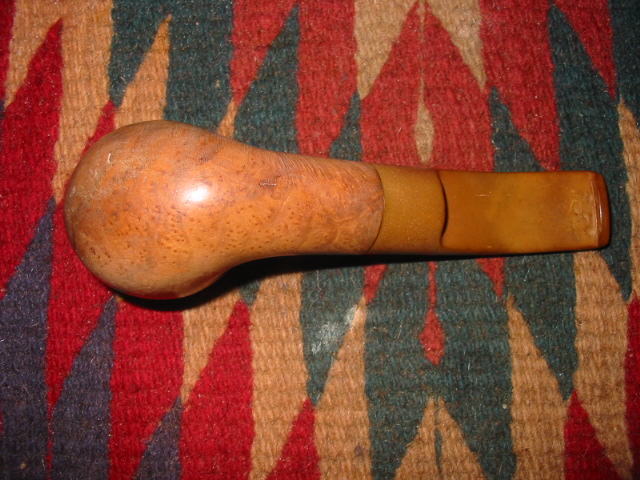
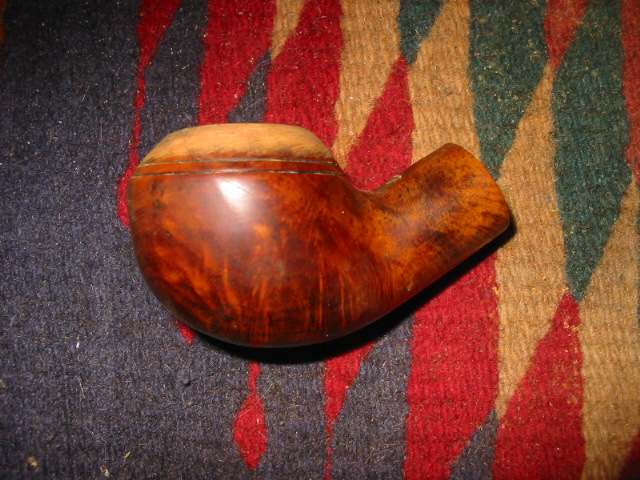
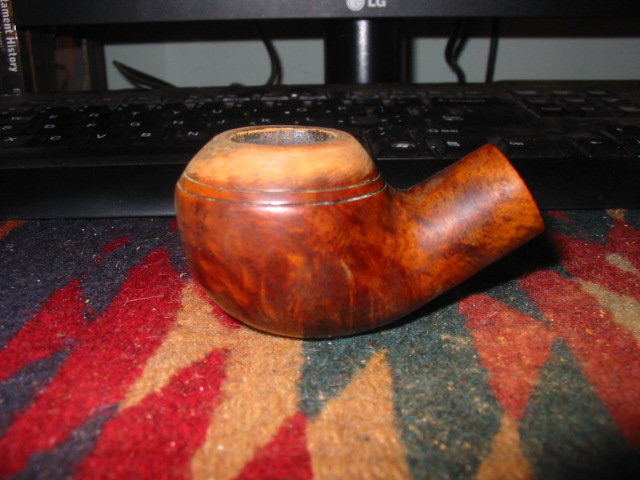
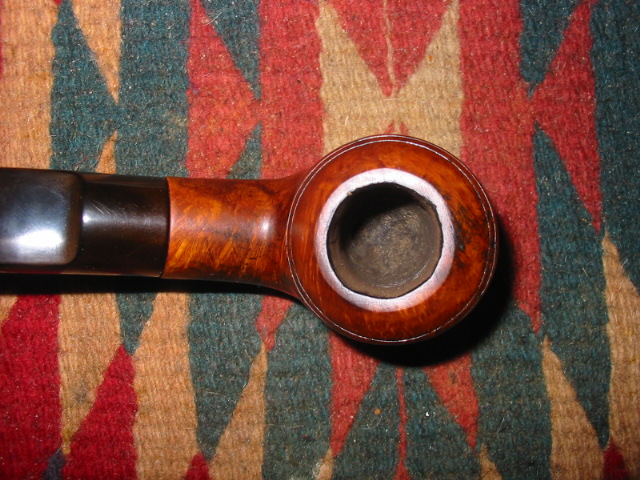
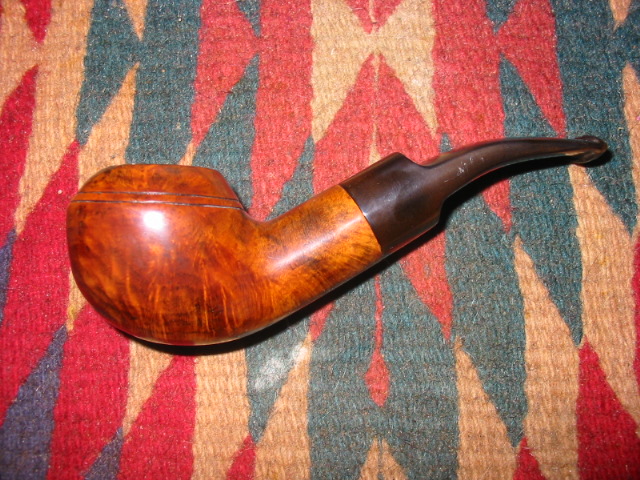
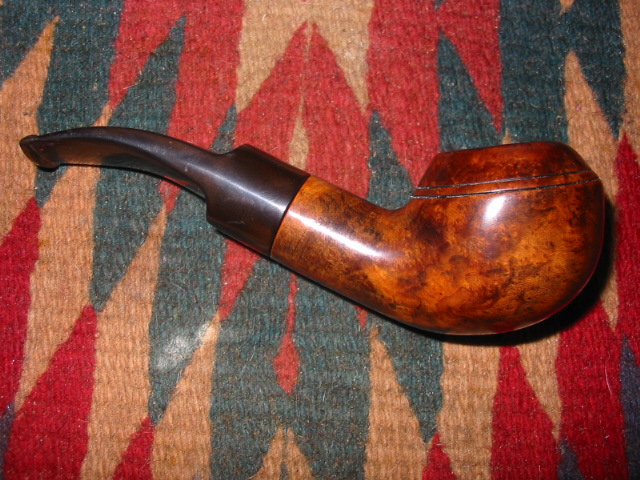
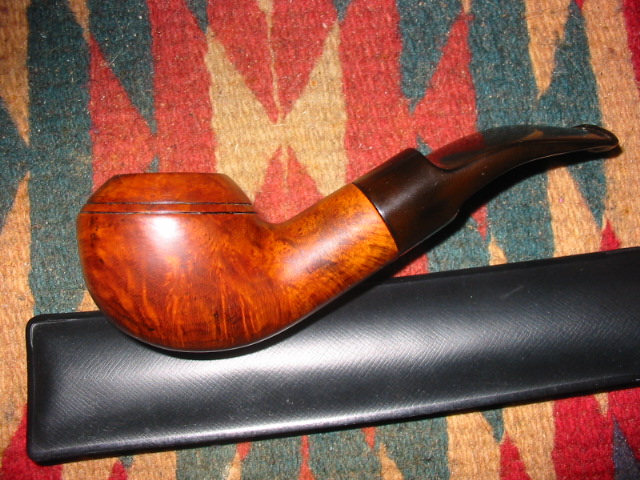
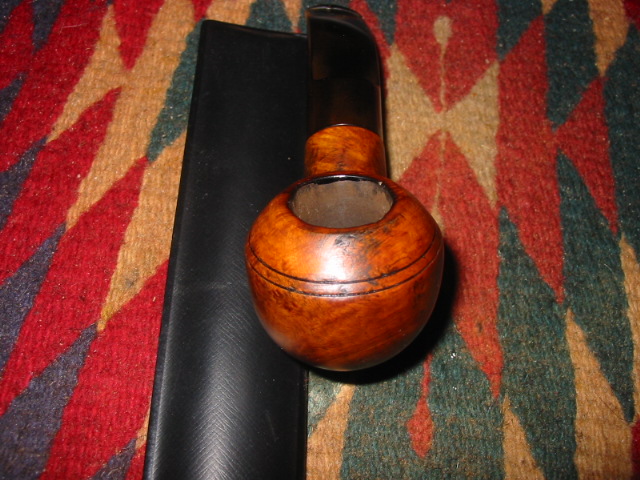
I finished up the refurb on a London Made billiard. It is a big pipe 7 1/2 inches long. This one was by far the worst one in the lot of three large pipes that I had in my box to refurbish. The rim was in very rough shape with burn marks on the right hand side and dents and scuffs from banging out the dottle. The bowl was heavily caked and the stem and shank were virtually plugged with tars.

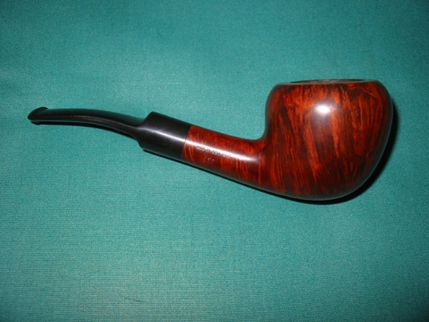
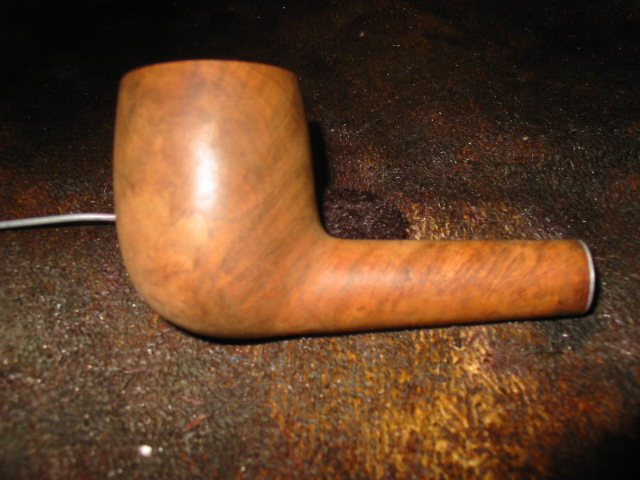
I reamed the bowl and cleaned the shank with pipe cleaners, cotton swabs and a shank brush and isopropyl alcohol. Then I gave the bowl an alcohol bath over night. The next morning I took it out of the bath, dried it off with a soft cloth. Once it was dry I sanded the bowl with micromesh sanding pads (1500-6000 grit) until it was smooth. I wiped it down with a cotton pad and some isopropyl to clean off the sanding dust and any remaining oils from my hands. I restained it with an oxblood aniline stain thinned with isopropyl alcohol.

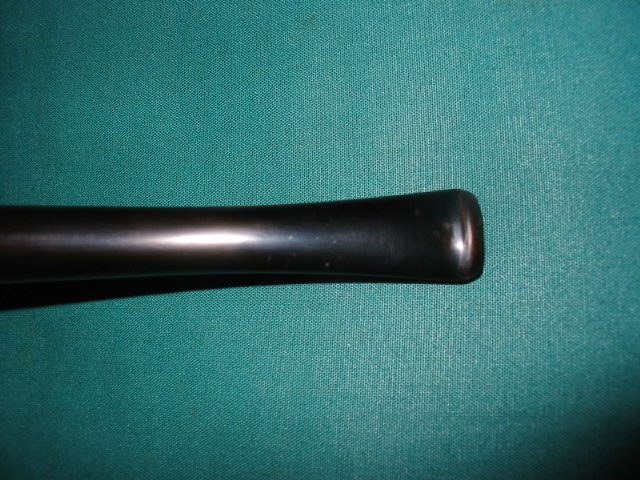
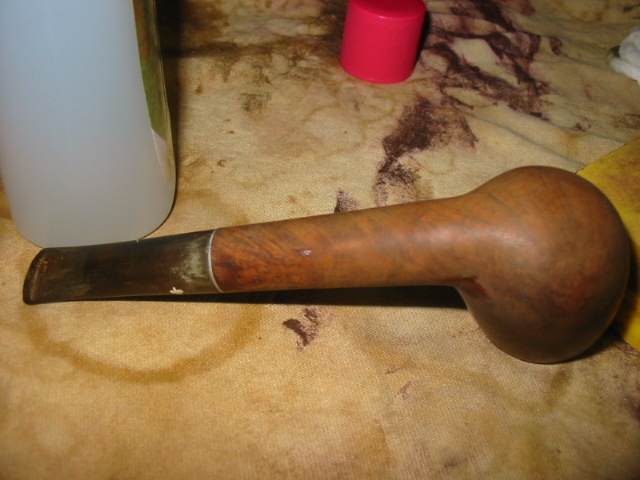
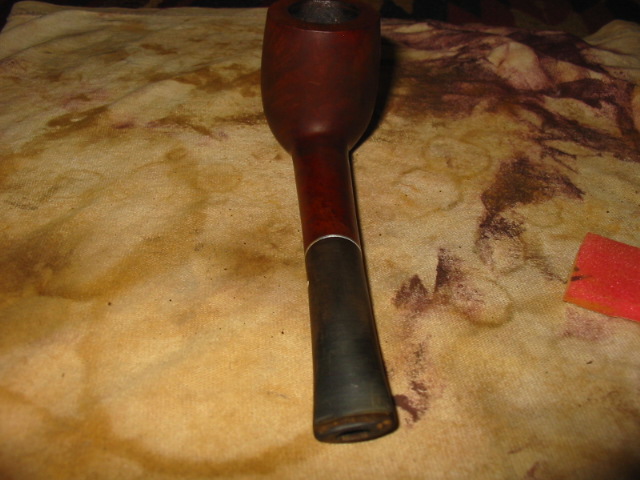
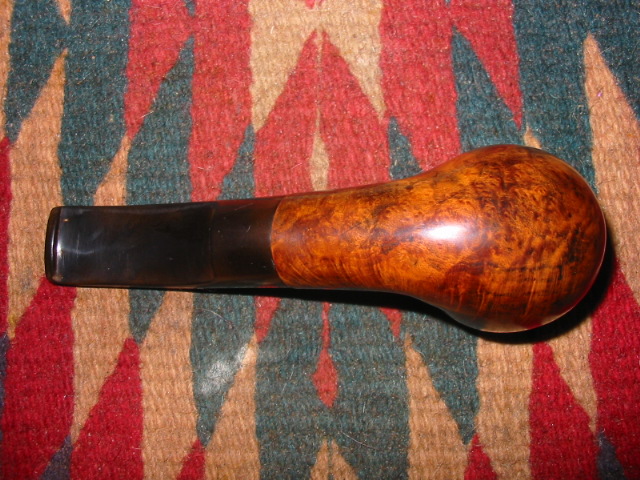
I went to work on the stem after that. The stem was in bad shape. There was a very deep cut mark on the top of the stem about a 1/4 inch from the button. There was also a bite through hole on the underside of the stem. I cleaned and sanded the stem until it was black once again. I left the area around the button, on top and bottom, a bit rough and then filled the cut on the top with krazy glue. I greased and inserted a pipe cleaner in the slot and then filled the hole with krazy glue. Once the glue was completely dry I sanded the two fills I made with sand paper – 400, 600 grit, and then micromesh sanding pads from 1800-6000 grit. (I have read of concern by different folks on how the super/krazy glue can melt or cause damage on vulcanite. I have now been using this process for several years and never had a problem. I have used it on both vulcanite and Lucite. In the past weeks I have also used it on a nylon stem without any probems.)

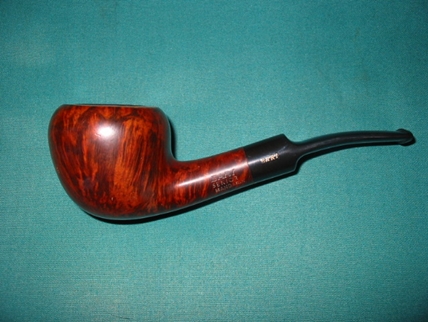
I took the pipe to my buffer and finished the refurbishing with a buff of White Diamond to polish the finish on the bowl and the stem. I gave the entirety several coats of carnauba wax and buffed it with a clean flannel buff to give it a shine.

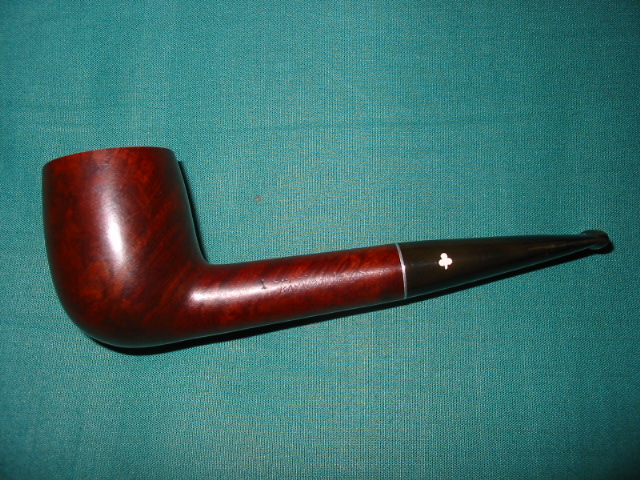
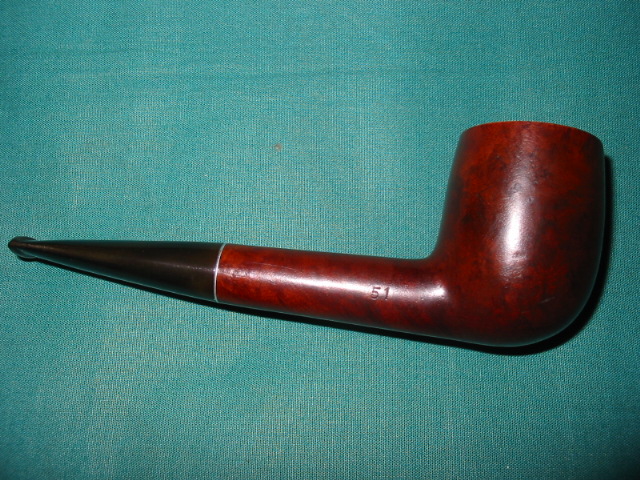
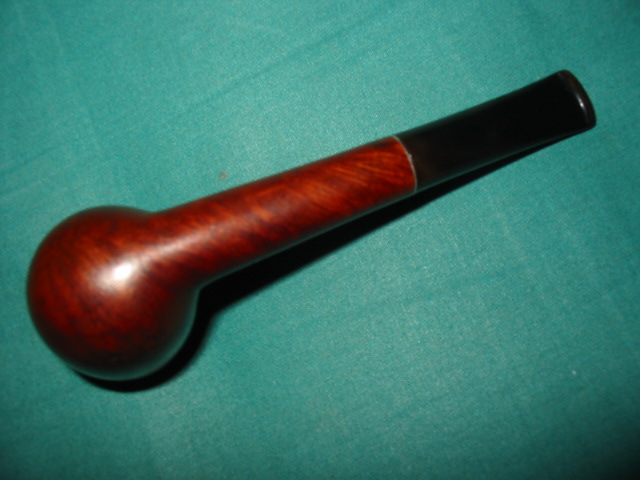
Here are the pics of the finished pipe (once again I forgot to take pictures of the pipe before I worked on it). Thanks for looking. ImageImageImageImageImage

Dr. Grabow Colour – Damaged and Reborn


Blog by Steve Laug

I have had this old Dr. Grabow Coloured pipe for a long time. It had damage to the colour coat and to the rim. I kept putting off doing anything with it as I could see no way of repairing the colour coat. It had the nylon stem as well with the Medico filter system. It was a screw mount tenon. The stem was covered with tooth marks and I just did not want to do anything with it… until yesterday.

Yesterday morning I took the pipe out of the box of pipes for repair and wiped it down with some acetone to see if I could clean up the bowl. At this point it was my plan to find some of the same coloured paint and respray the paint on the bowl to fix the spots where it was scratched off. I put the pipe bowl in my pocket and took a trip to Walmart to see if I could match the yellow colour of the paint. I went through about 6 or 7 different yellow colours and none matched. I stuck it back in my pocket and headed home. By this point I had decided to strip the bowl back to the wood and see what was under the paint. I had always heard that the bowls used in these pipes were pretty devoid of grain and had many fills so I figured what did I have to lose on stripping the paint.

I dropped the bowl in the alcohol bath for several hours while I was working on other things around the house. My hope was to loosen the paint coat not dissolve it into the water. Isopropyl should not dissolve the paint but it would certainly soften the paint and penetrate under the paint coat through the scratch marks in the surface. After I removed the bowl from the bath I used a sanding pad with medium grit and rubbed it across the painted surface and the paint began to peel back very easily. The next series of three photos show the effect of the paint coming off with a very light sanding.

I continued to sand the paint coat until it was gone. The next series of four photos show the bowl after the sanding. The paint coat is gone; all that remains is the light coating of yellow haze that will come off with a quick acetone wash. Once the paint was gone I was left with a pretty bland block of briar. There were fills around the front of the bowl and the sides. The shank, right side had a large fill that extended most of the length of the shank. The rim was in great shape with no dents of burns. The inner bevel on the rim was in great shape. I reamed the bowl to clean up the inside and the softened cake. It came out smooth and fresh. I cleaned the shank to remove and of the remaining tars and oils.

Once I had the internals cleaned up I washed the bowl down with a cotton pad and acetone. This removed the remnants of the yellow paint. It is amazing to me to see the amount of yellow colouration that came off with the acetone. The wood had quite a bit of yellow pigment on the surface of the bowl. I washed it down until the pads remained white. I sanded the tooth chatter and marks on the nylon stem (did I ever tell you how much I hate these nylon stems?? No? Well they are truly a pain). I was able to get the majority of the tooth marks out with emery cloth and then 240 grit sandpaper. I attached the stem to the bowl to have a look at what I had to work with  and where I should go with the finish work.

The fills seemed pretty disguised in the light colour of the briar so I decided to do a bit of an experiment. With a pipe of this calibre what do you have to lose? I stained it with a black aniline stain, flamed it and stained it a second time. My hope was that the fills would be hidden well by the stain coat. At first glance they seemed to remain hidden under the stain. I took the pipe to the buffer once it was dry and buffed the bowl with Tripoli to give it a shine and polish. As I did that the fills really stood out. The matte finish of the black hid them but the shine made them stand out. In the second photo below you can see the round fills on the front of the bowl. The one on the shank also stood out a bit.

The next series of photos show the pipe after a buff with Tripoli and White Diamond. The fills on the front now appeared to be a pinkish/red colour under the black coat. The one on the shank also looked pinkish/red. In the second photo below you can see where I restained the fill area on the shank. It was a large fill shaped almost like a moustache. Once it was dry I buffed it again with a light touch. The fills were just too obvious and ugly in my opinion. I even tried giving the pipe a top coat of dark brown stain to see if that would hide them. It did not. So I set the pipe down and went to supper. While I was eating I thought about the possibility of rusticating the bowl and giving the pipe a whole new look.

I took out my modified Philips screwdriver that I use for rustication and went to work on it. The screwdriver has the x pattern and a point. I used my Dremel to cut out the point and create four points with the remaining tip. It has a handle which I pad with a thick cotton cloth so that I can push it into the wood and minimize the discomfort on my palm from pressing. 

In the picture above you can see the work of rustication. The picture below shows the red coloured fills on the front of the bowl that made the decision to rusticate pretty easy for me.

I worked my way around the bowl as is seen in the next series of photos. I worked the front and then the bottom of the bowl and worked my way up each side of the bowl. In this case I decided that I wanted to see what the pipe would look like with a rusticated bowl and a smooth shank so I left the shank untouched with the rustication until I had finished the bowl.

The next three photos show the rusticated bowl and smooth shank look of the pipe. It just did not work for me. I did not like the look. As an aside – one of the great things with the rustication tool I use is the ability to use it in tight spaces and leave the surrounding surface untouched. By the way you will also note the photos that I left the rim smooth as well. 

The next two photos show the putty fills that were used. They seemed to have been white putty that was chalky when I scratched into it during the rustication process. You can see the location and the size of the fills in these photos. I am glad that I decided to rusticate this bowl.

I wrapped the shank and stem junction with a cellophane tape in multiple layers and extended onto the shank a quarter inch. I wanted to make a smooth band that would not be rusticated and match the smooth rim that I was leaving. The tape gave me an edge so that I would feel that as I twisted the tool in rusticating the shank. I also would give an edge to put the teeth of the tool against when I twisted it into the wood of the shank. The next series of photos show the rusticated shank. On the first one you can see the size of the fill on the right side of the shank. It also was the same white putty. As I hit it with the rusticator it left a white chalky residue. You can also see the intent of the band on the shank and the rim of the bowl being left smooth and what that would look like in contrast with the rough finish.

When I had finished the rustication I removed the tape guard and then sanded the band to get it smooth and to bring out the grain with dark undercoat.

Once that was complete I stained the pipe with a black aniline stain. I applied it heavily and then flamed it. The flaming sets the stain deep in the grooves and recesses of the rustication. I gave the rim and the band a coat of black as well. Once it was on I rubbed it off with a soft cloth to get the effect that is visible in the pictures below.

Once the stain was dry I worked on the smooth areas of the bowl – the rim and the band – with micromesh pads from 1500-6000 to polish them and smooth them out. I also worked on the nylon stem. It was a pain. The material scratches no matter what you do to it. And as I learned a long time ago it does not work to buff it as it has a very low melting point. So I sanded it with increasing grits of wet dry sandpaper – 400 to 600 grit and water and then sanded it with wet micromesh pads from 1500-12,000 to remove the scratching. I polished it on the buffer with blue polishing compound and a verrrrry light touch to give it a shine. I had waxed the smooth surfaces and the stem with carnauba and then wiped the pipe down with a cloth impregnated with Briar Wipe. Here is the finished pipe. I think the experiment worked!

Reworked Jobey Shellmoor Apple


This is one I wish that I had remembered to take a picture of before I started working on. But I did not. Sometimes when I am in a hurry I forget to take the photos and this was one of those cases. I was on my way out the door so I took this pipe out of my box of pipes to refurbish, quickly reamed the bowl and threw the stummel in the alcohol bath and the stem in a bath of Oxyclean. You will have to take my word for it – it was a mess. Probably the worst looking mess I had in the box. The bowl was caked with a dark, tarry cake that smelled like roses. The blast was so clogged with grit and grime that you could not feel texture anymore. It was smooth and muddy black looking in colour. The rim was thick with tars and lava build up and the stem was a dark and deep brown from the heavy oxidation. I pretty much figured I would be working on this one for a while to clean it up. After I dropped it in the bath I went off to work and promptly forgot about the pipe altogether. In fact it was two days before I remembered I had left it there.

I went to my work table and took both jars that held the baths. I opened the lid not sure of what I would find when I removed the pipe parts. I took the bowl out first and dried it off with a cotton cloth I have here. Then I took the stem out of the Oxyclean bath. The water had grown cold and dark tea coloured and I wondered what I would find. I dried off the stem with a cotton cloth and put them both on the work table. I was amazed at the work the baths had done to both of them. I reamed the bowl back to bare wood so start over and then wiped the bowl down with acetone on cotton pads. The first four pictures below show the bowl and stem after the bath and the reaming. I then went to work on the inside of the shank and bowl and the inside of the stem. I used both cotton swabs as pictured below and also a series of shank brush, bristle pipe cleaners and regular pipe cleaners all dipped in isopropyl to clean out the shank and stem. I went through quite a pile of both to clean out all the dark tars and oils from inside the shank and stem. The aromatic that had been smoked in this one still survived the two + days in the alcohol and Oxyclean baths and the floral scent remained – not a Lakeland like floral more of a Mixture 79 floral smell. Once the swabs and cleaners were coming out white the smell was gone from the stem and shank.

I scrubbed the exterior of the bowl one last time with a soft bristled brass tire brush to clean out any remaining grit in the sandblast finish. Once it was clean I wiped it down one last time with acetone before I was ready to stain it. I used a dark brown aniline stain to cover the bowl. I flamed it to set the stain and gave it a second coat, flamed it again and then took it to the buffer and buffed it with a Tripoli buff. The stain was still too dark to my liking and also too opaque (though they are dark photos 1-3 below give a pretty accurate picture of the colour of the pipe after staining and buffing). I took it back to my work table and wipe the bowl down with acetone on a cotton pad to lighten the stain. The fourth photo below showing the underside of the bowl gives you an idea of what the stain looked like when I was finished with the wipe down.

I worked on the scratches and tooth marks on the stem with emery cloth (medium grit) first. I worked until they were gone and then used a medium grit sanding pad and a fine grit sanding pad to remove the scratches left behind. I switched to 240 grit sandpaper and took out the rest of the scratches and marks. I buffed the stem with Tripoli and White Diamond and then used micromesh pads on it. I started with the 1500 and 1800 grit sanding pads and then applied a coat of Obsidian Oil. I let it soak in and then rubbed it down with a soft cloth. I then used the rest of my micromesh pads from 2400-12,000 grit to finish sanding the stem. I rubbed in some plastic polish and wiped it off and then buffed the stem with some Blue polishing compound on my buffing wheel. The finished pipe was given multiple coats of Halcyon II wax on the bowl and carnauba on the stem. The colour of the bowl is precisely what I was aiming for and the stem just glows. I am not sure my photos capture the reflective quality of the buff but it is pretty amazing in person.

A Quick and Simple Refurb on a Bari Senior Mandarin


Blog by Steve Laug

This Danish pipe stamped Bari Senior Mandarin was in my pipe box for quite awhile before I got to it. You have to understand that at that point box of pipes awaiting refurb was full of about 300+ pipes. It is down to about 30 now. It was a busy winter and spring as I cleaned up the lot. It rains here in Vancouver for most of the winter, so refurbishing is a nice dry past time.

The Bari Senior Mandarin came out of the box looking like the pictures below. I grabbed my camera and took a couple of shots of the pipe before I worked on it. It is a large bowled pipe with nice grain. It was dirty and just needed reaming and cleaning. The rim had a build up of tars and what some lovingly call pipe lava. The finish looked to be okay under the dirt. There were a few small dents in the sides of the bowl that would need to be looked after. The stem had some oxidation but no tooth marks or dents. ImageImage

The stem was a relatively simple cleaning job. The oxidation was easily removed with a good buff of Tripoli and White Diamond. I scrubbed the inside and outside of the stem to get rid of the tars and tobacco juice in the airway. The bowl was reamed back to a thin coat of cake and the rim was cleaned of the tars and lava buildup with Murphy’s Oil Soap (undiluted) I wiped the bowl down with a soft cloth and some oil soap to clean away the grime and grit on the bowl and shank. I cleaned the inside of the bowl and shank with a shank brush, bristle pipe cleaners and regular pipe cleaners dipped in isopropyl alcohol until they came out clean. I steamed out the dents with a wet cloth and hot butter knife. Once they were repaired I then buffed the bowl and stem with multiple coats of carnauba wax.

ImageImageImage

Refurb on a BBK Panel Billiard – Swiss made


This BBK Panel was an interesting refurb for me. I had not heard of BBK pipes until I came upon this one. I think it came in a box of pipes that was gifted to me but I am no longer certain where it came from or when I received it. It is stamped BBK both on the bottom of the shank and on the logo on the stem. It had a beautiful blast finish. When I took it out of the box it was dirty and the bowl had a thick cake in it. The rim was blackened and tarred. The stem was a brownish green from oxidation. The beauty was that it was not chewed or dented by tooth marks. It would take a thorough cleaning to learn more about this pipe.

I did not know that I was dealing with a meerschaum lined pipe until I wiped it down to begin the cleaning process. I always wipe down the rim with some Murphy’s Oil Soap to get to the rim and clean away the build up and grime. I use it undiluted and scrub it on the pipe with a toothbrush. Once found that I was dealing with a meerlined pipe I carefully reamed the cake that had built up and then sanded it back. I sanded the rim back to get the grime off of it and expose the meer again. In the second photo below you can see what I found once I had wiped the pipe down with oil soap.


The blast is really nice on this panel so I cleaned it and then restained it with a black aniline stain (Feibings Shoe Dye) to match the original colour of the pipe. I flamed the stain to set it in the briar and buffed it lightly with White Diamond to remove the excess and to give it a polish. I finished by giving it several coats of Halcyon Wax to protect the finish. The stem was oxidized so I buffed it with Tripoli to remove the surface coating of oxidation. I soaked it in Oxyclean to soften the remaining oxidation and then sanded it with 240 grit and 400 and 600 grit wet dry sandpaper before using the micromesh sanding pads (1500 to 6000 grit) to finish the work. I rubbed the stem down with Obsidian Oil and then gave the entirety another coat of Halcyon on the bowl and carnauba on the stem.

I used some liquid White Out to try to recolour the logo on the stem but it did not stick… time to try again. Thanks for looking.

A Frustrating Brigham 1 Dot Rehabilitation


This old Brigham came to me in a box pass here in Canada. Brigham pipes were made in Canada in the old days and had an aluminum tenon/filter holder. When I took it out of the pass I thought it would be an easy clean up and I could put it back in the box on the next pass through. The other day I took it out to clean it up and this is what I found when I took the stem out. The aluminum tenon/filter holder had literally been eaten away. The hard rock maple filter must have been the original and it too had been eaten away. It was stuck in the corroded and rough tenon and I could not get it off. I used a light to shine down the mortise and the aluminum end of the filter was stuck in the airway. It was perfectly situated to not block the airway at all but it was there. The stem also had some thick white build up all around the button end. The only good part of the mess was that there were just a few small tooth dents on the stem. The bowl exterior was in good shape. The inside of the bowl was caked with a very tarry and oily aromatic smelling stuff. The rim was thick with the same tars as the bowl.

I used a hack saw to cut off the aluminum filter holder/tenon. I cut it off the same length as a regular tenon and used a file sandpaper to clean up the rough edges after the cut. Once that was done the maple filter had to be coaxed out with a dental pick until it broke free and came out. I do not believe it was ever removed since the day it was purchased from Brigham. It was unbelievably tarred and oily. The end of the filter that was stuck in the airway was more of a problem. The aluminum seems to have bonded to the walls of the mortise. I tried the freezer method to see if it would break free – no luck. I went on to clean and restain the bowl as described below before filling the bowl with cotton bolls and alcohol to see if the tars will break free from around the aluminum. I am going to let it sit over night with the soak and see what happens. The soaking did not work. So I tried to drill it out I started with a bit the same size as the metal end of the filter. I worked my way up to larger bit to open it and see if I could back it out. The trouble is the situation of the insert is right against the opening into the bowl so I opened it as wide as I could without damaging the airway. So now there is a small metal tube in the end of the airway that is open to the bowl. It is probably ¼ inch deep so it will act like a sleeve in the airway. It looks to me that it will stay there!

I cleaned off the rim with acetone on a cotton pad while carefully keeping the acetone off the sides of the bowl. I also followed that with micromesh pads – sanding it with 1500-6000 grit pads. There were three dent marks at between one and two o’clock on the photo above. I steamed them out with a hot knife and wet cloth. These dents easily came out of the rim and the surface was smooth and after sanding they virtually disappeared. I reamed the bowl back to bare wood and sanded the remaining surface of the bowl.

I worked on the stem quite awhile. I used emery cloth, medium grit to remove the white build up and the tooth marks on the stem. They were not too deep but would not lift with heat. Once I had them removed I worked on the stem with 240 grit sandpaper and 400 and 600 grit wet dry sandpaper to remove the scratches. Then I worked over the stem with 1500-12,000 grit micromesh pads. When the stem was shiny I took it to the buffer and buffed it with White Diamond. I gave it several coats of Obsidian Oil to bring the vulcanite some life. Then I gave the stem multiple coats of carnauba wax to protect it. The first picture below is of the underside of the stem and the second one is the topside of the stem. The tooth marks and scratches are gone.

I restained the rim of the bowl with medium brown aniline stain and wipe it on and off with a cotton pad. I was trying to match the smooth portions on the side of the shank. The finished stain was a perfect match to the rest of the bowl. I buffed the rim with White Diamond as well and waxed it with Halcyon II wax to give the bowl a shine. I buffed it with a clean flannel buff. The finished pipe is pictured in the last series of photos.

Reborn Kaywoodie Super Grain Long Shank Billiard


I have grown in my love of the older Kaywoodies. The ones I have worked on are made of some great briar and have classic English shapes. The stems are comfortable and well engineered. The finishes are usually above average and they smoke great – even with the four-hole stingers! I picked this one up on a recent trip to the US. My wife and I were on our 37th Anniversary trip and we always visit antique shops and malls as well travel. This one was one of about 8 that I picked up on that trip. The briar under the grime was quite nice and the pipe showed some promise.

The bowl was in good condition and still round. No one had gone made with a knife or a reamer and ruined the bowl shape. The finish was shot and there were dark places on the wood from ground in dirt and grime. The stem was oxidized and there was some rippling along the stem for the first inch back from the button. I am still wondering if the stem had been trimmed and a new button cut on it. There are some conflicting signs regarding that. The slot is the typical KW slot in the button and the stem is meaty around the button. The taper looks right so I am not sure. The bowl had some caking but oilier tar rather than carbon cake – it reeked of cherry tobacco! The rim was damaged on the front from tapping out the dottle. This one would need some TLC and work to bring it back. ImageImageImageImage

I reamed the bowl and cleaned out the tars and oils that were in it. I also put it in the alcohol bath to soak for a half an hour while I worked on the stem. When I took it out of the bath I dried it off and then wiped down the bowl with acetone to remove the remaining stain and finish that the bath did not remove. I really like the way the acetone removes the finish and leaves the pipe clean and ready to stain. You can see in the four pictures below the shiny spots and dark spots on the briar where I needed to concentrate the work to remove the finish and grime with the acetone. ImageImageImageImage

The damage to the front of the bowl and rim required that the bowl be topped. I removed about 7mm from the height of the bowl to remedy the damage to the front. If I had not done that the bowl looked out of round. The damage made the front rim seem thin. It was not as the curve of the damage accounted for the apparent thinness. I topped it as pictured below using medium grit emery cloth to remove the damage and then following that up with 240 grit sandpaper and finally sanding with a fine grit sanding pad to remove the scratches left behind. ImageImage

When I finished the work on the rim I wiped the bowl down one last time with the acetone to clean off the dust and grime of the sanding and prepped the bowl for staining. In the photos below you can see the state of the bowl as it stood ready for staining. The grain is very nice. The grime was removed and the dark spots lightened. The rim was back to a clean and sharp state and ready to stain. The darkened spots on the right side of the bowl influenced the choice of stain used on the bowl.

ImageImageImage

I chose to use a medium brown aniline stain to give some coverage to the dark spots but still allow the grain to come through. I applied the stain with the dauber and then flamed it to set the stain in the briar. Then I repeated the staining and flaming a second time. Once it was done I wanted to remove a bit of the opacity of the stain so I used some acetone on a cotton pad and wiped the pipe down until it had the saturation that I was looking for. In the next series of four photos below you can see the colour and the saturation levels. At this point I had not buffed the pipe or polished it on the buffer. In the third photo you will note that the stem was under turned and would not line up straight with the shank. ImageImageImageImage

To correct the under turned stem I heated the stinger apparatus with my heat gun – avoiding heating the vulcanite. I wanted to soften the glue in the stem holding the stinger in place so that I could readjust the turn on the stem. Once the glue is heated and softened I screw the stem back in place and twist the stem in the shank until it aligns. I have to repeat it often to check on the softening of the glue. Once it is aligned I cool the stem and shank with running water and then dry quickly so as not to cause oxidation or damage to the finish. ImageImageImage

I continued to sand the stem to remove the oxidation and waves in the surface near the button using various grits of sandpaper. I started the process with medium grit emery cloth to level out the waves and remove tooth marks. Then I used 240 grit sandpaper to smooth out the scratches left by the emery cloth and level the stem. I followed that up with 400 and 600 grit wet dry sandpaper to smooth it more and remove more of the scratches. I finished the stem with micromesh sanding pads – 1500-12,000 grit to bring the stem to a shine. I coated it with Obsidian Oil and let it sit, repeated the application and wiped it down. I then gave the whole pipe a buff with White Diamond and then several coats of carnauba wax for protection and shine. ImageImageImageImage

A Beatup GBD 9438 Given a New Look


I bid on this one knowing full well that it was going to take a lot of work to get it back to some semblance of beauty and functionality. When I found it on EBay I thought it might be worth the effort but let it sit for awhile and then before the bidding ended I put in my bid. I honestly think I was the only bidder so I got it for a pittance.

When it arrived it was more rough than the EBay pictures intimated. The front edge of the bowl and rim looked like it had been used as a hammer. Not only were there dents and holes on the front of the bowl but the rim was chewed up like it had been hammered out on a piece of concrete. The finish was absolutely gone. The surface of the bowl was permeated with oils and grease from dirty hands and from looked like having been laid on its side in a full ashtray! At least the bowl was still semi-round and there were no burn marks. The other remarkable thing to me was that the stem was virtually unchewed. That surprised me actually given the overall state of the pipe. It was very oxidized and a deep brown colour. ImageImageImageImage

I reamed and cleaned the bowl and shank to remove the grime and tars. It took a lot of pipe cleaners and isopropyl alcohol to clean things up. I dropped the bowl in the alcohol bath and the stem in a bath of Oxyclean for a while and went about other work that I had going. I believe it soaked overnight before I got back to it. When I did I removed it from the bath, dried it off and went to work on the damaged rim and bowl. I used some medium grit emery cloth to reshape the rim. The tricky part here was to keep the angles even on all sides of the bowl. The front edge was heavily damaged and the rim itself was also badly chewed up. After the emery cloth I used 240 grit sandpaper to smooth the scratches out and then 400 and 600 grit wet dry sandpaper to finish the shaping. The series of three photos below show the progression of the shaping. ImageImageImage

Once the top was smooth and the shape retained I wiped the bowl down with an alcohol soaked cloth to remove any dust from the sanding. I also used a dental pick to clean out the rings around the bowl to prepare them for staining. I find that those collect a lot of grit and grime and can almost be smooth due to the buildup. I then stained the bowl with a medium brown aniline stain and flamed it to set the stain. I took it to the buffer and gave it a light buff with Tripoli to remove the excess stain and also give it a slight polish. Then took it back to the work table to work on the stem and to sand the bowl with micromesh to smooth the surface and bring the grain to the front. The pictures below show the stem after the soak in Oxyclean and then light sanding with 400 grit wet dry sand paper to remove the oxidation that was softened. The stem still needed more work to get out some of the stubborn places but it was getting close. ImageImageImage

I used micromesh pads 1500-6000 grit on the bowl and the stem to finish the smoothing and restoration. Once it was done and shining I gave the whole pipe a buff with White Diamond to polish it and then gave it multiple coats of carnauba wax and buffed it with a clean soft flannel buff to polish. ImageImageImageImage

Irwin 943810 by GBD – A Makeover.


I have had this older Irwin 943810 made by GBD for some time now. It is described on the GBD Models website http://www.perardua.net/pipes/GBDlines.html as follows: “The warm dual-tone brown finish deepens with repeated smoking. Finest rum is used in the special process of maturing these fine pipes. Its smooth flavour compliments the natural taste fine tobacco. Catalogue (1976)” With that description my old pipe looked pretty faded and worn.  The warm dual-tone brown finish was pretty much washed out and no longer “warm”. The dark undercoat on the pipe was clearly visible, highlighting the grain but it seemed that previous owners had buffed the pipe hard and the top stain of brown was gone. The bowl was dirty. The stamping is really light and I can just make out the Irwin stamp and the numbers on the side. The stem had some tooth damage in terms of scratching and tooth chatter but at least there were no deep dents. The edge of the button on the top had some minor denting to it. Tonight I decided it was time to give it a makeover.

As an aside, I have never seen the 6 digit stamping on the GBD lines so this one was interesting to me. I have sent out several emails to search out the stamping details but so far no luck. Anyone have any clue as to the meaning of the stamping? Thanks.

I started the makeover by wiping down the bowl with acetone and cleaning off the remnants of the stain and the finish that was pretty well gone. I also wanted to see if wetting the stamping would make it a bit more visible to my eye. It did and afterwards I was able to read the stamping. You can see the scratches and marks on the stem in the last two photos below. Right next to the button and on top of it there are some white spots that show the marks and scratches.

I decided to work on the stem with a medium grit sanding pad to remove the tooth marks and scratches. It also brought up the oxidation that was present but not visible in the photos above. Once I had the rough sanding done I stained the pipe with some oxblood stain. I daubed it on with the cotton/wool dauber that comes with the stain and then flamed it to dry it. In the photos below you can see the stain just after I applied it. I put it on good and heavy as I was wanting a rich coat to this old timer.

I hand buffed the bowl with a soft cotton cloth to remove the excess stain and to give it a quick polish. I decided not to use my buffer as I did not want to further damage the stamping that is already faint on this one. My goal was to enhance the pipe and try to raise the stamping a bit to make it more legible. I was able to do it enough to read it but it is still very faint. The hand buffing takes more work but I find that it does not harm the stamping at all.

The next series of four photos show both the new stain and the work that I was doing on the stem. You can see in the first and the third photos how the whole stem looked at this point in the process. The major scratches have been removed but there are still small scratches and oxidation that needed to be dealt with. In the second and the fourth photos you can see close up shots of the stem and button area. I continued to sand the stem at this point moving on to a fine grit sanding block to remove more of the scratches and the marks in the stem and the button.

I sanded the stem with micromesh pads from 1500 to 12,000 grit and the stem began to take on a shine. I gave it a coating of Obsidian Oil, rubbed it in and let it dry. I finished by giving the pipe several coats of carnauba wax.


Some Refurbs South African Style – Piet Binsbergen


One of my ideas when starting rebornpipes was to have a place where folks who did refurbishing could post and interact. Today another piece of that idea is coming to fruition. I am posting a series of refurbs from a friend in South Africa – Piet Binsbergen. Last evening (my time) we connected on Skype after a long interaction via email over the past year. Here are a few of his pipes that have been restored. Following is Piet’s post and the pictures.

Hey Steve,
Good to chat with you friend. Here are some of my latest clean ups. Here is a GBD Prehistoric Prince, 1960’s, I am not a cool as you so the stem needed replacing. I am working on the Steve Laug filling trick, I may just graduate soon. I opened the air way to 4mm right through.

Here is a Peterson that I needed to sand the bowl and restain. Round 1 black to penetrate the soft wood, sand and then round two I used brown stain. I have also been pre-carbonising the bowls of late.

Next is a pipe belonging to Mark Vosseler in NY. It was his dad’s. Wanted a new stem as this one draws bad! Fitted a pre-moulded sem and added elephant ivory ring, opened airway 4mm. Sanded and re stained bowl to get rid of fills.

The last one in this lot is this GBD Concord. It was cleaned and refurbished. Restained the bowl and worked on the oxidized stem.