Blog by Steve Laug
The next pipe I chose to work on came is another one from the lot of 11 pipes I purchased from a lady in Regina, Saskatchewan. She had found them in a house she bought and wanted to know if I wanted them. We struck a deal, I paid for the pipes and shipping and the box arrived while I was traveling in Europe. In the box were 4 Stanwells, 1 Danmore Bowl, 1 Soren Freehand, 1 Calabash with a Briar Bowl, 1 Nording Freehand, 1 Italian Made Bertenetti, 1 Rhodesian with a banded cracked shank, and 1 Brigham. I have restored the Nording, the snapped Stanwell, the Brigham, the Gourd Calabash with the briar bowl, restemmed and restored the Danmore bowl, a Stanwell Ivarsson design 11 Pot and Soren Hand Carved Freehand. There are blogs on each restoration available.
 The next pipe on the table is an extremely dirty pipes in a box full of very dirty pipes. It is stamped on the left side of the shank and reads Lorenzetti [over] Italy. On the right side it reads 3200 [over] 20 which could be the shape number of the pipe. There was a thick cake in the bowl, debris in the bottom and on the bowl walls and some remnants of tobacco. The airway was plugged and there was no draught on the pipe. There was a heavy lava overflow on the rim top flowing down the sides of the bowl and covering much of the shank. There appears to be some varnish or topcoat that is damaged and the grime is both on top of and underneath. It was hard to know the condition of the inner or the outer edge of the bowl for sure because of the cake. There was an acrylic shank extension sandwiching a briar ring. The shank end is also covered in a thick tar and oil residue flowing out of the mortise on to the stem and shank end. The acrylic stem had a briar ring next to the tenon and looked to be in decent condition underneath the thick oils and tars. There were minimal tooth marks and chatter on the shank. I took photos of the pipe before I started my cleanup work on it.
 I took a close-up photo of the bowl and the inwardly bevelled rim top to show the cake in the bowl. The rim top shows the thick lava on the inner edge of the bowl. The outer edges of the bowl also showed the lava flowing down the bowl sides. The shank end had an acrylic extension sandwiching a briar ring. I took photos of the stem surface and button to show its general condition. There was a briar ring around the stem surface near the tenon. The stem was a 9mm filter stem. The inside was filthy. It looked very good under the tars and oils that coated the surface.
 The stamping on the sides of the shank are covered with tars and oils but are readable as noted above. I took the stem off the shank and took a photo to give a sense of the proportion of the pipe.
 I have worked on a few Lorenzetti pipes over the years but have little memory of the background of the brand. I turned to Pipephil to get a quick overview (http://pipephil.eu/logos/en/logo-l6.html). I have included a screen capture of the information on that site for quick reference. I learned that the brand was created in 1934 by Otello Lorenzetti. As of (2009) the company was managed by Alessandro Lorenzetti.
 I then turned to Pipedia and found a great historical survey of the founder Otello Lorenzetti. It is a great read regarding the history of the brand and its development from small beginnings with Otello selling pipes from his bicycle around his community to a brand that is available around the world today (https://pipedia.org/wiki/Lorenzetti).
The site also had a photo of a pipe that has the same finish as the one that I am working on. You can see from the photo what the one I am working on must have looked like when it sold. Here is the photo courtesy SmokersHaven.com. From that I knew that the pipe in my hands looked like when it came out. It was a real beauty that gave me the impetus to work on it. Armed with that information I turned my attention to restoring the pipe.
I decided to start my work on the pipe by reaming the bowl with a PipNet pipe reamer using the first and second cutting head to take the cake back to bare briar. I cleaned up the reaming with a Savinelli Fitsall Pipe Knife. I sanded the walls with a piece of 180 grit sandpaper wrapped around a dowel to smooth them out. 
 I wiped the bowl down with acetone to remove the tarry build up and the varnish on the briar. There was a lot of grime that came off with the varnish. It still needed a lot of work but it was looking better.
 I scrubbed the exterior of the briar with a tooth brush and undiluted Murphy’s Oil Soap. I rinsed it off with warm water to remove the grime and soap. It looked much better and the dust and debris was gone. I dried it with a cotton towel.
 Next, I worked on the rim top of the bowl to clean up the bevel and the inner edge. I also worked on the marks around the bowl that needed work. It took some work but it cleaned up well. I used a folded piece of sandpaper to clean up the inner edge of the rim and to sand the darkening off around the bowl sides.

 I scrubbed out the internals of the pipe with 99% isopropyl alcohol, pipe cleaners and cotton swabs. I cleaned out the airway in the stem as well. The airway into the bowl was a little different. It was in the bottom of the bowl toward the back. It has some wear on the top edge of the airway entrance. I worked on these areas repeatedly until the shank and the airway in all the parts was clean.
 I stained the bowl and shank with a light brown stain wash. I applied it to the surface of the briar with a wool dauber. I flamed it with a lighter flame to set it in the grain. I repeated the process until I was satisfied with the coverage.
 I polished the shank extension and the briar with micromesh sanding pads – dry sanding it with 1500-12000 git sanding pads. I wanted to make the new stain coat a bit more transparent. I wiped it down with a cloth and some Obsidian Oil.


 The bowl had a very fowl tobacco ghost that hung over the pipe and the desk top where I was working on it. I stuffed the bowl with three cotton bolls and twisted one into the shank end. I used an ear syringe to fill the bowl with alcohol. I let the bowl sit for several hours to work on the stem. Once I came back to it the cotton boll was filthy. Once it was removed I ran pipe cleaners through and the pipe smelled much better.
 I worked some Before & After Restoration Balm into the surface of the briar with my fingertips to clean, enliven and protect the briar. I let the balm sit for 15 minutes and then buffed with a cotton cloth to raise the shine. The photos show the bowl at this point in the restoration process.

 With that done, the bowl was finished other than the final buffing. I set it aside and turned my attention to the stem. I polished the oxidation and tooth chatter on the stem with micromesh sanding pads – wet sanding with 1500-12000 grit sanding pads. I wiped it down after each sanding pad with Obsidian Oil.
 I finished polishing the stem with Before & After Pipe Stem polish (both Fine and Extra Fine) then wiped the stem down with another coat of Obsidian Oil.
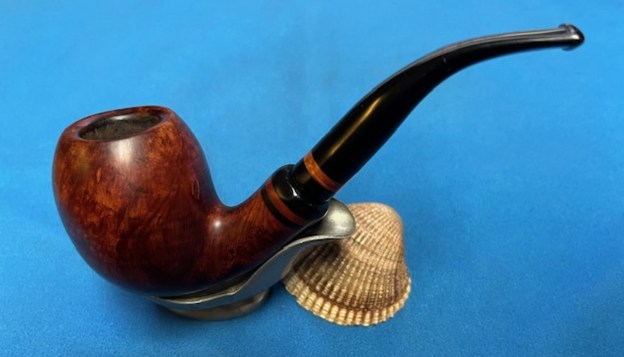
 I polished finished Lorenzetti Italy 3200-20 Bent Egg Sitter with Blue Diamond to polish out the remaining small scratches. I gave the bowl and the stem multiple coats of carnauba wax and buffed the pipe with a clean buffing pad to raise the shine. I hand buffed it with a microfiber cloth to deepen the shine. The pipe polished up pretty nicely. The smooth briar shows the effect of the brown stain wash and works very well with the black acrylic stem. The finished pipe is shown in the photos below. I have worked on several Lorenzetti’s over the years and I have always been impressed by his ability to a craft a comfortable and functional smoking pipe. The Length: 5 ½ inches, Height: 2 inches, Outside diameter of the bowl: 1 ¼ inches, Chamber diameter: 7/8 inches. The weight of the pipe is 64 grams/ 2.26 ounces. I will be putting it on the rebornpipes store in the Italian Pipemakers Section if you would like to add it to your rack and carry on the previous pipeman’s legacy. This is an interesting estate to bring back to life.
As always, I encourage your questions and comments as you read the blog. Thanks to each of you who are reading this blog. Remember we are not pipe owners; we are pipe men and women who hold our pipes in trust until they pass on into the trust of those who follow us. 


