Blog by Dal Stanton
This Stanwell Henley Special Chimney is the last of the 3 Stanwell Henley Specials that I obtained off the eBay auction block. Jim saw the Henley on the online ‘For “Pipe Dreamers” Only!’ and he commissioned the Oval Shank Billiard that I restored some time ago (see LINK) pictured in the middle below. I had also taken notice of the solid craftsmanship of these 3 Danish made pipes, so I just restored the second, the Blasted Saddle Stem Billiard and put it in the Store to also benefit the Daughters of Bulgaria. Then, I’ve claimed the third, a Chimney, to keep in my personal collection. But I’ve thrown down the gauntlet on the Henley Chimney – I’ve developed a tradition of restoring a pipe in my personal ‘Help Me!’ basket collection to take with me to the beach on the Black Sea coast where my wife and I enjoy our summer holiday😊.
To review what I know about this Stanwell Henley line, I start with the seller’s information on eBay:
This auction is for three vintage Stanwell, Henley Line estate pipes from the 1950’s-60’s era. All are in good pre-owned condition. The stems are primarily free from teeth marks. The stems do have some fading. All of the stems fit snug and the wooden bowls are free from outstanding blemishes. As seen from top to bottom, the first pipe reads Henley Special #57, the second and third read Henley Special without any numbers seen. All of the pipes read Made in Denmark.
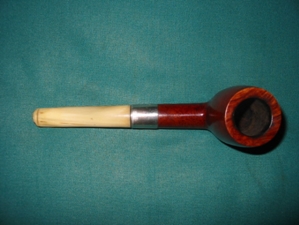
Here are the three Stanwell Henley Specials as I saw them on the eBay auction block.
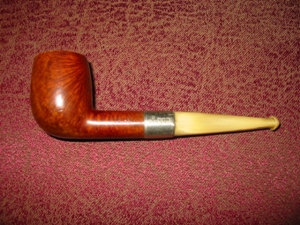
 Pictured are the first and second Henley Specials after each was restored are pictured below. The transformation in these beautiful Danish pipes is unbelievable!
 As I expressed in the previous Stanwell Henley Special restorations, since I started collecting and restoring pipes, I’ve grown in my appreciation for Danish made pipes. They tend to be stout, well-made pipes. In my research on the Henley pipes, I have found no conclusive information dating them, but anecdotal information and a the feel of these pipes, I’m confident placing them in the 1950s and 60s. Pipedia’s article on Stanwell pipes simply places the Henley Special line in the list of Stanwell second brands. The Chimney bound for my collection is identical with what Pipephil.eu provided. It shows a Henley Chimney with the Fishtail stem slightly bent, along with the distinctive characteristic of a bulging midsection, which attracted me to this pipe! The difference with the Pipephil listing is that it is blasted – nice. It also shows an ‘H’ stem stamping. The Chimney now on my worktable has no stamping on the stem – or it has worn off over time.
 The dating of the Henleys and this Chimney is elusive. The only information I found in my initial research that gave any reference to dating isn’t conclusive. I found the following picture on Google images but the link to pipesmokersforum.com. “Who made this pipe?” I went to the pipesmokersforum site and searched ‘Henley’ and no reference or article emerged. Having added this discussion to my research would have been helpful! The picture I found puts a question mark in the late 50s. Added to this the eBay seller’s description placing the pipes in the 50s or 60s and I do not know where this information originates. Even though this information is anecdotal, the dating seems accurate to me based upon the appearance, craftmanship and feel of these pipes.
  I really like the Chimney stacked shape with a very nice feel in the hand. I’m attracted to the tall Chimney and the interesting bulging of the bowl about midway. The other thing that I like is the unique, pinched saddle fishtail stem. Coupled with the tall bowl, the fishtail gives the pipe an overall sleekness – I like it a lot!
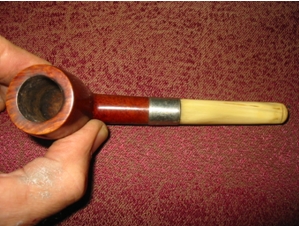
The dimensions of the Henley Chimney are: Length: 6 inches, Height: 2 3/16 inches, Rim width: 1 1/4 inches, Chamber width: 13/16 inches, Chamber depth: 2 inches. With the third Stanwell Henley Special Chimney on the worktable, I take some pictures to get a closer look.


 Of the 3 Stanwell Henleys I acquired, the nomenclature on this pipe is the clearest. The left shank flank is stamped in cursive ‘Henley’ [over] SPECIAL. The right shank side is stamped, MADE IN DENMARK [over] 57. I assume this to be the shape number.
 The general condition of the Henley Chimney is good. The chamber has thick cake buildup – but not has heavy as the other Henleys. The rim has caked gunk and the smooth briar surface has grime and dirt and needs cleaning. The one aspect of the stummel that is strange, are the dark areas on the upper and lower shank. These spots look like they’ve been scorched, but a shank usually isn’t the source of high temperatures. I’ll have to wait to see what the cleaning does with these spots. I take a few pictures to show what I see.
 The Pinched Saddle Fishtail stem has oxidation and some tooth compression – mainly on the lower bit. To begin the restoration of the Stanwell Henley Special Chimney, I add it to a bath of Before & After Deoxidizer along with other pipes in the queue to deal with the oxidation in the vulcanite stem. To keep the Deoxidizer as clean as possible, I first clean the airway using pipe cleaners dipped in isopropyl 95%.
 I then put the stem in the bath and allow it to soak for several hours.
 When I fish out the Pinched Fishtail stem, I run another pipe cleaner dipped in alcohol through the stem to clear away the excess Deoxidizer. I then wipe down the stem with a cotton pad also wet with isopropyl 95% to remove the raised oxidation. The B&A Deoxidizer does a good job.
 To begin the process of revitalizing the stem, I apply a coat of paraffin oil and rub it into the vulcanite. I set the stem aside for the oil to absorb.
 Turning back to the stummel, I begin the cleaning process by reaming the chamber. I take a starting picture and the last unsmoked baccy is seen on the floor of the chamber. Like the other Henleys, this one has thick cake. I’m wondering if this Henley will have as much heating damage as the Blasted Saddle Stem Billiard I just restored. I use the Pipnet Reaming Kit to ream starting with the smallest blade head. The cake is hard, but the blade eventually works through. I then use 2 more of the blade heads and then switch to the Savinelli Fitsall Tool to do the fine tuning by scraping the chamber walls. Finally, after wrapping a piece of 240 grit paper around a Sharpie Pen, I sand the chamber walls. Then, after wiping the chamber with a cotton pad wetted with isopropyl 95%, I inspect the chamber and I see some minor cracks in the chamber, but nothing requiring major attention.

 Transitioning now to the external surface, I take a few pictures to mark the start and then using undiluted Murphy’s Oil Soap, I begin scrubbing. I’m anxious to see what the cleaning does!

 I use a cotton pad to scrub the stummel using Murphy’s. I also use a pocketknife blade to scrape the rim and then I apply a brass wire brush to the rim. I work on the dark spots on the shank and nothing subdues the discoloration. I continue the cleaning by taking the stummel to the sink and rinsing it with warm water. I continue to scrub the briar surface with a bristled toothbrush and using anti-oil liquid dish soap. I transition to the internals using a shank brush with the liquid dish soap. I look at the shank and the dark spots are holding on, but they have changed – the spot has roughened in texture. This gave me the idea – I used the anti-oil dish soap and put a plastic dish scrubby and I apply it to the shank and voila!
 I’m not sure what the substance was, but it dissolved for which I’m thankful! I finish by fully rinsing the stummel and bringing it back to the worktable. I take some ‘after’ pictures showing the cleaned stummel and the areas of the shank. There still appears to be a discoloration after the stummel dries, but this should dissipate through the further stages of the restoration.

 I continue the cleaning procedure using cotton buds and pipe cleaners wetted with isopropyl 95% to clean the internals of the Henley. I also use a small dental spoon to scrape the mortise walls to remove old tars and oils. Through the narrowing of the airway, I also hand turn a drill bit to aid in the excavation of gunk. After some time, the buds and pipe cleaners are lightening, and I halt this phase of cleaning.
 To further clean the internals, I use a soak with kosher salt and isopropyl 95%. I like utilizing this soak as it freshens the stummel and removes old odors. I begin by pulling and twisting a cotton ball to serve as a ‘wick’ to draw out the old tars and oils that are further expunged from the internal briar. I insert it into the mortise with a straight wire and then fill the bowl with kosher salt and place the stummel in an egg crate for stability. I then fill the bowl with isopropyl 95% until it surfaces over the salt. I wait several minutes and after the alcohol has receded, I then top off the alcohol. Turning off the lights I let the soak work through the night.
 The next morning, I remove the wick and it has soiled through the night absorbing the tars and oils. The salt is also discolored showing it has done the job. I thump the expended salt into the waste basket and clean the salt out of the stummel by wiping with paper towel and blowing through the mortise. To make sure the cleaning is thorough; I follow by using cotton buds and pipe cleaners again. After two pipe cleaners and one bud, it is clear the soak did the job. I move on.
 Looking now at the rim, there remains a darkened discoloration as a remnant of the lava. I do not want to top the stummel in order to retain the original patina. Using a piece of 240 grade I lightly sand the rim, more to clean than to remove briar. I also lightly sand the inside rim edge to remove darkened briar on the edge.
 Looking at the stummel, there are very small scratches expected with normal wear.
  To address this, I use sanding sponges. A start with a coarse grade sponge, follow with medium grade, and then with the light grade. Sanding sponges are effective in cleaning the surface in a less invasive way.
 After the sanding sponges, I move straight away to the full regimen of micromesh pads. I first wet sand with pads 1500 to 2400, then dry sand with pads 3200 to 4000 and 6000 to 12000. The grain emerges very nicely through the process.
 Next, I apply Before & After Restoration Balm to the Henley Chimney stummel. I’ve been looking forward to this part of the process. The Restoration Balm does a great job bringing out the subtle tones of the natural briar grain hues. I put some of the Balm on my finger and I rub it in to the briar surface. It starts with a creamy consistency andthen thickens like a wax. After applying it thoroughly, I put the stummel aside for about 20 minutes to allow the Balm to do what it does then I use a cloth to wipe the excess Balm and buff up the stummel with a microfiber cloth.
 The Pinched saddle fishtail stem is waiting to catch up with the stummel. There are some tooth compressions on the bit, one on the upper and a few on the lower. I take a fresh picture of these to mark the start. I will first use the heating method to raise these compressions by painting them with the flame of a Bic lighter. When heated, the vulcanite expands to reclaim its original shape or closer to it. After applying the flame, there is a difference that I’ve pictured, before and after of the upper and lower bit.
 The heating minimized the compressions but did not fully erase them. I dispatch what is left by sanding the bit with 240 grade paper and I use a needle file on the bit and button. I refresh the button as well with the file.
 I wet sand the entire stem with 600 grade paper followed by applying 000 steel wool.
 Next, the micromesh process. Using first pads 1500 to 2400, I wet sand followed by dry sanding with pads 3200 to 4000 and 6000 go 12000. Between each set of 3 I apply Obsidian Oil to the pinched saddle fishtail stem. The stem looks great!
 After reuniting stem and stummel, I mount a cotton cloth buffing wheel to the Dremel set at 40% of full power and apply Blue Diamond compound to the pipe. When completed, using a felt cloth, I hand buff the pipe to remove the leftover compound dust in preparation for applying the wax.
 Again, after changing to another buffing wheel and maintaining the same speed, I apply a few coats of carnauba wax to the Henley. I finish the restoration after applying the wax with a rigorous hand buffing with a microfiber cloth to raise the shine and to blend any excess wax into the surface.
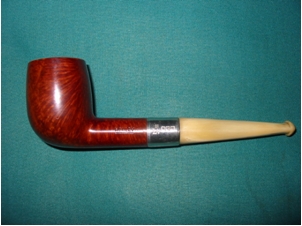
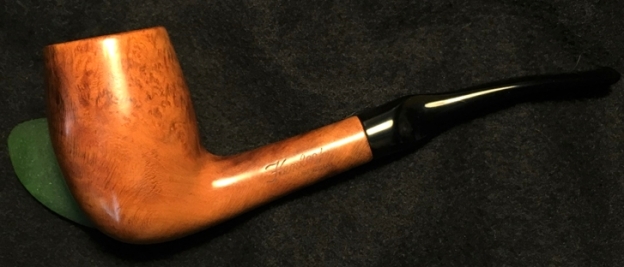
 The butterscotch hue of this Chimney shaped stummel has a very warm draw to it. I’m pleased with the plethora of grain movement that provides the kind of visual beauty that I appreciate in a pipe that I add to my collection. I especially like the Chimney’s midriff bulge that is unique bringing attention to the shape. The Pinched Saddle Fishtail stem also is a sleek and classy touch that completes the ensemble. My goal was to finish this Stanwell Henley Special to take with me to the Black Sea Coast for our time of R&R enjoying the beach as well as the cuisine in the evenings. A little respite from our work with the Daughters of Bulgaria. The Stanwell Henley Special performed well on the beach as well as in a classy, relaxed evening meal – the pictures tell the story. I tell people that, I believe I’m living the dream – some would agree! Thanks for joining me! (www.ThePipeSteward.com)