Tag Archives: Bowls – refinishing

Using Super Glue to Repair or Replace Putty Fills


Blog by Steve Laug

On one of the forums another member and I were chatting bemoaning the red putty fills that so often are a part of old time pipes. I have no idea why they choose to use the red putty but as the pipe ages and the stain mellows with age the putty sticks out in all of its awfulness! I really do not like the look of red putty fills. They have a look like pink/reddish bubble gum. On smaller ones I used to pick them out and refill them with briar dust and wood glue. I always over filled them a bit as the glue shrunk as it dried and I found that the wood glue did not take the colour of the stain well. I left that discussion behind and went to work the next day with other things on my mind. I came home that evening and a PM was waiting for me. Another member remembered that an old pipe repairman friend of his used to use superglue and briar dust to repair fills. He asserted that once the glue was dry it was invisible and the stains would cover it as well.

I had this old bulldog in my pipes to be repaired box. There were two large fills on it that had more or less fallen out over time. What remained were two rather large holes or divots in the right side of this old pipe. The top arrow points to the one on the shank about mid way between the bowl and the band. The lower arrow points to the on the lower portion of the bowl.

Image

I used a dental pick to clean out the remaining red putty from the pits. I wanted the holes to be clean of any remnant of the putty. I also used cotton swabs and Isopropyl alcohol to wash out the areas where there was any putty left. Between the pick and the swabs the holes were cleaned out and open as they appear in the picture above.

I then took a tin of briar dust I have saved from pipes I have worked on over the past months. I keep some on hand for patches like these. I wet the end of the dental pick and dipped it into the briar dust and move it around to form a ball of the dust on the end of the pick. I used my finger to move the dust ball into the hole on the shank and the bowl. I patted the dust into the hole with the tip of a knife blade as I wanted a good tight fill. I then squeezed a few drops of super glue into the dust in the hole. As I did this the dust would shrink a bit and I added more dust and more super glue. When I was done the holes were filled and both had a small bump over where they used to be. I always over fill the holes so that when I sand them down they are smooth and I can feather in the fills with the rest of the briar. I was fortunate in this case that the holes were lined up with the grain marking around them. Once the glue dried (very quickly by the way) I sanded and checked to see if I had missed any spots. I wanted the entire surface smooth to the touch and under a jewelers loop. I sanded the spots down and blended them into the bowl surface. Once that was done I wiped the bowl down with a cotton cloth dampened with Isopropyl alcohol to remove any remaining dust.

I then set up my stain area and stained the pipe with an oxblood aniline stain. In this case I did not let it dry but wiped it on and wiped it off. I wanted to make sure that I was getting good coverage on the fills. I repeated the staining until the colour was what I was aiming for. The picture below is of the same pipe after staining and buffing with White Diamond. It was finished with several coats of carnauba wax. Can you see the fills that were evident above? I assure you that in person it is just as hard to see them.

Image

Pulling a Broken Tenon


Over the years I have had my share of broken tenons to remove. Some of them came from carelessness on my part but others I purchased that way. I took pictures of the process I use on two different pipes recently. The first was a little Barling with a broken tenon and a chewed stem. I ended up restemming this one. The second one was a Peterson 999 with a broken tenon that I hope to reuse the stem by drilling/tapping and inserting a new tenon to refit it.

Image

Image

Insert a screw part way into the airway on the broken tenon in the shank of the pipe. I use a dry wall or gyprock screw. I turn the screw in by hand. I do not want to expand the tenon at all I just want the screw to have a little bite to it so that I can use it to pull the tenon out by hand or with a pair of needle nose pliers. In this case in both pipes I was not able to pull out the tenon easily. Many times I am able to pull it out in a matter of seconds using this method. But both of these were exceptionally tight and immovable. I put them both in the freezer for an hour as I know that vulcanite and briar contract at different rates with a change in temperature. After an hour I removed the Barling from the freezer and was able to pull the broken tenon out very easily. I then unscrew the broken piece and lay it aside to use for a match on the new tenon I will cut as a replacement. It helps me to eyeball the fit. I also measure the mortise and set the tenon turner as closely as possible to the measurements. I then take the broken piece and slide it on the tenon turner to check the fit.

The tenon on the Peterson however, still did not budge after an hour in the freezer. I left it in for another half hour. Still it did not budge. I then dripped Isopropyl alcohol into the exposed mortise and hoped that it would work as a solvent to break the tenon free. I repeated this several times and left the pipe sitting with alcohol in it over night. The next morning the tenon still did not move.

ImageImage

I decided to not fiddle around with trying to pull the tenon. I used my small drill bit and began to drill out the tenon. I never start with the exact size of the tenon but rather work with the size of the airway and work my way up. I have found that in the process of working through the bits the tenon inevitably breaks loose or crumbles to pieces. In this case, by the time I got to the third drill bit, when I reversed it the tenon came out with the bit. You will notice that I also flattened the broken portion of the tenon on the stem so that the surface was flat and smooth. I wanted it to be ready for when I would drill it out or tap to receive the new tenon that I have ordered.

ImageImage

As I close this essay I want to just mention a couple of reminders:

  1. Do not turn the screw into the airway to deeply as it does expand the airway and can actually crack the shank on the pipe. BE CAREFUL and go slowly.
  2. Do not use a tool to turn the screw into the airway – do it by hand so you can feel the progress and the bite before damage is done.
  3. If the tenon is stuck and immoveable in the first try put the pipe in the freezer for an hour or more to expand and contract the tenon and mortise. This usually works to break it free.
  4. Should you have to drill it out – use a bit a little larger than the airway to begin the process and work your way up to larger bits. Do not use a drill bit that is the size of the mortise lest you damage the mortise.
  5. Use a T handle hand drill not a power drill to do this as you can easily drill right through the bowl and ruin the pipe.

Using a Buffing Wheel


Blog by Steve Laug

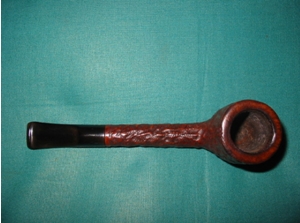
Using cloth buffing wheels to buff the finish on a refurbished pipe can work wonders by smoothing the surface giving the pipe a “like new shine”. However, a disclaimer needs to be stated up front – buffing will not remove scratches or imperfections and buffing can make things a mess if not done properly.

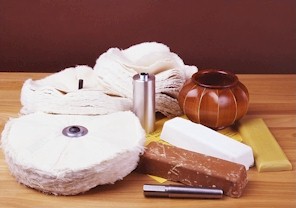
I use The Beall System buffing wheels on two bench grinders that I have stripped down. The system employs a three-step procedure using three different 8 inch buffing wheels. The first wheel uses Tripoli as a buffing compound; the second uses White Diamond (aluminum oxide). The third is used to apply carnauba wax and bring the finish to its final luster. So that I do not have to change the wheels between buffs I use the two bench grinders that I have stripped down. I removed the grinding stone wheels, the guards and left only the arbor on each side. I used the washers from the grinder stones and an extra washer to hold the pads/wheels firmly. I put the pads I use for White Diamond and Tripoli on one buffer and the carnauba and added a fourth clean felt pad on the other. I thus can work down the row – Tripoli, White Diamond, carnauba and then a clean flannel wheel to bring up the shine. The picture below shows the Beall system. It includes three buffing pads – clearly stamped for the product they are designed to apply, one bar each of Tripoli, White Diamond and carnauba. The cylinder standing in the centre is an arbor that can be attached to a single shaft motor so that the wheels can be spun on and off quickly. The long shank in the bottom of the picture is an extension that can be attached to the arbor to give some distance from the motor should you need it. If you use a bench grinder those two parts are not necessary.

Image

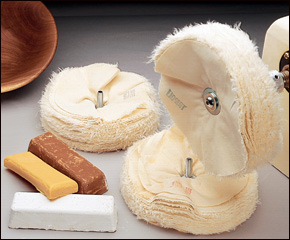
The photo below shows the wheels with the mounting screw that can be either screwed into the arbor unit as pictured in the one wheel on the buffer or they can be removed and the pads turned on to the spindles of the bench grinders as I picture in my setup.

Image

The kit can be purchased through the Beall Tool Company through their website at www.bealltool.com or Lee Valley Tools through their online catalogue at http://www.leevalley.com/en/wood/page.aspx?p=20092&cat=1,190,43040,43042 Both sites provide the ability to order individual components of the system. The Beall website also has a description of the system along with instructions. There are links to videos where Jerry Beall gives lessons on buffing.

In the essay below I will describe my set up and how I use it along with some quick reminders for you as you work with your buffer.

MY SETUP

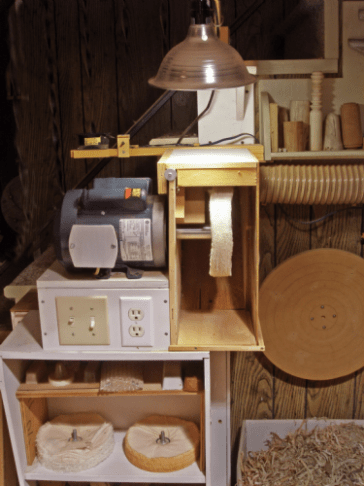
I use two 6 inch bench grinders that I bought from a tool liquidator near my home for my buffers. They are both 1750 RPM motors mounted on a stand with an arbor on each end. The stand that is part of the grinder keeps the wheels above the surface of the work table and at a comfortable height. I place my buffers on my work table so that they are at waist height for ease of buffing and because I don’t want to have to stoop down to buff. I stand to buff because I have more control over the angles which I hold the pipe against the wheel. Each wheel is held in place by a cup washer on each side and a nut that threads on to the end of the arbor. The shaft is the same size as the holes in the buffing wheels so I place the first cup washer on, twist the wheel in place, put a simple washer and then the cup washer on the outside to get a good tight fit. If the wheel is loose it can move around the spindle or shaft and do damage to the wheel and allow it to shift on the spindle.

Image

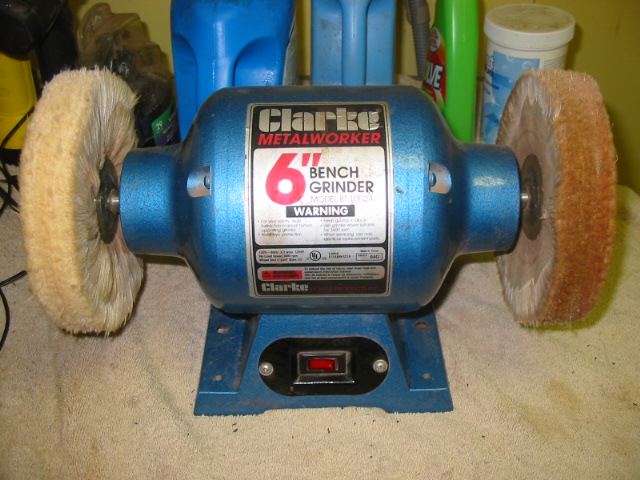
The blue buffer above is my work horse – the left side holds the White Diamond wheel and the right side the Tripoli wheel. You can see from the picture that the pads have worn down and are the way I like to use them. There are no more loose strings or fabric. The wheels are charged in the picture above with the amount of both products that I use on them. I find that if I over charge them with product it just gums up on the stem and makes a mess of things rather than polishing them.

Image

The yellow buffer above is my secondary or polishing buffer. The wheels are not as worn as the ones on the blue grinder because I use them less frequently in the process of buffing. It is used for the final polishing. The left side is a clean flannel wheel with no product on it. It still loses strings when I buff with it. It is soft and gives the carnauba a real shine. The right side is the carnauba wheel. It too is charged with wax and ready to use. I am careful how much wax I load the wheels with as too much can really make a mess.

When I first mounted the wheels the recommendation that I was given was to “clean” the wheels initially by backing a sheet of 100-grit sandpaper with a small board and touching the sandpaper to the wheel. I chose not to do so, because the description of the mess deterred me. It said that the air around the buffer would be filled with fibers and lint. I decided to live with this while I broke them in with the polishing compounds.

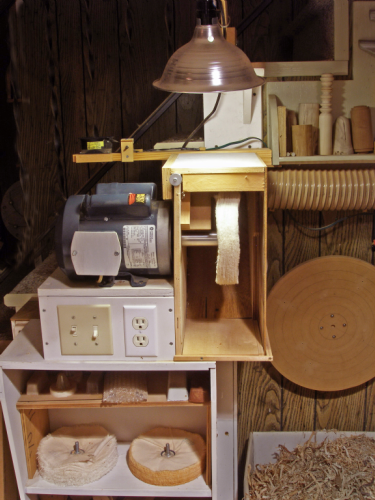
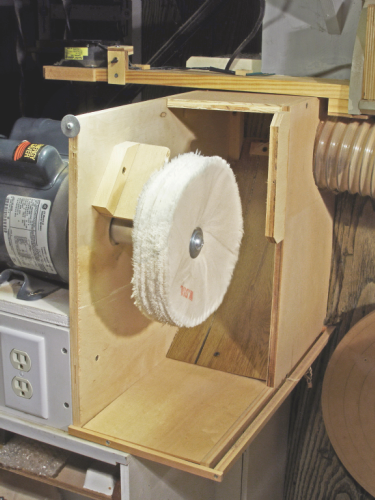
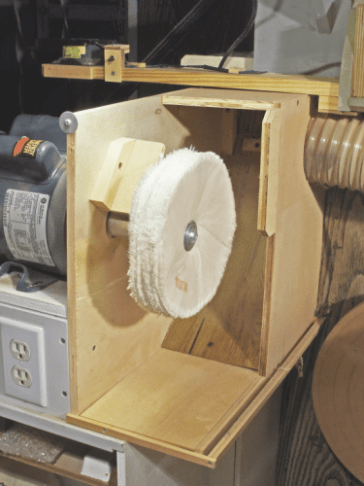
Some people have built enclosures around the wheels to attach a dust collector to catch whatever comes off the wheels. I have added a picture below to show the shield that can be used. It is a pretty elaborate shield. I have used cardboard boxes in the past to catch the lint and dust and the pipes that occasionally fly away! I generally do not use a shield because I find that it was in the way when I work on the pipes. I want a fully open wheel to work with. Besides there was far less debris produced after the wheels were put in service and loaded with compound. I do however put a thick towel or a piece of carpet under the buffer wheel as it picks up the dust, etc. and can easily be vacuumed for cleanup.

ImageImage

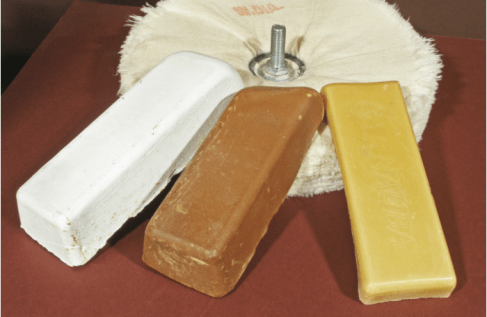
The first thing to do when you set up your buffing system is to charge the wheels with buffing compound. They key to remember is that it doesn’t take much for a wheel to be fully charged. Many people overdo on the charging and gum up the wheels and make a mess of the pipes they polish. Less is more is the rule of thumb. With the wheel rotating at speed, touch the bar of compound to the wheel only for a second or two and without forcing the bar into the fabric. The Tripoli is a dark reddish-brown color so you get a visual indication of the amount that’s been applied. With the white diamond and wax, it’s harder to judge. In the picture below you can see the White Diamond on the left, the Tripoli in the middle and the carnauba wax on the right side. Those bars should last a long time. I have found over the 10 + years that I have had my buffer that I had to replace the Tripoli at about year 5, followed a year later by the White Diamond. I still am using the same bar of carnauba.

Image

My suggestion is to do a bit of experimenting with a pipe that you are not afraid to damage or have thrown across the room. Try differing amounts of charge on the Tripoli wheel and note the effect. Begin with “obviously too little” and work your way to “probably too much.”  Do a similar test with the White Diamond and the carnauba wax. If you suspect you have too much charge on the wheel, some of it can be removed by lightly touching the sharp edge of a board to the wheel.

I hold the pipe in my left hand with a thumb or finger in the bowl so that I have a good firm hold on it. Practice buffing the pipe with each of the materials to get a feel for them. Each one is on a slightly different pad so they handle differently and the materials are different in their feel on the wheel. If you happen to put too much of any of the materials on the wheel and the pipe gums up you can wipe it down with Isopropyl alcohol and restart the process. Practice until you are comfortable with the feel of the pipe in your hand.

When you are buffing use a light touch. Pressing the pipe bowl against the wheel with considerable force only increases the heat generated where the wheel contacts the bowl. Pressing it hard against the stem can cause the vulcanite to burn or melt and make more work for you rather than less. A light touch is critical to getting a good finish and polish. Keep the pipe bowl moving as you are buffing, turning it so every surface get a good buff, with the stems the same thing is true so that the heat production is not concentrated in one area. I never buff a pipe bowl and stem separately. The buffer can round edges on the stem or the shank and the junction between the two is permanently damaged and the value and look of the pipe is affected.

A FEW SIMPLE REMINDERS

  1. Pay attention carefully and focus on the work. The equipment can hurt you so be careful! In regard to personal safety, just use common sense. A buffing wheel can grab loose sleeves, long hair, or dangling jewelry very quickly, so pay attention and be careful.
  2. While your safety is a potential hazard the greater one is the wheel can grab the pipe and take it out of your hands in a heartbeat. That is why I hold it the way I do – both hands, one with the thumb or finger in the bowl. This is a real issue; do not take it lightly.
  3. Always keep a firm grip on the pipe. It takes some thought and practice to grip the pipe firmly while applying it to the wheel with a light touch. The tendency is to hold it lightly, in keeping with the light touch.
  4. Be careful when buffing a pipe around the rim and bowl opening because the wheel can grab the edge of an opening.  Also, be alert when buffing near the rim because the reddish powder from the Tripoli and a white powder from the White Diamond gets into the inside of the bowl. It will need to be wiped out carefully with a cotton swab.
  5. The wheels can grab a small-diameter stem because the strings of the fabric tend to wrap around it if you press it too far into the wheel. The safest way to present the stem is with its length pointing in the direction the surface of the wheel is moving.
  6. Don’t try buffing metal bands, stingers or metal caps or rims.  It will work but will permanently discolor the buffing wheels.

New Life for a Yello Bole Canadian


On a recent trip to the US to visit my parents I also visited several antique malls in their city. I have three that I usually have on my list when I go there. The one I want to focus on in this post is in an old grain elevator and has three floors of many “antiques” which always surprise me because many are the same age as I am!  Anyway, on the second floor I found a booth with two pipe racks containing over a dozen older pipes. Most were junk in that they had cracked bowls and broken shanks etc. But also in the midst of it was this old Yello Bole Canadian. It had some beautiful briar in it. Yello Bole is the grade down the line for KayWoodie, or so I am told. Pipes that don’t make the grade for KW will often be stamped with the Yello Bole brand. This one was stamped KBB in a cloverleaf on the top of the shank and next to it Yello Bole over honey cured, over imported briar. The stem has the yellow circle inlaid in the vulcanite. If memory serves me correctly this is one of the older pipes in the line.

ImageImage

The bowl was in pretty clean shape. The yellow coating was still visible in the bowl and the bottom half of the bowl was very clean with just a bit of darkening to the yellow coating. The rim was dirty and dented. There were tars on the rim and some deep scratches to go along with the dents. The bowl however, was still round, it had not been ruined by a reamer going a muck. The stem was oxidized and was slightly brown. There was light tooth chatter but no dents on the surface of the stem. The overall finish of the pipe had light spots and dark spots where the finish seems to have been exposed to light or was wiped down and finish removed. There was no over coat of varnish or of lacquer just solid clean briar with a spotty stain.

ImageImage

I broke the pipe down as seen in the pictures below. The stinger apparatus can be seen in the pictures. It is an aluminum shovel like contraption with the hole near the tenon and a long shovel like extension that extends through most of the shank. I cleaned out the bowl with an alcohol scrub on cotton swabs and cleaned out the shank with a shank brush, bristle pipe cleaners and fluffy pipe cleaners and alcohol. When they came out clean I worked on the outside of the bowl. I used cotton balls and acetone to wipe down the outside of the bowl and shank. I wanted to remove the rest of the finish so that I could prepare it for restaining. I applied the acetone until the bowl was free of the stain and finish. The pictures below show the cleaned surface of the bowl. I also used the acetone and some 400 and 600 wet dry sandpaper to clean the top of the bowl and rim. A folded piece of sand paper was used on the inner edge of the rim to clean the beveled edge. Before I stained the pipe I decided to clean and polish the stem. I used the Bic lighter method mentioned in an earlier blog post to get rid of the oxidation. In the pictures below the stem has the majority of the oxidation removed using that method. I then used 400 and 600 grit wet dry sandpaper with water and my usual list of micromesh pads from 1500-6000 grit to polish the stem.

ImageImageImage

Once the stem was cleaned and polished by hand I inserted it into the bowl and used it to hold the pipe while I restained it. I used a medium brown aniline stain on this pipe to approximate the original stain and to highlight the grain. I applied it with the dauber that came with the stain and then flamed it to set the stain. I then took it to the buffer and buffed it with Tripoli to remove some of the opacity of the medium brown stain and bring the grain to life. Once that was done it was buffed with White Diamond. Both the stem and the bowl were buffed. Care should be exercised in the buffing process to not obliterate the stamping. I use a light touch when buffing around the stamping. The four pictures below show the finished pipe – ready to load with a favourite tobacco and enjoy!

ImageImageImageImage


Refurb – A Pair of Custombilt Look A Likes


I just finished up on these two Custom Bilt look a likes. The Rhodesian shaped pipe has no stamping other than Imported Briar. The bent pot is stamped Aged Imported Briar on one side and Ben Rogers on the other side. I am not familiar with the brand. So if anyone has information on it please post it here. I would appreciate learning about the twosome.

ImageImageImage

Both pipes needed quite a bit of work to make them smokeable once more. The bowls had a thick cake and each one of them still stuffed with half a bowl of tobacco. The stems were rough and pitted from the oxidation and had a white lime like coat on them. They were very dirty inside and out. I cleaned them with a shank brush, bristle pipe cleaners and finished with fluffy ones all dipped in isopropyl alcohol until they came out clean. I buffed the stems with Tripoli after cleaning them to try and break down the coat of oxidation. It did not do much so I put them both in a bath of Oxyclean to soak. I find that though it does not remove the oxidation it does soften it considerably and makes sanding and buffing it off much easier.

Once they were soaking I turned to the bowls. First I reamed them both to remove the crumbling and uneven cake. I generally take them back to bare wood when they are in this state or at the most leave a thin bit of cake on the walls. I cleaned the rims with alcohol and a soft cloth and sanded it with 600 wet dry sandpaper to remove the tar deposits and carbon on them. Once that was done I dropped them in the alcohol bath to wet them and scrubbed them with a soft bristle toothbrush. I find that on the smooth and semi-rusticated finish of these pipes the tooth brush works very well to remove deep seated grime and loosen oils and dirt.  I then left them to soak while I went back to the stems.

After the soak the stems came clean pretty easily with 240 grit sandpaper, 400 and 600 wet dry sand paper and a finishing buff with Tripoli. I worked on them for a while with the sandpapers and Tripoli and then used White Diamond for the final polishing buff. I was careful to not buff the last bit around the stem edge that would meet the shank. I would finish it once the bowls were stained and ready. Then I would buff them together with carnauba wax.

By the time I was done with the stems the bowls were ready. I took them out of the bath and wiped them down. Once they were dry I restained them both with a medium brown aniline stain, flamed the stain and then buffed them with White Diamond to remove excess stain and give a contrast between the smooth portions and the rustication. I hand waxed them both with Halcyon wax and buffed with a soft cotton cloth.

ImageImageImage

Custom-Bilt Saddle Billiard Comes Back to Life


Blog by Steve Laug

It was a pleasure to refurbish this original Custom-Bilt (note the hyphenated title). I have always loved the rugged individualism of Tracy Mincer’s pipes. They are like none of their imitators in terms of character and sheer smoke-ability. They feel great in the hand; have and open draw and generally a comfortable stem. They are nothing pretty to look at yet there is something endearing about their “ugliness”. This old pipe was in very rough shape when I started to work on it. I apologize up front in that I forgot to grab the camera to take pictures of the pipe when I began the work. My words will have to suffice as I tell you about it. There was still a dry and almost petrified dottle of tobacco left in the bottom of the bowl. The cake that was on the walls was filled with cracks and major chunks of it were missing. The only way to remedy that was to ream it. The exterior of the bowl had a very tarred and sticky rim and the finish was gone and flecks of white paint were all over the crevices of the rustication. The stem was dull brownish green with a white crust around the button and up the stem a good half inch. This stuff was like concrete.

I always start my refurbishing process by addressing the issues of the bowl. That way as it soaks I can work on the stem. I scraped out the petrified dottle and reamed the broken cake back to bare wood. I cleaned the inside of the shank with a shank brush and bristle and fluffy pipe cleaners and isopropyl alcohol until they came out clean. I wiped down the exterior of both the shank and bowl with a rub of alcohol. When finished it was dropped in the alcohol bath for most of the morning while I worked on the stem.

I went to work on the stem. I decided to buff it with black Tripoli (coarse polishing compound) to address the hard crust on the front of the stem and the general oxidation on the blade of the stem before the saddle. I did not want to work on the saddle with it off the shank as it is too easy to round the edges and spoil the fit. After buffing it was sanded with 240 grit sandpaper to finish breaking through the white crust. Once it was gone the rest of the stem was cleaned up with my normal list of 400, 600 grit wet dry (with water), and then micromesh pads – 1500, 1800, 2400, 3200, and 4000 grit. I also used the wet dry sandpaper and the pads to careful work on the saddle portion of the stem. Upon completion the entirety was given a coat of Obsidian Oil and then waxed with carnauba.

I set the stem aside and retrieved the bowl from the alcohol bath. As I took it from the bath I scrubbed it with a brass bristle tire brush to get into the crevices on the pipe and the rustication. It was a mess with some paint in the rustication. The alcohol had removed the grime and the wire brush removed the paint flecks. Just a reminder – I use a soft bristled brass white wall tire brush in these instances as the bristles do not damage the surface of the briar. When the bowl was clean I wiped it down with isopropyl on a cotton boll. It was ready to restained with a medium brown aniline stain. I applied the stain with the dauber that comes with the Fiebings Shoe Dye (aniline stain), flamed it and set it aside to dry thoroughly. Once it was dry I buffed it with White Diamond on my buffer and then applied a coat of Halcyon Wax and buffed it by hand with a cotton cloth.

ImageImageImage

The Alcohol Bath and New Life for a Brigham Acorn


The work on this older Brigham 4 Dot Acorn gives a clear picture of how the alcohol bath can remove the grime and prepare the older worn pipe for a restain that brings it back to life. When I am dealing with this kind of wear and tear on the finish of an estate pipe, it is generally my opinion that it is easier to take the pipe back to an unfinished condition rather than try to work with the existing finish and have any hope of restoring it. It also is a shortcut method to remove the finish without the labour intensive sanding that would normally be required. I have a pint jar with a lid on it that I keep on my work bench that is full of isopropyl alcohol. It is now brown but I find that it works well in removing the finish but also it seems to add depth to the stains I use. I recycle the alcohol monthly by pouring it off slowly and rinsing and scrubbing away the sediment in the bottom of the bath. Thus it is always clear – just with a brown tint.

ImageImage

The pipe I am using to illustrate the process is a Brigham Acorn. It has the standard Brigham style rustication on the bottom edges and on the side of the bowl. It was used to give the pipe character and hide flaws in the briar on an otherwise nicely grained pipe. This one was in rough shape. The bowl was incredibly grimy inside and out. I reamed it and cleaned the bowl and shank. Then it went into an alcohol bath overnight so the alcohol would do its work cut the grime and dirt as well as any remaining finish.

ImageImageImage

While the bowl was in the bath I turned my attention to the stem. From the pictures above you can see that the stem was another story. The first ¾ of an inch around the button was heavily caked with a lime like build up. I generally find this under stems that have used the softy bit to protect them from bites. Most folks who use them never remove them to clean them and this is the result. It is hard stuff to remove. I mixed a solution of Oxyclean and hot water – 1 scoop of the powder to a pint of water. I shook it and stirred it to get it dissolved and dropped the stem in it for several hours. I had other pipes to work on during the wait so it was not a problem. I find that the Oxyclean softens the oxidation and particularly this kind of lime scale. Once it is softened it is easily removed with the buffer and sandpapers.

I took it from the wash and went to work on the inside of the stem. On a typical pipe this is an easy thing to do. But on a Brigham the tenon is the length of the shank and is made of aluminum. It is designed to hold the Brigham filter system which is a hard rock maple tube that fits in the tenon. 

Image

Where there was normally a Brigham filter in this pipe it was gone and the tars had built up to the point that the stem was closed off and did not fit all the way into the shank. It took a lot of pipe cleaners and alcohol to get it clean. The outside aluminum shank was sanded 0000 steel wool and with micromesh pads to remove the oxidation and darkening of the metal. The stem was sanded with my normal list of sandpapers – 240 grit to break up the oxidation on the surface, 400 and 600 grit wet dry sandpaper with water to finish removing the problem and then the micromesh pads – 1500 to 6000 grit to polish and shine the stem. Upon completion the stem was set aside to be buffed when the bowl was finished. 

I removed the bowl from the alcohol bath the next morning. I dried it and looked it over for any remaining finish or grime. I wiped it down with a soft cotton cloth and some clean isopropyl then gave it a quick buff with Tripoli to smooth the surface. I took it back to my work table and restained it. For this one I used an oxblood or cherry stain, rubbed on and rubbed off several times until I got the colour I was looking for. I let it dry and then took it to the buffer to be polished with Tripoli and White Diamond. After that it was polished with a coat of carnauba wax. Here are some pictures of the finished pipe.

ImageImageImage


Refinished Rims and Touch-Ups


Blog by Alan Chestnutt

Alan, aka Castana on SF, posted this recently and I found it extremely helpful so I asked and received his permission to post it here as well. I am ordering some of these as I speak. Nicely done Alan. I look forward to gving them a try. They are available on Ebay and also on Amazon.

When restoring pipes, I nearly always like to refinish the rim. I think a nice clean sharp rim always sets a pipe off. As well as this it is just as easy to sand and refinish a rim as to try to remove tar and staining to the old rim. One of the problems though in refinishing a rim is trying to match the stain to the rest of the bowl. I always shied away from getting leather dyes, simply because you would need to be artist to be able to correctly mix all the differing shades.

I always remember my grandfather staining shoes and the smell of the dye always lingered in my brain. In more recent times that memory was triggered when smelling a sharpie marker, so my thoughts were that it must contain a similar alcohol based dye. I used a sharpie a few years ago to restain a black sandblast bowl and it worked a treat. “If only they were available in shades of brown” I thought to myself.

So while walking through a local discount store a few months ago, I spied furniture repair markers. Exactly what I had been thinking of.

Image

They come in 5 shades of brown plus black and cost £2 (about 3 bucks). I couldn’t wait to get home and try them. They are a chisel shape marker and apply a translucent stain exactly like an alcohol dye. Perfect! With the variety of shades a match can be made 99% of the time by application of a couple of coats or moving to the next darker shade. Simply cover the rim by wiping the marker over it and a few seconds later remove the excess with a soft cloth.

Image

A refinished Tilshead rim.

They are excellent for touch ups on other areas of the pipe and I often use them to just refinish the whole pipe to brighten up the grain. Needless to say I acquired a few more packs, but I have refinished literally hundreds of pipes and I am still on my first pack. Simple to use, no mess, a variety of shades and cheap. I class them as my best purchase ever for restoring pipes, so keep your eyes open for them. Available on eBay too, but at a premium.

Alan

A Tiny Pair – Refurbishing and repairing an old couple


Blog by Steve Laug

This morning I decided to work on these two old timers – a little mini bulldog and a mini bent billiard. Both are old as is clear from the orific button on the stems and the shape of button on both (the round hole in a crowned surface of the button – see the photo below).

Image

The first is a no name bulldog with a gold band on it. It has EP on the band which I believe means Electro Plated. The stem was in pretty fair shape though the previous owner had cut a small groove in the stem about a 1/8 inch ahead of the button on the top and the bottom. The bowl was in pretty good shape though it was darkened near the band and there was a deep cut on the shank about mid way along toward the bowl and on the bowl side – both on the right side and visible below. The photo with a penny (1 cent piece) gives a good picture of the size of this little dog. The bowl was pretty clean so all I needed to do was wipe it out with a cotton swab and isopropyl alcohol. I did the same with the shank and the stem as well. It was pretty black and tarry on the inside of the stem and shank. I had to use a paper clip to break through the clog that was in the shank about mid way to the bowl and also in the stem.

ImageImageImage

I worked on the bowl and shank exterior with sand paper to remove the finish around the two cuts in that I was going to work on. I washed off the surface after sanding with acetone to clean off the briar dust and the remaining finish. Once it dried I decided to fill the cuts with clear super glue. The process is pretty straight forward – I drip a drop in both holes and lay it aside until it dries. Then I add another drop, lay it aside and repeat until the cut is filled. I find that the clear super glue is a great way to fill the cuts or pits as it allows the briar to show through clearly and once it is stained it virtually disappears. Once the super glue dried I sanded the spots with 240 grit sandpaper and then with 400 and 600 grit wet dry and water to smooth off the spots and remove any of the over flow around the spots. I want the super glue to fill only the spot and not carry over onto the clean briar so I sand it down level with the surface it is filling. I then sanded the entire bowl with micromesh pads from 1500-6000 grit and then wiped the bowl down with isopropyl alcohol on a soft cloth.

I then worked on the stem and sanded down the grooves to make the stem smooth once again. I used the same pattern of sanding – 240, 400, 600 grit sandpaper and micromesh – 1500, 1800, 2400, 3200, 4000 and 6000 grit. Once I had the grooves and the stem clean and pretty polished I took it to the buffer and used White Diamond on both the stem and bowl. I took it back to the work table and gave it a coat of Obsidian Oil and set the stem aside while I stained the bowl. I wanted to keep a lighter look to the bowl so I used some oxblood stain and wiped it on and off before it had time to dry. I gave it two coats and then flamed it. I buffed the bowl with White Diamond and then gave it a coat of carnauba wax. I also polished the band and gave it a coat of wax. Here is the finished pipe. The two cuts or pits have disappeared on the right side of the bowl (top picture).

ImageImageImageImage

I finished it and put it aside to work on the bent billiard. It was in a bit rougher shape than the bulldog. It is also a no name old timer with a gold band – very tarnished. The bowl was very grimy on the outside and the finish was cloudy and dark. The stem was grooved in the same manner as the bulldog – probably same owner making his own comfort bit to enable him to clench these little guys.

ImageImage

I scrubbed the bowl down with acetone on a cotton boll and removed the finish and the grime. The top was a bit dented so I gave it a very light topping and then sanded out the inside of the bowl and worked on the roundness of the inner rim as it was a bit out of round.  I used a small piece of sandpaper to bevel the edge enough to repair the roundness. I cleaned out the shank and the stem. This pipe was also clogged in both the stem and the shank so I use a paper clip in the shank and to open the end of the stem from each end. I then used small pipe cleaners soaked with alcohol until they came out clean. I set the bowl aside to work on the stem.

Image

The stem needed the same treatment as the one on the bulldog to remove the grooves from the previous owner. Fortunately on both pipes they were not very deep so it did not change the profile of the stem. I sanded the entirety of the stem down and used the same pattern of sandpaper and micromesh as above. I buffed this one with Tripoli before finishing with the micromesh. I gave it a coat of Obsidian Oil and set it aside to stain the bowl.

I cleaned the bowl exterior one last time and then stained it with oxblood stain – wipe on and wiped off pretty quickly several times to get good coverage. I polished the gold band with the highest grit micromesh pad (6000) and then gave the bowl and band a coat of wax by hand and once it dried buffed it by hand with a soft cloth. I put the stem back on and took it to the buffer and buffed the entirety with White Diamond followed by carnauba wax.

ImageImageImageImage

Here is a picture of the pair together so their diminutive size is clearly seen. They are incredibly light with group one sized bowls. They are clean and ready to smoke.

Image

Refurb on a Brigham 2 Dot Lovat


Blog by Steve Laug

I just finished refurbishing this Brigham 2 Dot Lovat that I picked up in the estate pipe rack at a local tobacconist. This one was a challenge, but I loved working on it. It has the standard Brigham style rustication. It was in rough shape. The bowl was incredibly grimy and needed a lot of work. The grime had filled in most of the rustication to the point that it looked worn out and smooth. I soaked and scrubbed it for about an hour using a brass white wall tire brush to scrub out the grime caked on the outside of the bowl. The inside of the bowl was so badly caked that I reamed it back to the wood. Once I had it reamed and the scrubbing of the outside finished I dropped it in the alcohol bath overnight and went to work on the stem.

ImageImageImage

The stem was another story. It was given a soak in OxyClean to soften the oxidation. I find that OxyClean does not remove the oxidation at all, but it does soften it and make working on it much simpler. After the Oxy soak I went to work on the inside of the stem. Where normally there was to be a Brigham filter in the long metal tenon this time it was gone and the tars had built up to the point that the stem was totally closed off. I tried to blow through it but could not get any air through. I used an awl or ice pick to open up the stem and the tenon. Then I worked on it with bristle pipe cleaners and a shank brush. It took a lot of pipe cleaners and alcohol to get it clean. Then the outside was sanded with 400 and 600 grit wet dry sandpaper followed by the run of micromesh sanding pads. Once it was clean and shiny I set it aside and turned my attention to the bowl.

I took the pipe bowl out of the alcohol bath and went to work on it. I used the brass brush one last time to clean off the remaining grime and then dried off the pipe. There was no finish left on the pipe so I restained it with a cherry stain. I reinserted the stem in the shank and took it to my buffer and polished the entirety with Tripoli and White Diamond, finishing with a coat of wax.

ImageImageImage