Blog by Paresh Deshpande
This pipe was always being relegated down the line up for restorations because of its uncanny resemblance to a Peterson’s pipe and having worked on quite a few challenging Peterson’s, I just wanted to take a break from another Peterson’s. However, the shape, size and the overall quality of this piece was undeniably attractive.
Thus, this time around when I closely observed the stamping, it turned out to be stamped across the shank on the left side as “GREAVES” over “PATENT” followed by encircled numeral 2. The right side bears the COM stamp “MADE” over “IN” over “FRANCE” in a football shape. The vulcanite stem is stamped as “GREAVES” over “PATENT”. A silver band adorns the shank end and is stamped as “S.S.G” over “E.G” followed by three faux hallmarks. I say faux hallmarks since firstly; all the cartouches differ from other and secondly, the symbols, or those that are discernible, are nothing to match the lion passant or the date code letter or the Assay office.
 This brand/ manufacturer is unknown to me and thus I visited pipedia.org. The information provided therein is very meagre (https://pipedia.org/wiki/Greaves) and is reproduced below:
Greaves was one of many brands owned by the Oppenheimer Pipe group, apparently made in France, likely by Marechal Ruchon & Cie. as evidenced in the following catalog page from a Circa 1950s Oppenheimer Pipes Catalog. Unfortunately, for the info of readers, this link has expired and does not work.
I have also reproduced a couple of pictures of c.1950s Oppenheimer pipe catalog from this site. I visited pipephil.eu for some additional information on this brand. Here I learned that the Greaves stem differs from the Peterson P-Lip in that the hole is drilled straight in to the bit in Greaves stem and the smoke is not deflected towards the palate as in P-lip. I have included a screen shot of the same along with the link below. http://www.pipephil.eu/logos/en/logo-g5.html
 Greaves is a brand of Marechal Ruchon (which became C.G. Verguet Frères). These companies belonged to Oppenheimer Holding.
I further searched the internet for additional information and came up naught. There were a few pictures, some with ferrule and some without. However, those with ferrule all were stamped as GREAVES over PATENT in football shape. Here are a few pictures for your consumption. Thus from the above it is understood that this was one of the French brands, likely from Marechal Ruchon & Cie. in the Oppenheimer holdings and find mention in 1950s catalog. However, the question that still haunts me is the difference in the ferrule stampings and makes me question if the band is original to the pipe or otherwise and for what purpose. It definitely is not a repair band as the shank face shows no signs of cracked shank end and the only plausible reason is decorative purpose! Any clarifications on this issue would be most welcome.
Initial Inspection
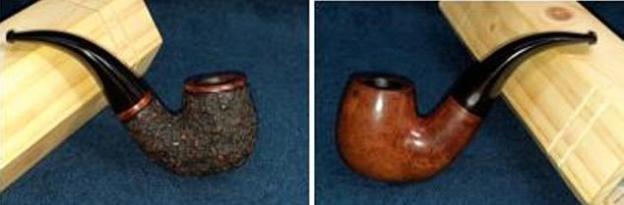
This Greaves Patent pipe has a classic chubby Billiard shape. It is a small sized pipe, about 5 inches in length, but the stout shank, bowl and stem lends it an overall attractiveness and hand feel. The rim top is covered in lava overflow while the chamber has a medium layer of uneven cake. The chamber appears to be out of round due to the thinning of the inner rim edge in the 12 ‘O’clock direction. The stummel surface is covered in dirt and grime through which beautiful flame grains are seen that radiate from the front of the bowl to the sides. The front of the bowl has a chipped area that will need to be filled. The mortise is clogged and the airflow through it is greatly restricted. The P-lip tapered vulcanite stem is oxidized with minor bite marks/ tooth indentations and traces of calcification in the bite zone. The stem does not fit snugly in to the mortise. The following pictures should give the readers a general idea of the condition of the pipe before I start working on it.

 Detailed Visual Inspection
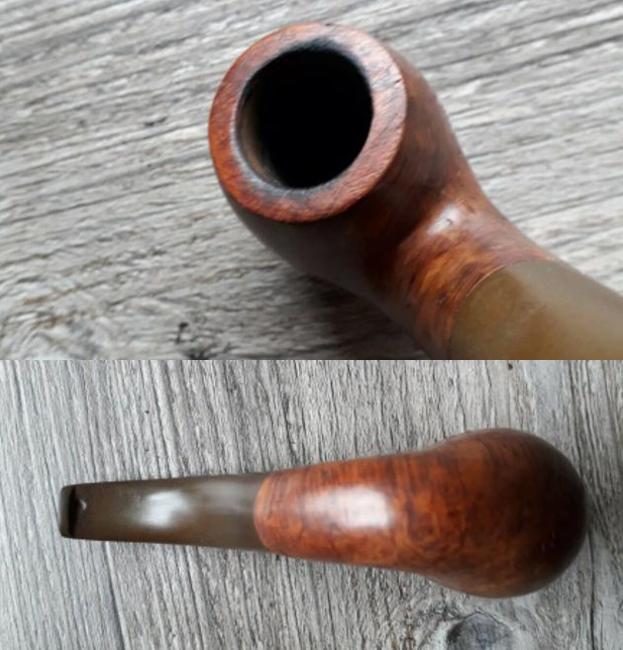
The chamber has a decent layer of uneven cake and has a strong residual pungent smell of Latakia forward blend of tobacco. There is thick overflow of tobacco oils, ash and grime over the rim top surface that spills over to the sides of the bowl. The condition of the outer rim edge can be ascertained only after the rim surface is rid of complete lava overflow. However, that the inner rim edge has damage is visible through the grime. The rim surface has thinned out (encircled in yellow) in 12 and 3 o’clock due to removal of charred edge by the erstwhile individual who held the pipe in his/ her trust. Any other issues with the inner rim edge will be known after the rim top surface has been cleaned. The draught hole is at the bottom centre of the chamber and thus should be a decent smoker. The smooth stummel surface has some very beautiful cross grain patterns on the sides with loosely packed bird’s eye grain to the front and back. The stummel has taken on a lovely dark patina from years of usage. The lava overflow from the chamber has spilled over on to the sides of the stummel and has accumulated a lot of grime and dust imparting the stummel a lifeless and bone dry appearance. The front of the stummel has a prominent chip from where a chunk of briar is missing (encircled in pastel blue). There are a few minor scratches and dings over the bowl surface commensurate to the pipe’s journey to date. The stem is very firmly attached in to mortise and would not budge. I shall initiate measures to separate the two subsequently.
 The P-lip like stubby tapered vulcanite stem is deeply oxidized and covered in dirt and grime. A few deep tooth chatter and tooth indentations are seen on both the upper and lower stem surfaces in the bite zone and the lower button edge has been chewed off. The tenon of the stem is firmly stuck in to the mortise and its condition will be ascertained once the two are separated. The airflow through the airway is laboured and not smooth.
 The Process
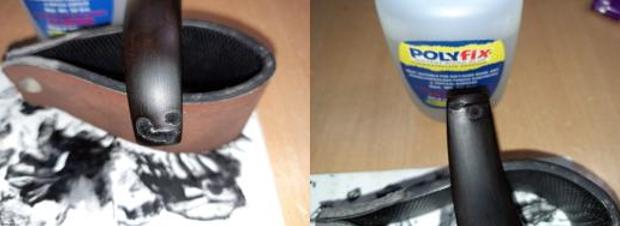
The first issue that I addressed was to separate the stem from the shank. I dribbled a few drops of alcohol through the gap between the stem and shank with an eyedropper with the intent that the alcohol would moisten and loosen the gunk holding the tenon and set it aside for a few minutes. Thereafter, I gently twisted the stem the stem in order to pull the stem out. However the stem did not budge. I repeated the process of moistening the gunk holding the tenon in to the mortise using alcohol. After repeating the process a couple of times, I was finally able to separate the stem from the shank. A close observation of the mortise revealed a completely clogged mortise and an equally gunk and crud encrusted tenon end. It appears that the mortise and stem has never ever been cleaned. With the stem now separated from the shank, I cleaned the stem airway and surface using thin shank brushes and anti oil dish washing soap. I dried the stem airway by blowing out excess water and thereafter running a couple of pipe cleaners through the airway.
  Once the stem internals had been cleaned, I immersed it in “Before and After Deoxidizer” solution along with the stem of other pipes in line for restoration. This solution has been developed by Mark Hoover and works to draw out all the deep seated oxidation from the surface making its subsequent cleaning and polishing a breeze. I would definitely recommend this product as it saves on to time and efforts. The pipe has been marked with a yellow arrow for easy identification.
 While the stem was soaking in the deoxidizer solution, I worked on the stummel by reaming the chamber walls with my fabricated knife to remove the carbon deposits. Once the cake was reamed back to the bare briar, I used a 150 grit sand paper followed by 220 grit sand paper to remove all the traces of the remaining cake and also to smooth out the inner walls of the chamber surface. Finally, to remove the residual carbon dust, I wiped the chamber with a cotton pad wetted with 99.9% pure isopropyl alcohol. I gently scraped the rim top surface to remove the lava overflow.
  This was followed by cleaning the mortise with cue tips, pipe cleaners and a shank brush dipped in isopropyl alcohol. I scraped the walls of the mortise with my fabricated knife to remove the dried oils and tars. The heap of gunk scraped out from the mortise walls tells the sordid saga of the condition of the shank internals. Well, the shank internals are clean and will be further cleaned once the stummel exterior is cleaned using oil soap and shank brushes. However, the odours are still very strong and would need more intrusive methods of cleaning.
 Continuing with the internal cleaning of the chamber and shank, I subjected it to a salt and alcohol bath. I used cotton balls which is an at par substitute to kosher salt as I have realized over the years. I drew out a wick from the cotton and along with a folded regular pipe cleaner; inserted it into the mortise and through the draught hole and further into the chamber. Thereafter, I packed the chamber with cotton balls to about quarter of an inch below the rim inner edge and soaked the cotton balls with isopropyl alcohol up to the brim. About half an hour later, the level of alcohol had gone down, having being absorbed by the cotton. I topped it up once again and set it aside overnight. By next afternoon, the cotton and alcohol had drawn out all the remaining oils/ tars from the chamber and mortise and loosened out any residual cake and tar build up, fulfilling its intended task. I removed the cotton balls and ran pipe cleaners through the mortise to clean out all the loosened tars and gunk. Using my fabricated tool, I scraped out the entire loosed gunk from the mortise and further cleaned it with alcohol and q-tips. I also scraped the moist cake from the chamber using my knife and sanding it smooth with 180 grit sandpaper. The chamber now smelled clean and fresh and the tiny veins observed in the chamber were eliminated. I set the stummel to dry out naturally.
 As I was cleaning the shank internals, the metal band came loose from the shank end. Careful inspection of the now exposed shank end confirmed that the surface is sans any cracks or chips. I kept the band aside to be worked upon later.
The next morning, I removed the stems that had been soaking in the deoxidizer solution overnight. I cleaned the stem surface and airway under running warm water and scrubbed the raised oxidation from the stem surface using a Scotch Brite pad and the airway with thin shank brush. I further removed the oxidation by scrubbing the stem with 0000 grade steel wool and applied a little olive oil to rehydrate the stem. While the stem was set aside to rehydrate and absorb the EVO, I cleaned the external surface of the stummel with Murphy’s Oil Soap. I scrubbed the stummel surface with anti oil dish washing detergent using a Scotch Brite pad and a hard bristle toothbrush under warm running water, always being mindful of the stamping on the shank surface. I paid particular attention to the rim top surface to rid the rim of all the residual crud and lighten the darkening around the rim surface. Thereafter, I dried the stummel using paper towels and a soft cotton cloth and set it aside to dry out naturally. The extent of the gouge is now easily discernible and is encircled in blue. This will need to be addressed.

 I followed up the external cleaning of the stummel with internal cleaning of the mortise and shank using anti oil soap and shank brushes. The shank internals are now clean and fresh.
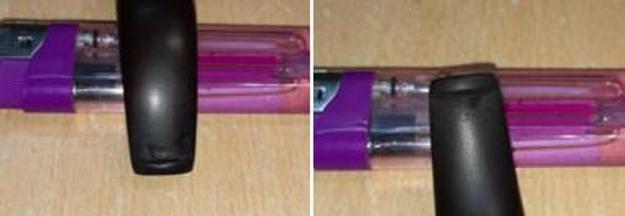
 Continuing with the stem refurbishing, I heated the bite zone with the flame of a lighter to raise the tooth indentations to the surface. Though the results were not what were expected, the vulcanite was raised a little leaving behind two visible tooth compressions on either surfaces. The button edges and deeper tooth indentations on either surfaces of the stem were filled with a mix of CA Gorilla superglue and activated charcoal powder and set aside for the fill to cure.
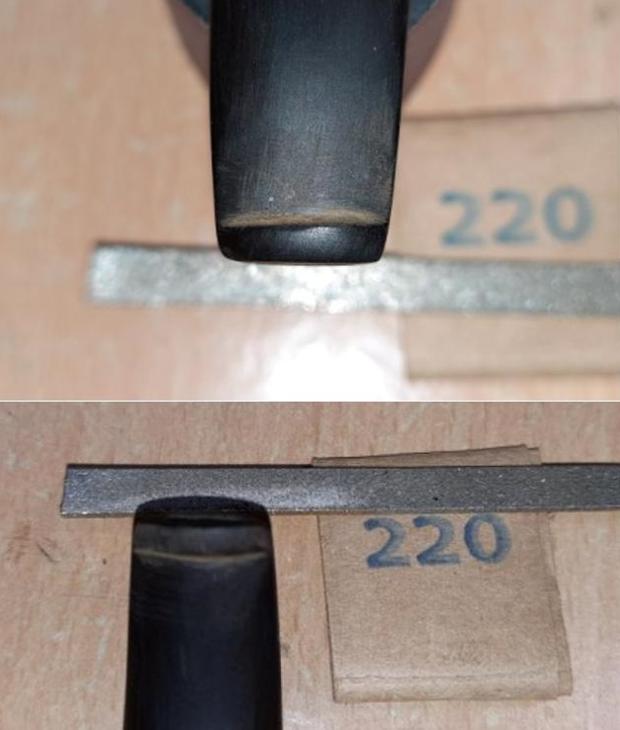
 With the stem repairs set aside, I addressed the rim top darkening and unevenness by topping the surface on a piece of 220 grit sandpaper. I frequently checked the progress being made as I hate to lose briar more than what is absolutely necessary. The chamber now appears more out of round than before and would be addressed by creating a bevel over the inner rim edge.
  With a folded piece of 220 grit sandpaper pinched between my forefinger and thumb, I imparted a nice bevel to the inner rim edge. This masked the out of round appearance of the chamber and also eliminated the minor charring over the edges. I evened out the outer rim edge n the same way. The rim top surface now has a nice rounded appearance with even rim edges.
 Next, I filled the deep gouge to the front of the stummel with a mix of briar dust and superglue. This mix hardens very rapidly and invariably reveals air pockets when sanded. To mitigate this, one has to re-patch the fill and this is exactly what I followed. Using a flat needle file, I sanded the patch to achieve a rough match of the fill with the rest of the stummel surface. I further evened out the patch with a folded piece of 220 grit sandpaper. I am quite satisfied with the appearance of the stummel surface at this point in restoration.
  Thereafter, I completed the polishing of the stummel by wet sanding the surface with 1500 to 12000 grit micromesh pads. I wiped the stummel with a moist cloth in between the pads to gauge the progress being made and massaged a small quantity of Before & After Restoration balm and set it aside for 10 minutes for the briar to rehydrate. Thereafter, I gave a rigorous hand rub using a microfiber cloth. The stummel now has a nice vibrant shine to it with the beautiful cross grains and bird’s eye grains resplendent in all their glory.

 I completed the mundane but equally important task of polishing the Sterling Silver filigree band. I used Colgate toothpowder to polish the band. The ultra fine powder was rubbed over the band and wiped it out. The polish completely removed the oxidation and gave a nice shine to the band which was further improved by polishing it with a jeweller’s cloth. Using CA superglue, I reattached the band at the shank end.
 Stummel repairs and refurbishing is now complete, save for the final polishing, I moved on to stem repairs. The stem had cured completely and began the stem refurbishing by first sanding the stem fills using a flat needle file to roughly match the rest of the stem surface. I masked the stem markings with a tape to preserve them as it was already worn out and avoid further wearing down during the polishing process. Thereafter I sand the fill with a piece of 320 grit sandpaper to blend in the repairs. I also lightly sand the entire stem surface to remove the raised oxidation from the surface.
 I followed it up by wet sanding the entire stem surface using 400, 600, 800, 1000, 1500 and finally with a piece of 2000 grit sand paper. This serves to reduce the sanding marks of the more abrasive sand papers. I also sharpened the button edges while sanding. I wiped the stem with a moist cotton swab to remove all the oxidation and sanding dust from the surface. I applied a little Extra Virgin Olive oil over the stem and set it aside to be absorbed by the vulcanite.
 I went through the 1500 to 12000 grit micromesh pads to wet and dry sand the stem. The stem now has a nice deep shine with no traces of oxidation around the entire stem surface.
  To apply the finishing touches, I mounted a cotton cloth buffing wheel on to my hand held rotary tool and applied a coat of Blue Diamond to the stummel and the stem to polish out the minor scratches.
 With a cotton buffing wheel that I use for carnauba wax, I applied a coat of carnauba wax and continued to work on it till the complete coat of wax had been polished out. I mounted a clean cotton cloth buffing wheel and gave the entire pipe a once over buff. I finished the restoration by giving the entire pipe a rigorous hand buffing using a microfiber cloth to raise the shine further. The finished pipe looks beautiful and is ready to be added to my collection of inherited pipes.


 I thoroughly enjoyed working on this project and seeing the pipe transforming itself in to a beautiful piece. However, the research on this particular pipe has highlighted more questions than answers. I would appreciate if the knowledgeable readers could clear the cobwebs of questions surrounding the provenance of this beauty. Thank you for reading through this write up and also in anticipation for the input on this particular piece.