Blog by Kenneth Lieblich
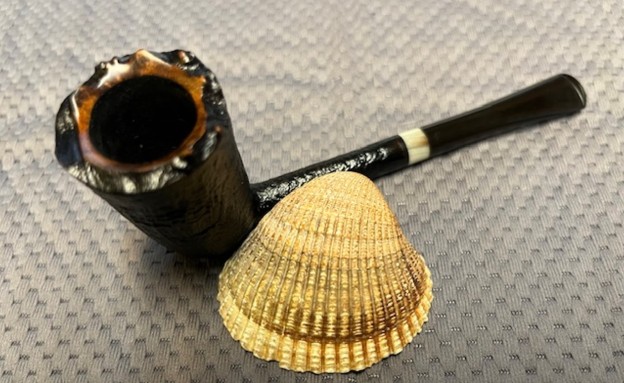
This is the fourth and final pipe I repaired for the gentleman in Washington. All four pipes have been great to work on, but I think I like this one best. It’s a portly and handsome Peterson Emerald XL02 Bent Apple. The pipe is smooth and has a P-lip stem. It is an elegant pipe with beautiful lines – and it feels so comfortable! Can’t wait to get this one done.


 Let’s take a closer look at the pipe. On the left side of the shank, it reads Peterson’s [over] Emerald. On the right side of the shank, it reads Made in the [over] Republic [over] of Ireland. To the right of that is the shape number, XL02. On the stem was the normal, stylized P of the Peterson firm. Interestingly, this P was in bas relief, rather than engraved.

 In an effort to learn more about the Emerald line of pipes, I went to Pipedia’s Peterson page – and learned precisely nothing. Pipephil provided just as much. Even the Peterson website itself had nothing on the historical Emeralds except to discuss the current crop of heavily rusticated pipes. So, naturally, my reliable source for all things Peterson is Mark Irwin from Peterson Pipe Notes. He has a blog post on the Emeralds – specifically the rusticated ones, but he does reference the smooth ones too. Have a look at the article here.
 Irwin and Gary Malmberg’s book, The Peterson Pipe: The Story of Kapp & Peterson, also made mention of the Emerald line:
Emerald (1987-) Moderate-priced line in Bordeaux and black rustic finish with a shank band of green acrylic between brass rings, P-lip mouthpiece; smooth walnut version added in ’91. Fishtail mouthpiece added in ’97. Identical line and finishes named Jade from early eighties until ’87. Putting all the bits and pieces together, I think we can safely say that this pipe dates from between 1991 and 1997.
 On to the stem. As usual, I cleaned the insides with lemon-infused isopropyl alcohol and some pipe cleaners. Fortunately, it wasn’t too dirty inside. Then I wiped down the outside of the stem with Murphy’s Oil Soap on some cotton rounds – that removed some exterior dirt. Then, of course, I stuck it in the deoxidizing solution overnight. The next day, I scrubbed it down with some SoftScrub on cotton rounds.

 I built up the tooth marks on the stem with black cyanoacrylate adhesive and let them fully cure. I had tried the BIC lighter trick, but it didn’t work. I then sanded the adhesive down – first with a small file, then with 400-grit sandpaper to meld seamlessly into the stem. I then used all nine Micromesh pads (1,500 through 12,000 grit) to bring out the lovely black lustre on the stem. I also used Obsidian Pipe Stem Oil in between each pad scrubbing (from 3,600 on).

 Moving on to the stummel, I used the PipNet Reamer to remove the built-up cake and followed that with 220-grit sandpaper taped to a dowel to eliminate as much as I could. I took the chamber down to bare briar. For now, I proceeded to clean out the insides of the shank with Q-tips, pipe cleaners, and lemon-infused isopropyl alcohol. There was quite a bit of filth inside this stummel and it took a fair amount of cotton to get it clean.
 I already knew there were going to be some big, bad problems inside, so no sense in delaying the inevitable work. As the photos show, there were many heat fissures in the briar and the major crack on the outside of the bowl was made to look even more dramatic once I cleaned the stummel. I used a dental pick to remove extra debris lodged inside this crack.


 Before moving to pipe surgery, I decided to de-ghost the pipe in order to remove any lingering smells of the past. I thrust cotton balls into the bowl and the shank and saturated them with 99% isopropyl alcohol. I let the stummel sit overnight. This caused any remaining oils, tars and smells to leach out into the cotton. The bowl was nice and clean after this.
 Repairing the crack first involves drilling a tiny hole at the end of the crack to stop it from elongating any further. I took my micro drill bit (see how tiny!) and delicately drilled a hole through the briar. I then administered a dose of CA glue (mixed with briar dust) along the crack and let it cure. This was done on the side of the bowl, as well as on the rim, of course.

 This crack was simply too severe to plug with pipe mortar. Instead, I prepared some J.B. Weld epoxy and filled the cracks and gouges, ensuring that the epoxy was evenly spread throughout the bowl. Of course, I did plug the draught hole with a folded pipe cleaner (coated in Vaseline) to make sure none of the epoxy made its way up there. Once done, a good 24 hours was needed to ensure that the epoxy was properly set.
 Once cured, I gently sanded the inside of the bowl to provide a surface for what was to come next. I coated the entire inside of the bowl with a mixture of activated charcoal and my wife’s homemade yogourt. Once hardened, this provided a good, slightly abrasive surface for a new cake to build.
 After all of that, I used all nine Micromesh pads (1,500 through 12,000 grit) all over the stummel to make it lovely and smooth. I then used my restoration balm and rubbed that into the wood to have its nourishing properties work on the wood. I let it set for 20 minutes or so. Afterwards, I rubbed down the stummel with a microfibre cloth.


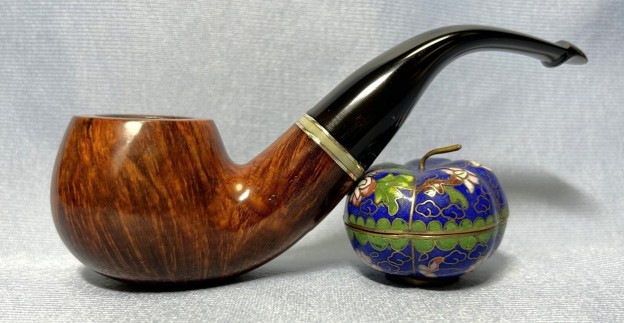
 At long last, I was off to my bench buffer to put the final touches on this pipe. I first gave it a thorough going-over with White Diamond compound. Following that, several coats of carnauba wax created a beautiful, glossy seal on the pipe and provided some closure to this involved repair.
 This Peterson Emerald XL02 Bent Apple is such a good-looking pipe. I’m thrilled to have completed all of my customers pipes and I trust that he will enjoy this one (and the others) for many years. I hope you enjoyed reading the story of this pipe as much I as I did in restoring it. If you are interested in more of my work, please follow me here on Steve’s website or email me directly at kenneth@knightsofthepipe.com. Thank you very much for reading and, as always, I welcome and encourage your comments.