Blog by Kenneth Lieblich
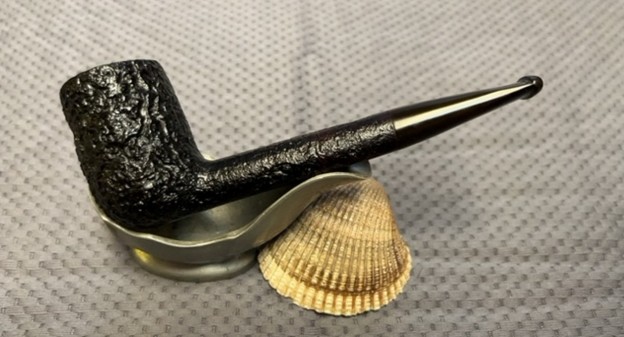
This happy little fellow is a sandblasted, stylized bent Zulu by Birks. My cousin gave me three pipes to repair – this is the first one I grabbed. I was interested in it for two reasons. First there was a cracked shank, and I always like giving life back to a pipe with a cracked shank. Second, the pipe comes with the name of the famous Canadian jewellery house, Birks. I’m interested in this because I have several Birks pipes in my workshop and they’re all a little different. More on that in a moment.


 The markings on the pipe don’t tell us much – but they tell us enough. The only markings are on the underside of the stummel and they read Birks [over] Regency. To the left of that are the words Made in England. Allow me to explain some of this.
 Birks refers to Henry Birks & Sons, a venerable and well-known luxury store based in Canada (now known as Maison Birks). It has focused primarily on jewellery throughout its history, but also other luxury items like watches, silverware, etc. There has been some discussion in pipe circles about whether Birks sold pipes or not – and whether Birks actually refers to an English company (as Wilczak and Colwell suggested in Who Made That Pipe?). I can say definitively that Henry Birks & Sons sold pipes. They did not manufacture their own, but had others make them for sale at Birks’ stores. Steve has already restored some Birks-branded pipes made by Savinelli. I have Birks-branded pipes made in England and in Denmark.
 Two further points about this. First, I wonder if Wilczak and Colwell were thinking of an English razor company (also called Birks) that frequently used a maker’s mark that was in the shape of a pipe (rather unhelpfully). For more on that, click here. Second (as I mentioned earlier), this particular pipe has the word Regency on it. Regency specifically refers to a Henry Birks line of silverware, china, etc. – so that makes sense.
The stummel was surprisingly clean when I took hold of it. I did use a few cotton swabs and pipe, cleaners, along with isopropyl alcohol, but it didn’t take much to finish it. I followed that up with some Castile soap, and tube brushes to really scrub the insides. Came out beautifully. I’ve then took some Murphy’s, and a toothbrush and gently scrubbed the years of filth and oil, etc. off of the sandblast. It certainly looked much cleaner after that, albeit much more faded. A new coat of stain will be required, I think.

 As a result, I took the opportunity to wipe down the stummel, with alcohol to remove some excess old stain, and make sure everything was clean for the repair to the crack in the shank.

 Let’s move onto the primary repair to this pipe: that crack in the shank. First of all, I took the most micro of micro drill bits and drilled a hole with my Dremel right through the shank wall into the airway. This is an important step as it stops the crack from extending later on in life. The drill bit is so thin that it’s always a bit nerve-racking, because I fear snapping the bit through such hardwood. Fortunately, it worked like a charm this time. I also stuffed the mortice with pipe cleaners coated in Vaseline, so that if – God forbid – any cyanoacrylate adhesive drip into the mortise, it can be easily removed by the petroleum jelly. I ran a thin bead of cyanoacrylate adhesive along the length of the crack, and then held the two sides of the crack together with some vice grips. I let it sit for a few hours to cure.


 Moving along to the stem. Like the stummel, it was also quite clean, but needed a few more pipe cleaners to finish the job. Of course, I used isopropyl alcohol with them. I then wiped down the stem with Murphy’s on a cotton round. Once done, I put the stem in the deoxidizing fluid, even though there wasn’t much oxidation to speak of. It can’t hurt, and it’ll remove what little there is.

 After the adhesive cured on the shank, I set about sanding the underside of the stummel because there were a lot of scratches there. I also needed to sand down the bead of adhesive that I put there. It was tricky, because there wasn’t much room to move, with the markings so nearby. I started out by masking those markings with hockey tape, which is a perfect masking material as it is extremely scratch resistant. However, it ended up being more trouble than it was worth given the tight spaces to work in. Instead, I just sanded the area down, freehand, so to speak.
 It was time to stain the pipe, so I took out my Fiebling’s black leather dye. I thoroughly coated the stummel with a dauber, then flamed it with my BIC lighter to set the color. I repeated this process three more times to ensure a really deep, rich, black colour. it worked a treat.
 In order to ensure the crack in the shank doesn’t open up again, I decided to add a band to the shank to secure everything in place. The bands always look a little dull when they come out of my drawer, so I polished it up with my micromesh sanding pads. Naturally, I did the same to the stem. Came out beautifully.


 The next step, of course, was adding the restoration balm to the wood. This not only enriches and enlivens the briar, but helps add a protective layer to the dye in the wood.

 Off to my bench polisher! As usual, I used white diamond as my first compound, but instead of the regular conservator’s wax that I would use on sandblasted or rusticated pipes, I opted to use Halcyon II this time. It also gives a nice polish to the pipe, but slightly less shiny than normal – which is what I was aiming for.
 This Birks Bent Zulu looks beautiful once again. I’m sure my cousin will love it. I hope you enjoyed reading the story of this pipe as much I as I did restoring it. If you are interested in more of my work, please follow me here on Steve’s website or email me directly at kenneth@knightsofthepipe.com. Thank you very much for reading and, as always, I welcome and encourage your comments.


