Blog by Steve Laug
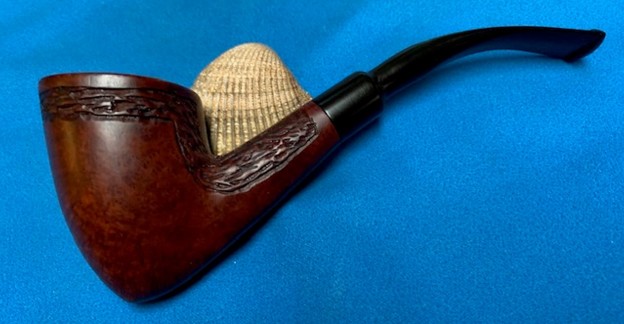
In the last box of pipes Jeff sent me there two Lakatosh freehand pipes. The first I have chosen to work on came to us from an online auction in Gonzales, Louisiana, USA on 09/04/2020. It is engraved by hand on the underside of the shank and reads Handmade [over] Lakatosh [over] 6-83. It was a beautiful pipe but a dirty pipe when we received it. The finish has a unique smooth finish on the bowl and shank with a ribbon of rustication around the top of the bowl and up the topsides of the shank on both sides. There was a moderate cake in the bowl that darkened the inner edge with a light coat of lava onto the topside. The vulcanite, fancy saddle stem was oxidized, calcified and there were light tooth marks and chatter on the top and underside ahead of the button. Jeff took some photos of the pipe before he started his cleanup work. He took photos of the bowl and rim top to show their general condition. You can see the moderate cake in the bowl and the slight lava coat on the top of the rim and inner edge of the bowl. The finish on the bowl is very dirty with grime and oils ground into the bowl, but still very stunning. This pipe has a Danish Freehand look to me with a bit of an American flair. The round saddle stem that has some oxidation, calcification on the surface of the vulcanite. There is chatter and tooth marks on the top and underside.


 Jeff took some photos of the sides and heel of the bowl to give an idea of the grain and the rustication around the bowl and shank. It is amazing and I cannot wait to see what it looks like once it is polished and waxed.
 He took a photo of the stamping on the underside of the shank to capture it for me. It is hand etched and is clear and readable as noted above.
 I remembered that Paresh had worked on three of these pipes in India and I believed they were from his Grandfather’s collection. We had chatted about them wondering how they had traveled from Pennsylvania to India. I turned to the blog that he wrote on the restoration to have a look at the information that he had gathered when he worked on the pipes (https://rebornpipes.com/2018/12/30/a-tribute-to-an-american-pipecarver-john-l-lakatosh/). I was not disappointed… the old memory still held onto a few things. I quote from his blog for the history of the brand. He also included a photo of the pipemaker that is great.
 … All these pipes bear the stamping “HANDMADE” over “LAKATOSH” over the “MONTH AND YEAR” in which they were made. These stamps are in engraved in a script hand on the shank end of each pipe.
I was keen to know more about John Lakatosh, the carver, his pipe making techniques and philosophy. I searched pipedia.com and there is a very brief write up on him. I reproduce the information available on pipedia.com for a quick read. [Editor: He quotes]
John Lakatosh was a carver from New Columbia, Pennsylvania. He made pipes in his home workshop in the Susquehana Valley up above Sunbury. John made pipes during the week and sold most of them at craft fairs in Central and Southern Pennsylvania. He retired from carving, to go back to bus mechanic work after the tobacco industry took a decline. He now lives with his wife in Lewisburg Pennsylvania, where he now crafts furniture for family and friends. He recently passed on March 8th 2018. (Primary/Familial Source)
As I was surfing the net for more information on Mr. John Lakatosh, I came across his obituary. Here is the link (https://www.heffnercare.com/obituaries/obituary-listings?obId=3010702)
With that information at hand I turned to work on the pipe itself. Jeff had thoroughly cleaned up the pipe. He reamed the pipe with a PipNet Pipe Reamer and cleaned up the remnants with a Savinelli Fitsall Pipe Knife. He scrubbed the bowl with undiluted Murphy’s Oil Soap with a tooth brush. He rinsed it under running warm water to remove the soap and grime. He cleaned out the inside of the shank and the airway in the stem with alcohol, cotton swabs and pipe cleaners. He scrubbed the exterior of the stem with Soft Scrub to remove as much of the oxidation and calcification as possible. He soaked the stem in Briarville’s Pipe Stem Deoxidizer and rinsed it off with warm water. I took photos of the pipe once I started to work on it. 
 I took some photos of the rim top and stem. The rim top and bowl looked very good. The cake and lava overflow were gone and the rim edge was very clean. Jeff had been able to get rid of all of the lava and tars. The rim top looked good with light marks and scratches on the surface. The closeup photos of the stem shows that it is a much cleaner and looks good. The light tooth marks and chatter were still present on both sides.
 I took a photo of the stamping on the underside of the shank to show the condition after the cleanup. It was very readable and undamaged. I took the stem off the shank and took a photo of the pipe to give a sense of the proportions of the pipe.
 I started my restoration work on this pipe by addressing the darkening around the inner edge of the bowl. I used a folded piece of 220 grit sandpaper to clean up the inner edge and the rim top with the same sandpaper. The finish rim top looked very good.
  I started my polishing regimen on the bowl. I used nine micromesh sanding pads and dry sanded the bowl with 1500-12000 grit pads. I wiped the bowl down with a damp cloth after each pad. The bowl really shines by the final three pads.


 I worked some Before & After Restoration Balm into the surface of the briar with my fingertips to clean, enliven and protect it. I let the balm sit for a little while and then buffed with a cotton cloth to raise the shine. The photos show the bowl at this point in the restoration process.

 I set the bowl aside and sanded out the tooth marks and chatter on both sides ahead of the button. I used a folded piece of 220 grit sandpaper to remove the damage. I started the polishing with 600 grit wet dry sandpaper.
 I polished the stem with micromesh sanding pads – dry sanding with 1500-12000 grit sanding pads. I wiped them down after each sanding pad with a cloth containing some Obsidian Oil.
 I finished polishing it with Before & After Pipe Stem Polish – both Fine and Extra Fine and buffed it off with a cotton cloth. I gave it a coat of Obsidian Oil to preserve and protect the stem.
  I don’t know how many times I have said this but I love it when I come to the end of a restoration and all of the parts come together and the pipe looks better than when we started the cleanup process. I put the stem back on the Lakatosh 6-83 Acorn and buffed the pipe with Blue Diamond on the buffing wheel. I carefully avoided the stamping on the shank sides during the process. I gave the bowl and stem multiple coats of carnauba wax on the buffing wheel and followed that by buffing it with a clean buffing pad on the buffer. I hand buffed the pipe with a microfiber cloth to deepen the shine. The finished pipe is a real stunning example of a Lakatosh 6-83 Handmade Acorn. Once again, the grain and the way the shape follows the grain is amazing. Give the finish pipe a look in the photos below. I can only tell you that it is much prettier in person than the photos capture. The dimensions of the pipe are Length: 6 inches, Height: 2 ¼ inches, Outside diameter of the bowl: 1 ½ inches, Chamber diameter: 7/8 of an inch. The weight of the pipe is 1.69 ounces/48 grams. This Lakatosh Freehand is a great piece of pipe history that is in exceptional condition. Thanks for walking through the restoration with me as I worked over another beautiful pipe. I will be putting this one on the rebornpipes store in the American Pipemakers Section. Let me know if you are interested in adding it to your collection. Thanks for your time.
As always, I encourage your questions and comments as you read the blog. Thanks to each of you who are reading this blog. Remember we are not pipe owners; we are pipe men and women who hold our pipes in trust until they pass on into the trust of those who follow us. 


