Blog by Dal Stanton
Jim was the recipient of the first Stanwell Henley Special, Oval Shank Billiard, that I restored some time ago (see LINK). Jim saw it on the online ‘For “Pipe Dreamers” Only!’ collection benefiting the Daughters of Bulgaria – our work here in Bulgaria helping women and girls who have been trafficked and sexually exploited. The second Stanwell Henley Special on the worktable is the Blasted Saddle Stem Billiard on the bottom in the picture below. This pipe has not been commissioned and will be heading to The Pipe Steward Store and this beautiful stout Danish will also benefit the Daughters when a new steward brings it home. I have also taken notice of the solid craftsmanship of these 3 Danish made pipes and decided that the third, a Stanwell Henley Special Chimney (on top in the picture below), would find a home in my personal collection. The eBay seller gave this helpful information about this Lot of 3 Stanwell Henley Special pipes:
This auction is for three vintage Stanwell, Henley Line estate pipes from the 1950’s-60’s era. All are in good pre-owned condition. The stems are primarily free from teeth marks. The stems do have some fading. All of the stems fit snug and the wooden bowls are free from outstanding blemishes. As seen from top to bottom, the first pipe reads Henley Special #57, the second and third read Henley Special without any numbers seen. All of the pipes read Made in Denmark.
Here are the three Stanwell Henley Specials that I acquired on the eBay auction block from a seller in Maryland. 
 The Henley Jim commissioned is pictured in the center above and below is the restored pipe now in Jim’s collection – an unbelievable transformation!
 As I expressed before, since I started collecting and restoring pipes, I’ve grown in my appreciation for Danish made pipes. They tend to be stout, well-made pipes and just fit the hand wonderfully. Unfortunately, my original research did not uncover much online regarding the Henley line. Pipedia’s article on Stanwell pipes simply places the Henley Special line in the list of Stanwell second brands. Pipephil.eu provided more information with a Henley much like the slightly bent Chimney above which I’m claiming for my collection, with the interesting characteristic bulging midsection, but with a blasted finish. It also shows an ‘H’ stem stamp. None of the 3 Henleys of my acquisition have stem stampings – or they wore off long ago.
 The only information I found in my initial research that gave any reference to dating isn’t conclusive. I found the following picture on Google images with the link to pipesmokersforum.com, “Who made this pipe?” I went to the pipesmokersforum site and searched ‘Henley’ and no reference or article emerged. I would have loved to read the thread that discussed the dating of the discontinued Stanwell second, Henley Special. The picture puts a question mark in the late 50s and the eBay seller’s description placing the pipes in the 50s or 60s are anecdotal but seem to me to be accurate. I will keep searching but based upon the look and feel of these Danish made pipes, I think the 50s/60s is on target.
 With the second Stanwell Henley Special on the worktable, I take some pictures to get a closer look. He’s a large bowled pipe with dimensions: Length: 5 1/2 inches, Height: 2 1/4 inches, Rim width: 1 7/16 inches, Chamber width: 7/8 inches, Chamber depth: 2 inches.


 The nomenclature on the blasted stummel is on the lower side of the pipe. There is a flat panel running the length of the heel and shank allowing this Billiard to sit on the table – nice feature! On the shank side of the panel in cursive is stamped a thin ‘Henley’ [over] SPECIAL. To the right of this is stamped MADE IN [over] DENMARK.
 The condition of this Henley resembles the others in that they are very dark and dirty from grime over the stummel. The blasted surface of this Henley will need much scrubbing with a brush. One crevasse is so large/deep that when I first saw it, I thought that the bowl had cracked. However, it is the result of the blasting process. The blasted surface is amazing on this pipe. The chamber is choked with carbon cake buildup – this needs to be removed to give the briar a fresh start and to examine the chamber walls. With the cake as thick as it is, there is concern for heating damage. The rim is inundated with lava flow – it’s thick! The saddle stem has also seen better days! The oxidation is thick, and the bit has been chewed – or more accurate, clenched. There are several compressions on both upper and lower bit – the former steward loved this pipe, but he was a hands-free clincher which would be no small feat for a pipe with a bowl this big!
This doesn’t happen often. My wife got into The Pipe Steward activities to picture me cleaning stems of pipes in queue – two Henleys included – this second one and the third staying with me. Yep, this is what my worktable looks like! I clean each airway with pipe cleaners dipped in isopropyl 95% as well as employing shank brushes. I clean the stems before placing them in the soak of Before & After Deoxidizer.
 The stems soak for several hours to work on removing the oxidation. The oxidation on the Henley is pretty think. We’ll see how the Deoxidizer works.
 When I fish out the Henley’s saddle stem, I rub/wipe the stem with cotton pads wetted with isopropyl 95% to remove the raised oxidation. I also run a few pipe cleaners wetted with isopropyl 95% through the airway to clear the Deoxidizer.
 I also apply paraffin oil, a mineral oil, to the stem to begin the conditioning process. The B&A Deoxidizer did a fair job on the stem.
 Turning now to the Henley stummel, I take a picture to show the condition of the chamber. The cake closes as it moves down the chamber. I’m hopeful that the chamber walls are not suffering from heating damage. To address the thick cake, I use the Pipnet Reaming Kit. After putting down paper towel to save time on cleaning, I begin with the smallest of the 4 blade heads available.
  With a chamber width of 7/8 inches and depth of 2 inches, he took all 4 blade heads that the Pipnet Reaming Kit had to offer. The cake is hard and crusty, and it takes patience to work the blades and not overdo it. I follow the reaming using the Savinelli Fitsall tool to continue to scrape the chamber walls clearing more carbon. Finally, I sand the chamber using 240 grade paper wrapped around a Sharpie Pen. The sanding is very helpful in cleaning the walls to allow inspection.
  After cleaning the chamber with a cotton pad wetted with isopropyl 95%, I’m able to get a good view of the chamber and the damage from heating is evident.
 I take pictures going around the chamber from different angles. With the thickness of the cake that I removed, I’m not surprised to find heating damage. I’m sure that the cracks and fissures that I’ve pictured are a result of the heat build-up caused by the thick cake and not allowing proper heating expansion and contraction. This puts more stress on the briar and these results occur. As I continue the cleaning, my mind will be processing the question of how to address this.

 Switching from the wall issues of the chamber, I move to cleaning the external surface. Without a doubt, this stummel is the King of Cragginess. I love the deeply hewn valleys and ridges of this large stummel created by a very thorough sandblasting process. I take pictures to show the various angles. The stummel is very dark and I’m anxious to see what cleaning does.

 I begin the cleaning by using undiluted Murphy’s Oil Soap and scrub with a cotton pad. With the craggy landscape, the process graduates very quick to scrubbing with a bristled tooth brush as well as a brass wire brush on the rim.
 Taking the stummel to the sink, warm water continues the cleaning rinsing off the Murphy’s Soap and scrubbing the surface of the crags with the toothbrush. I also attack the internals using shank brushes and anti-oil dish soap. I scrub the internals well and rinse the stummel thoroughly. The result of the cleaning is a considerably lightened stummel. Another round of pictures show the cleaned briar landscape on the Henley stummel.

 The rim still appears to have some lava residue on it, and I continue to clean it using a dental probe to break up the carbon in the crags as well as apply the brass bristle brush to the rim.

 I like the results and I love how the crevassed valley rises and bisects the rim! This blasted stummel has a lot of expression going on!
 I continue to clean the internals using cotton buds and pipe cleaners dipped in isopropyl 95%. Joining the cleaning process was a small dental spoon that allowed me to reach into the mortise and airway and scrape the wall, helping to clean the old tars and oils. I also utilize drill bits to help excavate tars and oils deeper in the airway. I insert the bit into the airway carefully and hand-rotate into the airway. The rotation helps to remove the gunk. After a good bit of cleaning, the buds and pipe cleaners start coming out lighter. I called a halt to the cleaning transitioning to a kosher salt and alcohol soak to continue the cleaning in stealth mode through the night.
 Before I set up the kosher salt and alcohol soak, I look at the stummel and it is a very dry piece of wood. I decide to apply a coat of paraffin oil to the stummel allowing the oil to hydrate the briar while it’s sitting through the night with the soak. Paraffin oil is a mineral oil available here in Bulgaria in the pharmacy. I apply the oil over the surface with a cotton pad and take a few pictures. Man, it looks good. This gives me a sneak peek at what the finished pipe will look like left in its present state. The rich dark burgundy tones are peeking out.
 Next, for the kosher salt and alcohol soak, I pull and twist a cotton ball to form a ‘wick’ that is inserted into the mortise with the help of a firm straight wire. The wick serves to draw the tars and oils that are released further from the internal wood. I then fill the bowl with kosher salt which will not leave an after taste as does an iodized salt. I then set the stummel in an egg crate for stability, tip the stummel so the salt surface is generally level with the end of the shank. Then with the use of a large eyedropper, I fill the bowl with isopropyl 95% until it surfaces over the salt. After a few minutes when the alcohol has been absorbed, I top off with more isopropyl 95%. I then put the stummel aside for the night and turn off the lights!
 The next morning the soak had done the job evidenced by the soiled salt and cotton wick. After tossing the expended salt in the waste, and wiping the chamber out with paper towel, and blowing through the mortise to dislodge salt crystals, I used a few more cotton buds and pipe cleaners wetted with isopropyl 95% to make sure all was clean. The soak did the job and the stummel will be much fresher for the new steward of this Stanwell Henley Special.
 Before moving further, I need to address the heating issues in the chamber. There are cracks and fissures which undoubtedly developed over time because the cake buildup became too much. With the cake so thick, it hinders proper expansion and contraction when the pipe is used. The result is what we now see in this chamber.
 To address this, I mix a batch of J-B KWIK Weld using the two components, Steel and Hardener. I use a plastic disc as a mixing pallet with scotch tape over it to aid in clean up. After mixing the two components on the pallet, about 4 minutes is available to apply the Weld before it begins to harden.
  I mix the components thoroughly with a toothpick, then using my finger (with a surgical glove on!), I scoop a bit of Weld and apply it to the chamber wall. I do this uniformly around the chamber and applying pressure to make sure the Weld is filling the cracks and fissures. I’m VERY careful to avoid dripping Weld on the rim during the application. Later, after the Weld thoroughly cures, I’ll sand the chamber removing all the excess Weld leaving behind only what filled the cracks and fissures – or that is the theory!
  I usually insert a pipe cleaner to guard the airway from the Weld, but this time I forgot and thankfully, no problems result. After completing the application, I put the stummel aside for several hours allowing the Weld to cure. Cleanup is quick – I simply peel the tape up and discard.
 Turning now to the saddle stem, the Before & After Deoxidizer did a good job, but I see residual oxidation yet remaining in the vulcanite. I take a few pictures with an opened aperture to show what I can see with the naked eye.
  The bit does not have tooth chatter as much as compressions – it appears the molars were engaged by the former steward to smoke the Henley hands-free. To address the bit compressions, I first use the heating method. Using a Bic lighter, I paint the compressions with flame and as the vulcanite heats, it expands to reclaim the original stem shape or at least the compressions are minimized. After heating several times, the compressions have lessened but are still visible. The before and after pictures tell the story – in fact, I had a hard time pairing the correct photos after the heating!
 I believe the compressions have been minimized enough that sanding will be all that is necessary to repair the bit. Using 240 grade paper, I sand not only the bit and button, but I expand it to the entire stem to address residual oxidation as well. I employ a flat needle file to freshen the button lips and to assist with the tooth compressions next to the lip. In the sanding of the saddle, I use a plastic disc I fashioned and with the disc separating the stem and stummel, I reunite the two. The disc acts as a shield to shouldering the stem shank facing. The sanding removed all the compressions. The pictures show the progress.
 With the major sanding with 240 paper complete, I continue by wet sanding the entire stem using 600 grade paper. I then follow the wet sanding by applying 000 grade steel wool to the stem. I’ve lost track of which is the upper and lower stem. The stem is looking great!
 I move directly to applying the full regimen of 9 micromesh pads starting by wet sanding with pads 1500 to 2400 then dry sanding with pads 3200 to 4000 and 6000 to 12000. Between each set of three pads I apply a coat of Obsidian Oil to assist in rejuvenating the vulcanite. The saddle stem has that glassy pop!
 I turn back to the stummel and the J-B Weld has had time to cure. I begin to sand off the excess J-B Weld by using the Dremel with a sanding drum. I set the Dremel to the slowest speed and gently, without much pressure, sand off the upper layer of the J-B Weld – the excess. With the drum, as I’m working patiently around the entire chamber, I also sand out a reaming step that had developed near the floor of the chamber. The Dremel shortens the work amazingly. I then switch by wrapping 240 grade paper around a Sharpie Pen. I fine tune the sanding in the chamber so that eventually, the cracks and fissures are revealed now having been filled. I love it when theory and practice come together! I clean out the chamber of the dust and it looks and feels great! I run my finger over the formerly cavern-filled chamber and it is smooth. I take finish pictures and move on.


 I’ve been looking forward to applying the Before & After Restoration Balm to this Stanwell Henley Special’s stummel to tease out the older patina of this vintage blasted briar surface. I make sure the surface is clean from all the chamber sanding and I take a few pictures to mark the start. I then apply the Balm to my fingers and rub it in to the surface. The surface practically drinks the Balm as I work the Balm into the craggy landscape. After it’s worked in well, I put the stummel aside for 20 minutes to allow the Balm to do what it does. I take a picture in this state.

 After about 20 minutes I wipe off the excess Balm and buff the blasted Henley Special stummel with a microfiber cloth. The hues are deeper and richer. I mount a cotton cloth buffing wheel onto the stummel and set the speed at 40% full power and after reuniting the stem and stummel, I apply Blue Diamond compound to the stem. As I go along, I experiment with the Blue Diamond on the stummel. I don’t want to gum up the craggy surface with Blue Diamond, but what I see, with a light application of the compound, is that the briar is sprucing up and I move the wheel along with the grain of the blasted briar. I like the results. When I complete the application of Blue Diamond, I give the pipe a good hand-wiping with a felt cloth to remove the carbon dust before application of the wax. I like the results.
 Straightaway, I load another cotton cloth buffing wheel onto the Dremel, increasing the speed of the Dremel to about 60% full power – faster than normal on smooth briar, I first apply carnauba wax to the stummel. I increase the speed for the blasted stummel to increase the heat of the application. I’ve found that using the Dremel on the craggy surface allows me to get up and close with the application of wax on the rough surface. Heating the wax more helps guard against it gunking up on the rough surface. The added speed helps dissolve the wax over the rough surface. I’m liking what I’m seeing! When I apply carnauba to the stem, I slow the speed of the Dremel back down to the normal 40% full power.
 After applying the wax, I give the pipe a rigorous hand buffing with a microfiber cloth. This not only raises the shine but also help disseminate any excess wax on the surface. There is one last project left to do. The chamber was riddled with heating cracks and fissures and I used heat resistant J-B Kwik Weld to fill in the cracks. I coated the entire chamber with the Weld mixture then sanded it after the Weld cured. After sanding, as the theory hoped, the results were, that the only Weld remaining was that which filled the cracks and the chamber wall is smooth and again usable to put this pipe back into service. Beautiful! I love it when theory and practice come together so well.
 To help provide a protective coat over the repairs and to encourage a new cake to develop, I apply to the chamber walls a coating mixture of natural yogurt (sour cream works, too) and activated charcoal. I mix a small amount of yogurt and charcoal in a bowl and when the consistency of the mixure will not drip off the spoon its ready to go. After putting a pipe cleaner through the draft hole, I use my index finger to reach into the chamber and apply the mixture. I make sure that the chamber walls are thoroughly covered, and I put the stummel aside for a time to allow the coating to cure. It dries into an amazingly hard surface. It’s important for the new steward to use a folded pipe cleaner to clean the bowl initially after putting the Henley into service – not to scrape the bowl!

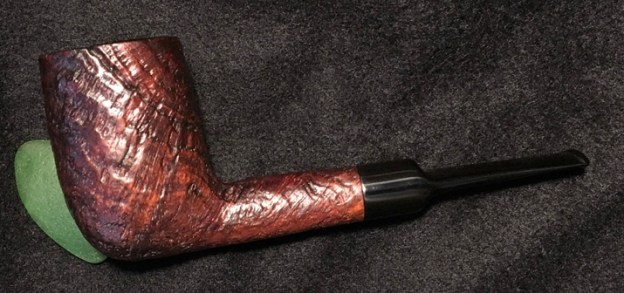
 I’m very pleased with the results of this second of the 3 1950/60s Stanwell Henley Specials I acquired. I appreciate the Danish craftmanship that is evident in all three pipes and this Blasted Billiard is no exception. The blasting amazes me with the craggy surface showing the 3-dimensional movement of the briar grain. One ravine is cut so drastically, at first, I thought it was a cracked bowl when I first acquired the pipes, but it remains as part of a very expressive, deep hued blasted briar landscape. With a chamber width of 7/8 inches and depth of 2 inches, the amount of blend one can pack into this bowl is pretty impressive and with the size of the stummel and the blasting – well, I’m tempted to keep it for myself, but the third Stanwell Henley Special next on the table will be staying with me. This Henley is heading for ThePipeSteward Store benefitting the Daughters of Bulgaria – our work here in Bulgaria helping women and girls who have been trafficked and sexually exploited. Thanks for joining me!


Reblogged this on The Pipe Steward.
LikeLike