Blog by Dal Stanton
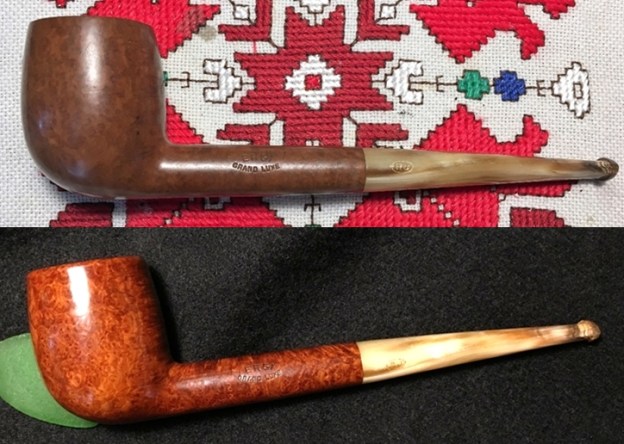
When this pipe came onto my worktable my assumption was that it was French made. This assumption was formed by it being part of the ‘French Lot of 50’ which I acquired off the French eBay auction block. Many of the pipes in this Lot bore horn stems which seemed to be the ‘French’ characteristic that formed my assumption that it too, was manufactured in France. But on my worktable, the only marks stamped onto the Billiard were the ERGI [over] Grand Luxe on the left flank of the shank and an encircled ‘RJ’ stamped on the stem. Here are the initial pictures of this attractive RJ Billiard with a horn stem and the nomenclature stampings: 


 Intrigued by the question of this pipe’s COM and ‘RJ’ and ‘ERGI’, I went to all my usual places – Pipedia and Pipephil both came up totally empty. I broadened the search to other blog threads and then to a wide-open Google search campaign. Nothing. I posted pictures of the nomenclature on Facebook groups, Gentlemen’s Pipe Smoking Society and Tobacco Pipe Restorers, and received only one response from Mike on GPSS who had this anecdotal information:
Mike: This pipe was made in Paris
Dal: Mike, Thanks. Do you know what RJ is? Company?? Thanks!
Mike: I know that the company closed down in 1998. As for the ERGI I believe it was an abbreviation for where the briar itself was harvested I picked one up years ago while in Paris. I also remember paying the equivalent of 120 US dollars for it back about 20 years ago. A really nice smoker. Dense briar.
Armed with Mike’s information about the Paris connection and encouraged by his experience, I Googled more (and a lot!) and also switched over to use Google of France hoping to get different responses. This did help and I found one other piece of information about another RJ of Paris pipe – formerly on the Worthpoint auction block a Torpedo shape with this scant information.
WO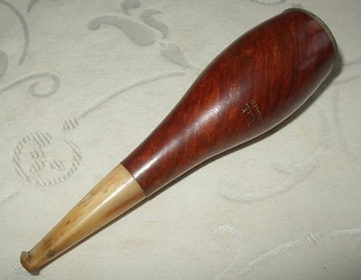 NDERFUL VINTAGE TORPEDO PIPE BY RJ PARIS WITH THE MAZE MORTONS PATENT DAMPER
This auction is for a super pipe in a torpedo shape made by RJ Paris (marked to the briar with name) and to the end is a mechanism that allows the damper to open and close – which is marked The Maze Morton’s Patent – a very good and interesting pipe.
An interesting pipe! Again, a horn stem. The French must like horn stems or at least ‘RJ’ did. This confirmed that there was at least one other RJ of Paris pipe out there, but it was also advertised with the “Maze Mortons Patent Damper’. I then searched again adding this to the search parameters and came up with no additional information – bah! I’ll keep researching while I work on the pipe and I’m open to anyone reading this write-up to send me a note with more information to add to the scant information I have!
Todd saw this pipe along with two others in the For “Pipe Dreamers” Only! collection – a Ben Wade Hand Model and a very nice GBD Pot with uber grain potential! Todd is a regular commenter on Rebornpipes and different Facebook pipe groups. In the past he had offered encouraging words for restorations I had published, so it was great dialoging with him while he chose pipes to commission! As he whittled his Dreamers list down from 5 pipes to the 3, we discovered we both have 2 grown children living in Denver, a parent living in Florida and connections in the Atlanta area – a small world sometimes in the pipedom community! Most interesting to me was to discover that Todd is a lawyer and fluent in Mandarin Chinese and who practices both commercial law for corporations and also political asylum cases for individuals. ‘Political asylum’ cases got my attention and appreciation, especially given our work here in Bulgaria among trafficked women. Todd’s final three Dreamer’s choices: a Ben Wade, GBD Pot and the RJ on the worktable. With the limited information about the pipe before me and an appreciation for the pipe man who commissioned it, I now look closer at the pipe’s condition. The interesting thing about this pipe is that it appears to be unsmoked and newish. The metal tenon appears to be threaded and I’m assuming will take a 5mm filter if one chooses. The chamber is virgin even though the external briar has some nicks and miniscule pits at places. The pipe is very attractive, but what strikes me is that the grain of the smooth briar is subdued, even for an unsmoked pipe! The rim is not marred, but the appearance is sharp and chopped. Softening the rim presentation would help. The horn stem is in pristine condition and simply needs to be polished. This ‘restoration’ is primarily a freshening, but my challenge is to show that generally (notice, qualifier!) a good restoration of a ‘new’ pipe will turn out better results than a factory manufactured new pipe. This is the gauntlet that I’m laying down for myself, and we’ll see!
 Even though the pipe is unsmoked, I use undiluted Murphy’s Oil Soap and clean the stummel using a cotton pad. Afterwards, I rinse the stummel with cool tap water. Doing this not only cleans the briar, but I also watch to see how the finish reacts. As you can see from the results below, the cotton pad picks up some grime.
 Next, to soften the rim’s ‘cut off’, block look, I introduce both an internal bevel and a gentle external bevel. At the end, these bevels will soften and will appear simply to be rounded edges, not distinct bevels. To do the initial shaping, I pinch a tightly rolled piece of 120 grit paper between my thumb and the rim edge and rotate around the circumference. I follow the 120 with rolled pieces of 240 and 600 grit papers.

 In the same way, I introduce a lesser bevel on the external rim edge. There are some wandering scratches on the rim top that micromesh should erase.
 Next, to clean up the minor surface imperfections and to tease out the grain, using micromesh pads 1500 to 2400 I wet sand the stummel. I follow by dry sanding using pads 3200 to 4000 and 6000 to 12000. The grains emerge more distinctly during the micromesh process and I study the patterns. The block was cut with a primary horizontal cross grain orientation that emerges on the front right and back left bowl quadrants. On the opposite quadrants, front left and back right – the cross section of the grain emerges in tight bird’s eye patterns. Very nice – I love the grain!
 Decision time. As I proceeded through the micromesh process, the question I was mulling over in my mind was whether to leave the finish as it is and move on to the compounds and waxing? Or, to apply a dye and employ the felt buffing wheel technique that will result in heightened grain contrast? After conferring with my stylistically superior, my wife, I decide to go in the latter direction. I use Fiebing’s Saddle Tan Pro Dye to do this – an aniline dye. My aim is not to darken the overall stummel appearance, but to create more contrast in the grains. I first wipe the bowl with a cotton pad wetted with alcohol to clean it. Then I heat the stummel using the hot air gun which helps expand the briar allowing the grain to be more receptive to the dye. After heated, using a folded over pipe cleaner, I apply the Saddle Tan dye to the stummel and then fire it with a lit candle. The alcohol in the dye combusts and sets the pigment in the briar. After a few minutes, I repeat the process of applying and firing the dye. I then put the stummel aside to rest for several hours.
 With the stummel on the resting allowing the dye to fully set, I study the horn stem. It’s a beautiful piece of horn and the only thing I can do is simply spruce it up. In the past, I benefited greatly by Steve’s essay on horn stem repair working on my first horn stem, A First Horn Stem on a Throw Away Pipe. The key thing in repairing horn is to fill the gaps to keep the horn from drying and splintering as horn is very porous. This stem needs no repairs, but looking closely, I do see normal miniscule porous texture. The tighter or smoother the horn surface is, helps to guard against the decay of the horn. I take a few closeups to show this.
 I treat the horn stem like a vulcanite stem but with greater gentleness 😊. I run the stem through the micromesh regimen, and I will apply compounds afterward. I wet sand with micromesh pads 1500 to 2400 and follow by dry sanding with pads 3200 to 4000 and 6000 to 12000. After each set of three pads, I apply Obsidian Oil to the horn and the horn drinks it up! I’m pleased with the results – even more gloss!
 While working on the stem, I kept seeing the nickel tenon and thinking that I needed to work on that a bit. I clean it initially with 0000 steel wool. After a bit of shining, that’s more like it!
 The newly stained and fired stummel has been resting for several hours and it’s time to unwrap the fired crust. I mount a felt cloth buffing wheel to the Dremel and set the speed to the slowest possible, so I don’t scorch the wood with too much friction. I then apply Tripoli compound to the briar surface which takes quite a bit of time. As the wheel ‘plows’ the crusted dye it loads up quickly requiring me to purge the wheel often. When finished with Tripoli compound, I wipe the stummel with a cotton pad wetted with isopropyl 95%. I do this to lighten the aniline dye as well as to blend it. Following this, I mount a cotton cloth buffing wheel to the Dremel, and increase the speed to about 40% full power. After rejoining the stem and stummel, I apply Blue Diamond compound to both the horn stem and stummel. When finished, I then wipe the pipe down with a felt cloth to clean it of compound dust before the application of the wax. The pictures show the process.
 Before moving to the waxing of the pipe, I apply a mixture of activated charcoal and yogurt (sour cream works too) to form a protective layer for the chamber. This mixture hardens in the chamber and provides a good starter layer for a cake to develop which protects the briar. First, I put some natural yogurt in a small dish and then while mixing, I add activated charcoal. As I add charcoal it thickens. I want it thick enough, so it doesn’t run after applied to the chamber and I don’t want it so thick that it clumps. When it looks good, after inserting a pipe cleaner through the draft hole to keep the airway open, I use a cotton bud and paint the chamber wall with the mixture. With this done, it is late, and I turn out the lights allowing the charcoal/yogurt mixture to cure through the night.


 The next morning, the chamber coating has cured and I’m ready now to apply the final wax.
  One more thing to do before applying wax. I have not seen any other RJ branded pipes that would provide a model informing me about the stem stamp. The oval-encircled ‘RJ’ appears to have had some color in it, but it’s not clear which. I decide to dress it up by applying Rub’n Buff European Gold to the stamp. I apply some over the stamping with a toothpick and after a few minutes, simply scrape most of the excess off using the hard side of a tooth pick and then finish it up by wiping it clean of excess with a cotton pad. It works exceptionally well and the subtle gold stamping blends well with the horn stem brown and tan hues. Wow! I’m liking this.
 I mount the Dremel with another cotton cloth wheel, maintain 40% full power speed, and apply several coats of carnauba wax to the stummel and horn stem. After this, I give the entire pipe a good hand buffing with a microfiber cloth to raise the shine.
Earlier, I threw down the gauntlet and made the statement that a well-done restoration has better results than most new, manufactured pipes. I’ll let you make your own judgement below as I begin with a ‘Before & After’ picture. John, my fellow GPSC Facebook group member, observed that the RJ pipe he acquired in Paris some years ago had dense briar. I would say that this ERGI Grand Luxe, if it too is Parisian, displays a grain that could be described the same way. The bird’s eye is beautiful, tightly wound, and gratuitously showcased throughout the briar landscape – very appealing. Complementing this beautiful display of briar is the rustic, earthy horn stem with its softly woven brown and tan hues. I also like the gold embossing of the RJ stamp – it fits well this striking straight Billiard. This is the first of 3 pipes that Todd commissioned and he will have the first opportunity to acquire it from The Pipe Steward Store. This pipe benefits our work here in Bulgaria, with the Daughters of Bulgaria – helping women and girls who have been trafficked and sexually exploited. Thanks for joining me! Now, ‘Before & After’. What do you think?


Thanks for sharing this refurbish with us. BEAUTIFUL pipe!
LikeLike
My pleasure, Dave! It turned out well and I’ve enjoyed refining my techniques that allow the beauty already there to come out.
LikeLike
Great job 👌🏻. Stunning briar & horn. First one to go into the TLP box.
LikeLike
Thanks, Todd! I’m glad you approve. Into the box it goes!
LikeLike
Reblogged this on The Pipe Steward.
LikeLike