Daily Archives: April 20, 2017

Freshening a Blatter One Dot Zulu


Great information here Charles. There is also a one dot green that is on early pipes made by the grandfather… I have one of those old timers and have been in correspondence with them regarding it. Well done on this pipe – it is a beauty!

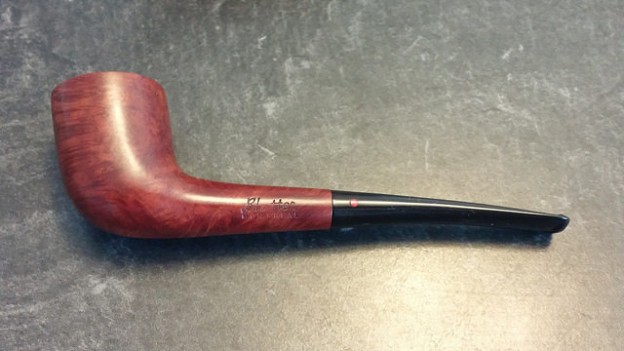
I was recently sent a box of six pipes for refurbishment from a gentleman in Iqaluit, Nunavut. All six pipes were made by Blatter & Blatter, Inc of Montreal, known at one point in the firm’s 100 year history as Blatter Bros.

Established in Montreal in 1907, Blatter & Blatter has remained, by choice, a small, family-owned pipe producer, currently putting out about 300 pipes annually. The company website is very short on details – I believe that the Quebec advertising laws restrict the firm from posting pictures and pricing – but as far as grading of Blatter pipes goes, Pipephil.eu can help.

Blatter pipes are marked with one or two dots on the side of the stem. One red dot indicates a machine-made pipe in a classic shape; two red dots mark a completely hand made pipe, usually in the freehand style. A few pipes are marked with one…

View original post 781 more words

Sandblast Reveals Stunning Grain on a GBD Concorde 9438


Blog by Steve Laug

The next pipe I brought to the table had two major attributes that piqued my interest. The first was that it has an amazing sandblast (or is it a combination blast and rustication?). The second thing was that it was a pipe in my favourite GBD shape that I think nobody does as well as they do – the 9438 Rhodesian.  The pipe is stamped on the smooth underside of the shank GBD in an oval and next to that Concorde. Running along the shank stem junction it reads 9438 and Made in France. The logo is stamped into the left side of the saddle portion of the stem. The next photos show what the pipe looked like when it arrived in Idaho before my brother started cleaning it for me.Jeff took some close up photos of the bowl, rim and stamping to show the condition and the brand of the pipe. Those of you who love the 9438 did not need to see the stamping to confirm the shape but here it is. The finish was dirty with lots of debris in the grooves and crevices on the bowl and shank. The rim had a tarry build up on the back half where the cake was overflowing the bowl. The mortise was so dirty that the stem no longer seated against the shank. The GBD oval was stamped on the side of the stem and did not have a brass roundel as some of the earlier ones did.The stem was oxidized and there was tooth chatter on both the top and bottom sides near the button.The finish was a new one to me. I have not worked on a Concorde before so I wanted to learn a bit about it. I was not sure if it was a sandblast or a rustication or both. I did some searching online and found some things about it however. The GBD Concorde was made in France and was a lower priced GBD. It sported what GBD called a “take-off” brown/black stained sandblast. The top three pipes (ABC) in the photo below are from a 1976 Tinderbox Catalog I located on Chris’ Pipepages. The weblink for the pages is shown in the link that follows: http://pipepages.com/2tinderbox3.htm

The pipe I was working on was “B” in the photo below. The finish on mine was very similar but mine did not have the brass roundel on the stem as the one in the photo does. On the second page of the catalogue there is a description of the pipe. It is a little hard to read but here is the text: “GBD Breaks with Tradition and Forges Bold New Designs. A.B.C. Concorde – This latest innovation from GBD’s French factory, the Concorde, offers exceptional value in the popular price range and features a most novel “take-off” process.” The catalogue lists the retail price in 1976 at $12.50. I have a sense of what they mean by the take of process in looking at the finish. It appears that the pipe has a dark brown stain applied to the bowl. It is buffed off the high spots on the pipe giving it a contrasting appearance. At least that is what I think is meant by the take-off process. When I received the pipe it was clean inside and out. My brother had done a great job cleaning out the grime and debris. The stem fit in the mortise perfectly and all looked good. The finish was clean and faded and the oxidation on the stem had come to the surface so it was ready for me to move ahead with the restoration. I took a few photos of the pipe so you could see what it looked like when it arrived in Vancouver. The rim looked much better but still had a bit of debris on the back side. It was nothing that a little sanding with micromesh could not cure. There is some stunning grain on the rounded rim top and on the smooth parts of the bowl. There is also some peeking through the sandblast. This is a beautiful pipe and one I may well hold onto.The oxidation on the stem had been brought to the surface by the cleanup. It definitely appears worse than it did in the earlier pictures but the difference is that the oxidation is on top now and easier to deal with. The tooth marks and chatter on the stem are visible in both photos.I polished the rim and the high surfaces of the bowl with a fine grit sanding block and with 1500-4000 grit micromesh pads to raise a shine. I gave it a coat of Conservator’s Wax and  hand buffed it with a shoe brush and cloth. The photos below show the bowl after that simple treatment. I sanded the stem with 220 grit sandpaper, carefully avoiding the area around the GBD Oval stamping. I did not want to damage that. I polished the stem with 1500-2400 grit micromesh to begin bringing the shine to the stem.I rubbed the stem down with Obsidian Oil and did something I probably should have waited to do. I cleaned around the area of the stamp with a damp cotton pad. I applied some Rub’n Buff European Gold to the stamping and rubbed it off the surface with a cotton pad. The second photo below shows the stamp when I had finished the first application. I can justify this step by saying it is actually easier to see the stamp with a little gold in place so that I can carefully polish around it. I repeated sanding the stem with 1800-2400 grit micromesh sanding pads.I polished it with 3200-12000 grit pads and gave it a coat of Obsidian Oil after each set of three pads. The shine was beginning to come through. I gave it a final coat of oil after the 12000 grit pad and set it aside to dry. I buffed the pipe with Blue Diamond to polish the stem and remove the scratches that still remained on the stem. I lightly buffed the bowl to raise a shine. I gave the stem several coats of carnauba wax and the bowl several coats of Conservator’s Wax and buffed the pipe with a clean buffing pad. The pipe began to truly shine. I hand buffed it with a microfibre cloth to deepen that shine. The finished pipe is shown in the photos below. It is really a beauty and one I am thinking seriously of adding to my own collection… ahh well… we shall see. Thanks for looking.