Blog by Anthony Cook
A friend from the Pipe Smoker Unlimited forum recently gifted me a batch of pipes that need a little TLC. In exchange, I offered to do some repair and restoration work on a couple of their own pipes. Believe me when I say that I received the better end of that deal. So, I wanted to go the extra mile on these if I could.
The first of my friend’s pipes that I chose to work on was this Savinelli Silver 320KS. I love the shape of the 320. When I hear “Savinelli,” this is the shape that I think of. Unfortunately, somebody had gotten to this one before me and it wasn’t better for it.
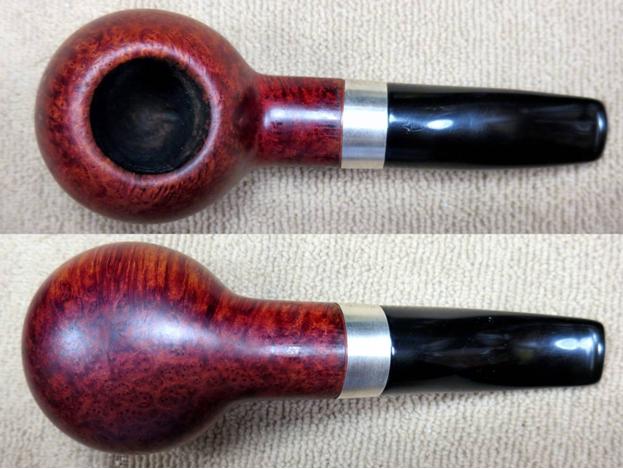
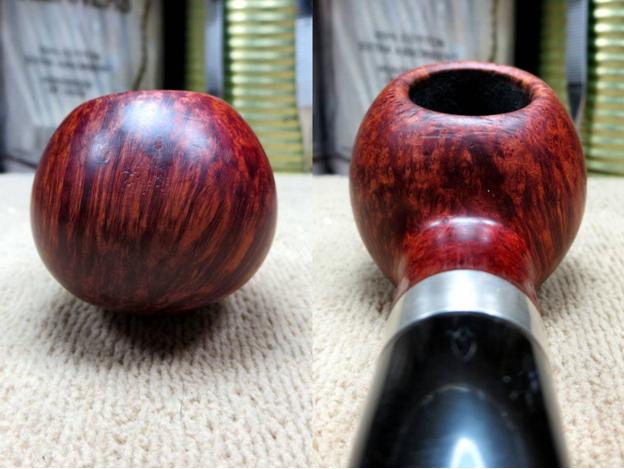
The initial request was just to repair the deep scratches that ran all the way around the rim. However, as I looked the pipe over, I could see that it had a few additional issues. The bowl rim was uneven and looked like it had been heavily buffed. The pipe should have had a deep, cherry red stain from the factory, but this one appeared to have been partially stripped and the stain was uneven and closer to the color of red clay. The silver shank band was loose and it had a couple of small dents on the right side. Finally, the shoulders of the stem face had been rounded with a buffer, which created a thin trench all the way around the stem where it met the band.
Oh, there was one more thing, but for reasons that I can’t explain, I hadn’t noticed it yet. I’m sure that you’ll see it in these photos of the pipe as it was on arrival.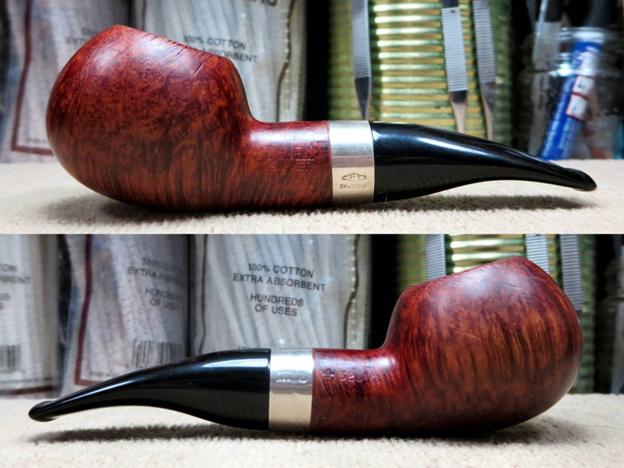
 Nomenclature and logo details (notice the “trench” on the stem next to the band):
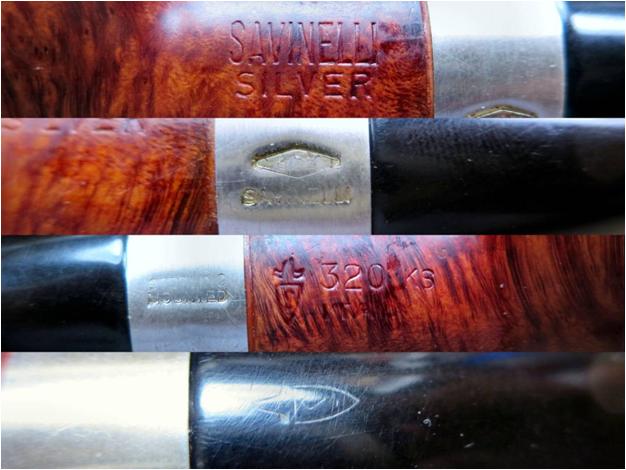 This 320 appeared to be pretty clean, but there’s no such thing as a pipe that’s too clean. So, I gave the internals of the stem and stummel a bit of a scrub with isopropyl alcohol, pipe cleaners, cotton swabs, a shank brush, and a percolator cleaner (the fat brush in the upper right). I’m glad that I did. As you can see below, there was still grime to be removed. After that, I gave the surface of the stummel a scrub with acetone on cotton pads to remove the old, spotty finish.
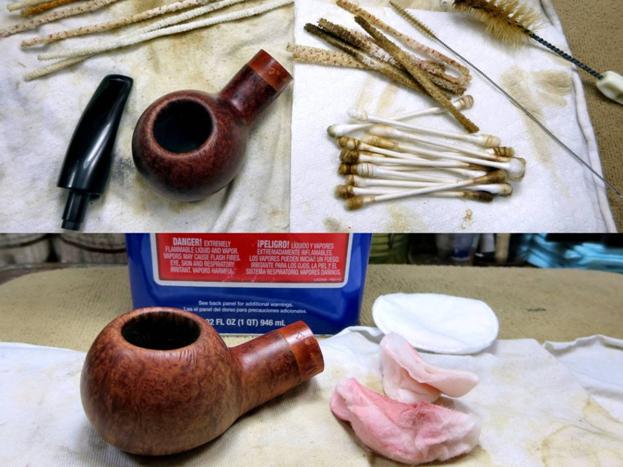 I took a few photos of the rim damage, and after seeing them enlarged a few hundred times on the big screen, I noticed that the edges of the marks were rounded. That seemed to indicate that they were more like dents than scratches.
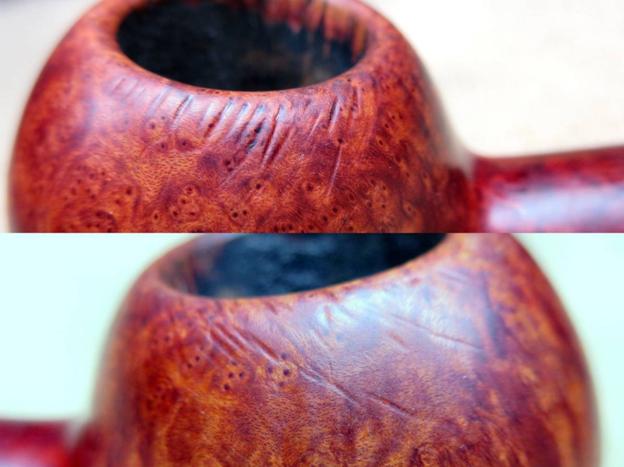 So, I decided to see what a little bit of steam would do for them. I used a tea candle to heat the end of a flat-head screwdriver. Then, I placed a wet cloth over the dents and pressed it into the cloth. The steam worked well on the marks, although I had to repeat the process several times to lift the deeper ones. After I had worked my way all the way around the bowl, the rim was in much better shape. It would still need some sanding, but not nearly as much as it would have taken before to get it smooth.
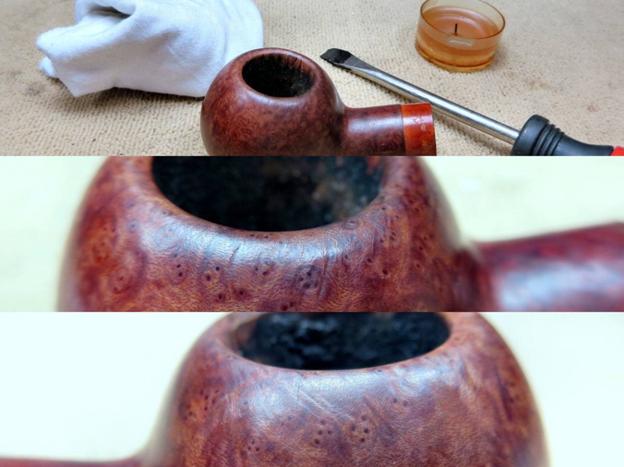 I sanded out the remaining dents with 220-grit paper before addressing a couple of small pits that were possibly missing fills on the bottom front of the stummel. I refilled them with a mixture of briar dust and CA, and then sanded them out with 220-grit as well. Three more fills were present on the front of the bowl, but they looked like they were in good shape and I had confidence that they would blend in with the final stain.
Next, I topped the bowl to level it out and chamfered the inner rim to match the original, factory shape with 220-grit paper. Then, I started cleaning up some of the light scratches and blemishes on the stummel with 320-grit.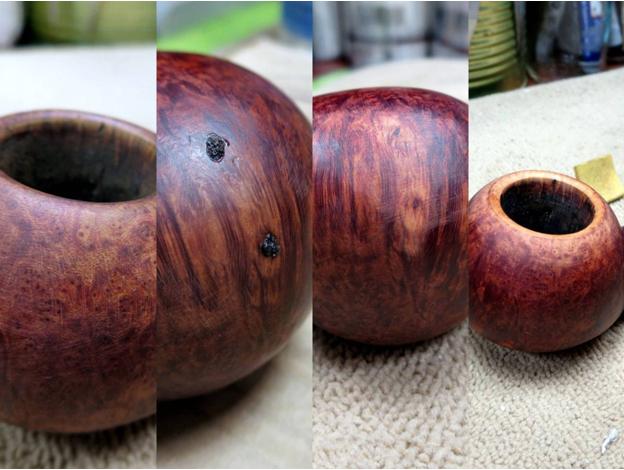 I then heated the stummel to open the grain and prep it for the first stain. I applied a mahogany stain thinned 3:1 with isopropyl alcohol. Mahogany is a nice dark color that gives contrast to the grain and it would play well with the red tones that would come later. After flaming the stain, I hand-buffed it with a soft cloth to remove the excess, and then wet sanded the stummel with 400-grit to remove most of the stain except for what had set into the soft grain.
To start bringing in those red tones I mentioned, I applied a 50/50 oxblood and medium brown stain thinned to the same ratio as the previous application. I again flamed and hand-buffed before lightly wet sanding with 600-grit and 1200-grit paper, and then polishing with Micro-Mesh pads 1500-2400.
I applied a third stain, red this time, and hand-buffed before giving the pipe a Tripoli buff on the buffing wheel. Then, I polished with Micro-Mesh pads 3200-4000. At that point, I didn’t like how bright the red was. So, I decided to darken it up with a thin stain wash. I can’t tell you the exact mix, because I just eyeballed it until it was what I wanted. I can say that it was at least 50% red mixed with a small amount of oxblood for richness and an even smaller amount of dark brown to darken it. I thinned it until it was about the same color density as Kool-Aid and applied it with cotton swab. After that, I hand-buffed the excess off and continued polishing with the remaining grits of Micro-Mesh pads.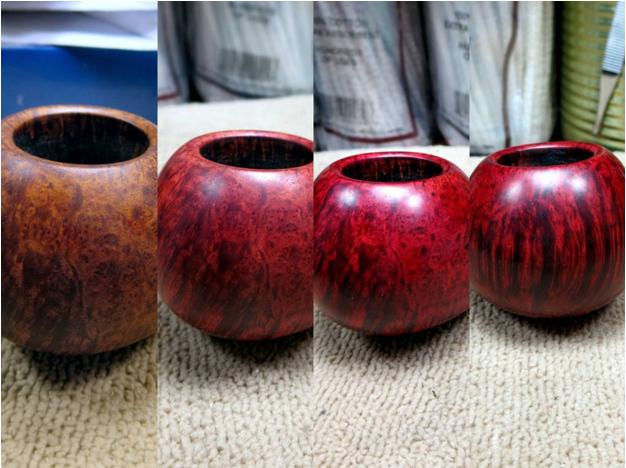 That finished up the work on the stummel. So, I thought I’d try to do something about those rounded shoulders on the stem face. In a scrap piece of wood, I drilled a hole large enough to easily accommodate the tenon. Then, I clamped a strip of sandpaper over the block and cut a matching hole with an X-Acto knife. I inserted the tenon into the hole and rotated it while applying firm but gentle pressure to keep the plane level. I started removing material with 220-grit and worked up to 600-grit. All in all, I probably removed 1/16 of an inch or less from the end of the stem. It wasn’t enough to completely correct the problem, but it did make it a great deal less obvious. The shoulders were nice and sharp again and I didn’t compromise the flow of the joint by creating a “step” down to a smaller diameter stem. You can see for yourself in the photos below.
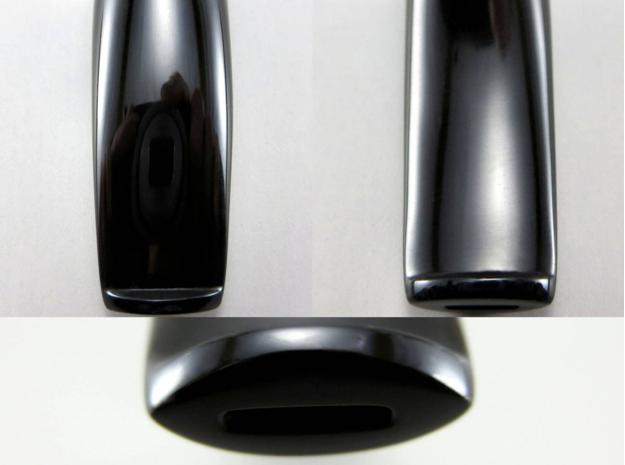
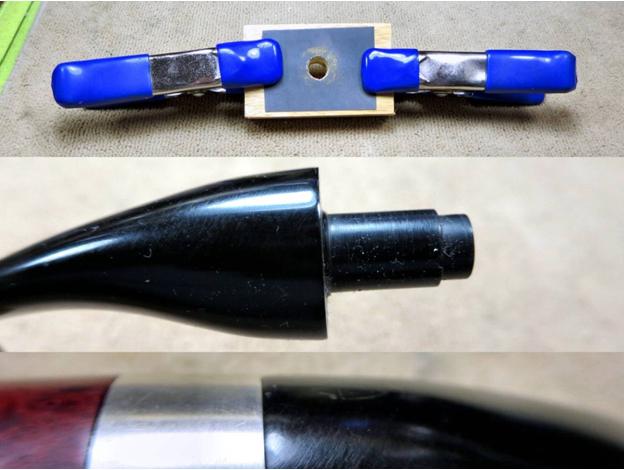 To be honest, I thought I was done at that point. It wasn’t until the pipe was reassembled and I was preparing to give it the final buff and wax that I noticed the glaring damage that I’m sure you’ve already seen. For the life of me I can’t figure out how it had escaped my attention, especially since I had just done work on the stem, but the button had been severely worn away by overbuffing. There was barely a button left at all. Of course, that wouldn’t do at all. So, after getting permission from the pipe’s owner to do some extra work, I began to create a new button.
I used 220-grit paper to rough up the surface of the damaged button and also a bit of the surrounding area. Next, I applied thin layers of black CA glue to the button to build it up. I lightly sanded between each layer with 220-grit to roughen them and ensure that the next layer had a good surface to cling to. Once the mound of CA was slightly higher than I wanted the button to be, I used 220-grit paper to start shaping the button, needle files and sanding files to carve a sharp edge at the back, and 320-grit paper to refine the shape.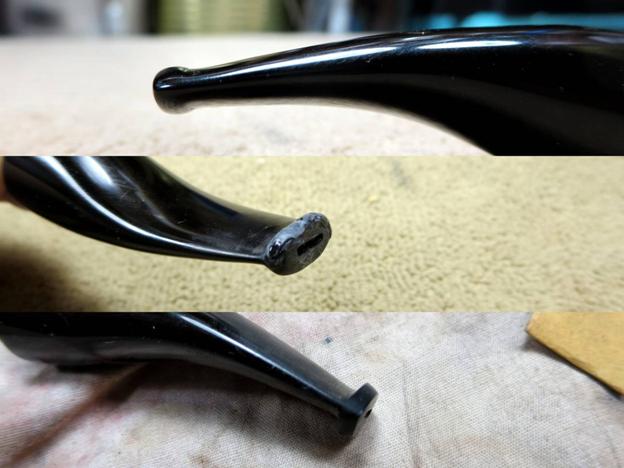 I continued to refine the shape and smooth the surface through 400, 600, and 1200-grit paper. Then I polished the button and the rest of the stem with the full range of Micro-Mesh pads and applied a drop of Obsidian oil to wrap up the stem work.
Before reassembling the pipe, I tried to lift the dents in the silver band by placing it over a wooden dowel, pressing firmly, and rotating it from side to side. My attempt was mostly in vain though. I was able to lift them slightly, mostly the one at the edge, but stopped when I began to worry about raising the stamping or tearing the band. I polished the band with Semichrome polish and placed it back on the shank with a small drop of CA to fix the looseness.
Finally, I put the pipe back together and buffed it with White Diamond on the buffing wheel. After buffing again with a clean wheel to remove any excess compound, I gave the pipe several coats of carnauba wax to complete the work on the pipe. The end results can be seen in the photos below.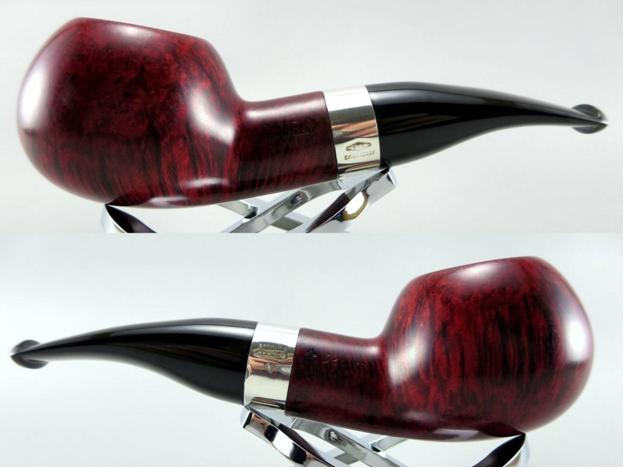
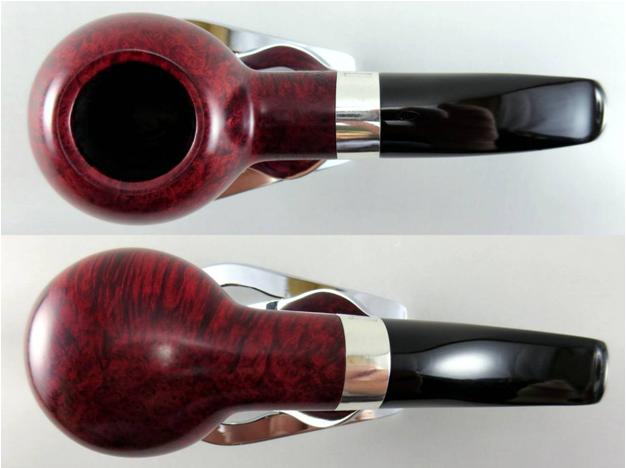

 I think the lines of a 320 are iconic and it is a fine example of the author shape. I’m glad that I was able to restore this one to at least a bit of its former glory and get it back into rotation. Thanks for looking!

Pingback: Restoring an Underwhelming Habitant Deluxe Chubby Bulldog | DadsPipes
Anthony, Great Job! I really like how you brought the rim back up. Looks like it just came from the maker!!
LikeLike
Thank you, John! I was really pleased with how well the steam worked on this one. It saved me some work and the pipe some briar.
LikeLike
A “bit of its former glory”??? I dont think any 320KS every left the factory looking that good. Nice job on the stain work and color layers. That’s also a neat idea on a fix for rounded edges.
Has anyone ever removed a band that wasn’t loose? The band on my 1910 Repro Pete has a few dents I’d like to fix but the band is firmly in place.
LikeLike
Thank you, Al!
Try heating the band on that Pete with a heat gun or hairdryer. The glue will soften and the metal will expand faster than the wood. You should be able to pull it off with little effort. Obviously, you don’t want to do it with bare fingers though. 😉
LikeLike
I tried that a few times, with a lighter. It doesn’t budge. Perhaps a heat gun would generate more heat, with no flame. I need to pick up one of those little hobby heat guns from Hobby Lobby. (need one for stem bending at any rate).
LikeLike
I don’t know that the heat gun would be any hotter, but it’ll give you better coverage and less chance of developing a “hot spot”. If there’s a hairdryer around the house, give it a try on high heat and low flow. Some of them get amazingly hot. Also, check out Harbor Freight for a cheap heat gun. It’ll be at least as good as one from Hobby Lobby and probably cost less.
LikeLike
Super tips in this post, Anthony and a great looking pipe! I’m definitely stealing the “shoulder block” squaring idea. I just wish my buttons came out half as good as yours did here. Great work!
LikeLike
You can’t steal what is gladly given away, DP. Take it with my compliments. The fewer rounded stem shoulders there are in the world, the happier I’ll be.
LikeLiked by 1 person
Cheers, my friend!
LikeLike
Thank you, Anthony.
You have brought the Savinelli Silver 320 back to life, it is beautiful.
Outstanding work. !!!!
AC
LikeLike
My pleasure, AC! It was a beauty from the start. All that I had to do was polish up the rough edges. Enjoy it!
LikeLike
Fantastic job, Anthony! Your stem work, especially on the button, is exceptional. I learned how to correct a rounded shoulder now, too. Thanks.
LikeLike
Thank you, Al. That method for correcting rounded stem shoulders works well as long as the stem doesn’t taper down too quickly. Luckily, this one had enough “meat” on the end to allow it.
LikeLike
Anthony you just keep getting better and better. You raise the bar for all of us. Keep up the great work my friend!
LikeLike
Thank you, Steve. Very kind of you to say. I think that we all raise the bar for each other. I’m often humbled by the fantastic work put on display here by yourself and the other contributors. It always inspires me to try to take things a step further than I have previously.
LikeLike