Monthly Archives: May 2013

Behold the Lowly Stinger


Blog by Steve Laug

Not too long ago I laid out the various stingers I have removed from the pipes that have passed over my refurbishing work table. I don’t know why I have kept them all, but I have. Most of them came from pipes that are no longer in my collection. I was reminded of this photo that I had taken in the past because of a stinger I removed from a Comoy’s the Guildhall pipe. The shapes and sizes of stingers and the size the mortise in the pipe to accommodate them is as varied as the inventors who came up with the “brilliant” idea in the first place. Fundamentally it is designed to act as a condenser to draw out and trap the moisture in the smoke of the tobacco. The burning tobacco in the bowl creates moisture as it burns. As it is drawn into the mortise it either naturally condenses on the walls of the briar or metal shank by simple cooling or its condensation is enhanced by the introduction of the metal apparatus that is commonly known as a stinger.

The basic concept is that the stinger provides multiple surfaces on which the moisture is condensed and collected. Theoretically, the smoker is to clean the stinger after each smoke and thus remove the debris of the condensation before the next smoke. Doing this would provide a clean surface for each smoke. The built in stingers that are a part of the screw in tenon were made to encourage taking the pipe apart while it was warm and the cleanup would be relatively simple. However, judging from the many pipes I have cleaned over the years this theoretical assumption of cleaning the apparatus between smokes never happened – or at best rarely happened. The juices and moisture from the heated smoke hardened into a dark tarry substance that often welded the stinger and tenon into the mortise until the time I decided to take it apart and clean it at my table. The sheer amount of “gunk” in the shank of pipes with stingers versus those that do not have stingers seems to prove the effectiveness of the stinger. It truly seems to work in condensing the moisture from the smoke. Though that should be no surprise – the introduction of a metal tube or apparatus into the path of hot/cooling smoke drawn through the shank can only attract moisture.

All that being said I question the validity of the supposed effectiveness of the apparatus. It seems to me that the introduction of the metal stinger into the shank, no matter what unique or strange design, in fact exacerbates the problem of moisture rather than reduces it. I have smoked many pipes without a stinger and had very few issues with moisture gurgling in the shank. And those that do can be tweaked to not gurgle at all. I have also smoked pipes with the stinger in place and struggled with gurgles and moisture in the stem and shank. I still recall an old pipeman on skid row where I worked showing me how to put my thumb over the bowl and flick the pipe to get rid of the moisture. It was not a pretty sight but it was very effective. Once I removed the stinger from the tenon I found that the same pipe would smoke dry. That led me to conclude that the stinger, while certainly working to attract moisture, may actually create more moisture. In its design the stinger was also believed to calm down hot smoking tobacco and remove tongue bite. This claim assumes that the tongue bite is caused by the moisture in the smoke. While this may be true in part, I believe it is also the effect of heat on the tongue generated by too energetic a puffing cadence. The hard puffing on burning tobacco in the bowl heats up the briar so why would it not also affect the tongue? I have found that when I slow the cadence I slow the likelihood of tongue bite. So in my opinion, the stinger’s effectiveness in alleviating tongue bite may be exaggerated. Or maybe it is just the constricted draught on the pipe that makes the likelihood of tongue bite reduced, for in my experience it seems that no matter how hard you puff on the pipes with stingers the draught is the same – constricted.

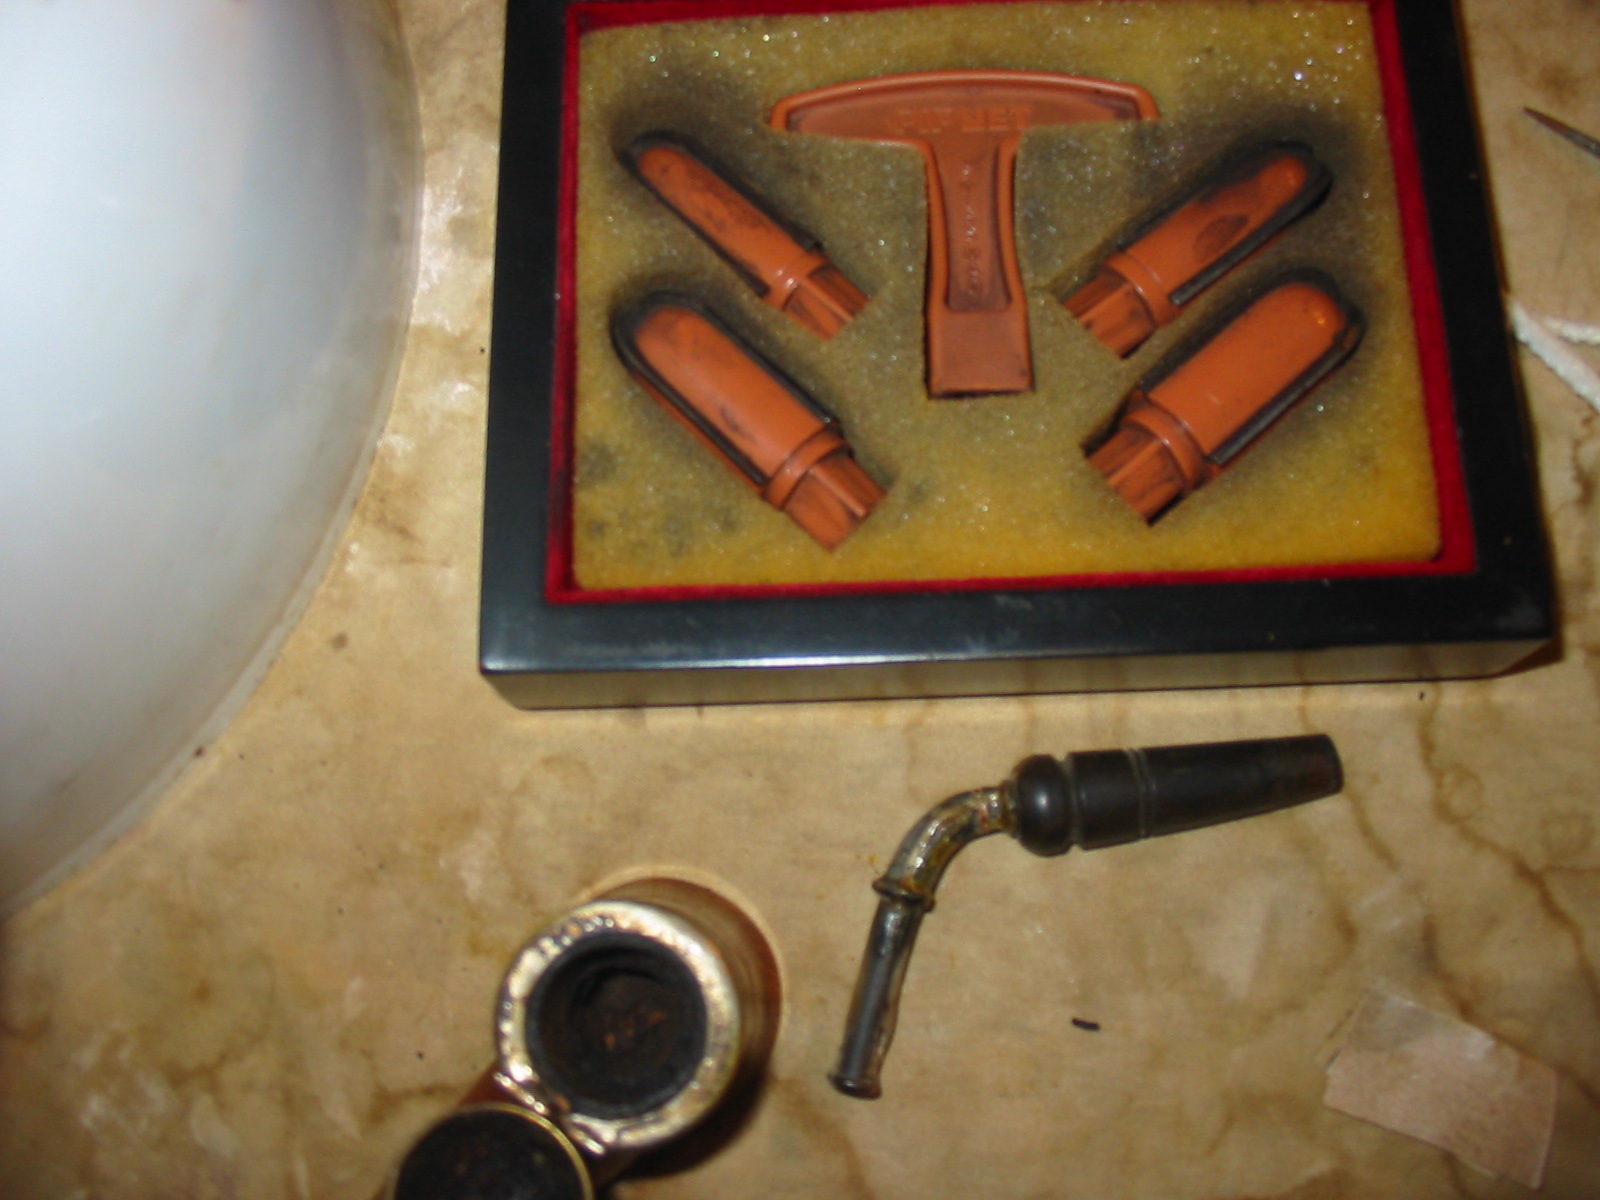
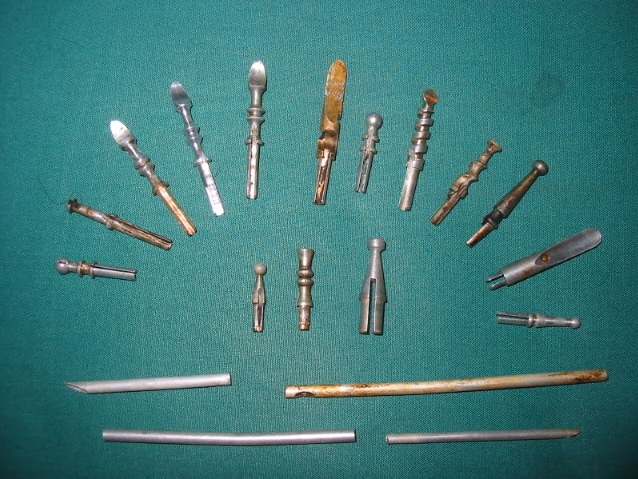
In looking at the many stingers I have collected over the years I have noted both similarities and some very distinctive differences. I only took photos of the ones that are removable and to be honest over the past months I have added at least another dozen variations on the theme. The pieces pictured below can be grouped into four categories – tubes, blades, round balls, twists/spirals. When I removed them from the pipes they all were equally dirty and tarred. All of them had a brown lacquer like substance under the tar that was almost permanently bonded to the aluminum of the apparatus regardless of the shape. In the next section of this article I will give a description of the shape, structure and function of each stinger within the particular group to understand the concept behind their design.

Tubes: The first group I have collectively called Tubes. The basic design is clear from the designation – they are all open tubes. The four pictured below are all different lengths. Some of the tubes extended into the bowl of the pipe. The top left tube and the bottom right tube are a Dunhill Inner Tubes and they have an angled end that fit up against the opening in the bottom of the bowl. They are both different diameters based upon the size of the bowl and the size of the drilling in the shank. The first is from a Group 4 sized pipe and the second from a Group 2 sized pipe. The second tube down on the left side came from a no name pipe and sat in the airway pressed against the opening in the bottom of the bowl. It fit flush against the opening in the bottom of the bowl and also flush against the opening in the tenon. It thus was intended to provide a clean and direct airway into the stem. The interior of the tubes acted to cool the smoke on its way to the mouth. The first tube on the right has a hole on top of the tube where it extended into the bottom of the bowl. It thus provided a 90 degree angle for the smoke to travel from the bowl bottom into the airway. The tube extended into the tenon of the stem about a ½ inch. Once again the concept was to provide a clean airway that would not collect the moisture in the shank of the pipe and provide a cool smoke. The problem with this apparatus is that it was easily plugged by small pieces of tobacco that entered the rather large hole in the tube at the bottom of the bowl.

Blades: The second group I have called Blades because of a prominent bladelike feature included in their design. From the left of the photo, the fourth, fifth, sixth and eleventh stingers all have a variety of blades on the end of the stinger. The first three have a form like a shovel. The end is turned up like a scoop to collect moisture on the topside and the underside of the blade. Behind the blade on these three were three different ridges. The third ridge was slotted for the flow of the air to enter the stem. The fourth blade is extended and the same diameter from the front of the blade to the edge that rests against the tenon. There is a slight twist cut into the blade about 2/3 of the way down the blade that is intended to “spin” the smoke around the blade before it enters the slot at the top back edge of the blade. This “spinning” was intended to remove moisture. The fifth blade is tubular in shape. There is a portion that is scooped out of the tube with an airhole in the end of the scooped out portion. The flat surface of the tube collects moisture and also the blade does. The shape of the blade directs the air across a broad surface and into the airway of the stem.

Round balls: The third group I have called Balls because of the round ball on the end of each of them. From the left side of the photo – the first, second, seventh, tenth and twelfth as well as the first and third in the centre of the photo all are variations on the ball theme. The first, second (half ball), and seventh all remind me of trailer hitches. The ball is quite large in proportion to the stinger. The ball sometimes has holes drilled into it surface (like the Kaywoodie Stinger) and sometimes does not. Behind the ball is a flat ridge that is slightly smaller than the second ridge that rests against the tenon. There is a slot in this ridge that is aligned with a slot in the second ridge that through which the air/smoke is drawn. The interior and exterior surface of the ball collects moisture on the drilled balls and the exterior surface collects it on the undrilled ones. I find that the undrilled balls are significantly larger than the drilled ones, thus providing more surface area for condensation. The eleventh, twelfth, and the first and third in the centre all are all balls resting on top of cones with a slight ridge to no ridge below the cone. The cone is slotted to direct air/smoke into the stem. The cone/ball combination again increases the area of condensation for the smoke.

Twists/Spirals: The fourth group I have called Twists or Spirals to summarize the shape of each of them. From the left side of the photo below – numbers 8 and 9 and the second one in the centre have been grouped together in this category. These stingers are actually very unique. The 8th one is a spiral around a centre rod. The end of the spiral is flattened like a small blade, similar to a spear tip. The smoke follows the twist up to the point it enters the stem and the moisture is almost spun out of the smoke in the process. The ninth one is a more smooth and scooped spiral or twist. The tip is a flat, round disk. The smoke is dissipated around the disk and then travels down the spiral to the slot in the bottom where it joins the tenon. Again the spiral serves to spin the moisture from the smoke. The second stinger in the middle is really not a spiral in the same sense as the other two. It is two cones separated by two tire shaped rings. The moisture is given many surfaces to condense on before it moves through the slot at the end where the stinger sits against the tenon.

Stingers
The diversity of the shapes and styles of stingers that have been created seems to be endless. Each new estate pipe I purchase that has a stinger, has one that is a variation on the ones above. Those pictured are representative of the creative energy that has been invested into making a cooler, drier, cleaner smoke for the pipeman. In my humble opinion, all of them achieve the same end. All of them collect moisture and may very well increase the moisture collected from the smoke. In the long run do they achieve what they were purposed to achieve? I leave that answer up to you. But to me they are appendages that are better removed from the shank and tenon. I have found that their removal holds the key to a drier and cooler smoke.

Whatever Happened to the Orific Button?


While I was sitting at my desk, looking over my pipe cabinet the other evening, it suddenly came to me that I could divide my pipes into two distinct groups – all grouped by the shape of the airway in the end of the button or stem – either round/orific or a slot. I have often wondered about the transition between the two types of airways as they each seem to come from two different time periods. What happened to the rounded one and when did the slotted airway begin to have ascendancy? I am not sure I can answer that question with any definitiveness but I want to look at both types and surmise what may have transpired to bring about the end of the orific button.

The pipes I would place in the first group are all older pipes with stems made of a variety of materials – amber, vulcanite, Bakelite and horn. In this group there are 45-50 pipes with this type of airway. All of them come from the mid to late 1800s and the early 1900s, literally another time and place. For some of them I can identify the time period they were manufactured and for some I have only the faintest idea of the era. The earliest dateable pipe I have is from 1912 – this is knowable from the hallmarks on the silver band on the shank of the pipe. The earliest ones in my collection appear to come from the 1850s and possibly earlier as far as I can tell. They have the filigree decorations, stampings and shapes of that earlier time. The stems, regardless of the time frame within this lot, all have a round/orific opening or airway in the end of the stem. The orific opening is a hole shaped like an O and is sometimes tapered into the airway from the outside. But often it is a straight shot into the airway with no variation in size. The button is generally oval/or round in all of them and the stem coming into the button is also thicker and more oval as well. There is not one thin stem in the lot. As a rule they are thicker and more rounded on the top so they are harder to clench. The two photos below show two different pipe stems from pipes that are in my collection. The first picture shows a horn stem with the orific or “O” shaped opening. The button on this one is quite oval and rounded. The stem itself is also oval and shaped similarly to the shape of the button. The second photo shows the same orific opening on a vulcanite stem. The shape of the button on it is an oval with pointed ends, like an American football. This stem is on a bulldog with a diamond shaped shank and stem. The blade or flat portion of the stem is crowned terminating in the button. The crown on the top and bottom of the stem matches the oval shape of the button both having pointed edges on the right and the left side.

Orific button1

Orific button2
I spent some time examining all of the pipes that I have with this kind of stem to observe similarities and differences. In looking at them I have found some interesting observations. First, it can be generally stated that when I received these pipes as estates that they did not have bite marks or tooth marks in the stem itself though there were marks/dents in the button surfaces on many of them. All had tooth chatter or tooth scratches on the surface of the stem regardless of the material. A second observation I made is that in the straight stems the airway is the same size from front to back or at the most minimally tapered from the tenon to the opening in the button. Holding the stem up to light and looking down the stem the airway is uniform. I would assume that the same would be true for the bent stems that are in my collection. Third, all take a pipe cleaner very easily. Fourth, all of them are thicker than my stems with slots. Fifth, at one level all are less comfortable than the thin stems. I say at one level, in that I find them uncomfortable when I am smoking them on the go or in the car as they are hard to clench. However, if I am sitting in my office or on my porch with one I find that the thickness is no detriment as I tend to hold them in my hand.

The second group of pipes in my collection is “newer” in age as a whole. As I observe this group of pipes I can make the following generalizations. I know that they are generalizations but that is my point in this article, I want to look at broad commonalities of each group. The buttons are thinner on the pipes throughout this group. They are flattened on the top and the bottom edges, which reduces the thickness of the button. The airway on the end of the stem is either a flat slot or a flattened oval that flares inward toward the airway in the stem. This slot becomes a funnel shape from the slot to the airway in many of the pipes. The drilling is also tapered and the airway flattened in the button end of the stem so that the stem can be significantly thinner. This is true in all of the pipes in this group regardless of the material that is used for the stems. In this group of pipes the stems are made out of vulcanite, Lucite, Bakelite and acrylic. All of the tapered stems have a more flattened profile, with more gentle angles to the taper from either the saddle or the taper from the shank to the button. The higher end pipes and handmade pipes all show a customization of the button slot. The machine made pipes generally have a straight line slot. Some of the machine-made pipes have slots that are very thin/ tight and will only take a thin pipe cleaner with effort. Others are wider and accommodate pipe cleaners easily. In my handmade/artisan pipes the slots are all of various shapes and adaptations. The one overarching theme in all of them is the flare on the inside of the slot that tapers back to the internal airway. The next three photos show a customized slot on three different pipes in my collection. Both pipes have vulcanite stems and both have oval shaped buttons and slots.

Slot 1

Slot 2

Slot 3

What have I learned from this comparative observation of both kinds of buttons/stem? What generalizations can I take away as I try to understand why the orific button was replaced with the slotted button? I can say unequivocally from my observations, that it seems the quest for ever thinner stems and the advent of “new” ideas regarding internal engineering of the airway from the bowl to the tip of the stem have brought about the end of the old orific button. I don’t know if anyone ever questioned its disappearance or mourned its demise. It almost seems to me that it just disappeared slowly and like the dinosaur left behind a few “fossil” remains to remind us of its presence.

Comoy’s The Guildhall London Pipe Liverpool Renewed


Blog by Steve Laug

The Comoy’s pipe pictured below was one of the pipes I picked up at an Antique Mall in Edmonton, Alberta. It was by far in the best condition of the three pipes I purchased that day. It also had the highest price tag – $30 of the three. It is stamped on the left side of the shank The Guildhall over London Pipe and on the right side it is stamped Made in London in a circle over England. The shape is stamped as 30. The grain on it is very nice with a few bald spots on the sides and front on the lower portions of the bowl. The contrast stain that is on these older Comoy’s pipes is extremely well done and it is what always draws me to them. The top of the bowl rim was covered with a little tar. The bowl itself was partially caked and a few tobacco remnants sat in the bottom of the bowl. The stem had tooth chatter and slight oxidation. When I picked it up the stem was on upside down so the three metal lines that were stem logos on these pipes was not visible. I was able to rotate the stem but it was tightly stuck in the shank. I did not want to damage the shank so I left it until I got home.
IMG_0302

IMG_0304
When I returned home from my trip and things settled down I took the pipe to the work table to refurbish it. I decided to take it apart to begin the process of cleaning it. The stem was tight in the shank and I needed to use the freezer technique to loosen it easily. The tenon is often easily snapped if you try to turn it when it is stuck. I put it in the freezer for 15 minutes and then it came out very easily. When I pulled it out of the shank it brought a lot of chunks of tar and oily buildup with it. The cloth on my worktable was littered with the black pieces that fell out of the shank. Once I had it out of the shank there was a stinger contraption that I have found is common in the older Everyman and Guildhall pipes. This one was covered thickly with tar and oil. It was pressure fit into the tenon but was tightly bonded to the vulcanite. I used a pipe cleaner with alcohol to scrub the inside of the stem and to also work around the exterior of the stinger. I scraped at the gunk that held it to the tenon and was able to remove much of the grit with a dental pick. I grabbed it with a piece of cloth and twisted and pulled at the same time. I kept the stem level during this process as I did not want to damage the tenon by pulling up as I tried to remove it. It finally broke free of the tenon and I laid it aside on the table top. I do not put the stinger back into a pipe that I intend to use. I tag the stingers and save them should I decide to sell the pipe in the future.
IMG_0757
I then cleaned out the shank and the stem with pipe cleaners and Everclear. It took a lot of pipe cleaners to remove the oils and tar from the stem and the shank. I cleaned it until they came out only stained but not covered in grime. I intended to use a retort on this pipe so my purpose was only to remove the heavy buildup on the surface in the stem and shank.
IMG_0758

IMG_0759

IMG_0760

IMG_0761
Once I had the interior relatively clean I took out my retort and hooked it up to the pipe. The retort is made up of a test tube and stopper with a permanently inserted brass tube to which a piece of surgical tubing is fitted on the end of the brass tube. The tubing fits over the stem. I put about ¾ of an inch to 1 inch of isopropyl alcohol in the test tube. I stuffed the bowl of the pipe with a cotton boll to stop the alcohol from coming out of the top of the pipe when I heated the alcohol. I lit a candle to heat the alcohol and boil it into the stem and shank. I began with a large candle to do the heating. The next series of seven photos show the first boil of the alcohol through the pipe. I let it boil for several minutes and then removed the test tube from the heat. As it cooled the alcohol was drawn back into the test tube. It was dark amber in colour and smelled strongly of old burned tobacco.
IMG_0762

IMG_0763

IMG_0764

IMG_0765

IMG_1109

IMG_1110

IMG_1111
I removed the tube from the flame, and once it had cooled I emptied the alcohol from the test tube, rinsed and refilled it. This time I chose to use a small tea light to heat the tube. It gave a better angle on the test tube and pipe. I boiled it again and when it cooled let the alcohol return to the tube. The series of five photos below shows the second boil and the amber fluid that filled the tube. I ran the retort a third and fourth time until the alcohol came out clear and then I knew the shank and stem were clean. I continue to boil the alcohol through the pipe until it is clean. The retort leaves a pipe smelling brand new once the alcohol smell has dissipated and the pipe dried out.
IMG_1112

IMG_1113

IMG_1114

IMG_1115

IMG_1116
I removed the retort from the stem and the cotton boll from the bowl of the pipe. Once it was removed I ran pipe cleaners through the shank and stem to remove any of moisture that may have been left behind and the pipe quickly dried out. It was time to clean the top of the rim of the pipe. Early on in the process I had examined it and found that the tars on the top were on the surface and that a good scrub with saliva on a cotton pad would remove the buildup quite easily. The next two photos show the cleaning of the rim with the cotton pads.
IMG_1117

IMG_1118
Once the rim was clean I buffed the pipe with White Diamond and gave the bowl and shank a first coat of carnauba wax. It was then time to work on the stem. I sanded the stem with 340 grit sandpaper to remove the tooth chatter and small dents in the surface of the vulcanite. I then wet sanded the stem with 1500-2400 grit micromesh sanding pads. The next two photos show the stem after the initial sanding with the 340 grit sandpaper.
IMG_1119

IMG_1120
The next two photos are randomly taken after I had sanded with the micromesh sanding pads 3200-12,000 grit. I dry sanded with these grits and the stem developed a shine and a depth to the blackness of the vulcanite. When I had finished sanding the stem I rubbed it down with Obsidian Oil to preserve the finish and then buffed it with White Diamond and finally multiple coats of carnauba wax.
IMG_1121

IMG_1122
The final four photos in this essay show the finished pipe. There is a bit of ghosting around the three bars in the photo that appear to be oxidation. The oxidation is gone. Rather what is happening is a reflection off the metal bars. In natural light the stem is a deep and rich black.
IMG_0778

IMG_0779

IMG_0780

IMG_0781

A Piece of Tobacciana History – a Bakelite Bowl on a Bakelite Base


This is a new one to me. I have never seen this combination of parts. I have refurbished quite a few of the screw on bowls on Bakelite bases with either metal or vulcanite stems. I even recently completed a Bakelite base with a Bakelite stem on it. But never have I seen a Bakelite bowl. This one is solid Bakelite with no lining whatsoever. The bowl is like a cup. This one was another Chuck Richards gift. I think he takes delight in these surprises. And a surprise it truly is. There is not a single identifying stamp on the pipe so it is a mystery as to its manufacture. It is very unique. The brass ring between the bowl and base was loose and slide around as the pipe was moved. The bowl was lightly coated with tar. The rim had some dings in it and the base/stem unit was not even at the button. Each side of the angle coming down to the button was off and there were tooth marks in the stem. The inside cup of the base was dirty and the inside of the shank and stem unit was also dirty with tars. The end of the button and orific “o” opening was very clean and unstained which is a bonus. Once I get it cleaned up I intend to load a bowl and see what it is like to smoke. The first series of four photos show the pipe as it was when it arrived to my worktable.
IMG_0727

IMG_0728

IMG_0729

IMG_0730
I took it to the work table this morning and took it apart. I cleaned all the parts of the pipe with Everclear and a soft pipe cleaner. I scrubbed out the cup in the Bakelite base with Everclear on a cotton pad. There was darkening to the Bakelite that I could not remove but the slight build up disappeared. I cleaned up the brass ring and then reglued it to the base. I used a white glue to anchor this to the base. The next series of three photos shows that process.
IMG_0731

IMG_0732

IMG_0733
I sanded out the interior of the bowl with 320 grit sandpaper, wiped it down with Everclear on a cotton pad and then sanded it again with a fine grit sanding sponge. I sanded down the rim of the bowl with the sanding sponge to remove the slight nicks in the edge of the bowl and clean up the rough edges. I followed up with a 1500 grit micromesh sanding pad. The picture below shows the cleaned bowl.
IMG_0736
I reshaped the stem and button area with needle files to repair the angles and remove the tooth marks. I sanded the newly shaped area with 240 and 320 grit sandpaper to remove the file scratches. I followed up with micromesh sanding pads 1500-12,000 grit to progressively polish and shine the stem and base. I sanded the entire base with the micromesh sanding pads. There were many small surface scratches in the surface that the micromesh took care of. The next series of eight photos show the reshaping of the button area from the use of the files through the sanding with 1500 grit micromesh sanding pads.
IMG_0734

IMG_0735

IMG_0737

IMG_0738

IMG_0739

IMG_0740

IMG_0741

IMG_0742
The bowl did not seat well on the base. It seemed to sit at a bit of an angle and did not fit into the bottom of the cup. I sanded down the bottom of the bowl insert to remove a small portion of the material to reduce the depth of the threaded portion of the bowl. I also sanded the thread carefully to remove the nicks and chips to the surface. I used micromesh to sand the threads as I wanted to merely clean them up not damage or reduce them. Once this was completed the bowl threaded on more easily and also was seated well on the base. The next series of three photos show the reseating of the bowl.
IMG_0743

IMG_0744

IMG_0745
At this point in the process I sanded the entire pipe with micromesh sanding pads. I used all the grits from 1500-12,000 to polish the Bakelite and give it back its luster. This took quite a bit of time as I was trying to remove all of the minute scratches in the base and on roughness on the outer edges of the bowl. The seven photos below show the progress shine developing through the sanding with the micromesh sanding pads.
IMG_0746

IMG_0747

IMG_0748

IMG_0749

IMG_0750

IMG_0751

IMG_0752
When I had finished with the sanding and the bowl and base had a shine to them I hand buffed it with carnauba wax, applying several coats and buffing it with a soft cotton cloth. My only frustration with the finished pipe is that the area around the button that I changed and sanded is a bit lighter than the yellow/amberlike colour of the rest of the base. It shined up nicely but is lighter. Ah well, it is better than it was and it is certainly more comfortable than when I began. The final series of four photos show the finished pipe. Now it is time to load it and fire it up. The experience is about to begin.
IMG_0753

IMG_0754

IMG_0755

IMG_0756

An Interesting Challenge – Restoring a Horn Stemmed Austrian Silver Capped Briar Sitter


Blog by Steve Laug

This is the second pipe that was given to me by Chuck Richards. It was a real challenge and it was actually an enjoyable restoration project. This particular pipe is stamped Algerian Briar over Austria on the left side of the shank and on the right side of the bowl below the cap it is stamped EL in an oval. It is actually a nice piece of briar. It is capped by a silver rim cap that goes down the bowl a 1/2 inch. It is rounded over the edges of the rim and flattens in towards the inner rim leaving a briar edge of 1/8 inch. It is topped by a silver wind cap that is hinged a little off centre toward the right side from the back of the bowl. The front of the cap has a folded ornate flap stamped with curls and swirls on the surface. This flap acts as a catch for the lid on the outer lip of the bowl. The cap has a small ball-shaped handle on the top that is for decoration. The cap also has two half circle opening for air. The bowl was heavily caked with a crumbly and soft cake. The stem was horn and was nicely carved. It had also been repaired at least once in its life. At the junction of the smaller part of the stem to the saddle there had been a repair done. It looked at first as if it was copper wire that was used to band the horn which seemed to have splintered and been repaired. Upon closer examination I am almost certain it is a small copper band that was set into the horn stem to secure the break. It is solid. The upper portion of the stem had also splintered and not been repaired. The round end of the button had been worn down on the top and bottom edges to where it was almost squared off. The splinter on the bottom of the stem was loose. The horn was also covered with a shiny lacquer like substance that hid the beauty of the horn. I wonder if it was part of the original repair. The next series of three photos show the pipe as it appeared when I took it out of the shipping box and bubble wrap. I was really interested in seeing what I could do with this one – a worthy challenge that would be enjoyable to work on.
IMG_0668

IMG_0669

IMG_0667
I took it to my work table and removed the stem. I examined the shank and the bowl as well as the stem. I have noted above what I saw in my examination. The interior of the shank was in good shape, there was little wear on the inside from the insertion of the horn stem. The drilling was similar to a Peterson in that it had a sump area with the airway drilled above that. It allowed for condensation of the tobacco juices to settle into that well. It was full and dark and the stain of the juices had migrated up the stem and stained the bottom edge. You can also see the repairs that had been made to the stem in the three photos below. The bowl cap was tarnished and the brass shank cap was also tarnished. The stamping is also clearly visible in the photos. At this point I sat and examined the stem to make a decision whether to seek and revive it or to replace it with a newer Peterson style fish tail stem. After some time examining it I decided to see what I could do with the existing stem and left the other stem idea in reserve should I need to do that.
IMG_0670

IMG_0671

IMG_0672
The first of the next two photos shows the bottom of the bowl and give a clear idea of the nice piece of briar that I was dealing with. The second photo shows the inside of the bowl and the wind cap. The cake and build up of lava like tar on the lid is prominent.
IMG_0673

IMG_0674
I decided to begin with cleaning the bowl. I used a PipNet reamer set with different sized cutting blades. I used the first two heads on this bowl. The first one, the smallest opened up the cake and cut off the broken edges. I followed that up with the second cutting head and took the cake back to the briar so that I could give it a thorough cleaning. The next four photos show the reaming process. I also cleaned out the sump and the airway in the shank with folded pipe cleaners, cotton swabs and Everclear. Once that was done I also scraped out the inside of the cap with the head of the cutting blades on the PipNet set.
IMG_0675

IMG_0676

IMG_0677

IMG_0678
I took a break from the work on the cap and bowl to work on the stem. I cleaned of the surface with a damp cloth and then used superglue to fill the openings in the surface of the stem left from the previous repaired splits. I also used it to repair the splintered part on the bottom of the stem. Once the glue was dry I used 240 grit sandpaper to sand off the excess glue and also the clear coat of varnish or lacquer on the stem. I tried to put a pipe cleaner through the stem and was not successful. I blew through it and found that it was open but that the draw was tight. I would work on that later. The main purpose at the moment was to see what was underneath the clear coat. The next photos show the grain pattern on the horn stem underneath the clear coat. That gave me hope to see if I could restore that unique pattern in the horn stem and bring it back to life. The entire stem from tip to the bottom of the tenon was all horn so it would have a unique look if I was able to restore it. Several of the photos below are out of focus, I apologize for that, however they help to see the pattern and colours of the horn stem. You can also see the repairs on the side of the stem toward the button and the copper band around the lower part of the stem.
IMG_0679

IMG_0680

IMG_0681

IMG_0682

IMG_0683
I worked on the inside of the cap and the rim with 0000 steel wool to remove the build up and tars. I worked on that until the surface of the inside shined and the rim was clean. I then polished the silver with a silver cloth to bring back some of the shine to the bling. The next three photos show that process. (You might have the impression from the photos that I bounced back and forth between the stem and the bowl in this refurbishing. While it appears that way in the photos it actually happened over the period of several days and hours. Each time I set the pipe aside to go and do something else I would come back and pick up at whatever point struck my fancy at the moment.)
IMG_0684

IMG_0685

IMG_0686
The next time I came back to work on the pipe I decided to open up the stem and improve the draw. I was able to ascertain that the tenon end of the stem was much more constricted than the button end. I could easily fit a pipe cleaner in the button and down about half way but was unable to do the same from the tenon end. Even the thinnest pipe cleaner would not go through from the tenon end. I measured the length of the tenon portion of the stem and then used a small drill bit to drill the depth of the larger portion of the tenon. I did this with a cordless drill and proceeded slowly. I was careful to keep the drill bit at the same angle as the airway as I did not want to make the problem worse by slanting the airway or overdrilling the stem. The next two photos show the drilling. The third photo below shows the newly opened end of the stem. The draw was now quite open and the airway clear for a pipe cleaner to easily pass all the way through the stem.
IMG_0699

IMG_0700

IMG_0701
I redefined the button area using needle files. The top edge and the bottom edge next to the button were not sharp and distinct. As the top and the bottom of the button had been flattened, it was almost parallel with the stem. I used the needle files to sharpen the edge and to round the button surface as well. The next two photos show the process and picture the results. Note also that the stem is shaping up nicely with the various sandpaper and the colours and definition of the horn are coming out beautifully.
IMG_0702

IMG_0703
The next series of four photos shows the progress of sanding the stem with 240, 320 grit sandpaper and a fine grit sanding sponge. The thick, shiny coat that hid the horn is pretty well gone at this point. The sanding has also smoothed out the shape of the stem and removed the overfills of the previous repair. The stem is beginning to take shape and the grain of the horn is visible. I think that the repair will work well and when I am done I will have a stem that will work quite well.
IMG_0704

IMG_0705

IMG_0706

IMG_0707
I continued to sand the stem with micromesh sanding pads from 1500-12,000 grit. I wet sanded with the 1500, 1800 and the 2400 grit pads. My goal was to remove the scratches in the horn and begin to bring out the natural shine of the material. The next series of four photos show the effects after sanding with the 1500 grit pads. The next four that follow show the finished stem after sanding with all of the micromesh pads. Once it was finished I coated it with Obsidian Oil to add some life to the horn stem. I have found that it soaks into the horn material and builds some luster over time. You can now see the variations in colour, almost striations in the horn stem. This pearlescence is what I love about the old horn stems and what made me want to try to redeem this old-timer.
IMG_0708

IMG_0709

IMG_0710

IMG_0711

IMG_0712

IMG_0713

IMG_0714

IMG_0715
I took the stem to my buffer and carefully buffed it with White Diamond. I was careful to have a light touch on the wheel as I did not want to damage the horn. The material is sensitive to pressure on the wheel so care must be exercised when buffing it. I gave it multiple coats of carnauba wax and hand buffed with a shoe brush and a soft cotton cloth. The next four photos show the rejuvenated stem ready to be put back on the pipe.
IMG_0718

IMG_0719

IMG_0720

IMG_0721
I reinserted the stem in the pipe, polished the entirety with another coat of carnauba and buffed it by hand to give it a shine. The next five photos show the finished pipe. This old-timer is ready to be loaded with a bowl of aged tobacco, fitting to the age of the pipe and given its reintroduction to its original purpose. This restoration was a pleasure to do and one that gave me a sense of accomplishment in bringing back the old horn stem. The variations in colour and the striations in the horn really give life to this old pipe. The copper repair in the stem actually adds a flair of uniqueness and mystery to the pipe – it makes me wonder who did it and where it was done. Thanks for the challenge Chuck.
IMG_0722

IMG_0723

IMG_0724

IMG_0725

IMG_0726

Rebirth of a No Name Bakelite Pipe with Bakelite Stem


This pipe came to me from Chuck Richards (Desertpipe) in a box he sent me. It is the first of three old timers that he sent for me to work with. It is a common interest that we share – this love of the old timers and restoring them to some of their former glory. The first four photos below show the pipe as it was when it arrived to my work table. There is no stamping on the pipe at all. The gold band is stamped 14K Gold Filled. The stem has no logos or stampings. The underside of the bowl and the Bakelite base has no information stamped on it either. It is much like some of the WDC or William Demuth pipes that I have from the same era. The pipe itself was in pretty decent shape. The bowl was very clean. The rim was undamaged and the finish on the bowl was quite nice. The double grooves around the bowl were filled with grit and the surface had a few pits in it. The Bakelite bowl base and shank were in good shape. There seems to have been a metal decorative rim that went around the base between the bowl and base that was missing. The 14K gold filled band was in place but was on backwards so that the stamping of the gold was upside down. The stem was very oxidized and had been filed to give a steeper angle on the taper to the button. The filing had gone too deep and the airway next to the button was exposed. At first examination it appeared that the stem was too hard a material to be vulcanite and the filing marks did not look like they were on vulcanite. My initial guess was that the stem was also Bakelite.
IMG_0649

IMG_0650

IMG_0651

IMG_0652
I removed the bowl from the base and reamed and cleaned it. I reamed it with a PipNet reamer back to a very thin cake. I cleaned out the airway at the bottom of the bowl. I used a dental pick to clean out the dual lines around the bowl top. I cleaned out the reservoir in the bottom of the base with cotton swabs and Everclear. I cleaned out the shank with bristle and fluffy pipe cleaners and Everclear as well. I removed the band from the shank by heating it gently. The glue softened and I was able to remove it and turn it around. I tapped the band with a small furniture hammer to flatten out the edges and squared the edges. I reglued it with wood glue. When this work was done I set the bowl and shank aside and went to work on the stem.
The stem took significant work. Somehow my camera failed (maybe the photographer did) and I was unable to get any good photos of the stem work. I built up the filed area against the button with clear superglue (Photos 1 -2). I layered on lightly, let it dry, relayered it and repeated until the thickness was sufficient enough for the airway to be protected. I also built up the button. It looked to me that a previous repair had been done and a new button had been cut in the stem. I repaired the shape and the thickness of the button. It was an old style bone tenon that was mounted in the shank so I cleaned that up and cleaned the inside the stem. The hole in the button was the old style orific or “o” opening. The rebuilding of the button and stem took the majority of time in working on this old stem. Once it was dry and had cured overnight I worked on the oxidation. I did not want to use anything that could possible harm the Bakelite so I kept the alcohol to a minimum and only on the inside the airway and was careful not let it touch the outside. For the outside I used 240 grit sandpaper to smooth out the newly repaired slope on the stem and to sand out the file marks that remained from the previous repair. I also sanded the corners on the stem to give it a more rounded look in keeping with the era it was made. The 240 grit sandpaper easily removed the oxidation. Photos 3 – 4, though of poor quality, give an idea of how the stem looked after patching with the superglue and sanding with the 240 grit sandpaper. The oxidation was pretty well removed. The button is shaped and the patch on the stem in front of the button is visible. There is still a lot of sanding to do at this point. From the 240 grit I went on to sand with 320 grit and also a fine grit sanding sponge to further blend the patch and to remove the oxidation.
IMG_0647

IMG_0648

IMG_0653

IMG_0660
I put the stem back on the pipe and worked on the fit against the band. When I reversed the band the stem was too large on the right side and extended beyond the width of the band. To repair that I had to take of material at the bottom edge of the top right side and the upper edge of the bottom right side of the diamond to reduce the angle of the diamond on that side. By reducing these two points on the stem I was able to bring the sharp edge to the same width as the shank and band. It balanced the look of the stem. I used the 240 and 320 grit sandpaper for doing this part of the stem work. I continued to use the sanding sponge to blend the patches on the top and bottom of the slope to the button. The next series of eight photos show the progress on the stem. The patch is clearly visible in the photos of the top side. The one on the bottom was not as big and it blended in more easily.
IMG_0662

IMG_0663

IMG_0664

IMG_0665

IMG_0666

IMG_0687

IMG_0688

IMG_0689
After removing the scratches and oxidation with the sandpaper I sanded with the fine grit sanding sponge and then progressed through the various grits of micromesh sanding pads from 1500-12,000 to smooth and polish the stem. As I worked on it my initial conjecture about the material being Bakelite was confirmed. The next four photos are a sample of the work of the micromesh sanding pads on the stem. The pad in the photos is 3600 grit. I also used the micromesh on the bowl and the Bakelite base and shank to remove some of the surface scratches.
IMG_0690

IMG_0691

IMG_0692

IMG_0693
I gave the pipe a very light buff on the buffer with White Diamond. I had learned on previous occasions that the speed of the buffing pad can produce heat that can actually damage the Bakelite and cause fibres from the pad to embed in the stem. A very light touch is necessary if you are going to buff these stems. I wanted to give them a quick light buff to remove any remaining scratches and give it a quick sheen. I buffed the base and bowl at the same time as well. The final series of four photos show the finished pipe. I applied a coating of carnauba wax to the pipe by hand. I buffed it lightly with a soft flannel cloth to bring up a shine and finished buffing with a soft shoe brush. The finished pipe speaks for itself. It is a testimony to the life that resides in these old timers. It is a life that will certainly extend beyond mine! As mentioned above, I share a love for these older pipes with Chuck that seems to extend to their restoration and re-entry into the purposes for which they were made. What do you think Chuck? How does the final pipe look to you?
IMG_0695

IMG_0696

IMG_0697

IMG_0698

Restoring a GBD 730 Toreador Volcano


I picked this old-timer up at an antique mall in Edmonton, Alberta two weeks ago. It was part of the threesome of pipes and tobacco and pipe cleaners that I purchased at the mall that day. In the photo below it is the pipe on the bottom of the picture.
IMG_0302
I had never seen the stamping on a GBD nor had I seen the shape number. It is not listed on any of the GBD name or shape charts that I have on my computer. I wrote to a friend who works with a lot of GBDs and he replied as follows: “I have not heard of a “Toreador” line, but nothing surprises me on GBD lines. They had a seemingly endless array of model lines. The 730 shape isn’t listed on my shape charts, but they are full of holes and I constantly see shape new shape numbers pop up. The pre-Cadogan key is the “London, England” stamp coupled with a metal rondel. “Made in London England” in a circle is Cadogan era, even with a metal rondell”. From my research and his I looked at the stampings on this pipe. It is stamped GBD in an oval over Toreador on the top of the shank. On the underside it is stamped London, England over 730. This would seem to put the date of this pipe in the pre-Cadogan era.

The next series of six photos show the pipe as it was when I found it. The first picture was taken at the antique mall with my iPhone. The remaining five photos were taken at my work bench before beginning to work on the pipe. The bowl was thickly caked with a hard buildup of carbon. The rim was coated with tars and buildup as well. The stem was upside down when I picked it up and very tight. I was able to turn it and straighten it out for the picture. It was oxidized and there was a line across the stem that showed where it had a rubber bite guard in place on it. There were two tooth marks on the top of the stem visible below and also two on the underside of the stem near the button. The slot in the end of the button was closed off with tar and the shank and inside of the stem were filthy.
IMG_0303

IMG_0595

IMG_0596

IMG_0597

IMG_0598

IMG_0599
I decided to use my PipNet reaming set on the bowl. I started with the smallest bit and worked it around. Once I dumped out the cuttings I used the next size up to take the cake back to the briar. I like to start over and build my own cake in the bowl. I find that I can develop a hard cake when I work at it slowly.
IMG_0600

IMG_0601

IMG_0602
Once I reamed the bowl out to the way I like it I worked on the rim of the bowl. I used some fine grit emery cloth to start breaking up the hard tars and then a fine grit sanding sponge to remove what remained. I work to keep the sharp inner and outer edge of the rim. I do not like it when it is rounded. This rim was also chamfered in toward the bowl and I wanted to keep the angles on that even when I was finished working it over. The next two photos show the cleaned rim. It has been sanded and the buildup is removed. There is a bit of rim darkening that will come off with a bit more work.
IMG_0603

IMG_0607
The next four photos show the bowl after I have wiped it down with acetone on a cotton pad. The darkening on the rim is growing fainter with each wipe. The pads are coloured from the dirt and grime as well as the stain from the pipe. I have found that the dark and medium brown wipe off and leave a yellow colour on the pads. I repeated the wipe down several times until the surfaces were clean.
IMG_0608

IMG_0609

IMG_0610

IMG_0611
After wiping the bowl down I cleaned out the stem and the shank. I used pipe cleaners and Everclear to scrub out the insides of the stem and shank. I scrubbed until they came out clean. I worked on the area of the button slot to clean out the tar buildup in that area. Then I decided to work on the stem. I sanded out the calcification on the stem from the rubber stem bite protector. It leaves a white sediment buildup that is rock hard so I sand it with medium grit emery paper. Removing this buildup also reveals the depth and nature of the tooth marks in the stem. The first picture below shows the topside of the stem and the tooth marks. The second picture shows the underside of the stem and the two tooth marks next to the button.
IMG_0612

IMG_0613
I then sanded the stem with 240 grit sandpaper and the medium grit sanding sponge to further remove the scratches and clean up around the tooth marks. Once I had the stem cleaned up of the white buildup and the scratches reduced I wiped down the stem with Everclear. I heated the surface of the stem with a lighter to lift the tooth marks as much as possible and then I picked out the grit and grime in the tooth marks with a dental pick to provide a clean surface for the superglue repair. The first two photos show the sanded stem and cleaned surface. The third and fourth photos below show the superglue patch. On this stem I chose to use clear superglue rather than the black glue. I often use them interchangeably.
IMG_0614

IMG_0615

IMG_0616

IMG_0617
I set the stem aside to dry and worked on the bowl again. I wiped it down a final time with acetone on a cotton pad. I chose to stain it with a dark brown aniline stain, thinned 2:1 with isopropyl alcohol. I did not want to darken the colour of the pipe but merely bring it back to its original colour as determined from several other smooth GBD pipes of this era. I gave it a coat of stain and flamed it with a lighter. I reapplied the stain and also flamed it a second time. The next series of four photos show the pipe after it has been stain. I wiped it down with a soft cloth. It had not been buffed at this point.
IMG_0618

IMG_0619

IMG_0620

IMG_0621
After the initial staining the colour was a bit dark and opaque to my liking so I use a cotton pad and wiped the bowl down with Everclear to lighten it and make the grain stand out a bit more. The next four photos show the bowl after wiping it down.
IMG_0624

IMG_0625

IMG_0626

IMG_0627
With the bowl finished it was time to work on the stem once again. The superglue was dry and it was time to do some sanding. The next two photos below show the stem after sanding on the patches. The topside and the underside tooth marks are repaired and even with the surface of the stem at this point. Now the stem needed to be worked on with further sandpapers and the micromesh sanding pads.
IMG_0622

IMG_0623
I wet sanded the stem with 1500 and 1800 grit micromesh sanding pads to remove the scratches left by the other sandpapers. I wet the sanding pads and then sanded the stem, wiped off the grime and water and resanded it until the majority of the scratches were removed from the surface of the stem. I worked the pads around the GBD rondel so as not to sand it and remove surface or stain in the metal. The next two photos show the stem after sanding with these two grits.
IMG_0632

IMG_0633
I had read much about using the Barkeepers Friend cleaner to remove oxidation so I mixed up a paste of the powder and scoured the stem with a tooth-brush. The paste worked very well to remove the oxidation around the rondel and around the sharp edges of the button. It really took care of the remaining oxidation. I applied the paste, wiped it off, rinsed, reapplied and repeated the process until I was satisfied with the results. The next two photos show the stem after polishing with the paste.
IMG_0634

IMG_0635
I then sanded the stem with 2400 and 3200 grit micromesh sanding pads to begin to bring out the shine. I also applied a coat of Obsidian Oil to the stem, rubbed it in and let it dry. The first two photos below show the stem after this treatment. Photos three and four show the stem after I had dry sanded it 3600 grit micromesh sanding pads. Photos five and six show the stem after I had finished sanding it with the remaining 4000 – 12,000 grits of micromesh sanding pads. I gave it another coat of Obsidian Oil before I took the pipe to the buffer and gave it a final buff with White Diamond.
IMG_0636

IMG_0637

IMG_0638

IMG_0639

IMG_0645

IMG_0646
The final series of four photos show the finished pipe. There are some dents remaining in the surface of the rim that show up under the light of the flash. They are not nearly as visible in normal light. The pipe is ready to be put to use. It came a long way from the shelf of the Edmonton Antique Mall to the finished pipe it is now.
IMG_0640

IMG_0641

IMG_0642

IMG_0643

A Book Review – The Smoker’s Guide – Philosopher and Friend


Smokers Guide 1 I picked up this old book on eBay after I came across it a few months ago. I was the only bidder so I got it for a good price. It is subtitled What to Smoke –What to Smoke With – And the Whole “What’s What” of Tobacco, Historical, Botanical, Manufactural, Anecdotal, Social, Medical, Etc. The author identifies himself as A Veteran of Smokedom. The book was originally published by Hardwicke & Bogue, 192 Piccadilly, London in 1877. The cover is stamped and embossed with gold leaf and shows a Turkish pipe smoker sitting on a carpet with his water pipe putting out a cloud of smoke. The spine of the book is stamped in gold leaf with the title, The Smoker’s Guide at the top of the spine and a line with H&B at the bottom of the spine.. The back cover is embossed with a rosette. The entire book is in great shape for its age with the only detracting feature being that the binding is a bit shaken and the corners of the cover and the top and bottom of the spine are slightly worn.

Like many of the books from this era the end papers on the front and the back of the book bear advertising broadsides. Inside the front cover is one for Registered Golden Bird’s-Eye Tobacco a product of the HY Archer and Co. The advert warns of others who have imitated their product and cautions the buyer to beware. Across t he page is an advert for John Wood and Son, Cigarette Manufacturers and Importers of Cigars. The content of these adverts is great to read.
smokers guide 2
Inside the back cover is an advertisment for Lambert and Butler’s Sun-Dried Cut Honey Dew tobacco. Across the page is one for Brankston’s Red Virginia Tobacco. All of these advertisements make my mouth water and create a desire to try out these old time tobaccos.
smokers guide 4
Turning the pages from the front one is taken to the title page of the book with an engraving of a tobacco plant on the opposite page. It appears that someone has written the name Steinmetz in brackets under the author’s title “A Veteran of Smokedom”. I am not sure if this is a guess of the original author’s name or a factual statement of the writer added by a librarian or previous owner of the book.
smokers guide 3
The book begins with a note to the reader that reads as follows: “The adoption of Pope’s memorable words addressed to Lord Bolingbroke for the title of this little work inspired the entire design, and made it incumbent upon the Author to do his utmost to render it worthy of so comprehensive a designation.

In the attempt he has been largely assisted by his innumerable predecessors in Tabacology, and almost every other “ology.” But, whilst drawing from every available source, he has taken nothing without striving to adorn it – after the good example of Virgil, Milton, Byron, and all the most enduring writers of ancient and modern times, who have thereby secured immortality – simply because so many other worthies have contributed to, and can vouch for, their excellence.

In like manner, whilst thankful to all the gods of Literature and Science for the gifts they have showered into his casket, the Author trusts that he has fashioned and set their gems in a new light, for livelier appreciation.”

After the note to the reader the Table of Contents shows the brief and broad categories of the chapters of the book. The Table of Contents also gives a brief description of the content of each chapter. I find this helpful in being able to look for particular topics that are covered in the book.

I have included a copy of the table of contents for you to have a look at. It will show you the flow and development of the book over the course of the pages.

A few words to begin with
Chapter 1 – The curious history of the Weed
Chapter 2 – The cultivation, manufacture and consumption of Tobacco
Chapter 3 – He who smokes dines
Chapter 4 – What Tobacco shall we smoke?
Chapter 5 – Of the Cigar and Cigarette
Chapter 6 – Of the qualities of a good pipe
Chapter 7 – Of Tobacco in the religious point of view
Chapter 8 – Of Tobacco and ‘Les Miserables,’ or as the comfort of the afflicted
Chapter 9 – Tobacco in the artistic point of view
Chapter 10 – Of Tobacco in the medical point of view
Chapter 11 – Tobacco a mine of gold to trade and government
Chapter 12 – Tobacco the firmest support of constitutional government
Chapter 13 – Smoking compared with other extravagances
Chapter 14 – Tobacco and its enemies
Chapter 15 – Words of the wise on Tobacco
Chapter 16 – Tobacco in the literary point of view
Chapter 17 – Tobacco and the Franco-German war
Chapter 18 – Of Tobacco in the poetic point of view
Chapter 19 – Tobacco and the fair sex
Chapter 20 – Of Tobacco in the ruminant or Quid point of view
Chapter 21 – Of snuff and snuffers
Chapter 22 – Useful hints to smokers
Chapter 23 – A word of advice to our young friends

Each chapter is written in a very clear and easy to read style. It is written in the period of the style of the age. The author uses language well and in a very picturesque way describes each of the topics at hand. The author also makes use of quite a few contemporary authors as well as ancient ones to substantiate his work. The quotes are well footnoted in the text of the book.

The first two chapters give the background information regarding the history and manufacture of tobacco. These provide the base from which he will develop the rest of the book. Chapter 1, the longest chapter in the book, gives a quick overview of the history of tobacco and traces it through various countries and kingdoms in terms of acceptance and rejection. I appreciate the way in which the author covers the history on both sides of the pro and anti camps. He traces the argument through each time period he covers. His method in looking at the history is a unique and fascinating read of the times. Chapter 2, also a long chapter looks at the various countries which produce tobacco and the amount and variety of the tobacco produced. After covering these bases the author steps aside from the background information and looks at the use and enjoyment of tobacco.

In the remaining chapters he intersperses what he call the various points of view from which he views tobacco. He develops chapters on the religious point of view, the use of tobacco for the suffering individual, the artistic point of view, the medical point of view, the literary point of view, the poetic point of view and from the point of view of the ruminant. Each of these chapters cites various authors and authorities in the particular field that is being viewed from both the positive and negative point of view. In between these chapters he covers a wide variety of topics. He has an essay on each of the following topics: the choice of tobacco that we use and the means of that use whether pipe, cigarette, cigar, snuff or chew. There are also topics on the economics of tobacco for governments – in other words taxation and its benefits to the government, on the enemies of tobacco and on the friends of tobacco – those he calls the wise. He writes about smoking in comparison to other extravagances, tobacco and women and even a chapter on tobacco and the Franco-German war. He concludes the book with two chapters in which he applies the information of which he has written. The first is written as hints to the smoker and the final he entitles advice to our young friends.

I appreciate the candour and thoroughness of the treatment he gives to tobacco. The older style of writing is not beyond our modern aversion to old and flowery language. He writes in a clear and entertaining fashion about the hobby we love. If you can find a copy of the book I highly recommend it for your reading pleasure. There is a quaint and delightful sense of being transported back in time as you turn the pages of chapter after chapter.

Refurbishing a Hilson Giant – Brian Devlin


Here is another post by Brian Devlin. I enjoy reading about and seeing photos of his refurbishing work. I am again posting this piece for your viewing. I wrote and asked Brian about more of his process in cleaning stems and rims and he answered with a pm on Smokers Forums. I have integrated that into the text of this piece for those who are interested in knowing more. Without further delay here is Brian’s article.

I picked up another eBay buy that needed a bit of work. This one was a dirty Hilson Giant badly charred rim and heavily oxidized stem. What it looked like when it arrived can be seen in the photo below.
wpid-20130507_093915
Once again I followed my process of cleaning and refurbishing. I begin by always cleaning the oxidation from the stem. I coated the stem spigot (tenon) and the Hilson logo with Vaseline to protect them from damage by the bleach soak.
wpid-20130507_094633
I then put the stem in the bleach soak. For this I use an old butter box half filled with a mixture of 50% bleach and 50% water and let it soak for 30 minutes. I have found that this amount of time in the wash works well to remove the oxidation.
wpid-20130507_0947172
I rinse of the stem and then reassemble the pipe. I attach it to a retort to clean out the inside of the bowl, shank and stem. I use 99.9% isopropyl with the retort. You can see how I set up the retort in the photo below. For the heat source I use canned heat (editor’s note: in North America Sterno makes a product that works very well for this. Great idea Brian!).
wpid-20130507_101458
The stem is pitted after soaking in the bleach mixture so I just buff with brown stick (middle cut) followed by white stick (finishing cut). For the rim I use white stick to polish the rim taking off the char build up. I finish by using Carnauba resin on an open mop (buffing pad) to finish the briar and the stem. It seems to stop the stem from oxidizing. I then buff the pipe and you have BRIAR REBORN!
wpid-20130507_113432

wpid-20130507_113713

wpid-20130507_113443

A Great Visit to Burlington on Whyte Tobacconist Edmonton, Alberta


I just returned from a long work related trip to the province of Alberta. My trip began in Edmonton, Alberta, the provincial capitol city. While I was there I planned to make a trip over to the Burlington on Whyte Tobacconist shop. Whyte Avenue is in an older part of Edmonton and has a lot of very interesting old shops, pubs and restaurants. My plan was to spend some time visiting the shop and having a look at their wares and their tobacco blends. I had looked at their website http://www.tobacconist.ca/ and had found some intriguing sounding blends of tobacco that I wanted to see and smell. Their website has some great photos. The first picture below shows the interior of the shop from the front door.
BW1
One click on the menu bar shows the tobacco menu of the house blends that shop carries. I have included a picture of the menu below for your viewing. This is unique in my experience of online pipe websites in Canada. I have found that generally tobacconists are not allowed to list their tobaccos and give details for the tobacco blends, so I was pleasantly surprised with this extensive list. Burlington on Whyte still gives an extended list of the blends and the basic components in each one. I have to say that for a Canadian pipe shop this is quite an impressive menu.
menu_updated
It was these two things – the look of the shop and the list of tobaccos – that intrigued me enough to add a visit to the shop to my itinerary.

So on a sunny afternoon I found myself free. All of my work meetings and appointments were over for the day. So my daughter and I took a trip over to Whyte Avenue. According to the website the shop is located at 10468 – 82nd Avenue just off of Whyte Avenue. I input that data into my iPhone GPS and headed out to find the place. I found curbside parking about a block away from the shop. I knew it was ahead of me by the GPS coordinates and the addresses on the buildings but had yet to see it. The next photo shows the exterior of the shop – its curbside view that I saw as I walked up the street to it. The yellow/butterscotch stucco and the red awning give it a bit of a California appearance. It was not at all what I was expecting to see when I walked up. In my mind it was a very different place than what was in front of me. The window display included pipes, posters, photos and tobacco. A bonus was the smell of pipe smoke in the air around the shop. The gentleman in the photo was smoking a nice Virginia in what appeared to be a small Dunhill billiard. He was sipping coffee and smoking while have a conversation with a friend. They were so engaged in their talk that we slipped by them without any notice. The doorway to the shop is on the right side of the photo and enters the interior at an angle.
IMG_0299
Upon entering the shop a pipeman’s dream unfolded before my eyes. The next photo shows what I saw. Down the right side of the store there were a variety of displays of pipes of many shapes and brands. These were held in both display cases and on wall mounts. Each display was well lit and easily accessible for a shopper to view and fondle. There was also a small humidor just inside the door that housed a small selection of Cuban cigars. I also noticed in the back of the shop a larger walk in humidor. Not being a cigar aficionado I did not make it back to the humidor. I was immediately preoccupied with the pipe displays.

However, the website has a great photo of the inside of the humidor. I have included that picture for those of you who enjoy a good cigar. The humidor certainly is well stocked with a wide range of cigars.
noncuban
The website labels this photo as the non-Cuban cigars. While I am not certain of that I do see there that the shop carries a wide range of Cuban, Nicaraguan, Dominican and Honduran cigars. This range of cigar brands and labels will provide something for every cigar smoker. I think that the next time I am in Edmonton I will have spend some time in the humidor and see what is available. But this time around I was there for a pipe visit.

I continued to look over the display cases on the right side of the shop and part of the left side as well and saw a wide range of smoking accessories – humidors of all shapes and sizes, lighters of various makes and prices, pipe bags, cigar cases, cigar cutters and the like. The variety of choices offered is quite impressive. I was not in the market for any of the items but had I been they would have been able to deliver. Burlington on Whyte is the exclusive Dunhill retailer for Edmonton so they carry a broad range of Dunhill products. They had Dunhill pipe bags, tampers, ashtrays, cigar cases etc. I could have spent several hours looking over the accessories but that also was not for this trip.
chris
Chris Hansen (pictured to the left) is the proprietor of the shop and it was a pleasure to visit with him and talk about pipes and tobaccos. He is a knowledgeable pipeman who also blends some, if not all, of the tobaccos that the shop sells. I had an enjoyable visit with him, while my daughter patiently waited in the wings. I think I could have talked for a lot longer if I had been alone and not cognizant of her desire to see other shops on the Avenue. As it was I brought our conversation up a bit short and asked Chris if he had estates for sale. He answered with an affirmative and brought out some display cases with estate pipes for sale. He laid them on the counter on the left side of the shop. I went through these pipes carefully hoping to find one that caught my fancy. I find that the longer I am refurbishing pipes the pickier I have become so it is always harder to find a pipe that calls out to me. This was the case that day as well. There were several older GBD’s that came close to hooking me but nothing that demanded my cash outlay.
IMG_0296
The wall behind the left side counter was lined with shelves of tins and jars of tobacco. There were also the obligatory rolling papers and pipe cleaners present. But my eye was drawn to jars of shop blends that occupied the shelves. I rarely buy tins of tobacco in pipe shops here in Canada as the cost is prohibitive – a 50 gram tin often is in the $28 to $30 range and sometimes even more costly. Because of this I try to purchase the bulk or house blends to try. This is especially the case when I come across a shop that advertises that it blends its own tobaccos.

I explained to Chris what I kind of tobaccos I smoked and he immediately suggested several of their blends that might interest me. Since I am predominantly a Virginia Perique smoker with an occasional foray into the world of English and Oriental tobaccos there were several that might work for me. He brought down the jars of Virginia Perique blends along a few English and Orientals ones as well. I opened each jar, talked with him about the makeup of the blends and enjoyed the smells of each tobacco. I felt like a kid in a candy shop. The prices were similar to those here in Vancouver, minus some of the taxes that are added at the till. I paid $18.40 for the ounce (thanks for the correction Aaron), although it is going up approximately $2.50-$3 per ounce within the next few weeks. This was due to a federal excise tax increase. The blend I purchased was Montego Bay, a Virginia that seems to have a little Perique for spice. There are also several other notes that come through the bouquet of smells that greet you when you inhale the aromas from the jar and bag. The website says it has some herbal additions to add to the sweetness of the Virginias. From the look of the blend it appears that there is at least a little Deer Tongue in the mix. It is a cool and flavourful smoking blend and certainly one that I will purchase again.

cody1 About mid-conversation an employee entered the shop and Chris went to the office. From the website I had remembered seeing his photo. We talked a bit but I failed to get his name. For that I apologize. Upon returning home I looked up the site and found that his name was Cody (pictured to left).

Cody was kind enough to pose for the photo below with his pipe in his mouth. Sadly it was unlit as we are not allowed to smoke in the tobacco shops in Canada these days. But as I walked through the shop and took in the ambience of the place I could easily see how that would have been a part of the history of this shop. I can almost smell the pipes and hear the conversation as pipemen sat in the back of the shop chatting and puffing while enjoying the fellowship of the pipe. Too bad we have lost those days.
IMG_0297
From the website I learned that last year 2012 and again this year, 2013, the shop brought in predrilled briar blocks for a pipe carving contest. I looked through the webpage of the different pipes that had been carved by patrons of the shop. There were some well carved pipes in the photos. The blocks of briar looked to have been very nicely grained and clean. So while I was there I asked about the availability of the blocks and was shown a box of predrilled blocks with acrylic stem blanks. In speaking to Chris I found out that these came from Brigham. I am still curious as to who supplies them for Brigham. Chris only said that Brigham Canada sold them to him and could give me no more information.

With my daughter ready to move on and take in the sites of Whyte Avenue I gathered my purchases and made my way to the till. I paid my bill and took the bag of bounty that I paid for and headed to the street. When I got to the place we were staying later that evening I took the photo below to show my haul from the shop – a package of pipe cleaners (never have enough), an ounce of Montego Bay, a predrilled briar block and the business card.
IMG_0301
If you live in Edmonton and have not been to this shop or you find yourself in town on a visit or business I can only say that it is well worth visiting Burlington on Whyte Tobacconist. The shop blends the ambience of an old tobacconist with an edginess of a new generation of pipemen. The friendly staff, wide selection of tobaccos, pipes and cigars makes it a spot that I will visit each time I am in town. Thanks Chris and staff for providing this great place for pipe and cigar smokers to visit and enjoy.